-
Contents
-
Table of Contents
-
Bookmarks
Quick Links
Compact Edition, Advanced Edition, Premium Edition
Installation Manual
Release 7.0 — April 2008
Related Manuals for Alcatel-Lucent OmniPCX Office
Summary of Contents for Alcatel-Lucent OmniPCX Office
-
Page 1
Compact Edition, Advanced Edition, Premium Edition Installation Manual Release 7.0 — April 2008… -
Page 2
Legal notice: Alcatel, Lucent, Alcatel-Lucent and the Alcatel-Lucent logo are trademarks of Alcatel-Lucent. All other trademarks are the property of their respective owners. The information presented is subject to change without notice. Alcatel-Lucent assumes no responsibility for inaccuracies contained herein. Copyright ©… -
Page 3: Table Of Contents
Chapter 1 General Presentation Preliminary ………………..Overview ………………….. Security …………………. Safety rules ………………..Chapter 2 Hardware: Platform and Interfaces Overview ………………..INSTALLING THE HARDWARE …………..Racks ………………….Detailed description ………………Installation ………………..Overview ………………….. Equipment ………………..Detailed description ………………
-
Page 4
Chapter 3 System Services Software Licence Management …………SOFTWARE LICENCE MANAGEMENT …………Software Keys ………………Overview ………………….. Chapter 4 Installation and Cabling Presentation ………………… Overview ………………….. Connections and Cabling …………..Detailed description ………………Power Supply ………………4.19 Installation procedure …………….4.19 Reflexes and e-Reflexes Terminals ………. -
Page 5
External connections …………….. 4.64 Intelligent Base Stations …………..4.66 Detailed description ………………. 4.66 Safety rules ………………..4.74 Client PCs ………………..4.77 Installation procedure …………….4.77 PIMphony ………………..4.82 Hardware aspects ………………4.82 Software aspects ………………4.82 Limits ………………….4.83 Extending Your Installation …………… -
Page 6
Services provided ………………6.18 WBM Managing Tool ……………… 6.19 Connecting your e-communication server to the LAN ……6.22 Setting an Internet Connection …………..6.22 Chapter 7 Maintenance Services Maintenance Level 1 …………….Maintenance ………………..Chapter 8 Glossary Glossary ………………..A ……………………B …………………… -
Page 7
Q ……………………R ……………………S ……………………T ……………………U ……………………V ……………………W ……………………X …………………… -
Page 9: Preliminary
Preliminary 1.1.1 Overview 1.1.1.1 SYMBOLS USED IN THE DOCUMENTATION See note. See important information. 1.1.1.2 CLAUSES Copyright and Trademarks Datalight is a registered trademark of Datalight,Inc. FlashFXtm is a trademark of Datalight, Inc. Copyright 1993 — 2000 Datalight, Inc., All Rights Reserved. Security 1.2.1 Safety rules…
-
Page 10
Chapter Protective earthing This equipment must imperatively be connected to a permanent earth protection installed according to current legislation. Installation of the mains power The mains power must be installed as close as possible to the unit and must be easily accessible. -
Page 11
The EC labeling indicates that this product conforms to the EC directives currently in force, in particular: 89/336/EEC (Electromagnetic compatibility) 73/23/EEC (Low Voltage) R&TTE 1999/5/EC compliance 1999/519/EC (Specific Absorption Rate) 1.2.1.4 INTERFACE CLASSIFICATION 1.2.1.4.1 Alcatel-Lucent OmniPCX Office Communication Server SELV: Safety Extra Low Voltage TNV-3: Telecommunication Network Voltage 1.2.1.4.2 Alcatel-Lucent OmniPCX Office Compact Edition… -
Page 12
Chapter Figure 1.3: First Generation cabinet… -
Page 13
Figure 1.4: Second Generation cabinet Note: The Mini-MIX daughter board can be used only on a Compact Edition 2nd Generation with a CPU-3m or a CPU-4. -
Page 14
Chapter… -
Page 15: Overview
Internet. This «multi-purpose» server provides a turnkey global communication solution for small and medium-scale businesses with 6 to 200 employees. For businesses with 6 to 12 employees, the Alcatel-Lucent OmniPCX Office Communication Server range has been expanded to include the Alcatel-Lucent OmniPCX Office Compact Edition module.
-
Page 16
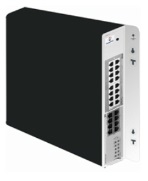
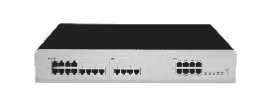
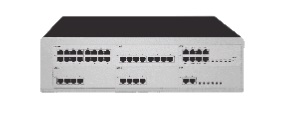
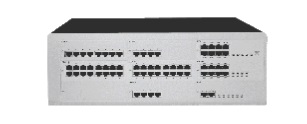
1 CPU slot + 4 general-purpose slots + 4 specific slots (no UAI16 and MIX boards) Energy consumption: 1,2 A (230 V) / 2,3 A (110 V) — 150 W. Dimension: H = 154 mm; W = 442 mm; D = 400 mm. Weight: 13 kg. 2.2.1.4 CE or Alcatel-Lucent OmniPCX Office Compact Edition… -
Page 17
Z accesses (SLI Analog Extension Access) and two additional ISDN / T0 accesses (ISDN Basic Rate Access). Starting with Alcatel-Lucent OmniPCX Office Communication Server release 5.1, the Mini-MIX daughter board is available on Compact Edition 2nd Generation with a CPU-3m or a CPU-4 ( ASPEN 133 MHZ and 128MB of flash). -
Page 18
Chapter Figure 2.5: Mini-MIX connections on CPU-3m RJ45 Equipment numbering: Slot 80 EN 01 for the first T0 access (80-001-01) Slot 80 EN 02 for the second T0 access (80-002-01) Slot 80 EN 09 for the first Z access (80-009-01) Slot 80 EN 10 for the second Z access (80-010-01) -
Page 19: Installation
Installation 2.3.1 Overview 2.3.1.1 INSTALLATION GUIDE…
-
Page 20: Equipment
Equipment shall be installed at the factory or in the field by submitter’s trained personnel in accordance with the installation instruction provided with the equipment. Equipment 2.4.1 Detailed description The following table lists the boards available on Alcatel-Lucent OmniPCX Office Communication Server (S, M or L racks). Board Function Optional boards…
-
Page 21
Board Function Optional boards Connections CPU-3 Processing Unit (From R5.0) 128 HSL1, HSL2: Lanswitch or Ethernet Mb Flash Memory. interconnection with terminal Optional Hard Drive add-on modules Please-wait message player AFU, AFU-1: (Auxiliary Tuner for background music Function Unit) Alarm VoIP4-1, VoIP8-1 and Doorphone VoIP16… -
Page 22
Chapter Board Function Optional boards Connections CoCPU CoProcessing Unit (Up to R1.1) VoIP: (Voice over IP): Lanswitch or Ethernet CoCPU-1 CoProcessing Unit (From R2.0) SLANX4: mini switch terminal CoCPU-2 CoProcessing Unit (From R3.1) (CPUs — CoCPUlink) DDI2 2 or 4 analog trunk line Analog trunk line with DDI4 interfaces with Multiple… -
Page 23
CPU-1. Only the 64 Mb flash memory is added. The CPU-3 board includes a 128 Mb flash memory. A CPU-3m (or CPU-4) board can also be used on an Alcatel-Lucent OmniPCX Office Advanced Edition CS system. The CPU-3m has the same characteristics as the CPU-3: Aspen 133Mhz, 64 Mb SD-Ram and 128 Mb NAND flash memory. -
Page 24
Alcatel-Lucent OmniPCX Office Premium Edition CS Processing Unit CPUe-1 and CPUe-2 Boards The CPUe-1 board performs the CPU functions of a Alcatel-Lucent OmniPCX Office Premium Edition CS system. The CPUe-2 board used for Alcatel-Lucent OmniPCX Office Communication Server 3.1 has the same main characteristics as the CPUe-1 board apart from the NOR Flash. -
Page 25
The CoCPU-1 board is necessary when using one of the two following functionalities: VoIP or RAS (no simultaneous use). The CoCPU-2 board used for Alcatel-Lucent OmniPCX Office Communication Server 3.1 has the same main characteristics as the CoCPU-1 board apart from the NOR Flash. -
Page 26
Chapter 2.4.1.5 UAI-X Boards Board used for connecting up Alcatel Reflexes terminals or DECT 4070 IO/EO base stations. The UAI16-1 board is used to power terminals connected to the 16 interfaces remotely from an EPS48 external power supply connected to interface 1 via an external adapter cable (splitter). Caution: Only use EPS48 power supplies and the splitters provided. -
Page 27
2.4.1.9 PRA Boards This board provides 1 primary access for connecting the Alcatel-Lucent OmniPCX Office Communication Server system to the ISDN digital public network or to private networks: PRA -T2, DASS2, DLT2 : 30 x 64-Kbps B-channels + 1 x 64-Kbps D-channel; 2048 Kbps. -
Page 28
Chapter 2.4.1.9.1 Function of the LEDs T2 Name T1 Name Function BUSY BUSY B-channels busy (red LED lights up if at least 1 B-channel is busy) RAI (ATD) Remote frame alarm (red LED lights up on alarm) AIS (SIA2M) Too many «1’s in the 2-Mbit binary train (red LED lights up on alarm) NOS (MS) NSIG Absence of 2-Mbit signal (red LED lights up on alarm) -
Page 29
Each category-5 RJ45 connector has 2 green LEDs: Left LED = link status and activity: • off: link disconnected • on: link connected • blinking: link active Right LED = full duplex/collision: • off: Half Duplex • on: Full Duplex •… -
Page 30
Chapter 2.4.1.13 DDI-X Board This board is used to connect 2 or 4 analog trunk lines with Multiple Subscriber Numbers. 2.4.1.14 ATA Board The ATA (Analog Trunk Access) board serves to connect analog trunk lines (2 or 4 TL). The ATA board does not support pulse dialing in Australia and New Zealand. 2.4.1.15 Daughter Board Provision/SDRAM on CPU Boards The table below presents the various ways the daughter boards can be provided on the… -
Page 31
SLANX4 PATA HARD DISK SATA HARD DISK + P2SATA-xxx Daughter Board Mini-Mix Alcatel-Lucent OmniPCX Office Compact Edition Compact Edition 2nd Generation Hard Disk XMEM Mini-MIX VoIP Note: The Mini-MIX daughter board requires a CPU-3m (or CPU-4) in a Compact Edition 2nd Generation. -
Page 32
Chapter Figure 2.26: Example of Daughter Boards on CPU-1 Figure 2.27: Example of CPU with SATA Hard Disk 2.4.1.16 BASE Module Provision 2.4.1.16.1 Rack 1 2-18… -
Page 33
Boards Slots 1-2 CPU Slot CPU-1, CPUe-1, CPU-2, CPUe-2, CPU-3, Obligatory CPU-3m, CPU-4 MIX x/y/z AMIX-1 x/y/z UAI4, UAI8, UAI16, UAI16-1 SLI4, SLI8, SLI4-1, SLI8-1 SLI16, SLI16-1 PRA-T2, PRA-T1, DASS2, DLT2, T1-CAS, PCM R2 APA4, APA8 DDI2, DD14 BRA2, BRA4, BRA8 CoCPU-1, CoCPU-2 LANX8, LANX16, LANX16-1, LANX8-2, LANX16-2… -
Page 34
UAI16, UAI16-1 SLI4, SLI8, SLI16, SLI4-1, SLI8-1, SLI16-1 PRA-T2, PRA-T1, DASS2, DLT2, T1-CAS, PCM R2 APA4 APA8 DDI2, DD14 BRA2, BRA4, BRA8 CoCPU-1, CoCPU-2 LANX8, LANX16, LANX16-1, LANX8-2, LANX16-2 2.4.1.17 Alcatel-Lucent OmniPCX Office Compact Edition 1st and 2nd Generations 2-20… -
Page 35
Board MIX Slot CPU Slot CPU-2, CPU-3, CPU-3m, CPU-4 Obligatory MIX x/y/z AMIX-1 x/y/z Mini-MIX 2-21… -
Page 36
Chapter 2-22… -
Page 37: Software Licence Management
3.1.1 SOFTWARE LICENCE MANAGEMENT On an Alcatel-Lucent OmniPCX Office Communication Server several types of devices may be connected, several services may be offered and several applications may run. The purpose of the feature “Software Licence Management” is to define for a given system (i.e.
-
Page 38
Chapter the PRINC (PRINCIPAL) software key or MAIN for the system functions (voice, Internet, etc.) the CTI Software key for the CTI functions The software key corresponds to a text file where the name is the CPU hardware number with the .MSL (MAIN key) or .CSL (CTI key) extension. -
Page 39
3.2.1.1 Voice services available in «limited» mode Stations in the default Attendant Group and analog sets with automatic call setup on going off-hook no DECT stations, including Alcatel-Lucent DECT Reflexes stations Voice server with name announcement, 2 ports and 20 minutes» storage 4 welcome messages (pre-announcement) 2 system languages «Please Wait»… -
Page 40
Chapter The following table lists the functions controlled by the «Main» software key, the «limited» mode values and the configuration modularity. Controlled services Relevant Values in Modularity Hardware software limited mode extension version STANDARD TELEPHONY Number of Reflexes sets According to selected model Number of analog sets MOBILITY… -
Page 41
Controlled services Relevant Values in Modularity Hardware software limited mode extension version LAN TELEPHONY Number of IP Phones (e-Reflexes and IP Touch) Number of PIMphony multimedia terminals VoIP GATEWAY Number of VoIP channels VOIP VoIP on application board R1.0/R1.1 VOICE MAIL UNIT AND AUTOMATED ATTENDANT Number of VMU ports 0 port Storage capacity… -
Page 42
Chapter Controlled services Relevant Values in Modularity Hardware software limited mode extension version Accounting over IP From R5.0 closed open LANGUAGES Number of languages SWL RELEASE Required system release From R2 0 (R1 or R1.1) 1 (R2) 2 (R3) 3 (R4) 4 (R5) 5 (R6) ENGINE… -
Page 43
75/200 * 0 (from R2) Number of monitors 250 (R1) 250/500 ** 0 (from R2) Features None Alcatel-Lucent OmniPCX Office Communication Server CALL CENTER Number of sessions 28/200 * Number of monitors 250/500 ** Features None CSTA DESKTOP CLIENT Number of sessions… -
Page 44
Chapter Number of sessions Number of monitors 250/500 ** Features None PIMphony UNIFIED Number of sessions From R3.1 Number of monitors From R3.1 75 ** Features From R3.1 None SOFTWARE LICENSE VERSION Required system version From R2 1 (R2) (R1/R1.1) 2 (R3) 3 (R4) 4 (R5) -
Page 45: Presentation
3. Placed on a table: no more than three units can be laid on top of each other. Remark: The Alcatel-Lucent OmniPCX Office Compact Edition unit is fixed either directly to the wall, or to a wall support (US version). In both cases, use the hole drilling template supplied with the unit.
-
Page 46
Moreover, the weight of the equipment must be evenly distributed between the brackets. If mounting the Alcatel-Lucent OmniPCX Office Communication Server module results in exceeding the load on the front supports (generally the total weight divided by two), the… -
Page 47: Connections And Cabling
When superposing them vertically, they should be separated by at least 10 cm. Verify that the cables connecting the Alcatel-Lucent OmniPCX Office Communication Server or other equipment, or the supports for the housing structure (19″ rack for example) do not obstruct the air flow through the unit.
-
Page 48
All outputs are made using Female RJ45 connectors. Remark: the CPU-2 and MIX boards used for Alcatel-Lucent OmniPCX Office Compact Edition have the same characteristics as those used by Alcatel-Lucent OmniPCX Office Communication Server. 4.2.1.1.1 CPU-1, CPU-2, CPU-3, CPU-3m, CPU-4, CPUe-1 and CPUe-2 boards… -
Page 49
RJ45 pin Up-Link Unit 1 to 3 outputs LAN : 10/100 base T Ethernet port (MDI-II/straight). UNIT1, UNIT2, UNIT3: ports on integrated LAN switch (MDI-X/crossover). UPLINK : integrated LAN switch uplink port (MDI-II/straight). 4.2.1.1.3 SLIboard RJ45 pin 1 to 16 1 to 16: connecting analog Z terminals. -
Page 50
Chapter PBX: use in private network with TX and RX twisted pairs. 4.2.1.1.8 LANX and LANX-1 board RJ45 pin Ports 1 to 15 Up-Link Ports 1 to 15: internal ports. Up-Link: LAN connection. 4.2.1.1.9 LANX-2 board RJ45 pin Ports 1 to 14 GE1, GE2 TR0+ TR0-… -
Page 51
Access Type Impedance Alcatel Reflexes, Z, T0, UTP, FTP or STP, Category 3 or 5 100 or 120 ohms UTP, FTP or STP, Category 3 or 5 120 Ohms UTP, FTP or STP, Category 3 or 5 120 Ohms Ethernet FTP or STP, Category 5 100 Ohms STP supplied with the product, Category 5… -
Page 52
Chapter 4.2.1.4 CONNECTING TERMINALS 4.2.1.4.1 Connection of Alcatel Reflexes terminals The terminals are equipped with a cable and a self-acting switch that plugs into the wall socket. Each terminal is connected up by a pair of 0.5 or 0.6 mm diameter wires. -
Page 53
System — Reflexes terminal distances: 0.5 mm SYT type cable: 800 m (station without option) or 600 m (station with S0 or Z option). 278 type 0.6 mm cable: 1200 m (station without option) or 850 m (station with S0 or Z option). -
Page 54
CONNECTION TO THE PUBLIC NETWORK 4.2.1.5.1 Digital public network via T0 access (or DLT0 private network) The Alcatel-Lucent OmniPCX Office Communication Server system can be installed near the digital network termination or at a certain distance (up to 350 m), as required. -
Page 55
Caution: The AFU-1 board (daughter board of the CPU board) must obligatorily be fitted to detect the ab- sence of power. The ISDN-EFM box must be installed as close as possible to the system (3 m maximum). All the box connections are made with straight RJ45-RJ45 cables. Output connector functions: BRA: connection of T0 access to be forwarded. -
Page 56
Chapter 4.2.1.5.2 Digital Public Network by T1 or T2 access The diagram below shows a PRA-T2 board, but is equally applicable for a PRA-T1 board. 4-12… -
Page 57
The PRA board is connected to a digital line termination (DLT) by 2 symmetrical twisted pairs. Cable impedance: 120 Ohms +/- 20% between 200kHz and 1MHz; 120 Ohms +/- 10% at 1 MHz. Remark: We recommend using an L120-series cable (or the L204 equivalent). The distance T1-DLT or T2-DLT is limited by the amount of loss between the DLT and T1/T2, which must not exceed 6 dB at 1024 kHz. -
Page 58
Chapter 4.2.1.5.4 Analog Public Network — Direct Dialing In. 4.2.1.6 LAN CONNECTION The LANX8/LANX16 board is used to connect servers, PCs, IP terminals and external switches. 4-14… -
Page 59
Category 5 cable, FTP or STP, impedance 100 Ohms: maximum length 100 m. 4.2.1.7 CONNECTING AUXILIARY EQUIPMENT All auxiliary equipment is connected via the AUDIO-IN, AUDIO-OUT and DOORPHONE connectors of the CPUe-1, CPUe-2, CPU-1, CPU-2, and CPU-3 boards. 4.2.1.7.1 Connecting a Please-Wait message player This is connected via the AUDCTRL output (control contact open when idle) and the AUDIN input of the AUDIO-IN connector. -
Page 60
Chapter Audio input characteristics: Input impedance : 600 Ohms Fuse characteristics: Max. power : 10 W Max. voltage : 60 V Max. current : 500 mA The contacts of the alarm and doorphone controls have the same electrical characteristics as those indicated above. 4.2.1.7.2 Connecting a background music tuner This is connected via the AUDIN input of the AUDIO-IN connector. -
Page 61
4.2.1.7.3 Connecting an alarm The alarm is activated in the event of a false stopping of the system. It is connected via the ALARM output (control contact closed when idle) of the AUDIO-IN connector. 4.2.1.7.4 Connecting a broadcast loudspeaker Broadcast loudspeakers are connected via the AUDOUT output of the AUDIO-OUT connector. Audio output characteristics: Output impedance: <… -
Page 62
Chapter 4.2.1.7.6 Connecting a doorphone 2 doorphone types are available, depending on the operating mode used: Type A: relay-controlled doorphones (e.g. NPTT) Type B: doorphones controlled by MF Q23 signals requiring an SLI interface (e.g. TELEMINI and UNIVERSAL DOORPHONE) The doorphone interface comprises an intercom and an optional latch powered by the mains supply through a SELV (Safety Extra Low Voltage) transformer. -
Page 63: Power Supply
A single doorphone with doorstrike may be connected to the system. The system also allows for the connection of 2 doorphones without latch. Connecting an NPTT doorphone These doorphones require the use of a Z station interface. Several of these doorphones can be connected to the system; the limit is determined by the maximum number of analog stations the system can support.
-
Page 64: Battery Replacement
4.3.1.2 BATTERY IMPLEMENTATION Alcatel-Lucent OmniPCX Office Communication Server is supplied with one or more integrated batteries; they are mounted and fixed with a solid bar on the rear plate. Caution: Alcatel-Lucent OmniPCX Office Compact Edition does not have integrated batteries.
-
Page 65
3EH 76177 AD Compact Edition Note: The external battery units for Alcatel-Lucent OmniPCX Office Communication Server units L, M and S are pre-wired and delivered with inter-battery connectors. In addition, you will need: 12V — 7Ah batteries (reference: 3EH 76156 AA) A connection kit (reference: 3EH 75031 AA) for connecting the external battery unit to the Alcatel-Lucent OmniPCX Office Communication Server unit. -
Page 66
Figure 4.24: Wiring diagram of a 12V external battery rack unit (2 or 3x7Ah in parallel) Figure 4.25: Wiring diagram of a 36V external battery rack unit (1 or 2x7Ah in parallel) This type of unit is only used for an Alcatel-Lucent OmniPCX Office Communication Server L model. -
Page 67
3. Place the batteries flat in the unit and close it. 4. Turn off the switch, and check the battery voltage directly on the connector at the rear of the unit. Preparing an external battery unit (stack version) Before starting the installation, note that: External batteries must be of the same type, must be supplied by the same manufacturer and be from the same batch run. -
Page 68
Chapter 4. Connect the negative (black) terminals of the batteries as described below (and shown in the figure below). a. Connect the middle connector of the black wire to the negative (black) terminal of battery B2. b. If required, connect the other connectors of the black wire to the negative (black) terminals of batteries B1 and B3. -
Page 69
6. Close the unit and secure it with the four screws. 7. Stick a label on the unit stating the date of the installation and the number of batteries installed. Procedure for 36 V stack version (for L systems) The 12 V stack version of the external battery unit can used with L systems. It uses three 12V — 7Ah batteries. -
Page 70
Chapter 4. Connect the terminals of the batteries strictly in the order detailed below (also see the figure below). a. Connect the black wire to the negative (black) terminal of battery B1. b. Connect a yellow wire between the positive (red) terminal of battery B1 and the negative (black) terminal of battery B2. -
Page 71
Mate-N-Lok 2-terminal connector must be connected to the extension unit. Installation of external batteries for the M and L units 1. Stop the Alcatel-Lucent OmniPCX Office Communication Server system, and remove the power supply cord from the system side. -
Page 72
Chapter 4. Remove the fan connector, then remove the power supply unit and the battery unit. 5. Replace the battery cable with the new cable provided with the connection kit (3EH 75031 AA). 6. If the BAT IN/EXT connector is present, remove the red jumper. 4-28… -
Page 73
• «EXTERNAL BATTERY 36VDC/3.5A» for unit L. 11. Connect the cable (with J1 connector) between the Alcatel-Lucent OmniPCX Office Communication Server system and the external unit. 12. Set the ON/OFF switch on the external battery unit to the ON position (I or red). -
Page 74
7. Put the upper cover back in place. 8. Connect the cable (with J1 connector) between the Alcatel-Lucent OmniPCX Office Communication Server system and the external unit. 9. Set the ON/OFF switch on the external battery unit to the ON position (I or red). -
Page 75
Ensure that the mains power cable is NOT connected. b. Ensure that the ON/OFF switch is set to the OFF position (O or black). c. Ensure that the J1 jack is NOT connected to the Alcatel-Lucent OmniPCX Office Compact Edition unit. -
Page 76
Chapter 3. Connect the negative (black) terminals of the batteries as described below (and shown in the figure below). a. Connect the middle connector of the black wire to the negative (black) terminal of battery B1. b. If required, connect the end connector of the black wire to the negative (black) terminal of battery B2. -
Page 77
2. Move the red extBAT jumper from the NO position to the YES position. Note: Since R5.0, it is possible to install a hard disk on a Alcatel-Lucent OmniPCX Office Compact Edition unit. In that case, it is MANDATORY to install the external battery unit, and the extBAT jumper of the PSXS MUST be set to YES. -
Page 78: Connecting A Ups
CONNECTING A UPS Note: This paragraph is not relevant to the Alcatel-Lucent OmniPCX Office Compact Edition unit. A UPS (Uninterruptible Power Supply) can be used to allow system data to be saved for at least an hour in the event of mains failure.
-
Page 79
Protective grounding terminal shall be permanently connected to the ground. 4.3.1.5.2 Alcatel-Lucent OmniPCX Office Compact Edition Alcatel-Lucent OmniPCX Office Compact Edition is powered by an external power supply unit (100/240V). It is connected via a jack plug at the front of the module (right hand side). -
Page 80: Reflexes And E-Reflexes Terminals
Chapter For performance and safety reasons, the system must always be connected to the ground. The ground must be connected prior to all the other connections. For performance and safety reasons, the whole system must always be coupled to the ground. The ground must be connected before any other connections. The ground protection connection terminal must always be connected to the ground.
-
Page 81
Attaching the line cable: Turn the terminal Remove the panel at the rear of the terminal (pull it towards the interior of the terminal and then pull it out). Plug in the line cable(connector ) and position it as shown in the illustration below. Replace the panel. -
Page 82
Chapter Attach the terminal using the two lugs: introduce the lugs into the holes previously occupied by the feet (left foot and hole intended for this purpose for Advanced Reflexes terminals). Stabilize the mounting by clipping the foot into the base of the terminal. Mounting optional modules: Turn the terminal Remove the panel situated at the rear of the terminal. -
Page 83
List of abbreviations TD: Transmit data RD: Receive data RTS: flow control output CTS: flow control output Adding a Sector Turn the set and the module upside down Connect the unit to the terminal. Join the module to the set using the metallic strip and the 4 screws provided in the kit 4.4.1.1.3 Alcatel-Lucent First AND Easy Reflexes TERMINALS Attaching the line cable: Turn the terminal… -
Page 84
Chapter Plug in the handset cable (connector ) into the guide intended for this purpose. Wall mounted Preparing the terminal Turn the terminal Unscrew A and remove the metal plate. Slide this plate up the lower groove and secure it with screw B. Remove the handset hang-up lug by turning screw C through half a turn. -
Page 85: E-Reflexes Terminals
For Alcatel-Lucent First and Easy Reflexes terminals, the optional module is external to the terminal; this module can be placed on a table or wall mounted. The installation simply involves connection between the terminal, the module and the wall sacket. Wall mounting an optional module Drill two holes (separation = 105 mm, diameter = 6 mm).
-
Page 86
4.4.2.2.1 Configuration procedure Depending on the network topology, the configuring of the IP Enablers can be: Completely automatic, if they are on the same subnet as Alcatel-Lucent OmniPCX Office Communication Server: simply connect the terminals to the LAN and connect the power supply unit. -
Page 87
CoCPU-1/CoCPU-2 board is deactivated: in this case the IP parameters and the TFTP server address have to be entered on the terminals. Registering e-Reflexes terminals connected to a different subnet from the Alcatel-Lucent OmniPCX Office Communication Server Connect the power to the relevant terminal. Press i then #. -
Page 88: Series Sets
Chapter For more information, refer to the section Voice over IP in the product documentation. 8 Series Sets 4.5.1 IPTouch 4008/4018 Phone 4.5.1.1 Commissioning 4.5.1.1.1 Overview This module presents all the actions required for commissioning: The Alcatel-Lucent IP Touch 4018 Phone set The Alcatel-Lucent IP Touch 4018 phone Extended Edition set The commissioning of Alcatel-Lucent IP Touch 4018 Phone and Alcatel-Lucent IP Touch 4018 phone Extended Edition sets is identical.
-
Page 89
Initialize the set Program keys Prerequisites None. Connecting the sets This section describes how to: Connect an IP Touch set to the LAN (Local Area Network) Connect the power supply Prerequisites None. Connecting an IP Touch set to the LAN To connect the set to the LAN: 1. -
Page 90
Chapter Choosing the initialization mode The default mode is dynamic mode. To choose the initialization mode, refer to the table below. table 4.21: Initialization modes Then the required initialization mode is You have a DHCP server Dynamic mode or Refer to table: Initialization Proprietary dynamic mode procedure… -
Page 91
Static 1. Connect the power supply. 2. Before initialization phase 5 starts, press i, then the # key. The Main menu appears. 3. From the Main menu, choose IP Parameters. The IP Parameters menu appears. 4. Choose Static and press the OK key. 5. -
Page 92: Ip Touch 4028/4038/4068 Phone
Chapter In the procedure below, it is assumed that: there is one DHCP server no VLAN has to be configured. Prerequisites None. Relocating and retaining the same set To relocate and retain the same set: 1. Unplug the set. 2. Plug the set into a connector at its new location. 4.5.1.1.3 The Alcatel-Lucent IP Touch 4008 Phone set The Alcatel-Lucent IP Touch 4008 Phone is a cost reduction of the Alcatel-Lucent IP Touch 4018 Phone with a new transceiver and a new LAN switch.
-
Page 93
Figure 4.50: Alcatel-Lucent IP Touch 4028 Phone, Alcatel-Lucent IP Touch 4038 Phone and Alcatel-Lucent IP Touch 4068 Phone connectors 4.5.2.1.2 Commissioning the sets This section describes how to: Connect the sets Initialize the sets Connect optional equipment Program keys Prerequisites None. -
Page 94
Chapter To connect the set to the LAN: 1. Turn the set over so that you can see its base. 2. Plug the RJ45 cable into the set’s LAN connector. 3. Connect the RJ45 cable to the LAN itself. Connecting power supply The set can be supplied from two possible power sources: An AC/DC external adapter which is a 42V power supply A female jack is used to connect the power adapter. -
Page 95
You do not have a DHCP Static mode Refer to table: Initialization server procedure Obtain from your network administrator: • An IP address for the IP Touch set • The subnetwork mask • The router address • The TFTP server address (master VoIP board address) Note:… -
Page 96
Chapter Static 1. Connect the power supply. 2. Before initialization phase 5 starts, press i, then the # key. The Main menu appears. 3. From the Main menu, choose IP Parameters. The IP Parameters menu appears. 4. Choose Static. 5. Enter the following: a. -
Page 97
AOM Alcatel-Lucent 8 series and Alcatel-Lucent 9 series Smart Display Module provides 14 keys with programmable LCD labels Prerequisites None. Rules and restrictions The following rules apply to the use of Add-On Modules with the Alcatel-Lucent IP Touch 4028 Phone, Alcatel-Lucent IP Touch 4038 Phone and Alcatel-Lucent IP Touch 4068 Phone sets: A maximum of three Add-On Modules of the types AOM10 and AOM40 can be connected to each set, providing up to 120 additional keys. -
Page 98
Chapter The 3.5 mm female jack can receive an external station speaker jack. In order to take the external station speaker into account, the set customization for the jack has to be set to “Loudspeaker”. Prerequisites None. Connecting an external station speaker To connect an external station speaker, plug the external station speaker jack into the associated connector on the side of the set. -
Page 99: Series Sets
2. Select Name and enter the name to be associated with the selected key, then press OK. The desired name is associated with the key. 3. Select Number and enter the telephone number to be associated with the key, then press The desired number is associated with the key.
-
Page 100
Chapter Figure 4.51: Alcatel-Lucent 4019 Digital Phone connectors 4.6.1.1.2 Commissioning the set This section describes how to: Connect the set Program keys Prerequisites None. Connecting the set This section describes how to connect the set to the telephone system. Prerequisites None. -
Page 101: 4029/4039 Digital Phone
In fact, only the direct call key can be programmed (with a telephone number), which by default is the sixth programmable key. However, the Personal/Dial by name key can be programmed in a similar way. To program a key: 1. Press the i key followed by the required programmable key. 2.
-
Page 102
Chapter Connect optional equipment Program keys Prerequisites None. Connecting the sets This section describes how to connect a set to the telephone system. Prerequisites None. Connecting to the telephone system To connect a set to the telephone system: 1. Turn the set over so that you can see its base. 2. -
Page 103
42 additional keys. Add-On Modules of types AOM10 and AOM40 can be used on the same set, but a Smart Display Module cannot be used in conjunction with an AOM10 or AOM40. If an AOM10 is used with other Add-On Modules, it must be connected as the last module on the far right of the set. -
Page 104: V24/Cti Interface Module
The desired name is associated with the key. Note: As of release 6.0 of Alcatel-Lucent OmniPCX Office Communication Server, it is possible to use Uni- code — Chinese and Cyrillic — characters. It is at this step that it becomes active, if used. For more in- formation about IME, refer to the section Operation — Input Method Editor in this chapter.
-
Page 105: Hardware Description
The V24/CTI Interface Module allows a Data Terminal Equipment (DTE) to be connected to the OmniPCX Office, via a UA link, by means of an RS232 serial link (CTI port) or a V24 link. The V24/CTI Interface Module can be used alone or combined with an Alcatel-Lucent 9 series set.
-
Page 106: Hardware Configuration
Chapter CAN/CSA-C22.2 No 950-95: Canada 4.7.1.2.2 ECM EN55022: Limits and methods of measurement of radio interference characteristics of information technology equipment EN55024: Limits and methods of measurement of immunity characteristics of information technology equipment FCC part15: US requirements 4.7.1.2.3 V24 & CTI CCITT Rec.: V24,V28, V25bis, V54, V110 Hayes protocols ECMA 102: Attachment requirements for pan-European approval for connection to PSTN…
-
Page 107
4.7.2.2 Jumpers The jumper in a gray background is factory installed. To configure the V24/CTI Interface Module, open the device with the 2 screws located under the module. If the jumper is positioned for «stand-alone» operation, an associated set cannot work. If the jumper is positioned for «associated UA set»… -
Page 108: External Connections
Chapter 4.7.3 External connections 4.7.3.1 V24/CTI Interface Module Connection The V24/CTI Interface Module is connected as follows: Figure 4.56: V24/CTI Interface Module Connection The V24/CTI Interface Module is connected to: 1. The UA set 3 m maximum length ( RJ11/RJ11 cable) 2.
-
Page 109
Figure 4.57: Rear Panel 1. RJ11 connector for UA line to PCX 2. V24 SUBD9 connector 3. CTI SUBD9 connector Figure 4.58: Connector Details RS 232 port (V24): Signal Description Data Carrier Detect. Transmit data. Received data. Data Terminal Ready. Protective ground. -
Page 110: Intelligent Base Stations
Chapter Data reception Protective ground Transmission request Ready for transmission Intelligent Base Stations 4.8.1 Detailed description This notice describes the rules to follow for an installation comprising three or four DECT bases. For a larger installation, a preliminary study must be carried out using coverage tools. The bases are then installed according to the results of this study.
-
Page 111
Both cables should have the same length. The first interface of the system’s UAI16 board should not be used since the operator station uses those points. 4.8.1.2 NUMBER OF USEFUL BASE STATIONS Any radio signal is subject to various propagation phenomena: attenuation, reflection and diffraction. -
Page 112
Interactions with other applications IBSs are fully compatible with other wireless technologies such as VOWLAN. Interactions with other software releases OmniPCX Office release 5.1 requires 4 kinds of DECT initialization: Europe, Latin America, United-States and China. See also: § IBS CONFIGURATION 4.8.1.6… -
Page 113
The Line length is the cable length used to plug the IBS to the system (distance between the IBS and OmniPCX Office). It enables the system to add a delay in signal and to avoid a shift in clock signal that creates a reset of the IBS. -
Page 114
Chapter There are 3 possibilities of configuration: Short line (0-400 meters) Medium line (400-800 meters) Long line (800-1200 meters) Restart the IBS after you have modified the Line length parameter. Antenna diversity Antenna diversity is the ability of the IBS to move the transmission and reception from one antenna to the other so that the signal is always of the highest quality. -
Page 115
Figure 4.61: DECT/PWT Frequencies Note 2: Due to hardware, there is a limit in the number of channels that you can configure. You can configure the following numbers of channels: DECT EUROPE, LATAM, CHINA: 1, 2, 4, 5, 8, 10 channels DECT US: 1, 2, 4, 5 channels PWT: 1, 2, 4, 5, 8 channels 4.8.1.9… -
Page 116
Chapter bands in the different countries, 4 types of initialization of frequency plans are available: Europe, Latin America, The United-States and China. table 4.30: RF Band Europe Channel TX Freq RX Freq 1897.344 1898.206 1895.616 1896.480 1893.888 1894.752 1892.160 1893.024 1890.432 1891.296 1888.704… -
Page 117
1926.720 1927.584 1924.992 1924.992 1923.264 1923.264 1921.536 1921.536 1919.808 1919.808 1918.060 1918.060 1916.352 1916.352 1914.624 1914.624 1912.896 1912.896 Note 3: By default, all frequencies used Value sent to IBS: 0x3FF 0000 0011 1111 1111 table 4.33: RF Band US Channel TX Freq RX Freq 1928.448… -
Page 118: Safety Rules
Chapter 0000 0011 1111 1100 4.8.2 Safety rules 4.8.2.1 ENVIRONMENTAL PROTECTION For an exterior installation, it is necessary to take precautions against lightning affecting the location of the Alcatel-Lucent 4070 IO/EO. 4.8.2.1.1 Conditions for using lightning protection: Protection of Alcatel-Lucent 4070 IO/EO against lightning should be used when they: — are less than 1.5 m from a wall more than 2 m below the antenna.
-
Page 119
External antennae According to the ETSI EN 301 406 standard, DECT antenna gain is limited to 12 dB +/-3dB. In the case of external directional antennae, if a minimum safety distance of 50 cm is respected, the SAR value is the same as the value obtained in the case of an integrated omni-directional antenna (and therefore, lower than: 0.5 W/kg). -
Page 120
Chapter Square zone Rectangular zone Example 1: square building Example 2: rectangular building floor floor floor floor It is possible to alter the number of base stations used from one floor to another for this type of building. The technique used is overlapping the location of base stations from one level to another. This technique can be used for alternate floors if the coverage of a level can be achieved from an adjacent level. -
Page 121: Client Pcs
Installation procedure The PCs connected to the company’s local network and which use the Alcatel-Lucent OmniPCX Office Communication Server internet services (network services, Internet access via proxy or not, e-mail, system administration, etc.), must be configured in a particular way in relation to the services available on the system.
-
Page 122
Chapter (release 6 and later). Note 2: For more details, refer to the documentation of the operating system used on the client workstation. The following services can be configured: network services Web browsing Electronic messaging access to an FTP server file server. -
Page 123
4.9.1.1.2 Ethernet network access board Dynamic IP Address (DHCP) Reserve a range of addresses for PCs in the system: WBM : Network -> DHCP tab . Enable obtaining IP addresses from a DHCP server on the PC. Example: Configuring with Windows XP Start ->… -
Page 124: Static Ip Address
The Internet browser must be configured to use the Proxy server. The IP address of this server is that of the Alcatel-Lucent OmniPCX Office Communication Server main CPU board that hosts the «Internet Access» software. The port number used by the proxy is that configured in WBM: Proxy ->…
-
Page 125
If the company is connected to the Internet via Alcatel-Lucent OmniPCX Office Communication Server, it is used as the gateway between the LAN and the Internet for the exchange of messages. -
Page 126: Pimphony
Chapter If the firewall is enabled on Alcatel-Lucent OmniPCX Office Communication Server, only passive FTP is authorized. This parameter depends on the FTP tool used, please refer to the FTP system user manual. 4.10 PIMphony Alcatel-Lucent PIMphony is a personal productivity tool that connects your phone terminal (Alcatel Reflexes, analog or DECT wireless set) with your computer, providing enhanced usage of your telephone.
-
Page 127: Limits
200 maximum for Alcatel-Lucent OmniPCX Office Premium Edition CS platforms Note: The maximum of simultaneous connected users in HTTPS is 10 for Alcatel-Lucent OmniPCX Office Ad- vanced Edition CS platforms and 25 for Alcatel-Lucent OmniPCX Office Premium Edition CS platform.
-
Page 128
The replacement set keeps its own default functions (customized settings are not transferred). The data not transferred is stored in the Alcatel-Lucent OmniPCX Office Communication Server system until a set of the same type as the initial one is connected. -
Page 129
resource keys are not preserved. The directory numbers are preserved in accordance with the size of the directories of the stations concerned (for example, when replacing a Advanced Reflexes set with a Premium Reflexes set, only the first 10 numbers are preserved. The add-on modules are always transferred provided the substitution set supports these modules. -
Page 130
Multi Reflexes 4099 option (also called Multiple UA hub) connects up to 3 Alcatel Reflexes or Alcatel-Lucent 9 series terminals to an Alcatel-Lucent OmniPCX Office Communication Server using just one UA link. It simplifies the installation of additional Reflexes or Alcatel-Lucent 9 series terminals. -
Page 131
Interface classification UA link: TBTS Hub/Alcatel Reflexes or Alcatel-Lucent 9 series 1 to 3 : TBTS Maximum distances between Alcatel-Lucent OmniPCX Office Communication Server and sets 0,4 mm cable: 325 m 0,5 mm cable: 505 m 0.6 mm cable: 730 m Cables of 3 m and 10 m are available for connecting the sets to the hub. -
Page 132
Chapter Figure 4.73: PATA Hard Disk Connection Figure 4.74: SATA Hard Disk Connection During installation, always take anti-static precautions (wristband, heelpiece, etc.) before handling the hard disk. Any degradation caused by electrostatic discharges will reduce the life of the disk. When going into stand-by mode, wait for the red Power LED to stop flashing before you remove the module’s CPU board. -
Page 133
It is possible to add one or two modules to the basic module. 4.11.1.4.1 Fitting an add on module. The CPU slot of the add on module must be fitted with an MEX board with an HSL1 daughter board. Fit the CPU board of the main module with an HSL daughter board. An add-on module may only include synchronous digital network interfaces (BRA, PRA) if this type of card is already incorporated into the main module (synchronization by the main module). -
Page 134
Chapter RJ45 pin MAIN: MAIN: HSL to basic module. 4.11.1.4.3 Role of the # key Name Color Feature POWER Red/Green Mains operation: steady green led Battery operation: steady yellow led Standy: steady red LED Red/Green Both fans functioning: steady green led 1 or both fans down: steady red led 4.11.1.4.4 Adding a third module Replace the HSL1 board of the CPU board with an HSL2 board. -
Page 135: Detailed Description
Stations Default Configuration 5.1.1 Detailed description 5.1.1.1 DEFAULT CONFIGURATION 5.1.1.1.1 Alcatel-Lucent 8 series and Alcatel-Lucent 9 series station profiles Alcatel-Lucent IP Touch 4038 Phone, Alcatel-Lucent IP Touch 4068 Phone and Alcatel-Lucent 4039 Digital Phone sets Each of these sets has 2 programmable keys (F1/F2) and 40 virtual add-on keys. Their default functions depend on: The configuration of the set (Operator, Manager, Assistant, Normal or Attendant) The market in which the set is sold (US or non-US)
-
Page 136
Chapter Figure 5.1: Virtual Key Functions for Operator Sets in KeySystem mode… -
Page 137
Figure 5.2: Virtual Key Functions for Manager/Assistant/Normal sets in KeySystem Mode… -
Page 138
Chapter Figure 5.3: Virtual Key Functions for Attendant sets in KeySystem Mode (with no Physical Add-on) -
Page 139
Figure 5.4: Virtual and Physical Add-on Key Functions for Attendant Sets in KeySystem mode… -
Page 140
Chapter Figure 5.5: [US only] Virtual Key Functions for Operator Sets in KeySystem Mode… -
Page 141
Figure 5.6: [US only] Virtual Key Functions for Manager/Assistant Sets in KeySystem Mode… -
Page 142
Chapter Figure 5.7: [US only] Virtual Key Functions for Normal Sets in KeySystem Mode… -
Page 143
Figure 5.8: Virtual Key Functions for Operator/Manager/Assistant/Normal Sets in PABX Mode… -
Page 144
Chapter Figure 5.9: [US only] Virtual Key Functions for Operator Sets in PABX Mode 5-10… -
Page 145
Figure 5.10: [US only] Virtual Key Functions for Manager/Assistant Sets in PABX Mode 5-11… -
Page 146
Chapter Figure 5.11: [US only] Virtual Key Functions for Normal Sets in PABX Mode Alcatel-Lucent IP Touch 4028 Phone and Alcatel-Lucent 4029 Digital Phone sets Each of these sets has 2 programmable keys (F1/F2) and 40 virtual add-on keys. Their default functions depend on: The configuration of the set (Operator, Manager, Assistant, Normal or Attendant) The market in which the set is sold (US or non-US) -
Page 147
There are 10 pages of virtual keys (the pages can be scrolled through using the up/down buttons of the set’s 4-way navigator), with 4 virtual keys on each page. Alcatel-Lucent IP Touch 4018 Phone and Alcatel-Lucent 4019 Digital Phone sets Each of these sets has 6 programmable keys which have the default functions indicated below. -
Page 148
Chapter 5-14… -
Page 149: System Startup From A Phone Set
System Startup from a Phone Set 6.1.1 Configuration procedure You can start-up the system using a phone set, provided this phone set is either an Alcatel-Lucent IP Touch 4038 Phone, Alcatel-Lucent 4039 Digital Phone, Alcatel-Lucent IP Touch 4068 Phone or an Advanced phone set. The phone set used needs to be defined as the operator phone set, that is the first phone set connected to the system.
-
Page 150
Chapter To restart the session from the beginning during programming. To restart the session if you quit using the Exit function 6.1.1.2 SYSTEM TYPE : Used to define the system type: Business or Hotel 6.1.1.3 INSTALLATION NUMBER This number must be entered in its entirety. The number of your installation can include a maximum of three fields for a total of 18 digits. -
Page 151
: Used to choose one of the pre-programmed numbering plans: (2 to 4 digits, national or with *). Any modification of the numbering plan causes the deletion of any existing DDI numbers. 6.1.1.5 TERMINAL DDI NUMBERS This function is used to define the DDI numbers (Direct Dialing Inwards) of all the terminals of a Business system and the Administrative terminals (dedicated terminals) of a Hotel system. -
Page 152
Chapter Look through the list of internal directory numbers and validate the entry displayed. Delete the digits contained in the field «Direct no.» (use the down arrow navigator key to display this option) Reject the complete list of DDI numbers as defined and return to the start of the function. -
Page 153
10: Number of numbers still available in the DDI table after configuration of Direct Dial numbers. In a Hotel installation, all the Z terminals are used as hotel room terminals (except the first which is a fax and the second which is a public telephone). A pool of DDI numbers means that these terminals can be assigned with a dynamic DDI number when a customer checks in. -
Page 154
Chapter This function is only available for a business installation (in a Hotel only PCX mode is used). «PCX Mode» and «Intercom Mode» PCX Mode: all the lines are available using two RSB keys (= resource key specific to a bundle) . -
Page 155
This function is only available if your installation is fitted with DECT functions The ARI (Access Right Identifier) number identifies the system uniquely to mobiles. It contains 11 octal digits (base 8). This number, assigned to an ETSI base by the installer, must be entered on installing the system. -
Page 156
Chapter Choice of language used on all the stations in the installation (display and spoken help) 6.1.1.12 BASIC METERING UNIT COST The value of the basic metering unit is introduced for calculating the cost of external calls. The cost (not the duration) and the changes in the charge meters during calls are displayed. The value entered can contain 5 figures (0-2 decimal places) in the chosen monetary unit. -
Page 157: System Startup From Omc
6.2.1 Overview OMC is the PC application used to program the Alcatel-Lucent OmniPCX Office Communication Server system via a local connection (V24 or LAN) or a remote connection (the PC modem is connected to the Alcatel-Lucent OmniPCX Office Communication Server integrated modem via the public network).
-
Page 158: Installation Procedure
When installation is finished, you access the application either: by double-clicking on the new icon created on the Windows desktop, or by selecting Start -> Program -> Alcatel-Lucent OmniPCX Office Communication Server -> OMC. The window Welcome to OMC appears.
-
Page 159
4. Select the Connect menu. 5. Select the Local menu. 6. The system offers to install Alcatel-Lucent OmniPCX Office Communication Server Direct V24. Click on Yes. The Modem options window is displayed. 7. Click Add. The Installation window is displayed. -
Page 160: Downloading The Software
A final software including all the countries parameters (S, M and L racks delivered in BTCO mode) or A software tool (Alcatel-Lucent OmniPCX Office Compact Edition system and S, M and L racks delivered in stock mode). This software tool is installed on the CPU and must be updated with a further system software package (including the specific country parameters) also called country software, so that the installation is complete.
-
Page 161
1. Open OMC. 2. Open the Tools folder. 3. Open the OMC-Software Download application. 4. In the Communication Mode window, select the type of download: • Local • Modem Direct • Modem Call Back • 5. Enter the password pbxk1064. 6. -
Page 162: Services Provided
Note: When available, a new BIOS version in the Alcatel-Lucent OmniPCX Office Compact Edition software will not be automatically included in the list of items to be downloaded from the system. You must select and include the new BIOS version manually.
-
Page 163
Access to modes 2, 3, 4 and 5 is password protected: pbxk1064 (using the OMC tool) Access to modes 2 and 3 is password protected: help1954 (using the OMC Easy tool) 6.2.3.1 Mode 1: Data and tool repository This mode is used to create .crp files offline (collective customer directories) which are used in the Typical Installation menu. -
Page 164
Chapter The 5 icons available in this mode (Terminals, Groups, System, Collective Directory and External Lines) are used to gain access to the wizards used to modify or configure simply various parameters as detailed below. The data will be taken into account by the system after clicking OK. 6.2.3.3.1 Subscribers List of subscribers: public number, name, discrimination level, accessible network line groups. -
Page 165
Internet access installation 6.3.1 Overview With Alcatel-Lucent OmniPCX Office Communication Server, several computers can be connected to the company’s LAN and access Internet services and applications through a shared Internet connection. The proposed Internet services are available even if Internet access is not established through Alcatel-Lucent OmniPCX Office Communication Server. -
Page 166
TYPES OF INTERNET ACCESS 6.3.1.1.1 Internet access via Alcatel-Lucent OmniPCX Office Communication Server Alcatel-Lucent OmniPCX Office Communication Server is used to connect to the Internet by three types of access. ISDN: shared access (T0 or T2) to the Internet, restricted to 2 B channels… -
Page 167
IAP assigns a new IP Address. Web Communication Assistant: it is a Web application designed for Alcatel-Lucent OmniPCX Office Communication Server end users to help them manage in-house corporate communication (e-mails and voice messages). All these services are configured via a secure Web interface; Web-based Management (WBM). -
Page 168
Chapter verification of information prior to validation, the possibility of choosing the display language (French, English, German, Italian, Spanish, Portuguese or Dutch). The language is configured in the Web navigator. The following diagram illustrates the main elements in a screen. The WBM interface contains three screen types: 1. -
Page 169
1. Open the Web navigator. 2. Enter the following address in the Address field of the Web navigator: https://<Alcatel-Lucent OmniPCX Office Communication Server>/admin where <Alcatel-Lucent OmniPCX Office Communication Server>is the machine’s IP address or name. You go to the Web-Based Management — Authentication page. -
Page 170
6.3.4 Connecting your e-communication server to the LAN 6.3.4.1 Configuration procedure The necessary hardware on Alcatel-Lucent OmniPCX Office Communication Server is: a CPUe-1/CPUe-2 board an ISDN T0 or T2 connector a client station connected to the LAN a LAN switch (LANX8, LAN X16 or external switch) -
Page 171
Communication Server and the access provider: On demand, Always on or Callback 5. IP Address: the IP address is allocated to Alcatel-Lucent OmniPCX Office Communication Server by the access provider 6. Primary and secondary name server: IP addresses of the DNS servers on the premises of the access provider. -
Page 172
• Profile name: this name identifies the new Internet connection managed by Alcatel-Lucent OmniPCX Office Communication Server. The profile groups together all the parameters associated with the connection. It is best to give it a name that represents the newly created connection — the name of the access provider, for example. -
Page 173
• Profile name: this name identifies the new Internet connection managed by Alcatel-Lucent OmniPCX Office Communication Server. The profile groups together all the parameters associated with the connection. It is advisable to enter a name that is representative of the created connection, such as the name of the access provider. -
Page 174
• Profile name: this name identifies the new Internet connection managed by Alcatel-Lucent OmniPCX Office Communication Server. The profile groups together all the parameters associated with the connection. It is best to give it a name that represents the newly created connection — the name of the access provider, for example. -
Page 175
ISDN or DSL modem/Cable modem. IP address negotiation: the system sends back the IP addresses of Alcatel-Lucent OmniPCX Office Communication Server, and of the router on the IAP’s premises. This negotiation is tested during an ISDN and DSL Modem/Cable Modem type connection. -
Page 176
Chapter Testing the remote address by pinging the ISP’s router. This checks that the router is working properly. DNS configuration check: this test is used to verify that the DNS configuration entered in the system is correct and, if not, it is used to dynamically locate the DNS servers present on the IAP’s premises. -
Page 177
BATTERY MAINTENANCE Alcatel-Lucent OmniPCX Office Communication Server systems (except the Alcatel-Lucent OmniPCX Office Compact Edition) are supplied with internal batteries that provide back-up power in the event of a mains power failure. Alternatively, all systems may be optionally equipped with an external battery pack to provide back-up power. -
Page 178
Chapter sealed lead battery 7 Ah / 12 V fire resistance better than or equal to UL94-V2 7.1.1.2 BOARD BATTERY MAINTENANCE It is recommended that the batteries in the CPU-1/CPUe-1, CPU-2/CPUe-2, CPU-3, CPU-3m, CPU-4, CoCPU-1, and CoCPU-2 boards should be replaced by batteries of the same type every two years. -
Page 179
The procedure presented below assumes that a board is to be installed in a vacant slot in the system cabinet. Note 1: Hot installation is forbidden in Alcatel-Lucent OmniPCX Office Compact Edition systems. It is also forbidden for CPU boards in all systems. -
Page 180: Hard Disk Maintenance
(of the same or different type) is to be installed in the same slot in the system cabinet. Note 1: Hot swap is forbidden in Alcatel-Lucent OmniPCX Office Compact Edition and Alcatel-Lucent Om- niPCX Office Compact Edition 2nd generation CS. It is also forbidden for CPU boards in all sys- tems.
-
Page 181
malfunctioning of your installation. 7.1.1.6.1 Handling Always wear a discharge device (bracelet, heel clip, etc.) to protect against electrostatic discharges. Avoid any knocks to the hard disk Do not touch the connector Handle the disk by holding it by the sides 7.1.1.6.2 Storage All hard disks must be stored in an electrostatic protective bag Avoid contact between hard disks… -
Page 182
Chapter… -
Page 183
Glossary 8.1.1 Automatic Call Distribution A computerized phone system that responds to the caller with a voice menu, and connects the call to the required agent. It can also control call flows by automatically routing calls in the order of arrival. ACSE Association Control Service Element. -
Page 184
Chapter Bandwidth Allocation Control Protocol. Control protocol associated with BAP. Bandwidth Allocation Protocol. PPP protocol that manages bandwidth by allocating it dynamically between two ports, i.e. between the two extremities of a point-to-point link. Bandwidth On Demand. Service that allocates bandwidth automatically in response to traffic volume. Basic Rate Access. -
Page 185
File Transfer Protocol. Standard protocol for exchanging files between remote computers over the Internet. FTP/STP/UTP Foiled Twisted Pairs/Shielded Twisted Pairs/Unshielded Twisted Pairs. Types of connection cables to be used between an Alcatel-Lucent OmniPCX Office Communication Server and an external distribution panel. 8.1.7 GATEKEEPER… -
Page 186
Chapter 8.1.8 H.323 ITU standard for multimedia communication (voice, video, data). H.450 Additional services associated with H.323 version 2. High Speed Link. Link between the basic module and an add-on module; requires an HSL daughter board to be fitted on the CPU and MEX boards. HTTP HyperText Transfer Protocol. -
Page 187
In the context of the OmniPCX Office, the LAN includes an IP network and provides services to the wired client and to the WLAN client: file server, proxy, main server. -
Page 188
Operator Station. Dedicated Reflexes terminal for answering incoming calls from the public network. OmniPCX Office Management Console (formerly PM5). A PC-based management and configuration tool. 8.1.15 Password Authentication Procedure. Procedure used by PPP servers to validate connection requests. -
Page 189
PSTN Public Switched Telephone Network. PTN(X) Private Telecommunications Network (eXchange). A private network consisting of switches and terminals connected together by telephone links. Personal Wireless Telecommunications. Corresponds to the DECT standard for the North American coun- tries (especially the US). 8.1.16 Quality Of Service. -
Page 190
Chapter Session Initiation Protocol. A signaling protocol for Internet conferencing, telephony, events notification, and instant messaging. SIP initiates for example, call setup, routing and authentication within an IP domain. SLAN LAN Switch. Daughter board for mounting on a CoCPU/CoCPU-1/CoCPU-2 board to enable it to commu- nicate with the CPU/CPUe/CPUe-1/CPUe-2. -
Page 191
Uniform Resource Locator. Address of a resource (file, program, image, etc.) accessible on the Internet. User to User Signaling. Information carried clear end-to-end by ISDN to enable exchanges between net- work subscribers; the ISVPN protocol is contained within this information. 8.1.21 Voice Mail Unit. -
Page 192
Chapter 8-10…

ООО Стандарт Телефон Электрика
+7 (495) 755-78-40
Искать…
- О компании
- Продукты и решения
- Трейдинговая телефония IPC
- Решения Alcatel-Lucent Enterprise
- Сертификаты
- Спецпредложения
- Партнеры
- Новости
- Контакты
- Результат поиска
Продукты и решения
-
Трейдинговая телефония IPC
-
Тарреты
-
TOUCH
-
IQMAX
-
EDGE
-
SYNC
-
-
Унифицированная коммуникационная платформа
-
Unigy
-
Unigy Management System
-
-
Приложения
-
QuickDial
-
FastFind
-
Unigy Connect для Microsoft Lync
-
Unigy Connect для Salesforce.com
-
-
Интерком и прямые каналы связи
-
Unigy Pulse
-
Unigy Pulse Enterprise
-
Unigy Pulse Mobile
-
-
-
Решения Alcatel-Lucent Enterprise
-
УАТС Alcatel-Lucent OmniPCX Enterprise
-
Архитектура
-
-
УАТС Alcatel-Lucent OmniPCX Office
-
Телефонные аппараты и терминалы
-
80-я серия IP
-
80-я серия
-
8-я серия IP
-
9-я серия
-
Руководства пользователя
-
Спецификации
-
-
-
Специальная оценка условий труда
-
Личный кабинет клиента
Спецпредложения

Audience22 в подарок!
С 01 мая получите телефон Audience22 в подарок при покупке пяти цифровых телефонов Alcatel-Lucent.
Подробнее
���� ������� ������ ������ ��� http://dengi.maximedia.ru/
Новости

Omni
Удаленный доступ к ресурсам системы Unigy…
Подробнее
���� ������� ������ ������ ��� http://dengi.maximedia.ru/
Руководства пользователя для телефонных аппаратов Alcatel-Lucent
- Печать
| Название | OmniPCX Enterprise OXE | OmniPCX Office OXO |
|---|---|---|
| Alcatel-Lucent 8078s-8068s-8058s-8028s-8018-8008 Premium DeskPhone s Series | Manual Полное |
Manual Полное |
| Alcatel-Lucent 8039s-8029s-8019s Premium DeskPhone s Series | Manual Полное |
Manual Полное |
| Alcatel-Lucent OmniTouch 8002/8012 | Полное | Полное Краткое |
| Alcatel-Lucent 8068/8039/8038/8029/8028 |
Полное |
Полное Краткое |
|
Alcatel-Lucent OmniTouch 8082 My IC Phone |
Полное Краткое |
Полное Краткое |
| Alcatel-Lucent OmniTouch 4135 IP | Manual Quick_guide Handbuch Kurzanleitung |
Manual Quick_guide Handbuch Kurzanleitung |
| Alcatel-Lucent 8232 DECT |
Полное |
Полное Краткое |
| Alcatel-Lucent 8242 DECT | Полное Краткое |
Полное Краткое |
| Alcatel-Lucent 4008/4018/4019 | Manual Краткое |
Полное Краткое |
| Alcatel-Lucent 4028/4029 | Manual User guide |
Полное Краткое |
| Alcatel-Lucent 4038/4068/4039 | Manual | Полное Краткое |
| Alcatel Audience 22 | Полное | Полное |
Здравствуй дорогой читатель!
В данной статье я хочу рассмотреть АТС от компании Alcatel-lucent серии Office RCE. Что из себя представляет, какой функционал имеет в наличии и как запустить по стандартному ТЗ. Во первых давайте разберемся что же такое АТС и где она используется. Вырезка из википедии:
 «Автомати́ческая телефо́нная ста́нция, АТС — устройство, автоматически передающее сигнал вызова от одного телефонного аппарата к другому. Система автоматических телефонных станций обеспечивает установление, поддержание и разрыв соединений между аппаратами, а также дополнительные возможности.»
 В нашем случае у нас имеется гибридная АТС с наличием как аналоговых так и IP портов:
 «Цифровые АТС (IP-PBX), где используется не коммутация каналов, а коммутация пакетов, и транспортом является протокол IP. Такие АТС осуществляют коммутацию устройств IP-телефонии.»
Осторожно трафик!
АТС-ки из данной серии бывают 4 типов:
1. OmniPCX office RCE Compact
2. OmniPCX office RCE Small
3. OmniPCX office RCE Medium
4. OmniPCX office RCE Large
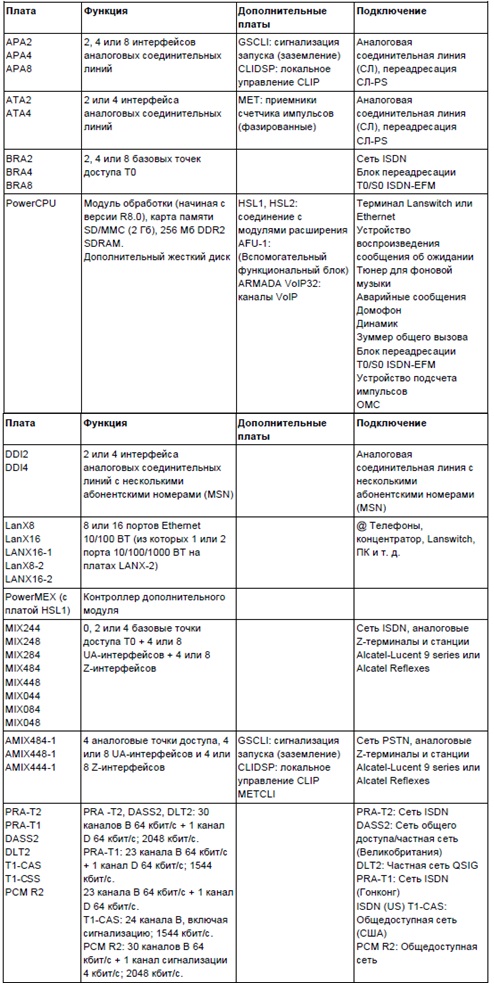
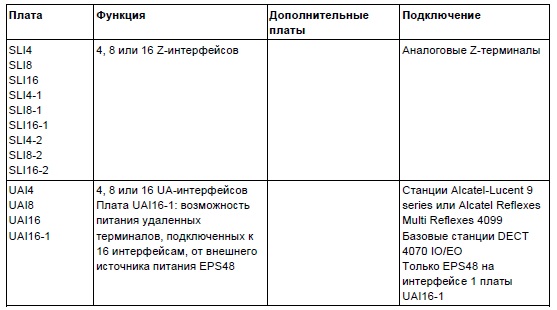
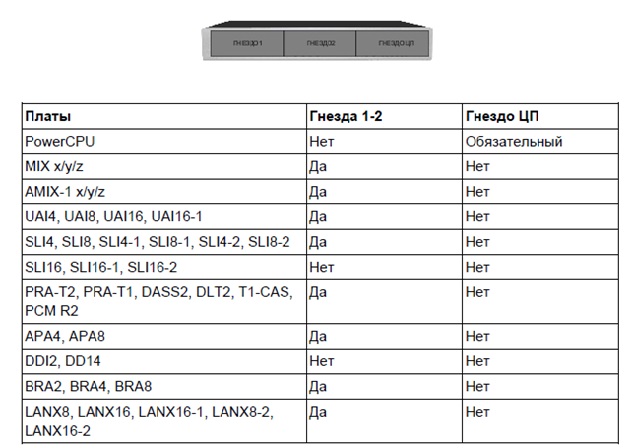
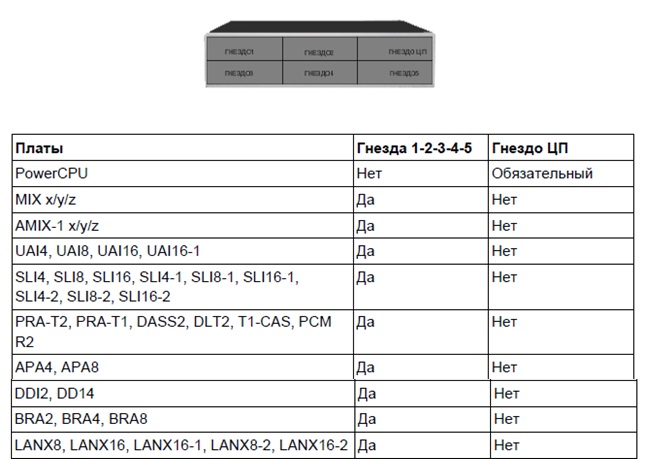
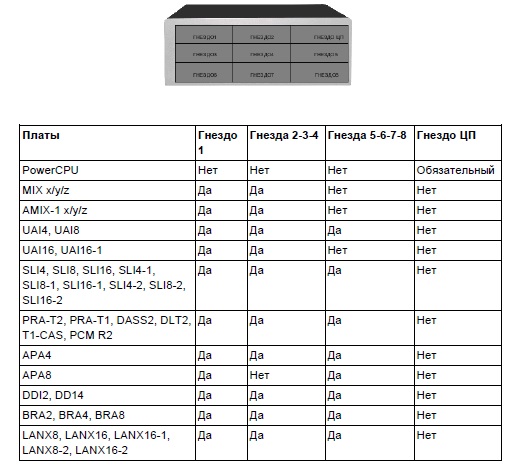
Основное различие — это количество портов, типы поставки и поддерживаемые платы, сильно углубляться не буду, мы рассмотрим вариант Medium. В следующей таблице приведен список доступных плат для моделей Small, Medium, Large:
Возможные варианты исполнения в зависимости от платформы:
OmniPCX office RCE Compact:
OmniPCX office RCE Small:
OmniPCX office RCE Medium
OmniPCX office RCE Large
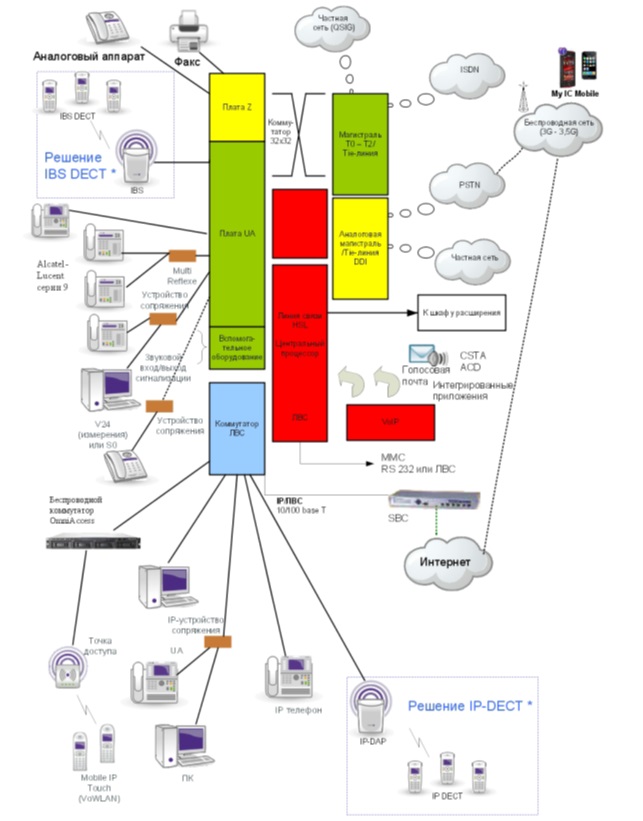
Таким образом выглядит полная топология системы:
Ну что же, немного ознакомившись с основами системы предлагаю перейти к запуску:
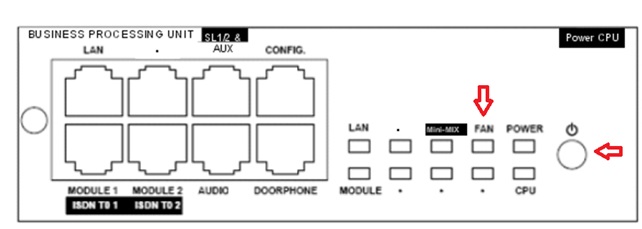
Включить АТС:
1. Нужно утопить кнопку питания
2. Дожидаемся, чтобы зажегся светодиод FAN
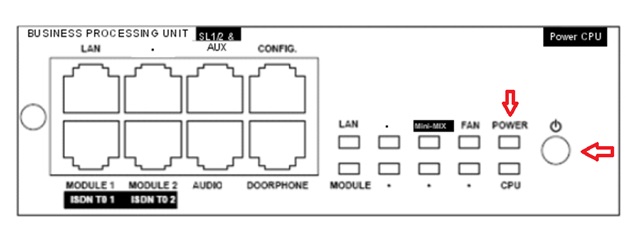
Выключить АТС:
1. Нажимаем кнопку питания
2. Дожидаемся, чтобы зажегся красным и не мигал светодиод POWER
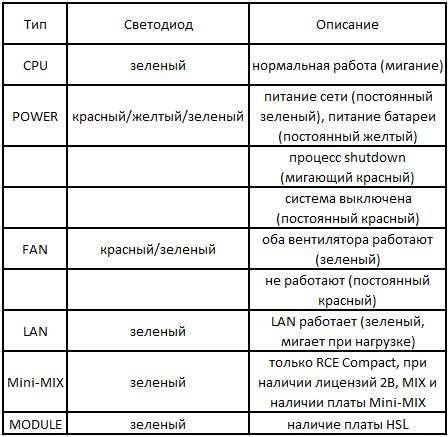
Описание светодиодов:
Для того чтобы получить доступ к настройке станции нам необходимо программное обеспечение «OMC» от Alcatel-lucent (скачать можно на партнерском сайте Alcatel-lucent либо по запросу в Google); также свежая документация по АТС (Expert documentation OXO x.x).
Подключаемся:
1. Открываем OMC (выбираем режим Expert);
2. Вкладка Comm -> Connect;
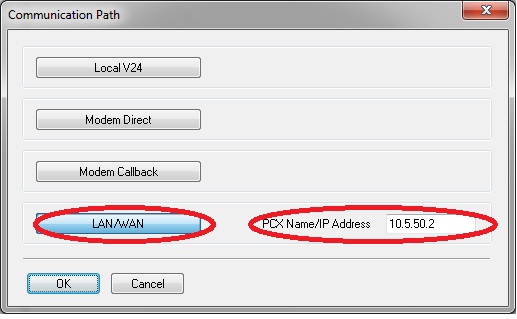
3. Выбираем Lan/Wan и пишем наш IP(IP адрес по умолчанию: 192.168.92.246.);
4. Нажимаем кнопку ОК, выбираем Installer и вводим пароль(по умолчанию pbxk1064).
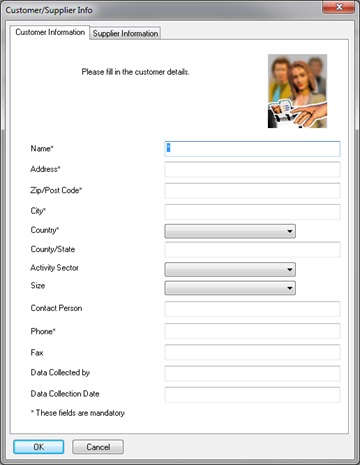
Сразу видим перед собой окошко с информацией о установщике и клиенте(заполняем):
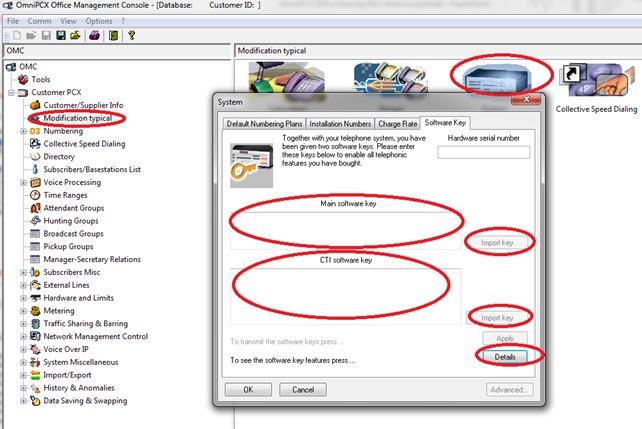
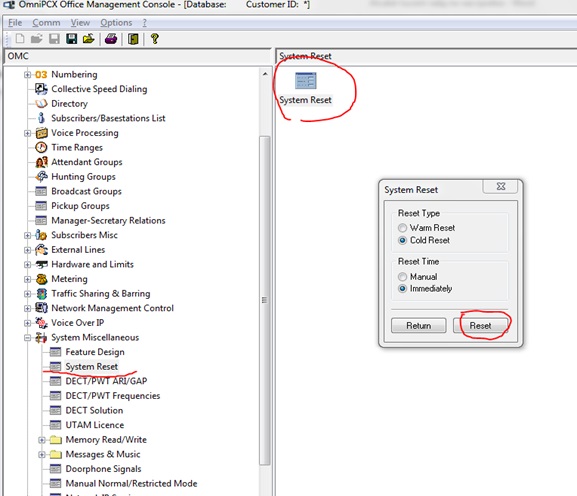
Первым делом заливаем файлы лицензий и делаем Cold Restart.
Restart:
При нажатии кнопки Details можем посмотреть информацию о том какие лицензии у нас есть.
Так же хочу сразу отметить что есть два типа перезагрузки Warm(обычная) и Cold(сброс на заводские).
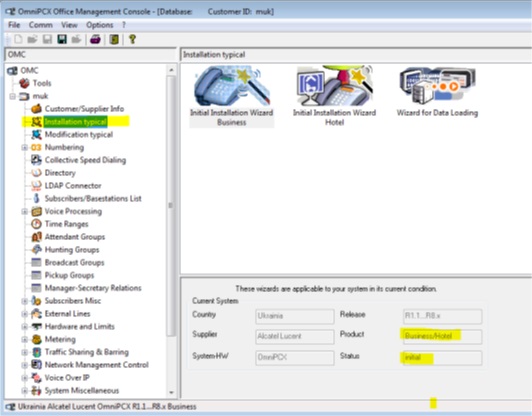
Ждем перезагрузки, заходим в станцию и начинаем Initial Installation Wizard:
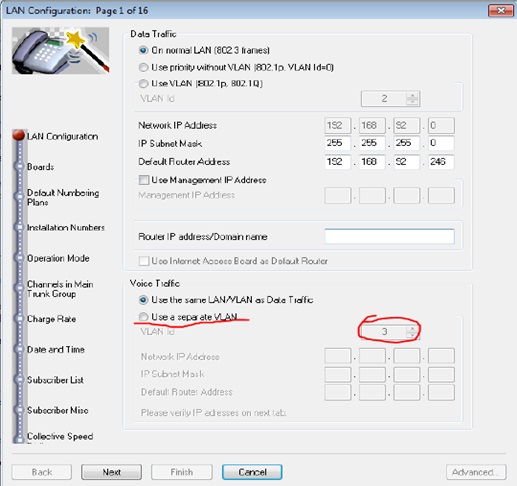
Шаг 1 Настройка LAN:
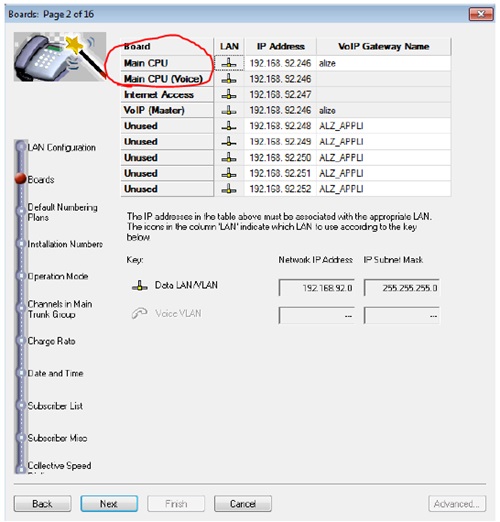
Мы имеем два типа трафика Data и Voice. Я рекомендую для Voice трафика использовать Voice VLAN(необходима поддержка на всех ваших коммутаторах к которым будут подключены телефоны). В VoIP телефоны Alcatel-lucent встроен минисвич на два порта, который позволяет подключить телефон к розетке, а компьютер к телефону. Этим мы экономим розетки и порты на свиче. Так же VoIP трафик должен быть изолирован от трафика, предназначенного компьютеру. Во имя приоретизации, что для VoIP критично, и безопасности. Переходим к шагу 2, записываем IP адреса Main CPU и Main CPU(voice) они могут понадобится при настройке телефонов.
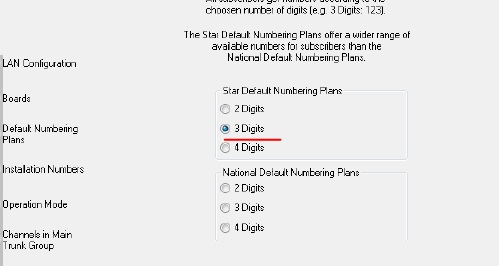
Шаг 3: Ставим количество цифр во внутренней нумерации:
Дальше жмем Next, Next…
Шаг 7 включаем External Meeting Activation;
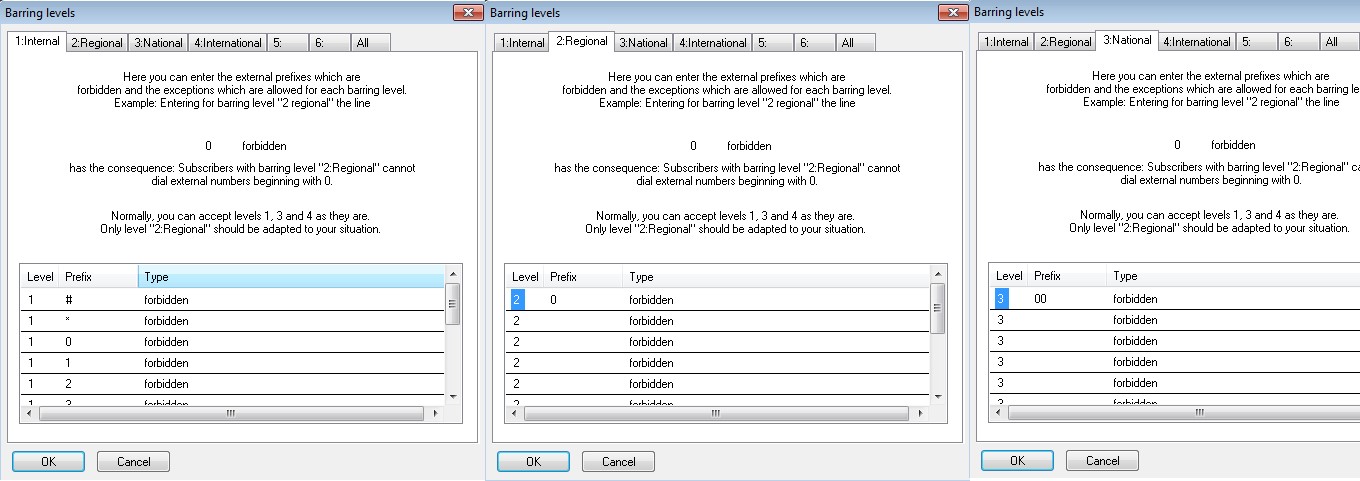
На шаге 9 заходим по вкладке Barring:
И ставим так же как скриншоте ниже:
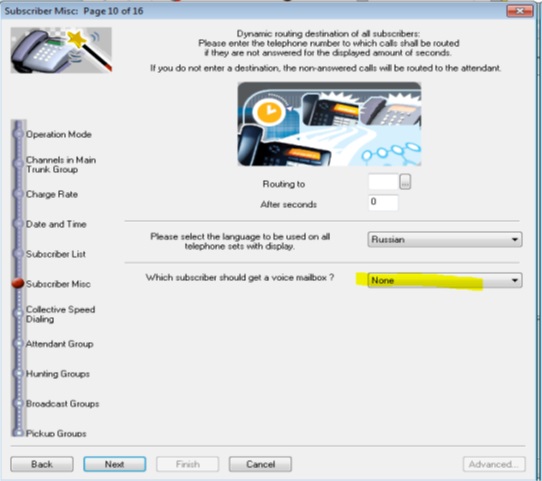
Шаг 10 – проверяем чтобы голосовая почта была не доступна для пользователей:
Дальше жмем Next, Next…Шаг 12 удаляем всех членов из Normal Day и Restricted Night Mode.
Дальше жмем Next, Next и перезагружаемся.
Последние корректировки:
1. Включаем гудок на телефонах — Memory Read/Write — Other Labels — DialToMult=01;
2. Удаляем emergency numbers(01, 02, 03, 04) — Memory Read/Write — Other Labels – EmergNum;
3. На первом аналоговом телефоне убираем fax(про настройку факсов я напишу позже)
Основные настройки
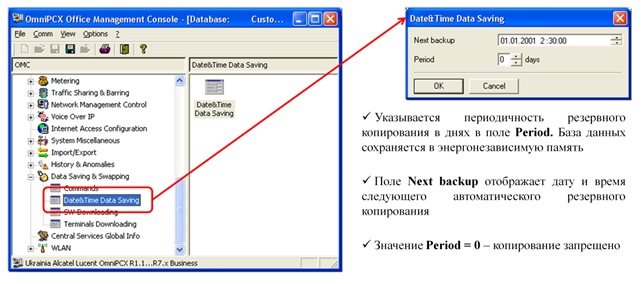
Резервное копирование базы данных:
Типы номерных планов:
Публичный номерной план: позволяет адресовать внутренние ресурсы из телефонной сети общего пользования(внешний номер = внутренний);
Ограниченный публичный номерной план: позволяет изменять маршрутизацию вызовов из телефонной сети общего пользования в зависимости от времени суток;
Внутренний номерной план: отображает все внутренние ресурсы и функции, которые доступны для внутренних абонентов;
Приватный номерной план: используется для маршрутизации вызовов из корпоративных сетей
Услуги во время разговора: описывает все услуги, которые доступные внутреннему абоненту во время разговора.
Внутренний номерной план:
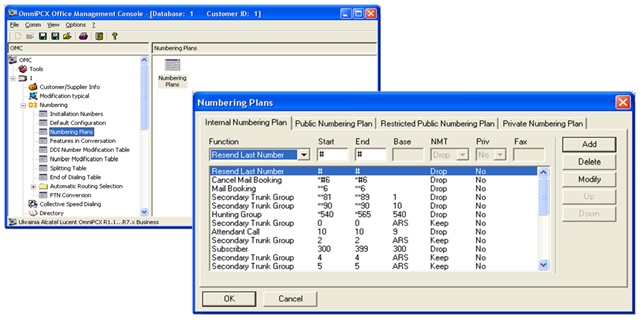
Доступ к внутреннему номерному плану осуществляется из главного дерева программы управления OMC. В главном дереве вкладка Numbering и подпункт Numbering plans.
Добавление новых записей в номерной план осуществляется следующим образом: В поле Function из выпадающего меню необходимо выбрать тип добавляемой записи, в поле Start ввести начальное значение диапазона, в поле End конечное (в случае если запись состоит из одного значения, то поле Start = End );
Поле Base содержит информацию о базе создаваемого объекта (может отсутствовать для некоторых типов записей), подтверждается созданная запись нажатием на Add.
Изменить существующую запись можно, выделив ее в списке (отображается другим цветом), после этого произвести необходимые изменения в заголовке номерного плана и подтвердить изменения нажатием на Modify.
Удалить запись можно, выделив ее в списке (отображается другим цветом), после этого и подтвердить нажатием на Delete.
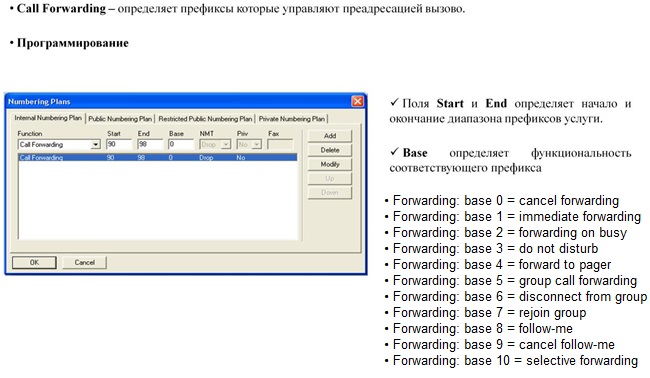
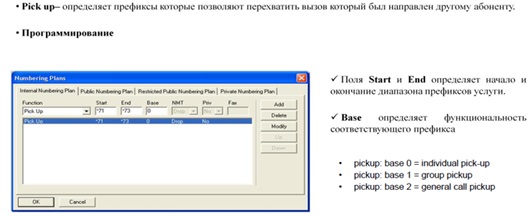
Услуги внутреннего номерного плана:
Значения префиксов в зависимости от базы:
0 – отмена всех типов переадресаций;
1 – немедленная переадресация;
2 – переадресация по занятости;
3 – режим «не беспокоить»;
4 – переадресация на текстовое сообщение;
5 – немедленная групповая переадресация;
6 – вход в Hunting group;
7 — выход из Hunting group;
8 – удаленная переадресация;
9 – отмена удаленной переадресации;
10 – выборочная переадресация.
Привязка пользователей к портам, публичные номера.
Прохождение входящего вызова:
1. Входящий вызов из телефонной сети общего пользования и попадает в Публичный номерной план, где программа ищет соответствующий номер (в например 4660466).По номеру находится соответствующая база(base);
2. По базе во Внутреннем номерном плане идет поиск внутреннего номер вызываемого абонента;
3. Используя найденный внутренний номер в таблице абонентов ему сопоставляется
физический адрес вызываемого абонента.
4. После всех описанных процедур происходит соединение соответствующих абонентского и линейного интерфейсов.
Automatic Routing Selection — Автоматическое распределение вызовов
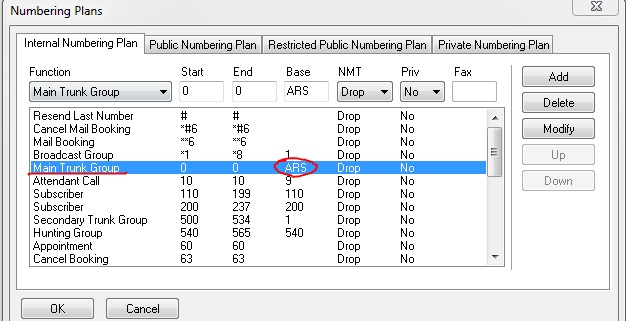
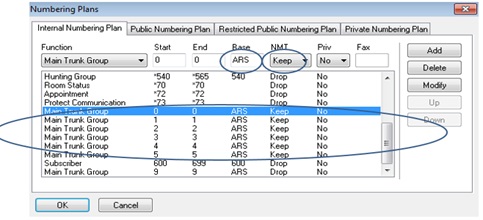
В Main Trunk Group в поле Base ставим ARS, Drop – означает что префикс не уйдет дальше в набор(например при наборе 067-ххх-хх-хх, 0 срежется и будет 67-ххх-хх-хх).
ARS – выход в город без префикса в случае Киева(Keep – означает что префикс сохраняется)
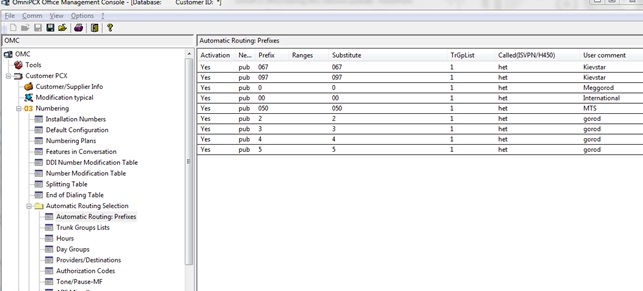
Префиксы:
Prefix – префикс набора, Ranges – длина, Substitute – на что заменить префикс, TrGpList – в какую группу транков отправить:
Абоненты:
Чтобы присвоить абоненту отдельный исходящий внешний номер находим в настройках CLIP/COLP и заполняем значение без префикса города.
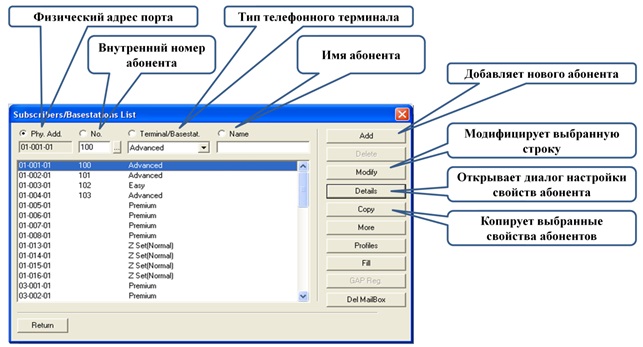
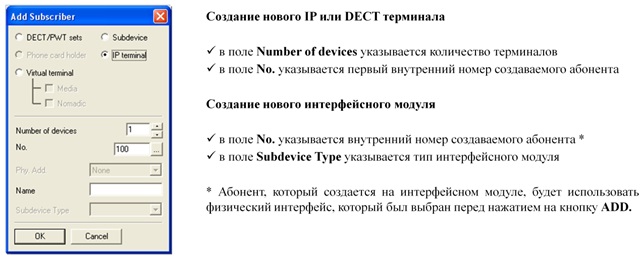
Создаем абонентов(DECT или Virtual)
Здесь не нужно создавать IP абонентов(они автоматически создаются при подключении нового телефона к АТС).
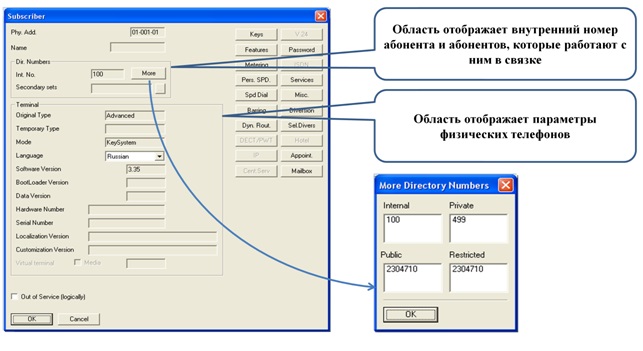
Дополнительные настройки пользователей, в области отображения номера абонента Dir. Numbers есть кнопка More.
Internal – внутренний;
Public – номер абонента доступный из сети общего пользования;
Restricted – номер абонента доступный из сети общего пользования в ограниченном режиме;
Private – номер абонента доступный из корпоративной сети.
Область параметров физических телефонов Terminal:
Original Type – указан тип аппарата, который был подключен при инициализации порта;
Temporary Type – указан тип аппарата, который был подключен уже после инициализации и отличный от Original Type;
Mode – режим работы телефона;
Language – язык, который используется в интерфейсе цифровых телефонов и для
голосовых подсказок;
Software Version – версия микропрограммы аппарата.
Out of Service (logically) – выбранной эта опция отключает телефон, т.е. он исключается из обслуживания.
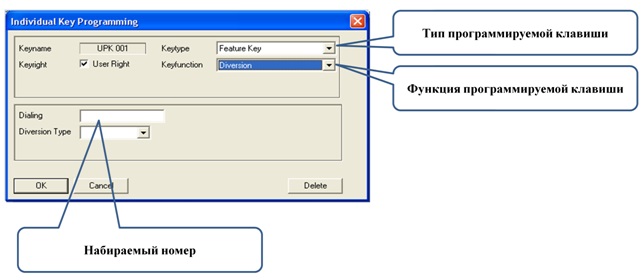
Клавиши:
Тип Feature key – позволяет запрограммировать ряд функций:
Diversion – переадресация;
Pickup – перехват;
Callback – ответный вызов;
Cancel Callback – отмена заказанного ответного вызова;
Conference;
Customization – доступ к управлению параметрами телефона;
Dialing – набор номера;
Intrusion – вторжение;
Lock/Unlock – блокировка/разблокировка телефона;
NR mode – переключение станции в ночной (ограниченный) режим.
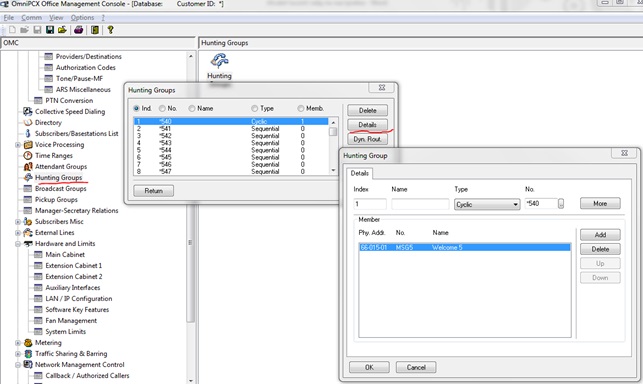
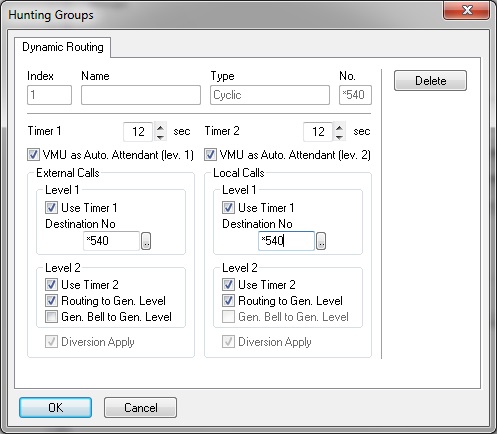
Группы пользователей(Hunt группы):
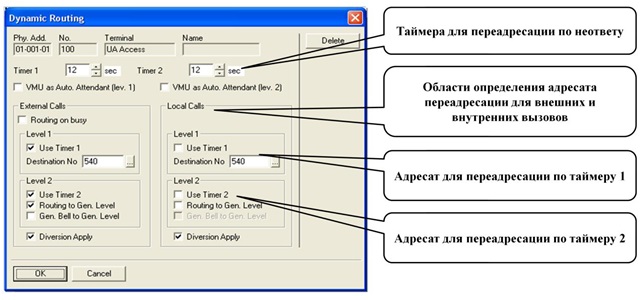
Динамическая переадресация:
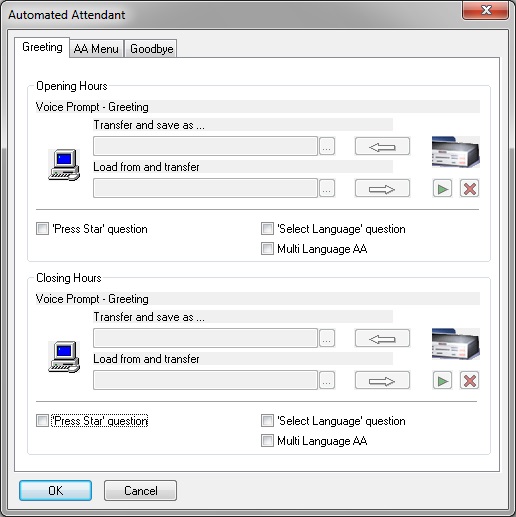
Создание Automated Attendant:
Создаем Virtual Terminal(также создаем ему mailbox нажатием по кнопки в настройках телефона) в абонентах и делаем такую конфигурацию переадресации:
*540 в нашем случае Base для hunt групп.
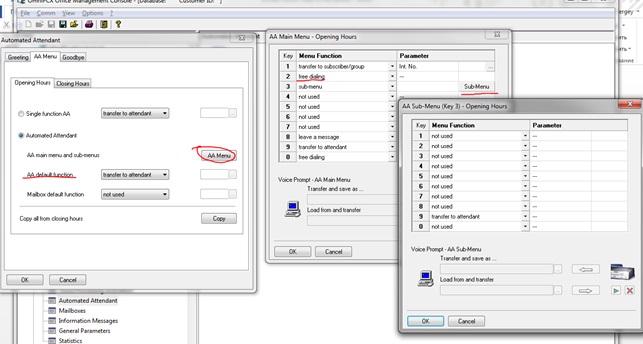
Настройки самого АА находятся в пункте Voice Processing:
Press Star – включает подсказку нажать звездочку, а Multi Language позволяет создать АА меню на нескольких языках.
AA default function – отвечает за действия если пользователь ничего не нажал.
Free dialing позволяет набор внутренних абонентов.
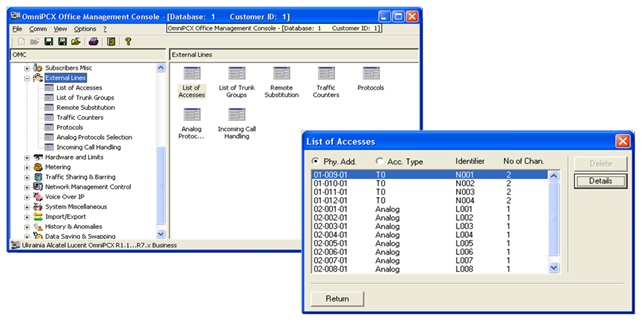
Соединительные линии:
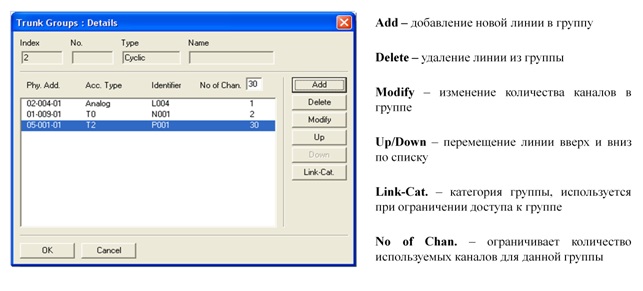
Группы соединительных линий:
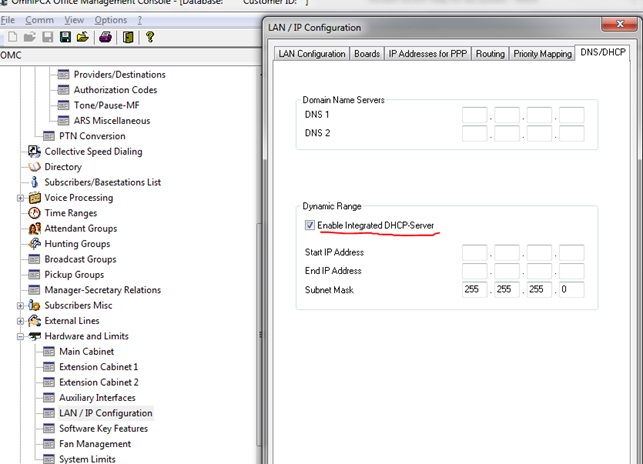
Запускаем DHCP сервер:
И можем подключать телефоны.
Чтобы подключить факс нужно указать в сервиса аналогового абонента 1 Analog phone, 2 Fax 2/3.
На этом все, спасибо за внимание!
Готов ответить на любые вопросы.

4018 / 4019 User guide
Keypad
Audio Keys &
Function Keys
1.
Customising your terminal
Modifying your personal code
1. Using the Up-down navigator, navigate to
Settings
2. Press OK, then scroll to Options
3. Press OK, then scroll to Password
4. Follow the spoken instructions to change your
password
5. To return to home page, a long press on the
Back/Exit key is required
Lock/unlock your telephone
1. Using the Up-down navigator, navigate to Lock
2. Press OK
3. Depending on the displayed information, enter
either your password or confirm (default is
1515)
Identifying the terminal you are on
1. Using the Up-down navigator, navigate to Who
am I
2. Press OK, and the system will display your
telephone number
3. To return to home page, a long press on the
Back/Exit key is required
Adjusting the audio functions
1. Using the Up-down navigator, navigate to
Settings
2. Press OK, then scroll to Phone
3. Press OK, then scroll to Ringing
AUDIO KEYS
Hang-up key: to terminate a call.
Hands-free/Loudspeaker Key: to make or answer a call
Navigation
without lifting the receiver (Alcatel 4018).
Intercom/Mute key: press during a conversation so that
your correspondent can no longer hear you
Terminal idle: press to answer calls automatically
without picking up the receiver.
Plus and Minus keys: To adjust the loudspeaker or
handset volume
FUNCTION KEYS
Messaging key: if the key flashes, a new voice or text
message has been received.
«Redial» key: to access the «Redial» function.
NAVIGATION
Up-down: use to navigate in the home page for
Information on the status of the set, date and time, set
programming and configuration functions.
OK key: used to validate your choices and options
Back/Exit key: to return to previous menu (short press)
or return to first screen (long press). You can also use
this key to correct a character you entered.
4. Press OK to adjust Melody, and use the Up-
down navigator
5. To select desired melody. Confirm your selection
with OK.
OR
1. Scroll to Volume, press OK, and use the Up-
down navigator to select desired volume.
Confirm your selection with OK.
2. To return to home page, a long press on
Back/Exit key is required
Adjusting screen brightness
1. Using the Up-down navigator, navigate to
Settings
2. Press OK, then scroll to Phone
3. Press OK, then scroll to Contrast
4. Using the Up-down navigator, adjust the contrast
5. To return to home page, a long press on
Back/Exit key is required
2.
Basic Functions
Making a call
Choose the method to suit:
A) Lift the receiver; or
B) Press the Handsfree button; or
B) Press the programmed line key; or
C) Dial the number for your call
Note — to make an external call, dial 0 before dialling
the telephone number
1300 133 996 www.evotec.com.au
Как пользоваться?
Наша цель — обеспечить Вам самый быстрый доступ к руководству по эксплуатации устройства Alcatel-Lucent IP Touch 4018. Пользуясь просмотром онлайн Вы можете быстро просмотреть содержание и перейти на страницу, на которой найдете решение своей проблемы с Alcatel-Lucent IP Touch 4018.
Для Вашего удобства
Если просмотр руководства Alcatel-Lucent IP Touch 4018 непосредственно на этой странице для Вас неудобен, Вы можете воспользоваться двумя возможными решениями:
- Полноэкранный просмотр -, Чтобы удобно просматривать инструкцию (без скачивания на компьютер) Вы можете использовать режим полноэкранного просмотра. Чтобы запустить просмотр инструкции Alcatel-Lucent IP Touch 4018 на полном экране, используйте кнопку Полный экран.
- Скачивание на компьютер — Вы можете также скачать инструкцию Alcatel-Lucent IP Touch 4018 на свой компьютер и сохранить ее в своем архиве. Если ты все же не хотите занимать место на своем устройстве, Вы всегда можете скачать ее из ManualsBase.
Руководство по эксплуатации Alcatel-Lucent IP Touch 4018
Печатная версия
Многие предпочитают читать документы не на экране, а в печатной версии. Опция распечатки инструкции также предусмотрена и Вы можете воспользоваться ею нажав на ссылку, находящуюся выше — Печатать инструкцию. Вам не обязательно печатать всю инструкцию Alcatel-Lucent IP Touch 4018 а только некоторые страницы. Берегите бумагу.
Резюме
Ниже Вы найдете заявки которые находятся на очередных страницах инструкции для Alcatel-Lucent IP Touch 4018. Если Вы хотите быстро просмотреть содержимое страниц, которые находятся на очередных страницах инструкции, Вы воспользоваться ими.
-
Contents
-
Table of Contents
-
Bookmarks
Quick Links
Alcatel OmniPCX Office
Alcatel 4018/4019
Related Manuals for Alcatel OmniPCX Office 4018/4019
Summary of Contents for Alcatel OmniPCX Office 4018/4019
-
Page 1
Alcatel OmniPCX Office Alcatel 4018/4019… -
Page 3: User Manual
User manual Introduction How to use this guide Thank you for choosing a telephone from the 4018/4019 range manufactured by Alcatel. Your terminal has a new ergonomic layout for more effective communication. Lift the receiver. Line key. Hang up. Specific key on numeric keypad.
-
Page 5: Table Of Contents
Contents Getting to know your telephone ……. . p. 6 Keeping in touch .
-
Page 6: Getting To Know Your Telephone
Back/Exit key: to return to previous menu (short press) or return to first screen (long press). You can also use this key to correct a character you entered. END key: to terminate a call. Handsfree/Speaker Key: to make or answer a call without lifting the receiver (Alcatel 4018). • Lit in handsfree mode or headset mode (short press).
-
Page 7: Using Your Telephone
Using your telephone Making a call Using the telephone in ‘handsfree’ mode (Alcatel 4018 only) Terminal idle: you are in handsfree mode dial the lift the number handsfree number number for receiver required (Alcatel 4018 required press and your call…
-
Page 8: Calling Your Correspondent By Name (Company Directory)
Call back on the last 10 number dialled: Screening calls using the voice mailbox (Alcatel 4018 only) This service lets you screen incoming calls to your voice mailbox. When your caller leaves his message you can choose to communicate with him.
-
Page 9: Answering An Internal Call In Intercom Mode
Using your telephone Answering an internal call in intercom mode (Alcatel 4018 only) Mute, so that your correspondent cannot hear you 1.10 1.12 You can answer without lifting the receiver. When you receive an internal call, your telephone rings and you are connected You can hear your correspondent but he/she cannot hear you: directly in handsfree mode.
-
Page 10: During A Call
During a call Making a second call during a conversation Answering a second call during a conversation A second correspondent is trying to call you: conv. The first call is placed on hold conv. call you are in number of auto call back conversation with second party…
-
Page 11: Transferring A Call
During a call Hang up on all correspondant: Transferring a call To transfer your call to another number: After the conference, to leave your two correspondents talking together: conv. The first call is placed on hold you are in no. of the 2nd conversation with terminal cancel the conference…
-
Page 12: Intrusion Into An Internal Conversation
During a call To recover the parked call: Store a number PickUp Unparkcall During a call, to save the number onto a call key: number of telephone from which call was conv. »Directory parked you are in select the key to If the parked call is not recovered within a preset time (default value 1 min 30), it is conversation with programme (0 to 9)
-
Page 13: Sharing
Sharing Receiving supervised call ringing Individual pick-up To receive the special ringing for calls to another number: You hear a telephone ringing in an office where no-one can answer. If authorised, you can answer the call on your own telephone. If the telephone ringing is in your own pick-up group: “Supervised call press the same key to…
-
Page 14: Answering Briefly In Place Of The Attendant
Sharing Answering briefly in place of the attendant Calling an internal correspondent on his/her pager Outside calls to the attendant will ring on your telephone and you can answer the call: The number called does not answer and you know that the person called has a pager: your telephone will ring at the alert same time as the switchboard…
-
Page 15: Sending A Written Message To An Internal Correspondent
Sharing The 27 standard messages are shown below: Call me back 15 Meeting on ___ (*) Sending a written message to an internal correspondent 3.10 Call me back tomorrow 16 Meeting on ___ at _:_ (*) Call me back at _:_ (*) 17 Out for a while Call back _____ (*) 18 Absent for the rest of the day…
-
Page 16: Sending A Recorded Message To A Number/A Distribution List
Sharing *To record a comment: Broadcasting a message on the loudspeakers of a station group 3.13 Record recording A message not requiring an answer can be broadcast on the loudspeakers within your broadcast group: start recording the comment recording speak, you have 20 seconds Listen number of end recording…
-
Page 17: Keeping In Touch
Keeping in touch Selecting calls to be forwarded Forwarding your calls to your voice message service When a forwarding is applied, you can select the types of call to be forwarded: outside, internal, all. Forward Immediate»VM forwarding is acknowledged type of call forwarded is Forward Ext/Int displayed…
-
Page 18: Personal Assistant: Reaching You With One Number Only
Keeping in touch Personal assistant: reaching you with one number only Forwarding your calls from the receiving terminal (“Follow me”) You wish to receive your calls in your present location: Use the “Follow me” feature. Settings Assistant Menu Forward Followme» select type of forwarding select the ‘Forward’ your extension…
-
Page 19: Cancelling All Forwardings
Keeping in touch Cancelling all forwardings Leaving a recorded message for internal callers 4.11 4.14 You can leave a message on your terminal which will be displayed on the screen of the terminal calling you. Forward Cancelforw» Forward Text press the ‘call select the ‘Forward’ forward’ feature feature…
-
Page 20: Consulting Written Messages
Keeping in touch The 27 standard messages are shown below: During consultation of a message, pressing the ‘i’ key provides access to the following features ( Call me back 15 Meeting on ___ (*) Call me back tomorrow 16 Meeting on ___ at _:_ (*) Erase message.
-
Page 21: Managing Your Charges
Managing your charges At the end of the call, you are called back and you can: Charging your calls directly to business accounts 1. Read information concerning call (cost, duration, number of units…). name of internal user and cost of You can charge the cost of your outside calls to business account numbers.
-
Page 22: Programming Your Telephone
Programming your telephone Initializing your voice mailbox Modifying your personal code Your personal code is used to access your voice mailbox and to lock your telephone. Enter your personal code, then record Light flashes your name following the voice guide instructions Settings My options…
-
Page 23: Adjusting Screen Brightness
Programming your telephone Activate/disable meeting mode (progressive ringing): Selecting language Progressive to activate to deactivate apply your choice Settings My options Activate/deactivate discreet ring mode: Beeps Language to activate to deactivate apply your choice select the language apply your choice of your choice Adjust ringer volume while a call arrives: Make a call using the personal phone book…
-
Page 24: Programming Speed Dialing (Direct Calls) Keys
Programming your telephone To cancel your temporary reminder call request: Programming speed dialing (direct calls) keys Appointment move to the end of enter the reminder the line time To cancel your permanent reminder call request: one direct call key to enter the number programme Appointment…
-
Page 25: Lock / Unlock Your Telephone
Programming your telephone Lock / unlock your telephone 6.12 your telephone is Lock locked/unlocked enter your personal code Activating/deactivating ‘forced headset’ mode 6.13 ‘Forced headset’ mode must be activated as soon as a headset is installed instead of the receiver;. Settings My phone ForcedHead…
-
Page 26: Compliance
Compliance Declaration of compliance We, Alcatel Business Systems, hereby declare that we assume the Alcatel Independently of the legal warranty that covers this appliance, it is 4018 or 4019 product to be compliant with the essential requirements of guaranteed for 1 year, parts and labour, counting from the date indicated Directive 1999/5/CE of the European Parliament and Council.
This manual is also suitable for:
40184019
инструкцияAlcatel-Lucent IP Touch 4018

Demoguide
Showroom Stuttgart
June 2013 — Ed.01
N. Skender
Copyright Alcatel-Lucent 2013. All rights reserved
Посмотреть инструкция для Alcatel-Lucent IP Touch 4018 бесплатно. Руководство относится к категории Телефоны, 11 человек(а) дали ему среднюю оценку 8.4. Руководство доступно на следующих языках: английский. У вас есть вопрос о Alcatel-Lucent IP Touch 4018 или вам нужна помощь? Задайте свой вопрос здесь
Главная
| Alcatel-Lucent | |
| IP Touch 4018 | 3GV27063DB | |
| Телефон | |
| 3326744908226 | |
| английский | |
| Руководство пользователя (PDF) |
Сеть
| Подключение Ethernet | Да |
| Bluetooth | Нет |
| Wi-Fi | Нет |
| Тип LAN Ethernet интерфейса | Быстрый Ethernet |
| Стандарты сети | IEEE 802.3, IEEE 802.3u |
Порты и интерфейсы
| Количество портов Ethernet LAN ( RJ-45) | 1 |
Вес и размеры
| Вес | 790 g |
| Высота | 133 mm |
| Глубина | 175 mm |
| Ширина | 220 mm |
Дизайн
| Цвет товара | Черный |
| Тип телефонной трубки | Проводная телефонная трубка |
| Тип продукта | IP телефон |
Аудио
| Громкоговоритель | Да |
| Отключение микрофона | Да |
Экран
Характеристики телефона
| Количество линий | — линий |
| Идентификация абонента (Caller ID) | — |
| Вместимость телефонной книги | — записей |
| Количество VoIP аккаунтов | — |
| Переадресация | Да |
| Удержание вызова | Да |
| Переадресация вызова | Да |
| Возможность совещаний по телефону | Да |
| Повторный набор | Да |
| Функциия «не беспокоить» | Да |
| Быстрый набор | Да |
Энергопитание
| Питание по Ethernet (PoE) | — |
Содержимое упаковки
| Количество ручек в комплекте | 1 шт |
Характеристики управления
| Встроенная голосовая почта | Да |
показать больше
Не можете найти ответ на свой вопрос в руководстве? Вы можете найти ответ на свой вопрос ниже, в разделе часто задаваемых вопросов о Alcatel-Lucent IP Touch 4018.
Какой вес Alcatel-Lucent IP Touch 4018?
Какая высота Alcatel-Lucent IP Touch 4018?
Какая ширина Alcatel-Lucent IP Touch 4018?
Какая толщина Alcatel-Lucent IP Touch 4018?
Инструкция Alcatel-Lucent IP Touch 4018 доступно в русский?
Не нашли свой вопрос? Задайте свой вопрос здесь

ООО Стандарт Телефон Электрика
- О компании
- Продукты и решения
- Трейдинговая телефония IPC
- Решения Alcatel-Lucent Enterprise
- Сертификаты
- Спецпредложения
- Партнеры
- Новости
- Контакты
- Результат поиска
Продукты и решения
-
Трейдинговая телефония IPC
-
Тарреты
-
TOUCH
-
IQMAX
-
EDGE
-
SYNC
-
-
Унифицированная коммуникационная платформа
-
Unigy
-
Unigy Management System
-
-
Приложения
-
QuickDial
-
FastFind
-
Unigy Connect для Microsoft Lync
-
Unigy Connect для Salesforce.com
-
-
Интерком и прямые каналы связи
-
Unigy Pulse
-
Unigy Pulse Enterprise
-
Unigy Pulse Mobile
-
-
-
Решения Alcatel-Lucent Enterprise
-
УАТС Alcatel-Lucent OmniPCX Enterprise
-
Архитектура
-
-
УАТС Alcatel-Lucent OmniPCX Office
-
Телефонные аппараты и терминалы
-
80-я серия IP
-
80-я серия
-
8-я серия IP
-
9-я серия
-
Руководства пользователя
-
Спецификации
-
-
-
Специальная оценка условий труда
-
Личный кабинет клиента
Спецпредложения

Audience22 в подарок!
С 01 мая получите телефон Audience22 в подарок при покупке пяти цифровых телефонов Alcatel-Lucent.
Подробнее
���� ������� ������ ������ ��� http://dengi.maximedia.ru/
Новости

Omni
Удаленный доступ к ресурсам системы Unigy…
Подробнее
���� ������� ������ ������ ��� http://dengi.maximedia.ru/
Руководства пользователя для телефонных аппаратов Alcatel-Lucent
- Печать
| Название | OmniPCX Enterprise OXE | OmniPCX Office OXO |
|---|---|---|
| Alcatel-Lucent 8078s-8068s-8058s-8028s-8018-8008 Premium DeskPhone s Series | Manual Полное |
Manual Полное |
| Alcatel-Lucent 8039s-8029s-8019s Premium DeskPhone s Series | Manual Полное |
Manual Полное |
| Alcatel-Lucent OmniTouch 8002/8012 | Полное | Полное Краткое |
| Alcatel-Lucent 8068/8039/8038/8029/8028 |
Полное |
Полное Краткое |
|
Alcatel-Lucent OmniTouch 8082 My IC Phone |
Полное Краткое |
Полное Краткое |
| Alcatel-Lucent OmniTouch 4135 IP | Manual Quick_guide Handbuch Kurzanleitung |
Manual Quick_guide Handbuch Kurzanleitung |
| Alcatel-Lucent 8232 DECT |
Полное |
Полное Краткое |
| Alcatel-Lucent 8242 DECT | Полное Краткое |
Полное Краткое |
| Alcatel-Lucent 4008/4018/4019 | Manual Краткое |
Полное Краткое |
| Alcatel-Lucent 4028/4029 | Manual User guide |
Полное Краткое |
| Alcatel-Lucent 4038/4068/4039 | Manual | Полное Краткое |
| Alcatel Audience 22 | Полное | Полное |
|
10 898 торговых марок |
Скачайте инструкцию БЕСПЛАТНО! Diplodocs позволяет скачать несколько типов инструкций для наилучшего использования ALCATEL OMNIPCX OFFICE 4019 |
|
Вам требуется помощь по использованию изделия? Все инструкции по категориям |
инструкция по эксплуатации ALCATEL OMNIPCX OFFICE 4019Diplodocs поможет скачать инструкцию ALCATEL OMNIPCX OFFICE 4019 .
Введите модель изделия ALCATEL…
Фрагмент инструкции: руководство пользователя ALCATEL OMNIPCX OFFICE 4019
|
Copyright © 2005 — 2012 — Diplodocs —
Все права защищены.
Торговые марки принадлежат их соответствующим владельцам.


