Прошивки и программы для PlayStation Vita
[pvc1 в 21:27|22 Апр 2023]
Прошивки и программы для PlayStation Vita
[pvc1 в 18:23|21 Апр 2023]
Общая дискуссия по PlayStation 5
[pvc1 в 14:47|19 Апр 2023]
Приложения для PlayStation 4
[pvc1 в 19:56|16 Апр 2023]
Приложения для PlayStation 4
[pvc1 в 08:32|16 Апр 2023]
ПК программы для PlayStation 3
Приложения для PlayStation 5
[pvc1 в 08:35|13 Апр 2023]
Прошивки и программы для PlayStation Vita
[pvc1 в 20:03|12 Апр 2023]
Прошивки и приложения для PlayStation 3
[pvc1 в 21:30|09 Апр 2023]
Общая дискуссия по PlayStation 3
Программы и Приложения для PlayStation Portable
[pvc1 в 09:21|03 Апр 2023]
Прошивки и программы для PlayStation Vita
[pvc1 в 08:57|02 Апр 2023]
Железные вопросы PlayStation 2
Общая дискуссия по PlayStation 5
[pvc1 в 14:00|01 Апр 2023]
Общая дискуссия по PlayStation 3
[pvc1 в 10:50|01 Апр 2023]
Приложения для PlayStation 2
Приложения для PlayStation 2
ПК софт для PlayStation 4
[pvc1 в 19:32|24 Мар 2023]
Прошивки и приложения для PlayStation 3
ПК софт для PlayStation 4
[pvc1 в 17:55|20 Мар 2023]
Общая дискуссия по PlayStation 2
Общая дискуссия по PlayStation 1
[pvc1 в 16:27|17 Мар 2023]
ПК софт для PlayStation 4
[pvc1 в 08:19|16 Мар 2023]
ПК софт для PlayStation 5
[pvc1 в 22:18|15 Мар 2023]
Приложения для PlayStation 2
[pvc1 в 16:41|11 Мар 2023]
Программы и Приложения для PlayStation Portable
[pvc1 в 16:40|11 Мар 2023]
Эмуляторы для PlayStation Vita
[pvc1 в 16:39|11 Мар 2023]
ПК программы для PlayStation 2
[pvc1 в 09:58|10 Мар 2023]
Прошивки для PlayStation 4
[pvc1 в 19:03|08 Мар 2023]
Прошивки и приложения для PlayStation 3
[pvc1 в 09:03|08 Мар 2023]
ПК софт для PlayStation 4
[pvc1 в 08:30|08 Мар 2023]
Прошивки и приложения для PlayStation 3
[pvc1 в 20:34|06 Мар 2023]
ПК программы для PlayStation 3
[pvc1 в 20:15|06 Мар 2023]
Приложения для PlayStation 2
[pvc1 в 20:18|04 Мар 2023]
ПК софт для PlayStation 4
[pvc1 в 19:38|03 Мар 2023]
ПК программы для PlayStation 3
[pvc1 в 16:55|02 Мар 2023]
Прошивки и приложения для PlayStation 3
[pvc1 в 12:45|28 Фев 2023]
Об играх PlayStation Vita
[pvc1 в 22:02|24 Фев 2023]
Об играх PlayStation Vita
[pvc1 в 21:52|24 Фев 2023]
ПК программы для PlayStation 2
[pvc1 в 09:56|13 Фев 2023]
Прошивки и программы для PlayStation Vita
[pvc1 в 09:41|13 Фев 2023]
Мобильные приложения
[pvc1 в 09:27|10 Фев 2023]
Железные вопросы PlayStation 2
Мобильные приложения
[pvc1 в 09:16|03 Фев 2023]
ПК программы для PlayStation 2
[pvc1 в 09:04|03 Фев 2023]
Приложения для PlayStation 2
Об играх PlayStation Vita
[pvc1 в 09:29|31 Янв 2023]
Прошивки и программы для PlayStation Vita
[pvc1 в 08:36|31 Янв 2023]
Прошивки и программы для PlayStation Vita
[pvc1 в 19:29|29 Янв 2023]
Прошивки и приложения для PlayStation 3
[pvc1 в 09:27|24 Янв 2023]
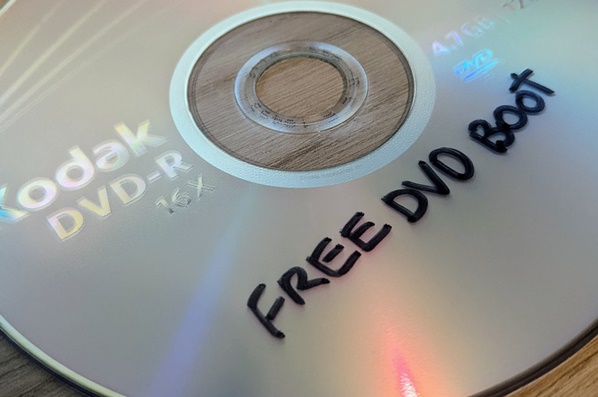
FreeDVDBoot
PlayStation 2 DVD Player Exploit. This allows you to burn your own PlayStation 2 homebrew discs and play them on an unmodified console as seen in the demo video. With uLaunchELF as the initial program, users can include multiple homebrew programs on the same disc.
For technical details please refer to my blog post.
Read from here if you have a Slim PS2.
Read from here if you have a Phat PS2.
Easy setup for all PS2 Slim consoles / Bravia TV
All you need is:
- A compatible console (all PS2 Slim / Sony Bravia TV units are supported),
- A DVD (not a CD), preferably a DVD-R as other types such as DVD+RW put more strain on the PS2 laser,
- A computer with a built-in disc burner / external USB disc burner,
Step 1: Download the ISO
Download PREBUILT ISOs/All PS2 Slims - English language.iso
Step 2: Burn the ISO
Please check following to ensure a good burn which the PS2 will be able to read:
- Clean off any dust from the disc,
- Select lowest burning speed option,
- Select finalise disc option,
Step 3: Set console language to English
Your console must be set to English language for the exploit to work (other languages cause memory contents to change).
To do this, boot without a disc inserted, press Circle to enter System Configuration and set your system language to English.
Step 4: Boot!
Insert the disc into your console, and wait. It should boot into uLaunchELF within a few seconds.
From uLaunchELF, you have the ability to run any homebrew you want over USB mass storage! Many people choose to run FreeMCBoot or Fortuna installer, as they find booting from a memory card more convenient.
If you want to add additional homebrew to your DVD / replace uLaunchELF, please read from Custom disc setup.
Troubleshooting — please read if the above didn’t work
| Problem | Solution |
|---|---|
| Disc doesn’t spin on slim console | Press the lid down hard to ensure the sensors detect that the lid is closed. If still not working try placing some weight such as a book on the top of the console. |
| PS2 detects the disc as «PlayStation 2 disc» instead of «DVD Video» in the browser | Your PS2 has a modchip which is incorrectly preventing the DVD player from launching. You do not need this exploit for a console with a modchip, but if you really want to try it some modchips offer the ability to temporarily disable themselves (by holding start when booting for example). |
| PS2 displays «unable to read disc» | Please try playing a real DVD movie disc to verify that your console’s DVD laser works; doing this can also recalibrate the laser which might solve the issue, as commented here. Also try the following PS2 setting Version -> Console -> Diagnosis -> On which can assist with laser problems. |
| PS2 freezes at black/red/green screen | If your PS2 DVD laser is really worn out, or you are using something difficult to read like a dusty DVD+RW burned on high speed, it might take some time before uLaunchELF actually starts. Please try waiting 3 minutes or so, per this comment |
Other suggestions that worked for others:
-
Try unplugging your controller, and plugging it back in. Apparently that solved the issue for this user.
-
Try removing all memory cards. Apparently that solved the issue for this user.
-
Try burning with different software. Apparently for this user and this user ImgBurn didn’t work, but CDBurnerXP with 1x speed, compatibility settings, and finalize option worked.
-
Check that your console’s language is set to English.
-
Check the GitHub repo to see if the image has been updated recently. Download the new one if it has.
Please, only open a GitHub issue if you have read and tried all of the above. If you do open an issue, please confirm that you tried a real DVD movie and it worked on your system so that we know it’s not just a laser failure; also include your DVD player version, the name of the ISO you tried, the type of DVD, and what happens when you launch the disc.
Phat consoles
Phat consoles have many different firmware version revisions, which makes them harder to add support for. It also means you will need to identify your firmware version, and burn the matching ISO file.
It’s still early in terms of support for different versions, check back here later. Hopefully over time other developers from the scene will also contribute support for additional DVD Player versions. The new exploit for 2.10 should be possible to port to all firmwares between 1.00 — 2.13 (Sony actually patched this one in 2.14 lol).
Step 1: Identify your DVD Player Version
Boot your PlayStation 2 without any disc inserted, and press Triangle to identify which DVD Player version your console has.
Currently only support:
-
2.10 (certain models only? Working: SCPH-30001 R (ROMGEN 0160AC20010427), SCPH-30000 (ROMGEN 0160JC20010427), SCPH-30004 R (ROMGEN 0160EC20011004), Not working: SCPH-39004 — todo),
-
2.12 (regions U, J, and G, if any other regions exist for 2.12 let me know),
-
3.04 (tested only region M in emulator so far, but guess most other regions EUMACDG, except for J will work — with English language set in settings),
Step 2: Download the ISO
Download the ISO that corresponds to your firmware version.
Please don’t bother trying on a non-supported firmware/language configuration, it won’t work…
For example, if your DVD Player version is 2.10J, you would want to download PREBUILT ISOs/2.10.iso.
Step 3, 4, 5 — Burn the ISO, set console language to English, and boot!
These steps are the same as described for slim above.
Custom disc setup — Slim
If you intend to make your own image containing additional homebrew / modified initial loader, please read on.
Step 1: Copy your homebrew
Once you’ve identified your console’s DVD Player version, copy all of the homebrew you would like to include on the disc into that directory in the Filesystems (EG: Filesystems/All PS2 slims (3.10 + 3.11) - English language/ is the one that supports all slim consoles).
Step 2: Make an image
Once you’ve placed all the homebrew files you’d like into the directory, generate a UDF (ISO9960/UDF hybrid also works) image of the directory (so VIDEO_TS is in the root).
On Windows, you can use a GUI like ImgBurn to make an disc image. It will give a warning that VIDEO_TS.BUP is missing, but just click continue anyway (PS2 doesn’t require this file).
On Linux the easiest way is probably to use genisoimage as it comes pre-installed on many Linux distributions like Ubuntu. Run the following on terminal (where exploit.iso is the output and Filesystem/All PS2 slims (3.10 + 3.11) - English language is the directory containing VIDEO_TS and any homebrew):
genisoimage -udf -o exploit.iso "Filesystems/All PS2 slims (3.10 + 3.11) - English language"
Step 3: Test and burn
I would recommend you test in PCSX2 first, but since PCSX2 doesn’t support loading the DVD Player, you have to decrypt and repack it yourself, which is beyond the scope of this README. With that said, if you aren’t touching anything in VIDEO_TS, there shouldn’t really be any reason for the exploit to fail.
Custom disc setup — Phat
Instructions for building the phat exploit coming soon.
Replacing the initial program — Slim
I’ve included uLaunchELF recompiled with DVD support as the default initial program. It presents a menu which allows you to select any of the homebrew programs you chose to include on the disc (and also allows booting from USB).
Alternatively, if you would rather just boot into a single homebrew application, the initial program the exploit attempts to boot is located at VIDEO_TS/VTS_02_0.IFO, replace it with your desired ELF file, with the below caveat that compatibility might be lower than if you booted a program through uLaunchELF:
For the initial release, I didn’t bother to reimplement a couple of functions used by the loader, so it requires that the ELF you load doesn’t overwrite those functions I use (those are around 0x84000 - 0x85fff and 0x250000 - 0x29ffff). I will probably remove this limitation in the future, but all ELFs I could find were fine with this limitation.
You can run readelf -l to verify your executable satisfies this requirement. For example, this Tetris homebrew just uses 0x00100000 - 0x0017a940:
$ readelf -l VTS_02_0.IFO

Elf file type is EXEC (Executable file)
Entry point 0x104490
There is 1 program header, starting at offset 52

Program Headers:
  Type           Offset   VirtAddr   PhysAddr   FileSiz MemSiz  Flg Align
  LOAD           0x001000 0x00100000 0x00100000 0x72ef4 0x7a940 RWE 0x1000

 Section to Segment mapping:
  Segment Sections...
   00     .text .ctors .dtors .rodata .data .jcr .sdata .sbss .bss
Replacing the initial program — Phat
The ELF is read from 0x5bb000 in the ISO file, copy to that location with a hex editor to replace it.
Loading backups
It’s possible to patch backup images of commercial games to make them bootable using this exploit. I didn’t want to maintain this tool, so it’s not included in this repository, but can be found by searching for something like FreeDVDBoot ESR auto patcher.
DEVELOPMENT: Replacing the loader payload — Slim
The default payload will boot VIDEO_TS/VTS_02_0.IFO as an ELF file, but tweaks might be desired to improve compatibility, or maybe changing the behaviour to boot BOOT.ELF instead for instance.
If you wish to update the loader payload, run build.sh inside PAYLOAD directory, and copy the output .bin files into VIDEO_TS/VIDEO_TS.IFO at the offsets displayed by the output of the command.
DEVELOPMENT: Replacing the loader payload — Phat
Run the following to build a new dvd.iso:
make -f hardware.mk
If you want to test on PCSX2 using KrHacken’s repacked DVD players, it loads udfio at a different base address, use the repacked Makefile to build an image for testing on the emulator:
make -f emulator.mk
clean before switching between these different Makefiles, or use -B flag.
PORTING:
Please read my technical writeup, to understand how the exploit works. I’ve also provided some notes about porting in the gh-pages branch.
Project Link: FreeDVDBoot
PlayStation 2 DVD Player Exploit created by Cturt. This allows you to burn your own PlayStation 2 homebrew discs and play them on an unmodified console as seen in the demo video. With uLaunchELF as the initial program, users can include multiple homebrew programs on the same disc.
For technical details please refer to CTurt’s blog post.
Easy setup for all PS2 Slim consoles / Bravia TV[edit]
All you need is:
A compatible console (all PS2 Slim / Sony Bravia TV units are supported),
A DVD (not a CD), preferably a DVD-R as other types such as DVD+RW put more strain on the PS2 laser,
A computer with a built-in disc burner / external USB disc burner,
see FreeDVDBoot Compatibility List for all supported SKU Models
Step 1: Download the ISO[edit]
Download PREBUILT ISOs/All PS2 Slims — English language.iso
Step 2: Burn the ISO[edit]
Please check following to ensure a good burn which the PS2 will be able to read:
- Clean off any dust from the disc,
- Select lowest burning speed option,
- Select finalise disc option,
Step 3: Set console language to English[edit]
Your console must be set to English language for the exploit to work (other languages cause memory contents to change).
To do this, boot without a disc inserted, press Circle to enter System Configuration and set your system language to English.
Step 4: Boot![edit]
Insert the disc into your console, and wait. It should boot into uLaunchELF within a few seconds.
From uLaunchELF, you have the ability to run any homebrew you want over USB mass storage! Many people choose to run FreeMCBoot or Fortuna installer, as they find booting from a memory card more convenient.
If you want to add additional homebrew to your DVD / replace uLaunchELF, please read from Custom disc setup.
FreeDVDBoot
PlayStation 2 DVD Player Exploit. This allows you to burn your own PlayStation 2 homebrew discs and play them on an unmodified console as seen in the demo video. With uLaunchELF as the initial program, users can include multiple homebrew programs on the same disc.
For technical details please refer to my blog post.
Read from here if you have a Slim PS2.
Read from here if you have a Phat PS2.
Easy setup for all PS2 Slim consoles / Bravia TV
All you need is:
- A compatible console (all PS2 Slim / Sony Bravia TV units are supported),
- A DVD (not a CD), preferably a DVD-R as other types such as DVD+RW put more strain on the PS2 laser,
- A computer with a built-in disc burner / external USB disc burner,
Step 1: Download the ISO
Download PREBUILT ISOs/All PS2 Slims - English language.iso
Step 2: Burn the ISO
Please check following to ensure a good burn which the PS2 will be able to read:
- Clean off any dust from the disc,
- Select lowest burning speed option,
- Select finalise disc option,
Step 3: Set console language to English
Your console must be set to English language for the exploit to work (other languages cause memory contents to change).
To do this, boot without a disc inserted, press Circle to enter System Configuration and set your system language to English.
Step 4: Boot!
Insert the disc into your console, and wait. It should boot into uLaunchELF within a few seconds.
From uLaunchELF, you have the ability to run any homebrew you want over USB mass storage! Many people choose to run FreeMCBoot or Fortuna installer, as they find booting from a memory card more convenient.
If you want to add additional homebrew to your DVD / replace uLaunchELF, please read from Custom disc setup.
Troubleshooting — please read if the above didn’t work
| Problem | Solution |
|---|---|
| Disc doesn’t spin on slim console | Press the lid down hard to ensure the sensors detect that the lid is closed. If still not working try placing some weight such as a book on the top of the console. |
| PS2 detects the disc as «PlayStation 2 disc» instead of «DVD Video» in the browser | Your PS2 has a modchip which is incorrectly preventing the DVD player from launching. You do not need this exploit for a console with a modchip, but if you really want to try it some modchips offer the ability to temporarily disable themselves (by holding start when booting for example). |
| PS2 displays «unable to read disc» | Please try playing a real DVD movie disc to verify that your console’s DVD laser works; doing this can also recalibrate the laser which might solve the issue, as commented here. Also try the following PS2 setting Version -> Console -> Diagnosis -> On which can assist with laser problems. |
| PS2 freezes at black/red/green screen | If your PS2 DVD laser is really worn out, or you are using something difficult to read like a dusty DVD+RW burned on high speed, it might take some time before uLaunchELF actually starts. Please try waiting 3 minutes or so, per this comment |
Other suggestions that worked for others:
-
Try unplugging your controller, and plugging it back in. Apparently that solved the issue for this user.
-
Try removing all memory cards. Apparently that solved the issue for this user.
-
Try burning with different software. Apparently for this user and this user ImgBurn didn’t work, but CDBurnerXP with 1x speed, compatibility settings, and finalize option worked.
-
Check that your console’s language is set to English.
-
Check the GitHub repo to see if the image has been updated recently. Download the new one if it has.
Please, only open a GitHub issue if you have read and tried all of the above. If you do open an issue, please confirm that you tried a real DVD movie and it worked on your system so that we know it’s not just a laser failure; also include your DVD player version, the name of the ISO you tried, the type of DVD, and what happens when you launch the disc.
Phat consoles
Phat consoles have many different firmware version revisions, which makes them harder to add support for. It also means you will need to identify your firmware version, and burn the matching ISO file.
It’s still early in terms of support for different versions, check back here later. Hopefully over time other developers from the scene will also contribute support for additional DVD Player versions. The new exploit for 2.10 should be possible to port to all firmwares between 1.00 — 2.13 (Sony actually patched this one in 2.14 lol).
Step 1: Identify your DVD Player Version
Boot your PlayStation 2 without any disc inserted, and press Triangle to identify which DVD Player version your console has.
Currently only support:
-
2.10 (certain models only? Working: SCPH-30001 R (ROMGEN 0160AC20010427), SCPH-30000 (ROMGEN 0160JC20010427), SCPH-30004 R (ROMGEN 0160EC20011004), Not working: SCPH-39004 — todo),
-
2.12 (regions U, J, and G, if any other regions exist for 2.12 let me know),
-
3.04 (tested only region M in emulator so far, but guess most other regions EUMACDG, except for J will work — with English language set in settings),
Step 2: Download the ISO
Download the ISO that corresponds to your firmware version.
Please don’t bother trying on a non-supported firmware/language configuration, it won’t work…
For example, if your DVD Player version is 2.10J, you would want to download PREBUILT ISOs/2.10.iso.
Step 3, 4, 5 — Burn the ISO, set console language to English, and boot!
These steps are the same as described for slim above.
Custom disc setup — Slim
If you intend to make your own image containing additional homebrew / modified initial loader, please read on.
Step 1: Copy your homebrew
Once you’ve identified your console’s DVD Player version, copy all of the homebrew you would like to include on the disc into that directory in the Filesystems (EG: Filesystems/All PS2 slims (3.10 + 3.11) - English language/ is the one that supports all slim consoles).
Step 2: Make an image
Once you’ve placed all the homebrew files you’d like into the directory, generate a UDF (ISO9960/UDF hybrid also works) image of the directory (so VIDEO_TS is in the root).
On Windows, you can use a GUI like ImgBurn to make an disc image. It will give a warning that VIDEO_TS.BUP is missing, but just click continue anyway (PS2 doesn’t require this file).
On Linux the easiest way is probably to use genisoimage as it comes pre-installed on many Linux distributions like Ubuntu. Run the following on terminal (where exploit.iso is the output and Filesystem/All PS2 slims (3.10 + 3.11) - English language is the directory containing VIDEO_TS and any homebrew):
genisoimage -udf -o exploit.iso "Filesystems/All PS2 slims (3.10 + 3.11) - English language" Step 3: Test and burn
I would recommend you test in PCSX2 first, but since PCSX2 doesn’t support loading the DVD Player, you have to decrypt and repack it yourself, which is beyond the scope of this README. With that said, if you aren’t touching anything in VIDEO_TS, there shouldn’t really be any reason for the exploit to fail.
Custom disc setup — Phat
Instructions for building the phat exploit coming soon.
Replacing the initial program — Slim
I’ve included uLaunchELF recompiled with DVD support as the default initial program. It presents a menu which allows you to select any of the homebrew programs you chose to include on the disc (and also allows booting from USB).
Alternatively, if you would rather just boot into a single homebrew application, the initial program the exploit attempts to boot is located at VIDEO_TS/VTS_02_0.IFO, replace it with your desired ELF file, with the below caveat that compatibility might be lower than if you booted a program through uLaunchELF:
For the initial release, I didn’t bother to reimplement a couple of functions used by the loader, so it requires that the ELF you load doesn’t overwrite those functions I use (those are around 0x84000 - 0x85fff and 0x250000 - 0x29ffff). I will probably remove this limitation in the future, but all ELFs I could find were fine with this limitation.
You can run readelf -l to verify your executable satisfies this requirement. For example, this Tetris homebrew just uses 0x00100000 - 0x0017a940:
$ readelf -l VTS_02_0.IFO

Elf file type is EXEC (Executable file)
Entry point 0x104490
There is 1 program header, starting at offset 52

Program Headers:
  Type           Offset   VirtAddr   PhysAddr   FileSiz MemSiz  Flg Align
  LOAD           0x001000 0x00100000 0x00100000 0x72ef4 0x7a940 RWE 0x1000

 Section to Segment mapping:
  Segment Sections...
   00     .text .ctors .dtors .rodata .data .jcr .sdata .sbss .bss
Replacing the initial program — Phat
The ELF is read from 0x5bb000 in the ISO file, copy to that location with a hex editor to replace it.
Loading backups
It’s possible to patch backup images of commercial games to make them bootable using this exploit. I didn’t want to maintain this tool, so it’s not included in this repository, but can be found by searching for something like FreeDVDBoot ESR auto patcher.
DEVELOPMENT: Replacing the loader payload — Slim
The default payload will boot VIDEO_TS/VTS_02_0.IFO as an ELF file, but tweaks might be desired to improve compatibility, or maybe changing the behaviour to boot BOOT.ELF instead for instance.
If you wish to update the loader payload, run build.sh inside PAYLOAD directory, and copy the output .bin files into VIDEO_TS/VIDEO_TS.IFO at the offsets displayed by the output of the command.
DEVELOPMENT: Replacing the loader payload — Phat
Run the following to build a new dvd.iso:
make -f hardware.mk
If you want to test on PCSX2 using KrHacken’s repacked DVD players, it loads udfio at a different base address, use the repacked Makefile to build an image for testing on the emulator:
make -f emulator.mk
clean before switching between these different Makefiles, or use -B flag.
PORTING:
Please read my technical writeup, to understand how the exploit works. I’ve also provided some notes about porting in the gh-pages branch.
2021 has been an incredible year for the PlayStation 2 modding scene. The PS2 may be over twenty years old now, but the community around it is still quite strong. Earlier this year, MechaCon was dumped in full. This allowed for people to investigate ways to modify this “security chip”. As a result, the MechaPwn exploit now exists.
MechaPwn allows certain models of the PS2 to break away from the system’s region locking. Once completed, it turns retail PS2s into a developer kit of sorts, enabling the ability to run retail PS1 and PS2 discs from any region on your system.
This is extremely exciting news for anyone who owns PS2 or PS1 discs from other regions but only has access to a PS2 from one specific region. Or, those who have multiple region systems may prefer to use one system for convivence sake. Yes, there have been many ways to play games from different regions on a PS2 in the past. These include modchips, Swap Magic discs and more. However, none of these are as convenient or cheap (if you don’t already have a solution in place) as the new MechaPwn option.
Before digging too deep into MechaPwn, interested parties must be aware of a few key points.
- This exploit only works on PS2 systems from model number SCPH-500xx and up. That includes some late model original PS2s and all PS2 Slim models.
- This exploit (as set up in my instructions below) only enables playing retail discs. It does not enable the ability to play burned discs.
- This exploit requires usage of a homebrew application to run initially. I will describe some methods of accessing the homebrew application below.
- If performed improperly, this mod can potentially brick your PS2. “Bricking” refers to rendering a system inoperable.
Determine Your PS2’s Version
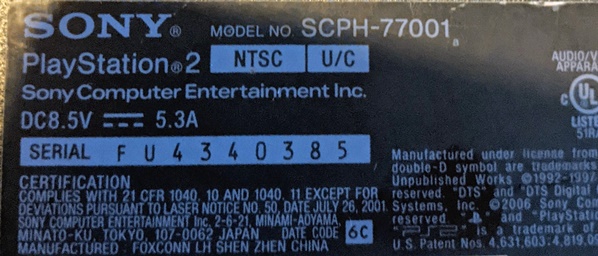
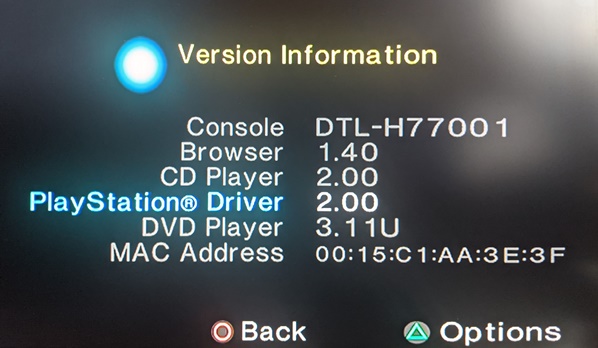
With those key points out of the way, let’s delve more into specifics to determine if your PS2 works with this exploit and what specifically will be enabled. To check what model number your system is, look on the back/bottom of the PS2 for a sticker (see image above for reference). If there is no sticker, turn on the PS2 and click Triangle at the home menu to pull up version information. The screen will list your PS2 model number as Console SCPH-xxxxx.
SCPH-500xx model systems enable running of all region PS1 and PS2 discs if you have a NTSC-U (USA) or ASIA (not NTSC-J) unit specifically. NTSC-J (Japan) units will only be able to play NTSC-U and NTSC-J discs PS2 discs. NTSC-J and PAL (Europe) units also will still only be able to play PS1 games of their specified region.
These confusing per-region discrepancies go away if you’re fortunate enough to have a PS2 with model number SCPH-7500x or above. With these models, the MechaPwn exploit enables the same features on all region systems. Basically, any region PS2 will be able to play any region PS2 or PS1 retail disc.
NOTE: Before proceeding, power up your PS2 and test loading a game disc. The PS2, like many disc-based consoles, can be afflicted by dead/dying lasers. Since MechaPwn requires the usage of discs to play games, if your disc-reading laser is dead, this mod will not be of any use!
Requirements to Launch MechaPwn
The MechaPwn exploit enables extreme ease of use for running multiple regions of game discs on your PS2. However, the ability to launch the program which runs MechaPwn initially requires existing access to a homebrew application called LaunchElf. Have you ever heard of FreeMcBoot, Fortuna or FreeDVDBoot? If not, then chances are you don’t already have access to this initial required program.
I only have experience with FreeMcBoot and FreeDVDBoot. There are additional options beyond these two, but unfortunately I cannot provide assistance on them. If you are interested then check out “The Great PS2 AIO Guide” Tutorial over on PSX Place. It provides much more information on how to install these various options.
All requirements are as follows:
- PS2 with model number SCPH-50xxx or above.
- A launcher program to run LaunchElf (FreeMcBoot, FreeDVDBoot, or something else).
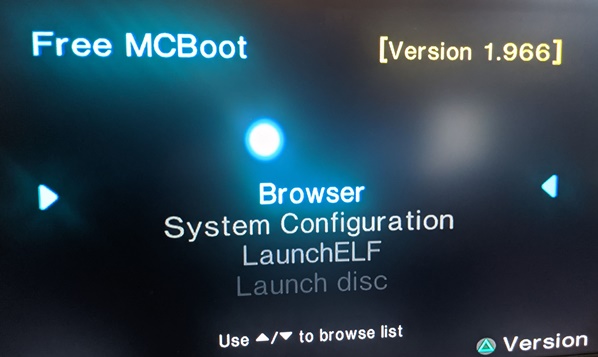
- If FreeMcBoot/FreeDVDBoot, it must be FreeMcBoot version 1.966 Multi-Install.
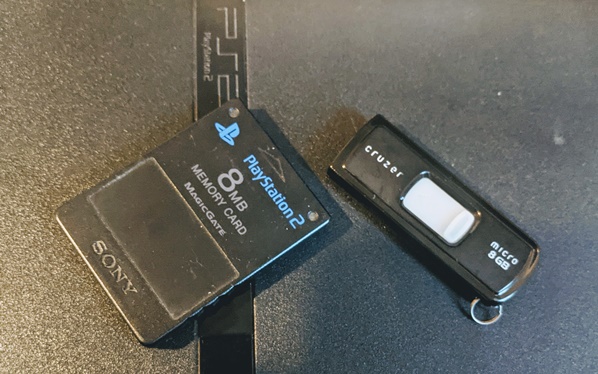
- USB flash drive formatted to FAT32.
- Latest MechaPwn ELF file.
If you need more information about FreeMcBoot or FreeDVDBoot, see the next two sections below. If you’re already set with a launcher program then head straight to the MechaPwn installation instructions.
FreeMcBoot
FreeMcBoot is one of the oldest and reliable homebrew launcher programs which runs on both models of the PS2 and runs off a PS2 memory card. It may not work on certain SCPH-9000xx PS2 models. Anyone with those models should investigate FreeDVDBoot or Fortuna instead. With that said, specific steps for getting FreeMcBoot onto a memory card are rather complex and require additional PS2 software to setup.
As a result, a few years ago I simply purchased a PS2 memory card with FreeMcBoot pre-installed on eBay. This is my recommendation if you want to use it. Alternately, ask if any friends already have a FreeMcBoot memory card. If they do, it’s a relatively simple procedure to use that card to perform a new FreeMcBoot install on another PS2 memory card.
FreeMcBoot also provides easy access to installing various other programs onto your memory card. These additional programs can turn the PS2 into a bit of a media server or emulation machine for classic consoles. If you ever had an original modded Xbox, then you know what to expect from a modded PS2.
Note: MechaPwn requires FreeMcBoot version 1.966 Multi-Install specifically. Previous versions may stop working if used to perform the MechaPwn exploit.
FreeDVDBoot
FreeDVDBoot is a newer, easier way to get FreeMcBoot-style functionality without needing to source a memory card with the program installed already. It utilizes an exploit discovered on the PS2 DVD player last year. It is still in active development and PS2 Slim is the primary model supported.
Note: If you do not have a PS2 Slim, please review the instructions on the FreeDVDBoot GitHub as certain DVD Player versions require a different version of FreeDVDBoot. To check your DVD version, turn on the PS2 and press Triangle to open the version details list.
- Download FreeMcBoot version 1.966 from developer Woon Yung’s website.
- Download FreeDVDBoot disc image file: All PS2 Slims – English language.iso.
- Insert a blank DVD-R disc into a DVD-R burner. Run a disc-writing program such as IMGBurn to write the ISO file to your disc.
- Extract FreeMcBoot ZIP. Copy all extracted contents onto the root directory of a FAT32 formatted USB flash drive.
- To test this is working, place the burned disc and flash drive into PS2 and power the system up. If successful, it will load up to another screen instead of the typical PS2 main menu.
With a successful test completed, you can now proceed to launch MechaPwn by following the steps in the next section to add the corresponding file to your flash drive and running the exploit. Ensure that the FreeMcBoot files are still saved on your flash drive, as they need to remain on there to run LaunchElf.
Launching MechaPwn Exploit
When you have some method of launching LaunchElf, you are now ready to run the MechaPwn exploit on your compatible PS2. The following instructions were tested on FreeMcBoot specifically. FreeDVDBoot should work similarly.
MechaPwn needs to be run twice. As a result, the instructions are not as immense as they may first seem due to repetition. Still, I wanted to keep them verbose so that folks can follow along with every single part of the process.
Note: Do NOT enable “Force Unlock” unless you know for certain you want to utilize that feature. Enabling Force Unlock will change your PS2 so it can no longer play PS1 games or DVDs, including running FreeDVDBoot.
- Download Mechapwn.elf file from the MechaResearch MechaPwn releases page on GitHub. Add this file to your FAT32-formatted USB flash drive.
- Plug FreeMcBoot memory card and USB flash drive into PS2 (If running FreeDVDBoot, then place the disc into system instead of memory card).
- Turn on PS2, which launches into FreeMcBoot/FreeDVDBoot automatically. Run LaunchElf.
- Browse to Mass directory (USB flash drive) and find your Mechapwn.elf file.
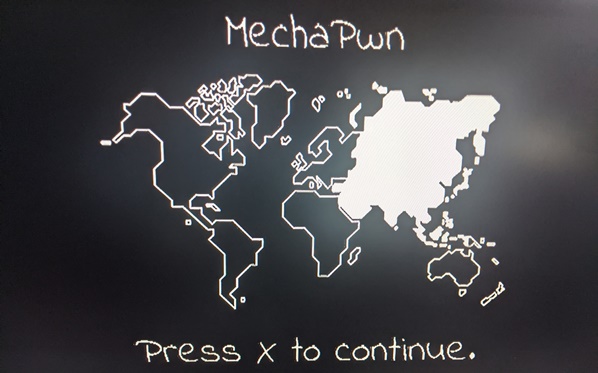
Example directory: mass:/Mechapwn.elf - MechaPwn launches with an animated map screen. Press X to continue. Program backs up nvm.bin file.
- Press Circle button to install the exploit.
- Now the screen shows to unplug the power cord. Unplug your PS2 from the power source. Only pressing the power button is not enough – you must unplug the unit so that MechaCon turns off.
- While system is unplugged, plug flash drive back into PC and copy the nvm.bin file somewhere safe on your PC. Also keep the file on your USB flash drive. Once done, plug flash drive back into PS2.
- Turn on PS2, which launches into FreeMcBoot/FreeDVDBoot automatically. Run LaunchElf.
- Browse to Mass directory (USB flash drive) and find your Mechapwn.elf file.
Example directory: mass:/Mechapwn.elf - MechaPwn launches with an animated map screen. Press X to continue.
- Select “Change region” option. Select “Retail-DEX” option to turn system from Retail to DEX (Development version).
- Select your corresponding model number on this screen.
Example: My PS2 is SCPH-77001. So I need to select DTL-H77xxx. This is because the version “77001” matches within “77xxx”. - The second Select Model screen lists regions. Select the corresponding region of your PS2.
Example: My PS2 is NTSC-U (USA) model. So for my SCPH-77001 system, I need to select “DTL-H77001 – USA” which matches the model number exactly. - Install Force Unlock option appears. Click No to NOT enable this option. This option, if enabled, causes every disc to be read as a PS2 disc. As a result, DVD playback and PS1 games will no longer work in the disc drive if you enable Force Unlock. This is why I chose to select No.
- Installation completes. When the screen displays the unplugging graphic, unplug your PS2 power cord again.
- Plug system back in and turn on. When you check version by pressing Triangle on the home menu, it should now list DTL-Hxxxxx instead of SCPH-xxxxx.
With the last step complete, you can put away your flash drive and FreeMcBoot memory card or FreeDVDBoot disc. From here on out all you need to do is turn the system on, insert a PS1 or PS2 disc from MechaPwn-enabled regions, and then it will be played successfully by the system.
Did this article help you out with running MechaPwn on your PS2? Hopefully so! If interested, you can send a buck my way via my Ko-Fi page.
Sources:
- FreeDVDBoot GitHub: FreeDVDBoot project
- MechaResearch GitHub: MechaPwn project
- MrMario2011: “MechaPwn: Endgame for PS2? – Region Unlocking the PS2 & More!” Youtube video
- PS2 Home: “[App] MechaPwn” forum thread
- PSX Place: “[Tutorial] The Great PS2 AIO Guide” forum thread
- RetroRGB: “MechaPwn exploit for PS2” news post
- Woon Yung’s Website: FreeMcBoot project
24th-September-2012, 10:36
#1
 PS2 Softmod ultimate guide
Last edited by Zorlon; 7th-November-2012 at 14:42.
The Following 4 Users Say Thank You to Zorlon For This Useful Post:
24th-September-2012, 11:00
#2
STUFF NEEDED
- A way to boot elf files (see Getting Started for more information and methods)
- A Playstation 2 (RGB mode for install only after if you like switch back to Y Cb/Pb Cr/Pr mode)
- A Playstation 2 memory card with apx 4MB free
- A USB storage device formated as FAT
If you do not have any part of the above or do not feel you can do this alone we do have an install service [ADD LINK HERE]
FILES NEEDED
To Install
Download the correct region file for your console
PAL-E files (English) NTSC-U files NTSC-J files
The above can be extracted directly to the root of the USB storage device you are using, make sure the path structure is kept
To create ESR DVD’s
ESR DVD Patcher … More tools to come please wait
GETTING STARTED
First thing we need is a way of booting elf files on the PS2
Over the years there have been many methods of doing this, I will outline these here
- Mod chip that can boot elf files from USB
- Mod chip that can only boot CD-R’s & DVD+/-R’s
- Swapmagic 3.2+ or higher/Game Injected with SwapMagic Elf
- Swapmagic CD or DVD/Game Injected with SwapMagic Elf
- Action Replay 2 v2 (Game Shark 2 v2) Cog Swop, Flip Lid or other PS2 CD swapping method
More methods to come (not all are listed already) [LINK IN GUIDES OR WRITE THEM]
- Action Replay Max Evo info not there yet
- Code Breaker 8.1 + info not there yet
- Memor32 card info not there yet
Pre-built uLaunch CD & DVD can be found at http://sksapps.com/index.php?page=launchers.html [UPLOAD DIRECTLY AT SOME POINT]
[LINK UP GUIDE FOR CREATING A SWAPMAGIC DISC FROM A RETAIL OWNED GAME]
Last edited by Zorlon; 1st-October-2012 at 19:56.
24th-September-2012, 11:03
#3
INSTALLING FREEMCBOOT & ESR
Now that you can run uLaunch you can get on with installing MC_BOOT and ESR to your PS2 memory card
Make sure both the memory card and usb device are both inserted into the PS2 before starting
1. run uLaunch with whatever method you use and press O once uLaunch loads
2. hit down until mass:/ is highlighted in red and press O
3. hit down until FREE_MCBOOT.ELF is highlighted in red and press O
4. MC_BOOT loads for the first time
5. Make sure Normal Install is highlighted and hit X (Multi-Version=works on all PS2’s in the region your PS2 is made)
6. Wait for the install to complete
7. hit right until fmcb configurator is highlighted and hit X
8. hit X and press down on the D-pad until Configure ESR path… is selected and hit X
9. hit X and go to mc0:/APPS/ (navigating with the D-Pad hitting X to open the paths) and then highlight ESR.ELF and hit X
10. hit down until Return is highlighted and hit X
11. hit up on the D-pad until Configure OSDSYS options… is selected and hit X
12. make sure uLaunch.elf is setup correctly on path1: if not.. do much the same as you did for ESR but for uLaunch.elf (path should be mc0:/APPS/ULAUNCH.ELF)
13. once done hit down on the D-pad until Return is highlighted and hit X
14. hit down until Return is highlighted and hit X
15. hit down until Save CNF to MC0 is selected and hit X
16. hit down until PS2 Browser (FMCB Restart) is selected and hit X
17. once the PS2 has booted select uLaunchELF and hit X
18. Hit O and on the next screen Hit O again
19. Press down till you get to B?EXEC-SYSTEM is highlighted red and press O
20. Press down once to highlight osdmain.elf and hit R1
21. Press down until Rename is selected and hit O
22. Rename file to dvdplayer.elf using the d-pad to navigate and O to select, X will delete what is behind the curser, once done hit O over OK
23. Hit R1 again and select Copy and hit O
24. Hit Triangle twice
25. Hit down until mass:/ is highlighted and hit O
26. Hit down until B?EXEC-DVDPLAYER/ is highlighted and hit O
27. Hit R1 and select Paste and hit O then hit triangle
28. (B?EXEC-DVDPLAYER/ should still be highlighted, if not make sure it is) hit R1
29. select Copy and hit O then hit triangle
30. select mc0:/ and hit O
31. hit R1 and select Paste and hit O
32. power off and power on the PS2, your mod is completed
Last edited by Zorlon; 24th-September-2012 at 11:05.
24th-September-2012, 11:08
#4
ESR DVD PATCHING — BURNING & MEDIA GUIDES
- CD media games, converted to DVD5 Media
- DVD5 media games (Create, Patch & Burn)
- DVD9 media games, (Create, Patch, Burn & Convert)
- Online Games [DNAS]
- Good Quality Media Guide
Last edited by Zorlon; 13th-February-2014 at 13:04.
24th-September-2012, 11:24
#5
CREDITS
OFFICIAL PAGES
- sksapps Home Page (FREEMCBOOT host)
- ESR forums
- More to add later
CREDITS
- Guide created by Zorlon
- ESR created by ffgriever
- MC BOOT created by xxxxx
- Toxic DL Patcher created by Team Toxic
- CDGenPS2 created by xxxxx
- ImgBurn created by xxxxxx
- uLaunch created by xxxxxx
- Playstation 2 created by Sony
PARTIAL INFORMATION ORIGINS
- ESR Information written by xxxxxx
- Action Replay Max Evo Tutorial & CD install Method written by JNABK
- Action Replay (non Evo)/Indep. Exploit Tutorial Written by pepsi_max2k
- Codebreaker and Swapmagic Tutorials written by bootlegninja
- FMCB User Guides written by JNABK & bootlegninja
- Gameshark / Sharkport Tutorial written by Shadow147
- Gameshark Swaptrick Tutorial written by creaper
Last edited by Zorlon; 26th-February-2014 at 09:03.
26th-September-2012, 17:14
#6
PS2 CHEAT SYSTEM
The only cheat system that will fully work with ESR patched games (will also work with original games) is Codebreaker version 9.2, 9.3 & 10
CODEBREAKER ELF FILES
Codebreaker 9.2 [MD5] [f279f8412cafe80f326bb945d7dc480f]
Codebreaker 9.2 unpacked [MD5] [7ccd8c03952838dc3a4ae9367b0c78a2] [Half way through the patching (this one is kinda complex to patch)]
Codebreaker 9.3 [MD5] [1c57469f0d7b923d8e8b72ebccedda3f]
Codebreaker 10 [MD5] [6e4d4c2723d0f83120cd06d2d0a6c8ed]MD5 info is provided to show those are the correct version for patching
CODEBREAKER PATCHES
Patch codebreaker so it will boot up ESR instead of looking directly at the CD/DVD rom drive
Codebreaker 9.2 pre-patched [Because there is no options for patching I will give you this one pre-patched]
Codebreaker 9.3 Patch (You can use your own custom paths)
Codebreaker 10 Patch (You can use your own custom paths)I will not include the patch for 9.2 and have instead provided that one pre-patched, see spoiler for what the patch does and the paths it looks for
RUNNING CODEBREAKER ON YOUR PS2
- Patch Codebreaker to look for ESR on your Memory Card
- Put the patched Codebreaker.elf onto a USB storage device
- Insert the USB storage device into the first USB slot of the PS2
- Boot your PS2 up normaly and then goto the Free McBoot Configurator
- Go to Configure ESR Path…
- Change Path2: to be your usual ESR path
- Change Path1: to be your Codebreaker elf file stored on that USB storage device (listed as mass:)
- Go to Return then go to Save CNF to MC0
- Go to PS2 Browser (FMCB Restart)
The above will let you boot Codebreaker when the USB storage is inserted and just boot ESR when the USB storage is not plugged in
CODEBREAKER DIFFERENCES
- Codebreaker 9.2 [after patching] Works with both official & custom 1day code files [before patching] only official day1 code files
- Codebreaker 9.3 Works with both official & custom 1day code files
- Codebreaker 10 Only works with official day1 code files
CREATING YOUR OWN DAY1 FILES FOR V9.2 & V9.3
cbcMaker PS2 XP 2007
The above will let you make your own day 1 cbc code files, this does not work with version 10 of the Codebreaker and for version 9.3 you are required to have the update.bin also on the root of the USB storage device
If you want to update your codes in the later versions and do not want to do it on the PS2 with a control pad you can do this on your PC using this guide (this also includes information for converting other code types to Codebreaker format)
HOW TO BACKUP SAVES WITH CODEBREAKER
Method 1. A PS2 Codebreaker and a USB storage device that works with Codebreaker
- Boot Codebreaker by whatever method works for you
- Tap right twice on your D-Pad to the Device Manager and Hit X (You will know at this point if your USB device is being recognised by CodeBreaker)
- Hit X again to select Memory Card 1
- Select the saves that you wish to backup via the D-Pad and X
- Hit Triangle to chose an action
- You want Copy at this time so just hit X
- You now want to select the destination of the save data with the D-Pad and then hit X (if there is only one device you only need hit X, as the D-Pad has no use)
That was simple eh now you can move that save to a PC with ease via USB (Files are named easy enough for you to recognis and they are in cbs format)
Method 2. A PS2 Codebreaker and a USB storage device that does not work with Codebreaker and uLaunch.elf
- Boot Codebreaker by whatever method works for you
- Tap right twice on your D-Pad to the Device Manager and Hit X (You will know at this point if your USB device is being recognised by CodeBreaker)
- Hit X again to select Memory Card 1
- Select the saves that you wish to backup via the D-Pad and X
- Hit Triangle to chose an action
- You want Compress at this time so tap down twice on the D-Pad & hit X
- You now want to select the destination of the save data with the D-Pad and then hit X (if there is only one device you only need hit X, as the D-Pad has no use)
- Next boot up uLaunch by whatever method you like
- Hit O
- D-Pad to the Memory Card you Compressed the data to mc0 or mc1 & Hit X
- D-Pad down to CBDM and Hit X (this folder has all the Compressed saves in it)
- D-Pad to the saves you want and Hit O to highlight them (they start with BESLES-#####/BESLUS-##### and vaious other codes #=numbers)
- Once you have every save you want highlighted Hit R1
- I would use the copy option here so just hit X (just think if you use move instead and something does go wrong you will of lost your save data)
- D-Pad to ../ and Hit X and again D-Pad to ../ (../ is at the very top) and Hit X
- D-Pad down to mass:/ (this is your USB device) and Hit X
- (Skip this if you want to just use the root folder of your USB device) D-Pad to the folder you want the save to be stored and Hit X
- Hit R1 (Paste should already be selected) and Hit X (Do make sure Paste is selected)
Slightly more complicated but it still works just fine and now the saves can be moved to your PC from USB for backup, these do not have a file extentions and are named by the games code.. e.g. SLUS15552 for Tomb Raider Anniversay NTSC version, might be an idea to store those in a folder named the same as the game the saves are from
Copy PSone-PSX-PS1-Playstation Saves
- Boot the PS2 normally with no game inserted
- Hit X on Browser
- Hit the D-Pad to select the PS1 memory card (the gray one) and Hit X
- Hit the D-Pad until you have selected the save you want and Hit X
- Hit X again to select the Copy option, and X again to select the Memory Card (PS2)
Easy enough then all you do is one of the above methods to backup the PSone save data

Last edited by Zorlon; 17th-February-2016 at 08:50.
Reason: disable smillies
Mod projects — XBOX
Phantasy Star Online Episodes 1 & 2 — online quests in offline mode packs [COMPLETE]
[Quest Packs Collection]
GTA San Andreas — Hot Coffee [COMPLETE]
[Mod ready] & [Full ISO ready]
GTA San Andreas — Real Car Names extra content mod [WIP] [Back burner, just won’t have the time
Please can all ESR users post your results here to help with the project and others wanting to use ESR


 ]
]The Following User Says Thank You to Zorlon For This Useful Post:
6th-October-2012, 12:26
#7
The compat list has now been seperated from this main guide and can be found at
http://www.epforums.org/showthread.php?80824
Mod projects — XBOX
Phantasy Star Online Episodes 1 & 2 — online quests in offline mode packs [COMPLETE]
[Quest Packs Collection]
GTA San Andreas — Hot Coffee [COMPLETE]
[Mod ready] & [Full ISO ready]
GTA San Andreas — Real Car Names extra content mod [WIP] [Back burner, just won’t have the time
Please can all ESR users post your results here to help with the project and others wanting to use ESR
The Following User Says Thank You to Zorlon For This Useful Post:
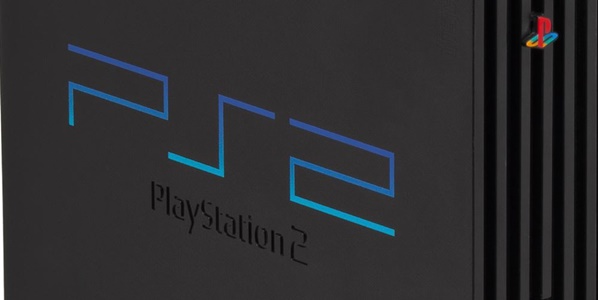
Дал вторую жизнь своей PS2 Slim благодаря софтверному взлому FMCB. На момент написания статьи игры и заставки работают без проблем (OPL v1.2.0-Beta-1897 от 19.06.2022), скорость загрузки тоже хорошая. Немного расскажу, про взлом в целом и свой опыт.
Что за взлом такой?
Free MC Boot — программный метод взлома, который устанавливается на консоль через карту памяти Memory Card. Подобный взлом стал возможен благодаря эксплойту для обновления ПО.
Sony обновляли ПО приставки через сохраненные файлы на диске. То есть, когда консолька видела определенный сейв на карте памяти, из него она тянула обновление ПО, это и послужило причиной для эксплойта.
FMCB ставится через специальный софт с диска на карту памяти. FMCB всего лишь устанавливает файл BOOT.ELF в корень карты и уже оттуда загружается как дополнение к стандартной прошивке консоли.
Основные преимущества такого взлома в том, что карту памяти со взломом можно применить ко всем приставкам слим серии (сейчас даже для 9000x моделей, благодаря FunTuna), а удаляется он простым извлечением Memory Card из порта.
Сам по себе FMCB (или FunTuna) не позволяет запускать игры и другое ПО с флешки, он лишь позволяет запускать неавторизированный софт, который уже в свою очередь и отвечает за запуск всего. Для запуска игр, например, самая популярная программа — OPL.
Как накатить такой взлом самостоятельно вы можете поискать на Ютубе, я же не стал париться и купил на авито, но можно и с Алика заказть, там подобных офферов куча.
Возможные проблемы
Я не могу сказать со 100%-ой уверенностью, но FMCB дружит не со всеми чипованнаыми приставками, поэтому при покупке желательно проверить на момент работоспособности. У меня, например, стоит чип, но я не знаю, какой, и с ним у меня все ок. У других эксплойт не срабатывает.
Также, не все версии FMCB поддерживают 9000x модели Playstation 2 Slim, но с ними отлично справляется Funtuna (другая версия софтверного взлома). Но Funtuna не дружит с Fat версиями консолей, а FMCB дружит, в общем, голову поломать придется как следует  Да еще и всю инфу про взлом нужно собирать по крупицам и на 100-ых страницах англоязычных форумов.
Запуск игр
Если у вас Fat версия консоли, то спокойно заряжайте в нее жесткий диск и играйте без проблем, на этом вопрос с Fat версией можно закрыть.
У меня слимка 7000х серии, порта под жесткий у нее нет, остается только бедненькй порт USB 1.1.
Когда искал инфу про этот взлом и запуск игр с флешки, видел, что были проблемы с воспроизведением видеороликов и долгими загрузками.
Пошел на авито в поисках прошитой карты памяти, увидел, что в объявлении написано о том, что ролики не глючат — запросил видео с работой. Ролики действительно не глючили, но загрузки достигали 30-50 сек.
Было решено брать и с такой скоростью загрузок, но приехав и протестив у продавца взлом, я очень сильно удивился — скорость загрузки была моментальная!
Все дело в том, что OPL обновился с тех пор, как я видел жалобы на игры. И каким-то образом PS2 со своего порта USB 1.1 умудряется отлично гонять игры, проблему я встретил только во вступительном ролике в Gran Turismo 4, но в остальных играх все супер — говорю на примере Психонавтов, DMC 3, God Hand, Tekken 5 и Jak 3.
Поэтому могу сделать вывод, что сейчас связка FMCB (Funtuna) и флешки дает отличную и удобную связку, которая без проблем запускает игры.
Вывод
С современной версией OPL никак проблем с запуска игр с флешки не возникает, но не все версии FMCB могут подружиться с вашей приставкой, поэтому посмотрите у продавца конкретно с вашей приставкой.
Я все выходные играл в PS2! В Психонавтов (скоро ждите статью) и GT4. Счастью не было предела, старушка получила вторую жизнь. Да еще и через HDMI по PS2 to HDMI.
Цена вопроса — 450 рублей на авито. А счастья полные штаны =)