Доставка
Salesbeat Dismiss
Фамилия и имя (Обязательно)
Укажите ваш е-mail (Обязательно)
Напишите ваш телефон (Обязательно)
Комментарий (Не обязательно)
Payment method
Онлайн оплата на сайте банковской картой или с помощью платежных средств: ЮMoney, Тинькоф, Сбер, телефоном через онлайн сервис Yookassa СбербанкаВыберите этот способ оплаты, если хотите запросить счет для оплаты юридическими лицами (обмен юридически значимыми документами по телекоммуникационным каналам)Не получается оформить, перезвоните!
- Manuals
- Brands
- AnyCubic Manuals
- 3D Printers
- i3 MEGA
- Quick start manual
-
Contents
-
Table of Contents
-
Troubleshooting
-
Bookmarks
Quick Links
Related Manuals for AnyCubic i3 MEGA
Summary of Contents for AnyCubic i3 MEGA
-
Page 3: Safety Instructions
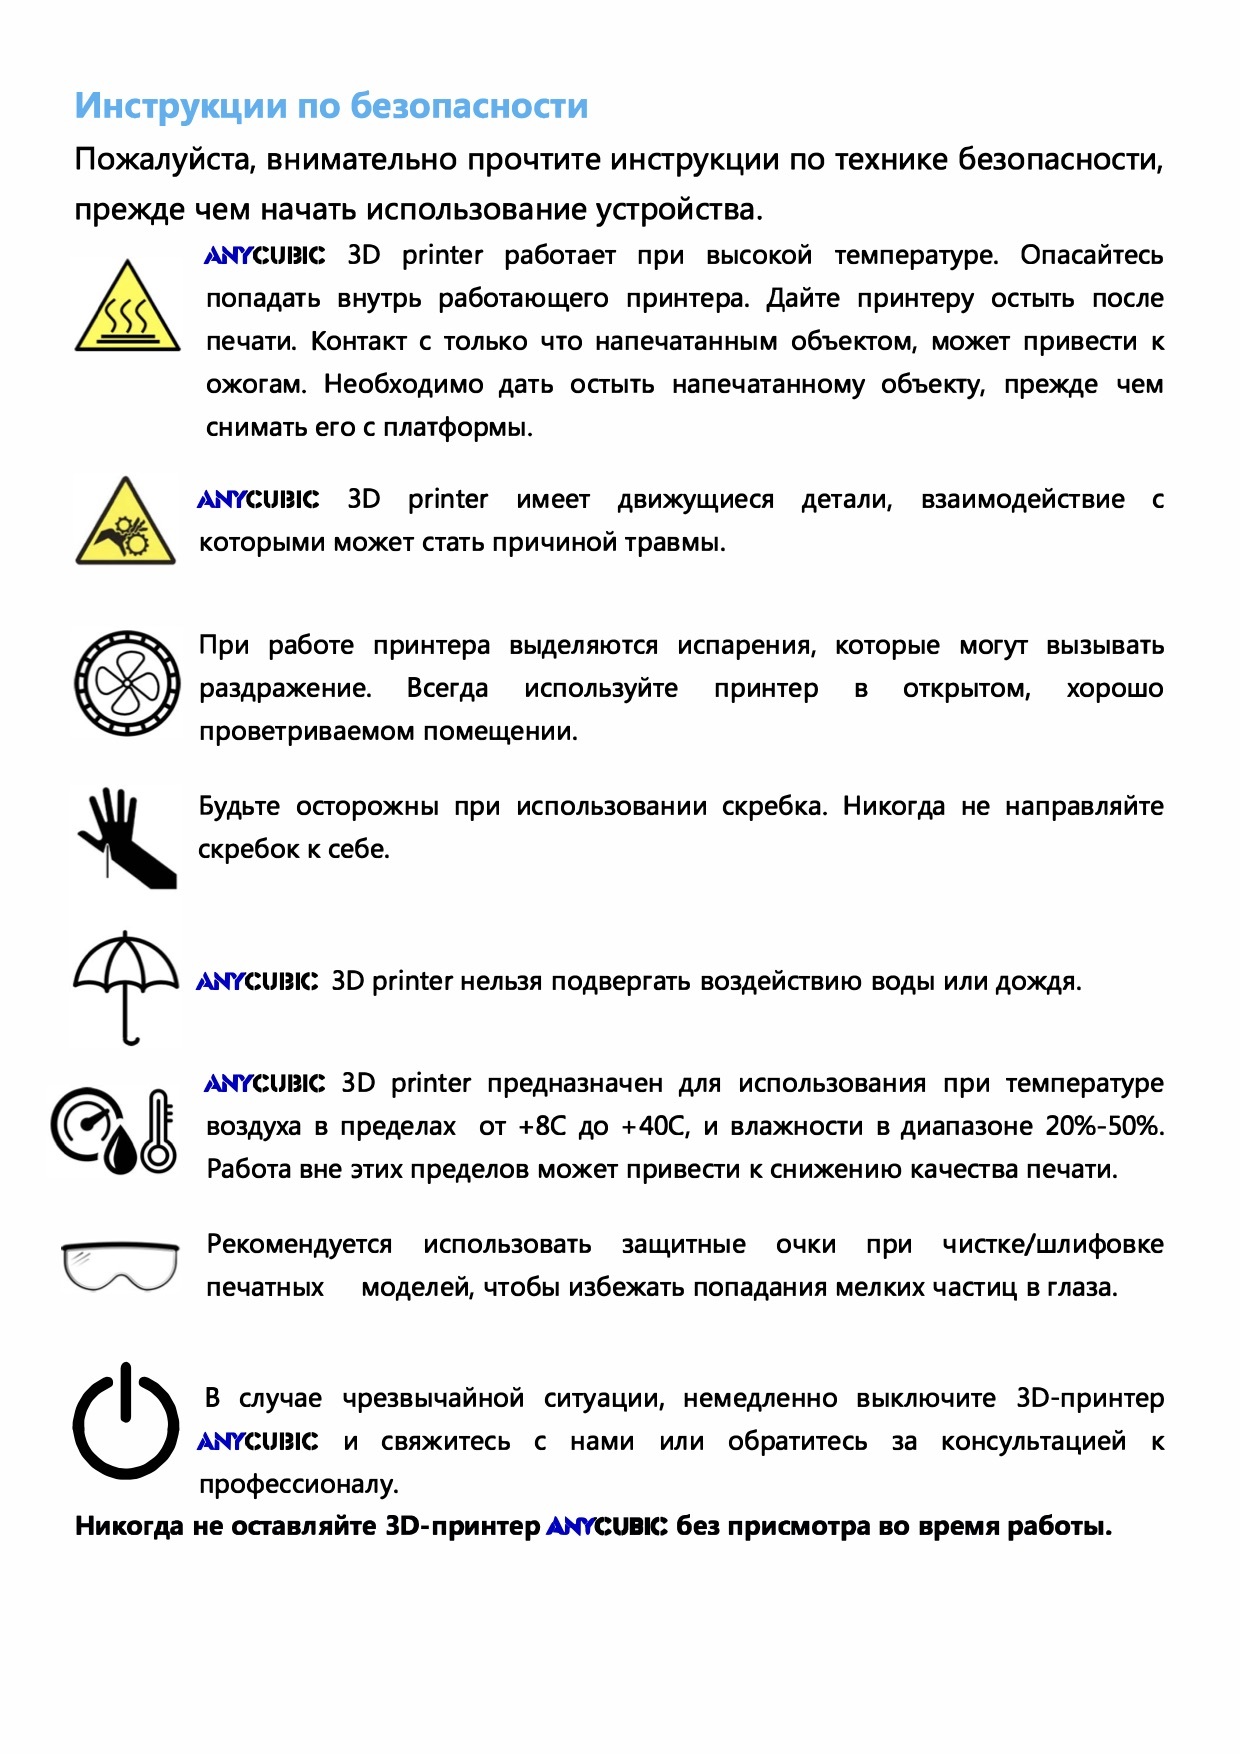
It is recommended to use protection glasses when cleaning/sanding the printed models to avoid small particles contacting eyes. In case of emergency, immediately turn off the ANYCUBIC 3D printer and contact us or consult for professional advice. Never leave the ANYCUBIC 3D printer unattended during operation.。…
-
Page 4
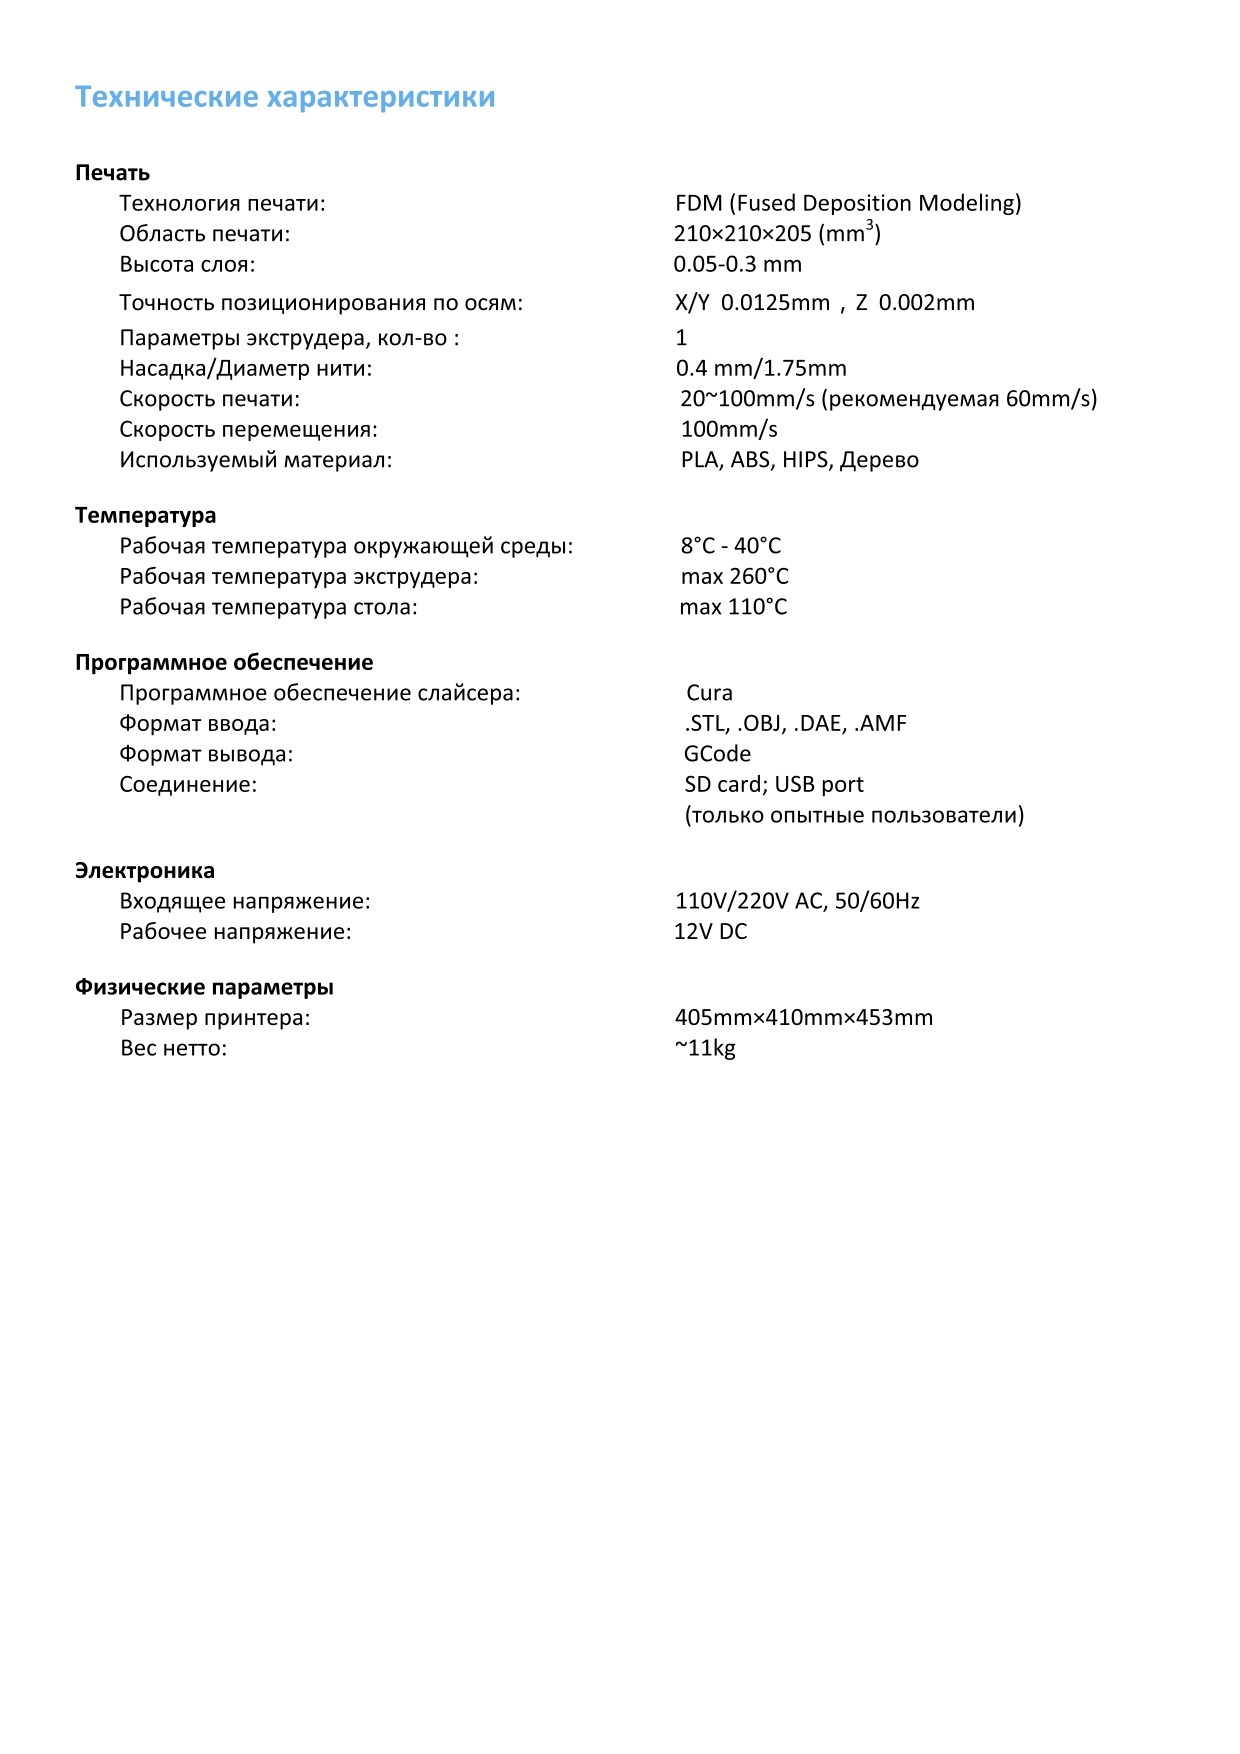
Technical Specification Printing Technology: FDM (Fused Deposition Modeling) Build Size: 210×210×205 (mm Layer Resolution: 0.05-0.3 mm Positioning Accuracy: X/Y 0.0125mm,Z 0.002mm Extruder Quantity: Single Nozzle/Filament Diameter: 0.4 mm/1.75mm Print Speed: 20~100mm/s (suggested 60mm/s) Travel Speed: 100mm/s Supported Materials: PLA, ABS, HIPS, Wood Temperature Ambient Operating Temperature: 8°C — 40°C… -
Page 5: Table Of Contents
Contents 1. Product Overview ……………………… 1 2. Part list …………………………. 4 3. Assembly instruction ……………………..5 4. Leveling …………………………9 4.1 Assisted Leveling ……………………… 9 4.2 Manual Leveling …………………….. 16 5. Software installation ……………………… 19 5.1 Driver installation ……………………19 5.2 Cura Installation ……………………..
-
Page 6
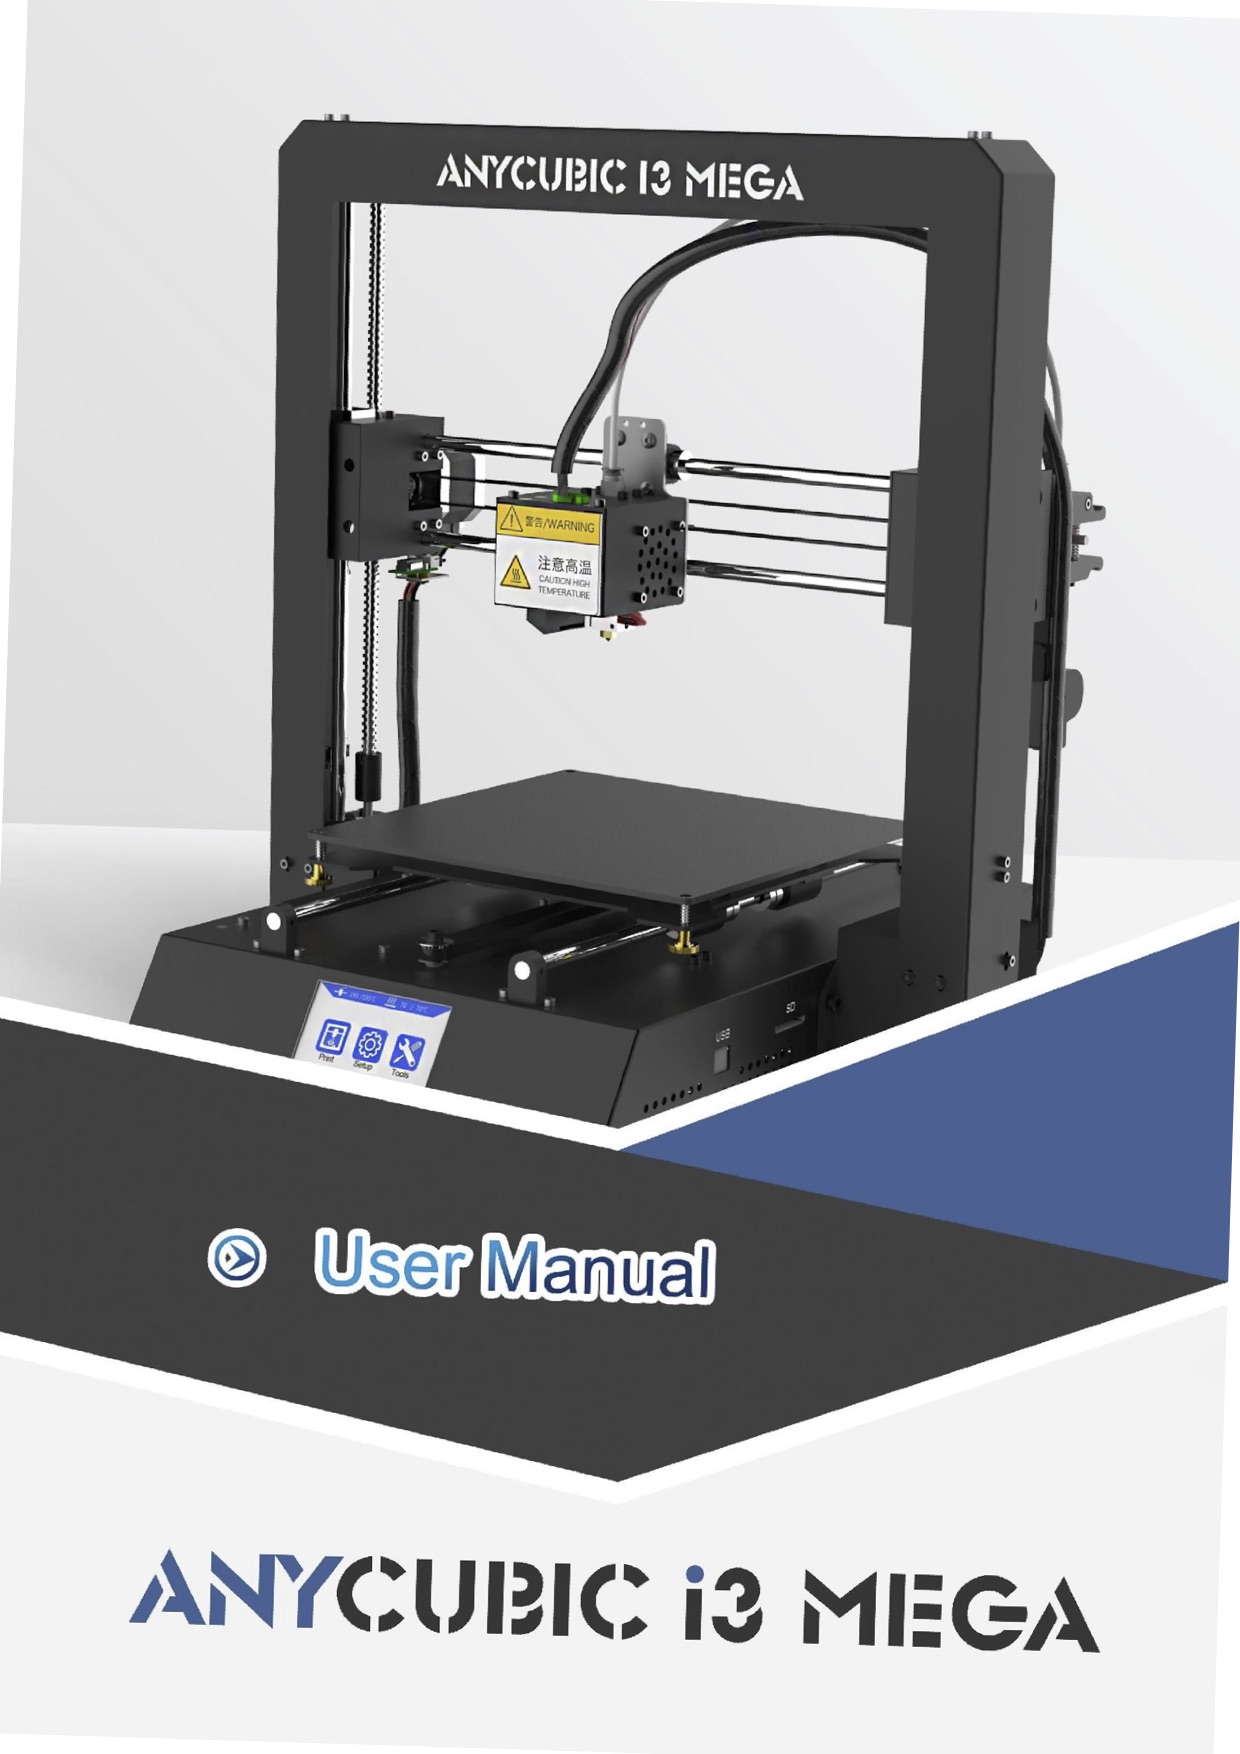
Thank you for choosing ANYCUBIC i3 MEGA 3D printer. Please read the assembly instructions carefully. Please visit www.anycubic3d.com for more support information. Email us on support@anycubic3d.com james@anycubic3d.com If you experience any issues with this product, or the performance is not what you had expected, please contact us first before returning the item. -
Page 7: Product Overview
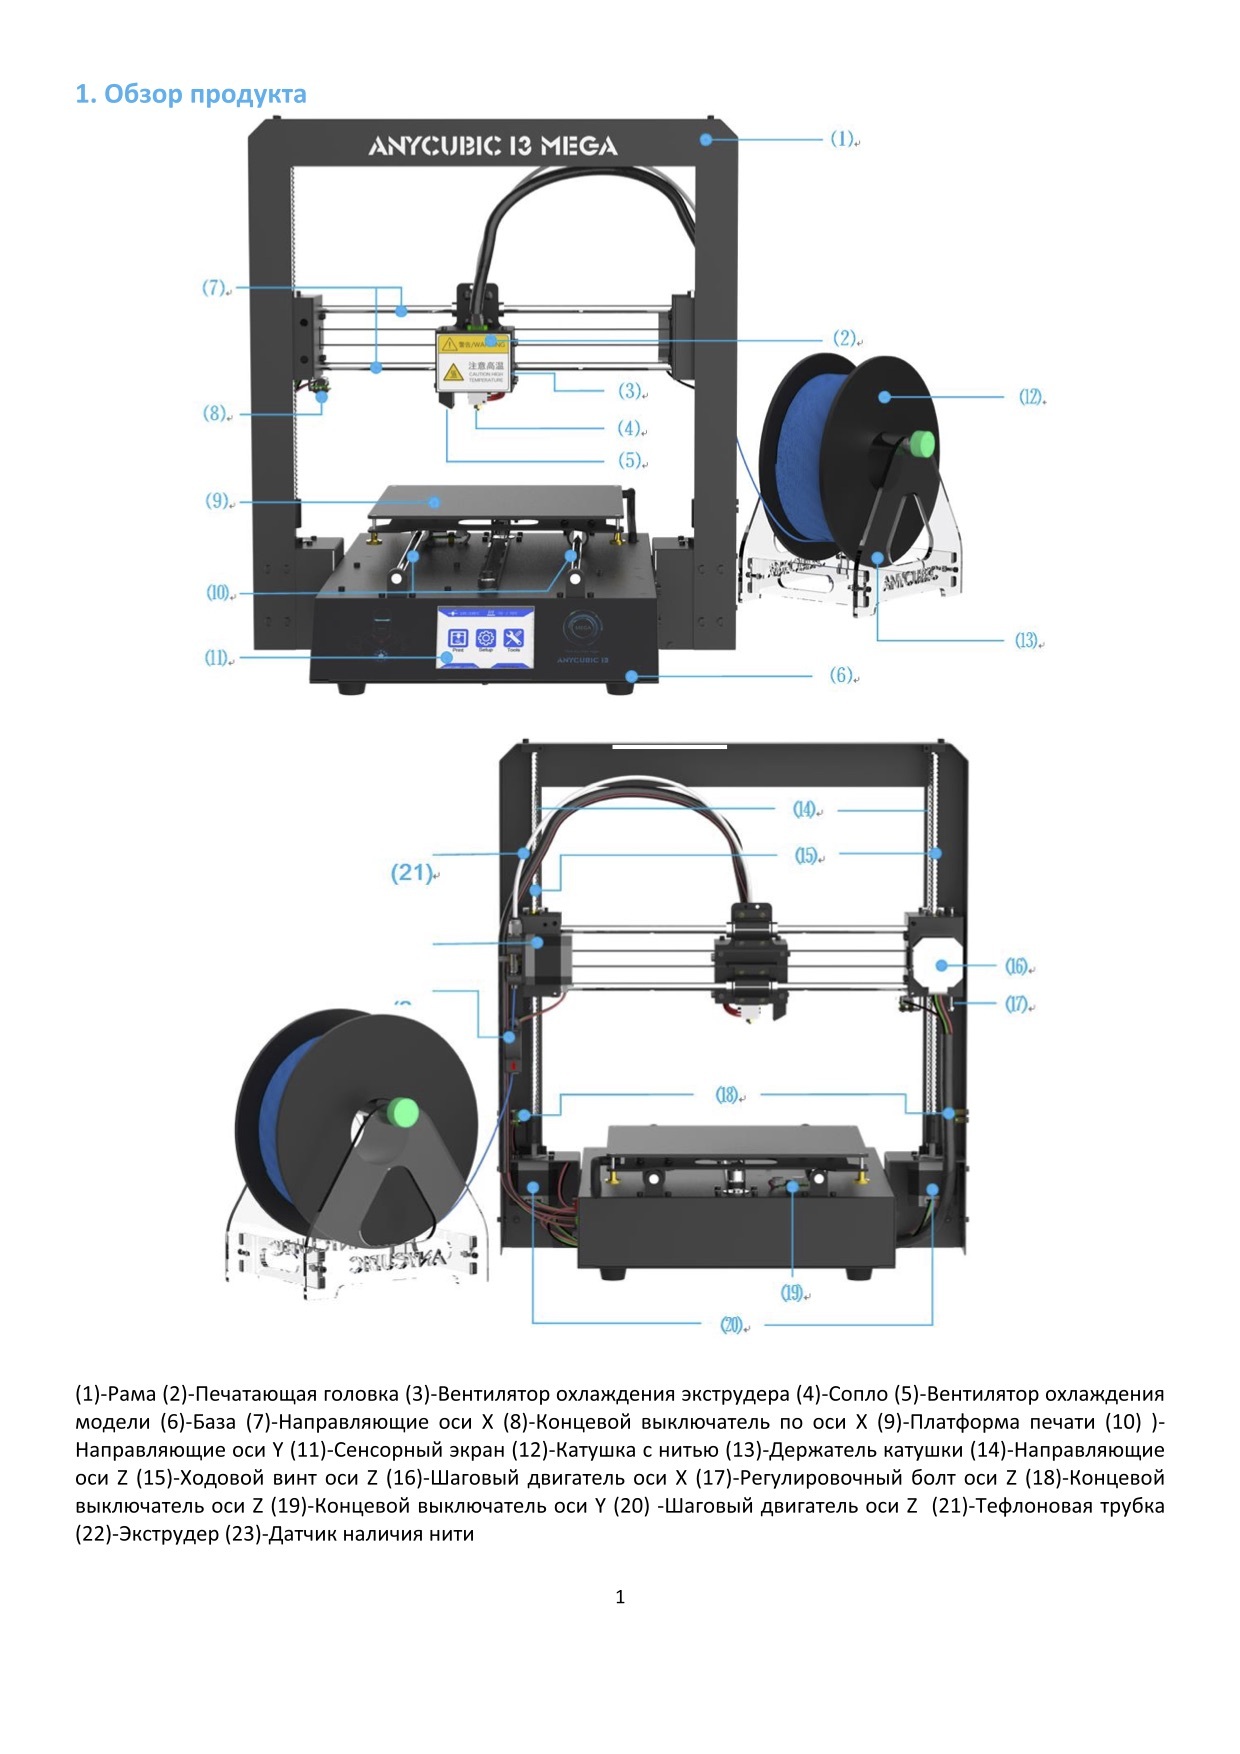
1. Product Overview ⑴ ⑹ ⑶ ⑺ ⑿ ⑷ ⑸ ⑻ ⑾ ⑼ ⑵ ⑽ ⒁ ⒂ (22) ⒀ ⒃ (21) ⒇ ⒆ ⒄ ⒅ ⑴Frame ⑵Base ⑶Print head ⑷Z probe ⑸Nozzle ⑹X smooth rods ⑺X end stop ⑻Print platform ⑼Y smooth rods ⑽Filament sensor ⑾Spool holder ⑿Filament spool ⒀Extruder ⒁Z smooth rods ⒂Z lead screw ⒃X motor ⒄Z end stop ⒅Z motors ⒆Y end stop ⒇…
-
Page 8
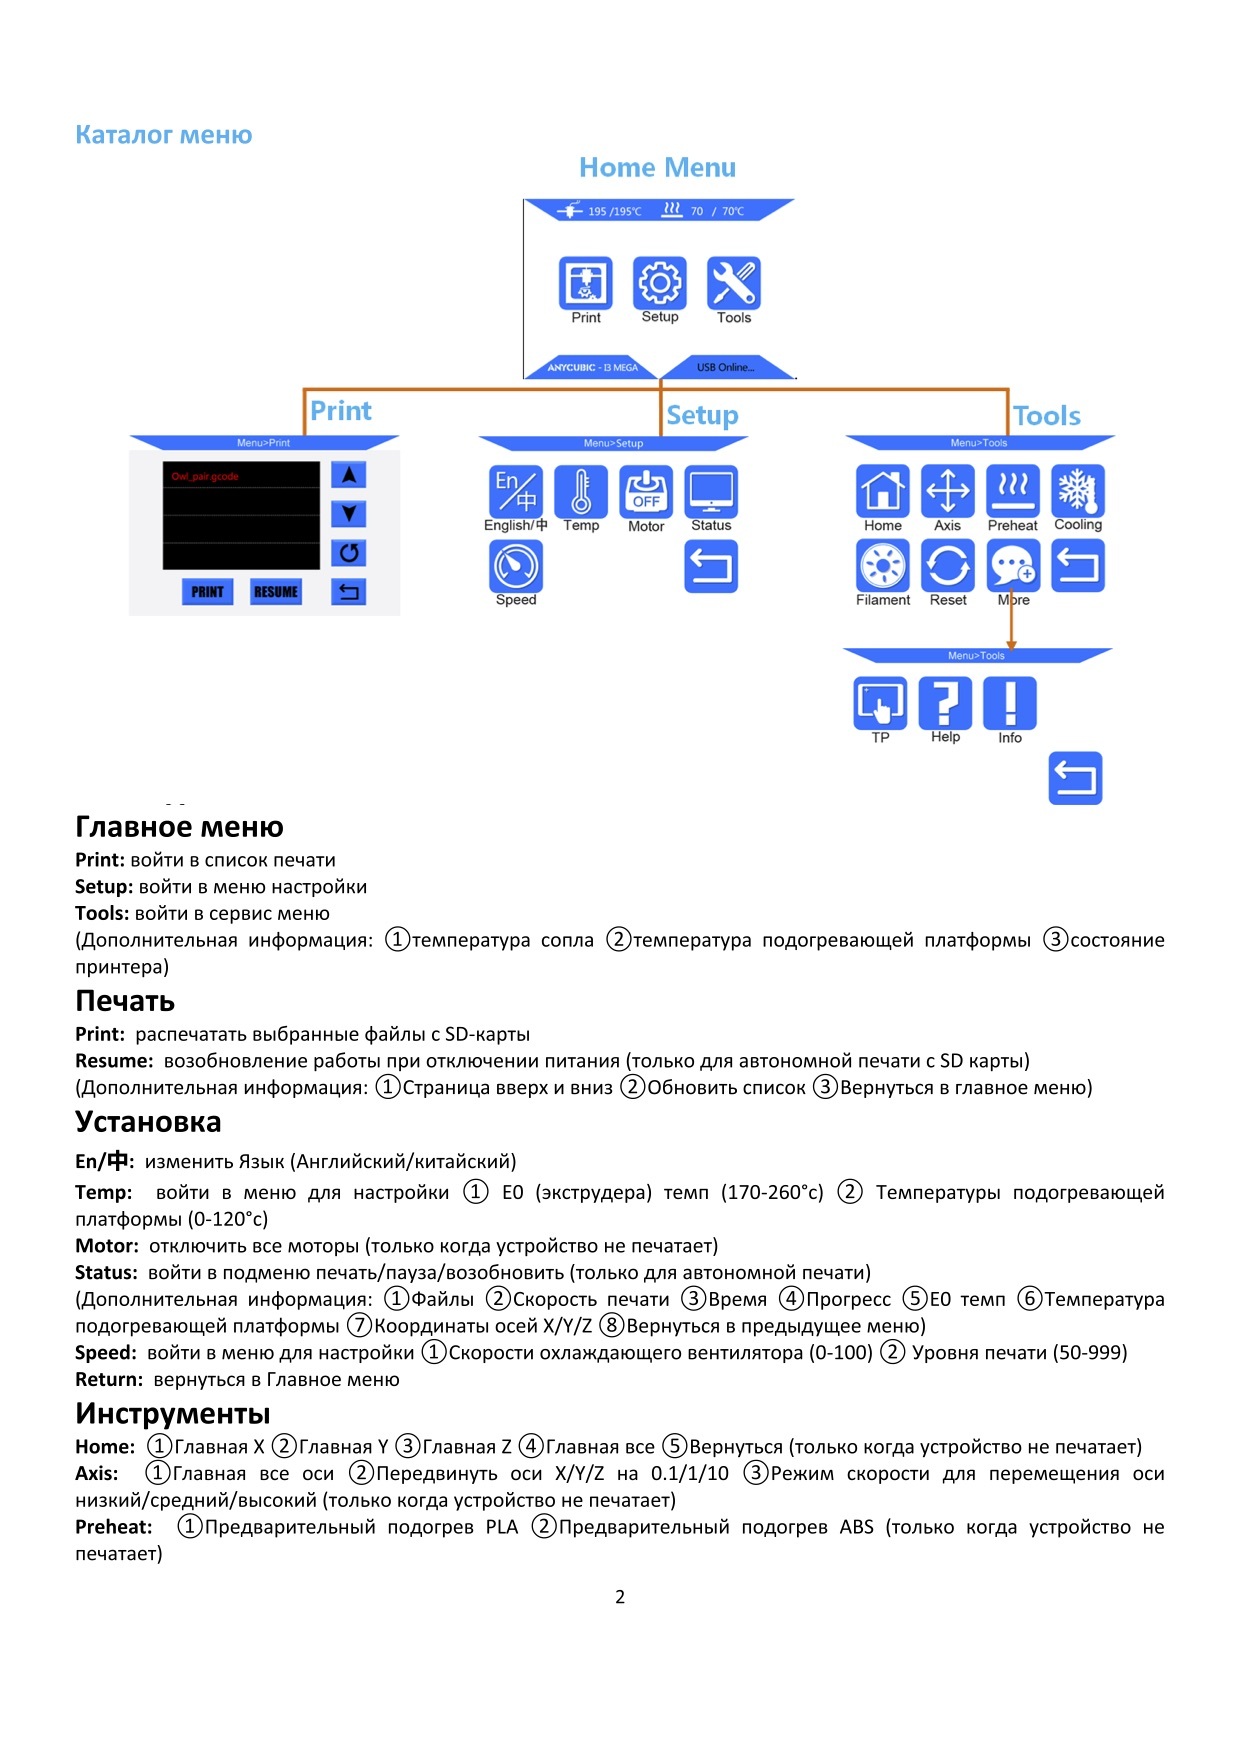
Menu Directory Home Menu Print Setup Tools Home menu Print: enter the print menu Setup: enter the setup menu Tools: enter the tools menu (Other information: ①nozzle temperature ②heated bed temperature ③printer status) Print Print: print the selected files in SD card Resume: Resume from outage (only valid for offline print) (Other information: ①Page up and down ②Refresh ③Return to the home menu) Setup… -
Page 9
Motor: Disable all motors (only valid when no print job) Status: Enter the sub-menu with Print/Pause/Resume icon (only valid for offline print) (Other information: ①Files ②Print Rate ③Time ④Progress ⑤E0 Temp ⑥Bed Temp ⑦ coordinates for X/Y/Z axis ⑧Return to previous menu) Speed: Enter the menu to adjust ①Fan speed (0-100) ②Print Rate (50-999) Return: Return to Home Menu Tools… -
Page 10: Part List
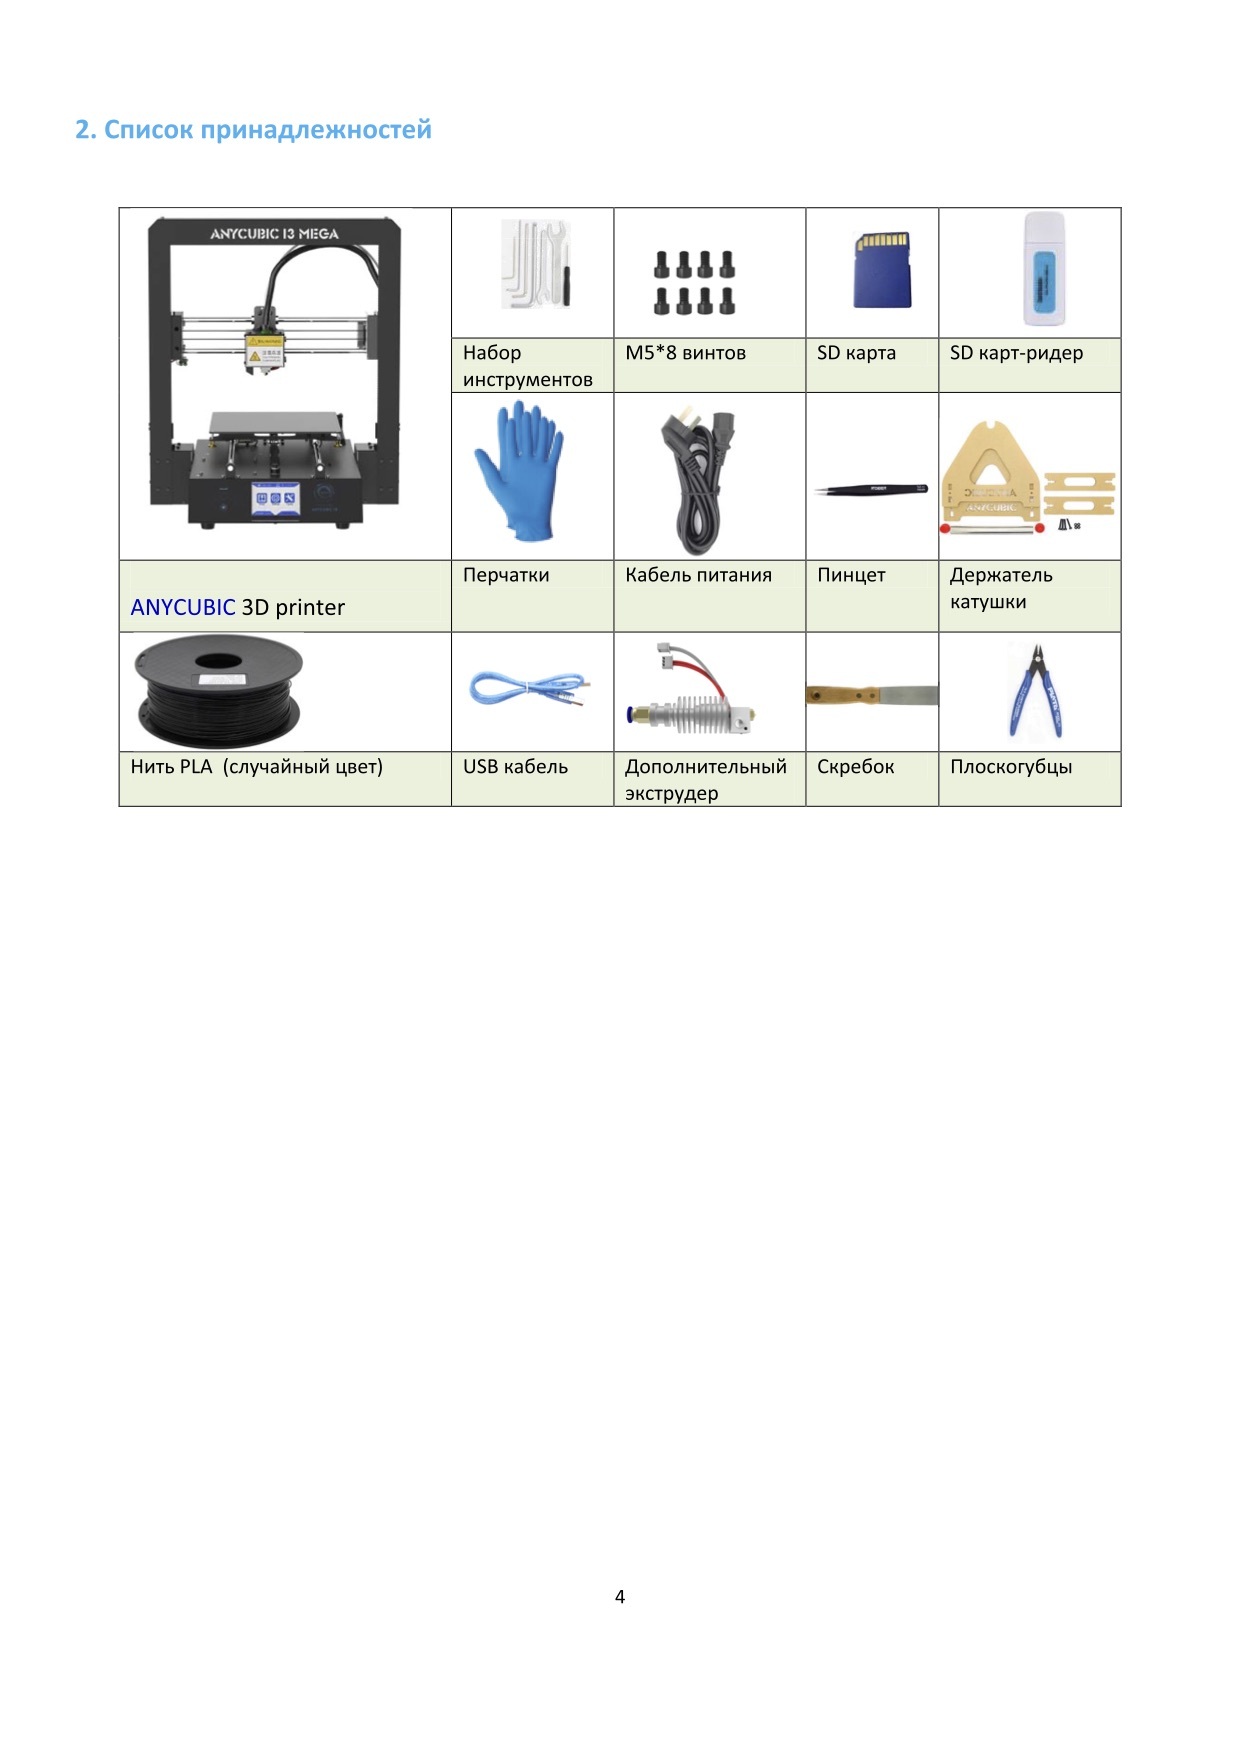
2. Part list Tool pack Screws(M5*8) SD card SD Card reader Gloves Power cord Tweezer Spool holder ANYCUBIC i3 MEGA Test filament (Random) USB cable Backup hotend Scraper Plier…
-
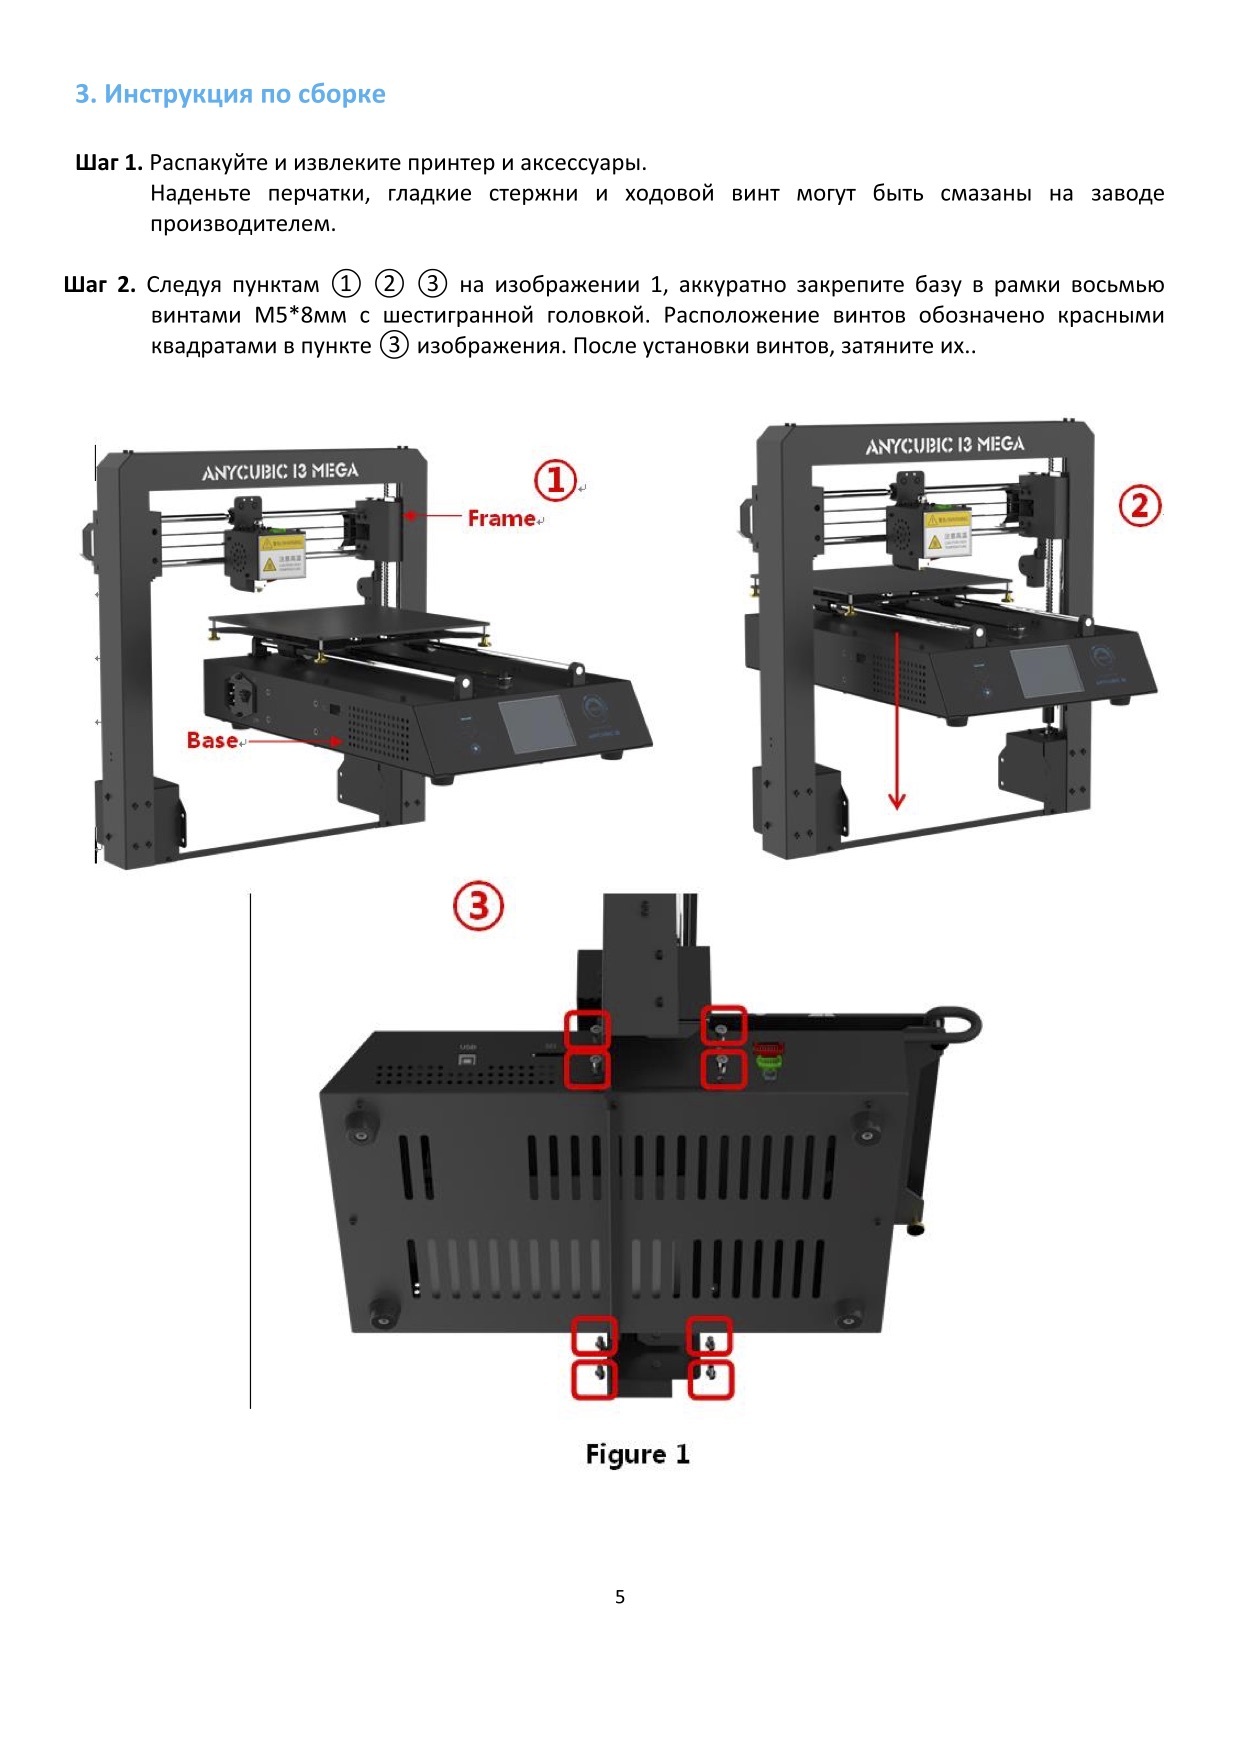
Page 11: Assembly Instruction
3. Assembly instruction 1. Unpack and take out the printer and accessories. The smooth rods and lead screw may be greased in factory, so please wear gloves. 2. Find 8 pieces of M5*8mm hex cap screws and the corresponding screw driver. Follow ①…
-
Page 12
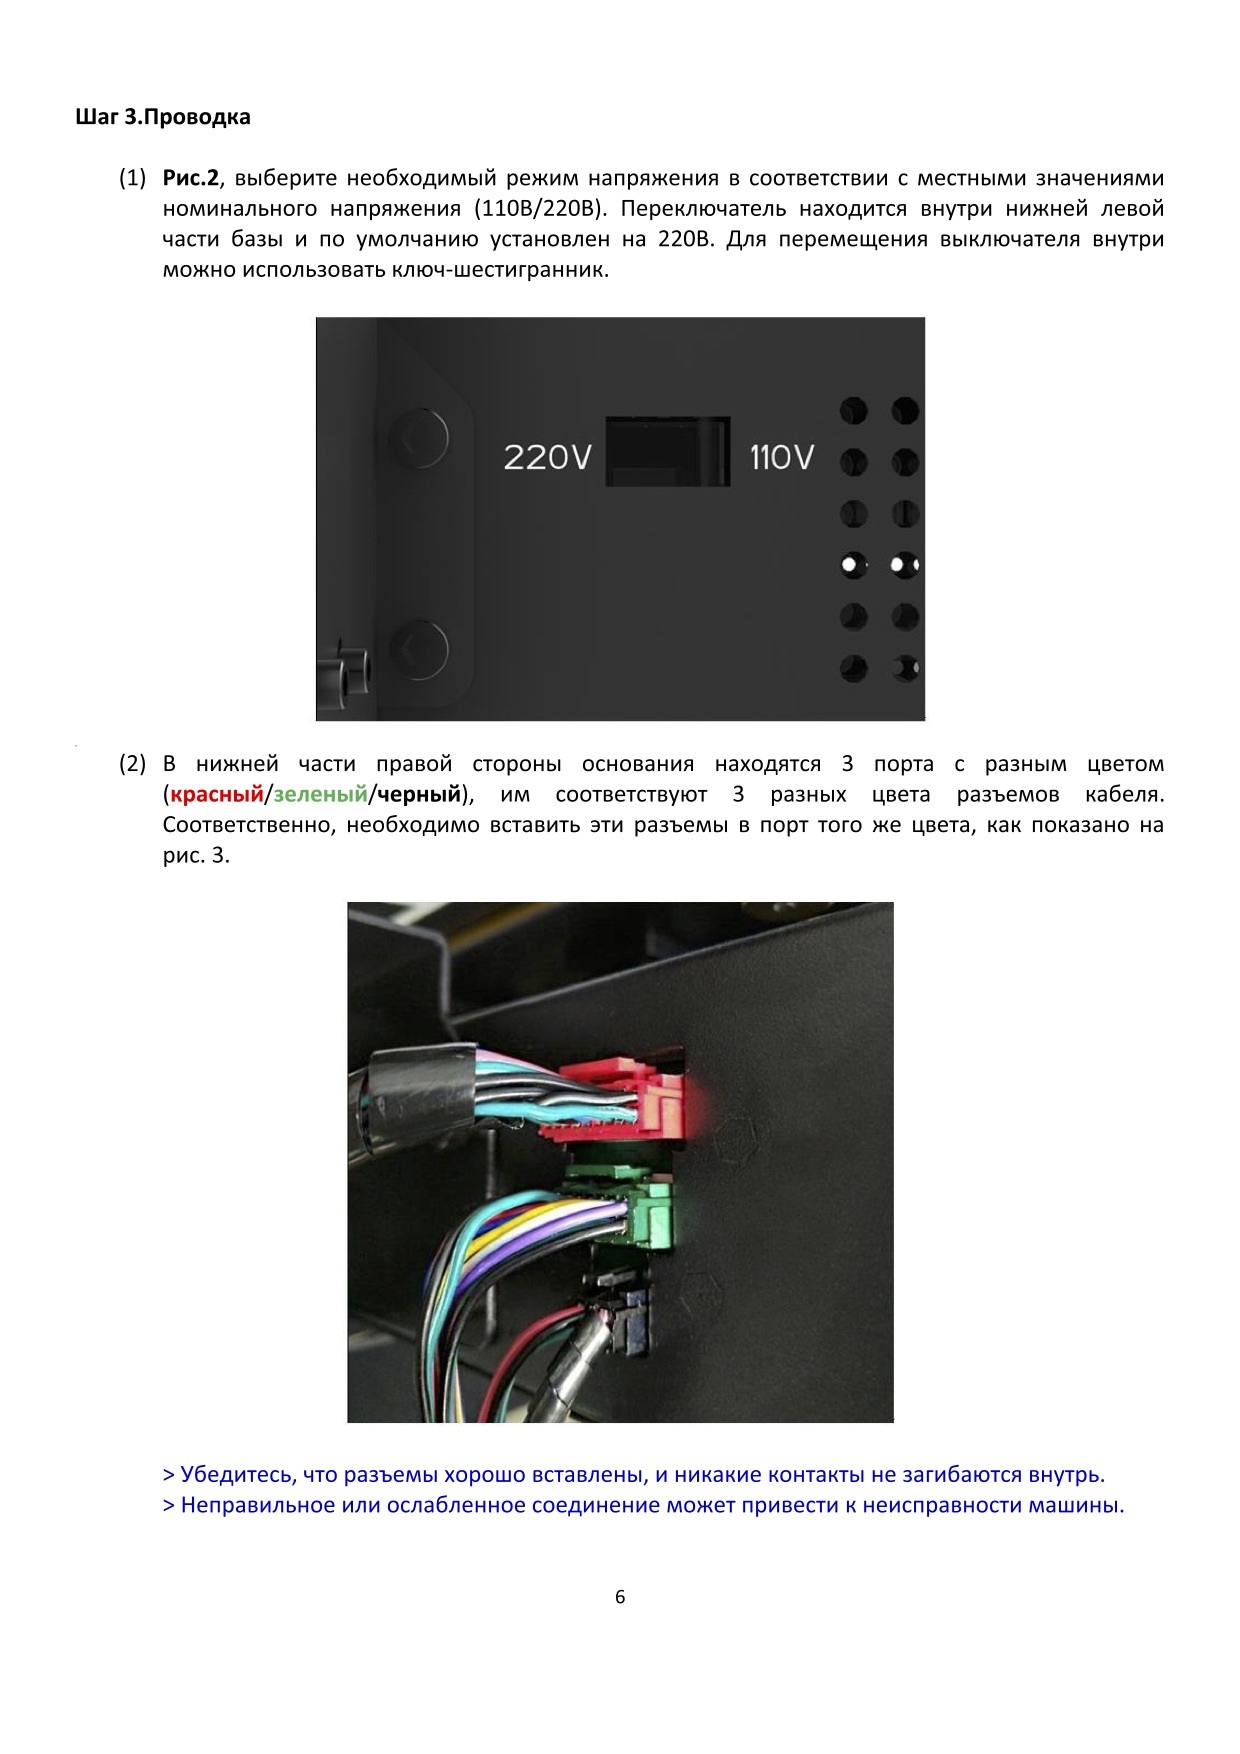
3. Wiring (1) Fig.2, customers are required to select the correct voltage mode according to their local voltage ratings (110V/220V). Please notice that the switch is inside the bottom left of the base and 220V is default. A hex screw driver can be used to move the switch inside. (Figure 2) Choose the voltage ratings (2) There are 3 ports at the bottom right of the base, and accordingly there are 3 cable… -
Page 13
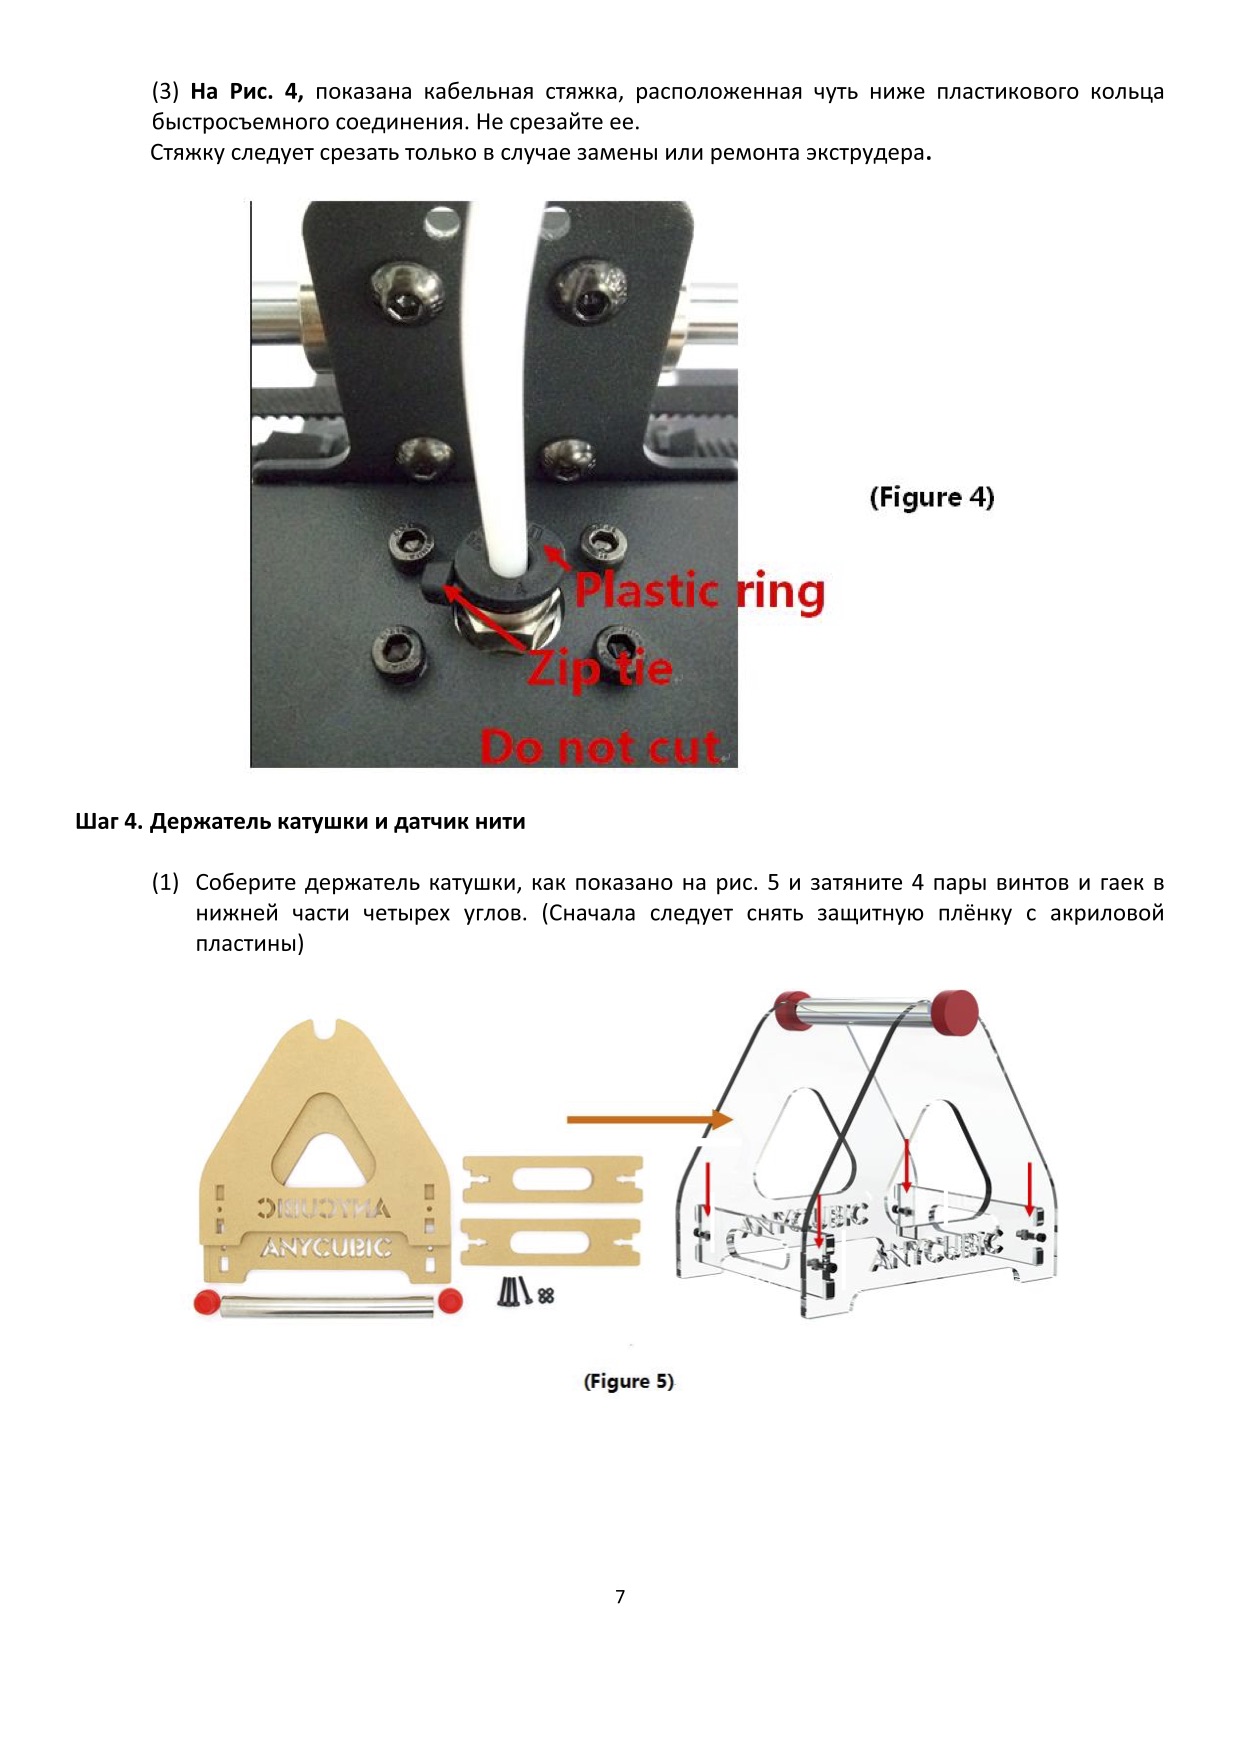
(3) Fig.4, insert “Hotend” connector to the middle port (14 pins). (4) Fig.5, insert “X/Z motors&endstops” connector to the upper port (16 pins). Upper port Convex line Middle port Convex line (Figure 4) (Figure 5) (5) Fig. 6, customers may notice there is a piece of zip tie attached just below the plastic ring of the quick connector. -
Page 14
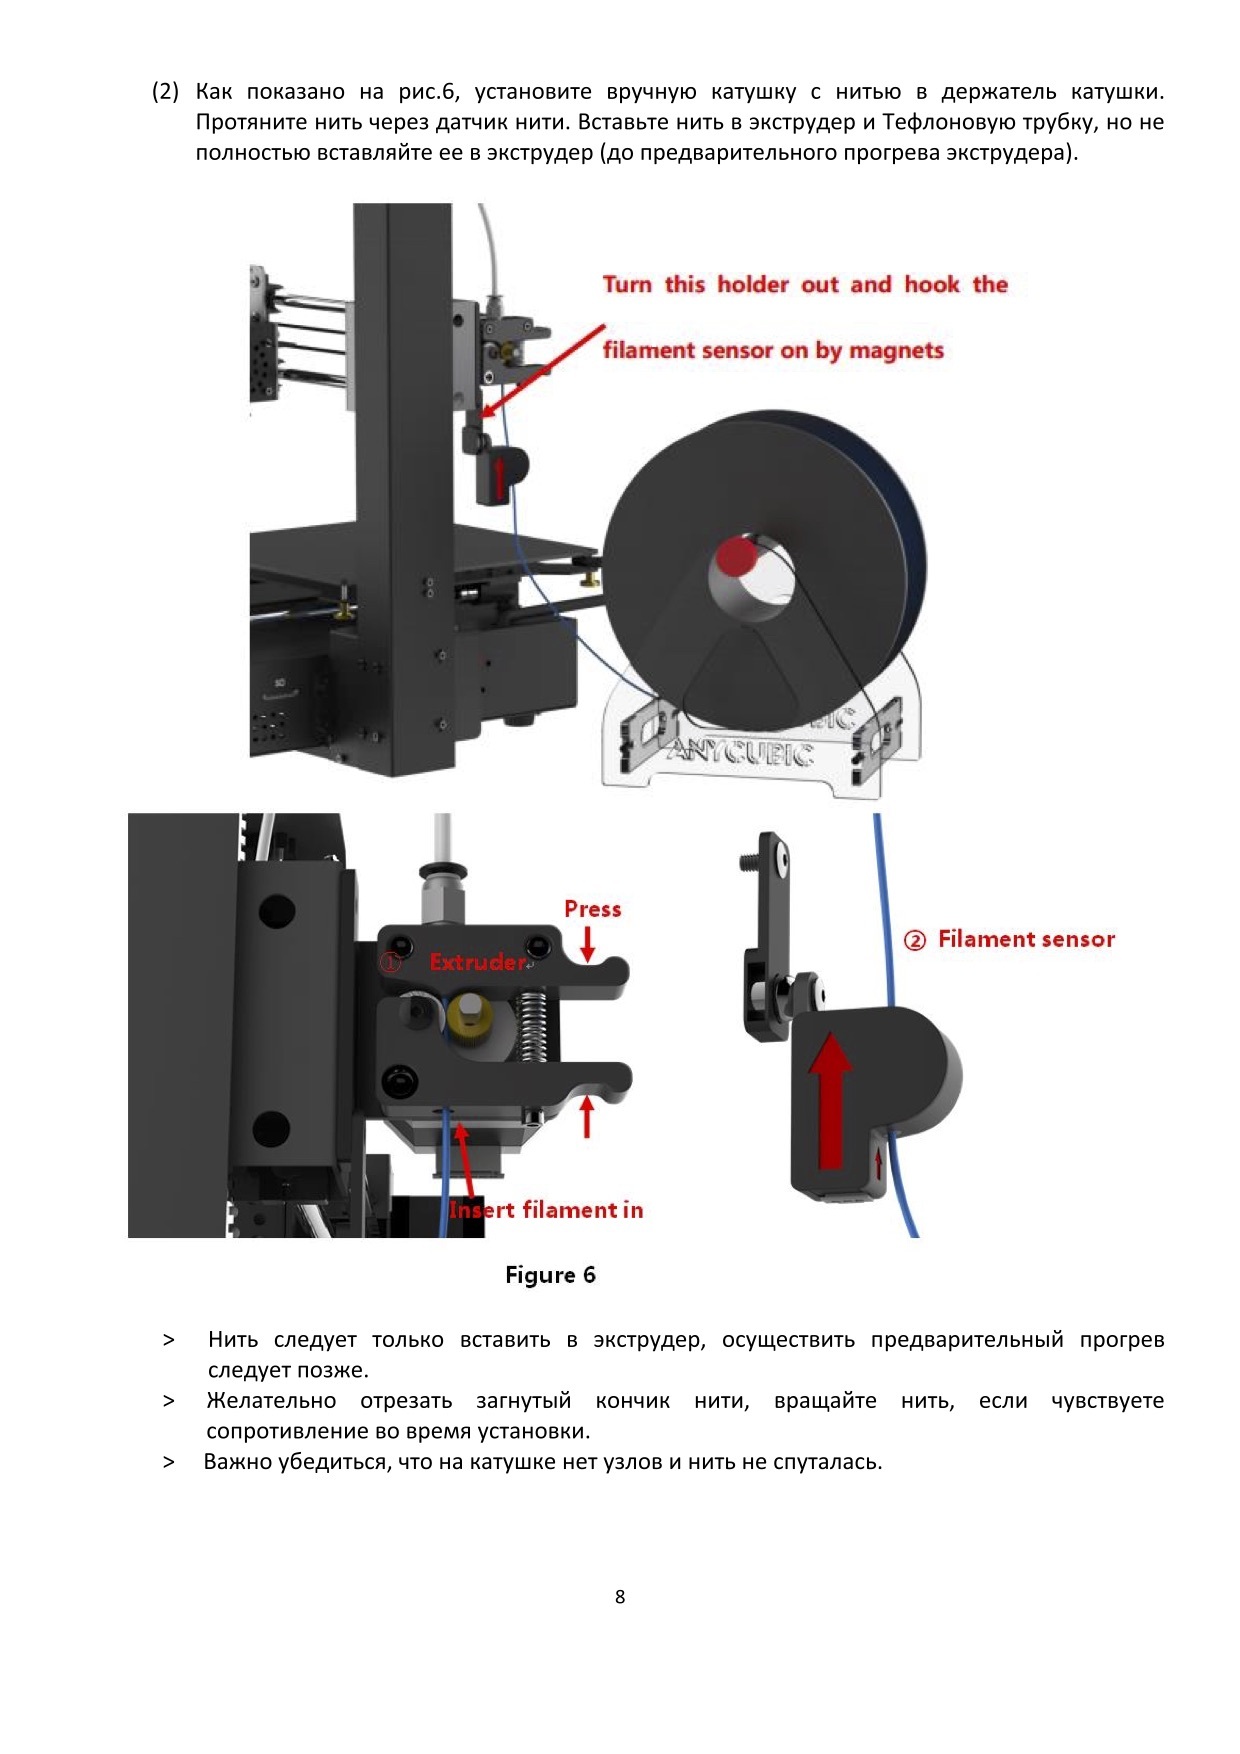
(Figure 7) (2) Install the filament spool to the spool holder. As shown in Fig.8, pass the filament through the filament sensor. Then, as shown in Fig. 9, insert the filament into the extruder and then into the Teflon tubing (but not fully into the hotend yet). When insert the filament to the sensor and extruder, it is suggested to cut off the bent tip of the filament, and rotate the angle if feels any resistance at the sensor or extruder. -
Page 15: Leveling
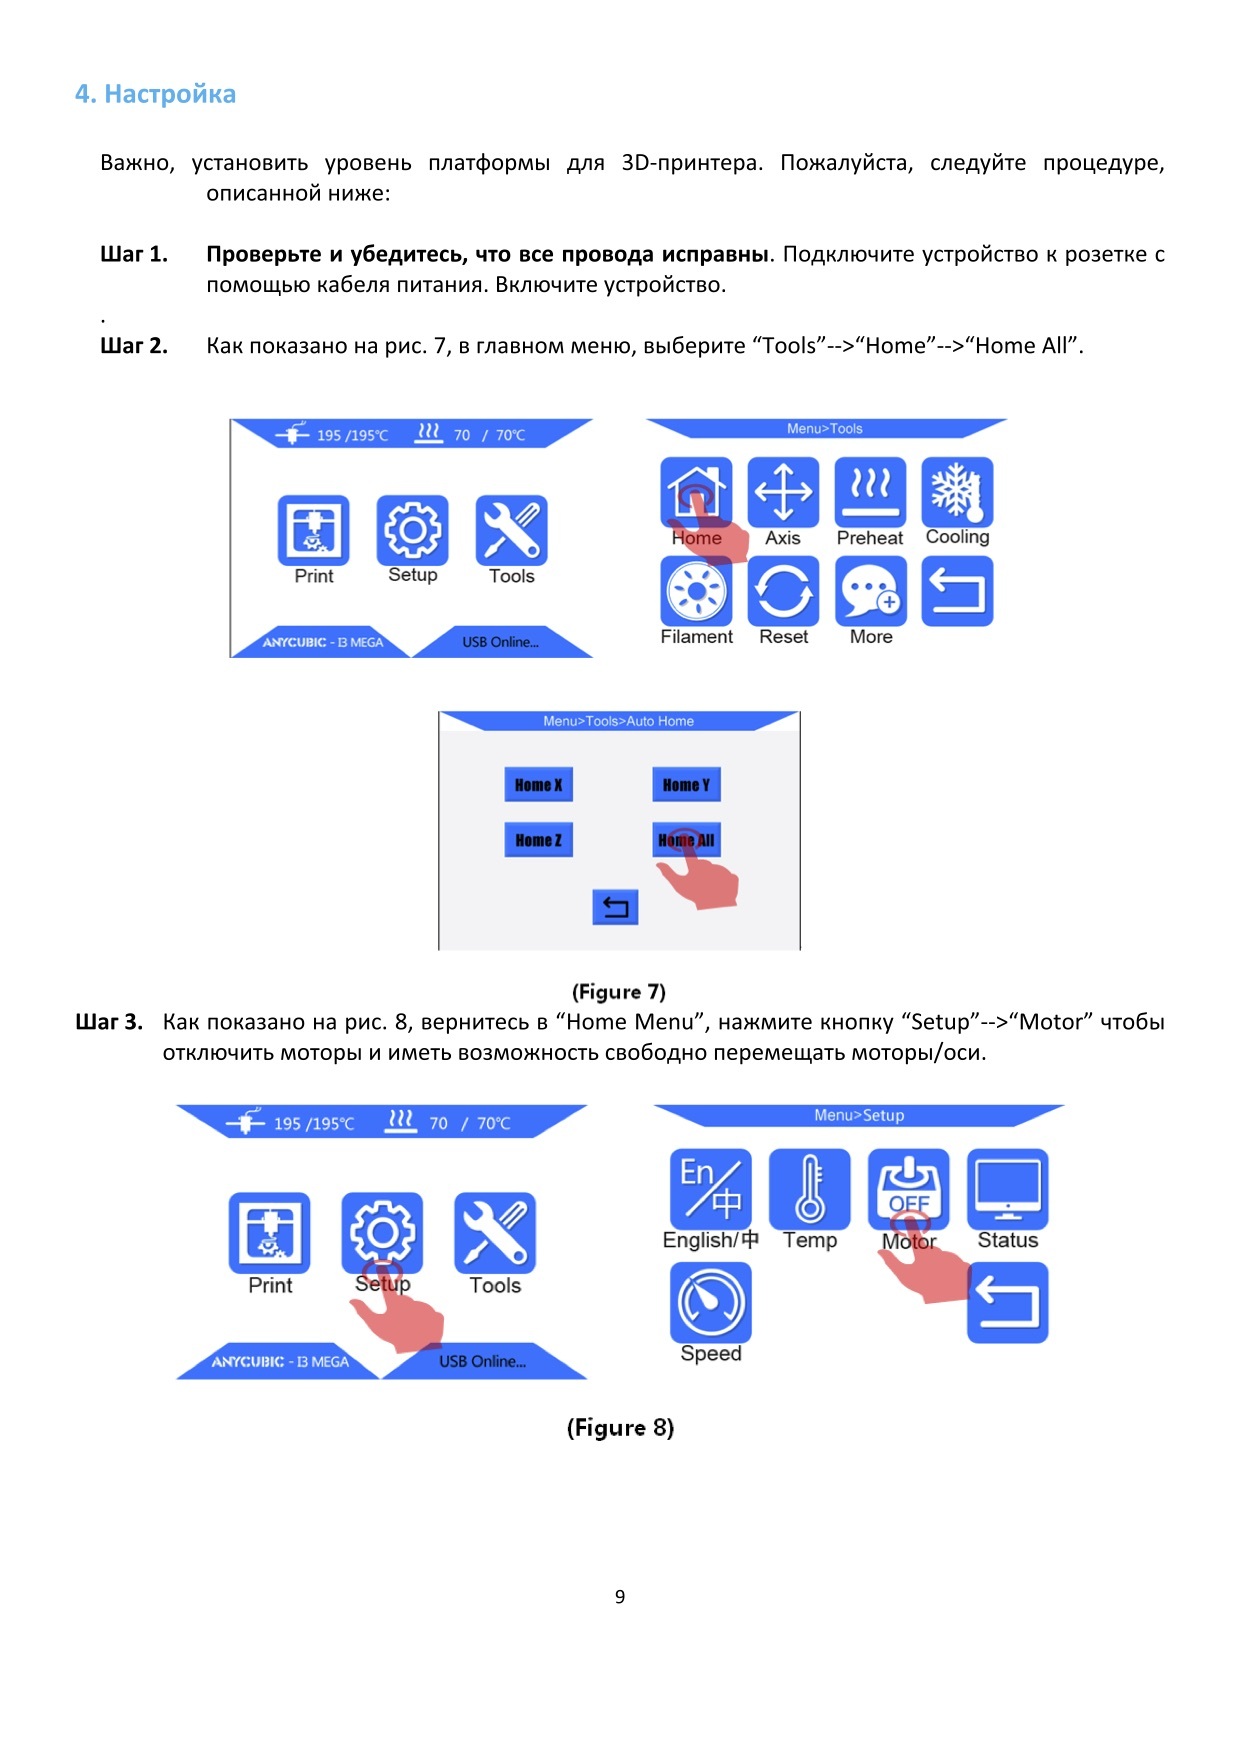
(Figure 9) Load the filament manually 4. Leveling It is essential to have the platform leveled for 3D printing. ANYCUBIC i3 MEGA offers two methods for platform leveling: assisted leveling and manual leveling. For experienced users, it is recommended to just level the platform manually. For new customers, you may use the assisted leveling.
-
Page 16
Before proceed, make sure the X axis is leveled (Fig. 10), in case X axis lost its balance during shipping or due to other unexpected causes. A rule or maybe caliper or anything with certain length can be used for this measure. The Z lead screw can be turned manually for adjust the levelness of the X axis (wear gloves). -
Page 17
(Figure 11) 3. Tighten the 4 screws/nuts underneath the print platform till stop (Fig. 12), to create a distance between the platform and print head. Click “Tools”—>“Level”, the machine will auto home first and then the X/Y/Z axis will be locked and cannot be moved manually. Next, click “Start” in the pup-up window. (Figure 12) 4. -
Page 18
and finally triggers the sensor and there will be audio feedback from the beeper. When you hear the beep, please stop adjusting the nut and click “Next” for the following point (Fig. 13). Do the same to the rest points. (Figure 13) 5. -
Page 19
If clicking “Check (No-heating)”, the print head will immediately run a rectangular on the print platform, you may observe the distance between the nozzle and platform. Ideally, the distance should be of 0.1~0.2 mm (approx. a paper thin) If clicking “Check (Heating)”(Fig. 15), the machine will automatically heating the nozzle to 200°C and run a rectangular again with extrusion. -
Page 20
Leveling good Too close to the nozzle, you may manually tighten the two nuts at filament evenly extruded to the the left side by ~half-circle. platform. (one circle~0.5mm) (Figure 16) As shown in Fig. 16B, you may need to manually fine tune after assisted leveling to achieve satisfying results. -
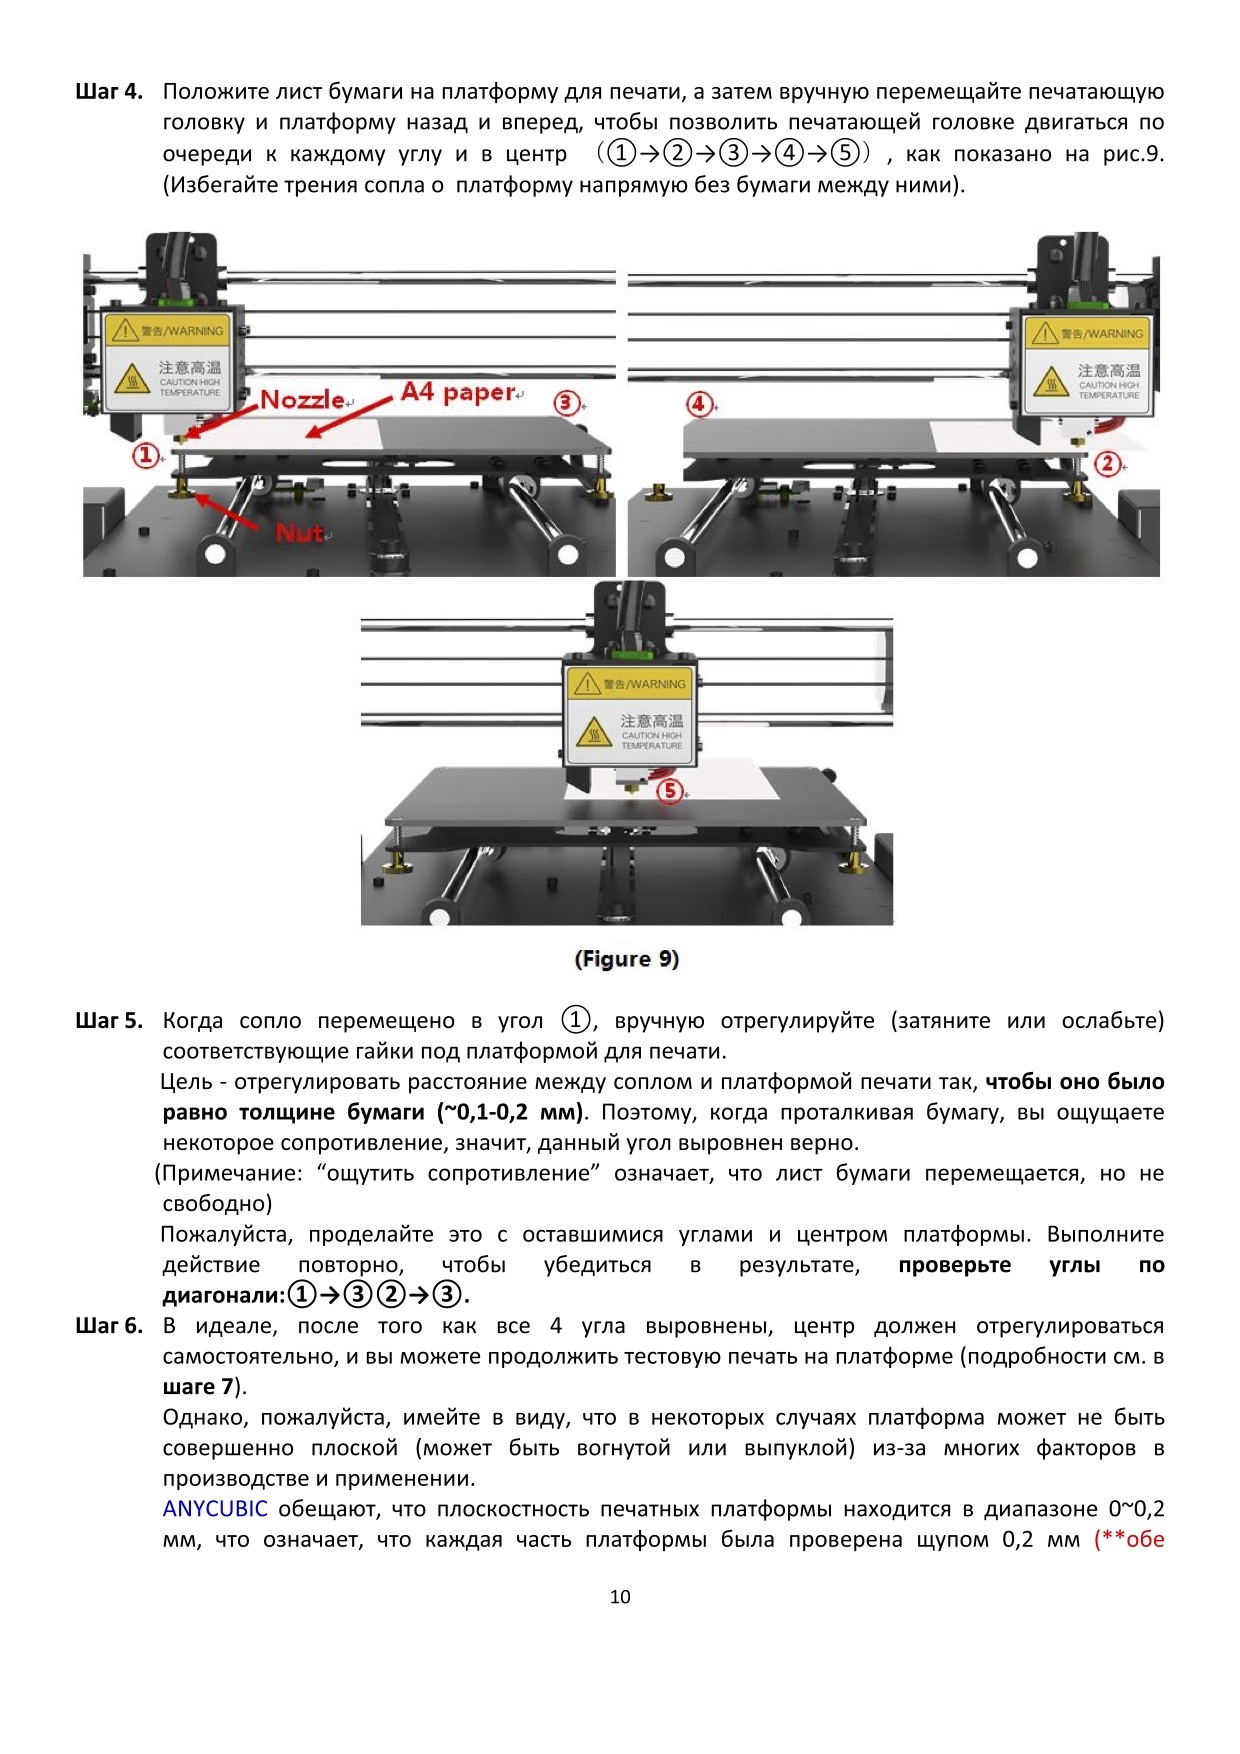
Page 21
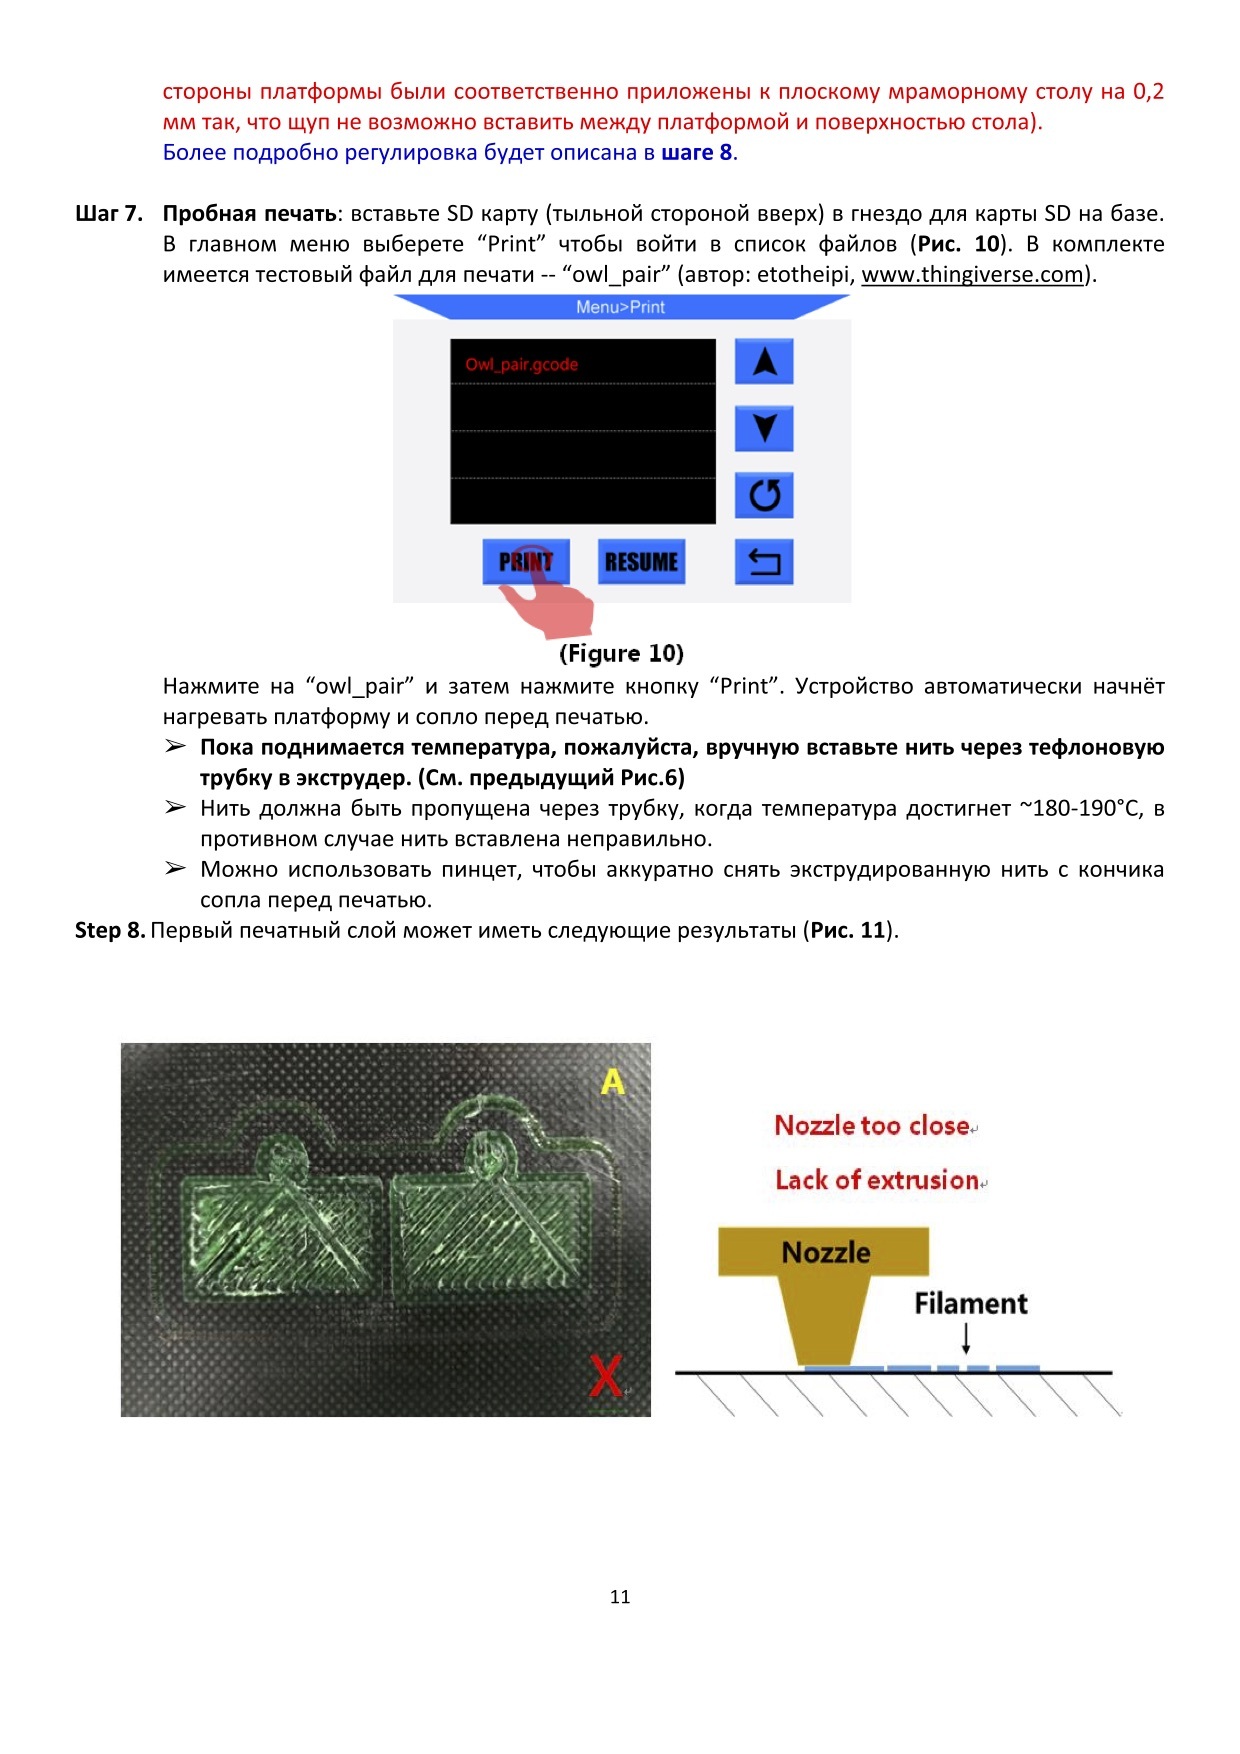
(Figure 17) As shown in Fig. 18, there might be 3 results for the first layer of the “owl_pair”. Leveled properly Nozzle too close Insufficient extrusion Filament evenly extruded Nozzle too high Poor adhesion (Figure 18) In case of “nozzle too high” or “nozzle too close”(Fig. 18 B & C), please click… -
Page 22: Manual Leveling
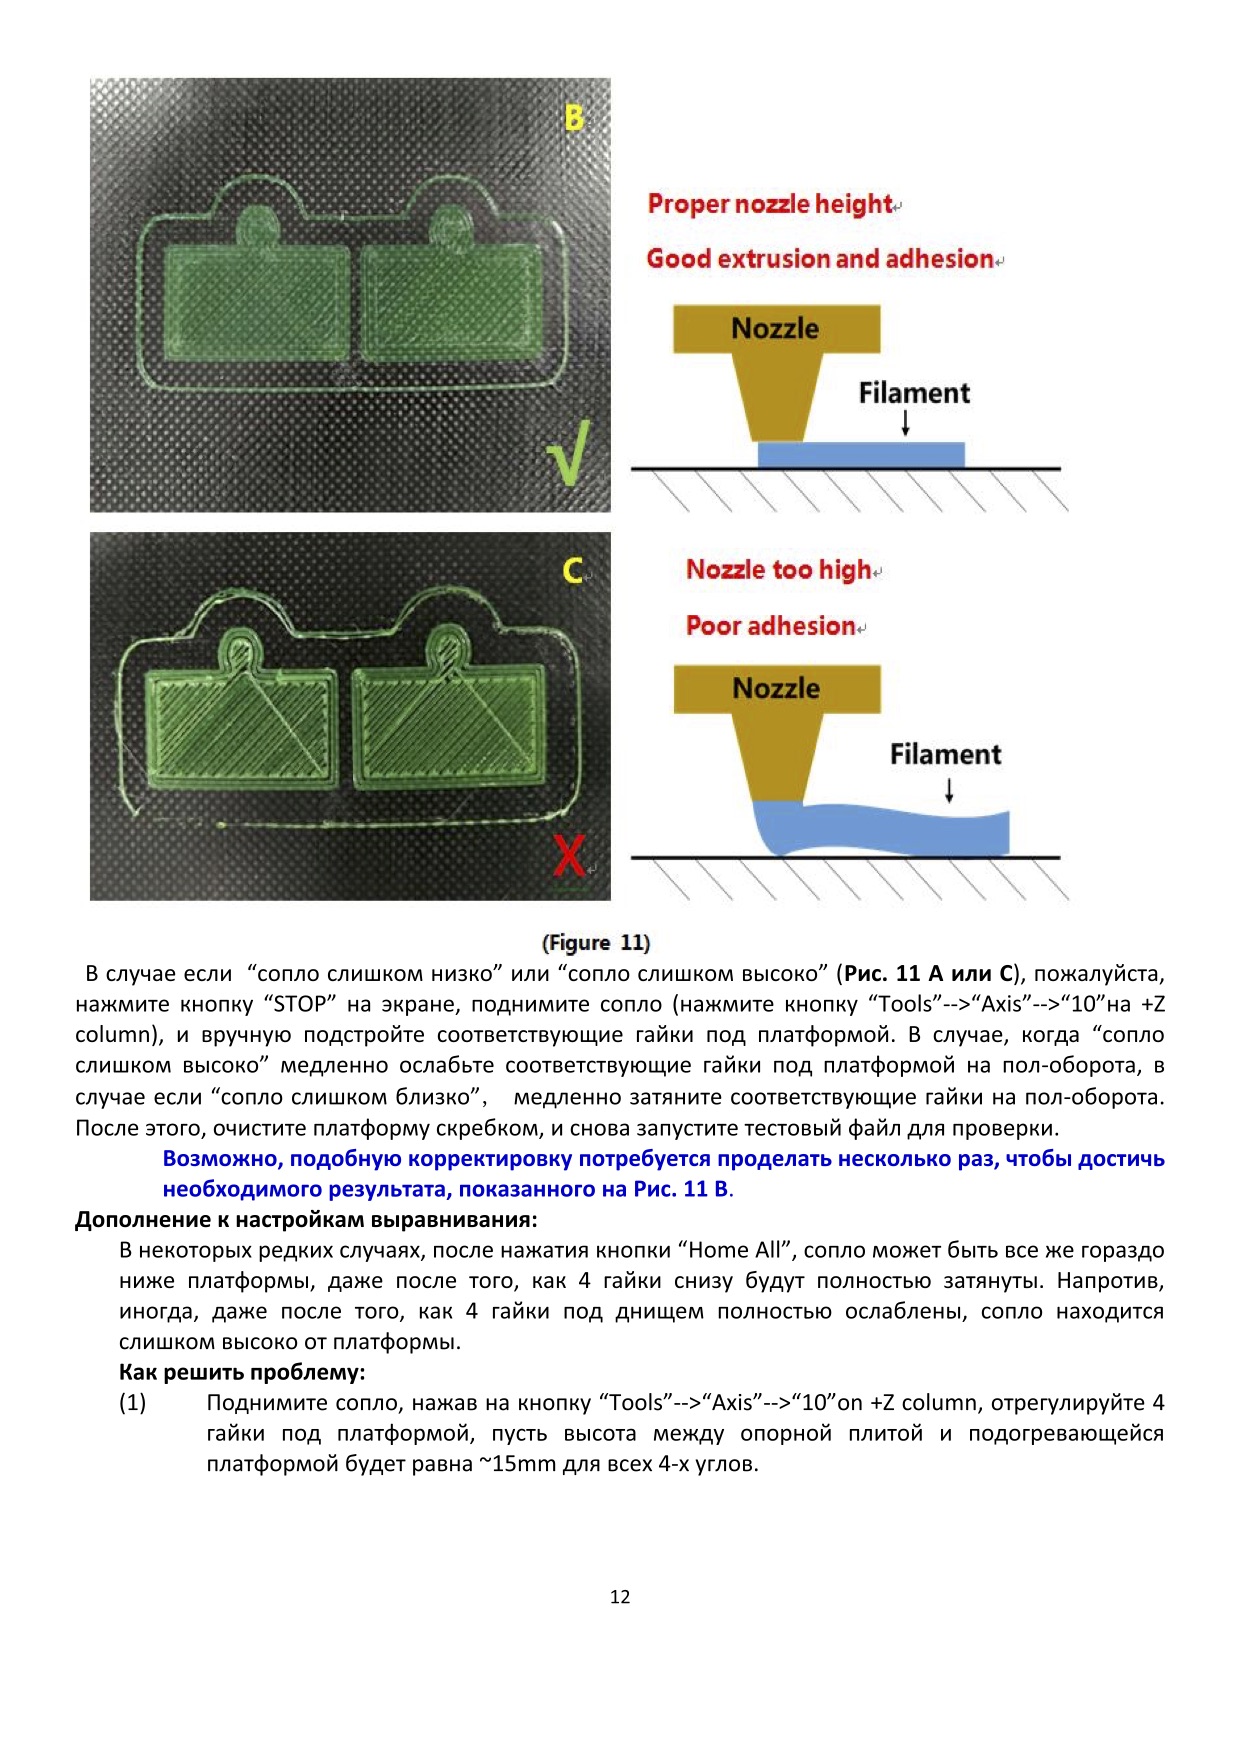
“Stop” on the screen, raise the nozzle to avoid platform burnt (click “Tools”—> “Axis”—>“10”on +Z column), and manually fine tune the nuts under the platform. Specifically, when “nozzle too high”, slowly loosen the corresponding nuts underneath by half circle, while “nozzle too close”, slowly tighten the corresponding nuts underneath by half circle.
-
Page 23
corresponding nut underneath the platform to let the nozzle and platform become closer until just feel the resistance when dragging the paper in between, (Fig. 19). Likewise, do the same to the rest of 3 corners and the center of the platform. Upon finish, you may refer to Step 8 in last section (Assisted leveling) to try to print the “owl_pair”… -
Page 24
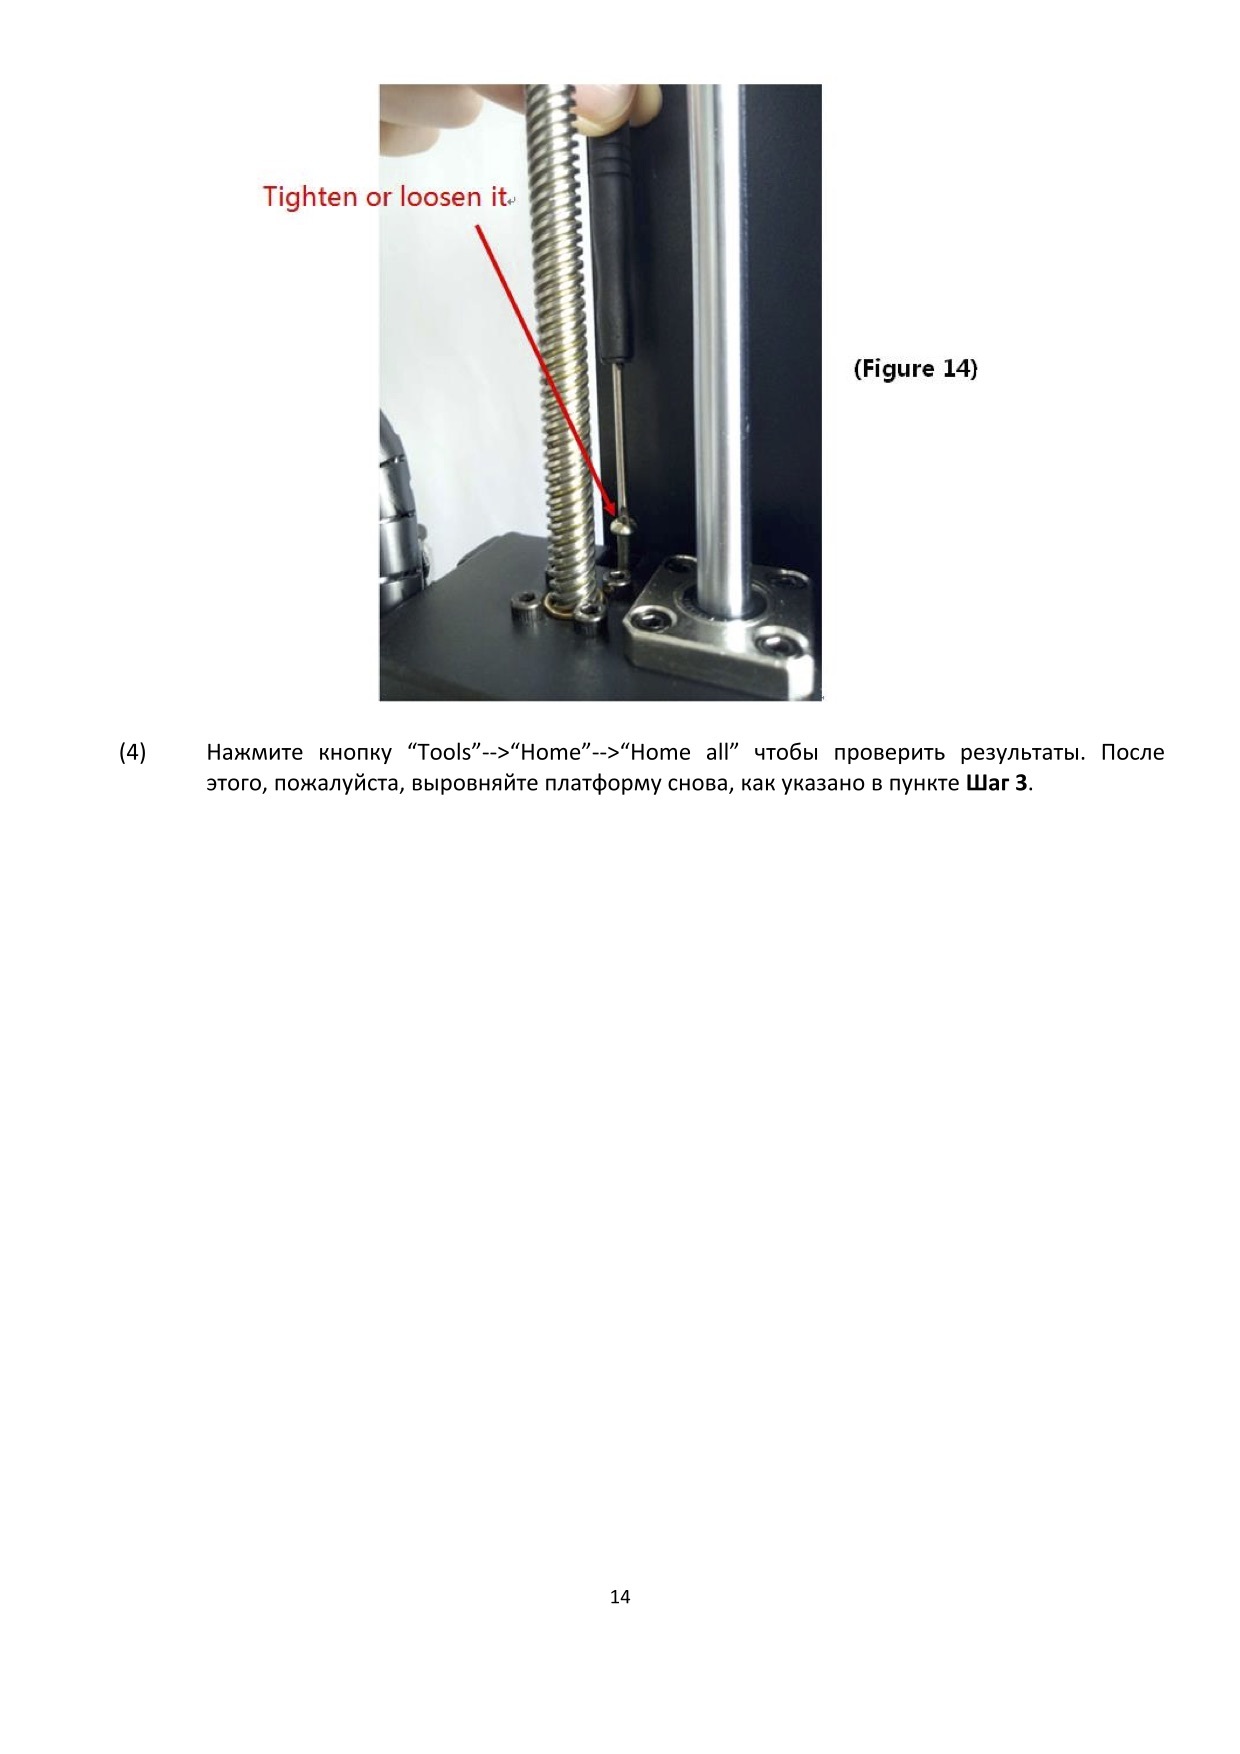
So, turn on the machine, fully tighten the 4 nuts underneath the print platform, and increase the height of print head by clicking “Tools”—> “Axis” —> “10” on +Z column. As shown in Fig. 20, at the right side of X axis, tighten the Z adjustable nut by ~2-3mm (which equals to the thickness of the glass bed). -
Page 25: Software Installation
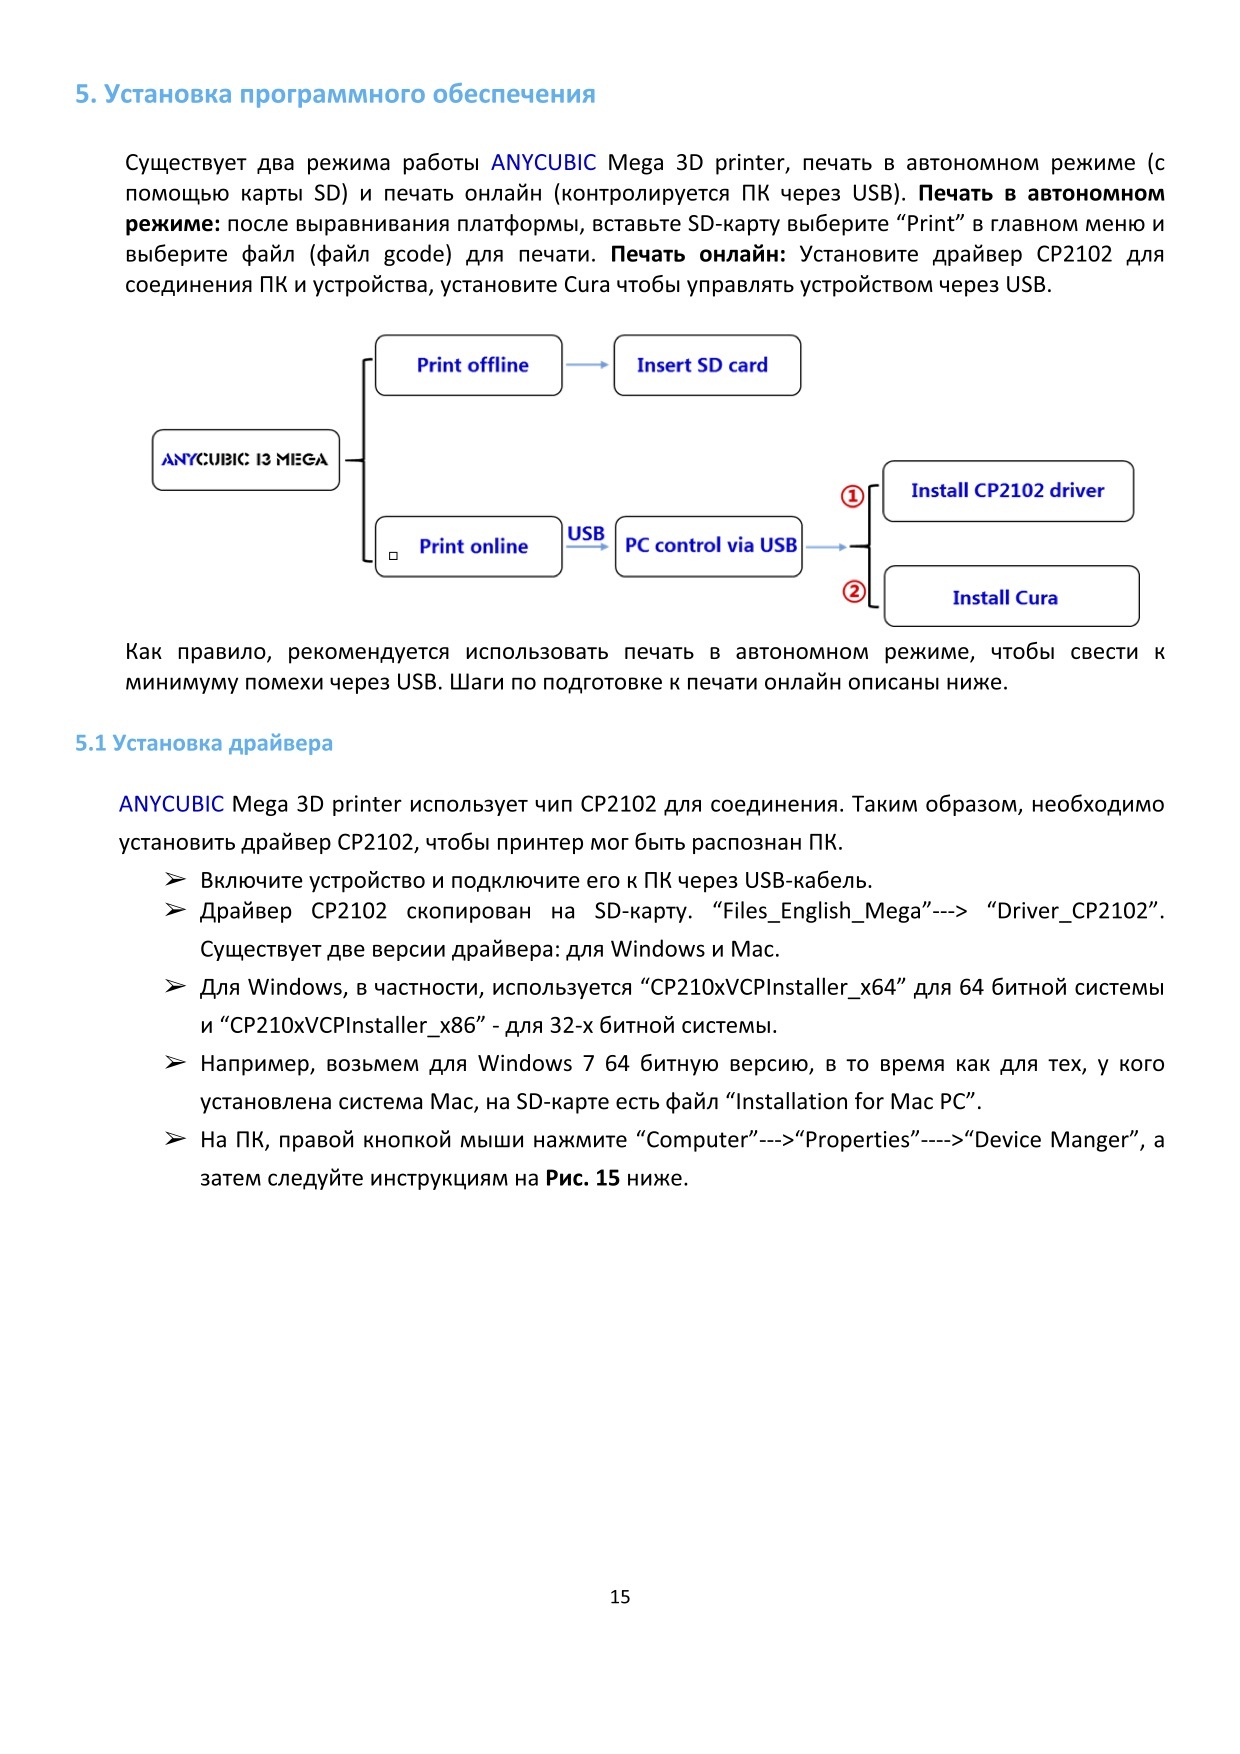
“owl pair” to check out the results. 5. Software installation There are two working mode for ANYCUBIC i3 MEGA 3D printer, print offline (SD card) and print online (controlled by PC via USB). Print offline: After leveling the platform, insert SD card, click “Print” at the Home menu and select a file (gcode file) to print.
-
Page 26
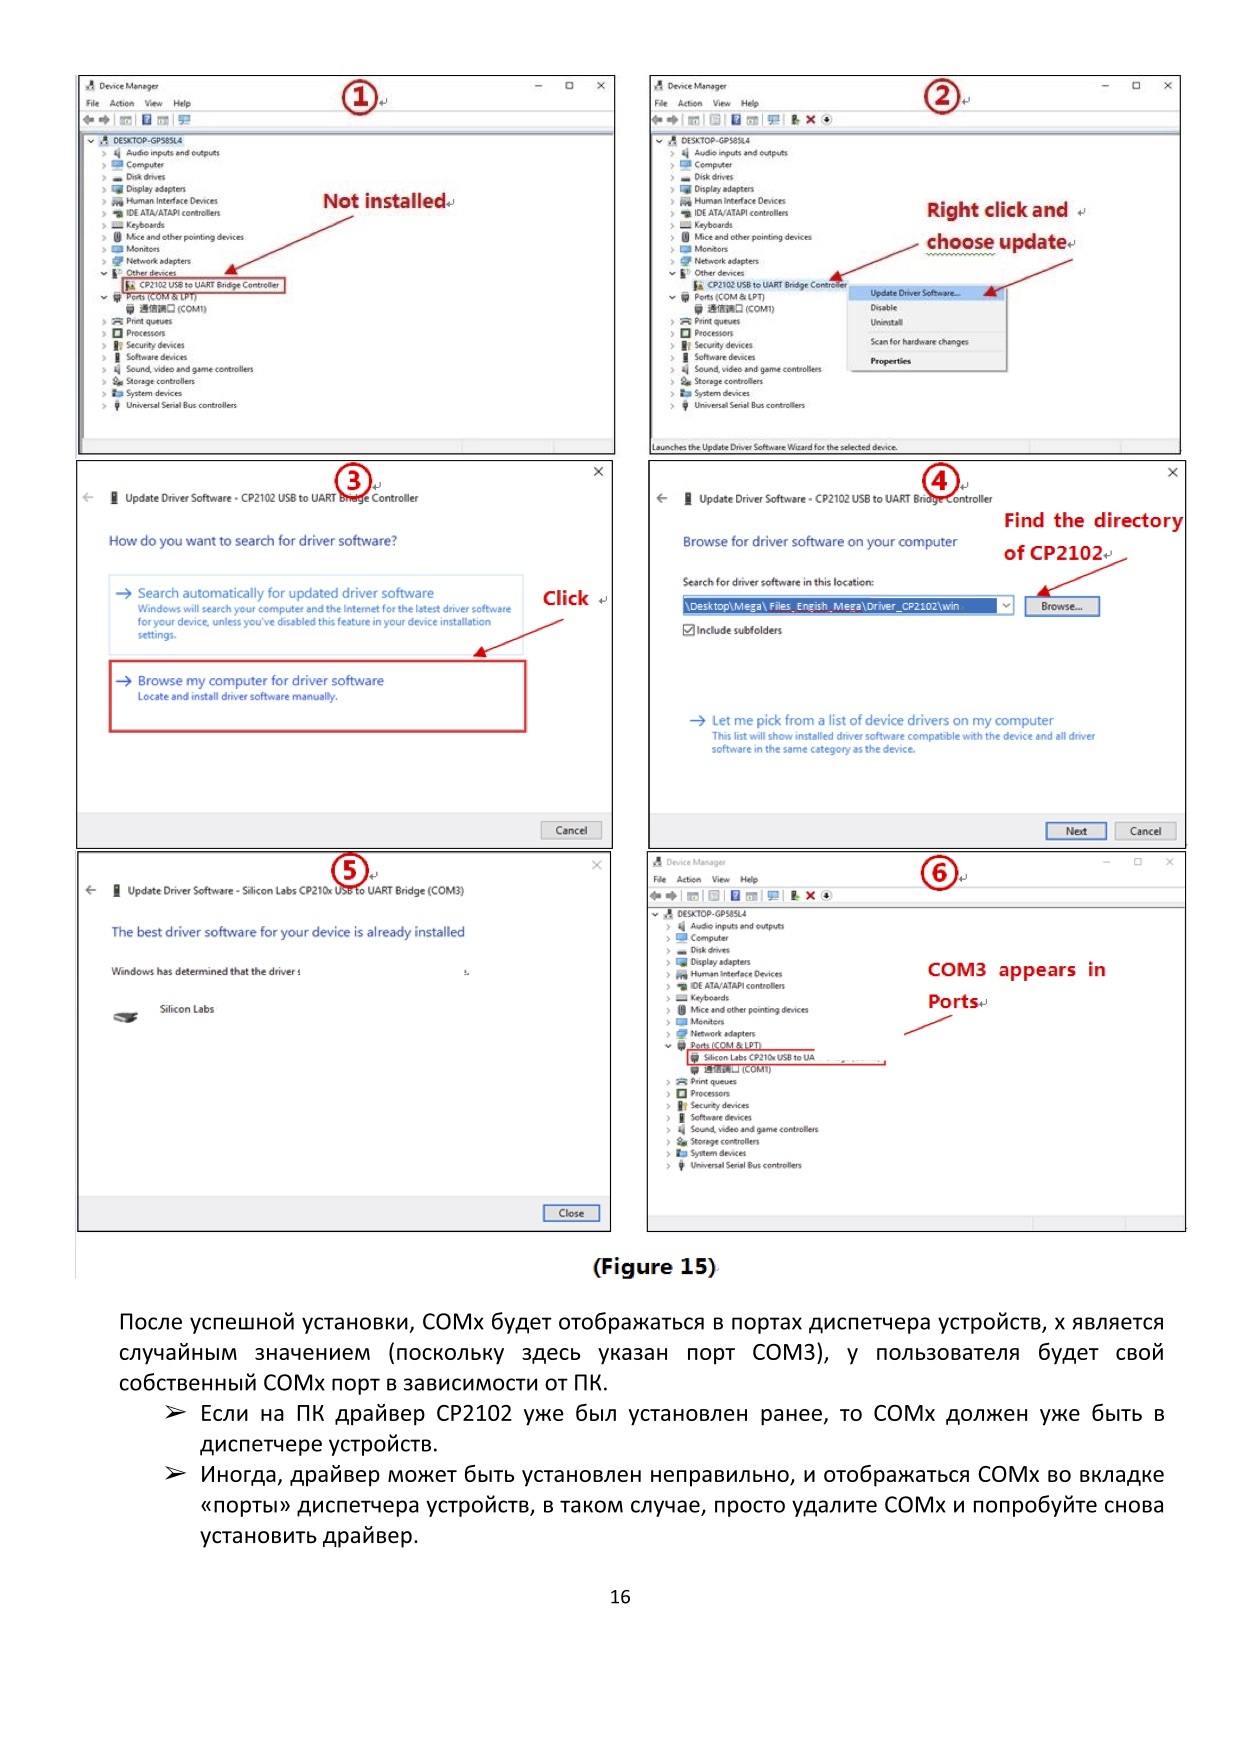
Detailed procedures: right click on “Computer”—> “ Properties ” —->“Device Manger”, and then follow the images in Fig. 21. Not installed Right click and choose update Find the folder of CP2102 in SD Card Click DesktopMega Files_Engish_MegaDriver_CP2102win COM3 appears in Ports (Figure 21) After successfully installation, the COMx will appear in the Ports of Device Manager. -
Page 27: Cura Installation
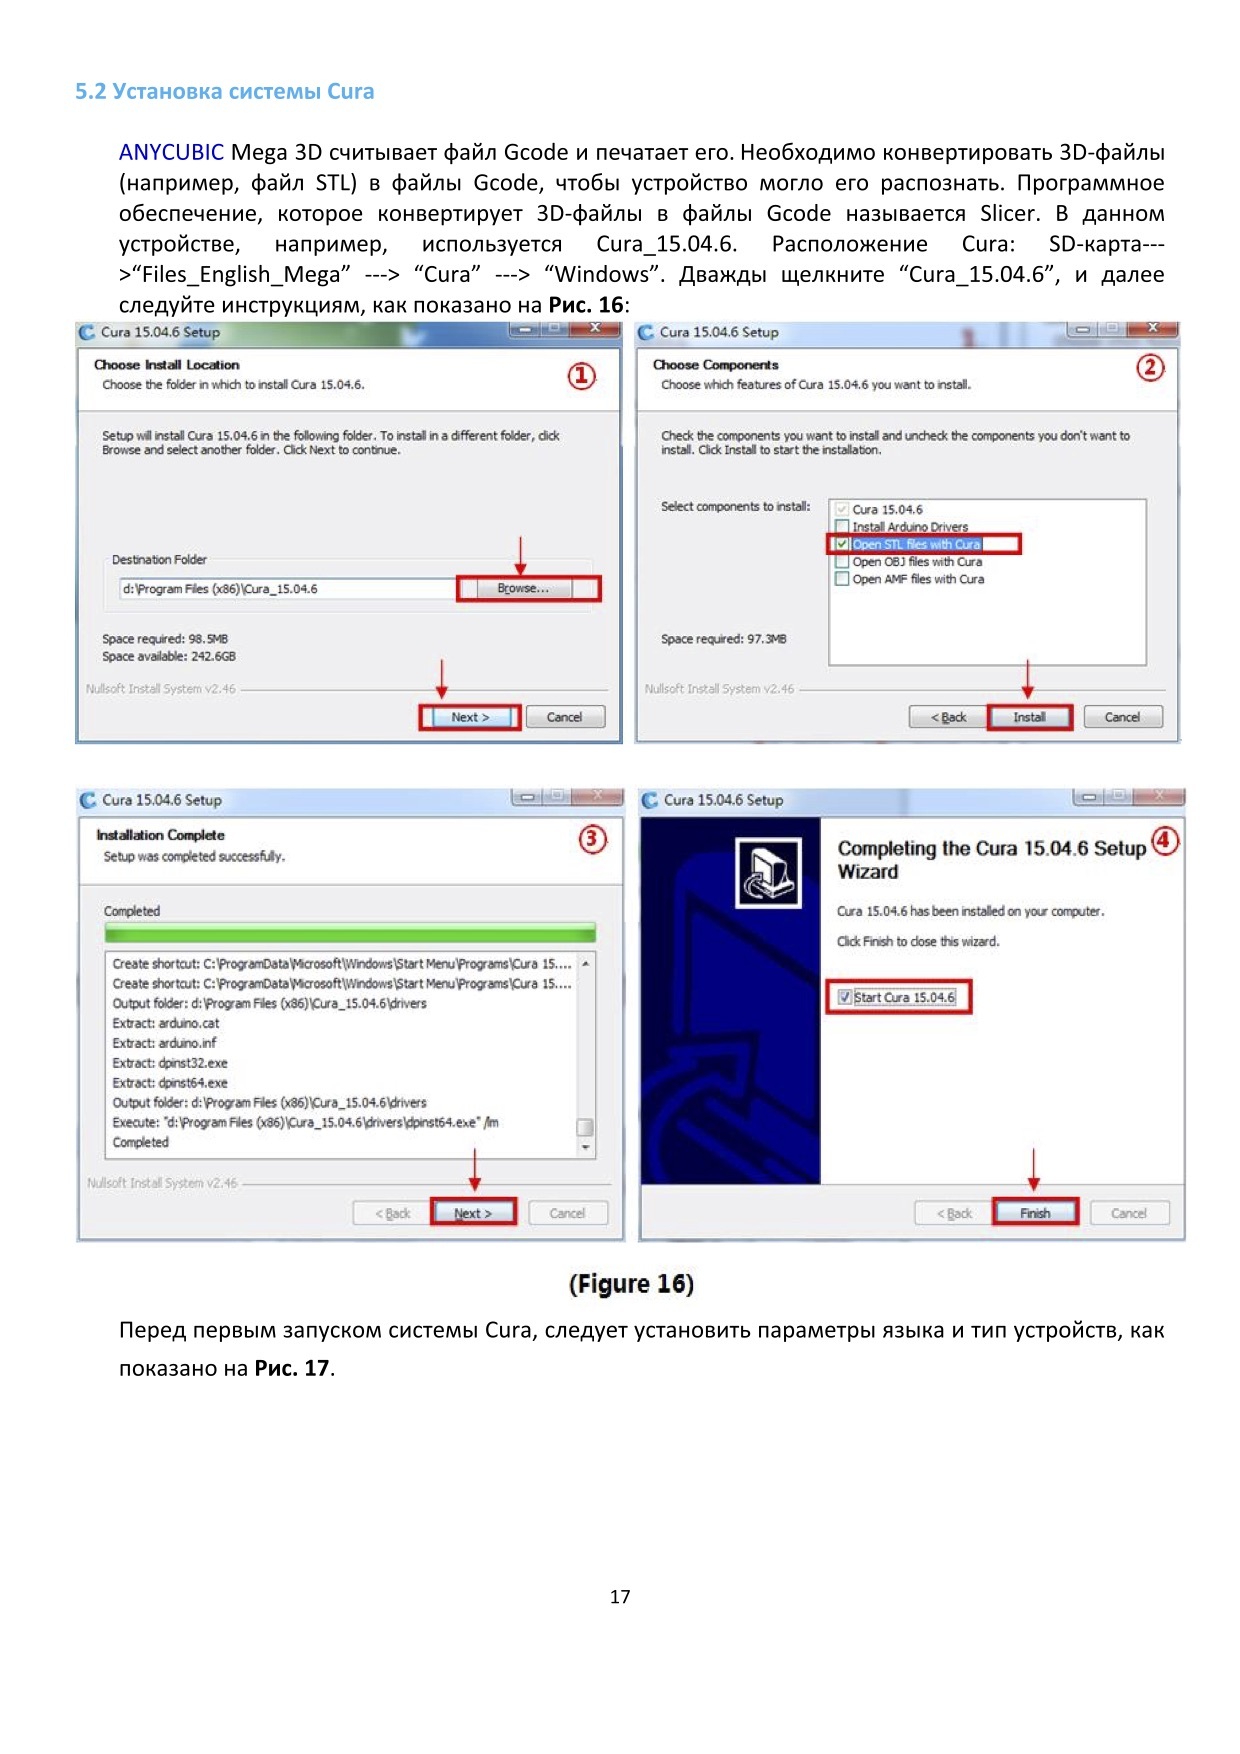
COMx in Ports, please just uninstall the COMx and try to install the driver again. 5.2 Cura Installation ANYCUBIC i3 MEGA 3D printer reads Gcode file and prints out object layer by layer. Normally we have to change 3D file (such as stl file) into Gcode file for 3D printer to read.
-
Page 28
(Figure 22) Next, there are few more settings regarding the machine type, show in Fig. 23. -
Page 29
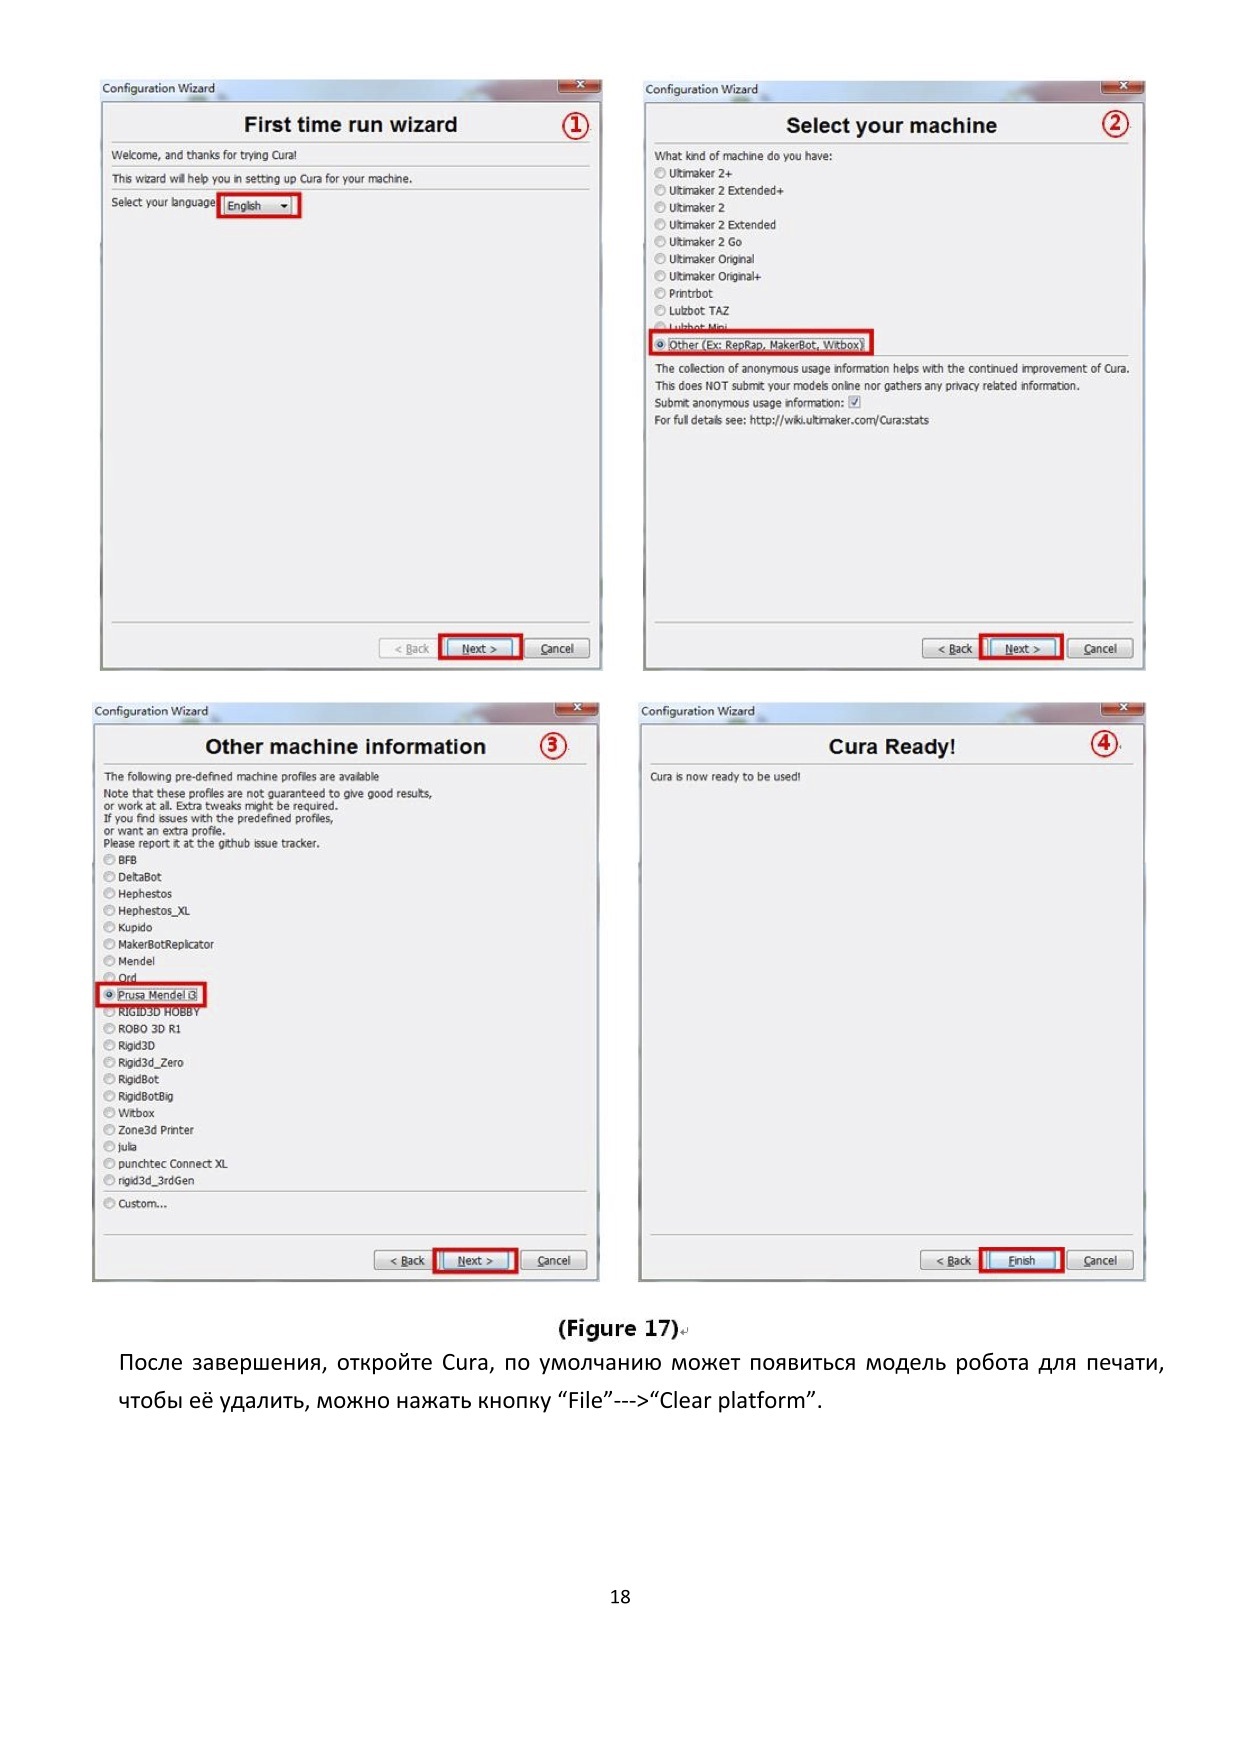
(Figure 23) Upon finish, and run Cura for the first time, there will be a default model, customers may click “File”—>“Clear platform” to delete it. 5.2.1 Load 3D model into Cura (1) Clear the platform by clicking “File”—>“Clear platform” (2) Load 3D files onto the platform by “File” —> “Load model file…” . Files with extension such as “STL”, “OBJ”, “DAE”… -
Page 30
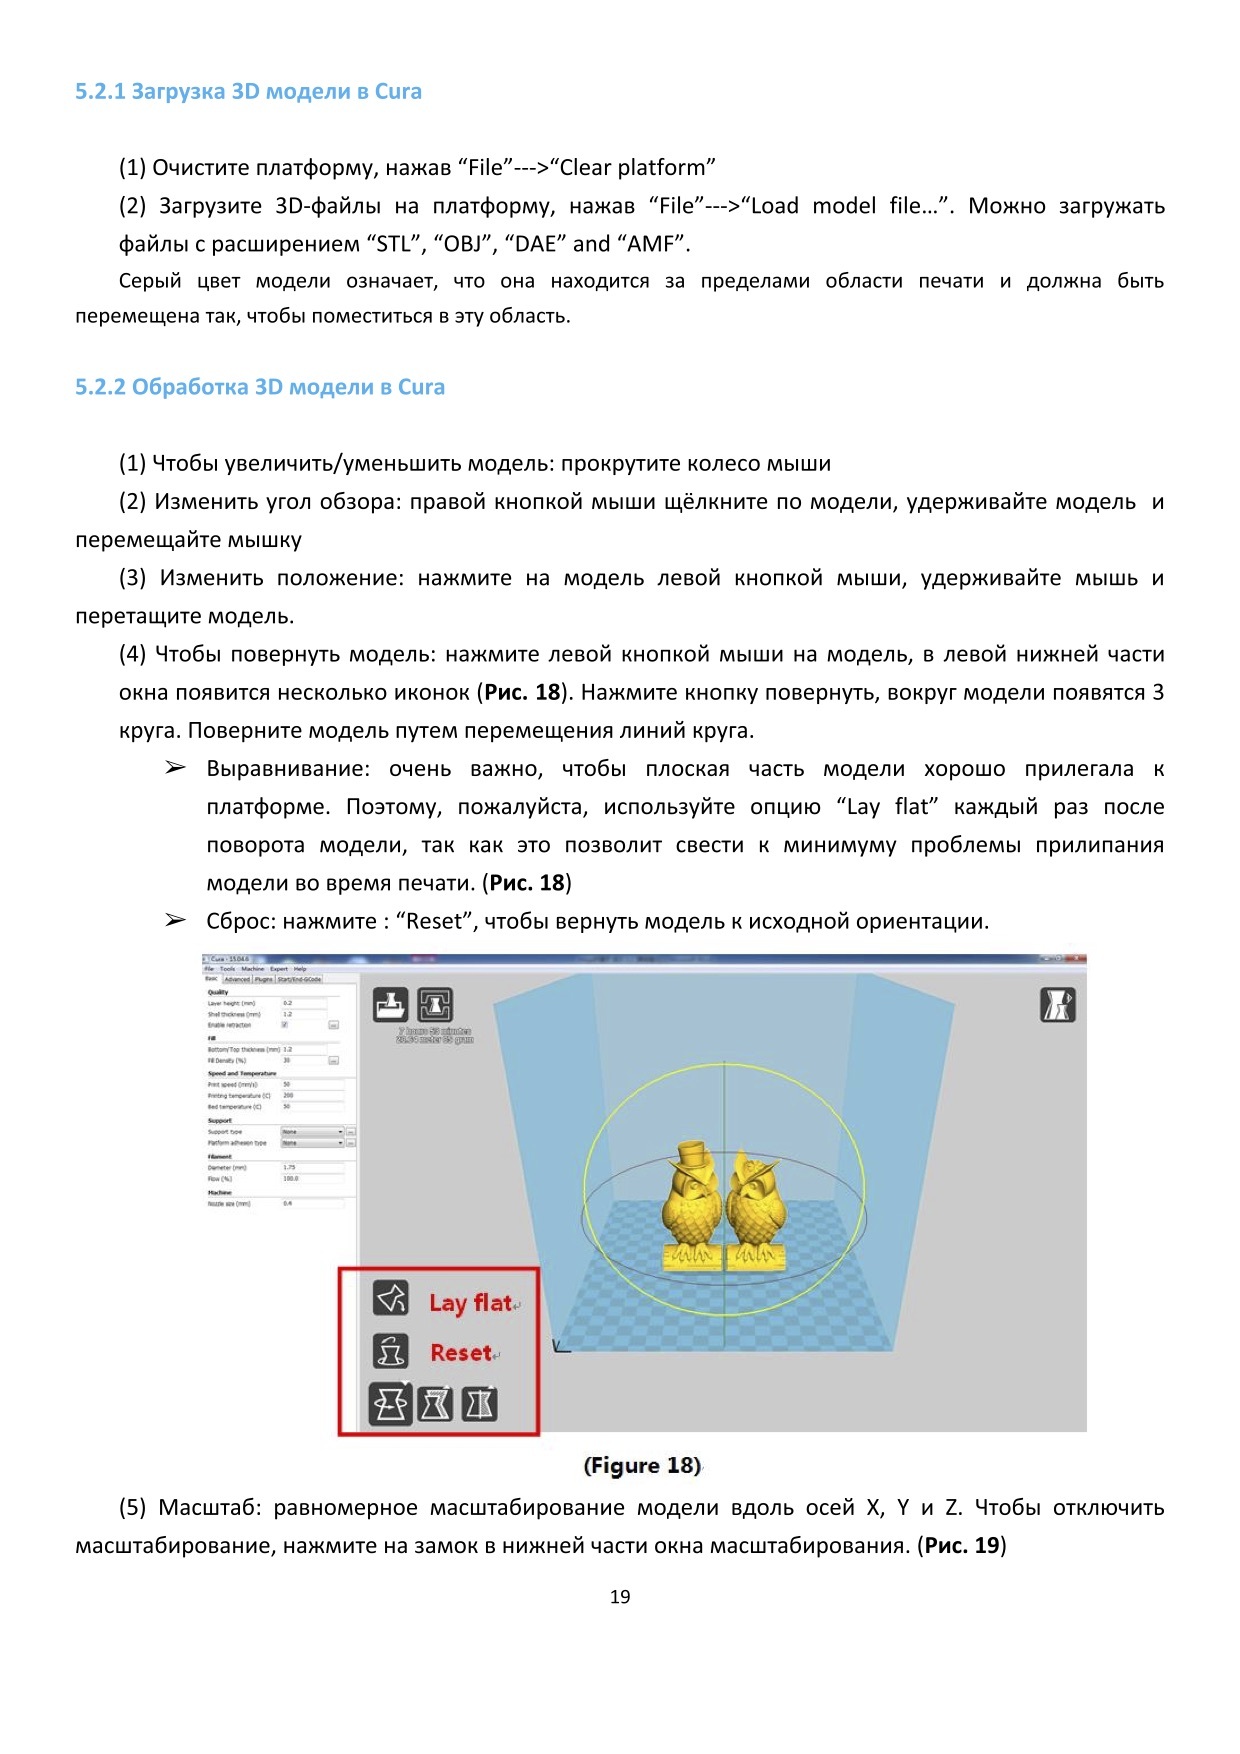
(4.1) Lay flat: it is very impartant to ensure the flat portion of the model is well attached to the platform. So, please use Lay Flat option everytime after rotating the model, as it will minimize the adhesion issues during printing. (Fig. 24) (4.2) Reset: click it to return the model to the original orientation. -
Page 31
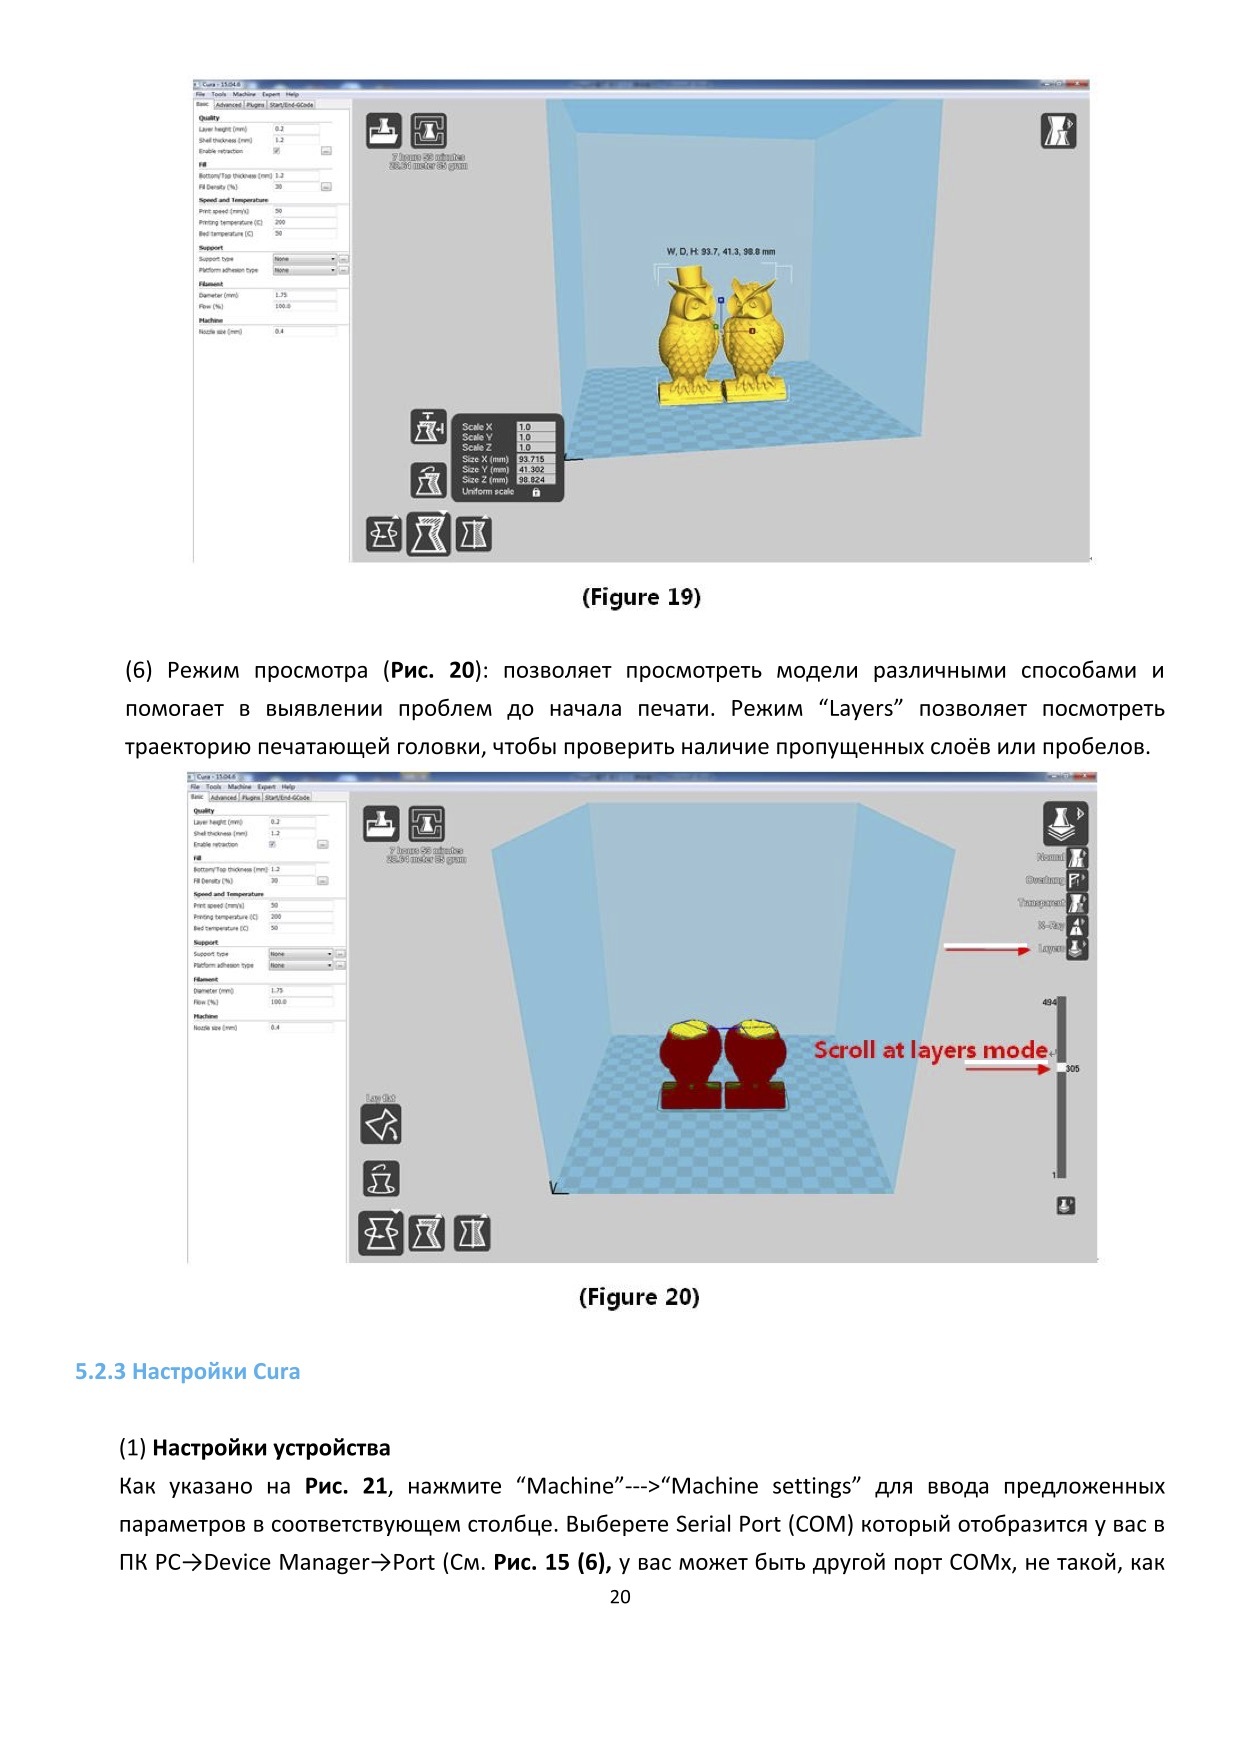
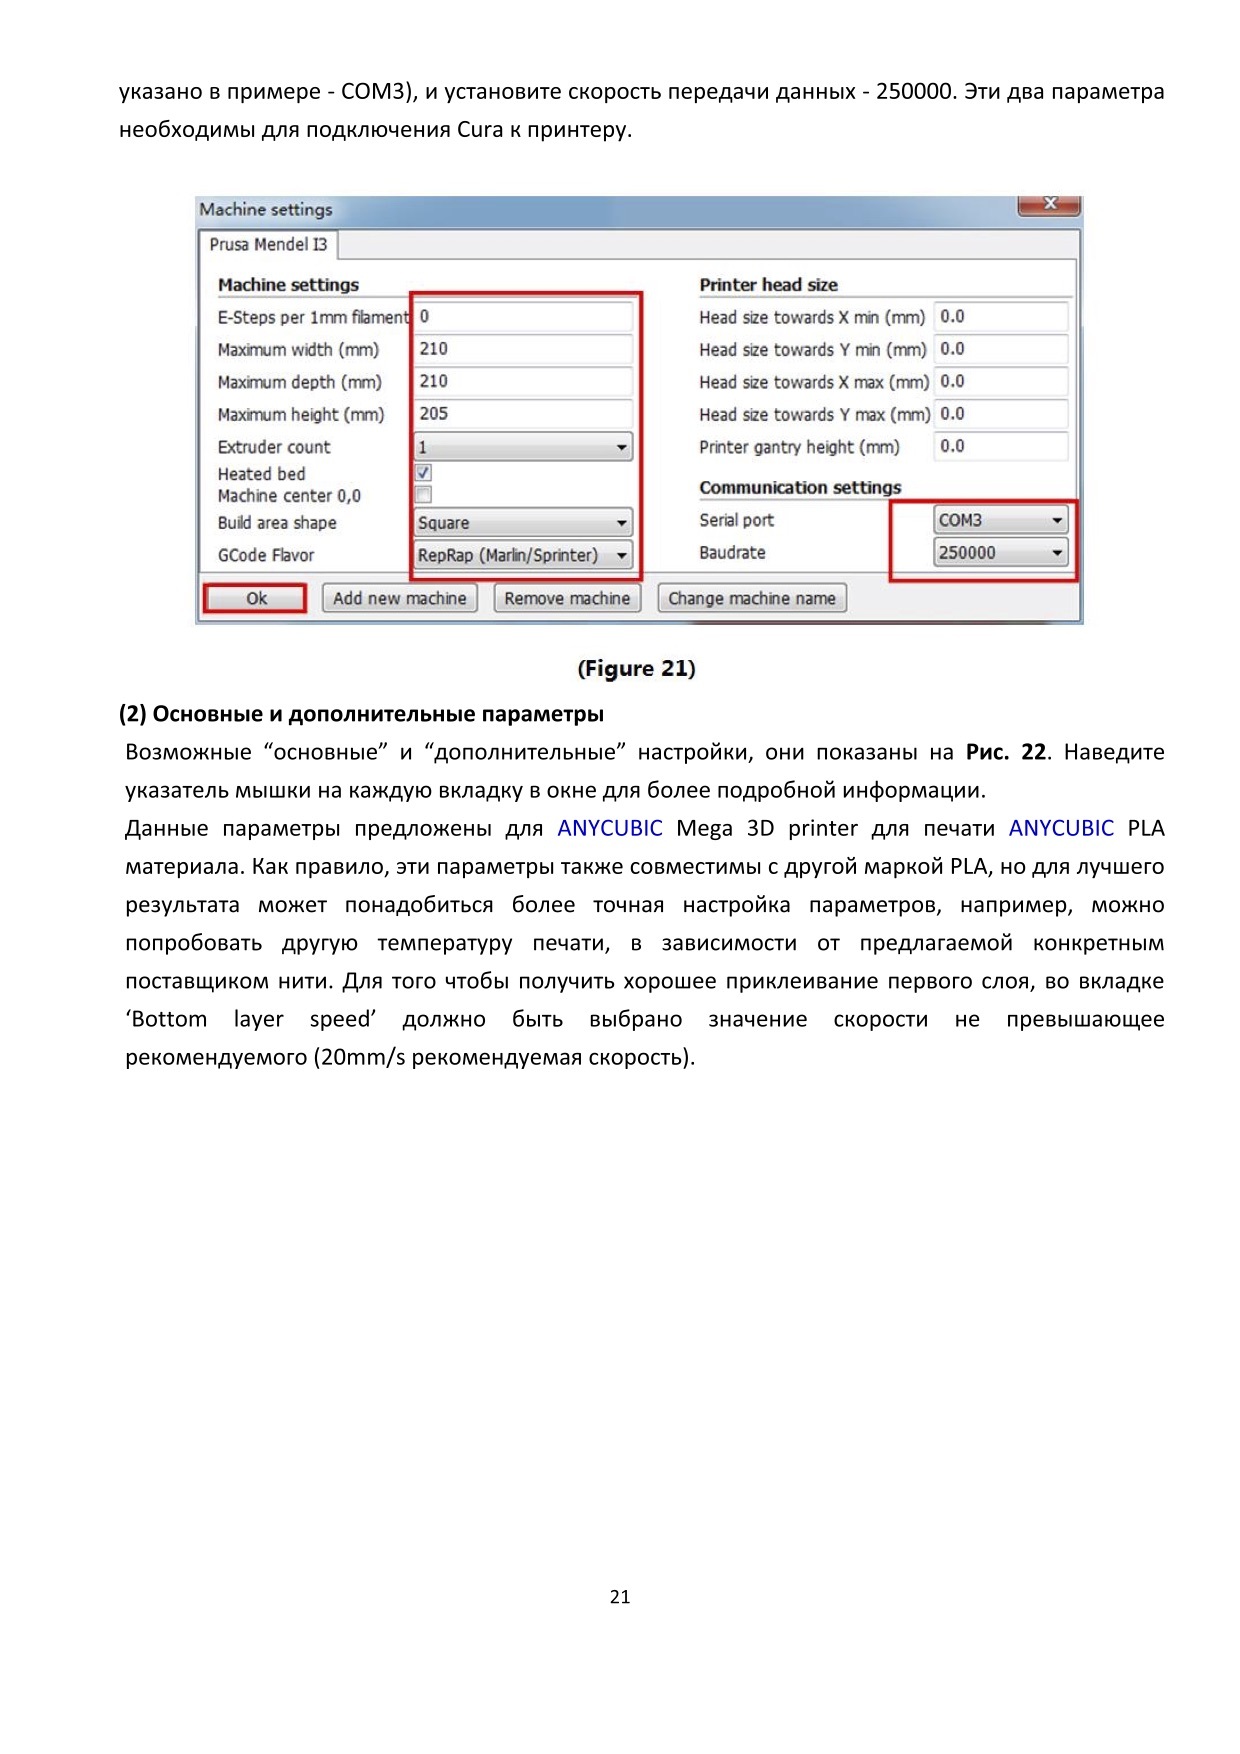
before print starts. Such as the Layers mode: to view the toolpath of the print head to check if there are skipped layers or gaps. Scroll at layers mode (Figure 26) 5.2.3 Cura settings (1) Machine settings Refer to Fig. 27, click “Machine”—>“Machine settings” to input those suggested parameters into the corresponding column. -
Page 32
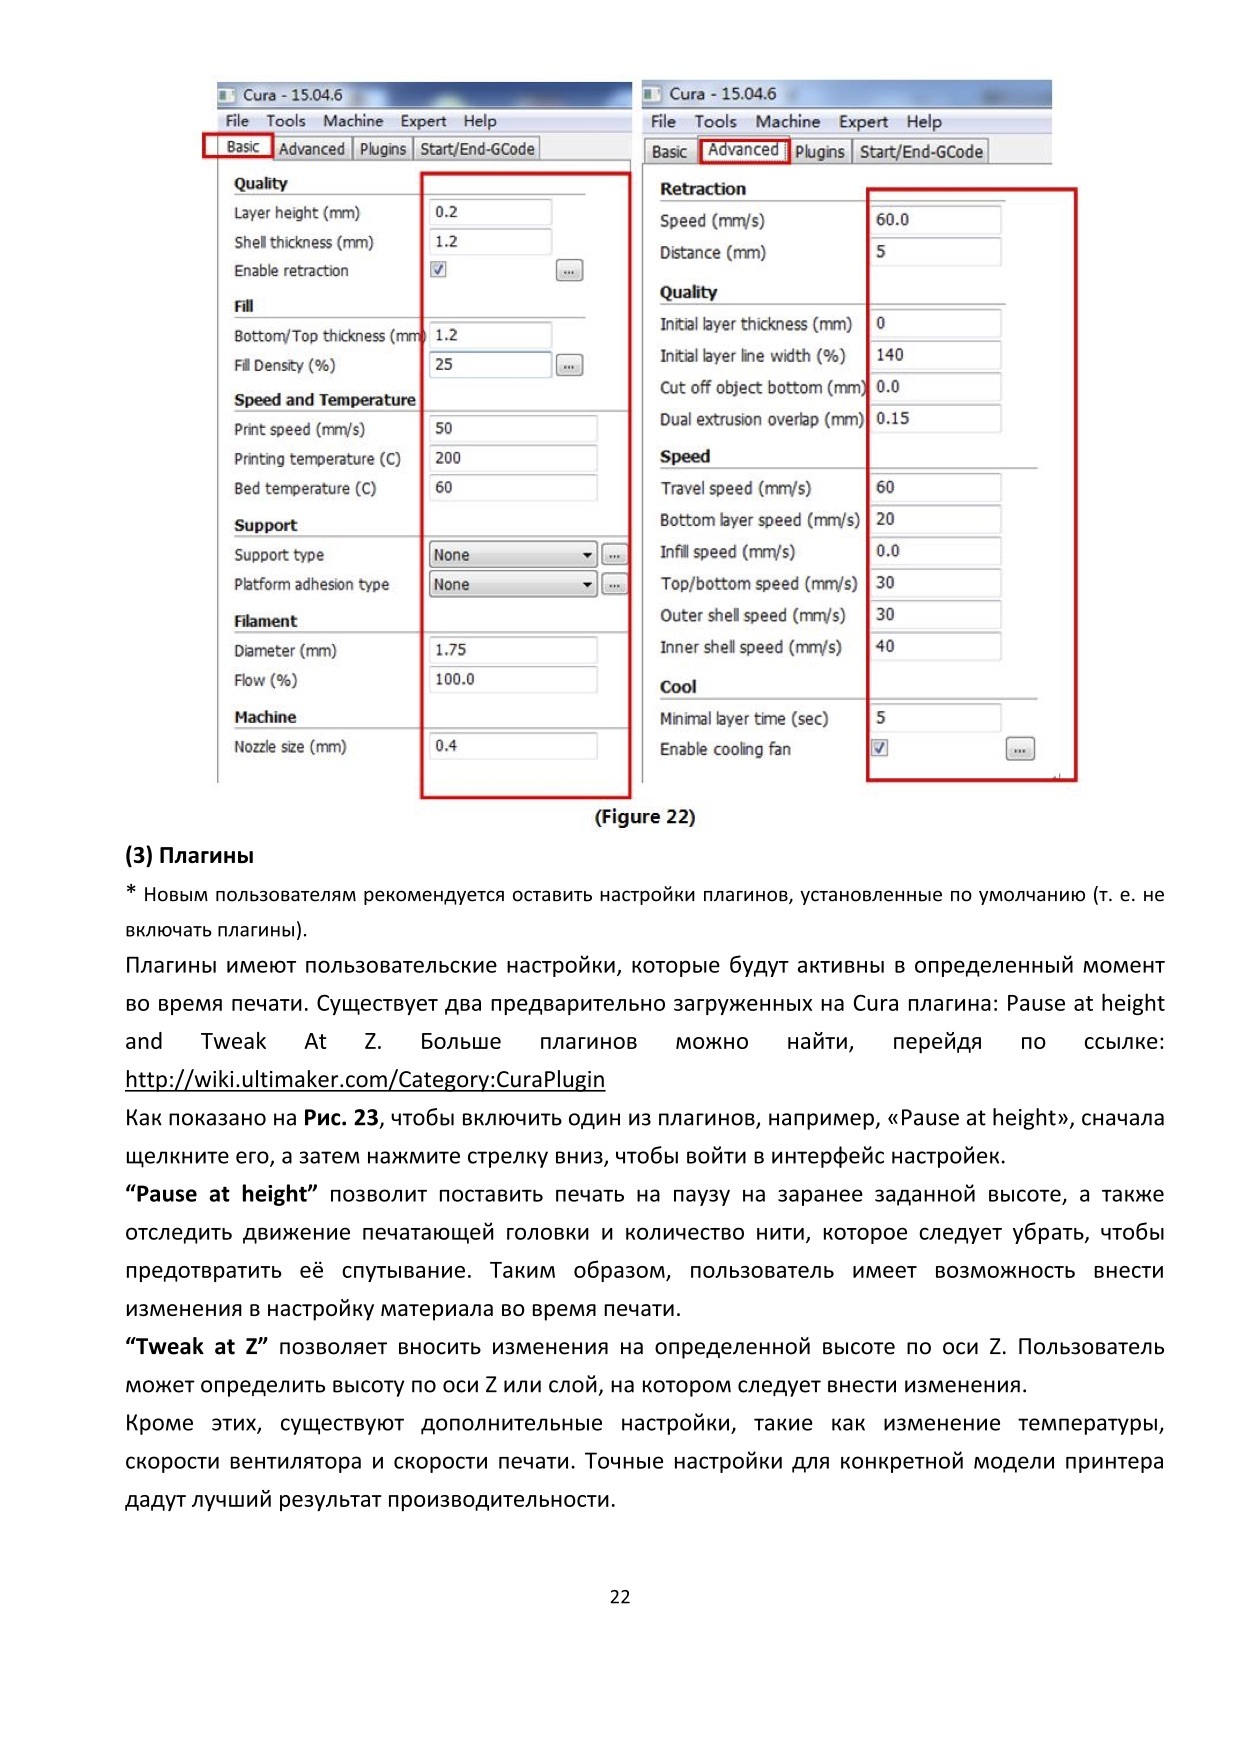
(2) Basic and Advanced options Suggested parameters of “Basic” and “Advanced” for printing PLA are shown in Fig. 28. Stay the mouse upon each box and there will be explanation for it. (Figure 28) (3) Plugins It is recommended for new user to leave the plugins as default (no plugin enabled). Plugins are custom settings which will active at specific point during printing. -
Page 33
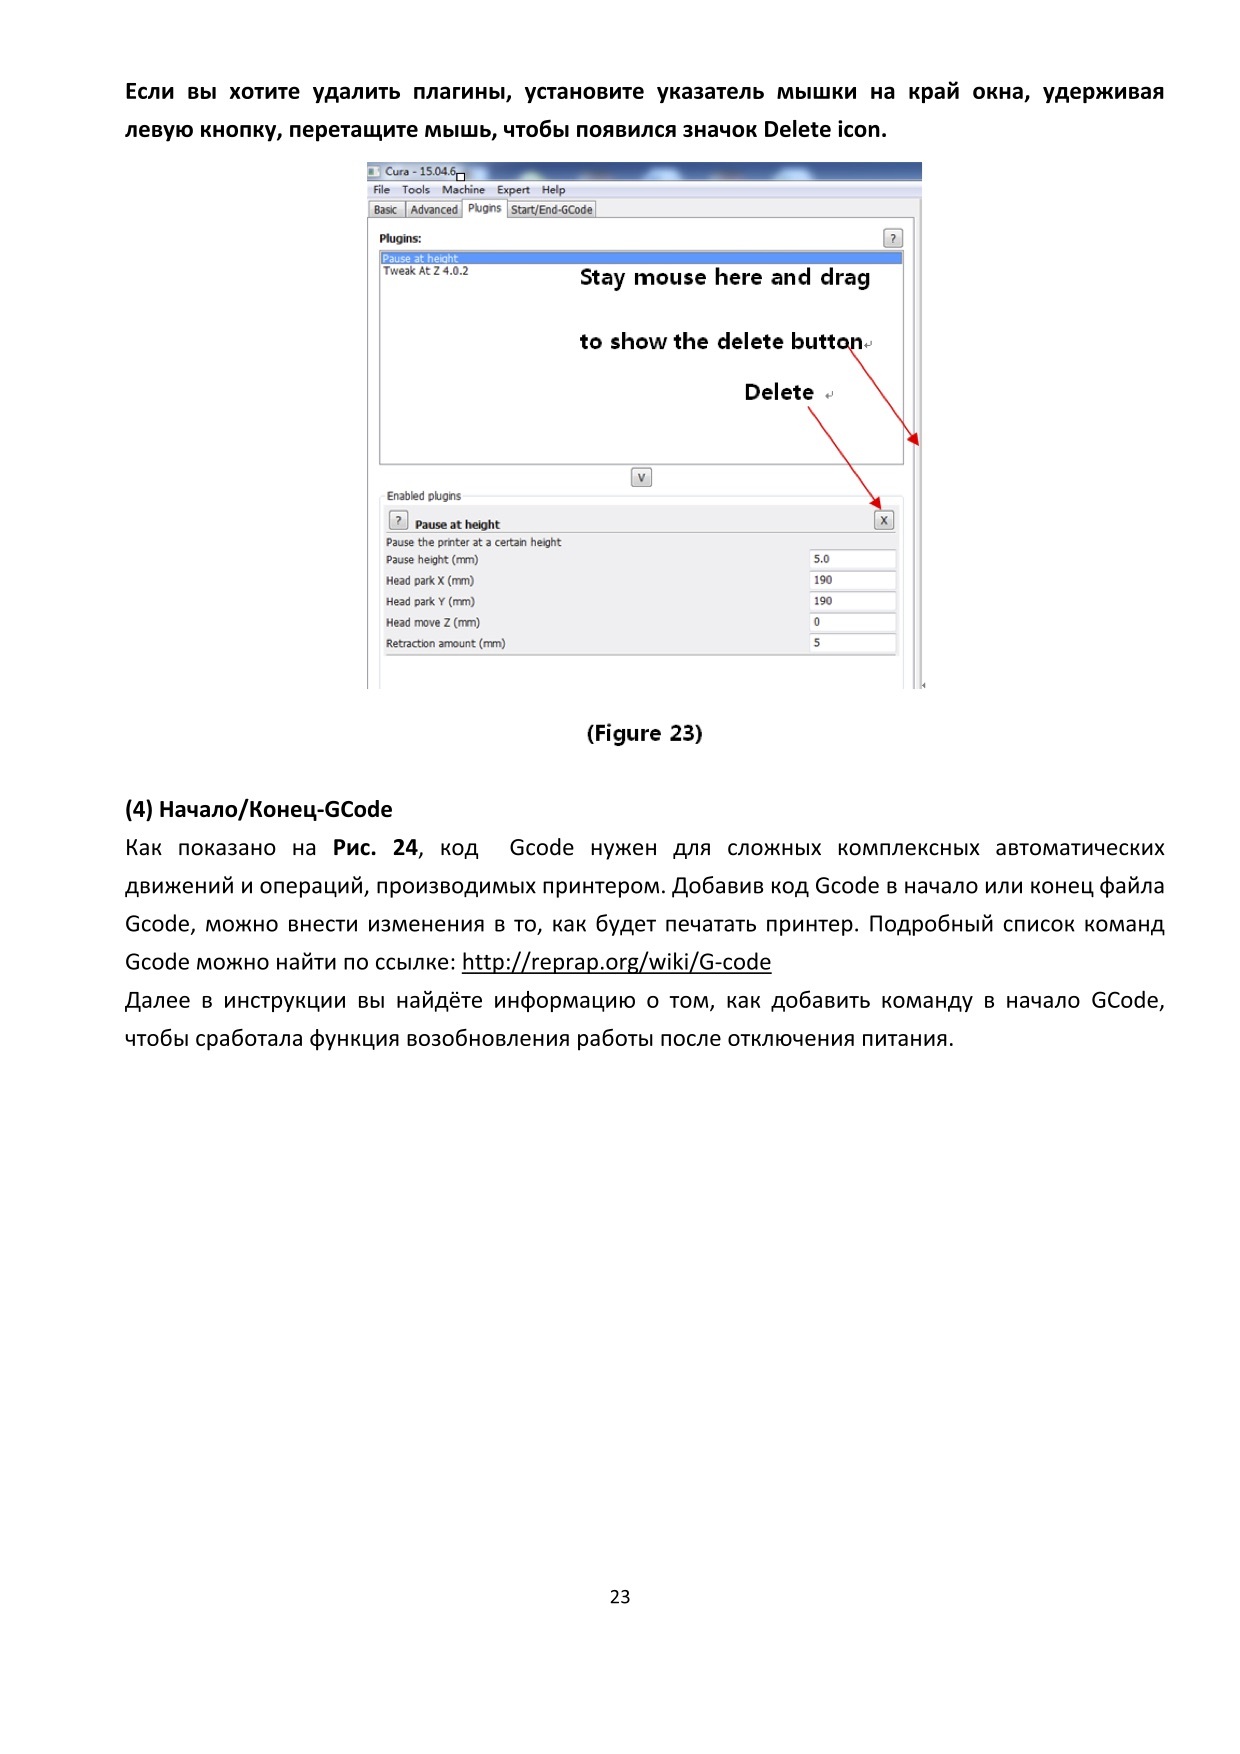
“Pause at height” will allow the printing to pause at a specified height, as well as where the print head would move to and how much filament to retract to prevent extruded filament blobs. So, customers could do filament change during printing. “Tweak at Z”… -
Page 34
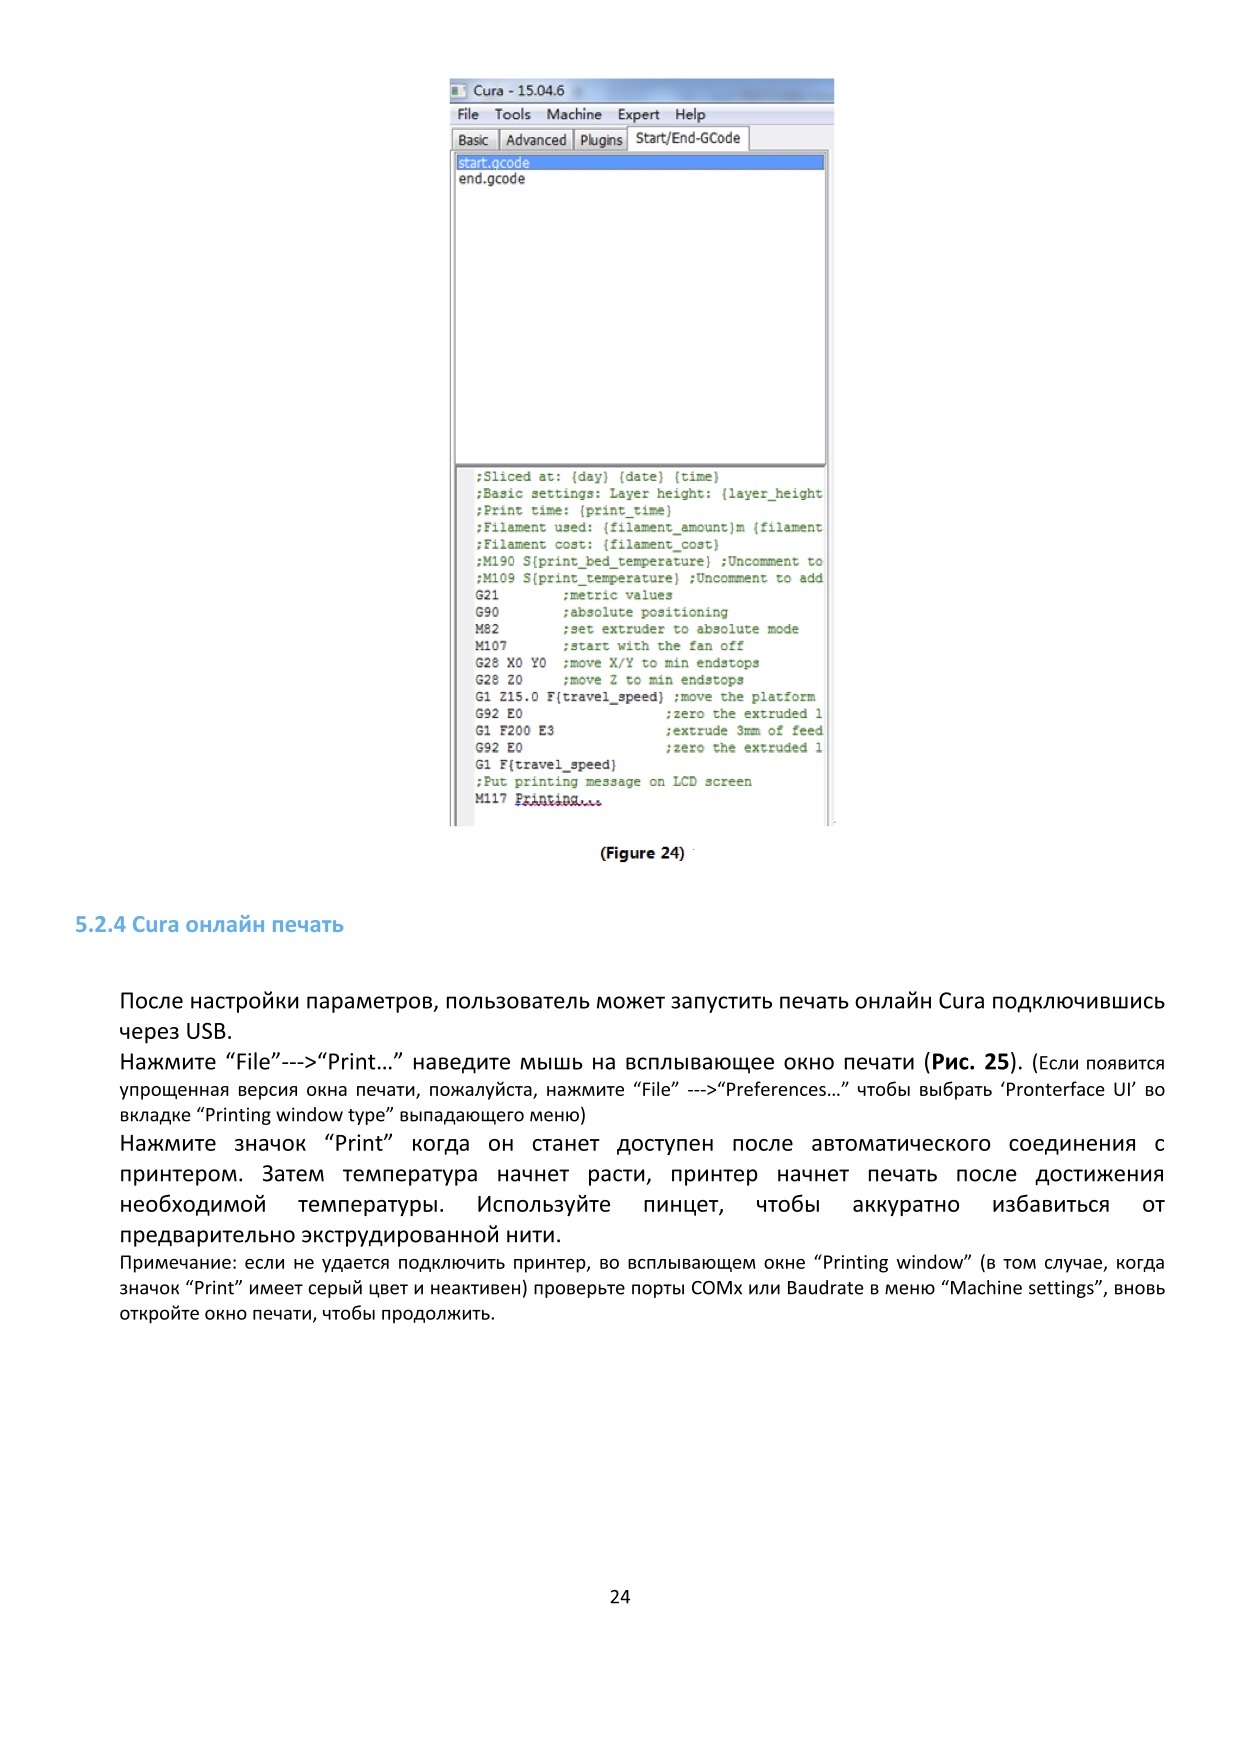
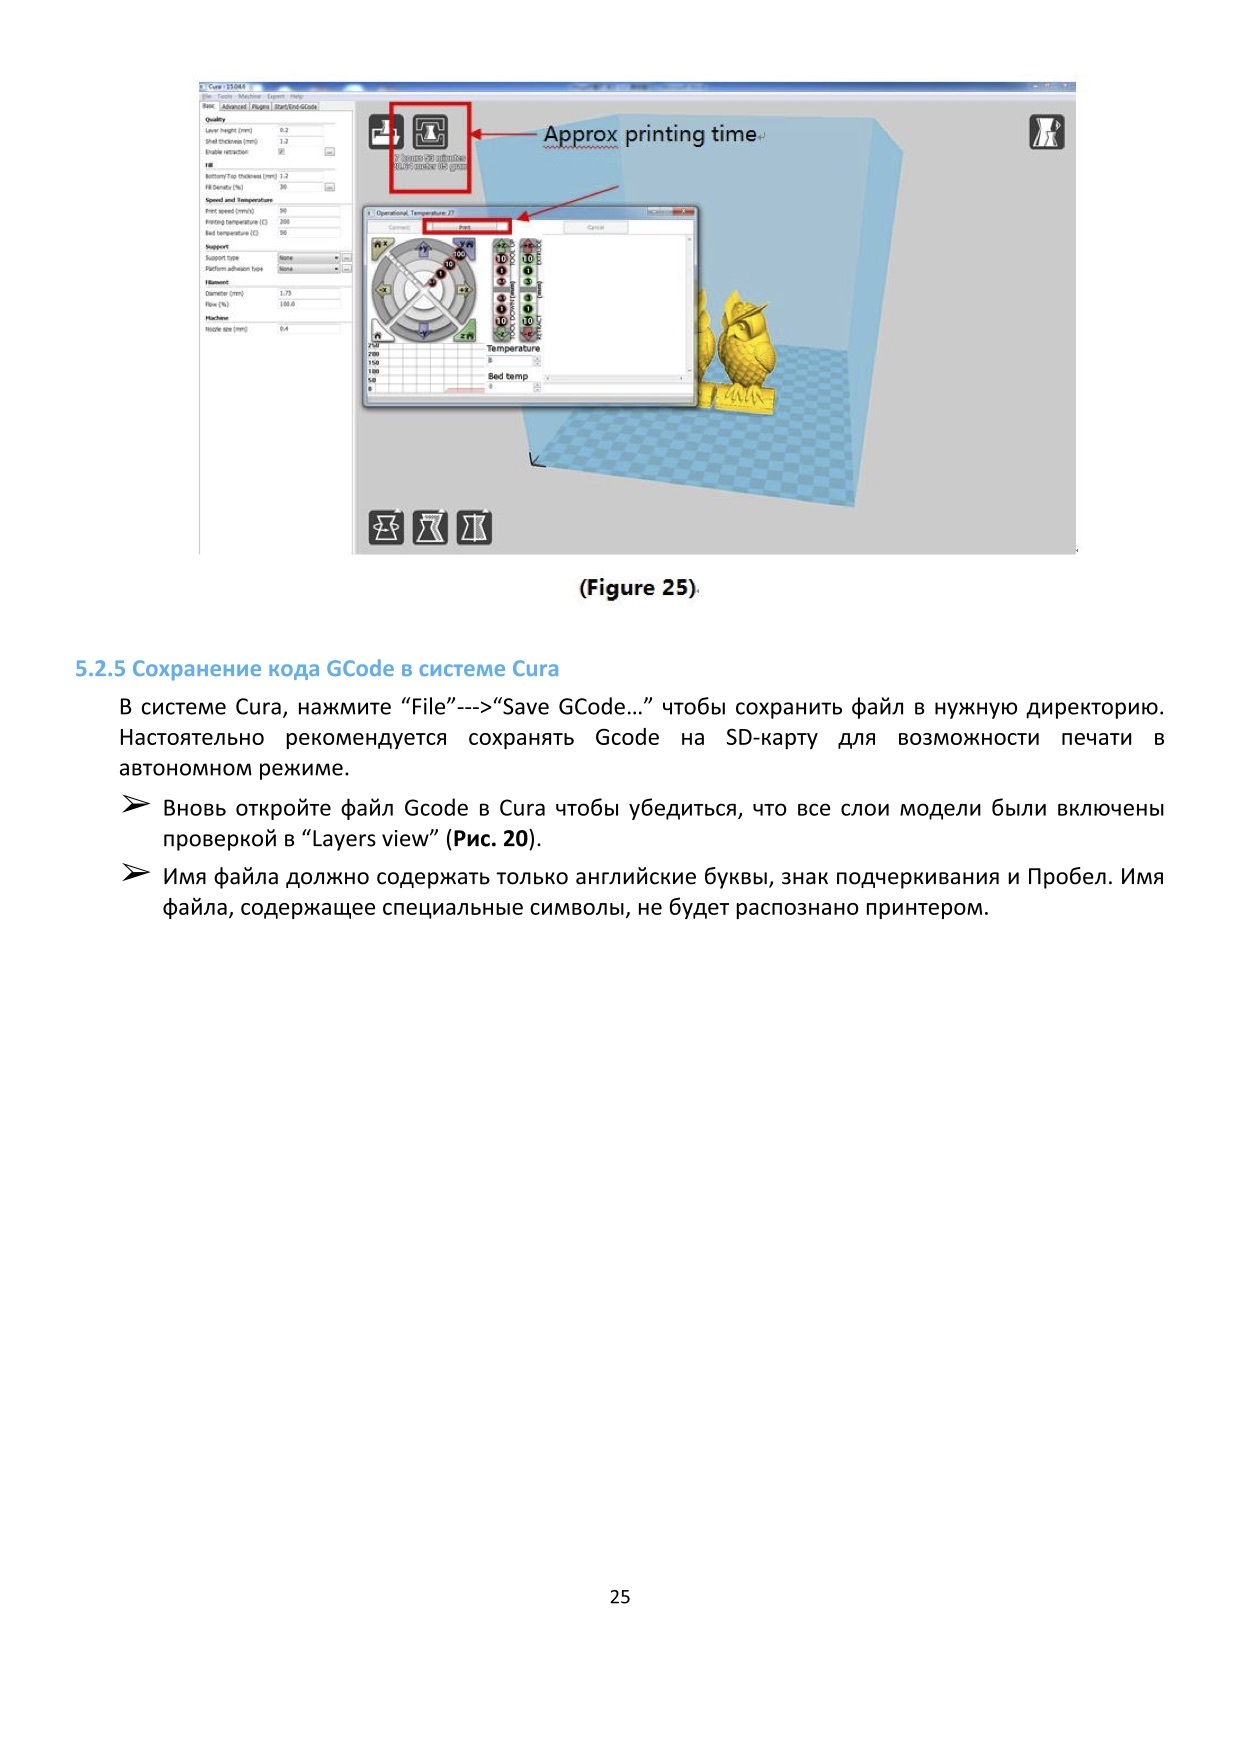
to start.gcode. (Figure 30) 5.2.4 Printing by Cura After parameter settings, customer can print online by Cura. Click “File”—>“Print…” enter the printing window. If you have a simplified printing window which is different from that in Fig. 31, please click “File”—>“Preferences…” to choose the ‘Pronterface UI’… -
Page 35: Printing
temperature would rise and it will start to print when reaching to the target temperature. Use tweezer to carefully get rid of the pre-extruded filament. Check with the COMx or baudrate in “Machine settings” if Cura fails to connect the printer in the “Printing window”.
-
Page 36
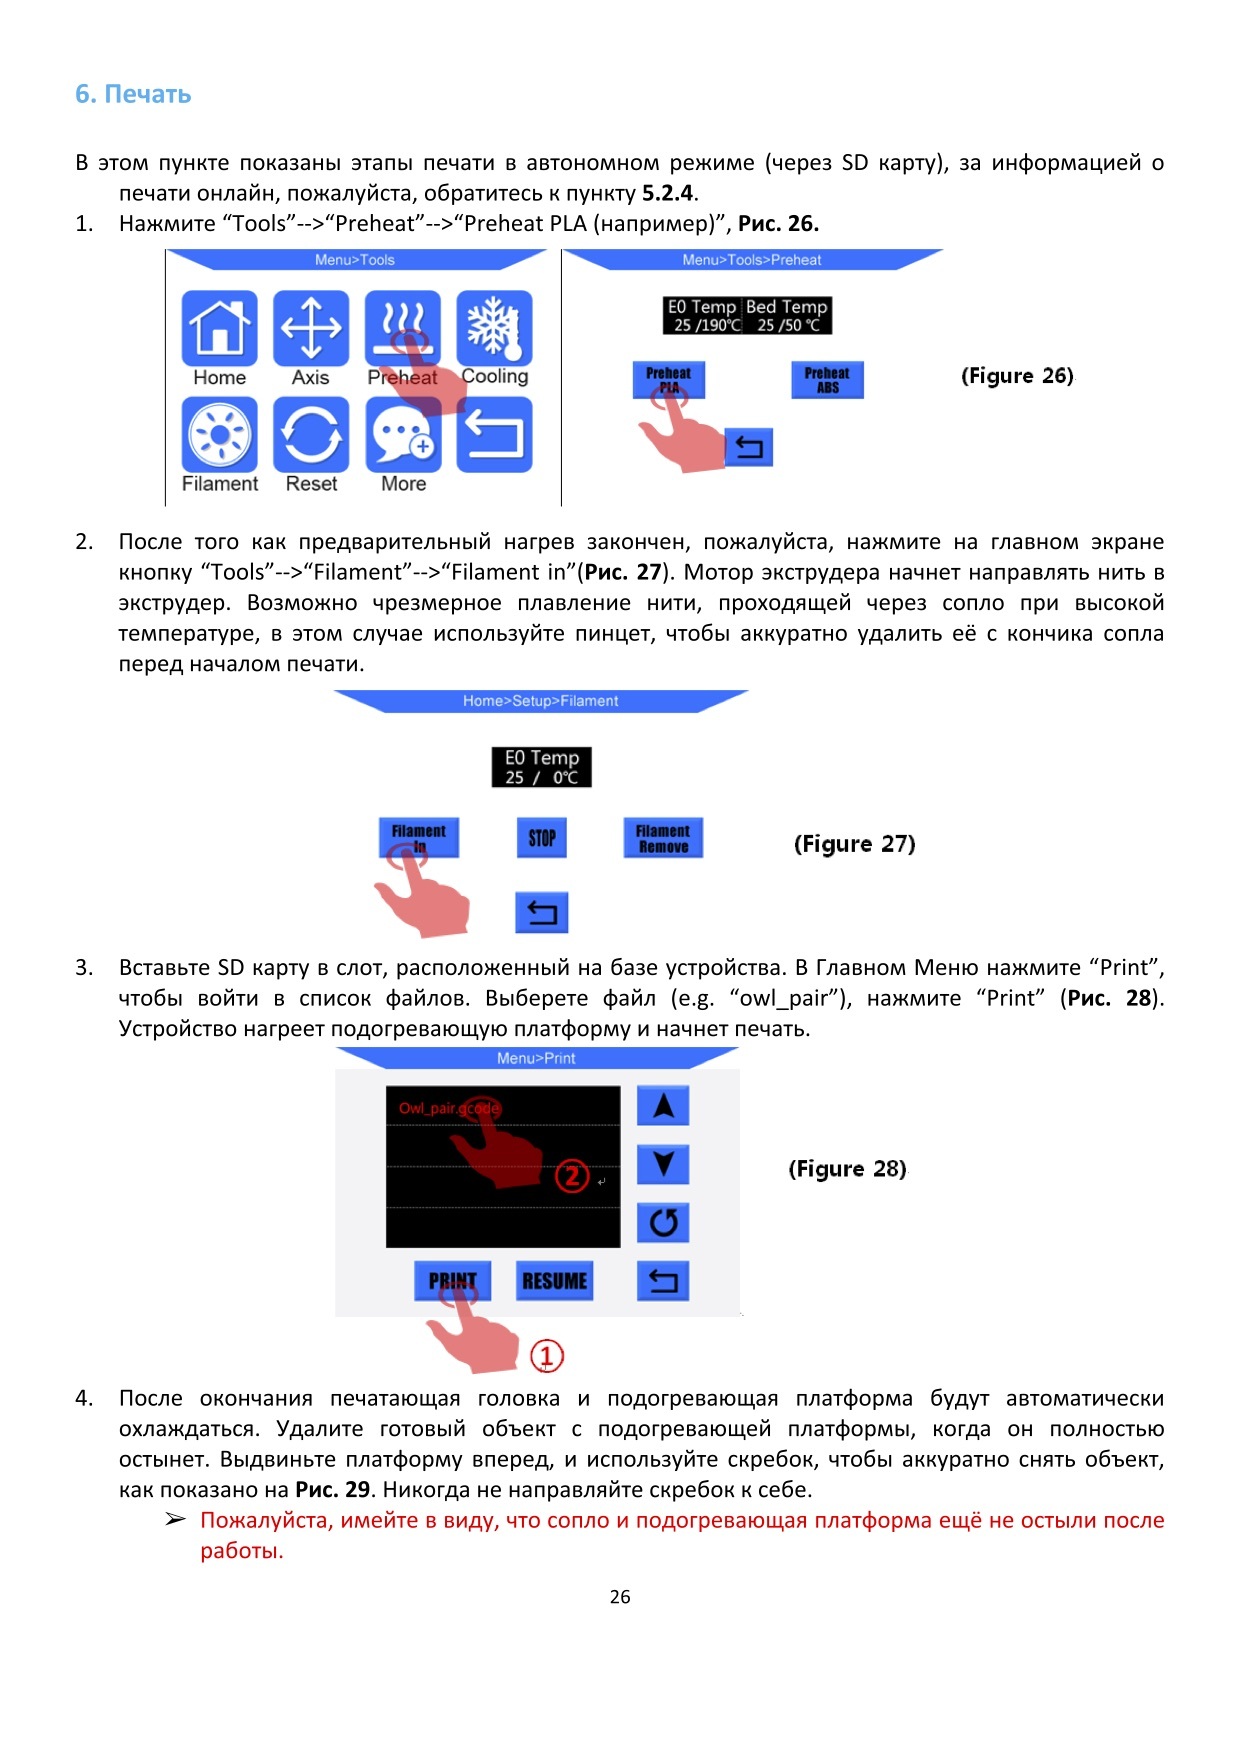
(Figure 32) 2. After pre-heat is finished, please click on Home screen “Tools”—>“Filament”—> “Filament in”(Fig. 33). The extruder motor will work to feed the filament into the hotend. There might be some excessive filament melt through the nozzle, please use tweezer to carefully remove it from the nozzle. -
Page 37
Fig. 35. Never direct scarper to your hands. (Figure 35) ANYCUBIC i3 MEGA 3D printer has a printing sticker which has a lift time about few weeks depends on the usage. Customer may use masking tape as alternative. Tips: ①… -
Page 38: Manual Filament Change
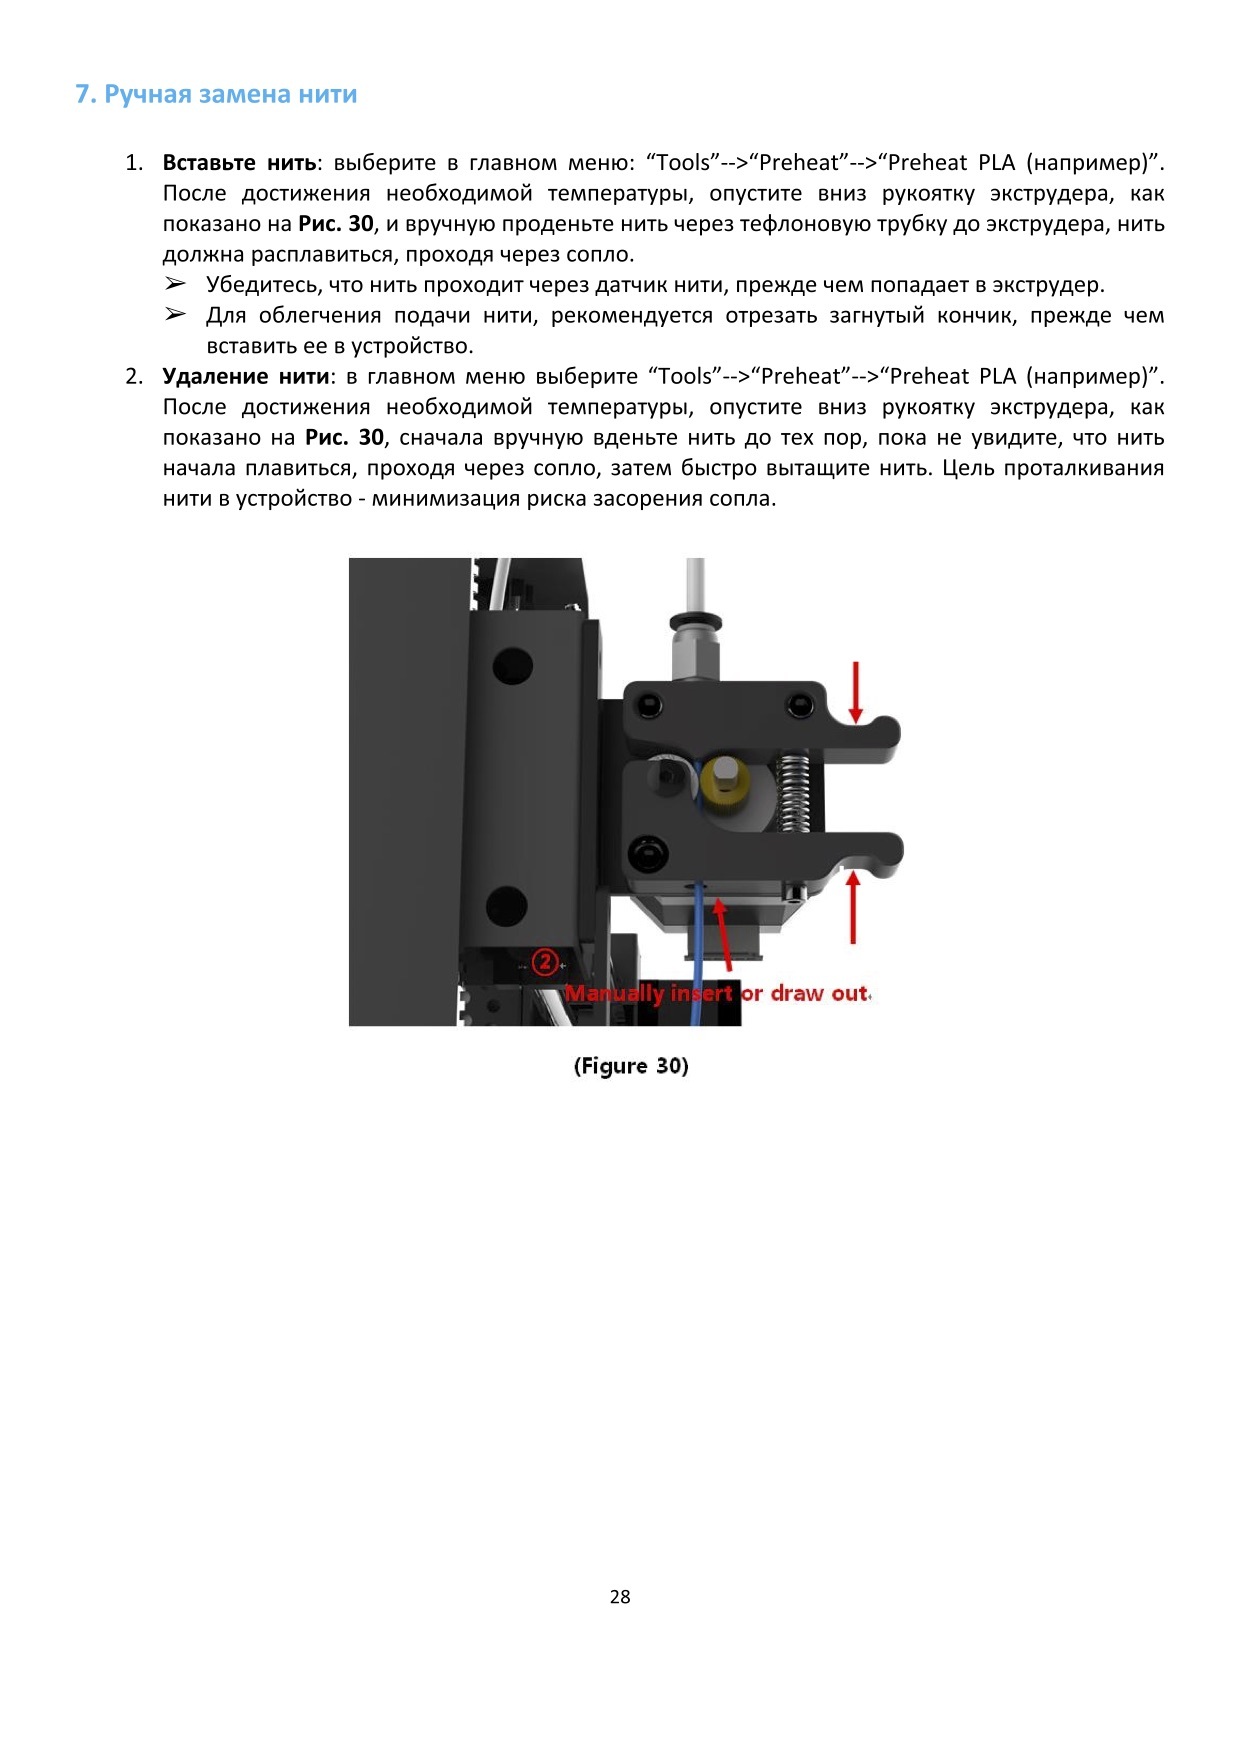
7. Manual filament change 1. Feed the filament: click via the Home menu: “Tools”—> “Preheat” —> “Preheat PLA (for example)”. After it reaches to the target temperature, press down the handle at the extruder as shown in Fig. 36, and manually push the filament through the Teflon tubing till the hotend and there should be filament melt through the nozzle.
-
Page 39: Resume From Outage
8. Resume from outage ANYCUBIC i3 MEGA allows resuming print job after accident power loss. This function only valid when print offline (by SD card only). 1. As shown in Fig. 37, in slicing software (i.e. Cura), it is required to place the model at the rear of platform.
-
Page 40
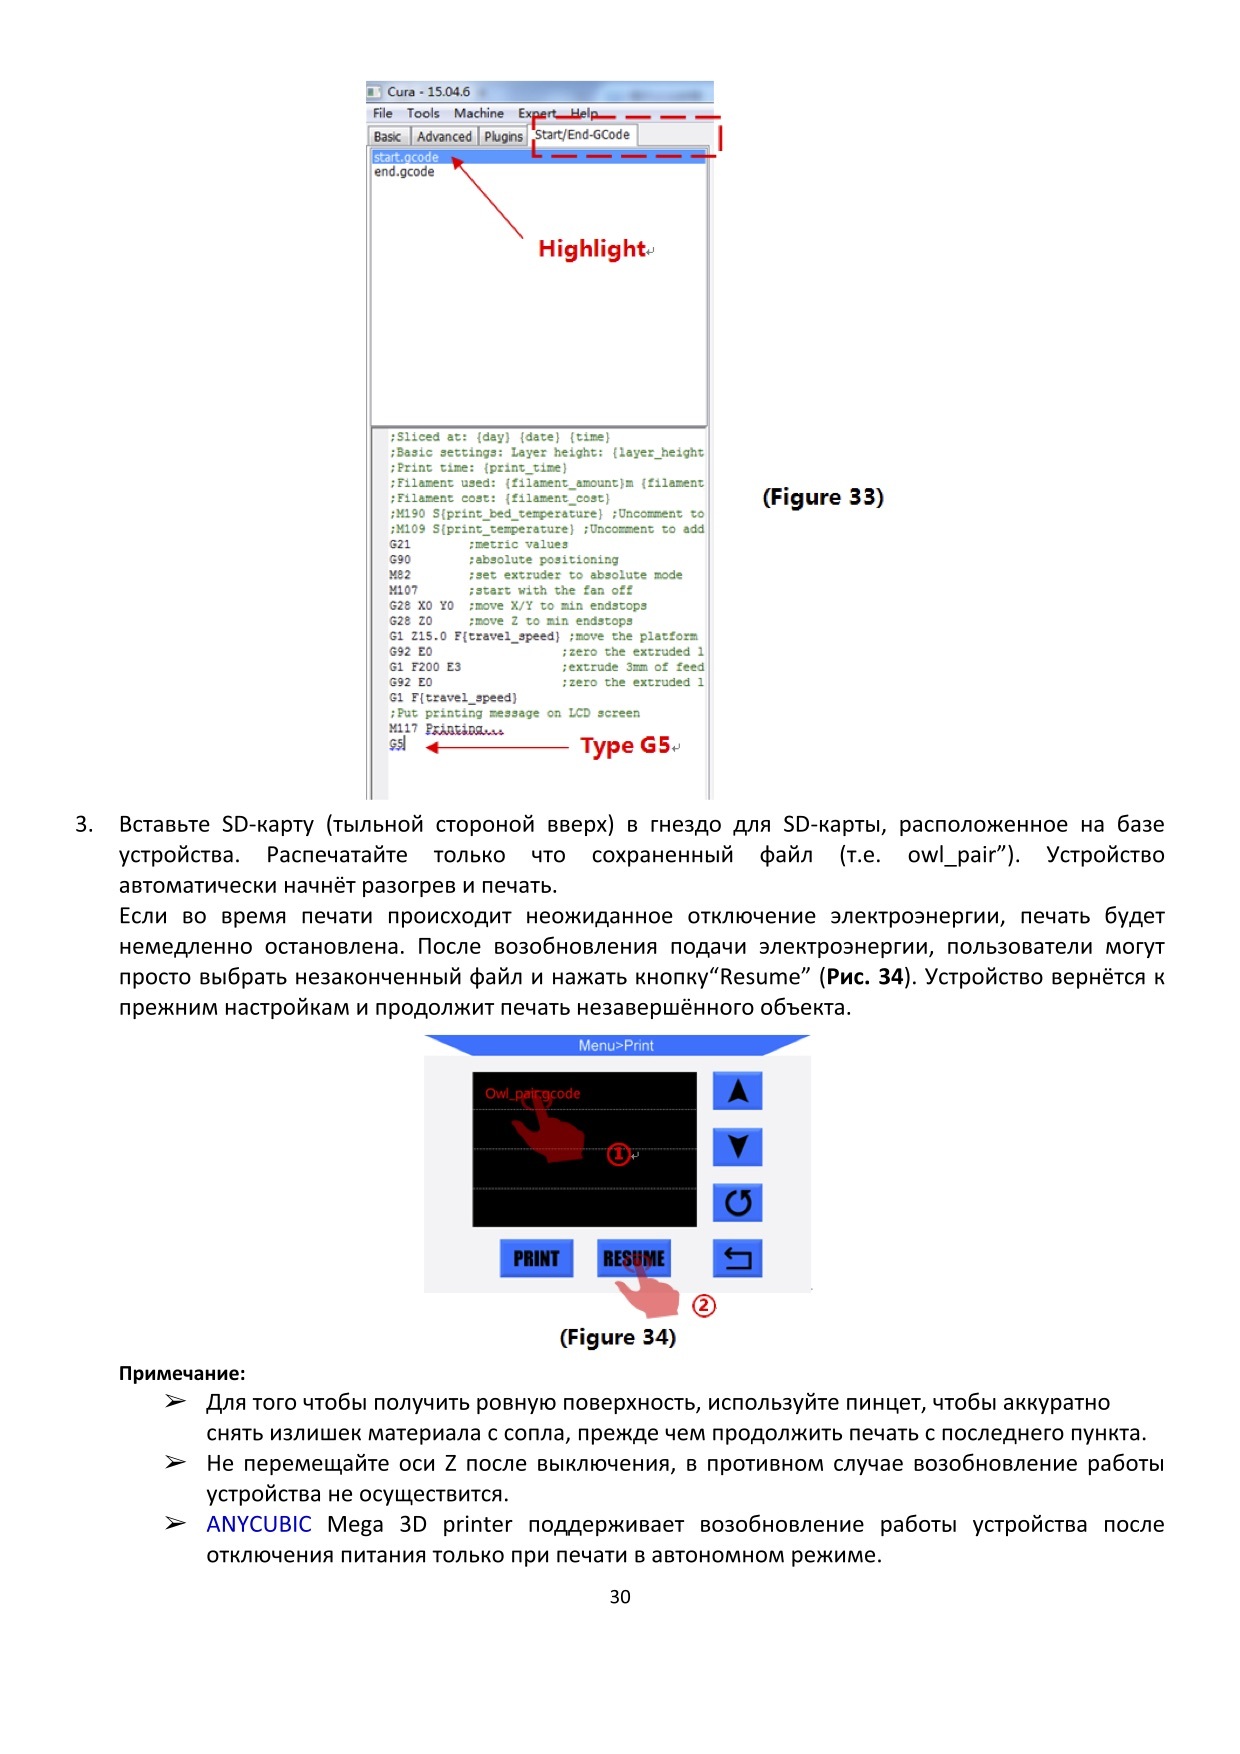
2. For the first time of using this function, customers are required to add “G5” to the start.gcode, as shown in Fig. 39. Then, save the model as Gcode file to the SD card by “File”—>“Save GCode…”. Highlight (Figure 39) Type G5 3. -
Page 41
② It is required not to move the Z axis after power off otherwise resume will be invalid. ③ ANYCUBIC i3 MEGA 3D supports resume from outage only when print offline ④ This function is developed based on Cura. We could not guarantee that this function compatible with other slicing software. -
Page 42: Trouble Shooting
9. Trouble shooting 1. Motor shaking or abnormal sound ① The corresponding end stop could not be triggered when Home, check the wirings, and inspect any obstacles when manually move the corresponding axis. ② The motor cable are not connected properly, check each connection and then inspect the cable routing for any faults.
-
Page 43
③ Check that the bed is leveled and set to a distance of approx. 0.1 mm. ④ Inspect if print mat needs replacement, or use masking tape instead. ⑤ add a brim or raft to the model in slicing software. ⑥…
Руководство
Английский:
- Mega_Руководство_en
- Mega_S_Руководство_en
Слайсер: Cura_V15.04.6
Windows:
- Cura_v15.04.6.exe
OS X:
- Cura_15.04.6
Питающий провод
- i3 Mega S Прошивка V1.1.5
- i3 Mega Прошивка V1.1.5
- Обновление_Mega_к_Mega-S Прошивка V1.1.5
Водитель
- i3_Mega_S Windows
- i3_Mega_S Mac OS
- i3_Mega Windows
- i3_Mega Mac OS
Видео:
2、Ручное выравнивание
3、Обновление Mega к MEGA-S
4、Очистка и уход за ультрабазой
Вернуться к Новости
Посмотреть инструкция для Anycubic i3 Mega S бесплатно. Руководство относится к категории 3D-принтеры, 2 человек(а) дали ему среднюю оценку 8.8. Руководство доступно на следующих языках: английский. У вас есть вопрос о Anycubic i3 Mega S или вам нужна помощь? Задайте свой вопрос здесь
Не можете найти ответ на свой вопрос в руководстве? Вы можете найти ответ на свой вопрос ниже, в разделе часто задаваемых вопросов о Anycubic i3 Mega S.
Инструкция Anycubic i3 Mega S доступно в русский?
Не нашли свой вопрос? Задайте свой вопрос здесь
Внимательно прочтите инструкцию по технике безопасности прежде чем начать использовать устройство


3D принтер Anycubic i3 Mega Pro

PJP/FDM/FFF, пластик — PLA, TPU, скорость — 100 мм/с, слой — 0.05 мм, microSD, USB
подробнее

1
Код товара: 5341485
AnyCubic i3 MEGA: Available Instructions
Note for Owners:
Guidesimo.com webproject is not a service center of AnyCubic trademark and does not carries out works for diagnosis and repair of faulty AnyCubic i3 MEGA equipment. For quality services, please contact an official service center of AnyCubic company. On our website you can read and download documentation for your AnyCubic i3 MEGA device for free and familiarize yourself with the technical specifications of device.
-
Creality CR-10
Installation stepsThe machine is basically installed before leaving the factory,soyou only need some simple steps to install machine.FirstTaking out all parts to ensure that if they are good.Now youmust connect the Portal frame with base platform by fourscrews(M5*20). …
CR-10 3D Printers, 5
-
Flashforge Creator Pro
You can find electronic version of this manual on the included SD cardStart Up and Instruction GuideSeller informationSeller Name: FlashForge 3D PrinterAmazon Storefront: www.amazon.com/shops/A8RK4QCP0IFCYSupport Contact: Mr. Tang E-mail: [email protected] …
Creator Pro 3D Printers, 27
-
flsun C-PLUS
-1-Debug and PrintcatalogueDebug and Print…………………………………………………………………………………………………………………………… — 1 -catalogue…………………………………………………………………………………………………………………………………… — 1 -1 Connect and Software…………………… …
C-PLUS 3D Printers, 61
-
Dremel 3D20 Idea Builder
FilamentGuidePRESSLIFTIMPORTANT: IMPORTANT : IMPORTANTE:Read Before Using Lire avant usage Leer antes de usarFor English Version Version française Versión en españolSee page 2 Voir page 37 Ver la página 73Operating/Safety InstructionsConsignes de sécurité/d’utilisationInstrucciones de funcionamiento y seguridad1-844-4DRML3D (1-844-437-6533) www.dremel.comCall Toll Free forConsumer Inform …
3D20 Idea Builder 3D Printers, 2
-
MiiCraft Hyper Series
3D production system ► Make a better world 1 Hyper series / Prime series 3D Printer User Manual for Hardware Version 1.0 …
Hyper Series 3D Printers, 12
-
LulzBot TAZ
View a video of the Quick Start Guide lulzbot.com/support/taz-setupDownload this document: www.LulzBot.com/QuickStartGuide Share ideas & collaborate: Forum.LulzBot.com READ THE ENCLOSED USER MANUAL COMPLETELY BEFORE POWERING UP YOUR TAZ 3D PRINTER.Remove red protective packing clips.Remove Protective Pieces!Locate and remove the gray foam block used to hold the X axis carriage in place during …
TAZ 3D Printers, 4
-
Kuhling&Kuhling RepRap
Quick Start GuideCongratulation, you probably just received your RepRap Industrial 3D Printer. Follow these shortinstructions and you are up and running in no time!You will always find the latest version of the manual, additional documentation and new softwarereleases athttp://docs.kuehlingkuehling.dePlease visit our site regularly so that you do not miss important developments and new features.S …
RepRap 3D Printers, 7
-
Sindoh 5X Series
Series USER MANUAL Read the User Manual before operating the product, and keep the manual at a convenient place near the product. 3dprinter.sindoh.com 5X/7X Read the User Manual before operating the a convenient …
5X Series 3D Printers, 33
-
Voxelab Polaris
This guide is only applicable to Voxelab Polaris 3D printer PolarisQuick Start GuideVL01-EN-A04Please put on gloves while using photopolymer resin to avoid direct contact with hands.To ensure the printing quality, please don’t open the light shield unless it’s necessary.Unused photopolymer resin needs to be stored in a dark, dry , and cool place.Please clean the finished model with anhydro …
Polaris 3D Printers, 20
Popular 3D Printers User Guides:
Categories of AnyCubic Devices:
- 3D Printers
![]() Всем привет! Пока ко мне едет последний и самый важный элемент – экструдер Titan Aero для моего принтера Anycubic 4Max, я решил не терять время и заняться доработкой уже изрядно запылившегося старого доброго Anycubic i3 mega. Этот принтер у меня работает в очень интенсивном режиме уже более полугода. На сайте представлено много моделей, напечатанных именно на нем. Настало время изучить, что произошло с принтером за это время. А кроме этого, вознаградить его старания апгрейдами и плюшками :).
Всем привет! Пока ко мне едет последний и самый важный элемент – экструдер Titan Aero для моего принтера Anycubic 4Max, я решил не терять время и заняться доработкой уже изрядно запылившегося старого доброго Anycubic i3 mega. Этот принтер у меня работает в очень интенсивном режиме уже более полугода. На сайте представлено много моделей, напечатанных именно на нем. Настало время изучить, что произошло с принтером за это время. А кроме этого, вознаградить его старания апгрейдами и плюшками :).
Вообще что я планирую сделать со своим Anycubic i3 mega? Все просто. Для начала хочу превратить его в Mega-S, а после этого прокачать его в тишину. Хочу чтобы оба принтера были максимально тихими. Но перед тем как заняться этими апгрейдами, необходимо разобраться с тем, какие настройки зашиты в прошивке принтера. Для тех кто не в теме, принтеры Anycubic i3 mega и Anycubic mega-s имеют удобные сенсорные дисплеи, с точки зрения удобства пользования для новичка – это круто. Однако, эти дисплеи не позволяют реализовать все фишки и плюшки стандартного марлина, так что обычный RepRap экран с энкодером значительно функциональнее. Но если посмотреть правде в глаза, тонкий тюнинг принтера можно делать не только с экрана, но и через терминал, да и постоянный доступ к таким настройкам не нужен. Так что большой беды в сенсорном дисплее нет. Тут каждый для себя решает сам, что удобнее. Ладно, перейдем к делу.
Короче, данная статья посвящена реверс инжинирингу 3д принтера Anycubic i3 mega. Все описанное в статье применимо и к 3Д принтеру Anycubic mega-s. Для тех кто не в теме, что такое реверс инжиниринг, вот цитата с википедии:
Обратная разработка (обратное проектирование, обратный инжиниринг, реверс-инжиниринг; англ. reverse engineering) — исследование некоторого готового устройства или программы, а также документации на него с целью понять принцип его работы; например, чтобы обнаружить недокументированные возможности (в том числе программные закладки), сделать изменение или воспроизвести устройство, программу или иной объект с аналогичными функциями, но без прямого копирования.
Применяется обычно в том случае, если создатель оригинального объекта не предоставил информации о структуре и способе создания (производства) объекта.
Источник: wikipedia.org
Зачем это нужно? На сайте производителя выложена готовая скомпилированная прошивка под принтер. С одной стороны, это хорошо. Взял, прошился и горя не знаешь. Однако в будущем я планирую установить на принтер тихие драйверы TMC2208. А вот на этот случай производитель принтера готовой прошивки уже не предусмотрел, а это все грозит установкой кастомной сборки марлина, как в статье Дневник 3Д печатника. Устанавливаем тихие драйверы TMC2208. Часть 2. Прошивка Anycubic 4max. Не известно, удастся ли найти годную сборку, а даже если и удастся, потребуется проверка параметров. Так что будет не лишним узнать настройки для экструдера и механики моего принтера. Если в 4max все было просто, достаточно было погулять по меню и все становилось известно, то с i3 mega все сложнее. настроек шагов, рывков, ускорений и прочих параметров в меню принтера не найдешь. Остается только вооружиться USB кабелем и вытащить всю необходимую информацию самостоятельно.
Для этого существует 2 методики, которые я вам и распишу. Для одной из них нам понадобится программа Repiter Host, для другой pronterface, скачать этот софт вы можете по ссылкам ниже:
- Repiter Host
- PronterFace
Собственно говоря, обе методики и основаны на том, что для каждой из них используется отдельная программа. Итак, начнем.
Как узнать настройки принтера с помощью программы Repiter Host
Итак, получение параметров прошивки принтера с помощью ПО Repiter Host очень простое дело.
Шаг 1. Для начала установите на свой компьютер указанную программу.
Шаг 2. После этого установите на свой компьютер необходимые драйвера.
Шаг 3. Подключите принтер USB кабелем к компьютеру и удостоверьтесь, что принтер правильно определился на вашем ПК.
Шаг 4. Запустите программу Repiter Host и подключитесь к принтеру:

Шаг 5. Считаем параметры из ПЗУ принтера. Для этого выбираем пункт “Конфигурация” – “Конфигурация EEPROM”
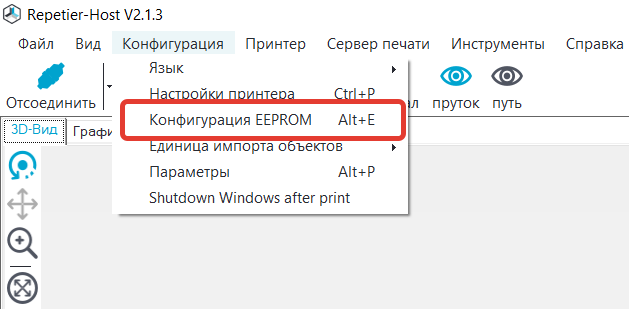
Шаг 6. Откроется окошко, в котором отображены параметры, сохраненные в ПЗУ микроконтроллера 3Д принтера. К таким параметрам относятся количество шагов по осям X/Y/Z, ускорения, рывки, профили пред нагрева пластика и т.д. Окно выглядит следующим образом:

На скриншоте представлены настройки по умолчанию моего 3Д принтера Anycubic i3 Mega в их первозданном виде. Настройки приведены для штатного экструдера.
Как узнать настройки принтера с помощью программы PronterFace
Шаг 1. Для начала установите на свой компьютер указанную программу.
Шаг 2. После этого установите на свой компьютер необходимые драйвера.
Шаг 3. Подключите принтер USB кабелем к компьютеру и удостоверьтесь, что принтер правильно определился на вашем ПК.
Шаг 4. Запустите программу Pronterface и подключитесь к принтеру:

Для этого выберите com-порт на котором определился Ваш принтер. Для 3д принтера Anycubic i3 mega скорость соединения необходимо выбрать 250000
Шаг 5. Нажмите кнопку Connect

Если все сделано верно, то программа подключится к Вашему 3Д принтеру. В окне программы с правой стороны отображается вся информация о настройках принтера:


Как видим, выудить из прошивки необходимые параметры не так уж и сложно. За то это сэкономит нам кучу времени. Не стоит забывать что у нас готовый, а не самосборный принтер и, если нам захочется сменить прошивку или доработать ее под себя, то эти данные нам здорово помогут, т.к. не придется с нуля калибровать весь принтер.
Для тех, у кого случилась беда и настройки из ПЗУ были утеряны, ниже я приведу перечень параметров и их значения:
| Параметр | Значение | Единицы измерения |
| Разрешение по оси X
(X axis resolution) |
80 | Шагов/мм
[Steps/mm] |
| Разрешение по оси Y
(Y axis resolution) |
80 | Шагов/мм
[Steps/mm] |
| Разрешение по оси Z
(Z axis resolution) |
400 | Шагов/мм
[Steps/mm] |
| Подача экструдера
(E axis resolution) |
92,60 | Шагов/мм
[Steps/mm] |
| Максимальная скорость по оси X
(X axis max. feedrate) |
500 | мм/сек
[mm/s] |
| Максимальная скорость по оси Y
(Y axis max. feedrate) |
500 | мм/сек
[mm/s] |
| Максимальная скорость по оси Z
(Z axis max. feedrate) |
6 | мм/сек
[mm/s] |
| Максимальная скорость подачи экструдера
(E axis max. feedrate) |
60 | мм/сек
[mm/s] |
| Максимальное ускорение по оси X
(X axis max. acceleration) |
3000 | мм/сек2
[mm/s2] |
| Максимальное ускорение по оси Y
(Y axis max. acceleration) |
2000 | мм/сек2
[mm/s2] |
| Максимальное ускорение по оси Z
(Z axis max. acceleration) |
60 | мм/сек2
[mm/s2] |
| Максимальное ускорение подачи пластика экструдером
(E axis max. acceleration) |
10000 | мм/сек2
[mm/s2] |
| Ускорение печати
(Acceleration printing) |
3000 | мм/сек2
[mm/s2] |
| Ускорение ретракта
(Acceleration retract) |
3000 | мм/сек2
[mm/s2] |
| Минимальная скорость
(Minimum feedrate) |
0 | мм/сек
[mm/s] |
| Minimum Segment Time | 20000 | ms |
| Максимальный рывок по оси X
(Maximum X jerk) |
10 | мм/сек
[mm/s] |
| Максимальный рывок по оси Y
(Maximum Y jerk) |
10 | мм/сек
[mm/s] |
| Максимальный рывок по оси Z
(Maximum Z jerk) |
0.40 | мм/сек
[mm/s] |
| Максимальный рывок экструдера (подача пластика)
(Maximum E jerk) |
5 | мм/сек
[mm/s] |
| Домашняя точка по оси X
(Home offset X) |
0 | мм
[mm] |
| Домашняя точка по оси Y
(Home offset Y) |
0 | мм
[mm] |
| Домашняя точка по оси Z
(Home offset Z) |
0 | мм
[mm] |
| Z endstop Adjustment | 0 | mm |
| Преднагрев для пластика 1 (Экструдер)
(Preheat 1 Extruder temperature) |
180 | градусов C |
| Преднагрев для пластика 1 (Стол)
(Preheat 1 Bed Temperature) |
70 | градусов C |
| Преднагрев для пластика 1 (Скорость вентилятора обдува детали)
(Preheat 1 Fan speed) |
0 | 0-255 |
| Преднагрев для пластика 2(Экструдер)
(Preheat 2 Extruder temperature) |
240 | градусов C |
| Преднагрев для пластика 2 (Стол)
(Preheat 2 Bed Temperature) |
110 | градусов C |
| Преднагрев для пластика 2 (Скорость вентилятора обдува детали)
(Preheat 2 Fan speed) |
0 | 0-255 |
| PID P | 16.43 | |
| PID I | 1.04 | |
| PID D | 61.37 | |
| Диаметр Филамента
(Filament diameter extr. 0) |
1,75 | мм
[mm] |
Пока писал статью неожиданно вспомнил, зачем еще можно использовать эти данные. Все мы знаем что кура редко угадывает время печати детали. Все потому, что она не знает вот этих самых параметров принтера. Если вы установите в куру плагин printer settings и впишите туда параметры полученные из EEPROM принтера, то точность предсказания времени печати у слайсера значительно повысится. Будет сказываться только погрешность, связанная со скоростью нагрева стола и экструдера.
Итак. Информацию о параметрах, забитых в прошивку мы получили. Теперь самое время заглянуть под капот моего Anycubic i3 mega. А для этого его необходимо раскрутить. Для этого нам понадобится отвертка или бита с шестигранником с маркировкой H 2.5.
Удобно располагаем принтер на боку и начинаем разборку.

Шаг 1. Откручиваем защиту нижнего кабельного жгута. Необходимо открутить 2 болта.

Шаг 2. Откручиваем нижнюю крышку. Если кто не в теме, то блок питания и блок электроники в 3д принтерах Anycubic i3 mega и Anycubic Mega-S расположен в нижней части корпуса. Вот тут придется покрутить. Откручиваем 8 болтов.
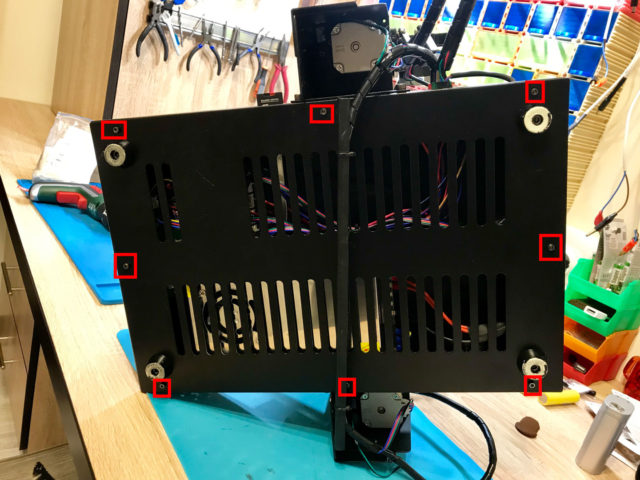
Снимаем крышку и вот они, потраха принтера!

По большому счету тут ничего сверхъестественного. Из того на что стоит обратить внимание:
- На 3д принтере установлен блок питания мощностью 300 ватт, выдает напряжение 12 вольт с максимальным током 25 ампер
- На блоке питания установлен кулер размером 65 мм
- В качестве платы управления используется Trigorilla на базе микроконтроллера Atmega 2560. Такая же плата управления установлена и в принтере Amycubic 4Max
- Над драйверами шаговых двигателей установлен вентилятор размером 50х50х10 мм
- В качестве драйверов шаговых двигателей используются старые добрые A4988
- Шлейф подключения картридера экранирован


Не смотря на то, что около полугода 3д принтер жил в чулане, где довольно пыльно,в течение этого времени в доме делался косметический ремонт, внутри чисто. Пыли практически нет :). Все выглядит как новенькое.
Из особенностей конструкции хочется отметить несколько интересных моментов.
Во первых, это пресловутый сенсорный дисплей. К плате управления он подключается через специальный переходник.
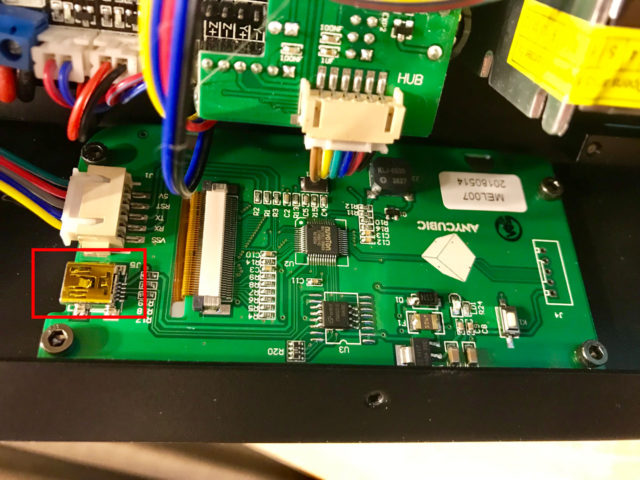
При этом на дисплее имеется собственный mini USB разъем, а это наводит на мысль, что дисплей не так прост как кажется. Да и судя по распиновке, общается он с платой управления по UART.
Вторым интересным моментом является то, что к разъему E1, к которому обычно подключается подающий мотор второго экструдера что-то подключено. При этом ко второму разъему для подключения второго мотора оси Z не подключено ничего. После проведения изысканий и тестов было выяснено, что к разъему E1 подключен второй мотор оси Z. Конфигурация явно не стандартная. Но техническое решение является довольно изящным, т.к. позволяет снизить нагрузку на драйвер оси Z, поскольку он будет управлять одним мотором. Кроме этого, такое решение позволяет оснастить концевиками каждый из моторов оси Z и подстраивать их положение независимо. На самом деле, такое решение может оказаться и спорным, т.к. всегда найдутся те, кто приведут аргументы в пользу недостатков. Лично я считаю такой подход оригинальным. Однако, в виду использования концепции 1 мотор 1 драйвер стоит помнить, что если вы захотите заменить драйверы на моторах осей то, вам понадобится не 3 драйвера, а 4.
Вот пока пожалуй и все, что я хотел рассказать Вам в данной статье.
Если вам понравилась статья и вы хотите поддержать сайт, получать уведомления о новых материалах, вступите в нашу группу Вконтакте: https://vk.com/ionline_by
Если вы хотите оперативно получать уведомления о выходе новых статей, подключите себе PUSH уведомления по ссылке: https://ionlineby.pushassist.com/
Если вы еще только думаете о покупке 3д принтера и ищете надежного продавца на Алиэкспресс, вот ссылки на покупку 3Д принтеров:
3д принтер Anycubic i3 Mega
3д принтер Anycubic Mega-S (Anycubic S)
3Д принтер Anycubic 4MAX Pro
Так же, вам могут понадобится драйвера шаговых двигателей TMC2208.