- Manuals
- Brands
- GE Manuals
- Fan
- CARESCAPE R860
- Quick manual
-
Contents
-
Table of Contents
-
Bookmarks
Quick Links
CARESCAPE
™
R860 Ventilator
O2 Therapy Quick Guide
gehealthcare.com
Related Manuals for GE CARESCAPE R860
Summary of Contents for GE CARESCAPE R860
-
Page 1
CARESCAPE ™ R860 Ventilator O2 Therapy Quick Guide gehealthcare.com… -
Page 2
Notice The materials contained in this document are intended for educational purposes only. This document does not establish specifications, operating procedures or maintenance methods for any of the products referenced. Always refer to the official written materials (labeling) provided with the product for specifications, operating procedures and maintenance requirements. -
Page 3: Table Of Contents
High Flow Oxygen Therapy Set-up on the CARESCAPE R860 Ventilator …….
-
Page 4: Equipment Required For High Flow Oxygen Therapy On The Carescape R860 Ventilator
PEEP effect, constant FiO2 and improvement of mucociliary clearance and patient comfort. The CARESCAPE R860 Ventilator offers integrated high flow oxygen therapy, which allows clinicians to seamlessly transition from high flow oxygen therapy to mechanical ventilation and back again.
-
Page 5: High Flow Oxygen Therapy Set-Up On The Carescape R860 Ventilator
High Flow Oxygen Therapy Set-up on the CARESCAPE R860 Ventilator Single-limb Circuit Set-up 1. Slide the humidification chamber onto the humidifier base. 2. Connect Circuit Dry Line to humidification chamber and Inspiratory Safety Guard. CARESCAPE R860 3. Connect the breathing circuit to the humidification chamber.
-
Page 6: High Flow Oxygen Therapy System Check
High Flow Oxygen Therapy System Check Be sure that the ventilator is prepared for mechanical ventilation in an emergency scenario. It is recommended that a full (dual-limb) system check be completed prior to use of the O2 Therapy feature with a single-limb configuration. To ensure the proper function of the system, it is highly recommended to complete a System Check before use and between patients.
-
Page 7
High Flow Oxygen Therapy System Check (cont.) Single-limb Circuit All checks run during a single-limb check are also run on a dual-limb system check. There is no need to perform a system check using a single-limb circuit if a dual-limb check was performed and passed. -
Page 8: Starting High Flow Oxygen Therapy After System Start-Up
Starting High Flow Oxygen Therapy After System Start-up 1. Confirm the appropriate patient circuit and humidified patient interface is connected to the inspiratory port. 2. Select NEW PATIENT to select the appropriate patient type and add any additional demographic data. 3.
-
Page 9
Starting High Flow Oxygen Therapy After System Start-up (cont.) 9. Complete a SYSTEM CHECK for the appropriate circuit type. 10. Select START O2 THERAPY. Note: The system delivers Oxygen and the O2 Therapy Present View shows. -
Page 10: Starting O2 Therapy From Invasive Or Noninvasive Ventilation
Starting O2 Therapy from Invasive or Noninvasive Ventilation 1. Confirm the appropriate patient circuit and humidified patient interface is connected to the inspiratory port. 2. Select Current Mode. 3. Select O2 Therapy from the list of Modes. 4. Set the FiO2%. 5.
-
Page 11: Navigating O2 Therapy Present View
Navigating O2 Therapy Present View 1. O2 Therapy. Patient alarms disabled in O2 Therapy message. 2. Current FiO2. 3. Pressure bar graph. 4. Standby. 5. Current Flow. 6. Flow setting. 7. FiO2 setting. 8. Current mode, O2 Therapy. Note: To view patient trends, swipe to the right to the past/historical data workspace.
-
Page 12: Stopping High Flow Oxygen Therapy To Begin Invasive Or Noninvasive Ventilation
Stopping High Flow Oxygen Therapy to Begin Invasive or Noninvasive Ventilation 1. Safeguard the patient. 2. Select Current Mode. 3. Select a mode from the list of modes. 4. Adjust the ventilation mode settings as needed. 5. Select Confirm from the ventilation mode window. 6.
-
Page 13: Conclusion
When used after mechanical ventilation, High Flow Oxygen Therapy has been shown to reduce the risk of reintubation. The O2 Therapy mode of the CARESCAPE R860 Ventilator was designed to support clinicians in treating a variety of patients. 1. Maggiore SM, et al. Am J Respir Crit Care Med. 2014 Aug 1;190(3):282-8.

-
Contents
-
Table of Contents
-
Bookmarks
Quick Links
CARESCAPE
™
R860 Ventilator
Quick Reference Guide
gehealthcare.com
Related Manuals for GE CARESCAPE R860
Summary of Contents for GE CARESCAPE R860
-
Page 1
CARESCAPE ™ R860 Ventilator Quick Reference Guide gehealthcare.com… -
Page 2
Notice The materials contained in this document are intended for educational purposes only. This document does not establish specifications, operating procedures or maintenance methods for any of the products referenced. Always refer to the official written materials (labeling) provided with the product for specifications, operating procedures and maintenance requirements. -
Page 3: Table Of Contents
Contents Before Powering the System On…………… . .4 Powering the System On .
-
Page 4: Before Powering The System On
Occlusion ® Connection port Hard keys on the CARESCAPE R860 Ventilator display 3b 3c 3d Powering the System On 1. Connect the air and oxygen supply hoses to the gas supply source. 2. Plug power cord into an approved electrical outlet.
-
Page 5: Patient Setup
Patient Setup 1. Select NEW PATIENT. 2. Select Adult, Pediatric or Neonatal patient type. Note: When selecting neonatal, a neonatal flow sensor is recommended for improved tidal volume delivery and monitoring. 3. Select Patient ID (Identification), if necessary, and enter 10 characters and select Confirm. Note: Only English alpha-numeric characters may be entered.
-
Page 6: System Check
System Check Circuit Setup 1. Select CIRCUIT SETUP. 2. Select check box for the HME or Humidifier. Note: Settings are confirmed when the setting is changed. 3. Select X to close the menu. Note: Use Circuit Setup to select settings that must be compensated for in the patient circuit measurements.
-
Page 7: Setting A Ventilation And Backup Mode
Setting a Ventilation and Backup Mode 1. Select Current Mode. 2. Select the desired ventilation mode. a. Depending on the facility default setup for ventilation modes, the Mode Settings menu may contain 2 icons, a partial list and a full list. 3.
-
Page 8: Starting Patient Ventilation
Starting Patient Ventilation 1. From Standby, select Start Ventilation. 2. After ventilation has started, connect the breathing circuit to the patient. Note: • It is recommended that a system check is completed prior to starting ventilation. • If the Start Ventilation button is yellow, the Complete System Check warning alert will display the following: –…
-
Page 9
Alarm Priority Priority Color Light Tone Audio and visual indicators tell the priority of the alarm. Series of five High Flashes red tones twice Series of Medium Yellow Flashes yellow three tones Informational Blue Solid blue Single tone Alarm Setup 1. -
Page 10: Nebulizer
Nebulizer Warning • Do not use a filter, heat-moisture exchanger or heat-moisture exchanger filter between the nebulizer and the patient airway. • Use of a heat-moisture exchanger or nebulizer in the breathing circuit can substantially increase flow resistance when a nebulizer is active.
-
Page 11
Warning • Do not use a filter, heat-moisture exchanger or heat-moisture exchanger filter between the nebulizer and the patient airway. • Use of a heat-moisture exchanger or nebulizer in the breathing circuit can substantially increase flow resistance when a nebulizer is active. Monitor the breathing system filter frequently for increased resistance and blockage. -
Page 12: Procedures
Procedures Suction Any ventilation mode may be used with a closed suction catheter. Patient disconnected, RR low, MVexp low, Vtexp low, Apnea and other alarms may occur during use of a closed suction catheter. To perform a suctioning without nuisance alarms, an open suction procedure is provided by the ventilator: 1.
-
Page 13: Navigation
Navigation 1. Past/Historical Trends Workspace. 2. Present/Patient Status Workspace. 3. Future/Clinical Decision Support Workspace. To Review Patient Data: 1. Touch the icon to display the Present/Patient Status Workspace or swipe to the right or left to move from the Past and Future workspaces. 2.
-
Page 14: To Review Patient Trends
To Review Patient Trends: 1. Touch the icon to display the Past/Historical Trends Workspace or swipe to the right to move from the Present/Patient Status Workspace. 2. From the Past/Historical Trends Workspace, choose any option below: a. Graphical Trends View: Use this view to review historical waveforms and patient trends.
-
Page 15: Powering The System Off
Powering the System Off 1. Disconnect the patient from the breathing circuit. 2. Select Standby. 3. Select Pause Ventilation. Note: Select Pause Ventilation to go into Standby. Ventilation and monitoring will be stopped. Select Cancel to continue ventilation if a warning message is displayed. 4.
 Loading…
![]()
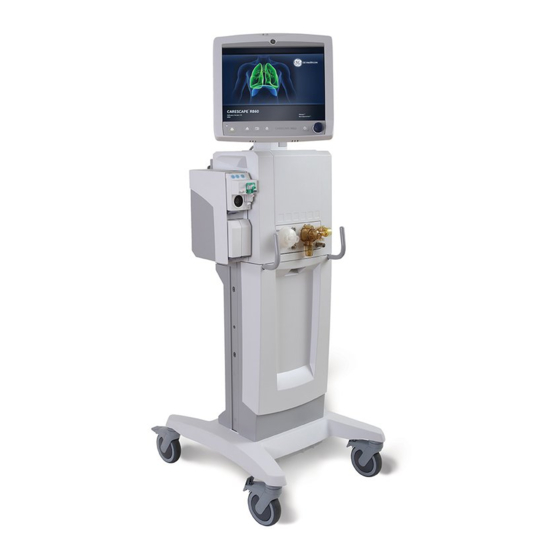
CARESCAPE R860
Quick Reference Guide
Software Revision 10
User responsiblity
Refer to the User’s Reference manual for step-by-step instructions. Read each component’s User’s Reference manual before using this system. All Warnings and Cautions are in the User’s Reference Manual.
WARNING
Before using this system:
•Complete all of the preoperative tests.
•Test all other system components.
Introduction
Welcome
Thank you for choosing the GE Healthcare CARESCAPE® R860. Our goal is to provide you with the highest quality product and services available. This ventilator features a user interface specifically designed to streamline workflow while providing exceptional insight into patient needs.
Measured data definitions
Patient monitoring views show patient data measured by the ventilator and accessories.
Note
Some measured data can be viewed with different units. Set unit preferences on the Configuration > Units menu. See «Configuring units» in the «System configuration (Super User) and service» section.
Note
Some data is only available when an airway module with the required capabilities, such as spirometry and metabolics, is installed and warmed up.
|
Gases Data |
Definition |
Unit |
|
FiO2 |
The percentage of oxygen that the |
% |
|
ventilator delivers to the patient. |
||
|
EtO2 |
The percentage of oxygen exhaled, |
% |
|
measured at the end of expiration. |
||
|
EtCO2 |
The percentage of carbon dioxide exhaled, |
%, kPa, or mmHg |
|
measured at the end of expiration. |
||
|
FI-ET O2 |
The difference between inspiratory and |
% |
|
expiratory concentrations of oxygen. |
||
|
Pulmonary Data |
Definition |
Unit |
|
C |
The compliance of the patient’s respiratory |
ml/cmH2O, ml/ |
|
system measured during the breath cycle. |
kPa, or ml/mbar |
|
|
Cstat |
The static compliance of the patient’s |
ml/cmH2O, ml/ |
|
respiratory system measured during an |
kPa, or ml/mbar |
|
|
inspiratory hold. |
||
|
Pulmonary Data |
Definition |
Unit |
|||
|
Raw |
The average inspiratory and expiratory |
cmH2O/l/s, |
|||
|
airway resistance measured during the |
kPa/l/s, or |
||||
|
breath cycle. |
mbar/l/s |
||||
|
PEEPe+i |
The sum of extrinsic and intrinsic positive |
cmH2O, kPa, or |
|||
|
end expiratory pressures. |
mbar |
||||
|
Time Constant |
The time needed for the lungs to deflate by |
ms |
|||
|
a certain amount or a percentage of |
|||||
|
volume. |
|||||
|
• |
One Time Constant allows 63% of |
||||
|
volume to be exhaled. |
|||||
|
• |
Two Time Constants allow for 86% of |
||||
|
volume to be exhaled. |
|||||
|
• |
Three Time Constants allow for 95% |
||||
|
of volume to be exhaled. |
|||||
|
• |
Four Time Contants allow for 98% of |
||||
|
volume to be exhaled. |
|||||
|
Static PEEPi |
The pressure above PEEPe that remains |
cmH2O, kPa, or |
|||
|
in the patient’s lungs, measured at the end |
mbar |
||||
|
of the expiratory phase during an |
|||||
|
expiratory hold. |
|||||
|
Mechanical/ |
Definition |
Unit |
|
Spontaneous |
||
|
Data |
||
|
MVexp spont |
The volume of gas the patient exhales per |
l/min |
|
minute with spontaneous breaths. |
||
|
RR spont |
The number of spontaneous breath cycles |
/min |
|
the patient completes per minute. |
||
|
VTexp spont |
The volume of gas the patient exhales with |
ml |
|
a spontaneous breath. |
||
|
MVexp mech |
The volume of gas the patient exhales per |
l/min |
|
minute with mechanical breaths. |
||
|
RR mech |
The number of mechanical breath cycles |
/min |
|
the patient completes per minute. |
||
|
VTexp mech |
The volume of gas the patient exhales with |
ml |
|
a mechanical breath. |
||
|
Mechanical/ |
Definition |
Unit |
||
|
Spontaneous |
||||
|
Data |
||||
|
RSBI |
The rapid shallow breathing index is |
/min/l |
||
|
calculated by dividing the spontaneous |
||||
|
breath rate by the tidal volume, averaged |
||||
|
over one minute. The RSBI reflects the |
||||
|
frequency and depth of the patient’s breath |
||||
|
cycles. A high RSBI value indicates that |
||||
|
patient’s breath cycles are more frequent |
||||
|
and shallow. RSBI is calculated in |
||||
|
spontaneous breathing modes (CPAP/PS, |
||||
|
VS, NIV, and SBT). |
||||
|
Per Weight Data |
Definition |
Unit |
|
Weight |
The calculated ideal body weight for adult |
kg |
|
patients. The entered weight of the patient |
||
|
for pediatric patients. |
||
|
MVexp/kg |
The volume of gas the patient exhales per |
l/min/kg |
|
minute per the patient’s ideal body weight. |
||
|
VTexp/kg |
The volume of gas the patient exhales in a |
ml/kg |
|
breath per the patient’s ideal body weight. |
||
|
MVexp spont/kg |
The volume of gas the patient exhales per |
l/min/kg |
|
minute with spontaneous breaths per the |
||
|
patient’s ideal body weight. |
||
|
VTexp spont/kg |
The volume of gas the patient exhales in a |
ml/kg |
|
spontaneous breath per the patient’s ideal |
||
|
body weight. |
||
|
C/kg |
The dynamic compliance of the patient’s |
ml/kPa/kg, ml/ |
|
lungs per the patient’s calculated ideal |
cmH2O/kg, or ml/ |
|
|
body weight. |
mbar/kg |
|
|
VO2/kg |
The volume of oxygen a patient inhales |
ml/min/kg |
|
(consumes) per minute per the patient’s |
||
|
set weight. |
||
|
Per Weight Data |
Definition |
Unit |
||
|
VCO2/kg |
The volume of carbon dioxide a patient |
ml/min/kg |
||
|
exhales (produces) per minute per the |
||||
|
patient’s set weight. |
||||
|
Metabolics Data |
Definition |
Unit |
|
EE |
The amount of energy the patient expends |
kcal/d or kJ/d |
|
per day in calories. |
||
|
RQ |
The ratio between the amount of carbon |
N/A |
|
dioxide the patient produces and oxygen |
||
|
the patient consumes. |
||
|
VO2 |
The volume of oxygen a patient inhales |
ml/min |
|
(consumes) per minute. |
||
|
VCO2 |
The volume of carbon dioxide a patient |
ml/min |
|
exhales (produces) per minute. |
||
|
VO2/m2 |
The volume of oxygen a patient inhales |
ml/min/m2 |
|
(consumes) per minute per square meter |
||
|
of body surface area. |
||
|
VCO2/m2 |
The volume of carbon dioxide a patient |
ml/min/m2 |
|
exhales per minute per square meter of |
||
|
body surface area. |
||
|
Spirometry Data |
Definition |
Unit |
|
Ppeak |
The highest pressure level measured |
cmH2O, kPa, or |
|
during the inspiratory phase. |
mbar |
|
|
Pplat |
The pressure level measured after the |
cmH2O, kPa, or |
|
inspiratory phase and before the expiratory |
mbar |
|
|
phase (during an inspiratory pause). |
||
|
Pmean |
The average pressure level measured |
cmH2O, kPa, or |
|
during the breath cycle. |
mbar |
|
|
PEEPe |
The pressure on the patient’s airway at the |
cmH2O, kPa, or |
|
end of the expiratory phase. |
mbar |
|
|
PEEPi |
The pressure that remains on the patient’s |
cmH2O, kPa, or |
|
airway at the end of the expiratory phase |
mbar |
|
|
due to incomplete expiration. PEEPi is |
||
|
measured above PEEPe. |
||
|
Spirometry Data |
Definition |
Unit |
||
|
VTinsp |
The volume of gas the patient inhales per |
ml |
||
|
breath. |
||||
|
MVinsp |
The volume of gas the patient inhales per |
l/min |
||
|
minute. |
||||
|
VTexp |
The volume of gas the patient exhales per |
ml |
||
|
breath. |
||||
|
MVexp |
The volume of gas the patient exhales per |
l/min |
||
|
minute. |
||||
|
Leak |
The percentage of volume leaked from the |
% |
||
|
patient circuit. |
||||
|
Timing Data |
Definition |
Unit |
|
I:E |
The ratio of inspiratory time to expiratory |
N/A |
|
time. |
||
|
Tinsp |
The duration of the inspiratory phase of the |
s |
|
breath cycle. |
||
|
Texp |
The duration of the expiratory phase of the |
s |
|
breath cycle. |
||
|
RR |
The number of breath cycles a patient |
/min |
|
completes per minute. |
||
|
Cycle Time |
The sum of the duration of inspiratory and |
s |
|
expiratory phases. |
||
Navigation
Note
Shared information section for adult, pediatric, and neonatal patient types.
Ventilator display
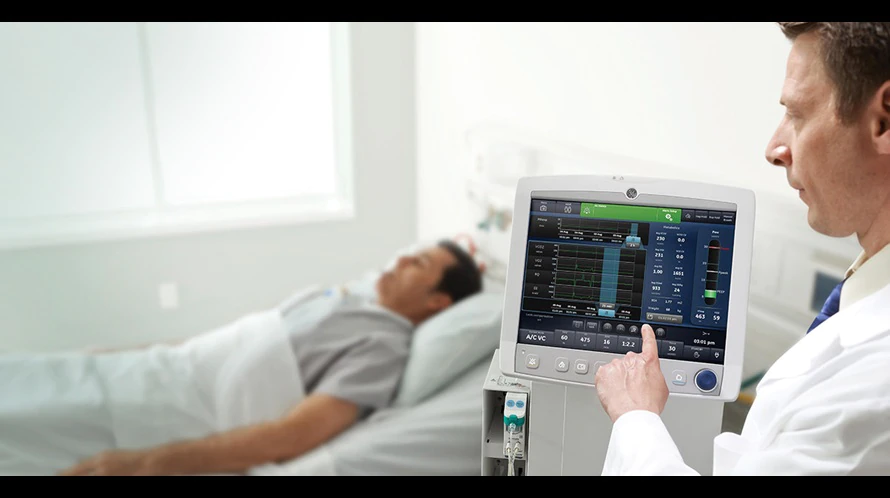
The 15-inch touchscreen display provides audible and visual alarms, integrated key pad, and a Trim Knob control. The display unit uses the Panasonic CR2477/BN battery (1000 mAh and 3V). To select menu options or settings, touch only one touch point at a time to make sure the correct selection is made. Touch the setting or press the Trim Knob to confirm settings.
The touchscreen allows swipe gestures to move from one workspace to another workspace.
Do not use pencils, pens, or other objects to activate the touchscreen. The touchscreen will not function properly if tape or paper is stuck to the display surface.
WARNING
Liquids on the display may degrade the performance of the touchscreen. If liquids come in contact with the display, lock the touchscreen and clean the display. Unlock the touchscreen once the display has been cleaned to resume use of the touchscreen.
CAUTION
Do not apply excessive force to the touchscreen as damage may occur.

1
4
AB.100.016
|
3 |
2 |
||
|
Figure 1 • Display controls and indicators |
|||
|
1. |
Alarm light |
The integrated alarm light provides a visual alarm |
|
|
when an alarm condition occurs. The alarm light also |
|||
|
provides a visual indicator when Audio Pause is |
|||
|
active and alarm audio is silenced. |
|||
|
2. |
Trim knob control |
Turn the Trim Knob clockwise or counterclockwise to |
|
|
change a setting. Press the Trim Knob to confirm a |
|||
|
setting. |
|||
|
3. |
Hard keys (key pad) |
Press the Audio Pause, Increase O2, Snapshot, Lock/ |
|
|
Unlock, or Home hard keys to access the associated |
|||
|
features. |
•Audio Pause: Press to silence alarms for 120 seconds.

|
4. LED indicator |
The green LED illuminates when the ventilator is |
|
connected to the main power supply. The internal |
|
|
battery is charging when the LED is lit. |
Display user interface
The user interface incorporates the Menu, Current Patient menu, alarm management, and Favorites procedures at the top of the display. The patient status (airway pressure bar) and workspace/monitoring area are located in the middle of the display. The navigation bar, message areas, battery status, standby, and quick keys are located at the bottom of the display.
|
3 |
|
|
9 |
4 |
|
8 |
5 |
|
AB.100.010 |
|
|
7 |
6 |
Figure 2 • Display user interface components
|
1. |
Favorites |
Provides short-cuts for up to four procedures (as |
|
selected by the user). Use to select specific |
||
|
procedures such as Increase O2, Inspiratory Hold, |
||
|
Expiratory Hold, and Manual Breath. See «Setting |
||
|
Favorites» in the «Operation» section. |
||
|
2. |
Patient status |
The airway pressure bar shows a dynamic view of |
|
the patient airway pressure, Pmax, Ppeak, PEEP, |
||
|
FiO2, and VTexp. Use the tab on the pressure bar |
||
|
to collapse (hide) from view when available. |
||
|
3. |
Navigation |
Select an icon to open the corresponding view. See |
|
«Navigating the user interface» for detailed |
||
|
information. |
||
|
4. |
Additional Information |
Shows current time and additional setting |
|
information. |
||
|
5. |
Main power |
Indicates whether the ventilator is connected to the |
|
main power supply or is running on battery. Also |
||
|
shows battery status when running on battery. |
||
|
6. |
Standby |
Select the Standby quick key to go into Standby |
|
(pause/stop ventilation). See «Standby» in the |
||
|
«Operation» section. |
||
|
7. |
Quick Keys |
Select to change the corresponding ventilator |
|
setting. Turn the Trim Knob to make a change. |
||
|
Select the quick key or press the Trim Knob to |
||
|
activate the change. When a quick key setting is |
||
|
selected, a Trim Knob visual cue indicates the |
||
|
change may be made by turning the Trim Knob and |
||
|
pressing to confirm the setting. |
||
|
8. |
Current Mode and Mode |
Shows the active ventilation mode. Select to |
|
Settings |
access ventilation modes, and change mode |
|
|
settings. |
||
|
9. |
General Messages |
Shows notices, procedure status, and system |
|
status information to the user. See «General |
||
|
messages» in the «Alarms and troubleshooting« |
||
|
section. |
||
|
10 Monitoring |
This area is used to view waveforms, measured |
|
|
. |
data, and settings. |
|
|
2065492-001 |
9 |

|
11 Menu |
Select to quickly access options such as: System |
|
. |
menu, Procedures, Lung Mechanics, Suction, and |
|
Nebulizer. See «Main menu» in the «Navigation« |
|
|
section. |
|
|
12 Current Patient menu |
Select to enter the Current Patient menu. This |
|
. |
menu allows entry of the patient ID using an alpha- |
|
numeric keyboard. Entered values for patient |
|
|
gender, height, and weight are used to calculate |
|
|
BSA (body surface area), and IBW (ideal body |
|
|
weight). This menu also allows the selection of tube |
|
|
type and diameter. See»New Patient» and «Current |
|
|
Patient» in the «Operation» section. |
|
|
13 Alarm management |
Select to view alarms, alarm history, alarm setup, |
|
. |
and alarm help. See «Alarms and troubleshooting« |
|
section. |
Navigating active alarms
When an alarm occurs for measured data, the number and alarm limits are shown with a border around them. The color of the border and the alarm limit shows the priority of the alarm. Select within the border of the active alarm to open the Alarm Setup menu. Select the alarm limit that needs adjustment, then use the Trim Knob to adjust the setting and confirm changes. See «Alarm management» in the «Alarms and troubleshooting» section for additional information.
AB.100.187
Figure 3 • Select inside of the border to open the Alarm Setup menu.
Standby
Standby is displayed upon system startup or when the Standby quick key is selected. When the system is in Standby, the Standby quick key and the patient status (airway pressure) bar are colored tan. A “Standby”

message is displayed in the navigation bar when in the Present/Patient Status workspace. Standby is used to stop ventilation to the patient, select a New or Previous patient, perform a System Check, and Park/ Unpark the patient circuit. The Setup button accesses the password protected Configuration (Super User) and Service menus.
|
AB.100.186 |
||||||||||
|
9 |
8 |
7 |
6 |
5 |
||||||
|
Figure 4 • Standby menu |
||||||||||
|
1. |
New Patient |
Select New Patient to enter patient information. |
||||||||
|
2. |
Circuit Setup |
Select Circuit Setup to select HME or Humidifier for |
||||||||
|
adult and pediatric patient types. |
||||||||||
|
3. |
Standby |
When Standby (hand icon) is selected the Standby |
||||||||
|
menu displays. If the Patient detected alarm |
||||||||||
|
occurs, the Standby menu automatically displays. |
||||||||||
|
4. |
Park/Unpark Circuit |
When the circuit is parked a message displays: |
||||||||
|
Patient circuit is occluded and ventilator is in |
||||||||||
|
Standby. |
||||||||||
|
5. |
Start Ventilation |
Select to start patient ventilation. |
||||||||
|
6. |
System Check |
Select System Check to perform a ventilator |
||||||||
|
system check. |
||||||||||
|
7. |
Information |
Select to access information regarding the system |
||||||||
|
check status and troubleshooting. |

|
8. |
Previous Patient/Current |
Select Previous Patient to use the previous |
|
Patient |
patient’s ventilator settings and patient information. |
|
|
Select Current Patient to open the Current Patient |
||
|
menu and use the current patient’s ventilator |
||
|
settings and patient information. |
||
|
9. |
Setup |
Select to access the Configuration (Super User) |
|
and Service menus. A password is required to |
||
|
enter these menus. Contact a training |
||
|
representative to obtain the password. |
Main menu
Select Menu to quickly access ventilator features and options.
1
2
3
4
5
AB.100.136
Figure 5 • The main Menu accesses the System menu, Procedures, Lung Mechanics, Nebulizer, and Suction options.
|
1. System |
Use the System menu to access data source, |
|
module type and version, calibrations (Paux Zero |
|
|
and Purge Flow), and display brightness. The |
|
|
System menu shows the software version, running |
|
|
hours, altitude, O2 supply pressure, air supply |
|
|
pressure, and battery status. See «System menu« |
|
|
located in this section. |
|
2. |
Procedures |
Use the Procedures menu to access the Assign |
|
Favorites menu and the following procedures: |
||
|
Manual Breath, Increase O2, Inspiratory Hold, |
||
|
Expiratory Hold, and Auto PEEP. See «Setting |
||
|
Favorites» in the «Operation» section. |
||
|
3. |
Lung Mechanics |
Use the Lung Mechanics menu to access the |
|
Assign Favorites menu and the following |
||
|
procedures: P0.1, Negative Inspiratory Force (NIF), |
||
|
and Vital Capacity. See «Setting Favorites» in the |
||
|
«Operation» section. |
||
|
4. |
Nebulizer |
Use the Nebulizer menu to access the Aerogen |
|
and Pneumatic Nebulizer procedures. See «Setting |
||
|
Favorites» section in the «Operation» section. |
||
|
5. |
Suction |
Use the Suction menu to access the Assign |
|
Favorites menu and the Suction procedure. See |
||
|
«Setting Favorites» in the «Operation» section. |
System menu
The System menu contains settings for data source selection, calibration options, display brightness, and system information.
1.Select Menu > System.
The Airway Module type and software version number are shown under data source.
2.Select Data Source (Ventilator or Airway Module).
•For Neonatal; select Ventilator or NFS. See «System menu» in the «Neonatal Operation» section.
3.Select Calibrations (Airway Module, Paux Zero, or Purge Flow).
•Select Airway Module to calibrate the airway module.
•Select Paux Zero. A green check mark indicates Paux Zeroing calibration was successful.
•Select Purge Flow. The Purge Flow check box may be checked or unchecked when performing a Paux Zero. Continuous purge flow will come from the Paux outlet when the Purge Flow check box is selected. A white check mark indicates Purge Flow is active.
Note
See «Purging the auxiliary pressure tubing» and «Zeroing auxiliary pressure» in the «Setup and connections» section.
4.Select Display Brightness to adjust the brightness level of the user interface.

Select brightness level of 1 (low) to 5 (high).
5.View system information: software version, service packet version, running hours, altitude, O2 supply pressure, air supply pressure, and battery status.
Changing a setting
1.Touch the setting.
2.Change the value by turning the Trim Knob or selecting a menu item.
3.Touch the setting or push the Trim Knob to confirm the setting.
Figure 6 • The Trim Knob graphic is used to indicate that the use of the Trim Knob is necessary to change or confirm a setting
Note
To cancel or back out of a setting change, select X in the lower right corner of the menu, touch outside of the setting twice, select the Home hard key, or wait for the selection to time out. For example, ventilation and alarm setting changes can be cleared by selecting the Home hard key prior to confirming a setting.
Navigating the user interface
The ventilator user interface uses three different workspaces: Past/ Historical trends, Present/Patient status, and Future/Clinical decision support. Each workspace (rectangle icon) contains views (circle icons) that contain different configurations of data and functions.
When a workspace is selected, the correlating view icons are displayed.
•Use a swipe gesture or touch a workspace icon to go to a new workspace (swipe gesture: touch display and move finger tip left or right).
•When you navigate away from a workspace and then navigate back, the display will show the last view that was displayed from the workspace.
•If a view is not supported by the current patient type or software is not installed, it will not display.

AB.100.185
Figure 7 • Navigation example; select a workspace (rectangle) to see correlating views (circle).
Present/Patient Status workspace and views
The Present/Patient Status workspace shows the following views: Basic, Basic Waveform, Advanced Waveform, Splitscreen, and Charting. This workspace allows the user to choose the view in which they would like to see patient data displayed. See «Measured data definitions» in the «Patient monitoring» section for information on the numerics displayed in the Present views. See «Neonatal measured data definitions» in the «Neonatal patient monitoring» section for information on the numerics displayed in the Present views for a neonatal patient type.
•Touch the icon to display the corresponding view.
•Use a swipe gesture to view and move to Past (Historical trends) and Future (Clinical decision support) workspaces.
Present/Patient Status Workspace

Basic View
AB.100.129
Use the Basic view to see measured data in a large format that can be easily viewed from a distance. Note: The patient status (airway pressure) bar is permanently displayed to easily view patient airway pressure, tidal volume, and FiO2.
Basic Waveform View
 AB.100.119
Use the Basic Waveform view to see patient waveforms and measured data. Note: the airway pressure bar may be collapsed to expand the monitoring area when the Paw and Flow waveforms are displayed.

Advanced Waveform View
 AB.100.120
Use the Advanced Waveform view to see additional measured data associated with the patient waveforms. Note: The airway pressure bar may be collapsed to expand the monitoring area when the Paw and Flow waveforms are displayed.
Splitscreen View
 AB.100.121
Use the Splitscreen view to see spirometry, measured data, and waveforms. Select the upper right corner of the spirometry waveform to change settings. Note: The airway pressure bar may be collapsed to expand the monitoring area when the Paw and Flow waveforms are displayed.

Charting View
AB.100.122
Use the Charting view to see a complete list of patient data.The airway pressure bar is permanently displayed to easily view patient airway and pressure settings, tidal volume and FiO2.
Past/Historical Trends workspace and views
The Past/Historical trends workspace shows information for the following views: Graphical trends, Numerical trends, Trends log, and Snapshot trends.
•Touch the icon to display the corresponding view.
•Use a swipe gesture to view and move to Present/Patient status or Future/Clinical Decision Support workspaces.
Past/Historical Trends Workspace
Graphical Trends View
AB.100.123
![]()
Graphical Trends View
Use the Graphical trends view to review historical waveforms and patient trends. See «Graphical trends view» and «Graphical trends view — Neonatal» in the Patient Monitoring section.
Numerical Trends View
AB.100.124
Use the Numerical trends view to review patient ventilation modes and settings, measured data, and alarm settings. See «Numerical trends view» and «Numerical trends — Neonatal» in the Patient Monitoring section.
Trends Log View
125 . 100 . AB
Use the Trends Log to review patient alarms and settings, and events that have occurred during ventilation. See «Trends log view» and «Trends log view — Neonatal» in the Patient Monitoring section.

Snapshot Trends View
AB. 126100.
Use Snapshot trends to view saved patient data. See «Snapshot trends view» and «Snapshot trends view — Neonatal» in the Patient Monitoring section for more information.
Future/Clinical Decision Support workspace and views
The Future/Clinical Decision Support workspace shows the following views (if software is installed): SBT, FRC, Spirometry, Metabolics, and Calculations.
•Touch the view icon to display the corresponding view.
•Use a swipe gesture to move to Present/Patient Status or Past/ HistoricalTrends workspaces and associated views.
Future/Clinical Decision Support
SBT View
AB.100.127

SBT View
Use the SBT view to evaluate spontaneous breathing trial data. See «SBT view» and «SBT view — Neonatal» in the Clinical Decision Support section.
FRC View
AB.100.128
Use the FRC view to evaluate and review patient respiratory data. The FRC view includes three tabs: Evaluate, FRC INview (FRC procedure), and PEEP INview (PEEP INview procedure). See «FRC INview procedures» in the Clinical Decision Support section.
Spirometry View
AB.100.130
Use the Spirometry view to evaluate and review graphs and data from spirometry and spirodynamic measurements. The Spirometry view includes the Spirometry tab and SpiroDynamics tab. See «Spirometry view» and «Spirometry view — Neonatal» in the Clinical Decision Support section.

Metabolics View
AB.100.131
Use the Metabolics view to evaluate and review Metabolics measurements. See «Metabolics view» in the Clinical Decision Support section.
Calculations View
AB.100.132
Use the Calculations view to calculate and review data based on the ventilator, measured data, and laboratory blood gas analysis data. See «Calculations view» in the Clinical decision support section.

Setup and connections
Note
Shared information section for adult, pediatric, and neonatal patient types.
Ventilator overview front
|
14:3 8 |
||||||||||
|
Airwa y |
||||||||||
|
FiO 2 |
PEEP e |
Peak Pressur e |
Pressur e |
|||||||
|
30 |
22 |
5 |
3 |
40 |
10 |
Pma x |
||||
|
% |
cmH2 O |
cmH2 O |
||||||||
|
40 |
10 |
50 |
60 |
|||||||
|
40 |
Ppea k |
|||||||||
|
Minute Volum e |
Tidal Volum e |
Respiratory Rat e |
20 |
1 |
||||||
|
6. 2 |
4 |
50 840 0 |
14 |
5 |
-5 |
|||||
|
l/mi n |
ml |
/mi n |
||||||||
|
12 |
60 0 |
20 |
0 |
PEE P |
|
VTex p |
|||||||||||
|
50 8 |
|||||||||||
|
30 |
33 |
10 |
1.7 |
5 |
5 |
||||||
|
2 |
9 |
10 |
11 |
12 |
13 |
||||||
|
3 |
|||||||||||
|
EXP |
|||||||||||
|
4 |
|||||||||||
|
8 |
|||||||||||
|
18 |
17 |
16 |
15 |
14 |
|||||||
|
5 |
|||||||||||
|
6 |


 AB.100.088

 7
7
Figure 8 • Ventilator front view
|
1. |
Display |
10. |
Exhalation valve housing |
|
2. |
Ventilator unit |
11. |
Expiratory port |
|
3. |
Inspiratory safety guard |
12. |
Expiratory flow sensor |

|
4. |
Ventilator lock |
13. |
Gas exhaust port |
|
5. |
Cart |
14. |
Park circuit port |
|
6. |
Dovetail rails |
15. |
Exhalation valve housing latch |
|
7. |
Caster (wheel) |
16. |
Water trap |
|
8. |
Airway module bay (optional) |
17. |
Auxiliary pressure port |
|
9. |
Nebulizer connection |
18. |
Inspiratory port |
Ventilator overview back
|
25 |
1 |
|
|
2 |
||
|
3 |
||
|
24 |
4 |
|
|
5 |
||
|
23 |
6 |
|
|
22 |
5 |
|
|
21 |
7 |
|
|
20 |
8 |
|
|
9 |
||
|
19 |
7 |
|
|
18 |
10 |
|
|
17 |
||
|
16 |
11 |
|
|
15 |
12 |
|
|
14 |
13 |
|
|
AB.100.100 |
Figure 9 • Ventilator back view
Note
Not all connections may be available on all ventilator configurations.
|
1. |
Ethernet connection (not |
14. Air high-pressure inlet filter |
|
supported) |
|
2. |
Ethernet connection (not |
15. |
Air supply connection (pipeline) |
|
supported) |
|||
|
3. |
USB connection (not supported) |
16. |
Retaining channel |
|
4. |
USB connection (Service |
17. |
Ventilator unit fan filter |
|
connection) |
|||
|
5. |
Display Unit connection |
18. |
Port 4 (Nurse call) |
|
6. |
VGA (not for clinical use) |
19. |
Patient circuit support arm |
|
7. |
Module bay connection |
20. |
Port 1 (neonatal flow sensor |
|
connection) |
|||
|
8. |
Main power inlet and fuse holder |
21. |
Port 2 (not supported) |
|
9. |
Power switch |
22. |
Port 3 (exhalation valve heater |
|
connection) |
|||
|
10. |
Equipotential stud |
23. |
Port 6 (RS232 Serial |
|
communication port) |
|||
|
11. |
Module bay mounting |
24. |
Port 5 (RS232 Serial |
|
thumbscrews |
communication port) |
||
|
12. |
Oxygen supply connection |
25. |
Display unit fan filter |
|
(pipeline) |
|||
|
13. |
O2 high-pressure inlet filter |
||
|
(optional) |
Connecting the breathing circuit
WARNING
Do not use antistatic or electrically conductive breathing tubes or masks.
Check all connections to the breathing circuit to make sure that there are no unintended connections made to other equipment, especially equipment that delivers fluids, as the patient could be harmed.
The inspiratory safety guard is required to connect the breathing circuits to the ventilator. The inspiratory safety guard must be used at all times during ventilation.
Note
See «Cleaning and maintenance» for information on the replacement of the inspiratory safety guard. See «Parts and accessories» for ordering information.
The exhalation valve heater should be used when an active humidifier with a heated expiratory limb is used.
Important
Consult your hospital guidelines for proper use of expiratory filters in conjunction with heated humidifiers.
Connecting a HME (heat and moisture exchanger)
Note
To prevent excessive resistance in the breathing circuit, the HMEF500 should not be used for Adult patients.
Note
If using optional accessories see Figure in «Connecting the Pedi-lite(+) and D-lite(+) sensors«.
1.Connect the inspiratory safety guard to the inspiratory port.
2.Attach the inspiratory limb of the patient circuit to the inspiratory safety guard.
3.Attach the expiratory limb of the patient circuit to the expiratory port or expiratory filter (if used).
4.Connect the Pedi-lite(+) or D-lite(+) sensor to the patient wye (if used). Use a 5 ml (minimum) spacer and elbow when using the Pedilite(+) or D-lite(+) sensor.
5.Connect the HME.
•Place the HME between the SpiroDynamics catheter (if used), but after the Pedi-lite(+) and D-lite(+) sensor (if used).
•The HME should be removed when a nebulizer is active. Replace the HME when the nebulizer is not in use.
6.Connect the circuit elbow to the HME (if used).
Note
To disconnect, follow instructions in reverse order.

|
Airway |
|||||
|
30 |
5 |
40 |
Pressure |
||
|
60 |
|||||
|
40 |
|||||
|
6.2 |
508 |
14 |
20 |
||
|
-5 |
|||||
|
0 |
|||||
|
508 |
|||||
|
30 |
33 |
10 |
1.7 |
5 |
5 |

 EXP INSP


1 


 3
3
4
5
 AB.100.188
Figure 10 • Overview of setup and connections with a HME
1.Inspiratory safety guard
2.Inspiratory limb
3.Expiratory port/expiratory filter if used
4.Expiratory limb
5.Patient wye
6.HME
Connecting the humidifier
The ventilator is designed to work with active humidification. GE Healthcare recommends the use of the Fisher & Paykel MR850 humidifier (refer to humidifier instructions for detailed information on humidifier connections and use).
WARNING
Never position any filter in the inspiratory limb downstream of a humidifier.
When adding attachments or other components to the ventilator, the pressure gradient across the breathing circuit may change.
1.Slide the humidifier heater onto the accessory rail (do not plug in).
Аппарат ИВЛ GE Carescape R860 — высокотехнологичный и современный прибор, используемый для осуществления качественной искусственной вентиляции легких. Он подходит для тех пациентов, кому необходимо пройти долговременный процесс терапии с надежным респираторным сопровождением.
Описание и главные преимущества аппарата ИВЛ GE Carescape R860
Благодаря широкому набору различных инструментов и активации скорого доступа ко всей необходимой информации, специалисты смогут существенно сэкономить время и отрегулировать настройки под индивидуальные потребности организма.
GE Carescape R860 представлен в различных форматах, а именно: ADVANCED UNIVERSAL, OPTIMA, ADVANCED, NEONATAL и EXPERT с возможностью подключения газового блока.
Основные преимущества:
— яркий цветной экран с наглядной демонстрацией всех необходимых параметров,
— сенсорный тип управления облегчает эксплуатацию и делает ее более комфортной,
— встроенная система тревожных оповещений в случае критических изменений показателей или технических неполадок,
— интуитивно понятный интерфейс со множеством настраиваемых параметров и режимов,
— поддержка различных вариантов вентиляции: SIMV VC, SIMV PC, CPAP/PS, SBT, A/C VC, A/C PC и другие,
— функция измерения газообмена,
— анализ процессов метаболизма,
— функция оказания нутритивной поддержки при необходимости,
— анализирование трендов в течение 2 недель (336 часов),
— определение остаточной легочной емкости с помощью инструмента PRC IN VIEW без прекращения вентиляции,
— определение трахейного давления и объема с помощью инструмента Spiro Dynamic в режиме здесь и сейчас,
— встроенный O2 датчик,
— поддержка трех вариантов калибровки,
— может быть представлен в форматах: ADVANCED UNIVERSAL, OPTIMA, ADVANCED, NEONATAL и EXPERT с возможностью подключения газового блока,
— стильный эргономичный дизайн и компактные размеры.
GE Carescape R860 оснащен всей необходимой стандартной конфигурацией, предоставляет расширенные опции для наблюдения, а также не вызывает каких-либо затруднений в ходе обслуживания и эксплуатации.
ИВЛ CARESCAPE R860
Развитие высоких технологий позволяет применять многофункциональные аппараты с современным программным обеспечением и в медицине. Особенно это востребовано при поддержке жизненно важных функций организма пациента, одной из которых является дыхание. Аппарат CARESCAPE R860, предназначенный для искусственной вентиляции легких, сочетает в себе удобство и технологичность. Данная модель обладает множеством инновационных решений как в области терапии, так и в интерфейсе.
Рассматриваемый аппарат относится к экспертному классу и эксплуатируется для взрослых и детей, а с опцией неонатального режима обеспечивает бережное и эффективное лечение для новорожденных.
Для всесторонней респираторной поддержки система CARESCAPE R860 оснащена режимами инвазивной и неинвазивной вентиляции легких. Кроме этого есть ряд дополнительных функций, которые значительно облегчают состояние пациентов в период лечения, позволяют сократить время пребывания на ИВЛ и способствуют защите легких от травматизации.
Удобство работы с аппаратом CARESCAPE R860 обеспечивается подвижным монитором с цветным сенсорным дисплеем 15”. Управление интуитивно понятное благодаря продуманному интерфейсу, что помогает освоить взаимодействие с системой в кратчайшие сроки.
Сфера применения ИВЛ CARESCAPE R860
Благодаря своему обширному функционалу ИВЛ Carescape R860 идеально подходит для отделений интенсивной терапии и реанимации. Мониторинг состояния пациента, а также возможности проведения различных типов искусственной вентиляции легких обеспечивают результативную поддержку на всех этапах выздоровления.
Аппарат ориентирован на комплексное ведение пациента. ПО устройства позволяет не только просматривать историю лечения, но и оценивать прогноз терапии, что упрощает принятие клинических решений. Уникальная технология – тестирование готовности пациента к отлучению от ИВЛ, обеспечивает плавный переход к естественному дыханию.
Принцип работы ИВЛ CARESCAPE R860

Рассматриваемый аппарат CARESCAPE R860 осуществляет работу на основе пневматического привода. При подключении пациентов к аппарату лечащий врач настраивает индивидуальные параметры терапии, а далее оборудование работает автоматически в выбранном режиме. При подаче дыхательной смеси к пациенту активируется функция защиты легких для предупреждения побочных эффектов искусственной вентиляции.
Предусмотренные режимы дыхательной поддержки:
- A/C VC – с контролем вдоха по объему;
- A/C PC – с контролем вдоха по давлению;
- A/C PRVC – контроль давления и заданного дыхательного объема;
- SIMV-VC – спонтанно-принудительная вентиляция с контролем вдоха по объему;
- SIMV-PC – спонтанно-принудительная вентиляция легких с контролем вдоха за давлением;
- BiLevel – режим вентиляции CARESCAPE R860 с возможностью самостоятельного дыхания и поддержкой давлением разного уровня на вдохе и выдохе;
- VS – с поддержкой самостоятельных вдохов пациента по объему;
- CPAP/PS – с непрерывным положительным давлением в дыхательных путях для поддержки самостоятельных вдохов пациента;
- Опция SIMV-PRVC – принудительная вентиляция легких с контролем давления и гарантированной доставкой заданного дыхательного объема;
- Опция BiLevel VG – поддержка с двумя уровнями давления в дыхательных путях и гарантированным дыхательным объемом;
- Опция APRV – с периодическим снижением давления в дыхательных путях;
- Опция SBT – фирменный режим CARESCAPE R860, позволяющий тестировать возможность самостоятельного дыхания пациента.
В интерфейсе системы вместо стандартного многоуровневого меню представлены рабочие области, в которых легко ориентироваться, оперативно получать нужную информацию и регулировать работу CARESCAPE R860. Благодаря сенсорному управлению удобно переключать окна интерфейса пролистыванием, перемещаясь от текущих показателей к журналу процедур или к функциям отлучения от вентиляции легких.
Специальные инструменты аппарата позволяют даже получать рекомендации по питанию за счет методики непрямой калориметрии.
Преимущества ИВЛ CARESCAPE R860
Помимо основных функций, в модели CARESCAPE R860 реализовано множество дополнительных технологических решений, которые выгодно выделяют данный аппарат на медицинском рынке:
- Легкое переключение между режимами респираторной поддержки, а также оперативная навигация по отслеживаемым параметрам;
- Возможность измерения концентрации кислорода и углекислого газа, а также отслеживание метаболизма в организме пациента;
- Высокое качество комплектующих аппарата CARESCAPE R860, что гарантирует их длительную эксплуатацию без необходимости замены и комплексного техобслуживания;
- Сохранение данных мониторинга пациента с возможностью их анализа и передачи на внешние устройства;
- Удобный сенсорный жидкокристаллический дисплей с численным и графическим отображением параметров в реальном времени;
- Наличие у CARESCAPE R860 мобильного основания с блокирующимися колесами для транспортировки по медицинскому учреждению;
- Продолжительный анализ трендов до 336 часов или 14 дней;
- Функция отлучения от ИВЛ;
- FRC INview – технология измерения функциональной остаточной емкости легких у пациентов без прерывания вентиляции;
- SpiroDynamics – измерение трахеального давления и построение кривой объем/давление в режиме реального времени.
Для эффективной и безопасной искусственной вентиляции легких важно подбирать качественное оборудование. Современные аппараты, такие как CARESCAPE R860, благодаря продвинутым алгоритмам способны минимизировать длительность терапии, помогая пациенту быстрее восстанавливаться.
На сайте нашей компании представлен широкий ассортимент аппаратов ИВЛ с различными режимами и функциями. Наши специалисты рады проконсультировать Вас по любой модели и ответить на все вопросы касательно условий приобретения, возможностей оплаты, доставки, а также гарантийного и постгарантийного обслуживания.
- Список литературы:
- Магомедов Н.А., Щербакова И.В. Физические основы повышения эффективности искусственной вентиляции легких // Бюллетень медицинских интернет-конференций – 2014.
- Сабиров Д.М., Мухитдинова Х.Н., Росстальная А.Л., Хайдарова С.Э. Применение искусственной вентиляции легких при критических состояниях у детей // Вестник экстренной медицины – 2015.
Характеристики
|
Автономная работа |
до 30 мин от встроенной батареи |
|
Дисплей |
цветной, сенсорный, 15” |
|
Вес |
78 кг (вместе с компрессором – 107 кг) |
|
Режимы вентиляции |
A/C VC, A/C PC, A/C PRVC, SIMV VC, SIMV PC, Bilevel, CPAP/PS, VS, SBT |
|
Максимальное давление |
125 см H2O |
|
Страна производства |
США |
|
Размер (ШxВxГ), см |
1520 х 530 х 810 мм |
|
Тип |
аппарат ИВЛ |
Для приобретения необходимого Вам устройства, сформируйте заказ. Вы можете сделать это несколькими способами:
- Выбрать понравившийся товар, нажать кнопку «Заказать» и заполнить специальную форму. Затем Вам перезвонит менеджер, чтобы уточнить детали.
- Связаться с нашими сотрудниками по номеру телефона 8 800 500 13 42 или электронной почте info@west-medical.ru.
- Заказать обратный звонок. Для этого необходимо нажать кнопку «Заказать звонок» в шапке сайта. Наши сотрудники оперативно свяжутся с Вами для оформления заказа и консультации.
Мы работаем с физическими и юридическими лицами. Для Вас доступно несколько методов оплаты:
- Наличный расчет при самовывозе товара из нашего офиса или доставке курьером.
- Безналичный расчет банковской картой.
- Безналичный расчет банковским переводом.
Вы можете получить Ваш заказ несколькими способами:
- Курьерская доставка по Москве и Московской области.
- Доставка удобной для Вас транспортной компанией в любой регион России и в страны СНГ.
- Самовывоз из нашего офиса после согласования с менеджером.
Аппарат искусственной вентиляции легких CARESCAPE R860 с принадлежностямиI. Состав:
1. Основной блок аппарата.
2. Кабель для подсоединения к сети.
3. Руководство по эксплуатации (не более 10 шт.) (при необходимости).
4. Краткое руководство пользователя (не более 10 шт.) (при необходимости).
5. Краткое руководство: предоперационное тестирование (при необходимости).
6. Встроенное программное обеспечение Adult/Ped (при необходимости).
7. Встроенное программное обеспечение Adult/Ped/Neo (при необходимости).
8. Встроенное программное обеспечение Neo (при необходимости).
9. Встроенное программное обеспечение на русском языке (при необходимости).
10. Встроенное программное обеспечение APRV (при необходимости).
11. Встроенное программное обеспечение BiLevel Vent (при необходимости).
12. Встроенное программное обеспечение BiLevel-VG (при необходимости).
13. Встроенное программное обеспечение SIMV-PRVC (при необходимости).
14. Встроенное программное обеспечение VS (при необходимости).
15. Встроенное программное обеспечение NIV (при необходимости).
16. Встроенное программное обеспечение NCPAP (при необходимости).
17. Встроенное программное обеспечение FRC (при необходимости).
18. Встроенное программное обеспечение Spirodynamics (при необходимости).
II. Принадлежности:
1. Кронштейн для поддержки дыхательного контура.
2. Одноразовый дыхательный контур для взрослых пациентов (не более 300 шт.).
3. Одноразовый дыхательный контур для педиатрических пациентов (не более 300 шт.).
4. Контур для новорожденных и педиатрических пациентов многоразовый (не более
50 шт.).
5. Контур для новорожденных пациентов (не более 300 шт.).
6. Дыхательный контур для взрослых многоразовый (не более 10 шт.).
7. Дыхательный контур детский многоразовый (не более 10 шт.).
8. Комплект небулайзера (не более 50 шт.), в сборе:
8.1. Камера небуйлазера.
8.2. Тройник взрослый, детский.
8.3. Кабель для подключения небулайзера.
9. Заглушка камеры небулайзера (не более 50 шт.).
10. Одноразовые камеры небулайзера Solo (5 шт.).
11. Одноразовые камеры небулайзера (10 шт.).
12. Т-образные переходники небулайзера взрослые, одноразовые (не более 300 шт.).
13. Т-образные переходники небулайзера неонатальные, одноразовые (не более 300 шт.).
14. Т-образные переходники небулайзера педиатрические, одноразовые (не более
300 шт.).
15. Кабель для небулайзера (не более 10 шт.).
16. Крышка камеры небулайзера с отверстием для заполнения (не более 50 шт.).
17. Небулайзер (не более 50 шт.).
18. Т-образный переходник небулайзера с силиконовой заглушкой многоразовый
(не более 50 шт.).
19. Набор небулайзера многоразовый, взрослый, в сборе (не более 50 шт.):
19.1. Камера небулайзера (не более 10 шт.).
19.2. Заглушка.
19.3. Т-образный переходник взрослый (не более 10 шт.).
20. Набор небулайзера многоразовый с силиконовой заглушкой, неонатальный (не более 50 шт.):
20.1. Камера небулайзера с крышкой (не более 10 шт.).
20.2. Т-образный переходник детский (не более 10 шт.).
20.3. Заглушка небулайзера.
21. Набор небулайзера многоразовый с силиконовой заглушкой, детский, в сборе
(не более 50 шт.):
21.1. Камера небулайзера (2 шт.).
21.2. Заглушка небулайзера.
21.3. Т-образный переходник детский (2 шт.).
22. Набор небулайзера многоразовый, детский, в сборе (не более 50 шт.):
22.1. Камера небулайзера с крышкой.
22.2. Т-образный переходник детский.
22.3. Заглушка небулайзера.
23. Заглушка камеры небулайзера силиконовая.
24. Экспираторный фильтр (не более 300 шт.).
25. Шланг для влагоотделителя (не более 50 шт.).
26. Экспираторный влагоотделитель, в сборе (не более 50 шт.):
26.1. Влагоотделитель.
26.2. Шланг для влагоотделителя.
27. Держатель баллона с газом.
28. Инспираторный защитный фильтр многоразовый (не более 300 шт.).
29. Инспираторный защитный фильтр, одноразовый (не более 300 шт.).
30. Катетер для измерения внутритрахеального давления (не более 300 шт.).
31. Тепловлагообменник с фильтром HMEF 500 (не более 500 шт.).
32. Тепловлагообменник с фильтром HMEF 1000/S с пробоотборным отверстием
(не более 500 шт.).
33. Рама для газового модуля с кабелем.
34. Дополнительное крепление для дыхательного контура.
35. Стойка для внутривенных вливаний.
36. Адаптер крепежного кронштейна (не более 5 шт.).
37. Корзина для компонентов.
38. Регулируемая монтажная рейка (не более 5 шт.).
39. Соединение Луер.
40. Адаптер регулируемой монтажной рейки (не более 5 шт.).
41. Маска серии 6500V2, большая (не более 50 шт.).
42. Маска серии 6500V2, средняя (не более 50 шт.).
43. Маска серии 6500V2, малая (не более 50 шт.).
44. Маска серии 6500V2, сверх малая (не более 50 шт.).
45. Маска серии 6500V2, для новорожденных (не более 50 шт.).
46. Адаптер для мониторинга (не более 200 шт.).
47. Клапан выдоха с датчиком потока (не более 20 шт.).
48. Клапан выдоха без датчика потока (не более 20 шт.).
49. Набор для спирометрии, в сборе (не более 300 шт.).
49.1. Линия отбора проб, 2 м.
49.2. Спирометрическая трубка, 2 м.
49.3. Адаптер для спирометрии.
49.4. Фильтр с тепловлагообменником.
50. Набор для спирометрии для использования во влажных условиях, в сборе (1-300 шт.):
50.1. Линия отбора проб для СО2 (не более 300 шт.).
50.2. Cпирометрическая трубка.
50.3. Датчик спирометрии для влажных условий.
51. Вспомогательный комплект для спирометрии пациента для ОИТ, в сборе (не более 300 шт.):
51.1. Линия отбора проб (2 м).
51.2. Спирометрическая трубка.
52. Комплект для спирометрии, одноразовый, в сборе (не более 300 шт.):
52.1. D-lite датчик.
52.2. Спирометрическая трубка (не более 300 шт.).
53. Крепление на полку.
54. Фильтр для дисплея (не более 300 шт.).
55. Фильтр охлаждающего вентилятора двигателя аппарата ИВЛ (не более 300 шт.).
56. Фильтрующий элемент клапана выдоха.
57. Корпус фильтра без уплотнительного кольца (не более 300 шт.).
58. Влагоотделитель D-fend+ (не более 30 шт.).
59. Влагоотделитель D-fend Pro+, одноразовый (не более 300 шт.).
60. Влагоотделитель типа D-fend, мини (не более 300 шт.).
61. Адаптер для спирометрии D-lite+, взрослый для использования во влажных условиях, одноразовый (не более 300 шт.).
62. Адаптер для спирометрии Ped-lite+, детский для использования во влажных условиях, одноразовый (не более 300 шт.).
63. Адаптер для спирометрии D-lite для использования во влажных условиях, взрослый многоразовый (не более 100 шт.).
64. Адаптер для спирометрии Pedi-lite для использования во влажных условиях, детский многоразовый (не более 100 шт.).
65. Линии для спирометрии одноразовые (не более 300 шт.).
66. Линии отбора проб CO2 (не более 300 шт.).
67. Заглушка для газового модуля (не более 5 шт.).
68. Газовый модуль.
69. Диафрагма клапана выдоха (не более 300 шт.).
70. Уплотнитель.
71. Корпус клапана выдоха (не более 300 шт.).
72. Датчик потока (не более 300 шт.).
73. Уплотнительное кольцо для поршня (не более 50 шт.).
74. Поршень.
75. Пружина (не более 50 шт.).
76. Уплотнительное кольцо между влагоотделителем и клапаном вдоха.
77. Влагосборник (не более 50 шт.).
78. Нагреватель клапана выдоха.
79. Кабель нагревателя клапана выдоха.
80. Кабель для подключения неонатального датчика потока (не более 50 шт.).
81. Неонатальный датчик потока (не более 50 шт.).
82. Тележка на колесах без задней панели.
83. Тележка на колесах с задней панелью.
84. Тележка с блоком электророзеток.
85. Крепление на консоль.
86. Газовый выход.
87. Провод для штепсельного разъема стандарта CEE 7/7 AC.
88. Провод для штепсельного разъема тележки.
89. Тележка на колесах с компрессором.
90. Тележка на колесах с компрессором и розетками.
91. Медицинский компрессор.
92. Электрическая конфигурация CEE 7/7 медицинского компрессора.
93. Шланг для подачи кислорода.
94. Шланг для подачи воздуха.
95. Карта для активации программного обеспечения VS на оптическом или электронном носителе.
96. Карта для активации программного обеспечения NIV на оптическом или электронном носителе.
97. Карта для активации программного обеспечения NCPAP на оптическом или электронном носителе.
98. Карта для активации программного обеспечения APRV на оптическом или электронном носителе.
99. Карта для активации программного обеспечения BiLevel на оптическом или электронном носителе.
100. Карта для активации программного обеспечения SIMV-PRVC на оптическом или электронном носителе.
101. Карта для активации программного обеспечения BiLevel-VG на оптическом или электронном носителе.
102. Карта для активации программного обеспечения FRC на оптическом или электронном носителе.
103. Карта для активации программного обеспечения Spirodynamics на оптическом или электронном носителе.
104. Карта для активации программного обеспечения для новорожденных на оптическом или электронном носителе.
105. Фильтр для разводки кислорода (не более 50 шт.).
106. Адаптер для крепления увлажнителя и влагоотделителя (не более 5 шт.).
107. Адаптер для крепления увлажнителя (не более 5 шт.).
108. Крепление для увлажнителя и водяной ловушки c возможностью самостоятельной установки (не более 5 шт.).
109. Крепление для увлажнителя c возможностью самостоятельной установки (не более
5 шт.).
110. Комплектующие для установки корзины для дополнительных устройств (не более
5 шт.).
111. Кабель системы вызова медсестры.
112. Кабель для дисплея (2 м) (не более 5 шт.).
113. Кабель для дисплея (5 м) (не более 5 шт.).
114. Справочное руководство для компрессора (не более 5 шт.).
115. Датчик температуры для увлажнителя (не более 5 шт.).
116. Линии отбора проб газа (не более 300 шт.).
117. Тестовое легкое (не более 5 шт.).
118. Водяная ловушка (не более 50 шт.).