Руководства пользователя
Версия 3.0
832.62 KB
ASUS Router MAC Clone Setup Procedure
English Version.
This document describes how to set up an ASUS wireless router (such as RT-N16, RT-N13U, RT-N15, etc.) to connect to the Internet if your cable modem does not renew an IP address to your ASUS router due to MAC binding.
Версия T4258
6.67 MB
ASUS WL-520GU user’s manual in traditional Chinese
Версия e4258
1.94 MB
ASUS WL-520GU user’s manual in English
Версия LI3188
2.84 MB
ASUS WL-520GU user’s manual in Lithuanian
Версия LT3188
2.94 MB
ASUS WL-520GU user’s manual in Latvian
Версия U3067
22.16 MB
WL-520GU Quick Start Guide for Multiple Languages
WL-520GU Quick Start Guide for Multiple Languages
Add Latvian/Lithuanian language version.
Версия 1.0
977.01 KB
ASUS WL-5XX Series Wireless Router Internet Configuration User’s Guide(Simplified Chinese Version)
This document describes how to set up ASUS WL-5XX series wireless router to getting connection to the Internet and provides troubleshooting tips to help you fix some simple problems.
Версия S3188
2.96 MB
ASUS WL-520GU/GC user’s manual in Spanish(S3188)
Версия PG3188
2.93 MB
ASUS WL-520GU/GC user’s manual in Portuguese(PG3188)
Версия P3188
2.92 MB
ASUS WL-520GU/GC user’s manual in Polish(P3188)
Версия HUG3188
3.09 MB
ASUS WL-520GU/GC user’s manual in Hungarian(HUG3188)
Версия GK3188
2.91 MB
ASUS WL-520GU/GC user’s manual in Greek(GK3188)
Версия 1.0
272.89 KB
ASUS Wireless Router WDS Configuration Guide v1.0
Версия 1.0
580.5 KB
ASUS Router Virtual Server Configuration Guide for WL-5xx series/WL-600g/700gE/RX3041/SL200/SL500/ SL1000/SL1200
This document describes how to configure virtual server on the WL-5xx series/WL-600g/700gE/RX3041/SL200/SL500/ SL1000/SL1200
Версия 1.0
2.5 MB
ASUS WL-5XX Series Wireless Router Internet Configurationn User’s Guide(English Version)
This document describes how to set up ASUS WL-5XX series wireless router to getting connection to the Internet and provides troubleshooting tips to help you fix some simple problems.
Версия E3188
2.26 MB
WL-520GC/GU user’s manual(English)
Всем привет! Сегодня мы будем заниматься настройкой роутера ASUS WL-520gU. Пугаться не стоит, все делается достаточно легко, и вы сейчас сами в этом убедитесь. Если он у вас совершенно новый, то пора вытаскивать его из коробки и начинать настройку. Для начала давайте с ним познакомимся, чтобы в дальнейшем у вас возникало как можно меньше вопросов.
Я постараюсь рассказывать как можно понятнее, но если у вас возникнут какие-то вопросы или вылезет ошибка, интернет не будет работать – то сразу же пишем в комментариях.
Содержание
- Индикаторы и подключение
- Настройка
- PPPoE
- PPTP и L2TP
- Статический IP
- Дополнительные данные
- Настройка Wi-Fi
- Смена пароля администратора
- Задать вопрос автору статьи
Индикаторы и подключение
Поверните его лицом к себе и взгляните на индикаторы или так называемые лампочки. Они будут сигнализировать о правильной или не правильной работе маршрутизатора, поэтому с ними нужно быть знакомым сразу.
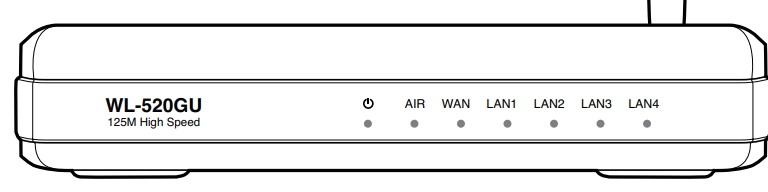
- Питания – включен или выключен роутер.
- AIR – работа Wi-Fi.
- WAN – интернет.
- LAN1-LAN4 – подключение устройств по кабелю к локальным портам.
Тут все ясно и понятно, если индикатор горит или мигает, значит идёт работа в данной среде, а информация передается. Если индикатор не горит, то значит есть какие-то проблемы на этой линии.
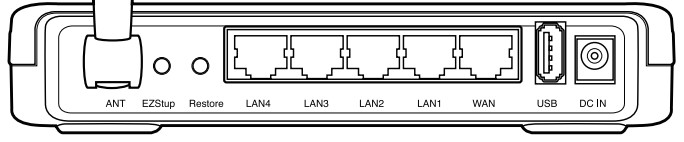
Теперь, давайте познакомимся со всеми портами и кнопками аппарата:
- ANT – это антенна, она у нас всего одна.
- EZStup – клавиша для запуска утилиты EZStup.
- Restore – кнопка для сброса роутера до заводских настроек. Если вы его получили от знакомого или друга, то стоит при включенном маршрутизаторе зажать эту кнопку на 10 секунд.
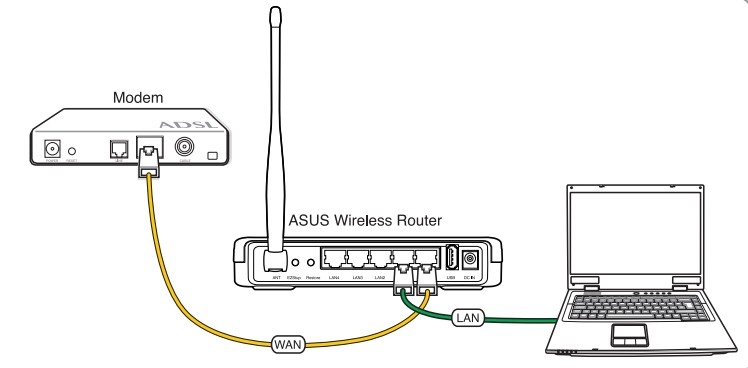
- LAN1-LAN4 – сюда можно подключить любое локальное устройство: компьютер, ноутбук, камеру, принтер, телевизор. Для этого используем обычный сетевой кабель. Один есть в коробке. Для настройки я буду использовать именно локальное прямое подключение и подключу ноутбук к первому порту.
- WAN – сюда нужно подключить кабель от провайдера или от aDSL модема.
- USB – для подключения 3G/4G модема и накопителя.
- DC ln – питание. Подключите сюда блок питания.
Настройка
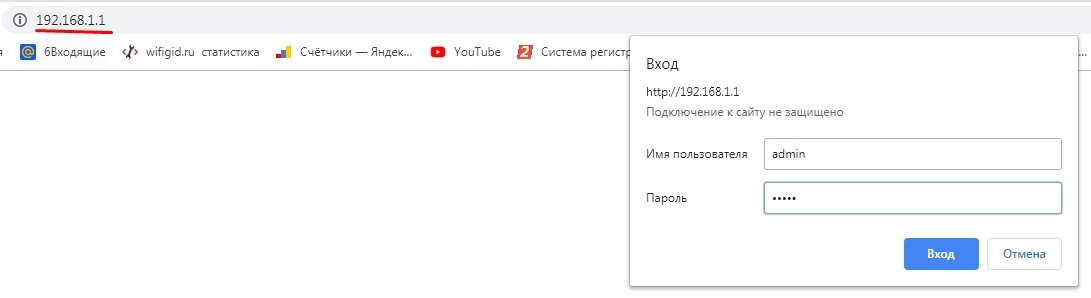
- После того как вы подключились к роутеру ASUS WL-520gU с помощью кабеля. С ноутбука или компьютера нужно запустить браузер и ввести в адресную строку: 192.168.1.1. Далее в обе строки введите: admin. Если пароль не подходит, то ещё раз сбросьте интернет-центр до заводской конфигурации.
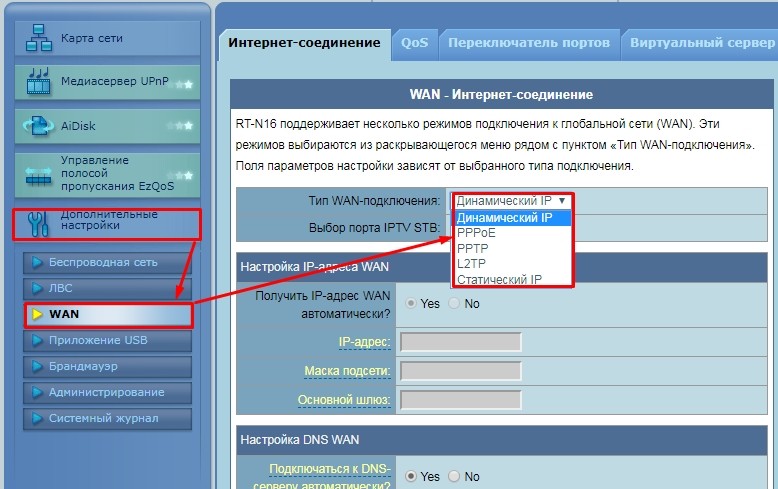
- Чтобы выполнить настройку интернета, откройте вкладку «Дополнительные настройки», далее переходим в «WAN». Теперь вам нужно взять договор от провайдера – там будет указан тип подключения, а также возможно нужно будет указать дополнительные данные. Так что выбираем «Тип WAN подключения»: Динамический IP, PPPoE, PPPTP, L2TP, статический IP. Если в договоре вообще ничего не сказано, то скорее всего ваш провайдера использует «динамический IP». В остальных случаях, нужно указать только то, что указано в договоре, а остальные строки оставляем со значениями по умолчанию или пустыми.
- После того как вы внесете изменения, обязательно нажмите на кнопку «Применить».
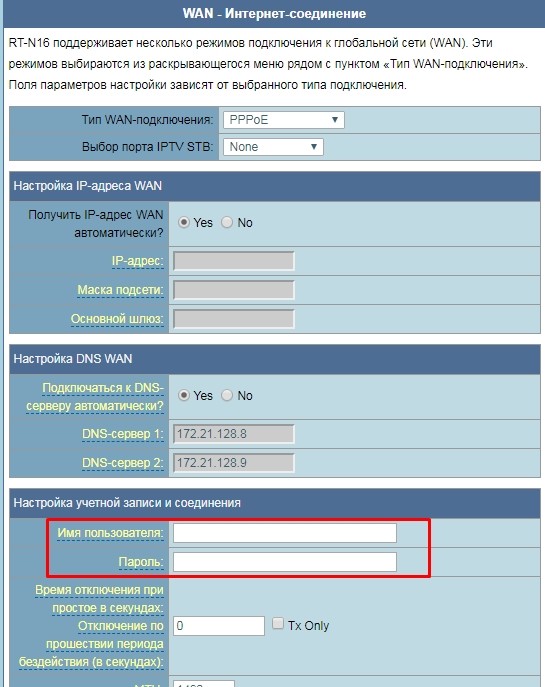
PPPoE
Чаще всего тут нужно указать только логин и пароль.
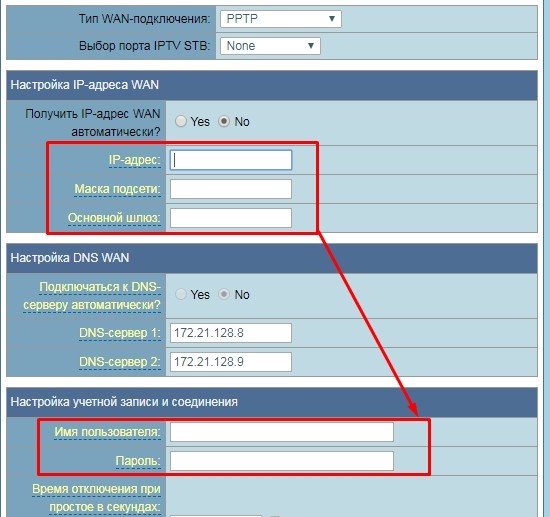
PPTP и L2TP
Сначала указываем IP адрес, маску и IP основного шлюза, а уже потом вводим имя пользователя и ключ.
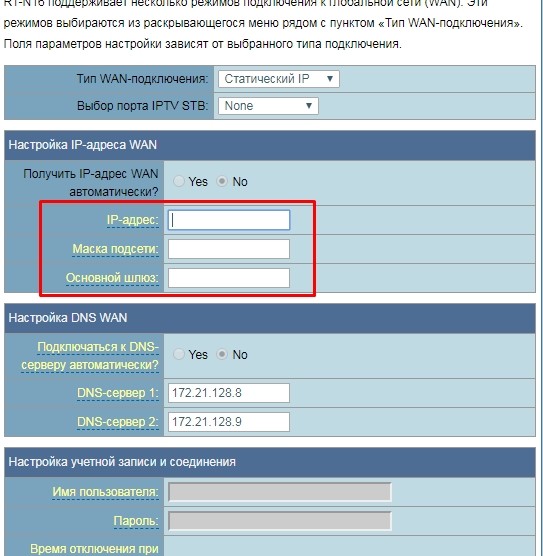
Статический IP
Здесь нужно указать только данные адреса: IP, маску, шлюз.
Дополнительные данные
Иногда также нужно указать адреса DNS, их просто вводим с листа. Но как я уже и говорил, если они не указаны, то оставляем данные по умолчанию. Это касается и другой информации в настройках.
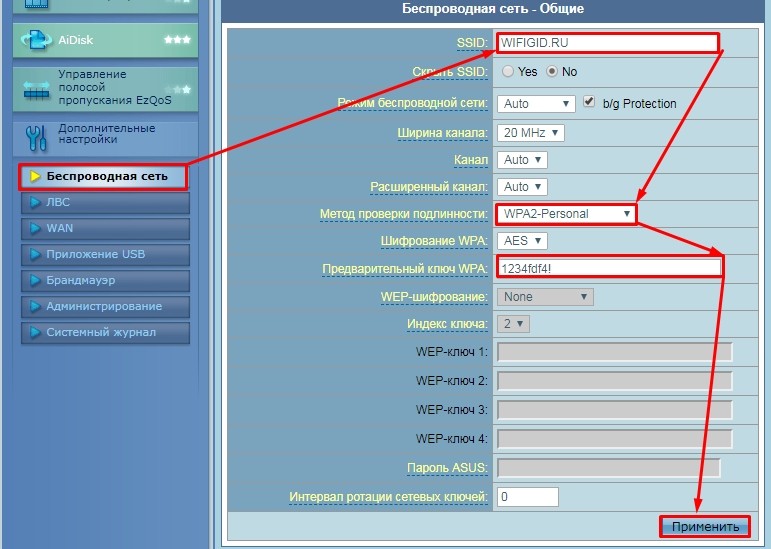
«Дополнительные настройки» – «Беспроводная сеть». Теперь, чтобы поменять имя WiFi в строку «SSID» вводим новое значение (имя может быть любым). Далее, чтобы установить пароль в строке «Метод проверки подлинности» указываем тип «WPA2-Personal». Для установки пароля вводим значение в строку «Предварительный ключ WPA». Нажимаем «Применить».
Смена пароля администратора
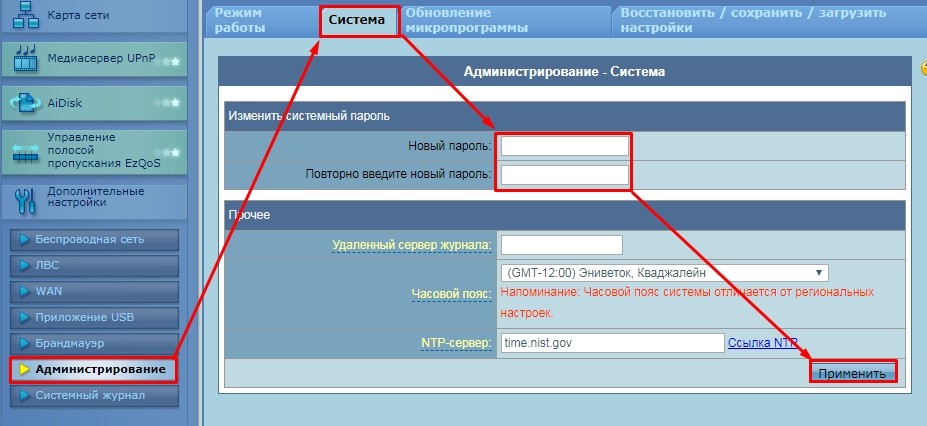
В качестве безопасности стоит поменять стандартный пароль от Web-интерфейса. Для этого там же переходим в раздел «Администрирование», далее во вкладку «Система». Два раза вписываем новый пароль и нажимаем «Применить».

-
Contents
-
Table of Contents
-
Troubleshooting
-
Bookmarks
Quick Links
WL-520GU Wireless Router
WL-520GU
AIR
WAN
LAN1
LAN2
LAN3
LAN4
125M High Speed
User Manual
Related Manuals for Asus WL-520gU
Summary of Contents for Asus WL-520gU
-
Page 1: User Manual
WL-520GU Wireless Router WL-520GU LAN1 LAN2 LAN3 LAN4 125M High Speed User Manual…
-
Page 2
Product warranty or service will not be extended if: (1) the product is repaired, modified or altered, unless such repair, modification of alteration is authorized in writing by ASUS; or (2) the serial number of the product is defaced or missing. -
Page 3: Table Of Contents
Table of contents About this guide … 4 How this guide is organized … 4 Conventions used in this guide … 5 Chapter 1: Knowing your wireless router Package contents … 6 System requirements … 6 Before you proceed … 6 Hardware features …
-
Page 4: About This Guide
This guide contains the following parts: • Chapter 1: Knowing your wireless router This chapter provides information on the package contents, system requirements, hardware features, and LED indicators of the ASUS Wireless Router. • Chapter 2: Setting up the hardware This chapter provides instructions on setting up, accessing, and configuring the ASUS Wireless Router.
-
Page 5: Conventions Used In This Guide
• Chapter 4: Configuring via the web GUI This chapter provides instructions on configuring the ASUS Wireless Router using its web graphics user interface (web GUI). • Chapter 5: Installing the utilities This chapter provides information on the utilities that are available from the support CD.
-
Page 6: Chapter 1: Knowing Your Wireless Router
• An installed TCP/IP and Internet browser Before you proceed Take note of the following guidelines before installing the ASUS Wireless Router: • The length of the Ethernet cable that connects the device to the network (hub, ADSL/cable modem, router, wall patch) must not exceed 100 meters.
-
Page 7: Hardware Features
Install the device at least 0cms from a person to insure that the product is operated in accordance with the RF Guidelines for Human Exposure adopted by the Federal Communications Commission. Hardware features Front panel WL-520GU 125M High Speed Status indicators Status (Power)
-
Page 8: Rear Panel
Rear panel Status indicators Item EZSetup Restore LAN1-LAN4 DC In WL-50GU Description Press this button to launch the EZSetup utility. Press this button to restore the router’s system to its factory default settings. Connect RJ-45 Ethernet cables to these ports to establish LAN connection.
-
Page 9: Bottom Panel
Bottom panel Item Air vents These vents provide ventilation to your router Mounting hooks Use the mounting hooks to mount your router on concrete or wooden surfaces using two roundhead screws. Note: For details on mounting your router on a wall or ceiling, refer to the section Mounting options on the next page of this user manual.
-
Page 10: Mounting Options
Mounting options Out of the box, the ASUS Wireless Router is designed to sit on a raised flat surface like a file cabinet or book shelf. The unit may also be converted for mounting to a wall or ceiling. To mount the ASUS Wireless Router: 1.
-
Page 11: Chapter 2: Setting Up The Hardware
• For more details on EZSetup, refer to the section EZSetup in Chapter 4 of this user manual. Setting up a wired connection The ASUS Wireless Router is supplied with an Ethernet cable in the package. The wireless router has integrated auto-crossover function, so use either straight-through or crossover cable for wired connection.
-
Page 12: Setting Up A Wireless Connection
. Connect an IEEE 80.11b/g/n compatible WLAN card. Refer to your wireless adapter user manual for wireless connection procedures. By default, the SSID of ASUS Wireless Router is “default” (in lower case), encryption is disabled and open system authentication is used.
-
Page 13
. After establishing a wireless connection, launch a web browser. Notes: • You may also manually key in the router’s default IP address (192.168.1.1) to launch the router’s web interface. • For more details on configuring your wireless router using the web GUI, refer to Chapter 4: Configuring via the web GUI. -
Page 14: Chapter 3: Configuring The Network Clients
• Subnet Mask: 55.55.55.0 (same as the ASUS Wireless Router) • Gateway: 19.18.1.1 (IP address of the ASUS Wireless Router) • DNS: 19.18.1.1 (ASUS Wireless Router) or assign a known DNS server in your network WL-520GU Configuring the…
-
Page 15
. If you want your computer to automatically obtain an IP address, click Obtain an IP address automatically then click OK. Otherwise, click Specify an IP address, then key in the IP address and Subnet Mask. Chapter 3: Configuring the clients WL-520GU… -
Page 16
4. Select Gateway tab, and key in New gateway then click Add. 5. Select the DNS configuration tab and click Enable DNS. Key in Host, Domain, and DNS Server Search Order, then click Add. . Click OK. WL-520GU Chapter 3: Configuring the clients… -
Page 17
• Select the type of network adapter installed in your system. • Set the router to assign IP address automatically. • Manually set up the IP address, subnet mask, and default gateway. Chapter 3: Configuring the clients WL-520GU… -
Page 18: Windows 2000
4. Select the DNS tab then click Add under the DNS Service Search Order and key in DNS. Windows 2000 ® 1. Click Start > Control Panel > Network and Dial-up Connection. Right-click Local Area Connection then click Properties. WL-520GU Chapter 3: Configuring the clients…
-
Page 19
Use the following DNS server address: and key in the Preferred and Alternate DNS server. 5. Click OK when done. Windows ® 1. Click Start > Control Panel > Network Connection. Right-click Local Area Connection then select Properties. Chapter 3: Configuring the clients WL-520GU… -
Page 20
DNS server settings to be assigned automatically. Otherwise, select Use the following DNS server addresses: and key in the Preferred and Alternate DNS server. 5. Click OK when done. WL-520GU Chapter 3: Configuring the clients… -
Page 21: Chapter 4: Configuring Via The Web Gui
Note: You may also manually key in the router’s default IP address (192.168.1.1) to launch the router’s web interface. . On the login page, key in the default user name (admin) and password (admin). Chapter 4: Configuring via the web GUI Configuring via the web GUI WL-520GU…
-
Page 22: Using The Network Map
3. From the main page, click the navigation menu or links to configure the various features of the ASUS Wireless Router. Using the Network Map Network Map allows you to view the status and configure the connection settings of the Internet, system, and clients in your network. It enables you to quickly set up your Wide Area Network (WAN) using the Quick Internet Setup (QIS) feature, or to quickly set up your Local Area Network (LAN) using the EZSetup utility.
-
Page 23: Setting Up Wan Using The Quick Internet Setup (Qis)
1. Under Internet status, click GO in the QIS field. . Select your connection type from these types of ISP services: Automatic IP, PPPoE, PPTP, L2TP, and Static IP. . Click Apply all settings to save the settings. Chapter 4: Configuring via the web GUI WL-520GU…
-
Page 24: Managing Ezqos Bandwidth
The router handles at first priority the traffic of downloading/ uploading data to/from the FTP server. Voip/Video Streaming The router handles the audio/video traffic at first priority. . Click Save to save the configuration settings. WL-520GU Chapter 4: Configuring via the web GUI…
-
Page 25: Upgrading The Firmware
Upgrading the firmware Note: Download the latest firmware from the ASUS website at To upgrade the firmware: 1. Click Advanced Setting from the navigation menu at the left side of your screen. . Under the Administration menu, click Firmware Upgrade.
-
Page 26: Restoring/Saving/Uploading Settings
• To restore previous system settings, click Browse to locate the system file that you want to restore, then click Upload. WL-520GU Chapter 4: Configuring via the web GUI…
-
Page 27: Installing The Utilities
Installing the utilities Installing the utilities The support CD contains the utilities for configuring the ASUS Wireless Router. To install the ASUS WLAN Utilities in Microsoft Windows, insert the support CD ® in the CD drive. If Autorun is disabled, run setup.exe from the root directory of the support CD.
-
Page 28
. Click Next to accept the default destination folder or click Browse to specify another path. 4. Click Next to accept the default program folder or enter another name. 5. Click Finish when setup is complete. WL-50GU Chapter 5: Installing the utilities… -
Page 29: Device Discovery
From your computer’s desktop, click Start > All Programs > ASUS Utility > Firmware Restoration. Note: This is not a firmware upgrade utility and cannot be used on a working ASUS Wireless Router. Normal firmware upgrades must be done through the web interface. Refer to Chapter 4: Configuring via the web GUI for more details.
-
Page 30: Ezsetup
XP SP XP SP1 and 000 To useEZSetup: 1. Click Start > All Programs > ASUS Utility > WLAN Card >EZSetup Wizard to launch theEZSetup Wizard. . Follow the instructions to set up your hardware. When done, click Next. WL-50GU…
-
Page 31
Note: Use the EZSetup utility with one wireless client at a time. If the wireless client cannot discover the wireless router while inEZSetup mode, shorten the distance between the client and the wireless router. . Push the EZSetup button at the back panel of the wireless router. EZSetup 3. -
Page 32
4. Assign a name to your network, then click Next. 5. Use the auto-generated passphrase as your network’s security key or manually assign a passphrase containing between 8 and characters. Click Next. WL-50GU Chapter 5: Installing the utilities… -
Page 33
. Installation is completed. Click Save or print settings for future reference or Save settings to a USB flash drive to add other devices to the network. Click Next to connect to the Internet. Note: For more details on adding devices to the network using a USB flash drive, refer to the section Adding network devices using a USB flash drive on the next page. -
Page 34: Adding Network Devices Using A Usb Flash Drive
Adding network devices using a USB flash drive With the EZSetup utility, you can add devices to your network using a USB flash drive. To add network devices using a USB flash drive: 1. In the EZSetup Wizard, click Save settings to a USB flash drive. 2.
-
Page 35
3. Remove the USB flash drive from this computer, and then plug to the computer that you want to add to the wireless network. 4. Locate the SetupWireless.exe from the USB drive, and double-click to run it. Click Yes to add this computer to the wireless network. 5. -
Page 36: Network Printer Setup
USB printer. Note: To check if your USB printer is compatible with your ASUS wireless router, visit the ASUS website at www.asus.com and click Products > Networks > Printer Server support.
-
Page 37
3. Wait for a few minutes for the initial setup to finish. Click Next. 4. Click Finish to complete the installation. Chapter 5: Installing the utilities WL-50GU… -
Page 38
5. Follow the Windows OS instructions to install the printer driver. ® . After setting up the hardware and installing the printer driver, you can now see the printer name in the wireless router’s web GUI. WL-50GU Chapter 5: Installing the utilities… -
Page 39: Chapter 6: Troubleshooting
Troubleshooting This troubleshooting guide provides solutions to some common problems that you may encounter while installing or using the ASUS Wireless Router. These problems require simple troubleshooting that you can perform by yourself. Contact the ASUS Technical Support if you encounter problems not mentioned in this chapter.
-
Page 40
Problem Cannot access the Internet via wireless LAN adapter Internet is not accessible When ADSL Modem “Link” light is ON (not blinking), this means Internet Access is possible. WL-50GU Action • Move the router closer to the wireless client. • Check whether the wireless adapter is connected to the correct wireless router. -
Page 41
Problem If the ADSL “LINK” light blinks continuously or stays off, Internet access is not possible — the Router is unable to establish a connection with the ADSL network. Network name or encryption keys are forgotten How to restore the system to its default settings Chapter : Troubleshooting Action… -
Page 42: Appendices
Notices Federal Communications Commission Statement This device complies with Part 15 of the FCC Rules. Operation is subject to the following two conditions: • This device may not cause harmful interference. • This device must accept any interference received, including interference that may cause undesired operation.
-
Page 43: Safety Information
Safety Information To maintain compliance with FCC’s RF exposure guidelines, this equipment should be installed and operated with minimum distance 0cm between the radiator and your body. Use on the supplied antenna. Declaration of Conformity for R&TTE directive 1999/5/EC Essential requirements – Article Protection requirements for health and safety –…
-
Page 44: Gnu General Public License
GNU General Public License Licensing information This product includes copyrighted third-party software licensed under the terms of the GNU General Public License. Please see The GNU General Public License for the exact terms and conditions of this license. We include a copy of the GPL with every CD shipped with our product.
-
Page 45
We protect your rights with two steps: (1) copyright the software, and () offer you this license which gives you legal permission to copy, distribute and/or modify the software. Also, for each author’s protection and ours, we want to make certain that everyone understands that there is no warranty for this free software. -
Page 46
modifications or work under the terms of Section 1 above, provided that you also meet all of these conditions: a) You must cause the modified files to carry prominent notices stating that you changed the files and the date of any change. b) You must cause any work that you distribute or publish, that in whole or in part contains or is derived from the Program or any part thereof, to be licensed as a whole at no charge to all third parties under the terms of this License. -
Page 47
c) Accompany it with the information you received as to the offer to distribute corresponding source code. (This alternative is allowed only for noncommercial distribution and only if you received the program in object code or executable form with such an offer, in accord with Subsection b above.) The source code for a work means the preferred form of the work for making modifications to it. -
Page 48
on you (whether by court order, agreement or otherwise) that contradict the conditions of this License, they do not excuse you from the conditions of this License. If you cannot distribute so as to satisfy simultaneously your obligations under this License and any other pertinent obligations, then as a consequence you may not distribute the Program at all. -
Page 49
For software which is copyrighted by the Free Software Foundation, write to the Free Software Foundation; we sometimes make exceptions for this. Our decision will be guided by the two goals of preserving the free status of all derivatives of our free software and of promoting the sharing and reuse of software generally. -
Page 50: Asus Contact Information
Telephone Support Fax Software download ASUS COMPUTER INTERNATIONAL (America) Address Telephone Website Software download ASUS COMPUTER GmbH (Germany and Austria) Address Telephone Online contact Technical Support Telephone Online support Website * Available on this site is an online Technical Inquiry Form that you can fill out to contact technical support.
Инструкция по настройке роутера Asus WL-520gU
Инструкция подходит для роутеров Asus WL-520gC и Asus WL-520gU
- Авторизация
- Смена заводского пароля
- Настройка Wi-Fi на роутере
- Настройка подключения к Интернет
- Настройка PPPoE подключения
- Настройка PPTP (VPN) при автоматическом получении локального IP адреса
- Настройка PPTP (VPN) при статическом локальном IP адресе
- NAT при автоматическом получении IP адреса (DHCP)
- Проверка статуса подключения к Интернет
- Сохранение/восстановление настроек роутера
- Восстановление заводских настроек
Авторизация
Для того, что бы попасть в веб-интерфейс роутера, необходимо открыть ваш Интернет браузер и в строке адреса набрать 192. 168.1.1, Имя пользователя — admin , Пароль — admin (при условии, что роутер имеет заводские настройки, и его IP не менялся).

Смена заводского пароля
В целях безопасности рекомендуется сменить заводской пароль.
По умолчанию: Логин admin, пароль admin.
В интерфейсе роутера необходимо зайти во вкладку ( System Setup ), далее (Change Password )
В поле ( New Password ) введите новый пароль. В следующее поле его необходимо повторить.
Далее сохраняем настройки нажатием кнопки Save;.

Настройка Wi-Fi на роутере
В интерфейсе роутера необходимо выбрать вкладку слева ( Wireless ), в открывшемся списке выбираем ( Interface ).
Выставляем параметры следующим образом:
- Поле SSID;: вводим название беспроводной сети. Значение в этом поле можно не менять.
- Метод проверки подлинности ( Authentication Method ) : WPA-Auto-Personal
- Шифрование WPA(WPA Encryption ) : TKIP + AES
- Предварительный ключ WPA ( WPA Pre-Shared Key ) : вы должны ввести любой набор цифр, длиной от 8 до 63. Их также необходимо запомнить, чтобы Вы могли указать их при подключении к сети.
- Рекомендуется использовать в качестве ключа серийный номер устройства (указан на коробке, в виде S/N ########).
Нажимаем ниже кнопку Apply;

Настройка подключения к Интернет
В интерфейсе роутера необходимо выбрать вкладку слева IP Config ;, в открывшемся списке выбираем WAN & LAN;.

Настройка PPPoE подключения
- Тип WAN-подключения (WAN Connection Type): PPPoE
- Получить IP адрес WAN автоматически (Get IP automatically): Yes
- Подключаться к DNS серверу автоматически (Get DNS Server automatically): Yes
- Имя пользователя (User Name): Ваш логин по договору
- Пароль (Password): Ваш пароль по договору
- MTU: 1472 7. Сохраняем настройки кнопкой Apply;.

Настройка PPTP (VPN) при автоматическом получении локального IP адреса
- Тип WAN-подключения (WAN Connection Type): PPTP
- Получить IP адрес WAN автоматически (Get IP automatically): Yes
- Подключаться к DNS серверу автоматически (Get DNS Server automatically): Yes
- Имя пользователя (User Name): Ваш логин по договору
- Пароль(Password): Ваш пароль по договору
- Сервер Heart-Beat или PPTP/L2TP(VPN): вводим ip-адрес или название vpn-сервера по договору
- Сохраняем настройки кнопкой Apply;.
 на роутере Asus WL-520gU")
Настройка PPTP (VPN) при статическом локальном IP адресе
- Тип WAN-подключения (WAN Connection Type): PPTP
- Получить IP адрес WAN автоматически (Get IP automatically): No
- IP адрес(IP Address): Вбиваем ваш IP адрес по договору
- Маска подсети (Subnet Mask): Вбиваем маску по договору
- Основной шлюз (Default Gateway): Вбиваем шлюз по договору
- DNS сервер 1: и DNS сервер 2: вводите сервера вашего провайдера (Ростелеком Омск DNS 1: 195.162.32.5 DNS 2: 195.162.41.8)
- Имя пользователя(User Name): Ваш логин по договору, Пароль(Password): Ваш пароль по договору
- Сервер Heart-Beat или PPTP/L2TP(VPN): вводим ip-адрес или название vpn-сервера по договору
- Сохраняем настройки кнопкой Apply;.
 на роутере Asus WL-520gU")
NAT при автоматическом получении IP адреса (DHCP)
- Тип WAN-подключения (WAN Connection Type): Automatic IP
- Сохраняем настройки кнопкой Apply;.
 на роутере Asus WL-520gU")
Проверка статуса подключения к Интернет

Сохранение/восстановление настроек роутера
После проведения настройки, рекомендуется сохранить их, чтобы в случае возникновения проблем, можно было их восстановить.
Для этого необходимо зайти во вкладку System Setup;, вкладка Setting Management;.
- Для сохранения текущих настроек роутера необходимо нажать кнопку Move your cursor over HERE;. Файл с настройками будет сохранен в указанное место на жёстком диске.
- Для восстановления настроек настроек из файла, необходимо нажать кнопку New Setting File;, указать путь к файлу с настройками, затем нажать кнопку Upload;.

Восстановление заводских настроек
Для этого необходимо зайти во вкладку System Setup;,вкладка Factory Default;.
Внимание! Нажатие кнопки Restore; приведет к восстановлению заводских настроек!

-
Драйверы
11
-
Инструкции по эксплуатации
12
Языки:


ASUS WL-520GU инструкция по эксплуатации
(11 страниц)
- Языки:Китайский
-
Тип:
PDF -
Размер:
1.21 MB -
Описание:
ASUS WL-5XX Series Wireless Router Internet Configuration User’s Guide(Simplified Chinese Version)
This document describes how to set up ASUS WL-5XX series wireless router to getting connection to the Internet and provides troubleshooting tips to help you fix some simple problems.

ASUS WL-520GU инструкция по эксплуатации
(14 страниц)
-
Тип:
PDF -
Размер:
742.64 KB -
Описание:
ASUS Router Virtual Server Configuration Guide for WL-5xx series/WL-600g/700gE/RX3041/SL200/SL500/ SL1000/SL1200
This document describes how to configure virtual server on the WL-5xx series/WL-600g/700gE/RX3041/SL200/SL500/ SL1000/SL1200

На NoDevice можно скачать инструкцию по эксплуатации для ASUS WL-520GU. Руководство пользователя необходимо для ознакомления с правилами установки и эксплуатации ASUS WL-520GU. Инструкции по использованию помогут правильно настроить ASUS WL-520GU, исправить ошибки и выявить неполадки.