Посмотреть инструкция для Asus Prime Z390-A бесплатно. Руководство относится к категории Материнские платы, 5 человек(а) дали ему среднюю оценку 8.6. Руководство доступно на следующих языках: английский. У вас есть вопрос о Asus Prime Z390-A или вам нужна помощь? Задайте свой вопрос здесь
Не можете найти ответ на свой вопрос в руководстве? Вы можете найти ответ на свой вопрос ниже, в разделе часто задаваемых вопросов о Asus Prime Z390-A.
Какая ширина Asus Prime Z390-A?
Какая толщина Asus Prime Z390-A?
Инструкция Asus Prime Z390-A доступно в русский?
Не нашли свой вопрос? Задайте свой вопрос здесь
- Manuals
- Brands
- Asus Manuals
- Motherboard
- PRIME Z390-A
- Manual
-
Contents
-
Table of Contents
-
Bookmarks
Quick Links
PRIME
Z390-A
E14498_PRIME Z390-A_UM.indb 1
8/22/2018 10:20:53
Related Manuals for Asus PRIME Z390-A
Summary of Contents for Asus PRIME Z390-A
-
Page 1
PRIME Z390-A E14498_PRIME Z390-A_UM.indb 1 8/22/2018 10:20:53… -
Page 2
Product warranty or service will not be extended if: (1) the product is repaired, modified or altered, unless such repair, modification of alteration is authorized in writing by ASUS; or (2) the serial number of the product is defaced or missing. -
Page 3: Table Of Contents
Contents Safety information …………………. vi About this guide ………………….vii PRIME Z390-A specifications summary …………..ix Package contents ………………… xiv Installation tools and components …………….xv Chapter 1: Product Introduction Motherboard overview …………….1-1 1.1.1 Before you proceed …………..1-1 1.1.2…
-
Page 4
3.6.14 HDD/SSD SMART Information ……….3-20 Monitor menu ………………. 3-21 Boot menu ………………..3-21 Tool menu ………………..3-23 3.9.1 ASUS EZ Flash 3 Utility …………3-23 3.9.2 Secure Erase …………….3-24 3.9.3 ASUS User Profile…………..3-25 3.9.4 ASUS SPD Information …………. 3-25 3.9.5… -
Page 5
Chapter 4: RAID Support RAID configurations ……………… 4-1 4.1.1 RAID definitions …………….4-1 Appendix Notices ……………………A-1 ASUS contact information ………………A-5 E14498_PRIME Z390-A_UM.indb 5 8/22/2018 10:20:54… -
Page 6: Safety Information
Safety information Electrical safety • To prevent electrical shock hazard, disconnect the power cable from the electrical outlet before relocating the system. • When adding or removing devices to or from the system, ensure that the power cables for the devices are unplugged before the signal cables are connected. If possible, disconnect all power cables from the existing system before you add a device.
-
Page 7: About This Guide
Refer to the following sources for additional information and for product and software updates. ASUS website The ASUS website (www.asus.com) provides updated information on ASUS hardware and software products. Optional documentation Your product package may include optional documentation, such as warranty flyers, that may have been added by your dealer.
-
Page 8
Conventions used in this guide To ensure that you perform certain tasks properly, take note of the following symbols used throughout this manual. DANGER/WARNING: Information to prevent injury to yourself when trying to complete a task. CAUTION: Information to prevent damage to the components when trying to complete a task. -
Page 9: Prime Z390-A Specifications Summary
Turbo Boost Technology 2.0* ® * Intel Turbo Boost Technology 2.0 support depends on the CPU type. ® ** Refer to www.asus.com for CPU support list. Intel Z390 Chipset Chipset ® 4 x DIMM, max. 64GB DDR4 4133+(OC)* / 4000(OC)* / 3866(OC)*…
-
Page 10
PRIME Z390-A specifications summary Intel ® CPU support with Intel ® Rapid Storage Technology (RAID 0 & RAID 1) — PCIEX16_1 slot supports up to 3 Intel PCIe NVME SSDs via a ® Hyper M.2 X16 series Card* — PCIEX16_2 slot supports up to 2 Intel PCIe NVME SSDs via a ®… -
Page 11
— ASUS Ai Charger — ASUS AI Suite 3 ASUS 5X Protection III — ASUS SafeSlot Core: Fortified PCIe with solid soldering — ASUS LANGuard: Protects against LAN surges, lightning strikes and static-electricity discharges! — ASUS Overvoltage Protection: World-class circuit-protecting… -
Page 12
2 x Aura RGB headers 1 x MemOK! II switch 1 x Node connector 1 x Power-on button 1 x Thunderbolt header (5-pin) for ASUS ThunderboltEX series support 1 x Clear CMOS jumper (2-pin) 1 x COM port 1 x TPM header… -
Page 13
10 64-bit Operating System Support ATX Form Factor, 12” x 9.6” (30.5 cm x 24.4 cm) Form Factor Specifications are subject to change without notice. Please refer to the ASUS website for the latest specifications. xiii E14498_PRIME Z390-A_UM.indb 13 8/22/2018 10:20:54… -
Page 14: Package Contents
Package contents Check your motherboard package for the following items. Motherboard 1 x PRIME Z390-A motherboard Cables 3 x Serial ATA 6.0Gb/s cables 1 x SLI™ HB Bridge (2-WAY-M) 1 x ASUS Q-Shield Accessories 1 x Q-connector 1 x M.2 screw package…
-
Page 15: Installation Tools And Components
Installation tools and components Intel LGA1151 CPU ® Intel LGA1151 compatible CPU Fan ® Phillips (cross) screwdriver SATA hard disk drive PC chassis DIMM 1 bag of screws Power supply unit SATA optical disc drive (optional) Graphics card (optional) M.2 SSD module (optional) The tools and components above are not included in the motherboard package.
-
Page 16
E14498_PRIME Z390-A_UM.indb 16 8/22/2018 10:20:54… -
Page 17: Chapter 1: Product Introduction
Chapter 1: Product Introduction Product Introduction Motherboard overview 1.1.1 Before you proceed Take note of the following precautions before you install motherboard components or change any motherboard settings. • Unplug the power cord from the wall socket before touching any component. • Before handling components, use a grounded wrist strap or touch a safely grounded object or a metal object, such as the power supply case, to avoid damaging them due to static electricity. • Hold components by the edges to avoid touching the ICs on them. • Whenever you uninstall any component, place it on a grounded antistatic pad or in the bag that came with the component. • Before you install or remove any component, ensure that the ATX power supply is switched off or the power cord is detached from the power supply. Failure to do so may cause severe damage to the motherboard, peripherals, or components. ASUS PRIME Z390-A E14498_PRIME Z390-A_UM.indb 1 8/22/2018 10:20:54…
-
Page 18: Motherboard Layout
1.1.2 Motherboard layout Refer to 1.1.9 Internal connectors and 2.2.1 Rear I/O connection for more information about rear panel connectors and internal connectors. Chapter 1: Product Introduction E14498_PRIME Z390-A_UM.indb 2 8/22/2018 10:20:55…
-
Page 19
12. System panel connector (20-3 pin PANEL) 1-21 13. Clear RTC RAM jumper (2-pin CLRTC) 1-11 14. USB 2.0 connectors (10-1 pin USB_E12; USB_E34; USB_1112) 1-17 15. USB 3.1 Gen 1 connector (20-1 pin U31G1_78) 1-16 16. TPM connector (14-1 pin TPM) 1-19 17. Node connector (12-1 pin NODE) 1-19 18. Serial port connector (10-1 pin COM) 1-24 19. Front panel audio connector (10-1 pin AAFP) 1-15 20. M.2 sockets (M.2_1 (Socket 3); M.2_2 (Socket 3)) 1-22 21. LED connector (8-pin LED1_CON) 1-25 22. CPU Over Voltage jumper (3-pin CPU_OV) 1-12 ASUS PRIME Z390-A E14498_PRIME Z390-A_UM.indb 3 8/22/2018 10:20:55… -
Page 20: Central Processing Unit (Cpu)
Central Processing Unit (CPU) This motherboard supports the Intel Socket 1151 for Intel Core™ 9000 series, 8th ® ® Generation Core™ i7/ i5/ i3, Pentium and Celeron processors, with memory and PCI ® ® Express controllers integrated to support dual-channel (4 DIMM) DDR4 memory and 16 PCI Express 3.0/2.0 lanes. Ensure that you install the correct CPU designed for LGA1151 socket only. DO NOT install a CPU designed for LGA1150, LGA1155, and LGA1156 sockets in the LGA1151 socket. • Ensure that all power cables are unplugged before installing the CPU. • Upon purchase of the motherboard, ensure that the PnP cap is on the socket and the socket contacts are not bent. Contact your retailer immediately if the PnP cap is missing, or if you see any damage to the PnP cap/socket contacts/motherboard components. ASUS will shoulder the cost of repair only if the damage is shipment/ transit-related. • Keep the cap after installing the motherboard. ASUS will process Return Merchandise Authorization (RMA) requests only if the motherboard comes with the cap on the LGA1151 socket. • The product warranty does not cover damage to the socket contacts resulting from incorrect CPU installation/removal, or misplacement/loss/incorrect removal of the PnP cap. Chapter 1: Product Introduction E14498_PRIME Z390-A_UM.indb 4 8/22/2018 10:20:55…
-
Page 21: System Memory
1.1.4 System memory The motherboard comes with four Double Data Rate 4 (DDR4) Dual Inline Memory Modules (DIMM) slots. A DDR4 module is notched differently from a DDR, DDR2, or DDR3 module. DO NOT install a DDR, DDR2, or DDR3 memory module to the DDR4 slot. Recommended memory configurations ASUS PRIME Z390-A E14498_PRIME Z390-A_UM.indb 5 8/22/2018 10:20:55…
-
Page 22
Memory configurations You may install 2 GB, 4 GB, 8 GB and 16 GB unbuffered and non-ECC DDR4 DIMMs into the DIMM sockets. • The default memory operation frequency is dependent on its Serial Presence Detect (SPD), which is the standard way of accessing information from a memory module. Under the default state, some memory modules for overclocking may operate at a lower frequency than the vendor-marked value. • For system stability, use a more efficient memory cooling system to support a full memory load (4 DIMMs) or overclocking condition. • Always install the DIMMS with the same CAS Latency. For an optimum compatibility, we recommend that you install memory modules of the same version or data code (D/C) from the same vendor. Check with the vendor to get the correct memory modules. • Visit the ASUS website for the latest QVL. Chapter 1: Product Introduction E14498_PRIME Z390-A_UM.indb 6 8/22/2018 10:20:56… -
Page 23: Expansion Slots
1.1.5 Expansion slots Unplug the power cord before adding or removing expansion cards. Failure to do so may cause you physical injury and damage motherboard components. Slot No. Slot Description PCIe 3.0 x1_1 slot PCIe 3.0 x16_1 slot PCIe 3.0 x1_2 slot PCIe 3.0 x16_2 slot PCIe 3.0 x1_3 slot PCIe 3.0 x16_3 slot ASUS PRIME Z390-A E14498_PRIME Z390-A_UM.indb 7 8/22/2018 10:20:56…
-
Page 24
PCIe operating mode VGA Configuration PCIEX16_1 PCIEX16_2 Single VGA/PCIe card x16 (Recommend for single VGA) Dual VGA/PCIe card • We recommend that you provide sufficient power when running CrossFireX™ or SLI ® mode. • Connect a chassis fan to the motherboard connector labeled CHA_FAN1-2 when using multiple graphics cards for better thermal environment. • The PCIe x16_3 slot shares bandwidth with SATA6G_56. The PCIe x16_3 is set at x2 mode by default. PCI Express 3.0 operating mode Hyper M.2 X16 series card configuration PCIEX16_1 PCIEX16_2 2 Intel SSD on CPU support x4+x4 ® 3 Intel SSD on CPU support x8+x4+x4 ®… -
Page 25: Onboard Buttons And Switches
1.1.6 Onboard buttons and switches Onboard buttons and switches allow you to fine-tune performance when working on a bare or open-case system. This is ideal for overclockers and gamers who continually change settings to enhance system performance. Power-on button (PWR_SW) The motherboard comes with a power-on button that allows you to power up or wake up the system. The LED near the button also lights up when the system is plugged to a power source indicating that you should shut down the system and unplug the power cable before removing or installing any motherboard component. ASUS PRIME Z390-A E14498_PRIME Z390-A_UM.indb 9 8/22/2018 10:20:56…
-
Page 26
Refer to section 1.1.8 Onboard LEDs for the exact location of the Mem_LED. • The DRAM LED also lights up when the DIMM is not properly installed. Turn off the system and reinstall the DIMM before using the MemOK! II function. • The MemOK! II switch does not function under Windows OS environment. ® • During the tuning process, the system loads and tests pretest profiles. It takes about 30 seconds for the system to test one set of profiles. If the test fails, the system reboots and tests the next set of profiles. The system will reboot multiple times when training, once the system has completed the training process the Mem_LED will turn off, please refrain from doing anything before the Mem_LED turns off. • Due to memory tuning requirement, the system automatically reboots when each profile is tested. • If you turn off the computer and replace DIMMs during the tuning process, the system continues memory tuning after turning on the computer. To stop memory tuning, turn off the computer and unplug the power cord for about 5–10 seconds, then set the MemOK! II switch to disabled. • Ensure to replace the DIMMs with ones recommended in the Memory QVL (Qualified Vendors Lists) at www.asus.com. • We recommend that you download and update to the latest BIOS version from www.asus.com after using the MemOK! II function. 1-10 Chapter 1: Product Introduction E14498_PRIME Z390-A_UM.indb 10 8/22/2018 10:20:56… -
Page 27: Jumper
Clear RTC RAM jumper (2-pin CLRTC) This jumper allows you to clear the Real Time Clock (RTC) RAM in CMOS. You can clear the CMOS memory of date, time, and system setup parameters by erasing the CMOS RTC RAM data. The onboard button cell battery powers the RAM data in CMOS, which include system setup information such as system passwords. To erase the RTC RAM: Turn OFF the computer and unplug the power cord. Short-circuit pin 1-2 with a metal object or jumper cap for about 5-10 seconds. Plug the power cord and turn ON the computer. Hold down the <Delete> key during the boot process and enter BIOS setup to re-enter data. Except when clearing the RTC RAM, never place a metal object or jumper cap on the CLRTC jumper. Placing a metal object or jumper cap will cause system boot failure! • If the steps above do not help, remove the onboard battery and place a metal object or jumper cap again to clear the CMOS RTC RAM data. After the CMOS clearance, reinstall the battery. • You do not need to clear the RTC when the system hangs due to overclocking. For system failure due to overclocking, use the C.P.R. (CPU Parameter Recall) feature. Shut down and reboot the system so the BIOS can automatically reset parameter settings to default values. • Due to the chipset behavior, AC power off is required to enable C.P.R. function. You must turn off and turn on the power supply or unplug and plug the power cord before rebooting the system. ASUS PRIME Z390-A 1-11 E14498_PRIME Z390-A_UM.indb 11 8/22/2018 10:20:56…
-
Page 28
CPU Over Voltage jumper (3-pin CPU_OV) The CPU Over Voltage jumper allows you to set a higher CPU voltage for a flexible overclocking system, depending on the type of the installed CPU. To gain more CPU voltage setting, insert the jumper to pins 2-3. To go back to its default CPU voltage setting, insert the jumper to pins 1-2. 1-12 Chapter 1: Product Introduction E14498_PRIME Z390-A_UM.indb 12 8/22/2018 10:20:56… -
Page 29: Onboard Leds
1.1.8 Onboard LEDs Q LEDs (BOOT_LED, VGA_LED, DRAM_LED, CPU_LED) Q LEDs check key components (CPU, DRAM, VGA card, and booting devices) in sequence during motherboard booting process. If an error is found, the corresponding LED remains lit until the problem is solved. This user-friendly design provides an intuitive way to locate the root problem within seconds. The Q LEDs provide the most probable cause of an error code as a starting point for troubleshooting. The actual cause may vary from case to case. Memory LED (Mem_LED) The Mem_LED will light up and remain lit while the MemOK! II function is in use. When the re-training is complete, the Mem_LED will turn off. ASUS PRIME Z390-A 1-13 E14498_PRIME Z390-A_UM.indb 13 8/22/2018 10:20:57…
-
Page 30: Internal Connectors
These connectors connect to Serial ATA 6 Gb/s hard disk drives via Serial ATA 6 Gb/s signal cables. If you installed Serial ATA hard disk drives, you can create a RAID 0, 1, 5, and 10 configuration with the Intel Rapid Storage Technology through the onboard Intel ® ® Z390 chipset. • The PCIe x16_3 slot shares bandwidth with SATA6G_56. The PCIe x16_3 is set at x2 mode by default. • The M.2_1 socket shares bandwidth with SATA_1 port when using M.2 SATA devices. Adjust BIOS settings to use a SATA device. • These connectors are set to [AHCI] by default. If you intend to create a Serial ATA RAID set using these connectors, set the SATA Mode Selection item in the BIOS to [Intel RST Premium With Intel Optane System Acceleration (RAID)]. • For more information on configuring your RAID sets, please refer to the RAID Configuration Guide which you can find at https://www.asus.com/support. 1-14 Chapter 1: Product Introduction E14498_PRIME Z390-A_UM.indb 14 8/22/2018 10:20:57…
-
Page 31
Front panel audio connector (10-1 pin AAFP) This connector is for a chassis-mounted front panel audio I/O module that supports HD Audio standard. Connect one end of the front panel audio I/O module cable to this connector. We recommend that you connect a high-definition front panel audio module to this connector to avail of the motherboard’s high-definition audio capability. USB 3.1 Gen 1 Type-C™ front panel connector (U31G1_C5) This connector allows you to connect a USB 3.1 Gen 1 module for additional USB 3.1 Gen 1 front or rear panel ports. With an installed USB 3.1 Gen 1 module, you can enjoy all the benefits of USB 3.1 Gen 1 including faster data transfer speeds of up to 5 Gb/s, faster charging time for USB-chargeable devices, and optimized power efficiency. The USB 3.1 Gen 1 module is purchased separately. ASUS PRIME Z390-A 1-15 E14498_PRIME Z390-A_UM.indb 15 8/22/2018 10:20:57… -
Page 32
USB 3.1 Gen 1 connector (20-1 pin U31G1_78) This connector allows you to connect a USB 3.1 Gen 1 module for additional USB 3.1 Gen 1 front or rear panel ports. With an installed USB 3.1 Gen 1 module, you can enjoy all the benefits of USB 3.1 Gen 1 including faster data transfer speeds of up to 5 Gb/s, faster charging time for USB-chargeable devices, optimized power efficiency, and backward compatibility with USB 2.0. The USB 3.1 Gen 1 module is purchased separately. 1-16 Chapter 1: Product Introduction E14498_PRIME Z390-A_UM.indb 16 8/22/2018 10:20:57… -
Page 33
USB 2.0 connectors (10-1 pin USB_E12; USB_E34; USB_1112) These connectors are for the USB 2.0 ports. Connect the USB module cable to this connector, then install the module to a slot opening at the back of the system chassis. This USB connector complies with USB 2.0 specification that supports up to 480 MBps connection speed. Never connect a 1394 cable to the USB connectors. Doing so will damage the motherboard! The USB 2.0 module is purchased separately. Thermal sensor connector (2-pin T_SENSOR) This connector is for the thermistor cable that allows you to monitor the temperature of your motherboard’s critical components and connected devices. ASUS PRIME Z390-A 1-17 E14498_PRIME Z390-A_UM.indb 17 8/22/2018 10:20:58… -
Page 34
Fan and pump connectors (4-pin CPU_FAN; 4-pin CPU_OPT; 5-pin EXT_FAN; 4-pin W_PUMP+; 4-pin AIO_PUMP; 4-pin CHA_FAN1-2; 4-pin M.2_FAN) Connect the fan cables to the fan connectors on the motherboard, ensuring that the black wire of each cable matches the ground pin of the connector. The EXT_FAN connector is only for the fan extension card. For more details on the fan extension card, please refer to the To install Fan Extension Card section in this guide. • DO NOT forget to connect the fan cables to the fan connectors. Insufficient air flow inside the system may damage the motherboard components. These are not jumpers! Do not place jumper caps on the fan connectors! • Ensure to fully insert the fan cable to the fan connector. • The FAN Extension card is purchased separately. • W_PUMP+ function support depends on water cooling device. • Connect the fan of your water cooling kit to the W_PUMP+ connector. Header Max. -
Page 35
Node connector (12-1 pin NODE) This connector allow you to connect a compatible PSU. Visit www.asus.com for more information about the devices and the latest compatibility list. TPM connector (14-1 pin TPM) This connector supports a Trusted Platform Module (TPM) system, which securely stores keys, digital certificates, passwords and data. A TPM system also helps enhance network security, protect digital identities, and ensures platform integrity. The TPM module is purchased separately. ASUS PRIME Z390-A 1-19 E14498_PRIME Z390-A_UM.indb 19 8/22/2018 10:20:58… -
Page 36
ATX power connectors (24-pin EATXPWR; 8-pin EATX12V) These connectors are for ATX power supply plugs. The power supply plugs are designed to fit these connectors in only one orientation. Find the proper orientation and push down firmly until the connectors completely fit. • For a fully configured system, we recommend that you use a power supply unit (PSU) that complies with ATX 12V Specification 2.0 (or later version) and provides a minimum power of 350 W. • Do not forget to connect the 8-pin EATX12V power plug. Otherwise, the system will not boot. • We recommend that you use a PSU with a higher power output when configuring a system with more power-consuming devices. The system may become unstable or may not boot up if the power is inadequate. • If you want to use two or more high-end PCIe x16 cards, use a PSU with 1000W power or above to ensure the system stability. 1-20 Chapter 1: Product Introduction E14498_PRIME Z390-A_UM.indb 20 8/22/2018 10:20:58… -
Page 37
• System power LED (2-pin or 3-1 pin PLED) The 2-pin or 3-1 pin connector is for the system power LED. Connect the chassis power LED cable to this connector. The system power LED lights up when you turn on the system power, and blinks when the system is in sleep mode. • Hard disk drive activity LED (2-pin HDD_LED) This 2-pin connector is for the HDD Activity LED. Connect the HDD Activity LED cable to this connector. The HDD LED lights up or flashes when data is read from or written to the HDD. • System warning speaker (4-pin SPEAKER) This 4-pin connector is for the chassis-mounted system warning speaker. The speaker allows you to hear system beeps and warnings. • ATX power button/soft-off button (2-pin PWRSW) This connector is for the system power button. Pressing the power button turns the system on or puts the system in sleep or soft-off mode depending on the operating system settings. Pressing the power switch for more than four seconds while the system is ON turns the system OFF. • Reset button (2-pin RESET) This 2-pin connector is for the chassis-mounted reset button for system reboot without turning off the system power. • Chassis intrusion connector (2-pin CHASSIS) This connector is for a chassis-mounted intrusion detection sensor or switch. Connect one end of the chassis intrusion sensor or switch cable to this connector. The chassis intrusion sensor or switch sends a high-level signal to this connector when a chassis component is removed or replaced. The signal is then generated as a chassis intrusion event. ASUS PRIME Z390-A 1-21 E14498_PRIME Z390-A_UM.indb 21 8/22/2018 10:20:59… -
Page 38
12. M.2 sockets (M.2_1 (Socket 3); M.2_2 (Socket 3)) These sockets allow you to install M.2 SSD modules. • M.2_1 socket supports PCIe 3.0 x4 and SATA mode M Key design and type 2242 / 2260 / 2280 PCIe and SATA storage devices. • M.2_2 socket supports PCIe 3.0 x4 M Key design and type 2242 / 2260 / 2280 / 22110 PCIe storage devices. • These sockets support IRST (Intel Rapid Storage Technology). ® • When the M.2_1(Socket 3) is operating in SATA mode, SATA port 1 (SATA6G_1) will be disabled. • The M.2 SSD module is purchased separately. 1-22 Chapter 1: Product Introduction E14498_PRIME Z390-A_UM.indb 22 8/22/2018 10:20:59… -
Page 39
AURA RGB headers (4-pin RGB_HEADER1-2) These connectors are for RGB LED strips. The RGB header supports 5050 RGB multi-color LED strips (12V/G/R/B), with a maximum power rating of 3A (12V), and no longer than 3 m. Before you install or remove any component, ensure that the ATX power supply is switched off or the power cord is detached from the power supply. Failure to do so may cause severe damage to the motherboard, peripherals, or components. • Actual lighting and color will vary with LED strips. • If your LED strip does not light up, check if the RGB LED extension cable and the RGB LED strip is connected in the correct orientation, and the 12V connector is aligned with the 12V header on the motherboard. • The LED strip will only light up when the system is operating. • The LED strips are purchased separately. ASUS PRIME Z390-A 1-23 E14498_PRIME Z390-A_UM.indb 23 8/22/2018 10:20:59… -
Page 40
Thunderbolt header (5-pin TB_HEADER) This connector is for the add-on Thunderbolt I/O card that supports Intel’s Thunderbolt Technology, allowing you to connect up to six Thunderbolt-enabled devices and a DisplayPort-enabled display in a daisy-chain configuration. The add-on Thunderbolt I/O card and Thunderbolt cables are purchased separately. Serial port connector (10-1 pin COM) This connector is for a serial (COM) port. Connect the serial port module cable to this connector, then install the module to a slot opening at the back of the system chassis. The COM module is purchased separately. 1-24 Chapter 1: Product Introduction E14498_PRIME Z390-A_UM.indb 24 8/22/2018 10:20:59… -
Page 41
LED connector (8-pin LED1_CON) This LED connector is for connecting LED strips on your back I/O cover. ASUS PRIME Z390-A 1-25 E14498_PRIME Z390-A_UM.indb 25 8/22/2018 10:21:00… -
Page 42
1-26 Chapter 1: Product Introduction E14498_PRIME Z390-A_UM.indb 26 8/22/2018 10:21:00… -
Page 43: Chapter 2: Basic Installation
The diagrams in this section are for reference only. The motherboard layout may vary with models, but the installation steps are the same for all models. 2.1.1 CPU installation • Ensure that you install the correct CPU designed for LGA1151 socket only. DO NOT install a CPU designed for LGA1155 and LGA1156 sockets on the LGA1151 socket. • ASUS will not cover damages resulting from incorrect CPU installation/removal, incorrect CPU orientation/placement, or other damages resulting from negligence by the user. ASUS PRIME Z390-A E14498_PRIME Z390-A_UM.indb 1 8/22/2018 10:21:00…
-
Page 44: Cooling System Installation
2.1.2 Cooling system installation Apply Thermal Interface Material to the CPU cooling system and CPU before you install the cooling system, if necessary. Chapter 2: Basic Installation E14498_PRIME Z390-A_UM.indb 2 8/22/2018 10:21:00…
-
Page 45
To install a CPU heatsink and fan assembly ASUS PRIME Z390-A E14498_PRIME Z390-A_UM.indb 3 8/22/2018 10:21:01… -
Page 46
To install an AIO cooler AIO_PUMP CPU_FAN CPU_OPT Chapter 2: Basic Installation E14498_PRIME Z390-A_UM.indb 4 8/22/2018 10:21:02… -
Page 47: Motherboard Installation
2.1.3 Motherboard installation Place the motherboard into the chassis, ensuring that its rear I/O ports are aligned to the chassis’ rear I/O panel. Place nine (9) screws into the holes indicated by circles to secure the motherboard to the chassis. DO NOT overtighten the screws! Doing so can damage the motherboard. ASUS PRIME Z390-A E14498_PRIME Z390-A_UM.indb 5 8/22/2018 10:21:02…
-
Page 48: Dimm Installation
2.1.4 DIMM installation To remove a DIMM Chapter 2: Basic Installation E14498_PRIME Z390-A_UM.indb 6 8/22/2018 10:21:02…
-
Page 49: Atx Power Connection
2.1.5 ATX power connection Ensure to connect the 8-pin power plug, or connect both the 8-pin and 4-pin power plugs. ASUS PRIME Z390-A E14498_PRIME Z390-A_UM.indb 7 8/22/2018 10:21:02…
-
Page 50: Sata Device Connection
2.1.6 SATA device connection Chapter 2: Basic Installation E14498_PRIME Z390-A_UM.indb 8 8/22/2018 10:21:03…
-
Page 51: Front I/O Connector
To install USB 3.1 Gen 1 connector front panel connector USB 3.1 Gen 1 USB 3.1 Gen 1 This connector will only fit in one orientation. Push the connector until it clicks into place. To install USB 2.0 connector To install front panel audio connector AAFP USB 2.0 ASUS PRIME Z390-A E14498_PRIME Z390-A_UM.indb 9 8/22/2018 10:21:03…
-
Page 52: Expansion Card Installation
2.1.8 Expansion card installation To install PCIe x16 cards To install PCIe x1 cards 2-10 Chapter 2: Basic Installation E14498_PRIME Z390-A_UM.indb 10 8/22/2018 10:21:03…
-
Page 53
To install FAN EXTENSION CARD • The illustrations in this section are for reference only. The motherboard layout may vary with models, but the installation steps are the same for all models. • The FAN Extension card is purchased separately. ASUS PRIME Z390-A 2-11 E14498_PRIME Z390-A_UM.indb 11 8/22/2018 10:21:03… -
Page 54
To install ThunderboltEX 3 card • The illustrations in this section are for reference only. The motherboard layout may vary with models, but the installation steps are the same for all models. • The ThunderboltEX 3 card is purchased separately. 2-12 Chapter 2: Basic Installation E14498_PRIME Z390-A_UM.indb 12 8/22/2018 10:21:04… -
Page 55: M.2 Installation
2.1.9 M.2 installation For type 22110 M.2 on M.2_2 socket For type 2242 / 2260 / 2280 M.2 on M.2_2 socket The M.2 is purchased separately. ASUS PRIME Z390-A 2-13 E14498_PRIME Z390-A_UM.indb 13 8/22/2018 10:21:04…
-
Page 56: Asus Fan Holder Installation
2.1.10 ASUS fan holder installation To install the ASUS fan holder and fan When using high performance settings whilst overclocking, ensure to install the fan holder for additional fan(s). • You may install 12V (1A, 12W), 40mm x 40mm fans or 50mm x 50mm fans. • Ensure to the use the bundled screws that came with your fans. • Fans are purchased separately. 2-14 Chapter 2: Basic Installation E14498_PRIME Z390-A_UM.indb 14 8/22/2018 10:21:05…
-
Page 57: Motherboard Rear And Audio Connections
* and ** : Refer to the tables on the next page for LAN port LEDs, and audio port definitions. • USB 3.1 Gen 1/Gen 2 devices can only be used as data storage only. • We strongly recommend that you connect your devices to ports with matching data transfer rate. Please connect your USB 3.1 Gen 1 devices to USB 3.1 Gen 1 ports and your USB 3.1 Gen 2 devices to USB 3.1 Gen 2 ports for faster and better performance for your devices. • Due to the design of the Intel chipset, all USB devices connected to the USB 3.1 Gen 1 ports are controlled by the xHCI controller. Some legacy USB devices must update their firmware for better compatibility. ASUS PRIME Z390-A 2-15 E14498_PRIME Z390-A_UM.indb 15 8/22/2018 10:21:05…
-
Page 58
* LAN ports LED indications ACT/LINK SPEED Activity Link LED Speed LED Status Description Status Description No link 10 Mbps connection ORANGE Linked ORANGE 100 Mbps connection LAN port BLINKING Data activity GREEN 1 Gbps connection ** Audio 2, 4, 5.1 or 7.1-channel configuration Headset Port 4-channel 5.1-channel 7.1-channel 2-channel Light Blue… -
Page 59: Audio I/O Connections
2.2.2 Audio I/O connections Audio I/O ports Connect to Headphone and Mic Connect to Stereo Speakers Connect to 2-channel Speakers ASUS PRIME Z390-A 2-17 E14498_PRIME Z390-A_UM.indb 17 8/22/2018 10:21:05…
-
Page 60
Connect to 4-channel Speakers Connect to 5.1-channel Speakers Connect to 7.1-channel Speakers 2-18 Chapter 2: Basic Installation E14498_PRIME Z390-A_UM.indb 18 8/22/2018 10:21:05… -
Page 61: Starting Up For The First Time
BIOS Beep Description VGA detected One short beep Quick boot set to disabled No keyboard detected One continuous beep followed by two No memory detected short beeps then a pause (repeated) One continuous beep followed by three No VGA detected short beeps One continuous beep followed by four Hardware component failure short beeps At power on, hold down the <Delete> key to enter the BIOS Setup. Follow the instructions in Chapter 3. Turning off the computer While the system is ON, press the power button for less than four seconds to put the system on sleep mode or soft-off mode, depending on the BIOS setting. Press the power button for more than four seconds to let the system enter the soft-off mode regardless of the BIOS setting. ASUS PRIME Z390-A 2-19 E14498_PRIME Z390-A_UM.indb 19 8/22/2018 10:21:05…
-
Page 62
2-20 Chapter 2: Basic Installation E14498_PRIME Z390-A_UM.indb 20 8/22/2018 10:21:05… -
Page 63: Chapter 3: Bios Setup
BIOS Setup Knowing BIOS The new ASUS UEFI BIOS is a Unified Extensible Interface that complies with UEFI architecture, offering a user-friendly interface that goes beyond the traditional keyboard- only BIOS controls to enable a more flexible and convenient mouse input. You can easily navigate the new UEFI BIOS with the same smoothness as your operating system.
-
Page 64: Bios Setup Program
RTC RAM via the Clear CMOS button. • The BIOS setup program does not support the Bluetooth devices. Please visit ASUS website for the detailed BIOS content manual. BIOS menu screen The BIOS Setup program can be used under two modes: EZ Mode and Advanced Mode.
-
Page 65: Ez Mode
Loads optimized Search on the FAQ default settings Click to display boot devices Selects the boot device priority The boot device options vary depending on the devices you installed to the system. ASUS PRIME Z390-A E14498_PRIME Z390-A_UM.indb 3 8/22/2018 10:21:06…
-
Page 66: Advanced Mode
3.2.1 Advanced Mode The Advanced Mode provides advanced options for experienced end-users to configure the BIOS settings. The figure below shows an example of the Advanced Mode. Refer to the following sections for the detailed configurations. The default screen for entering the BIOS setup program can be changed. Refer to the Setup Mode item in section Boot menu for details.
-
Page 67
This button above the menu bar allows you to view the descriptions of AI overclocking and enable it. • Refer to section 3.2.4 AI OC Guide for more information. • This function is only enabled when using an unlocked CPU. ASUS PRIME Z390-A E14498_PRIME Z390-A_UM.indb 5 8/22/2018 10:21:06… -
Page 68
Move your mouse over this button to show a QR code, scan this QR code on your mobile device to connect to the BIOS FAQ web page of the ASUS support website. You can also scan the following QR code:… -
Page 69
This button above the menu bar allows you to view and configure the RAID settings of your system. Refer to section 3.2.5 EZ Tuning Wizard for more information. Last Modified button This button shows the items that you last modified and saved in BIOS Setup. ASUS PRIME Z390-A E14498_PRIME Z390-A_UM.indb 7 8/22/2018 10:21:06… -
Page 70: Qfan Control
3.2.3 QFan Control The QFan Control allows you to set a fan profile or manually configure the operating speed of your CPU and chassis fans. Click to select a fan to be Click to activate Click to activate DC Mode configured PWM Mode Select a profile to apply to…
-
Page 71
Select the fan that you want to configure and to view its current status. Click and drag the speed points to adjust the fans’ operating speed. Click Apply to save the changes then click Exit (ESC). ASUS PRIME Z390-A E14498_PRIME Z390-A_UM.indb 9 8/22/2018 10:21:06… -
Page 72: Ai Oc Guide
3.2.4 AI OC Guide • The screenshot shown in this section is for reference purposes only, and may not exactly match what you see on your screen. • This function is only enabled when using an unlocked CPU. The AI OC Guide allows you to enable the Ai Overclocking feature, or view a quick guide of the Ai Overclocking feature which highlights the recommended setup procedure and descriptions of the AI Overclocking.
-
Page 73: Ez Tuning Wizard
Ensure that your HDDs have no existing RAID volumes. • Ensure to connect your HDDs to Intel ® SATA connectors. Select the port that you want to set to [RAID] mode, PCIE or SATA, then click Next. ASUS PRIME Z390-A 3-11 E14498_PRIME Z390-A_UM.indb 11 8/22/2018 10:21:06…
-
Page 74
Select the type of storage for your RAID, Easy Backup or Super Speed, then click Next. For Easy Backup, click Next then select from Easy Backup (RAID 1) or Easy Backup (RAID 10). You can only select Easy Backup (RAID 10) if you connect four (4) HDDs. For Super Speed, click Next then select from Super Speed (RAID 0) or Super Speed (RAID 5). -
Page 75: My Favorites
My Favorites is your personal space where you can easily save and access your favorite BIOS items. My Favorites comes with several performance, power saving, and fast boot related items by default. You can personalize this screen by adding or removing items. ASUS PRIME Z390-A 3-13 E14498_PRIME Z390-A_UM.indb 13 8/22/2018 10:21:07…
-
Page 76
Adding items to My Favorites To add BIOS items: Press <F3> on your keyboard or click MyFavorites(F3) from the BIOS screen to open Setup Tree Map screen. On the Setup Tree Map screen, select the BIOS items that you want to save in My Favorites screen. -
Page 77: Main Menu
If you install memory modules supporting the eXtreme Memory Profile (X.M.P.) Technology, choose this item to load the DIMM’s default XMP memory timings (CL, TRCD, TRP, TRAS) with BCLK frequency and other memory parameters optimized by ASUS. [XMP II] If you install memory modules supporting the eXtreme Memory Profile (X.M.P.) Technology, choose this item to load the DIMM’s complete default…
-
Page 78
CPU permanently. ASUS MultiCore Enhancement [Auto] This item allows you to maximize the oveclocking performance optimized by ASUS core ratio settings. [Disabled] This item allows you to set to default core ratio settings. CPU Core Ratio This item allows you to set the CPU core ratios. -
Page 79: Advanced Menu
This item allows you to set the power saving of the CPU states. Configuration options: [Auto] [Disabled] [Enabled] 3.6.3 System Agent (SA) Configuration The items in this menu allow you to adjust the Link Speed for PEG Port and Multi-Monitor. ASUS PRIME Z390-A 3-17 E14498_PRIME Z390-A_UM.indb 17 8/22/2018 10:21:07…
-
Page 80: Pch Configuration
3.6.4 PCH Configuration The items in this menu allow you to adjust the PCH PCI Express speed. PCI Express Configuration This item allows you to configure the PCI Express slots. PCIe Speed This item allows your system to automatically select the PCI Express port speed. Configuration options: [Auto] [Gen1] [Gen2] [Gen3] 3.6.5 PCH Storage Configuration…
-
Page 81: Pch-Fw Configuration
[PCIE mode] Only supports M.2 PCIE devices. PCIEX16_3 Bandwidth [X2] Run at X2 mode with SATA6G_56 enabled. [X4] Run at X4 mode for higher performance with SATA6G_56 disabled. ASUS PRIME Z390-A 3-19 E14498_PRIME Z390-A_UM.indb 19 8/22/2018 10:21:07…
-
Page 82: Apm Configuration
3.6.9 APM Configuration The items in this menu allow you to set system wake and sleep settings. ErP Ready This item allows you to switch off some power at S4+S5 or S5 to get the system ready for ErP requirement. When set to [Enabled], all other PME options are switched off. Configuration options: [Disabled] [Enable(S4+S5)] [Enable(S5)] 3.6.10 PCI Subsystem Settings…
-
Page 83: Monitor Menu
[Advanced Mode] This item allows you to go to Advanced Mode of the BIOS after POST. [EZ Mode] This item allows you to go to EZ Mode of the BIOS after POST. ASUS PRIME Z390-A 3-21 E14498_PRIME Z390-A_UM.indb 21 8/22/2018 10:21:07…
-
Page 84
CSM (Compatibility Support Module) This item allows you to configure the CSM (Compatibility Support Module) items to fully support the various VGA, bootable devices and add-on devices for better compatibility. Launch CSM [Auto] The system automatically detects the bootable devices and the add- on devices. -
Page 85: Tool Menu
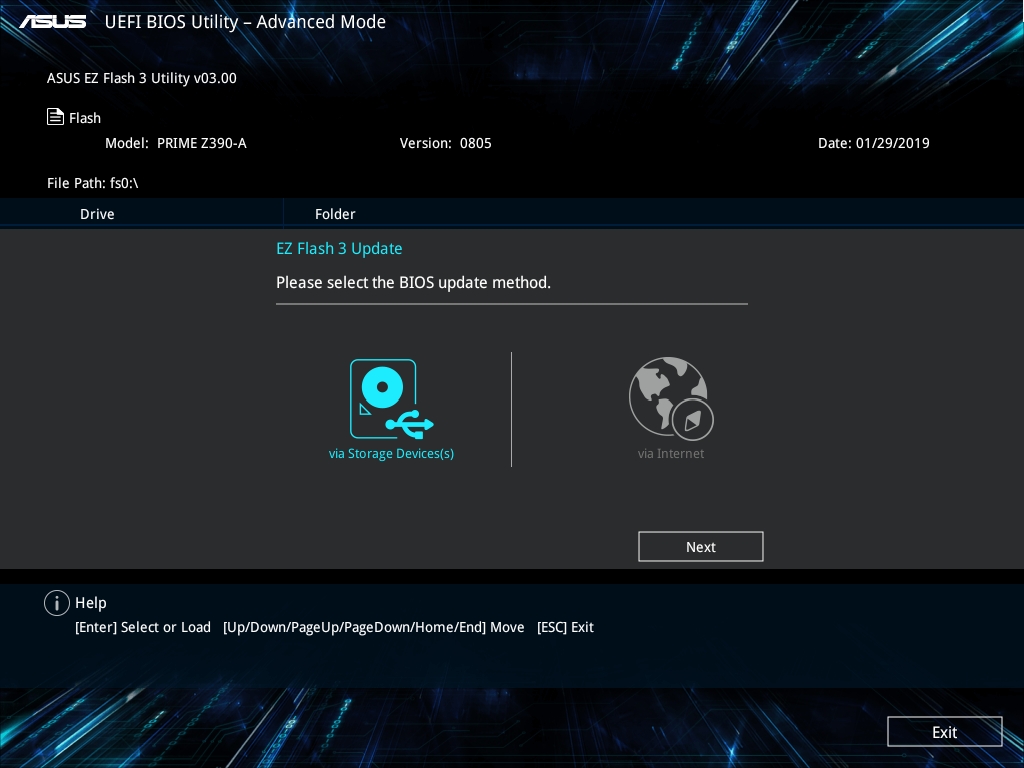
3.9.1 ASUS EZ Flash 3 Utility This item allows you to run ASUS EZ Flash 3. When you press <Enter>, a confirmation message appears. Use the left/right arrow key to select between [Yes] or [No], then press <Enter> to confirm your choice.
-
Page 86: Secure Erase
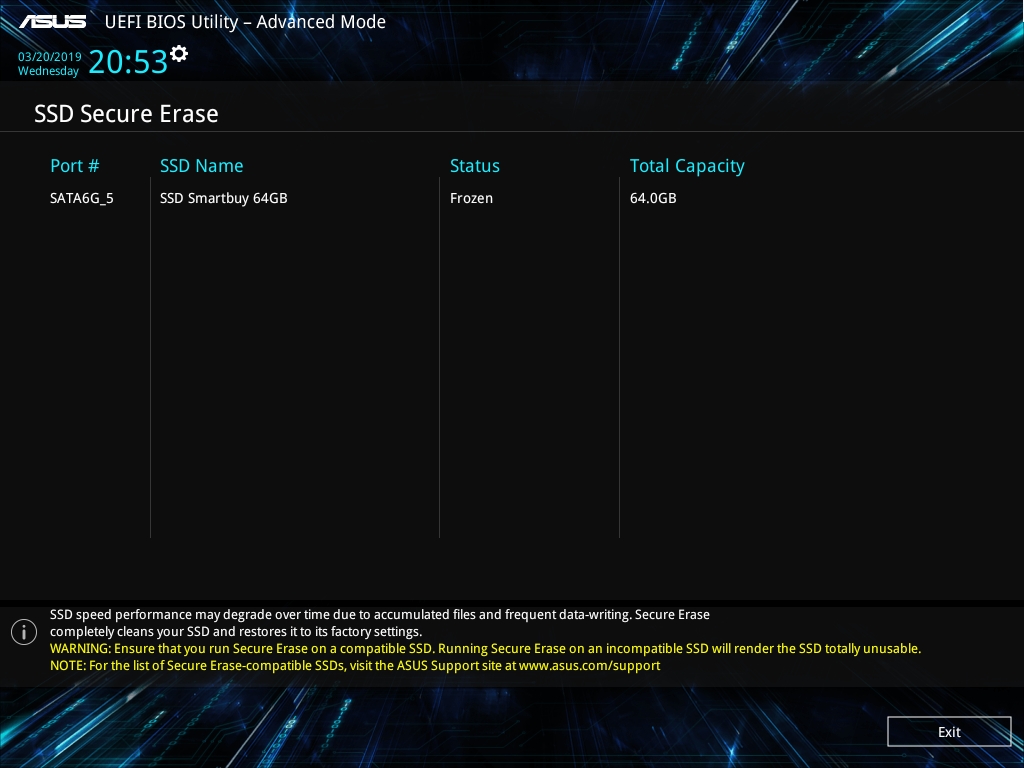
To launch Secure Erase, click Tool > Secure Erase on the Advanced mode menu. Check the ASUS support site for a full list of SSDs tested with Secure Erase. The drive may become unstable if you run Secure Erase on an incompatible SSD.
-
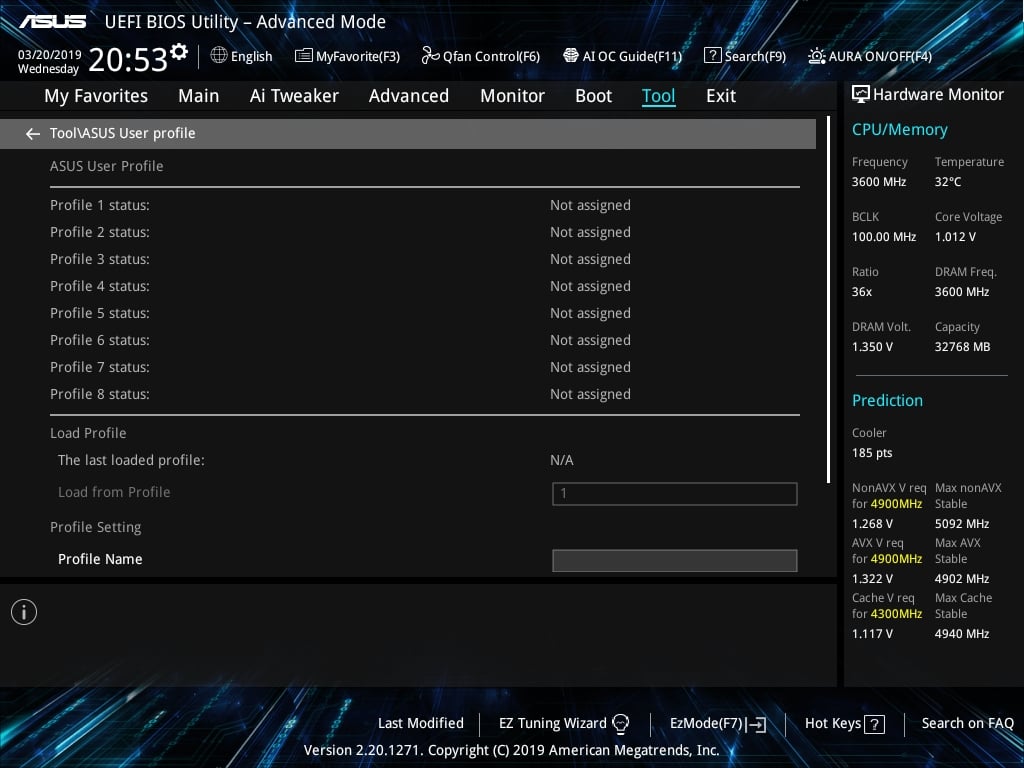
Page 87: Asus User Profile
This item displays the information and recommended configuration for the PCIE slots that the graphics card is installed in your system. This feature is only supported on selected ASUS graphics cards. Bus Interface This item allows you to select the bus interface.
-
Page 88: Exit Menu
3.10 Exit menu The Exit menu items allow you to load the optimal default values for the BIOS items, and save or discard your changes to the BIOS items. You can access the EZ Mode from the Exit menu. Load Optimized Defaults This option allows you to load the default values for each of the parameters on the Setup menus.
-
Page 89: Updating Bios
® ASUS EZ Flash 3: Updates the BIOS using a USB flash drive. ASUS CrashFree BIOS 3: Restores the BIOS using the motherboard support DVD or a USB flash drive when the BIOS file fails or gets corrupted. 3.11.1…
-
Page 90: Asus Ez Flash 3
3.11.2 ASUS EZ Flash 3 ASUS EZ Flash 3 allows you to download and update to the latest BIOS through the Internet without having to use a bootable floppy disk or an OS-based utility. Updating through the Internet varies per region and Internet conditions. Check your local Internet connection before updating through the Internet.
-
Page 91
To update the BIOS by Internet: Enter the Advanced Mode of the BIOS setup program. Go to the Tool menu to select ASUS EZ Flash Utility and press <Enter>. Select by Internet. Press the Left/Right arrow keys to select an Internet connection method, and then press <Enter>. -
Page 92: Asus Crashfree Bios 3
The BIOS file in the motherboard support DVD may be older than the BIOS file published on the ASUS official website. If you want to use the newer BIOS file, download the file at https://www.asus.com/support/ and save it to a USB flash drive.
-
Page 93: Chapter 4: Raid Support
® RAID 1, RAID 5 and RAID 10 configuration. For more information on configuring your RAID sets, please refer to the RAID Configuration Guide which you can find at https://www.asus.com/support. 4.1.1 RAID definitions RAID 0 (Data striping) optimizes two identical hard disk drives to read and write data in parallel, interleaved stacks.
-
Page 94
Chapter 4: RAID Support E14498_PRIME Z390-A_UM.indb 2 8/22/2018 10:21:08… -
Page 95: Appendix
Appendix Notices FCC Compliance Information Responsible Party: Asus Computer International Address: 48720 Kato Rd., Fremont, CA 94538, USA Phone / Fax No: (510)739-3777 / (510)608-4555 This device complies with part 15 of the FCC Rules. Operation is subject to the following two conditions: (1) This device may not cause harmful interference, and (2) this device must accept any interference received, including interference that may cause undesired operation.
-
Page 96
Compliance Statement of Innovation, Science and Economic Development Canada (ISED) This device complies with Innovation, Science and Economic Development Canada licence exempt RSS standard(s). Operation is subject to the following two conditions: (1) this device may not cause interference, and (2) this device must accept any interference, including interference that may cause undesired operation of the device. -
Page 97
ASUS Recycling/Takeback Services ASUS recycling and takeback programs come from our commitment to the highest standards for protecting our environment. We believe in providing solutions for you to be able to responsibly recycle our products, batteries, other components as well as the packaging materials. -
Page 98
доступний на: www.asus.com/support Cijeli tekst EU izjave o sukladnosti dostupan je na: www.asus.com/support Türkçe AsusTek Computer Inc., bu aygıtın temel gereksinimlerle ve ilişkili Čeština Společnost ASUSTeK Computer Inc. tímto prohlašuje, že toto Yönergelerin diğer ilgili koşullarıyla uyumlu olduğunu beyan eder. -
Page 99: Asus Contact Information
+1-510-739-3777 +1-510-608-4555 Web site http://www.asus.com/us/ Technical Support Support fax +1-812-284-0883 Telephone +1-812-282-2787 Online support http://qr.asus.com/techserv ASUS COMPUTER GmbH (Germany and Austria) Address Harkort Str. 21-23, 40880 Ratingen, Germany +49-2102-959931 Web site http://www.asus.com/de Online contact http://eu-rma.asus.com/sales Technical Support Telephone +49-2102-5789555 Support Fax…
-
Page 100
Appendix E14498_PRIME Z390-A_UM.indb 6 8/22/2018 10:21:08…
-
Драйверы
35
-
Инструкции по эксплуатации
1

ASUS PRIME Z390-A инструкция по эксплуатации
(98 страниц)
- Языки:Японский
-
Тип:
PDF -
Размер:
6.51 MB -
Описание:
PRIME Z390-A User’s Manual ( Japanese Edition )
Просмотр
На NoDevice можно скачать инструкцию по эксплуатации для ASUS PRIME Z390-A. Руководство пользователя необходимо для ознакомления с правилами установки и эксплуатации ASUS PRIME Z390-A. Инструкции по использованию помогут правильно настроить ASUS PRIME Z390-A, исправить ошибки и выявить неполадки.
В октябре прошлого года мы делали обзор платы Asus Prime Z370-A на новом для того времени чипсете Intel Z370. Впрочем, новым чипсетом Intel Z370 можно было назвать весьма условно. Кроме поддержки тогдашних новых процессоров Intel Core 8-го поколения (Coffee Lake) он практически ничем не отличался от Intel Z270. Фактически, на момент выхода процессоров Core 8-го поколения у Intel не было нового чипсета для них, так что компания быстренько переделала Z270 в Z370. Настоящие чипсеты Intel 300-й серии появились значительно позднее, причем, в нарушении традиций, сначала появились чипсеты младших серий (Q370, H370, B360 и H310), и лишь позже, в октябре 2018 г., одновременно с выходом процессоров Intel Core 9-го поколения, семейство пополнилось топовым чипсетом Intel Z390, который совмещает преимущества чипсетов Intel Z370 и Intel H370/B360.
Таким образом, на протяжении года Intel Z370 был единственным чипсетом для процессоров Coffee Lake, который позволял их разгонять, но при этом он был лишен всех преимуществ новых чипсетов Intel 300-й серии (об этих преимуществах мы расскажем чуть позже). С выходом чипсета Intel Z390 все изменилось и встало на свои места.
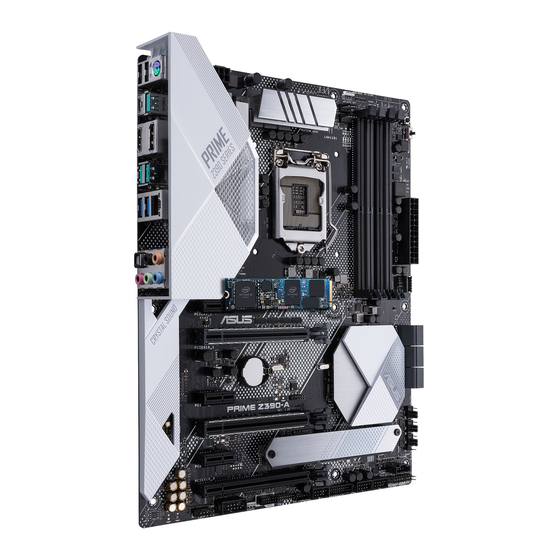
К особенностям нового чипсета мы еще вернемся, а пока рассмотрим одну из первых плат на Intel Z390 — Asus Prime Z390-A. Естественно, по ходу обзора мы будем сравнивать ее с платой Asus Prime Z370-A.
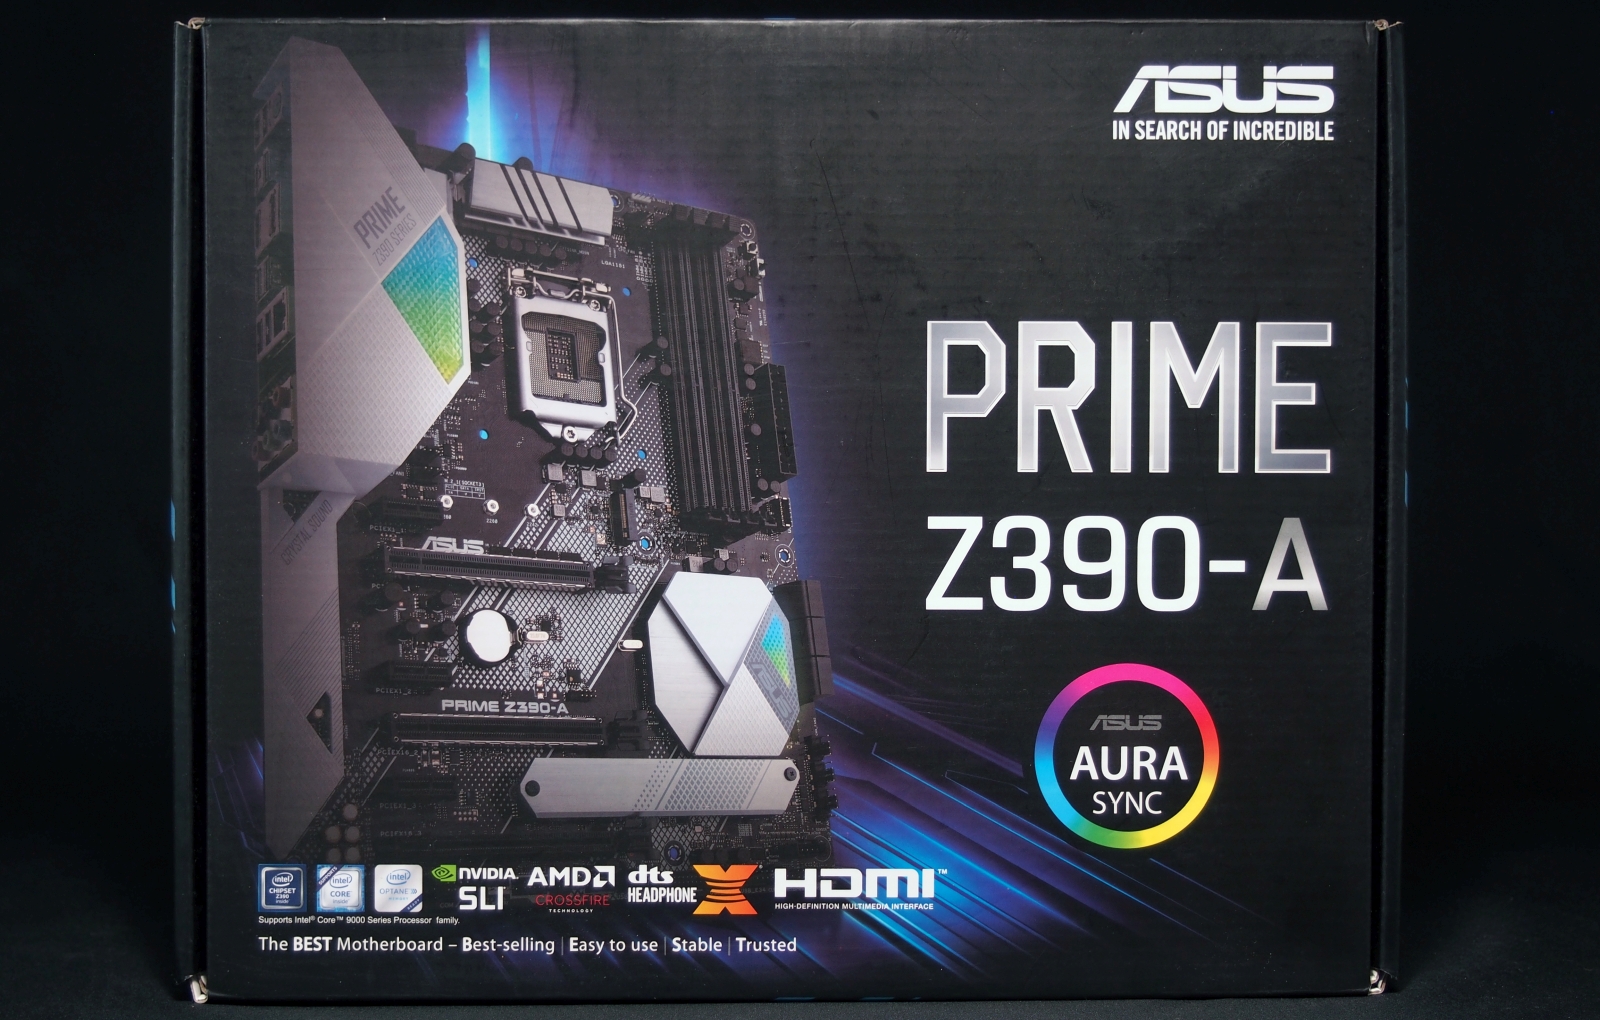
Комплектация и упаковка
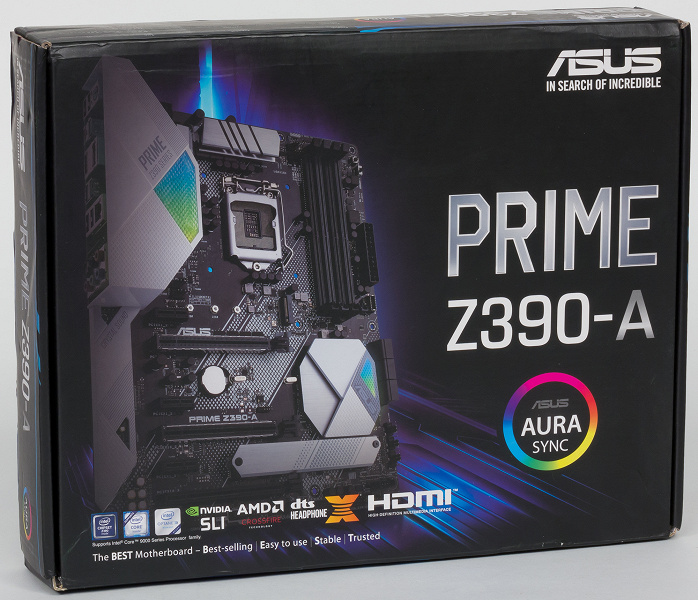
Asus Prime Z390-A поставляется в компактной по размерам коробке, которую можно назвать типичной для плат серии Prime.
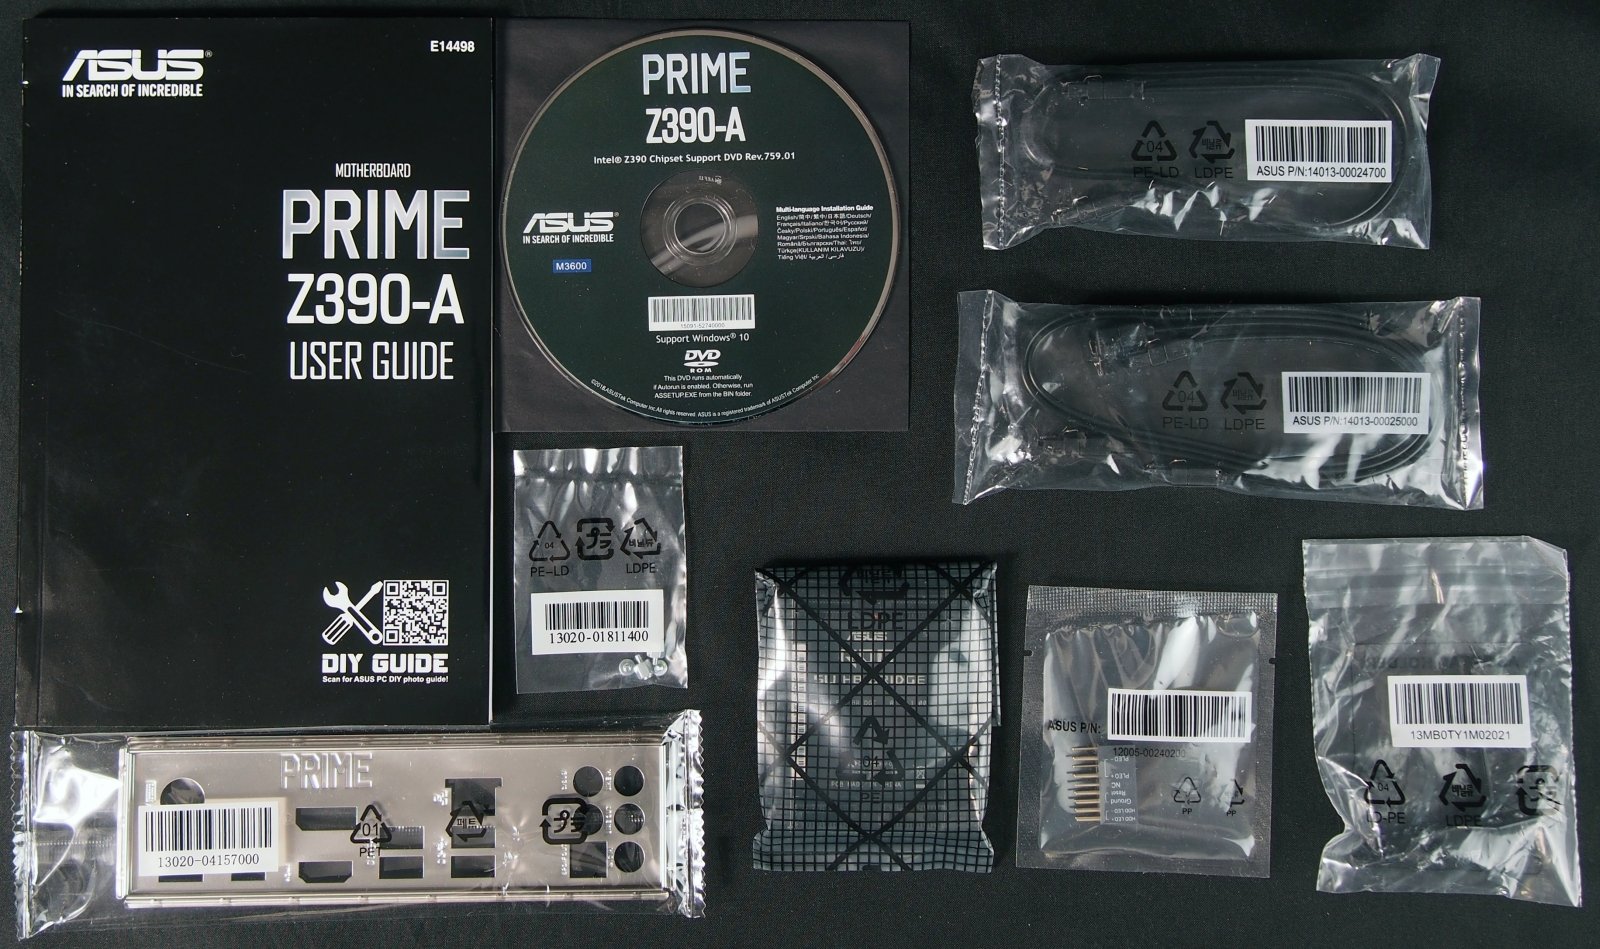
Комплект поставки очень скромный: три SATA-кабеля (все разъемы с защелками, один кабель с угловым разъемом с одной стороны), руководство пользователя, DVD-диск с программным обеспечением и драйверами, заглушка для задней панели платы, мостик SLI на две видеокарты и держатель для дополнительного вентилятора (40×40 или 50×50 мм), который опционально можно прикрутить к плате. Сам вентилятор в комплект не входит.
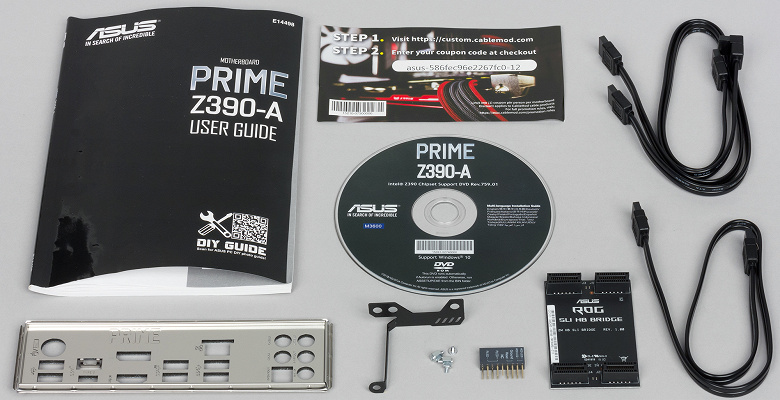
Абсолютно такой же комплект поставки и у платы Asus Prime Z370-A .
Конфигурация и особенности платы
Сводная таблица характеристик платы Asus Prime Z390-A приведена ниже, а далее по тексту мы рассмотрим все ее особенности и функциональные возможности.
| Поддерживаемые процессоры | Intel Core 8-го и 9-го поколений |
|---|---|
| Процессорный разъем | LGA1151 |
| Чипсет | Intel Z390 |
| Память | 4 × DDR4 (до 64 ГБ) |
| Аудиоподсистема | Realtek ALC1220 |
| Сетевой контроллер | 1 × Intel i219-V |
| Слоты расширения | 1 × PCI Express 3.0 x16 1 × PCI Express 3.0 x8 (в форм-факторе PCI Express 3.0 x16) 1 × PCI Express 3.0 x4 (в форм-факторе PCI Express 3.0 x16) 3 × PCI Express 3.0 x1 2 × M.2 |
| SATA-разъемы | 6 × SATA 6 Гбит/с |
| USB-порты | 4 × USB 3.0 (Type-A) 1 × USB 3.0 (Type-C) 3 × USB 3.1 (Type-A) 1 × USB 3.1 (Type-C) 6 × USB 2.0 |
| Разъемы на задней панели | 1 × HDMI 1.4 1 × DisplayPort 1.2 1 × USB 3.1 (Type-C) 3 × USB 3.1 (Type-A) 2 × USB 3.0 2 × USB 2.0 1 × RJ-45 1 × PS/2 1 × S/PDIF (оптический, выход) 5 аудиоразъемов типа миниджек |
| Внутренние разъемы | 24-контактный разъем питания ATX 8-контактный разъем питания ATX 12 В 6 × SATA 6 Гбит/с 2 × M.2 7 разъемов для подключения 4-контактных вентиляторов 1 разъем для подключения платы Asus Extension Fan 1 разъем для подключения портов USB 3.0 3 разъема для подключения портов USB 2.0 1 разъем для подключения COM-порта 1 разъем для подключения термодатчика 2 разъема для подключения неадресуемой RGB-ленты |
| Форм-фактор | ATX (305×244 мм) |
Если сравнивать конфигурации плат Asus Prime Z390-A и Asus Prime Z370-A, то отличий довольно много. Изменился набор разъемов на задней панели платы, изменился набор слотов и разъемов на самой плате. В итоге новая плата мало похожа на свою предшественницу.
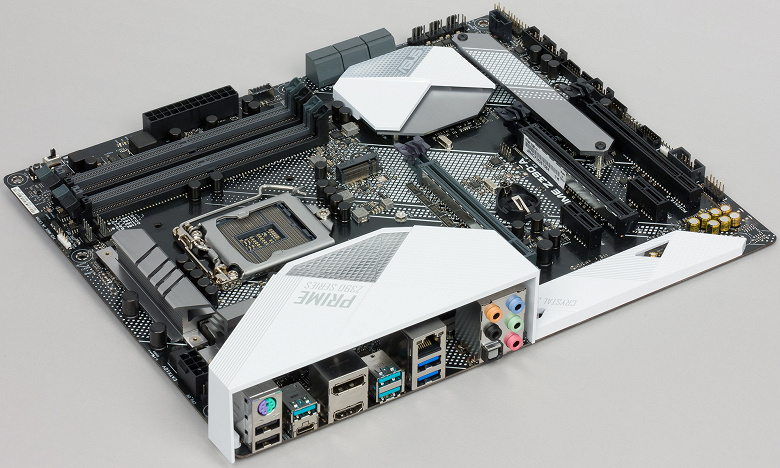
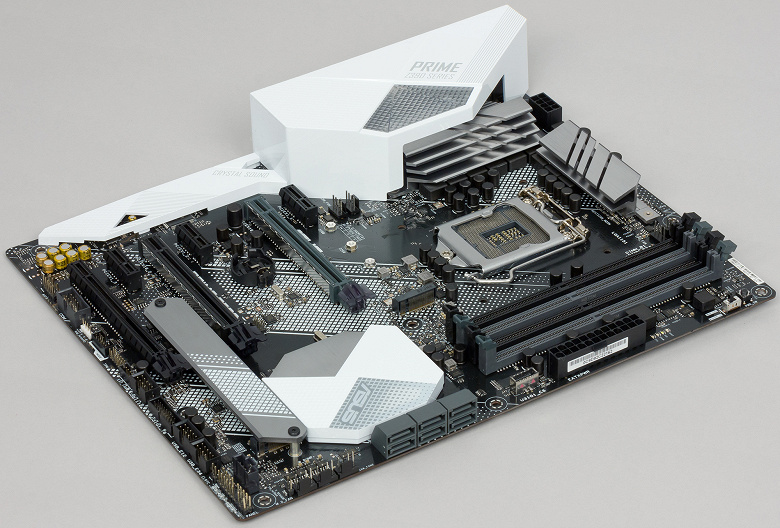
Форм-фактор
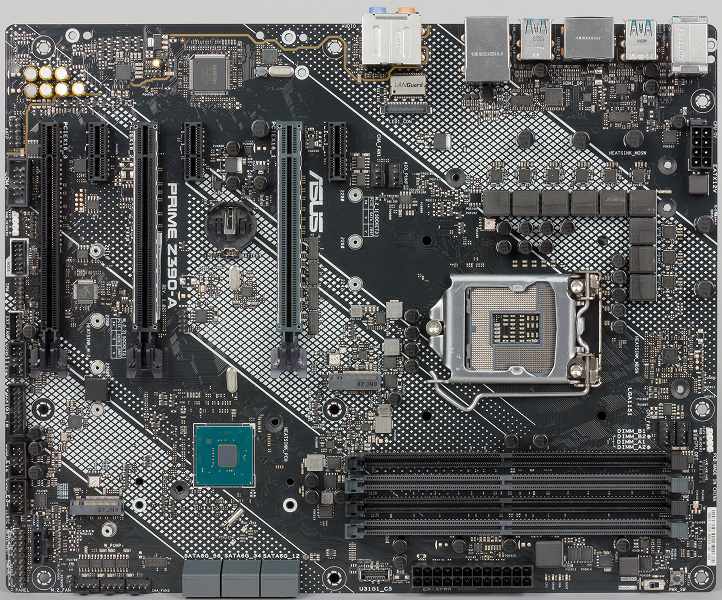
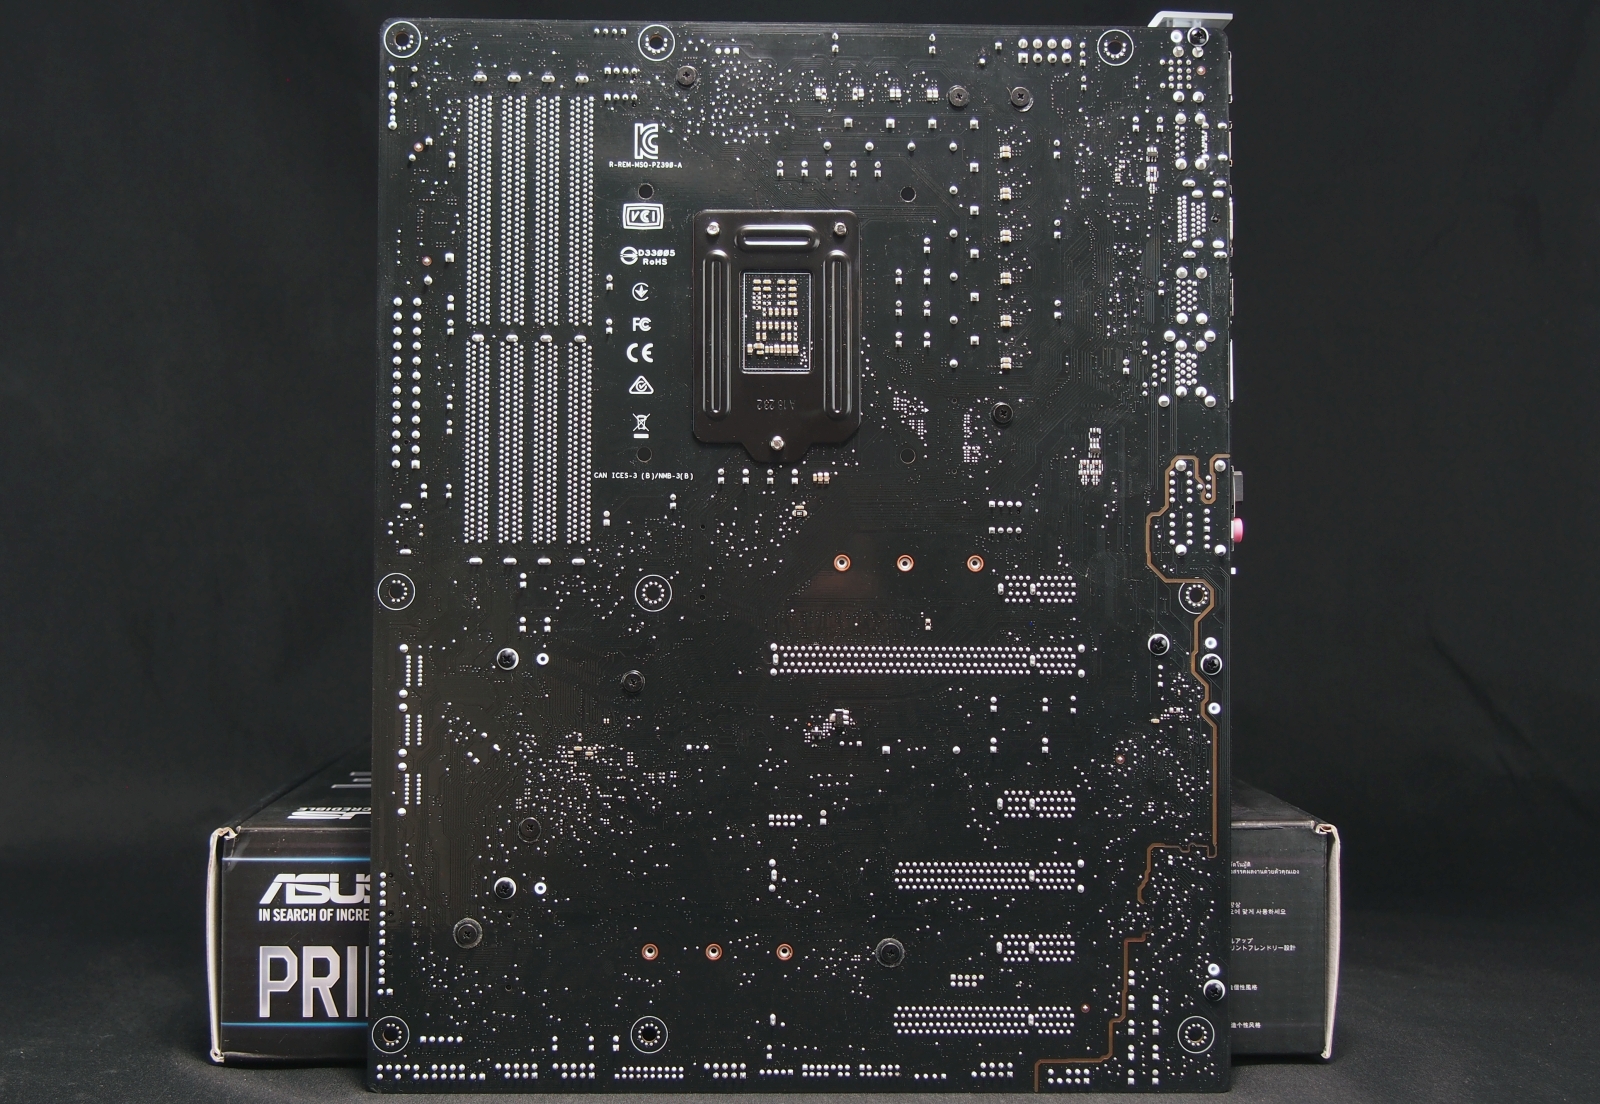
Плата Asus Prime Z390-A выполнена в форм-факторе ATX (305×244 мм), для ее монтажа в корпус предусмотрено девять стандартных отверстий.
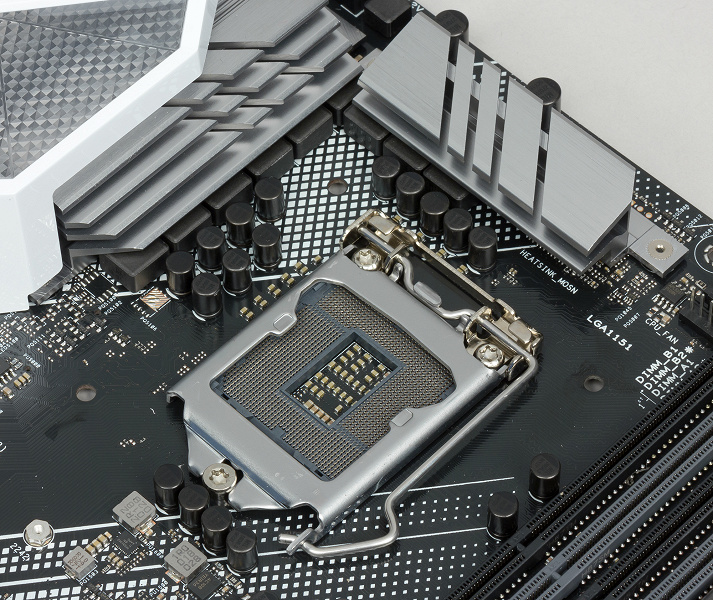
Чипсет и процессорный разъем
Плата Asus Prime Z390-A основана на чипсете Intel Z390 и поддерживает процессоры Intel Core 8-го поколения и новые процессоры Intel Core 9-го поколения с разъемом LGA1151.
Память
Для установки модулей памяти на плате Asus Prime Z390-A предусмотрено четыре DIMM-слота. Плата поддерживает небуферизованную память DDR4 (non-EСС), а максимальный объем памяти составляет 64 ГБ (при использовании модулей емкостью по 16 ГБ).

Слоты расширения, разъемы M.2
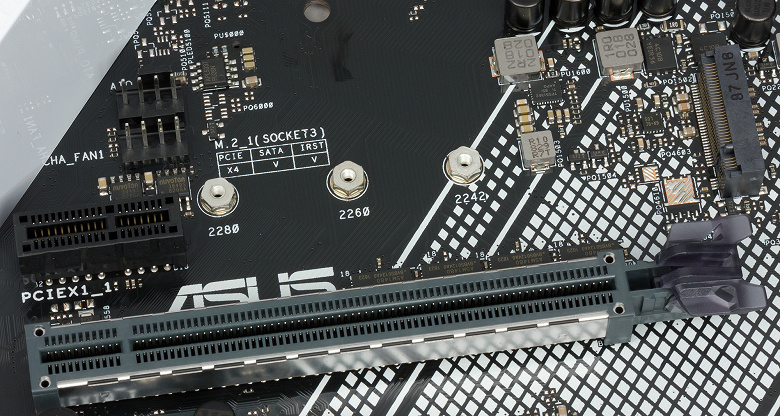
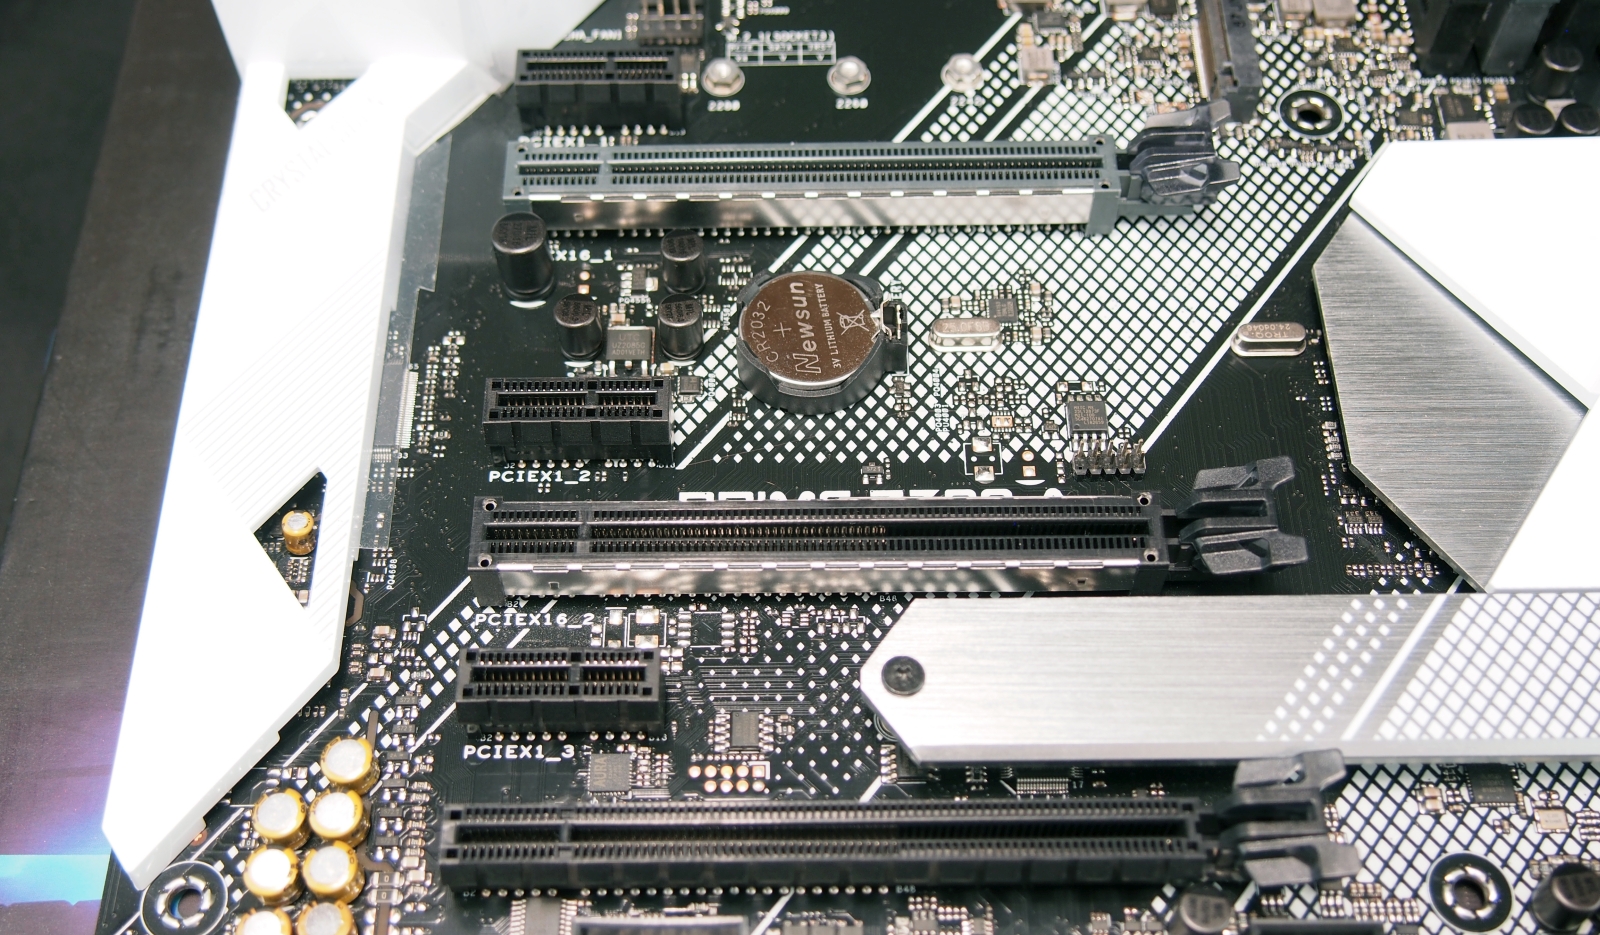
Для установки видеокарт, плат расширения и накопителей на материнской плате Asus Prime Z390-A имеется три слота с форм-фактором PCI Express x16, три слота PCI Express 3.0 x1 и два разъема M.2.

Первые два слота (если считать от процессорного разъема) с форм-фактором PCI Express x16 реализованы на базе 16 процессорных линий PCIe 3.0.
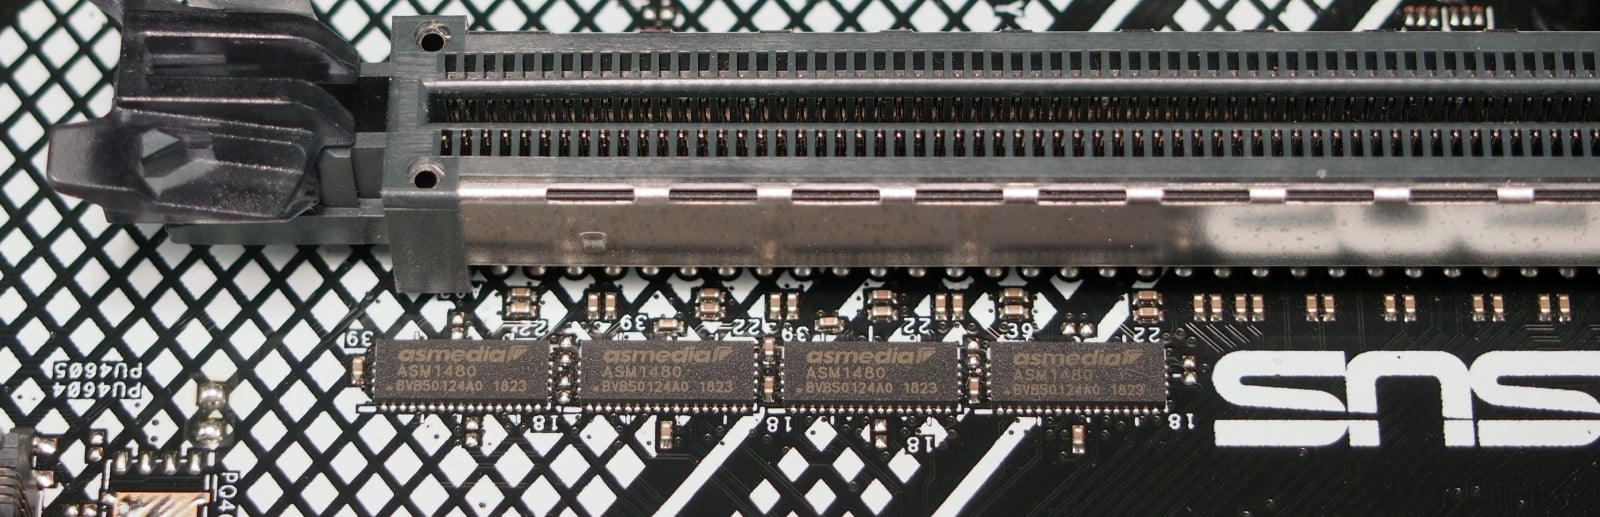
Первый слот переключаемый и может работать на скоростях x16/x8. То есть это слот PCI Express 3.0 x16/x8. Для переключения режимов работы этого слота используется четыре мультиплексора/демультиплексора линий PCIe 3.0 ASMedia ASM1480.
Второй слот с форм-фактором PCI Express x16 всегда работает на скорости x8. То есть это слот PCI Express 3.0 x8, но в форм-факторе PCI Express x16.
Соответственно, режимы работы этих двух слотов могут быть следующие: либо x16/–, либо x8/x8. То есть если задействуется только первый слот, то он будет работать на скорости x16, если же используются оба слота, то они работают на скорости x8.
Третий слот с форм-фактором PCI Express x16 работает только на скорости x4 и представляют собой слот PCI Express 3.0 x4 в форм-факторе PCI Express x16. Этот слот реализован на базе четырех чипсетных линий PCIe 3.0.
Отметим, что плата поддерживает технологии Nvidia SLI и AMD CrossFireX и допускает установку двух видеокарт Nvidia и до трех видеокарт AMD.
Три слота PCI Express 3.0 x1 также реализованы через чипсет Intel Z390.
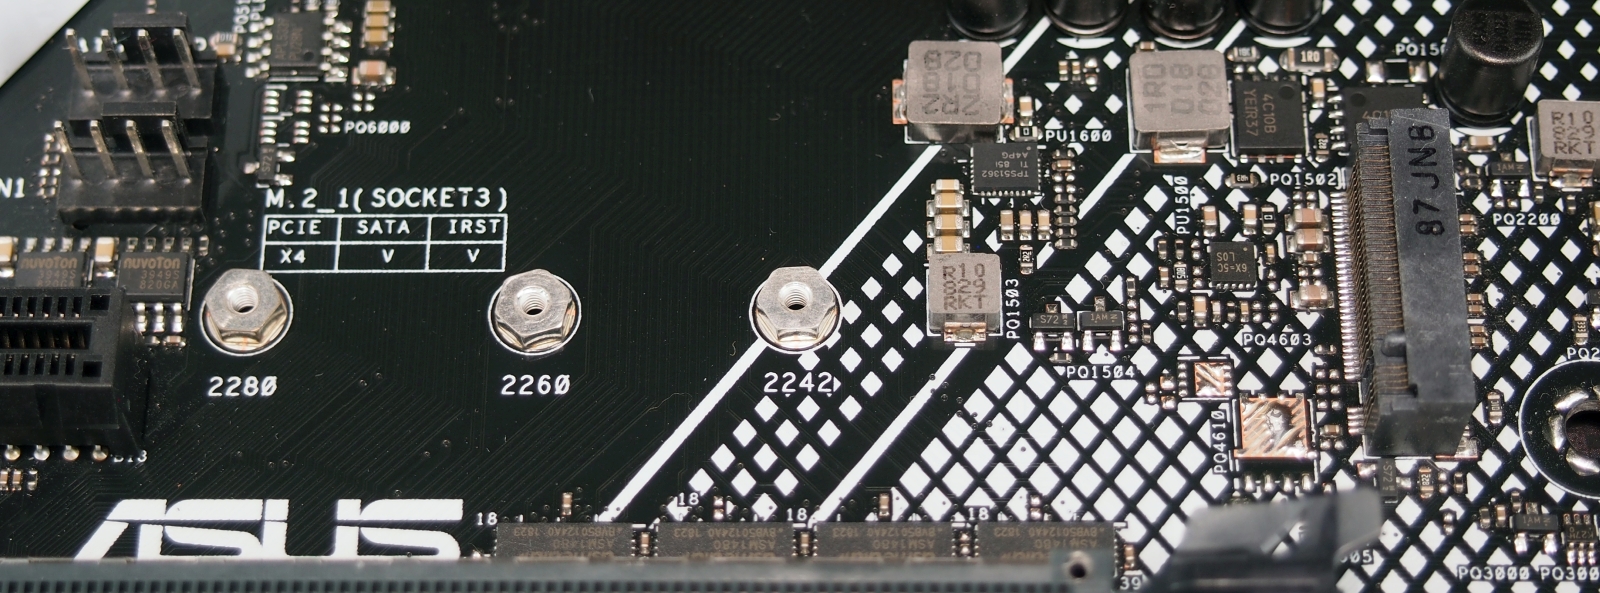
Разъемы M.2 предназначены для установки SSD-накопителей. Один разъем (M.2_1), ближайший к разъему процессора, поддерживает устройства c интерфейсом PCIe 3.0 x4/x2 или SATA и позволяет устанавливать накопители типоразмера 2242/2260/2280.
Второй разъем M.2_2 поддерживает устройства только c интерфейсом PCIe 3.0 x4/x2 c типоразмером 2242/2260/2280/22110.Для накопителей, устанавливаемых в данный разъем, предусмотрен радиатор.
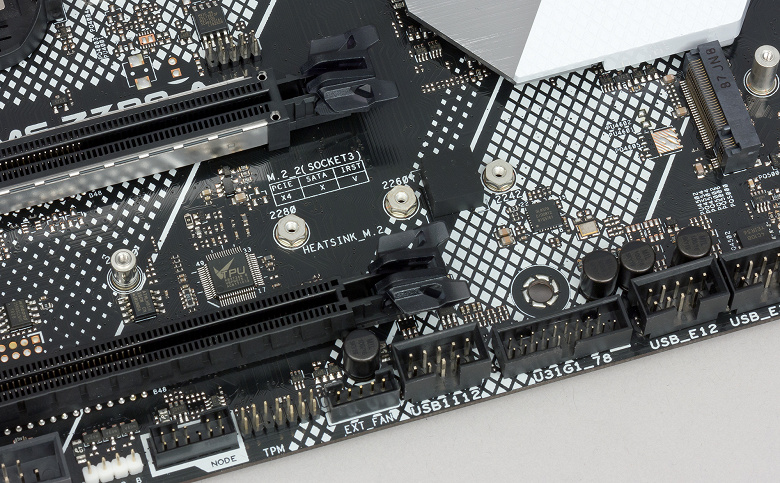
Оба разъема M.2 реализованы через чипсет.
Видеоразъемы
Поскольку процессоры Intel Core 8-го и 9-го поколений имеют интегрированное графическое ядро, для подключения монитора на задней панели платы имеются видеовыходы HDMI 1.4 и DisplayPort 1.2.
SATA-порты
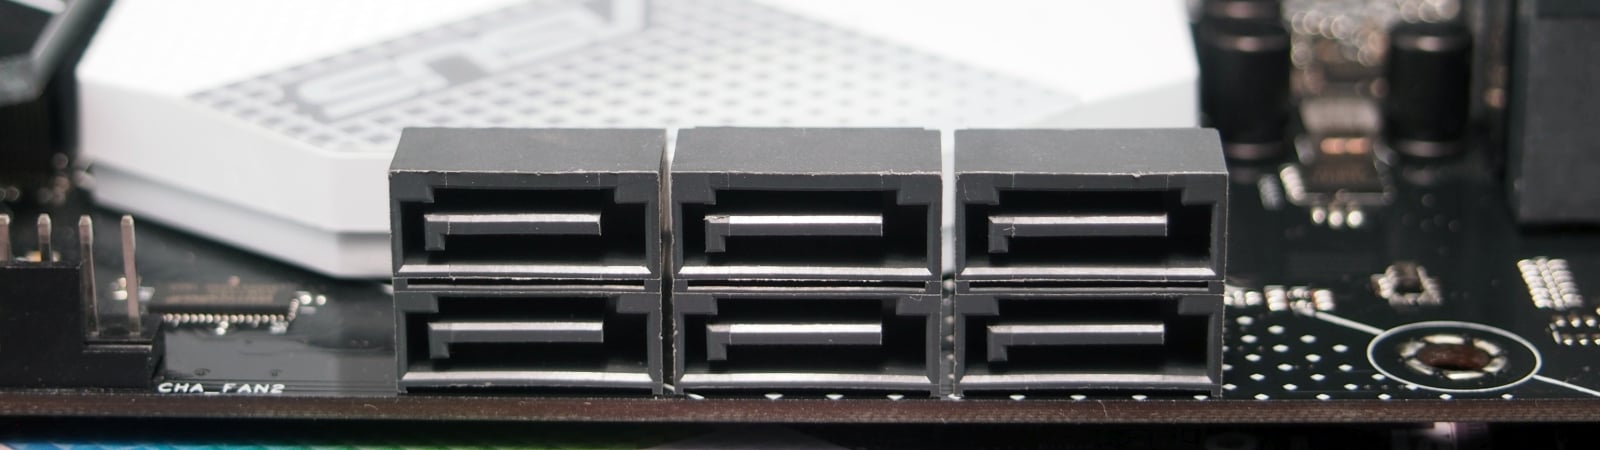
Для подключения накопителей или оптических приводов на плате предусмотрено шесть портов SATA 6 Гбит/с, которые реализованы на базе интегрированного в чипсет Intel Z390 контроллера. Эти порты поддерживают возможность создания RAID-массивов уровней 0, 1, 5, 10.

USB-разъемы
Для подключения всевозможных периферийных устройств на плате предусмотрено пять портов USB 3.0, восемь портов USB 2.0 и четыре порта USB 3.1.
Все USB-порты реализованы через чипсет Intel Z390. Два порта USB 2.0, два порта USB 3.0 и четыре порта USB 3.1 (три разъема Type-A и один разъем Type-C) выведены на заднюю панель платы. Для подключения еще шести портов USB 2.0 и двух портов USB 3.0 на плате имеется три разъема портов USB 2.0 и один разъем портов USB 3.0 (по два порта на разъем). Кроме того, на плате есть разъем вертикального типа для подключения порта USB 3.0 (Type-С).
Сетевой интерфейс
Для подключения к сети на плате Asus Prime Z390-A есть гигабитный сетевой интерфейс на базе контроллера физического уровня Intel i219-V (используется в сочетании с чипсетным контроллером MAC-уровня).
Как это работает
Прежде чем разобраться, как это работает, и учитывая, что это первый обзор платы на чипсете Intel Z390, сделаем небольшое лирическое отступление в сторону чипсетов Intel 300-й серии.
Как уже отмечалось, в 300-ю серию чипсетов входят: Z390, Z370, Q370, Q360, H370, B360 и H310. Q370 и Q360 ориентированы на корпоративный сегмент рынка, а Z390, Z370, H370, B360 и H310 предназначены как раз для пользовательских решений. Z390, Z370 и Q370 относятся к топовому сегменту, а остальные получаются путем урезания функциональных возможностей топовых моделей. H370 и B360 предназначены для массовых недорогих материнских плат, а H310 — для случая, когда все совсем плохо, а компьютер нужен (или для офисных самых дешевых ПК).
В топовых моделях Z390 и Q370 имеется ровно 30 пронумерованных HSIO-портов (USB 3.1/3.0, SATA 6 Гбит/с и PCIe 3.0). Обратите внимание, что мы не относим к топовым чипсет Z370, поскольку, как мы уже отмечали, он «ненастоящий» — в нем нет тех особенностей, которые присущи чипсетам Intel 300-й серии, хотя HSIO-портов у него тоже ровно 30. В частности, в Z370 нет контроллера USB 3.1 и нет контроллера CNVi, о чем мы расскажем чуть позже. Кроме того, чипсет Z370 производится по техпроцессу 22 нм, а все остальные чипсеты 300-й серии — по техпроцессу 14 нм. Итак, в чипсетах Z390 и Q370 имеется 30 HSIO-портов, из которых может быть до 24 портов PCIe 3.0, до 6 портов SATA 6 Гбит/с и до 10 портов USB 3.0/3.1, из которых до 6 портов могут быть USB 3.1. При этом всего может быть не более 14 портов USB 3.1/3.0/2.0.
Чтобы из топового чипсета получить нетоповый, нужно просто заблокировать часть HSIO-портов. Вот, собственно, и все. Правда, тут есть одно «но». Совсем уж «облегченный» чипсет H310 отличается от остальных не только тем, что у него заблокирована часть HSIO-портов, но и тем, что порты PCIe тут только версии 2.0, а не 3.0, как в случае остальных чипсетов. Кроме того, в нем заблокирован и контролер USB 3.1 — иначе говоря, есть только порты USB 3.0.
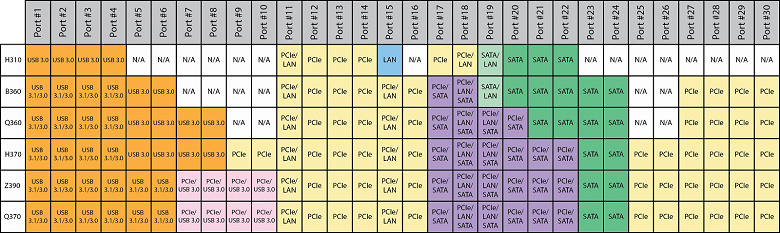
Диаграмма распределения высокоскоростных портов ввода/вывода для чипсетов Intel 300-й серии показана на рисунке.

И приведем также основные характеристики чипсетов Intel 300-й серии для настольных ПК.
| Q370 | Z390 | Z370 | H370 | Q360 | B360 | H310 | |
|---|---|---|---|---|---|---|---|
| Всего HSIO-портов | 30 | 30 | 30 | 30 | 26 | 24 | 15 |
| Линии PCIe 3.0 | до 24 | до 24 | до 24 | до 20 | 14 | 12 | 6 (PCIe 2.0) |
| Порты SATA 6 Гбит/с | до 6 | до 6 | до 6 | до 6 | до 6 | до 6 | 4 |
| Порты USB 3.1 | до 6 | до 6 | нет | до 4 | до 4 | до 4 | нет |
| Порты USB 3.0 | до 10 | до 10 | до 10 | до 8 | до 8 | 6 | 4 |
| Общее количество USB-портов | 14 | 14 | 14 | 14 | 14 | 12 | 10 |
| Intel RST для PCIe 3.0 (x4/x2 M.2) | 3 | 3 | 3 | 2 | 1 | 1 | нет |
| Поддержка разгона | нет | да | да | нет | нет | нет | нет |
| Конфигурации процессорных линий PCIe 3.0 | 1×16 2×8 1×8 и 2×4 |
1×16 | |||||
| Поддержка памяти | DDR4 | DDR4 | DDR4 | DDR4 | DDR4 | DDR4 | DDR4 |
| Количество каналов памяти/ количество модулей на один канал |
2/2 | 2/2 | 2/2 | 2/2 | 2/2 | 2/2 | 2/1 |
| Поддержка Intel Optane Memory | да | да | да | да | да | да | нет |
| Поддержка PCIe Storage | да | да | да | да | да | да | нет |
| Поддержка PCIe RAID 0, 1, 5 | да | да | да | да | нет | нет | нет |
| Поддержка SATA RAID 0, 1, 5, 10 | да | да | да | да | нет | нет | нет |
| Поддержка CNVi (Intel Wireless-AC) | да | да | нет | да | да | да | да |
| Встроенный гигабитный сетевой контроллер MAC-уровня |
да | да | да | да | да | да | да |
Теперь о контролере CNVi (Connectivity Integration), который есть во всех чипсетах, кроме Intel Z370. Он обеспечивает работу соединений Wi-Fi (802.11ac, до 1733 Гбит/с) и Bluetooth 5.0 (новая версия стандарта). Однако в чипсете не полноценный сетевой контроллер, а MAC. Для реализации контроллера нужна еще карта (например, Intel Wireless-AC 9560) с разъемом M.2 (ключ E-типа), которая поддерживает интерфейс CNVi.
Теперь, после краткого обзора особенностей чипсетов Intel 300-й серии, вернемся к плате Asus Prime Z390-A.
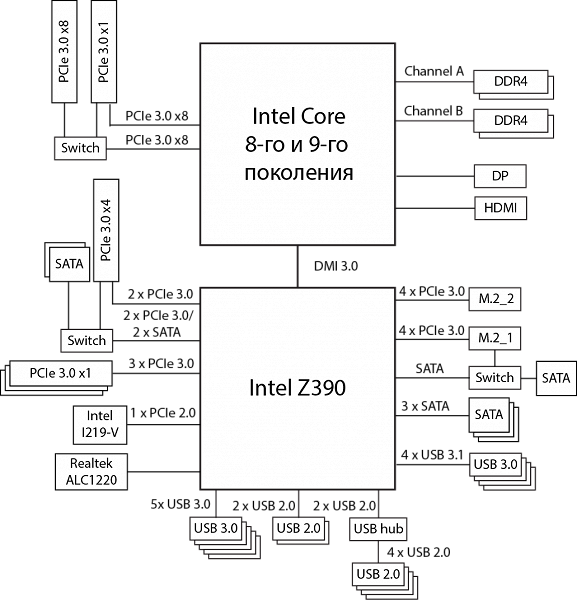
Через чипсет на плате реализованы: слот PCI Express 3.0 x4, три слота PCI Express 3.0 x1, два разъема M.2 и сетевой контроллер. Все это в совокупности требует 16 портов PCIe 3.0. На плате есть шесть портов SATA, пять портов USB 3.0, четыре порта USB 3.1, а это еще 15 HSIO-портов. То есть всего получается 31 HSIO-порт. Что-то с чем-то должно разделяться.
Кроме того, довольно странная ситуация складывается с USB-портами. Напомним, что всего чипсет Intel Z390 поддерживает не более 14 USB-портов, причем не более 10 портов USB 3.0/3.1, из которых не более 6 портов могут быть портами USB 3.1. На плате же Asus Prime Z390-A заявлено 15 портов USB (4 USB 3.1, 5 USB 3.0 и 6 USB 2.0), причем кроме двух портов USB 2.0, выведенных на заднюю панель, на плате есть еще три разъема для подключения портов USB 2.0, что дает в сумме 8 портов USB 2.0. Но без установки дополнительных контроллеров такого просто не может быть. В руководстве пользователя никаких разъяснения на этот счет не приводится.
Мы связались с инженерами компании Asus и выяснили, в чем тут фокус. На плате действительно 4 отдельных порта USB 3.1 и пять отдельных портов USB 3.0 (собственно, по этим портам вопросов не было). А с портами USB 2.0 ситуация следующая: действительно, на плате есть три разъема для подключения таких портов (суммарно на шесть портов) и еще два порта выведены на заднюю панель платы. Однако, во-первых, тут есть хаб USB 2.0, который превращает два порта USB 2.0 в четыре, а во-вторых, один разъем для двух USB-портов на плате разделяется с двумя портами USB 2.0 на задней панели разъемов. То есть всего у Asus Prime Z390-A четыре порта USB 2.0, которые превращаются в шесть портов с помощью хаба. Соответственно, всего через чипсет реализовано суммарно только 13 портов USB.
По поводу остальных разделений все еще проще. Слот PCI Express 3.0 x4 разделяется с двумя SATA-портами (SATA_5 и SATA_6): он может работать в режиме x4, но в этом случае порты SATA_5 и SATA_6 будут недоступны, если же используются порты SATA_5 и SATA_6, то в этом случае слот PCI Express 3.0 x4 будет работать в режиме x2. Такое разделение позволяет сэкономить два HSIO-порта. Далее, разъем M.2_1 разделяется с портом SATA_2 по линии SATA. То есть если разъем M.2_1 используется в режиме SATA, то порт SATA_2 будет недоступен, если же используется порт SATA_2, то разъем M.2_1 доступен только в режиме PCIe.
С учетом указанного разделения всего требуется 29 HSIO-портов. Блок-схема платы Asus Prime Z390-A показана на рисунке.
Дополнительные особенности
Дополнительных особенностей у Asus Prime Z390-A не так много, что типично для моделей серии Prime. На плате есть кнопка включения питания и переключатель MemOK! II (ранее на платах Asus использовалась кнопка MemOK!). Есть перемычка CLRTC для сброса настроек BIOS, а также перемычка CPU_OV для возможности задания высоких значений напряжения при разгоне процессора.
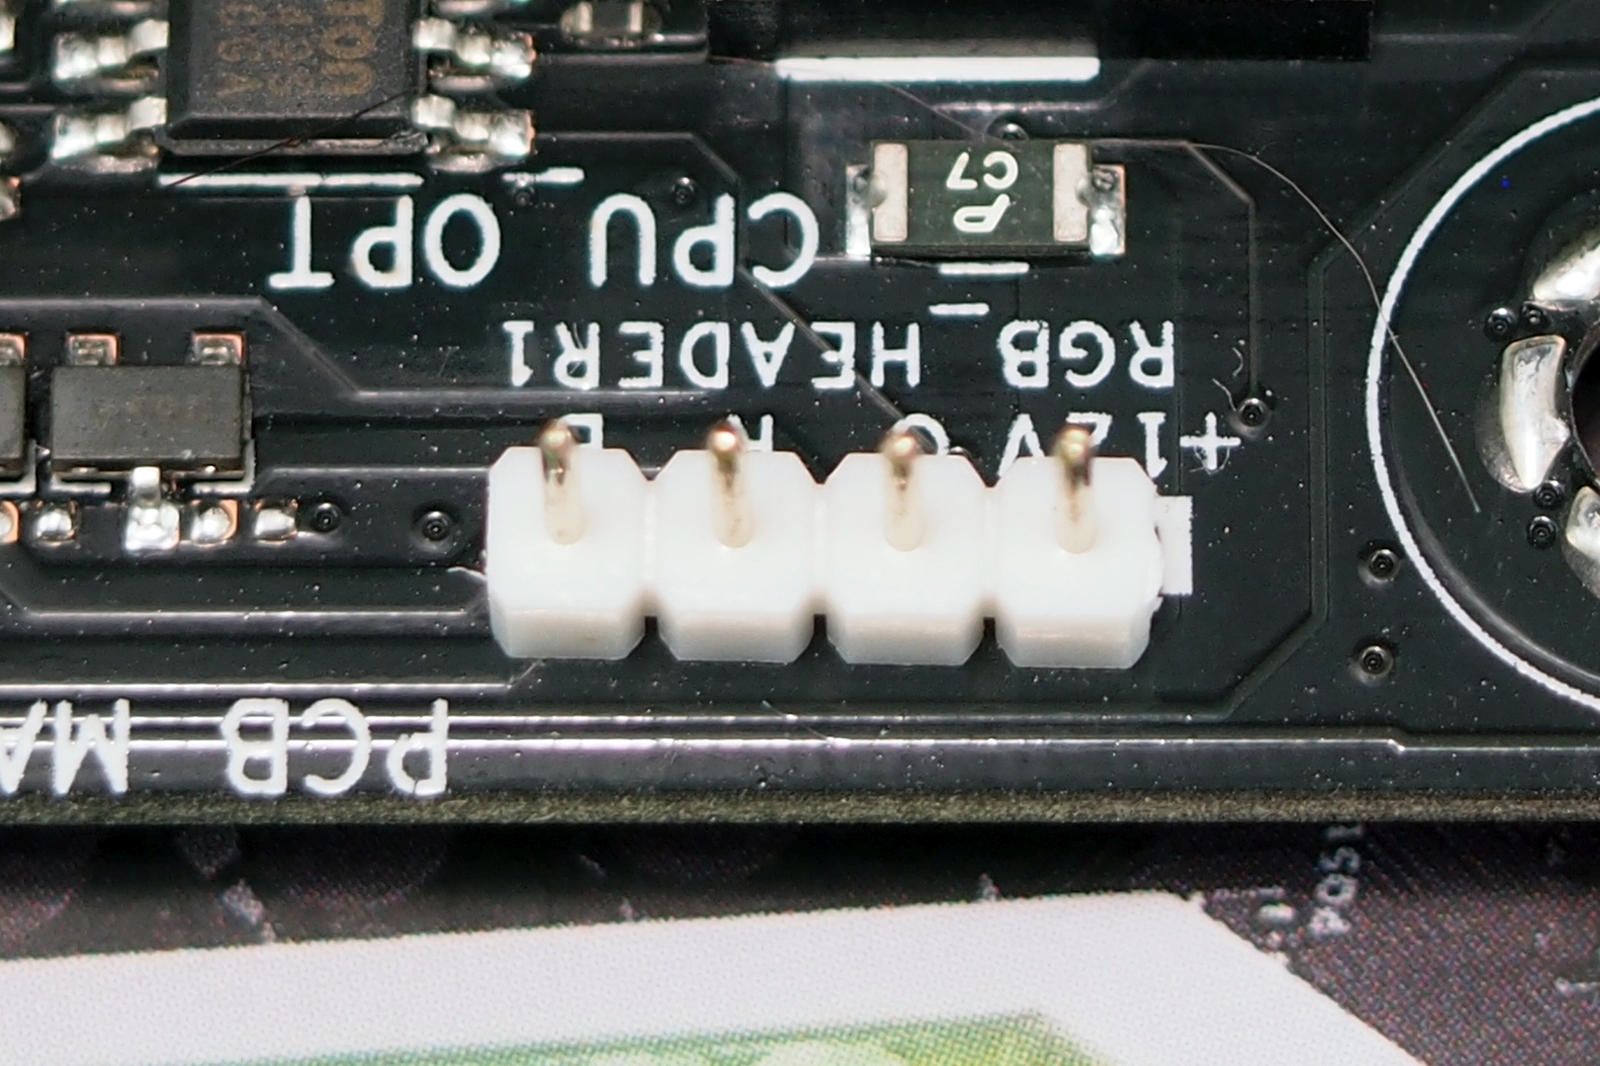
Еще одна особенность — реализация RGB-подсветки. На этой недорогой плате она минимальная, без изысков: подсвечивается радиатор чипсета и кожух задней панели разъемов. Естественно, подсветкой можно управлять с использованием утилиты Aura Sync. Можно задавать цвет подсветки и различные цветовые эффекты.
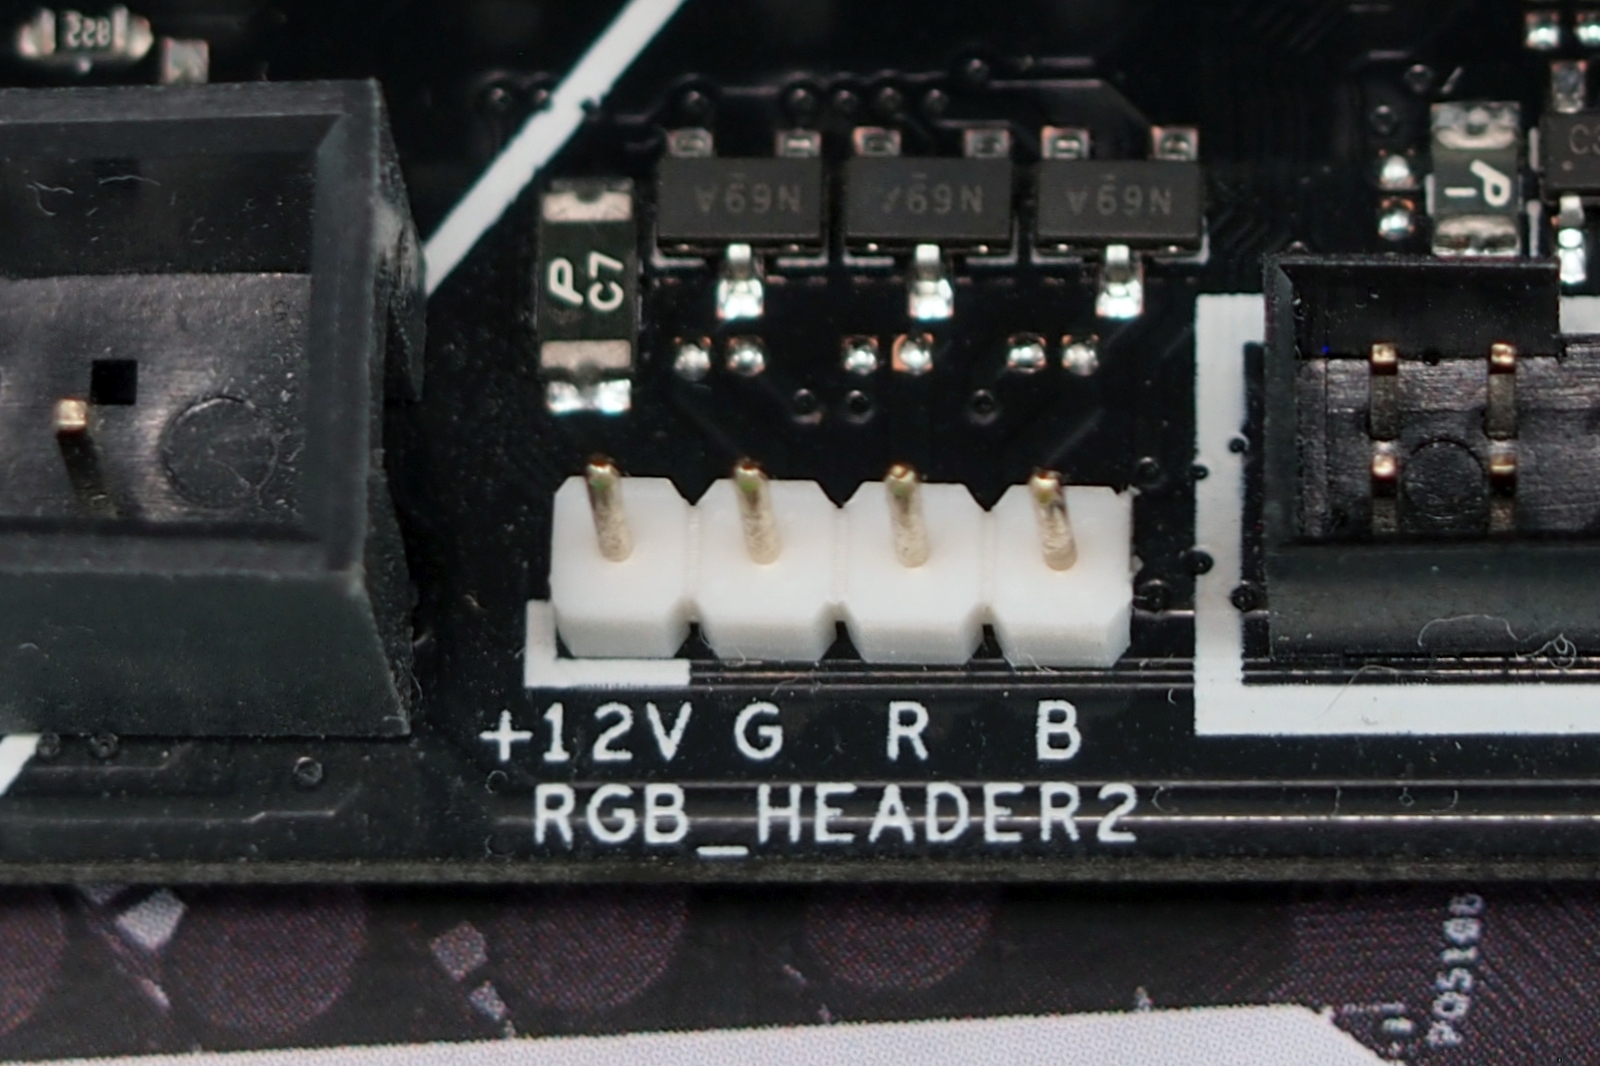
Кроме того, на плате есть два специальных четырехконтактных (12V/G/R/B) разъема для подключения светодиодной ленты.
Из нововведений можно отметить также наличие специального разъема Node для подключения совместимого блока питания (на сайте Asus можно найти список совместимых БП).
Система питания
Как и большинство плат, модель Asus Prime Z390-A имеет 24-контактный и 8-контактный разъемы для подключения блока питания.
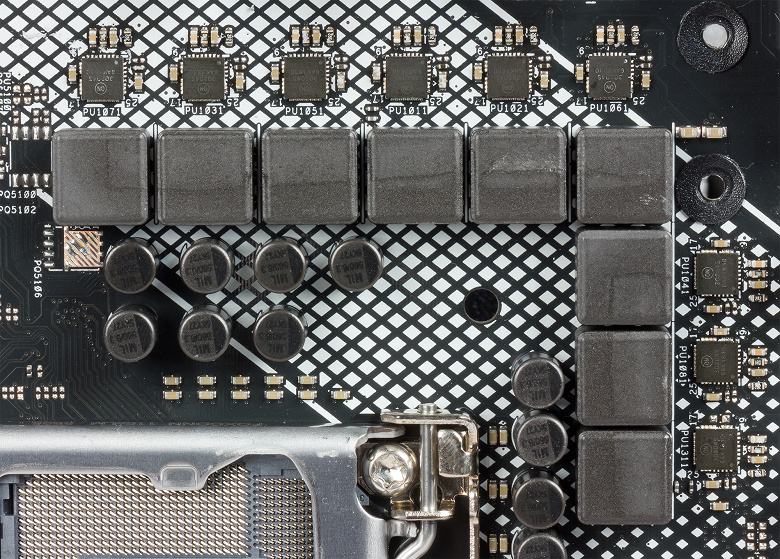
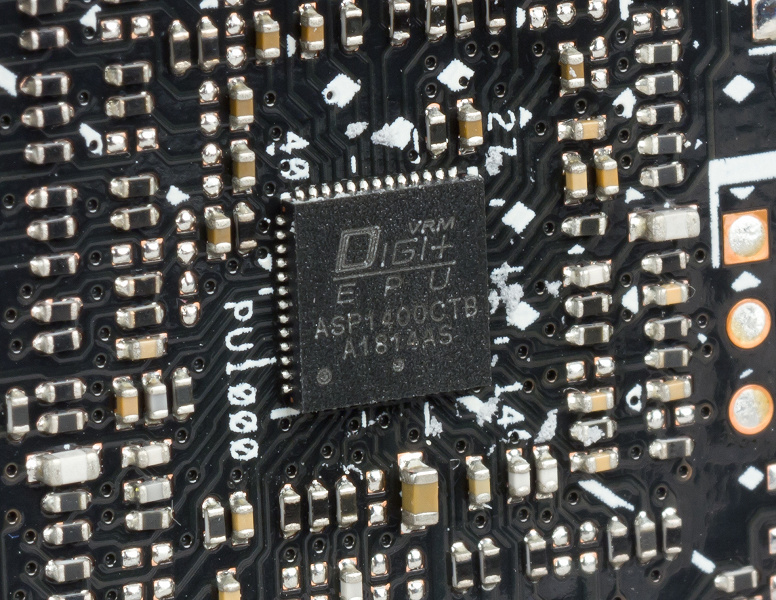
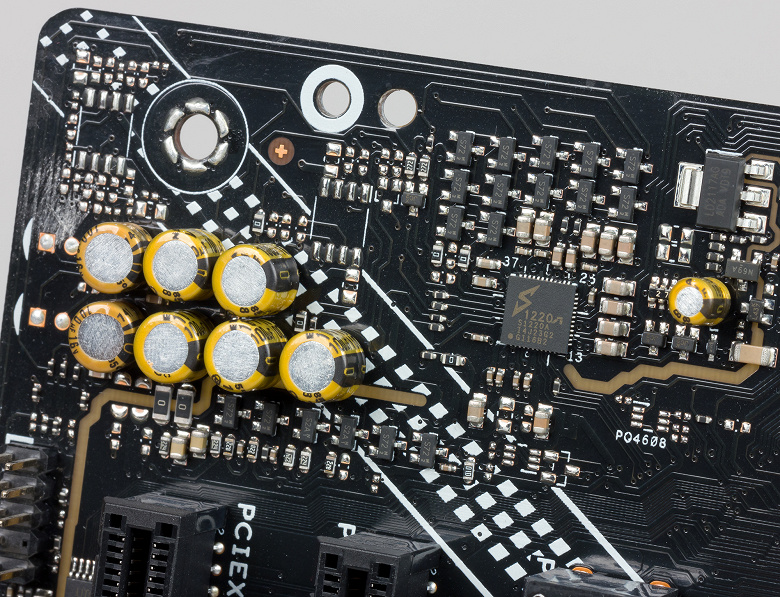
Регулятор напряжения питания процессора на плате является 9-канальным и управляется контроллером с маркировкой ASP1400СTB. В каждом канале питания используется по одному чипу NCP302045 компании On Semiconductor, который объединяет в себе два MOSFET-транзистора (High и Low), а также MOSFET-драйвер.
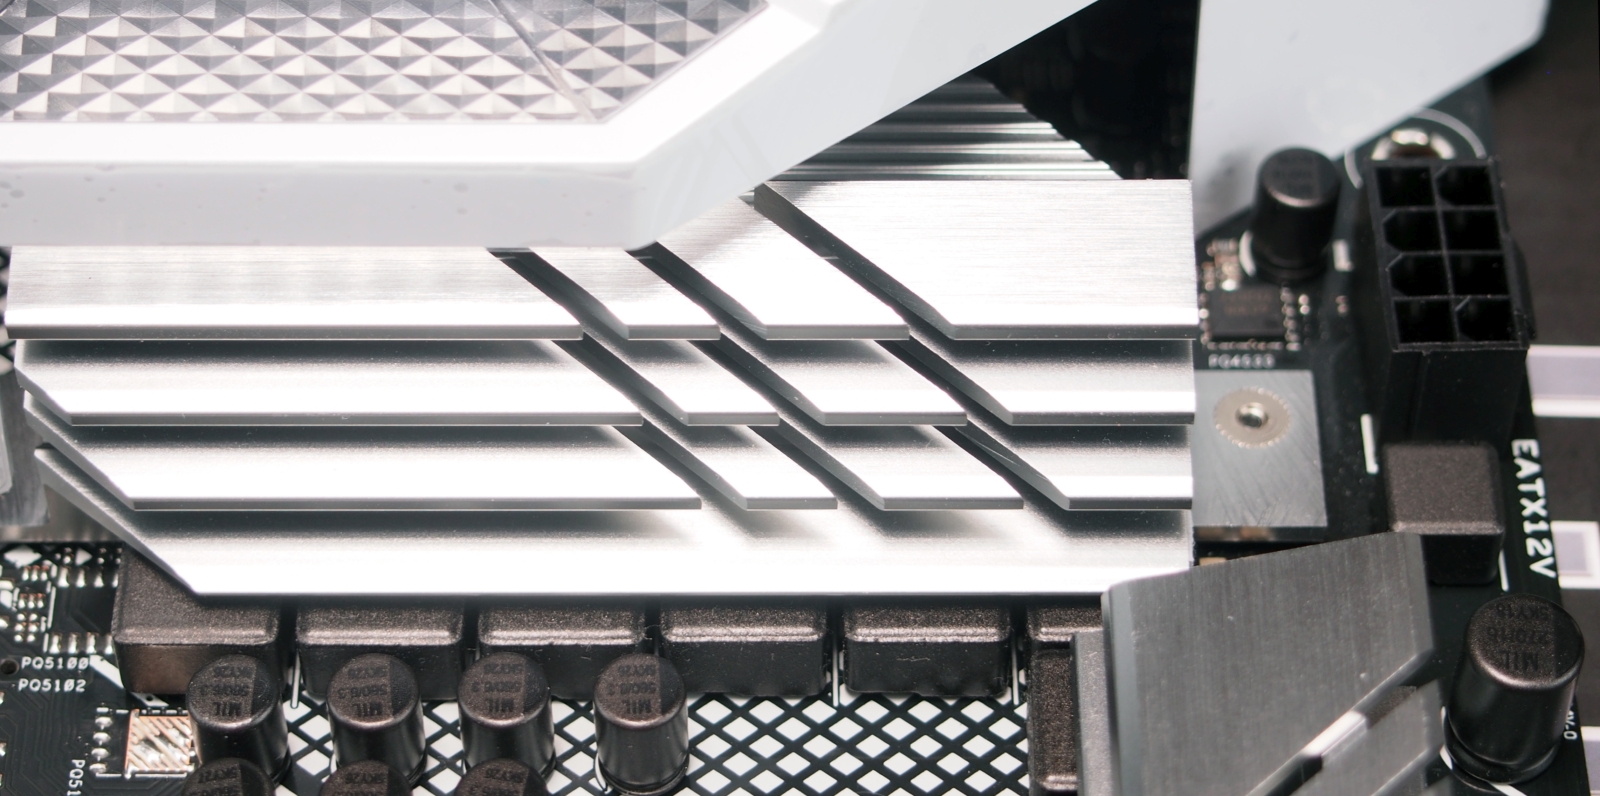
Система охлаждения
Система охлаждения платы Asus Prime Z390-A состоит из нескольких радиаторов. Два радиатора расположены по двум смежным сторонам процессорного разъема и предназначены для отвода тепла от элементов регулятора напряжения питания процессора. Еще один радиатор предназначен для охлаждения чипсета.
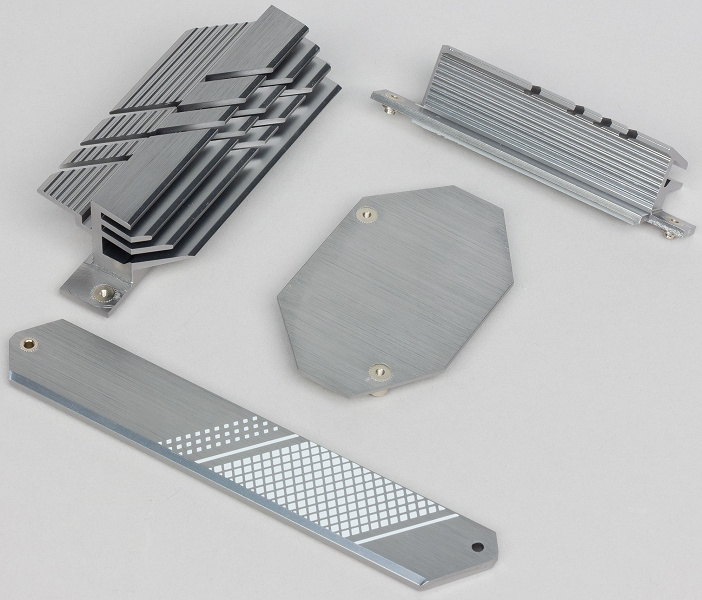
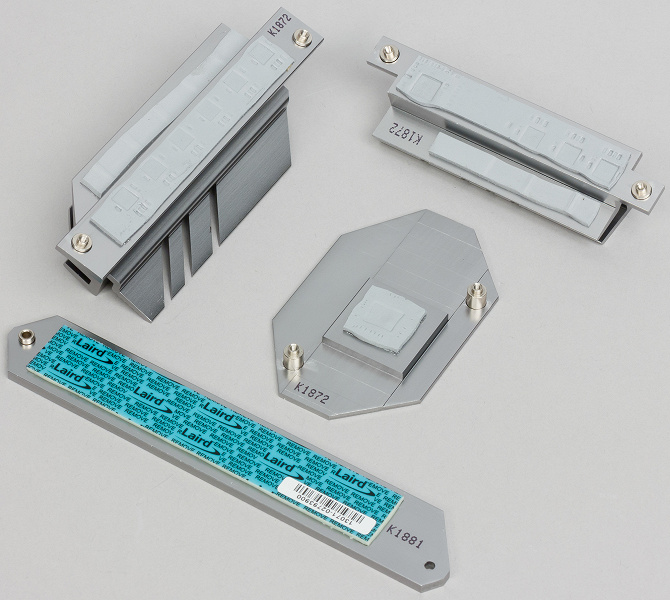
Кроме того, имеется отдельный радиатор для SSD-накопителя, устанавливаемого в один из разъемов M.2.
Помимо этого, для создания эффективной системы теплоотвода на плате предусмотрено семь четырехконтактных разъемов для подключения вентиляторов. Два разъема предназначены для кулера процессора, два — для дополнительных корпусных вентиляторов, еще два — для системы водяного охлаждения, и последний разъем предназначен для вентилятора накопителя, устанавливаемого в разъем M.2.
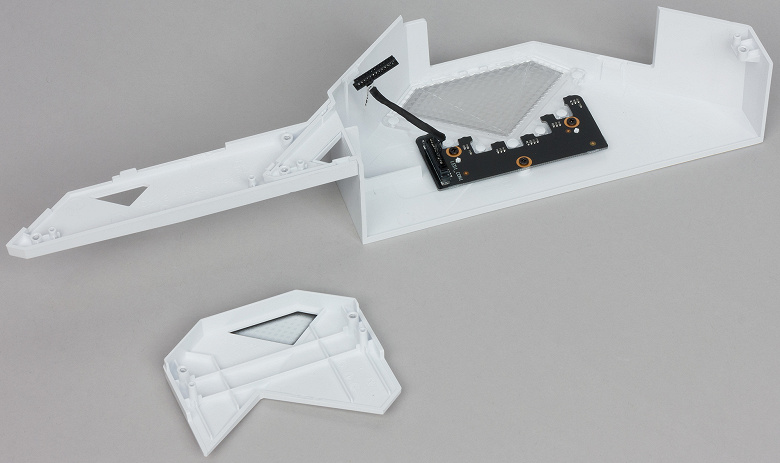
Кроме того, имеется разъем для подключения термодатчика (в комплект не входит) и пятиконтактный разъем Ext_Fan, который позволяет подключать плату Fan Extension (в комплект тоже не входит), к которой можно подключать еще дополнительные вентиляторы и термодатчики. Фишка тут в том, что вентиляторы, подключаемые к плате Fan Extension, управляются через UEFI BIOS материнской платы.
Аудиоподсистема
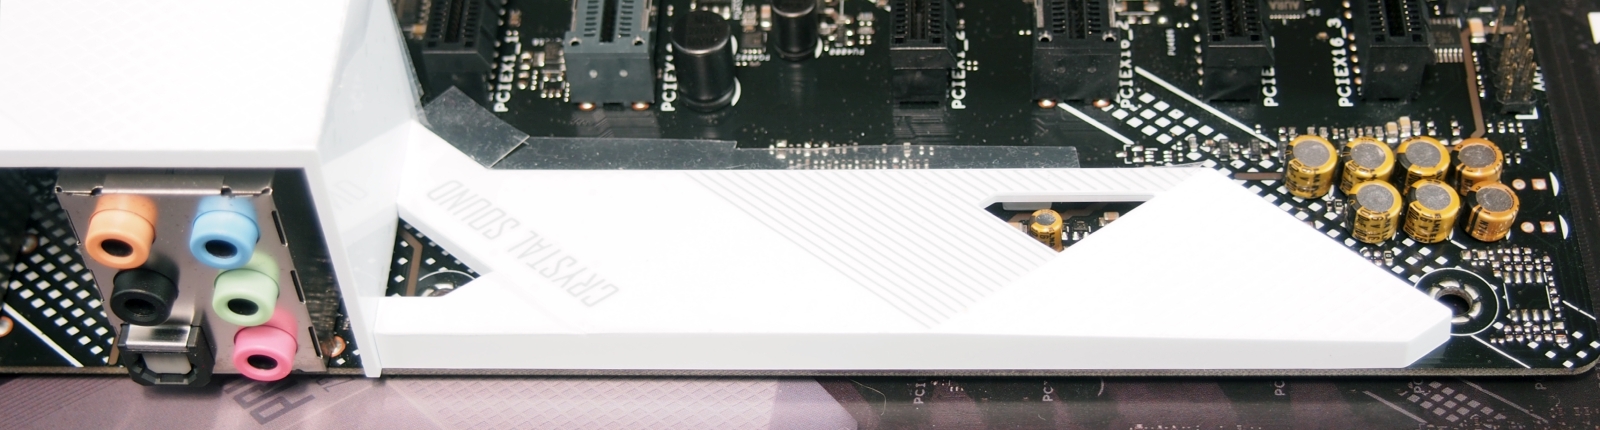
Аудиоподсистема платы Asus Prime Z390-A основана на кодеке Realtek ALC1220. Все элементы аудиотракта изолированы на уровне слоев PCB от прочих компонентов платы и выделены в отдельную зону.
На задней панели платы предусмотрено пять аудиоразъемов типа миниджек (3,5 мм) и один оптический разъем S/PDIF (выход).
Для тестирования выходного звукового тракта, предназначенного для подключения наушников или внешней акустики, мы использовали внешнюю звуковую карту Creative E-MU 0204 USB в сочетании с утилитой RightMark Audio Analyzer 6.3.0. Тестирование проводилось для режима стерео, 24-бит/44,1 кГц. По результатам тестирования аудиотракт на плате Asus Prime Z390-A получил оценку «Хорошо».
Результаты тестирования в RightMark Audio Analyzer 6.3.0
UEFI BIOS
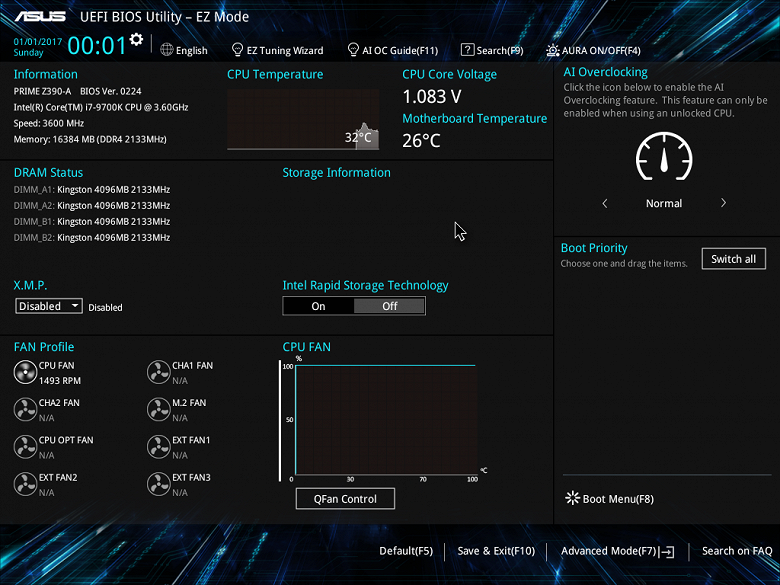
UEFI BIOS платы Asus Prime Z390-A по своему внешнему интерфейсу на первый взгляд не отличается от UEFI BIOS платы Asus Prime Z370-A (и других плат серии Prime предыдущего поколения).
Но это лишь кажущееся сходство. В новых платах на чипсетах Intel Z390 UEFI BIOS имеет больше настроек, особенно в плане разгона системы.
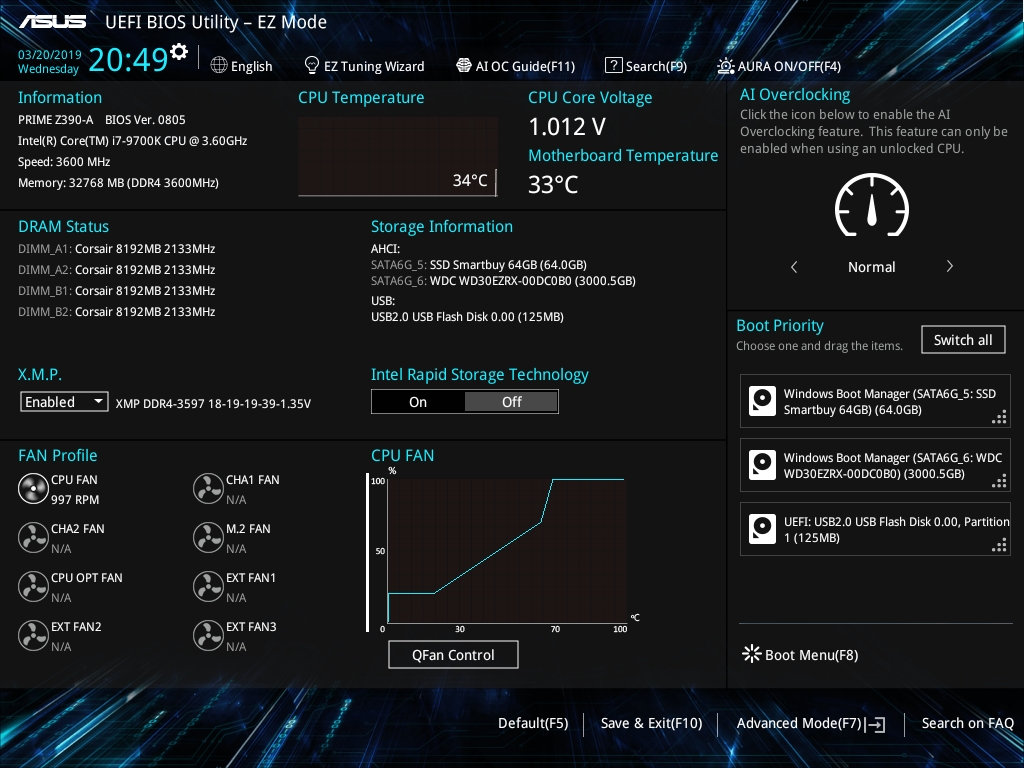
Начнем с того, что, как и ранее, имеется два режима отображения: EZ Mode и Advanced Mode. В упрощенном режиме EZ Mode можно лишь посмотреть основные параметры системы, а режим Advanced предназначен для тонкой настройки.
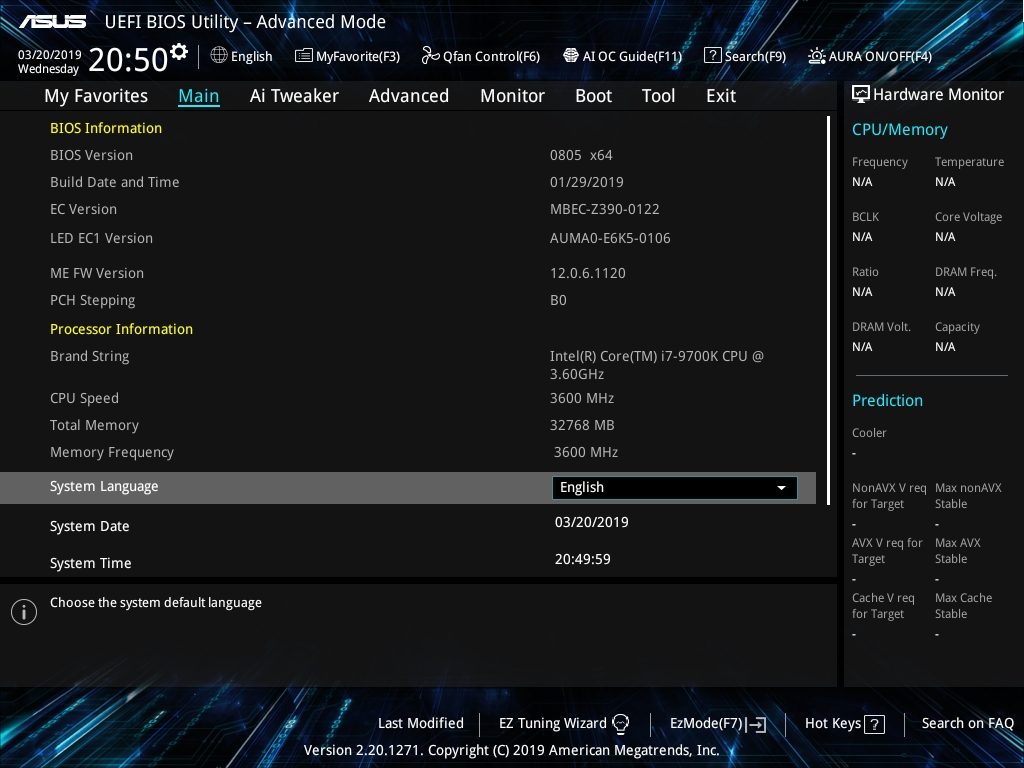
В режиме Advanced Mode пользователю доступны восемь традиционных вкладок.
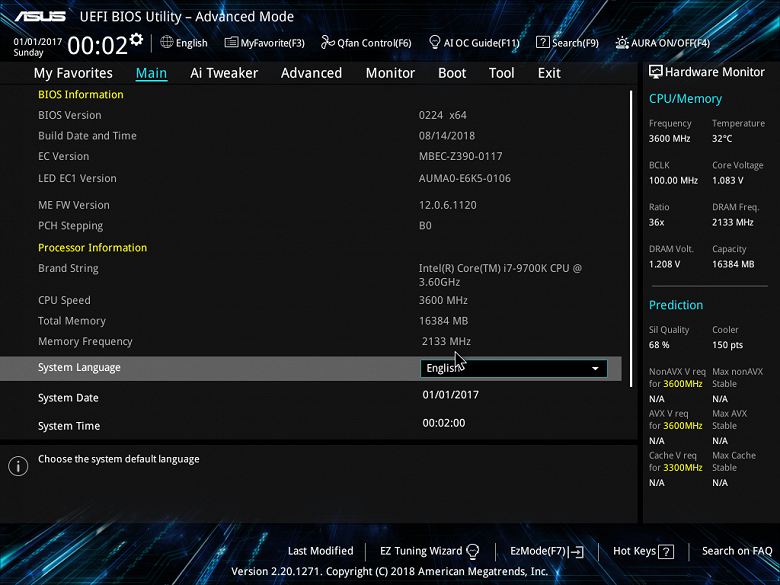
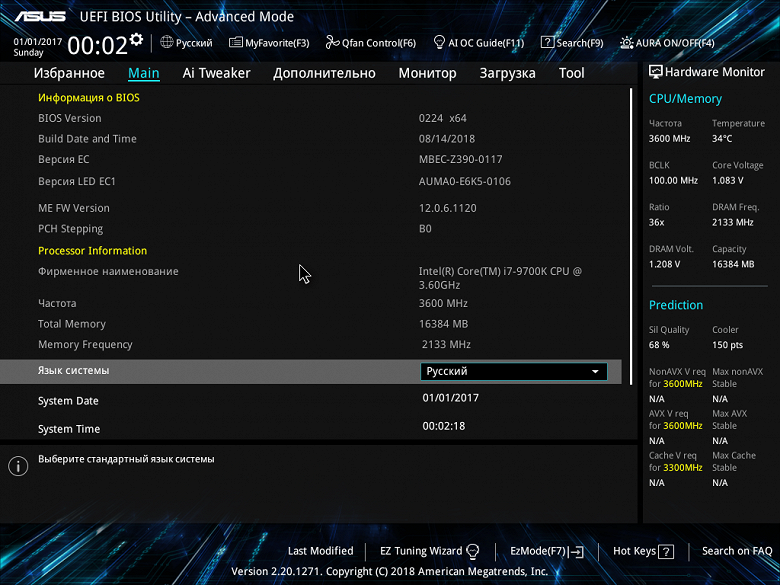
На вкладке Main можно даже выбрать русский язык, но… Переведено далеко не все и как-то немного коряво.
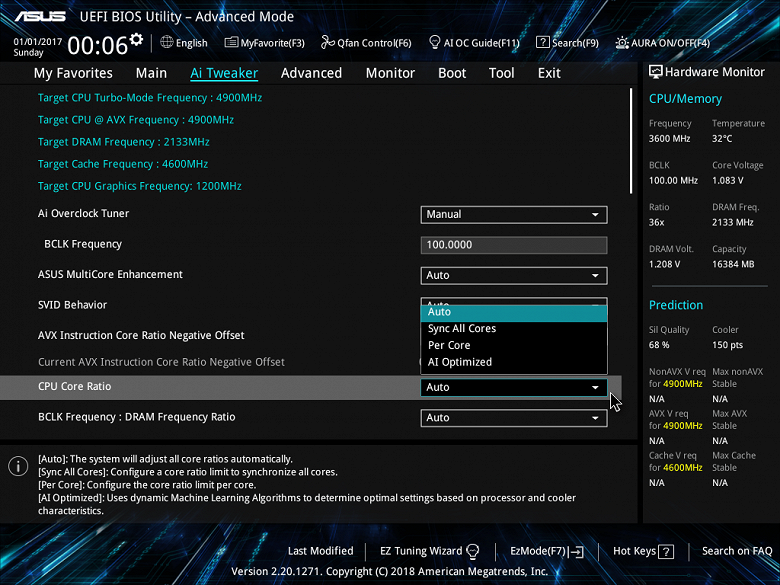
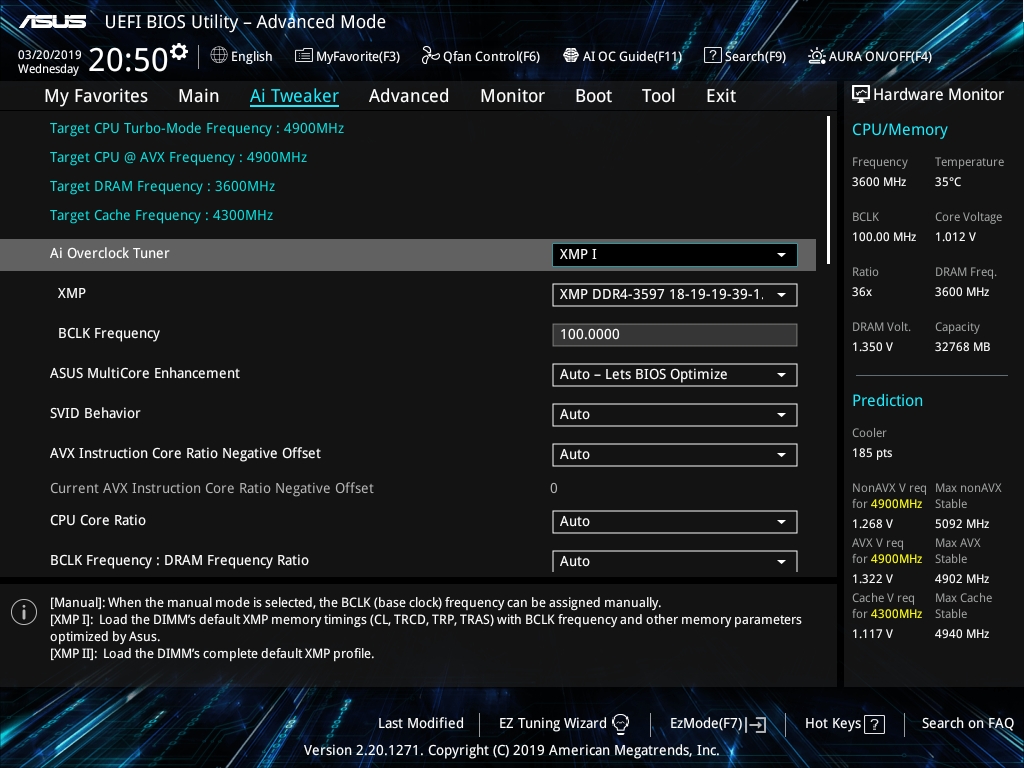
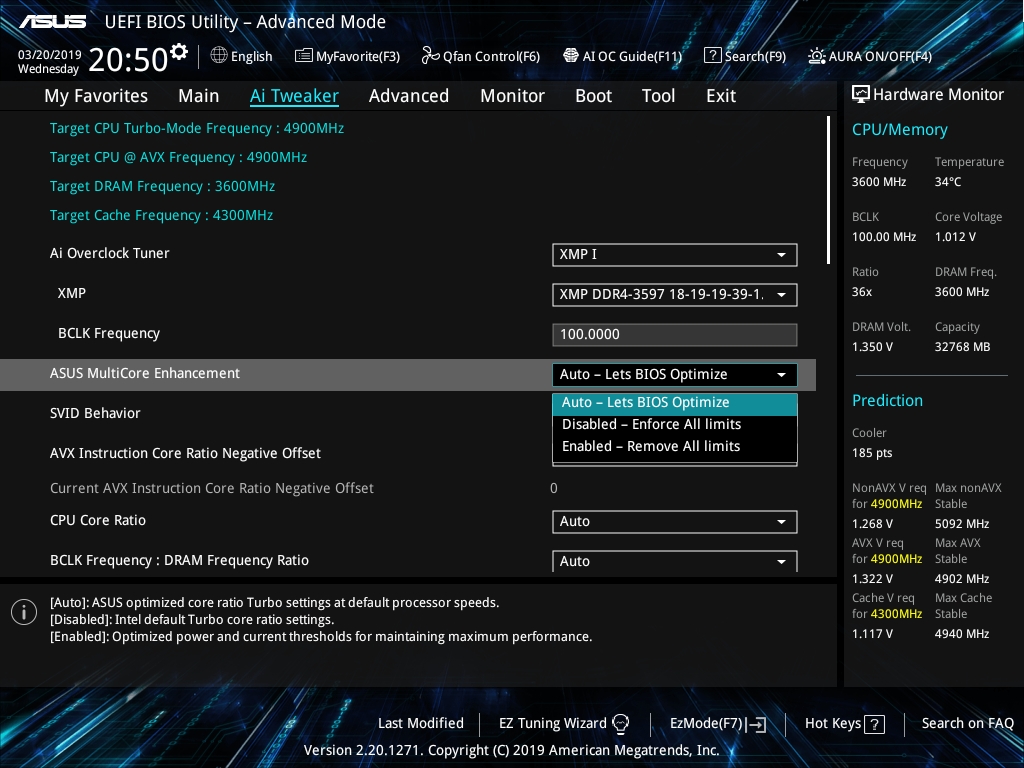
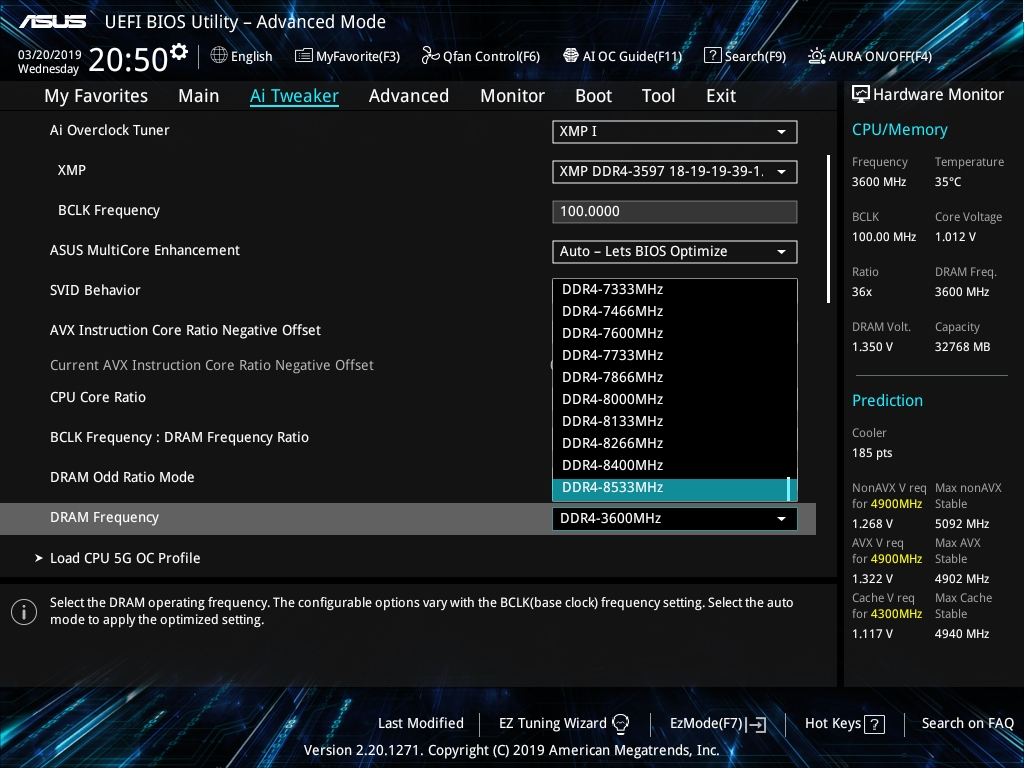
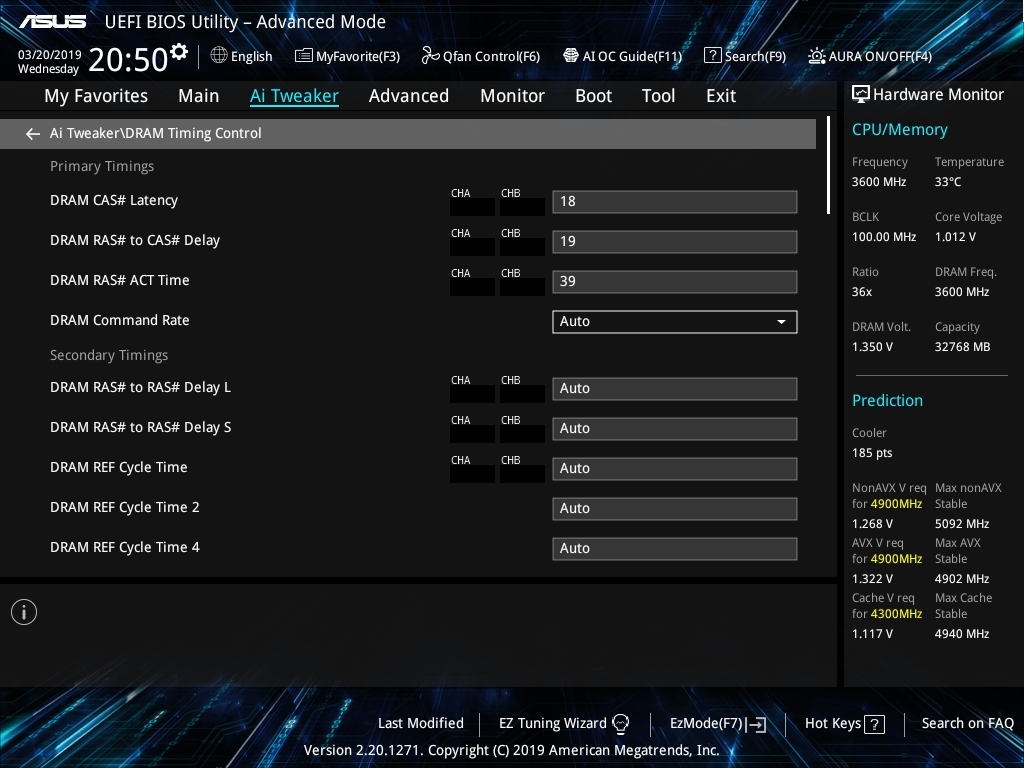
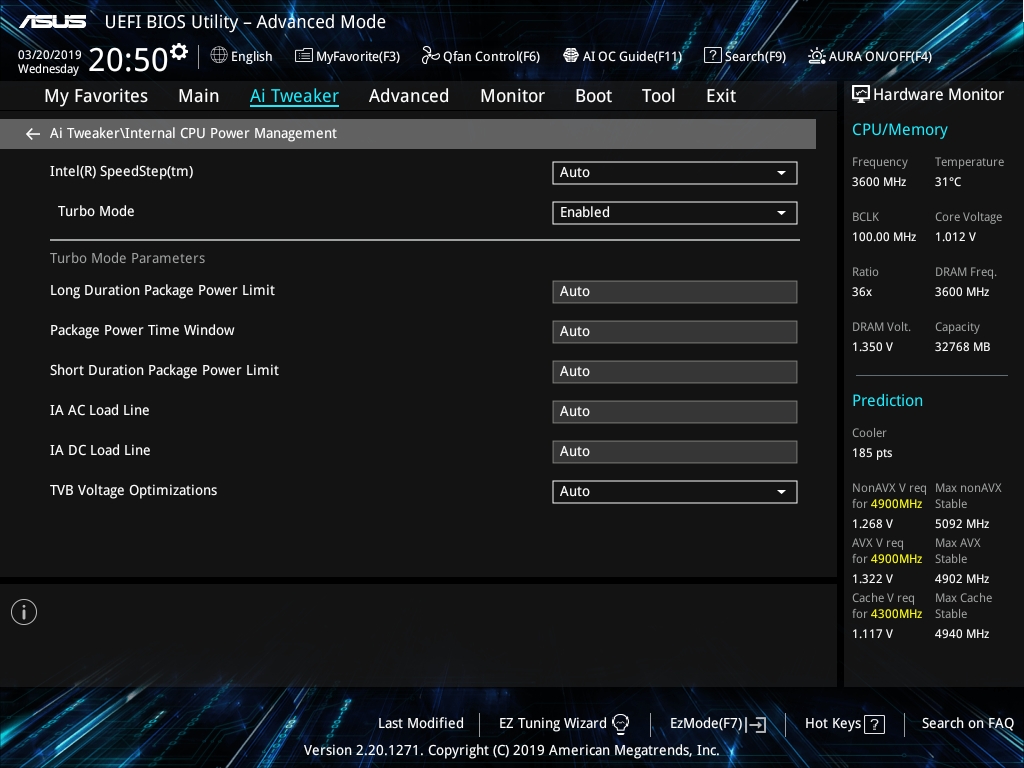
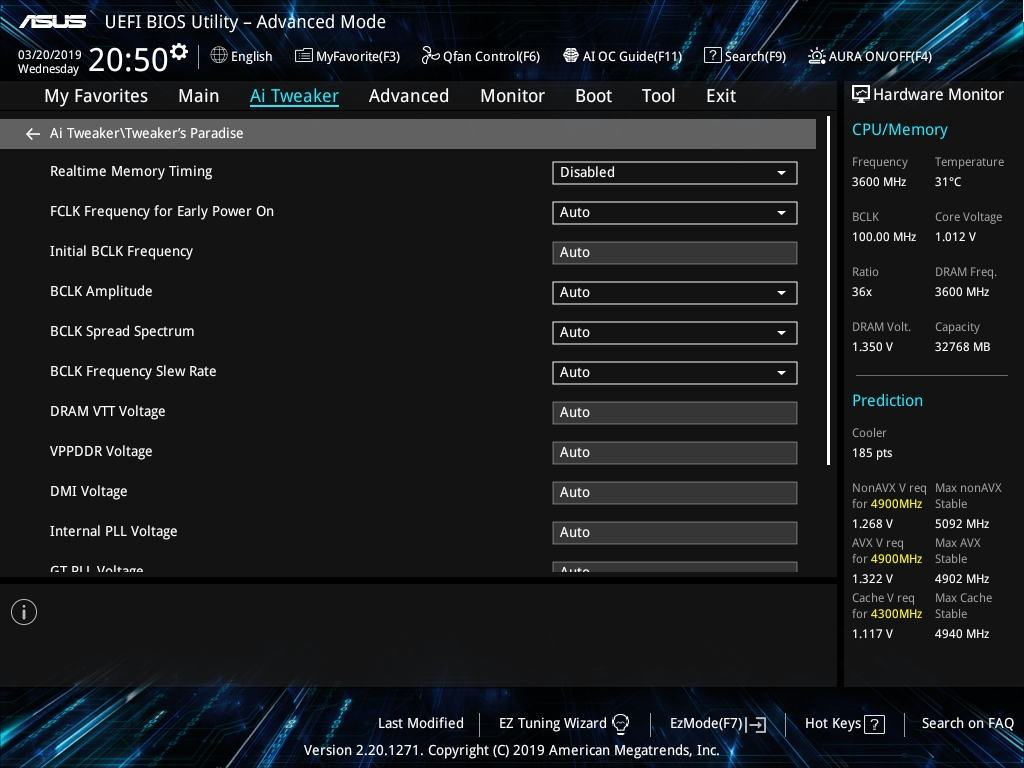
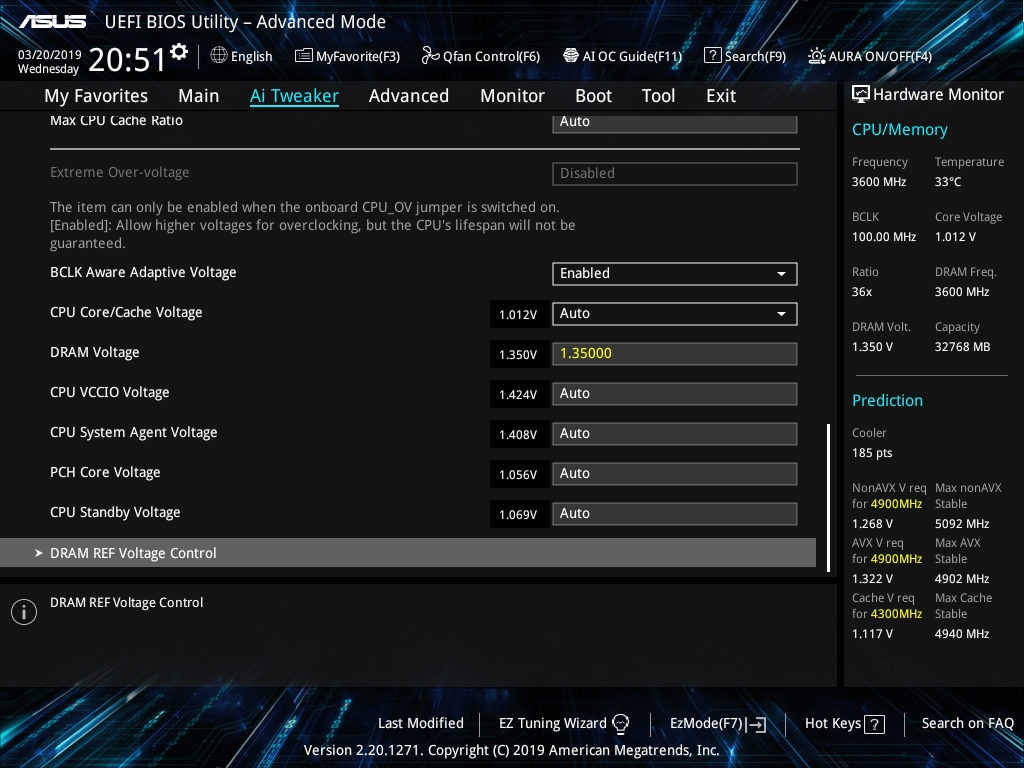
Наибольшее количество нововведений появилось на вкладке Ai Tweaker, где собраны все настойки для разгона процессора и памяти.
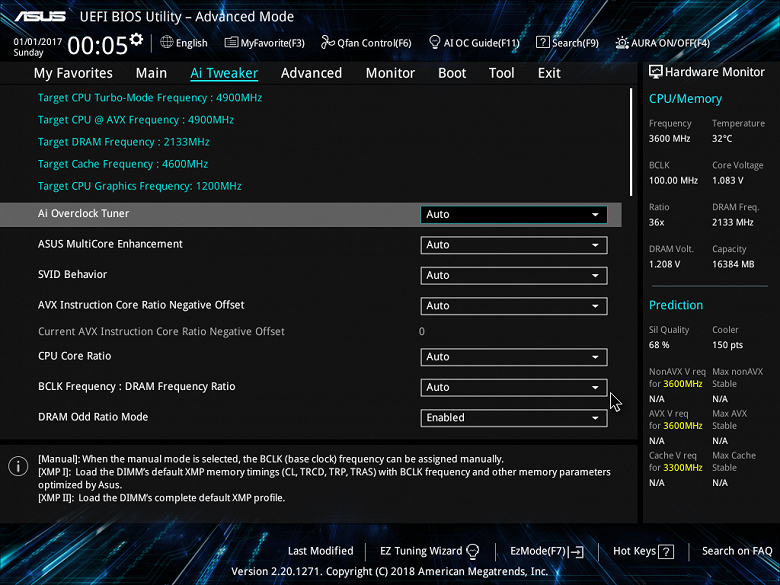
Сразу оговоримся, что мы тестировали плату с процессором 9-го поколения (Intel Core i7-9700K), и, скорее всего, в случае установки процессора 8-го поколения (например, Core i7-8700K) все будет немного иначе.
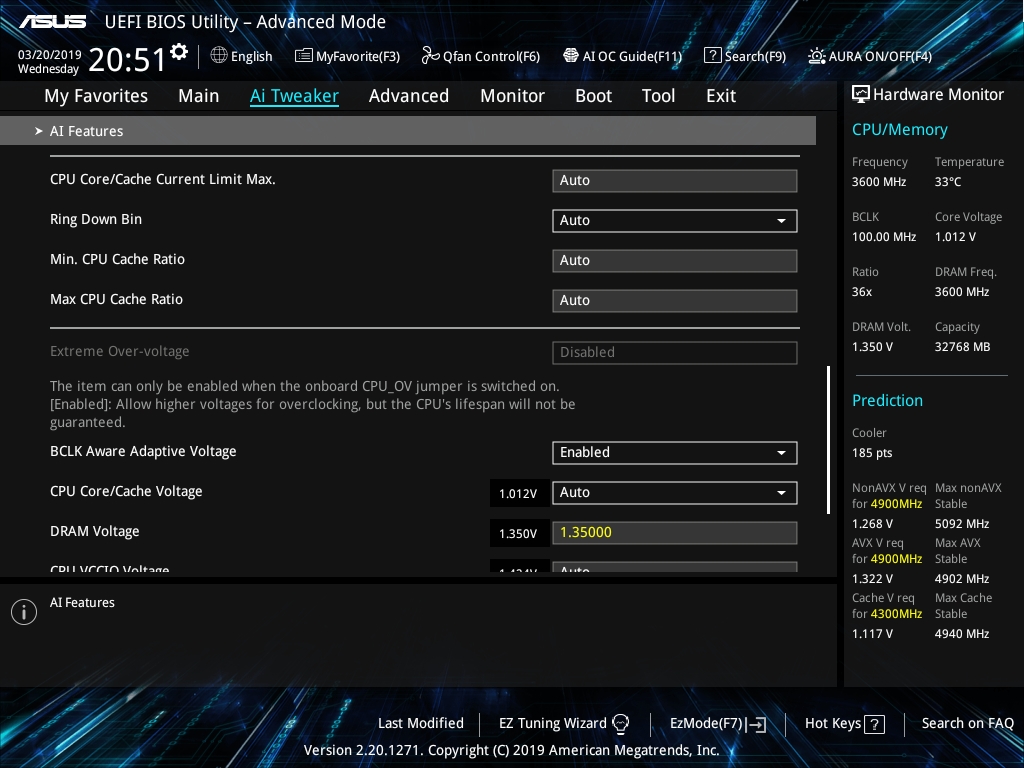
Итак, чтобы открыть все опции для разгона процессора, нужно для параметра Ai Overclocker выбрать значение Manual или XMP I/II.
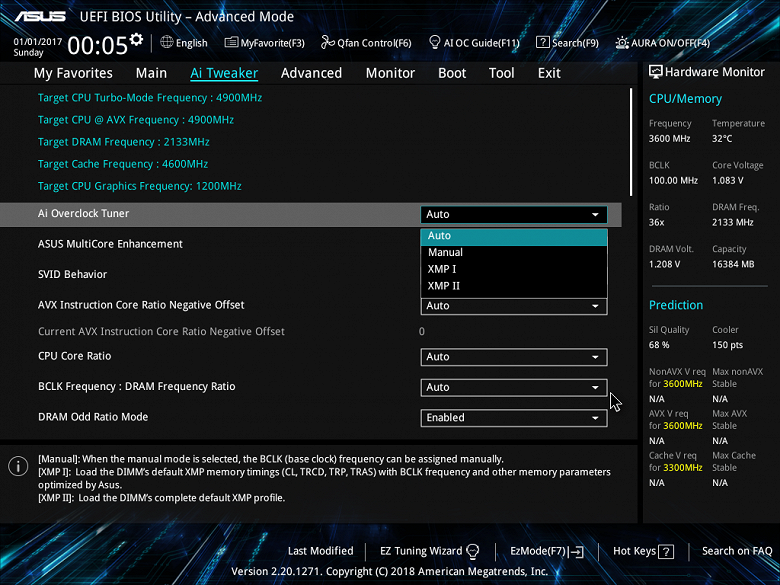
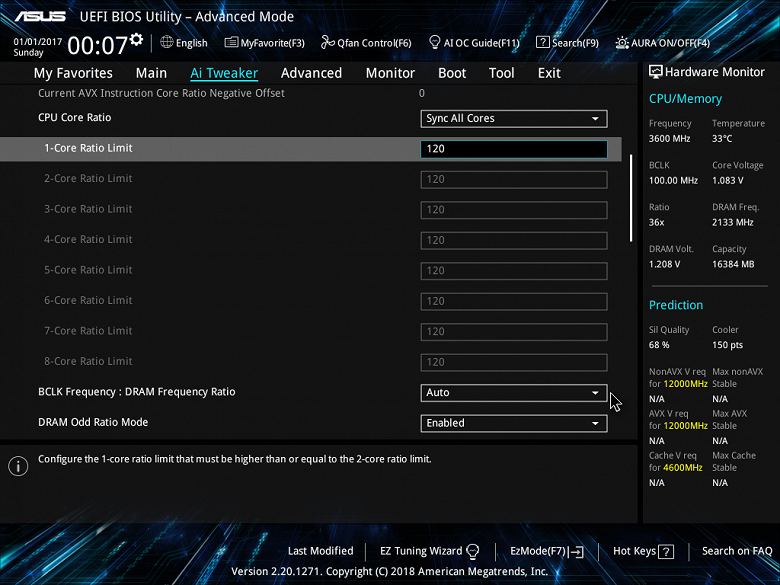
После этого появится возможность менять частоту BCLK и настраивать режим работы ядер процессора CPU Core Ratio. Кроме традиционных опций Auto, Sync All Cores и Per Core, здесь появилась новая опция AI Optimized.
Максимальный коэффициент умножения, который можно установить для процессора 9-го поколения с разблокированным множителем, составляет 120, то есть, формально, при частоте BCLK 100 МГц процессор можно разогнать путем изменения множителя до 12 ГГц. Это, конечно, фантастические частоты, и вряд ли они будут достигнуты даже при экстремальном разгоне с охлаждением жидким азотом.
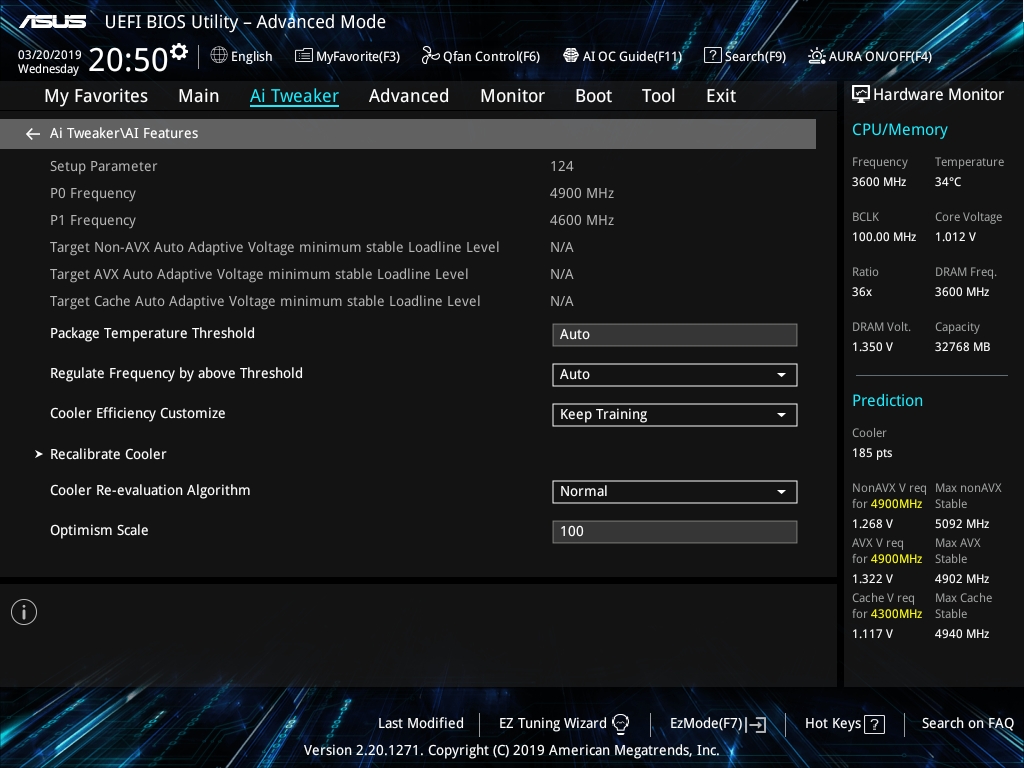
Теперь об опции AI Optimized. В описании говорится, что при выборе данного параметра используется алгоритм динамического машинного обучения для определения оптимальных настроек, основываясь на характеристиках процессора и системы охлаждения.
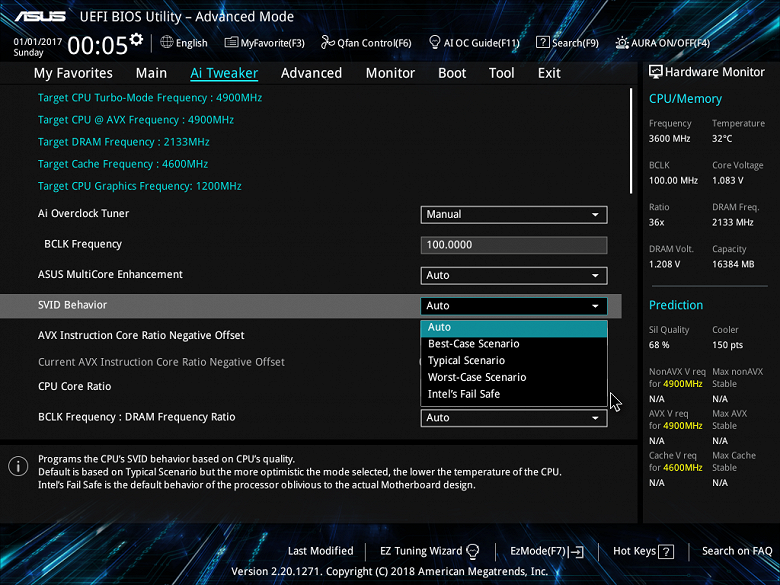
Есть и еще один интересный новый пункт SVID Behavior, для которого предусмотрен внушительный набор возможных значений: Auto, Beat-Case Scenario, Typical Scenario, Worst-Case Scenario и Intel’s Fail Safe. Напомним, что SVID — это протокол, по которому процессор взаимодействует с регулятором напряжения питания, запрашивая необходимое напряжение. Подобный параметр в UEFI BIOS был и ранее, но таких опций у него не было (было всего два варианта: Enable и Disable).
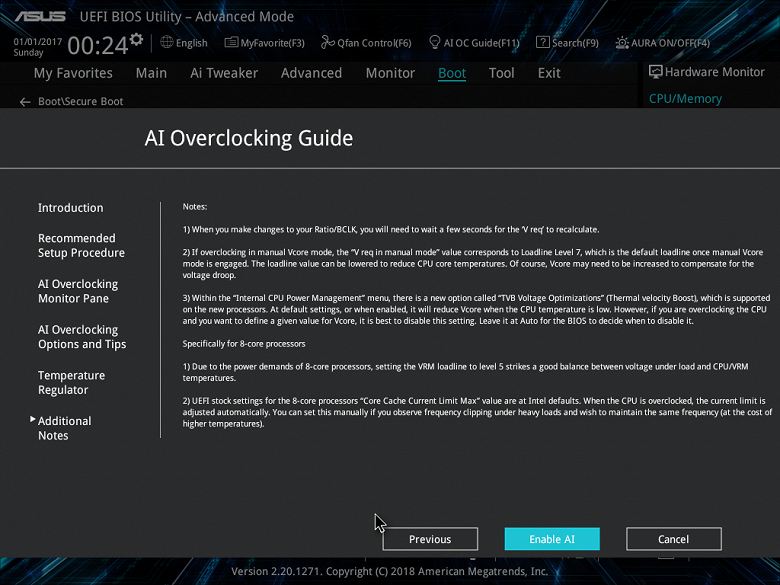
Есть в UEFI BIOS и новый интересный пункт AI Features. Что это такое и зачем нужно, объясняется в руководстве по разгону, который тоже встроен в UEFI BIOS. И этого раньше ни у кого не было.
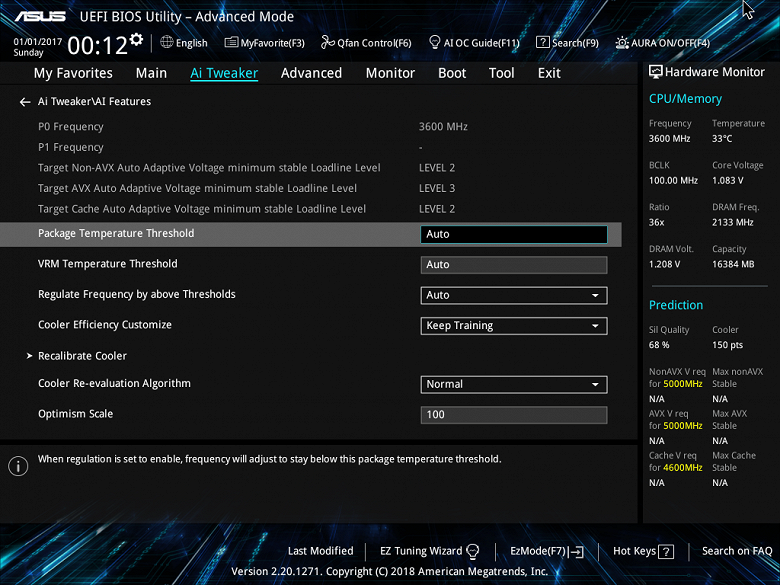
Учебник этот многостраничный, поэтому в качестве иллюстрации приведем лишь начальную страницу.
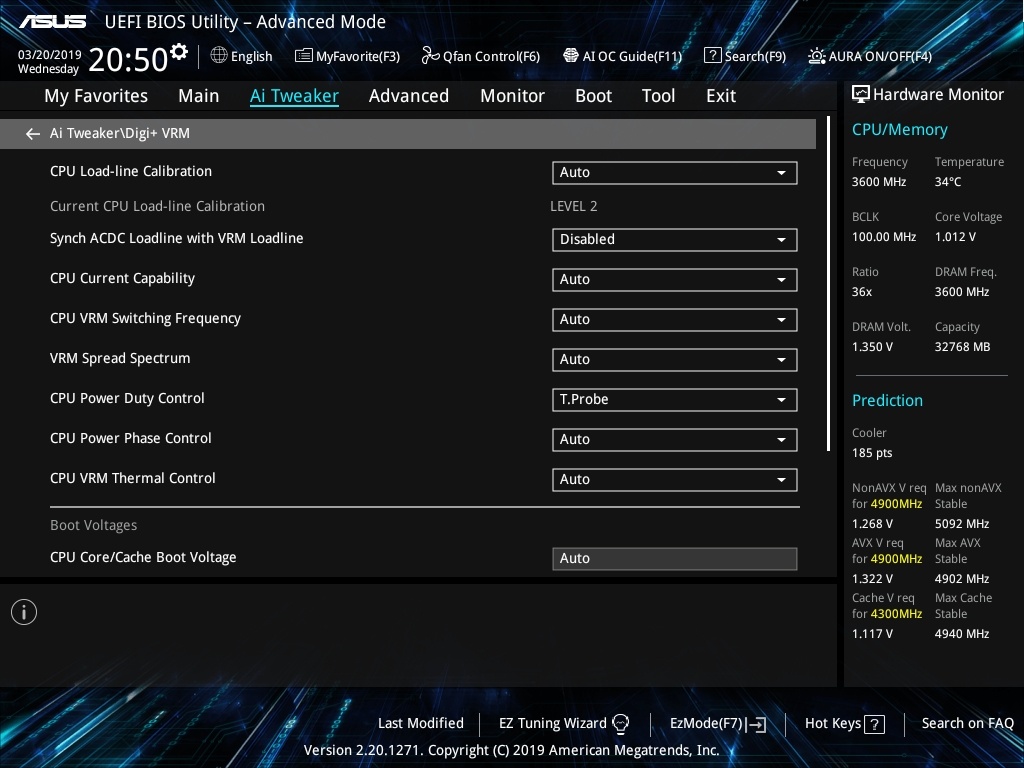
Кроме того, конечно же, все, что можно было найти в UEFI BIOS раньше (настройка памяти, регулятора напряжения питания и т. д.), никуда не делось. Все это есть и тут.
Выводы
В целом, Asus Prime Z390-A — отличная плата, которая предлагает пользователю базовую функциональность чипсета Intel Z390. Плата очень интересная, а новые возможности, реализованные в UEFI BIOS, оставляют широкий простор для экспериментов. Особенно интересна возможность разгона на основе предсказаний. Все это требует вдумчивого подхода и времени, и к этой теме (благо, новые возможности реализованы в UEFI BIOS всех новых плат Asus) мы еще обязательно вернемся.
Стильная и доступная по цене — все, что нужно знать о материнской плате ASUS Prime Z390-A, побывавшей у нас на тестировании.

Тот факт, что для полноценной работы 8-ядерных процессоров Coffee Lake Refresh требуется материнская плата с качественной системой питания, уже никто не ставит под сомнение. Отличным вариантом в свете сложившейся ситуации являются продукты серии Republic of Gamers на базе чипсета Intel Z390. Но не всегда стоимость этих материнских плат может быть подъемной для покупателя. В этом случае модель ASUS Prime Z390-A является неким оптимальным вариантом. Обладая интересным внешним видом, множеством современных интерфейсов и более доступным ценником, этот продукт еще и отлично сработался с нашим тестовым 8-ядерным Intel Core i7-9700k. На ASUS Prime Z390-A мы смогли заставить работать процессор не только свыше номинальных значений, но и разогнать оперативную память. Расскажем о побывавшей у нас в гостях материнской плате по порядку.
Технические характеристики
- Модель- Prime Z390-A
- Socket- 1151 v2
- Чипсет- Intel Z390
- Тип памяти- DDR-4
- Количество слотов памяти- 4
- Оперативная память: 4 x DIMM, Max. 64Гб, DDR4 4266(O.C) — 2800(O.C.), 2666, 2400, 2133 МГц;
- Слоты расширения- 3 x PCI-E 3.0 x16 (x16, x8+x8, x8/x4+x4), 3 x PCI-E x1, 2 x M.2
- Тип слотов M.2: type 2242/2260/2280 (SATA & PCIE 3.0 x 4 mode), type 2242/2260/2280/22110 (PCIE 3.0 x 4 mode);
- Звук- 8-канальный (7.1) SupremeFX S1220A
- Сетевой интерфейс- Gigabit Ethernet Intel I219V (10/100/1000 Мбит/с)
- Разъёмы на задней панели- PS/2, 2 x USB 2.0, 5 x USB 3.1, USB 3.1 Type-C, HDMI, DisplayPort, RJ-45, S/PDIF (оптический)
- Форм-фактор- ATX (305 ммx 244 мм).
Упаковка и комплектация
За свой внешний вид материнская плата Prime Z390-A уже успела получить награду IF Design Award 2019. Не менее интересно оформлена и упаковка девайса: изображение материнской платы представлено во всю лицевую грань коробки, а серия и наименование модели указаны крупными белыми буквами.
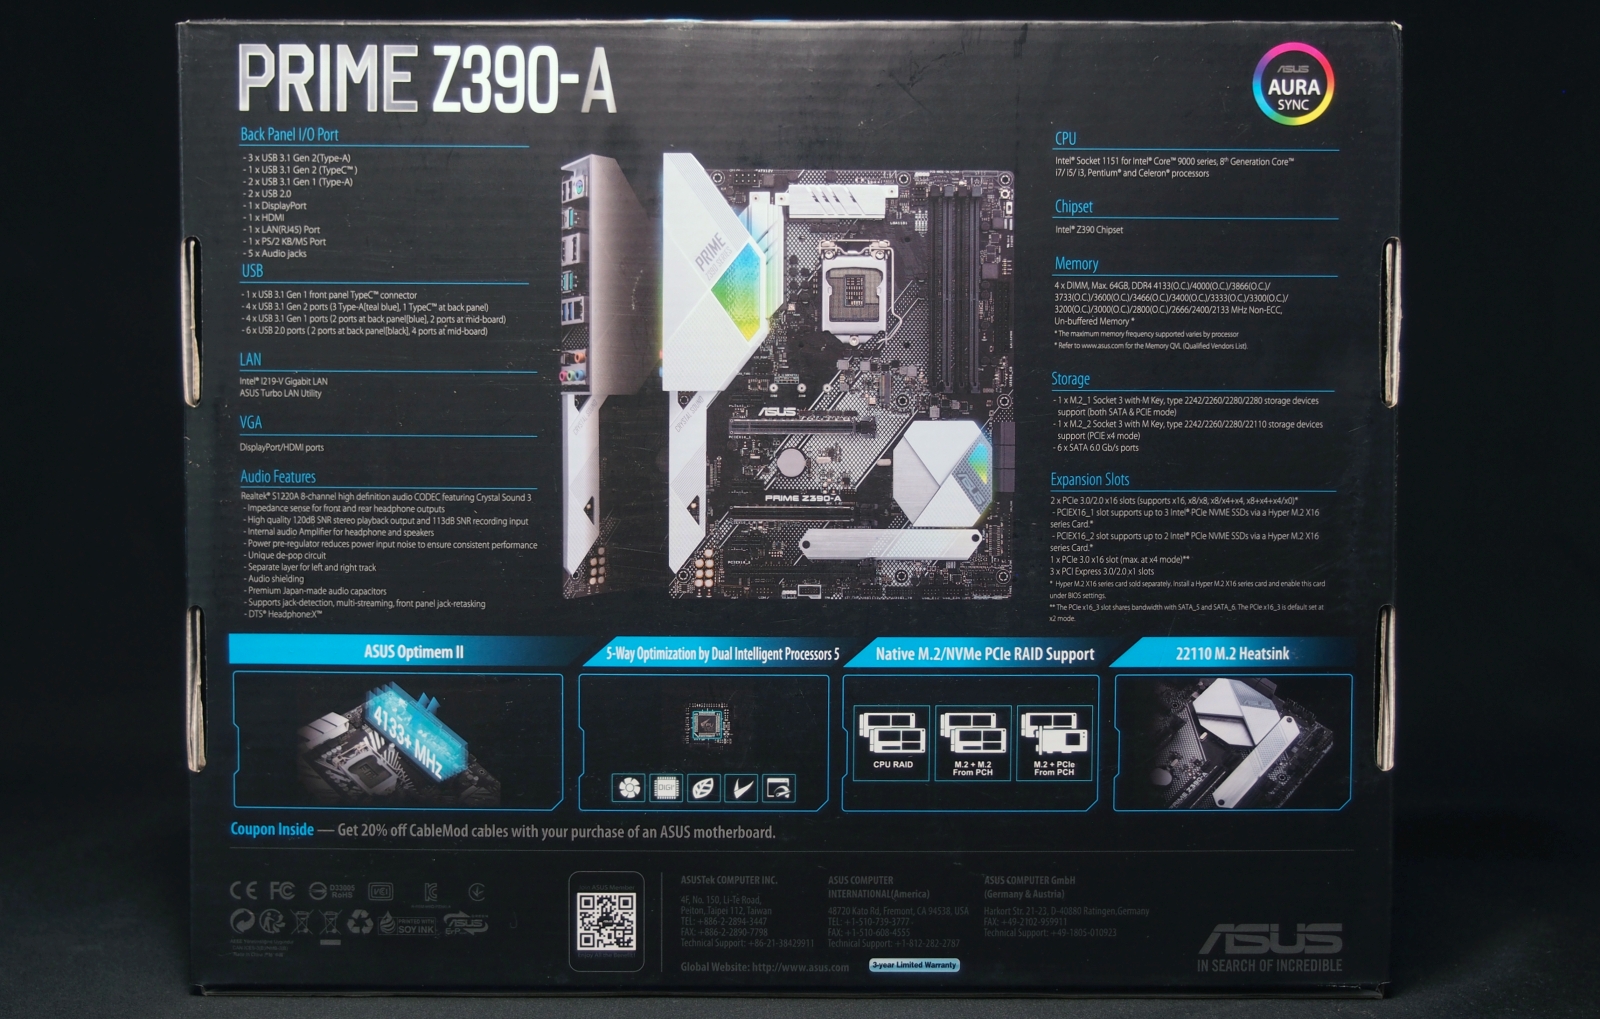
Техническая информация о Prime Z390-A размещена на тыльной стороне коробки. Здесь представлены подробные характеристики платы и карта разъемов тыльной панели. Фирменные особенности Prime Z390-A выделены отдельным блоком информации.
Комплектация материнской платы Prime Z390-A включает в себя:
- руководство пользователя;
- диск с драйверами и фирменным ПО;
- три кабеля SATA 6 Гбит/с;
- заглушку для панели разъемов;
- переходник Q-Connector;
- мостик NVIDIA SLI 2-Way;
- крепление вентилятора для обдува VRM;
- винты для М.2 накопителей.
Внешний вид и особенности
Для того, чтобы понять, за что этот продукт был удостоен награды IF Design Award 2019, стоит оценить внешний вид Prime Z390-A. Комбинация белых элементов и алюминиевых радиаторов на фоне темной печатной платы смотрится интересно. Материнская плата не выглядит скучно, а на ее основе можно собрать интересный игровой ПК. Для любителей подсветки эта модель предлагает пару разъемов +12В RGB.
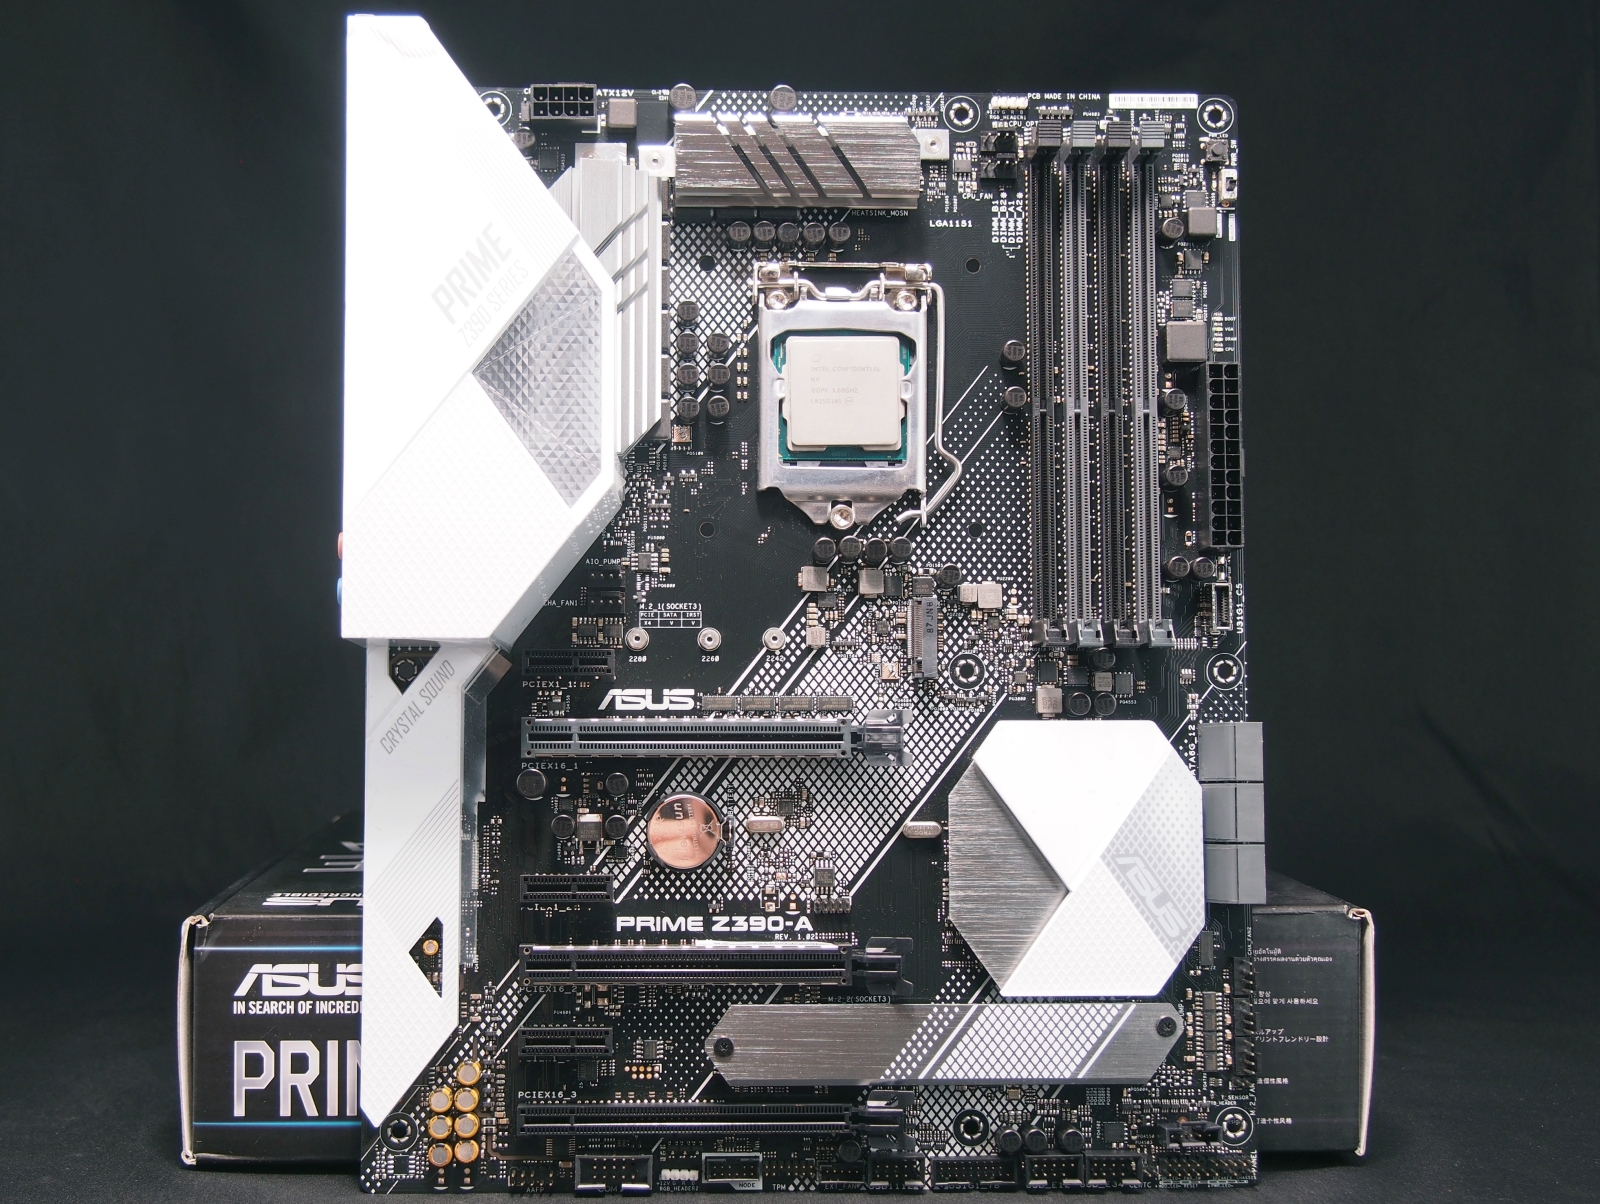
Prime Z390-A выполнена в форм-факторе АТХ, используется PCB черного цвета. Материнская плата обладает габаритами 305 х 244 мм, для установки в корпус ПК предусмотрено 9 точек крепления.
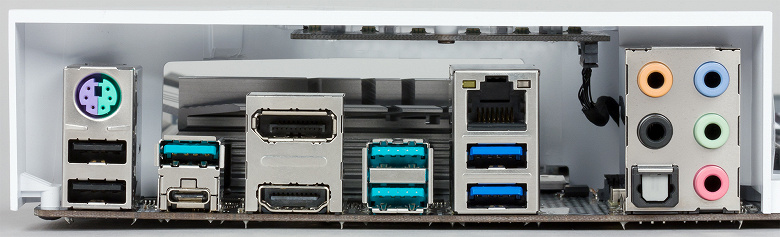
На тыльной панели разъемов Prime Z390-A находятся:
- один PS/2 для мыши или клавиатуры;
- два порта USB 2.0;
- два порта USB 3.1 Gen 1;
- три порта USB 3.1 Gen 2;
- один порт USB 3.1 Gen 2 Type-C;
- один HDMI;
- один DisplayPort;
- один гигабитный LAN RJ-45;
- один оптический S/PDIF Out;
- пять аудиоразъемов 3.5 мм.

Система питания на Prime Z390-A построена по 9-фазной схеме. Производитель использовал силовые элементы ON Semiconductor, дроссели с ферритовым сердечником, а управление питанием возложил на ШИМ-контроллер DIGI+ VRM ASP1400CTB. Для охлаждения силовой части предусмотрены два массивных алюминиевых радиатора со сложным оребрением.
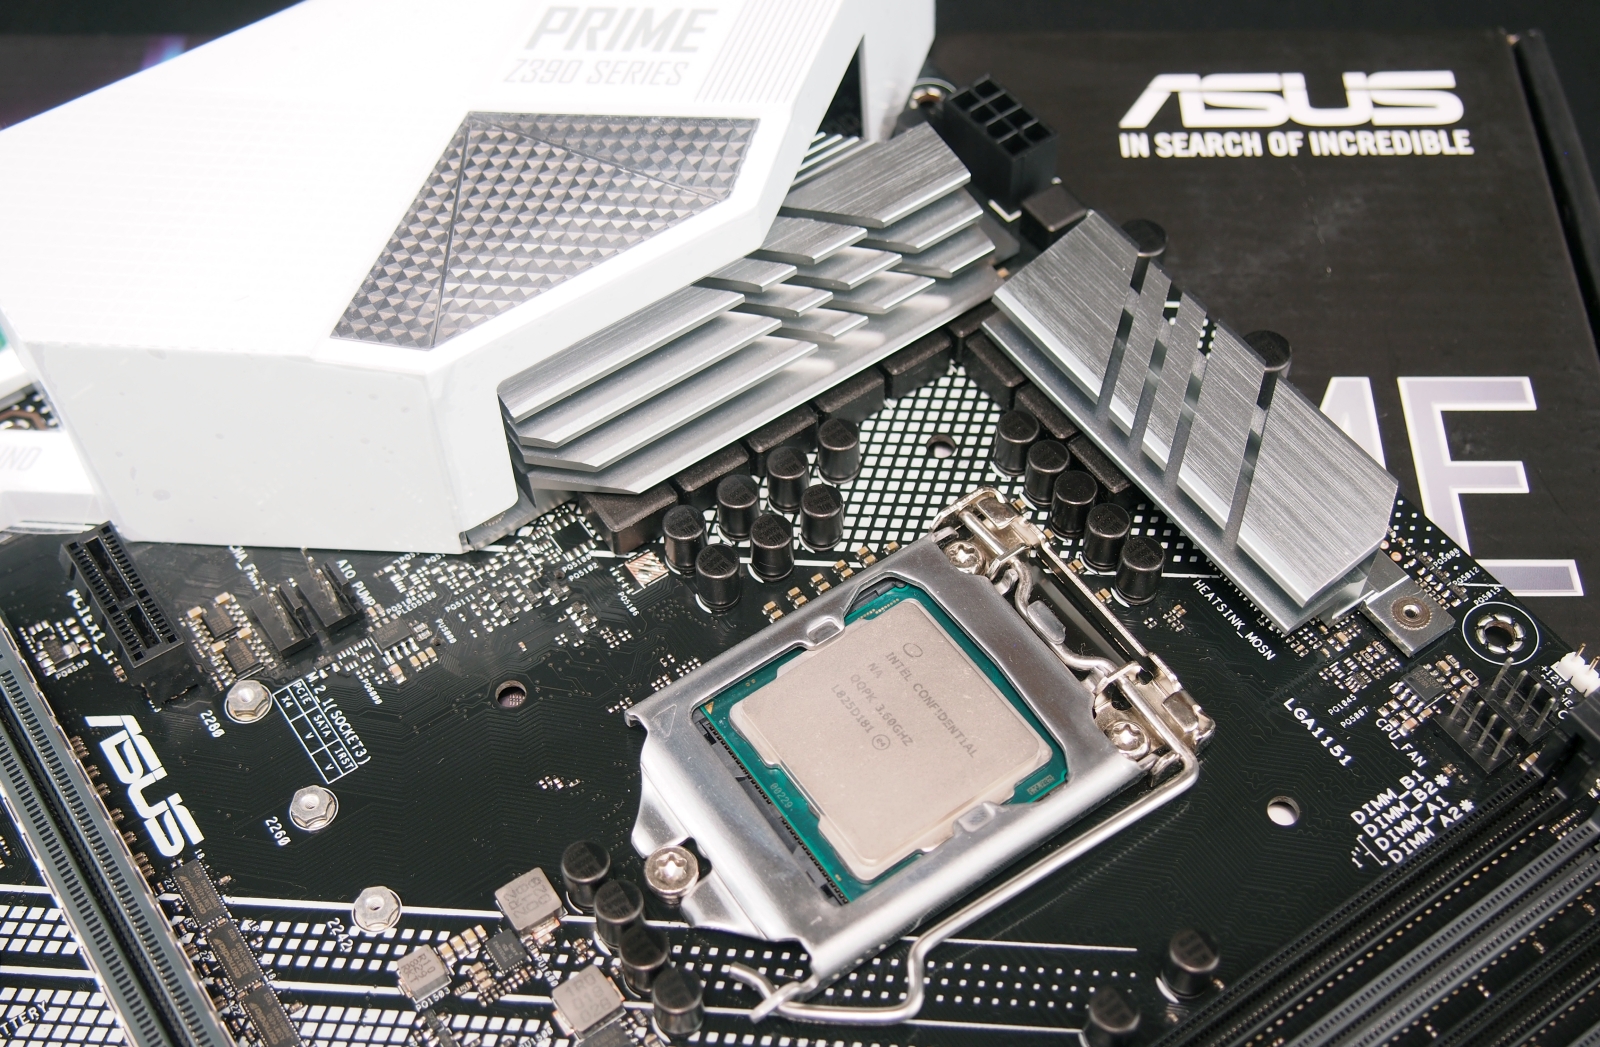
Основному радиатору здесь может потребоваться обдув, поэтому производитель положил в комплект Prime Z390-A крепление для 40 корпусного вентилятора. Для питания процессора плата располагает силовым разъемом 8-пин.
Основное же питание на плату подается через стандартный 24-пин коннектор. Для модулей памяти предусмотрены 4 слота DIMM DDR4. Поддерживается установка до 64 Гб памяти с частотой от 2133 до 4266 МГц.
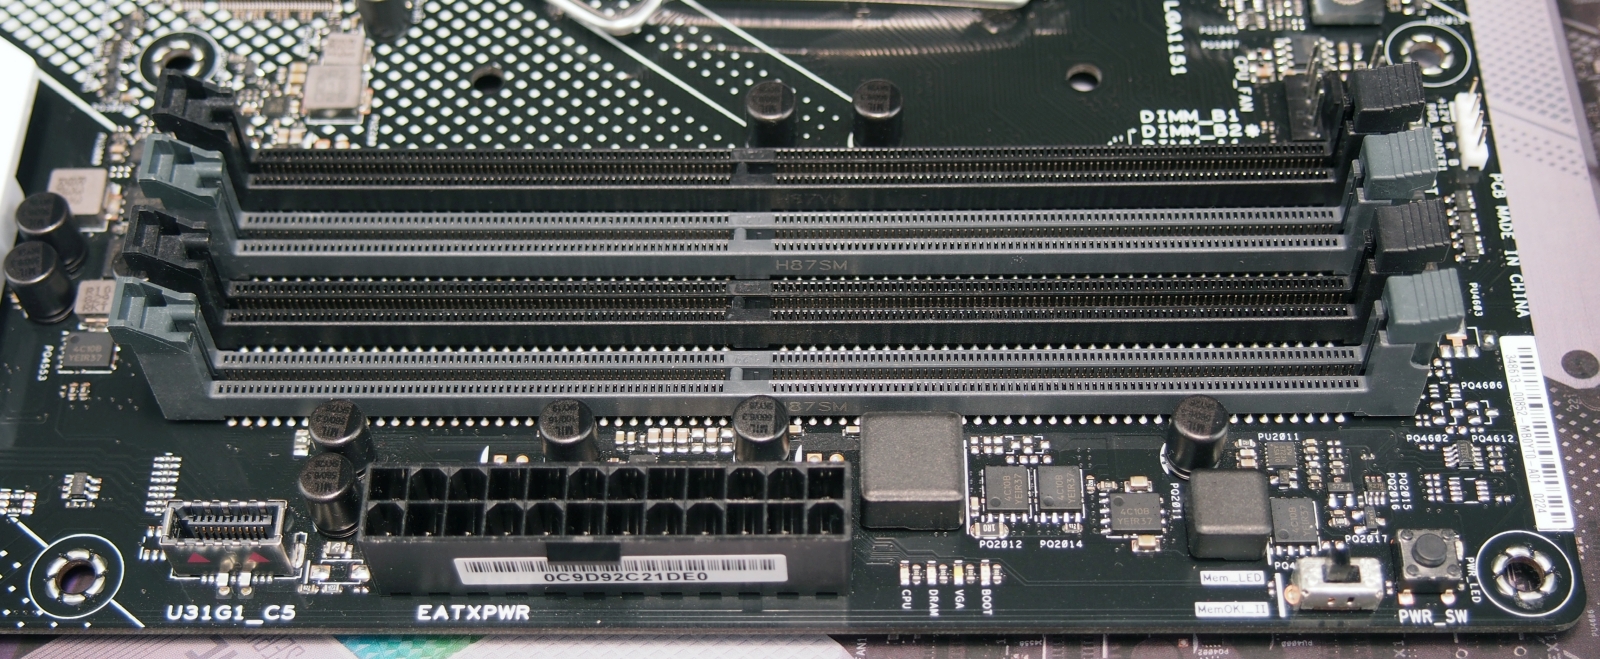
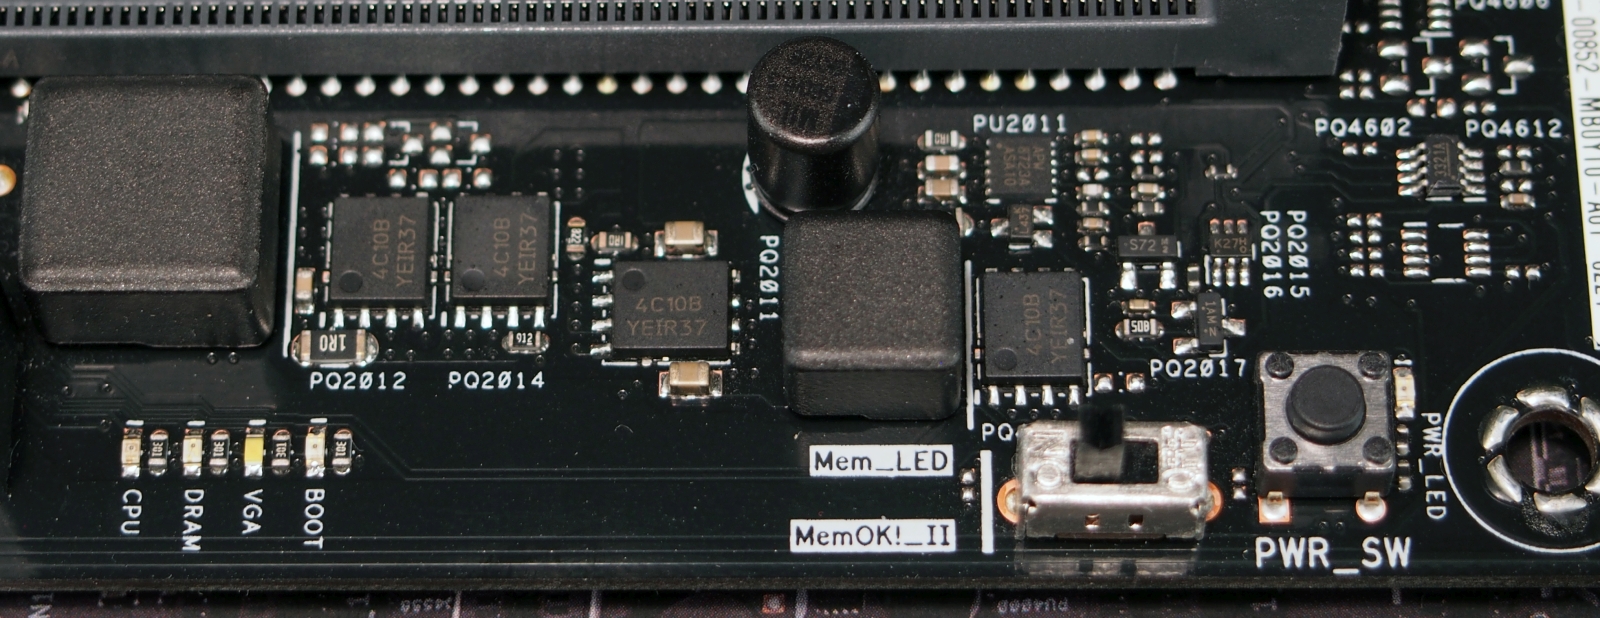
Правый верхний угол Prime Z390-A содержит инструменты для управления и диагностики материнской платы. Присутствует кнопка включения PWR_SW и тумблер MemOK! Для поиска причин отказа старта системы реализованы светодиоды CPU/MEM/VGA/BOOT и MEM_LED.
Материнская плата Prime Z390-A поддерживает NVIDIA SLI 2-Way и AMD 3-Way CrossFireX. Реализация этих технологий для графических адаптеров возможна на этой плате с помощью трех разъемов PCI-E 3.0 x16. Первые два слота имеют металлический усиленный корпус. Все три слота могут работать по схеме х16, или х8+х8 или х8+х4+х4 линий PCIe. Еще три слота PCI-E 3.0 x1 реализованы для периферийных устройств.
Для распределений линий PCIe между слотами PCI-E 3.0 x16 на плате распаяно четыре мультиплексора ASMedia ASM1480.
Для накопителей М.2 на плате Prime Z390-A предусмотрено два соответствующих разъема. Верхний М.2 поддерживает установку 2242/2260/2280 устройств с протоколами передачи данных SATA и PCIe 3.0 x4.
Второй М.2 прячется на плате под алюминиевым радиатором охлаждения с силиконовой термопрокладкой.

Сюда пользователь может установить устройства типоразмером 2242/2260/2280 и 22110. Нижний разъем поддерживает М.2 с протоколом передачи данных PCIe 3.0 x4.

Реализована возможность подключения до шести устройств с разъемом SATA.
Звуковая система на Prime Z390-A носит название Crystal Sound 3. Она включает в себя инновационный кодек Realtek S1220A с 7.1-канальным звучанием. Поддерживается автоматическое определение сопротивления подключенных наушников для настройки оптимального коэффициента сопротивления.
На нижней грани материнской платы Prime Z390-A можно обнаружить три колодки USB 2.0 для вывода шести разъемов, а также одну колодку USB 3.1 Gen 1. Помимо этого здесь присутствует разъем EXT_FAN для подключения платы-контроллера FAN_HUB (продается отдельно, в комплект поставки Prime Z390-A не входит).

Для лент и других элементов подсветки предусмотрены два разъема +12В RGB. Материнской платой поддерживается технология AURA Sync, которая позволяет синхронизировать подсветку Prime Z390-A с подключенными элементами в единую экосистему.
Возможности UEFI BIOS
Для материнских плат серии Prime компания ASUS делает фирменное оформление оболочки BIOS в черно-бирюзовых тонах. И в этом отношении Prime Z390-A — не исключение. Оболочка BIOS имеет два интерфейса: EZ Mode — общая информация о системе, а также Advanced Mode, предоставляющая полный перечень настроек.
Часть информации о системе консолидирована во вкладке «Main». Последние измененные пункты BIOS сохраняются в разделе «My Favorites».

Все, что требуется для разгона и тонкого тюнинга системы, находится в разделе «Ai Tweaker». По традиции компании ASUS здесь находится львиная доля всех настроек BIOS.
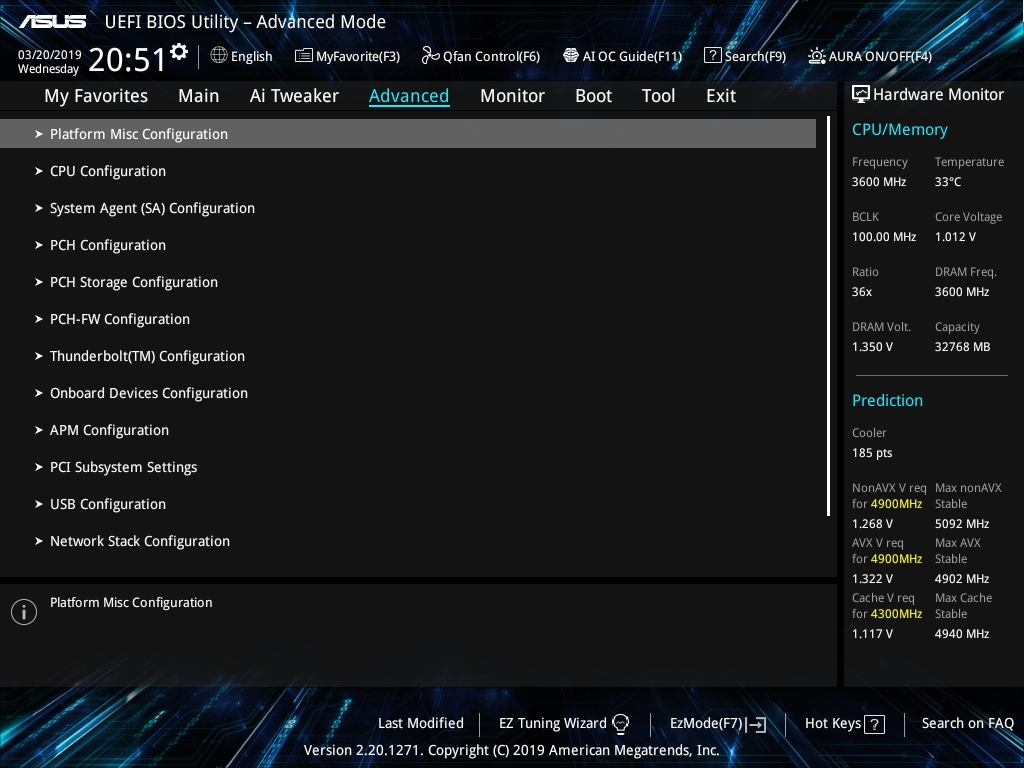
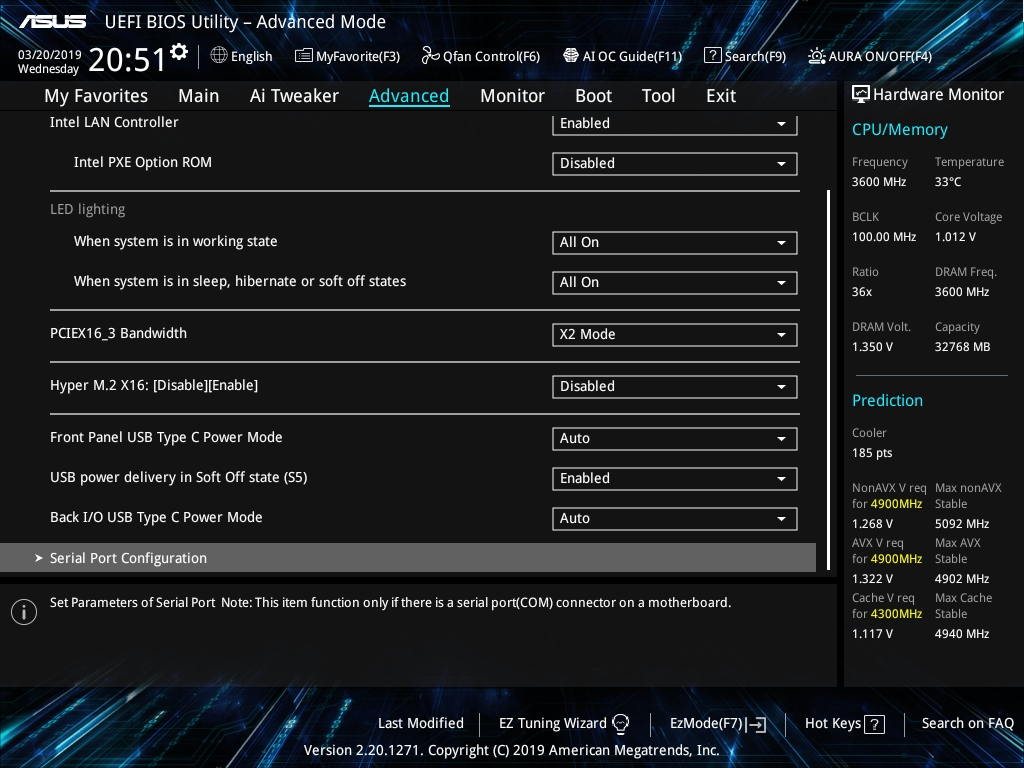
Для настройки периферийных устройств, слотов и разъемов платы предусмотрен раздел «Advanced».
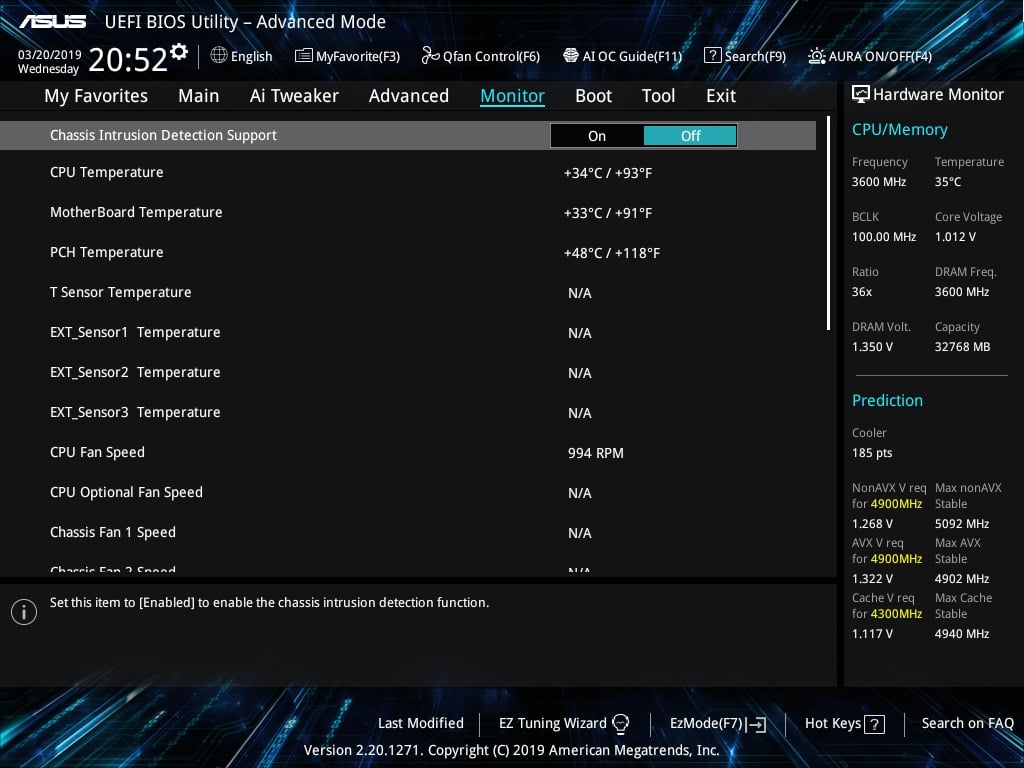
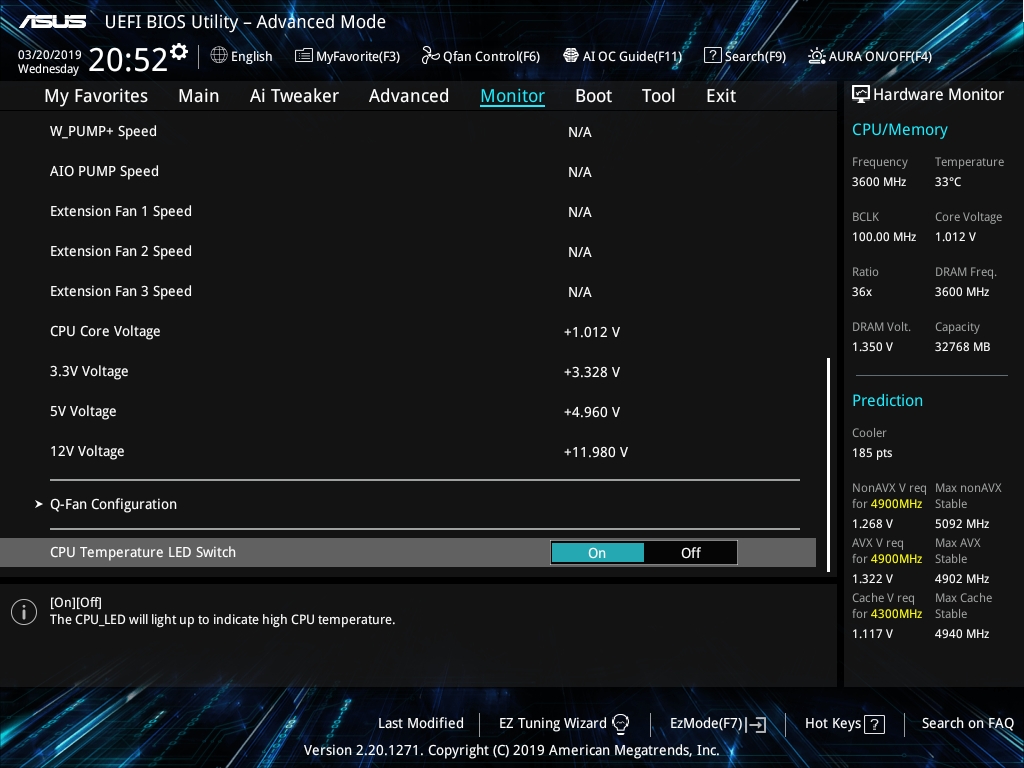
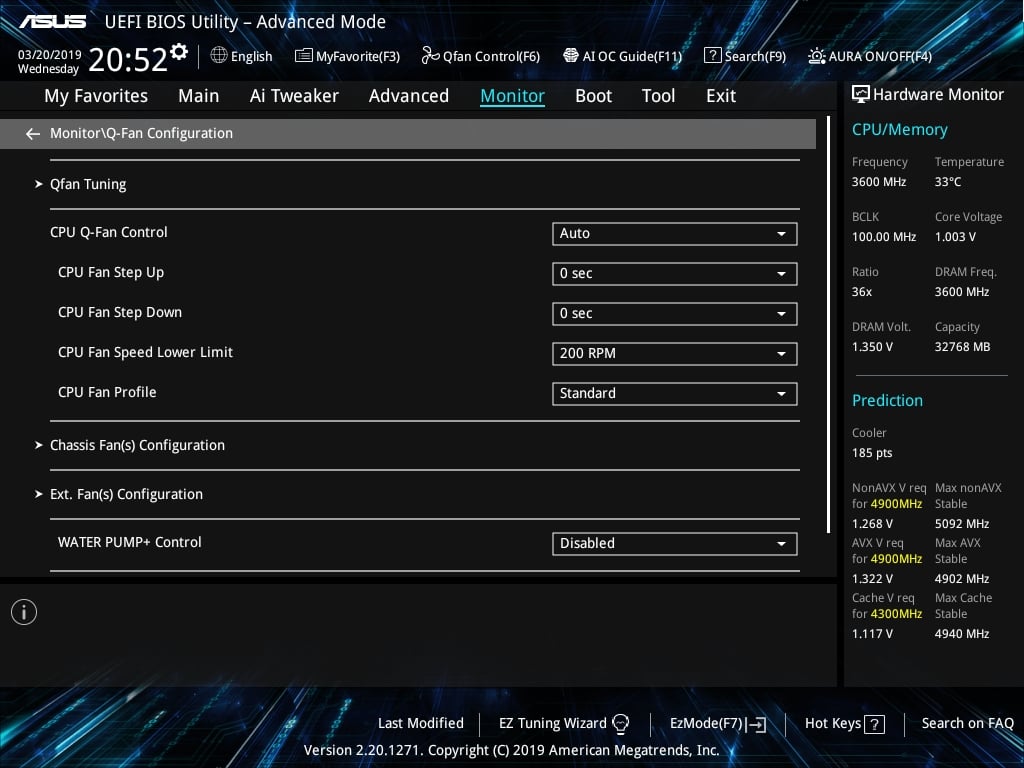
Функции мониторинга, управления вентиляторами и оперативные данные о напряжениях находятся во вкладке «Monitor».
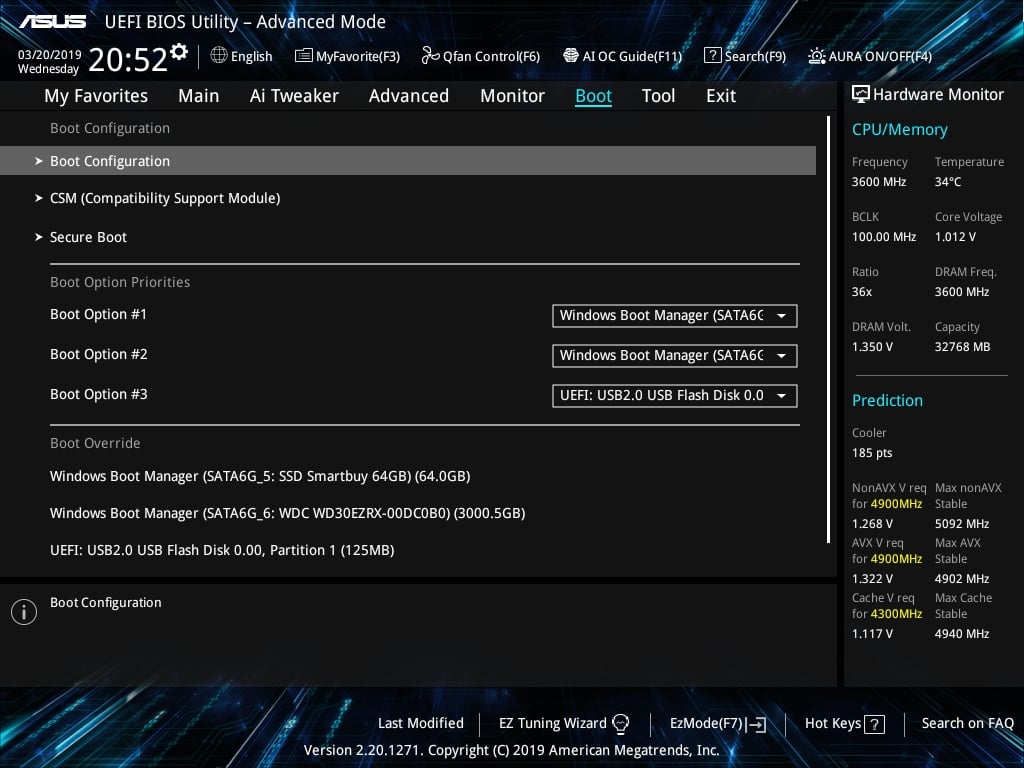
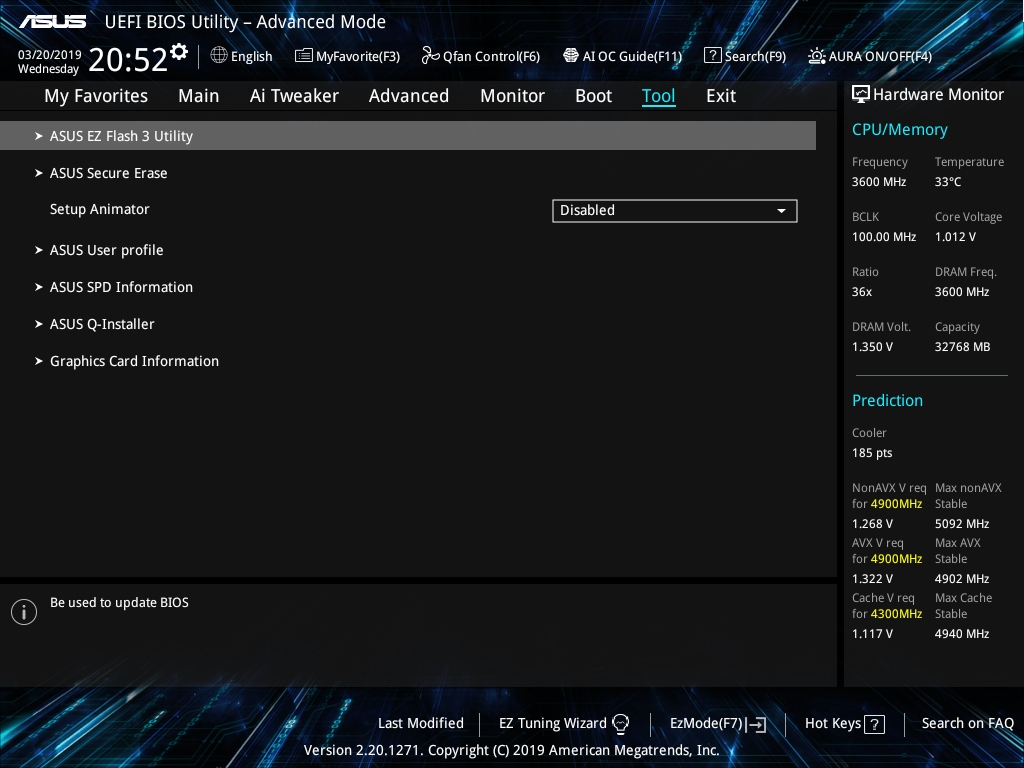
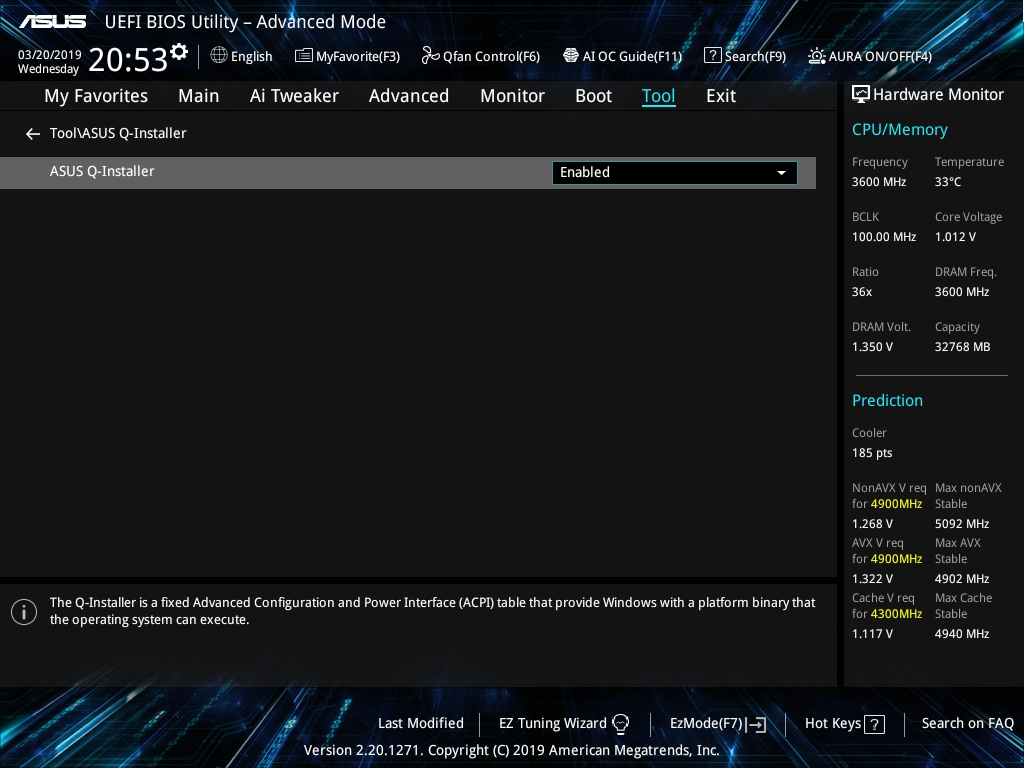
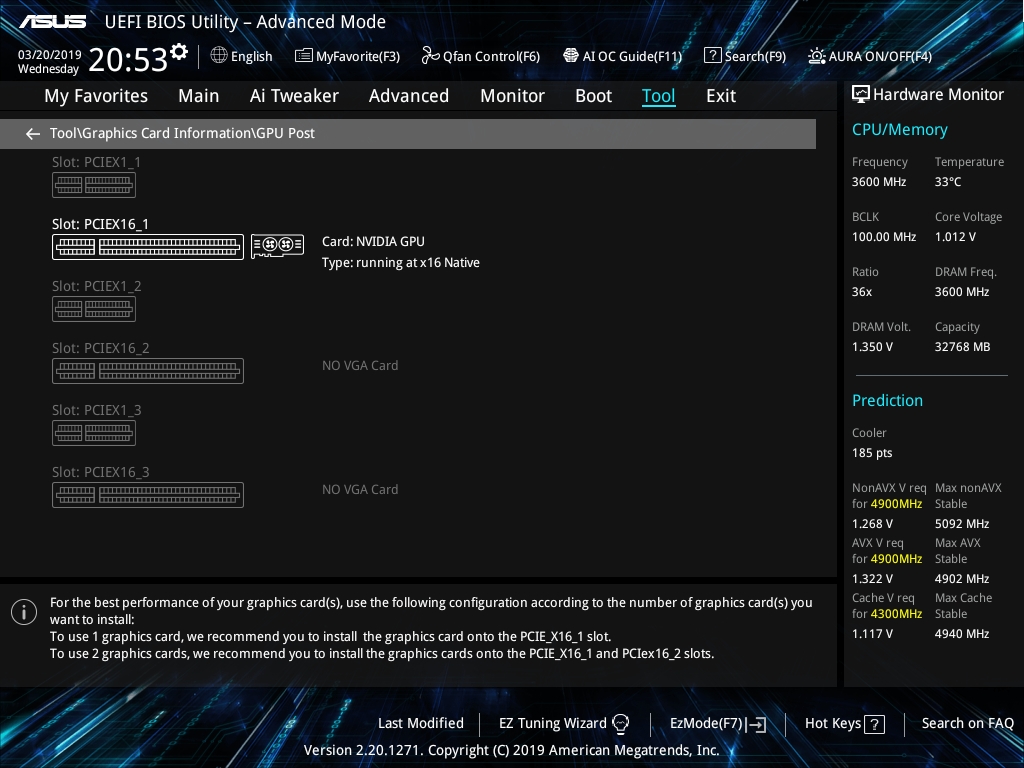
Не менее важные опции несет в себе и раздел «Tool», который представляет собой центр сервисных функций. Здесь присутствует возможность получить информацию об установленных компонентах системы, обновить прошивку BIOS, отформатировать накопители и другие, схожие по тематике функции.
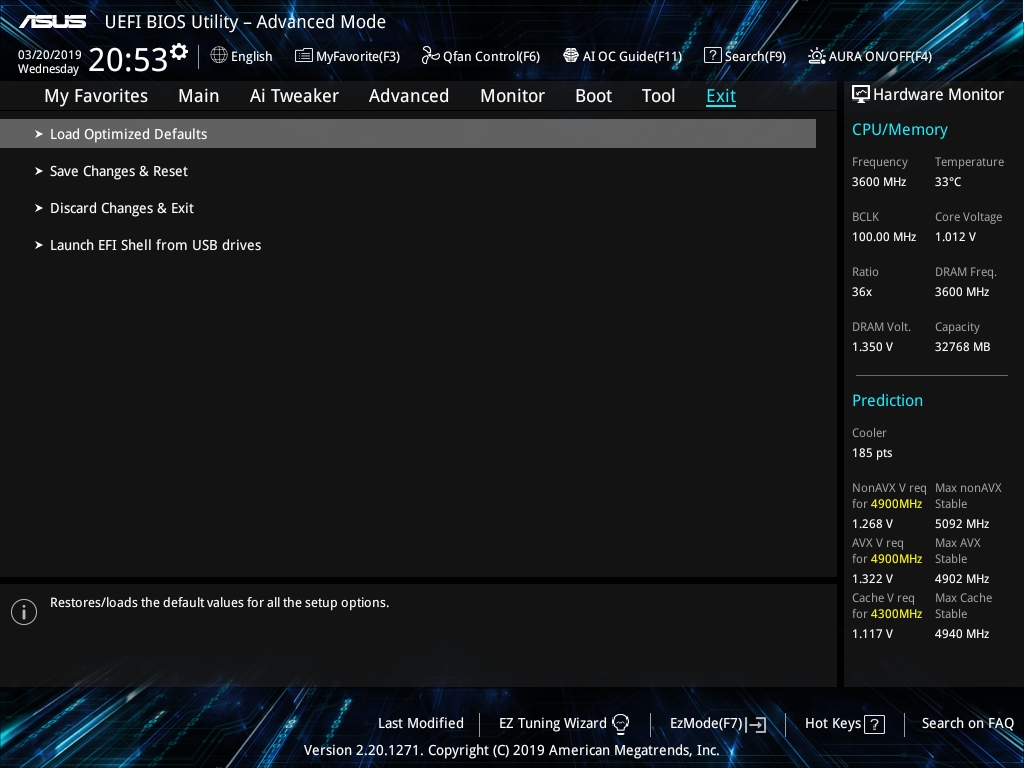
Последний раздел «Exit» предназначен для сохранения изменений настроек BIOS, сброса их на заводские и выхода без изменений.
Тестовый стенд и подсветка платы
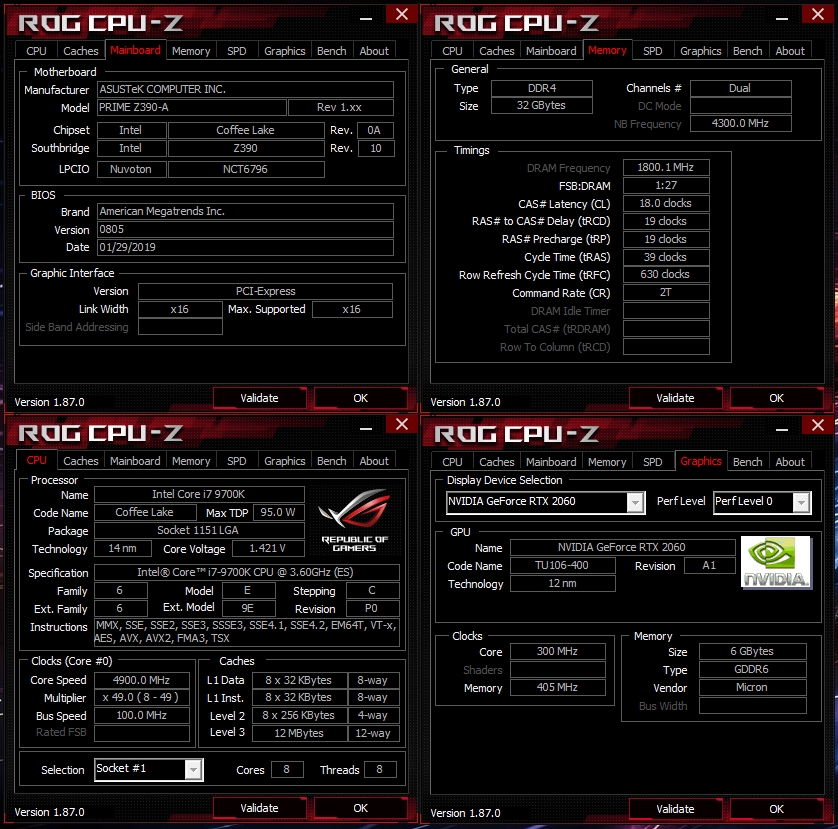
Нам было важно убедиться, что материнская плата Prime Z390-A может работать в полную силу вместе с 8-ядерными процессорами Coffee Lake Refresh. Поэтому для тестирования мы использовали процессор Intel Core i7-9700k. Тестирование проводилось на BIOS версии 0805, датированной 29/01/2019.
В корпусе Corsair 540 Air тестовая система с материнской платой Prime Z390-A приняла следующий вид.

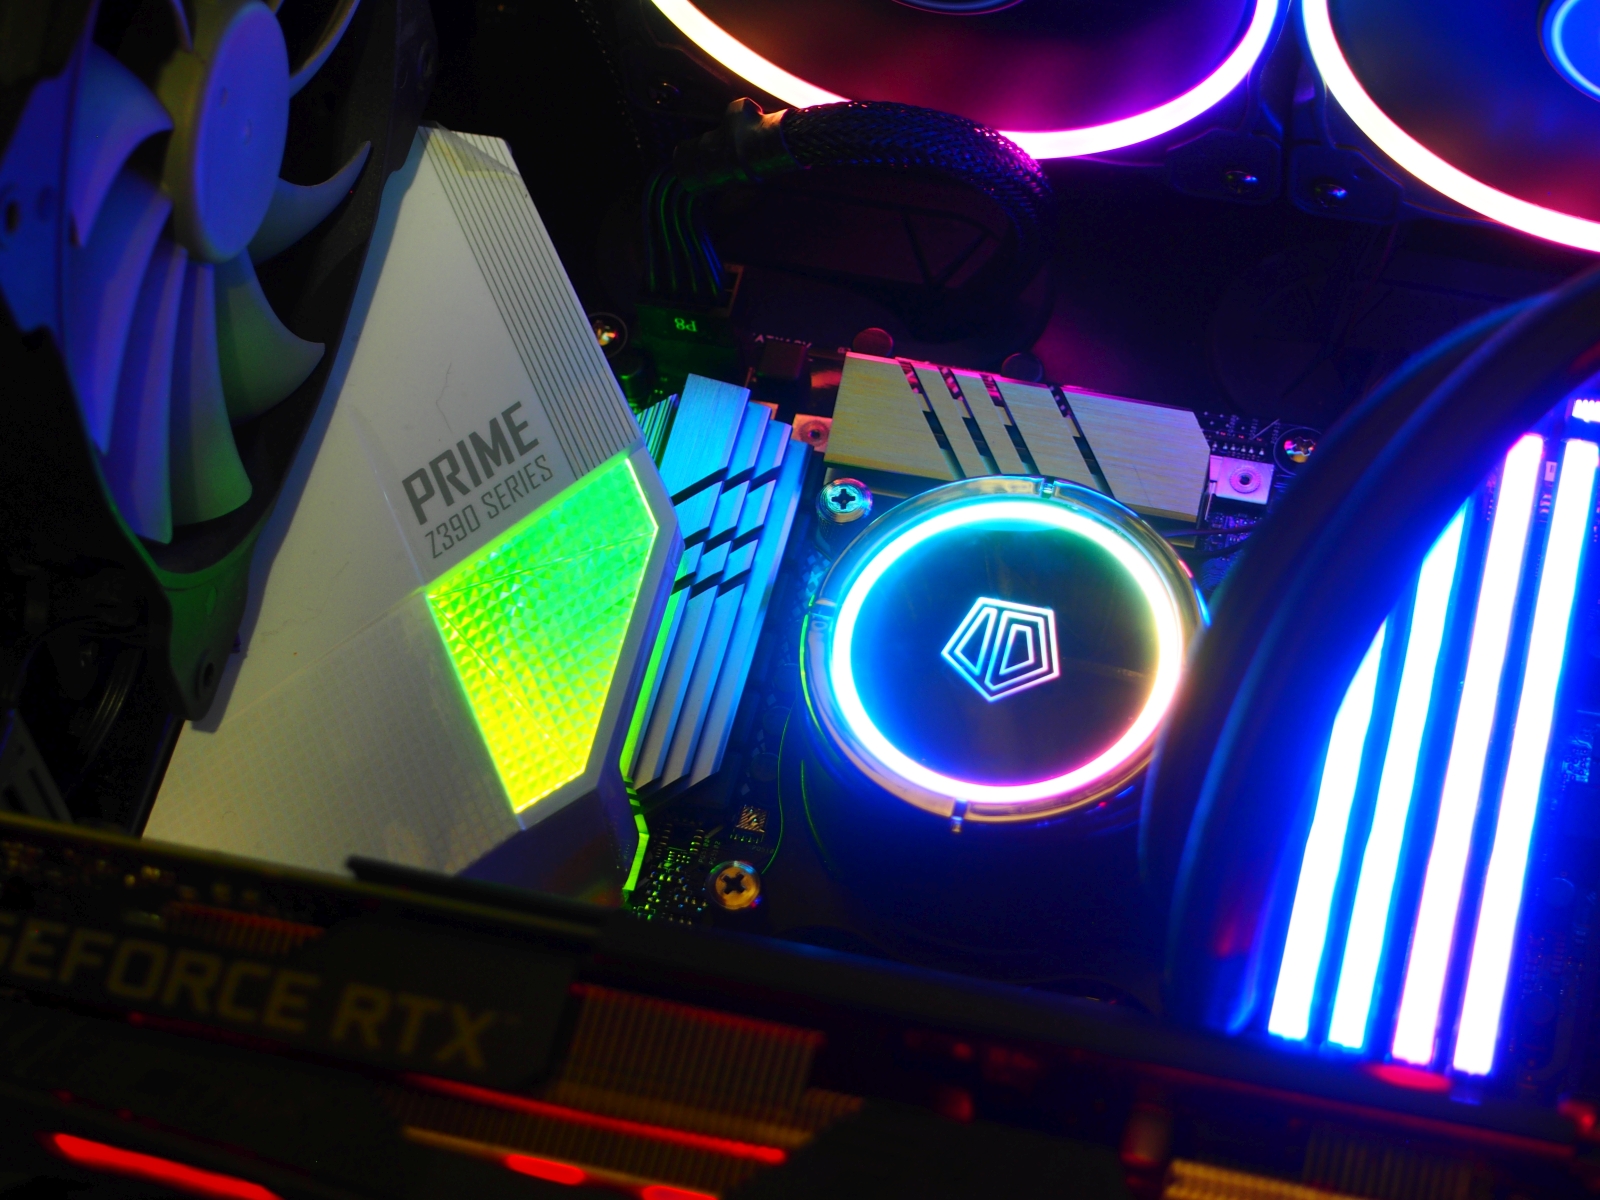
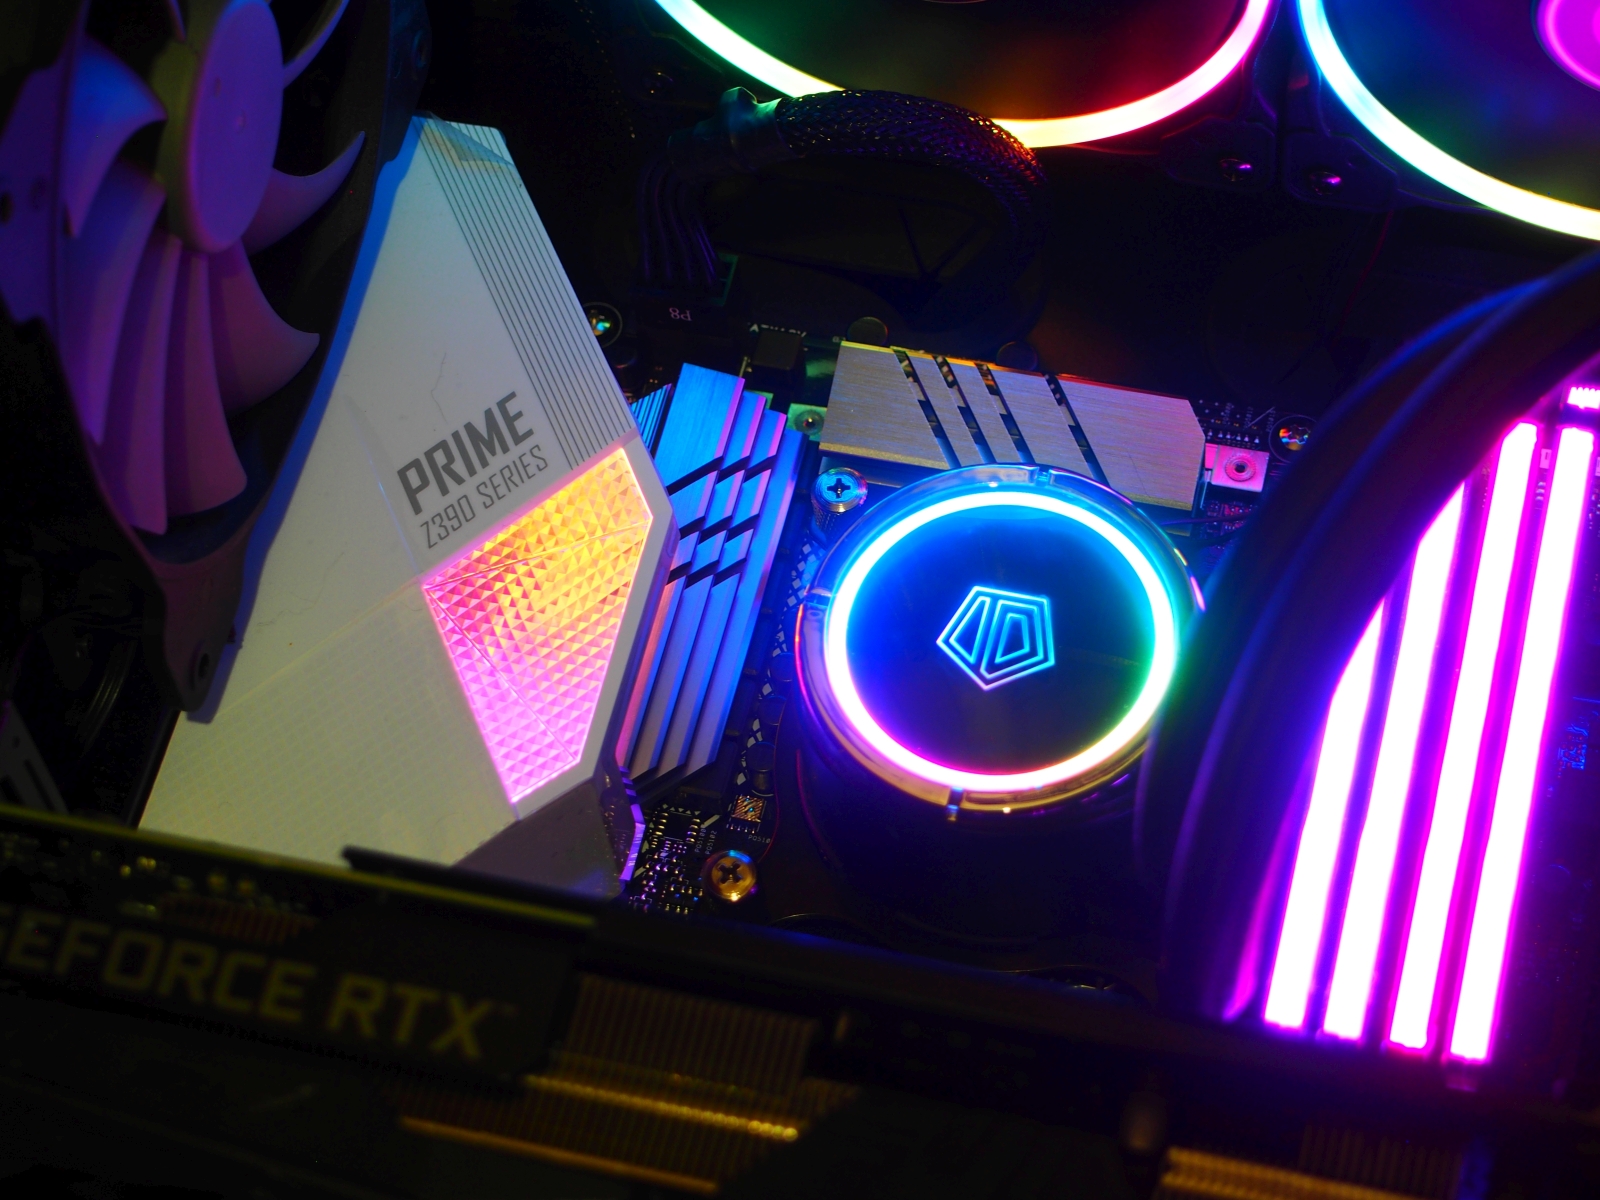
Очень красиво смотрится на материнской плате Prime Z390-A элемент RGB-подсветки с адресуемыми светодиодами. Благодаря кристаллизованной полупрозрачной накладке свет от элементов подсветки буквально переливается.
Результаты производительности
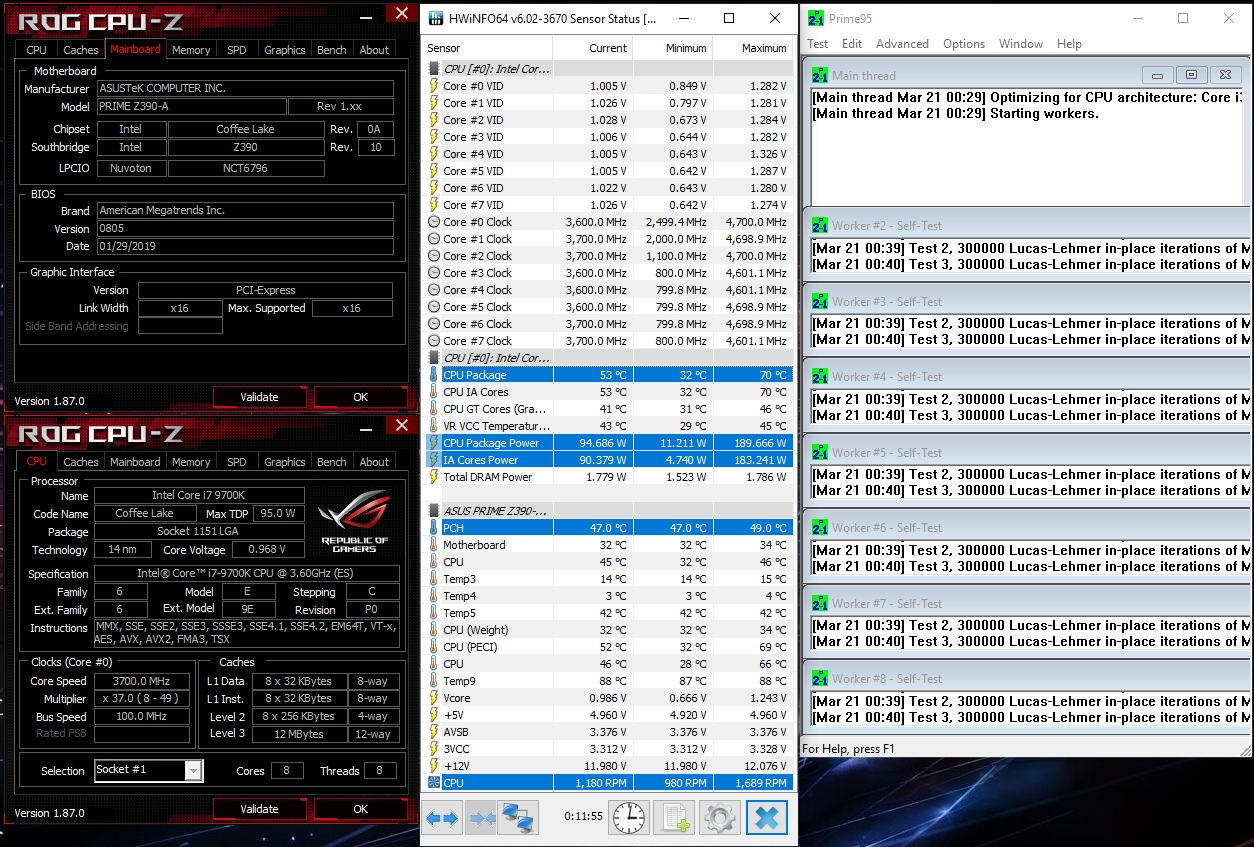
Тестировать материнскую плату Prime Z390-A мы начали дефолтными настройками BIOS. Исключением лишь стала активация профиля XMP, позволившая работать памяти из тестового стенда на штатных для нее 3600 МГц. С настройками BIOS по умолчанию Prime Z390-A удерживает процессор в рамках 95 Вт TDP. Вследствие этого при постоянной нагрузке частота всех ядер Intel Core i7-9700k опускается до 3600 МГц.
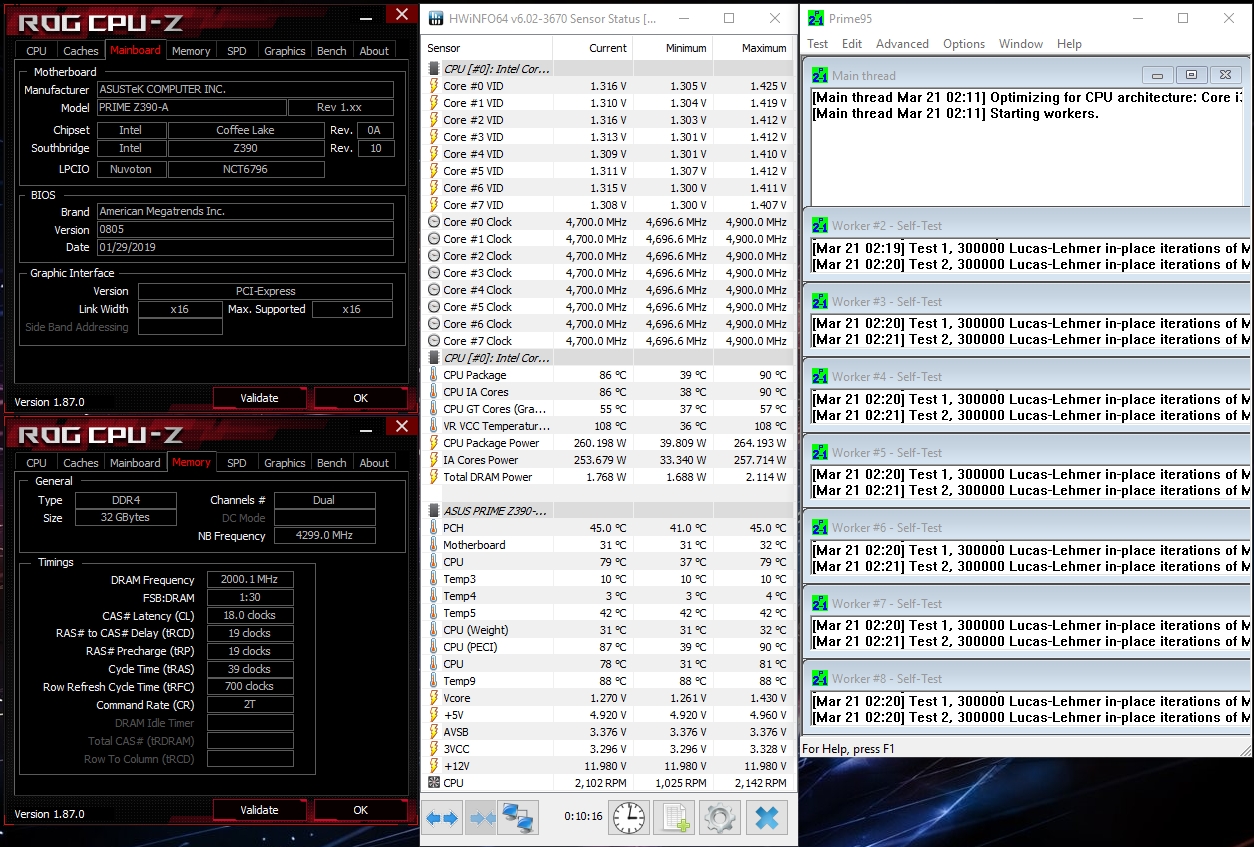
Отключив через BIOS все лимиты энергопотребления, мы сразу проверили материнскую плату на разгон процессора. На Prime Z390-A нам покорилась частота 4700 МГц с подтверждением стабильности в Prime95. Разогнать выше не позволила используемая нами система охлаждения, которая работала на пределе своих возможностей против процессора, потребляющего после отключения лимитов уже 260 Вт энергии.

Третьим этапом проверки Prime Z390-A стала оценка оверклокерских способностей материнской платы в отношении памяти DDR4. Наш комплект оперативной памяти заработал на частоте 4000 МГц, что для Prime Z390-A является неплохим результатом.
На материнской плате Prime Z390-A пункт в меню BIOS, который влияет на алгоритм работы процессора и лимиты, называется ASUS MultiCore Enhancement. Он него напрямую зависит то, насколько агрессивно процессор будет использовать технологию Turboboost при превышении заявленного для него TDP.

Поэтому в рамках тестирования материнской платы Prime Z390-A для нас было важно проверить, какова разница в производительности при отключении лимитов и разгоне оперативной памяти до 4000 МГц. Мы оценили производительность системы в синтетических бенчмарках и прикладных приложенияхи получили следующие результаты.


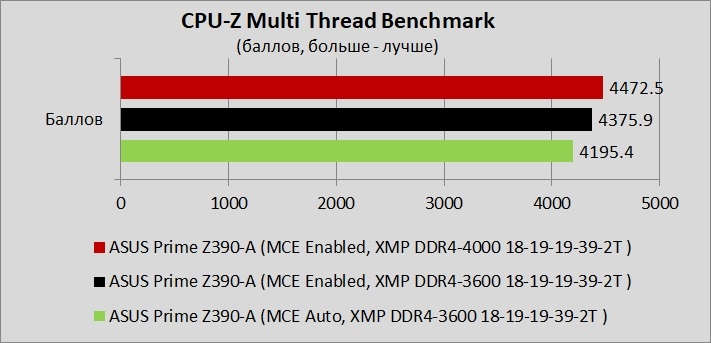
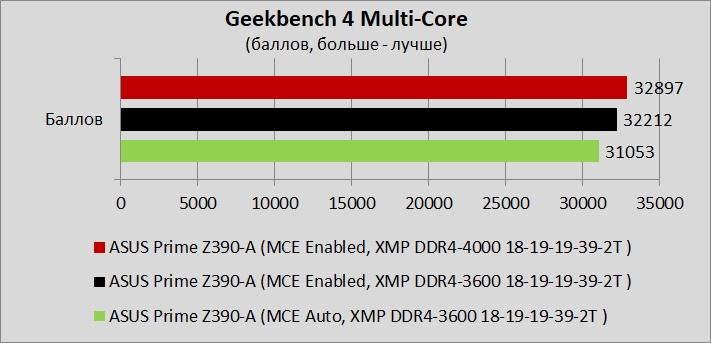


Разгон оперативной памяти на Prime Z390-A дал ощутимый рост производительности далеко не во всех выбранных нами тестах. В это же время отключение лимитов энергопотребления позволило зафиксировать более заметное увеличение производительности практически во всех бенчмарках и прикладных приложениях.
Заключение
Рассматривая ASUS Prime Z390-A в качестве основы для сборки мощного игрового компьютера, можно не сомневаться в том, что система будет работать корректно. В отличие от около бюджетных моделей, система питания которых не способна справиться с аппетитами современных 8-ядерных процессоров Intel, модель Prime Z390-A работает на полную отдачу. Возможности этого решения позволяют осуществить разгон процессора и памяти, а дружественная оболочка BIOS делает этот процесс легким и интуитивно понятным.
В вопросе технического оснащения упрекнуть в чем-то Prime Z390-A также не представляется возможным. Материнская плата обладает современным и сбалансированным набором разъемов и интерфейсов, востребованных большинством пользователей. В актив Prime Z390-A стоит записать наличие радиатора М.2 и порта USB 3.1 Gen 2 Type-C на тыльной панели. А оформление и интересная подсветка RGB могут стать приятным дополнением для тех, кто оценит по достоинству внешний вид собранного ПК на основе Prime Z390-A.
Плюсы:
- система питания справляется с 8-ядерными процессорами даже при потреблении 260 Вт;
- для обдува VRM в комплекте есть крепление для установки вентилятора;
- стильный внешний вид в бело-черном исполнении;
- нет проблем с разгоном оперативной памяти, стабильная работа на 4000 МГц;
- хорошо проработанный и богатый на настройки BIOS;
- наличие радиатора для М.2 накопителя;
- наличие USB 3.1 Gen 2 для фронтальной и тыльной панели корпуса.
Минусы:
- скромная комплектация для платы такого уровня;
- с настройками по умолчанию плата удерживает процессор в рамках заводского TDP.