Приветствую всех!
Сегодня установил процессор и принялся ковыряясь в меню настроек настраивать музыку. Md.Lab SQ6 торжественно отправился на полку пылиться пока его не купит новый хозяин)
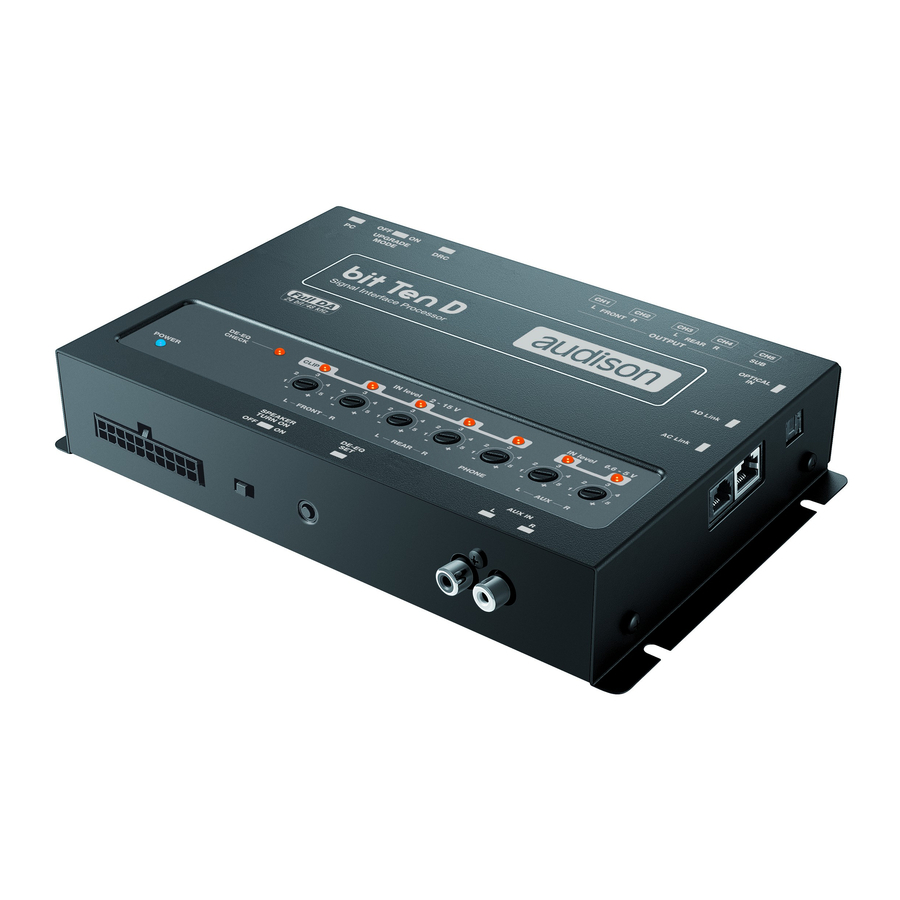
А вот вашему внимаю установленный AUDISON bit ten.
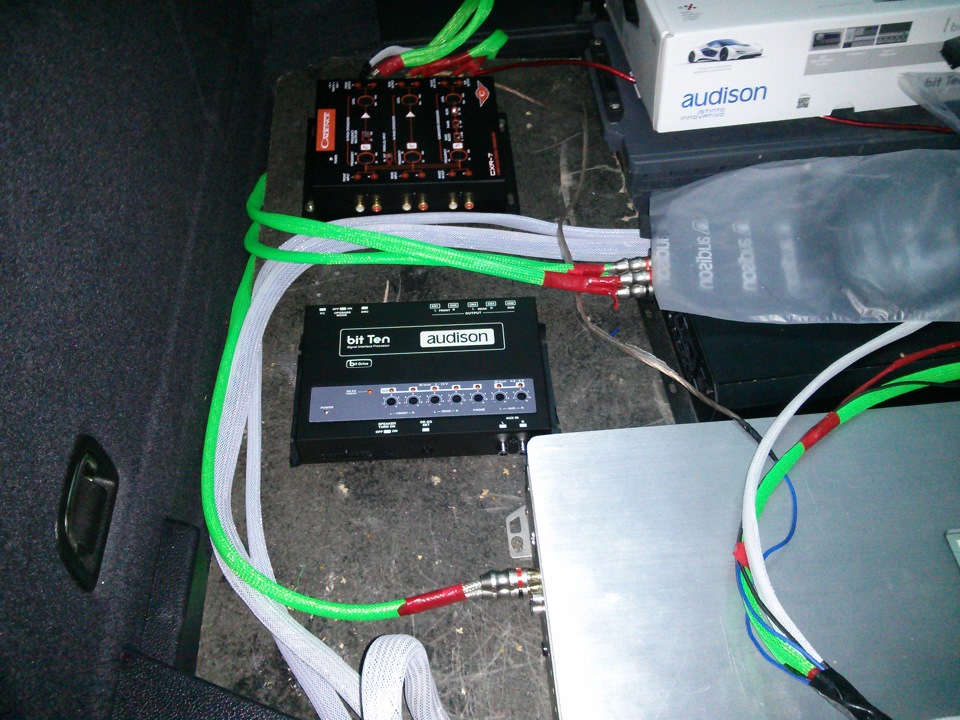
Примерка
установка
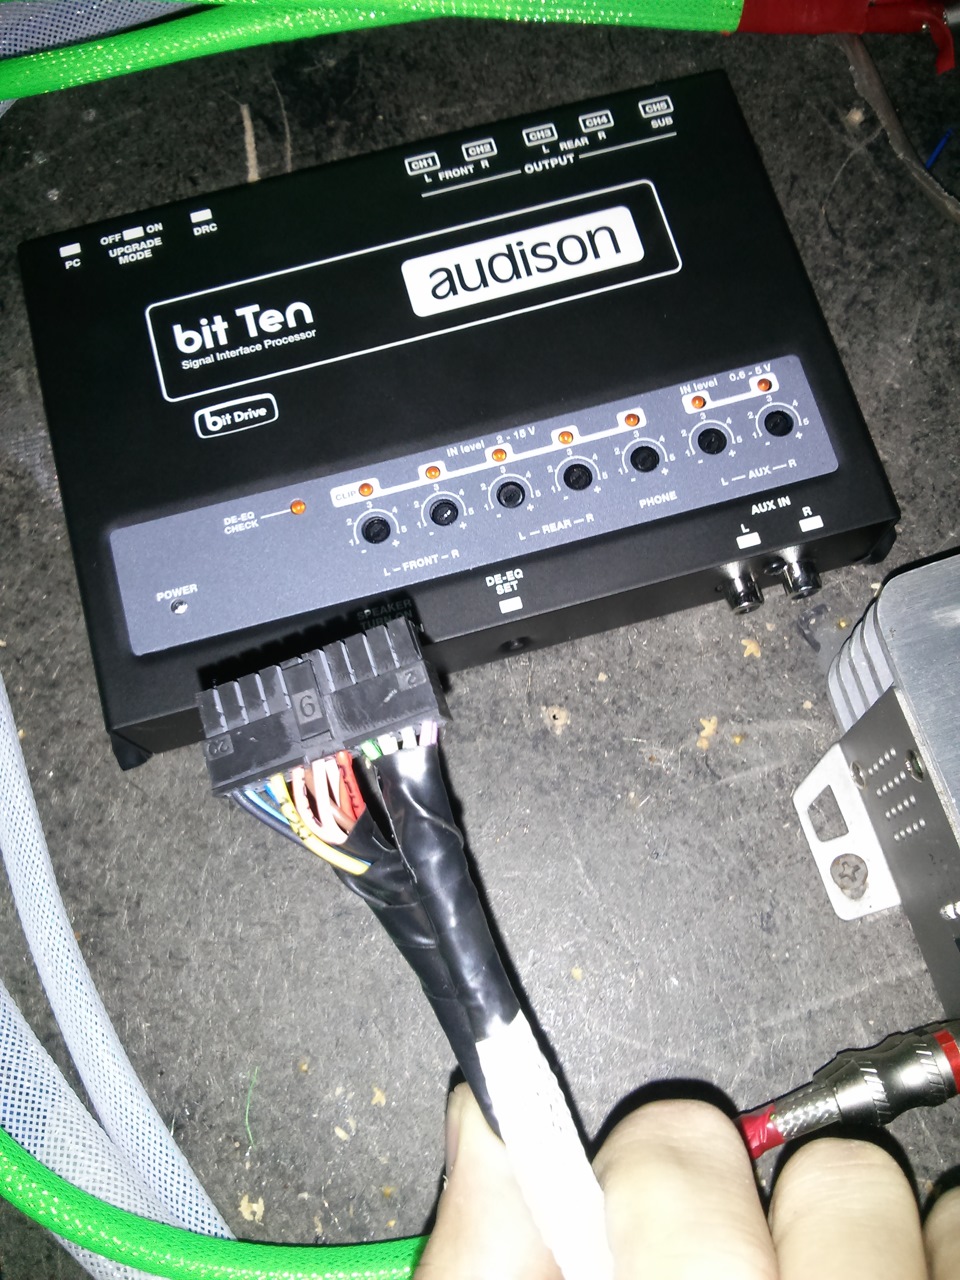
Далее подключив линейные провода, я принялся за настройку. Как вы помните BIT TEN имеет 5 выходов, а на усилителях в общем имеется 6 входов! (4 на Skar sk 125.4 и 2 на Kicx SQ 1000.1) Откуда же тогда взять еще один выход?! Выход прост) нужно установить на выход сабвуфера Y-коннектор и мы получим 2 выхода вместо 1.
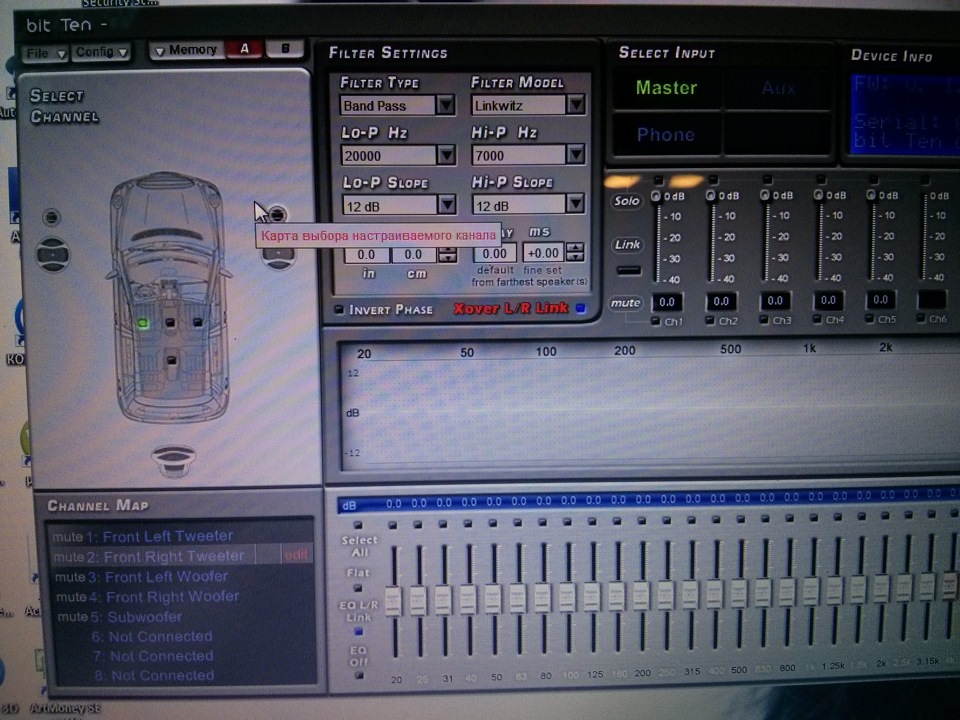
Но приступим к настройке фронта! а именно Hertz SPL SHOW 200.1 и пищалки PP PT52
Выставил настройки сначала на пищалки порезав их снизу на 7000.
Так же мы можем настроить крутизну среза и тд.
Настраивается все поканально, что очень порадовало( для моей будущей 3-х полоски все очень пригодится)
срезанные пищалки снизу
Теперь Срез мидбаса со 125 до 6500.
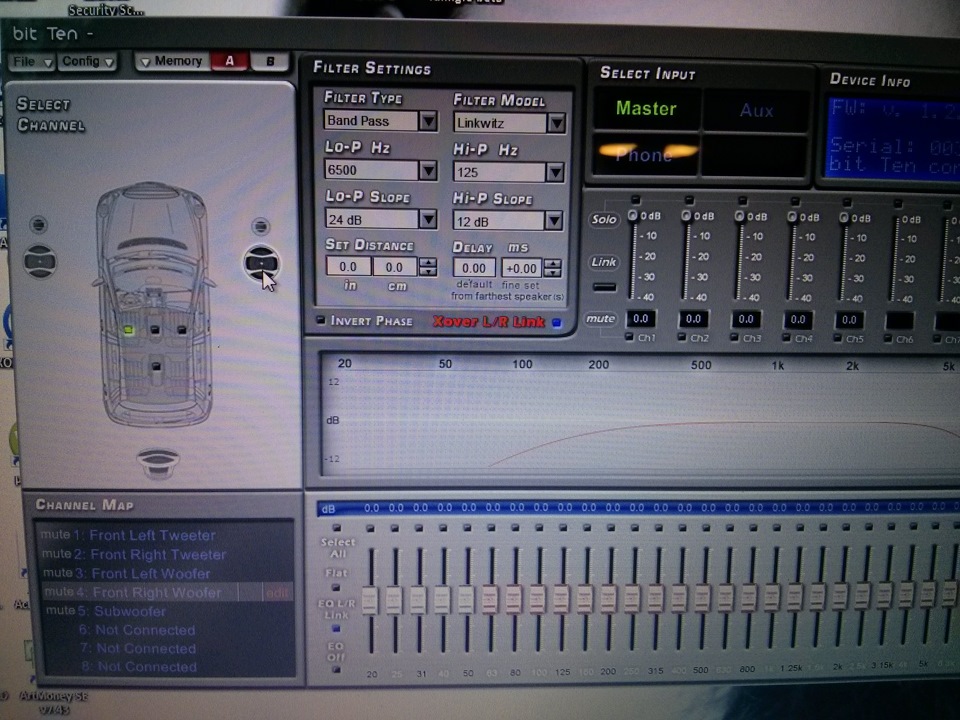
Срез мидбаса
Регулировать можно все что вашей душе угодно. Включая временные задержки, но с этим я займусь завтра так как уже ночь на дворе)
Так же в начале настройке использовался диск идущий в комплекте! на нем 5 треков для настройки. порадовало что выходной сигнал настроился по мощности сам в автоматическом режиме. Пропал небольшой фон издаваемый ГУ
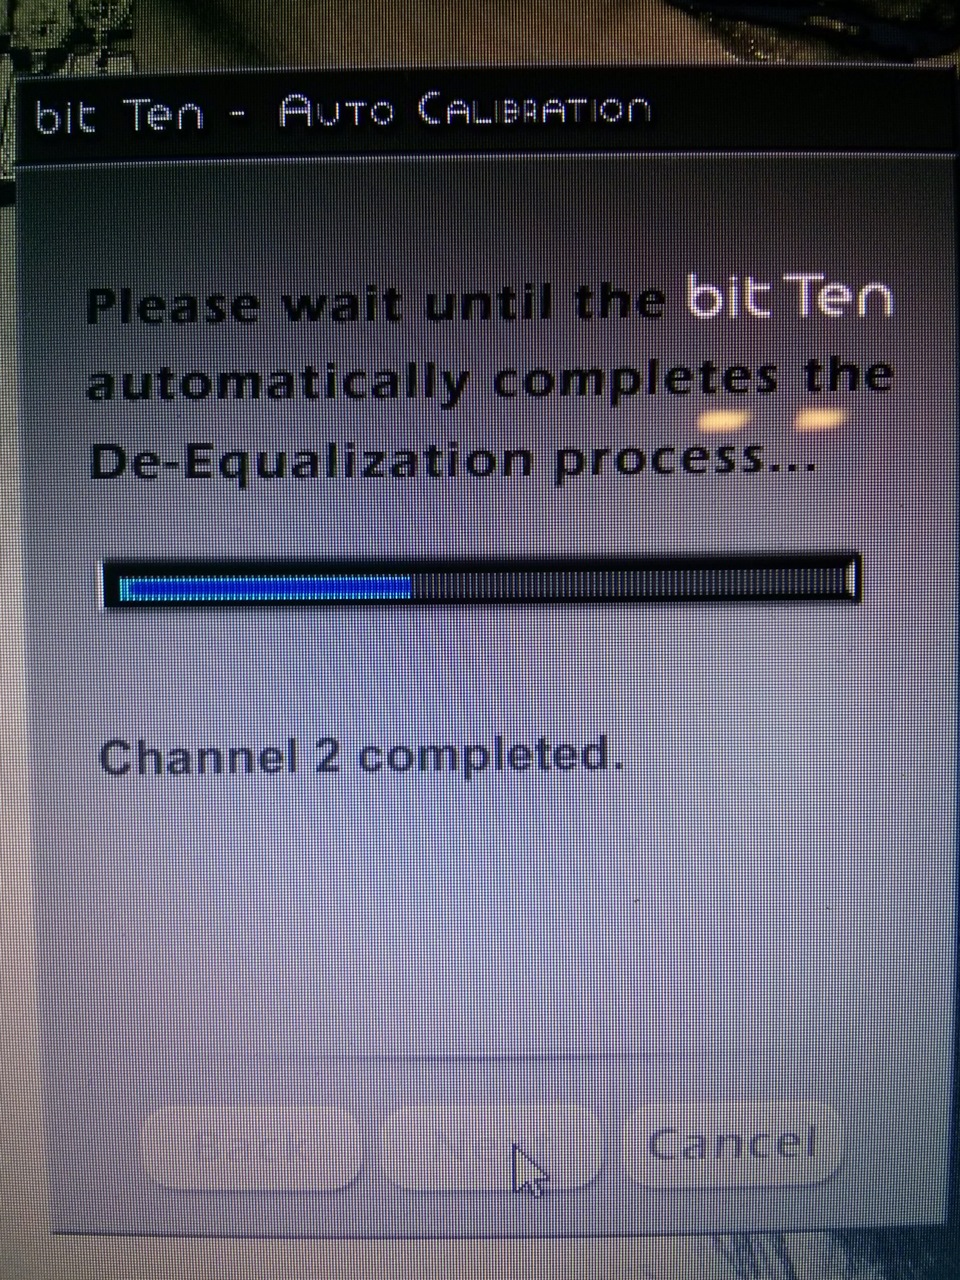
Автонастройка каналов
Залив все настройки почему-то пропал контакт ПК-Audison и выдало такое сообщение.
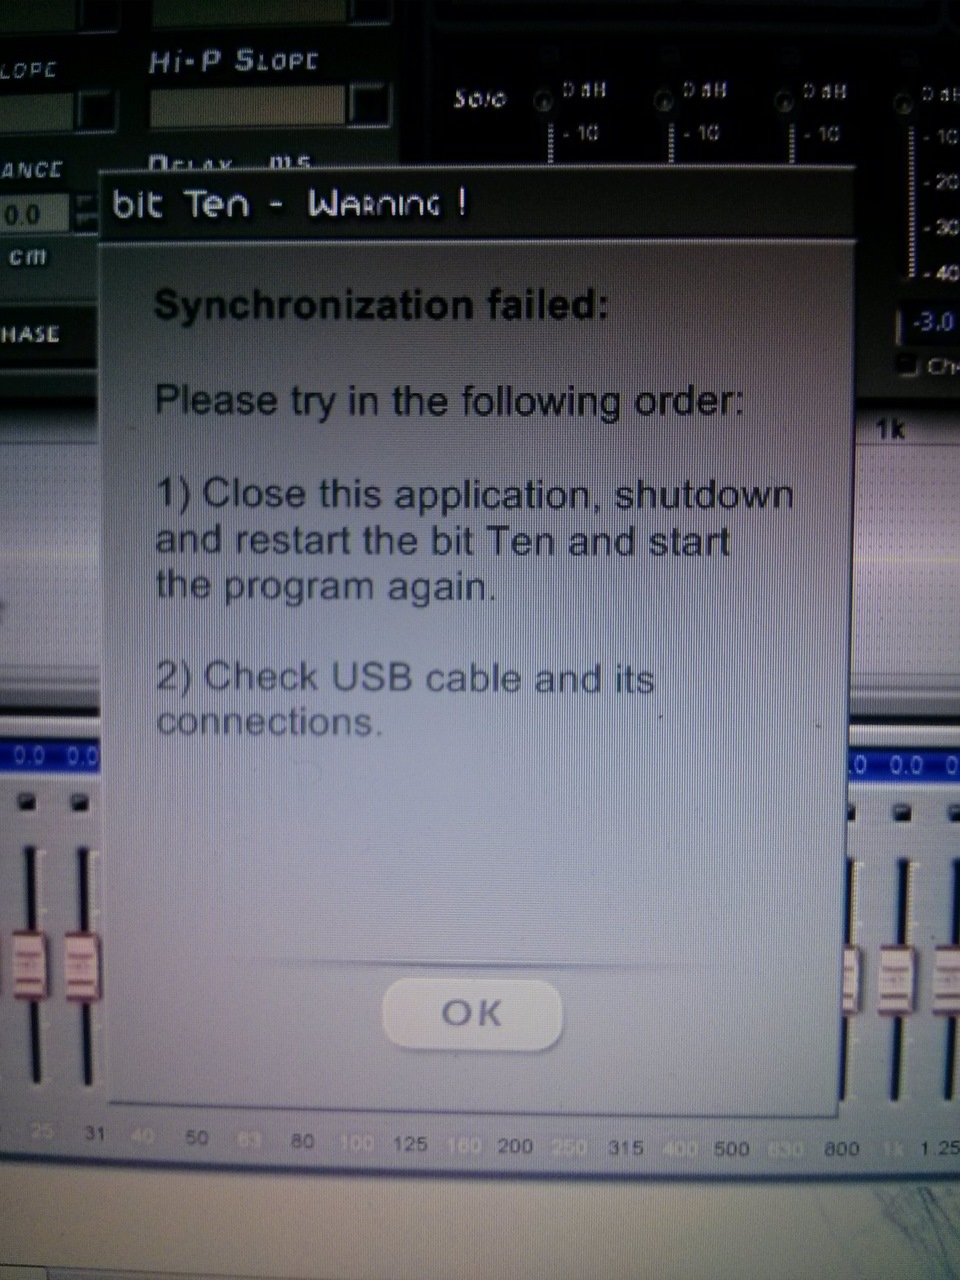
Но следуя подсказкам проблема сразу же исчезла. (думаю мои руки виноваты в этом сбое, но никак не процессор)
В общем всем спасибо! Завтра докуплю коннектор и попробую снять видео с работой аудиосистемы.
Если я сделал чтото в настройке не правильно, прошу вас тыкнуть меня в это носом)))
-
Contents
-
Table of Contents
-
Troubleshooting
-
Bookmarks
Quick Links
ADVANCED
MANUAL
Rev. 1.1c
www.audison.eu
Related Manuals for Audison bit Ten D
Summary of Contents for Audison bit Ten D
-
Page 1
ADVANCED MANUAL Rev. 1.1c www.audison.eu… -
Page 2: Table Of Contents
4.5 Controls and settings ……………………..08 CONNECTIONS ………………………..09 5.1 Power supply and remote turn on…………………..09 5.2 How to turn the bit Ten D on / off……………………09 5.3 Personal computer and Digital Remote Control (DRC) …………….10 5.4 High-Level input signals ……………………..10 5.5 Low-Level input signals ……………………..11 5.6 Optical in digital input ……………………..11…
-
Page 3: Product Description — Precautionary Notes
ADVANCED MANUAL / bit Ten D / 1. PRODUCT DESCRIPTION / PRECAUTIONARY NOTES The bit Ten D is a digital signal processor essential to maximize the acoustic performance of your car audio system. It consists of a 32-bit DSP processor and 24-bit AD and DA converters.
-
Page 4: Bit Ten D And Drc Installation
ADVANCED MANUAL / bit Ten D / 3. bit Ten D and DRC INSTALLATION External dimensions 191 mm / 7.51” 191 mm / 7.51” 191 mm / 7.51” Mounting dimensions How to install 4,2x20mm / 0,16”x0,78” 183.6 mm / 7.22”…
-
Page 5: Connection Panels — Description
ADVANCED MANUAL / bit Ten D / 4. CONNECTION PANELS – DESCRIPTION MULTIPOLAR CONNECTOR The bit Ten D comes with a 20 multipolar interface for input signals, power supply and various control connections. 1: violet 2: gray 3: white 4: green…
-
Page 6: Input Signals
In this case the PHONE input won’t be active 20: black 5: red Optical digital S/PDIF input Connect an optical fibre cable with TOSLINK connector. On its inputs the bit Ten D accepts PCM signals up to 15: red 96kHz sampling frequency (see section 5.6)
-
Page 7: Output Signals
WARNING: make sure the connection polarity is as indicated on the terminals. A misconnection may result in damage to the bit Ten D. After applying power, wait at least 10 seconds before turning the bit Ten D on. REMOTE IN-OUT.
-
Page 8: Controls And Settings
DRC or REM IN. MUTE IN: To mute the bit Ten D outputs when starting the engine by connecting the terminal to the starter turn-on input or other devices. This control works by jumping the terminal to 12V.
-
Page 9: Connections
HOW TO TURN THE bit Ten D ON / OFF The bit Ten D is on when the POWER ON LED lights up in blue. It can be turned on / off in the following ways: Push the DRC main control switch (to turn on). Keep the DRC main control knob pressed (to shut down).
-
Page 10: Personal Computer And Digital Remote Control (Drc)
ADVANCED MANUAL / bit Ten D / PERSONAL COMPUTER AND DIGITAL REMOTE CONTROL (DRC) USB cable (provided) AD Link DRC/ACLink cable AC Link (provied) HIGH-LEVEL INPUT SIGNALS SPEAKERS IN HI-LEVEL STEREO FRONT+REAR SPEAKERS IN HI-LEVEL MULTICHANNEL (see 8.1) (see 8.2)
-
Page 11: Low-Level Input Signals
(such as the audio of a film in DVD) or DTS can not be reproduced. The output of these devices will therefore be set in STEREO mode for the signal to be reproduced. If digital signals at frequency higher than 96kHz (Ex. 192 kHz) are supplied, the bit Ten D locks up.
-
Page 12: Connection With Hands-Free Phone Kit
AC Link reproduction when the phone call is finished. PHONE MUTE: bit Ten D OFF. This turns the bit Ten D on. When a phone call is received, the ring tone is audible after around 5 seconds. Once the phone call is finished, the bit Ten D turns off.
-
Page 13
ADVANCED MANUAL / bit Ten D / 2. OUTPUT TO PRE AMPLIFIER’S SYSTEM Example of Front active + Sub Example of a Front Rear + Sub amplifier’s system, amplifier’s system, connected with the default settings (see 8.2) (see 8.1) FRONT WF… -
Page 14: How To Setup The Bit Ten D Without A Pc
6. HOW TO SETUP THE bit Ten D WITHOUT A PC The bit Ten D can be used without a PC and in this case it will not be possible to use the AD Link digital outputs. In this case, you can mainly use only the DE-EQ (de-equalization) function to eliminate any pre-existing equalization in the audio system, usually installed as standard by the car manufacturer.
-
Page 15: Source De-Equalization
This means that the response curve is not flat and the difference between the highest and the lowest level can reach 6 dB. By calibrating the device so that the LED never lights up, the bit Ten D sensitivity may be suboptimal (low) and you may experience noise (whistle) on the speakers. A few quick LED flashes indicate…
-
Page 16
OUT OF DE-EQ PROCESS 5 sec • The DE-EQ LED turns on to show that you recorded a de-equalization curve, otherwise it will be off. MEMORY CANCEL LED OFF NO DE-EQ • If the DE-EQ CHECK LED on the bit Ten D is on, you can run the de-equalization procedure again. The new data will erase the ones previously stored. Important: Confirm or abort the de-equalization process within 5 minutes, otherwise the bit Ten D will automatically reset and turn off. 5 sec… -
Page 17: Amplifiers Sensitivity Calibration
— AUX IN: To use this input you need to install the DRC (optional). Through the DRC select AUX (see 10) — If a source with a CD player is connected to the AUX input, disconnect the bit Ten D outputs from the amplifiers and proceed as detailed in chapters 6.1.3 — 6.1.4 — If the source to be connected to the AUX IN input has no CD player (e.g.
-
Page 18: Bit Ten D Software And Drivers Installation / Uninstallation Guide
GUIDE PC SOFTWARE INSTALLATION GUIDE Insert the “bit Ten D Setup CD 1.0” CD-ROM into the CD player of the PC you are going to use. Windows XP: select My Computer from the Windows START menu; Windows Vista: select Computer from the Windows START menu;…
-
Page 19
ADVANCED MANUAL / bit Ten D / Windows XP: select NEXT to continue with the installation, CANCEL to interrupt it; Windows Vista: select NEXT to continue with the installation, CANCEL to interrupt it; Windows 7: select NEXT to continue with the installation, CANCEL to interrupt it;… -
Page 20: Drivers Installation Guide
DRIVERS INSTALLATION GUIDE Turn the bit Ten D on. Connect the USB cable to the appropriate port on the bit Ten D and to an available USB slot on the PC. WARNING When connecting a PC laptop via USB cable to the bit Ten D while the device is turned on, the laptop has to work with its own battery and stay disconnected from the mains adapter (external power supply).
-
Page 21: Bit Ten D Software Uninstall
Start / All Programs / bit Ten D / uninstall. Procedure 2 To uninstall the bit Ten D PC software you can also follow the standard procedure: Start / Control Panel / Applications Installation / bit Ten D / uninstall.
-
Page 22: Bit Ten D Installation Guide Using A Pc
(position -). Turn on the bit Ten D and connect the USB cable to a PC. After installing the bit Ten D software, start it by clicking the icon previously created on the PC desktop.
-
Page 23
ADVANCED MANUAL / bit Ten D / If synchronization is successful, a dialog box will show the data exchange between processor and software. Wait a few seconds and, finally, confirm by clicking the OK button. At this point you need to have in mind the system you want to realize beforehand, since from this moment if you want to change any of the settings you will have to go through the guided procedure all over again. -
Page 24
(hissing sound) when playing music tracks. This is due to the low signal / noise ratio provided by the bit Ten D input head unit. If you have this… -
Page 25
This means that the response curve is not flat and the difference between the highest and the lowest level can reach 6 dB. By calibrating the device so that the LED never lights up, the bit Ten D sensitivity may be suboptimal (low) and you may experience noise (whistle) on the speakers. A few quick LED flashes indicate only a small distortion when handling maximum peaks (very occasional) of music tracks. -
Page 26
Processor AD Link and PRE OUT outputs (Ch1÷Ch8) allocation. The bit Ten D features 5 PRE output channels and 8 digital channels on the AD Link output. The software will automatically assign a number from 1 to 5 for the analogue outputs and from 1 to 8 for the digital outputs to amplifiers provided with AD Link input. -
Page 27
Setup CD from the CD player of your head unit and then click OK. Once the de-equalization is complete, the bit Ten D DE-EQ CHECK LED will turn on indicating that you have recorded a curve. If you were to repeat the de-equalization, new data will replace the previous ones. -
Page 28
1. Connect the different amplifiers channels to the speakers. 2. Connect the bit Ten D PRE outputs (OUTPUT: Front — Rear — Sub / CHI -> CH5) to the amplifiers inputs using high quality RCA cables. -
Page 29: Offline Mode
— AUX IN: To use this input you need to install the DRC (optional). Through the DRC select AUX (see 10) — If a source with a CD player is connected to the AUX input, disconnect the bit Ten D outputs from the amplifiers and proceed as detailed in chapters 6.1.3 — 6.1.4 — If the source to be connected to the AUX IN input has no CD player (e.g.
-
Page 30: Adjusting Acoustic Reproduction
DEVICE INFO This window indicates whether the bit Ten D is correctly connected to the PC and the DRC. It also shows the device Firmware version.
-
Page 31
— Click NO to interrupt the process. WARNING: Before disconnecting the bit Ten D from the PC or each time that you exit the PC Software after modifying the system configuration, always run the Finalize to bit Ten D procedure. If you do not follow these instructions, all data entered will be lost and the device will use the previous settings. -
Page 32: Config Main Menu
Current Input Type: shows the specialization assigned to the MASTER inputs. Start up/Shutdown delays: allows you to change the bit Ten D turn on / off time settings. • StartUp Time: is the delay between turning the device on and audio output. Every amplifier exhibits, while turning on, its own delay before being operational.
-
Page 33: Selected Input
ADVANCED MANUAL / bit Ten D / SELECTED INPUT The Selected Input window shows the source that is active while the bit Ten D is connected to the PC. You can select the desired source by clicking it. Once the…
-
Page 34: Filter Settings
8.10 FILTER SETTINGS The bit Ten D has five crossover filters, one per each output channel. Each filter allows you to set the parameters of a single output channel. Xover L/R Link: modifications applied to one of the channels (right or left) will also automatically be applied to the other one.
-
Page 35
— Hi-P Slope 12/24 dB/Oct (Linkwitz) 6/12/18/24dB/Oct (Butterworth) — Lo-P Slope 12/24 dB/Oct (Linkwitz) 6/12/18/24 dB/Oct (Butterworth) When starting the bit Ten D software, it offers Linkwitz with 12 dB/Oct. slope. Eg.If you select Band Pass as filter type, the slope will be applied to both hi-pass and low-pass as the default slope, but it is also possible to unbind them. -
Page 36: Set Distance And Delay
If you set the distances of the different speakers in your system, the bit Ten D will automatically change them into time (ms — milliseconds). It does not assign a delay (0.0 ms) to the farthest speaker (usually the Subwoofer)
-
Page 37
If, once you have set the distances for the “driver” Fig. 5 listening point, you click on the “passenger” listening point, the bit Ten D won’t re-calculate the delays for the new reference point because the buttons available in the SELECT A CHANNEL diagram are merely descriptive. -
Page 38: Graphic Equalizer
ADVANCED MANUAL / bit Ten D / 8.12 GRAPHIC EQUALIZER The bit Ten D software features a 31-band, ± 12 dB graphic equalizer for each system channel. In compliance with ISO requirements, frequencies are equally spaced at 1/3 Oct. from 20 to 20 kHz.
-
Page 39: Output Level
If you click the “Mute” button, you can mute the corresponding output channels. If you click the “Mute” button again, output will resume If you click the “Link” button, you can simultaneously adjust all the bit Ten D output levels. If you click the Link button again, the function will be disabled.
-
Page 40: Memory
8.14 MEMORY The bit Ten D uses memory A by default for the system’s configuration; however, it also offers the possibility to store and recall two memories (A, B). By pressing the MEMORY button on the main menu, different functions are available for the featured presets.
-
Page 41: Troubleshooting
2. The bit Ten D does not connect to the PC software — If, while tuning the system with a laptop PC, the bit Ten D is switched off and then on again, the connection is lost and the software can not “finalize” the selected setup. If you don’t want to lose the modifications and setup previously selected, proceed as per the following steps: a- save the setup as a file on the PC using the function FILE / SAVE SETUP;…
-
Page 42
PC. WARNING: To ensure the Firmware is updated correctly, disconnect, if any, the terminals for the hands-free kit in use from the bit Ten D PHONE inputs. The bit Ten D firmware update procedure requires particular attention. -
Page 43
Do not interrupt the process in any way. 9. Once the update has been successfully completed, the window on the right will appear. To use the bit Ten D again, you have to exit the PC software and the bit Ten D will turn off. -
Page 44: Rescue Mode
A — Use a previous version of the PC software. E.g. if you are using PC software v.1.0, open v.0.9; B — Update the bit Ten D firmware. In this case you will have to proceed as follows: — Save the previous setup (in case you want to open it in OFFLINE mode);…
-
Page 45: Drc — Digital Remote Control
When it is turned on the first time, the display will show the firmware version installed in the DRC. When the bit Ten D is setup through the PC, the DRC can stay connected but its display will show the message “PC control — DRC is disabled”.
-
Page 46: Phone Call
MUTE impulse when receiving a phone call. The DRC display will show the message bit Ten D — PHONE CALL. The bit Ten D will set the source selected in that moment to mute, reproducing the signal coming from the PHONE input.
-
Page 47: Drc Firmware Upgrade
ADVANCED MANUAL / bit Ten D / 10.4 DRC FIRMWARE UPGRADE If, when launching the bit Ten D PC software, the “bit Ten D Warning” window pops up, it means that the DRC Firmware needs to be updated. Important Remark 1.
-
Page 48: Bit Ten D Accessories
ADVANCED MANUAL / bit Ten D / 11. bit Ten D ACCESSORIES 11.1 DRC CABLE EXTENSION KIT This kit is composed of a cable and adapter allowing 2 m / 78.74” additional extension of the cable supplied with the DRC.
-
Page 49: Technical Specifications
ADVANCED MANUAL / bit Ten D / 12. TECHNICAL SPECIFICATIONS POWER SUPPLY Voltage 11 ÷ 15 VDC Idling current 0.4 A Switched off without DRC 2.5 mA Switched off with DRC 4 mA Remote IN voltage 7 ÷ 15 VDC (1.3 mA)
-
Page 50
ADVANCED MANUAL / bit Ten D /…
This manual is also suitable for:
Bit tend
8 РУКОВОДСТВО ПОЛЬЗОВАТЕЛЯ / <strong>Bit</strong> <strong>Ten</strong> D /4 3. KEY MEM; управление включением процессора от замка зажигания автомобиля. Подключите к проводу голубого цвета замок зажигания автомобиля (АСС) или (если это невозможно) CANадаптер, который сформирует соответствующий сигнал из цифровой управляющей шины. ПРИМЕЧАНИЕ: при использовании провода KEY MEM процессор <strong>Bit</strong> <strong>Ten</strong> D “запоминает” свое состояние на момент включения зажигания. Например, если он был включен с помощью провода KEY MEM, а затем выключен принудительно с помощью пульта DRC, при следующем включении зажигания <strong>Bit</strong> <strong>Ten</strong> D не включится (потребуется его активация с помощью пульта DRC или с помощью провода REMOTE IN). 4. MUTE IN: отключение звука на выходе процессора в момент запуска двигателя. Если в момент запуска двигателя из-за просадки напряжения происходит слышимый в динамиках аудиосистемы хлопок, подсоедините коричневый провод MUTE IN к стартерному проводу на замке зажигания. ПРИМЕЧАНИЕ: терминал MUTE IN может быть перепрограммирован на активацию входа AUX IN или оптического цифрового входа (см. п. 8.6.5). В этом случае процессор будет переключаться на AUX IN вход при появлении на этом терминале +12 В. 5. DRC: подключите к этому разъему проводной пульт управления DRC (DIGITAL REMOTE CONTROL). 6. USB: USB порт (В типа) для подключения персонального компьютера и настройки процессора с помощью программного обеспечения <strong>Bit</strong> <strong>Ten</strong> D. Соединение соответствует спецификациям USB 1.1 / 2.0. 4.5. ОРГАНЫ УПРАВЛЕНИЯ 1. IN Level: регулировка чувствительности входных каналов процессора. Поворотом регулятора по часовой стрелке уровень чувствительности увеличивается, против часовой стрелки – уменьшается. Для обеспечения оптимального соотношения сигнал/шум крайне важно откалибровать входную чувствительность корректно (см. пп. 8.1 – 8.2). 2. CLIP: индикатор клиппирования (искажения входного сигнала) (см. пп. 8.1 – 8.2). Если светодиод моргает, значит на соответствующем входе сигнал имеет искаженную форму. 3. DE-EQ CHECK: светодиод, отображающий состояние системы де-эквализации (восстановления линейной амплитудно частотной характеристики штатного головного устройства). СВЕТОДИОД ГОРИТ: “восстанавливающий” де-эквалайзер запрограммирован и включен. СВЕТОДИОД НЕ ГОРИТ: система де-эквализации не включена. СВЕТОДИОД МОРГАЕТ: система де-эквализации находится в процессе анализа и программирования. Подробнее – см. пп. 6.2 и 8.1.13 – 8.1.18. 4. DE-EQ SET: кнопка включения режима анализа и де-эквализации амплитудно-частотной характеристики штатного головного устройства в “ручном” режиме (без персонального компьютера). Подробнее – см. п. 6.2. 5. SPEAKER TURN ON: тумблер включающий/выключающий систему автоматического включения процессора при появлении на левом переднем (FL) MASTER входе аудиосигнала. Если штатный источник сигнала не имеет REMOTE выхода, включите эту функцию (тумблер в положение ON). Обязательно убедитесь, что штатная аудиосистема не входит в режим самодиагностики, когда в автомобиле выключено зажигание. 6. UPGRADE MODE: включение этого тумблера позволяет апгрейдить процессор в режиме RESCUE MODE (см. п. 10.4).
5. ОПИСАНИЕ РАЗЪЕМОВ И ОРГАНОВ УПРАВЛЕНИЯ 5.1. ПОДКЛЮЧЕНИЕ ПИТАНИЯ И КАБЕЛЯ УПРАВЛЕНИЯ REMOTE 9 РУКОВОДСТВО ПОЛЬЗОВАТЕЛЯ / <strong>Bit</strong> <strong>Ten</strong> D /5 ПРЕДУПРЕЖДЕНИЕ: для подключения питания используйте провод сечением 1 мм² (16 AWG). ПРИМЕЧАНИЕ: <strong>Bit</strong> <strong>Ten</strong> D защищен внутренним резистивным предохранителем впаянным непосредственно в печатную плату. Для его замены (в случае неправильного подключения) обратитесь в сервисный центр. ОЧЕНЬ ВАЖНО: обратите внимание, что система усилителей подключена к выходу REMOTE OUT “цепочкой”. Все усилители <strong>Audison</strong> имеют специальную активную схему обеспечивающую надежность подобного включения (системы из нескольких усилителей) без щелчков и хлопков, слышимых в динамиках. Мы не гарантируем отсутствия подобных шумов при использовании усилителей других производителей. 5.1. ВКЛЮЧЕНИЕ И ВЫКЛЮЧЕНИЕ ПРОЦЕССОРА BIT TEN D Когда процессор <strong>Bit</strong> <strong>Ten</strong> D включен, индикатор POWER горит синим цветом. Процессор может быть включен/выключен одним из следующих способов: 1. Нажмите круглый энкодер на пульте DRC чтобы включить процессор. Нажмите круглый энкодер на пульте DRC чтобы выключить процессор. При таком способе включения и выключения процессора и усилителей подключение проводов Remote IN и KEY MEM не требуется, но возможно. 2. Подключите REMOTE OUT головного устройства к проводу REM IN красного цвета. Процессор будет включаться и выключаться автоматически от головного устройства. При таком способе включения и выключения процессора и усилителей подключение проводов и KEY MEM не требуется, но возможно. 3. С помощью провода KEY MEM (от замка зажигания, см. п. 4.4.3). Этот способ рекомендован в том случае если штатное головное устройство не имеет REMOTE OUT, а применение функции автоматического включения SPEAKER TURN ON не может быть использована, поскольку штатная аудиосистема “не засыпает” после выключения зажигания. 4. Передний левый MASTER вход (FL) оснащен функцией автоматического включения (SPEAKER TURN ON) при появлении сигнала на выходе усилителя мощности с мостовым включением BTL (Bridge Tied Load). Автоматическое включение очень удобно в том случае если штатное головное устройство не оснащено выходом REMOTE. Используя этот способ включения процессора и усилителей, убедитесь, что штатная аудиосистема после выключения зажигания “засыпает” (см. пп. 4.2.2 и 4.5.5.). 5. Процессор включится автоматически в момент, когда система HANDS-FREE активирует вход PHONE MUTE (см. пп. 4.2.3 и 5.6). 6. Процессор включится автоматически, если соответствующим образом для активации входа AUX IN будут запрограммированы провода MUTE IN / PHONE IN (см. п. 8.6.5). ПРЕДУПРЕЖДЕНИЕ: процессор <strong>Bit</strong> <strong>Ten</strong> D может включаться и выключаться несколькими разными способами. Во избежание путаницы не задействуйте все способы одновременно. Постарайтесь выбрать решение оптимальное именно для Вашей системы. Если Вы сомневаетесь в правильности выбора схемы подключения, необходимо обязательно провести тестовое подключение системы и убедиться, что всё работает корректно.