Chapter 1: Welcome to Band-in-a-Box!
Congratulations on your purchase of Band-in-a-Box, the favorite of musicians, students, and songwriters everywhere. Get ready to have fun!
What is Band-in-a-Box?

Band-in-a-Box is an intelligent automatic accompaniment program for your multimedia computer. You can hear and play along to many song ideas and go from “nothing” to “something” in a very short period of time with Band-in-a-Box as your “on demand” backup band.
Band-in-a-Box is so easy to use!
Just type in the chords for any song using standard chord symbols (like C, Fm7, or C13b9), choose the style you’d like, and Band-in-a-Box does the rest, automatically generating a complete professional-quality arrangement of piano, bass, drums, guitar, and strings or horns in a wide variety of popular styles plus live audio tracks with RealDrums and RealTracks.
And that’s not all…
Band-in-a-Box is a powerful and creative music composition tool for exploring and developing musical ideas with near-instantaneous feedback. Over the years many features have been added to Band-in-a-Box – Notation and Lyrics, Piano Roll, 16-channel MIDI multi-tracks, harmonization, the StyleMaker and StylePicker, a live performance Conductor window, Medley Maker, and 24 –substyle Multistyles. The Soloist and the Melodist are popular “intelligent” features that generate professional solos or even create whole new songs from scratch. RealDrums add the human element of a live drummer while RealTracks add even more live session musicians, bringing the entire Band-in-a-Box arrangement to life. You can even record your own UserTracks and Band-in-a-Box will play them just like RealTracks! Or use the MIDI SuperTracks for MIDI tracks with a “real feel” that you can edit and arrange. The Audio Chord Wizard has the amazing ability to analyze, extract, and show the chords from audio recordings on-screen and then write them to the Band-in-a-Box Chord Sheet.
The inclusion of digital audio features makes Band-in-a-Box the perfect tool for creating, playing, and recording your music with MIDI, vocals, and acoustic instruments. Band-in-a-Box for Windows® can also record an acoustic instrument or voice to add to the composition, with processing through its own DirectX audio effects. Its built-in audio harmonies will turn your audio track into multiple harmony parts or adjust its pitch. Use the Mixer window to select parts, set levels, and create a polished final mix.
You can print out your finished creation with lyrics, chords, repeats and endings, DC markings, and codas, or save it as a graphics file for web publication or to e-mail to a friend. And when you are ready to let others hear your composition, you can burn it directly to an audio CD. Or save your composition as a Windows® Media File (or in any other compressed formats you have) for a file that’s “Internet ready.”
You will have even more fun making automatic medleys, playing your favorite song lists in the Band-in-a-Box Jukebox, and singing along to your Karaoke files with CDG graphics.
Let’s get started!
This is a comprehensive guide to the program, including information not included in the printed manual. We will begin with the easy installation and setup procedure.
Installing Band-in-a-Box for Windows®
Minimum System Requirements
Windows® 7 / 8 / 10 / 11(32 or 64-bit)
Minimum 1 GB RAM (2 GB+ recommended)
Minimum 1.0 GHz processor (2 GHz+ multicore recommended)
1 GB free Hard Disk space for a minimal install. More space is required for RealTracks, depending on which package you buy…
- RealTracks & RealDrums: ~100-400 MB per set
- Pro RealCombos: ~20 GB
- MegaPAK RealCombos: ~30 GB
- Full UltraPAK/UltraPAK+ when installed to internal hard drive: ~140 GB (another ~100 GB is required for the installation files when downloading the UltraPAK or UltraPAK+)
- Hard Drive versions of the UltraPAK, UltraPAK+, or Audiophile Edition do not require any hard disk space when run directly from the external hard drive they are shipped on.
1024×768 screen resolution (1360×768+ recommended)
USB port for the USB flash drive version of the MegaPAK or Pro.
USB port for the USB hard drive version of the UltraPAK, UltraPAK+, or Audiophile Edition.
A MIDI sound source is required. This could be a sound card, a MIDI keyboard, MIDI sound module, or software synthesizer.
Internet connection recommended for activation and updates.
Installing the Program
Use one of the following methods to install the program files into the Band-in-a-Box directory. By default, this directory is C:bb, but you may choose another location. If you have a previous version of Band-in-a-Box installed on your computer, you should install the files to your existing Band-in-a-Box directory.
Installing from the Downloaded Installer Files
If you ordered the e-delivery, download all installer files from the link provided. Double-click on each file to run the installation program.
Installing from the USB Flash Drive
Connect the USB flash drive to the USB port. The Windows® AutoPlay should open the drive and show you the contents. If the drive does not automatically open, find the drive in the Windows® Explorer and double-click on the flash drive icon to open it. Double-click on a setup file to run the installation program.
Installing from the USB Hard Drive
Larger versions of Band-in-a-Box ship on portable USB hard drives. You can run Band-in-a-Box and RealBand directly from the hard drive by using the program shortcuts. Before you use the programs, you should double-click on Setup.exe. This will set up any files that need to be installed/registered on your computer.
Note: Before unplugging the hard drive from your computer, make sure it is not in use, then click the “Safely Remove Hardware” icon in your taskbar. When you plug the drive in, Windows® may prompt you to select an appropriate action — if so, select “Open folder to view files.”
MIDI Setup
Band-in-a-Box uses the multimedia drivers for your MIDI interface and/or sound card that are supported by the Windows® operating system. To get sound playback you need to have a MIDI (and audio — for songs with digital audio, RealDrums, and RealTracks) driver installed.
To start using the program you will need to make sure that your MIDI interface, audio driver, and Windows® sound source are installed and configured.
Run the program by double-clicking the program icon.
|
|
To check your MIDI driver setup, press the [MIDI] toolbar icon and select the menu item MIDI/Audio Drivers Setup. This will open the MIDI/Audio Drivers Setup dialog. You can also go to Options | MIDI/Audio Driver Setup to open this dialog. |
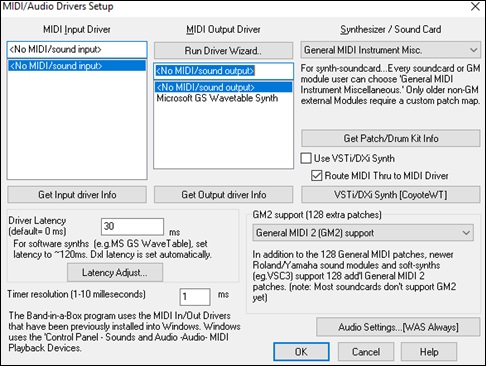
Select a MIDI Output Driver to use for MIDI sound playback and optionally a MIDI Input Driver if you are using an external MIDI controller keyboard or guitar. If the setup is panned to mono, the program offers to change it to stereo.
Perhaps the easiest way to configure Band-in-a-Box is to press the [Run Driver Wizard] button in the MIDI/Audio Drivers Setup dialog.
The MIDI Output Driver Wizard dialog will take you step-by-step through the process of auditioning and selecting an appropriate driver. This assumes that the appropriate Windows® sound drivers are installed and correctly configured.

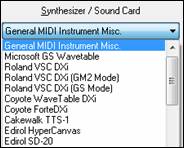
Output to Software Synthesizers (DXi and VSTi)
Software synthesizers allow Band-in-a-Box to play high quality sounds directly through your computer sound card, without requiring any external MIDI hardware. Most new software synthesizers are released as “plug-ins,” so they will work in a standard way with many programs. Connecting Band-in-a-Box to the software synth as a plug-in provides several advantages over the previous method of connecting as a MIDI driver. The plug-in allows Band-in-a-Box to merge/sync in any existing audio file (vocals etc.) with the synth output. You can also directly render your performance to a .WAV file using the plug-in. Sampler-based synths allow you to assemble a huge, customized library of instrument samples to use with Band-in-a-Box.
Check the Use VST/DXi Synth checkbox to enable DXi playback. While using DXi or VSTi, all playback information is routed to the DXi/VSTi, including the option to route the Thru track from your MIDI keyboard to the DXi/VSTi synth.
![]()
Note: To use this option, you must have a polyphonic DXi synthesizer installed on your computer, such as the CoyoteWT. It will also be most convenient if your DXisynthesizer can use General MIDI or GM2 patches.
![]() The current VSTi or DXi synth name is displayed in the [VSTi/DXi Synth] button. You can change the synth by pressing this button and selecting a synth from the list.
The current VSTi or DXi synth name is displayed in the [VSTi/DXi Synth] button. You can change the synth by pressing this button and selecting a synth from the list.
Support for 64-bit VST Plugins using jBridge
You can use your 64-bit VST plugins and VSTi instruments with Band-in-a-Box, using jBridge. Since Band-in-a-Box has built-in support for jBridge, you just use your plugins as you normally would, by selecting 32- or 64-bit plugins within Band-in-a-Box. (Note: jBridge is a third-party product.)
To use 64-bit plugins with Band-in-a-Box, you:
— Get and install jBridge,
— Select and use your 64- or 32-bit plugins within Band-in-a-Box, without any further setup or configuration!
VSTSynthFont64
The 64-bit version of Band-in-a-Box allows you to use the VSTSynthFont64 as the General MIDI (GM) synth.
![]() To use it, press the [VSTi/DXi Synth] button in the MIDI/Audio Drivers Setup dialog.
To use it, press the [VSTi/DXi Synth] button in the MIDI/Audio Drivers Setup dialog.
Then, in the VST/DX Synths/Plugin window choose the «VSTSynthFont64» from the list of available plugins.
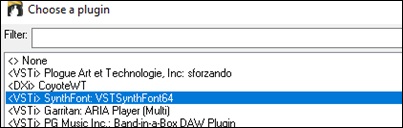
Note: If VSTSynthFont64 is not listed, close the dialog and go to the Mixer. Then click on a plugin in the Plugins tab and select Plugins Settings from the menu. When the Plugins Options dialog opens, press the [Add Plugins] button, select + Scan for VSTPlugins in a Specific Directory from the menu, and select C:bbDataLibx64.
![]() When the VSTSynthFont64ynth is selected, its name will show in the [VSTi/DXi Synth] button in the MIDI/Audio Drivers Setup dialog.
When the VSTSynthFont64ynth is selected, its name will show in the [VSTi/DXi Synth] button in the MIDI/Audio Drivers Setup dialog.
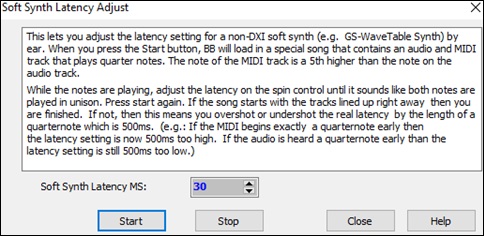
Driver Latency
Software synthesizers have some inherent latency, which is the delay between the time a note is played and it is processed by the computer. Older soft synths had noticeable latency, whereas a VSTi/DXi synth using ASIO drivers has very little. This setting is used to synchronize the visual display (notation, chords, virtual piano etc.) with the sound you hear.
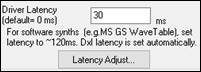
Band-in-a-Box automatically sets the latency for VSTi/DXi and some other soft synths
The [Latency Adjust…] button opens the Soft Synth Latency Adjust dialog where you can manually adjust the latency.
Alternate Patch Maps
You can choose the patch map (instrument list) that matches your synthesizer keyboard or sound module. Original equipment sound cards or integrated sound chips are General MIDI (GM) compatible.
We have made preset drum/patch files for many synthesizers and sound cards. If your synth is not listed, you should use the General MIDI Instrument Misc. patch kit (default).
You can probably omit this step unless you are using an old synth that is not General MIDI compatible. If your non-GM synthesizer or sound card is not listed, you can easily make your own patch map with the [Patch Map] button in Options | Preferences.
General MIDI 2 (GM2) Support
General MIDI 2 patches are supported for 128 additional instruments. The type of GM2 support is set in this dialog.
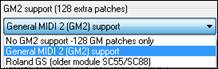
The GM2 support choices are:
- General MIDI 2 support: If you’re using a newer Sound Canvas (i.e. newer than 1999, or newer than the Roland SC88), then choose this GM2 support.
- Roland GS (older Modules): “Older” Sound Canvases (SC55/SC88) support GS, but not GM2. The good news is that they have the same patches available, just at different locations. So, if you choose this option, Band-in-a-Box will find the patches at the “GS” locations instead of the “GM2” locations. If you have a newer GS module like the SC8820, it supports both GM2 and GS — you should likely choose GM2.
- No GM2 support: Some sound cards don’t have GM2 support but they do support the original 128 General MIDI sounds. Band-in-a-Box will use the closest instrument in these cases.
Audio Setup
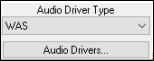
The [Audio Settings] button in the MIDI/Audio Drivers Setup displays the current audio driver and status (WAS/MME/ASIO).
![]()
Band-in-a-Box performs the audio setup automatically using the installed system audio components. To restore or modify this setup, click on the [Prefs] button and then click on the [Audio] tab to launch the Audio Settings dialog.
![]()
![]()
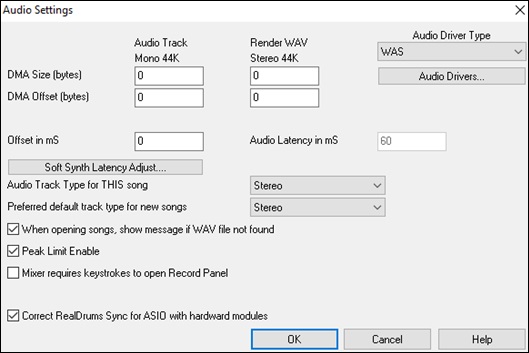
Audio Driver Type: You will see the following options for Audio Driver Type: MME, ASIO, or WAS. MME is the default audio driver type that is used in Windows®. MME is good, but there is latency (delay) associated with MME drivers. ASIO is a faster audio driver developed by Steinberg. It has much lower latency than ordinary MME drivers, but usually can be used by one program at a time. WAS (Windows® Audio Session) has ultra-low latency (< 25 ms on a typical Windows® PC), so audio operations like playing or sending out information via MIDI happen with no noticeable delay.
The DMA Size and DMA Offset settings are set automatically by the auto-testing of the sound card. The default value for all of these settings is 0 (zero). You can override these settings if required, but it is usually not necessary.
The Offset in mS is not a setting that gets set automatically. It defaults to zero. This allows you to adjust the timing that the sound card plays audio in relation to MIDI. Normally you’d leave this at zero, but if you need to fine tune the synchronization of audio to MIDI you could try changing this setting.
Audio Latency in mS: DirectX audio plug-ins and DXi synthesizer plug-ins can have playback latency (the delay between when a note is played, and when it is heard). Adjust “Audio Latency in mS” to fine-tune for your computer. If you have a fast computer and excellent sound card, the audio latency can be adjusted rather low. However, if you hear audio dropouts, you can set the latency as high as 2000 milliseconds.
Audio Track Type for THIS song: You can choose between mono and stereo for the audio track. Tracks can be edited in either format and converted from stereo to mono or vice versa. You can change a project from mono to stereo at any time. For example, if you have already recorded a mono track, changing the setting will convert the track to stereo for you.
Note: The built-in audio plug-ins work for either mono or stereo tracks.
Preferred default track type for new songs: This setting (mono/stereo) sets the default recording type for new songs that you record. For example, if you have a stereo microphone, you should likely record in stereo.
When opening songs, show message if WAV file not found: A Band-in-a-Box song called “My Song.MGU” will have the associated wave file called “My Song.wav.” If Band-in-a-Box loads this song file and it can’t find its associated file, it will put up a message to that effect. If the warning message is distracting, and for some reason you don’t have the wave files that were recorded with the songs then you can disable that message with this option box (disable).
Peak Limit Enable: Enable this to restrict excessive levels from being recorded (Filter).
Mixer requires keystrokes to open Record Panel : If you are running Windows® 95, check this box to allow access to the Record Panel from Band-in-a-Box. Do not check if using Windows® 98 or greater.
Correct RealDrums Sync for ASIO with hardware modules: Some systems have a sync problem when using RealDrums with hardware modules (zero latency). If this is set, the sync problem is fixed as the song starts to play (bar 1).
Windows® Audio Session (WAS)
Band-in-a-Box supports Windows® Audio Session (WAS) driver, an alternative to ASIO (a driver with low latency, but usually can be used by one program at a time) or MME (an older driver with worse latency). The WAS driver has ultra-low latency (< 25 ms on a typical Windows® PC), so audio operations like playing or sending out information via MIDI happen with no noticeable delay.
When you boot up Band-in-a-Box, it will be already set to use the WAS driver. If you want to change the settings, open the Windows Audio Devices dialog.
|
|
The dialog will open if you press the [Audio Drivers] button in the Audio Settings dialog when the “WAS” is selected for the audio driver type. |
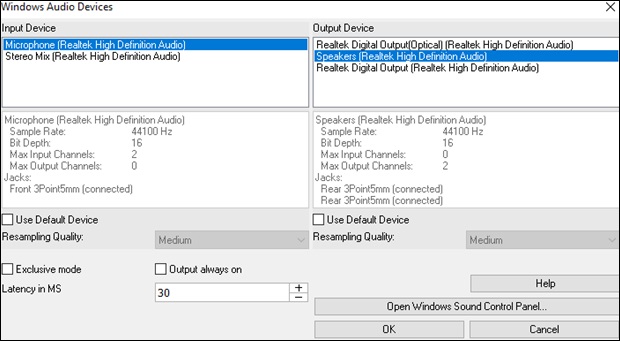
Input Device : This is the audio input device that will be used for recording a voice or an instrument. If you have multiple devices installed in your system, you can choose a device from the list.
Output Device : This is the audio output device that will be used for playing sound. If you have multiple devices installed in your system, you can choose a device from the list.
Use Default Device : If this option is enabled, the playback or recording device selected as the default device in your Windows® Sound Control Panel will be used.
Resampling Quality : You can choose a quality level for resampling. “Low” will improve performance if necessary, but “High” will sound best.
Exclusive mode : Use the exclusive mode if you want Band-in-a-Box to take full control over the audio device(s). In this mode, other applications might not be able to use the audio devices, so we recommend you do not use this mode.
Output always on : If this is enabled, sound will always be sent to the device. If this is disabled, sound will be sent to the device only when the song is playing. Enable this option if you want MIDI plugins to work when the song is not playing.
Latency in MS : This is the delay between when sound is sent from Band-in-a-Box and when you actually hear it by the audio device. Increase this setting if you are hearing sound glitches during playback.
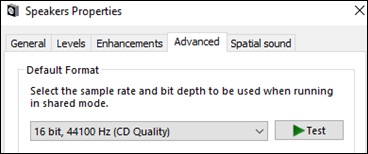
[Open Windows Sound Control Panel] : This button will open the Windows® Sound Control Panel. You can change your device settings by clicking on [Properties] > [Advanced]. For the “Default Format,” a setting of 44100 Hz is best for Band-in-a-Box.
ASIO Audio/Software Synth Drivers
ASIO drivers allows for much lower latency than ordinary MME drivers do.
Note: Most low-end sound cards do not include an ASIO driver, so you may not have an ASIO driver yet. In this case, you need to get an ASIO driver from the Internet.
This ASIO Audio Drivers dialog lets you choose an ASIO driver.
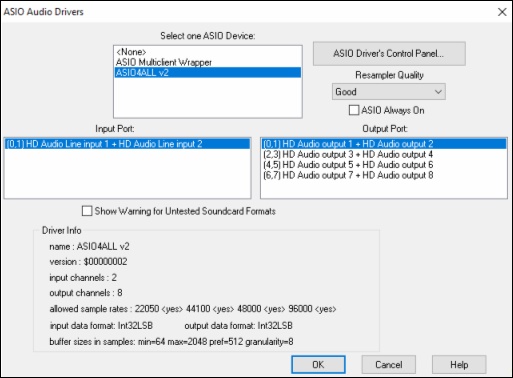
The Select one ASIO Driver list box lets you select an ASIO driver to use. You can only select one ASIO driver at a time.
Once you have selected an ASIO driver, you will see the Input Port and Output Port list boxes filled with your driver’s input and output ports. By default, the first of each will be selected. You are allowed to select different ports (but only one input and one output port at a time can be selected). The ports you selected will be available for output within Band-in-a-Box. If you do not hear input or output, then you may need to try different ports than the defaults. You may need to read your sound card’s instructions to determine the correct ports to use.
Tip: The ASIO4All driver sometimes cannot connect if the Microsoft GS Wavetable synth is being used as a driver. So, if this happens, you will get a message that ASIO will be silent, and the solution is to de-select the ASIO4All driver.
The [ASIO Driver’s Control Panel] button launches the Control Panel for your driver. This usually lets you adjust the latency by letting you choose different buffer sizes in milliseconds. Some drivers might let you choose the buffer size in samples, which is less convenient than milliseconds. The smaller the buffer size, the lower the latency, and the faster the response. Smaller buffers require more CPU power and if you hear dropouts or artifacts, you may need to increase the buffer size. See the Understanding Latency section that follows.
Since many ASIO drivers do not support multiple sample rates, Band-in-a-Box has a built-in resampler which lets you play and record songs that have a different sampling rate than the rate(s) directly supported by your ASIO driver. For example, if the driver does not support 44.1K sampling rate, but supports 48K, then Band-in-a-Box will use the resampler to convert to 48K when playing back, and to convert FROM 48K when recording. The Resampler Quality combo lets you choose Fast, Good, Better, or Best. Fast is the quickest but is the lowest of the four levels of quality. Best is the slowest (uses more CPU time), but the most transparent and accurate quality.
The [ASIO Driver’s Control Panel] button launches a settings dialog specifically provided by your driver manufacturer. This usually lets you adjust the latency, and usually you will have a choice between buffer sizes in milliseconds. See the following section on Understanding Latency.
Show Warning for Untested Soundcard Formats is an optional setting that shows a warning if your ASIO driver format has not been tested in Band-in-a-Box. It does not necessarily mean your driver will not work.
The Driver Info field shows various characteristics of your driver.
The Name is the driver’s name.
The Version is the version number of your driver.
Input Channels is the total number of mono input channels that your sound card has.
Note: Band-in-a-Box groups each Input and Output channel into a stereo pair.
Output Channels is the total number of mono output channels that your sound card has.
The Allowed Sample Rates field shows the sample rates are allowed by your sound card’s ASIO driver. Band-in-a-Box has a built-in resampler which lets you play and record files that aren’t directly supported by your ASIO driver.
The Buffer Sizes In Samples shows the range of allowed buffer sizes. The “Pref” is the preferred size, and this is the size that Band-in-a-Box uses. Your driver may alter the preferred size if you’ve launched the ASIO Driver Control Panel and have selected a new buffer size from within the driver’s Control Panel. If your driver changes the preferred size, then Band-in-a-Box will be aware of the new preferred size.
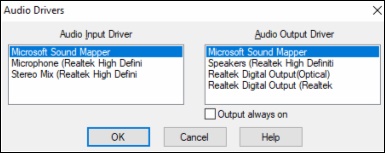
MME Audio Drivers
.MME is the default audio driver type that is used in Windows®. MME is good, but there is latency (delay) associated with MME drivers.
Choose MME as the “Audio Driver Type” and click on the [Audio Drivers] button to select which audio driver to use. This launches the Audio Drivers dialog.
|
|
The “Output always on” option allows you to use VST or Canyon GM DXi at all times, so MIDI can be routed and heard using these Plugins when the program is stopped. |
Understanding Latency
Latency is based on the buffer sizes. The smaller the buffer sizes the lower the latency. Lower latency allows you to hear mixer volume changes very quickly, as well as hear MIDI thru echoed out via a DXi soft synth practically in real time. The latency, in MS is determined by the buffer size in samples, as well as the driver’s sampling rate.
Note: If your ASIO driver’s control panel lets you select the buffer size in MS, then you don’t have to pay much attention to the part of discussion below about converting samples to MS.
Converting Samples to MS
For example, suppose the driver’s sample rate is 48K. A 48K sampling rate means that it is playing at 48,000 samples per second. If the buffer size were 48000 samples, then the latency would be 1 second, or 1000ms (which is very large and slow, and usually not allowed in ASIO). If the buffer size were 4800 samples, which is 1/10 second, then the latency would be 100ms. If the buffer size were 2400 samples, which is 1/20 second, the latency would be 50 ms. If the buffer size were 240 samples, which is 1/200 second, the latency would be a mere 5ms which is incredibly low and very fast.
Normally, you can change your driver’s latency by pressing the Launch ASIO Driver’s Control Panel button. Normally, the driver specifies the buffer sizes in milliseconds which is equal to the latency.
Low latency is faster and more responsive but uses more CPU power.
Depending on the speed of your computer, you may find that the playback has dropouts, clicks/pops, or other artifacts if you set the buffer sizes too small. This is because smaller buffers use more CPU power and if your computer can’t handle the low latency you will hear artifacts. If this happens, you would need to use larger buffer sizes. You may need to experiment to find what works well. You may be able to use smaller buffers with songs that don’t have a lot of tracks and effects but may find that you need to use larger buffers with songs that have more tracks and use more effects. This is because more tracks and more effects use more CPU power, which leaves less CPU power available for the audio routines to keep up with lower latencies.
Sample Rate Detection Warning
Windows 7 has a peculiar issue where if you choose Windows® Start button — Control Panel — “Sound,” right-click on your output device, choose “Properties” and then “Advanced,” you can see the default format. It should be 44100 Hz. Unfortunately, some apps change this setting without your knowledge. When it is set like this, all of your audio gets “resampled” and this can create obvious audible artifacts and make some things sound “bad.”
Band-in-a-Box detects this setting when you exit the MIDI/Audio Drivers Setup dialog, and will give you a notification about it, and that’s a clue for you to visit this dialog and set it back to 44100 Hz.
Руководство Band in a Box учебник по основам создания электронной музыки на компьютере, который поможет вам выбрать оптимальные программы. по созданию или редактированию музыки на своём компьютере. Описание виртуальных модулей и плагинов, скачать Band in a Box бесплатно. За многие века
существования профессиональной музыки сложился определеный опыт построения
музыкальной ткани. Этот опыт не является абсолютным в том смысле, что вы обязательно
должны писать музыку, как вам предлагет теория. Музыкальная форма — всего лишь средство, которое призвано помочь композитору наиболее точно выразить
свою мысль. Виртуальную музыкальную студию скачать учебник для начинающих!
- 1.Cоздание электронной музыки на компьютере.
- 2.Инструментоведение и аранжировка, работе на синтезаторах PSR, популярных среди музыкантов профессионалов.
- 3.Первое знакомство с одной из самых популярнейших программ обучения музыкальной аранжировки Band in a Box.
- 4.Работполностью посвящена программе, которая сама является профессиональной виртуальной студией. Cubase VST.
- 5.Виртуальные модули для обработки звука помогут обучить приёмам записи MIDI-информации в разных программах.
- 6 Глава посвящена аудио или Wave редакторам и некоторыми лучшими семплерными программами Cubase и Wave Lab.
- 7 Встраиваемые приложения и модули, предназначенных для обработки аудио звука совместимые с форматом Direct X.
- 8.Список литературы по работе со звуком и созданию электронной музыки на компьютере.
Виртуальная музыкальная студия Band in a Box руководство.
 |
Авторский сайт «Продавец Сыра» — http://prodavezsira.narod.ru/ Создание электронной компьютерной музыки в FL Studio, WaveLab, Nuendo, Cubase, Band-in-a-Box. Книги по звуковому редактированию Sound Forge. Cтатьи по созданию видео слайд шоу презентаций из видео и фото материалов со звуковым сопровождением. My slide show ProShow Producer and FL Studio. |
| Cоздание музыки на компьютере, учебник photoshop и бесплатные программы для создания слайд-шоу самому. |
- Home
- Support
- Online Manuals
- Band-in-a-Box 2022 for Windows User’s Guide
Band-in-a-Box® 2022 for Windows® User’s Guide
Contact Info
PG Music Inc.
29 Cadillac Ave Victoria BC Canada V8Z 1T3
Sales: 800-268-6272, 250-475-2874,+ 800-4746-8742*
* Outside USA & Canada where International Freephone service is available.
Access Codes
Tech Support: Live Chat, support@pgmusic.com
Message from PGMusic.com sales and support team
Hi, have any questions? We’re available to text chat.
Message from PGMusic.com sales and support team
Hi, have any questions? We’re available to text chat.
Band-in-a-Box – это инструмент автоаккомпанемента, который использует последовательность аккордов, тональность и темп по вашему выбору. Инструмент автоматически генерирует первоклассный, реально звучащий аккомпанемент. Это делается с помощью технологии, которая манипулирует аудио, записанным настоящими сессионными музыкантами, чтобы соответствовать выбранной тональности , аккордам и темпу. Эти музыканты на пике карьеры, и запись ведется в первоклассной студии.
Band-in-a-Box – это компьютерное приложение, которое автоматически генерирует музыкальное сопровождение с использованием реальных музыкантов и настоящих инструментов. Создатели программного обеспечения – компания PG Music из Британской Колумбии, возглавляемая доктором Питером Гэнноном. Программа превратилась из продукта на основе MIDI в полнофункциональный программный пакет для создания музыки. Band-in-a-Box имеет почти 3000 реальных инструментов и 588 настоящих барабанных дорожек.
На выбор предлагается 349 различных треков акустической гитары. Есть настоящие треки с необычными инструментами, такими как Кото и Калимба, и даже некоторые вокальные у-у и а-а.
Настоящие треки и барабаны организованы в более 4000 уникальных реальных стилей, профессионально сведенных и готовых к работе. Их дополняют 1778 стилей MIDI и более 1000 лупов.
Этот инструмент настолько глубок, что практически любой может извлечь из него пользу. Даже если вы ничего не знаете о теории музыки и не играете ни на каких инструментах, вы все равно можете создать профессионально звучащую специальную минусовку за считанные минуты. Если вы увлекаетесь игрой на музыкальном инструменте, вы можете использовать этот инструмент для быстрого создания тренировочных треков. Вы можете замедлить дорожку, ускорить ее и транспонировать на любую клавишу.
Авторы песен найдут этот инструмент бесценным не только для вдохновения, но и для записи демо. Возможности для учителей музыки безграничны. Исполнители могут создавать свои собственные минусовки для кавер-версий или оригиналов. Музыканты могут использовать программу для занятий и практики импровизации на музыкальных инструментах. Подкастеры могут быстро создавать музыку, не требующую лицензионных отчислений, для вставки и микширования в собственное аудио. Аудиоинженеры могут дополнять записи своего клиента профессиональными звуковыми инструментами, которые в противном случае были бы недоступны для клиента.
Системные требования Band in a Box

Band-in-a-Box доступен как для Windows, так и для Mac. Программа появилась в 1988 году в среде MS-DOS. В результате требуются очень мало ресурсов. Это не будет занимать память или вычислительные ресурсы на вашем компьютере . Он будет работать даже на компьютерах с минимальными техническими характеристиками. Для Windows вам понадобится компьютер под управлением Windows XP, Vista, Windows 7, 8, 8.1 или 10. Он будет работать как с 32-разрядной, так и с 64-разрядной архитектурой и требует всего 1 ГБ памяти и процессор с тактовой частотой 1 ГГц. Для Mac он будет работать в Mac OS X 10.6 или выше и требует минимум 512 МБ ОЗУ.
Основным ограничением ресурсов является дисковое пространство. В пакет входят звуковые дорожки каждого купленного реального трека. Однако вы можете выбрать доставку программного обеспечения на флэш-накопителе, DVD-диске или внешнем жестком диске. Вы можете сохранить настоящие треки на внешнем носителе и запустить только минимальную установку на жестком диске вашего компьютера. Для этого вам понадобится 1 ГБ на жестком диске вашего компьютера. Если вы решите загрузить программу или установить ее на жесткий диск вашего компьютера, объем необходимого дискового пространства будет зависеть от приобретенного пакета.
Каковы основные функции программы?
Band-in-a-Box – сложная программа, и даже самому энтузиасту аудиофилу потребуются месяцы, чтобы использовать все ее функции. Я расскажу вам о некоторых из моих любимых функций.
Введите тональность, аккорды, стиль и темп и создайте аккомпанемент
Эта особенность лежит в основе этого потрясающего продукта. Скажем, например, вы хотите сделать минусовку для Amazing Grace. Просто откройте Band-in-a-Box.
Выберите подходящий стиль (вы можете использовать базу песен, чтобы найти подходящий стиль). Выбери свой темп. Наберите аккорды, отрегулируйте полосу «End» и нажмите кнопку воспроизведения.
Транспонирование или изменение темпа
Вы можете легко транспонировать всю аранжировку на любую другую тональность или быстро замедлить темп, чтобы играть вместе со своим инструментом.
Добавление или замена инструмента

Band-in-a-Box может одновременно играть на 7 различных инструментах. Вы можете удалить ненужный инструмент и заменить его любым другим из более чем 2900 реальных треков. Используя функцию «Настройки такта», вы можете полностью изменить стиль (и, следовательно, инструменты) на определенном такте, а затем, при необходимости, изменить его обратно. Вы также можете изменить темп и тональность определенных тактов и вернуть их обратно.
Изменение аккорды каждой доли
Используя опцию «Настройки аккорда», вы можете изменить аккорд для каждой отдельной доли такта. Вы также можете использовать определенные инструменты для паузы, вступления или удержания. Программа также предложит подходящие замены аккордов для текущей последовательности аккордов.
Полная поддержка Midi
Инструмент имеет полную поддержку MIDI, включая обычное программирование и запись MIDI , пианино и нотную запись. В нем также есть несколько супертреков MIDI, которые похожи на настоящие треки, но основаны на MIDI. Если у вас есть отличный синтезатор на вашем компьютере, то эти супертреки MIDI могут звучать превосходно.
Тексты и караоке
Есть несколько разных способов прокрутки текста вместе с аккордами и минусовкой. Инструмент воспроизведет файл CDG (если он сможет его найти) с тем же именем, что и ваш файл Band-in-Box. Во-вторых, вы можете вводить тексты песен в нотный редактор. В-третьих, вы можете вводить тексты поэтапно, и Band-in-a-Box будет отображать их, прокручивая их вместе с аккордами.
Еще не много о Band in a Box
Band-in-Box – фантастический инструмент для всех, кому нужно простое и мощное решение для создания высококачественного автоматического аккомпанемента. Он идеально подходит для написания песен, обучения, преподавания и создания музыки. Если у продукта и есть обратная сторона, то с ним связано довольно сложное обучение. Некоторые говорят, что пользовательский интерфейс немного устарел и может быть довольно пугающим из-за количества функций в программе. Однако, на мой взгляд, плюсы программы намного перевешивают эти проблемы.
Музыка, созданная в Band-in-a-Box, может быть использована в любом проекте, коммерческом или ином, без каких-либо лицензионных платежей или приписывания оригинальному исполнителю записи. Как еще вы можете заставить Брента Мэйсона сыграть на своей гитаре столько ваших песен, сколько захотите, всего за 129 долларов? Я бы сказал, что вложения стоят того!
Мы надеемся, что это руководство помогло вам больше узнать о Band-in-a-Box и, возможно, даже вдохновило вас начать с ним работу. Пожалуйста, поделитесь статьей со всеми, кому нужны аккомпанементы, минусовки… или кто просто хочет проявить творческий подход!
1 742
1. Установка программы
— Установить программу.
— Установить опции портов ввода вывода музыкальной карты для миди — через Меню>Opt.>Midi driver setup>окно установки.
— Если есть дополнительные наборы стилей, установить их.
2. Запись, редактирование, прослушивание песни (сонга)
Запись аккордов
— Вводим в каждый такт (на 1-ю и 3-ю доли такта) обозначение аккорда, затем Enter (или стрелка клавиатуры влево, вправо).
— На 2-ю (4-ю) долю такта аккорд записывается через запятую после аккорда на 1 долю, например Am,E7.
— Чтобы в аккорде звучал не основной бас, он пишется дробью Am/C, Em6/B и т.д.
— Точки после аккорда делают его одноразово звучащим и меняют его длительность Am… (вступает в 1доле и длится весь такт), Am.. (более короткое звучание аккорда), Am. (отрывисто).
Установка количества куплетов (chorus) через кнопки в нижней части панели
— Первый такт куплета: нажимаем на первую кнопку (1 на рисунке ), затем нажимаем на нужный такт.
— Последний такт: аналогично но со второй кнопкой (27).
— На третьей кнопке устанавливаем количество повторов куплета (3).
Установка тональности, темпа
Установить тональность (в окошечке в нижнем ряду кнопок), Am, F, Bbm и т.п. Рядом кнопка установки темпа.
Запись мелодии
— Нажать на кнопку с изображением ноты, откроется окно (в котором удобно также записывать сразу и аккорды) с нотоносцем и следующими кнопками управления, окошечками :
Opt. — в открывшемся окне выбрать количество отображаемых тактов (в поле Bars/Screen);
N — нажимая на нее выбрать режим из трех возможных: (1) просто просмотр нот, (2) нормальный режим записи, когда каждая последующая нота сокращает длительность предыдущей, щелкнув по ноте правой кн. мышки вызывается окно редактирования ноты, (3) режим для визуальной установки нот и длительности (соответственно правой и левой кнопками мыши).
— Окошечки для установки галочки Note (для записи полифонии), Rest (записи пауз), Mono (записи одноголосной мелодии, наиболее часто применяемый).
— Распространить мелодию на всю песню, транспозиция мелодии и т.д. через Меню>Melody.
— Посмотреть ноты партий баса, ударных, пиано, гитары, струнных, мелодии, соло можно путем нажимания кнопок соответственно B, D, P, G, S, M, S, но вводить и изменять можно только ноты для мелодии и соло.
Другие действия с песней
— Чтобы развернуть песню в одну строку: Меню>Edit>Unfold (convert to 1 big chorus).
— Для изменения длительности всех аккордов (и соответственно количества тактов) в 2 раза (или наоборот в 1/2 раза): Меню>Edit>Expend (или Reduce).
— Создать 2 такта окончания: кнопка S , затем в окне поставить галочку напротив Generаte 2 bar.
— Песня имеет два варианта (подстиля) исполнения куплета (или его части) а (синий квадрат в начальном такте) или b (коричневый квадрат) устанавливаются ударяя по нужному такту 1, 2 раза, 3 раза (стереть). Такие квадратики можно устанавливать и для изменения звучания ударных перед этим тактом.
— Копирование и вставка записанных тактов (Сopy From… To…), вставка (Insert bars) или удаление (Delete bars) тактов, очищение (Erase From… To…) выбранных тактов (от мелодии, гармонии, соло), изменение тактового размера (Set Time Signature) и др. через Меню>Edit>нужное действие.
— Выделив такт и нажав кнопку клавиатуры F5 (появится окно) можно изменить (начиная с этого такта): стиль, состав инструментов, гармонии мелодии и соло, темп.
— Для создания вступления нажать кнопку в правом углу Intro, в открывшемся окне нажать кнопку Generate Intro Chords. Прослушать можно не закрывая окна.
Установка стиля
— Через кнопку STY вызвать окно в котором выбрать категорию (джаз, кантри, вальс, классик …) и сам стиль, прочитать его описание.
— Ведение нового стиля в часть песни более удобнее делать через маленькую кнопочку (ближайшую к окошку с наименованием тональности), откроется окно. Выбрать такт, нажать эту кнопку, затем выбрать обычным порядком новый стиль, закрыть окно.
Установка партии соло
— Партия соло записывается так же, как и мелодия (но при нажатой кнопке S в окне записи нот).
— Автоматический выбор сольной партии: нажать кнопку Solist и в новом окне (1) выбрать выбрать соло из списка, или (2) поставив галочку против Auto-Saggest и нажимая кнопку Saggest согласится автоподбором соло.
Проигрывание песни
Кнопки Play, Stop, H (для временной остановки), From (играть с выбранного такта, или можно 2раза щелкнуть мышкой по такту), галочка в Loop (зациклить песню).
Гармонизация мелодии (или партии соло)
Через кнопку М (Т) выбрать нужную гармонизацию (это удобно делать при проигрывании песни).
Изменение состава инструментов
— Нажать на одну из кнопок (кружок станет синим) Bass Drums Piano Guitar Strng Melody Solist , затем в окошечке Instrument выбрать из списка нужный инструмент (под кнопкой F можно быстро выбрать рекомендуемые программой инструменты); в расположенных ниже окошечках можно менять для этого инструмента громкость (и реже др. параметры).
— Заглушить звучание любого инструмента можно, нажав на его кнопку (станет красной) правой кнопкой мыши.
— Кнопка Соmbo для выбора готовых составов оркестра (нужна редко).
Необходимые изменения в конкретных тактах
Через кнопку клавиатуры 5, и соответствующие окно, такт изменения окрасится красным цветом.
Вставка вступления
Через кнопку Intro вызвать окно и выбрать количество тактов и гармонию вступления (которую потом можно будет самому изменять).
3. Перенос песни в СakeWalk
Для окончательной шлифовки песни я переношу ее в профессиональную программу обработки миди СakeWalk. Там можно добавлять различные эффекты, удобнее работать с темпом, нотами и т.п. Но вполне можно этого и не делать, а ограничиться работой в Band in a Box, последние версии которого многое позволяют, даже создание караоке и запись живого голоса.
— Через кнопку MID>Clipboard скопировать в память.
— Запустить СakeWalk, создать новый проект (нормальный)
— Вставить (Past)
— Можно в меню опций проекта установить величину тиков такта 96, как в программе ВВ.
О новом Band in a Box
В 2007 попробовал Band in a Box 2006 в русской версии (на сайте http://www.band-in-a-box.com/ru/ дается описание уже Band in a Box 2007).
Порадовали русификация, много новых стилей, русская помощь (чего очень не хватало раньше). Вот так выглядит новое окно программы.
Band in a Box needs a series of chords (a chord progression) as the basis for generating music. There are numerous ways of entering chords into Band-in-a-Box. You can use the computer keyboard, a MIDI controller keyboard, the Chord Builder, importing chords from a MIDI file, importing chords from an audio file (WAV, MP3, WMA, WMV) with the Audio Chord Wizard or load an existing Band-in-a-Box song.
Computer Keyboard[]
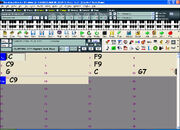
BiaB — Chord Sheet
On the main screen of the program, you’ll see an area called the chord sheet. Each of the numbered cells on the chord sheet represents a bar. In this example, we see that there is a C chord in the first bar of this song, an F9 chord in bar 3, and later in the song, a G and G7. Notice the box in the first half of bar 1. This is the highlight cell, and it represents the bar you are currently working on. You can move the highlight cell around using the cursor keys, or click on any bar with the mouse.
To enter a specific chord, move the highlight cell to where you want to place the chord. For example, to add (or change) a chord in bar 10, you would highlight bar 10 on the chord sheet. Next, type in your chord and press [Enter]. Notice that when you use the enter key, the highlight cell moves to the second half of the bar. You could then enter another chord at beat 3. Chords names are normally typed using standard chord symbols (like C or Fm7 or Bb7 or Bb13#9/E).[1]
MIDI Controller Keyboard[]
If you have a MIDI controller keyboard, you can use it to enter chords into Band-in-a-Box. Play a chord on your MIDI keyboard, and then type Ctrl+Enter. The chord will be entered into the chord sheet at the current highlight cell position.[2]
Chord Builder[]
Press the Chord Builder button. This opens the Chord Builder dialog with a list of chord roots and their extensions. To enter a chord at the current bar, select the chord root from the left pane, and then the extension on the right pane. Pressing [Enter Chord] or using the arrow keys will enter the chord and advance the highlight cell to the next half bar.[2]
MIDI File[]
You can have Band-in-a-Box import chords from an existing MIDI file. Choose Import Chords from MIDI File on the File menu. When the dialog opens, press the [Open (Change)…] button to choose a MIDI file that you want Band-in-a-Box to interpret the chords from. To help Band-in-a-Box interpret the chords better, you should choose a genre (Preset) for the song. Choose from among such genres as Pop, Rock, or Jazz Standard.[2]
Audio Chord Wizard[]
The Audio Chord Wizard is the amazing feature that automatically figures out the chords from
MP3 files (or other audio files like WAV, WMA, and audio CD etc.). You can make adjustments for the start of bar 1 and individual bar lines and also mark sections of the song using
part markers, and the sections will begin on a new line with a line space between so they are clearly seen.
Chords can be edited with a right-mouse click on the chord symbol. Edited chords are colored blue. Send the chords to Band-in-a-Box to make your own arrangement, tranpose to your key, and print your own lead sheet for the song with chords, melody, and lyrics.[3]
Band-in-a-Box Song[]
You can load a pre-existing song by using the File|Open menu item, or by typing [F3], which will launch the BB File open dialog.[4]
References[]
- ↑ Band-in-a-Box 2009.5 User’s Guide.pdf p16
- ↑ 2.0 2.1 2.2 Band-in-a-Box 2009.5 User’s Guide.pdf p17
- ↑ Band-in-a-Box 2009.5 User’s Guide.pdf p18
- ↑ Band-in-a-Box 2009.5 User’s Guide.pdf p19
External Links[]
 Loading…
![]()
Version 2005 for Windows®
Copyright PG Music Inc.1989-2005. All rights reserved.
PG Music Inc. License Agreement
CAREFULLY READ THE FOLLOWING TERMS AND CONDITIONS BEFORE COMPLETING THE INSTALLATION OF THIS SOFTWARE. USAGE OF THE SOFTWARE INDICATES YOUR ACCEPTANCE OF THE FOLLOWING TERMS AND CONDITIONS.
LICENSE
A.The program may only be used on a single machine.
B.You may transfer the program and license to another party if the other party agrees to accept the terms of this Agreement. If you transfer the program, you must either transfer all copies, whether in printed or machine readable form, to the same party, or, destroy all copies not transferred. This includes all modifications and/or portions of the program merged into other programs.
C.You may receive the program in more than one media. Regardless of the type or size of media you receive, you may install or use the media on a single machine.
D.The program (including any images, “applets,” photographs, animations, video, audio, music, and text incorporated into the program) is owned by PG Music Inc. or its suppliers, and is protected by international copyright laws and international treaty provisions.
You may not use, copy, or transfer the program, or any copy, modification or merged portion of the program, in whole or in part, except as expressly provided for in this license. If you transfer possession of any copy, modification or merged portion of the program to another party, your license is automatically terminated.
LIMITATION OF REMEDIES
PG Music Inc.’s entire liability and your exclusive remedy shall be:
A.The replacement of any media not meeting PG Music Inc.’s “Limited Warranty,” which are returned to PG Music Inc., or an authorized PG Music Inc. dealer, with a copy of your receipt.
B.If PG Music Inc. or the authorized dealer is unable to deliver replacement media which is free of defects in materials or workmanship, you may terminate this agreement, and your money will be refunded.
In no event will PG Music Inc. be liable to you for any damages, including but not limited to lost profits, lost savings, or other incidental or consequential damages arising out of the use or the inability to use such program, even if PG Music Inc. or an authorized PG Music Inc. dealer has been advised of the possibility of such damages, or for any claim by any other party.
TRADEMARKS
Band-in-a-Box®, PG Music®, and PowerTracks Pro® are the registered trademarks of PG Music Inc. in the United States, Canada, and other countries. Microsoft® and Windows® are either registered trademarks or trademarks of Microsoft Corporation in the United States and/or other countries. Apple®, the Apple logo, Macintosh®, Mac®, Power Mac®, QuickTime® and True Type® are trademarks of Apple Computer, Inc., registered in the U.S. and other countries. IBM® is the registered trademark of International Business Machines Corporation. Other brands and their products are trademarks or registered trademarks of their respective holders and should be noted as such.
PATENTS
Band-in-a-Box is protected under US Patent 5990407. The TC-Helicon Harmony feature in Band-in-a-Box is protected under US Patents 5567901, 5641926, 5986198, 34583, 296.80.173.9, PI9603819.5, 0368046, 0750776, 6,046,395, and patents pending.
Printed in Canada
|
2 |
PG Music Inc. License Agreement |
Table of Contents
|
PG MUSIC INC. LICENSE AGREEMENT………………………………………………………………………………………………. |
2 |
|
TABLE OF CONTENTS ………………………………………………………………………………………………………………………….. |
3 |
|
CHAPTER 1: WELCOME TO BAND-IN-A-BOX!……………………………………………………………………………………. |
6 |
|
WHAT IS BAND—IN—A-BOX? ………………………………………………………………………………………………………………………. |
6 |
|
® |
7 |
|
INSTALLING BAND—IN—A-BOX FOR WINDOWS …………………………………………………………………………………………….. |
|
|
CHAPTER 2: QUICKSTART…………………………………………………………………………………………………………………. |
11 |
|
STEP 1 – TYPING IN THE CHORDS …………………………………………………………………………………………………………….. |
11 |
|
STEP 2 – CHOOSING A STYLE…………………………………………………………………………………………………………………… |
13 |
|
STEP 3 – PLAY YOUR SONG!…………………………………………………………………………………………………………………….. |
15 |
|
CHAPTER 3: BAND-IN-A-BOX VERSION 2005 ……………………………………………………………………………………. |
17 |
|
NEW FEATURES IN BAND—IN—A-BOX 2005…………………………………………………………………………………………………. |
17 |
|
QUICKSTART TUTORIAL FOR THE VERSION 2005 UPGRADE…………………………………………………………………………. |
22 |
|
CHAPTER 4: THE MAIN SCREEN……………………………………………………………………………………………………….. |
30 |
|
MAIN SCREEN OVERVIEW ………………………………………………………………………………………………………………………. |
30 |
|
STATUS BAR…………………………………………………………………………………………………………………………………………. |
32 |
|
SYNTH WINDOW / PIANO KEYBOARD……………………………………………………………………………………………………….. |
33 |
|
TITLE WINDOW …………………………………………………………………………………………………………………………………….. |
38 |
|
CHORDSHEET AREA ………………………………………………………………………………………………………………………………. |
39 |
|
CHAPTER 5: GUIDED TOUR OF BAND-IN-A-BOX …………………………………………………………………………….. |
41 |
|
LOADING AND PLAYING SONGS……………………………………………………………………………………………………………….. |
41 |
|
ADD A MELODY – MIDI AND/OR AUDIO …………………………………………………………………………………………………… |
45 |
|
ADD A SOLO — “THE SOLOIST”…………………………………………………………………………………………………………………. |
47 |
|
VIEW AND PRINT NOTATION …………………………………………………………………………………………………………………… |
48 |
|
PIANO ROLL WINDOW……………………………………………………………………………………………………………………………. |
50 |
|
LEAD SHEET NOTATION WINDOW……………………………………………………………………………………………………………. |
57 |
|
THE GUITAR WINDOW …………………………………………………………………………………………………………………………… |
60 |
|
BIG PIANO WINDOW………………………………………………………………………………………………………………………………. |
65 |
|
PLAY THE JUKEBOX……………………………………………………………………………………………………………………………….. |
65 |
|
IMPORT A MIDI FILE……………………………………………………………………………………………………………………………… |
67 |
|
AUTOMATIC SONGS — “THE MELODIST” ……………………………………………………………………………………………………. |
68 |
|
MAKE YOUR OWN SONGS ………………………………………………………………………………………………………………………. |
69 |
|
SAVING YOUR WORK …………………………………………………………………………………………………………………………….. |
77 |
|
BURN YOUR OWN AUDIO-CD…………………………………………………………………………………………………………………. |
78 |
|
CHAPTER 6: BAND-IN-A-BOX POWERGUIDE …………………………………………………………………………………… |
80 |
|
OPENING FILES……………………………………………………………………………………………………………………………………… |
80 |
|
CHORD ENTRY ……………………………………………………………………………………………………………………………………… |
81 |
|
REPEATS AND ENDINGS………………………………………………………………………………………………………………………….. |
84 |
|
PLAYING/PAUSING/STOPPING SONGS ……………………………………………………………………………………………………….. |
84 |
|
ADDITIONAL PATCHES …………………………………………………………………………………………………………………………… |
87 |
|
CHANGING VOLUME, PANNING, REVERB, CHORUS, BANK…………………………………………………………………………… |
89 |
|
EDIT FUNCTIONS …………………………………………………………………………………………………………………………………… |
90 |
|
APPLYING STYLES…………………………………………………………………………………………………………………………………. |
93 |
|
BREAKS — RESTS, SHOTS, AND HELD CHORDS ……………………………………………………………………………………………. |
99 |
|
SONG SETTINGS DIALOG ………………………………………………………………………………………………………………………. |
101 |
|
SAVING SONGS ……………………………………………………………………………………………………………………………………. |
102 |
|
THE JUKEBOX……………………………………………………………………………………………………………………………………… |
105 |
|
CHAPTER 7: NOTATION AND PRINTING ………………………………………………………………………………………… |
107 |
|
EDITABLE NOTATION MODE …………………………………………………………………………………………………………………. |
109 |
|
NOTE ROLL NOTATION MODE……………………………………………………………………………………………………………….. |
112 |
|
NOTATION WINDOW OPTIONS……………………………………………………………………………………………………………….. |
113 |
|
LEAD SHEET WINDOW …………………………………………………………………………………………………………………………. |
120 |
|
LYRICS ………………………………………………………………………………………………………………………………………………. |
126 |
|
PRINTING……………………………………………………………………………………………………………………………………………. |
128 |
|
CHAPTER 8: AUTOMATIC MUSIC FEATURES………………………………………………………………………………… |
132 |
|
AUTOMATIC SONGS – “THE MELODIST” …………………………………………………………………………………………………. |
132 |
|
AUTOMATIC SOLO GENERATION – “THE SOLOIST” …………………………………………………………………………………… |
135 |
|
AUTOMATIC GUITAR SOLOS – “THE GUITARIST”……………………………………………………………………………………… |
139 |
|
AUTOMATIC EMBELLISHMENTS – “THE EMBELLISHER”…………………………………………………………………………….. |
142 |
|
CHAPTER 9: MIDI RECORDING……………………………………………………………………………………………………….. |
147 |
|
RECORDING LIVE IN REAL TIME ……………………………………………………………………………………………………………. |
147 |
|
ENTERING NOTES MANUALLY ………………………………………………………………………………………………………………. |
148 |
|
RECORDING WITH THE WIZARD FEATURE ……………………………………………………………………………………………….. |
149 |
|
IMPORTING MIDI FILES………………………………………………………………………………………………………………………… |
149 |
|
EDITING THE MELODY TRACK……………………………………………………………………………………………………………….. |
151 |
|
CHAPTER 10: AUDIO RECORDING AND RENDERING……………………………………………………………………. |
154 |
|
AUDIO TRACK …………………………………………………………………………………………………………………………………….. |
154 |
|
RECORD AUDIO …………………………………………………………………………………………………………………………………… |
154 |
|
PLAYING THE AUDIO FILE …………………………………………………………………………………………………………………….. |
158 |
|
EDIT THE AUDIO FILE…………………………………………………………………………………………………………………………… |
158 |
|
TC-HELICON AUDIO HARMONIES ………………………………………………………………………………………………………….. |
159 |
|
PITCH STYLES PRESET DETAILS (ONE PER VOICE) …………………………………………………………………………………….. |
163 |
|
APPLYING AUDIO PLUG-INS ………………………………………………………………………………………………………………….. |
164 |
|
RENDERING AUDIO FILES……………………………………………………………………………………………………………………… |
165 |
|
BURN YOUR OWN AUDIO-CD ………………………………………………………………………………………………………………… |
169 |
|
CHAPTER 11: USER PROGRAMMABLE FUNCTIONS……………………………………………………………………… |
173 |
|
THE STYLEMAKER™ …………………………………………………………………………………………………………………………… |
173 |
|
THE HARMONY MAKER………………………………………………………………………………………………………………………… |
187 |
|
THE SOLOIST MAKER …………………………………………………………………………………………………………………………… |
190 |
|
THE MELODIST MAKER………………………………………………………………………………………………………………………… |
193 |
|
THE GUITARIST MAKER ……………………………………………………………………………………………………………………….. |
196 |
|
CHAPTER 12: TUTORS AND WIZARDS ……………………………………………………………………………………………. |
199 |
|
VOCAL WIZARD ………………………………………………………………………………………………………………………………….. |
199 |
|
CHORD SUBSTITUTION WIZARD …………………………………………………………………………………………………………….. |
201 |
|
CHORD BUILDER …………………………………………………………………………………………………………………………………. |
203 |
|
EAR TRAINING TUTOR………………………………………………………………………………………………………………………….. |
205 |
|
RHYTHM GUITAR CHORD TUTOR …………………………………………………………………………………………………………… |
209 |
|
MIDI FILE CHORD INTERPRETATION WIZARD …………………………………………………………………………………………. |
211 |
|
MIDI FILE TO STYLE WIZARD……………………………………………………………………………………………………………….. |
216 |
|
CHAPTER 13: TOOLS AND UTILITIES……………………………………………………………………………………………… |
221 |
|
ROLAND VSC3 VIRTUAL SOUND CANVAS ………………………………………………………………………………………………. |
221 |
|
GUITAR TUNER……………………………………………………………………………………………………………………………………. |
222 |
|
DYNAMIC 3D DRUM KIT WINDOW…………………………………………………………………………………………………………. |
222 |
|
MIDI MONITOR…………………………………………………………………………………………………………………………………… |
225 |
|
SOUND BLASTER SUPPORT ……………………………………………………………………………………………………………………. |
226 |
|
CHAPTER 14: REFERENCE……………………………………………………………………………………………………………….. |
227 |
|
BAND—IN—A-BOX MENU DESCRIPTIONS …………………………………………………………………………………………………… |
227 |
|
FILE MENU …………………………………………………………………………………………………………………………………………. |
227 |
|
EDIT MENU ………………………………………………………………………………………………………………………………………… |
230 |
|
STYLES MENU …………………………………………………………………………………………………………………………………….. |
235 |
|
OPT. MENU…………………………………………………………………………………………………………………………………………. |
237 |
|
PLAY MENU ……………………………………………………………………………………………………………………………………….. |
266 |
|
LYRICS MENU …………………………………………………………………………………………………………………………………….. |
268 |
|
MELODY MENU…………………………………………………………………………………………………………………………………… |
270 |
|
SOLOIST MENU……………………………………………………………………………………………………………………………………. |
274 |
|
AUDIO MENU ……………………………………………………………………………………………………………………………………… |
277 |
|
GM MENU………………………………………………………………………………………………………………………………………….. |
280 |
|
HARMONY MENU ………………………………………………………………………………………………………………………………… |
283 |
|
NOT’N MENU ……………………………………………………………………………………………………………………………………… |
285 |
|
WINDOW MENU ………………………………………………………………………………………………………………………………….. |
286 |
|
HELP MENU………………………………………………………………………………………………………………………………………… |
288 |
|
KEYSTROKE COMMANDS — HOT KEYS…………………………………………………………………………………………………….. |
290 |
|
CHORD LIST ……………………………………………………………………………………………………………………………………….. |
293 |
|
BAND—IN—A-BOX FILES …………………………………………………………………………………………………………………………. |
294 |
|
PG MUSIC INC……………………………………………………………………………………………………………………………………. |
295 |
|
INDEX …………………………………………………………………………………………………………………………………………………. |
296 |
|
REGISTRATION FORM……………………………………………………………………………………………………………………… |
305 |
5

Chapter 1: Welcome to Band-in-a-Box!
Congratulations on your purchase of Band-in-a-Box, the favorite of musicians, students, and songwriters everywhere. Get ready to have fun!
What is Band-in-a-Box?
Band-in-a-Box is an intelligent automatic accompaniment program for your multimedia computer. You can hear and play along to many song ideas and go from “nothing” to “something” in a very short period of time when you have Band-in-a-Box as your “on demand” backup band.
Band-in-a-Box is so easy to use!
Just type in the chords to any song (like C or Fm7b5), pick a musical style from the hundreds available, and click the [Play] button. Band-in-a-Box then automatically generates a full backing arrangement of piano, bass, drums, guitar, and strings.
And that’s not all…
Band-in-a-Box is a powerful and creative music composition tool for exploring and developing musical ideas with near-instantaneous feedback. Over the years many features have been added to Band-in-a-Box — Notation, Piano Roll, Lyrics, Melody Tracks, Harmonization, the StyleMaker, and StylePicker. The Soloist and the Melodist are popular “intelligent” features; the Soloist generates professional quality solos over any chord progression, the Melodist can create songs from scratch with Chords, Melodies, Intros, Solos, and even a Title!
The inclusion of digital audio features makes Band-in-a-Box the perfect tool for creating, playing, and recording your music with MIDI, vocals, and acoustic instruments. Band-in-a-Box for Windows® can also record an acoustic instrument or voice to add to the composition, with processing through DirectX audio effects. Its built-in audio harmonies will turn your audio track into multiple harmony parts or adjust its pitch by tracking the Band-in-a-Box Melody track. Audio harmonies include vibrato and scooping effects for realistic styles.
You can print out your finished creation with repeats and endings, DC markings and codas, or save it as a graphic file for web publication or to e-mail to a friend. And when you’re ready to let others hear your composition, you can burn it directly to an audio CD. Or save your composition as a Windows Media File or in other compressed formats for a file that’s “Internet ready.”
Let’s get started!
This guide will have you making great music with Band-in-a-Box in a matter of minutes. We’ll begin with the easy installation and setup procedure.
|
6 |
Chapter 1: Welcome to Band-in-a-Box! |

Installing Band-in-a-Box for Windows®
Minimum System Requirements
—Windows® 9x/ME/NT/2000/XP.
—At least 16MB of available RAM for MIDI features.
—MIDI features require a 486DX processor or faster.
—Digital Audio features require additional RAM (at least 32MB recommended) and a Pentium-class (or faster) system.
—35MB to135MB available hard drive space. Add-on products and Digital Audio features require additional space and memory.
—PC sound card or external MIDI device (synthesizer, sound module, etc.).
Installing the Program
— Use any of the following three methods to install the program files into the Band-in-a-Box directory. By default this directory is C:bb; you may choose another location.
Method 1 – Auto Run.
1.Insert the program CD-ROM into the CD drive.
2.In a few seconds, a browser window will open with a list of the CD contents.
3.Double click on SETUP.EXE to run the installation program.
Method 2 – My Computer.
1.Insert the program CD-ROM into the CD drive.
2.Access your CD-ROM drive from the Windows desktop by double clicking on the My Computer icon.
3.Then, double-click on the CD-ROM drive icon and double-click again on the SETUP.EXE program found in the root or main folder of the CD-ROM.
Method 3 – Start Menu.
1.Insert the program CD-ROM into the CD drive.
2.From the Windows [Start] button select Run.
3.Type D:SETUP in the “Open:” command line box. If your CD-ROM drive uses another drive letter type the appropriate letter, for example E:SETUP.
4.If you don’t know the drive letter for your CD-ROM you can use the [Browse…] button to find it. SETUP.EXE will copy all of the program files to your Band-in-a-Box subdirectory (usually C:bb) and install icons to a Band-in-a-Box program group. Click on the Band-in-a-Box icon or launch bbw.exe to open the program and configure the setup.
Setup Instructions
Band-in-a-Box uses the multimedia drivers for your MIDI interface and/or sound card that are supported by the Windows operating system. To get sound playback you need to have a MIDI (and audio — for songs with digital audio) driver installed.
To start using the program you will need to make sure that your MIDI interface, audio driver, and Windows sound source is installed and configured.
Run the program by double-clicking the program icon. The first dialog you should encounter is a MIDI Output Driver message similar to this one:
The program sets your initial MIDI output driver automatically. Note which driver has been selected and press [OK] to continue.
|
Chapter 1: Welcome to Band-in-a-Box! |
7 |

The next dialog you encounter is the MIDI Driver Setup.
If the driver that was selected is not the best choice, simply make an alternate selection from the MIDI Driver Setup dialog. Select a MIDI Output Driver to use for MIDI sound playback and optionally a MIDI Input Driver if you are using an external MIDI controller keyboard or guitar. If the setup is panned to mono, the program offers to change it to stereo.
Perhaps the easiest way to configure Band-in-a-Box is to press the [Run Driver Wizard..] button in the Opt. | MIDI driver setup window.
The MIDI Output Driver Wizard dialog will take you step-by-step through the process of auditioning and selecting an appropriate driver. This assumes that the appropriate Windows sound drivers are installed and correctly configured.
|
8 |
Chapter 1: Welcome to Band-in-a-Box! |

DirectX Instrument Synthesizer (DXi plug-in) Support
Software synthesizers allow Band-in-a-Box to play high quality sounds directly through your computer sound card, without requiring any external MIDI hardware. Most new software synthesizers are released as “DXi plug-ins,” so they will work in a standard way with many programs. Connecting Band-in-a-Box to the software synth as a plug-in provides several advantages over the previous method of connecting as a MIDI driver. The plug-in allows Band-in- a-Box to merge/synch in any existing audio file (vocals etc.) with the synth output. You can also directly render your performance to a .WAV file using the DXi plug-in. Sampler-based synths allow you to assemble a huge, customized library of instrument samples to use with Band-in-a-Box. Examples of popular DXi synths include the RolandED VSC-DXi and Hyper Canvas.
To use DXi with Band-in-a-Box, you should think of the DXi as a type of “MIDI Out Driver.” As such, you visit either the Opt. | MIDI driver setup or click on [Pref] [MIDI Driver] and select the “Use DXi Synth” checkbox. When you do this, you can select the type of DXi to use (from a list of installed DXi, if any), and also will see a panel display of the DXi that allows you to make settings directly for your DXi synth.
The DXi will convert the MIDI information to audio, which Band-in-a-Box will playback through your sound card to audio speakers.
You can select DirectX DXi Software Synthesizers as the MIDI destination, and also apply DirectX Audio plug-ins to the Band-in-a-Box audio track.
Check the Use DXi Synth checkbox to enable DXi playback.
Note: To use this option, you must have a polyphonic DXi synthesizer installed on your computer, such as the Roland/Edirol VSC DXi. It will also be most convenient if your DXi synthesizer can use General MIDI or GM2 patches.
To select the DXi synthesizer, click the [DXi Synth Settings] button, which will open the DirectX Plugins window.
|
Chapter 1: Welcome to Band-in-a-Box! |
9 |

The Synth Track tab edits Synthesizer settings, and the Audio Track tab edits Band-in-a-Box audio track DirectX plug-ins. Select your desired DXi synth in the top plug-in Insert Slot 1.
To apply DirectX audio plug-ins to the synth, insert DX audio plug-ins to Insert Slots 2, 3, or 4. This can be useful to add EQ, Reverb, Compression, or Peak Limiting plug-ins, if the “raw sound” of the synthesizer needs sweetening.
You can also choose the patch map (instrument list) that matches your synthesizer keyboard or sound module. Original equipment sound cards or integrated sound chips are General MIDI (GM) compatible.
We have made preset drum/patch files for many synthesizers and sound cards. If your synth is not listed you should use the General MIDI Instrument Misc. patch kit (default).
You can probably omit this step unless you’re using an old synth that is not General MIDI compatible. If your non-GM synthesizer or sound card is not listed you can easily make your own patch map in Opt. | Preferences | Patch Map.
General MIDI 2 (GM2) Support
General MIDI 2 patches are supported for 128 additional instruments, the type of GM2 support is set in this dialog. The choices are:
—General MIDI 2 support: If you’re using the Roland VSC3, or a newer Sound Canvas (i.e. newer than 1999, or newer than the Roland SC88), then choose this GM2 support.
—Roland GS (older Modules): “Older” Sound Canvases (SC55/SC88) support GS, but not GM2. The good news is that they have the same patches available, just at different locations. So if you choose this option, Band-in-a-Box will find the patches at the “GS” locations instead of the “GM2” locations. If you have a newer GS module like the SC8820, it supports both GM2 and GS — you should likely choose GM2.
—No GM2 support: Some sound cards don’t have GM2 support yet; they just support the original 128 General MIDI sounds. Band-in-a-Box will use the closest instrument in these cases.
Now you’re ready to have fun with Band-in-a-Box!
|
10 |
Chapter 1: Welcome to Band-in-a-Box! |
![]()
Chapter 2: QuickStart
Creating music with Band-in-a-Box is as easy as 1-2-3! In this chapter, you’ll see just how easy it is to get Band-in- a-Box working for you.
Step 1 – Typing in the Chords
There are numerous ways of entering chords into Band-in-a-Box. We’ll discuss five fast ways of entering chords:
1.Using the computer keyboard.
2.Playing directly on a MIDI controller keyboard.
3.Using the Chord Builder feature.
4.Importing chords from a MIDI file.
5.Loading an Existing Band-in-a-Box format song.
On the main screen of the program, you’ll see an area called the chordsheet.
Band-in-a-Box main screen showing chordsheet.
Each of the numbered cells on the chordsheet represents a bar. In this example, we see that there is an E chord in the first bar of this song, an A chord in bar 5, and later in the song, an E7 in bar 12. Notice the box in the first half of bar 1. This is the highlight cell, and it represents the bar you are currently working on. You can move the highlight cell around using the cursor keys, or select a specific bar using the mouse.
Enter Chords Using the Computer Keyboard
To enter a specific chord, move the highlight cell to where you want to place the chord. For example, to add (or change) a chord in bar 10, you would highlight bar 10 on the chordsheet. Next, type in your chords. If you want an E at bar 10, type the [E] key on your keyboard, and press [Enter]. Notice that when you use the enter key, the highlight cell moves to the second half of the bar. You could then enter another chord at beat 3. Chords names are

normally typed using standard chord symbols (like C or Fm7 or Bb7 or Bb13#9/E), but you can enter them in any of the supported chord symbol display formats like Roman Numerals, Nashville Notation, and Solfeggio.
Enter Chords Using a MIDI Controller Keyboard
If you have a MIDI controller keyboard, you can use it to enter chords into Band-in-a-Box. Play a chord on your MIDI keyboard, and then type Ctrl+Enter. The chord will be entered into the chordsheet at the current highlight cell position. Another method allows you to choose alternate chords. From the Window | MIDI Chord Detection menu item, you’ll see this window:
When you play chords, Band-in-a-Box shows you the chord name and suggests alternates that you can choose from. Typing Ctrl+Enter enters the first selection, and advances the highlight cell by ½ bar.
Enter Chords Using the Chord Builder
Press the Chord Builder button. This opens the Chord Builder dialog with a list of chord roots and their extensions.
To enter a chord at the current bar, select the chord root from the left pane, and then the extension on the right pane. Pressing [Enter Chord] or using the arrow keys will enter the chord and advance the highlight cell to the next half bar.
Import Chords from a MIDI File
You can have Band-in-a-Box import chords from an existing MIDI file. Choose Import Chords from MIDI File on the File menu.

When the dialog opens, press the [Open (Change)…] button to choose a MIDI file that you want Band-in-a-Box to interpret the chords from. To help Band-in-a-Box interpret the chords better, you should choose a genre (Preset) for the song. Choose from among such genres as Pop, Rock, or Jazz Standard.
Tip: It helps if you’ve previously listened to the MIDI file, in order that you can choose a genre most appropriate to the song.
Loading an existing Band-in-a-Box format Song
Press the Open Song button. The first time you use this button, Band-in-a-Box will offer to build a Song list for you. We’ve included many demonstration songs; they are listed in the song list.
You could also load a pre-existing song by using the File | Open menu item, or by typing [F3], which will launch the Windows file dialog. Songs usually load a “Style,” which we’ll learn about in the next section.
Step 2 – Choosing a Style
Band-in-a-Box creates backing arrangements based on the chords you type in, applied to a particular Style.
What’s a Style?
A style is a set of rules that determine how Band-in-a-Box creates music using your chords. By adjusting the rules, we have created hundreds of styles for everything from Country to Bebop, such as Jazz Swing, Blues Shuffle, Hip Hop, Country 4/4, Pop Ballad, Waltz, and Medium Rock to name just a few. If you don’t find a pre-made style that suits your tastes, create one from scratch using the StyleMaker. There’s a “how-to” section on custom Styles in this manual.
Four Fast ways to open a Style
Method 1:
To open a user style from disk, you can just type the [F9] key. You will be presented with a Windows file dialog from which you can select a specific Style. Alternately you can select from the Styles menu item at the top of the screen.

Method 2:
You can use the StylePicker window to select your style. Select the button above the chordsheet, or type Ctrl+F9 on your computer.
This window shows styles listed by Category and by Styles Set number. Select a Set or genre from the left pane, and choose the specific style on the right pane. There are Memos and examples for each of the Styles.

Method 3: Styles that you’ve used previously show up in the Favorite Styles dialog. Choose this with the [f] button next to the [Style] button in the song title window, from the Styles menu, or type Shift+F9 on your computer keyboard.
You can choose to save a Favorites set for use later. You can also load a set of favorite styles in this manner.
Method 4:
In the Styles menu, you can choose from among the 24 “built-in” styles. This list provides a quick way to choose from among the most popular music genres.
Step 3 – Play your song!
You’ve entered chords on the chordsheet and chosen a style. Now it’s time to play the song! You’ll need to tell Band-in-a-Box how long your song is, how many times to play it through, in what key, and how fast.
Framing the Song
To tell Band-in-a-Box where to start and end the song, take a look at the middle of the main screen.
Locate the framing buttons. There are three of them, one each for Beginning of Chorus, End of Chorus, and Number of Choruses. In the example above, the chorus starts at bar 1, ends on bar 32, and is going to play 3 times.
Setting the Key
In the example above the key is set to C. However, you can set this to any key. In our first view of the chordsheet the Blues song was in the key of E. If you do change the key, Band-in-a-Box will offer to transpose the chordsheet for you.
Setting the Tempo
If you know the tempo value of your song, you can enter it in the tempo box. The song example above has a tempo of 120. There is an even faster way to enter a tempo. Locate the minus key [-] and the equals key [=] in the number row of your computer keyboard, they are usually next to each other. If you tap the minus key 4 times at your tempo, Band-in-a-Box will set the tempo automatically for you. If you tap the equals key four times, Band-in-a-Box will set the tempo and begin song playback!
More fun with Band-in-a-Box…
That’s all there is to quickly creating music with Band-in-a-Box. Band-in-a-Box has many more features and user settings, which are discussed in later chapters. Have fun making music with Band-in-a-Box!

Chapter 3: Band-in-a-Box Version 2005
New Features in Band-in-a-Box 2005
New Fully-Featured “Piano Roll” Window!
Now you can edit your tracks using the new “Piano Roll” window, similar to the type found in many sequencer programs. Edit the Melody or Soloist tracks with greater ease and precision. There are 2 panes in the window – one for notes and the other for controllers, velocity, and other data. All notes and controllers are displayed as bars on a grid. You can change note duration and pitch by selecting and dragging with your mouse.
Alternate Guitar Tunings added!
The Guitar window now supports alternate tunings, including DADGAD, Drop D, Double Drop D, Open G, and 11 others! You can also select “Nashville High Strung” tunings, which tune certain strings up an octave. The new tunings are supported in Styles, Chord Diagrams, Guitar Tutor, Notation, Tab, and Printout. Learn how to play these tunings by watching the on-screen Guitar Fretboard or Notation/Tab window. Easily change any style to use the alternate tuning that you want.
New Harmonies added with voicing in 4ths!
Modern Jazz harmonies often voice chords in 4ths. For example, a C chord with C melody might be voiced C, G, D, A, E. Now you can select 4ths voicings easily in Band-in-a-Box to harmonize the Melody, Soloist, or THRU parts using 3, 4, or 5 part voicings in 4ths. We’ve added presets for these harmonies, so you can easily select them. Use these sophisticated 4ths harmonies on your existing melodies to create a new sound.
|
Chapter 3: Band-in-a-Box Version 2005 |
17 |

“Auto Endings” added for Styles without Endings!
If you‘ve made a style, and haven’t included an ending, a 2-bar ending can now be generated automatically, based on the style. This makes it easier to make complete styles using the Style Wizard, which makes a style by analyzing a MIDI file.
Patch List Converter
Make Synthesizer Patch file lists (.PAT files) easily by converting PowerTracks or Cakewalk Patch lists!
Band-in-a-Box can now read a patch file list generated by PowerTracks Pro Audio or Cakewalk, and convert it to a .PAT file for use in Band-in-a-Box. The patch file contains the name and numbers for all patches on a synthesizer, so that you can access your patches easily by name. If you already have a patch list for your synthesizer from one of these other programs, you can now convert it to Band-in-a-Box format easily.
“Jazz Chord Symbol Graphics” (circles, triangles) supported!
Jazz and Pop music often use certain non-alphabetic symbols for chord types. These include a delta (triangle) for major chords, a circle for diminished, and a circle with a slash for half-diminished. Also, tensions like b9 and b13 are stacked vertically and contained in brackets. You can now select this option, and see these symbols for display/printout on the Chord Sheet, Notation, and Lead Sheet windows.
TC-Helicon Audio Harmonies enhanced with Pitch Styles (automatic “Vibrato” and “Scooping”)!
Now, when you generate audio harmonies to your recorded vocal tracks, you can select pitch styles to add vibrato and scooping effects to the vocal harmonies. Choose from presets, including “Ballad,” “Broadway,” “Pop Diva” and more!
|
18 |
Chapter 3: Band-in-a-Box Version 2005 |
StylePicker now Editable!
You can now add your own styles to the StylePicker list by pressing an ADD/EDIT button on the StylePicker. You can see all the information about the style, including memo, genre, feel, tempo, range, etc.
“Vocal Wizard” finds the best song keys for your vocal range!
This feature helps you choose the best song key for your vocal range from your vocal type (baritone, tenor, etc.), or a custom range. The wizard analyzes the song and recommends the best keys for that song. There are options to “include/exclude falsetto range” and “restrict choices to these keys […].”
Non-Destructive Audio Track Editing!
With previous versions of Band-in-a-Box, any changes to the audio track would be permanent, even if you didn’t save the song. Now the changes are non-destructive and only become permanent if you save the file.
Support for Multiple Sound Cards!
For the audio track, you can now choose which sound card to use, if you have more than one.
Multiple lines of Lyrics Supported on Fake Sheet and Printout!
If your song has 1st and 2nd endings or multiple verses of lyrics, multi-line lyrics can be displayed, so you’ll see all verses on the same Fake Sheet.
Full Stereo or Mono support for Audio Track!
You can now choose between mono and stereo for the audio track and the audio plug-ins work for mono or stereo. Tracks can be edited in either format, and converted from stereo to mono or vice versa.
Enhanced Audio Plug-in Effects!
Enhanced audio plug-in effects are included for EQ, Peak-Limit, and Reverb.
Selective Humanize option for the Melody Embellisher!
There is a new option for the Embellisher to only humanize the timing of the music if the timing was “stiff” to begin with. This allows the Embellisher to leave the timing of human input melodies alone, and humanize only the ones that were entered in step-time.
Lead Sheet highlighting is more visible!
During playback, the highlighting of bars on the Lead Sheet and Fake Sheet window is more visible, with red rectangles to highlight the current bar.
Karaoke Files (.KAR) now can be opened, including lyrics!
The popular Karaoke file format (.KAR) can now be opened directly into Band-in-a-Box, just like MIDI files. Chord symbols are displayed (Band-in-a-Box intelligently analyzes the chords of the song), as well as the lyrics from the Karaoke files.
Import .WAV file to Audio Track support!
A mono or stereo .WAV file can now be imported to the audio track, optionally merging or replacing any existing audio track.
Pitch Bends are now displayed on the Guitar Fretboard!
Pitch bends now show up on the Guitar Fretboard. As the pitch bend occurs, a blue line moves along the string in real time to show the height of the pitch bend.
Shift-Click support for Selecting Region of Chordsheet, Notation, or Audio Window!
To select a region of Chordsheet, Notation, or Audio Window, you can now Shift-click on the end point to easily select a large area.
Colors editor for Note Colors in the Notation Window!
Note colors for the Notation window may be edited to create custom color sets, using a new dialog box.
|
Chapter 3: Band-in-a-Box Version 2005 |
19 |
Entire song name displayed in Taskbar hint when Band-in-a-Box is minimized!
This is useful to find the name of a song playing when Band-in-a-Box is playing in the background.
Multi-colors for Event List!
Different colors are used for different event types in the event list, to visually distinguish notes, patch changes etc.
Song Picker Enhanced – Subfolder Support!
The SongPicker has been enhanced and now can optionally display songs from subfolders. For example, if you get a song list of c:bb, it can include songs in subfolders of c:bb like c:bbstyles34. You can also lock the SongPicker to always open in the same folder (EG: C:bb), so that you can use the same list to keep track of all songs on your disk. Other enhancements like “change folder,” and “go up one folder” are included.
Notation supports time signature changes!
Time signature changes are now printed on the Notation/Lead Sheet!
“Favorite Folder-Open Song” button!
By opening a song using “Favorite Folder-Open Song,” you first select the folder from a list of recently used folders, and then you can directly open the song from that folder. This allows you to quickly find a song in another folder.
Lyric breaks hidden in Lead Sheet window!
For lyrics, line break and paragraph marks (‘/’ and ‘’) are no longer shown on the Lead Sheet window.
Auto MIDI and Karaoke lyrics display!
Lyrics window optionally auto-opens for MIDI files with lyrics and Karaoke files!
Guitar TAB visibility is improved!
For the guitar tablature, the numbers are now more visible, as a portion of the black guitar line is “whited out” when a tab fret number is drawn.
Notation display improved!
The first note in every bar is drawn farther away from the bar line.
Big Lyrics Window Enhancements!
Chords can now be displayed on a row above the lyrics on the Big Lyrics Window. Separate chord colors are used for the Chords and Lyrics, allowing these elements to be visually separated.
MIDI file text markers for part markers!
MIDI files are now written with descriptive text markers for part markers! Text markers are also read in from MIDI files, and displayed as section markers on the notation.
Decibel (dB) scale now present in the Audio Edit window! New rest insert key!
In Editable Notation mode, you can now insert a rest by holding the back-quote key (tilde key without pressing Shift) then clicking on the Notation window. This is a way to avoid having to check the “Rest” checkbox first.
Reset to factory settings improved!
Reset to factory settings also offers to nuke the drum kit and MIDI driver choice, making the return to factory settings complete.
“Transpose” Chordsheet option added!
This is useful for non-concert pitch instruments like tenor saxophone. This option is also available on the Notation window.
|
20 |
Chapter 3: Band-in-a-Box Version 2005 |
“Play Selected Area as a Loop” function!
Shift-click on the Play button, or press F10 (Play Selected Area as Loop) and the program will play a selected region as a loop. For example, you can select bars 10 and 11, and then press F10, and bars 10 and 11 will play looped.
StyleMaker Enhancements!
If you don’t save the style, the previous style will load in, instead of reverting to “ZZJAZZ.STY.”
Guitar Tutor Enhancements!
The Guitar Chord Tutor now has an “Anticipate” mode that plays the next chord X beats in advance, allowing time for the user to prepare the chord for playing along. 11 new tutors have been added for the Alternate tunings like DADGAD, Open G, etc.
No more drum crash cymbals on Bar 1 of the song!
The very first bar of the song is (optionally) no longer considered to be following a fill, so a drum crash cymbal won’t be played. Most drummers wouldn’t play a crash cymbal on bar 1 of the song.
New hot keys added for Prefs tab dialog!
This allows navigation of the Preferences tabs by single keystrokes.
Auto “Staves per Page” Option!
Notation | Options now has an option to allow “Staves per Page” setting to be automatic or not!
Print to much larger BMP files!
Notation | Print to Graphics command can now print to high resolution BMP’s like 2400 x 3000! This feature is only limited by available memory.
Guitar TAB lines easier to see!
Guitar TAB lines now print in black, instead of grey, so tab is easier to read.
Larger Harmony display boxes!
Harmony display boxes are wider by 64 pixels on the main screen and Melodist/Soloist dialogs!
VU meters added for Audio!
These show the Record and Playback levels for audio, allowing adjustment of microphone and speaker levels.
Mouse wheel support!
Mouse wheel support added to the Chordsheet screen and other windows.
… and many more!
|
Chapter 3: Band-in-a-Box Version 2005 |
21 |

QuickStart Tutorial for the Version 2005 Upgrade.
The full descriptions of the new features in Version 2005 of Band-in-a-Box are provided elsewhere. This tutorial is a QuickStart tour of the new features in Band-in-a-Box 2005.
Note: It is assumed that you are somewhat familiar with the previous release of Band-in-a-Box.
Explore Band-in-a-Box Version 2005
First, we’ll take a quick tour of the new features in Band-in-a-Box 2005. Then we’ll do an in-depth tutorial for the new Piano Roll window. The other chapters in the manual are also tutorial style presentations of the new features.
Load in any song with a melody…
Now launch the Piano Roll window, by pressing the piano roll button on the toolbar, or choosing Window | Piano Roll Window. You’ll then see the Piano Roll window.
Drag the notes to change pitch, duration, or timing.
Insert notes by mouse click (while holding down Ctrl+Shift). We’ll explore the piano roll in detail later in the tutorial.
Now let’s close the Piano Roll window, and open the Notation window. You can do this by pressing the notation button.
Let’s hear the fourths harmonies…
Load in c:bbTutorial — BB 2005 4 Trumpets in 4ths — Harmony 219 demo. This will play the melody in 4-part harmony, using 4ths harmonies.
Let’s display “Jazz chord symbol graphics” to this song.
Use the Opt. | Preferences menu option and click on “Notation” to open the Notations Options dialogue box. In the Notation Options dialog:

 Press the [Jazz Fonts] button to select the Jazz music font.

 Select the “Jazz Symbols” checkbox.
Exit the Options dialog, and you’ll now see Jazz chord symbols.
|
22 |
Chapter 3: Band-in-a-Box Version 2005 |

Let’s examine the improvements in the SongPicker.
 Open the SongPicker. (The program may rebuild the song list prior to opening the dialog.)
 Look at the folder name displayed at the bottom of the dialog.
Select the checkboxes “Always open in this folder” and “Include Subfolders.”

 If the folder name isn’t already c:bb, press the [Change] button near the bottom of the dialog, to change the folder to c:bb.

 If the program doesn’t rebuild the list automatically, then force a rebuild by pressing the [Rebuild List] button.
songs in your c:bb folders and subfolders. demos!
The Song list will then be rebuilt, displaying ALL of the If you have the MegaPAK, this will be over 2,000 songs, riffs, and style
 Use the FILTER to manage this list. Set the Filter to “any column.” For example, type the word Bluegrass in the filter, and press [Apply Filter]. You’ll now see a list of 29 songs, all with the word Bluegrass somewhere in the title, filename, genre, or other field.
Let’s explore the new “Vocal Wizard.”
The Vocal Wizard determines the best keys for any song in your vocal range.
Load in the song c:bb Tutorial — BB 2005Old Folks at Home.MGU. This is in the key of F. We’ll assume that you are a male with a baritone range. If so, F is not a good key for this song, it is too high.
Choose Window | Vocal Wizard or press the Vocal Wizard button on the toolbar.
The Vocal Wizard will open. It displays color coded scores for each possible key, and has determined that they key of D is the best key for that song in your vocal range, which you can set in the same dialog.

 When you call out to your piano player “We can do this song in D.” he replies, “I don’t play much in D, I’m a Jazz player.”
|
Chapter 3: Band-in-a-Box Version 2005 |
23 |

So you use the “Allowable Keys” preset in this dialog, and set it to “Jazz keys,” and then the Vocal Wizard revises its recommendation to the key of C.
If you select “Auto-transpose to best key when a song is loaded,” every song will automatically be transposed to the best key for your vocal range when loaded. For now, let’s de-select that option, since we don’t want songs to be transposed when loaded.
Note that the Vocal Wizard can also be used for instruments, like tenor sax or trombone, to determine the best keys for playing the melody on those instruments.
Let’s check out the new PLAY LOOP feature.
On the Chordsheet, select the 2 bars from 9 to 10 by dragging the mouse to make the bars black.
Now, press the [Loop] button on the toolbar, or press F10, or choose the Play | Play (loop) Highlighted Section menu item. The 2 bars from 9 to 10 will play in a loop.
We can use the new Favorite Folders feature to quickly OPEN or SAVE a song from/to a different folder than we are in now.
Hold the Shift key as you click the [Open] button. This will launch the Favorite Folder dialog, allowing you to pick the folder to load from, and then the typical dialog will open up. This saves you time.
Similarly, Shift-clicking on the [Save As] button will allow you to choose a favorite folder prior to seeing the Save As dialog.
The TC-Helicon Harmonies are improved. Let’s load in the Tutorial Demo from 2004, called c:bbTutorial – Audio HarmoniesListen.MGU. We’ll now add audio harmonies, and the audio harmonies will now have vibrato!
After loading in Listen, launch the TC-Helicon Harmony dialog. Choose Harmonize to the MIDI Melody, and harmony #172, and click OK.
Now, in the TC-Helicon Harmony dialog, notice the new combo boxes at the bottom of the screen for Pitch Style presets (vibrato and scooping).
|
24 |
Chapter 3: Band-in-a-Box Version 2005 |

Set the 4 harmonies to the first vibrato setting “1 BNatural Vibrato,” and press the [PREVIEW] button. You’ll now hear these harmonies,
generated from MIDI notes in the Band-in-a-Box harmony, but with various types of vibrato and scooping pitch effects. On held notes, the vibrato is essential for a natural vocal sound.
Now let’s move on to the Piano Roll Tutorial.
Piano Roll Tutorial
The Piano Roll window enables precise graphic editing of note timing and duration. You can also graphically edit note velocity, controllers, program changes, channel aftertouch, or pitch bend.
The Piano Roll may be opened as a movable window (which floats above the Band-in-a-Box main window), or it may be opened embedded, which occupies the same position as the Chordsheet/Notation panel in the Band-in-a-Box main window.
Let’s load the song “PianoRollDemoSong.MGU.” This is a medium Bossa Nova with some horn noodling to demonstrate Piano Roll features. The song contains example use of several MIDI data types with which to experiment.
To open the Piano Roll, in the Band-in-a-Box Window menu, select the item Piano Roll Window.
|
Chapter 3: Band-in-a-Box Version 2005 |
25 |

Playback Control
In addition to other Band-in-a-Box methods, you can start playback by double-clicking the Chords Ruler above the Note Time Ruler. When polishing edits, it can be convenient to double-click the Chords Ruler to hear a couple of bars, and then click the Ruler or tap the <space bar> to stop playback and continue editing. When you click or drag in the Chords Ruler, it sets the Insertion Point. The Insertion Point determines the location that pasted events would be added to the track. It also determines the Playback Start bar if you use the Ctrl+G “play from here” keystrokes.
Splitter Bar
A vertical Splitter Bar sits between the Note Editing and Graphic Event panels. To maximize the Note Editing panel, drag the Splitter down, to maximize the Graphic Event panel for more accurate event editing, drag it up.
Note Selection
You can click on individual notes, and also Shift-click or Ctrl-click to select multiple notes.
You can make a “box selection” by clicking on white space and drawing a rectangle around notes.
|
26 |
Chapter 3: Band-in-a-Box Version 2005 |

Note Editing
Move the mouse cursor over the left side of a note, then click-drag horizontally to edit the note’s start time. To drag a group of selected notes, hold Shift while dragging the head of one of the notes, and all of the selection will follow!
Move the mouse cursor over the right side of a note, then click-drag horizontally to edit the note’s duration. To drag a group of selected notes, hold Shift while dragging the tail of one of the notes.
Move the mouse cursor over the center of a note, and then click-drag vertically to edit the note’s pitch. To transpose a group of selected notes, hold Shift while dragging the center of one of the Notes.
Insert a Note
Hold Shift+Ctrl, and then click where you want a new note.
Delete a Note
Select one or more notes, and then tap the computer’s Delete key. You Can also right-click and choose the “Delete Selected Events” item in the pop-up menu.
Undo Mistakes
You can use Edit | Undo (or Ctrl+Z) to recover from edits gone horribly wrong. You can also right-click and choose the “Undo” item in the pop-up menu.
If you make a mistake when inserting an event, it is often easy to fix by re-editing the event. For instance, if you intended to insert a C note, but accidentally inserted a B note, it is trivial to drag the new B note up to C.
After inserting events, the new events are selected (highlighted red). Therefore, you can also tap the Delete key to remove accidentally inserted events.
Graphic Event Editing
You can edit the value or time of individual graphic data items. To edit the value, move the mouse cursor over the top half of an event, and click-drag vertically. To edit the time of the event, move the cursor over the bottom half of an event, and click-drag horizontally. There are two tools for inserting graphic events, the Line Tool and the Pencil Tool.
Line Tool
Move the mouse cursor over white space in the Graphic Event panel. The cursor becomes a Line Tool. Click and then drag a line. When the mouse button is released, events are inserted or modified to fit the line. This illustrates the effect of the Line Tool for editing the velocity of the first 6 notes.
Pencil Tool
Hold Shift+Ctrl, and move the mouse cursor over white space in the Graphic Event panel. The cursor becomes a Pencil Tool. Click and then drag a free-form shape. When the mouse button is released, events are inserted or modified to fit the free-form shape. This illustrates the effect of the Pencil Tool for free form drawing the velocity of the first 6 notes.
|
Chapter 3: Band-in-a-Box Version 2005 |
27 |

Program Changes
The Piano Roll demo song contains some embedded program change events as a demo of this new method. Set the “View/Edit” control to “Program,” and the few program changes are displayed in the Graphic Event panel.
Program changes are zero-based. For example, General MIDI piano is zero rather than one. The demo song intro has a flute program change. Then the first chorus is trumpet, the second chorus is flute, and the third chorus is soprano sax.
Expression Controller
Set the View/Edit combo box to “Control” (controller MIDI events). Then select “11 Expression MSB” in the controller type combo box.
The Expression controller is recognized by most modern synthesizers (including most General MIDI synths). However, some older synths do not recognize this controller. Expression is an alternative to “7 Main Volume MSB.” Use the Expression controller for individual tracks, and reserve the main Volume controller for overall track loudness. That way, you can use the Band-in-a-Box main window Volume controls without affecting individual notes in the track.
In the example shown, the intro flute ostinato pattern fades in, and then fades back out, via the expression controllers. These events were entered with the Line Tool. Notice that before the trumpet comes in, there is a single expression event of value 127, to kick the loudness up to “normal.”
Single controllers are inserted by moving the mouse cursor to the desired position and then clicking the mouse button.
Play the demo song, and watch how Expression controls have been added for soft attack on some notes, and loudness reduction at the end of some notes.
|
28 |
Chapter 3: Band-in-a-Box Version 2005 |

Modulation Controller
Set the View/Edit combo box to “Control” (Controller MIDI Events). Then select “1 Mod Wheel MSB” in the controller type combo box.
The Modulation controller is not firmly defined, but it is usually a Vibrato or Tremolo effect (especially in General MIDI synths).
Play the Demo Song, and watch how Modulation has been added to some notes to add Vibrato. It is usually best to use tasteful amounts of Controllers. With graphic edits, too much is almost always too much!
Pitch Bend
Set the View/Edit combo box to “Pitch Bend.” Play the demo song, and watch how a few pitch bends have been inserted to “scoop” some note attacks, “sting” the middle of a note, or “fall off” some note releases.
More Details
Please see the Piano Roll Window topic for more information about this feature.
________________________________________________________________
This is the end of the tutorial. Thanks for taking the time to read this section. The next sections examine the new features in detail.
|
Chapter 3: Band-in-a-Box Version 2005 |
29 |

Chapter 4: The Main Screen
Main Screen Overview
The main screen gives direct access to the major features and program settings of Band-in-a-Box for ease and convenience during a session. There are five different areas on the main screen.
1→
2→
3→
4→
5→
The main screen of Band-in-a-Box with a new, blank song.
1.The Status Bar is used to show program running status messages and path names of the currently loaded song.
2.The Synth Window is the area between the Menu Bar and the Piano Keyboard where Instruments patches are set and levels are adjusted. It also includes buttons for adding harmonies to the Melody, Thru, or Soloist parts.
3.The Tool Bar area under the Piano Keyboard has buttons for direct access to important program features and menus. Hold the mouse cursor on any button to see a pop-up hint that describes its function.
4.The Title Window shares the Tool Bar area. In addition to the song title, it includes all the other settings for the song such as its Key Signature, Tempo, and Chorus settings. To the right of the Title Window are two floating, dockable toolbars that can be configured by the user.
5.The Chordsheet Area occupies the lower part of the screen. Chord changes for the song are typed into the numbered bars (cells) in the sheet. “a” and “b” part markers are entered here to switch between the “a” and “b” Band-in-a-Box substyles. Repeats and endings are also shown.
|
30 |
Chapter 4: The Main Screen |
![]()
Personalizing the Main Screen
Band-in-a-Box gives you many options to personalize the main screen.
Screen Layout
The Chordsheet area (or Notation Screen) can be placed at the top of the screen if desired by selecting the “Put Notation/Chords on Top” from the Window menu or by pressing Ctrl+T. (This is reversed by selecting the same option.)
Display Options
Go to Opt. | Preferences or click on the [Pref] button to open the Preferences dialog. Then click on the [Display] button to open the Display Options dialog where you can select a toolbar mode, show or hide the on-screen piano, pick a song title font and set options for the chordsheet display including the number of rows to display for the main chordsheet, the font to use, and the font size too. This allows you to read the chordsheet window from “across the room.”
If you choose a Custom font, you can choose the size as well. Choose a preset font, and the size will be set automatically to fit into the height of the row. Choose Jazz Symbols to see shorthand Jazz chord symbols in the chordsheet and notation. To revert to the “old look” that used a small System font, and lots of rows, you can choose that as the type of font “Small font (system).”
Color Schemes
You can choose from several color sets using the 256-color palette in Windows. Choose from pre-made color schemes or make your own. To change the color scheme, select Opt. | Preferences from the main screen, and then click on the [Colors] button in the Preferences dialog to launch the Color Selection dialog.
To select a pre-made color scheme, press the [Import..] button and choose from the list of schemes. Select [OK] to make the changes permanent. Use the [Export..] button to save and share your customized color schemes.
|
Chapter 4: The Main Screen |
31 |

To make your own color scheme, click on the name of the element you wish to change (Chord Area, List Box, etc.), then click on the [Choose…] button to bring up the Windows Color palette and click on the color you desire.
Status Bar
The name of the open song is identified in the status bar at the top of the screen. The full file name and path name are shown, as well as the length of the song in minutes and seconds and the current position of the highlight cell. Other “running status” messages such as Soloist Generation and Song Generation display in the status bar.
The status bar changes during playback to show additional information like the current bar and chorus location and the current style.
Status bar during playback.
Taskbar hint
The entire song name displays in the taskbar hint when Band-in-a-Box is minimized. This is useful to find the name of a song playing when Band-in-a- Box is playing in the background.
|
32 |
Chapter 4: The Main Screen |

Synth Window / Piano Keyboard
The Piano Keyboard:
This keyboard displays the notes (in different colors) that are being played by all instruments on various parts of the piano keyboard during playback (except drums). The MIDI Thru/Soloist is also displayed on the piano keyboard.
Instruments and Parts:
Part Settings: The Bass/Drum/Piano/Guitar/Strings/Melody/Soloist and Thru buttons refer to instrument parts. To change a setting for one of the parts you need to do the following:
—Select the part by mouse clicking on the part name, or on the button immediately to the left of the part name.
—Change the desired parameter to affect the new setting.
Instruments — Choosing
The instrument panel allows you to change the instrument for any part:
—Clicking on the drop-down arrow produces an instrument list that you can choose from by highlighting and clicking on the desired instrument name.
—Clicking the [F] button produces a representative list of predefined favorite instruments that you can choose from.
The [GM2] button lets you select patches from a list of both General MIDI and General MIDI 2 patches if your system supports GM2.
Clicking on the [+] button produces a comprehensive list of ALL the patches available for your synthesizer, including ones on higher banks
(if applicable). This list displays your patch names by name, where the patch is located (patch #, bank) and lets you pick them from an easily customizable list.
Harmony
The Harmony area displays the current Melody and Thru Harmony. At the top right, you’ll see the harmony boxes for the Melody and the Thru/Soloist.
The [M] button is for Melody harmony — pressing the [M] button produces a list of harmonies you can choose from.
Here it’s set to SuperSax for a Big Band saxophone section harmony.
|
Chapter 4: The Main Screen |
33 |

Pressing the [F] button produces a list of your favorites; the 50 most recently loaded harmonies.
The keystrokes Shift+F10 allow or disable the Melody harmony.
Tip: You can also search for a harmony by a keyword (i.e. typing in the first few letters of a harmony name) in either the Harmonies or Favorite Harmonies dialog.
The [T] button is for Thru/Soloist harmony. Either your live part or the Soloist will be harmonized in real time — in this case using George
Shearing Quintet type harmony (piano, vibes and guitar). Pressing the [f] button produces a list of your favorites; the 50 most recently loaded harmonies. Pressing the Shift+F11 keys toggles the Thru harmony on and off.
Toolbars
The main toolbar extends the full width of the screen. (It is divided in two here.)
The [New] button clears the Chordsheet to start a new song. Band-in-a-Box reminds you to save your work before it erases the chords.
The [Open] button is used to open (load) songs into the program from a standard Windows Open File dialog.
Use the [Prev.] button to immediately open the previous song in the same folder (in alphabetical order) without going through the usual file opening process.
Use the [Next] button to instantly open the next song in the same folder (in alphabetical order) without going through the usual file opening process.
The [Save] button saves the song to disk with the standard Windows Save As dialog.
This saves the song, allowing you to choose or confirm the name and location for the file save.
|
34 |
Chapter 4: The Main Screen |

The [.MID] button allows you to make a Standard MIDI File and save it to disk as a file with extension
.MID or to the Windows Clipboard with type “Standard MIDI File.” Type 0 and Type 1 MIDI files are supported, or you can also choose to save the song as a Karaoke file with the .KAR extension.
This is the “Render to WAV file” button, which will convert (render) your MIDI arrangement to an audio wave file.
Transport Controls
These buttons are like the transport controls on a CD player or a media player.
[Play] button generates a new arrangement and plays the song.
[Loop] plays the selected (highlighted) section of the chordsheet in a loop. [Replay] plays the song from the beginning without creating a new arrangement. [Stop] button stops the song or the Jukebox from playing.
[Pause] button pauses the song during playback.
[From] button is used to play a song starting anywhere in the song, including tags or endings.
The [Melodist] button opens the Generate Chords and/or Melody dialog, where you can choose the Melodist you wish to have generate chord changes and melody.
The [Soloist] button opens the Select Soloist Dialog, where you can choose the Soloist you wish to have play over any given chord changes.
The [Juke] button is used to start or stop the Jukebox. The [<] and [>] arrow keys are to move to the next or previous song in the Jukebox.
The [Rec.] button is to record a song from the beginning. The music that you play in to the computer will then be stored on the Melody track. The “R” key is the keyboard equivalent.
The [R. Aud] button launches the Record Audio dialog for live audio recording.
You can make yourself sound like a 5 piece vocal group! Record a vocal part, and add a 4 part audio harmony. Press the audio harmony button on screen to do this.
Band-in-a-Box supports DirectX Audio plug-ins – you can apply them directly to the digital audio track. Use the cool PG Music plug-ins provided, or any other DirectX plug-ins that you have.
This allows you to select and configure DXi (DirectX instruments) software synthesizers. The “Use DXi Synth” checkbox must be selected in the MIDI Driver Setup dialog.
Sends out an “all notes off” message to your synthesizer, so it can function as a “panic” button to stop a hung or stuck note .
|
Chapter 4: The Main Screen |
35 |

This button resets General MIDI devices by sending a GM mode On message and then setting up the Band-in-a-Box patches.
Floating Toolbars
These are Copy and Paste buttons for chords or notes. They copy to the Windows clipboard, and paste from the clipboard.
The Folder button allows you to change song and style folders or directories from within the program.
Use the Favorite Folders button to select a folder from previously used folders. Shift-click on this button to choose any folder.
The guitar button launches a guitar fretboard window that displays guitar notes as music is playing.
This button allows you to enter repeats, 1st and 2nd endings, DS al coda, DC al coda and more. The AutoFind feature enters them automatically.
The [Intro] allows you to generate and insert an intro into a song with a “press of the button.”
The Big Piano button launches a Big Piano window. It will display the notes to any track (except drums) as the music is playing.
This launches the Windows Mixer applet. Use the Windows Mixer to make global settings to your sound card’s input and output options.
Press the Guitar Chord button to launch the “Generate Guitar Chord Solo” dialog.
The Ear Training button opens the Ear Training Window that plays chord types and intervals for you to improve your playing-by-ear.
The Vocal Wizard selects and transposes the song to the best key for a singer’s vocal range.
This button launches the Chord Options dialog box, which allows you to add chord pushes, rests, shots, and held chords for any given bar.
The grace note button opens the Melody Embellisher dialog for customizing the Melody Embellisher.
You can convert your composition to an audio CD. Press the CD button to burn a CD with the built-in CD burner program.
This button connects to the www.pgmusic.com web site.
If you have a Sound Blaster card, this button runs the Creative Mixer.
This button opens the Notation window, where you can enter chords and lyrics, edit notation, and view MIDI notation in “note roll” style.
The Lead Sheet notation is a full-screen notation window with optional Fake Sheet mode that shows 1st and 2nd endings, repeats, and codas.
Launches the Piano Roll window for editing the Melody or Soloist tracks in a piano roll format, including graphic controller editing.
|
36 |
Chapter 4: The Main Screen |

The Audio Edit window displays a graphical waveform and allows editing. Hold Shift when pressing to open a moveable window.
Use the Print button to launch the Print Options dialog, which allows you to print Lead Sheet or Fake Sheet style notation.
The Drum button launches an animated Drum Kit window. Press it to launch this fully functional (and fun) GM-MIDI “virtual” drum kit.
The Song Title button generates a song title for the current song. Each time it is pressed a new title is generated.
This button opens the Big Lyrics window for full screen “Karaoke-style” scrolling lyrics.
The Audio VU meters display the input volume for audio recording and the output volume for audio playback.
There’s a Lyric Document window so you can easily copy and paste lyrics to and from your favorite word processor.
This button opens the Windows Recording mixer where you set your recording inputs. Select Microphone or Line-in to record audio.
The [Pref] button will bring up a dialog box where you can set various settings all at once and access most of the program options.
The StyleMaker button opens the current style in the StyleMaker, allowing you to edit the style by editing the patterns.
This button opens the “Hybrid Styles” feature that allows you to create a new style by using instrument parts from up to five different styles.
This opens the Style Creation Wizard dialog, where Band-in-a-Box will automatically convert a MIDI file into a Band-in-a-Box style.
This is the Chord Builder button. Chords may be heard and entered to the chordsheet by clicking in this dialog.
The MIDI Monitor button launches a MIDI Monitor that displays the MIDI Data flowing in and out of your computer/synth.
The tuner button opens the Guitar Tuner so you can tune a guitar or other instrument that is plugged into the sound card.
The SB button opens the Sound Blaster control panel, but only if you use a Sound Blaster card. Sound fonts are loaded in the control panel.
This button toggles the chord display among standard (CMaj7), Roman Numeral (Imaj7), Nashville (1Maj7), and Solfeggio (DoMaj7).
This runs the stand-alone Title Generator program, which will generate and print 50 new song titles at a time.
|
Chapter 4: The Main Screen |
37 |

Title Window
The Title window shows the basic information about the current song at a glance — its title, style, key, tempo, and the length and number of choruses. It also gives quick access to the Song List, the StylePicker, Memos, and Song Settings.
The [Song] button launches the Load Song by Full Titles dialog box.

 The [F] favorites button opens a list of the last 150 songs played.
The [Style] button launches the StylePicker window. This window offers detailed information about each style.

 The [F] favorites button opens a list of the last 150 styles chosen.
The names of the last five songs are listed at the bottom of the File menu, and are numbered from 0 to 4.
The Song Title window allows you to enter the name of a song.
Click in the box with your mouse to start an insertion cursor and type in the name of your song. The title is automatically included when the song is printed.
Style Display Window
This window displays the current style in use.
Key Signature
The key signature of the song is displayed on the main screen under the title. To change the key, click on the key signature to choose a new key from the dropdown list box. Band-in-a-Box will offer to
transpose the chordsheet to the new key signature.
Tempo Control
The current tempo displays in the Title window, with controls for easy tempo settings and adjustments.
Click the mouse on the spin control arrows to raise or lower the tempo in by 5 bpm (beats per minute) at a time. Use a right mouse click on the tempo arrows to change the tempo by 1 bpm at a time.
Tap the [=] key on the number row of your computer keyboard for 4 beats to set the tempo and start the playback immediately at that tempo. (Or click the [=] button on the screen with your mouse pointer.)
Tap the [-] key on the number row of your computer keyboard (see illustration above) for 4 beats to set the tempo. Or click the [-] button on the screen with your mouse pointer.
Chorus Control
The Chorus Control buttons are used to set the overall format of your song.
Chorus Begin button: Click on the Chorus Begin Button to select the first bar of the chorus. The Bar number that you select is displayed.
|
38 |
Chapter 4: The Main Screen |

Chorus End button: Click on the Chorus End Button to select the last bar of the chorus. The Bar number that you select is displayed.
The number of choruses possible for a tune is 40. Click on the chorus button and choose how many choruses you require.
As the song is playing the current chorus is displayed at in the chorus button. 2/3 shows that the second of three choruses is playing.
If you change the number of choruses, Band-in-a-Box will offer to fill up or remove choruses of the Melody track to match the new number of choruses.
Title window checkboxes
When the loop checkbox in the Title window is checked, the song plays endlessly until stopped by the [Esc] key, the space bar, or the [Stop] button. At the end of the song, it plays again from the start.
Enables fake sheet mode for the chordsheet with 1st and 2nd endings and repeats. Right click to autodetect repeats.

 The Wizard is an intelligent play along feature that uses your QWERTY keyboard as a substitute for an external MIDI piano-style keyboard. Toggle this checkbox “on” to play along with Band-in-a-Box.
During playback, the Melody Embellisher changes timing of notes, durations, velocities, legato, as
well as adding grace notes, additional notes, and “turns.” It is turned on and off by the Embellisher checkbox on the main screen. Embellisher settings are accessed from the menu item Melody | Embellisher or the Embellisher button on the toolbar.
Press the [S] button, or choose Edit | Settings (for This Song)… to select additional settings for the current song.
The [Memo] button allows you to put in a memo to a song. You can type in a memo or you can paste text from the Windows clipboard.
Loop Section Settings
The loop button launches the Loop Section Settings dialog, allowing you to set a range of bars to loop in Band-in-a-Box.
The LoopSec/LoopScn checkbox turns the Loop Section on/off. When it shows LoopSec a selected range of bars repeats in an endless loop. LoopScn indicates a screen of notation is looping.
Chordsheet Area
Chords, rests, shots, holds, and part markers are entered in the Chordsheet.
The chordsheet can be viewed in the full linear view showing all bars, or optionally in fake sheet view that shows 1st and 2nd endings and repeat signs. Another option shows bars past the end of the song in gray.
|
Chapter 4: The Main Screen |
39 |

Chord Entry
The basic way of entering a song into Band-in-a-Box is to type in the chords to the song on the chordsheet (worksheet). The arrow keys move the active (highlighted) cell around in the chordsheet. The Enter key advances to the next ½ bar. Chords can be entered from the QWERTY keyboard or an external MIDI keyboard (see Window | MIDI Chord Detection…).
Chords are typed in using any of the supported chord symbol displays:
1.Standard chord symbols (e.g., C or Fm7 or Bb7 or Bb13#9/E).
2.Roman numerals (Imaj7).
3.Nashville Notation (1Maj7).
4.Solfeggio (DoMaj7).
Notes: It is not necessary to type upper or lower case. The program will sort this out for you. Any chord may be entered with an alternate root (“Slash Chord”) e.g.: C7/E = C7 with E bass. Separate chords with commas to enter 2 chords in a 2 beat cell, e.g., Dm, G7
Shortcut Chords:
If you enter a lot of songs, you’ll appreciate these shortcut keys.
—J = Maj7
—H = m7b5 (H stands for Half diminished)
—D = dim
—S = Sus
Example: To type CMaj7, just type CJ (it will be entered as CMaj7)
Add your own chord shortcuts.
You can make your own shortcuts text file and name it bbshortcut.txt. This allows you to add new chord shortcuts. (Note that this file doesn’t ship with Band-in-a-Box or it would overwrite your file.)
If you find a chord that Band-in-a-Box won’t accept like Csus2 (it expects C2), you can enter this on a single line (without the quotes) “Csus2@C2.” Then Band-in-a-Box will enter the chord C2 if you type in Csus 2.
Play Selected Area as a Loop
To use this function, select a region on the Chordsheet
.
Click on the[Loop] button, Shift-click on the [Play] button, or press F10 (Play Selected Area as Loop) and the program will play a selected region, and loop the selection. For example, you can select bars 19 and 20, and then press F10, and bars 19 and 20 will play looped.
|
40 |
Chapter 4: The Main Screen |
![]()
Chapter 5: Guided Tour of Band-in-a-Box
With Band-in-a-Box you can arrange, record, save, and print your own song ideas. Just type in the chords to any song; choose a style and press [Play] to hear the “band” play a full arrangement. Then record a Melody — either MIDI or live audio – or have Band-in-a-Box write an original Melody for you. Add Melody embellishments and harmony, an automatically improvised Soloist, an Intro, and print out a multi-part Lead Sheet or a Fake Sheet with repeats and endings in a “handwritten” Jazz font. Edit the notes for the Melody or Soloist track in the Piano Roll window, with precision graphic editing of controllers. Use the Melody Pitch Tracking feature to “tweak” the pitch of your Band-in-a-Box audio track, and then add amazing “stylized” 4-part audio harmonies.
Loading and Playing Songs
Open any song file with the familiar dialog box, just like any other file on your disk.
Start song playback.
The [Loop] button plays the highlighted section of the chordsheet or notation in an endless loop. Click and drag the mouse to highlight a section of bars to loop.
Replays the song without regenerating the tracks, so the current arrangement is preserved. ( Save the song to a MIDI file to permanently save the arrangement.)
Stop song playback.
Pause playback with the [Pause] button; resume by pressing it again.
Jump to any bar in the song. Press the [From] button to choose which chorus and bar number to jump to.
The [Song] button opens the SongPicker window, a resizable window that lists all of the songs in the current directory and, optionally, its subdirectories. For example, if you get a song list of c:bb,
it can include songs in subfolders like c:bbstyles34. You can lock the SongPicker to always open in the same folder and use the same list to keep track of all songs on your disk.
The first time that you select the [Song] button Band-in-a-Box automatically writes the song list. The current folder name is displayed in the title bar, with the total # of songs displayed.
From then on, the SongPicker opens when the button is pressed and songs can be selected by title from the alphabetical list. Songs can be sorted by any of the column headings, like Song Title, File Name, Style, Tempo, etc. Check “Play when chosen” to automatically play the selected song.
|
Chapter 5: Guided Tour of Band-in-a-Box |
41 |

Band-in-a-Box SongPicker window.
The folder settings are at the bottom of the SongPicker.
 The Current Folder name is displayed.
The folder can be changed, either by:
1.Going “up” a folder (e.g. from c:bbstyles to c:bb).
2.Choosing a folder from recently used favorites folder.
3.Selecting the new folder.
When the new folder is chosen, the song list for that folder will be displayed. The song list may need to be rebuilt; the program will do that automatically.
If the “Always open in this folder” item is selected, the song picker will always open up in the specified folder. So if you put all of your songs in c:songs, you can make the SongPicker always open to the c:songs folder!
If “Include Subfolders” is selected, the SongPicker list will contain songs from the folder and any subfolders. So if
|
42 |
Chapter 5: Guided Tour of Band-in-a-Box |

you have subfolders to c:songs like c:songscountry and c:songsjazz, you can see/search all of these songs in the same SongPicker dialog.
Tip: If you choose c: as your folder, the SongPicker would find every Band-in-a-Box file on your hard drive and display it in the SongPicker. You might instead find it easier to put all of your songs within a folder like c:songs, and have various subfolders to that. And then set the SongPicker to always open up in the c:songs folder. Then you’ll have access to all of your songs easily.
 Use the Favorites folder button to jump to other folders easily.
Once you’ve loaded a song you’ll see the chords on-screen in the chordsheet so you can follow the chord changes and play along with the band.
Chordsheet Options
You can set up the chordsheet with your own preferences. Go to Opt. | Preferences or choose the [Pref] toolbar button to open the Preferences, and click on the [Display] button to open the Display Options.
In the Chordsheet area you can pick a chordsheet font and the number of rows to display, as well as other options for the chordsheet display.
Transpose Chordsheet option
The “Transpose” option is also found in the Display Options dialog. It is useful for non-concert pitch instruments like Tenor Saxophone. This option is also available on the Notation window.
Play along with your MIDI Controller Keyboard
If you have an external MIDI keyboard controller connected to your computer system, you can use the MIDI THRU features to play along with the program, including the Harmony feature.
When playing along on a keyboard to the Band-in-a-Box “band,” if the sound of your keyboard is too quiet and increasing the THRU Volume doesn’t help
enough, use this option to boost the THRU velocity and make your THRU playing louder. (For example, nonvelocity sensitive keyboards are usually set to output a quiet velocity of 64). To set this “THRU velocity boost,” open the MIDI Settings dialog (Opt. | Preferences | Channels). Click on the [Options] button and set “Boost THRU Velocity by” to a value in the range of –127 to +127 in the MIDI Options dialog. (Default is 0.)
|
Chapter 5: Guided Tour of Band-in-a-Box |
43 |

Harmonize your play along part by pressing the [T] button in the Synth window to choose a harmony, just as you would for the Melody.
Change the Style
Try different styles by clicking on the [Style] button to choose from a list of the styles available in the StylePicker window. Styles that have the same feel (triplets, eighths, sixteenths) and a
similar tempo range to the current prototype will be indicated with an (*) asterisk. Styles with (^) caret have a similar feel but a different tempo range.
Band-in-a-Box StylePicker window.
You can also change the style at any bar in the song, so you could use a few similar styles to add variety while keeping the same feel.
Change the Sound
You’ll find the Synth window at the top of the screen. Select an instrument part by clicking its name. The black dot beside the name indicates the selected part. Any changes to the Instrument, Volume, Reverb, Chorus, Bank, etc. will apply to that part. Change the instrument patch by scrolling through the 128 General MIDI instrument names in the Instrument box, even while the song is playing.
|
44 |
Chapter 5: Guided Tour of Band-in-a-Box |

The Band-in-a-Box Synth window controls instrument settings.
Solo an Instrument Part
While listening to Band-in-a-Box, you can easily solo (isolate) a certain part by holding the Control key and mouse clicking (left or right) on the instrument at the top of the screen. For example, if you want to hear only the Piano part, Control-Click on the Piano part. If you want to use hot keys for this, you can press Alt+2 (Mute-All) and then Alt+4 (Unmute Piano).
Mute All Parts
To mute/unmute all parts as the song is playing, simply press Alt+2 or right-click on the “Combo” radio buttons at the top of the screen.
Play Selected Area as a Loop
To use this function select a region on the Chordsheet.
Click on the[Loop] button, Shift-click on the [Play] button, or press F10 (Play Selected Area as Loop) and the program will play a selected region, and loop the selection. For example, you can select bars 19 and 20, and then press F10, and bars 19 and 20 will play looped until Stop is pressed.
Loop any Section of the song.
You can loop any section of the song. The program will then start playback at the first loop point and play the looped section until stop is pressed or looping is turned off. This feature is handy for looping a full chorus or other section of a song for practice or performance.
Looping of a section of the song is enabled by the “LoopSec” checkbox or with the keystroke
NUMPAD 1.
Open up the Loop Section Settings dialog by clicking the Loop button, or pressing NUMPAD 2. The Loop settings dialog will then display.
Add a Melody – MIDI and/or Audio
Band-in-a-Box is much more than an intelligent arranger and accompanist.
You can record your live MIDI performance to the Melody track, enter a Melody in the Notation note-by- note, or use the Wizard to record from your computer keyboard.
|
Chapter 5: Guided Tour of Band-in-a-Box |
45 |

Enable the Embellisher, and the Melody will be embellished as it plays. You hear a livelier, more realistic Melody, and it’s different every time. The Embellisher is only active while the music is playing; the recorded Melody track isn’t
affected. There is an option for the Embellisher to only humanize the timing of the music if the timing was “stiff” to begin with. This allows the Embellisher to leave the timing of human input melodies alone, and humanize only the ones that were entered in step-time.
You can record an audio track of your live vocal or instrumental performance and save it to an audio wave file along with the Band-in-a- Box accompaniment. Make sure that you have a microphone plugged in to your sound card, or a connection from a mixer, keyboard, or other audio device connected to the Line In jack on your sound card.
A Mono or Stereo WAV file can be imported to the Audio track, optionally merging with or replacing any existing audio track. Choose the menu item Audio | Import WAV File. You then choose a WAV file to import. The Import WAV dialog is then displayed, which allows selection of the point to insert the WAV file, and whether to merge or overwrite existing audio in the range.
Harmonize the MIDI Melody
Press the [M] button in the Synth window to add a MIDI harmony to the
Melody track.
Pressing the [F] favorites button brings up a list of the last 50 harmonies used.
The Select Melody Harmony dialog box allows you to choose from any of the pre-defined harmonies and even allows you to define your own.
|
46 |
Chapter 5: Guided Tour of Band-in-a-Box |

Play Along with the Wizard
The Wizard is an intelligent play along feature that is controlled with the bottom two rows of your computer’s QWERTY keyboard. The bottom row of keys plays chord tones; the second row plays passing tones. You play any key in either row and never make a mistake!
In the Play menu, toggle Wizard uses “Smart” notes to “off” (unchecked) to have the Wizard provide you access to the chromatic scale. Toggle it “on” to have access only to the notes based on the chord/key of the song.
This also allows you to record to the Melody or Soloist track without an external MIDI keyboard, and can even be used to trigger the Soloist Wizard. Also, play along using the Wizard works with the harmony feature, so you can play along live from your QWERTY keyboard in 4-part saxophone harmony for example.
Playing the Wizard
The Wizard Keys are active during playback. The active keys are the lower 2 rows of the keyboard.
Changing Instruments / Settings for the Wizard
As a play along instrument, the Wizard uses the Thru instrument part. To change the instrument patch, volume, reverb, etc. for the Wizard select the Thru instrument in the synth window.
Add a Solo — “The Soloist”
That’s right! Band-in-a-Box can “solo like a pro” in over 200 styles.
Use the [Soloist] button on the main screen to open the Select Soloist dialog box and choose from over 200 Soloist profiles.
|
Chapter 5: Guided Tour of Band-in-a-Box |
47 |

Use the preset Soloist settings, or choose a Mode and which Choruses to solo.
The Soloist Maker [Edit…] button gives access to the advanced settings in the Soloist Editor where you can edit existing profiles or create new Soloists of your own.
To see the Soloist part play in standard music notation open the Notation window and press the [S] button at the far right of the instrument buttons.
View and Print Notation
Open the Notation window with the Notation button. You will see standard notation on the grand staff.
There are 3 notation modes in Band-in-a-Box, the [N] button in the Notation window toolbar toggles through the three modes;
1.Standard Notation for display of notes, chords, lyrics, and optional guitar tablature as well as entering chords and lyrics.
2.Editable Notation to enter or edit notation with the mouse.
3.Note roll Notation works like the Editable Notation plus note velocities and durations can be viewed and edited with the mouse.
Standard Notation Window
Click on the instrument buttons to see the notation for the different parts: Bass, Drums, Piano, Guitar, Strings, and the Melody [M], or the Soloist [S].
Band-in-a-Box Standard Notation window.
The Standard Notation window can be used for notation display and the entry of chords and lyrics. Just type a chord name and it will be inserted at the current time line location (the black vertical stripe just below the notation tool bar.)
Toggle between Standard, Editable, and Note roll notation modes with the [N] button.
Press the [Opt.] button to set Notation window options such as track type, bar resolution, lyric font size, and position, transpose options, and Regular or Jazz fonts.
This button opens the Lead Sheet window, which provides a full screen of notation either for an individual instrument or for multiple instruments that you choose to view together by clicking the instrument buttons while holding the Ctrl key.
|
48 |
Chapter 5: Guided Tour of Band-in-a-Box |

Print out any part with the Print Button. In the Print Preview window save your notation as a graphic file to upload to the Internet or to e-mail.
The [#] button opens the Event List for editing the Melody or Soloist tracks.
This is the button for note-based lyrics, which are automatically aligned with the corresponding note in the Melody track.
Use the plus and minus buttons to zoom the Notation in and out.
The text button lets you enter section text or boxed text into the notation.
When the Scrub button is selected, notes will play as the mouse is dragged over them while holding down the left mouse button.
Editable Notation Mode
Click on the [N] button to go from Standard Notation to Editable Notation mode. Chords, lyrics, and text can be entered as in the Standard Notation window; the Editable Notation mode also permits point-and-click entry of notes and rests as well as drag-and-drop editing.
Band-in-a-Box Editable Notation window.
This is the screen for step-entry of a melody or for editing existing parts. Note that each beat is sub-divided by either 3 or 4 broken vertical lines.
—Swing styles use 3 lines to divide each beat into eighth note swing triplets.
—Straight styles use 4 lines to divide each beat into sixteenth notes.
|
Example of swing (triplet) resolution. |
Example of straight (16ths) resolution. |
Tip: The edits you make to Band-in-a-Box accompaniment parts will be overwritten when the [Play] button is pressed and the program generates a new arrangement. To hear the song play as edited, use the [Replay] button found next to the [Play] button. Edited songs can be permanently saved as a MIDI file with the [.MID] button.
|
Chapter 5: Guided Tour of Band-in-a-Box |
49 |

Note roll Notation Mode
In addition to the editing features of the Editable Notation mode, in Note roll mode the velocity (vertical line) and duration (horizontal line) of notes can be edited with the mouse.
Piano Roll Window
You can edit your tracks using the “Piano Roll” window, similar to the type found in many sequencer programs. Edit the Melody or Soloist tracks with greater ease and precision. There are 2 panes in the window – one for notes and the other for controllers, velocity, and other data. All notes and controllers are displayed as black/gray bars on a grid. You can change note duration and pitch by selecting and dragging with your mouse.
The Piano Roll window enables precise graphic editing of note timing and duration. You can also graphically edit note velocity, controllers, program changes, channel aftertouch, or pitch bend.
|
50 |
Chapter 5: Guided Tour of Band-in-a-Box |