
Всем привет. Знаю что мало литературы по данному авто (а точнее того что хотелось бы вообще нет), поэтому предлагаю то что есть у меня, вполне может кому пригодится.
Блокнот механика — можно посмотреть данные по затяжкам, некоторые моменты ремонта, заправочные объемы.
Ссылка для скачивания
Руководство по эксплуатации — оно идет вмнсте с авто но многие его утрачивают.
Ссылка для скачивания
Есть еще некоторая литература по др моделям.
Машины в продаже
Комментарии
25
Войдите или зарегистрируйтесь, чтобы писать комментарии, задавать вопросы и участвовать в обсуждении.
Все комментарии
инструкцияCitroën C4 Picasso (2007)

IN BRIEF
I
4
E X T E R I O R
Panoramic glass roof
Xenon directional
headlamps
Whether on dipped beams
or main beams, this func-
tion allows your headlamps
to follow the direction of the
road ahead.
Opening rear screen
Pneumatic rear
suspension
The rear pneumatic suspen-
sion enhances driving comfort
and maintains a constant body
height whatever the vehicle
load.
: 138
: 94
: 145
Exterior side
lighters
These light up the zones fac-
ing the driver’s and passen-
ger’s doors.
Front/rear parking
assistance
Sensors located in the
bumpers detect obstacles.
: 95-96
Parking space sensor
Measures the size of a space
and informs you of the possi-
bility of parking.
: 76-77
Посмотреть инструкция для Citroën C4 Picasso (2007) бесплатно. Руководство относится к категории Автомобили, 105 человек(а) дали ему среднюю оценку 8.7. Руководство доступно на следующих языках: английский. У вас есть вопрос о Citroën C4 Picasso (2007) или вам нужна помощь? Задайте свой вопрос здесь
Главная
Не можете найти ответ на свой вопрос в руководстве? Вы можете найти ответ на свой вопрос ниже, в разделе часто задаваемых вопросов о Citroën C4 Picasso (2007).
Не нашли свой вопрос? Задайте свой вопрос здесь
Смотрите тему до конца. Не всё выложено в первом посте.
Это НОВАЯ версия FAQ. В неё перенесено ещё далеко не всё, потому смотрите и тут:
http://citroens-club.ru/forum/index.php?showtopic=16660
Если Вы заметили ошибку, или хотите дополнить FAQ, или попросить выложить ещё какую-либо документацию, пишем ТУТ
Общая информация по машине. Теория. Принципы работы. И тому подобное.
LEXIA. Настройки компьютеров
1. Инфодиаг 422. Параметры BSI не забываем говорить спасибо автору
————————————————————————————————————
Коммерческая гамма C4 Picasso коммерческая гамма C4Picasso.pdf
Массовые характеристики массовые характеристики.pdf
Технические и рабочие характеристики технические и рабочие характеристики C4Picasso.pdf
Цвета кузова C4 Picasso цвета кузова C4Picasso_1.pdf
Цвета кузова 2 цвета кузова.pdf
Рекомендуемые расходные материалы 2011 год рекомендуемые расходные материалы 2011.pdf
Презентация механических узлов презентация механических узлов.pdf
Презентация системы кондиционирования презентация система кондиционирования.pdf
Принцип работы системы кондиционирования принцип работы система кондиционирования.pdf
Принципы работы: кондиционер принципы работы кондиционер.pdf
Принципы работы: удаление инея и конденсата принципы_работы_удаление_инея_и_конденсата.pdf
Презентация стеклоочистителей, стеклоомывателей презентация стеклоочиститель стеклоомыватель.pdf
Презентация электрического стояночного тормоза презентация стояночный тормоз с электроприводом.pdf
Презентация: управление открывающимися элементами кузова презентация управление открывающимися элементами кузова.pdf
Принцип функционирования: BSI1 принцип функционирования BSI1.pdf
Принцип функционирования: BSM принцип функционирования BSM.pdf
Презентация ESP, ABS презентация ESP ABS.pdf
Принцип функционирования: внутреннее освещение принцип функционирования внутренее освещение.pdf
Принцип работы: внешнее освещение принцип работы — внешнее освещение.pdf
Принцип работы: сигнализация принцип работы — сигнализация.pdf
Принцип функционирования: Просыпание и засыпание мультиплексных сетей принцип функционирования засыпание и просыпание мультиплексных сетей.pdf
Принцип функционирования: Помощь при парковке (парковочный радар, система определения свободного места) принцип функционирования помощь при парковке.pdf
Колёса:
Стальные диски колёса стальные диски.pdf
Легкосплавные диски колёса легкосплавные диски.pdf
Технические руководства.
Общие. Для C4 Picasso и C4 Grand Picasso.
Замена: лобовое стекло замена лобовое стекло.pdf
Ремонт лобового стекла: материалы и продукты ремонт лобового стекла материалы и продукты.pdf
Ремонт: Принципы ремонта лобового стекла ремонт принципы ремонта лобового стекла.pdf
Контроль: степень износа тормозных дисков контроль передний задний тормозной диск степень износа.pdf
Контроль и регулировка заднего стеклоочистителя контроль-регулировка механизм заднего стеклоочистителя.pdf
Контроль и регулировка фар (ТО) контроль-регулировка фары.pdf
Снятие, установка: фары снятие-установка фары.pdf
Снятие, установка, регулировка ПТФ: передние ПТФ снятие-установка передние ПТФ.pdf
Снятие, установка: омыватель фар снятие-установка омыватель фар.pdf
Слив, заполнение, прокачка: тормозная система слив-заполнение-прокачка тормозная система.pdf
Снятие, установка: воздушный компрессор подвески снятие-установка воздушный компрессор подвески.pdf
Снятие, установка: датчик давления в шинах снятие-установка датчик давления в шинах.pdf
Снятие, установка: декоративная накладка щели ветрового стекла снятие-установка декоративная накладка щели ветрового стекла.pdf
Снятие, установка: задние тормозные колодки (ТО) снятие-установка задние тормозные колодки.pdf
Снятие, установка: задний тормозной суппорт снятие-установка задний тормозной суппорт.pdf
Снятие, установка: ступица заднего тормозного механизма снятие-установка ступица заднего тормозного механизма.pdf
Снятие, установка: передние тормозные колодки (ТО) снятие-установка передние тормозные колодки.pdf
Снятие, установка: суппорт переднего тормоза снятие-установка суппорт переднего тормоза.pdf
Снятие, установка: передние тормозные диски снятие-установка передние тормозные диски.pdf
Снятие, установка: решётка воздухозаборника снятие-установка решётка воздухозаборника.pdf
Снятие, установка: аккумулятор (АКБ) http://citroens-club…ndpost&p=797155
Снятие, установка: боковые зеркала заднего вида: см. Разборка, сборка: передняя дверь
Разборка, сборка: наружные зеркала заднего вида разборка-сборка Наружные зеркала заднего вида.pdf
Снятие, установка: дефлектор под двигателем Снятие – установка _ Дефлектор под двигателем.pdf
Снятие, установка: топливный бак
Снятие, установка: узел в сборе — топливный насос и датчик уровня топлива
Снятие, установка: поворотный кулак
Снятие, установка: шаровая опора поворотного кулака
салон:
Снятие, установка: модуль солнцезащитного козырька снятие-установка модуль солнцезащитного козырька.pdf
Разборка, сборка: модуль солнцезащитного козырька разборка-сборка модуль солнцезащитного козырька.pdf
Снятие, установка: консоль крыши снятие-установка консоль крыши.pdf
Разборка, сборка: переднее сиденье разборка-сборка переднее сиденье.pdf
Снятие, установка: передние ремни безопасности снятие-установка передние ремни безопасности.pdf
Снятие, установка: переднее сиденье снятие-установка переднее сиденье.pdf
Снятие, установка: фильтр салона снятие-установка фильтр салона.pdf
Разборка, сборка: передняя дверь разборка-сборка передняя дверь.pdf
Снятие, установка: механизм переднего стеклоочистителя снятие-установка механизм переднего стеклоочистителя.pdf
Снятие, установка: вентиляционные дефлекторы приборной панели снятие-установка вентиляционные дефлекторы приборной панели.pdf
Снятие, установка: микроэлектродвигатели распределения и смешивания воздуха в салоне снятие-установка микродвигатели распределения и смешивания воздуха в салоне.pdf
Снятие, установка: коленная подушка безопасности водителя снятие-установка коленная подушка безопасности водителя.pdf
Снятие, установка: подушка безопасности водителя (в руле) снятие-установка подушка безопасности водителя.pdf
Снятие, установка: крышка нижнего правого перчаточного ящика снятие-установка крышка нижнего правого перчаточного ящика.pdf
Снятие, установка: панель управления снятие-установка панель управления.pdf
Снятие, установка: приборная панель снятие-установка приборная панель.pdf
Разборка, сборка: приборная панель разборка-сборка приборная панель.pdf
Снятие-установка: ШТАТНАЯ аудиосистема USB-BOX с USB-разъёмом вместо розетки рядом с прикуривателем снятие-установка ШТАТНАЯ аудиосистема USB-BOX с USB рядом с прикуривателем.pdf
Снятие, установка: приемная антенна системы блокировки замков снятие-установка приемная антенна системы блокировки замков.pdf
Снятие, установка: привод переключения передач, разборка рулевого колеса снятие-установка Привод переключения передач, разборка рулевого колеса.pdf
Снятие, установка: рулевое колесо снятие-установка Рулевое колесо.pdf
C4 Picasso
Габаритные характеристики C4 Picasso 5 мест габаритные характеристики.pdf
Снятие, установка и регулировка двери багажного отделения снятие-установка-регулировка дверь багажника.pdf
Снятие, установка спойлера двери багажника снятие-установка спойлер двери багажника.pdf
Разборка, сборка двери багажного отделения разборка-сборка дверь багажного отделения.pdf
Снятие, установка заднего бампера снятие-установка задний бампер.pdf
Разборка, сборка заднего бампера разборка-сборка задний бампер.pdf
Снятие, установка переднего бампера снятие-установка передний бампер.pdf
Разборка, сборка переднего бампера разборка-сборка передний бампер.pdf
Разборка, сборка задних боковых дверей разборка-сборка задняя дверь.pdf
Разборка, сборка сидений второго ряда разборка-сборка сиденья второго ряда.pdf
C4 Grand Picasso
Габаритные характеристики C4 Grand Picasso 7 мест габаритные характеристики 7мест.pdf
Снятие, установка, регулировка двери багажного отделения снятие-установка-регулировка дверь багажника 7мест.pdf
Разборка, сборка двери багажного отделения разборка-сборка дверь багажного отделения 7мест.pdf
Снятие, установка спойлера двери багажного отделения снятие-установка спойлер двери багажного отделения 7мест.pdf
Снятие, установка: механизм заднего стеклоочистителя снятие-установка механизм заднего стеклоочистителя 7мест.pdf
Снятие, установка стекло двери багажника снятие-установка стекло крышки багажника 7мест.pdf
Снятие, установка шарниров крышки багажника снятие-установка шарниры крышки багажника 7мест.pdf
Снятие, установка задних фонарей снятие-установка задние фонари 7мест.pdf
Снятие, установка заднего бампера снятие-установка задний бампер 7мест.pdf
Разборка, сборка заднего бампера разборка-сборка задний бампер 7мест.pdf
Снятие, установка переднего бампера снятие-установка передний бампер 7мест.pdf
Разборка, сборка переднего бампера разборка-сборка передний бампер 7мест.pdf
Снятие, установка рейлингов (КРЫША) снятие-установка рейлинги 7мест.pdf
Снятие, установка внутренней облицовки, панелей снятие-установка внутренняя облицовка 7мест.pdf
Снятие, установка: отделка потолка (КРЫША) снятие–установка отделка потолка 7мест.pdf
— панель отделки форточек, панели отделки стойки двери снятие-установка внутренняя облицовка 7мест.pdf
— модуль солнцезащитного козырька — см. раздел «салон»
Снятие, установка: снятие задних ремней безопасности снятие-установка задние ремни безопасности 7мест.pdf
Снятие, установка: сиденья третьего ряда снятие-установка третий ряд сидений 7мест.pdf
Разборка, сборка сидений второго ряда (СИДЕНЬЯ) разборка-сборка сиденья второго ряда 7мест.pdf
Разборка, сборка сидений третьего ряда (СИДЕНЬЯ) разборка-сборка сиденья третьего ряда 7мест.pdf
Двигатели.
EW7A Значения для проверки и регулировки ew7a.pdf
EW10A Значения для проверки и регулировки ew10a.pdf
EP6 Значения для проверки и регулировки ep6.pdf
EP6DT Значения для проверки и регулировки ep6dt.pdf
DV6TED4 Замена ГРМ снятие-установка ГРМ DV6TED4.pdf
DV6TED4 снятие-установка интегрированная система впуска воздуха DV6TED4.pdf
DV6TED4 снятие-установка радиатор кондиционера.pdf
DV6TED4_BVMP6 DV6TED4_BVMP6_слив-прокачка система охлаждения.pdf
DV6TED4 Снятие-установка: форсунка двигателя DV6TED4-Снятие – установка_ Дизельная форсунка.pdf
1.6 HDI Снятие – установка _ Эластичный ремень привода навесного оборудования (с холодильным компрессором) 1.6 HDi Снятие – установка _ Эластичный ремень привода навесного оборудования (с холодильным компрессором).pdf (thx Popesych)
EW7A EW10A Замена ГРМ снятие-установка ГРМ EW7A EW10A.pdf
EW7A EW10A Функция: охлаждение двигателя функция охлаждение двигателя EW10A EW7A.pdf
EW10A Функция: питание воздухом функция EW10A питание воздухом.pdf
EW10A Замена: ремень привода навесного оборудования EW10A_замена_ремня_привода_навесного_оборудования.pdf
EW7A EW10A Функция: принудительное охлаждение системы кондиционирования воздуха BRAC функция принудительное охлаждение системы кондиционирования воздуха BRAC EW10A EW7A.pdf
EW7A Малобюджетная замена датчика кислорода (BOSH для «Калины») на двигатель EW7A
EP6 Функция: зажигание функция Зажигание EP6.pdf
EP6 Функция: питание топливом функция Питание топливом EP6.pdf
EP6DT Функция: зажигание функция Зажигание EP6DT.pdf
EP6DT Функция: питание воздухом функция Питание воздухом EP6DT.pdf
EP6DT Cнятие, установка: ремень привода навесного оборудования снятие-установка ремня привода навесного оборудования EP6DT.pdf
САМАЯ ПРАВИЛЬНАЯ ИНИЦИАЛИЗАЦИЯ ДРОССЕЛЬНОЙ ЗАСЛОНКИ (EW7A ??)
Изменено 22 июля, 2016 пользователем Бес
- Главная
- Citroen
- C4
- Книга по эксплуатации Citroen C4 Picasso 2007 — 2009 гг.
Год выпуска:
2007 — 2009 гг.
Найдено 9 книг стоимостью от 501 руб.
Быстро купить книгу в оригинальной качественной версии PDF от издательства
Купить бумажную версию книги с доставкой по вашему адресу
Скачать руководство с предоставленного файлообменника
Предлагаем ознакомиться и скачать для личного пользования руководство по ремонту Citroen C4 Picasso, а также правила по правильной эксплуатации и проходящему техобслуживанию данной марки авто. В книге есть возможность лучше узнать устройство автомобилей Citroen C4 Picasso с 2007 по 2009 год выпуска. Эта марка авто снабжается не только бензиновыми двигателями обьемом 1,6, 1,8, 2,0 литра, но и дизелями объемом 1,6 и 2,0 литра.
В предлагаемом для скачивания пособии Citroen C4 Picasso есть описание для следующих марок двигателей, на топливе — бензине:
- Рабочим объемом 1,6 литров 16V (120 лошадиных сил);
- Рабочим объемом 1,6 литров 16V (140 лошадиных сил, турбо);
- Рабочим объемом 1,8 литров 16V (127 лошадиных сил);
- Рабочим объемом 2,0 литров 16V (145 лошадиных сил).
А также дизели:
- Рабочим объемом 1,6 литров HDi 16V (110 лошадиных сил, турбо);
- Рабочим объемом 2,0 литров HDi 16V (138 лошадиных сил, турбо).
В нашей книге мы на наглядных примерах в виде схем и цветных фотографий показали процессы сборки и разборки Citroen C4 Picasso, показали, как проводить диагностику и ремонт оборудования.
Похожие руководства на сайте
 Loading…
![]()
I E X T E R I O R
IN BRIEF
|
Panoramic glass roof |
|||
|
Xenon directional |
Opening rear screen |
||
|
headlamps |
|||
|
Whether on dipped beams |
: 138 |
||
|
or main beams, this func- |
|||
|
tion allows your headlamps |
|||
|
to follow the direction of the |
|||
|
road ahead. |
|||
|
: 94 |
|||
|
Pneumatic rear |
|||
|
Front/rear parking |
suspension |
||
|
The rear pneumatic suspen- |
|||
|
assistance |
sion enhances driving comfort |
||
|
Sensors located in the |
and maintains a constant body |
||
|
bumpers detect obstacles. |
height whatever the vehicle |
||
|
load. |
|||
|
: 95-96 |
: 145 |
||
|
Parking space sensor |
Exterior side |
||
|
lighters |
|||
|
Measures the size of a space |
These light up the zones fac- |
||
|
and informs you of the possi- |
ing the driver’s and passen- |
||
|
bility of parking. |
: |
76-77 |
ger’s doors. |
4

D
A
B
C
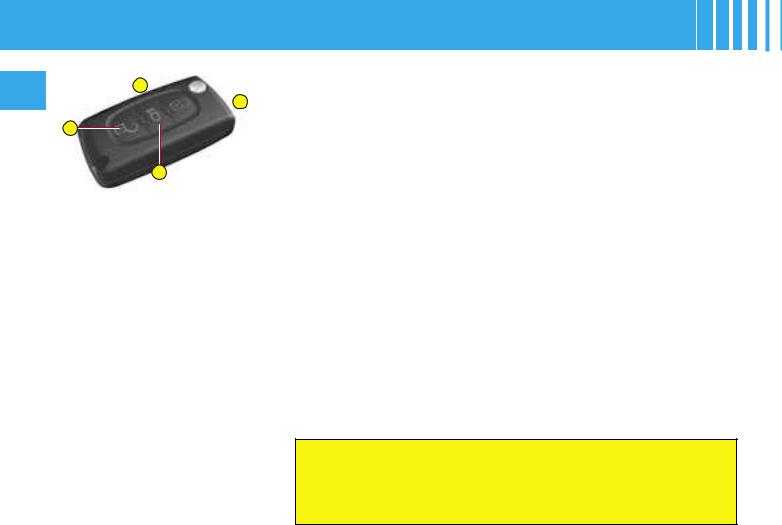
Remote control key
A.Central locking
B.Unlocking
C.Guide-me-home lighting
D.Key release/storage
: 22-23
|
O P E N I N G |
||
|
Bonnet opening/closing |
||
|
To unlock, pull the control |
locat- |
|
|
ed under the dashboard |
towards |
|
|
you. |
|
Bonnet stay : detach the stay and |
||||
|
pivot it upwards to insert it into the |
||||
|
notch. |
||||
|
To close : |
move |
the |
stay |
|
|
back |
to its |
initial |
position, |
|
|
lower |
the bonnet |
and |
then |
|
|
allow it to slam shut. |
||||
|
: |
163 |
I
|
B |
||
|
A |
BRIEF |
|
|
Fuel tank |
||
|
(60 litres) |
||
|
Press on control A located |
on |
|
|
the control panel to the left of |
the |
|
|
dashboard. The fuel flap automati- |
IN |
|
|
cally opens up fully. |
||
|
Insert the nozzle so as to push in |
||
|
the metallic gate valve B. |
||
|
Push the fuel flap to reclose it. |
||
|
: 162 |
||
|
After switching off the |
||
|
ignition, control A is only active |
||
|
for a few minutes. |
||
|
If necessary, switch on the |
||
|
ignition again to reactivate it. |
5 |
|
BRIEFIN
4 
2
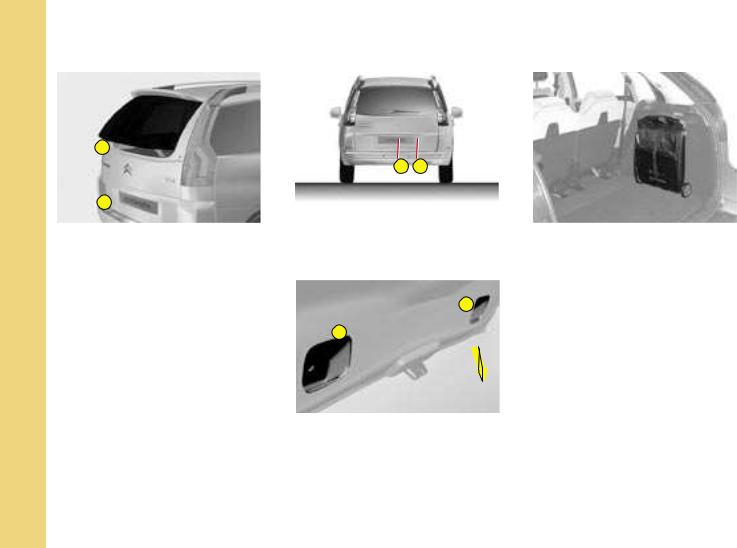
Opening rear screen
This opening gives you enhanced access to the boot, even if you are parked close to a wall or to another vehicle.
Opening
—Press on control 2. The handhold 4 is in line with the rear wiper.
Closing — Lower the rear screen.
: 138
|
1 |
2 |
||||
|
Opening the tailgate |
|||||
|
— Press on control 1. |
|||||
|
Note |
: |
You cannot |
open |
the |
tail- |
|
gate |
if |
the rear screen is already |
|||
|
open. |
|||||
|
3 |
|||||
|
3 |
Closing the tailgate
—Lower the tailgate, using one of the handholds 3, located on the inside of the tailgate trim.
—Past the balancing point, allow the tailgate to close itself (do not assist it or slow it down).
MODUBOX (22 kg maximum) C4 Picasso
The Modubox is composed of a shopping trolley and a flexible bag which can be used independently of each other depending on your needs.
: 140
6
|
B O O T |
I |
|
|
C4 Picasso |
Grand C4 Picasso |
|
|
Luggage cover in |
Luggage cover blind |
|
|
two sections |
: 139 |
: 142-143 |
Access to
spare wheel : 187
|
Pneumatic rear |
|||
|
suspension |
|||
|
Portable lamp |
Allows the height of the |
||
|
rear of the vehicle to be |
|||
|
: |
132 |
adjusted |
|
|
: 145-146 |
|||
PUNCTURE REPAIR KIT
The puncture repair kit is located either in the compartment under the left hand second-row passenger or in the boot well (according to equipment).
This puncture repair kit is a complete system including a compressor and a setting product.
: 185 7
|
I N T E R I O R |
C 4 |
|
T h i r d — r o w s e a t s – G r a n d |
3
G
|
To return the seats to the |
|
|
upright position |
|
|
Fold the concertina plates (1 |
2 3) |
|
arranged on each of the third-row |
|
|
seats. |
|
|
Pull on the black belt F located on |
|
|
the seat backrest. |
|
|
: |
119 |
|
To stow the seats |
|
|
Put the three sections of the con- |
|
|
certina plates (1 2 |
3) to their ver- |
|
tical position then |
pull on the red |
|
belt G. |
|
|
Before moving the third-row seats, |
|
|
return the rigid plates to the upright |
|
|
position and lock them. |
|
|
Do not leave objects either on or |
|
|
underneath the second-row seats |
|
|
when you are folding them. |
P i c a s s o
E
Access to third-row seats
Pull on control E located at the top of the second-row seats backrest.
: 118
8
|
T h i r d — r o w |
s e a t s – |
I N T E R I O R |
|
S e c o n d — r o w |
||
|
G r a n d C 4 |
P i c a s s o |
s e a t s |
|
Requirements for third-row |
|
|
passenger seat belts |
|
|
Take care to attach the third-row |
|
|
passenger seat belts on the rings |
|
|
provided for this purpose. |
|
|
Do not attach the |
belts on the |
|
anchoring points |
marked with |
|
a red cross (see illustration |
|
|
above). |
Stowing the tongue of the third-row seat belt
: 122
C D
D
TO FOLD THE SEATS
From outside
—Pull upwards on control C as indicated by the red arrow, to unlock the seat.
From the boot — whilst loading, for example (Grand C4 Picasso)
Having firstly folded the third-row seats.
—Pull on control D to unlock the required seat.
TO RETURN THE SEATS TO THE UPRIGHT POSITION
Return the rigid plates of the secondrow seats to their initial (upright) position and lock them in position (Grand C4 Picasso).
Raise the backrest and push it backwards until it locks in position.
: 117
I
A
|
RIGID PLATE |
BRIEF |
||||
|
(Grand C4 Picasso) |
|||||
|
A rigid |
plate is attached to |
each |
|||
|
second-row seat backrest. |
|||||
|
To unlock / lock the rigid plate : |
IN |
||||
|
— Slide |
latch A of the |
plate down- |
|||
|
wards, to unlock it. |
|||||
|
— Return the plate to |
the |
upright |
|||
|
position, then slide |
latch |
A up- |
|||
|
wards to lock it. |
|||||
|
Note : |
Before deploying the |
rigid |
|||
|
plates, |
check that the |
second-row |
|||
|
seats are slid as far back as |
pos- |
||||
|
sible. |
9
|
I N T E R I O R |
|||||||
|
S e c o n d — r o w s e a t s |
|||||||
|
D |
|||||||
|
C |
|||||||
|
B |
|||||||
|
A |
|||||||
|
THE « COMFORT » POSITION |
LONGITUDINAL ADJUSTMENT |
Positioning the central seat |
|||||
|
The 3 second-row seats are inde- |
Lift up |
control A, |
located at |
the |
belt |
||
|
pendent of each other and are all |
front of |
the seat, |
and adjust |
the |
— Insert tongue C into the buckle on |
||
|
the same width. They can all be ad- |
seat into the desired position. |
the |
right, then insert the second |
||||
|
justed to the « comfort » position. |
tongue D into the buckle on the |
||||||
|
left. |
|||||||
|
To place the seat(s) in the |
|||||||
|
comfort position |
|||||||
|
— Pull on control B. |
: |
121 |
|||||
|
The backrest reclines and the seat |
|||||||
|
base pivots slightly. |
|||||||
|
To return the seat to its original |
|||||||
|
position |
—Pull on control B and allow the seat to come forward.

|
D A S H B O A R D |
I |
||||
|
Automatic |
Manual and |
||||
|
electronic parking |
|||||
|
Passenger’s |
Instrument |
automatic gearbox |
|||
|
brake control |
Driver’s |
||||
|
air conditioning |
panel |
controls |
|||
|
controls |
air conditioning |
||||
|
controls |
|||||
|
Gear control |
Selector |
||||
|
levers |
IN BRIEF |
||||
Scented air freshener
|
Radio-CD |
|
|
Refrigerated |
Fixed centred |
|
controls steering |
|
|
storage |
wheel |
: 29 11
I
|
G E T T I N G |
S T A R T E D |
|
F r o n t |
s e a t s |
|
Manual adjustments |
|
|
Head restraint |
3
111
Armrest
Backrest angle
Driver’s seat height adjustment
Longitudinal adjustment
Lumbar support
|
Electric adjustments : |
||
|
|
Adjustment of seat height |
|
|
and angle, longitudinal |
||
|
|
adjustment |
|
|
Adjustment of backrest angle |
||
|
|
and lumbar support |
|
|
Driver : memorisation of |
||
|
driving positions |
||
|
Note : The seats can also be ad- |
||
|
justed on a temporary basis |
: |
—on opening one of the front doors,
—after switching on the ignition.
Heated seat control (located on the inside of the front seats)
: 112
|
G E T T I N G |
S T A R T E D |
I
|
A |
|
|
Adjusting the steering wheel |
|
|
The steering wheel can be adjusted |
|
|
in terms of height and reach. |
|
|
Unlock the steering wheel by pull- |
|
|
ing control |
A towards you. |
|
Adjust the |
position of the steer- |
|
ing wheel then lock it pushing the |
|
|
control back fully. |
|
|
: 86 |
2
1
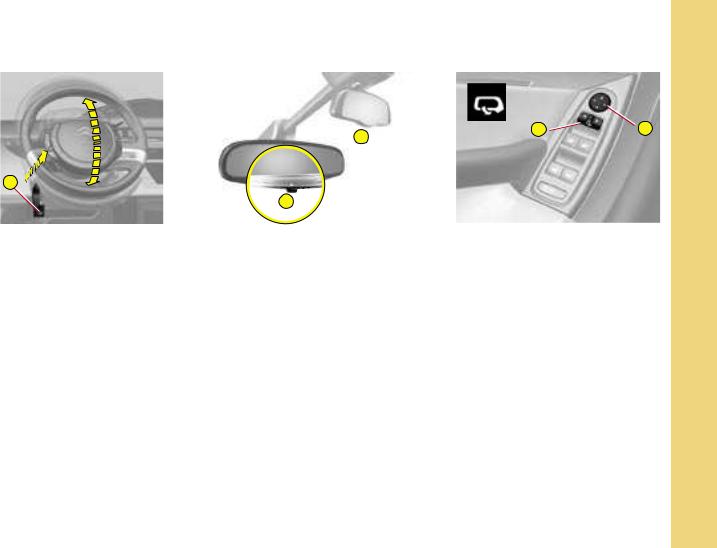
Automatic photochromic interior rear view mirror
This modifies its role automatically and progressively between day use and night use.
It can be deactivated using control 1.
Child mirror (2)
This allows you to monitor the rear passengers. It can be folded away to eliminate dazzle.
: 84
|
Rear view mirrors |
||
|
adjustment |
||
|
This operates with the ignition |
||
|
switched on. |
||
|
From the driver’s |
seat, select the |
|
|
rear view mirror by moving control |
||
|
1 to the left or right, then adjust |
||
|
the rear view mirror as required in |
||
|
the 4 directions using control 2. |
||
|
Demisting-deicing of the rear view |
||
|
mirrors is linked to that of the rear |
||
|
screen. |
||
|
Rear view mirrors foldback |
||
|
When the |
vehicle |
is parked, the |
|
rear view |
mirrors |
can be folded |
|
back either manually or automati- |
||
|
cally. |
||
|
: 85 |
BRIEFIN
13
![]()
I
|
G E T T I N G |
S T A R T E D |
IN BRIEF
|
Adjusting the seat belt |
||
|
height |
||
|
To adjust the seat belt, |
pinch |
the |
|
control and slide it in the direction |
||
|
required. |
||
|
: |
86 |
|
Electric windows |
||
|
controls |
||
|
From the driver’s |
seat |
position, |
|
the controls located on |
the door |
|
|
enable the electric windows to be |
||
|
controlled. |
||
|
: 97 |
Sliding sun visors
—Slide the blind on the visor to the desired position by pushing the area A.
|
The blinds are |
extended |
on |
the |
|
sun visor struts. |
—Fold the visor downwards, to protect against being dazzled.
|
Panoramic glass roof blind |
|
|
Opening (positions 1 to 9) |
|
|
Closing (position 0) |
|
|
The blind has an anti-pinch |
de- |
|
vice. |
: 87
14
|
1 |
A |
B |
|
2 |
||
|
3 |
||
|
4 |
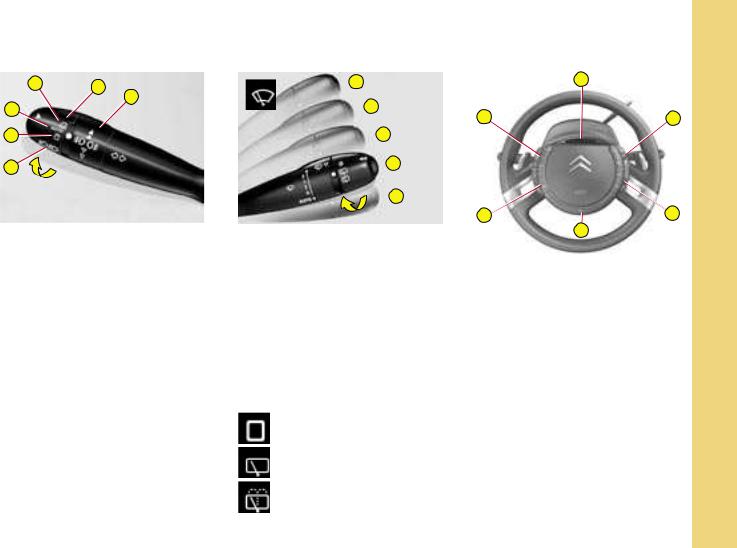
LIGHTING CONTROL
Ring A
1Off
2Automatic lighting
3Sidelamps
4Dipped beams / Main beams
Ring B
Front foglamps
Rear foglamps
: 80
|
D R I V I N G |
|
|
3 |
|
|
2 |
|
|
1 |
|
|
0 |
|
|
4 |
|
|
Windscreen wiper |
|
|
3 |
Rapid wipe. |
|
2 |
Normal wipe. |
|
1 |
Intermittent wipe. |
|
0 |
Off. |
4Automatic wipe by pressing downwards, and single wipe.
Note : To deactivate automatic wipe :
—go to position 1, then return to position 0.
|
Rear screen wipe |
|
|
Stop. |
|
|
Intermittent. |
|
|
Timed wash and wipe. |
|
|
: |
82-88 |
I
|
E |
C |
BRIEF |
|
D |
||
|
A |
Warning lamps for vehicle |
|
|
B |
lamps and direction indicators |
|
|
Audio system controls |
IN |
|
|
C |
Multifunction display |
|
|
D |
Horn |
|
|
controls |
||
|
E |
Optional function controls |
|
|
F |
Cruise control and speed |
|
|
limiter |
15
Position
selector
|
(6-Speed) electronic gearbox |
|
|
system |
|
|
R |
Reverse |
|
N |
Neutral |
|
A |
Automatic mode |
|
M |
Manual mode |
|
Using control levers + and — : |
—Gear changing in manual mode
—Temporary manual operation in automatic mode.
To start
(6-Speed) electronic gearbox system
—Check that you are in neutral (position N).
—Press firmly on the brake pedal and turn the ignition key.
: 58-62
D R I V I N G
Position selector
Position
selector
|
Automatic gearbox |
|
|
P |
Park |
|
R |
Reverse |
|
N |
Neutral |
|
D |
Automatic mode |
|
M |
Sequential mode |
|
Using control levers + and — : |
—Gear changing in sequential mode
—Temporary manual operation in automatic mode.
To start
Automatic gearbox
—Check that you are in position P or N and turn the ignition key.
Note : To exit position P, press on the brake pedal before moving the selector.
: 63-66
16
A
Electronic parking brake
This device combines :
—automatic functions :
Automatic application when the engine stops and automatic release on use of the accelerator (automatic operation by default) ;
—manual use :
Permanent manual application / release of parking brake is possible by pulling control A.
|
: 68-74 |
|
|
Hill start assist |
|
|
To aid starting on a gradient, your |
|
|
vehicle is equipped with a system |
|
|
which |
keeps it immobilised for |
|
about |
2 seconds, the approximate |
|
time it takes to move your foot |
|
|
from the brake pedal to the accel- |
|
|
erator pedal. |
|
|
: 75 |
|
Before leaving the vehicle, |
||
|
check that the electronic |
||
|
parking brake warning lamp P |
||
|
(red) is permanently on. |
||
|
If you leave the vehicle with |
||
|
the engine running, manually |
||
|
apply the parking brake. |
||
|
Never leave a child alone |
||
|
inside the vehicle with the |
||
|
ignition on, |
||
|
as they could release the |
||
|
parking brake. |
||
|
Warning |
Instrument |
Warning |
|
lamps display |
panel |
lamps display |
|
Multifunction display |
||||
|
: |
32-33 |
|||
|
Instrument |
||||
|
panel |
||||
|
Navidrive |
Multifunction |
|||
|
display |
||||
|
: |
34 |
|
< 20 km/h |
|
|
(approx. 12 mph) |
|
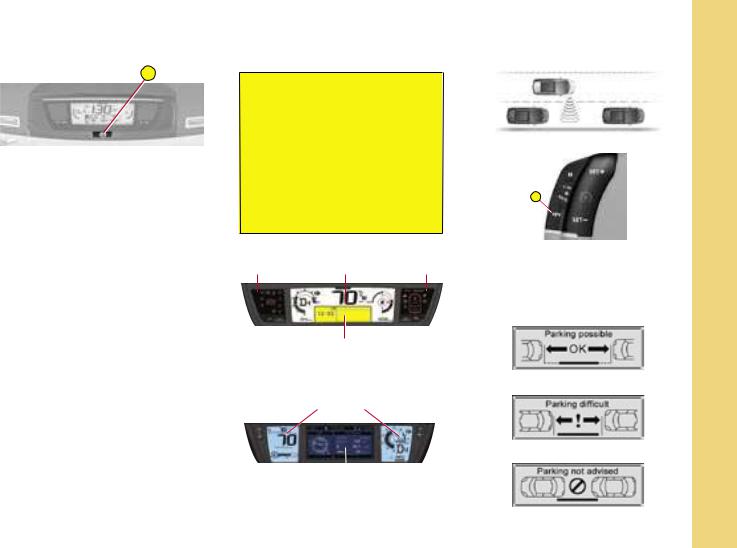
|
Parking space sensor |
|
|
A |
BRIEF |
|
You can select the « parking space sen- |
|
|
sor » function by pressing on button A. |
|
|
Once the space has been measured, the |
|
|
function displays the following messages : |
|
|
Parking possible |
IN |
|
Parking difficult |
Parking not advised
I
|
V E N T I L A T I O N |
||||
|
A u t o m a t i c |
a i r |
c o n d i t i o n i n g |
||
|
DRIVER’S AND PASSENGER’S |
REAR PASSENGERS’ CONTROL |
|||
|
CONTROL PANEL |
PANEL |
|||
|
Rapid deicing / |
Automatic comfort |
|||
|
demisting of front |
regulation |
Air recirculation, |
||
|
and rear windows |
Air |
|||
|
automatic |
||||
|
and rear view |
conditioning |
|||
|
(depending on version) |
||||
|
mirrors |
||||
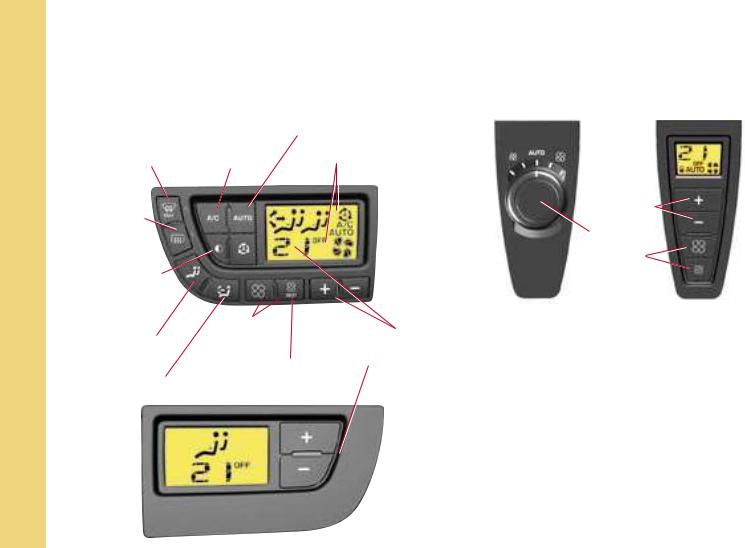
IN BRIEF
Deicing / demisting of rear screen and rear view mirrors
Black panel function (extinction of air conditioning displays and button backlighting)
Mode of adjustment for rear passengers
Adjustment of air distribution
Adjustment of air blower speed
REST function (retention of ventilation with the engine switched off)
Adjustment and display of temperature
(comfort requirement)
Temperature
adjustment
Adjustment of air blower speed
With additional air conditioning (no warm air distribution)
: 104-110
18
H e a t i n g
V a n
E d
N m
T I L a n u a
A l
T a i
I r
O N c o n d i t i o n i n g
I
DRIVER’S CONTROL PANEL
Adjustment of blown air temperature
Rapid deicing / demisting of front and rear windows and rear view mirrors
|
Deicing / |
|
|
demisting of rear |
|
|
screen and rear |
|
|
view mirrors |
|
|
Air conditioning |
|
|
(not available in |
|
|
heating version) |
|
|
Air recirculation |
Mode of |
|
temperature |
|
|
adjustment for |
|
|
passenger |
Display of air distribution
Adjustment and display of air blower speed
Adjustment of air distribution
PASSENGER’S CONTROL PANEL
Status of temperature adjustment (active/inactive)
IN BRIEF
Temperature
adjustment
: 101-103
19
I
Seat belts not fastened / unfastened warning lamp
|
This warning lamp informs you if the |
|
|
front passenger’s seat belt is not |
|
|
fastened / unfastened and if the sec- |
|
|
BRIEFIN |
ondand third-row rear passengers’ |
|
seat belts are unfastened. The lit up |
|
|
positions represent the passengers |
|
|
whose seat belts are not fastened / |
|
|
unfastened. |
|
|
: 36 |
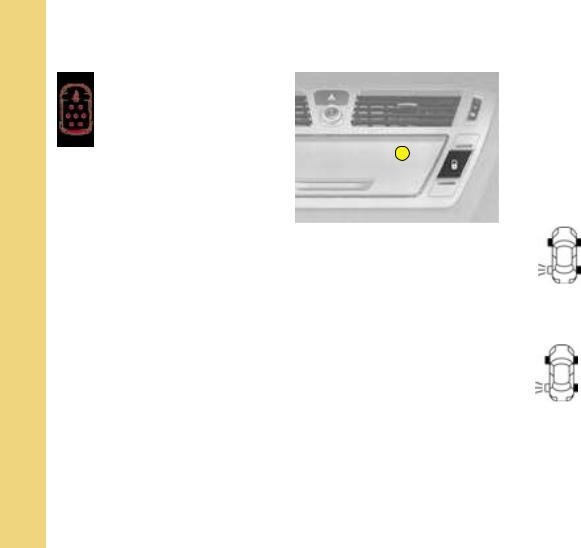
M O N I T O R I N G
A 
Locking from inside
You can use electrical central locking or unlocking by pressing on button A.
If one of the doors is open or is not closed properly, central locking will not work.
Anti-intrusion security
When starting the engine, the system automatically locks the doors once you reach approximately 10 km/h (approximately 6 mph).
: 98
Tyre deflation detection
This function warns you if a tyre is deflated or punctured.
This system does not absolve the driver of the need to regularly check the tyre pressures.
Deflation warning
The SERVICE warning lamp lights up, and a vehicle outline is displayed, accompanied by a message and a sound signal.
Puncture
The STOP warning lamp lights up, and a vehicle outline is displayed, accompanied by a message and a sound signal.
: 190
20
|
P A S S E N G E R |
S A F E T Y |
I
A
Deactivation of front passenger airbag
1.Insert key into (A).
2.Select «OFF» position.
3.Remove key.
: 123
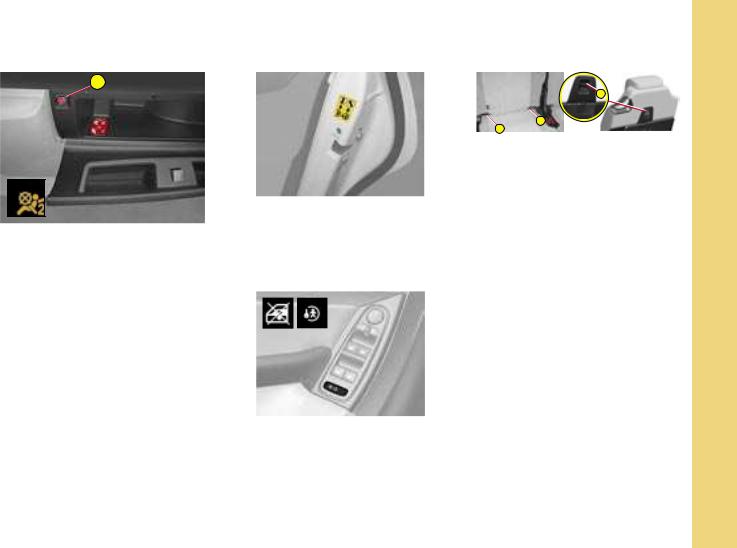
|
CHILD SAFETY |
|
|
Manual control |
|
|
The rear doors are locked by op- |
|
|
erating the lever |
(aperture at an |
|
angle). |
|
C |
||||
|
A |
B |
|||
|
ISOFIX fixing system |
||||
|
The |
3 |
second-row |
rear |
seats |
|
and |
the |
front passenger |
seat of |
|
|
your |
vehicle are fitted with regu- |
|||
|
lation ISOFIX anchoring |
points, |
|||
|
with |
3 rings for each seat position |
|||
|
(A B C). |
||||
|
This |
fixing system is designed for |
|||
|
children weighing up to 18 kg. |
: 128
IN BRIEF
|
Electric control |
||
|
Pressing on |
the |
button prohibits |
|
operation of |
the |
electric windows |
|
and opening of the rear doors from |
||
|
the rear of the vehicle. |
||
|
: 124 |
21
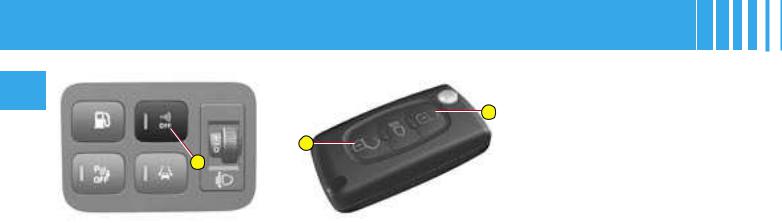
REMOTE CONTROL
II D A
A
B
C
Central unlocking
—A short press on button B unlocks your vehicle.
The unlocking is confirmed by the flashing of the direction indicators, and by the disarming of the alarm if the vehicle has one.
The unlocking activates:
—the deployment (to the last position registered) of the exterior rear view mirrors,
—the direction indicator side repeaters (located underneath the exterior rear view mirrors),
—the timed lighting of the interior lamps and the sill lighting for around 30 seconds,
—the timed lighting of the exterior side lighters (located underneath the exterior rear view mirrors) for around 30 seconds.
22
Note : if none of the doors is opened within thirty seconds following unlocking, the doors automatically relock.
Central locking — Deadlocking
—A short press on button A locks your vehicle.
—A long press on button A also closes the windows and the panoramic glass roof blind.
The locking is confirmed by the continuous lighting of the direction indicators and the arming of the alarm.
The locking activates:
—folding of the exterior rear view mirrors,
—operation of the guide-me-home lighting, if it is activated,
—the exterior side lighters.
If any of the doors, or the boot, is open or not properly closed, a rebound sound signals to you that it is impossible to lock the vehicle.
For vehicles equipped with deadlocking, two successive presses on button A deadlock the vehicle. It is then impossible to open the doors either from the inside or from the outside.
Selectivity of doors
If you have selected « driver » in the « access to the vehicle » menu of the multifunction screen :
—a press on button B opens the driver’s door,
—a second press opens all the doors.
This function is not available using the key.
It is dangerous to operate the deadlocking when someone is inside the vehicle because it is impossible to unlock the vehicle from the inside (without the remote control).
When you are closing the windows and/or the panoramic glass roof blind with the remote control, you must make sure that no-one is obstructing them from closing properly.

REMOTE CONTROL
Guide-me-home lighting
A press on button C operates the guide-me-home lighting (lighting of the sidelamps, dipped beams, number plate lamps and side lighters (located underneath the exterior rear view mirrors).
A second press before the end of the timing cancels the guide-me- home lighting.
Vehicle location
To locate the vehicle on a carpark, press button A. The location of the vehicle is revealed by :
—the flashing of the direction indicators and side repeaters for a few seconds,
—the lighting of the interior lamps for around 30 seconds,
—the lighting of the side lighters. The vehicle remains locked.
Foldaway and ejection of the key
Button D folds the key in and out of its housing in the remote control.
If you do not press on button D, you could damage the mechanism.
Remote control battery spent
This information is given by a message on the multifunction screen, accompanied by a sound signal and the lighting of the SERVICE warning lamp.
Changing the remote control battery
Detach the housing to access the battery. Battery : CR 0523, 3V.
Re-initialising the remote control
After a change of battery, it is necessary to re-initialise the remote control. For that, switch on the ignition and immediately press button A on your remote control until the action desired is triggered. This manœuvre may take some ten seconds.
Note : Make a careful note of the numbers for your keys and remote control on the ASSISTANCE card. Keep this in a safe place.
Do not throw away spent batteries. Return them to a CITROËN dealer or to an approved collection point (photo shops, etc.).
Simultaneous use of other high frequency equipment (mobile telephones, domestic alarms, etc.) may interfere temporarily with the operation of the remote control. If it malfunctions on a permanent basis, you must re-initialise the remote control.
Except for re-initialisation, the remote control cannot function while the key is in the ignition, even with the ignition switched off.
Be aware that an inadvertent manipulation of
the remote control in your pocket could cause the vehicle doors to unlock without your knowledge.
However, if no door is opened within thirty seconds following an unlocking, the doors will automatically relock.
Warning : there is a risk of damage if the replacement battery is not in conformity.
Use only those batteries that are identical or equivalent to those recommended by CITROËN.
![]()
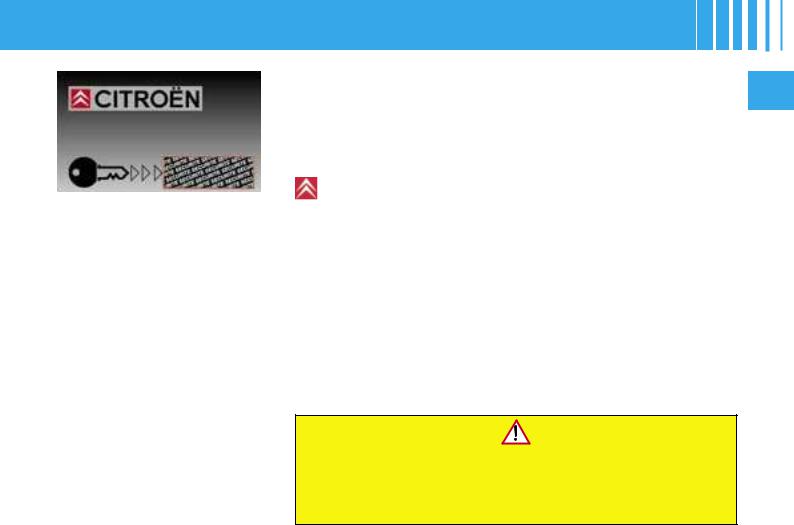
KEYS
II
Electronic immobiliser key
The key locks and unlocks all the vehicle’s doors, as well as switching on the engine.
Note : For security reasons when the ignition is switched off, when the driver’s door is opened a sound signal reminds you if you have not removed the key.
The key can also deactivate the front passenger airbag (see «Airbags»).
24
Central locking with the key
Turn the key briefly in the door lock. The vehicle is locked.
Deadlocking : Central locking with the key
Turn the key a second time in the door lock. The vehicle is deadlocked. It is then impossible to open the doors from the inside or from the outside.
A long action with the key closes the windows.
Note : With the vehicle stationary and the engine switched off, locking is signalled by the flashing of the warning lamp on the interior locking control.
If any of the doors, or the boot, is open or not properly closed, a rebound sound signals to you that it is impossible to lock the vehicle.
Electronic immobiliser
The ELECTRONIC IMMOBILISER locks the vehicle’s supply system. The system activates automatically when the key is removed from the ignition. All the vehicle keys contain an electronic immobiliser device.
After you switch on the ignition, a dialogue is established between the ignition key and the electronic immobiliser device.
If the key is not recognised, starting is impossible.
If this happens, leave your vehicle immobilised and contact a CITROËN dealer.
It is dangerous to operate the deadlocking when someone is inside the vehicle because it is impossible to unlock the vehicle from the inside (without the remote control).
The number of the key is on the label supplied with the key.
In the case of loss, only a CITROËN dealer can provide you with new keys or remote controls.
CODE CARD
A confidential card is given to the new owner when he takes delivery of his new vehicle.
This card bears a hidden access code for the use of the CITROËN dealer when servicing the electronic immobiliser device.
Do not scratch the confidential strip, the security of the immobiliser system depends on the information below remaining covered.
Should the card be lost, your immobiliser system can no longer be considered secure.
In the event of a change of vehicle ownership, it is essential for the new owner to possess the CODE card.
Never leave it in the vehicle.
Advice
Keep the code card bearing your personal electronic immobiliser number in a safe place (never in the vehicle).
If any key modifications become necessary (addition, cancellation or replacement of the key), It is essential to take the confidential card together with all the keys to a CITROËN dealer.
Never attempt to modify the electronic immobiliser’s electrical circuit, as that could render your vehicle undriveable.
Should the confidential card become lost, a CITROËN dealer would have to undertake a major repair.
ANTI-INTRUSION ALARM
II
A
B
Your vehicle may be equipped with an ANTI-INTRUSION ALARM.
This provides :
•Exterior perimeter protection by means of detectors on the vehicle access points (doors, boot, bonnet) as well as on the electrical supply.
|
• Interior |
volumetric |
protection |
||
|
by means |
of ultrasonic sensors |
|||
|
(detecting |
movement |
inside the |
||
|
passenger |
compartment). |
This |
||
|
can be |
deactivated |
using |
the |
|
|
control 1. |
The installation also has a siren, and a warning lamp on the control 1 which is visible from outside the vehicle, indicating the three possible statuses of the alarm:
•Alarm not active (disarmed), warning lamp off.
•Alarm active (armed), the warning lamp flashes slowly.
•Alarm triggered (signalling an intrusion), the warning lamp flashes rapidly if the alarm is disarmed by a press on the control B. It stops as soon as you switch on the ignition.
|
Note : If |
there |
is a malfunction, |
|
the warning lamp remains perma- |
||
|
nently on. |
26
DISARMING OF THE ALARM USING THE REMOTE CONTROL
The alarm is disarmed when you unlock the vehicle (with a press on button B on the remote control).
DISARMING OF THE ALARM WITH THE KEY
Unlock the doors with the key. The siren triggers. Enter the vehicle, insert the key in the ignition and turn it to the drive position to stop the siren. Otherwise the siren will continue for approximately 30 seconds.

ANTI-INTRUSION ALARM
OPERATION OF THE ALARM
First make sure all the doors are closed.
The alarm is armed by pressing button A on the remote control.
With the alarm armed, the protections are active after 5 seconds (perimeter) and 45 seconds (volumetric).
When the alarm is armed (on standby), any intrusion will trigger the siren for 30 seconds, accompanied by the direction indicators lighting up.
The alarm then goes back on standby, but the triggering remains memorised and is signalled by the rapid flashing of the warning lamp on control 1 after you have deactivated the alarm with a press on the unlocking button B. The flashing stops when you switch on the ignition.
The siren is also triggered if there is a cutting of the electrical supply. To stop it, restore the electrical supply then press on the unlocking button B.
Note :
•If you want to lock your vehicle without arming the alarm, just lock with the key only.
•If you try to lock your vehicle but a door, or the boot, is still open, the central locking does not operate but the alarm will arm itself after approx. 45 seconds. You will hear a rebound sound coming from the locks.
Note : The siren is automatically deactivated (for example for disconnecting the battery) as soon as the vehicle is unlocked using the remote control
|
Deactivation of the volumetric detection |
II |
|||||||||
|
You can operate the alarm with perimeter protection |
||||||||||
|
only, by deactivating the volumetric protection (if for |
||||||||||
|
example you wish to leave an animal in the vehicle). |
||||||||||
|
For this, switch off the ignition then immediately press |
||||||||||
|
button 1 for at least one second. |
||||||||||
|
The warning lamp on button 1 should come permanent- |
||||||||||
|
ly on. It will start to flash when the alarm is armed. |
||||||||||
|
Arm the alarm by locking your vehicle with the remote |
||||||||||
|
control. |
||||||||||
|
It is recommended to disarm the volumetric detection |
||||||||||
|
when you use an automatic car wash, to prevent ran- |
||||||||||
|
dom triggering of the alarm. |
||||||||||
|
Automatic activation (according to destination) |
||||||||||
|
The alarm is armed automatically, 2 minutes after the |
||||||||||
|
last door, or the boot, has been closed. |
||||||||||
|
In order to prevent the alarm from triggering when you |
||||||||||
|
open one of the doors or the boot, it is essential to press |
||||||||||
|
the unlocking button B again on the remote control. |
27
STEERING LOCK — IGNITION — STARTER
II
•S : Steering lock
To unlock the steering, gently move the steering wheel while turning the key, without forcing it.
•M : Drive position
Depending on the version of your vehicle, the following warning lamps should also come on for a short time :
•D : Starter
Release the key as soon the engine has started. Never action the key while the engine is already running.
Steering lock
S : After removing the key, turn the steering wheel to lock the steering. The key can only be removed in position S.
M : Ignition switched on, the steering is unlocked (by turning the key to position M, move the steering wheel gently if necessary).
D : Starter position.
Starting and stopping the engine : see « Starting ».
Economy mode
To ensure engine starting, in certain situations the vehicle goes into economy mode.
The electrical components relating to comfort and lighting of headlamps (except side markers) are automatically cut off.
To reactivate them, it will be necessary to restart the engine.
Note : When the vehicle goes into economy mode, a message displays.
|
Test with the key in |
||||
|
28 |
the ignition position |
NEVER REMOVE THE IGNITION KEY BEFORE THE VEHICLE HAS COME TO A COMPLETE STOP.
IT IS ESSENTIAL ALWAYS TO KEEP THE ENGINE RUNNING
IN ORDER TO RETAIN BRAKING
AND STEERING ASSISTANCE
(risk of triggering the steering lock and rendering the safety features inoperative).
When stationary, having removed the key, turn the steering wheel gently if necessary to ensure that the steering lock engages.
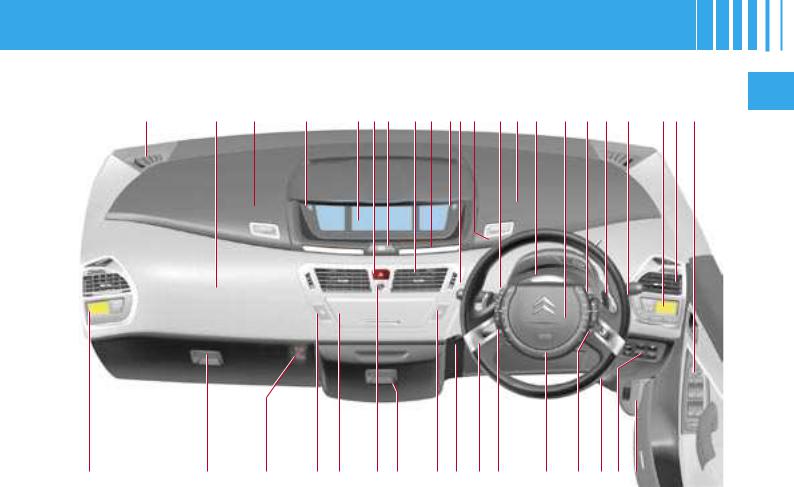
DASHBOARD
|
21 |
20 |
19 |
13 |
17 18 16 |
15 14 13 12 11 |
10 |
9 |
8
|
22 |
23 |
24 |
25 |
26 |
27 |
28 |
29 |
30 |
31 |
32 |
33 |
34 |
35 36 37 |
29

DASHBOARD
1Side air vent
2Loudspeaker (Tweeter) (right and left)
3Passenger’s airbag
4Right hand upper storage
5Controls :
•Trip mileage recorder reset button
•Lighting rheostat
•Colour (choice of background colour)
•Personalisation
6Instrument panel
7Hazard lamps control
8Automatic electronic parking brake
9Central air vents
10Warning lamps display
11Controls :
•Lighting
•Direction indicators
•Front and rear foglamps
12Gear controls
13Cruise control and speed limiter (controls on steering wheel)
14Left hand upper storage
15Direction indicator warning lamps
16Driver’s airbag
17Radio-CD controls on steering wheel
18Selector/controls for automatic gearbox or electronic gearbox system (6 speed)
19Controls :
•Windscreen wipe
•Screen wash
•Rear screen wipe
•Trip computer
20Driver’s air conditioning controls
21Controls :
•Rear view mirrors
•Windows
•Child safety
22Bonnet release
23Controls :
•Fuel flap
•Parking assistance
•Lane departure warning system
•Alarm deactivation
•Headlamps adjustment
24Steering lock — ignition
25Controls for multifunction display (on steering wheel)
26Horn
27Optional function controls (on steering wheel)
28Ambiance lighting control
29Central locking button
30Refrigerated storage
31Scented air freshener
32Radio-CD
33ESP deactivation button
34Key switch :
•Passenger’s airbag activation/deactivation
35Lower glovebox :
•Air freshener clips
•Various storage
36Fusebox access flap
37Passenger’s air conditioning controls

INSTRUMENT PANELS
The instrument panel groups all the driving and comfort information at the centre of the dashboard.
Mono-tone instrument panel with multifunction screen A
II
Bi-tone instrument panel with multifunction screen C
NaviDrive instrument panel with multifunction screen DT
31
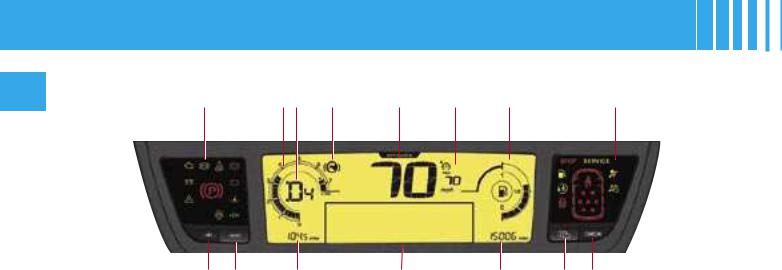
MONO-TONE INSTRUMENT PANEL — MULTIFUNCTION SCREEN A
II
|
Warning lamps |
1 |
2 |
3 |
4 |
5 |
6 |
Warning lamps |
|
display |
display |
CENTRAL DISPLAY
1.Rev counter
2.Gearbox information
3.« Foot on brake » warning lamp
4.Speed indicator
5.Cruise control or speed limiter reference
6.Fuel gauge
7.Trip mileage recorder
8.Multifunction screen A
9.Maintenance indicator, on switching on ignition, then total mileage recorder
32
COMMAND BUTTONS
A.Lighting rheostat (available day and night)
B.Trip mileage recorder reset
C.Lighting rheostat (available day and night)
D.Check (list of alerts)
:42-45
INSTRUMENT PANELS
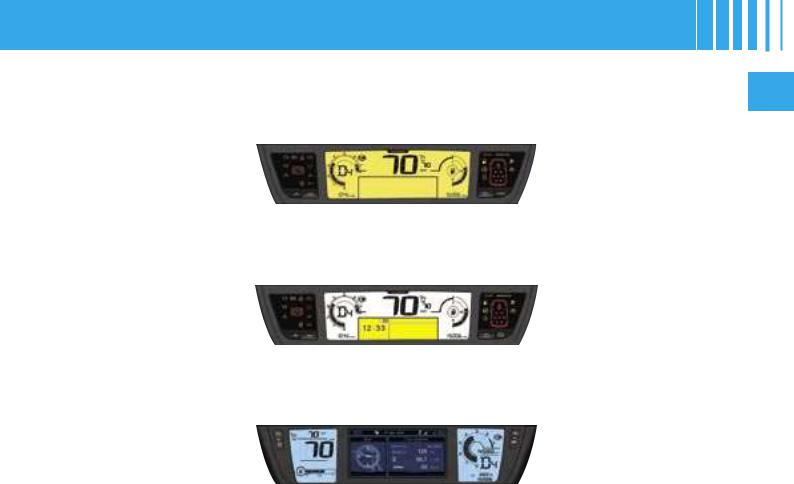
The instrument panel groups all the driving and comfort information at the centre of the dashboard.
Mono-tone instrument panel with multifunction screen A
II
Bi-tone instrument panel with multifunction screen C
NaviDrive instrument panel with multifunction screen DT
31
![]()
BI-TONE INSTRUMENT PANEL — MULTIFUNCTION SCREEN C
|
Warning lamps |
1 |
2 |
3 |
4 |
5 |
6 |
Warning lamps |
|
display |
display |
II
CENTRAL DISPLAY
1.Rev counter
2.Gearbox information
3.« Foot on brake » warning lamp
4.Speed indicator
5.Cruise control or speed limiter reference
6.Fuel gauge
7.Trip mileage recorder
8.Multifunction screen C
9.Maintenance indicator, on switching on ignition, then total mileage recorder
COMMAND BUTTONS
A.Lighting rheostat (available day and night)
B.Trip mileage recorder reset
C.Personalisation of the instrument panel (display of desired information)
D.COLOUR (choice of background colour)
This button offers you a whole range of colour backgrounds, from white to blue.
33

INSTRUMENT PANELS
The instrument panel groups all the driving and comfort information at the centre of the dashboard.
Mono-tone instrument panel with multifunction screen A
II
Bi-tone instrument panel with multifunction screen C
NaviDrive instrument panel with multifunction screen DT
31

NAVIDRIVE INSTRUMENT PANEL — MULTIFUNCTION SCREEN DT
CENTRAL DISPLAY
1.Cruise control or speed limiter reference
2.Speed indicator
3.NaviDrive display
(see NaviDrive instructions)
4.Rev counter
5.« Foot on brake » warning lamp
6.Fuel gauge
7.Trip mileage recorder
8.Maintenance indicator, on switching on ignition, then total mileage recorder
9.Gearbox information
COMMAND BUTTONS
A.Personalisation of the instrument panel (display of desired information)
B.COLOUR (choice of background colour)
This button offers you a whole range of colour backgrounds, from white to blue.
C.Lighting rheostat (available day and night)
D.Trip mileage recorder reset
34

|
Direction indicator and lighting lamps |
|
|
Left hand direction |
Right hand direction |
|
indicator |
indicator |
|
See «Signalling» |
See «Signalling» |
The direction indicators operate simultaneously when the hazard lamps are activated.
|
Sidelamps |
Dipped beams |
|
See «Signalling» |
See «Signalling» |
Foglamps (rear)
See «Signalling»
Front foglamps
See «Signalling»
Main beams
See «Signalling»
35

WARNING LAMPS
|
Imperative stop |
||||
|
II |
||||
|
warning lamp |
||||
|
When this warning lamp comes on, |
||||
|
it is essential to stop the vehicle and |
||||
|
switch off the engine. Contact a |
||||
|
CITROËN dealer. |
||||
|
The warning lamp is accompanied |
||||
|
by display on the screen of a Stop |
||||
|
symbol. |
||||
|
Warning lamp for low |
||||
|
brake fluid level and |
||||
|
braking distribution |
||||
|
malfunction |
||||
|
When the engine is running, this |
||||
|
warning lamp, always in associa- |
||||
|
tion with the STOP warning lamp, |
||||
|
indicates that the brake fluid level |
||||
|
is low. |
||||
|
If the warning lamp has come on, |
||||
|
stop immediately and contact a |
||||
|
CITROËN dealer (See « Brakes »). |
||||
|
Automatic electronic |
||||
|
parking brake warning |
||||
|
lamp |
||||
|
If this warning lamp comes on per- |
||||
|
manently, it is confirming that the |
||||
|
parking brake is applied. |
||||
|
If it flashes, it is indicating an ap- |
||||
|
plication or release fault. Urgently |
||||
|
contact a CITROËN dealer (See |
||||
|
« Automatic electronic parking |
||||
|
brake »). |
36
Automatic electronic parking brake fault warning lamp
This warning lamp comes on if there is a malfunction in the automatic electronic parking brake.
Warning lamp for deactivation of the automatic functions of the automatic electronic parking brake
This comes on if the « automatic application » and « automatic release » functions when you switch off the engine are deactivated or faulty.
Battery charge warning lamp
This warning lamp lights up for a short time when you start the engine. It should go off when the engine is running. If it comes on permanently, urgently contact a CITROËN dealer.
Seat belt non-fastening warning lamp
(on NaviDrive instrument panel)
Seat belt non-fastening/ unfastening warning lamp
This warning lamp informs you if the front passengers’ seat belts are non-fastened / unfastened or if the 2nd and 3rd row rear passengers’ seat belts are unfastened. The points illuminated represent those passengers whose seat belts are un-fastened / non-fastened.
Driver’s and front passenger’s seat belts not fastened :
—The warning lamp lights up between 0 and 20 km/h. Above 20 km/h (approx. 12 mph), it flashesaccompanied by a screen message and a sound signal for around 120 seconds.
Rear passengers’ seat belts not fastened:
—When the ignition is switched on, the points corresponding to the seat positions with seat belts not fastened remain lit up for 30 seconds.
Seat belts unfastened during the journey :
—The point corresponding to the seat position with seat belt unfastened lights up between 0 and 20 km/h. Above 20 km/h (approx. 12 mph), it flashes accompanied by a sound signal for around 120 seconds. The sound signal stops when the ignition is switched off or if a door is opened.

WARNING LAMPS
Warning lamp for detection of a door left open
When the engine is running, it comes on to indicate that a door, the bonnet and/or the boot is open.
Front / side airbag fault warning lamp
See « Airbags ».
Front passenger’s airbag deactivation warning lamp
See « Airbags ».
Coolant temperature warning lamp
This comes on each time you switch on the ignition, for a few seconds. If it comes on while the engine is running, this indicates an abnormal increase in the coolant temperature.
It is essential to stop the vehicle. Check the coolant level, having taken all the appropriate precautions. If the level is satisfactory, contact a CITROËN dealer.
ABS system
The ABS warning lamp comes on when you switch on the ignition and should go off after a few seconds.
If the warning lamp does not go off, there may be a system malfunction (see « Brakes »).
Diesel engine preheater warning lamp
See the procedures for starting the engine.
See the chapter « Starting ».
SERVICE warning lamp
This warning lamp remains on for as long as the fault relating to the alert message is present, this for a serious fault.
Urgently contact a CITROËN dealer.
The warning lamp remains on only temporarily in the case of minor faults.
Contact a CITROËN dealer.
To recall the corresponding alert message, see « Log of alerts ».
|
Depollution system |
||||||||||
|
II |
||||||||||
|
warning lamp |
||||||||||
If it flashes or lights up while you are driving, this indicates a depollution system malfunction.
Urgently contact a CITROËN dealer.
Child safety warning lamp
When you activate the child safety, or each time you switch on the ignition, the warning lamp appears but goes out after 10 seconds (see chapter « Child safety »).
37

WARNING LAMPS
ESP/ASR warning lamp
II
In operation
While either the ESP or the traction control system is operating, the ESP/ASR warning lamp flashes.
In the event of a malfunction
When the vehicle is moving, the lighting of the ESP/ASR warning lamp, accompanied by a message on the multi-function screen and a sound signal, indicates a system malfunction.
Contact a CITROËN dealer.
Deactivation
The lighting of the ESP/ASR warning lamp and the diode on the ESP deactivation button indicates that the system is deactivated.
See «ESP».
Fuel low warning lamp
When the tank is full, all the bars are lit up.
If the fuel low warning lamp comes on accompanied by a beep and a message on the multifunction screen, there are approximately 7 litres of fuel remaining in the tank and 2 or 3 bars flash in the instrument panel.
When the last bar goes out, there are approximately 2 litres of fuel remaining in the tank.
A control located on the panel to the left of the steering wheel allows you to open the fuel flap from inside the vehicle (see « Fuel »).
38
« Foot on brake » warning lamp
The flashing of this warning lamp on the display informs you that you need to press the brake pedal in order to be able to start the engine on a vehicle with the (6-speed) Electronic Gearbox System, or to quit position P in the case of an automatic gearbox.
This warning lamp comes on if you attempt to release the electric parking brake without pressing the brake pedal.
Note : In the case of the Electronic Gearbox System, this warning lamp flashes to indicate overheating of the clutch if you excessively use the accelerator to hold the vehicle on an uphill slope. Use the brake pedal or the electric parking brake.
Parking space warning lamp
This warning lamp comes on when the parking space function is selected.
It flashes while the space is being measured.

INSTRUMENT PANEL
When you switch on the ignition, the instrument panel displays :
—the maintenance indicator,
—the engine oil level indicator,
—the total mileage recoder,
—then the trip mileage recoder.
Engine oil level indicator
When you switch on the ignition, the maintenance indicator displays for a II few seconds (see « Maintenance indicator »), then the engine oil level is displayed, also for a few seconds.
Note : to make sure that the measurement is reliable, check the oil level on horizontal ground, with the engine having been stopped for at least 15 minutes.
|
oil ok |
This display indicates normal operation. |
A flashing of «OIL» indicates that the oil level is below minimum.
oil Check with the manual dipstick. See «Levels».
If the low level is confirmed, contact a CITROËN dealer.
|
oil |
A flashing of «OIL —-» indicates a problem with |
|
the indicator. Contact a CITROËN dealer. |
39

MAINTENANCE INDICATOR
It informs you when the next routine service is due in accordance with the vehicle servicing schedule in II the Maintenance Guide. This information is dependent on two parameters: the mileage covered, and the
time elapsed since the last visit.
Operation
From switching on the ignition and for a few seconds, the spanner symbolising maintenance operations lights up; the total mileage recorder display tells you the distance remaining to the next service (in thousands and hundreds of kilometres, or miles).
Example : before the next service you can still travel :
A few seconds after that, the total mileage recorder display appears.
Operation if the distance remaining to the next service is less than 1 000 km (approx. 600 miles)
Each time you switch on the ignition and for 5 seconds, the symbol and the distance flash.
Example : There remain up to the next service : 900 km (or miles).
On switching on the ignition and for 5 seconds, the instrument panel indicates :
A few seconds after that, the total mileage recorder display appears and the the maintenance symbol remains lit up.
Operation if the service interval has been exceeded
Each time you switch on the ignition, the maintenance symbol and the distance covered (preceded by a minus) beyond the recommended interval flash.
Example : You have passed the service interval by 300 km (or miles).
The routine service on your vehicle needs to be carried as soon as possible.
A few seconds after switching on the ignition, the total mileage recorder resumes its normal role and the maintenance symbol remains lit up.
40

MAINTENANCE INDICATOR
Maintenance intervals
If you use your vehicle in particularly difficult conditions, it is essential to have recourse to the service schedule for driving in conditions, comprising shorter intervals between services (see the Maintenance Guide).
II
|
A |
A |
|
Mono-tone or |
NaviDrive |
|
Bi-tone |
instrument panel |
|
instrument panel |
|
|
Reset to zero |
|
|
Your CITROËN technician resets the indicator to zero after each service. |
|
|
However, if you do your own servicing, the procedure for resetting to zero |
|
|
is as follows : |
—Switch off the ignition, then turn the key to position S, steering lock.
—Press on button A and keep it pressed.
—Switch on the ignition.
—Keep button A pressed until the screen indicates a zero and the maintenance symbol disappears.
—Switch off the ignition.
41
![]()
MULTIFUNCTION SCREEN A
|
It is recommended that the driver |
||||
|
should not manipulate the controls |
||||
|
described below while the vehicle |
||||
|
is in motion. |
||||
|
1 — |
Time |
|||
|
2 — |
Date and display zone |
|||
|
3 — |
Outside temperature |
|||
|
When the outside temperature is |
||||
|
between +3 °C and -3 °C, the dis- |
||||
|
play |
of |
temperature |
flashes (ice |
|
|
risk). |
||||
|
Note |
: |
The outside |
temperature |
|
|
displayed may be greater than the |
||||
|
actual temperature if the vehicle is |
||||
|
parked in bright sunlight. |
|
O |
L |
|
|
J |
||
|
R |
M |
|
|
H |
||
|
The display of certain types of in- |
||
|
formation is sometimes by scroll- |
||
|
ing and sometimes by alternation. |
||
|
Controls |
||
|
O |
— Access to the « Main Menu » |
|
|
J or M |
— Scrolling in the screen |
|
|
menus |
L— Validation and Selection in the menus of the function chosen or the value modified
|
H |
— Cancellation |
of |
the opera- |
|
tion or return to the previous |
|||
|
display |
R— Selection of the type of information to be displayed in zone 2 (date, radio/CD and trip computer)
K or N — Within the Menus, choice of activation/deactivation of functions and selection of adjustments
|
R |
H |
J |
L |
|
K |
|||
|
N |
|||
|
O |
M |
||
|
Main Menu |
|||
|
By pressing on the button O, then |
|||
|
using buttons J or M, you have ac- |
|||
|
cess to the following functions : |
•Radio-CD (see Radio-CD)
•Vehicle configuration, to activate/deactivate :
—operation of the rear wiper
—automatic guide-me-home lighting (according to version)
|
— |
electronic parking brake automatic |
|
— |
functions (application / release) |
|
door selectivity |
|
|
— |
lighting of daytime-running lamps |
|
(according to country). |
•Options, for display of alert messages
•Display adjustments, for altering the date and the time on the displays
•Languages, for choosing the display language
•Units, giving you access to the choice of units of Temperature and units of Fuel Consumption

MULTIFUNCTION SCREEN A
PERSONALISATION and CONFIGURATION
To activate/deactivate rear screen wipe when you engage reverse gear :
1.Press on O.
2.Use J or M to select the submenu for personalisation-con- figuration of your vehicle, then confirm your choice with a press on L.
3.Select rear wipe by pressing J or M.
4.The system tells you whether the function status is active or inactive. Modify this status with a press on K or N.
5.Validate with a press on L.
|
O |
R |
H |
J |
L |
|
|
L |
|||||
|
K |
|||||
|
J |
|||||
|
N |
|||||
|
R |
M |
O |
|||
|
H |
M |
||||
|
To activate/deactivate the automatic guide-me-home |
|||||
|
lighting : |
1.Press on O.
2.Use J or M to select the sub-menu for configuration of your vehicle, then confirm your choice with a press on L.
3.Select guide-me-home lighting, by pressing J or M.
4.The system tells you whether the function status is active or inactive. Modify this status with a press on K or N.
5.Validate with a press on L.
To activate/deactivate the electronic parking brake automatic functions :
1.Press on O.
2.Use J or M to select the sub-menu for configuration of your vehicle, then confirm your choice with a press on L.
3.Select electronic automatic parking brake by pressing J or M.
4.The system tells you whether the function status is active or inactive. Modify this status with a press on K or N.
5.Validate with a press on L.
II
43

II
|
MULTIFUNCTION SCREEN A |
||||||
|
O |
L |
R |
H |
J |
L |
|
|
K |
||||||
|
J |
||||||
|
N |
||||||
|
R |
M |
O |
||||
|
H |
M |
|||||
|
To activate/deactivate door selectivity : |
1.Press on O.
2.Use J or M to select the sub-menu for configuration of your vehicle, then confirm your choice with a press on L.
3.Select the access point by pressing J or M.
4.The system tells you the status of the doors/tailgate. Modify this status with a press on K or N.
5.Validate with a press on L.
To activate/deactivate lighting of daytime-running lamps (according to country) :
1.Press on O.
2.Use J or M to select the sub-menu for configuration of your vehicle, then confirm your choice with a press on L.
3.Select lighting of daytime-running lamps by pressing J or M.
4.The system tells you the status (active/inactive) of this function. Modify this status with a press K or N.
5.Validate with a press on L.
44

MULTIFUNCTION SCREEN A
|
O |
L |
|
|
J |
||
|
R |
M |
|
|
H |
||
|
To display the log of |
||
|
alerts : |
1.Press on O.
2.Use J or M to select the submenu for options. Confirm with two presses on L.
|
Note : |
You can cancel the start |
|
|
of the |
display |
by pressing button |
|
R to abandon |
and validating by |
|
|
pressing L. |
||
|
Alerts, signalled previously but not |
||
|
resolved, will scroll in the display |
||
|
for recall. |
|
R |
H |
J |
L |
|
K |
|||
|
N |
|||
|
O |
M |
||
|
To adjust the date and the time : |
1.Press on O.
2.Use J or M to select the submenu for Display Adjustments, then confirm by pressing L.
|
3. |
Press J or M to select what you |
|
want to modify : year, month, day, |
|
|
hour, minutes, mode of display. |
4.Make your adjustment by pressing K or N. You can continue your adjustments by selecting a different element by presses on J or M. When you have finished your adjustments, press L.
To choose the language :
1.Press on O.
2.Use J or M to select the submenu for Languages. Confirm your choice with a press on L.
3.With presses on K or N, select the language of your choice, then validate with a press on L.
To choose units :
1.Press on O.
2.Press J or M to select the submenu for Units. Confirm your choice with a press on L.
3.Press J or M to select the type of unit you wish to modify (Temperature or Fuel Consumption).
4.With presses on K or N, select the unit of your choice, then validate with a press on L.
|
Note : This choice concerns all the |
|
|
information (Consumption |
— Speed) |
|
appearing on the displays. |
II
45

MULTIFUNCTION SCREEN C
|
It is recommended that the driver |
|
|
should not manipulate the controls |
|
|
described below while the vehicle |
|
|
is in motion. |
|
|
1 — |
Time |
|
2 — |
Outside temperature |
|
3 — |
Date and display zone |
|
When the outside temperature is |
|
|
between +3 °C and -3 °C, the dis- |
|
|
play of temperature flashes (ice |
|
|
risk). |
|
|
Controls |
|
|
O |
— Access to the «Main Menu» |
|
J or M — Scrolling in the screen |
|
|
menus |
L— Validation and Selection in the menus of the function chosen or the value modified
H— Cancellation of the operation or return to the previous display
R— Selection of the type of information to be displayed permanently (date, radioCD, trip computer) on the right of the screen
|
O |
L |
|
|
J |
||
|
R |
H |
M |
|
Main Menu |
||
|
Press on the button O to view the |
||
|
«Main |
Menu» of the multifunction |
|
|
screen. This menu gives |
you ac- |
|
|
cess to the following functions : |
||
|
Radio-CD |
||
|
(See Radio-CD) |
||
|
Trip computer, |
||
|
for : |
—Entering the distance to your destination
—Access to the log of alerts (recall of alerts signalled previously)
—Access to the status of functions, such as automatic headlamps and windscreen wipe.
Personalisation — Configuration, for activating/ deactivating :
—operation of the rear wiper
—automatic guide-me-home lighting
—Xenon dual-function directional headlamps
|
— |
electronic parking brake automatic |
|
functions (application / release) |
—door selectivity
—lighting of daytime-running lamps and for choosing :
—brightness intensity, time, date and units
—the display language
Bluetooth® hands-free kit (See Radio-CD)
Note : The outside temperature displayed may be greater than the actual temperature if the vehicle is parked in bright sunlight.

MULTIFUNCTION SCREEN C
TRIP COMPUTER
To enter the distance to be travelled in the trip computer :
1.Press on O.
2.Use J or M to select the icon for the trip computer, then confirm your choice with a press on L.
3.Press J or M to select entry of distance. Confirm your choice with a press on L.
4.To choose the distance, select the figure you wish to modify via J or M, then confirm your choice with a press on L.
5.Using J or M, adjust the value then validate with a press on L.
6.Validate with «OK» on the display.
To access the log of alerts in the trip computer:
1.Press on O.
2.Use J or M to select the icon for the trip computer, then confirm your choice with a press on L.
3.Select the log of alerts.
4.When you see the list displayed, scroll down using J or M.
5.Press on H, to return to the permanent display.
To access the status of functions, proceed in a similar manner.
|
O |
L |
|
|
J |
||
|
R |
M |
|
|
H |
||
|
PERSONALISATION and |
||
|
CONFIGURATION |
||
|
To activate/deactivate rear |
||
|
screen wipe when you engage |
||
|
reverse gear : |
1.Press on O.
2.Use J or M to select «Person- alisation-Configuration», then confirm your choice with a press on L.
3.Then select the sub-menu for vehicle parameters. Confirm your choice with a press on L.
4.Using J or M, select «parking assistance». Confirm your choice with a press on L.
5.Then by pressing L, select/ deselect triggering of rear screen wipe in reverse gear, to activate/deactivate this.
6.Validate with «OK» on the display.
|
R |
H |
J |
L |
II |
|
K |
||||
|
N |
||||
|
O |
M |
|||
|
To activate/deactivate the |
||||
|
automatic guide-me-home |
||||
|
lighting : |
1.Press on O.
2.Use J or M to select «Person- alisation-Configuration», then confirm your choice with a press on L.
3.Then select the sub-menu for vehicle parameters. Confirm your choice with a press on L.
4.Using J or M, select «lighting and signalling». Confirm your choice with a press on L.
5.Then by pressing L, select/ deselect «guide-me-home lighting» to activate/deactivate this. After activation, choose its duration : press on L, then use J or M to select the duration and then press on L.
6.Validate with «OK» on the display.
47

MULTIFUNCTION SCREEN C
II
|
O |
L |
|
|
J |
||
|
R |
M |
|
|
H |
||
|
To activate/deactivate the |
||
|
Xenon dual-function directional |
||
|
headlamps : |
1.Press on O.
2.Use J or M to select «Person- alisation-Configuration», then confirm your choice with a press on L.
3.Then select the sub-menu for vehicle parameters. Confirm your choice with a press on L.
4.Using J or M, select « driving assistance ». Confirm your choice with a press on L.
5.Then by pressing L, select/ deselect Xenon dual-function directional headlamps to activate/ deactivate them.
6.Validate with «OK» on the display.
To activate/deactivate the electronic parking brake automatic functions (application/release) :
1.Press on O.
2.Use J or M to select «Person- alisation-Configuration», then confirm your choice with a press on L.
3.Then select the sub-menu for vehicle parameters. Confirm your choice with a press on L.
4.Using J or M, select « driving assistance ». Confirm your choice with a press on L.
5.Then by pressing L, select/ deselect «automatic parking brake» to activate/deactivate the electronic parking brake automatic functions (application/release).
6.Validate with «OK» on the display.
To activate/deactivate the door selectivity :
1.Press on O.
2.Use J or M to select «Person- alisation-Configuration», then confirm your choice with a press on L.
48
3.Then select the sub-menu for vehicle parameters. Confirm your choice with a press on L.
4.Using J or M, select «access to the vehicle». Confirm your choice with a press on L.
5.Then by pressing L, select the status of the vehicle access as desired.
6.Validate with «OK» on the display.
To activate/deactivate lighting of daytime-running lamps (according to country) :
1.Press on O.
2.Use J or M to select «Person- alisation-Configuration», then confirm your choice with a press on L.
3.Then select the sub-menu for vehicle parameters. Confirm your choice with a press on L.
4.Using J or M, select «lighting and signalling». Confirm your choice with a press on L.
5.Then by pressing L, select/ deselect «daytime-running lamps» to activate/deactivate the function.
6.Validate with «OK» on the display.

MULTIFUNCTION SCREEN C
|
O |
L |
|
|
J |
||
|
R |
M |
|
|
H |
||
|
To adjust the date and the time : |
1.Press on O.
2.Use J or M lto select «Person- alisation-Configuration», then confirm your choice with a press on L.
3.Select the display configuration using J or M». Confirm with a press on L.
4.Select the adjustment for the date and the time, using J or M. Confirm with a press on L.
5.Press J or M to select the values you wish to modify. Confirm your choice with a press on L.
6.Make your adjustments by pressing J or M, validating each adjustment choice by pressing L.
7.Validate with «OK» on the display.
|
R |
J |
L |
|
|
H |
|||
|
K |
|||
|
N |
|||
|
O |
M |
||
|
To choose the units : |
1.Press on O.
2.Use J or M to select «Person- alisation-Configuration», then confirm your choice with a press on L.
3.Select the display configuration using J or M. Confirm with a press on L.
4.Then select the sub-menu for units. Confirm your choice with a press on L.
5.Using J or M, select the unit you wish to modify (Temperature or Consumption), then validate by pressing L.
6.Validate with «OK» on the display.
|
Note : This choice concerns all the |
|
|
information (Consumption |
— Speed) |
|
appearing on the displays. |
To choose the language :
1.Press on O.
2.Use J or M to select «Person- alisation-Configuration», then confirm your choice with a press on L.
3.Make your choice of language, using J or M.
4.Using J or M, select the language and validate your choice with a press on L.
5.Validate with «OK» on the display.

MULTIFUNCTION SCREEN DT
|
1 |
2 |
3 |
4 |
5 |
II
|
It is recommended that the driver |
||||
|
should not manipulate the controls |
||||
|
described below while the vehicle |
||||
|
is in motion. |
||||
|
1 — |
Outside temperature |
|||
|
2 — |
Directory |
|||
|
3 — |
Date |
|||
|
4 — |
Telephone |
|||
|
5 — |
Time |
|||
|
When the outside |
temperature is |
|||
|
between +3 °C and -3 °C, the dis- |
||||
|
play of |
temperature |
flashes (ice |
||
|
risk). |
||||
|
Note: |
The outside |
temperature |
||
|
displayed may be greater than the |
||||
|
actual temperature if the vehicle is |
||||
|
parked in bright sunlight. |
||||
|
Controls |
||||
|
O |
— Access to the «Main Menu» |
|||
|
J or M — Scrolling |
in |
the screen |
||
|
L |
menus |
|||
|
— Validation |
and |
Selection in |
||
|
the menus of |
the function |
|||
|
chosen or the value modified |
50
|
O |
L |
|
|
J |
||
|
R |
M |
|
|
H |
||
H— Cancellation of the operation or return to the previous display
R— Selection of the type of information to be displayed permanently (date, radioCD, trip computer) on the right of the screen
|
Main Menu |
|
|
Press on the button O to view the |
|
|
«Main Menu» of the multifunction |
|
|
screen. |
|
|
This menu gives you |
access to |
|
the following functions |
: |
|
Navigation/guidance |
|
|
(See NaviDrive instructions) |
|
|
Audio |
|
|
(See NaviDrive instructions) |
|
|
Trip computer |
|
|
(See NaviDrive instructions) |
|
R |
J |
L |
H |
|
N |
|
O |
M |
|
Directory |
|
|
(See NaviDrive instructions) |
|
|
Telematics |
|
|
(See NaviDrive instructions) |
|
|
Configuration, for adjusting |
|
|
various parameters (date, |
|
|
time, units) |
|
|
(See NaviDrive instructions) |
|
|
Map |
|
|
(See NaviDrive instructions) |
|
|
Video |
|
|
(See NaviDrive instructions) |

To access display and selection of the various types of information, give short presses on the end of the windscreen wiper control stalk.
For multifunction screen C and DT, a press on the «Mode» button will display the trip computer information permanently.
To reset the trip computer information to zero, press continuously for a few seconds on the end of the control stalk when one of the types of information is displayed.
Multifunction screen A
The trip computer gives you 5 types of information accessible by successive presses on the control stalk.
•Range
•Instantaneous consumption
•Distance travelled
•Average consumption
•Average speed
To cancel the display of the trip computer information, press a fifth time.
Multifunction screens C and DT
The trip computer gives you access to 3 types of instantaneous information :
—Range
—Instantaneous consumption
—Distance remaining to be travelled
|
It also gives you access to 3 types |
|
|
of information for two Journeys |
|
|
1 and 2 : |
|
|
— The distance travelled |
|
|
— The average consumption |
|
|
— The average speed |
|
|
The Journeys |
|
|
Journeys 1 and 2 are independent |
|
|
of each other but identical in use. |
|
|
For example they allow you to al- |
|
|
locate journey 1 for daily calcula- |
|
|
tions and journey 2 for monthly |
|
|
calculations. |
|
|
Setting a Journey to zero |
|
|
When the relevant Journey is dis- |
|
|
played, give a long press on the |
51 |
|
end of the wiper control stalk. |