
ИНС
ТР
УКЦИЯ ПО ЭК
СПЛУ
А
ТАЦИИ
CEL-SR1UA200
© CANON INC. 2011
ОТПЕЧАТАНО В ЕС
Настоящая Инструкция по эксплуатации содержит сведения на январь 2011 года. За
информацией о совместимости фотоаппарата с другими принадлежностями и
объективами, выпущенными после данной даты, обращайтесь в сервисный центр Canon.
CANON INC.
30-2 Shimomaruko 3-chome, Ohta-ku, Tokyo 146-8501, Япония
Европа, Африка и Ближний Восток
CANON EUROPA N.V.
PO Box 2262, 1180 EG Amstelveen, Нидерланды
For your local Canon office, please refer to your warranty card or to www.canon-europe.com/Support
The product and associated warranty are provided in European countries by Canon Europa N.V.
Вводное руководство по программному обеспечению и Краткое
справочное руководство приведены в конце данной инструкции.
ИНСТРУКЦИЯ ПО
ЭКСПЛУАТАЦИИ
РУССКИЙ
 11:24
11:24
Canon 600D все еще актуальна
 15:36
15:36
Обзор на Canon 600D (Лучший вариант для новичка). Перезалив.
 07:47
07:47
ОБЗОР ФОТОАППАРАТ ДЛЯ НАЧИНАЮЩЕГО CANON 600D +KIT
 08:23
08:23
Обзор фотоаппарата Canon EOS 600D
 05:52
05:52
На что способна зеркальная камера Canon EOS 600D? КУПИЛ новую камеру! video test
 06:17
06:17
Canon EOS 600D для Видеосъемки в Youtube
 08:24
08:24
Canon EOS 600D Обзор Видео. Подробный видеообзор Canon EOS 600D от FERUMM.COM
 10:38
10:38
Настройка фотоаппарата Canon 600D
ИНС
ТР
УКЦИЯ ПО ЭК
СПЛУ
А
ТАЦИИ
CEL-SR1UA200
© CANON INC. 2011
ОТПЕЧАТАНО В ЕС
Настоящая Инструкция по эксплуатации содержит сведения на январь 2011 года. За
информацией о совместимости фотоаппарата с другими принадлежностями и
объективами, выпущенными после данной даты, обращайтесь в сервисный центр Canon.
CANON INC.
30-2 Shimomaruko 3-chome, Ohta-ku, Tokyo 146-8501, Япония
Европа, Африка и Ближний Восток
CANON EUROPA N.V.
PO Box 2262, 1180 EG Amstelveen, Нидерланды
For your local Canon office, please refer to your warranty card or to www.canon-europe.com/Support
The product and associated warranty are provided in European countries by Canon Europa N.V.
Вводное руководство по программному обеспечению и Краткое
справочное руководство приведены в конце данной инструкции.
ИНСТРУКЦИЯ ПО
ЭКСПЛУАТАЦИИ
РУССКИЙ

2
EOS 600D – это высокопроизводительный цифровой однообъективный
зеркальный фотоаппарат, оснащенный датчиком CMOS высокого
разрешения приблиз. с 18,0 эффективными мегапикселами, процессором
DIGIC 4, высокоточной и высокоскоростной 9-точечной системой
автофокусировки, режимом серийной съемки со скоростью прибл.
3,7 кадра/с, режимом съемки с использованием ЖКД-видоискателя и
режимом видеосъемки с разрешением Full High-Definition (Full HD).
Данный фотоаппарат очень хорошо приспособлен для съемок в любое
время, в нем предусмотрено большое количество функций для
профессиональной съемки и множество других возможностей.
Используйте данную инструкцию по эксплуатации при
использовании фотоаппарата, чтобы еще больше освоиться с
ним
Цифровая камера позволяет сразу же просмотреть снятое изображение.
При чтении данной Инструкции сделайте несколько пробных снимков и
оцените результаты. Это поможет лучше изучить камеру.
Во избежание несчастных случаев, а также для получения качественных
снимков сначала ознакомьтесь с разделами «Меры предосторожности»
(стр. 297, 298) и «Правила обращения» (стр. 14, 15).
Проверка фотоаппарата перед использованием и
ограничение ответственности
После съемки просмотрите снятые изображения и убедитесь, что они
нормально записались. В случае если из-за неисправности камеры или
карты памяти невозможно записать изображения или передать их на
компьютер, корпорация Canon не несет ответственности за какие-либо
убытки или причиненные неудобства.
Авторские права
Законы о защите авторского права в Вашей стране могут запрещать
использование записанных изображений, музыки, защищенной законами об
авторских правах, и изображений с музыкой на карте памяти в любых целях,
кроме личных. Следует также помнить, что на некоторых общественных
мероприятиях, выставках и т.п. фотосъемка может быть запрещена даже
для личных целей.
Введение
Данный фотоаппарат совместим с картами памяти SD, SDHC и
SDXC. В настоящем руководстве для обозначения всех этих
карт используется термин «карта».
* Карта для записи изображений не входит в комплект
камеры. Ее следует приобрести дополнительно.

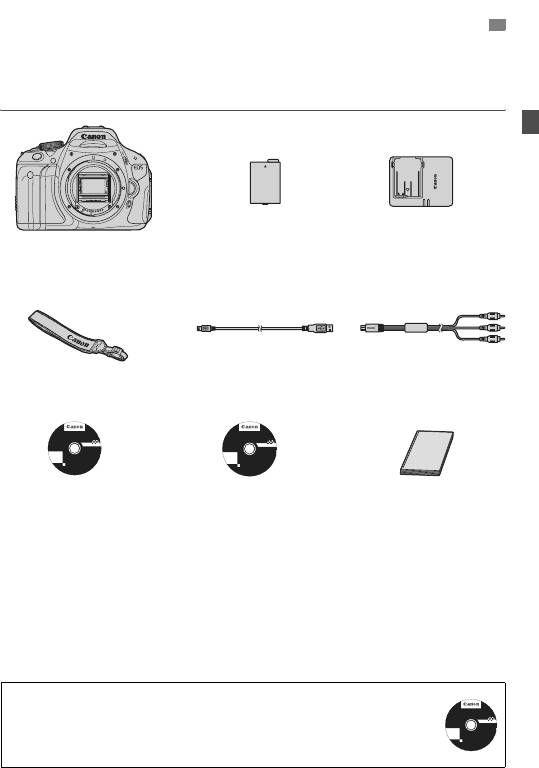
Контрольный список комплекта поставки, Eos software instruction manuals disk, Камера
Страница 3
- Изображение
- Текст
3
В первую очередь убедитесь, что в комплект поставки камеры
входят все перечисленные ниже компоненты. При отсутствии
каких-либо компонентов обращайтесь к своему дилеру.
При покупке комплекта Lens Kit проверьте наличие объектива.
В зависимости от типа комплекта Lens Kit в комплект поставки может
входить инструкция по эксплуатации объектива.
Не теряйте перечисленные выше компоненты.
Контрольный список комплекта поставки
Аккумулятор
LP-E8
(включая защитную
крышку)
Зарядное устройство
LC-E8E
Интерфейсный
кабель
Стереофонический
аудио/видеокабель
AVC-DC400ST
Широкий ремень
EW-100DB III
Камера
(с наглазником и крышкой
корпуса камеры)
EOS Solution Disk
(CD-ROM с программным
обеспечением)
EOS Software
Instruction Manuals Disk
(CD-ROM)
Инструкция по
эксплуатации
фотоаппарата
(данный документ)
Windows XXX XXX
EOS Software Instruction Manuals Disk XXX
Mac OS X XXX XXX
XXXXX
XXXXX
XXXXX
XXXXX
XXXXX
CEL-XXX XXX
© CA
NON INC. 20XX. Made in the E
U.
EOS Solution Disk XXX
CEL-XXX XXX
© C
ANON INC. 20XX. Made in the E
U.
Windows XXX XXX
Mac OS X XXX XXX
XXXXX
XXXXX
XXXXX
XXXXX
XXXXX
EOS Software Instruction Manuals Disk
Инструкции по эксплуатации программного обеспечения
включены на CD-ROM в виде PDF файлов. Информацию о том,
как найти отдельные инструкции на диске EOS Software
Instruction Manuals Disk, см. на стр. 305.
Windows XXX XXX
EOS Software Instruction Manuals Disk XXX
Mac OS X XXX XXX
XXXXX
XXXXX
XXXXX
XXXXX
XXXXX
CEL-XXX XXX
© CA
NON INC. 20XX. Made in the E
U.

4
Значки, используемые в настоящей Инструкции
<6>
: обозначает главный диск управления.
<
V> <U>
: обозначает клавиши направления <
S>.
<
0>
: обозначает кнопку установки.
0
, 9, 7, 8 : обозначает, что данная функция остается
активной в течение, соответственно, 4, 6, 10
или 16 с после того, как отпущена кнопка.
* Значки и метки, используемые в настоящей Инструкции для обозначения
кнопок, дисков и установок камеры, соответствуют значкам и меткам на
камере и на ЖК-дисплее.
3
: обозначает функцию, которую можно изменить, нажав
кнопку <M> и изменив настройку.
M
: при отображении в правом верхнем углу страницы
означает, что данная функция доступна только в режимах
творческой зоны (стр. 22).
(стр. **):за дополнительной информацией обращайтесь к
указанным страницам.
: рекомендация или совет для более эффективной съемки.
: рекомендация по устранению неполадок.
: предупреждение для предотвращения неполадок при
съемке.
: дополнительная информация.
Основные допущения
Во всех операциях, описываемых в данной инструкции,
предполагается, что выключатель питания уже установлен в
положение <1> (стр. 32).
Предполагается, что для всех параметров меню и
пользовательских функций установлены значения по умолчанию.
Для иллюстрации в приводимых в Инструкции примерах камера
показана с установленным объективом EF-S 18-55 mm f/3.5-5.6
IS II.
Обозначения, используемые в настоящей Инструкции

5
В главах 1 и 2 для начинающих пользователей цифровой зеркальной камеры
объясняются основные операции с камерой и процедуры съемки.
Оглавление
Введение
2
Начало работы
25
Основные операции съемки и воспроизведение изображений
49
Съемка в творческом режиме
73
Расширенные приемы съемки
93
Съемка с использованием ЖКД-видоискателя
123
Видеосъемка
141
Полезные функции
165
Фотография с беспроводной вспышкой
189
Просмотр изображений
201
Последующая обработка изображений
229
Печать изображений
235
Пользовательская настройка камеры
249
Справочная информация
259
Вводное руководство по программному обеспечению
301
Краткое справочное руководство и алфавитный указатель инструкции по эксплуатации
307
1
2
3
4
5
6
7
8
9
10
11
12
13
14
15

Краткое содержание Съемка Автоматическая съемка Î стр…
Страница 6
- Изображение
- Текст
6
Краткое содержание
Съемка
Автоматическая съемка
Î
стр. 49 — 63
(Режимы базовой зоны)
Серийная съемка
Î
стр. 88
(i Серийная съемка)
Съемка автопортрета в
Î
стр. 89
(j Автоспуск)
составе группы
Четкая съемка динамичных
Î
стр. 94
(s Автоэкспозиция с приоритетом выдержки)
сюжетов
Съемка динамичных сюжетов
с размытием
Размытие заднего плана
Î
стр. 56
(C Творческий авторежим)
Резкость заднего плана
стр. 96
(f Автоэкспозиция с приоритетом диафрагмы)
Настройка яркости
Î
стр. 103
(Компенсация экспозиции)
изображения (экспозиция)
Съемка при низкой освещенности
Î
стр. 50, 90
(D Съемка со вспышкой)
стр. 79
(Установка чувствительности ISO)
Съемка без вспышки
Î
стр. 55
(
7 Без вспышки)
стр. 58, 64
(b Вспышка откл.)
Ночная съемка фейерверков
Î
стр. 100
(Ручная выдержка)
Съемка с просмотром
Î
стр. 124
(A Съемка с использованием ЖКД-видоискателя)
изображения на ЖК-дисплее
Съемка видеофильмов
Î
стр. 141
(k
Видеосъемка)
Качество изображения
Съемка с эффектами, соответствующими
Î
стр. 81
(Выбор стиля изображения)
снимаемому объекту
Съемка для получения
Î
стр. 76
(73, 83, 1)
отпечатков большого формата

7
Большое количество снимков
Î
стр. 76
(7a, 8a, b, c)
Фокусировка
Изменение точки фокусировки
Î
стр. 85
(S Выбор точки AF)
Съемка движущегося объекта
Î
стр. 62, 84
(AI Servo AF (следящая автофокусировка))
Просмотр
Просмотр изображений в
Î
стр. 71
(x Просмотр)
камере
Быстрый поиск изображений
Î
стр. 202
(
H Индексный режим)
стр. 203
(I Поиск изображения)
Оценка изображений
Î
стр. 206
(Оценки)
Предотвращение случайного
Î
стр. 222
(
K Защита изображений)
удаления важных снимков
Удаление ненужных
Î
стр. 224
(L Удалить)
изображений
Автопросмотр изображений и
Î
стр. 215
(Слайд-шоу)
видеозаписей
Просмотр изображений или
Î
стр. 218
(Выход видео)
видеозаписей на экране телевизора
Установка яркости
Î
стр. 167
(Яркость ЖК-дисплея)
ЖК-дисплея
Печать
Простая печать фотографий
Î
стр. 235
(Прямая печать)

8
Питание
Аккумулятор
• Зарядка аккумулятора
Î
стр. 26
• Установка/Извлечение
Î
стр. 28
• Контроль заряда
аккумулятора
Î
стр. 33
Питание от электросети
Î
стр. 260
Автоотключение
Î
стр. 32
Карта
Установка/Извлечение
Î
стр. 29
Форматирование
Î
стр. 45
Спуск затвора без карты
Î
стр. 166
Объектив
Установка и снятие
Î
стр. 36
Зум
Î
стр. 37
Image Stabilizer (Стабилизатор
изображения)
Î
стр. 38
Базовые настройки
Диоптрийная регулировка
Î
стр. 39
Язык
Î
стр. 35
Дата/Время
Î
стр. 34
Звуковой сигнал
Î
стр. 166
Использование
ЖК-дисплея
Î
стр. 31
ЖКД Вкл./Откл.
Î
стр. 179
Регулировка яркости ЖКД
Î
стр. 167
Запись изображений
Создание и выбор папки
Î
стр. 168
№ файла
Î
стр. 170
Качество изображения
Качество записи
изображения
Î
стр. 76
Стиль изображения
Î
стр. 81
Баланс белого
Î
стр. 117
Цветовое пространство
Î
стр. 121
Функции улучшения изображений
• Auto Lighting Optimizer
(Автокоррекция яркости)
Î
стр. 109
• Коррекция периферийного освещения
объектива
Î
стр. 110
• Шумоподавление при
длительных выдержках
Î
стр. 253
• Шумоподавление при
высоких значениях
чувствительности ISO
Î
стр. 254
• Приоритет светов
Î
стр. 254
Автофокусировка
Режим автофокусировки
Î
стр. 83
Выбор точки автофокусировки
Î
стр. 85
Ручная фокусировка
Î
стр. 87
Перевод кадров
Режимы перевода кадров
(режимы съемки)
Î
стр. 20
Серийная съемка
Î
стр. 88
Автоспуск
Î
стр. 89
Максимальная длина серии
Î
стр. 77
Съемка
Чувствительность ISO
Î
стр. 79
Руководство по функциям
Î
стр. 48
Быстрый выбор
Î
стр. 41
Творческий авторежим
Î
стр. 56
Программная автоэкспозиция
Î
стр. 74
Автоэкспозиция с
приоритетом выдержки
Î
стр. 94
Автоэкспозиция с приоритетом
диафрагмы
Î
стр. 96
Ручная установка экспозиции
Î
стр. 99
Ручная выдержка
Î
стр. 100
Блокировка зеркала
Î
стр. 122
Автоэкспозиция с контролем
глубины резкости
Î
стр. 101
Алфавитный указатель функций

9
Алфавитный указатель функций
Режим замера
Î
стр. 102
Дистанционное управление
Î
стр. 261
Настройка экспозиции
Компенсация экспозиции
Î
стр. 103
Автоматический брекетинг
экспозиции (AEB)
Î
стр. 105
Фиксация автоэкспозиции
Î
стр. 107
Вспышка
Встроенная вспышка
Î
стр. 90
• Компенсация
экспозиции вспышки
Î
стр. 104
• Фиксация экспозиции
вспышки
Î
стр. 108
Внешняя вспышка
Î
стр. 263
Управление вспышкой
Î
стр. 180
• Беспроводная вспышка
Î
стр. 189
Съемка с использованием
ЖКД-видоискателя
Съемка с использованием
ЖКД-видоискателя
Î
стр. 123
Фокусировка
Î
стр. 131
Формат кадра
Î
стр. 129
Отображение сетки
Î
стр. 129
Быстрый выбор
Î
стр. 128
Видеосъемка
Видеосъемка
Î
стр. 141
Быстрый выбор
Î
стр. 149
Запись звука
Î
стр. 160
Отображение сетки
Î
стр. 161
Видеофрагмент
Î
стр. 153
Цифровое увеличение при
видеосъемке
Î
стр. 152
Ручная установка экспозиции
Î
стр. 144
Воспроизведение изображения
Время просмотра изображения
Î
стр. 166
Вывод одиночного
изображения
Î
стр. 71
• Отображение информации
о параметрах съемки
Î
стр. 226
Индексный режим
Î
стр. 202
Поиск изображения (режим
перехода)
Î
стр. 203
Увеличение
Î
стр. 204
Поворот
Î
стр. 205
Оценки
Î
стр. 206
Просмотр видеозаписи
Î
стр. 212
Удаление первого/последнего
фрагмента видеозаписи
Î
стр. 214
Слайд-шоу
Î
стр. 215
Просмотр изображений на
экране телевизора
Î
стр. 218
Защита
Î
стр. 222
Стирание
Î
стр. 224
Быстрый выбор
Î
стр. 208
Редактирование изображений
Художественные
фильтры
Î
стр. 230
Изменить размер
Î
стр. 233
Печать
PictBridge
Î
стр. 235
Заказ печати (DPOF)
Î
стр. 245
Пользовательская настройка
Пользовательские функции
(C.Fn)
Î
стр. 250
МОЁ МЕНЮ
Î
стр. 258
Программное обеспечение
Установка
Î
стр. 303
Инструкции по
эксплуатации программы
Î
стр. 305

10
2
1
Введение
2
Контрольный список комплекта поставки……………………………………………… 3
Обозначения, используемые в настоящей Инструкции …………………………. 4
Оглавление ………………………………………………………………………………………… 5
Краткое содержание……………………………………………………………………………. 6
Алфавитный указатель функций………………………………………………………….. 8
Правила обращения ………………………………………………………………………….. 14
Краткое руководство по началу работы ……………………………………………… 16
Обозначения …………………………………………………………………………………….. 18
Начало работы
25
Зарядка аккумулятора……………………………………………………………………….. 26
Установка и извлечение аккумулятора……………………………………………….. 28
Установка и извлечение карты …………………………………………………………… 29
Использование ЖК-дисплея ………………………………………………………………. 31
Включение камеры ……………………………………………………………………………. 32
Установка даты и времени…………………………………………………………………. 34
Установка языка интерфейса …………………………………………………………….. 35
Установка и снятие объектива …………………………………………………………… 36
О функции Image Stabilizer (Стабилизатор изображения) для объективов….. 38
Основные операции ………………………………………………………………………….. 39
Q Функции съемки экрана быстрого выбора ……………………………………… 41
3
Использование меню ……………………………………………………………….. 43
Форматирование карты памяти………………………………………………………….. 45
Переключение экрана ЖК-дисплея…………………………………………………….. 47
Руководство по функциям………………………………………………………………….. 48
Основные операции съемки и воспроизведение изображений 49
A Полностью автоматическая съемка (Интеллект. сценар. режим) …… 50
A Приемы съемки в полностью автоматическом режиме (Интеллект.
сценар. режим)………………………………………………………………………………….. 53
7 Отключение вспышки …………………………………………………………………… 55
C Съемка в творческом авторежиме………………………………………………… 56
2 Съемка портретов ………………………………………………………………………… 59
3 Съемка пейзажей ………………………………………………………………………… 60
4 Съемка крупным планом……………………………………………………………….. 61
5 Съемка движущихся объектов ……………………………………………………… 62
6 Съемка портретов ночью ………………………………………………………………. 63
Q Быстрая настройка ………………………………………………………………………. 64
Выбор атмосферы съемки…………………………………………………………………. 65
Съемка по освещению или сцене ………………………………………………………. 68
x
Воспроизведение изображений ……………………………………………………. 71
Содержание

Комментарии
Языки:

Canon EOS 600D инструкция по эксплуатации
(183 страницы)
- Языки:Русский
-
Тип:
PDF -
Размер:
29.59 MB -
Описание:
This document contains instructions on how to use Digital Photo Professional software.
Просмотр

Canon EOS 600D инструкция по эксплуатации
(23 страницы)
- Языки:Русский
-
Тип:
PDF -
Размер:
3.66 MB -
Описание:
This document contains instructions on how to use Picture Style Editor software.
Просмотр

Canon EOS 600D инструкция по эксплуатации
(328 страниц)
- Языки:Русский
-
Тип:
PDF -
Размер:
20.27 MB -
Описание:
Цифровой фотоаппарат
Просмотр

Canon EOS 600D инструкция по эксплуатации
(97 страниц)
- Языки:Русский
-
Тип:
PDF -
Размер:
10.25 MB -
Описание:
The file is an electronic instruction manual (PDF file) for the ZoomBrowser v6.7 software.
Просмотр

Canon EOS 600D инструкция по эксплуатации
(328 страниц)
- Языки:Русский
-
Тип:
PDF -
Размер:
19.63 MB -
Описание:
The file is an electronic guide (PDF file) for the EOS 600D.
Просмотр

Canon EOS 600D инструкция по эксплуатации
(152 страницы)
- Языки:Русский
-
Тип:
PDF -
Размер:
13.64 MB -
Описание:
This file is an electronic guide (PDF file) of the Digital Photo Professional for Windows. It corresponds to version 3.14 of the software.
Просмотр

Canon EOS 600D инструкция по эксплуатации
(112 страниц)
- Языки:Русский
-
Тип:
PDF -
Размер:
9.72 MB -
Описание:
This file is an electronic guide (PDF file) of the EOS Utility for Windows. It corresponds to version 2.14 of the software.
Просмотр

Canon EOS 600D инструкция по эксплуатации
(149 страниц)
- Языки:Русский
-
Тип:
PDF -
Размер:
28.04 MB -
Описание:
This document contains instructions on how to use your product. It corresponds to version 4.8 of the software.
Просмотр

Canon EOS 600D инструкция по эксплуатации
(22 страницы)
- Языки:Русский
-
Тип:
PDF -
Размер:
4.2 MB -
Описание:
This document contains instructions on how to use your product. It corresponds to version 1.20 of the software.
Просмотр

Canon EOS 600D инструкция по эксплуатации
(183 страницы)
- Языки:Английский
-
Тип:
PDF -
Размер:
29.53 MB -
Описание:
This document contains instructions on how to use Digital Photo Professional software.
Просмотр

Canon EOS 600D инструкция по эксплуатации
(23 страницы)
- Языки:Английский
-
Тип:
PDF -
Размер:
3.67 MB -
Описание:
This document contains instructions on how to use Picture Style Editor software.
Просмотр

Canon EOS 600D инструкция по эксплуатации
(328 страниц)
- Языки:Английский
-
Тип:
PDF -
Размер:
17.42 MB -
Описание:
The file is an electronic guide (PDF file) for the EOS 600D.
Просмотр

Canon EOS 600D инструкция по эксплуатации
(152 страницы)
- Языки:Английский
-
Тип:
PDF -
Размер:
14.56 MB -
Описание:
This file is an electronic guide (PDF file) of the Digital Photo Professional for Windows. It corresponds to version 3.14 of the software.
Просмотр

Canon EOS 600D инструкция по эксплуатации
(112 страниц)
- Языки:Английский
-
Тип:
PDF -
Размер:
10.33 MB -
Описание:
This file is an electronic guide (PDF file) of the EOS Utility for Windows. It corresponds to version 2.14 of the software.
Просмотр

Canon EOS 600D инструкция по эксплуатации
(149 страниц)
- Языки:Английский
-
Тип:
PDF -
Размер:
31.71 MB -
Описание:
This document contains instructions on how to use your product. It corresponds to version 4.8 of the software.
Просмотр

Canon EOS 600D инструкция по эксплуатации
(22 страницы)
- Языки:Английский
-
Тип:
PDF -
Размер:
4.11 MB -
Описание:
This document contains instructions on how to use your product. It corresponds to version 1.20 of the software.
Просмотр

Canon EOS 600D инструкция по эксплуатации
(183 страницы)
- Языки:Украинский
-
Тип:
PDF -
Размер:
29.85 MB -
Описание:
This document contains instructions on how to use Digital Photo Professional software.
Просмотр

Canon EOS 600D инструкция по эксплуатации
(183 страницы)
- Языки:Шведский
-
Тип:
PDF -
Размер:
29.67 MB -
Описание:
This document contains instructions on how to use Digital Photo Professional software.
Просмотр

Canon EOS 600D инструкция по эксплуатации
(183 страницы)
- Языки:Финский
-
Тип:
PDF -
Размер:
29.67 MB -
Описание:
This document contains instructions on how to use Digital Photo Professional software.
Просмотр

Canon EOS 600D инструкция по эксплуатации
(183 страницы)
- Языки:Словацкий
-
Тип:
PDF -
Размер:
29.93 MB -
Описание:
This document contains instructions on how to use Digital Photo Professional software.
Просмотр

Canon EOS 600D инструкция по эксплуатации
(183 страницы)
- Языки:Португальский
-
Тип:
PDF -
Размер:
29.73 MB -
Описание:
This document contains instructions on how to use Digital Photo Professional software.
Просмотр

Canon EOS 600D инструкция по эксплуатации
(183 страницы)
- Языки:Нидерландский
-
Тип:
PDF -
Размер:
29.74 MB -
Описание:
This document contains instructions on how to use Digital Photo Professional software.
Просмотр

Canon EOS 600D инструкция по эксплуатации
(183 страницы)
- Языки:Венгерский
-
Тип:
PDF -
Размер:
29.84 MB -
Описание:
This document contains instructions on how to use Digital Photo Professional software.
Просмотр

Canon EOS 600D инструкция по эксплуатации
(183 страницы)
- Языки:Казахский
-
Тип:
PDF -
Размер:
29.77 MB -
Описание:
This document contains instructions on how to use Digital Photo Professional software.
Просмотр

Canon EOS 600D инструкция по эксплуатации
(183 страницы)
- Языки:Итальянский
-
Тип:
PDF -
Размер:
53.89 MB -
Описание:
This document contains instructions on how to use Digital Photo Professional software.
Просмотр

Canon EOS 600D инструкция по эксплуатации
(183 страницы)
- Языки:Французский
-
Тип:
PDF -
Размер:
28.44 MB -
Описание:
This document contains instructions on how to use Digital Photo Professional software.
Просмотр

Canon EOS 600D инструкция по эксплуатации
(183 страницы)
- Языки:Испанский
-
Тип:
PDF -
Размер:
26.77 MB -
Описание:
This document contains instructions on how to use Digital Photo Professional software.
Просмотр

Canon EOS 600D инструкция по эксплуатации
(183 страницы)
- Языки:Эстонский
-
Тип:
PDF -
Размер:
30.13 MB -
Описание:
This document contains instructions on how to use Digital Photo Professional software.
Просмотр

Canon EOS 600D инструкция по эксплуатации
(183 страницы)
- Языки:Греческий
-
Тип:
PDF -
Размер:
30.28 MB -
Описание:
This document contains instructions on how to use Digital Photo Professional software.
Просмотр

Canon EOS 600D инструкция по эксплуатации
(183 страницы)
- Языки:Немецкий
-
Тип:
PDF -
Размер:
51.58 MB -
Описание:
This document contains instructions on how to use Digital Photo Professional software.
Просмотр

Canon EOS 600D инструкция по эксплуатации
(183 страницы)
- Языки:Датский
-
Тип:
PDF -
Размер:
29.64 MB -
Описание:
This document contains instructions on how to use Digital Photo Professional software.
Просмотр

Canon EOS 600D инструкция по эксплуатации
(183 страницы)
- Языки:Чешский
-
Тип:
PDF -
Размер:
29.85 MB -
Описание:
This document contains instructions on how to use Digital Photo Professional software.
Просмотр

Canon EOS 600D инструкция по эксплуатации
(23 страницы)
- Языки:Словацкий
-
Тип:
PDF -
Размер:
3.15 MB -
Описание:
This document contains instructions on how to use Picture Style Editor software.
Просмотр

Canon EOS 600D инструкция по эксплуатации
(23 страницы)
- Языки:Шведский
-
Тип:
PDF -
Размер:
3.11 MB -
Описание:
This document contains instructions on how to use Picture Style Editor software.
Просмотр

Canon EOS 600D инструкция по эксплуатации
(23 страницы)
- Языки:Украинский
-
Тип:
PDF -
Размер:
3.74 MB -
Описание:
This document contains instructions on how to use Picture Style Editor software.
Просмотр

Canon EOS 600D инструкция по эксплуатации
(23 страницы)
- Языки:Польский
-
Тип:
PDF -
Размер:
3.17 MB -
Описание:
This document contains instructions on how to use Picture Style Editor software.
Просмотр

Canon EOS 600D инструкция по эксплуатации
(23 страницы)
- Языки:Португальский
-
Тип:
PDF -
Размер:
3.11 MB -
Описание:
This document contains instructions on how to use Picture Style Editor software.
Просмотр

Canon EOS 600D инструкция по эксплуатации
(23 страницы)
- Языки:Итальянский
-
Тип:
PDF -
Размер:
3.1 MB -
Описание:
This document contains instructions on how to use Picture Style Editor software.
Просмотр

Canon EOS 600D инструкция по эксплуатации
(23 страницы)
- Языки:Казахский
-
Тип:
PDF -
Размер:
3.73 MB -
Описание:
This document contains instructions on how to use Picture Style Editor software.
Просмотр

Canon EOS 600D инструкция по эксплуатации
(23 страницы)
- Языки:Латышский
-
Тип:
PDF -
Размер:
3.72 MB -
Описание:
This document contains instructions on how to use Picture Style Editor software.
Просмотр

Canon EOS 600D инструкция по эксплуатации
(23 страницы)
- Языки:Литовский
-
Тип:
PDF -
Размер:
3.72 MB -
Описание:
This document contains instructions on how to use Picture Style Editor software.
Просмотр

Canon EOS 600D инструкция по эксплуатации
(23 страницы)
- Языки:Венгерский
-
Тип:
PDF -
Размер:
3.15 MB -
Описание:
This document contains instructions on how to use Picture Style Editor software.
Просмотр

Canon EOS 600D инструкция по эксплуатации
(23 страницы)
- Языки:Эстонский
-
Тип:
PDF -
Размер:
3.73 MB -
Описание:
This document contains instructions on how to use Picture Style Editor software.
Просмотр

Canon EOS 600D инструкция по эксплуатации
(23 страницы)
- Языки:Испанский
-
Тип:
PDF -
Размер:
3.65 MB -
Описание:
This document contains instructions on how to use Picture Style Editor software.
Просмотр

Canon EOS 600D инструкция по эксплуатации
(23 страницы)
- Языки:Французский
-
Тип:
PDF -
Размер:
3.91 MB -
Описание:
This document contains instructions on how to use Picture Style Editor software.
Просмотр

Canon EOS 600D инструкция по эксплуатации
(23 страницы)
- Языки:Чешский
-
Тип:
PDF -
Размер:
3.16 MB -
Описание:
This document contains instructions on how to use Picture Style Editor software.
Просмотр

Canon EOS 600D инструкция по эксплуатации
(23 страницы)
- Языки:Датский
-
Тип:
PDF -
Размер:
3.11 MB -
Описание:
This document contains instructions on how to use Picture Style Editor software.
Просмотр

Canon EOS 600D инструкция по эксплуатации
(23 страницы)
- Языки:Немецкий
-
Тип:
PDF -
Размер:
4.14 MB -
Описание:
This document contains instructions on how to use Picture Style Editor software.
Просмотр

Canon EOS 600D инструкция по эксплуатации
(326 страниц)
- Языки:Турецкий
-
Тип:
PDF -
Размер:
26.17 MB -
Описание:
The file is an electronic guide (PDF file) for the EOS 600D.
Просмотр

Canon EOS 600D инструкция по эксплуатации
(99 страниц)
- Языки:Шведский
-
Тип:
PDF -
Размер:
9.29 MB -
Описание:
The file is an electronic instruction manual (PDF file) for the ZoomBrowser v6.7 software.
Просмотр

Canon EOS 600D инструкция по эксплуатации
(328 страниц)
- Языки:Шведский
-
Тип:
PDF -
Размер:
26.25 MB -
Описание:
The file is an electronic guide (PDF file) for the EOS 600D.
Просмотр

Canon EOS 600D инструкция по эксплуатации
(328 страниц)
- Языки:Финский
-
Тип:
PDF -
Размер:
18.46 MB -
Описание:
The file is an electronic guide (PDF file) for the EOS 600D.
Просмотр

Canon EOS 600D инструкция по эксплуатации
(99 страниц)
- Языки:Португальский
-
Тип:
PDF -
Размер:
9.31 MB -
Описание:
The file is an electronic instruction manual (PDF file) for the ZoomBrowser v6.7 software.
Просмотр

Canon EOS 600D инструкция по эксплуатации
(328 страниц)
- Языки:Португальский
-
Тип:
PDF -
Размер:
18.59 MB -
Описание:
The file is an electronic guide (PDF file) for the EOS 600D.
Просмотр

Canon EOS 600D инструкция по эксплуатации
(99 страниц)
- Языки:Нидерландский
-
Тип:
PDF -
Размер:
9.31 MB -
Описание:
The file is an electronic instruction manual (PDF file) for the ZoomBrowser v6.7 software.
Просмотр

Canon EOS 600D инструкция по эксплуатации
(328 страниц)
- Языки:Нидерландский
-
Тип:
PDF -
Размер:
17.9 MB -
Описание:
The file is an electronic guide (PDF file) for the EOS 600D.
Просмотр

Canon EOS 600D инструкция по эксплуатации
(328 страниц)
- Языки:Венгерский
-
Тип:
PDF -
Размер:
18.9 MB -
Описание:
The file is an electronic guide (PDF file) for the EOS 600D.
Просмотр

Canon EOS 600D инструкция по эксплуатации
(328 страниц)
- Языки:Латышский
-
Тип:
PDF -
Размер:
19.3 MB -
Описание:
The file is an electronic camera user guide (PDF file) for the EOS 600D.
Просмотр

Canon EOS 600D инструкция по эксплуатации
(328 страниц)
- Языки:Латышский
-
Тип:
PDF -
Размер:
18.44 MB -
Описание:
The file is an electronic guide (PDF file) for the EOS 600D.
Просмотр

Canon EOS 600D инструкция по эксплуатации
(99 страниц)
- Языки:Итальянский
-
Тип:
PDF -
Размер:
10.48 MB -
Описание:
The file is an electronic instruction manual (PDF file) for the ZoomBrowser v6.7 software.
Просмотр

Canon EOS 600D инструкция по эксплуатации
(328 страниц)
- Языки:Итальянский
-
Тип:
PDF -
Размер:
18.8 MB -
Описание:
The file is an electronic guide (PDF file) for the EOS 600D.
Просмотр

Canon EOS 600D инструкция по эксплуатации
(99 страниц)
- Языки:Французский
-
Тип:
PDF -
Размер:
9.84 MB -
Описание:
The file is an electronic instruction manual (PDF file) for the ZoomBrowser v6.7 software.
Просмотр

Canon EOS 600D инструкция по эксплуатации
(328 страниц)
- Языки:Французский
-
Тип:
PDF -
Размер:
19.2 MB -
Описание:
The file is an electronic guide (PDF file) for the EOS 600D.
Просмотр

Canon EOS 600D инструкция по эксплуатации
(99 страниц)
- Языки:Эстонский
-
Тип:
PDF -
Размер:
13.72 MB -
Описание:
The file is an electronic instruction manual (PDF file) for the ZoomBrowser v6.7 software.
Просмотр

Canon EOS 600D инструкция по эксплуатации
(99 страниц)
- Языки:Немецкий
-
Тип:
PDF -
Размер:
9.98 MB -
Описание:
The file is an electronic instruction manual (PDF file) for the ZoomBrowser v6.7 software.
Просмотр

Canon EOS 600D инструкция по эксплуатации
(328 страниц)
- Языки:Немецкий
-
Тип:
PDF -
Размер:
18.6 MB -
Описание:
The file is an electronic guide (PDF file) for the EOS 600D.
Просмотр

Canon EOS 600D инструкция по эксплуатации
(328 страниц)
- Языки:Датский
-
Тип:
PDF -
Размер:
18.45 MB -
Описание:
The file is an electronic guide (PDF file) for the EOS 600D.
Просмотр

Canon EOS 600D инструкция по эксплуатации
(99 страниц)
- Языки:Чешский
-
Тип:
PDF -
Размер:
9.37 MB -
Описание:
The file is an electronic instruction manual (PDF file) for the ZoomBrowser v6.7 software.
Просмотр

Canon EOS 600D инструкция по эксплуатации
(328 страниц)
- Языки:Чешский
-
Тип:
PDF -
Размер:
17.91 MB -
Описание:
The file is an electronic guide (PDF file) for the EOS 600D.
Просмотр

Canon EOS 600D инструкция по эксплуатации
(152 страницы)
- Языки:Украинский
-
Тип:
PDF -
Размер:
20.99 MB -
Описание:
This file is an electronic guide (PDF file) of the Digital Photo Professional for Windows. It corresponds to version 3.14 of the software.
Просмотр

Canon EOS 600D инструкция по эксплуатации
(112 страниц)
- Языки:Украинский
-
Тип:
PDF -
Размер:
13.28 MB -
Описание:
This file is an electronic guide (PDF file) of the EOS Utility for Windows. It corresponds to version 2.14 of the software.
Просмотр

Canon EOS 600D инструкция по эксплуатации
(149 страниц)
- Языки:Украинский
-
Тип:
PDF -
Размер:
27.92 MB -
Описание:
This document contains instructions on how to use your product. It corresponds to version 4.8 of the software.
Просмотр

Canon EOS 600D инструкция по эксплуатации
(152 страницы)
- Языки:Шведский
-
Тип:
PDF -
Размер:
13.48 MB -
Описание:
This file is an electronic guide (PDF file) of the Digital Photo Professional for Windows. It corresponds to version 3.14 of the software.
Просмотр

Canon EOS 600D инструкция по эксплуатации
(112 страниц)
- Языки:Шведский
-
Тип:
PDF -
Размер:
9.43 MB -
Описание:
This file is an electronic guide (PDF file) of the EOS Utility for Windows. It corresponds to version 2.14 of the software.
Просмотр

Canon EOS 600D инструкция по эксплуатации
(149 страниц)
- Языки:Шведский
-
Тип:
PDF -
Размер:
31.77 MB -
Описание:
This document contains instructions on how to use your product. It corresponds to version 4.8 of the software.
Просмотр

Canon EOS 600D инструкция по эксплуатации
(152 страницы)
- Языки:Финский
-
Тип:
PDF -
Размер:
13.5 MB -
Описание:
This file is an electronic guide (PDF file) of the Digital Photo Professional for Windows. It corresponds to version 3.14 of the software.
Просмотр

Canon EOS 600D инструкция по эксплуатации
(149 страниц)
- Языки:Финский
-
Тип:
PDF -
Размер:
32.12 MB -
Описание:
This document contains instructions on how to use your product. It corresponds to version 4.8 of the software.
Просмотр

Canon EOS 600D инструкция по эксплуатации
(112 страниц)
- Языки:Словацкий
-
Тип:
PDF -
Размер:
10.14 MB -
Описание:
This file is an electronic guide (PDF file) of the EOS Utility for Windows. It corresponds to version 2.14 of the software.
Просмотр

Canon EOS 600D инструкция по эксплуатации
(152 страницы)
- Языки:Португальский
-
Тип:
PDF -
Размер:
13.56 MB -
Описание:
This file is an electronic guide (PDF file) of the Digital Photo Professional for Windows. It corresponds to version 3.14 of the software.
Просмотр

Canon EOS 600D инструкция по эксплуатации
(112 страниц)
- Языки:Португальский
-
Тип:
PDF -
Размер:
10.06 MB -
Описание:
This file is an electronic guide (PDF file) of the EOS Utility for Windows. It corresponds to version 2.14 of the software.
Просмотр

Canon EOS 600D инструкция по эксплуатации
(149 страниц)
- Языки:Португальский
-
Тип:
PDF -
Размер:
32 MB -
Описание:
This document contains instructions on how to use your product. It corresponds to version 4.8 of the software.
Просмотр

Canon EOS 600D инструкция по эксплуатации
(152 страницы)
- Языки:Польский
-
Тип:
PDF -
Размер:
13.73 MB -
Описание:
This file is an electronic guide (PDF file) of the Digital Photo Professional for Windows. It corresponds to version 3.14 of the software.
Просмотр

Canon EOS 600D инструкция по эксплуатации
(112 страниц)
- Языки:Польский
-
Тип:
PDF -
Размер:
10.52 MB -
Описание:
This file is an electronic guide (PDF file) of the EOS Utility for Windows. It corresponds to version 2.14 of the software.
Просмотр

Canon EOS 600D инструкция по эксплуатации
(112 страниц)
- Языки:Нидерландский
-
Тип:
PDF -
Размер:
10.04 MB -
Описание:
This file is an electronic guide (PDF file) of the EOS Utility for Windows. It corresponds to version 2.14 of the software.
Просмотр

Canon EOS 600D инструкция по эксплуатации
(149 страниц)
- Языки:Нидерландский
-
Тип:
PDF -
Размер:
31.77 MB -
Описание:
This document contains instructions on how to use your product. It corresponds to version 4.8 of the software.
Просмотр

Canon EOS 600D инструкция по эксплуатации
(152 страницы)
- Языки:Венгерский
-
Тип:
PDF -
Размер:
13.64 MB -
Описание:
This file is an electronic guide (PDF file) of the Digital Photo Professional for Windows. It corresponds to version 3.14 of the software.
Просмотр

Canon EOS 600D инструкция по эксплуатации
(112 страниц)
- Языки:Венгерский
-
Тип:
PDF -
Размер:
9.58 MB -
Описание:
This file is an electronic guide (PDF file) of the EOS Utility for Windows. It corresponds to version 2.14 of the software.
Просмотр

Canon EOS 600D инструкция по эксплуатации
(149 страниц)
- Языки:Венгерский
-
Тип:
PDF -
Размер:
32.35 MB -
Описание:
This document contains instructions on how to use your product. It corresponds to version 4.8 of the software.
Просмотр

Canon EOS 600D инструкция по эксплуатации
(152 страницы)
- Языки:Литовский
-
Тип:
PDF -
Размер:
20.65 MB -
Описание:
This file is an electronic guide (PDF file) of the Digital Photo Professional for Windows. It corresponds to version 3.14 of the software.
Просмотр

Canon EOS 600D инструкция по эксплуатации
(112 страниц)
- Языки:Литовский
-
Тип:
PDF -
Размер:
13.14 MB -
Описание:
This file is an electronic guide (PDF file) of the EOS Utility for Windows. It corresponds to version 2.14 of the software.
Просмотр

Canon EOS 600D инструкция по эксплуатации
(149 страниц)
- Языки:Литовский
-
Тип:
PDF -
Размер:
27.72 MB -
Описание:
This document contains instructions on how to use your product. It corresponds to version 4.8 of the software.
Просмотр

Canon EOS 600D инструкция по эксплуатации
(152 страницы)
- Языки:Латышский
-
Тип:
PDF -
Размер:
20.75 MB -
Описание:
This file is an electronic guide (PDF file) of the Digital Photo Professional for Windows. It corresponds to version 3.14 of the software.
Просмотр

Canon EOS 600D инструкция по эксплуатации
(112 страниц)
- Языки:Латышский
-
Тип:
PDF -
Размер:
13.18 MB -
Описание:
This file is an electronic guide (PDF file) of the EOS Utility for Windows. It corresponds to version 2.14 of the software.
Просмотр

Canon EOS 600D инструкция по эксплуатации
(149 страниц)
- Языки:Латышский
-
Тип:
PDF -
Размер:
27.69 MB -
Описание:
This document contains instructions on how to use your product. It corresponds to version 4.8 of the software.
Просмотр

Canon EOS 600D инструкция по эксплуатации
(152 страницы)
- Языки:Казахский
-
Тип:
PDF -
Размер:
20.86 MB -
Описание:
This file is an electronic guide (PDF file) of the Digital Photo Professional for Windows. It corresponds to version 3.14 of the software.
Просмотр

Canon EOS 600D инструкция по эксплуатации
(149 страниц)
- Языки:Казахский
-
Тип:
PDF -
Размер:
27.8 MB -
Описание:
This document contains instructions on how to use your product. It corresponds to version 4.8 of the software.
Просмотр

Canon EOS 600D инструкция по эксплуатации
(152 страницы)
- Языки:Итальянский
-
Тип:
PDF -
Размер:
13.56 MB -
Описание:
This file is an electronic guide (PDF file) of the Digital Photo Professional for Windows. It corresponds to version 3.14 of the software.
Просмотр

Canon EOS 600D инструкция по эксплуатации
(112 страниц)
- Языки:Итальянский
-
Тип:
PDF -
Размер:
10.45 MB -
Описание:
This file is an electronic guide (PDF file) of the EOS Utility for Windows. It corresponds to version 2.14 of the software.
Просмотр

Canon EOS 600D инструкция по эксплуатации
(149 страниц)
- Языки:Итальянский
-
Тип:
PDF -
Размер:
32.62 MB -
Описание:
This document contains instructions on how to use your product. It corresponds to version 4.8 of the software.
Просмотр

Canon EOS 600D инструкция по эксплуатации
(152 страницы)
- Языки:Французский
-
Тип:
PDF -
Размер:
13.68 MB -
Описание:
This file is an electronic guide (PDF file) of the Digital Photo Professional for Windows. It corresponds to version 3.14 of the software.
Просмотр

Canon EOS 600D инструкция по эксплуатации
(112 страниц)
- Языки:Французский
-
Тип:
PDF -
Размер:
11.03 MB -
Описание:
This file is an electronic guide (PDF file) of the EOS Utility for Windows. It corresponds to version 2.14 of the software.
Просмотр

Canon EOS 600D инструкция по эксплуатации
(149 страниц)
- Языки:Французский
-
Тип:
PDF -
Размер:
32.03 MB -
Описание:
This document contains instructions on how to use your product. It corresponds to version 4.8 of the software.
Просмотр

Canon EOS 600D инструкция по эксплуатации
(152 страницы)
- Языки:Испанский
-
Тип:
PDF -
Размер:
37.18 MB -
Описание:
This file is an electronic guide (PDF file) of the Digital Photo Professional for Windows. It corresponds to version 3.14 of the software.
Просмотр

Canon EOS 600D инструкция по эксплуатации
(112 страниц)
- Языки:Испанский
-
Тип:
PDF -
Размер:
9.42 MB -
Описание:
This file is an electronic guide (PDF file) of the EOS Utility for Windows. It corresponds to version 2.14 of the software.
Просмотр

Canon EOS 600D инструкция по эксплуатации
(149 страниц)
- Языки:Испанский
-
Тип:
PDF -
Размер:
30.77 MB -
Описание:
This document contains instructions on how to use your product. It corresponds to version 4.8 of the software.
Просмотр

Canon EOS 600D инструкция по эксплуатации
(152 страницы)
- Языки:Эстонский
-
Тип:
PDF -
Размер:
20.57 MB -
Описание:
This file is an electronic guide (PDF file) of the Digital Photo Professional for Windows. It corresponds to version 3.14 of the software.
Просмотр

Canon EOS 600D инструкция по эксплуатации
(112 страниц)
- Языки:Эстонский
-
Тип:
PDF -
Размер:
13.61 MB -
Описание:
This file is an electronic guide (PDF file) of the EOS Utility for Windows. It corresponds to version 2.14 of the software.
Просмотр

Canon EOS 600D инструкция по эксплуатации
(149 страниц)
- Языки:Эстонский
-
Тип:
PDF -
Размер:
28.41 MB -
Описание:
This document contains instructions on how to use your product. It corresponds to version 4.8 of the software.
Просмотр

Canon EOS 600D инструкция по эксплуатации
(152 страницы)
- Языки:Греческий
-
Тип:
PDF -
Размер:
14 MB -
Описание:
This file is an electronic guide (PDF file) of the Digital Photo Professional for Windows. It corresponds to version 3.14 of the software.
Просмотр

Canon EOS 600D инструкция по эксплуатации
(112 страниц)
- Языки:Греческий
-
Тип:
PDF -
Размер:
11.28 MB -
Описание:
This file is an electronic guide (PDF file) of the EOS Utility for Windows. It corresponds to version 2.14 of the software.
Просмотр

Canon EOS 600D инструкция по эксплуатации
(149 страниц)
- Языки:Греческий
-
Тип:
PDF -
Размер:
33.13 MB -
Описание:
This document contains instructions on how to use your product. It corresponds to version 4.8 of the software.
Просмотр

Canon EOS 600D инструкция по эксплуатации
(152 страницы)
- Языки:Немецкий
-
Тип:
PDF -
Размер:
13.27 MB -
Описание:
This file is an electronic guide (PDF file) of the Digital Photo Professional for Windows. It corresponds to version 3.14 of the software.
Просмотр

Canon EOS 600D инструкция по эксплуатации
(112 страниц)
- Языки:Немецкий
-
Тип:
PDF -
Размер:
10.46 MB -
Описание:
This file is an electronic guide (PDF file) of the EOS Utility for Windows. It corresponds to version 2.14 of the software.
Просмотр

Canon EOS 600D инструкция по эксплуатации
(149 страниц)
- Языки:Немецкий
-
Тип:
PDF -
Размер:
32.48 MB -
Описание:
This document contains instructions on how to use your product. It corresponds to version 4.8 of the software.
Просмотр

Canon EOS 600D инструкция по эксплуатации
(152 страницы)
- Языки:Датский
-
Тип:
PDF -
Размер:
13.52 MB -
Описание:
This file is an electronic guide (PDF file) of the Digital Photo Professional for Windows. It corresponds to version 3.14 of the software.
Просмотр

Canon EOS 600D инструкция по эксплуатации
(112 страниц)
- Языки:Датский
-
Тип:
PDF -
Размер:
10.02 MB -
Описание:
This file is an electronic guide (PDF file) of the EOS Utility for Windows. It corresponds to version 2.14 of the software.
Просмотр

Canon EOS 600D инструкция по эксплуатации
(149 страниц)
- Языки:Датский
-
Тип:
PDF -
Размер:
32.04 MB -
Описание:
This document contains instructions on how to use your product. It corresponds to version 4.8 of the software.
Просмотр

Canon EOS 600D инструкция по эксплуатации
(152 страницы)
- Языки:Чешский
-
Тип:
PDF -
Размер:
13.68 MB -
Описание:
This file is an electronic guide (PDF file) of the Digital Photo Professional for Windows. It corresponds to version 3.14 of the software.
Просмотр

Canon EOS 600D инструкция по эксплуатации
(112 страниц)
- Языки:Чешский
-
Тип:
PDF -
Размер:
11.03 MB -
Описание:
This file is an electronic guide (PDF file) of the EOS Utility for Windows. It corresponds to version 2.14 of the software.
Просмотр

Canon EOS 600D инструкция по эксплуатации
(149 страниц)
- Языки:Чешский
-
Тип:
PDF -
Размер:
31.87 MB -
Описание:
This document contains instructions on how to use your product. It corresponds to version 4.8 of the software.
Просмотр

Canon EOS 600D инструкция по эксплуатации
(151 страница)
- Языки:Персидский
-
Тип:
PDF -
Размер:
26.62 MB -
Описание:
This file is an electronic guide (PDF file) of the Digital Photo Professional for Windows. It corresponds to version 3.14 of the software.
Просмотр

Canon EOS 600D инструкция по эксплуатации
(151 страница)
- Языки:Арабский
-
Тип:
PDF -
Размер:
26.67 MB -
Описание:
This file is an electronic guide (PDF file) of the Digital Photo Professional for Windows. It corresponds to version 3.14 of the software.
Просмотр

Canon EOS 600D инструкция по эксплуатации
(22 страницы)
- Языки:Украинский
-
Тип:
PDF -
Размер:
4.1 MB -
Описание:
This document contains instructions on how to use your product. It corresponds to version 1.20 of the software.
Просмотр

Canon EOS 600D инструкция по эксплуатации
(22 страницы)
- Языки:Финский
-
Тип:
PDF -
Размер:
4.1 MB -
Описание:
This document contains instructions on how to use your product. It corresponds to version 1.20 of the software.
Просмотр

Canon EOS 600D инструкция по эксплуатации
(22 страницы)
- Языки:Словацкий
-
Тип:
PDF -
Размер:
4.15 MB -
Описание:
This document contains instructions on how to use your product. It corresponds to version 1.20 of the software.
Просмотр

Canon EOS 600D инструкция по эксплуатации
(22 страницы)
- Языки:Португальский
-
Тип:
PDF -
Размер:
4.11 MB -
Описание:
This document contains instructions on how to use your product. It corresponds to version 1.20 of the software.
Просмотр

Canon EOS 600D инструкция по эксплуатации
(22 страницы)
- Языки:Польский
-
Тип:
PDF -
Размер:
4.15 MB -
Описание:
This document contains instructions on how to use your product. It corresponds to version 1.20 of the software.
Просмотр

Canon EOS 600D инструкция по эксплуатации
(22 страницы)
- Языки:Нидерландский
-
Тип:
PDF -
Размер:
4.11 MB -
Описание:
This document contains instructions on how to use your product. It corresponds to version 1.20 of the software.
Просмотр

Canon EOS 600D инструкция по эксплуатации
(22 страницы)
- Языки:Литовский
-
Тип:
PDF -
Размер:
4.08 MB -
Описание:
This document contains instructions on how to use your product. It corresponds to version 1.20 of the software.
Просмотр

Canon EOS 600D инструкция по эксплуатации
(22 страницы)
- Языки:Венгерский
-
Тип:
PDF -
Размер:
4.13 MB -
Описание:
This document contains instructions on how to use your product. It corresponds to version 1.20 of the software.
Просмотр

Canon EOS 600D инструкция по эксплуатации
(22 страницы)
- Языки:Латышский
-
Тип:
PDF -
Размер:
4.08 MB -
Описание:
This document contains instructions on how to use your product. It corresponds to version 1.20 of the software.
Просмотр

Canon EOS 600D инструкция по эксплуатации
(22 страницы)
- Языки:Итальянский
-
Тип:
PDF -
Размер:
4.28 MB -
Описание:
This document contains instructions on how to use your product. It corresponds to version 1.20 of the software.
Просмотр

Canon EOS 600D инструкция по эксплуатации
(22 страницы)
- Языки:Казахский
-
Тип:
PDF -
Размер:
4.1 MB -
Описание:
This document contains instructions on how to use your product. It corresponds to version 1.20 of the software.
Просмотр

Canon EOS 600D инструкция по эксплуатации
(22 страницы)
- Языки:Французский
-
Тип:
PDF -
Размер:
4.13 MB -
Описание:
This document contains instructions on how to use your product. It corresponds to version 1.20 of the software.
Просмотр

Canon EOS 600D инструкция по эксплуатации
(22 страницы)
- Языки:Эстонский
-
Тип:
PDF -
Размер:
4.08 MB -
Описание:
This document contains instructions on how to use your product. It corresponds to version 1.20 of the software.
Просмотр

Canon EOS 600D инструкция по эксплуатации
(22 страницы)
- Языки:Испанский
-
Тип:
PDF -
Размер:
4.13 MB -
Описание:
This document contains instructions on how to use your product. It corresponds to version 1.20 of the software.
Просмотр

Canon EOS 600D инструкция по эксплуатации
(22 страницы)
- Языки:Немецкий
-
Тип:
PDF -
Размер:
4.3 MB -
Описание:
This document contains instructions on how to use your product. It corresponds to version 1.20 of the software.
Просмотр

Canon EOS 600D инструкция по эксплуатации
(22 страницы)
- Языки:Греческий
-
Тип:
PDF -
Размер:
4.21 MB -
Описание:
This document contains instructions on how to use your product. It corresponds to version 1.20 of the software.
Просмотр

Canon EOS 600D инструкция по эксплуатации
(22 страницы)
- Языки:Датский
-
Тип:
PDF -
Размер:
4.11 MB -
Описание:
This document contains instructions on how to use your product. It corresponds to version 1.20 of the software.
Просмотр

Canon EOS 600D инструкция по эксплуатации
(22 страницы)
- Языки:Чешский
-
Тип:
PDF -
Размер:
4.14 MB -
Описание:
This document contains instructions on how to use your product. It corresponds to version 1.20 of the software.
Просмотр
Раздел: Бытовая, кухонная техника, электроника и оборудование
Тип: Цифровая Фотокамера
Характеристики, спецификации
Общее число пикселов:
18.7 млн
Число эффективных пикселов:
18 млн
Размер:
133x100x80 мм, без объектива
Максимальное разрешение:
5184 x 3456
Чувствительность:
100 — 6400 ISO, Auto ISO, ISO6400, ISO12800
Функция очистки матрицы:
есть
Баланс белого:
автоматический, ручная установка, из списка, брекетинг
Вспышка:
встроенная, до 13 м, подавление эффекта красных глаз, башмак, брекетинг, E-TTL II
Стабилизатор изображения (фотосъемка):
отсутствует
Скорость съемки:
3.7 кадр./сек
Максимальная серия снимков:
34 для JPEG, 6 для RAW
Время работы таймера:
2, 10, 2 — 10 c
Формат кадра (фотосъемка):
4:3, 3:2, 1:1, 16:9
Поддержка сменных объективов:
байонет Canon EF/EF-S
Объектив в комплекте:
есть, модель уточняйте у продавца
Видоискатель:
зеркальный (TTL)
Использование экрана в качестве видоискателя:
есть
Поле зрения видоискателя:
95%
Жидко кристалический экран:
1040000 точек, 3 дюйма
Тип ЖК экрана:
поворотный
Выдержка по технологии X-Sync:
1/200 c
Ручная настройка выдержки и диафрагмы:
есть
Автоматическая обработка экспозиции:
с приоритетом затвора, с приоритетом диафрагмы
Экспо коррекция:
+/- 5 EV с шагом 1/3 ступени
Замер экспозиции:
центровзвешенный, общий (Evaluative), точечный
Брекетинг экспозиции:
есть
Подсветка автофокуса:
есть
Тип карт памяти:
SD, SDHC, SDXC
Форматы изображения:
2 JPEG, RAW
Интерфейсы:
USB 2.0, видео, HD-видео, HDMI, аудио, разъем для пульта ДУ
Формат аккумуляторов:
свой собственный
Количество аккумуляторов:
1
Емкость аккумулятора:
1120 мА*ч или 440 фотографий
Запись видео роликов:
есть
Максимальное разрешение видеороликов:
1920×1080
Максимальная частота кадров видеоролика:
60 кадров/с
Максимальная частота кадров при съемке HD видео:
50/60 кадров/с при разрешении 1280×720, 25/30 кадров/с при разрешении 1920×1080
Оптический Zoom при записи видео:
есть
Вес устройства:
515 г, без элементов питания, 570 г, с элементами питания. без объектива
Инструкция к Цифровой Фотокамере Canon EOS 600D
CANON INC.
30-2 Shimomaruko 3-chome, Ohta-ku, Tokyo 146-8501, Япония
Европа, Африка и Ближний Восток
CANON EUROPA N.V.
PO Box 2262, 1180 EG Amstelveen, Нидерланды
For your local Canon office, please refer to your warranty card or to www.canon-europe.com/Support
The product and associated warranty are provided in European countries by Canon Europa N.V.
ИНСТРУКЦИЯ ПО ЭКСПЛУАТАЦИИ
Настоящая Инструкция по эксплуатации содержит сведения на январь 2011 года. За
информацией о совместимости фотоаппарата с другими принадлежностями и
РУССКИЙ
объективами, выпущенными после данной даты, обращайтесь в сервисный центр Canon.
Вводное руководство по программному обеспечению и Краткое
ИНСТРУКЦИЯ ПО
CEL-SR1UA200 © CANON INC. 2011 ОТПЕЧАТАНО В ЕС
ЭКСПЛУАТАЦИИ
справочное руководство приведены в конце данной инструкции.

Введение
EOS 600D – это высокопроизводительный цифровой однообъективный
зеркальный фотоаппарат, оснащенный датчиком CMOS высокого
разрешения приблиз. с 18,0 эффективными мегапикселами, процессором
DIGIC 4, высокоточной и высокоскоростной 9-точечной системой
автофокусировки, режимом серийной съемки со скоростью прибл.
3,7 кадра/с, режимом съемки с использованием ЖКД—видоискателя и
режимом видеосъемки с разрешением Full High-Definition (Full HD).
Данный фотоаппарат очень хорошо приспособлен для съемок в любое
время, в нем предусмотрено большое количество функций для
профессиональной съемки и множество других возможностей.
Используйте данную инструкцию по эксплуатации при
использовании фотоаппарата, чтобы еще больше освоиться с
ним
Цифровая камера позволяет сразу же просмотреть снятое изображение.
При чтении данной Инструкции сделайте несколько пробных снимков и
оцените результаты. Это поможет лучше изучить камеру.
Во избежание несчастных случаев, а также для получения качественных
снимков сначала ознакомьтесь с разделами «Меры предосторожности»
(стр. 297, 298) и «Правила обращения» (стр. 14, 15).
Проверка фотоаппарата перед использованием и
ограничение ответственности
После съемки просмотрите снятые изображения и убедитесь, что они
нормально записались. В случае если из—за неисправности камеры или
карты памяти невозможно записать изображения или передать их на
компьютер, корпорация Canon не несет ответственности за какие—либо
убытки или причиненные неудобства.
Авторские права
Законы о защите авторского права в Вашей стране могут запрещать
использование записанных изображений, музыки, защищенной законами об
авторских правах, и изображений с музыкой на карте памяти в любых целях,
кроме личных. Следует также помнить, что на некоторых общественных
мероприятиях, выставках и т.п. фотосъемка может быть запрещена даже
для личных целей.
Данный фотоаппарат совместим с картами памяти SD, SDHC и
SDXC. В настоящем руководстве для обозначения всех этих
карт используется термин «карта».
* Карта для записи изображений не входит в комплект
камеры. Ее следует приобрести дополнительно.
2
Контрольный список комплекта поставки
В первую очередь убедитесь, что в комплект поставки камеры
входят все перечисленные ниже компоненты. При отсутствии
каких—либо компонентов обращайтесь к своему дилеру.
Аккумулятор
Зарядное устройство
Камера
LP-E8
LC-E8E
(с наглазником и крышкой
(включая защитную
корпуса камеры)
крышку)
Широкий ремень
Интерфейсный
Стереофонический
EW-100DB III
кабель
аудио/видеокабель
AVC-DC400ST
EOS Solution Disk XXX
EOS Software Instruction Manuals Disk XXX
CEL-XXX XXX
XXXXX
CEL-XXX XXX
XXXXX
XXXXX
XXXXX
XXXXX
XXXXX
XXXXX
XXXXX
XXXXX
Mac OS X XXX XXX
Windows XXX XXX
XXXXX
Windows XXX XXX
Mac OS X XXX XXX
©
C
N
A
N
O
I
N
C
.
2
0
X
.
X
M
d
a
e
n
i
t
h
e
E
U
.
©
A
C
O
N
N
I
N
C
.
2
0
X
X
.
M
a
d
e
i
n
t
h
e
U
E
.
EOS Solution Disk
EOS Software
Инструкция по
(CD-ROM с программным
Instruction Manuals Disk
эксплуатации
обеспечением)
(CD-ROM)
фотоаппарата
(данный документ)
При покупке комплекта Lens Kit проверьте наличие объектива.
В зависимости от типа комплекта Lens Kit в комплект поставки может
входить инструкция по эксплуатации объектива.
Не теряйте перечисленные выше компоненты.
EOS Software Instruction Manuals Disk
Инструкции по эксплуатации программного обеспечения
EOS Software Instruction Manuals Disk XXX
включены на CD-ROM в виде PDF файлов. Информацию о том,
CEL-XXX XXX
XXXXX
XXXXX
XXXXX
XXXXX
XXXXX
Windows XXX XXX
Mac OS X XXX XXX
как найти отдельные инструкции на диске EOS Software
©
C
A
N
N
O
I
N
C
.
2
0
X
.
X
M
a
d
e
i
n
t
h
e
U
E
.
Instruction Manuals Disk, см. на стр. 305.
3

Обозначения, используемые в настоящей Инструкции
Значки, используемые в настоящей Инструкции
<6>:обозначает главный диск управления.
<V> <U>:обозначает клавиши направления <S>.
<0>:обозначает кнопку установки.
0, 9, 7, 8 : обозначает, что данная функция остается
активной в течение, соответственно, 4, 6, 10
или 16 с после того, как отпущена кнопка.
* Значки и метки, используемые в настоящей Инструкции для обозначения
кнопок, дисков и установок камеры, соответствуют значкам и меткам на
камере и на ЖК—дисплее.
3 : обозначает функцию, которую можно изменить, нажав
кнопку <M> и изменив настройку.
M : при отображении в правом верхнем углу страницы
означает, что данная функция доступна только в режимах
творческой зоны (стр. 22).
(стр. **):за дополнительной информацией обращайтесь к
указанным страницам.
: рекомендация или совет для более эффективной съемки.
: рекомендация по устранению неполадок.
: предупреждение для предотвращения неполадок при
съемке.
: дополнительная информация.
Основные допущения
Во всех операциях, описываемых в данной инструкции,
предполагается, что выключатель питания уже установлен в
положение <1> (стр. 32).
Предполагается, что для всех параметров меню и
пользовательских функций установлены значения по умолчанию.
Для иллюстрации в приводимых в Инструкции примерах камера
показана с установленным объективом EF-S 18-55 mm f/3.5-5.6
IS II.
4

Оглавление
В главах 1 и 2 для начинающих пользователей цифровой зеркальной камеры
объясняются основные операции с камерой и процедуры съемки.
Введение
2
Начало работы
25
Основные операции съемки и воспроизведение изображений
49
Съемка в творческом режиме
73
Расширенные приемы съемки
93
Съемка с использованием ЖКД—видоискателя
123
Видеосъемка
141
Полезные функции
165
Фотография с беспроводной вспышкой
189
Просмотр изображений
201
Последующая обработка изображений
229
Печать изображений
235
Пользовательская настройка камеры
249
Справочная информация
259
Вводное руководство по программному обеспечению
301
Краткое справочное руководство и алфавитный указатель инструкции по эксплуатации
307
5
1
2
3
4
5
6
7
8
9
10
11
12
1
3
14
1
5

Краткое содержание
Съемка
Автоматическая съемка Î стр. 49 — 63 (Режимы базовой зоны)
Серийная съемка Î стр. 88 (i Серийная съемка)
Съемка автопортрета в
Î стр. 89 (j Автоспуск)
составе группы
Четкая съемка динамичных
Î стр. 94 (s
Автоэкспозиция с приоритетом выдержки
)
сюжетов
Съемка динамичных сюжетов
с размытием
Размытие заднего плана Î стр. 56 (C Творческий авторежим)
Резкость заднего плана стр. 96 (f
Автоэкспозиция с приоритетом диафрагмы
)
Настройка яркости
Î стр. 103 (Компенсация экспозиции)
изображения (экспозиция)
Съемка при низкой освещенности
Î стр. 50, 90 (D Съемка со вспышкой)
стр. 79 (
Установка чувствительности ISO
)
Съемка без вспышки Î стр. 55 (7 Без вспышки)
стр. 58, 64 (b Вспышка откл.)
Ночная съемка фейерверков
Î стр. 100 (
Ручная выдержка
)
Съемка с просмотром
Î стр. 124 (A
Съемка с использованием ЖКД—видоискателя
)
изображения на ЖК—дисплее
Съемка видеофильмов Î стр. 141 (k Видеосъемка)
Качество изображения
Съемка с эффектами, соответствующими
Î стр. 81 (Выбор стиля изображения)
снимаемому объекту
Съемка для получения
Î стр. 76 (73, 83, 1)
отпечатков большого формата
6
Большое количество снимков Î стр. 76 (7a, 8a, b, c)
Фокусировка
Изменение точки фокусировки
Î стр. 85 (S Выбор точки AF)
Съемка движущегося объекта Î стр. 62, 84
(AI Servo AF (следящая автофокусировка))
Просмотр
Просмотр изображений в Î стр. 71 (x Просмотр)
камере
Быстрый поиск изображений Î стр. 202 (H Индексный режим)
стр. 203 (I
Поиск изображения
)
Оценка изображений Î стр. 206 (Оценки)
Предотвращение случайного Î стр. 222 (K
Защита изображений
)
удаления важных снимков
Удаление ненужных Î стр. 224 (L Удалить)
изображений
Автопросмотр изображений и Î стр. 215 (Слайд—шоу)
видеозаписей
Просмотр изображений или
Î стр. 218 (Выход видео)
видеозаписей на экране телевизора
Установка яркости Î стр. 167 (Яркость ЖК—дисплея)
ЖК—дисплея
Печать
Простая печать фотографий Î стр. 235 (Прямая печать)
7

Алфавитный указатель функций
Питание
Цветовое пространство
Î стр. 121
Функции улучшения изображений
Аккумулятор
•
Auto Lighting Optimizer
•
Зарядка аккумулятора
Î стр. 26
(Автокоррекция яркости)
Î стр. 109
•
Установка/Извлечение
Î стр. 28
•
Коррекция периферийного освещения
• Контроль заряда
объектива
Î стр. 110
аккумулятора Î стр. 33
•
Шумоподавление при
Питание от электросети
Î стр. 260
длительных выдержках
Î стр. 253
Автоотключение Î стр. 32
•
Шумоподавление при
высоких значениях
Карта
чувствительности ISO
Î стр. 254
Установка/Извлечение
Î стр. 29
• Приоритет светов Î стр. 254
Форматирование Î стр. 45
Автофокусировка
Спуск затвора без карты
Î стр. 166
Режим автофокусировки
Î стр. 83
Объектив
Выбор точки автофокусировки
Î стр. 85
Установка и снятие Î стр. 36
Ручная фокусировка Î стр. 87
Зум Î стр. 37
Перевод кадров
Image Stabilizer (Стабилизатор
изображения) Î стр. 38
Режимы перевода кадров
(режимы съемки) Î стр. 20
Базовые настройки
Серийная съемка Î стр. 88
Диоптрийная регулировка
Î стр. 39
Автоспуск Î стр. 89
Язык Î стр. 35
Максимальная длина серии
Î стр. 77
Дата/Время Î стр. 34
Съемка
Звуковой сигнал Î стр. 166
Чувствительность ISO
Î стр. 79
Использование
ЖК—дисплея Î стр. 31
Руководство по функциям
Î стр. 48
ЖКД Вкл./Откл. Î стр. 179
Быстрый выбор Î стр. 41
Регулировка яркости ЖКД
Î стр. 167
Творческий авторежим
Î стр. 56
Программная автоэкспозиция
Î стр. 74
Запись изображений
Автоэкспозиция с
Создание и выбор папки
Î стр. 168
приоритетом выдержки
Î стр. 94
№ файла Î стр. 170
Автоэкспозиция с приоритетом
диафрагмы
Î стр. 96
Качество изображения
Ручная установка экспозиции
Î стр. 99
Качество записи
Ручная выдержка
Î стр. 100
изображения Î стр. 76
Блокировка зеркала Î стр. 122
Стиль изображения Î стр. 81
Автоэкспозиция с контролем
Баланс белого Î стр. 117
глубины резкости
Î стр. 101
8

Алфавитный указатель функций
Режим замера Î стр. 102
Вывод одиночного
Дистанционное управление
Î стр. 261
изображения Î стр. 71
•
Отображение информации
Настройка экспозиции
о параметрах съемки
Î стр. 226
Компенсация экспозиции
Î стр. 103
Индексный режим Î стр. 202
Автоматический брекетинг
Поиск изображения (режим
экспозиции (AEB) Î стр. 105
перехода) Î стр. 203
Фиксация автоэкспозиции
Î стр. 107
Увеличение Î стр. 204
Поворот Î стр. 205
Вспышка
Оценки Î стр. 206
Встроенная вспышкаÎ стр. 90
Просмотр видеозаписи
Î стр. 212
• Компенсация
экспозиции вспышки Î стр. 104
Удаление первого/последнего
•
Фиксация экспозиции
фрагмента видеозаписи
Î стр. 214
вспышки Î стр. 108
Слайд—шоу Î стр. 215
Внешняя вспышка Î стр. 263
Просмотр изображений на
Управление вспышкой
Î стр. 180
экране телевизора Î стр. 218
•
Беспроводная вспышка
Î стр. 189
Защита Î стр. 222
Стирание Î стр. 224
Съемка с использованием
Быстрый выбор Î стр. 208
ЖКД—видоискателя
Съемка с использованием
Редактирование изображений
ЖКД—видоискателя Î стр. 123
Художественные
Фокусировка Î стр. 131
фильтры Î стр. 230
Формат кадра Î стр. 129
Изменить размер Î стр. 233
Отображение сетки Î стр. 129
Печать
Быстрый выбор Î стр. 128
PictBridge Î стр. 235
Видеосъемка
Заказ печати (DPOF) Î стр. 245
Видеосъемка Î стр. 141
Пользовательская настройка
Быстрый выбор Î стр. 149
Запись звука Î стр. 160
Пользовательские функции
(C.Fn) Î стр. 250
Отображение сетки Î стр. 161
МОЁ МЕНЮ Î стр. 258
Видеофрагмент Î стр. 153
Цифровое увеличение при
Программное обеспечение
видеосъемке Î стр. 152
Установка Î стр. 303
Ручная установка экспозиции
Î стр. 144
Инструкции по
Воспроизведение изображения
эксплуатации программы
Î стр. 305
Время просмотра изображения
Î стр. 166
9

Содержание
Введение 2
Контрольный список комплекта поставки……………………….…………………….. 3
Обозначения, используемые в настоящей Инструкции …………………………. 4
Оглавление ………………………………………………..………………………………………. 5
Краткое содержание……………………………………………………………………………. 6
Алфавитный указатель функций………………………………………………………….. 8
Правила обращения………………………………………………………………………….. 14
Краткое руководство по началу работы ……………………………………………… 16
Обозначения …………………………………………………………………………………….. 18
Начало работы 25
1
Зарядка аккумулятора……………………………………………………………………….. 26
Установка и извлечение аккумулятора……………………………………………….. 28
Установка и извлечение карты…………………………………………………………… 29
Использование ЖК—дисплея ………………………..…………………………………….. 31
Включение камеры ……………………………………………………….…………………… 32
Установка даты и времени……………………………………………………………….… 34
Установка языка интерфейса …………………………………………………………….. 35
Установка и снятие объектива …………………………………………………………… 36
О функции Image Stabilizer (Стабилизатор изображения) для объективов….. 38
Основные операции ………………………………………………………………………….. 39
Q Функции съемки экрана быстрого выбора ……………………………………… 41
3 Использование меню ……………………………………………………………….. 43
Форматирование карты памяти………………………………………………………….. 45
Переключение экрана ЖК—дисплея…………………………………………………….. 47
Руководство по функциям………………………………………………………………….. 48
Основные операции съемки и воспроизведение изображений
49
2
A Полностью автоматическая съемка (Интеллект. сценар. режим) …… 50
A Приемы съемки в полностью автоматическом режиме (Интеллект.
сценар. режим)………………………………………………………………………………….. 53
7 Отключение вспышки…………………………………………………………………… 55
C Съемка в творческом авторежиме………….…………………………………….. 56
2 Съемка портретов ………………………………………………………………………… 59
3 Съемка пейзажей ……………….……………………………………………………….. 60
4 Съемка крупным планом……………………………………………………………….. 61
5 Съемка движущихся объектов ……………………………………………………… 62
6 Съемка портретов ночью………………………………………………………………. 63
Q Быстрая настройка ……………..……………………………………………………….. 64
Выбор атмосферы съемки…………………………………………………………………. 65
Съемка по освещению или сцене ………………………………………………………. 68
x Воспроизведение изображений ……………………………………………………. 71
10

Содержание
3
Съемка в творческом режиме 73
d : Программная автоэкспозиция ……………………………………………………….74
Установка качества записываемых изображений ……..………………………….76
Z: Изменение числа ISO………………………………………………………….……….79
A Выбор оптимальных характеристик изображения объекта
(Стиль изображения)…………………………………………………………………………..81
E: Изменение режима автофокусировки (Режим AF) ………………………….83
S Выбор точки автофокусировки……………………………………………………….85
Объекты, сложные для фокусировки……………………………………………………87
MF: Ручная фокусировка …………………….……………………………………………87
i Серийная съемка ………………………………………………………………….……….88
j Использование автоспуска……………………………………………………………..89
D Использование встроенной вспышки ……………………………………………….90
4
Расширенные приемы съемки 93
s: Съемка динамичных сюжетов ……………………………………………..……….94
f: Изменение глубины резкости……………………………………………………….96
Предварительный просмотр глубины резкости ………………………………….98
a: Ручная установка экспозиции ………………………………………………………..99
8: Автоэкспозиция с контролем глубины резкости ……………………….101
q Изменение режима замера экспозиции…………………………………………102
O y Установка компенсации экспозиции………………………………………103
Автоматический брекетинг по экспозиции (AEB)……….………………………..105
A Фиксация экспозиции (Фиксация AE) …………………………………………….107
A Фиксация экспозиции вспышки (Фиксация FE) ……………………………….108
Автоматическая корректировка яркости и контрастности (Auto Lighting Optimizer (Автокоррекция яркости))
….109
Коррекция темных углов изображения……………………………………………….110
A Настройка характеристик изображения (Стиль изображения)………112
A Регистрация предпочтительных характеристик изображения
(Стиль изображения)…………………………………………………………………………115
B: Соответствие источнику света (Баланс белого) ………………………….117
2 Настройка тона цвета для источника света …………………………………..119
Установка репродуцируемого цветового диапазона
(Цветовое пространство) …………………………………………………………………..121
Блокировка зеркала для снижения эффекта дрожания фотоаппарата………122
5
Съемка с просмотром изображения на ЖК—дисплее (Съемка с использованием ЖКД—видоискателя)
123
A Съемка с просмотром изображения на ЖК—дисплее ……………………..124
Настройки функций съемки ……………………………………………………………….128
z Настройки функций меню …………………………………………………………….129
Изменение режима автофокусировки ………………………………………………..131
MF: Ручная фокусировка …………………………………………………………………..138
11

Содержание
Видеосъемка 141
6
k Видеосъемка……………………………………………………………………………… 142
Настройки функций съемки ……………………………………………………………… 149
Установка размера видеозаписи………………………………………………………. 150
Использование цифрового увеличения при видеосъемке………………….. 152
Съемка видеофрагментов ………..……………………………………………………… 153
Настройки функций меню ………………………………………………………………… 157
Полезные функции 165
7
Полезные функции ..………………………………………………………………………… 166
Отключение звукового сигнала ……………………………………………………... 166
Напоминание о карте памяти ………………………………………………………… 166
Установка времени просмотра изображения ………………………………….. 166
Установка времени автоматического выключения ………………………….. 167
Настройка яркости ЖК—дисплея ………………..…………………………………… 167
Создание и выбор папки ………..……………………………………………………… 168
Способы нумерации файлов …………………………………………………………. 170
Настройка информации об авторских правах…………………………………. 172
Автоповорот вертикально ориентированных изображений ……………… 174
C Проверка настроек камеры …………………………………………………… 175
Возврат камеры к настройкам по умолчанию …………………………………. 176
Вкл./Выкл. ЖКД—видоискателя……………………………………………………….. 179
Изменение цвета экрана параметров съемки …………………………………. 179
Настройка вспышки ………………….……………………………………………………… 180
f Автоматическая очистка датчика изображения…………………………… 184
Добавление данных для удаления пыли…………………………………………… 185
Ручная очистка датчика изображения ………………………………………………. 187
8
Фотография с беспроводной вспышкой 189
Использование беспроводной вспышки ……………………………………………. 190
Удобная съемка с беспроводной вспышкой….…………………………………… 191
Пользовательский режим беспроводной вспышки…………………………….. 194
Другие настройки ………………………………………………………….…………………. 198
Просмотр изображений 201
9
H I Быстрый поиск изображений ………………………………………………….. 202
u/y Увеличение при просмотре …………………………………………………….. 204
b Поворот изображения ………….……………………………………………………… 205
Установка оценок……………………..……………………………………………………… 206
Q Быстрый выбор при просмотре …………………………………………………… 208
k Просмотр видеозаписей …………………………………………………………….. 210
12

Содержание
k Воспроизведение видеозаписей…………………………………………………..212
X Редактирование первого и последнего фрагмента видеозаписи …….214
Слайд—шоу (Автопросмотр) ………………………………………………………..……..215
Просмотр изображений на экране телевизора…………………………….……..218
K Защита изображений………………………..………………………………………….222
L Удаление изображений…………………………………………………………………224
C Отображение информации о параметрах съемки……………………….226
Последующая обработка изображений 229
10
U Художественные фильтры……………………………………………………………230
S Изменить размер ………………………………………………………………….……..233
11
Печать изображений 235
Подготовка к печати………………………………………………………………………….236
wПечать……………………………………………..………………………………………….238
Кадрирование изображения ……………………………………………………………243
W Формат заказа цифровой печати (DPOF)………………………………………245
W Прямая печать с параметрами DPOF……………………………………………248
Пользовательская настройка камеры 249
12
Установка пользовательских функций ……………………..………………………..250
Настройки пользовательских функций……………………………………………….252
Внесение пунктов в МОЁ МЕНЮ ……………………………………………………….258
Справочная информация 259
13
Питание камеры от бытовой электросети.………………………………………….260
Съемка с дистанционным управлением……………………………………………..261
Внешние вспышки Speedlite ..…………………………………………………………….263
Использование карт Eye-Fi………………………………………………………………..265
Таблица доступности функций при различных режимах съемки…..……..268
Параметры меню…………………………………..………………………………………….270
Состав системы………………………………………………………………………………..276
Поиск и устранение неполадок ………………………………..………………………..278
Коды ошибок…………………………………………………………………………………….287
Технические характеристики………………….………………………………………….288
Меры предосторожности ……………………….………………………………………….297
14
Вводное руководство по программному обеспечению
301
Вводное руководство по программному обеспечению ………………………..302
15
Краткое справочное руководство и алфавитный указатель инструкции по эксплуатации
307
Краткое справочное руководство……………………………………………………….308
Алфавитный указатель……………………………………………………………………..320
13

Правила обращения
Уход за камерой
Камера представляет собой высокоточный аппарат. Избегайте
падения камеры и механических воздействий на нее.
Данная камера не является водонепроницаемой, ее нельзя использовать
под водой. Если Вы случайно уронили камеру в воду, незамедлительно
обратитесь в ближайший сервисный центр компании Canon. Вытирайте
капли воды сухой тканью. Если камера подверглась воздействию соленого
воздуха, протрите ее тщательно отжатой влажной тканью.
Не оставляйте камеру вблизи от устройств, генерирующих сильные
магнитные поля, например, рядом с магнитами или электродвигателями.
Старайтесь не пользоваться камерой вблизи источников сильных
радиоволн, например больших антенн. Сильные магнитные поля могут
вызвать сбои в работе камеры или уничтожить данные изображений.
Не оставляйте камеру в местах с высокой температурой, например в
автомобиле, стоящем на открытом солнце. Высокие температуры
могут привести к сбоям в работе камеры.
Камера содержит высокоточные электронные компоненты.
Запрещается самостоятельно разбирать камеру.
Для удаления пыли с объектива, видоискателя, зеркала и фокусировочного
экрана пользуйтесь специальным чистящим устройством с грушей. Не
используйте для протирки корпуса или объектива камеры чистящие средства,
содержащие органические растворители. Для удаления стойких загрязнений
обращайтесь в ближайший сервисный центр компании Canon.
Не прикасайтесь пальцами к электрическим контактам камеры. Это
предотвратит их коррозию. Корродированные контакты могут
послужить причиной сбоев в работе камеры.
Если камера быстро переносится с холода в теплое помещение, то на камере
и ее внутренних деталях может образоваться конденсат. Во избежание
конденсации сначала поместите камеру в закрывающийся пластиковый пакет.
Перед извлечением камеры из пакета подождите, пока она нагреется.
При образовании на камере конденсата не пользуйтесь ею. Это
предотвратит повреждение камеры. В случае обнаружения
конденсации снимите объектив, извлеките из камеры карту памяти и
аккумулятор и подождите, пока конденсат испарится. Камерой можно
пользоваться только после испарения конденсата.
Если вы не планируете использовать камеру в течение длительного
времени, извлеките из нее аккумулятор и храните камеру в сухом,
прохладном помещении с хорошей вентиляцией. Даже в периоды,
когда камера не используется, иногда несколько раз нажимайте кнопку
спуска затвора для проверки работоспособности камеры.
Не храните камеру в помещениях, в которых находятся вызывающие коррозию
химические вещества (например, в фотолабораториях и химических лабораториях).
Если камера не использовалась в течение длительного времени, перед
использованием камеры следует проверить все ее функции. В том случае,
если камера некоторое время не использовалась или приближается важная
съемка, отнесите камеру на проверку своему дилеру Canon или проверьте
камеру самостоятельно, чтобы убедиться в ее надлежащей работе.
14

Правила обращения
ЖК—дисплей
Хотя ЖК—дисплей изготовлен по высокоточной технологии и имеет более
чем 99,99% эффективных пикселов, среди оставшихся 0,01% могут быть
несколько неработоспособных пикселов. Неработоспособные пикселы,
отображающие только черный, красный и т.п. цвет, не означают
неисправность. Они не оказывают влияния на записанные изображения.
Если ЖК—дисплей оставался включенным длительное время, возможно
появление остаточного изображения. Однако это временное явление,
которое пройдет, если не использовать камеру несколько дней.
При низких или высоких температурах возможно замедление смены
изображений на экране ЖК—дисплея или экран может выглядеть темным. При
комнатной температуре обычные свойства экрана восстанавливаются.
Карты памяти
Для защиты карты и хранящихся на ней данных учтите следующее:
Не допускайте падения карты памяти, не сгибайте карту и не мочите
ее. Не применяйте к ней силу и не допускайте механических
воздействий или сотрясений.
Не прикасайтесь к электрическим контактам карты руками или чем—
нибудь железным.
Не храните и не используйте карту памяти вблизи от объектов, создающих
сильное магнитное поле, таких как телевизоры, громкоговорители или
магниты. Избегайте также мест скопления статического электричества.
Не оставляйте карты памяти под прямыми солнечными лучами или
рядом с нагревательными приборами.
Храните карту памяти в чехле.
Не храните карты памяти в жарких, пыльных или сырых помещениях.
Объектив
После снятия объектива с камеры наденьте крышку
Контакты
объектива или поставьте объектив нижним концом вверх,
чтобы не поцарапать поверхность объектива и не
повредить электрические контакты.
Предупреждения при длительном использовании
При длительной работе в режимах серийной съемки,
съемки с использованием ЖКД—видоискателя или
видеосъемки камера может сильно нагреться. Хотя это не
является неисправностью, при длительном контакте с
камерой возможны незначительные ожоги кожи.
О разводах на внешней поверхности сенсора
Кроме того, что в фотоаппарат может попасть пыль извне, в редких случаях смазка с
внутренних деталей фотоаппарата может попасть на переднюю часть датчика. При
наличии видимых пятен, остающихся после автоматической очистки сенсора,
рекомендуется обратиться в сервисный центр компании Canon для очистки сенсора.
15
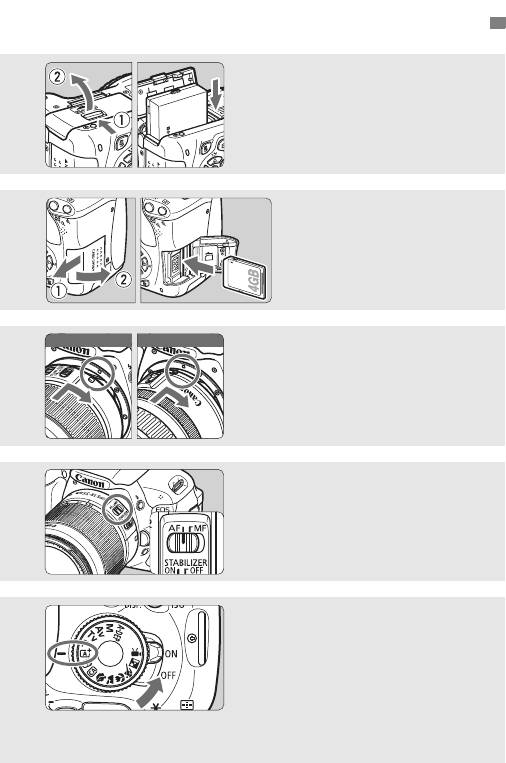
Краткое руководство по началу работы
Вставьте аккумулятор. (стр. 28)
1
Сведения о зарядке аккумулятора
см. на стр. 26.
Установите карту
2
памяти. (стр. 29)
Поверните карту этикеткой к
задней стороне фотоаппарата и
вставьте в отделение для карты.
Красная индексная меткаБелая индексная метка
Установите объектив. (стр. 36)
3
Совместите белую или красную
индексную метку объектива с
индексной меткой
соответствующего цвета на камере.
Установите переключатель
4
режима фокусировки на
объективе в положение <AF>.
(стр. 36)
Установите переключатель
питания в положение <
1
>, и
5
установите диск установки режима
в положение <
A
> (Интеллект.
сценар. режим).
(стр. 50)
Все необходимые параметры
камеры устанавливаются
автоматически.
16
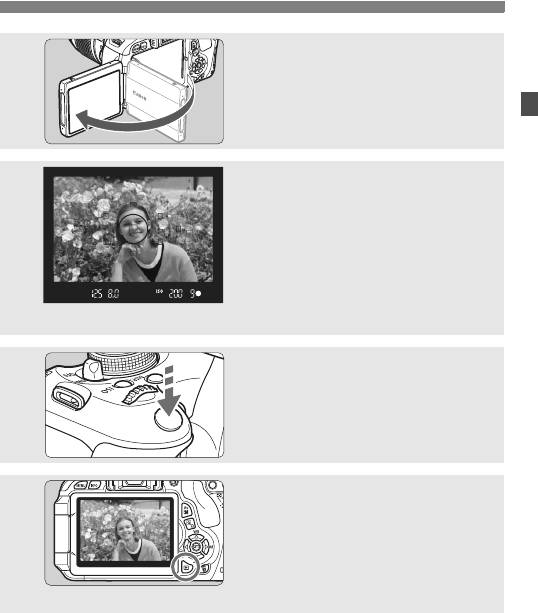
Краткое руководство по началу работы
Откиньте ЖК—дисплей. (стр. 31)
6
При отображении на ЖК—дисплее
экрана установки даты/времени
см. стр. 34.
Сфокусируйтесь на объект.
(стр. 40)
7
Смотря в видоискатель, наведите
центр видоискателя на объект.
Наполовину нажмите кнопку
спуска затвора — камера
сфокусируется на объект.
При необходимости автоматически
выдвигается встроенная вспышка.
Сделайте снимок. (стр. 40)
8
Для съемки полностью нажмите
кнопку спуска затвора.
Просмотрите снимок. (стр. 166)
9
Отснятое изображение появится
на ЖК—дисплее примерно на
2 секунды.
Для повторного отображения
изображения нажмите кнопку
<x> (стр. 71).
Чтобы снимать, глядя на ЖК—дисплей, см. «Съемка с
использованием ЖКД—видоискателя» (стр. 123).
О просмотре отснятых изображений см. главу
«Воспроизведение изображений» (стр. 71).
Об удалении изображений см. раздел «Удаление
изображений» (стр. 224).
17
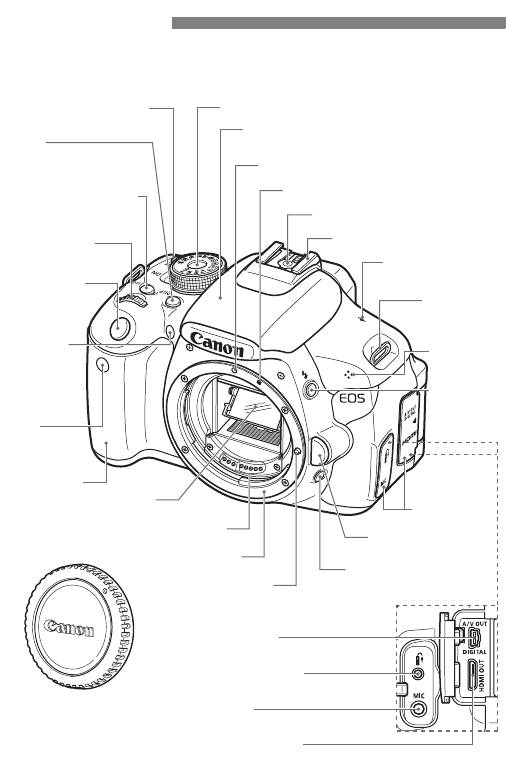
Обозначения
Жирным шрифтом отмечены названия компонентов, описание
которых приводится до раздела «Основные операции съемки и
воспроизведения изображений».
Переключатель
Диск установки режима (стр. 22)
питания (стр. 32)
Встроенная вспышка/Включение
<B>
лампы помощи AF (стр. 90/86)
Кнопка отображения
(стр. 47, 152, 167, 179)
Индексная метка крепления объектива
<Z> Кнопка установки
EF-S (стр. 36)
чувствительности ISO
Контакты синхронизации вспышки
(стр. 79)
<6> Главный
диск управления
<V> Отметка
фокальной
Кнопка спуска
плоскости (стр. 61)
затвора
Ушко для
(стр. 40)
ремня
(стр. 25)
Уменьшение
Микрофон
эффекта
«красных глаз»/
(стр. 142)
Индикатор
автоспуска
<D> Кнопка
(стр. 91/89)
вспышки
(стр. 90)
Зеркало (стр. 122,187)
Крышка разъемов
камеры
Контакты (стр. 15)
Кнопка разблокировки
объектива (стр. 37)
Крепление объектива
Кнопка предварительного
просмотра глубины
Штифт фиксации
резкости (стр. 98)
объектива
Крышка корпуса
камеры (стр. 36)
18
Д
атчик
д
Индексная метка крепления объектива
EF (стр. 36)
Горячий башмак (стр. 263)
истанционного
управления
(стр. 122, 261)
Ручка
Аудио/видеовыход/
Цифровой разъем (стр. 221, 236)
Разъем дистанционного
управления (стр. 262)
Вход внешнего
микрофона (стр. 160)
Выходной мини-разъем
HDMI (стр. 218)
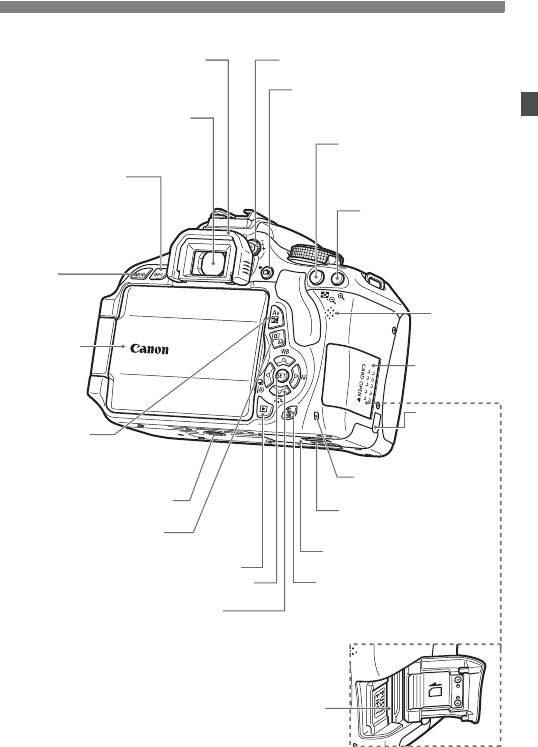
Обозначения
Наглазник (стр. 262)
Ручка диоптрийной регулировки
(стр. 39)
<A>
Кнопка съемки с
использованием ЖКД-видоискателя/
видеосъемки
Окуляр видоискателя
(стр. 124/142)
<A/I>
Кнопка фиксации
автоэкспозиции/фиксации
автоэкспозиции вспышки/Кнопка
<C> Кнопка
индексного режима/уменьшения
информации
(стр. 107/108/202/204, 243)
(стр. 47, 71, 126, 146,
175)
<S/u>
Кнопка выбора точки
автофокусировки/
увеличения
(стр. 85/204, 243)
<M>
Кнопка меню
(стр. 43)
Громкого—
воритель
(стр. 212)
ЖК-дисплей
(стр. 31, 43,
Крышка отсека
167)
карты (стр. 29)
Отверстие
для кабеля
<O> Кнопка
постоянного
диафрагмы/
тока (стр. 260)
компенсации экспозиции
(стр. 99/103)
Индикатор обращения
к карте (стр. 30)
Штативное гнездо
Рычажок фиксатора
<Q/l>
крышки отсека
Кнопка быстрого выбора/
аккумулятора (стр. 28)
Кнопка прямой печати (стр. 41/241)
Крышка отсека аккумулятора
<x> Кнопка просмотра (стр. 71)
(стр. 28)
<0> Кнопка установки (стр. 43)
<L> Кнопка стирания
(стр. 224)
<S> Клавиши направления (стр. 43)
<WB> Кнопка выбора баланса белого
(стр. 117)
<XA> Кнопка выбора стиля
изображения (стр. 81)
<Yi/Q> Кнопка выбора режима
перевода кадров (стр. 88, 89)
<ZE> Кнопка выбора режима
Отсек карты
автофокусировки (стр. 83)
(стр. 29)
19
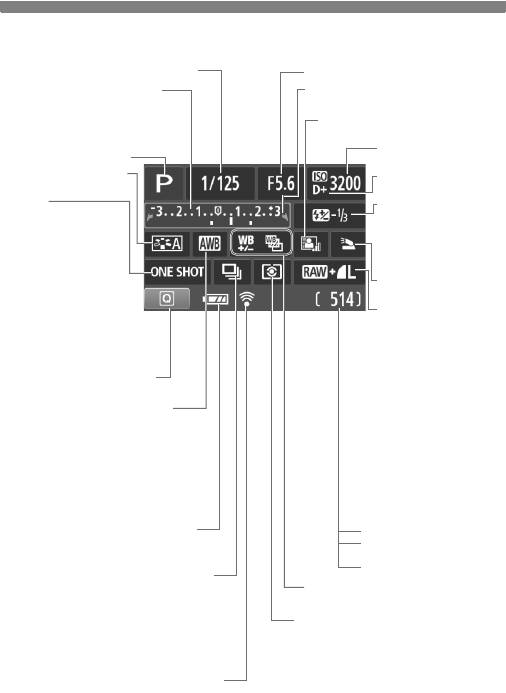
Обозначения
Отображение параметров съемки
(В режимах творческой зоны, стр. 22)
Выдержка
Диафрагма
Индикатор величины экспозиции
c Указатель главного диска
Величина компенсации экспозиции
управления (стр. 93)
(стр. 103)
Auto Lighting Optimizer
Диапазон автоматического брекетинга
(Автокоррекция яркости) (стр. 109)
экспозиции (AEB) (стр. 105)
Чувствительность
Режим съемки
ISO (стр. 79)
Стиль изображения
Приоритет светов
(стр. 81)
(стр. 254)
Режим
y Компенсация
автофокусировки
экспозиции вспышки
(стр. 83)
(стр. 104)
X
0 Компенсация
Покадровая автофокусировка
экспозиции внешней
9
вспышки
Интеллектуальная
Настройки встроенной
автофокусировка
1
вспышки*
(стр. 181)
Z
Качество записи изображений
Следящая автофокусировка
(стр. 76)
g
73
Высокое разрешение/
Ручная фокусировка
высокое качество
83
Высокое разрешение/
обычное качество
74
Среднее разрешение/
Значок быстрого
высокое качество
выбора (стр. 41)
84
Среднее разрешение/
обычное качество
Баланс белого (стр. 117)
7a
Низкое разрешение 1/
Q Авто
высокое качество
W Дневной свет
8a
Низкое разрешение 1/
E Тень
обычное качество
b
Низкое разрешение 2
R Облачно
(высокое качество)
Y Лампы накаливания
c
Низкое разрешение 3
U Флуоресцентные лампы
(высокое качество)
1
RAW
I Вспышка
1+73
RAW+Высокое
O Ручной
разрешение/высокое качество
Контроль заряда аккумулятора
Количество кадров
(стр. 33)
Количество кадров при
zxcn
брекетинге ББ
Обратный отсчет автоспуска
Режим перевода кадров (стр. 88, 89)
u Покадровая съемка
2
Коррекция баланса белого (стр. 119)
i Серийная съемка
B
Вилка баланса белого (стр. 120)
Q Таймер автоспуска: 10-с задержка/
Режим замера (стр. 102)
Дистанционное управление
q Оценочный замер
l Таймер автоспуска: 2-с задержка
w Частичный замер
q Таймер автоспуска: Серийная
r Точечный замер
e
Центрально-взвешенный усредненный замер
2
Статус передачи Eye-Fi*
(стр. 265)
*1: Отображается при поднятии встроенной вспышки.
*2: Отображается при использовании карты Eye-Fi.
На экране отображаются только установки, применимые к текущему режиму.
20
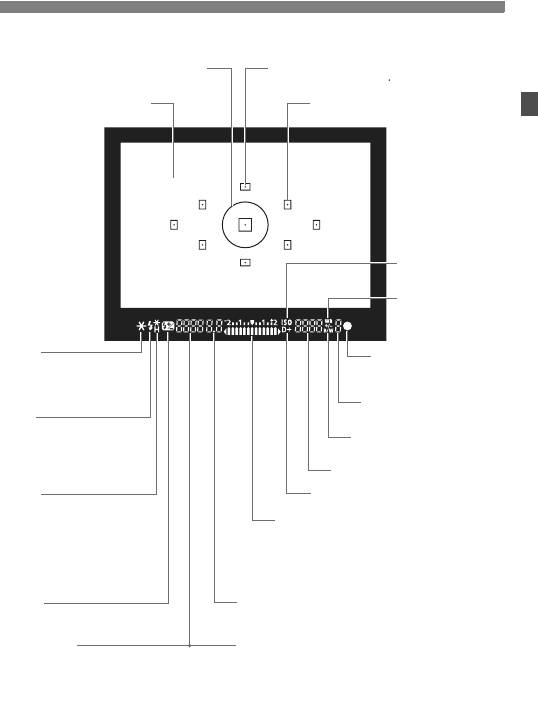
Обозначения
Информация в видоискателе
Круг точечного замера
Индикатор активации точки
автофокусировки < >
Фокусировочный
Точки автофокусировки
экран
<Z>
Чувствительность
ISO
<2>
Коррекция
баланса
белого
<A>
<o> Индикатор
Фиксация автоэкспозиции/
подтверждения
выполнение автоматического
фокусировки
брекетинга экспозиции (AEB)
Максимальная
длина серии
<D>
Предупреждение о
<
0
>
готовности вспышки
Предупреждение о
Монохромная съемка
неправильной фиксации
Чувствительность ISO
экспозиции
<e>
<A> Приоритет светов
Синхронизация вспышки
при короткой выдержке
Индикатор величины экспозиции
(режим FP-вспышки)
Величина компенсации экспозиции
<d>
Диапазон автоматического
Фиксация экспозиции
брекетинга экспозиции (AEB)
вспышки/работа в режиме
Индикатор включения лампы
вилки FEB
уменьшения эффекта «красных глаз»
<y>
Диафрагма
Компенсация экспозиции
вспышки
Выдержка
Карта заполнена (FuLL)
Фиксация экспозиции вспышки (FEL)
Ошибка карты (Card)
Занят (buSY)
Карта отсутствует (Card)
Зарядка встроенной вспышки (D buSY)
На экране отображаются только установки, применимые к текущему режиму.
21
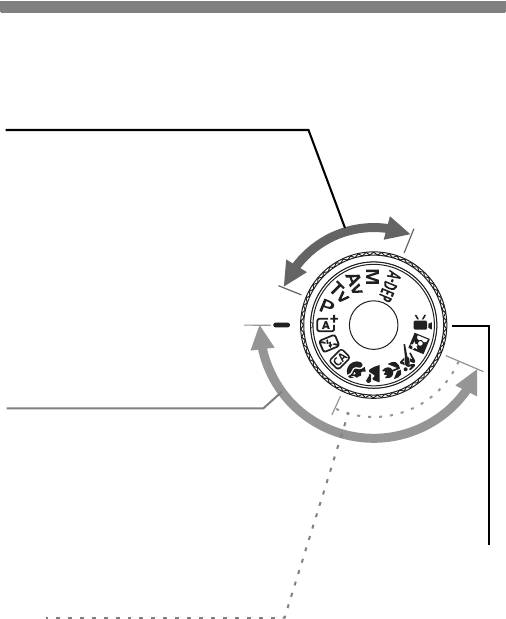
Обозначения
Диск установки режима
На диске установки режима имеются режимы базовой зоны,
режимы творческой зоны и режим видеосъемки.
Творческая зона
Эти режимы расширяют возможности управления
камерой при съемке различных объектов.
d : Программная автоэкспозиция
(стр. 74)
s : Автоэкспозиция с приоритетом
выдержки (стр. 94)
f :
Автоэкспозиция с приоритетом
диафрагмы (стр. 96)
a : Ручная экспозиция (стр. 99)
8: Автоэкспозиция с
контролем глубины
резкости (стр. 101)
Базовая зона
Требуется просто нажать кнопку спуска
затвора. Фотоаппарат устанавливает
настройки, подходящие объекту.
A : Интеллект. сценар. режим
(стр. 50)
7 : Без вспышки (стр. 55)
C : Творческий авторежим
k: Видеосъемк
(стр. 56)
Зона автоматических режимов
2 : Портрет (стр. 59)
3 : Пейзаж (стр. 60)
4 : Макро (стр. 61)
5 : Спорт (стр. 62)
6 : Ночной портрет (стр. 63)
22
а
(стр. 141
)
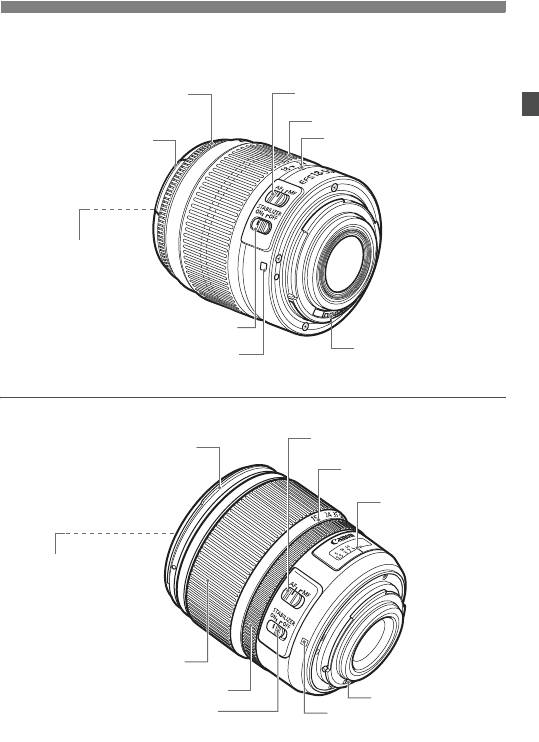
Обозначения
Объектив
Объектив без шкалы расстояний
Кольцо фокусировки
Переключатель режима
(стр. 87, 138)
фокусировки (стр. 36)
Кольцо зумирования (стр. 37)
Крепление бленды
Индексная метка положения
зумирования (стр. 37)
(стр. 294)
Резьба для фильтров
(передний торец
объектива) (стр. 294)
Переключатель Image Stabilizer
(Стабилизатор изображения) (стр. 38)
Контакты (стр. 15)
Индексная метка крепления
объектива (стр. 36)
Объектив со шкалой расстояний
Переключатель режима
Крепление бленды
фокусировки (стр. 36)
(стр. 294)
Индексная метка положения
зумирования (стр. 37)
Шкала расстояний
Резьба для фильтров
(передний торец
объектива) (стр. 294)
Кольцо зумирования (стр. 37)
Кольцо фокусировки (стр. 87, 138)
Контакты (стр. 15)
Переключатель Image Stabilizer
Индексная метка крепления
(Стабилизатор изображения) (стр. 38)
объектива (стр. 36)
23
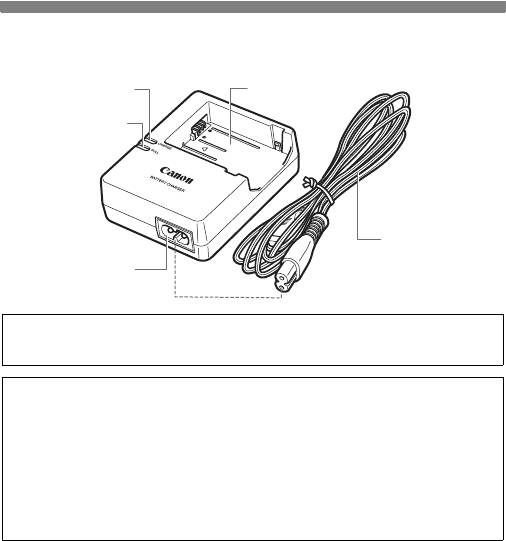
Обозначения
Зарядное устройство LC-E8E
Зарядное устройство для аккумулятора LP-E8 (стр. 26).
Индикатор
Гнездо
зарядки
аккумулятора
Индикатор
окончания зарядки
Кабель питания
Гнездо кабеля
питания
Данный блок питания должен быть установлен в правильной
ориентации – вертикально или на полу.
ВАЖНЫЕ МЕРЫ ПРЕДОСТОРОЖНОСТИ: СОХРАНИТЕ ДАННЫЕ
ИНСТРУКЦИИ.ВНИМАНИЕ: ВО ИЗБЕЖАНИЕ РИСКА ВОЗГОРАНИЯ
ИЛИ ПОРАЖЕНИЯ ЭЛЕКТРИЧЕСКИМ ТОКОМ, ВЫПОЛНЯЙТЕ
СЛЕДУЮЩИЕ ИНСТРУКЦИИ.
При необходимости подсоединения устройства к электрическому
питанию во время его эксплуатации за пределами США следует
использовать съемный переходник для электрической вилки,
подходящий к имеющейся электрической розетке.
24
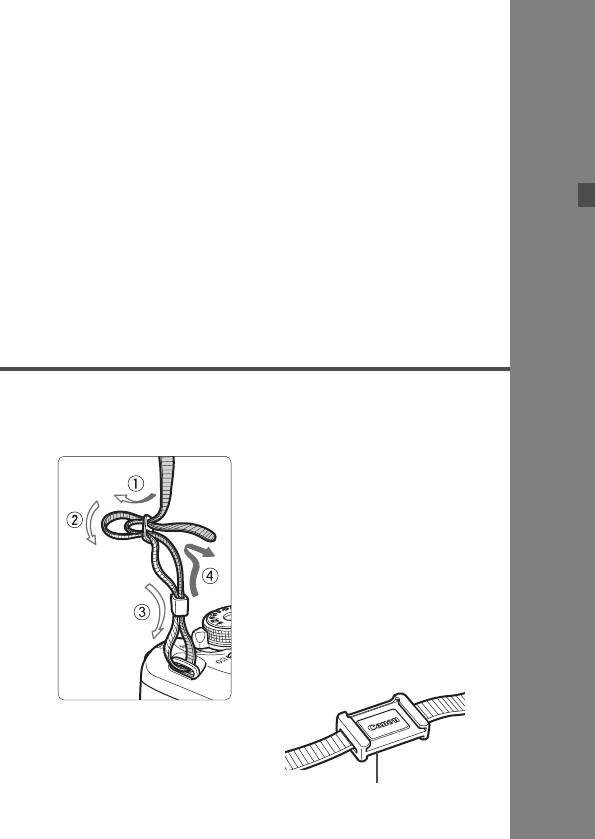
1
Начало работы
В этой главе рассматриваются подготовительные
этапы перед началом съемки и основные операции
с камерой.
Закрепление ремня
Проденьте конец ремня через
ушко для ремня,
предусмотренное на камере с
нижней стороны. Затем
проденьте ремень через пряжку,
как показано на рисунке.
Натяните ремень, чтобы
убедиться, что он не провисает и
не выскочит из пряжки.
Крышка окуляра видоискателя
также закрепляется на ремне
(стр. 262).
Крышка окуляра видоискателя
25
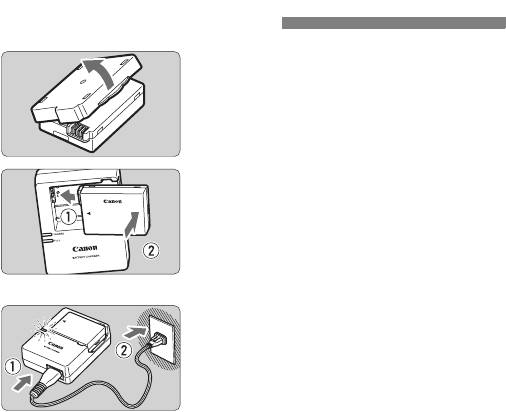
Зарядка аккумулятора
Снимите защитную крышку.
1
Отсоедините защитную крышку,
поставляющуюся с аккумулятором.
Подсоедините аккумулятор.
2
Надежно подсоедините аккумулятор
к зарядному устройству, так, как
показано на рисунке.
Для снятия аккумулятора
выполните описанную выше
операцию в обратном порядке.
Зарядите аккумулятор.
3
Для LC-E8E
Подсоедините кабель питания к
зарядному устройству и вставьте
вилку шнура в сетевую розетку.
X
Зарядка начинается автоматически,
и индикатор зарядки загорается
оранжевым цветом.
X После полной зарядки индикатор
окончания зарядки загорается
зеленым цветом.
Для того чтобы зарядить полностью разрядившийся аккумулятор,
необходимо примерно 2 часа при температуре 23°C. Время,
необходимое для зарядки, зависит от температуры окружающей
среды и уровня заряда аккумулятора.
В целях безопасности зарядка при низких температурах (6
°
C —
10
°
C) занимает больше времени (до 4 ч).
26

Зарядка аккумулятора
Рекомендации по использованию аккумулятора и зарядного устройства
Сразу после покупки аккумулятор заряжен не полностью.
Перезарядите аккумулятор перед использованием.
Заряжайте аккумулятор накануне или в день
предполагаемого использования.
Даже во время хранения заряженный аккумулятор будет
постепенно разряжаться и терять свой заряд.
После зарядки аккумулятора снимите его и отсоедините
зарядное устройство от электрической розетки.
Если камера не используется, извлеките из нее аккумулятор.
Если аккумулятор в течение длительного времени остается в
камере, из—за небольшого потребляемого тока аккумулятор
слишком сильно разряжается, что приводит к сокращению срока
его службы. Храните аккумулятор с подсоединенной защитной
крышкой (прилагается). При хранении полностью заряженного
аккумулятора его технические характеристики могут ухудшиться.
Зарядным устройством можно пользоваться в других странах.
Зарядное устройство рассчитано на напряжение питания от 100 до
240 В переменного тока частотой 50/60 Гц. При необходимости
используйте имеющийся в продаже переходник вилки для
соответствующей страны или региона. Не подключайте зарядное
устройство к портативным преобразователям напряжения. Это
может привести к повреждению зарядного устройства.
Если аккумулятор быстро разряжается даже после полной
зарядки, это говорит об окончании срока его службы.
Следует приобрести новый аккумулятор.
После отключения зарядного устройства от сети не дотрагивайтесь
до его контактов по крайней мере 3 сек.
Заряжать любые аккумуляторы, кроме LP-E8, запрещено.
Аккумулятор LP-E8 предназначен только для изделий марки Canon.
Компания Canon не несет ответственности за неполадки или
повреждения, возможные при использовании несовместимых
аккумуляторов, зарядных устройств или других изделий.
27
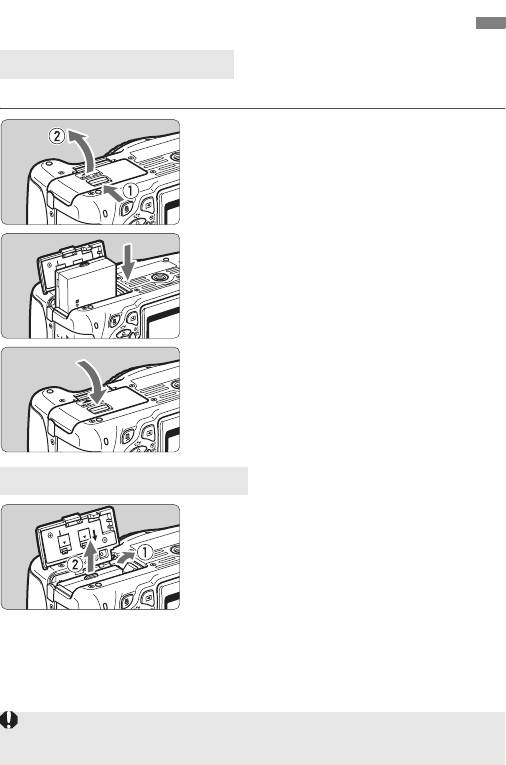
Установка и извлечение аккумулятора
Установка аккумулятора
Установите в камеру полностью заряженный аккумулятор LP-E8.
Откройте крышку.
1
Сдвиньте рычажок, как показано
стрелками, и откройте крышку.
Вставьте аккумулятор.
2
Вставьте его концом с контактами.
Вставьте аккумулятор до фиксации
со щелчком.
Закройте крышку.
3
Нажмите на крышку до
характерного щелчка.
Извлечение аккумулятора
Откройте крышку и извлеките
аккумулятор.
Нажмите рычаг фиксатора аккумулятора
в направлении, показанном стрелкой, и
извлеките аккумулятор.
Для предотвращения короткого замыкания
контактов аккумулятора обязательно
подсоединяйте защитную крышку
(прилагается, стр. 26) к аккумулятору.
Открыв крышку отсека аккумулятора, не пытайтесь открывать ее еще
больше. Это может привести к поломке шарнира.
28

Установка и извлечение карты
Могут использоваться карты памяти (продается отдельно) SD,
SDHC или SDXC. Снятые изображения записываются на карту.
Убедитесь, что язычок защиты карты установлен в
верхнее положение, позволяющее запись/удаление.
Установка карты
Откройте крышку.
1
Сдвиньте крышку, как показано
стрелками, чтобы открыть ее.
Переключатель защиты от записи
Установите карту памяти.
2
Поверните карту стороной с
этикеткой к себе, как показано
стрелками, и вставьте ее до
фиксации со щелчком.
Закройте крышку.
3
Закройте крышку и сдвиньте ее в
направлении стрелок до закрытия с
характерным щелчком.
При установке переключателя
питания в положение <1> на ЖК—
дисплее отображается количество
Возможное количество кадров
оставшихся кадров (стр. 33).
Количество оставшихся кадров зависит от наличия свободного
места на карте памяти, качества записи изображений,
чувствительности ISO и т.п.
Установка [1 Спуск затвора без карты] на [Запрещён] сделает
съемку без карты памяти невозможной (стр. 166).
29
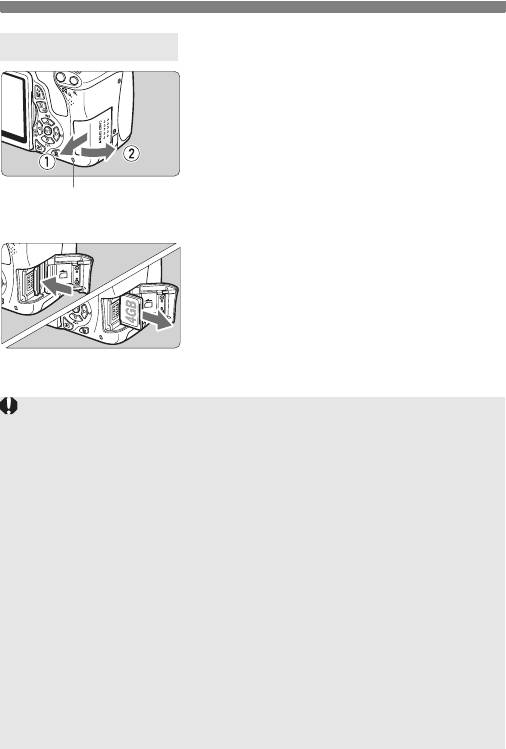
Установка и извлечение карты
Извлечение карты
Откройте крышку.
1
Установите переключатель питания
в положение <2>.
Убедитесь, что индикатор
обращения к карте не горит, и
откройте крышку.
Индикатор обращения к карте
Если отображается «Производится
запись…», закройте крышку.
Извлеките карту памяти.
2
Слегка нажмите на карту и
отпустите. Карта памяти
выдвинется наружу.
Выньте карту памяти и закройте
крышку.
Горящий или мигающий индикатор обращения к карте означает, что
изображения записываются на карту, считываются с нее или
удаляются или производится передача данных. Не открывайте отсек
карты в это время.
Также, никогда не делайте ничего из нижеперечисленного пока
лампа доступа горит или мигает. Иначе данные изображений,
карта или фотоаппарат могут повредиться.
• Не извлекайте карту.
• Не извлекайте аккумулятор.
• Не встряхивайте камеру и не стучите по ней.
Если карта памяти уже содержит изображения, нумерация
изображений может начаться не с номера 0001 (стр. 170).
Не прикасайтесь к контактам карты пальцами или металлическими
предметами.
Если на ЖК—дисплее отображается сообщение об ошибке,
связанное с картой, выньте карту и вставьте ее снова. Если ошибка
не устранена, используйте другую карту.
Если есть возможность переписать все изображения с карты на
компьютер, перепишите все изображения, а затем отформатируйте
карту (стр. 45). Нормальная работа карты может восстановиться.
30
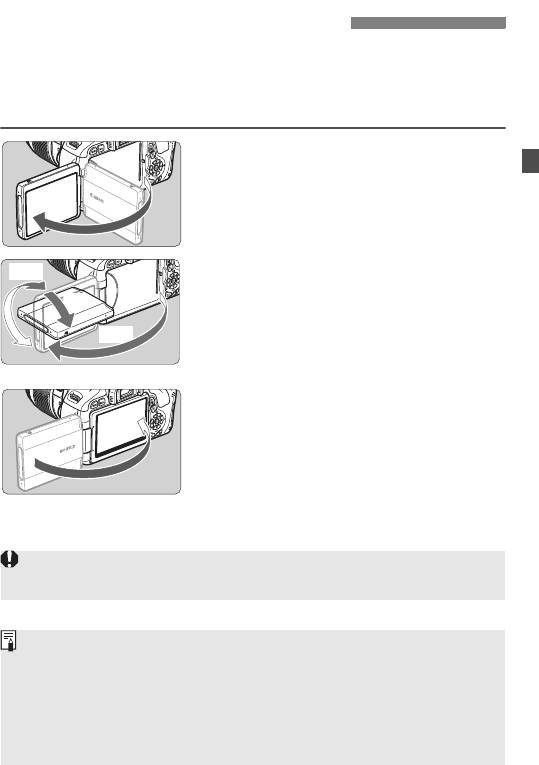
Использование ЖК—дисплея
После того как Вы откините ЖК—дисплей, можно будет настраивать
функции меню, использовать съемку с ЖКД—видоискателем,
видеосъемку, а также просматривать изображения и видеозаписи.
Можно менять направление и угол ЖК—дисплея.
Откиньте ЖК—дисплей.
1
Поверните ЖК—дисплей.
180°
2
Когда ЖК—дисплей открыт, его можно
90°
поворачивать вверх и вниз либо
направить в сторону объекта.
175°
На рисунке указан
приблизительный угол наклона.
Поверните к себе.
3
Для обычной съемки поверните
ЖК—дисплей к себе.
Будьте осторожны, чтобы не сломать крепление ЖК—дисплея при его
повороте.
Когда фотоаппарат не используется, закрывайте ЖК—дисплей
экраном вовнутрь. Так экран будет защищен.
Если во время съемки с использованием ЖКД—видоискателя или
видеосъемки ЖК—дисплей повернут в сторону объекта, изображение
будет отображаться на нем зеркально.
В зависимости от угла ЖК—дисплея экран может отключиться
непосредственно перед тем, как ЖК—дисплей будет закрыт.
31

Включение камеры
Если при включении питания появляется экран настройки
даты/времени, настройте дату и время, как показано на
странице 34.
<1>: Камера включается.
<2>: Камера выключена и не
работает. Установите
переключатель питания в
это положение, если камера
не используется.
Об автоматической очистке датчика изображения
Каждый раз при установке переключателя питания в положение
<1> или <2> автоматически выполняется очистка датчика
изображения. Во время очистки датчика изображения на ЖК—
дисплее отображается <f>. Даже во время очистки датчика
изображения можно фотографировать, наполовину нажав
кнопку спуска затвора (стр. 40) для прекращения очистки
датчика и выполнения съемки.
Если в течение короткого промежутка времени несколько раз изменить
положение переключателя питания
<1>/<2>
, значок
<f>
может не появиться. Это нормально и не является неполадкой.
3 О функции автоотключения
Если камера не использовалась в течение приблизительно 30 с,
она автоматически выключается для экономии заряда
аккумулятора. Для повторного включения камеры просто
наполовину нажмите кнопку спуска затвора (стр. 40).
Задержку автоматического выключения можно изменить с
помощью параметра [5 Автоотключение] (стр. 167).
Если установить переключатель питания в положение <2> во время
записи изображения на карту памяти, отображается сообщение
[Производится запись...], и питание выключается после завершения
записи изображения на карту памяти.
32
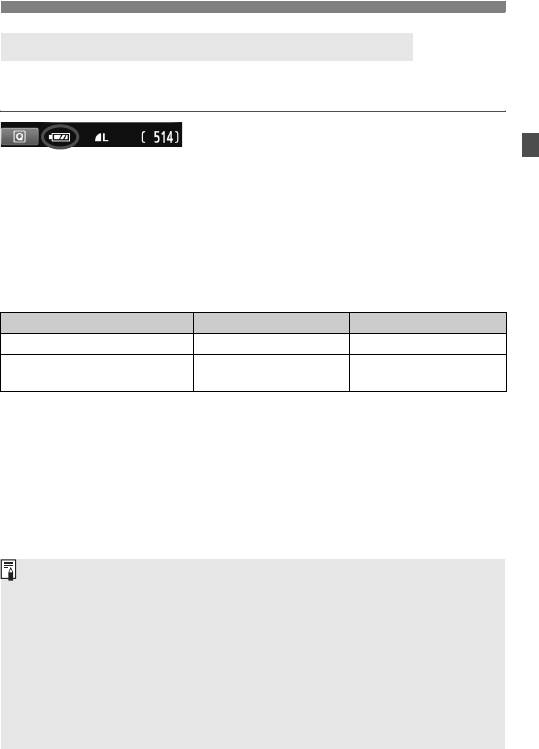
Включение камеры
z Проверка уровня заряда аккумулятора
Когда переключатель питания установлен в положение
<1>
,
индикатор заряда аккумулятора показывает одно из четырех значений:
z : Достаточный уровень заряда
аккумулятора.
x : Уровень заряда аккумулятора
низкий, но еще достаточный.
c : Аккумулятор скоро полностью
разрядится. (Мигает)
n : Необходимо зарядить
аккумулятор.
Запас заряда аккумулятора
Температура 23°C 0°C
Без вспышки Прибл. 550 кадров Прибл. 470 кадров
Вспышка используется в
Прибл. 440 кадров Прибл. 400 кадров
50% случаев
Приведенные выше цифры относятся к следующему случаю: полностью заряженный
аккумулятор LP-E8, режим съемки с использованием ЖКД—видоискателя отключен,
используются стандарты тестирования CIPA (Camera & Imaging Products Association/
Ассоциация производителей камер и устройств обработки изображения).
При использовании двух аккумуляторов LP-E8 в ручке—держателе аккумуляторов
BG-E8 возможное количество снимков увеличивается приблизительно в два раза.
При установленных элементах питания типоразмера-AA/LR6, количество
возможных снимков при температуре 23°C составляет прибл. 470 без использования
вспышки и прибл. 270 снимков при использовании вспышки в 50% случаев.
При выполнении перечисленных ниже действий количество
возможных снимков сокращается:
• Длительное нажатие кнопки спуска затвора наполовину.
• Частая активация только функции автофокусировки без
выполнения съемки.
• Частое использование ЖК—дисплея.
• Использование функции Image Stabilizer (Стабилизатор
изображения) для объектива.
Объектив получает питание от аккумулятора камеры. В зависимости от
используемого объектива количество возможных снимков может сокращаться.
Количество оставшихся кадров в режиме съемки с использованием
ЖКД—видоискателя см. на стр. 125.
33
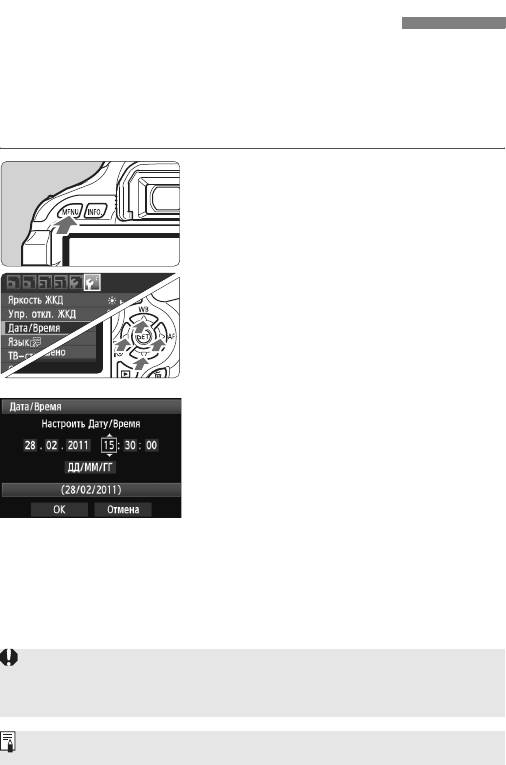
3 Установка даты и времени
При первом включении питания или в случае сброса даты и времени
открывается экран установки Даты/Времени. Для установки даты и времени
выполните шаги 3 и 4.
Учтите, что дата и время, добавляемые к
записываемому изображению, будут основаны на указанных значениях
параметра дата/время. Обязательно установите правильные дату и время.
Отобразите экран меню.
1
Для отображения экрана меню
нажмите кнопку <M>.
На вкладке [6] выберите пункт
2
[Дата/Время].
Клавишами <U> выберите
вкладку меню [6].
Клавишами <
V
> для выбора [
Дата/
Время
], затем нажмите кнопку <
0
>.
Установите дату и время.
3
Нажмите клавиши <U> для
выбора даты или времени.
Нажмите кнопку <0> для
отображения символа <a>.
Нажмите клавиши <V>, чтобы
установить номер, затем нажмите
<0>. (Снова отображается b.)
Выйдите из режима настройки.
4
Клавишами <U> выберите [OK],
затем нажмите <0>.
X Дата и время будут установлены.
При хранении камеры без аккумулятора или в случае разрядки
аккумулятора в камере значения даты/времени могут быть сброшены.
В этом случае заново установите дату и время.
Отсчет даты и времени начнется после нажатия на шаге 4 кнопки <0>.
34
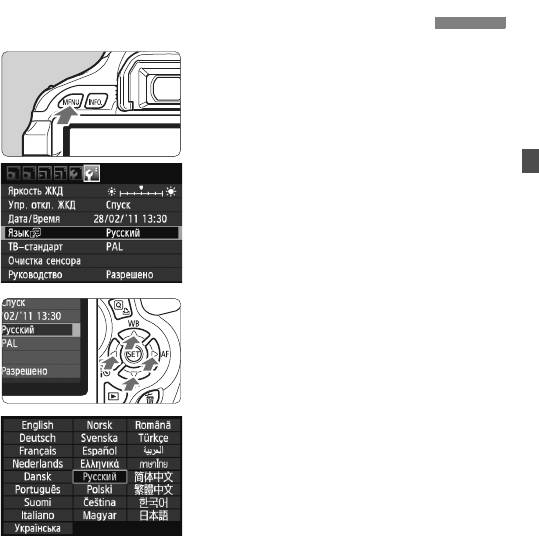
3 Установка языка интерфейса
Отобразите экран меню.
1
Для отображения экрана меню
нажмите кнопку <M>.
На вкладке [6] выберите пункт
2
[ЯзыкK].
Клавишами <U> выберите
вкладку меню [6].
Клавишами <V> выберите пункт
[Язык
K] (четвертый сверху),
затем нажмите кнопку <0>.
Задайте нужный язык.
3
Клавишами <S> выберите язык,
затем нажмите кнопку <0>.
X Язык интерфейса будет изменен.
35
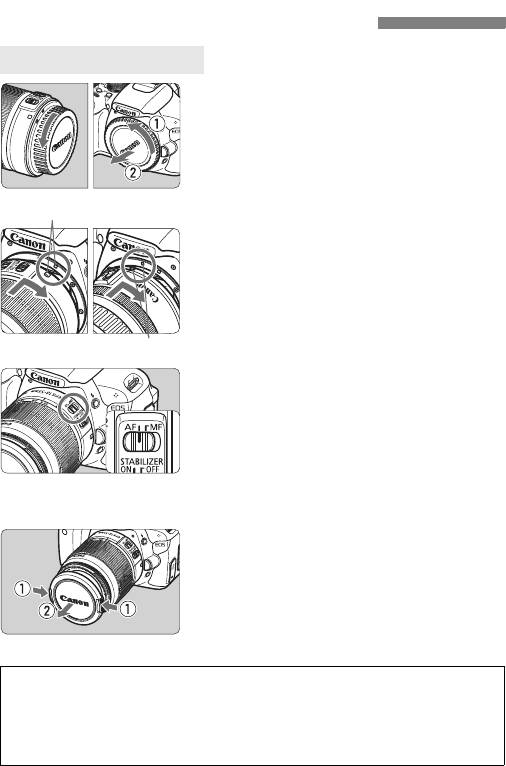
Установка и снятие объектива
Установка объектива
Снимите крышки.
1
Снимите заднюю крышку объектива
и крышку корпуса камеры, повернув
их в направлении стрелок, как
показано на рисунке.
Белая индексная метка
Установите объектив.
2
Совместите красную или белую
индексную метку объектива с
индексной меткой соответствующего
цвета на фотоаппарате. Поверните
объектив в направлении, указанном
стрелкой, до фиксации со щелчком.
Красная индексная метка
Установите переключатель
3
режима фокусировки на
объективе в положение <AF>
(автофокусировка).
Если переключатель режима
фокусировки установлен в положение
<
MF
> (ручная фокусировка), функция
автофокусировки работать не будет.
Снимите переднюю крышку
4
объектива.
Сведение к минимуму количества пыли
При смене объективов делайте это в местах с минимальной запыленностью.
При хранении камеры без объектива обязательно устанавливайте на
корпус камеры крышку.
Перед установкой крышки корпуса камеры удалите с нее пыль.
36
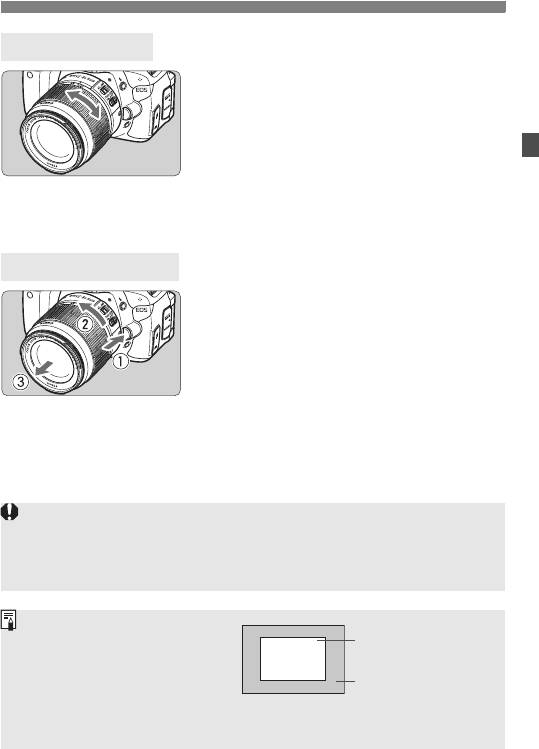
Установка и снятие объектива
О зумировании
Для зумирования поверните пальцами
кольцо зумирования.
Зумирование следует производить
до выполнения фокусировки. При
повороте кольца зумирования
после наводки на резкость
возможно небольшое нарушение
фокусировки.
Снятие объектива
Удерживая нажатой кнопку
разблокировки объектива,
поверните объектив так, как
показано стрелкой.
Поверните объектив до упора,
затем снимите его.
Наденьте на снятый объектив
заднюю крышку объектива.
Не смотрите прямо на солнце через какой—либо объектив. Это
может вызвать потерю зрения.
Если передняя часть объектива (кольцо фокусировки) вращается во
время автофокусировки, не прикасайтесь к вращающейся части.
Коэффициент преобразования
Размер датчика изображения
изображения
(приблизительный) (22,3 x 14,9 мм)
Поскольку размер сенсора
изображения меньше, чем формат
Размер изображения
35 мм пленки, будет казаться, что
формата 35—мм пленки
(36 x 24 мм)
фокусное расстояние объектива
увеличилось приблиз. в 1,6 раза.
37
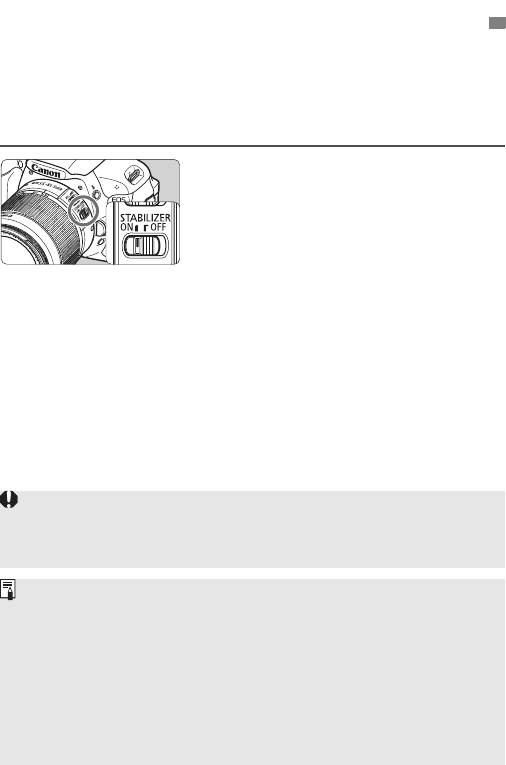
О функции Image Stabilizer (Стабилизатор изображения) для объективов
При использовании встроенной функции Image Stabilizer (Стабилизатор
изображения) объектива IS производится компенсация дрожания
фотоаппарата для получения более резкого снимка. Для примера здесь
рассматривается порядок действий с объективом EF-S 18-55 mm f/3.5-5.6 IS II.
* IS означает Image Stabilizer (Стабилизатор изображения).
Установите переключатель IS в
1
положение <1>.
Установите переключатель питания
фотоаппарата в положение <1>.
Нажмите кнопку спуска затвора
2
наполовину.
X
Включается функция Image Stabilizer
(Стабилизатор изображения).
Сделайте снимок.
3
Когда изображение в видоискателе
стабилизируется, полностью
нажмите кнопку спуска затвора,
чтобы сделать снимок.
Функция Image Stabilizer (Стабилизатор изображения) может быть
неэффективна, если объект двигается во время настройки экспозиции.
Функция Image Stabilizer (Стабилизатор изображения) может быть неэффективна
при слишком сильных сотрясениях, например на качающейся лодке.
Функция Image Stabilizer (Стабилизатор изображения) может работать в том
случае, если переключатель режима <
f
> или <
g
>.
Если камера установлена на штатив, для экономии заряда
аккумулятора можно установить переключатель IS в положение <
2
>.
Функция Image Stabilizer (Стабилизатор изображения) эффективна
даже в том случае, если камера установлена на монопод.
Некоторые объективы со стабилизацией изображения IS позволяют
вручную переключать режим IS в соответствии с условиями съемки. Однако
нижеперечисленные объективы включают режим IS автоматически:
• EF-S 18-55 mm f/3.5-5.6 IS II • EF-S 18-135 mm f/3.5-5.6 IS
• EF-S 15-85 mm f/3.5-5.6 IS USM • EF-S 18-200 mm f/3.5-5.6 IS
38
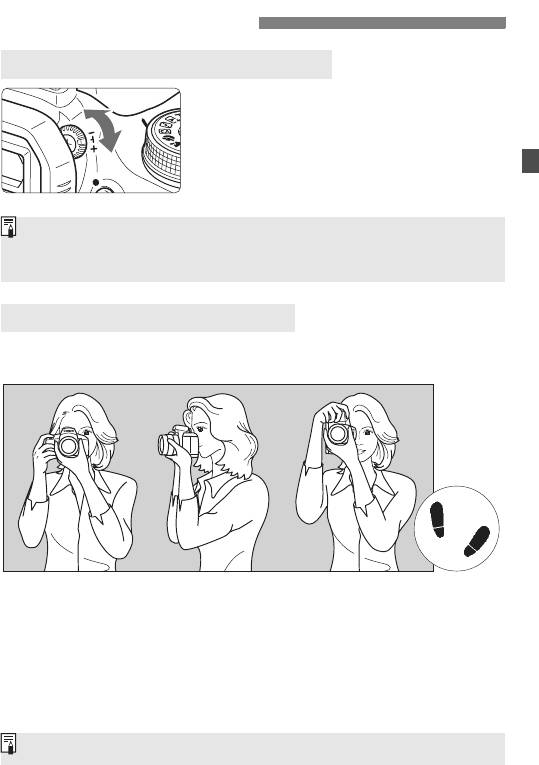
Основные операции
Настройка четкости видоискателя
Вращайте ручку диоптрийной
регулировки.
Поворачивая ручку влево или
вправо, добейтесь резкого
изображения девяти точек
автофокусировки в видоискателе.
Если диоптрийная регулировка камеры не позволяет обеспечить четкое
изображение в видоискателе, рекомендуется использовать линзы
диоптрийной регулировки серии E (10 типов, продаются отдельно).
Как правильно держать камеру
Для получения четких фотографий держите камеру неподвижно,
чтобы свести к минимуму ее дрожание.
Съемка в горизонтальном положении
Съемка в вертикальном положении
1. Плотно обхватите правой рукой ручку камеры.
2. Левой рукой поддерживайте объектив снизу.
3.
Положите указательный палец правой руки на кнопку спуска затвора.
4. Слегка прижмите руки и локти к груди.
5.
Для обеспечения устойчивости поставьте одну ногу немного впереди другой.
6. Прижмите камеру к лицу и посмотрите в видоискатель.
Информацию о съемке с использованием ЖК—дисплея см. на стр. 123.
39
Основные операции
Кнопка спуска затвора
Кнопка спуска затвора срабатывает в два этапа. Можно нажать кнопку спуска
затвора наполовину. Затем кнопка спуска затвора нажимается до упора.
Нажатие наполовину
Этим нажатием активизируется функция
автофокусировки и автоматического
экспозамера, которая устанавливает
выдержку и величину диафрагмы.
Значение экспозиции (выдержка и
диафрагма) отображается в
видоискателе (0).
При нажатии кнопки спуска затвора
наполовину ЖК—дисплей отключается
(стр. 179).
Полное нажатие
Этим нажатием осуществляется спуск
затвора, и производится съемка.
Предотвращение сотрясения камеры
Движения фотоаппарата, который держат руками, во время
настройки экспозиции называется сотрясением камеры. Из—за
этого снимки могут получиться смазанными. Во избежание
сотрясения камеры обратите внимание на следующее:
• Держите камеру неподвижно, как показано на предыдущей странице.
• Нажмите кнопку спуска затвора наполовину для автофокусировки,
затем медленно нажмите полностью кнопку спуска затвора.
Если сразу полностью нажать кнопку спуска затвора или нажать ее
наполовину, а затем сразу же до упора, камера производит съемку с
некоторой задержкой.
Даже во время отображения меню, воспроизведения или записи
изображения можно немедленно вернуться в режим готовности к
съемке, наполовину нажав кнопку спуска затвора.
40
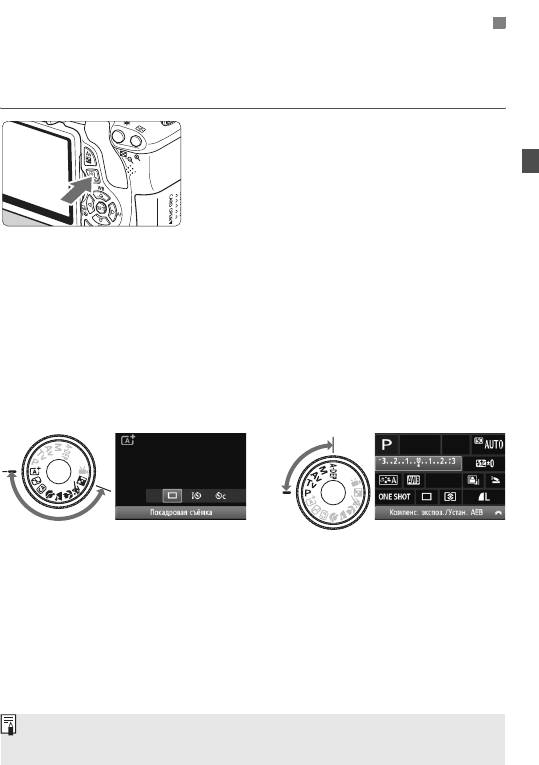
Q
Функции съемки экрана быстрого выбора
Вы можете непосредственно выбирать и устанавливать функции
съемки, отображенные на ЖК—дисплее. Это называется экраном
быстрого выбора.
Нажмите кнопку <Q>.
1
X Отображается экран быстрого
выбора (7).
Установите нужную функцию.
2
Клавишами <S> выберите
функцию, которую требуется
установить.
X
Появится выбранная функция и
Руководство по функциям (стр. 48) .
Для изменения настройки
поверните диск <6>.
Режимы базовой зоны Режимы творческой зоны
Сделайте снимок.
3
Для съемки полностью нажмите
кнопку спуска затвора.
X Будет отображено отснятое
изображение.
Функции, которые можно установить в режимах базовой зоны, и
процедуру установки см. на странице 64.
41
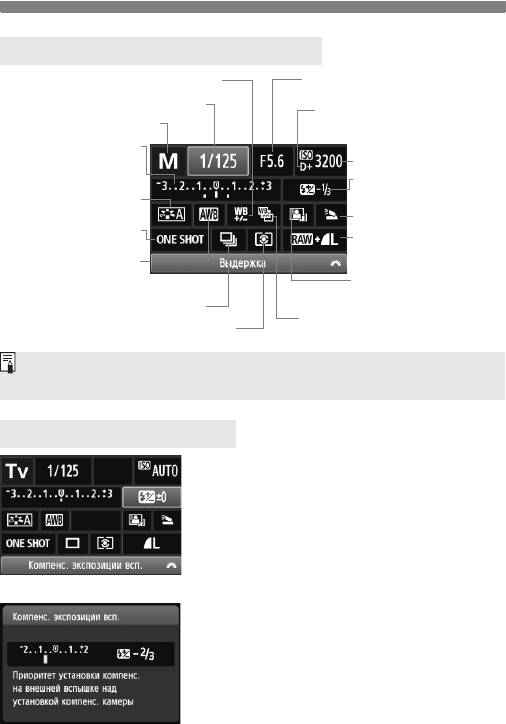
Q Функции съемки экрана быстрого выбора
Функции экрана быстрого выбора
Коррекция баланса белого* (стр. 119)
Диафрагма (стр. 96)
Выдержка (стр. 94)
Приоритет светов* (стр. 254)
Режим съемки* (стр. 22)
Компенсация экспозиции/
Диапазон автоматического
Чувствительность ISO (стр. 79)
брекетинга экспозиции (стр. 103, 105)
Компенсация экспозиции
вспышки (стр. 104)
Стиль изображения (стр. 81)
Функция встроенной вспышки
Режим автофокусировки
Качество записи
(стр. 83)
изображения (стр. 76)
Баланс белого (стр. 117)
Auto Lighting Optimizer
(Автокоррекция яркости) (стр. 109)
Режим перевода кадров (стр. 88, 89)
Вилка баланса белого*
Режим замера (стр. 102)
(стр. 120)
Функции, отмеченные звездочкой, невозможно установить с помощью
экрана быстрого выбора.
Экран настроек функций
Выберите нужную функцию и
нажмите <0>. Появляется
соответствующий экран настройки.
Нажмите клавиши <U> или
поверните диск <6>, чтобы
изменить настройку. Также
имеются функции,
<0>
Ð
устанавливаемые кнопкой <C>.
Нажмите кнопку <0> для
завершения настройки и возврата к
экрану быстрого выбора.
42

3 Использование меню
С помощью меню можно настраивать разнообразные функции: качество
записи изображений, дату/время и т.п. Глядя на ЖК—дисплей, используйте
кнопку <
M
>, клавиши направления <
S
> и кнопку <
0
> на задней
панели фотоаппарата, чтобы управлять меню.
Кнопка
<M>
Кнопка <0>
ЖК—дисплей
<S> Клавиши
направления
Экран меню
В режимах базовой зоны, видеосъемки и творческой зоны вкладки
и отображаемые пункты меню будут отличаться.
Режимы базовой зоны Режим видеосъемки
Режимы творческой зоны
5 Настройка
3 Просмотр
1 Съемка
9 МОЁ МЕНЮ
Вкладка
Установки
Пункты меню
меню
43
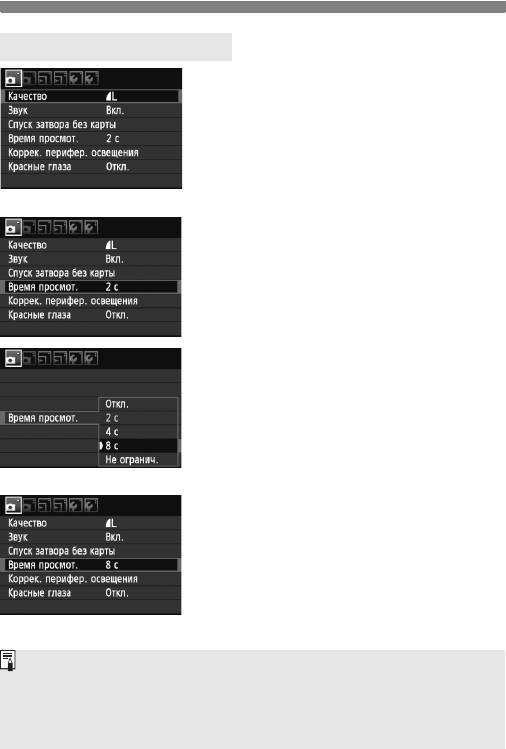
3 Использование меню
Порядок работы с меню
Отобразите экран меню.
1
Для отображения экрана меню
нажмите кнопку <M>.
Выберите вкладку меню.
2
Нажмите клавиши <U>, чтобы
выбрать вкладку меню.
Выберите требуемый вариант.
3
Клавишами <V> выберите пункт,
затем нажмите кнопку <0>.
Выберите значение.
4
Используйте клавиши <V> или
<U>, чтобы выбрать требуемую
установку. (Для выбора некоторых
значений необходимо нажать или
клавиши <V>, или <U>.)
Текущая настройка указана синим цветом.
Задайте требуемое значение.
5
Для этого нажмите кнопку <0>.
Выйдите из режима настройки.
6
Для возвращения к экрану
параметров съемки нажмите
кнопку <M>.
На Шаге 2 Вы также можете повернуть диск <6>, чтобы выбрать
вкладку меню.
В приводимых далее описаниях функций меню предполагается, что
была нажата кнопка <M> для отображения экранных меню.
Подробные сведения по каждому пункту меню см. на странице 270.
44
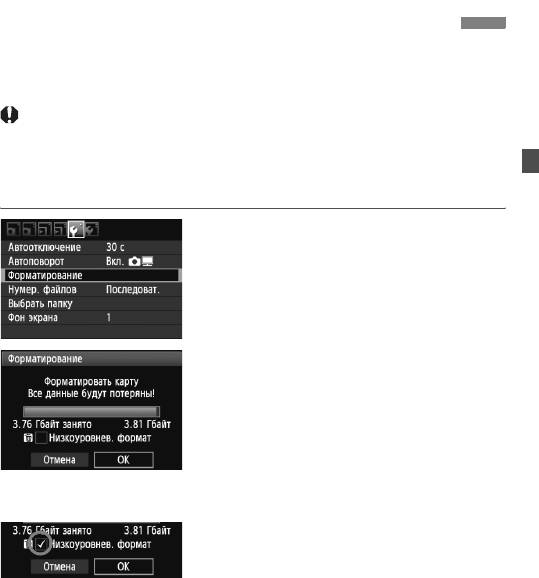
3 Форматирование карты памяти
Новую карту памяти или карту памяти, ранее отформатированную
в другой камере или на компьютере, необходимо отформатировать
в этой камере.
При форматировании карты памяти с нее стираются все
данные. Стираются даже защищенные изображения,
поэтому убедитесь, что на карте нет важной информации.
При необходимости перед форматированием карты
перенесите изображения на компьютер и т.п.
Выберите [Форматирование].
1
На вкладке [5] выберите пункт
[Форматирование], затем нажмите
кнопку <0>.
Отформатируйте карту.
2
Выберите [OK], затем нажмите
кнопку <0>.
X Выполняется форматирование
карты памяти.
X После завершения
форматирования снова
отобразится меню.
Для выполнения низкоуровневого
форматирования нажмите кнопку
<L>, чтобы установить в пункте
[Низкоуровнев. формат] флажок
<X>, затем выберите [OK].
45
3 Форматирование карты памяти
Выполняйте [Форматирование] в перечисленных ниже случаях.
Используется новая карта.
Карта была отформатирована в другой камере или на
компьютере.
Карта заполнена изображениями или данными.
Отображается сообщение об ошибке, связанное с картой
(стр. 287).
Низкоуровневое форматирование
Низкоуровневое форматирование следует выполнять в том случае,
если скорость записи или чтения карты кажется низкой или если Вы
хотите удалить все данные с карты.
Поскольку низкоуровневое форматирование удаляет все секторы
записи на карте памяти, такое форматирование может занять больше
времени по сравнению с обычным.
Низкоуровневое форматирование можно остановить, выбрав
[Отмена]. Даже в этом случае обычное форматирование будет
завершено, и карта может быть использована как обычно.
При форматировании карты памяти или удалении с нее данных
изменяется только информация о размещении файлов. Полное
стирание фактических данных не производится. Помните об этом,
продавая или выбрасывая карту. При утилизации карты памяти
выполните низкоуровневое форматирование или уничтожьте карту
физически, чтобы исключить утечку личных данных с карты.
Перед использованием новой карты Eye-Fi находящаяся на
карте программа должна быть установлена на Ваш компьютер.
Затем отформатируйте карту с помощью фотоаппарата.
Емкость карты памяти, отображаемая на экране форматирования
карты, может быть меньше емкости, указанной на карте.
Данное устройство содержит технологию exFAT, залицензированную
от компании Microsoft.
46
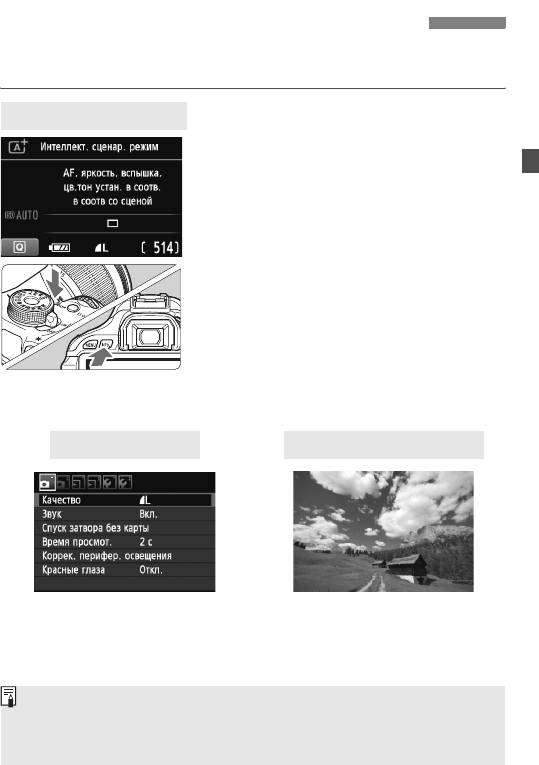
Переключение экрана ЖК—дисплея
На ЖК—дисплее могут быть показаны экран параметров съемки,
экран меню, отснятые изображение и т.п.
Параметры съемки
Когда Вы включите фотоаппарат,
будут отображены настройки съемки.
При нажатии кнопки спуска затвора
наполовину ЖКД будет выключен.
Когда Вы отпустите кнопку спуска
затвора, ЖКД включится.
Вы также можете выключить
видоискатель, нажав кнопку
<B>.
Нажмите кнопку снова,
чтобы включить видоискатель.
Нажатие кнопки <
C
> переключает
между экраном настроек съемки
(стр.20) и экраном настроек
фотоаппарата (стр. 175).
Функции меню Снятое изображение
Появляется при нажатии кнопки
Появляется при нажатии кнопки
<
M
>. Нажмите кнопку
<
x
>. Нажмите кнопку снова,
снова, чтобы вернуться на экран
чтобы вернуться на экран
настроек съемки.
настроек съемки.
Вы можете установить [5 Упр. откл. ЖКД], чтобы отображение
настроек съемки не отключалось (стр. 179).
Даже если отображен экран меню или отснятое изображение, нажатие
кнопки спуска затвора позволит Вам фотографировать немедленно.
47
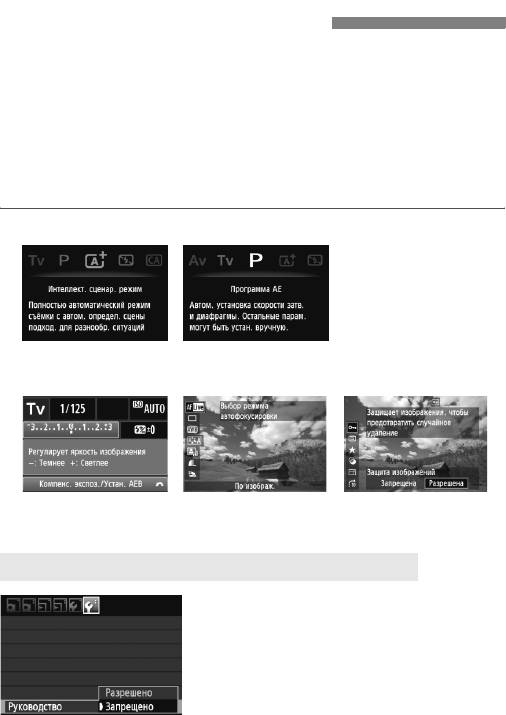
Руководство по функциям
Данное руководство является простым описанием
соответствующей функции или опции. Оно отображается, когда
меняется режим съемки либо когда используется экран быстрого
выбора для установки функции съемки, съемки с использованием
ЖКД—видоискателя, видеосъемки или просмотра. Описание из
руководства отображается, когда выбрана функция или опция на
экране быстрого выбора. Руководство по функциям отключается,
когда Вы начинаете выполнять какую—либо операцию.
Режим съемки (Пример)
Быстрый выбор (Пример)
Функция съемки
Съемка с использованием
Просмотр
ЖКД—видоискателя
3 Отключение Руководства по функциям
Выберите [Руководство].
На вкладке [6] выберите пункт
[Руководство], затем нажмите
кнопку <0>. Выберите вариант
[Запрещено], затем нажмите
кнопку <0>.
48
Оглавление
Аннотация для Цифровой Фотокамеры Canon EOS 600D в формате PDF
Топ 10 инструкций
Другие инструкции
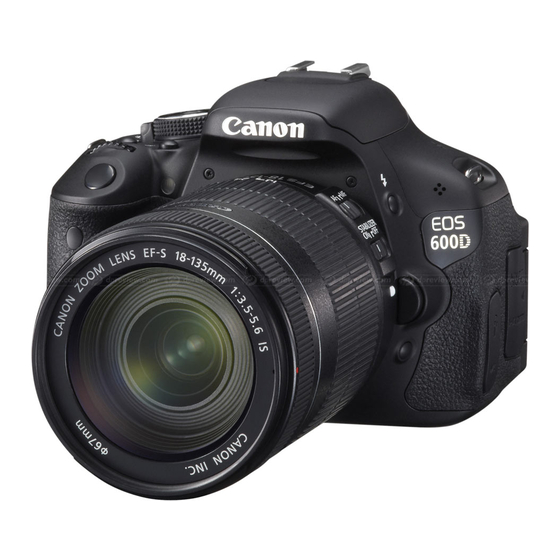
-
Contents
-
Table of Contents
-
Troubleshooting
-
Bookmarks
Quick Links
The «Software Start Guide» and «Quick Reference Guide» are
provided at end of this manual.
ENGLISH
INSTRUCTION
MANUAL
Related Manuals for Canon EOS 600D
Summary of Contents for Canon EOS 600D
-
Page 1
ENGLISH INSTRUCTION The “Software Start Guide” and “Quick Reference Guide” are MANUAL provided at end of this manual. -
Page 2: Introduction
Introduction The EOS 600D is a high-performance, digital single-lens reflex camera featuring a fine-detail CMOS sensor with approx. 18.0 effective megapixels, DIGIC 4, high-precision and high-speed 9-point AF, approx. 3.7 fps continuous shooting, Live View shooting, and Full High- Definition (Full HD) movie shooting.
-
Page 3: Item Check List
Item Check List Before starting, check that all the following items have been included with your camera. If anything is missing, contact your dealer. Battery Pack Battery Charger Camera LP-E8 LC-E8/LC-E8E* (with eyecup and body cap) (with protective cover) Wide Strap Interface cable Stereo AV Cable EW-100DB III…
-
Page 4: Conventions Used In This Manual
Conventions Used in this Manual Icons in this Manual <6> : Indicates the Main Dial. <V> <U> : Indicates the <S> cross keys. <0> : Indicates the setting button. 0, 9, 7, 8 : Indicates that the respective function remains active for 4 sec., 6 sec., 10 sec., or 16 sec.
-
Page 5: Chapters
Chapters For first-time DSLR users, Chapters 1 and 2 explain the camera’s basic operations and shooting procedures. Introduction Getting Started Basic Shooting and Image Playback Creative Shooting Advanced Shooting Shooting with the LCD Monitor (Live View Shooting) Shooting Movies Handy Features Wireless Flash Photography Image Playback Post-Processing Images…
-
Page 6: Contents At A Glance
Contents at a Glance Shooting Shoot automatically p.49 — 63 (Basic Zone modes) Shoot continuously p.88 (i Continuous shooting) Take a picture of yourself in a group p.89 (j Self-timer) Freeze the action p.94 (s Shutter-priority AE) Blur the action Blur the background p.56 (C Creative Auto)
-
Page 7
Take many pictures p.76 (7a, 8a, b, c) Focusing Change the point of focus p.85 (S AF point selection) Shoot a moving subject p.62, 84 (AI Servo AF) Playback View the images with the camera p.71 (x Playback) Search for pictures quickly p.202 (H Index display) p.203… -
Page 8: Index To Features
Index to Features Power Image Quality Battery Image-recording quality p.76 • Charging p.26 Picture Style p.81 • Installing/Removing p.28 White balance p.117 • Battery check p.33 Color space p.121 Power outlet p.260 Image enhancement features Auto power off p.32 • Auto Lighting Optimizer p.109 •…
-
Page 9
Index to Features Image Playback Mirror lockup p.122 Automatic Depth-of-field Image review time p.166 p.101 Single image display p.71 Metering mode p.102 • Shooting information Remote control p.261 display p.226 Index display p.202 Exposure Adjustments Image browsing Exposure compensation p.103 (Jump display) p.203 p.105… -
Page 10: Table Of Contents
Contents Introduction Item Check List………………..3 Conventions Used in this Manual …………..4 Chapters ………………….5 Contents at a Glance………………6 Index to Features ………………..8 Handling Precautions ………………14 Quick Start Guide ……………….. 16 Nomenclature ………………..18 Getting Started Charging the Battery ………………
-
Page 11
Contents Creative Shooting d: Program AE………………..74 Setting the Image-recording Quality…………..76 Z: Changing the ISO Speed ……………..79 A Selecting the Subject’s Optimal Image Characteristics (Picture Style) ..81 E: Changing the Autofocus Mode (AF Mode) ……….83 S Selecting the AF Point …………….85 Subjects Difficult to Focus…………….87 MF: Manual Focusing ……………….87 i Continuous Shooting ………………88… -
Page 12
Contents Shooting Movies k Shooting Movies………………142 Shooting Function Settings …………….149 Setting the Movie-recording Size…………..150 Using Movie Digital Zoom…………….152 Taking Video Snapshots …………….153 Menu Function Settings…………….. 157 Handy Features Handy Features ………………… 166 Silencing the Beeper ……………… 166 Card Reminder ………………. -
Page 13
Contents k Playing Movies………………212 X Editing a Movie’s First and Last Scenes ………..214 Slide Show (Auto Playback)…………….215 Viewing the Images on TV …………….218 K Protecting Images ………………222 L Erasing Images ………………224 C Shooting Information Display …………..226 Post-Processing Images U Creative Filters ………………230 S Resize ………………….233 Printing Images Preparing to Print ……………….236… -
Page 14: Handling Precautions
The camera is not waterproof and cannot be used underwater. If you accidentally drop the camera into water, promptly consult your nearest Canon Service Center. Wipe off any water droplets with a dry cloth. If the camera has been exposed to salty air, wipe it with a well-wrung wet cloth.
-
Page 15: Lcd Monitor
Besides dust entering the camera from outside, in rare cases lubricant from the camera’s internal parts may adhere to the front of the sensor. In case visible spots still remain after the automatic sensor cleaning, having the sensor cleaned by a Canon Service Center is recommended.
-
Page 16: Quick Start Guide
Quick Start Guide Insert the battery. (p.28) To charge the battery, see page 26. Insert a card. (p.29) With the card’s label facing toward the camera back, insert it into the slot. Attach the lens. (p.36) White index Red index Align the lens’…
-
Page 17
Quick Start Guide Flip out the LCD monitor. (p.31) When the LCD monitor displays the date/time setting screen, see page Focus the subject. (p.40) Look through the viewfinder and aim the viewfinder center over the subject. Press the shutter button halfway, and the camera will focus the subject. -
Page 18: Nomenclature
Nomenclature The names in bold indicate the parts mentioned up until the “Basic Shooting and Image Playback” section. Mode Dial (p.22) Power switch (p.32) Built-in flash/AF-assist beam <B> Display button (p.90/86) (p.47,152,167,179) EF Lens mount index (p.36) EF-S Lens mount index (p.36) <Z>…
-
Page 19
Nomenclature Eyecup (p.262) Dioptric adjustment knob (p.39) <A> Live View shooting/ Movie shooting button (p.124/142) Viewfinder eyepiece <A/I> AE lock/ FE lock button/ Index/Reduce button <C> Info button (p.107/108/202/204,243) (p.47,71,126,146,175) <S/u> AF point selection/ Magnify button (p.85/204,243) <M> Menu button (p.43) Speaker (p.212) -
Page 20
Nomenclature Shooting Settings Display (in Creative Zone modes, p.22) Shutter speed Aperture Exposure level indicator c Main Dial pointer (p.93) Exposure compensation amount (p.103) Auto Lighting Optimizer (p.109) AEB range (p.105) ISO speed (p.79) Shooting mode Highlight tone priority Picture Style (p.81) (p.254) AF mode (p.83) -
Page 21: Viewfinder Information
Nomenclature Viewfinder Information Spot metering circle AF point activation indicator < > Focusing screen AF points <Z> ISO speed <2> White balance correction <A> AE lock/ <o> Focus AEB in-progress confirmation light Max. burst <D> Flash-ready Improper FE lock <0> Monochrome shooting warning ISO speed <e>…
-
Page 22
Nomenclature Mode Dial The Mode Dial includes the Basic Zone modes, Creative Zone modes, and the Movie shooting mode. Creative Zone These modes give you more control for shooting various subjects. : Program AE (p.74) : Shutter-priority AE (p.94) f : Aperture-priority AE (p.96) : Manual exposure (p.99) 8: Automatic depth-of-field AE (p.101) -
Page 23
Nomenclature Lens Lens without a distance scale Focus mode switch (p.36) Focusing ring (p.87,138) Zoom ring (p.37) Zoom position index (p.37) Hood mount (p.294) Filter thread (front of lens) (p.294) Image Stabilizer switch (p.38) Contacts (p.15) Lens mount index (p.36) Lens with a distance scale Focus mode switch (p.36) -
Page 24
Nomenclature Battery Charger LC-E8 Charger for Battery Pack LP-E8 (p.26). Power plug Battery pack slot Charge lamp Full-charge lamp This power unit is intended to be correctly orientated in a vertical or floor mount position. IMPORTANT SAFETY INSTRUCTIONS-SAVE THESE INSTRUCTIONS. DANGER-TO REDUCE THE RISK OF FIRE OR ELECTRIC SHOCK, CAREFULLY FOLLOW THESE INSTRUCTIONS. -
Page 25: Getting Started
Getting Started This chapter explains preparatory steps before you start shooting and basic camera operations. Attaching the Strap Pass the end of the strap through the camera’s strap mount eyelet from the bottom. Then pass it through the strap’s buckle as shown in the illustration.
-
Page 26: Charging The Battery
Charging the Battery Remove the protective cover. Detach the protective cover provided with the battery. Attach the battery. As shown in the illustration, attach the battery securely to the charger. To detach the battery, follow the above procedure in reverse. LC-E8 Recharge the battery.
-
Page 27
3 sec. Do not charge any battery other than a Battery Pack LP-E8. The Battery Pack LP-E8 is dedicated to Canon products only. Using it with an incompatible battery charger or product may result in malfunction or accidents for which Canon cannot be held liable. -
Page 28: Installing And Removing The Battery
Installing and Removing the Battery Installing the Battery Load a fully charged Battery Pack LP-E8 into the camera. Open the cover. Slide the lever as shown by the arrows and open the cover. Insert the battery. Insert the end with the battery contacts.
-
Page 29: Installing And Removing The Card
Installing and Removing the Card The card (sold separately) can be an SD, SDHC, or SDXC memory card. The captured images are recorded onto the card. Make sure the card’s write-protect switch is set upward to enable writing/erasing. Installing the Card Open the cover.
-
Page 30: Removing The Card
Installing and Removing the Card Removing the Card Open the cover. Set the power switch to <2>. Make sure the access lamp is off, then open the cover. If “Recording …” is displayed, close the cover. Access lamp Remove the card. Gently push in the card, then let go.
-
Page 31: Using The Lcd Monitor
Using the LCD Monitor After you flip out the LCD monitor, you can set menu functions, use Live View shooting, shoot movies, and playback images and movies. You can change the direction and angle of the LCD monitor. Flip out the LCD monitor. Rotate the LCD monitor.
-
Page 32: Auto Power Off P
Turning on the Power If you turn on the power switch and the date/time setting screen appears, see page 34 to set the date/time. <1> : The camera turns on. <2> : The camera is turned off and does not operate. Set to this position when not using the camera.
-
Page 33: Checking The Battery Level
Turning on the Power z Checking the Battery Level When the power switch is set to <1>, the battery level will be indicated in one of four levels: z : Battery level is OK. x : Battery level is low, but still enough for now.
-
Page 34: Setting The Date And Time
Setting the Date and Time When you turn on the power for the first time or if the date/time has been reset, the Date/Time setting screen will appear. Follow steps 3 and 4 to set the date/time. Note that the date/time appended to recorded images will be based on this date/time setting.
-
Page 35: Selecting The Interface Language
Selecting the Interface Language Display the menu screen. Press the <M> button to display the menu screen. Under the [6] tab, select [LanguageK]. Press the <U> key to select the [6] tab. Press the <V> key to select [Language ] (the fourth item from the top), then press <0>.
-
Page 36: Attaching And Detaching A Lens
Attaching and Detaching a Lens Attaching a Lens Remove the caps. Remove the rear lens cap and the body cap by turning them as shown by the arrows. Attach the lens. White index Align the lens’ red or white index with the camera’s index matching the same color.
-
Page 37: Detaching The Lens
Attaching and Detaching a Lens About Zooming To zoom, turn the zoom ring on the lens with your fingers. If you want to zoom, do it before focusing. Turning the zoom ring after achieving focus may throw off the focus slightly. Detaching the Lens While pressing the lens release button, turn the lens as shown by…
-
Page 38: About The Lens Image Stabilizer
About the Lens Image Stabilizer When you use the IS lens’ built-in Image Stabilizer, camera shake is corrected to obtain a sharper shot. The procedure explained here is based on the EF-S 18-55mm f/3.5-5.6 IS II lens as an example. * IS stands for Image Stabilizer.
-
Page 39: Basic Operation
Basic Operation Adjusting the Viewfinder Clarity Turn the dioptric adjustment knob. Turn the knob left or right until the nine AF points in the viewfinder look sharp. If the camera’s dioptric adjustment still cannot provide a sharp viewfinder image, using Dioptric Adjustment Lens E (10 types, sold separately) is recommended.
-
Page 40: Shutter Button
Basic Operation Shutter Button The shutter button has two steps. You can press the shutter button halfway. Then you can further press the shutter button completely. Pressing halfway This activates autofocusing and the automatic exposure system that sets the shutter speed and aperture. The exposure setting (shutter speed and aperture) is displayed in the viewfinder (0).
-
Page 41: Q Quick Control For Shooting Functions
Q Quick Control for Shooting Functions You can directly select and set the shooting functions displayed on the LCD monitor. This is called the Quick Control screen. Press the <Q> button. The Quick Control screen will appear (7). Set the desired function. Press the <S>…
-
Page 42
Q Quick Control for Shooting Functions Settable Functions on Quick Control Screen Aperture (p.96) White balance correction* (p.119) Shutter speed (p.94) Highlight tone priority* (p.254) Shooting mode* (p.22) Exposure compensation/ ISO speed (p.79) AEB setting (p.103, 105) Flash exposure compensation (p.104) Picture Style (p.81) Built-in flash function Image-recording quality… -
Page 43: Menu Operations
Menu Operations With menus, you can set various functions such as the image-recording quality, date/time, etc. While looking at the LCD monitor, use the <M> button, <S> cross keys, and < > button on the camera back to operate the menus. <M>…
-
Page 44
3 Menu Operations Menu Setting Procedure Display the menu screen. Press the <M> button to display the menu screen. Select a tab. Press the <U> key to select a menu tab. Select the desired item. Press the <V> key to select the item, then press <0>. -
Page 45: Formatting The Card
Formatting the Card If the card is new or was previously formatted by another camera or computer, format the card with the camera. When the card is formatted, all images and data in the card will be erased. Even protected images will be erased, so make sure there is nothing you need to keep.
-
Page 46
3 Formatting the Card Execute [Format] in the following cases: The card is new. The card was formatted by a different camera or a computer. The card is full with images or data. A card-related error is displayed (p.287). About Low-level Formatting Do low-level formatting if the card’s recording or reading speed seems slow or if you want to totally erase all data in the card. -
Page 47: Switching The Lcd Monitor Display
Switching the LCD Monitor Display The LCD monitor can display the shooting settings screen, menu screen, captured images, etc. Shooting Settings When you turn on the power switch, the shooting settings will be displayed. When you press the shutter button halfway, the display will turn off.
-
Page 48: Feature Guide
Feature Guide The Feature guide is a simple description of the respective function or option. It is displayed when you change the shooting mode or use the Quick Control screen to set a shooting function, Live View shooting, movie shooting, or playback. When you select a function or option on the Quick Control screen, the Feature guide description is displayed.
-
Page 49: Basic Shooting And Image Playback
Basic Shooting and Image Playback This chapter explains how to use the Basic Zone modes on the Mode Dial for best results and how to playback images. With Basic Zone modes, all you do is point and shoot and the camera sets everything automatically (p.64, 268).
-
Page 50: A Fully Automatic Shooting (Scene Intelligent Auto)
A Fully Automatic Shooting (Scene Intelligent Auto) The camera analyzes the scene and sets the optimum settings automatically. It is a fully-automatic mode. Even with moving subjects, the camera will automatically continue to focus the subject (p.53). Set the Mode Dial to <A>. Aim any AF point over the AF point subject.
-
Page 51: Take The Picture
A Fully Automatic Shooting (Scene Intelligent Auto) Take the picture. Press the shutter button completely to take the picture. The captured image will be displayed for approx. 2 sec. on the LCD monitor. If the built-in flash has popped up, you can push it back down with your fingers.
-
Page 52
A Fully Automatic Shooting (Scene Intelligent Auto) Although it is daylight, the flash popped up. For a backlit subject, the flash may pop up to help lighten the subject’s dark areas. In low light, the built-in flash fired a series of flashes. Pressing the shutter button halfway may trigger the built-in flash to fire a series of flashes to assist autofocusing. -
Page 53: A Full Auto (Scene Intelligent Auto) Techniques
A Full Auto (Scene Intelligent Auto) Techniques Recomposing the Shot Depending on the scene, position the subject toward the left or right to create a balanced background and good perspective. In the <A> (Scene Intelligent Auto) mode, while you press the shutter button halfway to focus a still subject, the focus will be locked.
-
Page 54: The Lcd Monitor
A Full Auto (Scene Intelligent Auto) Techniques A Live View Shooting Live View shooting allows you to shoot while looking at the image on the LCD monitor. For details, see page 123. Display the Live View image on the LCD monitor. Press the <A>…
-
Page 55: Disabling Flash
7 Disabling Flash In places where flash photography is prohibited, use the <7> (Flash Off) mode. This mode is also effective for capturing the particular ambience of a scene, such as candlelight scenes. Shooting Tips Prevent camera shake if the numeric display in the viewfinder blinks.
-
Page 56: C Creative Auto Shooting
C Creative Auto Shooting Unlike the <A> Scene Intelligent Auto mode where the camera sets everything, the <C> Creative Auto mode enables you to easily change the depth of field, drive mode, and flash firing. You can also choose the ambience you want to convey in your images. The default settings are the same as the <A>…
-
Page 57
C Creative Auto Shooting Shutter speed Aperture ISO speed Battery check Possible shots Image-recording quality Pressing the <Q> button enables you to set the following: (1) Shoot by ambience selection You can set the ambience you want to convey in your images. Press the <U>… -
Page 58
C Creative Auto Shooting (3) Drive mode/Flash firing When you press <0>, the drive mode or flash firing setting screen will appear. Set as desired, then press <0> to finalize the setting and return to the Quick Control screen. Drive mode: Press the <U> key or turn the <6> dial to set it as desired. -
Page 59: Shooting Portraits
2 Shooting Portraits The <2> (Portrait) mode blurs the background to make the human subject stand out. It also makes skin tones and the hair look softer. Shooting Tips The further the distance between the subject and background, the better. The further the distance between the subject and background, the more blurred the background will look.
-
Page 60: Shooting Landscapes
3 Shooting Landscapes Use the <3> (Landscape) mode for wide scenery, night scenes, or to have everything in focus from near to far. For vivid blues and greens, and very sharp and crisp images. Shooting Tips With a zoom lens, use the wide-angle end. When using the wide-angle end of a zoom lens, objects near and far will be in focus better than at the telephoto end.
-
Page 61: Shooting Close-Ups
4 Shooting Close-ups When you want to photograph flowers or small things up close, use the <4> (Close-up) mode. To make small things appear much larger, use a macro lens (sold separately). Shooting Tips Use a simple background. A simple background makes the flower, etc., stand out better. Move to the subject as close as possible.
-
Page 62: Shooting Moving Subjects
5 Shooting Moving Subjects To photograph a moving subject, whether it is a child running or a moving vehicle, use the <5> (Sports) mode. Shooting Tips Use a telephoto lens. Using a telephoto lens is recommended so you can shoot from afar. Use the center AF point to focus.
-
Page 63: Shooting Portraits At Night
6 Shooting Portraits at Night To shoot someone at night and obtain a natural-looking exposure in the background, use the <6> (Night Portrait) mode. Shooting Tips Use a wide-angle lens and a tripod. When using a zoom lens, use the wide-angle end to obtain a wide night view.
-
Page 64: Q Quick Control
Q Quick Control In Basic Zone modes when the shooting Example: Portrait mode settings screen is displayed, you can press the <Q> button to display the Quick Control screen. The table below indicates the functions that can be set with the Quick Control screen in each Basic Zone mode.
-
Page 65: Shoot By Ambience Selection
Shoot by Ambience Selection Except in the <A> (Scene Intelligent Auto) and <7> (Flash Off) Basic Zone modes, you can select the ambience for shooting. Ambience Ambience Effect A 7 C 2 3 4 5 6 k k k k k (1) Standard setting No setting k k k k k…
-
Page 66
Shoot by Ambience Selection Set the ambience effect. Press the <V> key to select the effect bar so that [Effect] appears at the bottom. Press the <U> key or turn the <6> dial to select the desired effect. Take the picture. To shoot while the Live View image is displayed, press the shutter button. -
Page 67
Shoot by Ambience Selection Ambience Settings (1) Standard setting Standard image characteristics for the respective shooting mode. Note that <2> has image characteristics geared for portraits and <3> is geared for landscapes. Each ambience is a modification of the respective shooting mode’s image characteristics. (2) Vivid The subject will look sharp and vivid. -
Page 68: Shoot By Lighting Or Scene Type
Shoot by Lighting or Scene Type In the <2> (Portrait), <3> (Landscape), <4> (Close-up), and <5> (Sports) Basic Zone modes, you can shoot while the settings match the lighting or scene type. Normally, [Default setting] is adequate, but if the settings match the lighting condition or scene, the picture will look more accurate to your eye.
-
Page 69
Shoot by Lighting or Scene Type On the Quick Control screen, select the lighting or scene type. Press the <Q> button (7). Press the <V> key to select [Default setting] (shown in the sample screen). [Shoot by lighting or scene type] will appear on the screen’s bottom. -
Page 70
Shoot by Lighting or Scene Type Lighting or Scene Type Settings (1) Default setting The default setting. (2) Daylight For subjects under sunlight. Gives more natural-looking blue skies and greenery and reproduces light-colored flowers better. (3) Shade For subjects in the shade. Suitable for skin tones, which may look too bluish, and for light-colored flowers. -
Page 71: Image Playback
x Image Playback The easiest way to playback images is explained below. For more details on the playback procedure, see page 201. Playback the image. When you press the <x> button, the last image captured will be displayed. Select an image. To view images starting with the last image, press the <Y>…
-
Page 73: Creative Shooting
Creative Shooting In the Basic Zone modes, to prevent spoiled shots, most functions are set automatically and cannot be changed. In the <d> (Program AE) mode, you can set various functions and be more creative. In the <d> mode, the camera sets the shutter speed and aperture automatically to obtain a standard exposure.
-
Page 74: D: Program Ae
d: Program AE The camera automatically sets the shutter speed and aperture to suit the subject’s brightness. This is called Program AE. Set the Mode Dial to <d>. Focus the subject. Look through the viewfinder and aim the selected AF point over the subject.
-
Page 75: Shooting Tips
d: Program AE Shooting Tips Change the ISO speed or use the built-in flash. To match the subject and ambient lighting level, you can change the ISO speed (p.79) or use the built-in flash (p.90). In the <d> mode, the built-in flash will not fire automatically. So under low light, press the <I>…
-
Page 76: Setting The Image-Recording Quality
* Figures for the file size, number of possible shots, and maximum burst are based on Canon’s 4GB test card and testing standards (3:2 aspect ratio, ISO 100, and Standard Picture Style). These figures will vary depending on the subject, card brand,…
-
Page 77
3 Setting the Image-recording Quality I want to select the image-recording quality matching the paper size for printing. Refer to the diagram on the left when Paper size choosing the image-recording quality. If you want to crop the image, selecting a A2 (42×59.4cm/16.5×23.4in.) higher quality (more pixels) such as 73, A3 (42×29.7cm/… -
Page 78
3 Setting the Image-recording Quality About 1 1 is the raw image data before it is made into 73 or other images. Although 1 images require software like Digital Photo Professional (provided, p.305) so they can be displayed on the computer, they also offer flexibility for image adjustments possible only with 1. -
Page 79: Z: Changing The Iso Speed
Z: Changing the ISO SpeedN Set the ISO speed (image sensor’s sensitivity to light) to suit the ambient light level. In Basic Zone modes, the ISO speed is set automatically (p.80). Press the <Z> button. [ISO speed] will appear. Set the ISO speed. Press the <U>…
-
Page 80
Z: Changing the ISO SpeedN ISO [AUTO] If the ISO speed is set to [AUTO], the actual ISO speed to be set will be displayed when you press the shutter button halfway. As indicated below, the ISO speed will be set automatically to suit the shooting mode. -
Page 81: A Selecting The Subject’s Optimal Image Characteristics (Picture Style)
A Selecting the Subject’s Optimal Image CharacteristicsN By selecting a Picture Style, you can obtain image characteristics matching your photographic expression or the subject. In Basic Zone modes, you cannot select the Picture Style. Press the <XA> button. [Picture Style] will appear. Select a Picture Style.
-
Page 82
A Selecting the Subject’s Optimal Image CharacteristicsN R Landscape For vivid blues and greens, and very sharp and crisp images. Effective for impressive landscapes. S Neutral This Picture Style is for users who prefer to process images with their computer. For natural colors and subdued images. U Faithful This Picture Style is for users who prefer to process images with their computer. -
Page 83: E: Changing The Autofocus Mode (Af Mode)
E: Changing the Autofocus ModeN You can select the AF (autofocus) mode to suit the shooting conditions or subject. In Basic Zone modes, the most suitable AF mode is set automatically. On the lens, set the focus mode switch to <AF>. Press the <ZE>…
-
Page 84: Ai Servo Af For Moving Subjects
E: Changing the Autofocus ModeN If focus cannot be achieved, the focus confirmation light <o> in the viewfinder will blink. If this occurs, a picture cannot be taken even if the shutter button is pressed completely. Recompose the picture and try to focus again.
-
Page 85: S Selecting The Af Point
S Selecting the AF Point N In Basic Zone modes, the camera will normally focus the closest subject automatically. Therefore, it might not always focus your target subject. In the <d>, <s>, <f>, and <a> modes, you can select the AF point and use it to focus the target subject.
-
Page 86
S Selecting the AF Point N Shooting Tips When shooting a portrait up close, use One-Shot AF and focus the eyes. If you focus the eyes first, you can then recompose and the face will remain sharp. If it is difficult to focus, select and use the center AF point. The center AF point is the most sensitive among the nine AF points. -
Page 87: Subjects Difficult To Focus
Subjects Difficult to Focus Autofocus can fail to achieve focus (viewfinder’s focus confirmation light <o> blinks) with certain subjects such as the following: Very low-contrast subjects. (Example: Blue sky, solid-color walls, etc.) Subjects in very low light Extremely backlit or reflective subjects (Example: Car with a highly reflective body, etc.) Near and far subjects covered by an AF point (Example: Animal in a cage, etc.)
-
Page 88: Continuous Shooting
i Continuous ShootingN You can shoot up to about 3.7 shots per sec. This is effective for shooting a child running toward you or capturing different facial expressions. Press the < iQ> button. Select <i>. Press the <U> key or turn the <6>…
-
Page 89: Using The Self-Timer
j Using the Self-timer Press the <Yi > button. Select the self-timer. Press the <U> key or turn the <6> dial to select the desired self- timer, then press <0>. Q : 10-sec. self-timer The remote control can also be used.
-
Page 90: D Using The Built-In Flash
D Using the Built-in Flash In indoors, low light, or backlit conditions in daylight, just raise the built- in flash and press the shutter button to take flash pictures. In the <d> mode, the shutter speed (1/60 sec. — 1/200 sec.) will be set automatically to prevent camera shake.
-
Page 91: Red-Eye Reduction
D Using the Built-in Flash Shooting Tips If the subject is far away, increase the ISO speed (p.79). By increasing the ISO speed, you can extend the flash range. In bright light, decrease the ISO speed. If the exposure setting in the viewfinder blinks, decrease the ISO speed.
-
Page 93: Advanced Shooting
Advanced Shooting This chapter builds on Chapter 3 and introduces more ways to shoot creatively. The first half of this chapter explains how to use the <s>, <f>, <a>, and <8> modes on the Mode Dial. All the functions explained in Chapter 3 can also be used in the <s>, <f>, and <a>…
-
Page 94: S: Action Shots
s: Action Shots You can either freeze the action or create motion blur with the <s> (Shutter-priority AE) mode on the Mode Dial. * <s> stands for Time value. Blurred motion Frozen action (Slow shutter speed: 1/30 sec.) (Fast shutter speed: 1/2000 sec.) Set the Mode Dial to <s>.
-
Page 95
s: Action Shots Shooting Tips To freeze the action or moving subject. Use a fast shutter speed such as 1/4000 sec. to 1/500 sec. To blur a running child or animal giving the impression of fast movement. Use a medium shutter speed such as 1/250 sec. to 1/30 sec. Follow the moving subject through the viewfinder and press the shutter button to take the picture. -
Page 96: F: Changing The Depth Of Field
f: Changing the Depth of Field To blur the background or to make everything near and far look sharp, set the Mode Dial to <f> (Aperture-priority AE) to adjust the depth of field (range of acceptable focus). * <f> stands for Aperture value which is the size of the diaphragm hole inside the lens. Blurred background Sharp foreground and background (With a low aperture f/number: f/5.6)
-
Page 97
f: Changing the Depth of Field Shooting Tips When using an aperture with a high f/number, note that camera shake can occur in low light scenes. A higher aperture f/number will make the shutter speed slower. Under low light, the shutter speed can be as long as 30 sec. In such cases, increase the ISO speed and hold the camera steady or use a tripod. -
Page 98: Depth Of Field Preview
f: Changing the Depth of Field D Using the Built-in Flash To obtain a correct flash exposure, the flash output will be set automatically to match the set aperture (autoflash exposure). The shutter speed will be set automatically between 1/200 sec. — 30 sec. to suit the scene’s brightness.
-
Page 99: A: Manual Exposure
a: Manual Exposure You can set both the shutter speed and aperture manually as desired. While referring to the exposure level indicator in the viewfinder, you can set the exposure as desired. This method is called manual exposure. * <a> stands for Manual. Set the Mode Dial to <a>.
-
Page 100
a: Manual Exposure I Using the Built-in Flash To obtain a correct flash exposure, the flash output will be set automatically (autoflash exposure) to match the manually-set aperture. The flash sync speed can be set from 1/200 sec. to 30 sec. and bulb. BULB: Bulb Exposures A bulb exposure keeps the shutter open for as long as you hold down the shutter… -
Page 101: 8: Automatic Depth-Of-Field Ae
8: Automatic Depth-of-Field AE Objects in the foreground and background will be in focus automatically. All the AF points will function to detect the subject, and the aperture required to attain the necessary depth of field will be set automatically. * <8>…
-
Page 102: Changing The Metering Mode
q Changing the Metering ModeN Four methods (metering modes) to measure the subject’s brightness are provided. Normally, evaluative metering is recommended. In Basic Zone modes, evaluative metering is set automatically. Select [Metering mode]. Under the [2] tab, select [Metering mode], then press <0>. Set the metering mode.
-
Page 103: O Setting Exposure Compensation
Setting Exposure CompensationN O Setting Exposure Compensation Set exposure compensation if the exposure (without flash) does not come out as desired. This feature can be used in Creative Zone modes (except <a>). You can set the exposure compensation up to ±5 stops in 1/3-stop increments. Making it brighter: Hold down the <O>…
-
Page 104: Flash Exposure Compensation
Setting Exposure CompensationN y Flash Exposure Compensation Set flash exposure compensation if the flash exposure of the subject does not come out as desired. You can set the flash exposure compensation up to ±2 stops in 1/3-stop increments. Press the <Q> button. The Quick Control screen will appear (p.41).
-
Page 105: Auto Exposure Bracketing (Aeb)
Auto Exposure BracketingN This feature takes exposure compensation a step further by varying the exposure automatically (up to ±2 stops in 1/3-stop increments) with three shots as shown below. You can then choose the best exposure. This is called AEB (Auto Exposure Bracketing). Darker exposure Brighter exposure Standard exposure…
-
Page 106: Canceling Aeb
3 Auto Exposure BracketingN Canceling AEB Follow steps 1 and 2 to turn off the AEB amount display. The AEB setting will also be canceled automatically if the power switch is set to <2>, flash recycling is completed, etc. Shooting Tips Using AEB with continuous shooting: If <i>…
-
Page 107: A Locking The Exposure (Ae Lock)
A Locking the ExposureN You can lock the exposure when the area of focus is to be different from the exposure metering area or when you want to take multiple shots at the same exposure setting. Press the <A> button to lock the exposure, then recompose and take the shot.
-
Page 108: A Locking The Flash Exposure (Fe Lock)
This is when you should use FE lock. After setting the proper flash exposure for the subject, you can recompose (put the subject toward the side) and shoot. This feature can also be used with a Canon EX- series Speedlite.
-
Page 109: Correcting The Brightness And Contrast Automatically (Auto Lighting Optimizer)
Correcting the Brightness and Contrast AutomaticallyN If the image comes out dark or the contrast is low, the brightness and contrast can be corrected automatically. This feature is called Auto Lighting Optimizer. The default setting is [Standard]. With JPEG images, the correction is done when the image is captured.
-
Page 110: Correcting The Image’s Dark Corners
Correcting the Image’s Dark Corners Due to the lens characteristics, the four corners of the picture might look darker. This phenomenon is called lens light fall-off or drop in peripheral illumination and can be corrected automatically. The default setting is [Enable].
-
Page 111
Depending on shooting conditions, noise might appear on the image periphery. When using a non-Canon lens, setting the correction to [Disable] is recommended, even if [Correction data available] is displayed. Lens peripheral light correction is also applied when an Extender is attached. -
Page 112: A Customizing Image Characteristics (Picture Style)
A Customizing Image CharacteristicsN You can customize a Picture Style by adjusting individual parameters like [Sharpness] and [Contrast]. To see the resulting effects, take test shots. To customize [Monochrome], see page 114. Press the <XA> button. Select a Picture Style. Select a Picture Style, then press the <C>…
-
Page 113
A Customizing Image CharacteristicsN Parameter Settings and Effects Sharpness Adjusts the sharpness of the image. To make it less sharp, set it toward the E end. The closer it is to E, the softer the image will look. To make it sharper, set it toward the F end. The closer it is to F, the sharper the image will look. -
Page 114
A Customizing Image CharacteristicsN V Monochrome Adjustment For Monochrome, you can also set [Filter effect] and [Toning effect] in addition to [Sharpness] and [Contrast] explained on the preceding page. kFilter Effect With a filter effect applied to a monochrome image, you can make white clouds or green trees stand out more. -
Page 115: A Registering Preferred Image Characteristics (Picture Style)
A Registering Preferred Image CharacteristicsN You can select a base Picture Style such as [Portrait] or [Landscape], adjust its parameters as desired and register it under [User Def. 1], [User Def. 2], or [User Def. 3]. You can create Picture Styles whose parameter settings such as sharpness and contrast are different.
-
Page 116
A Registering Preferred Image CharacteristicsN Select a parameter. Select a parameter such as [Sharpness], then press <0>. Set the parameter. Press the <U> key to adjust the parameter as desired, then press <0>. For details, see “Customizing Image Characteristics” on pages 112-114. Press the <M>… -
Page 117: B: Matching The Light Source (White Balance)
B: Matching the Light SourceN The function adjusting the color tone so that white objects look white in the picture is called white balance (WB). Normally, the <Q> (Auto) setting will obtain the correct white balance. If natural-looking colors cannot be obtained with <Q>, you can select the white balance to match the light source or set it manually by shooting a white object.
-
Page 118
B: Matching the Light SourceN Select [Custom White Balance]. Under the [2] tab, select [Custom White Balance], then press <0>. The custom white balance selection screen will appear. Import the white balance data. Select the image that was captured in step 1, then press <0>. -
Page 119: Adjusting The Color Tone For The Light Source
2 Adjusting the Color Tone for the Light SourceN You can correct the white balance that has been set. This adjustment will have the same effect as using a commercially-available color temperature conversion filter or color compensating filter. Each color can be corrected to one of nine levels.
-
Page 120: White Balance Auto Bracketing
2 Adjusting the Color Tone for the Light SourceN White Balance Auto Bracketing With just one shot, three images having a different color balance can be recorded simultaneously. Based on the color temperature of the current white balance setting, the image will be bracketed with a blue/amber bias or magenta/green bias.
-
Page 121: Setting The Color Reproduction Range (Color Space)
Setting the Color Reproduction RangeN The range of reproducible colors is called the color space. With this camera, you can set the color space to sRGB or Adobe RGB for captured images. For normal shooting, sRGB is recommended. In Basic Zone modes, sRGB is set automatically. Select [Color space].
-
Page 122: Mirror Lock-Up To Reduce Camera Shake
Mirror Lock-up to Reduce Camera ShakeN The camera’s mechanical shake caused by the reflex mirror action can blur images taken with a super telephoto lens or close-up (macro) lens. In such cases, mirror lockup is effective. Mirror lockup is enabled by setting [8: Mirror lockup] to [1: Enable] in the [7 Custom Functions (C.Fn)] (p.255).
-
Page 123: Shooting With The Lcd Monitor (Live View Shooting)
Shooting with the LCD Monitor (Live View Shooting) You can shoot while viewing the image on the camera’s LCD monitor. This is called “Live View shooting”. Live View shooting is effective for still subjects which do not move. If you handhold the camera and shoot while viewing the LCD monitor, camera shake can cause blurred images.
-
Page 124: A Shooting With The Lcd Monitor
A Shooting with the LCD Monitor Display the Live View image. Press the <A> button. The Live View image will appear on the LCD monitor. The Live View image will closely reflect the brightness level of the actual image you capture. Focus the subject.
-
Page 125: Enabling Live View Shooting
A Shooting with the LCD Monitor Enabling Live View Shooting Set [Live View shoot.] to [Enable]. In Basic Zone modes, [Live View shoot.] will be displayed under [2], and in Creative Zone modes, it will be displayed under [z]. Battery Life with Live View Shooting [Approx.
-
Page 126
A Shooting with the LCD Monitor About the Information Display Each time you press the <C> button, the information display will change. AF mode AF point (Quick mode) • d : Live mode Magnifying frame • c : Face detection Live mode Histogram •… -
Page 127
A Shooting with the LCD Monitor Final Image Simulation The final image simulation reflects the effects of the Picture Style, white balance, etc., in the Live View image so you can see what the captured image will look like. During shooting, the Live View image will automatically reflect the function settings listed below. -
Page 128: Shooting Function Settings
Shooting Function Settings Function settings particular to Live View shooting are explained here. Q Quick Control While the image is displayed on the LCD monitor in Creative Zone modes, pressing the <Q> button will enable you to set the AF mode, drive mode, white balance, Picture Style, Auto Lighting Optimizer, image-recording quality, and built-in flash settings.
-
Page 129: Menu Function Settings
z Menu Function Settings The menu options below are displayed. In Basic Zone modes, the Live View menu options will be displayed under [2], and in Creative Zone modes, they will be displayed under [z]. Live View shooting You can set Live View shooting to [Enable] or [Disable]. AF mode You can select [Live mode] (p.131), [u Live mode] (p.132), or [Quick mode] (p.136).
-
Page 130
z Menu Function Settings Aspect Ratio and Pixel Count Quality 16:9 5184×3456 4608×3456 5184×2912* 3456×3456 (18.0 megapixels) (16.0 megapixels) (15.1 megapixels) (11.9 megapixels) 3456×2304 3072×2304 3456×1944 2304×2304 (8.0 megapixels) (7.0 megapixels) (6.7 megapixels) (5.3 megapixels) 2592×1728 2304×1728 2592×1456* 1728×1728 (4.5 megapixels) (4.0 megapixels) (3.8 megapixels) (3.0 megapixels) -
Page 131: Changing The Autofocus Mode
Changing the Autofocus Mode Selecting the AF Mode The AF modes available are [Live mode], [u Live mode] (face detection, p.132), and [Quick mode] (p.136). If you want to achieve precise focus, set the lens focus mode switch to <MF>, magnify the image, and focus manually (p.138). Select the AF mode.
-
Page 132
Changing the Autofocus Mode Focus the subject. Aim the AF point over the subject and press the shutter button halfway. When focus is achieved, the AF point will turn green and the beeper will sound. If focus is not achieved, the AF point will turn orange. -
Page 133
Changing the Autofocus Mode Focus the subject. Press the shutter button halfway and the camera will focus the face covered by the <p> frame. When focus is achieved, the AF point will turn green and the beeper will sound. If focus is not achieved, the AF point will turn orange. -
Page 134
Changing the Autofocus Mode Live Mode and u (Face Detection) Live Mode Notes AF operation Focusing will take slightly longer. Even when focus has been achieved, pressing the shutter button halfway will focus again. The image brightness may change during and after the AF operation. -
Page 135
Changing the Autofocus Mode Shooting conditions which can make focusing difficult: Low-contrast subjects such as the blue sky and solid-color, flat surfaces. Subjects in low light. Stripes and other patterns where there is contrast only in the horizontal direction. Under a light source whose brightness, color, or pattern keeps changing. -
Page 136
Changing the Autofocus Mode Quick Mode: f The dedicated AF sensor is used to focus in One-Shot AF mode (p.83), using the same AF method as with viewfinder shooting. Although you can focus the target area quickly, the Live View image will be interrupted momentarily during the AF operation. -
Page 137
Changing the Autofocus Mode Focus the subject. Aim the AF point over the subject and press the shutter button halfway. The Live View image will turn off, the reflex mirror will go back down, and AF will be executed. When focus is achieved, the AF point which achieved focus will turn green and the Live View image will reappear. -
Page 138: Mf: Focusing Manually
MF: Focusing Manually You can magnify the image and focus precisely manually. Set the lens focus mode switch to <MF>. Turn the lens focusing ring to focus roughly. Move the magnifying frame. Press the <S> key to move the magnifying frame to the position where you want to focus.
-
Page 139
Live View Shooting Cautions White <s> and Red <E> Internal Temperature Warning Icons If the camera’s internal temperature increases due to prolonged Live View shooting or a high ambient temperature, a white <s> icon will appear. If you continue shooting while this icon is displayed, the image quality of still photos may deteriorate. -
Page 140
Live View Shooting Cautions Shooting Result Cautions When you shoot continuously with the Live View function for a long period, the camera’s internal temperature may increase and it can degrade image quality. Terminate Live View shooting when not shooting images. Before taking a long exposure, stop Live View shooting temporarily and wait several minutes before shooting. -
Page 141: Shooting Movies
Shooting Movies Set the Mode Dial to <k> to shoot movies. The movie recording format will be MOV. Cards which can record movies When shooting movies, use a large-capacity SD card rated SD Speed Class 6 “ ” or higher. If you use a slow-writing card when shooting movies, the movie might not be recorded properly.
-
Page 142: Shooting Movies
k Shooting Movies Connecting the camera to a TV set is recommended to playback the movies shot (p.218, 221). Autoexposure Shooting Set the Mode Dial to <k>. The reflex mirror will make a sound, then the image will appear on the LCD monitor.
-
Page 143
k Shooting Movies During movie shooting, do not point the lens toward the sun. The sun’s heat can damage the camera’s internal components. Cautions for movie shooting are on pages 163 and 164. If necessary, also read the Live View shooting cautions on pages 139 and 140. -
Page 144: Manual Exposure Shooting
k Shooting Movies Manual Exposure Shooting You can manually set the shutter speed, aperture, and ISO speed for movie shooting. Using manual exposure to shoot movies is for advanced users. Set the Mode Dial to <k>. The reflex mirror will make a sound, then the image will appear on the LCD monitor.
-
Page 145
k Shooting Movies Focus and shoot the movie. The procedure is the same as steps 2 and 3 for “Autoexposure Shooting” (p.142). AE lock and exposure compensation cannot be set. Changing the shutter speed or aperture during movie shooting is not recommended since the changes in the exposure will be recorded. -
Page 146
k Shooting Movies About the Information Display Each time you press the <C> button, the information display will change. Picture Style Movie shooting remaining time/ AF mode Elapsed time • d : Live mode AF point (Quick mode) • c : Face detection Live Magnifying frame mode •… -
Page 147
k Shooting Movies Notes for Both Autoexposure and Manual Exposure Shooting A movie file is recorded each time you shoot a movie. The image’s field of view is approx. 99%. The sound will be recorded by the camera’s built-in monaural microphone (p.142). -
Page 148: Shooting Still Photos
k Shooting Movies Shooting Still Photos While shooting a movie, you can also take a still photo by pressing the shutter button completely. Shooting Stills in the <k> Mode If you take a still photo during movie shooting, the movie will record a still moment lasting approx.
-
Page 149: Shooting Function Settings
Shooting Function Settings Function settings particular to movie shooting are explained here. Q Quick Control While the image is displayed on the LCD monitor, you can press the <Q> button to set the AF mode, white balance, Picture Style, Auto Lighting Optimizer, image-recording quality (for still photos), movie- recording size, movie digital zoom, and video snapshots.
-
Page 150: Setting The Movie-Recording Size
Setting the Movie-recording Size Under the [o] tab, [Movie rec. size] enables you to select the movie’s image size [****x****] and frame rate [9] (frames recorded per second). The 9 (frame rate) switches automatically depending on the [6 Video system] setting.
-
Page 151
3 Setting the Movie-recording Size Total Movie Recording Time and File Size Per Minute Due to limitations of the file system, movie shooting will stop automatically if the file size of a single movie clip reaches 4GB. To resume movie shooting, press the <A> button. (A new movie file starts being recorded.) Total Recording Time (approx.) Movie-recording… -
Page 152: Using Movie Digital Zoom
Using Movie Digital Zoom When the image size is set to [1920×1080] (Full HD), you can shoot with an approx. 3x to 10x digital zoom. Select [1920×1080 9]. Under the [o] tab, set [Movie rec. size] to [1920×1080 9] by turning the <6>…
-
Page 153: Taking Video Snapshots
Taking Video Snapshots You can easily create a short movie with the video snapshot function. A video snapshot is a short movie clip lasting 2 sec., 4 sec., or 8 sec. A collection of video snapshots is called a video snapshot album and can be saved to the card as a single movie file.
-
Page 154
3 Taking Video Snapshots Creating a Video Snapshot Album Shoot the first video snapshot. Press the <A> button to shoot. The blue bars indicating the shooting duration will gradually decrease. After the set shooting duration elapses, the shooting stops automatically. After the LCD monitor turns off and Shooting duration the access lamp stops blinking, the… -
Page 155
3 Taking Video Snapshots Options in Steps 4 and 5 Option Description The movie clip will be saved as the video Save as album (Step 4) snapshot album’s first video snapshot. The video snapshot just recorded will be added Add to album (Step 5) to the album recorded immediately before. -
Page 156
3 Taking Video Snapshots You can add to an album only video snapshots having the same duration (approx. 2 sec., 4 sec., or 8 sec. each). If you stop shooting a video snapshot before the set shooting duration elapses, the video snapshot will be added to the preceding album. -
Page 157: Menu Function Settings
Menu Function Settings The menu options displayed under the [n], [o], and [Z] tabs are explained below. [n] tab Movie exposure Normally, set this to [Auto]. Setting it to [Manual] enables you to manually set the ISO speed, shutter speed, and aperture for movie shooting (p.144). AF mode The AF modes will be the same as described on pages 131-137.
-
Page 158
3 Menu Function Settings kShutter/AE lock button You can change the function assigned to the shutter button’s halfway position and to the AE lock button. • AF/AE lock: Normal function. Press the shutter button halfway to execute AF. Press the <w> button for AE lock. •… -
Page 159
3 Menu Function Settings Remote control You can use the Remote Controller RC-6 (sold separately, p.261) to start and stop the movie shooting. Set the release mode switch to <2>, then press the transmit button. If the switch is set to <o> (immediate shooting), still photo shooting will take effect. -
Page 160: Sound Recording
3 Menu Function Settings [o] tab Sound recording Normally, the built-in microphone will record monaural sound. Stereo sound recording is possible by connecting an external microphone equipped with a stereo mini plug (3.5mm dia.) to the camera’s external microphone IN terminal (p.18).
-
Page 161: Grid Display
3 Menu Function Settings [Wind filter] When [Enable] is set, outdoor wind noise entering the microphone will be reduced. Note that some low-tone noise might also be reduced. When shooting in places where there is no wind, set this to [Disable] for a more natural sound recording.
-
Page 162
3 Menu Function Settings [Z] tab Exposure compensation Although exposure compensation can be set up to ±5 stops, exposure compensation for movies is restricted only up to ±3 stops. For still photos, exposure compensation may extend up to ±5 stops. Auto Lighting Optimizer The Auto Lighting Optimizer can be set as explained on page 109. -
Page 163
White <s> and Red <E> Internal Temperature Warning Icons If the camera’s internal temperature increases due to prolonged movie shooting or a high ambient temperature, a white <s> icon will appear. Even if you shoot a movie while this icon is displayed, the movie’s image quality will not be affected. -
Page 164
Movie Shooting Cautions Recording and Image Quality If you use a card having a slow writing speed, a five-level indicator might appear on the right of the screen during movie shooting. It indicates how much data has not yet been written to the card (remaining capacity of the internal buffer memory). -
Page 165: Handy Features
Handy Features Silencing the Beeper (p.166) Card Reminder (p.166) Setting the Image Review Time (p.166) Setting the Auto Power-off Time (p.167) Adjusting the LCD Monitor Brightness (p.167) Creating and Selecting a Folder (p.168) File Numbering Methods (p.170) Setting Copyright Information (p.172) Auto Rotation of Vertical Images (p.174) Checking Camera Settings (p.175) Reverting the Camera to the Default Settings (p.176)
-
Page 166: Handy Features
Handy Features 3 Silencing the Beeper You can prevent the beeper from sounding when focus is achieved or during self-timer operation. Under the [1] tab, select [Beep], then press <0>. Select [Disable], then press <0>. 3 Card Reminder This prevents shooting if there is no card in the camera. Under the [1] tab, select [Release shutter without card], then press <0>.
-
Page 167: Setting The Auto Power-Off Time
Handy Features 3 Setting the Auto Power-off Time To save battery power, the camera turns off automatically after the set time of idle operation elapses. You can set this auto power-off time. When the camera has turned off due to auto power off, you can wake it up by pressing the shutter button halfway or pressing any of the following buttons: <M>, <B>, <x>, <A>…
-
Page 168: Creating And Selecting A Folder
Handy Features 3 Creating and Selecting a Folder You can freely create and select the folder where the captured images are to be saved. This is optional since a folder will be created automatically for saving captured images. Create a Folder Select [Select folder].
-
Page 169: Selecting A Folder
Handy Features Selecting a Folder With the folder selection screen Lowest file number displayed, select a folder and press Number of images in folder <0>. The folder where the captured images will be saved is selected. Subsequent captured images will be recorded into the selected folder.
-
Page 170: File Numbering Methods
Handy Features 3 File Numbering Methods The image files will be numbered from 0001 to 9999 in the order the images are taken, then saved in a folder. You can change how the file number is assigned. The file number will appear on your computer in this format: IMG_0001.JPG.
-
Page 171
Handy Features [Auto reset]: The file numbering is reset to 0001 whenever you replace the card or create a folder. Whenever the card is replaced or a new folder created, the file numbering starts from 0001. This is convenient if you want to organize images according to cards or folders. -
Page 172: Setting Copyright Information
Handy Features 3 Setting Copyright InformationN When you set the copyright information, it will be appended to the image as Exif information. Select [Copyright information]. Under the [7] tab, select [Copyright information], then press <0>. Select the option to be set. Select [Enter author’s name] or [Enter copyright details], then press <0>.
-
Page 173
Handy Features Text Entry Procedure Changing the entry area: Press the <Q> button to toggle between the top and bottom entry areas. Moving the cursor: Press the <U> key to move the cursor. Entering text: In the bottom area, press the <S> key or turn the <6> dial to select a character, then press <0>… -
Page 174: Auto Rotation Of Vertical Images
Handy Features 3 Auto Rotation of Vertical Images Vertical images are rotated automatically so they are displayed vertically on the camera’s LCD monitor and on the personal computer instead of horizontally. The setting of this feature can be changed. Under the [5] tab, select [Auto rotate], then press <0>.
-
Page 175: C Checking Camera Settings
Handy Features C Checking Camera Settings While the shooting settings (p.47) are displayed, press the <C> button to display the camera’s major function settings. Settings display Card remaining capacity Color space (p.121) WB correction (p.119)/ WB bracketing (p.120) Live View shooting (p.123) Red-eye reduction (p.91) Auto rotate display (p.174) Date/Time (p.34)
-
Page 176: Reverting The Camera To The Default Settings
Handy Features 3 Reverting the Camera to the Default SettingsN The camera’s shooting settings and menu settings can be reverted to the default. This option is available in Creative Zone modes. Select [Clear settings]. Under the [7] tab, select [Clear settings], then press <0>.
-
Page 177: Shooting Settings
Handy Features Shooting Settings Image-recording Settings AF mode One-Shot AF Quality AF point selection Automatic selection Picture Style Auto Drive mode u (Single shooting) Auto Lighting Standard Optimizer q (Evaluative Metering mode metering) Peripheral Enable/ ISO speed AUTO (Auto) illumination Correction data correction retained…
-
Page 178
Handy Features Live View Shooting Settings Movie Shooting Settings Live View shooting Enable Movie exposure Auto AF mode Live mode AF mode Live mode Grid display AF w/ shutter Disable button during k Aspect ratio Metering timer 16 sec. kShutter/AE lock AF/AE lock button Remote control… -
Page 179: Turning The Lcd Monitor Off/On
Handy Features 3 Turning the LCD Monitor Off/On The shooting settings display (p.47) can be turned on or off by pressing the shutter button halfway. Under the [6] tab, select [LCD off/on btn], then press <0>. The available settings are described below. Select one, then press <0>.
-
Page 180: Setting The Flash
Setting the FlashN The built-in flash and external Speedlite settings can be set with the camera’s menu. You can use the camera’s menu to set the external Speedlite function settings only if the attached EX-series Speedlite is compatible with this function. The setting procedure is the same as setting a camera menu function.
-
Page 181
3 Setting the FlashN [Built-in flash func. setting] and [External flash func. setting] With [Built-in flash func. setting] and [External flash func. setting], you can set the functions listed in the table below. The functions displayed under [External flash func. setting] will vary depending on the Speedlite model. -
Page 182
3 Setting the FlashN Shutter sync. Normally, set this to [1st curtain] so that the flash fires immediately after the exposure starts. If [2nd curtain] is set, the flash will fire right before the exposure ends. When this is combined with a slow sync speed, you can create a trail of light such as from car headlights at night. -
Page 183
3 Setting the FlashN Clear flash settings With the [Built-in flash func. setting] or [External flash func. setting] screen displayed, press the <C> button to display the screen to clear the flash settings. When you select [OK], the settings for the flash will be cleared. Setting the External Speedlite Custom Functions The Custom Functions displayed under [External flash C.Fn setting] will vary depending on the Speedlite model. -
Page 184: Automatic Sensor Cleaning
f Automatic Sensor Cleaning Whenever you set the power switch to <1> or <2>, the Self Cleaning Sensor Unit operates to automatically shake off the dust on the front of the sensor. Normally, you need not pay attention to this operation.
-
Page 185: Appending Dust Delete Data
Appending Dust Delete DataN Normally, the Self Cleaning Sensor Unit will eliminate most of the dust that might be visible on captured images. However, in case visible dust still remains, you can append the Dust Delete Data to the image for erasing the dust spots later.
-
Page 186: Photograph A Solid-White Object
3 Appending Dust Delete DataN Photograph a solid-white object. At a distance of 20 cm — 30 cm (0.7 ft. — 1.0 ft.), fill the viewfinder with a patternless, solid-white object and take a picture. The picture will be taken in aperture- priority AE mode at an aperture of f/22.
-
Page 187: Manual Sensor Cleaning
The surface of the image sensor is extremely delicate. If the sensor needs to be cleaned directly, having it done by a Canon Service Center is recommended. Before cleaning the sensor, detach the lens from the camera.
-
Page 188
If the battery level becomes low while you clean the sensor, the beeper will sound as a warning. Stop cleaning the sensor. If a smudge that cannot be removed with a blower remains, having the sensor cleaned by a Canon Service Center is recommended. -
Page 189: Wireless Flash Photography
You can use the built-in flash for wireless flash shooting. The camera’s built-in flash can work as a master unit with Canon Speedlites having a wireless slave feature and wirelessly trigger the Speedlite(s) to fire. Canceling the slave unit’s auto power off To cancel the slave unit’s auto power off, press the…
-
Page 190: Using Wireless Flash
Regarding your Speedlite (slave unit), refer to its instruction manual and set it as follows. The settings other than the below for the slave unit’s control are all set with the camera. Different types of Canon Speedlite slave units can be used and controlled together.
-
Page 191: Easy Wireless Flash Shooting
Easy Wireless Flash Shooting An easy, basic, and fully-automatic wireless flash shooting is explained below. Fully Automatic Shooting with One External Speedlite Steps 1 to 4 and 6 apply to all wireless flash shooting. Therefore, these steps are omitted in the other wireless flash setups explained on the pages hereafter.
-
Page 192
Easy Wireless Flash Shooting Select [Built-in flash func. setting]. Select [Built-in flash func. setting], then press <0>. Select [EasyWireless]. For [Built-in flash], select [EasyWireless], then press <0>. Set [Channel]. Set the channel (1-4) to the same one as the slave unit. Take the picture. -
Page 193: Basic Settings
Easy Wireless Flash Shooting Fully-automatic Shooting with Multiple External Speedlites You can have multiple slave units fire as if they were a single Speedlite. Convenient when you need a large flash output. Basic settings: Flash mode : E-TTL II E-TTL II meter. : Evaluative Built-in flash : EasyWireless Channel…
-
Page 194: Custom Wireless Flash Shooting
Custom Wireless Flash Shooting Fully-automatic Shooting with One External Speedlite and Built-in Flash This describes fully-automatic wireless flash shooting with one external Speedlite and the built-in flash. You can change the flash ratio between the external Speedlite and built-in flash to adjust how the shadows look on the subject.
-
Page 195
Custom Wireless Flash Shooting Fully-automatic Shooting with Multiple External Speedlites Multiple Speedlite slave units can be treated as one flash unit or separated into slave groups whose flash ratio can be set. The basic settings are shown below. By changing the [Firing group] setting, you can shoot with various wireless flash setups with multiple Speedlites. -
Page 196
Custom Wireless Flash Shooting [1 (A:B)] Multiple slave units in multiple groups Divide the slave units into groups A and B, and change the flash ratio to obtain the desired lighting effect. Refer to your Speedlite’s instruction manual to set one slave unit’s slave ID to A (Group A) and the other slave unit’s ID to B (Group B) and position them as shown in the illustration. -
Page 197
Custom Wireless Flash Shooting Fully-automatic Shooting with the Built-in Flash and Multiple External Speedlites The built-in flash can also be added to wireless flash shooting explained on pages 195-196. The basic settings are shown below. By changing the [Firing group] setting, you can shoot with various wireless flash setups of multiple Speedlites complemented with the built-in flash. -
Page 198: Other Settings
Other Settings Flash Exposure Compensation When [Flash mode] is set to [E-TTL II], flash exposure compensation can be set. The flash exposure compensation settings (see below) which can be set will differ depending on the [Wireless func.] and [Firing group] settings. [Flash exp.
-
Page 199
Other Settings Setting the Flash Output Manually for Wireless Flash When [Flash mode] is set to [Manual flash], the flash output can be set manually. The flash output settings ([1 flash output], [Group A output], etc.) that can be set will differ depending on the [Wireless func.] setting (see below). -
Page 201: Image Playback
Image Playback This chapter explains features related to viewing photos and movies, going into more detail than in Chapter 2 “Basic Shooting and Image Playback.” Here you will find explanations about how to playback and erase photos and movies with the camera and viewing them on a TV set.
-
Page 202: H I Searching For Images Quickly
x Searching for Images Quickly H Display Multiple Images on One Screen (Index display) Search for images quickly with the index display showing four or nine images on one screen. Playback the image. When you press the <x> button, the last image captured will be displayed.
-
Page 203
x Searching for Images Quickly Jump through Images (Jump display) With the single image display, you can turn the <6> dial to jump through the images forward or back according to the jump method that was set. Select [Image jump w/6]. Under the [4] tab, select [Image jump w/6], then press <0>. -
Page 204: U/Y Magnified View
u/y Magnified View You can magnify a shot image by 1.5x to 10x on the LCD monitor. Magnify the image. During image playback, press the <u> button. The image will be magnified. If you hold down the <u> button, the image will be magnified until it reaches the maximum magnification.
-
Page 205: Rotating The Image
b Rotating the Image You can rotate the displayed image to the desired orientation. Select [Rotate]. Under the [3] tab, select [Rotate], then press <0>. Select an image. Press the <U> key to select the image to be rotated. You can also select an image on the index display (p.202).
-
Page 206: Setting Ratings
Setting Ratings You can rate images and movies with one of five rating marks: l/m/ n/o/p. Select [Rating]. Under the [4] tab, select [Rating], then press <0>. Select an image or movie. Press the <U> key to select an image or movie to be rated. You can display three images by pressing the <I>…
-
Page 207
3 Setting Ratings The total number of a rating can be displayed up to 999. If there are 1,000 or more images for a rating, [###] will be displayed. Taking advantage of ratings With [4 Image jump w/6], you can display only the rated images and movies. -
Page 208: Q Quick Control During Playback
Q Quick Control During Playback During playback, you can press the <Q> button to set any of the following: [ Protect images], [b Rotate], [9 Rating], [U Creative filters], [S Resize (JPEG images only)], and [e Image jump w/6]. For movies, only the functions in bold above can be set. Press the <Q>…
-
Page 209
Q Quick Control During Playback Pressing the <Q> button during the index display will switch to the single-image display and the Quick Control icons will appear. Pressing the <Q> button again will return to the index display. For images taken with another camera, selectable functions may be limited. -
Page 210: Enjoying Movies
k Enjoying Movies Basically, you can playback movies in the following three ways: Playback on a TV set (p.218, 221) Use the provided AV cable or an HDMI Cable HTC-100 (sold separately) to connect the camera to a TV set. Then you can playback the captured movies and still photos on the TV.
-
Page 211
k Enjoying Movies Playback and Editing with a Personal Computer (See the PDF file instruction manual for ZoomBrowser EX/ImageBrowser, p.305) The movie files recorded in the card can be transferred to a personal computer and played or edited with ZoomBrowser EX/ImageBrowser (provided software, p.302). -
Page 212: Movie Playback P
k Playing Movies Playback the image. Press the <x> button to display images. Select a movie. Press the <U> key to select a movie. On the single-image display, the <1s> icon displayed on the upper left indicates a movie. If the movie is a video snapshot, <…
-
Page 213
k Playing Movies Function Playback Description Exit Returns to the single-image display. Play Pressing <0> toggles between play and stop. Adjust the slow motion speed by pressing the <U> key. Slow motion The slow-motion speed is indicated on the upper right. First frame Displays the movie’s first frame. -
Page 214: Editing A Movie’s First And Last Scenes
X Editing a Movie’s First and Last Scenes You can edit out the first and last scenes of a movie in 1-sec. increments. On the movie playback screen, select [X]. The editing screen will be displayed. Specify the part to be edited out. Select either [U] (Cut beginning) or [V] (Cut end), then press <0>.
-
Page 215: Slide Show (Auto Playback)
Slide Show (Auto Playback) You can playback the images in the card as an automatic slide show. Select [Slide show]. Under the [4] tab, select [Slide show], then press <0>. Select the images to be played. Number of images to be played Press the <V>…
-
Page 216
3 Slide Show (Auto Playback) Set [Set up] as desired. Press the <V> key to select [Set up], then press <0>. Set the [Display time] (still photos), [Repeat], [Transition effect], and [Background music]. The background music selection procedure is explained on the next page. -
Page 217: Start The Slide Show
3 Slide Show (Auto Playback) Start the slide show. Press the <V> key to select [Start], then press <0>. After [Loading image…] is displayed, the slide show will start. Quit the slide show. To quit the slide show and return to the setting screen, press the <M>…
-
Page 218: Viewing The Images On Tv
Viewing the Images on TV You can view the still photos and movies on a TV set. Adjust the movie’s sound volume with the TV set. The sound volume cannot be adjusted with the camera. Before connecting or disconnecting the cable between the camera and television, turn off the camera and TV set.
-
Page 219
Viewing the Images on TV Press the <x> button. The image will appear on the TV screen (Nothing will be displayed on the camera’s LCD monitor). The images will automatically be displayed at the TV’s optimum resolution. By pressing the <C> button, you can change the display format. -
Page 220
Viewing the Images on TV Press the camera’s <x> button. An image will appear on the TV screen and you can use the TV’s remote control to playback images. Select an image or movie. Point the remote control toward the TV set and press the button to select an image. -
Page 221: The Camera
Viewing the Images on TV Viewing on Non-HD (High-Definition) TV Sets Connect the provided AV cable to the camera. With the plug’s <Canon> logo facing the back of the camera, insert it into the < > terminal. Connect the AV cable to the TV (Red) set.
-
Page 222: K Protecting Images
K Protecting Images Protecting an image prevents it from being erased accidentally. 3 Protecting a Single Image Select [Protect images]. Under the [3] tab, select [Protect images], then press <0>. The protect setting screen will appear. Select [Select images]. Select [Select images], then press <0>.
-
Page 223: Protecting All Images In A Folder Or Card
K Protecting Images 3 Protecting All Images in a Folder or Card You can protect all the images in a folder or card at one time. When you select [All images in folder] or [All images on card] in [3 Protect images], all the images in the folder or card will be protected.
-
Page 224: L Erasing Images
L Erasing Images You can either select and erase images one by one or erase them in one batch. Protected images (p.222) will not be erased. Once an image is erased, it cannot be recovered. Make sure you no longer need the image before erasing it. To prevent important images from being erased accidentally, protect them.
-
Page 225
L Erasing Images Select [Select and erase images]. Select [Select and erase images], then press <0>. The images will be displayed. To display the three-image display, press the <I> button. To return to the single-image display, press the <u> button. Select the images to be erased. -
Page 226: C Shooting Information Display
C Shooting Information Display Sample Image Taken in a Creative Zone Mode Protect Exposure compensation amount Rating Flash exposure Folder number — File number compensation amount Aperture Histogram Shutter speed (Brightness/RGB) Picture Style/Settings Metering mode Shooting mode ISO speed Highlight tone priority White balance Color space Image-recording…
-
Page 227
C Shooting Information Display Sample Image Taken in a Basic Zone Mode Ambience and Shooting mode ambience effects Lighting or scene * For images taken in Basic Zone modes, the information displayed differ depending on the shooting mode. * Photos taken in the <C> mode will show [Background blur]. Sample Movie Taken in Movie Mode Shooting time Movie/Playback… -
Page 228: About The Histogram
C Shooting Information Display About the Highlight Alert When the shooting information is displayed, any overexposed areas of the image will blink. To obtain more image detail in the overexposed areas, set the exposure compensation to a negative amount and shoot again. About the Histogram The brightness histogram shows the exposure level distribution and overall brightness.
-
Page 229: Post-Processing Images
Post-Processing Images After shooting, you can apply Creative filters or resize the images (downsize the pixel count). It may not be possible to process images shot with a different camera. Post-processing images as described in this chapter cannot be done while the camera is connected to a personal computer via the <C>…
-
Page 230: U Creative Filters
U Creative Filters You can apply the following Creative filters to an image and save it as a new image: Grainy B/W, Soft focus, Fish-eye effect, Toy camera effect, and Miniature effect. Select [Creative filters]. Under the [3] tab, select [Creative filters], then press <0>.
-
Page 231
U Creative Filters Save the image. Select [OK] to save the image. Note the destination folder and image file number, then select [OK]. To apply a filter to another image, repeat steps 2 to 5. To exit and return to the menu, press the <M>… -
Page 232
U Creative Filters Creative Filter Features Grainy B/W Makes the image grainy and black and white. By adjusting the contrast, you can change the black-and-white effect. Soft focus Gives the image a soft look. By adjusting the blur, you can change the degree of softness. -
Page 233: S Resize
S Resize You can resize an image to make the pixel count lower and save it as a new image. Resizing an image is possible only with JPEG 3/4/a/b images. JPEG c and RAW images cannot be resized. Select [Resize]. Under the [3] tab, select [Resize], then press <0>.
-
Page 234
S Resize Resize Options According to Original Image Size Available Resize Settings Original Image Size About Image Sizes Images such as the [8.0M 3456×2304] image size displayed in step 3 (p.233) have a 3:2 aspect ratio. The image size according to aspect ratios is shown in the table below. -
Page 235: Printing Images
Printing Images Printing (p.236) You can connect the camera directly to a printer and print out the images in the card. The camera is compatible with “wPictBridge” which is the standard for direct printing. Digital Print Order Format (DPOF) (p.245) DPOF (Digital Print Order Format) enables you to print images recorded in the card according to your printing instructions such as the image selection, quantity to print,…
-
Page 236: Preparing To Print
Preparing to Print The direct printing procedure is done entirely with the camera while you look at the LCD monitor. Connecting the Camera to a Printer Set the camera’s power switch to <2>. Set up the printer. For details, see the printer’s instruction manual.
-
Page 237
Preparing to Print Playback the image. PictBridge Press the < > button. The image will appear, and the <w> icon will appear on the upper left to indicate that the camera is connected to a printer. Movies cannot be printed. The camera cannot be used with printers compatible only with CP Direct or Bubble Jet Direct. -
Page 238: Wprinting
wPrinting The screen display and setting options will differ depending on the printer. Some settings might not be available. For details, see the printer’s instruction manual. Printer-connected icon Select the image to be printed. Check that the <w> icon is displayed on the upper left of the LCD monitor.
-
Page 239
wPrinting Q Setting the Paper Size Select the size of the paper loaded in the printer, then press <0>. The paper type screen will appear. Y Setting the Paper Type Select the type of the paper loaded in the printer, then press <0>. The page layout screen will appear. -
Page 240: Set The Printing Effects
wPrinting Set the printing effects. Set as necessary. If you need not set any printing effects, go to step 5. What is displayed on the screen differs depending on the printer. Select the option on the upper right (circled in the screenshot), then press <0>.
-
Page 241: Start Printing
wPrinting Set the date and file number imprinting. Set as necessary. Select < >, then press <0>. Set as desired, then press <0>. Set the number of copies. Set as necessary. Select < >, then press <0>. Set the number of copies, then press <0>.
-
Page 242
wPrinting e Adjustment of Printing Effects In step 4 on page 240, select the printing effect. When the <e> icon is displayed brightly next to <x>, you can press the <C> button to adjust the printing effect. What can be adjusted or what is displayed will depend on the selection made in step 4. -
Page 243: Trimming The Image
wPrinting Trimming the Image You can crop the image and print only Tilt correction the trimmed portion as if the image was recomposed. Do the trimming right before printing. If you set the trimming and then set the print settings, you may have to set the trimming again.
-
Page 244: Error Messages
wPrinting Depending on the printer, the trimmed image area might not be printed as you specified. The smaller you make the trimming frame, the grainier the picture will look in the print. While trimming the image, look at the camera’s LCD monitor. If you look at the image on a TV screen, the trimming frame might not be displayed accurately.
-
Page 245: W Digital Print Order Format (Dpof)
W Digital Print Order Format (DPOF) You can set the print type, date imprinting, and file No. imprinting. The print settings will be applied to all print-ordered images. (They cannot be set individually for each image.) Setting the Printing Options Select [Print order].
-
Page 246
W Digital Print Order Format (DPOF) Standard Prints one image on one sheet. Index Multiple thumbnail images are printed on one sheet. Print type Both Prints both the standard and index prints. Date [On] imprints the recorded date on the print. File number [On] imprints the file No. -
Page 247: Print Ordering
W Digital Print Order Format (DPOF) Print Ordering Sel.Image Select and order images one by one. To display the three-image display, press the <I> button. To return to the single-image display, press the <u> button. After completing the print order, press the <M>…
-
Page 248: W Direct Printing With Dpof
W Direct Printing with DPOF With a PictBridge printer, you can easily print images with DPOF. Prepare to print. See page 236. Follow the “Connecting the Camera to a Printer” procedure up to step 5. Under the [3] tab, select [Print order]. Select [Print].
-
Page 249: Customizing The Camera
Customizing the Camera You can customize various camera features to suit your picture-taking preferences with Custom Functions. Custom Functions can be set and used only in Creative Zone modes.
-
Page 250: Setting Custom Functions
Setting Custom FunctionsN Select [Custom Functions (C.Fn)]. Under the [7] tab, select [Custom Functions (C.Fn)], then press <0>. Select the Custom Function No. Custom Function No. Press the <U> key to select the Custom Function No., then press <0>. Change the setting as desired. Press the <V>…
-
Page 251: Custom Functions
3 Setting Custom FunctionsN Custom Functions C.Fn I: Exposure A LV shooting Exposure level increments ISO expansion p.252 Flash sync. speed in Av mode C.Fn II: Image Long exposure noise reduction p.253 High ISO speed noise reduction p.254 Highlight tone priority C.Fn III: Autofocus/Drive k (With f*) AF-assist beam firing…
-
Page 252: Custom Function Settings
Custom Function SettingsN Custom Functions are organized into four groups based on the function type: C.Fn I: Exposure, C.Fn II: Image, C.Fn III: Autofocus/Drive, C.Fn IV: Operation/Others. C.Fn I: Exposure C.Fn-1 Exposure level increments 0: 1/3-stop 1: 1/2-stop Sets 1/2-stop increments for the shutter speed, aperture, exposure compensation, AEB, flash exposure compensation, etc.
-
Page 253
3 Custom Function SettingsN 2: 1/200 sec. (fixed) The flash-sync speed is fixed to 1/200 sec. This more effectively prevents subject blur and camera shake than with setting 1. However, the background may come out darker than with setting 1. When 1 or 2 is set, high-speed sync cannot be used with an external Speedlite. -
Page 254
3 Custom Function SettingsN C.Fn-5 High ISO speed noise reduction Reduces the noise generated in the image. Although noise reduction is applied at all ISO speeds, it is particularly effective at high ISO speeds. At low ISO speeds, the noise in the shadow areas is further reduced. Change the setting to suit the noise level. -
Page 255
3 Custom Function SettingsN C.Fn III: Autofocus/Drive C.Fn-7 AF-assist beam firing The AF-assist beam can be emitted by the camera’s built-in flash or by an external, EOS-dedicated Speedlite. 0: Enable If necessary, the AF-assist beam will be emitted by the built-in flash or external Speedlite. -
Page 256
3 Custom Function SettingsN C.Fn IV: Operation/Others C.Fn-9 Shutter/AE lock button 0: AF/AE lock 1: AE lock/AF Convenient when you want to focus and meter separately. Press the <A> button to autofocus, and press the shutter button halfway to apply AE lock. 2: AF/AF lock, no AE lock In the AI Servo AF mode, you can press the <A>… -
Page 257
3 Custom Function SettingsN C.Fn-11 LCD display when power ON 0: Display on When the power switch is turned on, the shooting settings will be displayed (p.47). 1: Previous display status If you pressed the <B> button and turned off the camera while the LCD monitor was off, the shooting settings will not be displayed when you turn on the camera again. -
Page 258: Registering My Menu
Registering My MenuN Under the My Menu tab, you can register up to six menu options and Custom Functions whose settings you change frequently. Select [My Menu settings]. Under the [9] tab, select [My Menu settings], then press <0>. Select [Register to My Menu]. Select [Register to My Menu], then press <0>.
-
Page 259: Reference
Reference This chapter provides reference information for camera features, system accessories, etc.
-
Page 260: Using A Household Power Outlet
Using a Household Power Outlet With AC Adapter Kit ACK-E8 (sold separately), you can connect the camera to a household power outlet and not worry about the remaining battery level. Connect the power cord. Connect the power cord as shown in the illustration.
-
Page 261: Remote Control Shooting
Remote Control Shooting Remote Controller RC-6 (Sold separately) This remote controller enables you to take pictures wirelessly up to about 5 meters/16.4 feet from the camera. You can either shoot immediately or use a 2-sec. delay. Remote control sensor Set the self-timer to <Q> (p.89). Point the remote controller toward the camera’s remote control sensor and press the transmit button.
-
Page 262: Using The Eyepiece Cover
Remote Control Shooting F Remote Switch RS-60E3 (Sold separately) Remote Switch RS-60E3 (sold separately) comes with an approx. 60 cm/2.0 ft cord. When connected to the camera’s remote control terminal, Remote Switch RS-60E3 can be used to press the shutter button halfway and completely.
-
Page 263: External Speedlites
External Speedlites EOS-dedicated, EX-series Speedlites Basically operates like a built-in flash for easy operation. When an EX-series Speedlite (sold separately) is attached to the camera, almost all the autoflash control is done by the camera. In other words, it is like a high-output flash attached externally in place of the built-in flash.
-
Page 264: Using Non-Canon Flash Units
Using Non-Canon Flash Units Sync Speed The camera can synchronize with compact, non-Canon flash units at 1/200 sec. or slower shutter speeds. Use a sync speed slower than 1/200 sec. Be sure to test the flash unit beforehand to make sure it synchronizes properly with the camera.
-
Page 265: Using Eye-Fi Cards
Using Eye-Fi Cards With a commercially-available Eye-Fi card already set up, you can automatically transfer captured images to a personal computer or upload them to an online service via a wireless LAN. The image transfer is a function of the Eye-Fi card. For instructions on how to set up and use the Eye-Fi card or to troubleshoot any image transfer problems, refer to the Eye-Fi card’s instruction manual or inquire the card’s manufacturer.
-
Page 266
Using Eye-Fi Cards Check the [Access point SSID:]. Check that an access point is displayed for [Access point SSID:]. You can also check the Eye-Fi card’s MAC address and firmware version. Press the <M> button three times to exit the menu. Take the picture. -
Page 267
Using Eye-Fi Cards Cautions for Using Eye-Fi Cards If “J” is displayed, an error occurred while retrieving the card information. Turn the camera’s power switch off and on again. Even if [Eye-Fi trans.] is set to [Disable], it may still transmit a signal. In hospitals, airports, and other places where wireless transmissions are prohibited, remove the Eye-Fi card from the camera. -
Page 268: Function Availability Table According To Shooting Modes
Function Availability Table According to Shooting Modes o: Set automatically k: User selectable : Not selectable Basic Zone Creative Zone Mode Dial 2 3 4 5 6 k z* d s f a All recording quality settings selectable Auto / ISO Auto Manual speed Settable maximum…
-
Page 269
Function Availability Table According to Shooting Modes Basic Zone Creative Zone Mode Dial d s f a 8 k z* 2 3 4 5 6 Metering Evaluative mode Metering mode selection Program shift Exposure compensation Exposure AEB AE lock Depth-of-field preview Single shooting Continuous shooting… -
Page 270: Menu Settings
Menu Settings For Viewfinder Shooting and Live View Shooting 1 Shooting 1 (Red) Page 73 / 83 / 74 / 84 / 7a / 8a / b / c / Quality 1+73 / 1 Beep Enable / Disable Release shutter Enable / Disable without card Image review…
-
Page 271
3 Menu Settings y Shooting 3 (Red) Page Dust Delete Data Obtains data to be used to erase dust spots Max.: 400 / Max.: 800 / Max.: 1600 / ISO Auto Max.: 3200 / Max.: 6400 z Shooting 4 (Red) Live View shooting Enable / Disable AF mode… -
Page 272
3 Menu Settings 5 Set-up 1 (Yellow) Page 30 sec. / 1 min. / 2 min. / 4 min. / 8 min. / Auto power off 15 min. / Off Auto rotate OnPD / OnD / Off Format Initialize and erase data on the card File numbering Continuous / Auto reset / Manual reset Select folder… -
Page 273
3 Menu Settings k For Movie Shooting n Movie 1 (Red) Page Movie exposure Auto / Manual AF mode Live mode / u Live mode / Quick mode AF with shutter button Disable / Enable during k AF/AE lock / AE lock/AF / kShutter/AE lock AF/AF lock, no AE lock / button… -
Page 274
3 Menu Settings Z Movie 3 (Red) Page Exposure 1/3-stop increments, ±5 stops compensation Auto Lighting Disable / Low / Standard / Strong Optimizer Custom White Balance Manual setting of white balance DAuto / PStandard / QPortrait / Picture Style RLandscape / SNeutral / UFaithful / VMonochrome / WUser Def. -
Page 275
3 Menu Settings 4 Playback 2 (Blue) Page Histogram Brightness / RGB 1 image / 10 images / 100 images / Date / Image jump w/6 Folder / Movies / Stills / Rating Playback description / Display time / Repeat / Slide show Transition effect / Background music Rating… -
Page 276: System Map
System Map ST-E2 270EX II 320EX 430EX II 580EX II Macro Ring Lite Macro Twin Lite MR-14EX MT-24EX Eyepiece Extender Bundled EP-EX15ll Accessories Rubber Frame Ef Eyecup Ef E-series Dioptric Adjustment Lenses Wide Strap EW-100DB lll Angle Finder C Semi Hard Case EH19-L AC Adapter Kit ACK-E8…
-
Page 277
System Map Remote Controller Remote Switch RC-6 RS-60E3 EF lenses EF-S lenses External microphone HDMI Cable HTC-100 (2.9 m/9.5 ft.) TV/Video Stereo AV Cable AVC-DC400ST (1.3 m/4.3 ft.) EOS Solution EOS Software PictBridge-compatible printer Disk Instruction Manuals Disk Interface Cable (1.3 m/4.3 ft.) Interface Cable IFC-200U/500U (1.9 m/6.2 ft.) / (4.7 m/15.4 ft.) -
Page 278: Troubleshooting Guide
Canon Service Center. Power-Related Problems The battery pack does not recharge. Do not recharge any battery pack other than a genuine Canon Battery Pack LP-E8. The battery charger’s lamp blinks. If there is a problem with the battery charger, the protective circuit will stop the charging operation and the charge lamp will blink in orange.
-
Page 279
Troubleshooting Guide The battery becomes exhausted quickly. Use a fully-charged battery pack (p.26). The rechargeable battery pack performance will degrade over repeated use. Purchase a new one. If you use Live View shooting or shoot movies for a prolonged period (p.123, 141), the number of possible shots will decrease. -
Page 280: The Image Is Out Of Focus
Troubleshooting Guide The card cannot be used. If a card error message is displayed, see page 30 or 287. The file numbering does not start from 0001. If the card already contains recorded images, the image number might not start from 0001 (p.170). The image is out of focus.
-
Page 281
Troubleshooting Guide The maximum burst during continuous shooting is lower. Under [7 Custom Functions (C.Fn)], set [5: High ISO speed noise reduction] to [Standard], [Low], or [Disable]. If it is set to [Strong], the maximum burst during continuous shooting will greatly decrease (p.254). -
Page 282
Troubleshooting Guide When I use the <f> mode with flash, the shutter speed becomes slow. If you shoot at night when the background is dark, the shutter speed becomes slow automatically (slow-sync shooting) so that both the subject and background are properly exposed. If you do not want a slow shutter speed to be set, set [3: Flash sync. -
Page 283
Troubleshooting Guide The shutter makes two shooting sounds during Live View shooting. If you use flash, the shutter will make two sounds each time you shoot (p.125). During Live View and movie shooting, a white <s> or red <E> icon is displayed. It indicates that the camera’s internal temperature is high. -
Page 284
Troubleshooting Guide Playback Problems The LCD monitor does not display a clear image. If the LCD monitor is dirty, use a soft cloth to clean it. In low or high temperatures, the LCD monitor display may seem slow or might look black. It will return to normal at room temperature. Part of the image blinks in black. -
Page 285
Troubleshooting Guide The subject looks distorted during movie shooting. If you move the camera to the left or right quickly (high-speed panning) or shoot a moving subject, the image may look distorted. No image appears on the TV screen. Make sure the AV cable or HDMI cable’s plug is inserted all the way in (p.218, 221). -
Page 286
Troubleshooting Guide The file name starts with “MVI_”. It is a movie file (p.171). The shooting date and time displayed is incorrect. The correct date and time has not been set (p.34). The date and time is not in the picture. The shooting date and time does not appear in the picture. -
Page 287: Error Codes
50, 60, Operate the power switch, remove and install the battery pack 70, 80 again, or use a Canon lens (p.32, 28). * If the error still persists, write down the error No. and contact your nearest Canon Service Center.
-
Page 288: Specifications
SD memory card, SDHC memory card, SDXC memory card Image sensor size: Approx. 22.3 x 14.9 mm Compatible lenses: Canon EF lenses (including EF-S lenses) (35mm-equivalent focal length is approx. 1.6 times the lens focal length) Lens mount: Canon EF mount •…
-
Page 289
Specifications • Viewfinder Type: Eye-level pentamirror Coverage: Vertical/Horizontal approx. 95% (with Eye point approx. 19 mm) Magnification: Approx. 0.85x (-1 m with 50mm lens at infinity) Eye point: Approx. 19 mm (From eyepiece lens center at -1 m Built-in dioptric adjustment: Approx. -3.0 — +1.0 m (dpt) Focusing screen: Fixed, Precision Matte… -
Page 290
Max. burst: JPEG Large/Fine: Approx. 34 shots RAW: Approx. 6 shots RAW+JPEG Large/Fine: Approx. 3 shots * Figures are based on Canon’s testing standards (ISO 100 and “Standard” Picture Style) using a 4GB card. • Live View Shooting Aspect ratio settings:… -
Page 291
Specifications • Movie Shooting Movie compression: MPEG-4 AVC/H.264 Variable (average) bit rate Audio recording format: Linear PCM Recording format: Recording size and frame rate: 1920×1080 (Full HD) : 30p/25p/24p 1280×720 (HD) : 60p/50p 640×480 (SD) : 30p/25p * 30p: 29.97 fps, 25p: 25.00 fps, 24p: 23.976 fps, 60p: 59.94 fps, 50p: 50.00 fps File size: 1920×1080 (30p/25p/24p) : Approx. -
Page 292
Specifications • Playback Image display formats: Single image, Single image + Info (Basic info, shooting info, histogram), 4-image index, 9-image index, image rotate possible Zoom magnification: Approx. 1.5x — 10x Image browsing methods: Single image, jump by 10 or 100 images, by shooting date, by folder, by movies, by stills, by rating Highlight alert: Overexposed highlights blink… -
Page 293
Specifications • Power Battery: Battery Pack LP-E8 (Quantity 1) * AC power can be supplied via AC Adapter Kit ACK-E8 * With Battery Grip BG-E8 attached, size-AA/LR6 batteries can be used Battery life: With viewfinder shooting: (Based on CIPA Approx. 440 shots at 23°C/73°F, approx. 400 shots at 0°C/32°F testing standards) With Live View shooting: Approx. -
Page 294
Specifications • Battery Charger LC-E8E Compatible battery: Battery Pack LP-E8 Recharging time: Approx. 2 hours (at 23°C/73°F) Rated input: 100 — 240 V AC (50/60 Hz) Rated output: 8.4 V DC / 720 mA Working temperature range: 6°C — 40°C / 43°F — 104°F Working humidity: 85% or less Dimensions (W x H x D): Approx. -
Page 295
EW-73B (sold separately) Case: LP1116 (sold separately) All the data above is based on Canon’s testing standards and CIPA (Camera & Imaging Products Association) testing standards and guidelines. Dimensions, maximum diameter, length and weight listed above are based on CIPA Guidelines (except weight for camera body only). -
Page 296
Use of genuine Canon accessories is recommended This product is designed to achieve excellent performance when used with genuine Canon accessories. Canon shall not be liable for any damage to this product and/or accidents such as fire, etc., caused by the malfunction of non- genuine Canon accessories (e.g., a leakage and/or explosion of a battery… -
Page 297: Safety Warnings
Safety Warnings Follow these safeguards and use the equipment properly to prevent injury, death, and material damage. Preventing Serious Injury or Death • To prevent fire, excessive heat, chemical leakage, and explosions, follow the safeguards below: — Do not use any batteries, power sources, and accessories not specified in this booklet.
-
Page 298
• Do not use paint thinner, benzene, or other organic solvents to clean the equipment. Doing so may cause fire or a health hazard. If the product does not work properly or requires repair, contact your dealer or your nearest Canon Service Center. -
Page 299
Your cooperation in the correct disposal of this product will contribute to the effective usage of natural resources. For more information about the recycling of this product, please contact your local city office, waste authority, approved scheme or your household waste disposal service or visit www.canon-europe.com/environment. (EEA: Norway, Iceland and Liechtenstein) -
Page 300
4. Do not expose the charger to rain or snow. 5. Use of an attachment not recommended or sold by Canon may result in fire, electric shock, or personal injury. 6. To reduce risk of damage to electric plug and cord, pull by plug rather than by cord when disconnecting charger. -
Page 301: Software Start Guide
Software Start Guide This chapter gives an overview of the software in the EOS Solution Disk (CD-ROM) provided with the camera and explains how to install the software in a personal computer. It also explains how to view the pdf files in the EOS Software Instruction Manuals Disk (CD-ROM).
-
Page 302: Software Start Guide
You can copy background music tracks, such as EOS Sample Music*, to the card. Five original tracks provided by Canon, which you can play as background music during playback of video snapshot albums, movies, and slide shows on the camera.
-
Page 303: Installing The Software
Software Start Guide Installing the Software Compatible OS Windows 7 Windows Vista Windows XP Check that the camera is not connected to your computer. Never connect the camera to your computer before you install the software. The software will not be installed correctly. Insert the EOS Solution Disk (CD).
-
Page 304
Check that the camera is not connected to your computer. Insert the EOS Solution Disk (CD). On your computer’s desktop, double-click and open the CD-ROM icon, and then double-click [Canon EOS Digital Installer]. Click [Install] to start installation. Follow the windows displayed for the rest of the installation procedure. -
Page 305
Software Start Guide [WINDOWS] EOS Software Instruction Manuals Disk EOS Software Instruction Manuals Disk XXX Copy the PDF Instruction Manuals contained on the disk to your computer. CEL-XXX XXX XXXXX XXXXX XXXXX XXXXX XXXXX Windows XXX XXX Mac OS X XXX XXX Insert the EOS Software Instruction Manuals Disk (CD) into the CD-ROM drive of your computer. -
Page 307: Quick Reference Guide And Instruction Manual Index
Quick Reference Guide and Instruction Manual Index Menu Operations — — — — — — — — — — — — — — — — — — — — — p.308 Image-recording Quality — — — — — — — — — — — — — — — — p.309 A Picture Style- — — — — — — — — — — — — — — — — — — — — p.309 Q Quick Control Screen — — — — — — — — — — — — — — — p.310 Nomenclature — — — — — — — — — — — — — — — — — — — — — — — p.311…
-
Page 308: Quick Reference Guide
Quick Reference Guide Menu Operations <M> button <0> button monitor <S> Cross keys 1. Press the <M> button to display the menu. 2. Press the <U> key to select a tab, then press the <V> key to select the desired item. 3.
-
Page 309: Image-Recording Quality
Quick Reference Guide Image-recording Quality Select [1 Quality], then press <0>. Press the <U> key to select the quality, then press <0>. Image-recording quality Recorded pixels Possible shots A Picture StyleN Press the <A> button. Press the <U> key to select the Picture Style, then press <0>.
-
Page 310: A Picture Style
Quick Reference Guide Q Quick Control Press the <Q> button. The Quick Control screen will appear. Basic Zone Modes Creative Zone Modes Aperture Shutter speed Highlight tone priority Shooting mode ISO speed Exposure Flash exposure compensation/ compensation AEB setting Auto Lighting Picture Style Optimizer AF mode…
-
Page 311: Nomenclature
Quick Reference Guide Nomenclature Power switch Mode Dial <Z> ISO speed <D> Flash setting button button <6> Main Dial Shutter button Focus mode switch <A> Live View shooting/ <A> AE lock button Movie shooting button <S> AF point selection button <S>…
-
Page 312
Quick Reference Guide Shooting Settings Display Shutter speed Aperture ISO speed Shooting mode Exposure level Auto Lighting indicator Optimizer White balance Picture Style Built-in flash func. setting AF mode Image-recording Quick Control quality icon Possible shots Battery check Metering mode zxcn Drive mode Viewfinder Information… -
Page 313: Basic Zone Modes
Quick Reference Guide Basic Zone Modes All the settings necessary for shooting are set automatically. You just press the shutter button, and the camera does the rest. A Scene Intelligent Auto 3 Landscape 7 Flash Off 4 Close-up 5 Sports C Creative Auto 2 Portrait 6 Night Portrait…
-
Page 314: Creative Zone Modes
Quick Reference Guide Creative Zone Modes You can change the camera settings as desired to shoot in various ways. d: Program AE The camera automatically sets the shutter speed and aperture in the same way as the <A> mode. Set the Mode Dial to <d>. s: Shutter-priority AE Set the Mode Dial to <s>.
-
Page 315: E: Af Mode
Quick Reference Guide E: AF ModeN Set the lens focus mode switch to <f>. Press the <ZE> button. Press the <U> key or turn the <6> dial to select the AF mode, then press <0>. X(One-Shot AF): For still subjects 9(AI Focus AF): Switches the AF mode automatically…
-
Page 316: Z: Iso Speed
Quick Reference Guide Z: ISO SpeedN Press the <Z> button. Press the <U> key or turn the <6> dial to select the ISO speed, then press <0>. When [AUTO] is selected, the ISO speed is set automatically. When you press the shutter button halfway, the ISO speed setting will be displayed.
-
Page 317: A Live View Shooting
Quick Reference Guide A Live View Shooting Press the <A> button to display the Live View image. Press the shutter button halfway to focus. Press the shutter button completely to take the picture. Live View shooting settings will appear under the [2] menu tab in Basic Zone modes and under the [z] menu tab in Creative Zone modes.
-
Page 318: Shooting Movies
Quick Reference Guide k Shooting Movies Set the Mode Dial to <k>. Press the shutter button halfway to focus. Press the <A> button to start shooting a movie. To stop movie shooting, press the <A> button again. Recording movie Microphone…
-
Page 319: Image Playback
Quick Reference Guide Image Playback Index Magnify Select image Playback Erase Shooting information…
-
Page 320: Index
Index 10-sec. or 2-sec. delay ….89 Background music……217 1280×720 ……..150 Basic Zone modes ……22 1920×1080 ……..150 Bass boost ……..213 1st-curtain sync……182 Battery…….. 26, 28, 33 2nd-curtain sync ……182 Battery check ……… 33 4- or 9-image index display…202 Battery Grip ……
-
Page 321
Index Cleaning (Image sensor)..184, 187 Eyecup ……… 262 Clear camera settings ….176 Eye-Fi card ……..265 Close-ups……..61 Eyepiece cover……. 25, 262 Color space (color reproduction range)…..121 Faithful……….82 Color temperature ……117 FE lock ……… 108 Color tone ……..113 Feature guide ……… 48 Continuous……..170 FEB ………. -
Page 322
Index Focusing AF mode……..83 ICC profile ……..121 AF point selection…….85 Image AF-assist beam ….86, 255 Auto playback ……215 Beeper……..166 Auto rotate ……. 174 Difficult-to-focus subjects..87, 135 Erase ……..224 Manual focusing ….87, 138 Highlight alert……228 Out of focus ….38, 39, 87, 135 Histogram …….. -
Page 323
Index Manual selection (AF) ….85 Maximum burst……76, 77 Landscape ……..60, 82 Medium (Image-recording Language selection……35 quality)……..76, 234 Large (Image-recording quality)..76 Memory card …… 15, 29, 45 LCD monitor……..15 Menu ……….43 Brightness adjustment ….167 My Menu ……..258 Image playback ….71, 201 Setting procedure……. -
Page 324
High ISO speed ……254 Program shift ……..75 Long exposures……253 Protect (image erase-protection).. 222 Nomenclature ………18 Non-Canon flash units ….264 Normal (Image-recording quality) …76 Q (Quick Control) … 41, 64, 208 NTSC ……..150, 272 Quick mode (AF) ……136 ONE SHOT (One-Shot AF)…..83 Rating……….. -
Page 325
Index Shoot by ambience selection ..65 Shoot by lighting or scene type..68 Temperature warning…. 139, 163 Shooting information display..226 Tone priority……159, 254 Shooting mode……..22 Toning effect (Monochrome)..114 A-DEP Toy camera effect ……232 (Automatic Depth-of-Field AE)..101 Trimming (printing) ……. 243 Av (Aperture-priority AE) ….96 Tripod socket …….. -
Page 328
CANON EUROPA N.V. PO Box 2262, 1180 EG Amstelveen, The Netherlands For your local Canon office, please refer to your warranty card or to www.canon-europe.com/Support The product and associated warranty are provided in European countries by Canon Europa N.V. This Instruction Manual booklet is current as of January 2011. For information on the camera’s compatibility with any accessories and lenses introduced after this…