Introduction
Operating Systems (Android, Windows, Linux, Ubuntu, Mac, etc) are made up of separate sections called partitions. These different partitions work together as one, constituting the OS. The partitions are made usable by flashing their corresponding files called partition images onto the device (the files are in IMG format). Without the image file of a partition installed, the partition can not be put into use and if such a partition is a critical one, then issues start arising which can extend up to the device becoming completely dead. While every Operating System has its own specific partitions, there are partitions common to almost all of them like system, recovery, boot, and userdata.
It is possible to edit the image files of partitions and this is what we are going to see here, using the Android OS as an example and to be specific, the boot and recovery images. There are many reasons for editing partition images (that we will also discuss here) – but if you do things wrongly, you will end up with a faulty or even unusable device.
Table Of Contents
- Introduction
- Disclaimer
- Image Unpacking, Editing And Repacking
- Reasons For Editing Partition Images
- The Boot And Recovery Images
- Unpack/Repack Boot/Recovery/Ramdisk/Kernel Images With Android Image Kitchen On Windows
- Unpacking, Repacking, Or Cleaning Through CMD Or PowerShell
- Unpack/Repack Boot/Recovery/Ramdisk/Kernel Images With Android Image Kitchen Using A Phone
- Using MiXplorer Silver File Manager Instead Of Root Browser Classic
- Other Helpful Articles
- Using MiXplorer Silver File Manager Instead Of Root Browser Classic
- Conclusion
Disclaimer
I won’t be held responsible in case anything happens to your device trying to use this article. You are doing things at your own risk. Before using this article, make sure you have properly understood how to root and flash an Android device and make sure your device is amongst the devices supported by this article as there might be a high possibility of bricking your device. However, you can fix whatever software issue your device faces by flashing the stock firmware.
Image Unpacking, Editing And Repacking
— To edit an image, you have to unpack it, do the editing, and then repack it.
— There are many unpacking and repacking tools or scripts out there, each having the types of images they can handle as well as their own methods of carrying out the processes. Examples are Android Image Kitchen (AIK – packs and repacks recovery and boot images), Android Image Studio (packs and repacks recovery and boot images), Carliv Image Kitchen (packs and repacks recovery and boot images), mkbootimg (official Android utility to pack boot images), abootimg (an alternative to mkbootimg used to pack and unpack boot images, but doesn’t work with ramdiskless boot images).
— When it comes to editing, there are two ways:
1. You can either do editing of files by deleting or replacing them with files from somewhere else – this is used when porting custom recovery.
2. Exporting unpacked files somewhere and do editing using a text editor (e.g Hex Editor, Notepad++, DroidEdit, etc) and then bringing the edited file back. Here, make sure the edited file bears the same name as the original and sits in the same place where it was originally – this approach is used to remove DM-Verity from the boot image (for devices that have DM-Verity in the boot – usually in old Android versions).
— After editing, you have to repack to get the final edited image.
Reasons For Editing Partition Images
The reasons are many, depending on what the user wants to achieve. Let’s look at two cases of editing recovery and boot images:
1. Recovery: Porting of custom recovery is the reason why one can choose to edit a recovery image. This will allow them to make custom recovery for their devices if they can’t find one online.
2. Boot: Old Android versions have DM-verity in the boot image. DM-verity might affect the booting of an OS if unwanted changes are detected. These changes involve flashing files or custom partitions. This, therefore, means one can edit the boot image to remove this boot check. However, things have changed on recent Android versions as DM-verity now sits in the vbmeta image, meaning your target here should be the vbmeta and not boot.
The Boot And Recovery Images
The boot and recovery images are similar. They contain the same contents: a kernel and a ramdisk.
The only difference between the recovery and boot images is that booting the boot image takes us to the System while the recovery image takes us to the recovery mode – the phone can determine which image to boot from based on the command it sees.
Because of the similarities between the boot and recovery image, A/B devices lack a separate recovery partition. Instead, the recovery has been moved to the boot image as boot-ramdisk. Editing the recovery images of these devices is therefore not straightforward as you will have to be targeting the boot image for the recovery. The reason for the incorporation is to save storage and reduce the total partition count as A/B devices have partitions in twos. However, there are a few A/B devices with separate recovery and boot partitions.
Let’s now move to the unpacking, editing, and repacking of the recovery and boot images using AIK.
A PC is required.
You need the image that you want to unpack or edit. Android Image Kitchen only works with boot and recovery images. That means you can’t use other images like system.img, vbmeta.img, etc.
— Download the latest version of 7-Zip according to your PC architecture here (or here) and install it (note that files for 32bit devices can run on 64bit devices but the reverse is not possible).
— Download Android Image Kitchen (AIK) here or here. Android Image Kitchen is a simple tool to unpack/repack a boot/recovery image (and kernel/ramdisk images). By so doing, you can edit these images. The tool is made by XDA recognized developer osm0sis.
— Extract Android Image Kitchen (AIK) to a convenient location using 7-Zip. Go to the extraction folder and you will see a folder named Android Image Kitchen. Open it.
— Copy the image file you want to unpack to the Android Image Kitchen folder (use only one file at a time).
— It is now time to unpack the image file. Go to the Android Image Kitchen folder and double-click the file named unpackimg (unpackimg.bat with extension) to unpack the image file – or you can just drag and drop the image file onto the unpackimg.bat file. A terminal will open and you will see the unpacking process ongoing. When done, you will be asked to press any key to continue. Just press the Enter key or any other. Two subfolders (ramdisk and split_img) will be created in the Android Image Kitchen.

— If you have done everything well, you should have ramdisk and split_img subfolders in the Android Image Kitchen folder. You can then edit the files in these subfolders. See an example here about Porting Custom Recovery For MediaTek Android Devices (allow the page to load completely and skip to the appropriate section).

— When you are done with the editing, you need to repack the image. Now in the Android Image Kitchen folder, double-click repackimg (repackimg.bat with extension) to repack the edited image. A terminal will open and you will see the repacking process ongoing. When done, you will be asked to press any key to continue. Just press the Enter key or any other. A new file named image-new (image-new.img with extension) will be created. Copy the image-new file to a convenient location and rename it to its appropriate name e.g boot, recovery – voila you have just finished editing the image file.

— You can then flash it on your device using flash tools, custom recovery, Flashify app or platform tools. If you face a brick after flashing the edited image file, just flash the stock one back. Keep in mind, boot.img is unique only to the boot.img of the current ROM installed on the device and none other.
— Now to remove any file or folder that has been added due to unpacking or repacking (leaving just the Android Image Kitchen contents), you can either delete them manually or click on cleanup (cleanup.bat with extension).
Unpacking, Repacking, Or Cleaning Through CMD Or PowerShell
Note: You can unpack and repack the boot image or cleanup the AIK folder through CMD or PowerShell. If you use platform tools (ADB and fastboot), then the approach is similar. Go to the Android Image Kitchen folder and type cmd in the address bar, then press Enter to open through CMD. If you prefer using PowerShell instead, then in the Android Image Kitchen folder, hold down the Shift key and right-click on an empty space, then choose Open PowerShell window here.
To run any of the scripts through CMD, use its corresponding command. The commands are:
To run any of the scripts through PowerShell, use its corresponding command. The commands are:
Unpack/Repack Boot/Recovery/Ramdisk/Kernel Images With Android Image Kitchen Using A Phone
If you don’t have a PC, you can unpack, edit and repack boot and recovery images using your Android phone. Below are the requirements:
° Your device should be rooted with a root manager (like Magisk, SuperSu, etc) installed.
° Download and install the Magisk application (version 18.0 or later) or install a custom recovery on your device.
° Download and install a root file manager that supports the execution of script files. A good example is Root Browser Classic by Android Toolbox – Root, ROM, BusyBox & More. Download it from Play Store here.
° Download and install a text editor. A good example is Sublime Text Editor by A389 St.. Download it from Play Store here.
° You need the image that you want to unpack or edit (the image should carry its proper name e.g boot, recovery). Android Image Kitchen only works with boot and recovery images. That means you can’t use other images like system.img, vbmeta.img, etc.
° Download the latest version of AIK-Mobile Installer zip file here. This is the Android Image Kitchen tool that will be installed on the phone.
With the above requirements ready, you can proceed below.
— Flash the AIK-Mobile Installer zip file in Magisk (see how to flash modules via Magisk here – allow the page to load completely to skip to the appropriate section) or custom recovery and reboot. A folder called AIK-mobile containing the necessary files will be created in system root > data > local (/data/local)..

— Launch Root Browser Classic and grant root as well as storage access. By default, you will be presented with the system root directory. To locate the internal storage, scroll down and tap sdcard. Copy the image file from where you placed it, press the top-left or bottom-left Home button, then go to data > local > AIK-mobile and paste the file (use only one file at a time).
— Inside the AIK-mobile folder, tap on unpackimg.sh and a window will pop up. Make sure Execute script as root is ticked, then click on Execute. Wait for the process to complete. Two subfolders (ramdisk and split_img) will be created. If they don’t appear, refresh the page using the Refresh button at the bottom bar (you might need to scroll the bar horizontally) or force stop and then relaunch Root Browser Classic.


— If you have done everything well, you should have ramdisk and split_img subfolders in the AIK-mobile folder. You can then edit the files in these subfolders. If you need to edit using a text editor, first copy the target file to somewhere in the internal storage. Now launch Sublime Text Editor and grant storage access then locate the file by tapping on the top-left Menu icon and then choosing Open…. You can search using the search icon at the top bar. When you are done with the editing, tap the Save button at the top bar and choose Save (not Save as in order to preserve the name of the edited file else you will have to make sure the edited file carries the original name). Copy the file back to where you first removed it from in the ramdisk or split_img subfolder.


— To repack the image, tap repackimg.sh and a window will pop up. Make sure Execute script as root is ticked, then click on Execute. Wait for the process to complete. A new file named image-new (image-new.img with extension) will be created. If it doesn’t appear, refresh the page using the Refresh button at the bottom bar (you might need to scroll the bar horizontally) or force stop and then relaunch Root Browser Classic. Copy the image-new file to a convenient location in the internal storage and rename it to its appropriate name e.g boot, recovery – voila you have just finished editing the image file.

— You can then flash it on your device using flash tools, custom recovery, Flashify app, or platform tools. If you face a brick after flashing the edited image file, just flash the stock one back. Keep in mind, boot.img is unique only to the boot.img of the current ROM installed on the device and none other.
— Now to remove any file or folder that has been added due to unpacking or repacking (leaving just the Android Image Kitchen contents), you can either delete them manually or click on cleanup.sh. If the files don’t get removed, refresh the page using the Refresh button at the bottom bar (you might need to scroll the bar horizontally) or force stop and then relaunch Root Browser Classic.

Using MiXplorer Silver File Manager Instead Of Root Browser Classic
Note: instead of using Root Browser Classic file manager, you can use MiXplorer Silver which has a modern interface and runs smoother – there’s no need for a second root file manager. To execute the unpackimg.sh, repackimg.sh and cleanup.sh scripts using MiXplorer Silver, just long-press, click on the three vertical dots at the top-right and choose Execute. The process will run in the background and a success window will appear when done. If the changes seem not to appear after execution, refresh by swiping down on the screen.

Another way to execute these scripts is through MiXplorer Silver’s built-in terminal. Go to the AIK-mobile folder and tap on the three vertical dots at the top-right. Choose Execute and a terminal will show up. To run any of the scripts, use its corresponding command. The commands are:


Other Helpful Articles
° How To Port Custom Recovery (TWRP, OFRP, PBRP, etc) For MediaTek Android Devices
° How To Disable DM-Verity In The Boot Image Using Android Image Kitchen (AIK)
° Stock vs Custom Recovery | Flashing Recovery | Recovery vs Boot | Wipe Data vs Format Data
° Flashing Various Files On Android | Part 1
° Flashing Various Files On Android | Part 2
° What Is Verified Boot (DM-Verity) In Android And How To Disable It
° Encryption, Decryption And Forceencryptin
° Quick Tips On Rooting And Flashing Android
° A/B And A-only Devices | Seamless Upgrades
° Android Partitions And The Different Android Modes
° How To Extract Flashable Firmware Files From MediaTek Devices
° How To Fix Bricked MediaTek Devices
° Rooting And Flashing Android | The Complete Guide
Conclusion
— Like, Share & Comment 👍: We are done with the unpacking/repacking of the boot and recovery images using AIK. Hope the article helped. If you find this post helpful, then scroll down to like and share. Also, drop a comment below in case of any difficulty.
— Donate ❤: Please help us to keep the site running. You can support us with whatever you have here.
— Report Broken Link, Any Error, Or Wrong Information ⚠: Is a link not working, or have you found an error that needs correction, or do you believe there’s an information you have read that is wrong, report to us here. We will verify and try to update as soon as possible. Don’t forget to give us the link that is broken or to point directly to the section that needs correction. Thanks for your loyalty.
— Contact 🗨: If you wish to contact the SakoPhone team, then click here.
— Join Us ➕: Want to be part of the SakoPhone Team, join us here. Those eligible to join us are: Bloggers/Writers/Editors (to write helpful articles), Readers/Subscribers (to receive alert of every article we drop, Supporters (those who will cross-check articles and report errors, wrong details or broken links, provide helpful suggestions and information as well as increase traffic by sharing and recommending our articles to various platforms) and lastly Sponsors (those who can assist us financially with little donations to keep the site running).
Содержание
- Android image kitchen windows инструкция
- Android image kitchen windows инструкция
- Android image kitchen windows инструкция
- Android image kitchen windows инструкция
- Android image kitchen windows инструкция
Android image kitchen windows инструкция
Новые темы необходимо создавать только в корневом разделе! В дальнейшем они будут обработаны модераторами.
Если Вы выложили новую версию программы, пожалуйста, сообщите об этом модератору нажав на вашем сообщении кнопку «Жалоба».
AIK — Android Image Kitchen
версия: 3.7 / 4.3.1
Последнее обновление программы в шапке: 26.05.2020

Для функционирования программы необходимы права root пользователя.
Краткое описание:
Распаковка и запаковывание boot.img, recovery.img
Описание:
Данная программа (а точнее, набор скриптов) предназначен для распаковки boot.img, recovery
img прямо на телефоне.
AIK имеет так же windows и linux версии (смотреть тут)
Внимание! Для LG G2, Samsung Galaxy S4 нужен специальный Loki аддон, который можно найти в той же ветке на xda
Русский интерфейс: Нет
Сообщение отредактировал iMiKED — 26.05.20, 06:42
Здрствуйте.что то неработает эти скрипты.всегда пищет что нет файла или же нет рута.хотя есть рут.вчем может быть дело?


Сообщение отредактировал ganjybas — 09.08.15, 11:07
Пример расспаковки. Для чайников.
Пример. Внутренняя карта.

Сообщение отредактировал vitalysters — 31.08.15, 21:32
 ganjybas,
./unpackimg.sh /sdcard/boot.img
т.е. перед /sdcard пробел
Добавлено 05.09.2015, 21:41:
grinjuk1999, можно. распакуйте зип, содержимое папки data переносите в /data/ , из папки bin берете бинари под вашу архитектуру и кидаете в /data/local/AIK-mobile/bin/ , потом открываете терминал и в нем:
su
mount -o rw,remount /system
ln -s /data/local/AIK-mobile/bin/aik /system/xbin/aik
chmod 755 /system/xbin/aik
mount -o ro,remount /system
Android image kitchen windows инструкция
Новые темы необходимо создавать только в корневом разделе! В дальнейшем они будут обработаны модераторами.
Если Вы выложили новую версию программы, пожалуйста, сообщите об этом модератору нажав на вашем сообщении кнопку «Жалоба».
AIK — Android Image Kitchen
версия: 3.7 / 4.3.1
Последнее обновление программы в шапке: 26.05.2020
Для функционирования программы необходимы права root пользователя.
Краткое описание:
Распаковка и запаковывание boot.img, recovery.img
Описание:
Данная программа (а точнее, набор скриптов) предназначен для распаковки boot.img, recovery
img прямо на телефоне.
AIK имеет так же windows и linux версии (смотреть тут)
Внимание! Для LG G2, Samsung Galaxy S4 нужен специальный Loki аддон, который можно найти в той же ветке на xda
Русский интерфейс: Нет
Сообщение отредактировал iMiKED — 26.05.20, 06:42
Здрствуйте.что то неработает эти скрипты.всегда пищет что нет файла или же нет рута.хотя есть рут.вчем может быть дело?
Сообщение отредактировал ganjybas — 09.08.15, 11:07
Пример расспаковки. Для чайников.
Пример. Внутренняя карта.
Сообщение отредактировал vitalysters — 31.08.15, 21:32
ganjybas,
./unpackimg.sh /sdcard/boot.img
т.е. перед /sdcard пробел
Добавлено 05.09.2015, 21:41:
grinjuk1999, можно. распакуйте зип, содержимое папки data переносите в /data/ , из папки bin берете бинари под вашу архитектуру и кидаете в /data/local/AIK-mobile/bin/ , потом открываете терминал и в нем:
su
mount -o rw,remount /system
ln -s /data/local/AIK-mobile/bin/aik /system/xbin/aik
chmod 755 /system/xbin/aik
mount -o ro,remount /system
Android image kitchen windows инструкция
2016-06-21 Update to version 1.2 stable
Changelog:
— improved the clean menu;
— added option to clean the output folder;
— new binary for coloring dos in windows;
— added the command to apped execute rights to executables in windows; CarlivImageKitchen_Windows_v1.2.zip ( 6,47 МБ )CarlivImageKitchen_Windows_x64_v1.2.zip ( 6,71 МБ )CarlivImageKitchen-Linux_v1.2.zip ( 105,9 КБ )CarlivImageKitchen-Linux_v1.2_x64.zip ( 108,67 КБ )
Сообщение отредактировал daradan — 22.06.16, 12:20
2016-06-30 Update to version 1.3 stable
Changelog:
— detect mtk header during unpacking;
— removed grep methodCarlivImageKitchen_Windows_v1.3.zip ( 6,29 МБ )CarlivImageKitchen_Windows_x64_v1.3.zip ( 6,53 МБ )CarlivImageKitchen-Linux_v1.3.zip ( 105,88 КБ )CarlivImageKitchen-Linux_x64_v1.3.zip ( 108,63 КБ )
Сообщение отредактировал vadolaz — 08.07.16, 20:27
А как прога может писать разным цветом? o.O
А, не, всё понял.
В директории приложения есть скрытая папка «bin».


Там есть файл ctext.exe, который и делает такой текст.
Сообщение отредактировал indeterminacy — 31.07.16, 17:08
Суть мода — теперь перепаковка стала еще проще.
За основу был взят СIK 1.3 (последний на сегодня)
В основном переписан только файл распаковки.
Для распаковки тащим на boot_recovery_unpack.bat свой образ и он распаковывает.
Для запаковки тащим на boot_recovery_repack.bat папку и он запаковывает.
Бонусом идет распаковка образов System.img, userdata.img, system.new.dat (для распаковки system.new.dat необходим файл system.transfer.list) так же перетаскиванием на system_unpack.bat.
Требования такие же как и у CIK — распаковать на диск с системой.
Сообщение отредактировал blackeangel — 08.09.16, 15:56
blackeangel,
system_unpack.bat не работает с распаковкой system.new.dat.
Вот так работает, я правда для себя выводы оставил и удаление system.new.img убрал, т.к c образами из некоторых прошивок ImgExtractor не справляется, так хоть system.new.img будет.
Посмотришь?system_unpack.zip ( 457 байт )
blackeangel, Здравствуйте. firmware_MK908II-kk-20140521-vl.img это прошивка для смарт тв приставки на android. мне внутри нужно кое что изменить. точнее чтобы поменять диски. Как Вашим модом это сделать. если не трудно. Подскажите. Спасибо
Сообщение отредактировал RWA50 — 16.12.16, 12:53
Diman_3452, У меня приставка Akai SM 601M на андроид. Процессор: ARM Cortex A9 Quard core
• Количество ядер: 4
Сообщение отредактировал RWA50 — 16.12.16, 13:18
Android image kitchen windows инструкция
Новые темы необходимо создавать только в корневом разделе! В дальнейшем они будут обработаны модераторами.
Если Вы выложили новую версию программы, пожалуйста, сообщите об этом модератору нажав на вашем сообщении кнопку «Жалоба».
AIK — Android Image Kitchen
версия: 3.7 / 4.3.1
Последнее обновление программы в шапке: 26.05.2020
Для функционирования программы необходимы права root пользователя.
Краткое описание:
Распаковка и запаковывание boot.img, recovery.img
Описание:
Данная программа (а точнее, набор скриптов) предназначен для распаковки boot.img, recovery
img прямо на телефоне.
AIK имеет так же windows и linux версии (смотреть тут)
Внимание! Для LG G2, Samsung Galaxy S4 нужен специальный Loki аддон, который можно найти в той же ветке на xda
Русский интерфейс: Нет
Сообщение отредактировал iMiKED — 26.05.20, 06:42
Здрствуйте.что то неработает эти скрипты.всегда пищет что нет файла или же нет рута.хотя есть рут.вчем может быть дело?
Сообщение отредактировал ganjybas — 09.08.15, 11:07
Пример расспаковки. Для чайников.
Пример. Внутренняя карта.
Сообщение отредактировал vitalysters — 31.08.15, 21:32
ganjybas,
./unpackimg.sh /sdcard/boot.img
т.е. перед /sdcard пробел
Добавлено 05.09.2015, 21:41:
grinjuk1999, можно. распакуйте зип, содержимое папки data переносите в /data/ , из папки bin берете бинари под вашу архитектуру и кидаете в /data/local/AIK-mobile/bin/ , потом открываете терминал и в нем:
su
mount -o rw,remount /system
ln -s /data/local/AIK-mobile/bin/aik /system/xbin/aik
chmod 755 /system/xbin/aik
mount -o ro,remount /system
Android image kitchen windows инструкция
Новые темы необходимо создавать только в корневом разделе! В дальнейшем они будут обработаны модераторами.
Если Вы выложили новую версию программы, пожалуйста, сообщите об этом модератору нажав на вашем сообщении кнопку «Жалоба».
AIK — Android Image Kitchen
версия: 3.7 / 4.3.1
Последнее обновление программы в шапке: 26.05.2020
Для функционирования программы необходимы права root пользователя.
Краткое описание:
Распаковка и запаковывание boot.img, recovery.img
Описание:
Данная программа (а точнее, набор скриптов) предназначен для распаковки boot.img, recovery
img прямо на телефоне.
AIK имеет так же windows и linux версии (смотреть тут)
Внимание! Для LG G2, Samsung Galaxy S4 нужен специальный Loki аддон, который можно найти в той же ветке на xda
Русский интерфейс: Нет
Сообщение отредактировал iMiKED — 26.05.20, 06:42
Здрствуйте.что то неработает эти скрипты.всегда пищет что нет файла или же нет рута.хотя есть рут.вчем может быть дело?
Сообщение отредактировал ganjybas — 09.08.15, 11:07
Пример расспаковки. Для чайников.
Пример. Внутренняя карта.
Сообщение отредактировал vitalysters — 31.08.15, 21:32
ganjybas,
./unpackimg.sh /sdcard/boot.img
т.е. перед /sdcard пробел
Добавлено 05.09.2015, 21:41:
grinjuk1999, можно. распакуйте зип, содержимое папки data переносите в /data/ , из папки bin берете бинари под вашу архитектуру и кидаете в /data/local/AIK-mobile/bin/ , потом открываете терминал и в нем:
su
mount -o rw,remount /system
ln -s /data/local/AIK-mobile/bin/aik /system/xbin/aik
chmod 755 /system/xbin/aik
mount -o ro,remount /system
Introduction
Carliv Image Kitchen is used to unpack and repack system images. You can port Boot.img and Recovery.img using Carliv Image Kitchen on your computer. Carliv Image Kitchen is developed by XDA Senior Member Bluefirebir and all credits goes to him. This tool also available for Linux.
Features
=> Unpack Boot and Recovery images.
=> Repack Boot and Recovery images.
=> Unpack Multiple images at one time.
=> Executable Kitchen no need to enter commands.
Screen Shots


Download Link

ABOUT :
Carliv Image Kitchen for Android is a simple tool used to unpack and repack .IMG files in windows desktop or pc.
REQUIRMENTS :
- A pc or laptop with (windows or linux).
- Any Extracting Tool like (Winrar, Winzip, 7Zip, etc….)
- A litttle Patience.
Procedure :
- Go to the Download Link and Download the required files.
- Extract the Carliv Image Kitchen Windows v1.3.zip.
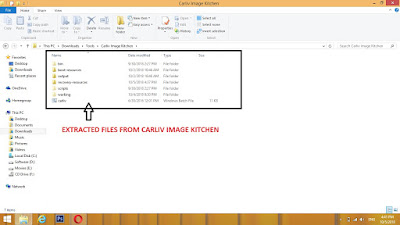
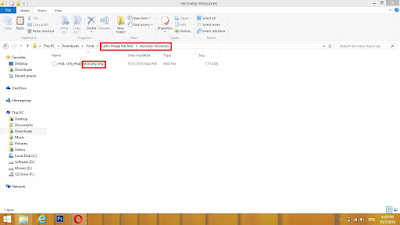
- Copy the IMG file you want to unpack and paste it into extracted folder (boot-resources or recovery-resources) that belongs to which type of img file you are going to unpack.
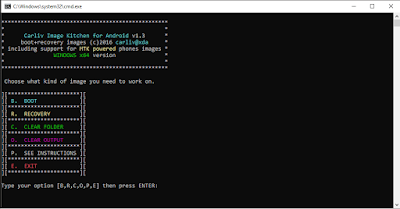
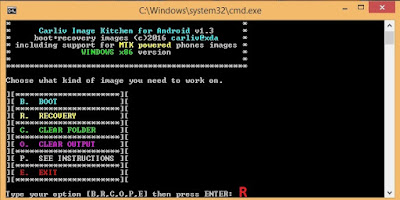
- Now Run carliv.bat file.

- Now Command Prompt Screen Appears.
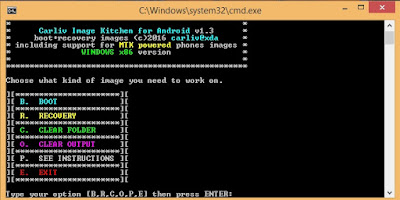
- For example: B — BOOT, R — RECOVERY
- Press B or R and hit enter.
- Now Press 1 (to select your file) and Hit Enter.

- Now Press 1 to unpack img file. After unpack it asks for Press any Key to continue.
- Don’t Close the Command Prompt Window until you repack. Otherwise you can’t repack.

- Now the img file is unpacked into a folder by the name of Img file
- For Example: Stockboot.img unpacked to Stockboot folder.
- After the changes made to the extracted folder now come back to Command Prompt and Press 2(Repack) and Hit Enter.
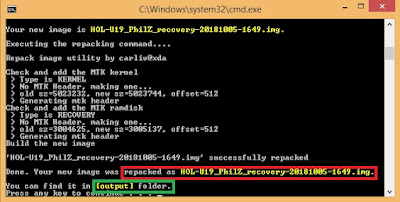
- Now you can get the repacked file from the output folder.
- That’s it. I hope you guyz Understand.
PORTED BY :

DOWNLOADS :

Android image kitchen windows инструкция
2016-06-21 Update to version 1.2 stable
Changelog:
— improved the clean menu;
— added option to clean the output folder;
— new binary for coloring dos in windows;
— added the command to apped execute rights to executables in windows; CarlivImageKitchen_Windows_v1.2.zip ( 6.47 МБ )CarlivImageKitchen_Windows_x64_v1.2.zip ( 6.71 МБ )CarlivImageKitchen-Linux_v1.2.zip ( 105.9 КБ )CarlivImageKitchen-Linux_v1.2_x64.zip ( 108.67 КБ )
Сообщение отредактировал daradan — 22.06.16, 12:20
2016-06-30 Update to version 1.3 stable
Changelog:
— detect mtk header during unpacking;
— removed grep methodCarlivImageKitchen_Windows_v1.3.zip ( 6.29 МБ )CarlivImageKitchen_Windows_x64_v1.3.zip ( 6.53 МБ )CarlivImageKitchen-Linux_v1.3.zip ( 105.88 КБ )CarlivImageKitchen-Linux_x64_v1.3.zip ( 108.63 КБ )
Сообщение отредактировал vadolaz — 08.07.16, 20:27
А как прога может писать разным цветом? o.O
А, не, всё понял.
В директории приложения есть скрытая папка «bin».


Там есть файл ctext.exe, который и делает такой текст.
Сообщение отредактировал indeterminacy — 31.07.16, 17:08
Суть мода — теперь перепаковка стала еще проще.
За основу был взят СIK 1.3 (последний на сегодня)
В основном переписан только файл распаковки.
Для распаковки тащим на boot_recovery_unpack.bat свой образ и он распаковывает.
Для запаковки тащим на boot_recovery_repack.bat папку и он запаковывает.
Бонусом идет распаковка образов System.img, userdata.img, system.new.dat (для распаковки system.new.dat необходим файл system.transfer.list) так же перетаскиванием на system_unpack.bat.
Требования такие же как и у CIK — распаковать на диск с системой.
Сообщение отредактировал blackeangel — 08.09.16, 15:56
 blackeangel,
system_unpack.bat не работает с распаковкой system.new.dat.
Вот так работает, я правда для себя выводы оставил и удаление system.new.img убрал, т.к c образами из некоторых прошивок ImgExtractor не справляется, так хоть system.new.img будет.
Посмотришь?system_unpack.zip ( 457 байт )
blackeangel, Здравствуйте. firmware_MK908II-kk-20140521-vl.img это прошивка для смарт тв приставки на android. мне внутри нужно кое что изменить. точнее чтобы поменять диски. Как Вашим модом это сделать. если не трудно. Подскажите. Спасибо
Сообщение отредактировал RWA50 — 16.12.16, 12:53
Diman_3452, У меня приставка Akai SM 601M на андроид. Процессор: ARM Cortex A9 Quard core
• Количество ядер: 4
Сообщение отредактировал RWA50 — 16.12.16, 13:18
Источник
Как установить Android Kitchen на Windows [Инструкция]
![]()
Инструкция по установке и настройке Android Kitchen на Windows
Android Kitchen — инструмент созданный пользователем dsixda с xda-developers, которая облегчает создание кастомных прошивок и их модификацию
1. Установите Java JDK (нажмите на Java Platform (JDK), поставьте флажок напротив «Accept License Agreement) и скачайте нужную версию Java JDK (x86 для 32-битной версии Windows, x64 для 64-битной)
2. Далее устанавливаем cygwin, для этого скачайте архив cygwin.zip и распакуйте его в отедльную, удобную для вас папку. Зайдите в только что распакованную папку и запустите setup.exe .
3. В появившемся окне установки, нажмите Далее , а в следующем окне выбирите пункт Install from Local Directory . Далее оставьте путь установки cygwin дефолтным, то есть C:cygwin и просто нажмите Далее
4. В следующем окне установки нам надо будет выбрать откуда мы хотим установить пакеты cygwin (так как ранее мы выбрали пункт установки из своей папки). Для этого нажмте кнопку Browse , и выберите папку cygwin_packages , которую вы распаковали из архива cygwin.zip (если «вылезет» ошибка Setup Alert, то просто нажмите ОК)
5. Далее начнётся установка во время которой «вылезет» большое окно в котором нам надо будет выбрать все пакеты для установки. Для этого наведите мышкой на значёк рядом с надписью All и кликните по нему чтобы показывало Install напротив всех пунктов (смотрим скриншот ниже):

6. После выбора Install напротив всех пакетов, нажмите Далее и дайте завершитсья установке (может занять пару минут). После завершения установки оставьте флажки напротив Create icon on Desktop и Add icon Start Menu и нажмите Готово
7. Далее запускаем Cygwin при помощи иконки созданной во время установки. Запускать необходимо на правах администратора (правый клик по иконке -> запуск от имени администратора). Откроется командная строка и произойдёт первый запуск Cygwin, оставьте окно командной строки открытым и переходите к следующему пункту
8. Теперь нам надо установить Android Kitchen. Из вложений (в самом низу поста) скачайте архив dsixda_Android_Kitchen_0.224.zip и распакуйте его. Полученную папку переименуйте в kitchen (переименовывать обязательно, иначе могут быть ошибки при работе) и скопируйте её в C:cygwinhomeИмя Компьютера . Данная папка будет создана при первом запуске Cygwin и будет иметь имя вашего компьютера, путь к папке не должен иметь пробелов в названии. Важный момент, если имя вашего компьютера имеет пробелы в названии, то вам надо будет перенести папку Kitchen на один уровень выше, то есть в C:cygwinhome
9. Теперь давайте убедимся что Android Kitchen работает коректно. Для этого, вернитесь к командной строке Cygwin (которую вы не закрыли в 7м пункте данной инструкции) и введите следующую команду (после каждой команды нажать Enter):
Пример (имя своего ПК я забелил):

10. Если всё было сделано и настроено верно, то далее вы увидите пункты меню Android Kitchen, как показано на скриншоте ниже:

Важно: если имя вашего ПК имеет в себе пробел, и вы перенесли папку kitchen на один уровень выше, тогда порядок выполнения команд после запуска Cygwin будет таким:
Cкачать:
 dsixda_Android_Kitchen_0.224.zip
Источник
Android image kitchen windows инструкция
Здрствуйте.что то неработает эти скрипты.всегда пищет что нет файла или же нет рута.хотя есть рут.вчем может быть дело?


Сообщение отредактировал ganjybas — 09.08.15, 11:07
Пример расспаковки. Для чайников.
Пример. Внутренняя карта.

Сообщение отредактировал vitalysters — 31.08.15, 21:32
ganjybas,
./unpackimg.sh /sdcard/boot.img
т.е. перед /sdcard пробел
Добавлено 05.09.2015, 21:41:
grinjuk1999, можно. распакуйте зип, содержимое папки data переносите в /data/ , из папки bin берете бинари под вашу архитектуру и кидаете в /data/local/AIK-mobile/bin/ , потом открываете терминал и в нем:
su
mount -o rw,remount /system
ln -s /data/local/AIK-mobile/bin/aik /system/xbin/aik
chmod 755 /system/xbin/aik
mount -o ro,remount /system
Источник
Android image kitchen windows инструкция
Здрствуйте.что то неработает эти скрипты.всегда пищет что нет файла или же нет рута.хотя есть рут.вчем может быть дело?
Сообщение отредактировал ganjybas — 09.08.15, 11:07
Пример расспаковки. Для чайников.
Пример. Внутренняя карта.
Сообщение отредактировал vitalysters — 31.08.15, 21:32
ganjybas,
./unpackimg.sh /sdcard/boot.img
т.е. перед /sdcard пробел
Добавлено 05.09.2015, 21:41:
grinjuk1999, можно. распакуйте зип, содержимое папки data переносите в /data/ , из папки bin берете бинари под вашу архитектуру и кидаете в /data/local/AIK-mobile/bin/ , потом открываете терминал и в нем:
su
mount -o rw,remount /system
ln -s /data/local/AIK-mobile/bin/aik /system/xbin/aik
chmod 755 /system/xbin/aik
mount -o ro,remount /system
Источник