Ref: 8384004, 8384000, 8547996, 8543076
2017
Первое использование
Как использовать секундомер?
Как использовать обратный отсчет?
Батарея
Вы можете заменить батарею в Мастерской ближайшего магазина.
Срок службы батареи?
При нормальной эксплуатации срок службы батареи составляет около 2 лет. Он в значительной степени зависит от интенсивности и условий использования. Использование подсветки и аварийного сигнала способствует быстрому расходу ее ресурса.
Другой вопрос?
Ваши часы сохраняют герметичность при давлении до 5 АТМ. Это значит, что вы можете плавать в бассейне или в море, не снимая часов.
У меня сломался браслет, где я могу купить новый?
Вы можете приобрести браслет в Мастерской ближайшего магазина.
Вы желаете связаться с нами? перейти к контактному формуляру
Инструкции
- Manuals
- Brands
- Kalenji Manuals
- Watch
- 500 SD
- User manual
-
Contents
-
Table of Contents
-
Troubleshooting
-
Bookmarks
Quick Links
Kalenji:
User manual for the 500 SD
watches with accelerometer
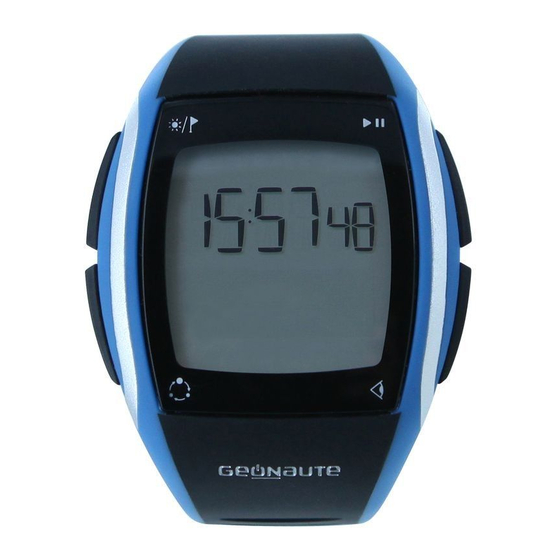
W 500 SD
Watch with accelerometer
CW 500 SD
Heart rate monitor with accelerometer
CW 500 SD PC
Heart rate monitor with accelerometer and PC connection
Related Manuals for Kalenji 500 SD
Summary of Contents for Kalenji 500 SD
-
Page 1
Kalenji: User manual for the 500 SD watches with accelerometer W 500 SD Watch with accelerometer CW 500 SD Heart rate monitor with accelerometer CW 500 SD PC Heart rate monitor with accelerometer and PC connection… -
Page 2: Table Of Contents
5.1. Accelerometer……………………..4 5.1.1 Positioning on the shoe………………….4 5.1.2. Positioning in the shoe………………….4 5.2. Heart rate monitor belt (except W 500 SD)……………… 4 6. Homepage screen: TIME……………………5 7. Navigation in the modes……………………5 8.
-
Page 3
13. Troubleshooting……………………..31 13.1. Abnormal heart rhythm………………….31 13.2. Abnormal speed and distance………………..32 13.3. Low battery for the watch………………….32 13.4. No access to certain modes or functions…………….32 13.5. Detecting the sensors………………….. 33 13.6. -
Page 4: Usage And Precautions For Use
The watch is designed to be worn on the wrist during running sessions in a temperate climate. WARNING!!! For the models with a heart rate monitor function (CW 500 SD-CW 500 SD PC). This equipment is designed for sports and leisure use. It is not a medical monitoring device.
-
Page 5: A Word From The Product Manager
(W 500 SD), as well as your heart rate (CW 500 SD) and transfer your data to your PC (CW 500 SD PC). Thanks to the technology used, this product will allow you to measure speeds and distances cove- red with 98% accuracy.
-
Page 6: Watch Configuration
4. Watch configuration. 4.1. Functions of the buttons. This watch has 4 buttons: Light / Lap: to activate the backlight (long press) or to indicate a new lap. Mode: to access the different modes: FREE, INTER- VALS, CHALLENGE, to the DATA of the previous ses- sions or to the SETTINGS of your watch.
-
Page 7: Fitting The Different Sensors
It must be positioned with its back pointing upwards (you can identify this by the ANT+ logo and the battery compartment). 5.2. Heart rate monitor belt (except W 500 SD). Setting up: Sensors Reception cone: *118.08 inchs…
-
Page 8: Homepage Screen: Time
6. Homepage screen: TIME. In TIME mode: — An initial press on the button displays the date; — A subsequent press on controls the alarm mode status. After 5 secs, the date or alarm display disappears from the screen. 7. Navigation in the modes. FREE INTERVALS SETTINGS…
-
Page 9: Free Mode
The FREE mode allows you to run as you want, depending on your mood, while controlling different parameters: running time, speed, dis- tance, heart rate (except model W 500 SD), calories burnt… To exit the mode, press the button shown by the…
-
Page 10: Lap Information
(OK). The watch will then search for available sensors: accelerometer and heart rate monitor (except W 500 SD). In the search screen, the sen- sors found are identified by the symbol and the sensors not found by the symbol.
-
Page 11: Using The Free Mode
Accelerometer found. Heart rate monitor belt found. Once the sensors have been found, you can start your exercise. The sensors found are displayed at the top of the screen: If the sensors cannot be found by the watch, please refer to section 13 Troubleshooting.
-
Page 12: Start / Stop The Stopwatch And Its Recording
8.3.2. Start / stop the stopwatch and its recording. Press to start the stopwatch. The recording begins. The stopwatch appears. The recording has begun. The time is counted down. A subsequent press on will pause the stopwatch and the recording. The stopwatch symbol and the first row flash to indicate this pause mode.
-
Page 13: Configuration In Intervals Mode
— rest: plan a recovery time (TIME), or a distance (DIST), or a heart rate (HR) to reach in order to start the following action phase (except W 500 SD). By default, the watch shows you a recovery heart rate (75% of the maximum heart rate), but you can adjust the value yourself by selecting USER in the list.
-
Page 14: Using The Intervals Mode
9.3. Using the INTERVALS mode. 9.3.1. Changing the indicators displayed on the screen. In this menu, the first row is fixed and cannot be swapped with the second row. During the warm- up phases, series breaks and warm-down, it is devoted to the stopwatch. During the action or rest phases it is devoted to the timer, the distance or the heart rate depending on the criteria you have chosen.
-
Page 15: St Series
Press to stop the warm-up. The stopwatch and the recording will pause. The stopwatch symbol and the first row flash to indicate this pause mode. You can then choose from the following selection: resume: restarts your stopwatch in warm-up mode; go to series: to start your first series (choice by default);…
-
Page 16: Series Break And Following Series
The sequence of action and rest phases will continue in this way until you have reached the pro- grammed number of repetitions. At any time during an action or rest phase you can pause your stopwatch using the button. You can then choose from the following selection: resume: restarts your stopwatch at the point where you had stopped it;…
-
Page 17: Warming Down
You can stop this series break phase and start the next series using the button and you will get the following selection: resume: restarts your stopwatch in series break mode. action: to the 1st action phase of the next series. stop: stops your recording and gives you the following choice: save ? your record;…
-
Page 18: Configuration In Challenge Mode
10.1. Configuration in CHALLENGE mode. 10.1.1. Distance You can configure a distance selected from the list (2 km, 3 km, 5 km, 8 km, 10 km, 12 km, 15 km) or specify your own (USER). The distance cannot be less than 0.1 km. If a lower value is confirmed, the symbol will appear and the entered value will flash for 3 seconds before you can enter a new value.
-
Page 19: Search For Sensors
Once the configuration of your lap information has been completed, you can go on to the next stage by selecting (OK). The watch will then search for available sensors: accelerometer and heart rate monitor (except W 500 SD). In the search screen, the sen- sors found are identified by the symbol and the sensors not found by the symbol.
-
Page 20: Start / Stop You Challenge
To choose your indicators and manage their order in the list, refer to section 12.4 Your display. 10.3.2. Start / stop you challenge. Press to start the stopwatch. A 3-sec countdown starts to show start time. By default the watch shows you the gap between you and your rival in the 2 row.
-
Page 21: Recording Manual Laps
PC (only CW 500 SD PC or as an option on the W 500 SD and CW 500 SD using the Kalenji SD Connect data transfer USB flash drive);…
-
Page 22: Viewing Data
HR avg: the average heart rate in Beats Per Minute. Except W 500 SD; HR max: the maximum heart rate in Beats Per Minute. Except W 500 SD;…
-
Page 23: Transferring Data
11.3. Transferring data The CW 500 SD PC watch has an ANT+ data transfer USB flash drive that allows you to transfer your data to your PC and analyse it with Géonaute Software. Please refer to the Géonaute Software instructions to install the program, transfer your data to your PC and use your data.
-
Page 24
Before going on a long run like a half marathon or a full marathon for example, we recommend that you check that there is enough memory available and free up some space by deleting some sessions if necessary. Saturation of the memory during the run: Maximum number laps… -
Page 25: Settings Mode
This is measured using a heart rate monitor (function available on the CW 500 SD and 500 SD PC) during an intense exercise session over a relatively short period, for example, after a good warm-up followed by an uphill run.
-
Page 26: Target Zone
By default, it is not active, «NO» is displayed on the screen. You can configure a target zone based on the following selection: HR: the heart rate, (except W 500 SD); SPEED: the speed in km/h; PACE: the pace in min / km;…
-
Page 27: Your Watch
A beep will warn you at each lap, the information relating to the com- pleted lap will appear for 5 seconds (split time since the beginning of the session, lap number, lap time or distance). lap 1 12.3. Your watch You can set the following parameters in this menu: The time.
-
Page 28: Manage Your List Of Favourite Indicators
Hr: the immediate heart rate hr avg: the heart rate, (except W 500 SD) lap hr avg: the average heart rate for the lap (except W 500 SD) cal/h: the immediate calories burnt per hour cal/h avg: the average calories burnt / hour…
-
Page 29
As long as the watch shows you a dotted line, you can select this row and add an indicator. lap dist. Your list of indicators cannot exceed 10 rows. Tip: it is cumbersome to have a long list of favourites that takes a while to scroll through when running. -
Page 30: Display Mode Without Sensor
12.4.3. Display mode without sensor. In the event you are not using any of the sensors (accelerometer and heart rate monitor belt), the number of indicators displayed is automatically reduced: In Free mode: — Row 1 = stopwatch; — Row 2 = the lap time (by default) or the time (press on the button — In Intervals mode: — Row 1 = stopwatch;…
-
Page 31: Searching For Sensors
missing pair Pairing: detecting the Accelerometer and Belt not detected / active sensors Belt detected Accelerometer by the watch detected If the pairing is unsuccessful within a period of 30 seconds, the pairing process will stop by itself. You can shorten the pairing phase by pressing If the pairing procedure fails see section 13.5.
-
Page 32: Calibrating The Accelerometer
2 scenarios can occur: The watch detects the sensors corresponding to the memorized identification numbers: the exercise can start. missing If the search does not find your sensors or either of them within a period of 20 seconds, the pairing process will stop by itself.
-
Page 33: Activating The Sensors
All the indicators connected with this sensor will no longer be accessible. You can deactivate the heart rate monitor belt for the CW 500 SD and CW 500 SD PC. You can deactivate the «S&D Connect» data transfer PC flash drive for the CW 500 SD PC.
-
Page 34: Troubleshooting
The power saving Mode is not reversible. In order to recover all the functions of your watch, you must replace the battery (see section 17 Battery replacement). You can recover all your watch’s functions by removing and putting the used battery back in but you run the risk of losing power suddenly when using the functions that consume a lot of power.
-
Page 35: Abnormal Speed And Distance
13.2. Abnormal speed and distance. The distance displayed by the watch does not correspond to the known actual distance covered: check that the accelerometer is properly positioned on the shoe and calibrate it (Section 5.1.1. Positioning on the shoe). It is advisable to put the accelerometer on the same foot for running as that used for calibrating. Example: if the accelerometer was calibrated on the right foot, it must be used on the right foot.
-
Page 36: Detecting The Sensors
13.5. Detecting the sensors. Sensors not detected: — Move at least 10 metres from other potential users of heart rate monitor belts or accelerometers. — Bring the sensors close to the watch. — Activate the accelerometer (shake it). — Position the moistened belt correctly (section 13.1.
-
Page 37: Technical Features
14. Technical features. Heart rate monitor Data transfer USB Watches Accelerometers belt flash drive Waterproof 5 ATM 1 ATM 1 ATM Not waterproof Battery life depending on the sports use of the product (with the sensors) 1 hour / week 18 months 12 months 5 years…
-
Page 38: Guarantees
The W 500 SD is compatible: — with a Kalenji ANT+ heart rate monitor belt (available in Decathlon workshops); — the «Kalenji S&D Connect» data transfer USB flash drive (that enables the transfer of data towards the Geonaute Software analysis and saving software.
-
Page 39: Replacing The Accelerometer’s Battery
Replace the cover by aligning the point on the cover with the back of the Close arrow and screw clockwise. The point on the cover and the point of the arrow must be aligned. 17.3. Replacing the heart rate monitor belt’s battery. Open Close Except W 500 SD…
-
Page 40: Contact Us
Warning: Any change or modification which has not been expressly authorised by Décathlon is liable to delete the authorisation granted to the user for the use of the equipment. 18. Contact us. www.kalenji.com We will reply as soon as possible.
-
Page 41: Index
19. Index. Accelerometer Positioning ………………….4 Calibration ………………….29 Battery replacement ………………..36 Accelerometer calibration ………………….29 Accessories ……………………..35 Activation (accelerometer, heart rate monitor belt) …………..30 Alarms ……………………….24 ANT + data transfer USB flash drive ………………20 Back-lighting Button……………………3 Fast mode ………………….24 Battery Information ………………….30 Replacement ………………….35 Management (power saving mode) …………..30 Belt cleaning ……………………..1…
-
Page 42
Viewing data ………………….19 Help ……………………….31 History (See data) Indicators Number of indicators………………..24 Manage your list ………………..25 Intervals (mode) ……………………9 Kalenji ……………………….37 Languages ……………………..22 Automatic lap information ……………….23 Manual lap information ………………3 Manage your list of indicators …………….25 Lighting button ……………………3 fast mode ………………….24… -
Page 43
Oxylane — 4 Boulevard de Mons BP299 — 59665 Villeneuve d’Ascq Cedex France IMPORTADO PARA BRASIL POR IGUASPORT Ltda CNPJ : 02.314.041/0001-88 :;<#»,'»=*>>>*?>@,#ABCDE*FGFHIFE*J#KK$LE*M#K@#&K@-L*#AB-K,NE* MO,$P$)K@$Q*»-Q#)E*M+RS*TGUQ*@;VE*W!X*?RB,CYN’&#DE*&B-(‘)$’*IE* K,»#’)$’*I Z[]^_`Z*^ab7*[7c91274*^09064*d2*Z4e072f*gf3Vhf4* ib7j/*klf09mj1*nopV*]be0f2a2*p0qV*r*s1bt*ub=*F* s0670/a0v0*U*IGwIx*klf09mj1*U*Zj7t26 Made in China Fabricado na China &'(#)* !»#$%&'(‘)#*&*+$,-‘ RN # 106987 NIF : N0013342-A ./01*23413454*627*849 GB 18401-2003 !»#$%…
-
Contents
-
Table of Contents
-
Bookmarks
-
ENGLISH, page 4
-
РУССКИЙ, страница 99
-
FRANÇAIS, page 15
-
ESPAÑOL, página 25
-
DEUTSCH, seite 36
-
ITALIANO, pagina 46
-
DUTCH, pagina 57
-
PORTUGUÊS, página 67
-
SVENSKA, sida 142
-
POLSKI, strona 78
-
ČEŠTINA, strana 131
-
MAGYAR, oldal 88
-
SLOVENČINA, strana 121
-
TÜRKÇE, sayfa 163
-
ROMÂNĂ, pagina 110
-
БЪЛГАРСКИ, страница 152
-
УКРАЇНСЬКА, сторінка 173
Quick Links
OXYLANE
4 Boulevard de Mons — BP299
59665 Villeneuve d’Ascq Cedex
France
CNPJ : 02.314.041/0001-88
IMPORTADO PARA BRASIL POR IGUASPORT Ltda
Summary of Contents for Kalenji SW Kalenji 900
Ref: 8563505, 8563506
2020
First use
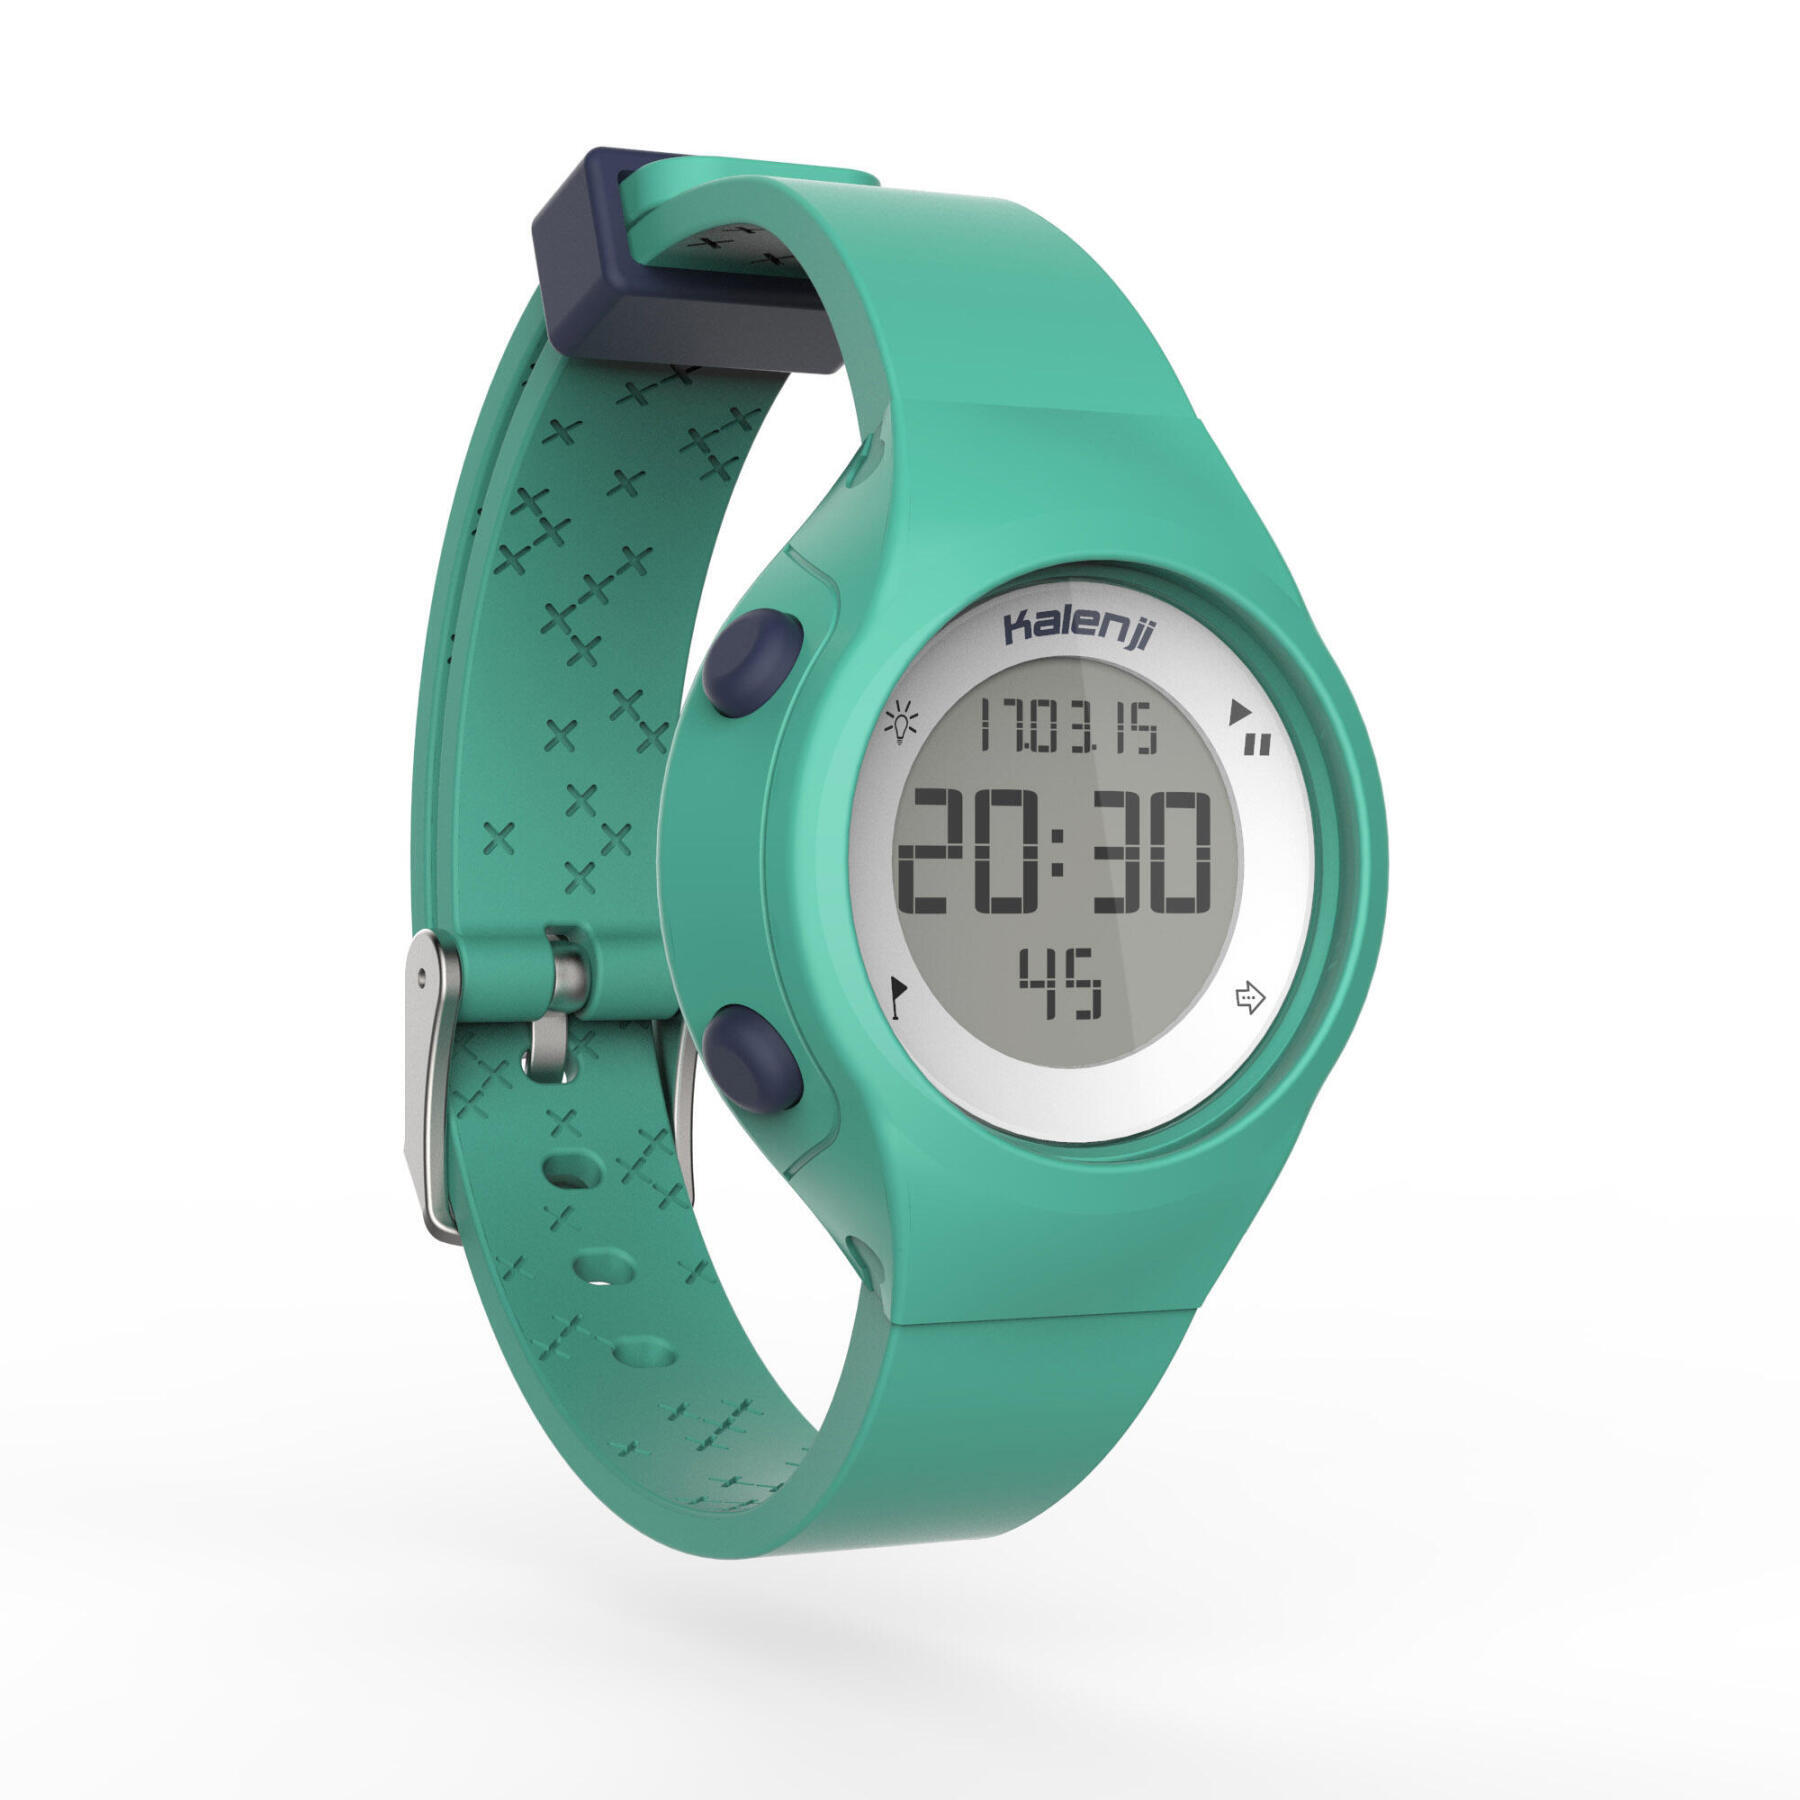
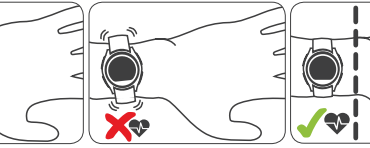
Your Kalenji HR500 has a heart-rate monitor with an optical sensor to help you find your pace when jogging.
To guarantee accurate measurement of your heart rate:
— wear the watch with the dial above your wrist
— the watch must be positioned after the bone, in contact with the skin
— adjust the bracelet so that it fits snugly but does not cause discomfort
The watch must not twist or move on your wrist.
1.2. Start your watch
When the watch is off, press for a long time on the START button at the top right. The watch starts. If it does not start, (nothing shows on the screen), place it on the charger.
1.3. How to change the display while running
Once the stopwatch has started, you can change the display using the buttons located at the bottom right and bottom left of the watch (indicated by arrows on the dial).
3 available displays:
Display 1: Stopwatch
Display 2:Heart rate and effort zone
Display 3: Calories burned
Display 4: Time
1.4. How are my effort zones calculated?
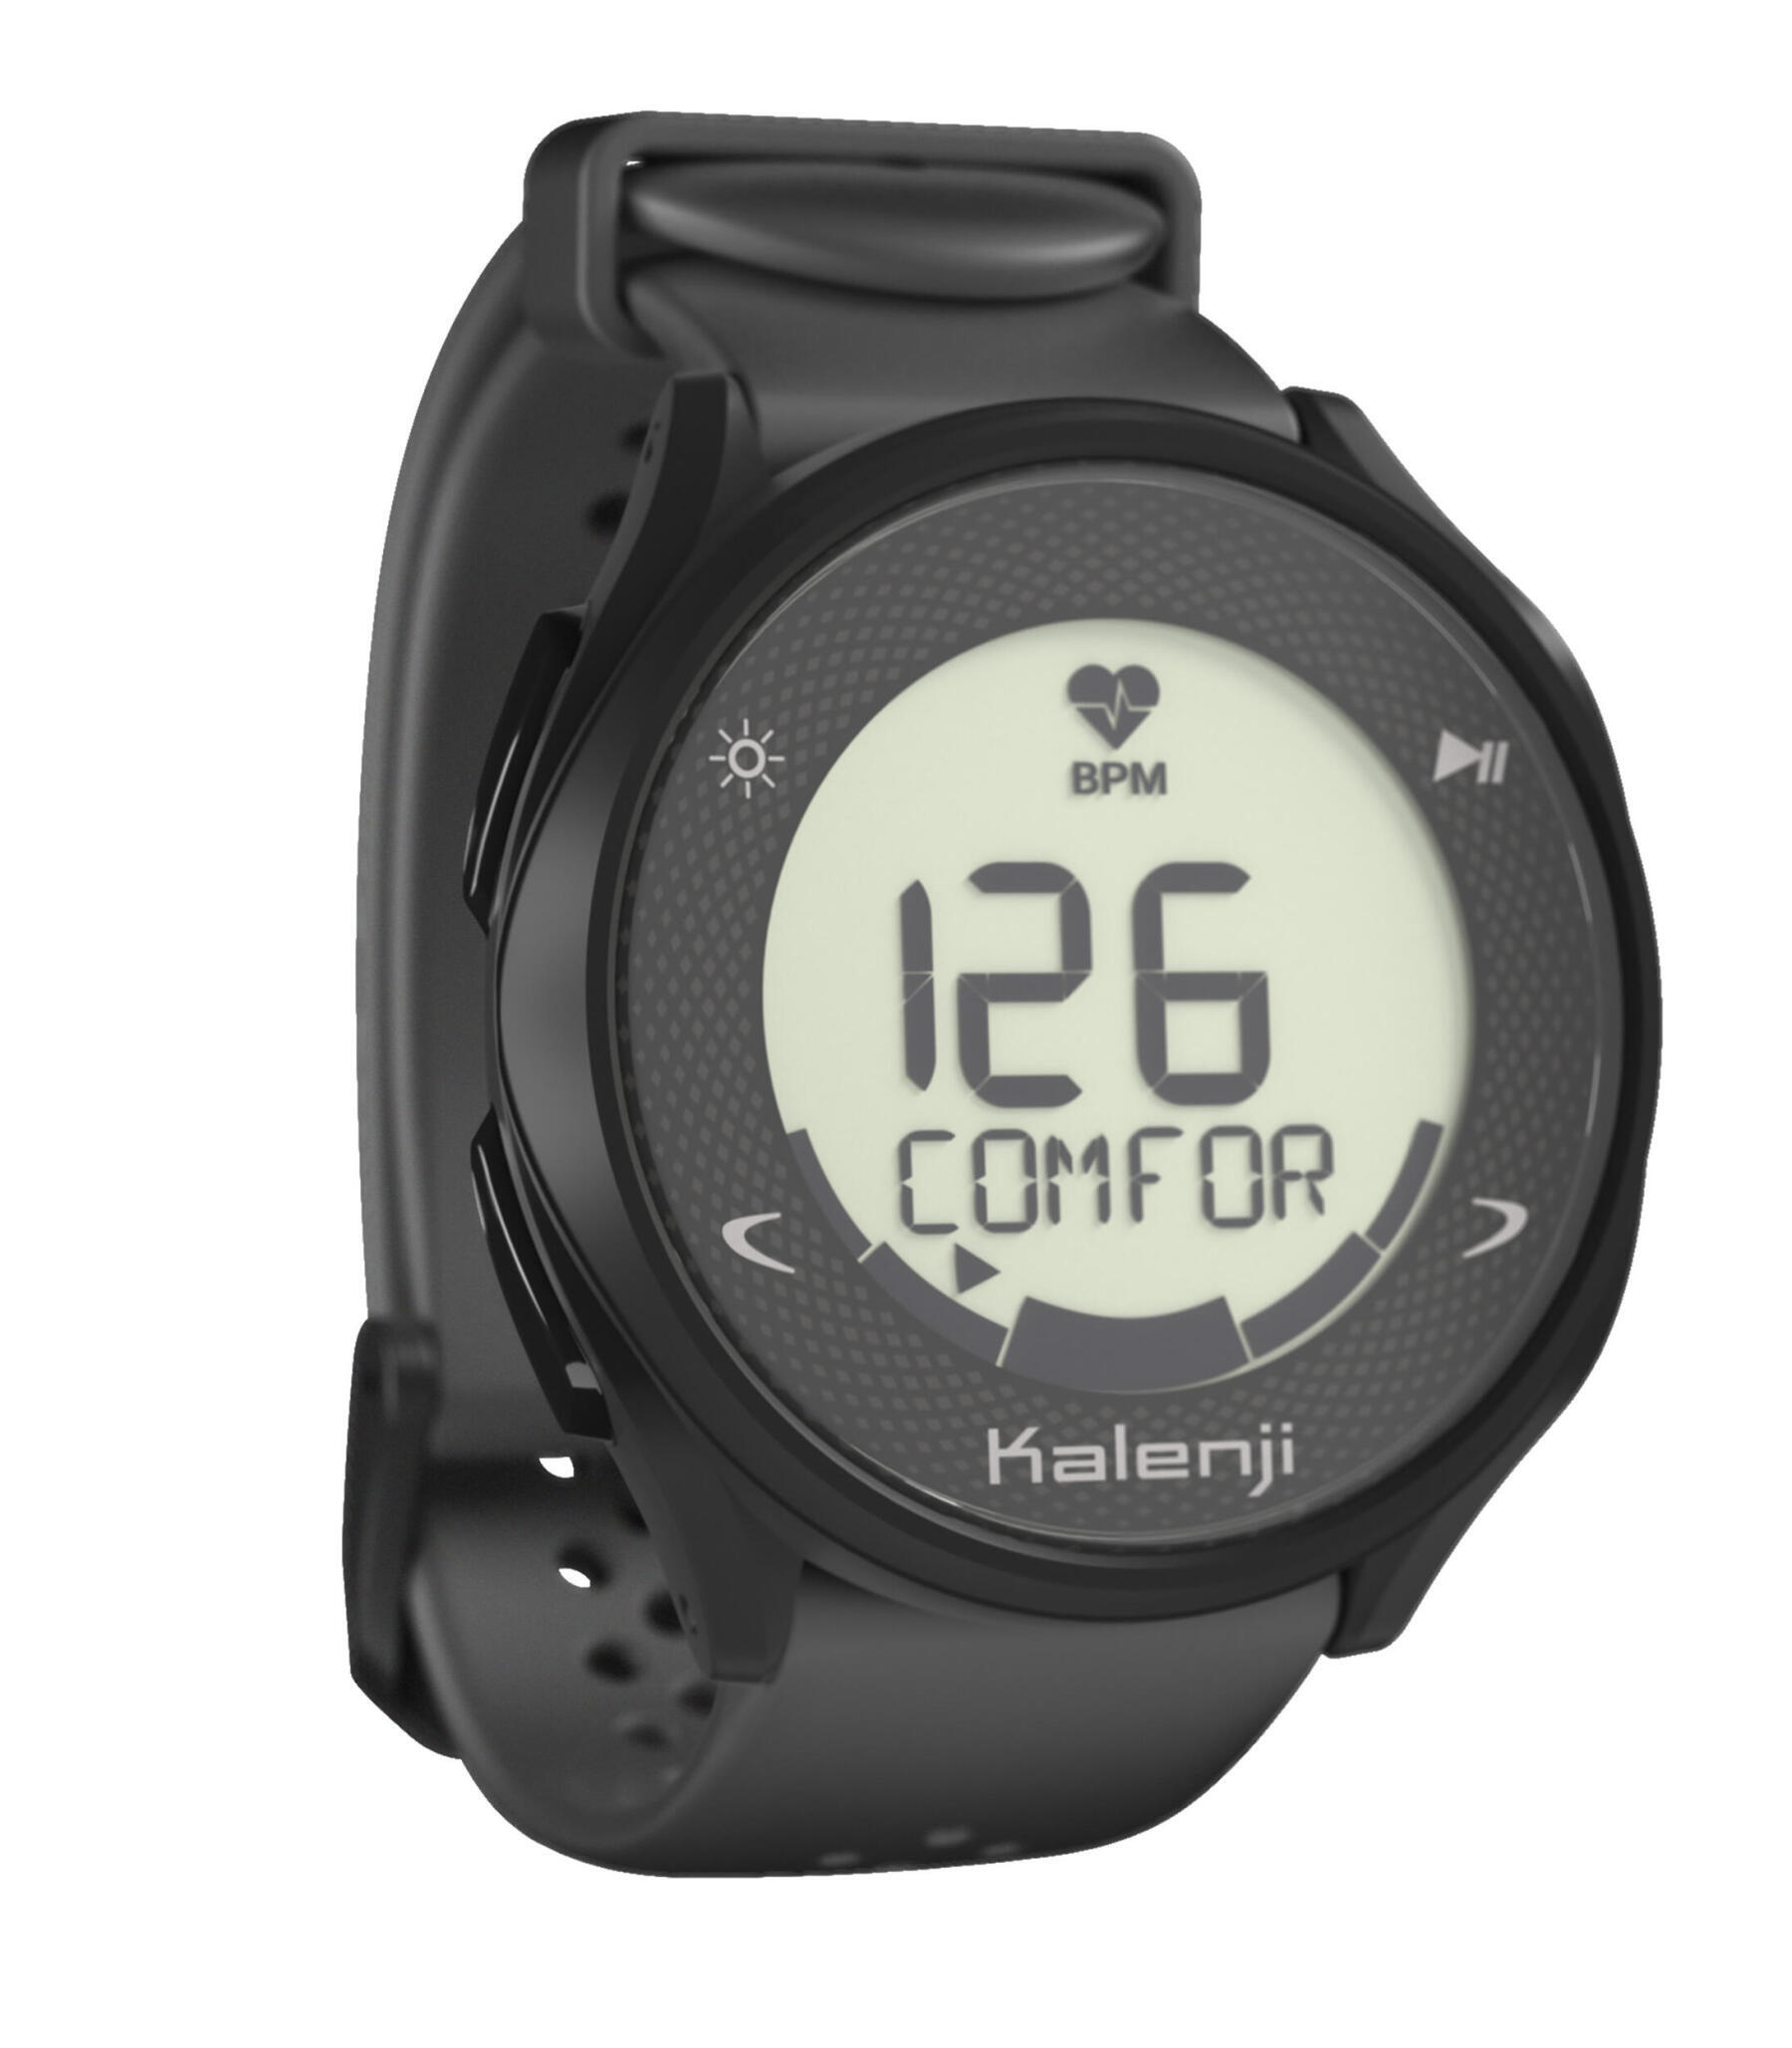
Your effort zones (warm-up, comfort, endurance, resistance and intense resistance) are calculated automatically depending on your maximum heart rate (MHR).
Your maximum heart rate is estimated according to your age and your gender.The default resting heart rate is 70 bpm.
Warm-up: under 60% of your MHR.
Comfort (also called fundamental endurance):60 to 70% of your MHR.
Endurance: 70 to 80% of your MHR.
Resistance: 80 to 90% of your MHR.
Intense resistance: 90 to 100% of your MHR.
The zones are shown at the bottom of your watch display, indicating one of the 5 zones listed above.
1.5. How to modify my maximum or rest heart rate
You can enter your maximum heart rate from the “Settings” menu, then choosing “User”. Confirm the suggested settings until you reach “max HR” or “rest HR”.
1.6. How to programme a manual zone
You can programme a manual cardiac zone for your jogging. The watch will make a sound when you leave your zone.
In order to do so, go into the watch settings, then the Activity menu, then Zones. Select MANUAL, then the minimum and maximum value of your zone.
To return to automatic effort zones (warm-up, comfort, endurance etc.) select OFF.
To return to automatic effort zones (warm-up, comfort, endurance etc.) select AUTO.
1.7. Switching off your watch
Switch off your watch the same way you switched it on: press for a long time on the START button at the top right. The display closes. The watch consumes very little energy in this mode.
We recommend leaving it in this mode if you store your watch for several months. To prevent damage to the battery, make sure the battery is charged when in this mode and charge it regularly.
Bluetooth connection
1. Download and open Decathlon Coach on your phone2. Go to settings3. Go to products4. Choose Kalenji HR5005. Connect ma watch — start detection: on the watch, from the main menu, press on the «START» button at the top right. The Bluetooth logo at the top of the screen starts to flash. 6. Select your watch
When the watch is paired with the application, the Bluetooth logo stops flashing. The application then receives your heart rate
NOTE! Do not pair your watch from the telephone Bluetooth menu. Use the application to pair your watch.
2.2. Connect your watch to another running application
The Kalenji HR500 watch uses standard Bluetooth protocol to share your heart rate. It is compatible with all applications with Bluetooth protocol: Runtastic, Endomondo, etc.
In the main menu, press «START» at the top right of your watch. The Bluetooth logo at the top of the screen starts to flash.Now search for “Kalenji HR500” in the settings of the running application you wish to use.
The Bluetooth logo stops flashing when the watch is paired with the application. The application starts receiving your heart rate immediately.
NOTE! Do not pair your watch from the telephone Bluetooth menu. Use the application to pair your watch.
2.3. How to check my watch is connected
The Bluetooth logo at the top of the screen shows if you are connected.
If it is flashing, there is no application connected to the watch.
If it is not flashing, the application is connected to the watch. If your pplication is not showing your heart rate and the Bluetooth logo on the watch is not flashing, check your connection with the application: close all other applications and check that another application is not connected to another phone.
2.4. Which functions are transmitted by bluetooth?
Only the heart rate is transmitted by Bluetooth to a running application,not the stopwatch, calories and on/off controls.
2.5. Can i control the application with my watch?
You cannot switch on, off or pause the application with the watch. Only your heart is transmitted to the running application.
2.6. Why does my application lose the heart-rate signal?
The watch and the application must be close for the connection to work: maximum 10 metres without obstacles, 2-3 metres when there are obstacles between the watch and the application.
2.7. Stopping the bluetooth function on my watch.
You can stop the Bluetooth function on your watch if you no longer wish to use it. Go to «Settings» then “Activities” then “Bluetooth”. Select “OFF”.
Precision
The technology used in the Kalenji HR500 heart-rate monitor is ideal for sports with repeated movements such as running, walking or exercising on a cross trainer.
Vibrations may cause errors. When cycling on the road or a particularly rough trail, you may notice fluctuations in your heart rate figure.
Errors may be observed when using the heart-rate monitor for sports with unsynchronised movement such as fitness classes, body-building, racket and team sports.
Reliable heart-rate measures are also not possible for water sports. It is not recommended to use the heart-rate monitor in the water, for swimming for example. The watch, however is waterproof to 5 ATM for swimming.
3.2. Does the kalenji hr500 optical heart-rate monitor work on all skin types?
The Kalenji HR500 optical sensor technology is designed for all skin colours and degrees of hair cover. On dark or tattooed skin, there is less light reflected by the skin. The sensor thus adapts, by increasing the light or adjusting the light sensitivity of the sensor. However, if you still have problems, contact our team using the button at the bottom of this page.
3.3. Why is my heart rate incorrect?
We tested the latest optical technologies to provide you with the most reliable solution. Some factors can, however, reduce the reliability of the heart-rate measure: YOUR WATCH IS IN THE WRONG POSITION: Your must wear your watch in a comfortable position above your wrist bone. If the strap is too loose, the watch will be unable to correctly measure the signal. See the section: «How to position the watch on my wrist.”THE SENSOR IS DIRTY: If the back of your watch is dirty (soil, sun cream etc.), this may affect the sensor. Your HR500 watch is waterproof. You can clean it by rinsing it in clean water.YOU PRACTISE A NON-REPETITIVE SPORT: Measuring your heart rate with a monitor on the wrist (optical reader) is optimal for sports with repetitive movements such as running, or using a cross trainer or exercise bike. It is not recommended to use a heart-rate belt for fitness class, body-building, etc.THE WEATHER IS VERY COLD:Blood vessels reduce in size when the weather is cold, making reading the heart rate more difficult.Blood circulation improves as you work out, improving your heart-rate measure.INTERVAL TRAINING:The watch is not very close to the heart so the blood will take some time to flow to your wrist. For interval training, there will be a delay in the time it takes to measure the signal. For very short minute-long intervals, it will be difficult for the watch to measure the maximum heart-rate.TATTOOS: If you have tattoos on the area where the watch is located, you may notice errors in your heart rate measurement.
USING IN WATER:
The heart-rate monitor does not function correctly in water.OTHER REASONS: The blood vessels in your right and left arm may be different. If the results on one arm are not optimal, try the other arm.
Battery
Connect your Kalenji HR500 watch with the cable provided to your computer, a power bank or a 5V 1A mains adapter.
4.2. I have lost or broken my charging cable or bracelet. where can i get a new one?
If you have lost or broken your cable or bracelet, contact our technical team using the button «Contact Form» at the bottom of the page.
Our tips
I maintain my watch
— Cleaning the watch :
In order to keep your watch glass clean, it is advisable to clean it with a damp cloth.
In order to optimize the performance of the heart sensor, it is also advisable to clean it regularly with a damp cloth.
You can also clean the charging connector with a dry toothbrush.
— Reloading the watch :
You can charge your watch using the USB cable that came with your watch on a computer or any USB power outlet.
Troubleshooting
Here you will find the troubleshooting sheet for your product.
By following the steps in this sheet, you can check if there is a possible problem with your product. If necessary, you will find in the «I REPAIR» section the tutorials indicated for the repair. You can also come to the workshops of your DECATHLON store.
Link to download the watch troubleshooting sheet (coming soon).
I repair my watch
The following repairs can be carried out on this product :
If your product cannot be repaired, return it to a WEEE collection point or any DECATHLON store to optimize recycling.
Spare parts
Here is the list of spare parts for the KALENJI HR500 :
(currently no stock)
Workshop services
You want to entrust us with your product for repair. Here is the list of services offered by our workshops :
(No workshop service for the KALENJI HR500).