Метеостанции Oregon Scientific RM338P — инструкция пользователя по применению, эксплуатации и установке на русском языке. Мы надеемся, она поможет вам решить возникшие у вас вопросы при эксплуатации техники.
Вы можете скачать инструкцию к Oregon Scientific RM338P по ссылке ниже, если не хотите ждать загрузки. Если остались вопросы, задайте их в комментариях после инструкции.
«Загружаем инструкцию», означает, что нужно подождать пока файл загрузится и можно будет его читать онлайн. Некоторые инструкции очень большие и время их появления зависит от вашей скорости интернета.
Полезные видео
Остались вопросы?
Не нашли свой ответ в руководстве или возникли другие проблемы? Задайте свой вопрос в форме ниже с подробным описанием вашей ситуации, чтобы другие люди и специалисты смогли дать на него ответ. Если вы знаете как решить проблему другого человека, пожалуйста, подскажите ему


Часто задаваемые вопросы

Как посмотреть инструкцию к Oregon Scientific RM338P?
Необходимо подождать полной загрузки инструкции в сером окне на данной странице или скачать кликнув по специальной кнопке.
Руководство на русском языке?
Все наши руководства представлены на русском языке или схематично, поэтому вы без труда сможете разобраться с вашей моделью
Как можно распечатать инструкцию?
Скачайте ее по специальной кнопке над формой чтения на ваше устройства и отправьте на печать.
-
Contents
-
Table of Contents
-
Bookmarks
Quick Links
PROJI
Projection Clock
User Manual
RM338PX/RM338PAX/RM338PUX
Related Manuals for Oregon Scientific PROJI RM338PX
Summary of Contents for Oregon Scientific PROJI RM338PX
-
Page 1
PROJI Projection Clock User Manual RM338PX/RM338PAX/RM338PUX… -
Page 2
CONTENTS EN………………………….. 2 IT …………………………… 16 FR ………………………….. 28 DE………………………….. 40 ES ………………………….. 52 POR …………………………64 NL ………………………….. 76 SWE …………………………88 TC ………………………….. 100 SC………………………….. 110 — 1 -… -
Page 3: Package Contents
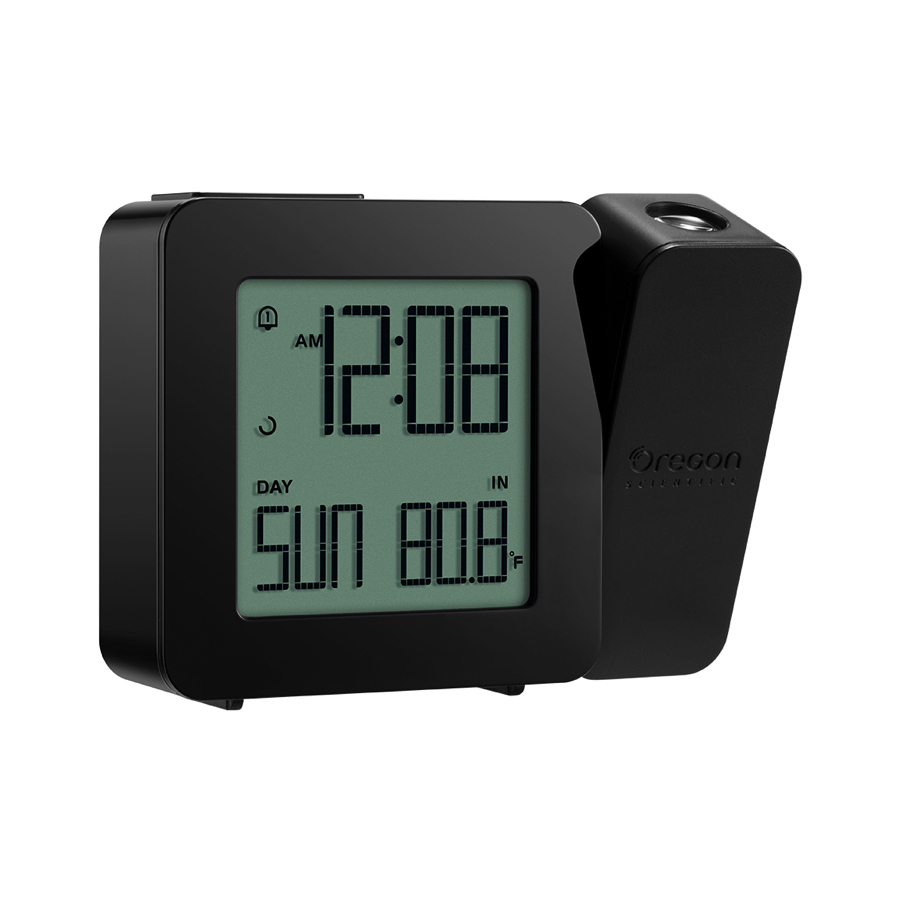
INTRODUCTION Thank you for purchasing the Oregon Scientific™ PROJI Projection Clock (model: RM338PX/ RM338PAX/RM338PUX). This device bundles precise time keeping, alarm and temperature monitoring features into a single tool you can use from the convenience of your home. Keep this manual handy as you use your new product.
-
Page 4
OVERVIEW TOP VIEW 1. + — Press to increase settings, or press and hold to increase rapidly in setting mode. 2. SNOOZE | LIGHT — Press to snooze an alarm or activate the backlight and projection. Press and hold until you hear a beep to activate the projection for 5 minutes. — Press to toggle between current time, calendar or alarm 1/2 displays for 5 seconds. -
Page 5: Rear View
REAR VIEW 1. Battery compartment 2. RESET — Press to reset the unit to default. / PROJECTION — Press to flip the projection content in 90°. Press and hold to toggle continuous projection on/off. 4. RCC – Press to turn on and search RCC signal. Press and hold to turn off. 5.
-
Page 6: Lcd Screen
LCD SCREEN 1. Time display 2. Weekday display 3. Indoor temperature display Symbol Description Alarm 1 is on. Alarm 2 is on. RCC signal received Main unit low battery GETTING STARTED INSERT BATTERIES 1. Gently push the battery compartment cover downwards to remove it from the main unit. 2.
-
Page 7
CLOCK CLOCK RECEPTION This clock synchronizes automatically with a clock signal. Press RCC to turn on and search for the clock signal. The main unit is able to receive RF clock data with different RCC signal: Model number Region Signal RM338PX RM338PUX RM338PAX… -
Page 8: Set The Clock Manually
NOTE • • It takes 2-10 minutes to receive the clock signal. If the signal is weak, it could take up to 24 hours • to receive a valid signal. • Not applicable to Asia and non-designated areas. SET THE CLOCK MANUALLY 1.
-
Page 9: Operation
• While in the setting mode, press and hold to save the settings and leave the setting mode. • The daylight saving time (DST) is set to OFF when the RCC is turned off, or when the time/ year, month or date is changed. ALARM SETTING/ADJUSTING ALARM TIME 1.
-
Page 10
PROJECTION • • • • • • • • The projector displays the time on your ceiling for easy viewing in a darkened room. For the optimal projection results, place the unit within 1.5 — 2 m (5 — 6.5 ft) from the ceiling or wall. •… -
Page 11
• When disposing of this product, ensure it is collected separately for special treatment. • Placement of this product on certain types of wood may result in damage to its finish for which Oregon Scientific will not be responsible. Consult the furniture manufacturer’s care instructions for information. -
Page 12: About Oregon Scientific
For any enquiry, please contact our Customer Services at info@oregonscientific.com. Oregon Scientific Global Distribution Limited reserves the right to interpret and construe any contents, terms and provisions in this user manual and to amend it, at its sole discretion, at any time without prior notice.
-
Page 13: Eu Declaration Of Conformity
EU-DECLARATION OF CONFORMITY Hereby the manufacturer, Oregon Scientific Global Distribution Limited, declares that the radio equipment type PROJI Projection Clock (model: RM338PX/RM338PAX/RM338PUX) is in compliance with 2014/53/EU Directive. The full text of the EU Declaration of Conformity is available at the following Internet address : http://global.oregonscientific.com/customerSupport.php…
-
Page 14: Fcc Statement
The adequate separate collection for the subsequent start-up of the equipment sent to be recycled, treated and disposal of in an environmentally compatible way contributes to preventing possible negative effects on the environment and health and optimizes the recycling and reuse of components making up the apparatus. Abusive disposal of the product by the user involves application of the administrative sanctions according to the laws in force.
-
Page 15: Declaration Of Conformity
The following information is not to be used as contact for support or sales. Please call our customer service number (listed on our website at www.oregonscientific.com), or on the warranty card for this product) for all inquiries instead. Name: Oregon Scientific Inc. Address: Brea Corporate Park 3020 Saturn St. Suite 200 Brea, CA 92821 1 (888) 950-8889 Telephone No.:…
-
Page 16
RM338PX/RM338PAX/RM338PUX Product Name: PROJI Projection Clock Manufacturer: Oregon Scientific Global Distribution Limited Address: Block C, 9/F, Kaiser Estate, Phase 1, 41 Man Yue St., Hung Hom, Kowloon, Hong Kong is in conformity with Part 15 of the FCC Rules. Operation is subject to the following two conditions: 1) This device may not cause harmful interference.
Часы проекционные Oregon Scientific RM338P
будильник, проектор, датчик температуры, тип питания — от сети, резервное питание от батареек
подробнее

4
Код товара: 1041265
PROJI Projection Clock
RM338P/RM338PU
User Manual
EN
INTRODUCTION
Thank you for purchasing the Oregon Scientific™ PROJI
Projection Clock (model: RM338P/RM338PU). This device
bundles precise time keeping, alarm and temperature
monitoring features into a single tool you can use from the
convenience of your home. Keep this manual handy as
you use your new product. It contains practical step-by-
step instructions, as well as technical specifications and
warnings you should know.
PACKAGE CONTENTS
Main unit
Power adapter
AAA batteries
for main unit x 2
OVERVIEW
TOP VIEW
1
4
2
5
3
6
1. + — Press to increase settings, or press and hold to
increase rapidly in setting mode.
2. SNOOZE | LIGHT — Press to snooze an alarm or
activate the backlight and projection. Press and hold
until you hear a beep to activate the projection for 5
minutes.
3.
— Press to toggle between current time, calendar
or alarm 1/2 displays for 5 seconds. Press and hold to
enter setting mode.
4. – — Press to decrease settings, press and hold to
decrease settings rapidly.
5. Projection lens
6.
— Press to turn on/off alarms, press and hold to enter
alarm setting mode.
REAR VIEW
1
2
3
4
5
1. Battery compartment
2. RESET — Press to reset the unit to default.
3.
/ PROJECTION — Press to flip the projection content in
180°. Press and hold to toggle continuous projection on/off.
4. RCC – Press to turn on and search RCC signal. Press
and hold to turn off.
5. Battery compartment cover
LCD SCREEN
1
2
3
1. Time display
2. Weekday display
3. Indoor temperature display
Symbol
Description
Alarm 1 is on.
Alarm 2 is on.
RCC signal received
Main unit low battery
GETTING STARTED
INSERT BATTERIES
1. Gently push the battery compartment cover downwards
to remove it from the main unit.
2. Insert the batteries, matching the polarities (+/-).
NOTE
Replace the batteries when displays
, or when
the display is dim.
DC POWER
Plug the power cable to the power jack and plug the power
adapter into a suitable power outlet.
NOTE
It is recommended to insert the battery as a backup
power source.
CLOCK
CLOCK RECEPTION
This clock synchronizes automatically with a clock signal.
Press RCC to turn on and search for the clock signal.
The main unit is able to receive RF clock data with different
RCC signal:
Model number
Region
Signal
RM338P
EU
DCF
RM338PU
UK
MSF
Clock signal reception indicator:
Icons
Description
Main unit is searching for
clock signal strength
Main unit is searching for
clock signal
(flash)
No clock signal
Strong RCC signal
received
Weak RCC signal received
NOTE
It takes 2-10 minutes to receive the clock signal. If
the signal is weak, it could take up to 24 hours to receive a
valid signal.
SET THE CLOCK MANUALLY
1. Press and hold
. The screen displays ZONE and the
number flashes.
2. Press once or press and hold +/- to adjust the setting.
For EU/UK, the time-zone offset sets the clock up to
+/- 23 hours from the received clock signal time.
3. Press
to confirm.
4. Press once or press and hold +/- to adjust the setting for
12/24h hour format, hour, minute, year, calendar format
(month-day/day-month), month, date, temperature unit
(°C/°F) and language.
5. Press
to confirm each setting.
NOTE
• The language options are English (ENG), Spanish (SPA),
Italian (ITA), French (FRE) and German (GER).
• The signal reception is on after each reset or battery
replacement.
• While in the setting mode, press and hold to save the
settings and leave the setting mode.
ALARM
SETTING/ADJUSTING ALARM TIME
1. Press and hold
.
2. Press once or press and hold +/- to adjust the hour and
minute setting, then press
to confirm.
3. Press +/- to toggle the weekday alarm ON/OFF, then
press
to confirm.
• The alarm rings only on weekdays when the setting is ON.
4. Repeat step 2 – 4 for alarm 2 setting.
TURN ON/OFF ALARMS:
Press to turn on/off the alarm in sequence:
Alarm1
> Alarm 2
> Both ON
> Both OFF.
OPERATION
When the alarm rings, the backlight will flash. You may:
• Press
to stop. The alarm will ring again on the next
day.
• Press SNOOZE | LIGHT to snooze. The alarm rings again
after 8 minutes.
PROJECTION
The projector displays the time on your ceiling for easy
viewing in a darkened room. For the optimal projection
results, place the unit within 1.5 — 2 m (5 — 6.5 ft) from the
ceiling or wall.
• Press SNOOZE | LIGHT to activate the backlight and
projection for 5 seconds.
• Press and hold SNOOZE | LIGHT until you hear a beep to
activate the projection for 5 minutes.
• Press
/ PROJECTION to flip the projection content by
180°.
• Press and hold
/ PROJECTION to toggle the
continuous projection on/off.
NOTE
The continuous projection function is disabled when
the main unit is not connected to the power adapter.
PRECAUTIONS
• Do not subject the unit to excessive force, shock, dust,
temperature or humidity.
• Do not immerse the unit in water. If you spill liquid over it,
dry it immediately with a soft, lint-free cloth.
• Do not clean the unit with abrasive or corrosive materials.
• Do not tamper with the unit’s internal components. This
invalidates the warranty.
• Only use fresh batteries. Do not mix new and old
batteries.
• Images shown in this manual may differ from the actual
display.
• When disposing of this product, ensure it is collected
separately for special treatment.
• Placement of this product on certain types of wood
may result in damage to its finish for which Oregon
Scientific will not be responsible. Consult the furniture
manufacturer’s care instructions for information.
• The contents of this manual may not be reproduced
without the permission of the manufacturer.
• Do not dispose old batteries as unsorted municipal waste.
Collection of such waste separately for special treatment
is necessary.
• Please note that some units are equipped with a
battery safety strip. Remove the strip from the battery
compartment before first use.
NOTE
The technical specifications for this product and the
contents of the user manual are subject to change without
notice.
SPECIFICATIONS
MAIN UNIT
L x W x H
108 x 26 x 77 mm
(4.25 x 1.02 x 3.03 in)
Weight
112 g
Temperature range
-5°C to 50°C
(23°F to 122°F)
Accuracy
0°C to 40°C: ± 1°C (± 2.0°F)
< 0°C and >40°C: ± 2°C (± 4.0°F)
Resolution
0.1°C (0.2°F)
Power
2 x UM-4 (AAA) 1.5 V batteries
3.6 V adapter
ABOUT OREGON SCIENTIFIC
Visit our website www.oregonscientific.com to learn more
about Oregon Scientific products.
For any enquiry, please contact our Customer Services at
info@oregonscientific.com.
Oregon Scientific Global Distribution Limited reserves the
right to interpret and construe any contents, terms and
provisions in this user manual and to amend it, at its sole
discretion, at any time without prior notice. To the extent that
there is any inconsistency between the English version and
any other language versions, the English version shall prevail.
EU-DECLARATION OF CONFORMITY
Hereby, Oregon Scientific, declares that this PROJI
Projection Clock (model: RM338P/RM338PU) is in
compliance with the essential requirements and other
relevant provisions of Directive 1999/5/EC. A copy of the
signed and dated Declaration of Conformity is available on
request via our Oregon Scientific Customer Service.
Countries RTTE Approval Complied
All EU countries, Switzerland CH
and Norway
N
FCC STATEMENT
This device complies with Part 15 of the FCC Rules.
Operation is subject to the following two conditions: (1) This
device may not cause harmful interference, and (2) This
device must accept any interference received, including
interference that may cause undesired operation.
WARNING
Changes or modifications not expressly
approved by the party responsible for compliance could void
the user’s authority to operate the equipment.
This equipment has been tested and found to comply with
the limits for a Class B digital device, pursuant to Part 15
of the FCC Rules. These limits are designed to provide
reasonable protection against harmful interference in a
residential installation.
NOTE
This equipment generates, uses and can radiate
radio frequency energy and, if not installed and used
in accordance with the instructions, may cause harmful
interference to radio communications. However, there
is no guarantee that interference will not occur in a
particular installation. If this equipment does cause harmful
interference to radio or television reception, which can be
determined by turning the equipment off and on, the user is
encouraged to try to correct the interference by one or more
of the following measures:
• Reorient or relocate the receiving antenna.
• Increase the separation between the equipment and receiver.
• Connect the equipment into an outlet on a circuit different
from that to which the receiver is connected.
• Consult the dealer or an experienced radio/TV technician
for help.
This Class B digital apparatus complies with Canadian
ICES- 3(B)/NMB-3(B)
DECLARATION OF CONFORMITY
The following information is not to be used as contact for
support or sales. Please call our customer service number
(listed on our website at www.oregonscientific.com), or on
the warranty card for this product) for all inquiries instead.
We
Name:
Oregon Scientific, Inc.
Address:
10778 SW Manhasset Dr. Tualatin,
Or 97062 USA
1-800-853-8883
Telephone No.:
declare that the product
Product No.:
RM338P/RM338PU
Product
PROJI Projection Clock
Name:
Manufacturer:
IDT Technology Limited
Address:
Block C, 9/F, Kaiser Estate,
Phase 1, 41 Man Yue St.,
Hung Hom, Kowloon,
Hong Kong
DISPOSAL INFORMATION FOR USERS
Pursuant to and in accordance with Article 14
of the Directive 2012/19/EU of the European
Parliament on waste electrical and electronic
equipment (WEEE), and pursuant to and in
accordance with Article 20 of the Directive
2006/66/EC of the European Parliament on batteries and
accumulators and waste batteries.
The barred symbol of the rubbish bin shown on the
equipment indicates that, at the end of its useful life, the
product must be collected separately from other waste.
Please note that the batteries/rechargeable batteries
must be removed from the equipment before it is given as
waste. To remove the batteries/accumulators refer to the
specifications in the user manual. Therefore, any products
that have reached the end of their useful life must be given
to waste disposal centers specializing in separate collection
of waste electrical and electronic equipment, or given back
to the dealer when purchasing a new WEEE, pursuant to
and in accordance with Article 14 as implemented in the
country.
The adequate separate collection for the subsequent
start-up of the equipment sent to be recycled, treated
and disposal of in an environmentally compatible way
contributes to preventing possible negative effects on the
environment and health and optimizes the recycling and
reuse of components making up the apparatus.
Abusive disposal of the product by the user involves
application of the administrative sanctions according to the
laws in force.
Проекционные часы «PROJI»
Модель: RM338P
РУКОВОДСТВО ПОЛЬЗОВАТЕЛЯ
RU
ВВЕДЕНИЕ
Примите наши поздравления в связи приобретением
проекционных часов из серии «PROJI», модель
RM338P. Настоящее руководство содержит пошаговые
инструкции, касающиеся настройки и эксплуатации
устройства, а также его технические характеристики
и некоторые меры предосторожности, которые
необходимо соблюдать во время его эксплуатации.
Храните руководство в доступном месте для
обеспечения возможности получения дальнейших
справок по мере эксплуатации устройства.
КОМПЛЕКТ ПОСТАВКИ
Oосновное
Cетевой
Батарейка AAA
устройство
адаптер
дпя основного
устройства,
2 шт
ОСНОВНЫЕ ЭЛЕМЕНТЫ УСТРОЙСТВА
ВИД СВЕРХУ
1
4
2
5
3
6
1. Кнопка + : увеличение значения параметра при
настройке; переключение каналов дистанционных
датчиков.
2. Кнопка ДРЕМАТЬ / ПОДСВЕТКА (SNOOZE / LIGHT):
пауза сигнала будильника, включение подсветки и
проекции. Нажать и удерживать до звукового сигнала
для активации проекции на 5 мин.
3. Кнопка
: переключение между отображением
текущего времени, календаря или будильника.
Нажать и удерживать для входа в режим настроек.
4. Кнопка – : уменьшение значения параметра при
настройке.
5. Линза проектора.
6.
— Кнопка : включение / выключение будильников,
нажать и удерживать для входа в режим настройки
будильников.
ВИД СЗАДИ
1
2
3
4
5
1. Отсек для батареек.
2. Кнопка СБРОС НАСТРОЕК (RESET): возврат
настроек в заводское состояние.
3. Кнопка
/ ПРОЕКЦИЯ (
/ PROJECTION):
поворот изображения на 180º, нажать и удерживать
для выключения / включения постоянной проекции.
4. Кнопка RCC: поиск сигнала точного времени, нажать
и удерживать для отключения приема сигнала
точного времени.
5. Крышка отсека для батареек.
ЖК ДИСПЛЕЙ
1
2
3
1. Текущее время.
2. Текущая дата.
3. Значение комнатной температуры.
НАЧАЛО РАБОТЫ
БАТАРЕЙКИ
1. Аккуратно потяните вниз крышку отсека для
батареек, чтобы открыть его.
2. Вставьте батарейки, соблюдая полярность.
ПРИМЕЧАНИЕ
Заменяйте батарейки при появлении
на дисплее соответствующего сигнала либо при
снижении яркости дисплея.
СЕТЕВОЙ АДАПТЕР
Подсоедините сетевой адаптер в соответствующее
гнездо. Старайтесь расположить адаптер таким
образом, чтобы всегда иметь к нему быстрый доступ.
Для отключения от питания просто отсоедините
сетевой адаптер. При включенном адаптере батарейки
выполняют функцию резервного источника питания.
ПРИМЕЧАНИЕ
Не рекомендуется включать адаптер
в сети при высокой влажности. Не располагайте рядом
с сетевым адаптером сосуды с жидкостью, например,
вазы.
ЧАСЫ
ПРИЕМ СИГНАЛА ТОЧНОГО ВРЕМЕНИ
Устройство способно автоматически устанавливать
текущие дату и время при условии его нахождения в
радиусе приема сигнала DCF-77 из Франкфурта для
Европы. Сигнал принимается устройством в радиусе до
1500 км от местонахождения радиостанции.
Активация поиска сигнала осуществляется нажатием
кнопки RCC.
ПРИМЕЧАНИЕ
Продолжительность первого приема
колеблется в пределах от 2 до 10 минут. Первый
сеанс приема осуществляется непосредственно после
установки батареек в устройство, а также после каждого
нажатия кнопки СБРОС НАСТРОЕК (RESET).
Однако при слабом сигнале продолжительность сеанса
приема может достигать 24 часов.
ВАЖНО
Функция радиосинхронизации точного
времени, используемая в устройствах Oregon Scientific,
принимает сигнал с передатчика, расположенного
неподалеку от города Франкфурт-на-Майне (Германия).
Сигнал передатчика транслируется раз в сутки и
уверенно принимается на расстоянии до 1500 км,
поэтому в России эта функция работает не во всех
регионах, что не является неисправностью. Сигнал
передает значение среднеевропейского времени,
которое на 2 часа отличается от Московского зимой и
на 1 час летом. В связи с этим в устройствах, которые
используют функцию корректировки точного времени,
рекомендуется ее отключить.
УСТАНОВКА ТЕКУЩЕГО ВРЕМЕНИ
При невозможности осуществления автоматической
установки текущего времени по радиосигналу следует
отключить данную функцию и установить текущее время
вручную.
1. Нажмите и удерживайте кнопку
. На экране
отобразится ZONE, цифры начнут мигать.
2. Используйте кнопки + и – для изменения параметров
источника приема сигнала точного времени (EU /
UK), далее для установки часового пояса (+/- 23
часа).
3. Для подтверждения нажмите кнопку
.
4. Используйте кнопки + и – для изменения формата
отображения времени (12 / 24), часов, минут, года,
формата отображения даты, месяца, числа, единицы
измерения температуры и языка календаря.
5. Для подтверждения каждой сделанной установки
используйте кнопку
.
ПРИМЕЧАНИЕ
Функцию часового пояса необходимо
использовать, если локальное время отличается от
того, радиосигнал которого принимает устройство. Если
функция автоматического приема радиосигнала точного
времени отключена, не изменяйте значение функции
часового пояса.
ПРИМЕЧАНИЕ
В режиме настройки нажмите
и удерживайте кнопку
для сохранения текущих
параметров и выхода из режима настройки.
БУДИЛЬНИК
НАСТРОЙКА / УСТАНОВКА БУДИЛЬНИКА
1. Нажмите и удерживайте кнопку
.
2. Используйте кнопки + и – для установки значения
часов и минут времени срабатывания сигнала
будильника, затем нажмите кнопку
для
подтверждения.
3. Используйте кнопки + и – для вкл / выкл сигнала
в будние дни, затем нажмите кнопку
для
подтверждения. В положении ВКЛ (ON) сигнал
будильника будет срабатывать в будние дни.
4. Повторите шаги 2-4 для настройки Будильника 2.
ВКЛЮЧЕНИЕ / ВЫКЛЮЧЕНИЕ БУДИЛЬНИКА
Используйте кнопку
для вкл / выкл будильников
в следующей последовательности: Будильник 1 ВКЛ
> Будильник 2 ВКЛ > Оба будильника ВКЛ > оба
будильника ВЫКЛ.
УПРАВЛЕНИЕ
При активации сигнала будильника подсветка дисплея
будет мигать. При этом:
• нажатие кнопки
остановит сигнал будильника. Он
повторится на следующий день.
• нажатие кнопки ДРЕМАТЬ / ПОДСВЕТКА (SNOOZE
/ LIGHT) прервет сигнал будильника, он повторится
впоследствии через 8 минут.
ТЕМПЕРАТУРА
Текущее значение комнатной температуры постоянно
отображается в правом нижнем углу дисплея.
ПРИМЕЧАНИЕ
При снижении комнатной
температуры ниже -5°C на дисплее устройства
отобразятся символы LL.L. В случае повышения
комнатной температуры выше +50°C на дисплее
отобразятся символы НН.Н.
ПРОЕКЦИЯ
Проекция текущего времени осуществляется на
потолок или стену для удобства просмотра при низком
окружающем освещении. Оптимальное расстояние от
проектора до поверхности (стена / потолок) – от 1,5 до
2,0 метров.
• Нажмите кнопку ДРЕМАТЬ / ПОДСВЕТКА (SNOOZE /
LIGHT) для активации проекции и подсветки дисплея
на 5 секунд.
• Нажмите и удерживайте кнопку ДРЕМАТЬ /
ПОДСВЕТКА (SNOOZE / LIGHT) до звукового сигнала
для активации проекции на 5 минут.
• Нажмите кнопку
/ ПРОЕКЦИЯ (
/ PROJECTION)
для поворота проекции на 180º.
• Нажмите и удерживайте кнопку
/ ПРОЕКЦИЯ (
/
PROJECTION) для вкл / выкл постоянной проекции.
• Настройте фокус проектора при необходимости.
ПРИМЕЧАНИЕ
Функция постоянной проекции
активна только при питании от сетевого адаптера.
СБРОС НАСТРОЕК
Для возвращения всех настроек устройства в их
изначальное заводское состояние нажмите кнопку
СБРОС НАСТРОЕК (RESET).
ТЕХНИЧЕСКИЕ ХАРАКТЕРИСТИКИ
ОСНОВНОЕ УСТРОЙСТВО
Размеры, мм
108 х 26 х 77
Вес без батареек, г
112
Диапазон измерения
–5 … +50
температуры, °С
Точность измеренияa
От 0°C до 40°C: ±2°C
Разрешение измерения
0,1°C
Питание
2 ААА батарейки (в
комплекте)
МЕРЫ ПРЕДОСТОРОЖНОСТИ
Конструкция устройства обеспечивает долгие годы его
бесперебойной работы при условии надлежащего с
ним обращения. Ниже приводятся несколько правил
эксплуатации устройства.
• Запрещается прикладывать к корпусу устройства
чрезмерные усилия. Не подвергайте устройство
воздействию сильных сотрясений, пыли, а также резких
перепадов температуры и влажности. Указанные
воздействия могут привести к сокращению срока
службы устройства, к выходу из строя его батареек,
а также к повреждению его частей. Не закрывайте
вентиляционные отверстия.
• Категорически запрещается погружать устройство в
воду. В случае попадания воды на корпус устройства
необходимо немедленно стереть ее с помощью мягкой
ткани без ворсинок.
• Запрещается использовать для чистки устройства
едкие и абразивные моющие вещества.
• Запрещается разбирать устройство. При этом вы
потеряете право на гарантийное обслуживание.
Помимо этого, подобные действия могут стать
причиной серьезных повреждений устройства.
Устройство не содержит элементов, которые могут
быть отремонтированы или заменены пользователем.
• При размещении устройства на некоторых деревянных
поверхностях, оно может оставлять царапины.
Проконсультируйтесь с производителем Вашей мебели.
• При длительном хранении извлекайте батарейки из
устройства.
• Твердые предметы могут оставлять царапины на
панели дисплея.
• При утилизации устройства, либо его компонентов
соблюдайте региональные правила утилизации.
• Из-за ограничений печатных технологий вид дисплеев,
изображенных в руководстве, может отличаться от их
оригинального вида.
Содержание руководства не может быть воспроизведено
без согласия производителя.
О КОМПАНИИ OREGON SCIENTIFIC
Посетите сайт www.oregonscientific.com (на русском
языке: www.oregonscientific.ru) для получения сведений
о других продуктах компании Oregon Scientific, таких
как проекционные часы, аромадиффузоры, погодные
станции, детские электронные обучающие и игровые
устройства.
ДЕКЛАРАЦИЯ СООТВЕТСТВИЯ ДЛЯ СТРАН ЕС
Настоящим компания Oregon Scientific заявляет, что
проекционные часы, серия PROJI, модель RM338P,
соответствуют основным требованиям Директивы ЕС
1999/5/EC и дополняющих ее нормативных актов. Копия
подписанной и датированной декларации соответствия
предоставляется отделом обслуживания клиентов по
запросу потребителя.
Страны, на которые распространяется директивы
Европейского сообщества по вопросу оконечного радио-
и телекоммуникационное оборудования:
В
а
Е
а, Ш
а
CH
.
Н
N
С
а – 2
а.
300103833-00002-10

PROJI Projection Clock
RM338P/RM338PU
User Manual
EN
INTRODUCTION
Thank you for purchasing the Oregon Scientic™ PROJI
Projection Clock (model: RM338P/RM338PU). This device
bundles precise time keeping, alarm and temperature
monitoring features into a single tool you can use from the
convenience of your home. Keep this manual handy as you
use your new product. It contains practical step-by-step
instructions, as well as technical specications and warnings
you should know.
PACKAGE CONTENTS
Main unit Power adapter AAA batteries
for main unit x 2
OVERVIEW
TOP VIEW
4
5
6
1
2
3
1. + — Press to increase settings, or press and hold to
increase rapidly in setting mode.
2. SNOOZE | LIGHT — Press to snooze an alarm or activate
the backlight and projection. Press and hold until you
hear a beep to activate the projection for 5 minutes.
3.
— Press to toggle between current time, calendar or
alarm 1/2 displays for 5 seconds. Press and hold to enter
setting mode.
4. – — Press to decrease settings, press and hold to
decrease settings rapidly.
5. Projection lens
6.
— Press to turn on/off alarms, press and hold to enter
alarm setting mode.
REAR VIEW
1
23 4
5
1. Battery compartment
2. RESET — Press to reset the unit to default.
3.
/ PROJECTION — Press to ip the projection content in
180°. Press and hold to toggle continuous projection on/off.
4. RCC – Press to turn on and search RCC signal. Press
and hold to turn off.
5. Battery compartment cover
LCD SCREEN
1
1. Time display
2. Weekday display
3. Indoor temperature display
Symbol Description
Alarm 1 is on.
Alarm 2 is on.
RCC signal received
Main unit low battery
GETTING STARTED
INSERT BATTERIES
1. Gently push the battery compartment cover downwards
to remove it from the main unit.
2. Insert the batteries, matching the polarities (+/-).
NOTE Replace the batteries when displays , or when
the display is dim.
DC POWER
Plug the power cable to the power jack and plug the power
adapter into a suitable power outlet.
NOTE It is recommended to insert the battery as a backup
power source.
CLOCK
CLOCK RECEPTION
This clock synchronizes automatically with a clock signal.
Press RCC to turn on and search for the clock signal.
The main unit is able to receive RF clock data with different
RCC signal:
Model number Region Signal
RM338P EU DCF
RM338PU UK MSF
Clock signal reception indicator:
Icons Description
Main unit is searching for
clock signal strength
(ash)
Main unit is searching for
clock signal
No clock signal
Strong RCC signal
received
Weak RCC signal received
NOTE It takes 2-10 minutes to receive the clock signal. If
the signal is weak, it could take up to 24 hours to receive a
valid signal.
SET THE CLOCK MANUALLY
1. Press and hold . The screen displays ZONE and the
number ashes.
2. Press once or press and hold +/- to adjust the setting.
For EU/UK, the time-zone offset sets the clock up to
+/- 23 hours from the received clock signal time.
3. Press
to conrm.
4. Press once or press and hold +/- to adjust the setting for
12/24h hour format, hour, minute, year, calendar format
(month-day/day-month), month, date, temperature unit
(°C/°F) and language.
5. Press
to conrm each setting.
NOTE
• The language options are English (ENG), Spanish (SPA),
Italian (ITA), French (FRE) and German (GER).
• The signal reception is on after each reset or battery
replacement.
• While in the setting mode, press and hold to save the
settings and leave the setting mode.
ALARM
SETTING/ADJUSTING ALARM TIME
1. Press and hold .
2. Press once or press and hold +/- to adjust the hour and
minute setting, then press
to conrm.
3. Press +/— to toggle the weekday alarm ON/OFF, then
press
to conrm.
• The alarm rings only on weekdays when the setting is ON.
4. Repeat step 2 – 4 for alarm 2 setting.
TURN ON/OFF ALARMS:
Press to turn on/off the alarm in sequence:
Alarm1
> Alarm 2 > Both ON > Both OFF.
OPERATION
When the alarm rings, the backlight will ash. You may:
• Press
to stop. The alarm will ring again on the next
day.
• Press SNOOZE | LIGHT to snooze. The alarm rings again
after 8 minutes.
PROJECTION
The projector displays the time on your ceiling for easy
viewing in a darkened room. For the optimal projection
results, place the unit within 1.5 — 2 m (5 — 6.5 ft) from the
ceiling or wall.
• Press SNOOZE | LIGHT to activate the backlight and
projection for 5 seconds.
• Press and hold SNOOZE | LIGHT until you hear a beep to
activate the projection for 5 minutes.
• Press
/ PROJECTION to ip the projection content by
180°.
• Press and hold
/ PROJECTION to toggle the
continuous projection on/off.
NOTE The continuous projection function is disabled when
the main unit is not connected to the power adapter.
PRECAUTIONS
• Do not subject the unit to excessive force, shock, dust,
temperature or humidity.
• Do not immerse the unit in water. If you spill liquid over it,
dry it immediately with a soft, lint-free cloth.
• Do not clean the unit with abrasive or corrosive materials.
• Do not tamper with the unit’s internal components. This
invalidates the warranty.
• Only use fresh batteries. Do not mix new and old
batteries.
• Images shown in this manual may differ from the actual
display.
• When disposing of this product, ensure it is collected
separately for special treatment.
• Placement of this product on certain types of wood
may result in damage to its nish for which Oregon
Scientic will not be responsible. Consult the furniture
manufacturer’s care instructions for information.
• The contents of this manual may not be reproduced
without the permission of the manufacturer.
• Do not dispose old batteries as unsorted municipal waste.
Collection of such waste separately for special treatment
is necessary.
• Please note that some units are equipped with a
battery safety strip. Remove the strip from the battery
compartment before rst use.
NOTE The technical specications for this product and the
contents of the user manual are subject to change without
notice.
SPECIFICATIONS
MAIN UNIT
L x W x H 108 x 26 x 77 mm
(4.25 x 1.02 x 3.03 in)
Weight 112 g
Temperature range -5°C to 50°C
(23°F to 122°F)
Accuracy 0°C-40°C: ±1°C (± 2.0°F)
40°C <T<0°C: ±2°C (± 4.0°F)
Resolution 0.1°C (0.2°F)
Power 2 x UM-4 (AAA) 1.5 V batteries
3.6 V adapter
SPECIFICATIONS
Visit our website www.oregonscientic.com to learn more
about Oregon Scientic products.
For any enquiry, please contact our Customer Services at
info@oregonscientic.com.
Oregon Scientic Global Distribution Limited reserves the
right to interpret and construe any contents, terms and
provisions in this user manual and to amend it, at its sole
discretion, at any time without prior notice. To the extent that
there is any inconsistency between the English version and
any other language versions, the English version shall prevail.
EU-DECLARATION OF CONFORMITY
Hereby, Oregon Scientic, declares that this PROJI
Projection Clock (model: RM338P/RM338PU) is in
compliance with the essential requirements and other
relevant provisions of Directive 1999/5/EC. A copy of the
signed and dated Declaration of Conformity is available on
request via our Oregon Scientic Customer Service.
Countries RTTE Approval Complied
All EU countries, Switzerland CH
and Norway N
FCC STATEMENT
This device complies with Part 15 of the FCC Rules.
Operation is subject to the following two conditions: (1) This
device may not cause harmful interference, and (2) This
device must accept any interference received, including
interference that may cause undesired operation.
WARNING Changes or modications not expressly
approved by the party responsible for compliance could void
the user’s authority to operate the equipment.
This equipment has been tested and found to comply with
the limits for a Class B digital device, pursuant to Part 15
of the FCC Rules. These limits are designed to provide
reasonable protection against harmful interference in a
residential installation.
NOTE This equipment generates, uses and can radiate
radio frequency energy and, if not installed and used
in accordance with the instructions, may cause harmful
interference to radio communications. However, there
is no guarantee that interference will not occur in a
particular installation. If this equipment does cause harmful
interference to radio or television reception, which can be
determined by turning the equipment off and on, the user is
encouraged to try to correct the interference by one or more
of the following measures:
• Reorient or relocate the receiving antenna.
• Increase the separation between the equipment and receiver.
• Connect the equipment into an outlet on a circuit different
from that to which the receiver is connected.
• Consult the dealer or an experienced radio/TV technician
for help.
This Class B digital apparatus complies with Canadian
ICES- 3(B)/NMB-3(B)
DECLARATION OF CONFORMITY
The following information is not to be used as contact for
support or sales. Please call our customer service number
(listed on our website at www.oregonscientic.com), or on
the warranty card for this product) for all inquiries instead.
We
Name: Oregon Scientic, Inc.
Address: 10778 SW Manhasset Dr. Tualatin,
Or 97062 USA
Telephone No.:
1-800-853-8883
declare that the product
Product No.: RM338P/RM338PU
Product
Name:
PROJI Projection Clock
Manufacturer: IDT Technology Limited
Address: Block C, 9/F, Kaiser Estate,
Phase 1, 41 Man Yue St.,
Hung Hom, Kowloon,
Hong Kong
DISPOSAL INFORMATION FOR USERS
Pursuant to and in accordance with Article 14
of the Directive 2012/19/EU of the European
Parliament on waste electrical and electronic
equipment (WEEE), and pursuant to and in
accordance with Article 20 of the Directive
2006/66/EC of the European Parliament on batteries and
accumulators and waste batteries.
The barred symbol of the rubbish bin shown on the
equipment indicates that, at the end of its useful life, the
product must be collected separately from other waste.
Please note that the batteries/rechargeable batteries
must be removed from the equipment before it is given as
waste. To remove the batteries/accumulators refer to the
specications in the user manual. Therefore, any products
that have reached the end of their useful life must be given
to waste disposal centers specializing in separate collection
of waste electrical and electronic equipment, or given back
to the dealer when purchasing a new WEEE, pursuant to
and in accordance with Article 14 as implemented in the
country.
The adequate separate collection for the subsequent
start-up of the equipment sent to be recycled, treated
and disposal of in an environmentally compatible way
contributes to preventing possible negative effects on the
environment and health and optimizes the recycling and
reuse of components making up the apparatus.
Abusive disposal of the product by the user involves
application of the administrative sanctions according to the
laws in force.
PROJI Orologio con proiezione
RM338P/RM338PU
Manuale Utente
IT
INTRODUZIONE
Grazie per aver acquistato PROJI Orologio con proiezione
di Oregon Scientic™ (modello: RM338P/RM338PU).
Questo dispositivo riunisce le caratteristiche di un orario
preciso, una sveglia e il controllo della temperatura in un
singolo strumento che potete utilizzare dalla comodità della
vostra sede. Vogliate tenere questo manuale a portata
di mano mentre usate il vostro nuovo prodotto. Esso
contiene istruzioni pratiche passo passo, come pure le
speciche tecniche e le avvertenze di cui dovreste essere a
conoscenza.
CONTENUTO DELLA CONFEZIONE
Unità Principale Adattatore di
corrente
Batterie AAA per
l’unità principale
x 2
PANORAMICA
VISTA DALL’ALTO
4
5
6
1
2
3
1. Premete + — per aumentare impostazioni, oppure
tenete premuto per aumentare rapidamente in modalità
impostazione.
2. SNOOZE | LIGHT — premere per rinviare la sveglia o
attivare la retroilluminazione e la proiezione, tenere
premuto no a che non sentiate un bip per attivare la
proiezione per 5 minuti.
3.
— Premere per cambiare per 5 secondi la
visualizzazione fra l’ora attuale, la data o sveglia 1/2.
Tenete premuto per entrare in modalità impostazione.
4. Premere – — per diminuire le impostazioni, tenete
premuto per diminuire rapidamente le impostazioni.
5. Lenti di proiezione
6.
— Premere per accendere/spegnere le sveglie, tenere
premuto per entrare in modalità impostazione sveglia.
VISTA POSTERIORE
1
1. Compartimento batterie
2. RESET [RIPRISTINO] – Premere per ripristinare le
impostazioni di default.
3.
/PROJECTION – Premere per ruotare la proiezione
di 180°. Tenere premuto per accendere/spegnere la
proiezione.
4. RCC — Premere per accendere e cercare il segnale
RCC. Tenete premuto per spegnere.
5. Coperchio compartimento batterie
SCHERMO A CRISTALLI LIQUIDI
1
1. Visualizzazione ora
2. Visualizzazione giorno della settimana
3. Visualizzazione temperatura interna
Simbolo Descrizione
Sveglia 1 attiva.
Sveglia 2 attiva.
Segnale RCC ricevuto
Batteria scarica unità
principale
COME INIZIARE
INSERIRE LE BATTERIE
1. Spingere delicatamente la copertura dello
scompartimento batterie verso il basso per rimuoverlo
dall’unità principale.
2. Inserire le batterie, rispettando le polarità (+/-).
NOTA Sostituire le batterie quando viene visualizzata
l’icona
, o quando la visualizzazione è oca.
CORRENTE CONTINUA
Inserire il cavo elettrico nella presa di alimentazione ed
inserire l’adattatore di corrente a una presa di corrente
adeguata.
NOTA Si suggerisce di inserire la batteria come fonte di
energia di riserva.
OROLOGIO
RICEZIONE OROLOGIO
Questo orologio si sincronizza automaticamente con un
segnale orario. Premere RCC per accendere e cercare il
segnale orario.
L’unità principale può ricevere i dati dell’orologio in RF con
diversi segnali RCC:
Numero di
modello:r
Regione Segnale
RM338P EU DCF
RM338PU UK MSF
Indicatore ricezione segnale orario:
Icone Descrizione
L’unità principale sta cer-
cando il segnale orario
(lampeggia)
L’unità principale sta cer-
cando il segnale orario
Nessun segnale orario
Forte segnale RCC
ricevuto
Debole segnale RCC
ricevuto
NOTA Ci vogliono da 2 a 10 minuti per ricevere il segnale
orario. Se il segnale è debole, ci potrebbero volere no a 24 ore
per ricevere un segnale valido.
IMPOSTARE MANUALMENTE L’OROLOGIO
1. Tenere premuto . Lo schermo mostra ZONE ed il
numero lampeggia.
2. Premere una volta o tenere premuto +/- per regolare
l’impostazione. Per UE/RU, la compensazione del fuso
orario imposta l’orologio no a +/- 23 ore dall’ora del
segnale orario ricevuto.
3. Premere
per confermare.
4. Premere una volta o tenere premuto +/- per regolare
l’impostazione per il formato 12/24h, ore, minuti, anno,
formato di calendario (mese-giorno/giorno-mese), mese,
data, unità di misura della temperatura (°C/°F) e lingua.
5. Premere
per confermare ogni impostazione.
NOTA
• Le opzioni della lingua sono Inglese (ENG), Spagnolo
(SPA), Italiano (ITA), Francese (FRE), Tedesco (GER).
• La ricezione del segnale RCC si attiva dopo ogni ripristino
o sostituzione batterie.
• In modalità impostazione, premere e tenere premuto
per
salvare le impostazioni e uscire dalla modalità di impostazione.
SVEGLIA
IMPOSTAZIONE/REGOLAZIONE ORARIO DI
SVEGLIA
1. Tenere premuto .
2. Premere una volta o tenere premuto +/- correggere
l’impostazione ora e minuti, quindi premere per
confermare.
3. Premere +/— per cambiare la sveglia del giorno
della settimana tra ON/OFF, quindi premere
per
confermare.
• La sveglia squilla soltanto nei giorni della settimana in
cui la regolazione è ON.
4. Ripetere i passi 2 — 4 per l’impostazione della sveglia.
COME ACCENDERE/SPEGNERE LE SVEGLIE:
Premere per accendere/spegnere la sveglia in sequenza:
Sveglia 1
> Sveglia 2 > Entrambe ON >
Entrambe OFF.
FUNZIONAMENTO
Funzionamento Quando la sveglia suona, la
retroilluminazione lampeggia. Potete:
• Premere
per arrestare. La sveglia squillerà ancora il
giorno seguente.
• Premere SNOOZE | LIGHT per rinviare la sveglia. La
sveglia suonerà di nuovo dopo 8 minuti.
PROIEZIONE
Il proiettore visualizza l’ora sul vostro softto per una
facile vista in una stanza scura. Per risultati ottimali della
proiezione, posizionare l’unità entro 1,5 — 2 m. (5 — 6.5 piedi)
dal softto o dalla parete.
• Premere SNOOZE | LIGHT per attivare la
retroilluminazione e la proiezione per 5 secondi.
• Tenere premuto SNOOZE | LIGHT no a che non si sente
un bip per attivare la proiezione per 5 minuti.
• Premere
/PROJECTION per ruotare la proiezione di 180°.
• Tenere premuto
/PROJECTION per accendere/
spegnere la proiezione continua.
NOTA La funzione di proiezione continua è disabilitata
quando l’unità principale non è collegata all’adattatore di
alimentazione.
SPECIFICHE
UNITÀ PRINCIPALE
Lu x La x H 108 x 26 x 77 mm
(4,25 x 1,02 x 3,03 pollici)
Peso 112 g (3,95 once) senza batterie
Intervallo tempera-
tura
da — 5°C a 50°C
(da 23°F a 122°F)
Tolleranza 0°C-40°C: ±1°C (±2.0°F)
40°C <T<0°C: ±2°C (±4.0°F)
Risoluzione 0,1°C (0,2°F)
Alimentazione 2 x batterie UM-4 (AAA) da 1,5 V
adattatore 3,6V
PRECAUZIONI
• Non sottoporre il prodotto a forza eccessiva, urti, polvere,
sbalzi eccessivi di temperatura o umidità.
• Non otturare i fori di aerazione con oggetti come giornali,
tende, etc.
• Non immergere l’unità in acqua. Se si versa del liquido
sul prodotto, asciugarlo immediatamente con un panno
morbido e liscio.
• Non pulire l’unità con materiali abrasivi o corrosivi.
• Non manomettere i componenti interni. In questo modo si
invalida la garanzia.
• Oregon Scientic declina ogni responsabilità per eventuali
danni alle niture causati dal posizionamento del prodotto
su determinati tipi di legno. Consultare le istruzioni fornite
dal fabbricante del mobile per ulteriori informazioni.
• Le immagini del manuale possono differire dalla realtà.
• Il contenuto di questo manuale non può essere ristampato
senza l’autorizzazione del fabbricante.
• Utilizzare solo batterie nuove. Non mescolare batterie
nuove con batterie vecchie.
• Al momento dello smaltimento del prodotto, attenersi alla
nota relativa in allegato.
• Non smaltire le batterie vecchie come riuto indifferenziato.
È necessario che questo riuto venga smaltito mediante
raccolta differenziata per essere trattato in modo idoneo.
• Alcune unità sono dotate di una striscia di sicurezza per le
batterie. Rimuovere la striscia dal vano batterie prima del
primo utilizzo.
NOTA Le speciche tecniche del prodotto e il contenuto del
manuale per l’utente possono essere modicati senza preavviso.
NOTA Caratteristiche e accessori non disponibili in tutti i
paesi. Per ulteriori informazioni, rivolgersi al proprio rivenditore.
INFORMAZIONI SU OREGON SCIENTIFIC
Per ulteriori informazioni sui prodotti Oregon Scientic,
visitate il nostro sito web www.oregonscientic.com.
Per richiedere informazioni, contattate il nostro Servizio
Clienti all’indirizzo info@oregonscientic.com.
Oregon Scientic Global Distribution Limited si riserva il
diritto di interpretare e denire eventuali contenuti, termini
e disposizioni contenuti in questo manuale per l’utente
e di modicarli, a sua esclusiva discrezione, in qualsiasi
momento e senza preavviso. Nella misura in cui risultassero
incongruenze tra la versione in inglese e quelle in altre
lingue, farà fede la versione in inglese.
UE – DICHIARAZIONE DI CONFORMITÁ
Con la presente Oregon Scientic dichiara che PROJI
Orologio con proiezione (modello: RM338P/RM338PU) è
conforme ai requisiti essenziali ed alle altre disposizioni
pertinenti stabilite dalla direttiva 1999/5/CE. Una copia
rmata e datata della Dichiarazione di Conformità è
disponibile, su richiesta, tramite il servizio clienti della
Oregon Scientic.
PAESI CONFORMI ALLA DIRETTIVA R&TTE
Tutti I Paesi UE, Svizzera CH
e Norvegia N
INFORMAZIONE AGLI UTENTI
Ai sensi dell’art.26 del Decreto Legislativo 14
marzo 2014, n. 49 «Attuazione della Direttiva
2012/19/UE sui riuti di apparecchiature
elettriche ed elettroniche (RAEE)» ed ai sensi
dell’art.22 del Decreto Legislativo 188 del 20
novembre 2008 «Attuazione della direttiva 2006/66/CE
concernente pile, accumulatori e relativi riuti «.
Il simbolo del cassonetto barrato riportato
sull’apparecchiatura o sulla sua confezione indica che il
prodotto alla ne della propria vita utile deve essere raccolto
separatamente dagli altri riuti per permetterne un adeguato
trattamento e riciclo.
Si ricorda che le pile/accumulatori devono essere rimosse
dall’apparecchiatura prima che questa sia conferita come
riuto. Per rimuovere le pile/ accumulatori fare riferimento alle
speciche indicazioni riportate nel manuale d’uso.
L’utente dovrà, pertanto, conferire gratuitamente
l’apparecchiatura e la pila giunta a ne vita agli idonei
centri comunali di raccolta differenziata dei riuti elettrici ed
elettronici, oppure riconsegnarle al rivenditore secondo le
seguenti modalità:
• sia pile portatili sia apparecchiature di piccole dimensioni,
ovvero con almeno un lato esterno non superiore a 25 cm,
è prevista la consegna gratuita senza obbligo di acquisto
presso i negozi con una supercie di vendita delle
apparecchiature elettriche ed elettroniche superiore ai
400 mq. Per negozi con dimensioni inferiori, tale modalità
è facoltativa.
• per apparecchiature con dimensioni superiori a 25 cm, è
prevista la consegna in tutti i punti di vendita in modalità
1 contro 1, ovvero la consegna al rivenditore potrà
avvenire solo all’atto dell’acquisto di un nuovo prodotto
equivalente, in ragione di uno a uno.
L’adeguata raccolta differenziata per l’avvio successivo
dell’apparecchiatura e delle pile/accumulatori dismessi al
riciclaggio, al trattamento e allo smaltimento ambientalmente
compatibile contribuisce ad evitare possibili effetti negativi
sull’ambiente e sulla salute e favorisce il reimpiego e/o riciclo
dei materiali di cui essi sono composti.
Lo smaltimento abusivo di apparecchiature, pile ed
accumulatori da parte dell’utente comporta l’applicazione
delle sanzioni di cui alla corrente normativa di legge.
Réveil Projecteur PROJI
RM338P/RM338PU
Mode d’emploi
FR
INTRODUCTION
Merci d’avoir choisi le Réveil Projecteur PROJI d’Oregon
Scientific™ (modèles: RM338P/RM338PU). Cet appareil
regroupe une mesure du temps précise, deux alarmes, et un
suivi des températures dans un outil unique que vous pouvez
utiliser dans le confort de votre maison. Conservez ce mode
d’emploi à disposition lors des premières utilisations de ce
produit. Il contient des instructions étape par étape, ainsi que
des spécications techniques et autres avertissements que
vous vous devez de connaitre.
CONTENU DE L’EMBALLAGE
Unite principale Adaptateur
secteur
2 piles AAA pour
l’unite principale
VUE D’ENSEMBLE
VUE DE DESSUS
4
5
6
1
2
3
1. + — Appuyez ici pour augmenter les réglages, ou maintenez
appuyé pour augmenter rapidement les valeurs en mode
réglage.
2. SNOOZE | LIGHT (Veille/Lumière) — Appuyez pour
mettre en veille l’alarme ou activer le retro-éclairage et
la projection. Maintenez appuyé jusqu’à ce que vous
entendiez un bip sonore pour activer le projection pendant
5 minutes.
3.
— Appuyez pour alterner entre l’afchage de l’heure,
du calendrier ou de l’alarme 1 ou 2 pendant 5 secondes.
Maintenez appuyé pour entrer dans le mode de réglage.
4. – — Appuyez ici pour diminuer les réglages, ou maintenez
appuyé pour diminuer rapidement les valeurs en mode
réglage.
5. Lentille de projection
6.
— Appuyez pour activer/désactiver les alarmes,
maintenez appuyé pour entrer dans le mode de réglage
des alarmes.
VUE ARRIERE
1
1. Compartiment à piles
2. RESET (Réinitialisation) – Appuyez ici pour réinitialiser
l’appareil.
3.
/PROJECTION – Appuyez ici pour inverser l’image
projetée de 180 degrés. Maintenez appuyé pour mettre
la projection en continue sur on/off.
4. RCC – Appuyez pour activer et rechercher le signal
RCC. Maintenez appuyé pour désactiver.
5. Couvercle du compartiment à piles
ECRAN LCD
1
1. Afchage de l’heure
2. Afchage des jours de la semaine
3. Afchage de la température intérieure
Symbole Description
Alarme 1 activée
Alarme 2 activée
Signal RCC reçu
Niveau des piles de l’unité
principale faible
POUR COMMENCER
INSTALLATION DES PILES
1. Poussez doucement le couvercle du compartiment à piles
vers le bas pour le retirer de l’unité principale.
2. Installez les piles en respectant les indications de polarité (+/-).
REMARQUE Remplacez les piles lorsque l’icone
s’afche ou lorsque la luminosité de l’afchage diminue.
ALIMENTATION SECTEUR
Branchez le câble de l’adaptateur secteur sur la prise
d’alimentation de l’appareil puis branchez l’adaptateur sur
une prise de courant.
REMARQUE Il est recommandé d’installer les piles en tant
que source d’alimentation de secours.
HORLOGE
RECEPTION DE L’HORLOGE
L’horloge est désignée pour se synchroniser automatiquement
avec un signal d’horloge. Appuyez sur RCC pour activer et
rechercher le signal d’horloge.
L’unité principale est capable de recevoir des données
d’horloge RF suivant différents signaux RCC:
Numéro du
modèle
Région Signal
RM338P EU DCF
RM338PU UK MSF
Indicateur de réception du signal d’horloge
Icones Description
L’unité principale est à la
recherche d’un signal d’horloge
sufsement puissant.
(ash)
L’unite principale est à
la recherche d’un signal
d’horloge.
Pas de signal d’horloge
Signal RCC reçu fort
Signal RCC reçu faible
REMARQUE Cela peut prendre entre 2 et 10 minutes pour
recevoir le signal d’horloge. Si le signal est faible, cela pourra
prendre jusqu’ à 24 heures pour recevoir un signal valide.
REGLAGE MANUEL DE L’HORLOGE
1. Maintenez appuyé RCC pour désactiver le signal de
réception. L’icone
s’éteint.
2. Maintenez appuyé
. L’écran afche alors ZONE et les
chiffres clignotent.
3. Appuyez une fois sur ou maintenez appuyé +/— pour
ajuster les réglages. Pour EU/UK, le réglage de la zone
horaire règle l’horloge avec une différence de +/- par
rapport au signal d’horloge reçu.
4. Appuyez sur
pour conrmer
5. Appuyez une fois sur ou maintenez appuyé+/- pour régler le
format de l’heure sur 12/24h, l’heure, les minutes, l’année,
le format du calendrier (mois-jour/jour-mois), du mois, de
la date, de l’unité de température (°C/°F) e de la langue.
6. Appuyez sur
pour conrmer chaque réglage.
REMARQUE
• Les options de langue sont l’anglais (ENG), l’espagnol (SPA),
l’italien (ITA), le français (FRE) et l’allemand (GER).
• Le signal de réception RCC est activé après chaque Reset
ou changement de piles.
• Appuyez et maintenez
pour sauvegarder les réglages et
quitter le mode réglages.
ALARME
REGLAGES/AJUSTEMENT DE L’HEURE
DE L’ALARME
1. Maintenez appuyé .
2. Appuyez une fois sur ou maintenez appuyé +/— pour ajuster
le réglage de l’heure et des minutes, puis appuyez sur
pour conrmer.
3. Appuyez sur +/— pour mettre l’alarme des jours de la
semaine sur ON/OFF, puis appuyez sur
pour conrmer.
• L’alarme ne se déclenche pendant les jours de la
semaine que lorsque le réglage est sur ON.
4. Répétez les étapes 2 – 4 pour les réglages de l’alarme 2.
ACTIVEZ/DESACTIVEZ LES ALARMES
Appuyez sur pour activer/désactiver l’alarme en suivant la
séquence suivante:
Alarm1
> Alarm 2 > es deux sur ON > les deux sur OFF.
OPERATION
Lorsque l’alarme sonne, le retro-éclairage clignotera. Vous
pouvez alors:
• Appuyez sur
pour arrêter l’alarme. L’alarme sonnera de
nouveau le lendemain.
• Appuyez sur SNOOZE | LIGHT pour mettre en veille l’alarme.
L’alarme sonne de nouveau après 8 minutes.
PROJECTION
Le projecteur affiche l’heure sur votre plafond pour une
meilleure lecture de l’heure dans une pièce sombre. Placez
l’appareil à une distance d’environ 1.5-2 m de la meilleure
position pour le visionnage de l’heure.
• Appuyez sur SNOOZE | LIGHT pour activer le retro-éclairage
et la projection pendant 5 secondes.
• Maintenez appuyé SNOOZE | LIGHT jusqu’à ce que vous
entendiez un bip sonore pour activer le projection pendant
5 minutes.
• Appuyez sur
/ PROJECTION pour faire basculer le
contenu de la projection de 180 degrés.
• Maintenez appuyé
/ PROJECTION pour choisir entre une
projection en continue On ou Off.
REMARQUE La fonction de projection en continue est
désactivée lorsque l’unité principale n’est pas connectée à
l’alimentation secteur.
PRECAUTIONS
• Ne pas soumettre le produit à une force excessive, au
choc, à la poussière, aux changements de température
ou à l’humidité.
• Ne pas couvrir les trous de ventilation avec des
journaux, rideaux etc…
• Ne pas immerger le produit dans l’eau. Si vous
renversez du liquide sur l’appareil, séchez-le
immédiatement avec un tissu doux.
• Ne pas nettoyer l’appareil avec des matériaux corrosifs
ou abrasifs.
• Ne pas trafiquer les composants internes. Cela
invalidera votre garantie.
• N’utilisez que des piles neuves. Ne pas mélanger des
piles neuves et usagées.
• Les images de ce manuel peuvent différer de l’aspect
réel du produit.
• Lorsque vous désirez vous débarrasser de ce produit,
assurez-vous qu’il soit collecté séparément pour un
traitement adapté.
• Le poser sur certaines surfaces en bois peut
endommager la finition du meuble, et Oregon Scientific
ne peut en être tenu responsable. Consultez les mises
en garde du fabricant du meuble pour de plus amples
informations.
• Le contenu du présent manuel ne peut être reproduit
sans la permission du fabriquant.
• Ne pas jeter les piles usagées dans les containers
municipaux non adaptés. Veuillez effectuer le tri de ces
ordures pour un traitement adapté si nécessaire.
• Veuillez remarquer que certains appareils sont
équipés d’une bande de sécurité. Retirez la bande du
compartiment des piles avant la première utilisation.
REMARQUE Les caractéristiques techniques de ce
produit et le contenu de ce manuel peuvent être soumis à
modifications sans préavis.
REMARQUE Caractéristiques et accessoires ne seront pas
valables pour tous les pays. Pour plus d’information, contacter
le détaillant le plus proche.
SPECIFICATIONS
UNITE PRINCIPALE
L x W x H 108 x 26 x 77 mm
(4.25 x 1.02 x 3.03 in)
Poids 112 g (3.95 oz) sans les piles
Plage de température -5°C à 50°C
(23°F à 122°F)
Exactitude 0°C-40°C: ±1°C (± 2.0°F)
40°C <T<0°C: ±2°C (± 4.0°F)
Résolution 0.1°C (0.2°F)
Alimentation 2 piles UM-4 (AAA) 1.5 V
Adaptateur 3.6V
À PROPOS D’OREGON SCIENTIFIC
Pour plus d‘informations sur les produits Oregon Scientific
France, rendez-vous sur notre site www.oregonscientific.fr.
Besoin de plus d’informations? Contactez notre service client
expert à info@oregonscientific.fr.
Oregon Scientific Global Distribution Limited se réserve le droit
d’interpréter tout contenu, termes et provisions du présent
manuel de l’utilisateur et de les amender à sa seule discrétion,
n’importe quand et sans avis préalable. Dans la mesure où des
incohérences sont constatées entre la version anglaise et les
versions traduites en langues étrangères, la version anglaise
prévaudra.
EU – DÉCLARATION DE CONFORMITÉ
Par la présente Oregon Scientific déclare que le Réveil
Projecteur PROJI (Modèle : RM338P/RM338PU) est conforme
aux exigences essentielles et aux autres dispositions
pertinentes de la directive 1999/5/CE. Une copie signée et datée
de la déclaration de conformité est disponible sur demande
auprès de notre Service Client.
CH
N
PAYS CONCERNES RTT&E
Tous les pays membres de l’EU, la Suisse
et la Norvège
.
INFORMATIONS AUX USAGERS
Aux termes des Directives européennes 2011/65/
EU et 2012/19/EU, relatives à la réduction de
l’utilisation de substances dangereuses dans les
appareils électriques et électroniques et à
l’élimination des déchets.
Le symbole représentant une poubelle barrée reporté sur
l’appareil indique que le produit doit être collecté séparément
des autres déchets à la n de sa propre vie.
L’usager devra done remettre l’appareil, lorsqu’il ne l’utilisera
plus, à des centres adaptés de collecte sélective pour les
déchets électroniques et électrotechniques, ou bien il devra
le rapporter au revendeur au moment de l’achat d’un nouvel
appareil de type équivalent, en raison d’un contre un.
La collecte sélective adéquate pour la transmission successive
de l’appareil qui n’est plus utilisé au recyclage, au traitement ou
à l’élimination compatible au niveau environnemental, contribue
à éviter les effets négatifs possibles sur l’environnement et sur
la santé et favorise le recyclage des matériaux dont l’appareil
est composé.
L’élimination illégale du produit par l’usager est passible de
l’application de sanctions selon les lois en vigueur.
PROJI Proyector con Alarma
RM338P/RM338PU
Manual de usuario
ES
INTRODUCCIÓN
Gracias por adquirir el PROJI Proyector con Alarma de Oregon
Scientific™ (modelo: RM338P/RM338PU). Esta unidad
proporciona una hora precisa junto con las funciones de alarma
y monitoreo de la temperatura para que pueda utilizarla de
manera conveniente desde cualquier lugar de su casa. Tenga
este manual a mano al utilizar su nuevo producto, ya que
contiene instrucciones prácticas paso a paso, así como datos
técnicos y advertencias que es preciso conocer.
CONTENIDO
Unidad principal Adaptador de
alimentación
Pilas AAA (x 2)
para la unidad
principal
DESCRIPCIÓN GENERAL
VISTA SUPERIOR
4
5
6
1
2
3
1. + — En el modo de ajuste, pulse este botón para incrementar
los valores de los parámetros, o manténgalo pulsado para
incrementarlos con más rapidez.
2. SNOOZE | LIGHT — Pulse este botón para activar la
función de repetición de alarma o la retroiluminación y la
proyección. Mantenga el botón pulsado hasta escuchar un
pitido para activar la proyección durante 5 minutos.
3.
— Pulse este botón para mostrar la hora, la fecha o la
alarma 1/ alarma 2 durante 5 segundos. Mantenga el botón
pulsado para acceder al modo de ajuste.
4. – — Pulse este botón para reducir los valores de los
parámetros, o manténgalo pulsado para reducirlos con
más rapidez.
5. Lente de proyección
6.
— Pulse este botón para activar o desactivar las alarmas,
o manténgalo pulsado para acceder al modo de ajuste de
la alarma.
VISTA TRASERA
1
23 4
5
1. Compartimento de las pilas
2. RESET — Pulse este botón para resetear la unidad a los
valores por defecto.
3.
/ PROJECTION — Pulse este botón para invertir la imagen
proyectada 180°. Mantenga el botón pulsado para activar o
desactivar la proyección continua.
4. RCC – Pulse este botón para activar y buscar la señal
RCC. Manténgalo pulsado para desactivarla.
5. Tapa del compartimento de las pilas
PANTALLA LCD
1
1. Pantalla de la hora
2. Día de la semana
3. Temperatura interior
Símbolo Descripción
Alarma 1 está activada.
Alarma 2 está activada.
Señal RCC recibida.
Pilas de la unidad principal bajas
GUÍA DE INICIO
INSTALACIÓN DE LAS PILAS
1. Empuje con cuidado la tapa del compartimento de las
pilas hacia abajo para retirarla de la unidad principal.
2. Inserte las pilas haciendo coincidir los polos (+/-).
NOTA Cambie las pilas cuando la pantalla muestre
o se atenúe.
ADAPTADOR DE ALIMENTACIÓN
Conecte el cable de alimentación a la toma de alimentación
y enchufe el adaptador a una toma de corriente apropiada.
NOTA Se recomienda instalar las pilas a modo de fuente de
alimentación de reserva.
RELOJ
RECEPCIÓN DE LA HORA
Este reloj se sincroniza automáticamente con la señal horaria.
Pulse RCC para activar esta función y buscar la señal horaria.
La unidad principal podrá recibir los datos horarios RF de las
diferentes señales RCC:
Número de
modelo
Región Señal
RM338P EU DCF
RM338PU UK MSF
Indicador de recepción de la señal horaria:
Iconos Descripción
La unidad principal está de-
tectando la intensidad de la
señal horaria
(parpadeando)
La unidad principal está bus-
cando una señal horaria
No se ha encontrado una
señal horaria
Señal RCC fuerte recibida
Señal RCC débil recibida
NOTA La recepción de la señal puede tardar de 2 a 10 minutos
en establecerse. Si la señal es débil, puede tardar hasta
24 horas en recibir una señal válida.
AJUSTE MANUAL DEL RELOJ
1. Mantenga pulsado el botón La pantalla mostrará ZONE
y los dígitos parpadearán.
2. Pulse reiteradamente, o mantenga pulsados, los botones
+/— para ajustar los dígitos del reloj. Para EU/UK, la
compensación del huso horario permite ajustar la señal
horaria en un intervalo comprendido entre +/- 23 horas.
3. Pulse
para conrmar.
4. Pulse reiteradamente, o mantenga pulsado, +/— para
ajustar los valores del formato de 12/24 horas, las horas,
los minutos, el año, el formato de fecha (mes-día/día-mes),
el mes, el día del mes, la unidad de temperatura (°C/°F) y
el idioma.
5. Pulse
para conrmar cada parámetro.
NOTA
• Los idiomas disponibles son inglés (ENG), español (SPA),
italiano (ITA), francés (FRE) y alemán (GER).
• La recepción de la señal RCC se activará cada vez que
resetee la unidad o cambie las pilas.
• En el modo de ajuste, pulse y mantenga pulsado para
guardar los ajustes y salir del modo de ajuste.
ALARMA
AJUSTE/ACTIVACIÓN DE LA ALARMA
1. Mantenga pulsado el botón .
2. Pulse una vez, o mantenga pulsado, los botones +/- para
ajustar las horas y los minutos, y pulse
para conrmar.
3. Pulse +/— para activar o desactivar la alarma de los días
entre semana, y pulse
para conrmar.
• Cuando está activada, la alarma solo suena los días
entre semana.
4. Repita los pasos del 2 al 4 para establecer la alarma 2.
ACTIVACIÓN Y DESACTIVACIÓN DE
LAS ALARMAS:
Pulse para activar o desactivar la alarma siguiendo esta
secuencia:
Alarma 1
> Alarma 2 > Ambas activadas >Ambas
desactivadas.
MODO DE EMPLEO
La retroiluminación parpadeará cuando suene la alarma. Puede
hacer lo siguiente:
• Pulse
para detenerla. La alarma volverá a sonar al día
siguiente.
• Pulse SNOOZE | LIGHT para activar la función de repetición
de alarma. La alarma sonará de nuevo después de 8 minutos.
PROYECCIÓN
La unidad proyecta la hora en la pared para poder verla con
facilidad en una habitación a oscuras. Para conseguir una
buena proyección, coloque la unidad entre 1,5 y 2 m (de 5 a
6.5 pies) del techo o la pared.
• Pulse SNOOZE | LIGHT para activar la retroiluminación y la
proyección durante 5 segundos.
• Mantenga pulsado SNOOZE | LIGHT hasta que escuche un
pitido para activar la proyección durante 5 minutos.
• Pulse PROJECTION para invertir la proyección 180°.
• Mantenga pulsado PROJECTION para activar o desactivar
la proyección continua.
NOTA La función de proyección continua permanece
desactivada cuando la unidad principal no está conectada al
adaptador principal.
PRECAUCIÓN
• No exponga el producto a fuerza extrema, descargas,
polvo, uctuaciones de temperatura o humedad.
• No cubra los oricios de ventilación con objetos como
periódicos, cortinas, etc.
• No sumerja el dispositivo en agua. Si se vertiera
líquido en la unidad, límpiela con un paño suave y sin
electricidad estática.
• No limpie la unidad con materiales abrasivos o
corrosivos.
• No manipule los componentes internos. De hacerlo se
invalidaría la garantía.
• Use siempre pilas nuevas. No mezcle pilas viejas con
pilas nuevas.
• Las imágenes de esta guía para el usuario pueden ser
distintas al producto en sí.
• Cuando elimine este producto, asegúrese de que no
vaya a parar a la basura general, sino separadamente
para recibir un tratamiento especial.
• La colocación de este producto encima de ciertos tipos de
madera puede provocar daños a sus acabados. Oregon
Scientic no se responsabilizará de dichos daños.
Consulte las instrucciones de cuidado del fabricante para
obtener más información.
• Los contenidos de este manual no pueden reproducirse
sin permiso del fabricante.
• No elimine las pilas gastadas con la basura normal.
Es necesario desecharlas separadamente para poder
tratarlas.
• Tenga en cuenta que algunas unidades disponen de
una cinta de seguridad para las pilas. Retire la cinta de
compartimento para pilas antes de usarlo por primera vez.
NOTA La cha técnica de este producto y los contenidos de este
manual de usuario pueden experimentar cambios sin previo aviso.
NOTA No todas las funciones y accesorios estarán
disponibles en todos los países. Sírvase ponerse en contacto
con su distribuidor local si desea más información.
ESPECIFICACIONES
UNIDAD PRINCIPAL
La. x An. x Al. 108 x 26 x 77 mm
(4,25 x 1,02 x 3,03 pulgadas)
Peso 112 g (3,95 onzas) sin pilas
Intervalo de temperatura De -5°C a 50°C
(de 23°F a 122°F)
Precisión 0°C-40°C: ±1°C (±2.0°F)
40°C <T<0°C: ±2°C (±4.0°F)
Resolución 0.1°C (0.2°F)
Alimentación 2 pilas UM-4 (AAA) 1.5 V
Adaptador de 3,6 V
SOBRE OREGON SCIENTIFIC
Visite nuestro sitio web www.oregonscientic.com para
obtener más información sobre los productos de Oregon
Scientic.
Si tiene alguna duda, póngase en contacto con nuestros
servicios al cliente en info@oregonscientic.com.
Oregon Scientic Global Distribution Limited se reserva el
derecho de interpretar e inferir cualquier contenido, términos
y provisiones de este manual de usuario y corregirlo, a
su discreción en cualquier momento y sin aviso previo. Si
hubiese alguna divergencia entre la versión en inglés y las
versiones de otros idiomas, prevalecerá la versión en inglés.
UE – DECLARACIÓN DE CONFORMIDAD
Por medio de la presente Oregon Scientic declara que el PROJI
Proyector con Alarma de Oregon Scientic™ (modelo: RM338P/
RM338PU) cumple con los requisitos esenciales y cualesquiera
otras disposiciones aplicables o exigibles de la Directiva 1999/5/
EC . Tiene a su disposición una copia rmada y sellada de la
Declaración de Conformidad, solicítela al Departamento de
Atención al Cliente de Oregon Scienti.
CH
N
.
PA
SES CON HOMOLOGACI
N RTTE
Todos los países de la UE, Suiza
y Noruega
INFORMACIÒN A LOS USUARIOS
Segùn las Directrices Europeas 2011/65/EU y
2012/19/EU, relativas a la reducción del uso de
sustancias peligrosas en los aparatos eléctricos
y electrónicos, además del desecho de los
residuos.
El símbolo tachado del contenedor que se encuentra en el
aparato indica que el producto, al nal de su vida útil, deberá
depositarse en un lugar separado de los demás residuos.
Por lo tanto, el usuario deberá entregar el aparato, cuando
deje de utilizarse, a los adecuados centros de recogida
diferenciada de residuos electrónicos y electrotécnicos, o
deberá devolverlo al vendedor en el momento de compra de
un nuevo aparato de tipo equivalente, uno a cambio de otro.
La adecuada recogida diferenciada del aparato inutilizado
para el sucesivo reciclaje, tratamiento y desecho
ambientalmente compatibles, contribuye a evitar posibles
efectos negativos en el medioambiente y en la salud,
y favorece el reciclaje de los materiales de los que se
compone el aparato.
El desecho abusivo del producto por parte del usuario
implica la aplicación de las sanciones previstas por la ley.
PROJI Projektionsuhr
RM338P/RM338PU
Bedienungsanleitung
DE
EINFÜHRUNG
Vielen Dank für den Kauf dieser Oregon Scientic™ PROJI
Projektionsuhr (Modell: RM338P/RM338PU). Dieses
Gerät bietet die Funktionen der präzisen Zeitanzeige,
Alarmfunktionen und Temperaturmessung in einem einfach zu
bedienenden Gerät in Ihrem Zuhause. Bitte bewahren Sie diese
Bedienungsanleitung zur Bezugnahme bei der Bedienung
Ihres neuen Gerätes auf. Diese Bedienungsanleitung enthält
sowohl detaillierte Bedienungshinweise, als auch Angaben zu
den technischen Daten sowie wichtige Warnhinweise, die Sie
unbedingt beachten sollten.
PACKUNGSINHALT
Basisgerät Netzadapter
AAA Batterien für
Basisgerät x 2
ÜBERSICHT
ANSICHT VON OBEN
4
5
6
1
2
3
1. + — Betätigen, um die Anzeigewerte aufwärts einzustellen,
oder gedrückt halten, um Einstellungen im Einstellmodus
schnell aufwärts vorzunehmen.
2. SCHLUMMERN/LICHT (SNOOZE | LIGHT) — Betätigen,
um die Schlummern-Funktion für den Alarm zu aktivieren,
oder um die Anzeigebeleuchtung und die Zeitprojektion;
halten Sie dazu die Taste gedrückt, bis Sie einen Piepton
hören, um die Zeitprojektion 5 Minuten lang zu aktivieren.
3.
— Ca. 5 Sekunden lang betätigen, um zwischen der
Anzeige der aktuellen Uhrzeit, der Kalenderanzeige oder
Alarm 1/2 umzuschalten. Halten Sie de Taste gedrückt, um
den Einstellmodus zu aktivieren.
4. – — Betätigen, um die Anzeigewerte abwärts einzustellen,
oder gedrückt halten, um Einstellungen im Einstellmodus
schnell abwärts vorzunehmen.
5. Projektionsobjektiv
6.
— Betätigen, um die Alarmfunktion “ein/aus” zu schalten,
oder gedrückt halten, um den Alarm-Einstellmodus zu
aktivieren.
ANSICHT VON HINTEN
1
23 4
5
1. Batteriefach
2. RÜCKSETZUNG (RESET) — Betätigen, um eine
Rücksetzung des Gerätes auf die Werksvorgaben
auszuführen.
3.
/ PROJEKTION — Betätigen, um die Projektionsanzeige
um 180° zu drehen. Gedrückt halten, um die fortlaufende
Zeitprojektion ein/aus zu schalten.
4. RCC – Betätigen, um die Suche nach dem RCC-Zeitsignal
zu aktivieren. Gedrückt halten, um die Funktion zu
deaktivieren.
5. Batteriefachabdeckung
LCD-ANZEIGE
1
1. Zeitanzeige
2. Wochentag-Anzeige
3. Innentemperatur-Anzeige
Symbol Beschreibung
Alarm 1 ist ein.
Alarm 2 ist ein.
RCC-Signal wird empfangen
Basisgerät — schwache Batterien
VORBEREITUNG ZUM EINSATZ
BATTERIEN EINLEGEN
1. Drücken Sie vorsichtig auf die Batteriefachabdeckung,
um diese vom Basisgerät abzunehmen.
2. Legen Sie die Batterien ein, und achten Sie auf die
korrekte Ausrichtung der Polarisierungsangaben (+/-).
HINWEIS Wechseln Sie die Batterien aus, sobald der
-Indikator in der Anzeige erscheint, oder wenn die Anzeige
schwächer wird.
DC-STROMVERSORGUNG
Schließen Sie den Stecker des Kabels für die Stromversorgung
an der Buchse auf der Rückseite an, und verbinden Sie den
Netzadapter mit einer geeigneten Netzdose.
HINWEIS Wir empfehlen die Batterien zur Stromversorgung
während eines Netzstromausfalls einzulegen.
UHR
FUNKZEITSIGNAL-EMPFANG
Diese Uhr kann die Zeitanzeige automatisch mit einem
Funkzeitsignal synchronisieren. Betätigen Sie die RCC-Taste,
um die Funktion einzuschalten, und das Gerät sucht nun nach
einem verwendbaren Funkzeitsignal.
Das Basisgerät kann RF-Funkzeitsignale verschiedener RCC-
Signalstandards empfangen:
Modellnummer Region Signal
RM338P EU DCF
RM338PU UK MSF
Funkzeitsignal-Empfangsindikator:
Symbole Beschreibung
Das Basisgerät sucht
nach einem verwendbaren
Funkzeitsignal.
(ash)
Das Basisgerät empfängt
das Funkzeitsignal.
Kein Funkzeitsignal
vorhanden.
Starkes RCC- Signal wird
empfangen.
Schwaches RCC-Signal
wird empfangen.
NOTE Der Empfang des Funkzeitsignals dauert ca.
2-10 Minuten. Wenn das Funkzeitsignal sehr schwach ist,
kann der Empfang eines verwendbaren Signals bis zu
24 Stunden dauern.
UHRZEIT MANUELL EINSTELLEN
1. Drücken und halten Sie . In der Anzeige erscheint nun
die Meldung ZONE (ZEITZONE), und die Nummer der
Zeitzone blinkt.
2. Drücken Sie einmal, oder halten Sie die Tasten +/— gedrückt,
um die Einstellung auszuführen. Für EU/UK kann eine
Zeitzoneneinstellung +/— 23 Stunden bezüglich des
empfangenen Zeitsignals eingestellt werden.
3. Betätigen Sie
, um die Einstellungen zu bestätigen.
4. Die Tasten einmal betätigen oder gedrückt halten,
um die Einstellungen für das 12/24-Stundenformat,
die Stunden, Minuten, das Jahr, das Kalenderformat
(Monat-Datum/Datum-Monat), den Monat, das Datum,
die Temperatureinheitenanzeige (°C/°F) und die
Anzeigesprache.
5. Betätigen Sie
, um die Einstellungen jeweils zu bestätigen.
HINWEIS
• Die Optionen für die Sprachenauswahl sind Englisch (ENG),
Spanisch (SPA), Italienisch (ITA), Französisch (FRE) und
Deutsch German (GER).
• Der RCC-Funkzeitsignalempfang wird nach jeder
Rücksetzung, oder nach einem Batteriewechsel erneut aktiviert.
• Im Einstellungsmodus, drücken und halten Sie um die
Einstellungen zu speichern und den Einstellungsmodus zu
verlassen.
ALARM
AKTIVIERUNG/EINSTELLUNG DER ALARMZEIT
1. Drücken und halten Sie .
2. Die Tasten +/— einmal drücken, oder gedrückt halten, um
die Stunden- und Minutenanzeige einzustellen; betätigen
Sie
, um zu bestätigen.
3. Die Tasten +/- betätigen, um den Wochentagalarm EIN/
AUS zu schalten; betätigen Sie
to conrm.
• Der Alarm ertönt nur an Wochentagen wenn diese
Einstellung EIN-geschaltet ist.
4. Wiederholen Sie die Schritte 2 – 4 für die Einstellung von
Alarm 2. In der Anzeige erscheint
/ und zeigt an,
wenn die Alarmfunktionen aktiviert sind.
ALARMFUNKTIONEN EIN/AUS SCHALTEN:
Betätigen Sie , um die Alarmfunktionen wie folgt „ein/aus“
zu schalten:
Alarm1
> Alarm 2 > Beide EIN > Beide AUS.
BETRIEB
Die Anzeigebeleuchtung blinkt sobald der Alarm ertönt. Gehen
Sie wie folgt vor:
• Betätigen Sie
, um den Alarm abzuschalten. Der Alarm
ertönt erneut zur eingestellten Alarmzeit am nächsten Tag.
• Betätigen Sie die Taste SCHLUMMERN/LICHT (SNOOZE |
LIGHT), um die Schlummerfunktion zu aktivieren. Der Alarm
ertönt nun erneut nach 8 Minuten.
PROJEKTION DER ZEITANZEIGE
Der Projektor kann die Zeit an Ihre Zimmerdecke projizieren,
so dass Sie die Zeit leicht in einem abgedunkelten Raum
ablesen können. Das Gerät sollte sich in einem Abstand von ca.
1.5-2m (5 – 6.5 Fuß) von der Decke oder Wand benden, um
eine optimale Projektionsqualität zu gewährleisten.
• Betätigen Sie die Taste SCHLUMMERN/LICHT (SNOOZE |
LIGHT). um die Anzeigebeleuchtung und die Zeitprojektion
ca. 5 Sekunden lang einzuschalten.
• Drücken und halten sie die Taste SCHLUMMERN/LICHT
(SNOOZE | LIGHT) bis Sie einen Piepton hören, um die
Zeitprojektion 5 Minuten lang einzuschalten.
• Betätigen Sie die
/ PROJEKTION -Taste, um die
Zeitprojektion 180° zu drehen.
• Drücken und halten Sie die
/ PROJEKTION -Taste, um
die kontinuierliche Projektion der Zeitanzeige “ein/aus” zu
schalten.
HINWEIS Die kontinuierliche Zeitprojektion ist deaktiviert
während das Gerät nicht mittels eines Netzadapters betrieben
wird.
VORSICHTSMASSNAHMEN
• Setzen Sie das Gerät keiner extremen Gewalteinwirkung
und keinen Stößen aus, und halten Sie es von übermäßigem
Staub, Hitze oder Feuchtigkeit fern.
• Sie dürfen die Belüftungsöffnungen nicht mit Gegenständen
abdecken, wie z.B. Zeitungen, Vorhänge, usw.
• Tauchen Sie das Gerät niemals in Wasser. Falls Sie eine
Flüssigkeit über das Gerät verschütten, trocknen Sie es
sofort mit einem weichen, faserfreien Tuch.
• Reinigen Sie das Gerät keinesfalls mit scheuernden oder
ätzenden Mitteln.
• Machen Sie sich nicht an den internen Komponenten des
Geräts zu schaffen, da dies zu einem Verlust der Garantie
führen kann.
• Verwenden Sie nur neue Batterien. Verwenden Sie
keinesfalls neue und alte Batterien gemeinsam.
• Die in dieser Anleitung dargestellten Abbildungen können
sich vom Original unterscheiden.
• Entsorgen Sie das Gerät ausschließlich in den dafür
vorgesehenen, kommunalen Sammelstellen, die Sie bei
Ihrer Gemeinde erfragen können.
• Wenn dieses Produkt auf bestimmte Holzächen gestellt wird,
kann die Oberäche beschädigt werden. Oregon Scientic
ist nicht haftbar für solche Beschädigungen. Entsprechende
Hinweise entnehmen Sie bitte der Pegeanleitung Ihres
Möbelherstellers.
• Der Inhalt dieser Anleitung darf ohne Genehmigung des
Herstellers nicht vervielfältigt werden.
• Verbrauchte Batterien gehören nicht in den Hausmüll. Bitte
geben Sie sie bei einer Sammelstelle für Altbatterien bzw.
Sondermüll ab.
• Bitte beachten Sie, dass manche Geräte mit einem
Batterieunterbrechungsstreifen bestückt sind. Vor dem ersten
Gebrauch müssen Sie den Streifen aus dem Batteriefach
ziehen.
HINWEIS Die technischen Daten für dieses Produkt und der
Inhalt der Bedienungsanleitung können ohne Benachrichtigung
geändert werden.
HINWEIS Eigenschaften und Zubehör nicht in allen Ländern
verfügbar. Weitere Informationen erhalten Sie von Ihrem
Fachhändler vor Ort.
TECHNISCHE DATEN
MAIN UNIT
L x B x H 108 x 26 x 77 mm
Gewicht 112g ohne Batterien
Temperaturanzeigebereich -5°C to 50°C
Genauigkeit 0°C-40°C: ±1°C (±2.0°F)
40°C <T<0°C: ±2°C (±4.0°F)
Auösung 0.1°C (0.2°F)
Stromversorgung 2 x UM-4 (AAA) 1.5 V Batterien
3.6 V adapter
ÜBER OREGON SCIENTIFIC
Besuchen Sie unsere Website www.oregonscientific.com,
um mehr über die Produkte von Oregon Scientific zu erfahren.
Für etwaige Anfragen kontaktieren Sie bitte unseren
Kundendienst unter info@oregonscientific.de.
Oregon Scientific Global Distribution Limited behält sich das
Recht vor, die Inhalte, Bedingungen und Bestimmungen
in dieser Bedienungsanleitung zu interpretieren und
auszulegen, und diese jederzeit nach eigenem Ermessen ohne
vorherige Ankündigung abzuändern. Soweit es irgendwelche
Unterschiede zwischen der englischen Version und den
Versionen in anderen Sprachen gibt, ist die englische Version
maßgebend.
EU-KONFORMITÄTSERKLÄRUNG
Hiermit erklärt Oregon Scientific, PROJI Projektionsuhr (Modell:
RM338P/RM338PU) oder mit den grundlegenden Anforderungen
und anderen relevanten Vorschriften der Richtlinie 1999/5/
EG übereinstimmt. Eine Kopie der unterschriebenen und
mit Datum versehenen Konformitätserklärung erhalten Sie
auf Anfrage über unseren Oregon Scientific Kundendienst.
KONFORM IN FOLGENDEN LÄNDERN
Alle Länder der EU, Schweiz CH
und Norwegen N
INFORMATIONEN FÜR DIE BENUTZER
Gemäß den Europäischen Richtlinien 2011/65/EU
und 2012/19/EU über die Reduzierung der
Verwendung gefährlicher Stoffe in elektrischen
und elektronischen Geräten, sowie die
Abfallentsorgung.
Das Symbol der durchgestrichenen Mülltonne auf dem Gerät
besagt, dass es am Ende seiner Verwendungszeit getrennt
von anderen Abfällen entsorgt werden muss.
Der Benutzer muss daher das Gerät nach Beendigung
seiner Verwendungsdauer zu geeigneten Sammelstellen
für die getrennte Abfallentsorgung von elektrischen und
elektronischen Geräten bringen oder es dem Endverkäufer
beim Kauf eines neuen Geräts von ähnlicher Art im Verhältnis
eins zu eins übergeben.
Die angemessene Abfalltrennung und die darauf folgende
Verbringung des aufgelassenen Geräts in den Recyclingkreis-lauf
zur umweltverträglichen Verwertung und Entsorgung tragen
dazu bei, mögliche negative Auswirkungen auf die Umwelt
und die Gesundheit zu vermeiden und sie begünsti-gen das
Recycling von Materialien, aus denen das Gerät besteht.
Die rechtswidrige Entsorgung des Produktes veranlässt die
Verwendung der geltenden Verwaltungssanktionen.