CSS Grid Layout — самая мощная система компоновки из доступных на данный момент в CSS. Это двумерная система, которая может обрабатывать как колонки так и строки, в отличии от Flexbox, который в значительной степени является одномерной системой. При работе с CSS Grid, вы применяете CSS правила и родительским элементам (которые становятся Grid контейнерами) и к дочерним элементам (которые становятся Grid элементами).
Введение
CSS Grid Layout (aka «Grid») — это двумерная система компоновки основанная на сетке, цель которой заключается в том чтобы полностью изменить способ проектирования пользовательских интерфейсов основанных на сетке. CSS всегда использовался для разметки веб-страниц, но никогда не делал эту работу хорошо. Сначала мы использовали таблицы, потом обтекания (floats), позиционирование и инлайновые блоки (inline-block), но все эти методы по существу являются просто хаками и опускают много важных функциональных возможностей (например, вертикальное выравнивание). Flexbox помог, но он предназначен для более простых одномерных макетов, а не для сложных двумерных (на самом деле Flexbox и Grid очень хорошо работают вместе). CSS Grid’ы — это первый модуль созданный специально для решения проблем компоновки, которые до сих пор мы решали с помощью хаков при создании сайтов. Есть две основные вещи, которые вдохновили меня на создание этого руководства. Первое, это замечательная книга от Rachel Andrew’s Get Ready for CSS Grid Layout. Это подробное и понятное введение в CSS Grid’ы, которое является основой для всей этой статьи. Я настоятельно рекомендую купить и прочитать его. Вторая вещь, которая меня вдохновила — это A Complete Guide to Flexbox (Полное руководство по Flexbox) от Chris Coyier’s, которая стала моим основным ресурсом по Flexbox. Она помогла большому количеству людей, о этом свидетельствует тот факт, что это лучший результат в поисковой выдаче при запросе»Flexbox» в Google. Вы увидите много похожего между этой статьей и моей, потому что почему бы не украсть у лучших?
Моя цель в этом руководстве — это возможность представить вам концепции CSS Grid’ов так как они существуют в самой последней версии спецификации. Поэтому я не буду освещать устаревший синтаксис для IE и сделаю всё возможное, чтобы это руководство регулярно обновлялось, по мере изменения спецификации.
Основы и поддержка браузерами
Для того чтобы начать работу, нам нужно определить элемент-контейнер с помощью display: grid, настроить размеры колонок и строк с помощью grid-template-columns и grid-template-rows, а также разместить его дочерние элементы внутри сетки с помощью grid-column и grid-row. Так же как и во Flexbox, порядок элементов в источнике сетки, не имеет значения (прим. переводчика: в HTML разметке). Ваш CSS может размещать их в любом порядке, что собственно упрощает перегруппировку сетки с помощью медиа запросов. Представьте, что вы определяете разметку всей страницы, а затем полностью переставляете её, чтобы разместить элементы под другую ширину экрана всего лишь с помощью нескольких CSS строк кода. CSS Grid — это один из самых мощных CSS модулей, представленных когда-либо. По состоянию на март 2017 года, многие браузеры уже поддерживают CSS Grid, без префиксов: Chrome (включая Android), Firefox, Safari (включая iOS), и Opera. Internet Explorer 10 и 11 поддерживают его но с реализацией более старого синтаксиса. Была анонсирована поддержка в Edge, но её пока нет.
CSS Grid Layout (level 1)
Полная поддержка
Частичная поддержка
С префиксом
Не поддерживается
Помимо Microsoft, производители браузеров по всей видимости придерживают запуск CSS Grid’ов в свободное плавание, пока спецификация не будет полностью готова. И это хорошо, потому что нам не придется заботится об изучении нескольких синтаксисов.
Это всего лишь вопрос времени, когда вы сможете использовать Grid’ы в продакшене. Но самое время, чтобы узнать о нём побольше.
Важная терминология
Перед тем как мы погрузимся в концепцию Grid’ов, важно понимать её терминологию. Так как используемые здесь термины концептуально похожи, их довольно легко перепутать друг с другом, если с самого начала не запомнить их значения, определённые в спецификации. Не волнуйтесь их не так много.
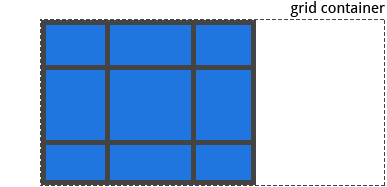
Контейнер сетки
Элемент к которому применяется display: grid. Это прямой родитель для всех элементов сетки. В этом примере container является контейнером.
<div class="container">
  <div class="item item-1"></div>
  <div class="item item-2"></div>
  <div class="item item-3"></div>
</div>
Элемент сетки
Дочерние элементы (прямые потомки) контейнера. Здесь item это элемент сетки, но не sub-item.
<div class="container">
<div class="item"></div>
<div class="item">
<p class="sub-item"></p>
</div>
<div class="item"></div>
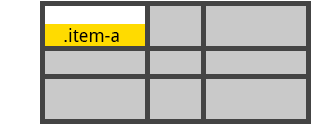
</div>Линия сетки
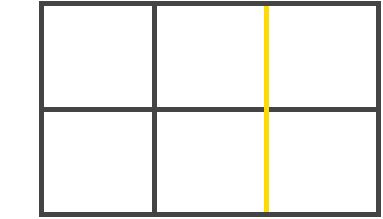
Разделительные линии, составляющие структуру для сетки. Они могут быть вертикальными («линии колонок») или горизонтальными («линии строк») и располагаться по обе стороны от строки или столбца. На изображении жёлтая линия является примером вертикальной линии (линией колонки).
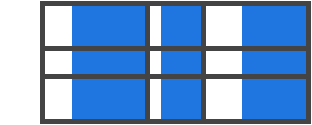
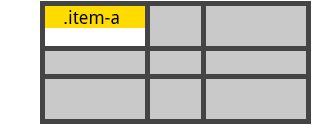
Трек сетки
Пространство между двумя соседними линиями. Вы можете думать об этом как о столбцах или строках сетки. Вот трек между второй и третьей линией строк.

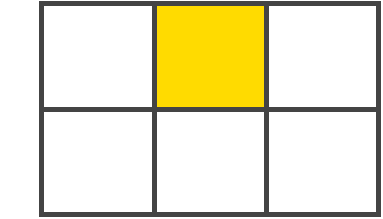
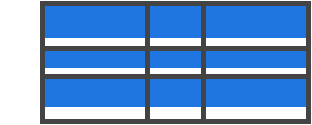
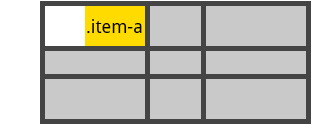
Ячейка сетки
Пространство между линиями двух соседних строк и двух соседних столбцов. Это отдельная «единица измерения» сетки. Вот пример ячейки между линиями строк 1 и 2, линиями колонок 2 и 3.
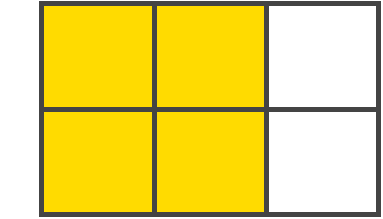
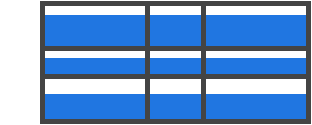
Область сетки
Общее пространство окружённое четырьмя линиями. Область может состоять из любого количества ячеек. Вот пример области между строками 1 и 3, и колонками 1 и 3.
Содержание
Свойства для контейнера
- display
- grid-template-columns
- grid-template-rows
- grid-template-areas
- grid-template
- grid-column-gap
- grid-row-gap
- grid-gap
- justify-items
- align-items
- justify-content
- align-content
- grid-auto-columns
- grid-auto-rows
- grid-auto-flow
- grid
Свойства для родительского элемента
(Контейнера сетки)
display
Определяет элемент как контейнер и устанавливает новый контекст форматирования сетки для его содержимого.
Значения:
- grid — формирует сетку как блок;
- inline-grid — формирует сетку как инлайновый блок;
- subgrid — если ваш контейнер это ещё и элемент (вложенная сетка), то вы можете использовать это свойство для обозначения того, чтобы размеры строк/колонок были взяты из родительского элемента, а не определяли собственный;
.container {
  display: grid | inline-grid | subgrid;
}
Обратите внимание на то, что column, float, clear и vertical-align не дадут никакого эффекта на контейнере.
grid-template-columns
grid-tempate-rows
Определяет колонки и строки сетки с помощью списка значений разделённого пробелами. Значения представляют из себя размер трека, а пробелы между ними представляют линии сетки.
Значения:
- <track-size> — может быть фиксированным размером, процентами или частью свободного пространства в сетке (определяется с помощью единицы
fr(fraction)); - <line-name> — произвольное имя на ваш выбор;
.container {
  grid-template-columns: <track-size> ... | <line-name> <track-size> ...;
  grid-template-rows: <track-size> ... | <line-name> <track-size> ...;
}
Примеры:
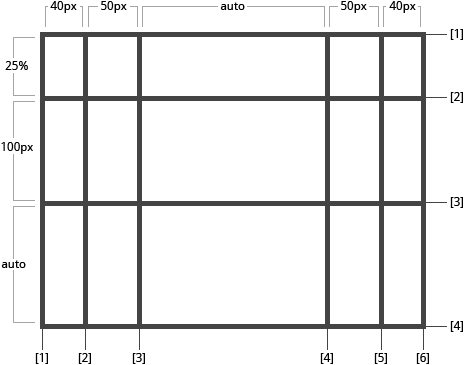
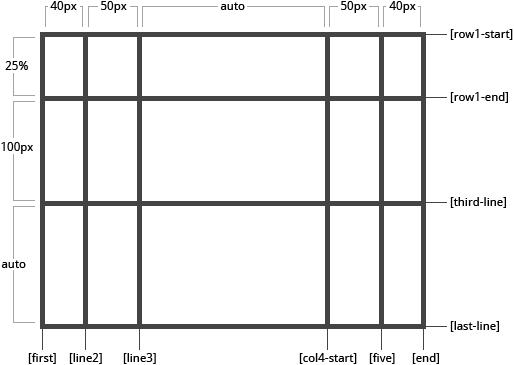
Когда вы оставляете пустое пространство между значениями треков, линиям сетки автоматически присваиваются числовые имена:
.container{
  grid-template-columns: 40px 50px auto 50px 40px;
  grid-template-rows: 25% 100px auto;
}
Но вы можете называть линии явно. Обратите внимание на синтаксис для их названия:
.container {
  grid-template-columns: [first] 40px [line2] 50px [line3] auto [col4-start] 50px [five] 40px [end];
  grid-template-rows: [row1-start] 25% [row1-end] 100px [third-line] auto [last-line];
}
Обратите внимание на то что у линии может быть несколько названий. Например, здесь у второй линии будет два названия: row1-end и row2-start:
.container{
  grid-template-rows: [row1-start] 25% [row1-end row2-start] 25% [row2-end];
}
Если в вашем определении содержатся повторяющиеся части, то можно использовать нотацию repeat():
.container {
  grid-template-columns: repeat(3, 20px [col-start]) 5%;
}
Тоже самое что и:
.container {
  grid-template-columns: 20px [col-start] 20px [col-start] 20px [col-start] 5%;
}
Единица fr позволяет вам настраивать размер треков как часть свободного пространства в контейнере. Вот пример, который устанавливает каждому элементу одну третью ширины контейнера.
.container {
  grid-template-columns: 1fr 1fr 1fr;
}
Свободное пространство высчитывается после вычисления всех фиксированных элементов. В этом примере, общее количество свободного пространства для единиц fr не будет включать в себя 50px.
grid-template-areas
Определяет шаблон сетки ссылаясь на имена областей, которые заданы с помощью свойства grid-area. Повторение названия области приводит к тому, что содержимое охватывает эти ячейки. Точка означает пустую ячейку. Сам синтаксис предоставляет визуализацию структуры сетки.
Значения:
- <grid-area-name> — имя области заданное с помощью grid-area;
- . — точка обозначающая пустую ячейку;
- none — области не определены;
.container {
grid-template-areas:
"<grid-area-name> | . | none | ..."
"...";
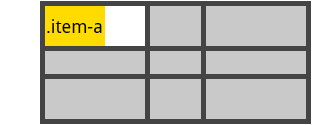
}Пример:
.item-a {
grid-area: header;
}
.item-b {
grid-area: main;
}
.item-c {
grid-area: sidebar;
}
.item-d {
grid-area: footer;
}
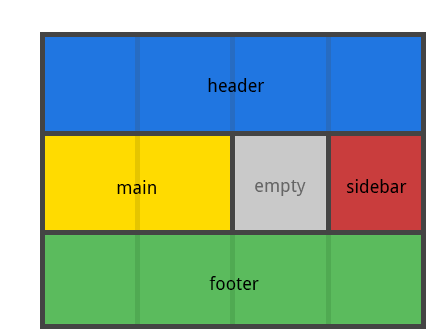
.container {
grid-template-columns: 50px 50px 50px 50px;
grid-template-rows: auto;
grid-template-areas:
"header header header header"
"main main . sidebar"
"footer footer footer footer";
}Пример выше создаст сетку из 4 колонок и 3 строк. Вся верхняя строка будет состоять из области header. Строка по середине будет состоять из области main, занимающей две колонки, пустой ячейки и области sidebar, которая занимает одну колонку. Последняя строка будет состоять только из области footer.
У каждой строки должно быть одинаковое количество ячеек. Вы можете использовать любое количество примыкающих точек для объявления пустых ячеек. Пока между точками нет пробелов, они представляют одну ячейку.
Обратите внимание на то, что вы никак не называете линии, только области. Когда вы используете такой синтаксис, линии на обоих концах областей будут именоваться автоматически. Если ваша область называется foo, то название первых линий для строк и столбцов будет foo-start, а название для последних линий строк и столбцов будет foo-end. Это означает, что у некоторых линий может быть несколько имён, как нашем случае, у самой левой линии будет три названия: header-start, main-start, и footer-start.
grid-template
Сокращение для grid-template-rows, grid-template-columns, и grid-template-areas.
Значения:
- none — устанавливает все три свойства в их начальное значение;
- subgrid — устанавливает grid-template-rows и grid-template-columns в
subgrid, и grid-template-areas в его начальное значение; - <grid-template-rows> / <grid-template-columns> — устанавливает grid-template-columns и grid-template-rows в определённое значение, соответственно, и устанавливает grid-template-areas в
none;
.container {
  grid-template: none | subgrid | <grid-template-rows> / <grid-template-columns>;
}
Он также принимает более сложный, но довольно удобный синтаксис, для указания всех трёх свойств. Вот пример:
.container {
  grid-template:
    [row1-start] 25px "header header header" [row1-end]
    [row2-start] "footer footer footer" 25px [row2-end]
    / auto 50px auto;
}
Что эквивалентно следующему:
.container {
  grid-template-rows: [row1-start] 25px [row1-end row2-start] 25px [row2-end];
  grid-template-columns: auto 50px auto;
  grid-template-areas:
    "header header header"
    "footer footer footer";
}
Так как grid-template не сбрасывает неявные свойства (grid-auto-columns, grid-auto-rows, и grid-auto-flow), а в большинстве случаев, вероятно, вы бы захотели это сделать, рекомендуется использовать свойство grid, вместо grid-template.
# grid-column-gap
grid-row-gap
Определяет размер ширины линий. Вы можете думать об этом, как о настройке ширины отступов между столбцами и строками.
Значения:
- <line-size> — значение размера;
.container {
  grid-column-gap: <line-size>;
  grid-row-gap: <line-size>;
}
Пример:
.container {
  grid-template-columns: 100px 50px 100px;
  grid-template-rows: 80px auto 80px;
  grid-column-gap: 10px;
  grid-row-gap: 15px;
}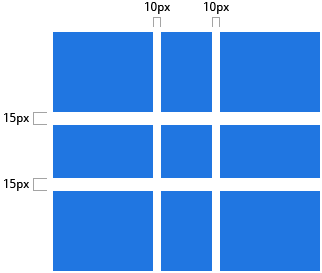
Отступы создаются только между колонками и строками, но не для внешних краев сетки.
grid-gap
Сокращение для grid-row-gap и grid-column-gap.
Значение:
- <grid-row-gap> <grid-column-gap> — значения размеров;
.container {
  grid-gap: <grid-row-gap> <grid-column-gap>;
}
Пример:
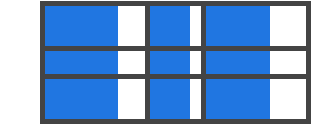
.container{
  grid-template-columns: 100px 50px 100px;
  grid-template-rows: 80px auto 80px;
  grid-gap: 10px 15px;
}
Если значение для grid-row-gap не задано, ему присваивается такое же значение как и у grid-column-gap.
justify-items
Выравнивает содержимое вдоль оси строки (в отличии от align-items который выравнивает элементы вдоль оси столбца). Это значение применяется ко всем элементам сетки внутри контейнера.
Значения:
- start — выравнивает содержимое по левой стороне области;
- end — выравнивает содержимое по правой стороне области;
- center — выравнивает содержимое по центру области;
- stretch — заполняет всю ширину области (по умолчанию);
.container {
  justify-items: start | end | center | stretch;
}
Примеры:
.container {
  justify-items: start;
}
.container{
  justify-items: end;
}
.container{
justify-items: center;
}.container{
justify-items: stretch;
}
align-items
Выравнивает содержимое вдоль оси столбца (в отличии от justify-items который выравнивает элементы вдоль оси строки). Это значение применяется ко всем элементам сетки внутри контейнера.
Значения:
- start — выравнивание элементов по верхней части области;
- end — выравнивание элементов по нижней части области;
- center — выравнивание элементов по центру области;
- stretch — заполняет всю высоту области (по умолчанию);
.container {
  align-items: start | end | center | stretch;
}
Примеры:
.container {
  align-items: start;
}
.container {
  align-items: end;
}
.container {
align-items: center;
}.container {
align-items: stretch;
}
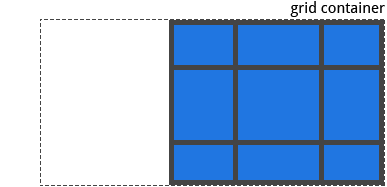
justify-content
Иногда общий размер сетки может быть меньше размера контейнера. Такое может случится если у всех элементов сетки заданы фиксированные единицы измерения, например px. В таком случае можно установить выравнивание сетки внутри контейнера. Это свойство выравнивает сетку вдоль оси строки (в отличии от свойства align-content, которое выравнивает сетку вдоль оси столбца).
Значения:
- start — выравнивает сетку по левой стороне контейнера;
- end — выравнивает сетку по правой стороне контейнера;
- center — выравнивает сетку по центру контейнера;
- stretch — масштабирует элементы чтобы сетка могла заполнить всю ширину контейнера;
- space-around — одинаковое пространство между элементами, и полуразмерные отступы по краям;
- space-between — одинаковое пространство между элементами, без отступов по краям;
- space-evenly — одинаковое пространство между элементами, и полноразмерные отступы по краям;
.container {
  justify-content: start | end | center | stretch | space-around | space-between | space-evenly;
}
Примеры:
.container {
  justify-content: start;
}
.container {
  justify-content: end;
}
.container {
justify-content: center;
}.container {
justify-content: stretch;
}.container {
justify-content: space-around;
}.container {
justify-content: space-between;
}.container {
justify-content: space-evenly;
}
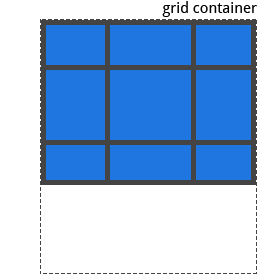
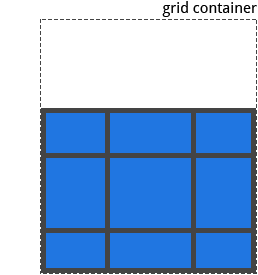
align-content
Иногда общий размер сетки может быть меньше размера контейнера. Такое может случится если у всех элементов сетки зада фиксированные единицы измерения, например px. В таком случае можно установить выравнивание сетки внутри контейнера. Это свойство выравнивает сетку вдоль оси колонки (в отличии от свойства justify-content, которое выравнивает сетку вдоль оси строки).
Значения:
- start — выравнивает сетку по верхней части контейнера;
- end — выравнивает сетку по нижней части контейнера;
- center — выравнивает сетку по центру контейнера;
- stretch — масштабирует элементы чтобы сетка могла заполнить всю высоту контейнера;
- space-around — одинаковое пространство между элементами, и полуразмерные отступы по краям;
- space-between — одинаковое пространство между элементами, без отступов по краям;
- space-evenly — одинаковое пространство между элементами, и полноразмерные отступы по краям;
.container {
  align-content: start | end | center | stretch | space-around | space-between | space-evenly;
}
Примеры:
.container {
  align-content: start;
}
.container {
  align-content: end;
}
.container {
align-content: center;
}.container {
align-content: stretch;
}.container {
align-content: space-around;
}.container {
align-content: space-between;
}.container {
align-content: space-evenly;
}
grid-auto-columns
grid-auto-rows
Определяет размер любых автоматически созданных треков (иначе говоря, неявных треков). Неявные треки создаются при явном позиционировании столбцов и строк (через grid-template-rows/grid-template-columns), которые находятся за пределами заданной сетки.
Значения:
- <track-size> — может быть фиксированным размером, процентами, или частью свободного пространства в сетке (с использованием единицы
fr);
.container {
grid-auto-columns: <track-size> ...;
grid-auto-rows: <track-size> ...;
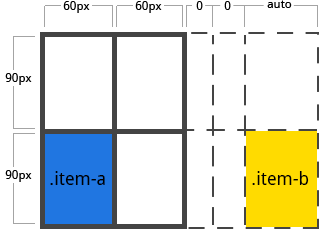
}Чтобы проиллюстрировать то как создаются неявные треки, посмотрите на это:
Пример выше создаст сетку 2 x 2.
А теперь представьте, что вы позиционируете элементы сетки с помощью grid-column и grid-row следующим образом:
.item-a {
  grid-column: 1 / 2;
  grid-row: 2 / 3;
}
.item-b {
  grid-column: 5 / 6;
  grid-row: 2 / 3;
}
Мы сказали чтобы элемент .item-b начинался с 5 линии и заканчивался на 6 линии, по оси столбцов, но мы не определяли линии 5 и 6. Так как мы ссылаемся на не существующие линии, неявные треки с шириной 0 были созданы чтобы заполнить пробелы. Мы можем использовать grid-auto-columns и grid-auto-rows чтобы указать ширину этим неявным трекам:
.container {
  grid-auto-columns: 60px;
}
grid-auto-flow
Если у вас есть элементы, которые вы явно не позиционируете в сетке, запускается алгоритм авто-размещения, чтобы их автоматически разместить. Это свойство контролирует то как алгоритм авто-размещения работает.
Значения:
- row — говорит алгоритму авто-размещения заполнять каждую строку поочерёдно, добавляя новые строки при необходимости;
- column — говорит алгоритму авто-размещения заполнять каждую колонку поочерёдно, добавляя новые колонки при необходимости;
- dense — говорит алгоритму авто-размещения попытаться заполнить дыры в сетке, если более мелкие элементы появляются позже;
.container {
  grid-auto-flow: row | column | row dense | column dense
}
Обратите внимание на то что dense может привести к тому, что ваши элементы будут отображаться не по порядку.
Примеры:
Рассмотрим следующий HTML:
<section class="container">
<div class="item-a">item-a</div>
<div class="item-b">item-b</div>
<div class="item-c">item-c</div>
<div class="item-d">item-d</div>
<div class="item-e">item-e</div>
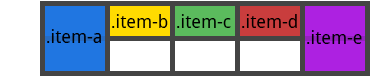
</section>Вы определили сетку с пятью колонками и двумя рядами, а свойство grid-auto-flow установили в row (оно же значение по умолчанию).
.container {
  display: grid;
  grid-template-columns: 60px 60px 60px 60px 60px;
  grid-template-rows: 30px 30px;
  grid-auto-flow: row;
}
При размещении элементов в сетке, вы указываете позиции только для двух из них:
.item-a {
  grid-column: 1;
  grid-row: 1 / 3;
}
.item-e {
  grid-column: 5;
  grid-row: 1 / 3;
}
Так как мы установили grid-auto-flow в row, наша сетка будет выглядеть как на изображении ниже. Обратите внимание на то, как три элемента которые мы не расположили (item-b, item-c и item-d) перетекают через пустые строки:
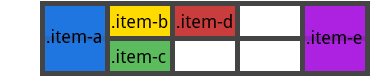
Если вместо этого мы установим свойство grid-auto-flow в column, элементы item-b, item-c and item-d будут перетекать сквозь колонки:
.container {
  display: grid;
  grid-template-columns: 60px 60px 60px 60px 60px;
  grid-template-rows: 30px 30px;
  grid-auto-flow: column;
}
grid
Сокращение для настройки всех следующих свойств: grid-template-rows, grid-template-columns, grid-template-areas, grid-auto-rows, grid-auto-columns, и grid-auto-flow. Он также настраивает grid-column-gap и grid-row-gap на их начальные значения, даже если они не могут быть явно заданы этим свойством.
Значения:
- none — настраивает все свойства на их начальные значения;
- <grid-template-rows> / <grid-template-columns> — настраивает grid-template-rows и grid-template-columns на соответствующие указанные значения, а все остальные свойства сбрасывает к их начальным значениям;
- <grid-auto-flow> [<grid-auto-rows> [ / <grid-auto-columns>] ] — принимает те же самые значения что и grid-auto-flow, grid-auto-rows и grid-auto-columns, соответственно. Если grid-auto-columns опущено, устанавливается значение соответствующие для grid-auto-rows. Если опущены оба, то они устанавливаются в начальные значения;
.container {
    grid: none | <grid-template-rows> / <grid-template-columns> | <grid-auto-flow> [<grid-auto-rows> [/ <grid-auto-columns>]];
}
Примеры:
Следующие два блока кода эквивалентны:
.container {
  grid: 200px auto / 1fr auto 1fr;
}
.container {
grid-template-rows: 200px auto;
grid-template-columns: 1fr auto 1fr;
grid-template-areas: none;
}И следующие два блока также эквивалентны:
.container {
  grid: column 1fr / auto;
}
.container {
grid-auto-flow: column;
grid-auto-rows: 1fr;
grid-auto-columns: auto;
}Он также принимает более сложный, но довольно удобный синтаксис для настройки всего и сразу. Вы указываете grid-template-areas, grid-template-rows и grid-template-columns, а все остальные свойства устанавливаются в начальные значения. Всё что вы делаете, это указываете имена строк и размеры треков в строке соответствующим областям сетки. Это проще всего описать на примере:
.container {
  grid: [row1-start] "header header header" 1fr [row1-end]
        [row2-start] "footer footer footer" 25px [row2-end]
        / auto 50px auto;
}
Это эквивалентно следующему:
.container {
  grid-template-areas:
    "header header header"
    "footer footer footer";
  grid-template-rows: [row1-start] 1fr [row1-end row2-start] 25px [row2-end];
  grid-template-columns: auto 50px auto;
}
Свойства для дочерних элементов
(Grid элементы)
grid-column-start
grid-column-end
grid-row-start
grid-row-end
Определяют местоположение в сетке ссылаясь на конкретные линии. grid-column-start/grid-row-start — это линия с которой начинается элемент, а grid-column-end/grid-row-end — это линия на которой элемент заканчивается.
Значения:
- <line> — может быть числом ссылающимся на пронумерованную линию, или названием ссылающимся на именованую линию;
- span <number> — элемент, который будет охватывать предоставленное количество треков;
- span <name> — элемент будет будет охватывать пока не достигнет линии с указанным названием;
- auto — указывает автоматическое размещения, автоматическое охват, или охват по умолчанию;
.item {
  grid-column-start: <number> | <name> | span <number> | span <name> | auto
  grid-column-end: <number> | <name> | span <number> | span <name> | auto
  grid-row-start: <number> | <name> | span <number> | span <name> | auto
  grid-row-end: <number> | <name> | span <number> | span <name> | auto
}
Примеры:
.item-a {
  grid-column-start: 2;
  grid-column-end: five;
  grid-row-start: row1-start
  grid-row-end: 3
}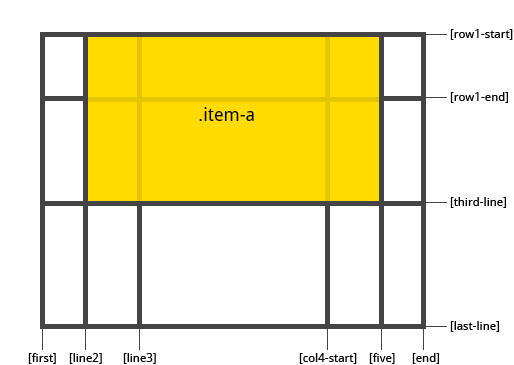
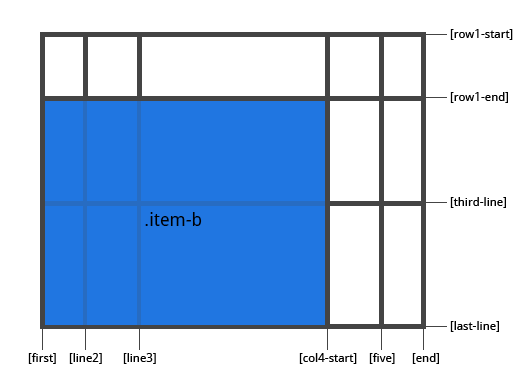
.item-b {
  grid-column-start: 1;
  grid-column-end: span col4-start;
  grid-row-start: 2
  grid-row-end: span 2
}
Если grid-column-end/grid-row-end не объявлены, элемент будет охватывать 1 трек по умолчанию.
grid-column
grid-row
Сокращение для grid-column-start + grid-column-end, и grid-row-start + grid-row-end, соответственно.
Значения:
- <start-line> / <end-line> — каждый из них принимает тоже самое, что и в длинной версии, включая охват;
.item {
  grid-column: <start-line> / <end-line> | <start-line> / span <value>;
  grid-row: <start-line> / <end-line> | <start-line> / span <value>;
}
Пример:
.item-c {
  grid-column: 3 / span 2;
  grid-row: third-line / 4;
}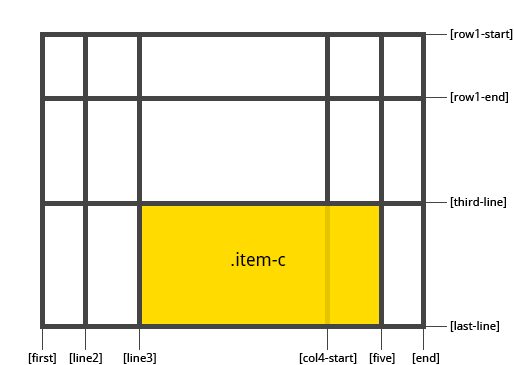
Если значение конечной линии не указано, то элемент будет охватывать только 1 трек, по умолчанию.
grid-area
Даёт название элементу чтобы можно было ссылаться на него с помощью шаблона созданного через grid-template-areas свойство. В качестве альтернативы, это свойство может быть использовано в качестве сокращения для grid-row-start + grid-column-start + grid-row-end + grid-column-end.
Значения:
- <name> — название, которое вы выберите;
- <row-start> / <column-start> / <row-end> / <column-end> — может быть нумерацией или названиями линий;
.item {
  grid-area: <name> | <row-start> / <column-start> / <row-end> / <column-end>;
}
Примеры:
Как способ назначить название элементу:
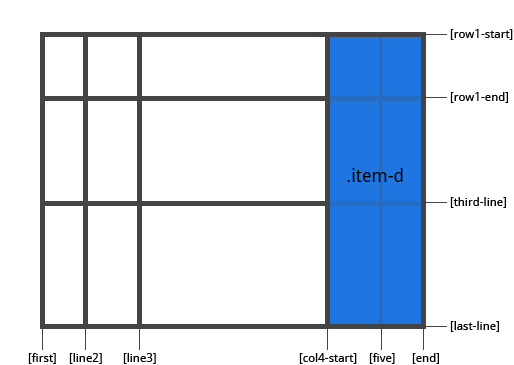
.item-d {
  grid-area: header
}
Как сокращение для grid-row-start + grid-column-start + grid-row-end + grid-column-end:
.item-d {
  grid-area: 1 / col4-start / last-line / 6
}
justify-self
Выравнивает содержимое элемента вдоль оси строки (в отличии от align-self, который выравнивает вдоль оси столбца). Это значение применяется к содержимому внутри отдельного элемента.
Значения:
- start — выравнивает содержимое по левой части области;
- end — выравнивает содержимое по правой части области;
- center -выравнивает содержимое по центру области;
- stretch — заполняет всю ширину области (по умолчанию);
.item {
  justify-self: start | end | center | stretch;
}
Примеры:
.item-a {
  justify-self: start;
}
.item-a {
  justify-self: end;
}
.item-a {
justify-self: center;
}.item-a {
justify-self: stretch;
}
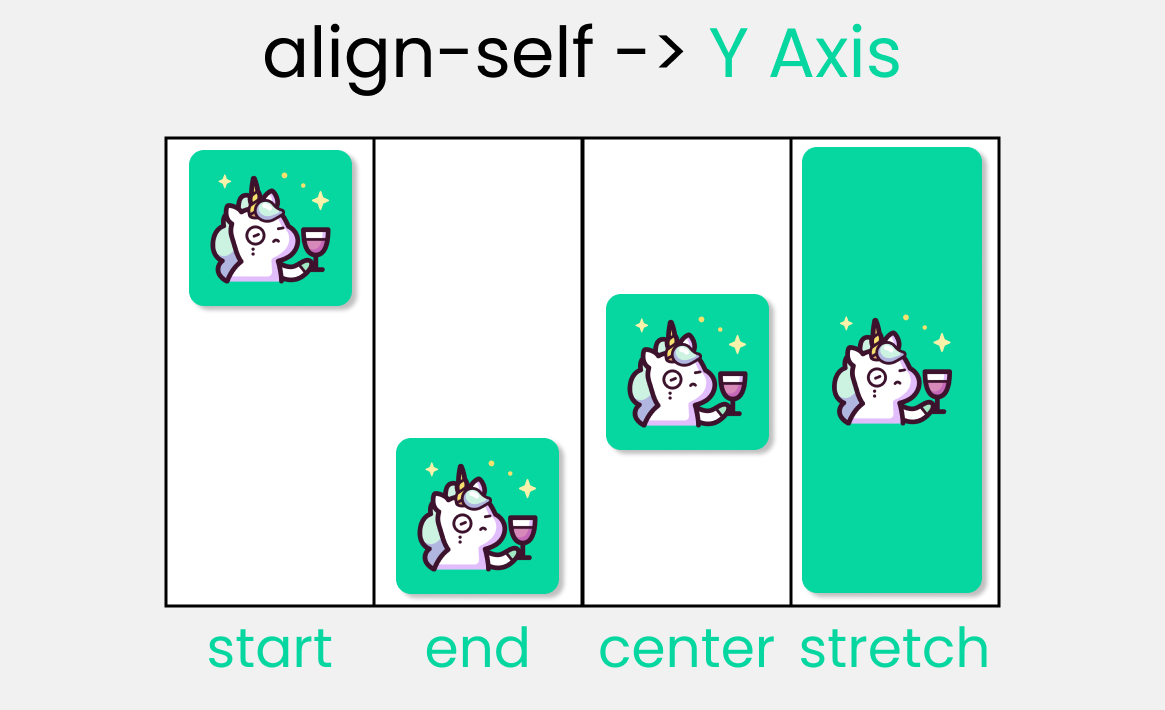
align-self
Выравнивает содержимое элемента вдоль оси столбца (в отличии от justify-self, который выравнивает вдоль оси строки). Это значение применяется к содержимому внутри отдельного элемента.
Значения:
- start — выравнивает содержимое по верхней части области;
- end — выравнивает содержимое по нижней части области;
- center -выравнивает содержимое по центру области;
- stretch — заполняет всю высоту области (по умолчанию);
.item {
  align-self: start | end | center | stretch;
}
Примеры:
.item-a {
  align-self: start;
}
.item-a {
  align-self: end;
}
.item-a {
align-self: center;
}.item-a {
align-self: stretch;
}
Время на прочтение
7 мин
Количество просмотров 245K

Сегодня мы с вами рассмотрим свойства CSS Grid (далее также — Грид), позволяющие создавать адаптивные или отзывчивые макеты веб-страниц. Я постараюсь кратко, но полно объяснить, как работает каждое свойство.
Что такое CSS Grid?
Грид — это макет для сайта (его схема, проект).
Грид-модель позволяет размещать контент сайта (располагать его определенным образом, позиционировать). Она позволяет создавать структуры, необходимые для обеспечения отзывчивости сайтов на различных устройствах. Это означает, что сайт будет одинаково хорошо смотреться на компьютере, телефоне и планшете.
Вот простой пример макета сайта, созданного с помощью Грида.
Компьютер

Телефон

Архитектура CSS Grid
Как же Грид работает? Элементы Грида (grid items) располагаются вдоль главной или основной (main) и поперечной (cross) оси (axis). При помощи различных свойств мы можем манипулировать элементами для создания макетов.

Помимо прочего, у нас имеется возможность объединять строки и колонки подобно тому, как мы это делаем в Excel, что предоставляет нам большую гибкость, чем Флекс (Flexbox).
К слову, если вас интересует Флекс, вот соответствующая статья.
Схема CSS Grid

Схема содержит все возможные свойства, предоставляемые Гридом. Эти свойства делятся на:
- родительские (свойства грид-контейнера) и
- дочерние (свойства грид-элементов)
Обратите внимание: красным цветом отмечены сокращения для свойств:
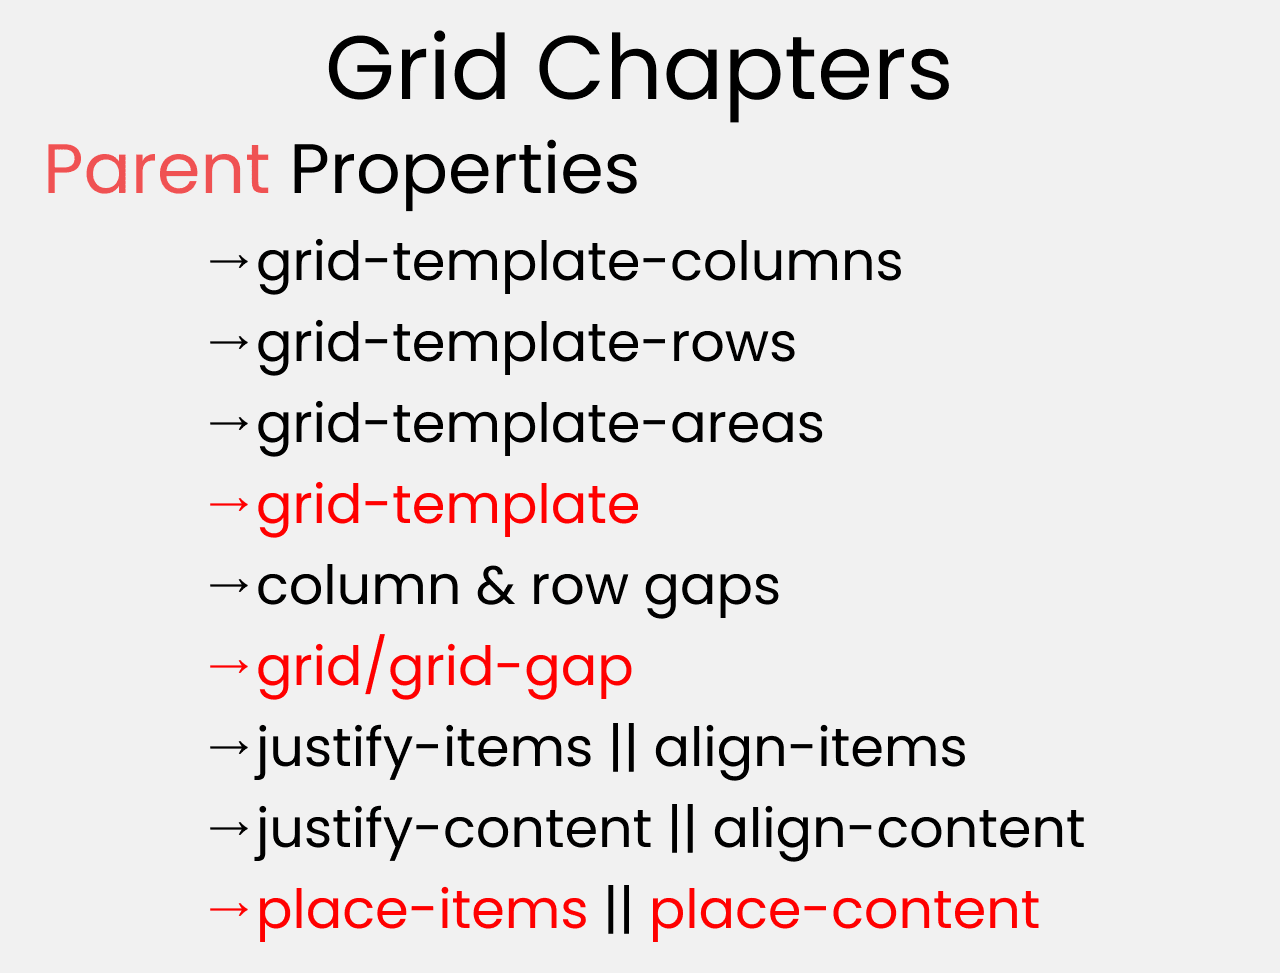

К концу настоящей статьи у вас будет полное понимание того, как работает каждое из них.
Настройка проекта
Для данного проекта требуются начальные знания HTML, CSS и умение работать с VSCode (или другим редактором по вашему вкусу). Делаем следующее:
- Создаем директорию для проекта, например,
Project1и открываем ее в редакторе (cd Project1,code .) - Создаем файлы
index.htmlиstyle.css - Устанавливаем в
VSCodeсервер для разработки (Live Server, расширение) и запускаем его
Или вы можете просто открыть Codepen (или любую другую песочницу) и начать писать код.
Все готово, можно приступать к делу.

HTML
Создаем 3 контейнера внутри body:
<div class="container">
  <div class="box-1"> A </div>
  <div class="box-2"> B </div>
  <div class="box-3"> C </div>
</div>
CSS
Шаг 1
Сбрасываем стили:
* {
  margin: 0;
  padding: 0;
  box-sizing: border-box;
}
Шаг 2
Немного стилизуем body:
body {
  font-family: sans-serif;
  font-size: 40px;
  width: 100%;
  min-height: 100vh;
}
Шаг 3
Стилизуем все контейнеры:
[class^="box-"] {
  background-color: skyblue;
  /* Размещаем контейнеры по центру */
  display: grid;
  place-items: center;
}
Не волнуйтесь, мы рассмотрим каждое из указанных свойств Грида.
Шаг 4
Добавим небольшой отступ между контейнерами:
.container {
  display: grid;
  gap: 20px;
}
Погодите-ка

Давайте разберемся с отношениями между родительским и дочерними элементами.

Свойства родительского элемента определяются в .container, а свойства дочерних элементов — в .box-*.
Свойства грид-контейнера

Начнем со свойств родительского элемента.
grid-template-columns
Данное свойство используется для определения количества и ширины колонок. При этом, можно определять как свойства для каждой колонки в отдельности, так и устанавливать ширину всех колонок с помощью функции repeat().


Добавим строку в style.css:
.container {
  display: grid;
  gap: 20px;

  /* ! */
  grid-template-columns: 200px auto 100px;
}
Обратите внимание:
- значения в пикселях будут точными. Ключевое слово
autoозначает заполнение элементом всего доступного пространства - использование единицы
fr(фракция) вrepeat()означает, что все контейнеры будут иметь одинаковую ширину
grid-template-rows
Данное свойство используется для определения количества и высоты строк. При этом, можно определять как высоту каждой колонки в отдельности, так и устанавливать высоту всех строк с помощью функции repeat().


Изменим строку в style.css:
.container {
  display: grid;
  gap: 20px;
  height: 100vh;

  /* ! */
  grid-template-rows: 200px auto 100px;
}
grid-template-areas
Данное свойство используется для определения количества пространства, занимаемого ячейкой Грида (grid cell), в терминах колонок и строк, в родительском контейнере.
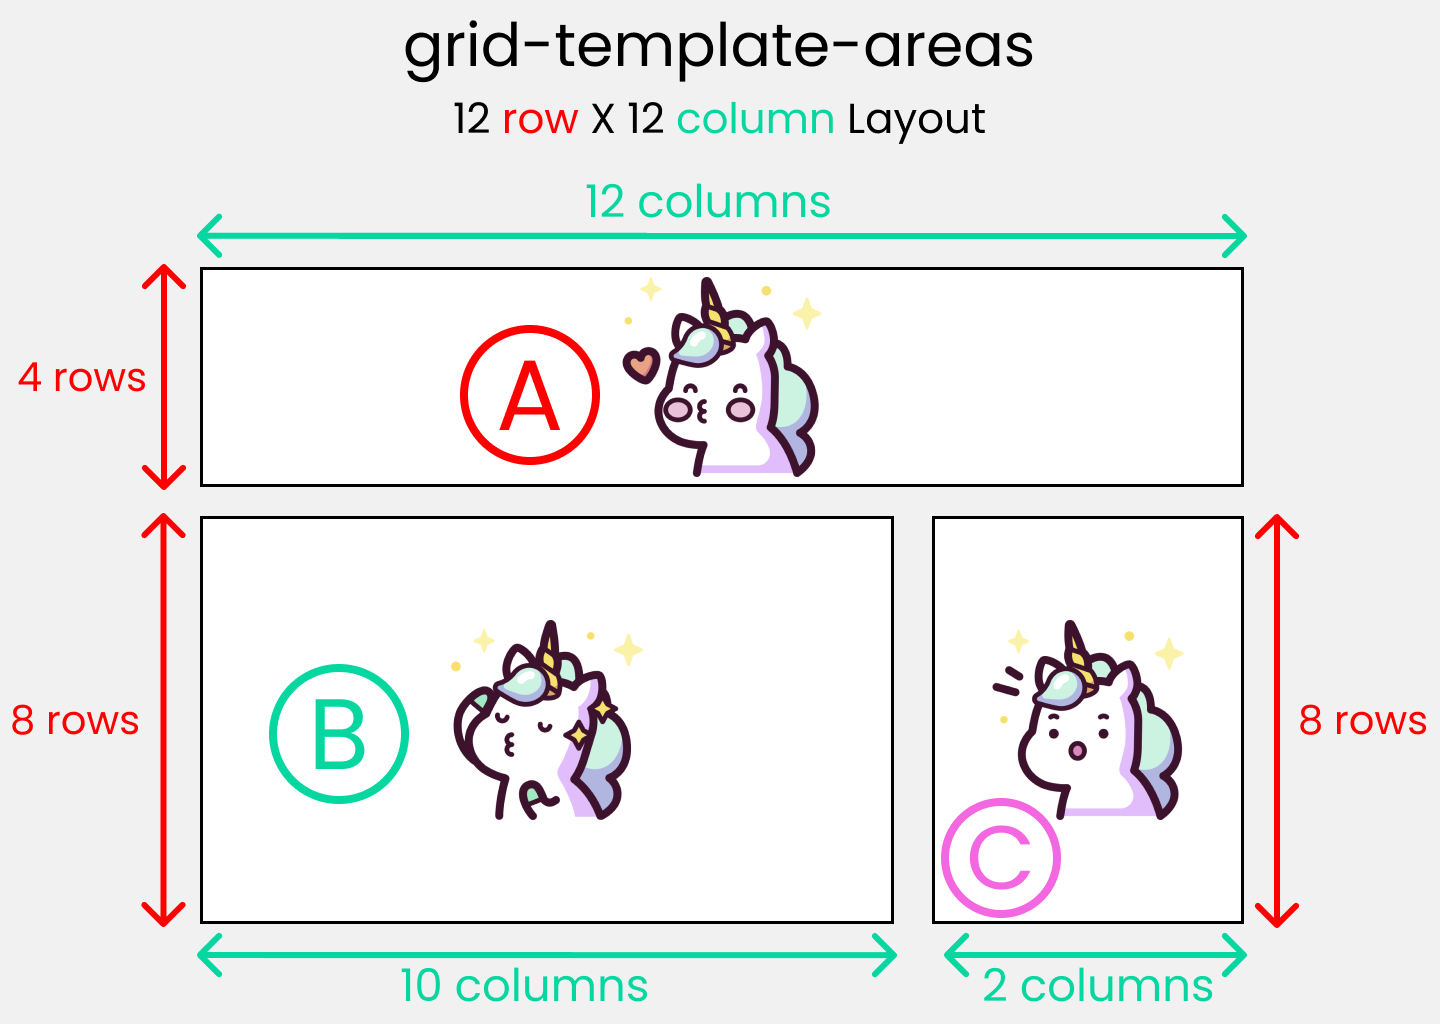
Это можно считать схемой макета:
Для получения результата требуется не только родительское, но и хотя бы одно дочернее свойство:
grid-template-areas: родительское свойство, создающее схемуgrid-area: дочернее свойство, которое использует схему
Создаем схему
.container {
display: grid;
gap: 20px;
height: 100vh;
/* ! */
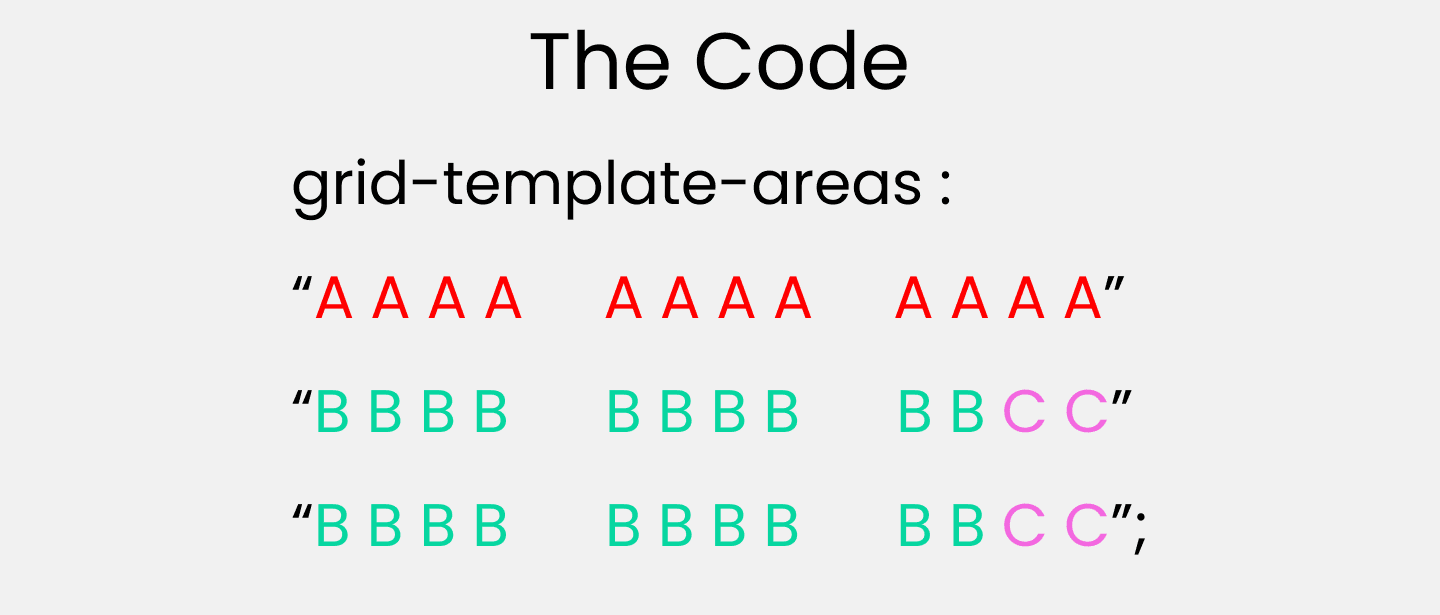
grid-template-areas:
"A A A A A A A A A A A A"
"B B B B B B B B B B C C"
"B B B B B B B B B B C C";
}Применяем схему
.box-1 {
  grid-area: A;
}
.box-2 {
  grid-area: B;
}
.box-3 {
  grid-area: C;
}
Обратите внимание: мы вернемся к свойству grid-area, когда будем говорить о дочерних свойствах.
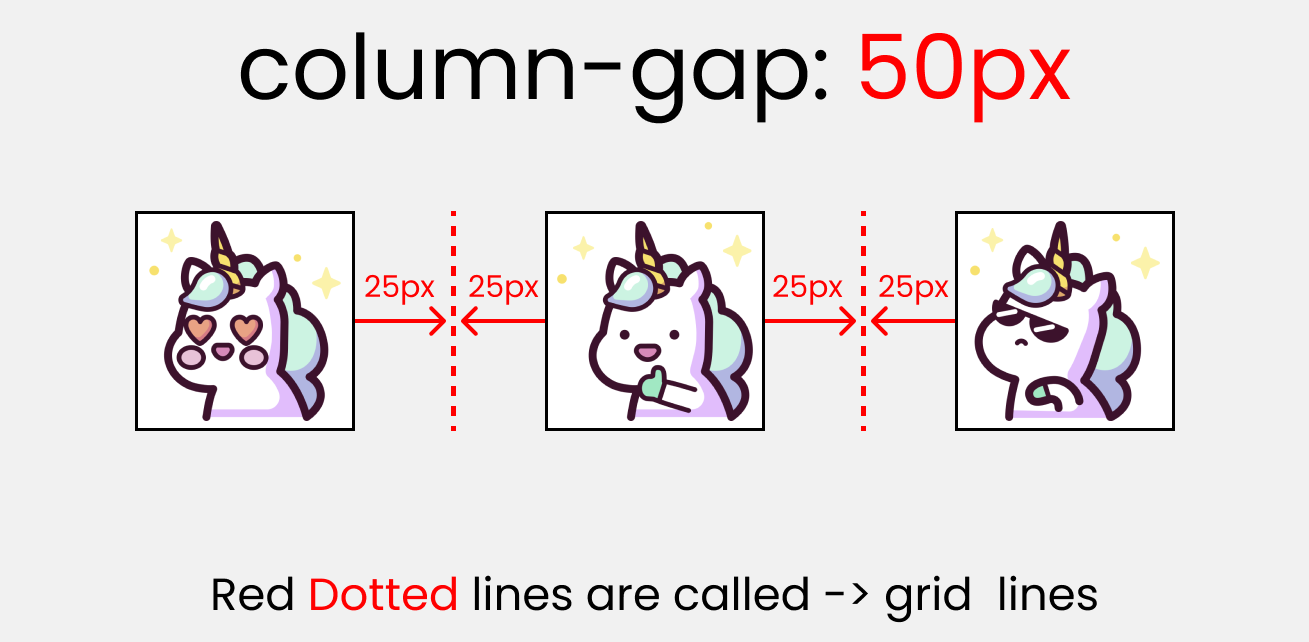
column-gap
Данное свойство используется для добавления отступа между колонками.
style.css:
.container {
  display: grid;
  height: 100vh;
  grid-template-columns: 100px 100px 100px;

  /* ! */
  column-gap:  50px;
}
Обратите внимание: свойство column-gap используется совместно со свойством grid-template-columns.
row-gap
Данное свойство используется для добавления отступов между строками.
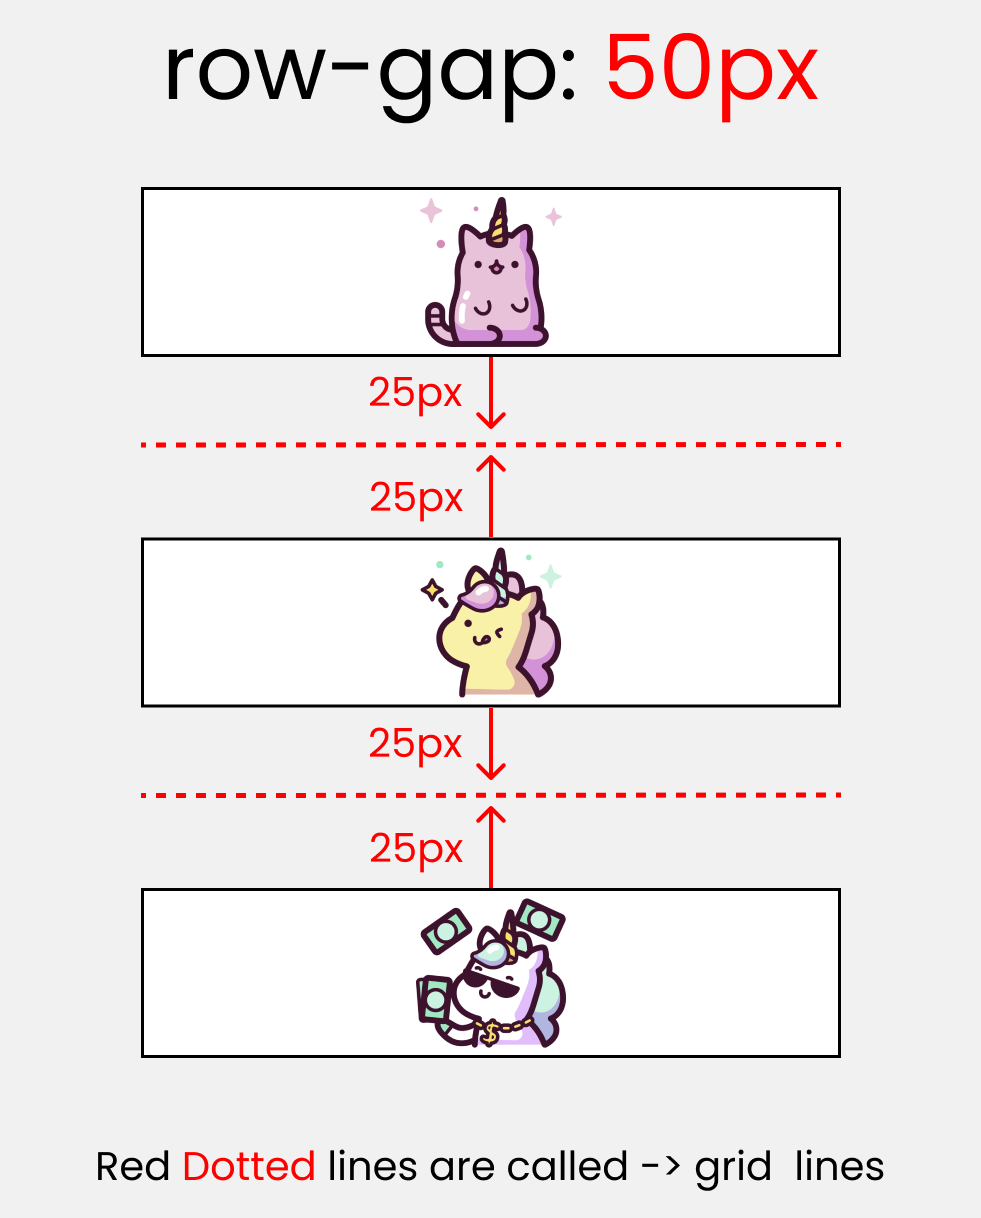
style.css:
.container {
  display: grid;
  height: 100vh;
  grid-template-rows: 100px 100px 100px;

  /* ! */
  row-gap:  50px;
}
Обратите внимание: свойство row-gap используется совместно со свойством grid-template-rows.
justify-items
Данное свойство используется для позиционирования грид-элементов внутри грид-контейнера вдоль главной оси. Оно принимает 4 возможных значения:

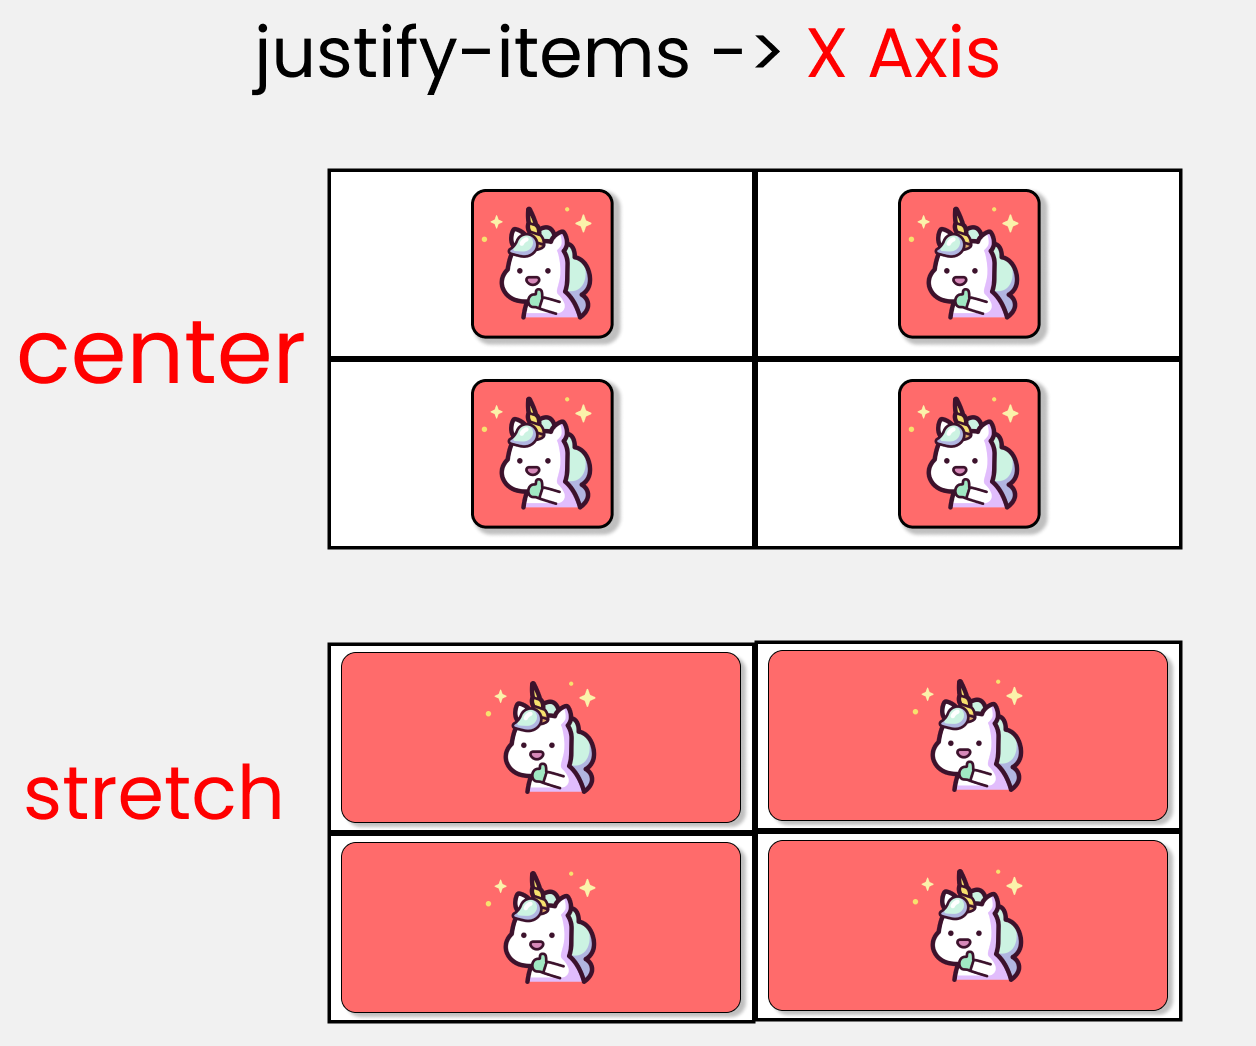
Добавим еще один контейнер в HTML:
<div class="container">

  <!-- Здесь находятся контейнеры A, B, C -->

  <div class="box-4"> D </div>
</div
И немного изменим CSS:
.container {
  display: grid;
  gap: 50px;
  height: 100vh;

  /* Каждый контейнер имеет размер 200px на 200px */
  grid-template-rows: 200px 200px;
  grid-template-columns: 200px 200px;

  /* ! */
  justify-items : end;
}
align-items
Данное свойство используется для позиционирования грид-элементов внутри грид-контейера вдоль поперечной оси. Оно принимает 4 возможных значения:

style.css:
.container {
  display: grid;
  gap: 50px;
  height: 100vh;
  grid-template-rows: 200px 200px;
  grid-template-columns: 200px 200px;

  /* ! */
  align-items: center;
}
justify-content
Данное свойство используется для позиционирования самого грида внутри грид-контейнера вдоль основной оси. Оно принимает 7 возможных значений:


style.css:
.container {
  display: grid;
  gap: 50px;
  height: 100vh;
  grid-template-rows: 200px 200px;
  grid-template-columns: 200px 200px;

  /* ! */
  justify-content: center;
}
align-content
Данное свойство используется для позиционирования самого грида внутри грид-контейнера вдоль поперечной оси. Оно принимает 7 возможных значений:
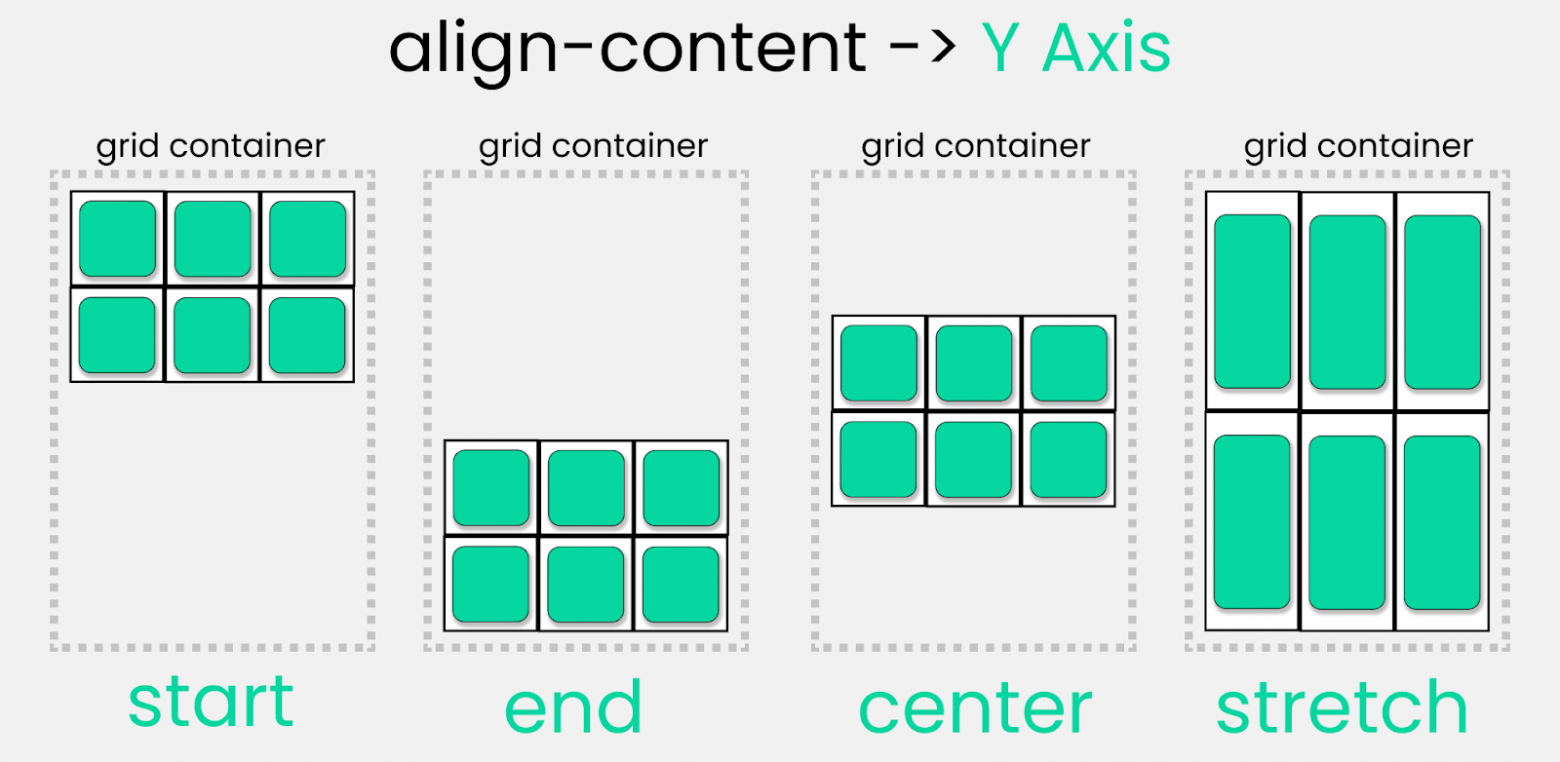

style.css:
.container {
  display: grid;
  gap: 50px;
  height: 100vh;
  grid-template-rows: 200px 200px;
  grid-template-columns: 200px 200px;

  /* ! */
  align-content : center;
}
Свойства грид-элементов

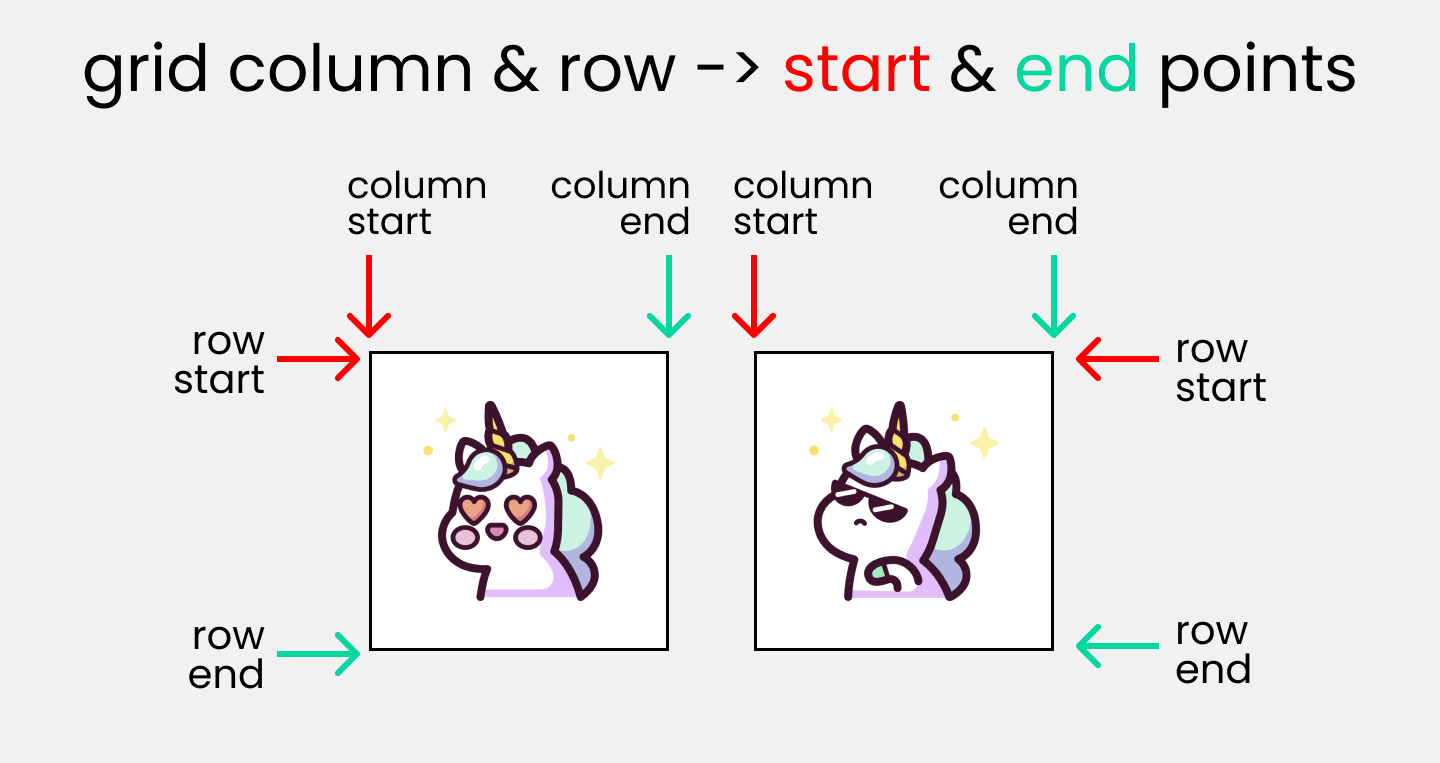
Шкала CSS Grid
Данная шкала показывает, как вычисляются строки и колонки при их объединении. Для этого используется два вида единиц:
- целые числа (1, 2, 3 и т.д.)
- ключевое слово
span
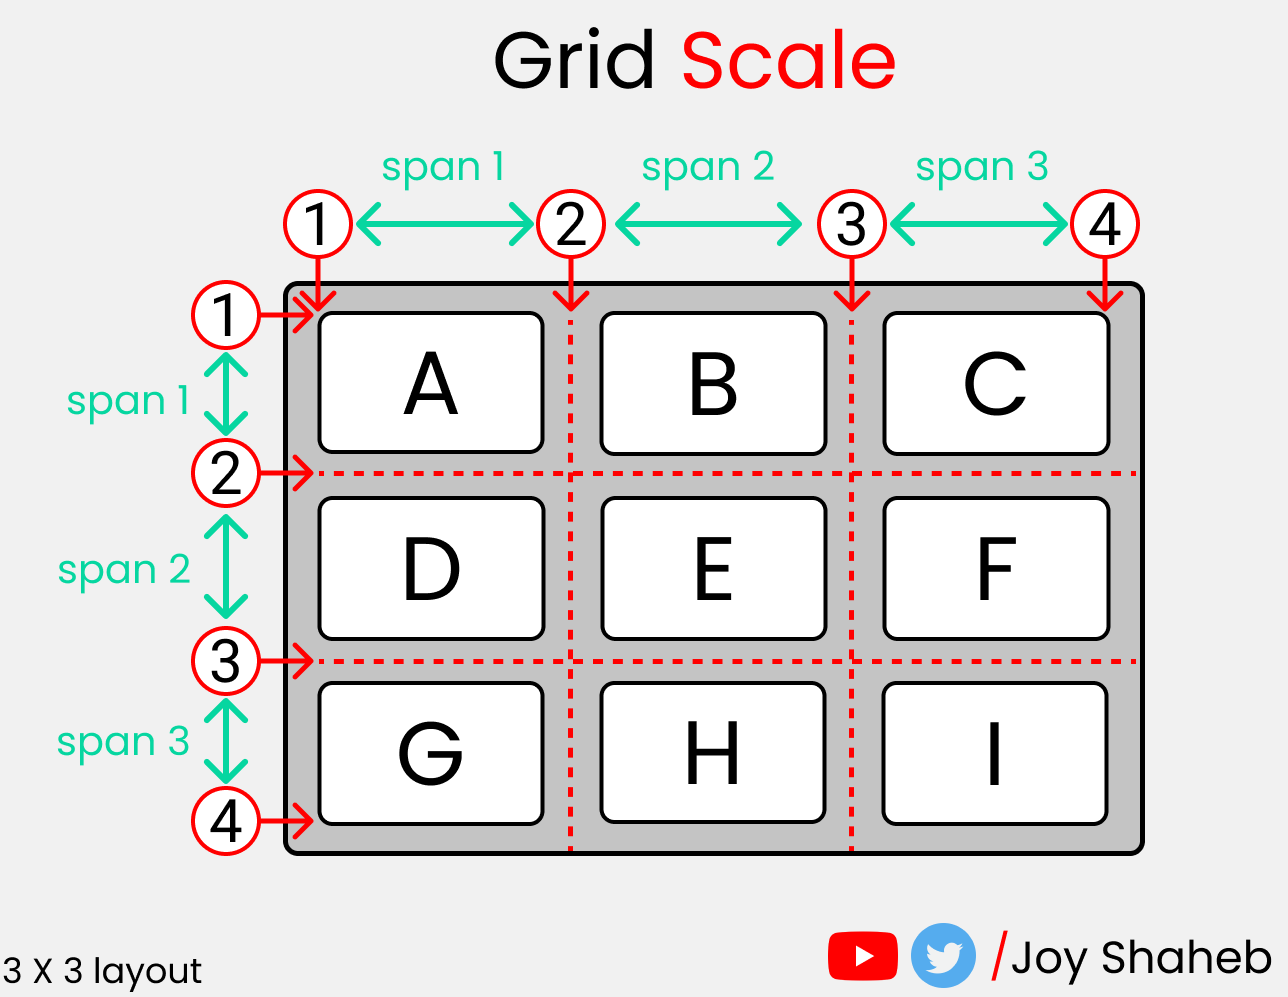
На представленной ниже иллюстрации показаны начальные и конечные точки строк и колонок в одной ячейке:
index.html:
<div class="container">
  <div class="box-1"> A </div>
  <div class="box-2"> B </div>
  <div class="box-3"> C </div>
  <div class="box-4"> D </div>
</div>
При использовании функции repeat() мы может установить одинаковую ширину/высоту для колонок/строк. Пример с колонками:
grid-template-columns : repeat(4, 1fr);Это аналогично следующему:
grid-template-columns : 1fr 1fr 1fr 1fr;Небольшая заметка

При использовании единицы измерения fr, доступное пространство делится на равные части.
grid-template-columns : repeat(4, 1fr);В данном случае доступное пространство делится на 4 равные части.
Продолжаем веселиться!
grid-columns: start/end
Данное свойство позволяет объединять колонки. Оно является сокращением для:
grid-column-startgrid-column-end
style.css:
.container {
display: grid;
gap: 20px;
height: 100vh;
grid-template-columns: repeat(12, 1fr);
grid-template-rows: repeat(12, 1fr);
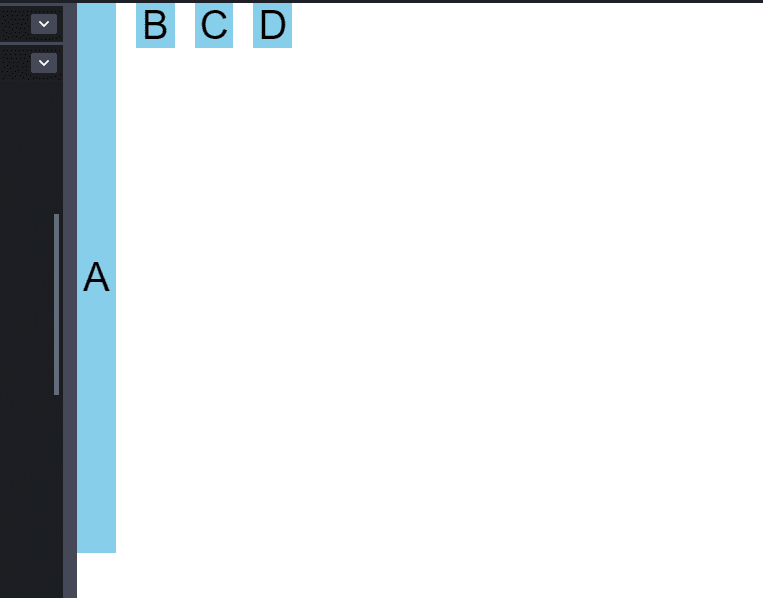
}Результат:

Мы разделили доступное пространство на 12 равных частей как по ширине, так и по высоте. 1 контейнер занимает 1 часть или фракцию. В данном случае 8 фракций остались невостребованными.
Поскольку мы говорим о свойствах дочерних элементов, имеет смысл разделить их стили:
.box-1 {}
.box-2 {}
.box-3 {}
.box-4 {}
Вернемся к шкале. Мы разбираемся с колонками — поэтому пока не обращайте внимания на строки.
Каждый класс .box-* по умолчанию имеет такой масштаб (scale):
grid-column-start: 1;
grid-column-end: 2;

/* Сокращение */
grid-column: 1 / 2
Это можно переписать с помощью ключевого слова span:
grid-column : span 1;Давайте «присвоим» 8 фракций .box-1:
.box-1 {
  grid-column: 1 / 10
}
Результат:

Небольшая заметка
Как мы производим вычисления? box-1 занимает 1 часть. Кроме этого, к ней добавляется еще 8 частей. И еще 1 в конце. Получается: 8 + 1 + 1 = 10.
Как использовать ключевое слово span
Считается, что использование span делает код более читаемым.
В этом случае нам просто нужно добавить к box-1 8 частей:
.box-1 {
  grid-column: span 9;
}
Это даст такой же результат.
grid-row: start/end
Данное свойство позволяет объединять строки. Оно является сокращением для:
grid-row-startgrid-row-end
Теперь сосредоточимся на строках:
Давайте добавим к box-1 9 частей:
.box-1 {
  grid-row : 1 / 11;
}
Расчет выглядит так: box-1 занимает 1 часть + 9 частей + 1 часть в конце, получается 9 + 1 + 1 = 11.
Вот вариант со span:
.box-1 {
  grid-row: span 10;
}
Результат:
grid-area
Сначала нам нужно настроить grid-temlate-areas, о чем мы говорили выше. После этого в дочерних классах определяются названия областей, которые используются в родительском классе:

Определяем grid-template-areas в родительском классе:
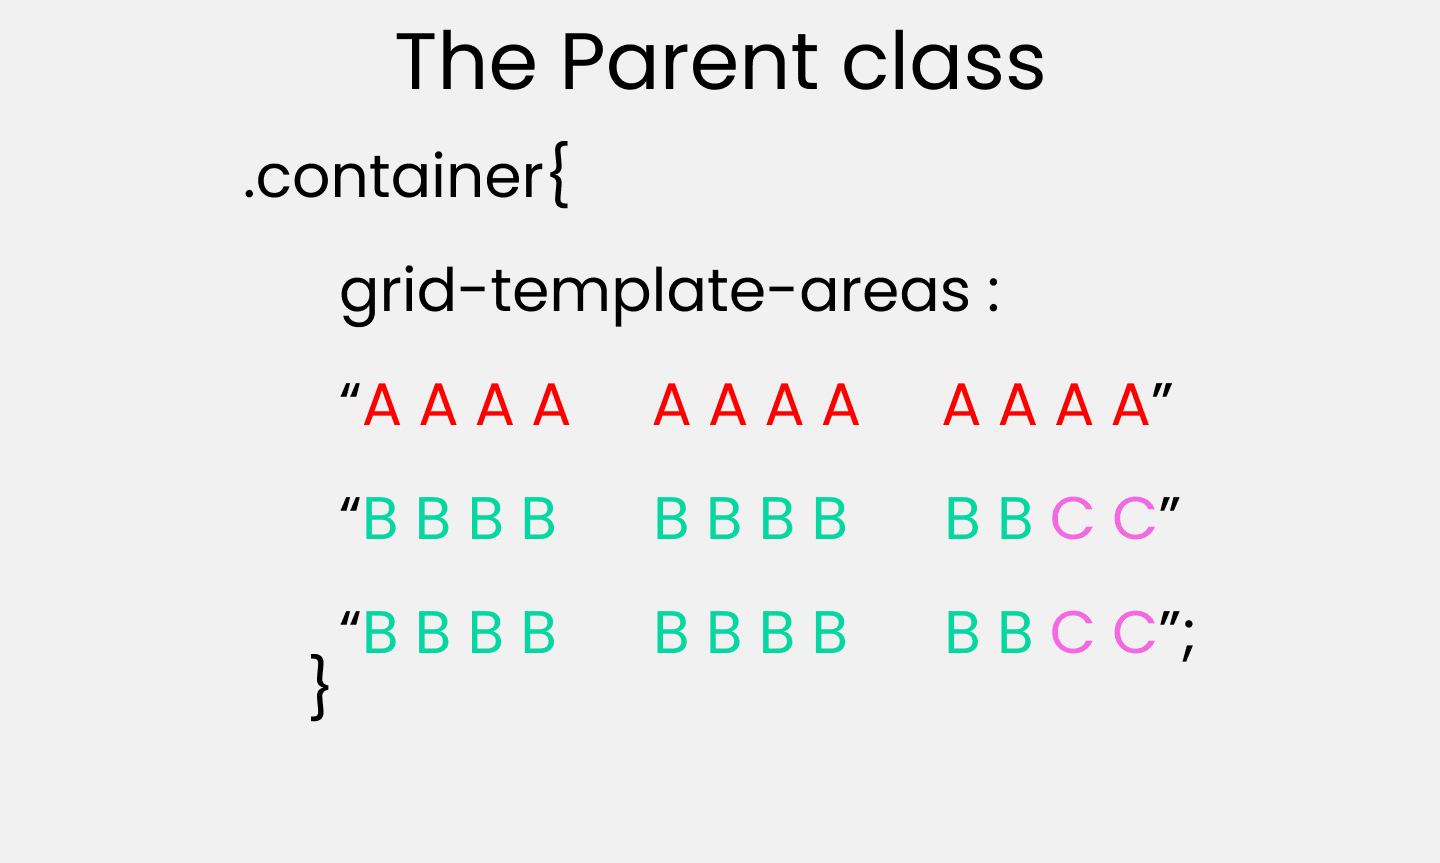
style.css:
.container {
  display: grid;
  gap: 20px;
  height: 100vh;

  grid-template-areas:
    "A A A A   A A A A   A A A A"
    "B B B B   B B B B   B B C C"
    "B B B B   B B B B   B B C C";
}
Затем определяем grid-area в дочерних классах:

style.css:
.box-1 {
  grid-area: A;
}
.box-2 {
  grid-area: B;
}
.box-3 {
  grid-area: C;
}
justify-self
Данное свойство используется для позиционирования отдельного грид-элемента вдоль основной оси. Оно принимает 4 возможных значения:
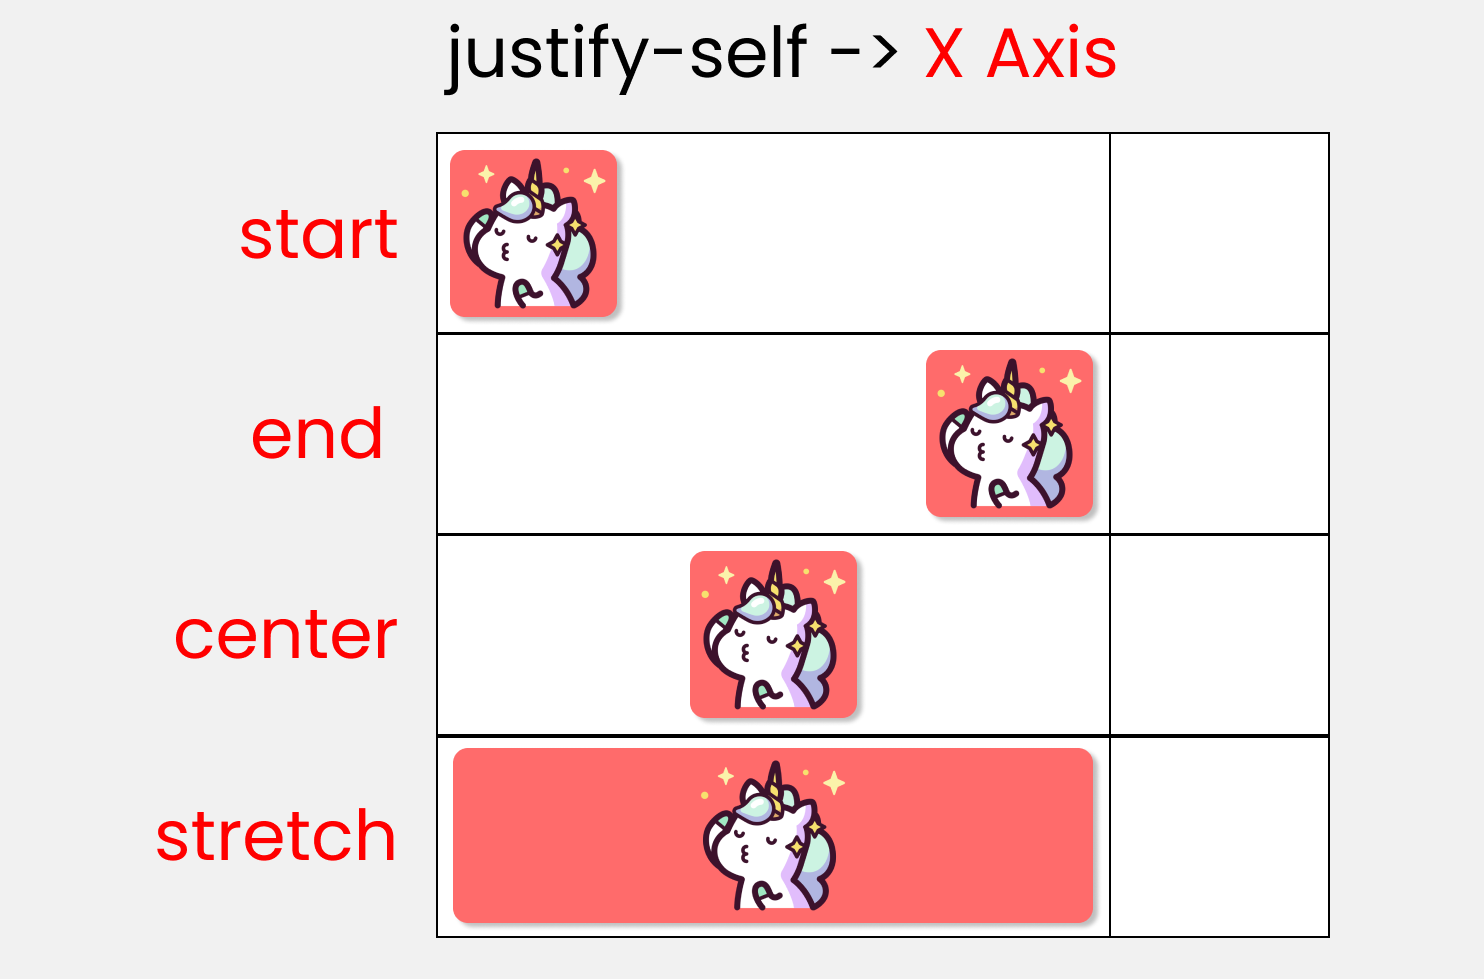
style.css:
.container {
  display: grid;
  gap :25px;
  height: 100vh;
  grid-template-rows: 1fr 1fr;
  grid-template-columns: 1fr 1fr;
}

.box-1 {
  /* ! */
  justify-self : start;
}
align-self
Данное свойство используется для позиционирования отдельного грид-элемента вдоль поперечной оси. Оно принимает 4 возможных значения:
style.css:
.container {
  display: grid;
  gap :25px;
  height: 100vh;
  grid-template-rows: 1fr 1fr;
  grid-template-columns: 1fr 1fr;
}
.box-1 {
  /* ! */
  align-self : start;
}
Сокращения для свойств CSS Grid
place-contentplace-itemsplace-selfgrid-templategap/grid-gap
place-content

Данное свойство является сокращением для:
align-contentjustify-content
Пример:
align-content: center;
justify-content: end;

/* ! */
place-content: center / end;
place-items

Данное свойство является сокращением для:
align-itemsjustify-items
Пример:
align-items: end;
justify-items: center;

/* ! */
place-items: end / center;
place-self

Данное свойство является сокращением для:
align-selfjustify-self
Пример:
align-self: start;
justify-self: end;

/* ! */
place-self: start / end;
grid-template

Данное свойство является сокращением для:
grid-template-rowsgrid-template-columns
Пример:
grid-template-rows: 100px 100px;
grid-template-columns: 200px 200px;

/* ! */
grid-template: 100px 100px / 200px 200px;
gap/grid-gap

Данное свойство является сокращением для:
row-gapcolumns-gap
Пример:
row-gap: 20px ;
column-gap: 30px ;

/* ! */
gap: 20px  30px;
Заключение
Теперь в ваших руках имеется мощное средство для создания адаптивных макетов веб-страниц.
VPS-хостинг с быстрыми NVMе-дисками и посуточной оплатой. Загрузка своего ISO.

1. Introduction and Overview
Grid layout contains features targeted at web application authors.
The grid can be used to achieve many different layouts.
It excels at dividing up space for major regions of an application,
or defining the relationship in terms of size, position, and layer
between parts of a control built from HTML primitives.
Like tables,
grid layout enables an author to align elements into columns and rows,
but unlike tables,
grid layout doesn’t have content structure,
and thus enables a wide variety of layouts not possible with tables.
For example, the children of a grid container can position themselves
such that they overlap and layer similar to positioned elements.
In addition, the absence of content structure in grid layout helps to manage changes to layout
by using fluid and source order independent layout techniques.
By combining media queries with the CSS properties that control layout of the grid container and its children,
authors can adapt their layout to changes in device form factors, orientation, and available space,
without needing to alter the semantic nature of their content.
1.1. Background and Motivation
As websites evolved from simple documents into complex, interactive applications,
tools for document layout, e.g. floats,
were not necessarily well suited for application layout.
By using a combination of tables, JavaScript, or careful measurements on floated elements,
authors discovered workarounds to achieve desired layouts.
Layouts that adapted to the available space were often brittle
and resulted in counter-intuitive behavior as space became constrained.
As an alternative, authors of many web applications opted for a fixed layout
that cannot take advantage of changes in the available rendering space on a screen.
The capabilities of grid layout address these problems.
It provides a mechanism for authors to divide available space for layout into columns and rows
using a set of predictable sizing behaviors.
Authors can then precisely position and size the building block elements of their application
by into grid areas defined by these columns and rows.
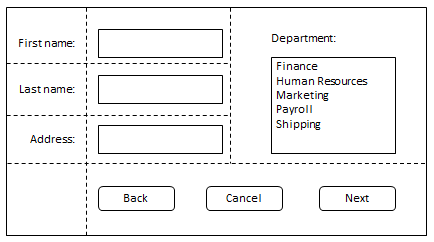
Figure 1 illustrates a basic layout which can be achieved with grid layout.
1.2. Adapting Layouts to Available Space
Grid layout can be used to intelligently reflow elements within a webpage.
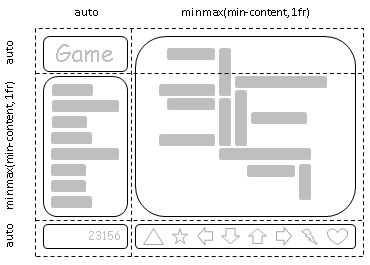
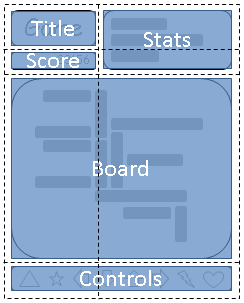
Figure 2 represents a game with five major areas in the layout:
the game title, stats area, game board, score area, and control area.
The author’s intent is to divide the space for the game such that:
- The stats area always appears immediately under the game title.
- The game board appears to the right of the stats and title.
- The top of the game title and the game board should always align.
- The bottom of the game board and the stats area align when the game has reached its minimum height,
but otherwise the game board will stretch to take advantage of all the screen real-estate available to it. - The score area should align into the column created by the game and stats area,
while the controls are centered under the board.
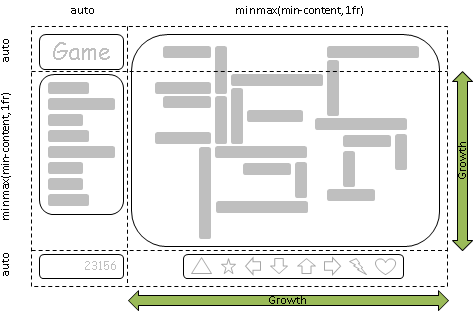
As an alternative to using script to control the absolute position, width, and height of all elements,
the author can use grid layout,
as shown in Figure 3.
The following example shows how an author might achieve all the sizing, placement, and alignment rules declaratively.
Note that there are multiple ways to specify the structure of the grid
and to position and size grid items,
each optimized for different scenarios.
This example illustrates one that an author may use to define the position and space for each grid item using the grid-template-rows and grid-template-columns properties on the grid container,
and the grid-row and grid-column properties on each grid item.
#grid {
  display: grid;

  /* Two columns: the first sized to content, the second receives
   * the remaining space, but is never smaller than the minimum
   * size of the board or the game controls, which occupy this
   * column. */
  grid-template-columns: auto minmax(min-content, 1fr);

  /* Three rows: the first and last sized to content, the middle
   * row receives the remaining space, but is never smaller than
   * the minimum height of the board or stats areas. */
  grid-template-rows: auto minmax(min-content, 1fr) auto
}

/* Each part of the game is positioned between grid lines by
 * referencing the starting grid line and then specifying, if more
 * than one, the number of rows or columns spanned to determine
 * the ending grid line, which establishes bounds for the part. */
#title    { grid-column: 1; grid-row: 1 }
#score    { grid-column: 1; grid-row: 3 }
#stats    { grid-column: 1; grid-row: 2; align-self: start }
#board    { grid-column: 2; grid-row: 1 / span 2; }
#controls { grid-column: 2; grid-row: 3; justify-self: center }
<div id="grid">
  <div id="title">Game Title</div>
  <div id="score">Score</div>
  <div id="stats">Stats</div>
  <div id="board">Board</div>
  <div id="controls">Controls</div>
</div>
1.3. Source-Order Independence
Continuing the prior example,
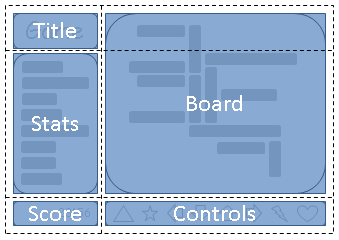
the author also wants the game to adapt to the space available on traditional computer monitors, handheld devices, or tablet computers.
Also, the game should optimize the placement of the components when viewed either in portrait or landscape orientation (Figures 4 and 5).
By combining grid layout with media queries,
the author is able to use the same semantic markup,
but rearrange the layout of elements independent of their source order,
to achieve the desired layout in both orientations.
The following example leverages grid layout’s ability to name the space which will be occupied by a grid item.
This allows the author to avoid rewriting rules for grid items as the grid’s definition changes.
@media (orientation: portrait) {
  #grid {
    display: grid;

    /* The rows, columns and areas of the grid are defined visually
    * using the grid-template-areas property.  Each string is a row,
    * and each word an area.  The number of words in a string
    * determines the number of columns. Note the number of words
    * in each string must be identical. */
    grid-template-areas: "title stats"
                         "score stats"
                         "board board"
                         "ctrls ctrls";

    /* Columns and rows created with the template property can be
    * assigned a sizing function with the grid-template-columns
    * and grid-template-rows properties. */
    grid-template-columns: auto minmax(min-content, 1fr);
    grid-template-rows: auto auto minmax(min-content, 1fr) auto
  }
}

@media (orientation: landscape) {
  #grid {
    display: grid;

    /* Again the template property defines areas of the same name,
    * but this time positioned differently to better suit a
    * landscape orientation. */
    grid-template-areas: "title board"
                         "stats board"
                         "score ctrls";

    grid-template-columns: auto minmax(min-content, 1fr);
    grid-template-rows: auto minmax(min-content, 1fr) auto
  }
}

/* The grid-area property places a grid item into a named
* region (area) of the grid. */
#title    { grid-area: title }
#score    { grid-area: score }
#stats    { grid-area: stats }
#board    { grid-area: board }
#controls { grid-area: ctrls }
<div id="grid">
  <div id="title">Game Title</div>
  <div id="score">Score</div>
  <div id="stats">Stats</div>
  <div id="board">Board</div>
  <div id="controls">Controls</div>
</div>
Note: The reordering capabilities of grid layout intentionally affect only the visual rendering,
leaving speech order and navigation based on the source order.
This allows authors to manipulate the visual presentation
while leaving the source order intact and optimized for non-CSS UAs
and for linear models such as speech and sequential navigation.
Grid item placement and reordering must not be used
as a substitute for correct source ordering,
as that can ruin the accessibility of the document.
1.4. Grid Layering of Elements
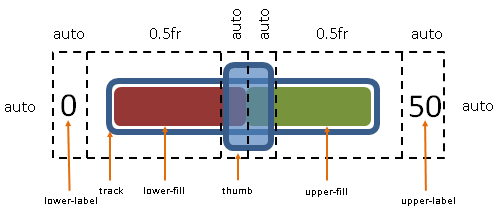
In the example shown in Figure 6,
the author is creating a custom slider control.
The control has six parts.
The lower and upper labels align to the left and right edges of the control.
The track of the slider spans the area between the labels.
The lower and upper fill parts touch beneath the thumb,
and the thumb is a fixed width and height that can be moved along the track
by updating the two flex-sized columns.
Prior to the introduction of grid layout,
the author would have likely used absolute positioning to control the top and left coordinates,
along with the width and height of each HTML element that comprises the control.
By leveraging grid layout,
the author can instead limit script usage to handling mouse events on the thumb,
which snaps to various positions along the track
as the grid-template-columns property of the grid container is updated.
#grid {
  display: grid;

  /* The grid-template-columns and rows properties also support
  * naming grid lines which can then be used to position grid
  * items.  The line names are assigned on either side of a column
  * or row sizing function where the line would logically exist. */
  grid-template-columns:
    [start]        auto
    [track-start]  0.5fr
    [thumb-start]  auto
    [fill-split]   auto
    [thumb-end]    0.5fr
    [track-end]    auto
    [end];
}

/* The grid-placement properties accept named lines. Below the
* lines are referred to by name. Beyond any
* semantic advantage, the names also allow the author to avoid
* renumbering the grid-column-start and grid-row-start properties of the
* grid items.  This is similar to the concept demonstrated in the
* prior example with the grid-template-areas property during orientation
* changes, but grid lines can also work with layered grid items
* that have overlapping areas of different shapes like the thumb
* and track parts in this example. */
#lower-label { grid-column-start: start }
#track       { grid-column: track-start / track-end; justify-self: center }
#upper-label { grid-column-end: end; }

/* Fill parts are drawn above the track so set z-index to 5. */
#lower-fill  { grid-column: track-start / fill-split;
               justify-self: end;
               z-index: 5 }
#upper-fill  { grid-column: fill-split / track-end;
               justify-self: start;
               z-index: 5 }

/* Thumb is the topmost part; assign it the highest z-index value. */
#thumb       { grid-column: thumb-start / thumb-end; z-index: 10 }
<div id="grid">
  <div id="lower-label">Lower Label</div>
  <div id="upper-label">Upper Label</div>
  <div id="track">Track</div>
  <div id="lower-fill">Lower Fill</div>
  <div id="upper-fill">Upper Fill</div>
  <div id="thumb">Thumb</div>
</div>
2. Grid Layout Concepts and Terminology
In grid layout,
the content of a grid container is laid out
by positioning and aligning it into a grid.
The grid is an intersecting set of horizontal and vertical grid lines that divides the grid container’s space into grid areas,
into which grid items (representing the grid container’s content) can be placed.
There are two sets of grid lines:
one set defining columns that run along the block axis (the column axis),
and an orthogonal set defining rows along the inline axis (the row axis). [CSS3-WRITING-MODES]
2.1. Grid Tracks and Cells
Grid track is a generic term for a grid column or grid row—in
other words, it is the space between two adjacent grid lines.
Each grid track is assigned a sizing function,
which controls how wide or tall the column or row may grow,
and thus how far apart its bounding grid lines are.
A grid cell is the similar term for the full grid—it
is the space between two adjacent row and two adjacent column grid lines.
It is the smallest unit of the grid that can be referenced when positioning grid items.
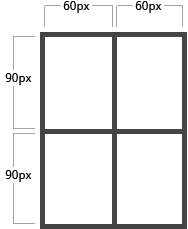
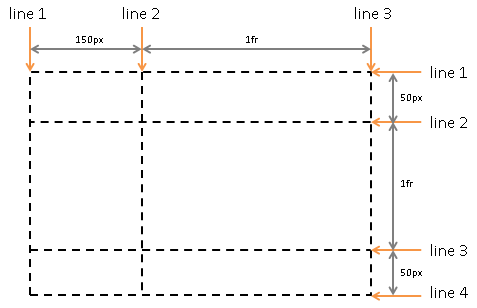
In the following example there are two columns and three rows.
The first column is fixed at 150px.
The second column uses flexible sizing, which is a function of the unassigned space in the Grid,
and thus will vary as the width of the grid container changes.
If the used width of the grid container is 200px, then the second column 50px wide.
If the used width of the grid container is 100px, then the second column is 0px
and any content positioned in the column will overflow the grid container.
<style type="text/css">
  #grid {
    display: grid;
    grid-template-columns: 150px 1fr; /* two columns */
    grid-template-rows: 50px 1fr 50px /* three rows  */
  }
</style>
2.2. Grid Lines
Grid lines are the horizontal and vertical dividing lines of the grid.
A grid line exists on either side of a column or row.
They can be referred to by numerical index,
or by an author-specified name.
A grid item references the grid lines to determine its position within the grid using the grid-placement properties.
The following two examples create three column grid lines and four row grid lines.
The first example demonstrates how an author would position a grid item using grid line numbers.
The second example uses explicitly named grid lines.
<style type="text/css">
#grid {
  display: grid;
  grid-template-columns: 150px 1fr;
  grid-template-rows: 50px 1fr 50px
}

#item1 { grid-column: 2;
         grid-row-start: 1; grid-row-end: 4; }
</style>
<style type="text/css">
/* equivalent layout to the prior example, but using named lines */
#grid {
  display: grid;
  grid-template-columns: 150px [item1-start] 1fr [item1-end];
  grid-template-rows: [item1-start] 50px 1fr 50px [item1-end];
}

#item1 {
  grid-column: item1-start / item1-end;
  grid-row: item1-start / item1-end
}
</style>
2.3. Grid Areas
A grid area is the logical space used to lay out one or more grid items.
It is bound by four grid lines, one on each side of the grid area,
and participates in the sizing of the grid tracks it intersects.
A grid area can be named explicitly using the grid-template-areas property of the grid container,
or referenced implicitly by its bounding grid lines.
A grid item is assigned to a grid area using the grid-placement properties.
<style type="text/css">
/* using the template syntax */
#grid  {
display: grid;
grid-template-areas: ". a"
                     "b a"
                     ". a";
grid-template-columns: 150px 1fr;
grid-template-rows: 50px 1fr 50px
}

#item1 { grid-area: a }
#item2 { grid-area: b }
#item3 { grid-area: b }

/* Align items 2 and 3 at different points in the Grid Area "b".  */
/* By default, Grid Items are stretched to fit their Grid Area    */
/* and these items would layer one over the other. */
#item2 { align-self: start }
#item3 { justify-self: end; align-self: end }
</style>
A grid item’s grid area forms the containing block into which it is laid out.
Percentage lengths specified on a grid item resolve against this containing block.
Percentages specified for margin-top, padding-top, margin-bottom, and padding-bottom on a grid item resolve against the height of its containing block,
rather than the width (as for blocks).
This margin/padding behavior is disputed. (see discussion)
Grid items placed into the same grid area do not directly affect each other’s layout.
Indirectly, a grid item can affect the position of a grid line in a column or row that uses a content-based relative size,
which in turn can affect the position or size of another grid item.
3. Grid Containers
3.1. Establishing Grid Containers: the grid and inline-grid display values
| Name: | display |
|---|---|
| New values: | grid | inline-grid |
- grid
- This value causes an element to generate a block-level grid container box.
- inline-grid
- This value causes an element to generate an inline-level grid container box.
A grid container establishes a new grid formatting context for its contents.
This is the same as establishing a block formatting context,
except that grid layout is used instead of block layout:
floats do not intrude into the grid container,
and the grid container’s margins do not collapse with the margins of its contents.
The contents of a grid container are laid out into a grid,
with grid lines forming the boundaries of each grid items’ containing block.
The overflow property applies to grid containers.
Grid containers are not block containers,
and so some properties that were designed with the assumption of block layout
don’t apply in the context of grid layout.
In particular:
- the column-* properties in the Multi-column Layout module [CSS3COL] have no effect on a grid container.
- float and clear have no effect on a grid item.
(However, the float property still affects the computed value of display on children of a grid container,
as this occurs before grid items are determined.) - vertical-align has no effect on a grid item.
- the ::first-line and ::first-letter pseudo-elements do not apply to grid containers,
and grid containers do not contribute a first formatted line or first letter to their ancestors.
If an element’s specified display is inline-grid and the element is floated or absolutely positioned,
the computed value of display is grid.
The table in CSS 2.1 Chapter 9.7 is thus amended
to contain an additional row,
with inline-grid in the «Specified Value» column
and grid in the «Computed Value» column.
3.2. Sizing Grid Containers
A grid container is sized
using the rules of the formatting context in which it participates.
As a block-level box in a block formatting context,
it is sized like any other block-level box that establishes a formatting context,
with an auto inline size calculated as for in-flow block boxes.
As an inline-level box in an inline formatting context,
it is sized as an atomic inline-level box (such as an inline-block).
In both inline and block formatting contexts,
the grid container’s auto block size is its max-content size. The block layout spec should define this?
The max-content size of a grid container is
the sum of the grid container’s track sizes in the appropriate axis,
when the grid is sized under a max-content constraint.
The min-content size of a grid container is
the sum of the grid container’s track sizes in the appropriate axis,
when the grid is sized under a min-content constraint.
See [CSS3-SIZING] for a definition of the terms in this section.
4. Grid Items
The contents of a grid container consists of zero or more grid items:
each child of a grid container becomes a grid item,
and each contiguous run of text that is directly contained inside a grid container is wrapped in an anonymous grid item.
However, an anonymous grid item that contains only white space is not rendered, as if it were display:none.
Examples of grid items:
<div style="display:grid">

  <!-- grid item: block child -->
  <div id="item1">block</div>

  <!-- grid item: floated element; floating is ignored -->
  <div id="item2" style="float: left;">float</div>

  <!-- grid item: anonymous block box around inline content -->
  anonymous item 3

  <!-- grid item: inline child -->
  <span>
    item 4
    <!-- grid items do not split around blocks -->
    <div id=not-an-item>item 4</div>
    item 4
  </span>
</div>
The display value of a grid item is blockified:
if the specified display of an in-flow child of an element generating a grid container is an inline-level value, it computes to its block-level equivalent.
(See CSS2.1§9.7 [CSS21] and CSS Display [CSS3-DISPLAY] for details on this type of display value conversion.)
Some values of display trigger the generation of anonymous boxes.
For example, a misparented table-cell child is fixed up
by generating anonymous table and table-row elements around it. [CSS21] This fixup must occur before a grid container’s children are promoted to grid items.
For example, given two contiguous child elements with display:table-cell,
an anonymous table wrapper box around them becomes the grid item.
Future display types may generate anonymous containers (e.g. ruby) or otherwise mangle the box tree (e.g. run-ins).
It is intended that grid item determination run after these operations.
A grid item establishes a new formatting context for its contents.
The type of this formatting context is determined by its display value, as usual.
The computed display of a grid item is determined by applying the table in CSS 2.1 Chapter 9.7.
However, grid items are grid-level boxes, not block-level boxes:
they participate in their container’s grid formatting context,
not in a block formatting context.
A grid item is sized within the containing block defined by its grid area similarly to an equivalent block-level box in an equivalently-sized containing block,
except that auto margins and the box alignment properties have special effects. (See §11 Alignment and Spacing.)
The auto value of min-width and min-height behaves on grid items in the relevant axis
analogously to its behavior on flex items in the main axis.
See §4.4 Implied Minimum Size of Grid Items.
Review implications of intrinsic ratio and Grid’s 2D nature.
4.1. Collapsed Grid Items: the visibility property
We want the ability to collapse grid tracks
(similar to collapsing flex items or table rows/columns),
but we’re not sure exactly how to do it.
Ideas welcome, please post them to www-style@w3.org.
4.2. Reordered Grid Items: the order property
The order property also applies to grid items.
It affects their auto-placement and painting order.
As with reordering flex items,
the order property must only be used
when the visual order needs to be out-of-sync with the speech and navigation order;
otherwise the underlying document source should be reordered instead.
See Reordering and Accessibility in [CSS-FLEXBOX-1].
4.3. Z-axis Ordering: the z-index property
Grid items can overlap when they are positioned into intersecting grid areas,
or even when positioned in non-intersecting areas because of negative margins or positioning.
The painting order of grid items is exactly the same as inline blocks [CSS21],
except that order-modified document order is used in place of raw document order,
and z-index values other than auto create a stacking context even if position is static.
Thus the z-index property can easily be used to control the z-axis order of grid items.
Note: Descendants that are positioned outside a grid item still participate in any stacking context established by the grid item.
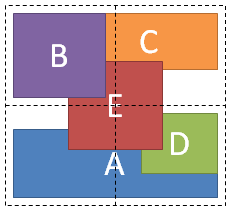
The following diagram shows several overlapping grid items,
with a combination of implicit source order
and explicit z-index used to control their stacking order.
<style type="text/css">
#grid {
  display: grid;
  grid-template-columns: 1fr 1fr;
  grid-template-rows: 1fr 1fr
}
#A { grid-column: 1 / span 2; grid-row: 2; align-self: end; }
#B { grid-column: 1; grid-row: 1; z-index: 10; }
#C { grid-column: 2; grid-row: 1; align-self: start; margin-left: -20px; }
#D { grid-column: 2; grid-row: 2; justify-self: end; align-self: start; }
#E { grid-column: 1 / span 2; grid-row: 1 / span 2;
     z-index: 5; justify-self: center; align-self: center; }
</style>

<div id="grid">
  <div id="A">A</div>
  <div id="B">B</div>
  <div id="C">C</div>
  <div id="D">D</div>
  <div id="E">E</div>
</div>
4.4. Implied Minimum Size of Grid Items
To provide a more reasonable default minimum size for grid items,
this specification defines the effects of the min-width/min-height auto value
for grid items.
On a grid item whose overflow is visible,
when auto is specified on the grid item,
the following table gives the minimum size in that dimension:
| Specified Size | Transferred Size | Minimum Size |
|---|---|---|
| content size | ||
| ✓ | min(specified size, content size) | |
| ✓ | min(transferred size, content size) | |
| ✓ | ✓ | min(specified size, content size) |
Where:
- specified size
- If the item’s computed width/height is definite,
then the specified size is that size
(clamped by its max size property in that dimension if it’s definite).
It is otherwise undefined. - transferred size
- If the item has an intrinsic aspect ratio
and its computed height/width is definite,
then the transferred size is that size
(clamped by its min and max size properties in that dimension if they are definite),
converted through the aspect ratio.
It is otherwise undefined. - content size
- The content size is the min-content size in that dimension,
clamped, if it has an aspect ratio, by any definite min and max size properties in the perpendicular dimension
converted through the aspect ratio,
and then further clamped by the max size property in the relevant dimension if that is definite.
Note that while a content-based minimum size is often appropriate,
and helps prevent content from overlapping or spilling outside its container,
in some cases it is not:
In particular, if flex sizing is being used for a major content area of a document,
it is better to set an explicit font-relative minimum width such as min-width: 12em.
A content-based minimum width could result in a large table or large image
stretching the size of the entire content area into an overflow zone,
and thereby making lines of text gratuitously long and hard to read.
Note also, when content-based sizing is used on an item with large amounts of content,
the layout engine must traverse all of this content before finding its minimum size,
whereas if the author sets an explicit minimum, this is not necessary.
(For items with small amounts of content, however,
this traversal is trivial and therefore not a performance concern.)
5. The Explicit Grid
The three properties grid-template-rows, grid-template-columns, and grid-template-areas together define the explicit grid of a grid container.
The grid-template property is a shorthand that sets all three at the same time.
The final grid may end up larger due to grid items placed outside the explicit grid;
in this case, any implicit tracks are sized by the grid-auto-rows and grid-auto-columns properties.
The size of the explicit grid is determined by the larger of
the number of rows/columns defined by grid-template-areas and the number of rows/columns sized by grid-template-rows/grid-template-columns.
Any rows/columns defined by grid-template-areas but not sized by grid-template-rows/grid-template-columns take their size from the grid-auto-rows/grid-auto-columns properties.
If these properties don’t define any explicit tracks,
the explicit grid still contains one grid line in each axis.
Numeric indexes in the grid-placement properties count from the edges of the explicit grid.
Positive indexes count from the start side
(starting from 1 for the start-most explicit line),
while negative indexes count from the end side
(starting from -1 for the end-most explicit line).
5.1. Track Sizing: the grid-template-rows and grid-template-columns properties
| Name: | grid-template-columns, grid-template-rows |
|---|---|
| Value: | none | <track-list> | <auto-track-list> | subgrid <line-name-list>? |
| Initial: | none |
| Applies to: | grid containers |
| Inherited: | no |
| Percentages: | refer to corresponding dimension of the content area |
| Media: | visual |
| Computed value: | As specified, with lengths made absolute |
| Animatable: | no |
These properties specify,
as a space-separated track list,
the line names and track sizing functions of the grid.
Each track sizing function can be specified as a length,
a percentage of the grid container’s size,
a measurement of the contents occupying the column or row,
or a fraction of the free space in the grid.
It can also be specified as a range using the minmax() notation,
which can combine any of the previously mentioned mechanisms
to specify separate min and max track sizing functions for the column or row.
The grid-template-columns property specifies the track list for the grid’s columns,
while grid-template-rows specifies the track list for the grid’s rows.
The none value indicates that there is no explicit grid;
any rows/columns will be implicitly generated,
and their size will be determined by the grid-auto-rows and grid-auto-columns properties.
The subgrid value indicates that the grid will align to its parent grid in that axis.
Rather than specifying the sizes of rows/columns explicitly,
they’ll be taken from the parent grid’s definition.
The syntax of a track list is:
<track-list>       = [ <line-names>? [ <track-size> | <track-repeat> ] ]+ <line-names>?
<auto-track-list>  = [ <line-names>? [ <fixed-size> | <fixed-repeat> ] ]+ <auto-repeat>
                     [ <line-names>? [ <fixed-size> | <fixed-repeat> ] ]+ <line-names>?
<line-name-list>   = [ <line-names> | <name-repeat> ]+

<track-size>       = <track-breadth> | minmax( <track-breadth> , <track-breadth> )
<fixed-size>       = <fixed-breadth> | minmax( <fixed-breadth> , <track-breadth> )
<track-breadth>    = <length> | <percentage> | <flex> | min-content | max-content | auto
<fixed-breadth>    = <length> | <percentage>
<line-names>       = '[' <custom-ident>* ']'
Where:
- <length>
- A non-negative length, as defined by CSS3 Values. [CSS3VAL]
- <percentage>
- A non-negative percentage, as defined by CSS3 Values. [CSS3VAL] <percentage> values are relative to the inline size of the grid container in column grid tracks,
and the block size of the grid container in row grid tracks.
If the inline or block size of the grid container is indefinite, <percentage> values relative to that size are treated as auto. - <flex>
-
A non-negative dimension with the unit fr specifying the track’s flex factor.
Each <flex>-sized track takes a share of the remaining space in proportion to its flex factor.
See Flexible Lengths for more details.When appearing outside a minmax() notation,
implies an automatic minimum (i.e. »minmax(auto, <flex>)»). - max-content
- Represents the largest max-content contribution of the grid items occupying the grid track.
- min-content
- Represents the largest min-content contribution of the grid items occupying the grid track.
- minmax(min, max)
- Defines a size range
greater than or equal to min and less than or equal to max.
If max < min,
then max is ignored and minmax(min,max) is treated as min.
As a maximum, a <flex> value sets the track’s flex factor.
As a minimum, it is treated as zero
(or min-content, if the grid container is sized under a min-content constraint). - auto
-
As a maximum, identical to max-content.
As a minimum, represents the largest minimum size (as specified by min-width/min-height)
of the grid items occupying the grid track.Note: auto track sizes (and only auto track sizes)
can be streched by the align-content and justify-content properties.
Given the following grid-template-columns declaration:
grid-template-columns: 100px 1fr max-content minmax(min-content, 1fr);
Five grid lines are created:
- At the start edge of the grid container.
- 100px from the start edge of the grid container.
- A distance from the previous line equal to half the free space (the width of the grid container, minus the width of the non-flexible grid tracks).
- A distance from the previous line equal to the maximum size of any grid items belonging to the column between these two lines.
- A distance from the previous line at least as large as the largest minimum size of any grid items belonging to the column between these two lines,
but no larger than the other half of the free space.
If the non-flexible sizes
(100px, max-content, and min-content)
sum to larger than the grid container’s width,
the final grid line will be a distance equal to their sum away from the start edge of the grid container (the 1fr sizes both resolve to 0).
If the sum is less than the grid container’s width,
the final grid line will be exactly at the end edge of the grid container.
This is true in general whenever there’s at least one <flex> value among the grid track sizes.
Additional examples of valid grid track definitions:
/* examples of valid track definitions */
grid-template-rows: 1fr minmax(min-content, 1fr);
grid-template-rows: 10px repeat(2, 1fr auto minmax(30%, 1fr));
grid-template-rows: calc(4em - 5px)
Note: The size of the grid is not purely the sum of the track sizes,
as grid-row-gap, grid-column-gap and justify-content, align-content can add additional space between tracks.
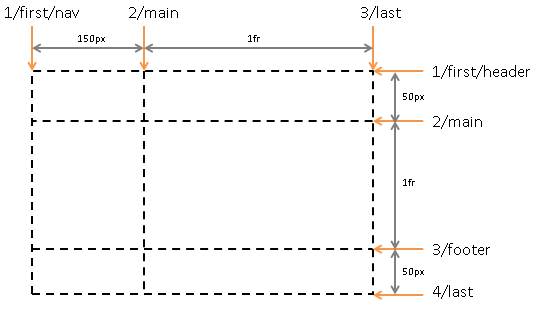
5.1.1. Named Grid Lines: the [<custom-ident>*] syntax
While grid lines can always be referred to by their numerical index, named lines can make the grid-placement properties easier to understand and maintain.
Lines can be explicitly named in the grid-template-rows and grid-template-columns properties,
or implicitly named by creating named grid areas with the grid-template-areas property.
For example,
the following code gives meaningful names to all of the lines in the grid.
Note that some of the lines have multiple names.
<style>
#grid {
  display: grid;
  grid-template-columns: [first nav] 150px [main] 1fr [last];
  grid-template-rows: [first header] 50px [main] 1fr [footer] 50px [last];
}
</style>
5.1.2. Repeating Rows and Columns: the repeat() notation
The repeat() notation represents a repeated fragment of the track list,
allowing a large number of columns or rows that exhibit a recurring pattern
to be written in a more compact form.
The syntax of the repeat() notation
has several forms:
<track-repeat> = repeat( [ <positive-integer> ]  , [ <line-names>? <track-size> ]+ <line-names>? )
<auto-repeat>  = repeat( [ auto-fill | auto-fit ],   <line-names>? <fixed-size>    <line-names>? )
<fixed-repeat> = repeat( [ <positive-integer> ]  , [ <line-names>? <fixed-size> ]+ <line-names>? )
<name-repeat>  = repeat( [ <positive-integer> | auto-fill ], <line-names>+)
The first argument specifies the number of repetitions.
The second argument is a track list,
which is repeated that number of times.
-
The <track-repeat> variant can represent the repeatition of any <track-size>,
but is limited to fixed repetitions. -
The <auto-repeat> variant can repeat automatically to fill a space,
but requires definite minimum track sizes so that the number of repetitions can be calculated.
It can only appear once in the track list,
but the same track list can also contain <fixed-repeat>s. -
The <name-repeat> variant can be used with the subgrid keyword:
it only repeats names.
The auto-fill keyword is only valid once per <line-name-list>,
and repeats enough times for the name list to match the subgrid’s specified grid span (defaulting to 0 if that is auto or if the span is already fulfilled).
This example shows two equivalent ways of writing the same grid definition.
Both ways produce a grid with a single row and four «main» columns, each 250px wide,
surrounded by 10px «gutter» columns.
<style>
#grid {
  display: grid;
  grid-template-columns: 10px [col-start] 250px [col-end]
                         10px [col-start] 250px [col-end]
                         10px [col-start] 250px [col-end]
                         10px [col-start] 250px [col-end] 10px;
  grid-template-rows: 1fr;
}

/* Equivalent definition. */
#grid {
  display: grid;
  grid-template-columns: repeat(4, 10px [col-start] 250px [col-end]) 10px;
  grid-template-rows: 1fr;
}
</style>
If the repeat() function ends up placing two <line-names> adjacent to each other,
the name lists are merged.
For example, repeat(2, [a] 1fr [b]) is equivalent to [a] 1fr [b a] 1fr [b].
When auto-fill is given as the repetition number,
if the grid container has a definite size or max size in the relevant axis,
then the number of repetitions is the largest possible positive integer
that does not cause the grid to overflow its grid container (treating each track as its max track sizing function if that is definite or as its minimum track sizing function otherwise).
Otherwise, if the grid container has a definite min size in the relevant axis,
the number of repetitions is the largest possible positive integer that fulfills that minimum requirement.
Otherwise, the specified track list repeats only once.
The auto-fit keyword behaves the same as auto-fill,
except that after grid item placement any empty repetitions are dropped.
In order to simplify implementation and testing requirements for Level 1,
the <auto-repeat> syntax only accepts a single <fixed-size>.
Now that we have gutters, most use cases for auto-repetition will need only one track size.
However, if there are important use cases for having a full track listing,
the CSSWG is not opposed to expanding the syntax;
please send such use cases to www-style@w3.org
for consideration.
5.1.3. Flexible Lengths: the fr unit
A flexible length or <flex> is a dimension with the fr unit,
which represents a fraction of the free space in the grid container.
The distribution of free space occurs after all non-flexible track sizing functions have reached their maximum.
The total size of such rows or columns is subtracted from the available space, yielding the free space,
which is then divided among the flex-sized rows and columns in proportion to their flex factor.
Note: Flexible lengths in a track list work similarly to flexible lengths with a zero base size in [CSS3-FLEXBOX].
Each column or row’s share of the free space can be computed as the column or row’s <flex> * <free space> / <sum of all flex factors>.
For the purpose of this calculation,
a flexible length in the min position of a minmax() function is treated as 0 (an inflexible length).
When the available space is infinite
(which happens when the grid container’s width or height is indefinite),
flex-sized grid tracks are sized to their contents while retaining their respective proportions.
The used size of each flex-sized grid track is computed by
determining the max-content size of each flex-sized grid track and dividing that size by the respective flex factor to determine a “hypothetical 1fr size”.
The maximum of those is used as the resolved 1fr length (the flex fraction),
which is then multiplied by each grid track’s flex factor to determine its final size.
5.1.4. Subgrids: the subgrid keyword
A grid item can itself be a grid container by giving it display: grid;
in this case the layout of its contents will be independent of the layout of the grid it participates in.
In some cases it might be necessary for the contents of multiple grid items to align to each other.
A grid container that is itself a grid item can defer the definition of its rows or columns to its parent grid container by using the subgrid keyword in grid-template-rows and/or grid-template-columns,
making it a subgrid in that dimension.
In this case, the grid items of the subgrid participate in sizing the grid of the parent grid container,
allowing the contents of both grids to align.
If a grid container that is not a grid item uses the subgrid keyword,
its grid-template-rows/grid-template-columns value is treated identically to none (i.e. it doesn’t have an explicit grid in that dimension).
For example, suppose we have a form consisting of a list of inputs with labels:
<ul>
  <li><label>Name:</label> <input name=fn>
  <li><label>Address:</label> <input name=address>
  <li><label>Phone:</label> <input name=phone>
</ul>
We want the labels and inputs to align, and we want to style each list item with a border.
This can be accomplished with subgrid layout:
ul {
  display: grid;
  grid-auto-flow: row;
  grid-template-columns: auto 1fr;
}
li {
  display: grid;
  grid: subgrid;
  margin: 0.5em;
  border: solid;
  padding: 0.5em;
}
label {
  grid-column: 1;
}
input {
  grid-column: 2;
}
A subgrid behaves just like a normal grid container except that:
- The number of explicit tracks is given by its grid span,
rather than by grid-template-rows/grid-template-columns.
If the grid has an automatic grid span,
the number of tracks is determined by the size of the subgrid’s implicit grid. - The grid-placement properties of the subgrid’s grid items are scoped to the lines covered by the subgrid.
E.g., numeric indices count starting from the first line of the subgrid
rather than the first line of the parent grid. -
The subgrid’s own grid items participate in the sizing of its parent grid and are aligned to it.
In this process, the sum of the subgrid’s margin, padding, and borders are applied as an extra layer of margin to the items at those edges.For example, if we have a 3×3 grid with the following tracks:
#parent-grid { grid-template-columns: 300px auto 300px; }If a subgrid covers the last two tracks, its first two columns correspond to the parent grid’s last two columns,
and any items positioned into those tracks participate in sizing the parent grid.
Specifically, an item positioned in the first track of the subgrid
influences the auto-sizing of the parent grid’s middle track.#subgrid { grid-column: 2 / span 2; } /* cover parent’s 2nd and 3rd tracks */ #subgrid :first-child { grid-column: 1; } /* subgrid’s 1st track, parent grid’s 2nd track */If the subgrid has margins/borders/padding,
the the size of those margins/borders/padding also influence sizing.
For example, if the subgrid has 100px padding:#subgrid { padding: 100px; }Then when the parent grid auto-sizes its second track,
it will be at least 100px wider than any items in the subgrid’s first track,
and any items in the subgrid’s second track will be sized to fit a slot 200px wide (instead of 300px wide).However, any overflow tracks
(i.e. those outside the explicit grid when the subgrid has a definite grid span)
do not correspond to any tracks in the parent grid;
they effectively extend in a third dimension.For example, if a parent grid has adjacent tracks A, B, and C,
and a span 1 subgrid with an extra implicit grid track is placed in track B,
the items in that implicit grid track are not considered part of track B. - The subgrid is always stretched in its subgridded dimension:
the align-self/justify-self properties on it are ignored in that dimension,
and any specified width/height constraints are also ignored in that dimension. - Layoutwise, the subgrid’s explicit grid is always aligned with the corresponding section of the parent grid;
the align-content/justify-content properties on it are ignored.
However, overflow does apply,
so the contents of the subgrid can be scrolled aside.
(Note: the act of scrolling does not affect layout.) -
Explicit named lines can also be specified together with the subgrid keyword;
these names apply (within the subgrid) to the corresponding lines of the parent grid.
If the subgrid has an explicit grid span,
any names specified for lines beyond the span are ignored.For example, if the subgrid above were specified with 5 names:
#subgrid { grid-template-columns: subgrid [first] [second] [third] [fourth] [fifth]; }Items within the subgrid could be positioned using the first four line names;
the last name would be ignored (as if it didn’t exist),
since the subgrid only covers four lines.If the subgrid has an explicit grid position as well as an explicit grid span,
it also automatically receives the line names specified for its parent grid.
(In such cases the author can rely on the names specified in the parent grid,
and does not need to duplicate those names in each subgrid declaration.)People should review how subgrid line names are assigned, to ensure it is sane and useful.
5.1.5. Resolved Values
When an element’s display is grid or inline-grid and it generates a box,
the resolved value of the grid-template-rows and grid-template-columns properties is the used value,
serialized as follows:
- Every track listed,
whether implicitly or explicitly created. - Every track size given as a length in pixels,
regardless of sizing function. - A contiguous run of two or more tracks that have the same size and associated line names
may be serialized with the repeat() notation.
Otherwise, (e.g. when the element has display: none or is not a grid)
the resolved value is simply the computed value.
<style>
#grid {
  width: 500px;
  grid-template-columns:
    [a]     auto
    [b]     minmax(min-content, 1fr)
    [b c d] repeat(2, [e] 40px)
            repeat(5, auto);
}
</style>
<div id="grid">
  <div style="grid-column-start:1; width:50px"></div>
  <div style="grid-column-start:9; width:50px"></div>
</div>
<script>
  var gridElement = document.getElementById("grid");
  getComputedStyle(gridElement).gridTemplateColumns;
  // [a] 50px [b] 320px [b c d] repeat(2, [e] 40px) repeat(4, 0px) 50px
</script>
Note: In general, resolved values are the computed values,
except for a small list of legacy 2.1 properties.
However, compatibility with early implementations of this module
requires us to define grid-template-rows and grid-template-columns as returning used values.
Authors are recommended to use the .rawComputedStyle and .usedStyle attributes instead of getComputedStyle().
5.2. Named Areas: the grid-template-areas property
| Name: | grid-template-areas |
|---|---|
| Value: | none | <string>+ |
| Initial: | none |
| Applies to: | grid containers |
| Inherited: | no |
| Percentages: | n/a |
| Media: | visual |
| Computed value: | specified value |
| Animatable: | no |
This property specifies named grid areas,
which are not associated with any particular grid item,
but can be referenced from the grid-placement properties.
The syntax of the grid-template-areas property also provides a visualization
of the structure of the grid,
making the overall layout of the grid container easier to understand.
Values have the following meanings:
- none
- The grid container doesn’t define any named grid areas.
- <string>+
-
A row is created for every separate string listed for the grid-template-areas property,
and a column is created for each cell in the string,
when parsed as follows:Tokenize the string into a list of the following tokens,
using longest-match semantics:- A sequence of name code points,
representing a named cell token with a name consisting of its code points. - A sequence of one or more «.» (U+002E FULL STOP),
representing a null cell token. - A sequence of whitespace,
representing nothing
(do not produce a token). - A sequence of any other characters,
representing a trash token.
Note: These rules can produce cell names that do not match the <ident> syntax,
such as «1st 2nd 3rd»,
which requires escaping when referencing those areas by name in other properties,
like grid-row: 31st; to reference the area named 1st.- A null cell token represents an unnamed area in the grid container.
- A named cell token creates a named grid area with the same name.
Multiple named cell tokens within and between rows
create a single named grid area that spans the corresponding grid cells. - A trash token is a syntax error,
and makes the declaration invalid.
All strings must have the same number of columns,
or else the declaration is invalid.
If a named grid area spans multiple grid cells,
but those cells do not form a single filled-in rectangle,
the declaration is invalid.Note: Non-rectangular or disconnected regions may be permitted in a future version of this module.
- A sequence of name code points,
In this example, the grid-template-areas property is used to create a page layout
where areas are defined for header content (head),
navigational content (nav),
footer content (foot),
and main content (main).
Accordingly, the template creates three rows and two columns,
with four named grid areas.
The head area spans both columns and the first row of the grid.
<style type="text/css">
#grid {
  display: grid;
  grid-template-areas: "head head"
                       "nav  main"
                       "foot ...."
}
#grid > header { grid-area: head; }
#grid > nav    { grid-area: nav; }
#grid > main   { grid-area: main; }
#grid > footer { grid-area: foot; }
</style>
5.2.1. Implicit Named Lines
The grid-template-areas property creates implicit named lines from the named grid areas in the template.
For each named grid area foo, four implicit named lines are created:
two named foo-start, naming the row-start and column-start lines of the named grid area,
and two named foo-end, naming the row-end and column-end lines of the named grid area.
These named lines behave just like any other named line,
except that they do not appear in the value of grid-template-rows/grid-template-columns.
Even if an explicit line of the same name is defined,
the implicit named lines are just more lines with the same name.
5.2.2. Implicit Named Areas
Since a named grid area is referenced by the implicit named lines it produces,
explicitly adding named lines of the same form (foo-start/foo-end)
effectively creates a named grid area.
Such implicit named areas do not appear in the value of grid-template-areas,
but can still be referenced by the grid-placement properties.
5.3. Explicit Grid Shorthand: the grid-template property
| Name: | grid-template |
|---|---|
| Value: | none | subgrid | <‘grid-template-columns’> / <‘grid-template-rows’> | [ <track-list> / ]? [ <line-names>? <string> <track-size>? <line-names>? ]+ |
| Initial: | see individual properties |
| Applies to: | grid containers |
| Inherited: | see individual properties |
| Percentages: | see individual properties |
| Media: | visual |
| Computed value: | see individual properties |
| Animatable: | no |
The grid-template property is a shorthand for setting grid-template-columns, grid-template-rows, and grid-template-areas in a single declaration.
It has several distinct syntax forms:
- none
- Sets all three properties to their initial values (none).
- subgrid
- Sets grid-template-rows and grid-template-columns to subgrid,
and grid-template-areas to its initial value. - <‘grid-template-columns’> / <‘grid-template-rows’>
-
Sets grid-template-columns and grid-template-rows to the specified values, respectively,
and sets grid-template-areas to none.grid-template: auto 1fr auto / auto 1fr;
is equivalent to
grid-template-columns: auto 1fr auto;
grid-template-rows: auto 1fr;
grid-template-areas: none;
- [ <track-list> / ]? [ <line-names>? <string> <track-size>? <line-names>? ]+
-
- Sets grid-template-columns to the track listing specified before the slash
(or none, if not specified). - Sets grid-template-areas to the strings listed after the slash.
- Sets grid-template-rows to the <track-size>s following each string
(filling in auto for any missing sizes),
and splicing in the named lines defined before/after each size.
This syntax allows the author to align track names and sizes inline with their respective grid areas.
grid-template: auto 1fr auto /
  [header-top] "a   a   a"     [header-bottom]
    [main-top] "b   b   b" 1fr [main-bottom];
is equivalent to
grid-template-columns: auto 1fr auto; grid-template-rows: [header-top] auto [header-bottom main-top] 1fr [main-bottom]; grid-template-areas: "a a a" "b b b"; - Sets grid-template-columns to the track listing specified before the slash
Note: The grid shorthand accepts the same syntax,
but also resets the implicit grid properties to their initial values.
Unless authors want those to cascade in separately,
it is therefore recommended to use grid instead of grid-template.
6. The Implicit Grid
The grid-template property and its longhands define a fixed number of tracks that form the explicit grid.
When grid items are positioned outside of these bounds,
the grid container generates implicit grid tracks by adding implicit grid lines to the grid.
These lines together with the explicit grid form the implicit grid.
The grid-auto-rows and grid-auto-columns properties size these implicit grid tracks.
The grid-auto-flow property controls auto-placement of grid items without an explicit position.
Once the explicit grid is filled
(or if there is no explicit grid)
auto-placement will also cause the generation of implicit grid tracks.
6.1. Sizing Auto-generated Rows and Columns: the grid-auto-rows and grid-auto-columns properties
| Name: | grid-auto-columns, grid-auto-rows |
|---|---|
| Value: | <track-size> |
| Initial: | auto |
| Applies to: | grid containers |
| Inherited: | no |
| Percentages: | see Track Sizing |
| Media: | visual |
| Computed value: | see Track Sizing |
| Animatable: | no |
If a grid item is positioned into a row or column that is not explicitly sized
by grid-template-rows or grid-template-columns, implicit grid tracks are created to hold it.
This can happen either by explicitly positioning into a row or column that is out of range,
or by the auto-placement algorithm creating additional rows or columns.
The grid-auto-columns and grid-auto-rows properties specify the size of such implicitly-created tracks.
This example illustrates the sizing of implicit grid tracks.
Note that grid item B is positioned on grid line 5,
which automatically creates four implicit grid columns.
However, only two of them
(the first and the last)
are occupied by any grid items,
so the two empty grid tracks collapse to zero width.
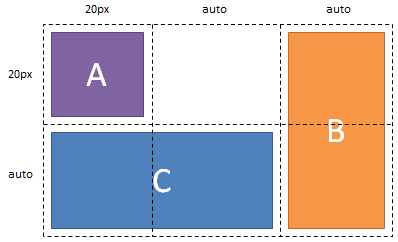
<style type="text/css">
  #grid {
    display: grid;
    grid-template-columns: 20px;
    grid-template-rows: 20px }
  #A { grid-column: 1;          grid-row: 1; }
  #B { grid-column: 5;          grid-row: 1 / span 2; }
  #C { grid-column: 1 / span 2; grid-row: 2; }
</style>

<div id="grid">
  <div id="A">A</div>
  <div id="B">B</div>
  <div id="C">C</div>
</div>
6.2. Automatic Placement: the grid-auto-flow property
| Name: | grid-auto-flow |
|---|---|
| Value: | [ row | column ] || dense |
| Initial: | row |
| Applies to: | grid containers |
| Inherited: | no |
| Percentages: | n/a |
| Media: | visual |
| Computed value: | specified value |
| Animatable: | no |
Grid items that aren’t explicitly placed are automatically placed
into an unoccupied space in the grid container by the auto-placement algorithm. grid-auto-flow controls how the auto-placement algorithm works,
specifying exactly how auto-placed items get flowed into the grid.
See §9.5 Grid Item Placement Algorithm for details on precisely how the auto-placement algorithm works.
- row
- The auto-placement algorithm places items
by filling each row in turn,
adding new rows as necessary.
If neither row nor column is provided, row is assumed. - column
- The auto-placement algorithm places items
by filling each column in turn,
adding new columns as necessary. - dense
-
If specified, the auto-placement algorithm uses a “dense” packing algorithm,
which attempts to fill in holes earlier in the grid if smaller items come up later.
This may cause items to appear out-of-order,
when doing so would fill in holes left by larger items.If omitted, a “sparse” algorithm is used,
where the placement algorithm only ever moves “forward” in the grid when placing items,
never backtracking to fill holes.
This ensures that all of the auto-placed items appear “in order”,
even if this leaves holes that could have been filled by later items.
Note: A future level of this module is expected to add a value that flows auto-positioned items together into a single “default” cell.
Auto-placement takes grid items in order-modified document order.
In the following example, there are three columns, each auto-sized to their contents.
No rows are explicitly defined.
The grid-auto-flow property is row which instructs the grid to search across its three columns starting with the first row,
then the next,
adding rows as needed until sufficient space is located to accommodate the position of any auto-placed grid item.
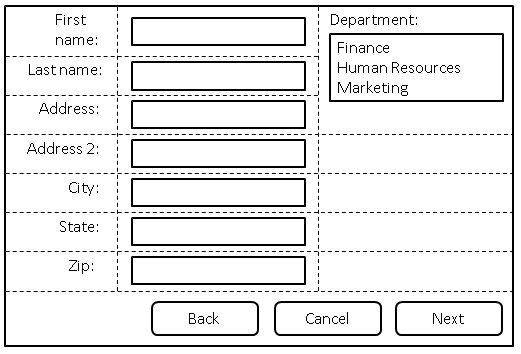
A form arranged using automatic placement.
<style type="text/css">
form {
  display: grid;
  /* Define three columns, all content-sized,
     and name the corresponding lines. */
  grid-template-columns: [labels] auto [controls] auto [oversized] auto;
  grid-auto-flow: row dense;
}
form > label {
  /* Place all labels in the "labels" column and
     automatically find the next available row. */
  grid-column: labels;
  grid-row: auto;
}
form > input, form > select {
  /* Place all controls in the "controls" column and
     automatically find the next available row. */
  grid-column: controls;
  grid-row: auto;
}

#department-block {
  /* Auto place this item in the "oversized" column
     in the first row where an area that spans three rows
     won’t overlap other explicitly placed items or areas
     or any items automatically placed prior to this area. */
  grid-column: oversized;
  grid-row: span 3;
}

/* Place all the buttons of the form
   in the explicitly defined grid area. */
#buttons {
  grid-row: auto;

  /* Ensure the button area spans the entire grid element
     in the row axis. */
  grid-column: 1 / -1;
  text-align: end;
}
</style>
<form>
  <label for="firstname">First name:</label>
  <input type="text" id="firstname" name="firstname" />
  <label for="lastname">Last name:</label>
  <input type="text" id="lastname" name="lastname" />
  <label for="address">Address:</label>
  <input type="text" id="address" name="address" />
  <label for="address2">Address 2:</label>
  <input type="text" id="address2" name="address2" />
  <label for="city">City:</label>
  <input type="text" id="city" name="city" />
  <label for="state">State:</label>
  <select type="text" id="state" name="state">
    <option value="WA">Washington</option>
  </select>
  <label for="zip">Zip:</label>
  <input type="text" id="zip" name="zip" />

  <div id="department-block">
    <label for="department">Department:</label>
    <select id="department" name="department" multiple>
      <option value="finance">Finance</option>
      <option value="humanresources">Human Resources</option>
      <option value="marketing">Marketing</option>
    </select>
  </div>

  <div id="buttons">
    <button id="cancel">Cancel</button>
    <button id="back">Back</button>
    <button id="next">Next</button>
  </div>
</form>
7. Grid Definition Shorthand: the grid property
| Name: | grid |
|---|---|
| Value: | <‘grid-template’> | [ <‘grid-auto-flow’> [ <‘grid-auto-columns’> [ / <‘grid-auto-rows’> ]? ]? ] |
| Initial: | see individual properties |
| Applies to: | grid containers |
| Inherited: | see individual properties |
| Percentages: | see individual properties |
| Media: | visual |
| Computed value: | see individual properties |
| Animatable: | no |
The grid property is a shorthand that sets
all of the explicit grid properties
(grid-template-rows, grid-template-columns, and grid-template-areas),
all the implicit grid properties
(grid-auto-rows, grid-auto-columns, and grid-auto-flow),
and the gutter properties
(grid-column-gap and grid-row-gap)
in a single declaration.
If <‘grid-auto-rows’> value is omitted,
it is set to the value specified for grid-auto-columns.
Other omitted values are set to their initial values.
Note: Note that you can only specify the explicit or the implicit grid properties in a single grid declaration.
The sub-properties you don’t specify are set to their initial value,
as normal for shorthands.
Also, the gutter properties are reset by this shorthand,
even though they can’t be set by it.
In addition to accepting the grid-template shorthand syntax for setting up the explicit grid,
the grid shorthand can also easily set up parameters for an auto-formatted grid.
For example, grid: row 1fr; is equivalent to
grid-template: none;
grid-auto-columns: 1fr;
grid-auto-rows: 1fr;
grid-auto-flow: row;
Similarly, grid: column 1fr / auto is equivalent to
grid-template: none;
grid-auto-columns: 1fr;
grid-auto-rows: auto;
grid-auto-flow: column;
8. Clamping Overlarge Grids
Since memory is not infinite,
UAs may clamp the the possible size of the grid to within a UA-defined limit,
dropping all lines outside that limit.
If a grid item is placed outside this limit,
its grid area must be clamped to within this limited grid.
To clamp a grid area:
-
If the grid area would span outside the limited grid,
its span is clamped to the last line of the limited grid. -
If the grid area would be placed completely outside the limited grid
is span must be truncated to 1
and the area repositioned into the last grid track on that side of the grid.
For example, if a UA only supported grids with at most 1000 tracks in each dimension,
the following placement properties:
.grid-item {
  grid-row: 500 / 1500;
  grid-column: 2000 / 3000;
}
Would end up being equivalent to:
.grid-item {
  grid-row: 500 / 1000;
  grid-column: 999 / 1000;
}
9. Placing Grid Items
Every grid item has a grid area,
a rectangular set of grid cells that the grid item occupies.
This grid area defines the containing block for the grid item within which the alignment properties (justify-self and align-self) determine their actual position.
The cells that a grid item occupies also influence the sizing of the grid’s rows and columns,
defined in §12 Grid Sizing.
The location of a grid item’s grid area within the grid is defined by its placement,
which consists of a grid position and a grid span:
- grid position
- The grid item’s location in the grid.
A grid position can be either definite (explicitly specified)
or automatic (determined by auto-placement). - grid span
- How many grid tracks the grid item occupies.
A subgrid’s grid span can be automatic (determined by its implicit grid) if not specified or implied;
a grid item’s grid span is otherwise always definite (defaulting to 1).
The grid-placement properties—the longhands grid-row-start, grid-row-end, grid-column-start, grid-column-end, and their shorthands grid-row, grid-column, and grid-area—allow the author to specify a grid item’s placement by providing any (or none) of the following six pieces of information:
| Row | Column | |
|---|---|---|
| Start | row-start line | column-start line |
| End | row-end line | column-end line |
| Span | row span | column span |
A definite value for any two of Start, End, and Span in a given dimension implies a definite value for the third.
The following table summarizes the conditions under which a grid position or span is definite or automatic:
| Position | Span | |
|---|---|---|
| Definite | At least one specified line | Explicit, implicit, or defaulted span. Note: Non-subgrids default to 1. |
| Automatic | No lines explicitly specified | Subgrid without an explicit or implied span |
9.1. Common Patterns for Grid Placement
This section is informative.
The grid-placement property longhands are organized into three shorthands:
| grid-area | |||
| grid-column | grid-row | ||
| grid-column-start | grid-column-end | grid-row-start | grid-row-end |
9.1.1. Named Areas
An item can be placed into a named grid area (such as those produced by the template in grid-template-areas)
by specifying the area’s name in grid-area:
article {
  grid-area: main;
  /* Places item into the named area "main". */
}
An item can also be partially aligned with a named grid area,
with other edges aligned to some other line:
.one {
  grid-row-start: main;
  /* Align the row-start edge to the start edge of the "main" named area. */
}
9.1.2. Numeric Indexes and Spans
Grid items can be positioned and sized by number,
which is particularly helpful for script-driven layouts:
.two {
  grid-row: 2;    /* Place item in the second row. */
  grid-column: 3; /* Place item in the third column. */
  /* Equivalent to grid-area: 2 / 3;
}
By default, a grid item has a span of 1.
Different spans can be given explicitly:
.three {
  grid-row: 2 / span 5;
  /* Starts in the 2nd row,
     spans 5 rows down (ending in the 7th row). */
}

.four {
  grid-row: span 5 / 7;
  /* Ends in the 7th row,
     spans 5 rows up (starting in the 2nd row). */
}
Note: Note that grid indexes are writing mode relative.
For example, in a right-to-left language like Arabic,
the first column is the rightmost column.
9.1.3. Named Lines and Spans
Instead of counting lines by number, named lines can be referenced by their name:
.five {
  grid-column: first / middle;
  /* Span from line "first" to line "middle". */
}
Note: Note that if a named grid area and a named line have the same name,
the placement algorithm will prefer to use named grid area’s edge instead.
If there are multiple lines of the same name,
they effectively establish a named set of grid lines,
which can be exclusively indexed by filtering the placement by name:
.six {
  grid-row: text 5 / text 7;
  /* Span between the 5th and 7th lines named "text". */
  grid-row: text 5 / span text 2;
  /* Same as above. */
}
9.1.4. Auto Placement
A grid item can be automatically placed into the next available empty grid cell,
growing the grid if there’s no space left.
.eight {
  grid-area: auto; /* Initial value */
}
This can be used, for example, to list a number of sale items on a catalog site
in a grid pattern.
Auto-placement can be combined with an explicit span,
if the item should take up more than one cell:
.nine {
  grid-area: span 2 / span 3;
  /* Auto-placed item, covering two rows and three columns. */
}
Whether the auto-placement algorithm searchs across and adds rows,
or searches across and adds columns,
is controlled by the grid-auto-flow property.
Note: By default, the auto-placement algorithm looks linearly through the grid without backtracking;
if it has to skip some empty spaces to place a larger item,
it will not return to fill those spaces.
To change this behavior,
specify the dense keyword in grid-auto-flow.
9.1.5. Auto Sizing Subgrids
A subgrid without a definite grid span is sized to its implicit grid,
i.e. all of its items within it are first placed into its own grid,
and its span is the resulting size of its grid.
For example, a subgrid spanning two columns can be given an auto-spanning block size:
.adverts {
  grid: subgrid;
  grid-column: span 2;
}
If it contains 10 auto-placed items, it will span 5 rows in its parent grid.
Note: Since auto-spanning subgrids determine their span before being positioned,
they can also be auto-positioned.
The above example would auto-place the .adverts block,
if no further rules specified its position.
9.2. Grid Item Placement vs. Source Order
“With great power comes great responsibility.”
The abilities of the grid-placement properties allow content to be freely arranged and reordered within the grid,
such that the visual presentation can be largely disjoint
from the underlying document source order.
These abilities allow the author great freedom
in tailoring the rendering to different devices
and modes of presentation
e.g. using media queries.
However they are not a substitute for correct source ordering.
Correct source order is important for speech,
for sequential navigation (such as keyboard navigation),
and non-CSS UAs such as search engines, tactile browsers, etc.
Grid placement only affects the visual presentation!
This allows authors to optimize the document source for
non-CSS/non-visual interaction modes,
and use grid placement techniques to further manipulate the visual presentation
so as to leave that source order intact.
9.3. Line-based Placement: the grid-row-start, grid-column-start, grid-row-end, and grid-column-end properties
| Name: | grid-row-start, grid-column-start, grid-row-end, grid-column-end |
|---|---|
| Value: | <grid-line> |
| Initial: | auto |
| Applies to: | grid items and absolutely-positioned boxes whose containing block is a grid container |
| Inherited: | no |
| Percentages: | n/a |
| Media: | visual |
| Computed value: | specified value |
| Animatable: | no |
<grid-line> =
  auto |
  <custom-ident> |
  [ <integer> && <custom-ident>? ] |
  [ span && [ <integer> || <custom-ident> ] ]
The grid-row-start, grid-column-start, grid-row-end, and grid-column-end properties
determine a grid item’s size and location within the grid by contributing a line, a span, or nothing (automatic)
to its grid placement,
thereby specifying the inline-start, block-start, inline-end, and block-end edges of its grid area.
Values have the following meanings:
- <custom-ident>
-
First attempt to match the grid area’s edge to a named grid area:
if there is a named line with the name »<custom-ident>-start (for grid-*-start) / <custom-ident>-end» (for grid-*-end),
contributes the first such line to the grid item’s placement.Note: Named grid areas automatically generate implicit named lines of this form,
so specifying grid-row-start: foo will choose the start edge of that named grid area (unless another line named foo-start was explicitly specified before it).Otherwise,
treat this as if the integer 1 had been specified along with the <custom-ident>. - <integer> && <custom-ident>?
-
Contributes the Nth grid line to the grid item’s placement.
If a negative integer is given,
it instead counts in reverse,
starting from the end edge of the explicit grid.If a name is given as a <custom-ident>,
only lines with that name are counted.
If not enough lines with that name exist,
all implicit grid lines are assumed to have that name for the purpose of finding this position.A <integer> value of zero makes the declaration invalid.
- span && [ <integer> || <custom-ident> ]
-
Contributes a grid span to the grid item’s placement such that the corresponding edge of the grid item’s grid area is N lines from its opposite edge.
If a name is given as a <custom-ident>,
only lines with that name are counted.
If not enough lines with that name exist,
all implicit grid lines are assumed to have that name for the purpose of counting this span.If the <integer> is omitted, it defaults to 1.
Negative integers or zero are invalid. - auto
- The property contributes nothing to the grid item’s placement,
indicating auto-placement, an automatic span, or a default span of one.
(See §9 Placing Grid Items, above.)
Given a single-row, 8-column grid and the following 9 named lines:
1  2  3  4  5  6  7  8  9
+--+--+--+--+--+--+--+--+
|  |  |  |  |  |  |  |  |
A  B  C  A  B  C  A  B  C
|  |  |  |  |  |  |  |  |
+--+--+--+--+--+--+--+--+
The following declarations place the grid item between the lines indicated by index:
grid-column-start: 4; grid-column-end: auto;
/* Line 4 to line 5 */

grid-column-start: auto; grid-column-end: 6;
/* Line 5 to line 6 */

grid-column-start: C; grid-column-end: C -1;
/* Line 3 to line 9 */

grid-column-start: C; grid-column-end: span C;
/* Line 3 to line 6 */

grid-column-start: span C; grid-column-end: C -1;
/* Line 6 to line 9 */

grid-column-start: span C; grid-column-end: span C;
/* Error: The end span is ignored, and an auto-placed
   item can’t span to a named line.
   Equivalent to grid-column: span 1;. */

grid-column-start: 5; grid-column-end: C -1;
/* Line 5 to line 9 */

grid-column-start: 5; grid-column-end: span C;
/* Line 5 to line 6 */

grid-column-start: 8; grid-column-end: 8;
/* Error: line 8 to line 9 */

grid-column-start: B 2; grid-column-end: span 1;
/* Line 5 to line 6 */
9.3.1. Grid Placement Conflict Handling
If the placement for a grid item contains two lines,
and the start line is further end-ward than the end line,
swap the two lines.
If the placement contains two spans,
remove the one contributed by the end grid-placement property.
If the placement contains only a span for a named line,
replace it with a span of 1.
9.4. Placement Shorthands: the grid-column, grid-row, and grid-area properties
| Name: | grid-row, grid-column |
|---|---|
| Value: | <grid-line> [ / <grid-line> ]? |
| Initial: | see individual properties |
| Applies to: | grid items and absolutely-positioned boxes whose containing block is a grid container |
| Inherited: | see individual properties |
| Percentages: | see individual properties |
| Media: | visual |
| Computed value: | see individual properties |
| Animatable: | no |
The grid-row and grid-column properties are shorthands for grid-row-start/grid-row-end and grid-column-start/grid-column-end, respectively.
If two <grid-line> values are specified,
the grid-row-start/grid-column-start longhand is set to the value before the slash,
and the grid-row-end/grid-column-end longhand is set to the value after the slash.
When the second value is omitted,
if the first value is a <custom-ident>,
the grid-row-end/grid-column-end longhand is also set to that <custom-ident>;
otherwise, it is set to auto.
| Name: | grid-area |
|---|---|
| Value: | <grid-line> [ / <grid-line> ]{0,3} |
| Initial: | see individual properties |
| Applies to: | grid items and absolutely-positioned boxes whose containing block is a grid container |
| Inherited: | see individual properties |
| Percentages: | see individual properties |
| Media: | visual |
| Computed value: | see individual properties |
| Animatable: | no |
If four <grid-line> values are specified, grid-row-start is set to the first value, grid-column-start is set to the second value, grid-row-end is set to the third value,
and grid-column-end is set to the fourth value.
When grid-column-end is omitted,
if grid-column-start is a <custom-ident>, grid-column-end is set to that <custom-ident>;
otherwise, it is set to auto.
When grid-row-end is omitted,
if grid-row-start is a <custom-ident>, grid-row-end is set to that <custom-ident>;
otherwise, it is set to auto.
When grid-column-start is omitted,
if grid-row-start is a <custom-ident>,
all four longhands are set to that value.
Otherwise, it is set to auto.
Note: The resolution order for this shorthand is row-start/column-start/row-end/column-end,
which goes CCW for LTR pages,
the opposite direction of the related 4-edge properties using physical directions, like margin.
9.5. Grid Item Placement Algorithm
The following grid item placement algorithm resolves automatic positions of grid items into definite positions,
ensuring that every grid item has a well-defined grid area to lay out into.
(Grid spans need no special resolution;
if they’re not explicitly specified,
they default to either 1 or,
for subgrids,
the size of their explicit grid.)
Note: This algorithm can result in the creation of new rows or columns in the implicit grid,
if there is no room in the explicit grid to place an auto-positioned grid item.
Every grid cell (in both the explicit and implicit grids)
can be occupied or unoccupied.
A cell is occupied if it’s covered by a named grid area,
or by the grid area of a grid item with a definite grid position;
otherwise,
the cell is unoccupied.
A cell’s occupied/unoccupied status can change during this algorithm.
To aid in clarity,
this algorithm is written with the assumption that grid-auto-flow has row specified.
If it is instead set to column,
swap all mentions of rows and columns, inline and block, etc. in this algorithm.
-
Position anything that’s not auto-positioned.
-
Process the items locked to a given row.
For each grid item with a definite row position (that is, the grid-row-start and grid-row-end properties define a definite grid position),
in order-modified document order:-
“sparse” packing (omitted dense keyword)
-
Set the column-start line of its placement to the earliest (smallest positive index) line index
that ensures this item’s grid area will not overlap any occupied grid cells
and that is past any grid items previously placed in this row by this step. -
“dense” packing (dense specified)
-
Set the column-start line of its placement to the earliest (smallest positive index) line index
that ensures this item’s grid area will not overlap any occupied grid cells.
-
-
Determine the number of columns in the implicit grid.
Set the number of columns in the implicit grid to the larger of:
-
The number of columns in the explicit grid.
-
Among all the items with a definite column position (explicitly positioned items, items positioned in the previous step, and items not yet positioned but with a definite column)
the largest positive column-end line index,
minus 1. -
The largest column span of all items.
For example, in the following style fragment:
#grid {
  display: grid;
  grid-template-columns: repeat(5, 100px);
  grid-auto-flow: row;
}
#grid-item {
  grid-column: 4 / span 3;
}
The number of columns needed is 6.
The#grid-itemelement’s column-start line is index 4,
so its span ensures that it’s column-end line will be index 7.
This requires7 - 1 = 6columns to hold,
which is larger than the explicit grid’s 5 columns. -
-
Position the remaining grid items.
The auto-placement cursor defines the current “insertion point” in the grid,
specified as a pair of row and column grid lines.
Initially the auto-placement cursor is specified with a row and column position both equal to 1.The grid-auto-flow value in use determines how to position the items:
-
“sparse” packing (omitted dense keyword)
-
For each grid item that hasn’t been positioned by the previous steps,
in order-modified document order:-
If the item has a definite column position:
-
-
Set the column position of the cursor to be equal to the column-start line index of the grid item.
If this is less than the previous column position of the cursor,
increment the row position by 1. -
Increment the cursor’s row position until a value is found
where the grid item does not overlap any occupied grid cells
(creating new rows in the implicit grid as necessary). -
Set the item’s row-start line to the cursor’s row position.
(Implicitly setting the item’s row-end line according to its span, as well.)
-
-
If the item has an automatic grid position in both axes:
-
-
Increment the column position of the auto-placement cursor until either this item’s grid area does not overlap any occupied grid cells,
or the cursor’s column position,
plus the item’s column span,
overflow the number of columns in the implicit grid,
as determined earlier in this algorithm. -
If a non-overlapping position was found in the previous step,
set the item’s row-start and column-start lines to the cursor’s position.
Otherwise,
increment the auto-placement cursor’s row position
(creating new rows in the implicit grid as necessary),
set its column position to 1,
and return to the previous step.
-
-
-
“dense” packing (dense specified)
-
For each grid item that hasn’t been positioned by the previous steps,
in order-modified document order:-
If the item has a definite column position:
-
-
Set the row position of the cursor to 1.
Set the column position of the cursor to be equal to the column-start line index of the grid item. -
Increment the auto-placement cursor’s row position until a value is found
where the grid item does not overlap any occupied grid cells
(creating new rows in the implicit grid as necessary). -
Set the item’s row-start line index to the cursor’s row position.
(Implicitly setting the item’s row-end line according to its span, as well.)
-
-
If the item has an automatic grid position in both axes:
-
-
Set the cursor’s row and column positions both to 1.
-
Increment the column position of the auto-placement cursor until either this item’s grid area does not overlap any occupied grid cells,
or the cursor’s column position,
plus the item’s column span,
overflow the number of columns in the implicit grid,
as determined earlier in this algorithm. -
If a non-overlapping position was found in the previous step,
set the item’s row-start and column-start lines to the cursor’s position.
Otherwise,
increment the auto-placement cursor’s row position
(creating new rows in the implicit grid as necessary),
set its column position to 1,
and return to the previous step.
-
-
-
10. Absolute Positioning
10.1. With a Grid Container as Containing Block
If an absolutely positioned element’s containing block is generated by a grid container,
the containing block corresponds to the grid area determined by its grid-placement properties.
The offset properties (top/right/bottom/left)
then indicate offsets inwards from the corresponding edges
of this containing block, as normal.
Note: While absolutely-positioning an element to a grid container does allow it to align to that container’s grid lines,
such elements do not take up space or otherwise participate in the layout of the grid.
.grid {
  grid: 10rem 10rem 10rem 10rem / 1fr 1fr 1fr 1fr;
  /* 4 columns of 10rem each,
     4 equal-height rows filling the grid container */
  justify-content: center;
  /* center the grid horizontally within the grid container */
  position: relative;
  /* Establish abspos containing block */
}

.abspos {
  grid-row-start: 1;     /* 1st grid row line = top of grid container */
  grid-row-end: span 2;  /* 3rd grid row line */
  grid-column-start: 3;  /* 3rd grid col line */
  grid-column-end: auto; /* right padding edge */
  /* Containing block covers the top right quadrant of the grid container */

  position: absolute;
  top: 70px;
  bottom: 40px;
  left: 100px;
  right: 30px;
}

Note: Grids and the grid-placement properties are flow-relative,
while abspos offsets are physical,
so if the direction or writing-mode properties change,
the grid will transform to match,
but the offsets won’t.
Instead of auto-placement, an auto value for a grid-placement property contributes a special line to the placement whose position is that of the corresponding padding edge of the grid container (the padding edge of the scrollable area, if the grid container overflows).
These lines become the first and last lines (0th and -0th) of the augmented grid used for positioning absolutely-positioned items.
Note: Thus, by default, the absolutely-positioned box’s containing block will correspond
to the padding edges of the grid container, as it does for block containers.
Absolute positioning occurs after layout of the grid and its in-flow contents
and does not contribute to the sizing of any grid tracks
or affect the size/configuration of the grid in any way.
If a grid-placement property refers to a non-existent line
either by explicitly specifying such a line or by spanning outside of the existing implicit grid,
it is instead treated as specifying auto (instead of creating new implicit grid lines).
If the placement only contains a grid span,
replace it with the two auto lines in that axis.
(This happens when both grid-placement properties in an axis contributed a span originally,
and §9.3.1 Grid Placement Conflict Handling caused the second span to be ignored.)
10.2. With a Grid Container as Parent
The static position [CSS21] of an absolutely-positioned child of a grid container is determined as if it were the sole grid item
in a grid area whose edges coincide with the padding edges of the grid container.
However, if the grid container parent is also the generator of the absolutely positioned element’s containing block,
instead use the grid area determined in §10.1 With a Grid Container as Containing Block.
Note: Note that this position is affected by the values of justify-self and align-self on the child,
and that, as in most other layout models,
the absolutely-positioned child has no effect on the size of the containing block
or layout of its contents.
11. Alignment and Spacing
After a grid container’s grid tracks have been sized,
and the dimensions of all grid items are finalized, grid items can be aligned within their grid areas.
The margin properties can be used to align items in a manner similar to,
but more powerful than,
what margins can do in block layout. Grid items also respect the alignment properties from the Box Alignment spec,
which allow easy keyword-based alignment of items in both the row axis and column axis.
By default, grid items stretch to fill their grid area.
However, if justify-self or align-self compute to a value other than stretch or margins are auto, grid items will auto-size to fit their contents.
11.1. Gutters: the grid-column-gap, grid-row-gap, and grid-gap properties
| Name: | grid-row-gap, grid-column-gap |
|---|---|
| Value: | <length> |
| Initial: | 0 |
| Applies to: | grid containers |
| Inherited: | no |
| Percentages: | n/a |
| Media: | visual |
| Computed value: | specified value |
| Animatable: | no |
These properties specify the gutters between grid rows and grid columns, respectively.
The effect is as though the affected grid lines acquired width:
the grid track between two grid lines is the space between the gutters that represent them.
For the purpose of track sizing,
each gutter is essentially treated as an extra track of the specified length.
Note: Additional spacing may be added between tracks
due to justify-content/align-content.
See §12.1 Grid Sizing Algorithm.
This space effectively increases the size of the gutters.
| Name: | grid-gap |
|---|---|
| Value: | <‘grid-column-gap’> <‘grid-row-gap’>? |
| Initial: | normal |
| Applies to: | grid containers |
| Inherited: | no |
| Percentages: | n/a |
| Media: | visual |
| Computed value: | specified value |
| Animatable: | no |
This property is a shorthand that sets grid-column-gap and grid-row-gap in one declaration.
If <‘grid-row-gap’> is omitted,
it’s set to the same value as <‘grid-column-gap’>.
11.2. Aligning with auto margins
This section is non-normative.
The normative definition of how margins affect grid items is in §12 Grid Sizing.
Auto margins on grid items have an effect very similar to auto margins in block flow:
- During calculations of grid track sizes, auto margins are treated as 0.
- Auto margins absorb positive free space
prior to alignment via the alignment properties
(defined in the next sections). - Overflowing elements ignore their auto margins and overflow in the end directions.
Note: Note that, if free space is distributed to auto margins,
the alignment properties will have no effect in that dimension
because the margins will have stolen all the free space
left over after sizing.
11.3. Row-axis Alignment: the justify-self and justify-items properties
Grid items can be aligned in the inline dimension
by using the justify-self property on the grid item or justify-items property on the grid container,
as defined in [CSS3-ALIGN].
For example,
for an English document,
the inline axis is horizontal,
and so the justify-* properties align the grid items horizontally.
TODO: provide example
11.4. Column-axis Alignment: the align-self and align-items properties
Grid items can also be aligned in the block dimension
(perpendicular to the inline dimension)
by using the align-self property on the grid item or align-items property on the grid container,
as defined in [CSS3-ALIGN].
11.5. Aligning the Grid: the justify-content and align-content properties
If the grid’s outer edges do not correspond to the grid container’s content edges
(for example, if no columns are flex-sized),
the grid tracks are aligned within the content box according to the justify-content and align-content properties on the grid container.
For example, the following grid is centered vertically,
and aligned to the right edge of its grid container:
.grid {
  display: grid;
  grid: 12rem 12rem 12rem 12rem / 10rem 10rem 10rem 10rem;
  justify-content: end;
  align-content: center;
}

Note that certain values of justify-content and align-content can cause the tracks to be spaced apart
(space-around, space-between, space-evenly)
or to be resized (stretch).
Add example of fixed size spanner getting extra space from content-distribution.
11.6. Grid Baselines
The baselines of a grid container are determined as follows:
- If any of the grid items whose areas intersect the grid container’s first row/column participate in baseline alignment,
the grid container’s baseline is the baseline of those grid items. - Otherwise, if the grid container has at least one grid item whose area intersects the first row/column,
and the first such grid item (in order-modified grid order) has a baseline
parallel to the relevant axis,
the grid container’s baseline is that baseline. - Otherwise, the grid container’s baseline is synthesized from the first item’s (in order-modified grid order) content box,
or, failing that, from the grid container’s content box.
A grid item participates in baseline alignment in a particular dimension
if its value for align-self or justify-self, as appropriate, is baseline and its inline axis is parallel to that dimension.
order-modified grid order is the order in which grid items are encountered when traversing the grid’s grid cells,
in row-major order if calculating the inline-axis baseline,
or in column-major order if calculating the block-axis baseline.
If two items are encountered at the same time,
they are taken in order-modified document order.
When calculating the baseline according to the above rules,
if the box contributing a baseline has an overflow value that allows scrolling,
the box must be treated as being in its initial scroll position
for the purpose of determining its baseline.
When determining the baseline of a table cell,
a grid container provides a baseline just as a line box or table-row does. [CSS21]
12. Grid Sizing
This section defines the grid sizing algorithm,
which determines the size of all grid tracks and, by extension, the entire grid.
Each track has specified minimum and maximum sizing functions (which may be the same).
Each sizing function is either:
- A fixed sizing function (<length> or resolveable <percentage>).
- An intrinsic sizing function (min-content, max-content, or auto).
- A flexible sizing function (<flex>).
The grid sizing algorithm defines how to resolve these sizing constraints into used track sizes.
12.1. Grid Sizing Algorithm
-
First, the track sizing algorithm is used to resolve the sizes of the grid columns.
If calculating the layout of a grid item in this step
depends on the available space in the row axis,
assume the available space that it would have
if any row with a definite max track sizing function had that size and all other rows were infinite. - Next, the track sizing algorithm resolves the sizes of the grid rows,
using the grid column sizes calculated in the previous step. -
Then, if the min-content contribution of any grid items have changed
based on the row sizes calculated in step 2,
steps 1 and 2 are repeated with the new min-content contribution (once only).Is one cycle enough?
- Finally, the grid container is sized
using the resulting size of the grid as its content size,
and the tracks are aligned within the grid container according to the align-content and justify-content properties. Note: This can introduce extra space within or between tracks. When introducing space within tracks,
only tracks with an auto max track sizing function accept space.
Once the size of each grid area is thus established,
the grid items are laid out into their respective containing blocks.
12.2. Track Sizing Terminology
- min track sizing function
- If the track was sized with a minmax() function,
this is the first argument to that function.
Otherwise, it’s the track’s sizing function. - max track sizing function
- If the track was sized with a minmax() function,
this is the second argument to that function.
Otherwise, it’s the track’s sizing function. - free space
-
Equal to the available space minus the sum of the base sizes of all the grid tracks,
clamped to a minimum of zero.
This value can change over the course of the algorithm,
as base sizes are adjusted.If available space is indefinite,
the free space is indefinite as well. - span count
- The number of grid tracks crossed by a grid item in the applicable dimension.
12.3. Track Sizing Algorithm
The remainder of this section is the track sizing algorithm,
which calculates from the min and max track sizing functions the used track size.
Each track has a base size,
a <length> which grows throughout the algorithm
and which will eventually be the track’s final size,
and a growth limit,
a <length> which provides a desired maximum size for the base size.
There are 4 steps:
- Initialize Track Sizes
- Resolve Intrinsic Track Sizes
- Maximize Tracks
- Stretch Flexible Tracks
12.4. Initialize Track Sizes
Initialize each track’s base size and growth limit. For each track,
if the track’s min track sizing function is:
- A fixed sizing function
-
Resolve to an absolute length and use that size as the track’s initial base size.
Note: Indefinite lengths cannot occur,
as they’re treated as auto. - An intrinsic sizing function
- A flexible sizing function
- Use an initial base size of zero.
For each track,
if the track’s max track sizing function is:
- A fixed sizing function
- Resolve to an absolute length and use that size as the track’s initial growth limit.
- An intrinsic sizing function
- Use an initial growth limit of infinity.
- A flexible sizing function
- Use the track’s initial base size as its initial growth limit.
In all cases, if the growth limit is less than the base size,
increase the growth limit to match the base size.
Note: Gutters are treated as fixed-size tracks for the purpose of the track sizing algorithm.
12.5. Resolve Intrinsic Track Sizes
This step resolves intrinsic track sizing functions to absolute lengths.
First it resolves those sizes based on items that are contained wholly within a single track.
Then it gradually adds in the space requirements of items that span multiple tracks,
evenly distributing the extra space across those tracks
insofar as possible.
When the grid container is being sized under a min-content constraint,
a track with a flexible min track sizing function is treated as if its min track sizing function was min-content for the purposes of this step. This seems correct, but should be checked because it wasn’t in the original algorithm.
Note: There is no single way to satisfy these constraints
when items span across multiple tracks.
This algorithm embodies a number of heuristics
which have been seen to deliver good results on real-world use-cases,
such as the «game» examples earlier in this specification.
This algorithm may be updated in the future
to take into account more advanced heuristics as they are identified.
-
Size tracks to fit non-spanning items: For each track with an intrinsic track sizing function,
consider the items in it with a span of 1:- For min-content minimums: If the track has a min-content min track sizing function,
set its base size to the maximum of the items’ min-content contributions. - For max-content minimums: If the track has a max-content min track sizing function,
set its base size to the maximum of the items’ max-content contributions. - For auto minimums: If the track has an auto min track sizing function,
set its base size to the maximum of the items’ outer minimum sizes,
as specified by their respective min-width or min-height properties
(whichever matches the relevant axis). - For min-content maximums: If the track has a min-content max track sizing function,
set its growth limit to the maximum of the items’ min-content contributions. - For max-content and auto maximums: If the track has a max-content or auto max track sizing function,
set its growth limit to the maximum of the items’ max-content contributions.
In all cases, if a track’s growth limit is now less than its base size,
increase the growth limit to match the base size. - For min-content minimums: If the track has a min-content min track sizing function,
-
Increase sizes to accommodate spanning items: Next, consider the items with a span of 2
that do not span a track with a flexible sizing function:- For intrinsic minimums: First increase the base size of tracks with
a min track sizing function of min-content, max-content, or auto by distributing extra space as needed
to accommodate the contributions dictated by these items’
minimum size (as specified by min-width/min-height). - For content-based minimums: Next continue to increase the base size of tracks with
a min track sizing function of min-content or max-content by distributing extra space as needed
to account for these items’ min-content contributions. - For max-content minimums: Third continue to increase the base size of tracks with
a min track sizing function of max-content by distributing extra space as needed
to account for these items’ max-content contributions. - If at this point any track’s growth limit is now less than its base size,
increase its growth limit to match its base size. -
For intrinsic maximums: Next increase the growth limit of tracks with
a max track sizing function of min-content or max-content (including auto)
by distributing extra space as needed
to account for these items’ min-content contributions.
Mark any tracks whose growth limit changed
from infinite to finite in this step
as infinitely growable for the next step.Why does the infinitely growable flag exist?
Peter Salas explains:
Consider the following case:
Two «auto» tracks (i.e. «minmax(min-content, max-content) minmax(min-content, max-content)»).
Item 1 is in track 1, and has min-content = max-content = 10.
Item 2 spans tracks 1 and 2, and has min-content = 30, max-content = 100.After resolving min-content/max-content for the first item, we have this.
track 1: used breadth = 10 max breadth = 10
track 2: used breadth = 0 max breadth = infinity
Then we resolve min-content/max-content for the second item.
Phase 1 sets the used breadth of track 2 to 20 so that the two tracks’ used breadths sum to 30.
Phase 2 does nothing because there are no relevant tracks.
Phase 3 sets the max breadth of track 2 to 20 so that the two tracks’ max breadths sum to 30.
In phase 4, we need to grow the sum of the max breadths by 70 to accommodate item 2.
Two options are:-
Grow each track’s max breadth equally,
and end up with max breadths = [45, 55]. -
Grow only the second track’s max breadth,
and end up with max breadths = [10, 90].
By not considering the just-set max breadth as a constraint during space distribution
(i.e. by treating it as infinity),
we get the second result,
which we considered a better result because the first track remains sized exactly to the first item. -
- For max-content maximums: Lastly continue to increase the growth limit of tracks with
a max track sizing function of max-content (including auto)
by distributing extra space as needed
to account for these items’ max-content contributions.
Repeat incrementally for items with greater spans until all items have been considered.
- For intrinsic minimums: First increase the base size of tracks with
- If any track still has an infinite growth limit (because, for example, it had no items placed in it),
set its growth limit to its base size.
- Maintain separately for each affected base size or growth limit an amount of planned increase.
(This prevents the size increases from becoming order-dependent.) -
For each considered item,
-
Find the space to distribute: Subtract the corresponding size (base size or growth limit) of every spanned track
from the item’s size contribution to find the item’s remaining size contribution.
(For infinite growth limits, substitute the track’s base size.)
This is the space to distribute. Floor it at zero.extra-space = max(0, size-contribution - ∑track-sizes)
-
Distribute space to base sizes up to growth limits: Distribute the space equally to the planned increase of each spanned track with an affected size,
freezing tracks as their planned size reaches their growth limits (and continuing to grow the unfrozen tracks as needed).If a track was marked as infinitely growable for this phase,
treat its growth limit as infinite for this calculation
(and then unmark it).Note: If the affected size was a growth limit,
this step has no effect. -
Distribute space beyond growth limits: If space remains after all tracks are frozen,
unfreeze and continue to distribute space to…- when handling min-content or auto base sizes:
any affected track that happens to also have an intrinsic max track sizing function;
if there are no such tracks, then all affected tracks. - when handling max-content base sizes:
any affected track that happens to also have a max-content max track sizing function;
if there are no such tracks, then all affected tracks. - when handling any intrinsic growth limit:
all affected tracks.
- when handling min-content or auto base sizes:
- Update the tracks’ affected sizes by folding in the calculated increase
so that the next round of space distribution will account for the increase.
(If the affected size is infinite,
set it to the track’s base size plus the calculated increase.)
-
Find the space to distribute: Subtract the corresponding size (base size or growth limit) of every spanned track
Note: When this step is complete,
all intrinsic base sizes and growth limits will have been resolved to absolute lengths.
12.6. Maximize Tracks
If the free space is positive, distribute it equally to all tracks,
freezing tracks as they reach their growth limits (and continuing to grow the unfrozen tracks as needed).
For the purpose of this step:
if sizing the grid container under a max-content constraint,
the free space is infinite;
if sizing under a min-content constraint,
the free space is zero.
12.7. Stretch Flexible Tracks
This step sizes flexible tracks
using the largest value it can assign to an fr without exceeding the available space.
First, find the used flex fraction:
- If the free space is zero:
- The used flex fraction is zero.
- If the free space is a definite length:
- The used flex fraction is the result of finding the size of an fr using all of the grid tracks and a space to fill of the available space.
- If the free space is an indefinite length:
-
The used flex fraction is the maximum of:
- Each flexible track’s base size divided by its flex factor.
- The result of finding the size of an fr for each grid item that crosses a flexible track,
using all the grid tracks that the item crosses
and a space to fill of the item’s max-content contribution.
For each flexible track,
if the product of the used flex fraction and the track’s flex factor is greater than the track’s base size,
set its base size to that product.
12.7.1. Find the Size of an fr
This algorithm finds the largest size that an fr unit can be
without exceeding the target size.
It must be called with a set of grid tracks and some quantity of space to fill.
- Let leftover space be the space to fill minus the base sizes of the non-flexible grid tracks.
- Let flex factor sum be the sum of the flex factors of the flexible tracks.
If this value is less than 1,
set it to 1 instead. - Let the hypothetical fr size be the leftover space divided by the flex factor sum.
- If the product of the hypothetical fr size and a flexible track’s flex factor is less than the track’s base size,
restart this algorithm
treating all such tracks as inflexible. - Return the hypothetical fr size.
Grid containers can break across pages
between rows
and inside items.
The break-* properties apply to grid containers
as normal for the formatting context in which they participate.
This section defines how they apply to grid items
and the contents of grid items.
The following breaking rules refer to the fragmentation container as the “page”.
The same rules apply to any other fragmentation containers.
(Substitute “page” with the appropriate fragmentation container type as needed.)
See the CSS3 Fragmentation Module [CSS3-BREAK].
The exact layout of a fragmented grid container is not defined in this level of Grid Layout.
However, breaks inside a grid container are subject to the following rules:
- The break-before and break-after properties on flex items
are propagated to their grid row.
The break-before property on the first row
and the break-after property on the last row
are propagated to the grid container. - A forced break inside a grid item effectively increases the size of its contents;
it does not trigger a forced break inside sibling items. - Class A break opportunities occur between rows,
and Class C break opportunities occur between the first/last row and the flex container’s content edges. [CSS3-BREAK] - When a grid container is continued after a break,
the space available to its grid items (in the block flow direction of the fragmentation context)
is reduced by the space consumed by grid container fragments on previous pages.
The space consumed by a grid container fragment is
the size of its content box on that page.
If as a result of this adjustment the available space becomes negative,
it is set to zero. - Aside from the rearrangement of items imposed by the previous point,
UAs should attempt to minimize distortation of the grid container
with respect to unfragmented flow.
13.1. Sample Fragmentation Algorithm
This is just a rough draft.
This section needs to be severely cross-checked with the [CSS3-FLEXBOX] algorithm.
Feedback overall is welcome; please reference the rules above instead as implementation guidance.
- Layout the grid following the §12 Grid Sizing by using the
fragmentainer box width and assume unlimited height. During this step all grid-row auto and fr values must be resolved. - Layout the grid container using the values resolved in the previous step.
-
If a grid area dimensions change due to fragmentation (do not include items that
span rows in this decision), increase the grid row as necessary for rows that either:- have a content min track sizing function.
- are in a grid that does not have an explicit height and the grid row is flexible.
- If the grid height is auto, the height of the grid should be the sum of the final
row sizes. - If a grid area overflows the grid container due to margins being collapsed during
fragmentation, extend the grid container to contain this grid area (this step is
necessary in order to avoid circular layout dependencies due to fragmentation).
If the grid’s height is specified, steps three and four may cause the grid rows to
overflow the grid.
Acknowledgements
This specification is made possible by input from
Erik Anderson,
Rossen Atanassov,
Manuel Rego Casasnovas,
Arron Eicholz,
Sylvain Galineau,
Markus Mielke,
Daniel Holbert,
John Jansen,
Chris Jones,
Kathy Kam,
Veljko Miljanic,
Mats Palmgren,
François Remy,
Sergio Villar Senin,
Christian Stockwell,
Eugene Veselov,
and the CSS Working Group members,
with special thanks to
Rossen Atanassov, Alex Mogilevsky, Phil Cupp, and Peter Salas of Microsoft for creating the initial proposal.
Thanks also to Eliot Graff for editorial input.
Changes
The following significant changes were made since the 6 August 2015 Working Draft.
-
Renamed row-gap/column-gap to grid-row-gap/grid-column-gap to avoid having multicol and grid share column-gap.
This also preserves grid- as a prefix across these properties and their shorthand. -
Split auto into auto-fill and auto-fit keywords for repeat() notation,
adjusted grammar to guarantee a definite number of repetitions,
and allowed minimum sizes to increase the number of repetitions past one to fulfill the minimum. -
Reduced <auto-repeat> syntax to accept only a single track size, for simplicity.
-
Added information on the speech and navigation impact of reordering with grid placement or order vs. reordering the underlying source.
A partial Disposition of Comments is available.
Appendix A: Translated Layout Algorithm
Note: The following is a more direct translation of the original Microsoft editors’ track sizing algorithm,
from which the current algorithm is derived.
It follows the original algorithm structure
without being as programmatic in its language.
It is preserved here to aid in review of the current specification
(and will be removed in the next revision).
This algorithm is run multiple times,
once for each set of grid items with a particular span count,
and each time it moves through four phases,
each one addressing one combination of min-content or max-content as a min track sizing function or max track sizing function.
Starting from the set of all grid items in the grid,
remove any with a span count greater than one
which span a track with a <flex> max track sizing function.
Of the remaining,
sort them into groups according to their span count,
and order the groups in ascending order of span count.
For each group, in order,
perform the following steps four times:
-
Initialize variables.
Let each item’s needed space be:
- In phase 1
- The min-content size of the item,
minus the sum of the base sizes of the grid tracks it spans. - In phase 2
- The max-content size of the item,
minus the sum of the base sizes of the grid tracks it spans. - In phase 3
- The min-content size of the item,
minus the sum of the growth limits of the grid tracks it spans
(or, if the growth limit is infinite, the base size). - In phase 4
- The max-content size of the item,
minus the sum of the growth limits of the grid tracks it spans
(or, if the growth limit is infinite, the base size).
Let each item’s growable tracks be:
- In phase 1
- The grid tracks it spans with a min-content or max-content min track sizing function.
- In phase 2
- The grid tracks it spans with a max-content min track sizing function.
- In phase 3
- The grid tracks it spans with a min-content or max-content max track sizing function.
- In phase 4
- The grid tracks it spans with a max-content max track sizing function.
Let each item’s overgrowable tracks be:
- In phase 1
- The item’s growable tracks that also have a min-content or max-content max track sizing function.
If there are no such tracks,
then it’s all the growable tracks. - In phase 2
- The item’s growable tracks that also have a max-content max track sizing function.
If there ar eno such tracks,
then it’s all the growable tracks. - In phase 3
- In phase 4
- The item’s growable tracks.
Let each track’s growth delta initially be zero.
-
Calculate growth deltas.
For each grid item in the group:
-
- In phase 1
- In phase 2
- Let each track’s hypothetical size be the track’s base size.
- In phase 3
- In phase 4
- Let each track’s hypothetical size be the track’s growth limit if it’s finite,
or else the track’s base size otherwise.
-
Distribute the item’s needed space as evenly as possible among the hypothetical sizes of the item’s growable tracks,
maxing each out as its hypothetical size reaches its growth limit.- In phase 4
- If the track’s growth limit was changed from infinite to a finite value
in phase 3,
treat its growth limit as infinite for the purposes of this step.
- If all growable tracks reached their growth limit in the previous step
and there is still needed space to distribute,
distribute the leftover space evenly among the hypothetical sizes of the item’s overgrowable tracks. -
- In phase 1
- In phase 2
- For each track,
if the difference between its hypothetical size and its base size is greater than its growth delta,
set its growth delta to that difference. - In phase 3
- In phase 4
- For each track,
if its growth limit is finite,
and the difference between its hypothetical size and its growth limit is greater than its growth delta,
set its growth delta to that difference.
Otherwise, if its growth limit is infinite,
and the difference between its hypothetical size and its base size is greater than its growth delta,
set its growth delta to that difference.
-
-
Adjust each track’s affected size.
- In phase 1
- In phase 2
- For each track,
increase its base size by its growth delta. - In phase 3
- In phase 4
- For each track,
if its growth limit is finite,
increase its growth limit by its growth delta.
Otherwise, if its growth limit is infinite,
set its growth limit to the sum of its base size and its growth delta.
Conformance requirements are expressed with a combination of
descriptive assertions and RFC 2119 terminology. The key words «MUST»,
«MUST NOT», «REQUIRED», «SHALL», «SHALL NOT», «SHOULD», «SHOULD NOT»,
«RECOMMENDED», «MAY», and «OPTIONAL» in the normative parts of this
document are to be interpreted as described in RFC 2119.
However, for readability, these words do not appear in all uppercase
letters in this specification.
All of the text of this specification is normative except sections
explicitly marked as non-normative, examples, and notes. [RFC2119]
Examples in this specification are introduced with the words «for example»
or are set apart from the normative text with class="example",
like this:
Informative notes begin with the word «Note» and are set apart from the
normative text with class="note", like this:
Note, this is an informative note.
Advisements are normative sections styled to evoke special attention and are
set apart from other normative text with <strong class="advisement">, like
this: UAs MUST provide an accessible alternative.
A style sheet is conformant to this specification
if all of its statements that use syntax defined in this module are valid
according to the generic CSS grammar and the individual grammars of each
feature defined in this module.
A renderer is conformant to this specification
if, in addition to interpreting the style sheet as defined by the
appropriate specifications, it supports all the features defined
by this specification by parsing them correctly
and rendering the document accordingly. However, the inability of a
UA to correctly render a document due to limitations of the device
does not make the UA non-conformant. (For example, a UA is not
required to render color on a monochrome monitor.)
An authoring tool is conformant to this specification
if it writes style sheets that are syntactically correct according to the
generic CSS grammar and the individual grammars of each feature in
this module, and meet all other conformance requirements of style sheets
as described in this module.
So that authors can exploit the forward-compatible parsing rules to
assign fallback values, CSS renderers must treat as invalid (and ignore
as appropriate) any at-rules, properties, property values, keywords,
and other syntactic constructs for which they have no usable level of
support. In particular, user agents must not selectively
ignore unsupported component values and honor supported values in a single
multi-value property declaration: if any value is considered invalid
(as unsupported values must be), CSS requires that the entire declaration
be ignored.
To avoid clashes with future CSS features, the CSS2.1 specification
reserves a prefixed
syntax for proprietary and experimental extensions to CSS.
Prior to a specification reaching the Candidate Recommendation stage
in the W3C process, all implementations of a CSS feature are considered
experimental. The CSS Working Group recommends that implementations
use a vendor-prefixed syntax for such features, including those in
W3C Working Drafts. This avoids incompatibilities with future changes
in the draft.
Once a specification reaches the Candidate Recommendation stage,
non-experimental implementations are possible, and implementors should
release an unprefixed implementation of any CR-level feature they
can demonstrate to be correctly implemented according to spec.
To establish and maintain the interoperability of CSS across
implementations, the CSS Working Group requests that non-experimental
CSS renderers submit an implementation report (and, if necessary, the
testcases used for that implementation report) to the W3C before
releasing an unprefixed implementation of any CSS features. Testcases
submitted to W3C are subject to review and correction by the CSS
Working Group.
![]()
CSS Grid
CSS Grid Layout Module (CSS Grid) is one of the most widely used and popular mechanisms which provides flexibility to create/build or design complex, nested, highly professional and two-dimensional system layouts (2D - handles both columns as well as rows).
Welcome
Hi All, I’m Dinanath Jayaswal, Senior UI/Web Developer and Adobe Certified Expert Professional, I wanna welcome you to CSS Grid Tutorial for beginners.
About the Course/Tutorial
This is a comprehensive guide to the CSS Grid Layout Module. This complete guide explains everything about the CSS Grid Layout Module (CSS Grid).
Who is this for?
This Course/Tutorial is ideal for:
- Any Web designer/developer interested in getting a deep understanding of CSS Grid Layout Module (CSS Grid)
- CSS lovers want to acquire knowledge of next/latest CSS level (properties/features)
- Candidates desire to become CSS Expert and better Front End web Developer / Designer
- Web designers/developers who want to improve skills with new web standards
Course/Tutorial achievement
Course/Tutorial Goal
After completing/attending/finishing this Course/Tutorial, participants should be able to:
- Align/arrange elements using modern CSS module, like CSS Grid
- Create Complex grid-based web layouts
- Use the new CSS3 Grid model to create responsive web layouts more effectively!
- Use/Operate CSS Grid confidently to create modern/advanced layouts
- implement complete complex-nested site layouts / create modern grids
Prerequisites for current course / What you need to know
- Basic knowledge of HTML5 and CSS3
Topics included/covered
-
Introduction to CSS Grid
- 1.1. What is CSS Grid
- 1.2. Layout modes
- 1.3. Why CSS Grid?
- 1.4. Browser support
- 1.5. Important Terminology
-
CSS Grid Container Properties
- 2.1. Grid Display
- 2.2. Grid Template Columns
- 2.3. The fr Unit
- 2.4. The repeat() function
- 2.5. Grid Template Rows
- 2.6. Grid Column Gap
- 2.7. Grid Row Gap
- 2.8. Grid Gap
- 2.9. Grid Template Areas
- 2.10. Grid Template
- 2.11. Nested Grid
-
CSS Grid Item Properties
- 3.1. Grid Lines — Columns
- 3.2. Grid Lines — Rows
- 3.3. Grid Lines — Grid Column
- 3.4. Grid Lines — Grid Row
- 3.5. Alignment and Justifying items
-
CSS Grid Practical Demo Examples
- 4.1. Mosaic Layout
- 4.2. Responsive Grid Layout
- 4.3. Create Custom 12 Column Grid Framework
- 4.4. Columner Layout with Auto Flow Dense
- 4.5. Grid Card Layout
- 4.6. Grid Card Nested Layout
-
CSS Grid Resources
1 Introduction to CSS Grid
1.1. What is CSS Grid
CSS Grid is a two-dimensional layout systemcreated specifically to tackle grid-based user interfaces on the webCSS Grid Layout Moduleis a CSS3 layout mode that provides an easy, professional and advanced clean way to arrange child elements/items within a container- CSS Grid is a brand new layout system in CSS! It’s not a framework or library — it’s an addition to the CSS stylesheet language that allows us to quickly
create flexible, two-dimensional layouts(with Columns and Rows) - CSS Grid can be used to
place, size, align, arrange and architect complex layouts/designsthat were previously pretty difficult or even impossible with floats or flexbox - The Grid Layout Working Draft was published back in April 2011, W3C Candidate Recommendation as of 14 December 2017
1.2. Layout modes
Before CSS there were 5 layout modes/models:
Block(for different sections in a webpage)Inline(for text and spans in the same line)Table(for two-dimensional tabular data)Position(for the explicit position of an element)Flexbox(for one-dimensional grid layout)
Pre-CSS Grid we have used:
- Different positional properties like
fixed, absoluteto set alignment at the exact required place Floats and clear fixesto create navigation, detailed section- Fixed heights columns to show equality
- Above mentioned layout modes does not provide enough flexibility to create/build or design professional/nested/modern layouts
- we need to include another CSS mechanism like Floats, Vertical alignment of text/elements and other hacks with Margin, Padding to create the accurate/desired layout
CSS Flexible Box Layout Module (Flexbox), makes it easier to design flexible responsive layout structure without using float or positioning
1.3. Why CSS Grid?
Grid/CSS Grid Layout provides lots of flexibilities while creating complex layouts like:
- CSS Grid is a new way of creating layouts, the first time a proper layout system available natively in the browser with tons of benefits
- Grid is a new CSS display type designed to craft CSS layouts in a much easier way
- No CSS Float used
- Offers ultimate flexibility to create complex layouts without using extra markup or containers or floats
- Helps to create a nested Grid layout and place them on a webpage
- Arrange items from left to right or top to bottom and vice versa
- Adjust the spacing between objects
- Position and alignments of items
- Order and placements of various elements
- Improve the items alignment, directions and order in the container even when they are with dynamic or even unknown size
- Equal height columns
- Ability to modify the width or height of its children to fill the available space in the best possible way on different screen sizes
- Control the position, size, and spacing of child elements relative to parent container and other child elements
- CSS Grid works great responsively (RWD — Responsive Web Design)
- Responsive and Mobile friendly
1.4. Browser support
The CSS Grid properties are supported in all modern browsers:

Image — CSS Grid browser support
1.5. Important Terminology
Let’s learn some of the Important Terminology/concepts related to CSS Grid Layout to get proper understandings and how does it work. Here are the main terms or entities while dealing with CSS Grid:
display:grid(CSS property/style which converts an HTML element to a grid container —display: grid or inline-grid)
Grid Container(Direct Parent/Container to hold sub-items, to the container we applydisplay: grid or inline-gridproperty)Grid Items(Child/sub-items [direct descendants] within Container — All direct children of thegrid containerautomatically becomegrid items)Grid Column(The vertical series-part/portrait lines of the grid, table, chart or spreadsheet. CSS property isgrid-template-columns)Grid Row(The horizontal series-part/landscape lines of the grid, table, chart or spreadsheet. CSS property isgrid-template-rows)Grid Gaps(The spaces (margin or cell-spacing) between each column/row. CSS property isgrid-column-gapandgrid-row-gap)Grid Line(The lines between columns/rows, the dividing lines that make up the structure of the grid. CSS property isgrid-column-start,grid-column-endandgrid-row-start,grid-row-end)Grid Track(A grid track is a space between 2 adjacent grid lines, they are the rows and columns of your grid)Grid Cell(A box/intersection point where the column and row get insects it creates a box/cell like a table cell, A grid cell is the space between 2 adjacent row grid lines and 2 adjacent column grid lines)Grid Area(The total space surrounded by four grid lines, A grid area is made up of 1 or more grid cells, and is bound by 4 grid lines on each side of the grid area. CSS property is grid-item =grid-area, grid-container =grid-template-areas)The fr Unit(The newfr unit (fractional unit)represents a fraction of the available space or free space available in the grid container. Simply available space is nothing but free space so you can also considerfrasfree space. CSS property isgrid-template-columns/rows: 1fr 1fr 1fr)Explicit Column/RowAny Column or Row created as per needs and requirements with propertygrid-template-columnsandgrid-template-rowsrespectively (Explicit = Developer or User defines how many Columns or Rows required)Implicit Column/RowAuto-generated Column/Row.grid-auto-columnsandgrid-auto-rowsproperty used to handle/control/size any auto-generated grid tracks ie. implicit grid (Implicit = Automatically generated Column/Row. [Total Grid Items are 10, we defined 2 columns and 2 Rows withgrid-template-columnsandgrid-template-rowsproperty, so 4 items areExplicitand rest 6 items areImplicit])
To start with CSS Grid just apply a property display type of grid to the parent container/Grid Container (grid container), so Grid Items/child items/elements automatically turn to the grid item.
Syntax & Example:
1.5-grid-container-item.html basic markup
 <div class="main-container">
  <div class="item item-1">item-1</div>
  <div class="item item-2">item-2</div>
  <div class="item item-3">item-3</div>
  <div class="item item-4">item-4</div>
  <div class="item item-5">item-5</div>
  <div class="item item-6">item-6</div>
  <div class="item item-7">item-7</div>
  <div class="item item-8">item-8</div>
  <div class="item item-9">item-9</div>
</div>
Syntax & Example:
1.5-grid-container-item.html default markup and output
<!DOCTYPE html>

<html lang="en">

  <head>
    <meta charset="UTF-8">
    <meta name="viewport" content="width=device-width, initial-scale=1.0">
    <meta http-equiv="X-UA-Compatible" content="ie=edge">
    <title>1.5-grid-container-item.html</title>

    <style type="text/css">

      body {
        margin: 0;
        padding: 0;
        font-family: verdana;
      }

      .main-container {
        border: 4px solid #826a98;
        margin: 0 auto;
      }

      .item {
        color: #ffffff;
        font-size: 1rem;
        padding: 0.75rem;
        text-align: center;
      }

      .main-container div:nth-child(odd) {
        background: #8FBC8E;
      }

      .main-container div:nth-child(even) {
        background: #734F96;
      }

    </style>

  </head>

  <body>

    <div class="main-container">
      <div class="item item-1">item-1</div>
      <div class="item item-2">item-2</div>
      <div class="item item-3">item-3</div>
      <div class="item item-4">item-4</div>
      <div class="item item-5">item-5</div>
      <div class="item item-6">item-6</div>
      <div class="item item-7">item-7</div>
      <div class="item item-8">item-8</div>
      <div class="item item-9">item-9</div>
    </div>

  </body>

</html>

Image — Grid parent container and grid child item markup
Syntax & Example:
1.5-flex-container-item.html display:grid
<style type="text/css">
  .main-container {
    border: 4px solid #826a98;
    margin: 0 auto;

    display: grid; /* block level grid container */
    /* display: inline-grid; */ /* inline grid container */
  }
</style>
2 CSS Grid Container Properties
Let’s look into some of the important properties used with Grid Container:
display- It defines the Grid Container inline or block
- An important and mandatory property to work with CSS Grid
grid-template-columns- Defines/specify grid track list for all the columns in the grid with grid tracks and line names
grid-template-rows- Defines/specify grid track list for all the rows in the grid with grid tracks and line names
grid-template-areas- Defines a grid template by referencing the names of the grid areas which are specified/named with the grid-area property for visualisation of the grid structure
grid-template- Shorthand property for defining/setting a combination of grid-template-columns, grid-template-rows and grid-template-areas
grid-column-gap- The spaces (margin or cell-spacing or gutter) between each column/row, it specifies the size of the grid lines
grid-row-gap- The spaces (margin or cell-spacing or gutter) between each row/column, it specifies the size of the grid lines
grid-gap- Shorthand property for setting grid-row-gap and grid-column-gap in a single declaration
justify-items- Defines alignment of items along the main ie. inline (row) axis (horizontal)
align-items- Defines how grid items layout/laid out with the cross ie. block (column) axis (vertical)
place-items- place-items sets both the align-items (columner or vertical) and justify-items (row or horizontal) properties in a single declaration
justify-content- Defines alignment of items (distributes space between grid items) along the main axis (horizontal)
align-content- Defines alignment of items (distributes space between grid items) along the cross axis (vertical)
place-content- Shorthand CSS property for align-content and justify-content in a single declaration
grid-auto-columns- Specifies the size of any auto-generated grid tracks ie. implicit grid tracks columns
grid-auto-rows- Specifies the size of any auto-generated grid tracks ie. implicit grid tracks rows
grid-auto-flow- Controls/adjust how the automatic placement of grid items work when they are not explicitly positioned with any grid-placement properties
grid- Shorthand for setting properties like: grid-template-rows, grid-template-columns, grid-template-areas, grid-auto-rows, grid-auto-columns, and grid-auto-flow in a single declaration
2.1. Grid Display
- To create a grid container, we set the value of the container’s
displayproperty togridorinline-grid - It creates/builds a
grid formatting contextfor its content. It only applies to direct child elements and does not extend to grandchild elements and beyond
display property creates either a block-level or inline-level grid container:
display: grid;- block level grid, covers 100% width
display: inline-grid;- inline-level, same line grid, covers only required width as per items width
- syntax:
.container {
  /* display: grid; */ /* block level grid container */
  /* display: inline-grid; */ /* inline grid container */

  display : grid | inline-grid;
}
Syntax & Example:
2.1-grid-display.html, display: grid; /* block level grid container */
<!DOCTYPE html>

<html lang="en">

  <head>
    <meta charset="UTF-8">
    <meta name="viewport" content="width=device-width, initial-scale=1.0">
    <meta http-equiv="X-UA-Compatible" content="ie=edge">
    <title>2.1-grid-display</title>

    <style type="text/css">

      body {
        margin: 0;
        padding: 0;
        font-family: verdana;
      }

      .main-container {
        border: 4px solid #826a98;
        margin: 0 auto;

        display: grid; /* block level grid container */
        /* display: inline-grid; */ /* inline grid container */
      }

      .item {
        color: #ffffff;
        font-size: 1rem;
        padding: 0.75rem;
        text-align: center;
      }

      .main-container div:nth-child(odd) {
        background: #8FBC8E;
      }

      .main-container div:nth-child(even) {
        background: #734F96;
      }
    </style>

  </head>

  <body>

    <div class="main-container">
      <div class="item item-1">item-1</div>
      <div class="item item-2">item-2</div>
      <div class="item item-3">item-3</div>
      <div class="item item-4">item-4</div>
      <div class="item item-5">item-5</div>
      <div class="item item-6">item-6</div>
      <div class="item item-7">item-7</div>
      <div class="item item-8">item-8</div>
      <div class="item item-9">item-9</div>
      <!-- <div class="item item-10">item-10</div> -->
    </div>

  </body>

</html>

Image — display: grid;
Syntax & Example:
2.1-grid-display.html, display: inline-grid; /* inline grid container */
.main-container {
  border: 4px solid #826a98;
  margin: 0 auto;

  /* display: grid; */ /* block level grid container */
  display: inline-grid; /* inline grid container */
}

Image — display: inline-grid;
2.2. Grid Template Columns
2.2. grid-template-columns
- The vertical series-part/portrait lines of the grid, table, chart or spreadsheet are known/called as
columns. CSS property to create columns isgrid-template-columns grid-template-columnsproperty defines the columns of the grid with a space-separated list of values. The values represent the track size, and the space between them represents the grid line- It simply defines/specify number of columns in grid layout (how many columns we want in the grid) with grid track list for all the columns in the grid with grid tracks and line names
- syntax:
.container {
  /*grid-template-columns: <track-size> | <line-name> <track-size>; */

  /* grid-template-columns: 150px 350px 480px; */ /* 3 columns in grid with different width - in pixel */
  /* grid-template-columns: 15% 35% 48%; */ /* width - in percentage */
  grid-template-columns: 150px 35% auto; /* width - in combination of pixel, percentage and auto/available space */
}
Syntax & Example:
2.2-grid-template-columns-width-px-auto.html
<!DOCTYPE html>

<html lang="en">

  <head>
    <meta charset="UTF-8">
    <meta name="viewport" content="width=device-width, initial-scale=1.0">
    <meta http-equiv="X-UA-Compatible" content="ie=edge">
    <title>2.2-grid-template-columns-width-px-auto.html</title>

    <style type="text/css">

      body {
        margin: 0;
        padding: 0;
        font-family: verdana;
      }

      .main-container {
        border: 4px solid #826a98;
        width: 1000px;
        margin: 0 auto;

        display: grid; /* block level grid container */
        /* display: inline-grid; */ /* inline level grid container */

        /* grid-template-columns: 150px 350px 500px; */ /* 3 columns grid with different width - in pixel */
        /* grid-template-columns: 15% 35% 50%; */ /* width - in percentage */
        grid-template-columns: 150px 35% auto; /* width - in combination of pixel, percentage and auto */
      }

      .item {
        color: #ffffff;
        font-size: 1rem;
        padding: 0.75rem;
        text-align: center;
      }

      .main-container div:nth-child(odd) {
        background: #8FBC8E;
      }

      .main-container div:nth-child(even) {
        background: #734F96;
      }

    </style>

  </head>

  <body>

    <div class="main-container">
      <div class="item item-1">item-1</div>
      <div class="item item-2">item-2</div>
      <div class="item item-3">item-3</div>
      <div class="item item-4">item-4</div>
      <div class="item item-5">item-5</div>
      <div class="item item-6">item-6</div>
      <div class="item item-7">item-7</div>
      <div class="item item-8">item-8</div>
      <div class="item item-9">item-9</div>
      <!-- <div class="item item-10">item-10</div> -->
    </div>

  </body>

</html>

Image — grid-template-columns: 150px 350px 500px; /* 3 columns in grid with different width — in pixel */

Image — grid-template-columns: 15% 35% 50%; /* width — in percentage */

Image — grid-template-columns: 150px 35% auto; /* width — in combination of pixel, percentage and auto */
2.3. The fr Unit
2.3. The fr fractional Unit
- When sizing rows and columns, one can use different CSS lengths like px, % percentage, rem, auto (like 250px or 20%) and perhaps the most useful and important one is
frie. thefractional units frie. thefractional unitsis a flexible length, declared using thefr, which takes up a share of the remaining free space in proportion to its flex factor- The new
fr Unitrepresents a fraction of the available space in the grid container - Example: Given a grid container of
1000px with 3 columnsof200px, 2fr and 3frrespectively. The flexibly sized columns will take up the remaining800pxin the ratio of2:3(remaining 800px divided into 5 equal parts of 160px each), so the second column takes up 320px and the third column takes up 480px - CSS property is
grid-template-columns/rows: 1fr 1fr 1fr) - syntax:
.container {
  /*grid-template-columns: <track-size> | <line-name> <track-size>; */

  grid-template-columns: 200px 2fr 3fr; /* fr/fraction = proportionate size/space ie. 200px 320px 48px */
  /* grid-template-columns: 1fr 200px; */ /* fr/fraction = proportionate size/space ie. 88px 200px */
}
Syntax & Example:
2.3-grid-template-columns-width-fr-fraction-unit.html
<!DOCTYPE html>

<html lang="en">

  <head>
    <meta charset="UTF-8">
    <meta name="viewport" content="width=device-width, initial-scale=1.0">
    <meta http-equiv="X-UA-Compatible" content="ie=edge">
    <title>2.3-grid-template-columns-width-fr-fraction-unit.html</title>

    <style type="text/css">

      body {
        margin: 0;
        padding: 0;
        font-family: verdana;
      }

      .main-container {
        border: 4px solid #826a98;
        width: 1000px;
        margin: 0 auto;

        display: grid; /* block level grid container */
        /* display: inline-grid; */ /* inline level grid container */

        grid-template-columns: 200px 2fr 3fr; /* fr/fraction = proportionate size/space ie. 200px 320px 48px */
        /* grid-template-columns: 1fr 200px; */ /* fr/fraction = proportionate size/space ie. 800px 200px */
      }

      .item {
        color: #ffffff;
        font-size: 1rem;
        padding: 0.75rem;
        text-align: center;
      }

      .main-container div:nth-child(odd) {
        background: #8FBC8E;
      }

      .main-container div:nth-child(even) {
        background: #734F96;
      }

    </style>

  </head>

  <body>

    <div class="main-container">
      <div class="item item-1">item-1</div>
      <div class="item item-2">item-2</div>
      <div class="item item-3">item-3</div>
      <div class="item item-4">item-4</div>
      <div class="item item-5">item-5</div>
      <div class="item item-6">item-6</div>
      <div class="item item-7">item-7</div>
      <div class="item item-8">item-8</div>
      <div class="item item-9">item-9</div>
      <!-- <div class="item item-10">item-10</div> -->
    </div>

  </body>

</html>

Image — grid-template-columns: 200px 2fr 3fr; /* fr/fraction = proportionate size/space ie. 200px 320px 48px */

Image — grid-template-columns: 1fr 200px; /* fr/fraction = proportionate size/space ie. 800px 200px */
2.4. The repeat function
2.4. The repeat() function
- The
repeat() functionallows us to repeat/iterate something (columns or rows) n number of times - We can use the
repeat() notationto define repeating parts while declaring columns or rows and save some typing - CSS property is
grid-template-columns/rows: repeat(2, 1fr)) - syntax:
.container {
  /*grid-template-columns: <track-size> | <line-name> <track-size>; */

  grid-template-columns: repeat(2, 1fr); /* 2 columns of 1fr each of equal width */
}
Syntax & Example:
2.4.1-grid-template-columns-repeat.html
<!DOCTYPE html>

<html lang="en">

  <head>
    <meta charset="UTF-8">
    <meta name="viewport" content="width=device-width, initial-scale=1.0">
    <meta http-equiv="X-UA-Compatible" content="ie=edge">
    <title>2.4.1-grid-template-columns-repeat.html</title>

    <style type="text/css">

      body {
        margin: 0;
        padding: 0;
        font-family: verdana;
      }

      .main-container {
        border: 4px solid #826a98;
        width: 1000px;
        margin: 0 auto;

        display: grid; /* block level grid container */
       /* display: inline-grid; */ /* inline level grid container */

        grid-template-columns: repeat(2, 1fr); /* 2 columns of 1fr each of equal width */
      }

      .item {
        color: #ffffff;
        font-size: 1rem;
        padding: 0.75rem;
        text-align: center;
      }

      .main-container div:nth-child(odd) {
        background: #8FBC8E;
      }

      .main-container div:nth-child(even) {
        background: #734F96;
      }

    </style>

  </head>

  <body>

    <div class="main-container">
      <div class="item item-1">item-1</div>
      <div class="item item-2">item-2</div>
      <div class="item item-3">item-3</div>
      <div class="item item-4">item-4</div>
      <div class="item item-5">item-5</div>
      <div class="item item-6">item-6</div>
      <div class="item item-7">item-7</div>
      <div class="item item-8">item-8</div>
      <div class="item item-9">item-9</div>
      <div class="item item-10">item-10</div>
    </div>

  </body>

</html>
; /* 2 columns of 1fr each of equal width */")
Image — grid-template-columns: repeat(2, 1fr); /* 2 columns of 1fr each of equal width */
Syntax & Example:
2.4.2-grid-template-columns-repeat.html
<!DOCTYPE html>

<html lang="en">

  <head>
    <meta charset="UTF-8">
    <meta name="viewport" content="width=device-width, initial-scale=1.0">
    <meta http-equiv="X-UA-Compatible" content="ie=edge">
    <title>2.4.2-grid-template-columns-repeat.html</title>

    <style type="text/css">

      body {
        margin: 0;
        padding: 0;
        font-family: verdana;
      }

      .main-container {
        border: 4px solid #826a98;
        width: 1000px;
        margin: 0 auto;

        display: grid; /* block level grid container */
        /* display: inline-grid; */ /* inline level grid container */

        grid-template-columns: repeat(1, 1fr 2fr 1fr); /* repeate 3 columns 1 time and create 3 columns of different width */

        /* grid-template-columns: repeat(6, 1fr 2fr); */ /* repeate 2 columns 6 times = create 12 columns of different width */
      }

      .item {
        color: #ffffff;
        font-size: 1rem;
        padding: 0.75rem;
        text-align: center;
      }

      .main-container div:nth-child(odd) {
        background: #8FBC8E;
      }

      .main-container div:nth-child(even) {
        background: #734F96;
      }

    </style>

  </head>

  <body>

    <div class="main-container">
      <div class="item item-1">item-1</div>
      <div class="item item-2">item-2</div>
      <div class="item item-3">item-3</div>
      <div class="item item-4">item-4</div>
      <div class="item item-5">item-5</div>
      <div class="item item-6">item-6</div>
      <div class="item item-7">item-7</div>
      <div class="item item-8">item-8</div>
      <div class="item item-9">item-9</div>
      <div class="item item-10">item-10</div>
      <div class="item item-11">item-11</div>
      <div class="item item-12">item-12</div>
    </div>

  </body>

</html>
; /* repeate 3 columns 1 time and create 3 columns of different width")
Image — grid-template-columns: repeat(1, 1fr 2fr 1fr); /* repeate 3 columns 1 time and create 3 columns of different width */
; /* repeate 2 columns 6 times = create 12 columns of different width */")
Image — grid-template-columns: repeat(6, 1fr 2fr); /* repeate 2 columns 6 times = create 12 columns of different width */
2.5. Grid Template Rows
2.5. grid-template-rows
- The horizontal series-part/landscape lines of the grid, table, chart or spreadsheet are known/called as
rows. CSS property to create rows isgrid-template-rows grid-template-rowsproperty defines the rows of the grid with a space-separated list of values. The values represent the track size (height), and the space between them represents the grid line- It simply defines/specifies the height of each row present in grid layout container ie.
explicit grid tracks rows - Grid rows are calculated and created automatically (as it depends on two things: the number of columns defined and the total number of grid items ie. content present)
- Row height is fully dependent on text matter/content available inside the grid item. By default min-height of a row is equivalent to the height of text contents
grid-auto-rowsproperty helps to define/specify and set the height of all rows inside grid container (Specifies the size of any auto-generated grid tracks ie.implicit grid tracks rows)minmax(minHight, maxHight)function is also used to set default minimum default height and specify maximum height if content expanded/enlarged. example:minmax(50px, auto)- syntax:
.container {
  /*grid-template-rows: <track-size> | <line-name> <track-size>; */

  grid-template-rows: 100px 300px 100px; /* defines the height of each row - in pixel */
  /* grid-template-rows: 20% 60% 20%; */ /* height of each row - in percentage */
  /* grid-template-rows: auto auto auto; */ /* height of each row - in combination of pixel, percentage and auto */
  /* grid-template-rows: 1fr 2fr 1fr; */ /* height of each row - in fr fractional unit */
}
Syntax & Example:
2.5.1-grid-template-rows-height-px-auto-fr-fraction-unit.html
<!DOCTYPE html>

<html lang="en">

  <head>
    <meta charset="UTF-8">
    <meta name="viewport" content="width=device-width, initial-scale=1.0">
    <meta http-equiv="X-UA-Compatible" content="ie=edge">
    <title>2.5.1-grid-template-rows-px-auto.html</title>

    <style type="text/css">

      body {
        margin: 0;
        padding: 0;
        font-family: verdana;
      }

      .main-container {
        border: 4px solid #826a98;
        width: 1000px;
        margin: 0 auto;

        height: 500px;

        display: grid; /* block level grid container */
        /* display: inline-grid; */ /* inline level grid container */

        grid-template-columns: 150px 35% auto;

        grid-template-rows: 100px 300px 100px; /* defines the height of each row - in pixel */
        /* grid-template-rows: 20% 60% 20%; */ /* height of each row - in percentage */
        /* grid-template-rows: auto auto auto; */ /* height of each row - in combination of pixel, percentage and auto */
        /* grid-template-rows: 1fr 2fr 1fr; */ /* height of each row - in fr fractional unit */
      }

      .item {
        color: #000;
        font-size: 1rem;
        padding: 0.75rem;
        text-align: center;
      }

      .main-container div:nth-child(odd) {
        background: #8FBC8E;
      }

      .main-container div:nth-child(even) {
        background: #734F96;
      }

    </style>

  </head>

  <body>

    <div class="main-container">
      <div class="item item-1">item-1: Row height is by default depends on content</div>
      <div class="item item-2">item-2</div>
      <div class="item item-3">item-3</div>
      <div class="item item-4">item-4</div>
      <div class="item item-5">item-5</div>
      <div class="item item-6">item-6: Row height is by default depends on content 1 , Row height is by default depends on content 2 , Row height is by default depends on content 3, Row height is by default depends on content 4 , Row height is by default depends on content 5 , Row height is by default depends on content 6 , Row height is by default depends on content 7, Row height is by default depends on content 8</div>
      <div class="item item-7">item-7</div>
      <div class="item item-8">item-8: Row height is by default depends on content 1 , Row height is by default depends on content 2 , Row height is by default depends on content 3, Row height is by default depends on content 4 </div>
      <div class="item item-9">item-9</div>
      <!-- <div class="item item-10">item-10</div> -->
    </div>

  </body>

</html>

Image — grid-template-rows: 100px 300px 100px; /* defines the height of each row — in pixel */

Image — /* grid-template-rows: 20% 60% 20%; */ /* height of each row — in percentage */

Image — /* grid-template-rows: auto auto auto; */ /* height of each row — in combination of pixel, percentage and auto */

Image — /* grid-template-rows: 1fr 2fr 1fr; */ /* height of each row — in fr fractional unit */
Syntax & Example:
2.5.2-grid-template-rows-height-minmax.html
<!DOCTYPE html>

<html lang="en">

  <head>
    <meta charset="UTF-8">
    <meta name="viewport" content="width=device-width, initial-scale=1.0">
    <meta http-equiv="X-UA-Compatible" content="ie=edge">
    <title>2.5.2-grid-template-rows-height-minmax.html</title>

    <style type="text/css">

      body {
        margin: 0;
        padding: 0;
        font-family: verdana;
      }

      .main-container {
        border: 4px solid #826a98;
        width: 1000px;
        margin: 0 auto;

        display: grid; /* block level grid container */
        /* display: inline-grid; */ /* inline level grid container */

        grid-template-columns: 150px 35% auto;
        grid-template-rows: repeat(3, minmax(50px, auto)); /* repeat the rows with minimum height of 50px and maximum auto */
      }

      .item {
        color: #000;
        font-size: 1rem;
        padding: 0.75rem;
        text-align: center;
      }

      .main-container div:nth-child(odd) {
        background: #8FBC8E;
      }

      .main-container div:nth-child(even) {
        background: #734F96;
      }

    </style>

  </head>

  <body>

    <div class="main-container">
      <div class="item item-1">item-1</div>
      <div class="item item-2">item-2</div>
      <div class="item item-3">item-3</div>
      <div class="item item-4">item-4</div>
      <div class="item item-5">item-5</div>
      <div class="item item-6">item-6: Row height is by default depends on content 1 , Row height is by default depends on content 2 , Row height is by default depends on content 3, Row height is by default depends on content 4 , Row height is by default depends on content 5 , Row height is by default depends on content 6 , Row height is by default depends on content 7, Row height is by default depends on content 8</div>
      <div class="item item-7">item-7</div>
      <div class="item item-8">item-8</div>
      <div class="item item-9">item-9</div>
      <!-- <div class="item item-10">item-10</div> -->
    </div>

  </body>

</html>
); /* repeat the rows with minimum height of 50px and maximum auto */")
Image — grid-template-rows: repeat(3, minmax(50px, auto)); /* repeat the rows with minimum height of 50px and maximum auto */
2.6. Grid Column Gap
- The spaces (margin or cell-spacing or gutter) between each column, it specifies the size of the grid lines. We can think of it like setting the width of the gutters/margin/spacing between the columns
Note: When we apply Margin to grid item/child it by default applies to all sides as well as outside of grid item/child so eventually to grid container — to avoid this unwanted gaps we must use and apply
grid-column-gap or grid-row-gap or grid-gapproperty
- syntax:
.container {
  grid-column-gap: <line-size>;

  grid-column-gap: 10px;
}
Syntax & Example:
2.6-grid-column-gap.html
<!DOCTYPE html>

<html lang="en">

  <head>
    <meta charset="UTF-8">
    <meta name="viewport" content="width=device-width, initial-scale=1.0">
    <meta http-equiv="X-UA-Compatible" content="ie=edge">
    <title>2.6-grid-column-gap.html</title>

    <style type="text/css">

      body {
        margin: 0;
        padding: 0;
        font-family: verdana;
      }

      .main-container {
        border: 4px solid #826a98;
        width: 1000px;
        margin: 0 auto;

        display: grid; /* block level grid container */
       /* display: inline-grid; */ /* inline level grid container */

        grid-column-gap: 10px;
        /* grid-row-gap: 10px; */
        /* grid-gap: 10px; */

        grid-template-columns: 150px 35% auto; /* width - in combination of pixel, percentage and auto */
      }

      .item {
        color: #ffffff;
        font-size: 1rem;
        padding: 0.75rem;
        text-align: center;
      }

      .main-container div:nth-child(odd) {
        background: #8FBC8E;
      }

      .main-container div:nth-child(even) {
        background: #734F96;
      }

    </style>

  </head>

  <body>

    <div class="main-container">
      <div class="item item-1">item-1</div>
      <div class="item item-2">item-2</div>
      <div class="item item-3">item-3</div>
      <div class="item item-4">item-4</div>
      <div class="item item-5">item-5</div>
      <div class="item item-6">item-6</div>
      <div class="item item-7">item-7</div>
      <div class="item item-8">item-8</div>
      <div class="item item-9">item-9</div>
      <!-- <div class="item item-10">item-10</div> -->
    </div>

  </body>

</html>

Image — grid-column-gap: 10px;
2.7. Grid Row Gap
- The spaces (margin or cell-spacing or gutter) between each row, it specifies the size of the grid lines. We can think of it like setting the width of the gutters/margin/spacing between the rows
- syntax:
.container {
  grid-row-gap: <line-size>;

  grid-row-gap: 10px;
}
Syntax & Example:
2.7-grid-row-gap.html
<!DOCTYPE html>

<html lang="en">

  <head>
    <meta charset="UTF-8">
    <meta name="viewport" content="width=device-width, initial-scale=1.0">
    <meta http-equiv="X-UA-Compatible" content="ie=edge">
    <title>2.7-grid-row-gap</title>

    <style type="text/css">

      body {
        margin: 0;
        padding: 0;
        font-family: verdana;
      }

      .main-container {
        border: 4px solid #826a98;
        width: 1000px;
        margin: 0 auto;

        display: grid; /* block level grid container */
       /* display: inline-grid; */ /* inline level grid container */

        /* grid-column-gap: 10px; */
        grid-row-gap: 10px;
        /* grid-gap: 10px; */

        grid-template-columns: 150px 35% auto; /* width - in combination of pixel, percentage and auto */

        grid-template-rows: 100px 70px 100px; /* row height in pixel */
      }

      .item {
        color: #ffffff;
        font-size: 1rem;
        padding: 0.75rem;
        text-align: center;
      }

      .main-container div:nth-child(odd) {
        background: #8FBC8E;
      }

      .main-container div:nth-child(even) {
        background: #734F96;
      }

    </style>

  </head>

  <body>

    <div class="main-container">
      <div class="item item-1">item-1</div>
      <div class="item item-2">item-2</div>
      <div class="item item-3">item-3</div>
      <div class="item item-4">item-4</div>
      <div class="item item-5">item-5</div>
      <div class="item item-6">item-6</div>
      <div class="item item-7">item-7</div>
      <div class="item item-8">item-8</div>
      <div class="item item-9">item-9</div>
      <!-- <div class="item item-10">item-10</div> -->
    </div>

  </body>

</html>

Image — grid-row-gap: 10px;
2.8. Grid Gap
- A shorthand property for setting grid-row-gap and grid-column-gap in a single declaration. We can think of it like setting the width of the gutters/margin/spacing between the columns/rows
- syntax:
.container {
  grid-gap: <grid-row-gap> <grid-column-gap>;

  /* grid-column-gap: 10px;
  grid-row-gap: 10px; */

  /* grid-gap: 20px; */ /* single value for both row as well column gap */
  grid-gap: 20px 10px;
}
Syntax & Example:
2.8-grid-gap.html
<!DOCTYPE html>

<html lang="en">

  <head>
    <meta charset="UTF-8">
    <meta name="viewport" content="width=device-width, initial-scale=1.0">
    <meta http-equiv="X-UA-Compatible" content="ie=edge">
    <title>2.8-grid-gap.html</title>

    <style type="text/css">

      body {
        margin: 0;
        padding: 0;
        font-family: verdana;
      }

      .main-container {
        border: 4px solid #826a98;
        width: 1000px;
        margin: 0 auto;

        display: grid; /* block level grid container */
       /* display: inline-grid; */ /* inline level grid container */

        grid-column-gap: 10px;
        /* grid-row-gap: 10px; */

        /* grid-gap: 20px; */ /* single value for both row as well column gap */
        grid-gap: 20px 10px;

        grid-template-columns: 150px 35% auto; /* width - in combination of pixel, percentage and auto */

        grid-template-rows: 100px 70px 100px; /* row height in pixel */
      }

      .item {
        color: #ffffff;
        font-size: 1rem;
        padding: 0.75rem;
        text-align: center;
      }

      .main-container div:nth-child(odd) {
        background: #8FBC8E;
      }

      .main-container div:nth-child(even) {
        background: #734F96;
      }

    </style>

  </head>

  <body>

    <div class="main-container">
      <div class="item item-1">item-1</div>
      <div class="item item-2">item-2</div>
      <div class="item item-3">item-3</div>
      <div class="item item-4">item-4</div>
      <div class="item item-5">item-5</div>
      <div class="item item-6">item-6</div>
      <div class="item item-7">item-7</div>
      <div class="item item-8">item-8</div>
      <div class="item item-9">item-9</div>
      <!-- <div class="item item-10">item-10</div> -->
    </div>

  </body>

</html>

Image — /* grid-gap: 20px; */ /* single value for both row as well column gap */
grid-gap: 20px 10px;
2.9. Grid Template Areas
- Defines a grid template by referencing the names of the grid areas which are specified/named with the
grid-areaproperty for visualisation of the grid structure - This property defines
named grid areasand provides a visualisation of the grid structure, which may help and significantly make underlying code easier to understand - Repeating the name of a grid area causes the content to span those cells. A period signifies an empty cell
- syntax:
.container {

  grid-template-areas:
    "<grid-area-name> | . | none | ..."
    "...";

  - <grid-area-name> - the name of a grid area specified with grid-area
  - . - a period signifies an empty grid cell
  - none - no grid areas are defined
}
Syntax & Example:
2.9.1-grid-template-area-web-layout.html
<!DOCTYPE html>

<html lang="en">

  <head>
    <meta charset="UTF-8">
    <meta name="viewport" content="width=device-width, initial-scale=1.0">
    <meta http-equiv="X-UA-Compatible" content="ie=edge">
    <title>2.9.1-grid-template-area-web-layout.html</title>

    <style type="text/css">

      body {
        margin: 0;
        padding: 0;
        font-family: verdana;

        color: #ffffff;
        font-size: 1rem;
        text-align: center;
      }

      .main-container {
        width: 980px;
        margin: 0 auto;

        display: grid; /* block level grid container */
        grid-template-columns: repeat(4, 1fr);
        grid-template-rows: auto;
        grid-gap: 20px;

        grid-template-areas:
          "headerArea headerArea headerArea headerArea"
          "mainArea mainArea asideArea asideArea"
          "mainArea mainArea navArea navArea"
          "sectionArea sectionArea sectionArea sectionArea"
          "footerArea footerArea footerArea footerArea";
      }

      .main-container > * {
        background-color: #00bcd4;
        padding: 20px;
      }

      .header-section {
        grid-area: headerArea;
        background-color: #0199ad;
      }

      .main-section {
        grid-area: mainArea;
      }

      .section {
        grid-area: sectionArea;
      }

      .aside-section {
        grid-area: asideArea;
      }

      .nav-section {
        grid-area: navArea;
      }

      .footer-section {
        grid-area: footerArea;
        background-color: #0199ad;
      }
    </style>

  </head>

  <body>

    <div class="main-container">
      <header class="header-section"><h1>Header Section</h1></header>
      <main class="main-section">Main Section</main>
      <section class="section">Section Section</section>
      <aside class="aside-section">Aside Section</aside>
      <nav class="nav-section">Nav Section</nav>
      <footer class="footer-section"><small>Footer Section</small></footer>
    </div>

  </body>

</html>

Image — grid-template-areas and grid-area
Syntax & Example:
2.9.2-grid-template-area-web-layout.html
.main-container {
  width: 980px;
  margin: 0 auto;

  display: grid; /* block level grid container */
  grid-template-columns: repeat(4, 1fr);
  grid-auto-rows: minmax(80px, auto);
  grid-gap: 20px;

  grid-template-areas:
    "headerArea headerArea headerArea headerArea"
    "asideArea asideArea mainArea mainArea "
    "navArea navArea mainArea mainArea "
    "sectionArea sectionArea sectionArea sectionArea"
    "sectionArea sectionArea sectionArea sectionArea"
    "footerArea footerArea footerArea footerArea";
}

Image — grid-template-areas and grid-area
Syntax & Example:
2.9.3-grid-template-area-web-layout-empty-cell-area.html
.main-container {
  width: 980px;
  margin: 0 auto;

  display: grid; /* block level grid container */
  grid-template-columns: repeat(4, 1fr);
  grid-auto-rows: minmax(80px, auto);
  grid-gap: 20px;

  grid-template-areas:
    "headerArea headerArea headerArea headerArea"
    "asideArea . mainArea mainArea "
    ". . mainArea mainArea "
    "navArea . sectionArea sectionArea"
    ". . sectionArea sectionArea"
    "footerArea footerArea footerArea footerArea";
}
")
Image — grid-template-areas and grid-area with dot (an empty cell/area)
")
Image — grid-template-areas and grid-area with dot (an empty cell/area)
2.10. Grid Template
- A shorthand property for defining/setting a combination of grid-template-columns, grid-template-rows and *grid-template-areas
grid-templateproperty is a shorthand for setting properties likegrid-template-rows,grid-template-columns, andgrid-template-areasin a single declaration- syntax:
.container {

  grid-template: none | <grid-template-rows> / <grid-template-columns> | <grid-template-areas>;

  - none - sets all three properties to their initial values
}
2.11. Nested Grid
Syntax & Example:
2.11-nested-grid-template.html
<!DOCTYPE html>

<html lang="en">

  <head>
    <meta charset="UTF-8">
    <meta name="viewport" content="width=device-width, initial-scale=1.0">
    <meta http-equiv="X-UA-Compatible" content="ie=edge">
    <title>2.11-nested-grid-template.html</title>

    <style type="text/css">

      body {
        margin: 0;
        padding: 0;
        font-family: verdana;

        color: #000000;
        font-size: 1rem;
        text-align: center;
      }

      .main-container {
        width: 980px;
        margin: 0 auto;

        display: grid; /* block level grid container */
        grid-template-columns: repeat(4, 1fr);
        grid-template-rows: auto;
        grid-gap: 20px;

        grid-template-areas:
          "headerArea headerArea headerArea headerArea"
          "mainArea mainArea asideArea asideArea"
          "mainArea mainArea navArea navArea"
          "sectionArea sectionArea sectionArea sectionArea"
          "footerArea footerArea footerArea footerArea";
      }

      .main-container > * {
        background-color: #e6ba6c;
        padding: 20px;
      }

      .header-section {
        grid-area: headerArea;
        background-color: #bd7b04;
      }

      .main-section {
        grid-area: mainArea;
      }

      .section {
        grid-area: sectionArea;
      }

      .aside-section {
        grid-area: asideArea;
      }

      .nav-section {
        grid-area: navArea;
      }

      .footer-section {
        grid-area: footerArea;
        background-color: #bd7b04;
      }

      .nested-grid-container {
        margin-top: 20px;
        display: grid;
        grid-template-columns: 1fr 1fr 1fr 1fr;
        grid-template-rows: 150px;
        grid-gap:10px;
      }

      .nested-grid-container article{
        background-color: #bb8b34;
        padding:10px;
      }

    </style>

  </head>

  <body>

    <div class="main-container">
      <header class="header-section"><h1>Header Section</h1></header>

      <main class="main-section">
        <strong>Main Section with Nested Sub Section</strong>

        <section class="nested-grid-container">
          <article class="article1">Article 1</article>
          <article class="article2">Article 2</article>
          <article class="article3">Article 3</article>
          <article class="article4">Article 4</article>
        </section>

      </main>

      <section class="section">Section Section</section>
      <aside class="aside-section">Aside Section</aside>
      <nav class="nav-section">Nav Section</nav>
      <footer class="footer-section"><small>Footer Section</small></footer>
    </div>

  </body>

</html>

Image — Netsted grid template web layout
.nested-grid-container {
  margin-top: 20px;
  display: grid;
  /*  grid-template-columns: 1fr 1fr 1fr 1fr;
  grid-template-rows: 150px; */
  grid-gap:10px;

  /* */
  grid-template-columns: 1fr 1fr;
  grid-template-rows: auto 150px;
}

Image — Netsted grid template web layout
.nested-grid-container {
  margin-top: 20px;
  display: grid;
  /*  grid-template-columns: 1fr 1fr 1fr 1fr;
  grid-template-rows: 150px; */
  grid-gap:10px;

  /* */
  /* grid-template-columns: 1fr 1fr;
  grid-template-rows: auto 150px; */

  /* */
  grid-template-columns: 1fr 1fr;
}

Image — Netsted grid template web layout
3 CSS Grid Item Properties
Let us look into the some of the important properties used with and applicable to Grid Item or Child Elements (usually known as Items, present inside Grid container):
grid-column-start- Determines/indicates the column grid line where the grid item starts
- Specifies a grid item’s start position/location within the grid column
grid-column-end- Determines/indicates the column grid line where the grid item ends
- Specifies a grid item’s end position/location within the grid column
grid-row-start- Determines/indicates the row grid line where the grid item starts
- Specifies a grid item’s start position/location within the grid row
grid-row-end- Determines/indicates the row grid line where the grid item ends
- Specifies a grid item’s end position/location within the grid row
grid-column- Shorthand property that sets the start line and end line grid-column-start and grid-column-end for the respective dimensions in the same declaration
grid-row- Shorthand property that sets the start line and end line grid-row-start and grid-row-end for the respective dimensions in the same declaration
grid-area- Gives an item a name so that it can be referenced by a template created with the containers grid-template-areas property
- Alternatively its shorthand property for grid-row-start, grid-column-start, grid-row-end and grid-column-end
justify-self- Aligns a grid item inside a cell along the inline (row) axis, this value applies to a grid item inside a single cell
align-self- Aligns a grid item inside a cell along the block (column), this value applies to the content inside a single grid item
place-self- Shorthand property sets both the align-self and justify-self properties
3.1. Grid Lines Columns
3.1. Grid Lines — Columns grid-column-start & grid-column-end
grid-column-start- Determines/indicates the column grid line where the grid item starts
- Specifies a grid item’s start position/location within the grid column
grid-column-end- Determines/indicates the column grid line where the grid item ends
- Specifies a grid item’s end position/location within the grid column
- syntax:
.grid-item {
  grid-column-start: <number> | <name> | span <number> | span <name> | auto;
  grid-column-end: <number> | <name> | span <number> | span <name> | auto;

  grid-column-start: 1;
  grid-column-end: 3;
}
Syntax & Example:
3.1.1-grid-lines-grid-column-start-end-web-layout.html
<!DOCTYPE html>

<html lang="en">

  <head>
    <meta charset="UTF-8">
    <meta name="viewport" content="width=device-width, initial-scale=1.0">
    <meta http-equiv="X-UA-Compatible" content="ie=edge">
    <title>3.1.1-grid-lines-grid-column-start-end-web-layout.html</title>

    <style type="text/css">

      body {
        margin: 0;
        padding: 0;
        font-family: verdana;

        color: #ffffff;
        font-size: 1rem;
        text-align: center;
      }

      .main-container {
        width: 980px;
        margin: 0 auto;

        display: grid; /* block level grid container */
        grid-template-columns: repeat(6, 1fr);
        grid-template-rows: repeat(4, minmax(70px, auto));
        grid-gap: 20px;
      }

      .main-container > * {
        background-color: #ff7f50;
        padding: 20px;
      }

      .header-section {
        background-color: #e03f00;
        grid-column-start: 1;
        grid-column-end: 7;
      }

      .main-section {
        grid-column-start: 1;
        grid-column-end: 5;
      }

      .aside-section {
        grid-column-start: 5;
        grid-column-end: 7;
      }

      .nav-section {
        grid-column-start: 1;
        grid-column-end: 3;
      }

      .section {
        grid-column-start: 3;
        grid-column-end: 7;
      }

      .footer-section {
        background-color: #e03f00;
        grid-column-start: 1;
        grid-column-end: 7;
      }
    </style>

  </head>

  <body>

    <div class="main-container">
      <header class="header-section"><h1>Header Section</h1></header>
      <main class="main-section">Main Section</main>
      <aside class="aside-section">Aside Section</aside>
      <nav class="nav-section">Nav Section</nav>
      <section class="section">Section Section</section>
      <footer class="footer-section"><small>Footer Section</small></footer>
    </div>

  </body>

</html>

Image — grid-column-start, grid-column-end
Syntax & Example:
3.1.2-grid-lines-grid-column-start-end-web-layout.html
.main-container {
  width: 980px;
  margin: 0 auto;

  display: grid; /* block level grid container */
  grid-template-columns: repeat(6, 1fr);
  grid-template-rows: repeat(5, minmax(70px, auto));
  grid-gap: 20px;
}

.header-section {
  background-color: #e03f00;
  grid-column-start: 1;
  grid-column-end: 7;
}

.main-section {
  grid-column-start: 2;
  grid-column-end: 6;
}

.aside-section {
  grid-column-start: 1;
  grid-column-end: 4;
}

.nav-section {
  grid-column-start: 4;
  grid-column-end: 7;
}

.section {
  grid-column-start: 2;
  grid-column-end: 6;
}

.footer-section {
  background-color: #e03f00;
  grid-column-start: 1;
  grid-column-end: 7;
}

Image — grid-column-start, grid-column-end
3.2. Grid Lines Rows
3.2. Grid Lines — Rows grid-rows-start & grid-rows-end
grid-row-start- Determines/indicates the row grid line where the grid item starts
- Specifies a grid item’s start position/location within the grid row
grid-row-end- Determines/indicates the row grid line where the grid item ends
- Specifies a grid item’s end position/location within the grid row
- syntax:
.grid-item {
  grid-row-start: <number> | <name> | span <number> | span <name> | auto;
  grid-row-end: <number> | <name> | span <number> | span <name> | auto;

  grid-row-start: 1;
  grid-row-end: 3;
}
Syntax & Example:
3.2.1-grid-lines-grid-row-start-end-web-layout.html
<!DOCTYPE html>

<html lang="en">

  <head>
    <meta charset="UTF-8">
    <meta name="viewport" content="width=device-width, initial-scale=1.0">
    <meta http-equiv="X-UA-Compatible" content="ie=edge">
    <title>3.2.1-grid-lines-grid-row-start-end-web-layout.html</title>

    <style type="text/css">

      body {
        margin: 0;
        padding: 0;
        font-family: verdana;

        color: #ffffff;
        font-size: 1rem;
        text-align: center;
      }

      .main-container {
        width: 980px;
        margin: 0 auto;

        display: grid; /* block level grid container */
        grid-template-columns: repeat(6, 1fr);
        grid-template-rows: repeat(5, minmax(70px, auto));
        grid-gap: 20px;
      }

      .main-container > * {
        background-color: #ff6c88;
        padding: 20px;
      }

      .header-section {
        background-color: #ed143d;
        grid-column-start: 1;
        grid-column-end: 7;
      }

      .main-section {
        grid-column-start: 1;
        grid-column-end: 5;

        grid-row-start:2;
        grid-row-end:4;
      }

      .aside-section {
        grid-column-start: 5;
        grid-column-end: 7;

        grid-row-start:3;
        grid-row-end:4;
      }

      .nav-section {
        grid-column-start: 1;
        grid-column-end: 3;

      }

      .section {
        grid-column-start: 3;
        grid-column-end: 7;

        grid-row-start:4;
        grid-row-end:6;
      }

      .footer-section {
        background-color: #ed143d;
        grid-column-start: 1;
        grid-column-end: 7;
      }
    </style>

  </head>

  <body>

    <div class="main-container">
      <header class="header-section"><h1>Header Section</h1></header>
      <main class="main-section">Main Section</main>
      <aside class="aside-section">Aside Section</aside>
      <nav class="nav-section">Nav Section</nav>
      <section class="section">Section Section</section>
      <footer class="footer-section"><small>Footer Section</small></footer>
    </div>

  </body>

</html>

Image — grid-row-start, grid-row-end

Image — grid-row-start, grid-row-end
Syntax & Example:
3.2.2-grid-lines-grid-row-start-end-web-layout.html
<!DOCTYPE html>

<html lang="en">

  <head>
    <meta charset="UTF-8">
    <meta name="viewport" content="width=device-width, initial-scale=1.0">
    <meta http-equiv="X-UA-Compatible" content="ie=edge">
    <title>3.2.2-grid-lines-grid-row-start-end-web-layout.html</title>

    <style type="text/css">

      body {
        margin: 0;
        padding: 0;
        font-family: verdana;

        color: #ffffff;
        font-size: 1rem;
        text-align: center;
      }

      .main-container {
        width: 980px;
        margin: 0 auto;

        display: grid; /* block level grid container */
        grid-template-columns: repeat(6, 1fr);
        grid-template-rows: repeat(6, minmax(70px, auto));
        grid-gap: 20px;
      }

      .main-container > * {
        background-color: #ff6c88;
        padding: 20px;
      }

      .header-section {
        background-color: #ed143d;
        grid-column-start: 1;
        grid-column-end: 7;
      }

      .main-section {
        grid-column-start: 2;
        grid-column-end: 6;
      }

      .aside-section {
        grid-column-start: 1;
        grid-column-end: 4;

        grid-row-start: 3;
        grid-row-end: 5;
      }

      .nav-section {
        grid-column-start: 4;
        grid-column-end: 7;

        grid-row-start: 3;
        grid-row-end: 5;
      }

      .section {
        grid-column-start: 2;
        grid-column-end: 6;
      }

      .footer-section {
        background-color: #ed143d;
        grid-column-start: 1;
        grid-column-end: 7;
      }
    </style>

  </head>

  <body>

    <div class="main-container">
      <header class="header-section"><h1>Header Section</h1></header>
      <main class="main-section">Main Section</main>
      <aside class="aside-section">Aside Section</aside>
      <nav class="nav-section">Nav Section</nav>
      <section class="section">Section Section</section>
      <footer class="footer-section"><small>Footer Section</small></footer>
    </div>

  </body>

</html>

Image — grid-row-start, grid-row-end
3.3. Grid Lines Grid Column
3.3. Grid Lines — Column grid-column
grid-column- A shorthand property that sets the start line and end line grid-column-start and grid-column-end for the respective dimensions in the same declaration
- syntax:
.grid-item {
  grid-column: <start-line> / <end-line> | <start-line> / span <value>;

  /* grid-column-start: 1;
  grid-column-end: 3; */

  grid-column: 1/3;
}
Syntax & Example:
3.3.1-grid-lines-grid-column-layout.html
<!DOCTYPE html>

<html lang="en">

  <head>
    <meta charset="UTF-8">
    <meta name="viewport" content="width=device-width, initial-scale=1.0">
    <meta http-equiv="X-UA-Compatible" content="ie=edge">
    <title>3.3.1-grid-lines-grid-column-layout.html</title>

    <style type="text/css">

      body {
        margin: 0;
        padding: 0;
        font-family: verdana;

        color: #ffffff;
        font-size: 1rem;
        text-align: center;
      }

      .main-container {
        width: 980px;
        margin: 0 auto;

        display: grid; /* block level grid container */
        grid-template-columns: repeat(6, 1fr);
        grid-template-rows: repeat(4, minmax(70px, auto));
        grid-gap: 20px;
      }

      .main-container > * {
        background-color: #ff7f50;
        padding: 20px;
      }

      .header-section {
        background-color: #e03f00;
        /* grid-column-start: 1;
        grid-column-end: 7; */
        grid-column: 1/7;
      }

      .main-section {
       /*  grid-column-start: 1;
        grid-column-end: 5; */
        grid-column:1/5;
      }

      .aside-section {
       /*  grid-column-start: 5;
        grid-column-end: 7; */
        grid-column: 5/7;
      }

      .nav-section {
        /* grid-column-start: 1;
        grid-column-end: 3; */
        grid-column: 1/3;
      }

      .section {
        /* grid-column-start: 3;
        grid-column-end: 7; */
        grid-column: 3/7;
      }

      .footer-section {
        background-color: #e03f00;
        /* grid-column-start: 1;
        grid-column-end: 7; */
        grid-column: 1/7;
      }
    </style>

  </head>

  <body>

    <div class="main-container">
      <header class="header-section"><h1>Header Section</h1></header>
      <main class="main-section">Main Section</main>
      <aside class="aside-section">Aside Section</aside>
      <nav class="nav-section">Nav Section</nav>
      <section class="section">Section Section</section>
      <footer class="footer-section"><small>Footer Section</small></footer>
    </div>

  </body>

</html>

Image — grid-column-start-end
Syntax & Example:
3.3.2-grid-lines-grid-column-layout.html
.main-container {
  width: 980px;
  margin: 0 auto;

  display: grid; /* block level grid container */
  grid-template-columns: repeat(6, 1fr);
  grid-template-rows: repeat(5, minmax(70px, auto));
  grid-gap: 20px;
}

.main-container > * {
  background-color: #ffaf5f;
  padding: 20px;
}

.header-section {
  background-color: #e08931;
  /* grid-column-start: 1;
  grid-column-end: 7; */
  grid-column: 1/7;
}

.main-section {
  /*  grid-column-start: 2;
  grid-column-end: 6; */
  grid-column: 2/6;
}

.aside-section {
  /* grid-column-start: 1;
  grid-column-end: 4; */
  grid-column: 1/4;
}

.nav-section {
  /* grid-column-start: 4;
  grid-column-end: 7; */
  grid-column: 4/7;
}

.section {
  /* grid-column-start: 2;
  grid-column-end: 6; */
  grid-column: 2/6;
}

.footer-section {
  background-color: #e08931;
  /* grid-column-start: 1;
  grid-column-end: 7; */
  grid-column: 1/7;
}

Image — grid-column-start-end
3.4. Grid Lines Grid Row
3.4. Grid Lines — Rows grid-rows
grid-row- Shorthand property that sets the start line and end line grid-row-start and grid-row-end for the respective dimensions in the same declaration
- syntax:
.grid-item {
  grid-row: <start-line> / <end-line> | <start-line> / span <value>;

  /* grid-row-start: 1;
  grid-row-end: 3; */

  grid-row: 1/3;
}
Syntax & Example:
3.4.1-grid-lines-grid-row-layout.html
<!DOCTYPE html>

<html lang="en">

  <head>
    <meta charset="UTF-8">
    <meta name="viewport" content="width=device-width, initial-scale=1.0">
    <meta http-equiv="X-UA-Compatible" content="ie=edge">
    <title>3.4.1-grid-lines-grid-row-layout.html</title>

    <style type="text/css">

      body {
        margin: 0;
        padding: 0;
        font-family: verdana;

        color: #ffffff;
        font-size: 1rem;
        text-align: center;
      }

      .main-container {
        width: 980px;
        margin: 0 auto;

        display: grid; /* block level grid container */
        grid-template-columns: repeat(6, 1fr);
        grid-template-rows: repeat(5, minmax(70px, auto));
        grid-gap: 20px;
      }

      .main-container > * {
        background-color: #a9da41;
        padding: 20px;
      }

      .header-section {
        background-color: #739e17;
        /* grid-column-start: 1;
        grid-column-end: 7; */

        grid-column: 1/7;
      }

      .main-section {
        /* grid-column-start: 1;
        grid-column-end: 5;

        grid-row-start:2;
        grid-row-end:4; */

        grid-column: 1/5;
        grid-row: 2/4;
      }

      .aside-section {
        /* grid-column-start: 5;
        grid-column-end: 7;

        grid-row-start:3;
        grid-row-end:4; */

        grid-column: 5/7;
        grid-row: 3/4;
      }

      .nav-section {
        /* grid-column-start: 1;
        grid-column-end: 3; */

        grid-column: 1/3;
      }

      .section {
        /* grid-column-start: 3;
        grid-column-end: 7;

        grid-row-start:4;
        grid-row-end:6; */

        grid-column: 3/7;
        grid-row: 4/6;
      }

      .footer-section {
        background-color: #739e17;
       /*  grid-column-start: 1;
        grid-column-end: 7; */

        grid-column: 1/7;
      }
    </style>

  </head>

  <body>

    <div class="main-container">
      <header class="header-section"><h1>Header Section</h1></header>
      <main class="main-section">Main Section</main>
      <aside class="aside-section">Aside Section</aside>
      <nav class="nav-section">Nav Section</nav>
      <section class="section">Section Section</section>
      <footer class="footer-section"><small>Footer Section</small></footer>
    </div>

  </body>

</html>

Image — grid-row-start-end
Syntax & Example:
3.4.2-grid-lines-grid-row-layout.html
<!DOCTYPE html>

<html lang="en">

  <head>
    <meta charset="UTF-8">
    <meta name="viewport" content="width=device-width, initial-scale=1.0">
    <meta http-equiv="X-UA-Compatible" content="ie=edge">
    <title>3.4.2-grid-lines-grid-row-layout.html</title>

    <style type="text/css">

      body {
        margin: 0;
        padding: 0;
        font-family: verdana;

        color: #ffffff;
        font-size: 1rem;
        text-align: center;
      }

      .main-container {
        width: 980px;
        margin: 0 auto;

        display: grid; /* block level grid container */
        grid-template-columns: repeat(6, 1fr);
        grid-template-rows: repeat(6, minmax(70px, auto));
        grid-gap: 20px;
      }

      .main-container > * {
        background-color: #a9da41;
        padding: 20px;
      }

      .header-section {
        background-color: #739e17;
        /* grid-column-start: 1;
        grid-column-end: 7; */
        grid-column: 1/7;
      }

      .main-section {
        /* grid-column-start: 2;
        grid-column-end: 6; */
        grid-column: 2/6;
      }

      .aside-section {
        /* grid-column-start: 1;
        grid-column-end: 4;

        grid-row-start: 3;
        grid-row-end: 5; */
        grid-column: 1/4;
        grid-row:3/5;
      }

      .nav-section {
       /*  grid-column-start: 4;
        grid-column-end: 7;

        grid-row-start: 3;
        grid-row-end: 5; */
        grid-column: 4/7;
        grid-row: 3/5;
      }

      .section {
        /* grid-column-start: 2;
        grid-column-end: 6; */
        grid-column: 2/6;
      }

      .footer-section {
        background-color: #739e17;
        /* grid-column-start: 1;
        grid-column-end: 7; */
        grid-column: 1/7;
      }
    </style>

  </head>

  <body>

    <div class="main-container">
      <header class="header-section"><h1>Header Section</h1></header>
      <main class="main-section">Main Section</main>
      <aside class="aside-section">Aside Section</aside>
      <nav class="nav-section">Nav Section</nav>
      <section class="section">Section Section</section>
      <footer class="footer-section"><small>Footer Section</small></footer>
    </div>

  </body>

</html>

Image — grid-row-start-end
Syntax & Example:
3.4.3-grid-lines-grid-column-row-layout-span.html
<!DOCTYPE html>

<html lang="en">

  <head>
    <meta charset="UTF-8">
    <meta name="viewport" content="width=device-width, initial-scale=1.0">
    <meta http-equiv="X-UA-Compatible" content="ie=edge">
    <title>3.4.3-grid-lines-grid-column-row-layout-span.html</title>

    <style type="text/css">

      body {
        margin: 0;
        padding: 0;
        font-family: verdana;

        color: #ffffff;
        font-size: 1rem;
        text-align: center;
      }

      .main-container {
        width: 980px;
        margin: 0 auto;

        display: grid; /* block level grid container */
        grid-template-columns: repeat(6, 1fr);
        grid-template-rows: repeat(6, minmax(70px, auto));
        grid-gap: 20px;
      }

      .main-container > * {
        background-color: #ddd459;
        padding: 20px;
      }

      .header-section {
        background-color:#aaa459;
        /* grid-column-start: 1;
        grid-column-end: 7; */

        /* grid-column: 1/7; */

        /* grid-column: 1 / -1; */ /* Negative ie -1 is used for last-till end column/row */
        /* grid-column: span 6; */ /* cover-span 6 columns/row */
        grid-column: 1 / span 6; /* start from 1st track and cover-span 6 */
      }

      .main-section {
        /* grid-column-start: 2;
        grid-column-end: 6; */

        /* grid-column: 2/6; */

        grid-column: 2 / span 4;
      }

      .aside-section {
        /* grid-column-start: 1;
        grid-column-end: 4;

        grid-row-start: 3;
        grid-row-end: 5; */

        /* grid-column: 1/4;
        grid-row:3/5; */

        grid-column: 1 / span 3;
        grid-row: 3 / span 2;
      }

      .nav-section {
       /*  grid-column-start: 4;
        grid-column-end: 7;

        grid-row-start: 3;
        grid-row-end: 5; */

        /* grid-column: 4/7;
        grid-row: 3/5; */

        grid-column: 4 / span 3;
        grid-row: 3 / span 2;
      }

      .section {
        /* grid-column-start: 2;
        grid-column-end: 6; */

        /* grid-column: 2/6; */

        grid-column: 2 / span 4;
      }

      .footer-section {
        background-color:#aaa459;
        /* grid-column-start: 1;
        grid-column-end: 7; */

        /* grid-column: 1/7; */

        /* grid-column: 1 / -1; */
        /* grid-column: span 6; */

        grid-column: 1 / span 6;
      }
    </style>

  </head>

  <body>

    <div class="main-container">
      <header class="header-section"><h1>Header Section</h1></header>
      <main class="main-section">Main Section</main>
      <aside class="aside-section">Aside Section</aside>
      <nav class="nav-section">Nav Section</nav>
      <section class="section">Section Section</section>
      <footer class="footer-section"><small>Footer Section</small></footer>
    </div>

  </body>

</html>

Image — grid-column-row with span
Syntax & Example:
3.4.4-grid-lines-grid-column-row-layout-span.html
<!DOCTYPE html> <html lang="en"> <head> <meta charset="UTF-8"> <meta name="viewport" content="width=device-width, initial-scale=1.0"> <meta http-equiv="X-UA-Compatible" content="ie=edge"> <title>3.4.4-grid-lines-grid-column-row-layout-span.html</title> <style type="text/css"> body { margin: 0; padding: 0; font-family: verdana; color: #ffffff; font-size: 1rem; text-align: center; } .main-container { width: 980px; margin: 0 auto; display: grid; /* block level grid container */ grid-template-columns: repeat(4, 1fr 1fr); grid-template-rows: repeat(10, 60px); grid-gap: 10px; } .main-container > * { background-color:#00bfff; padding: 20px; border: 2px solid #0000004f; } .item { /* display: grid; justify-content: center; align-items: center; */ } .item1 { /* grid-column: 2 / 4; */ grid-column: 2 / span 2; } .item2 { /* grid-column: 4 / -1; */ grid-column: 4 / span 5; } .item3, .item4 { grid-column: span 2; grid-row: span 2; } .item6, .item8 { grid-row: span 2; } .item11 { grid-column: 1 / -1; /* grid-column: 1 / span 8; */ } .item12, .item14 { grid-column: span 3; grid-row: span 3; } .item13, .item15 { grid-row: span 3; } .item16, .item17 { grid-column: span 4; } .item18 { grid-column: 2 / span 6; } .item19 { grid-column: 1 / span 8; } </style> </head> <body> <div class="main-container"> <div class="item item1">Item 1 LOGO </div> <div class="item item2">Item 2 NAVIGATION BAR </div> <div class="item item3">Item 3</div> <div class="item item4">Item 4</div> <div class="item item5">Item 5</div> <div class="item item6">Item 6</div> <div class="item item7">Item 7</div> <div class="item item8">Item 8</div> <div class="item item9">Item 9</div> <div class="item item10">Item 10</div> <div class="item item11">Item 11</div> <div class="item item12">Item 12</div> <div class="item item13">Item 13</div> <div class="item item14">Item 14</div> <div class="item item15">Item 15</div> <div class="item item16">Item 16</div> <div class="item item17">Item 17</div> <div class="item item18">Item 18</div> <div class="item item19">Item 19</div> <div class="item item20">Item 20</div> <div class="item item21">Item 21</div> <div class="item item22">Item 22</div> <div class="item item23">Item 23</div> <div class="item item24">Item 24</div> <div class="item item25">Item 25</div> <div class="item item26">Item 26</div> <div class="item item27">Item 27</div> <div class="item item28">Item 28</div> <div class="item item29">Item 29</div> <div class="item item30">Item 30</div> </div> </body> </html>

Image — grid-column-row with span
3.5. Alignment and Justifying items
3.5. Alignment & Justify items — justify-self & align-self
justify-self- Aligns a grid item inside a cell along the inline (row — horizontal) axis, this value applies to a grid item inside a single cell
align-self- Aligns a grid item inside a cell along the block (column — vertical), this value applies to the content inside a single grid item
- syntax:
.grid-item { justify-self: start | end | center | stretch; align-self: start | end | center | stretch; }
Syntax & Example:
3.5-grid-item-alignment-justify-align-self.html
<!DOCTYPE html> <html lang="en"> <head> <meta charset="UTF-8"> <meta name="viewport" content="width=device-width, initial-scale=1.0"> <meta http-equiv="X-UA-Compatible" content="ie=edge"> <title>3.5-grid-item-alignment-justify-align-self.html</title> <style type="text/css"> body { margin: 0; padding: 0; font-family: verdana; } .main-container { width: 1000px; margin: 0 auto; /* 3.5.1 */ display: grid; grid-template-columns: repeat(3, 1fr); grid-auto-rows: minmax(200px, auto); grid-gap: 10px; } .item { color: #ffffff; font-size: 1rem; padding: 0.75rem; text-align: center; } .main-container div:nth-child(odd) { background: #ffa500; } .main-container div:nth-child(even) { background: #008080; } .item { color: #ffffff; font-size: 1rem; padding: 0.75rem; text-align: center; } .main-container div:nth-child(odd) { background: #ffa500; } .main-container div:nth-child(even) { background: #008080; } </style> </head> <body> <div class="main-container"> <div class="item item-1">item-1</div> <div class="item item-2">item-2</div> <div class="item item-3">item-3</div> <div class="item item-4">item-4</div> <div class="item item-5">item-5</div> <div class="item item-6">item-6</div> <div class="item item-7">item-7</div> <div class="item item-8">item-8</div> <div class="item item-9">item-9</div> </div> </body> </html>

Image — grid default basic alignment
.item-1 { justify-self: end; align-self: end; } .item-2 { justify-self: center; align-self: center; } .item-3 { justify-self: start; align-self: start; } .item-7 { justify-self: end; align-self: start; } .item-8 { justify-self: center; align-self: center; } .item-9 { justify-self: start; align-self: end; }

Image — grid design with justify and align
.main-container div:nth-child(odd) { justify-self: center; align-self: center; }

Image — grid design with justify and align
4 CSS Grid Practical Demo Examples
4.1. Mosaic Layout
Syntax & Example:
4.1-demo-mosaic-layout.html
<!DOCTYPE html> <html lang="en"> <head> <meta charset="UTF-8"> <meta name="viewport" content="width=device-width, initial-scale=1.0"> <meta http-equiv="X-UA-Compatible" content="ie=edge"> <title>4.1-demo-mosaic-layout.html</title> <style type="text/css"> body { margin: 0; padding: 0; font-family: verdana; } .main-container { width: 1000px; margin: 0 auto; display: grid; grid-template-columns: repeat(6, 1fr); grid-auto-rows: minmax(100px, auto); grid-gap: 10px; } .item { background-color: #1e90ff; color: #ffffff; font-size: 1rem; padding: 0.75rem; text-align: center; } .item-1 { grid-column: 1/3; grid-row: 1/5; } .item-2 { grid-column: 3/7; grid-row: 1/3; } .item-3 { grid-column: 3/5; grid-row: 3/5; } .item-4 { grid-column: 5/7; grid-row: 3/7; } .item-5 { grid-column: 1/5; grid-row: 5/7; } </style> </head> <body> <div class="main-container"> <div class="item item-1">item-1</div> <div class="item item-2">item-2</div> <div class="item item-3">item-3</div> <div class="item item-4">item-4</div> <div class="item item-5">item-5</div> </div> </body> </html>

Image — Demo Example: Grid Mosaic Layout
.main-container { width: 1000px; margin: 0 auto; display: grid; grid-template-columns: repeat(6, 1fr); grid-auto-rows: minmax(150px, auto); grid-gap: 10px; transform: rotate(45deg) scale(0.5); }

Image — Demo Example: Grid Mosaic Layout Transform Rotate
4.2. Responsive Grid Layout
Syntax & Example:
4.2-demo-responsive-grid-layout.html
<!DOCTYPE html> <html lang="en"> <head> <meta charset="UTF-8"> <meta name="viewport" content="width=device-width, initial-scale=1.0"> <meta http-equiv="X-UA-Compatible" content="ie=edge"> <title>4.2-demo-responsive-grid-layout.html</title> <style type="text/css"> body { margin: 0; padding: 0; font-family: verdana; color: #ffffff; font-size: 1rem; text-align: center; } /* Desktop view */ @media screen and (min-width: 760px){ .main-container { width: 980px; margin: 0 auto; display: grid; /* block level grid container */ grid-template-columns: repeat(4, 1fr); grid-auto-rows: minmax(80px, auto); grid-gap: 20px; grid-template-areas: "headerArea headerArea headerArea headerArea" "asideArea asideArea mainArea mainArea " "navArea navArea mainArea mainArea " "sectionArea sectionArea sectionArea sectionArea" "sectionArea sectionArea sectionArea sectionArea" "footerArea footerArea footerArea footerArea"; } } .main-container > * { background-color: #00bcd4; padding: 20px; } .header-section { grid-area: headerArea; background-color: #0199ad; } .main-section { grid-area: mainArea; } .section { grid-area: sectionArea; } .aside-section { grid-area: asideArea; } .nav-section { grid-area: navArea; } .footer-section { grid-area: footerArea; background-color: #0199ad; } </style> </head> <body> <div class="main-container"> <header class="header-section"><h1>Header Section</h1></header> <main class="main-section">Main Section</main> <section class="section">Section Section</section> <aside class="aside-section">Aside Section</aside> <nav class="nav-section">Nav Section</nav> <footer class="footer-section"><small>Footer Section</small></footer> </div> </body> </html>

Image — Demo Example: Responsive Grid Layout Desktop view

Image — Demo Example: Responsive Grid Layout Mobile Basic view
/* Mobile basic view is defualt, we get just after applying desktop media query */ /* Mobile enhanced view */ @media screen and (max-width: 760px) { body { font-size: 2rem; } .main-container > * { padding: 40px !important; } .main-container { width: 980px; margin: 0 auto; display: grid; /* block level grid container */ grid-template-columns: repeat(4, 1fr); grid-auto-rows: minmax(100px, auto); grid-gap: 30px; grid-template-areas: "headerArea headerArea headerArea headerArea" "footerArea footerArea footerArea footerArea" "mainArea mainArea mainArea mainArea" "mainArea mainArea mainArea mainArea" "asideArea asideArea navArea navArea" "sectionArea sectionArea sectionArea sectionArea" "sectionArea sectionArea sectionArea sectionArea"; } }

Image — Demo Example: Responsive Grid Layout Mobile enahnced view
4.3. Custom 12 Column Grid
4.3. Create Custom 12 Column Grid Layout/Framework
Syntax & Example:
4.3-demo-custom-12-column-grid-framework.html
<!DOCTYPE html> <html lang="en"> <head> <meta charset="UTF-8"> <meta name="viewport" content="width=device-width, initial-scale=1.0"> <meta http-equiv="X-UA-Compatible" content="ie=edge"> <title>4.3-demo-custom-12-column-grid-framework.html</title> <style type="text/css"> body { margin: 0; padding: 0; font-family: verdana; color: #ffffff; font-size: 1rem; text-align: center; } .main-container { width: 960px; margin: 0 auto; display: grid; grid-template-columns: repeat(12, 1fr); grid-auto-rows: minmax(100px, auto); grid-gap: 10px; } .main-container > * { background-color: #b5b5b5; padding: 20px; } .header-section { background-color: #5b5b5b; grid-column: 1/13; } .main-section { grid-column: 5/13; grid-row: 2/4; } .aside-section { grid-column: 1/5; } .nav-section { grid-column: 1/5; } .section { grid-column: 1/13; grid-row: 4/6; } .footer-section { background-color: #5b5b5b; grid-column: 1/13; } </style> </head> <body> <div class="main-container"> <header class="header-section"><h1>Header Section</h1></header> <main class="main-section">Main Section</main> <aside class="aside-section">Aside Section</aside> <nav class="nav-section">Nav Section</nav> <section class="section">Section Section</section> <footer class="footer-section"><small>Footer Section</small></footer> </div> </body> </html>

Image — Demo Example: Grid Column Row Layout
<!DOCTYPE html> <html lang="en"> <head> <meta charset="UTF-8"> <meta name="viewport" content="width=device-width, initial-scale=1.0"> <meta http-equiv="X-UA-Compatible" content="ie=edge"> <title>4.3-demo-custom-12-column-grid-framework.html</title> <style type="text/css"> body { margin: 0; padding: 0; font-family: verdana; color: #ffffff; font-size: 1rem; text-align: center; } .main-container { width: 960px; margin: 0 auto; display: grid; grid-template-columns: repeat(12, 1fr); grid-auto-rows: minmax(100px, auto); grid-gap: 10px; /* 4.3.2 custom 12 columner grid */ position: relative; } /* 4.3.2 custom columner grid */ #custom-grid-overlay-container { display: grid; grid-template-columns: repeat(12, 1fr); grid-auto-rows: minmax(100%, auto); position: absolute; width: 100%; height: 100%; background: transparent; padding: 0; margin: 0; } #custom-grid-overlay-container div { opacity: 0.25; border: 1px solid #ffffff; } /* */ .main-container > * { background-color: #b5b5b5; padding: 20px; } .header-section { background-color: #5b5b5b; grid-column: 1/13; } .main-section { grid-column: 5/13; grid-row: 2/4; } .aside-section { grid-column: 1/5; } .nav-section { grid-column: 1/5; } .section { grid-column: 1/13; grid-row: 4/6; } .footer-section { background-color: #5b5b5b; grid-column: 1/13; } </style> </head> <body> <div class="main-container"> <!-- /* 4.3.2 custom 12 columner grid */ --> <section id="custom-grid-overlay-container"> <div>Column <br/> 1</div> <div>Column <br/> 2</div> <div>Column <br/> 3</div> <div>Column <br/> 4</div> <div>Column <br/> 5</div> <div>Column <br/> 6</div> <div>Column <br/> 7</div> <div>Column <br/> 8</div> <div>Column <br/> 9</div> <div>Column <br/> 10</div> <div>Column <br/> 11</div> <div>Column <br/> 12</div> </section> <!-- Basic layout --> <header class="header-section"><h1>Header Section</h1></header> <main class="main-section">Main Section</main> <aside class="aside-section">Aside Section</aside> <nav class="nav-section">Nav Section</nav> <section class="section">Section Section</section> <footer class="footer-section"><small>Footer Section</small></footer> </div> </body> </html>

Image — Demo Example: Custom 12 column grid layout framework
4.4. Columner Layout with Auto Flow Dense
Syntax & Example:
4.4-demo-grid-auto-flow-dense.html
<!DOCTYPE html> <html lang="en"> <head> <meta charset="UTF-8"> <meta name="viewport" content="width=device-width, initial-scale=1.0"> <meta http-equiv="X-UA-Compatible" content="ie=edge"> <title>4.4-demo-grid-auto-flow-dense.html</title> <style type="text/css"> body { margin: 0; padding: 0; font-family: verdana; color: #ffffff; font-size: 1rem; text-align: center; } .main-container { width: 960px; margin: 0 auto; display: grid; grid-template-columns: repeat(10, 1fr); grid-gap: 10px; /* 4.4.2 - */ /* grid-auto-flow: dense; */ } .item:nth-child(6n) { background-color:#a9a906; /* 4.4.1 - right side every 6th column should cover span remaining space */ grid-column: span 5; /* 4.4.2 - */ /* grid-column: span 6; */ } .main-container > * { background-color: #dcdc65; padding: 20px; } </style> </head> <body> <div class="main-container"> <div class="item item1">1</div> <div class="item item2">2</div> <div class="item item3">3</div> <div class="item item4">4</div> <div class="item item5">5</div> <div class="item item6">6</div> <div class="item item7">7</div> <div class="item item8">8</div> <div class="item item9">9</div> <div class="item item10">10</div> <div class="item item11">11</div> <div class="item item12">12</div> <div class="item item13">13</div> <div class="item item14">14</div> <div class="item item15">15</div> <div class="item item16">16</div> <div class="item item17">17</div> <div class="item item18">18</div> <div class="item item19">19</div> <div class="item item20">20</div> <div class="item item21">21</div> <div class="item item22">22</div> <div class="item item23">23</div> <div class="item item24">24</div> <div class="item item25">25</div> <div class="item item26">26</div> <div class="item item27">27</div> <div class="item item28">28</div> <div class="item item29">29</div> <div class="item item30">30</div> <div class="item item31">31</div> <div class="item item32">32</div> <div class="item item33">33</div> <div class="item item34">34</div> <div class="item item35">35</div> <div class="item item36">36</div> <div class="item item37">37</div> <div class="item item38">38</div> <div class="item item39">39</div> <div class="item item40">40</div> <div class="item item41">41</div> <div class="item item42">42</div> <div class="item item43">43</div> <div class="item item44">44</div> <div class="item item45">45</div> <div class="item item46">46</div> <div class="item item47">47</div> <div class="item item48">48</div> <div class="item item49">49</div> <div class="item item50">50</div> <div class="item item51">51</div> <div class="item item52">52</div> <div class="item item53">53</div> <div class="item item54">54</div> <div class="item item55">55</div> <div class="item item56">56</div> <div class="item item57">57</div> <div class="item item58">58</div> <div class="item item59">59</div> <div class="item item60">60</div> </body> </html>

Image — Demo Example: Columner Layout
.main-container { width: 960px; margin: 0 auto; display: grid; grid-template-columns: repeat(10, 1fr); grid-gap: 10px; /* 4.4.2 - */ grid-auto-flow: dense; } .item:nth-child(6n) { background-color:#a9a906; /* 4.4.1 - right side every 6th column should cover span remaining space */ /* grid-column: span 5; */ /* 4.4.2 - */ grid-column: span 6; }

Image — Demo Example: Columner Layout with Auto-flow: dense
4.5. Grid Card Layout
Syntax & Example:
4.5-demo-grid-card-layout.html
<!DOCTYPE html> <html lang="en"> <head> <meta charset="UTF-8"> <meta name="viewport" content="width=device-width, initial-scale=1.0"> <meta http-equiv="X-UA-Compatible" content="ie=edge"> <title>4.5-demo-grid-card-layout.html</title> <style type="text/css"> body { margin: 0; padding: 0; font-family: verdana; } .main-container { width: 960px; margin: 0 auto; display: grid; grid-template-columns: repeat(4, 1fr); /* grid-auto-rows: minmax(300px, auto); */ grid-gap: 10px; } .card { color: #000000; border: 2px solid #000000; font-size: 1rem; padding: 1rem; text-align: left; } .card .logo-holder{ background-color: #ffdab9; height: 5em; margin-bottom: 1em; } .card .header{ color: #ffb470; font-size: 1.25em; font-weight: bold; margin-bottom: 0.5em; } .card .article{ color:#ddb470; font-size: 0.75em; } .card2 .logo-holder{ height: 7em; } .card3 .logo-holder{ height: 9em; } .card4 .logo-holder{ height: 11em; } .card6 .logo-holder, .card7 .logo-holder{ height: 9em; } </style> </head> <body> <div class="main-container"> <div class="card card1"> <section class="logo-holder"></section> <header class="header">Card1 Heading</header> <article class="article"> This is dummy teaser text. </article> </div> <div class="card card2"> <section class="logo-holder"></section> <header class="header">Card2 Headline Logo content</header> <article class="article"> This is dummy teaser text. It may varies card to card. </article> </div> <div class="card card3"> <section class="logo-holder"></section> <header class="header">Card3 Heading</header> <article class="article"> This is dummy teaser text. It may varies card to card. This is dummy teaser text. </article> </div> <div class="card card4"> <section class="logo-holder"></section> <header class="header">Card4 Heading</header> <article class="article"> This is dummy teaser text. It may varies card to card. This is dummy teaser text. It may varies card to card. </article> </div> <div class="card card5"> <section class="logo-holder"></section> <header class="header">Card5 Heading & Logo Wrapper</header> <article class="article"> This is dummy teaser text. It may varies card to card. This is dummy teaser text. It may varies card to card. This is dummy teaser text. </article> </div> <div class="card card6"> <section class="logo-holder"></section> <header class="header">Card6 Heading</header> <article class="article"> This is dummy teaser text. It may varies card to card. This is dummy teaser text. It may varies card to card. This is dummy teaser text. It may varies card to card. </article> </div> <div class="card card7"> <section class="logo-holder"></section> <header class="header">Card7 Heading</header> <article class="article"> This is dummy teaser text. It may varies card to card. This is dummy teaser text. It may varies card to card. This is dummy teaser text. It may varies card to card. This is dummy teaser text. </article> </div> <div class="card card8"><section class="logo-holder"></section> <header class="header">Card8 Heading</header> <article class="article"> This is dummy teaser text. It may varies card to card. This is dummy teaser text. It may varies card to card. This is dummy teaser text. It may varies card to card. This is dummy teaser text. It may varies card to card. </article> </div> </div> </body> </html>

Image — Demo Example: Card Layout
4.6. Grid Card Nested Layout
Syntax & Example:
4.6-demo-grid-card-nested-layout.html
<!DOCTYPE html> <html lang="en"> <head> <meta charset="UTF-8"> <meta name="viewport" content="width=device-width, initial-scale=1.0"> <meta http-equiv="X-UA-Compatible" content="ie=edge"> <title>4.6-demo-grid-card-nested-layout.html</title> <style type="text/css"> body { margin: 0; padding: 0; font-family: verdana; } .grid-layout-container { width: 960px; margin: 0 auto; } .main-container { display: grid; grid-template-columns: repeat(2, 1fr); grid-auto-rows: minmax(165px, auto); grid-gap: 10px; } .card { display: grid; grid-template-columns: repeat(1, 130px 1fr); /* grid-auto-rows: minmax(300px, auto); */ grid-gap: 10px; color: #000000; font-size: 1rem; padding: 1rem; text-align: left; background-color: #fff; border: 1px solid #ddd; border-radius: 5px; -ms-box-shadow: 0 2px 2px rgba(0,0,0,.075); -moz-box-shadow: 0 2px 2px rgba(0,0,0,.075); -webkit-box-shadow: 0 2px 2px rgba(0,0,0,.075); box-shadow: 0 2px 2px rgba(0,0,0,.075); } .card .header{ color:#428bca; font-size: 1.25em; margin-bottom: 0.5em; font-weight: bold; } .card .article{ color:#666666; font-size: 0.75em; } </style> </head> <body> <div class="grid-layout-container"> <h1>Enable CSS Grid Layout</h1> <p>CSS Grid Layout enabled different browser version:</p> <div class="main-container"> <div class="card card1"> <section class="logo-holder"> <img src="../_images-css-grid/4.6-images/chrome.png" alt="chrome"> </section> <section class="text-contaner"> <header class="header">Chrome</header> <article class="article"> Enabled by default since version 57 </article> </section> </div> <div class="card card2"> <section class="logo-holder"> <img src="../_images-css-grid/4.6-images/firefox.png" alt="firefox"> </section> <section class="text-contaner"> <header class="header">Firefox</header> <article class="article"> Enabled by default since version 52 </article> </section> </div> <div class="card card3"> <section class="logo-holder"> <img src="../_images-css-grid/4.6-images/internet-explorer.png" alt="internet-explorer"> </section> <section class="text-contaner"> <header class="header">Internet-Explorer</header> <article class="article"> Enabled by default since IE10 (old syntax) </article> </section> </div> <div class="card card4"> <section class="logo-holder"> <img src="../_images-css-grid/4.6-images/opera.png" alt="opera"> </section> <section class="text-contaner"> <header class="header">Opera</header> <article class="article"> Enabled by default since version 44 </article> </section> </div> <div class="card card5"> <section class="logo-holder"> <img src="../_images-css-grid/4.6-images/safari.png" alt="safari"> </section> <section class="text-contaner"> <header class="header">Safari</header> <article class="article"> Enabled by default since version 10.1 </article> </section> </div> <div class="card card6"> <section class="logo-holder"> <img src="../_images-css-grid/4.6-images/epiphany.png" alt="epiphany"> </section> <section class="text-contaner"> <header class="header">Epiphany</header> <article class="article"> Enabled by default since version 3.24 </article> </section> </div> </div> </div> </body> </html>

Image — Demo Example: Card Nested Layout
5 CSS Grid Resources
Reference: — https://www.w3schools.com/css/css_grid.asp
Reference: — https://developer.mozilla.org/en-US/docs/Web/CSS/CSS_Grid_Layout
Reference: — https://css-tricks.com/snippets/css/complete-guide-grid/
Reference: — https://tympanus.net/codrops/css_reference/grid/
Reference: — https://gridbyexample.com/what/
Reference: — https://learncssgrid.com/
CSS Grid Layout — один из самых обсуждаемых инструментов верстальщиков на данный момент. Однако он не является чем-то очень новым. Дело в том, что система приобрела поддержку самых известных браузеров: Firefox, Chrome, Opera, а также Safari. Именно этим и вызван такой ажиотаж в сторону Grid.
Но что же такое CSS Grid Layout (он же Grid) на самом деле? На что он способен? И готов ли он для использования в полной степени в проектах? Давайте разберёмся в этом и посмотрим на подборку полезных ресурсов, способных помочь вам с началом использования Grid.
История инструмента начинается с 2011 года. Именно тогда компания Microsoft отправила предложение группе разработчиков CSS. По этой ссылке вы можете посмотреть, как изначально выглядело предложение от Microsoft об использовании Grid вместе с Flexbox для вёрстки адаптивных макетов.
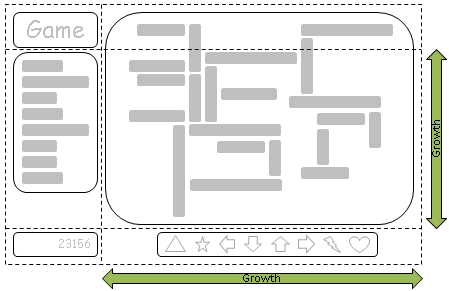
Данный CSS модуль определяет двумерную систему компоновки на основе сетки, оптимизированной для дизайна пользовательского интерфейса. Дочерние элементы могут быть помещены в произвольные места (слоты) при предопределённой гибкой или фиксированной сетке макета.
Краткое описание Grid от консорциума W3C.
Если у вас есть время и желание углубиться в документацию, можете сделать это на сайте консорциума.
Разница между Flexbox и Grid
Главным отличием Grid от Flexbox является количество измерений (осей). При работе только с последним вам придётся выбирать между осью X и осью Y. Иначе говоря, Flexbox может быть направлен на создание только колонок или только строк. Однако эти инструменты не конкурируют друг с другом, поэтому можно применять их вместе.
На иллюстрации ниже можно наглядно ознакомиться с отличительными чертами инструментов:

Вывод таков: CSS Grid Layout — новая и мощная система компоновки, позволяющая с лёгкостью разделить веб-страницу на столбцы и строки.
Полезные ресурсы, уроки и руководства
В последнее время, в связи с включением поддержки Grid в популярные браузеры, появилось огромное количество отличных уроков и вводных пособий по инструменту. Мы внимательно следили за выходившими и выходящими обновлениями и теперь рады представить список ресурсов, которые помогут вам начать работать и экспериментировать с CSS Grid.
Основные понятия в контексте CSS Grid

На этом ресурсе вы найдёте введение в работу с Grid, объяснение механизма работы Grid-контейнера, описание размещения элементов внутри контейнеров и многое другое.
Детальное руководство по CSS Grid

Подробное руководство, покрывающее все детали последней версии Grid. Крис Хаус рассматривает все нужные вам свойства и обозревает высокоуровневые концепты. Кроме того, он подкрепляет это образцами кода и визуальными примерами.
Grid в примерах

Приглашённый эксперт рабочей группы CSS, Рейчел Эндрю, — давний сторонник внедрения Grid в современный веб. Она делится большим количеством примеров о том, как использовать Grid, а также образцами кода, видеоуроками прочими полезными материалами на своём сайте Grid by Example.
В этом видео Рейчел объясняет множество практических примеров с Grid и показывает, как он может использоваться для создания современных адаптивных макетов.

Если вы до сих пор не выбрали между Flexbox и Grid, то посетите ещё один сайт Рейчел, где она рассказывает о ключевых различиях этих инструментов.
Рабочий пример: мой первый макет, созданный с CSS Grid
В этом примере Тайлер Стика показывает старый способ построения макетов (с помощью float) и пытается достичь того же результата с помощью Grid.
Особенности CSS Grid, которые заставляют моё сердце биться быстрее

Фронтенд разработчик Уна Кравец рассказывает о трёх функциях Grid, восхищающих её: включение элемента minmax (), использование grid-gap и названные области.
Практическое использование CSS Grid: добавление Grid в существующий проект

Эрик Мейер рассматривает процесс преобразования существующих CSS наработок в Grid без нарушения их работоспособности в браузерах без поддержки Grid.
Grid-огород

Grid Garden — небольшая и забавная браузерная игра, основанная на написании кода для выращивания моркови в огороде. Это замечательный способ для практики и изучения основ CSS.
Цель моей игры не включает в себя охват всех новых аспектов инструмента CSS Grid. Главное предназначение игры — помочь игрокам развить интуицию и признать потенциал инструмента.
Говорит Томас Парк.
Шпаргалка по CSS Grid

Отличная песочница с качественным визуальным оформлением, которая поможет разобраться с терминологией, свойствами и с тем, как Grid работает в браузере.
Заключение
Данные из скриншота с сайта Can I Use выглядят довольно многообещающе, показывая, что большинство современных браузеров готовы к работе с CSS Grid и могут поддерживать его свойства без префиксов:

Однако компания Microsoft снова разочаровала: на данный момент в браузерах IE и Edge присутствует только частичная поддержка Grid через префикс -ms-. Сейчас в Microsoft отправлена заявка на развитие поддержки Grid, и она находится в топе по количеству заявителей.
Несмотря на то, что большинство браузеров поддерживает Grid, он работает только в последних версиях этих браузеров (а в некоторых только частично), что составляет только 30–40 % от общего числа используемых браузеров. Если вы не уверены, что подавляющее большинство ваших пользователей имеет последние сборки браузеров с поддержкой Grid, то желательно не экспериментировать с созданием крупномасштабных проектов.
Перевод статьи «Getting started with CSS Grid Layout»