Punktilious’ Guide To Cultist Simulator[]
This page is intended to be a quick guide to gameplay for new players.
Obviously, this page will rob you of the experience of experimenting and learning about the game yourself, and should be read only if you are aware that the themes of the game center around exploration, secrecy, mystery, and discovery, and while reading this page will help you accomplish Events in the game, it will not give you the truest experience of the occult.
First game basics[]
When you start the game for the first time, you will be an acolyte with access only to a manual labour job. When the screen comes up, you will see two icons: One is a box with a hand with a sign on it, and the other is slimmer icon with a number of silhouettes in a walking position; these represent Work and your manual labour job respectively.
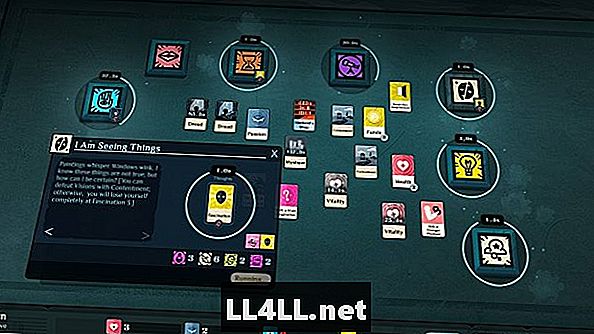
Clicking on the Work box will open a dialogue which allows you to perform work Events. The rounded black rectangle is a hole which can be filled with a number of appropriate cards.
You only have one option, so dragging the labour job into the hole is the natural option. As an alternative, you can drag the labour job onto the work box and it will automatically fill the empty spot.
It will not start immediately, requiring you to click the [S]tart button or press S.
It will begin processing your Event, giving you a timer. It will continue whether the dialogue is open or closed, with a circular halo around the box when it closes to keep you informed of the progress.
After allowing the timer to progress to completion, it will unlock another box, marking the passage of time. As the game progresses, more Events will be opened up to you, and you will gain more resources.
General case basics[]
Important Pre-Play Glossary[]
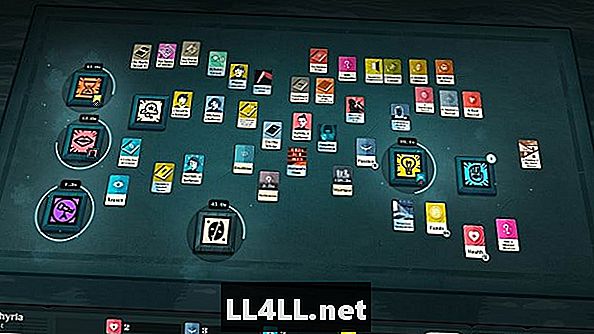
- Table
- The surface on which you play. All elements exist on the Table. Your camera view includes space that is not on the Table, but you cannot place game elements there.
- Events
- Beveled boxes, appearing raised off the table. They represent occurrences in the game, including: the passage of time, the ending of worlds, and going to work.
- Resources
- More slender objects, similar to cards, which are used in different events in the game. These include investigators trying to jail you, your abstract passions, and locations you remember.
Handy UI tips[]
Clicking an empty slot in an Event box will highlight cards that match the needs of the slot.
Dragging a Resource card around the board may highlight places it can fit.
In both cases, some combinations will not produce a result despite being permitted. (For example, Talking to your followers about Passion will do nothing.)
Events[]
There are six basic Events that will be unlocked early in the game: Explore, Talk, Study, Dream, Work, and Time.
Time is a special case Event: It will automatically consume Funds to keep you relatively healthy. If you do not have funds before the end of a time cycle, you will fall ill. You may not actively begin or end a Time Event.
Work is the first Event most lifestyles begin with. Among its uses are the following: Working a Job, Writing a Paper, Performing a Rite.
Dream allows you to: Restore Drained Attributes, Explore the Dream World, Meditate on an Attribute.
Study allows you to: Read and Translate Books, Examine Lore, Exercise an Attribute.
Explore allows you to: Mount Expeditions, Explore the City, Delegate Exploration, Visit a Location.
Talk allows you to: Recruit Followers, Attract Attention, Assign Followers, Visit Contacts, Organize Cult Activities.
The above lists are not complete, but suggestive.
It is possible to accidentally end up in a state where you do not have access to all Events (for example, as a Detective who fails to show up to work.) This does not make a game unwinnable, but is not something you should consider if you’re reading a beginner’s guide.
There are a number of additional Events which pop up from time to time, including things like Illness, Despair, Exotic Cravings, The Perils of Renown, and many more. If something is occurring to you, it is occurring inside a Event.
Some Events will automatically pull Resources from your table; some will not, in spite of being very, very important.
Some Events will consume your Resources; some will simply require their existence.
There are icons at the bottom of the Resource slots that indicate if it will pull automatically or if it will consume your resource.
Punktilious’ Guide To Cultist Simulator[]
This page is intended to be a quick guide to gameplay for new players.
Obviously, this page will rob you of the experience of experimenting and learning about the game yourself, and should be read only if you are aware that the themes of the game center around exploration, secrecy, mystery, and discovery, and while reading this page will help you accomplish Events in the game, it will not give you the truest experience of the occult.
First game basics[]
When you start the game for the first time, you will be an acolyte with access only to a manual labour job. When the screen comes up, you will see two icons: One is a box with a hand with a sign on it, and the other is slimmer icon with a number of silhouettes in a walking position; these represent Work and your manual labour job respectively.
Clicking on the Work box will open a dialogue which allows you to perform work Events. The rounded black rectangle is a hole which can be filled with a number of appropriate cards.
You only have one option, so dragging the labour job into the hole is the natural option. As an alternative, you can drag the labour job onto the work box and it will automatically fill the empty spot.
It will not start immediately, requiring you to click the [S]tart button or press S.
It will begin processing your Event, giving you a timer. It will continue whether the dialogue is open or closed, with a circular halo around the box when it closes to keep you informed of the progress.
After allowing the timer to progress to completion, it will unlock another box, marking the passage of time. As the game progresses, more Events will be opened up to you, and you will gain more resources.
General case basics[]
Important Pre-Play Glossary[]
- Table
- The surface on which you play. All elements exist on the Table. Your camera view includes space that is not on the Table, but you cannot place game elements there.
- Events
- Beveled boxes, appearing raised off the table. They represent occurrences in the game, including: the passage of time, the ending of worlds, and going to work.
- Resources
- More slender objects, similar to cards, which are used in different events in the game. These include investigators trying to jail you, your abstract passions, and locations you remember.
Handy UI tips[]
Clicking an empty slot in an Event box will highlight cards that match the needs of the slot.
Dragging a Resource card around the board may highlight places it can fit.
In both cases, some combinations will not produce a result despite being permitted. (For example, Talking to your followers about Passion will do nothing.)
Events[]
There are six basic Events that will be unlocked early in the game: Explore, Talk, Study, Dream, Work, and Time.
Time is a special case Event: It will automatically consume Funds to keep you relatively healthy. If you do not have funds before the end of a time cycle, you will fall ill. You may not actively begin or end a Time Event.
Work is the first Event most lifestyles begin with. Among its uses are the following: Working a Job, Writing a Paper, Performing a Rite.
Dream allows you to: Restore Drained Attributes, Explore the Dream World, Meditate on an Attribute.
Study allows you to: Read and Translate Books, Examine Lore, Exercise an Attribute.
Explore allows you to: Mount Expeditions, Explore the City, Delegate Exploration, Visit a Location.
Talk allows you to: Recruit Followers, Attract Attention, Assign Followers, Visit Contacts, Organize Cult Activities.
The above lists are not complete, but suggestive.
It is possible to accidentally end up in a state where you do not have access to all Events (for example, as a Detective who fails to show up to work.) This does not make a game unwinnable, but is not something you should consider if you’re reading a beginner’s guide.
There are a number of additional Events which pop up from time to time, including things like Illness, Despair, Exotic Cravings, The Perils of Renown, and many more. If something is occurring to you, it is occurring inside a Event.
Some Events will automatically pull Resources from your table; some will not, in spite of being very, very important.
Some Events will consume your Resources; some will simply require their existence.
There are icons at the bottom of the Resource slots that indicate if it will pull automatically or if it will consume your resource.

Содержание
- Прочитайте Аспекты Ваших Карт
- Знать, как надежно приобрести ресурсные карты
- Здоровье
- фонды
- страсть
- причина
- Положение Гловера и Гловера
- Избегайте использования здоровья на работе, если можете
- Больше последователей всегда помогает, и как вы их используете
- Не позволяйте экспедициям израсходовать всех ваших последователей
Не каждая игра дает вам ключи от главного входа. И в Культист симуляторразработчики хотят, чтобы вы заглянули под каждый камень, чтобы найти скрытый ключ, который они поместили для входа.
Эта сложная игра предлагает игрокам попробовать новый метод и использовать другой подход для достижения успеха на своих собственных условиях. Это руководство предлагает некоторые полезные советы для тех, кто застрял в Культист симулятор или кто хочет улучшить свои шансы на выживание.
Примечание: разработчики поощряют эксперименты в этой игре. Большая часть советов, которыми здесь делятся, может содержать спойлеры.
Прочитайте Аспекты Ваших Карт
Вы найдете их в правой нижней части каждой карты, на которую вы нажимаете. Вы должны понимать, что означают эти символы и как они работают вместе с другими глаголами, которые появляются на вашей доске.

Это означает, что вы потратите много времени, чтобы начать игру с паузы и прочитать аспекты, связанные с вашей стартовой колодой. Не бойтесь читать столько, сколько сможете — чем больше вы читаете, тем больше у вас шансов сразу узнать, какие карты идут вместе.
Обязательно сделайте это, даже если вы испытываете убытки.Найдите минутку, чтобы прочитать аспекты глаголов, которые вам дали, а также карты, которые у вас есть на вашей доске. Это даст вам лучшее представление о том, почему вы проиграли и как вы можете исправить это в следующий раз.
Знать, как надежно приобрести ресурсные карты
Начало игры может показаться всепоглощающим, предоставляя вам здоровую базу личных характеристик, таких как карты здоровья, фондов, страсти и разума. Это остается трудным ресурсом для сбора на протяжении всего прохождения Культист симулятор, и вы всегда будете находить оправдание для хранения этих товаров на складе. Лучший способ держать их при себе — знать самые простые и быстрые способы их приобретения.
Здоровье
Это может оказаться самым трудным ресурсом для приобретения. Вы хотите запастись картами Vitality. Вы можете приобрести их, поместив карты здоровья в ячейку для изучения. Потребуются две карты жизнеспособности, чтобы получить другое здоровье, и это может занять некоторое время; убедитесь, что вы делаете это раньше, чем позже. Чтобы еще больше увеличить свое здоровье, вам понадобится как минимум четыре карты Vitality одновременно, чтобы получить еще одну; То же самое относится к Страсти и Разуму, для которых вам понадобятся Мерцание и Эрудиция соответственно.
фонды
Вы найдете эту простейшую личную статистику, которую сможете получить, и у вас будет большая ее часть. Вы можете использовать свою другую личную статистику, такую как Здоровье, Страсть и Разум, чтобы получить больше. Вы пополняете это из рабочего глагола. Вы захотите иметь много фондов, так как эта статистика может помочь вам улучшить другие ваши характеристики, и она остается полезным инструментом для продвижения игры!
страсть
Если вы поместите Passion в глагол изучения, вы обнаружите, что можете приобрести Glimmering. Когда вы добавите достаточное количество мерцания (вместе с денежными средствами) к глаголу изучения, вы можете добавить больше страсти в свой общий пул. Другие карты, такие как Fascination, могут появиться после изучения мерцания. Вы можете использовать Fascination с Sleep Verb, добавить к нему Dread и получить больше Passion.
причина
Так же, как и Passion, вы можете использовать карту Reason с Study для приобретения Erudition. С Erudition вы можете использовать его вместе с глаголом обучения, добавить карту Фонда и получить повышение в Reason. Если вы берете карту Dread, используйте ее со сном и добавьте к ней контент, чтобы увеличить свой пул разума.
В Культист симулятор, нет верного способа получить карту, когда вы используете ее с задачей. Всегда есть небольшой риск, что вы получите негативный аспект, но это часть игры. Если вы хотите получить наибольшее вознаграждение, вы должны подготовиться к тому, чтобы справиться с рисками, связанными с ними.
Положение Гловера и Гловера
Из всех заданий, доступных вам в игре, карьера Гловера и Гловера может предоставить вам наибольшее количество средств, Если вы планируете идти по этому маршруту, не застрять на младшей позиции. Вы хотите зарабатывать больше средств и расширять свою карьеру, зарабатывая акции.
Вы можете зарабатывать повышение по службе, добавляя Reason, когда вы помещаете Glover и Glover Junior Position в рабочий глагол. Поскольку это занимает вашу карту Причины, лучше всего делать это, когда в вашем пуле есть по крайней мере 2 Причины.
Получив повышение, вы заметите, что ваш начальник, мистер Олден, начинает требовать от вас сверхурочной работы. Он будет продолжать требовать это от вас, и если вы не будете соблюдать его, он будет пристыковывать вашу зарплату.
Чтобы получить максимальную отдачу от этой карьеры, вы должны убить мистера Олдена. Вы можете сделать это, поместив карту Здоровья или Последователя в слот Исследовать. Это может занять несколько попыток. В конце концов, вы должны получить наемную помощь, чтобы справиться с мистером Олденом.
Когда вы будете готовы, поместите наемную справочную карту в слот Talk, а затем добавьте в нее свою карту Job. Они должны устранить мистера Олдена. Это может занять несколько попыток, поскольку вы можете потерять эту возможность. После ухода мистера Олдена вы можете продолжать работать, как обычно, и через некоторое время вы должны получить еще одно повышение.
Старшая позиция — не самый высокий уровень, который вы достигли в Glover и Glover. Так же, как вы убили мистера Олдена, вы можете таким же образом убрать одного из сидящих председателей компании. Опять же, это может занять некоторое время, так как вы можете упустить эту возможность. После того, как вы вынули младшего Гловера, вы окажетесь в компании Гловер и Гловер.
Для тех, кто только начинает, это безопасная позиция для игры.
Избегайте использования здоровья на работе, если можете
Вбрасывая карту здоровья в рабочий глагол, вы выполняете ручной труд. Вы найдете, что это отличный способ заработать деньги в краткосрочной перспективе, но это не сулит ничего хорошего для вашей длинной игры. Используйте эту опцию экономно и только если у вас есть запас здоровья.
Если вы в крайнем случае, конечно, это отличный вариант, если вам нужен быстрый приток средств. Но когда вы делаете это слишком много, вы рискуете получить карту Травмы. Вы должны будете использовать средства, чтобы превратить эту карту травмы обратно в карту здоровья. Итак, если вы делали это, чтобы получить средства в первую очередь, и вы взяли карту травмы, вам не повезло.
Используйте Health в рабочем глаголе только в том случае, если у вас есть свободные средства для спасения.
Больше последователей всегда помогает, и как вы их используете
Если вы не используете свой глагол Talk для чего-либо конкретного, оптимизируйте этот пустой раздел и попытайтесь найти последователей. Чем больше у вас на стороне, тем больше вариантов у вас будет в середине или конце игры.
Важно также понимать, что вы, вероятно, найдете два разных типа: именованные подписчики и Hangers-On. Привязки ниже на полюсе власти по сравнению с именованными последователями, и вы можете улучшить их только один раз до уровня Пешки.
Вы можете обновить названных подписчиков три раза. Они начинаются как Знакомые, и вы можете превратить их в верующих, а затем в учеников. Несколько избранных могут превратиться в Возвышенных. Это может произойти, только если они связаны с основным принципом вашего культа.
Из двух, используйте вешалку в ритуале, чтобы получить выгоду, поскольку они не так важны, как названные. Кроме того, если вы повысите уровень Вешалки до уровня Пешки, вы сможете использовать его в качестве козла отпущения, когда Бюро Подавления начнет замечать вас.
Поскольку вы резервируете своих именованных подписчиков для реальных задач, назначайте их только тем задачам, которые вы хотите выполнить правильно. Вероятность успеха у верующих составляет 30%, у учеников — 70%, у Возвышенных — 100%.
Не позволяйте экспедициям израсходовать всех ваших последователей
У вас есть три результата, когда дело доходит до завершения экспедиции:
- Вы добились успеха (отлично!)
- У вас кончились деньги
- У вас закончились подписчики
Из этих трех наихудший из-за недостатка подписчиков, потому что их было труднее всего приобрести, и как только вы их потеряете, они исчезнут. Вы можете вернуть деньги. Не люди. Если вы видите, что ваша экспедиция идет не очень хорошо, лучше всего позволить ей закончиться без денег — не бросайте последователей в проблему!
Если у вас все еще есть проблемы, или если у вас есть конкретный вопрос, пусть ваш голос будет услышан в комментариях ниже.
Для большего Культист симулятор гиды, держите это здесь в GameSkinny.

Вы были выбраны, чтобы видеть то, что не должно быть замечено. Вы должны подготовиться…, и Вы должны выжить…
Другие руководства симулятора Cultist:
- Как выжить как Cultist.
- Краткое руководство по обрядам.
- Быстрая ссылка исследования знаний.
- Справочник по Mansus.
- Как делать деньги & заработать продвижения.
Начало
Для этого руководства мы предположим, что Вы выбрали фон Кандидата. Это — начало по умолчанию для всех новых игроков.

Эти блоки называют Глаголами. Они будут то, как Вы взаимодействуете с миром. Это — Глагол Работы. Это управляет и заплаченными трудовыми и личными проектами (больше на последнем позже). У каждого глагола есть свой собственный таймер, и они все бегут друг независимо от друга.
Во-первых, работайте изменение в больнице как носильщик. Не стесняйтесь занимать время, чтобы прочитать текст аромата, поскольку на некоторое время еще не будет никакой нехватки времени. После Вашего изменения Вы получите Фонды и одно здоровье, и получите Глагол Сна.
Глагол Сна скажет Вам о мечте о старике, с которым Вы работали в больнице. Часы тогда запустятся, поскольку Глагол Времени добавлен к Вашему столу. Сначала, часы ничего не будут стоить Вам и дадут Вам Глагол Исследования, наряду с наследованием от старика. После того это будет стоить Вам одной монеты в минуту как прожиточный минимум. Если Вы не можете накормить Глагол Времени, Вы получите голод. Голод будет стоить Вам фондов, чтобы удалить и будет стоить Вам Вашего здоровья, которое может привести к Игра закончена. Деньги будут очень важны очень скоро, но сначала Вы должны изучить свое наследство.
Изучите наследство или с Причиной или со Страстью. Выберите тот что большинство обращений. Вы получите карту Понятия, которую Вы должны отложить на данный момент, книга для профессионального обучения (больше на том позже), и две других карты, что Вы можете работать на Глаголе Исследования. Карта Понятия будет важна позже, но у Вас есть более неотложные проблемы в данный момент. Проблемы как создание достаточного количества денег, чтобы сохранять Глагол Времени счастливым…
Не стесняйтесь управлять другими картами на Глаголе Исследования, если Вы хотите или не стесняетесь игнорировать их на данный момент. Пауза — Ваш друг, если Вы принимаете решение работать в многозадачном режиме (Короткий путь: Интервал) и Вы можете всегда стоять в очереди любые действия, которые Вы любите, в то время как игра сделана паузу. Хотя безотносительно Вашего выбора, Ваша первоочередная задача будет находить устойчивый источник Фондов…
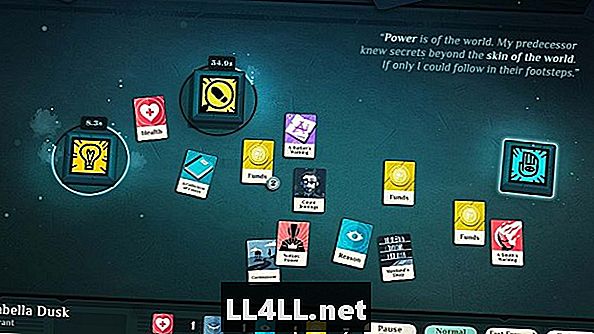
Делание денег
Вы можете делать деньги одним из четырех способов:
- Используйте свою медицинскую карточку с Глаголом Работы, чтобы сделать ручной труд. Это не рекомендуется долгосрочное, поскольку у этого есть небольшой риск превращения Вашей Медицинской карточки в карту Травмы, которая будет стоить одной карты Фондов, чтобы возвратиться в Медицинскую карточку. Фонды Вы не будете в состоянии предоставить. Ваша игра, вероятно, закончится вскоре после.
- Используйте карту Страсти со своим Глаголом Работы, чтобы сделать живопись. Иногда это делает деньги. Иногда Вы только получаете удовлетворенность. Иногда Вы рисуете Mansus, и это не живопись, которую Вы хотите показать незнакомцам…
- Используйте Причину карта на Вашем Глаголе Работы. Это откроет возможность работать в Glover и Перчаточнике как Младший Партнер. В конечном счете это — Ваш наилучший вариант для делания денег, но не, если Вы остаетесь в Младшем Объединенном положении. Чтобы получить продвижение, Вы должны будете управлять картой Перчаточника и Перчаточника в Глаголе Работы, открыть Глагол Работы и затем поместить Причину карта в место в центре таймера. От того пункта на Вы должны будете продолжать использовать причину карта вместе с Вашей картой Перчаточника и Перчаточника, чтобы продолжать делать ту же самую сумму денег, которая в ранней игре может связать Вашу Причину. Но иногда Вы будете зарабатывать Эрудицию, которая может быть превращена в большую Причину (больше на этом позже).
- Продайте Spintria через Глагол Работы. Это требует, чтобы деньги начали, и таким образом не подходит для ранней игры. Однако это может быть очень прибыльным, как только у Вас есть деньги, чтобы вложить капитал в покупку книг.
Вероятно, самое верное начало должно использовать Причину с Глаголом Работы и получить Младшую Объединенную карту от Перчаточника & Перчаточника. Вы можете обойтись некоторое время просто, что, но у Вас не будет большой части системы поддержки, если вещи пойдут не так, как надо. Вы должны пытаться создать свою причину. Как только Вы имеете два, рассуждают, Вы можете подняться разряды и начать создавать Вашу заначку.
Личная статистика

Причина и Страсть — возобновляемые ресурсы. Если Вы включите их во что-нибудь, большую часть времени они возвратятся к Вам после завершения работы. Однако, в то время как они работают, они будут заняты.
Предупреждение: если Вы делаете живопись, ничего не помещайте в слот Inspiration, который Вы не хотите терять. Это включает здоровье, Причину и Страсть. Они будут разрушены. Не помещайте irreplacable карты в место вдохновения также. Вы, вероятно, лучше всего оставляете слот Inspiration, незаполненный, если Вы просто надеетесь делать деньги, поскольку помещение вдохновения там только приведет к неденежному вознаграждению. Это могло бы открыть новые карты позже, но на данный момент, просто проигнорировать его. И определенно не включайте здоровье, Причину или Страсть в нее. Только когда Вы можете сэкономить их.
Вы можете думать о здоровье, Причине и Страсти как статистика. Вы можете получить больше Причины при помощи карты Эрудиции на Глаголе Исследования и расходах Фондов. Вы можете получить карту Эрудиции при помощи Причины карта на Глаголе Исследования, или это может обнаружиться беспорядочно. То же самое верно для Страсти и Мерцающей карты, и для здоровья и карты Живучести. Таким образом Вы можете обучить любой из своих факультетов быть больше, изучив их, изучив получающуюся карту и расходуя Средства на их исследование. Никакие фонды, никакая модернизация статистики.
Это не гарантируется, хотя это Вы получите Причину от Эрудиции, Страсть от Мерцания или здоровье от Живучести. Вы можете также получить Страх от Эрудиции, Восхищение от Мерцания и Травму от Живучести. Это не идеально, но Вы можете все еще оценить свою статистику с этими картами.
Страх может быть превращен в причину при помощи его на Глаголе Сна. В то время как это тикает, добавьте карту Удовлетворенности (Удовлетворенность может обнаружиться беспорядочно или при помощи карты Страсти на Глаголе Сна). Когда таймер будет закончен, у Вас будет больше Причины.
Восхищение может быть превращено в Страсть при помощи его на Глаголе Сна. В то время как это тикает, добавьте Страх. Когда таймер будет закончен, Вы получите Страсть.
Травма может быть превращена в здоровье при помощи его на Глаголе Сна. В то время как это тикает, добавьте Средства для продуктов питания и лекарств. Когда таймер будет закончен, Вы получите здоровье (дополнительное здоровье может держать смерть в страхе, даже если Вы достаточно неудачны, чтобы заболеть двумя болезнями подряд от Глагола Времени).
Если Вы будете управлять каким-либо вышеупомянутым без его соответствующей карты, Вы просто потратите впустую 90 секунд времени на Глаголе Сна. Это ничего не будет стоить Вам, но Вы ничего также не получите.
Быть установленным
Теперь, когда у Вас есть источник фондов, Вы должны подготовиться к тому, что должно прибыть. Изучение Наследства или с Причиной или со Страстью дало Вам книгу, которая модернизирует Вашу выбранную статистику, если у Вас будет достаточно Эрудиции или Мерцания. Это также дало Вам, доступ к два ведет. Изучите их, чтобы открыть Глаголы Исследования и Разговора, если Вы уже не имеете.
Отсюда на, попытайтесь делать успехи Вашего голода. Всегда держите несколько карт Фондов в запасе, чтобы иметь дело с неожиданными расходами, как болезнь или травма. Вы не хотите, чтобы Ваша единственная Медицинская карточка была израсходована, когда болезнь прибывает, стуча. Фонды помогут возвратить Ваше здоровье после болезни и держать Вас в игре.
Помните, Вы можете возвратить свое здоровье, в то время как Глагол Болезни ездит на велосипеде. Обязательно возвратите Ваше здоровье как можно скорее, когда оно будет иссушаться болезнью. Используйте Болезнь с Глаголом Сна и потратьте деньги на него. Если Глагол Сна закончится (и Вы требуете его), прежде чем Глагол Болезни будет считать в обратном порядке, Глагол Болезни захватит Ваше здоровье, и Вы будете жить. Всегда держите по крайней мере одну Медицинскую карточку в игре в любом случае.
Затем, Вы можете основываться на Причине прогрессировать в разряде и Перчаточнике и Перчаточнике, или делать деньги от Вашего искусства. Долгосрочный, хотя, Вы должны будете, вероятно, стать Старшим научным сотрудником в Glover и Перчаточнике. Вам будут нужны две Причины карты для этого, и обе карты будут заняты, когда Вы будете делать деньги, но как только Вы достигаете той точки, у Вас будет очень эффективный источник Фондов.
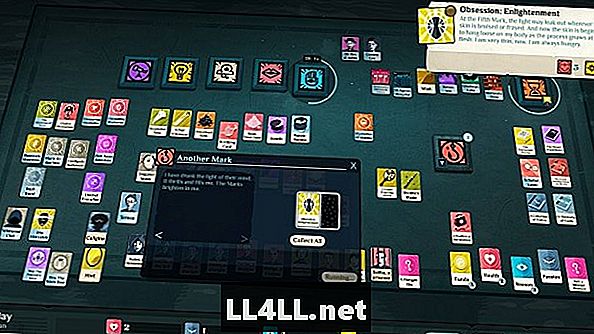
С надежным источником Фондов Вы будете в состоянии изучить оккультизм. Когда Вы изучили Наследство, Вы получили Понятие. Если Вы изучили его с Причиной, Понятием будет Просвещение. Если Вы изучили его со Страстью, Понятием будет Власть. Оба — достойные цели, но имеют различные требования для победы. Эти Понятия могут быть изменены, включив их в Глагол Сна, который изменит требования победы.

Например, Понятие Просвещения требует знания Фонаря. Это — Знания, и есть, возможно, приблизительно дюжина различных наборов Знаний. Они все тайные, странные, и возможно запрещенные.
Иногда на серьезном основании. Некоторое знание опасно.
В любом случае, исследуя Ваше Понятие, Вы будете знать, на каких Знаниях Вы нуждаетесь к найденному в своем Культе. Вы… — здесь к найденному культ, правильно?
Lore и Spintria
Конечно, изучение, как использовать Знания, является своим собственным предметом. Сбор Знаний является необходимым шагом к основанию Культа, но у этого есть другое использование также…
Книги приведут к Знаниям, но Вы должны будете щелкнуть по каждой карте Знаний и прочитать ее описание, чтобы выяснить, какие Знания это. Ищите символ с числом рядом с ним. Этот символ скажет Вам, которые — Знания, который… и число скажет Вам, насколько ценный это. Некоторые тайны больше, чем другие…
Теперь, если Вы — постоянный клиент в Магазине Морлэнда, Вы можете иногда сталкиваться с книгами на латинском, греческом, или даже арамейском языке. Ни один из них не языки, которые Вы знаете, так чтобы получить Знания от них, Вы должны будете найти наставников.
Во-первых, используйте Страсть, или Причина на Вашем Исследовать Глагол (с Невилла строят, Вы можете также использовать Восхищение). Вы найдете, что один из трех различных ученых… принимающих Вас, не находит Славу вместо этого. Если это происходит, просто продолжайте пробовать, пока Вы не находите тот… или предпочтительно все три, если у Вас есть время и Страсть/Причина, чтобы сэкономить.
Как только Вы нашли ученого, Вы можете выучить их язык, таща их к Глаголу Исследования. Но эти ученые не хотят быть заплаченными в монете…
Если Вы нажмете на платежное место, Вы найдете, что оно только принимает карты с аспектом Spintria. Это — специальная валюта преступного мира… не, преступный преступный мир возражает против Вас, академический преступный мир… место далекий skeezier и вдвое более опасный… контакт с запрещенным знанием и опасными идеями…
С Невилла строят, Вы можете только заработать Spintria, закончив академические комиссии. Чтобы сделать это, включите своего новооткрытого друга в Глагол Разговора. После десяти секунд они попросят комиссию по определенным Знаниям.
Как отмечалось ранее, Вы можете найти Знания, изучив книги. Карты знаний легко повторно используемы. Как только у Вас есть широкая коллекция тайных Знаний, Вы можете использовать их, чтобы заработать столько Spintria, сколько Вам, возможно, понадобилось бы.
Но… книги стоят Фондам, и получить Знания требует, чтобы Вы провели время в Глаголе Исследования. В конце каждая книга даст Вам определенные Знания, но Вы, вероятно, не будете знать, какой, пока это не сделано. Описание книги может дать Вам ключ к разгадке, но оно точно не скажет Фонарь или Моль или Секретные Истории на покрытии.
Продолжайте исследовать книги, пока Вы не получаете Знания, которые соответствуют комиссии, которую Ваш академический друг дал Вам. У каждых знаний есть тип и счет, который Вы можете изучить, щелкнув по карте, которую Вы получили от изучения книги. Ищите символ с числом рядом с ним. Щелкните по символу, чтобы узнать, какой тип Знаний Вы имеете (Фонарь, Моль, Чаша Грааля, и т.д.).
Число рядом со знаниями — свой счет, который указывает, насколько важный эти знания. Это также затрагивает качество отчета, который Вы напишете для своей академической комиссии. Счет 2 приведет к Краткому отчету, один из 4 предоставит Существенный отчет. Комиссия попросит у Вас конкретного качества Знаний, но Вы можете безопасно проигнорировать, что в Невилле строят. Обширная комиссия может быть удовлетворена Кратким отчетом. Возьмите Знания и включите их в свой Глагол Работы (быть уверенным, что у Вас есть достаточное покрытие, чтобы покрыть Ваши расходы на проживание тем временем (требуется точно 60 секунд)). Вы получите Отчет об этих Знаниях.
Как только Вы имеете свой отчет, захватываете Карту Комиссии и включаете его в Глагол Разговора. Схватите своего академического друга также. Если Вы забыли, кто уполномочил эту конкретную комиссию, щелкните по слоту Patron, и это напомнит Вам (щелкните по какому-либо месту, если Вы когда-либо не уверены, что, как предполагается, соответствует там, и это будет (иногда) говорить Вам, в чем Вы нуждаетесь (… иногда)). Тогда заполните последнее место отчетом, который Вы просто написали. Периодически повторите Глагол, и Вы получите Spintria.
Оттуда, Вы можете или преобразовать его в наличные деньги с Глаголом Работы, потратить его на языковые уроки с ученым по Вашему выбору, или просто окружить валом его для более позднего использования. Помните, Серебряный Spintria стоит больше Фондов, чем Бронза, которая стоит больше Фондов, чем Железо. Также помните, что Академический Преступный мир не дает изменение…
… хорошо, не точное изменение… изменяется, вероятно, неизбежно, изучая то, что не должно быть изучено…
Основание Вашего культа
А-а-а, теперь мы добираемся до мяса предмета. Ваш собственный Культ. В конце концов, это не Тайный Академический Симулятор, не так ли?
К найденному культ Вам будут нужны или Мистика или в Слава и правильные Знания. Будьте очень осторожны с Мистикой и Славой, поскольку это может использоваться, чтобы создать доказательства против Вас. Если слишком много будет накоплено, то Вам будет нужен patsy, чтобы взять падение для Вас… весь больше причины для найденного культ, действительно.
У Вас должно быть много Знаний от Ваших научных исследований, но для лучших результатов они должны, вероятно, соответствовать Вашему Понятию. Еще, победа будет оставаться когда-либо вне Вашего схватывания.
Если Вы испытываете затруднения при нахождении правильных Знаний, Вы можете также найти Знания в мечтах, обычно применив Причину для Вашего Глагола Сна. Это — также способ исследовать Mansus… Я позволю Вам выяснить, как сделать это самим. Помните, это — пустое место, которое делает миску полезной.
Как только у Вас есть Знания, которые соответствуют Вашему Понятию, Вам будет нужен Найденный Культовый Глагол. Используйте Мистику или Славу на Глаголе Разговора, чтобы открыть Найденный Культовый Глагол. Как только это сделано, Вы получите неоднократно подсчет вниз Найденный Культовый Глагол. Не волнуйтесь об обратном отсчете, что глагол, не идущий нигде. Судьба неожиданно не исчезнет на Вас.
Как только Вы имеете глагол, открываете его и включаете Знания, которые соответствуют Вашему Понятию в место, затем ждите обратного отсчета, чтобы закончиться. Вы немедленно получите карту с именем своего культа на нем.

Не волнуйтесь о потере тех Знаний. Это будет возвращено Вам целый.
Расширение Вашего культа
Теперь, когда у Вас есть культ, Вам будут нужны последователи. В конце концов, без последователей, Вы просто были бы расстроенным отшельником, ищущим просвещение. И это не забава.

Чтобы принять на работу последователя, тяните свою Культовую карту к Глаголу Разговора. Тогда включите своего потенциального последователя, Фонды, и или одна Мистика или Слава. Не забывайте, Вы можете получить Мистику или Славу, говоря с Вашим партнером.
У принятия Вас есть все, в чем Вы нуждаетесь, у Вас теперь есть лояльный последователь.

Последователи великие. Они могут сделать все виды незаконных вещей для Вас. Они также приносят большие жертвы…
… хорошо, лучше их, чем Вы, правильно?
Следующие шаги
Ну, теперь, когда у Вас есть основы, Вы можете исследовать всю эту игру, должен предложить! Эксперимент с различными картами на различных глаголах! Исследуйте странные мечты! Исследование неясные Знания и раскрывает скрытые истины!
(Ну, если мы абсолютно честны здесь, те истины были, вероятно, скрыты на серьезном основании).
У меня нет ничего больше, чтобы предложить. Я дал Вам фонд. Постройте из него, что Вы будете.
First of all, part of the fun and frustration of Cultist Simulator is experimenting and failing a lot, and then learning from those failures. After about 4 or 5 defeats where my character either went insane, suicidal, or arrested (have never died from lack of Health yet), my character Guybrush Threepwood finally became Enlightened after 45 hours. Sorry, just wanted to brag a bit since I didn’t play the early access. :p (Nyahaha, finally won with all the Desires. I am done with this game for now!)
Anyway, the takeaway is: the game will be less fun if you read this guide and you’ll be spoiled with most of the info here (I haven’t marked most of the stuff with spoiler tags) so consider yourself warned. But if you’re feeling frustrated on a certain part, feel free to go ahead, or even message me.
General
-
Pause a card’s timer Simply place them on any slot that will accept them! This way, you’ll be able to keep your Jobs, Hirelings, Summons, Prisoners, Corpses, Influences, Vitality/Erudition/Glimmering, and other cards practically forever! And remember, you can pause the game at anytime to carry out other actions. You can only leave one window open though. This makes upgrading your Skills a breeze!
-
Can’t find the right card to use on a slot? Click on a slot to make cards that can be slotted into it glow.
Dealing with Hunters and Evidence
You’ve got a variety of ways to deal with these problems
-
Hush hush — You can’t really go wrong with being stealthy, you’re a cult after all! Do this by not performing actions that create Mystique and Notoriety, letting them expire naturally, or getting your Heart cultists to erase them. Notoriety is really the only thing you should be concerned about since only Notoriety will give/upgrade Evidence against you while Mystique only lengthens the time that they investigate you. They only have a chance of creating Evidence from Notoriety however, unless you’re dealing with Meticulous Hunters, which always make Evidence from Notoriety. Erratic Hunters can create Evidence even if there’s no Notoriety, but in turn have a lower chance of making Evidence from Notoriety, so it might be good to actually have some Notoriety when they’re present. Earning money from Painting is also a good idea if Erratic Hunters on the board!
-
Kill them all! — Keep murdering/capturing Hunters as they show up by using followers with Edge, or using poisons (items received from Expeditions). Success will give you Notoriety, and either a Corpse or capturing them. Failed attempts will make Notoriety though, and might even kill whoever you sent to do the job! It’s somewhat safe to keep attempting to murder them as long as they don’t have any Evidence present, or if you can destroy the Evidence. Poisons don’t get consumed if they fail to kill them, but will still create Notoriety! Tenacious Hunters have a 1/3 chance of not getting killed, even if it should result in 100% chance (by sending in 10 Edge Summons), and Tenacious also applies to poisoning attempts. Mystic Hunters are protected from Summons, but they’re not immune. If you send a Summon and they fail, Hunters have a chance of becoming a Mystic! Just keep sending minions (and poisons) at them until they die or use other tactics.
-
I’ve got a secret to tell you… — Use Dread, Fascination, Lantern, or Winter Lore to drive Investigators insane. Grim Hunters are weak to Dread and Winter Lore while Idealists are weak to Fascination and Lantern. I don’t suggest using Dread and Fascination though since I’ve never succeeded with using them so far. Higher levels of Winter/Lantern have a higher success chance, although I’m not sure if that only applies if the text description changes… Using Dread/Winter or Fascination/Lantern might give them a chance to become Grim/Idealist/Tenacious though, and it always makes Dread/Fascination and Notoriety (if you fail) so be careful! If you succeed though, they’ll become insane and then they’ll be gone after a while without leaving a Corpse… or you can use them as a sacrifice in your Rites or the Spider Door!
-
Well, I didn’t do anything — Keep destroying Evidence using Moth followers. No matter what traits Hunters have, they can’t do anything at all if their Evidence keeps disappearing! Failure to destroy Evidence will create Notoriety, or kill your minion. Earning Funds by Painting is a breeze this way, but be warned, there are no Summons that have more than 8 Moth, and even Moth Exalted don’t have 100% chance to succeed.
-
In the public’s eye — A tactic for Painters. By using Mystique when painting (no Lore or Summons as your Inspiration though), you get more Mystique as a result and stop the timers of any Mystique you used while you’re painting. If you have a lot of Mystique present, Hunters will have a hard time investigating you so one or two Notoriety isn’t bad at all and allows you to earn a bit more money. Or, if they’re close to investigating you, you can use Notoriety to paint, although this is somewhat dangerous since there’s always a chance that they’ll investigate you for two consecutive Seasons.
-
Winter is coming — A certain Winter spell will randomly kill Mortals (including you). Obviously, only do this if desperate or want to get The Sun Before Me achievement.
Work
-
Earn Funds by dragging Ability aspects such as Health and Passion.
-
Working Health and Passion, as well as their associated Skill cards will usually earn you Vitality and Glimmering.
-
Health and Passion Skills can also be dragged here for an improved effect. Realistically though, you’ll never earn that enough money through the Health even with max Health Skill.
-
Painting using Passion or Skill can sometimes net you some much needed Contentment.
-
Using only Passion, you can consume Restlessness (which results in Dread after a minute). You can also Paint using the Skill card, and Restlessness as your Inspiration to consume it. Painting does not consume other Influences aside from Restlessness.
-
Earn more money through the painting by using Mystique or Notoriety instead of just Passion. Like the game warns though, it will also generate more Mystique or Notoriety after you’re done painting. Using Notoriety nets you about 2 Funds, so for example, if you used 3, you’ll get around 6 Funds.
-
You can make special Paintings that can be used as Tools (gives 8 Aspect) or auction away. To get a Forge painting for example, you’ll need at least 6 Forge Aspect total, the pigment associated with Forge, and some Passion (I always use 4 Passion when making these paintings. Haven’t tested it yet with only 1-3 Passion. Not using any Passion will not make special Paintings.). All pigments give 4 Aspect, so you’ll only need 2 Aspect from Lore, Influences, or Summons. However, you won’t get Funds after finishing the Painting and get some Notoriety as a result.
-
Dragging Reason will earn you a clerical Job card. Afterwards, you won’t be able to directly use Reason on Work, but the Job itself will require Reason.
-
Some characters have Jobs at the start.
-
You can get promoted on some of the Jobs. For the clerical Job, there’s (I’m not 100% sure) a small chance of becoming promoted whenever you Work. For a more surefire way to promotion, you’re can let your minions remove certain… Annoyances.
-
On some Jobs, you’ll be demoted, or even lose them entirely if you don’t Work on them after a while. You can usually beg using Passion to keep your Job.
-
Fulfill Commissions and write Manuscripts dragging them here. You’ll need the appropriate Lore, 1-2 Reason, and sometimes Passion depending on the commission. These commissions can be a reliable way of earning Funds after auctioning the Spintrias.
-
Get to the next level of ascension by dragging your Dedication card. You’ll need some other stuff though.
-
Cast spells or summon creatures through Rite cards. After amassing enough Lore, Tools, Followers, and Ingredients, Summons are better for doing anything that your cultists can, and you can just keep summoning them if they die somehow. Spoiler
Sleep/Dream
-
You can take a nap by dragging fatigued Health to Sleep, which has a shorter 30 second timer compared to naturally letting it recover for 60 seconds.
-
Counter Dread by dragging Dread to Sleep and then using Contentment. Fascination can be countered by Dread using Sleep, but it doesn’t consume Dread.
-
Funds can be used to buy tinctures of opium, generating Contentment. There’s a chance of becoming Ill though. The game says there’s a small chance of provoking despair but I haven’t seen it.
-
Illness and Injuries can be cured using Funds or Vitality.
-
Using Health, Passion, or Reason will allow you to dream. Dreams randomly give you: Dread, Vitality, Contentment, Fascination, and Glimmering (not sure if it also gives Erudition). In other words, very unreliable.
-
Using Passion, and then either Lantern or Knock lore, you can enter the Mansus.
-
To progress through the Mansus (and thus the game), you’ll need to improve your knowledge of Knock or Lantern.
-
When entering the Mansus, the Way cards are usually a better option than just dreaming randomly since one of the results are always shown. From what I’ve seen, each location for each Way has 2-5 cards to draw from.
-
I’ve found The White Door as one of the most useful Ways. By exhausting just one of your Health, you can get: get Restlessness (useful for countering Fascination), Fascination, Glimmering, Erudition, and if you’re really close to getting arrested, A Favour from Authority.
-
Be careful when dreaming, the Mansus is usually where Fascination comes from. Also, some of the more powerful Influences will turn into Dread, Fascination, and others.
-
You can enter the Peacock Door by Spoiler
Study
-
Use Advancement cards like Vitality, Erudition, and Glimmering to improve your Attributes and Skills. Higher levels of Skill will need more cards up to a maximum of 8.
-
It seems there’s no limit to how much you can improve your Attributes, but you’ll always need 8 Advancement cards.
-
Read books to learn Lore. Rarer books may also give you Dread, Fascination, or Influences.
-
Books in another language need to be translated to be read. Some books and Patrons/creatures can teach you how to translate them.
-
Combine same levels of Lore to improve it. You’ll usually need some Glimmering, Erudition, and Reason to do it though.
-
Split Lore into two lower levelled Lore using one Reason. This is easier and faster than combining or subverting.
-
You can subvert Lores using two different Lores. For example, you can Study Grail with Moth, which will subvert (i.e. consume) that Grail lore and improve Moth to the next level. This makes it possible to convert excess Lores into other types. Like with combining, you’ll need Glimmering, Erudition, and Reason.
-
Studying Knock with another type of Lore will always turn it into Knock, so be careful.
-
My advice, always leave at least one level 2 Lore (the minimum level) since all Lore books are Unique (only one exists per game). Some of the rare books give 14 (max) level Lore though, so you probably don’t need to subvert that much.
Talk
-
Use with any type or level of Lore to find Acquaintances, and sometimes Hanger-Ons, but you’ll need Reason or Passion. This always generates Mystique afterwards.
-
Important: ALL cultists are Unique. Each Aspect has 2-3 cultists, and you only have up to 8 Hanger-ons per game. Do try to keep them alive and sane.
-
Talk to Summons and Hirelings to keep them around longer.
-
Talk to your Summon and let them talk to another Summon/other card (with a timer) to keep them both of them longer.
-
Talk directly with your Followers/creatures/hirelings, and then drag your Cult card to carry out actions in your cult’s name. Depending on a Follower’s Aspect, they can do different things. There’s always a chance of failure (usually killing them and generating Notoriety), but having 10 in an Aspect is guaranteed…most of the time!
-
Heart removes Mystique and Notoriety. Failure has no downsides, aside from not removing Mystique/Notoriety and «extending» their timers (since timers don’t run out when in a slot).
-
Grail finds Prisoners for your Rites or Desire. Can also be used for Annoyances.
-
Edge and Winter are the only ones that have a decent chance of killing Hunters and Annoyances. Edge is better than Winter though.
-
Moth can steal Funds and (Common?)Tools/Ingredients, and destroy Evidence. Failure can result in death or increase in Notoriety. Even Moth Exalted doesn’t have a 100% chance of destroying evidence! Can also be used for Annoyances.
-
Forge repair broken Tools for you, but you’ll need Funds or Spintrias.
-
Lantern can randomly generate Erudition (not sure about Glimmering) and Influences. Failure can generate Fascination, or kill/turn them insane.
-
Knock, Forge, and Moth steals Funds for you. Probably not worth it unless they’re Exalted.
-
Edge and Winter can bring you Corpses for Rites.
-
You can’t sacrifice Hirelings for Poppy’s first request, so it’s best to sacrifice a Pawn instead.
-
By using your Cult card (e.g. Order of the Bloody Cup for Grail), you can recruit and promote Acquaintances to Believers (or Hanger-Ons to Pawns). You’ll need also need enough on a specific Aspect depending on your Cult (e.g. Grail for Order of the Bloody Cup).
-
To promote your Believers to Disciples, you’ll need at least 7 of your cult’s chosen Aspect. Beginners might think they need level 8 Lore, but you can use Ingredients, Tools, Influences, and Creatures to do bring the amount up. For example, Children of Silence (Winter cult) can use level 2+ Winter Lore together with An Icy Atmosphere (6 Winter Influence) to promote them to Disciples.
-
To Exalt a Disciple, you’ll need 21 of your cult’s Aspect. Exalted have unique names depending on your cult.
-
You can’t promote your Disciples to Exalted if it’s not your cult’s Aspect (e.g. can’t promote Edge Disciples to Assassins if your cult’s Aspect isn’t Edge)
-
Believers have 2 on one Aspect, Disciples have 5, while Exalted have 10. (just a guess) Each point is a 10% chance of succeeding, whether its to carry out cult business or while exploring.
-
You can talk directly with Hunters. If you plan to kill Hunters, this is better than talking to a Follower first then dragging the Hunter’s because if they’re investigating you next Season, the Hunter’s card will be taken from the Talk slot.
-
Kill or capture Hunters by sending Edge or Winter cultists/creatures. Some Hunters are more resistant to being killed though, or even resistant to creature attacks, generating Notoriety or even killing the assailant if the attempt fails. If the the assailant has 10 Edge but failed because of a Hunter’s specific trait, they won’t die from what I’ve seen, but it will still generate Notoriety.
-
Lead them to madness by using Dread or Fascination, or by using Winter or Lantern Lores. Higher level Lores will have a higher chance of success. I haven’t succeeded ever by using Dread or Fascination on them though. Using Lore or Dread/Fascination will also generate Dread/Fascination, so be careful.
-
Grim Hunters are more vulnerable to Dread/Winter while Idealists are more vulnerable to Lantern/Fascination. Failure will usually make them immune for future attempts, and even make them resistant to being murdered.
-
Like your cultists, Hunters with names are Unique per game, so its possible to kill, imprison, or drive them all mad. Eventually, you’ll only face
-
Talk with Patrons to receive and fulfill commissions. Finishing commissions will earn you Iron, Bronze, or Silver Spintrias, and either Erudition or Glimmering. A useful way to earn Funds and getting Erudition/Glimmering for upgrading/subverting Lore!
-
Drag your Temporary Headquarters to imprison Followers or Hirelings. If you need Prisoners, I suggest using Hirelings since they don’t run out.
Explore
-
Use Health or Followers to Explore places, or find Hirelings. Use Secret Histories Lore to launch Expeditions and find Vaults to raid.
-
There are only 3 notable Locations: Morland’s Shop, Oriflamme’s Auction House, and the Ecdysis Club.
-
Morland and Oriflamme’s are a source of Books in the early game, but they’ll eventually run out!
-
Make sure you don’t miss any books you need when buying stuff from Oriflamme, cause they’ll be gone forever. Remember, Lore books are Unique! Of note is a movie reel that will teach you a useful Rite.
-
Also, this means that you should never sell Lore books, or those books that increase Passion or Reason. Feel free to sell Spintrias and translation books if you’ve already learned the language though!
-
Ecdysis Club is useful for getting Contentment. Sometimes generates other stuff too that help or hinder you, like Erudition or Notoriety. Has a cooldown after being visited though, and needs one Fund.
-
After finding the three places above, you’ll either get Streets Strange by Moonlight or an opportunity to hire a Hireling.
-
Streets Strange by Moonlight generates Contentment, Fascination, Erudition, Glimmering and some Influences. It never generates Dread, so it’s a free and useful source of those things. The card is timed and will run out eventually though, and be careful of Fascination.
-
Hirelings have different Aspects just like your Followers, but they’re generated randomly. You can take a peek at who you’re going to hire though so as not to waste Funds.
-
Forgot their names, so I’ll just list the Aspects that Hirelings can have: 3 or 5 Edge/Moth/Knock, 3 Edge and 5 Forge, 5 Lantern and some other Aspect I forgot.
-
Hirelings are limitless and can make do if some of your cultists have died, but they’re only temporary and they can’t Explore to find more Hirelings, or Streets Strange by Moonlight for you.
-
Like I mentioned earlier, they’re a useful source of Prisoners.
-
I suggest using Hirelings or summons when exploring Vaults for the first time, then taking note of the Obstacles once there so you’ll be prepared.
-
I suggest that you keep looking for cultists until you can’t find them anymore and then promoting them as much as possible before sending them to Expeditions. And making sure they have a total of 10 Aspect for a guaranteed success when overcoming Obstacles.
-
Vaults have 1-4 Obstacles (depending on the level of the Secret Histories Lore used).
-
Each level of Secret Histories have 4 Unique Vaults, and one that’s repeatable. Repeatable vaults are usually harder and/or give lesser rewards compared to the Unique Vaults of the same level.
-
Each Obstacle needs a Fund, and a Follower with the appropriate Aspect to conquer it. Running out of Funds or Followers will stop the Expedition and generate Mystique and Dread.
-
All Obstacles can be defeated using one of the three Aspects. For example, Forgotten Mithraeum has one obstacle, Hidden Door, that needs Lantern or Knock. That’s or to be clear, getting a mix of Lantern or Knock will not help, but having a higher amount of either Lantern or Knock will.
-
Most Obstacles can kill your Followers, and some of them can result in you becoming Cursed. I didn’t notice myself, but apparently Curses permanently reduces one of your Abilities.
-
More advanced Vaults will need at least a mix of three Aspects. An example is Star-shattered Fane (level 12 SH), which has Hidden Door(Lantern/Knock), Desolation (Forge/Grail) and The Fifth Eye Curse(Heart/Winter).
-
A successful Expedition will allow you to receive excess Funds that you’ve invested into Expedition, and usually net you at least 2 treasures, which can be: Lore books, Ingredients, Spintrias, or Tools. It will also always generate Notoriety.
-
Treasures can be Common, Uncommon, or Rare.
Time Passes
-
Consumes Funds whenever the timer/Season runs out and there’s no way of stopping it unless you pause the game. Running out of Funds will cause Starvation (decays to Decrepitude), which can only be cured by using Funds.
-
Preview the next Season by opening its window. You can check if you’re going to become Ill or if Hunters are planning to investigate you on the next Season for example.
The Perils of Renown
-
If Time Passes causes Season of Suspicion, you’ll be Investigated.
-
This will automatically take Hunter, Mystique or Notoriety, and then Evidence cards in that order.
-
If no Hunter is present, sometimes this won’t look for Mystique or Notoriety, and then generates Contentment.
-
This randomly chooses between Mystique or Notoriety. If Mystique is consumed, the Hunter will keep looking for clues for another minute until it finds Notoriety. Notoriety gives Hunters a chance to create or upgrade Evidence.
-
Some Hunter Aspects will give them 100% to create/upgrade Evidence from Notoriety or even give them a lower chance but allows them to generate Evidence even with no Notoriety.
-
You should keep a low profile especially if they have Evidence against you (like a real cult should!), unless you have a reliable way to deal with Hunters and Notoriety.
-
Heart cultists to eliminate Mystique and Notoriety. It’s not 100% guaranteed unless you have a Heart Exalted, but they’ll never die even if they fail and it can tie up Mystique/Notoriety since they’ll be busy «using» said Mystique/Notoriety until they’re done Charming.
-
Consider readying a Heart cultist before an Expeditions finishes so they can use their charms as soon as the Expedition is over.
Recruitable Cultists
All cultists are Unique so there’s always a danger of running out of cultists if you keep sending them to Expeditions unprepared, or some summoning accidents happen, or if they’re arrested by Hunters. Here are their names so you can prioritize who to bring into your cult first! Trying to recruit more members beyond the ones below will give you Mistaken Identity cards instead, telling you that no-one else is available to recruit for the rest of the game.
-
Heart: Dorothy, Leo, Clovette
-
Edge: Elridge, Rose, Victor
-
Moth: Sylvia, Ysabet, Porter
-
Knock: Enid, Neville
-
Forge: Tristan, Valciane, Laidlaw
-
Grail: Saliba, Renira
-
Lantern: Slee, Cat Caro, Pope Clifton
-
Winter: Auclair, Violet
-
Hanger-ons: 8
Rites
All Rites are learned from books except for one case.
Aside from requirements, all Rites are the same and can be used to Summon creatures or cast spells.
All Rites (except one) have four slots. One slot for Lore and another for Desire, while the other two slots use Followers, Prisoners, Tools, Ingredients, or Influences. Usually, one of those slots will permanently consume a card. No Rite can have the same requirement (e.g. two slots for Ingredients).
About the Desire slot — It was confusing to me at first as well, but you do not need to use or level-up your Desire to use Rites! You’ll only need that for one thing. Spoiler
List of Rites
-
Sunset Rite: Assistant, consumes Influences. Can be learned by using the film reel called STUMM! from the auction, or a specific Rare(?) book. An extremely useful Rite for all stages of the game since it can be learned early on and consumes Influences. You do not want to miss STUMM! from the auction no matter what! With just 2 Knock Lore you can use some Summons as Assistants to summon another one of them!
-
Rite of Map’s Edge: Tools, consumes Influences. I consider this the 2nd most useful Rite after Sunset Rite, if you have the Tools that is. Also useful if somehow all your cultists are dead.
-
Rite of the Mother’s Mercy: Assistant, consumes Ingredients. An awesome Rite if you have some Corpses and Ingredients, and a reliable Rite for making Risen.
-
Rite of the Sea’s Feasting: Tools, consumes Ingredients. I consider this equal, if not a little less useful than Map’s Edge.
-
Rite of the Sea’s Marriage: Influence, consumes Ingredients. An interesting Rite since it doesn’t consume Influences. I can see this being really useful if you’ve got a ton of Ingredients though.
-
Rite of the Watchman’s Sorrow: Consumes Lore, and two other slots that I can’t remember sorry! Probably Tool or Assistant. This consumes Lore, so I find this Rite this pretty useless, unless you’re at the late game already and want to clean the board of lower-level Lore (since you should have a couple of max level Lore at this point).
-
Rite of the Crucible Soul: Tools, consumes Sacrifices. A convenient way to dispose of Prisoners if you haven’t unlocked the Spider Door. You definitely don’t want to sacrifice your cultists, but you can use this to resummon, although this kills the summon.
-
Rite of the Rebel’s Striving: Assistant, consumes Tools. This destroys Tools, so, not that useful.
-
Rite Intercalate: Consumes Lore, Sacrifices/Assistants, Tools, Ingredients, and Influences. Yep, it consumes everything you’ve used for the Rite. Not that bad if you have a lot of Ingredients and multiple copies of tools, or you’re desperate or close to victory.
-
Rite of the Beast’s Division: Influence, consumes Sacrifices. Yes it doesn’t consume Influence. Not that useful since Influence only last a minute anyway, unless you have a bunch of Prisoners that you want to turn into Risen maybe.
Summons
Values shown in parentheses are the minimum Aspects you’ll need to summon them (from what I’ve tested), while the values on the right are their Aspects. All summons except Risen need at least 2 Knock, but Risen needs Corpses. Most Summons have a chance to devour or drive Mortals insane for every summoning attempt. All Summons except Risen have 3 minute timers before they disappear.
Risen
A good way to use Corpses to prevent them from turning into Notoriety. They’re not as good as disciples and other summons, but hey, zombies are disposable! They only last 1 minute.
-
Shattered Risen (8 Winter, Edge): 4 Edge and Winter.
-
Burgeoning Risen (8 Winter, Moth): 4 Moth and Winter.
Standard
Your bread and butter for murdering, stealing evidence, and exploration. You can usually start summoning these as soon as you have 6 Lore and the Influences from the White and Stag Door. Most can be summoned with 2 Knock.
-
Percussigant (6 Hearts, Edge): 8 Heart and Edge
-
Hint (6 Lantern, Edge): 8 Lantern and Edge
-
Caligine (6 Forge, Winter): 8 Forge and Moth
-
Raw Prophet (6 Grail, Moth): 8 Grail and Moth
-
Voiceless Dead (5? Heart and Winter): 6 Moth and Winter. Doesn’t need a Corpse.
-
Maid-In-The-Mirror (8 Winter, Edge, 5 Knock): 10 Edge and Winter. Yup, 10 Edge is certain death for Hunters, except if they’re Tenacious and/or Mystic.
Unique
Powerful and can teach you other languages, but you need other languages like Greek to learn them. Unlike standard summons, they need 5 Knock to be summoned and they’re Unique so only one of them can exist on the board. However, you can summon them again if they disappear.
-
King Crucible (10 Forge, Lantern): 12 Edge and Forge. Teaches Mandaic.
-
Ezeem (10 Grail, Forge) 12 Edge and Grail. Teaches Phyrgian.
-
Teresa (10 Lantern, Secret Histories): 12 Lantern and Secret Histories. Teaches Fucine.
The Mansus
A safer and more predictable way to Dream than just using Health/Reason/Passion. Access locations in the Mansus by using Way cards and another card. This is the standard way of getting more Secret Histories Lore (for Expeditions) and Influences (for summoning). In most cases, you’ll need the higher-tier Influences to win the game.
You can get up 3-5 random cards from each location, but one of them is always displayed and usually safer option. Most locations in the Mansus can give you Dread and Fascination, so make sure you’re not one card away from losing the game!
To unlock each Way, you’ll need increasing levels of Knock or Lantern Lore. Re-entering a Way will require another card. If those Ways require Health/Reason/Passion, don’t worry, they only exhaust, not consume them permanently!
Some info may be wrong or incomplete, and I’ve abbreviated Secret Histories Lore to SH to shorten the text.
Woods
The First Way. You’ll need to dream using Passion first, and then using at least 2 Knock/Lantern. Re-enter the Woods using Passion. Completely safe, and it’s good way to get Vitality and some Influences.
-
Visible cards: Occult Scrap (2 SH), Peculiar Rumor, A Buzzing in the brain (2 Moth)
-
The Well: An Awareness of Appetite (2 Grail), Peculiar Rumor, Vitality
-
The Temple of the Wheel: A Furtive Truth (4 SH), Peculiar Rumor, Subtle Flaw (2 Knock)
White door
The Second Way. Unlock by using the Way:Woods card with 4 Knock/Lantern. Re-enter using Health. Extremely useful for all stages of the game, particularly for controlling Dread/Fascination, summoning, getting Erudition/Glimmering, and if you or your cultists are close to getting arrested.
-
Visible cards: Forgotten Chronicles(6 SH), Restlessness, An Icy Atmosphere (6 Winter), A Furtive Truth (2 SH). Restlessness is a good Influence for summons/promotion or reducing Fascination since it decays to Dread. An Icy Atmosphere is great for summoning Voiceless Dead, but it decays to Dread.
-
Orchard: Contentment, Forgotten Chronicle (6 SH), Glimmering, An intensity of radiance (6 Lantern). Go here if you need Glimmering or to counter Dread. An Intensity of Radiance for summoning Hints, but it decays to Fascination.
-
Lodge of the sage knight: Fascination, Subtle Fracture (6 Knock), Erudition, A Favour from Authority, Forgotten Chronicle (6 SH). Subtle Fracture is useful for all Summons, and Favours are great if you’re close to getting arrested.
Stag Door
The Third Way. You’ll need to get the Stag’s Riddle card first by using your Desire when Dreaming about the White Door, and then solving the Riddle using a random level 6 (at least) Lore. Re-enter using Reason.
-
Visible cards: Forbidden epic (8 SH), Subtle Rupture(10 Knock), A trembling heat (6 Forge), Forgotten Chronicles(6 SH). Trembling heat to summon Caligines, yipee. If I remember correctly, these two influences don’t decay into anything dangerous, if at all.
-
Ascent of Knives: A furious Air (10 Edge), A bitter atmosphere (10 Winter), An Urgency of Appetite (6 Grail). A bitter atmosphere for summoning Maid-In-The-Mirrors (my waifu), and An Urgency of Appetite to summon Raw Prophets. A Furious Air is nice for summoning creatures with Edge. Careful with Bitter Atmosphere since it decays to either Dread.
-
Painted River: Fascination, Erudition, Forbidden epic (8 SH). If you’re looking for Erudition, Fascination, or the next tier of SH, Painted River is the place to be. If you haven’t noticed, knowledge usually comes at a price of sanity!
Spider Door
The Fourth Way. Unlock this by using 8 Knock/Lantern when dreaming about Stag Door. A little trickier than the other Doors as you’ll need Prisoners or Lunatics to re-enter. One good thing about using Prisoners for this is they don’t turn into Corpses afterwards (so no Notoriety)!
-
Visible cards: A forbidden epic(8 SH), A Favour from Authority, An imperative of appetite(10 Grail). Another way to earn Favour, and a powerful Grail Influence to summon Ezeem.
-
The Chamber of Ways: Forgotten Chronicle (6 SH), A howling in the heart(10 Moth), Wrong Door (15 Knock), A Blaze of Radiance (10 Lantern), A Bitter Atmosphere (10 Winter), Fascination. Some very useful influences, but Blaze of Radiance and Bitter Atmosphere decays to Fascination and Dread respectively, so be careful.
-
The Malleary: An incandescence (15 Forge), Fascination, Iotic Essence(12 Forge ingredient), Unresolved Ambuiguity (10 SH). Incandescence (decays to Fascination) and Iotic Essence are useful for summoning King Crucible and Ezeem, or winning the game if you Desire Power. This is also where the next tier of SH is found!
Peacock’s Door
The Fifth and last Way available, to mortals at least. Unlock using 10 Knock/Lantern on Spider’s Door. To re-enter, you’re gonna need mirrors which are Uncommon and Rare treasures, or the Franciglave (Rare) which doesn’t break and allows you to enter whenever you want. They break after you use them though, and you’ll need Forge cultists and Bronze/Silver Spintrias to repair them. If all your Forge cultists are dead, you can use Forge Hirelings to repair them. I’m also not sure about some of the cards here, sorry! If you Desire Sensation or Enlightenment, you’ll likely need the Influences here to win. If you want to explore the 14 SH Vaults, you’ll need the Vagabond’s Maps from here and combine them into Port Noon Anecdotes (14 SH Lore) since only Rare SH books can directly give 14 SH Lore. Unresolved Ambiguities are also ok, but you’ll need 4 of them and a lot of time Studying to get just 1 Anecdote.
-
Visible cards: Fascination, Unresolved Ambiguity (10 SH), Scholar:Vak, A Splendour(15 Lantern). Learn Vak from here! Splendour to summon Teresa or win through Enlightenment.
-
The Worm Museum: Dread, The Perfect Frost (15 Winter), A Vagabond’s Map (12 SH). Oof, Dread, and Perfect Frost decays to Dread. Vagabond’s Map though!
-
The Red Church: An Incarnadescence (15 Grail), Amaranthine Nectar (8 Grail ingredient), A Favour from Authority, A Vagabond’s Map (12 SH). This is the place if you want to summon Ezeem or satisfy your Desire for Sensation! Amaranthine Nectar is also a good source of Funds.
Vaults
Vaults are the places you send Expeditions to. Use Secret Histories Lore learned from books or the Mansus to find them! I’ve listed all the Vaults I’ve explored so far, their obstacles/guardians, what Aspects you’ll need to conquer them, and amount and rarity of treasures you can get. All of them add Notoriety if successful, and some of the more difficult locations even gives you Influences (some even dangerous), while failure (i.e. all explorers died or ran out of Funds) will give you Mystique and Dread.
Each tier of Secret Histories unlocks 4 Unique Vaults, and one Repeatable Vault. You can have many copies of Repeatable Vaults, but they have more obstacles and/or lower rewards compared to Unique Vaults of the same tier.
Seals like Hidden Door won’t kill your minions as far as I know, but they’ll waste Funds if they can’t get through them.
Curses won’t stop you from finishing Expeditions, but they can permanently reduce your Attributes or randomly kill someone after some time. You can’t stop a Curse after it triggers, you can only prevent them.
-
Fifth eye: Turns Passion to Fascination
-
Dry soul: Turns Reason to Dread
-
Creeping breath: Turns Health into Decrepitude
-
Worms in the world: Makes Notoriety. Chance to kill Mortals?.
2 Secret Histories (1-3 Common)
-
St. Agnes Hospital: Dry Soul Curse(Heart/Lantern)
-
Strathcoyne’s Residence: Watchers(Edge/Grail/Moth)
-
Cater & Hero Limited: Treacherous Ground(Forge/Lantern)
-
Forgotten Mithraeum: Hidden Door(Lantern/Knock)
-
The Forsaken Reach (repeatable):Treacherous Ground(Forge/Lantern), Watchers(Edge/Grail/Moth).
4 Secret Histories (1 Common and Uncommon)
-
Keglin’s Scratch:Fretful Dead(Edge/Winter),Treacherous Ground(Forge/Lantern)
-
Gladwyn Lake: Younger Sister(Edge/Knock)
-
Crowkiss Hill: A Warded Door(Forge/Knock)
-
Lockwood Fen: Treacherous Ground(Forge/Lantern), Watchers(Edge/Grail/Moth)
-
Kerisham (repeatable): Watchers(Edge/Grail/Moth), A Warded Door(Forge/Knock), The Fifth Eye Curse(Heart/Winter)
6 Secret Histories (1 Common and 1-2 Uncommon)
-
The Vanderschaaf Collection: A Warded Door(Forge/Knock), The Fifth Eye Curse(Heart/Winter)
-
Fermier Abbey: Peril-Prowed Forest(Forge/Moth), Monks(Edge/Moth)
-
Orthos Wood: Peril-Prowed Forest(Forge/Moth), Watchers(Edge/Grail/Moth)
-
Chateau Raveline: Hidden Door(Lantern/Knock), Dry-Soul Curse(Heart/Lantern)
-
The Unnumbered Stones (repeatable): Peril-Prowed Forest(Forge/Moth), Hidden Door(Lantern/Knock), Watchers(Edge/Grail/Moth)
8 Secret Histories (1 Common, Uncommon, and Rare)
-
Voivode’s Citadel: Hidden Door(Lantern/Knock), Fretful Dead(Edge/Winter)
-
Grunewald’s Permanent Circus: Watchers(Edge/Grail/Moth), The Worms in the World (curse, Lantern/Moth)
-
Cave of Candles: Younger Sister(Edge/Knock), The High Passes(Forge/Winter)
-
Tower Revek: Hidden Door(Lantern/Knock), The Creeping Breath Curse(Heart/Grail)
-
Foxlily Meadows (repeatable): Watchers(Edge/Grail/Moth), The High Passes(Forge/Winter), The Fifth Eye Curse(Heart/Winter)
10 Secret Histories (2 Uncommon and 1 Rare)
-
Hunter’s Pits: Watchers(Edge/Grail/Moth), Younger Sister(Edge/Knock), The High Passes(Forge/Winter)
-
Mausoleum of Wolves: Fretful Dead(Edge/Winter), The High Passes(Forge/Winter), A Warded Door(Forge/Knock)
-
The Eye of Ikirmawi (2 Uncommon, 1 Rare): The High Passes(Forge/Winter), A Warded Door(Forge/Knock), The Fifth Eye Curse(Heart/Winter)
-
Snow’s Keeper (2 Uncommon, 1 Rare): Fretful Dead(Edge/Winter), The Worms in the world(curse, Lantern/Moth), The High Passes(Forge/Winter)
-
Tombs of the Shadowles Kings (repeatable): Hidden Door(Lantern/Knock), Watchers(Edge/Grail/Moth), The Creeping Breath Curse(Heart/Grail), The High Passes(Forge/Winter)
12 Secret Histories (1 Uncommon, 1-2 Rare)
-
Star-shattered Fane: Hidden Door(Lantern/Knock), Desolation (Forge/Grail), The Fifth Eye Curse(Heart/Winter)
-
Messana: Watchers(Edge/Grail/Moth), Desolation (Forge/Grail), Creeping Breath Curse(Heart/Grail)
-
Lagun’s Tomb: Dry-Soul Curse(Heart/Lantern), Desolation (Forge/Grail), A Warded Door(Forge/Knock)
-
Temple of Seven Coils: Desolation (Forge/Grail), The Worms in the world (Lantern/Moth), A Warded Door(Forge/Knock)
-
Miah (repeatable): Desolation (Forge/Grail), Creeping Breath Curse (Heart/Grail), Fretful Dead(Edge/Winter)
14 Secret Histories (3 Rare)
Honestly, I don’t think it’s worth it to raid these since Port Noon Anecdotes are too much of a hassle to get, but if you’re after the story in the game (from exploring these or reading rare books) or lacking some much needed items or Lore, then go ahead!
-
Fort Geryk: A Western Sea (Heart/Forge), Fretful Dead (Edge/Winter), A Warded Door (Forge/Knock)
-
St. Tentreto of the Deep Door: Hidden Door (Lantern/Knock), Monks(Edge/Moth), The Fifth Eye Curse(Heart/Winter)
-
Raven Isle: Soucouyants (Lantern/Moth), A Western Sea (Heart/Forge), The Fifth Eye Curse (Heart/Winter)
-
The Wreck of the Christabel: A Western Sea (Heart/Forge), Creeping Breath Curse (Heart/Grail), Younger Sister(Edge/Knock)
-
Port Noon (repeatable, 2 Rare): A Western Sea (Heart/Forge), Long (Moth/Grail), A Warded Door(Forge/Knock), The Fifth Eye Curse (Heart/Winter)