Посмотреть инструкция для D-Link DCS-2102 бесплатно. Руководство относится к категории Камеры видеонаблюдения, 2 человек(а) дали ему среднюю оценку 7.5. Руководство доступно на следующих языках: английский. У вас есть вопрос о D-Link DCS-2102 или вам нужна помощь? Задайте свой вопрос здесь
Не можете найти ответ на свой вопрос в руководстве? Вы можете найти ответ на свой вопрос ниже, в разделе часто задаваемых вопросов о D-Link DCS-2102.
Какой вес D-Link DCS-2102?
Что означает аббревиатура MП?
Какие сертификаты D-Link DCS-2102 имеет?
Инструкция D-Link DCS-2102 доступно в русский?
Не нашли свой вопрос? Задайте свой вопрос здесь
-
Contents
-
Table of Contents
-
Bookmarks
Quick Links
Related Manuals for D-Link DCS-2102 — SECURICAM Network Camera
Summary of Contents for D-Link DCS-2102 — SECURICAM Network Camera
-
Page 2: Table Of Contents
Table of Contents Package Contents ……………………………………….. 1 Minimum System Requirements ……………………………………2 Introduction ………………………………………….. 3 Features and Benefits ……………………………………….4 Hardware Overview ……………………………………….5 Hardware Installation ……………………………………….7 Attach the Antenna (DCS-2121 only) ………………………………….7 Connect the camera base …………………………………….. 7 Connect the Ethernet Cable ……………………………………
-
Page 3
1) Identify Your Camera on the Network ………………………………. 42 2) Assign a Local IP Address and Port for Your Camera …………………………..43 3) Open the HTTP Port ……………………………………44 4) Open Virtual Server Ports to Enable Remote Image Viewing …………………………46 Viewing Your Camera Over the Internet …………………………………. -
Page 4: Package Contents
CAT 5 Ethernet Cable Power Adapter Mounting Kit Quick Installation Guide CD-ROM with Software and Product Documentation DCS-2121 Megapixel Wireless Internet Camera D-Link DCS-2121 Megapixel Wireless Internet Camera Detachable antenna CAT 5 Ethernet Cable Power Adapter Mounting Kit Quick Installation Guide CD-ROM with Software and Product Documentation WARNING: Using a power supply with a different voltage than the one included with your product may cause damage, and will void the warranty for this product.
-
Page 5: Minimum System Requirements
Minimum System Requirements Wired (10/100 Fast Ethernet) network Wireless 802.11g network (for DCS-2121 only, for wireless use only) PC with: 1.3 GHz processor or higher 128 MB memory or more Windows XP SP2 or Vista Internet Explorer 6 or higher Multiple camera operation requires: 2.4 GHz processor or higher 512 MB memory or more…
-
Page 6: Introduction
Introduction Congratulations on your purchase of the DCS-2102/2121 Megapixel Internet Camera! The DCS-2102/2121 is a versatile and unique solution for your small office or home. Unlike a standard webcam, the DCS-2102/2121 is a complete system with a built-in CPU and web server that transmits high quality video images for security and surveillance.
-
Page 7: Features And Benefits
Features and Benefits Simple to Use: The DCS-2102/2121 is a stand-alone system with a built-in CPU, requiring no special hardware or software such as PC frame grabber cards. The DCS-2102/2121 supports ActiveX mode for Internet Explorer. All that is required is a computer with Internet Explorer 6.0 or above. Supports a Variety of Platforms: Supports TCP/IP networking, HTTP, and other Internet related protocols.
-
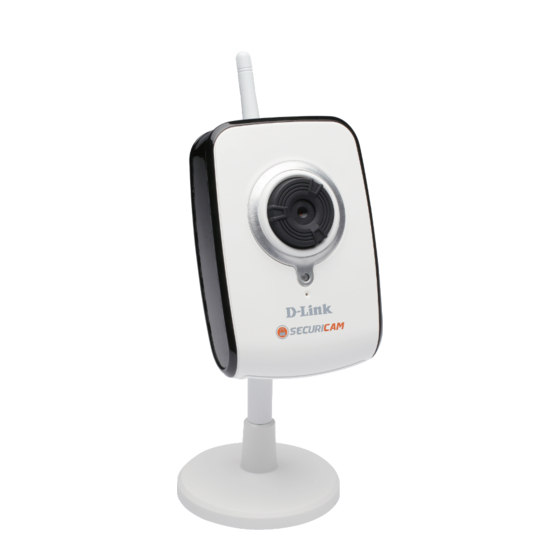
Page 8: Hardware Overview
Hardware Overview Front Back Camera lens Antenna connector (DCS-2121 only) Focus ring WPS button and LED (DCS-2121 only) Status LED 10. Camera base mount Microphone Wireless antenna (DCS-2121 only) SD Card slot Reset button…
-
Page 9
Bottom External speaker jack Power jack Ethernet port DI/DO port… -
Page 10: Hardware Installation
Hardware Installation Attach the Antenna (DCS-2121 only) Screw the wireless antenna onto the antenna connector. Connect the camera base 1. Screw the base stem into the base. 2. Take the hinge bracket and tighten the wheel. 3. Screw the hinge bracket into the base stem. 4.
-
Page 11: Connect The Ethernet Cable
Connect the Ethernet Cable Connect the included Ethernet cable to the network cable connector located on the bottom of the DCS-2102/2121 and attach it to your network switch or router. Connect the Power Adapter Attach the power adapter to the power jack located on the bottom of the DCS-2102/2121 and connect the power adapter to a power outlet.
-
Page 12: Autorun Installation
Autorun Installation Insert the Installation CD-ROM into your computer’s CD-ROM drive to initiate the autorun program. The content of the Installation CD-ROM includes: View QIG: Click here to view the Quick Installation Guide for a quick step-by-step guide to installing the DCS-2102/2121. View Manual: Click here to view the User Manual for detailed information about the DCS-2102/2121.
-
Page 13: Software Installation
Software Installation Click the Installation Wizard button from the autorun program on the CD. Follow the simple steps below to run the Setup Wizard to guide you quickly through the installation process. Click Next.
-
Page 14
Click Yes. Click Next. Click Finish. -
Page 15
Now, click on ffdshow from the autorun screen. This will install the proper codecs that will allow you to playback video taken by the DCS-2102/2121. Click I Agree. Click Next. -
Page 16
Click Install. Click Close. -
Page 17
Before using ffdshow, you must configure its properties. From your computer, please click on Start Programs ffdshow Configuration. At the ffdshow properties window, scroll to the bottom and click Miscellaneous. Be sure that Autodetect is checked and that Error resilience and Error concealment are set to “none”. Click OK and close the window. -
Page 18
To run the Setup Wizard, click on Start Programs D-Link Setup Wizard SE. The Setup Wizard will then scan for all available cameras connected to your wired network. Each camera will appear with its MAC address, current IP address, and camera name. -
Page 19
Here, you can set whether the camera should use a direct or static IP. If you use a static IP, the camera’s IP Address, Subnet Mask, Gateway, and DNS addresses must correspond with your network settings for you to access the camera. -
Page 20
If you need to make any changes, click Back to modify your camera settings. Otherwise, click Restart to save and apply your settings. This may take a few minutes. (Wireless settings are for DCS-2121 only) Camera setup is now complete! Wait until the Link LED on the camera turns green, then click Link to launch your Web browser and view your images. -
Page 21
After you click the Link button, the Installation Wizard will automatically open your Web browser to the IP address of the DCS-2102/2121 and prompt you for a user name and password. Enter “admin” into the User name field, then click OK. If you changed your password in the Setup Wizard, enter your password then click OK. After you successfully log in, your camera’s video will be displayed inside the web browser window. -
Page 22: Adjusting The Camera Focus
Adjusting the Camera Focus After opening the web interface, turn the focus ring left or right until the area you want to view is in focus. You can use the video feed of the web interface as a guide. Note: You can adjust other settings such as brightness, contrast, orientation in the SETUP > Image Setup section of the web interface.
-
Page 23: Setting Up A Wireless Connection With Wps (Dcs-2121 Only)
Setting up a Wireless Connection with WPS (DCS-2121 only) If your wireless access point or router supports push-button Wireless Protected Setup (WPS), you can quickly WPS button configure your wireless network and camera without using the camera’s web interface. After plugging the power adapter to your camera and the front status LED lights up, hold down the WPS button on the back of the camera for 3 seconds.
-
Page 24: Using The Configuration Menu
Using the Configuration Menu After completing the Setup Wizard, you are ready to use your camera. The Web configuration utility is designed to easily access and configure your DCS-2102/2121. Click the “Link” button will open up the main configuration page. If you would like to open the configuration page from a Web Browser, enter the IP address that you assigned to your DCS-2102/2121.
-
Page 25: Live Video
LIVE VIDEO This section allows you to set up your IP camera’s live video by using the buttons below. LIVE VIDEO > Camera Screen Size: You can change the video screen size to Small, Medium, or Large. Full Screen: This allows you to view the video in full screen mode. To exit full screen mode, press the ESC key on your keyboard.
-
Page 26: Setup
SETUP This section allows you to further set up or change the configuration of your IP camera. SETUP > Wizard The setup wizards guide you through initial setup of your IP camera. You can use the Internet Connection Setup Wizard for initial network setup, and you can use the Motion Detection Setup Wizard to set up motion detection and snapshots.
-
Page 27: Setup > Network Setup
SETUP > Network Setup This option, Network Setup, allows you to configure your LAN and Internet configuration, including the settings for LAN, PPPoE, and port. DHCP Connection: This allows the camera to get an IP address automatically from your router or Internet service. If you are not sure which LAN settings to use, try using DHCP mode first.
-
Page 28: Setup > Wireless (Dcs-2121 Only)
SETUP > Wireless (DCS-2121 only) To set up your IP camera’s wireless network interface settings, enable Wireless Settings in this window first. Then continue the further configuration next. Site survey: Clicking this button will scan for available wireless networks. After scanning, you can use the dropdown box to select an available wireless network, and related information(SSID, Wireless Mode, Channel, Authentication, Encryption) will be automatically filled in for you.
-
Page 29: Setup > Dynamic Dns
SETUP > Dynamic DNS If you have a DSL or Cable service provider that changes your modem IP address periodically, Dynamic DNS (Domain Name Service), a method of keeping a domain name linked to a dynamic IP address, is useful. With most Cable and DSL connections, you are assigned a dynamic IP address and that address is used only for the duration of that specific connection.
-
Page 30: Setup > Image Setup
SETUP > Image Setup The options in Image Setup allow you to adjust the settings for your IP camera sensor and image. Brightness: This adjusts the brightness of the camera image. This is set to 60 by default. Saturation: This adjusts the color saturation of the camera image. This is set to 60 by default. Contrast: This adjusts the contrast of the camera image.
-
Page 31: Setup > Audio And Video
SETUP > Audio and Video This Audio and Video option allows you to set up your IP camera’s video quality, resolution, and frame rate. Video Sensor Sensor Output: You can set the camera’s sensor output to VGA quality (640×640), XGA quality (1024×768), or SXGA quality (1280×1024).
-
Page 32
Note: Higher frame size, frame rate and bit rates will give you better video quality, but they will also require more network bandwidth. For best viewing results on a mobile phone, we suggest setting the Frame Rate to 5 fps and bit rate to 20 Kbps. After making any changes, click the Save Settings button to save your changes, or click the Don’t Save Settings button to discard your changes. -
Page 33: Setup > Motion Detection
SETUP > Motion Detection This option allows you to set up Motion Detection on your IP camera. In order to use motion detection you must first check the Enable Video Motion checkbox. You can then click on the video window and draw motion detection zones by clicking and dragging your mouse. Red areas indicate areas that will be monitored for motion.
-
Page 34: Setup > Time And Date
SETUP > Time and Date This option allows you to configure, update, and maintain the correct time on the internal system clock. From this section you can set the time zone that you are in and set the NTP (Network Time Protocol) Server. Daylight Saving can also be configured to automatically adjust the time when needed.
-
Page 35: Setup > Recording
SETUP > Recording This option allows you to configure recording settings and scheduling. You can record video to a Secure Digital card inserted into the SD card slot, or you can have video saved to a Samba network drive. Enable recording: Check this checkbox to enable the recording feature. After enabling recording, you will need to select a location to record to (SD Card or Samba network drive), and you will need to select a scheduling method.
-
Page 36
Scheduling Event Based: Event based recording will allow you to record video when specific events happen. Motion detection triggered recording: Enabling this option will set the camera to record video when motion is detected by the camera. Digital input triggered recording: When the camera receives a signal from its DI input, it will start recording. -
Page 37: Setup > Snapshot
SETUP > Snapshot Here, you can set the camera to take snapshots when motion is detected and/or when a signal is sent to the DI input. Snapshots can be sent to an e-mail address and/or to an FTP server. Enable Snapshot: Check this box to enable the snapshot feature.
-
Page 38: Setup > Digital Output
SETUP > Digital Output This screen allows you to enable the Digital Out (D/O) port, and allows you to select what events will trigger the Digital Out signal. Enable D/O: Check this box to enable the D/O port. Motion Detection: When checked, the D/O port will send a signal whenever motion is detected by the camera.
-
Page 39: Maintenance
MAINTENANCE MAINTENANCE > Device Management Here you can change the Admin password, add and manage Users, and adjust some camera settings. Admin Password Setting: This section lets you change the admin password used to log in to the camera and adjust settings. After installing the camera for the first time, it is highly recommended that you change the admin password for security purposes.
-
Page 40: Maintenance > Backup And Restore
MAINTENANCE > Backup and Restore This screen llows you to save and restore the camera’s current configuration. You can also reset all settings to factory default, and reboot the device. Save To Local Hard Drive: Click on the Save Configuration button to save the current configuration to a hard drive.
-
Page 41: Maintenance > Firmware Upgrade
MAINTENANCE > Firmware Upgrade Here, you can see your current firmware version and you can also upgrade your firmware with a new version. Firmware upgrades are made available at support.dlink.com.tw. To upgrade your firmware, go to support.dlink.com.tw and download the latest firmware to your computer’s hard drive.
-
Page 42: Status
STATUS The Status section provides the detail information about your IP camera. STATUS> Device Info This screen shows you various information about your camera and its current settings.
-
Page 43: Status> Log
STATUS> Log The log shows you a list of events that have happened recently. You can download the log by clicking the Download button, or you can empty the log by clicking the Clear button.
-
Page 44: Help
HELP The Help screen provides you with support information about the DCS-2102/2121 for your reference.
-
Page 45: Installing The Dcs-2102/2121 Behind A Router
Installing the DCS-2102/2121 Behind a Router If you connect your cameras to an Internet router, follow these steps to allow remote access to your cameras, so you can access your cameras from any Internet-connected PC: 1) Identify your camera on the network 2) Assign a local IP address and port for your camera 3) Determine your router’s WAN IP Address (Enable Remote Viewing) 4) Open virtual server ports for your router (Enable Remote Viewing)
-
Page 46: Assign A Local Ip Address And Port For Your Camera
You may use the default camera IP Address of 192.168.0.20. If you wish to use a different IP Address, be sure that the camera settings correspond to your network settings. The Default Gateway will be the IP Address of your router’s Local IP Address (e.g.192.168.0.1, if you are using a D-Link router)
-
Page 47: Open The Http Port
3) Open the HTTP Port The HTTP Port option is used when multiple cameras are being installed behind a single public IP address and will be accessed remotely OR for using a port other than the default port for image viewing. For each additional camera that is installed, you must assign the appropriate Web server port for each camera to enable remote viewing.
-
Page 48
Router Setup The following steps generally apply to any router that you have on your network. The D-Link DIR-300 is used as an example to clarify the configuration process. Your WAN IP Address information will be listed on following window. -
Page 49: Open Virtual Server Ports To Enable Remote Image Viewing
4) Open Virtual Server Ports to Enable Remote Image Viewing The Virtual Server Ports of your router must be opened for remote access to your camera. This is also referred to as port forwarding. Please proceed as follows: Select Enabled to enable virtual server settings. Select a camera name.
-
Page 50: Viewing Your Camera Over The Internet
Viewing Your Camera Over the Internet After all settings have been entered correctly, a user inside or outside your network will have access to the camera through a standard Web browser. To access your camera, simply type in the IP Address of the router given to you by your ISP, a colon, and the HTTP port number that you gave your camera. http://<ip address>:<port>…
-
Page 51: Frequently Asked Questions
7 Can the Internet Camera be used as a webcam for my computer? No, the Internet Camera only functions through an Ethernet or wireless (DCS-2121 only) network. Other cameras such as the D-Link DSB-C110 and DSB-C310 can be used as a PC Camera (webcam).
-
Page 52: Internet Camera Installation
10 Why can’t I access the Internet Camera from a web browser? A possible cause might be that the IP Address for the Internet Camera is already being used by another device. To correct the possible problem, you need to first disconnect the Internet Camera from the network.
-
Page 53
18 Why are no images available through the Web browser? ActiveX might be disabled on your web browser. If you are viewing the images from Internet Explorer, make sure ActiveX has been enabled in the Internet Options menu. You may also need to change the security settings on your browser to allow the ActiveX plug-in to be installed. If you are using Internet Explorer version 5 or lower, then you will need to upgrade your Web browser software in order to view the streaming video transmitted by the Internet Camera. -
Page 54: How To Ping Your Ip Address
How to Ping Your IP Address The PING (Packet Internet Groper) command can determine whether a specific IP Address is accessible by sending a packet to the specific address and waiting for a reply. It is a very useful tool to confirm if the IP Address conflicts with the Internet Camera over the network. Follow the step-by-step procedure below to utilize the PING command.
-
Page 55
If you fail to connect to your camera you will see the following: Check to see if you have entered your camera’s IP Address correctly or reassign your camera’s IP Address. -
Page 56: Time Zone Table
Time Zone Table (GMT -12:00) International Dateline West (GMT -11:00) Midway Island, Samoa (GMT -10:00) Hawaii Island (GMT -09:00) Alaska (GMT -08:00) Pacific Time (US & Canada); Tijuana (GMT -07:00) Mountain Time (US & Canada) (GMT -06:00) Central Time (US & Canada) (GMT -05:00) Eastern Time (US &…
-
Page 57: Di/Do Input Specifications
DI/DO Input specifications DO Digital Output: Normal: open circuit Trigger: short circuit After powering on or rebooting the DCS-2121, the camera will be in Normal mode by default. DI Digital Input: Normal: no current Trigger: 12V current As the Digital Input signal is controlled by an external device, we recommend that you set your device to feed no current normally, and feed a 12V current only to trigger a DI event on the DCS-2121.
-
Page 58: Technical Specifications
Technical Specifications Video Codec MPEG-4 / MJPEG Audio Codec GSM-AMR: 8kbps, ADPCM: 8Kbps Sensor 1/4″ color 1.3MP CMOS sensor SDRAM 64 Mbytes Flash Memory 8 Mbytes SD-Card Slot Supports SD Cards up to 16GB Lens 5.01mm, F2.8 • 10/100BASE T port •…
-
Page 59
Audio Out Reset Button Reset to factory default Dimension (WxDxH) 71.9mm x 110.0mm x 37mm (without bracket and stand) Weight DCS-2121: 281.4g (without bracket and stand) DCS-2102: 265.3g (without bracket and stand) Max Power Consumption • 6W • Input: 100-240VAC, 50/60Hz •… -
Page 60
Video Algorithm Supported • MPEG-4/MJPEG simultaneous dual-format compression • JPEG for still image Features • Adjustable image size and quality • Time stamp and text overlay • Configurable motion detection zones Resolution 1.3M: 1280 x 1024 at up to 10fps 1024 x 768 / 512 x 384 / 256 x 192 at up to 10fps 300K: 640 x 480 / 320 x 240 / 160 x 120 at up to 30fps… -
Page 61
OS Support Device Windows 2000 / Windows XP / Windows Vista / 3GPP Mobile Phone Utility Windows 2000 / Windows XP / Windows Vista Physical Environment Power • 5V 2.5A switching power adapter • External AC-to-DC Switching Power Adapter • Type: USA / UK / EUR / AUS / CN Operation Temperature 0 to 40 ˚C (32 to 104˚F) Storage Temperature…
This manual is also suitable for:
Dcs-2121
Описание Интернет видеокамеры DCS-2102/2121 от D-Link
Интернет камера DCS-2102
! Обзор полностью подходит и для IP камеры DCS-2121, но беспроводная часть не будет полноценно описана, ввиду отсутствия самой камеры. В дальнейшем, я буду оперировать только моделью DCS-2102, но это можно смело отнести и к IP камере DCS-2121.
Не буду описывать все прелести и возможности этих моделей IP камер, скажу просто, камеры на 5+, почитав обзор, вы поймете и оцените настоящий функционал готового решения от D-Link.
Знакомство с камерой.
Вид спереди.

1. Оптическая линза.
2. Вращающееся кольцо для настройки фокуса.
3. Индикация состояния (двуцветный светодиод — зеленый, красный)
4. Встроенный микрофон
5. Антенна для подключения по беспроводной технологии Wi-Fi (актуально только для модели DCS-2121)
6. Слот для подключения карты памяти форм фактора SD
7. Скрытая кнопка сброса настроек
Вид сзади

8. Разъем для подключения антенны (актуально только для модели DCS-2121)
9. Кнопка активации технологии WPS (быстрая настройка беспроводного подключения по Wi-Fi, актуально только для модели DCS-2121 )
10. Отверстие для крепления кронштейна.
Вид снизу

1. Разъем miniJack для подключения внешней акустической системы (компьютерные колонки)
2. Разъем для подключения блока питания (камеру можно подключать по технологии PoE, если использовать PoE адаптер DWL-P200 или DWL-P50+ PoE коммутатор)
3. Разъем для подключения UTP кабеля с наконечником RJ-45.
4. Порт DI (Digital Input) для подключения внешних датчиков и DO (Digital Output) для подключения внешних контроллеров.
Сборка и подключение

Без комментариев )
По просьбе посетителя, сообщаю, что камера с легкостью монтируется на потолок, изображение площадки ниже, распорные дюбеля в комплекте с камерой.


Возможные варианты подключения по приоритету выше — ниже:
-к локальной сети, через Интернет шлюз со встроенным DHCP сервером
-к локальной сети через коммутатор-напрямую к сетевой карте вашего компьютераПри подключении IP камеры, к локальной сети, через коммутатор, то тут есть два варианта:
— в вашей локальной сети есть DHCP сервер. В этом случае параметры IP для DCS-2102, будут назначены вашим DHCP сервером. Посмотрите в статусе вашего DHCP сервера, какой IP адрес назначен IP камере. Изначально IP камера является DHCP клиентом.
— в вашей локальной сети нет DHCP сервера. В этом случае, на компьютере с которого вы намерены выполнить настройку IP камеры, сетевой адаптер (сетевуху), необходимо перевести в подсеть 192.168.0.XXX. По умолчанию, IP камера имеет IP адрес 192.168.0.20.
При подключении напрямую через сетевую карту компьютера, последнюю необходимо перевести в подсеть 192.168.0.XXX. По умолчанию, IP камера имеет IP адрес 192.168.0.20. При таком типе подключении, возможны проблемы с подключением IP камеры, которые могут быть вызваны следующими факторами:
— у вас стоит гигабитная сетевая карта без функции MDI/MDX, при попытке подключиться «прямым» кабелем нет подключения. Решением будет использование «обратного» кабеля или подключите IP камеру через коммутатор.
— не исправна сетевая карта вашего компьютера. Решением будет замена нерабочей или устаревшей сетевой карты на новую сетевую карту.
В данной статье будет рассмотрено только подключение через Интернет шлюз, на примере Интернет шлюза DIR-655.
Скачаем новую прошивку для DCS-2102 по ссылке
Выполняем подключение IP камеры электрической сети 220 Вольт и к Интернет шлюзу DIR-655.
Заходим на WEB интерфейс DIR-655 в раздел SETUP — NETWORK SETTINGS, там мы смотрим, какой IP адрес получила наша IP камера.

В моем случае, IP камере DIR-655, назначил IP адрес 192.168.0.197.Зайдем по узнанному IP адресу на IP камеру. Для этого в адресной строке вашего Интернет браузера, это должен быть либо Internet Explorer, либо FireFox, вписываем адрем http://192.168.0.197 и нажимаем Enter.
Должно появиться окно авторизации пользователя для входа на IP камеру… В поле Пользователь, вписываем admin, а поле Пароль, оставляем пустым и нажимаем Ок.

Вот собственно и сама IP камера, точнее ее графический интерфейс (WEB).

Займемся прошивкой IP камерой.Для этого, зайдем в раздел MAINTENANCE — Firmware Upgrate, кнопкой ОБЗОР, указываем на заведомо скачанный файл прошивки и нажимаем на кнопку Upload, ждем окончания прошивки…

После окончания, перед вами снова появиться окно авторизации, зайдем на камеру и по рекомендации производителя выполним сброс камеры на заводские настройки, для этого выберем сверху раздел MAINTENANCE, а слева System и в основном окне, нажмем на кнопку Restore Factory Defaults.

На появившейся вопрос отвечаем Ок

наблюдаем …

Для IP камеры DCS-2121
Прошивку IP камеры производите только при подключении через кабель !!! После перепрошивки и сброса настроек, для того, что бы быстро настроить подключение IP камеры DCS-2121 по беспроводной технологии Wi-Fi c любым беспроводным Интернет шлюзом серии DIR, используйте технологию WPS. Кратко, нажмите кнопку с торца Интернет шлюза серии DIR, при этом она должна начать мигать и нажмите на кнопку WPS на самой IP камере DCS-2121, при этом она должна начать мигать, немного подождите и все будет готово. На все провсе должно уйти не более 1-2 минуты.
После того, как вы увидели изображение, выполните фокусировку

Теперь рассмотрим возможности камеры
Раздел LIVE VIDEO

1. Текущее разрешение просматриваемого видео.
2. Состояние SD карты ( в тестовой камере нет установлена SD карта, поэтому ее статус Invalid)
3. Отображает текущую дату и время, установленное на IP камере. Справа имя камеры. Все эти параметры изменяемы.
4. Просмотр видео изображения с параметрами, выставленными в профиле 1
5. Просмотр видео изображения с параметрами, выставленными в профиле 2
6. Просмотр видео изображения с параметрами, выставленными в профиле 3
7. Просмотр видео изображения с параметрами, выставленными в профиле 4 (для мобильных устройств, формат 3gpp).
8. Просмотр видео изображения в полноэкранном режиме. Для выхода из режима, нажмите клавишу ESC.
9. Позволяет получить изображение стоп кадра с IP камеры.
10. Запись видео изображения на жесткий диск компьютера, с которого вы просматриваете видео. Для остановки записи, нажмите повторно на кнопку записи.
11. Указывается папка на вашем компьютере, куда будут сохраняться видео записи и стоп кадры, получаемые с IP камеры. По умолчанию все записанное видео и стоп кадры будут сохраняться в папке DCS-2102, которая располагается в папке Мои документы.
12. Включает или выключает прослушивание встроенного в IP камеру микрофона, т.е. все, что слышит IP камера, будете слышать вы, откуда бы вы к ней не подключились.
![]() первое положение — звук отключен, второе — включен.
первое положение — звук отключен, второе — включен.
13. Включение и отключение микрофона на стороне удаленного пользователя. Актуально, если к разъему камеры подключена внешняя активная акустика (обычные компьютерные колонки). Пример работы этой функции: допустим, что камера стоит у вас в офисе, к IP камере подключена внешняя акустика (обычные компьютерные колонки) через встроенный в IP камеру разъем miniJack. IP камера имеет выход в сеть Интернет. Вы находитесь вне офиса, но подключены к сети Интернет. Вы можете выполнить подключение к IP камере, через свой ноутбук, со встроенным микрофоном. В результате, вы, если активируете опцию 12 (включение прослушивания встроенного в IP камеру микрофона), то вы будете слышать все, что происходит около IP камеры. При необходимости, вы активируете описываемую опцию и через встроенный в ноутбук микрофон, можете говорить, и вас услышат через акустическую систему, которая подключена к IP камере. По сути, вы будете видеть и слышать все, что происходит перед IP камерой, а вас, могут только слышать.
![]() первое положение — микрофон отключен, второе — включен
первое положение — микрофон отключен, второе — включен
14. Включение и отключение внешнего датчика (полное описание будет позже)
![]() первое положение — цифровой выход отключен, второе — включен
первое положение — цифровой выход отключен, второе — включен
Раздел SETUP — Setup Wizard
В этом разделе, представлены различные помощники, которые позволяют настроить подключение к сети Интернет и настроить датчик движения. Этот раздел не рассматривается.

Раздел SETUP — Network Setup
В этом разделе выполняются сетевые параметры подключения IP камеры к вашей сети или сети вашего Интернет провайдера.

1. Указываются параметры IP подключения к вашей локальной сети или к сети Интернет. При использовании в сети с DHCP сервером или Интернет шлюза серии DIR, установите DHCP Connection. При необходимости прописать параметры IP вручную, выставьте Static IP Adderss и настройте необходимые параметры IP.
2. При активации данной опции, ваша IP камера, будет распознаваться, и отображаться вашей операционной системой по протоколу Universal Plug and Play.
Пример реализации на ОС Windows XP Pro:
Зайдите в Сетевое окружение, слева нажмите на Показывать значки для сетевых UPnP-устройств.

Система выдаст сообщение..

После автоматической установки необходимых компонентов, в Сетевом окружении вы должны увидеть свою IP камеру и все сетевые устройства, подключенные к вашей локальной сети, которые поддерживают этот протокол.

3. Активация этой опции, IP камера, автоматически будет опубликована во внешнюю сеть. Данную опцию должен поддерживать ваш Интернет шлюз. Интернет шлюзы серии DIR, поддерживают эту функцию. При активации данной опции, вам будет нужно указать, какие порты должны быть проброшены для IP камеры через встроенный в Интернет шлюз Firewall. По сути это избавляет от создания правила виртуального сервера на Интернет шлюзе вручную. Необходимо указать HTTP порт, для доступа на Web интерфейс самой камеры и RTSP порт, для передачи аудио и видео.
4. В случае подключения IP камеры непосредственно к сети провайдера с типом подключения PPPoE, активируйте эту опцию и настройте ее должным образом.
5. Указывается сетевой порт для доступа к Web интерфейсу IP камеры, как из локальной сети, так и из внешней и указывается RTSP порт для получения аудио и видео с камеры. Установив галочку в опции User Authentication, то при запросе потока RTSP будет запрошен логин и пароль для доступа к данному потоку.
Раздел SETUP — Dynamic DNS
Одна из самых полезных и востребованных функций это поддержка сервиса DDNS ( Dynamic DNS).
! Для IP камер это актуально только в случае, если камера напрямую подключена к сети Интернет. В случае, если вы подключаете IP камеру через Интернет шлюз серии DIR, то используйте эту функцию на самом Интернет шлюзе.

DDNS- позволяет вам не использовать внешний статический Интернет IP адрес и для того, что бы иметь возможность получать доступ к вашим сервисам, будь то ваш FTP, WEB или игровой сервер, или иметь возможность удаленного доступа к вашим компьютерам по терминалам RDP, Citrix и т.д, для доступа к системе видеонаблюдения, реализованных на IP камерах или просто для возможности удаленного администрирования самого Интернет шлюза.
Принцип работы DDNS следующий.Вы регистрируете на одном из предложенных в пункте 2 ресурсах свою учетную запись, например на http:// dlinkddns. com, берете себе имя, например, test_camera, указываете имя пользователя и пароль.
1. Активирует / деактивирует использование DDNS
2. Выберите ресурс, на котором вы активировали свою DDNS учетную запись
3. Введите имя вашего хоста (ресурса), которое вы активировали при регистрации, например test_camera
4. Введите имя пользователя, указанное при регистрации
5. Введите пароль, указанный при регистрации
6. Введите пароль, указанный при регистрации, повторно, это исключит ошибку ввода пароля.
7. Указывается время принудительного обновления записи, если IP адрес все это время не изменялся. Указывается в часах.
Статус подключения к DDNS серверу отображается ниже.
При подключении к сети Интернет, IP камера автоматически идет на DDNS ресурс, регистрируется по прописанной вами учетной записи.В свою очередь DDNS делает запись соответствия, например test_camera. dlinkddns. com = 81.30.24.51, после этого данная запись будет реплицирована на сервере и ваш узел будет доступен по имени test_camera. dlinkddns. com. При смене IP адреса, IP камера снова обратиться к службе DDNS размещенного на dlinkddns. com, после чего, если IP поменялся, DDNS создаст новую запись соответствия, например, test_camera. dlinkddns. com = 77.73.12.149, после полной репликации записи на все свои DNS сервера, ваша IP камера снова будет доступена по имени http:// test_camera. dlinkddns. com Для того, что бы при подключении указать необходимый порт подключения, например если у вас несколько IP камер или есть другие устройства или приложения, которые так или иначе должны быть опубликованы в Интернет, то используйте различные порты.
На пример IP камера настроена на порт 8080, вам достаточно прописать http:// test_camera. dlinkddns.com:8080.
Раздел SETUP — Image Setup
В данном разделе настраиваются параметры видео изображения.

1. Яркость
2. Контраст
3. Баланс белого
4. Если камера подвешена к верху ногами, то активируйте эту опцию, изображение перевернется на 180 градусов.
5. Насыщенность
6. Частота (для России это 50 Герц)
7. Черно белый режим
8. Зеркальное отображение.
Раздел SETUP — Audio and Video

1. Выбор работы видео режима IP камеры:- VGA — поддерживает видео режимы 640X480, 320X240, 160X120- XGA — поддерживает видео режимы 1024X768, 512X384, 256X192 (оптимальный режим работы)- SXGA — поддерживает видео режимы 1280X1024, 640X512, 320X256
! В режиме SXGA не будет работать детектор движения.
2. Настройка видео профиля 1:- Encode Type — выбирается из выпадающего списка. Доступно к выбору: MPEG4 и JPEG- Resolution — видео разрешение. Выбирается из выпадающего списка. Зависит от выбранного п.1- FPS (Frame Per Second) — количество кадров в секунду. Выбирается из выпадающего списка. Возможны варианты выбора: в режиме VGA 30,15,10,5,3,2 1 кадра в секунду, в режиме XGA и SXGA: 10,5,3,2 1 кадров в секунду.- bps (bits per second) — битрейт, доступен для выбора из выпадающего списка, только если в поле Encode Type (пункт 2) выбрано MPEG4. Возможные варианты: 2 Mbps, 1,5 Mbps, 1 Mbps, 768 kbps, 512 kbps, 384 kbps,256 kbps, 128 kbps, 64 kbps. Качество видеоизображения будет подобрано под выбранную вами скорость, т.е. чем ниже скорость, тем хуже качество изображения.- JPEG Quality — качество изображения, доступно для выбора из выпадающего списка, только если в поле Encode Type (пункт 2) выбран режим JPEG. Возможные варианты: Low, Fair, Standart, Good, Excellent.- RTSP (Real Time Stream Protocol) — указывается имя видео потока, для подключения к видео потоку по протоколу RTSP. Пример rtsp://192.168.0.197/play1.sdp.
3. Настройка видео профиля 2:Все аналогично пункту 2, но этот профиль в режиме XGA не поддерживает разрешения 1024X768, а в режиме SXGA не поддерживает разрешение 1280X1024 и имеет собственное имя для подключения по протоколу RTSP.
4. Настройка видео профиля 3Поддерживает только режим JPEG и унаследует все свойства для данного режима из видео профиля 2. При настройке отправки стоп кадра (раздел SnapShot) на FTP или на E-Mail, будет использоваться качество изображения именно видео профиля 3. Имеет собственное имя для подключения по протоколу RTSP.
5. Настройка видео профиля 4 Поддерживает только режим MPEG4 и унаследует все свойства для данного режима из видео профиля 2. Данный профиль рассчитан для пользователей мобильных устройств, понимающие видео формат 3gpp.
6. Активируйте в случае если камера, предполагает работу в сумерках. Указывается скорость работы затвора объектива в режиме ночь. Выбирается из выпадающего списка. Доступны варианты: 1/5, 1/10, 1/15.
7. Раздел для настройки аудио параметров, такие как активация внешней акустической системы подключенной к камере. В случае активации, будет доступен регулятор уровня громкости. Варинты от 10 до 100 с шагом 10. Активация опции Enable Microphone, активирует встроенный в камеру микрофон. Чувствительность выбирается при активированной опции от 10 до 100 с шагом 10.
Примеры для разичных режимов:
VGA
MPEG4_640x480_30_fps_2_mbit
JPEG_640x480_30_fps_good
JPEG_640x480_30_fps_excellent
XGA
JPEG_1024x768_10_fps_excellent (улица)
JPEG_1024x768_2+10_fps_excellent (улица + помещение)
Дополнительно рекомендую прочитать статью
Раздел SETUP — Motion Detection

1. Активация/ деактивация датчика движения.
2. Чувствительность датчика. Настраивается по задаче методом подбора.
3. Режим рисования областей, которые попадают под настройки детектора движения. Например, нам не нужно, что бы срабатывал датчик движения на движение на заднем плане (смотрите мой пример), там, где проходит основная дорога, ведь там движение происходит каждую секунду.
К примеру, я хочу фиксировать всех, кто въезжает, входит в наш двор. Область может быть прорисована так, как вам хочется, без ограничений. Для указания области, наведите мышку на ту зону, которую вы хотите обозначить, нажмите левую клавишу мыши и, не отпуская, растяните прямоугольник нужного размера. При необходимости процедуру рисования повторите.
4. Режим стирания области детектора движения. Все аналогично рисованию области детектора.
5. При нажатии обозначенная область детектора движения будет полностью вычищена.
Раздел SETUP — Time and Date

1. Указывается часовой пояс, для Башкирии это +5 Екатеринбург.
2. Активация автоматического перехода часов в летний или зимний режим.
3. Если требуется указание иного времени перехода с зимнего времени на летнее или указать иной часовой отрыв, активируйте данную опцию и выполните настройку. Режим для нашего региона не актуален, дальше не описывается.
4. Активация данного режима, позволит IP камере автоматически синхронизировать время с NTP серверами. Выбор NTP серверов доступен из выпадающего списка.
5. Если камера не имеет выхода в сеть Интернет или вы по каким либо другим соображениям не хотите использовать автоматическую синхронизацию с серверами времени, то активируйте этот раздел и настройте дату и время вручную. Кнопка Copy Your Computers Time Settings, позволит автоматически выставить настройки даты и времени, которые настроены на компьютере с которого вы выполняете настройку IP камеры.
Раздел SETUP — Recording

1. Активирует / деактивирует режим записи.
2. Указывается носитель, куда будет производиться запись. Варианты: на SD карту или сетевую папку.
— Samba Auth — из выпадающего списка выбирается тип учетной записи для подключения IP камеры к сетевой папке для записи видео. Доступно: Anonymous — когда доступ к сетевой папке с правами на чтение/запись доступно для всех, Account — когда доступ к сетевой папке с правами чтение/запись разрешена только под определенной учетной записи. При выборе последнего режима, будут доступны для редактирования поля User name (имя пользователя), Password (пароль пользователя) и Password confirm (подтверждение пароля пользователя).
— В поле Server — необходимо указать IP адрес или имя компьютера (видео сервера) на который будет осуществляться видео запись.
— В поле Share Folder, необходимо указать имя расшаренной папки. Важно, что бы имя папки было написано латинскими буквами.
— Нажатием на кнопки Samba Status и Test проверяется доступность этой папки.
3. Указывается, с какого видео профиля брать изображение. Можно указать один из четырех существующих видео профилей.
4. Указывается, что делать камере, если достигнет указанный в поле Record Until размер оставшегося дискового пространства по объему на диске или в сетевой папке (используются квоты дискового пространства на пользователя).
Доступные варианты: Stop recording — остановить запись и Overwrite older recordings — стереть старые записи (по сути, запись по кольцу).
5. Раздел, который позволяет настроить, на основании какого события и как она будет делать запись. Таких событий всего три:
— Event Based (запись по событию): варианты:
Motion detection triggered recording — при срабатывании датчика движения,
Digital input 1 triggered recording — запись по событию цифрового входа 1.
При записи в этом режиме, у вас есть возможность указать какое время камера должна включить в запись до наступления события и время после окончания события. Указывается от 0 до 15 секунд
.- Continuous (Samba only) -режим постоянной записи, т.е. 24 часа, 7 дней в неделю.
— Scheduled (Samba only) — режим записи по расписанию. В расписании указывается дни недели, время начала записи и время окончания записи.
Пример настройки режима записи под ОС Windows XP Pro
Пример без подробных описаний действий.

Создаем нового пользователя для IP камеры.


Создаем папку, в которую будет писать наша камера

Откроем свойства папки

Настроим сетевой доступ к этой папке

Если у вас нет подобных вкладок, то установите патч фикс от Microsoft, скачать
Выберите группу Все и снимите разрешения на Изменить и запись, тем самым мы защитим содержимое папки от случайного или намеренного стирания.

После нажмите на кнопку Добавить, нажмите кнопку Дополнительно, нажмите на кнопку Поиск и найдите там только что созданную учетную запись.

Нажмите Ок и вы увидите

Нажмите Ок и закройте все остальные окна.
Получаем расшаренную папку с ограниченными правами доступа.

Зайдем в настройки IP камеры

Указываем, что мы пишем на Samba под определенной учетной записью, вписываем Имя пользователя и пароль (пароль пишем два раза), указываем IP адрес компьютера, на который будет идти запись и указываем имя расшаренной папки.Запись у нас будет с видео профиля 1, при остатке на диске 100 мегабайт, старые записи будут удаляться. Запись будет осуществляться только по событию, срабатывание датчика движения. Запись до движения и после окончания движения выставлено 0 секунд, хотя я рекомендую выставить 15, 15.
Сохраняем настройки.
Если все было сделано правильно, то примерно через минуту, информация Samba Status: должен стать Ready, а при нажатии на кнопку Test, вы должны получить Ок.

Раздел SETUP — Snapshot
Использование данного раздела, позволяет выкладывать стоп кадры в указанное место по заданному событию. Качество изображения берется только из видео профиля 3.

1. Активация/ деактивация опции
2. Выбор режима работы опции, возможны три варианта:
— Event Based — стоп кадры будут делаться только при срабатывании датчика движения и (или) при получении сигнала с цифрового разъема.
-Continuous — постоянная выкладка стоп кадров. Данный режим может сливать стоп кадры только на FTP.
— Scheduled — выкладка стоп кадров по расписанию. При активации данного режима, раздел расписания станет доступным для редактиварования.
3. При необходимости, выкладку стоп кадров можно организовать на ваш почтовый ящик, для этого вам потребуется:
— активировать опцию E-Mail Adderss
— в поле User Name, вписать имя для входа на почтовый ящик (обратите внимание, что иногда требуется ввод имени пользователя с указанием имени почтового домена, а иногда не требуется)
.- в поле Password, впишите пароль для доступа к вашему почтовому ящику.
— SMTP Mail Server, вписывается имя или IP адрес вашего почтового сервера
— Sender E-Mail Address, указывается почтовый ящик отправителя (как правило оно совпадает с получателем)
-Recipient E-Mail Address, указывается почтовый ящик получателя.-Port, указывается номер сетевого порта, по которому работает ваш почтовый сервер по протоколу SMTP, как правило, это 25 порт.
После сохранения настроек, нажмите на кнопку Test и если все было сделано правильно, то тест будет успешно пройден, при это на ваш почтовый ящик упадет тестовое письмо высланное IP камерой.
4. Активация использования внешнего FTP сервера.
— User Name — имя пользователя для входа на FTP (логин)
— Password — пароль пользователя для входа на FTP- Host Name — сетевое имя (адрес) FTP сервера
— Path -имя подключаемой папки
— File Name Prefix — префикс, дописываемый к названию файла стоп кадра.
-Port — номер сетевого порта, по которому доступен FTP сервер, как правило это 21 порт.
— Interval — периодичность отправки стоп кадров
— Passive Mode — активация пассивного режима работы FTPПосле сохранения настроек, нажмите на кнопку тест, если все было сделано верно, то на FTP сервере в вашей папке появиться тестовый стоп кадр.
Ниже, пример полученного письма, смотрим, письмо выслано с почтового ящика на dlink-help@mail.ru Этот e-mail защищен от спам-ботов. Для его просмотра в вашем браузере должна быть включена поддержка Java-script , тема письма From Internet Camera (название вашей камеры) с указанием даты. В теле письма будет информация о том, с какой камеры отправлено это письмо, ее IP адрес, дата создания письма, а так же будет информация на основании чего сгенерировано письмо. В нашем случае сработал датчик движения. dlink-help@mail.ru Этот e-mail защищен от спам-ботов. Для его просмотра в вашем браузере должна быть включена поддержка Java-script

Раздел SETUP — Digital Output

Активация данной опции, позволит активировать интерфейс Digital Output, при наступлении события: сработал датчик движения и (или) появился сигнал от внешнего датчика, подключенного к разъему Digital Input.
Например: у нас такая схема… к разъему Digital Input подключен датчик открытия двери, на камере, также настроен датчик движения, к разъему Digital Output, через силовое реле времени подключен прожектор (фонарь).
Данная опция активирована и на движение и на открытие двери. В результате, мы получил, что при наступлении любого события (появилось движение или открыли дверь) камера подаст сигнал на реле времени, на котором, например, выставлено, при появлении сигнала держать включенным прожектор в течении 5 минут, по истечению которых, если не поступало повторных сигналов выключить прожектор. Схемы могут быть самыми различными и не обязательно работать так, как я описал в примере. Примерные схемы и варианты подключения, я скоро постараюсь выложить.
Раздел SETUP- SD Card
При установленной SD карте, через данную опцию, можно отформатировать установленную в слот SD флеш карту. Форматирование, как правило, используется в случае если была установлена новая карта памяти, карта памяти имеет логическую ошибку и дальнейшая работа без форматирования не возможна или требуется быстро ее очистить.

Раздел — MAINTENANCE — Admin

1. Задается пароль для пользователя admin, который имее полные права доступа к IP камере. Если пароль уже был установлен, то появиться дополнительное поле, в котором потребуется ввод старого пароля.
2. Раздел, в котором создаются учетные записи для пользователей IP камеры, требуется ввод имени пользователя и пароля (для исключения ввода пароля, его нужно будет ввести два раза). После того, как поля User Nmae, New Password, Retype Password будут заполнены, нажмите на кнопку Add. В отличие от администратора камеры, пользователь может только просматривать IP камеру, производить какие либо настройки пользователь не сможет.
3. Для удаления учетной записи пользователя, выберите его из выпадающего списка и нажмите на кнопку Delete.
4. Имя камеры — произвольный параметр, как правило, названия дают согласно схеме проекта, или по названию места установки. Место отображение имени указано на рисунке ниже.

5. Enable OSD — отображение информации на поверх изображения, отображает текущее дату, время и маркер камеры (параметр Label). Место отображения указано на примере ниже.

6. Маркер IP камеры — произвольное название.
7. Активация параметра, позволяет отображать текущее время в OSD.
8. Установка в положение Off, выключит индикацию на передней панели IP камеры. Это делается, как правило, в случае если, камера стоит за стеклом, в этом случае не будет блика светового индикатора в стекле или для того, чтобы устранить раздражающий (палевный) эффект. По умолчанию индикация включена, если она горит красным цветом, это говорит о том, что камера не имеет подключения к локальной сети. Зеленый цвет, говорит о том, что все в порядке, я работаю, мигающий зеленый, говорит о том, что кто-то зашел на камеру и просматривает ее.
Раздел — MAINTENANCE — System

1. Позволяет сохранить настройки камеры в виде файла конфигурации на жесткий диск компьютера.
2. Позволяет загрузить и применить настройки из файла конфигурации. Кнопкой обзор указывается файл конфигурации, после необходимо нажать на кнопку Load Configuration и через пару минут, IP камера применит все настройки, которые были указаны в файле конфигурации.
3. Позволяет сбросить все настройки в значение по умолчанию (сброс к заводским настройкам).
4. При нажатии, произойдет перезагрузка IP камеры. Раздел — MAINTENANCE — Firmware UpgradeЭто раздел вам уже знаком. Обсуждался в самом начале.
Раздел — STATUS — Device Info
Без комментариев

Раздел — STATUS — Log
Без комментариев

Как пользоваться?
Наша цель — обеспечить Вам самый быстрый доступ к руководству по эксплуатации устройства D-Link DCS-2102. Пользуясь просмотром онлайн Вы можете быстро просмотреть содержание и перейти на страницу, на которой найдете решение своей проблемы с D-Link DCS-2102.
Для Вашего удобства
Если просмотр руководства D-Link DCS-2102 непосредственно на этой странице для Вас неудобен, Вы можете воспользоваться двумя возможными решениями:
- Полноэкранный просмотр -, Чтобы удобно просматривать инструкцию (без скачивания на компьютер) Вы можете использовать режим полноэкранного просмотра. Чтобы запустить просмотр инструкции D-Link DCS-2102 на полном экране, используйте кнопку Полный экран.
- Скачивание на компьютер — Вы можете также скачать инструкцию D-Link DCS-2102 на свой компьютер и сохранить ее в своем архиве. Если ты все же не хотите занимать место на своем устройстве, Вы всегда можете скачать ее из ManualsBase.
Руководство по эксплуатации D-Link DCS-2102
Печатная версия
Многие предпочитают читать документы не на экране, а в печатной версии. Опция распечатки инструкции также предусмотрена и Вы можете воспользоваться ею нажав на ссылку, находящуюся выше — Печатать инструкцию. Вам не обязательно печатать всю инструкцию D-Link DCS-2102 а только некоторые страницы. Берегите бумагу.
Резюме
Ниже Вы найдете заявки которые находятся на очередных страницах инструкции для D-Link DCS-2102. Если Вы хотите быстро просмотреть содержимое страниц, которые находятся на очередных страницах инструкции, Вы воспользоваться ими.
-
Page 1: D-Link DCS-2102
[…]
-
Page 2: D-Link DCS-2102
i T able of Conte nt s Package Contents ………………………. …………………… ……………………. …………………… …………………… …………………… …………………… …………………… …………………… ………. 1 Minimum System Requirements …………………………….. …[…]
-
Page 3: D-Link DCS-2102
ii 1) Identify Y our Cam era on the Net work ………………. …………………… …………………… …………………… ……………………. …………………… …………………… …………….. 42 2) Assign a Loca l IP Address and Port for Y our Camera … …………………… …………………… …[…]
-
Page 4: D-Link DCS-2102
1 Package Contents If any of the below it ems are missing from your package, please contact your retailer . DCS-2102 Meg apixel Internet Came ra D-Link DCS-2102 Megapixel Internet Cam era CA T 5 Ethernet Ca ble Power Adapter Mounting Kit Quick Installation Guide CD-ROM with Software an d Product Docum entation DCS-2121 Meg a[…]
-
Page 5: D-Link DCS-2102
2 Minimum Sy stem Requirements W ired (10/ 100 Fast Ether net) network W irel ess 802.11g networ k (for DCS-2121 only, for wireless use onl y) PC with: 1.3 GHz processor or higher 128 MB mem ory or more W indows XP SP2 or Vista Internet Explorer 6 or h igher Multiple cam era operation requires : 2.4 GHz processor[…]
-
Page 6: D-Link DCS-2102
3 Introduction Congratulations on your purchase of the DCS-2102/2121 Megapixel Internet Camera! The DCS-2102/2121 is a v ersatile and unique s olution for your s mall office or home. Unlike a s tandard w ebcam , th e DCS-2102/2121 is a complete system with a built-in CPU and web server that tr ansmits hig h qualit y video i mages for security and s[…]
-
Page 7: D-Link DCS-2102
4 Features and Benefits Simple to Use: T he DCS-2102/212 1 is a stand-alo ne system with a built-in CPU, r equiring no specia l hardware or sof tware such as PC f rame grabber car ds. The DCS-2102/2121 suppor ts ActiveX m ode for Internet Explorer. All that is requ ired is a com puter with Internet Explorer 6.0 or abov e. Supports a Variet […]
-
Page 8: D-Link DCS-2102
5 Hard w are Overv ie w 1. Camera lens 8. Antenna connector ( DCS-2121 only) 2. Focus ring 9. W PS button and LED (DCS-2121 on ly) 3. S tatus LED 10. Camera base m ount 4. Microphone 5. W ireless antenna (DCS-2121 onl y) 6. SD Card slot 7. Reset button 8 9 10 1 2 3 6 7 5 4 Front Back[…]
-
Page 9: D-Link DCS-2102
6 1. External speak er jack 2. Power jack 3. Ethernet port 4. DI/DO port Bottom 1 2 3 4[…]
-
Page 10: D-Link DCS-2102
7 2 1 4 5 3 Hard w are Installation A ttach the Antenna (DCS-2121 only) Screw the wireless a ntenna onto the antenna connecto r . Connect the camera base 1. Screw the base stem into the base. 2. T ake the hinge brack et and tighten the wheel. 3. Screw the hinge bracket into the base stem . 4. Screw the collar on to the hinge bracket. 5. Screw the c[…]
-
Page 11: D-Link DCS-2102
8 Connect the Ethernet Ca ble Connect the includ ed Ethernet cable to t he network cable connector loca ted on the bottom of the DCS-2102/212 1 and attach it to your network switch or router . Connect the Po w er A dapter Attach the power adapter to the power jack located on t he bottom of the DCS-2102/212 1 and connect the po wer adapter to a po w[…]
-
Page 12: D-Link DCS-2102
9 Autorun Installation Insert the Installation CD-R OM into your com puter ’s CD-ROM dri ve to initiate the autorun program . The content of the Installat ion CD-ROM inc ludes: View QIG: Click here to view the Quick Installation Guid e for a quick step-by-step guide to installing the DCS-2102/21 21. View Manual: Click here to vie w the Us[…]
-
Page 13: D-Link DCS-2102
10 Soft w are Installation Click the Installation Wizard button from the autorun program on the CD. Follow the sim ple steps below to run the Setup W izard to guide you quick ly through the installation proces s. Click Next .[…]
-
Page 14: D-Link DCS-2102
1 1 Click Y es . Click Next . Click Finish .[…]
-
Page 15: D-Link DCS-2102
12 Now , click on ffdshow fr om the autorun screen. This will install the proper c odecs t hat will allow you to playback video taken by the DCS-210 2/2121. Click I A gr ee . Click Next .[…]
-
Page 16: D-Link DCS-2102
13 Click Install . Click Close .[…]
-
Page 17: D-Link DCS-2102
14 Before using ffdshow , you m ust configure its properties. Fr om your computer , p lease click on St art Programs ffdsho w Configuration . At the ffdshow properties window , s croll to the botto m and click Miscellaneous . Be sur e that Autodetect is checked and that Error resilience an d Error con[…]
-
Page 18: D-Link DCS-2102
15 T o run the Setup Wizard , click on St art Programs D-Link Setup Wizard SE . The Setup W izard will then scan f or all available cam eras connected to your wired net work. Each cam era will appear with its MAC addres s, current IP address, and c am era name. Y o u can choose f rom the f ollowing options f rom the […]
-
Page 19: D-Link DCS-2102
16 Here, y ou can s et w hether the c amera should use a direct or static I P . If yo u use a static IP , the camera’s IP Address, Subnet Mask , Gateway , and DNS address es m ust correspond with your n etwork settings for you to access the camera. If y o u are un sure of what t hese settings should be, please check with your netwo rk administ[…]
-
Page 20: D-Link DCS-2102
17 If you need to m ake any changes, c lick Back to m odif y y our cam era settings. Otherwise, cl ick Restart to save and apply your settings. This m ay take a few minutes. (Wireless s ettings are for DCS-2121 o nly) Camera setup is n ow complete! Wait un til the Link LED on the cam era turns green, the n click Link to launch your Web browser and […]
-
Page 21: D-Link DCS-2102
18 After yo u click the Link button, the Installation W iz ard will automatically open y our Web brow ser to t he IP add ress of the DCS-2102/212 1 and prom pt you for a user nam e and password. Enter “adm in” into the User name field, th en click OK. If you changed your password in th e Setup W izard, enter your password then click O K. After […]
-
Page 22: D-Link DCS-2102
19 Adjusting the Camera Focus After open ing the web i nterface, turn the f ocus ring left or right un til the area you want to view is in focus. Y ou can use the video fee d of the web interface as a gu ide. Note: Y ou ca n adjust other settings suc h as brightness, c ontrast, orientation in the SET UP > Image Setup section of the web i nterfac[…]
-
Page 23: D-Link DCS-2102
20 Setting up a Wireless Connection w ith WPS (DCS-2121 only) If your wireless acces s point or rout er supports push-button W i reless Protected S etup (W PS), you can quickly configure your wireless network and camer a without using the cam era’s web interface. After plugging the power ad apter to your cam era and the front status LED li ghts u[…]
-
Page 24: D-Link DCS-2102
21 Using the Configuration Menu After completing the Setup W izard, y ou are rea dy to use your cam era. The Web configuration utilit y is designed to easi ly access and co nfigure your DCS-2102/2121. C lick the “Link” button will open up the m ain configuratio n page. If you would lik e to open the conf iguration page from a W eb Brow ser , en[…]
-
Page 25: D-Link DCS-2102
22 LIVE VIDEO This section allo ws you to set up your IP camer a’s live video by using th e buttons belo w . LIVE VIDEO > C amera Screen Size : Y o u can change th e video sc reen size to Sm all, Medium , or Large. Full Screen : T his allows you to v iew the video in full sc reen mode. T o exit ful l screen mode, press the ESC k ey on your […]
-
Page 26: D-Link DCS-2102
23 SETUP This section allo ws you to further set up or change th e configuration of your IP cam era. SETUP > Wizard The setup wizards guide you throu gh initial setup of your IP camera. Y ou can use the Inter net Connection Setup W izard for i nitial network setup, and you can u se the Motion Detection Setup W izard to set up motion detection an[…]
-
Page 27: D-Link DCS-2102
24 SETUP > Netw ork Setup This option, Netw ork Setup , al lows you to conf igure your LAN a nd Internet config uration, including the settin gs for LAN, PPPo E, and port. DHCP Connection: This allows the cam era to get an IP address autom atically from your router or Internet serv ice. If you are not sure which LA N settings to use, try using D[…]
-
Page 28: D-Link DCS-2102
25 SETUP > Wirele ss (DCS-2121 o nly) T o set up your IP camera’s wireless network interface settings, enable Wirele ss Settings in th is window firs t. Then continue the further c onfiguration next. Site survey : Clicking this button will scan for available wireless network s. After scanning, you can use the dropd own box to sel ect an ava[…]
-
Page 29: D-Link DCS-2102
26 SETUP > D ynamic DNS If you have a DSL or Cable service prov ider that chang es your m odem IP address periodicall y , Dynamic DNS (Dom ain Nam e Service), a method of keeping a dom ain name linked to a dynamic IP address, is usef ul. W ith most Cable and DSL connections, you are ass igned a dynamic IP address and that ad dress is used on ly […]
-
Page 30: D-Link DCS-2102
27 SETUP > Image S etup The options in Imag e Setup allow you to adjust the se ttings for your IP camera sensor and image. Brightness : T his adjusts the brightness of the camera im age. This is set to 60 b y default. Saturation : T his adjusts the color saturation of the cam era image. This is set to 60 b y default. Contrast : T his adjusts the[…]
-
Page 31: D-Link DCS-2102
28 SETUP > A udio and Vi deo This Audio and Video option a llows you to set up your IP camera’s video quality , resolution, an d fram e rate. Video Sensor Sensor Output : Y ou can set the cam era’s sensor output to VGA qualit y (640×640), XG A quality (1024×768), or SXGA qualit y (1280×1024). Note: W hen using SXGA m ode, please not e tha[…]
-
Page 32: D-Link DCS-2102
29 Note: Higher frame siz e, frame rate a nd bit r ates will give y ou better video quality , but th ey will a lso require more network bandwidth. For best viewing results on a mobile phone, we suggest setting the Fr ame Rate to 5 fps and bit rate to 20 Kbps. After making any changes, click the Save Settings button t o save your changes, or c lick […]
-
Page 33: D-Link DCS-2102
30 SETUP > Motion Det ection This option allo ws you to set up Motion Det ection on your IP camera. In order to use m otion detection you m ust first c heck the Enable Video Motion check box. Y ou can t hen click on the video window an d draw motion detec tion zones b y clicking and draggin g your m ouse. Red areas indicate areas that will be m […]
-
Page 34: D-Link DCS-2102
31 SETUP > Time and Da te This option allo ws you to configure, up date, and m aintain the correct tim e on the internal system c lock. From this section you can set the tim e zone that you are in and set the NT P (Network Ti m e Protocol) Ser ver . Daylight Sav ing can also be conf igured to autom atically adjust the time when need ed. Time Zon[…]
-
Page 35: D-Link DCS-2102
32 SETUP > Recording This option allo ws you to configure recor ding settings and sc heduling. Y ou can re cord video to a Secure Digital card insert ed into the SD card s lot, or you can h ave video save d to a Sam ba network drive. Enable recording : Check this checkbox to enable the recor ding feature . After enabling recording, you will need[…]
-
Page 36: D-Link DCS-2102
33 Scheduling Event Based: Event based recording wil l allow you to record video when specif ic events happen. Motion det ection triggered recording : Enabling this option will set the camera to record video when m otion is detecte d by the cam era. Digital input triggered recording: W hen the camera rec eives a signal from its DI input, it will st[…]
-
Page 37: D-Link DCS-2102
34 SETUP > Snaps hot Here, you can set the cam era to take snapshots when m otion is detected an d/or when a signal is sent to the DI inp ut. Snapshots can be sent to an e- m ail address and/or to an FT P server . Enable Snapshot: Check this box to enable th e snapshot feature. T rigger Event: Motion det ection: T his will set the cam era to tak[…]
-
Page 38: D-Link DCS-2102
35 SETUP > Digital Ou tput This scr een allows you to enable the D igital Out (D/O) port, and a llows you to select what events will trigger the Digital Out si gnal. Enable D/O: Check this box to enabl e the D/O port. Motion Detectio n: W hen checked, the D/O po rt will send a s ignal whenever m otion is detected b y the camera. (W hen motion de[…]
-
Page 39: D-Link DCS-2102
36 MAINTENANCE M A I NTEN ANCE > De vice Management Here you can cha nge the Adm in password, add and manage Users , and adjust so m e camera settings. Admin Passwo rd Setting: T his section lets you chang e the admin password used to log in to the camera and adj ust settings. Af te r installing the camera for the first time, it is highl y recom[…]
-
Page 40: D-Link DCS-2102
37 M A I NTEN ANCE > Backup and Restore This scr een llows you to save and restor e the cam era’s current configuration. Y ou can a lso reset all settings to f actory default, an d reboot the de vice. Save T o Local Hard Drive : Click on the Sav e Configuration button to save the c urrent configuration to a hard drive. Load From Local Ha rd Dr[…]
-
Page 41: D-Link DCS-2102
38 M A I NTEN ANCE > Firmw are Upgrade Here, you can see your curr ent firmware version and you can also upgr ade your f irmware with a new version. Firm ware upgrades are m ade available a t support.dlink.c om.tw . T o upgrade your firm ware, go to support.dlink .com .tw and download the latest f irmware to your computer ’s hard dri ve. Click[…]
-
Page 42: D-Link DCS-2102
39 ST A TUS The S tatus section pr ovides the detail inform ation about your IP camera. STATUS> De vice Info This scr een shows you various inform ation about your camera and its current sett ings.[…]
-
Page 43: D-Link DCS-2102
40 STATUS> Log The log shows you a list of events that have ha ppened recentl y . Y ou can d ownload the log b y clicking the Dow nload button, or you can em pty the log by clicking the Cl ear button.[…]
-
Page 44: D-Link DCS-2102
41 HELP The Help screen pro vides you with support inform ation about the DCS-2 102/212 1 for your reference.[…]
-
Page 45: D-Link DCS-2102
42 Installing the DCS-2102/2121 Behind a Router If you connect your cameras to an Intern et router , f ollow these steps to allow rem ote access to your cam eras, so you can access your cam eras from any Internet-connected PC: 1) Identify your camera on the network 2) Assign a local IP addres s and port for your camera 3) Determine your router ’s[…]
-
Page 46: D-Link DCS-2102
43 2) Assign a Local IP Address and Port for Y our Camera Click on the SET UP t ab, and select Netw ork Setup A Local IP Address is requ ired to conf igure your cam era and to view your camera within your local network. Y ou m ay use the d efault camera IP Address of 192.168.0.20. If you wish to use a different IP Addres s, be sure that th e ca[…]
-
Page 47: D-Link DCS-2102
44 3) Open the HTTP Port The HTT P Port opt ion is us ed when multiple c ameras are being installed behind a single p ublic IP add ress and will be acces sed rem otely OR for using a port oth er than the def ault port for image viewing. For each additional cam era that is ins talled, you m ust assign the appropriate Web server port for each cam era[…]
-
Page 48: D-Link DCS-2102
45 Router Setup The following steps general ly apply to an y router that you have on your net work. The D-Link DIR-300 is used as an exam ple to clarif y the configuration process. Y o ur WAN IP Address i nform ation will be listed on following window . Note: Because a dy nam ic WAN IP address can chan ge from time to ti me depending on y our ISP ,[…]
-
Page 49: D-Link DCS-2102
46 4) Open Virtual Ser ver Ports to Enable Rem ote Image View ing The Virtual Server Ports of your router m ust be opened for r emote access to your cam era. This is also referred to as port for warding. Please proc eed as f ollows: Select Enabled to ena ble virtual ser ver settings. Select a camer a name. Enter your cam era’s Local I[…]
-
Page 50: D-Link DCS-2102
47 Viewing Your Camera Over the Internet After all sett ings have be en entered c orrectly , a user ins ide or outside y our network will have access to the c amera through a standard W eb browser . T o access your camera, sim ply type in the IP Address of the router g iven to you by your ISP , a colon, a nd the HTT P port number that you gave your[…]
-
Page 51: D-Link DCS-2102
48 Frequently Asked Questions Internet Camera Features 1 What is an Internet C amera? An Internet Cam era is a stand alone system that connects di rectly to an Ethernet or Fast E thernet network and supported by the wireless transmission based on the IEEE 802.1 1g standard, whereas con ventional PC Cam eras require connect ion to a po wered PC to f[…]
-
Page 52: D-Link DCS-2102
49 10 Why can’t I acce ss the Internet Ca mera from a web brow ser? A possible cause might be t hat the IP Address for the Internet Camera is alread y being used b y another devi ce. T o correct the pos sible problem , you need to firs t disconnect the Inter net Cam era from the network . Then try to PING (follow the ins tructions in the sect ion[…]
-
Page 53: D-Link DCS-2102
50 18 Why are no images available throu gh the Web browser? ActiveX m ight be disabled on your web browser . If you are viewing th e images fr om Internet Explorer , m ak e sure ActiveX has been en abled in the In ternet Options menu. Y ou m ay also need to c hange the securit y settings on your browser to al low the ActiveX plug-in to be in stalle[…]
-
Page 54: D-Link DCS-2102
51 Ho w to Ping Your IP Addres s The PING (P acket Internet Groper) c omm and can determine whether a specific IP Address is accessible by sending a packet to t he specific address and waiting for a reply . I t is a ver y useful tool to confirm if the IP Address c onflicts with the Internet Cam era over the net work. Follow the step-b y-step proced[…]
-
Page 55: D-Link DCS-2102
52 If you fail to connect to your cam era you will see the fol lowing: Check to see if you have entered your camera’s IP Address correctl y or reassign your cam era’s IP Address.[…]
-
Page 56: D-Link DCS-2102
53 Time Zone Table (GMT -12:00) International Dateline West (GMT -1 1:00) M idway Island, Sam oa (GMT -10:00) Hawaii Island (GMT -09:00) Alask a (GMT -08:00) Pacific Ti m e (US & Canada); Tijuana (GMT -07:00) Mountain Ti me (US & Cana da) (GMT -06:00) Central T im e (US & Canada) (GMT -05:00) Eastern T ime (US & Canada) (GMT -04:00)[…]
-
Page 57: D-Link DCS-2102
54 DI/DO Input specifica tions DO Digital Output : Normal: open circ uit Trigger: short circuit After powering on or rebooting the DCS-2121, the cam era will be in Norm al m ode by default. DI Digital Input: Normal: no current Trigger: 12V current As the Digital Input s ignal is c ontrolled by an externa l device, we recom mend that[…]
-
Page 58: D-Link DCS-2102
55 Technical Specifications Video Codec MPEG-4 / MJPEG Audio Codec GSM-AMR: 8kbps, A DPCM: 8Kbps Sensor 1/4″ color 1.3MP CMO S sensor SDRAM 64 Mbytes Flash Memory 8 Mbytes SD-Card Slot Supports SD Cards u p to 16GB Lens 5.01mm, F 2.8 LAN • 10/100BASE T port • IEEE 802.3 com pliant • IEEE 802.3u com pliant • Supports Full-Dupl ex operat[…]
-
Page 59: D-Link DCS-2102
56 Audio Out Yes Reset Button Reset to factor y default Dimension (WxDxH) 71.9mm x 110.0mm x 37mm (without brack et and stand) Weight DCS-2121: 281.4g ( without brack et and stand) DCS-2102: 265.3g ( without brack et and stand) Max Pow er Consumption • 6 W • Input: 100-240VAC, 50/60H z • Output: 5VDC, 2.5 A Networking Protocol • IPV4, ARP, […]
-
Page 60: D-Link DCS-2102
57 Video Algorithm Supported • MPEG-4/MJPEG sim ultaneous d ual-form at compression • JPEG for still im age Features • Adjustable im age size and qual ity • Time stam p and text overlay • Configurable m otion detec tion zones Resolution 1.3M: 1280 x 1024 at up to 10f ps 1024 x 768 / 512 x 384 / 256 x 192 at u p to 10fps 300K: 640 x 480 / […]
-
Page 61: D-Link DCS-2102
58 OS Support Device W indows 2000 / W indows XP / W indows Vista / 3GPP Mobile Phone Utility W indows 2000 / W indows XP / W indows Vista Physical Env ironment Power • 5V 2.5A switching p ower adapter • External AC-to-DC Switching Power Adapter • T y pe: USA / UK / EUR / AUS / CN Operation Temp erature 0 to 40 C (3 2 to 104 F) Storage Temper[…]