-
Contents
-
Table of Contents
-
Bookmarks
Quick Links
DE1126
FM STEREO · MW (AM) · SW DSP RECEIVER /
MP3 PLAYER / DIGITAL RECORDER
Operation Manual
Summary of Contents for DEGEN DE1126
-
Page 1: Operation Manual
DE1126 FM STEREO · MW (AM) · SW DSP RECEIVER / MP3 PLAYER / DIGITAL RECORDER Operation Manual…
-
Page 2: Charging The Battery
POWER SUPPLY INSTALLING THE BATTERY 1. Turn off the unit and open the battery cover. 2. Install the provided lithium battery according to the battery polarity. 3. Close the battery cover. CHARGING THE BATTERY After installing the lithium battery, connect the unit with the provided USB adaptor to charge the battery.
-
Page 3: Battery Consumption Indication
BATTERY CONSUMPTION INDICATION 1. Full 2. Medium 3. Low 4. Exhausted Require to charge The unit will turn off the battery. automatically Note: Please fully charge and drain the battery for the first three times in order to extend the battery’s life. HOW TO TURN ON/OFF THE UNIT Press the [ ] button to turn on the unit;…
-
Page 4
MAIN MENU The radio will directly enter the “Main Menu” when you turn it on, you can rotate the [TUNING] knob to select either of the below function and then press the [MENU] button to enter your selection. FM Radio: FM/MW/SW radio After FM Radio selection, you can press either the FM/MW/SW button to select your desired band Music: MP3 music play mode… -
Page 5: System Setting
SYSTEM SETTING In “Main Menu” mode, rotate the [TUNING] knob to select [Sys Set], press the [MENU] button to enter below settings: Note: Operation time for each step is about 5 seconds. Sys Set (system setting): Time Date Calendar Info Alarm Backlight Language…
-
Page 6
TIME SET 1. Select [Time] in [Sys Set] mode by rotating the [TUNING] knob 2. Press the [MENU] button; while the hours indicator flashes; rotate the [TUNING] knob to adjust the hour, 3. Press the [MENU] button; while the minutes indicators flashes, rotate the [TUNING] knob to adjust the minute 4. -
Page 7: Alarm Set
ALARM SET Select [Alarm] in [Sys Set] mode and press the [MENU] button. Now [New] appears on the display. Press the [MENU] button again to enter a new alarm setting; [Normal Alarm / Power Off / Power on] appears. Rotate the [TUNING] knob to select [Normal Alarm] and press the [MENU] button.
-
Page 8: Language Selection
BACKLIGHT (Lighting timer) Select [Backlight] in [Sys Set] mode and press the [MENU] button to enter, then rotate the [TUNING] knob to adjust the lighting timer from 5~30 seconds. Press the [MENU] button again or wait for about 8 seconds to confirm and exit. LANGUAGE SELECTION Select [Language] in [Sys Set] mode, press the [MENU] button and then rotate the [TUNING] knob to select your…
-
Page 9: Power Off
POWER OFF Select [Power off] in [Sys Set] mode, press the [MENU] button and then rotate the [TUNING] knob to adjust the auto turn off timer from 5 ~ 90 minutes. REPLAY MODE Select [Replay mode] in [Sys Set] mode and press the [MENU] button.
-
Page 10: Firmware Upgrade
FIRMWARE UPGRADE Download the upgrade firmware from our website to a computer. Use the provided USB cable to connect the unit to the computer and transfer the data to the unit. Turn on the unit and select [Firmware upgrade] in system setting mode Press the [MENU] button and select [Local folder] to enter firmware upgrade software.
-
Page 11: Listening To Radio
RADIO OPERATION USING ANTENNA 1. While listening to the FM and SW station, fully extend the telescopic antenna to get the best reception. 2. While listening to the MW (AM) station, rotate the radio to find the position which gives the best reception, as the built-in ferrite bar is located inside the unit and it is strongly affected by the direction of placing your unit.
-
Page 12: Volume Adjust
1~50 Record: Select 129K / 96K BPS direct radio recording Delete: Delete single memory Delete all: Delete all stored memory ATS: Auto tunes and store all stations into memory Normal Band: 87~108 MHz Japan Band: 76~90 MHz School Band: 64~87 MHz MW Spacing Switch: Repeatedly press to select 9K/10K tuning step and direct enter MW listening…
-
Page 13: Working With Station Memories
until the stereo symbol appears; press and hold again to deactivate it. WORKING WITH STATION MEMORIES This unit can store 248 stations with the following memory location: MEMORY LOCATIONS FM/SW (ATS): M51~M99 MW (ATS): M26 ~ M50 FM/SW (manual storage): M1 ~ M50 MW (manual storage): M26 ~ M50 Note: 1.
-
Page 14
within the memories. LISTENING TO STORED MEMORY After storing stations into memory, press the [M- / M+] with the memory address [M01~99] displays next to the frequency to select your desired station memory. DELETE SINGLE/ALL MEMORY Press the [MENU] button in radio mode, then rotate the [TUNING] knob to select either [Delete] or [Delete all] and press the [MENU] button again to delete single memory or all memory. -
Page 15: Mic Recording
WORKING WITH RECORDING MIC RECORDING Press and hold the [MENU] button to enter the “Main Menu”, then rotate the [TUNING] knob to select [RECORD], press the [MENU] button again to go into MIC recording function. Adjust the volume by pressing on the [V-] or [V+] button Press the [MENU] button to select [REC] type: Long Rec (Long time recording –…
-
Page 16
96k BPS (40Kbps MP3 format, file stored in [MUSIC] folder Press the [MENU] button again to confirm your selection and start recording. The timer on the top of the display starts increasing Press the [ ] button to stop and auto store the recorded file into the memory. -
Page 17
selection: Radio (Listening to the last radio station) Music (Playing the last music file) Mic Record (Recording via Mic) Radio Record (Listening to & recording the last radio station) To select above setting, rotate the [TUNING] knob, then press [MENU] button to confirm your setting. Note: Please also set the [Power off] timer following the same steps as [Power on] timer. -
Page 18
WORKING WITH MP3 LISTENING TO MP3 FILE Use the provided USB cable to connect the unit to the computer and transfer your selected music files. Turn on the unit and select [MUSIC] from the “Main Menu”, then press the [MENU] button to enter. Press the [ ] button to play, press it again to pause;… -
Page 19
WORKING WITH EBOOK Select Ebook from the “Main Menu”, press the [MENU] button to enter. Select your desired file by rotating the [TUNING] knob, then press the [MENU] to enter below settings: — Local File: Select play file — Play set: Manual play or Auto Play (1~10 seconds – page changing time) — Delete file: Delete a single file by rotating the [TUNING] knob to select [YES] to delete;… -
Page 20: Specifications
Note: Before using Ebook function, please first format your file to “.txt” in the computer, then copy to the unit. SPECIFICATIONS…
-
Page 21
Specifications for Radio 1. Frequency Range 87.0 — 108.0 MHz MW (AM) 522 — 1710 KHz/ 520 — 1710KHz 2.30 — 23.00 MHz 2. Preset Memories: FM 99; MW 50; SW 99 (total 248) 3. Noise Limit Sensitivity μ ≤ MW (AM) ≤…
В представленном списке руководства для конкретной модели Радиоприемника — Degen DE-1126. Вы можете скачать инструкции к себе на компьютер или просмотреть онлайн на страницах сайта бесплатно или распечатать.
В случае если инструкция на русском не полная или нужна дополнительная информация по этому устройству, если вам нужны
дополнительные файлы: драйвера, дополнительное руководство пользователя (производители зачастую для каждого
продукта делают несколько различных документов технической помощи и руководств), свежая версия прошивки, то
вы можете задать вопрос администраторам или всем пользователям сайта, все постараются оперативно отреагировать
на ваш запрос и как можно быстрее помочь. Ваше устройство имеет характеристики:Настройка частоты: цифровая, Прием: FM, УКВ, СВ, КВ, Разъем для наушников: есть, Воспроизведение MP3: есть, Отображение информации: дисплей, Функции: часы, полные характеристики смотрите в следующей вкладке.
Для многих товаров, для работы с Degen DE-1126 могут понадобиться различные дополнительные файлы: драйвера, патчи, обновления, программы установки. Вы можете скачать онлайн эти файлы для конкретнй модели Degen DE-1126 или добавить свои для бесплатного скачивания другим посетителями.
Если вы не нашли файлов и документов для этой модели то можете посмотреть интсрукции для похожих товаров и моделей, так как они зачастую отличаются небольшим изменениями и взаимодополняемы.
Обязательно напишите несколько слов о преобретенном вами товаре, чтобы каждый мог ознакомиться с вашим отзывом или вопросом. Проявляйте активность что как можно бльше людей смогли узнать мнение настоящих людей которые уже пользовались Degen DE-1126.

Всеволод
2017-10-12 15:13:02
На дисплее появился значекselsct и два треугольника, приёмник ни в какие режимы не переключается.
k,hnfvnfn
2019-10-29 20:55:02
tyilm p;/.op[‘/(.
-09./
gjm yuiy,y
Основные и самые важные характеристики модели собраны из надежных источников и по характеристикам можно найти похожие модели.
| Технические характеристики | |
| Настройка частоты | цифровая |
| Прием | FM, УКВ, СВ, КВ |
| Разъем для наушников | есть |
| Воспроизведение MP3 | есть |
| Отображение информации | дисплей |
| Функции | часы |
| Питание от сети | есть |
| Размеры (ШхВхГ) | 63х116х16 мм |
| Вес | 0.12 кг |
| Дополнительная информация | автономная работа до 8 часов, mini USB, будильник, чехол для переноски, встроенная память 4 Гб, диктофон, встроенный аккумулятор |
Здесь представлен список самых частых и распространенных поломок и неисправностей у Радиоприемников. Если у вас такая поломка то вам повезло, это типовая неисправность для Degen DE-1126 и вы можете задать вопрос о том как ее устранить и вам быстро ответят или же прочитайте в вопросах и ответах ниже.
| Название поломки | Описание поломки | Действие |
|---|---|---|
| Не Включается | ||
| Нет Сигнала | ||
| Не Ловит Радио | ||
| Хрипит Звук | ||
| Нет Звука | ||
| Нет Сигнала | ||
| Supra-Sa-26 | Сильно Отстают На Целых 30 Секунд В Минуту ???? | |
| Не Настраиваются Часы | Невозможно Настроить Часы , | |
| Не Настраивается Время | Настраиваю Время. Через Какой-То Промежуток Часы Начинают Идти Вперед (Как Будто Зажаты Кнопки Hour И Time), А Минуты Идут В Обычном Режиме. Кнопки Исправны, Нажимаются Как И Раньше. Проблема Возникла Внезапно, Часы Никто Не Настраивал. | |
| Каждый Час Звучит Сигнал | Каждый Час Звучит Сигнал | |
| Как Отключить Поставленный Будильник | ||
| Отломились Микровыключатель И Микрорезистор Регулировки Громкости И Изображения Движка Громкости | После Трех Лет Эксплуатации Одновременно Отломились Указанные Детали. Детали Назодятся Под Соответствующими Кнопками Сверху Корпуса На Дополнительной Малой Плате. При Нажатии Кнопок Крепления Микровыключателя И Микрорезистора К Плате Управления Работают Н | |
| Не Работает От Аккумуляторной Бат | ||
| Не Заряжается Новый Аккумулятор | ||
| Erisson-1203 | Часы Дисплей Sda-24Hg Светит Тускло | |
| Тихий Звук | ||
| Время Постоянно Мигает | Постоянно Мигает Настроенное Время | |
| Самовыключение | После Включения Интернет Приемник Работает От 5 Мин До 60-65 Мин, Потом Сам Выключается !? | |
| Как Устранить Время | Какие Кнопки Нажать, Чтобы Правильно Установить Время? | |
| Не Работают Кнопки | ||
| Сломался Проектор | В Один Прекрасный День Решил Выключить Будильник И Слабенько, Кулаком Ударил По Проектору, Дабы Он Выключился, Но Получилось Наоборот. Проектор Провалился Внутрь. Как Разобрать Или Же Починить ? | |
| Сильно Спешат | Часы Сильно Спешат. Как Отрегулировать Ход Часов? | |
| Tesler Cr-230P | Сильно Спешат | |
| Не Настраивается Время. | Не Включается Кнопка Cet В Режиме Часов | |
| Не Убирается Громкость Приёмника |
В нашей базе сейчас зарегестрированно 18 353 сервиса в 513 города России, Беларусии, Казахстана и Украины.

СОВИНСЕРВИС
⭐
⭐
⭐
⭐
⭐
Адресс:
ул. Расковой, д. 12
Телефон:
74956132579
Сайт:
n/a
Время работы
Время работы не указано
НИКОМ
⭐
⭐
⭐
⭐
⭐
Адресс:
ул. Широкая, д.1к1
Телефон:
74959267226
Сайт:
n/a
Время работы
Будни: с 1000 до 2000
Суббота: с 1100 до 1800
Воскресенье: с 1100 до 1800
МТЕХНИК
⭐
⭐
⭐
⭐
⭐
Адресс:
Острякова ул., д. 6
Телефон:
74991572252
Сайт:
n/a
Время работы
Время работы не указано
БСМ ТЕХНОЛОДЖИС
⭐
⭐
⭐
⭐
⭐
Адресс:
Волгоградский проспект 28
Телефон:
74956209820
Сайт:
n/a
Время работы
Будни: с 0900 до 1900
Суббота: выходной
Воскресенье: выходной
СЕРВИС СЛАИР
⭐
⭐
⭐
⭐
⭐
Адресс:
маршала федоренко д.7
Телефон:
79778029960
Сайт:
n/a
Время работы
Будни: с 1000 до 1800
Суббота: с 1000 до 1500
Воскресенье: выходной
Здравствуйте. Предлагаю вам обзорчик приемника который я получил около месяца назад.Долго искал подобный девайс среди миниспикеров, но все они обладали недостатками- небольшая автономность, чуствительность встроенного FM приемника позволяла уверенно ловить лишь в черте города. И тут, наткнувшись на этот обзор решил купить этого малыша. Продавца я выбрал по минимальной цене товара, на рейтинги не смотрел.И вот дней этак через 60 получил пакет.
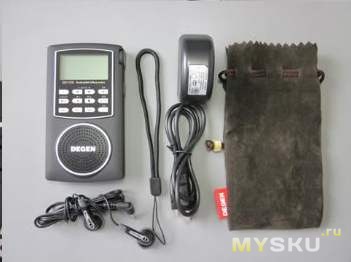
Коробка в которой находился приемник довольно солидная, из наружной оболочки выдвигается картонный кейс раскладывающийся как книга, в одной половине приемник, в другой аксессуары
Чехол из псевдозамши, зарядное устройство., юсб кабель, наушники, темлячок.
Технические характеристики
Specifications for Radio:
Frequency Range:
FM: 87.0~108.0MHz or 64.0~108.0MHz
MW(AM): 522~1710KHz
SW: 2.30~23.00MHz
Preset Memories: FM 99; MW 50; SW99 (total 248)
Noise Limit Sensitivity:
FM <=5µV
MW (AM) <= 2.5mv/m
SW<=50µV
Signal Selection? 40dB
Multiple tuning methods selectable: jog dial tuning, manual tuning, auto scan tuning, memory preset tuning, ATS tuning.
Specifications for Mp3
Memory: 4GB
Record format: WAV/MP3
Max. Record Time about 215H (40kbps, MP3 format, 4GB)
Earphone output: ?20mW*2
Communication Standard: USB2.0
Access Rate
MP3: 16-320Kbps
WMA: 8-384Kbps
Max. out power (Speaker): about 150mW
Max Consumption Current: about 180mA
Built-in Lithium battery: 3.7V BL-5C, external adaptor: 5V (Not included)
Battery consumption (volume is 22 level)
MP3: about 8H (by speaker)
Radio: about 8H (by speaker)
Speaker: D50mm
Earphone: D3.5mm
Product dimensions: (L*W*H) 109.5*65*15mm
Product net weight: 90g
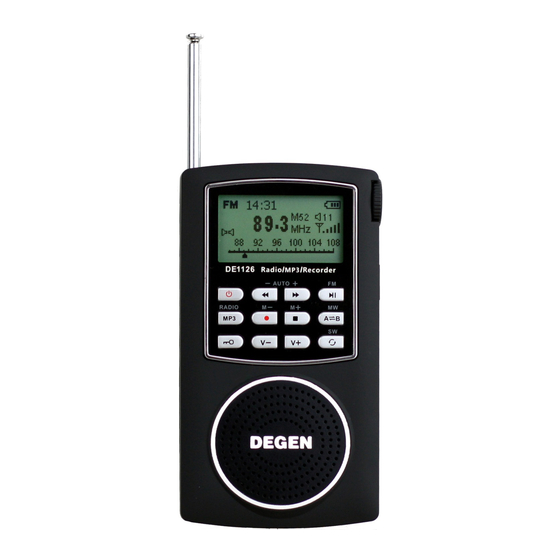
Клавиш достаточно чтобы одним нажатием выходить в нужный режим, не путешевствуя по меню
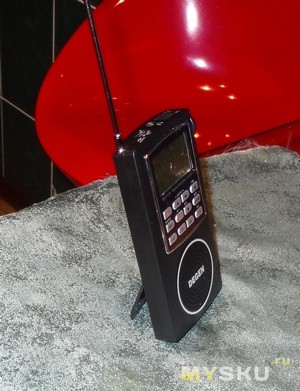
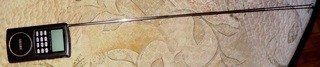
Имется откидывающаяся подставка позволяющая приемнику находиться в вертикальном положении
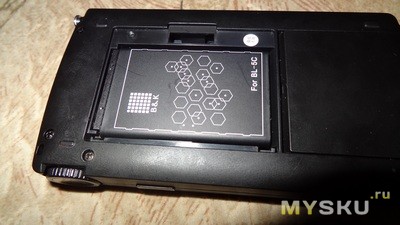
Батарейка-мегапопулярная в Китае BL-5C
Антенна довольно длинная.
Многофункциональное колесико позволяющая бродить по эфиру подобно аналоговому радио, с ее же помощью выбираются пункты меню и треки
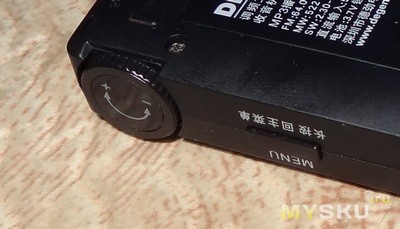
При первом включении ожидает засада- интерфейс на китайском языке. Поэтому сразу инструкция как перевести на английский. Итак Вкл- длительное нажатие на боковую клавишу(приемник переходит в основное меню)-стрелкой ( а лучше колесиком)перемещаем курсор на крайний правый значок с изображением ключа и отвертки- кратковременное нажатие на боковую клавишу- перемещаемся на 5 строчку- короткое нажатие боковой клавиши-перемещаемся на вторую строчку это и будет английский, ну а потом можно установить и русский, просто он расположен в конце списка и найти его среди иероглифов будет проблематично.
Кратко опишу основные характеристики и особенности.
Приемник всеволновой (хотя длинных волн нет) имеются средние волны, 9 поддиапозонов коротких,FM.FM можно выбрать 87.0~108.0MHz или 64.0~108.0MHz. Чувствительность FM заметно выше чем у мини спикеров, но ниже чем например у ветерана Океан 209.
На настройках останавливаться не буду- все стандартно, как и у других цифровых приемников
Аппарат имеет встроенный мп3 плеер с памятью 4 гб. При подключении к компьютеру определяется как запоминающее устройство. В инструкции написано мп3 плеер поддерживает mp3,wma.Тут китайцы поскромничали плеер прекрасно кушает flac и даже ogg правда не столь прекрасно, возможно что то еще, не проверял.Звук плеера можно смело назвать высококачественным.Но есть одна досадная неприятность при воспризведении мп3 периодически ( не часто)запинается( звук прерывается где то на полсекунды). На wma и flac этот глюк гораздо менее выражен.Эквалайзер с предустановленными пресетами, линейного нет. Пресеты вполне юзабельны, я меняю либо классик, либо DBB в в зависимости от звонкости применяемых наушников.Почему не стандартный режим? А все из-за вышеуказанного глюка- на зарубежном форуме вычитал, что он в основном проявляется при установке нормального режима эквалайзера.
При выключении трек запоминается и в дальнейшем воспроизводится с того места где был выключен. Выход на наушники достаточно мощный, раскачивает например Sony MDR7506.Комплектные уши конечно не такой отстой, как в китайских нонеймах, но имхо недостаточно хороши, чтобы слушать музыку.
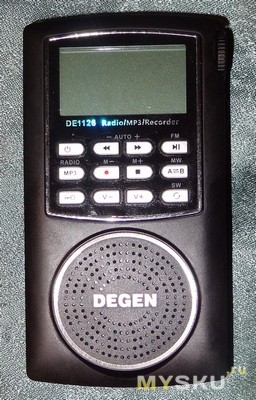
Динамик приемника нельзя назвать музыкальным, по причине малой мощности-150 мвт.А иначе бы приемник бы не держался 8 часов от одной зарядки. Но тем не менее довольно громкий, для прослушивания радиопередач громкости более чем достаточно.
Встроенный диктофон приемлемо записывает звук в пределах 2 м, имеется возможность записать в память радиопередачу одним нажатием клавиши с красным кружочком на передней панели.
Будильник тоже присутствует. Можно установить обычный звонок, либо автоматическое включение приемника в определенное время.
При переходе в ждущий режим на экране появляется время и дата, которые тоже вскоре тухнут. Время и дату в любое момент можно посмотреть нажав любую клавишу.
Имеется возможность обновления прошивки. Как прошить и не превратить в кирпич можно прочитать здесь. В моем экземпляре последняя прошивка V.1.9 от 08.03.12 так что необходимости обновлять нет
Спасибо за внимание.
Инструкции
| № | Модель радиоприёмника | Инструкция |
| 1 | Degen DE-1003 | Скачать |
| 2 | Degen DE-1126 | Скачать |
| 3 | Degen DE-1127 | Скачать |
| 4 | Degen DE-1128 | Скачать |
| 5 | Degen DE-1129 | Скачать |
| 6 | Degen DE13 | Скачать |
| 7 | Eton Field BT Grundig Edition | Скачать |
| 8 | Eton G3 Globe Traveler | Скачать |
| 9 | Eton Grundig Satellit 750 | Скачать |
| 10 | Sangean ATS-505 | Скачать |
| 11 | Sangean ATS-909X, 909XR | Скачать |
| 12 | Sangean H201 | Скачать |
| 13 | Sangean PR-D5 | Скачать |
| 14 | Sangean PR-D8 | Скачать |
| 15 | Sangean SG-622 | Скачать |
| 16 | Sangean WR-1 | Скачать |
| 17 | Sangean WR-11 | Скачать |
| 18 | Sangean WR-12 | Скачать |
| 19 | Tecsun BCL-3000 | Скачать |
| 20 | Tecsun CR-200 | Скачать |
| 21 | Tecsun CR-220 | Скачать |
| 22 | Tecsun CR-300 | Скачать |
| 23 | Tecsun DR-920 | Скачать |
| 24 | Tecsun PL-300et | Скачать |
| 25 | Tecsun PL-310et | Скачать |
| 26 | Tecsun PL-350 | Скачать |
| 27 | Tecsun PL-360 | Скачать |
| 28 | Tecsun PL-380 | Скачать |
| 29 | Tecsun PL-390 | Скачать |
| 30 | Tecsun PL-398mp | Скачать |
| 31 | Tecsun PL-450 | Скачать |
| 32 | Tecsun PL-505 | Скачать |
| 33 | Tecsun PL-600 | Скачать |
| 34 | Tecsun PL-606 | Скачать |
| 35 | Tecsun PL-660 | Скачать |
| 35 | Tecsun PL-880 | Скачать |
| 37 | Tecsun R-1012 | Скачать |
| 38 | Tecsun R-201T | Скачать |
| 39 | Tecsun R-202T | Скачать |
| 40 | Tecsun R-203T | Скачать |
| 41 | Tecsun R-212T | Скачать |
| 42 | Tecsun R-303 | Скачать |
| 43 | Tecsun R-404T | Скачать |
| 44 | Tecsun R-909T | Скачать |
| 45 | Tecsun S-2000 | Скачать |
| № | Модель радиоприёмника | Инструкция |
| 1 | Часы VST | Скачать |
| 1 | Часы VST 780, 795 | Скачать |
- Home
- Brands
- DEGEN
- Media Player
- DE1126
- Operation Manual
Manual for DEGEN DE1126 Media Player (21 pages)
Specifications:
|
DEGEN DE1126: Read PDF Manual Online
Accompanying Data:
DEGEN DE1126 Media Player PDF Operation Manual (Updated: Sunday 16th of April 2023 02:36:47 AM)
Rating: 4.1 (rated by 51 users)
Compatible devices: SA220, T.0X Series, FNM-706, SSI 108, DSM-320, CDJ-250, AMP-4K HE315035, HMP400.
Recommended Documentation:
DEGEN DE1126: Text of Operation Manual
(Ocr-Read Version Summary of Contents, UPD: 16 April 2023)
-
15, 14 WORKING WITH RECORDING MIC RECORDING Press and hold the [MENU] button to enter the “Main Menu”, then rotate the [TUNING] knob to select [RECORD], press the [MENU] button again to go into MIC recording function. 1. Adjust the volume by pressing on the [V-] or [V+] button 2. Press the [MENU] button to select [REC] …
-
18, 17 WORKING WITH MP3 LISTENING TO MP3 FILE 1. Use the provided USB cable to connect the unit to the computer and transfer your selected music files. 2. Turn on the unit and select [MUSIC] from the “Main Menu”, then press the [MENU] button to enter. 3. Press the [ ] button to play, press it again to pa…
-
5, 4 SYSTEM SETTING In “Main Menu” mode, rotate the [TUNING] knob to select [Sys Set], press the [MENU] button to enter below settings: Note: Operation time for each step is about 5 seconds. Sys Set (system setting): — Time — Date — Calendar Info — Alarm — Backlight — Language — Power off — Repl…
-
14, 13 within the memories. LISTENING TO STORED MEMORY After storing stations into memory, press the [M- / M+] with the memory address [M01~99] displays next to the frequency to select your desired station memory. DELETE SINGLE/ALL MEMORY Press the [MENU] button in radio mode, then rotate the [TUNING] knob to select either [Delete] or [De…
-
2, 1 POWER SUPPLY INSTALLING THE BATTERY 1. Turn off the unit and open the battery cover. 2. Install the provided lithium battery according to the battery polarity. 3. Close the battery cover. CHARGING THE BATTERY After installing the lithium battery, connect the unit with the provided USB adaptor to charge the …
-
20, 19 Note: Before using Ebook function, please first format your file to “.txt” in the computer, then copy to the unit. SPECIFICATIONS
… -
8, 7 BACKLIGHT (Lighting timer) Select [Backlight] in [Sys Set] mode and press the [MENU] button to enter, then rotate the [TUNING] knob to adjust the lighting timer from 5~30 seconds. Press the [MENU] button again or wait for about 8 seconds to confirm and exit. LANGUAGE SELECTION Select [Language] in [Sys Set] mode, press the [MENU] button and then r…
-
10, 9 FIRMWARE UPGRADE 1. Download the upgrade firmware from our website to a computer. 2. Use the provided USB cable to connect the unit to the computer and transfer the data to the unit. 3. Turn on the unit and select [Firmware upgrade] in system setting mode 4. Press the [MENU] button and select [Local folder] to enter firmware upgrade software. N…
-
6, 5 TIME SET 1. Select [Time] in [Sys Set] mode by rotating the [TUNING] knob 2. Press the [MENU] button; while the hours indicator flashes; rotate the [TUNING] knob to adjust the hour, 3. Press the [MENU] button; while the minutes indicators flashes, rotate the [TUNING] knob to adjust the minute 4. Press the [MENU] button; while the sec…
-
9, 8 POWER OFF Select [Power off] in [Sys Set] mode, press the [MENU] button and then rotate the [TUNING] knob to adjust the auto turn off timer from 5 ~ 90 minutes. REPLAY MODE Select [Replay mode] in [Sys Set] mode and press the [MENU] button. Now [Manual/Automatic] appears on the display, rotate the [TUNING] knob to select your desir…
-
17, 16 selection: — Radio (Listening to the last radio station) — Music (Playing the last music file) — Mic Record (Recording via Mic) — Radio Record (Listening to & recording the last radio station) To select above setting, rotate the [TUNING] knob, then press [MENU] button to confirm your setting. Note: Please also set the …
-
1, DE1126 FM STEREO · MW (AM) · SW DSP RECEIVER / MP3 PLAYER / DIGITAL RECORDER Operation Manual
…
DOC-faecef6b:
DEGEN DE1126: Recommended Instructions
MDR-XB950BT, pdc-45, 624, DCP-385C, CVYZ-M466-White, S2723


-
4-277-821-01 (1)© 2011 Sony CorporationDigital Signage PlayerVSP-BZ10お買い上げいただきありがとうございます。電気製品は安全のための注意事項を守らないと、火災や人身事故になることがあります。この設置説明書には、事故を防ぐための重要な注意事項と製品の取り扱いかたを示してあります。こ …
VSP-BZ10 80
-
4K Media PlayerFMP-X5Use this Help Guide when you have any questions on how to use the 4K Media Player.Preparations and ConnectionsEnjoying 4K Video ContentConfiguring Settings (Settings/Customer Support menus)Parts and ControlsAnnouncementsTroubleshooting4-541-609-11(1)Copyright 2014 Sony CorporationHelp Guide …
FMP-X5 96
-
SA5225SA5245SA5247SA5285SA5287SA5295Congratulations on your purchase and welcome to Philips! To fully benefit from the support that Philips offers, register your product at www.philips.com/welcomeDigital audio video player …
SA5225 55
-
www.fantec.deENGLISH: First StepsWhen you use the player the first time, connect it to the TV with the AV-cable first!The device will initialize, when you turn on the power and after a minute it will change to standby. To turn on the device press the power-button.The HDD have to be formatted first!- for this purpose open the setup-menu by pressing the setup-button- choose t …
MM-HDRL 2
-
products with watertight reputationBLUECUBE+ AQ-BC-6UBT’HIDE-AWAY’ MEDIA PLAYERfor Bluetooth, USB, iPhone, iPod, MP3 devices, and FM RadioUSER / INSTALLATION MANUALPLEASE READ THIS INSTRUCTION MANUAL BEFOREINSTLAATION AND OPERATION! !BluetoothUSB 2.0 …
AQ-BC-6UBT 13
-
1 Model Eclipse Supra Fit Instruction Manual Congratulations on purchasing your Eclipse Personal Media Player! To get the most out of your purchase, please take the time to carefully read through this manual. Foreword If any problems occur while using your Eclipse, please feel free to contact Mach Speed technical support at 580-272-0035, or send an email to mssupport …
Supra Fit 42
-
Techn i cal Support Serviceshttp://support.wdc.comwww.westerndigital.comIf you encounter problems with this product, please contact WD Technical Support.Western Digital, WD, the WD logo, and WD TV are registered trademarks of Western Digital Technologies, Inc.in the U.S. and other countries; and WD TV Live is a trademark of Western Digital Technologies, Inc. Other marks may be mentioned her …
WDBGXT0000NBK 12
-
Copyright® 2009 by Conceptronic – All rights reserved www.conceptronic.net Page 1 of 5 Conceptronic CMT2D Firmware Upgrade Instructions A. Suitable devices This firmware upgrade is only suitable for Conceptronic CMT2D (Wired version). Note: This firmware upgrade is not suitable for the Conceptronic CMT2DW (Wireless version). …
CMT2D 5
-
GoGEARPhilips GoGEAR MP3 PlayerQuick start guideGuide de mise en routeKurzanleitungGuía de conguración rápidaGuida rapidaQuick start guideSA5MXXRegister your product and get support atwww.philips.com/support*1GB = 1 billion bytes; available storage capac-ity will be less.*1 Go = 1 milliard d’octets ; la capacité de stockage disponible sera inférieure.*1 GB …
GoGear Digital Audio Player 2
-
QRS Music Technologies, Inc. Petine Owner’s Manual Update Use these pages to replace those in your current version 041 owners manual. Updates to Application Version 045 Press the F1/SOURCE button to display the current source. Press the STOP button to halt play. Tap the F1/SOURCE button and then the number button corresponding to the desired source. 1 cd=CD Drive 2iN=I …
Petine 15