 11:30
11:30
Настройка WiFi роутера DLink DIR 300, DIR 615 и подобных
 06:41
06:41
D-Link Dir-300 настройка Wi-Fi роутера
 07:54
07:54
Обновление прошивки, настройка Интернет и Wi-Fi сети на Dlink Dir-300
 04:05
04:05
Настройка D-Link DIR-300 на примере Билайн
 03:08
03:08
Настройка роутеров D-Link DIR-300/320/615/815/885
![Видео Роутер D-link DIR-300 зависает, отключается, обновляем прошивку (DIR300NRU B5A B5E) (автор: [VM] Valera Malko)](https://i.ytimg.com/vi/RHtYHUX4DGI/mqdefault.jpg) 06:34
06:34
Роутер D-link DIR-300 зависает, отключается, обновляем прошивку (DIR300NRU B5A B5E)
 04:58
04:58
D-Link DIR-300 N обзор www.nowbest.ru
 06:36
06:36
Настройка D-Link DIR-300 Ростелеком
Руководство пользователя
DIR-300NRU
Беспроводной маршрутизатор со встроенным
4-портовым коммутатором
Версия 1.2.25. Февраль, 2011 г.


DIR-300NRU Беспроводной маршрутизатор
со встроенным 4-портовым коммутатором
Руководство пользователя
Введение
ГЛАВА 1.
ВВЕДЕНИЕ
Аудитория и содержание
В данном руководстве приводится описание маршрутизатора DIR-300NRU, порядок
настройки и рекомендации по его использованию.
Настоящее руководство предназначено для пользователей, знакомых с основными
принципами организации сетей, которые создают домашнюю локальную сеть, а также
системных администраторов, которые устанавливают и настраивают сети в офисах
компаний.
Условные обозначения
Пример
Описание
текст
Основной текст документа.
Предварительная
подготовка
Ссылка на главу или раздел данного руководства
пользователя.
«Руководство
по
быстрой установке»
Ссылка на документ.
Изменить
Название раздела меню, пункта меню, какого-либо элемента
web-интерфейса (поле, флажок, переключатель, кнопка и пр.)
192.168.0.1
Текст, который необходимо ввести в указанное поле.
!
Информация
Важная информация, на которую необходимо обратить
внимание.
Структура документа
Глава 1 содержит сведения о назначении и организации документа.
Глава 2 содержит описание технических характеристик маршрутизатора DIR-300NRU и его
внешнего вида, а также перечисление содержимого комплекта поставки.
Глава 3 описывает процесс установки маршрутизатора DIR-300NRU и настройки
компьютера для подключения к web-интерфейсу устройства.
Глава 4 содержит подробное описание всех разделов меню web-интерфейса.
Глава 5 содержит рекомендации по безопасному использованию маршрутизатора DIR-
300NRU, советы по построению беспроводной сети и подключению дополнительного
оборудования.
Глава 6 содержит список сокращений, используемых в настоящем руководстве
пользователя.
Страница 4 из 100

DIR-300NRU Беспроводной маршрутизатор
со встроенным 4-портовым коммутатором
Руководство пользователя
Обзор маршрутизатора
ГЛАВА 2.
ОБЗОР МАРШРУТИЗАТОРА
Общее описание
Устройство DIR-300NRU представляет собой беспроводной маршрутизатор со встроенным
4-портовым коммутатором, который позволяет быстро и просто организовать беспроводную
и проводную сеть дома и в офисе.
Вы можете подключить беспроводной маршрутизатор DIR-300NRU к кабельному или DSL-
модему или выделенной Ethernet-линии, чтобы использовать высокоскоростное соединение с
сетью Интернет для решения широкого круга профессиональных задач. Встроенный 4-
портовый коммутатор маршрутизатора позволяет подключать компьютеры, оснащенные
Ethernet-адаптерами, игровые консоли и другие устройства к Вашей сети.
Используя беспроводной маршрутизатор DIR-300NRU, Вы сможете быстро организовать
беспроводную сеть дома и в офисе, что позволит Вашим сотрудникам или членам Вашей
семьи подключаться к беспроводной сети практически в любой точке (в зоне действия
беспроводной сети). Маршрутизатор работает с беспроводными устройствами стандарта
802.11b/g.
В маршрутизаторе реализовано множество функций для беспроводного интерфейса.
Устройство поддерживает несколько стандартов безопасности (WEP, WPA/WPA2, IEEE
802.1X), фильтрацию подключаемых устройств по MAC-адресу, несколько режимов работы
(точка доступа, клиент, мост), а также позволяет использовать технологии WPS и WMM.
Беспроводной маршрутизатор DIR-300NRU оснащен встроенным межсетевым экраном.
Расширенные функции безопасности позволяют минимизировать последствия действий
хакеров и предотвращают вторжения в Вашу сеть и доступ к нежелательным сайтам для
пользователей Вашей локальной сети.
Для управления и настройки беспроводного маршрутизатора DIR-300NRU используется
простой и удобный встроенный web-интерфейс (доступен на двух языках – русском и
английском).
Страница 5 из 100

DIR-300NRU Беспроводной маршрутизатор
со встроенным 4-портовым коммутатором
Руководство пользователя
Обзор маршрутизатора
Технические характеристики
Интерфейс WAN:
•
1 порт 10/100BASE-TX Ethernet для подключения кабельного или DSL-модема или
подключения к выделенной Ethernet-линии.
Интерфейс LAN:
•
4 порта 10/100BASE-TX Ethernet.
Интерфейс WLAN:
•
IEEE 802.11b/g.
Сетевые функции:
•
типы подключения WAN:
•
IPoE,
•
PPPoE,
•
PPTP,
•
L2TP,
•
DHCP-сервер и DHCP-клиент,
•
DNS relay,
•
пропуск VPN-тоннеля (PPTP),
•
поддержка VLAN,
•
Dynamic DNS,
•
статическая IP-маршрутизация,
•
удаленный доступ,
•
сетевая статистика для каждого интерфейса,
•
IGMP Proxy,
•
RIP,
•
UPnP.
Страница 6 из 100

DIR-300NRU Беспроводной маршрутизатор
со встроенным 4-портовым коммутатором
Руководство пользователя
Обзор маршрутизатора
Беспроводное соединение:
•
сегментация беспроводной сети (до 4-х SSID),
•
поддерживаемые стандарты безопасности:
◦
WEP,
◦
WPA/WPA2 Personal,
◦
WPA/WPA2 Enterprise,
◦
IEEE 802.1X,
•
MAC-фильтр,
•
управление подключенными устройствами,
•
методы PIN и PBC функции WPS,
•
функция WMM (Wi-Fi QoS),
•
расширенные настройки,
•
функция WDS,
•
поддержка режима «клиент».
Функции межсетевого экрана:
•
преобразование сетевых адресов (NAT),
•
контроль состояния соединений (SPI),
•
IP-фильтры,
•
URL-фильтр,
•
MAC-фильтр,
•
DMZ-зона,
•
функция защиты от ARP- и DDoS-атак,
•
виртуальные серверы.
Настройка и управление:
•
web-интерфейс настройки и управления на двух языках (русском и английском),
•
обновление внутреннего программного обеспечения маршрутизатора через web-
интерфейс,
•
сохранение и загрузка конфигурации,
•
поддержка удаленного журналирования,
•
автоматическая синхронизация системного времени с NTP-сервером,
•
функция Ping.
Страница 7 из 100

DIR-300NRU Беспроводной маршрутизатор
со встроенным 4-портовым коммутатором
Руководство пользователя
Обзор маршрутизатора
Индикаторы:
•
Питание,
•
Интернет,
•
Беспроводная сеть,
•
4 индикатора Локальная сеть.
Питание:
•
источник питания: внешний адаптер питания постоянного тока 5В/1,2А,
•
кнопка Reset для возврата к заводским установкам по умолчанию.
Рабочая температура:
•
от 0 до 40
0
C.
Влажность при эксплуатации:
•
от 5% до 95% без конденсата.
Сертификаты:
•
CE,
•
FCC,
•
C-Tick.
Страница 8 из 100

Внешний вид устройства, Передняя и правая боковая панели
Страница 9
- Изображение
- Текст
DIR-300NRU Беспроводной маршрутизатор
со встроенным 4-портовым коммутатором
Руководство пользователя
Обзор маршрутизатора
Внешний вид устройства
Передняя и правая боковая панели
Рисунок 1. Вид передней панели DIR-300NRU.
Светодиодный
индикатор
Режим
Значение
Питание
Горит постоянно (зелёный)
Питание включено
Не горит
Питание отключено
Горит постоянно (желтый)
После включения – загрузка устройства;
после загрузки – сбой в работе
устройства
Интернет
Горит постоянно (зеленый)
Соединение установлено
Мигает (зеленый)
WAN-интерфейс активен (трафик в
одном из направлений)
Горит постоянно (желтый)
Соединение не установлено
Беспроводная сеть
Горит постоянно (зеленый)
Беспроводная сеть включена
Мигает (зеленый)
WLAN-интерфейс активен (трафик в
одном из направлений)
Локальная сеть 1-4
Горит постоянно (зеленый)
Устройство (компьютер) подключено к
соответствующему порту, соединение
установлено
Мигает (зеленый)
Соответствующий LAN-порт активен
(трафик в одном из направлений)
На правой боковой панели маршрутизатора расположена кнопка WPS, предназначенная для
быстрого добавления устройств в беспроводную локальную сеть маршрутизатора. На кнопке
расположен отдельный светодиодный индикатор.
Режим
Значение
Мигает (голубой)
Попытка установки Wi-Fi-соединения с помощью функции WPS
Горит постоянно
(голубой)
Установлено соединение (горит в течение нескольких минут)
Горит постоянно
(желтый)
Ошибка при установке Wi-Fi-соединения с помощью функции WPS
Страница 9 из 100

DIR-300NRU Беспроводной маршрутизатор
со встроенным 4-портовым коммутатором
Руководство пользователя
Обзор маршрутизатора
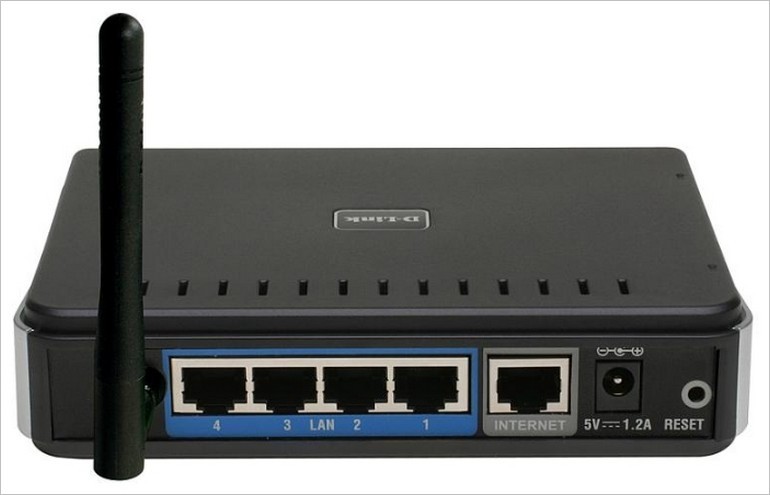
Задняя панель
Рисунок 2. Вид задней панели DIR-300NRU.
Порт
Описание
LAN 1-4
4 Ethernet-порта для подключения компьютеров или сетевых
устройств.
INTERNET
Порт для подключения к выделенной Ethernet-линии или
подключения кабельного или DSL-модема (рекомендуется
использовать кабель, входящий в комплект поставки).
5V-1.2A
Разъём питания.
RESET
Кнопка для сброса настроек к заводским установкам.
Для восстановления заводских установок необходимо нажать и
удерживать 10 секунд (при включенном устройстве).
Страница 10 из 100

Комментарии

Руководство пользователя
DIR-300NRU
Беспроводной маршрутизатор со встроенным
4-портовым коммутатором
Версия 1.2.25. Февраль, 2011 г.
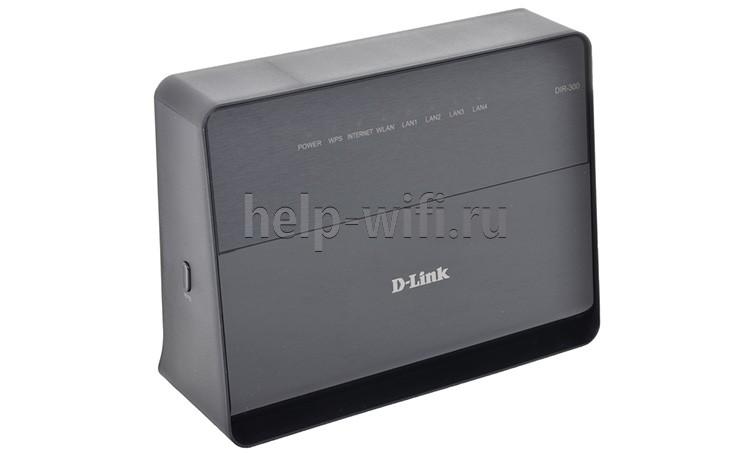
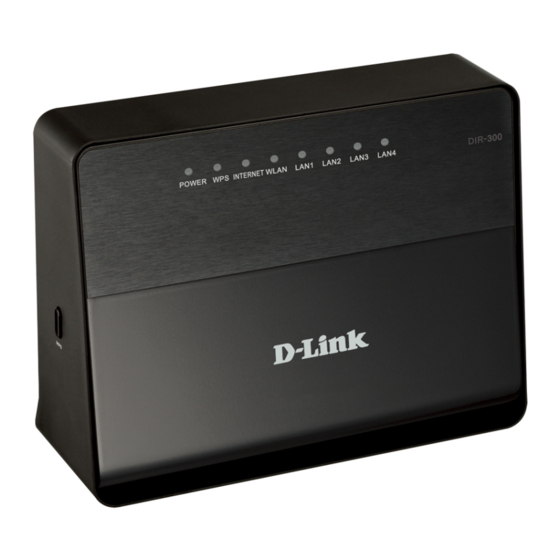
Всем доброго дня! Сегодня к нам на обзор и настройку попадает, пожалуй, самая популярная модель от D-Link – D-Link DIR-300, или в простонародье «трехсотка». Где и как их только не используют, а после их активного пользования в Ростелекоме, такая моделька побывала в каждой третьей семье в России. Так что посмотрим, что это за зверь, да выведем его грамотную настройку по шагам.
Примерный план действий: подключим, настроим сеть, интернет, раздадим Wi-Fi и поменяем везде пароли для безопасности. Вот и все, давайте уже приступать.
Содержание
- Видеоверсия
- Подключение
- Предварительные настройки – Windows
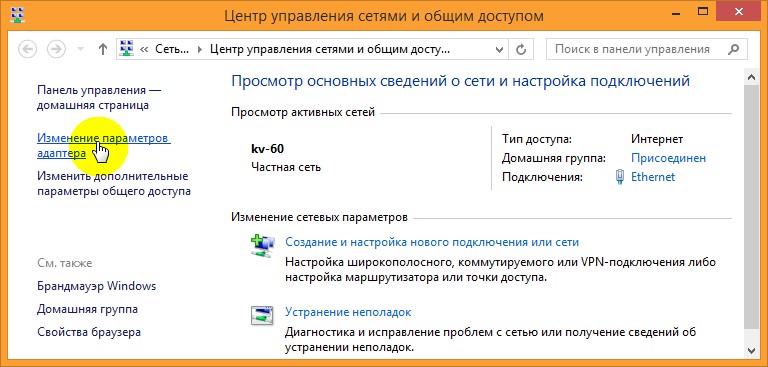
- Шаг 1. Центр управления сетями и общим доступом
- Шаг 2. Изменение параметров адаптера
- Шаг 3. Свойства адаптера
- Шаг 4. Настройки – автомат
- Вход в настройки
- Подключение к интернету
- Настройка Wi-Fi
- Пароль роутера
- Другой интерфейс
- Мастер настройки
- Интересные продвинутые настройки
- Подключение к роутеру по Wi-Fi
- Инструкции
- Задать вопрос автору статьи
Видеоверсия
Для понимающих, сразу предлагаю видео по полной настройке D-Link DIR 300 старой и новой ревизии. Оба интерфейса, все базовые настройки.
Подключение
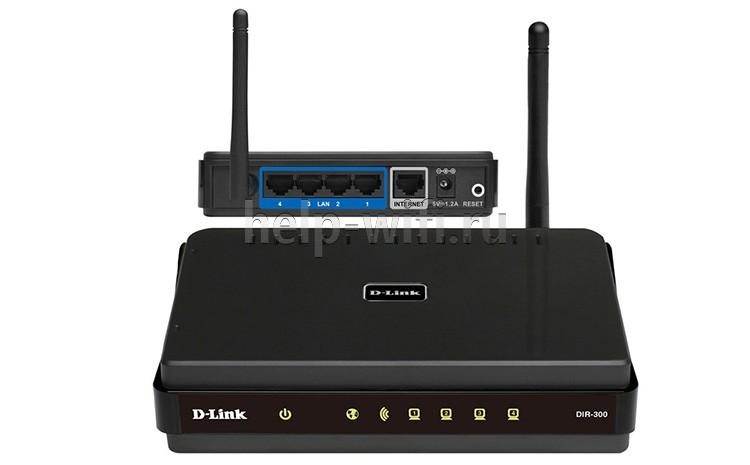
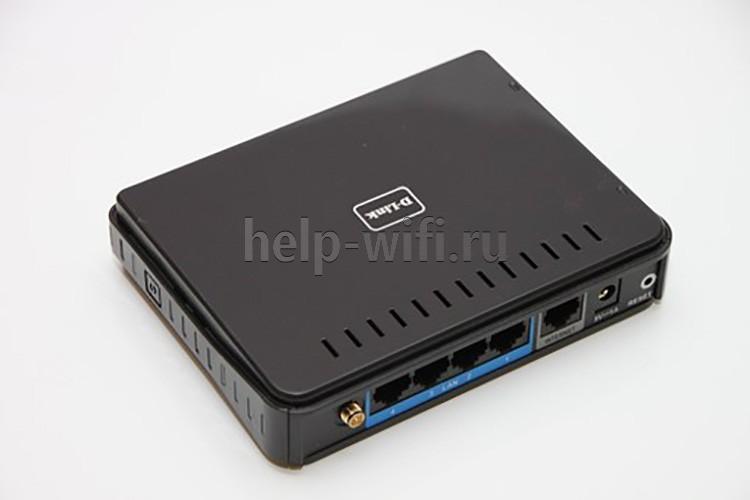
Прежде чем переходить к настройкам, все нужно грамотно подключить. Обратите внимание на заднюю панель роутера:
Что здесь важно сделать, чтобы успешно выполнить подключение нашего роутера D-Link DIR-300:
- Установить маршрутизатор в удобном месте – чтобы и Wi-Fi добивал примерно во все комнаты, чтобы и до провода провайдера хватало расстояния, чтобы можно было подключить по проводу компьютер или ноутбук.
- Подключить питание, убедиться, что горит хотя бы один из индикаторов – значит роутер включен и можно работать дальше.
- Подключаем провод вашего провайдера интернета из подъезда в порт INTERNET – никакое другое место не подойдет, для внешнего кабеля только этот порт.
- Подключите по проводу в любой порт LAN (их 4) свой компьютер или ноутбук, с которого будете производить настройку.
Обратите внимание! Здесь же расположена кнопка в углублении RESET – ничего с ней не делайте, но возможно она нам пригодится далее. Чтобы сбросить настройки на заводские, нужно нажать на эту кнопку и подержать около 10 секунд.

Все! Пока ничего больше не делаем здесь. Заодно можно посмотреть на переднюю панель – там во время подключения будут загораться соответствующие индикаторы:
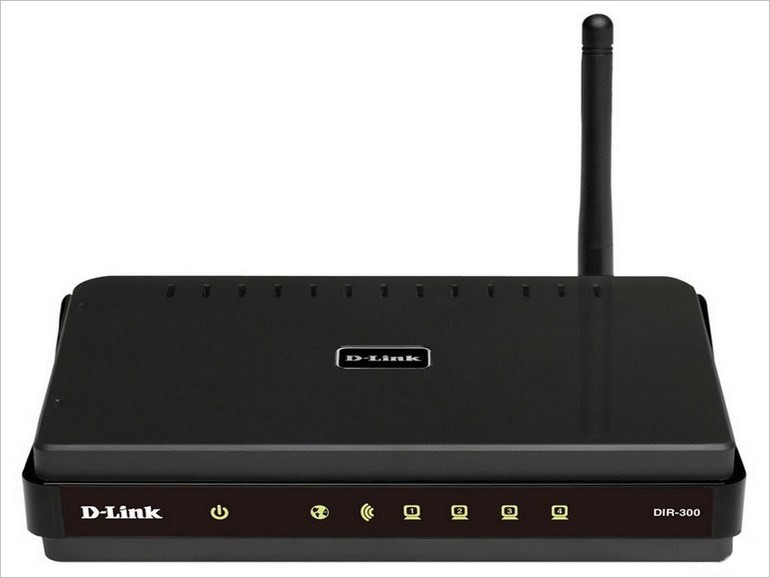
Слева-направо:
- Подключено питание – загорается, когда вы включаете ваш роутер в сеть. Индикация, что с питанием все хорошо.
- INTERNET – когда подключаете кабель провайдера, здесь начнутся изменения. Если загорелось в итоге зеленым – все хорошо. Быстрое мигание на любом индикаторе – передача данных, это нормально, пугаться не стоит.
- Wi-Fi – если включен, то горит.
- 1-2-3-4 – подключенные устройства по проводу. Если включили свой компьютер или ноутбук, то здесь загорится нужный индикатор. Проконтролируйте, что он горит. Плохое соединение – одна из возможных проблем при подключении к панели управления.
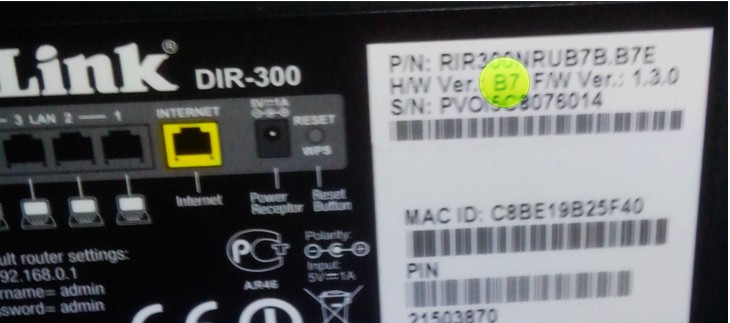
Для справки. За все время выпускалось много версий роутера, отличающихся своей аппаратной частью, прошивкой и немного внешними изменениями. Хотя внешне в основном этот роутер DIR-300 был все той же старенькой рабочей «трехсоткой». Выпускаемые ревизии – NRU B1, B2, B3 (самые первые модели), NRU B5, B6 (чуть новее), NRU B7 (небольшие внешние изменения), A/C1 (последние модификации). Возможно, что-то выпущено уже и новее. Свою версию вы можете посмотреть на наклейке под роутером. Но все настройки ниже подходят под любую ревизию.
Дополнение. Модели DIR-300 и D-Link D-300 – это одно и то же, как бы их не путали. Модели у TP-Link с таким номером не существует.
Предварительные настройки – Windows
Если вы уверены, что у вас все отличное в системе – смело пропускайте этот раздел.
Чтобы исключить все возможные проблемы от былых настроек, предлагаю немного покопаться в системе, и убедиться, что сетевые настройки получаются автоматически. На этапе настройки — это важно, т.к. есть вероятность или не подключиться к роутеру, или не получить интернет. Так что лучше изначально проверить, что все выставлено на автомат, а уже после базовой настройки делать что угодно со своей сетью.
Дальнейшие действия подходят для всех современных операционных систем – Windows 7, Windows 8, Windows 10. Различия между ними минимальны, любые погрешности в тексте восстанавливаются на глаз. Если вдруг возникла какая-то сложно – или ищем настройки под свою систему на нашем сайте, или просто задаем вопрос в комментарии. Скриншоты ниже взяты с «семерки».
Для справки. Настроить роутер можно и без компьютера – через телефон или планшет, подключившись по Wi-Fi. Но компьютерная настройка самая простая.
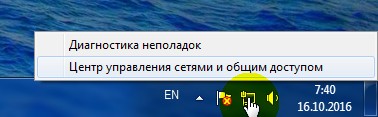
Шаг 1. Центр управления сетями и общим доступом
Ищем возле часов значок подключения к сети, щелкаем по нему правой кнопкой мыши и выбираем наш Центр управления:
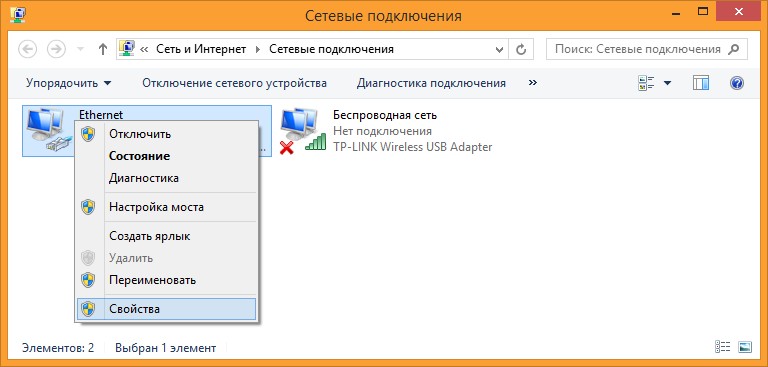
Шаг 2. Изменение параметров адаптера
Шаг 3. Свойства адаптера
На этой страничке у вас может быть несколько адаптеров – например, проводной и беспроводной. Выбираем тот, через который подключены к маршрутизатору, щелкаем по нему правой кнопкой мыши и активируем Свойства.
Шаг 4. Настройки – автомат
А далее просто нужно пощелкать, чтобы добраться до нужных нам настроек:
- Протокол интернета версии 4 (TCP/IP).
- Свойства.
- В обеих графах, если у вас что-то стояло, выбираем автоматическое получение настроек.
- Не забудьте нажать кнопку ОК, чтобы все сохранилось.
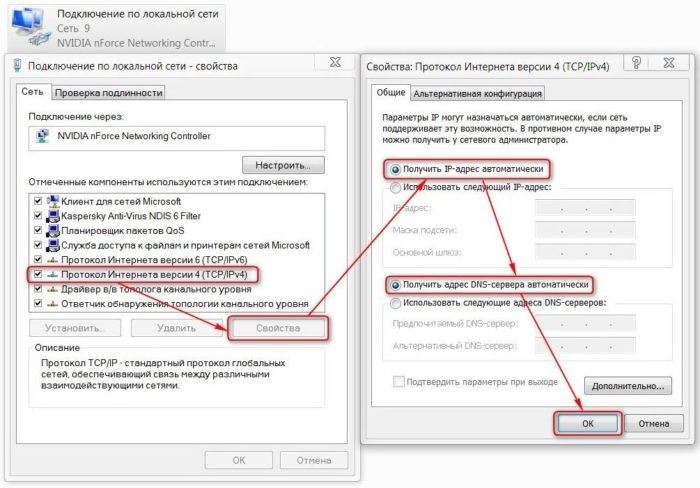
Теперь ваш компьютер будет получать настройки от самого роутера – а это и подключиться даст, и интернет правильно потечет без лишних танцев с бубнами.
Вход в настройки
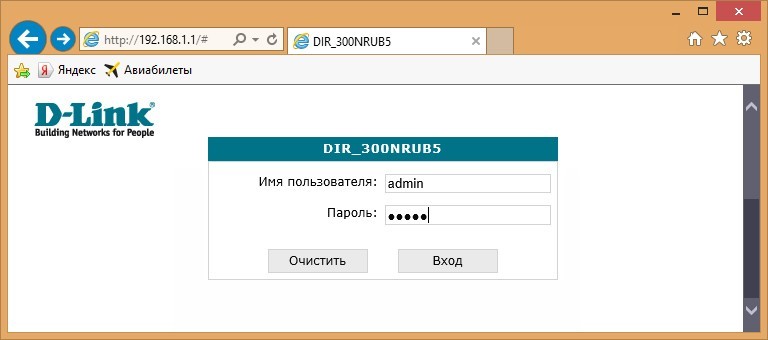
Приступаем к непосредственной настройке. Перед тем как настроить роутер D-Link Dir-300, нужно зайти в его панель управления:
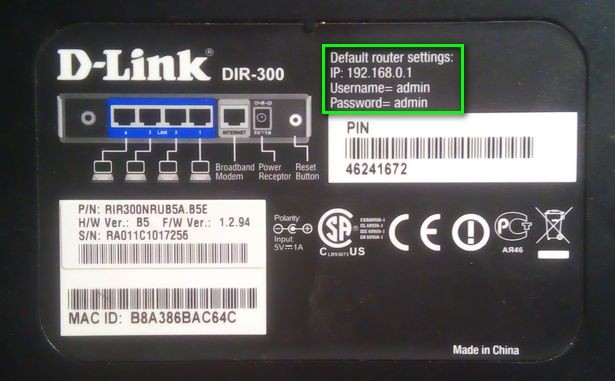
- Попробуйте перейти по следующим IP адресам – 192.168.0.1 (бывает и 192.168.1.1)
- Логин – admin
- Пароль – admin
Обычно в рамках одного устройства адреса подключения одинаковые. Но на этой популярной модели встречаются оба варианта. Так что попробуйте и то, и то, а там, где откроется, и вводите. Вот пример подключения к панели через один адрес:
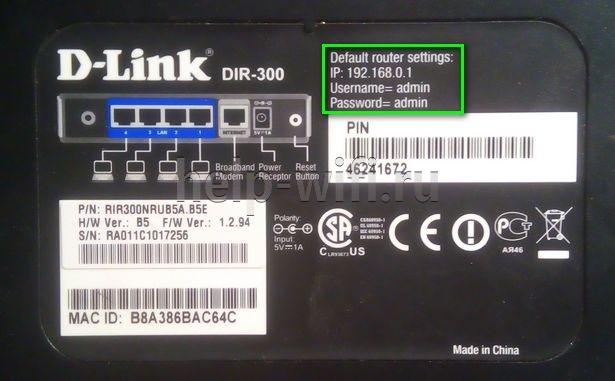
А вот уже на другом устройстве наклейка на нижней части (здесь на любом маршрутизаторе и можно подсмотреть данные для подключения):
После успешного ввода вы и попадаете в настройки. Но если вдруг что-то не получилось, напишите свою ситуацию в комментариях. Обычные причины такой проблемы:
- Нет подключения.
- Роутер выключен.
- Кривые настройки сети – нужно автомат, можно на всякий случай перезагрузиться.
- Роутер кто-то использовал до вас и перебил настройки подключения – можно сбросить их на заводские (инструкция была разделом выше).
Подключение к интернету
Теперь пытаемся подключиться к интернету на нашем Д-Линке. Главный мой совет, т.к. интернет-провайдеров в нашем большом мире очень много, и под всех не подстроишься:
Если возникла проблема с настройкой на этапе подключения к интернету – смело звоните вашему интернет-провайдеру и уточняйте необходимые настройки.
Сделать это придется один раз и на долгие годы, так что ничего страшного нет. Вдруг именно ваш провайдер имеет какие-то специфичные технологии, бывает и такое. Но обычно все успешно подключается и при самостоятельных действиях.
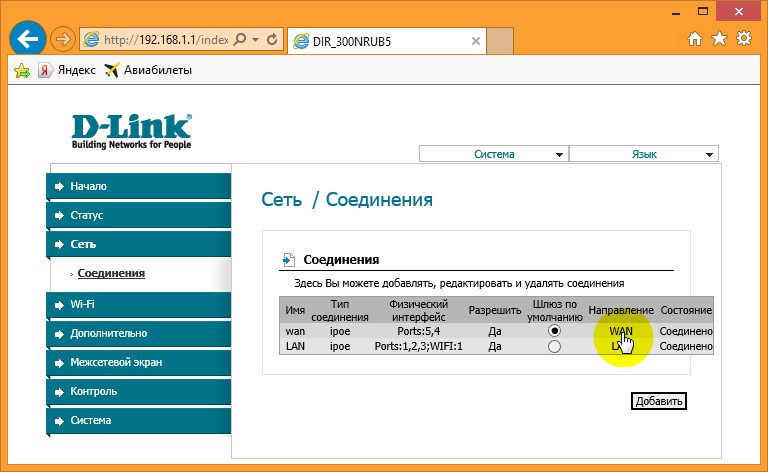
Сеть – Соединение – WAN
Переходим по этому пути и попадаем вот сюда:
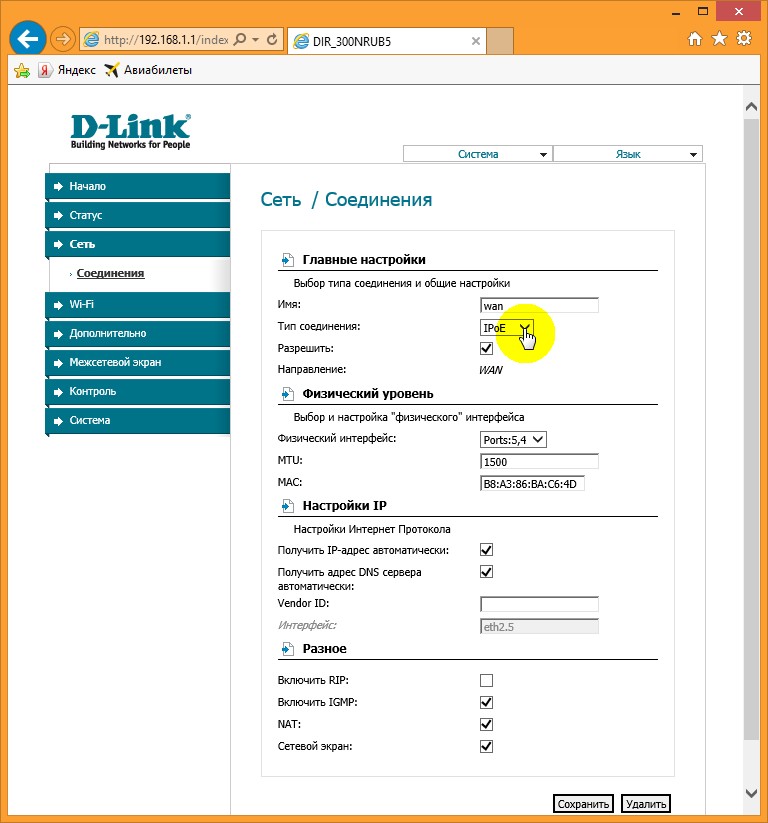
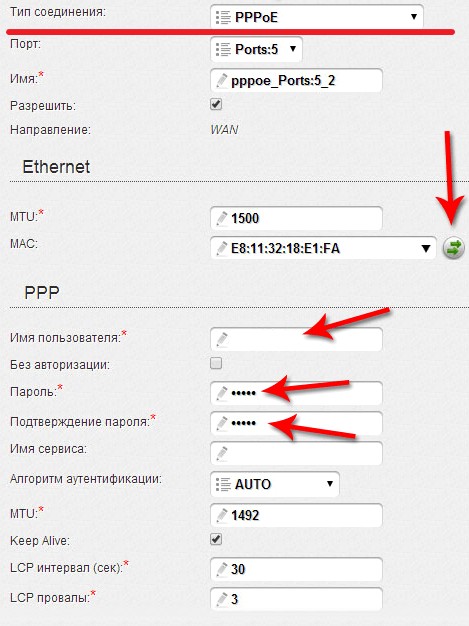
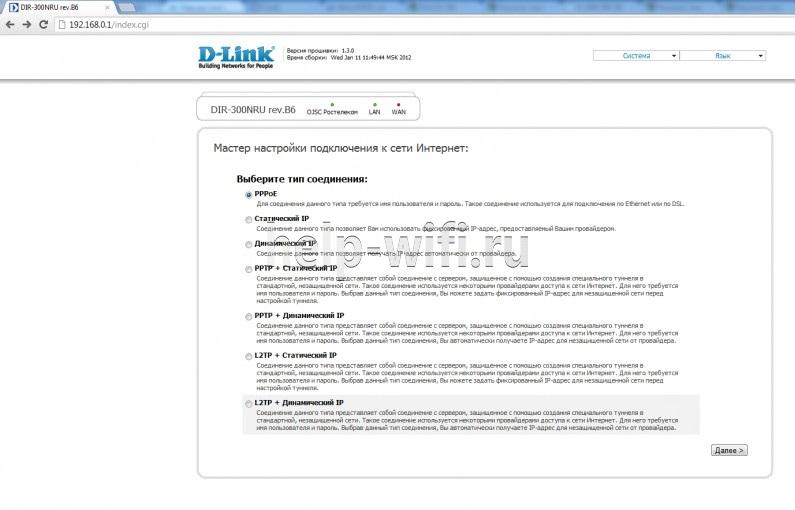
На последней странице главное выбрать свой тип соединения – PPPoE или IPoE. Тут посмотрите на свой договор с провайдером – там обычно указывается и тип соединения, и логин, и пароль. На рисунке показано подключение через IPoE – здесь ничего дополнительного не нужно вводить, но если у вас требуется ввести логин и пароль – ставьте PPPoE и соответствующие поля появятся.
Вводите все как здесь, сохраняете – интернет работает.
Настройка Wi-Fi
Самое главное в настройке Вай-Фая – чтобы все работало, и был свой пароль. Делаем так:
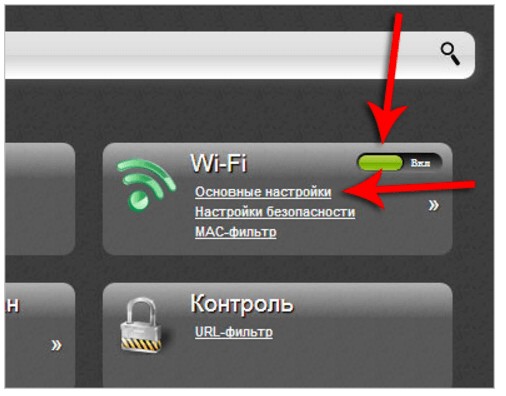
Wi-Fi – Общие настройки
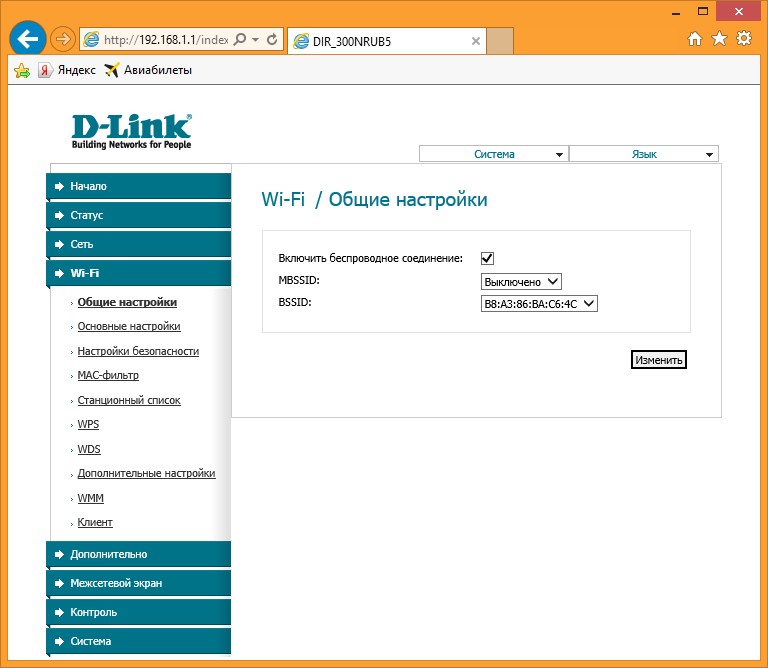
Здесь убедитесь, что включена галка «Включить беспроводное соединение». Либо можно просто посмотреть на переднюю панель роутера и убедиться, что индикатор беспроводной сети горит или мигает.
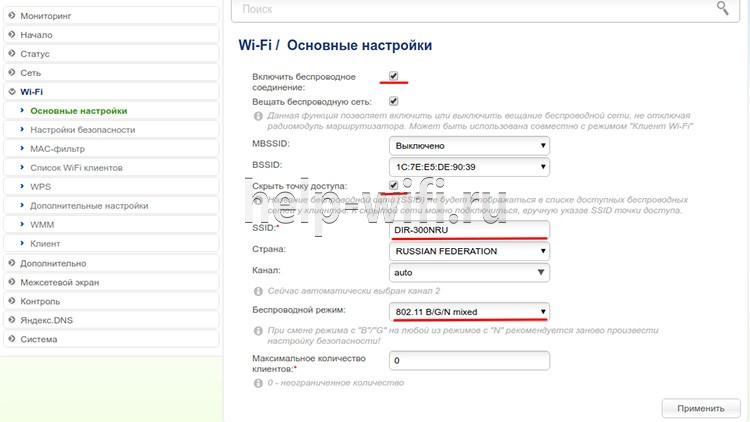
Wi-Fi – Основные настройки
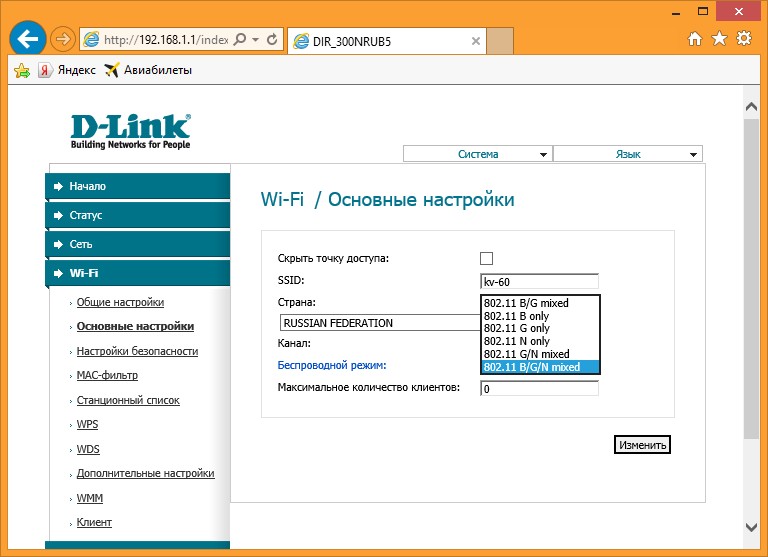
Здесь посмотрите на SSID – название вашей сети. Так вы ее будете видеть при поиске сетей, так ее будут видеть все ваши соседи. Еще посмотрите, чтобы режим стоял в B/G/N mixed – так будет обеспечено полное сочетание стандартов между всеми возможными устройствами и вашим маршрутизатором, чтоб проблем не было.
Wi-Fi – Настройки безопасности
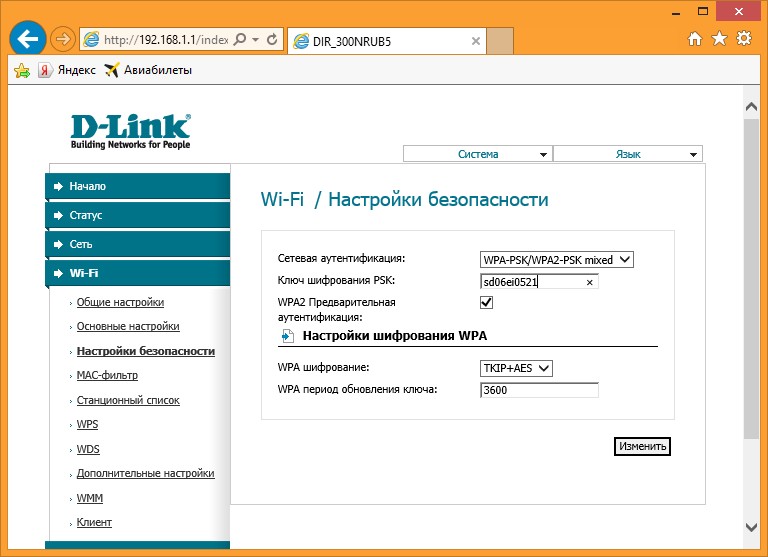
Здесь и задаются основные настройки безопасности вашей домашней беспроводной сети. Не игнорируйте этот пункт! Обязательно установите свой пароль.
Что важно:
- Сетевая аутентификация – WPA-PSK/WPA2-PSK mixed – только так, никаких незащищенных сетей, никаких WEP, которые ломаются на раз-два.
- Ключ шифрования PSK – а это ваш пароль, который будет запрашиваться при подключении любого устройства к вашему Wi-Fi. Его не нужно делать простым, но сразу же запишите куда-нибудь. Посмотреть его повторно можно будет здесь же, но проще ввести с бумажки.
Пароль роутера
Интернет у нас есть, Wi-Fi от соседей обезопасили, теперь самое время защитить и любой роутер – ведь сейчас любое устройство извне может подключиться к нему, ввести admin-admin и, например, подменить все ваши сайты на свои со злыми намерениями. Поэтому:
Система – Пароль администратора
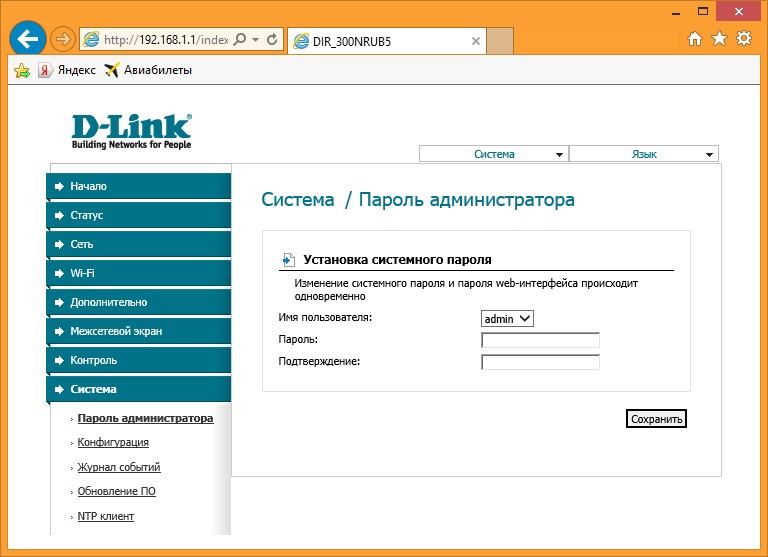
И меняем здесь пароль на новый сложный. Ничего сложного)
Другой интерфейс
Как уже писал выше, у D 300 было много вариантов изготовления, и было много разных интерфейсов. Вся вышеописанная суть подойдет под любую модель – да даже на любой другой роутер, ведь везде процесс одинаковый. Ниже просто покажу, какие еще бывают вариации интерфейса.
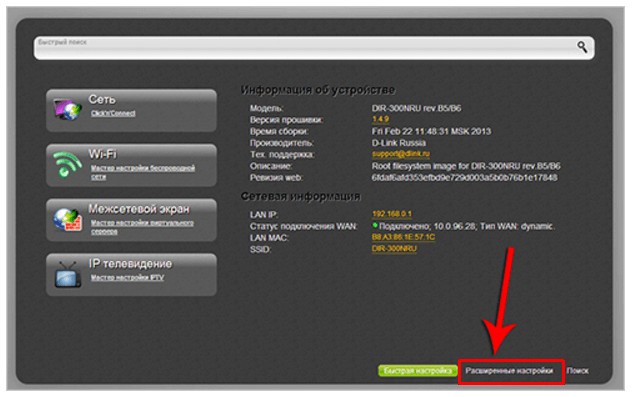
Главная страница и вход в расширенные настройки:
Наша сеть WAN (куда нужно добавить новую настройку с типом соединения и логином-паролем провайдера):

А вот и сами настройки для PPPoE. Напомнию, нужно ввести только сам Тип соединения, а также логин и пароль:
Внутренности Wi-Fi выглядят примерно одинаково, поэтому показываю лишь точку входа во все необходимые настроечки:
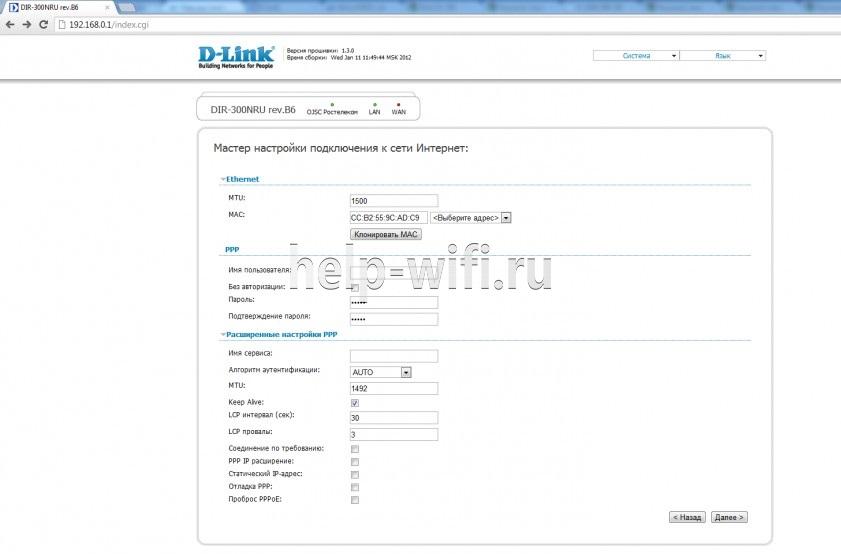
Мастер настройки
Выше я описал процесс ручной настройки – там нет ничего сложного, и каждый может справиться. Но все, что было описано выше, можно сделать и через автоматическую настройку, которая проведет вас по шагам, как и этот мануал.
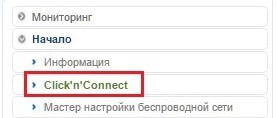
Начало – Click’n’Connect
Интересные продвинутые настройки
Внимание! Вышеописанных пунктов обычно достаточно, чтобы подключиться к интернету и раздать его через Wi-Fi. Я не рекомендую использовать сложные настройки D-Link DIR-300 «любителям».
Просто бегло затрону, что еще умеет эта моделька. Профессионалы просто поймут о чем идет речь и без проблем выстроят свою задачу. Так что для упоминания.
- Маршрутизация. Позволяет прокинуть любые маршруты. На то он и Роутер (маршрутизатор), а не просто модем. Моделька хоть и старенькая, но позволяет решать задачи на дому.
- VLAN – позволяет делить наши сети на виртуальные пространства. Это и контент-фильтр поможет наложить, и IP телевидение отделить от общего потока трафика.
- Firewall, NAT и проброс портов – все присутствует. Видео по пробросу прикладываю далее:
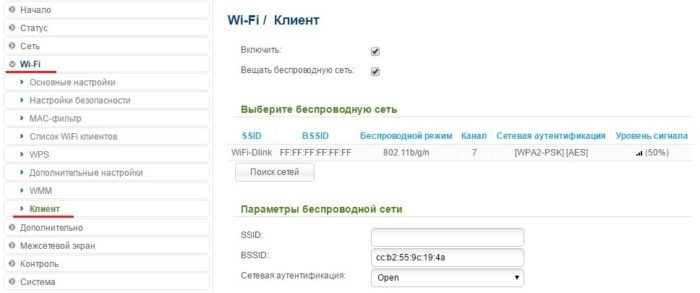
- Репитер (повторитель, усилитель, ретранслятор). Если у вас уже есть какая-то сеть, то этот роутер можно подключить к ней и просто дублировать ее для расширения зоны покрытия. Делается это в настройках «Wi-Fi – Клиент». Здесь отмечаем галку на переход в режим и вещание, выбираем нужную сеть и все работает.
- Аппарат отлично прошивается. Если у вас старенькая моделька – зайдите на официальный сайт, гляньте прошивку под свою ревизию и просто обновите ПО. Но по мне, официальные прошивки, если нет никаких проблем, проще оставлять теми же, а смысл обновляться есть только для профессионалов сразу на какую-нибудь стороннюю OpenWRT.
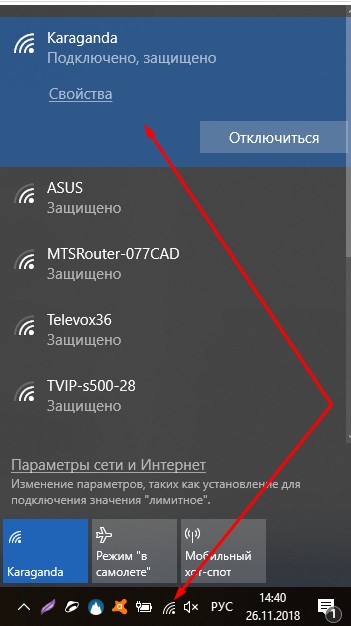
Подключение к роутеру по Wi-Fi
В подключении к Wi-Fi роутеру D-Link DIR 300 по вай-фаю нет чего-то особенного. Все просто – открываете список сетей, ищете свою (название указывали в SSID), подключаетесь, вводите ключ безопасности. Все.
Инструкции
Кому вдруг нашего руководства оказалось недостаточно, предлагаю к ознакомлению 2 официальные инструкции на эту модель роутера. Там есть все, от технических спецификаций до нюансов настройки.
Вот и все! Надеюсь эта статья была полезна для вас. Обязательно оставьте свой комментарий! И не бойтесь менять настройки, если вдруг что-то не получится или «поломается» – просто делайте сброс настроек и приступайте заново. Уверен, все получится!
На чтение 13 мин Просмотров 26.4к.

Специалист техподдержки, PHP-программист, разработчик WordPress
Задать вопрос
Пик продаж описываемой модели приходится на конец первого десятилетия 21 века. Но и сегодня настройка D-Link DIR-300 вызывает вопросы у отдельных пользователей. Именно для них этот обзор. Видя популярность модели, Д-Линк старательно выпускал новые модификации и релизы, а после того, как моделью заинтересовался Ростелеком, она стала «культовой». Четверть рынка продаж тех лет приходилась именно на DIR-300.
Содержание
- Характеристики разновидностей
- Подключение
- Предварительные настройки Windows
- Различные интерфейсы
- Вход в настройки
- Автоматическая настройка
- Ручная настройка интернета
- Настройка Wi-Fi
- Режим повторителя
- Заводская прошивка
- Альтернативная (DD-WRT) прошивка
- Смена пароля от веб-интерфейса
- Обновление прошивки
- IPTV
- Сброс настроек
- Отзывы
Характеристики разновидностей
Раз уж началось о ревизиях — для начала краткий список версий и отличий.
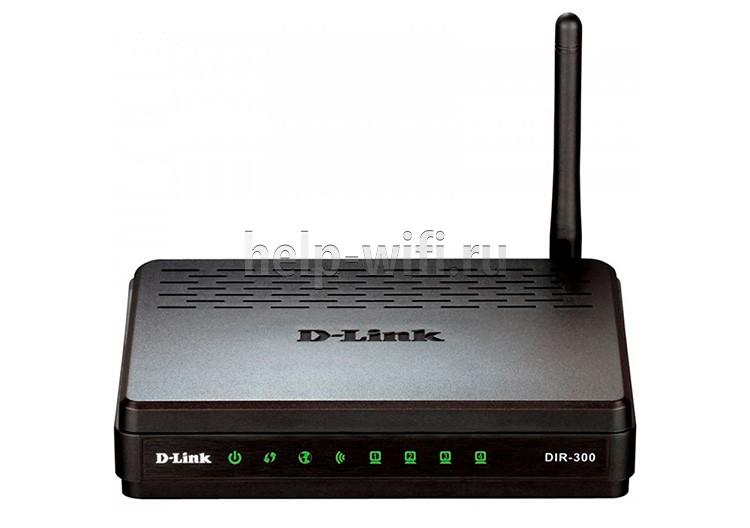
- DIR-300 A1. Выпуск линейки стартовал в 2007 году с ревизии, получившей впоследствии индекс A1.
Внешний вид стандартен. По одной антенне и порту для кабеля от провайдера, четыре пользовательских порта.
Процессор — AR2317 (Atheros) 182 мГц, оперативная память 16 Мб, пользовательская — 4 Мб.
- DIR-300 B1, B2, B3, B4. Спустя два года появится линейка с индексом В. Оперативка вырастает в два раза, до 32 мб. Ставится процессор от Ralink с частотой 384 мГц.

Интересно, что на рынках России модели этой ревизии появляются как DIR-300NRU.
- DIR-300 B5, B6, B7. Новая или скорее продолжение старой ревизии. Единственное отличие — процессор ставится уже на 360 мГц. На российские рынки направляется только третья модель, с прежней маркировкой — NRU.
- DIR-300 С1. Изменений минимум, только чуть более мощный процессор — 400 мГц.
- DIR-300 D1. В 2013 пользователю представляется D1. Основное отличие — внешний вид. Теперь девайс «стоит» на торце.
- DIR-300 S/A1. Выходит на рынок параллельно с D1. Форм-фактор не столь кардинально меняется, зато в строго рубленом виде первых редакций появляются изгибы, скосы, необычные очертания. К достоинствам можно отнести рост пользовательской памяти — 8 Мб.

- DIR-300 A/A1A. На этом компания решает остановится. На очереди 320 модель. Последним отголоском становится A1A. По сути это уже 320, но без USB и с возвратом к 4 Мб памяти для пользователя. Неожиданным решением стала внешняя форма. Девайс снова «стоит» на торце, но имеет форму цилиндра.

Удобство и простота настройки
8
Подключение
Исходя из того, что изменения вносились только в технические характеристики D-Link DIR-300, подключение и дальнейшие настройки соединения могут рассматриваться на примере DIR-300NRU, одной из ревизий для рунета.
Для работы нам понадобится компьютер/ноутбук, так как начальные настройки для роутера D-Link DIR-300 возможны только при кабельном подключении. Беспроводная точка «из коробки» выключена.
Роутер нужно установить на столе, повернуть съёмную антенну вверх.

Пошаговый план подключения:
- Вынуть кабель от провайдера из компьютера.
- Вставить его в синее гнездо на задней панели.
- Проверить настройки сети на компьютере (об этом ниже).
- Кабелем из комплекта поставки соединить компьютер и одно из жёлтых гнёзд на маршрутизаторе DIR-300.
- Включить питание обоих устройств.
После нескольких секунд, когда лампочки на устройстве перестанут мигать, можно переходить к следующим шагам. Роутер готов к настройке.
Предварительные настройки Windows
Пару слов о настройке ОС. Возможно, ранее компьютер подключался к другому устройству, а роутер по умолчанию настроен на то, что все нужное для выхода в сеть он выдаёт сам. Нужно правильно выставить установки системы, иначе сеть не заработает.
На примере Windows 7/10 это выглядит так:
- Заходят в панель управления, выбирают «Просмотр состояния сети и задач».

- В открывшемся окне «Подключение по локальной сети», а затем «Свойства».

- В новом окне «Протокол Интернета версии 4», снова «Свойства».

- На правой картинке указаны правильные настройки для работы с роутером.


Различные интерфейсы
Несмотря на большое количество ревизий, прошивка DIR-300 менялась незначительно и админ-панель настроек устройства получила всего два исполнения — в чёрных тонах (у первых версий) и светлое — у последних.
Функции и там и там названы одинаково, но могут немного различаться по своему местоположению. Поэтому пошаговая инструкция по настройке роутера D-Link DIR-300 будет сопровождаться подробными скринами.
Вход в настройки
Учитывая возраст модели, каких-то фраз вместо цифрового адреса для доступа в интерфейс настроек ждать не приходится.
- Вход в роутер D-Link DIR-300 выполняют по стандартному IP 192.168.0.1 в адресной строке браузера.

- Пользователя встречает стандартное окошко с предложением войти, используя пароль по умолчанию DIR-300. Он такой же как и логин — admin. Данные обычно стандартны, но если есть сомнения, их можно найти на нижней крышке.

- На следующем шаге предложат назначить новый пароль на роутер D-Link DIR-300 и дальше использовать только его. После этого пользователь попадает в веб-интерфейс. Хотя его цветовая гамма и изменилась, функционал — нет.


Автоматическая настройка
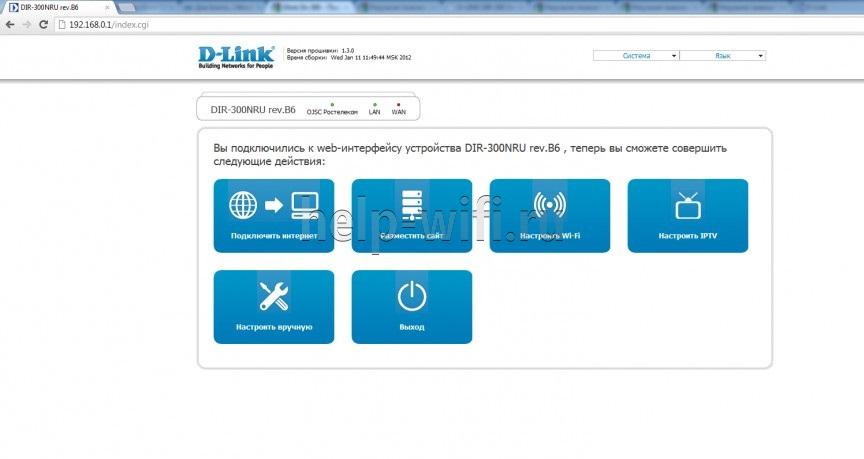
Обычного мастера, как это принято на других моделях, тут нет, как, собственно, и кнопки «Автоматическая настройка». Но если выбрать вкладку «Подключить Интернет» — запустится мастер подключения к сети, предлагая выбор между несколькими вариантами.

Но если в списке предложений нет нужного провайдера или пользователь хочет контролировать все процессы самостоятельно, нажатие на логотип вернёт на главную страницу. Но можно поставить флажок в положение «WAN» или выбрать в списке «Добавить новое».
На следующей странице нужно указать тип подключения.
Затем ввести логин и пароль из договора с провайдером.
На следующем экране включить IGMP (нужно, если есть желание смотреть IPTV) и проверить положение других галок.

На этом подключение интернета закончено. Пользователю выдаётся сводная информация для проверки.
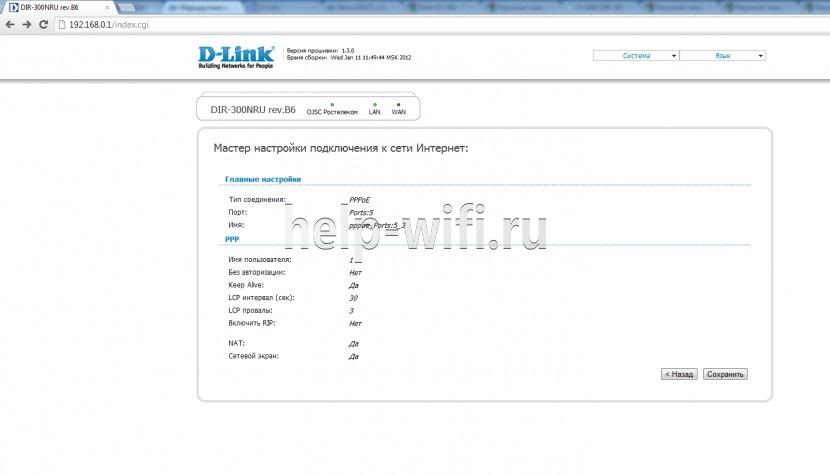
Если все верно — процесс завершён.
Автоматическая настройка позволяет выставить все необходимые параметры без навязывания своих значений.
Ручная настройка интернета
Настройка D-Link DIR-300 вручную не намного сложнее. Для примера можно рассмотреть, как получить интернет от Билайн и Ростелеком. В главном меню есть пункт «Настроить вручную», позволяющий сделать большинство настроек самостоятельно.
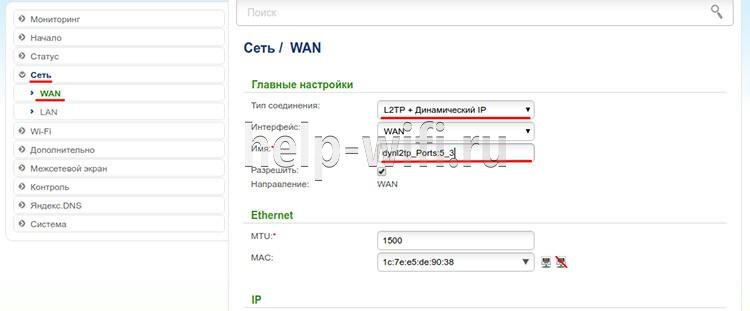
В разделе «Сеть» открываем вкладку «WAN».
Для Билайн:
- Тип соединения сменить на «L2TP + Динамический IP». Название любое — оно нужно только для админки. Потом установить настройки VPN. Адрес сервера обычно не меняется — tp.internet.beeline.ru.

- Затем вводится имя пользователя и пароль из договора. Остальное без изменений.


Для Ростелеком и Дом.ру:
- Тип соединения нужно выбрать PPPoE, задать произвольное имя соединения.
- Ввести логин и пароль, который обычно указывается в договоре с провайдером.
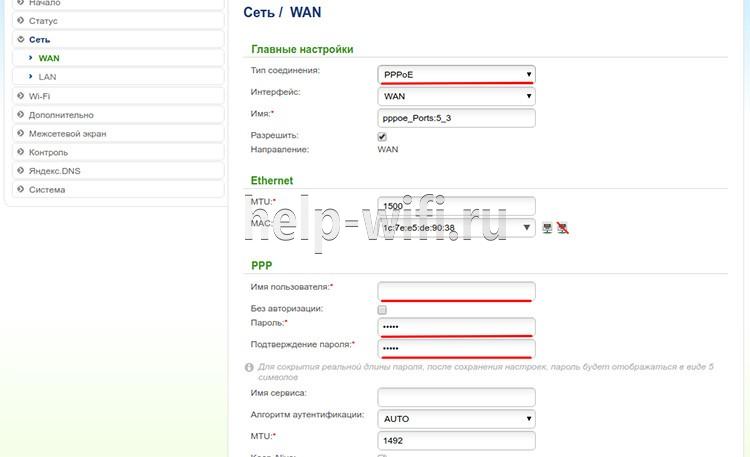
Важно! Лучше убедится в типе подключения, посмотрев договор с провайдером. В нем есть все нужные параметры.
Переходим к поднятию вайфай соединения.
Настройка Wi-Fi
Пошаговый алгоритм:
- Чтобы включить беспроводную сеть, нужно зайти в админ-панель роутера D-Link DIR-300 и в главном меню выбрать раздел «Wi-Fi». Далее выбираем вкладку «Основные настройки».
- Обязательно устанавливаем галочку «Включить беспроводное соединение». В поле SSID указываем имя сети (домашние устройства найдут роутер именно по нему). Страна «Russian Federation». Также можно скрыть точку доступа при желании. Остальные настройки можно оставить как на скриншоте и нажать кнопку «Применить».

- В подменю «Настройка безопасности» нужно запаролить сетку, чтобы ей действительно не воспользовался сосед. Заполняем поля, как указано. Ключ шифрования PSK — пароль, который нужно будет вводить при первом входе нового устройства.


Режим повторителя
В базовой, заводской прошивке режима повторителя устройства от D-Link обычно не имеют. Но в то же время можно установить режим клиента, где роутер получает сигнал от удалённого устройства и раздаёт его дальше. То есть в итоге получается тот же режим ретранслятора.
Эта же проблема решается и поиском альтернативной, не родной прошивки, известной как версия «DD-WRT». Но так как это всё-таки не родная версия, её опишем второй, чуть ниже.
Заводская прошивка
Сначала вариант клиента для другой сети.
Настройка DIR-300 в режиме репитера состоит из двух этапов:
- В параметрах настройки Wi-Fi вместо собственных данных нужно установить данные сети, которую планируется усиливать. Все данные копируются с основного устройства.
- Чтоб решить возможную проблему конфликтов устройств, нужно выключить DHCP на DIR-300, а на странице «WAN» раздела «Сеть» добавить новое подключение (или сменить текущее, если роутер далее не планируется для подключения к провайдеру). Нужно установить тип подключения «Динамический IP», интерфейс «WiFiClient».
- Необязательный. Если ранее к сети роутера подключались беспроводные клиенты, то после установки его повторителем она исчезнет. Чтобы устройства зря не искали несуществующее соединение, рекомендуется забыть сеть и произвести поиск заново.
Сохранить и перезагрузить роутер.
Альтернативная (DD-WRT) прошивка
Другой вариант получения ретранслятора — это установка альтернативной прошивки.
Устанавливается она стандартно — в разделе «Система» есть страница.
Для настройки репитера нужно, как и в работе с оригинальной прошивкой, пройти несколько шагов.
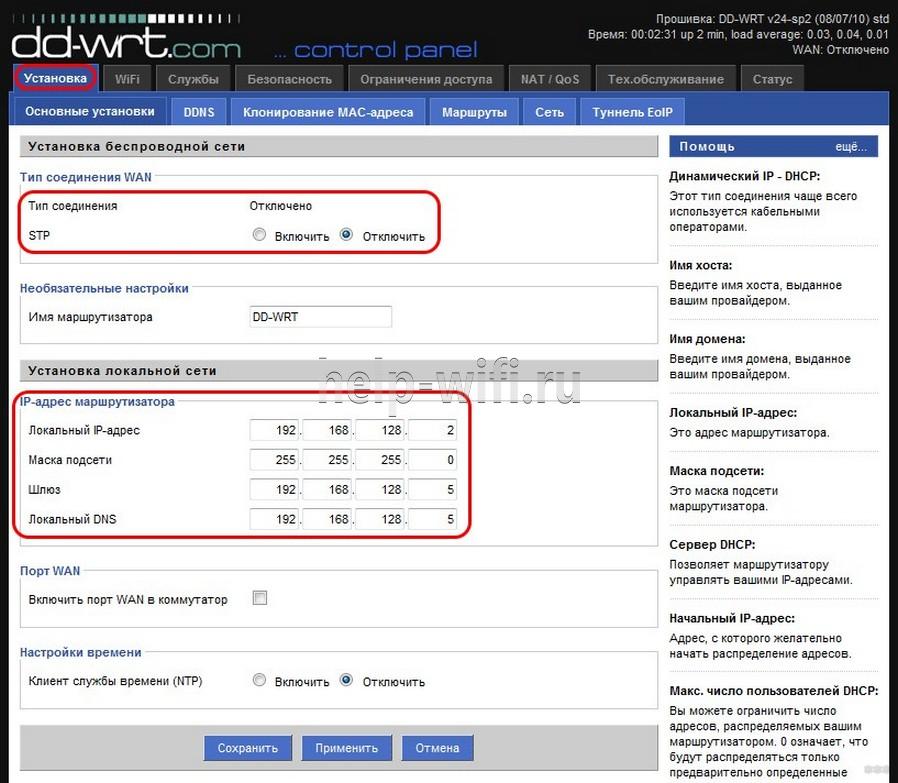
- Первое, что нужно сделать, это установить IP будущего усилителя. Можно использовать любой адрес с одним условием — он должен находится в подсети основного устройства. Если там раздаётся сеть в диапазоне 192.168.0.* — репитер не может иметь 192.168.1.*
- На вкладке «Установка» в разделе «Основные установки» выключить WAN.

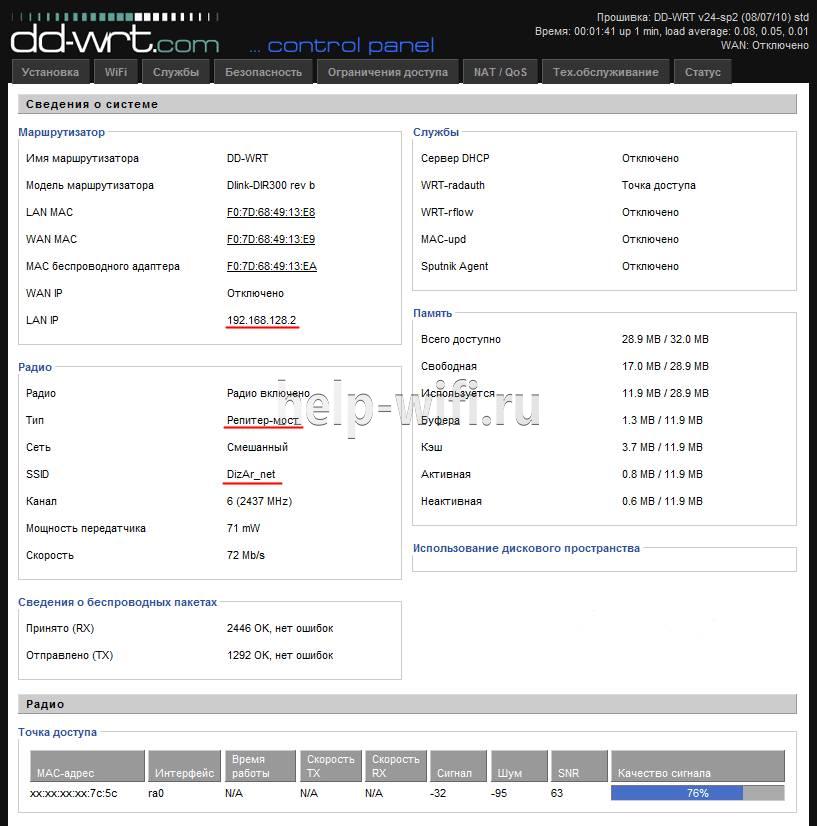
- Следующим шагом переходят в раздел «Основные установки», но уже на вкладке Wi-Fi. В альтернативной прошивке есть возможность выбрать тип беспроводной сети — «репитер-мост».

- Выбирают его. Далее нужно указать имя сети — оно должно повторять имя на основном роутере.
- Выставив флажки, как указано на картинке, переходят в раздел «Безопасность» (вкладка Wi-Fi). Здесь нужно повторить все настройки защиты основного устройства.

- Сохранив все сделанные изменения, нужно перезагрузить DIR-300.


После перезагрузки в Web-интерфейсе видно, что используется сеть основного устройства.
Можно отметить, что альтернативная прошивка — улучшенная версия заводской. Настройками моста её возможности не ограничиваются. Во многих торговых точках роутер сразу перешивался на альтернативную версию, которая предлагает более расширенные и гибкие настройки.
Смена пароля от веб-интерфейса
Поменять пароль администратора, который создали при первом входе в настройки роутера, можно в разделе «Система», на специальной странице. Однако перед тем как устанавливать другой, нужно обратить внимание на сообщения на странице. В зависимости от версии прошивки возможен вариант, что заменить можно только сразу два пароля — для веб-интерфейса и Wi-Fi. Установить общий.

Защиту сети в этом случае придётся настраивать заново.
Обновление прошивки
В том же разделе «Система» можно сделать обновление прошивки. Для роутера D-Link DIR-300 предлагаются два варианта решения.
Пользователь может проверить сам обычным способом, потом скачать прошивку с официального сайта или при настройке адреса обновлений (обычно установлен по умолчанию) сделать это в автоматическом режиме, когда устройство само будет проверять свой сайт на наличие обновлений.

IPTV
В старых прошивках роутера настройка TВ, если оно предлагалось провайдером, проблем не вызывала. Однако по непонятным соображениям в новых версиях функцию убрали.
Настройка будет проводится на примере провайдера Ростелеком.
На странице «WAN» (раздел «Сеть») нужно создать новое подключение.
Все настройки повторяют те, которые настраивали при подключении к провайдеру, включая галочку «Keep Alive», но есть и несколько отличий.
Тип соединения «Статический IP», MTU — 1492.

Раздел IP заполняется, как на картинке:
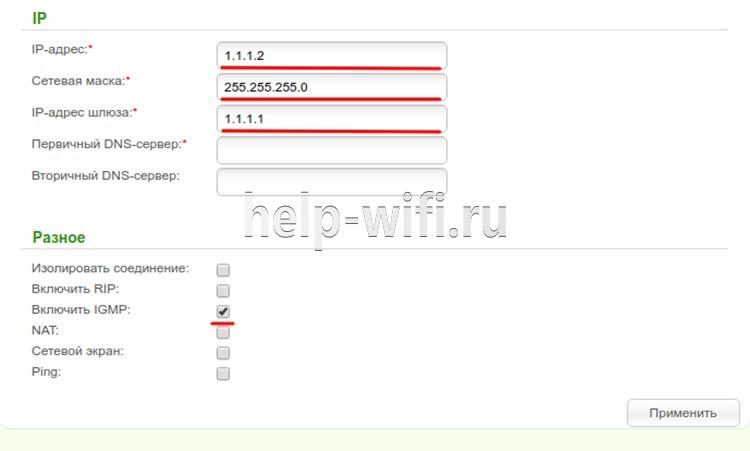
Обязательно нужно отметить галочкой пункт «Включить IGMP». Затем включить IGMP, версия 2 на вкладке «Дополнительно» раздела «Разное».
Сброс настроек
Вне зависимости от прошивки DIR-300, сброс настроек, возможность сохранить и вернуть ранее установленные собраны на экране «Конфигурация» раздела «Система». Каждая кнопка отвечает за одну функцию.
Сохранить — когда роутер настроен, все параметры можно импортировать в один файл на компьютере.
Восстановить (здесь есть окно для выбора файла) — обратная операция. Указывается файл, нажимается кнопка, после перезагрузки все настройки восстановлены. Может быть полезным при решении вернуться из режима репитера в режим маршрутизатора. Если файл был ранее сохранён, одна перезагрузка вернёт все предыдущие настройки.
Сброс на заводские настройки DIR-300 выполняется нажатием на одноимённую кнопку.
Здесь же есть четвертая кнопка, позволяющая перезагрузить устройство, не отключая электропитания.
В старых версиях прошивок существовала ещё одна функция. Пользователь мог сменить язык интерфейса просто загрузив/удалив языковый файл. Новые прошивки идут мультиязычными — выбор языка общения выведен в правую часть шапки.
Если же пользователь забыл пароль от роутера, придётся воспользоваться физическим сбросом настроек посредством кнопки RESET на задней панели. В целях защиты от случайного нажатия она немножко утоплена, поэтому нужно воспользоваться стержнем, иголкой или подобным предметом. Удержание кнопки в течение 15 секунд приведёт к перезагрузке роутера, что покажут индикаторы. После новой загрузки роутер забудет все настройки пользователя, включая изменённый пароль.
Отзывы
Пользователи о девайсе говорят по разному.
Плюсы:
- Основой плюс, отмечаемый большинством пользователей, — цена прибора. Кто-то пишет — низкая цена, другие — дешёвый. Есть мнения о хорошем балансе цены и качества.
- Простоту настройки всех D-Link можно отнести к большим плюсам моделей, при этом как на заводской, так и на альтернативной прошивках. Основные проблемы настройки у пользователей — невнимательность.
- Быстро подключается по Wi-Fi, даже при одном делении на значке идеален для небольшого числа подключаемых девайсов.
Есть и минусы
- Главный минус, указываемый большинством пользователей, — прошивка. Та, с которой роутер поставлялся, на момент продаж была безнадёжно устаревшей. Первое, что нужно было делать после включения девайса, — переходить на сайт производителя и обновляться. У D-Link и 300-ка не исключение, существует альтернативная прошивка. Она имеет больше возможностей настройки и ряд дополнительных функций, про которые производитель забыл.
- Второй минус, отмеченный владельцами, — раз в неделю, а иногда и чаще беспричинная перезагрузка. Максимум беспрерывной работы — 6 дней. Другой вариант этой же проблемы — просто без видимых признаков перестаёт открывать страницы. Нужна перезагрузка.
- Третьей проблемой можно назвать скорость. Как по кабелю, так и по радио скорость ниже, чем при связи напрямую.
-
Contents
-
Table of Contents
-
Bookmarks
Quick Links
User Manual
DIR-300
Wireless N 150 Home Router
March 2013
Related Manuals for D-Link DIR-300
Summary of Contents for D-Link DIR-300
-
Page 1
User Manual DIR-300 Wireless N 150 Home Router March 2013… -
Page 2: Table Of Contents
DIR-300 Wireless N 150 Home Router User Manual Contents Chapter 1. Introduction……….5 Contents and Audience…………5 Conventions…………..5 Document Structure…………5 Chapter 2. Overview……….6 General Information…………6 Specifications…………..7 Product Appearance…………13 Front Panel…………..13 Side Panel……………14 Back Panel……………15 Delivery Package…………16 Chapter 3. Installation and Connection……17 Before You Begin…………17 Connecting to PC…………18…
-
Page 3
DIR-300 Wireless N 150 Home Router User Manual IPTV Setup Wizard…………80 Status…………..81 Network Statistics…………81 DHCP…………..82 Routing Table…………83 Clients…………..84 Net…………….85 WAN…………..85 Creating PPPoE WAN Connection……….86 Creating Static IP WAN Connection……..90 Creating Dynamic IP WAN Connection……..93 Creating PPTP + Static IP or L2TP + Static IP WAN Connection…96 Creating PPTP + Dynamic IP or L2TP + Dynamic IP WAN Connection..101… -
Page 4
DIR-300 Wireless N 150 Home Router User Manual System…………..155 Administrator Password……….156 Configuration…………157 System Log…………..159 Firmware Upgrade…………161 NTP Client…………..163 Ping…………..164 Traceroute…………..165 Telnet…………..166 Chapter 5. Operation Guidelines……..167 Safety Instructions…………167 Wireless Installation Considerations……..167 Connecting to Cable or DSL Modem……….168 Chapter 6. Abbreviations and Acronyms……169… -
Page 5: Chapter 1. Introduction
Chapter 2 gives an overview of the router’s hardware and software features, describes its appearance and the package contents. Chapter 3 explains how to install the router DIR-300 and configure a PC in order to access its web- based interface.
-
Page 6: Chapter 2. Overview
You are able to connect the wireless router DIR-300 to a cable or DSL modem or to a private Ethernet line and use a high-speed Internet connection to successfully fulfill a wide range of professional tasks.
-
Page 7: Specifications
DIR-300 Wireless N 150 Home Router Overview User Manual Specifications WAN Interface 1 10/100BASE-TX Ethernet port for cable or DSL modem or private Ethernet line • LAN Interface 4 10/100BASE-TX Ethernet ports • WLAN Interface IEEE 802.11n (up to 150Mbps) •…
-
Page 8
DIR-300 Wireless N 150 Home Router Overview User Manual Flow control • WAN ping respond • Wireless Connection Supported security settings • ◦ WEP ◦ WPA/WPA2 Personal ◦ WPA/WPA2 Enterprise MAC filter • Managing connected stations • PIN and PBC methods of WPS •… -
Page 9
DIR-300 Wireless N 150 Home Router Overview User Manual Modulation Schemes 802.11b: DQPSK, DBPSK, DSSS, CCK • 802.11g: BPSK, QPSK, 16QAM, 64QAM with OFDM • 802.11n: BPSK, QPSK, 16QAM, 64QAM with OFDM • Receiver Sensitivity 802.11b (typical at PER = 8% (1000-byte PDUs) at room temperature 25 °C) •… -
Page 10
DIR-300 Wireless N 150 Home Router Overview User Manual ◦ HT40 ◦ –79dBm at MCS0 ◦ –76dBm at MCS1 ◦ –74dBm at MCS2 ◦ –71dBm at MCS3 ◦ –67dBm at MCS4 ◦ –63dBm at MCS5 ◦ –62dBm at MCS6 ◦ –61dBm at MCS7 Transmitter Output Power 802.11b (typical at room temperature 25 °C) -
Page 11
DIR-300 Wireless N 150 Home Router Overview User Manual 802.11n (typical at room temperature 25 С) • ◦ HT20 ◦ 16.5dBm (+/-1.5dB) MCS0 ◦ 16.5dBm (+/-1.5dB) MCS1 ◦ 16.5dBm (+/-1.5dB) MCS2 ◦ 16dBm (+/-1.5dB) MCS3 ◦ 16dBm (+/-1.5dB) MCS4 ◦ 15.5dBm (+/-1.5dB) MCS5 ◦… -
Page 12
DIR-300 Wireless N 150 Home Router Overview User Manual Configuration and Management Multilingual web-based interface for configuration and management • Access via TELNET • Firmware update via web-based interface • Saving/restoring configuration to/from file • Support of remote logging •… -
Page 13: Product Appearance
DIR-300 Wireless N 150 Home Router Overview User Manual Product Appearance Front Panel Figure 1. Front panel view. Mode Description The router is powered on. Solid green POWER The router is powered off. No light Attempting to add a wireless device via the WPS Blinking green function.
-
Page 14: Side Panel
DIR-300 Wireless N 150 Home Router Overview User Manual A device (computer) is connected to the relevant port, Solid green the connection is on. The LAN port is active (upstream/downstream LAN 1-4 Blinking green traffic). The cable is not connected to the relevant port.
-
Page 15: Back Panel
DIR-300 Wireless N 150 Home Router Overview User Manual Back Panel Figure 3. Back panel view. Name Description LAN 1-4 4 Ethernet ports to connect computers or network devices. A port to connect to a cable or DSL modem or to a private Ethernet line INTERNET (it is recommended to use the cable included in the delivery package).
-
Page 16: Delivery Package
DIR-300 Wireless N 150 Home Router Overview User Manual Delivery Package The following should be included: Wireless router DIR-300 • Power adapter DC 12V/0.5A • Ethernet cable (CAT 5E) • Quick Installation Guide” (brochure). • The “User Manual” and “Quick Installation Guide” documents in Russian and English are available on D-Link website (see ftp.dlink.ru/pub/Router/DIR-300A_D1/Description/).
-
Page 17: Chapter 3. Installation And Connection
Operating System Configuration of the wireless router DIR-300 with a built-in 4-port switch (hereinafter referred to as “the router”) is performed via the built-in web-based interface. The web-based interface is available from any operating system that supports a web browser.
-
Page 18: Connecting To Pc
DIR-300 Wireless N 150 Home Router Installation and Connection User Manual Connecting to PC PC with Ethernet Adapter 1. Make sure that your PC is powered off. 2. Connect an Ethernet cable between any of LAN ports located on the back panel of the router and the Ethernet port of your PC.
-
Page 19
DIR-300 Wireless N 150 Home Router Installation and Connection User Manual 3. In the Local Area Connection Properties window, on the General tab, select the Internet Protocol (TCP/IP) line. Click the Properties button. Figure 5. The Local Area Connection Properties window. -
Page 20
DIR-300 Wireless N 150 Home Router Installation and Connection User Manual 4. Select the Obtain an IP address automatically and Obtain DNS server address automatically radio buttons. Click the OK button. Figure 6. The Internet Protocol (TCP/IP) Properties window. 5. Click the ОК button in the connection properties window. -
Page 21: Obtaining Ip Address Automatically In Os Windows 7
DIR-300 Wireless N 150 Home Router Installation and Connection User Manual Obtaining IP Address Automatically in OS Windows 7 1. Click the Start button and proceed to the Control Panel window. 2. Select the Network and Sharing Center section. (If the Control Panel has the category…
-
Page 22
DIR-300 Wireless N 150 Home Router Installation and Connection User Manual 3. In the menu located on the left part of the window, select the Change adapter settings line. Figure 8. The Network and Sharing Center window. Page 22 of 170… -
Page 23
DIR-300 Wireless N 150 Home Router Installation and Connection User Manual 4. In the opened window, right-click the relevant Local Area Connection icon and select the Properties line in the menu displayed. Figure 9. The Network Connections window. Page 23 of 170… -
Page 24
DIR-300 Wireless N 150 Home Router Installation and Connection User Manual 5. In the Local Area Connection Properties window, on the Networking tab, select the Internet Protocol Version 4 (TCP/IPv4) line. Click the Properties button. Figure 10. The Local Area Connection Properties window. -
Page 25: Pc With Wi-Fi Adapter
DIR-300 Wireless N 150 Home Router Installation and Connection User Manual 6. Select the Obtain an IP address automatically and Obtain DNS server address automatically radio buttons. Click the OK button. Figure 11. The Internet Protocol Version 4 (TCP/IPv4) Properties window.
-
Page 26: Configuring Wi-Fi Adapter In Os Windows Xp
DIR-300 Wireless N 150 Home Router Installation and Connection User Manual Configuring Wi-Fi Adapter in OS Windows XP 1. Click the Start button and proceed to the Control Panel > Network and Internet Connections > Network Connections window. 2. Select the icon of the wireless network connection and make sure that your Wi-Fi adapter is Figure 12.
-
Page 27: Configuring Wi-Fi Adapter In Os Windows 7
DIR-300 Wireless N 150 Home Router Installation and Connection User Manual Configuring Wi-Fi Adapter in OS Windows 7 1. Click the Start button and proceed to the Control Panel window. 2. Select the Network and Sharing Center section. (If the Control Panel has the category…
-
Page 28
DIR-300 Wireless N 150 Home Router Installation and Connection User Manual 6. In the opened window, in the list of available wireless networks, select the wireless network DIR-300 and click the Connect button. Figure 15. The list of available networks. -
Page 29: Connecting To Web-Based Interface
2. In the address bar of the web browser, enter the IP address of the router (by default, the following IP address is specified: 192.168.0.1). Press the Enter key. Figure 16. Connecting to the web-based interface of the DIR-300 device. 3. On the opened page, enter the username and password for the administrator account in the Login and Password fields correspondingly (by default, the following username and password are specified: admin, admin).
-
Page 30
DIR-300 Wireless N 150 Home Router Installation and Connection User Manual Right after the first access to the web-based interface you are forwarded to the page for changing the administrator password specified by default. Figure 18. The page for changing the default administrator password. -
Page 31: Web-Based Interface Structure
DIR-300 Wireless N 150 Home Router Installation and Connection User Manual Web-based Interface Structure After successful registration the router’s quick settings page opens. Figure 19. The quick settings page. The web-based interface of the router is multilingual. Select a needed language from the menu displayed when the mouse pointer is over the Language caption.
-
Page 32
DIR-300 Wireless N 150 Home Router Installation and Connection User Manual On the quick settings page you can run a needed Wizard, quickly get to some pages of the web- based interface, search for a specific page, or switch to the advanced settings section. -
Page 33
DIR-300 Wireless N 150 Home Router Installation and Connection User Manual Figure 21. The advanced settings page. The pages of the Status section display data on the current state of the router (for the description of the pages, see the Status section, page 81). -
Page 34: Saving And Restoring Settings
DIR-300 Wireless N 150 Home Router Installation and Connection User Manual Also you can find a specific page via search. To do this, enter the name of the page, wholly or partly, in the search bar in the top part of the web-based interface page, and then select a needed link in the search results.
-
Page 35
DIR-300 Wireless N 150 Home Router Installation and Connection User Manual Figure 24. The top-page menu. Click the Reboot line if you have already saved the router’s settings. Click the Save&Reboot line to save new settings and immediately reboot the router. -
Page 36: Chapter 4. Configuring Via Web-Based Interface
DIR-300 Wireless N 150 Home Router Configuring via Web-based Interface User Manual CHAPTER 4. CONFIGURING WEB-BASED INTERFACE Click’n’Connect To configure connection to the Internet, click the Click’n’Connect link in the Net section. Figure 25. Configuring connection to the Internet. Connect the Ethernet cable provided by your ISP to the WAN port of the router. Verify the relevant LED (the INTERNET LED should be on).
-
Page 37
DIR-300 Wireless N 150 Home Router Configuring via Web-based Interface User Manual Figure 26. The page for selecting the connection type. On the opened page, select the needed choice of the radio button and click the Next button. Page 37 of 170… -
Page 38: Creating Wan Connection
DIR-300 Wireless N 150 Home Router Configuring via Web-based Interface User Manual Creating WAN Connection PPPoE Connection Figure 27. Configuring PPPoE WAN connection. In the Connection name field, specify a name for the connection for easier identification. In the Username field, enter your login, and in the Password and Password confirmation fields –…
-
Page 39
DIR-300 Wireless N 150 Home Router Configuring via Web-based Interface User Manual Figure 28. Configuring PPPoE WAN connection. The expert settings mode. The Ethernet section. Parameter Description Connection name A name for connection for easier identification. Ethernet The maximum size of units transmitted by the interface. -
Page 40
DIR-300 Wireless N 150 Home Router Configuring via Web-based Interface User Manual Figure 29. Configuring PPPoE WAN connection. The expert settings mode. The PPP section. Parameter Description Username A username (login) to access the Internet. Select the checkbox if you don’t need to enter a username and Without authorization password to access the Internet. -
Page 41
DIR-300 Wireless N 150 Home Router Configuring via Web-based Interface User Manual Parameter Description Select the checkbox if you want the router to establish connection to the Internet on demand. In the Maximum idle time field, specify a Dial on demand period of inactivity (in seconds) after which the connection should be terminated. -
Page 42
DIR-300 Wireless N 150 Home Router Configuring via Web-based Interface User Manual Figure 30. Configuring PPPoE WAN connection. The expert settings mode. The Miscellaneous section. Parameter Description Miscellaneous Enable RIP Select the checkbox to allow using RIP for this connection. -
Page 43: Static Ip Connection
DIR-300 Wireless N 150 Home Router Configuring via Web-based Interface User Manual Static IP Connection Figure 31. Configuring Static IP WAN connection. In the Connection name field, specify a name for the connection for easier identification. Fill in the IP Address and Netmask fields.
-
Page 44
DIR-300 Wireless N 150 Home Router Configuring via Web-based Interface User Manual Figure 32. Configuring Static IP WAN connection. The expert settings mode. The Ethernet section. Parameter Description Connection name A name for connection for easier identification. Ethernet The maximum size of units transmitted by the interface. -
Page 45
DIR-300 Wireless N 150 Home Router Configuring via Web-based Interface User Manual Figure 33. Configuring Static IP WAN connection. The expert settings mode. The IP and Miscellaneous sections. Parameter Description IP Address Enter an IP address for this WAN connection. -
Page 46
DIR-300 Wireless N 150 Home Router Configuring via Web-based Interface User Manual Parameter Description Select the checkbox to allow the router to answer ping requests Ping from the external network through this connection. For security reasons, it is recommended not to select this checkbox. -
Page 47: Dynamic Ip Connection
DIR-300 Wireless N 150 Home Router Configuring via Web-based Interface User Manual Dynamic IP Connection Figure 34. Configuring Dynamic IP WAN connection. In the Connection name field, specify a name for the connection for easier identification. If your ISP has provided the addresses of the DNS servers, deselect the Obtain DNS server addresses automatically checkbox and fill in the Primary DNS server field.
-
Page 48
DIR-300 Wireless N 150 Home Router Configuring via Web-based Interface User Manual Figure 35. Configuring Dynamic IP WAN connection. The expert settings mode. The Ethernet section. Parameter Description Connection name A name for connection for easier identification. Ethernet The maximum size of units transmitted by the interface. -
Page 49
DIR-300 Wireless N 150 Home Router Configuring via Web-based Interface User Manual Figure 36. Configuring Dynamic IP WAN connection. The expert settings mode. The IP and Miscellaneous sections. Parameter Description Obtain DNS server Select the checkbox to configure automatic assignment of DNS addresses server addresses. -
Page 50
DIR-300 Wireless N 150 Home Router Configuring via Web-based Interface User Manual Parameter Description Select the checkbox to allow the router to answer ping requests Ping from the external network through this connection. For security reasons, it is recommended not to select this checkbox. -
Page 51: Pptp + Static Ip Or L2Tp + Static Ip Connection
DIR-300 Wireless N 150 Home Router Configuring via Web-based Interface User Manual PPTP + Static IP or L2TP + Static IP Connection Figure 37. Configuring PPTP + Static IP WAN connection. Fill in the IP Address and Netmask fields. In the Gateway IP address field, enter the IP address of the gateway used by this WAN connection.
-
Page 52
DIR-300 Wireless N 150 Home Router Configuring via Web-based Interface User Manual Figure 38. Configuring PPTP + Static IP WAN connection. The expert settings mode. The Ethernet section. Parameter Description Ethernet The maximum size of units transmitted by the interface. -
Page 53
DIR-300 Wireless N 150 Home Router Configuring via Web-based Interface User Manual Figure 39. Configuring PPTP + Static IP WAN connection. The expert settings mode. The IP and Miscellaneous sections. Parameter Description IP Address Enter an IP address for this WAN connection. -
Page 54
DIR-300 Wireless N 150 Home Router Configuring via Web-based Interface User Manual Parameter Description Select the checkbox to allow the router to answer ping requests Ping from the external network through this connection. For security reasons, it is recommended not to select this checkbox. -
Page 55
DIR-300 Wireless N 150 Home Router Configuring via Web-based Interface User Manual Figure 41. Configuring PPTP + Static IP WAN connection. In the Connection name field, specify a name for the connection for easier identification. In the Username field, enter your login, and in the Password and Password confirmation fields –… -
Page 56
DIR-300 Wireless N 150 Home Router Configuring via Web-based Interface User Manual Figure 42. Configuring PPTP + Static IP WAN connection. The expert settings mode. The VPN section. Parameter Description Connection name A name for connection for easier identification. Select the checkbox to enable auto-start of the connection upon the Connect automatically boot-up of the router. -
Page 57
DIR-300 Wireless N 150 Home Router Configuring via Web-based Interface User Manual Parameter Description Select a method of MPPE encryption. No encrypt: MPPE encryption is not applied. • MPPE 40/128 bit: MPPE encryption with a 40-bit or 128-bit • key is applied. -
Page 58
DIR-300 Wireless N 150 Home Router Configuring via Web-based Interface User Manual Figure 43. Configuring PPTP + Static IP WAN connection. The expert settings mode. The Miscellaneous section. Parameter Description Miscellaneous Enable RIP Select the checkbox to allow using RIP for this connection. -
Page 59: Pptp + Dynamic Ip Or L2Tp + Dynamic Ip Connection
DIR-300 Wireless N 150 Home Router Configuring via Web-based Interface User Manual PPTP + Dynamic IP or L2TP + Dynamic IP Connection Figure 44. Configuring PPTP + Dynamic IP WAN connection. If your ISP has provided the addresses of the DNS servers, deselect the Obtain DNS server addresses automatically checkbox and fill in the Primary DNS server field.
-
Page 60
DIR-300 Wireless N 150 Home Router Configuring via Web-based Interface User Manual Figure 45. Configuring PPTP + Dynamic IP WAN connection. The expert settings mode. The Ethernet section. Parameter Description Ethernet The maximum size of units transmitted by the interface. -
Page 61
DIR-300 Wireless N 150 Home Router Configuring via Web-based Interface User Manual Figure 46. Configuring PPTP + Dynamic IP WAN connection. The expert settings mode. The IP and Miscellaneous sections. Parameter Description Obtain DNS server Select the checkbox to configure automatic assignment of DNS addresses server addresses. -
Page 62
DIR-300 Wireless N 150 Home Router Configuring via Web-based Interface User Manual Parameter Description Select the checkbox to allow the router to answer ping requests Ping from the external network through this connection. For security reasons, it is recommended not to select this checkbox. -
Page 63
DIR-300 Wireless N 150 Home Router Configuring via Web-based Interface User Manual Figure 48. Configuring PPTP + Dynamic IP WAN connection. The expert settings mode. The VPN section. Parameter Description Connection name A name for connection for easier identification. Select the checkbox to enable auto-start of the connection upon the Connect automatically boot-up of the router. -
Page 64
DIR-300 Wireless N 150 Home Router Configuring via Web-based Interface User Manual Parameter Description Select a method of MPPE encryption. No encrypt: MPPE encryption is not applied. • MPPE 40/128 bit: MPPE encryption with a 40-bit or 128-bit • key is applied. -
Page 65
DIR-300 Wireless N 150 Home Router Configuring via Web-based Interface User Manual Figure 49. Configuring PPTP + Dynamic IP WAN connection. The expert settings mode. The Miscellaneous section. Parameter Description Miscellaneous Enable RIP Select the checkbox to allow using RIP for this connection. -
Page 66: Checking Internet Availability
DIR-300 Wireless N 150 Home Router Configuring via Web-based Interface User Manual Checking Internet Availability On the page, you can check the WAN connection you have created. Figure 50. Checking the Internet availability. In the Result section, the status of the WAN connection and possible causes of malfunctions are displayed.
-
Page 67: Configuring Wireless Connection
DIR-300 Wireless N 150 Home Router Configuring via Web-based Interface User Manual Configuring Wireless Connection Figure 51. Selecting the operating mode for the wireless network. If you are not going to use the wireless connection, select the Turn off choice of the Mode radio button.
-
Page 68: Router Mode
DIR-300 Wireless N 150 Home Router Configuring via Web-based Interface User Manual Router Mode On the opened page, in the SSID field, specify a new name for the network (use digits and Latin characters). Figure 52. Changing the name of the wireless LAN.
-
Page 69
DIR-300 Wireless N 150 Home Router Configuring via Web-based Interface User Manual On the next page, you can modify security settings of the WLAN. The default security settings do not provide sufficient protection for the WLAN. Please, specify your own security settings for the WLAN. -
Page 70: Client Mode
DIR-300 Wireless N 150 Home Router Configuring via Web-based Interface User Manual Client Mode On the opened page, click the Search button. Figure 54. Selecting a network to connect. Select the network to which you want to connect and click the Next button.
-
Page 71
On the next page, the parameters of the network to which you want to connect and the entered password are displayed. Make sure that the specified settings are correct and then click the Save button. After that, the wireless channel of DIR-300 will switch to the channel of the wireless access point to which you have connected. -
Page 72: Configuring Iptv
DIR-300 Wireless N 150 Home Router Configuring via Web-based Interface User Manual Configuring IPTV On the page, you can configure the router to use an IPTV set-top box. Figure 56. Selecting a LAN port to connect an IPTV set-top box.
-
Page 73: Wireless Network Settings Wizard
DIR-300 Wireless N 150 Home Router Configuring via Web-based Interface User Manual Wireless Network Settings Wizard To specify all needed settings for your wireless network, click the Wireless network settings wizard in the Wi-Fi section. Figure 57. The page for selecting the operating mode for the wireless network.
-
Page 74: Router Mode
DIR-300 Wireless N 150 Home Router Configuring via Web-based Interface User Manual Router Mode On the opened page, in the SSID field, specify a new name for the network (use digits and Latin characters). Figure 58. Page for changing the name of the wireless LAN.
-
Page 75
DIR-300 Wireless N 150 Home Router Configuring via Web-based Interface User Manual On the next page, you can modify security settings of the WLAN. The default security settings do not provide sufficient protection for the WLAN. Please, specify your own security settings for the WLAN. -
Page 76: Client Mode
DIR-300 Wireless N 150 Home Router Configuring via Web-based Interface User Manual Client Mode On the opened page, click the Search button. Figure 60. The page for selecting a network to connect. Select the network to which you want to connect and click the Next button.
-
Page 77
On the next page, the parameters of the network to which you want to connect and the entered password are displayed. Make sure that the specified settings are correct and then click the Save button. After that, the wireless channel of DIR-300 will switch to the channel of the wireless access point to which you have connected. -
Page 78: Virtual Server Settings Wizard
DIR-300 Wireless N 150 Home Router Configuring via Web-based Interface User Manual Virtual Server Settings Wizard To create a virtual server for redirecting incoming Internet traffic to a specified IP address in the LAN, click the Virtual server settings wizard link in the Firewall section.
-
Page 79
DIR-300 Wireless N 150 Home Router Configuring via Web-based Interface User Manual Parameter Description A port of the IP address specified in the Private IP field to which traffic is directed from the Public port. Specify the start and the Private port (begin)/ end value for the port range. -
Page 80: Iptv Setup Wizard
DIR-300 Wireless N 150 Home Router Configuring via Web-based Interface User Manual IPTV Setup Wizard To configure the router to use an IPTV set-top box, click the IPTV settings wizard in the IP-TV section. Figure 63. The page for selecting a LAN port to connect an IPTV set-top box.
-
Page 81: Status
DIR-300 Wireless N 150 Home Router Configuring via Web-based Interface User Manual Status The pages of this section display data on the current state of the router: network statistics • IP addresses leased by the DHCP server • the routing table •…
-
Page 82: Dhcp
DIR-300 Wireless N 150 Home Router Configuring via Web-based Interface User Manual DHCP The Status / DHCP page displays the information on computers that have been identified by hostnames and MAC addresses and have got IP addresses from the DHCP server of the device, as well as the IP address expiration periods (the lease time).
-
Page 83: Routing Table
DIR-300 Wireless N 150 Home Router Configuring via Web-based Interface User Manual Routing Table The Status / Routing table page displays the information on routes. The table contains destination IP addresses, gateways, subnet masks, and other data. Figure 66. The Status / Routing table page.
-
Page 84: Clients
DIR-300 Wireless N 150 Home Router Configuring via Web-based Interface User Manual Clients On the Status / Clients page, you can view the list of devices connected to the router and devices accessing its web-based interface. Figure 67. The Status / Clients page.
-
Page 85: Net
DIR-300 Wireless N 150 Home Router Configuring via Web-based Interface User Manual In this menu you can configure basic parameters of the router’s local area network and configure connection to the Internet (a WAN connection). On the Net / WAN page, you can create and edit connections used by the router.
-
Page 86: Creating Pppoe Wan Connection
DIR-300 Wireless N 150 Home Router Configuring via Web-based Interface User Manual Creating PPPoE WAN Connection To create a connection of the PPPoE type, click the Add button on the Net / WAN page. On the opened page, select the PPPoE value from the Connection Type drop-down list and specify the needed values.
-
Page 87
DIR-300 Wireless N 150 Home Router Configuring via Web-based Interface User Manual Parameter Description A MAC address assigned to the interface. This parameter is mandatory if your ISP uses MAC address binding. In the field, enter the MAC address registered by your ISP upon concluding the agreement. -
Page 88
DIR-300 Wireless N 150 Home Router Configuring via Web-based Interface User Manual Parameter Description Username A username (login) to access the Internet. Select the checkbox if you don’t need to enter a username and Without authorization password to access the Internet. -
Page 89
DIR-300 Wireless N 150 Home Router Configuring via Web-based Interface User Manual Figure 71. The page for creating a new connection. The Miscellaneous section. Parameter Description Miscellaneous Enable RIP Select the checkbox to allow using RIP for this connection. Select the checkbox to allow multicast traffic from the external Enable IGMP Multicast network (e.g. -
Page 90: Creating Static Ip Wan Connection
DIR-300 Wireless N 150 Home Router Configuring via Web-based Interface User Manual Creating Static IP WAN Connection To create a connection of the Static IP type, click the Add button on the Net / WAN page. On the opened page, select the Static IP value from the Connection Type drop-down list and specify the needed values.
-
Page 91
DIR-300 Wireless N 150 Home Router Configuring via Web-based Interface User Manual Parameter Description A MAC address assigned to the interface. This parameter is mandatory if your ISP uses MAC address binding. In the field, enter the MAC address registered by your ISP upon concluding the agreement. -
Page 92
DIR-300 Wireless N 150 Home Router Configuring via Web-based Interface User Manual Parameter Description IP Address Enter an IP address for this WAN connection. Netmask Enter a subnet mask for this WAN connection. Gateway IP address Enter an IP address of the gateway used by this WAN connection. -
Page 93: Creating Dynamic Ip Wan Connection
DIR-300 Wireless N 150 Home Router Configuring via Web-based Interface User Manual Creating Dynamic IP WAN Connection To create a connection of the Dynamic IP type, click the Add button on the Net / WAN page. On the opened page, select the Dynamic IP value from the Connection Type drop-down list and specify the needed values.
-
Page 94
DIR-300 Wireless N 150 Home Router Configuring via Web-based Interface User Manual Parameter Description A MAC address assigned to the interface. This parameter is mandatory if your ISP uses MAC address binding. In the field, enter the MAC address registered by your ISP upon concluding the agreement. -
Page 95
DIR-300 Wireless N 150 Home Router Configuring via Web-based Interface User Manual Parameter Description Obtain DNS server Select the checkbox to configure automatic assignment of DNS addresses server addresses. If the checkbox is selected, the Primary DNS automatically server and Secondary DNS server fields are not displayed. -
Page 96: Creating Pptp + Static Ip Or L2Tp + Static Ip Wan Connection
DIR-300 Wireless N 150 Home Router Configuring via Web-based Interface User Manual Creating PPTP + Static IP or L2TP + Static IP WAN Connection To create a connection of the PPTP + Static IP or L2TP + Static IP type, click the Add button on the Net / WAN page.
-
Page 97
DIR-300 Wireless N 150 Home Router Configuring via Web-based Interface User Manual Parameter Description A MAC address assigned to the interface. This parameter is mandatory if your ISP uses MAC address binding. In the field, enter the MAC address registered by your ISP upon concluding the agreement. -
Page 98
DIR-300 Wireless N 150 Home Router Configuring via Web-based Interface User Manual Parameter Description Primary DNS server/ Enter addresses of the primary and secondary DNS servers in the relevant fields. Secondary DNS server Miscellaneous Enable RIP Select the checkbox to allow using RIP for this connection. -
Page 99
DIR-300 Wireless N 150 Home Router Configuring via Web-based Interface User Manual Parameter Description Select the checkbox to enable auto-start of the connection upon the Connect automatically boot-up of the router. Username A username (login) to access the Internet. Select the checkbox if you don’t need to enter a username and Without authorization password to access the Internet. -
Page 100
DIR-300 Wireless N 150 Home Router Configuring via Web-based Interface User Manual Parameter Description Fill in the field if you want to use a static IP address to access the Static IP Address Internet. Select the checkbox if you want to log… -
Page 101: Creating Pptp + Dynamic Ip Or L2Tp + Dynamic Ip Wan Connection
DIR-300 Wireless N 150 Home Router Configuring via Web-based Interface User Manual Creating PPTP + Dynamic IP or L2TP + Dynamic IP WAN Connection To create a connection of the PPTP + Dynamic IP or L2TP + Dynamic IP type, click the Add button on the Net / WAN page.
-
Page 102
DIR-300 Wireless N 150 Home Router Configuring via Web-based Interface User Manual Parameter Description A MAC address assigned to the interface. This parameter is mandatory if your ISP uses MAC address binding. In the field, enter the MAC address registered by your ISP upon concluding the agreement. -
Page 103
DIR-300 Wireless N 150 Home Router Configuring via Web-based Interface User Manual Parameter Description Enable RIP Select the checkbox to allow using RIP for this connection. Select the checkbox to allow multicast traffic from the external Enable IGMP Multicast network (e.g. video streaming) to be received. -
Page 104
DIR-300 Wireless N 150 Home Router Configuring via Web-based Interface User Manual Parameter Description Select the checkbox to enable auto-start of the connection upon the Connect automatically boot-up of the router. Username A username (login) to access the Internet. Select the checkbox if you don’t need to enter a username and Without authorization password to access the Internet. -
Page 105
DIR-300 Wireless N 150 Home Router Configuring via Web-based Interface User Manual Parameter Description Fill in the field if you want to use a static IP address to access the Static IP Address Internet. Select the checkbox if you want to log… -
Page 106: Lan
DIR-300 Wireless N 150 Home Router Configuring via Web-based Interface User Manual To configure the router’s local interface, proceed to the Net / LAN page. Figure 84. Basic settings of the local interface. If needed, edit the basic settings of the local interface.
-
Page 107
DIR-300 Wireless N 150 Home Router Configuring via Web-based Interface User Manual Parameter Description Select the checkbox so that the devices connected to the router obtain the address transmitted by the ISP or specified on the Advanced / DNS page as the DNS server address. -
Page 108: Wi-Fi
(It is recommended not to select this checkbox in order to simplify initial configuration of your WLAN.) A name for the WLAN. By default, the value DIR-300 is specified. SSID It is recommended to specify another name for the network upon initial configuration (use digits and Latin characters).
-
Page 109
DIR-300 Wireless N 150 Home Router Configuring via Web-based Interface User Manual Parameter Description The wireless channel number. When the auto value is selected, the Channel router itself chooses the channel with the least interference. Operating mode of the wireless network of the router. This… -
Page 110: Security Settings
DIR-300 Wireless N 150 Home Router Configuring via Web-based Interface User Manual Security Settings On the Wi-Fi / Security settings page, you can modify security settings of the WLAN. Figure 88. The default security settings. By default, the Open network authentication type with no encryption is specified for the WLAN.
-
Page 111
DIR-300 Wireless N 150 Home Router Configuring via Web-based Interface User Manual Figure 89. Network authentication types supported by the router. The router supports the following authentication types: Authentication type Description Open authentication (with WEP encryption for wireless network Open modes not supporting 802.11n devices). -
Page 112
DIR-300 Wireless N 150 Home Router Configuring via Web-based Interface User Manual The WPA , WPA2 , and WPA/WPA2 mixed authentication types require a RADIUS server. When the Open or Shared value is selected, the WEP Encryption settings section is displayed (the section is unavailable for the wireless network operating modes which support the standard 802.11n):… -
Page 113
DIR-300 Wireless N 150 Home Router Configuring via Web-based Interface User Manual Parameter Description The checkbox activating WEP encryption. When the checkbox is selected, the Default Key ID field, the Encryption Key WEP as Enable Encryption WEP HEX checkbox, and four Encryption Key WEP fields are displayed on the page. -
Page 114
DIR-300 Wireless N 150 Home Router Configuring via Web-based Interface User Manual When the WPA-PSK, WPA2-PSK, or WPA-PSK/WPA2-PSK mixed value is selected, the WPA Encryption settings section is displayed: Figure 91. The WPA2-PSK value is selected from the Network Authentication drop-down list. -
Page 115
DIR-300 Wireless N 150 Home Router Configuring via Web-based Interface User Manual When the WPA, WPA2, or WPA/WPA2 mixed value is selected, the RADIUS settings and WPA Encryption settings sections are available: Figure 92. The WPA2 value is selected from the Network Authentication drop-down list. -
Page 116: Mac Filter
DIR-300 Wireless N 150 Home Router Configuring via Web-based Interface User Manual MAC Filter On the Wi-Fi / MAC Filter page, you can define a set of MAC addresses of devices which will be allowed to access the WLAN, or define MAC addresses of devices which will not be allowed to access the WLAN.
-
Page 117
DIR-300 Wireless N 150 Home Router Configuring via Web-based Interface User Manual Figure 94. The tab for adding a MAC address. Click the Add button and enter an address in the field displayed. Also you can enter the MAC address of a device connected to the router’s LAN at the moment. To do this, select the relevant device from the Known IP/MAC addresses drop-down list (the field will be filled in automatically). -
Page 118: Station List
DIR-300 Wireless N 150 Home Router Configuring via Web-based Interface User Manual Station List On the Wi-Fi / Station List page, you can view the list of wireless clients connected to the router. Figure 95. The list of the wireless clients.
-
Page 119: Wps
DIR-300 Wireless N 150 Home Router Configuring via Web-based Interface User Manual On the Wi-Fi / WPS page, you can enable the function for secure configuration of the WLAN and select a method used to easily add wireless devices to the WLAN.
-
Page 120
DIR-300 Wireless N 150 Home Router Configuring via Web-based Interface User Manual To activate the WPS function, select the WPS Enable checkbox and click the Change button. When the checkbox is selected, the Information and Connection sections are available on the page. -
Page 121: Using Wps Function Via Web-Based Interface
DIR-300 Wireless N 150 Home Router Configuring via Web-based Interface User Manual Using WPS Function via Web-based Interface To add a wireless device via the PIN method of the WPS function, follow the next steps: 1. Select the WPS Enable checkbox.
-
Page 122
DIR-300 Wireless N 150 Home Router Configuring via Web-based Interface User Manual Later you will be able to add wireless devices to the WLAN by pressing the WPS button of the router. 1. Select the PBC method in the software of the wireless device that you want to connect to the router’s WLAN. -
Page 123: Additional Settings
DIR-300 Wireless N 150 Home Router Configuring via Web-based Interface User Manual Additional Settings On the Wi-Fi / Additional settings page, you can define additional parameters for the WLAN of the router. Changing parameters presented on this page may negatively affect your WLAN! Figure 97.
-
Page 124
DIR-300 Wireless N 150 Home Router Configuring via Web-based Interface User Manual Parameter Description The channel bandwidth for 802.11n devices. 20MHz: 802.11n devices operate at 20MHz channels. 40MHz: 802.11n devices operate at 40MHz channels. 20/40MHz -: 802.11n devices operate at 20MHz and 40MHz… -
Page 125: Wmm
DIR-300 Wireless N 150 Home Router Configuring via Web-based Interface User Manual On the Wi-Fi / WMM page, you can enable the Wi-Fi Multimedia function. The WMM function implements the QoS features for Wi-Fi networks. It helps to improve the quality of data transfer over Wi-Fi networks by prioritizing different types of traffic.
-
Page 126
DIR-300 Wireless N 150 Home Router Configuring via Web-based Interface User Manual For every Access Category the following fields are available: Parameter Description Arbitrary Inter-Frame Space Number. This parameter influences Aifsn time delays for the relevant Access Category. The lower the value, the higher is the Access Category priority. -
Page 127: Client
DIR-300 Wireless N 150 Home Router Configuring via Web-based Interface User Manual Client On the Wi-Fi / Client page, you can configure the router as a client to connect to a wireless access point. As a rule, the client mode is used to connect to a WISP network. All parameters specified on this page should be provided by your WISP.
-
Page 128
DIR-300 Wireless N 150 Home Router Configuring via Web-based Interface User Manual When the Open or Shared authentication type is selected, the following fields are available: Parameter Description The checkbox activating WEP encryption. When the checkbox is selected, the Default Key ID field, the Encryption Key WEP as… -
Page 129
Configuring via Web-based Interface User Manual After clicking the Change button, the wireless channel of DIR-300 will switch to the channel of the wireless access point to which you have connected. If the router is connected to the selected network successfully, the green indicator appears to the right of the network’s SSID in the table. -
Page 130: Advanced
DIR-300 Wireless N 150 Home Router Configuring via Web-based Interface User Manual Advanced In this menu you can configure advanced settings of the router: create groups of ports for VLANs • enable the UPnP function • configure a DDNS service •…
-
Page 131: Vlan
DIR-300 Wireless N 150 Home Router Configuring via Web-based Interface User Manual VLAN On the Advanced / VLAN page, you can create and edit groups of ports for virtual networks (VLANs). By default, 2 groups are created in the router’s system: lan: it includes ports 1-4 and the wireless interface;…
-
Page 132
DIR-300 Wireless N 150 Home Router Configuring via Web-based Interface User Manual Figure 101. The page for adding a group of ports for VLAN. You can specify the following parameters: Parameter Description Main settings Name A name for the port for easier identification. -
Page 133
DIR-300 Wireless N 150 Home Router Configuring via Web-based Interface User Manual Parameter Description Ports From the list, select an available value (a physical port of the router, Port the wireless interface) to assign it to this group. The port will be displayed in the table at the bottom of the page. -
Page 134: Upnp
DIR-300 Wireless N 150 Home Router Configuring via Web-based Interface User Manual UPnP On the Advanced / UPnP page, you can enable and disable the UPnP function. UPnP is a set of networking protocols designed for automatic configuration of network devices. The UPnP function performs automatic configuration of the device’s parameters for network applications requiring an incoming connection to the router.
-
Page 135: Ddns
DIR-300 Wireless N 150 Home Router Configuring via Web-based Interface User Manual DDNS On the Advanced / DDNS page, you can define parameters of the DDNS service, which allows associating a domain name with dynamic IP addresses. Figure 103. The Advanced / DDNS page.
-
Page 136
DIR-300 Wireless N 150 Home Router Configuring via Web-based Interface User Manual Figure 104. The page for editing the DDNS service. You can specify the following parameters: Parameter Description DDNS Service Select a DDNS provider from the drop-down list. Host name The domain name registered at your DDNS provider. -
Page 137: Dns
DIR-300 Wireless N 150 Home Router Configuring via Web-based Interface User Manual On the Advanced / DNS page, you can add DNS servers to the system. Figure 105. The Advanced / DNS page. DNS servers are used to determine the IP address from the name of a server in Intranets or the Internet (as a rule, they are specified by an ISP or assigned by a network administrator).
-
Page 138: Routing
DIR-300 Wireless N 150 Home Router Configuring via Web-based Interface User Manual Routing On the Advanced / Routing page, you can add static routes (routes for networks that are not connected directly to the device but are available through the interfaces of the device) into the system.
-
Page 139
DIR-300 Wireless N 150 Home Router Configuring via Web-based Interface User Manual After specifying the needed parameters, click the Save button. To edit an existing route, select a needed field in the relevant line of the table, change its value, and click the Save button. -
Page 140: Remote Access
DIR-300 Wireless N 150 Home Router Configuring via Web-based Interface User Manual Remote Access On the Advanced / Remote access page, you can configure access to the web-based interface of the router. By default, the access from external networks to the router is closed. If you need to allow access to the router from the external network, create relevant rules.
-
Page 141
DIR-300 Wireless N 150 Home Router Configuring via Web-based Interface User Manual Figure 108. The page for adding a rule for remote management. You can specify the following parameters: Parameter Description IP address A host or a subnet to which the rule is applied. -
Page 142: Igmp
DIR-300 Wireless N 150 Home Router Configuring via Web-based Interface User Manual IGMP On the Advanced / IGMP page, you can enable IGMP for the router. IGMP is used for managing multicast traffic (transferring data to a group of destinations). This protocol allows using network resources for some applications, e.g., for streaming video, more…
-
Page 143: Flow Control
DIR-300 Wireless N 150 Home Router Configuring via Web-based Interface User Manual Flow Control On the Advanced / Flow Control page, you can enable and disable data flow control for the WAN port of the router. This function is used for equal load balancing in ISPs’ networks. Contact your ISP to clarify if this function needs to be enabled.
-
Page 144: Firewall
DIR-300 Wireless N 150 Home Router Configuring via Web-based Interface User Manual Firewall In this menu you can configure the firewall of the router: add rules for IP filtering • create virtual servers • define a DMZ • configure the MAC filter.
-
Page 145
DIR-300 Wireless N 150 Home Router Configuring via Web-based Interface User Manual Figure 112. The page for adding a rule for IP filtering. You can specify the following parameters: Parameter Description General Name A name for the rule for easier identification. -
Page 146
DIR-300 Wireless N 150 Home Router Configuring via Web-based Interface User Manual Parameter Description The source host/subnet IP address. To choose a device connected to the router’s LAN at the moment, select the relevant IP address from the drop-down list (the field will be filled in automatically). -
Page 147: Virtual Servers
DIR-300 Wireless N 150 Home Router Configuring via Web-based Interface User Manual Virtual Servers On the Firewall / Virtual servers page, you can create virtual servers for redirecting incoming Internet traffic to a specified IP address in the local area network.
-
Page 148
DIR-300 Wireless N 150 Home Router Configuring via Web-based Interface User Manual Figure 114. The page for adding a virtual server. You can specify the following parameters: Parameter Description Select a virtual server template from the drop-down list, or select… -
Page 149
DIR-300 Wireless N 150 Home Router Configuring via Web-based Interface User Manual Parameter Description The IP address of the server from the local area network. To choose a device connected to the router’s LAN at the moment, select the Private IP relevant value from the drop-down list (the field will be filled in automatically). -
Page 150: Dmz
DIR-300 Wireless N 150 Home Router Configuring via Web-based Interface User Manual A DMZ is a host or network segment located “between” internal (local) and external (global) networks. In the router, the DMZ implements the capability to transfer a request coming to a port of the router from the external network to a specified host of the internal network.
-
Page 151: Mac Filter
DIR-300 Wireless N 150 Home Router Configuring via Web-based Interface User Manual MAC Filter On the Firewall / MAC filter page, you can configure MAC-address-based filtering for computers of the router’s LAN. Figure 116. The Firewall / MAC filter page.
-
Page 152
DIR-300 Wireless N 150 Home Router Configuring via Web-based Interface User Manual To edit a rule for filtering, select a needed field in the relevant line of the table, change its value, and click the Save button. To remove a rule for filtering, select the checkbox located to the left of the relevant line in the table and click the Save button. -
Page 153: Control
DIR-300 Wireless N 150 Home Router Configuring via Web-based Interface User Manual Control This menu is designed to create restrictions on access to certain web sites. URL Filter On the Control / URL filter page, you can specify restrictions on access to certain web sites.
-
Page 154
DIR-300 Wireless N 150 Home Router Configuring via Web-based Interface User Manual Figure 118. The Control / URL filter page. The URL addresses tab. Click the Add button and enter an address in the field displayed. Then click the Save button. -
Page 155: System
DIR-300 Wireless N 150 Home Router Configuring via Web-based Interface User Manual System In this menu you can do the following: change the password used to access the router’s settings • save the current settings to the non-volatile memory •…
-
Page 156: Administrator Password
DIR-300 Wireless N 150 Home Router Configuring via Web-based Interface User Manual Administrator Password On the System / Administrator password page, you can change the password for the administrator account used to access the web-based interface of the router and to access the device settings via TELNET.
-
Page 157: Configuration
DIR-300 Wireless N 150 Home Router Configuring via Web-based Interface User Manual Configuration On the System / Configuration page, you can save the changed settings to the non-volatile memory, restore the factory defaults, backup the current configuration, or restore the router’s configuration from a previously created file.
-
Page 158
DIR-300 Wireless N 150 Home Router Configuring via Web-based Interface User Manual The following buttons are available on the page: Control Description Click the button to save settings to the non-volatile memory. Please, save settings every time you change the router’s parameters. -
Page 159: System Log
DIR-300 Wireless N 150 Home Router Configuring via Web-based Interface User Manual System Log On the System / System log page, you can set the system log options and configure sending the system log to a remote host. Figure 121. The System / System log page. The Configuration tab.
-
Page 160
DIR-300 Wireless N 150 Home Router Configuring via Web-based Interface User Manual Control Description A port of the host specified in the Server field. By default, the value Port 514 is specified. After specifying the needed parameters, click the Change button. -
Page 161: Firmware Upgrade
The current version of the router’s firmware is displayed in the Firmware version field located next the D-Link logo in the top left corner of the page. If you need to install a newer version of the firmware, follow the next steps: Attention! Do not turn off the router before the firmware upgrade is completed.
-
Page 162
DIR-300 Wireless N 150 Home Router Configuring via Web-based Interface User Manual 6. Select the Factory line in the top-page menu displayed when the mouse pointer is over the System caption. 7. Wait until the router is rebooted. Log into the web-based interface, using the default IP address, login and password (192.168.0.1, admin, admin). -
Page 163: Ntp Client
DIR-300 Wireless N 150 Home Router Configuring via Web-based Interface User Manual NTP Client On the System / NTP client page, you can manually set the time and date of the router or configure automatic synchronization of the system time with a time server on the Internet.
-
Page 164: Ping
DIR-300 Wireless N 150 Home Router Configuring via Web-based Interface User Manual Ping On the System / Ping page, you can check availability of a host from the local or global network via the Ping utility. The Ping utility sends echo requests to a specified host and receives echo replies.
-
Page 165: Traceroute
DIR-300 Wireless N 150 Home Router Configuring via Web-based Interface User Manual Traceroute On the System / Traceroute page, you can define the route of data transfer to a host via the traceroute utility. Figure 126. The System / Traceroute page.
-
Page 166: Telnet
DIR-300 Wireless N 150 Home Router Configuring via Web-based Interface User Manual Telnet On the System / Telnet page, you can enable or disable access to the device settings via TELNET from your LAN. By default, access is enabled. Figure 127. The System / Telnet page.
-
Page 167: Chapter 5. Operation Guidelines
RF noise in your home or office. To maximize your wireless range, follow the guidelines below. 1. Keep the number of walls and ceilings between the DIR-300 device and other network devices to a minimum – each wall or ceiling can reduce your wireless network range by 3- 90 feet (1-30 meters).
-
Page 168: Connecting To Cable Or Dsl Modem
DIR-300 Wireless N 150 Home Router Operation Guidelines User Manual Connecting to Cable or DSL Modem If you need to connect the router to a cable or DSL modem, do the following. 1. Place the router in an open location in the supposed center of your wireless network. Do not plug the power adapter into the router.
-
Page 169: Chapter 6. Abbreviations And Acronyms
DIR-300 Wireless N 150 Home Router Abbreviations and Acronyms User Manual CHAPTER 6. ABBREVIATIONS AND ACRONYMS Access Category Advanced Encryption Standard Address Resolution Protocol BSSID Basic Service Set Identifier Cyclic Redundancy Check DDNS Dynamic Domain Name System DDoS Distributed Denial of Service…
-
Page 170
DIR-300 Wireless N 150 Home Router Abbreviations and Acronyms User Manual Quality of Service RADIUS Remote Authentication in Dial-In User Service Routing Information Protocol Request To Send SSID Service Set Identifier TKIP Temporal Key Integrity Protocol User Datagram Protocol UPnP…