Посмотреть инструкция для Ikea DATID OV8 бесплатно. Руководство относится к категории Печи, 14 человек(а) дали ему среднюю оценку 7.8. Руководство доступно на следующих языках: русский, английский. У вас есть вопрос о Ikea DATID OV8 или вам нужна помощь? Задайте свой вопрос здесь
Не можете найти ответ на свой вопрос в руководстве? Вы можете найти ответ на свой вопрос ниже, в разделе часто задаваемых вопросов о Ikea DATID OV8.
Правильно ли, что вентилятор продолжает работать, когда духовка уже выключена?
Что происходит при использовании функции «гриль»?
Обязательно ли предварительно разогревать духовку Ikea?
Как очистить духовку от пригоревшего жира?
Какой способ лучше всего подходит для очистки решетки в духовке?
Инструкция Ikea DATID OV8 доступно в русский?
Не нашли свой вопрос? Задайте свой вопрос здесь
-
Contents
-
Table of Contents
-
Bookmarks
Quick Links
Related Manuals for IKEA DATID OV8
Summary of Contents for IKEA DATID OV8
-
Page 1
DÅTID… -
Page 3
ENGLISH DEUTSCH FRANÇAIS ITALIANO… -
Page 4: Table Of Contents
Installation Daily use Electrical connection Cooking tables Environmental concerns Cleaning and maintenance IKEA GUARANTEE Safety Information Your safety and that of others are very The power cable must be long enough important for connecting the appliance, once This manual and the appliance itself provide…
-
Page 5
ENGLISH During and after use, do not touch the Scrapping of household appliances heating elements or interior surfaces This appliance is manufactured with of the appliance — risk of burns. Do not recyclable or reusable materials. allow the appliance to come into contact Dispose of it in accordance with local with cloths or other flammable materials waste disposal regulations. -
Page 6: Product Description
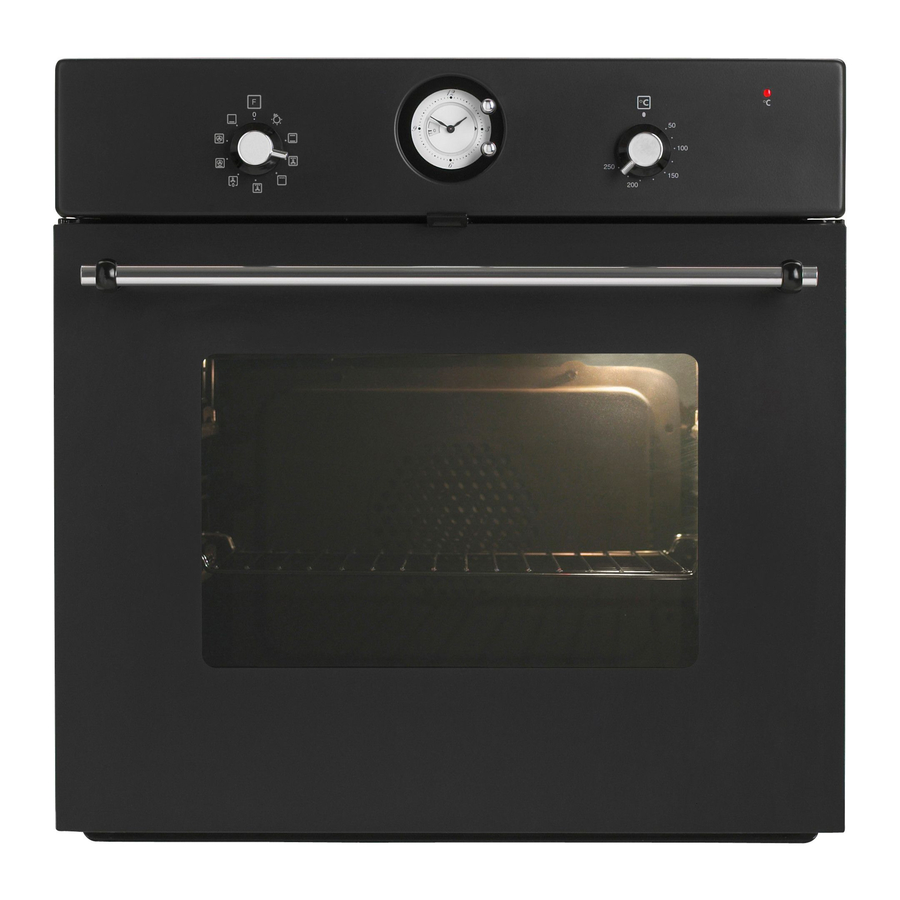
ENGLISH Product description Control panel Circular heating element Cooling fan (not visible) Top heating element Bottom heating element (not visible) Grill element (can be lowered) Oven cool door Rear oven lamp Accessories Baking tray Wire Shelf Drip tray Catalytic panels…
-
Page 7: Control Panel
ENGLISH Control panel Function selector knob Thermostat knob Analog clock Thermostat indicator light (red) Daily use Analog clock The analog clock allows: Viewing the time of the day. To adjust the time of the day press button (B) and turn it anti-clockwise to set the time. Programming the cooking start time.
-
Page 8: Switching On The Oven
ENGLISH Switching on the oven Turn the selector knob to the required symbol. Manual cooking Turn the thermostat knob clockwise to Turn the button (B) anti-clockwise the required temperature. (without pressing), until the symbol is At the end of the set cooking time an displayed in the window acoustic signal will sound and the oven Press the button (A) and turn it anti-…
-
Page 9
ENGLISH Oven Functions table Function Description of function OVEN OFF LAMP To switch on the oven light. TOP AND To cook meat, fish and poultry in the oven. BOTTOM Preheat the oven to the required cooking temperature and place HEATING the food inside as soon as the red thermostat light turns off. -
Page 10: Cooking Tables
ENGLISH Cooking tables Recipe Function Preheating Level (from the Temperature Cooking time bottom) (°C) (min) MEAT Lamb, Kid, Mutton 90-100 100-1 10 100-1 10 Veal, Beef, Pork 90-100 90-1 10 90-1 10 Chicken, Rabbit, 70-80 Duck 70-80 70-80 Turkey 160-180 (3-5 kg) 170-180 170-180…
-
Page 11
ENGLISH Recipe Function Preheating Level (from the Temperature Cooking time bottom) (°C) (min) VEGETABLES Peppers, 50-60 tomatoes, roast 50-60 potatoes 50-60 SWEETS, PASTRIES, ETC Raising cakes 40-50 40-50 40-50 Filled pies 60-90 (with cheese) 60-90 60-90 Tarts 40-50 40-50 40-50 Apple strudel, 50-60 crèpes… -
Page 12
ENGLISH Recipe Function Preheating Level (from the Temperature Cooking time bottom) (°C) (min) Lasagna, potatoes 40-50 au gratin, cannelloni, pasta 40-50 timbales 40-50 Bread 30-40 30-40 30-40 Pizza 15-20 20-30 20-30 Vol-au-vents 20-30 30-40 30-40 Soufflés 40-50 50-60 50-60… -
Page 13
ENGLISH Cooking table for grill function Recipe Function Preheating Level (from the Temperature Cooking time bottom) (°C) (min) Toast 200-225 10-15 Sirloin steak 200-225 30-40 Cutlets 200-225 30-40 Sausages 200-225 30-40 Pork chops 200-225 30-40 Fish (cutlets) 200-225 30-40 Chicken legs 200-225 40-50 Kebabs… -
Page 14: Cleaning And Maintenance
ENGLISH Cleaning and maintenance CLEANING Accessories • Soak the accessories in water with WARNING! washing up detergent immediately after Never use steam cleaning equipment. use, handling them with oven gloves if Only clean the oven when it is cool to still hot.
-
Page 15
ENGLISH • The appliance could be equipped with 2 Close the door as far as it will go (A), lift pyrolysis functions: it up (B) and turn it (C) until it is released • Energy-saving cycle (PYRO EXPRESS/ (D) (Fig. 2, 3, 4). ECO): which consumes approximately 25% less energy than the standard cycle. -
Page 16: Important
Reconnect the oven to the power supply. NOTE: Only use 25-40W/230V type E-14, T300°C incandescent lamps. Fig. 6 Lamps are available from IKEA After Sales To reposition the heating element, lift Service. it up, pulling it slightly towards you, IMPORTANT: using halogen lamps, do…
-
Page 17: What To Do If
“What to do if…” table. If any repairs are required, please contact Switch the appliance off and back on IKEA After Sales Service (to guarantee that again it to see if the fault persists. original spare parts will be used and repairs If after the above checks the fault still occurs, carried out correctly).
-
Page 18: Technical Data
ENGLISH Technical data Dimensions Width Height Depth Usable volumes l Area of largest baking sheet (net surface) cm 1200 Bottom heating element W 1 150 Full oven (Top + Bottom) W 2550 Grill W 1400 Turbo grill W 1425 Fan cooking W 2025 Bottom heating element + fan W 3150…
-
Page 19: Installation
ENGLISH Installation During use After unpacking the oven, make sure that it has not been damaged during transport Do not place heavy objects on the door and that the oven door closes properly. In as they could damage it. the event of problems, contact the dealer or Do not cling to the door or hang your nearest After-sales Service.
-
Page 20
ENGLISH Door safety device To open the door with the door safety device see Fig 1. Fig. 1 The door safety device can be removed by following the sequence of images (see Fig. 2). Fig. 2… -
Page 21: Electrical Connection
1,5 mm ) must be carried out by a qualified the mains voltage. The rating plate is on electrician. Contact IKEA After Sales Service. the front edge of the oven (visible when the door is open). Environmental concerns…
-
Page 22: Ikea Guarantee
Replaced service contractual partner or where non- parts become the property of IKEA.. original parts have been used. What will IKEA do to correct the problem? • Repairs caused by installation which is IKEA appointed service provider will examine faulty or not according to specification.
-
Page 23
• ask for clarifications on installation of the another address, IKEA is not liable for IKEA appliance in the dedicated IKEA any damage that may occur during kitchen furniture;… -
Page 24
© Inter IKEA Systems B.V. 2010 18535 AA-486217-1…
- Главная
- Каталог с отзывами
Offer links may be what’s known as affiliate or referral links which provide us a commission for purchases.

3.1/5 оценка (65 голосов)
Артикульный номер 201.823.20
Описание
-Духовка с горячим обдувом обеспечивает идеальное качество приготовления блюд.
-Духовка с горячим обдувом; обеспечивает равномерное нагревание.
-Функция выпечки мучных изделий с равномерным подогревом; подходит для выпечки печенья, пирогов и т.п.
-Турбогриль; легко и удобно жарить и готовить большие блюда из мяса.
-Разморозка с обудувом; быстро и гигиенично размораживает продукты.
-Нагревающие элементы верх+дно+гриль; для приготовления блюд на гриле и медленной варки.
-Жаропрочная дверца духовки; благодаря эффективной системе вентиляции воздух задерживается между двумя стеклянными панелями и охлаждает дверцу.
-Нагревающий элемент дно; можно использовать в конце приготовления для поджаривания нижней поверхности. Идеально подходит для приготовления пирогов с начинкой и пиццы.
-Духовка с каталитическим эмалевым покрытием; легко поддерживать в чистоте, так как брызги жира, попадая на это покрытие, сгорают.
-Дверца духовки с замком, обеспечивает безопасность на кухне.
-Гладкое внутреннее стекло дверцы духовки; дверцу можно снять для мытья.
-Когда пройдет установленное время готовки, прозвучит сигнал механических часов, и духовка автоматически выключится.
-Вентилятор предохраняет от перегрева.
Размеры товара
Ширина: 59.5 см
Глубина: 56.4 см
Высота: 59.5 см
Размеры и вес упаковки
Упаковки:1
Цены в магазинах ИКЕА в разных странах
Последнее обновление: 05.04.2023. Цены взяты с сайтов ИКЕА соответствующих стран.
- По цене
- По алфавиту
- Без сортировки
-
Индонезия
- 0 IDR
- 0 EUR
- 0 USD
В следующих странах товар не представлен на сайте или продается под другим артикулом:
- Бельгия
- Болгария
- Чехия
- Дания
- Германия
- Испания
- Греция
- Франция
- Хорватия
- Исландия
- Ирландия
- Италия
- Кипр
- Латвия
- Литва
- Люксембург
- Венгрия
- Нидерладны
- Норвегия
- Австрия
- Россия
- Польша
- Португалия
- Румыния
- Швейцария
- Словакия
- Финляндия
- Швеция
- Турция
- Великобритания
- Сербия
- Украина
- Эстония
- Канада
- США
- Мексика
- Бахрейн
- Египет
- Кувейт
- Израиль
- Марокко
- Катар
- Саудовская Аравия
- ОАЭ
- Иордания
- Австралия
- Китай
- Гонконг
- Индия
- Япония
- Малайзия
- Тайвань
- Сингапур
- Южная Корея
- Таиланд
- Доминиканская республика
- Пуэрто-Рико
История изменения цены на товар
За период начиная с марта 2019 года, с которого отслеживается история изменения цен, товар не продавался ни в одной из стран, в которых присутствует ИКЕА.
ENGLISH
Oven Functions table
Function
0
OVEN OFF
LAMP
TOP AND
BOTTOM
HEATING
PASTRY
GRILL
TURBO GRILL
DEFROST
BOTTOM
HEATING +
FORCED AIR
FORCED AIR
BOTTOM
HEATING
Description of function
—
To switch on the oven light.
To cook meat, fish and poultry in the oven.
Preheat the oven to the required cooking temperature and place
the food inside as soon as the red thermostat light turns off.
It is advisable to use the second or third level
To cook on max. two levels.
If necessary, switch the position of the dishes in the oven for
optimum cooking performance.
It is not necessary to preheat the oven (except for pizzas and
focaccias).
Use the grill function to cook sirloin steaks, kebabs, sausages,
vegetables au gratin and for making toast.
Preheat the oven for 3/5 min.
During cooking the door must remain closed.
When cooking meat, to avoid spatters of fat and smoke, pour
a little water into the drip tray.
It is advisable to turn the food during cooking.
This function is ideal for cooking large pieces of meat (roast
beef, roast joints).
During cooking the door must remain closed.
When cooking meat, to avoid spatters of fat and smoke, pour
a little water into the drip tray.
Turn the meat during grilling.
Ideal for thawing frozen food at room temperature.
The food should be placed in the oven in its wrapping to
prevent it from drying out.
To cook on one level (e.g.: fruit, cakes, timbales, vegetables,
pizza, poultry).
To cook (without preheating) foods that require the same
cooking temperature on one or more levels
(e.g.: fish, vegetables, sweets), without transferring odours
from one foodstuff to the other.
Use this function:
—
To finish cooking fruit or cheese cakes.
—
To thicken sauces.
Use this function for the last 10/15 minutes of cooking time.
9
Требуется руководство для вашей IKEA DATID IV8 духовой шкаф? Ниже вы можете просмотреть и загрузить бесплатно руководство в формате PDF. Кроме того, приведены часто задаваемые вопросы, рейтинг изделия и отзывы пользователей, что позволит оптимально использовать ваше изделие. Если это не то руководство, которое вы искали, – свяжитесь с нами.
Ваше устройство неисправно, и в руководстве отсутствует решение? Перейдите в Repair Café для получения бесплатных ремонтных услуг.
Руководство

Рейтинг
Сообщите нам, что вы думаете о IKEA DATID IV8 духовой шкаф, оставив оценку продукта. Хотите поделиться вашими впечатлениями от данного изделия или задать вопрос? Вы можете оставить комментарий в нижней части страницы.
Довольны ли вы данным изделием IKEA?
Да Нет
Будьте первым, кто оценит это изделие
0 голоса
Часто задаваемые вопросы
Наша служба поддержки выполняет поиск полезной информации по изделиям и отвечает на часто задаваемые вопросы. Если вы заметили неточность в наших часто задаваемых вопросах, сообщите нам об этом с помощью нашей контактной формы.
Как лучше всего разобрать мебель из IKEA? Проверенный
IKEA советует разбирать мебель, используя инструкцию по сборке в обратном порядке.
Это было полезно (16788)
У моей мебели из IKEA не достает винтика/заглушки/гвоздя. Где я могу найти замену? Проверенный
В каждом магазине IKEA есть отдел, где можно бесплатно взять винтики, заглушки и другие расходные материалы.
Это было полезно (8231)
Духовка недостаточно нагревается. Что мне делать? Проверенный
За нагревание духовки до заданной температуры отвечает термостат. Скорее всего, термостат неисправен. Его следует заменить. В случае сомнений обратитесь к производителю.
Это было полезно (2319)
Что такое пиролиз? Проверенный
Некоторые духовки оснащены функцией пиролиза. Это система очистки, которая сжигает грязь и жир в духовке за счет очень высоких температур. После пиролиза вся грязь превратится в золу, и ее легко удалить. Если духовка имеет функцию пиролиза, рекомендуется использовать ее 3-4 раза в год, чтобы духовка оставалась чистой.
Это было полезно (2144)
Не могу извлечь шкант из изделия IKEA. Что делать? Проверенный
Лучше всего воспользоваться пассатижами и постараться не сжимать шкант слишком сильно, в противном случае он не будет сидеть так плотно.
Это было полезно (1302)
Почему в духовке при разогреве накапливается дым? Проверенный
Вероятно, в духовке остались остатки пищи от предыдущего использования. При нагревании особенно жирные остатки пищи могут выделять дым. Тщательно очистите духовку.
Это было полезно (513)
Когда я использую духовку, продукты часто падают на дно, вызывая дым. Как я могу предотвратить это? Проверенный
Многие духовки поставляются с решеткой и противнем. Когда пища готовится на решетке, противень можно ставить на дно, чтобы остатки пищи не пригорали и не задымились.
Это было полезно (513)
Могу ли я приготовить несколько блюд одновременно, используя несколько противней для гриля? Проверенный
Технически это возможно. Однако это зависит от типа продуктов, нужно ли вам регулировать время приготовления или менять противни на полпути во время приготовления.
Это было полезно (513)
 Loading…
![]()
DÅTID
FRAMTID / NUTID
OV3
OV5
OV7
OV8
OV9

ENGLISH
WARNING — The electrical, water and gas installation and connection must be carried out by a qualified technician according to the manufacturer’s instructions and in compliance with the local safety regulations.
DEUTSCH
WARNUNG — Die Installation für Elektrik, Wasser und Gas und der Anschluss müssen von einer Fachkraft gemäß den Herstellerangaben und den gültigen örtlichen Sicherheitsbestimmungen durchgeführt werden.
FRANÇAIS
AVERTISSEMENT — Les installations et les raccordements électriques, d’eau et de gaz sont du ressort exclusif d’un technicien spécialisé, et doivent être réalisés conformément aux instructions du fabricant et aux réglementations locales en vigueur en matière de sécurité.
ITALIANO
AVVERTENZA — L’installazione e il collegamento elettrico, dell’acqua e del gas devono essere eseguiti esclusivamente da un tecnico specializzato, in conformità alle istruzioni del fabbricante e nel rispetto delle norme locali vigenti in materia di sicurezza.
DANSK
ADVARSEL — Tilslutningen til elnettet og til vandog gasforsyningen skal udføres af en faguddannet tekniker i overensstemmelse med producentens anvisninger og gældende lovgivning.
NORSK
ADVARSEL — Strøm-, vannog gassinstallasjon og elektrisk tilkobling må utføres av en kvalifisert elektriker i samsvar med produsentens anvisninger og lokale sikkerhetsforskrifter.
SUOMI
VAROITUS — Sähkö-, vesija kaasuasennukset ja -liitännät saa suorittaa ainoastaan koulutettu asentaja, joka toimii valmistajan ohjeiden ja paikallisten turvallisuusmääräysten mukaisesti.
SVENSKA
VARNING — Installation och anslutning av elektricitet, vatten och gas måste utföras av en behörig tekniker enligt tillverkarens instruktioner och lokala säkerhetsbestämmelser.

PORTUGUÊS
ATENÇÃO — A instalação e a ligação eléctrica, da água e do gás devem ser efectuadas por um técnico qualificado de acordo com as instruções do fabricante e em conformidade com as normas de segurança locais.
ESPAÑOL
ADVERTENCIA — La instalación y conexión de la electricidad, el agua y el gas tienen que ser efectuadas por un técnico cualificado según las instrucciones del fabricante y de acuerdo con la normativa local de seguridad.
ΕΛΛΑΣ
ΠРΟΕIΔOΠOIHΣH— Η εγκατάσταση και οι συνδέσεις για τον ηλεκτρισμό, το νερό και το αέριο πρέπει να γίνουν από εξειδικευμένο τεχνικό σύμφωνα με τις οδηγίες του κατασκευαστή αλλά και σε συμμόρφωση με τους τοπικούς κανονισμούς ασφαλείας.
NEDERLANDS
WAARSCHUWING — De installatie en de aansluiting van de elektriciteit, het water en het gas moeten door een erkend vakman worden uitgevoerd worden, volgens de aanwijzingen van de fabrikant en in overeenstemming met de plaatselijke veiligheidsvoorschriften.
POLSKI
OSTRZEŽENIE — Podłączenie instalacji elektrycznej, hydraulicznej i gazowej powinno być wykonane przez wykwalifikowanego technika według instrukcji producenta i zgodnie z lokalnymi przepisami bezpieczeństwa.
TURKCE
UYARI — Elektrik, su ve gaz kurulumu ve bağlantısı kalifiye bir teknisyen tarafından, üreticinin talimatlarına göre ve yerel güvenlik yönetmeliklerine uygun şekilde yapılmalıdır.
РУCCКИЙ
OCTOPOЖHO — Монтаж и подключение прибора к водопроводу, газовой магистрали и сети электропитания должны выполняться квалифицированным специалистом в соответствии с инструкциями производителя и действующими местными нормами по безопасности.
ČESKY
VAROVÁNÍ — Elektrickou, vodovodní a plynovou instalaci a připojení musí prové st kvalifikovaný technik podle pokynů výrobce a v souladu s platnými mí stní mi bezpečnostní — mi předpisy.
3

SLOVENSKY
OPOZORILO — Elektrické , vodné a plynové prí pojky a zapojenie musí urobiť kvalifikovaný technik v súlade s pokynmi výrobcu a v súlade s platnými miestnymi bezpečnostnými predpismi.
MAGYAR
FIGYELMEZTETÉSI — Az elektromos, vízés gázszerelési és csatlakoztatási munkákat szakembernek kell végeznie a gyártó utasításai szerint és a helyi biztonsági előírásokkal összhangban.
БЪЛГАРСКИ
ВHИMAHИE — Eлектрическите, водните и газовите инсталации и свързване трябва да се направят от квалифициран техник съобразно инструкциите на производителя и в съответствие с местните изисквания за безопасност.
ROMANA
ATEN∂IE — Instalarea şi racordarea la electricitate, apă şi gaz trebuie să fie efectuate de către un tehnician calificat, în conformitate cu instrucţiunile producătorului şi cu respectarea normelor locale referitoare la siguranţă.
5

|
6 |
AA-513801-2 |
||

 A
A
2x
7
|
20 |
||
|
545 |
||
|
595 |
||
|
537 |
572 |
|
|
595 |
||
|
558 |
||
|
5 mm |
||
|
8 |
AA-513801-2 |
You can only view or download manuals with
Sign Up and get 5 for free
Upload your files to the site. You get 1 for each file you add
Get 1 for every time someone downloads your manual
Buy as many as you need
Скачать
DÅTID
FRAMTID
OV3
OV5
OV8
OV9
Download Operation & user’s manual of IKEA DATID OV8 Oven for Free or View it Online on All-Guides.com.

1

2

3

4

5

6

7

8

9

10

11

12

13

14

15

16

17

18

19

20

21

22

23

24

View a manual of the Ikea DATID OV8 below. All manuals on ManualsCat.com can be viewed completely free of charge. By using the ‘Select a language’ button, you can choose the language of the manual you want to view.

MANUALSCAT | EN
Question & answers
Have a question about the Ikea DATID OV8 but cannot find the answer in the user manual? Perhaps the users of ManualsCat.com can help you answer your question. By filling in the form below, your question will appear below the manual of the Ikea DATID OV8. Please make sure that you describe your difficulty with the Ikea DATID OV8 as precisely as you can. The more precies your question is, the higher the chances of quickly receiving an answer from another user. You will automatically be sent an e-mail to inform you when someone has reacted to your question.
Ask a question about the Ikea DATID OV8
Page: 1
ENGLISH 4
Your safety and that of others are very
important
This manual and the appliance itself provide
important safety warnings, to be read and
observed at all times.
This is the danger symbol, pertaining to
safety, which alerts users to potential
risks to themselves and others.
All safety warnings are preceded by the
danger symbol and the following terms:
DANGER! Indicates a hazardous
situation which, if not avoided, will
cause serious injury.
WARNING! Indicates a hazardous
situation which, if not avoided, could
cause serious injury.
All safety warnings give specific details of
the potential risk present and indicate how
to reduce risk of injury, damage and electric
shock resulting from improper use of the
appliance. Carefully observe the following
instructions:
The appliance must be disconnected
—
—
from the power supply before carrying
out any installation work.
Electrical installation and maintenance
—
—
must be carried out by a qualified
technician, in compliance with the
manufacturer’s instructions and local
safety regulations. Do not repair or
replace any part of the appliance unless
specifically stated in the user manual.
Regulations require that the appliance is
—
—
earthed.
The power cable must be long enough
—
—
for connecting the appliance, once
fitted in its housing, to the power supply
socket.
For installation to comply with current
—
—
safety regulations, an all-pole
disconnect switch with minimum contact
gap of 3 mm must be utilized.
Do not use multiple plug adapters or
—
—
extension leads.
Do not pull the power supply cable in
—
—
order to unplug the appliance.
The electrical components must not be
—
—
accessible to the user after installation.
Do not touch the appliance with any wet
—
—
part of the body and do not operate it
when barefoot.
This appliance is designed solely
—
—
for use as a domestic appliance for
cooking food. No other type of use is
permitted (e.g.: heating rooms). The
Manufacturer declines all responsibility
for inappropriate use or incorrect setting
of the controls.
The appliance is not intended for use
—
—
by persons (including children) with any
physical, sensory or mental impairment,
or without experience and knowledge
of the appliance, unless supervised or
previously instructed in its use by those
responsible for their safety.
The accessible parts of the appliance
—
—
may become very hot during use. Young
children should be kept away from the
appliance and supervised to ensure that
they do not play with it.
Safety information 4
Product description 6
Control panel 7
Daily use 7
Cooking tables 10
Cleaning and maintenance 14
What to do if… 17
Technical data 18
Installation 19
Electrical connection 21
Environmental concerns 21
IKEA GUARANTEE 22
Safety Information
Table of contents
Page: 2
ENGLISH 5
During and after use, do not touch the
—
—
heating elements or interior surfaces
of the appliance — risk of burns. Do not
allow the appliance to come into contact
with cloths or other flammable materials
until all the components have cooled
sufficiently.
At the end of cooking, exercise
—
—
caution when opening the appliance
door, letting the hot air or steam exit
gradually before accessing the oven.
When the appliance door is shut, hot air
is vented from the aperture above the
control panel. Do not obstruct the vent
apertures.
Use oven gloves to remove pans and
—
—
accessories, taking care not to touch the
heating elements.
Do not place flammable materials in or
—
—
near the appliance: a fire may break out
if the appliance is inadvertently switched
on.
Do not heat or cook sealed jars or
—
—
containers in the appliance. The pressure
that builds up inside might cause the jar
to explode, damaging the appliance.
Do not use containers made of synthetic
—
—
materials.
Overheated oils and fats catch fire
—
—
easily. Always remain vigilant when
cooking foods rich in fat and oil.
Never leave the appliance unattended
—
—
during food drying.
If alcoholic beverages are used when
—
—
cooking foods (e.g. rum, cognac, wine),
remember that alcohol evaporates at
high temperatures. As a result, there is a
risk that vapours released by the alcohol
may catch fire upon coming into contact
with the electrical heating element.
Scrapping of household appliances
This appliance is manufactured with
—
—
recyclable or reusable materials.
Dispose of it in accordance with local
waste disposal regulations. Before
scrapping, cut off the power supply
cable.
For further information on the treatment,
—
—
recovery and recycling of household
electrical appliances, contact your
competent local authority, the collection
service for household waste or the store
where you purchased the appliance.
Page: 3
ENGLISH 6
Product description
1 Control panel
2 Cooling fan (not visible)
3 Top heating element
4 Grill element (can be lowered)
5 Rear oven lamp
6 Circular heating element
7 Fan
8 Bottom heating element (not visible)
9 Oven cool door
Accessories
Baking tray Wire Shelf
1x 1x
Drip tray Catalytic panels
1x 2x
1
2
3
7
4
5
6
8
9
Page: 4
ENGLISH 7
1 2 3 4
Control panel
Analog clock
The analog clock allows:
Viewing the time of the day. To adjust
1.
the time of the day press button (B) and
turn it anti-clockwise to set the time.
Programming the cooking start time. The
2.
maximum programmed cooking start
time is 12 hours.
Programming the duration of the
3.
cooking process. Select the cooking
time (available with any function) to
turn the oven on for a specified period
of time. At the end of the specified time
the oven will switch off automatically.
The minimum programmed cooking
time is 5 minutes and the maximum
programmed cooking time is
180 minutes.
A
B
D
C
Daily use
1 Function selector knob
2 Analog clock
3 Thermostat knob
4 Thermostat indicator light (red)
Page: 5
ENGLISH 8
Switching on the oven
Manual cooking
Turn the button (B) anti-clockwise
1.
(without pressing), until the symbol is
displayed in the window .
Press the button (A) and turn it anti-
2.
clockwise until the triangle (D) u points
to the time shown on the clock (hour
hand). The button clicks when turned to
the proper position.
Turn the selector knob to the required
3.
symbol. The oven light switches on.
Turn the thermostat knob clockwise
4.
to the required temperature. The red
thermostat indicator light switches on.
At the end of cooking, turn the knobs to
5.
OFF (0 — •) because in manual mode the
oven will NOT switch off automatically.
Manual cooking with cooking start time
Turn the button (B) anti-clockwise
1.
(without pressing), until the symbol is
displayed in the window .
Press the button (A) and turn it anti-
2.
clockwise until the triangle (D) u points
to the time at which cooking is to start
(e.g. in figure: 1
1:30).
Turn the selector knob to the required
3.
symbol.
Turn the thermostat knob clockwise to
4.
the required temperature.
At the end of cooking, turn the knobs to
5.
OFF (0 — •) because in manual mode the
oven will NOT switch off automatically.
Programmed cooking with cooking start
time and cooking duration
Turn the button (B) anti-clockwise
1.
(without pressing) until the required
cooking duration is displayed in the
window (C) (5-180 min.).
Press the button (A) and turn it anti-
2.
clockwise until the triangle (D) u points
to the time at which cooking is to start
(e.g. in figure: 1
1:30).
Turn the selector knob to the required
3.
symbol.
Turn the thermostat knob clockwise to
4.
the required temperature.
At the end of the set cooking time an
5.
acoustic signal will sound and the oven
will switch off automatically. To exclude
the acoustic signal, turn the button (B)
anti-clockwise (without pressing) until the
symbol is displayed in the window.
At the end of the set cooking time,
6.
cooking may be prolonged by following
the instructions given above, or by using
the manual cooking procedure.
Programmed cooking with cooking
duration
Turn the button (B) anti-clockwise
1.
(without pressing) until the required
cooking duration is displayed in the
window (C) (5-180 min.).
Press the button (A) and turn it anti-
2.
clockwise until the triangle (D) u points
to the time shown on the clock (hour
hand). The button clicks when turned to
the proper position.
Turn the selector knob to the required
3.
symbol. The oven light switches on.
Turn the thermostat knob clockwise
4.
to the required temperature. The red
thermostat indicator light switches on.
At the end of the set cooking time an
5.
acoustic signal will sound and the oven
will switch off automatically. To exclude
the acoustic signal, turn the button (B)
anti-clockwise (without pressing) until the
symbol is displayed in the window.
At the end of the set cooking time,
6.
cooking may be prolonged by following
the instructions given above, or by using
the manual cooking procedure.
Page: 6
ENGLISH 9
Oven Functions table
Function Description of function
0 OVEN OFF —
LAMP To switch on the oven light.
TOP AND
BOTTOM
HEATING
To cook meat, fish and poultry in the oven.
Preheat the oven to the required cooking temperature and place
the food inside as soon as the red thermostat light turns off.
It is advisable to use the second or third level
PASTRY To cook on max. two levels.
If necessary, switch the position of the dishes in the oven for
optimum cooking performance.
It is not necessary to preheat the oven (except for pizzas and
focaccias).
GRILL Use the grill function to cook sirloin steaks, kebabs, sausages,
vegetables au gratin and for making toast.
Preheat the oven for 3/5 min.
During cooking the door must remain closed.
When cooking meat, to avoid spatters of fat and smoke, pour
a little water into the drip tray.
It is advisable to turn the food during cooking.
TURBO GRILL This function is ideal for cooking large pieces of meat (roast
beef, roast joints).
During cooking the door must remain closed.
When cooking meat, to avoid spatters of fat and smoke, pour
a little water into the drip tray.
Turn the meat during grilling.
DEFROST Ideal for thawing frozen food at room temperature.
The food should be placed in the oven in its wrapping to
prevent it from drying out.
BOTTOM
HEATING +
FORCED AIR
To cook on one level (e.g.: fruit, cakes, timbales, vegetables,
pizza, poultry).
FORCED AIR To cook (without preheating) foods that require the same
cooking temperature on one or more levels
(e.g.: fish, vegetables, sweets), without transferring odours
from one foodstuff to the other.
BOTTOM
HEATING
Use this function:
To finish cooking fruit or cheese cakes.
—
—
To thicken sauces.
—
—
Use this function for the last 10/15 minutes of cooking time.
Page: 7
ENGLISH 10
Recipe Function Preheating Level (from the
bottom)
Temperature
(°C)
Cooking time
(min)
MEAT
Lamb, Kid, Mutton X 2 200 90-100
X 2 200 100-1
10
X 2 200 100-1
10
Veal, Beef, Pork X 2 200 90-100
X 2 200 90-1
10
X 2 200 90-1
10
Chicken, Rabbit,
Duck
X 2 200 70-80
— 2 190 70-80
X 2 200 70-80
Turkey
(3-5 kg)
X 2 210 160-180
X 2 200 170-180
X 2 200 170-180
Goose
(2 kg)
X 2 210 100-130
X 2 200 100-130
X 2 200 100-130
FISH
Gilt-head, Bass,
Tuna, Salmon, Cod
(1 kg)
X 2 200 60-80
— 2 190 60-80
X 2 190 60-80
Sword fish, Tuna
(<1 kg — cutlets)
X 2 190 50-60
— 2 190 50-60
X 2 190 50-60
Cooking tables
Page: 8
ENGLISH 1
1
Recipe Function Preheating Level (from the
bottom)
Temperature
(°C)
Cooking time
(min)
VEGETABLES
Peppers,
tomatoes, roast
potatoes
X 2 190 50-60
— 2 190 50-60
X 2 190 50-60
SWEETS, PASTRIES, ETC
Raising cakes X 2 180 40-50
X 2 180 40-50
X 2 180 40-50
Filled pies
(with cheese)
X 2 190 60-90
— 2 180 60-90
— 2 180 60-90
Tarts X 2 190 40-50
X 2 180 40-50
X 2 180 40-50
Apple strudel,
crèpes
X 2 200 50-60
X 1-3 190 50-60
X 2 190 50-60
Biscuits, sponge
rings, shortbread
X 2 180 20-30
X 1-3 180 30-40
X 2 180 30-40
Choux buns, sweet
sponge rolls
X 2 180 35-45
X 1-3 180 35-45
X 2 180 35-45
Savoury pies,
filled fruit pies,
e.g. Pineapple,
Peach
X 2 200 50-60
X 2 190 45-55
X 2 190 44-55
Page: 9
ENGLISH 13
Cooking table for grill function
Recipe Function Preheating Level (from the
bottom)
Temperature
(°C)
Cooking time
(min)
Toast X 3-4 200-225 10-15
Sirloin steak X 3-4 200-225 30-40
Cutlets X 3-4 200-225 30-40
Sausages X 3 200-225 30-40
Pork chops X 3 200-225 30-40
Fish (cutlets) X 3 200-225 30-40
Chicken legs X 3 200-225 40-50
Kebabs X 3 200-225 40-50
Spare ribs X 3 200-225 40-50
Chicken halves X 3 200-225 40-50
Chicken halves — 3 200-225 40-50
Whole chicken — 2-3 200-225 60-70
Roast (pork,
beef)
— 2-3 200-225 60-80
Duck — 1-2 200-225 60-80
Leg of lamb — 1-2 200-225 80-100
Roast beef — 2 200-225 60-70
Baked
potatoes
— 2-3 200-225 40-50
Fish, e.g.: Gilt-
head, Trout
— 3 190-200 40-50
Note: Cooking times and temperatures are approximate only.
Page: 10
ENGLISH 14
Cleaning and maintenance
CLEANING
WARNING!
Never use steam cleaning equipment.
—
—
Only clean the oven when it is cool to
—
—
the touch.
Disconnect the appliance from the
—
—
power supply.
Oven exterior
i
IMPORTANT: do not use corrosive or
abrasive detergents. If any of these
products accidentally comes into contact
with the appliance, clean immediately with
a damp cloth.
Clean the surfaces with a damp cloth.
•
If it is very dirty, add a few drops of
washing up detergent to the water.
Finish off with a dry cloth.
Oven interior
i
IMPORTANT: do not use abrasive
sponges or metallic scrapers or scourers.
Over time, these can ruin enamelled surfaces
and the oven door glass.
After every use, allow the oven to cool
•
then clean it preferably while it is still
warm in order to remove built-up dirt
and stains caused by food residues (e.g.
food with a high sugar content).
Use proprietary oven detergents and follow
•
the manufacturer’s instructions to the letter.
Clean the door glass with a suitable
•
liquid detergent. The oven door can
be removed to facilitate cleaning (see
MAINTENANCE).
The top heating element of the grill (see
•
MAINTENANCE) can be lowered (some
models only) to clean the roof of the oven.
NOTE: during prolonged cooking of foods
with a high water content (e.g. pizza,
vegetables, etc.) condensation may form on
the inside of the door and around the seal.
When the oven is cold, dry the inside of the
door with a cloth or sponge.
Accessories
Soak the accessories in water with
•
washing up detergent immediately after
use, handling them with oven gloves if
still hot.
Food residues can be easily removed
•
using a brush or sponge.
Cleaning the rear wall and catalytic side
panels of the oven (if present):
i
IMPORTANT: do not use corrosive or
abrasive detergents, coarse brushes,
pot scourers or oven sprays which could
damage the catalytic surface and ruin its
self-cleaning properties.
Operate the oven empty with the forced
•
air function at 200°C for about one hour.
Next, leave the appliance to cool down
•
before removing any food residue with
a sponge.
Cleaning cycle of ovens with Pyrolytic
function (if present):
WARNING!
Do not touch the oven during the
•
pyrolysis cycle.
Keep children away from the oven
•
during the pyrolysis cycle.
This function burns off spatters produced
inside the oven during cooking at a
temperature of approx. 500°C. At this high
temperature, the deposits turn into a light
ash which can be easily wiped away with
a damp cloth, when the oven is cool. Do
not select the pyrolysis function after every
use, only when the oven is very dirty or
produces smoke or fumes while preheating
or cooking.
If the oven is installed below a hob,
•
make sure that all burners or electric
hotplates are switched off during the
self-cleaning (pyrolysis) function.
Remove all accessories before running
•
the pyrolysis function.
Page: 11
ENGLISH 15
The appliance could be equipped with 2
•
pyrolysis functions:
Energy-saving cycle (PYRO EXPRESS/
•
ECO): which consumes approximately
25% less energy than the standard
cycle. Select it at regular intervals (after
cooking meat on 2 or 3 consecutive
occasions).
Standard cycle (PYRO): which is suitable
•
for cleaning a very dirty oven.
In any case, after a certain number of
•
uses and depending on how dirty the
oven is, a message on the oven display
advises you to run a self-cleaning cycle.
NOTE: during the pyrolysis function, the
oven door will not open; it will remain
locked until the temperature inside the oven
has returned to an acceptably safe level.
Maintenance
WARNING!
Use safety gloves.
—
—
Ensure the oven is cold before carrying
—
—
out the following operations.
Disconnect the oven from the power supply.
—
—
To remove the door
Open the door fully.
1.
Lift the catches and push them forwards
2.
as far as they will go (Fig. 1).
Fig. 1
Close the door as far as it will go (A), lift
3.
it up (B) and turn it (C) until it is released
(D) (Fig. 2, 3, 4).
A
Fig. 2
B
B
C
Fig. 3
D
Fig. 4
Page: 12
ENGLISH 16
To refit the door
Insert the hinges in their seats.
1.
Open the door fully.
2.
Lower the two catches.
3.
Close the door
4.
Moving the top heating element (some
models only)
Remove the oven runners (Fig. 5).
1.
Fig. 5
Pull the heating element out a little
2.
(Fig. 6) and lower it.
Fig. 6
To reposition the heating element, lift
3.
it up, pulling it slightly towards you,
making sure it comes to rest on the
lateral supports (Fig. 7).
Fig. 7
To replace the rear lamp
Disconnect the oven from the power supply.
1.
Unscrew the lamp cover (Fig. 8), replace
2.
the lamp (see note for lamp type) and
screw the lamp cover back on.
Fig. 8
Reconnect the oven to the power supply.
3.
NOTE:
Only use 25-40W/230V type E-14, T300°C
incandescent lamps.
Lamps are available from IKEA After Sales
Service.
i
IMPORTANT: using halogen lamps, do
not handle with bare hands since
fingerprints can damage them.
Do not use the oven until the lamp cover has
been repositioned.
Page: 13
ENGLISH 17
Problem Possible cause Solution
The oven does not work. No presence of mains
electrical power.
Verify the presence of mains
electrical power.
The oven is not
connected to the
electrical supply.
Connect the oven to the
power supply.
The oven selector is
turned to “0”.
Turn the oven selector and
select a cooking function.
The oven selector is
turned to “ ”.
Turn the oven selector and
select a cooking function.
The door is locked and will not
release.
Electronic malfunction
due to voltage
variations.
Turn off the oven and restart it
to see if the fault persists.
The electronic programmer
does not work.
Electronic malfunction
due to voltage
variations.
If the electronic programmer
(depending on the model)
presents the message “F HH”,
contact the nearest After Sales
Service. Specify in this case
the number that follows the
letter “F”.
What to do if…
Before calling the After-Sales Service:
See if you can solve the problem
1.
yourself with the help of the suggestions
given in the “What to do if…” table.
Switch the appliance off and back on
2.
again it to see if the fault persists.
If after the above checks the fault still occurs,
contact IKEA After Sales Service.
Always specify:
a brief description of the fault;
•
the type and exact model of the oven;
•
the service number (number after the
•
word Service on the rating plate),
located on the right hand edge of the
oven cavity (visible when the oven door
is open);
your full address;
•
your telephone number.
•
If any repairs are required, please contact
IKEA After Sales Service (to guarantee that
original spare parts will be used and repairs
carried out correctly).
Page: 14
ENGLISH 18
Technical data
Dimensions
Width 595
Height 595
Depth 564
Usable volumes l 51
Area of largest baking sheet (net surface) cm2
1200
Bottom heating element W 1
150
Full oven (Top + Bottom) W 2550
Grill W 1400
Turbo grill W 1425
Fan cooking W 2025
Bottom heating element + fan W 3150
Defrost W 25
Oven lamp W 25
Cooling fan W 25
Total rating W 3225
Number of functions 8
Energy consumption kWh 0.79
Energy Consumption with a standard load
and bottom heating kWh
1.10
Energy Consumption with a standard load
forced air oven kWh
0.79
The technical informations are situated in
the rating plate inside the appliance.
Page: 15
ENGLISH 19
After unpacking the oven, make sure that
it has not been damaged during transport
and that the oven door closes properly. In
the event of problems, contact the dealer or
your nearest After-sales Service. To prevent
any damage, only remove the oven from
its polystyrene foam base at the time of
installation.
Preparing the housing unit
Kitchen units in contact with the oven
•
must be heat resistant (min 90°C).
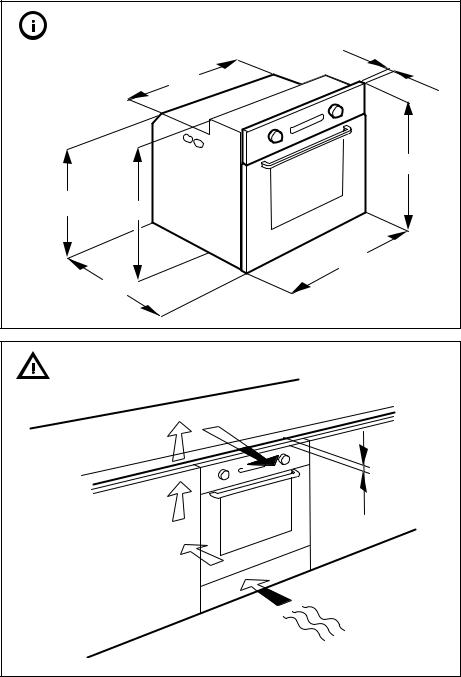
Carry out all cabinet cutting work before
•
fitting the oven in the housing and
carefully remove all wood chips and
sawdust.
After installation, the bottom of the oven
•
must no longer be accessible.
For correct appliance operation, do
•
not obstruct the minimum gap between
the worktop and the upper edge of the
oven.
General recommendations
Before use
Remove cardboard protection pieces,
—
—
protective film and adhesive labels from
accessories.
Remove the accessories from the oven
—
—
and heat it at 200° for about an hour
to eliminate the smell and fumes from
the insulating materials and protective
grease.
During use
Do not place heavy objects on the door
—
—
as they could damage it.
Do not cling to the door or hang
—
—
anything from the handle.
Do not cover the inside of the oven with
—
—
aluminium foil.
Never pour water into the inside of a
—
—
hot oven; this could damage the enamel
coating.
Never drag pots or pans across the
—
—
bottom of the oven as this could damage
the enamel coating.
Make sure that the electrical cables of
—
—
other appliances do not touch hot parts
of the oven or become trapped in the
door.
Do not expose the oven to atmospheric
—
—
agents.
Installation
Page: 16
ENGLISH 20
Door safety device
To open the door with the door safety
device see Fig 1.
Fig. 1
The door safety device can be removed
by following the sequence of images
(see Fig. 2).
Fig. 2
Page: 17
ENGLISH 21
Disposal of packing material
The packing material is 100% recyclable
—
—
and is marked with the recycle
symbol ( ). The various parts of the
packing must therefore be disposed of
responsibly and in full compliance with
local authority regulations governing
waste disposal.
Scrapping the product
This appliance is marked in compliance
—
—
with European Directive 2002/96/
EC, Waste Electrical and Electronic
Equipment (WEEE).
By ensuring this product is disposed
—
—
of correctly, you will help prevent
potential negative consequences for
the environment and human health,
which could otherwise be caused by
inappropriate waste handling of this
product.
The symbol
—
— on the product or
on the accompanying documentation
indicates that it should not be treated
as domestic waste but must be taken
to an appropriate collection centre for
the recycling of electrical and electronic
equipment.
Energy saving
Only pre-heat the oven if specified in
—
—
the cooking table or your recipe.
Use dark lacquered or enamelled
—
—
baking moulds as they absorb heat far
better.
Switch the oven off 10/15 minutes before
—
—
the set cooking time. Food requiring
prolonged cooking will continue to cook
even once the oven is switched off.
Declaration of conformity
This oven, which is intended to come
—
—
into contact with foodstuffs, complies
with European Regulation ( )
n. 1935/2004 and has been designed,
manufactured and sold in conformity
with the safety requirements of the
“Low Voltage” directive 2006/95/
CE (which replaces 73/23/CEE and
subsequent amendments), the protection
requirements of “EMC” 2004/108/CE.
Environmental concerns
Make sure the power voltage specified on
the appliance rating plate is the same as
the mains voltage. The rating plate is on
the front edge of the oven (visible when the
door is open).
Power cable replacement (type H05 RR-F 3
x 1,5 mm2
) must be carried out by a qualified
electrician. Contact IKEA After Sales Service.
Electrical connection
Page: 18
ENGLISH 22
Ikea guarantee
How long is the IKEA guarantee valid?
This guarantee is valid for five (5) years
from the original date of purchase of your
appliance at IKEA, unless the appliance is
named LAGAN in which case two (2) years of
guarantee apply. The original sales receipt,
is required as proof of purchase to validate
the guarantee. If service work is carried out
under guarantee, this will not extend the
guarantee period for the appliance.
Which appliances are not covered by the
IKEA five (5) years guarantee?
The range of appliances named LAGAN and
all appliances purchased in IKEA before 1st
of August 2007.
Who will execute the service?
IKEA service provider will provide the
service through its own service operations or
authorized service partner network.
What does this guarantee cover?
The guarantee covers faults of the
appliance, which have been caused by
faulty construction or material faults from the
date of purchase from IKEA. This guarantee
applies to domestic use only. The exceptions
are specified under the headline “What is
not covered under this guarantee?” Within
the guarantee period, the costs to remedy
the fault e.g. repairs, parts, labour and travel
will be covered, provided that the appliance
is accessible for repair without special
expenditure and that the fault is related to
faulty construction or material fault covered
by warranty. On these conditions the EU
guidelines (Nr. 99/44/EG) and the respective
local regulations are applicable. Replaced
parts become the property of IKEA..
What will IKEA do to correct the problem?
IKEA appointed service provider will examine
the product and decide, at its sole discretion,
if it is covered under this guarantee. If
considered covered, IKEA service provider
or its authorized service partner through its
own service operations, will then, at its sole
discretion, either repair the defective product
or replace it with the same or a comparable
product.
What is not covered under this guarantee?
Normal wear and tear.
•
Deliberate or negligent damage,
•
damage caused by failure to observe
operating instructions, incorrect
installation or by connection to the wrong
voltage, damage caused by chemical or
electrochemical reaction, rust, corrosion
or water damage including but not
limited to damage caused by excessive
lime in the water supply, damage caused
by abnormal environmental conditions.
Consumable parts including batteries
•
and lamps.
Non-functional and decorative parts
•
which do not affect normal use of the
appliance, including any scratches and
possible color differences.
Accidental damage caused by foreign
•
objects or drainage systems or soap
drawers.
Damage to the following parts: ceramic
•
glass, accessories, crockery and cutlery
baskets, feed and drainage pipes, seals,
lamps and lamp covers, screens, knobs,
casings and parts of casings. Unless such
damages can be proved to have been
caused by production faults.
Cases where no fault could be found
•
during a technician’s visit.
Repairs not carried out by our appointed
•
service providers and/or an authorized
service contractual partner or where non-
original parts have been used.
Repairs caused by installation which is
•
faulty or not according to specification.
The use of the appliance in a non-
•
domestic environment i.e. professional
use.
Page: 19
ENGLISH 23
Transportation damages (such as
•
scratches, bumps, ..etc). If a customer
transports the product to his home or
another address, IKEA is not liable for
any damage that may occur during
transport. However, if IKEA delivers
the product to the customer’s delivery
address, then damage to the product
that occurs during this delivery will be
covered by IKEA.
Cost for carrying out the initial installation
•
of the IKEA appliance.
However, if an IKEA service provider or
its authorized service partner repairs or
replaces the appliance under the terms
of this guarantee, the service provider or
its authorized service partner will reinstall
the repaired appliance or install the
replacement, if necessary.
These restrictions do not apply to fault-free
work carried out by a qualified specialist
using our original parts in order to adapt
the appliance to the technical safety
specifications of another EU country.
How country law applies
The IKEA guarantee gives you specific legal
rights, which cover or exceed all the local
legal demands that are subject to vary from
country to country.
Area of validity
For appliances which are purchased in
one EU country and taken to another EU
country, the services will be provided in
the framework of the guarantee conditions
normal in the new country.
An obligation to carry out services in the
framework of the guarantee exists only if
the appliance complies and is installed in
accordance with the technical specifications
of the country in which the guarantee claim
is made.
The dedicated AFTER SALES for IKEA
appliances
Please don’t hesitate to contact IKEA
appointed Service Provider to:
make a claim under this guarantee;
•
ask for clarifications on installation of the
•
IKEA appliance in the dedicated IKEA
kitchen furniture;
ask for clarification on functions of IKEA
•
appliances.
To ensure that we provide you with the
best assistance, please read carefully the
Assembly Instructions and/or the User
Manual before contacting us.
How to reach us if you need our service
Please refer to the last
page of this manual
for the full list of IKEA
appointed Service
Providers and relative
national phone numbers.
i
In order to provide you a quicker
service, we recommend to use the
specific phone numbers listed on the
manual. Always refer to the numbers
listed in the booklet of the specific
appliance you need an assistance for.
Please also always refer to the
selected IKEA article numbers, 8 digit
codes and 12 digit service number
placed on the rating plate of your
appliance.
i
SAVE THE SALES RECEIPT!
It is your proof of purchase and required
for the guarantee to apply. The sales
receipt also reports the IKEA name and
article number (8 digit code) you have
purchased.
Do you need extra help?
For any additional questions not related
to After Sales of your appliances please
contact your nearest IKEA store call centre.
We recommend you read the appliance
documentation carefully before contacting us.