-
Contents
-
Table of Contents
-
Troubleshooting
-
Bookmarks
Quick Links
Related Manuals for Humminbird DUAL BEAM 250DX
Summary of Contents for Humminbird DUAL BEAM 250DX
-
Page 1
Operations Manual… -
Page 2: Thank You
THANK YOU Thank you for choosing Humminbird, America’s #1 name in fishfinders. Humminbird has built its reputation by designing and manufacturing top-quality, thoroughly reliable marine equipment. Your Humminbird is designed for trouble-free use in even the harshest marine environment. In the unlikely event that your Humminbird does require repairs, we offer an exclusive Service Guarantee — free of charge during the first year after purchase, and available at a reasonable rate after the one-year period.
-
Page 3: Table Of Contents
INSTALLATION PREPARATION ….. . . 2 Parts Supplied ……2 Accessories .
-
Page 4: Installation Preparation
INSTALLATION PREPARATION PARTS SUPPLIED PARTS SUPPLIED Before installing your 250DX, please ensure the following parts are included in the box: • 250DX fishfinder • Transducer with 6m (20′) of cable and mounting hardware kit • Mounting system and mounting hardware kit •…
-
Page 5
INSTALLATION PREPARATION display on the control head. It should be installed in contact with the surface of the water in an area that has smooth water flow — usually on the transom of the boat. There are several mounting options for the transducer. -
Page 6: Alternative Transducers And Mounting Methods
INSTALLATION PREPARATION ALTERNATE TRANSDUCERS AND MOUNTING METHODS Inside the hull installations require no holes be drilled into the boat and through experimentation, high-speed operation comparable to transom mounting can be achieved. Two part, slow cure epoxy is required to glue the transducer in place.
-
Page 7: Transducer Exchange
INSTALLATION PREPARATION TRANSDUCER EXCHANGE (which do not conduct sonar signals) make inside the hull mounting inadvisable. Thru-hull mounting may require the use of a fairing block to level the transducer with the waterline. Also, since special tools and knowledge may be required to perform this type of installation it is best to refer to a qualified marine technician.
-
Page 8: Using The 250Dx
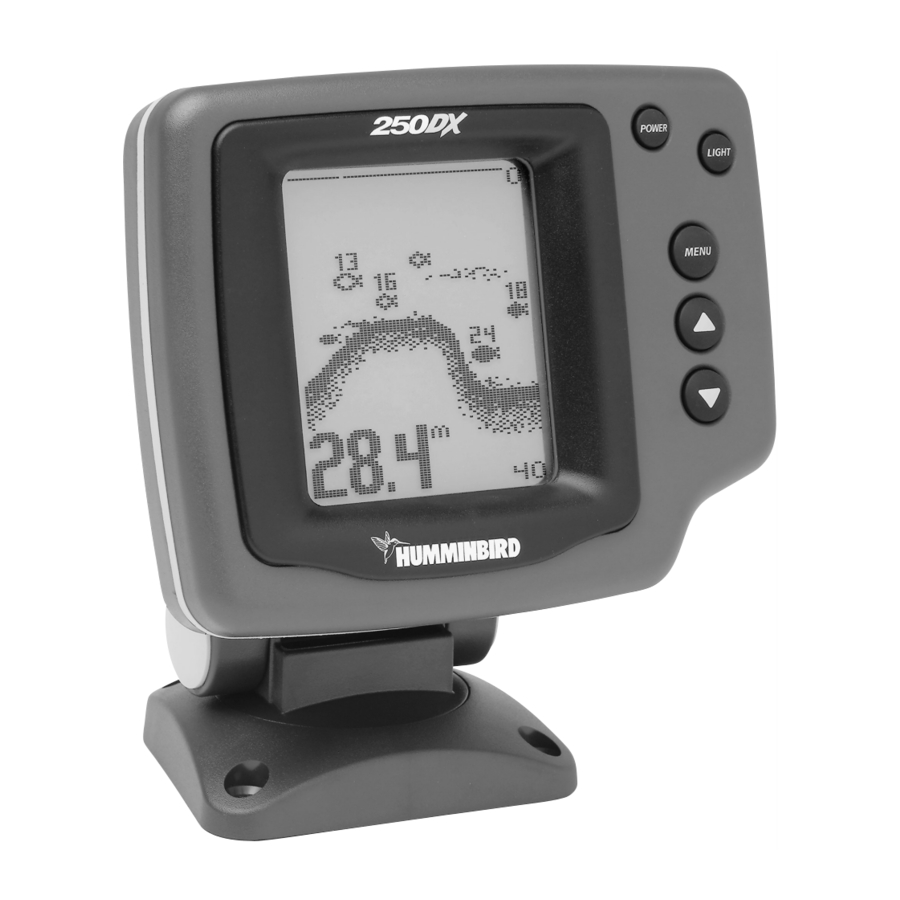
USING THE 250DX HOW SONAR WORKS HOW SONAR WORKS Your Humminbird unit uses sonar to locate and define underwater objects, define the bottom terrain, as well as determine distance. Sonar technology is based on sound waves. Your Humminbird unit sends out a sound wave signal.
-
Page 9: Simulator Operation
USING THE 250DX SIMULATOR OPERATION Actual depth capability depends on factors such as bottom hardness, water conditions, and transducer installation. Units will typically read to deeper depths in fresh water than in salt water. SIMULATOR OPERATION The 250DX contains a simulator that allows you to use the unit as if you are on the water.
-
Page 10: What You See On Screen
USING THE 250DX WHAT YOU SEE ON-SCREEN If you are using the 250DX in Simulator when no transducer is connected, any selected options are lost when the unit is powered off. The 250DX will return to Factory Settings, or options selected when last used with a transducer, if no transducer is connected.
-
Page 11
USING THE 250DX WHAT YOU SEE ON-SCREEN Bottom Depiction Zero Line depth of the water changes, the range changes as necessary in order to retain a bottom representation on-screen. When in Auto mode, the horizontal line at the top of the screen is the “zero line,”… -
Page 12
USING THE 250DX WHAT YOU SEE ON SCREEN distance measurement, so if the boat is moving up and down over flat bottom, the bottom depiction often appears in regular variations that match wave timing. Structure. Structure is defined as any object physically attached to the bottom. -
Page 13: Control Functions
USING THE 250DX CONTROL FUNCTIONS return meets certain additional criteria, a Fish in Wide Beam fish symbol will be assigned. There are three different size fish symbols used to indicate the intensity of the sonar return. While signal intensity is a good indicator of relative fish size, different species of fish have different sonar characteristics, so it is not always possible to distinguish…
-
Page 14
USING THE 250DX CONTROL FUNCTIONS powered off, press and hold POWER for several seconds until a continuous chirp is heard. Light. LIGHT controls the unit’s display backlight. With the unit powered on, press LIGHT once to turn the backlight on “high.” Press LIGHT a second time to turn the backlight on “low,”… -
Page 15
affect the menu adjustment. The ARROW buttons often can be used when no menu is on-screen. In these situations, pressing the ARROW button affects the function of the active (last- used) menu. This is a short-cut to menu operation. The menu appears on-screen while the adjustment is made and times out. -
Page 16: Menu Functions
USING THE 250DX MENU FUNCTIONS Menu Functions Sensitivity. The Sensitivity function controls the sensitivity of the sonar receiver. The 250DX automatically adjusts the level of receiver sensi- tivity based on a number of factors including the depth of the water and the level of noise present.
-
Page 17
USING THE 250DX MENU FUNCTIONS Depth Range. The Depth Range function controls the vertical distance displayed on the graphic area of the display. There are nine depth ranges available. The top of the range is always 0, or the surface of the water. -
Page 18
USING THE 250DX MENU FUNCTIONS To return to automatic Depth Range control, press the MENU button until the Depth Range menu appears on- screen and use the UP ARROW to select AUTO. Zoom. Zoom is similar to Depth Range because it controls the range of information displayed on screen. -
Page 19
USING THE 250DX MENU FUNCTIONS Automatic Zoom is especially helpful when looking for structure or bottom detail. The Automatic Zoom keeps the bottom in view even in quickly changing terrain, but is most useful in flatter areas without considerable depth variation. Manual Zoom provides detailed information of any area from the surface to the bottom. -
Page 20
USING THE 250DX MENU FUNCTIONS Fish Alarm. The Fish Alarm alerts you to the presence of fish, or other targets not connected to the bottom. The Fish Alarm has three different settings that correspond to the three different size fish symbols shown on-screen. The default setting is “OFF.”… -
Page 21
USING THE 250DX MENU FUNCTIONS the 250DX is operated from a battery source, the voltage number can be used to determine battery life. The 250DX will operate at voltages from 10 to 20 VDC. Voltages in excess of 20 or less than 10 VDC cause the unit to power off. -
Page 22
USING THE 250DX MENU FUNCTIONS Display Speed. Display Speed controls the rate at which the graphic information moves across the display. There are 5 possible speeds; the fastest rate (5) is the factory setting. Keep in mind that the closer the update rate matches your boat speed, the more accurate is the graphic depiction of the terrain beneath your boat. -
Page 23
Fish ID. There are three selections available: OFF, ID+ ON, and ADJUST. The factory setting is ID+ ON. With Fish ID OFF, sonar returns are displayed as “raw” information. There is no interpretation made by the unit. Selecting ID OFF also disables the fish alarm. ID+ ON enables the 250DX to interpret the raw sonar data and, using a variety of techniques, depict appropriate target… -
Page 24
USING THE 250DX MENU FUNCTIONS Numeral Size. Two options are available: BIG and SMALL. The factory setting is BIG. With this setting, the digital depth and speed and temp numerals are drawn large enough to be read from across the boat. The big numerals occupy space on the display that could be used for the graphics area. -
Page 25
USING THE 250DX MENU FUNCTIONS Speed Offset. The Speed Offset option allows the user to compensate for differences in hull design, and its effect on the accuracy of the speed measurement. If there is a discrepancy between the indicated speed and another speed measurement device on the boat, the speed measurement can be varied to improve accuracy. -
Page 26: Advanced Features
ADVANCED FEATURES USING DIAGNOSTIC Reset. With the many User Options available to customize the 250DX, it is easy to configure the unit in such a way that it is detrimental to a particular use. By using the Reset function, all variable or user- controlled features (except Filter) of the 250DX are returned to the factory settings.
-
Page 27: Maintenance
Boat Speed/Water Temperature Connection. Other connections tested include the boat speed and surface water temperature sensors. These accessory sensors can be purchased independently or together as a single sensor (see the Humminbird Accessories catalog). If the sensors are connected and working properly, a “connected” message appears. The speed input feature only works when the boat is in motion as the paddle wheel on the speed sensor must rotate to be detected.
-
Page 28: Troubleshooting
MAINTENANCE TROUBLESHOOTING mild cleaner. Do not wipe while dirt or grease is on the lens. Be careful to avoid scratching the lens. • If your boat remains in the water for long periods of time, algae and other marine growth can reduce the effectiveness of the transducer. Periodically clean the face of the transducer with liquid detergent.
-
Page 29
MAINTENANCE TROUBLESHOOTING If the unit is wired through a fuse panel, ensure the panel is powered. Often accessory fuse panels are controlled by a separate switch or the ignition switch. Also, often a fuse can appear to be good when in fact is not. Check the fuse with a tester or replace it with a fuse known to be good. -
Page 30
MAINTENANCE TROUBLESHOOTING If you are using a transducer switch to connect two transducers to the 250DX, ensure the switch is in the correct position to connect a transducer that is in water. (If a trolling motor transducer is selected and the trolling motor is out of water, no sonar information appears.) If none of the above solve the problem, inspect the transducer cable from end to end for breaks, kinks, or cuts in the outer casing of the cable. -
Page 31
MAINTENANCE TROUBLESHOOTING 7. My unit loses power at high speeds. Your 250DX has over-voltage protection that turns the unit off when input voltage exceeds 20 VDC. Some outboard motors do not effectively regulate the power output of the engine’s alternator and can produce voltage in excess of 20 volts when running at high RPMs. -
Page 32: Customer Support
MAINTENANCE CUSTOMER SUPPORT CUSTOMER SUPPORT If you have any problems or questions with your Humminbird unit, contact your local distributor. Humminbird Service Department 108 Maple Lane Eufaula, AL 36027…
-
Page 33: Specifications
SPECIFICATIONS Operating Frequency …..200 kHz and 83 kHz Power Output ……250 Watts (RMS) 2000 Watts (Peak to Peak) Area of Coverage .
-
Page 34
Use with XT series Transducers… -
Page 35
P/N 530975-2…
инструкцияHumminbird 250DX

offered by Busse-Yachtshop.com
Посмотреть инструкция для Humminbird 250DX бесплатно. Руководство относится к категории Без категории, 2 человек(а) дали ему среднюю оценку 6.8. Руководство доступно на следующих языках: английский. У вас есть вопрос о Humminbird 250DX или вам нужна помощь? Задайте свой вопрос здесь
Нужна помощь?
У вас есть вопрос о Humminbird а ответа нет в руководстве? Задайте свой вопрос здесь Дай исчерпывающее описание проблемы и четко задайте свой вопрос. Чем детальнее описание проблемы или вопроса, тем легче будет другим пользователям Humminbird предоставить вам исчерпывающий ответ.
Марина • 9-9-2021Нет комментариев
Артем • 29-9-2022Нет комментариев
Как настроить эхолот а то там все на англиском
Владимир • 13-8-2022Нет комментариев
Совместимость датчиков. Купить новый
Количество вопросов: 3
Главная
Не можете найти ответ на свой вопрос в руководстве? Вы можете найти ответ на свой вопрос ниже, в разделе часто задаваемых вопросов о Humminbird 250DX.
Инструкция Humminbird 250DX доступно в русский?
Не нашли свой вопрос? Задайте свой вопрос здесь
Помогите разобраться с эхолотом HAMMINBIRD 250DX M
-
#1
Ув. товарищи цеховики!
Ситуация такая. Потеряли излучатель от данной модели эхолота. Заказали — прислали от другой (но тоже от хаммина). Возможно ли его переподключить? если да то —
Заранее признателен. С меня пиво с воблой 
-

107.8 КБ
· Просмотры: 170
hamminb.jpg
Помогите разобраться с эхолотом HAMMINBIRD 250DX M
-
#2
Видать не субдия, а так ухи охота………………………
Помогите разобраться с эхолотом HAMMINBIRD 250DX M
-
#3
Задайте свой вопрос в теме «Эхолоты».
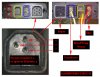
У меня тоже 250, но нет документации.
На рисунке у Вас синим вход трансдьюсера, подключать точно в этот разъём. А вот какие провода ? вопрос. У меня на написано на входе трансдьюсера цифра 8 — нижняя клемма, что ближе к экрану, а верхняя — цифра 10.
Новый датчик скорее всего ещё с датчиком температуры, вот и три выхода. Марка датчика какая ?
Помогите разобраться с эхолотом HAMMINBIRD 250DX M
-
#4
У меня есть 250DX.У него сонар(датчик) штатный без указателя температуры не смотря на то,что двухлучевой.Но у меня прибору уже больше 10 лет.Он ещё cделан в USA. Волею судеб я на нём по разным причинам поменял три датчика(один раскололи об корягу,другой потёк и отгнил внутри корпуса).Так вот,в последний раз я долго не мог купить для него датчик не смотря на то,что цена его не высокая.Просто модель уже древняя и в наличии нигде нет.В итоге купил однолучевой и не смотря на это особой разницы в картинке не заметил.Я не понял вопроса.Что значит переподключить?Датчик что сонар,что температуры идёт со штатным разъёмом и подключается в разъём который на фото выделен синим цветом.Откуда заморочка с проводами?Если датчик совсем от иной модели,то например в Москве Хаминами как я понял серьёзно занимается только «Рыболов эксперт»я думаю так как у них раньше даже услуга по гарантии и ремонту с прошивкой была,то вопрос о совместимости лучше задать им.
Помогите разобраться с эхолотом HAMMINBIRD 250DX M
-
#5
Новый датчик скорее всего ещё с датчиком температуры, вот и три выхода. Марка датчика какая ?
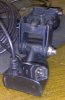
датчик такой, тоже хамминберд, три конца, а вот какой куды?
-

175.2 КБ
· Просмотры: 97
sonar.jpg
Помогите разобраться с эхолотом HAMMINBIRD 250DX M
-
#6
Датчик что сонар,что температуры идёт со штатным разъёмом и подключается в разъём который на фото выделен синим цветом.Откуда заморочка с проводами?Если датчик совсем от иной модели,то например в Москве Хаминами как я понял серьёзно занимается только «Рыболов эксперт»я думаю так как у них раньше даже услуга по гарантии и ремонту с прошивкой была,то вопрос о совместимости лучше задать им.
Так вот и вопрос, разъем на датчике другой, на самой эхолоте там пустышка — отсюда и «переподключить». Понятно, что на всю серию девайсов один футляр, какой куды кинуть? а до Московии мне как до луны с таким вопросом…
Помогите разобраться с эхолотом HAMMINBIRD 250DX M
-
#7
датчик такой, тоже хамминберд, три конца, а вот какой куды?
Могу только посоветовать методом тыка, на свой страх и риск.
Зачистить три провода и втыкать по очереди в разъём, что синим обведен.
Или найти контору, что занимается ремонтом эхолотов.
Попробуйте зачистить внешнюю оплетку провода датчика, у Вас на фото есть синим обведенный вход и два провода — белый и зеленый.
На новом датчике один провод скорее всего отвечает за температуру.
И всё же, марка то какая ? И что никаких документов не было ?
-
29.7 КБ
· Просмотры: 78
hamminb — копия.jpg

Последнее редактирование: 15.09.2010
Помогите разобраться с эхолотом HAMMINBIRD 250DX M
-
#8
Да, один конец это датчик температуры, один значит общий, метод тыка не помог — не видит трансдьюсера эхолот.
Помогите разобраться с эхолотом HAMMINBIRD 250DX M
-
#9
Выводы трансдьюсера можно определить осциллографом или, на крайний случай, аудиовходом любой аппаратуры, постучав лёгким предметом по датчику.
Эхолот может не «видеть» датчик из-за разных электрических параметров(частоты).
Выход с эхолота на датчик можно попробовать определить по сопротивлению(менее 10 Ом), как правило, выходом является обмотка трансформатора.
Смотреть руководство для Humminbird 250DX ниже. Все руководства на ManualsCat.com могут просматриваться абсолютно бесплатно. Нажав кнопку «Выбор языка» вы можете изменить язык руководства, которое хотите просмотреть.

MANUALSCAT | RU
Вопросы и ответы
У вас есть вопрос о Humminbird 250DX, но вы не можете найти ответ в пользовательском руководстве? Возможно, пользователи ManualsCat.com смогут помочь вам и ответят на ваш вопрос. Заполните форму ниже — и ваш вопрос будет отображаться под руководством для Humminbird 250DX. Пожалуйста, убедитесь, что вы опишите свои трудности с Humminbird 250DX как можно более детально. Чем более детальным является ваш вопрос, тем более высоки шансы, что другой пользователь быстро ответит на него. Вам будет автоматически отправлено электронное письмо, чтобы проинформировать вас, когда кто-то из пользователей ответит на ваш вопрос.
Задать вопрос о Humminbird 250DX
- Бренд:
- Humminbird
- Продукт:
- Без категории
- Модель/название:
- 250DX
- Тип файла:
- Доступные языки:
- английский
Сопутствующие товары Humminbird 250DX
Thank you for choosing Humminbird, America’s #1 name
in fishfinders. Humminbird has built its reputation by
designing and manufacturing top-quality, thoroughly
reliable marine equipment. Your Humminbird is designed
for trouble-free use in even the harshest marine
environment.
In the unlikely event that your Humminbird does require
repairs, we offer an exclusive Service Guarantee — free of
charge during the first year after purchase, and available at
a reasonable rate after the one-year period. Complete
details are included at the end of this manual.
We encourage you to read this operations manual carefully
in order to get full benefit from all the features and uses of
your Humminbird product. Also, to register your purchase
and help us learn more about you, please fill out the
warranty registration card at the back of this manual.
WARNING! This device should not be used as a
navigational aid to prevent collision, grounding,
boat damage, or personal injury. When the boat is
moving, water depth may change too quickly to
allow time for you to react. Always operate the boat
at very slow speeds if you suspect shallow water or
submerged objects.
WARNING: Dis-assembly and repair of this electronic unit should only be performed
by authorized service personel. Any modification of the serial number or attempt to
repair the original equipment or accessories by unauthorized individuals will void the
warranty. Handling and/or opening this unit may result in exposure to lead, in the form
of solder.
Warning: This product contains lead, a chemical known to the State of
California to cause cancer and birth defects and other reproductive harm.