![]()
ELECTROLUX EW1063S SCH

Type:  (PDF)
(PDF)
Size
42.9 KB
Page
1
Category
WASHING-MACHINE
SERVICE MANUAL
If you get stuck in repairing a defective appliance
download
this repair information for help. See below.
Good luck to the repair!
Please do not offer the downloaded file for sell only
use it for personal usage!
Looking for similar electrolux manual?
Document preview [1st page]

Click on the link for free download!
Please tick the box below to get download link:
- Also known:
ELECTROLUX EW-1063S EW1063S EW 1063
- If you have any question about repairing write your question to the Message board. For this no need registration.
- Please take a look at the below related repair forum topics. May be help you to repair.
Warning!
If you are not familiar with electronics, do not attempt to repair!
You could suffer a fatal electrical shock! Instead, contact your nearest service center!
Note! To open downloaded files you need acrobat reader or similar pdf reader program. In addition,
some files are archived,
so you need WinZip or WinRar to open that files. Also some files are djvu so you need djvu viewer to open them.
These free programs can be found on this page: needed progs
If you use opera you have to disable opera turbo function to download file!
If you cannot download this file, try it with CHROME or FIREFOX browser.
Üdvözlet. Segitséget kérnék Electrolux tip-EOC5751FOX beépitett sütö f130 hiba cod jelenik meg bekapcsolás után. Hűtőventilátor cserélve volt nem rég. Neten nem találok róla hogy mire utal F130 hiba cod. Üdv robi69.
A és a kozakg ne szóljon hozzá!
Sziasztok!
Egy telefont kaptam a fenti üzenettel.
Kapásból az
E16,hibakód
jutott az eszembe. Felültöltős mosógépnél a dob pozíciónáló hibája.
De,az elöltöltős mosógépnél?
Kiváncsi vagyok,hogy más is találkozott-e már ezzel?
Köszönöm.
Jano
U.I.
Szerintem,fals hibakód jelzés.
Öblítésnél ruhák nélkül majd félig tölt a tengely alatt 1-2 cm-re , többi programokon is 2-3 újnyi a tengely alatt . Eddig még nem nézegetem ennél típusnál mennyi víz magassága , de a többi félé készülékekhez képes , soknak találom . Esetleg valami infó mennyi kell hogy legyen .
Ennek a légsűrítő meg a szivattyú elöl , egymás mellet az üstön kapott helyet , s minden tiszta , a nyomáskapcsolóba belefújva megáll a vízfelvétel . Elképzelhető hogy mégis a színt szabályozó rossz .
Sziasztok!
Adott a címben lévő szárítógép, amely nem akarja felszivattyúzni a vizet a felső viztárolóba.
Egyszer már volt ilyen hibája, szerelő kijött, kitisztította és kész. Én sajnos nem voltam ott,
nem láttam, hogyan csinálja. Kellene hozzá valami doksi, vagy szervízkód, hogy pl csak a
szivattyút indítsam el. Mert szerintem megint az a gondja.
És nem akarnék érte megint több tízezret kifizetni kiszállással egy kb 10 perces munkáért.
Tudnátok ebben segíteni?
Similar manuals:
If you want to join us and get
repairing help
please sign in or sign up by completing a simple electrical test
or write your question to the Message board without registration.
You can write in English language into the forum (not only in Hungarian)!
E-Waste Reduce
- Manuals
- Brands
- Electrolux Manuals
- Washer
- EW 1063 S
- Instruction booklet
-
Contents
-
Table of Contents
-
Bookmarks
Quick Links
W A S H I N G M A C H I N E
T V Ä T T M A S K I N
P Y Y K I N P E S U K O N E
STIRALWNAÅ MAfiINA
IN S TRU CTION B OO KLET
B RUK SA NVISNING
KÄ YTTÖOHJE
RUKOVODSTVO PO ÈKSPLUATACII
E W 1063 S
GB
S
S
FIN
SF
RUS
132 998 631
Related Manuals for Electrolux EW 1063 S
Summary of Contents for Electrolux EW 1063 S
-
Page 1
W A S H I N G M A C H I N E T V Ä T T M A S K I N P Y Y K I N P E S U K O N E STIRALWNAÅ MAfiINA IN S TRU CTION B OO KLET B RUK SA NVISNING KÄ… -
Page 2
Dear customer, Please read these operating instructions carefully and pay particular attention to the safety notes indicated in the first pages. We recommend that you keep this instruction booklet for future reference and pass it on to any future owners. Transport damages When unpacking the appliance, check that it is not damaged. -
Page 3: Table Of Contents
Contents Warnings Maintenance Bodywork Disposal Detergent dispenser drawer Drain filter Tips for environmental protection 5 Water inlet filter Emergency emptying out Technical specifications Frost precautions Installation Something not working? 20-21 Unpacking Positioning Water inlet Water drainage Electrical connection Your new washing machine Description of the appliance Detergent dispenser drawer Control panel…
-
Page 4: Warnings
Warnings The following warnings are provided in the interests of overall safety. You must read them carefully before installing or using the appliance. Installation • Leave the porthole door slightly ajar when the appliance is not in use. This preserves the door •…
-
Page 5: Disposal
Child safety • Keep all detergents in a safe place out of children’s reach. • Children are often not aware of how dangerous • Make sure that children or pets do not climb into electrical appliances can be. When the machine is the drum.
-
Page 6: Technical Specifications
Technical specifications DIMENSIONS Height 85 cm Width 60 cm Depth 45 cm MAXIMUM LOAD Cotton 4.5 kg Synthetics 1.5 kg Delicates 1.5 kg Woollens SPIN SPEED 1000 rpm max. POWER SUPPLY VOLTAGE/FREQUENCY 220-230 V/50 Hz TOTAL POWER ABSORBED 2200 W MINIMUM FUSE PROTECTION 10 A WATER PRESSURE…
-
Page 7: Installation
Installation Unpacking Positioning Install the machine on a flat hard floor. All transit bolts and packing must be removed Make sure that air circulation around the machine is before using the appliance. not impeded by carpets, rugs etc. Check that the machine does not touch the wall or other kitchen You are advised to keep all transit devices so that units.
-
Page 8: Water Drainage
Water drainage Electrical connection The end of the drain hose can be positioned in three This machine is designed to operate on a 220-230 V, ways: single-phase, 50 Hz supply. Hooked over the edge of a sink using the plastic Check that your domestic electrical installation can hose guide supplied with the machine.
-
Page 9: Your New Washing Machine
Your new washing machine This new machine meets all modern requirements for effective treatment of laundry with low water, energy and detergent consumption. • The temperature selector dial will allow you to choose the most suitable temperature for your laundry. •…
-
Page 10: Use
Control panel EW 1063 S 2 3 4 5 6 7 8 1 Programme chart 6 Anti-crease button It will help you to choose the most suitable washing Using this option the last rinse water is not emptied programme for your laundry.
-
Page 11: Washing Hints
Washing hints Laundry weights The following weights are indicative: Sorting the laundry bathrobe 1200 g Follow the wash code symbols on each garment napkin 100 g label and the manufacturer’s washing instructions. quilt cover 700 g Sort the laundry as follows: sheet 500 g whites, coloureds, synthetics, delicates, woollens.
-
Page 12: Detergents And Additives
Red wine: soak in water and detergent, rinse and Quantity of detergent to be used treat with acetic or citric acid, then rinse. Treat any The type and quantity of detergent will depend on residual marks with bleach. the type of fabric, load size, degree of soiling and Ink: depending on the type of ink, moisten the fabric hardness of the water used.
-
Page 13: International Wash Code Symbols
International wash code symbols These symbols appear on fabric labels, in order to help you choose the best way to treat your laundry. Energetic wash Max. wash Max. wash Max. wash Max. wash temperature temperature temperature temperature 95 C 60 C 40 C 30 C Hand wash…
-
Page 14: Operating Sequence
4. Select the temperature Operating sequence Turn the dial to the required setting. Before washing your first load of laundry, we recommend that you run a cotton cycle at 60°C, with the machine empty, in order to remove any manufacturing residue from the drum and tub. Pour half a measure of detergent into the main wash compartment and start up the machine.
-
Page 15: At The End Of The Programme
7. At the end of the programme The machine stops automatically. If you have selected a programme which ends with the water of the last rinse left in the tub (option drain the water before opening the door. Select programme “N” (drain) or depress again button Wait one or two minutes before opening the door to give the electric locking mechanism time to release it.
-
Page 16: Washing Programmes
Programme table Washing programmes for cotton and linen Max load: 4.5 kg Consumptions* Additional Programme Temp. Fabrics Description functions Energy Water Duration min. Prewash at WHITES WITH PREWASH, for 40°C example work garments, Wash at 60°-95° 60°-95°C sheets, household linen, 3 rinses underwear, towels Long spin…
-
Page 17: Washing Programmes
Programme table Washing programmes for synthetics, mixed fabrics, delicates and wool Max load: 1.5 kg, wool 1 kg Consumptions* Additional Description Programme Temp. Fabrics functions Energy Water Duration min. Prewash at SYNTHETICS WITH 40 °C PREWASH, for example Wash at 40°-60°…
-
Page 18: Maintenance
Maintenance 1. Bodywork 3. Drain filter Clean the outside of the machine with warm water The drain filter collects threads and small objects and a neutral, non-abrasive household detergent. inadvertently left in the laundry. Check regularly that Rinse with clean water and dry with a soft cloth. the filter is clean.
-
Page 19: Emergency Emptying Out
5. Emergency emptying out If the water is not discharged (outlet pump is blocked, filter or drain pipe are clogged), proceed as follows to empty out the machine: • pull out the plug from the power socket; • close the water tap; •…
-
Page 20: Something Not Working
Something not working? Problems which you can resolve yourself. Problem Possible cause • The machine does not start up: • The door is not firmly closed. • The machine is not plugged in or there is no power at the socket. •…
-
Page 21
Problem Possible cause • Spinning starts late or the • The electronic unbalance detection device has cut in because the laundry is not evenly distributed in machine does not spin: the drum. The laundry is redistributed by reverse rotation of the drum. This may happen several times before the unbalance disappears and normal spinning can resume.
The following warnings are provided in the interests of overall safety. You must read them carefully before
installing or using the appliance.
Installation
• All internal packing must be removed before using
the appliance. Serious damage may be caused to
the machine or adjacent furniture if the protective
transit devices are not removed or are not
completely removed. Refer to the relevant
paragraph in the instruction book.
• Any electrical work required to install this appliance
must be carried out by a qualified electrician.
• Any plumbing work required to install this
appliance must be carried out by a qualified
plumber.
• After having installed the machine, check that it is
not standing on its electrical supply cable.
• If the appliance is placed on a carpeted floor,
ensure that air can circulate freely between the feet
and the floor.
Use
• This appliance is designed for domestic use. It
must not be used for purposes other than those for
which it was designed.
• Only wash fabrics which are designed to be
machine washed. Follow the instructions on each
garment label.
• Do not overload the appliance. Follow the
instructions in the instruction book.
• Make sure that all pockets are empty. Objects such
as coins, safety pins, pins and screws can cause
extensive damage.
• Do not machine wash garments saturated with
petroleum, methylated spirits, trichlorethylene, etc.
If such fluids have been used to remove stains
prior to washing, wait until they have completely
evaporated from the fabric before placing garments
in the appliance.
• Place small items such as socks, belts, etc. in a
cloth bag or pillowcase to prevent them getting
trapped between the drum and the tub.
• Use only the recommended quantities of fabric
softener. An excessive amount could damage the
laundry.
• Leave the porthole door slightly ajar when the
appliance is not in use. This preserves the door
seal and prevents the formation of musty smells.
• Always check that water has emptied out before
opening the door. If not, drain the water following
the instructions in the instruction book.
• Always unplug the appliance and shut the water
tap after use.
General safety
• Repairs to the machine must be carried out only by
qualified personnel. Repairs carried out by
inexperienced persons could cause serious
danger. Contact your local Service Centre.
• Never pull the power supply cable to remove the
plug from the socket; always take hold of the plug
itself.
• During high temperature wash programmes the
door glass may get hot. Do not touch it!
4
Раздел: Бытовая, кухонная техника, электроника и оборудование
Тип: Стиральная Машина
Инструкция к Стиральной Машине Electrolux EW 1063 S
WASHING MACHINE
TVÄTTMASKIN
PYYKINPESUK
ONE
STIRALWNAÅ MAfiINA
INSTRUCTION BOOKLET
BRUKSANVISNING
KÄYTTÖOHJE
RUKOVODSTVO PO ÈKSPLUATACII
EW 1063 S
GB
S
S
FIN
SF
RUS
132 998 631
Dear customer,
Please read these operating instructions carefully
and pay particular attention to the safety notes
indicated in the first pages. We recommend that you
keep this instruction booklet for future reference and
pass it on to any future owners.
Transport damages
When unpacking the appliance, check that it is not
damaged. If in doubt, do not use it and contact the
Service Centre.
The symbols you will see on some paragraphs of this booklet have the following meaning:
The warning triangle and/or the key words (Warning!, Caution!) emphasize information that is particularly
important for your safety or correct functioning of the appliance.
The information marked with this symbol provides additional instructions and practical tips on the use of
the appliance.
Tips and information about economical and ecological use of the machine are marked with this symbol.
Our contribution to the protection of the
environment: we use recycled paper.
2

Contents
Warnings 4-5
Maintenance 18
Bodywork 18
Disposal 5
Detergent dispenser drawer 18
ENGLISH
Drain filter 18
Tips for environmental protection 5
Water inlet filter 18
Emergency emptying out 19
Technical specifications 6
Frost precautions 19
Installation 7
Something not working? 20-21
Unpacking 7
Positioning 7
Water inlet 7
Water drainage 8
Electrical connection 8
Your new washing machine 9
Description of the appliance 9
Detergent dispenser drawer 9
Use 10
Control panel 10
Controls 10
Washing hints 11
Sorting the laundry 11
Temperatures 11
Before loading the laundry 11
Maximum loads 11
Laundry weights 11
Removing stains 11
Detergents and additives 12
International wash code symbols 13
Operating sequence 14-15
Washing programmes 16-17
3

Warnings
The following warnings are provided in the interests of overall safety. You must read them carefully before
installing or using the appliance.
• Leave the porthole door slightly ajar when the
Installation
appliance is not in use. This preserves the door
• All internal packing must be removed before using
seal and prevents the formation of musty smells.
the appliance. Serious damage may be caused to
• Always check that water has emptied out before
the machine or adjacent furniture if the protective
opening the door. If not, drain the water following
transit devices are not removed or are not
the instructions in the instruction book.
completely removed. Refer to the relevant
paragraph in the instruction book.
• Always unplug the appliance and shut the water
tap after use.
• Any electrical work required to install this appliance
must be carried out by a qualified electrician.
• Any plumbing work required to install this
General safety
appliance must be carried out by a qualified
• Repairs to the machine must be carried out only by
plumber.
qualified personnel. Repairs carried out by
• After having installed the machine, check that it is
inexperienced persons could cause serious
not standing on its electrical supply cable.
danger. Contact your local Service Centre.
• If the appliance is placed on a carpeted floor,
• Never pull the power supply cable to remove the
ensure that air can circulate freely between the feet
plug from the socket; always take hold of the plug
and the floor.
itself.
• During high temperature wash programmes the
door glass may get hot. Do not touch it!
Use
• This appliance is designed for domestic use. It
must not be used for purposes other than those for
which it was designed.
• Only wash fabrics which are designed to be
machine washed. Follow the instructions on each
garment label.
• Do not overload the appliance. Follow the
instructions in the instruction book.
• Make sure that all pockets are empty. Objects such
as coins, safety pins, pins and screws can cause
extensive damage.
• Do not machine wash garments saturated with
petroleum, methylated spirits, trichlorethylene, etc.
If such fluids have been used to remove stains
prior to washing, wait until they have completely
evaporated from the fabric before placing garments
in the appliance.
• Place small items such as socks, belts, etc. in a
cloth bag or pillowcase to prevent them getting
trapped between the drum and the tub.
• Use only the recommended quantities of fabric
softener. An excessive amount could damage the
laundry.
4
• Keep all detergents in a safe place out of children’s
Child safety
reach.
• Children are often not aware of how dangerous
• Make sure that children or pets do not climb into
electrical appliances can be. When the machine is
ENGLISH
the drum.
working, children should be carefully supervised
and not be allowed to play with the appliance.
• When the appliance is to be scrapped, cut off the
electrical supply cable and destroy the plug with
• The packaging components (e.g. plastic film,
the remaining cable. Disable the door catch in
polystyrene) can be dangerous to children — danger
order to prevent children from becoming trapped
of suffocation! Keep them out of children’s reach.
inside while playing.
Disposal
Packaging materials
Machine
The materials marked with the symbol are
Use authorised disposal sites for your old appliance.
recyclable.
Help to keep your country tidy!
>PE<=polyethylene
>PS<=polystyrene
>PP<=polypropylene
This means that they can be recycled by disposing of
them properly in appropriate collection containers.
Tips for environmental protection
To save water, energy and to help protect the
• With adequate pre-treatment, stains and limited
environment, we recommend that you follow these
soiling can be removed; the laundry can then be
tips:
washed at a lower temperature.
• Normally soiled laundry may be washed without
• Measure out detergent according to the water
prewashing in order to save detergent, water and
hardness, the degree of soiling and the quantity of
time (the environment is protected too!).
laundry being washed.
• The machine works more economically if it is fully
• Use a short programme for lightly soiled laundry.
loaded.
5

Technical specifications
DIMENSIONS Height 85 cm
Width 60 cm
Depth 45 cm
MAXIMUM LOAD Cotton 4.5 kg
Synthetics 1.5 kg
Delicates 1.5 kg
Woollens 1 kg
SPIN SPEED 1000 rpm max.
POWER SUPPLY VOLTAGE/FREQUENCY 220-230 V/50 Hz
TOTAL POWER ABSORBED 2200 W
MINIMUM FUSE PROTECTION 10 A
WATER PRESSURE Minimum 050 kPa
Maximum 800 kPa
This appliance complies with the following EEC Directives:
73/23/EEC of 19/02/73 relating to low voltage
89/336/EEC of 03/05/89 relating to electromagnetic compatibility.
6
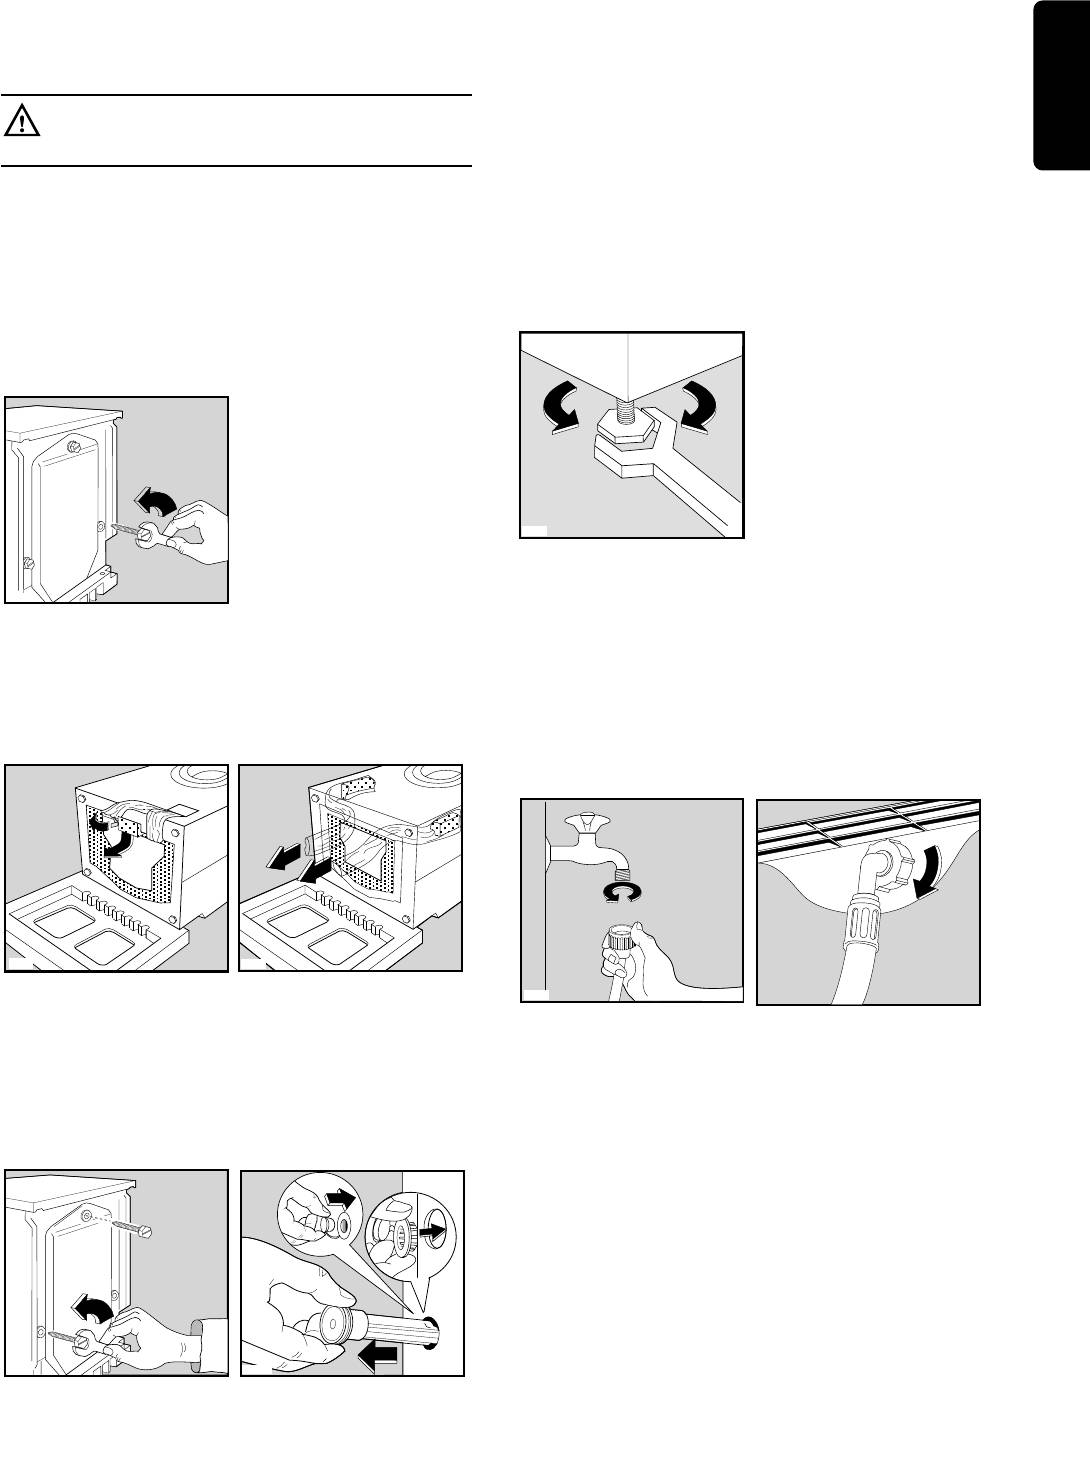
Unpacking
All transit bolts and packing must be removed
ENGLISH
before using the appliance.
You are advised to keep all transit devices so that
they can be refitted if the machine ever has to be
transported again.
1. Using a spanner, unscrew and remove the rear
right-hand bolt and lay the machine on its back,
taking care not to squash the hoses. This can be
avoided by placing one of the corner packing
pieces between the machine and the floor.
2. Remove the polystyrene block from the bottom of
the machine and release the two plastic bags.
3. Carefully remove the right-hand bag (1) then the
left-hand bag (2) by pulling them towards the
centre of the machine.
4. Set the machine upright and remove the two
remaining bolts from the back.
5. Pull out the three plastic spacers from the holes
into which the bolts were fitted.
6. Plug all the holes with the plugs supplied with the
instruction booklet.
7
P0020
P0256
P1068
P0255
Positioning
Install the machine on a flat hard floor.
Make sure that air circulation around the machine is
not impeded by carpets, rugs etc. Check that the
machine does not touch the wall or other kitchen
units.
Carefully level by screwing the adjustable feet in or
out. Never place cardboard, wood or similar
materials under the machine to compensate for any
unevenness in the floor.
Water inlet
Connect the water inlet hose to a tap with a 3/4″
thread.
The other end of the inlet hose which connects to the
machine can be turned in any direction. Simply
loosen the fitting, rotate the hose and retighten the
fitting, making sure there are no water leaks.
The inlet hose must not be lengthened. If it is too
short and you do not wish to move the tap, you will
have to purchase a new, longer hose specially
designed for this type of use.
P0021
P1088
P1051
Installation

Water drainage
The end of the drain hose can be positioned in three
ways:
Hooked over the edge of a sink using the plastic
hose guide supplied with the machine. In this
case, make sure the end cannot come unhooked
when the machine is emptying.
This could be done by tying it to the tap with a piece
of string or attaching it to the wall.
In a sink drain pipe branch. This branch must be
above the trap so that the bend is at least 60 cm
above the ground.
Directly into a drain pipe at a height of not less
than 60 cm and not more than 90 cm.
The end of the drain hose must always be
ventilated, i.e. the inside diameter of the drain pipe
must be larger than the outside diameter of the drain
hose.
The drain hose must not be kinked. Run it along the
floor; only the part near the drainage point must be
raised.
8
P0023
P0022
Electrical connection
This machine is designed to operate on a 220-230 V,
single-phase, 50 Hz supply.
Check that your domestic electrical installation can
take the maximum load required (2.2 kW), also
taking into account any other appliances in use.
Connect the machine to an earthed socket.
The manufacturer declines any responsibility
for damage or injury through failure to comply
with the above safety precaution.
Should the appliance power supply cable
need to be replaced, this should be carried
out by our Service Centre.
Important!
When the appliance is installed the power supply
cable must be easily accessible.
Your new washing machine
This new machine meets all modern requirements for effective treatment of laundry with low water, energy and
detergent consumption.
• The temperature selector dial will allow you to choose the most suitable temperature for your laundry.
ENGLISH
• The automatic cooling of the washing water from 95° to 60°C before draining reduces thermal shock to
fabrics, helping to prevent creasing.
• The special wool programme with its new delicate wash system treats your woollens with extreme care.
• The balance control device ensures the machine is stable during the spin.
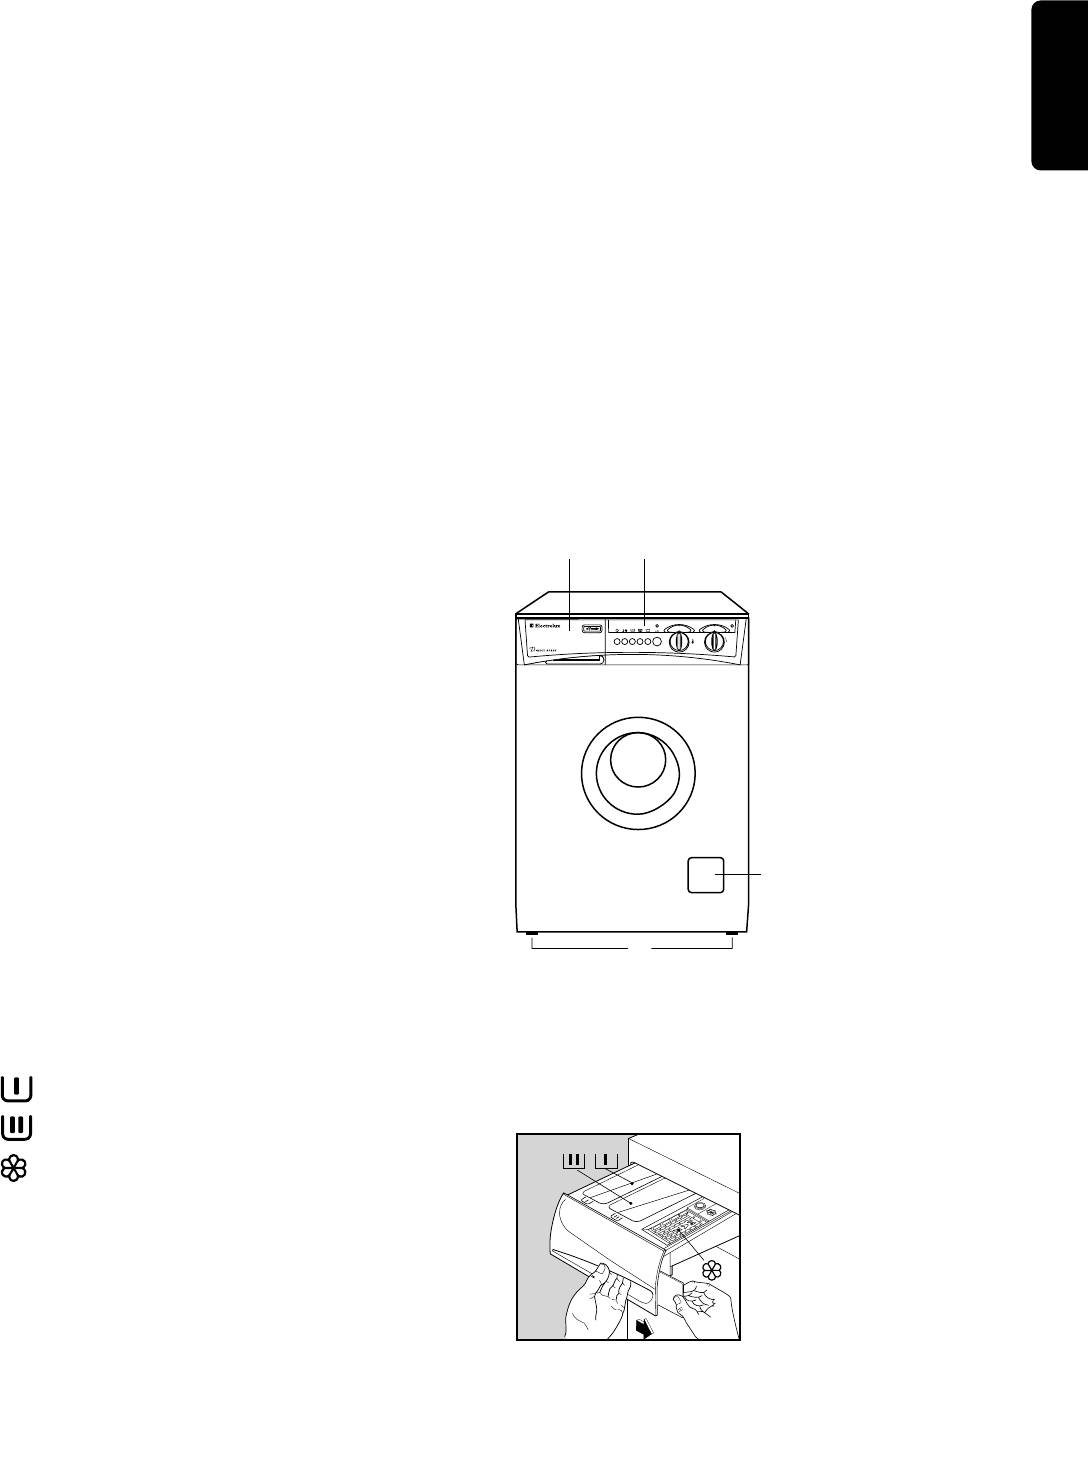
Description of the appliance
1 Detergent dispenser drawer
1
2
2 Control panel
3 Drain filter
4 Adjustable feet
3
4
Detergent dispenser drawer
Prewash
Main wash
Fabric softener, starch
P1017
9
Use
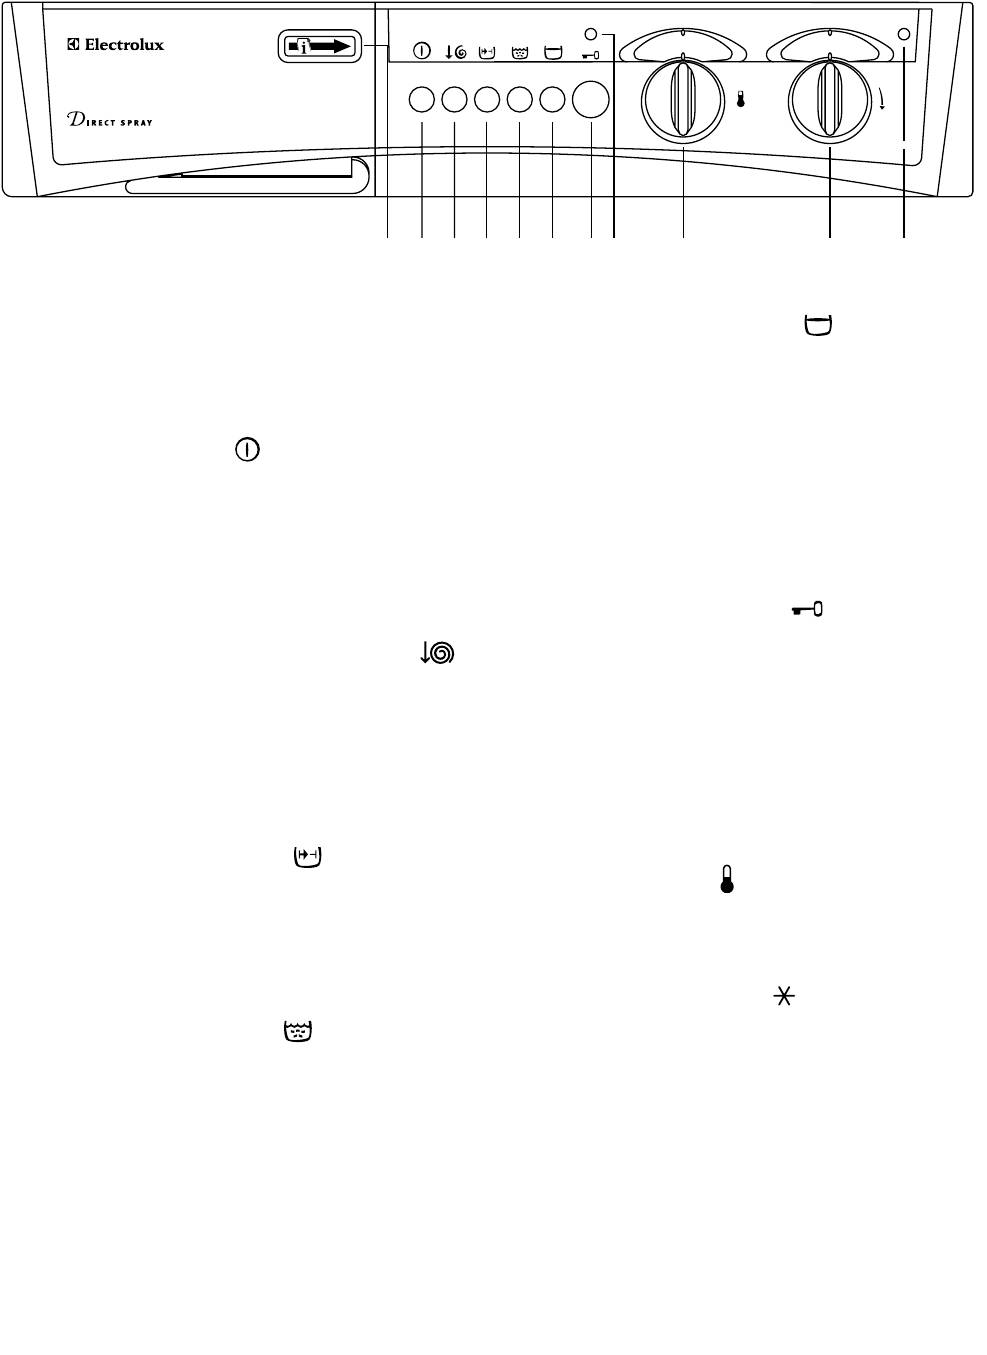
Control panel
EW 1063 S
1234567891011
1
1 Programme chart
6 Anti-crease button
It will help you to choose the most suitable washing
Using this option the last rinse water is not emptied
programme for your laundry.
out, so as to avoid creasing if the laundry is not
removed from the machine immediately after
washing.
2 On/Off button
The water can be emptied out by pressing the button
again (emptying will be followed by a spin) or by
Press this button to start the machine. The same
selecting the drain programme “N”.
button is used to switch the machine off.
If the button is not pressed, the programmes end
Before selecting a programme or changing an
with a spin.
ongoing programme the machine must be
switched off by depressing the On/Off button.
7 Door open button
Press to open the door.
3 Spin speed reduction button
By depressing this button the spin speed is reduced
8 “Door locked” pilot light
as follows:
• cotton and linen: from 1000 to 650 rpm
This light comes on when the programme starts,
• synthetics and delicates: from 900 to 650 rpm
indicating that the door is locked.
• wool: from 1000 to 650 rpm
The door cannot be opened until the light goes out.
4 Quick wash button
9 Temperature selector dial
(thermostat)
By depressing this button on programmes A-B-C-G
and H the washing time will be reduced.
To select the washing temperature turn the dial to
Max. recommended temperature 60°C.
the required value.
To be used for lightly soiled laundry.
When your laundry is only lightly soiled, a cold wash
can be used (dial to position ).
5 Extra rinse button
10 Programme selector dial
By depressing this button on programmes A—B and C
for cotton and linen the machine will perform the
To select the required washing programme turn the
rinses with more water.
dial clockwise.
To be used in areas where the water is very soft or
for people allergic to detergents or who have very
delicate skin.
11 Mains-on light
It comes on when the machine starts operating and
goes out by depressing ON/OFF button to switch the
machine off.
10

Washing hints
Laundry weights
The following weights are indicative:
ENGLISH
Sorting the laundry
bathrobe 1200 g
Follow the wash code symbols on each garment
napkin 100 g
label and the manufacturer’s washing instructions.
quilt cover 700 g
Sort the laundry as follows:
sheet 500 g
whites, coloureds, synthetics, delicates, woollens.
pillow case 200 g
Temperatures
tablecloth 250 g
towelling towel 200 g
95° for normally soiled white cottons and linen
tea cloth 100 g
(e.g. tea cloths, towels, tablecloths,
sheets…)
night dress 200 g
60° for normally soiled, colour fast garments
ladies’ briefs 100 g
(e.g. shirts, night dresses, pyjamas….) in
man’s work shirt 600 g
linen, cotton or synthetic fibres and for
man’s shirt 200 g
lightly soiled white cotton (e.g. underwear).
man’s pyjamas 500 g
(cold)for delicate items (e.g. net curtains), mixed
30°-40° laundry including synthetic fibres and
blouse 100 g
woollens bearing the label «pure new
men’s underpants 100 g
wool, machine washable, non-shrink».
Removing stains
Before loading the laundry
Stubborn stains may not be removed by just water
Never wash whites and coloureds together. Whites
and detergent. It is therefore advisable to treat them
may lose their “whiteness” in the wash.
prior to washing.
New coloured items may run in the first wash; they
Blood: treat fresh stains with cold water. For dried
should therefore be washed separately the first time.
stains, soak overnight in water with a special
Make sure that no metal objects are left in the
detergent then rub in the soap and water.
laundry (e.g. hair clips, safety pins, pins).
Oil based paint: moisten with benzine stain
Button up pillowcases, close zip fasteners, hooks
remover, lay the garment on a soft cloth and dab the
and poppers. Tie any belts or long tapes.
stain; treat several times.
Remove persistent stains before washing. Rub
Dried grease stains: moisten with turpentine, lay
particularly soiled areas with a special detergent or
the garment on a soft surface and dab the stain with
detergent paste.
the fingertips and a cotton cloth.
Treat curtains with special care. Remove hooks or tie
Rust: oxalic acid dissolved in hot water or a rust
them up in a bag or net.
removing product used cold. Be careful with rust
stains which are not recent since the cellulose
Maximum loads
structure will already have been damaged and the
fabric tends to hole.
Recommended loads are indicated in the
Mould stains: treat with bleach, rinse well (whites
programme charts.
and fast coloureds only).
General rules:
Grass: soap lightly and treat with bleach (whites and
Cotton, linen: drum full but not too tightly packed;
fast coloureds only).
Synthetics: drum no more than half full;
Ball point pen and glue: moisten with acetone (*),
Delicate fabrics and woollens: drum no more than
lay the garment on a soft cloth and dab the stain.
one third full.
Lipstick: moisten with acetone as above, then treat
Washing a maximum load makes the most efficient
stains with methylated spirits. Remove any residual
use of water and energy.
marks from white fabrics with bleach.
For heavily soiled laundry, reduce the load size.
11
Red wine: soak in water and detergent, rinse and
Quantity of detergent to be used
treat with acetic or citric acid, then rinse. Treat any
The type and quantity of detergent will depend on
residual marks with bleach.
the type of fabric, load size, degree of soiling and
Ink: depending on the type of ink, moisten the fabric
hardness of the water used.
first with acetone (*), then with acetic acid; treat any
Water hardness is classified in so-called “degrees” of
residual marks on white fabrics with bleach and then
hardness. Information on hardness of the water in
rinse thoroughly.
your area can be obtained from the relevant water
Tar stains: first treat with stain remover, methylated
supply company, or from your local authority.
spirits or benzine, then rub with detergent paste.
Follow the product manufacturers’ instructions on
(*) do not use acetone on artificial silk.
quantities to use.
Use less detergent if:
Detergents and additives
– you are washing a small load,
Good washing results also depend on the choice of
– the laundry is lightly soiled,
detergent and use of the correct quantities to avoid
– large amounts of foam form during washing.
waste and protect the environment. Although
biodegradable, detergents contain substances
which, in large quantities, can upset the delicate
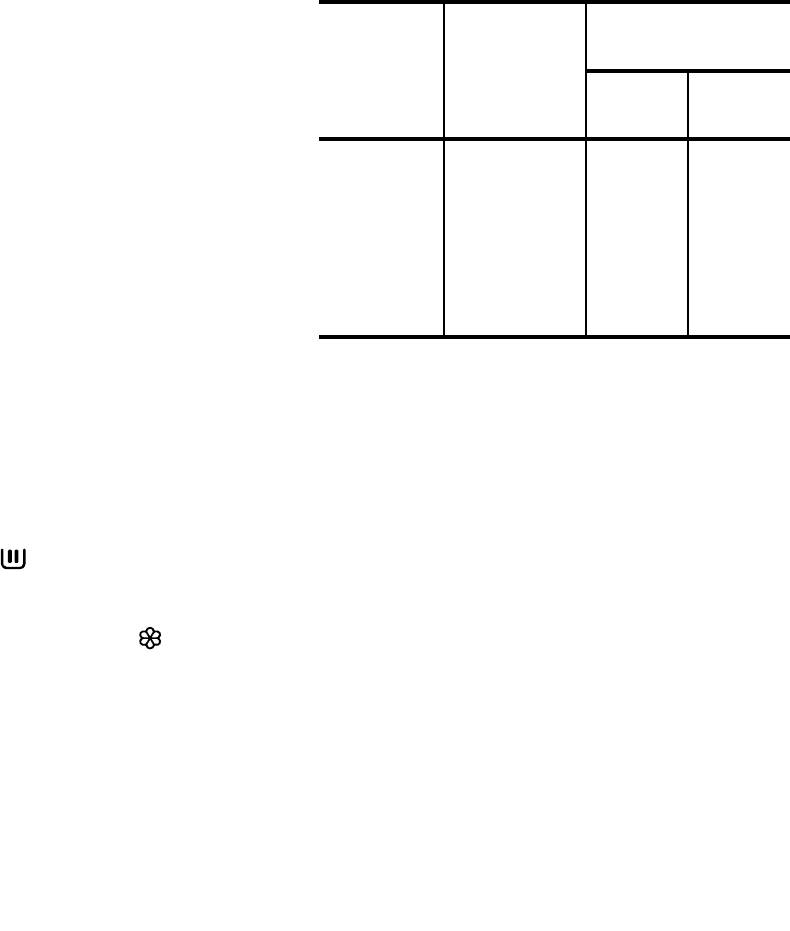
Degrees of water hardness
balance of nature.
The choice of detergent will depend on the type of
Degrees
fabric (delicates, woollens, cottons, etc.), the colour,
Level Characteristic
washing temperature and degree of soiling.
German
French
All commonly available washing machine detergents
°dH
°T.H.
may be used in this appliance:
– powder detergents for all types of fabric,
0- 7
0-15
1
soft
– powder detergents for delicate fabrics (60°C max)
8-14
16-25
and woollens,
2
medium
– liquid detergents, preferably for low temperature
15-21
26-37
3
hard
wash programmes (60°C max) for all types of
more than
more than
fabric, or special for woollens only.
4
very hard
21
37
The detergent and any additives must be placed in
the appropriate compartments of the dispenser
drawer before starting the wash programme.
If using concentrated powder or liquid detergents, a
programme without prewash must be selected.
The washing machine incorporates a recirculation
system which allows an optimal use of the
concentrated detergent.
Pour liquid detergent into the dispenser drawer
compartment marked just before starting the
programme.
Any fabric softener or starching additives must be
poured into the compartment marked before
starting the wash programme.
Follow the product manufacturer’s recommendations
on quantities to use and do not exceed the «MAX»
mark in the detergent dispenser drawer.
12
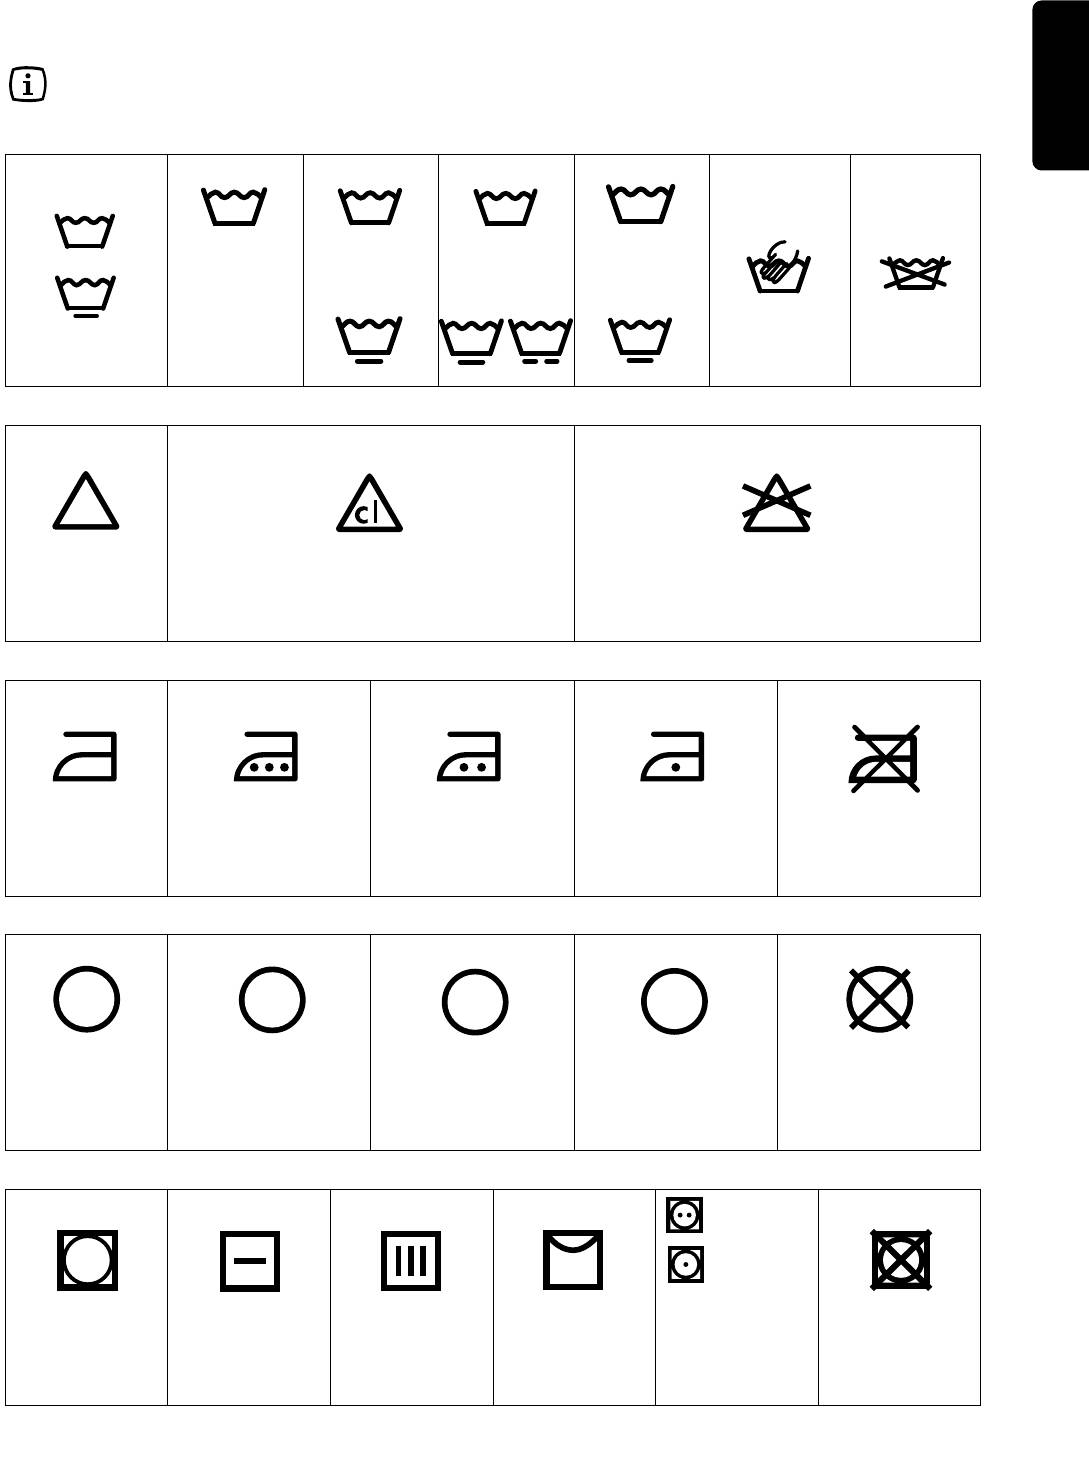
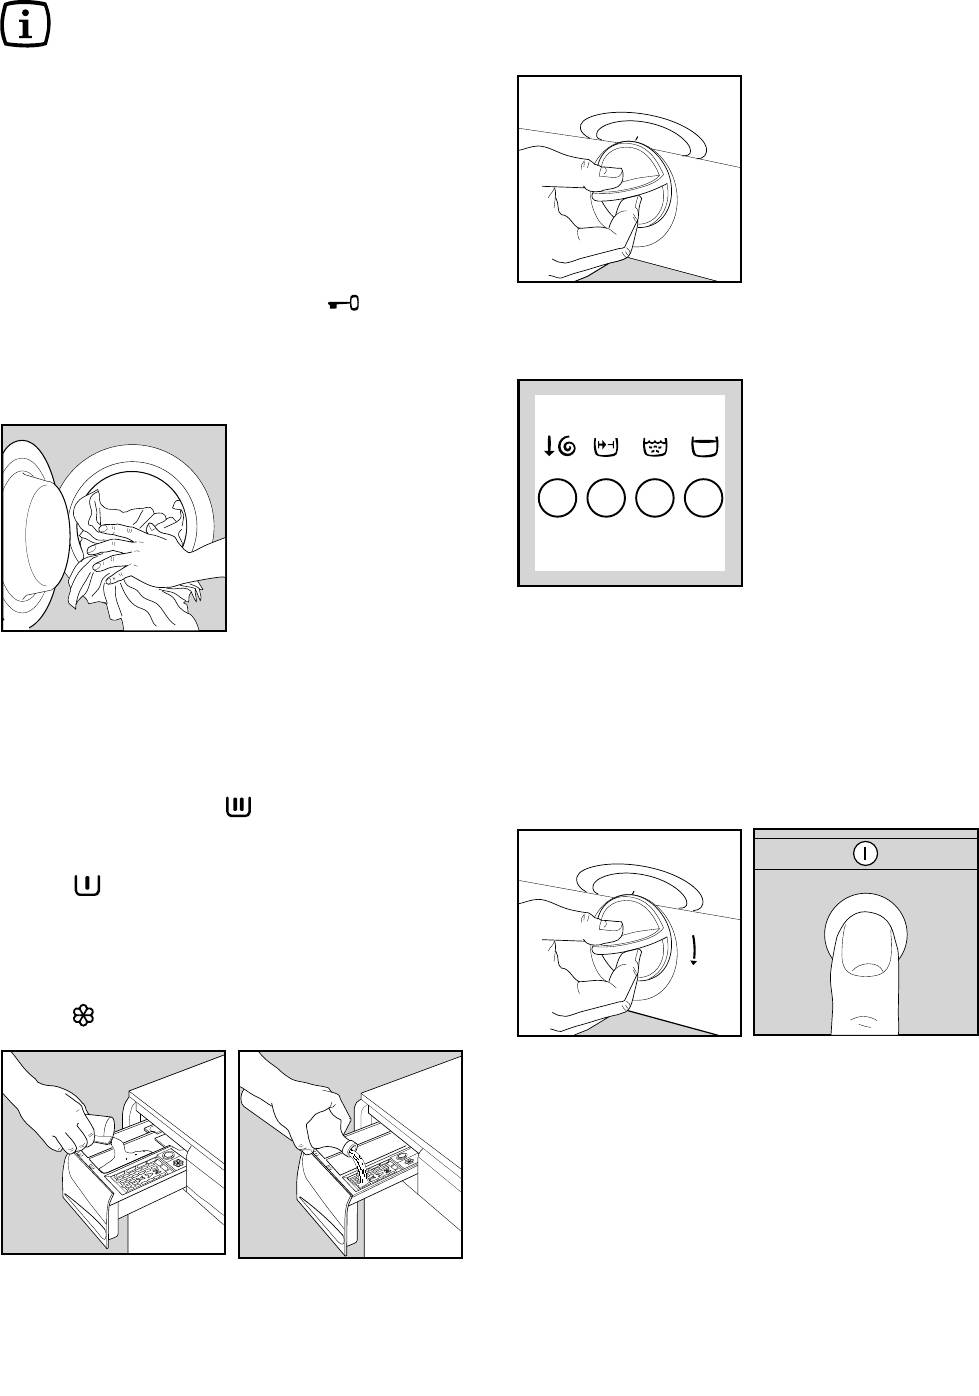
International wash code symbols
These symbols appear on fabric labels, in order to help you choose the best way to treat your laundry.
ENGLISH
Energetic wash
95
60
40
30
Max. wash
Max. wash
Max. wash
Max. wash
temperature
temperature
temperature
temperature
95°C
60°C
40°C
30°C
Hand wash Do not
Delicate wash
60
40
40
30
wash
at all
Bleaching Bleach in cold water Do not bleach
Ironing Hot iron
Warm iron
Lukewarm iron
Do not iron
max 200°C
max 150°C
max 110°C
A
P
F
Dry cleaning Dry cleaning
Dry cleaning in
Dry cleaning
Do not
in all solvents
perchlorethylene,
in petrol,
dry clean
petrol, pure alcohol,
pure alcohol
R 111 & R 113
and R 113
high
temperature
low
temperature
Drying Flat On the line On clothes
Tumble dry
Do not
hanger
tumb
le dr
y
13
4. Select the temperature
Turn the dial to the required setting.
5. Select the required option(s)
6. Select the programme and start
the machine
Turn the programme selector dial clockwise to the
required programme and press the ON/OFF button:
the mains on light and “door locked” light come on
and the machine starts to operate.
14
P0033
Operating sequence
Before washing your first load of laundry, we
recommend that you run a cotton cycle at 60°C, with
the machine empty, in order to remove any
manufacturing residue from the drum and tub.
Pour half a measure of detergent into the main wash
compartment and start up the machine.
1. Place the laundry in the drum
Open the door by depressing button .
Place the laundry in the drum, one item at a time,
shaking them out as much as possible.
Close the door.
2. Measure out the detergent
Pull out the dispenser drawer until it stops. Measure
out the amount of detergent recommended by the
manufacturer in a graduated cup and pour it into the
main wash compartment .
If you wish to carry out a programme with prewash,
pour detergent into the appropriate compartment
marked .
3. Measure out the additives
If required, pour fabric softener into the compartment
marked , without exceeding the «MAX» mark.
P1019
P1018
P0004

7. At the end of the programme
The machine stops automatically.
If you have selected a programme which ends with
ENGLISH
the water of the last rinse left in the tub (option ),
drain the water before opening the door. Select
programme “N” (drain) or depress again button .
Wait one or two minutes before opening the door to
give the electric locking mechanism time to release
it. The door can be opened when the relevant light
goes out.
Depress the ON/OFF button again to switch the
machine off. The mains on light goes out.
Remove the laundry.
Turn the drum by hand to make sure it is completely
empty, so as to avoid any forgotten items being
damaged in a subsequent wash (e.g. shrinking) or
their colour running into a load of whites.
Release any buttons which have been pressed.
Turn the water tap off and unplug the machine.
Leave the door ajar to air the machine.
15
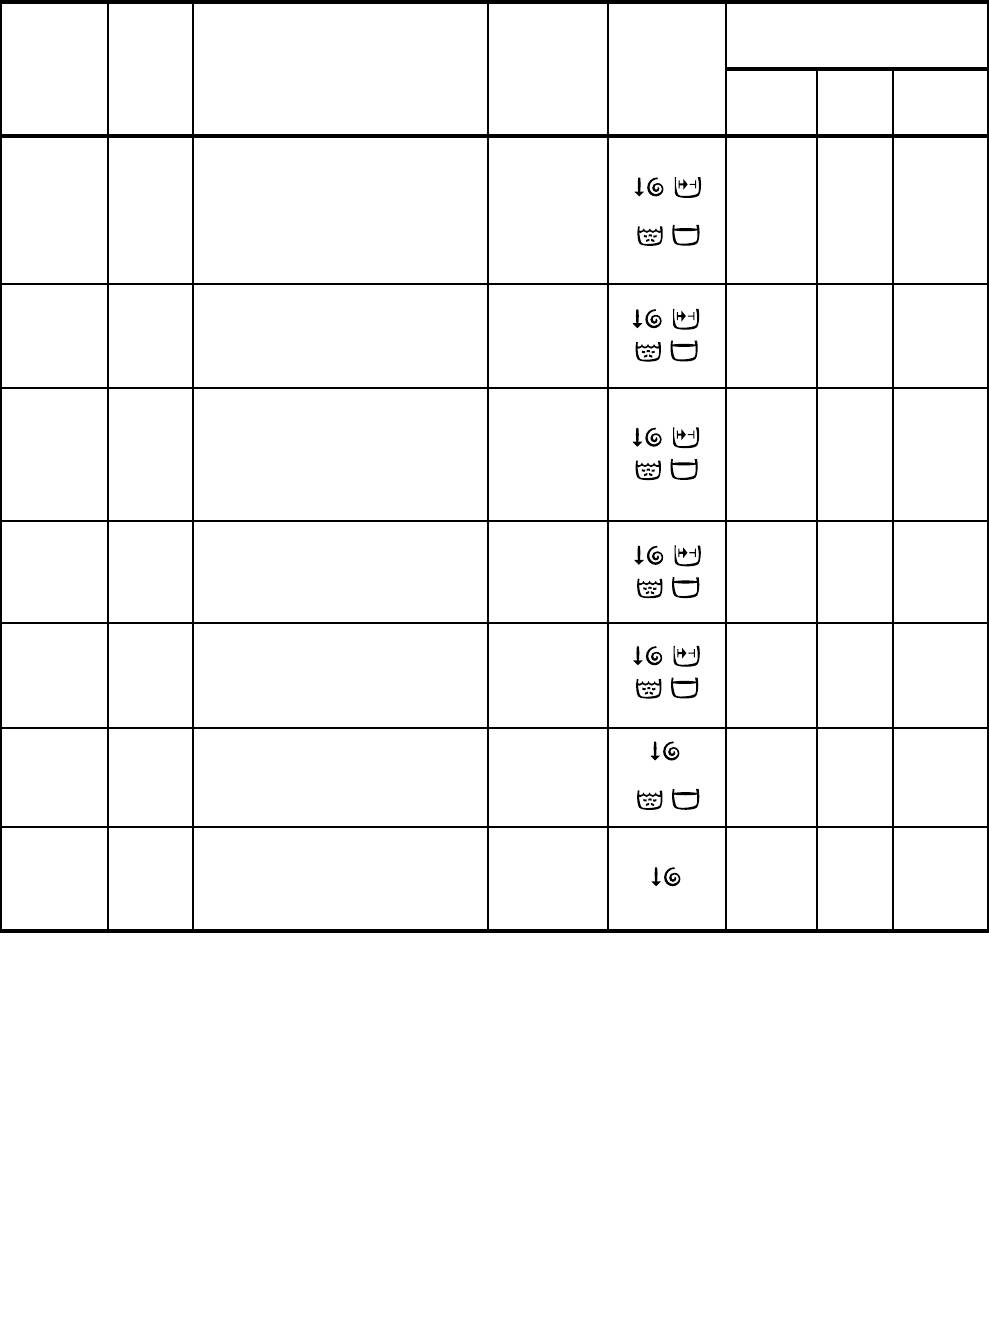
Programme table
Washing programmes for cotton and linen
Max load: 4.5 kg
Consumptions*
Additional
Programme
Temp. Fabrics
Description
functions
Energy
Water
Duration
kWh
lt
min.
Prewash at
WHITES WITH PREWASH, for
40°C
example work garments,
Wash at
A 60°-95°
2.0
57
140
sheets, household linen,
60°-95°C
underwear, towels
3 rinses
Long spin
WHITES WITHOUT
Wash at
PREWASH, for example
60°-95°C
B
60°-95°
1.7
48 125
household linen, sheets, shirts,
3 rinses
Long spin
underwear
Prewash at
COLOUREDS WITH
40°C
PREWASH, for example shirts,
Wash at
A 40°-60°
1.2
54
135
blouses, household linen,
40°-60°C
sheets
3 rinses
Long spin
FAST COLOUREDS WITHOUT
Wash at
PREWASH, for example shirts,
40°-60°C
B
40°-60°
0.9
48
120
blouses, terry cloths,
3 rinses
underwear
Long spin
NON-FAST COLOUREDS
Wash at
WITHOUT PREWASH, for
30°-40°C
C
30°-40°
0.7
48
90
example shirts, blouses,
3 rinses
underwear
Long spin
D
This programme can be used
3 rinses
COLD
for rinsing hand washed
0.1
39
45
Long spin
Rinses
garments
F
Separate spin for cotton and
Long spin
—
—
10
linen
Long spin
In compliance with EC directive 92/75, the consumption figures indicated on the energy label refer to the 60°C
wash programme for cotton (programme “B”).
* The consumption data shown on this chart is to be considered purely indicative, as it may vary depending on
the quantity and type of laundry, on the inlet water temperature and on the ambient temperature. It refers to the
highest temperature for each wash programme.
16
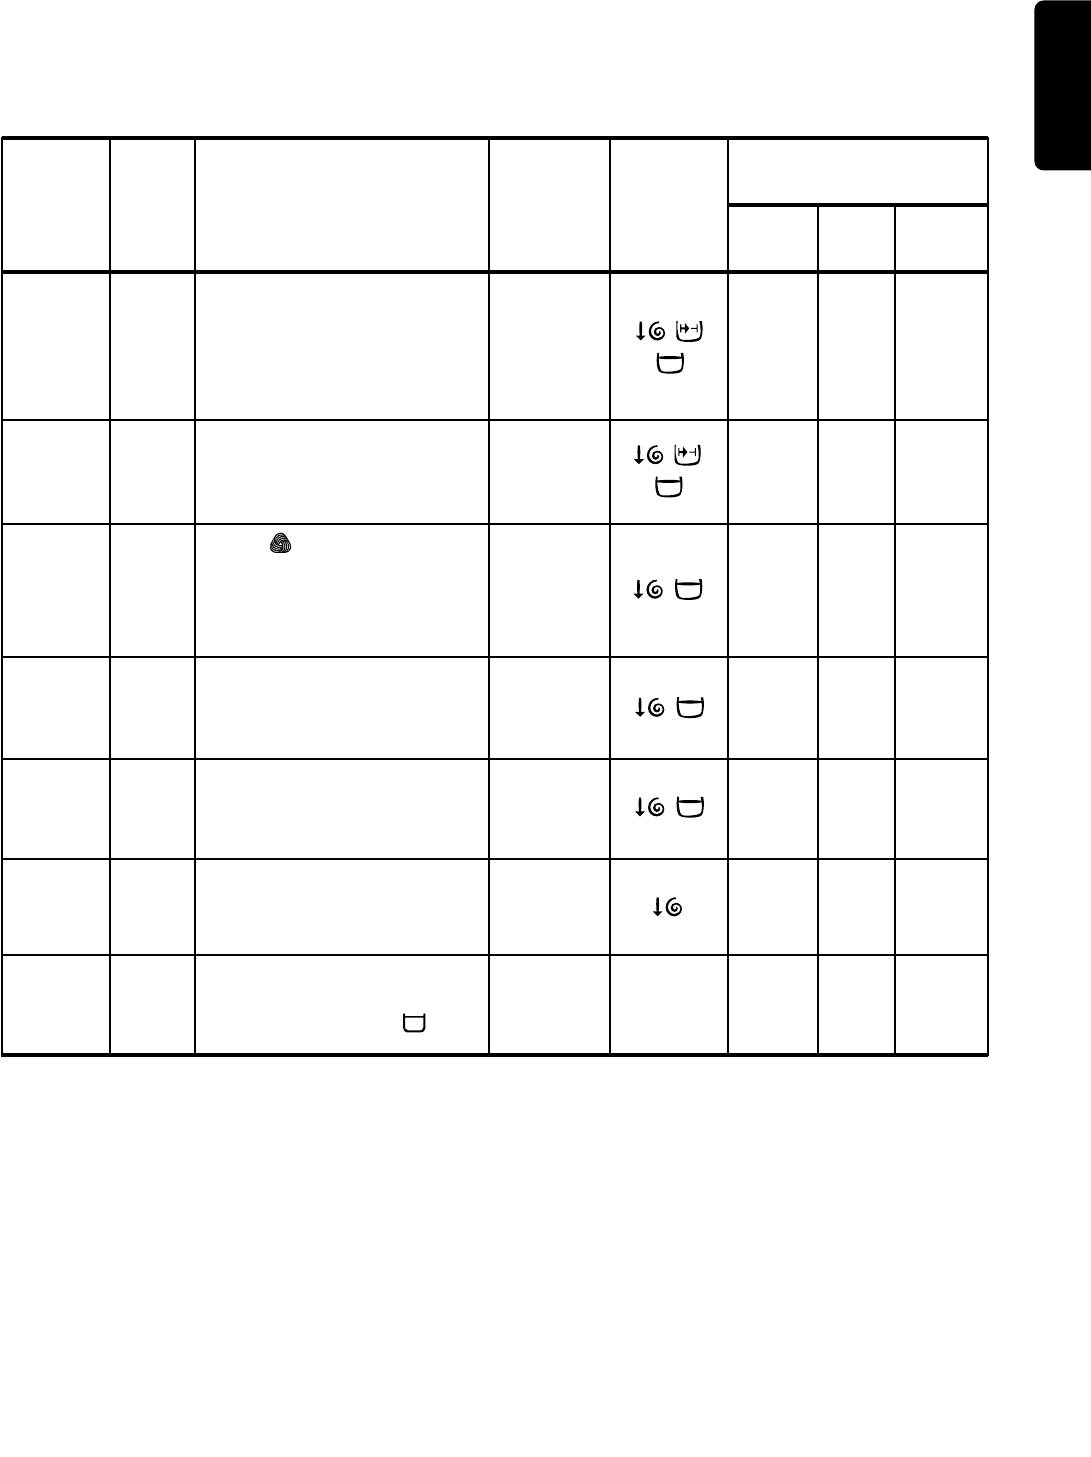
Programme table
Washing programmes for synthetics, mixed fabrics, delicates and wool
Max load: 1.5 kg, wool 1 kg
ENGLISH
Consumptions*
Additional
Programme
Temp. Fabrics
Description
functions
Energy
Water
Duration
kWh
lt
min.
Prewash at
SYNTHETICS WITH
40 °C
PREWASH, for example
G 40°-60°
Wash at
1.0
56
95
underwear, coloured items,
40°-60°C
shirts, blouses
3 rinses
Short spin
Wash at
SYNTHETICS WITHOUT PRE-
40°-60°C
H
40°-60°
WASH, for example shirts,
0.7
50 80
3 rinses
blouses, mixed fabrics
Short spin
WOOL
Wash at
Special programme for
30°-40°C
J 30°-40°
garments bearing the “Pure
0.45
45
55
3 rinses
new wool, non-shrink, machine
Short spin
washable” label
Wash at
DELICATES, for example
30°-40°C
K
30°-40°
0.45
43
50
curtains
3 rinses
Short spin
This programme can be used
L
3 rinses
COLD
for rinsing hand washed
0.02
30
25
Short spin
Rinses
garments
M
Separate spin for hand washed
Drain and
—
—
5
synthetics, delicates and wool
short spin
Short spin
For emptying out the last rinse
N
Draining of
water of the programmes with
—
—
1
water
Drain
the anti-crease option .
* The consumption data shown on this chart is to be considered purely indicative, as it may vary depending on
the quantity and type of laundry, on the inlet water temperature and on the ambient temperature. It refers to the
highest temperature for each wash programme.
17
1. Bodywork
Clean the outside of the machine with warm water
and a neutral, non-abrasive household detergent.
Rinse with clean water and dry with a soft cloth.
Important: do not use methylated spirits, solvents or
similar products to clean the bodywork.
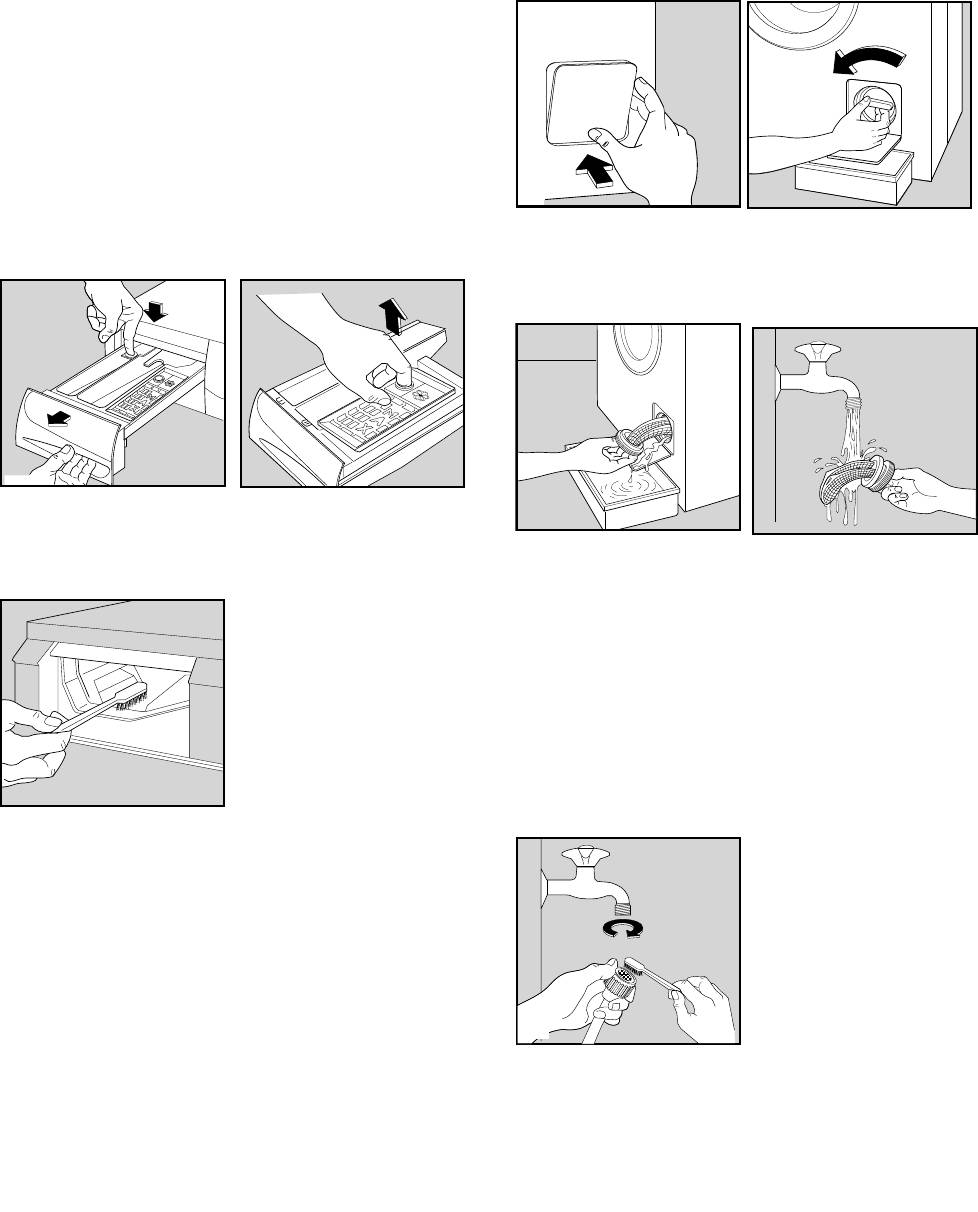
2. Detergent dispenser drawer
After a while, detergents and fabric softeners leave
deposits in the drawer.
Clean the drawer from time to time by rinsing it under
a running tap. To remove the drawer from the
machine, press the button in the rear left-hand
corner.
To facilitate cleaning, the top part of the additive
compartment can be removed.
Detergent can also accumulate inside the drawer
recess: clean it with an old toothbrush. Refit the
drawer after cleaning.
18
P0038
P1021
P1020
3. Drain filter
The drain filter collects threads and small objects
inadvertently left in the laundry. Check regularly that
the filter is clean.
Open the filter door.
Place a container under the filter and unscrew it.
Pull out the filter.
Clean the filter under a running tap, then refit it,
screwing it fully in.
4. Water inlet filter
If you notice that the machine is taking longer to fill,
check that the filter in the water inlet hose is not
blocked.
Turn off the water tap.
Unscrew the hose from the tap.
Clean the filter with a stiff brush.
Screw the hose back onto the tap.
P1090
P0040
P0133
P0132
P0011
Maintenance

5. Emergency emptying out
If the water is not discharged (outlet pump is
blocked, filter or drain pipe are clogged), proceed as
ENGLISH
follows to empty out the machine:
• pull out the plug from the power socket;
• close the water tap;
• if necessary, wait until the water has cooled down;
• place a bowl on the floor;
• put the drain hose end into the bowl and let the
water come out.
Should it not be possible to have access to the drain
hose because, for example, the appliance is built in
the kitchen furniture, slightly loosen the drain filter
after placing a bowl on the floor, to let the water
come out slowly.
At the end screw the filter again.
6. Frost precautions
If the machine is installed in a place where the
temperature could drop below 0°C, proceed as
follows:
• Close the water tap and unscrew the water inlet
hose from the tap.
• Place the end of the drain hose and that of the inlet
hose in a bowl placed on the floor.
• Select programme “N” (drain) and run it until the
machine stops.
• Remove the plug from the socket.
• Screw the water inlet hose back on and put the
drain hose back in its place.
By doing this, any water remaining in the machine is
removed, avoiding the formation of ice and,
consequently, breakage of the affected parts.
When you use the machine again, make sure that
the ambient temperature is above 0°C.
19
Something not working?
Problems which you can resolve yourself.
Problem Possible cause
• The door is not firmly closed.
• The machine does not start up:
• The machine is not plugged in or there is no power
at the socket.
• The main fuse has blown.
• The programme selector dial is not positioned correctly
and the ON/OFF button has not been depressed.
• The water tap is closed.
• The machine does not fill:
• The inlet hose is squashed or kinked.
• The filter in the inlet hose is blocked.
• The door is not properly closed.
• The end of the drain hose is too low. Refer to
• The machine fills then empties
relevant paragraph in “water drainage” section.
immediately:
• The drain hose is squashed or kinked.
• The machine does not empty
• The option has been selected.
and/or does not spin:
• The laundry is not evenly distributed in the drum.
• The drain filter is clogged.
• There is water on the floor:
• Too much detergent or unsuitable detergent
(creates too much foam) has been used.
• Check whether there are any leaks from one of the
inlet hose fittings. It is not always easy to see this
as the water runs down the hose; check to see if it
is damp.
• The drain hose is damaged.
• Unsatisfactory washing results:
• Too little detergent or unsuitable detergent has
been used.
• Stubborn stains have not been treated prior to
washing.
• The correct temperature was not selected.
• Excessive laundry load.
• The machine vibrates or is
• The transit bolts and packing have not been
removed.
noisy:
• The support feet have not been adjusted.
• The laundry is not evenly distributed in the drum.
• Maybe there is very little laundry in the drum.
• The programme is still running.
• The door will not open:
• The door lock has not been released. The door
locked light is on.
• There is water in the drum.
20

ENGLISH
If you are unable to identify or solve the problem,
contact our service centre. Before telephoning, make
a note of the model, serial number and purchase
date of your machine: the Service Centre will require
this information.
21
P0042
Problem Possible cause
• The electronic unbalance detection device has cut
• Spinning starts late or the
in because the laundry is not evenly distributed in
machine does not spin:
the drum. The laundry is redistributed by reverse
rotation of the drum. This may happen several
times before the unbalance disappears and normal
spinning can resume. If, after 10 minutes, the
laundry is still not evenly distributed in the drum,
the machine will not spin. In this case, redistribute
the load manually and select the spin programme.
• The machine is fitted with a type of motor which
• The machine makes an unusual
makes an unusual noise compared with other
noise
traditional motors. This new motor ensures a softer
start and more even distribution of the laundry in
the drum when spinning, as well as increased
stability of the machine.
• Machines based on modem technology operate
• No water is visible in the drum
very economically using very little water without
affecting performance.

Bästa kund,
vi ber dig att läsa igenom den här bruksanvisningen
noggrant.
Framför allt är det viktigt att du läser
säkerhetsinformationen på de första sidorna i
bruksanvisningen. Förvara alltid bruksanvisningen
lättillgänglig, så att du snabbt kan hitta den och slå
upp information i den vid ett senare tillfälle. Om du
säljer maskinen ska bruksanvisningen överlämnas till
nästa ägare.
Transportskador
Kontrollera att maskinen inte är skadad. Eventuella
transportskador skall omedelbart anmälas till den
som ansvarat för transporten. Skador, felaktigheter
och ev. saknade delar skall omedelbart anmälas till
säljaren.
Så här använder du bruksanvisningen
Några stycken i bruksanvisningen är försedda med en symbol. Dessa symboler betyder följande:
Här finns viktig information om olämplig användning av tvättmaskinen som skulle kunna
förorsaka person- och egendomsskada.
Här finns information, som är särskilt viktig för att erhålla bästa möjliga tvättresultat.
Här finns viktiga miljö- och energispartips.
Vårt bidrag till miljöskyddet är att vi använder returpapper.
22

Innehållsförteckning
Avkalkning av maskinen 37
Viktig säkerhetsinformation 24-25
Åtgärd vid frysrisk 37
Bortskaffning/avfallshantering25
Nödtömning 37
Energisparråd 25
Om maskinen inte fungerar 38-39
Service och reservdelar 40
FÖR ANVÄNDAREN
Konsumentköp EHL 40
Garanti (gäller för Finland) 40
Din nya maskin 26
SVENSK
Konsumentkontakt 40
Beskrivning av maskinen 26
FÖR INSTALLATÖREN
Tvättmedelslådan 26
Tekniska data 40
Bruk 27
Kontrollpanel 27
Installation 41
Beskrivning av maskinens panelfunktioner 27-28
Uppackning 41
Tillbehör 41
Viktiga råd och tips
Transportsäkring 41
för dig som tvättar 29
Placering 41
Sortering av tvätt 29
Nivåjustering 41
Temperaturer 29
Vattenanslutning 42
Hur mycket tvätt per omgång? 29
Avloppsanslutning 42
Tvättmedel och tillsatser 29-30
— Över kanten på en vask 42
Tvättmärkning 31
— Anslutning till golvbrunn 42
— Anslutning till vattenlås 42
Så här använder du
Elektrisk anslutning 43
tvättmaskinen 32
Lägg i tvätten 32
Fyll på tvättmedel 32
Tillsätt sköljmedel 32
Tryck på önskad tillvalsknapp 32
Välj önskad temperatur 32
Välj önskat program och starta maskinen 32
Avslutat tvättprogram 33
Programöversikt 34-35
Skötsel och rengöring 36
Rengöring av höljet 36
Rengöring av tvättmedelslådan 36
Rengöring av lådöppningen 36
Rengöring av avloppssilen 36
Rengöring av tilloppsslangens filter 37
Rengöring av maskinen 37
23
Аннотации для Стиральной Машиной Electrolux EW 1063 S в формате PDF
Топ 10 инструкций
Другие инструкции
Specifications:
|
Accompanying Data:
AEG Electrolux EW 1063 S Washer PDF Instruction Booklet (Updated: Friday 11th of November 2022 11:03:05 PM)
Rating: 4.3 (rated by 61 users)
Compatible devices: EWF 668, EWT 1342, EWF 925, EWP 0864 TDW, EWT518, EW514S, EWS11056EDU, EWF1495.
Recommended Documentation:
AEG Electrolux EW 1063 S: Text of Manual, Instruction Booklet
(Ocr-Read Version Summary of Contents, UPD: 11 November 2022)
-
11, ENGLISH 11 Washing hints Sorting the laundry Follow the wash code symbols on each garment label and the manufacturer’s washing instructions. Sort the laundry as follows: whites, coloureds, synthetics, delicates, woollens. Temperatures 95° for normally soiled white cottons and linen (e.g. tea cloths, towels, tablecloths, sheets…) 60° for normally soiled, colour…
-
20, 20 Something not working? Problems which you can resolve yourself. Problem Possible cause • The machine does not start up: • The door is not firmly closed. • The machine is not plugged in or there is no power at the socket. • The main fuse has blown. • The programme selector dial is not positioned correctly and the ON/OFF button has not been depressed. • The machine does …
-
15, ENGLISH 15 7. At the end of the programme The machine stops automatically. If you have selected a programme which ends with the water of the last rinse left in the tub (option ), drain the water before opening the door. Select programme “N” (drain) or depress again button . Wait one or two minutes before opening the door to give the electric locking mechanism time to rele…
-
12, 12 Red wine: soak in water and detergent, rinse and treat with acetic or citric acid, then rinse. Treat any residual marks with bleach. Ink: depending on the type of ink, moisten the fabric first with acetone (*), then with acetic acid; treat any residual marks on white fabrics with bleach and then rinse thoroughly. Tar stains: first treat with stain remover, methylated spirits…
-
17, ENGLISH 17 Programme table Washing programmes for synthetics, mixed fabrics, delicates and wool Max load: 1.5 kg, wool 1 kg Programme Temp. Fabrics Additional functions Consumptions* Energy kWh Water lt Duration min. * The consumption data shown on this chart is to be considered purely indicative, as it may vary depending on the quantity and type of laundry, on the inlet wate…
-
14, 14 4. Select the temperature Turn the dial to the required setting. 5. Select the required option(s) 6. Select the programme and start the machine Turn the programme selector dial clockwise to the required programme and press the ON/OFF button: the mains on light and “door locked” light come on and the machine starts to operate. P0033 B M0043 M0042 60 Operating sequence Bef…
-
8, 8 Water drainage The end of the drain hose can be positioned in three ways: Hooked over the edge of a sink using the plastic hose guide supplied with the machine. In this case, make sure the end cannot come unhooked when the machine is emptying. This could be done by tying it to the tap with a piece of string or attaching it to the wall. In a sink drain pipe branc…
-
16, 16 Programme table Washing programmes for cotton and linen Max load: 4.5 kg In compliance with EC directive 92/75, the consumption figures indicated on the energy label refer to the 60°C wash programme for cotton (programme “B”). * The consumption data shown on this chart is to be considered purely indicative, as it may vary depending on the quantity and type of…
-
5, ENGLISH 5 Disposal Tips for environmental protection Packaging materials The materials marked with the symbol are recyclable. >PE<=polyethylene >PS<=polystyrene >PP<=polypropylene This means that they can be recycled by disposing of them properly in appropriate collection containers. Machine Use authorised disposal sites for your old appliance…
-
21, ENGLISH 21 If you are unable to identify or solve the problem, contact our service centre. Before telephoning, make a note of the model, serial number and purchase date of your machine: the Service Centre will require this information. P0042 Problem Possible cause • Spinning starts late or the machine does not spin: • The electronic unbalance detection device has cut in …
-
2, 2 Dear customer, Please read these operating instructions carefully and pay particular attention to the safety notes indicated in the first pages. We recommend that you keep this instruction booklet for future reference and pass it on to any future owners. Transport damages When unpacking the appliance, check that it is not damaged. If in doubt, do not use it and contact the S…
-
3, ENGLISH 3 Maintenance 18 Bodywork 18 Detergent dispenser drawer 18 Drain filter 18 Water inlet filter 18 Emergency emptying out 19 Frost precautions 19 Something not working? 20-21 Warnings 4-5 Disposal 5 Tips for environmental protection 5 Technical specifications 6 Installation 7 Unpacking 7 Positioning 7 Water inlet 7 Water drainage 8 Electrical connection 8 Y…
AEG Electrolux EW 1063 S: Recommended Instructions
GSS20, PipeRider HM200c, U36-2G24R, COOK-RITE EL24027, VR-ACF, 20230


-
Model/Modelo: 796.4198*Kenmore Elite®Front-LoadingAutomatic WasherLavadora automática de carga frontalSears Brands Management CorporationHoman Estates, IL 60179 U.S.A.www.kenmore.comwww.sears.comSears Canada Inc.Toronto, Ontario, Canada M5B 2C3www.sears.caUse & Care GuideManual de Uso y CuidadoEnglish / Español* = color number, número de color®For bes …
796.4198 series 70
-
Page 1Pages 2-3Pages 4-5Page 5Page 5Page 6Page 7Page 8Page 16OVERSIZED CAPACITY PLUS WASHER MAV-12Have complete model and serial numberidentification of your washer. This is locatedon a data plate on the back left of the controlpanel. Record these numbers below for easyaccess.Model Number–– –– –– –– –– –– –– –– ––Serial Number–– –� …
MAV-12 24
-
MAYTAG NEPTUNE®TL WASHERMAYTAG NEPTUNE®TL WASHERFAV-26 2906140 Rev. B B/01/04 ©2004 Maytag Appliances Sales Co.Safety Instructions …………………………………………. 1-2Operating Instructions………………………………………..3Control Panel ……………………………………………………. 4Set Your Own Cycle……………. …
NEPTUNE WASHER 80
-
WasherSafe~ instructions ………….,……3, 4Operating Instructions, TipsAuto Soak Cycle ……………………………………..7Bleach Dispenser …………………………………….7Control Settings…….., . . . . . . . . . . . . . . . . . . . . . . . . . . . ……….6Cycle Descriptions …………………………………..5Cycle Times .. …
WA8600SCL 24
-
GEAppliances.comSafety Instructions ………. 2,sOperating InstructionsCare and Cleaningof the Washer …………………. 7Control Panels …………………. 4Control Settings …………….. 4, 5Features ………………………. 6Loading and Usingthe Washer …………………… 7Troubleshooting Tips …… 8-10Consumer SupportConsumer Support ……………. 12 …
GTWN4000M0WS 24
-
1 2 3 4 56Emptying condensationEmpty container after each drying ope ration!1. Pull out condensation container keepin g it horizontal.2. Pour out condensation.3. Always push container in fully until it clicks into place.If Container flashes in the displa y panel a What to do if…, Page 10.Cleaning the fluff filterClean the fluff filter after each d rying operation.1. Open the …
Instructions for Use 8
-
3FHJTUFSZPVSOFXEFWJDFPO.Z#PTDIOPXBOEHFUGSFFCFOFGJUTCPTDIIPNFDPNXFMDPNFen Instruction Manual and Installation InstructionsWashing machineWGA144A0AU …
WGA144A0AU 56
-
CONTENTSBEFORE USING THE WASHING MACHINEFIRST WASH CYCLEPRECAUTIONS AND GENERAL RECOMMENDATIONSDESCRIPTION OF THE WASHING MACHINEPREPARATION OF THE WASHINGDETERGENTS AND ADDITIVESLIQUID BLEACH (HYPOCHLORITE)DYEINGWASHING PROGRAMMEREMOVING THE FILTERDRAINING RESIDUAL WATERCARE AND MAINTENANCETROUBLESHOOTING GUIDEAFTER-SALES SERVICETRANSPORT AND HANDLINGINSTALLATION3g …
AWM 5500 16
-
L140WM10E WASHING MACHINEINSTALLATION GUIDE / INSTRUCTION MANUALGBVASKEMASKININSTALLASJONSVEILEDNING/BRUKERVEILEDNINGTVÄTTMASKININSTALLATIONS- OCH BRUKSANVISNINGPESUKONEASENNUS- JA KÄYTTÖOPASVASKEMASKINEINSTALLATIONS- OG BRUGERVEJLEDNINGNOSEFIDKLogik L140WM10E_IB_5L_101011.indb 1 11/10/2010 11:36 AM …
L140WM10E 108
-
100WASHING MACHINESERVICE MANUAL READ THIS MANUAL CAREFULLY TO DIAGNOSE PROBLEMS CORRECTLY BEFORE SERVICING THE UNIT.MODEL : WM2411HW/WM2011H*/WM1811CWWM2432HW/WM2032H*/WM1832CWWM0532HW/WD-10210BD/WD-12210(5)BDWM2444H*M/WM2442H*/WM2042CW WM0642H*CAUTION Website:http://www.LGEservice.comE-mail:http://www.LGEservice.com/techsup.html! …
WM2411HW 43