перейти к содержанию
Руководства пользователя, инструкции и руководства для продуктов FLAMINGO.
Найти
Dog Guide Инструкции по использованию велосипедного поводка 5308389 Инструкции по использованию велосипедного поводка Самое важное: проверьте винты, в том числе красивые винты, и при необходимости затяните их! ВНИМАНИЕ: Пожалуйста, соблюдайте следующие инструкции по технике безопасности: Перед использованием Dog Guide проверьте крепление на велосипеде. Dog Guide должен собираться и использоваться только в соответствии с …
Подробнее «FLAMINGO 5308389 Инструкция по эксплуатации велосипедного ведущего устройства»
Дымовой извещатель FLAMINGO ОБЩАЯ ИНФОРМАЦИЯ Этот извещатель представляет собой дымовой извещатель, работающий по принципу фотоэлемента. Это означает, что сигнализация проверяет воздух на наличие дыма в результате пожара. Он не обнаруживает тепло, газ или огонь. Если детектор дыма правильно установлен и обслуживается, он подаст сигнал тревоги в первые секунды.tagе. …
Подробнее «Руководство пользователя дымового извещателя FLAMINGO»
В настоящее время вы находитесь на странице с руководствами . Выберите один из продуктов, чтобы сразу перейти к руководству по этому продукту. Не можете найти ? Тогда попробуйте вбить в поле поиска и модель, чтобы найти нужное руководство . На ManualsPDF.ru в настоящее время имеется 5 руководств . Самые популярные :
- Flamingo FA370
- Flamingo FA22RF
- Flamingo FA25
Последнее добавленное руководство было добавлено 2018-11-05, и это Flamingo FA25.
- Manuals
- Brands
- R82 Manuals
- Wheelchair
- Flamingo
- User manual
-
Contents
-
Table of Contents
-
Troubleshooting
-
Bookmarks
Quick Links
flamingo
TM
English user manual
11.2004
© 2004 R82 A/S. All rights reserved.
The R82 logo and the Flamingo are registered trademarks of R82 A/S.
Related Manuals for R82 Flamingo
Summary of Contents for R82 Flamingo
-
Page 1
English user manual 11.2004 © 2004 R82 A/S. All rights reserved. The R82 logo and the Flamingo are registered trademarks of R82 A/S. -
Page 2: Table Of Contents
Guarantee …………….. 4 Maintenance …………..4 Flamingo ready for use …………5 Angling the seat and back ……….6 Height adjustment of the Flamingo ……..7 Adjustable footrests …………8 Side supports …………..9 Head support …………..10 Push brace …………..11 Armrest / tray …………..
-
Page 3
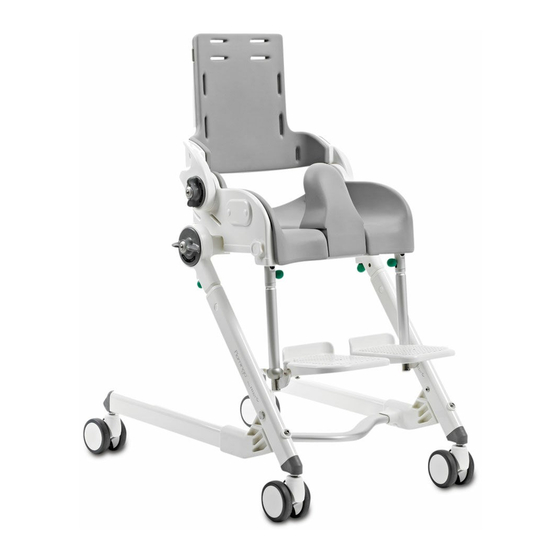
The Flamingo is designed to make the toilet-/bathing situation as pleasent and comfortable for both the child and adult. Use the Flamingo as bathing chair, toilet seat or bathing seat. Bring the Flamingo on a journey and get fully advantage of the numerous features the Flamingo offers. -
Page 4: Safety
SAFETY Flamingo has earned the CE-mark. This certifies that it meets all relevant European safety requirements. Remove the CE-mark, when rebuilding the product or when using other than original R82 spare parts. Never leave your child unattended in this product.
-
Page 5: Flamingo Ready For Use
FLAMINGO READY FOR The Flamingo is delivered folded so that it takes up the minimum of room during transport. Un- pack the Flamingo. Unfold the frame and fit the struts at point (A) using screws. You will find the struts and screws in a pla- stic bag at the top of the back support.
-
Page 6: Angling The Seat And Back
Do not activate the green security nuts under the seat to adjust the angle. The se- curity nuts is only to be used when folding the Flamingo. Make sure that the grips on either side of the chair are tightened.
-
Page 7: Height Adjustment Of The Flamingo
HEIGHT ADJUSTMENT OF THE FLAMINGO Unscrew the screws at the top of the lower frame (A) and pull the frame from the seat until you have the height you desire. The screw hole must be aligned with a corre- sponding hole on the inside of the frame before you begin to screw the screws back in place.
-
Page 8: Adjustable Footrests
ADJUSTABLE FOOTRESTS 1) The footplates can be adjusted to the wanted angle and position (A). The footplates are individually height adjustable. Loosen the wing screw (B) on the footsupport bar and adjust the height. 2) Angle the complete footrest unit: * Tip up the footplates to vertical position (C) * Pull down the green security nuts (D) below the seat and angle the footrest unit forwards…
-
Page 9: Side Supports
SIDE SUPPORTS 1) Fixed side supports: Follow the below to mount the side supports correct: * Place the side support in the groove as shown * Push the side support in place behind the upholstery (B) * Fasten the side support with a Allen screw Remove the Allen screw to dismount the side support.
-
Page 10: Head Support
HEAD SUPPORT 1) The head support is mounted in the fitting on the back. Use the handle (A) to adjust the height.Use the Allen key to angle (B) and adjust the head support from side to side (C). 2) Replace the head support bar with a swan- neck bar, when support further ahead is needed.
-
Page 11: Push Brace
PUSH BRACE 1) The Flamingo can be equipped with push brace. Mount the push brace in the fitting on the back of the chair and fasten with the handle (A). Loosen the handle (B) to adjust the height of the push brace.
-
Page 12: Armrest / Tray
ARMREST / TRAY 1) The armrest/tray easily swing away when the child is to be placed. * The tray is mounted in the fittings on both sides (A). * Open the fitting below the tray, to swing-away the armrest/tray (B).
-
Page 13: Commode Pan
COMMODE PAN The Flamingo can be equipped with an easily removeable commode pan. Mount holders beneath the seat to be able to mount the commode pan. 1) Use Allen screws to mount the two holders in the holes (A) beneath the seat.
-
Page 14: Upholstery And Splashguard
UPHOLSTERY AND SPLASHGUARD 1) The upholstery and splashguard is very easy to dismount, for instance when cleaning the chair. * Lift up and remove the splashguard (A) * Remove the upholstery (B) by pressing/pulling the knobs out of the holes in the chair. 2) The splashguard is available in two versions;…
-
Page 15: Vest / Crossvest
VEST / CROSSVEST 1) Mounting the vest / crossvest: * Mount the shoulder straps through the holes in the back (A). * Mount the side straps through the holes in the seat (B). * Fasten the straps with snap-locks buckles (C) on the back.
-
Page 16: H-Strap / Hipstrap
H-STRAP / HIPSTRAP 1) Mounting the H-strap / Hipstrap: * Mount the shoulder straps (H-strap) through the holes in the back (A). * Mount the side straps through the holes in the seat (B). * Fasten the straps with snap-locks buckles (C) on the back.
-
Page 17: Dismounting The Seat
DISMOUNTING THE SEAT Another unique feature of the Flamingo is the seat. It can be removed from the frame and mounted on a standard toilet or used in an ordinary bathtub. Remove the screws (A) on both sides of the chair, to dismount the seat.
-
Page 18: Mounting The Seat On A Toilet
MOUNTING THE SEAT ON A TOILET To be able to mount the Flamingo seat on a standard toilet, an extra fitting must be ordered and the following instructions must be followed: 1) Making the seat ready: * Dismount the seat (see page 15) * Remove the mounting for commode pan, if any.
-
Page 19: Flamingo As Bathing Seat
FLAMINGO AS BATHING SEAT With suction cups mounted underneath the seat, the Flamingo is easy to mount in the bathtub. * Dismount the seat (see page 15) * Remove the mountings for commode pan, if 1) Mount the four suction cups (A) below the…
-
Page 20: Folding The Flamingo
FLAMINGO The Flamingo is folded/unfolded very easily and is therefore easy to bring anywhere. To make the Flamingo take up as little room as possible, this correct sequence must be followed: 1) Dismount the commode pan, if any (A). 2) Tip the footplates into vertical position (B) and…
-
Page 21: Product Identification
PRODUCT IDENTIFICATION A) Serial number The label is placed on the inside of the frame just above left front wheel. B) Manufacturer The label is placed on the frame just above left rear wheel. Dato: 31-01-02 Belast: kg 0840-01-111878-001 Varenr: 880003 5707292 134158…
-
Page 22: Measurements
MEASUREMENTS Size 1 Size 2 Size 3 Size 4 cm (inch) cm (inch) cm (inch) cm (inch) Shoulder width (SHW) 30 (12″) 32 (12½») 38 (15″) 40 (15½») Back height (BH) 36 (14″) 40 (15½») 43 (17″) 47 (18½») Seat width (SW) 25 (10″) 28 (11″) 32 (12½»)
-
Page 23: Order Numbers / Accessories
* X = H for right / V for left TECHNICAL DATA Seat: Made of white ABS. Recyclable Upholstery: PUR (polyurethaan) Frame: Aluminium and powder painted stainless steel 37 PRODUCER DISTRIBUTOR R82 A/S Parallelvej 3 8751 Gedved Denmark Please find your distributor on www.r82.com…
-
Page 24: Care And Maintenance
Accessories or available spare parts which are broken can be forwarded to R82 for repair. If fault in the fundamental pars, the hole chair need to be returned to R82 for repair. R82 will not be held responsible for damage or injury caused by use of non-original parts or repairs made by a non- authorized R82 person.