Данная статья является частью цикла статей FM8
Мы рекомендуем вам не торопиться, и выполнить следующие короткие участки пошагового руководства. Они помогут вам понять некоторые из ключевых аспектов вашего FM8.
Содержание
- 1 Загрузка и использование звуков
- 2 Морфинг и простое редактирование
- 3 Использование арпеджиатора и изменение атрибутов
- 4 Создание своего первого звука с нуля
Загрузка и использование звуков[править]
Хотя это структурированный учебник, если вы найдёте что-то интересное на этом пути, не стесняйтесь исследовать всё, что вас интересует.
Звуковая библиотека FM8 организована в базу данных предоставляя вам удобные средства для поиска и извлечения звуков, которые вы ищете.
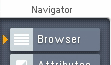
Кнопка выбора браузера
Давайте начнём прямо сейчас и откроем браузер, нажав на соответствующую кнопку в навигаторе.
![]()
Кнопка переключения окна базы данных
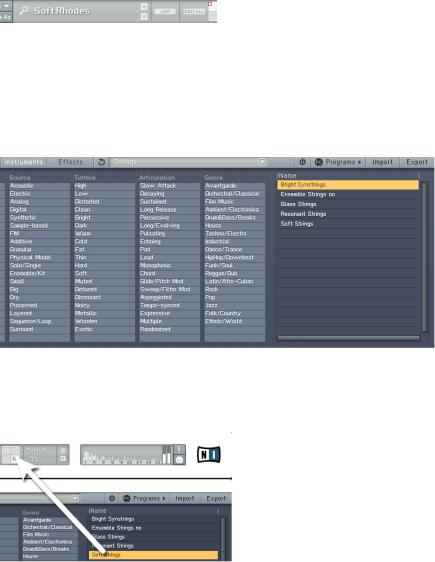
Нажмите кнопку окна базы данных, чтобы увидеть окно базы данных как показано ниже.
Открытая библиотека с браузером
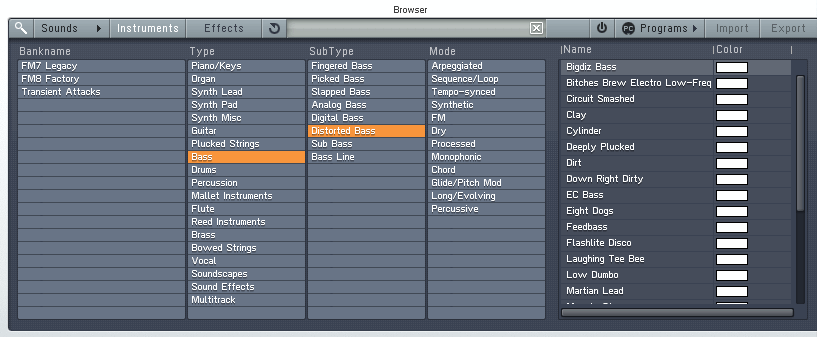
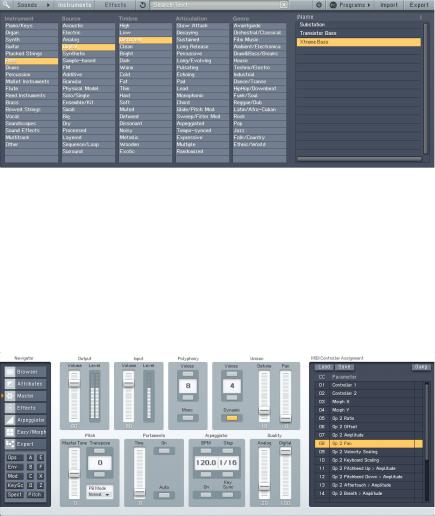
Теперь библиотека FM8 на кончиках ваших пальцев. С левой стороны браузера находится четыре столбцов категорий. Они содержат атрибуты, используемые для пометки, классификации и поиска всех звуков. Это тоже самое, что и во всех продуктах NI где используется KORESounds.
Давайте отфильтруем для класс FM E-Piano. Чтобы сделать это, мы объединяем несколько атрибутов, щелкая по ним в списке:
- В самом левом столбце выберите название банка FM7 Legacy.
- Нажмите на Piano/Keys в столбце Type.
- Выберите Electric Piano в столбце SubType.
- И в столбце Mode выберите характеристики звука к примеру Synthetic.
Когда вы комбинируете атрибуты, на поиск накладывается всё больше и больше ограничений, поэтому количество результатов поиска, отображаемые в правой части уменьшается.
Звук FM8 Soft Rhodes выглядит многообещающим, так что дважды щелкните по нему.
![]()
Теперь вы можете воспроизводить звук через вашу MIDI-клавиатуру. Если вы ещё не настроили MIDI подключение, пожалуйста, посмотрите Руководство по установке для получения большей информации по этой процедуре.
Морфинг и простое редактирование[править]
Теперь давайте проверим функцию морфинга. Мы собираемся загрузить четыре различных струнных звука в график морфинга.
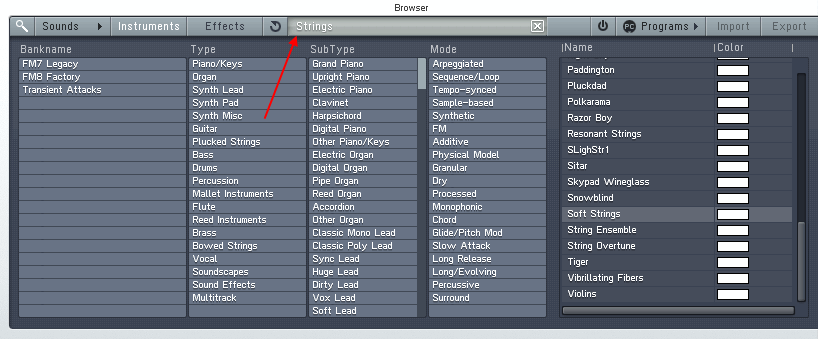
Обзор струнных
Откройте браузер, нажав на соответствующую кнопку в навигаторе, и в поле поиска введите Strings. В результатах поиска вы увидите список струнных звуков.
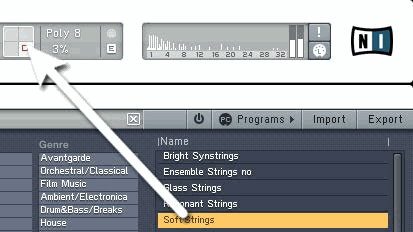
Перетащите звук на график морфинга
Теперь мы собираемся перетащить четыре звука в четырех небольших квадранта на графике морфинга в панели управления синтезатором. Первый звук, который вы перетащите на график будет устанавливать все параметры, которые не подвергаются морфингу (огибающие, модуляций и т.д.).
- Glass Strings
- Hirez Bell String
- Soft Strings
- Resonant Strings
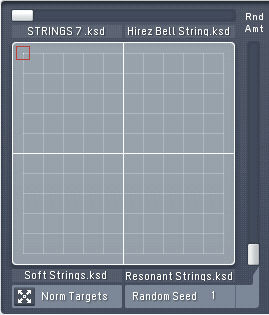
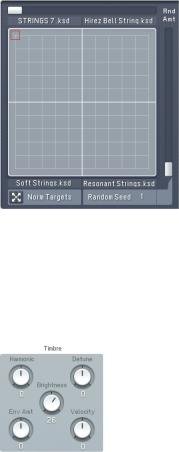
Заполненный график морфинга
Переключитесь на окно Easy/Morph. Вы видите четыре звука занимающих четырех угла графика морфинга. Возьмите несколько аккордов во время перемещения ручки морфинга (маленький красный квадрат). Вы можете услышать звук, который превращается между четырьмя разными тембрами.
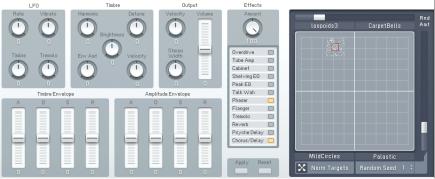
Звук немного приглушенный, особенно на двух верхних звуках струн. Мы собираемся украсить их.
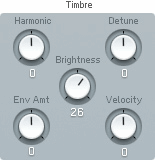
Добавьте немного блеска
Нажмите по ручке Brightness (яркость) и потяните её вверх до значения 26 (см. рис. выше). Если вы сейчас играете ноты, то вы можете услышать как все четыре звука становится всё ярче. Редактирование ручек макросов изменяет параметры звука после произведения морфинга, поэтому это влияет на всех четырех угла.
Немного больше движения также может хорошо звучать, поэтому мы добавляем к тембру звука LFO.

Быстрое применение LFO
Установите Rate (частота) в значение -82 и Timbre (тембр) в значение 46. Теперь вы можете услышать, что звуки стали гораздо живее.
Параметры окна Easy являются макро контроллерами. Здесь вы можете полностью изменить звук с помощью поворотов нескольких ручек, без того чтобы погружаться во внутренности FM синтеза.
Использование арпеджиатора и изменение атрибутов[править]
Теперь что-то совсем другое: арпеджиатор. Звуки струнных не очень хорошо поддаются арпеджированию, мы сначала должны найти другой звук. Переключитесь обратно в браузер.
Загрузите бас
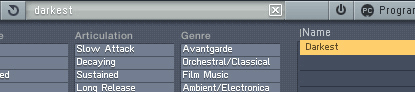
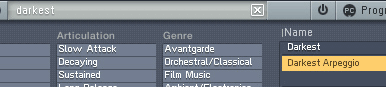
Введите Darkest в поле поиска. Это позволит найти хороший, аналогово звучащий синтезированный бас. Загрузить его с помощью двойного щелчка по результату поиска в браузере.
Теперь переключитесь на арпеджиатор.
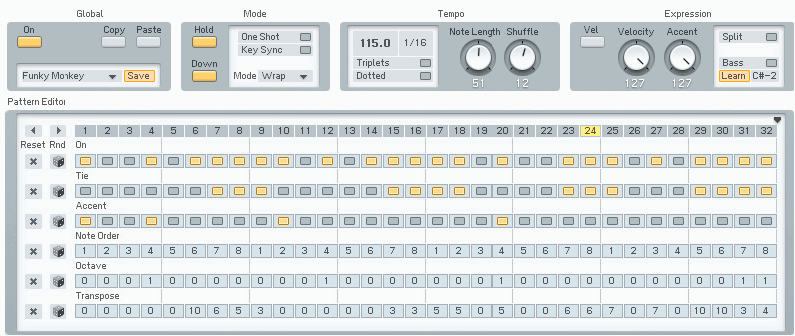
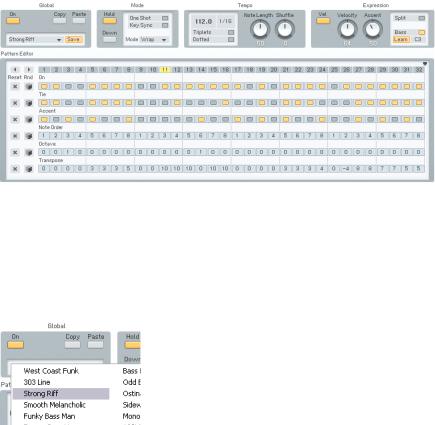
Веселье с последовательностями
Нажмите кнопку включения On и нажмите аккорд на клавиатуре.
Теперь вы можете начать экспериментировать с немного различными настройками арпеджиатора. Хороший старт это переключение в режим автопилота (удерживание кнопки), чтобы освободить руки для настроек.
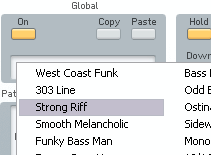
Поскольку линия которую вы слышите в данный момент может быть немного скучной, выберите другую линию из меню Template (шаблон) (меню находится ниже кнопки On). Как вам Strong Riff?
Выбор последовательностей
Другой плодотворный набор параметров можно найти в разделе Expression (выразительность). Немного поэкспериментируйте с настройками Velocity (велосити) и Accent (акцент), чтобы получить представление о том, что они делают. Вы можете отключить кнопку Vel и тогда арпеджиатор будет воспроизводить те велосити которыми вы первоначально играли. Accent устанавливает количество применяемого акцента для каждого акцентированного шага на сетки последовательности.
Затем мы собираемся добавить хороший эффект. Переключитесь на страницу Effects.
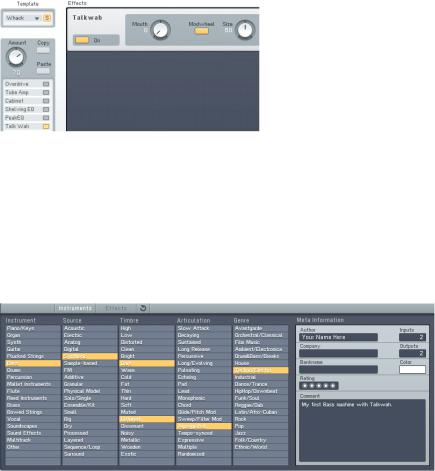
Добавление Talkwah
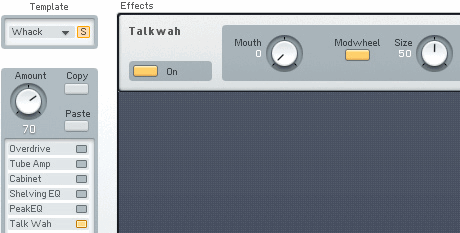
Talkwah всегда хороший эффект, когда речь идет о добавлении характера басовой линии. Включите его через переключатель эффектов на левой стороне окна.
Установите параметр Amount (количество) в значение около 70, так чтобы звук оригинального баса ещё просвечивл. Теперь активируйте опцию Modwheel (колесо модуляции) и повеселитесь изменяя значение через значение Mouth вашим колесом модуляции.
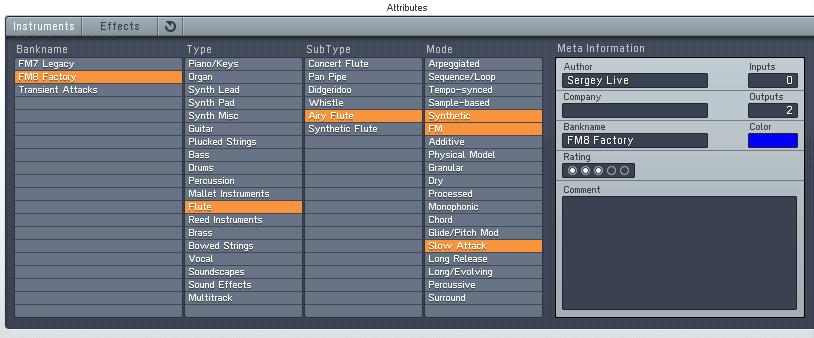
Теперь, когда мы создали нашу собственную басовую линию, мы хотим сохранить звук с новым названием и с некоторыми дополнительными атрибутами, так чтобы мы могли найти его снова в будущем. Перейдите в окно Attributes.
Новые атрибуты
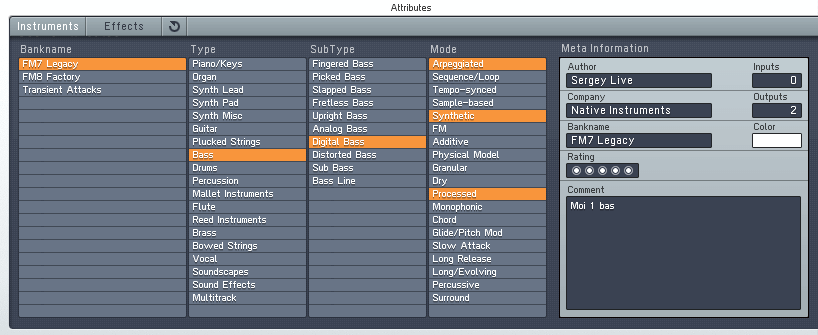
Вы видите оригинальные настройки звука Darkest FM8. Измените имя в поле Author на ваше имя и добавить несколько соответствующих атрибутов для характеризования изменений, которые мы сделали. На скриншоте мы добавили:
- Type — Bass.
- SubType — Digital Bass.
- Mode — Arpeggiated, Synthetic, Processed.
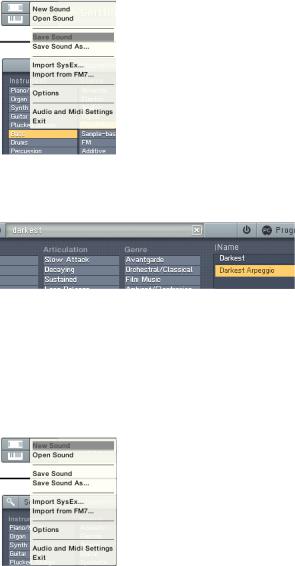
Сохранение вашего звука
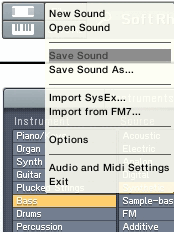
Теперь сохраните свой новый звук, выбрав Save Sound из меню File. Откроется диалоговое окно, просящее ввести название файла. Мы выбрали Darkest Arpeggio.
Новый звук в базе данных
Переключитесь обратно в браузер и введите Darkest в поле поиска. Вы увидите новый звук в результатах поиска.
Создание своего первого звука с нуля[править]
Теперь пришло время создать свой первый FM звук с нуля. Конечно, мы собираемся иметь его простым и ясным.
Инициализация буфера редактирования
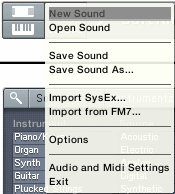
Выберите New Sound из меню File в панели управления синтезатором. Это действие загружает начальный звук хранящийся в файле NewSound.ksd (находится в папке синтезатора). Если вы сыграете ноту вы услышите простую и чистую синусоиду, исходящую из оператора F (если у вас ещё не отредактирован NewSound.ksd).
Один оператор
Нажми по нему для открытия страницы оператора F в экспертном управлении. Это звучит довольно скучно, поэтому давайте добавим несколько гармоник.

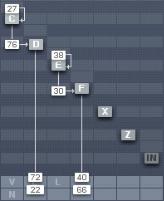
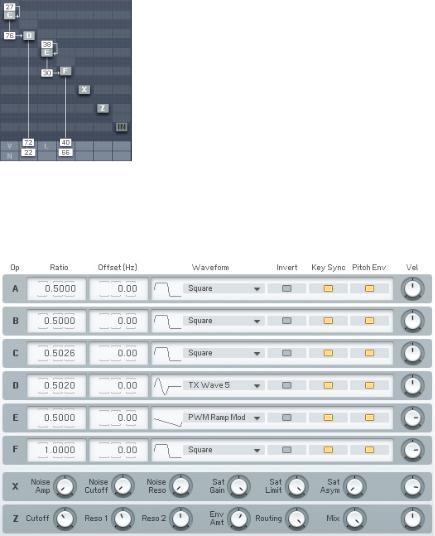
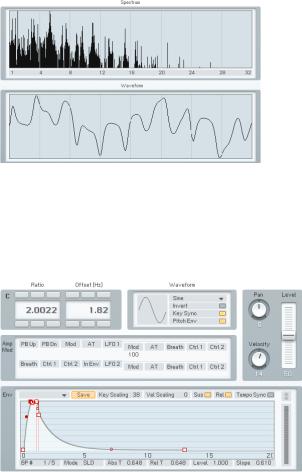
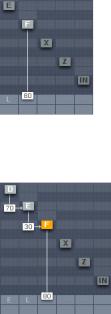
Три оператора и некоторая модуляция
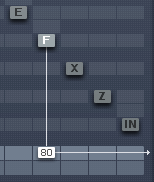
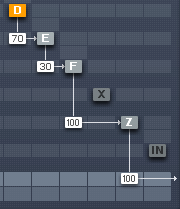
Для этого щёлкните правой кнопкой мыши по операторам D и E, чтобы включить их (буквы станут белыми). Затем нажмите непосредственно слева от оператора F и перетащите мышью, пока вы не получите сумму около 30. Теперь оператор Е модулирует оператор F.
Следующим шагом сделайте так чтобы оператор D модулировал оператор Е суммой в 70. Мы получили небольшую сеть модуляторов и носителей. Вы видите, что модулятор (например, Op. Е) модулирует носитель (Ор. F), который сам может быть носителем (например, Op. E модулируется Op. D).
При игре на клавиатуре вы услышите дополнительные гармоники производимые частотной модуляцией.
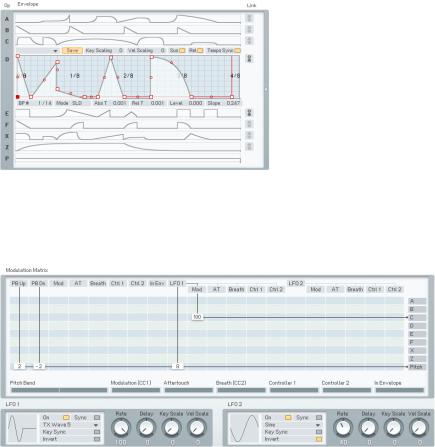
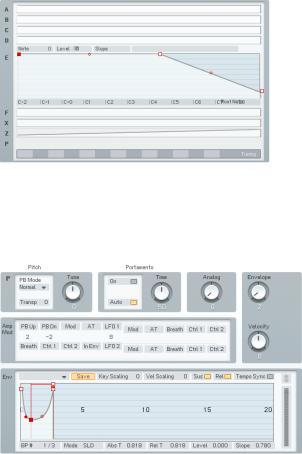
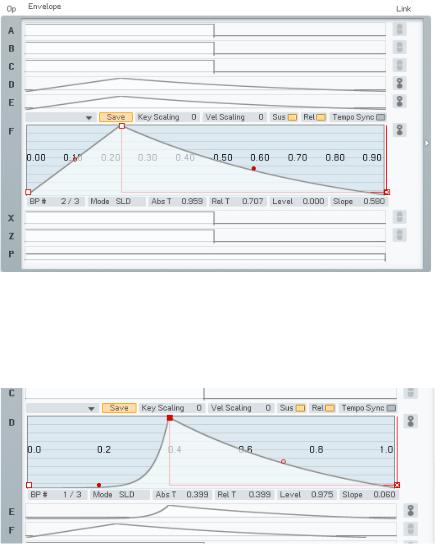
Давайте добавим звуку некоторое движение путём настройки огибающих. Переключитесь на страницу огибающих (Env).
Теперь убедитесь, что для редактирования выбран оператор F и привяжите операторы D и Е к оператору F, нажав на их кнопки цепей справа от графиков огибающих. Теперь каждое изменение, внесённое в оператора F будет отражено на двух других операторах, и наоборот.
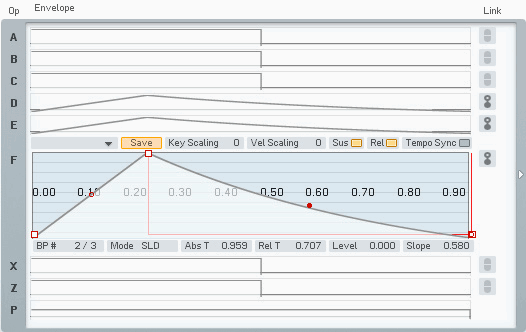
Установите немного атаки и хорошее затухание, как показано на рисунке выше. Помните, что вы можете произвести двойной щелчок по графику для его центрирования. Вы видите, что все три огибающие имеют одинаковую форму.
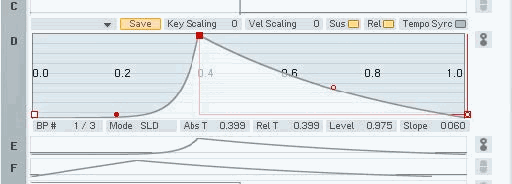
На следующем этапе отключите кнопки привязок и переключаться на огибающую оператора D. Возьмите ручку склона фазы атаки (красная точка) и установите экспоненциальный склон. Сыграйте некоторые клавиши, и вы услышите, что гармоники в настоящее время в звуке отодвинулись в соответствии с огибающей оператора D, которая является модулятором. Это делает огибающую оператора D похожей на огибающую фильтрации.
Давайте немного подтолкнём звук в деревянно духовом направлении. Прежде всего, мы хотим, чтобы он стал немного мягче. Что может быть лучше, чем низкочастотный фильтр, чтобы смягчить его?
К действию присоединяется оператор Z
Оператор Z содержит большое количество многорежимных фильтров, так что мы просто маршрутизируем наш сигнала через него. Посмотрите на картинку выше для того чтобы понять, как это сделать. Не забудьте полностью убрать отправку прямого сигнала от оператора F (двойной щелчок по значению это ярлык для этого).
Теперь переключитесь на окно оператора Z.
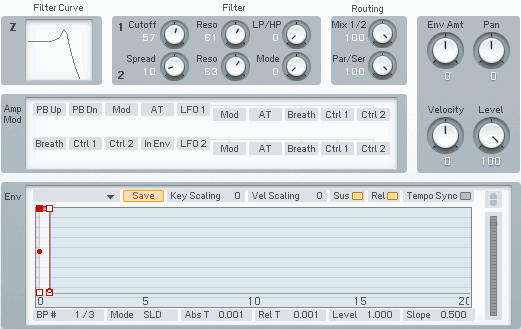
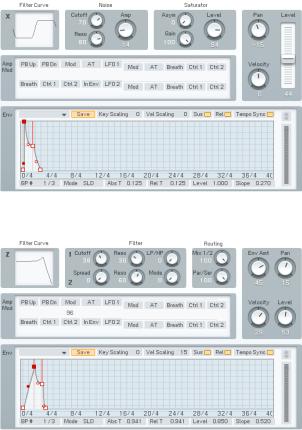
Установка фильтра
Установите Cutoff (частота среза) до около 60 и Resonance (резонанс) первого фильтра до около 60. Этот устанавливает потолки высоко-средних и высоких частот при добавлении некоторого характера через резонансный пик. Просто взгляните на кривую фильтра, чтобы увидеть ответ.
Мы по-прежнему что-то упускаем — дыхание. Хриплые звуки, обычно синтезируются с шумом, и что вы думаете — FM8 может производить это тоже. Генератор шума находится в операторе X.
Шумовой оператор на сцену
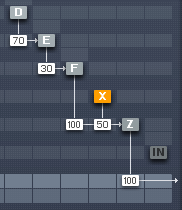
Активируйте оператор X и маршрутизируйте его сигнал через фильтр (оператор Z), как показано на рисунке выше. Теперь мы переходим к окну оператора X и настраиваем параметры.
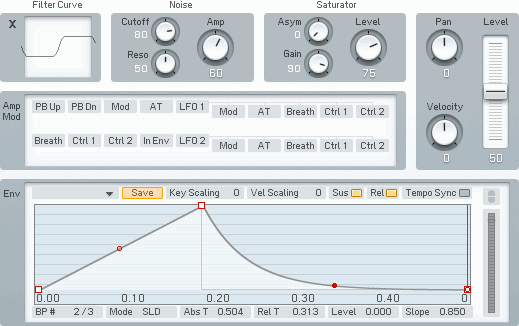
Элементы управления шумом
Помимо огибающей, настройки которые находятся выше, оставьте в значениях по умолчанию.
Мы должны создать форму огибающей с небольшой атакой и экспоненциальной фазой затухания. Мы хотим получить простой, короткий, мягкий шум вырывающийся в начале звука, так что вы можете отключить кнопки Sustain и Release. Сыграйте несколько нот, чтобы услышать как шум постепенно появляться и исчезает в звуке.
Пришло время сохранить новый звук, но не раньше, чем мы добавим кучу атрибутов для его интеграции в базу данных FM8. Чтобы сделать это, откройте окно Attributes.
Добавление некоторых атрибутов
Введите свое имя в поле Author и добавить соответствующие атрибуты, описывающие новый звук.
Последний шаг это выбрать Save Sound из меню File, введите название звука и сохранять его в звуковую папку. Мы оставим его название вашему воображению.
Ну, вот и всё пока. Просто продолжайте экспериментировать с новым звуком. Может быть стоит, добавить некоторые эффекты или LFO чтобы сделать его более живым…
FM8 Руководство по синтезатору
Автор: Сергей Live
Сайт: Wikisound.org
Видеокурс по синтезу в синтезаторе FM8. Рассмотрение всех параметров и примеры синтеза.
ЧТО ДАСТ ВАМ КУРС ПО СИНТЕЗАТОРУ FM8?
* Ясность и понимание параметров синтезатора, в курсе наглядно показано как работают и на что влият все ручки и кнопки.
* В вашей власти окажется мощнейший инструмент по созданию звуков, что позволит реализовать ваш потенциал в максимальной степени.
* Теперь, садясь писать музыку вы не будите крутить наугад и гадать на что влияет определённый параметр.
* Посмотрев данный курс вы получите понимание инструмента с помощью которого вы сможете реализовать свой творческий потенциал в макимальной степени. Таким образом ваша музыка начнёт выделятся среди общей массы музыкантов.
* Верное и последовательное понимание всех функции синтезатора, они объяснены подробно и наглядно.
* Вам откроются ранее неизвестные возможности синтеза — это 100% даст новый творческий толчок.
ЧТО ТАКОЕ СИНТЕЗАТОР FM8
FM8 это синтезатор с очень широкими возможностями, основанный частотной модуляции. Мощный звуковой-движок позволяет достичь непревзойденного качества, генерирует мощный и энергичный звук. Ясно спроектированный интерфейс, с простыми элементами управления, которые регулируют более сложные параметры автоматически. FM8 Предлагает большой диапазон характеристик и эффектов. Уникальный арпеджиатор, революционный звук морфинга, большой выбор новых эффектов открывают новые бесчисленные возможности. Акустический потенциал FM8 выходит далеко за границы стандартного FM-синтеза.
СОДЕРЖАНИЕ КУРСА
Курс вместе с бонусами состоит из 39 видео-уроков общей продолжительностью 5ч. 30мин., в ходе которых автор доходчиво и понятно объясняет функции синтезатора, необходимые для успешного и комфортного создания собственных звуков. Всё объясняется и показывается подробно, у вас не останется вопросов что означает какой либо параметр синтезатора.
Список уроков
01 Краткий обзор основных функций
02 Страницы операторов A-E
03 Страницы операторов A-E огибающая
04 Матрица
05 Что такое FM синтез
06 Окно оператора X
07 Окно оператора Z
08 Окно операторов
09 Окно огибающих
10 Окно модуляций
11 Окно масштабирования клавиш
12 Окно высоты тона
13 Окно спектра
14 Окно эффектов
15 Эффекты искажений (Overdrive, Tube Amp)
16 Эффект Cabinet
17 Эффекты эквалайзеры
18 Эффект Talk Wah
19 Эффект Phaser
20 Эффект Flanger
21 Эффект Tremolo
22 Эффект Reverb
23 Эффект PsycheDelay
24 Эффект Chorus.Delay
25 Страница Arpeggiator
26 Страница Master
27 Страница Easy-Morph глобальные параметры
28 Страница Easy-Morph график морфинга
29 Использование браузера
30 Сохранение пресетов
31 Панель управления синтезатором
32 Настройки синтезатора
33 Как операторам настроить смещение фазы
34 Использование FM8 в качестве эффекта
БОНУСЫ
Конечно же, присутствуют полезнейшие бонусы, которые помогут вам эффективно эксперементировать в создании собственных звуков, в уроке под названием «Рецепты FM синтеза».
Также в бонусах рассматриваются способы создания некоторых популярных звуков. Вы увидите, как делается уникальное звучание и как создаются собственные звуки на лету
И не мало важные моменты о том как получать широкий звук.
01 Рецепты FM синтеза
02 Синтез кислоты
03 Синтез лидов
04 Синтез говорящего баса
05 Как синтезировать широкие звуки
КУПИТЬ ВИДЕОКУРС

 Loading…
![]()
FM8
Operation Manual

The information in this document is subject to change without notice and does not represent a commitment on the part of NATIVE INSTRUMENTS GmbH. The software described by this document is subject to a License Agreement and may not be copied to other media. No part of this publication may be copied, reproduced or otherwise transmitted or recorded, for any purpose, without prior written permission by NATIVE INSTRUMENTS GmbH, hereinafter referred to as NATIVE INSTRUMENTS. All product and company names are trademarks of their respective owners.
Furthermore, the fact that you are reading this text means you are the owner of legal version rather than an illegal, pirated copy. It is only through the loyalty and honesty of people like yourself that NATIVE INSTRUMENTS GmbH can continue to develop and create innovative audio software. On behalf of the entire company, thank you very much.
Users Guide written by Thomas Loop
Special thanks to the Beta Test Team, who were invaluable not just in tracking down bugs, but in making this a better product.
© Native Instruments GmbH, 2006. All rights reserved.
|
Germany |
USA |
|
NATIVE INSTRUMENTS GmbH |
NATIVE INSTRUMENTS North America, Inc. |
|
Schlesische Str. 28-30 |
5631 A Hollywood Boulevard |
|
D-10997 Berlin |
Los Angeles, CA 90028 |
|
Germany |
USA |
|
info@native-instruments.de |
info@native-instruments.com |
|
www.native-instruments.de |
www.native-instruments.com |
|
Table Of Contents |
|
|
1. Welcome to FM8.………………………………………………………………… |
6 |
|
2. Installation and Setup…………………………………………………………… |
7 |
|
3. Overview and Tutorial……………………………………………………………. |
7 |
|
3.1. New in This Version…………………………………………………………. |
7 |
|
3.1.1. New Features………………………………………………………… |
7 |
|
3.2. Basic Concepts………………………………………………………………. |
9 |
|
3.2.1. Frequency Modulation……………………………………………… |
9 |
|
3.2.2. Modulating Parameters…………………………………………… |
10 |
|
3.2.3. Morphing Sounds………………………………………………….. |
11 |
|
3.2.4. Arpeggiate…………………………………………………………… |
11 |
|
3.3. Outline of the Interface……………………………………………………. |
12 |
|
3.3.1. Global Sections: Application Control Bar, Navigator and |
|
|
Keyboard.……………………………………………………………………. |
12 |
|
3.3.2. Browser & Attributes Page.……………………………………… |
13 |
|
3.3.3. Master Window…………………………………………………….. |
13 |
|
3.3.4. Effects Window…………………………………………………….. |
14 |
|
3.3.5. Arpeggiator Window……………………………………………….. |
14 |
|
3.3.6. Easy/Morph Page………………………………………………….. |
15 |
|
3.3.7. Expert Windows……………………………………………………. |
15 |
|
3.4. Quickstarts………………………………………………………………….. |
20 |
|
3.4.1. Loading and Using Sounds………………………………………. |
21 |
|
3.4.2. Morphing and Easy Editing……………………………………… |
22 |
|
3.4.3. Using the Arpeggiator and Modifying Attributes…………….. |
24 |
|
3.4.1. Create your First Sound from Scratch.………………………… |
27 |
|
4. Reference………………………………………………………………………… |
33 |
|
4.1. What is Frequency Modulation?…………………………………………. |
33 |
|
4.1.1. The Basics………………………………………………………….. |
33 |
|
4.1.2. Meet the Algorithm……………………………………………….. |
34 |
|
4.1.3. Feedback.………………………………………………………….. |
35 |
|
4.1.4. The Envelope Generator.………………………………………… |
35 |
|
4.2. Interaction with the GUI………………………………………………….. |
36 |
|
4.2.1. Mac and Windows Conventions .………………………………. |
36 |
|
4.2.2. Buttons and Switches …………………………………………… |
36 |
|
4.2.3. Faders and Knobs………………………………………………… |
36 |
|
4.2.4. Numeric Values…………………………………………………….. |
37 |
|
4.2.5. Popup Menus.……………………………………………………… |
37 |
|
4.2.6. FM Matrix.…………………………………………………………. |
38 |
|
4.2.7. Graphical Interfaces ……………………………………………… |
39 |
FM8 –
|
4.2.8. Envelopes.…………………………………………………………. |
40 |
|
4.2.9. Pages and Tabs……………………………………………………. |
40 |
|
4.3. Standalone menus………………………………………………………… |
40 |
|
4.3.1. File Menu…………………………………………………………… |
40 |
|
4.3.2. Help Menu………………………………………………………….. |
41 |
|
4.4. Application Control Bar……………………………………………………. |
41 |
|
4.4.1. Options………………………………………………………………. |
41 |
|
4.4.2. Menu Functions and Status Displays .……………………….. |
45 |
|
4.5. Navigator.……………………………………………………………………. |
47 |
|
4.6. Keyboard……………………………………………………………………. |
48 |
|
4.7. Master Window……………………………………………………………… |
48 |
|
4.7.1. Level Controls……………………………………………………… |
48 |
|
4.7.2. Voices and Polyphony……………………………………………… |
49 |
|
4.7.3. Pitch and Portamento.…………………………………………… |
50 |
|
4.7.4. Arpeggiator and Quality…………………………………………… |
51 |
|
4.7.5. MIDI Controls……………………………………………………….. |
51 |
|
4.8. Effects Window…………………………………………………………….. |
52 |
|
4.8.1. Overdrive……………………………………………………………. |
53 |
|
4.8.2. Tube Amp.…………………………………………………………. |
53 |
|
4.8.3. Cabinet……………………………………………………………… |
53 |
|
4.8.4. Shelving EQ………………………………………………………… |
55 |
|
4.8.5. Peak EQ…………………………………………………………….. |
55 |
|
4.8.6. Talk Wah……………………………………………………………. |
56 |
|
4.8.7. Phaser .…………………………………………………………….. |
56 |
|
4.8.8. Flanger………………………………………………………………. |
57 |
|
4.8.9. Tremolo……………………………………………………………… |
58 |
|
4.8.10. Reverb.……………………………………………………………. |
58 |
|
4.8.11. PsycheDelay……………………………………………………… |
59 |
|
4.8.12. Chorus / Delay…………………………………………………… |
60 |
|
4.9. Arpeggiator Window………………………………………………………… |
61 |
|
4.9.1. Arpeggiator Controls.…………………………………………….. |
62 |
|
4.9.2. Pattern Editor……………………………………………………… |
65 |
|
4.10. Easy / Morph Window…………………………………………………… |
66 |
|
4.10.1. Timbre Controls………………………………………………….. |
67 |
|
4.10.2. Output Controls………………………………………………….. |
68 |
|
4.10.3. LFO and Amplitude Envelopes.………………………………. |
68 |
|
4.10.4. Apply and Reset………………………………………………….. |
69 |
|
4.10.5. Effect Controls……………………………………………………. |
70 |
|
4.10.6. Morph Controls…………………………………………………… |
70 |
– FM8
|
4.11. Expert Controls.…………………………………………………………… |
72 |
|
4.11.1. FM Matrix………………………………………………………….. |
72 |
|
4.11.2. Operator A-E Pages.…………………………………………….. |
74 |
|
4.11.3. Operator X Window.…………………………………………….. |
80 |
|
4.11.4. Operator Z Window.…………………………………………….. |
83 |
|
4.11.5. Operators Window……………………………………………….. |
86 |
|
4.11.6. Envelopes Window………………………………………………. |
88 |
|
4.11.7. Modulations Windows…………………………………………… |
89 |
|
4.11.8. Key Scaling Window…………………………………………….. |
92 |
|
4.11.9. Pitch Window…………………………………………………….. |
95 |
|
4.11.10. Spec Window……………………………………………………. |
99 |
|
4.12. Browser and Attributes Window………………………………………. |
100 |
|
4.12.1. Attribute Concept.……………………………………………… |
100 |
|
4.12.2. Searching and Loading Sounds with the Browser………… |
101 |
|
4.12.3. Defining Attributes and Saving Sounds…………………….. |
106 |
|
4.12.4. Loading FM7 Sounds………………………………………….. |
108 |
|
4.12.5. Importing System Exclusive Data…………………………… |
109 |
|
Appendix A – Attributes Explained…………………………………………….. |
110 |
|
Appendix B – Attributes Reference……………………………………………. |
120 |
|
Appendix C – Keyboard Shortcuts……………………………………………… |
133 |
|
Index………………………………………………………………………………… |
134 |
FM8 –
1. Welcome to FM8
Congratulations on your purchase of the Native Instruments FM8 software synthesizer. You’ll be glad you did.
The FM8 is based on FM synthesis, which made its mass market debut in 1983 with the Yamaha DX7. Boasting aftertouch, velocity sensitivity, a new type of synthesis that was very different from analogue subtractive synthesizers, a new protocol called “MIDI,” and a shockingly low list price, the DX7 was an instant hit and went on to become the best-selling synthesizer of its time. It spawned several offspring, including the famous TX81Z (still one of the best synths for MIDI guitar) and the TX802, probably the finest hardware implementation of FM synthesis that Yamaha ever produced.
Native Instruments brought back FM synthesis with the FM7, and it was better than ever. The new incarnation of this successful synthesizer is the FM8.
Designed as a convenient plug-in, the FM8 has 32-bit resolution for superb sound quality, an innovative algorithm programming matrix whose flexibility is light years ahead of older FM synthesizers, extensive modulation, a rack of effects, a filter module/Operator, multiple waveforms and an Arpeggiator.
Although FM synths had a reputation of being difficult to program – and they were! — the FM8 offers a unique “easy” page that makes it simple to customize sounds to perfection, without having to learn programming.
All the great features of FM synthesis are included, such as an “analog” control to add slight amounts of randomness, and a microtuning page for alternate tunings. But it also has modern essentials, such as envelope and delay sync to host tempo, 64-voice polyphony, variable resolution for lo-fi sounds, total
MIDI control, and much more to bring FM synthesis into the 21st century.
The FM8 integrates perfectly into the computer-based virtual studio, whether Macintosh or Windows. It can serve as a stand-alone module, turning your computer into a synthesizer. It also works as a sequencer plug-in with various interfaces.
If you were around for the first wave of FM synthesis, you’ll be pleasantly surprised at just how good it can sound with up-to-date technology. If you’re new to FM synthesis, you’re in for a great time. You can coax sounds out of the FM8 that range from angelically clean to hellishly nasty…from sweet to sour…and from traditional to innovative.
– FM8
2. Installation and Setup
Your FM8 ships with a separate manual – the Setup Guide — providing details about all things installation and setup. Please follow the Setup Guide’s instructions before you proceed with the information given in this manual.
3. Overview and Tutorial
3.1. New in This Version
Native Instruments has built upon the years of experience with the FM7 and came up with a host of new and exciting features for the FM8.
All FM 7 functionality is still available in FM8, and FM8 is 100% backwards compatible with FM7 sounds.
3.1.1. New Features
Usability
•The “Easy page” is more prominently featured and simplifies quick sound tweaks.
•An Expert Page provides access to all Operator details for advanced programming tasks.
•The overall functionality of the various Edit Pages has been improved for a better sound design experience.
•The new, unified NI Sound Browser has beren added, streamlining the functionality of all NI synthesis products.
Large Amount of Factory Sounds
•The FM8 sports all FM7 factory Sounds, as well as the FM7 Sounds Vol. 1 & Vol. 2 from the NI Sound Line.
•About 200 additional new Sounds come with the FM8, featuring the new capabilities of the software.
•12 new rack effects in addition to the FM7 effects.
•All sounds already attributed and ready for KORE.
FM8 –
Arpeggiator
The FM8 features a uniquely flexible, programmable Arpeggiator with a step sequencer-like matrix of up to 32 steps.
You get:
•Different modes for pattern generation
•Keyboard split features (arpeggios triggered by parts of the keyboard only)
•Preset Arpeggio templates
Sound Morphing
One of the key new features in FM8 is Sound Morphing. It enables you to seamlessly morph between 4 arbitrarily chosen timbres.
There is an X-Y-control with each corner corresponding to one complex timbre. The 4 timbres are easily assigned using drag and drop from the Sound Browser. A graphic handle in the square is used for setting the interpolation (interpolated from the corner’s parameter values).
•When running the FM8 as a plug-in in a host that supports automation, the handle’s movement can be automated.
•Only timbre parameters can be morphed. This is essentially the FMMatrix and the Operator settings. Envelopes and modulation settings are not morphed
•Effects are not morphed, but the Effects amount parameter is morphed.
High Resolution mode
The High resolution mode improves the general sound quality by reducing aliasing (in FM modulation, the X-Operator wave shaping, the overdrive effect or the tube amp effect) and achieves a cleaner and more analogue sound. This feature is a global parameter and can’t be saved with the sound.
New Effects
The FM8 brings a number of new Effects including a rack concept for constructing effects chains and a preset system for the complete Effects rack. The old FM7 effect is of course still available as the Chorus/Delay effects unit.
Choose from:
– FM8
•Overdrive
•Tube Amp
•Cabinet
•Shelving EQ
•Peak EQ
•Talk Wah
•Phaser
•Flanger
•Tremolo
•Reverb
•Psychedelay
•Chorus/Delay
3.2.Basic Concepts
3.2.1. Frequency Modulation
Subtractive synthesis has its firm place in sound design; there are lots of good synthesizers with a huge basis of presets available. Still, sometimes it can be a bit boring due to its ubiquitous presence.
FM synthesis offers a universe of new and fresh sounding timbres while still providing an extremely large library of classic Sounds from the DX-7 and its derivatives.
Build your own algorithms with the FM Matrix.
FM8 –

The FM8 is ideal for developing new and very original Sounds due to its very flexible FM Matrix with its never ending supply of Algorithms.
The FM8 is completely programmable when it comes to the FM engine. Combine the eight Operators arbitrarily in Algorithms to produce sound never heard before.
3.2.2. Modulating Parameters
The basic timbre of a sound is only the beginning. The world is full of boring and static synth sounds and of course you want your creations to be animate and articulate.
The old DX-7 was already known for its very lively and expressive sounds and the FM8 builds on this heritage and extends it with the ability to change the parameters over time either via internal means or by external automation in a sequencing environment.
A typical FM8 envelope.
Use the powerful and accurate multi-stage Envelopes to get the sound moving and to gain tight control over the timbral changes. Examples could be an evolving pad sound that fades several Operators in and out via slow moving envelopes or a dissonant sound that smoothes out in its decay phase.
Another approach for moving sound are the FM8’s LFOs that can add simple vibrato and tremolo effects but can also be the source for complex changes in harmonic content when you use them on modulators.
10 – FM8
![]()
3.2.3. Morphing Sounds
The FM8 takes vivid sound and evolving textures a step beyond with its Morph Square.
The Morph Square in action.
With the Morphing function you can melt four different sounds into one interactive sound field.
The basis of the FM sound always is the FM Matrix (see above) and the different matrix settings of different Sounds can be smoothly morphed into each other in real-time. This leads to sound transitions that cannot be accomplished via conventional means like fading in and out.
3.2.4. Arpeggiate
So you want those grooving, pumping, sequenced lines that are so important for today’s dance music? And of course you want them intuitively playable.
The Arpeggiator – sequence away.
FM8 – 11

No problem with the FM8 Arpeggiator. Just play a chord and it will be transformed, rhythmically re-triggered and transformed into grooving monophonic synth-lines.
The Arpeggiator is much more flexible than its analogue ancestors as in the FM8 it got injected with a fresh step-sequencing concept. It’s playing a sequencer like a musical instrument.
3.3. Outline of the Interface
The new design of the FM8 Interface improves on the FM7 with a fresh look and a host of usability enhancements.
The Interface is divided into four zones:
•The Application Control bar on top of the window.
•The Navigator to the left is for choosing the different Editor windows.
•The Editing Area to the right displays the currently selected Editor.
•The Keyboard is for playing the sound with your mouse.
The following paragraphs only give a very brief introduction into the scope of the different interface sections. Please read the respective reference chapters for a detailed description of all parameters.
3.3.1. Global Sections: Application Control Bar, Navigator and Keyboard
The Application Control Bar is the most basic Interface of your FM8. You can toggle the display of the Navigator/Edit Area and the Keyboard via two dedicated buttons. You get a mirror of the File menu and a host of status displays dealing with MIDI, polyphony and the like. Please have a look at the Reference section for details.
12 – FM8
3.3.2. Browser & Attributes Page
The Advent of NI KORE has brought a unified Sound format that is also used in the FM8 – the KORESound. This also brings a unified interface for managing Sounds. The Browser is your interface to finding Sounds via a powerful system of Attributes that characterize each and every Sound of all NI Sound products. The complete FM8 Sound library has been fully tagged via an extensive system of Attributes and you can quickly filter and search for any combination of the provided Attributes or keywords.
Finding the right Sound has never been easier — they’re all in the database.
3.3.3. Master Window
The Master Window provides access to the global parameters of the FM8.
Here you find things like the main levels, Polyphony settings, global pitch controls and the MIDI controller assignments.
FM8 – 13

3.3.4. Effects Window
The FM8 sports a great sounding selection of Effects processors that can be combined to produce a variety of professional sounds. The effects range from classics like chorus and flanger over bread-and-butter tools like equalizers and reverb to a cabinet modelling unit and the crazy Psychedelay.
3.3.5. Arpeggiator Window
The FM8 Arpeggiator combines the old-school Arpeggiator approach with a flexible step-sequencer concept including ties between notes, transposition of steps and rearrangements of note orders. The results range from classic arpeggios to rather complex sequences.
14 – FM8
3.3.6. Easy/Morph Page
The Easy controls provide a convenient set of macro controls that allow for sound manipulations without having to bother about the gory details of FM synthesis. Just grab a knob and change the timbre of your Sound with a single tweak. You can easily route an LFO to the main pitch or to the harmonic content or manipulate the amplitude envelope of all Operators at once and much more.
The Morph Square is a new FM8 feature for seamless morphing between the timbral characteristics of four FM8 Sounds. You can freely choose those four Sounds to produce new ones that you would possibly never have gotten when programming the FM8 the normal way. A randomization function throws in the possibility for additional variations.
3.3.7. Expert Windows
The Expert Windows offer detailed control of the FM synthesis engine. Here you can edit and program every tiny detail of the Sound and its movements over time.
The Expert windows can be divided into two groups. The global group deals with parameters that can only be set for the complete Sound (like the FM Matrix and the Pitch window) or showing aspects of all Operators on a single page (like the Envelopes, Keyscaling and Operators window). The second group include the dedicated Operator windows showing the various parameters focussed on the respective Operator.
Depending on the job to be done, both approaches can be the way to go. Sometimes you have to see all parameters of a single Operator, sometimes you want to see a special class of parameters for all Operators at once.
FM8 – 15
Global Windows
The FM Matrix can be found in almost all Expert windows. It is the heart of the FM8 synthesis engine where the modulation relationships between Operators are defined. You can arbitrarily take any Operator’s output to modulate the frequency of any other Operator using a concise interface.
The Operators sub page presents all important parameters of all Operators at a single glance. Use it to manipulate the Ratios and frequencies of multiple Operators without getting lost on different pages.
16 – FM8
An important aspect of a vivid FM Sound is the Envelopes controlling the amplitude of modulators and carriers. The Envelope window gives an overview over all envelopes and still maintains the possibility to edit them. You can also display a single envelope filling out the complete window or even stack multiple envelopes in one single graph.
Another way to arrive at lively, interactive Sounds is using modulations via MIDI or the two FM8 LFOs. The Modulation window shows all current Modulation assignments of the standard MIDI controllers and the LFO parameters.
FM8 – 17
Keyscaling can be very important to make a Sound playable over the complete range of MIDI notes. Use the Keyscaling window to edit multi-segment keyscaling graphs for each Operator.
Another function to be found here is the Microtuning editor for producing alternative tunings.
All aspects of pitch are assembled on the Pitch window. Dial in the main pitch, Portamento and the Pitch Envelope.
18 – FM8
Sometimes it’s nice to not only hear sound, but also to be able to actually see its frequency content. The Scopes are your trusty companions when it comes to judging changes in timbre due to edits you made somewhere in the FM8 synthesis engine.
Operator Windows
Each of the Operators has a dedicated page containing all its individual parameters.
FM8 – 19
Operator X is a special one, allowing for the addition of noise and wave shaping to the signal.
The second special Operator is Operator Z. It offers a great sounding, analoguestyle multimode filter including a filter Envelope.
3.4. Quickstarts
We encourage you to take the time and complete the following short walkthrough sections. They will help you to understand some of the key aspects of your FM8.
20 – FM8
![]()
3.4.1. Loading and Using Sounds
While this is a structured tutorial, if you find something interesting along the way, feel free to investigate anything that interests you.
The FM8 Sound Library is organized in a Database providing you with convenient means for searching and retrieving the Sounds you seek.
Hit the Browser button.
Let’s start right away and open the Browser by clicking on the respective button on the Navigator.
Toggle the Database View button.
With the Browser open, click the Database View button to yellow to see the
Database View.
Mining the Library with the browser.
Now the FM8 Library is at your fingertips. On the Browser’s left side are five
Category columns. These contain the Attributes used to tag, classify and search all Sounds. These are the same in all NI products using KORESounds.
Let’s filter for a classic FM E-Piano. To do this, we combine several Attributes by clicking them in the Attributes list:
•Click on Piano/Keys under Instrument
•Choose Electric and Synthetic under Source
•In the Timbre Category, click on Bright.
•Under Articulation, we want a Decaying sound
FM8 – 21
As you combine Attributes you put more and more constraints on your search, so the number of Search Results displayed on the right side decreases.
The FM8 Sound Soft Rhodes looks promising, so double-click it.
You can now play the Sound via your MIDI keyboard. If you have not set up your MIDI connections, please have a look at the Setup Guide for details on the procedure.
3.4.2. Morphing and Easy Editing
Now let’s check the Morphing feature. We are going to load four different string Sounds into the Morph Square.
Browsing for Strings.
Open the Browser by clicking on the respective Navigator button and type Strings into the Search Field. You see a list of string Sounds in the Search Results.
Drag the Sound to the Morph Square.
22 – FM8
Now we are going to drag four of the Sounds into the four quadrants of the small Morph Square in the Application Control Bar. The first Sound you drag into the square will establish all the parameters that are not morphed (envelopes, modulations, etc.).
•Glass Strings
•Hirez Bell String
•Soft Strings
•Resonant Strings
The populated Morph Square.
Please switch to the Easy/Morph window. You see the four Sounds occupying the four corners of the Morph Square. Play a few chords while moving the Morph Handle (the small red square). You can hear the sound being morphed between the four different timbres.
The Sound is a bit on the muffled side, especially with the upper two strings
Sounds. We are going to brighten things up.
Add a bit of sparkle.
Click the Timbre dial and pull it up to a value of 26. If you now play you can hear all four Sounds getting brighter. The Easy edit macro controls change
FM8 – 23

the Sound’s parameters after the morphing has taken place, so it affects all four corners.
A bit more movement could also sound nice, so we add an LFO to the timbre of the Sounds.
Quick application of the LFO.
Dial in a Rate of -82 and a Timbre value of 46. Now you can hear that the Sounds have become a lot livelier.
The controls of the Easy window are macro controls. Here you can alter the sound completely with a few twists and without having to dive into the innards of FM synthesis.
3.4.3. Using the Arpeggiator and Modifying Attributes
Now to something completely different: the Arpeggiator. As string sounds don’t lend themselves very well to Arpeggiators, we first have to find a different
Sound. Switch back to the Browser.
Loading the bass.
Type “Darkest” into the Search Field. This will find a nice, analogue sounding synth bass. Load it with a double-click from the Browser’s Search Results.
Now switch to the Arpeggiator.
24 – FM8
Fun with the sequences.
Hit the On button and lay down a chord on your keyboard.
Now you can start experimenting a bit with the various Arpeggiator settings. A good start is switching to Autopilot mode (Hold button) to get the hands free for tweaks.
As the line you hear at the moment might be a bit boring, choose another one from the Template menu. How about Strong Riff?
Choose your sequence.
Another fruitful set of parameters can be found in the Expression section. Experiment a bit with the Velocity and Accent settings to get a feeling for what they do. You might want to deactivate the Velocity switch to have the Arpeggiator reproduce the velocities you originally played. The Accent dial sets the amount of accent applied for every accented step on the sequencing grid.
Next we are going to add a nice effect. Switch over to the Effects page.
FM8 – 25
Adding the Talkwah.
A Talkwah is always a nice effect when it comes to adding character to a bass line. Switch it on via the Effects selector on the left side of the window.
Dial in an Amount of around 70, so that the original bass Sound still shines through. Now activate the Modwheel option and have some fun with altering the Mouth value via your modulation wheel.
Now that we have set up our bass line machine, we want to save the Sound with a new name and with some additional Attributes so that we can find it again in the future. Switch to the Attributes window.
New Attributes.
You see the original settings of the Darkest FM8 Sound. Change the name in the Author f eld to your name and add a few matching Attributes to characterize the changes we made. In The screenshot we added:
•Synthetic under Source
•Arpeggiated for Articulation
•Techno/Electro for Genre.
26 – FM8
Save your Sound.
Now save your new Sound by choosing Save Sound from the File menu. A dialog opens asking for a file name. We chose DarkestArpeggio.
The new Sound is in the Database.
Switch back to the Browser and type Darkest into the Search Field. You can see the new Sound in the Search Results.
3.4.1. Create your First Sound from Scratch
Now it’s time to design your first FM Sound from scratch. Of course we are going to keep it simple and clear.
Initialize the Edit Buffer.
Choose New Sound from the File menu of the Application Control Bar. This loads an initial sound stored in NewSound.ksd (to be found in the application folder). If you play a key you will hear a simple and clean sine wave, stemming from Operator F (unless you already have edited the NewSound.ksd).
FM8 – 27
The lonely Operator.
Click on the Operator page of Operator F in the Expert Controls. This sounds rather dull, so let’s add some harmonics.
Three Operators and some modulation.
Do this by right-clicking Operators D and E to switch them on (the letters become white). Then click directly to the left of Operator F and drag your mouse up until you get a value of about 30. Now Operator E modulates Operator F.
The next step is to have Operator D modulate Operator E with an amount of 30. We have a nice little chain of modulators and carriers. You see that a modulator (like Op. E) modulating a carrier (Op. F) can be a carrier by himself (like Op. E being modulated by Op. D).
When playing your keyboard you will hear the additional harmonics produced by the frequency modulation.
Let’s add some movement to the sound by tweaking the envelopes. Switch to the Envelopes page (Env).
28 – FM8
Now make sure you have Operator F selected for edits and link Operators D and E to Operator F by clicking on their Link buttons. Now every change you make to Operator F will be mirrored in the other two Operators and vice versa.
Dial in a bit of Attack and a nice Release, as shown in the picture above. Remember that you can centre in on the complete Envelope with a doubleclick on the graph. You see that all three envelopes have the same shape.
In the next step deactivate the link buttons and switch to the Envelope of
Operator D. Grab the Slope handle of the Attack phase (the red dot) and dial in an exponential slope. Play some keys and you will hear that the harmonics are being faded into the Sound along the Envelope of Operator D, which is a modulator. This makes the Envelope of Operator D similar to a filter
Envelope.
FM8 – 29

Let’s push the Sound a bit more into the woodwind-direction. First of all we want it to be a bit softer. What could be better than a low-pass filter to soften things up?
Operator Z joins the action.
The Operator Z contains a great multimode filter, so we just route our signal through it. Have a look at the picture above for pointers how to do it. Don’t forget to turn the direct signal from Operator F completely down (a doubleclick on the value is a shortcut for doing this).
Now switch to the Operator Z window.
Dial in the filter.
Set the Cutoff to about 60 and the Resonance of the first filter to about 60. This setting caps the high mids and highs while adding some character via the resonant peak. Just have a look at the filter curve to see the response.
We still miss something – the breath. Breathy sounds are usually synthesized with noise and guess what – the FM8 can produce that too. The noise generator is located in Operator X.
30 – FM8
![]()
Noise Op to the scene.
Activate Operator X and route its signal through the filter (Operator Z), as shown in the picture above. Now we switch over to the Operator X window to tweak the settings.
Noise controls.
Apart from the envelope, the above settings are default values.
We have to change the Envelope to a shape with a small Attack and an exponential decay phase. We just want a short, soft noise burst at the beginning of the sound, so you can deactivate the Sustain and Release buttons. Play some notes to hear the noise being faded in and out at the beginning of the Sound.
It’s time to save the new Sound but not before we have added a bunch of Attributes to integrate it into the FM8 Database. To do this, open the Attributes window.
FM8 – 31

Adding some Attributes.
Type your name into the Author field and add the appropriate Attributes describing the new Sound. In the picture above we chose:
•Reed Instrument for Instrument
•FM for Source
•Wooden for Timbre
•Sustained for Articulation
The last step is choosing Save Sound from the File menu, type in a name for the Sound and save it to your Sound folder. We’ll leave the name to your imagination.
Well, that’s it for now. Just go on experimenting with the new Sound. Maybe by adding some effects, or an LFO for more liveliness…
32 – FM8

4. Reference
4.1. What is Frequency Modulation?
4.1.1. The Basics
The principle behind FM synthesis is of remarkable simplicity. The basis of all FM synthesis is a sine wave oscillator, represented below as a circle and an output.
A keyboard or other controller sets the oscillator‘s pitch. However, we now need a way to gate this oscillator on and off. Analogue synthesizers used a circuit called a VCA (voltage-controlled amplifier) to alter the oscillator level.
The level depended on a control signal (called a control voltage) fed into the VCA. Many modern digital synths and programs still use this terminology, even though the level changes are all generated digital, by altering numbers within the program. Some digital synths refer to VCA as DCA (for Digitally Controlled
Amplifier”), while others just refer to it as amp.
With analogue synths, the control signal that changes the level is generated by a circuit called the envelope generator (EG). It causes the level to change over time in a predictable way. For example, to create a plucked sound, the envelope might start at a very high value and then drop over several milliseconds to a much lower value, or even turn off completely. In digital gear, the program generates a data stream that changes level the way an envelope generator would. However, the concept is still usually referred to as envelope generation. This grouping of a sine wave oscillator, VCA/DCA, and EG is called an Operator, which is the basic building block of FM synthesis.
As a pure sine wave is pretty boring from a musical standpoint, this leads us to the extremely clever aspect of FM synthesis. Let’s add a control input to the Operator to modulate its frequency.
FM8 – 33

Feed a sine wave into that control input. A low frequency wave produces vibrato by slowly changing the frequency over time. But an audio range signal produces one of two results. Signals that are not harmonically-related to the main oscillator create “clangourous” sounds. Injecting a harmonically-related signal generates harmonics that sound more “in-tune” (Both types of effects can be useful).
The amount of harmonics depends on the level of signal injected into the main oscillator, and the harmonic structure depends on the modulating oscillator’s frequency. As timbre is primarily affected by the injected signal’s amplitude, adding a VCA after the modulating oscillator (along with an envelope generator to control the VCA/DCA) allows predictable control over the signal, hence the overall timbre. Our FM synthesis block diagram now looks like this.
Note how the same Operator structure can provide an audio signal (Operator 1) or modulate that audio signal (Operator 2), so we need to differentiate between the two functions. The Operator we hear is called the carrier. An Operator is called a modulator if it modulates the carrier.
This two-Operator structure can actually make some very sweet brass timbres. Increasing the output of Op 2 creates a sound somewhat like opening up a lowpass filter; decreasing the output is like closing the filter down.
4.1.2. Meet the Algorithm
You can combine Operators in various ways to create a variety of Algorithms. The FM8 has several preset algorithms, accessible from a drop-down menu on the FM Matrix window. They use up to six conventional Operators, and you can see how they are combined in the various macro algorithms. For example, the following algorithm has two carriers. Each has its own modulator.
34 – FM8

4.1.3. Feedback
The next diagram shows the previous algorithm, but with feedback added to the modulators — in effect, an Operator becomes its own modulator. Increasing feedback can add bite and grittiness.
Please note that the Input is also present on the FM Matrix. You can use it as modulator and carrier as if it where a normal Operator. This opens a lot of new possibilities for using the FM8 as an effects processor.
4.1.4. The Envelope Generator
The envelopes in vintage synths worked on the rate/level principle, which specified the rate at which the envelope goes from one level to another.
Unfortunately this was quite confusing, as going from zero to a high level would take longer than going from zero to a low level, given the same rate.
The FM8 solves this problem by letting you set a specific time for one level to transition to another, and does all the necessary calculations internally to convert this into the correct rate.
The envelope level typically starts at zero. To create an attack, you specify the level to be attained, and the time it takes for the envelope to reach that
FM8 – 35

level. Other stages of the envelope are set similarly, according to times and levels. Going from a higher level to a lower one produces a decay, going from lower to higher produces an attack.
4.2. Interaction with the GUI
4.2.1. Mac and Windows Conventions
Operating the FM8 on Mac or Windows machines is identical, with some slight differences due to the way the two operation systems handle file systems and keyboards. Key commands are given for Windows. For the Mac, when the text says “right-click,” you may also use Ctrl-click.
4.2.2. Buttons and Switches
Click once on a button or switch to activate it, click again to de-select or disable. An active switch will change its colour to orange.
4.2.3. Faders and Knobs
To change a slider or knob setting, click with the mouse and drag it up or down to change the value. For fine tuning, press the Shift key prior to moving the element, and keep holding the Shift key while moving the slider. You may also double-click on the value for direct editing.
A double-click on the control resets the value to default.
36 – FM8

4.2.4. Numeric Values
For value tweaking, click on the numeric readout below the slider. Drag the mouse up or down to change the value. When there is both a slider and a numeric value, you get finer resolution by dragging the numeric value. Hold the Shift key to get an even finer resolution.
For setting up the parameters Ratio and Offset dragging on the 1s digit of the numeric readout will change the value in 1s. If you drag on the 10s digit, the value will change in 10s.
If the numeric value has buttons above and below, clicking on the top button raises the value by one, and clicking on the bottom button lowers the value by one. Clicking and holding on these buttons scrolls through the values at a moderate rate.
You can also double-click on a value and type in a new one via your computer’s keyboard.
4.2.5. Popup Menus
There are two types of popup menus in FM8. The first type is for preset-type menus, as with the waveform selection for the Operators. The other one can be found in the Template selection sections for envelopes, the Arpeggiator or the Algorithm selector.
For both types, a click on the triangle will open up the menu and a click on the desired item will load it.
FM8 – 37

4.2.6. FM Matrix
The following mouse operations and key commands are available in the Matrix:
•A click on an Operator selects the appropriate Operator page.
•Right-clicks (Mac: Ctrl-clicks) on Operators switches them on and off.
•Shift+Right Click (Mac: Shift+Ctrl click)on Operator X and Z switches Bypass on and off (if Operator X/Z is active)
Constructing your own algorithms is an easy task with the Matrix:
•To send an Operator output to another Operator input, imagine a line going downward from the first Operator. Imagine a second line going across to the right, to the target Operator.
•Click and hold at the junction of these two imaginary lines, as represented by a blue field in the background where you click.
•Drag up. The imaginary lines are now drawn in and a box appears with a numerical value. This controls the level of the modulator feeding the carrier. Drag until the numerical shows the desired level.
•Any Operator can feed back not just to itself, but to any other Operator. To create feedback from one Operator to another, imagine a line going upward from the first Operator and a second line going across to the left, to the target Operator.
•Click and hold at the junction of these two imaginary lines.
•Drag up. The imaginary lines are now drawn in, and a box appears with a numerical value that acts like a volume control. Drag until the numerical shows the desired level.
•For removal of a connection, drag its value down to 0 or simply doubleclick it.
38 – FM8

4.2.7. Graphical Interfaces
There are some specialty graphical interfaces in FM8.
The Microtuning Editor on the Pitch window acts like a bunch of faders. Click on the small squares and drag the mouse up and down to change the note tuning.
Another graphical interface can be found on the Modulation window. It works along the lines of the FM Matrix:
•To send a modulation source’s output to a target input, imagine a line going downward from the source. Imagine a second line going across to the right, to the target.
•Click and hold at the junction of these two imaginary lines, as represented by a field in the background where you click.
•Drag up. The imaginary lines are now drawn in, and a box appears with a numerical value. This controls the amount of the modulation applied to the target. Drag until the numerical shows the desired level.
Modulation amounts can be positive and negative.
FM8 – 39

4.2.8. Envelopes
Some parameters, such as envelopes, are shown graphically as curves and lines with nodes.
•To change an envelope’s shape, click on a node with the mouse, and drag the breakpoint into the new position.
•To create a new node, right-click where you want the node to appear.
•Drag the Slope handles up or down to change the Envelope’s slope between breakpoints.
•To delete a node, right-click on the node.
•The ruler behind the envelope is calibrated in seconds. If the envelope extends past the envelope’s visible range, click on the blue background and drag to the left or right to see a different range of the ruler.
•Clicking the background and dragging the mouse up or down zooms in and out.
Double-click on the background to have the envelope fit exactly within the visible part of the ruler.
4.2.9. Pages and Tabs
Most windows you find in the FM8 are Editors that are switched via the
Navigator and fill out the Editing Area. On some of them (like on the Browser) you also find special buttons, called Tabs. Clicking them switches the window into a different mode, displaying a different page of controls.
4.3. Standalone menus
4.3.1. File Menu
The File menu of the standalone application is mirrored from the Plugin File menu to be found in the Application Control Bar. For a detailed documentation please have a look at chapter 0.
40 – FM8
![]()
4.3.2. Help Menu
Launch Service Center
This command does exactly what it says: It launches the NI Service Center for managing your NI software licenses. Please have a look at the separate Setup Guide manual for details.
Visit FM8 on the web
This menu entry opens an external browser window connecting you to the FM8 pages of the NI website. Use it to stay up to speed with the latest information and development of your FM8.
About FM8
A click on the FM8 or NI logos opens the About FM8 window where you find the FM8’s program version number and other information.
The About window can be closed with a click on the close button in the upper right corner.
4.4. Application Control Bar
The upper portion of the FM8 remains constant as you switch among the various Editors. It is also the bare minimum interface of the FM8, as you can hide the Navigator, the Editing Area and the Keyboard.
4.4.1. Options
The Options window has two tabs.
The General Options tab provides access to some parameters concerning the behaviour of your FM8.
FM8 – 41

Velocity
The Velocity option toggles between two different modes for the reception of MIDI velocity. The original DX7 has a note velocity range from 0 to 100, while all other keyboards and sequencers generate notes with velocities between 0 and 127. If you control the FM8 from a DX7, you can use the DX7 Keyboard option to adapt the velocity range. With a standard keyboard connected in this mode, velocities higher than 100 let the presets sound brighter than they have been programmed. In the Standard Keyboard mode a DX7 would not use the full dynamic range, so the sounds would be softer than intended.
MIDI Controller Range
Many FM8 parameters have a range from 0 to 100. If you remote control the FM8 by MIDI control changes it can be advantageous to read the identical values between 0 and 100 from the remote device. This can be attained with the 0…100 option; values higher than 100 will be clipped to 100.
Note: this does not apply to parameters that can be negative (like Pan). In the standard setting, 0…127, the values are mapped to the full range of an FM8 parameter.
The second pair of switches let you decide how the buttons react to MIDI controllers. The standard mode is 0…63: Off / 64..127: On, where values smaller than 64 set the button to the off position, and values greater than 63 set it on. Some MIDI instruments, especially those with multi-step selector switches, send a value with each change with the sequence being 0, 1, 2, 3, … Here the Even: Off / Odd: On option can be used so that the FM8 switches toggle on/off with each action of the remote control switches.
42 – FM8
Frequency modulation synthesis has a reputation for being difficult to learn, and is often taught with a focus on the theoretical rather than practical. This makes it seem more complicated than it actually is: in reality it’s barely more involved than subtractive ‘virtual analogue’-style synthesis.
In this five minute video, Native Instruments goes over the fundamentals of FM with the powerful FM8, and demonstrates how it’s possible to make a variety of classic FM sounds. Once you have understood these basics you’ll find frequency modulation synths much easier to comprehend, and you’ll also have the knowledge you need to make your own unique patches from scratch.
Want to learn more about FM8, check out this tutorial video by Eomac, recorded live at Native Sessions Berlin.
Download free FM8 demo

Skip to content

«FM8» Полное изучение синтезатора
 Автор: WikiSound
 Автор: WikiSound
Название: «FM8» Полное изучение синтезатора
Цифровая версия: За любую цену!
ЧТО ДАСТ ВАМ КУРС ПО СИНТЕЗАТОРУ «FM8»
- Ясность и понимание параметров синтезатора, в курсе наглядно показано как работают и на что влият все ручки и кнопки.
- В вашей власти окажется мощнейший инструмент по созданию звуков, что позволит реализовать ваш потенциал в максимальной степени.
- Теперь, садясь писать музыку вы не будите крутить наугад и гадать на что влияет определённый параметр.
- Посмотрев данный курс вы получите понимание инструмента с помощью которого вы сможете реализовать свой творческий потенциал в макимальной степени. Таким образом ваша музыка начнёт выделятся среди общей массы музыкантов.
- Верное и последовательное понимание всех функции синтезатора, они объяснены подробно и наглядно.
- Вам откроются ранее неизвестные возможности синтеза — это 100% даст новый творческий толчок.
УЗНАТЬ БОЛЬШЕ
Похожее
About the Author: SerKit
Оставить комментарий Отменить ответ
Сохранить мои данные для последующих комментариев.
Уведомить меня о новых комментариях по email.
Уведомлять меня о новых записях почтой.