Фокусрите Аудио Инжиниринг Лимитед находится в ХАЙ-УАЙКОМБЕ, Великобритания, и является частью индустрии звукозаписи. В FOCUSRITE AUDIO ENGINEERING LIMITED работает 295 сотрудников, а объем продаж составляет 173.32 млн долларов США. (количество сотрудников ориентировочное). В корпоративную семью FOCUSRITE AUDIO ENGINEERING LIMITED входит 9 компаний. Их официальный webсайт Focusrite.com
Каталог руководств пользователя и инструкций для продуктов Focusrite можно найти ниже. Продукция Focusrite запатентована и зарегистрирована под торговыми марками Фокусрите Аудио Инжиниринг Лимитед
Контактная информация:
Сотрудники (этот сайт): 295
Доход: $ 173.32 миллионов
Конец финансового года: АвгустГод начала: 1989
Зарегистрировано: 1989
Найти
Focusrite Scarlett Audio Interfaces ИНСТРУКЦИЯ ПО УСТАНОВКЕ Расширение Hitmaker, доступное каждому вновь зарегистрированному пользователю интерфейса, создано для немедленного создания записей. Это все инструменты, которые вам нужны для написания, создания, микширования и мастеринга вашей музыки в студийном качестве.
Подробнее «Руководство пользователя аудиоинтерфейсов Focusrite Scarlett»
Руководство пользователя Focusrite FAST Limiter и FAST Bundle Введение Последней частью эксклюзивного розыгрыша сообщества плагинов является MASSIVE от Native Instruments и Ozone Elements от iZotope. Обычно эти plugins могут быть загружены бесплатно для участников Plugin Collective с 6 октября по 12 января (4:XNUMX по Гринвичу). …
Подробнее «Focusrite FAST Limiter и руководство пользователя FAST Bundle»
USB-аудиоинтерфейс Focusrite Clarett Plus 8PreVIEW ПРЕДУПРЕЖДЕНИЕ. Чрезмерный уровень звукового давления в наушниках и наушниках может привести к потере слуха. ПРЕДУПРЕЖДЕНИЕ. Данное оборудование должно подключаться только к портам USB Type 2.0+ или Thunderbolt 3.0+. Введение Благодарим вас за покупку Clarett+ 8Pre, высокопроизводительного и невероятно функционального студийного центрального элемента для ПК или Mac. …
Подробнее «Руководство пользователя USB-аудиоинтерфейса Focusrite Clarett Plus 8Pre»
Микрофон Focusrite vocaster DM14v Введение Vocaster DM14v — это динамический микрофон, предназначенный для записи трансляций, webактеры и голоса студийного качества в стиле подкастов. Он имеет гладкую и широкую частотную характеристику, а также встроенное ветрозащитное стекло для записи с близкого расстояния. Vocaster DM14v включает в себя: Встроенное ветровое стекло. Внутренняя подвеска и амортизирующее крепление Встроенное крепление на стойку в стиле телевещания. …
Подробнее «Руководство пользователя микрофона Focusrite vocaster DM14v»
Аудиоинтерфейс Focusrite Clarett Plus 4Pre Desktop 18×8 USB Type-C. Руководство пользователя.VIEW ПРЕДУПРЕЖДЕНИЕ. Чрезмерный уровень звукового давления в наушниках и головных наушниках может привести к потере слуха. ПРЕДУПРЕЖДЕНИЕ. Данное оборудование должно подключаться только к портам USB Type 2.0+ или Thunderbolt 3.0+. Введение Благодарим вас за покупку Clarett+ 4Pre, аудиоинтерфейса студийного уровня для ПК…
Подробнее «Руководство пользователя аудиоинтерфейса Focusrite Clarett Plus 4Pre Desktop 18×8 USB Type-C»
Руководство пользователя focusrite.com Версия 2.0 ВЫШЕVIEW ВВЕДЕНИЕ Благодарим вас за приобретение Clarett+ OctoPre, восьмиканального микрофонного предусилителя студийного класса.amp с подключением ADAT, разработанным для инженеров и продюсеров, которым нужны входные и выходные данные чрезвычайно высокого качества. Восемь микрофонных предусилителей Clarett+ нового поколения с высоким запасом по уровню шума и низким уровнем искаженийamps — с уникальной полностью аналоговой функцией Air — поможет вам снимать невероятно четкие…
Подробнее «Focusrite Clarett++ OctoPre Mic Preamp и Руководство пользователя конвертера AD-DA»
Руководство пользователя Scarlett 18i6 Важные инструкции по технике безопасности Прочтите эти инструкции Сохраняйте эти инструкции Учитывайте все предупреждения Следуйте всем инструкциям Не используйте Scarlett 18i6 рядом с водой Протирайте только Scarlett 18i6 сухой тканью Не закрывайте вентиляционные отверстия. Устанавливайте в соответствии с инструкциями производителя. Не устанавливайте Scarlett 18i6 вблизи источников тепла…
Подробнее «Руководство пользователя USB-аудиоинтерфейса Focusrite Scarlett 18i6»
Руководство пользователя vocaster hub Версия 1 Расскажите свои истории Введение Это руководство пользователя для Vocaster Hub, программного приложения, которое вы используете для управления интерфейсом Vocaster. В этом руководстве пользователя описывается программное обеспечение Vocaster Hub, но для получения дополнительной информации об интерфейсе Vocaster вам необходимо прочитать как это руководство пользователя, так и руководство пользователя…
Подробнее «Руководство пользователя аудиоинтерфейса Focusrite 4A742 Vocaster Hub Two USB-C»
Focusrite Clarett+ OctoPre студийный восьмиканальный микрофонный предусилительamp OVERVIEW Введение Благодарим вас за покупку Clarett+ OctoPre, восьмиканального микрофонного предусилителя студийного уровня.amp с подключением ADAT, разработанным для инженеров и продюсеров, которым нужны входные и выходные данные чрезвычайно высокого качества. Восемь микрофонных предусилителей Clarett+ нового поколения с высоким запасом по уровню шума и низким уровнем искаженийamps — с уникальной полностью аналоговой функцией Air — помогите…
Подробнее «Focusrite Clarett+ OctoPre Studio Восьмиканальный микрофонный предусилительamp Гид пользователя»
Руководство пользователя Версия 3 КОНЕЦVIEW ПРЕДУПРЕЖДЕНИЕ. Чрезмерный уровень звукового давления в наушниках и головных наушниках может привести к потере слуха. ПРЕДУПРЕЖДЕНИЕ. Данное оборудование должно подключаться только к портам USB Type 2.0+ или Thunderbolt 3.0+. Введение Благодарим вас за приобретение этого Clarett+ 2Pre, потрясающего звука, чисто звучащего интерфейса с питанием от шины для ПК или Mac, который позволит вам…
Подробнее «Focusrite HN235199 Clarett+ 2Pre USB Audio Interface User Guide»
IMPORTANT SAFETY INSTRUCTIONS
- Read these instructions.
- Keep these instructions.
- Heed all warnings.
- Follow all instructions.
- Clean only with dry cloth.
- Do not install near any heat sources such as radiators, heat registers, stoves, or other apparatus (including amplifiers) that produce heat.
- Do not defeat the safety purpose of the polarized or grounding-type plug. A polarized plug has two blades with one wider than the other. A grounding type plug has two blades and a third grounding prong. The wide blade or the third prong are provided for your safety. If the provided plug does not fit into your outlet, consult an electrician for replacement of the obsolete outlet.
- Protect the power cord from being walked on or pinched particularly at plugs, convenience receptacles, and the point where they exit from the apparatus.
- Only use attachments/accessories specified by the manufacturer.
Use only with the cart, stand, tripod, bracket, or table specified by the manufacturer, or sold with the apparatus. When a cart is used, use caution when moving the cart/ apparatus combination to avoid injury from tip-over.
- Unplug this apparatus during lightning storms or when unused for long periods of time.
- Refer all servicing to qualified service personnel. Servicing is required when the apparatus has been damaged in any way, such as power-supply cord or plug is damaged, liquid has been spilled or objects have fallen into the apparatus, the apparatus has been exposed to rain or moisture, does not operate normally, or has been dropped.
- No naked flames, such as lighted candles, should be placed on the apparatus.
Excessive sound pressure levels from earphones and headphones can cause hearing loss.
This equipment must only be connected to USB 2.0-compatible ports.
TO REDUCE THE RISK OF ELECTRIC SHOCK, DO NOT REMOVE COVER (OR BACK). NO USER-SERVICEABLE PARTS INSIDE. REFER SERVICING TO QUALIFIED SERVICE PERSONNEL. The lightning flash with arrowhead symbol, within equilateral triangle, is intended to alert the user to the presence of uninsulated «dangerous voltage» within the product’s enclosure that may be of sufficient magnitude to constitute a risk of electric shock to persons.
The exclamation point within an equilateral triangle is intended to alert the user to the presence of important operating and maintenance (servicing) instructions in the literature accompanying the appliance.
ENVIRONMENTAL DECLARATION
Compliance Information Statement: Declaration of Compliance procedure
Product Identification: Focusrite Scarlett 2i4
Responsible party: American Music and Sound
Address: 5304 Derry Avenue #C
Agoura Hills,
CA 91301
Telephone: 800-994-4984
This device complies with part 15 of the FCC Rules. Operation is subject to the following two conditions: (1) This device may not cause harmful interference, and (2) this device must accept any interference received, including interference that may cause undesired operation.
For USA
To the User:
1. Do not modify this unit! This product, when installed as indicated in the instructions contained in this manual, meets FCC requirements. Modifications not expressly approved by Focusrite may void your authority, granted by the FCC, to use this product.
2. Important: This product satisfies FCC regulations when high quality shielded cables are used to connect with other equipment. Failure to use high quality shielded cables or to follow the installation instructions within this manual may cause magnetic interference with appliances such as radios and televisions and void your FCC authorization to use this product in the USA.
3. Note: This equipment has been tested and found to comply with the limits for a Class B digital device, pursuant to part 15 of the FCC Rules. These limits are designed to provide reasonable protection against harmful interference in a residential installation. This equipment generates, uses and can radiate radio frequency energy and, if not installed and used in accordance with the instructions, may cause harmful interference to radio communications. However, there is no guarantee that interference will not occur in a particular installation. If this equipment does cause harmful interference to radio or television reception, which can be determined by turning the equipment off and on, the user is encouraged to try to correct the interference by one or more of the following measures:
• Reorient or relocate the receiving antenna.
• Increase the separation between the equipment and receiver.
• Connect the equipment into an outlet on a circuit different from that to which the receiver is connected.
• Consult the dealer or an experienced radio/TV technician for help.
For Canada
To the User:
This Class B digital apparatus complies with Canadian ICES-003.
Cet appareil numé rique de la classe B est conforme à la norme NMB-003 du Canada.
RoHS Notice
Focusrite Audio Engineering Limited has conformed and [its/this] product[s] conform[s], where applicable, to the European Union’s Directive 2002/95/EC on Restrictions of Hazardous Substances (RoHS) as well as the following sections of California law which refer to RoHS, namely sections 25214.10, 25214.10.2, and 58012, Health and Safety Code; Section 42475.2, Public Resources Code.
OVERVIEW
Introduction
Thank you for purchasing this Scarlett 2i4, one of the family of Focusrite professional computer audio interfaces incorporating high quality Focusrite analogue pre-amplifiers. You now have a simple and compact solution for routing high quality audio to and from your computer.
This User Guide provides a detailed explanation of the hardware to help you achieve a thorough understanding of the product’s operational features. We recommend that both users who are new to computer recording, as well as more experienced users, take the time to read through the User Guide so that you are fully aware of all the possibilities that the Scarlett 2i4 and accompanying software has to offer. If the main User Guide sections do not provide the information you need, be sure to consult http://www.focusrite.com/answerbase, which contains a comprehensive collection of common technical support queries.
Features
The Scarlett 2i4 hardware interface provides the means for connecting microphones, musical instruments or line level audio signals to a computer running Mac OS or Windows. The signals at the physical inputs can be routed to your audio recording software / digital audio workstation (referred to throughout this user guide as the «DAW») at up to 24-bit, 96 kHz resolution; similarly, the DAW’s monitor or recorded output will appear at the unit’s physical outputs.
Audio sources – mics, instruments, etc. – connected to the physical inputs can be recorded in the DAW and then routed from your DAW to the physical outputs. The 2i4 is equipped with four audio output channels, which can be connected to an amplifier and speakers, powered monitors, headphones, DJ or other type of mixer, or any other analogue audio equipment that you wish to use. Although all inputs and outputs on the Scarlett 2i4 are routed directly to and from your DAW for recording and playback, you can configure the routing within your DAW in order to meet your needs. A Direct Monitoring feature lets you hear what you are playing without the effects of computer latency. The 2i4 also acts as a convenient MIDI interface between your computer and other MIDI equipment.
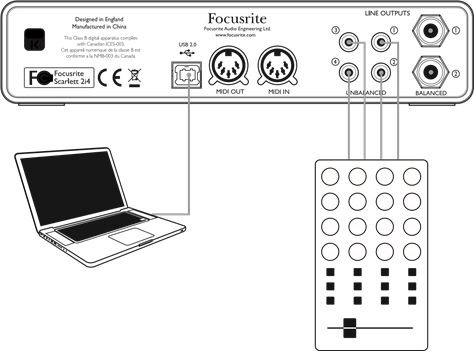
For DJs, the two pairs of outputs make it simple to interface the stereo output from a laptop running DJ software to two channels of a DJ mixer.
Box Contents
Along with your Scarlett 2i4 you should have:
- Software Activation card, with codes for accessing the following on-line resources:
— 2i4 USB Drivers for Mac and Windows
— Scarlett Plug-in Suite for Mac and Windows
— Ableton Live Lite
— LoopMasters sample library
— Novation Bass station
— Multi-language User Guides
• USB cable
• 8-page hard-copy «Getting Started Guide»
System requirements
Mac OS
Apple Macintosh with a USB 2.0 compliant USB port
OS: Mac OS X 10.7 (Lion) or OS X 10.8 (Mountain Lion)
Windows
Windows compatible computer with a USB 2.0 compliant USB port
OS: Windows 7 (32- or 64-bit)
GETTING STARTED
IMPORTANT: PLEASE ENSURE THAT YOU RUN THE INSTALLER BEFORE CONNECTING THE SCARLETT 2i4 TO YOUR COMPUTER.
Software Installation
All software required by the Scarlett 2i4 — and several powerful and useful extras — is available for download from the Focusrite website http://www.focusrite.com/register. The Software Activation card provided with your Scarlett 2i4 contains validation codes which you will need to enter in the downloads area. This procedure ensures that you will have the most up-to-date software versions.
- Using your usual browser, go to http://www.focusrite.com/register/.
- Follow the on-screen instructions, entering the «Product Bundle Code» into the form where prompted. Your «Product Bundle Code» can be found on the Software Download Card packed with the unit.
- You will then be able to access the «My Products» page, where the software products to which your registration entitles you are available for download, complete with activation codes where applicable.
- Download and install the Scarlett 2i4 drivers. Follow all on-screen instructions.
- When the installation is complete, restart your computer.
- After restart, connect the Scarlett 2i4 to your computer with the USB cable supplied.
Mac OS X:
Your OS should automatically switch the computer’s default audio outputs to the Scarlett 2i4. To verify this, go to System Preferences > Sound, and ensure that the input and output are set to Scarlett 2i4. For more detailed setup options on a Mac, open Applications > Utilities > Audio MIDI Setup.
Windows:
Your OS should automatically switch the computer’s default audio outputs to the Scarlett 2i4. To verify this go to: Start > Control Panel > Hardware and Sound > Sound > Manage Audio
Devices and ensure that ‘Default Playback‘ and ‘Recording‘ are set to ‘Scarlett 2i4‘
Connecting your Scarlett 2i4
IMPORTANT: Before you connect the Scarlett 2i4 to your computer, please complete the software installation according to the previous instructions. This will ensure that the hardware uses the correct drivers, and will prevent unexpected behaviour.
The Scarlett 2i4 has a single USB 2.0 port (on the rear panel). Once the software installation is complete, simply connect the Scarlett 2i4 to your computer using the USB cable provided. (Note that Scarlett 2i4 is a USB 2.0 device, and thus the USB connection requires a USB 2.0+ compliant port on your computer. It will not operate correctly with USB 1.0/1.1 ports)
Audio Setup in your DAW
The Scarlett 2i4 is compatible with any Windows-based DAW that supports ASIO or WDM* and any Mac-based DAW that uses Core Audio. After installing the drivers and connecting the hardware, you can start using the Scarlett 2i4 with the DAW of your choice. To allow you to get started if you do not already have a DAW application installed on your computer, Ableton Live Lite is included in the Xcite+ software pack; this will be available to you once you’ve downloaded and activated your software online. To install Ableton Lite Live, download and save the Ableton installer file from your registered Focusrite «My Products» page as described above, and then run it, following all on-screen instructions.
Operating instructions for Ableton Live Lite are beyond the scope of this User Guide, but the application includes a full set of Help files.
*only compatible with 16-bit audio under WDM
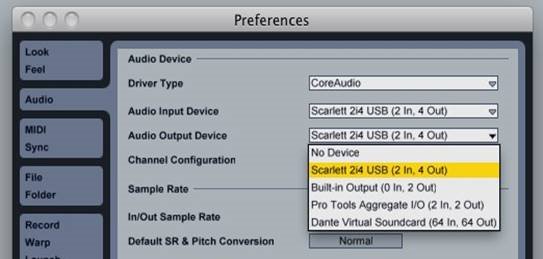
Please note — your DAW may not automatically select the Scarlett 2i4 as its default I/O device. In this case, you must manually select ‘Scarlett 2i4‘ as the driver on your DAW’s Audio Setup* page. Please refer to your DAW’s documentation (or Help files) if you are unsure where to select the ASIO or Core Audio driver. The example below shows the correct configuration in the Ableton Live Lite Preferences panel (Mac version shown).
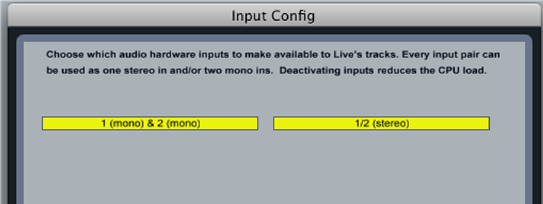
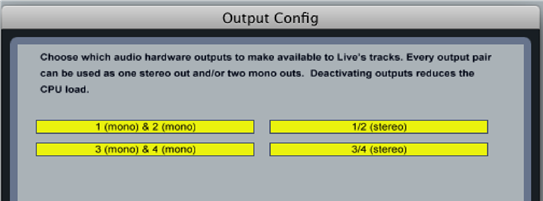
Once the Scarlett 2i4 is set as the preferred Audio Device* in your DAW, Inputs 1 & 2 and Outputs 1 to 4 will appear in your DAW’s Audio I/O preferences. Depending on your DAW, you may need to enable certain inputs or outputs before use. The two examples below show Inputs 1 & 2 and Outputs 1 to 4 enabled in the Ableton Lite Audio Preferences.
*Typical name. Terminology may differ slightly between DAWs.
Example of Usage
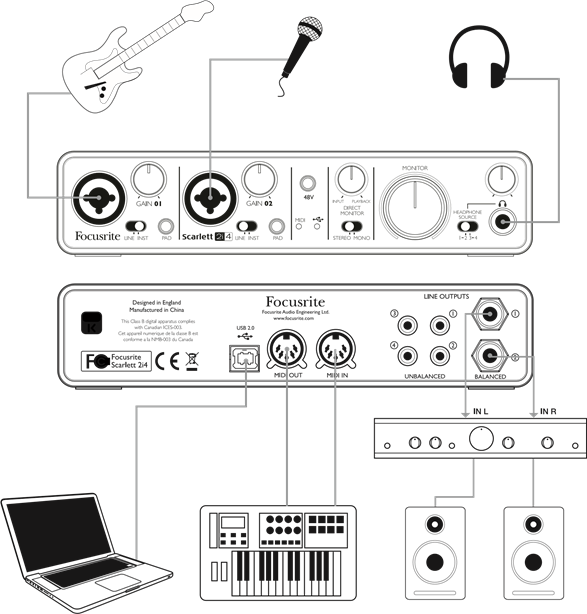
The Scarlett 2i4 is an excellent choice for several different recording and monitoring applications. Some typical configurations are shown below.
Connecting a microphone or instrument
This setup illustrates the most typical configuration for recording with DAW software on your Mac or PC. In this case, you might record guitar through Input 1 and vocals through Input 2 into Ableton Live Lite, while monitoring the playback from the DAW via headphones or loudspeakers.
The front panel input sockets are Neutrik Combo® type, which accept either an XLR male connector (you will probably have one on the end of your microphone cable) or a ¼» (6.35 mm) jack plug. Note the Scarlett 2i4 has no «Mic/line» switch – the Focusrite preamplifier stage is automatically configured for a microphone when you plug an XLR into the input, and for a line or instrument when you connect a jack plug. Set the LINE/INST switch next to the socket to INST if you are connecting musical instrument (a guitar in the example) via an ordinary 2-pole guitar jack, or to LINE if you are connecting a line level source such as the balanced output of an external audio mixer via a 3-pole (TRS) jack. Note the Combo connector accepts both types of jack plug.
If you are using a capacitor (condenser) microphone, press the 48V button to supply phantom power to the mic. Don’t turn this on if you’re using any other type of mic.
Each channel of the Scarlett 2i4 has a PAD button on the front panel; pressing this reduces the input sensitivity by 10 dB. You may find this useful if you are feeding the input from a line level source when the output is particularly «hot».
Using Direct Monitoring
You will frequently hear the term «latency» used in connection with digital audio systems. In the case of the simple DAW recording application described above, latency will be the time it takes for your input signals to pass through your computer and audio software, and back out again via your audio interface. Latency can be a problem for a performer who wishes to record while monitoring their input signals.
The Scarlett 2i4 is fitted with a «Direct Monitoring» option, which overcomes this problem.
Setting the front panel DIRECT MONITOR control to INPUT will route your input signals directly to the Scarlett 2i4’s headphone and main monitor outputs. This enables you to hear yourself with zero latency – i.e., in «real time». Users can vary the amount of computer playback heard by using the DIRECT MONITOR control. The input signals to your computer are not affected in any way by this setting.
DIRECT MONITOR is a «mix» control – it lets you set your own preferred blend of input signals and DAW playback. As you rotate the control clockwise, the level of DAW playback increases and the level of your input signal decreases. At the 12 o’clock position, a 50/50 mix of the two is obtained.
Note that if the DIRECT MONITOR control is set anywhere other than fully clockwise or fully anticlockwise, ensure that your DAW software is not set to route its input (what you are currently recording) to its output. If it is, you will hear yourself «twice», with one signal audibly delayed as an echo.
The Direct Monitoring facility can also be switched for mono operation, which is useful if you are only recording one instrument or voice. With the STEREO/MONO switch set to STEREO, Input 1 is routed to the left input channel and Input 2 to the right, and this will be the correct setting if you are recording a stereo source. In MONO mode, both inputs are routed equally to both channels, and will appear in the centre of the stereo image.
Connecting Scarlett 2i4 to loudspeakers
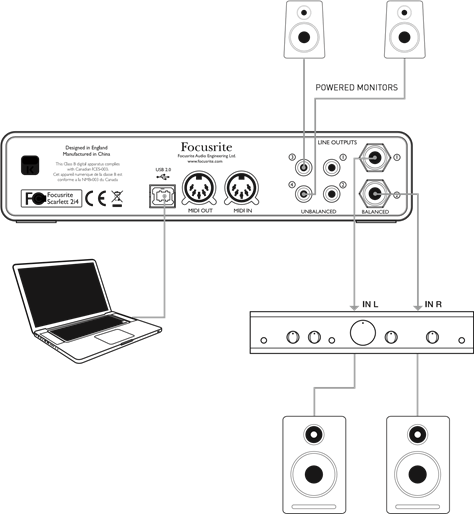
If connecting 1 and 2 and 3 and 4 to the two decks of a DJ Mixer make sure to turn the Monitor Knob all the way up to send a full line signal to 1 and 2, Deck A. Output channels 1 and 2 are provided both in variable-level, electronically balanced form on ¼» (6.35 mm) 3-pole (TRS) jacks and as unbalanced signals on phono (RCA) sockets. Outputs 3 and 4 are provided in fixed-level unbalanced form only, also on phono (RCA) sockets.
If Outputs 1 and 2 are used, Outputs 3 and 4 are free to be used for another purpose, such as connecting to an additional recording device or an additional pair of monitors. However, please note that the balanced versions of channels 1 and 2 – i.e., the signals at the two ¼» (6.35 mm) jack sockets and the unbalanced versions of channels 1 and 2 – are affected in level by the the large front panel MONITOR volume control. The signals at outputs 3 – 4 phono (RCA) sockets are at (full) fixed level, and thus if you use these for monitoring, you will have to control the volume either at source (within the DAW itself), or by adjusting the volume on an external amplifier.
Self-powered monitors (i.e., typical computer speakers) incorporate internal amplifiers with a volume control, and may be connected directly. Larger, passive loudspeakers will require a separate stereo amplifier; in this case, the outputs should be connected to the amplifier’s inputs.
Typical consumer (hi-fi) amplifiers and small powered monitors will have unbalanced inputs, either on phono (RCA) sockets, or via a 3.5 mm 3-pole jack plug intended for direct connection to a computer. In either case, use a suitable connecting cable with phono plugs (RCA jacks) at one end. Hi-fi amplifiers and powered monitors will have their own volume controls; use these to adjust the monitoring volume.
Professional power amplifiers will generally have balanced inputs (either on 3-pin XLR or 3-pole (TRS) ¼» (6.35 mm) jack sockets); use a suitable cable to connect them to the ¼» jack outputs of the Scarlett 2i4. If you use the balanced outputs, you can adjust the monitoring volume from the Scarlett 2i4’s front panel.
NOTE: You run the risk of creating an audio feedback loop if loudspeakers are active at the same time as a microphone! We recommend that you always turn off (or turn down) monitoring loudspeakers while recording and use headphones when overdubbing.
Connecting Scarlett 2i4 to a DJ mixer
The Scarlett 2i4 makes an excellent interface between a laptop running DJ software and the channels of a DJ mixer. In this setup, Outputs 1 and 2 can be connected to Line Inputs 1 and 2 of an external DJ mixer, and Outputs 3 and 4 to Line Inputs 3 and 4. Connecting in this way means that all mixer facilities, such as EQs and crossfading, are easily accessible. If connecting 1 and 2 and 3 and 4 to the two decks of a DJ Mixer make sure to turn the Monitor Knob all the way up to send a full line signal to 1 and 2, Deck A.
HARDWARE FEATURES
Front Panel
The Front Panel includes the input connectors for Mic, Line and Instrument signals, as well as the input gain and monitoring controls.
- Inputs 1 & 2 – Neutrik Combo® input sockets — connect microphones, instruments (e.g., guitar), or line level signals via XLR or ¼» (6.35 mm) jacks as appropriate.
- GAIN 01 and GAIN 02 — adjust the input gain for input signals on inputs 1 and 2 respectively. The gain controls have concentric bi-colour LED ‘rings’ to confirm signal level: green indicates an input level of at least -24 dBFS (i.e., ‘signal present’), the ring then turns red when signal level reaches 0 dBFS.
- PAD – 10 dB pad for each input. Pressing this button reduces the sensitivity of the input; use if feeding the input with a particularly high-level signal.
- LINE/INST — Instrument/Line level switches for each input – switches gain to suit instrument or line level signals.
- 48V — phantom power switch for mic inputs — enables 48 V phantom power at XLR contacts of both Combo connectors.
- USB LED — illuminates when the unit receives USB bus power and is confirmed by the computer as connected and operating correctly.
- MIDI LED – illuminates when MIDI data is received at the MIDI IN port.
- DIRECT MONITOR – rotary «blend» control letting you set your monitor mix as a balance of the input signal(s) and the DAW playback.
- STEREO/MONO – selects whether the inputs are summed to mono for monitoring.
- MONITOR – main monitor output levels control – sets the output level at the balanced and unbalanced (rear panel) outputs of channels 1 and 2 on both the TRS and RCA connectors.
- Headphone level — adjusts the output level at the front panel stereo headphone output.
- HEADPHONE SOURCE – allows you to select whether the headphones output is fed from Outputs 1 and 2 or Outputs 3 and 4 (as stereo pairs; modified by the setting of [9]).
- Headphone socket — ¼» TRS output jack — connect your stereo headphones here.
Back Panel
- Kensington security lock – secure your Scarlett 2i4 to a suitable structure if desired. Please see http://www.kensington.com/kensington/us/us/s/1704/kensington-security-slot.aspx for further information on how to use this feature.
- USB 2.0 port – Type B connector; connect to your computer with cable supplied.
- MIDI IN and MIDI OUT – standard 5-pin DIN sockets for connection of external MIDI equipment such as keyboards or sound modules. The Scarlett 2i4 provides a convenient MIDI interface with your DAW, making a computer MIDI card unnecessary.
- Line outputs 1 and 2 — 2 x ¼» (6.35 mm) TRS jack sockets; +4 dBV output level (variable), electronically balanced. Either ¼» TRS (balanced connection) or TS (unbalanced connection) jack plugs can be used.
- Line outputs 3 and 4 – 2 x phono (RCA) sockets; unbalanced outputs, -10 dBV level (fixed).
- Line outputs 1 and 2 – 2 x phono (RCA) sockets; unbalanced outputs, -10dBV level (variable).
- These sockets carry the same signal as [17] at all times.
Here you can download full pdf version of manual, it may contain additional safety instructions, warranty information, FCC rules, etc.
ВВЕДЕНИЕ
Это руководство пользователя программного обеспечения Focusrite Control, которое предназначено для использования с USB-аудиоинтерфейсами Focusrite Scarlett 3-го поколения.
Если вы только что приобрели интерфейс Scarlett 3-го поколения, то вам потребуется как данное руководство пользователя, так и руководство пользователя аппаратуры. Руководство пользователя аппаратуры можно скачать по адресу Downloads | Customer Portal.
Сочетание великолепных характеристик звукового тракта и профессионального качества изготовления Scarlett с простым и интуитивно понятным интерфейсом Focusrite Control позволяет создать универсальную систему компьютерной записи, используя предпочитаемую цифровую звуковую рабочую станцию (DAW).
Хотя программа Focusrite Control является максимально интуитивно понятной и ориентированной на решение конкретных задач, любой пользователь найдет в этом руководстве полезную информацию, так как полное понимание особенностей программного обеспечения возможно лишь при его рассмотрении в сочетании с подключенной аппаратурой.
ВАЖНАЯ ИНФОРМАЦИЯ
Ассортимент интерфейсов Scarlett включает несколько разных моделей, и все они поддерживают Focusrite Control. Фундаментальное различие между этими моделями заключается в количестве доступных входов и выходов, а также в наборе функций, которыми можно управлять напрямую из Focusrite Control.
Focusrite Control распознает конкретную аппаратуру Scarlett, подключенную к компьютеру, и настраивается соответствующим образом. Поэтому на экране будут отображаться лишь те входы и выходы, которые фактически поддерживаются используемой аппаратурой.
Благодаря этой автоматической настройке данное руководство пользователя применимо ко всем моделям в ассортименте Scarlett, хотя большая часть информации в нем применима к старшим моделям в ассортименте Scarlett, а именно Scarlett 4i4 и выше (см. ПРИМЕЧАНИЕ ниже). Так как включение в руководство снимков экранов для разных моделей может запутать читателя, мы решили использовать в качестве «базовой» модели устройство Scarlett 18i20. Если вы приобрели Scarlett 18i20, то снимки экранов в данном руководстве пользователя будут в точности соответствовать реальным экранам. При использовании другой модели существенные различия в виде экрана будут заключаться лишь в количестве доступных входов и выходов, а также в функциях, управляемых программным обеспечением.
ПРИМЕЧАНИЕ . Только для пользователей Scarlett 2i2 и Solo
Хотя программное управление для данных моделей ограничено, установка Focusrite Control все равно необходима для обеспечения полной функциональности устройства при частотах дискретизации выше 48 кГц, а также для обновлений микропрограммы. Однако в целом для использования аппаратного интерфейса нет необходимости запускать Focusrite Control на компьютере. Обратите внимание, что в будущем будут доступны новые функции, управляемые программным обеспечением.


 Use only with the cart, stand, tripod, bracket, or table specified by the manufacturer, or sold with the apparatus. When a cart is used, use caution when moving the cart/ apparatus combination to avoid injury from tip-over.