Введение
Об этом руководстве……………………………..7
Словарь символов…………………………………7
Запасные части и аксессуары………………..8
Быстрый обзор
Быстрый обзор…………………………………….10
Безопасность детей
Детские сиденья………………………………….21
Установка детского сиденья…………………22
Дополнительные подушки…………………….24
Места расположения креплений
ISOFIX……………………………………………..25
Замки с функцией блокировки от
отпирания детьми…………………………….25
Защита людей, находящихся в
автомобиле
Принципы работы………………………………..27
Пристегивание ремней безопасности……29
Регулировка высоты крепления ремня
безопасности……………………………………30
Система определения непристегнутого
ремня безопасности………………………….30
Использование ремней безопасности во
время беременности………………………..31
Дуги защиты при опрокидывании………….31
Отключение подушки безопасности
пассажира………………………………………..32
Ключи и пульты дистанци-
онного управления
Общая информация о радиочастотах…..33
Программирование пульта
дистанционного управления……………..33
Замена элемента питания пульта
дистанционного управления……………..34
Замки
Блокировка и разблокировка замков…….37
Система управления замками без помощи
ключа……………………………………………….39
Полное открывание/ закрывание………….42
Иммобилайзер двигателя
Принципы работы………………………………..44
Запрограммированные ключи………………44
Активация иммобилайзера
двигателя…………………………………………44
Отключение иммобилайзера
двигателя…………………………………………44
Сигнализация
Принципы работы………………………………..45
Активация сигнализации………………………46
Отключение сигнализации……………………46
Рулевое колесо
Регулировка положения рулевого
колеса……………………………………………..48
Управление аудиосистемой………………….48
Голосовое управление…………………………49
Стеклоочистители и стеклоомы-
ватели
Очистители ветрового стекла……………….50
Автоматические стеклоочистители……….51
Омыватели ветрового стекла……………….51
Очиститель и омыватели заднего
стекла………………………………………………52
Регулировка положения жиклеров
омывателей стекол…………………………..53
Омыватели фар…………………………………..53
Проверка щеток стеклоочистителей……..53
Замена щеток стеклоочистителей…………53
Осветительное оборудование
Органы управления осветительным
оборудованием…………………………………55
Адаптивное освещение………………………..56
Передние противотуманные фары……….56
1
Содержание
Здравствуйте друзья!
Поздравляю всех с прошедшими и наступающими новогодними праздниками!
Не расслабляйтесь! Впереди ещё старый новый и традиционный для России китайский новый год!
Буквально вчера, один добрый человек поделился со мной парочкой книг, которыми я делюсь с Вами:
Про первый фокус
1. Ford Focus с двигателями 1,6i; 1,8i; 2,0i. Устройство, эксплуатация, обслуживание, ремонт. Иллюстрированное руководство
• Дата написания: 2011
• Объем: 346 стр.
• ISBN: 978-5-9698-0379-8
• Общий размер: 28 MB
• Общее кол-во страниц: 346
• Размер страницы: 200 x 255 мм
• Правообладатель: За рулем
• Ссылка для скачивания PDF файла.
Полный размер
Про второй фокус
2. Ford Focus II c двигателями 1,4 (80 л.с.); 1,6 (100 и 115 л.с.) Устройство, эксплуатация, обслуживание, ремонт: Иллюстрированное руководство.
• Дата написания: 2011
• Объем: 329 стр.
• ISBN: 978-5-9698-0325-1
• Общий размер: 43 MB
• Общее кол-во страниц: 329
• Размер страницы: 205 x 265 мм
• Правообладатель: За рулем
• Ссылка для скачивания PDF файла.
Надеюсь, кому-то будет полезно!
P.S. У издательского дома «За рулём» достаточно большое количество книг по устройству и эксплуатации различных автомобилей.
Кому интересно, смотрите тут
с бензиновыми двигателями: Duratec 1.4 л (1388 см³) 80 л.с./ 59 кВт, Duratec 1.6 л Sigma (1596 см³) 100 л.с./ 74 кВт, Duratec Ti-VCT 1.6 л (1596 см³) 115 л.с./ 85 кВт, Duratec-HE 1.8 л MI4 (1798 см³) 125 л.с./ 92 кВт, Duratec-HE 2.0 л MI4 (1998 см³) 145 л.с./ 107 кВт, Duratec-ST 2.5 л (2521 см³) 225 л.с./ 166 кВт и турбодизельными Duratorq TDCi 1.6 л (1560 см³) 90-109 л.с./ 66-80 кВт, Duratorq TDCi (KENT) 1.8 л (1753 см³) 115 л.с./ 85 кВт, 2.0-литровыми Duratorq TDCi мощностью — 136 л.с./ 100 кВт, рабочим объемом — 1997 см³. Инструкция пользователя Форд Фокус 2 переднеприводные модели второго поколения до рестайлинга выпуска с 2004 по 2008 год читать онлайн, скачать
Ford Focus II / C-Max устройство, обслуживание, ремонт и эксплуатация Здесь
Ford Focus II 1.4/ 1.6 л устройство, обслуживание, эксплуатация и ремонт
Форд Фокус 2 1.6/1.8/2.0 руководство по эксплуатации, техобслуживанию и ремонту
Ford Focus II Duratec Ti-VCT 1.6 л Руководство по ремонту
Ford Focus II 1.8/ 2.0 л устройство, обслуживание, эксплуатация и ремонт
Ford Focus II — Руководство по ремонту и эксплуатации
Видео Ford Focus 2 замена свечей зажигания и как поменять батарейку в ключе замка зажигания (Форд Фокус 04-11)
Ford Focus Mk II общая информация (Форд Фокус 2004-2011)


ПУЛЬТА ДИСТАНЦИОННОГО УПРАВЛЕНИЯ
Если мощность передатчика в пульте дистанционного управления постепенно снижается, то следует заменить батарейку (тип 3V CR 2032).
Пульт дистанционного управления, тип 1
Вначале нажмите кнопку, чтобы освободить стержень ключа.
Пассивный ключ
Извлеките запасной ключ из корпуса.
Открывание корпуса пульта (ключа)
Пульт дистанционного управления, тип 1

• Вставьте жало отвёртки как можно глубже в прорезь на боковой поверхности корпуса пульта и надавите на неё в сторону рабочей части ключа, чтобы извлечь контейнер.

• Вставьте отвертку в прорезь на боковой поверхности корпуса пульта (ключа) и поверните ее, чтобы начать открывать корпус.
Пульт дистанционного управления (тип 1) и пассивный ключ

A Система дистанционного управления
B Пассивный ключ
• Вставьте отвертку в прорезь в передней части корпуса пульта (ключа) и поворачивайте ее, чтобы полностью открыть корпус.
Соблюдайте осторожность, чтобы не потерять кольцо ключа.
Пульт дистанционного управления, тип 2

• Осторожно отсоедините блок передатчика от головки ключа, вставив отвертку в вырез на задней части головки.
• Откройте блок передатчика, при помощи плоского предмета отсоединив крепежные зажимы, расположенные по бокам.
Замена элемента питания

A Тип 1
B Тип 2
C Пассивный ключ
• Вставьте отвертку в отверстие, показанное стрелкой, и осторожно извлеките элемент питания. Будьте осторожны, чтобы не коснуться контактной поверхности элемента питания или поверхности микросхемы.
• Вставьте новый элемент питания. «Положительный» вывод элемента питания, (помеченный символом +), должен быть обращен вверх.
Сборка корпуса пульта (ключа)
Соедините две половинки корпуса и сожмите их до щелчка.
Пульт дистанционного управления, тип 1
Установите стержень ключа так, чтобы он защелкнулся в корпусе.
Пульт дистанционного управления, тип 2
Вставьте блок передатчика обратно в корпус ключа.
Пассивный ключ
Вставьте стержень запасного ключа в корпус пассивного ключа до щелчка.
| Деталь | Спецификации | Коэффициент вязкости | Рекомендуемая рабочая жидкость |
|---|---|---|---|
| Моторное масло для двигателя / Motor Oil | WSS-M2C913-B | SAE 5W-30 | Моторное масло Castrol |
| Смазка для механической коробки передач / 5/6-Speed Manual transaxle fluid | WSS-M2C200-C | — | Motorcraft |
| Смазка для автоматической коробки передач / Automatic Transmission Fluid | WSS-M2C200-B | — | Motorcraft |
| Жидкость усилителя рулевого управления | WSS-M2C204-A2 | — | Ford или Motorcraft |
| Охлаждающая жидкость двигателя / Coolant | WSS-M97 B44-D | — | Охлаждающая жидкость Motorcraft Super Plus/ Orange Antifreeze |
| Тормозная жидкость / Brake Fluid | ESD-M6C 57-А. | Ford или Motorcraft Super DOT 4 | |
| Жидкость омывателя ветрового стекла / Windshield Wash Concentrate | WSS-M14P19-A | — | Motorcraft Premium Windshield Wash Concentrate with Bitterant |
| Смазка спрей / Grease Spray Door latch, hood Not applicable latch, trunk latch and seat tracks | ESB-M1C93-B | — | Motorcraft Multi-Purpose Grease Spray XL-5 or CRC SL3151ESB |
| Хладагент для системы воздушного кондиционирования / Refrigerant | WSH-M17B19-A | — | Motorcraft R-134a Refrigerant YN-19 / CYN-16-R (Canada) |
| Смазка для системы воздушного кондиционирования / Compressor Oil | WSH-M1C231-B | — | Motorcraft PAG Refrigerant Compressor Oil YN-12-D |
| Смазка / Grease Lock cylinder | ESA-M1C75-B | — | Motorcraft Penetrating and Lock Lubricant XL-1 (U.S.) / Motorcraft Penetrating fluid CXC-51-A (Canada) |
| Проникающая жидкость / Penetrating and Lock Lubricant | — | — | Penetrating and Lock Lubricant XL-1 |
| Заправочные объемы (л) / Capacity (qt) | 1.4 литра Duratec | 1.6 литра Duratec/ Duratec Ti-VCT | 1.8/ 2.0 литра Duratec-HE | 2.5 литра Duratec-ST | 1.6/ 1.8/ 2.0 литра Duratorq-TDCi | |
|---|---|---|---|---|---|---|
| Масло для двигателя / Engine lubrication system — с фильтром / including the oil filter — без фильтра / including the oil filter — объемы доливки |
3.8 литра 3.5 литра 0.7 литра |
4.1 литра 3.75 литра 0.7 литра |
4.3 литра 3.9 литра 0.7 литра |
6.4 литра 6.1 литра 1.3 литра |
3.8/ 5.6/ 5.5 литра 3.4/ 5.0/ 5.0 литра 1.6/ 1.0/ 1.8 литра |
|
| Гидроусилитель руля | Между отметками MIN и MAX | |||||
| Система охлаждения / Engine cooling system | с предпусковым подогревателем — автомобили с кондиционером воздуха | 5.5 литра | 5.8 литра | 6.5/ 6.3 литра | 7.1 литра | 7.3/ 8.1/ 8.4 литра |
| с предпусковым подогревателем — автомобили без кондиционера воздуха | 5.2 литра | 5.5/ 6.0 литра | ||||
| Система омывания стекол / Windshield washer fluid | с омывателями фар | 4.5 литра | ||||
| без омывателей фар | 3.3 литра | |||||
| Бензобак / Fuel tank | 55 литров | 53 литров | ||||
| Тормозная система | Между отметками MIN и MAX |


| № | Спецификация / Specs | Данные |
| Габариты (мм/mm) и масса (кг/kg) / Dimensions and Weight | ||
| 1 | Длина / Length | 4472 |
| 2 | Ширина (без/с зеркалами) / Width | 1840/1991 |
| 3 | Высота (загружен/пустой) / Height | 1501/1609 |
| 4 | Колёсная база / Wheelbase | 2640 |
| 5 | Дорожный просвет (клиренс) / Ground clearance | 140 |
| 6 | Снаряжённая масса / Total (curb) weight | 1350 |
| Полная масса / Gross (max.) weight | 1845 | |
|
Двигатель / Engine |
||
| 7 | Тип / Engine Type, Code | Бензиновый, жидкостного охлаждения, четырехтактный, HWDA Duratec (Sigma) |
| 8 | Количество цилиндров / Cylinder arrangement: Total number of cylinders, of valves | 4-цилиндровый, рядный, 16V, DOHC с верхним расположением двух распредвалов |
| 9 | Диаметр цилиндра / Bore | 79.0 мм |
| 10 | Ход поршня / Stroke | 81.4 мм |
| 11 | Объём / Engine displacement | 1596 см³ |
| 12 | Система питания / Fuel supply, Aspiration | Распределенный впрыск топлива SEFI (Sequential electronic fuel injection) |
| Атмосферный | ||
| 13 | Степень сжатия / Compression ratio | 11.0:1 |
| 14 | Максимальная мощность / Max. output power kW (HP) at rpm | 74 кВт (100 л.с.) при 6000 об/мин |
| 15 | Максимальный крутящий момент / Max. torque N·m at rpm | 150 Нм при 4000 об/мин |
|
Трансмиссия / Transmission |
||
| 16 | Сцепление / Clutch type | Гидротрансформатор с блокировкой |
| 17 | КПП / Transmission type | Durashift-ECT АКПП 4 Автоматическая, четырёхступенчатая, гидромеханическая, адаптивная |
О Книге
- Название: Ford Focus Ⅱ Руководство по эксплуатации
- Бензиновые двигатели: Duratec 1.4 л (1388 см³) 80 л.с./ 59 кВт, Duratec 1.6 л Sigma (1596 см³) 100 л.с./ 74 кВт, Duratec Ti-VCT 1.6 л (1596 см³) 115 л.с./ 85 кВт, Duratec-HE 1.8 л MI4 (1798 см³) 125 л.с./ 92 кВт, Duratec-HE 2.0 л MI4 (1998 см³) 145 л.с./ 107 кВт, Duratec-ST 2.5 л (2521 см³) 225 л.с./ 166 кВт и турбодизельными Duratorq TDCi 1.6 л (1560 см³) 90-109 л.с./ 66-80 кВт, Duratorq TDCi (KENT) 1.8 л (1753 см³) 115 л.с./ 85 кВт, Duratorq TDCi 2.0 л (1997 см³) 136 л.с./ 100 кВт
- Выпуск с 2004 года
- Серия: «Owner Guide»
- Год издания: Январь 2007
- Автор: Коллектив авторов
- Издательство: «Ford Motor Company»
- Формат: PDF
- Страниц в книге: 346
- Размер: 50.68 МБ
- Язык: Русский
- Количество электросхем: 0

Основные неисправности, для устранения которых необходимо снимать механическую коробку передач с автомобиля, следующие: повышенный
Если во время движения автомобиля в поворотах слышны стуки в переднем приводе, проверьте шарниры
Конструкция коробки передач не предусматривает замены масла в течение всего срока службы автомобиля. Однако
Вам потребуется ключ «на 10». 1. Снимите кулису рычага управления коробкой (см. «Снятие и
Рис. 6.8. Приводы передних колес: а – привод левого переднего колеса; б – привод
Подшипник промежуточной опоры можно снять с промежуточного вала правого привода без разборки внутреннего шарнира.
Приводы передних колес снимают для их замены при повреждении или для замены шарниров и
На автомобили Ford Focus II в базовой комплектации устанавливают механическую коробку передач типа iB5,
Привод управления коробкой передач состоит из двух тросов: выбора и переключения передач, однако регулируется
При обнаружении течи топлива в баке замените бак, так как он отформован из специальной
- Руководства по ремонту
- Ford Focus 2 2005-2008
Общая информация об автомобиле.
Парижский автомобильный салон представил модель Ford Focus II в 2005 году. В отличие от первого поколения, второе стало немного больше. Имеется ввиду ширина и длина кузова (почти на 50 миллиметров). Увеличение колесной базы, колеи, диаметра колес — все это сделало салон автомобиля довольно просторным.
Уже через год автолюбителям предлагался выбор между тремя видами кузовов: хэтчбек (5- или 3-дверный), универсал и седан. В различных комплектациях покупатели могли себе выбрать дополнительно биксеноновые фары, климат-контроль, парктроник, сенсорный дисплей или систему ABS.
Оснащается автомобиль Форд Фокус II бензиновыми 1,4 и 1,6-литровыми двигателями с мощностью 80 и 100 лошадиных сил соответственно. Также возможна покупка комплектации с дизельным 1,6-литровым двигателем.
Ремонт Ford Focus II производится в специализированных СТО, хотя его можно провести и своими руками. Для получения качественного результата от проведения ремонтных работ можно воспользоваться данным онлайн руководством или же скачать его.
Интерьер был создан в обычном, добротном стиле. Ее современность стала заслугой использования при производстве высококачественных материалов. Весьма гармонично смотрится сочетание светлого «низа» салона и сидений из качественных материалов. К тому же, разработчики внесли в дизайн много приятных мелочей, среди которых: подстаканники, бардачок на 12 литров, лампа подсветки и отсек для бумаг. Задний диванчик получился не менее удобным. На нем спокойно может поместиться три взрослых человека.
Объем багажника составляет 385 литров, а со сложенными сидениями – 1245 литров.
В плане безопасности разработчики также неплохо потрудились, оборудовав автомобиль боковые и передние надувные подушки нового поколения. Современные тормозные механизмы, сохранившие в себе лучшие разработки, позволяют быстро и адекватно замедлять движение, максимально сократив при этом тормозной путь.
В 2008 году Фокус подвергли рестайлингу, в котором был обновлен дизайн, эргономика и технические характеристики. Все эти качества и сделали модель Ford Focus II лидером по количеству продаж в РФ среди автомобилей «гольф-класса».
↓ Комментарии ↓
Раздел 1. Устройство автомобиля
Общие сведения об автомобиле
Паспортные данные
Ключи автомобиля
Органы управления
Отопление (кондиционирование) и вентиляция салона
Двери
Ремни безопасности
Сиденья
Регулировка положения рулевого колеса
Зеркала заднего вида
Освещение салона
Противосолнечные козырьки
Вещевые ящики салона
Капот
Управление коробкой передач
Багажник крыши
Раздел 2. Рекомендации по эксплуатации
Правила техники безопасности и рекомендации
Что нужно иметь в автомобиле
Обкатка автомобиля
Эксплуатация автомобиля в гарантийный период
Подготовка автомобиля к выезду
Заправка автомобиля бензином
Использование домкрата
Буксировка автомобиля
Раздел 3. Неисправности в пути
Двигатель не заводится
Неисправности системы впрыска топлива
Пропал холостой ход
Перебои в работе двигателя
Диагностика состояния двигателя по внешнему виду свечей зажигания
Автомобиль движется рывками
Автомобиль плохо разгоняется
Двигатель заглох во время движения
Упало давление масла
Перегрев двигателя
Аккумуляторная батарея не подзаряжается
Пуск двигателя от внешних источников тока
Неисправности электрооборудования
Появились посторонние стуки
Проблемы с тормозами
Прокол колеса
Раздел 4. Техническое обслуживание
Общие положения
Ежедневное обслуживание (ЕО)
Первое техническое обслуживание (ТО-1)
Второе техническое обслуживание (ТО-2)
Раздел 5. Двигатель
Особенности конструкции
Возможные неисправности двигателя, их причины и способы устранения
Полезные советы
Проверка компрессии в цилиндрах
Снятие и установка брызговика двигателя
Замена опор подвески силового агрегата
Установка поршня первого цилиндра в положение ВМТ такта сжатия
Снятие, установка и дефектовка маховика
Замена деталей уплотнения двигателя
Регулировка зазоров в приводе клапанов
Головка блока цилиндров
Снятие и установка двигателя
Система смазки
Система охлаждения
Система выпуска отработавших газов
Система питания двигателя
Система улавливания паров топлива
Раздел 6. Трансмиссия
Сцепление
Коробка передач
Приводы передних колес
Раздел 7. Ходовая часть
Передняя подвеска
Задняя подвеска
Раздел 8. Рулевое управление
Особенности конструкции
Возможные неисправности рулевого управления с гидроусилителем, их причины и способы устранения
Рулевая колонка
Рулевые тяги
Рулевой механизм
Раздел 9. Тормозная система
Особенности устройства
Возможные неисправности тормозной системы, их причины и способы устранения
Прокачка гидропривода тормозной системы
Проверка положения педали тормоза
Главный тормозной цилиндр
Вакуумный усилитель тормозов
Замена шлангов и трубок гидропривода тормозов
Снятие и установка педали тормоза
Тормозные механизмы передних колес
Тормозные механизмы задних колес
Стояночный тормоз
Антиблокировочная система тормозов
Раздел 10. Электрооборудование
Особенности конструкции
Диагностика неисправностей бортового электрооборудования
Монтажные блоки
Аккумуляторная батарея
Генератор
Стартер
Выключатель (замок) зажигания
Система управления двигателем
Освещение, световая и звуковая сигнализация
Замена моторедуктора стеклоочистителя ветрового окна
Замена моторедуктора стеклоочистителя окна двери задка
Снятие и установка омывателя стекла ветрового окна
Замена моторедуктора стеклоподъемника передней двери
Снятие и установка электродвигателя вентилятора радиатора системы охлаждения двигателя
Замена дополнительного сопротивления вентилятора радиатора системы охлаждения двигателя
Снятие и установка электродвигателя отопителя
Замена дополнительного сопротивления электровентилятора отопителя
Электрообогрев стекла окна задка (двери задка)
Комбинация приборов
Выключатели панели приборов
Замена блока управления электростеклоподъемниками и электроприводом зеркал
Автомобильная аудиосистема
Замена датчиков и выключателей
Раздел 11. Кузов
Особенности конструкции
Возможные неисправности кузова, их причины и способы устранения
Снятие и установка облицовки радиатора
Снятие и установка брызговиков колес и подкрылков
Снятие и установка бамперов
Снятие и установка переднего крыла
Снятие и установка каркаса моторного отсека и бруса переднего бампера
Снятие и установка решетки короба воздухопритока и водоотводящего щитка
Капот
Боковые двери
Дверь задка автомобилей с кузовом хэтчбек
Крышка люка наливной трубы топливного бака
Сиденья
Снятие и установка облицовки тоннеля пола
Система пассивной безопасности (SRS)
Зеркала заднего вида
Панель приборов
Отопитель и кондиционер
Арматура салона
Снятие и установка облицовок салона
Снятие и установка облицовок багажника
Стеклоочиститель ветрового окна
Стеклоочиститель окна двери задка
Замена неподвижного остекления кузова
Снятие и установка полки крепления аккумуляторной батареи
Уход за кузовом
Раздел 12. Колеса и шины
Технические характеристики
Маркировка колесных дисков
Маркировка шин
Замена колес
Колесные гайки
Обкатка шин
Хранение шин
Балансировка колес
Цепи противоскольжения
Запасное колесо
Проверка давления в шинах
Проверка протектора шин
Проверка вентиля
Проверка радиального и бокового биения дисков
Раздел 13. Покупка запасных частей
Моторное масло
Пластичные смазки
Охлаждающие жидкости
Тормозная жидкость
Топливный фильтр тонкой очистки
Воздушный фильтр
Масляный фильтр системы смазки двигателя
Свечи зажигания
Раздел 14. Поездка на СТО
Раздел 15. Зимняя эксплуатация автомобиля
Как подготовить автомобиль к зиме
Рекомендации по пуску двигателя в сильный мороз
Что полезно купить к зиме
Полезные зимние советы
Раздел 16. Подготовка к техосмотру
Рекомендации
Перечень неисправностей и условий, при которых запрещается эксплуатация транспортных средств
Изменения к государственным стандартам, регламентирующим предельно допустимое содержание вредных веществ в отработавших газах автотранспортных средств
Раздел 17. Советы начинающему автомеханику
Техника безопасности при проведении ремонтных работ
Инструменты
Перед началом работы
Восстановление резьбовых соединений
Советы по кузовному ремонту
Приложения
Приложение 1. Моменты затяжки резьбовых соединений, Н·м
Приложение 2. Габаритные размеры (мм) автомобилей Ford Focus II с кузовами седан и универсал
Приложение 3. Технические характеристики двигателей и эксплуатационные показатели автомобилей в зависимости от типа применяемого двигателя
Приложение 4. Давление воздуха в холодных шинах
Приложение 5. Заправочные объемы, л
Схемы электрооборудования
Схема 1. Соединения стеклоочистителя и стеклоомывателя ветрового стекла
Схема 2.Соединения системы заряда аккумуляторной батареи
Схема 3. Соединения системы гидропривода тормозной системы
Схема 4. Соединения системы вентиляции, отопления и кондиционирования воздуха
Схема 5. Соединения системы пуска двигателя
Схема 6а. Соединения системы контроля скорости
Схема 6б. Соединения системы контроля скорости
Схема 7а. Соединения системы управления двигателем
Схема 7б. Соединения системы управления двигателем
Схема 7в. Соединения системы управления двигателем
Схема 7г. Соединения системы управления двигателем
Схема 7д. Соединения системы управления двигателем
Схема 7е. Соединения системы управления двигателем
Схема 7ж. Соединения системы управления двигателем
Схема 8а. Соединения системы кондиционирования воздуха
Схема 8б. Соединения системы кондиционирования воздуха
Схема 9. Соединения системы усилителя рулевого управления
Схема 10а. Соединения антиблокировочной системы тормозов (АБС)
Схема 10б. Соединения антиблокировочной системы тормозов (АБС)
Схема 11. Соединения системы динамической стабилизации автомобиля
Руководство по эксплуатации, техническому обслуживанию и ремонту Форд Фокус 2 рестайлинг второго поколения с 2008 года
ЕСЛИ ВЫ ВИДИТЕ ОШИБКУ 406 Not Acceptable и не видите документ, то скорей всего у Вас IP РФ и его надо сменить, на любой другой страны, с помощью VPN ( Scribd и SlideShare блокируют посетителей с Российским IP).
Видео Форд Фокус 2 с 08 ремонт передней подвески: замена задних сайлентблоков передних рычагов, шаровых опор, рулевых тяг на новые и как снять передние фары и поменять все лампы
Ford Focus II общая информация (Форд Фокус 2008-2011)
Общие сведения об автомобиле
Впервые автомобиль Ford Focus 2 был представлен в сентябре 2004 года на Парижском автосалоне. На российском заводе концерна во Всеволожске (пригород Санкт-Петербурга) автомобили этой модели начали собирать летом 2005 года. В 2007 году автомобиль подвергли глубокому рестайлингу, изменили интерьер и внешний вид. Для российского рынка автомобили Ford Focus II комплектуют следующими двигателями: 1.4 л R4 16V (80 л.с.); 1,6 л R4 16V (100 л.с.); 1,6 л R4 16V Duratec Ti-VCT с изменяемыми фазами газораспределения (115 л.с.), 1,8 л R4 16V Duratec-HE (125 л.с.); 2,0 л R4 16V (145 л.с.) и турбодизель Duratorq 1,8 л R4 16V (115 л.с.).
В данной книге описаны бензиновые модификации применяемых двигателей. На автомобили устанавливают механические коробки передач (пятиступенчатые мод. IB5 или МТХ75, шести ступенчатые мод. ММТ6) либо четырехступенчатые автоматические (только на автомобили с двигателями рабочим объемом 1,6 и 2,0 л). Автомобили Ford Focus II выпускают с кузовами пяти- или трехдверный хэтчбек, седан и универсал. В России автомобиль предлагают в четырех базовых комплектациях:
— Ambiente (подушка безопасности водителя, пиротехнические преднатяжители ремней безопасности передних сидений с ограничителями натяжения, передние стеклоподъемники с электроприводом, центральный замок и иммобилизатор, регулируемая no вылету и углу наклона рулевая колонка, отопитель с режимом рециркуляции воздуха);
— Comfort (дополнительно к оборудованию комплектации Ambiente устанавливают кондиционер, алюминиевую отделку внутренних дверных ручек. боковые молдинги и наружные ручки дверей, окрашенные в цвет кузова, хромированную окантовку решетки радиатора);
— Trend (дополнительно к оборудованию комплектации Comfort установлены темные ободки фар, противотуманные фары, бортовой компьютер, улучшен интерьер);
— Ghia (по сравнению с комплектацией Trend дополнительно выполнена отделка салона алюминием и кожей, центральный замок оснащен дистанционным управлением, а вещевой ящик — индивидуальным охлаждением, установлены электростеклоподъемники всех дверей, полный набор подушек безопасности, включая боковые; дополнительный плафон освещения салона для задних пассажиров, система задержки выключения света фар при выходе из автомобиля, боковые зеркала заднего вида с электроприводом и электрообогревом. улучшен интерьер и др.).
По специальному заказу на автомобиль могут быть установлены антиблокировочная система тормозов (ABS) с электронной системой распределения тормозных усилий (EBD), система динамической стабилизации (ESP), раздельный климат-контроль, ксеноновые фары, парктроник, аудиосистема с многофункциональным сенсорным дисплеем (на выбор предлагают 6 вариантов аудиосистем), литые диски (три варианта), предусмотрена возможность установки голосового управления мобильным телефоном. В комплектацию автомобилей для российского рынка входят защита двигателя и порогов, брызговики всех колес и полноразмерное запасное колесо.
В России также предлагают спортивную версию Focus ST (только с кузовом хэтчбек) с форсированным двигателем 2,5 л R5 20V, оснащенным турбонаддувом (225 л.с., 320 Н·м), и шестиступенчатой механической коробкой передач. Кроме того, эта модификация отличается 18-дюймовыми литыми дисками, металлической отделкой интерьера и спортивной подвеской.
Кузова всех модификаций автомобилей Ford Focus 2 несущие, цельнометаллические, сварной конструкции с навесными передними крыльями, дверьми, капотом и крышкой багажника (дверью задка). Ветровое и заднее стекла (стекло двери задка) вклеенные. Сиденье водителя регулируется в продольном направление, no наклону спинки и высоте, сиденье переднего пассажира — в продольном направление и по наклону спинки. Передние и задние сиденья оборудованы регулируемыми по высоте подголовниками. Спинка заднего сиденья может быть откинута вперед по частям в пропорции 40:60.
Трансмиссия выполнена по переднеприводной схеме с приводами передних колес, оснащенными шарнирами равных угловых скоростей. В базовой комплектации автомобили комплектуют пятиступенчатой механической коробкой передач. По заказу на автомобили с двигателями рабочим объемом 1,6 и 2,0 л может быть установлена четырехступенчатая автоматическая коробка передач.
Передняя подвеска типа Макферсон, независимая, пружинная, со стабилизатором поперечной устойчивости, с гидравлическими амортизаторными стойками. Задняя подвеска независимая, пружинная, с гидравлическими амортизаторами. Тормозные механизмы передних колес дисковые, вентилируемые, с плавающей скобой; задних — барабанные, с устройством автоматической регулировки зазоров между тормозными колодками и барабанами. Тормозная система оснащена вакуумным усилителем.
Рулевое управление травмобезопасное, с рулевым механизмом типа шестерня — рейка, на часть автомобилей устанавливают гидравлический или электрогидравлический усилитель. Рулевая колонка регулируется пo вылету и углу наклона. В ступице рулевого колеса расположена фронтальная подушка безопасности. Все автомобили оснащены инерционными диагональными ремнями безопасности для водителя, переднего пассажира и крайних пассажиров на заднем сиденье Для среднего пассажира на заднем сиденье предусмотрен поясной ремень.
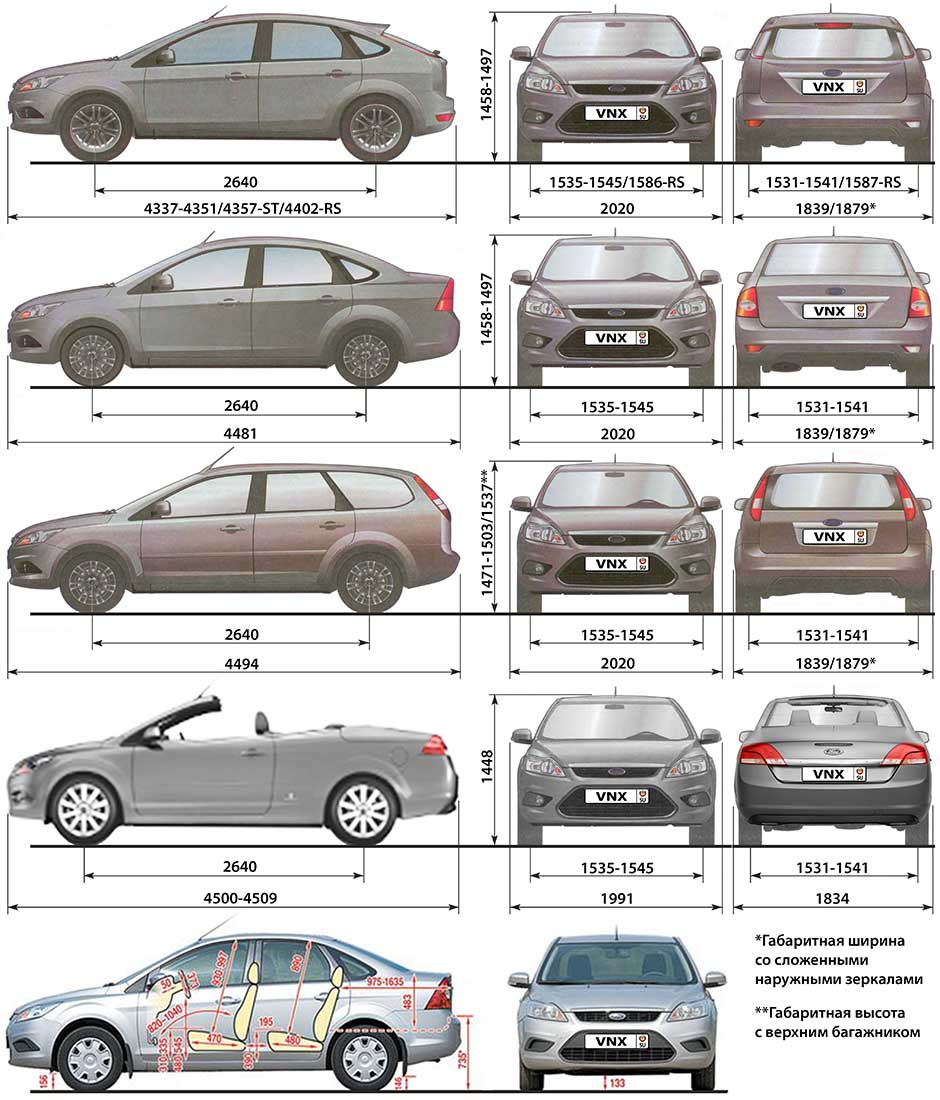
Габаритные размеры автомобиля с кузовом пятидверный хэтчбек (габаритные размеры автомобиля с кузовом трехдверный хэтчбек аналогичны), с кузовом седан — с кузовом универсал. Технические характеристики автомобиля приведены. Элементы автомобиля с двигателем 1,6 л Duratec Ti-VG, расположенные в подкапотном пространстве, и основные агрегаты показаны автомобиля с двигателем объемом 1,8л Duratec-HE. Основные агрегаты автомобилей (вид снизу сзади) представлены.
| № | Спецификация / Specs | Данные |
| Габариты (мм/mm) и масса (кг/kg) / Dimensions and Weight | ||
| 1 | Длина / Length | 4337 |
| 2 | Ширина (без/со сложенными/с зеркалами) / Width | 1839/1879/2020 |
| 3 | Высота (загружен/пустой) / Height | 1458/1497 |
| 4 | Колёсная база / Wheelbase | 2640 |
| 5 | Дорожный просвет (клиренс) / Ground clearance | 140 |
| 6 | Снаряжённая масса / Total (curb) weight | 1352-1404 |
| Полная масса / Gross (max) weight | 1750 | |
|
Двигатель / Engine |
||
| 7 | Тип / Engine Type, Code | Бензиновый, жидкостного охлаждения, четырехтактный, Duratec |
| 8 | Количество цилиндров / Cylinder arrangement: Total number of cylinders, of valves | 4-цилиндровый, рядный, 16V, DOHC с верхним расположением двух распредвалов |
| 9 | Диаметр цилиндра / Bore | 76.0 мм |
| 10 | Ход поршня / Stroke | 76.5 мм |
| 11 | Объём / Engine displacement | 1388 см³ |
| 12 | Система питания / Fuel supply, Aspiration | Распределенный впрыск топлива SEFI EEC V |
| Атмосферный | ||
| 13 | Степень сжатия / Compression ratio | 11.0:1 |
| 14 | Максимальная мощность / Max. output power kW (HP) at rpm | 59 кВт (80 л.с.) при 5700 об/мин |
| 15 | Максимальный крутящий момент / Max. torque N·m at rpm | 124 Нм при 3500 об/мин |
|
Трансмиссия / Transmission |
||
| 16 | Сцепление / Clutch type | Однодисковое, сухое, с диафрагменной нажимной пружиной и гасителем крутильных колебаний, постоянно замкнутого типа |
| 17 | КПП / Transmission type | IB5 МКПП 5 пятиступенчатая механическая, двухвальная, с синхронизаторами на всех передачах переднего хода |
О Книге
- Название: Ford Focus 2 рестайлинг 2008 года седан, хэтчбек, универсал выпуск с 2008 г. Руководство по эксплуатации, техническому обслуживанию и ремонту. Пошаговый ремонт в фотографиях
- Бензиновые двигатели: (DOHC): 1.4, 1.6, 1.8, 2.0 литра и 1.6 л Ti-VCT
- Выпуск с 2008 года
- Серия: «Ремонт без проблем»
- Год издания: 2008
- Автор: Коллектив авторов
- Издательство: «Ассоциация независимых издателей»
- Формат: PDF
- Страниц в книге: 367
- Размер: 78.72 МБ
- Язык: Русский
- Количество электросхем: Более 10

Руководства по эксплуатации автомобилей

Сервисная книжка
Скачать (PDF, 331КБ)
Аудиосистема
Руководство по эксплуатации
Скачать (PDF, 5,83Мб)
Навигационная система с DVD-проигрывателем
Руководство по эксплуатации
Скачать (PDF, 6,23Мб)

Ka
Руководство по эксплуатации
Скачать (PDF, 2,37Мб)

Fiesta
Руководство по эксплуатации
Скачать (PDF, 3,29Мб)

Fiesta 2010
Руководство по эксплуатации
Скачать (PDF, 6.38 Мб)

Focus I
Руководство по эксплуатации
Скачать (PDF, 4,02Мб)

Focus II
Руководство по эксплуатации
Скачать (PDF, 8,3Мб)
Скачать (PDF, 8,0Мб)
.jpg "Focus")
Focus II 2009 (рестайлинг)
Руководство по эксплуатации
Скачать (PDF, 7.7 Мб)

Focus III 2011
Руководство по эксплуатации
Скачать (PDF, 9.8 Мб)

Grand C-MAX 2010
Руководство по эксплуатации
» Скачать (PDF, 8.81 Мб)

C-MAX
Руководство по
эксплуатации
Скачать (PDF, 7.75 Мб)

Fusion
Руководство по эксплуатации
Скачать (PDF, 3,43Мб)

Fusion 2010
Руководство по эксплуатации
Скачать (PDF, 5.88 Мб)

Focus C-MAX
Руководство по эксплуатации
Скачать (PDF, 4,45Мб)

S-MAX 2010
Руководство по эксплуатации
Скачать (PDF, 8.43 Мб)

Mondeo
Руководство по эксплуатации
Скачать (PDF, 3,91Мб)

Mondeo 2010
Руководство по эксплуатации
Скачать (PDF, 7.83 Мб)

Kuga 2010
Руководство по эксплуатации
Скачать (PDF, 6.47 Мб)

Maverick
Руководство по эксплуатации
Скачать (PDF, 2,28Мб)

Galaxy
Руководство по эксплуатации
Скачать (PDF, 3,95Мб)

Galaxy 2010
Руководство по эксплуатации
Скачать (PDF, 8.43 Мб)

Transit Connect
Руководство по эксплуатации
Скачать (PDF, 2,82Мб)

Transit Connect 2010
Руководство по эксплуатации
Скачать (PDF, 5.52 Мб)

Tourneo Connect
Руководство по эксплуатации
Скачать (PDF, 3,72Мб)

Tourneo Connect 2010
Руководство по эксплуатации
Скачать (PDF, 8.43 Мб)

Transit
Руководство по эксплуатации
Скачать (PDF, 2,89Мб)

Transit 2010
Руководство по эксплуатации
Скачать (PDF, 6.80 Мб)

Escape
Руководство по эксплуатации
Скачать (PDF, 4 Мб)

Explorer
Руководство по эксплуатации
Скачать (PDF, 4 Мб)

Ranger 2010
Руководство по эксплуатации
Скачать (PDF, 5.56 Мб)
Подробную информацию узнавайте в автосалонах Major Ford:
Вы можете продолжить просмотр:
- Перейти на главную страницу
- Перейти в раздел «Автомобили в наличии»
- Перейти в раздел «Ford с пробегом»
- Перейти в раздел «Вопросы и ответы»

Feel the difference
FordFocus
Руководство
пользователя

- Manuals
- Brands
- Ford Manuals
- Automobile
- Focus 2008
- Owner’s manual
-
Contents
-
Table of Contents
-
Bookmarks
Quick Links
AM/FM stereo with CD/MP3
Auxiliary input jack (Line in)
USB port
Satellite radio information
Headlamps
Mirrors
Moon roof
Locks
2008 Focus (foc)
Owners Guide
USA (fus)
Table of Contents
10
17
32
35
44
61
4
10
15
17
25
27
28
31
32
34
35
38
39
44
45
46
47
49
53
55
61
61
71
1
Related Manuals for Ford Focus 2008
Summary of Contents for Ford Focus 2008
-
Page 1
Table of Contents Introduction Instrument Cluster Warning lights and chimes Gauges Entertainment Systems AM/FM stereo with CD/MP3 Auxiliary input jack (Line in) USB port Satellite radio information SYNC Climate Controls Manual heating and air conditioning Rear window defroster Lights Headlamps Turn signal control Bulb replacement Driver Controls… -
Page 2: Table Of Contents
Table of Contents Seating and Safety Restraints Seating Safety restraints Airbags Child restraints Tires, Wheels and Loading Tire information Tire inflation Tire Pressure Monitoring System (TPMS) Vehicle loading Trailer towing Recreational towing Driving Starting Brakes Traction Control™ Transmission operation Roadside Emergencies Getting roadside assistance Hazard flasher switch Fuel pump shut-off switch…
-
Page 3: Table Of Contents
Ford Motor Company. Ford may change the contents without notice and without incurring obligation. Copyright © 2008 Ford Motor Company…
-
Page 4: Introduction
– Special handling may apply for service or vehicle end of life disposal. See www.dtsc.ca.gov/hazardouswaste/perchlorate. CONGRATULATIONS Congratulations on acquiring your new Ford. Please take the time to get well acquainted with your vehicle by reading this handbook. The more you know and understand about your vehicle, the greater the safety and pleasure you will derive from driving it.
-
Page 5
Introduction SAFETY AND ENVIRONMENT PROTECTION Warning symbols in this guide How can you reduce the risk of personal injury to yourself or others? In this guide, answers to such questions are contained in comments highlighted by the warning triangle symbol. These comments should be read and observed. -
Page 6
In order to properly diagnose and service your vehicle, Ford Motor Company, Ford of Canada, and service and repair facilities may access vehicle diagnostic information through a direct connection to your vehicle when diagnosing or servicing your vehicle. -
Page 7
Introduction To access this information, special equipment must be directly connected to the recording modules. Ford Motor Company and Ford of Canada do not access event data recorder information without obtaining consent, unless pursuant to court order or where required by law enforcement, other government authorities or other third parties acting with lawful authority. -
Page 8
Introduction These are some of the symbols you may see on your vehicle. Vehicle Symbol Glossary Safety Alert See Owner’s Guide Fasten Safety Belt Airbag — Front Child Seat Lower Airbag — Side Anchor Child Seat Tether Brake System Anchor Anti-Lock Brake System Parking Brake System Brake Fluid -… -
Page 9
Introduction Vehicle Symbol Glossary Power Windows Power Window Lockout Front/Rear Child Safety Door Interior Luggage Lock/Unlock Compartment Release Panic Alarm Engine Oil Engine Coolant Engine Coolant Temperature Do Not Open When Hot Battery Avoid Smoking, Flames, Battery Acid or Sparks Explosive Gas Fan Warning Maintain Correct Fluid… -
Page 10: Warning Lights And Chimes
Instrument Cluster WARNING LIGHTS AND CHIMES Standard instrument cluster Optional instrument cluster Warning lights and gauges can alert you to a vehicle condition that may become serious enough to cause expensive repairs. A warning light may illuminate when a problem exists with one of your vehicle’s functions. Many lights will illuminate when you start your vehicle to make sure the bulb works.
-
Page 11
Instrument Cluster Service engine soon: The Service engine soon indicator light illuminates when the ignition is first turned to the on position to check the bulb and to indicate whether the vehicle is ready for Inspection/Maintenance (I/M) testing. Normally, the Service engine soon light will stay on until the engine is cranked, then turn itself off if no malfunctions are present. -
Page 12
Instrument Cluster WARNING: Driving a vehicle with the brake system warning light on is dangerous. A significant decrease in braking performance may occur. It will take you longer to stop the vehicle. Have the vehicle checked by your authorized dealer. Driving extended distances with the parking brake engaged can cause brake failure and the risk of personal injury. -
Page 13
Instrument Cluster WARNING: Never remove the coolant reservoir cap while the engine is running or hot. Anti-theft system: Flashes when the SecuriLock™ Passive Anti-theft System has been activated. Overdrive off (if equipped): Illuminates when the overdrive function of the transaxle has been turned off, refer to the Driving chapter. -
Page 14
Instrument Cluster AdvanceTrac™/Traction Control™ system (if equipped): Illuminates when the Traction Control™ is turned off and will flash when active. If the light remains on, have the system serviced immediately, refer to the Driving chapter for more information. Throttle Control/Transmission: Illuminates when a powertrain fault has been detected. -
Page 15: Gauges
Instrument Cluster GAUGES Speedometer: Indicates the current vehicle speed. Engine coolant temperature gauge: Indicates engine coolant temperature. At normal operating temperature, the needle will be in the normal range. If it enters the red section, the engine is overheating. Stop the vehicle as soon as safely possible, switch off the engine and let the engine cool.
-
Page 16
Instrument Cluster Odometer: Registers the total miles (kilometers) of the vehicle. If equipped with a message center, refer to Message center in the Driver Controls chapter on how to switch the display from Metric to English. Trip odometer: Registers the miles (kilometers) of individual journeys. •… -
Page 17: Entertainment Systems
WARNING: Driving while distracted can result in loss of vehicle control, accident and injury. Ford strongly recommends that drivers use extreme caution when using any device that may take their focus off the road. The driver’s primary responsibility is the safe operation of their vehicle.
-
Page 18
Entertainment Systems Note: Your vehicle is equipped with a unique audio system. If your display shows six small circles in the display, your audio system is a CD6 system. If not, your system is a Single CD system. 1. EJECT: For a single CD system, press EJECT to eject the For a CD6 system, press EJECT and select the desired CD slot by pressing the corresponding memory preset #. -
Page 19
Entertainment Systems TREBLE: Press SOUND repeatedly to reach the treble setting. Press SEEK/TRACK to adjust the level of treble. BALANCE: Press SOUND repeatedly to reach the balance setting. Press SEEK/TRACK to adjust the audio between the left (L) and right (R) speakers. FADE: Press SOUND repeatedly to reach the fade setting. -
Page 20
Entertainment Systems 6. MENU: Press repeatedly to access the following features: SATELLITE RADIO MENU (if equipped): Press MENU when satellite radio mode is active to access. Press OK to enter into the satellite radio menu. Press to cycle through the following options: •… -
Page 21
Entertainment Systems • ENABLE ALERTS / DISABLE ALERTS: Press OK to enable/disable the satellite alert status which alerts you when your selected songs are playing on a satellite radio channel. (The system default is disabled.) SONG ALERTS ENABLED/DISABLED will appear in the display. The menu listing will display the opposite state. -
Page 22
Entertainment Systems SHUFFLE: Press MENU until SHUFFLE ON/OFF appears in the display. SEEK/TRACK to toggle ON/OFF. If you wish to engage shuffle mode right away, press SEEK/TRACK to begin random play. Otherwise, random play will begin when the current track is finished playing. -
Page 23
Entertainment Systems 12. SEEK/TRACK: In radio mode, press SEEK/TRACK access the previous/next strong radio station. In CD/MP3 mode, press SEEK/TRACK to access the previous/next track. In satellite radio mode (if equipped), press SEEK/TRACK to seek to the previous/next channel. If a specific category is selected, (Jazz, Rock, News, etc.), press SEEK/TRACK to seek to the… -
Page 24
Entertainment Systems 14. ON/OFF/VOL (Volume): Press to turn ON/OFF. Turn to increase/decrease volume. Note: If the volume is set above a certain level and the ignition is turned off, the volume will come back on at a “nominal” listening level when the ignition switch is turned back on. -
Page 25: Auxiliary Input Jack (Line In)
Auxiliary input jack (Line in)-(if equipped) WARNING: Driving while distracted can result in loss of vehicle control, accident and injury. Ford strongly recommends that drivers use extreme caution when using any device that may take their focus off the road. The driver’s primary responsibility is the safe operation of their vehicle.
-
Page 26
Entertainment Systems Required equipment: 1. Any portable music player designed to be used with headphones 2. An audio extension cable with stereo male 1/8 in. (3.5 mm) connectors at each end To play your portable music player using the auxiliary input jack: 1. -
Page 27: Usb Port
USB port (if equipped) WARNING: Driving while distracted can result in loss of vehicle control, accident and injury. Ford strongly recommends that drivers use extreme caution when using any device that may take their focus off the road. The driver’s primary responsibility is the safe operation of their vehicle.
-
Page 28: Satellite Radio Information
(12 cm) audio compact discs only. Due to technical incompatibility, certain recordable and re-recordable compact discs may not function correctly when used in Ford CD players. Dirty, warped or damaged CDs, irregular shaped CDs, CDs with a scratch protection film attached, and CDs with homemade paper (adhesive) labels should not be inserted into the CD player.
-
Page 29
Note: SIRIUS reserves the unrestricted right to change, rearrange, add or delete programming including canceling, moving or adding particular channels, and its prices, at any time, with or without notice to you. Ford Motor Company shall not be responsible for any such programming changes. -
Page 30
Entertainment Systems Radio Display Condition Action Required ACQUIRING Radio requires more No action required. than two seconds to This message should produce audio for the disappear shortly. selected channel. SAT FAULT Internal module or If this message does system failure not clear within a short present. -
Page 31: Sync
Entertainment Systems Radio Display Condition Action Required NO TEXT Song title information Song title information not available. not available at this time on this channel. The system is working properly. NO TEXT Category information Category information not available. not available at this time on this channel.
-
Page 32: Climate Controls
Climate Controls MANUAL HEATING AND AIR CONDITIONING SYSTEM Fan speed adjustment: Controls the volume of air circulated in the vehicle. Rear defroster: Press to activate/deactivate the rear window defroster. Refer to Rear window defroster later in this chapter for more information.
-
Page 33
Climate Controls 9. Temperature control: Controls the temperature of the airflow in the vehicle. Passenger heated seat control (if equipped): Press to activate/deactivate the passenger heated seat. See Heated seats in the Seating and Safety Restraints chapter. Recirculated air: Press to activate/deactivate air recirculation in the vehicle. -
Page 34: Rear Window Defroster
Climate Controls During extreme high ambient temperatures when idling stationary for extended periods of time in gear, it is recommended to run the A/C in the MAX A/C position, reduce blower fan speed from the highest setting and put the vehicle’s transmission into the PARK gear position (automatic transmission only) to continue to receive cool air from your A/C system.
-
Page 35: Lights
Lights HEADLAMP CONTROL Turns the lamps off. Turns on the parking lamps, instrument panel lamps, license plate lamps and tail lamps. Turns the low beam headlamps Fog lamp control (if equipped) The fog lamps can be turned on when the headlamp control is in position and the high beams are not turned on.
-
Page 36
Lights Flash to pass Pull toward you slightly to activate and release to deactivate. Daytime running lamps (DRL) (if equipped) Turns the headlamps on with a reduced output. To activate: • the ignition must be in the on position and •… -
Page 37
Lights AIMING THE HEADLAMPS The headlamps on your vehicle are properly aimed at the assembly plant. If your vehicle has been in an accident, the alignment of your headlamps should be checked by your authorized dealer. Vertical aim adjustment 1. Park the vehicle directly in front of a wall or screen on a level surface, approximately 25 feet (7.6 meters) away. -
Page 38: Turn Signal Control
Lights 5. Locate the vertical adjuster on each headlamp, then use a 7 mm Allen wrench or a Phillips screwdriver to adjust the headlamp up or down. 6. HORIZONTAL AIM IS NOT REQUIRED FOR THIS VEHICLE AND IS NON-ADJUSTABLE. 7. Close the hood and turn off the lamps.
-
Page 39: Bulb Replacement
Lights Ambient lighting (if equipped) Illuminates four footwells and three cupholders with a choice of seven colors. The ambient lighting control switch is located on the instrument panel. To activate, press and release the control switch to cycle through the seven color choices plus the off state.
-
Page 40
Lights Function Trade number Headlamps Park and turn lamp (front) 3457 NAK Side marker lamp (front) Fog lamps (if equipped) H11 LL Stop/turn and tail lamps 3057K Backup lamp License plate lamp C5W L * High-mount brake lamp * To replace these lamps — see your authorized dealer. To replace all instrument panel lights — see your authorized dealer Replacing the interior bulbs Check the operation of all bulbs frequently. -
Page 41
Lights 6. Remove bulb from the headlamp assembly by turning it counterclockwise, then pull it straight out. Install the new bulb in reverse order. WARNING: Handle a halogen headlamp bulb carefully and keep out of children’s reach. Grasp the bulb by only its plastic base and do not touch the glass. -
Page 42
Lights Replacing side marker bulbs 1. Make sure the headlamp control is in the off position and open the hood. 2. Remove two push pins from the radiator grille on the side being serviced and push the grille back to access the lower screw. -
Page 43
Lights Replacing fog lamp bulbs (if equipped) 1. Make sure the headlamp switch is in the off position. 2. Reach under the front fender, and remove the harness/bulb assembly from the fog lamp by turning counterclockwise. 3. Disconnect the harness from the bulb by pulling it straight off. -
Page 44: Driver Controls
Driver Controls MULTI-FUNCTION LEVER Windshield wiper: Rotate the end of the control away from you to increase the speed of the wipers; rotate towards you to decrease the speed of the wipers. Windshield washer: Push the end of the stalk: •…
-
Page 45
Driver Controls TILT STEERING WHEEL To adjust the steering wheel: 1. Pull the lever down to unlock the steering column. 2. While the lever is in the down position, move the steering wheel up or down until you find the desired position. -
Page 46: Power Windows
Driver Controls To prevent the fuse from being blown, do not use the power point(s) over the vehicle capacity of 12 VDC/180W. If the power point or cigar lighter socket is not working, a fuse may have blown. Refer to Fuses and relays in the Roadside Emergencies chapter for information on checking and replacing fuses.
-
Page 47: Mirrors
Driver Controls Press and pull the window switches to open and close windows. • Push down (to the first detent) and hold the switch to open. • Pull up (to the first detent) and hold the switch to close. One touch down (AUTO) Allows the driver’s window to open fully without holding the control down.
-
Page 48
Driver Controls Automatic dimming interior rear view mirror (if equipped) With microphone Your vehicle may be equipped with an interior rear view mirror which has an auto-dimming function. The electronic day/night mirror will change from the normal (high reflective) state to the non-glare (darkened) state when bright lights (glare) reach the mirror. -
Page 49: Speed Control
Driver Controls Heated outside mirrors (if equipped) Both mirrors are heated automatically to remove ice, mist and fog when the rear window defrost is activated. Do not remove ice from the mirrors with a scraper or attempt to readjust the mirror glass if it is frozen in place.
-
Page 50
Driver Controls 3. Press the SET + control and release it. 4. Take your foot off the accelerator pedal. 5. The indicator light on the instrument cluster will turn on. Note: • Vehicle speed may vary momentarily when driving up and down a steep hill. -
Page 51
Driver Controls Increasing speed while using speed control There are three ways to set a higher speed: • Press and hold the SET + control until you get to the desired speed, then release the control. • Press and release the SET + control to operate the Tap-Up function. -
Page 52
Driver Controls Turning off speed control There are two ways to turn off the speed control: • Press the speed control OFF control. • Turn off the ignition. Note: When you turn off the speed control or the ignition, your speed control set speed memory is erased. -
Page 53: Moon Roof
Driver Controls In any mode: • Press VOL + or VOL — to adjust the volume. SYNC hands free control feature (if equipped) Press briefly to use the voice command feature. You will hear a tone and LISTENING will appear in the radio display.
-
Page 54
Driver Controls To open the moon roof: The moon roof is equipped with an automatic, one-touch, express opening and closing feature. To stop AUTO motion at any time during the one-touch operation, press the control a second time. • To open the moon roof, press and release the rear portion of the moon roof control to open. -
Page 55: Message Center
Driver Controls MESSAGE CENTER (IF EQUIPPED) With the ignition in the on position, the message center, located on your instrument cluster, displays important vehicle information through a constant monitor of vehicle systems. You may select display features on the message center for a display of status. The system will also notify you of potential vehicle problems with a display of system warnings followed by a long indicator chime.
-
Page 56
Driver Controls Average fuel economy (AFE) Select this function from the INFO menu to display your average fuel economy in miles/gallon or liters/100 km. If you calculate your average fuel economy by dividing miles traveled by gallons of fuel used (liters of fuel by used 100 kilometers traveled), your figure may be different than displayed for the following reasons: •… -
Page 57
Driver Controls • Autolock (if equipped) • Autounlock (if equipped) • Language Reset to English (if in another language) When entering the SETUP MENU and a non-English language has been selected, “HOLD RESET FOR ENGLISH” will be displayed to change back to English. Hold the RESET control to change back to English. -
Page 58
Driver Controls 1. To disable/enable the autolock feature, select this function from the SETUP control for the current display mode. 2. Press the RESET control to turn the autolock ON or OFF. Autounlock This feature automatically unlocks all vehicle doors when the driver’s door is opened within 10 minutes of the ignition being turned off. -
Page 59
Driver Controls Warning messages that have been reset are divided into two categories: • They will reappear on the display 10 minutes from the reset. • They will not reappear until an ignition off-on cycle has been completed. This acts as a reminder that these warning conditions still exist within the vehicle. -
Page 60
Driver Controls BRAKE FLUID LEVEL LOW — Indicates the brake fluid level is low and the brake system should be inspected immediately. Refer to Brake/clutch fluid in the Maintenance and Specifications chapter. LOW TIRE PRESSURE — Displayed when one or more tires on your vehicle have low tire pressure. -
Page 61: Locks And Security
Locks and Security KEYS The key operates all locks on your vehicle. You should always carry a second key with you in a safe place in case you require it in an emergency. If your vehicle is equipped with the SecuriLock™ Passive Anti-theft system, your keys are electronically coded to your vehicle;…
-
Page 62
Locks and Security The autolock feature repeats when: • any door is opened then closed while the ignition is in the on position and the vehicle speed is 9 mph (15 km/h) or lower, and • the vehicle attains a speed greater than 12 mph (20 km/h). Deactivating/activating autolock Your vehicle comes with the autolock feature enabled. -
Page 63
Locks and Security Power door unlock/lock procedure Before starting, ensure the ignition is in the off position and all vehicle doors are closed. You must complete Steps 1–5 within 30 seconds or the procedure will have to be repeated. If the procedure needs to be repeated, wait a minimum of 30 seconds before beginning again. -
Page 64
Locks and Security Deactivating/activating autounlock feature Your vehicle comes with the autounlock features activated; there are three methods to enable/disable this feature: • Through your authorized dealer, • by using a power door unlock/lock sequence • or by using the instrument cluster message center. Refer to Message center in the Driver Controls chapter. -
Page 65
Locks and Security CHILDPROOF DOOR LOCKS • When these locks are set, the rear doors cannot be opened from the inside. • The rear doors can be opened from the outside when the doors are unlocked. The childproof locks are located on rear edge of each rear door and must be set separately for each door. -
Page 66
Locks and Security To open the luggage compartment door (lid) from within the luggage compartment, pull the illuminated “T” shaped handle and push up on the trunk lid. The handle is composed of a material that will glow for hours in darkness following brief exposure to ambient light. -
Page 67
Locks and Security REMOTE ENTRY SYSTEM (IF EQUIPPED) This device complies with part 15 of the FCC rules and with RSS-210 of Industry Canada. Operation is subject to the following two conditions: (1) This device may not cause harmful interference, and (2) This device must accept any interference received, including interference that may cause undesired operation. -
Page 68
Locks and Security 2. With the all-door remote entry, press and release again within three seconds to unlock all the doors. The remote entry system activates the illuminated entry feature. This feature turns on the interior lamps for 25 seconds or until the ignition is turned to the on position. -
Page 69
Locks and Security Sounding a panic alarm Press to activate the alarm. Press the control again, or turn the ignition to the on position to deactivate. Note: The panic alarm will only operate when the ignition is in the off or accessory position. -
Page 70
Locks and Security 5. Snap the two halves back together. Note: Replacement of the battery will not cause the remote transmitter to become deprogrammed from your vehicle. The remote transmitter should operate normally after battery replacement. Replacing lost remote entry transmitters If you would like to have your remote entry transmitter reprogrammed because you lost one, or would like to buy additional remote entry transmitters, you can either reprogram them yourself, or take all… -
Page 71: Anti-Theft System
Note: The SecuriLock™ passive anti-theft system is not compatible with non-Ford aftermarket remote start systems. Use of these systems may result in vehicle starting problems and a loss of security protection. Note: Large metallic objects, electronic devices that are used to purchase gasoline or similar items, or a second coded key on the same key chain may cause vehicle starting issues.
-
Page 72
Locks and Security If a problem occurs with the SecuriLock™ system, the indicator will flash rapidly or glow steadily when the ignition is in the on position. If this occurs, the vehicle should be taken to an authorized dealer for service. Replacement keys If your keys are lost or stolen and you don’t have an extra coded key, you will need to have your vehicle towed to an authorized dealer. -
Page 73
Locks and Security 6. Turn the ignition from the 1 (off) position to the 3 (on) position. Keep the ignition in the 3 (on) position for at least one second but not more than 10 seconds. 7. Turn the ignition to the 1 (off) position. 8. -
Page 74
Locks and Security Disarming the system You can disarm the system by any of the following actions: • Unlock the doors by pressing the control on your remote entry transmitter. • Unlock the doors with a key. Turn the key full travel (toward the front of the vehicle) to ensure the alarm disarms. -
Page 75: Seating And Safety Restraints
Seating and Safety Restraints SEATING WARNING: Reclining the seatback can cause an occupant to slide under the seat’s safety belt, resulting in severe personal injuries in the event of a collision. WARNING: Do not pile cargo higher than the seatbacks to reduce the risk of injury in a collision or sudden stop.
-
Page 76
Seating and Safety Restraints To adjust the head restraint, do the following: 1. Adjust the seatback to an upright driving/riding position. 2. Raise the head restraint by pulling up on the head restraint. 3. Lower the head restraint by pressing and holding the guide sleeve adjust release button and pushing down on the head restraint. -
Page 77
Seating and Safety Restraints To remove the adjustable head restraint, do the following: 1. Pull up the head restraint until it reaches the highest adjustment position. 2. Press and hold the unlock/remove button, then pull up on the head restraint. To reinstall the adjustable head restraint, do the following: 1. -
Page 78
Seating and Safety Restraints WARNING: To minimize the risk of neck injury in the event of a crash, head restraints must be installed properly. Adjusting the front manual seat WARNING: Sitting improperly out of position or with the seat back reclined too far can take off weight from the seat cushion and affect the decision of the passenger sensing system, resulting in serious injury or death in a crash. -
Page 79
Seating and Safety Restraints Pull up on the control (if equipped) to raise the seat and push down on the control to lower the seat. Lift the control to adjust the angle of the seatback. WARNING: Reclining the seatback can cause an occupant to slide under the seat’s safety belt, resulting in severe personal injuries in the event of a collision. -
Page 80
Seating and Safety Restraints Heated seats (if equipped) WARNING: Persons who are unable to feel pain to the skin because of advanced age, chronic illness, diabetes, spinal cord injury, medication, alcohol use, exhaustion, or other physical conditions, must exercise care when using the seat heater. The seat heater may cause burns even at low temperatures, especially if used for long periods of time. -
Page 81
Seating and Safety Restraints Tip/slide front passenger seat (if equipped) Lift the control and fold the seatback forward. The seat can be slid forward to allow easier entry to the rear seats. Slide the seat back and fold back the seatback until it locks with a distinct click. -
Page 82: Safety Restraints
Seating and Safety Restraints SAFETY RESTRAINTS Personal Safety System™ The Personal Safety System™ provides an improved overall level of frontal crash protection to front seat occupants and is designed to help further reduce the risk of airbag-related injuries. The system is able to analyze different occupant conditions and crash severity before activating the appropriate safety devices to help better protect a range of occupants in a variety of frontal crash situations.
-
Page 83
Seating and Safety Restraints Driver and passenger dual-stage airbag supplemental restraints The dual-stage airbags offer the capability to tailor the level of airbag inflation energy. A lower, less forceful energy level is provided for more common, moderate-severity impacts. A higher energy level is used for the most severe impacts. -
Page 84
Seating and Safety Restraints The front passenger sensing system can automatically turn off the passenger front airbag. The system is designed to help protect small (child size) occupants from airbag deployments when they are improperly seated or restrained in the front passenger seat contrary to proper child-seating or restraint usage recommendations. -
Page 85
Seating and Safety Restraints The Restraints Control Module (RCM) monitors its own internal circuits and the circuits for the airbag supplemental restraints, crash sensor(s), safety belt pretensioners, front safety belt buckle sensors, front passenger sensing system, and the driver seat position sensor. In addition, the RCM also monitors the restraints warning light in the instrument cluster. -
Page 86
Seating and Safety Restraints WARNING: In a rollover crash, an unbelted person is significantly more likely to die than a person wearing a seat belt. WARNING: Each seating position in your vehicle has a specific safety belt assembly which is made up of one buckle and one tongue that are designed to be used as a pair. -
Page 87
Seating and Safety Restraints 2. To unfasten, push the release button and remove the tongue from the buckle. Energy management feature • This vehicle has a safety belt system with an energy management feature at the front outboard seating positions to help further reduce the risk of injury in the event of a head-on collision. -
Page 88
This indicates the safety belt is now in the automatic locking mode. How to disengage the automatic locking mode WARNING: Ford Motor Company recommends that all passenger safety belt assemblies and attaching hardware should be inspected by an authorized dealer after any collision to verify that the automatic locking retractor feature for child seats is still working properly. -
Page 89
Seating and Safety Restraints Safety belts with locking cinch tongue (rear center position only) The locking cinch tongue will slide up and down the belt webbing when the belt is in the stowed position or while putting safety belts on. When the locking cinch tongue of the lap/shoulder combination safety belt is latched into the buckle, the cinch tongue will allow the lap portion to become shorter, but locks the webbing in place to restrict it from… -
Page 90
Seating and Safety Restraints WARNING: Each seating position in your vehicle has a specific safety belt assembly which is made up of one buckle and one tongue that are designed to be used as a pair. 1) Use the shoulder belt on the outside shoulder only. -
Page 91
(if equipped), shoulder belt guide on seatback (if equipped), child safety seat LATCH and tether anchors, and attaching hardware, should be inspected after a collision. Ford Motor Company recommends that all safety belt assemblies in use in vehicles involved in a collision be replaced. -
Page 92
Seating and Safety Restraints Conditions of operation If… Then… The driver’s safety belt is not The safety belt warning light buckled before the ignition illuminates 1-2 minutes and the switch is turned to the ON warning chime sounds 4-8 seconds. position… -
Page 93
Seating and Safety Restraints If… Then… The driver’s and front The Belt-Minder feature will not passenger’s safety belts are activate. buckled before the ignition switch is turned to the ON position or less than 1-2 minutes have elapsed since the ignition switch has been turned ON… -
Page 94
Seating and Safety Restraints The following are reasons most often given for not wearing safety belts (All statistics based on U.S. data): Reasons given… Consider… “Crashes are rare events” 36700 crashes occur every day. The more we drive, the more we are exposed to “rare”… -
Page 95
Seating and Safety Restraints Reasons given… Consider… “I have an airbag” Airbags offer greater protection when used with safety belts. Frontal airbags are not designed to inflate in rear and side crashes or rollovers. “I’d rather be thrown clear” Not a good idea. People who are ejected are 40 times more likely to DIE. -
Page 96
Seating and Safety Restraints The driver and front passenger Belt-Minder features can be deactivated/activated by performing the following procedure: Before following the procedure, make sure that: • The parking brake is set • The gearshift is in P (Park) (automatic transmission) and in N (neutral) (manual transmission) •… -
Page 97: Airbags
Seating and Safety Restraints AIRBAG SUPPLEMENTAL RESTRAINT SYSTEM (SRS) The supplemental restraint system is designed to work with the safety belt to help protect the driver and right front passenger from certain upper body injuries. WARNING: Airbags DO NOT inflate slowly or gently, and the risk of injury from a deploying airbag is the greatest close to the trim covering the airbag module.
-
Page 98
Seating and Safety Restraints WARNING: When possible, all children 12 years old and under should be properly restrained in a rear seating position. WARNING: The National Highway Traffic Safety Administration (NHTSA) recommends a minimum distance of at least 10 inches (25 cm) between an occupant’s chest and the driver airbag module. -
Page 99
Seating and Safety Restraints Children and airbags Children must always be properly restrained. Accident statistics suggest that children are safer when properly restrained in the rear seating positions than in the front seating position. Failure to follow these instructions may increase the risk of injury in a collision. -
Page 100
Seating and Safety Restraints The airbags inflate and deflate rapidly upon activation. After airbag deployment, it is normal to notice a smoke-like, powdery residue or smell the burnt propellant. This may consist of cornstarch, talcum powder (to lubricate the bag) or sodium compounds (e.g., baking soda) that result from the combustion process that inflates the… -
Page 101
Seating and Safety Restraints • safety belt pretensioners • one or more impact and safing sensors. • Front passenger sensing system. Refer to Front passenger sensing system later in this chapter. • “Passenger airbag off” or “pass airbag off” indicator lamp. Refer to Front passenger sensing system later in this chapter. -
Page 102
Seating and Safety Restraints The front passenger sensing system will turn off the passenger seat side airbag if: • the seat is empty and safety belt is unbuckled. The front passenger sensing system uses a passenger airbag off or pass airbag off indicator which will illuminate and stay lit to remind you that the front passenger frontal airbag is disabled. -
Page 103
Seating and Safety Restraints • Restart the vehicle and have the person remain in this position for about two minutes. This will allow the system to detect that person and enable the passenger’s frontal airbag. • If the indicator lamp remains lit even after this, the person should be advised to ride in the rear seat. -
Page 104
Seating and Safety Restraints The front passenger sensing system may detect small or medium objects placed on the seat cushion. For most objects that are in the front passenger seat, the passenger airbag will be disabled. Even though the passenger airbag is disabled, the pass airbag off lamp may or may not be illuminated according to the table below. -
Page 105
If it is necessary to modify an advanced front airbag system to accommodate a person with disabilities, contact the Ford Customer Relationship Center at the phone number shown in the Customer Assistance section of this Owner’s Guide. -
Page 106
Seating and Safety Restraints WARNING: Any alteration/modification to the front passenger seat may affect the performance of the front passenger sensing system. Determining if the system is operational The supplemental restraint system uses a warning indicator light in the instrument cluster or a back-up tone to indicate the condition of the system. -
Page 107
Seating and Safety Restraints WARNING: Do not attempt to service, repair, or modify the airbag SRS, its fuses or the seat cover on a seat containing an airbag. See your authorized dealer. WARNING: All occupants of the vehicle should always wear their safety belts even when an airbag SRS is provided. -
Page 108
Seating and Safety Restraints designed to inflate between the door panel and occupant to further enhance the protection provided occupants in side impact collisions. The airbag SRS is designed to activate when the vehicle sustains lateral deceleration sufficient to cause the sensors to close an electrical circuit that initiates airbag inflation. -
Page 109
Seating and Safety Restraints WARNING: Do not place objects or mount equipment on or near the side air curtain cover. WARNING: Do not lean your head on the door. The side airbag could injure you as it deploys from the seat. WARNING: Do not attempt to service, repair, or modify the side air curtain system, its fuses, the A, B, or C pillar trim, or the headliner on a vehicle containing a side air curtain. -
Page 110
Seating and Safety Restraints How does the side air curtain system work? The design and development of the side air curtain system included recommended testing procedures that were developed by a group of automotive safety experts known as the Side Airbag Technical Working Group. -
Page 111
Seating and Safety Restraints window area and occupant to further enhance the head protection provided to occupants in side impact collisions. The seat-mounted side airbag was designed to inflate between the door panel and occupant to further enhance the protection provided occupants in side impact collisions. -
Page 112: Child Restraints
Seating and Safety Restraints • The readiness light will not illuminate immediately after ignition is turned on. • A series of five beeps will be heard. The tone pattern will repeat periodically until the problem and/or light are repaired. If any of these things happen, even intermittently, have the SRS serviced at your authorized dealer immediately.
-
Page 113
Seating and Safety Restraints Important child restraint precautions You are required by law to use safety restraints for children in the U.S. and Canada. If small children (generally children who are four years old or younger and who weigh 40 lb [18 kg] or less) ride in your vehicle, you must put them in safety seats made especially for children. -
Page 114
Seating and Safety Restraints To improve the fit of both the lap and shoulder belt on children who have outgrown child safety seats, Ford Motor Company recommends use of a belt-positioning booster. Booster seats position a child so that safety belts fit better. They lift the child up so that the lap belt rests low across the hips and the knees bend comfortably. -
Page 115
Seating and Safety Restraints • Those with a high back. If, with a backless booster seat, you cannot find a seating position that adequately supports your child’s head, a high back booster seat would be a better choice. Either type can be used at any seating position equipped with lap/shoulder belts if your child is over 40 lb (18 kg). -
Page 116
Seating and Safety Restraints WARNING: Move a child to a different seating location if the shoulder belt does not stay positioned on the shoulder during use. WARNING: Follow all instructions provided by the manufacturer of the booster seat. WARNING: Never put the shoulder belt under a child’s arm or behind the back because it eliminates the protection for the upper part of the body and may increase the risk of injury or death in a collision. -
Page 117
80 lb (36 kg) using an upper torso harness and a belt-positioning booster. Ford recommends the use of a child safety seat having a top tether strap. Install the child safety seat in a seating position with LATCH and tether anchors. -
Page 118
Seating and Safety Restraints WARNING: Children 12 and under should be properly restrained in the rear seat whenever possible. 1. Position the child safety seat in a seat with a combination lap and shoulder belt. 2. Pull down on the shoulder belt and then grasp the shoulder belt and lap belt together. -
Page 119
Seating and Safety Restraints 4. Insert the belt tongue into the proper buckle (the buckle closest to the direction the tongue is coming from) for that seating position until you hear a snap and feel the latch engage. Make sure the tongue is latched securely by pulling on it. -
Page 120
Seating and Safety Restraints 8. Allow the safety belt to retract to remove any slack in the belt. 9. Before placing the child in the seat, forcibly move the seat forward and back to make sure the seat is securely held in place. To check this, grab the seat at the belt path and attempt to move it side to side and forward. -
Page 121
Seating and Safety Restraints 2. Slide the tongue up the webbing. 3. While holding both shoulder and lap portions next to the tongue, route the tongue and webbing through the child seat according to the child seat manufacturer’s instructions. Be sure that the belt webbing is not twisted. -
Page 122
Seating and Safety Restraints 5. While pushing down with your knee on the child seat pull up on the shoulder belt portion to tighten the lap belt portion of the combination lap and shoulder belt. 6. Allow the safety belt to retract and remove any slack in the belt to securely tighten the child safety seat in the vehicle. -
Page 123
Seating and Safety Restraints The tether strap anchors in your vehicle are in the following positions (shown from top view, left is front of the vehicle): WARNING: Attach the tether strap only to the appropriate tether anchor as shown. The tether strap may not work properly if attached somewhere other than the correct tether anchor. -
Page 124
Seating and Safety Restraints 6. Install the child safety seat tightly using the LATCH anchors or safety belts. Follow the instructions in this chapter. 7. Tighten the child safety seat tether strap according to the manufacturer’s instructions. WARNING: If the safety seat is not anchored properly, the risk of a child being injured in a collision greatly increases. -
Page 125
Seating and Safety Restraints The LATCH anchors are located on the rear section of the seat cushion, at the bottom of the seatback. Follow the child seat manufacturer’s instructions to properly install safety seats with LATCH attachments. WARNING: Attach the LATCH lower attachments of the child seat only to the appropriate locations shown. -
Page 126: Tires, Wheels And Loading
Title 49 Code of Federal Regulations Part 575.104(c)(2). U.S. Department of Transportation-Tire quality grades: The U.S. Department of Transportation requires Ford Motor Company to give you the following information about tire grades exactly as the government has written it.
-
Page 127
Tires, Wheels and Loading WARNING: The traction grade assigned to this tire is based on straight-ahead braking traction tests, and does not include acceleration, cornering, hydroplaning or peak traction characteristics. Temperature A B C The temperature grades are A (the highest), B and C, representing the tire’s resistance to the generation of heat and its ability to dissipate heat when tested under controlled conditions on a specified indoor laboratory test wheel. -
Page 128
Ford Motor Company. You are strongly urged to buy a reliable tire pressure gauge, as automatic service station gauges may be inaccurate. Ford recommends the use of a digital or dial-type tire pressure gauge rather than a stick-type tire pressure gauge. -
Page 129: Tire Inflation
Always inflate your tires to the Ford recommended inflation pressure even if it is less than the maximum inflation pressure information found on the tire. The Ford recommended tire inflation pressure is found on the Safety Compliance Certification Label or Tire Label which is located on the B-Pillar or the edge of the driver’s door.
-
Page 130
Tires, Wheels and Loading Note: If you have to drive a distance to get air for your tire(s), check and record the tire pressure first and add the appropriate air pressure when you get to the pump. It is normal for tires to heat up and the air pressure inside to go up as you drive. -
Page 131
Tires, Wheels and Loading Improper or inadequate vehicle maintenance can cause tires to wear abnormally. Inspect all your tires, including the spare, frequently, and replace them if one or more of the following conditions exist: Tire wear When the tread is worn down to 1/16th of an inch (2 mm), tires must be replaced to help prevent your vehicle from skidding and… -
Page 132
B-Pillar or edge of the driver’s door. If this information is not found on these labels then you should consult your Ford Dealer. Use of any tire or wheel not recommended by Ford can affect the safety and performance of your vehicle, which could result in an increased risk of loss of vehicle control, vehicle rollover, personal injury and death. -
Page 133
4. Use both eye and ear protection. For a mounting pressure more than 20 psi greater than the maximum pressure, a Ford Dealer or other tire service professional should do the mounting. Always inflate steel carcass tires with a remote air fill with the person inflating standing at a minimum of 12 ft. -
Page 134
Tires, Wheels and Loading • Do not run over curbs or hit the tire against a curb when parking WARNING: If your vehicle is stuck in snow, mud, sand, etc., do not rapidly spin the tires; spinning the tires can tear the tire and cause an explosion. -
Page 135
Tires, Wheels and Loading • Front Wheel Drive (FWD) vehicles (front tires at top of diagram) Sometimes irregular tire wear can be corrected by rotating the tires. Note: If your tires show uneven wear ask an authorized dealer to check for and correct any wheel misalignment, tire imbalance or mechanical problem involved before tire rotation. -
Page 136
Tires, Wheels and Loading Information on “P” type tires P215/65R15 95H is an example of a tire size, load index and speed rating. The definitions of these items are listed below. (Note that the tire size, load index and speed rating for your vehicle may be different from this example.) 1. -
Page 137
Tires, Wheels and Loading Note: You may not find this information on all tires because it is not required by federal law. Letter rating Speed rating — mph (km/h) 81 mph (130 km/h) 87 mph (140 km/h) 99 mph (159 km/h) 106 mph (171 km/h) 112 mph (180 km/h) 118 mph (190 km/h) -
Page 138
Tires, Wheels and Loading 12. Treadwear, Traction and Temperature Grades • Treadwear: The treadwear grade is a comparative rating based on the wear rate of the tire when tested under controlled conditions on a specified government test course. For example, a tire graded 150 would wear one and one-half (1 ⁄… -
Page 139
Tires, Wheels and Loading Additional information contained on the tire sidewall for “LT” type tires “LT” type tires have some additional information beyond those of “P” type tires; these differences are described below. Note: Tire Quality Grades do not apply to this type of tire. 1. -
Page 140: Tire Pressure Monitoring System (Tpms)
Tires, Wheels and Loading Information on “T” type tires “T” type tires have some additional information beyond those of “P” type tires; these differences are described below: T145/80D16 is an example of a tire size. Note: The temporary tire size for your vehicle may be different from this example.
-
Page 141
Tires, Wheels and Loading vehicle placard or tire inflation pressure label. (If your vehicle has tires of a different size than the size indicated on the vehicle placard or tire inflation pressure label, you should determine the proper tire inflation pressure for those tires.) As an added safety feature, your vehicle has been equipped with a tire pressure monitoring system (TPMS) that illuminates a low tire pressure… -
Page 142
Tires, Wheels and Loading Changing tires with TPMS Each road tire is equipped with a tire pressure sensor fastened to the inside rim of the wheel. The pressure sensor is covered by the tire and is not visible unless the tire is removed. The pressure sensor is located opposite (180 degrees) from the valve stem. -
Page 143
Tires, Wheels and Loading When you believe your system is not operating properly The main function of the Tire Pressure Monitoring System is to warn you when your tires need air. It can also warn you in the event the system is no longer capable of functioning as intended. -
Page 144
Tires, Wheels and Loading Low Tire Pressure Possible cause Customer Action Required Warning Light Flashing Warning Spare tire in use Your temporary spare tire is in Light use. Repair the damaged road wheel and re-mount it on the vehicle to restore system functionality. -
Page 145: Vehicle Loading
SNOW TIRES AND CHAINS WARNING: Snow tires must be the same size, load index, speed rating as those originally provided by Ford. Use of any tire or wheel not recommended by Ford can affect the safety and performance of your vehicle, which could result in an increased risk of loss of vehicle control, vehicle rollover, personal injury and death.
-
Page 146
Tires, Wheels and Loading Cargo Weight – includes all weight added to the Base Curb Weight, including cargo and optional equipment. When towing, trailer tongue load weight is also part of cargo weight. GAW (Gross Axle Weight) – is the total weight placed on each axle (front and rear) –… -
Page 147
Tires, Wheels and Loading GVWR (Gross Vehicle Weight Rating) – is the maximum allowable weight of the fully loaded vehicle (including all options, equipment, passengers and cargo). The GVWR is shown on the Safety Compliance Certification Label located on the B-Pillar or the edge of the driver’s door. -
Page 148
Tires, Wheels and Loading Maximum Loaded Trailer Weight – is the highest possible weight of a fully loaded trailer the vehicle can tow. It assumes a vehicle with only mandatory options, no cargo (internal or external), a tongue load of 10–15% (conventional trailer), and driver only (150 lb. -
Page 149
Tires, Wheels and Loading The following gives you a few examples on how to calculate the available amount of cargo and luggage load capacity: • Another example for your vehicle with 1400 lb. (635 kg) of cargo and luggage capacity. You decide to go golfing. Is there enough load capacity to carry you, 4 of your friends and all the golf bags? You and four friends average 220 lb. -
Page 150: Trailer Towing
Tires, Wheels and Loading TRAILER TOWING WARNING: Never tow a trailer with this vehicle. Your vehicle is not equipped to tow. No towing packages are available through an authorized dealer. RECREATIONAL TOWING Follow these guidelines if you have a need for recreational (RV) towing. An example of recreational towing would be towing your vehicle behind a motorhome.
-
Page 151: Driving
Driving STARTING Positions of the ignition 1. OFF, locks the steering wheel, automatic transmission gearshift lever and allows key removal. This position also shuts the engine and all electrical accessories off. 2. ACCESSORY, allows the electrical accessories such as the radio to operate while the engine is not running.
-
Page 152
Driving WARNING: If you smell exhaust fumes inside your vehicle, have your dealer inspect your vehicle immediately. Do not drive if you smell exhaust fumes. Important safety precautions When the engine starts, the idle RPM runs faster to warm the engine. If the engine idle speed does not slow down automatically, have the vehicle checked. -
Page 153
Driving • Make sure the gearshift is in P (Park). If starting a vehicle with a manual transmission: 1. Make sure the parking brake is set. 2. Push the clutch pedal to the floor. • Turn the key to 3 (ON) without turning the key to 4 (START). -
Page 154
Driving Starting the engine 1. Turn the key to 3 (ON) without turning the key to 4 (START). 2. Turn the key to 4 (START), then release the key as soon as the engine starts. Excessive cranking could damage the starter. Note: If the engine does not start on the first try, turn the key to OFF, wait 10 seconds and try again. -
Page 155
Driving WARNING: Failure to follow engine block heater instructions could result in property damage or physical injury. WARNING: To reduce the risk of electrical shock, do not use your heater with ungrounded electrical systems or two-pronged (cheater) adapters. Prior to using the engine block heater, follow these recommendations for proper and safe operation: •… -
Page 156: Brakes
Driving • Finally, have the engine block heater system checked during your fall tune-up to be sure it’s in good working order. How to use the engine block heater Ensure the receptacle terminals are clean and dry prior to use. To clean them, use a dry cloth.
-
Page 157
Driving Using ABS When hard braking is required, apply continuous force on the brake pedal; do not pump the brake pedal since this will reduce the effectiveness of the ABS and will increase your vehicle’s stopping distance. The ABS will be activated immediately, allowing you to retain steering control during hard braking and on slippery surfaces. -
Page 158: Traction Control
Driving WARNING: Always set the parking brake fully and make sure that the gearshift is securely latched in P (Park) (automatic transmission) or in 1 (First) (manual transmission). WARNING: If the parking brake is fully released, but the brake warning lamp remains illuminated, the brakes may not be working properly.
-
Page 159
Driving The Traction Control™ switch is located on the instrument panel. The Traction Control™ system will automatically turn on every time the ignition is turned off and on. If you should become stuck in snow or ice or on a very slippery road surface, try switching the Traction Control™… -
Page 160: Transmission Operation
Driving • loose or worn steering components • improper steering alignment A high crown in the road or high crosswinds may also make the steering seem to wander/pull. AUTOMATIC TRANSMISSION OPERATION (IF EQUIPPED) Brake-shift interlock This vehicle is equipped with a brake-shift interlock feature that prevents the gearshift lever from being moved from P (Park) when the ignition is in the ON position unless the brake pedal is depressed.
-
Page 161
Driving WARNING: Always set the parking brake fully and make sure the gearshift is latched in P (Park). Turn the ignition to the OFF position and remove the key whenever you leave your vehicle. WARNING: If the parking brake is fully released, but the brake warning lamp remains illuminated, the brakes may not be working properly. -
Page 162
Driving To put your vehicle in gear: • Start the engine • Depress the brake pedal • Move the gearshift lever into the desired gear To put your vehicle in P (Park): • Come to a complete stop • Move the gearshift lever and securely latch it in P (Park) WARNING: Always set the parking brake fully and make sure the gearshift is latched in P (Park). -
Page 163
Driving D (Drive) without Overdrive Overdrive can be deactivated by pressing the transmission control switch on the side of the gearshift lever. • This position allows for all forward gears (1–3) except overdrive. • Provides engine braking. • Use when driving conditions cause excessive shifting from O/D to other gears. -
Page 164
Driving If necessary, try turning the Traction Control™ system off. This will allow the wheels to spin, which may help to free your stuck vehicle. For more information, refer to Traction Control™ in this chapter. Do not rock the vehicle if the engine is not at normal operating temperature or damage to the transmission may occur. -
Page 165
Driving Recommended shift speeds Do not downshift into 1 (First) when your vehicle is moving faster than 15 mph (24 km/h). This will damage the clutch. Upshift according to the following chart: Recommended upshifts (for best fuel economy) when accelerating 5-speed manual transmission Shift from: 1 — 2… -
Page 166
Driving DRIVING THROUGH WATER If driving through deep or standing water is unavoidable, proceed very slowly especially when the depth is not known. Never drive through water that is higher than the bottom of the wheel rims (for cars) or the bottom of the hubs (for trucks). -
Page 167: Roadside Emergencies
Roadside Emergencies ROADSIDE ASSISTANCE Getting roadside assistance To fully assist you should you have a vehicle concern, Ford Motor Company offers a complimentary roadside assistance program. This program is separate from the New Vehicle Limited Warranty. The service is available: •…
-
Page 168
Assistance, call 1-800-241-3673. Canadian customers who require roadside assistance, call 1-800-665-2006. If you need to arrange roadside assistance for yourself, Ford Motor Company will reimburse a reasonable amount for towing to the nearest dealership within 35 miles. To obtain reimbursement information, U.S. -
Page 169: Fuel Pump Shut-Off Switch
Roadside Emergencies FUEL PUMP SHUT-OFF SWITCH This device stops the electric fuel pump from sending fuel to the engine when your vehicle has had a substantial jolt. After an accident, if the engine cranks but does not start, this switch may have been activated.
-
Page 170
Roadside Emergencies Standard fuse amperage rating and color COLOR Cartridge Fuse Mini Standard Maxi Fuse link maxi rating fuses fuses fuses cartridge fuses Grey Grey — — — Violet Violet — — — Pink Pink — — — — — —… -
Page 171: Fuses
Roadside Emergencies The fuses are coded as follows. Fuse/Relay Fuse Amp Passenger Compartment Fuse Location Rating Panel Description Not used (spare) Brake Switch CHMSL Satellite Radio — Not used Shift Interlock Right Front Turn lamp/Left Front Turn lamp, Rear stop/turn lamps Left Low beam Headlamp Right Low beam Headlamp Interior Lamps…
-
Page 172
Roadside Emergencies Fuse/Relay Fuse Amp Passenger Compartment Fuse Location Rating Panel Description Recirculated Air, Air Conditioning Not used (spare) Power Locks, Trunk Release Heated Seats Not used (spare) Data Link Connector Foglamps, Foglamp Indicator Parking Lamps High Beam Lamps Horn Demand Lamps, Trunk Lamps Instrument Cluster Ignition Switch… -
Page 173
Roadside Emergencies Fuse/Relay Fuse Amp Passenger Compartment Fuse Location Rating Panel Description Not used (spare) Front Wipers (logic) 7.5A Front Passenger Sensing System 30A (circuit Sunroof, Power Windows breaker) Power distribution box The power distribution box is located in the engine compartment. The power distribution box contains high-current fuses that protect your vehicle’s main electrical systems from overloads. -
Page 174: High-Current Fuses
Roadside Emergencies The high-current fuses are coded as follows: Fuse/Relay Fuse Amp Power Distribution Box Location Rating Description Heated mirror Rear defrost Power point Fuel pump Powertrain control module (PCM) KAPWR / Canister Vent Alt sense Reverse lamps — Not used ABS motor Wipers Starter…
-
Page 175
Roadside Emergencies Fuse/Relay Fuse Amp Power Distribution Box Location Rating Description — Spare Ignition — Cooling fan low speed relay — Starter relay — Spare — Cooling fan high speed relay — Reverse lamp relay — Fuel pump relay — Spare —… -
Page 176
Ford. If the dissimilar spare tire or wheel is damaged, it should be replaced rather than repaired. -
Page 177
Roadside Emergencies When driving with one of the dissimilar spare tires listed above, do not: • Exceed 50 mph (80 km/h) • Load the vehicle beyond maximum vehicle load rating listed on the Safety Compliance Label • Tow a trailer •… -
Page 178
Roadside Emergencies When driving with the full-size dissimilar spare tire/wheel additional caution should be given to: • Towing a trailer • Driving vehicles equipped with a camper body • Driving vehicles with a load on the cargo rack Drive cautiously when using a full-size dissimilar spare tire/wheel and seek service as soon as possible. -
Page 179
Roadside Emergencies WARNING: Do not attempt to change a tire on the side of the vehicle close to moving traffic. Pull far enough off the road to avoid the danger of being hit when operating the jack or changing the wheel. -
Page 180
Roadside Emergencies 4. Loosen each wheel lug nut one-half turn counterclockwise but do not remove them until the wheel is raised off the ground. 5. The vehicle jacking points are depicted on the yellow warning label on the jack shown here (2-door model shown, 4-door model similar). -
Page 181: Temporary Mobility Kit
120 miles (200 km) at a maximum speed of 50 mph (80 km/h). Note: The temporary mobility kit sealant compound in the canister is to be used for one tire only. See your Ford authorized dealer for additional replacement sealant canisters. 2008 Focus (foc)
-
Page 182
Roadside Emergencies 1. Air compressor (inside) 2. Diverter knob 3. On/Off switch 4. Air pressure gauge 5. Sealant bottle/canister 6. Sealant filling clear tube 7. Sealant tube — tire valve connector 8. Yellow cap tool 9. Air compressor hose 10. Air hose — tire valve connector 11. -
Page 183
• Do not drive the vehicle above 50 mph (80 km/h). • Do not drive further than 120 miles (200 km). Drive only to the closest Ford Motor Company authorized dealer or tire repair shop to have your tire inspected. -
Page 184
Always store the kit in its original location. • After sealant use, the TPMS sensor and valve stem on the wheel must be replaced by an authorized Ford dealer. • When inflating a tire or other objects, use the black air hose only. Do not use the transparent hose which is designed for sealant application only. -
Page 185
Roadside Emergencies Do not remove any foreign object that has pierced the tire. If a puncture is located in the tire sidewall, stop and call roadside assistance. 1. Remove the valve cap from the tire valve. 2. Unwrap the clear tube from the compressor housing. 3. -
Page 186
Roadside Emergencies 8. Inflate the tire to the pressure listed on the tire label located on the driver’s door or the door jam area. Note: When the sealing compound is first added into the tire, the air pressure gauge reading on the compressor unit may indicate a higher value;… -
Page 187
After using the temporary mobility kit to seal your tire, you will need to replace the sealant canister and clear tube (hose). Sealing compound and spare parts can be obtained and replaced at an authorized Ford Motor Company dealership or tire dealer. Empty sealant bottles may be disposed of at home;… -
Page 188
120 miles (200 km). The sealed tire should be inspected immediately. Note: After sealant use, the TPMS sensor and valve stem on the wheel must be replaced by an authorized Ford dealer. You can check the tire pressure any time within the 120 miles (200 km) by performing the procedure from Second stage: Checking tire pressure listed previously. -
Page 189
Roadside Emergencies 3. Using the yellow cap tool, press the tab located on the temporary mobility kit compressor housing while pulling up on the sealant canister. Installation of the Sealant Canister to the Temporary Mobility 1. Align the sealant canister with the temporary mobility kit housing. -
Page 190
3. Wrap the clear tube around the compressor housing. Note: If you experience any difficulties with the removal or installation of the sealant canister, consult your Ford Motor Company authorized dealer for assistance. Be sure to check the sealant compound’s use by date regularly. -
Page 191: Wheel Lug Nut Torque
M12 x 1.5 * Torque specifications are for nut and bolt threads free of dirt and rust. Use only Ford recommended replacement fasteners. WARNING: When a wheel is installed, always remove any corrosion, dirt or foreign materials present on the mounting surfaces of the wheel or the surface of the wheel hub, brake drum or brake disc that contacts the wheel.
-
Page 192: Jump Starting
Roadside Emergencies JUMP STARTING WARNING: The gases around the battery can explode if exposed to flames, sparks, or lit cigarettes. An explosion could result in injury or vehicle damage. WARNING: Batteries contain sulfuric acid which can burn skin, eyes and clothing, if contacted. Do not attempt to push-start your automatic transmission vehicle.
-
Page 193
Roadside Emergencies Connecting the jumper cables 1. Connect the positive (+) jumper cable to the positive (+) terminal of the discharged battery. Note: In the illustrations, lightning bolts are used to designate the assisting (boosting) battery. 2. Connect the other end of the positive (+) cable to the positive (+) terminal of the assisting battery. -
Page 194
Roadside Emergencies 3. Connect the negative (-) cable to the negative (-) terminal of the assisting battery. 4. Make the final connection of the negative (-) cable to an exposed metal part of the stalled vehicle’s engine, away from the battery and the carburetor/fuel injection system. -
Page 195
Roadside Emergencies Jump starting 1. Start the engine of the booster vehicle and run the engine at moderately increased speed. 2. Start the engine of the disabled vehicle. 3. Once the disabled vehicle has been started, run both engines for an additional three minutes before disconnecting the jumper cables. -
Page 196
Roadside Emergencies 3. Remove the jumper cable from the positive (+) terminal of the booster vehicle’s battery. 4. Remove the jumper cable from the positive (+) terminal of the disabled vehicle’s battery. After the disabled vehicle has been started and the jumper cables removed, allow it to idle for several minutes so the engine computer can relearn its idle conditions. -
Page 197: Wrecker Towing
It is recommended that your vehicle be towed with a wheel lift or flatbed equipment. Do not tow with a slingbelt. Ford Motor Company has not approved a slingbelt towing procedure. If your vehicle is to be towed from the rear using wheel lift equipment, the front wheels (drive wheels) must be placed on a dolly to prevent damage to the transmission.
-
Page 198
Roadside Emergencies Emergency towing In case of a roadside emergency with a disabled vehicle (without access to wheel dollies, car hauling trailer, or flatbed transport vehicle) your vehicle (regardless of transmission powertrain configuration) can be flat towed (all wheels on the ground) under the following conditions: •… -
Page 199: Customer Assistance
Center at 1-800-392-3673 (FORD). Away from home If you own a Ford or Mercury vehicle and are away from home when your vehicle needs service, or if you need more help than the authorized dealer could provide, after following the steps described above, contact the Ford Customer Relationship Center to find an authorized dealer to help you.
-
Page 200
If you own a Lincoln vehicle and are away from home when your vehicle needs service, or if you need more help than the authorized dealer could provide, after following the steps described above, contact the Ford Customer Relationship Center to find an authorized dealer to help you. -
Page 201
Customer Assistance In some states (in the U.S.) you must directly notify Ford in writing before pursuing remedies under your state’s warranty laws. Ford is also allowed a final repair attempt in some states. In the United States, a warranty dispute must be submitted to the BBB… -
Page 202
You are not bound by the decision but may choose to accept it. If you choose to accept the BBB AUTO LINE decision then Ford must abide by the accepted decision as well. If the arbitrator has decided in… -
Page 203
(CANADA ONLY) For vehicles delivered to authorized Canadian dealers. In those cases where you continue to feel that the efforts by Ford of Canada and the authorized dealer to resolve a factory-related vehicle service concern have been unsatisfactory, Ford of Canada participates in an impartial third party mediation/arbitration program administered by the Canadian Motor Vehicle Arbitration Plan (CAMVAP). -
Page 204
Customer Assistance If you did not take advantage of the Ford Extended Service Plan at the time of purchasing your vehicle, you may still be eligible. Since this information is subject to change, please ask your authorized dealer for complete details about Ford Extended Service Plan coverage options, or visit the Ford ESP website at www.ford-esp.com. -
Page 205: Reporting Safety Defects (U.s. Only)
However, NHTSA cannot become involved in individual problems between you, your dealer, or Ford Motor Company. 2008 Focus (foc)
-
Page 206: Reporting Safety Defects (Canada Only)
Customer Assistance To contact NHTSA, you may call the Vehicle Safety Hotline toll-free at 1–888–327–4236 (TTY: 1–800–424–9153); go to http://www.safercar.gov; or write to: Administrator 1200 New Jersey Avenue, Southeast Washington, D.C. 20590 You can also obtain other information about motor vehicle safety from http://www.safercar.gov.
-
Page 207: Cleaning
Cleaning WASHING THE EXTERIOR Wash your vehicle regularly with cool or lukewarm water and a neutral pH shampoo, such as Motorcraft Detail Wash (ZC-3-A), which is available from your authorized dealer. • Never use strong household detergents or soap, such as dish washing or laundry liquid.
-
Page 208
Cleaning WAXING • Wash the vehicle first. • Do not use waxes that contain abrasives; use Motorcraft Premium Liquid Wax (ZC-53-A), which is available from your authorized dealer, or an equivalent quality product. • Do not allow paint sealant to come in contact with any non-body (low-gloss black) colored trim, such as grained door handles, roof racks, bumpers, side moldings, mirror housings or the windshield cowl area. -
Page 209
Cleaning ENGINE Engines are more efficient when they are clean because grease and dirt buildup keep the engine warmer than normal. When washing: • Take care when using a power washer to clean the engine. The high-pressure fluid could penetrate the sealed parts and cause damage. -
Page 210
Cleaning WINDOWS AND WIPER BLADES The windshield, rear and side windows and the wiper blades should be cleaned regularly. If the wipers do not wipe properly, substances on the vehicle’s glass or the wiper blades may be the cause. These may include hot wax treatments used by commercial car washes, water repellent coatings, tree sap, or other organic contamination;… -
Page 211
Cleaning • Be certain to wash or wipe your hands clean if you have been in contact with certain products such as insect repellent and suntan lotion in order to avoid possible damage to the interior painted surfaces. • Do not use household or glass cleaners as these may damage the finish of the instrument panel, interior trim and cluster lens. -
Page 212
Cleaning WARNING: Do not use cleaning solvents, bleach or dye on the vehicle’s safety belts, as these actions may weaken the belt webbing. WARNING: On vehicles equipped with seat-mounted airbags, do not use chemical solvents or strong detergents. Such products could contaminate the side-airbag system and affect performance of the side airbag in a collision. -
Page 213
Cleaning FORD AND LINCOLN MERCURY CAR CARE PRODUCTS Your Ford or Lincoln Mercury authorized dealer has many quality products available to clean your vehicle and protect its finishes. These quality products have been specifically engineered to fulfill your automotive needs; they are custom designed to complement the style and appearance of your vehicle. -
Page 214: Maintenance And Specifications
Maintenance and Specifications SERVICE RECOMMENDATIONS To help you service your vehicle, we provide scheduled maintenance information which makes tracking routine service easy. If your vehicle requires professional service, your authorized dealer can provide the necessary parts and service. Check your Warranty Guide/Customer Information Guide to find out which parts and services are covered.
-
Page 215
Maintenance and Specifications Working with the engine on • Automatic transmission: 1. Set the parking brake and shift to P (Park). 2. Block the wheels. • Manual transmission: 1. Set the parking brake, depress the clutch and place the gearshift in N (Neutral). -
Page 216: Engine Compartment
Maintenance and Specifications 3. Lift the hood and locate the prop rod on the passenger side of the vehicle near the fender. Support the hood with the prop rod. IDENTIFYING COMPONENTS IN THE ENGINE COMPARTMENT 1. Engine oil filler cap 2.
-
Page 217
In very cold weather, do not fill the reservoir completely. Only use a washer fluid that meets Ford specification WSB-M8B16-A2. Do not use any special washer fluid such as windshield water repellent type fluid or bug wash. They may cause squeaking, chatter noise, streaking and smearing. -
Page 218: Engine Oil
Maintenance and Specifications CHANGING THE WIPER BLADES 1. Pull the wiper blade and arm away from the glass. Turn the blade at a right angle to the arm. Push the lock tab (A) to release the blade from the arm loop and pull the blade down toward the windshield to remove it from the arm.
-
Page 219
Maintenance and Specifications • If the oil level is between the MIN and MAX marks, the oil level is acceptable. DO NOT ADD OIL. • If the oil level is below the MIN mark, add enough engine oil to raise the level within the MIN and MAX range. -
Page 220: Engine Oil And Filter Recommendations
Change your engine oil and filter according to the appropriate schedule listed in the scheduled maintenance information. Ford production and aftermarket (Motorcraft) oil filters are designed for added engine protection and long life. If a replacement oil filter is used that does not meet Ford material and design specifications, start-up engine noises or knock may be experienced.
-
Page 221: Battery
Maintenance and Specifications BATTERY Your vehicle is equipped with a Motorcraft maintenance-free battery which normally does not require additional water during its life of service. If your battery has a cover/shield, make sure it is reinstalled after the battery has been cleaned or replaced. For longer, trouble-free operation, keep the top of the battery clean and dry.
-
Page 222
Maintenance and Specifications WARNING: Keep batteries out of reach of children. Batteries contain sulfuric acid. Avoid contact with skin, eyes or clothing. Shield your eyes when working near the battery to protect against possible splashing of acid solution. In case of acid contact with skin or eyes, flush immediately with water for a minimum of 15 minutes and get prompt medical attention. -
Page 223: Engine Coolant
Maintenance and Specifications • Always dispose of automotive batteries in a responsible manner. Follow your local authorized standards for disposal. Call your local authorized recycling center to find out more about recycling automotive batteries. RECYCLE ENGINE COOLANT Checking engine coolant The concentration and level of engine coolant should be checked at the intervals listed in scheduled maintenance information.
-
Page 224
Maintenance and Specifications When the engine is cold, check the level of the engine coolant in the reservoir. • The engine coolant should be at the “FULL COLD” level or within the “COLD FILL RANGE” as listed on the engine coolant reservoir (depending upon application). -
Page 225
Motorcraft Premium Gold Engine Coolant from yellow to golden tan. • Do not add/mix an orange-colored, extended life coolant such as Motorcraft Specialty Orange Engine Coolant, meeting Ford specification WSS-M97B44-D, or DEX-COOL brand with the factory-filled coolant. Mixing Motorcraft Specialty Orange Engine… -
Page 226
Recycled engine coolant Ford Motor Company does NOT recommend the use of recycled engine coolant in vehicles originally equipped with Motorcraft Premium Gold Engine Coolant since a Ford-approved recycling process is not yet available. -
Page 227
Maintenance and Specifications Coolant refill capacity To find out how much fluid your vehicle’s cooling system can hold, refer to Maintenance product specifications and capacities in this chapter. Fill your engine coolant reservoir as outlined in Adding engine coolant in this section. Severe climates If you drive in extremely cold climates (less than –34°F [–36°C]): •… -
Page 228
Maintenance and Specifications How fail-safe cooling works If the engine begins to overheat: • The engine coolant temperature gauge will move to the red (hot) area. • The (engine coolant temperature) indicator light will illuminate. If the engine reaches a preset over-temperature condition, the engine will automatically switch to alternating cylinder operation. -
Page 229
Maintenance and Specifications FUEL FILTER For fuel filter replacement, see your authorized dealer. Refer to scheduled maintenance information for the appropriate intervals for changing the fuel filter. Replace the fuel filter with an authorized Motorcraft part. The customer warranty may be void for any damage to the fuel system if an authorized Motorcraft fuel filter is not used. -
Page 230
Maintenance and Specifications Observe the following guidelines when handling automotive fuel: • Extinguish all smoking materials and any open flames before refueling your vehicle. • Always turn off the vehicle before refueling. • Automotive fuels can be harmful or fatal if swallowed. Fuel such as gasoline is highly toxic and if swallowed can cause death or permanent injury. -
Page 231
Maintenance and Specifications Refueling WARNING: Fuel vapor burns violently and a fuel fire can cause severe injuries. To help avoid injuries to you and others: • Read and follow all the instructions on the pump island; • Turn off your engine when you are refueling; •… -
Page 232
The customer warranty may be void for any damage to the fuel tank or fuel system if the correct genuine Ford, Motorcraft or other certified fuel filler cap is not used. WARNING: The fuel system may be under pressure. If the fuel filler cap is venting vapor or if you hear a hissing sound, wait until it stops before completely removing the fuel filler cap. -
Page 233
Maintenance and Specifications prohibited by law and could damage your vehicle. Do not use fuel containing methanol. It can damage critical fuel system components. Your vehicle was not designed to use fuel or fuel additives with metallic compounds, including manganese-based additives. Studies indicate that these additives can cause your vehicle’s emission control system to deteriorate more rapidly. -
Page 234
Maintenance and Specifications Cleaner air Ford endorses the use of reformulated “cleaner-burning” gasolines to improve air quality, per the recommendations in the Choosing the right fuel section. Running out of fuel Avoid running out of fuel because this situation may have an adverse effect on powertrain components. -
Page 235
Maintenance and Specifications empty. Empty reserve is the small amount of fuel remaining in the fuel tank after the fuel gauge indicates empty. The amount of usable fuel in the empty reserve varies and should not be relied upon to increase driving range. When refueling your vehicle after the fuel gauge indicates empty, you might not be able to refuel the full amount of the advertised capacity of the fuel tank due to the empty reserve still present in the tank. -
Page 236
Maintenance and Specifications economy under current driving conditions. Additionally, keeping records during summer and winter will show how temperature impacts fuel economy. In general, lower temperatures give lower fuel economy. Driving style — good driving and fuel economy habits Give consideration to the lists that follow and you may be able to change a number of variables and improve your fuel economy. -
Page 237
Maintenance and Specifications Conditions • Heavily loading a vehicle or towing a trailer may reduce fuel economy at any speed. • Carrying unnecessary weight may reduce fuel economy (approximately 1 mpg [0.4 km/L] is lost for every 400 lb [180 kg] of weight carried). •… -
Page 238
If other than Ford, Motorcraft or Ford-authorized parts are used for maintenance replacements or for service of components affecting emission control, such non-Ford parts should be equivalent to genuine Ford Motor Company parts in performance and durability. -
Page 239
Maintenance and Specifications a malfunction. Temporary malfunctions may cause the Service engine indicator to illuminate. Examples are: soon 1. The vehicle has run out of fuel—the engine may misfire or run poorly. 2. Poor fuel quality or water in the fuel—the engine may misfire or run poorly. -
Page 240
Maintenance and Specifications for 15 seconds without cranking the engine. If the Service engine soon indicator blinks eight times, it means that the vehicle is not ready for I/M testing; if the Service engine soon indicator stays on solid, it means that the vehicle is ready for I/M testing. The OBD-II system is designed to check the emission control system during normal driving. -
Page 241
Maintenance and Specifications BRAKE/CLUTCH FLUID Brake and clutch systems are supplied from the same reservoir. The fluid level will drop slowly as the brakes wear, and will rise when the brake components are replaced. Fluid levels between the “MIN” and “MAX”… -
Page 242
Maintenance and Specifications 6. Install the dipstick making sure it is fully seated in the filler tube. 7. Remove the dipstick and inspect the fluid level. The fluid should be in the designated areas for normal operating temperature. Low fluid level Do not drive the vehicle if the fluid level is at the bottom of the dipstick and the outside temperatures are… -
Page 243: Air Filter(S)
5. Install and tighten the fill plug securely. Use only fluid that meets Ford specifications. Refer to the Maintenance product specifications and capacities section in this chapter. AIR FILTER Refer to scheduled maintenance information for the appropriate intervals for changing the air filter element.
-
Page 244: Part Numbers
Maintenance and Specifications Changing the air filter element (Non-PZEV only) 1. Release the clamps that secure the air filter housing cover. 2. Carefully separate the two halves of the air filter housing. 3. Remove the air filter element from the air filter housing. 4.
-
Page 245
PCV valve. Replace the PCV valve with one that meets Ford material and design specifications for your vehicle, such as a Motorcraft or equivalent replacement part. The customer warranty may be void for any damage to the emissions system if such a PCV valve is not used. -
Page 246: Specifications
Maintenance and Specifications 2008 Focus (foc) Owners Guide USA (fus)
-
Page 247
Maintenance and Specifications 2008 Focus (foc) Owners Guide USA (fus) -
Page 248: Engine Data
Maintenance and Specifications ENGINE DATA Engine 2.0L I4 engine Cubic inches Required fuel 87 octane Firing order 1–3–4–2 Ignition system C.O.P Compression ratio 10.0:1 Spark plug gap .051 inch +/- .002 (1.3 mm +/- .05) Engine drivebelt routing • Without A/C •…
-
Page 249
Maintenance and Specifications IDENTIFYING YOUR VEHICLE Safety Compliance Certification Label The National Highway Traffic Safety Administration Regulations require that a Safety Compliance Certification Label be affixed to a vehicle and prescribe where the Safety Compliance Certification Label may be located. The Safety Compliance Certification Label is located on the structure (B-Pillar) by the trailing edge of the driver’s… -
Page 250
Maintenance and Specifications The Vehicle Identification Number (VIN) contains the following information: 1. World manufacturer identifier 2. Brake system / Gross Vehicle Weight Rating (GVWR) / Restraint System 3. Vehicle line, series, body type 4. Engine type 5. Check digit 6. -
Page 251: Accessories
GENUINE FORD ACCESSORIES FOR YOUR VEHICLE A wide selection of Genuine Ford Accessories are available for your vehicle through your local Ford or Ford of Canada dealer. These quality accessories have been specifically engineered to fulfill your automotive needs; they are custom designed to complement the style and aerodynamic appearance of your vehicle.
-
Page 252
Accessories Peace of mind Mobile-Ease™ hands free communication system Remote start Vehicle security systems Wheel locks For maximum vehicle performance, keep the following information in mind when adding accessories or equipment to your vehicle: • When adding accessories, equipment, passengers and luggage to your vehicle, do not exceed the total weight capacity of the vehicle or of the front or rear axle (GVWR or GAWR as indicated on the Safety Compliance Certification label). -
Page 253: Index
Index Air cleaner filter ….243–244 Battery ……..221 acid, treating emergencies ..221 Air conditioning manual heating and air jumping a disabled battery ..192 conditioning system ….32 maintenance-free ….221 Airbag supplemental restraint replacement, specifications …244 system ……97, 106, 108 servicing ……..221 and child safety seats ….99 Belt-Minder …….92 description ….97, 106, 108…
-
Page 254
Cruise control refill capacities ……246 (see Speed control) ….49 service points ….216–217 starting after a collision ..169 Customer Assistance ….167 Ford Extended Service Engine block heater ….154 Plan ……….203 Engine fan ………216 Getting assistance outside the U.S. and Canada …..204 Engine oil ……..218… -
Page 255
Index Event data recording ….6 Head restraints ……75 Exhaust fumes ……154 Headlamps ……..35 aiming ……..37 bulb specifications ….39 Fail safe cooling ……227 daytime running lights …..36 flash to pass ……36 Fan, Engine Cooling ..214, 216 high beam ………35 Floor mats ……..60 replacing bulbs ……40 Fluid capacities ……246 turning on and off ….35… -
Page 256
Index Motorcraft parts ..213, 229, 244 Lamps bulb replacement Octane rating ……233 specifications chart ….39 daytime running light ….36 Oil (see Engine oil) ….218 fog lamps ……..35 headlamps ………35 headlamps, flash to pass ..36 Parking brake ……157 instrument panel, dimming ..36 Parts (see Motorcraft parts) ..244 interior lamps …..38, 40 replacing bulbs ……40… -
Page 257
Index Safety belts Stereo CD-MP3 ……..17 (see Safety restraints) …82, 85–90 Sunroof (moonroof) ….53 Safety Canopy ……106 SYNC ……….31 Safety defects, reporting ..205–206 Safety restraints ….82, 85–90 Belt-Minder ……92 extension assembly ….91 Temporary mobility kit …..181 for adults ……86–89 Tilt steering wheel ……45 for children …..112–113 Occupant Classification Tire Pressure Monitoring… -
Page 258
Index fluid, checking and adding Vehicle loading ……145 (automatic) ……241 Ventilating your vehicle …154 fluid, checking and adding (manual) ………243 fluid, refill capacities ….246 manual operation ….164 Warning lights (see Lights) ..10 Trunk ………..65 remote release ……69 Washer fluid ……217 Turn signal ……..38 Water, Driving through …..166 Windows…