- Manuals
- Brands
- Fritz! Manuals
- Network Router
- Box 6490 cable
- Installation and operation manual
-
Contents
-
Table of Contents
-
Bookmarks
Quick Links
FRITZ!Box 6490 Cable
Installation
Installation
and Operation
and Operation
Related Manuals for Fritz! Box 6490 cable
Summary of Contents for Fritz! Box 6490 cable
-
Page 1
FRITZ!Box 6490 Cable Installation Installation and Operation and Operation… -
Page 2: Table Of Contents
Handling the FRITZ!Box ……..9…
-
Page 3
Using FRITZ!Box Users ……..45… -
Page 4
IPv6: The New Internet Protocol ……79 13.10 LISP: FRITZ!Box as a LISP Router ……80 FRITZ!Box as a Wireless Access Point . -
Page 5
Starting FRITZ!NAS …….. -
Page 6
27.3 Feedback on FRITZ!Box ……..162 27.4 Assistance from the Support Team . -
Page 7: Security And Handling
– Provide for sufficient air circulation around the FRITZ!Box. – Make sure that the ventilation slits on the FRITZ!Box housing are always unobstructed. – The FRITZ!Box should not be placed on a carpet or on upholstered furniture. FRITZ!Box 6490 Cable…
-
Page 8
– Do not cover the FRITZ!Box. • The base of the FRITZ!Box can heat up during normal op- eration. This heat can cause damage to heat-sensitive surfaces. – Do not place the FRITZ!Box on heat-sensitive surfac- • During electrical storms, lightning and electrical surges present a danger to connected electrical devices. -
Page 9: Handling The Fritz!Box
FRITZ!Box on a wall, see page 167. • Place or hang the FRITZ!Box in a dry location that is free of dust and protected from direct sunlight. • For ideal operating conditions, mount the FRITZ!Box on a wall with the cables connected on the bottom.
-
Page 10: Conventions In The Manual
Bold type emphasizes important words. Example Do not leave the page without saving. • Blue font in the text designates links and references within this manual and addresses to be entered in the browser. Example See also the information on page FRITZ!Box 6490 Cable…
-
Page 11: The Fritz!Box 6490 Cable
The FRITZ!Box is equipped with ports for computers, telephones and USB devices and supports the wireless technologies WiFi and DECT. You can use the FRITZ!Box as a wireless LAN access point for wireless devices like notebooks, tablets or smartphones and as DECT base sta- tion for your cordless telephones.
-
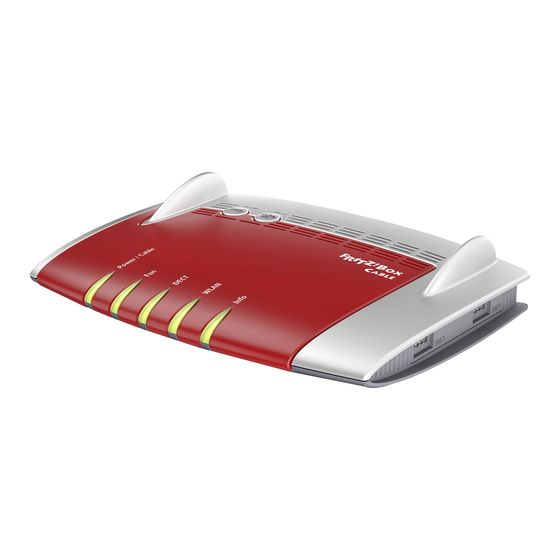
Page 12: Ports, Interfaces, Buttons And Leds
DECT telephones Possibilities for connecting the FRITZ!Box • CABLE Socket for connecting with the cable junction • FON 1 and FON 2 2 TAE sockets and 2 RJ11 sockets for connecting analog…
-
Page 13: Buttons
Integrated DECT base station for connecting up to 6 cordless telephones that use the DECT standard Buttons The FRITZ!Box has two buttons on the top of the housing. FRITZ!Box buttons You can lock the keys on the FRITZ!Box. For more information,…
-
Page 14: Meaning Of The Leds
Adopting the wireless LAN settings • Switching the wireless LAN function on or off • Performing WPS • WPS procedure aborted: More than two wireless LAN de- • vices are performing WPS at the same time. Repeat the WPS procedure. FRITZ!Box 6490 Cable…
-
Page 15
Condition Meaning Info The LED signals an event specified in the user interface • under “System / Buttons and LEDs / “Info” Display” Stick & Surf procedure with FRITZ!WLAN USB Stick from • AVM concluded flashing Updating FRITZ!OS • Signals missed calls, new messages on the FRITZ!Box •… -
Page 16: Before You Connect The Fritz!Box
• one quick guide Requirements for Operation In order to operate the FRITZ!Box, you must have the following: • an up-to-date web browser Some of the FRITZ!Box functions can be used only with a web browser that supports HTML5, for instance Firefox version 17 or higher, Internet Explorer version 9 or high- er, or Google Chrome version 23 or higher.
-
Page 17: Connecting The Fritz!Box
Installing at the Cable Connection R a d i o Installing at the cable connection To connect the FRITZ!Box you need the coaxial cable provided by your cable network operator. The FRITZ!Box package does not contain a coaxial cable. Connect the coaxial cable to the “CABLE” port of the FRITZ!Box and to your multimedia socket.
-
Page 18
Connecting to Electrical Power Pick up the power supply unit included in the FRITZ!Box package. Use only this power supply unit for connecting to electri- cal power. Connect the power supply unit to the socket on the FRITZ!Box labeled “Power”. -
Page 19: Connecting A Computer With A Network Cable
You can also use any other network cable. For more in- formation, see page 160. Insert the free end of the cable into a LAN socket on the FRITZ!Box. Now the FRITZ!Box and the computer are connected with each other. FRITZ!Box 6490 Cable…
-
Page 20: Connecting A Network Hub Or Switch
You can also use any other network cable. For more in- formation, see page 160. Insert the free end of the cable into a LAN socket on the FRITZ!Box. The FRITZ!Box and the network hub are now connected with each other. FRITZ!Box 6490 Cable…
-
Page 21: Connecting Computers With The Fritz!Box Over Wireless
You can establish the wireless LAN connection using WPS or by enter- ing the FRITZ!Box network key on the wireless device. Procedure for Establishing Secure Wireless LAN Connections With the following procedure you can establish a secure wire- less LAN connection to the FRITZ!Box on a wireless device: Procedure Description Instructions…
-
Page 22
Establishing a Wireless LAN Connection Using WPS If the FRITZ!Box“ LED on the WLAN” is off, press the “WLAN” button briefly. The wireless radio network of the FRITZ!Box will be switched on. Open the wireless LAN software on the computer. -
Page 23
Here is how to establish a wireless connection with WPS on a wireless LAN device without Windows: If the FRITZ!Box“ LED on the WLAN” is off, press the “WLAN” button briefly. The wireless radio network of the FRITZ!Box will be switched on. -
Page 24: Establishing A Wireless Lan Connection With A Network Key
Establishing a Wireless LAN Connection with a Network Key You can establish a wireless LAN connection by entering the FRITZ!Box network key on the wireless device: If the“WLAN” LED on the FRITZ!Box is off, press the “WLAN” button briefly. The wireless radio network of the FRITZ!Box will be switched on.
-
Page 25: The Fritz!Box User Interface
The FRITZ!Box User Interface The FRITZ!Box User Interface The FRITZ!Box has a user interface you can open in a web browser on your computer. In the user interface you can set up the FRITZ!Box, enable or disable functions and receive information on the FRITZ!Box and on your con- nections.
-
Page 26
FRITZ!Box is displayed, along with the currently in- stalled version of FRITZ!OS, and its current energy consump- tion. If you assigned a name of your own for your FRITZ!Box (see page 137), this name will be displayed here. -
Page 27: Standard View And Advanced View
FRITZ!Box operation. Fast Switching between the Views The “View” link in the footer of the FRITZ!Box allows you to switch instantly between the standard view and the advanced view: “View”…
-
Page 28: Using System Functions Of The Fritz!Box
Using System Functions of the FRITZ!Box Using System Functions of the FRITZ!Box The FRITZ!Box offers a slew of system functions like notification ser- vices, diagnostics functions and updating services. These system functions inform you about the activities and functional status of the FRITZ!Box and help you operate the FRITZ!Box safely and always keep it up to date.
-
Page 29: Using Energy-Saving Functions Of The Fritz!Box
Using Energy-Saving Functions of the FRITZ!Box Using Energy-Saving Functions of the FRITZ!Box The FRITZ!Box combines a variety of devices in one device: ca- ble modem, WLAN router, media server, answering machine, fax machine and DECT base station for cordless telephones.
-
Page 30
Using Energy-Saving Functions of the FRITZ!Box Enabling Energy-Saving Mode for USB Hard Drives In the FRITZ!Box you can enable an energy-saving function for USB hard drives connected to the FRITZ!Box. When the ener- gy-saving function is enabled, connected USB hard drives will be switched off when they are idle—as long as the hard drives… -
Page 31: Push Services: Notification Services Of The Fritz!Box
Push Services: Notification Services of the FRITZ!Box Push services are notification services that inform you about the activities of your FRITZ!Box and assist you in saving your passwords and FRITZ!Box settings. With the push services you can have e-mail sent to you at regular intervals informing you about the latest connections, usage and configuration of your FRITZ!Box.
-
Page 32: Locking The Buttons On The Fritz!Box
The Help of the FRITZ!Box user interface presents compre- hensive information on the settings of each push service. Click “OK” to save your settings. In the Help of the FRITZ!Box user interface you can find de- tailed instructions. Locking the Buttons on the FRITZ!Box With the “Keylock”…
-
Page 33: Saving And Restoring The Fritz!Box Settings
Disable the setting “Buttons locked”. Saving and Restoring the FRITZ!Box Settings All of the settings you configure in the FRITZ!Box can be saved in a backup file. With this file you can restore your settings at any time: •…
-
Page 34: Restoring Settings
Backup files created with a different FRITZ!Box model. If you apply settings from a backup file that was created with a FRITZ!Box of a different model, then you can re- store several selected settings to your FRITZ!Box. A wizard is available in the FRITZ!Box user interface to assist you in restoring your FRITZ!Box settings, guiding you through the process step by step.
-
Page 35: Connecting Telephones And Other Terminal Devices
Connecting Telephones and Other Terminal Devices Connecting Telephones and Other Terminal Devices This chapter describes how to connect telephones, fax machines, an- swering machines and telephone systems (PBXs) to the FRITZ!Box. Connecting Analog Telephones and Terminal Devices You can connect two analog terminal devices.
-
Page 36: Connecting Isdn Telephones And Isdn Terminal Devices
ISDN tele- phones to the FRITZ!Box. Please note for configuration: • Since the FRITZ!Box has terminators installed, the FRITZ!Box must be positioned on one end of the S cabling. • The FRITZ!Box can supply one ISDN telephone with elec- trical power.
-
Page 37: Registering Fritz!Fon And Other Cordless (Dect) Telephones
FRITZ!Box. Start the registration of your cordless telephone with a base station. Press and hold down the FRITZ!Box button on the DECT until the DECT LED on the FRITZ!Box flashes. 10 seconds If you are asked on your cordless telephone for the PIN of the base station, enter the PIN of the FRITZ!Box.
-
Page 38
Registering an iPhone or Android Smartphone How FRITZ!App Fon Works Once it has been set up on your smartphone, FRITZ!App Fon remains active in the background. Whenever the smartphone is connected with the FRITZ!Box over wireless LAN, the follow- ing applies: •… -
Page 39: Connecting An Ip Telephone
IP telephones are telephones for making calls over the Inter- net and other computer networks. Connecting via LAN or Wireless LAN Connect the IP telephone to the FRITZ!Box using a LAN cable or wireless LAN. The preconfigured wireless network key of the FRITZ!Box is printed on the underside of the FRITZ!Box.
-
Page 40: Configuring The Fritz!Box For Telephone Calls
FRITZ!Box automatically. This procedure is al- so known as “remote configuration”. Remote configuration starts right after the FRITZ!Box is con- nected to the Internet or right after the FRITZ!Box user inter- face is opened. The configured Internet telephone numbers are located in the user interface under “Telephony / Telephone Numbers”.
-
Page 41
Configuring Phones and Other Terminal Devices in the FRITZ!Box • Numbers for incoming calls: Should the terminal device ring for every call (telephone) or pick up (fax machine, answering machine)? Or only for calls to previously defined telephone numbers? Configuring Terminal Devices Open the FRITZ!Box user interface;… -
Page 42: Password Protection: Using Fritz!Box Safely
Password Protection: Using FRITZ!Box Safely Password protection for access to the user interface is a security fea- ture of your FRITZ!Box. This section describes how to use a password for the FRITZ!Box user interface and why you should use password protection.
-
Page 43: Using A Fritz!Box Password
11.2 Using a FRITZ!Box Password The basic method of logging in to the FRITZ!Box user interface is to enter the FRITZ!Box password. With this password all us- ers can open the user interface and access all of the FRITZ!Box’s contents and settings.
-
Page 44
FRITZ!Box. Password protection is enabled in your FRITZ!Box. With the FRITZ!Box password it is not possible to access the FRITZ!Box from the Internet. For users who require access to the FRITZ!Box via Internet, you must also set up an account as a FRITZ!Box user;… -
Page 45: Using Fritz!Box Users
Configuring FRITZ!Box Users You can set up as many as 18 user accounts in the FRITZ!Box. Before you can select the “Login with FRITZ!Box user name and password” method in the “System / FRITZ!Box Users / Login to Home Network”…
-
Page 46
Internet the FRITZ!Box contents for which she or he has access rights. Keep in mind that in order to access the FRITZ!Box from the Internet, a corresponding service must also be en- abled in the FRITZ!Box. For information on how to do… -
Page 47
Setting Up More FRITZ!Box Users In the FRITZ!Box user interface, open the “System / FRITZ!Box Users / User” menu. A list of the FRITZ!Box user accounts is displayed. Click the button after each list entry to view, change , or delete the corresponding user account. -
Page 48
Here she or he can see and edit all settings. Configuration rights automatically include the right to access voice mes- sages, faxes, FRITZ!App Fon and the call list as well as the right to control Smart Home devices. A registered user cannot revoke these rights herself or himself and cannot disable her or his own account. -
Page 49
VPN connection to the FRITZ!Box and its home network. Accessing the FRITZ!Box from the Internet To be able to access your FRITZ!Box from the Internet, the fol- lowing conditions must be fulfilled: • You have set up an account with the MyFRITZ! service;… -
Page 50
If you use only the login method with FRITZ!Box user name and password to access your FRITZ!Box, you can also set up a user account with NAS access rights. You can delete the preconfigured ftpuser account only if you FRITZ!Boxalways use your FRITZ!Box user account to access the “”, be it from home or via the Internet. -
Page 51
Using FRITZ!Box Users Quick Access to Your Own User Account In the upper navigation bar of the FRITZ!Box is the name of the FRITZ!Box user account with which the user is currently logged in to the user interface. Click the blue triangle to control basic functions of this user account: •… -
Page 52: Forgot Password-What To Do
Forgot Password—What to Do If you have forgotten your password for the user interface, for reasons of security, you have to restore the factory settings to your FRITZ!Box. You can avoid this by enabling the “Forgot password” push service when you configure your FRITZ!Box.
-
Page 53: No Login» Mode
In the “Welcome to your FRITZ!Box” window, click “For- got your password?” underneath the password query and follow the instructions on the screen. The FRITZ!Box is reset to the factory settings and then re- started. Afterwards you can once again access the FRITZ!Box user interface.
-
Page 54: Myfritz!: Accessing The Fritz!Box From Anywhere
MyFRITZ!: Accessing the FRITZ!Box from Anywhere MyFRITZ! is a web service from AVM, with which you can access your FRITZ!Box from anywhere in the world over the Internet, just as if you were at home. This chapter describes what MyFRITZ! does and how to configure MyFRITZ!.
-
Page 55: Configuring Myfritz
Register your MyFRITZ! with this FRITZ!Box account. Once your FRITZ!Box is registered with your MyFRITZ! account, the FRITZ!Box determines the public IP address each time it is changed and conveys it to the MyFRITZ!. The FRITZ!Box can be reached at this IP address in the Internet from anywhere in the world.
-
Page 56: Using Myfritz
Using MyFRITZ! If you do not have a FRITZ!Box user account yet, you will be prompted to set one up by assigning a user name and an additional password. If you already have a FRITZ!Box user account, follow the instructions in the FRITZ!Box user interface.
-
Page 57
To register with your FRITZ!Box, enter the data of your FRITZ!Box user account. You will be directed to the MyFRITZ! page of your FRITZ!Box. Here you have access to the FRITZ!Box contents that are re- leased for sharing in your FRITZ!Box user account; see… -
Page 58
FRITZ!Box user ac- count. You will be directed to the MyFRITZ! page of your FRITZ!Box. In this case no login to MyFRITZ! is required. If you logged in with the FRITZ!Box password, you now have access to all of the contents stored on your FRITZ!Box. -
Page 59: Security With Myfritz
For the following MyFRITZ! activities the HTTPS security proto- col is used: • setting up a MyFRITZ! account with myfritz.net • registration of the FRITZ!Box with the MyFRITZ! account • accessing the MyFRITZ! page of your FRITZ!Box over myfritz.net • accessing the user interface of the FRITZ!Box over myfritz.net…
-
Page 60: Fritz!Box As An Internet Router
The FRITZ!Box connects computers in your home network with the In- ternet. This chapter explains the possibilities presented by using the FRITZ!Box as an Internet router and how to take advantage of them. 13.1 Parental Controls: Access Profiles for Internet Use Using access profiles you can control the use of the Internet by devices in your network.
-
Page 61: Preconfigured Access Profiles
Parental Controls: Access Profiles for Internet Use • Network devices that log in to the FRITZ!Box guest net- work are automatically assigned the “Guest” access pro- file. This is the only access profile possible in the guest network. Preconfigured Access Profiles In the FRITZ!Box there are four preconfigured access profiles available for use.
-
Page 62
Changeable The “Guest” profile can be changed. Automatic assignment Network devices that are connect- ed with the FRITZ!Box via the guest access receive the “Guest” profile. Single access profile This is the only access profile available for the guest access. -
Page 63
Saturday and Sunday from 10 am to noon; and from 4 pm to 10 pm; no more than 5 hours each day Shared budget all devices (computer, game console, smartphone, etc.) share the online time. FRITZ!Box 6490 Cable… -
Page 64
For applications that address web sites only directly via the IP address, for instance virus scanner update software, the relevant IP addresses can be released for access by entering them in the exception list of “Permitted IP addresses”. FRITZ!Box 6490 Cable… -
Page 65
Internet. Configuring Parental Controls Requirements The “Internet / Filters” menu is available only if the FRITZ!Box is connected with the cable junction. Preparations • Configure the access profiles required for the members of the home network;… -
Page 66
AVM FRITZ!Box parental controls are installed on the computer as a service. The service must be enabled at all times. If it is not enabled, the FRITZ!Box will not de- tect the user accounts. Windows users that are not de- tected are treated like user accounts without any paren- tal controls. -
Page 67
Select the access profile to be applied to the Windows user and then click “OK”. Configuring an Access Profile Requirements The “Internet / Filters” menu is available only if the FRITZ!Box is connected with the cable junction. Setting up an access profile Open the FRITZ!Box user interface; see page Select the “Internet / Filters”… -
Page 68: Port Forwarding: Making Computers Accessible From The Internet
Edit the list in the window that opens. Adding Network Applications Requirements The “Internet / Filters” menu is available only if the FRITZ!Box is connected with the cable junction. Adding a Network Application Open the FRITZ!Box user interface; see page Select the “Internet / Filters”…
-
Page 69
IPv6 address. IPv4: Within IPv4 networks you can open the FRITZ!Box firewall for the protocols TCP and UDP when en- tering the port range. One port can be opened for exactly one computer. -
Page 70
“IPv6” page. Determining the IPv4 Address for Accessing the FRITZ!Box If you have enabled ports for forwarding in the FRITZ!Box, oth- er Internet users can access your computers at the IP address assigned to your FRITZ!Box by the Internet service provider. -
Page 71: Dynamic Dns: Name Instead Of Ip Address
Access from the Internet via HTTPS, FTP and FTPS Over the Internet it is possible to access the user interface of the FRITZ!Box. With a laptop, smartphone or tablet PC you can configure settings in the FRITZ!Box user interface. Requirements for Access over the Internet •…
-
Page 72
Access to storage: Every user who would like to access the storage of the FRITZ!Box externally from the Internet re- quires a FRITZ!Box user account with the right to access the contents on the storage media from the Internet. •… -
Page 73: Prioritization: Right Of Way For Internet Access
If multiple network applications are assigned to this cat- egory, then they must share the available capacity. • Whenever Internet telephony is included in this catego- ry, this application always has the highest priority, even over other real-time applications. FRITZ!Box 6490 Cable…
-
Page 74
If no other network applications are active, then the background applications receive the entire bandwidth. Prioritization Method in the FRITZ!Box The following techniques are used in the FRITZ!Box to send data packets according to their prioritization: • Change in the order in which packets are sent to the In-… -
Page 75: Vpn: Remote Access To The Home Network
Via a VPN (Virtual Private Network) a secure remote access to the network of the FRITZ!Box can be established. VPN in the FRITZ!Box IPSec VPN in the FRITZ!Box is based on the IPSec standard. Computer-LAN Computer-LAN linkup: VPN connections can be configured for individual remote com- puters.
-
Page 76
AVM web- site. The AVM website offers a Service Portal which presents com- prehensive information on VPN in general and in connection with the FRITZ!Box. Visit this portal to obtain more detailed in- formation. en.avm.de/service/vpn/overview Configuring VPN in the FRITZ!Box Open the FRITZ!Box user interface;… -
Page 77: Freely Selectable Dns Servers
13.7 Freely Selectable DNS Servers DNS servers are preset in the FRITZ!Box for IPv4 and IPv6. These are the DNS servers assigned by the Internet service provider. For both IPv4 and IPv6, the preset DNS server can be replaced by a free DNS server.
-
Page 78: Dnssec: Security For Dns Queries
Support with the FRITZ!Box The FRITZ!Box supports DNSSEC queries over UDP. The FRITZ!Box has a DNS proxy. The computers in the home network use the FRITZ!Box as a DNS server. The FRITZ!Box for- wards DNSSEC queries from the home network to the Inter- net.
-
Page 79: Ipv6: The New Internet Protocol
IPv6: The New Internet Protocol IPv6 stands for Internet protocol version 6 and is the succes- sor to IPv4. The FRITZ!Box supports the new IPv6 web protocol and can establish IPv6 connections: • IPv6 support can be switched on in the FRITZ!Box user interface.
-
Page 80: 13.10 Lisp: Fritz!Box As A Lisp Router
Enable the advanced view. Select the “Internet / Type of Connection” menu. Select the “IPv6” page and configure IPv6 in the FRITZ!Box. See the Help available in the FRITZ!Box user interface for more information. Configuring IPv6 on the Computer You can establish connections in the IPv6 range of the Inter- net only if IPv6 is installed and enabled on the computers in your home network.
-
Page 81
LISP: FRITZ!Box as a LISP Router Definition and Components LISP: Definition LISP: Locator/Identifier Separation Protocol IP protocol LISP is a protocol for the transmission of IP packets. IP address pair LISP uses IP address pairs: One IP address for identification, which is •… -
Page 82
LISP: FRITZ!Box as a LISP Router Properties of RLOC and EID RLOC specifies the location where the addressed network • (network segment or network device) is located is assigned by the Internet service provider • is a public IP address •… -
Page 83
FRITZ!Box as a LISP Router • The FRITZ!Box can be configured as a LISP router. • As a LISP router the FRITZ!Box is an xTR (ETR and ITR). Preparations You need a LISP provider. Register with a LISP provider. -
Page 84
LISP: FRITZ!Box as a LISP Router All of the information you need to configure the FRITZ!Box as a LISP router is supplied by the LISP provider. Configuring a LISP Router Open the FRITZ!Box user interface; see page Enable the advanced view. -
Page 85: Fritz!Box As A Wireless Access Point
FRITZ!Box as a Wireless Access Point FRITZ!Box as a Wireless Access Point The FRITZ!Box is a wireless access point for wireless devices like note- books, tablets or smartphones. The FRITZ!Box can establish wireless LAN connections compliant with the fast wireless AC standard and the wireless N standard in two frequency bands at the same time.
-
Page 86: Extending A Wireless Lan Network
FRITZ!Box that work in the same frequency range You can extend the range of your wireless radio network with a wireless LAN repeater. Or you can set up a second FRITZ!Box as a wireless LAN re- peater. Extending a Wireless Radio Network with a Wireless LAN…
-
Page 87: Wireless Lan-Getting Technical
Enable the advanced view. Select the “WLAN / Repeater” menu and follow the in- structions displayed on the screen. In the Help of the FRITZ!Box user interface you can find de- tailed instructions. 14.3 Wireless LAN—Getting Technical A wireless LAN is based on standards defined by the Institute of Electrical and Electronic Engineers (IEEE).
-
Page 88
With a maximum throughput rate of 11 Mbit/s, this is the old- est wireless standard. Older wireless devices of the first gen- eration can communicate with the FRITZ!Box using 802.11b. However, if the wireless device supports newer standards such as 802.11g, the latest standard should be used. -
Page 89
The FRITZ!Box 6490 Cable has a second access point respon- sible for the 2.4-GHz range. This allows wireless devices com- patible with the 802.11b/g/n to be used as well. -
Page 90
• Set the standards of the two wireless radio networks in the FRITZ!Box such that they are compatible with all of the wireless LAN devices used in the wireless network. Make a note of which standards the wireless devices in your… -
Page 91
802.11ac standard: Set the wireless LAN standard for the 5-GHz frequency band to: 802.11ac An unused frequency band can be disabled in the FRITZ!Box in order to reduce energy consumption without losing wire- less LAN connections. The Standard for Security IEEE 802.11i… -
Page 92
FRITZ!Box supports the AES encryption procedure as part of the WPA2 mechanism, and the TKIP encryption procedure as part of the WPA mechanism. This means that the FRITZ!Box can be used in combination with any wireless devices that al- so support WPA2 with AES or WPA with TKIP. -
Page 93
DFS ensures that the channels from 52 to 140 are kept free for higher-priority users, like weather radar systems. If you are operating your FRITZ!Box in one of these channels, it mon- itors the selected channel periodically for higher-priority us- ers, and, if necessary, switches to a different channel. -
Page 94
Bandwidth Depending on which generation of the IEEE 802.11n standard is used, the FRITZ!Box can transport 300 to 450 Mbit/s over wireless LAN. Up to 1300 Mbit/s are possible with the IEEE 802.11ac standard. If not enough space is available in… -
Page 95
Allocation of the Wireless LAN Channels in the 5-GHz Range Channel Frequency (GHz) Channel Frequency (GHz) 5.180 5.540 5.200 5.560 5.220 5.580 5.240 5.600 5.260 5.620 5.280 5.640 5.300 5.660 5.320 5.680 5.500 5.700 (20 MHz band- width only) 5.520 FRITZ!Box 6490 Cable… -
Page 96: Fritz!Box As A Telephone System
FRITZ!Box as a Telephone System FRITZ!Box as a Telephone System This chapter describes how to use the FRITZ!Box as a telephone sys- tem. 15.1 Telephone Book How Can I Use the Telephone Book? On FRITZ!Fon Cordless Telephones The telephone book is available in the menu of your FRITZ!Fon cordless telephones.
-
Page 97
Save with “OK”. For Google contacts you can also select contact groups. In the Help on the FRITZ!Box user interface you can find detailed instructions. The telephone book is available in the menu of your selected FRITZ!Fon cordless telephones. -
Page 98: Call List
Select “Telephony / Telephone Book / Click to Dial”. Enable click to dial and select a telephone. Save with “OK”. You can use click to dial. In the Help of the FRITZ!Box user in- terface you can find detailed instructions. 15.2…
-
Page 99: Answering Machine
Click the “Settings” button to configure the first answer- ing machine. To configure a new answering machine, click the “Other answering machine” link. In the Help of the FRITZ!Box user interface you can find de- tailed instructions. FRITZ!Box 6490 Cable…
-
Page 100
Operating the Answering Machine Using the Voice Menu Using a voice menu you can operate the answering machine on any telephone connected with the FRITZ!Box. Audio prompts in the voice menu guide the user through op- eration. Use the telephone keys to select functions. -
Page 101
8 Record greeting/announcement > End recording by pressing 1 0 Listen to “Record and select” menu again r Back to main menu Listen to “Record greetings” menu again Back to main menu Switch recording and announcement mode on/off Listen to main menu again FRITZ!Box 6490 Cable… -
Page 102: Fax Function
Fax Function 15.4 Fax Function With the FRITZ!Box you can send and receive faxes without a fax ma- chine. The FRITZ!Box can be configured to forward received faxes by e-mail. Configuring the Fax Function Open the FRITZ!Box user interface; see page Select “Telephony / Telephony Devices”.
-
Page 103
Callers can leave a mes- sage, and faxes are forwarded to the fax function. Here is how to enable automatic fax detection: Open the FRITZ!Box user interface; see page Configure the fax function; see page 102. -
Page 104: Call Diversion
Select the “Telephony / Call Handling / Call Diversion” menu. Click “New Call Diversion”. Define which calls should be diverted. In the Help of the FRITZ!Box user interface you can find detailed instructions. Define the destination and the type of call diversion. Click “OK” to save the settings.
-
Page 105: Dialing Rules For Outgoing Calls
If you have multiple telephone numbers, you can configure di- aling rules. A dialing rule determines which telephone number the FRITZ!Box uses for outgoing calls in a certain number range, for instance to the mobile network or abroad. Example: You have a telephone number with which you can save on calls to foreign numbers.
-
Page 106: Do Not Disturb
15.8 Do Not Disturb Do Not Disturb for All Telephones In the FRITZ!Box schedule you can set up a Do Not Disturb function so that none of the connected telephones or other terminal devices signal calls. Do Not Disturb is switched on and off daily at previously spec- ified times.
-
Page 107
• Telephones will not ring. This is not the case for IP telephones. It is not possible to set up Do Not Disturb for IP telephones in the FRITZ!Box. • Fax and answering machines are disabled. The Do Not Disturb setting has no effect on fax reception or the answering machines integrated in the FRITZ!Box. -
Page 108: Alarm
When a telephone is configured as a baby monitor, it calls a previously specified telephone number automatically when- ever the volume in the room reaches a defined level. Configuring a FRITZ!Fon Cordless Telephone as a Baby Monitor Press the menu key on your FRITZ!Fon.
-
Page 109
Enter an external telephone number, an internal tele- phone number or ss9 for an internal broadcast call. The internal numbers of the telephones you have con- nected are listed in telephone book of the FRITZ!Box us- er interface. Press “OK”. -
Page 110: 15.11 Making Telephone Calls With Convenience Functions
You can conduct free, internal calls between telephones con- nected to the FRITZ!Box. Enter an internal telephone number on the telephone. The internal numbers of the telephones you have con- nected are listed in telephone book of the FRITZ!Box us- er interface. Pick up the handset. Group Call A group call or broadcast call is an internal call that is sig- naled on all telephones connected with the FRITZ!Box.
-
Page 111
The call is on hold. Enter an internal number. The internal numbers of the telephones you have con- nected are listed in telephone book of the FRITZ!Box us- er interface. When the called party accepts the call the second call is connected. -
Page 112
• The FRITZ!BoxCall waiting feature must be enabled for the individual telephone in the “”. The telephone set- tings can be edited in the user interface of the FRITZ!Box- under “Telephony / Telephony Devices”. Rejecting a Waiting Call Press the keys R0. -
Page 113
Alternating between calls Here is how to switch from the active to the held call: Press the keys R2. The call that was just active is put on hold and you con- tinue the other call. FRITZ!Box 6490 Cable… -
Page 114
Press the keys sr< Seq>. <Seq> stands for a keyboard sequence. If the telephone is connected to the “FON 1” or “FON 2” port and you have disabled automatic outside dialing 153), press 0sr<Seq>. (see page Pick up the handset. FRITZ!Box 6490 Cable… -
Page 115: Fritz!Box As A Dect Base Station
FRITZ!Box as a DECT Base Station FRITZ!Box as a DECT Base Station The FRITZ!Box is equipped with a DECT base station, on which you can register and configure a total of up to six cordless telephones. 16.1 Paging Cordless Telephones…
-
Page 116: Enabling Dect Eco
How Does DECT Eco Work? When all registered cordless telephones are in standby oper- ation, the DECT radio transmission of the FRITZ!Box and the telephones is switched off. When a call arrives or you press a key on a cordless telephone, the FRITZ!Box switches DECT radio transmission back on.
-
Page 117: Fritz!Box Connects Network Devices
The devices can be connected with the FRITZ!Box by ca- ble or wirelessly. This chapter describes the network settings in the FRITZ!Box and how you can change them. You will also learn how you can change the IP settings for the computer in the most common oper- ating systems.
-
Page 118
The columns have the following meanings: Symbol A green LED before the device name indicates that a device is actively connected with the FRITZ!Box, but not using the Internet connection at this time. A green-blue globe indicates that the device is cur- rently using the Internet connection. -
Page 119
Network Settings in the FRITZ!Box When this setting is enabled for a network device, the DHCP server of the FRITZ!Box will assign the same IP address to this device each time the connection is established. Starting the Computer—Wake on LAN Wake on LAN is a function that allows a computer in the local network to be started when it is accessed from the Internet. -
Page 120: Ipv4 Address
192168178255 dress used to send messages into the network IP Address in Case of Emergency The FRITZ!Box has a fixed IP address that cannot be changed. The FRITZ!Box always can be reached at this IP address. Fixed IP address 169.254.1.1…
-
Page 121: Dhcp Server For Ipv4
• You want to connect the FRITZ!Box to the local IPv4 net- work in order to make the FRITZ!Box features available to all of the computers in the IPv4 network.
-
Page 122
First disable the option “Obtain an IP address automatically” and then enter the IP address manually in the appropriate field. In the case of the preset IPv4 address of the FRITZ!Box, the following IPv4 addresses are available for assignment to the computers: 192.168.178.2 –… -
Page 123
Network Settings in the FRITZ!Box Note that changes to the network settings in the FRITZ!Box may make it necessary to adjust the network settings of your computers so that you can continue to access the FRITZ!Box user interface. IPv6 Settings in the FRITZ!Box The following settings options for IPv6 are found in the ad- vanced view in the “Home Network / Network”… -
Page 124: Obtaining An Ip Address Automatically
“Programs” page. 17.2 Obtaining an IP Address Automatically The FRITZ!Box has its own DHCP server, which assigns IP ad- dresses to the connected computers. The connected comput- ers must be configured such that they can receive their IP ad- dresses automatically.
-
Page 125
Enter “ncpa.cpl” in the search field and press Enter. Entering “ncpa.cpl” in Windows 8 Click the network connection between the computer and the FRITZ!Box with the right mouse button and select “Properties”. Under “This connection uses the following items”, select “Internet Protocol Version 4 (TCP/IPv4)”. -
Page 126
Switch to the “TCP/IP” tab and select the “Using DHCP” option from the “Configure IPv4:” drop-down list. Click “OK”. The computer now receives an IP address from the FRITZ!Box. Obtaining an IP Address Automatically in Linux For comprehensive information and tips on the topic of net- work settings in Linux, see, for example: www.tldp.org/HOWTO/NET3-4-HOWTO-5.html… -
Page 127: Connecting Usb Devices To The Fritz!Box
USB devices. All network devices in the FRITZ!Box home network can use these USB devices jointly and simultaneously. This chapter describes how to share a printer in the network, which USB devices can be used in your FRITZ!Box home network, and how to use these devices safely. 18.1…
-
Page 128: Using Usb Devices Safely
130. • You can connect a USB hub to the FRITZ!Box and use up to four USB devices at this hub. You can use USB hubs with or without a separate power supply. We recommend deploying a USB hub with its own power supply if the USB devices to be connected ex- ceed a total current consumption of 500 mA;…
-
Page 129: Accessing Usb Memory
USB storage media each user is al- lowed to access. A USB storage medium connected to the FRITZ!Box can be reached in the home network by entering the shared FRITZ!Box password. From the Internet you can reach the USB storage medium only by logging in with your individual user name and password.
-
Page 130: Sharing A Usb Printer
Server”. 18.6 Sharing a USB Printer You can connect a USB printer to the FRITZ!Box to make it available to all participants in your home network. You can either release the printer for sharing as a network printer or use the FRITZ!Box USB remote connection software to connect it with a computer.
-
Page 131
Configuring a USB Printer with FRITZ!Box USB Remote Connection page 134. Configuring a USB Printer as a Network Printer Connect the USB printer to the USB port of the FRITZ!Box. Preparing Configuration Open the FRITZ!Box user interface; see page Enable the advanced view. -
Page 132
In the menu bar, click “Add a printer”. In the “Add Printer” window, select “The printer that I want isn’t listed” and then “Next”. Enable the option “Add a printer using TCP/IP address or hostname” and click “Next”. FRITZ!Box 6490 Cable… -
Page 133
Sharing a USB Printer Enter “fritz.box” in the “Hostname or IP address:” field. If the FRITZ!Box is configured as a wireless repeater or an IP client, enter here the IP address at which the FRITZ!Box can be reached within the network. -
Page 134
Enter “9100” as the port. • Enter “fritz.box” as the printer name. If the FRITZ!Box is configured as a wireless repeater or an IP client, enter here the IP address at which the FRITZ!Box can be reached within the network. -
Page 135
Click “Refresh”. Click the USB printer in the “Devices” area. The USB printer is being connected to the computer. Do not conduct any FRITZ!OS updates for USB devices that are connected with the computer via the FRITZ!Box USB re- mote connection. -
Page 136: Managing Memory With Fritz!Nas
Managing Memory with FRITZ!NAS Managing Memory with FRITZ!NAS With FRITZ!NAS you can display the data on the storage media of your FRITZ!Box in a clearly arranged interface. All participants in the FRITZ!Box home network can start FRITZ!NAS in a web browser and use it as a platform to access music, images, videos and documents in the FRITZ!Box memory.
-
Page 137: Assigning Fritz!Box A Name
Assigning FRITZ!Box a Name Assigning FRITZ!Box a Name You can assign an individual name for your FRITZ!Box in the FRITZ!Box user interface. The name is set up under “Home Network / FRITZ!Box Name” and appears in the following ar- eas of your home network display: •…
-
Page 138: Controlling Smart Home Devices
FRITZ!Box. All connected Smart Home devices can be configured directly at “Home Network / Smart Home” in the FRITZ!Box user interface, for instance, to automatically switch a lamp on and off and measure its ener- gy consumption.
-
Page 139: Configuring Internet Access For Guests
Configuring Internet Access for Guests Configuring Internet Access for Guests With the FRITZ!Box you can provide houseguests with an Internet con- nection of their own. At this guest access they can surf the web with their own devices, but cannot access the contents of your home net- work.
-
Page 140: Configuring Guest Access On The Lan 4 Port
This access profile can be edited in the “Internet / Filters” menu on the “Access Profiles” tab. Configuring Guest Access Set up the guest access as follows: Open the FRITZ!Box user interface; see page In the “Home Network / Network” menu, select the “Net- work Settings” page.
-
Page 141: Help In Case Of Errors
Help in Case of Errors Here you can find assistance if you are not able to open the user interface of your FRITZ!Box, or if errors occur with wire- less LAN connections. For more help, see the AVM Knowledge Base in the Internet: en.avm.de/service…
-
Page 142: Clearing The Cache Of Web Browser
Select “the beginning of time”, and below it only the op- tion “Empty the cache”. Click “Clear browsing data”. Other Web Browsers If you use a different web browser, see the Help for your browser for instructions on how to clear the cache. FRITZ!Box 6490 Cable…
-
Page 143
The User Interface Does Not Open Check the Proxy Settings of the Web Browser If a proxy server is enabled in your web browser, the address of the FRITZ!Box must be entered as an exception. Check your web browser settings. Firefox Click the orange Firefox button and select “Settings /… -
Page 144
Connect your computer to the “LAN 2” port of the FRITZ!Box using a LAN cable. If your computer is already connected with the FRITZ!Box over wireless LAN, clear the wireless connection. Make sure that the computer obtains its IP address auto- matically;… -
Page 145: Cannot Establish A Wireless Lan Connection
23.2 Cannot Establish a Wireless LAN Connection If you cannot establish a wireless LAN connection between your computer and the FRITZ!Box, this may be due to a variety of causes. Work through the following steps in sequence until the error has been resolved.
-
Page 146: Wireless Lan Connection Interrupted
23.3 Wireless LAN Connection Interrupted If the wireless LAN connection between your computer and the FRITZ!Box is disrupted, this may be due to a variety of causes. Work through the following steps in sequence until the error has been resolved.
-
Page 147: Configuring Fritz!Box On The Telephone
Various functions can be configured using a telephone connected to the FRITZ!Box. 24.1 Alarm Requirements You set up an alarm in the FRITZ!Box; see Alarm page 108. Can I switch more than one alarm on and off? No. With the telephone keys you always switch on or off the first alarm.
-
Page 148: Do Not Disturb
For the lines “FON 1” and “FON 2” you can enable the Do Not Disturb feature. In the FRITZ!Box user interface you can also configure the Do Not Disturb function for other telephones. Schedule and Do Not Disturb for Other Telephones In the FRITZ!Box user interface you can also configure the Do Not Disturb function for other telephones.
-
Page 149: Call Diversion
If your telephony provider supports this, calls will be diverted by your provider. Otherwise the FRITZ!Box establishes a sec- ond connection. In either case, extra charges will accrue ac- cording to your contracted telephone rates.
-
Page 150
Press the following keys on the telephone: Type of Call Diversion Keys s21ss<own number>r immediately s61ss<own number>r delayed (after 20 seconds) s67ss<own number>r only when busy Pick up the handset. Wait for the second-long positive acknowledgment tone. Hang up the handset. FRITZ!Box 6490 Cable… -
Page 151
Wait for the second-long positive acknowledgment tone. Hang up the handset. Enabling: Call Diversion for FON 2 Press the following keys on the telephone: Type of Call Diversion Keys r412s<destination num- immediately without ringing ber>s r452s<destination num- immediately with ring ber>s FRITZ!Box 6490 Cable… -
Page 152: Switching The Wireless Network On And Off
Pick up the handset and hang it up again. 24.5 Loading Factory Settings All settings you made in the FRITZ!Box will be deleted. Press the keys r991s15901590s. Pick up the handset and hang it up again. The factory settings are loaded. Then the FRITZ!Box will re- start.
-
Page 153: Disabling And Enabling Automatic Outside Dialing
Pick up the handset and hang it up again. Automatic outside dialing on FON 2 Press the following keys on the telephone: Function Keys Disable Automatic Outside Dialing r12s0s r12s1s Enable Automatic Outside Dialing Pick up the handset and hang it up again. FRITZ!Box 6490 Cable…
-
Page 154: Taking Fritz!Box Out Of Operation
FRITZ!Box are restored to their condition upon delivery. Restoring the factory settings is recommended if you would like to pass the FRITZ!Box on to another user. By restoring the factory settings you can delete incorrect settings that prevent the FRITZ!Box from functioning properly.
-
Page 155: Uninstalling Supplementary Software
Saving FRITZ!Box Settings Before loading the factory settings, save all of the settings you made in your FRITZ!Box to a backup file. With this backup file you can restore your settings to the FRITZ!Box at any time or load them to another FRITZ!Box. For more information on…
-
Page 156
Uninstalling Programs in Windows Vista Open “Start / Settings / Control Panel / Programs and Functions”. Mark the AVM program you want to remove in the list. Click the “Uninstall/Change” button and confirm with “Continue”. The program will be removed. FRITZ!Box 6490 Cable… -
Page 157: Technical Specifications
Facts worth knowing: Here you will find comprehensive technical data on your FRITZ!Box 6490 Cable. 26.1 Network Access Interface The FRITZ!Box 6490 Cable fulfills the interface specification for public network in accordance with the following standards and directives: • ETSI TS 102 639 (DOCSIS or EuroDOCSIS 3.0 cable broadband access for Internet and telephony) •…
-
Page 158: Router Functions
• Five LEDs indicate the condition of the device 26.5 Tones • Busy signal: 500 ms tone, 500 ms pause, +/– 20 ms • Ring tone: 1 s tone, 4 s pause +/– 100 ms FRITZ!Box 6490 Cable…
-
Page 159: Device Properties
Device Properties 26.6 Device Properties • Dimensions (W x D x H): circa 245 x 55 x 175 mm • FRITZ!OS can be updated (installed by your cable net- work provider) • Conforms to CE standards • Ambient conditions –…
-
Page 160: Cable
100 meters long. Additional network cable is required if you would like to use all • of the FRITZ!Box 6490 Cable network ports. Extension You can extend one or both ends of the network cable. You will need the following components to extend the cable: Standard CAT-5 network cable •…
-
Page 161: Customer Service
Documentation on the FRITZ!Box To take advantage of all commands and features of your FRITZ!Box, consult the following documentation: Help In the FRITZ!Box user interface you can open the comprehen- sive Online Help by clicking the “Help” icon and the “Help” buttons. Manual…
-
Page 162: Feedback On Fritz!Box
AVM. The error report helps improve the stability of FRITZ!OS. Settings options for automatically sending error reports are lo- cated on the “Contents / AVM Services” page of the FRITZ!Box user interface. Evaluating the Wireless LAN Connection On the “WLAN / Radio Network / Known Wireless LAN Devices /…
-
Page 163: Assistance From The Support Team
The contents of the call and numbers participating will not be transmitted to AVM. 27.4 Assistance from the Support Team If you have problems with FRITZ!Box, proceed as follows: If you have questions about starting operation of your FRITZ!Box, please consult the following chapters: –…
-
Page 164: Legal Notice
The licensing conditions are presented in the FRITZ!Box user interface under the “Legal Notice” heading. This documentation and software have been produced with all due care and checked for correct- ness in accordance with the best available technology.
-
Page 165: Declaration Of Ce Conformity
Declaration of CE Conformity The manufacturer AVM GmbH Alt-Moabit 95 D 10559 Berlin Germany herewith declares that the product FRITZ!Box 6490 Cable Cable WLAN router complies with the following directives: 1999/5/EC R&TTE Directive: Radio Equipment and Telecommunica- tions Terminal Equipment…
-
Page 166: Disposal Information
After use, please dispose of FRITZ!Box 6490 Cable and all electronic components and devices included with delivery at a collection point in your local community for the disposal of electric and electronic appliances.
-
Page 167: Drilling Template
Drilling Template A drilling template is presented below. Use the drilling template as a guide to mark the holes needed to mount the FRITZ!Box on a wall. FRITZ!Box 6490 Cable…
-
Page 168
This page must be printed out at a size of 100%. Do not enlarge it, adjust its size, reformat or rescale it in your printer settings. -
Page 169: Index
USB devices ….FRITZ!App Fon ….connecting IP telephones…
-
Page 170
……FRITZ!App Fon …. -
Page 171
… . guest access ….overview FRITZ!Box ….LEDs meaning . -
Page 172
IPv6 ….support ports on the FRITZ!Box … . by e-mail …. -
Page 173
… user account ….using remote access… . FRITZ!Box 6490 Cable…
Посмотреть инструкция для AVM Fritz!Box 6490 бесплатно. Руководство относится к категории Маршрутизаторы (роутеры), 4 человек(а) дали ему среднюю оценку 8.4. Руководство доступно на следующих языках: английский. У вас есть вопрос о AVM Fritz!Box 6490 или вам нужна помощь? Задайте свой вопрос здесь
Не можете найти ответ на свой вопрос в руководстве? Вы можете найти ответ на свой вопрос ниже, в разделе часто задаваемых вопросов о AVM Fritz!Box 6490.
В чем разница между роутером и модемом?
От чего зависит скорость загрузки в Интернете?
Вредно ли Wi-Fi-излучение?
Инструкция AVM Fritz!Box 6490 доступно в русский?
Не нашли свой вопрос? Задайте свой вопрос здесь
Следуя инструкциям по настройке, необходимо выполнить только один раз. После завершения первоначальной настройки вам не нужно будет выполнять те же самые действия в любое время. Ваше соединение будет работать автоматически *в любое время! Эти инструкции показывают меню на английском языке. Так как этот маршрутизатор очень популярен в Германии, здесь в квадратных скобках приведены соответствующие немецкие термины.
* Инструкции основаны на кабеле FRITZ!Box 6490.
1. Открытая страница администрирования маршрутизаторов. Обычно http://192.168.178.1
2. Введите свой пароль, если он у вас есть. Пароль по умолчанию напечатан на этикетке под маршрутизатором.
3. Убедитесь, что у вас активирован «Расширенный» вид [Эрвайтер]. Текущая настройка находится в нижней левой части экрана: «Вид»: Дополнительно» [Ansicht: Erweitert]. Если на экране написано «Вид: Стандартный» Вы можете нажать на слово «Стандартный», чтобы переключиться в «Расширенный» режим. Альтернативно можно нажать на меню гамбургеров в правом верхнем углу и затем активировать «Расширенный вид» [Arweiterte Ansicht].


4. Нажмите на «Интернет» слева, «Тип подключения» [Zugangsart], а затем перейдите на вкладку «DNS-сервер».

5. В разделе «Серверы DNSv4» нажмите «Использовать другие серверы DNSv4» [Andere DNSv4-Server verwenden] и заполните оба поля «Сервер DNS» IP-адресами прокси-сервера Smart DNS Proxy из списка.
Список IP-адресов наших DNS-серверов можно найти в нашем списке DNS-серверов здесь:
https://www.smartdnsproxy.com/Servers
Используйте ближайшие к вашему физическому местоположению DNS-серверы. Выберите ближайший к вашему физическому местоположению сервер в качестве основного. Затем выберите 2-й ближайший сервер в вашем физическом местоположении в качестве Вторичного сервера.
В нашем примере мы выбрали Германию: 54.93.173.183 и Великобританию: 35.178.60.174 6. нажмите «Применить» [Übernehmen].
7. Нажмите кнопку «Система» слева, «Резервное копирование» [Sicherung], а затем нажмите на вкладку «Перезагрузка» [Neustart].

8. Нажмите кнопку «Перезапустить» [Neu starten]. Теперь маршрутизатор перезагрузится, обратите внимание, что все активные соединения с Интернетом и телефоном будут потеряны до тех пор, пока маршрутизатор не перезагрузится (может занять около 5 минут).
* Помните, что всякий раз, когда IP-адрес вашего ПК/маршрутизатора меняется, наш сервис перестает работать на вас. Вам необходимо будет войти в систему Smart DNS Proxy и обновить свой IP-адрес. Таким образом, наша система проверит ваш IP-адрес и добавит ваш новый IP-адрес в нашу базу данных. После этого вы сможете продолжать пользоваться нашим сервисом. Если вы настраиваете систему в первый раз, мы также предлагаем вам войти с вашего компьютера на наш сайт из той же проводной/беспроводной сети, чтобы показать нашей системе ваш IP-адрес.
Для автоматизации этого процесса, пожалуйста, выполните следующие дополнительные шаги:
9. После перезагрузки маршрутизатора снова войдите в свой роутер, как описано выше в разделах 1 и 2.
10. Если Вы не настроили учетную запись MyFritz!, сделайте это сейчас и убедитесь, что Ваш маршрутизатор подключен к ней. Вы можете сделать это здесь: https://sso.myfritz.net/.
11. Нажмите на «Интернет» слева, «MyFRITZ!Account» [MyFRITZ!-Konto].

12. Если Ваша учетная запись MyFritz! была настроена правильно, Ваш индивидуальный адрес теперь можно найти в строке «Ваш адрес MyFRITZ!». Выберите всю запись и скопируйте ее.
например «5gljskt56f5gestt.myfritz.net» — этот код для Вас будет другим. Не используйте версию, которая начинается с «https://».
14: Зайдите на страницу MyAccount и проверьте, есть ли у вас 4 зеленых галочки. Если нет, проверьте, что вы отключили IPv6 на вашем компьютере, и что вы перезагрузили маршрутизатор и компьютер.
Если вы установили автоматическую настройку DNS, это подтверждается внизу:
https://www.smartdnsproxy.com/MyAccount

С вами покончено! 
Внимание
* Помните, что всякий раз, когда IP-адрес вашего ПК/маршрутизатора меняется, наш сервис перестает работать на вас. Вам необходимо будет LOG INTO Smart DNS Proxy и UPDATE ваш IP-адрес, чтобы наша система могла проверить ваш IP-адрес и добавить ваш новый IP-адрес в нашу базу данных. После этого вы сможете продолжать пользоваться нашим сервисом. Если вы настраиваетесь в первый раз, мы также предлагаем вам войти с вашего компьютера на наш сайт из той же проводной/беспроводной сети, чтобы показать нашу систему ваш IP-адрес и активировать его в вашем аккаунте.
Это ответило на твой вопрос?
Спасибо за отзывы
Возникла проблема с отправкой вашего отзыва. Пожалуйста, повторите попытку позже.
Последнее обновление 3 января 2021 года
В этой статье будет подробно рассказано о том, как самостоятельно настроить Fritz!Box Fon WLAN (7170), но эта инструкция также поможет настроить подобные Fritz!Box, такие как 7050, 7140, 7141, 7113, 5050, 5140 и т.д. По настройкам они все между собой почти одинаковы, различия только отсутствии или наличии некоторых функций. Статья написана на примере настроек под провайдера 1und1, но, действуя по аналогии, можно настроить модем под любого из провайдеров. Будьте внимательны! Лучше всего, перед тем, как приступить к настройке, распечатайте эту статью, чтобы иметь возможность на каждом этапе сверять рисунки с Вашими настройками.
Подключаем кабеля:
Полученный от провайдера Fritz!Box распаковываем и подключаем. Питание включаете в последнюю очередь!
На Рис. 1 и 2 вы можете увидеть подробную схему подключения Fritz!Box к компьютеру, телефону и телефонной розетке.
Рис.1
Рис.2Итак, модем подключен. Если это произошло в тот самый день, который провайдер обозначил в письме как дату подключения, то лампочка «Power» через пару минут после включения Fritz!Box в сеть перестанет моргать и будет гореть постоянно, что будет свидетельствовать о подключённой DSL линии.
Если вы подключаете модем задолго до назначенного термина, то лампочка у вас будет моргать круглые сутки, и успокоится только в день термина.
Не забудьте подключить Fritz!Box к компьютеру красным кабелем из комплекта. Если компьютер расположен слишком далеко от телефонной розетки, то удлинять нужно именно этот кабель, и ни в коем случае не нужно использовать телефонные удлинители. На участке между сплитером и телефонной розеткой должен быть только тот коротенький чёрный кабель, который шёл в комплекте с оборудованием.
На компьютере необходимо активировать сетевую карту, как показано на рисунке:
Рис. 3Настройка!
После того, как вы правильно подключили модем, в адресной строке браузера (Internet Explorer, Opera, FireFox или любой другой) набираем http://192.168.178.1/ или http://fritz.box/
И нажимаем «перейти» (или просто жмем Enter)
Рис. 4После этого мы попадаем в настройки Fritz!Box.
Если у вас Fritz!Box новый, полученный от провайдера 1&1, а не приобретенный с рук, то первым что вы увидите, это окно с просьбой ввести StartCode. Этот код обычно находится в письме, которое Вы найдёте в коробке с оборудованием.Код написан большими буквами, расположен вверху на одной из страничек, и выглядит например как этот:
AGL8-jRWh-6N5zОбращаем внимание на, то что присутствуют как большие, так и маленькие буквы (если ввести все маленькими, то выдаст ошибку)
Итак, вы набрали ваш код и нажали кнопку «weiter»
Если в это время ваш модем правильно подключен и вам уже включили линию DSL, то Fritz!Box сам синхронизируется с центральным сервером провайдера и скачает необходимые предварительные настройки (телефония, Zugangsdaten, и т.д.)
Прошу обратить внимание!!! На моих скринах вы видите три телефонных номера, на ваших будет только один (это нормально), пока не обращайте на это внимание, то есть не добивайтесь сходства, просто у меня эти номера уже зарегистрированы как дополнительные, у вас же пока нет.
нажимаем Telefoniegerat einrichten и переходим к пошаговой настройке телефонии:
На этом шаге вам нужно поставить галочку напротив analog, но это только в том случае, если у вас дома не ISDN (у большинства людей analog)
Жмем «weiter»
Здесь вписываем ваш домашний номер (без форваля)
Если вы не настраиваете факс или автоответчик, то выберете просто Telefon и нажмите «weiter»После этого вы попадете вот сюда
Эти настройки очень важны, так как именно здесь вы выбираете к какому выходу/разъёму (FON 1, 2 или 3) подключен ваш телефонный аппарат (ведь можно подключить несколько см. в следующих пунктах). И так если у вас один телефон, то выберете FON 1 и назовите его например Telefon 1
Жмем «weiter»Если вы всё правильно сделали и ваш телефонный аппарат правильно подключен к Fritz!box, то ваш телефон зазвонит
Если зазвенел, то нажимаем JA если нет, то жмем Nein и все делаем заново (проверяем подключение телефона)В этом окне
Выбираем верхний пункт (как на скриншоте) и выбираете через какой номер будут идти звонки (если у вас только один номер, то в списке будет только он)
Опять же жмем «weiter»
Здесь оставляем всё по умолчанию, то есть жмем «weiter»Откроется вот такое информационное окно
здесь проверяем, всё правильно ли вы сделали, если да то смело жмите UbernehmenПосле этого вы увидите вот это:
Если у вас только один телефонный аппарат, то жмите Assistenten beenden но даже если у вас два телефонных аппарата, то я бы посоветовал всё равно нажать Assistenten beenden так как второй аппарат всегда можно настроить позже (удобнее)После того как вы нажали Assistenten beenden вы перейдете в главное окно настроек фритц бокса (Fritz.Box)
Выглядит оно так:
Обратите внимание оно разделено на три части:
System Здесь стоит информация о имени вашего Fritz.Box а так же о том какая на нем установленна прошивка (Firmware)
Anschlusse Здесь собранна информация о подключениях таких как: скорость подключения интернета (DSL 16104/1183 kBit/s, то есть у меня на скриншоте 16 тысяч) Здесь же показывается включен ли WLAN.
Internet und Telefonie Здесь собранна информация о ваших телефонных интернет-номерах и о их состоянии.
Если стоит Registriert, то номер активен и может использоваться.Но все-таки не всегда автоматом все настраивается как Вам надо. Поэтому кое-что всё же стоит перенастроить.
Первым делом, для того чтоб видеть скрытые пункты настроек, нам надо активировать режим «Expertenansicht»
Делается это так — в главном окне слева ищем пункт «Einstellungen» нажимаем его, далее там же ищем «System» нажимаем, этот пункт как бы раскрывается и внизу мы видим пункт «Ansicht» переходим в него.
Примечание — далее для упрощения я буду писать подобные действия как Einstellungen >>> System >>> AnsichtТам мы увидим «Expertenansicht aktivieren» и рядом место для галочки, если галочки нету, то ее стоит поставить и нажать снизу страницы «Übernehmen»
Если же галочка стоит, то просто переходим к следующему шагу, без каких либо нажатий.
Итак, мы включили «Expertenansicht», получив таким образом доступ к дополнительным тонким настройкам.
Теперь идем в пункт Internet >>> Zugangsdaten
Там мы видим вот такую картину:
Теперь стоит разделить пользователей, у которых все автоматом настроилось (при вводе StartCode) и тех, кто сами вручную настраивают Fritz!Box
Те, у кого настроилось автоматически, могут сравнить свои настройки со скриншотами (там самые оптимальные настройки) и, если надо, кое-что поднастроить. А вот пользователям, которые сами настраивают Fritz!Box
Придется все вводить вручную.
Смотрим Рис. 7И так первым делом переводим Fritz!Box в режим «Router»
Выставив галочку напротив
«Eine Internetverbindung für alle Computer verwenden (Router)»
Далее стоит ввести свои Zugangsdaten в соответствующие поля
Internetzugangs-Kennung
Internetzugangs-Passwort
Passwortbestätigung
Ставим галочку «Internetverbindung dauerhaft halten» а так же галочку напротив «Zwangstrennung durch den Anbieter verschieben in die Zeit zwischen»
И ниже выставляем 4-5 Uhr
Это нужно для того, чтоб интернет прерывался (смена IP адреса) не тогда, когда захочет, а ночью когда компьютер и телефон не используются.Телефония
Находим пункт Einstellungen>>>Telefonie >>> Telefoniegerete переходим на закладку «Festnetz»
Там ставим галочку напротив «Analog-Anschluss»
В поле вводим свой фестнец номер без форваля
Нажимаем «Übernehmen»Настройки Fritz!Box пока отложим и перейдем к регистрации основного городского телефонного номера (вашего Festnetzrufnummern) для DSL-Телефонии (если вы настраивали Fritz.box через StartCode, (как в начале статьи) то вам этого делать не нужно)
В случае если вы хотите зарегистрировать ваш домашний номер телефона для звонков через DSL, вы должны пройти в свой Control-Center в Интернете по этому адресу https://login.1und1.de/ , ввести свои данные и войти в свой офис.
Находим там пункт DSL—Telefonie заходим в него там находим кнопочку «Neu»
нажимаем и переходим на страницу регистрации своего номера
Ставим галочку напротив «Bestehende Festnetz-Rufnummer»
В нужные поля вводим данные (телефон, форваль)
Задаем пароль (запомните его он понадобится для Fritz!Box) подобные пароли лучше записывать на листочек, а листочек не терять.
Не забываем поставить галочку «Ich habe die besonderen Bedingungen für DSL-Telefonie……..»
Нажимаем «ОК»
Система выдаст вам подтверждающий код.
Запишите его!
Проследите чтобы ваш телефонный аппарат был подключен как раньше к сплитеру, чтобы вы были уверены в принятии звонка на старый номер.
ОБРАТИТЕ ВНИМАНИЕ! Начиная с этого момента, в течении 30 минут на ваш домашний номер телефона позвонит «автоответчик» и вы должны будете ввести тот самый подтверждающий код на клавиатуре телефона и подтвердить нажатием клавиши «#». После этого, если вы все правильно ввели, вам сразу же по телефону сообщат, что ваш номер активирован. Может пройти некоторое время (до 1 часа) прежде чем сам провайдер у себя всё до конца зарегистрирует.
После того, как вы сообщите код и активируете свой номер вы можете подключить телефонный аппарат к модему как показано на Рис. 2
Опять заходим во Fritz!Box в пункт Einstellungen>>>Telefonie >>> Internettelefonie
Там есть кнопочка «neue Internetrufnummern»
Нажав на нее мы попадаем в окно где заносится интернет номер.
В этом меню вы вписываете номер вашего фестнец телефона и тот самый пароль который вы ввели при регистрации этого номера.
ОБРАТИТЕ ВНИМАНИЕ вписывая номер телефона выНЕ ставите „0″ перед Ortsnetz-Vorwahl.
(Beachten Sie
Ortsnetz-Vorwahl eingeben. Klicken Sie auf Ubernehmen“.)
Нажав «Ubernehmen» автоматом переходим к списку интернет номеров «Internetrufnummern»
Теперь перейдем на закладку «Erweiterte Einstellungen»
И где-то в середине страници вы увидите пункт
«immer Sprachkodierung mit Festnetzqualität verwenden»
вот напротив него поставьте галочку
нажимаем «Ubernehmen»
Это нужно для наилучшего качества телефонии.теперь перейдем в самый верхний пункт «Ubersicht»
и если вы все сделали правильно, то вы увидите такую вот картину
там мы видим (или не видим, если где-то неправильно что-то задали) что
Internetrufnummer ХХХХХRegistriert
Если
Registriert , то все отлично, а если нет, то все перепроверяем. Но не забывайте про то, что провайдеру нужно время, чтоб зарегистрировать ваш номер (после того как вы его задали в своем Control-Centre)
Wahlregeln (важно)
Теперь перейдем к Wahlregeln, то есть какие номера через что звонить (Интернет или фестнец)
это надо для того чтобы сэкономить деньги. Так как звонки по кодам (например 010057) в Россию дешевле чем звонки через интернет (то есть через 1und1), а так же звонки на Хенди через фестнец дешевле чем через Интернет, то соответственно мы и настраиваем фритца таким образом, чтоб определенные звонки шли через фестнец (телеком).
Если во фритце в разделе «Wahlregeln» добавить правило 010 то при наборе на телефонной трубке номера 010057007 он автомат переключит на фестнец
Тоже самое для Handy-ков, выставляем правила:
015, 016, 017
а выставлять их так:
Telefonie>>> Wahlregeln там под списком нажимаем кнопку «Neue Wahlregeln» откроется новое окно, в котором напротив «Rufnummer/Bereich» ставим 010 и ниже выбираем «Festnetz»
нажимаем «Übernehmen»
Рис. 17и точно так же повторяем для правил 015, 016, 017
В конце должна получится такая вот картина
Рис. 18
(Либо, просто выставьте 01. Этого будет достаточно для того, чтобы все звонки по дешёвым кодам и на хенди шли через Festnetz.)Теперь если вы позвоните себе на хенди, и при этом посмотрите на Фритц бокс, то вы увидите что горит «Festnetz» лампочка. А если позвоните на любой городской номер, то будет гореть лампочка «Internet» что говорит о звонке через
1und1 (то есть бесплатно)
Если же при звонке на обычный городской номер у вас горит лампочка «Фестнец» , то рекомендую вам проверить все настройки связанные с телефонией. Помним что когда звонок идет через Фестнец, то он тарифицируется по ценам ТЕЛЕКОМАИсточник: http://www.rozetka.de
 В этой статье будет подробно рассказано о том, как самостоятельно настроить Fritz!Box Fon WLAN (7170), но эта инструкция также поможет настроить подобные Fritz!Box, такие как 7050, 7140, 7141, 7113, 5050, 5140 и т.д. По настройкам они все между собой почти одинаковы, различия только отсутствии или наличии некоторых функций. Статья написана на примере настроек под провайдера 1und1, но, действуя по аналогии, можно настроить модем под любого из провайдеров. Будьте внимательны! Лучше всего, перед тем, как приступить к настройке, распечатайте эту статью, чтобы иметь возможность на каждом этапе сверять рисунки с Вашими настройками.


 , dass Sie nicht die „0“ vor Ihrer


Смотреть руководство для AVM Fritz!Box 6490 ниже. Все руководства на ManualsCat.com могут просматриваться абсолютно бесплатно. Нажав кнопку «Выбор языка» вы можете изменить язык руководства, которое хотите просмотреть.

MANUALSCAT | RU
Вопросы и ответы
У вас есть вопрос о AVM Fritz!Box 6490, но вы не можете найти ответ в пользовательском руководстве? Возможно, пользователи ManualsCat.com смогут помочь вам и ответят на ваш вопрос. Заполните форму ниже — и ваш вопрос будет отображаться под руководством для AVM Fritz!Box 6490. Пожалуйста, убедитесь, что вы опишите свои трудности с AVM Fritz!Box 6490 как можно более детально. Чем более детальным является ваш вопрос, тем более высоки шансы, что другой пользователь быстро ответит на него. Вам будет автоматически отправлено электронное письмо, чтобы проинформировать вас, когда кто-то из пользователей ответит на ваш вопрос.
Здравствуйте! У меня временами загорается красный глазок «Info». Что это значит и каковы должны быть мои действия?
Valeri Kosolapow2019-08-14
Здравствуйте,
Мой компьютер подсоединен к интернету через FritzBox 6490
Во время телефонного вызова звонит как домашний так и
мобильный телефоны одновременно,
Как отключить мобильный телефон?
Спасибо
Давид2018-12-24
Задать вопрос о AVM Fritz!Box 6490
- Бренд:
- AVM
- Продукт:
- Маршрутизаторы (роутеры)
- Модель/название:
- Fritz!Box 6490
- Тип файла:
- Доступные языки:
- английский