 10:42
10:42
Каша из топора. Ремонт Hyundai H-CDM8048
 08:56
08:56
Ремонт Автомагнитол HYUNDAI H-CMD4001 2ver G
 05:55
05:55
hyundai H-CMD4002(TV/DVD/CD/MP3/FM/USB/SD).AVI
 04:33
04:33
Обзор магнитолы Hyundai H-CMMD4048 после ремонта
 03:43
03:43
Ремонт магнитолы Hyundai h-cmd4012. Ремонт магнитолы своими руками.
 08:55
08:55
разборка магнитолы Hyundai H-CDM8042
 02:04
02:04
Автомагнитола Hyundai H-CMMD4043
 09:36
09:36
Ленивые мастера или как я ремонтировал рабочую магнитолу
EXCELLENCE
by
HYUND/ÌI
H-CMMD4042
MULTIMEDIA DVD-RECEIVER WITH MOTORIZED 7” TFT DISPLAY AND
TV-TUNER
Instruction manual
МУЛЬТИМЕДИЙНЫЙ DVD-РЕСИВЕР C 7” МОТОРИЗИРОВАННЫМ TFT
ДИСПЛЕЕМ И ТВ-ТЮНЕРОМ
Руководство по эксплуатации

Thank you for purchasing our product. For safety, it is str…
Страница 2
- Изображение
- Текст

General operations………………………………………
Страница 3
- Изображение
- Текст

pausing……………………………………………….
Страница 4
- Изображение
- Текст

Manual tuning…………………………………………..
Страница 5
- Изображение
- Текст

Important safeguards
Using the device at temperature below -10°C may cause the breakage of the device. BEFORE USING PLEASE
HEAT UP THE PASSENGER COMPARTMENT TO THE RECOMMENDED TEMPERATURE!
Read carefully through this manual to familiarize yourself with this high-quality sound system.
Disconnect the vehicle’s negative battery terminal while mounting and connecting the unit.
When replacing the fuse, be sure to use one with an identical amperage rating. Using a fuse with a higher amperage
rating may cause serious damage to the unit.
Do not use the unit in places where it can be exposed to water, moisture and dust.
DO NOT attempt to disassemble the unit. Laser beams from the optical pickup are dangerous to the eyes.
Make sure that pins or other foreign objects do not get inside the unit; they may cause malfunctions, or create safety
hazards such as electrical shock or laser beam exposure.
If you have parked the car for a long time in hot or cold weather, wait until the temperature in the car becomes
normal before operating the unit.
DO NOT open covers and do not repair yourself. Consult the dealer or an experienced technician for help.
Make sure you disconnect the power supply and aerial if you will not be using the system for a long period or during
a thunderstorm.
Make sure you disconnect the power supply if the system appears to be working incorrectly, is making an unusual
sound, has a strange smell, has smoke emitting from it or liquids have got inside it. Have a qualified technician check
the system.
The unit is designed for negative terminal of the battery, which is connected to the vehicle metal. Please confirm it
before installation.
Do not allow the speaker wires to be shorted together when the unit is switched on. Otherwise it may overload or
burn out the power amplifier.
6

Installation/ connection
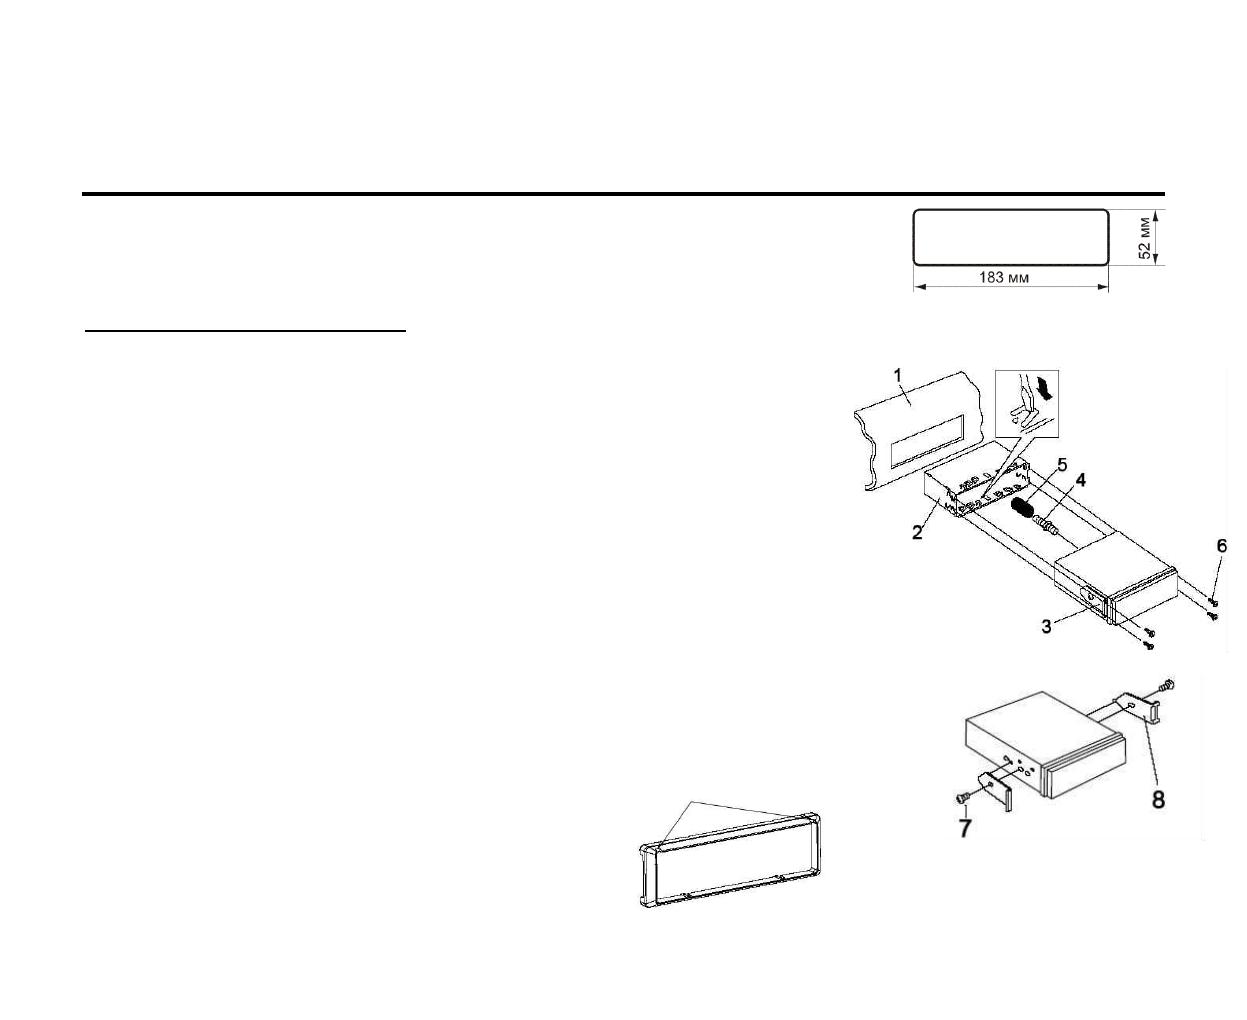
This unit can be installed in any dashboard having an opening as shown on the
picture. The dashboard should be ~ 4.5 — 5.5 mm thick in order to be able to
support the unit.
Din front-mount (method 1)
1.
2.
3.
4.
5.
6.
Insert mounting bracket (2) into the dashboard (1), select the
appropriate tabs and bend them out with a screwdriver.
Use 2 pieces of M5 cone shaped screws (7) to fix two assemble bars (3)
on both sides of the unit.
Secure the rear of the unit. Fix mounting bolt (4) on the rear panel of
the unit.
Put the rubber cushion (5) on the bolt.
Insert the unit into the mounting bracket (2). Use 4 pieces of M2 screw to
lock the assemble bars (3) and the mounting bracket (2) in position.
Attach the trim ring around the front panel with 2 indentions on one side
f
acing upwards
.
Indentions face upward
Note:
according to the depth of the opening, use different length of assemble bar accordingly. If the opening is
too shallow the monitor may be extended out 10 mm from the dashboard.
7

Removing the unit
1. Push trim ring upward and pull out the upper part. Push it downward and pull out the lower part.
2.
Unscrew 4 pieces M2 screws.
3. Remove the rubber sheath.
4.
Use a screwdriver to bend straight the bended mounting tab and tip out the unit from the mounting bracket.
5. Pull out the unit from the mounting bracket with both hands.
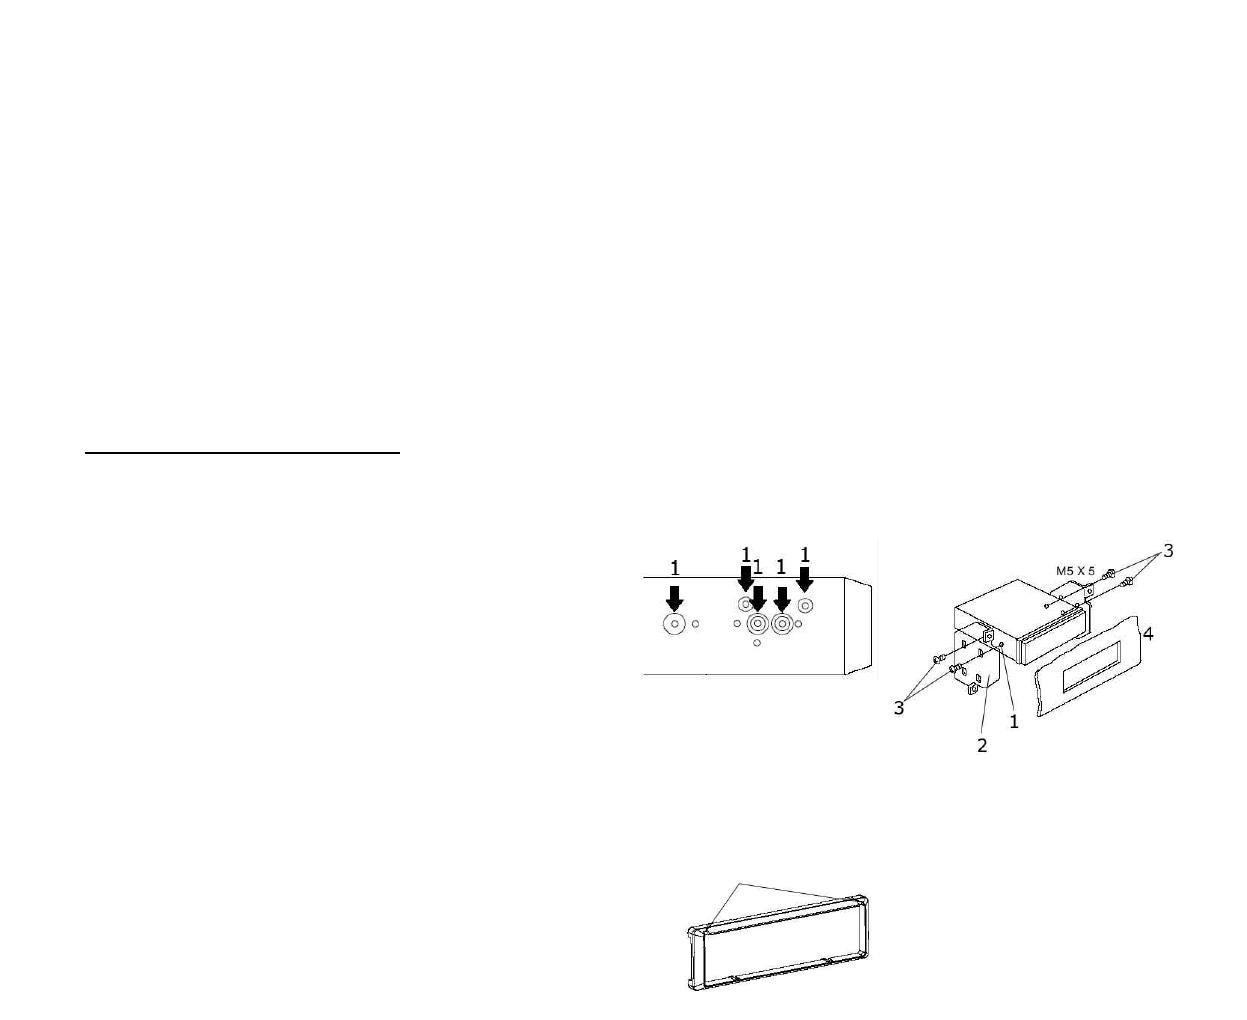
Din rear-mount (method 2)
Installation using the screw holes at both sides of the
unit (if they are there).
1. Insert the unit into the dashboard (4).
2.
Select a position where the screw holes of the
main unit (1) are fitted for holes in mounting
frame (2).
3.
Tighten the screws (3) on each side.
4.
Attach the trim ring around the front panel with 2
indentions on one side facing upwards.
Indentions face upward
8


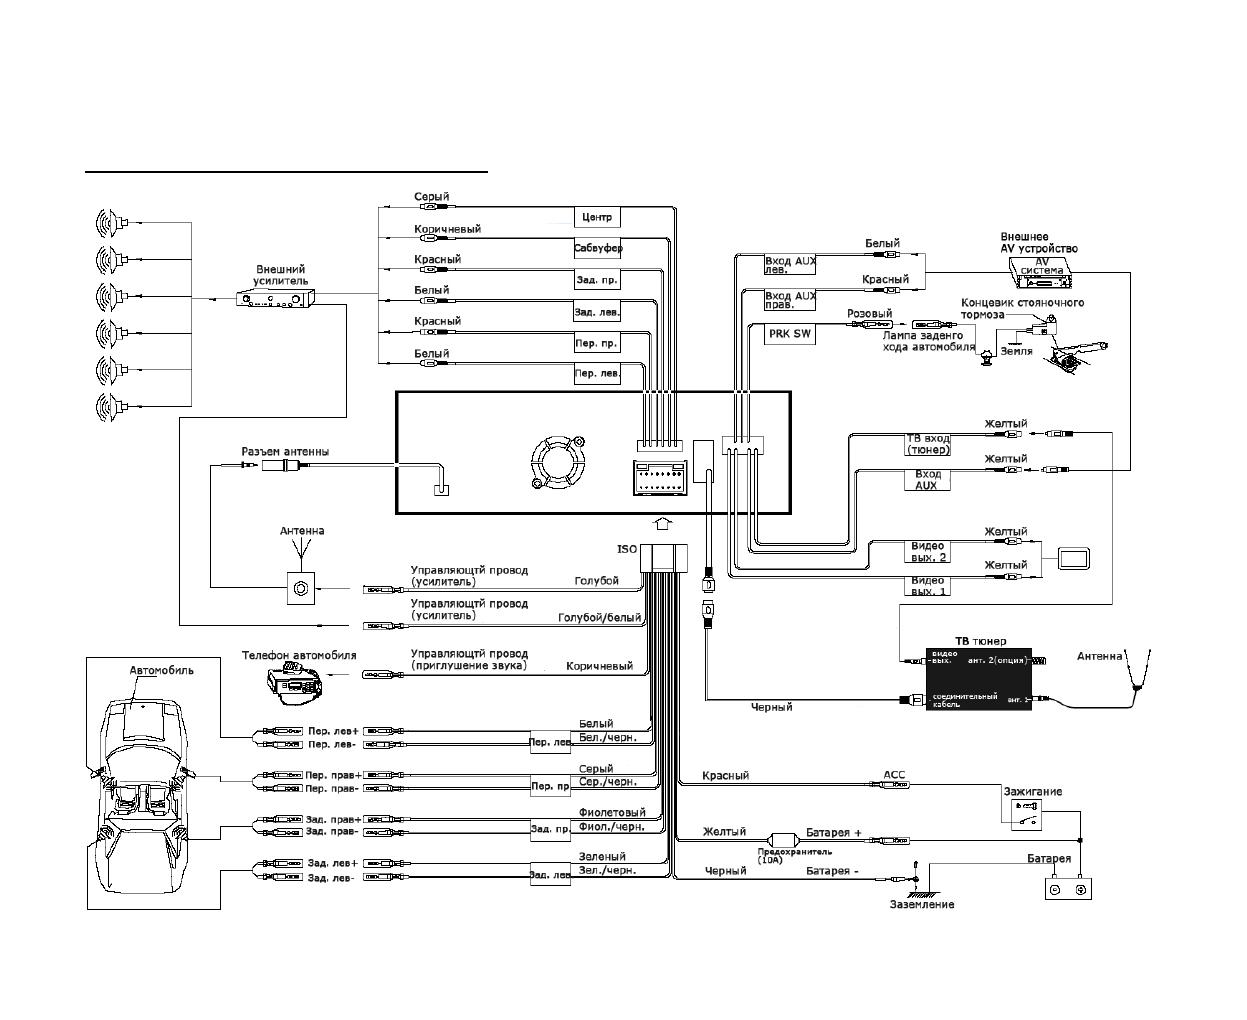
Note: For your driving safety, please link your parking wir…
Страница 10
- Изображение
- Текст
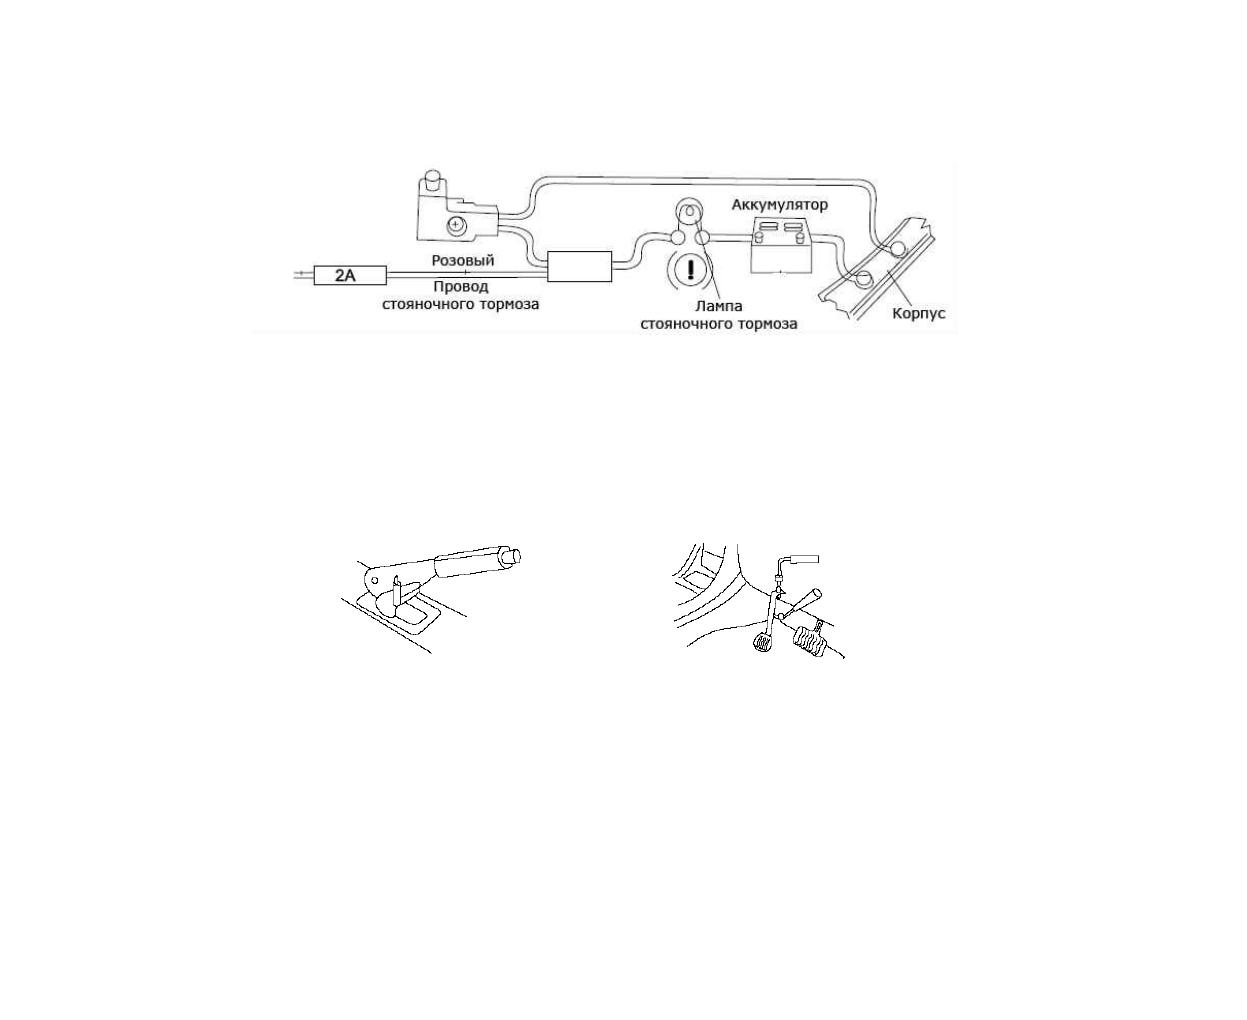
Note:
For your driving safety, please link your parking wire with low power level, and keep it controlled by
manual brake switch. Wire should be high power level and the unit cannot play video disc.
Caution:
For some car models you may need to modify wiring of the supplied power cord. Contact your
authorized car dealer before installing this unit.
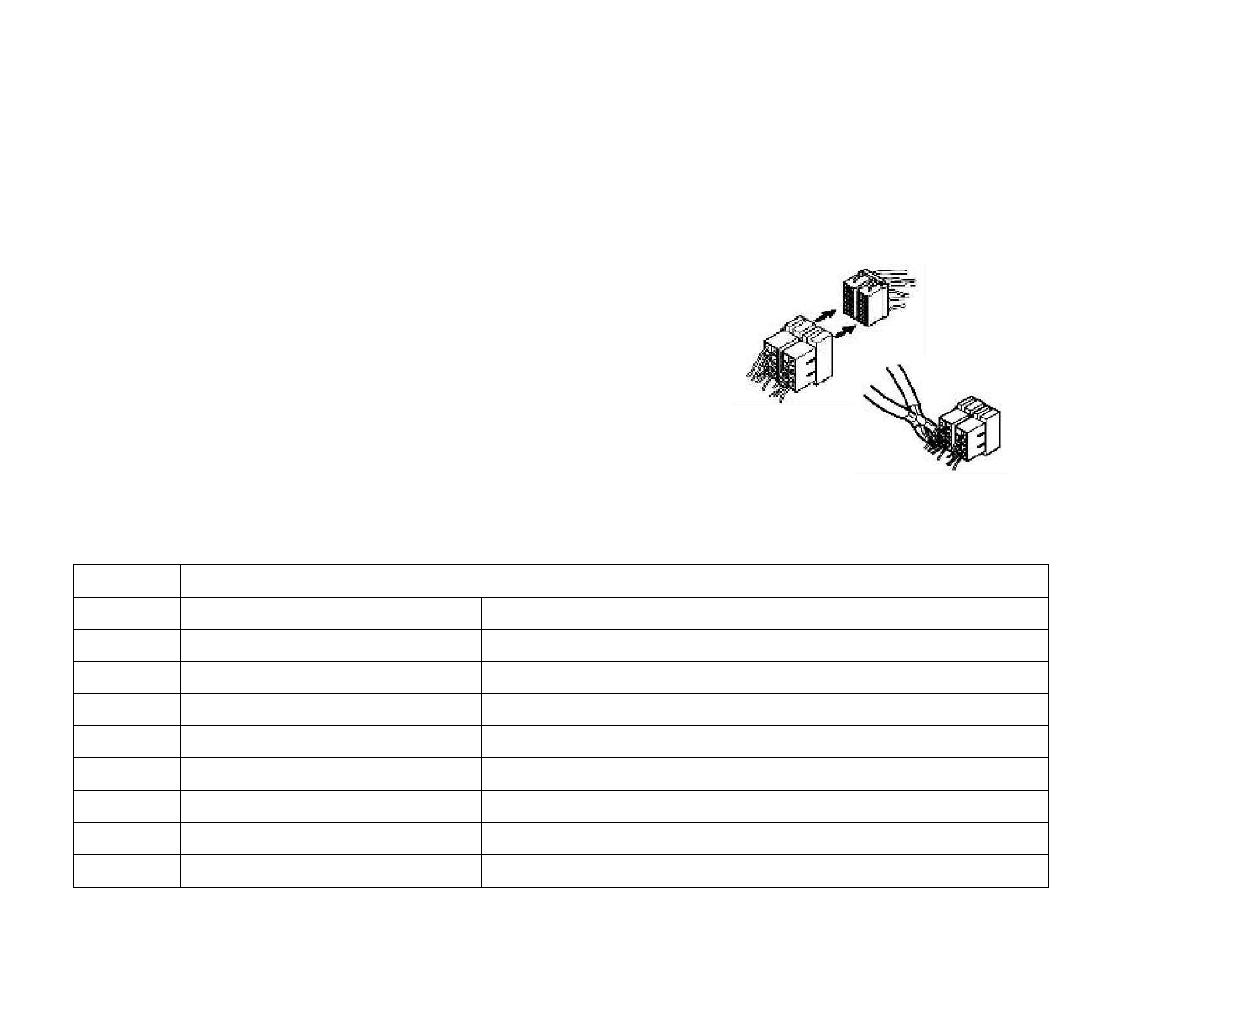
Using the ISO Connector
1. If your car is equipped with the ISO connector, then connect the ISO connectors as
illustrated.
2.
For connections without the ISO connectors, check the wiring in the vehicle carefully
before connecting, incorrect connection may cause serious damage to this unit.
3.
Cut the connector, connect the colored leads of the power cord to the car battery as
shown in the color code table below for speaker and power cable connections.
Location
Function
Connector A
Connector B
1
Rear Right(+)—Purple
2
Rear Right(-)—Purple/Black Stripe
3
Front Right(+)—Grey
4
Battery 12V (+)/yellow
Front Right(-)—Grey/Black Stripe
5
Auto Antenna/blue
Front Left(+)—White
6
Front Left((-)—White/Black Stripe
7
ACC+/red
Rear Left(+)—Green
8
Ground/black
Rear Left(-)—Green/Black Stripe
10

Комментарии

EXCELLENCE
by
HYUND/ÌI
H-CMMD4042
MULTIMEDIA DVD-RECEIVER WITH MOTORIZED 7” TFT DISPLAY AND
TV-TUNER
Instruction manual
МУЛЬТИМЕДИЙНЫЙ DVD-РЕСИВЕР C 7” МОТОРИЗИРОВАННЫМ TFT
ДИСПЛЕЕМ И ТВ-ТЮНЕРОМ
Руководство по эксплуатации

EXCELLENCE
by
H-CMMD4042
MULTIMEDIA DVD-RECEIVER WITH MOTORIZED 7 TFT DISPLAY AND
TV-TUNER
Instruction manual
DVD- 7 TFT

59
!
.
, ,
.
……………………………………………………..……………………………………………………..……………………59
……………………………………………………………………………………………………………….63
/ …………………………………………….……………………..………….……………………..……….64
…………………………..…………………………..…………….…………………………..…..64
…………………………….……………..…………………………….……………..……………65
…………………………………………………………………………………………….66
………………………………………………………………………………………………………………………69
………………………………………………………………………………………………………………………………..69
…………………………….……………..…………………………….……………..………………………….70
……………………………………………………………………………………………………………………………….74
LCD ……………………..……………………..………….……………………..………….………………77
………………….………………….………..………..………………….………..………..………………..79
/ …………………………………………………………………………………………………79
…………………………………………………………………………………………79
………………………………………………………………….……………………..79
………………………………………………………………………………………………………………80
………………………………………………………………………………………………………….80
……..…………….……..…………….……..……..…………….……..…………….…….80
………………….………..………………….………..………..………………….………..………....81

60
…………..…………..…………..…….…………..…….…………..…….…………..……..82
………………………………..……………….………………………………..……………….…………………84
………………………………………………………………………………..…………………………………..84
/ ……….……….……….………………..……….……….………………..……….……84
………..………..………………….………..………..………………….………..…………………...84
………….……………………..………….……………………..………….……………………..………….85
…………….……..…………….……..…………….……..…………….……..…………….…85
………………….………..………..………………….………..………………….………..…………..85
……………………..………….……………………..………….……………………..………….………85
…………….…………….…………………………..…………….…………………………..…………….…………86
……………………………………………………..……………………………………………………..………….86
…………………………………………………………………………………………………………………….87
/ …. …….. …. …….. …….. …. …….. …. …….. …. …….. …….. …. ……87
……………………….…….…………..…….…….…………..…….…………..……87
………………………………………………88
…………..…………..…….…………..…….…….…………..…….…….…….88
LOC () ………….. ………….. ………….. ……. ………….. ………….. ………….. …88
AF ()…………………………………………………………………………………….88
TA () ……..….……..….……..….……..….……..….….……..….…..89
PTY () ……….………………..……….………………..……….………………..……….………89
REGION…………………..……………………………………….…………………..…………………………………90
RDS …………………………………………….…………………………………………….……………………..…………90
…………….…………………………..…………….…………………………..…………….……………91
…………….……..…………….……..…………….……..…………….……..……………...91
……..…………….……..……..…………….……..…………….……..……..…………….…92

61
……………….……………….………………………………..……………….………………………………....93
/ ……………………..………….……………………..………….……………………..………….….93
…….…………..…………..…….…………..…….…………..…….…………..…….……….93
/ …….…….…………..…….…………..…….…….……..93
………..………………….………..………..………………….………..………..………………….……93
…………….……..…………….……..……..…………….……..……..…………….……...94
……………………….…….…….…………..…….…….…………..…….…….………….94
…….…………..…………..…….…………..…….…………..…….…………..…….…………...94
………………….………..………..………………….………..………………….………..………………….…95
( DVD/CD/VCD/MP3)…………………………………………95
Scan ( CDDA/VCD)…… ………… ………… ……………… ………… ………… ………… …………95
GOTO ( DVD/VCD)……………………………………………………………………..95
/ ( CD/VCD ) ……………………………………………….96
( CD/VCD/DVD )……….…..……….…..……….……….…..……….….96
DV D ………………….………..………………….………..………..………………….………..……..97
PBC () ( VCD ) ………………………………………………….97
…. …. …. …….. …. …. …….. …. …. …….. …. …. …….. …. …. …….. .98
( DVD/VCD ) ……..….……..….….….….….……..….….….….99
( DVD )……..….……..….……..….……..….….……..….……...99
( DVD ) ……..…………….……..……..…………….……..…………….……..….. 99
/ / ….……..….……..……..….……..….……..….……..….…100
2- 6-……….…..……….…..…..…..…..……….…..…..…..……….…..100
3…………………………………………………………..…………………………………………….…………………101
………..………..………..………………….………..………………….………..………..……………103
……………………..……………………..…………………………………………….……………………..…..103

62
……………………………………………………………………………………………..103
………………….………………….………..………..………………….………..………..………….103
….….….……..….….……..….….……..….……..….….……..….. 103
……..……..…………….……..…………….……..…………….……..……..……………...104
………….……………………..………….……………………..………….……………………..….104
………. …………… …………… …………… …………… ……….………. ……104
AUX………………………………………………………………………………………………………………………………..104
……………………….…………..……………………….…………..……………………….…………..……..105
……………………………………………………..……………………………………………………...106
ASP ……………………………….………………………………………………………………..……………..107
RDS ……………………………….……………………………….……………………………………………………108
……….……….………………..……….………………..……….………………..……….………………109
DVD ……………………..…………………………………………….…………………………………………….……….105
……………………………………….……………………………………….………………………………………………….. 110
……………………………………….………………………………………………………………………………..……….. 111
…………………………………………………….……………………………………………………………………………. 112
ProLogic II ………………………………………………………………………………..……………………………………….…113
…………….…………………………..…………….…………………………..…………….…..115
……………………….……………………….…………..……………………….…………..………116
………………………………………………………………………………………………………………….112
…………………………………………………………..……………..…………………………….…………….. 118
…………………………………………………………………………………119
……………………………………………………………………………………………………….120

63
-10º .
!
, .
.
, , .
,
.
. ,
, .
, .
, .
, ,
, .
.
, ,
.
, , ,
, , .
.
,
. , .
.
, .
64
/
,
, .
~ 4,5 5,5 , .
1. (2) (1);
,
,
, .
2. 2 5 (7) 2 (3)
.
3.
(4).
4.
(5),
.
5. (2). 4
2 (3)
(2).
6. .
65
:
. , 1 .
1. .
.
2. 4 2.
3. .
4. .
5. .
,
,
.
1.
(2).
2. ,
(2)
(1).
3. (3).
, ,
.
4. .
66
67
:
.
.
ISO
1. ISO,
, .
2. ISO
,
.
3. , ,
:
A B
1 (+)—
2 (-)—
3 (+)—
4 12 (+)/ (-)—
5 / (+)—
6 ((-)-—
7 ACC+/ (+)—
8 (-)——
68
: : DVD
, .
().
(
«» ).
:

69
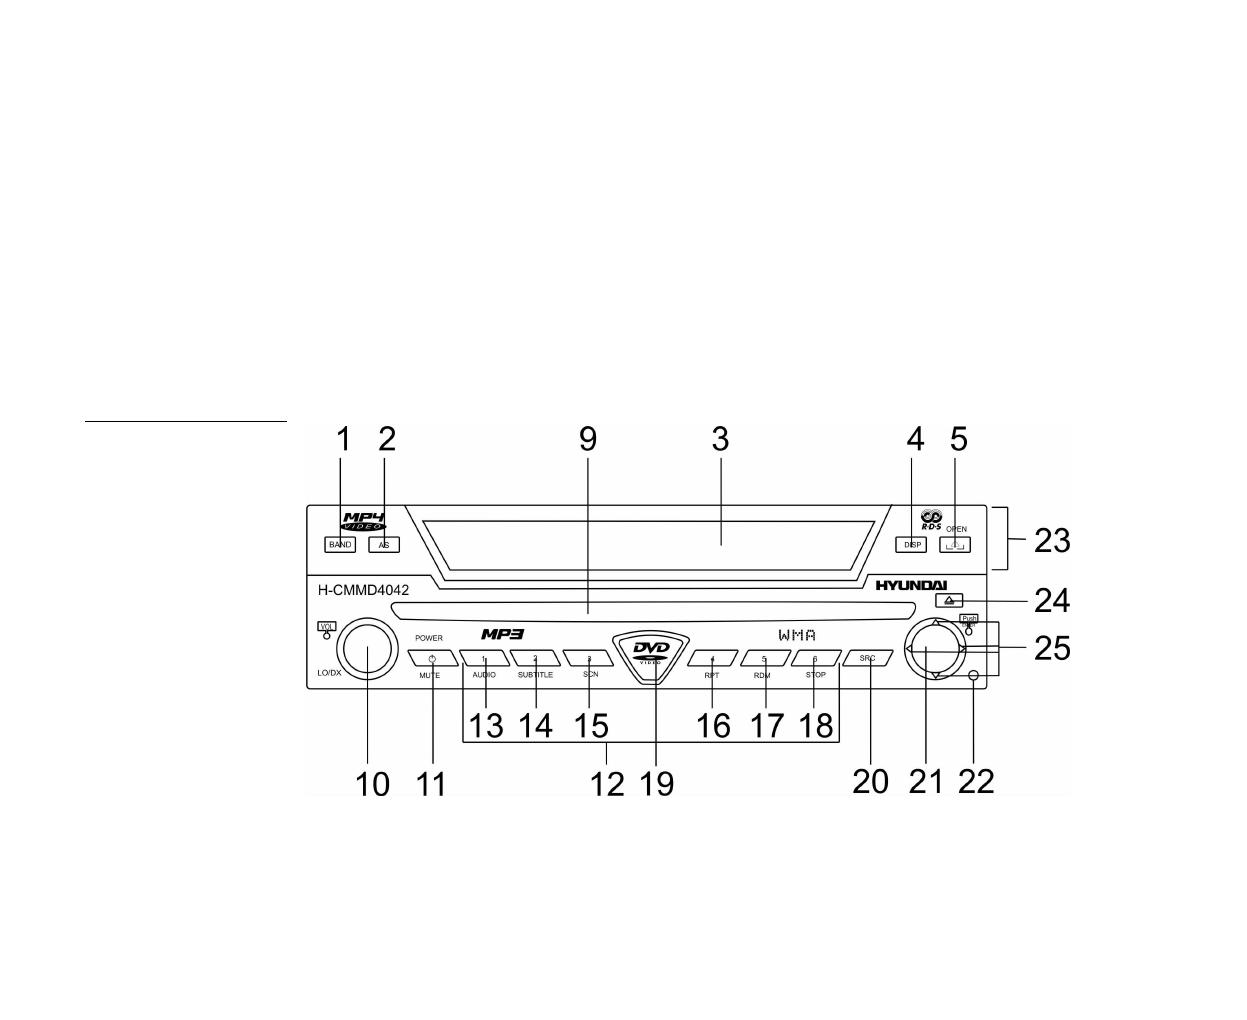
1. BAND
TUNER ()
, .
2. AS
TUNER ()
,
.
3.
4. DISP
,
.
5. OPEN/CLOSE
,
.
6.
7. ANGLE
,
.
70
2 ,
.
8. WIDE/PIC
, .
2 ,
. .
.
2 .
9.
10. VOL / AUDIO / LO/DX
, ,
, .

71
( AUDIO), .
, . , .
2 .
TUNER () 2 ,
: LOCAL DISTANT.
11. POWER/ MUTE
, . ,
.
, . ,
.
12. [1-6]
13. AUDIO
DVD , . VCD .
14. SUBTITLE
DVD , .
15. SCN
, / .
16. RPT
.
17. RDM
, .
2 , 2- 6-
.
18. STOP
, .

72
19.
20. SRC
, : TUNER (
), DVD, DVDC, AUX IN, CAMERA.
21. PLAY/PAUSE / ENTER / SCAN
( ENTER).
, . ,
( PLAY/PAUSE).
TUNER () 2 ,
( SCAN).
TUNER () ,
. 2 ,
( SCAN).
22. RESET
RESET, .
23.
24. EJECT
, .
25.
.
DVD , / .
DVD , / .
, /
/ .

73
TUNER () ,
.
TUNER () , /
.
TUNER () ,
. 2 ,
/ .
74
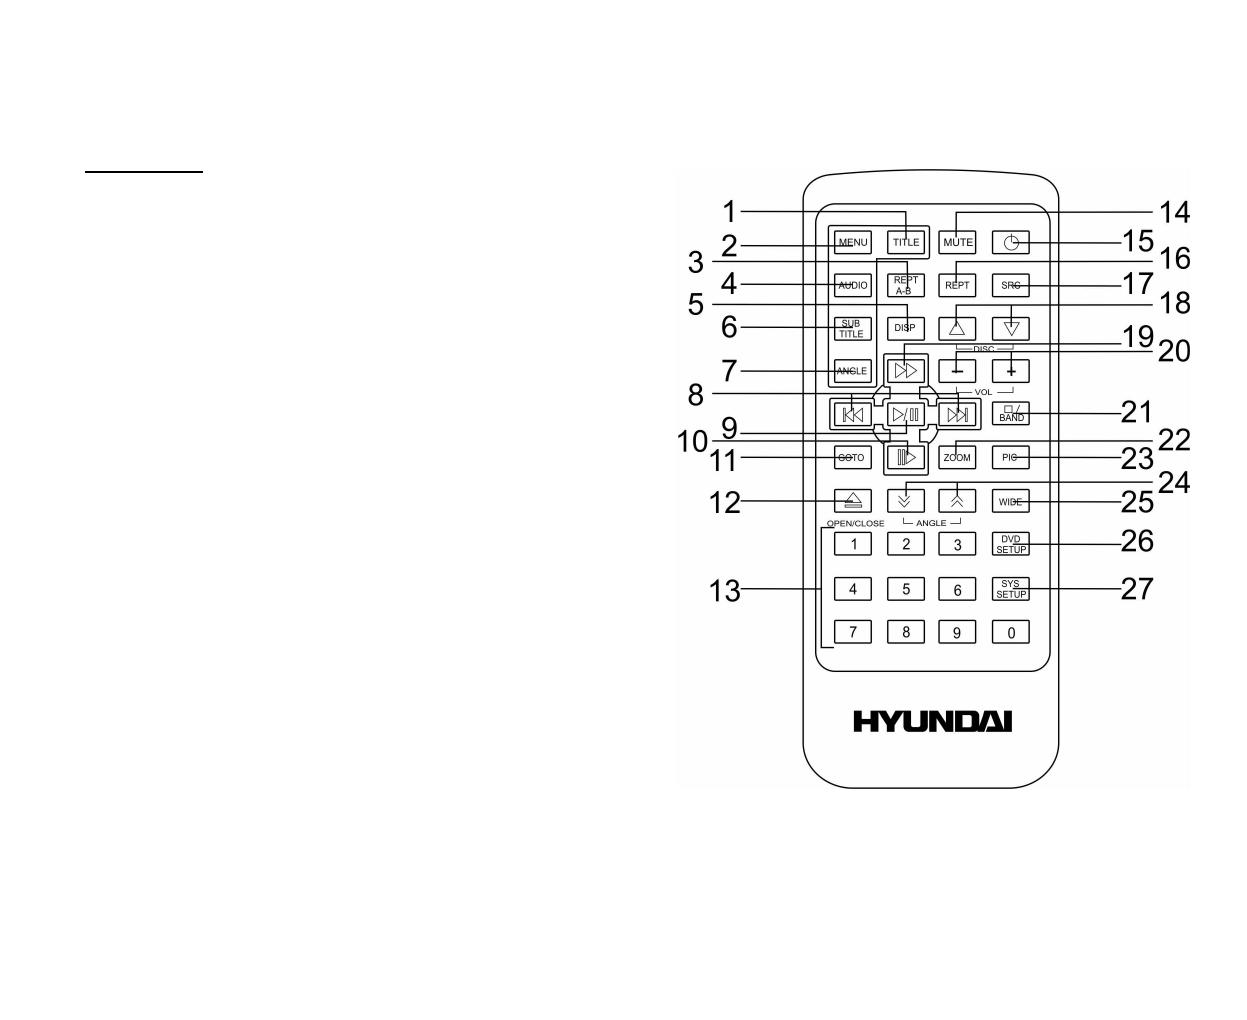
1. TITLE ,
.
2. MENU ,
.
3. REPT A-B ,
.
4. AUDIO — DVD
, . VCD
, .
5. DISP — ,
.
6. SUBTITLE — DVD
, .
7. ANGLE — DVD
, .
8. 9/: — DVD
, /
/ .
TUNER () ,
/ .

75
/
.
9. PLAY/PAUSE / ENTER / SCAN —
ENTER).
, . ,
( PLAY/PAUSE).
TUNER () ,
( SCAN).
10. .
DVD , .
11. GOTO ,
.
12. OPEN/CLOSE — , .
13. .
14. MUTE — , .
, .
15. POWER — , . ,
.
16. RPT DVD ,
/ / .
17. SRC — , : TUNER (), DVD, DVDC, AUX
IN, CAMERA.
18. CD .
19. 8 — .
DVD , .
76
20. VOL +/- — , .
21. STOP/ BAND DVD , .
TUNER () , .
22. ZOOM , .
23. PIC , .
24. ANGLE
,
.
25. WIDE — , .
26. DVD SETUP , DVD .
27. SYS SETUP , .
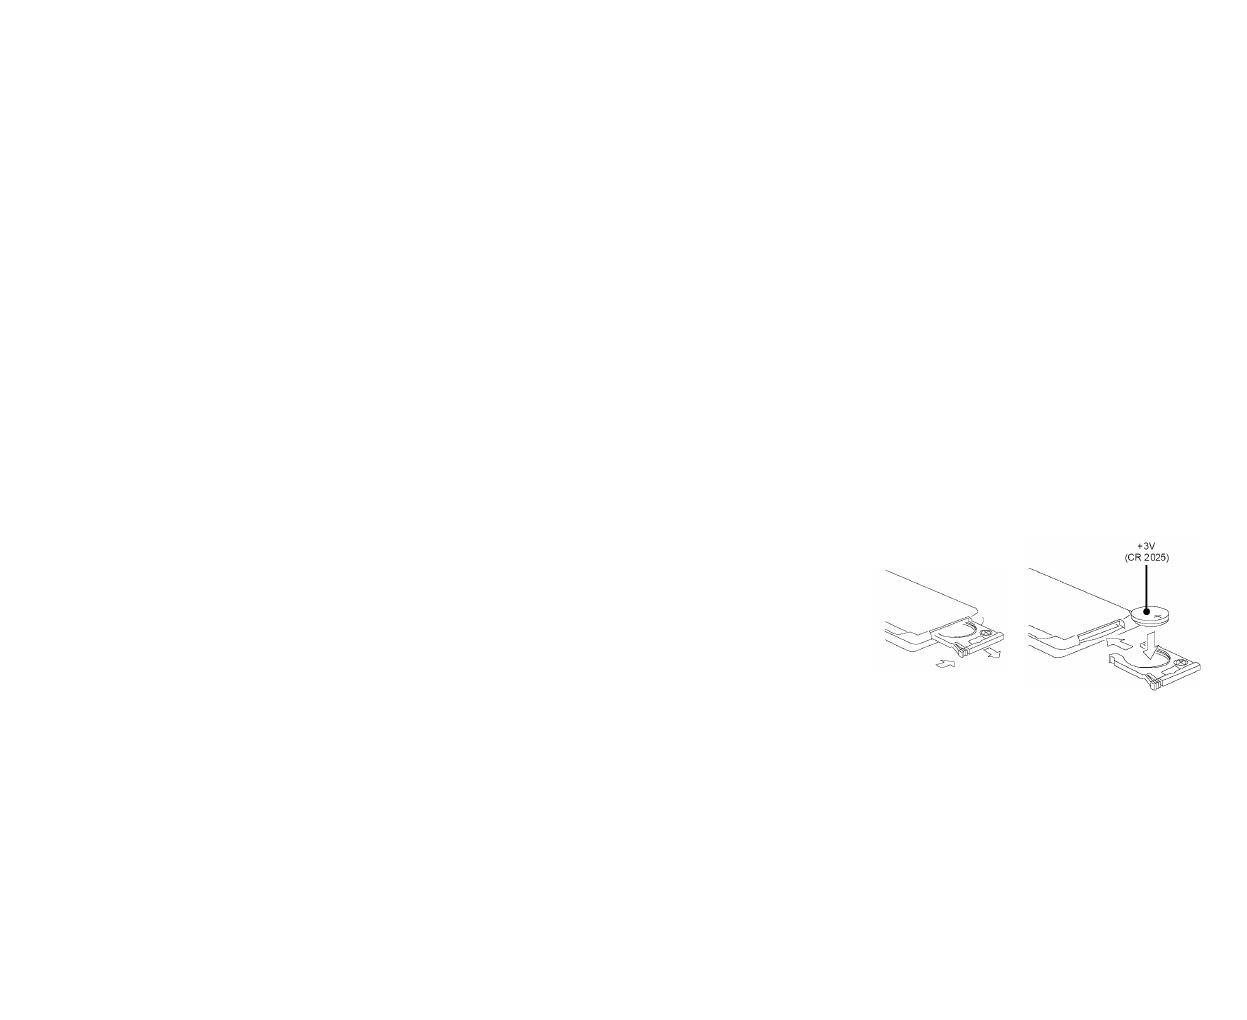
:
1. , (. 1).
2. (CR 2025 3V),
. (. 2).
:
.
,
.
( 6
).
. .
. 1
. 2
77
LCD
1. .
2. : SCN
), RPT (), RDM
), ALL
).
3. LOUD.
4. .
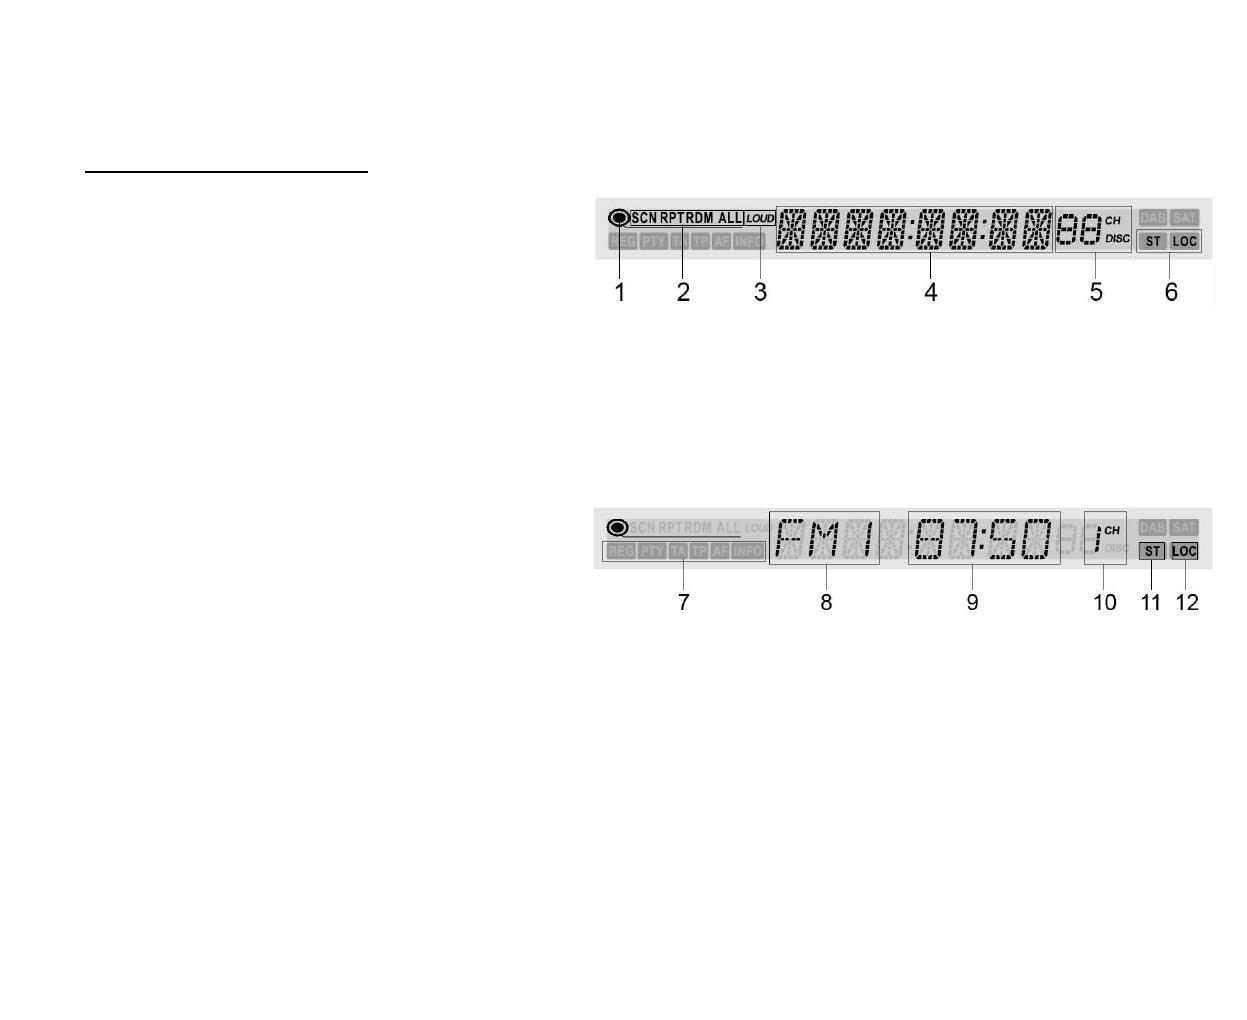
5. CH (), DISC, RADIO () .
6. ST (), LOC () .
Tuner ()
7. RDS: REG
), PTY (
), TA (
), TP, AF (
), INFO (
).
8. .
9. .
10. .
11. ST () .
12. LOC () .
EXCELLENCE by H-CMMD4042 MULTIMEDIA DVD-RECEIVER WITH MOTORIZED 7 TFT DISPLAY AND TV-TUNER Instruction manual DVD- 7 TFT
Dear customer! Thank you for purchasing our product. For safety, it is strongly recommended to read this manual carefully before connecting, operating and/or adjusting the product and keep the manual for reference in the future. Table of contents Table of contents
General operations………………………………………………………………………………………………………………………….24 Reset the unit
Playing/ pausing ………………………………………………………………………………………………………………………33
Manual tuning………………………………………………………………………………………………………………………….42 Auto preset memory
Important safeguards Using the device at temperature below -10º may cause the breakage of the device. BEFORE USING PLEASE HEAT UP THE PASSENGER COMPARTMENT TO THE RECOMMENDED TEMPERATURE! Read carefully through this manual to familiarize yourself with this high-quality sound system. Disconnect the
Installation/ connection This unit can be installed in any dashboard having an opening as shown on the picture. The dashboard should be ~ 4.5 5.5 mm thick in order to be able to support the unit. Din front-mount (method 1) 1. 2. 3. 4. 5. 6. Insert mounting bracket (2) into the dashboard (1), select
Removing the unit 1. Push trim ring upward and pull out the upper part. Push it downward and pull out the lower part. 2. Unscrew 4 pieces M2 screws. 3. Remove the rubber sheath. 4. Use a screwdriver to bend straight the bended mounting tab and tip out the unit from the mounting bracket. 5. Pull out
Electrical connection 9
Caution: For some car models you may need to modify wiring of the supplied power cord. Contact your authorized car dealer before installing this unit. Using the ISO Connector 1. If your car is equipped with the ISO connector, then connect the ISO connectors as illustrated. 2. For connections
Parking brake cable connections Note: for safety purpose professional installation for the following connections is recommended. For cars with hand brake For cars with foot brake 11
Unit controls Monitor 1. 2. 3. 4. 5. 6. 7. 8. BAND button Press it repeatedly to select your desired radio band during TUNER (RADIO) mode. AS button In TUNER (RADIO) mode press it to start automatic station search. LCD display DISP button Use this button to show the playback info or TV channel
Front panel 9. Disc slot 10. VOL knob/ AUDIO / LO/DX button Rotate VOL knob to adjust the volume. Press it (the AUDIO button) to enter audio setting mode. Press the repeatedly to select the audio setting. Press the buttons to adjust it. Press it and hold for 2 seconds to exit the audio setting
13. AUDIO button In DVD mode press it to select the channel. In VCD mode press it to change the channel. 14. SUBTITLE button In DVD mode press it to select subtitle language. 15. SCN button In DVD mode press it to start/stop scan playback. 16. RPT button In DVD mode press it to start/stop repeat
22. RESET button Press the RESET button to restore the unit to the original factory settings. 23. Monitor 24. EJECT button Press this button to eject the disc. 25. Cursor buttons buttons In the menu use the cursor buttons to move through it. In DVD mode press the button to fast backward/ fast
Remote control 1. 2. 3. TITLE button press it to open the disc title list. MENU button press it to open the disc menu. REPT A-B button use it to start repeat of the A-B fragment. 4. AUDIO button in DVD mode press it to change the audio language. In VCD mode press it to change the channel. 5. DISP
11. 12. 13. 14. 15. 16. 17. 18. 19. 20. 21. 22. 23. 24. 25. 26. 27. In DVD mode press this button to slow the playback. Press again to slow rewind playback. GOTO button — press this button to set the player play disc starting at certain time. OPEN/CLOSE button — press this button to slide the
Changing the battery 1. Press the catch and at the same time pull out the battery tray (pic. 1). 2. Insert the 1 x lithium battery, type CR2025 (3V) battery with the stamped (+) mark facing upward. Insert the battery tray into the remote control (pic.2). Pic. 1 Pic. 2 Warning: Store the battery
LCD display 1. 2. Disc indicator. Disc playback indicators: SCN (scan), RPT (repeat), RDM (random), ALL (all chapters playback). 3. LOUD indicator. 4. Main display. 5. CH (displays the channel), DISC, RADIO (radio station number) indicator. 6. ST (stereo), LOC (local) indicator. Radio display
Monitor operations Open/close TFT monitor 1. 2. Press the OPEN/CLOSE button to open the monitor to the last viewing position. Press the OPEN/CLOSE button to load the monitor to the unit. TFT monitor auto open 1. 2. Enter the GENERAL SETUP menu (please refer to SYSTEM SETUP menu chapter of this
OR press the WIDE/PIC button on the monitor or the WIDE button on the RC repeatedly to select the aspect ratio: CINEMA => NORMAL => STANDBY. Image setting 1. 2. 3. 4. Press the PIC button on the RC or press and hold for 2 seconds the WIDE/PIC button on the monitor to enter the picture quality
Touch screen operations In any mode touch the left corner of the top area of the TFT display to open the main menu. Now you can select the playing source (Radio, DVD/CD, Aux in, TV (if the TV tuner is connected)) by touching the proper button on the display. To enter the unit setup menu touch the
Touch operations under DVD mode during playing the PM3/WMA files Touch operations under Tuner (Radio) mode 23
General operations Reset the unit Operating the unit for the first time or after replacing the car battery, you must reset the unit. Press the RESET button on the front panel to restore the unit to the original factory settings. Power on/off Press POWER/MUTE button on the front panel or the POWER
2. Press the buttons on the front panel or press the 9/: buttons on the RC to select the desired audio setting: EQ => BASS => TREBLE => FADER => BALANCE => LOUD. 3. Press the buttons to adjust the setting. 4. To exit the menu press and hold the volume knob. Note: If turning off the ACC power all
Digital tuner operations Note: RDS service availability varies with areas. Please understand if RDS service is not available in you area, the following service is not available, either. To activate this function enter the RDS SETUP menu (please refer to SYSTEM SETUP menu chapter of this manual).
Band selection Press BAND button on the front panel or the STOP/BAND on the RC once or more to select: FM1, FM2, FM3, FM (OIRT), AM1, AM2, AM3. Manual/ automatic tuning Manual tuning: Press the 8/ buttons on the RC or the / buttons on the panel repeatedly to select a station upward or downward step
AMS (Auto Memory Store) function Select the band. Press AS button on the panel or the PLAY/PAUSE / ENTER / SCAN button on the RC to enter auto search and store mode. The radio will automatically store the 6 strongest available stations to the 6 preset memories of the current band. The search will
TA (Traffic Alarm) function In TUNER (RADIO) mode press the button on the panel and hold for 2 seconds to turn ON or turn OFF the TA function. In TA mode press the 9/ : buttons on the RC or the / on the panel to start the traffic announcement program searching until the program is received. After
Saving the PTY When the PTY function is on and the unit receives the current program type press the 1~6 button to store it into the channel selected. The default preset channels: P1 DNEWS, P2 DSPEECH, P3 DSPORT, P4 DPOP M, P5 CLASSIC, P6 DMUSIC. Quick PTY searching When the PTY function is on press
Disc operations Glossary PBC (PlayBack Control) PlayBack Control is a menu recorded on the disc with SVCD or VCD2.0 format. For the discs contained PBC, it can playback interactive software with the menu displayed on TV. And if the disc contains still images, it can playback high definition of
Discs for playback This unit can play disc types: CD/DVD/CDDA/CD-R/-RW/DVD±R/±RW. Compatible with formats: DVD-video/SVCD/VCD/HDCD/MP3/MP4/WMA/Picture-CD/JPEG. The following file types are supported: Audio files: MP3 (*.mp3) WMA (*.wma) Video files: MP4 (*.avi, DIVX3.11/4.0/5.0/6.0 and XVID) MPEG
Loading a disc 1. 2. 3. Turn the power on. Insert the disc with the printed side facing upward into the slot. The unit will switch to DVD mode automatically. Press the EJECT button on the panel to eject the disc. Playing/ pausing To ensure good system performance, wait until the unit finishes
Direct entering the number To enter the 2- or 3-digit number of the track or chapter press the desired buttons with digits on the RC. For example, to enter number 135 press 1 => 3 => 5. Scanning forward and backward 1. Press the 8 button on the RC or button on the panel to select the speed of fast
Repeat playback Press the RPT button on the panel or REPT button on the RC once or more to repeat the playback: For VCD/CD: REPEAT SINGLE => REPEAT OFF For DVD: REPEAT TITLE => REPEAT CHAPTER => REPEAT OFF For MP3: REPEAT SINGLE => REPEAT FOLDER => REPEAT OFF RPT icon will appear on the display.
1. During the disc playback press the GOTO button on the RC to enter the Search menu. For VCD discs press the GOTO button repeatedly to select the Track or Disc search. For DVD Search Time Title/Chapter 2. 3. —:—:—-/— For MPEG4/VCD Track search Time —:—:-OR Track —/— Disc search Time
Audio track and channel selection (for CD/VCD/DVD discs) For DVD playback: press the AUDIO button to change the audio language. OR enter the AUDIO menu (please refer to DVD SETUP menu chapter of this manual). For CD/VCD playback: press the AUDIO button repeatedly to alter the select the channel:
4. 5. Press STOP button to return to menu. Press MENU again to exit menu. On-screen display (OSD) 1. During playback press the DISP button on the RC to show the short playback information on display: DVD disc: T-Title (current/total) C Chapter (current/total) 00:41:28 Current playback time of the
The playback status will be shown as following: Source: — the current source EQ: user — current equalizer setting Loud: — the loudness status. 2. Press the DISP button on the front panel repeatedly to show the following information on the display: Playback time => Clock => Disc format => Playback
Press the AUDIO button on the panel or the RC to select the audio language or the channel. Press the REPEAT or RANDOM buttons to select the mode of the playback. Alter between 2 Ch and 6 Ch Press and hold for 2 seconds the RDM button on the panel to alter between 2 Channel mode and 6 Channel mode.
If you play a non- MP3 file that has the .mp3 extension, you may hear some noise. In this manual, we refer to what are called MP3 file and folder in PC terminology as track and album , respectively. Maximum number of directory level is 8, including the root directory. Maximum number of files and
TV tuner operations Switch to TV tuner mode 1. 2. Connect the TV set to the unit. Press the SRC button repeatedly to select the TUNER (TV) mode. OR in the SYSTEM SETUP menu select the TV item. Auto tuning 1. 2. Press the button on the panel or the 9/: button on the RC to start auto search of
Scan tuning 1. 2. You can scan each stored channel for 10 seconds in sequence. Press the ENTER button on the panel to start scanning. Press the PLAY/PAUSE / ENTER / SCAN button on the panel or the STOP/BUTTON on the RC to stop auto scanning. Select the TV station 1. 2. Press the number buttons on
System setup menu In any mode touch the left top corner of the screen to open the main MENU. Use the cursor buttons or press the SETUP button on the screen to open the SETUP menu. In SETUP menu press the buttons on the panel or 9/: buttons on the RC or touch the desired button on the screen to
General setup 1. 2. Enter the GENERAL SETUP menu. Use the buttons on the panel or 8/ buttons on the RC or touch the desired item on the screen to select the desired setting: Radio, Clock mode, Parking, OSD menu, Clock, Video format, TFT auto open. 3. Press the buttons on the panel or 9/: buttons on
TFT auto open: set the monitor working mode when the unit is on and off: On (when the unit is off the monitor draws down into the unit automatically, when it s on the monitor unfurls automatically), Off (when the unit is off the monitor draws down into the unit automatically, when it s on the
Sub phase: if trying to boost the bass output of subwoofer the bass gets more murky. This may indicate that the subwoofer s output and bass content you hear from other speakers cancel each other out. To remove this problem change the setting of subwoofer: 0D (subwoofer output in phase), 180D
DVD setup menu In any mode touch the left top corner of the screen to display the main MENU. Use the cursor buttons or touch the SETUP button on the screen to open the SETUP menu. In SETUP menu press the buttons on the panel or 9/: buttons on the RC or touch the desired item on the screen to select
Language 1. 2. Enter the LANG menu. Use the buttons on the panel or 8/ buttons on the RC or touch the desired item on the screen to select the desired setting: Subtitle, Audio, DVD menu. 3. Press the buttons on the panel or 9/: buttons on the RC or touch the desired button on the screen to enter
4. 5. Press the buttons on the panel or 8/ buttons on the RC or touch the desired button on the screen to select the desired value. Press PLAY/PAUSE / ENTER / SCAN button to confirm. TV shape: select the width/height of the image: 16:9 (wide screen), 4:3 (normal view). This function is not
DRC: set the DRC (dynamic range control) for better playback for low volume playback: On (use bass to play the more dynamical audio), Off (normal playback). Center delay: the time difference between center and front speakers. The time delay makes audio signal more accurate. Select the time delay: 0
4. Press the buttons on the panel or 8/ buttons on the RC or touch the desired button on the screen to select the desired value. 5. Press PLAY/PAUSE / ENTER / SCAN button to confirm. Surround mode: select the surround sound effect: Off (playback as the original audio output), Surround I (using the
SPK configuration 1. 2. Enter the SPK CONFIG menu. Use the buttons on the panel or 8/ buttons on the RC or touch the desired item on the screen to select the settings: Multi-CH, Stereo, Sub, Center. 3. Press the buttons on the panel or 9/: buttons on the RC or touch the desired button on the screen
Rating This unit has the built in parental lock feature to prevent authorized person to view restricted disc content. 1. 2. Enter the RATING menu Use the buttons on the panel or 8/ buttons on the RC or touch the desired item on the screen to select the setting: Password, Rating, Load factory. 3.
Handling and cleaning discs Dirty, scratched or warped discs may cause skip ping or noise. Handle the disc only by the edges. To keep clean do not touch its surface. Discs should be stored in their cases after use to avoid scratches. Do not expose discs to direct sunlight, high humidity, high
Troubleshooting guide Symptom Cause Solution No power. The car ignition is not on. The fuse is blown. If the power supply is properly connected to the car accessory switch the ignition key to ACC . Replace the fuse. Disc cannot be loaded. Presence of disc inside the player. Remove the disc in the
Specification General Power supply: Current consumption: Maximum power output: Compatible formats: 12 V DC max. 10 A 50 W x 4 channels DVD/SVCD/VCD/HDCD/MP3/MP4/WMA/CDDA/Picture-CD/JPEG/ CD-R/-RW/DVD±R/±RW playback Dimensions (L x W x H) / weight: 200 x 190 x 55 mm / 2.2 kg Working temperature
AM section Frequency range: Preset memory stations: 522 kHz — 1620 kHz 12 Audio specification Maximum output: Frequency response: S/N ratio(A-vtd): 2 Vrms (+/- 3 dB) 20 Hz — 20 KHz 70 dB Line out Output: CD max 2000 mV TV Color system Sensitivity PAL/SECAM/NTSC 65 dB Specifications are subject to
! . , , . ………………………………………………………………………………………………………………………………….59 ……………………………………………………………………………………………………………….63 /
…………………………………………………………………………………………………..82 ………………………………………………………………………………………………………………………84
………………………………………………………………………………………………………………………93 / ………………………………………………………………………………………………………….93
…………………………………………………………………………………………….. 103 ……………………………………………………………………………………………………………103
-10º . ! , . . , , . , . . , , . , . , . , , , . . , , . , , , , , . . , . , . . , . 63
/ , , ~ 4,5 5,5 . , . 1. (2) (1); , , , 2. 2 . 5 (7) 2 (3) . 3. (4). 4. (5), . 5. (2). (3) 2 (2). 6. . 64 4
: . , 1 1. . . . 2. 3. 4. 5. 4 2. . . . , , . 1. (2). 2. , (2) (1). 3. (3). , . 4. . 65 ,
66
: . . ISO 1. ISO, . , 2. ISO , . 3. , , : A 1 2 3 4 5 6 7 8 B (+)—(-)—(+)—(-)—(+)—((-)—(+)—(-)— 12 (+)/ / ACC+/ 67
: , : DVD . ( ). ( « » ). : 68
1. BAND TUNER ( ) , 2. . AS TUNER ( ) , . 3. 4. DISP , . 5. OPEN/CLOSE , . 6. 7. ANGLE , . 69
2 8. , . WIDE/PIC , . 2 , . . . 2 9. 10. VOL / . AUDIO / LO/DX , , , . 70
( AUDIO), , . , 2 . TUNER ( . ) 2 : LOCAL 11. . , DISTANT. POWER/ MUTE , . . , , . , . 12. 13. [1-6] AUDIO DVD SUBTITLE DVD SCN 14. 15. , , , 16. . VCD . . / . RPT . 17. RDM , . 2 , 2- . 18. STOP , . 71 6-
19. 20. SRC 21. , : TUNER ( ), DVD, DVDC, AUX IN, CAMERA. PLAY/PAUSE / ENTER / SCAN ( ENTER). , . ( TUNER ( PLAY/PAUSE). ) 2 ( TUNER ( ) SCAN). 2 ( , SCAN). RESET RESET, 23. 24. , , . 22. , . EJECT , . 25. . DVD DVD , , / / , / . . 72 . /
TUNER ( . TUNER ( ) , ) , / . TUNER ( . ) , 2 / 73 . ,
1. TITLE , . 2. MENU , . 3. REPT A-B 4. , . DVD . AUDIO , , 5. VCD . DISP — , . 6. SUBTITLE — DVD . DVD , 7. ANGLE , 8. . 9/: — DVD , / / TUNER ( / . ) , . 74
/ . 9. PLAY/PAUSE / ENTER / SCAN ENTER). , . ( , PLAY/PAUSE). TUNER ( ) ( SCAN). , . 10. DVD GOTO . OPEN/CLOSE . MUTE — 11. 12. 13. 14. , , . , , POWER . 16. RPT / / 17. SRC IN, CAMERA. 18. 19. 8DVD . , . . 15. , . DVD , , . , : TUNER ( CD ), DVD, DVDC, AUX . . , . 75
20. 21. 22. 23. 24. VOL +/- STOP/ BAND TUNER ( ZOOM PIC ANGLE , . DVD , ) . , . , . , . , 25. 26. 27. . WIDE DVD SETUP SYS SETUP , . , DVD . , . : 1. , ( 2. (CR 2025 3V), . ( . 1). . 2). : .2 .1 . , . ( 6 ). . . 76
LCD 1. 2. . : SCN ), RDM ), ALL ). ), RPT ( 3. 4. 5. 6. LOUD. . CH ( ST ( ), DISC, RADIO ( ) ), LOC ( Tuner ( RDS: REG ), PTY ( ), TA ( ), TP, AF ( ), INFO ( 7. ) . ) ). 8. 9. 10. 11. ST ( 12. LOC ( . . . ) . ) . 77 .
13. ), RPT ( 14. 15. : SCN ), RDM ), ALL ). . . 78
/ 1. OPEN/CLOSE, . , . 2. OPEN/CLOSE, . 1. ( ). 2. / : On ( .) ( . ); Off ( .) ( . OPEN/CLOSE, Manual ( ); )( / OPEN/CLOSE, ). , . , NGLE . 79
, NGLE ( . DVD ). CINEMA ( 1. 2. 3. 4. WIDE/PIC ) => NORMAL ( PIC WIDE/PIC , 8 ), CONTRAST ( 9/: . PIC : 16:9 (wide screen), 4:3 (normal view). WIDE , ) => STANDBY ( ). : 2 . , ), BRIGHT ( : COLOR ). , WIDE/PIC , . «PRK SW» , TFT. , « , « 80 » ». . :
« », , . , OPEN , . . OPEN , RESET, . 81
, (MENU), TFT. , (Radio, DVD/CD, Aux in, TV ( )), DVD- ( SETUP ). DVD DVD (MENU) B DISP C D E F STOP, 9, :, 7, 8. ( ) : MENU, PLAY/PAUSE, 82 :
DVD MP3/WMA , Tuner ( ) , 83
RESET. : , , . / POWER/MUTE POWER , . 2 POWER/MUTE : , . , , . VOL + , . VOL , . : . 84
, , 1. 2. 3. 4. POWER/MU , . AUDIO ( ) MUTE . , . , 9/: => BASS => TREBLE => FADER => BALANCE => LOUD. , 2 : : EQ . . . 3 , . SRC, ) => DVDC => AUX-IN => CAMERA ( , DVD , Loud. TUNER ( ) , . , : TUNER ( ) => DVD ). DISP, : DISP, , : 85
: RDS RDS ( ) . . , RDS, RDS ) ( ON ( SRC, , RADIO .). — TUNER ( : ). . , . 1. 2. 3. 4. 5. 6. 7. 8. 9. , RDS (AF, TA, TP, PTY) RDS RADIO 86 . ,
B ND FM2, FM3, FM (OIRT), AM1, AM2, AM3. STOP/BAND , : FM1, / : , 8/ . 2 , . 9/: : 2 . , . , . . 2 , . . 6 7 . : — ( ). . 1~6, . — : ( , ). 1~6. 87
. ,6 SCAN AS 1~6. , 2 , PLAY/PAUSE / ENTER / . AS. PLAY/PAUSE / ENTER / SCAN, 10 . , . LOC ( ) LOC , . 2 LO/DX ( ), LOC. , AF ( . ) , , . . 2 BAND, AF. AF , RDS . , . 88
RDS , AF. . TA ( TUNER ( ) ) 2 , . , 9/: , . , . , SEEK, SCAN, AMS . . PTY ( FM1. 2. 3. ) , RDS, TUNER ( TA . ) 2 , PTY. PTY 8/ , : None, News, Speech, Music, Document, Fock M, Oldies, Nation M, Country, Jazz, Leisure, Travel, Phone in, Religion, Social, Children, Finance, Weather, Other M,
, PTY, , 1~6, : P1 DNEWS, P2 DSPEECH, P3 . DSPORT, P4 PTY DPOP M, P5 CLASSIC, P6 DMUSIC. 1~6, . REGION REGION, RDS ( ). AF REGION , AF , AF , REGION AF . , . RDS RDS, ( ). , RDS , . CT . 90 ,
PBC ( ) , PBC, . . . . 3 ( ), 1, , 1 3. 2 . , . . . , . . 91 , , ,
: CD/DVD/CDDA/CD-R/-RW/DVD±R/±RW. : DVD-video, SVCD/VCD/HDCD/MP3/MP4/WMA/ Picture-CD/JPEG. : : MP3 (*.mp3) WMA (*.wma) : MP4 (*.avi, DIVX3.11/4.0/5.0/6.0 and XVID) MPEG 2(*.vob) MPEG 1(*.dat) : JPEG (*.jpg) ISO 9660 ISO 9660 + Joliet 30 . 448. -8 . 99. — 99 59 . MP3 : 8 48 ( 44,1 ). P3 : 32 — 320 (
1. 2. 3. . . EJECT DVD. , . / , . . PLAY/PAUSE, . STOP STOP/BAND . . PLAY/PAUSE . / 1. , 9 / . 2. , : / 3. 2- . (1-9, 0) / . 3. , 93 135, 1 => 3 => 5.
1. , PLAY/PAUSE, 8 : 2 => 4 => 8 => 20. . , : , 2. : 2 => 4 => . 8 => : 1/2 => 1/4 => 1/6 => 1/7 ( PLAY/PAUSE, : . 7/8 20. . PLAY/PAUSE, , ), 1/2 => 1/4 => 1/6 => 1/7 ( . ). , , . RE : VCD/CD: REPEAT SINGLE ( DVD: REPEAT TITLE ( REPEAT OFF ( ). MP3: REPEAT SINGLE ( ) => REPEAT OFF ( ) => REPEAT
REPEAT OFF ( ). RPT. 1. , REPT A-B 2. , REPT A-B ( ), . ( ), . . 3. . ( . DVD/CD/VCD/MP3) RDM . , Scan ( , CDDA/VCD) 10 SCN . , GOTO ( . , . DVD/VCD) , , . 1. GOTO VCD GOT , 95 , . .)
DVD Search Time Title/Chapter MPEG4/VCD Track search Time Track —:—:—-/— —:—:—-/— 2. ( => 8 => 2 => 0 => 0 => 0. => 0 => ). => 8. , ). , PLAY/PAUSE, : . PLAY/PAUSE, : 13, —:—:—-/—: Time ( 8/ ), Track ( , ), Title/Chapter ( : 3. OR Disc search Time Track 18 , 20 00 , :1 . , 20 8, :2
channel ( ) => Stereo ( ). DVD 1. 2. MENU 8/ /9/: , . , . 3. PLAY/PAUSE, 1. 2. TITLE . , . 8/ . 3. PLAY/PAUSE, PBC ( . )( VCD VCD ) PBC, 1- . 1. MENU, . 2. , 8/ , 3. 4. 5. PLAY/ PAUSE, STOP, MENU, . VCD. . 97 .
1. DISP , : DVD TC ( 00:41:28 2/6 Eng : ( ) ) 6 , 2 : Source: Dolby digital ByPass VCD VCD2/0 Title: 00:02:18 ( ProLogic ) . : / . 98 .
: Source: EQ: user Loud: — ( ) Loud. 2. DISP Loud. , , : ( ZOOM : 1 => 2 => 3 => 4 => ( DVD/VCD , ) . . DVD ) . SUB-TITLE . SUBT , ( DVD . ) DVD- , . , . 99 ANGLE
/ / ( . PAGE +/-. / / 7/8. , , ), DIR +/-, / . 9/:, AUDIO . REPEAT RANDOM . 2- 62 6- RDM , 2- . : . 226- Dolby Pro-Logic. 2- 6- Dolby Pro-Logic. 6- 6- 100 . .
: . MP3 CD . 6- 2- , DVD 3 3: 3 MPEG 3 . DVD-R/-RW, DVD+R/+RW, 3 CD-ROM, CD-R/-RW. 3, , 3, ISO 9660. . 3, , .mp3 . 3 , .mp3 , . , MP3 PC , . 8, . 448. . , , 3. 8 (VBR), , , , . 101
CD-R MP3: CD-RW, 3 44,1 128 448 3 ISO 9660, , 8, . . ( ). CD-R , . , MP3 CD-R CD-RW , . 3 , . CD-R CD-RW . . CD-R 16 , CD-RW . , . 102 . 1. ID3TAG.
. SRC, TUNER ( TV 1. ). . , 9/: , . . , . 2. , . 2 , . 1. 2 PLAY/PAUSE , . . 2. PLAY/PAUSE . 103 STOP ,
1. 10 ENTER 2. . PLAY/PAUSE 1. 2. . STOP , , . . . 8/ DISP . AUX AV AUX (DVD . .). , , , . , . AUX IN . AUX IN. 104 .
, . . . 9/: , DVD . ). PLAY/PAUSE, SYS.SETUP , . 8/ /9/: , , ASP . PLAY/PAUSE, 105 : , , RDS .
1. 2. . . 8/ , , : , . , . , , 3. , , 9/: . 4. 8/ , 5. : : , : . . PLAY/PAUSE, . 1, , , . . 2, , . : 12 Hr (12 ), 24 Hr (24 ). : : ), . ( .( : : . : , ). ., . . 1: . . 106 + -,
2: . . , 8/ 9/: : : , , NTSC, PAL, SECAM. : On ( / .) ( . ); Off ( .) ( . Manual ( / : OPEN/CLOSE, )( ); OPEN/CLOSE, ). ASP 1. 2. ASP . 8/ , Sub. w , Sub. W : . , Bass q-factor. 3. ., Treble 8/ , 5. . PLAY/PAUSE, 107 ., , 9/: . 4. . .
: , 150 Treble , 15 , 200 , 80 , 100 , 130 . : , 17 Sub.w Sub.w : 60 : 10 , 12.5 . : : 80 , 120 , 160 . : : 0D, 180D. Bass Q-factor: : 1.0, 1.25, 1.5, 2.0. RDS 1. 2. RDS . 8/ , : RDS, CT, 3. . 9/: , . 4. 8/ , 5. RDS: / RDS . PLAY/PAUSE, . 108 .
CT: / : I, RDS. / : ), .( .( ). , . , , . DVD , . . . 9/: , ). . 109 DVD PLAY/PAUSE, (
DVD SETUP , DVD . DVD 8/ , /9/: , , , II, . PROLOGIC , PLAY/PAUSE, 1. 2. : . . 8/ , : , , DVD 9/: 3. . , . 4. 8/ , 5. : : . PLAY/PAUSE, ( . ), , ), ). SUBTITLE . 110 , . (
: . AUDIO DVD : DVD . , . . MENU/TITLE 1. 2. . 8/ , : , 3. , 9/: . , . 4. 8/ , 5. . PLAY/PAUSE, : 16:9, 4:3. . : : ( ), : ), DVD ): .( . ). : ( . ), , , . 111 , (Pan & Scan). (
1. 2. . 8/ , : , DRC, ., 9/: 3. ., . , . 4. 8/ , 5. . PLAY/PAUSE, . : . DRC: . , . , : . : 0 ), 1 ( 1 ), ,5 ( . : . : 0 112 (
), 3 ( 1 ), : : 48 , 15 . .( . ( ), 96 ). ProLogic II Dolby ProLogic II — Dolby ProLogic, . , ( ProLogic , , : , ). Dolby ProLogic , . DPL . . ProLogic — , . . 1. 2. PROLOGIC II. 8/ , . : Surround mode, 3. 9/: . 113 , , ,
4. 8/ , 5. . PLAY/PAUSE, . Surround: Surround), Surround I ( ), Surr movie ( Surr music ( :« : .( Dolby ProLogic), Surr matrix ( , : DVD), ). » . ProLogic . : . : . ProLogic Music : ( ), . . ProLogic Music : 1, 2, 3, 4, 5, 6. 114 . . : 1, 2, 3, 4, 5, 6. .,
. 1. 2. . 8/ , : , , , . 3. , 9/: . 4. 8/ , 5. : PLAY/PAUSE, ( ). : ( 13 : . : ( ( 13 : ), : . ( 16 ), 16 ), ). ( 25, 30 ), ( ). : ), : ( 13 ( ), 115 ( 16 ).
1. 2. . 8/ , : , 3. , 9/: . . , . 4. 8/ , . 5. PLAY/PAUSE, : , 4 PLAY/PAUSE, , «8888» ( , — . , . . ). . , .. PLAY/PAUSE, , 4- . PLAY/PAUSE 116 .
: , . 1 1 8 — 8: . . , , : ). 117 .
, ( ). , . , . , , . ( , ). . , , . . . . ( ), . . , , . . , , . . 118
. , . . . . , . . . . . , . . . . . . RESET. . . . 30 . . , 30 . . . . . . . 119
: : 12 10 : 50 4 DVD/SVCD/VCD/HDCD/MP3/MP4/WMA/CDDA/Picture-CD/JPEG/ CD-R/ -RW/DVD±R/±RW 200 190 55 / 2,2 -10º — +60º 40 CD, 120 3 : ( )/ : : ESP : : 480 234 dpi 16:9 300:1 350 2 : 110°, : 130° : : : : FM : : 65.0 6 24 74.0 / 87.5 120 108.0 MHz
AM : 522-1620 12 2 RMS (+/-3 20 70 20 CD . 2000 ) : : (A-vtd): PAL/SECAM/NTSC 65 . . 121
(скачивание инструкции бесплатно)
Формат файла: PDF
Доступность: Бесплатно как и все руководства на сайте. Без регистрации и SMS.
Дополнительно: Чтение инструкции онлайн

EXCELLENCE
by
H-CMMD4042
MULTIMEDIA DVD-RECEIVER WITH MOTORIZED 7” TFT DISPLAY AND
TV-TUNER
Instruction manual
DVD-
7”
TFT
Страница:
(1 из 123)
навигация

1

2

3

4

5

6

7

8

9

10

11

12

13

14

15

16

17

18

19

20

21

22

23

24

25

26

27

28

29

30

31

32

33

34

35

36

37

38

39

40

41

42

43

44

45

46

47

48

49

50

51

52

53

54

55

56

57

58

59

60

61

62

63

64

65

66

67

68

69

70

71

72

73

74

75

76

77

78

79

80

81

82

83

84

85

86

87

88

89

90

91

92

93

94

95

96

97

98

99

100

101

102

103

104

105

106

107

108

109

110

111

112

113

114

115

116

117

118

119

120

121

122

123
Оглавление инструкции
- Страница 1 из 124
EXCELLENCE by H-CMMD4042 MULTIMEDIA DVD-RECEIVER WITH MOTORIZED 7” TFT DISPLAY AND TV-TUNER Instruction manual DVD- 7” TFT - Страница 2 из 124
Dear customer! Thank you for purchasing our product. For safety, it is strongly recommended to read this manual carefully before connecting, operating and/or adjusting the product and keep the manual for reference in the future. Table of contents Table of contents - Страница 3 из 124
General operations………………………………………………………………………………………………………………………….25 Reset the unit - Страница 4 из 124
Playing/ pausing ………………………………………………………………………………………………………………………34 Stop - Страница 5 из 124
Manual tuning………………………………………………………………………………………………………………………….43 Auto preset memory - Страница 6 из 124
Important safeguards Using the device at temperature below -10º may cause the breakage of the device. BEFORE USING PLEASE HEAT UP THE PASSENGER COMPARTMENT TO THE RECOMMENDED TEMPERATURE! Read carefully through this manual to familiarize yourself with this high-quality sound system. Disconnect the - Страница 7 из 124
Installation/ connection This unit can be installed in any dashboard having an opening as shown on the picture. The dashboard should be ~ 4.5 – 5.5 mm thick in order to be able to support the unit. Din front-mount (method 1) 1. 2. 3. 4. 5. 6. Insert mounting bracket (2) into the dashboard (1), - Страница 8 из 124
Removing the unit 1. Push trim ring upward and pull out the upper part. Push it downward and pull out the lower part. 2. Unscrew 4 pieces M2 screws. 3. Remove the rubber sheath. 4. Use a screwdriver to bend straight the bended mounting tab and tip out the unit from the mounting bracket. 5. Pull out - Страница 9 из 124
Electrical connection 9 - Страница 10 из 124
Note: For your driving safety, please link your parking wire with low power level, and keep it controlled by manual brake switch. Wire should be high power level and the unit cannot play video disc. Caution: For some car models you may need to modify wiring of the supplied power cord. Contact your - Страница 11 из 124
Parking brake cable connections Note: for safety purpose professional installation for the following connections is recommended. For cars with hand brake For cars with foot brake 11 - Страница 12 из 124
Unit controls Monitor 1. 2. 3. 4. 5. 6. 7. 8. BAND button Press it repeatedly to select your desired radio band during TUNER (RADIO) mode. AS button In TUNER (RADIO) mode press it to start automatic station search. LCD display DISP button Use this button to show the playback info or TV channel - Страница 13 из 124
repeatedly. To adjust the setting press the buttons. Press it and hold for 2 seconds to exit the mode. Front panel 9. Disc slot 10. VOL knob/ AUDIO / LO/DX button Rotate VOL knob to adjust the volume. Press it (the AUDIO button) to enter audio setting mode. Press the repeatedly to select the audio - Страница 14 из 124
13. AUDIO button In DVD mode press it to select the channel. In VCD mode press it to change the channel. 14. SUBTITLE button In DVD mode press it to select subtitle language. 15. SCN button In DVD mode press it to start/stop scan playback. 16. RPT button In DVD mode press it to start/stop repeat - Страница 15 из 124
22. RESET button Press the RESET button to restore the unit to the original factory settings. 23. Monitor 24. EJECT button Press this button to eject the disc. 25. Cursor buttons buttons In the menu use the cursor buttons to move through it. In DVD mode press the button to fast backward/ fast - Страница 16 из 124
Remote control 1. 2. 3. TITLE button – press it to open the disc title list. MENU button – press it to open the disc menu. REPT A-B button – use it to start repeat of the A-B fragment. 4. AUDIO button – in DVD mode press it to change the audio language. In VCD mode press it to change the channel. - Страница 17 из 124
11. 12. 13. 14. 15. 16. 17. 18. 19. 20. 21. 22. 23. 24. 25. 26. 27. In DVD mode press this button to slow the playback. Press again to slow rewind playback. GOTO button — press this button to set the player play disc starting at certain time. OPEN/CLOSE button — press this button to slide the - Страница 18 из 124
Changing the battery 1. Press the catch and at the same time pull out the battery tray (pic. 1). 2. Insert the 1 x lithium battery, type CR2025 (3V) battery with the stamped (+) mark facing upward. Insert the battery tray into the remote control (pic.2). Pic. 1 Pic. 2 Warning: Store the battery - Страница 19 из 124
LCD display 1. 2. Disc indicator. Disc playback indicators: SCN (scan), RPT (repeat), RDM (random), ALL (all chapters playback). 3. LOUD indicator. 4. Main display. 5. CH (displays the channel), DISC, RADIO (radio station number) indicator. 6. ST (stereo), LOC (local) indicator. Radio display - Страница 20 из 124
Monitor operations Open/close TFT monitor 1. 2. Press the OPEN/CLOSE button to open the monitor to the last viewing position. Press the OPEN/CLOSE button to load the monitor to the unit. TFT monitor auto open 1. 2. Enter the GENERAL SETUP menu (please refer to SYSTEM SETUP menu chapter of this - Страница 21 из 124
OR press the WIDE/PIC button on the monitor or the WIDE button on the RC repeatedly to select the aspect ratio: CINEMA => NORMAL => STANDBY. Image setting 1. 2. 3. 4. Press the PIC button on the RC or press and hold for 2 seconds the WIDE/PIC button on the monitor to enter the picture quality - Страница 22 из 124
unit. If it doesn’t help please reset the unit. 22 - Страница 23 из 124
Touch screen operations In any mode touch the left corner of the top area of the TFT display to open the main menu. Now you can select the playing source (Radio, DVD/CD, Aux in, TV (if the TV tuner is connected)) by touching the proper button on the display. To enter the unit setup menu touch the - Страница 24 из 124
Touch operations under DVD mode during playing the PM3/WMA files Touch operations under Tuner (Radio) mode 24 - Страница 25 из 124
General operations Reset the unit Operating the unit for the first time or after replacing the car battery, you must reset the unit. Press the RESET button on the front panel to restore the unit to the original factory settings. Power on/off Press POWER/MUTE button on the front panel or the POWER - Страница 26 из 124
2. Press the buttons on the front panel or press the / buttons on the RC to select the desired audio setting: EQ => BASS => TREBLE => FADER => BALANCE => LOUD. 3. Press the buttons to adjust the setting. 4. To exit the menu press and hold the volume knob. Note: If turning off the ACC power all the - Страница 27 из 124
Digital tuner operations Note: RDS service availability varies with areas. Please understand if RDS service is not available in you area, the following service is not available, either. To activate this function enter the RDS SETUP menu (please refer to SYSTEM SETUP menu chapter of this manual). - Страница 28 из 124
Band selection Press BAND button on the front panel or the STOP/BAND on the RC once or more to select: FM1, FM2, FM3, FM (OIRT), AM1, AM2, AM3. Manual/ automatic tuning Manual tuning: Press the / buttons on the RC or the / buttons on the panel repeatedly to select a station upward or downward step - Страница 29 из 124
AMS (Auto Memory Store) function Select the band. Press AS button on the panel or the PLAY/PAUSE / ENTER / SCAN button on the RC to enter auto search and store mode. The radio will automatically store the 6 strongest available stations to the 6 preset memories of the current band. The search will - Страница 30 из 124
TA (Traffic Alarm) function In TUNER (RADIO) mode press the button on the panel and hold for 2 seconds to turn ON or turn OFF the TA function. In TA mode press the / buttons on the RC or the / on the panel to start the traffic announcement program searching until the program is received. After the - Страница 31 из 124
Saving the PTY When the PTY function is on and the unit receives the current program type press the 1~6 button to store it into the channel selected. The default preset channels: P1 – DNEWS, P2 – DSPEECH, P3 – DSPORT, P4 – DPOP M, P5 – CLASSIC, P6 – DMUSIC. Quick PTY searching When the PTY function - Страница 32 из 124
Disc operations Glossary PBC (PlayBack Control) PlayBack Control is a menu recorded on the disc with SVCD or VCD2.0 format. For the discs contained PBC, it can playback interactive software with the menu displayed on TV. And if the disc contains still images, it can playback high definition of - Страница 33 из 124
Discs for playback This unit can play disc types: CD/DVD/CDDA/CD-R/-RW/DVD±R/±RW. Compatible with formats: DVD-video/SVCD/VCD/HDCD/MP3/MP4/WMA/Picture-CD/JPEG. The following file types are supported: Audio files: MP3 (*.mp3) WMA (*.wma) Video files: MP4 (*.avi, DIVX3.11/4.0/5.0/6.0 and XVID) MPEG - Страница 34 из 124
Loading a disc 1. 2. 3. Turn the power on. Insert the disc with the printed side facing upward into the slot. The unit will switch to DVD mode automatically. Press the EJECT button on the panel to eject the disc. Playing/ pausing To ensure good system performance, wait until the unit finishes - Страница 35 из 124
Direct entering the number To enter the 2- or 3-digit number of the track or chapter press the desired buttons with digits on the RC. For example, to enter number 135 press 1 => 3 => 5. Scanning forward and backward 1. Press the button on the RC or button on the panel to select the speed of fast - Страница 36 из 124
Repeat playback Press the RPT button on the panel or REPT button on the RC once or more to repeat the playback: For VCD/CD: REPEAT SINGLE => REPEAT OFF For DVD: REPEAT TITLE => REPEAT CHAPTER => REPEAT OFF For MP3: REPEAT SINGLE => REPEAT FOLDER => REPEAT OFF RPT icon will appear on the display. - Страница 37 из 124
1. During the disc playback press the GOTO button on the RC to enter the Search menu. For VCD discs press the GOTO button repeatedly to select the Track or Disc search. For DVD Search Time Title/Chapter 2. 3. —:—:—-/— For MPEG4/VCD Track search Time —:—:-OR Track —/— Disc search Time - Страница 38 из 124
Audio track and channel selection (for CD/VCD/DVD discs) For DVD playback: press the AUDIO button to change the audio language. OR enter the AUDIO menu (please refer to DVD SETUP menu chapter of this manual). For CD/VCD playback: press the AUDIO button repeatedly to alter the select the channel: - Страница 39 из 124
4. 5. Press STOP button to return to menu. Press MENU again to exit menu. On-screen display (OSD) 1. During playback press the DISP button on the RC to show the short playback information on display: DVD disc: T-Title (current/total) C – Chapter (current/total) 00:41:28 – Current playback time of - Страница 40 из 124
The playback status will be shown as following: Source: — the current source EQ: user — current equalizer setting Loud: — the loudness status. 2. Press the DISP button on the front panel repeatedly to show the following information on the display: Playback time => Clock => Disc format => Playback - Страница 41 из 124
Press the AUDIO button on the panel or the RC to select the audio language or the channel. Press the REPEAT or RANDOM buttons to select the mode of the playback. Alter between 2 Ch and 6 Ch Press and hold for 2 seconds the RDM button on the panel to alter between 2 Channel mode and 6 Channel mode. - Страница 42 из 124
If you play a non- MP3 file that has the “.mp3” extension, you may hear some noise. In this manual, we refer to what are called “MP3 file” and “folder” in PC terminology as “track” and “album”, respectively. Maximum number of directory level is 8, including the root directory. Maximum number of - Страница 43 из 124
TV tuner operations Switch to TV tuner mode 1. 2. Connect the TV set to the unit. Press the SRC button repeatedly to select the TUNER (TV) mode. OR in the SYSTEM SETUP menu select the TV item. Auto tuning 1. 2. Press the button on the panel or the / button on the RC to start auto search of - Страница 44 из 124
Scan tuning 1. 2. You can scan each stored channel for 10 seconds in sequence. Press the ENTER button on the panel to start scanning. Press the PLAY/PAUSE / ENTER / SCAN button on the panel or the STOP/BUTTON on the RC to stop auto scanning. Select the TV station 1. 2. Press the number buttons on - Страница 45 из 124
OR in the main menu select the AUX IN item. 45 - Страница 46 из 124
System setup menu In any mode touch the left top corner of the screen to open the main MENU. Use the cursor buttons or press the SETUP button on the screen to open the SETUP menu. In SETUP menu press the buttons on the panel or / buttons on the RC or touch the desired button on the screen to select - Страница 47 из 124
General setup 1. Enter the GENERAL SETUP menu. 2. Use the buttons on the panel or / buttons on the RC or touch the desired item on the screen to select the desired setting: Radio, Clock mode, Parking, OSD menu, Clock, Video format, TFT auto open. 3. Press the buttons on the panel or / buttons on - Страница 48 из 124
TFT auto open: set the monitor working mode when the unit is on and off: On (when the unit is off the monitor draws down into the unit automatically, when it’s on the monitor unfurls automatically), Off (when the unit is off the monitor draws down into the unit automatically, when it’s on the - Страница 49 из 124
Sub phase: if trying to boost the bass output of subwoofer the bass gets more murky. This may indicate that the subwoofer’s output and bass content you hear from other speakers cancel each other out. To remove this problem change the setting of subwoofer: 0D (subwoofer output in phase), 180D - Страница 50 из 124
DVD setup menu In any mode touch the left top corner of the screen to display the main MENU. Use the cursor buttons or touch the SETUP button on the screen to open the SETUP menu. In SETUP menu press the buttons on the panel or / buttons on the RC or touch the desired item on the screen to select - Страница 51 из 124
Language 1. Enter the LANG menu. 2. Use the buttons on the panel or / buttons on the RC or touch the desired item on the screen to select the desired setting: Subtitle, Audio, DVD menu. 3. Press the buttons on the panel or / buttons on the RC or touch the desired button on the screen to enter the - Страница 52 из 124
4. 5. Press the buttons on the panel or / buttons on the RC or touch the desired button on the screen to select the desired value. Press PLAY/PAUSE / ENTER / SCAN button to confirm. TV shape: select the width/height of the image: 16:9 (wide screen), 4:3 (normal view). This function is not available - Страница 53 из 124
DRC: set the DRC (dynamic range control) for better playback for low volume playback: On (use bass to play the more dynamical audio), Off (normal playback). Center delay: the time difference between center and front speakers. The time delay makes audio signal more accurate. Select the time delay: 0 - Страница 54 из 124
3. Press the buttons on the panel or / buttons on the RC or touch the desired button on the screen to enter the list of values. 4. Press the buttons on the panel or / buttons on the RC or touch the desired button on the screen to select the desired value. 5. Press PLAY/PAUSE / ENTER / SCAN button - Страница 55 из 124
SPK configuration 1. Enter the SPK CONFIG menu. 2. Use the buttons on the panel or / buttons on the RC or touch the desired item on the screen to select the settings: Multi-CH, Stereo, Sub, Center. 3. Press the buttons on the panel or / buttons on the RC or touch the desired button on the screen to - Страница 56 из 124
Rating This unit has the built in parental lock feature to prevent authorized person to view restricted disc content. 1. Enter the RATING menu 2. Use the buttons on the panel or / buttons on the RC or touch the desired item on the screen to select the setting: Password, Rating, Load factory. 3. - Страница 57 из 124
Handling and cleaning discs Dirty, scratched or warped discs may cause skip ping or noise. Handle the disc only by the edges. To keep clean do not touch its surface. Discs should be stored in their cases after use to avoid scratches. Do not expose discs to direct sunlight, high humidity, high - Страница 58 из 124
Troubleshooting guide Symptom Cause Solution No power. The car ignition is not on. The fuse is blown. If the power supply is properly connected to the car accessory switch the ignition key to “ACC”. Replace the fuse. Disc cannot be loaded. Presence of disc inside the player. Remove the disc in the - Страница 59 из 124
Specification General Power supply: Current consumption: Maximum power output: Compatible formats: 12 V DC max. 10 A 50 W x 4 channels DVD/SVCD/VCD/HDCD/MP3/MP4/WMA/CDDA/Picture-CD/JPEG/ CD-R/-RW/DVD±R/±RW playback Dimensions (L x W x H) / weight: 200 x 190 x 55 mm / 2.2 kg Working temperature - Страница 60 из 124
AM section Frequency range: Preset memory stations: 522 kHz — 1620 kHz 12 Audio specification Maximum output: Frequency response: S/N ratio(A-vtd): 2 Vrms (+/- 3 dB) 20 Hz — 20 KHz 70 dB Line out Output: CD max 2000 mV TV Color system Sensitivity PAL/SECAM/NTSC 65 dB Specifications are subject to - Страница 61 из 124
! . , , . ………………………………………………………………………………………………………………………………….61 ……………………………………………………………………………………………………………….65 / - Страница 62 из 124
…………………………………………………………………………………………………..84 ………………………………………………………………………………………………………………………86 - Страница 63 из 124
………………………………………………………………………………………………………………………95 / ………………………………………………………………………………………………………….95 - Страница 64 из 124
……………………………………………………………………………………………..105 ……………………………………………………………………………………………………………105 - Страница 65 из 124
-10º . ! , . . , , . , . , , . . , , . , . , . , , , . . , , . , , , , , . . , . , . . 65 - Страница 66 из 124
, . / , , ~ 4,5 – 5,5 . , . 1. (2) (1); , , , 2. 2 . 5 (7) 2 (3) . 3. (4). 4. (5), . 5. (2). (3) 2 (2). 6. . 66 4 - Страница 67 из 124
: . , 1 1. . . . 2. 3. 4. 5. 4 2. . . . , , . 1. (2). , 2. (2) (1). 3. (3). , . 4. . 67 , - Страница 68 из 124
68 - Страница 69 из 124
: , . , . . : . . ISO 1. ISO, . , 2. ISO , . 3. , , : 4. A 1 2 3 4 5 6 7 8 B (+)—(-)—(+)—(-)—(+)—((-)—(+)—(-)— 12 (+)/ / ACC+/ 69 - Страница 70 из 124
: , : DVD . ( ). ( « » ). : 70 - Страница 71 из 124
1. BAND TUNER ( ) , 2. . AS TUNER ( ) , . 3. 4. DISP , . 5. OPEN/CLOSE , . 6. 7. ANGLE , . 71 - Страница 72 из 124
2 8. , . WIDE/PIC , . , 2 . . . 2 9. 10. VOL / . AUDIO / LO/DX , , , . 72 - Страница 73 из 124
( AUDIO), , . , 2 . TUNER ( . ) 2 : LOCAL 11. . , DISTANT. POWER/ MUTE , . . , , . , . 12. 13. [1-6] AUDIO DVD SUBTITLE DVD SCN 14. 15. , , , 16. . VCD – . . / . RPT . 17. RDM , . 2 , 2- . 18. STOP , . 73 6- - Страница 74 из 124
19. 20. SRC 21. , : TUNER ( ), DVD, DVDC, AUX IN, CAMERA. PLAY/PAUSE / ENTER / SCAN – ( ENTER). , . ( TUNER ( PLAY/PAUSE). ) 2 ( TUNER ( ) SCAN). 2 ( , SCAN). RESET RESET, 23. 24. , , . 22. , . EJECT , . 25. . DVD DVD , , / / , / . . 74 . / - Страница 75 из 124
TUNER ( . TUNER ( ) , ) , / . TUNER ( . ) , 2 / 75 . , - Страница 76 из 124
1. TITLE – , . 2. MENU – , . 3. REPT A-B – 4. , . DVD . AUDIO , , 5. VCD . DISP — , . 6. SUBTITLE — DVD . DVD , 7. ANGLE , 8. . / — DVD , / / TUNER ( / . ) , . 76 - Страница 77 из 124
/ . 9. PLAY/PAUSE / ENTER / SCAN ( ENTER). , . ( TUNER ( ) ( SCAN). – DVD GOTO – . OPEN/CLOSE . MUTE — 10. 11. 12. 13. 14. PLAY/PAUSE). , . , . , , . , , POWER . 16. RPT – DVD / / . 17. SRC AUX IN, CAMERA. 18. CD 19. DVD , . . 15. , . , , , : TUNER ( – ), DVD, DVDC, . . , . 77 - Страница 78 из 124
20. 21. 22. 23. 24. VOL +/- STOP/ BAND – TUNER ( ) ZOOM – PIC – ANGLE , . DVD , . , . , . , . , 25. 26. 27. . WIDE DVD SETUP – SYS SETUP – , . , DVD . , . : 1. , ( 2. (CR 2025 3V), . ( . 1). . 2). : .2 .1 . , . ( –6 ). . . 78 - Страница 79 из 124
LCD 1. 2. . : SCN ), RDM ), ALL ). ), RPT ( 3. 4. 5. 6. LOUD. . CH ( ST ( ), DISC, RADIO ( ) ), LOC ( Tuner ( RDS: REG ), PTY ( ), TA ( ), TP, AF ( ), INFO ( 7. ) . ) ). 8. 9. 10. 11. ST ( 12. LOC ( . . . ) . ) . 79 . - Страница 80 из 124
13. ), RPT ( 14. 15. : SCN ), RDM ), ALL ). . . 80 - Страница 81 из 124
/ 1. OPEN/CLOSE, . , . 2. OPEN/CLOSE, . 1. ( ). 2. / : On ( .) ( . ); Off ( .) ( . OPEN/CLOSE, Manual ( ); )( / OPEN/CLOSE, ). , . , NGLE . 81 - Страница 82 из 124
, NGLE ( . DVD ). CINEMA ( WIDE/PIC ) => NORMAL ( 1. : 16:9 (wide screen), 4:3 (normal view). WIDE , ) => STANDBY ( ). PIC , WIDE/PIC : 2 . 2. , ), CONTRAST ( / 3. ), BRIGHT ( : COLOR ). , . 4. PIC WIDE/PIC , . «PRK SW» , TFT. , « , « 82 » ». . : - Страница 83 из 124
« », , . , OPEN , . . OPEN , RESET, . 83 - Страница 84 из 124
, (MENU), TFT. , (Radio, DVD/CD, Aux in, TV ( )), DVD- ( SETUP ). DVD DVD – B– DISP C– D– E– F– STOP, (MENU) ( ) : MENU, PLAY/PAUSE, , , , . 84 : - Страница 85 из 124
DVD MP3/WMA , Tuner ( ) , 85 - Страница 86 из 124
RESET. : , , . / POWER/MUTE POWER , . 2 POWER/MUTE : , . , , . VOL + , . VOL , . : . 86 - Страница 87 из 124
, , 1. 2. 3. 4. POWER/MU , . AUDIO ( ) MUTE . , . / => BASS => TREBLE => FADER => BALANCE => LOUD. , 2 : , : EQ . . . 3 , . SRC, ) => DVDC => AUX-IN => CAMERA ( , DVD , Loud. TUNER ( ) , . , : TUNER ( ) => DVD ). DISP, : DISP, , : 87 - Страница 88 из 124
: RDS RDS ( ) . . , RDS, RDS ) ( ON ( SRC, , RADIO .). — TUNER ( : ). . , . 1. 2. 3. 4. 5. 6. 7. 8. 9. , RDS (AF, TA, TP, PTY) RDS RADIO 88 . , - Страница 89 из 124
B ND FM2, FM3, FM (OIRT), AM1, AM2, AM3. STOP/BAND , : FM1, / : / , . 2 , . . : / 2 , . , . . 2 , . . 6 7 . : — ( ). . 1~6, . — : ( , ). 1~6. 89 - Страница 90 из 124
. ,6 SCAN AS 1~6. , 2 , PLAY/PAUSE / ENTER / . AS. PLAY/PAUSE / ENTER / SCAN, 10 . , . LOC ( ) LOC , . 2 LO/DX ( ), LOC. , AF ( . ) , , . . 2 BAND, AF. AF , RDS . , . 90 - Страница 91 из 124
RDS , AF. . TA ( TUNER ( ) ) 2 , . / , , . , . , SEEK, SCAN, AMS . . PTY ( FM1. 2. 3. ) , RDS, TUNER ( TA . ) 2 , PTY. PTY / , : None, News, Speech, Music, Document, Fock M, Oldies, Nation M, Country, Jazz, Leisure, Travel, Phone in, Religion, Social, Children, Finance, Weather, Other M, Classics, - Страница 92 из 124
, PTY, 1~6, , . : P1 – DNEWS, P2 – DSPEECH, P3 – DSPORT, P4 – DPOP M, P5 – CLASSIC, P6 – DMUSIC. PTY 1~6, . REGION REGION, RDS ( ). AF REGION , AF , AF , REGION AF . , . RDS RDS, ( ). , RDS , . CT . 92 , - Страница 93 из 124
PBC ( ) – , PBC, . . . . 3 ( ), , 1, 2 1 3. . , . . – . , . . 93 , , , - Страница 94 из 124
: CD/DVD/CDDA/CD-R/-RW/DVD±R/±RW. : DVD-video, SVCD/VCD/HDCD/MP3/MP4/WMA/ Picture-CD/JPEG. : : MP3 (*.mp3) WMA (*.wma) : MP4 (*.avi, DIVX3.11/4.0/5.0/6.0 and XVID) MPEG 2(*.vob) MPEG 1(*.dat) : JPEG (*.jpg) ISO 9660 ISO 9660 + Joliet 30 . – 448. -8 . – 99. — 99 59 . MP3 : 8 48 ( 44,1 ). P3 : 32 — - Страница 95 из 124
1. 2. 3. . . EJECT DVD. , . / , . . PLAY/PAUSE, . STOP STOP/BAND . . PLAY/PAUSE . / 1. , / . 2. , / 3. 2- . (1-9, 0) / . 3. , 95 135, 1 => 3 => 5. - Страница 96 из 124
1. , PLAY/PAUSE, : 2 => 4 => 8 => 20. . , : , . 2. / : 2 => 4 => . 8 => . PLAY/PAUSE, 20. , ), 1/2 => 1/4 => 1/6 => 1/7 . : 1/2 => 1/4 => 1/6 => 1/7 ( PLAY/PAUSE, , ). : , . RE : VCD/CD: REPEAT SINGLE ( DVD: REPEAT TITLE ( REPEAT OFF ( ). MP3: REPEAT SINGLE ( ) => REPEAT OFF ( ) => REPEAT CHAPTER ( - Страница 97 из 124
REPEAT OFF ( ). RPT. 1. , REPT A-B 2. , REPT A-B ( ), . ( ), . . 3. . ( DVD/CD/VCD/MP3) RDM . , Scan ( , . CDDA/VCD) 10 SCN . , GOTO ( . , . DVD/VCD) , , . 1. GOTO VCD GOT , 97 , . .) - Страница 98 из 124
DVD Search Time Title/Chapter MPEG4/VCD Track search Time Track —:—:—-/— —:—:—-/— 2. 3. OR Disc search Time Track —:—:—-/— / ), Title/Chapter ( : ( => 8 => 2 => 0 => 0 => 0. => 0 => ), Track ( , ). , ). , PLAY/PAUSE, : . PLAY/PAUSE, : 13, => 8. : Time 18 , 20 00 , :1 . , 20 8, :2 - Страница 99 из 124
channel ( ) => Stereo ( ). DVD 1. 2. MENU , / / . / , . 3. PLAY/PAUSE, 1. 2. . TITLE , . / . 3. PLAY/PAUSE, PBC ( . )( VCD VCD ) PBC, 1- . 1. MENU, . 2. , / 3. 4. 5. , PLAY/ PAUSE, STOP, MENU, . VCD. . 99 . - Страница 100 из 124
1. DISP , : DVD : T( C– ( 00:41:28 – 2/6 Eng – ) ) 6 , –2 : Source: Dolby digital – ByPass – VCD VCD2/0 – Title: 00:02:18 – ( ProLogic ) . : / . 100 . - Страница 101 из 124
: Source: EQ: user – Loud: — ( ) Loud. 2. DISP Loud. , , : ( ZOOM : 1 => 2 => 3 => 4 => ( DVD/VCD , ) . . DVD ) . SUB-TITLE . SUBT , ( DVD . ) DVD- , . , . 101 ANGLE - Страница 102 из 124
/ / ( . – PAGE +/-. / / / . – , , ), DIR +/-, / . / , AUDIO . REPEAT – RANDOM . 2- 62 6- RDM , 2- . : . 226- Dolby Pro-Logic. 2- 6- Dolby Pro-Logic. 6- 6- 102 . . - Страница 103 из 124
: . MP3 CD . 6- 2- , DVD 3 3: 3 MPEG 3 . DVD-R/-RW, DVD+R/+RW, 3 CD-ROM, CD-R/-RW. 3, , ISO 9660. 3, . 3, , “.mp3”. 3 , “.mp3”, . , PC “ ” “ “ ” MP3” “ ”, . 8, . 448. . , , 3. 8 (VBR), , , , . 103 - Страница 104 из 124
CD-R MP3: CD-RW, 3 44,1 128 448 3 ISO 9660, , 8, . . ( ). CD-R , . , MP3 CD-R CD-RW , . 3 , . CD-R CD-RW . . CD-R 16 , CD-RW . , . 104 . 1. ID3TAG. - Страница 105 из 124
. SRC, TUNER ( TV 1. ). . / . , , . , . 2. , . 2 , . 1. 2 PLAY/PAUSE , . . 2. PLAY/PAUSE . 105 STOP , - Страница 106 из 124
1. 10 ENTER 2. . PLAY/PAUSE . STOP , . 1. 2. , . / . DISP . AUX AV AUX (DVD . .). , , – . , . AUX IN . AUX IN. 106 . , - Страница 107 из 124
, . . . / , DVD . ). PLAY/PAUSE, SYS.SETUP , . / / / , : , PLAY/PAUSE, 107 , ASP . , . RDS - Страница 108 из 124
1. 2. . . / , : , , . , , , , . 3. / , . 4. / , . 5. : : , : . PLAY/PAUSE, . 1, , , . . 2, , . : 12 Hr (12 ), 24 Hr (24 ). : : ), . ( .( : : . , ). : ., . . 1: . . 108 + -, - Страница 109 из 124
2: . . / , / : : , , NTSC, PAL, SECAM. : On ( / : .) ( . ); Off ( . ); Manual ( OPEN/CLOSE, .) ( OPEN/CLOSE, ) ( / ). ASP 1. 2. ASP . / , ., Sub. w : , Sub. W . , Bass q-factor. 3. ., Treble / , . 4. / , 5. . PLAY/PAUSE, 109 . . - Страница 110 из 124
: , 150 Treble , 15 , 200 , 80 , 100 , 130 . : , 17 Sub.w Sub.w : 60 : 10 , 12.5 . : : 80 , 120 , 160 . : : 0D, 180D. Bass Q-factor: : 1.0, 1.25, 1.5, 2.0. RDS 1. 2. RDS . / , : RDS, CT, 3. . / , . 4. / , 5. RDS: / RDS . PLAY/PAUSE, . 110 . - Страница 111 из 124
CT: / : I, RDS. / : ), .( .( ). , . , , . DVD , . . . / , ). . 111 DVD PLAY/PAUSE, ( - Страница 112 из 124
DVD SETUP , DVD . DVD / / / , : , , , PLAY/PAUSE, 1. 2. , PROLOGIC II, . . . / , : , , DVD / 3. . , . 4. / , 5. : : . PLAY/PAUSE, ( . ), , ), ). SUBTITLE . 112 , . ( - Страница 113 из 124
: . AUDIO , . DVD : DVD . . MENU/TITLE 1. 2. . / , : , , 3. . / , . 4. / , 5. . PLAY/PAUSE, : 16:9, 4:3. . : : ( ), . DVD ): .( . ). : : 113 , , ( - Страница 114 из 124
), ( ), , . 1. 2. (Pan & Scan). . / , : , DRC, ., ., . 3. / , . 4. / , . 5. PLAY/PAUSE, . : . DRC: . , . , : . : 0 ), 1 ( 1 114 ), …, 5 . - Страница 115 из 124
: . : 0 ), 3 ( 1 ), …, 15 : : 48 ( . .( . ( ), 96 ). ProLogic II Dolby ProLogic II — Dolby ProLogic, . , ( : , ). Dolby ProLogic , . ProLogic , , DPL . . ProLogic — , . . 1. 2. PROLOGIC II. / , . : Surround mode, 115 , , - Страница 116 из 124
3. / , . 4. / , 5. . PLAY/PAUSE, . Surround: Surround), Surround I ( ), Surr movie ( Surr music ( : « : .( Dolby ProLogic), Surr matrix ( : DVD), ). » . : , ., ProLogic . . : . ProLogic Music : ( ), . . ProLogic Music 116 . . : 1, 2, 3, 4, 5, 6. - Страница 117 из 124
: 1, 2, 3, 4, 5, 6. . 1. 2. . / , : , , , . 3. / , . 4. / , 5. : PLAY/PAUSE, ( ). : ( 13 : . : ( : 16 ), ( ( ). 25, 30 ). 117 ), ( ), 16 ( 13 : . ), - Страница 118 из 124
: ), : ( ( 13 ), 16 ( ). 1. 2. . / , : , , 3. . . / , . 4. / , . 5. PLAY/PAUSE, : , 4 PLAY/PAUSE, , «8888» ( , — . , . . ). . , .. PLAY/PAUSE, , 4- . PLAY/PAUSE 118 . - Страница 119 из 124
: , . 1 1 8 — 8: . . , , : ). 119 . - Страница 120 из 124
, ( ). , . , . , , . ( , ). . , , . . . . ( ), . . , , . . , , . . 120 - Страница 121 из 124
. , “ ”. . . . , . . . . , . . . . . . . RESET. . . . 30 . . , 30 . . . . . . . 121 - Страница 122 из 124
: : 12 10 : 50 4 DVD/SVCD/VCD/HDCD/MP3/MP4/WMA/CDDA/Picture-CD/JPEG/ CD-R/ -RW/DVD±R/±RW 200 190 55 / 2,2 -10º — +60º 40 CD, 120 3 : ( )/ : : ESP : 7” 480 234 dpi 16:9 300:1 350 2 : 110°, : 130° : : : : : FM : : 65.0 – 74.0 / 87.5 – 108.0 MHz 6 122 - Страница 123 из 124
24 AM : 522-1620 12 2 RMS (+/-3 ) : : (A-vtd): 20 70 CD – 20 . 2000 PAL/SECAM/NTSC 65 . . 123 - Страница 124 из 124
Страницы и текст этой инструкции
 Инструкция автомагнитолы Hyundai Electronics H-CMMD4042
 Информация отображена на картинке
 Информация отображена на картинке
 Информация отображена на картинке
 Информация отображена на картинке
Как использовать наш сайт инструкций OnlineManuals.ru
Наша цель состоит в том, чтобы предоставить вам быстрый доступ к содержанию инструкции для автомагнитолы Hyundai Electronics H-CMMD4042.
С помощью онлайн просмотра, Вы можете быстро просмотреть содержимое инструкции и найти решение проблемы с автомагнитолы Hyundai Electronics H-CMMD4042.
Для Вашего удобства
Если листать руководство пользователя автомагнитолы Hyundai Electronics H-CMMD4042 прямо на сайте, не очень удобно для Вас, есть два возможных решения:
• Просмотр в полноэкранном режиме — легко просмотреть руководство пользователя (без загрузки его на свой компьютер), Вы можете использовать режим полноэкранного просмотра.
Для просмотра инструкции пользователя автомагнитолы Hyundai Electronics H-CMMD4042 на полном экране, используйте кнопку «Открыть в Pdf-viewer».
• Загрузка на компьютер — Вы можете также скачать Инструкция автомагнитолы Hyundai Electronics H-CMMD4042 на свой компьютер и сохранить его в файлах.
Многие люди предпочитают читать документы не на экране, а в печатной версии.
Возможность печати руководства пользователя также была предусмотрена на нашем сайте,
и вы можете использовать ее, нажав на иконку «печать» в Pdf-viewer.
Нет необходимости печатать все руководство автомагнитолы Hyundai Electronics H-CMMD4042, можно выбрать только нужные страницы инструкции.