hp-detect-load-my-device-portlet
![]()
Действия
- ${title}
Загрузка…
hp-product-information-portlet
![]()
Действия
- ${title}
Загрузка…
У вас уже есть учетная запись HP? Выберите продукты, которыми вы владеете.
Войти
/
Зарегистрироваться
Док-станция HP USB-C G5

Выбрать другие серии продуктов
![]()
Добавить этот продукт в личную панель


Этот продукт был добавлен в личную панель
hp-product-builder-portlet
![]()
Действия
- ${title}
Загрузка…
hp-pdp-secondary-navigation-portlet
![]()
Действия
- ${title}
Загрузка…
hp-promotion-tiles-portlet
![]()
Действия
- ${title}
Загрузка…
hp-country-locator-portlet
![]()
Действия
- ${title}
Загрузка…
Страна/регион:

Казахстан
hp-product-warranty-check
![]()
Действия
- ${title}
Загрузка…
инструкцияHP USB Type-C Dock G5

User Guide
Посмотреть инструкция для HP USB Type-C Dock G5 бесплатно. Руководство относится к категории Подставки для подзарядки / док-станции, 1 человек(а) дали ему среднюю оценку 6.9. Руководство доступно на следующих языках: английский. У вас есть вопрос о HP USB Type-C Dock G5 или вам нужна помощь? Задайте свой вопрос здесь
- Getting started
- Using the docking station
- Disconnecting the docking station
- Troubleshooting
- Specifications
- Electrostatic discharge
- Accessibility
- Index
Нужна помощь?
У вас есть вопрос о HP а ответа нет в руководстве? Задайте свой вопрос здесь Дай исчерпывающее описание проблемы и четко задайте свой вопрос. Чем детальнее описание проблемы или вопроса, тем легче будет другим пользователям HP предоставить вам исчерпывающий ответ.
Количество вопросов: 0


Главная
| HP | |
| USB Type-C Dock G5 | |
| Подставка для подзарядки / док-станция | |
| английский | |
| Руководство пользователя (PDF) |
Не можете найти ответ на свой вопрос в руководстве? Вы можете найти ответ на свой вопрос ниже, в разделе часто задаваемых вопросов о HP USB Type-C Dock G5.
Инструкция HP USB Type-C Dock G5 доступно в русский?
Не нашли свой вопрос? Задайте свой вопрос здесь
Нет результатов

HP Thunderbolt Dock G2
инструкция35 страниц(ы)

Lenovo ThinkPad USB Type-C Dock Gen 2
инструкция20 страниц(ы)

Lenovo Hybrid USB-C with USB-A Dock
инструкция24 страниц(ы)

Edifier Tick Tock Dock
инструкция1 страница

KitSound Clock Dock
инструкция3 страниц(ы)

OWC Thunderbolt Dock
инструкция10 страниц(ы)

Lenovo ThinkPad Hybrid USB-C
инструкция24 страниц(ы)

Sharkoon SATA QuickPort USB 3.1 Type C
инструкция2 страниц(ы)

Satechi Type-C Multimedia Adapter
инструкция1 страница

Lenovo ThinkPad USB C Doc
инструкция42 страниц(ы)
Посмотреть все HP руководства Посмотреть все HP Подставка для подзарядки / док-станция руководства
Главная » HP » Руководство пользователя док-станции HP USB Type-C G5
Содержание скрывать
1
Руководство пользователя док-станции HP USB Type-C G5
2
Похожие сообщения
 Руководство пользователя док-станции HP USB Type-C G5

View Fullscreen
Похожие сообщения
-

Руководство пользователя монитора HP
Руководство пользователя монитора HP — Загрузить [оптимизированное] Руководство пользователя монитора HP — Загрузить
-
Руководство пользователя монитора HP G4 FHD USB-C
Технические характеристики монитора HP G4 FHD USB-C Монитор HP E24u G4 FHD USB-C Кнопки экранного меню на передней панели Кнопка питания…
-
Руководство пользователя приложения HP Smart
Руководство пользователя приложения HP Smart
-
Руководство пользователя ноутбука HP
Руководство пользователя ноутбука HP — Оптимизированный PDF-файл Руководство пользователя ноутбука HP — Исходный PDF-файл


Оставить комментарий
Ваш электронный адрес не будет опубликован. Обязательные поля помечены * *
КОММЕНТАРИЙ *
Имя и фамилия
Эл. адрес
Cайт
Сохраните мое имя, адрес электронной почты и веб-сайт в этом браузере для следующего комментария.
View a manual of the HP USB Type-C Dock G5 below. All manuals on ManualsCat.com can be viewed completely free of charge. By using the ‘Select a language’ button, you can choose the language of the manual you want to view.
Page: 1
© Copyright 2019 HP Development Company,
L.P.
DisplayPort™ and the DisplayPort™ logo are
trademarks owned by the Video Electronics
Standards Association (VESA®) in the United
States and other countries.Windows is either a
registered trademark or trademark of
Microsoft Corporation in the United States
and/or other countries.
The information contained herein is subject to
change without notice. The only warranties for
HP products and services are set forth in the
express warranty statements accompanying
such products and services. Nothing herein
should be construed as constituting an
additional warranty. HP shall not be liable for
technical or editorial errors or omissions
contained herein.
First Edition: May 2019
Document Part Number: L63477-001
Page: 2
Table of contents
1 Getting started …………………………………………………………………………………………………………………………… 1
Components ……………………………………………………………………………………………………………………………………….. 1
Top ……………………………………………………………………………………………………………………………………. 1
Front …………………………………………………………………………………………………………………………………. 2
Left ……………………………………………………………………………………………………………………………………. 3
Rear …………………………………………………………………………………………………………………………………… 4
Bottom ………………………………………………………………………………………………………………………………. 5
Setting up the docking station ……………………………………………………………………………………………………………… 6
Step 1: Connecting to AC power ……………………………………………………………………………………………. 6
Step 2: Connecting to a computer …………………………………………………………………………………………. 7
Step 3: Turning on the docking station ………………………………………………………………………………….. 8
Step 4: Preventing Sleep or Hibernation ………………………………………………………………………………… 8
Setting up the software ……………………………………………………………………………………………………………………….. 8
Updating the docking station ……………………………………………………………………………………………………………….. 9
Downloading HP Firmware Installer ………………………………………………………………………………………. 9
Installing updates ……………………………………………………………………………………………………………….. 9
Configuring an external monitor …………………………………………………………………………………………………………. 10
Using Windows …………………………………………………………………………………………………………………. 10
Sleep, Hibernation, shutdown, and restart …………………………………………………………………………… 11
2 Using the docking station …………………………………………………………………………………………………………….. 12
Docking station guidelines …………………………………………………………………………………………………………………. 12
Connecting to a network ……………………………………………………………………………………………………………………. 13
Connecting USB devices ……………………………………………………………………………………………………………………… 14
Connecting to a DisplayPort device ……………………………………………………………………………………………………… 15
Connecting to an HDMI device …………………………………………………………………………………………………………….. 16
Connecting audio ………………………………………………………………………………………………………………………………. 17
Connecting analog audio devices ………………………………………………………………………………………… 17
Connecting an optional security cable …………………………………………………………………………………………………. 17
3 Disconnecting the docking station …………………………………………………………………………………………………. 18
4 Troubleshooting ………………………………………………………………………………………………………………………… 19
Solving common problems …………………………………………………………………………………………………………………. 19
General use and connection problems ………………………………………………………………………………… 19
Audio problems ………………………………………………………………………………………………………………… 19
iii
Page: 3
Video problems ………………………………………………………………………………………………………………… 20
Getting more information …………………………………………………………………………………………………………………… 20
5 Specifications ……………………………………………………………………………………………………………………………. 21
Input power ………………………………………………………………………………………………………………………………………. 21
Operating environment ……………………………………………………………………………………………………………………… 21
6 Electrostatic discharge ……………………………………………………………………………………………………………….. 22
7 Accessibility ……………………………………………………………………………………………………………………………… 23
Accessibility ……………………………………………………………………………………………………………………………………… 23
Finding the technology tools you need ……………………………………………………………………………….. 23
Our commitment ………………………………………………………………………………………………………………. 23
International Association of Accessibility Professionals (IAAP) ………………………………………………. 23
Finding the best assistive technology …………………………………………………………………………………. 24
Assessing your needs ……………………………………………………………………………………….. 24
Accessibility for HP products ……………………………………………………………………………… 24
Standards and legislation …………………………………………………………………………………………………………………… 25
Standards ………………………………………………………………………………………………………………………… 25
Mandate 376 – EN 301 549 ……………………………………………………………………………….. 25
Web Content Accessibility Guidelines (WCAG) ………………………………………………………. 25
Legislation and regulations ……………………………………………………………………………………………….. 25
United States ……………………………………………………………………………………………………. 26
21st Century Communications and Video Accessibility Act (CVAA) …………………………. 26
Canada …………………………………………………………………………………………………………….. 26
Europe …………………………………………………………………………………………………………….. 27
United Kingdom ……………………………………………………………………………………………….. 27
Australia ………………………………………………………………………………………………………….. 27
Worldwide ……………………………………………………………………………………………………….. 27
Useful accessibility resources and links ……………………………………………………………………………………………….. 28
Organizations …………………………………………………………………………………………………………………… 28
Educational institutions …………………………………………………………………………………………………….. 28
Other disability resources ………………………………………………………………………………………………….. 28
HP links ……………………………………………………………………………………………………………………………. 28
Contacting support ……………………………………………………………………………………………………………………………. 29
Index …………………………………………………………………………………………………………………………………………. 30
iv
Page: 4
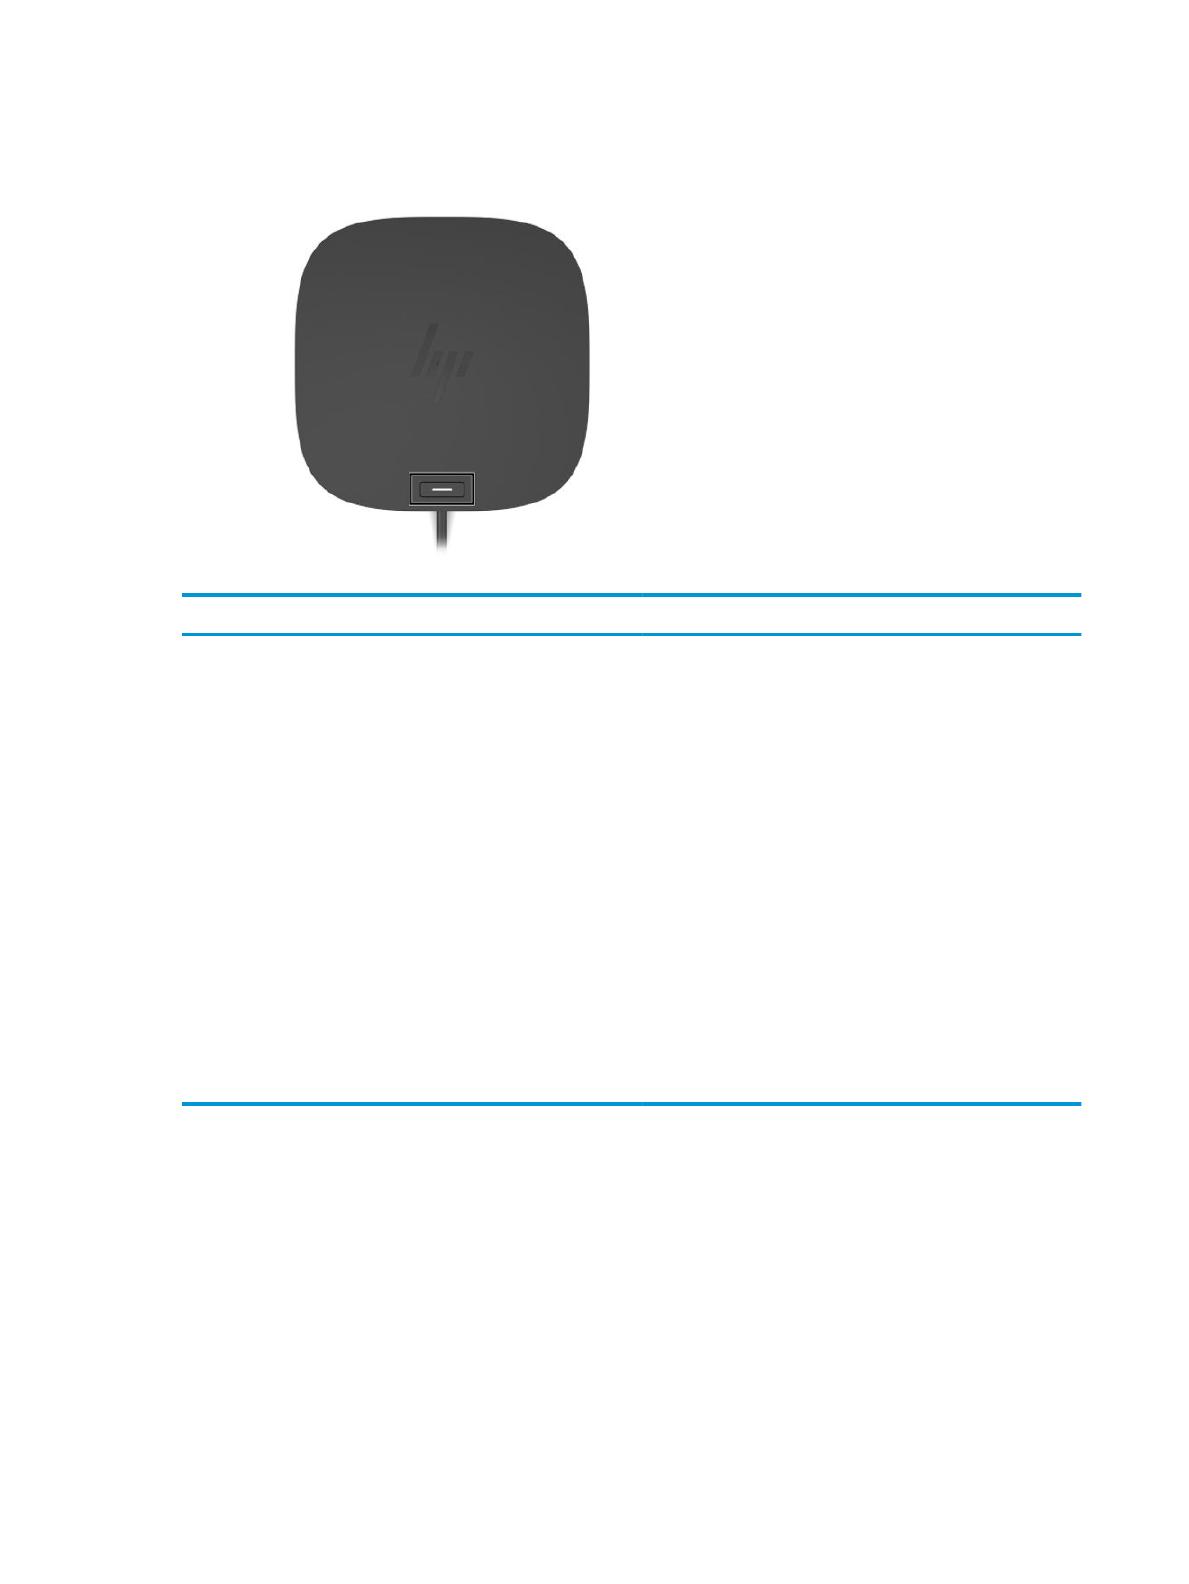
1 Getting started
Components
This chapter identifies the visible hardware features of the docking station and provides setup instructions.
NOTE: Some features of the docking station may not be supported by your computer.
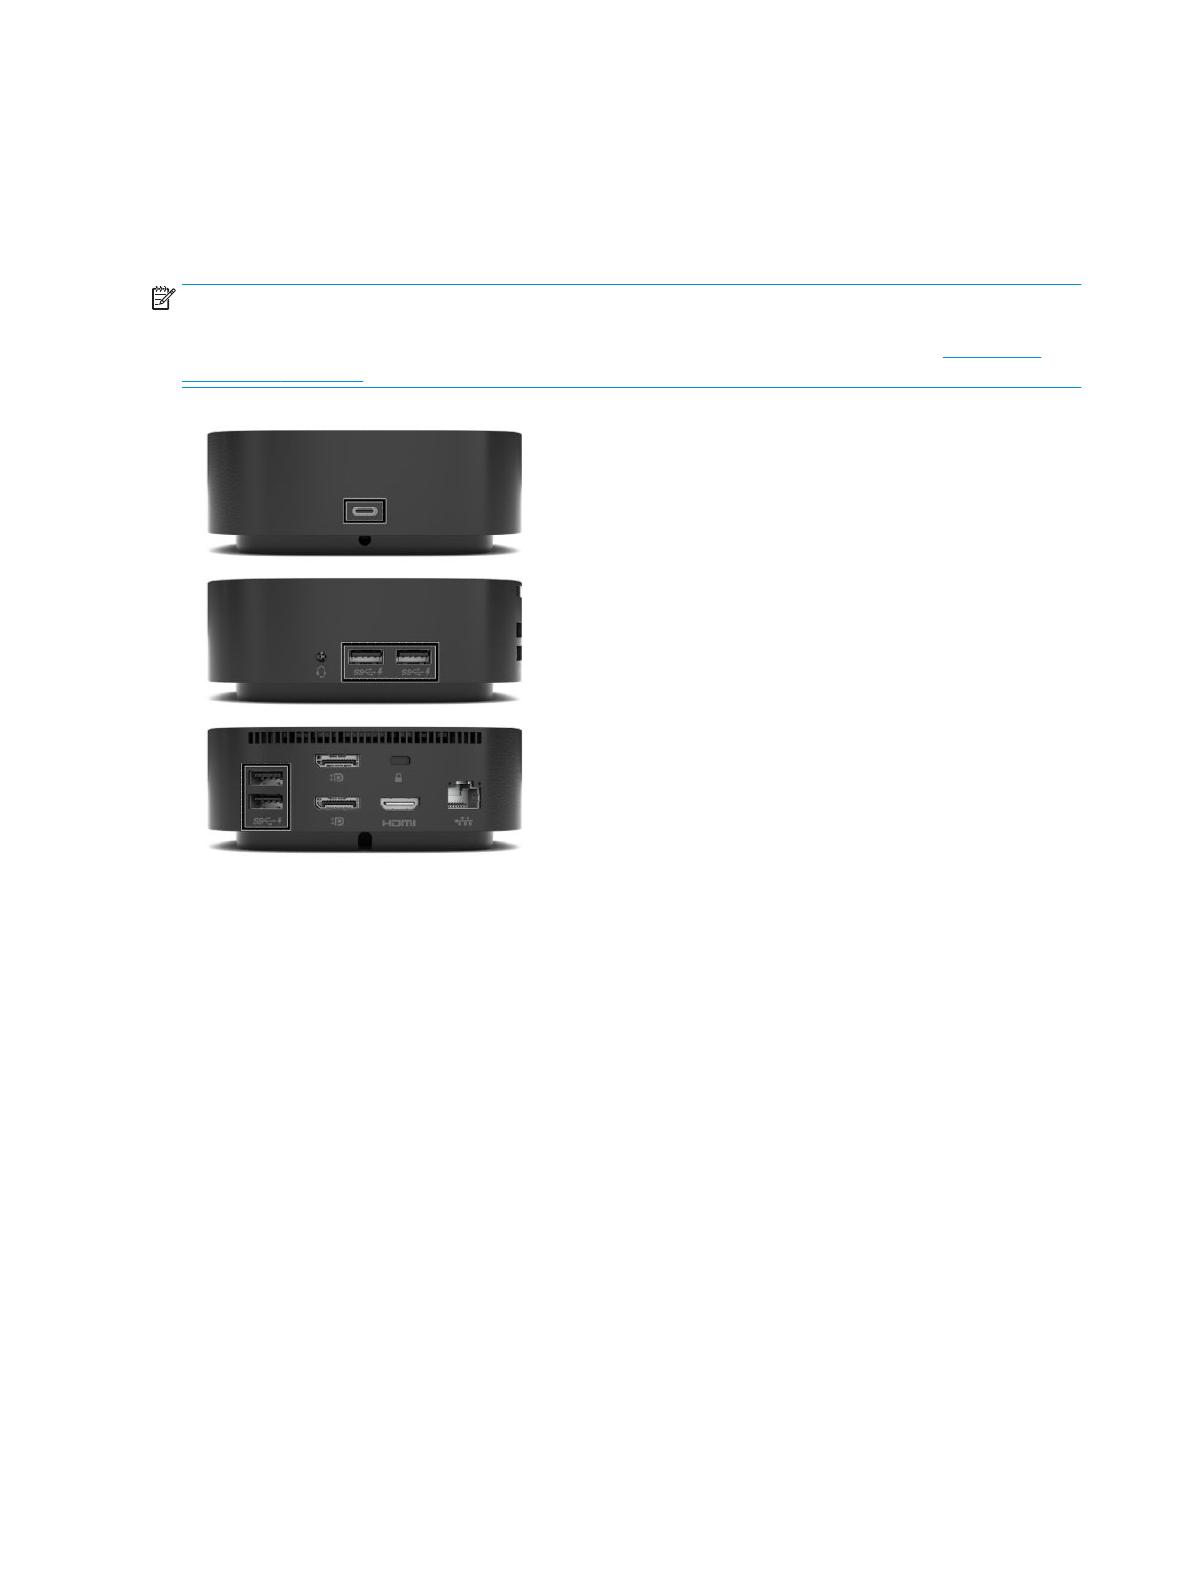
Top
Table 1-1 Top component and its description
Component Description
Power button and light Button:
● When the computer is off, press the button to turn on the
computer.
● When the computer is on, press the button briefly to
initiate Sleep.
● When the computer is in the Sleep state, press the button
briefly to exit Sleep (select products only).
● When the computer is in Hibernation, press the button
briefly to exit Hibernation.
CAUTION: Pressing and holding down the power button results
in the loss of unsaved information.
If the computer has stopped responding and shutdown
procedures are ineffective, press and hold the power button for
at least 5 seconds to turn off the computer.
Light:
● On: The docking station is on.
Components 1
Page: 5
Front
Table 1-2 Front components and their descriptions
Component Description
(1) USB Type-C SuperSpeed port with HP Sleep and Charge Connects a USB device that has a Type-C connector, provides
data transfer, and even when the computer is off, charges most
products such as a cell phone, camera, activity tracker, or
smartwatch.
NOTE: Cables and/or adapters (purchased separately) may be
required.
(2) USB Type-C cable Connects the docking station to a notebook or tablet computer.
NOTE: If a computer does not support power over USB Type-C
connections or requires more than 100 W of power, you must
use the AC adapter included with the computer to power or
charge the computer.
2 Chapter 1 Getting started
Page: 6
Left
Table 1-3 Left components and their descriptions
Component Description
(1) Audio-out (headphone)/Audio-in (microphone)
combo jack
Connects optional powered stereo speakers, headphones,
earbuds, a headset, or a television audio cable. Also connects an
optional headset microphone. This jack does not support
optional standalone microphones.
WARNING! To reduce the risk of personal injury, adjust the
volume before putting on headphones, earbuds, or a headset.
For additional safety information, see the Regulatory, Safety,
and Environmental Notices.
To access this guide:
▲ On your computer, select the Start button, select HP Help
and Support, and then select HP Documentation.
NOTE: When a device is connected to the jack, the computer
speakers are disabled.
(2) USB SuperSpeed ports with HP Sleep and
Charge (2)
Connect a USB device, provides data transfer, and even when
the computer is off, charges most products such as a cell phone,
camera, activity tracker, or smartwatch.
Components 3
Page: 7
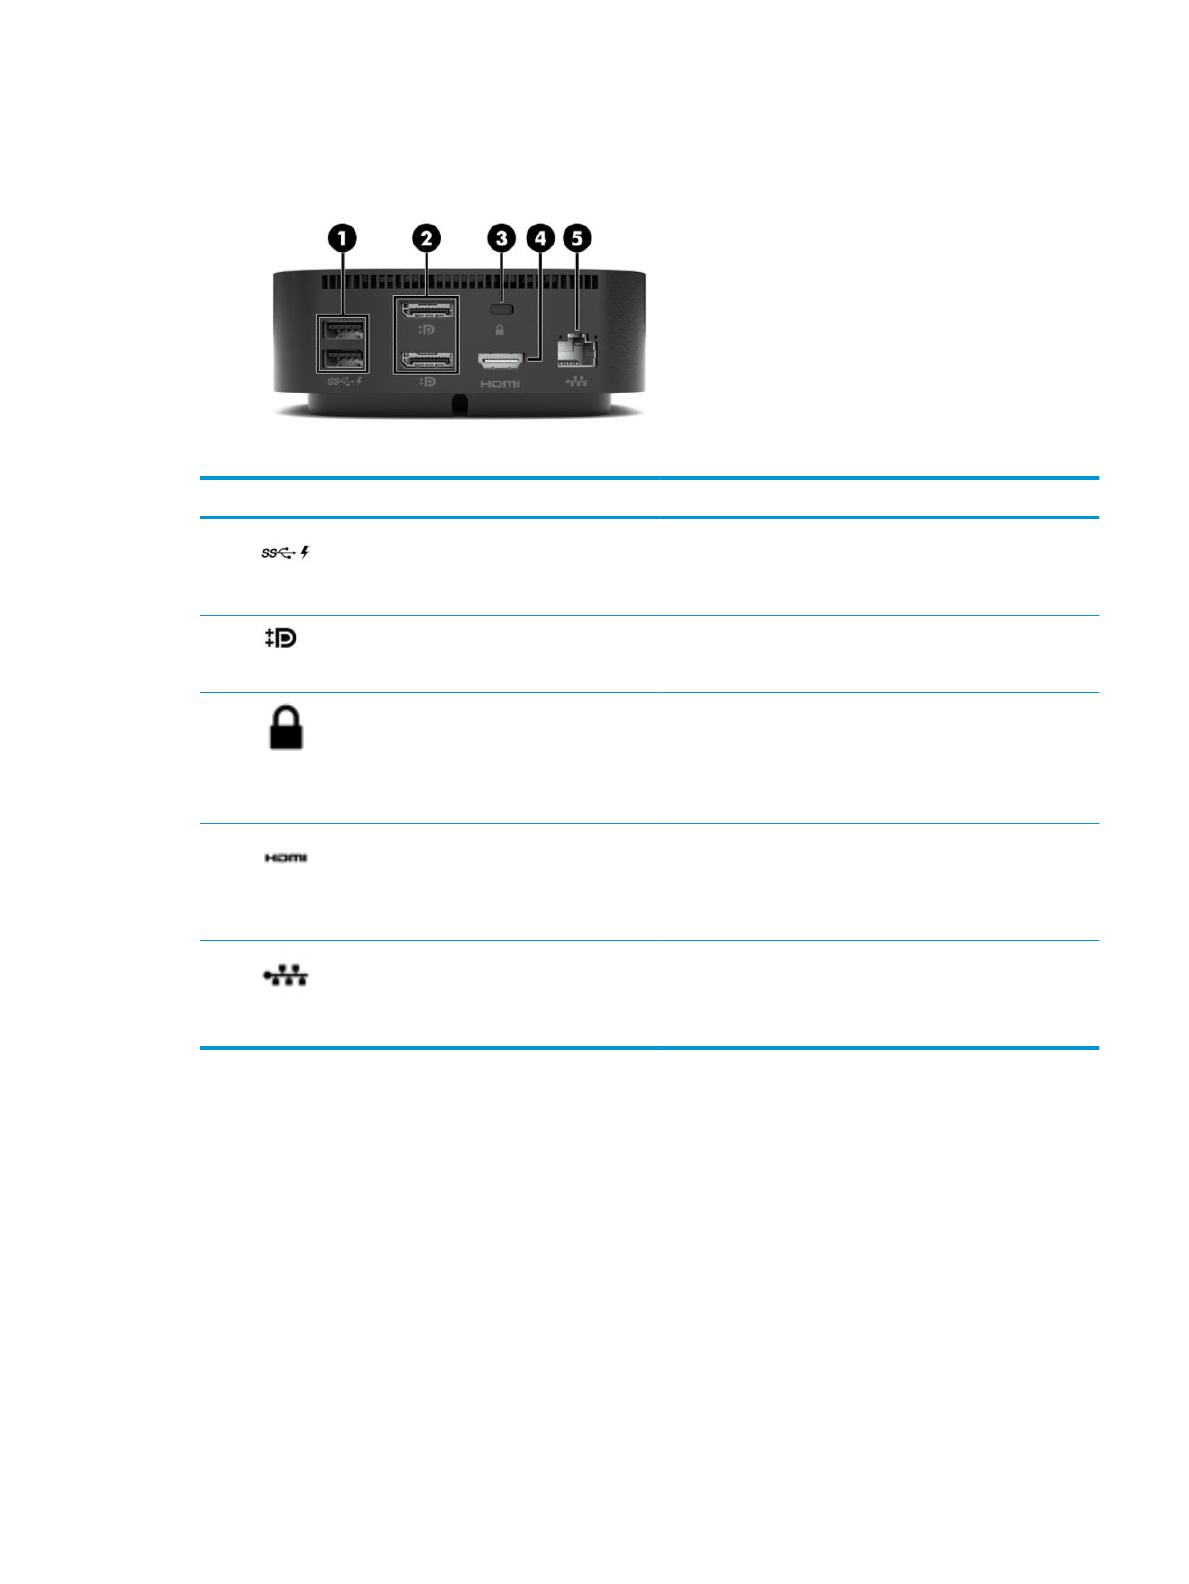
Rear
Table 1-4 Rear components and their descriptions
Component Description
(1) USB SuperSpeed ports with HP Sleep and
Charge (2)
Connect a USB device, provides data transfer, and even when the
computer is off, charges most products such as a cell phone,
camera, activity tracker, or smartwatch.
(2) Dual-Mode DisplayPort™ connectors (2) Connect an optional digital display device, such as a high-
performance monitor or projector.
(3) Security cable slot Attaches an optional security cable to the docking station.
NOTE: The security cable is designed to act as a deterrent, but
it may not prevent the docking station from being mishandled or
stolen.
(4) HDMI port Connects an optional video or audio device, such as a high-
definition television, any compatible digital or audio component,
or a high-speed High Definition Multimedia Interface (HDMI)
device.
(5) RJ-45 (network) jack/status lights Connects a network cable.
● Green (right): The network is connected.
● Amber (left): Activity is occurring on the network.
4 Chapter 1 Getting started
Page: 8
Bottom
Table 1-5 Bottom components and their descriptions
Components Description
AC adapter light ● On: AC power is connected to the docking station.
Components 5
Page: 9
Setting up the docking station
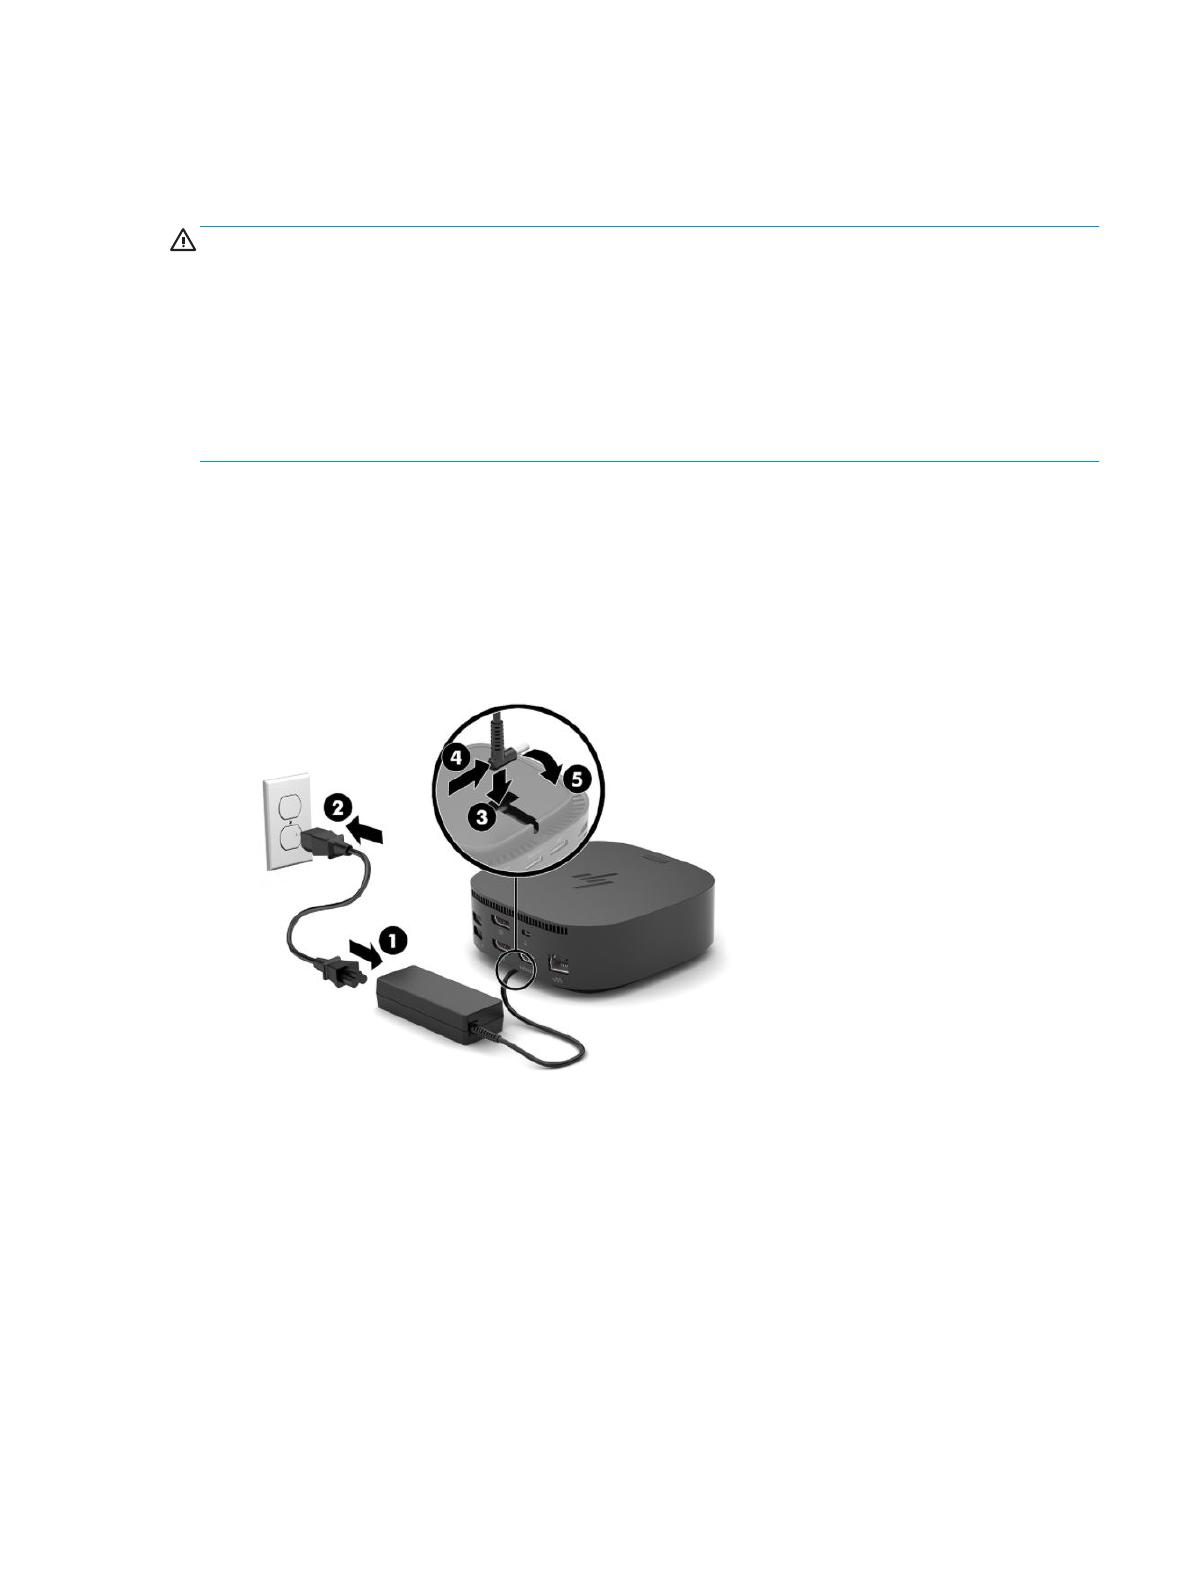
Step 1: Connecting to AC power
WARNING! To reduce the risk of electric shock or damage to your equipment:
Plug the power cord into a grounded (earthed) outlet that is easily accessible at all times.
Disconnect power from the equipment by unplugging the power cord from the electrical outlet.
Do not disable the power cord grounding plug. The grounding plug is an important safety feature.
To ensure the correct performance of all docking station features, connect the docking station to an AC power
source using the docking station power cord.
1. Connect one end of the power cord to the AC adapter (1), and connect the other end of the power cord to
an AC outlet (2).
2. Lower the AC adapter connector into the power-in connector slot on the docking station (3), press the
connector to the side until it is firmly seated (4), and then rotate the connector so that the cable is
routed through the channel on the side of the docking station chassis (5).
6 Chapter 1 Getting started
Page: 10
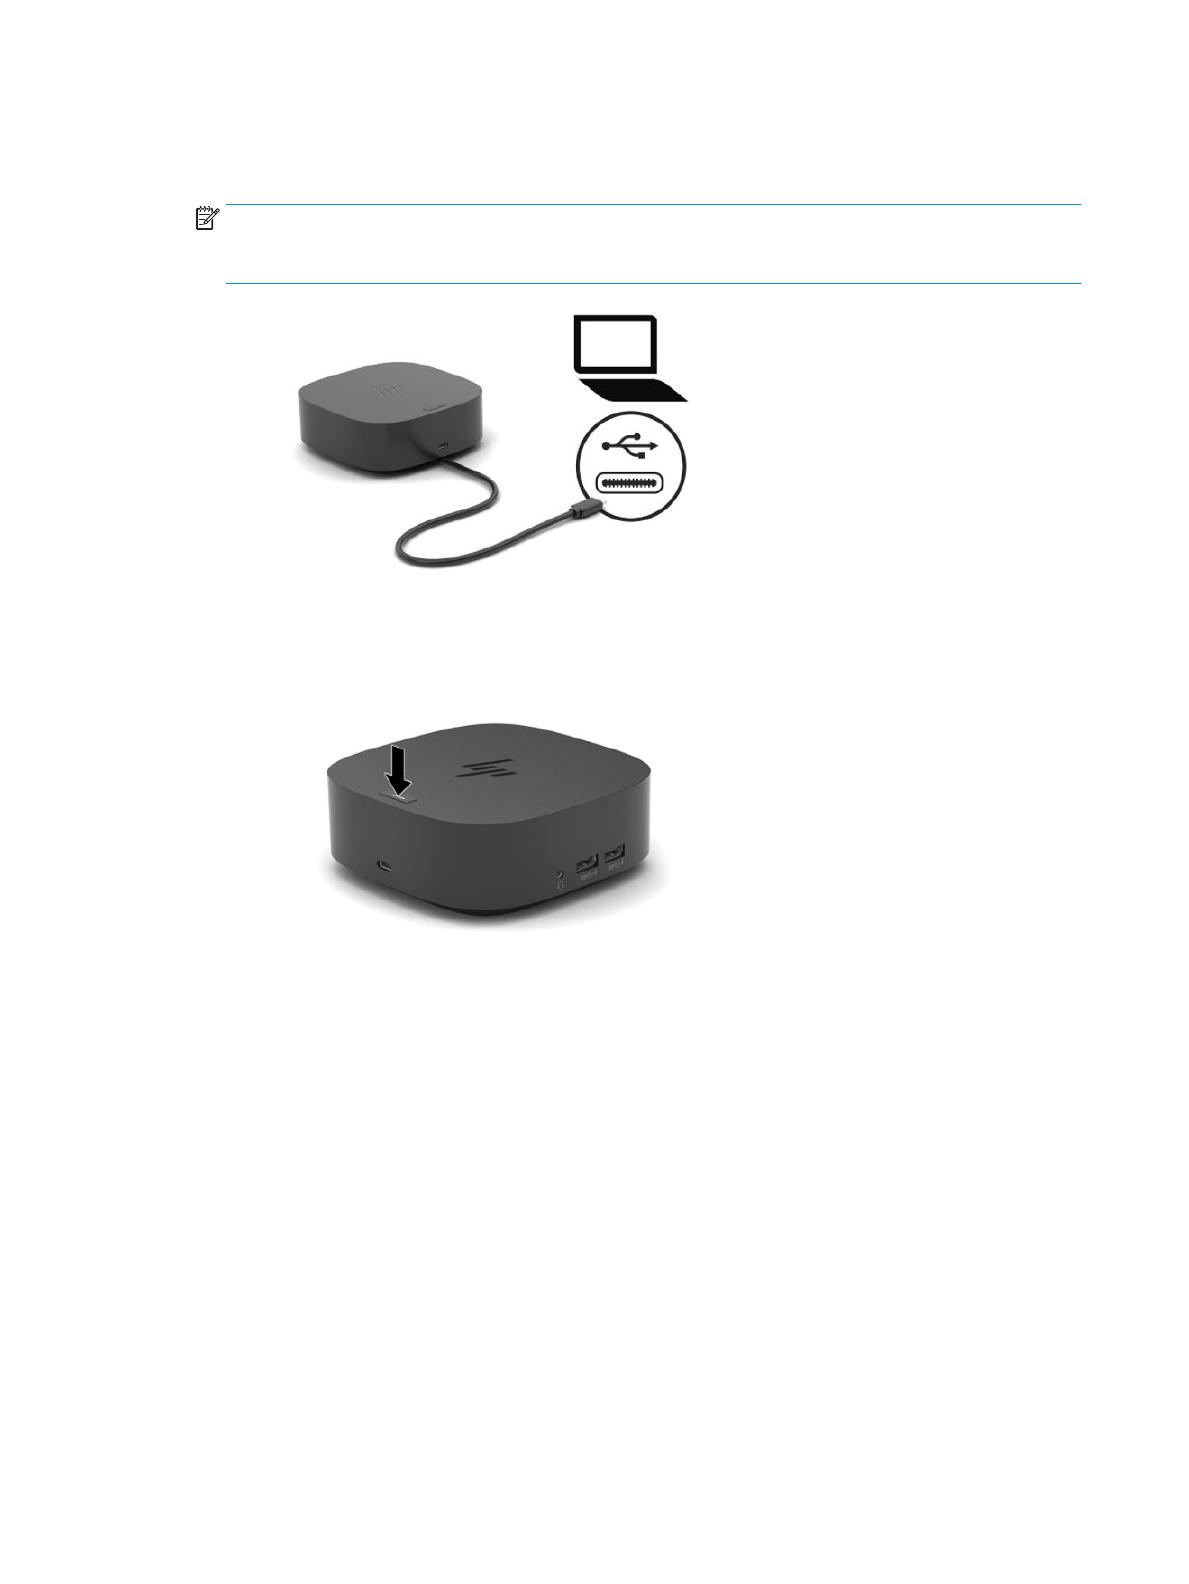
Step 2: Connecting to a computer
▲ Connect the USB Type-C cable to a USB Type-C port on your computer.
NOTE: If the computer does not support power over USB Type-C connections or requires more than
100 W of power, you must use the AC adapter included with the computer to power or charge the
computer.
Setting up the docking station 7
Page: 11
Step 3: Turning on the docking station
▲ Press the power button.
Step 4: Preventing Sleep or Hibernation
When using an external monitor, you might want to close the computer. For more information about
configuring an external monitor, see Configuring an external monitor on page 10.
To ensure that the computer does not initiate Sleep or Hibernation when it is closed:
1. Type control panel in the taskbar search box, and then select Control Panel.
2. Select Power Options.
3. Select Choose what closing the lid does.
4. Next to When I close the lid, under On battery, select Do nothing.
5. Next to When I close the lid, under Plugged in, select Do nothing.
6. Select Save changes.
Setting up the software
This section describes how to install the docking station software on a computer running the Windows® 10
operating system.
1. With the computer on, Windows running, and the Internet connected, connect the docking station to the
computer.
2. Go to http://www.hp.com/support.
3. Select Get software and drivers, and follow the on-screen instructions to find your docking station.
4. Follow the on-screen instructions to select and download the latest firmware update and each driver.
5. Complete the installation wizard.
6. Choose to restart now or later. The docking station might not work until the next restart. If you choose
to restart the computer, first remove any discs from the computer drives. Click Finish.
8 Chapter 1 Getting started
Page: 12
Updating the docking station
Downloading HP Firmware Installer
1. Go to http://www.hp.com/support.
2. Select Get software and drivers, and follow the on-screen instructions to find your docking station.
3. Follow the on-screen instructions to select and download HP Firmware Installer.
4. Complete the installation wizard.
5. Choose to restart now or later. The docking station might not work until the next restart. If you choose
to restart the computer, first remove any discs from the computer drives. Click Finish.
Installing updates
You can update the docking station while connected to your computer or, for better performance, schedule
the docking station to update when you disconnect your computer from the docking station.
1. Open Windows Explorer and navigate to where you saved HP Firmware Installer.
2. Double-click HPFirmwareInstaller.exe.
3. Verify that updates are available, and then select which updates to Install.
TIP: You must be connected to the Internet for new updates to download to HP Firmware Installer.
4. Select one of the following:
● Update now: Installs the update immediately.
NOTE: You cannot disconnect your computer from the docking station during an update.
Your might see your monitor flicker and hear some audio clicks, your Internet connection might be
intermittent, and your mouse and keyboard could become unresponsive until installation is
complete.
● Update on dock disconnect: Installs the update after you disconnect your computer from the
docking station.
NOTE: You cannot connect your computer to the docking station during an update.
The dock power light might blink while the update is being installed.
5. Select Install.
Updating the docking station 9
Page: 13
Configuring an external monitor
Using Windows
Use Windows to configure the display of a monitor attached to the docking station.
1. Type control panel in the taskbar search box, and then select Control Panel. Select Appearance
and Personalization.
2. To set the external monitor as the primary monitor, select Second screen only.
– or –
To set the external monitor as an extension of the primary monitor on computers, select Extend.
– or –
To set the external monitor as a copy of the primary monitor, select Duplicate.
You can also access the display settings by pressing the Windows key +p.
10 Chapter 1 Getting started
Page: 14
Sleep, Hibernation, shutdown, and restart
If the computer initiates Sleep or Hibernation, the monitor turns off. When the computer exits Sleep or
Hibernation, the connected monitor returns to the previous monitor settings.
If you restart or shut down the computer and then turn it back on, the connected monitor returns to the
previous monitor settings.
Configuring an external monitor 11
Page: 15
2 Using the docking station
Docking station guidelines
● Operating systems: For optimal performance, use the docking station with a computer running a
Windows 10, version 1809 or higher operating system.
● Power: To use docking station features, AC power must be connected to the docking station.
● Connecting and disconnecting: The docking station can be connected to or disconnected from the
computer whether the computer is on or off. (See Step 2: Connecting to a computer on page 7 and
Disconnecting the docking station on page 18.)
● External devices: When the docking station is connected to the computer, external devices can be
connected to the ports on the docking station or to the ports on the computer.
12 Chapter 2 Using the docking station
Page: 16
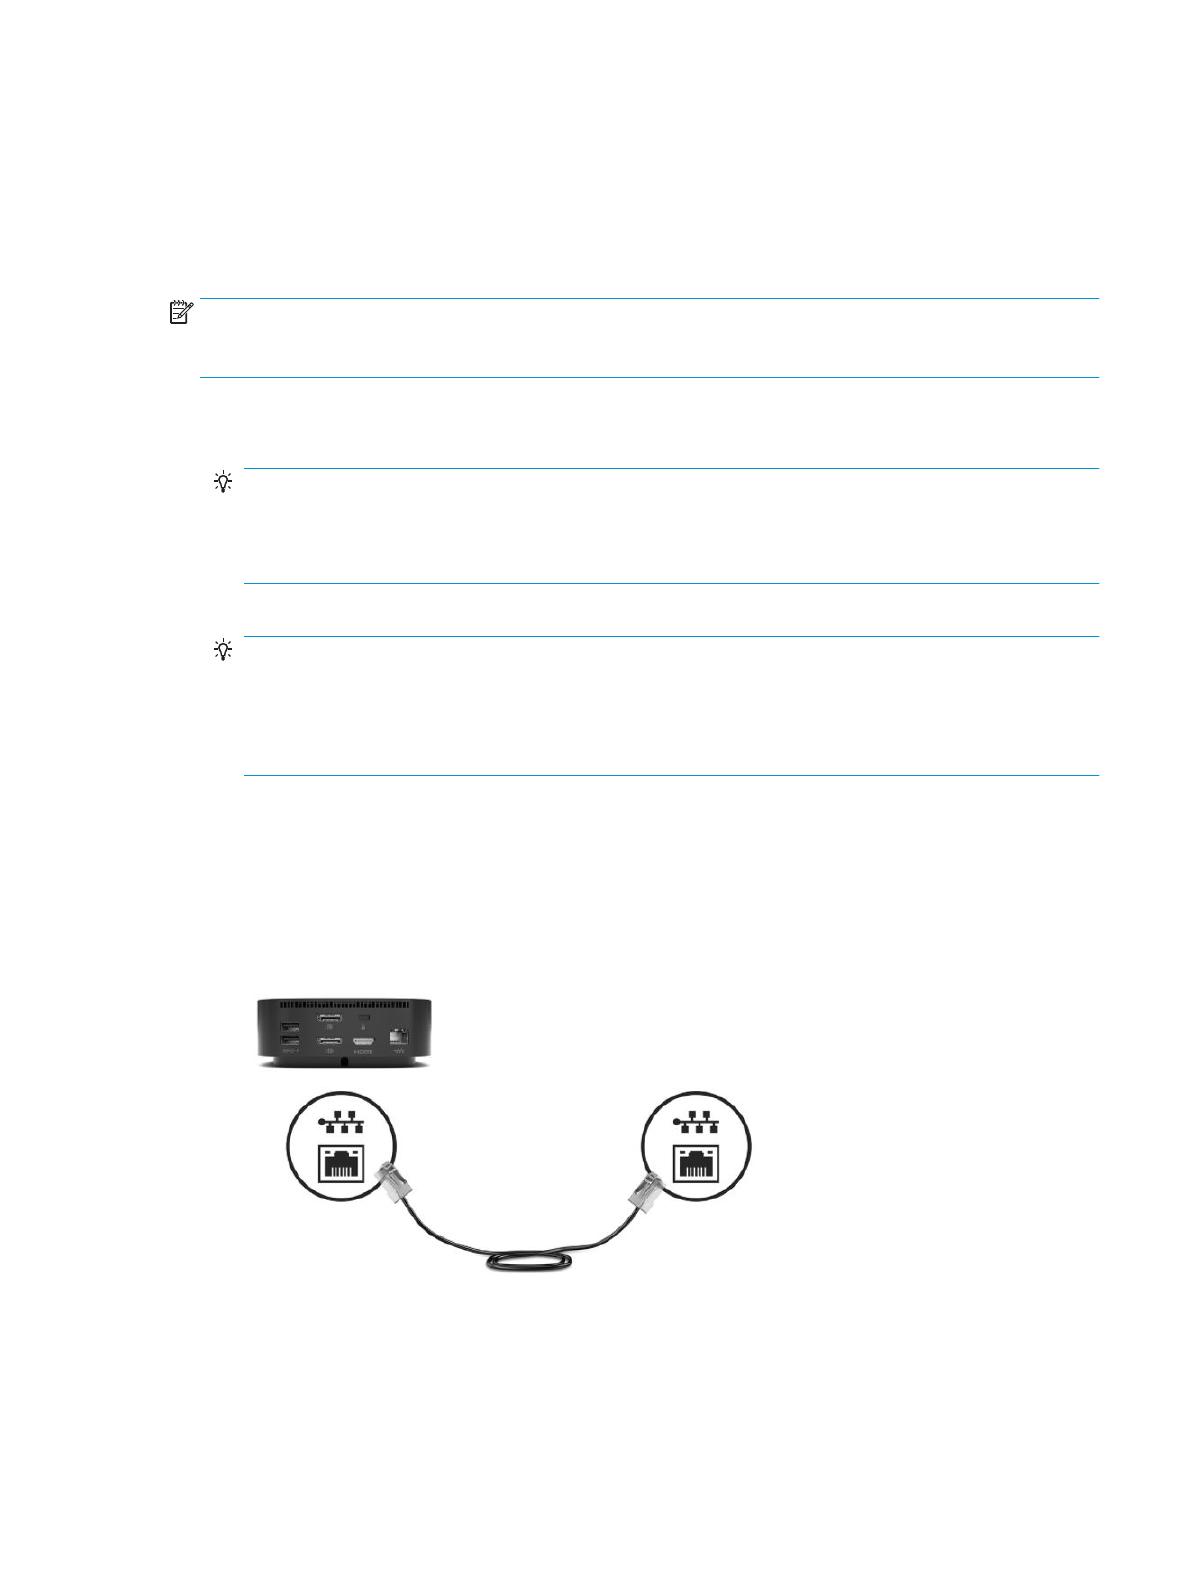
Connecting to a network
You can connect the computer to a network through the docking station. This requires a network cable
(purchased separately).
The docking station supports the following computer functions over the network connection:
NOTE: Before using these functions, verify that your computer has the latest BIOS, network controller
driver, and USB LAN driver installed. For instructions on updating these drivers, see your computer
documentation.
● PXE boot
● MAC Address Pass Through
TIP: Your computer might support MAC Address Pass Through from the On, Off, Sleep, or Hibernation
states, or only when the computer is on or in Sleep.
MAC Address Pass Through is supported for UEFI PXE boot.
● Wake on LAN (WOL)
TIP: Your computer might support WOL from the Off, Sleep, or Hibernation states, or only when the
computer is on or in Sleep.
WLAN-LAN switching is supported only on select computers running the Windows 10 operating system.
1. Connect the docking station to the computer.
2. Connect one end of the network cable to the RJ-45 (network) jack on the docking station and connect
the other end to an RJ-45 wall jack or router.
Connecting to a network 13
Page: 17
Connecting USB devices
The docking station has five USB ports: one USB Type-C port with HP Sleep and Charge on the front panel, two
USB SuperSpeed ports with HP Sleep and Charge on the middle panel, and two USB SuperSpeed ports with HP
Sleep and Charge on the rear panel. Use the USB ports to connect optional external USB devices, such as a
keyboard or mouse.
NOTE: Be sure that the external device is compliant with the docking station power specifications. Using a
noncompliant device might disable the port to which the device is attached. To reset the port, see
Troubleshooting on page 19.
14 Chapter 2 Using the docking station
Page: 18
Connecting to a DisplayPort device
The docking station can also be connected to an external video device, such as a monitor or a projector,
through the DisplayPort connectors. The docking station supports video connections to both DisplayPort
connectors at the same time. A single DisplayPort can support a screen resolution up to 5120 × 2880 @ 60
Hz, depending on your computer, cable, and monitor capabilities.
NOTE: To transmit video signals through the DisplayPort connection, you need a DisplayPort cable
(purchased separately).
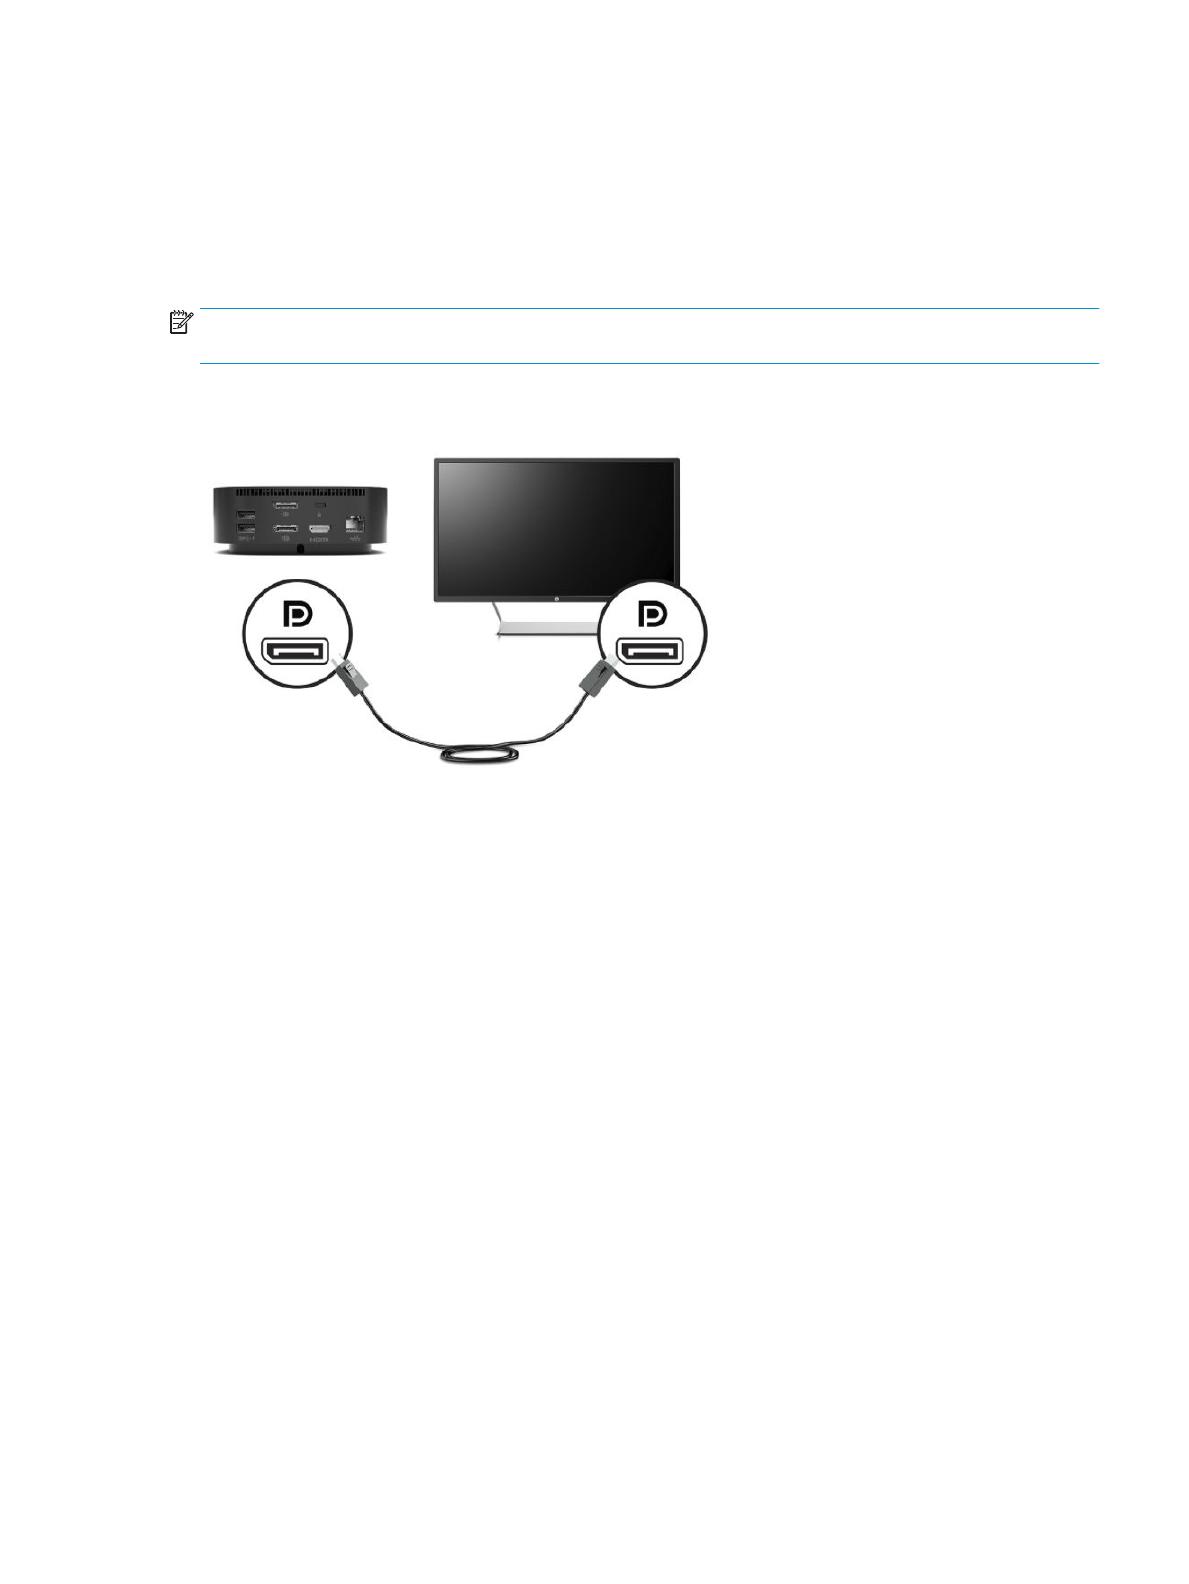
Connecting to a DisplayPort device 15
Page: 19
Connecting to an HDMI device
You can connect the docking station to an external video or audio device, such as a high-definition television,
or to any digital audio components, through the HDMI port.
The docking station supports simultaneous video connections to the HDMI port and a DisplayPort connector.
NOTE: To transmit video signals through the HDMI port, you need an HDMI cable (purchased separately).
16 Chapter 2 Using the docking station
Page: 20
Connecting audio
You can connect headphones or speakers directly into the audio-out (headphone)/audio-in (microphone)
combo jack on the docking station. You can also connect analog audio devices.
NOTE: If the audio does not automatically switch to the docking station, set the docking station as the
default audio device in your computer settings.
Connecting analog audio devices
To connect analog audio:
1. Connect one end of an audio Y-cable (purchased separately) to the audio-out (headphone)/audio-in
(microphone) combo jack on the docking station.
2. Connect the other end to the red and white audio-in jacks on your television or stereo equipment. See
your television or stereo equipment user guide for the jack names and locations.
Connecting an optional security cable
A security cable (purchased separately) is designed to act as a deterrent, but it may not prevent the docking
station from being mishandled or stolen. To connect a security cable to your docking station, follow the device
manufacturer’s instructions.
Connecting audio 17
Page: 21
3 Disconnecting the docking station
To disconnect the docking station from the computer, follow these steps:
1. Click the Safely Remove Hardware icon in the notification area, at the far right of the taskbar.
2. Click Safely Remove USB Docking Station. The Safe to Remove Hardware message is displayed.
3. Disconnect the attached USB Type-C cable from the computer.
18 Chapter 3 Disconnecting the docking station
Page: 22
4 Troubleshooting
Solving common problems
The following tables list possible problems and the recommended solutions.
General use and connection problems
Table 4-1 General use and connection problems, causes, and solutions
Problem Possible cause Solution
The power light is off. The docking station is not connected to AC
power.
Connect the power cord to the docking
station and to an electrical outlet.
The ports or jacks on the docking station
are not working.
The docking station is not connected to AC
power.
Connect the power cord to the docking
station and to an electrical outlet.
The docking station is not connected to the
computer correctly.
Disconnect the USB cable from the
computer, and then reconnect it.
A USB port on the docking station is
disabled.
The USB device attached to the port may
not be compliant with the docking station
power specifications and is using too much
power.
Reset the port:
1. Disconnect the device that disabled
the port.
2. Disconnect the power cord from the
docking station, and then reconnect
it.
– or –
Disconnect the docking station from
the computer, and then reconnect it.
When the docking station is connected to
the computer, both the WLAN and the LAN
are connected.
Switching from the WLAN connection to
the LAN connection may not be supported
on your computer.
NOTE: WLAN-LAN switching is supported
only on select computers running the
Windows 10 operating system.
Disable the WLAN connection:
1. Right-click Start, and then select
Network Connections.
2. Right-click Wi-Fi, and then click
Disable.
Data transfer speeds through USB or
Ethernet are slow.
Multiple high-resolution monitors are
connected to the docking station.
Either disable high-resolution mode or
disconnect a monitor.
Audio problems
Table 4-2 Audio problems, causes, and solutions
Problem Possible cause Solution
Audio does not play. The drivers are not installed. Install the drivers. See Setting up the
software on page 8.
Headphones or other audio device
connected to the docking station do not
produce sound.
An audio device is connected to the
headphone jack on the docking station, but
Set the docking station as the default
audio device in the computer settings, or
connect the audio device to the computer.
Solving common problems 19
Page: 23
Table 4-2 Audio problems, causes, and solutions (continued)
Problem Possible cause Solution
the docking station is not the default audio
device.
A microphone connected to the docking
station does not work.
A microphone is connected to the docking
station, but the docking station is not the
default audio device.
Set the docking station as the default
audio device in the computer settings, or
connect the microphone to the computer.
A connected home entertainment system
does not have audio.
Audio is not connected properly. Be sure that the docking station is properly
connected to the home entertainment
system.
Video problems
Table 4-3 Video problems, causes, and solutions
Problem Possible cause Solution
A video does not display. The drivers are not installed. Install the drivers. See Setting up the
software on page 8.
Fonts and other characters on the external
monitor appear large.
The external monitor screen resolution is
higher than the maximum limit of 5120 ×
2880.
Set the screen resolution equal to or lower
than the maximum limit.
The graphics application does not detect
the external monitor.
Some graphics applications do not detect
external monitors connected to the
docking station.
Configure the external monitor. See
Configuring an external monitor
on page 10.
The external monitor cannot be set as the
primary monitor when using some Intel
graphics applications.
Older Intel graphics applications do not
support setting the external monitor as
the primary monitor.
Download the latest Intel drivers from
http://www.hp.com/support.
The computer monitor does not work. The external monitor has been
disconnected from the docking station
before the docking station was
disconnected from the computer.
Disconnect the docking station from the
computer, and then disconnect the
external monitor from the docking station.
Getting more information
● For comprehensive information about the docking station, as well as governmental agency and safety
information about the use of the docking station, access HP Help and Support.
● The HP website (http://www.hp.com) provides product news and software updates.
20 Chapter 4 Troubleshooting
Page: 24
5 Specifications
Input power
The power information in this section may be helpful if you plan to travel internationally with the docking
station.
The docking station operates on DC power, which can be supplied by an AC or a DC power source. The AC
power source must be rated at 100–240 V, 50–60 Hz. Although the docking station can be powered from a
standalone DC power source, it should be powered only with an AC adapter or a DC power source supplied and
approved by HP for use with this docking station.
The docking station can operate on DC power within the following specifications.
Table 5-1 DC power specifications
Input Power Rating
Operating voltage and current 19.5 V dc @ 6.15 A – 120 W
NOTE: This product is designed for IT power systems in Norway with phase-to-phase voltage not exceeding
240 V rms.
NOTE: The docking station operating voltage and current can be found on the docking station’s regulatory
label.
Operating environment
Table 5-2 Operating environment specifications
Factor Metric U.S.
Temperature
Operating 0°C to 35°C 32°F to 95°F
Nonoperating -40°C to 70°C -40°F to 158°F
Relative humidity (noncondensing)
Operating 5% to 95% 5% to 95%
Nonoperating 5% to 90% 5% to 90%
Maximum altitude (unpressurized)
Operating -15 m to 3,048 m -50 ft to 10,000 ft
Nonoperating -15 m to 9,144 m -50 ft to 30,000 ft
Input power 21
Page: 25
6 Electrostatic discharge
Electrostatic discharge is the release of static electricity when two objects come into contact—for example,
the shock you receive when you walk across the carpet and touch a metal door knob.
A discharge of static electricity from fingers or other electrostatic conductors may damage electronic
components.
IMPORTANT: To prevent damage to the computer, damage to a drive, or loss of information, observe these
precautions:
● If removal or installation instructions direct you to unplug the computer, first be sure that it is properly
grounded.
● Keep components in their electrostatic-safe containers until you are ready to install them.
● Avoid touching pins, leads, and circuitry. Handle electronic components as little as possible.
● Use nonmagnetic tools.
● Before handling components, discharge static electricity by touching an unpainted metal surface.
● If you remove a component, place it in an electrostatic-safe container.
22 Chapter 6 Electrostatic discharge
Page: 26
7 Accessibility
Accessibility
HP is working to weave diversity, inclusion and work/life into the fabric of our company, so it is reflected in
everything we do. Here are some examples of how we are putting differences to work to create an inclusive
environment focused on connecting people to the power of technology throughout the world.
Finding the technology tools you need
Technology can unleash your human potential. Assistive technology removes barriers and helps you create
independence at home, at work, and in the community. Assistive technology helps increase, maintain, and
improve the functional capabilities of electronic and information technology. For more information, see
Finding the best assistive technology on page 24.
Our commitment
HP is committed to providing products and services that are accessible for people with disabilities. This
commitment supports our company’s diversity objectives and helps us ensure that the benefits of technology
are available to all.
Our accessibility goal is to design, produce, and market products and services that can be effectively used by
everyone, including people with disabilities, either on a stand-alone basis or with appropriate assistive
devices.
To achieve our goal, this Accessibility Policy establishes seven key objectives to guide our actions as a
company. All HP managers and employees are expected to support these objectives and their implementation
in accordance with their roles and responsibilities:
● Raise the level of awareness of accessibility issues within our company, and provide our employees with
the training they need to design, produce, market, and deliver accessible products and services.
● Develop accessibility guidelines for products and services, and hold product development groups
accountable for implementing these guidelines where competitively, technically, and economically
feasible.
● Involve people with disabilities in the development of accessibility guidelines, and in the design and
testing of products and services.
● Document accessibility features and make information about our products and services publicly
available in an accessible form.
● Establish relationships with leading assistive technology and solution providers.
● Support internal and external research and development that will improve assistive technology relevant
to our products and services.
● Support and contribute to industry standards and guidelines for accessibility.
International Association of Accessibility Professionals (IAAP)
IAAP is a not-for-profit association focused on advancing the accessibility profession through networking,
education, and certification. The objective is to help accessibility professionals develop and advance their
careers and to better enable organizations to integrate accessibility into their products and infrastructure.
Accessibility 23
Page: 27
HP is a founding member, and we joined to participate with other organizations to advance the field of
accessibility. This commitment supports our company’s accessibility goal of designing, producing, and
marketing products and services that can be effectively used by people with disabilities.
IAAP will make our profession strong by globally connecting individuals, students, and organizations to learn
from one another. If you are interested in learning more, go to http://www.accessibilityassociation.org to join
the online community, sign up for newsletters, and learn about membership options.
Finding the best assistive technology
Everyone, including people with disabilities or age-related limitations, should be able to communicate,
express themselves, and connect with the world using technology. HP is committed to increasing accessibility
awareness within HP and with our customers and partners. Whether it’s large fonts that are easy on the eyes,
voice recognition that lets you give your hands a rest, or any other assistive technology to help with your
specific situation—a variety of assistive technologies make HP products easier to use. How do you choose?
Assessing your needs
Technology can unleash your potential. Assistive technology removes barriers and helps you create
independence at home, at work, and in the community. Assistive technology (AT) helps increase, maintain,
and improve the functional capabilities of electronic and information technology.
You may choose from many AT products. Your AT assessment should allow you to evaluate several products,
answer your questions, and facilitate your selection of the best solution for your situation. You will find that
professionals qualified to do AT assessments come from many fields, including those licensed or certified in
physical therapy, occupational therapy, speech/language pathology, and other areas of expertise. Others,
while not certified or licensed, may also provide evaluation information. You will want to ask about the
individual’s experience, expertise, and fees to determine if they are appropriate for your needs.
Accessibility for HP products
The following links provide information about accessibility features and assistive technology, if applicable,
included in various HP products. These resources will help you select the specific assistive technology
features and product(s) most appropriate for your situation.
● HP Elite x3–Accessibility Options (Windows 10 Mobile)
● HP PCs–Windows 7 Accessibility Options
● HP PCs–Windows 8 Accessibility Options
● HP PC’s–Windows 10 Accessibility Options
● HP Slate 7 Tablets–Enabling Accessibility Features on Your HP Tablet (Android 4.1/Jelly Bean)
● HP SlateBook PCs–Enabling Accessibility Features (Android 4.3,4.2/Jelly Bean)
● HP Chromebook PCs–Enabling Accessibility Features on Your HP Chromebook or Chromebox (Chrome
OS)
● HP Shopping–peripherals for HP products
If you need additional support with the accessibility features on your HP product, see Contacting support
on page 29.
Additional links to external partners and suppliers that may provide additional assistance:
● Microsoft Accessibility information (Windows 7, Windows 8, Windows 10, Microsoft Office)
● Google Products accessibility information (Android, Chrome, Google Apps)
24 Chapter 7 Accessibility
Page: 28
● Assistive Technologies sorted by impairment type
● Assistive Technologies sorted by product type
● Assistive Technology vendors with product descriptions
● Assistive Technology Industry Association (ATIA)
Standards and legislation
Standards
Section 508 of the Federal Acquisition Regulation (FAR) standards was created by the US Access Board to
address access to information and communication technology (ICT) for people with physical, sensory, or
cognitive disabilities. The standards contain technical criteria specific to various types of technologies, as well
as performance-based requirements which focus on functional capabilities of covered products. Specific
criteria cover software applications and operating systems, web-based information and applications,
computers, telecommunications products, video and multi-media, and self-contained closed products.
Mandate 376 – EN 301 549
The EN 301 549 standard was created by the European Union within Mandate 376 as the basis for an online
toolkit for public procurement of ICT products. The standard specifies the functional accessibility
requirements applicable to ICT products and services, together with a description of the test procedures and
evaluation methodology for each accessibility requirement.
Web Content Accessibility Guidelines (WCAG)
Web Content Accessibility Guidelines (WCAG) from the W3C’s Web Accessibility Initiative (WAI) helps web
designers and developers create sites that better meet the needs of people with disabilities or age-related
limitations. WCAG advances accessibility across the full range of web content (text, images, audio, and video)
and web applications. WCAG can be precisely tested, is easy to understand and use, and allows web
developers flexibility for innovation. WCAG 2.0 has also been approved as ISO/IEC 40500:2012.
WCAG specifically addresses barriers to accessing the web experienced by people with visual, auditory,
physical, cognitive, and neurological disabilities, and by older web users with accessibility needs. WCAG 2.0
provides characteristics of accessible content:
● Perceivable (for instance, by addressing text alternatives for images, captions for audio, adaptability of
presentation, and color contrast)
● Operable (by addressing keyboard access, color contrast, timing of input, seizure avoidance, and
navigability)
● Understandable (by addressing readability, predictability, and input assistance)
● Robust (for instance, by addressing compatibility with assistive technologies)
Legislation and regulations
Accessibility of IT and information has become an area of increasing legislative importance. This section
provides links to information about key legislation, regulations, and standards.
● United States
● Canada
● Europe
Standards and legislation 25
Page: 29
● United Kingdom
● Australia
● Worldwide
United States
Section 508 of the Rehabilitation Act specifies that agencies must identify which standards apply to the
procurement of ICT, perform market research to determine the availability of accessible products and
services, and document the results of their market research. The following resources provide assistance in
meeting Section 508 requirements:
● www.section508.gov
● Buy Accessible
The U.S. Access Board is currently updating the Section 508 standards. This effort will address new
technologies and other areas where the standards need to be modified. For more information, go to Section
508 Refresh.
Section 255 of the Telecommunications Act requires telecommunications products and services to be
accessible to people with disabilities. FCC rules cover all hardware and software telephone network
equipment and telecommunications equipment used in the home or office. Such equipment includes
telephones, wireless handsets, fax machines, answering machines, and pagers. FCC rules also cover basic and
special telecommunications services, including regular telephone calls, call waiting, speed dialing, call
forwarding, computer-provided directory assistance, call monitoring, caller identification, call tracing, and
repeat dialing, as well as voice mail and interactive voice response systems that provide callers with menus of
choices. For more information, go to Federal Communication Commission Section 255 information.
21st Century Communications and Video Accessibility Act (CVAA)
The CVAA updates federal communications law to increase the access of persons with disabilities to modern
communications, updating accessibility laws enacted in the 1980s and 1990s to include new digital,
broadband, and mobile innovations. Regulations are enforced by the FCC and documented as 47 CFR Part 14
and Part 79.
● FCC Guide on the CVAA
Other U.S. legislation and initiatives
● Americans with Disabilities Act (ADA), Telecommunications Act, the Rehabilitation Act and others
Canada
The Accessibility for Ontarians with Disabilities Act was established to develop and implement accessibility
standards to make goods, services, and facilities accessible to Ontarians with disabilities and to provide for
the involvement of persons with disabilities in the development of the accessibility standards. The first
standard of the AODA is the customer service standard; however, standards for transportation, employment,
and information and communication are also being developed. The AODA applies to the Government of
Ontario, the Legislative Assembly, every designated public sector organization, and to every other person or
organization that provides goods, services, or facilities to the public or other third parties and that has at
least one employee in Ontario; and accessibility measures must be implemented on or before January 1,
2025. For more information, go to Accessibility for Ontarians with Disability Act (AODA) .
26 Chapter 7 Accessibility
Page: 30
Europe
EU Mandate 376 ETSI Technical Report ETSI DTR 102 612: «Human Factors (HF); European accessibility
requirements for public procurement of products and services in the ICT domain (European Commission
Mandate M 376, Phase 1)» has been released.
Background: The three European Standardization Organizations have set up two parallel project teams to
carry out the work specified in the European Commission «Mandate 376 to CEN, CENELEC and ETSI, in Support
of Accessibility Requirements for Public Procurement of Products and Services in the ICT Domain.»
ETSI TC Human Factors Specialist Task Force 333 has developed ETSI DTR 102 612. Further details about the
work performed by STF333 (e.g., Terms of Reference, specification of the detailed work tasks, time plan for
the work, previous drafts, listing of comments received and means to contact the task force) can be found at
the Special Task Force 333.
The parts relating to the assessment of suitable testing and conformity schemes were carried out by a
parallel project, detailed in CEN BT/WG185/PT. For further information, go to the CEN project team website.
The two projects are closely coordinated.
● CEN project team
● European Commission mandate for e-accessibility (PDF 46KB)
United Kingdom
The Disability Discrimination Act of 1995 (DDA) was enacted to ensure that websites are accessible to blind
and disabled users in the United Kingdom.
● W3C UK Policies
Australia
The Australian government has announced their plan to implement Web Content Accessibility Guidelines 2.0.
All Australian government websites will require Level A compliance by 2012, and Double A by 2015. The new
standard replaces WCAG 1.0, which was introduced as a mandated requirement for agencies in 2000.
Worldwide
● JTC1 Special Working Group on Accessibility (SWG-A)
● G3ict: The Global Initiative for Inclusive ICT
● Italian accessibility legislation
● W3C Web Accessibility Initiative (WAI)
Standards and legislation 27
Page: 31
Useful accessibility resources and links
The following organizations may be good resources for information about disabilities and age-related
limitations.
NOTE: This is not an exhaustive list. These organizations are provided for informational purposes only. HP
assumes no responsibility for information or contacts you may encounter on the Internet. Listing on this page
does not imply endorsement by HP.
Organizations
● American Association of People with Disabilities (AAPD)
● The Association of Assistive Technology Act Programs (ATAP)
● Hearing Loss Association of America (HLAA)
● Information Technology Technical Assistance and Training Center (ITTATC)
● Lighthouse International
● National Association of the Deaf
● National Federation of the Blind
● Rehabilitation Engineering & Assistive Technology Society of North America (RESNA)
● Telecommunications for the Deaf and Hard of Hearing, Inc. (TDI)
● W3C Web Accessibility Initiative (WAI)
Educational institutions
● California State University, Northridge, Center on Disabilities (CSUN)
● University of Wisconsin — Madison, Trace Center
● University of Minnesota computer accommodations program
Other disability resources
● ADA (Americans with Disabilities Act) Technical Assistance Program
● Business & Disability network
● EnableMart
● European Disability Forum
● Job Accommodation Network
● Microsoft Enable
● U.S. Department of Justice — A Guide to disability rights Laws
HP links
Our contact webform
HP comfort and safety guide
HP public sector sales
28 Chapter 7 Accessibility
Page: 32
Contacting support
NOTE: Support is in English only.
● Customers who are deaf or hard of hearing that have questions about technical support or accessibility
of HP products:
– Use TRS/VRS/WebCapTel to call (877) 656-7058 Monday through Friday, 6 a.m. to 9 p.m. Mountain
Time.
● Customers with other disabilities or age-related limitations who have questions about technical support
or accessibility of HP products, choose one of the following options:
– Call (888) 259-5707 Monday through Friday, 6 a.m. to 9 p.m. Mountain Time.
– Complete the Contact form for people with disabilities or age-related limitations.
Contacting support 29
Page: 33
Index
A
AC adapter light 5
accessibility 23
accessibility needs assessment 24
analog audio 17
assistive technology (AT)
finding 24
purpose 23
AT (assistive technology)
finding 24
purpose 23
audio connection, analog 17
audio, connecting 17
audio-out (headphone)/audio-in
(microphone) combo jack 17
audio-out (headphone)/audio-in
(microphone) combo jack,
identifying 3
C
cable, identifying 2
components
bottom 5
front 2
left 3
rear 4
top 1
computer
connecting 7
sleeping 8
connectors
Dual-Mode DisplayPort 4
power 6
customer support, accessibility 29
D
DisplayPort device, connecting 15
Dual-Mode DisplayPort connector
identifying 4
E
electrostatic discharge 22
external devices 12
H
HDMI device, connecting 16
HDMI port, identifying 4
Help and Support 20
HP Assistive Policy 23
I
input power 21
International Association of
Accessibility Professionals 23
J
jacks
audio-out (headphone)/audio-in
(microphone) combo 3
audio-out (headphone)/audio-in
(microphone) combo jack 17
network 4
RJ-45 (network) 4, 13
L
lights
AC adapter 5
RJ-45 (network) 4
lights, power 1
N
network (RJ-45) jack
using 13
network jack, identifying 4
O
operating environment 21
operating systems supported 12
P
ports
HDMI 4
USB 14
USB SuperSpeed port with HP
Sleep and Charge 3, 4
USB Type-C SuperSpeed with HP
Sleep and Charge 2
power
docking station, connecting 6
guidelines 12
power connector 6
power light, identifying 1
R
resources, accessibility 28
RJ-45 (network) jack
using 13
RJ-45 (network) jack, identifying 4
RJ-45 (network) lights, identifying
4
S
Section 508 accessibility standards
25, 26
security cable slot, identifying 4
slots
security cable 4
standards and legislation,
accessibility 25
T
Troubleshooting 19
U
USB devices, connecting 14
USB SuperSpeed port with HP Sleep
and Charge, identifying 3, 4
USB Type-C SuperSpeed port with HP
Sleep and Charge, identifying 2
30 Index
Код товара: 5TW10AA#ABB
Приступайте к работе, подключив свои ноутбуки с портом USB-C к мониторам, устройствам и проводным сетям с помощью одного кабеля и универсальной док-станции HP USB-C G5 в привлекательном и компактном корпусе. Эта док-станция совместима с ноутбуками таких марок, как HP, Apple, Dell, Lenovo и других производителей.
Обратите внимание на доступную новинку

Описание
Совместимость с вашей разнородной компьютерной средой
Эта универсальная док-станция создавалась для обеспечения широкой совместимости, поэтому она работает с ноутбуками HP и других производителей, оснащенных разъемами USB-C и Thunderbolt.
Решение с одним кабелем
К док-станции можно подсоединить все аксессуары и до трех мониторов. Затем просто подключите ее к ноутбуку с помощью одного кабеля USB-C, чтобы получить доступ ко всем своим устройствам и одновременно заряжать компьютер.
Простое управление вашим парком коммерческих устройств HP
Предоставьте своим ИТ-специалистам возможность безопасно и удаленно управлять коммерческими ноутбуками HP и док-станциями благодаря усовершенствованным функциям сетевого управления, таким как PXE Boot и переключение LAN/WLAN, а также WoL и MAC Address Pass-Through во всех режимах питания.
Компактный корпус
Освободите свой стол с помощью компактной док-станции, которая занимает пространство 5 х 5 дюймов.
Характеристики
Док-станция HP USB-C G5 (5TW10AA)
Количество портов USB 3.0
4
Количество портов USB Type-C™
1
RJ-45 Network Connector
1
Комплект поставки
Док-станция HP USB-C, блок и шнур питания, брошюра, гарантийный талон
Размеры (Ш x Г x В), см
12.2 x 12.2 x 4.5
Размеры в упаковке (Ш x Г x В), см
9.3 x 42 x 31
Наличие на складах


Люсиновская
115093, г. Москва, ул. Люсиновская 11/12 стр,1
* Цена в розничном магазине может отличаться от цены сайта.

Док-станция HP USB-C G5 (5TW10AA)
Это последняя цена по которой товар продавался. Данный товар отсутсвует с 09.11.2022 13:55:48.
Подобрать аналог
Добавить к сравнению
Отзывы
Хотите оставить отзыв?Поставьте свою оценку!
Сделайте выбор!
HP USB-C Dock G5 (5TW10AA)
| Compatibility |
Compatible with HP laptops, MacBook® computers, and other laptops. |
|---|---|
| Product subgroup |
Docking |
| Color |
Black |
| Power |
Power to system: Up to 100W via USB-C® Power to host (USB-C PD): 5V , 9V, 10V, 12V, 15V, 20V all at 5A MAX |
| Ports |
Front: 1 USB-C® port with data and power out (15W); 1 USB-C® cable to connect to host system Side: 2 USB 3.0 charging ports; 1 combo audio jack Back: 2 USB 3.0 charging ports; 2 DisplayPort™ ports; 1 RJ45 port; 1 HDMI 2.0 port; 1 standard lock slot |
| Security management |
1 Lock slot (side, lock is sold separately) |
| Compatible Operating Systems |
Windows 10; Windows 11; macOS; Chrome OS™ |
| Minimum dimensions (W x D x H) |
12.2 x 12.2 x 4.5 cm |
| Package dimensions (W x D x H) |
19.2 x 15.6 x 16.5 cm |
| Weight |
0.75 kg |
| Package weight |
1.49 kg |
| Minimum System Requirements |
USB Type-C®️ (USB Power Delivery, Alt Mode DisplayPort™) |
| What’s in the box |
HP USB-C® Dock G5; AC Adapter; AC Power cord; Product notices; Warranty; Quick Start guide |
| Manufacturer Warranty |
One-year limited warranty. |
| Support service included |
HP 3 years Advanced Exchange Bundled Support Denmark Sweden Norway Finland. Service levels and response times for HP Care Packs may vary depending on your geographic location. Service starts on date of hardware purchase. Restrictions and limitations apply |

Руководство пользователя

© HP Development Company, L.P., 2019.
DisplayPort™ и логотип DisplayPort™
являются товарными знаками Ассоциации
стандартизации видеоэлектроники (VESA®) в
США и других странах. Windows является
товарным знаком или зарегистрированным
товарным знаком корпорации Майкрософт в
США и (или) других странах.
Приведенная в этом документе информация
может быть изменена без уведомления.
Гарантийные обязательства для продуктов
и услуг HP приведены только в условиях
гарантии, прилагаемых к каждому продукту
и услуге. Никакие содержащиеся здесь
сведения не могут рассматриваться как
дополнение к этим условиям гарантии. HP не
несет ответственности за технические или
редакторские ошибки и упущения в данном
документе.
Редакция 1: май 2019 г.
Номер документа: L63477-251

Содержание
1 Начало работы ………………………………………………………………………………………………………………………….. 1
Компоненты ………………………………………………………………………………………………………………………………………. 1
Вид сверху ………………………………………………………………………………………………………………………… 2
Вид спереди ……………………………………………………………………………………………………………………… 3
Вид слева ………………………………………………………………………………………………………………………….. 4
Вид сзади ………………………………………………………………………………………………………………………….. 5
Вид снизу ………………………………………………………………………………………………………………………….. 6
Настройка док-станции ……………………………………………………………………………………………………………………… 7
Шаг 1. Подключение адаптера переменного тока ……………………………………………………………… 7
Шаг 2. Подключение к компьютеру …………………………………………………………………………………… 8
Шаг 3. Включение док-станции …………………………………………………………………………………………. 8
Шаг 4. Предотвращение перехода в спящий режим или режим гибернации ………………………. 9
Настройка программного обеспечения ………………………………………………………………………………………………. 9
Обновление док-станции …………………………………………………………………………………………………………………… 9
Загрузка установщика микропрограмм HP …………………………………………………………………………. 9
Установка обновлений …………………………………………………………………………………………………….. 10
Настройка внешнего монитора ………………………………………………………………………………………………………… 10
Использование Windows ………………………………………………………………………………………………….. 10
Спящий режим, гибернация, завершение работы и перезагрузка …………………………………….. 11
2 Использование док-станции ………………………………………………………………………………………………………. 12
Рекомендации для док-станции ………………………………………………………………………………………………………. 12
Подключение к сети ………………………………………………………………………………………………………………………… 13
Подключение устройств USB ……………………………………………………………………………………………………………. 14
Подключение устройства DisplayPort ………………………………………………………………………………………………. 15
Подключение к устройству HDMI ……………………………………………………………………………………………………… 16
Подключение аудиоустройств …………………………………………………………………………………………………………. 17
Подключение аналоговых аудиоустройств ……………………………………………………………………… 17
Подключение дополнительного замка с тросиком …………………………………………………………………………… 17
3 Отключение док-станции ………………………………………………………………………………………………………….. 18
4 Устранение неполадок ………………………………………………………………………………………………………………. 19
Решение распространенных проблем ………………………………………………………………………………………………. 19
Неполадки при обычном использовании и подключении …………………………………………………. 19
Неполадки, связанные со звуком …………………………………………………………………………………….. 20
iii

Неполадки, связанные с видео ………………………………………………………………………………………… 20
Получение дополнительных сведений …………………………………………………………………………………………….. 20
5 Технические характеристики ……………………………………………………………………………………………………… 21
Входное питание ……………………………………………………………………………………………………………………………… 21
Рабочая среда …………………………………………………………………………………………………………………………………. 21
6 Электростатический разряд ……………………………………………………………………………………………………….. 22
7 Специальные возможности ………………………………………………………………………………………………………… 23
Специальные возможности ……………………………………………………………………………………………………………… 23
Поиск технических средств, соответствующих вашим потребностям ……………………………….. 23
Наше стремление ……………………………………………………………………………………………………………. 23
Международная ассоциация специалистов по специальным возможностям (IAAP) …………… 24
Поиск наиболее подходящих вспомогательных технологий ……………………………………………. 24
Оценка потребностей ……………………………………………………………………………………… 24
Специальные возможности в продуктах HP …………………………………………………….. 25
Стандарты и законодательство ……………………………………………………………………………………………………….. 25
Стандарты ………………………………………………………………………………………………………………………. 25
Мандат 376 — EN 301 549 ……………………………………………………………………………….. 26
Рекомендации по обеспечению доступности веб-контента (WCAG) ………………….. 26
Законодательные и нормативные акты …………………………………………………………………………… 26
США ………………………………………………………………………………………………………………… 26
Закон о доступности средств связи и видео в XXI веке (CVAA) …………………………… 27
Канада ……………………………………………………………………………………………………………. 27
Европа ……………………………………………………………………………………………………………. 28
Великобритания ……………………………………………………………………………………………… 28
Австралия ……………………………………………………………………………………………………….. 28
Другие страны мира ………………………………………………………………………………………… 28
Полезные ресурсы и ссылки с информацией по доступности ……………………………………………………………. 29
Организации ……………………………………………………………………………………………………………………. 29
Образовательные учреждения ………………………………………………………………………………………… 29
Другие ресурсы ……………………………………………………………………………………………………………….. 29
Ссылки HP ……………………………………………………………………………………………………………………….. 30
Обращение в службу поддержки …………………………………………………………………………………………………….. 30
Указатель …………………………………………………………………………………………………………………………………… 31
iv

1 Начало работы
Компоненты
В этой главе описаны видимые аппаратные функции док-станции и приведены инструкции по ее
настройке.
ПРИМЕЧАНИЕ. Некоторые функции док-станции могут не поддерживаться на вашем компьютере.
Компоненты 1
Вид сверху
Таблица 1-1 Компонент (вид сверху) и его описание
Компонент Описание
Кнопка и индикатор питания Кнопка
● Если компьютер выключен, нажмите эту кнопку, чтобы
включить его.
● Если компьютер включен, нажмите и отпустите эту
кнопку для перевода компьютера в спящий режим.
● Если компьютер находится в спящем режиме, для
выхода из него нажмите и сразу отпустите эту кнопку
(только на некоторых моделях).
● Если компьютер находится в режиме гибернации, для
выхода из него нажмите и сразу отпустите эту кнопку.
ПРЕДУПРЕЖДЕНИЕ. Если нажать и удерживать кнопку
питания, все несохраненные данные будут утеряны.
Если компьютер не отвечает, а процедуры завершения
работы не дают результата, для выключения компьютера
нажмите и удерживайте кнопку питания не менее 5 секунд.
Индикатор
● Светится: док-станция включена.
2 Глава 1 Начало работы

Вид спереди
Таблица 1-2 Компоненты (вид спереди) и их описание
Компонент Описание
(1) Порт USB Type-C SuperSpeed с функцией HP Sleep and
Charge
Используется для подключения устройств USB с разъемом
Type-C, чтобы осуществлять передачу данных и даже при
выключенном компьютере заряжать разнообразные
устройства, такие как мобильный телефон, камера, трекер
деятельности или умные часы.
ПРИМЕЧАНИЕ. Могут потребоваться кабели и (или)
адаптеры (приобретаются отдельно).
(2) Кабель USB Type-C Подключение док-станции к ноутбуку или планшетному
компьютеру.
ПРИМЕЧАНИЕ. Если компьютер не поддерживает питание
через разъемы USB Type-C или ему необходима мощность
более 100 Вт, для питания и зарядки нужно использовать
адаптер переменного тока, который входит в комплект его
поставки.
Компоненты 3
Вид слева
Таблица 1-3 Компоненты (вид слева) и их описание
Компонент Описание
(1) Комбинированное гнездо аудиовыхода (для
наушников) и аудиовхода (для микрофона)
Используется для подключения дополнительных
стереодинамиков с внешним питанием, обычных или
вставных наушников, гарнитуры или телевизионной
акустической системы, а также гарнитуры с микрофоном.
Это гнездо не поддерживает дополнительные автономные
микрофоны.
ВНИМАНИЕ! Прежде чем надеть обычные или вставные
наушники либо гарнитуру, во избежание повреждения
слуха уменьшите громкость. Для получения
дополнительных сведений о безопасности см. документ
Уведомления о соответствии нормам, требованиям к
безопасности и охране окружающей среды.
Чтобы открыть это руководство, выполните следующие
действия.
▲ На компьютере нажмите кнопку Пуск, а затем –
Справка и поддержка НР и Документация HP.
ПРИМЕЧАНИЕ. При подключении устройства к гнезду
динамики компьютера отключаются.
(2) Порты USB SuperSpeed с функцией HP Sleep
and Charge (2)
Используются для подключения устройств USB, передачи
данных и зарядки таких устройств, как мобильный телефон,
камера, трекер деятельности или умные часы, даже когда
компьютер выключен.
4 Глава 1 Начало работы
Вид сзади
Таблица 1-4 Компоненты (вид сзади) и их описание
Компонент Описание
(1) Порты USB SuperSpeed с функцией HP Sleep
and Charge (2)
Используются для подключения устройств USB, передачи
данных и зарядки таких устройств, как мобильный телефон,
камера, трекер деятельности или умные часы, даже когда
компьютер выключен.
(2) Разъемы Dual-Mode DisplayPort™ (2) Подключение дополнительного цифрового устройства
отображения, такого как высокопроизводительный монитор
или проектор.
(3) Гнездо замка с тросиком Крепление к док-станции дополнительного защитного
тросика.
ПРИМЕЧАНИЕ. Защитный тросик является сдерживающим
фактором, но он может не предотвратить ненадлежащее
использование или хищение док-станции.
(4) Порт HDMI Используется для подключения дополнительной видео-
или аудиоаппаратуры, например телевизора высокой
четкости, или любого другого совместимого цифрового либо
звукового компонента или же высокоскоростного
устройства HDMI.
(5) Разъем RJ-45 (сеть)/индикаторы состояния Подключение сетевого кабеля.
● Светится зеленым (справа): сеть подключена.
● Светится желтым (слева): по сети передаются данные.
Компоненты 5
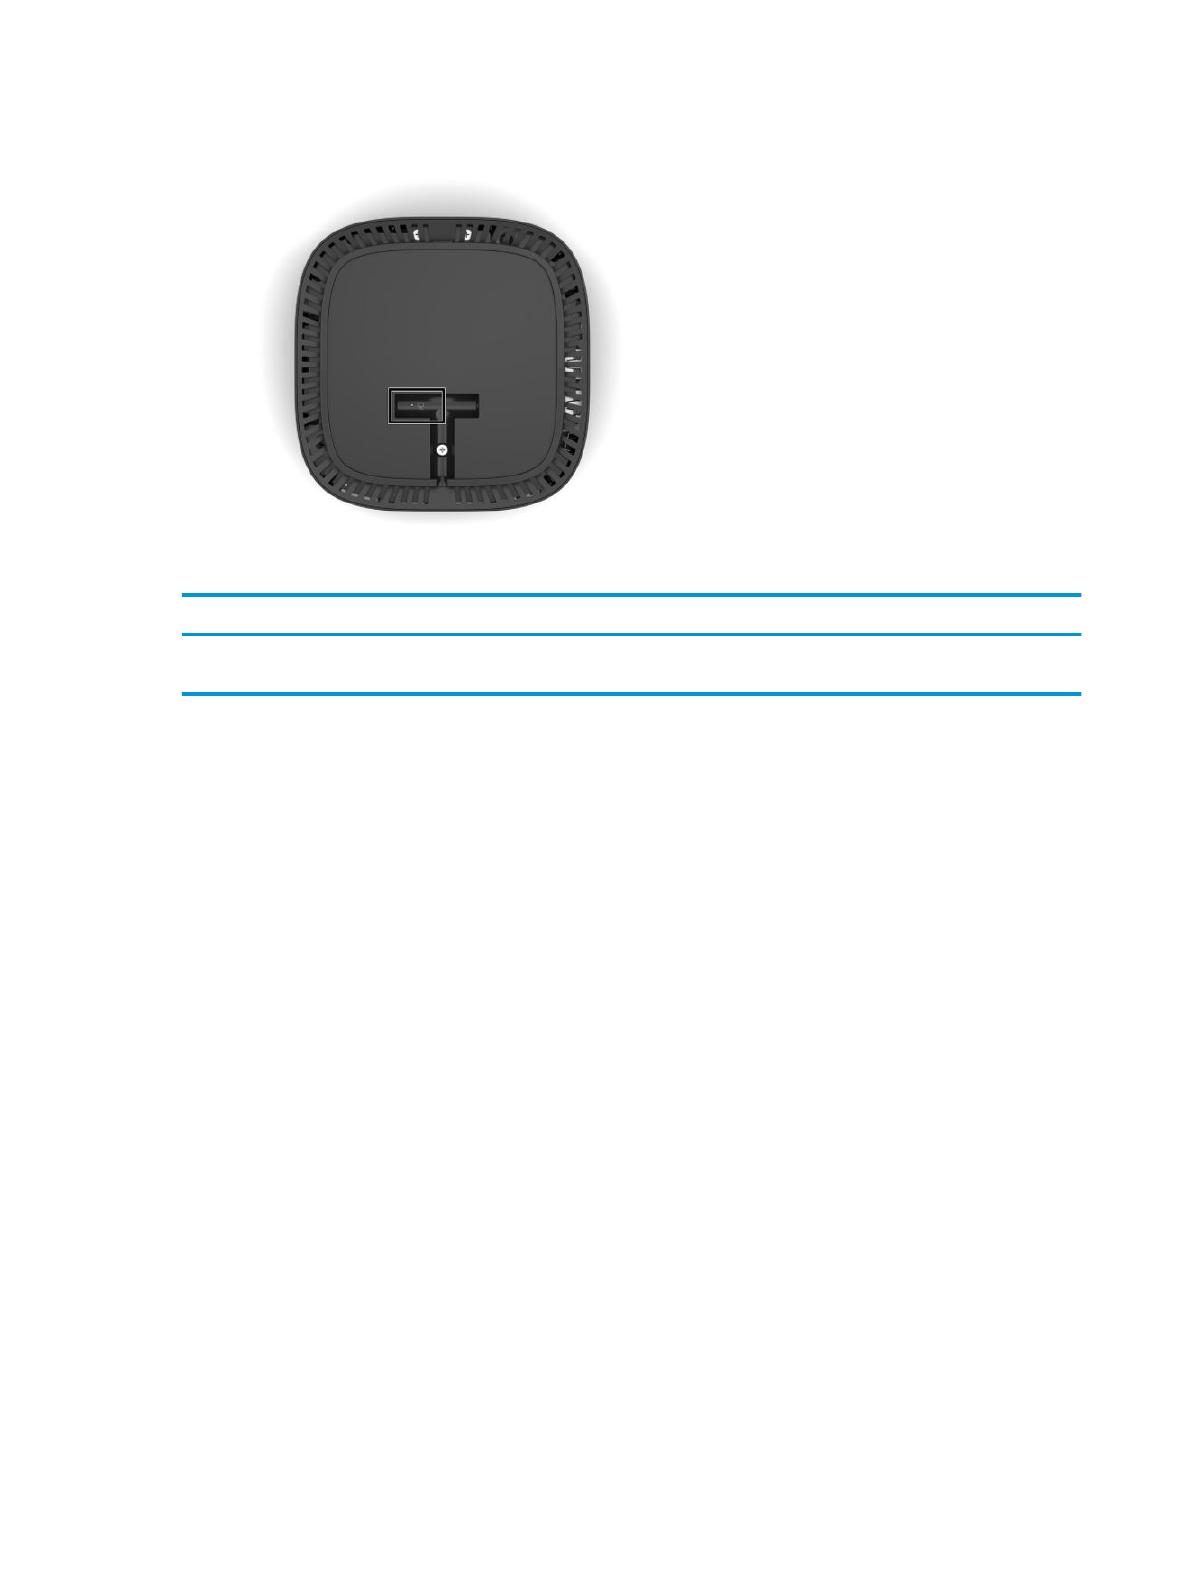
Вид снизу
Таблица 1-5 Компоненты (вид снизу) и их описание
Компоненты Описание
Индикатор адаптера переменного тока ● Светится: док-станция подключена к источнику переменного
тока.
6 Глава 1 Начало работы
Настройка док-станции
Шаг 1. Подключение адаптера переменного тока
ВНИМАНИЕ! Во избежание поражения электрическим током или повреждения оборудования
соблюдайте следующие правила.
Подключайте кабель питания к заземленной электрической розетке, расположенной в легкодоступном
месте.
Чтобы отключить устройство от источника питания, отсоедините кабель питания от электрической
розетки.
Не отключайте вилку с контактом для заземления кабеля питания. Заземление очень важно для
обеспечения безопасной эксплуатации.
Для обеспечения корректной работы всех функций док-станции подключите ее к источнику питания с
помощью кабеля питания, входящего в комплект поставки.
1. Подключите один конец кабеля питания к адаптеру переменного тока (1), а другой – к
электрической розетке (2).
2. Опустите разъем адаптера переменного тока в гнездо для питания док-станции (3), надавите на
разъем сбоку, пока он не зафиксируется (4), а затем поверните его так, чтобы кабель проходил
через канал на боковой панели корпуса док-станции (5).
Настройка док-станции 7
Шаг 2. Подключение к компьютеру
▲ Подключите кабель USB Type-C к порту USB Type-C компьютера.
ПРИМЕЧАНИЕ. Если компьютер не поддерживает питание через разъемы USB Type-C или ему
необходима мощность более 100 Вт, для питания и зарядки нужно использовать адаптер
переменного тока, который входит в комплект его поставки.
Шаг 3. Включение док-станции
▲ Нажмите кнопку питания.
8 Глава 1 Начало работы

Шаг 4. Предотвращение перехода в спящий режим или режим гибернации
При использовании внешнего монитора может потребоваться закрыть компьютер. Дополнительные
сведения о настройке внешнего монитора приводятся в разделе Настройка внешнего монитора
на стр. 10.
Чтобы избежать перехода в спящий режим или режим гибернации при закрытии экрана, выполните
следующие действия.
1. В поле поиска на панели задач введите панель управления и выберите Панель управления.
2. Выберите Электропитание.
3. Нажмите Действие при закрытии крышки.
4. Для пункта При закрытии крышки в столбце От батареи выберите Действие не требуется.
5. Для пункта При закрытии крышки в столбце От сети выберите Действие не требуется.
6. Нажмите Сохранить изменения.
Настройка программного обеспечения
В этом разделе описан процесс установки программного обеспечения док-станции на компьютере,
работающем под управлением операционной системы Windows® 10.
1. Включите компьютер, запустите Windows, подключитесь к Интернету, после чего подключите
док-станцию к компьютеру.
2. Перейдите на веб-страницу http://www.hp.com/support.
3. Выберите Загрузка ПО и драйверов и следуйте инструкциям на экране, чтобы найти свою док-
станцию.
4. Следуйте инструкциям на экране, чтобы выбрать и загрузить последнее обновление
микропрограммы и все драйверы.
5. Выполните последовательность шагов в мастере установки.
6. Выберите, перезагрузить компьютер сейчас или позже. Док-станция может не работать до
следующей перезагрузки. Если вы решите перезагрузить компьютер, сначала извлеките все
диски из дисководов компьютера. Нажмите кнопку Готово.
Обновление док-станции
Загрузка установщика микропрограмм HP
1. Перейдите на веб-страницу http://www.hp.com/support.
2. Выберите Загрузка ПО и драйверов и следуйте инструкциям на экране, чтобы найти свою док-
станцию.
3. Следуйте инструкциям на экране, чтобы найти и загрузить HP Firmware Installer.
4. Выполните последовательность шагов в мастере установки.
5. Выберите, перезагрузить компьютер сейчас или позже. Док-станция может не работать до
следующей перезагрузки. Если вы решите перезагрузить компьютер, сначала извлеките все
диски из дисководов компьютера. Нажмите кнопку Готово.
Настройка программного обеспечения 9

Установка обновлений
Док-станцию можно обновлять, когда она подключена к компьютеру, или же для повышения
быстродействия можно запланировать обновление док-станции, когда от нее будет отключен
компьютер.
1. Откройте проводник Windows и перейдите в папку, в которую сохранили HP Firmware Installer.
2. Дважды щелкните файл HPFirmwareInstaller.exe.
3. Убедитесь, что доступны обновления, а затем выберите те, которые нужно установить.
СОВЕТ: Для загрузки новых обновлений в HP Firmware Installer необходимо подключение к
Интернету.
4. Выберите один из следующих вариантов.
● Обновить сейчас: обновление устанавливается сразу же.
ПРИМЕЧАНИЕ. При выполнении обновления нельзя отключать компьютер от док-станции.
До завершения установки может наблюдаться мерцание изображения монитора, могут быть
слышны щелчки, возможны перебои с подключением к Интернету, а мышь и клавиатура
могут перестать реагировать.
● Обновить после отключения док-станции: обновление устанавливается после отключения
компьютера от док-станции.
ПРИМЕЧАНИЕ. В процессе обновления невозможно подключить компьютер к док-станции.
Во время установки обновления может мигать индикатор питания док-станции.
5. Нажмите Установить.
Настройка внешнего монитора
Использование Windows
Используйте ОС Windows для настройки дисплея монитора, подключенного к док-станции.
1. В поле поиска на панели задач введите панель управления и выберите Панель управления.
Выберите Оформление и персонализация.
2. Чтобы настроить внешний монитор в качестве основного, выберите Только второй экран.
– или –
Если внешний монитор должен дополнять основной, выберите Расширить.
– или –
Чтобы на внешнем мониторе дублировалось содержимое основного, выберите Повторяющийся.
Доступ к настройкам дисплея можно получить, нажав сочетание клавиш Windows + p.
10 Глава 1 Начало работы

Спящий режим, гибернация, завершение работы и перезагрузка
Если компьютер переходит в спящий режим или режим гибернации, монитор выключается. Когда
компьютер выходит из спящего режима или гибернации, ранее настроенные параметры
подключенного монитора восстанавливаются.
После перезагрузки или завершения работы компьютера и последующего его включения ранее
настроенные параметры подключенного монитора восстановятся.
Настройка внешнего монитора 11

2 Использование док-станции
Рекомендации для док-станции
● Операционные системы. Для оптимального быстродействия используйте док-станцию с
компьютером под управлением операционной системы Windows 10 версии 1809 или более
поздней
.
● Питание. Для использования функций док-станции необходимо подключить ее к источнику
переменного тока.
● Подключение и отключение. Док-станцию можно подключить к компьютеру и отключить от
него независимо от того, включен компьютер или нет. (См. Шаг 2. Подключение к компьютеру
на стр. 8 и Отключение док-станции на стр. 18.)
● Внешние устройства. Когда док-станция подключена к компьютеру, внешние устройства можно
подключать к портам док-станции или к портам на компьютере.
12 Глава 2 Использование док-станции
Подключение к сети
Компьютер можно подключить к сети через док-станцию. Для этого нужен сетевой кабель
(приобретается отдельно).
Док-станция поддерживает следующие функции компьютера с использованием сетевого
подключения.
ПРИМЕЧАНИЕ. Прежде чем использовать эти функции, убедитесь, что на компьютере установлены
последние версии BIOS, драйвера сетевого контроллера и драйвера USB LAN. Инструкции по
обновлению этих драйверов приводятся в документации к компьютеру.
● Загрузка PXE
● Сквозная передача MAC-адреса
СОВЕТ: Компьютер может поддерживать сквозную передачу MAC-адреса во включенном и
выключенном состоянии, в спящем режиме или режиме гибернации либо же только во
включенном состоянии или в спящем режиме.
Сквозная передача MAC-адреса поддерживается для загрузки UEFI PXE.
● Пробуждение по локальной сети (WOL)
СОВЕТ: Компьютер может поддерживать пробуждение по локальной сети из выключенного
состояния, из спящего режима или режима гибернации или же только из включенного состояния и
спящего режима.
Переключение между беспроводной и проводной локальными сетями поддерживается только на
некоторых компьютерах под управлением операционной системы Windows 10.
1. Подключите док-станцию к компьютеру.
2. Подключите один конец сетевого кабеля к сетевому разъему RJ-45 на док-станции, а второй
конец – к настенной розетке RJ-45 или маршрутизатору.
Подключение к сети 13
Подключение устройств USB
У док-станции пять портов USB: один порт USB Type-C с функцией HP Sleep and Charge на передней
панели, два порта USB SuperSpeed с функцией HP Sleep and Charge на средней панели и два порта USB
SuperSpeed с функцией HP Sleep and Charge на задней панели. Используйте порты USB для
подключения дополнительных внешних устройств USB, например клавиатуры и мыши.
ПРИМЕЧАНИЕ. Убедитесь, что внешнее устройство соответствует техническим характеристикам
электропитания док-станции. Использование несовместимого устройства может вывести из строя порт,
к которому подключено устройство. Инструкции по сбросу порта приводятся в разделе Устранение
неполадок на стр. 19.
14 Глава 2 Использование док-станции
Подключение устройства DisplayPort
Док-станцию также можно подключить к внешнему видеоустройству, например монитору или
проектору, через порты DisplayPort. Док-станция поддерживает одновременное подключение для
передачи видеоизображения к обоим разъемам DisplayPort. Один разъем DisplayPort может
поддерживать разрешение экрана до 5120 × 2880 при частоте 60 Гц в зависимости от возможностей
компьютера, кабеля и монитора.
ПРИМЕЧАНИЕ. Для передачи видеосигналов через разъем DisplayPort нужен кабель DisplayPort
(приобретается отдельно).
Подключение устройства DisplayPort 15
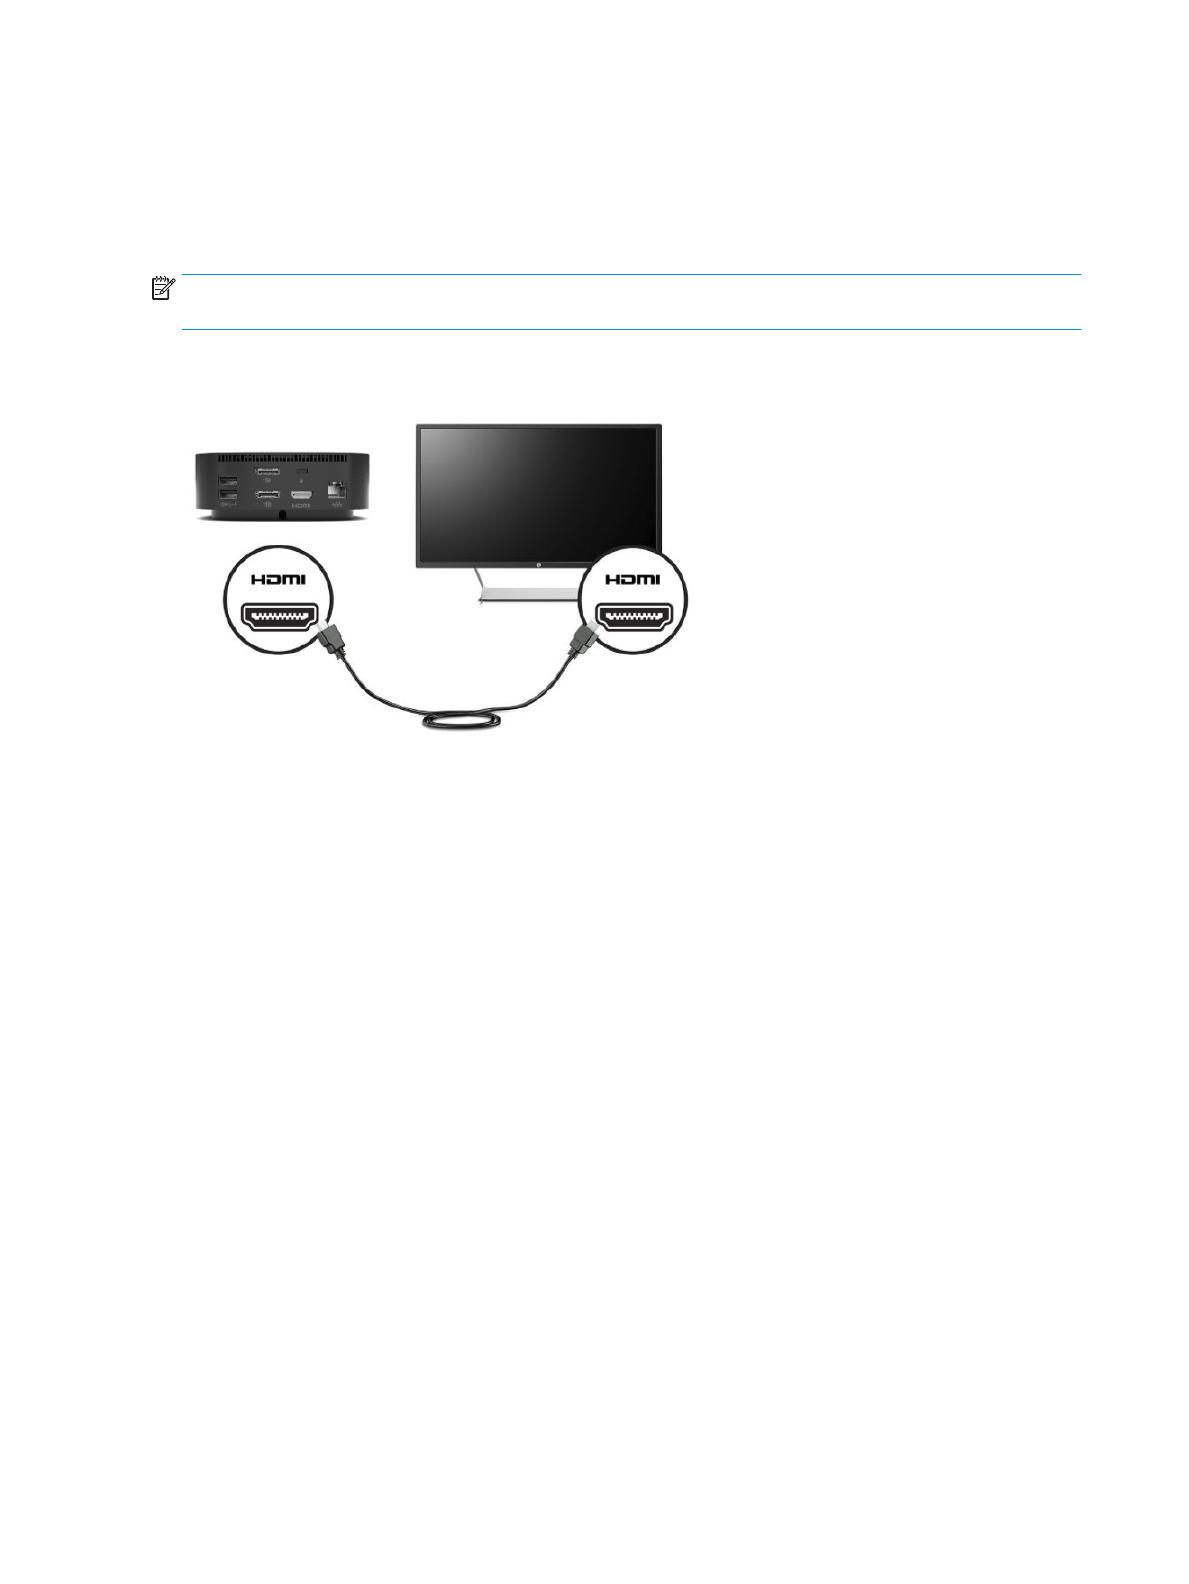
Подключение к устройству HDMI
Док-станцию можно подключить к внешнему видео- или аудиоустройству, например телевизору
высокой четкости или любым компонентам цифровых аудиоустройств, через порт HDMI.
Док-станция поддерживает одновременное подключение и к порту HDMI, и к порту DisplayPort.
ПРИМЕЧАНИЕ. Для передачи видеосигналов через порт HDMI необходим кабель HDMI (приобретается
отдельно).
16 Глава 2 Использование док-станции
/