-
Contents
-
Table of Contents
-
Troubleshooting
-
Bookmarks
Quick Links
737 GPS
737 GPS
Chartplotter Operations Manual
Chartplotter Operations Manual
531592-1_A
Related Manuals for Humminbird 737 GPS
Summary of Contents for Humminbird 737 GPS
-
Page 1
737 GPS 737 GPS Chartplotter Operations Manual Chartplotter Operations Manual 531592-1_A… -
Page 2: Thank You
Your Humminbird® is designed for trouble-free use in even the harshest marine environment. In the unlikely event that your Humminbird® does require repairs, we offer an exclusive Service Policy — free of charge during the first year after purchase, and available at a reasonable rate after the one-year period.
-
Page 3: Table Of Contents
Table of Contents How Sonar Works QuadraBeam PLUS™ Sonar………………………. 3 DualBeam PLUS™ Sonar ……………………….3 WideSide® Sonar (with optional-purchase WideSide® transducer)…………4 Universal Sonar 2 …………………………4 How GPS and Cartography Work (with optional-purchase GPS Receiver) Multi-Media Card (MMC)/SD Slot ……………………6 Software Updates…………………………
-
Page 4
Table of Contents Viewing Cartography (with optional-purchase GPS Receiver) Introduction to Navigation Waypoints, Routes and Tracks ……………………30 Save, Edit or Delete a Waypoint ……………………31 Navigate to a Waypoint or Position …………………… 32 Add a Waypoint Target or Trolling Grid ………………….33 Save, Edit or Delete a Route…………………….. -
Page 5
Table of Contents Start-Up Options Menu Normal Operation …………………………44 Simulator …………………………..44 System Status ………………………….. 45 Self Test …………………………….45 Accessory Test ………………………….. 46 GPS Diagnostic View (with optional-purchase GPS Receiver only) …………46 PC Connect (with PC Connect Cable only)………………….47 Sonar X-Press™… -
Page 6
Table of Contents Remove Grid (only if Grid is Active) ……………………59 Sonar Window (Combo view only) ……………………60 Waypoint [Name] (Most recently-created waypoint) ………………60 Snapshot and Recording X-Press™ Menu (Snapshot and Recording View, optional-purchase MMC/SD card only) Start Recording (optional-purchase MMC/SD Card, Snapshot and Recording View only)……62 Stop Recording (optional-purchase MMC/SD Card) ……………….. -
Page 7
Table of Contents Navigation Menu Tab (with optional-purchase GPS receiver) Current Track…………………………..78 Saved Tracks …………………………..78 Waypoints …………………………….79 Routes ……………………………… 80 Chart Orientation …………………………80 North Reference …………………………..81 Grid Rotation …………………………..81 Trackpoint Interval…………………………81 Track Min Distance (Advanced)……………………..82 Map Datum (Advanced) ………………………. -
Page 8
Temp Alarm …………………………..92 Off Course Alarm (optional-purchase GPS receiver) ………………92 Arrival Alarm (optional-purchase GPS receiver) ……………….. 93 Drift Alarm (optional-purchase GPS receiver) ………………..93 Alarm Tone…………………………..94 Setup Menu Tab Units — Depth …………………………..96 Units — Temp (International only)……………………96 Units — Distance (with Temp/Speed or optional-purchase GPS receiver)………. -
Page 9
Connect Cable Only) or (with optional-purchase WideSide® transducer) or (with optional-purchase MMC/SD card) require the purchase of separate accessories. You can visit our website at www.humminbird.com to order these accessories online or contact our Customer Resource Center at 1-800-633-1468. viii… -
Page 10: How Sonar Works
How Sonar Works Sonar technology is based on sound waves. The 700 Series™ Fishing System uses sonar to locate and define structure, bottom contour and composition, as well as depth directly below the transducer. Your 700 Series™ Fishing System sends a sound wave signal and determines distance by measuring the time between the transmission of the sound wave and when the sound wave is reflected off of an object;…
-
Page 11
The sound pulses are transmitted at various frequencies depending on the application. Very high frequencies (455kHz) are used for greatest definition but the operating depth is limited. High frequencies (200kHz) are commonly used on consumer sonar and provide a good balance between depth performance and resolution. -
Page 12: Quadrabeam Plus™ Sonar
QuadraBeam PLUS™ Sonar Your 700 Series™ Fishing System supports QuadraBeam PLUS™ sonar. QuadraBeam PLUS™ sonar provides an extremely wide 90° area of coverage. QuadraBeam PLUS™ starts with two fan-shaped 35° 455 kHz Side Structure locating sonar beams to spot fish, bait and structure to the left and right of the boat over an area of the bottom that’s always equal to twice your depth.
-
Page 13: Wideside® Sonar (With Optional-Purchase Wideside® Transducer)
Universal Sonar 2 features new temperature sensing and the performance of DualBeam PLUS™ technology (available with all Humminbird® DualBeam PLUS™ models). An expanded view and greater bottom detail gives you a totally new perspective of the water below, along with optimal…
-
Page 14: How Gps And Cartography Work (With Optional-Purchase Gps Receiver)
How GPS and Cartography Work (with optional-purchase GPS Receiver) With the purchase of an additional GPS Receiver, your 700 Series™ Fishing System also supports GPS and chartplotting. With a GPS Receiver, your 737 uses GPS and sonar to determine your position, display it on a grid, and provide detailed underwater information. The Global Positioning System (GPS) is a satellite navigation system designed and maintained by the U.S.
-
Page 15: Multi-Media Card (Mmc)/Sd Slot
MMC/SD card. You can obtain software updates from the www.humminbird.com website.
-
Page 16: What’s On The Display
What’s On the Display The 700 Series™ Fishing System can display a variety of useful information about the area Depth — water depth; can be set to alarm Cursor — available in Freeze Frame and can when the water becomes too shallow. provide depth of a sonar return and bottom Speed — if a Temp/Speed accessory or GPS Receiver is attached, the 700 Series™…
-
Page 17
under and adjacent to your boat, including the following items: 83 kHz, Wide Beam Hollow Fish Symbol be positioned in the Sonar View to depthbelow the cursor. Structure — where fish may be hiding. Fish — fish are displayed as arches and/or fish icons, and the unit can be set to alarm when a fish of a certain size is detected. -
Page 18: Views
NOTE: WideSide® View requires the purchase of the WideSide® transducer. You can visit our website at www.humminbird.com to order accessories online or contact our Customer Resource Center at 1-800-633-1468. NOTE: Navigation views require the purchase of the GPS Receiver. You can visit our website at www.humminbird.com to order these accessories online or contact our Customer Resource Center…
-
Page 19: Sonar View
Sonar View Sonar View presents a historical log of sonar returns. Depth is always displayed. Readouts for temperature and speed are automatically displayed if the appropriate accessory is connected. The most recent sonar returns are charted on the right side of the window; as new information is received, the older information is moved across the display to the left.
-
Page 20: Understanding Sonar History
Understanding Sonar History It is important to understand the significance of the 700 Series™ Fishing System display. The display does NOT show a literal 3-dimensional representation of what is under the water. Each vertical band of data received by the control head and plotted on the display represents something that was detected by a sonar return at a particular time.
-
Page 21: Bottom Presentation
Bottom Presentation As the boat moves, the unit charts the changes in depth on the display to create a profile of the Bottom Contour. The type of bottom can be determined from the return charted on the display. A Hard Bottom such as compacted sediment or flat rock appears as a thinner line across the display. A Soft Bottom such as mud or sand appears as a thicker line across the display.
-
Page 22
Inverse is a method where weak returns are shown with dark pixels and strong returns with lighter pixels. This has the benefit of ensuring that weak signals will be clearly visible on the display. Structure ID® represents weak returns as light pixels and strong returns as dark pixels. -
Page 23: Sonar Zoom View
Sonar Zoom View Sonar Zoom View increases the displayed resolution to separate sonar returns that are very close together, such as those caused by fish suspended close to the bottom or within structure. In Zoom View, the display is split to show a narrow slice of the full range view on the right and the zoomed view on the left.
-
Page 24: 200/83 Khz Split Sonar View
200/83 kHz Split Sonar View Split Sonar View displays sonar returns from the 83 kHz wide beam on the left side of the screen and displays sonar returns from the 200 kHz narrow beam on the right side of the screen. Depth is always displayed in the upper left hand corner.
-
Page 25: Big Digits View
Big Digits View Big Digits View provides digital data in a large, easy-to-see format. Depth is always displayed. Readouts for temperature, speed and Triplog information are displayed automatically if the appropriate accessory is connected to the system. The Triplog shows distance traveled, average speed, and time elapsed since the Triplog was last reset.
-
Page 26: Snapshot And Recording View
Snapshot and Recording View Snapshot and Recording View displays and allows you to view both screen snapshot thumbnails and recording icons captured to an optional-purchase MMC/SD card installed in your unit. In addition, when you are in the Snapshot and Recording View, Start Recording, Stop Recording, Delete Image, Delete All Images, Delete Recording, Delete All Recordings, Pings Per Second, Playback Speed and Stop Playback are added to the X-Press™…
-
Page 27
Screen Snapshot: When Screen Snapshot is enabled (from the Accessories menu tab), pressing the MARK key creates a saved screen capture (when you have an optional-purchase MMC/SD card installed). Once you have created a screen capture, a screen capture thumbnail is added to the Snapshot and Recording View, and is available to view at a later date. -
Page 28
Recording and Playback: From the Snapshot and Recording View, you can use the X-Press™ menu to start and stop recording, and to change the pings per second (which alters the detail level of the recording). Once you are recording already, playing back a recording and screen snapshot viewing are not allowed, and the only Sonar Recording menu choices available in the X-Press™… -
Page 29
Recording Slider Bar Name of recording Time and Date recording was started Position where recording was started Current Ping Rate Average Ping Rate Recording Indicator Amount of space remaining on card Amount of space and time Total amount of used by space on card this recording Highlighting a recording: You can scroll through the whole list of recording icons available in… -
Page 30
Recording Playback Name of recording Time and Date recording started Position when recording started Current Ping Rate Average Ping Rate Amount of time remaining to play Playback speed icons Amount of Time Already Played Amount of time remaining to play Overall length of recording You can delete the highlighted recording, or all recordings, using Delete Recording or Delete All… -
Page 31: Side Beam View
Side Beam View Side Beam View shows sonar information from both the left and right 455 kHz beams and the 200 kHz down-looking beam in one view. You can customize the way the sonar data is displayed in the Side Beam View to suit your personal preferences. Depending on the layout selected from the Quad Layout Sonar X-Press™…
-
Page 32
Classic layout: The top portion of the display presents a historical log of sonar returns from the 200 kHz down-looking sonar beam. New information in the down beam panel scrolls from right to left. The bottom portion of the display presents a historical log of sonar returns from the 455 kHz right- and left-looking sonar beams. -
Page 33
Slanted layout: This layout presents the two 455 kHz side sonar beams and the 200 kHz down-looking sonar beam as three panels of historical data. This layout is presented as three slanted panels. New information appears on the right, and scrolls to the left. Side Beam View, Slanted Layout Depth Speed… -
Page 34: Wideside® View (With Optional-Purchase Wideside® Transducer)
WideSide® View (with optional-purchase WideSide® transducer) WideSide® View is only available if you have purchased and connected an optional-purchase WideSide® transducer accessory and when Transducer Select is set to WideSide® (see Sonar Menu Tab: Transducer Select). The WideSide® View displays information from the 455 kHz WideSide® transducer.
-
Page 35: Bird’s Eye View (With Optional-Purchase Gps Receiver)
Bird’s Eye View (with optional-purchase GPS receiver) Bird’s Eye View — This view is only available if you have purchased and connected a GPS Receiver, and shows a 3-D perspective view of the track and the chart’s land contour from a point above and behind the boat (the eye point).
-
Page 36: Chart View (With Optional-Purchase Gps Receiver)
Chart View (with optional-purchase GPS receiver) Chart View — This view is only available if you have purchased and connected a GPS Receiver, and shows cartography from the built-in World Map or an optional MMC map for the area surrounding your current position.
-
Page 37: Combo View (With Optional-Purchase Gps Receiver)
Combo View (with optional-purchase GPS receiver) Combo View — This view is only available if you have purchased and connected a GPS Receiver, and is displayed as a split screen, with Chart View on the left and Sonar View on the right side of the screen.
-
Page 38: Viewing Cartography (With Optional-Purchase Gps Receiver)
Viewing Cartography (with optional-purchase GPS receiver) In the Chart or Combo Views (available when you have purchased and connected a GPS Receiver), there are several cartography-related functions that you can access using various keys. Panning: Use the 4-WAY Cursor keys to move the chart around on the display in the direction of the key being pressed.
-
Page 39: Introduction To Navigation
NOTE: Navigation requires the purchase of the GPS receiver. You can visit our website at www.humminbird.com to order this accessory online or contact our Customer Resource Center at 1-800-633-1468. Waypoints, Routes and Tracks (with optional-purchase GPS receiver) Waypoints are stored positions that allow you to mark areas of interest or navigation points.
-
Page 40: Save, Edit Or Delete A Waypoint
Routes link two or more waypoints together to create a path for navigation, and are used in trip planning. You can link individual waypoints together by using the GOTO key. A route represents your intended navigation and shows the shortest path from each waypoint to the next. As you travel a route, staying on the route line is the most efficient way to get to your destination, although you should always look out for obstacles not shown on the chart.
-
Page 41: Navigate To A Waypoint Or Position
fields, use the UP and DOWN Cursor keys to change the letter or number. All upper and lower case letters are available, as well as digits 0-9 and some punctuation characters. In the Waypoint Icon field, use the UP and DOWN Cursor keys to change the icon used to represent the waypoint on the Combo and Chart Views.
-
Page 42: Add A Waypoint Target Or Trolling Grid
Add a Waypoint Target or Trolling Grid (with optional-purchase GPS receiver) Waypoint Target Add or Remove a Waypoint Target: From the Waypoints submenu, select Target and press the RIGHT Cursor key to display a list of waypoints. Select the waypoint you want to target.
-
Page 43: Save Or Clear A Current Track
Create a route: From the Routes submenu, select Create and press the RIGHT Cursor key. A Route Edit screen will be displayed with an empty route. You can name the route, add waypoints to the route from the list of all waypoints, and order the waypoints in the route using the Cursor keys. Edit a saved route: From the Routes submenu, select Edit and press the RIGHT Cursor key.
-
Page 44: Man Overboard (Mob) Navigation
Edit Track dialog box appears, use the Cursor keys to move between fields. In the Track Name field, the UP and DOWN Cursor keys change the letter or number. All upper and lower case letters are available, as well as digits 0-9 and some punctuation characters. You can exit the Track Name field with the LEFT and RIGHT Cursor keys or by pressing the EXIT key.
-
Page 45
Activate MOB navigation: Press and hold the GOTO key for more than 1.5 seconds to activate the Man Overboard (MOB) function. Cancel MOB navigation: From the Navigation X-Press™ menu, select Cancel MOB and press the RIGHT Cursor key. Canceling MOB navigation removes the route and any waypoints created using the GOTO key, but does not remove any saved routes from memory. -
Page 46: Key Functions
Key Functions Your 700 Series™ Fishing System user interface consists of a set of easy-to-use keys that work with various on-screen views and menus to give you flexibility and control over your fishing experience. POWER/LIGHT Key The POWER/LIGHT key is used to turn the 700 Series™ Fishing System on and off, and also to adjust the backlight and contrast of the display.
-
Page 47: Menu Key
If the cursor is not active, the following menu will be displayed. Use the 4-WAY Cursor key to select Nearest Port, Nearest Tide Station or Nearest Current Station, then use the RIGHT Cursor key to display the requested information. NOTE: The built-in World map does not contain any chart information, including Port, Tide or Current information.
-
Page 48: 4-Way Cursor Control Key
4-WAY Cursor Control Key The 4-Way Cursor Control Key has multiple functions, depending on the situation: • Use the DOWN or UP arrow keys to select a menu choice from the menu list, then use the LEFT or RIGHT arrow keys to change a menu setting. NOTE: Menu choices are implemented and saved immediately — no further action is required.
-
Page 49: Goto Key
GOTO Key The GOTO Key has multiple functions, depending on the situation: • If the Cursor is active, pressing the GOTO key while in any view creates a waypoint and starts navigation towards that waypoint. If the Cursor is not active, pressing the GOTO key displays the list of waypoints, so that you can select the waypoint towards which you want to navigate.
-
Page 50: Accessory Bus
Operations Manual for additional details. NOTE: Accessories to enable WeatherSense®, GPS Functionality and the SmartCast® Wireless Sonar Link require separate purchases. You can visit our website at www.humminbird.com or contact our Customer Resource Center at 1-800-633-1468 for additional details. Powering Up the Unit Turn on your 700 Series™…
-
Page 51: The Menu System
The Menu System The menu system is divided into easy-to-use menu modules. The main components of the menu system are: Start-Up Options Menu — Press the MENU key during the power up sequence to view the Start-Up Options menu. X-Press Menu — The X-Press Menu allows you to access the settings that are changed frequently without having to navigate through the…
-
Page 52
Press the MENU key twice for the Main Menu, then use the 4-WAY Cursor LEFT or RIGHT key to select a tab, and use the DOWN or UP key to select a specific menu item under that tab, then use the LEFT or RIGHT keys again to change a menu setting. -
Page 53: Start-Up Options Menu
Start-Up Options Menu Press the MENU key when the Title screen is displayed to access the Start-Up Options menu. Use the UP or DOWN 4-WAY Cursor keys to position the cursor, then the RIGHT Cursor key to select one of the following choices.
-
Page 54: System Status
NOTE: To get the full benefit of the Simulator, it is important to select Simulator manually from the Start-Up Options menu as opposed to letting the Fishing System enter Simulator automatically (as it will if a transducer is not connected and you do nothing during power up). Manually selecting Simulator from the Start-Up Options menu allows you to pre-configure your 700 Series™…
-
Page 55: Accessory Test
Accessory Test Accessory Test lists the accessories connected to the system. NOTE: The speed accessory will be detected only if the paddlewheel has moved since your 700 Series™ Fishing System was powered up. System Status Accessory Test Screen GPS Diagnostic View (with optional-purchase GPS receiver) GPS Diagnostic View shows a sky chart and numerical data from the GPS receiver.
-
Page 56: Pc Connect (With Pc Connect Cable Only)
PC Connect Cable. Complete instructions are included with the PC Connect Cable accessory. NOTE: The PC Connect Cable requires a separate purchase. For more information visit our website at www.humminbird.com or contact our Customer Resource Center at 1-800-633-1468. Exit PC Connect mode by powering the Fishing System off.
-
Page 57: Sonar X-Press™ Menu
WideSide® view. NOTE: Side requires the purchase of the WideSide® transducer. You can visit our website at www.humminbird.com to order this accessory online or contact our Customer Resource Center at 1-800-633-1468. To adjust the Side: 1.
-
Page 58: Sensitivity
Sensitivity Sensitivity controls how much detail is shown on the display and will adjust the sensitivity of all sonar frequencies. Increasing the sensitivity shows more sonar returns from small baitfish and suspended debris in the water; however, the display may become too cluttered.
-
Page 59: Upper Range (Advanced: Sonar, Split Sonar, Big Digits And Circular Flasher Views Only)
Upper Range (Advanced: Sonar, Split Sonar, Big Digits and Circular Flasher views only) Upper Range sets the shallowest depth range that will be displayed on the Sonar, Split Sonar, Big Digits and Circular Flasher Views. The Upper Range menu choice is available when User Mode is set to Advanced (see Setup Menu Tab: User Mode) and can only be accessed from the Sonar, Split Sonar, Big Digits and Circular Flasher Views.
-
Page 60: Lower Range
Lower Range Lower Range sets the deepest depth range that will be displayed. Automatic is the default setting. When in automatic mode, the lower range will be adjusted by the unit to follow the bottom. Selecting a specific setting locks the depth range into Manual mode.
-
Page 61: Side Beam Range (Wideside® Transducer: Wideside® View Only)
WideSide® view. NOTE: The Side Beam Range requires the purchase of the WideSide® transducer. You can visit our website at www.humminbird.com to order this accessory online or contact our Customer Resource Center at 1-800-633-1468. To adjust the Side Beam Range: 1.
-
Page 62: Quad Layout
Quad Layout Quad Layout selects the method used to represent the sonar information from the two side-looking beams plus the down- looking beam to be presented on the Side Beam View, and is only available when an optional- purchase QuadraBeam PLUS™ transducer is attached and the Side Beam View is active. Use Quad Layout to change the way the Side Beam View is displayed.
-
Page 63: Bottom Range (Sonar Zoom View Only When Bottom Lock Is On)
Bottom Range (Sonar Zoom view only when Bottom Lock is On) Bottom Range allows you to control how much of the water column, measured up from the bottom, is shown in the Sonar Zoom View. Choose a small value to see low-lying bottom structure or details of the bottom return.
-
Page 64: (Optional-Purchase Gps Receiver, Navigation Views Only)
Navigation X-Press Menu (optional-purchase GPS receiver, navigation views only) The Navigation X-Press menu provides access to the settings most frequently used. Press the MENU key once while in the Bird’s Eye View, the Chart or the Combo View to access the Navigation X-Press menu.
-
Page 65: Waypoint [Name] (Only With An Active Cursor On A Waypoint)
Waypoint [Name] (Only with an active cursor on a waypoint) Waypoint [Name] allows you to view the Waypoints submenu for the waypoint under your cursor. To view the Waypoint [Name] Submenu: 1. Move the cursor onto an existing waypoint and press the MENU key once, or use Cursor to Waypoint to select a waypoint from a list of saved waypoints.
-
Page 66: Cursor To Waypoint (Chart Or Combo View Only)
Cursor to Waypoint (Chart or Combo view only) Cursor to Waypoint allows you to quickly move the cursor to any saved waypoint, so that you can locate it or edit it. NOTE This X-Press menu item appears only if you have saved waypoints. To move cursor to a saved waypoint: 1.
-
Page 67: Save Current Route (Only When Navigating)
Save Current Route (only when Navigating) Save Current Route allows you to save the current route being displayed. This menu choice will only appear when you are currently navigating a route. To Save Current Route: 1. Highlight Save Current Route on the Navigation X-Press menu.
-
Page 68: Cancel Mob Navigation (Only When Mob Navigation Is Activated)
Cancel MOB Navigation (only when MOB Navigation is activated) Cancel MOB Navigation removes the Man Overboard (MOB) waypoint and exits Man Overboard mode. This menu choice will only appear when you are currently navigating in Man Overboard mode. To Cancel MOB Navigation: 1.
-
Page 69: Sonar Window (Combo View Only)
Sonar Window (Combo view only) Sonar Window sets the size of the Sonar Window in the Combo View. Sonar Window can only be accessed from the Combo View. To Set the Size of the Sonar Window in the Combo View: 1.
-
Page 70: Snapshot And Recording X-Press™ Menu
Snapshot and Recording X-Press™ Menu (Snapshot and Recording View only) The Snapshot and Recording X-Press™ menu provides access to the image management and sonar recording functions. Press the MENU key once while in the Snapshot and Recording View to access the Snapshot and Recording X-Press™…
-
Page 71: Start Recording (Optional-Purchase Mmc/Sd Card, Snapshot And Recording View Only)
Start Recording (optional-purchase MMC/SD Card, Snapshot and Recording View only) Start Recording allows you to start sonar recording from the Snapshot and Recording View. This menu option is only available when you have an optional-purchase MMC/SD card installed and you are in Snapshot and Recording View. To start sonar recording: 1.
-
Page 72: Delete Image (Optional-Purchase Mmc/Sd Card Only)
Delete Image (optional-purchase MMC/SD Card, Snapshot and Recording View only) Delete Image allows you to delete a single screen capture image from the Snapshot and Recording View. This menu option is only available when you have an optional-purchase MMC/SD card installed and you are in Snapshot and Recording View and you have selected an image thumbnail.
-
Page 73: Delete Recording (Optional-Purchase Mmc/Sd Card, Snapshot And Recording View Only)
Delete Recording (optional-purchase MMC/SD Card, Snapshot and Recording View only) Delete Recording allows you to delete a single sonar recording from the Snapshot and Recording View. This menu option is only available when you have an optional-purchase MMC/SD card installed, you are in Snapshot and Recording View. To delete a recording: 1.
-
Page 74: Pings Per Second (Optional-Purchase Mmc/Sd Card, Snapshot And Recording View Only)
Pings Per Second (optional-purchase MMC/SD Card, Snapshot and Recording View only) Pings Per Second allows you to specify the maximum ping rate for the sonar recording currently in progress from the Snapshot and Recording View. This menu option is only available when you have an optional-purchase MMC/SD card installed and you are in Snapshot and Recording View and are actively recording (not playing back).
-
Page 75: Stop Playback (Optional-Purchase Mmc/Sd Card)
Stop Playback (optional-purchase MMC/SD Card only) Stop Playback allows you to stop playback of a sonar recording from any view. This menu option is only available when you have an optional-purchase MMC/SD card installed and you are playing back a recording. To stop playback of a recording: 1.
-
Page 76: Sonar Menu Tab
Sonar Menu Tab Press the MENU key twice to access the Main Menu System and then press the RIGHT Cursor key to select the Sonar tab. NOTE: Menu choices will vary depending on system settings such as whether the unit is set for Advanced User mode or what transducer is currently selected.
-
Page 77: Beam Select
Beam Select Beam Select sets which sonar returns from the transducer will be displayed on the screen. When set to 200/83 kHz, the returns from both beams are blended by starting with the 83 kHz wide beam return, dimming it, and then overlaying it with the 200 kHz narrow beam return. The darker 200 kHz wide beam sonar returns will stand out from the paler 83 kHz narrow beam sonar returns.
-
Page 78: Fish Id+ Tm
Fish ID+ Fish ID+ uses advanced signal processing to interpret sonar returns, and will display a Fish Symbol when very selective requirements are met. When a fish is detected, a fish icon and its depth are displayed above the return that has been classified as being a fish.
-
Page 79: Fish Id Sensitivity
Fish ID Sensitivity Fish ID Sensitivity adjusts the threshold of the Fish ID+ detection algorithms. Selecting a higher setting allows weaker returns to be displayed as fish. This is useful for identifying smaller fish species or baitfish. Selecting a lower setting displays fewer fish from weak sonar returns.
-
Page 80: Zoom Width
Zoom Width Zoom Width adjusts the width of the Zoom window on the Sonar Zoom View. To change the Zoom Width Setting: 1. Highlight Zoom Width on the Sonar main menu. 2. Use the LEFT or RIGHT 4-WAY Cursor Control keys to change the Zoom Width setting. (Narrow, Medium, Wide, Default = Wide) 83 kHz Sensitivity (Advanced)
-
Page 81: 455 Khz Sensitivity (Advanced)
Tab: Transducer Select) and User Mode is set to Advanced (see Setup Menu Tab: User Mode). NOTE: The WideSide® Sensitivity requires the purchase of the WideSide® transducer. You can visit our website at www.humminbird.com to order this accessory online or contact our Customer Resource Center at 1-800-633-1468.
-
Page 82: Depth Lines (Advanced)
Depth Lines (Advanced) Depth Lines divide the display into four equal sections which are separated by three horizontal depth lines. The depth of each line is displayed along the depth scale. You can either turn Depth Lines On or Off. The Depth Lines menu choice is available when User Mode is set to Advanced (see Setup Menu Tab: User Mode).
-
Page 83: Surface Clutter (Advanced)
Surface Clutter (Advanced) Surface Clutter adjusts the filter that removes surface clutter noise caused by algae and aeration. The lower the setting, the less surface clutter will be displayed. The Surface Clutter menu choice is available when User Mode is set to Advanced (see Setup Menu Tab: User Mode). Surface Clutter To change the Surface Clutter setting:…
-
Page 84: Noise Filter (Advanced)
Noise Filter (Advanced) Noise Filter adjusts the sonar Noise Filter to limit interference on the display from sources such as your boat engine, turbulence, or other sonar devices. The Noise Filter menu choice is available when User Mode is set to Advanced (see Setup Menu Tab: User Mode). NOTE: The Off setting removes all filtering;…
-
Page 85: Water Type (Advanced)
Water Type (Advanced) Water Type configures your unit for operation in fresh or salt water. The Water Type menu choice is available when User Mode is set to Advanced (see Setup Menu Tab: User Mode). NOTE: In salt water, what would be considered a large fish might be 2 to 10 times bigger than a large fish in fresh water (depending on the type of fish you are seeking).
-
Page 86: Navigation Menu Tab (With Optional-Purchase Gps Receiver)
Navigation Menu Tab (with optional-purchase GPS receiver) Press the MENU key twice to access the Main Menu System, then press the RIGHT cursor key to select the Navigation tab. NOTE: The Navigation menu tab will only appear if you have an optional-purchase GPS receiver connected.
-
Page 87: Current Track
Current Track Current Track allows you to view the Current Track submenu. To view the Current Track Submenu: 1. Highlight Current Track on the Navigation main menu. 2. Use the RIGHT 4-WAY Cursor Control keys to view the Current Track submenu. Current Track Submenu The Current Track Submenu contains the following menu choices: Save Current Track allows you to save the current track.
-
Page 88: Waypoints
Waypoints Waypoints allows you to view the Waypoints submenu. To view the Waypoints Submenu: 1. Highlight Waypoints on the Navigation main menu. 2. Use the RIGHT 4-WAY Cursor Control keys to view the Waypoints submenu. Waypoints Submenu The Waypoints Submenu contains the following menu choices: Create allows you to create a new waypoint and edit it immediately.
-
Page 89: Routes
Routes Routes allows you to view the Routes submenu. To view the Routes Submenu: 1. Highlight Routes on the Navigation main menu. 2. Use the RIGHT 4-WAY Cursor Control keys to view the Routes submenu. Routes Submenu The Routes Submenu contains the following menu choices: Create allows you to create a new, empty route and add waypoints to it immediately.
-
Page 90: North Reference
North Reference North Reference allows you to have bearings displayed with one of two orientations: True North or Magnetic North. To change the North Reference setting: 1. Highlight North Reference on the Navigation main menu. 2. Use the LEFT or RIGHT 4-WAY Cursor Control keys to change the North Reference setting. (True, Magnetic, Default = True) Grid Rotation Grid Rotation allows you to set the orientation of the trolling…
-
Page 91: Track Min Distance (Advanced)
Track Min Distance (Advanced) Track Min Distance allows you to set a minimum distance of travel before a trackpoint is added to the track. The Track Min Distance menu choice is only available when User Mode is set to Advanced (see Setup Menu Tab: User Mode). NOTE: Track Min Distance works in conjunction with Trackpoint Interval.
-
Page 92: Course Projection Line
Course Projection Line Course Projection Line allows you to display or hide an arrow extending from the bow of the boat that projects your current course, and shows where the boat will go if you continue on your present course. To change the Course Project Line setting: 1.
-
Page 93: Delete All Nav Data (Advanced)
Delete All Nav Data (Advanced) Delete All Nav Data allows you to delete all saved Tracks, Waypoints and Routes. This menu choice should be used with caution. The Delete All Nav Data menu choice is only available when User Mode is set to Advanced (see Setup Menu Tab: User Mode). To Delete All Navigation Data: 1.
-
Page 94: Chart Menu Tab (With Optional-Purchase Gps Receiver)
Chart Menu Tab (with optional-purchase GPS Receiver only) Press the MENU key twice to access the Main Menu System and then press the RIGHT Cursor key to select the Chart tab. NOTE: Menu choices will vary depending on system settings such as whether the unit is set for Advanced User mode.
-
Page 95: Lat/Lon Grid
Map Borders Map Borders To change the Map Borders setting: 1. Highlight Map Borders on the Chart main menu. 2. Use the LEFT or RIGHT 4-WAY Cursor Control keys to change the Map Borders setting. (Hidden, MMC/SD Only, All Visible, Default = Hidden) Lat/Lon Grid Lat/Lon Grid allows you to display or hide a grid showing latitude and longitude lines.
-
Page 96: Navaids On Bird’s Eye View
Navaids on Bird’s Eye View Navaids on Bird’s Eye View allows you to display or hide additional navigational aids, such as lights and buoys, in Bird’s Eye View. NOTE: You will see more navigational aids with and optional-purchase MMC/SD card. To change the Navaids on Bird’s Eye View setting: 1.
-
Page 97: Set Map Offset (Advanced)
Set Map Offset (Advanced) Set Map Offset allows you to change the map offset used by the 700 Series™. The Set Map Offset menu choice is only available when User Mode is set to Advanced (see Setup Menu Tab: User Mode). NOTE: The Map Offset will be applied to all maps and not just the map that requires the correction.
-
Page 98: Alarms Menu Tab
Alarms Menu Tab From any view, press the MENU key twice to access the Main Menu System. The Alarms tab will be the default selection. NOTE: When an alarm is triggered, you can silence it by pressing any key. The alarm will be silenced, and will not be triggered again until a new instance of the alarm condition is detected.
-
Page 99: Depth Alarm
Depth Alarm Depth Alarm sounds when the depth becomes equal to or less than the menu setting. To change the Depth Alarm setting: 1. Highlight Depth Alarm on the Alarms main menu. 2. Use the LEFT or RIGHT 4-WAY Cursor Control keys to change the Depth Alarm setting. (OFF, 1 to 100 feet, or 0.5 to 30 meters [International Models only], Default = OFF) Fish ID Alarm Fish ID Alarm sounds when the Fishing System detects fish…
-
Page 100: Low Battery Alarm
Low Battery Alarm Low Battery Alarm sounds when the input battery voltage is equal to or less than the menu setting. The battery alarm will only sound for the battery that is connected to the 700 Series™ Fishing System. The Low Battery Alarm should be set to warn you when the battery voltage drops below the safety margin that you have determined.
-
Page 101: Temp Alarm
Temp Alarm Temp Alarm sounds when the water temperature detected by the 700 Series™ reaches the Temp Alarm setting, which is either set in degrees Fahrenheit or Celsius [International Models only]. For example, if the Temp Alarm is set to 58 degrees Fahrenheit, and the water temperature falls from 60 degrees to 58 degrees, the Temp Alarm will sound.
-
Page 102: Arrival Alarm (Optional-Purchase Gps Receiver)
Arrival Alarm (with optional-purchase GPS receiver) Arrival Alarm sounds when the boat has either exceeded the distance to the destination waypoint, or has entered the Arrival Alarm Circle, based on the menu setting when navigating, and will only appear in the Alarms menu when an optional-purchase GPS receiver is connected. Arrival Alarm allows you to set how close the boat must be to the destination waypoint before the Arrival Alarm will sound.
-
Page 103: Alarm Tone
Alarm Tone Alarm Tone selects the pitch of the alarm sound. A brief tone will be produced as you adjust the Alarm Tone so that you can select the tone that you can hear best. To change the Alarm Tone setting: 1.
-
Page 104: Setup Menu Tab
Setup Menu Tab From any view, press the MENU key twice to access the tabbed Main Menu System, then press the RIGHT cursor key until the Setup tab is selected. NOTE: Menu choices will vary depending on system settings such as whether the unit is set for Advanced User mode and what accessories are attached to the unit.
-
Page 105: Units — Depth
Units — Depth Units — Depth selects the units of measure for all depth- related readouts. To change the Units — Depth setting: 1. Highlight Units — Depth on the Setup menu. 2. Use the LEFT or RIGHT 4-WAY Cursor Control keys to change the Units — Depth setting. (Meters [International Models only], Feet, Fathoms;…
-
Page 106: Units — Speed (With Temp/Speed Or Optional-Purchase Gps Receiver)
Units — Speed (with Temp/Speed or optional-purchase GPS receiver) Units — Speed selects the units of measure for speed-related readouts, and will appear in the menu if a Temp/Speed Accessory is connected and the paddlewheel has moved at least once, or if an optional-purchase GPS Receiver is connected.
-
Page 107: Triplog Reset (With Temp/Speed Or Optional-Purchase Gps Receiver)
Triplog Reset (with Temp/Speed or optional-purchase GPS receiver) Triplog Reset resets the Triplog to zero, and will appear in the menu if a Temp/Speed Accessory is connected and the paddlewheel has moved at least once, or if an optional-purchase GPS Receiver is connected.
-
Page 108: Select Readouts (Advanced, Sonar View Only)
Select Readouts (Advanced, Sonar view only) Select Readouts sets individual digital readouts on the Sonar View. This Advanced feature allows you to select what data will be displayed in each of 6 fixed-position data windows arranged around the left and bottom edges of the Sonar View screen, or whether a particular window will be turned off, displaying nothing in that area;…
-
Page 109
Customized Sonar View Default Sonar View To Select Readouts: 1. Make sure you are in Advanced User Mode, then highlight Select Readouts on the Setup main menu. 2. Use the RIGHT 4-WAY Cursor Control key to initiate this procedure. 3. The Select Readouts submenu will appear, showing a list of all Readouts. Use the UP or DOWN Cursor keys to select a particular Readout position, then use the RIGHT or LEFT Cursor keys to change what will be displayed at that position. -
Page 110: Depth Offset (Advanced)
Depth Offset (Advanced) Depth Offset will adjust the digital depth readout to indicate depth from the waterline or boat’s keel. Enter a positive vertical measurement from the transducer to the waterline to read the depth from the waterline. Enter a negative vertical measurement from the transducer to keel to read the depth from the keel.
-
Page 111: Temp Offset (Advanced)
Temp Offset (Advanced) Temp Offset will adjust the temperature readout by the amount entered. This menu choice is available only when in Advanced User Mode (see Setup Menu Tab: User Mode.) To change the Temp Offset setting: 1. Make sure you are in Advanced User Mode, then highlight Temp Offset on the Setup menu.
-
Page 112: Daylight Saving Time (Advanced, With Optional-Purchase Gps Receiver)
Daylight Saving Time (Advanced, with optional-purchase GPS receiver only) Daylight Saving Time adjusts the time display to account for local Daylight Saving Time when Time+Date is selected as a Digital Readout on the Sonar View (see Select Readouts). Selecting On adds one hour to the time display adjusted for your local time zone. Selecting Off leaves the time display as adjusted for your local time zone.
-
Page 113: Date Format (Advanced, International And Optional-Purchase Gps Receiver Only)
Date Format (Advanced, International and optional-purchase GPS receiver only) Date Format changes the date format used by the unit This menu choice is available only when in Advanced User Mode (see Setup Menu Tab: User Mode) and when an optional-purchase GPS receiver is connected.
-
Page 114: Nmea Output (Advanced)
NMEA Output (Advanced) NMEA Output turns the NMEA* output on or off. This menu choice is available only when in Advanced User Mode (see Setup Menu Tab: User Mode). NMEA Output should be turned On if you connect the NMEA Output wires of the optional-purchase GPS Receiver cable to another NMEA-compatible device, such as an autopilot.
-
Page 115: Views Menu Tab
(with optional-purchase GPS receiver). NOTE: The Bird’s Eye, Chart, Combo and GPS Diagnostic views require the purchase of the GPS receiver. You can visit our website at www.humminbird.com to order this accessory online or contact our Customer Resource Center at 1-800-633-1468.
-
Page 116: Accessories Menu Tab
(with accessories attached) NOTE: Accessories to enable WeatherSense®, GPS Functionality and the SmartCast® Wireless Sonar Link require separate purchases. You can visit our website at www.humminbird.com or contact our Customer Resource Center at 1-800-633-1468 for additional details. Using Screen Snapshot Screen Snapshot activates the screen snapshot function.
-
Page 117
To make a screen snapshot (Screen Snapshot must be enabled): 1. Make sure you have installed an optional-purchase MMC/SD card into your card slot. 2. From any view you want to capture, press the MARK key. When you start a screen capture, you will see a message that a waypoint has been created at the point where your cursor is on the screen, and the screen will freeze. -
Page 118: Troubleshooting
Troubleshooting Before contacting the Humminbird® Customer Resource Center, please read the following section. Taking the time to review these troubleshooting guidelines may allow you to solve a performance problem yourself, and therefore avoid sending your unit back for repair. 700 Series™ Doesn’t Power Up If your 700 Series™…
-
Page 119: Display Problems
Display Problems There are several main conditions or sources of possible interference that may cause problems with the quality of the information displayed on the control head. Look in the following table for some symptoms of display problems and possible solutions: Problem Possible Cause The control head loses power…
-
Page 120: Finding The Cause Of Noise
Finding the Cause of Noise Electrical noise usually affects the display with many black dots at high speeds, and high sensitivity readings. One or more of the following sources can cause noise or interference: Possible Source of Noise Isolation Other electronic devices Turn off any nearby electronic devices to see if the problem goes away, then turn them on one at a time to see if the noise re-appears.
-
Page 121: 700 Series™ Fishing System Accessories
PC Connect Cable: Purchase the PC Connect Cable to connect the 700 Series™ Fishing System to a PC in order to upload product software updates and new features obtained from www.humminbird.com. This accessory requires the MSWindows-compatible HumminbirdPC™ software downloaded from our website to your PC in order to communicate with the 700 Series™…
-
Page 122
With the new InterLink™ Network Connection, you can now share GPS position, waypoints, routes and your current track between two Humminbird Fishing Systems in real time. Mark a waypoint at the console, and it’s instantly available on the second unit. No matter where you’re at on the boat, you’ll have access to your critical fishing and navigation information. -
Page 123: Specifications
Transducer ………………….XNT 9 QB 90 T Transducer Cable Length ………………20 ft (6 m) NOTE: Humminbird® verifies maximum stated depth in saltwater conditions, but actual depth performance may vary due to transducer installation, water type, thermal layers, bottom composition and slope.
-
Page 124: Glossary
When speed input is available, the Big Digits View also shows the TripLog. See TripLog. Bottom Black: Bottom Black is a Humminbird® feature that «fills in» the area of the display below the bottom contour. Bottom Black is preferred by some anglers because of its high contrast and easy readability, even though it can obscure bottom hardness information.
-
Page 125
Fish and other objects close to the bottom that fall within the dead zone will probably not be visible in the sonar beam. Precision sonar beams, such as the Humminbird® 20° beam, have a smaller dead zone than wider sonar beams. -
Page 126
Freeze Frame: Freeze Frame is a Humminbird® feature that pauses the sonar scrolling so that the image on screen can be studied with greater detail. See Instant Image Update. Frequency: Frequency is a measure of the number of sound wave cycles per second of a sound impulse transmitted underwater. -
Page 127
Chart Speed setting. A greater number of horizontal pixels show more sonar history that the boat has passed through. On many models, Humminbird® provides the most vertical pixels to provide a better display resolution. See Chart Speed and Pixels. -
Page 128
Quick Disconnect Mount: The Quick Disconnect Mounting system is an exclusive Humminbird® feature that permits the unit to be easily removed from the mounting base by pressing a release button, and re-installed by simply snapping it back into place. All cable connections are made when installing, so that no separate wiring connections are required. -
Page 129
Many Humminbird® units operate at up to 40 times per second when in single frequency operation. Due to the limitation of the speed of sound in water, the update rate begins to slow as depth increases to deeper than 50 feet. -
Page 130
TrueArch®: TrueArch® is a Humminbird® feature that provides true fish arches, not artificial arches or symbols. Humminbird® units are capable of producing fish arches due to the wide 60° sonar beam of DualBeam PLUS™, an extremely sensitive sonar receiver. See Fish Arch. -
Page 131
Split screen zoom divides the display into the full range view on the right, and the zoomed view on the left. Humminbird® offers One-Touch® Zoom which allows the zoom feature to be easily accessed from the regular sonar view with just one key press, eliminating the need to use menus to access the feature. -
Page 132
Chartplotter: Chartplotter describes a navigation device that shows Present Position on a Map, along with Tracks, Waypoints, and Routes. All Chartplotters are also considered Trackplotters. All Humminbird® GPS Combo units are Chartplotters. See Trackplotter. Cold Start: Cold Start refers to the procedure that a GPS receiver must perform when it does not have historical information regarding its current location. -
Page 133
The MMC is removable from Humminbird® products, and can be used in a PC that is equipped with an appropriate card reader. MMC is the same format that many digital cameras use. See SD. -
Page 134
Speed Over Ground is optimal for navigation because accurate destination times can be derived from this measurement. Humminbird® products allow for input and display of both speed measurements. Time To Go (TTG): Time To Go is the estimated time required to reach the destination waypoint. -
Page 135
Greenwich England. (UTC is equivalent to Greenwich Mean Time (GMT)). To display the correct Local Time in a Humminbird® GPS unit, the user must use the Local Time Zone menu and select the time zone (i.e. EST, CST). -
Page 136
Notes… -
Page 137
Notes… -
Page 138: Contact Humminbird
Contact Humminbird® Contact the Humminbird® Customer Resource Center in any of the following ways: By Telephone: (Monday — Friday 8:00 a.m. to 4:30 p.m. Central Standard Time): 1-800-633-1468 By e-mail: (typically we respond to your e-mail within three business days): custserv@johnsonoutdoors.com…
Обзор эхолота Humminbird 737
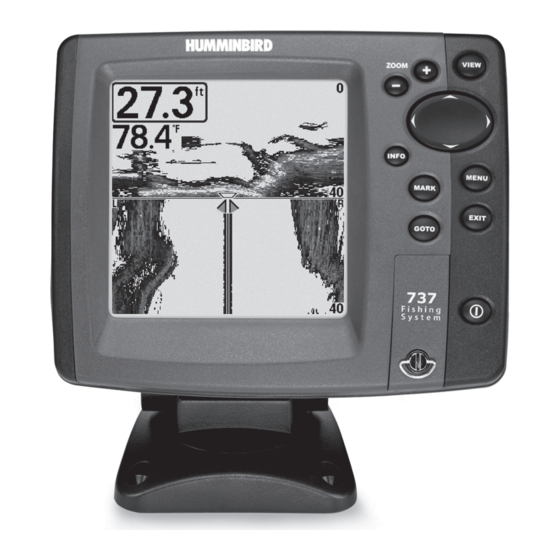
Эхолоты компании Humminbird полюбились многим рыбакам за свою функциональность, надежность и большой ассортимент. Торговая марка в продаже эхолотов занимает первое место и имеет большой опыт в производстве оборудования для рыбной ловли. Эхолоты Humminbird 700-й серии оснащены всеми необходимыми функциями для успешного поиска рыбы и имеют 5-дюймовый экран с высоким качеством изображения.

Модель Humminbird 737 имеет высококонтрастный монохромный дисплей с отображением 16 оттенков серого и диагональю 5″. Быстросъемное наклонно-поворотное крепление и водонепроницаемый корпус обеспечивают удобную фиксацию и надежную защиту прибора на лодке. Эхолот использует 4-лучевой датчик QuadraBeam для более точного сканирования водного пространства под лодкой и по её сторонам, суммарный угол обзора при этом составляет 90°. Лучи работают на частотах 83, 200 и 455 кГц и позволяют достигать глубины эхолокации до 450 метров. Прибор имеет разъемы для одновременного подключения дополнительных устройств с помощью Y-кабеля. Также имеется слот для (MMC)/SD карт памяти, на которые можно сохранять снимки экрана, навигационные карты и маршруты. Питание устройства осуществляется от источника постоянного тока 10-20 Вольт, что обеспечивает среднюю мощность 500 Вт и пиковую – 4000 Вт.
Основные возможности эхолота
Эхолот Humminbird 737 включает в себя все основные функции для рыбной ловли, такие как глубина и температура водоёма, структура дна и местонахождение рыбы. Для идентификации рыбы используется технология Fish ID+. Это улучшенная обработка сигнала эхолота, для определения соответствия его параметрам настоящей рыбы. При обнаружении рыбы, на экране отображается значок, который соответствует приблизительному размеру и глубина, на которой находится рыба. Функция мгновенной паузы эхограммы, даст вам больше времени для изучения деталей. Для быстрого доступа к часто используемым функциям используется X-Press меню.
Дополнительной функцией эхолота является возможность его использования как картплоттер. Для этого надо дополнительно подключить к устройству GPS приемник и вставить карту памяти в специально предназначенный слот. На карте памяти предварительно должны быть записаны навигационные карты Navionics® Gold или HotMaps™.
Также есть возможность подключать такие приборы как:
• Датчик бокового обзора WideSide®. Он позволяет получать информацию про объекты, которые находятся по бокам лодки. Датчик имеет три луча, направленных вправо, влево и вниз. Боковые лучи работают на частоте 455 кГц с углом обзора 16°, а нижний луч – на частоте 200 кГц с углом обзора 24°.
• Датчик Температуры/Скорости. Предоставляет информацию о температуре воды и скорости судна. При подключении этого датчика необходимо отключать встроенный температурный сенсор.
• Барометрический датчик WeatherSence™. Подключается для получения информации об атмосферном давлении, влияющем на поведение рыбы.
• Приёмник SmartCast™, для возможности работы эхолота с беспроводным датчиком системы SmartCast™.
При подключении этих дополнительных приборов в меню эхолота появляются соответствующие опции.
Как работает эхолот Humminbird 737
Работа сонара основывается на передаче звуковых волн четырьмя лучами датчика. Лучи проходят через толщу воды и эхом отражаются, воспроизводя на дисплее картинку подводной структуры и расположении объектов. Общий угол сканирования равен 90° и охватывает площадь до 40 м. Два боковых луча по 45° работают на частоте 455 кГц и собирают информацию слева и справа от лодки. Для сканирования водоёма под лодкой используются лучи 20° и 60° с технологией DualBeam PLUS, которые работают на частоте 83 и 200 кГц соответственно. Работая вместе, они позволяют более точно отображать информацию в узком луче и расширяют область за счет широкого луча. Сигналы, подаваемые на самых высоких частотах, имеют более высокое расширение, но проникают они не очень глубоко. И наоборот, низкочастотные сигналы могут проникать глубже, но площадь обзора у них меньше. При подключенном GPS приемнике и датчике WideSide® возможен боковой обзор и вид сверху в ЗD перспективе.
Как использовать эхолот
Для начала нужно закрепить устройство на транце лодки, подключить датчик-трансдьсер и подсоединить к источнику питания. При необходимости подключить дополнительные устройства. После включения эхолота необходимо выбрать режим работы прибора – нормальный режим, режима «Симулятор» или режим подключения к ПК. Эхолот готов к работе сразу же после подключения питания. В меню настраиваются параметры чувствительности, диапазон глубин, работу лучей и другие функции. В инструкции по эксплуатации подробно описана настройка каждого пункта.
Технические характеристики
• монохромный дисплей FSTN, 16 оттенков серого, диагональ 5 дюймов с расширением 640х320 пикселей;
• подсветка экрана;
• размеры устройства (ВхШхТ) – 17,25 x 19,25 x 11,25 см;
• питание – 10-20 В;
• водонепроницаемый корпус;
• мощность подачи сигнала – 500/4000 Вт;
• частота сигналов – 83/200/455 кГц;
• количество лучей – 4, технологии QuadraBeam и DualBeam PLUS;
• угол обзора – 90°(4 луча по 60°, 20°, 2х45°);
• максимальная глубина сканирования – 450 м;
• длина кабеля датчика – 6 м;
• звуковой сигнал обнаружения рыбы;
• функция идентификации рыбы Fish ID+;
• меню Navigation X-PressTM, при подключенном GPS датчике;
• звуковой сигнал глубины;
• температурный сигнал;
• сигнал отклонения от курса;
• подключение дополнительных приборов (спидометра, беспроводного датчика, датчика бокового обзора, GPS);
• слот для SD/(MMC) карт памяти;
• режим «тренажер»;
• подключение к ПК;
• сохранение снимков экрана;
Преимущества и недостатки
Преимущества модели эхолота Humminbird 737:
• 4-х лучевой датчик с общим углом обзора 90° и технологией QuadraBeam, которая одновременно использует все лучи и объединяет полученную информацию в одно целое;
• возможность подключения дополнительных устройств, таких как датчик бокового обзора WideSide®, погодный датчик WeatherSense™, беспроводной датчик-трансдьюсер;
• использование эхолота в качестве картплоттера (при подключенном GPS-приемнике);
• поддержка SD/(MMC) карт памяти;
• функция Fish ID+, для улучшения распознавания и отображения объектов на экране прибора.
Недостатками этой модели можно считать, разве что отсутствие встроенного GPS-модуля, но это легко компенсируется приобретенным дополнительным устройством.
Обзор эхолотов для рыбалки: для каяка, лодки ПВХ, байдарки. Эхолоты – устройства, определяющие рельеф дна, и позволяющие быстро найти места для хорошего улова.
Если у вас отсутствует техническая возможность для скачивания Инструкция по эксплуатации для Humminbird 737
вы можете прочесть документ прямо на нашем сайте или
Скачать Humminbird 737 Инструкция по эксплуатации

- 1
- 2
- 3
- 4
- 5
- 6
- 7
- 8
- 9
- 10
- 11
- 12
- 13
- 14
- 15
- 16
- 17
- 18
- 19
- 20
- 21
- 22
- 23
- 24
- 25
- 26
- 27
- 28
- 29
- 30
- 31
- 32
- 33
- 34
- 35
- 36
- 37
- 38
- 39
- 40
- 41
- 42
- 43
- 44
- 45
- 46
- 47
- 48
- 49
- 50
- 51
- 52
- 53
- 54
- 55
- 56
- 57
- 58
- 59
- 60
Инструкции для прочих Humminbird GPS-навигаторы
Инструкции для прочих Humminbird
В представленном списке руководства для конкретной модели Эхолота — Humminbird 737. Вы можете скачать инструкции к себе на компьютер или просмотреть онлайн на страницах сайта бесплатно или распечатать.
В случае если инструкция на русском не полная или нужна дополнительная информация по этому устройству, если вам нужны
дополнительные файлы: драйвера, дополнительное руководство пользователя (производители зачастую для каждого
продукта делают несколько различных документов технической помощи и руководств), свежая версия прошивки, то
вы можете задать вопрос администраторам или всем пользователям сайта, все постараются оперативно отреагировать
на ваш запрос и как можно быстрее помочь. Ваше устройство имеет характеристики:Тип: эхолот, Расположение корпуса: стационарное, Трансдьюсер: в комплекте, Длина кабеля трансдьюсера: 6 м, Крепление трансдьюсера: на транец, Корпус: влагозащищенный, полные характеристики смотрите в следующей вкладке.
Для многих товаров, для работы с Humminbird 737 могут понадобиться различные дополнительные файлы: драйвера, патчи, обновления, программы установки. Вы можете скачать онлайн эти файлы для конкретнй модели Humminbird 737 или добавить свои для бесплатного скачивания другим посетителями.
Если вы не нашли файлов и документов для этой модели то можете посмотреть интсрукции для похожих товаров и моделей, так как они зачастую отличаются небольшим изменениями и взаимодополняемы.
Обязательно напишите несколько слов о преобретенном вами товаре, чтобы каждый мог ознакомиться с вашим отзывом или вопросом. Проявляйте активность что как можно бльше людей смогли узнать мнение настоящих людей которые уже пользовались Humminbird 737.

кывеоркы
2019-02-28 23:18:28
пноаенго
Сергей
2019-10-08 11:17:55
Только приобрел
111111111111111111111
2020-10-30 11:32:08
11111111111111111111
Основные и самые важные характеристики модели собраны из надежных источников и по характеристикам можно найти похожие модели.
| Конструкция | |
| Тип | эхолот |
| Расположение корпуса | стационарное |
| Трансдьюсер | в комплекте |
| Длина кабеля трансдьюсера | 6 м |
| Крепление трансдьюсера | на транец |
| Корпус | влагозащищенный |
| Питание | от сети 12В |
| Экран | |
| Тип экрана | черно-белый |
| Количество цветов/градаций экрана | 16 |
| Диагональ экрана | 5″ |
| Разрешение экрана | 640×320 пикс. |
| Подсветка экрана | есть |
| Солнцезащитный козырек | опционально |
| Трансдьюсер | |
| Количество лучей | 4 |
| Первый луч | угол 20?, частота 200 кГц |
| Второй луч | угол 60?, частота 83 кГц |
| Третий луч | угол 35?, частота 455 кГц |
| Четвертый луч | угол 35?, частота 455 кГц |
| Общий угол излучения | 90? |
| Макс. глубина сканирования в пресной воде | 450 м |
| Выходная мощность, пиковая | 4000 Вт |
| Выходная мощность, RMS | 500 Вт |
| Функции и особенности | |
| GPS-модуль | встроенный |
| Количество путевых точек | 750 |
| Количество маршрутов | 10 |
| Количество точек в маршруте | 2000 |
| Датчик температуры | встроенный |
| Датчик скорости | опциональный |
| Звуковая сигнализация | есть |
| Определение размера и глубины рыбы | есть |
| Отображение структуры дна | есть |
| Увеличение изображения | есть |
| Подключение компьютера или флэш-накопителя | есть |
| Габариты (ШхВхГ) | 172x192x112 мм |
Здесь представлен список самых частых и распространенных поломок и неисправностей у Эхолотов. Если у вас такая поломка то вам повезло, это типовая неисправность для Humminbird 737 и вы можете задать вопрос о том как ее устранить и вам быстро ответят или же прочитайте в вопросах и ответах ниже.
| Название поломки | Описание поломки | Действие |
|---|---|---|
| Эхолот Не Видит Рыбу | ||
| Не Адекватно Показывает Рельеф Дна | ||
| Не Адекватно Показывает Рельеф Глубину | ||
| Не Включается | ||
| Не Включается Эхолот | Соединяю Провода Он Не Включается,В Прошлом Году Прекрасно Работал | |
| На Экране Очень Низкая Яркость, Звук Есть. | Изо То Появляется Чуть-Чуть, То Пропадает. | |
| Нет Сигнала Глубины С Датчика | Нет Индикации Глубинв | |
| Lorance Elite-5Hdi | Не Могу Переустановить Дату Пишет 2056 Гю | |
| Не Работает1 Луч | ||
| Оборвалась Провода От Разъёма Датчика Внутри Корпуса | Красный, Зелёный, Синий. Какой Куда Подпаивать? | |
| Он Горит И Не Чего Не Показывает | Он Горит И Не Чего Не Показывает |
В нашей базе сейчас зарегестрированно 18 353 сервиса в 513 города России, Беларусии, Казахстана и Украины.
Краткое содержание страницы № 1
531438-1_A — 737_EnglishOnly.qxd 9/25/2005 7:51 PM Page 1
737 GPS
737 GPS
Chartplotter Operations Manual
Chartplotter Operations Manual
531438-1_A
Краткое содержание страницы № 2
531438-1_A — 737_EnglishOnly.qxd 9/25/2005 7:51 PM Page 2 Thank You! Table of Contents Thank you for choosing Humminbird®, America’s #1 name in fishfinders. Humminbird® has built How Sonar Works 1 its reputation by designing and manufacturing top-quality, thoroughly reliable marine equipment. Your Humminbird® is designed for trouble-free use in even the harshest marine QuadraBeam™ Sonar………………………………………………………………………………………………
Краткое содержание страницы № 3
531438-1_A — 737_EnglishOnly.qxd 9/25/2005 7:51 PM Page 4 Table of Contents Table of Contents Navigation X-Press™ Menu (optional-purchase GPS receiver, navigation views only) 47 Key Functions 29 POWER/LIGHT Key ……………………………………………………………………………………………………………………………… 29 Waypoint [Name] (Only with an active cursor on a waypoint) ………………………………………………………….. 48 VIEW
Краткое содержание страницы № 4
531438-1_A — 737_EnglishOnly.qxd 9/25/2005 7:51 PM Page 6 Table of Contents Table of Contents North Reference………………………………………………………………………………………………………………………………………… 68 Temp Offset (Advanced) ………………………………………………………………………………………………………………………. 85 Speed Calibration (Advanced, with Temp/Speed only) ………….
Краткое содержание страницы № 5
531438-1_A — 737_EnglishOnly.qxd 9/25/2005 7:51 PM Page 8 The sound pulses are transmitted at various frequencies How Sonar Works depending on the application. Very high frequencies (455kHz) Sonar technology is based on sound waves. The 700 Series™ Fishing System uses sonar to locate are used for greatest definition but the operating depth is and define structure, bottom contour and composition, as well as depth directly below the limited. High frequencies (200kHz) are commonly used on tran
Краткое содержание страницы № 6
531438-1_A — 737_EnglishOnly.qxd 9/25/2005 7:52 PM Page 10 QuadraBeam™ Sonar WideSide® Sonar (with optional-purchase WideSide® transducer) Your 700 Series™ Fishing System supports QuadraBeam™ sonar. QuadraBeam™ sonar Your 700 Series™ Fishing System also supports provides an extremely wide 90° area of WideSide® sonar with the purchase of an additional coverage. QuadraBeam™ starts with two 45° 455 WideSide® transducer. The WideSide® transducer is a kHz beams for a continuous 90° of specialized
Краткое содержание страницы № 7
531438-1_A — 737_EnglishOnly.qxd 9/25/2005 7:52 PM Page 12 Your 700 Series™ supports Navionics® Gold, HotMaps™ and HotMaps™Preimium on MMC or SD How GPS and Cartography Work card media. (with optional-purchase GPS Receiver) NOTE: Your 700 Series™ does not support Navionics® Classic Charts, only Navionics® Gold, With the purchase of an additional GPS Receiver, your 700 Series™ Fishing System also HotMaps™, and HotMaps™ Premium. supports GPS and chartplotting. With a GPS Receiver, your 737 u
Краткое содержание страницы № 8
531438-1_A — 737_EnglishOnly.qxd 9/25/2005 7:52 PM Page 14 What’s On the Display The 700 Series™ Fishing System can display a variety of useful information about the area under and adjacent to your boat, including the following items: 83 kHz, Wide Beam Hollow Fish Symbol Depth — water depth; can be set to alarm Cursor — available in Freeze Frame and can be positioned in the Sonar View to provide when the water becomes too shallow. depth of a sonar return and bottom depth below the cursor. Sp
Краткое содержание страницы № 9
531438-1_A — 737_EnglishOnly.qxd 9/25/2005 7:52 PM Page 16 Views Sonar View The views available on your 700 Series™ Fishing System are: Sonar View presents a historical log of sonar returns. Depth is always displayed. Readouts for temperature and speed are automatically displayed if the appropriate accessory is connected. The Sonar views: Navigation views: most recent sonar returns are charted on the right side of the window; as new information is received, the older information is moved acr
Краткое содержание страницы № 10
531438-1_A — 737_EnglishOnly.qxd 9/25/2005 7:52 PM Page 18 Understanding Sonar History Bottom Presentation It is important to understand the significance of the 700 As the boat moves, the unit charts the changes in depth on the display to create a profile of the Series™ Fishing System display. The display does NOT show a Bottom Contour. The type of bottom can be determined from the return charted on the display. A literal 3-dimensional representation of what is under the water. Hard Bottom s
Краткое содержание страницы № 11
531438-1_A — 737_EnglishOnly.qxd 9/25/2005 7:52 PM Page 20 Inverse is a method where weak returns are shown with dark Sonar Zoom View pixels and strong returns with lighter pixels. This has the benefit Sonar Zoom View increases the displayed resolution to separate sonar returns that are very close of ensuring that weak signals will be clearly visible on the together, such as those caused by fish suspended close to the bottom or within structure. In Zoom display. View, the display is split
Краткое содержание страницы № 12
531438-1_A — 737_EnglishOnly.qxd 9/25/2005 7:52 PM Page 22 200/83 kHz Split Sonar View Big Digits View Split Sonar View displays sonar returns from the 83 kHz wide beam on the left side of the screen Big Digits View provides digital data in a large, easy-to-see format. Depth is always displayed. and displays sonar returns from the 200 kHz narrow beam on the right side of the screen. Depth Readouts for temperature, speed and Triplog information are displayed automatically if the is always dis
Краткое содержание страницы № 13
531438-1_A — 737_EnglishOnly.qxd 9/25/2005 7:52 PM Page 24 Screen Snapshot View Side Beam View When Screen Snapshot is enabled (from the Accessories menu tab), pressing the MARK key Side Beam View shows sonar information from both the left and right 90° 455 kHz beams and the creates a saved screen capture (when you have an optional-purchase MMC/SD card installed). 200 kHz down-looking beam in one view. The top portion of the display presents a historical log of sonar returns from the 200 kH
Краткое содержание страницы № 14
531438-1_A — 737_EnglishOnly.qxd 9/25/2005 7:52 PM Page 26 WideSide® View (with optional-purchase WideSide® transducer) Bird’s Eye View (with optional-purchase GPS receiver) WideSide® View is only available if you have purchased and connected an optional-purchase Bird’s Eye View — This view is only available if you have purchased and connected a GPS Receiver, WideSide® transducer accessory and when Transducer Select is set to WideSide® (see Sonar Menu and shows a 3-D perspective view of the t
Краткое содержание страницы № 15
531438-1_A — 737_EnglishOnly.qxd 9/25/2005 7:52 PM Page 28 Chart View (with optional-purchase GPS receiver) Combo View (with optional-purchase GPS receiver) Chart View — This view is only available if you have purchased and connected a GPS Receiver, and Combo View — This view is only available if you have purchased and connected a GPS Receiver, and shows cartography from the built-in World Map or an optional MMC map for the area surrounding is displayed as a split screen, with Chart View on t
Краткое содержание страницы № 16
531438-1_A — 737_EnglishOnly.qxd 9/25/2005 7:52 PM Page 30 Nearest Current Station: Current information for the nearest current station to your present Viewing Cartography (with optional-purchase GPS receiver) position will be displayed. This includes the position of the station and the current changes for In the Chart or Combo Views (available when you have purchased and connected a GPS Receiver), today. Two graphs are also presented that show the time, direction and flow speed of the curren
Краткое содержание страницы № 17
531438-1_A — 737_EnglishOnly.qxd 9/25/2005 7:52 PM Page 32 fields, use the UP and DOWN Cursor keys to change the letter or number. All upper and lower case Routes link two or more waypoints together to create a path for navigation, and are used in trip letters are available, as well as digits 0-9 and some punctuation characters. In the Waypoint Icon planning. You can link individual waypoints together by using the GOTO key. A route represents field, use the UP and DOWN Cursor keys to change t
Краткое содержание страницы № 18
531438-1_A — 737_EnglishOnly.qxd 9/25/2005 7:52 PM Page 34 Create a route: From the Routes submenu, select Create and press the RIGHT Cursor key. A Route Add a Waypoint Target or Trolling Grid Edit screen will be displayed with an empty route. You can name the route, add waypoints to the (with optional-purchase GPS receiver) Waypoint Target route from the list of all waypoints, and order the waypoints in the route using the Cursor keys. Add or Remove a Waypoint Target: From the Waypoints Edit
Краткое содержание страницы № 19
531438-1_A — 737_EnglishOnly.qxd 9/25/2005 7:52 PM Page 36 Edit Track dialog box appears, use the Cursor keys to move between fields. In the Track Name field, VIEW Key the UP and DOWN Cursor keys change the letter or number. All upper and lower case letters are The VIEW key is used to cycle through all available views. Press the VIEW key to available, as well as digits 0-9 and some punctuation characters. You can exit the Track Name field advance to the next view. Repeatedly pressing VIEW cy
Краткое содержание страницы № 20
531438-1_A — 737_EnglishOnly.qxd 9/25/2005 7:52 PM Page 38 Main Menu — Press the MENU key twice for the tabbed Main Menu System. The Main Menu GOTO Key System is organized under tabbed headings to help you find a specific menu item quickly: Alarms, If the Cursor is active, pressing the GOTO key while in any view creates a waypoint Sonar, Navigation, Chart, Setup, Views and Accessories tabs are part of your tabbed Main Menu and starts navigation towards that waypoint. If the Cursor is not acti