 12:08
12:08
Сколько денег может стоить Корейская Газель? Обзор Hyundai H1
 17:48
17:48
Hyundai H1 2019 2.5D (170 л.с.) AT Family — видеообзор
 10:03
10:03
2008 Hyundai H-1 (Grand Starex) POV Test Drive
 24:11
24:11
Hyundai H1 2018. Качественнее Citroen Spacetourer.
 20:59
20:59
Hyundai H-1 Baru Review & Test Drive by AutonetMagz
 03:44
03:44
The New 2020 Hyundai H-1 — The Experience
![Видео In Depth Tour Hyundai H-1 Elegance CRDi [TQ] Facelift (2018) - Indonesia (автор: B Channel)](https://i.ytimg.com/vi/tMaAhkp7fbM/mqdefault.jpg) 07:49
07:49
In Depth Tour Hyundai H-1 Elegance CRDi [TQ] Facelift (2018) — Indonesia
 05:55
05:55
2019 Hyundai H-1 Full Option
WMA RECEIVER Руководство по эксплуатации Instruction manual…
Автомагнитолы Hyundai
- Изображение
- Текст
CD/MP3/WMA-РЕСИВЕР
CD/MP3/WMA RECEIVER
Руководство по эксплуатации
Instruction manual
H-CDM8035

2
3
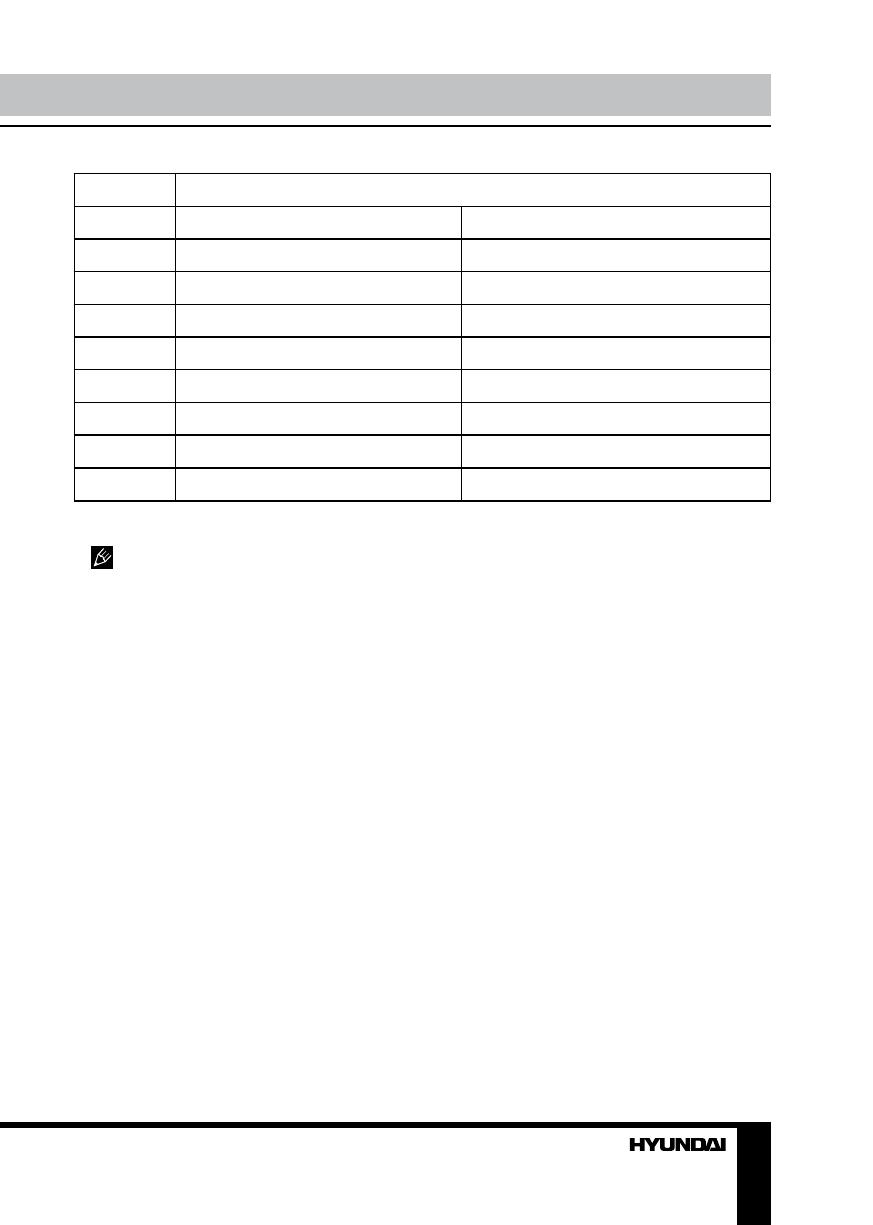
Table of contents
Before you start
Dear customer!
Thank you for purchasing our product. For safety, it is strongly recommended to read
this manual carefully before connecting, operating and/or adjusting the product and keep
the manual for reference in the future.
13
13
13
13
14
14
14
14
14
15
15
15
15
15
15
16
16
16
16
16
16
16
17
18
18
18
18
18
19
20
Table of contents
Before you start
Utilization of the product
Important safeguards
Installation/Connection
Installation
General notes
Din Front/Rear-Mount
1. DIN front-mount (Method A)
Dismantling the unit
Trim frame installation
2. DIN rear-mount (Method B)
Detachable control panel
Anti-theft system
Connection
Connection diagram
Using the ISO Connector
Operation
Control elements
Front panel
Back of the front panel
LCD layout
Remote controller
General operations
Turning on/off
Mode selection
Volume control
Mute function
Audio parameter setting
Beep
Equalizer modes
Loudness
Color (option)
Clock setting
Subwoofer control
AUX in jack
Radio operations
Band select
Auto/Manual tuning
2
3
3
3
4
4
4
4
4
4
5
5
5
5
6
6
6
8
8
8
9
10
11
12
12
12
12
12
12
12
12
12
12
12
13
13
13
13
13
Programming tuner stations
Auto memory store/preset scan
Mono/Stereo control
Local radio station search
RDS function
AF (Alternative Frequencies)
function
TA (Traffic Alarm) function
PTY (Program Type)
Other parameter setting
Disc/USB/SD/MMC operations
USB/SD/MMC notes
Insert/Eject disc
Inserting an SD/MMC card/
USB device
USB/SD/MMC folder playback
MP3/WMA track search
Play/pause
Fast forward/rewind
Scanning tracks
Repeat
Random playback
Multi-session disc reading
Notes on MP3 and WMA
Notes on creating your own CD-Rs
or CD-RWs containing MP3 files
General information
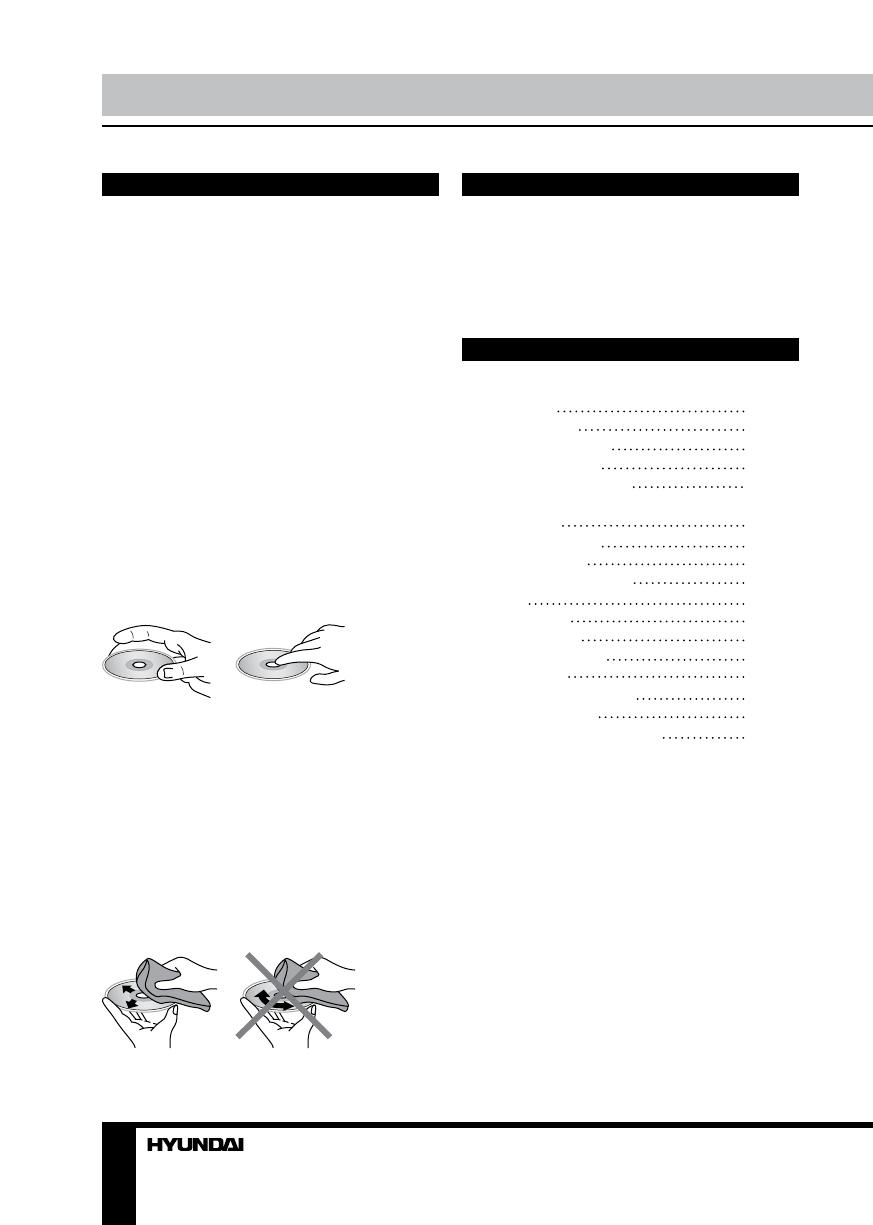
Handling compact discs
Cleaning discs
Cleaning the unit body
Accessories
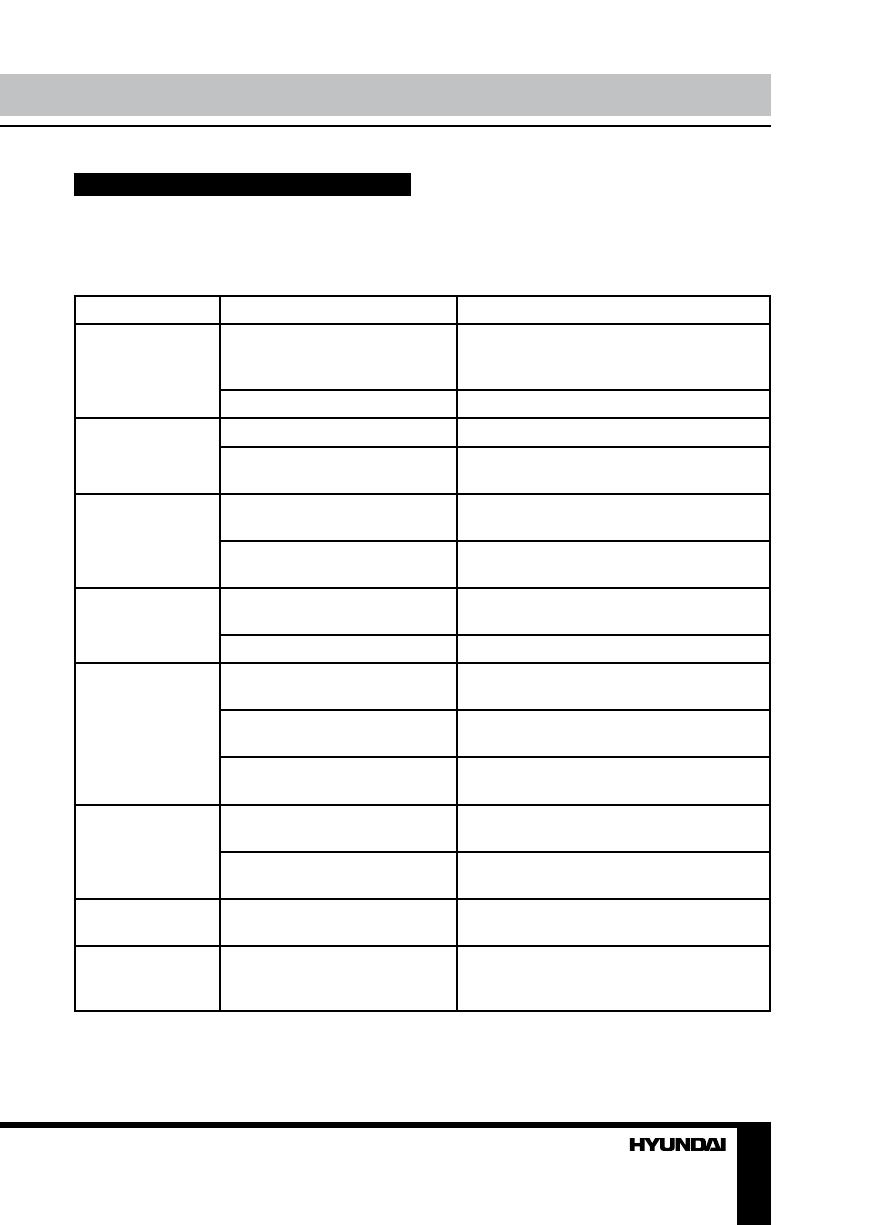
Troubleshooting guide
Specification

2
3
Table of contents
Before you start
If you want to dispose this product, do not mix it with general household waste. There is
a separate collection system for used electronic products in accordance with legislation
that requires proper treatment, recovery and recycling.
Please contact your local authorities for the correct method of disposal. By doing so, you
will ensure that your disposed product undergoes the necessary treatment, recovery and
recycling and thus prevent potential negative effects on the environment and human health.
Utilization of the product
Important safeguards
• Read carefully through the manual to
familiarize yourself with this unit.
• Keep this manual handy as a reference
for operating procedures and precautions. Do
not allow persons who have not read through
this manual to use this unit.
• “CLASS 1 LASER PRODUCT”
This product contains a laser diode of
higher class than 1. Laser beams from the
optical pickup are dangerous to the eyes. To
ensure continued safety, do not remove any
covers or attempt to gain access to the inside
of the product. Refer all servicing to qualified
personnel.
• Do not allow this unit to come into contact
with liquids. Electrical shock could result. Also,
damage to this unit, smoke, and overheating
could result from contact with liquids or dust.
Protect this unit from moisture.
• Make sure that foreign objects do not get
inside the unit; they may cause malfunctions,
or create safety hazards such as electrical
shock or laser beam exposure.
• The beginning of operation is the moment
of the unit installation. Before use the device
in winter it is recommended to heat up the
passenger compartment during 20 seconds or
to the operation temperature.
• Using the unit with the temperature that
goes beyond the operation temperature greatly
decreases the operation resource of the screen
and other components of the unit and can
result in an outage.
• Disconnect the vehicle’s negative battery
terminal while mounting and connecting the
unit.
• The unit is designed for negative
terminal of the battery, which is connected
to the vehicle metal. Please ensure it before
installation.
• When replacing the fuse, be sure to use
one with an identical amperage rating. Using a
fuse with a higher amperage rating may cause
serious damage to the unit.
• Do not allow the speaker wires to be
shorted together when the unit is switched
on. Otherwise it may overload or burn out the
power amplifier.
• Make sure you disconnect the power supply
and aerial if you will not be using the system
for a long period or during a thunderstorm.
• Make sure you disconnect the power supply
if the system appears to be working incorrectly,
is making an unusual sound, has a strange
smell, has smoke emitting from it or liquids
have got inside it. Let a qualified technician
check the system.
• Always keep the volume low enough so that
you can hear sounds from outside the vehicle.
• Should this product fail to operate properly,
contact your dealer or nearest service center.

4
Installation/Connection
Installation
General notes
• Choose the mounting location where the
unit will not interfere with the normal driving
function of the driver.
• Before finally installing the unit, connect
the wiring and make sure that the unit works
properly.
• Consult with your nearest dealer if
installation requires the drilling of holes or other
modifications of the vehicle.
• Install the unit where it does not get in the
driver’s way and cannot injure the passenger if
there is a sudden stop, like an emergency stop.
• If installation angle exceeds 30° from
horizontal, the unit may not perform properly.
• Avoid installing the unit where it would
be subject to high temperature, such as from
direct sunlight, or from hot air, from the heater,
or where it would be subject to dust, dirt or
excessive vibration.
Din Front/Rear-Mount
This unit can be properly installed either
from ‘Front’ (conventional DIN Front-mount) or
‘Rear’ (DIN Rear-mount installation, utilizing
threaded screw Holes at the sides of the unit
chassis). For details, refer to the following
illustrated installation methods.
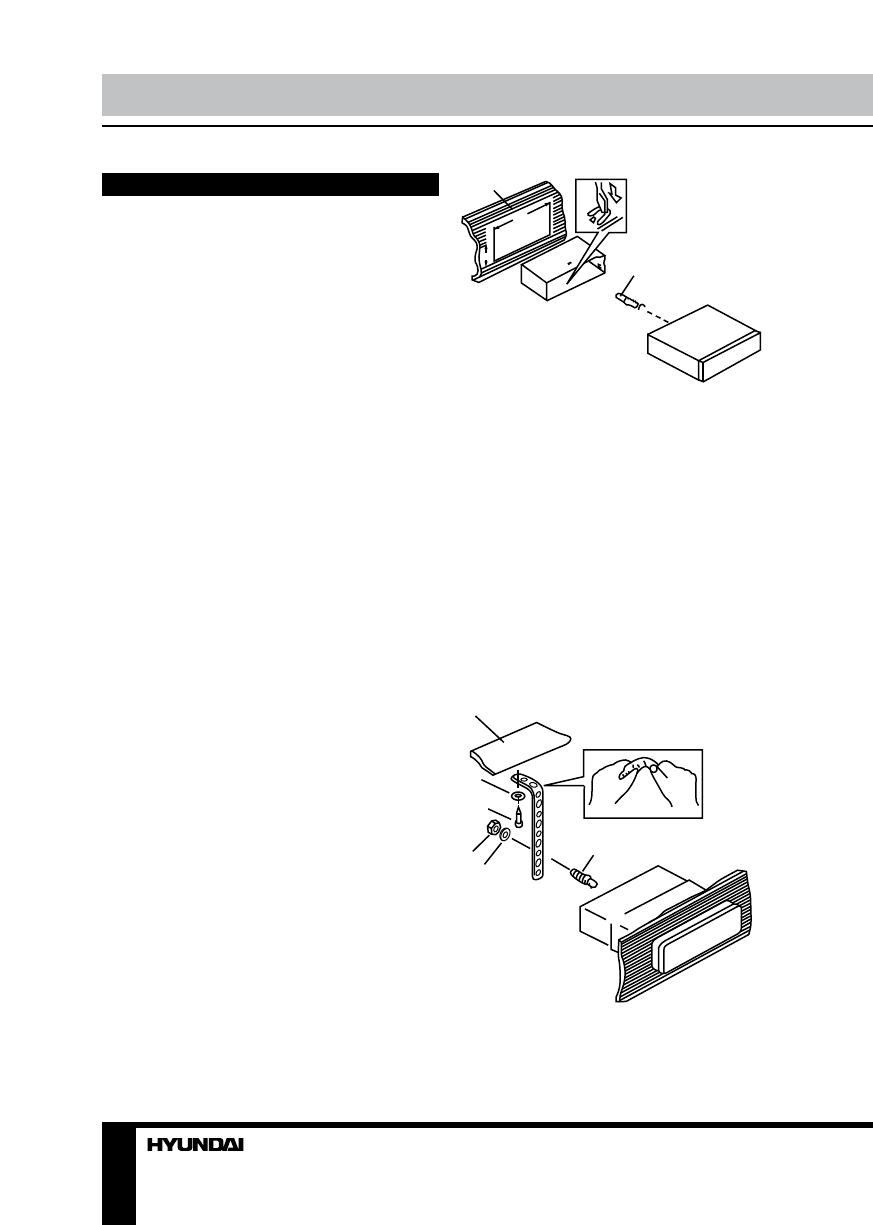
1. DIN front-mount (Method A)
1. Car dashboard
2. Sleeve
3. Screw
4. Nut (5 mm)
5. Spring washer
6. Screw (5 х 25 mm)
7. Metal strap
8. Flat washer
3
2
1
182
53
1. Install the sleeve into the dashboard;
ensure it is installed with the correct side and
there are no obstacles (wires, dashboard
elements, etc) for the unit installation.
2. After installing the sleeve into the
dashboard, bend tabs fitting to the size of the
dashboard to fix the sleeve in place.
3. Use the metal strap to fix the rear side of
the unit. Determine a place for fixing and install
the strap as shown in the picture. You can bend
the strap to the needed angle with your hands.
4. Make the necessary wire connections.
Ensure the connections are correct.
5. Install the unit into the sleeve until the side
locks are fixed.
3
5
4
6
8
1
7
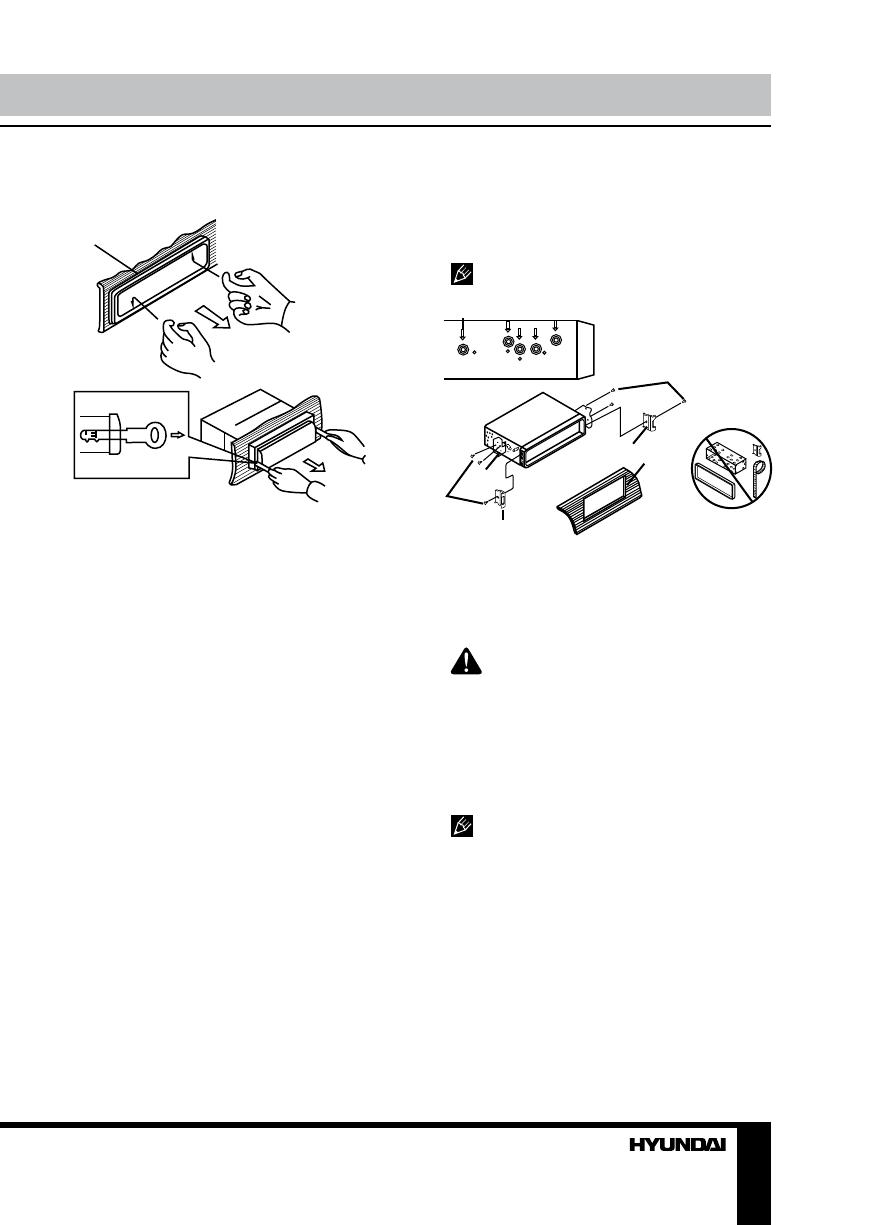
Dismantling the unit
a – Trim frame

5
Installation/Connections
b – Frame uninstall direction
c – Release key insertion
B
б
а
1. Switch off the unit and detach the front
panel.
2. Insert your fingers into the groove in the
front side of the trim frame (apply some effort to
detach the frame). Pull the frame to detach it.
3. Insert the supplied release keys into the
both sides of the unit body to click, as shown
in the picture. To extract the unit from the
dashboard, pull the release keys or the unit
body to pull it out. Before detaching the unit,
ensure it is not fixed with the metal strap.
Trim frame installation
To install the trim frame, press it to the unit
body and push it to fix it in place. This should
be done before installing the front panel;
otherwise you are not able to install the trim
frame. When the trim frame being installed,
the side with the groove should face down and
fixed first.
2. DIN rear-mount (Method B)
For this method, use the screw holes in the
lateral sides of the unit. Fix the unit with the
help of the factory radio mounting brackets.
1. Select a position in which the screw holes
of the brackets (3) are aligned with the screw
holes in the unit body, and screw in two screws
(2) in each side.
2. Screw.
3. Factory radio mounting brackets.
4. Vehicle dashboard.
5. Lock (remove this part).
The outer trim frame and mounting
sleeve are not used for method of installation.
2
2
5
5
4
3
Detachable control panel
Insert the right side of the panel, and then
press on the left side until the click.
To detach the front panel, press REL button.
The control panel can easily be
damaged by shocks. After removing it, place
it in a protective case and be careful not to
drop it or subject it to strong shocks. The rear
connector that connects the main unit and the
control panel is an extremely important part. Be
careful not to damage it by pressing on it with
fingernails, pens, screwdrivers, etc.
If the control panel is dirty, wipe off the
dirt with soft, dry cloth only. And use a cotton
swab soaked in isopropyl alcohol to clean the
socket on the back of the control panel.
Anti-theft system
The front panel of this unit can be stored in
the included protective case when not in used
and carried away when you leave the vehicle
to deter theft.
Switch off the power of the unit. Detach the
front panel, then put it to the protective case
and take it with you.

Installation/connection, Connection connection diagram, Using the iso connector
Страница 6
- Изображение
- Текст
6
Installation/Connection
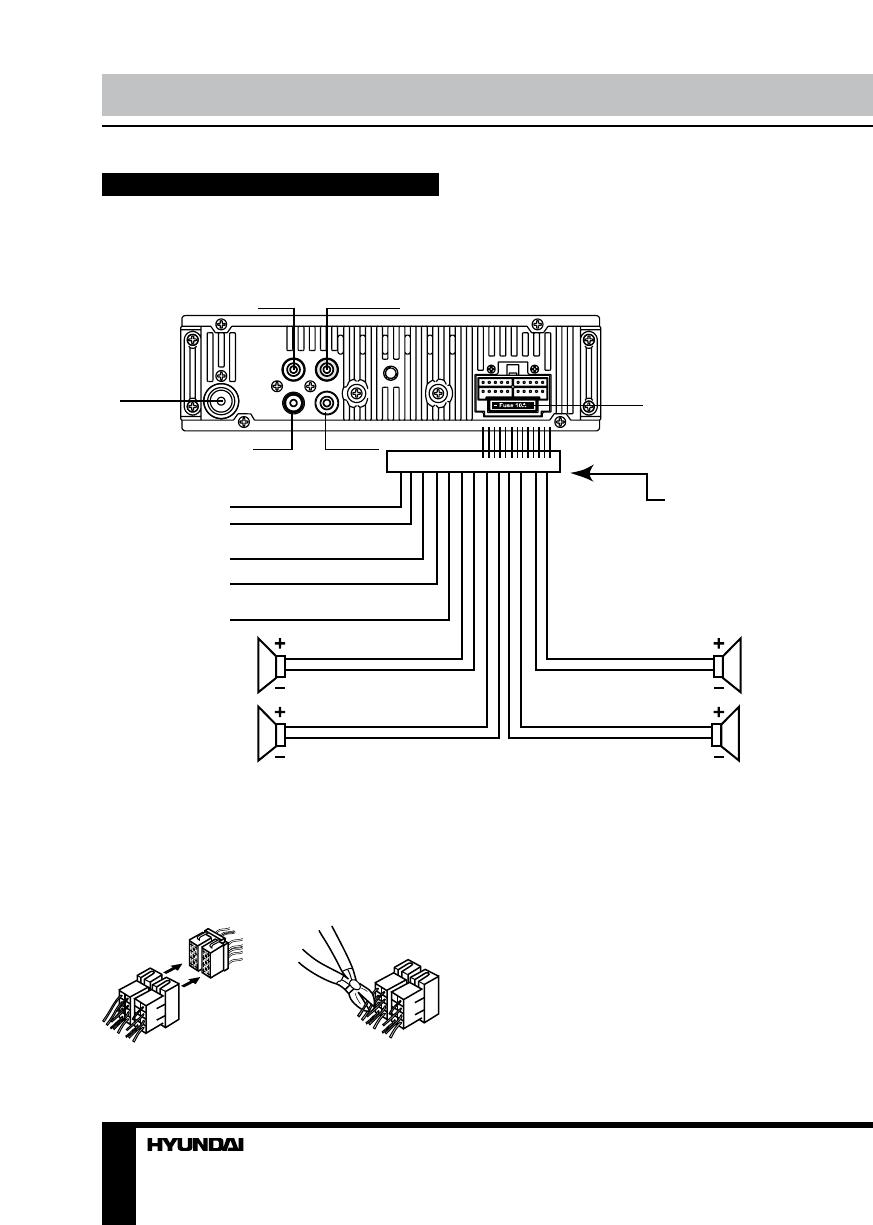
Connection
Connection diagram
SUB 1
ISO
CONNECTOR
ANTENNA
SOCKET
SUB 2
WHITE
PANEL LIGHT
POWER ANTENNA
BLACK (GND)
POWER B+
FRONT
4 ohm
FRONT
4 ohm
REAR
4 ohm
RIGHT
SP
REAR
4 ohm
LEFT
SP
TO CAR BATTERY
MEMOTY B+
ORANGE
YELLOW
RED +12V
FUSE
GREEN
GREY
GREEN/WHITE
GREY/WHITE
BROWN
BLUE
BROWN/WHITE
BLUE/WHITE
RCA OUT RIGHT (red)
RCA OUT LEFT (white)
Using the ISO Connector
1. If your car is equipped with the ISO
connector, then connect the ISO connectors as
illustrated.
2. For connections without the ISO
connectors, check the wiring in the vehicle
carefully before connecting, incorrect
connection may cause serious damage to this
unit.
Cut the connector, connect the colored leads
of the power cord to the car battery as shown
in the colour code table below for speaker and
power cable connections.
1.
2.

7
Installation/Connections
Panel light wire should be connected to “+” of the side parking lights wire. Power antenna
wire is intended for power supply of the antenna and for remote control of an additional amplifier.
Location
1
2
3
4
5
6
7
8
Connector A
Battery 12V (+)/yellow
Power Antenna/Orange
Panel light/White
ACC+/red
Ground/black
Connector B
Rear Right(+)—Blue
Rear Right(-)—Blue/White Stripe
Front Right(+)—Grey
Front Right(-)—Grey/White Stripe
Front Left(+)—Green
Front Left((-)—Green/White Stripe
Rear Left(+)—Brown
Rear Left(-)—Brown/White Stripe
Function

8
9
Operation
Operation
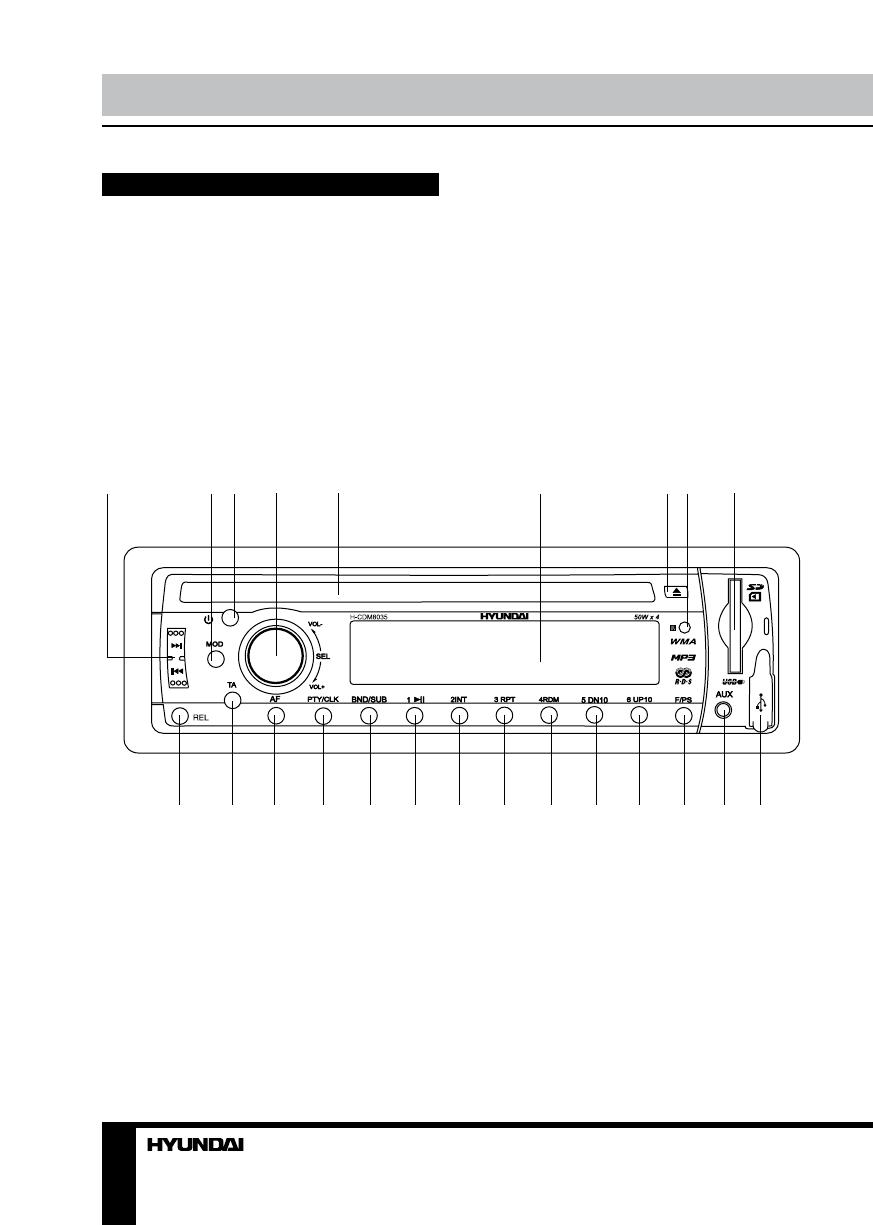
Control elements
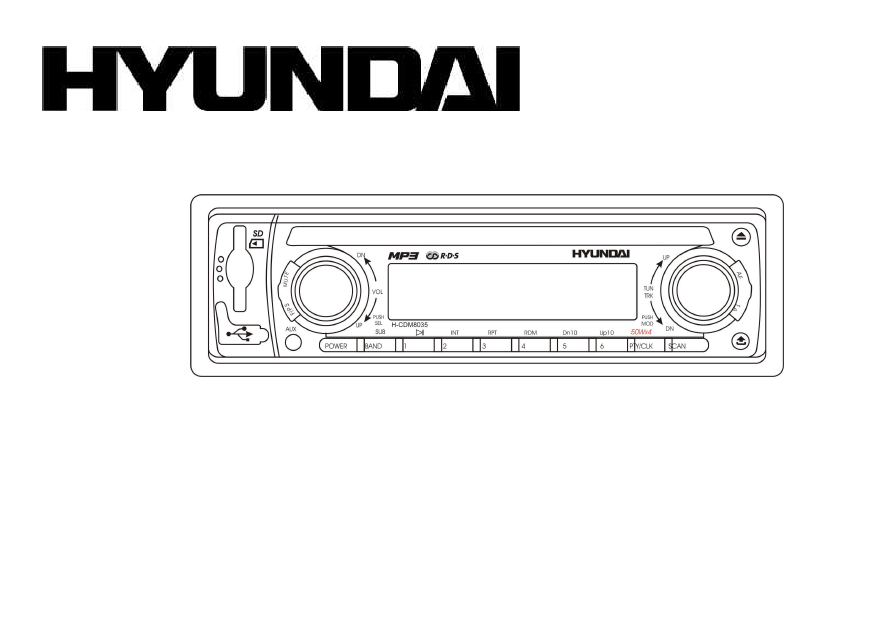
Front panel
1. PREVIOUS/NEXT button
2. MODE button
3. POWER button
4. VOLUME knob/SEL button
5. Disc slot
6. Display
7. EJECT button
8. IR sensor
9. Memory card slot
10. USB port
11. AUX in jack
1
2 3
4
5
6
7 8
9
10
11
12
13
14
15
16
17
18
19
20
21
22
23
12. F/PS button
13. 6/UP10 button
14. 5/DN10 button
15. 4/RDM button
16. 3/RPT button
17. 2/INT button
18. 1/PLAY/PAUSE button
19. BAND/SUB button
20. PTY/CLK button
22. TA button
23. REL button

8
9
Operation
Operation
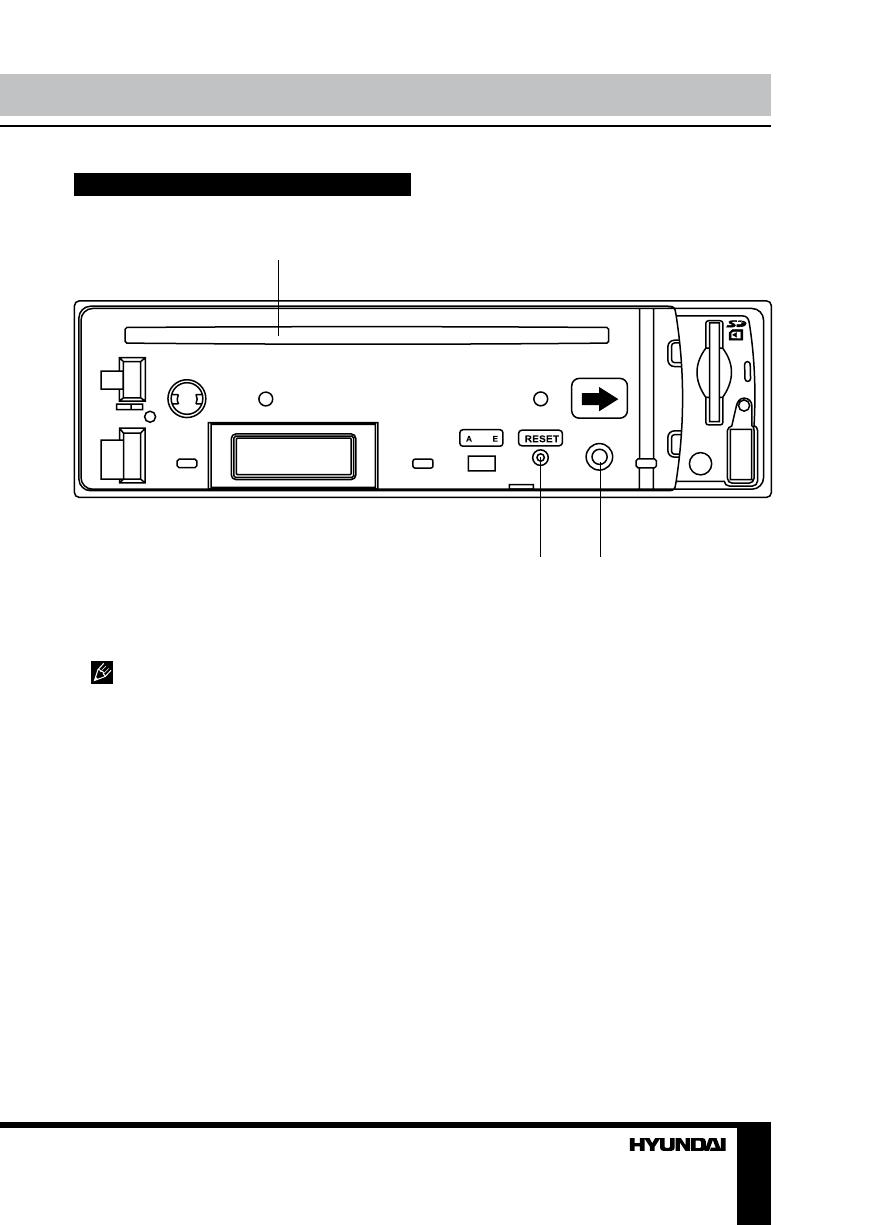
Back of the front panel
1
2
3
1. Disc slot
2. Panel status indicator
3. RESET button (hole)
Pressing RESET hole will erase the
clock setting and stored stations.
Panel status indicator lights up when you
slide the panel down, flashes when you remove
the panel.

10
Operation
LCD layout
1
2
3
4
5
6 7 8 9 10 11 12 13141516 17 18 19 20
21
22
23
24
25
26
27
28
29
30
1. Track name on
2. Album name on
3. Music playback indicator
4. Folder name on
5. ESP system indicator
6. Artist name on
7. Repeat playback indicator
8. File name on
9. Intro playback indicator
10. Random playback indicator
11. ROCK equalizer mode
12. POP equalizer mode
13. EON function indicator
14. CLASS equalizer mode
15. AF function indicator
16. FLAT equalizer mode
17. TA function indicator
18. TP function indicator
19. Equalizer indicator
20. PTY function indicator
21. Mute function indicator
22. MP3 playback
23. Signal indicator
24. Video playback indicator (not active)
25. Stereo signal reception indicator
26. WMA playback
27. Subwoofer indicator
28. Digit display (radio frequency, track name/
number, etc.)
29. Disc loading indicator
30. Loudness function indicator

Комментарии

CD/MP3/WMA-РЕСИВЕРCD/MP3/WMA RECEIVER
Руководство по эксплуатации Instruction manual
H-CDM8035
Table of contents Before you start
Dear customer!
Thank you for purchasing our product. For safety, it is strongly recommended to read
this manual carefully before connecting, operating and/or adjusting the product and keep
the manual for reference in the future.
Table of contents
Before you start
Installation/Connection
Operation
General information

Table of contents Before you start
If you want to dispose this product, do not mix it with general household waste. There is
a separate collection system for used electronic products in accordance with legislation
that requires proper treatment, recovery and recycling.
Please contact your local authorities for the correct method of disposal. By doing so, you
will ensure that your disposed product undergoes the necessary treatment, recovery and
recycling and thus prevent potential negative effects on the environment and human health.
Utilization of the product
Important safeguards
Installation/Connection
Installation
General notes
Din Front/Rear-Mount
1. DIN front-mount (Method A)
Dismantling the unit
Installation/Connections
Trim frame installation
2. DIN rear-mount (Method B)
Detachable control panel
Anti-theft system
Installation/Connection
Connection
Connection diagram
Using the ISO Connector
Installation/Connections
Location
Function
Operation Operation
Control elements
Front panel
Operation Operation
Back of the front panel

Operation
LCD layout
Operation
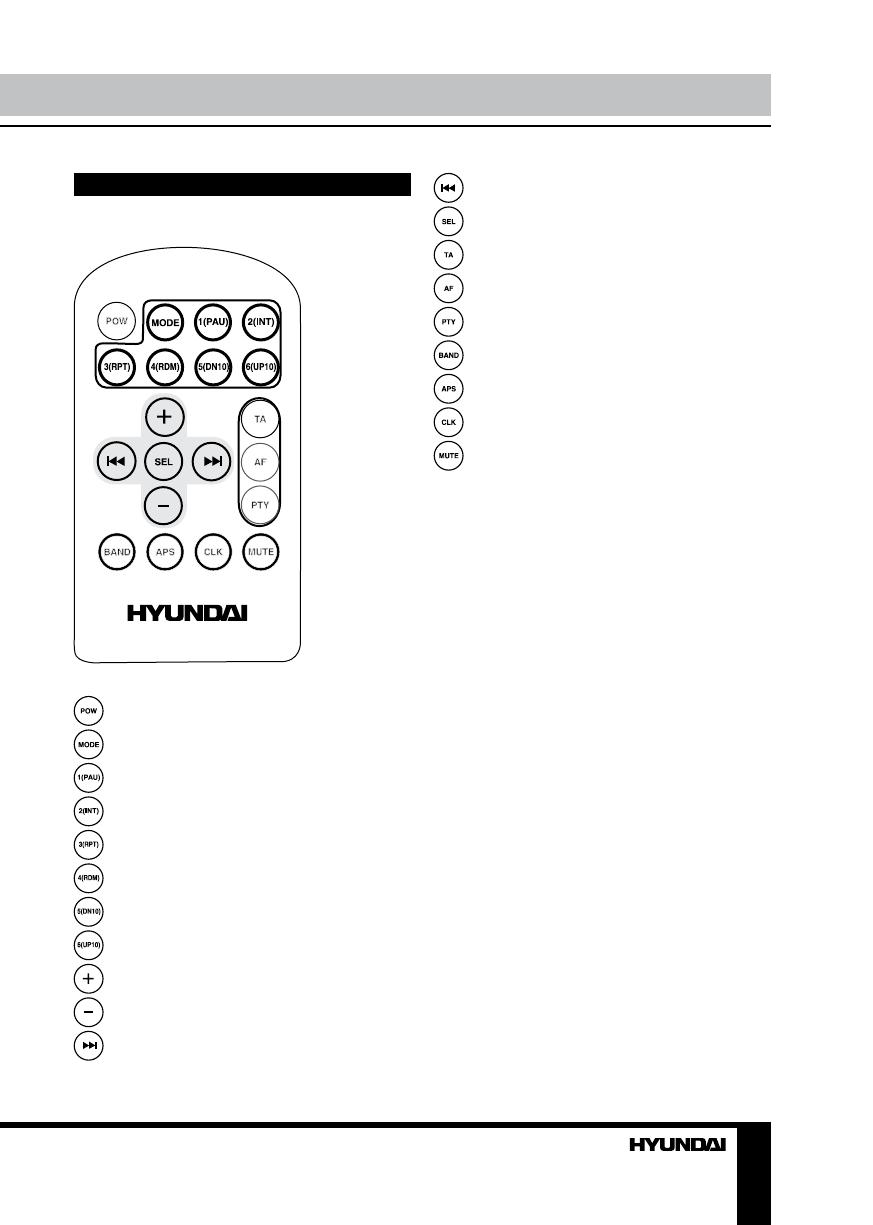
Remote controller
Operation Operation
General operations
Turning on/off
Mode selecting
Volume control
Mute function
Audio parameter setting
Beep
Equalizer modes
Loudness
Color
Clock setting
Operation Operation
Subwoofer control
AUX in jack
Radio operations
Band select
Auto/Manual tuning
Programming tuner stations
Automatic store/preset scan
Mono/Stereo control
Local radio station search
Operation
RDS function
AF (alternative frequencies) function
TA (Traffic Alarm) function
PTY (Program Type)
Button Music group Speech group
Other parameter setting

Operation
Disc/USB/SD/MMC operations
USB/SD/MMC notes
Insert/Eject discs
Inserting the SD/MMC card/USB
device
USB/SD/MMC folder playback
MP3/WMA track search
Operation
Fast Forward/rewind
Scanning tracks
Repeat
Random playback
Multi-session disc reading
Notes on MP3 and WMA
Play/pause

Operation
Notes on creating your own CD-Rs
or CD-RWs containing MP3 files
General information
Handling compact discs
Cleaning discs
Cleaning the unit body
Accessories
General information
Troubleshooting
Symptom Cause Solution
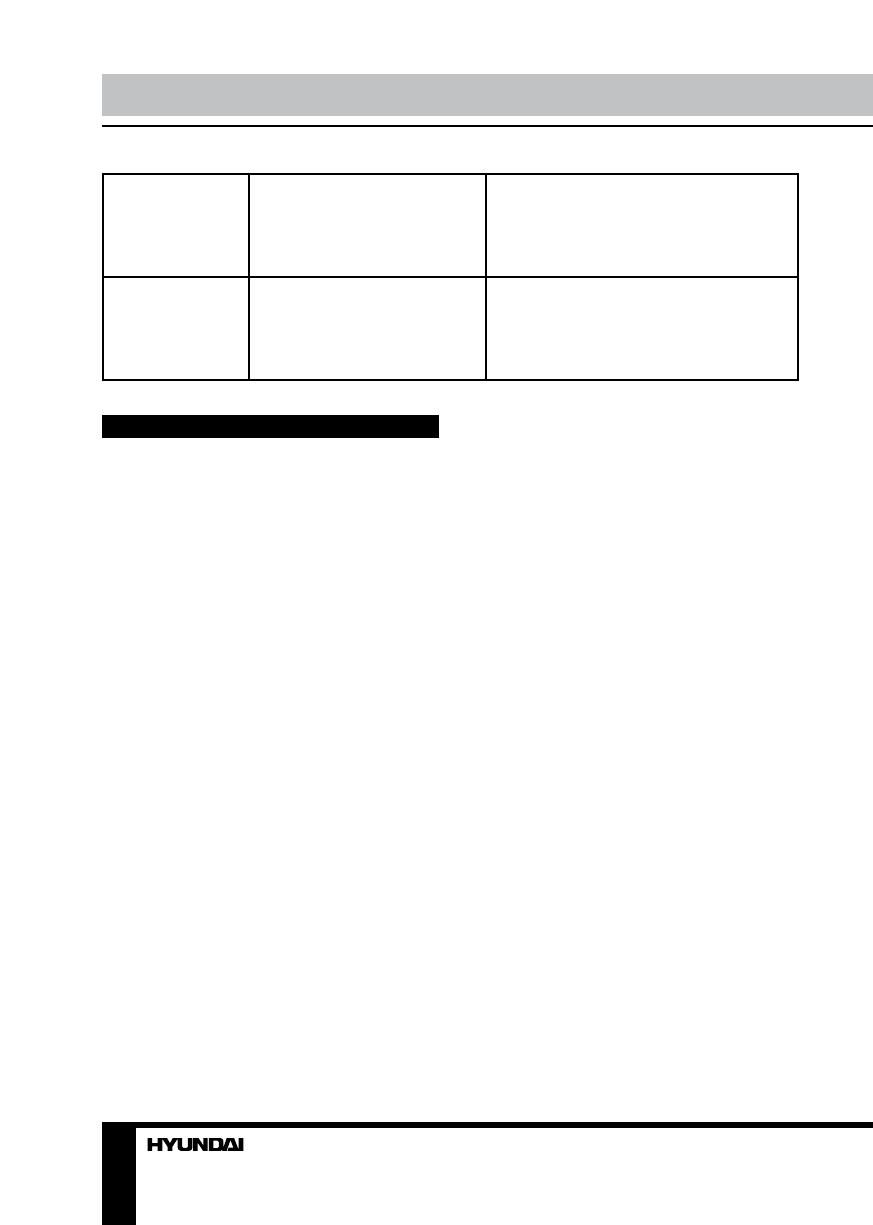
Specifications
General
FM stereo radio
MW Section
Disc player
≤
≤
Line out
General information Содержание
/
(скачивание инструкции бесплатно)
Формат файла: PDF
Доступность: Бесплатно как и все руководства на сайте. Без регистрации и SMS.
Дополнительно: Чтение инструкции онлайн
H-CDM8035
CD/MP3-RECEIVER CD/MP3-
Instruction manual
Страница:
(1 из 45)
навигация

1

2

3

4

5

6

7

8

9

10

11

12

13

14

15

16

17

18

19

20

21

22

23

24

25

26

27

28

29

30

31

32

33

34

35

36

37

38

39

40

41

42

43

44

45
Оглавление инструкции
- Страница 1 из 46
H-CDM8035 CD/MP3-RECEIVER Instruction manual CD/MP3- - Страница 2 из 46
Dear customer! Thank you for purchasing our product. For safety, it is strongly recommended to read this manual carefully before connecting, operating and/or adjusting the product and keep the manual for reference in the future. Table of contents TABLE OF CONTENTS - Страница 3 из 46
Important safeguards · · · · · · · · · · · · Read carefully through this manual to familiarize yourself with this high-quality sound system. Disconnect the vehicle’s negative battery terminal while mounting and connecting the unit. When replacing the fuse, be sure to use one with an identical - Страница 4 из 46
Installation/ Connections First complete the electrical connections, and then check them for correctness. Installation way It is an anti-theft installation way. The chassis wear a metal sliding housing. Please have the wiring connection of the power supply, speakers and antenna as for the - Страница 5 из 46
Din rear-mount (method 2) Installation using the screw holes at both sides of the unit. 1. Select a position where the screw holes of the main unit are fitted for aligned, and tighten the screws at 2 positions at each side. Use either truss screws (5 x 8mm) or flush surface screws (4 x 8mm), - Страница 6 из 46
Connection scheme Notes: · In spite of having any kinds of speaker system, must use 4 ohms impedance of speaker to reduce the distortion during high volume level. · Prohibit to make the conductors of auto antenna and ground touch with each other. 6 - Страница 7 из 46
Panel controls Front panel 1. 2. 3. 4. 5. 6. 7. 8. 9. 10. 11. 12. 13. 14. OPEN BUTTON Press it to remove the front panel. TA BUTTON Press it to active the TA function. SCAN BUTTON PTY / CLK BUTTON Press it to active the PTY function. Press and hold it to set the time. PRESET STATION [1-6] BUTTONS - Страница 8 из 46
15. 16. 17. 18. 19. 20. 21. 22. 23. 24. F / PS BUTTON USB socket SD socket MUTE BUTTON Press it to switch the sound off. VOL KNOB / SEL BUTTON Rotate it clockwise to increase the volume level; rotate anticlockwise to decrease the volume level. LCD (LIQUID CRYSTAL DISPLAY) CD slot TUNING / TRK KNOB - Страница 9 из 46
Functions of controls General operations Power button Press any button to switch the unit on. The display will show a message WELCOME . Press and hold the POWER button to switch the unit off. The display will show a message GOOD-BYE . Note: After the unit is off, volume level and radio current - Страница 10 из 46
Beep Sound Off function Press the VOLUME knob / SEL until Beep On is displayed. Turn the Volume knob to switch between Beep ON and OFF. Equalizer setting Press the Volume button, until EQ indication is displayed then rotate the Volume knob to choose between the EQ sound effects: CLASS => POP => - Страница 11 из 46
· · · · · · Select a band (if needed). Select a station by 3/4 buttons. Press and hold a numbered button (1-6) which you want store the station for at least 2 seconds. To recall a station: Select a band (if needed). Press a Preset button (1-6) briefly to recall the stored station. RDS function - Страница 12 из 46
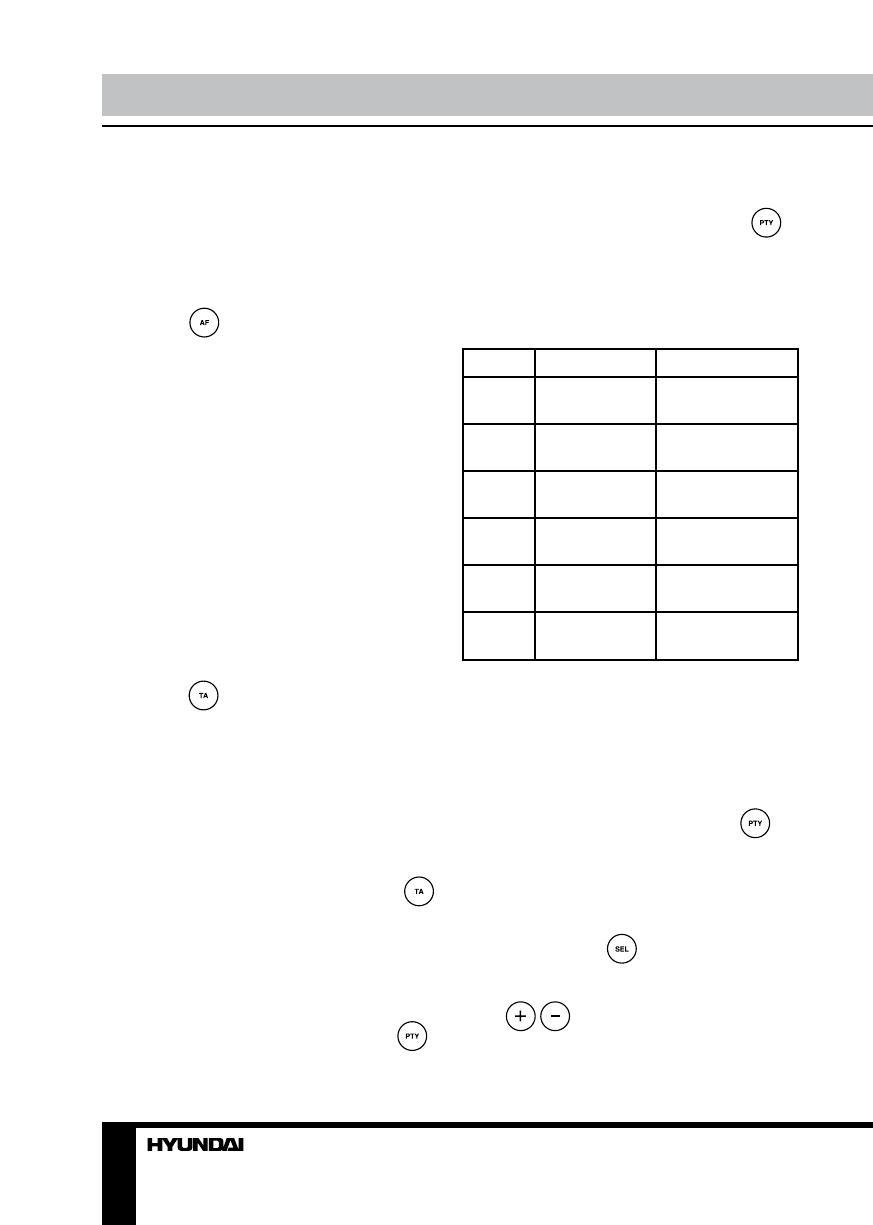
PTY function Press the PTY / CLK button once to show the music type. Then press 1-6 button to choose the different music types available. Press the PTY / SLK button twice to show the speech type program. Then press 1-6 button to choose the different speech type program. Each number key will show 3 - Страница 13 из 46
CD/ / MP3/ WMA/ USB/ SD card operations Discs for playback This unit can play disc types: CD/CD-R/-RW. Compatible with formats: MP3/WMA. USB/ SD/ MMC notes USB functions (flash memory type) MP3 music play. SD/ MMC card support, 2in1 (SD/ MMC) support. USB flash memory. FAT 12/ FAT 16/ FAT 32 is - Страница 14 из 46
Inserting the USB/ SD device Remove the cover from the USB port, then insert the USB device into the USB slot on the front panel. Then the playing mode will be changed into USB mode automatically. Or press the MODE button to select USB. The first USB device track playback will start. Pausing - Страница 15 из 46
Search function (for MP3/ WMA modes) The search modes only works with MP3/ WMA CDs and USB flash memory with MP3/ WMA files. Cancel Random, Repeat and Intro features before searching. Track search: · Press the F/ PS button, then use the volume button to select the track number. · Press the SEL - Страница 16 из 46
RCA line out This output is for connecting amplifier, equalizer or other audio component that requires a pre-amp out connection (Red = Right, White = Left). Subwoofer output Press and hold the BND / SUB button to turn on/ off the subwoofer function. 16 - Страница 17 из 46
MP3 overview Notes on MP3 · MP3 is short for MPEG Audio Layer 3 and refers to an audio compression technology standard. · This product allows playback of MP3 files on CD-ROM, CD-R or CD-RW discs. · The unit can read MP3 files written in the format compliant with ISO 9660. However it does not - Страница 18 из 46
Anti-theft system This unit is equipped with a slide-down detachable and mask panel. Panel can be detached and taken with you, helping to deter theft. Detaching the front panel 1. Press the PWR button to turn the power off. 2. Press the OPEN button on the front panel. 3. Push the panel to the right - Страница 19 из 46
Handling compact discs Dirty, scratched or warped discs may cause skip ping or noise. Handle the disc only by the edges. To keep clean do not touch its surface. Discs should be stored in their cases after use to avoid scratches. Do not expose discs to direct sunlight, high humidity, high - Страница 20 из 46
Troubleshooting guide Symptom Cause Solution General No power The car ignition is not on. If the power supply is properly connected to the car accessory switch the ignition key to » ACC «. Replace the fuse. Remove the disc in the player then put a new upward. Insert the compact disc with the label - Страница 21 из 46
Specification General Power supply Current consumption Maximum power output Fuse Dimensions (L x W x H) 12 V DC max. 10 A 50Wx4 channels 15A 178 x 50 x 150 mm FM stereo radio Frequency range Usable sensitivity I.F. Frequency 87.5 — 108.0 MHz 3 uV 10.7 MHz MW Section Frequency range Usable - Страница 22 из 46
! . , , . ……………………………………………………………………………………………………………………………………………………….. 22 - Страница 23 из 46
· · · , , , . , · · . . . , , . , . , · . , , · · · . , . , , , , . . · · . . , , · . , , . . . . . 23 , - Страница 24 из 46
/ , . . , , . . , . . 1. , . . (5 . 2. 3. 4. 5. . . . ( ). 24 8 ), (4 8 ), - Страница 25 из 46
: , . : : , . . . , : , , . . 25 , . - Страница 26 из 46
: · · , , . . 26 4 - Страница 27 из 46
1. OPEN , SD EJECT 2. TA 3. 4. , SCAN ( PTY / CLK , . / / , 5. 6. 7. 8. 9. TA. ) PTY. RDS . (1-6) 1/ 2/ 3/ 4/ PLAY/PAUSE ( INT ( RPT ( ) RDM ( ) 10 ) ) 27 - Страница 28 из 46
10. 11. 12. 5/ 6/ DN 10 ( UP 10 ( BAND / SUB BAND ( 10 10 ) ) ) , . . 13. POWER , 14. AUX 15. . . F / PS . . 16. 17. 18. USB SD MUTE MUTE, 19. . / SEL , . , SEL, , 20. 21. 22. . : VOL => BAS => TRE => BAL => FAD. . / TRK . 23. 24. . EJECT AF , / AF. 28 - Страница 29 из 46
OPEN, 1. 2. 3. . LED RESET 29 - Страница 30 из 46
, POWER, . «WELCOME». «GOOD-BYE». . : , , . . . SEL ( => BAL R-L ( · · · / ), ) => FAD ( . BASS/TREBLE: -7, -6, -5,……, 0, +1, +2,……+5, +6, +7 BALANCE: 7L, 11L,……, L=R, 1R,……,7R (R,L) FADER: 7R, 11R,……, R=F, 1F,……, 7F : BASS TREBLE 5 . : : BAS 0 ( / ) => TRE 0 ( ) , ). . . , - Страница 31 из 46
Volume/ SEL OFF. ON , «LOUD OFF». . MUTE, , . VOL+/ -, . BAND/ SUB, . . Volume Beep On . / Volume : CLASS => POP => ROCK => FLAT. PTY / CLK . . PTY / CLK , . , 3 . , , . CLK, 31 . - Страница 32 из 46
B ND / SUB, 6 : FM1, FM2, FM3, AM1, 30. , TUNE, . . / . ( FM VOLUME / SEL , ) «ST ON» / «ST OFF» ( », . 3 . . F/ PS , . 30 · · · · (18 FM, 12 AM) . : ( ). 3/4. (1-6) 2 , . : ( Preset (1-6), ). . F / PS · · · 3 , « · 2. ). . 32 - Страница 33 из 46
RDS CD . , . . AF ( ) AF, FM , RDS . TA ( . «AF» AF . , RDS ) TA, . TA, 2 SEEK. , TA SEEK TA SEEK TA ALARM . , TA . TA ALARM, , TA. «TA/TP» / , SEL, . ( ) , . , , . PTY PTY / CLK, . PTY , . . 1-6, . 3 33 1-6, . - Страница 34 из 46
· · · · Mask DPI- Mask all . SEL, «Mask DPI». , MASK DPI MASK DPI, , MASK ALL, PI, , PI, Retune S/L · · · · MASK ALL. . (AF), AF. , RDS. Short/ Long TA. 2 SEL, VOL+/«RETUNE_S». «RETUNE_S» «RETUNE_L». 34 «TA SEEK». «RETUNE_S». - Страница 35 из 46
CD / SD / USB : CD/CD-R/-RW. : MP3/WMA. · · · · USB/ SD/ MMC MP3 USB ( SD/ MMC, 2 1 (SD/MMC). USB . FAT 12/ FAT 16/ FAT 32 FAT 12/ 16 ( 200 , 500 ), FAT 32 ( 200 , 500 ). : 32 / : 32 . (id3tag ver 2.0) / / : 32 . ). . USB 2.0. : USB: SD: . MMC: ~1 USB 2.0. SD :8M ~1 :8M ~1 . : Cannon, Fuji film, - Страница 36 из 46
· . «LOAD» . MP3/ WMA , . ID3, · . EJECT, . . 5 , , . Multi-session CD , USB/ SD USB , . USB . USB. MODE, USB. . / , , . No 1 / PLAY / PAUSE, . , . TUNING / TRK, / . . TUNING / TRK , 36 , 3 , . . - Страница 37 из 46
UP 10/ DN 10 ( MP3, WMA No 6 / UP 10, No 5 / DN 10, ) 10 . . No 3 / R «RPT». , , RPT-1, RPT-DIR ( . . MP3/ WMA/ USB/ SD RPT-OFF. ) No 3/ RPT, No 4 / RDM, USB/ SD). «RDM»/ «RDM ON» ( . , . Intro 10 «INT». ID3 Tag ( , MP3/ WMA MP3 Search ( Search · · MP3/ WMA c , . No 2 / INT, . . ) ID3 Tag, . . ) - Страница 38 из 46
: · F / PS , · · . «F». , , . SEL, . : · F/ PS . , · · , «D». , . SEL, . USB: MP3/ WMA USB , . , . USB USB · · · · , . . AUX IN AUX IN MODE, . AUX. , , DVD VCD . AUX IN RCA , ( = , = BND / SUB, , ). / 38 . . - Страница 39 из 46
3 · · · · · · 3 3 MPEG 3 . 3 CD-ROM, CD-R 3, , 3, CD-RW. ISO 9660. . 3, 3 , .mp3 , MP3 , , .mp3 . . , PC . · 8, . 256. · · · . , 8 , 3. VBR, , . VBR: . 39 - Страница 40 из 46
CD-R CD-RW, MP3 · 3 128 · , ( · MP3 CD-R · · CD-R . ISO 9660, 256 3 8, ). CD-R CD-RW 3 , CD-RW , · · . , , . , 3 3. . CD-RW 44,1 . . CD-R . 16 . , 1. ID3TAG. , 40 . - Страница 41 из 46
. , . 1. 2. 3. 4. PWR, OPEN 1. 2. , 1. 2. 3. . . . , . , , . . . , ( . . 1). .1 41 - Страница 42 из 46
· · · · , ( , . , . , , . · ( , ). · · · · · ). . , , . , . , . CD CD , 3 3 , (8 ). , . 42 CD . - Страница 43 из 46
. ( , ), , . ) . , , , . ) , . , . . 43 - Страница 44 из 46
. , « ». . . CD . , . . . . . . . . . RESET. . . . 30 . , . 30 . . . . . . . 44 - Страница 45 из 46
: ( 12 , 50 4 . 10 15 178 50 150 ) FM 87.5 — 108.0 3 10.7 MW 522-1620 40 450 MP3/ CD-R/ CD-RW 20-100 5 10-20 5 50 (1 ) 2 CD CD . 2000 . . 45 - Страница 46 из 46
-
Contents
-
Table of Contents
-
Troubleshooting
-
Bookmarks
Quick Links
H-CDM8035
CD/MP3-RECEIVER
CD/MP3-
Instruction manual
Related Manuals for Hyundai H-CDM8035
Summary of Contents for Hyundai H-CDM8035
-
Page 1
H-CDM8035 CD/MP3-RECEIVER CD/MP3- Instruction manual… -
Page 2: Table Of Contents
Dear customer! Thank you for purchasing our product. For safety, it is strongly recommended to read this manual carefully before connecting, operating and/or adjusting the product and keep the manual for reference in the future. Table of contents TABLE OF CONTENTS … 2 IMPORTANT SAFEGUARDS …
-
Page 3: Important Safeguards
Important safeguards · Read carefully through this manual to familiarize yourself with this high-quality sound system. · Disconnect the vehicle’s negative battery terminal while mounting and connecting the unit. · When replacing the fuse, be sure to use one with an identical amperage rating. Using a fuse with a higher amperage rating may cause serious damage to the unit.
-
Page 4: Installation/ Connections
Installation/ Connections First complete the electrical connections, and then check them for correctness. Installation way It is an anti-theft installation way. The chassis wear a metal sliding housing. Please have the wiring connection of the power supply, speakers and antenna as for the requirement of the manual, and then install the metal sliding housing into the car according to the diagram.
-
Page 5
Din rear-mount (method 2) Installation using the screw holes at both sides of the unit. 1. Select a position where the screw holes of the main unit are fitted for aligned, and tighten the screws at 2 positions at each side. Use either truss screws (5 x 8mm) or flush surface screws (4 x 8mm), depending on the shape of the screw holes in the bracket. -
Page 6: Connection Scheme
Connection scheme Notes: · In spite of having any kinds of speaker system, must use 4 ohms impedance of speaker to reduce the distortion during high volume level. · Prohibit to make the conductors of auto antenna and ground touch with each other.
-
Page 7: Panel Controls
Panel controls Front panel 1. OPEN BUTTON Press it to remove the front panel. 2. TA BUTTON Press it to active the TA function. 3. SCAN BUTTON 4. PTY / CLK BUTTON Press it to active the PTY function. Press and hold it to set the time.
-
Page 8: Inner Panel
15. F / PS BUTTON 16. USB socket 17. SD socket 18. MUTE BUTTON Press it to switch the sound off. 19. VOL KNOB / SEL BUTTON Rotate it clockwise to increase the volume level; rotate anticlockwise to decrease the volume level. 20.
-
Page 9: Functions Of Controls
Functions of controls General operations Power button Press any button to switch the unit on. The display will show a message WELCOME . Press and hold the POWER button to switch the unit off. The display will show a message GOOD-BYE . Note: After the unit is off, volume level and radio current settings will be memorized, and when you turn the unit on it will resume the stored status you set.
-
Page 10: Radio Operations
Beep Sound Off function Press the VOLUME knob / SEL until Beep On is displayed. Turn the Volume knob to switch between Beep ON and OFF. Equalizer setting Press the Volume button, until EQ indication is displayed then rotate the Volume knob to choose between the EQ sound effects: CLASS =>…
-
Page 11: Rds Function
· Select a band (if needed). · Select a station by 3/4 buttons. · Press and hold a numbered button (1-6) which you want store the station for at least 2 seconds. · To recall a station: · Select a band (if needed). ·…
-
Page 12
PTY function Press the PTY / CLK button once to show the music type. Then press 1-6 button to choose the different music types available. Press the PTY / SLK button twice to show the speech type program. Then press 1-6 button to choose the different speech type program. -
Page 13
CD/ / MP3/ WMA/ USB/ SD card operations Discs for playback This unit can play disc types: CD/CD-R/-RW. Compatible with formats: MP3/WMA. USB/ SD/ MMC notes USB functions (flash memory type) MP3 music play. SD/ MMC card support, 2in1 (SD/ MMC) support. USB flash memory. -
Page 14
Inserting the USB/ SD device Remove the cover from the USB port, then insert the USB device into the USB slot on the front panel. Then the playing mode will be changed into USB mode automatically. Or press the MODE button to select USB. The first USB device track playback will start. Pausing playback To ensure good system performance, wait until the unit finishes reading the disc information before proceeding. -
Page 15
Search function (for MP3/ WMA modes) The search modes only works with MP3/ WMA CDs and USB flash memory with MP3/ WMA files. Cancel Random, Repeat and Intro features before searching. Track search: · Press the F/ PS button, then use the volume button to select the track number. ·… -
Page 16
RCA line out This output is for connecting amplifier, equalizer or other audio component that requires a pre-amp out connection (Red = Right, White = Left). Subwoofer output Press and hold the BND / SUB button to turn on/ off the subwoofer function. -
Page 17: Mp3 Overview
MP3 overview Notes on MP3 · MP3 is short for MPEG Audio Layer 3 and refers to an audio compression technology standard. · This product allows playback of MP3 files on CD-ROM, CD-R or CD-RW discs. · The unit can read MP3 files written in the format compliant with ISO 9660. However it does not support the MP3 data written by the method of packet write.
-
Page 18: Anti-Theft System
Anti-theft system This unit is equipped with a slide-down detachable and mask panel. Panel can be detached and taken with you, helping to deter theft. Detaching the front panel Press the PWR button to turn the power off. Press the OPEN button on the front panel. Push the panel to the right and then pull it towards you.
-
Page 19: Handling Compact Discs
Handling compact discs Dirty, scratched or warped discs may cause skip ping or noise. Handle the disc only by the edges. To keep clean do not touch its surface. Discs should be stored in their cases after use to avoid scratches. Do not expose discs to direct sunlight, high humidity, high temperature or dust.
-
Page 20: Troubleshooting Guide
Troubleshooting guide Symptom General No power Disc Disc cannot be loaded. Disc cannot be read. No sound The operation keys do not work. Sound skips. The radio does not work, the radio station automatic selection does not work. Cause The car ignition is not on. The fuse is blown.
-
Page 21: Specification
Specification General Power supply Current consumption Maximum power output Fuse Dimensions (L x W x H) FM stereo radio Frequency range Usable sensitivity I.F. Frequency MW Section Frequency range Usable sensitivity I.F. Frequency: Disc player System: Usable disc: Frequency characteristics: Signal to noise CD: Number of channels: Line out…
-
Page 22
… 22 … 23 … 24 … 27 … 29 3 … 39 … 41 … 42 … 43 … 45 … 43 … 44… -
Page 23
· · · · · · · · · · · ·… -
Page 26
· ·… -
Page 27
OPEN EJECT SCAN ( PTY / CLK PLAY/PAUSE ( INT ( RPT ( RDM ( PTY. (1-6) -
Page 28
DN 10 ( UP 10 ( BAND / SUB BAND ( POWER 14. AUX F / PS MUTE MUTE, SEL, EJECT : VOL => BAS => TRE => BAL => FAD. / TRK… -
Page 29
OPEN, 1. LED RESET… -
Page 30
POWER, SEL ( => BAL R-L ( · BASS/TREBLE: -7, -6, -5,…, 0, +1, +2,…+5, +6, +7 · BALANCE: 7L, 11L,…, L=R, 1R,…,7R , L — · FADER: 7R, 11R,…, R=F, 1F,…, 7F BASS TREBLE : AUX => RADIO => DISK => USB => CARD ( USB, CARD, DISK ) =>… -
Page 31
Volume/ SEL «LOUD OFF». OFF. MUTE, VOL+/ -, BAND/ SUB, Volume Beep On . Volume : CLASS => POP => ROCK => FLAT. PTY / CLK PTY / CLK CLK,… -
Page 32
B ND / SUB, ( FM VOLUME / SEL · F/ PS · · · · · · · Preset (1-6), TUNE, « F / PS (18 FM, 12 AM) 3/4. (1-6) : FM1, FM2, FM3, AM1, «ST ON» «ST OFF» ( »,… -
Page 33
AF ( TA ( SEEK. TA SEEK TA ALARM PTY / CLK, TA SEEK TA ALARM, «TA/TP» SEL, «AF» , RDS 1-6, 1-6,… -
Page 34
Mask DPI- Mask all · · SEL, · · MASK DPI, MASK ALL, Retune S/L · · SEL, · VOL+/- · «RETUNE_S». «Mask DPI». Short/ Long «RETUNE_S» «RETUNE_L». MASK DPI MASK ALL. (AF), RDS. «RETUNE_S». «TA SEEK». -
Page 35
: MP3/WMA. USB/ SD/ MMC SD/ MMC, 2 1 (SD/MMC). FAT 12/ FAT 16/ FAT 32 · FAT 12/ 16 ( · FAT 32 ( · : 32 · (id3tag ver 2.0) USB 2.0. USB: USB 2.0. : 8 M ~ 1 MMC: / SD , 500… -
Page 36
· · EJECT, Multi-session CD USB/ SD No 1 / PLAY / PAUSE, MP3/ WMA ID3, USB. TUNING / TRK, TUNING / TRK «LOAD» MODE, USB. -
Page 37
UP 10/ DN 10 ( MP3, WMA No 6 / UP 10, No 5 / DN 10, «RPT». RPT-1, RPT-DIR ( «RDM»/ «RDM ON» ( Intro «INT». ID3 Tag ( MP3/ WMA Search ( MP3/ WMA Search · F / PS, ·… -
Page 38
· F / PS · · SEL, · F/ PS · · SEL, USB: MP3/ WMA AUX IN · AUX IN · MODE, · · BND / SUB, «F». «D». AUX. AUX IN… -
Page 39
· · · · · · · 256. · · · MPEG 3 VBR, CD-ROM, CD-R CD-RW. ISO 9660. .mp3 . .mp3 , . VBR:… -
Page 40
· · · CD-R MP3 CD-R CD-RW · · CD-R CD-RW CD-RW · · CD-R CD-RW, ISO 9660, 1. ID3TAG. 44,1 CD-R… -
Page 41
PWR, OPEN . 1). -
Page 42
· · · · · · · · · ·… -
Page 44
« ». RESET. -
Page 45
12 , . 10 178 50 150 87.5 — 108.0 10.7 522-1620 MP3/ CD-R/ CD-RW 20-100 10-20 . 2000…
Страницы и текст этой инструкции
 Инструкция — H-CDM8035
 Информация отображена на картинке
 Информация отображена на картинке
 Информация отображена на картинке
 Информация отображена на картинке
Как использовать наш сайт инструкций OnlineManuals.ru
Наша цель состоит в том, чтобы предоставить вам быстрый доступ к содержанию инструкции для — H-CDM8035.
С помощью онлайн просмотра, Вы можете быстро просмотреть содержимое инструкции и найти решение проблемы с — H-CDM8035.
Для Вашего удобства
Если листать руководство пользователя — H-CDM8035 прямо на сайте, не очень удобно для Вас, есть два возможных решения:
• Просмотр в полноэкранном режиме — легко просмотреть руководство пользователя (без загрузки его на свой компьютер), Вы можете использовать режим полноэкранного просмотра.
Для просмотра инструкции пользователя — H-CDM8035 на полном экране, используйте кнопку «Открыть в Pdf-viewer».
• Загрузка на компьютер — Вы можете также скачать Инструкция — H-CDM8035 на свой компьютер и сохранить его в файлах.
Многие люди предпочитают читать документы не на экране, а в печатной версии.
Возможность печати руководства пользователя также была предусмотрена на нашем сайте,
и вы можете использовать ее, нажав на иконку «печать» в Pdf-viewer.
Нет необходимости печатать все руководство — H-CDM8035, можно выбрать только нужные страницы инструкции.