MANUALS


-
- Electric Guitars
- Electric Basses
- Acoustic Guitars
- Amplifiers
- Electronics
- Tuners
- Wireless System
- Accessories
-
SELECT YOUR LANGUAGE
When you select one of the following refinement criteria, the page will update with the corresponding results displayed.
Electric Guitars
-

SAFETY PRECAUTIONS
2.2MB — EN

Manual list by name
-
Maintenance Manual
808KB — EN -
BACKSTOP Manual
814KB — EN -
Electric Guitars 2014
39.7MB — EN -
Electric Guitars 2014 (Prestige)
29MB — EN -
RGKP6 & SRKP4 installation manual
1.4MB — EN -
Electric Guitars 2013 (Prestige)
24.7MB — EN -
Electric Guitars 2013
29.2MB — EN -
Electric Guitars 2009
11.6MB — EN -
Electric Guitars 2008 (Correction)
11.7MB — EN -
Electric Guitars 2008
41.5MB — EN -
Electric Guitars 2007 (Correction)
11.1MB — EN -
Electric Guitars 2005 (Excl. Prestige)
2.3MB — EN -
Electric Guitars 2004
2.6MB — EN -
ARTCORE 2004
6.1MB — EN -
Electric Guitars w/ Locking System 2000
260KB — EN
Manual list by bridge
- Tremolo Locking
- Tremolo Non-Locking
- Non Tremolo Fixed
- Tailpiece
- Others
-
-
Edge tremolo bridge
1MB — EN -
Edge Ⅲ tremolo bridge
982KB — EN -
Edge-Zero Ⅱ tremolo
1MB — EN -
Edge-Zero tremolo bridge w/ZPS3
1.4MB — EN -
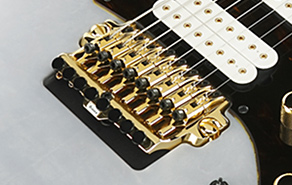
Lo-Pro Edge tremolo bridge
1.0MB — EN -
Std. DL tremolo bridge
952KB — EN
-
-
-
T1802 / T1502 tremolo bridge
1.2MB — EN -
SAT10 tremolo bridge
600KB — EN -
SAT Pro Ⅱ tremolo bridge
600KB — EN -
Std. tremolo bridge
576KB — EN -
SynchroniZR tremolo bridge
877KB — EN -
ITL10 tremolo bridge
576KB — EN -
FAT-6 tremolo bridge
600KB — EN -
FAT-10 tremolo bridge
600KB — EN -
Vintage Vibrato
474KB — EN
-
-
-
Ibanez Mono-Tune bridge
759KB — EN -
Gibraltar Performer Bridge / Gibraltar Artist Bridge
938KB — EN -
FX Edge Ⅲ-8 bridge
800KB — EN -
Gibraltar bridge
648KB — EN -
Gibraltar Standard Ⅱ bridge
460KB — EN -
Fixed bridge
492KB — EN -
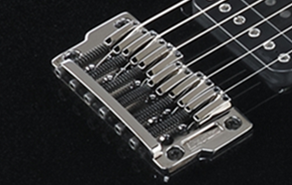
Mono-rail bridge
446KB — EN -
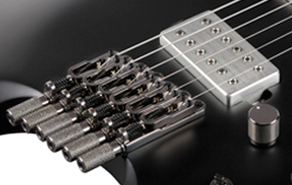
Tight-End bridge
662KB — EN -
Tight-End R bridge
662KB — EN -
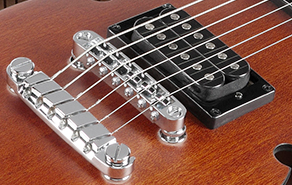
Tight-Tune bridge
492KB — EN -
Full Tune Ⅱ bridge
449KB — EN -
ART-1 bridge
448KB — EN -
ART-W bridge
439KB — EN
-
-
-
GB10 tailpiece
430KB — EN -
Quick Change tailpiece
468KB — EN -
Tight-Tune tailpiece
492KB — EN
-
-
-
BACKSTOP
814KB — EN
-


Switching system & Controls
Signature Series
-
APEX
98KB — EN -
AT
104KB — EN -
BWM
99KB — EN -
CBM
107KB — EN -
CMM
120KB — EN -
DCM
76KB — EN -
EGEN
155KB — EN -
EKM
99KB — EN -
FRM
117KB — EN -
FTM
661KB — EN -
GB
136KB — EN -
JBM
113KB — EN -
JBBM
660KB — EN -
JEM
115KB — EN -
JIVA
672KB — EN -
JS
1.4MB — EN -
JSM
153KB — EN -
KIKO
196KB — EN -
KOMRAD
103KB — EN -
M8M
78KB — EN -
MM
159KB — EN -
MSM
103KB — EN -
MTM
101KB — EN -
NDM
84KB — EN -
PGM
113KB — EN -
PM
78KB — EN -
PS
105KB — EN -
PWM
124KB — EN -
STM
101KB — EN -
TAM
153KB — EN -
TQM
157KB — EN
-
DT Series
108KB — EN -
FR Series
154KB — EN -
IC Series
109KB — EN -
RC Series
186KB — EN -
RG Series
1.3MB — EN -
RGA Series
162KB — EN -
RGD Series
103KB — EN -
S Series
156KB — EN -
SA Series
186KB — EN -
SV Series
157KB — EN -
TM Series
158KB — EN -
Hollow Body
346KB — EN
Electric Basses
-
SAFETY PRECAUTIONS
2.2MB — EN
Manual list by name
-
Maintenance Manual
808KB — EN -
Electric Basses 2016
6.6MB — EN -
Electric Basses 2014
3.3MB — EN -
Electric Basses 2012
2.3MB — EN -
Electric Basses 2011
2.9MB — EN -
Electric Basses 2011 (Additional instruction)
2.9MB — EN -
Electric Basses 2010
3.1MB — EN -
Electric Basses 2009
2.7MB — EN -
Electric Basses 2008
2.9MB — EN -
Electric Basses 2007
3.0MB — EN -
Electric Basses (Prestige) 2004
1.0MB — EN -
Electric Basses (Excl. Prestige) 2004
1.0MB — EN -
EDA Bass
328KB — EN
Manual list by bridge
-
AFB (Acoustic Bridge)
455KB — EN -
AFR
472KB — EN -
AGB
467KB — EN -
ASB
467KB — EN -
ATK
473KB — EN -
BTB
745KB — EN -
EHB
776KB — EN -
GSR
479KB — EN -
GVB
493KB — EN -
GWB
433KB — EN -
K5
433KB — EN -
MDB
657KB — EN -
PIB
515KB — EN -
SDB
515KB — EN -
SR
818KB — EN -
SRC
452KB — EN -
SRF
470KB — EN -
SRH
470KB — EN -
SRMD
478KB — EN -
SRMS
487KB — EN -
SRSC
473KB — EN -
SRX
660KB — EN -
TMB
478KB — EN -
UB
473KB — EN
Acoustic Guitars
-
Quick Reference
470KB — EN
Manual list by name
-
JGM10 extra saddle in the package
755KB — EN -
Acoustic Guitar Instruction Manual
714KB — EN -
AE
1.8MB — EN -
AGP10
3.1MB — EN -
Acoustic Guitars 2014
4MB — EN -
Acoustic Guitars 2010
2.9MB — EN -
Acoustic Guitars 2007
4.5MB — EN -
Acoustic Guitars
4.1MB — EN -
Ukulele Starting Guide 2018
77KB — EN
Preamp Information
-
AEQ2T
916KB — EN -
AEQ2TM
948KB — EN -
AEQ2U
1MB — EN -
AEQ2UT
1.1MB — EN -
AEQ200M
771KB — EN -
AEQ210T
931KB — EN -
AEQ210TF
932KB — EN -
AEQSP1
881KB — EN -
AEQSP2
876KB — EN -
AEQTP2
980KB — EN -
AEQTTS
618KB — EN -
Ibanez Custom Electronics (AHA1)
648KB — EN -
DP1
643KB — EN -
FISHMAN® POWERTAP EARTH BLEND
662KB — EN -
Ibanez Custom Electronics Magnetic PU & Contact PU
609KB — EN -
Ibanez Custom Electronics Magnetic PU & Undersaddle PU
498KB — EN -
Ibanez Custom Electronics Magnetic PU, Undersaddle PU & Contact PU
650KB — EN -
Ibanez Custom Electronics Magnetic PU Volume, Magnetic PU Tone & Contact PU Volume
636KB — EN -
Ibanez Custom Electronics w/ Vol. & Tone
480KB — EN
Amplifiers
Manual list by name
Promethean
-
P20
9.3MB — EN -
P110C/P115CC/P410CC(Discontinued model)
4.1MB — EN -
P300H/P3110/P3115
6.4MB — EN -
P500H/5110(Discontinued model)
27.2MB — EN -
P5115K/410CC/115CC110C/210KC
4.1MB — EN
IBZ
-
IBZ2G
2.6MB — EN -
IBZ2B
2.6MB — EN -
IBZ10A(Discontinued model)
848KB — EN -
IBZ10B/IBZ15B
2.0MB — EN -
IBZ10B(2011)/15B
2.0MB — EN -
IBZ10B(2019)
630KB — EN -
IBZ10BV2
630KB — EN -
IBZ10G
2.0MB — EN -
IBZ10G(2011)
2.0MB — EN -
IBZ10G(2019)
640KB — EN -
IBZ10GV2
640KB — EN -
IBZ15GR
1.6MB — EN
Troubadour
-
T10
8.8MB — EN -
T15
3.1MB — EN -
T15II
1.6MB — EN -
T20/35(Discontinued model)
14.8MB — EN -
T30
4.8MB — EN -
T30II
2.3MB — EN -
T80(Discontinued model)
7.2MB — EN -
T80II/T80IISM
2.5MB — EN -
T80N/T150S
6.1MB — EN -
TA20(Discontinued model)
2.5MB — EN -
TA35(Discontinued model)
3.3MB — EN -
TA225(Discontinued model)
1.7MB — EN
OTHERS
-
ACA10(Discontinued model)
476KB — EN -
ACA15(Discontinued model)
1.9MB — EN -
BSA10(Discontinued model)
272KB — EN -
Desktop Amps DAG1/DAB1(Discontinued model)
852KB — EN -
GA1B/1G(Discontinued model)
256KB — EN -
GTA10(Discontinued model)
276KB — EN -
GTA15R(Discontinued model)
1.1MB — EN -
IFS2X/4X
480KB — EN -
IS412CA/CS(Discontinued model)
3.7MB — EN -
MIMX30(Discontinued model)
15.6MB — EN -
MIMX150H/65V
10.9MB — EN -
SW15
732KB — EN -
SW20(Discontinued model)
400KB — EN -
SW35(Discontinued model)
684KB — EN -
SW35/80(Discontinued model)
5.0MB — EN -
SW65(Discontinued model)
644KB — EN -
SW100(Discontinued model)
2.2MB — EN -
SW115S(Discontinued model)
376KB — EN -
SWX100/65/35/20(Discontinued model)
12.0MB — EN -
TB15/15R(Discontinued model)
1.9MB — EN -
TB25/25R(Discontinued model)
2.2MB — EN -
TB50R(Discontinued model)
932KB — EN -
TB100H(Discontinued model)
1.4MB — EN -
TB100R(Discontinued model)
1.5MB — EN -
TB212(Discontinued model)
600KB — EN -
TB412A/TB412S(Discontinued model)
796KB — EN -
TBX(Discontinued model)
6.8MB — EN -
TN120(Discontinued model)
22.1MB — EN -
TN412A/TN412S(Discontinued model)
8.4MB — EN -
VBG(Discontinued model)
1.6MB — EN -
WT80(Discontinued model)
4.7MB — EN
Electronics
Manual list by name
Tube Screamer
-
NTS
1.4MB — EN -
TS808HW
10.0MB — EN -
TS808
10.0MB — EN -
TS808DX
13.3MB — EN -
TS9
11.1MB — EN -
TS9B
11.1MB — EN -
TS9DX
11.2MB — EN -
TSMINI
10.0MB — EN -
TSV808
2.2MB — EN
MINI
-
ADMINI
9.3MB — EN -
BIGMINI
11.0MB — EN -
BTMINI
590KB — EN -
CSMINI
10.1MB — EN -
FLMINI
830KB — EN -
FZMINI
7.9MB — EN -
PHMINI
620KB — EN -
SMMINI
9.2MB — EN -
TRMINI
930KB — EN -
TSMINI
10.0MB — EN
9 series
-
AD9(Discontinued model)
232KB — DE/FR/JP -
BB9
3.6MB — EN -
CS9(Discontinued model)
356KB — DE/FR/JP -
FL9(Discontinued model)
348KB — DE/FR/JP -
JD9
692KB — EN -
SD9M
751KB — EN
Tone-Lok
-
AP7(Discontinued model)
682KB — EN -
AW7(Discontinued model)
332KB — EN -
CF7(Discontinued model)
256KB — EN -
DE7(Discontinued model)
304KB — EN -
DS7(Discontinued model)
124KB — EN -
FZ7(Discontinued model)
126KB — EN -
LF7(Discontinued model)
256KB — EN -
PD7(Discontinued model)
176KB — EN -
PM7(Discontinued model)
344KB — EN -
SB7(Discontinued model)
388KB — EN -
SM7(Discontinued model)
168KB — EN -
TC7(Discontinued model)
646KB — EN -
TS7(Discontinued model)
156KB — EN -
WD7
456KB — EN -
WD7JR(Discontinued model)
1.1MB — EN
Tuners
Manual list by name
-
6PTIT05
1.5MB — EN -
CU10(Discontinued model)
923KB — EN/FR/JP -
CU20(Discontinued model)
2.9MB — EN -
GU1(Discontinued model)
644KB — EN -
GU20(Discontinued model)
3.3MB — EN -
GU30(Discontinued model)
784KB — EN -
LU20(Discontinued model)
488KB — EN -
LU30(Discontinued model)
2.6MB — EN -
MU2
2.6MB — EN -
PU1G/PU1U(Discontinued model)
3.3MB — EN -
PU2(Discontinued model)
2.4MB — JP -
PU3
2.3MB — EN -
PU10(Discontinued model)
956KB — EN -
PU30(Discontinued model)
1.2MB — EN -
RU10(Discontinued model)
1.7MB — EN -
TuNANO
1.8MB — EN
Accessories
|
Всего инструкций в разделе: 29 |


| инструкция | устройство | размер |
| IBANEZ Acoustic Guitars | акустические гитары | 3.87 MB |
| IBANEZ Acoustic Guitars (2007) | акустические гитары 2007 г.в. | 4.34 MB |
| IBANEZ Acoustic Guitars (2010) | акустические гитары 2010 г.в. | 2.75 MB |
| IBANEZ Acoustic Guitars (2014) | акустические гитары 2014 г.в. | 3.80 MB |
| IBANEZ Maintenance | — | 203.92 kB |
| IBANEZ EDA Bass | — | 326.33 kB |
| IBANEZ Electric Guitars w/ Locking System (2000) | Electric Guitars w/ Locking System 2000 г.в. | 256.91 kB |
| IBANEZ Electric Guitars & Basses (2000) | Electric Guitars & | 331.70 kB |
| IBANEZ Artcore | — | 6.10 MB |
| IBANEZ Electric Basses (Excl. Prestige) | электробасгитары (Excl. Prestige) | 1.02 MB |
| IBANEZ Electric Basses (Prestige) | электробасгитары (Prestige) | 1.02 MB |
| IBANEZ Electric Guitars (Excl. Prestige) | электрогитары (Excl. Prestige) | 2.34 MB |
| IBANEZ Electric Guitars (Prestige) | электрогитары (Prestige) | 2.45 MB |
| IBANEZ Electric Basses (2007) | электробасгитары 2007 г.в. | 2.90 MB |
| IBANEZ Electric Guitars (2007) | электрогитары 2007 г.в. | 10.58 MB |
| IBANEZ Electric Guitars (2008) (Prestige) | электрогитары 2008 г.в. (Prestige) | 39.57 MB |
| IBANEZ Electric Basses (2008) | электробасгитары 2008 г.в. | 2.81 MB |
| IBANEZ Electric Guitars (2008) | электрогитары 2008 г.в. | 11.14 MB |
| IBANEZ Electric Basses (2009) | электробасгитары 2009 г.в. | 2.61 MB |
| IBANEZ Electric Guitars (2009) | электрогитары 2009 г.в. | 11.11 MB |
| IBANEZ Electric Basses (2010) | электробасгитары 2010 г.в. | 2.97 MB |
| IBANEZ Electric Basses (2011) | электробасгитары 2011 г.в. | 2.77 MB |
| IBANEZ Electric Basses (2012) | электробасгитары 2012 г.в. | 2.61 MB |
| IBANEZ Electric Basses (2013) | электробасгитары 2013 г.в. | 4.04 MB |
| IBANEZ Electric Guitars (2013) (Prestige) | электрогитары 2013 г.в. (Prestige) | 26.31 MB |
| IBANEZ Electric Guitars (2013) | электрогитары 2013 г.в. | 30.61 MB |
| IBANEZ Electric Basses (2014) | электробасгитары 2014 г.в. | 3.17 MB |
| IBANEZ Electric Guitars (2014) (Prestige) | электрогитары 2014 г.в. (Prestige) | 27.67 MB |
| IBANEZ Electric Guitars (2014) | электрогитары 2014 г.в. | 34.31 MB |
-
Contents
-
Table of Contents
-
Bookmarks
Quick Links
Related Manuals for Ibanez Ibanez
Summary of Contents for Ibanez Ibanez
-
Page 2: Table Of Contents
ENGLISH INTRODUCTION Thank you for purchasing an Ibanez guitar. In order to keep your guitar in the best possible condition, please read this manual for information on care and adjustment. Maintenance Manual GUITAR PART IDENTIFICATION ……35 ATTACHMENTS ……….36 STRING REPLACEMENT ……..
-
Page 3: Maintenance Manual
TREMOLO ARM NECK PICKUP TONE These illustrations show typical Ibanez models. The guitar you purchased might not match the illustration. Tremolo/bridge adjustments will differ depending on the type of tremolo/bridge that is installed. For details, refer to the applicable tremolo/bridge section.
-
Page 4: Attachments
ATTACHMENTS Allen wrench Multi- Tremolo socket tool 1.5mm 2.5mm wrench Edge tremolo bridge Edge-Pro tremolo bridge Edge-Zero tremolo bridge Lo-Pro Edge tremolo bridge FX Edge III-8 bridge synchroniZR tremolo bridge Tight-End / Tight-End R bridge ZR-2 tremolo bridge Semi-acoustic guitars Full acoustic guitars Models equipped with DiMarzio pickups are shipped with an Allen wrench for adjusting the height of the pole pieces.
-
Page 5: Tuning
TUNING When shipped from the factory, Ibanez guitars are set up using the following tunings. 6-strings 7-strings Note that following models are set up differently. RGD, APEX1 6-strings 7-strings RG2228, M8M Use a tuner or tuning fork to tune up the sound of each open string to the above frequencies. If the pitch is higher than the above frequency, loosen the string to lower the pitch, and wind the string in small increments to tune it up.
-
Page 6: Neck Adjustment
You must take care when adjusting the neck. Forced adjustments can damage your guitar. If you are unable to adjust the neck correctly, please contact your dealer or the Ibanez Corporation. INTONATION If you’ve changed string gauges or are using your guitar with an alternative tuning, you’ll need…
-
Page 7: Cleaning
CLEANING After playing, wipe sweat and oil off metal parts such as the underside of the strings, the frets, bridge saddles and nut. This will help to prevent rust. Dirt or dust that adheres to metal parts may adversely affect their function. Wipe off stubborn dirt with a soft cloth moistened with a small amount of oil.
-
Page 8: Auto-Trim Peg
AUTO-TRIM peg STRING REPLACEMENT ■ Removing a string Loosen the string, and turn the lock knob located below the peg to unlock the string. Memo • Exercise care as the string may come out with great force immediately after you release the lock. Installing a string ■…
-
Page 9: Adjustment Manual
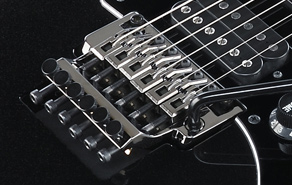
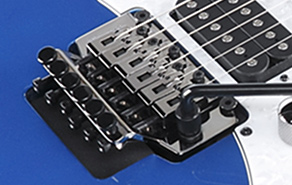
Adjustment Manual Edge/Lo-Pro Edge tremolo bridge Edge Lo-Pro Edge ■ ■ Rear ■ 1Knife edge 2Saddle lock bolt 3String holder block 4Tremolo arm socket 5String stopper bolt 6Fine tuning bolt 7Tremolo spring 8Spring lock Attaching the tremolo arm The tremolo arm employs a snap-in/snap-out design. Hold the corner of the tremolo arm, and press it fi…
-
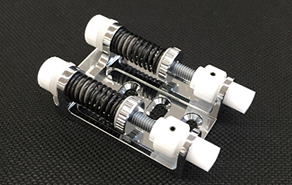
Page 10: Tremolo Springs
The tightness of the tremolo arm attachment can be adjusted by adding or removing Tefl on washers. Using a larger number of washers will make the attachment tighter, and removing all the washers will leave the arm free. The Tefl on washers can be added or removed diagonally via the slit.
-
Page 11: Adjusting The Action
Memo • Loosen the strings suffi ciently before you install or remove tremolo springs. Be aware that if you remove all of the springs, the tremolo unit will detach from the guitar. • To reattach the tremolo, insert the knife edge of the tremolo securely into the groove of the stud bolts, and then install the tremolo springs.
-
Page 12: Replacing The Strings
Replacing the strings Use an Allen wrench (3 mm) to loosen the pressure pad bolts of the locking nut, and remove the string from the tuning peg. EDGE Lo-Pro EDGE Use an Allen wrench (3 mm) to loosen the string stopper bolt of the tremolo unit;…
-
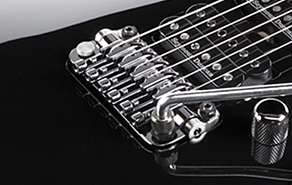
Page 13: Edge-Pro Tremolo Bridge
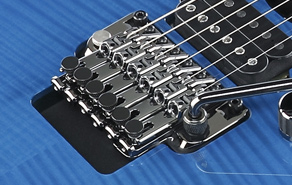
Edge-Pro tremolo bridge Overview Rear ■ ■ 1Knife edge 7Tremolo spring 2Saddle lock bolt 8Spring lock 3String holder block 4Tremolo arm socket 5String stopper bolt 6Fine tuning bolt Attaching the tremolo arm The tremolo arm employs a snap-in/snap-out design. Holding the corner of the tremolo arm, press it fi rmly into the arm socket of the base plate until the Tefl…
-
Page 14
Adjusting the tremolo attachment angle The tremolo attachment angle is adjusted by changing the balance between the string tension and the tension of the tremolo springs installed on the back of the guitar body. You’ll obtain the optimal performance by adjusting this so that the tremolo is approximately horizontal to the surface of the guitar body. -
Page 15
Adjusting the action To adjust the height of the entire tremolo unit, use an Allen wrench (4 mm) to turn the stud bolts located at the left and right of the tremolo unit. (It is not possible to make adjustments for each string individually.) Adjusting the intonation Use an Allen wrench (3 mm) to loosen the pressure… -
Page 16
You can also insert the strings with the ball ends cut off, as on a conventional locking tremolo. Removing all strings at the same time will cause the tremolo attachment angle to change signifi cantly, so we recommend that you replace the strings one at a time. -
Page 17: Edge-Zero / Zr-2 Tremolo Bridge
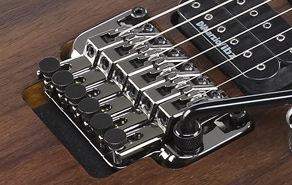
Edge-Zero / ZR-2 tremolo bridge Edge-Zero ■ ■ Rear ■ 1Knife edge 2Saddle lock bolt 3String holder block 4Tremolo arm socket 5String stopper bolt 6Fine tuning bolt 7Intonation adjustment bolt 8Main spring 9Sub spring 0Stopper AStop rod BTremolo block CSpring adjustment knob Attaching the tremolo arm The tremolo arm employs a snap-in/snap-out design.
-
Page 18
Tremolo angle adjustment / Zero point system adjustment The tremolo attachment angle is adjusted by changing the balance between the string tension and the tension of the zero point system installed on the back of the guitar body. The Edge-Zero/ZR2 tremolo bridge is designed so that the tremolo will be approximately parallel with the surface of the guitar body when the zero point system is adjusted correctly, and will perform optimally in this state. -
Page 19
Stud lock (Edge-Zero tremolo bridge) Edge-Zero The Edge-Zero tremolo bridge is equipped with a stud lock function. Insert an Allen wrench (2 mm) through the hole at the top of the stud bolt. Turning the stud lock bolt clockwise, tighten it until the stud lock bolt contacts the anchor nut and will no longer rotate. -
Page 20
Replacing the strings Use an Allen wrench (3 mm) to loosen the pressure pad bolts of the locking nut, and remove the string from the tuning peg. Use an Allen wrench (3 mm) to loosen the string stopper bolt of the tremolo unit; then pull the string out of the saddle and remove it. -
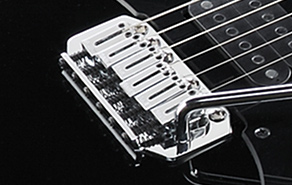
Page 21: Fx Edge Iii/Fx Edge Iii-8 Bridge
FX Edge III/FX Edge III-8 bridge FX Edge III ■ 1Main stud 2Saddle lock bolt 3String holder block 4String stopper bolt 5Rear stud 6Fine tuning bolt Adjusting the action To adjust the string height, use a slotted screwdriver to turn the main studs at the left and right of the bridge unit to adjust the height of the entire tremolo unit.
-
Page 22
Replacing the strings Use an Allen wrench (3 mm) to loosen the pressure pad bolts of the locking nut, and remove the string from the tuning peg. Use an Allen wrench (3 mm) to loosen the string stopper bolt of the bridge unit; then pull the string out of the saddle and remove it. -
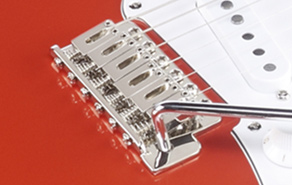
Page 23: Synchronizr
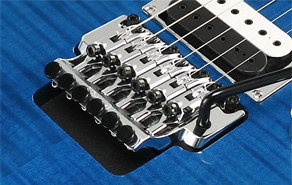
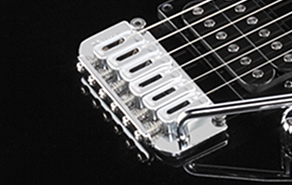
SynchroniZR Overview Rear ■ ■ 1Saddle lock bolt 4Tremolo spring 2Tremolo arm socket 5Tremolo block stopper 3Intonation adjustment bolt 6Tremolo block stopper knob 7Tremolo block 8Spring adjustment knob Attaching the tremolo arm The tremolo arm employs a snap-in design. Holding the corner of the tremolo arm, press it fi rmly into the arm socket of the base plate until it clicks into place.
-
Page 24
Adjusting the tremolo attachment angle The angle at which the tremolo is attached is adjusted by the balance between the tension of the strings and the tension of the tremolo springs installed in the back of the guitar body. The tremolo will perform optimally when adjusted so that it is approximately parallel with the surface of the guitar body. -
Page 25: Intonation Adjustment
Intonation adjustment Remove the intonation adjustment bolts stored in the tremolo unit, and screw them into the adjustment holes at the rear of the saddle until the bolt tips touch the wall of the tremolo unit. Use an Allen wrench (2 mm) to loosen the saddle lock bolt, and turn the intonation adjustment bolt to adjust the saddle position.
-
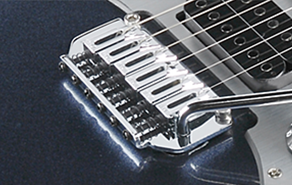
Page 26: Tight-End Bridge / Tight-End R Bridge
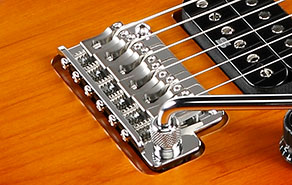
Tight-End bridge / Tight-End R bridge (for 6-string and 7-string) Tight-End bridge Tight-End R bridge ■ ■ Intonation adjustment bolt Intonation adjustment bolt String height adjustment screw String height adjustment screw Saddle lock bolt Saddle lock bolt Adjusting the action Use an Allen wrench (2 mm) to loosen the saddle lock bolts.
-
Page 27: Full Tune Ii Bridge
Full Tune II bridge Intonation adjustment bolt Adjustment spinner Adjusting the action To adjust the height of the entire bridge, use your fi ngers to turn the adjustment spinners located at the left and right ends of the bridge. (It is not possible to individually adjust the height of each string.) Adjusting the intonation To adjust the saddle position, use a slotted screwdriver to turn the…
-
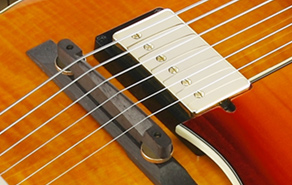
Page 28: Full Acoustic Guitar Bridge
Full acoustic guitar strap button Full acoustic guitars do not have a strap button installed on the neck side of the instrument. If you would like to have a strap button installed, please contact your dealer or Ibanez Corporation.
-
Page 29: Pickups
PICKUPS H-S-H (5-WAY) H-H (5-WAY) Humbucker is parallel connected. H-H (3-WAY) S-S-H (5-WAY) Volume Pot Switch Push Down Volume Pot Switch Pull Up Tone Pot Switch Tone Pot Switch Push Down Push Down Tone Pot Switch Tone Pot Switch Pull Up Pull Up EGEN APEX…
-
Page 30: Controls
CONTROLS 1-V, 1-T 1-V, 1-T TONE W/ COIL TAP SW. 3 OR 5 WAY P.U. SELECTOR 3 WAY P.U. SELECTOR VOLUME W/ VOLUME HIGH PASS FILTER SW. TONE VOLUME 3 WAY P.U. SELECTOR 1-V, 2-T 1-V, 1-T VOLUME W/ VOLUME PUSH PULL SW.
-
Page 31
The followings complies with the requirements of the EMC Directive 2004/108/EC of the European Union. No.22, 3-CHOME, SHUMOKU-CHO, HIGASHI-KU, NAGOYA, 461-8717, JAPAN AUTHORIZED REPRESENTATIVE : J.N.WAGENAARWEG 9, 1422 AK UITHOORN, NETHERLANDS Ibanez 2012 Printed in Japan SEP12917…
This manual is also suitable for:
Prestige
перейти к содержанию
Ибаньес, Карлос Альберто управляет сайтом ibanez.com/usa («Сайт»). Следующие Условия использования/Официальное уведомление/Соглашение («УИ») регулируют использование вами Сайта. Другие сайты или контент, принадлежащие или контролируемые Hoshino USA, могут иметь свои собственные условия использования и должны быть пересмотрены.viewизд. Их официальный webсайт Ibanez.com.
Каталог руководств пользователя и инструкций для продуктов Ibanez можно найти ниже. Продукты Ibanez запатентованы и зарегистрированы под торговыми марками Ибаньес, Карлос Альберто
Контактная информация:
АДРЕС:1726 Winchester Rd, Бенсалем, Пенсильвания. 19020 США
MAIL: ibanez@hoshinousa.com
ТЕЛЕФОН: 215-638-8670
Найти
Гитарная беспроводная система Ibanez WS1 РУКОВОДСТВО ПОЛЬЗОВАТЕЛЯ http://www.hoshinogakki.eo.jp/pdf/ibanez/manual/en/electronics/WS1.pdf Перед использованием этого устройства. обязательно внимательно прочитайте это руководство для безопасного использования. После этого сохраните это руководство в надежном месте и при необходимости прочитайте ij. Меры предосторожности === Обязательно соблюдайте следующие меры предосторожности === Чтобы использовать это …
Подробнее «Руководство пользователя беспроводной гитарной системы Ibanez WS1»
Тремоло-бридж T1802 / T1502 Крепление тремоло-штанги Тремоло-штанга имеет защелкивающуюся конструкцию. Возьмитесь за угол рычага тремоло и плотно вставьте его в гнездо для рычага на опорной пластине. Используйте колпачок регулировки крутящего момента, чтобы отрегулировать натяжение рычага тремоло. При повороте крышки по часовой стрелке…
Подробнее «Руководство по эксплуатации моста тремоло Ibanez T1802»
Ibanez Акустическая гитара Ibanez Custom Electronics с основными регуляторами громкости и тембра. VOLUME.Amp. TONE Регулирует качество звука магнитного звукоснимателя. В центральном положении (положение ручки показано на рисунке) ровно поверните ручку по часовой стрелке, чтобы увеличить диапазон высоких частот, и против часовой стрелки, чтобы…
Подробнее «Руководство пользователя акустической гитары Ibanez»
INSTRUCTION MANUAL
ELECTRIC GUITARS AND BASSES
BRIDGES
This is to certify that the aforementioned equipments fully conform to
protection requirements of the following EC council directives.
DIRECTIVES : 89/336/EEC Electromagnetic compatibility
Printed in JAPAN NOV00374 ©Copyright 2000
B A S S I N F O R M A T I O N
M A I N T E N A N C E
CLEANING
Regular cleaning of your guitar
is one the most important
ways you can maintain the
finish and lengthen string life.
After playing, wipe down your
instrument to remove any
perspiration from the
instrument. Perspiration can
actually contain acids that can
be corrosive to the strings and
metal parts of the guitar. Gloss finish guitars should be polished with
polish formulated specifically for musical instruments, and a soft, treated
guitar cloth or a cotton rag. Abrasive rags such as polyester can scratch
the finish. Oil finished guitars should be wiped clean immediately after
playing with a dry cotton rag only. If your guitar has become discolored
due to extended use or heavy perspiration, factory appearance, see a
qualified guitar repair person about methods to restore the oil finish to
its original factory appearance.
STRINGS AND TUNING MACHINES
If strings become dirty,
discolored, or produce a dull
sound or buzz, replace the
strings with new ones. For best
results we recommend replacing
one string at a time, this will
help to avoid removing the string
tension from the neck. When
replacing strings with different
gauge strings, it may be
necessary to adjust the truss rod
tension. (We recommend only
qualified technicians perform
this.) Instruments that have
tremolo systems installed may
need to be adjusted after string
replacement as changes in
string tension can cause the
tremolo to raise or lower. Ibanez
guitars and basses are factory
equipped with the following
string gauges. Please follow the instructions
below for your particular model.
The strings should be tightly wound on to the
tuning machines from top to bottom with 2 to 3
string wraps around the post. In the case of
unwound guitar strings, the ends of the strings
should be prepared as shown in the diagram to
prevent unintentional slippage from the posts. In
the case of tuning machines, where the string
ends are inserted into the posts, the string can be
cut to length in advance using a pair of string
cutters.
If the tuning machines are
sealed gear units, they are
self-lubricating types. The
set screws for the tuning
knob are adjustment screws
that can be tightened with a
small Phillips head
screwdriver to increase the
tension.
*The use of coarse strings may lead to buzzing and sound distortion. Using strings that have twists or
kinks may cause buzzing or decreased sustain. Make sure that the new strings are smooth and free
from any defects before installing.
MODELS
STRING GAUGES
ELECTRIC GUITARS
.009-.042”
4-STRING BASSES
.044,.063,.080,.102”
5-STRING BASSES
.044,.063,.080,.098,.121”
35” SCALE 4-STRING BASSES
.045,.065,.085,.105”
35” SCALE 5-STRING BASSES .045,.065,.085,.105,.130”
35” SCALE 6-STRING BASSES .030,.045,.065,.085,.105,.130”
Ibanez steel string models
are equipped with
adjustable truss rods. The
purpose of a truss rod is to
adjust the neck to
counteract string tension.
There are many reasons
for truss rod adjustments.
One of the most frequent
reasons is changing string
gauges or tuning pitch which
can affect string tension.
String tension changes may
affect the string height and
cause fret buzz or notes that
don’t ring true. To adjust the
truss rod, locate the truss
rod nut and adjust it by
inserting the correct wrench
into the nut and tightening (clockwise) or loosening (counter clockwise)
the rod. Truss rod tension can be measured by installing a capo at the
first fret the holding the strings down at the fret position where the neck
joins the body. Insert a thickness gauge between the string and the fret
at the 8th fret. There should between 0.3 mm to 0.5mm clearance. That
clearance is referred to as “neck relief.” Too much neck relief can cause
the neck to have higher action in the middle of the neck causing poor
intonation and uncomfortable playability. No neck relief can cause fret
buzz.
*Appropriate care must be taken when adjusting the neck and we recommend only qualified
technicians perform this procedure.
ACTION
Ibanez guitar and bass string action is set at the
factory. However there are many reasons that an
instrument’s string height can change. Instruments
can be affected by changes in temperature and
moisture. High string action can make the guitar
difficult to play. If the string action is too low, fret
buzz or unclear notes can occur. To remedy this,
follow the instructions for the particular type of
bridge installed. In the case of string action, make
sure the guitar is in tune and the truss rod is
adjusted properly. Ibanez action is set at the 12th
fret. The action may also need
to be readjusted after the neck
has been adjusted or strings
have been changed to a
different gauge. Follow the
instructions in the relevant
bridge manual to make
adjustments.
*If strings other than those described above are used, gradually increase the action clearance from
the treble side through to the bass side.
INTONATION
Intonation adjustment is the operation of adjusting the location of the
string at the saddle to compensate for different string gauges or
different tunings. Follow the instructions of the particular bridge
intonation below. Intonation is properly set when the 12th fret note and
the 12th fret harmonic are exactly the same note . This is the center point
of the scale and the most accurate way of setting a standard scale
length. With the harmonic note as the standard, if the fretted note is flat
move the bridge saddle forward toward the headstock (a) to decrease
the string length. If the fretted note is sharp, move it back away from the
headstock (b) to
increase the string
length intonation
adjustments.
*Please note that strings can be
broken when the saddle is moved,
so always loosen the strings
before making adjustments.
PICKUPS
TREBLE SIDE
BASS SIDE
SOLID GUITARS
1.5mm
2.0mm
FULL ACOUSTIC
1.7mm
2.3mm
GUITARS
4-STRING BASSES
2.0mm
2.5mm
5/6-STRING BASSES
2.0mm
2.8mm
The output level of the instrument as
well as the quality of the signal can be
affected by the pickup height. Pickup
height should be adjusted until the
volume of neck and bridge pickups are
almost equal with both volumes wide
open. The volume may drop drastically
if the pickup height is too low. As the
pickups are magnetic, fret buzzing and
distortion may occur if the pickup is
too close to the strings. Use a small
screwdriver to make adjustments to
raise or lower the pickup.
*Instruments that have adjustable pole pieces can be
adjusted to balance the output of each string.
Our congratulations and deepest thanks
on making Ibanez your choice of instrument.
Ibanez standards are second to none.
All Ibanez instruments are set up
to our strict quality control standards before shipping.
The purpose of this manual is to explain
how to maintain your instrument’s finish
and to keep your guitar playing
as well as it did when it left our factory.
BASS CONTROLS
3way PU Character Sw.
ATK/5way PU Selecter
Volume
Treble Boost/Cut
Mid Boost/Cut
Bass Boost/Cut
Mid Boost/Cut
Balancer
Volume
Treble Boost/Cut
Bass Boost/Cut
Mid Frequency
ATK
BTB : VARI-MID
LOOSEN
TIGHTEN
8th fret
LOOSEN
TIGHTEN
LOOSEN
TIGHTEN
1
3
2
LOOSEN
TIGHTEN
LOOSEN
TIGHTEN
0.3~0.5mm
NECK
ATK
ATK bridges were designed to allow the
maximum amount of string vibration to
transfer from the body. For slightly more
sustain, strings can be installed either from
the back of the instrument through the
string grommets. For slightly more attack,
the strings can be lowered into the bridge
from the front of the instrument and
hooked onto the
string catch. Intonation adjustments can be
made by adjusting the intonation screws (A) at
the rear of the bridge clockwise to move the
saddle back, and counter clockwise to move
the saddle forward.
*Note: When replacing string check with the dealer to
make sure the new strings are long enough for the full
scale length of the bass.
(A)
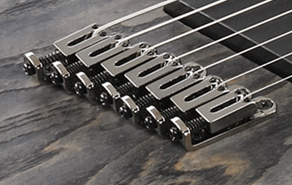
MONO-RAIL II
Mono-Rail II bridges allow the bass strings to be
isolated from one another by using independent
bridge plates for each string. The strings are
installed by lowering the ball end into the bridge
and hooking the ball
end below the string
catch at the rear of
the bridge.
Intonation adjustments can be made by
adjusting the intonation screws (A) at the rear
of the bridge clockwise to move the saddle
back, and counter clockwise to move the
saddle forward.
(A)
ACTIVE EQ.
BTB SERIES : VARI-MID 3B
The Vari-Mid 3B EQ was designed to work with passive pickups and is
loaded with 18 volts to allow the user to get more output from the bass
before distortion.
VARI-MID EQ
ATK : 3 BAND EQ
The Ibanez ATK 3 BAND EQ was
designed for use with passive
pickups and allows the user to
control the bass/treble and mid
range boost and cut.
PICKUP SELECTION
ATK : 5 WAY PICKUP CHARACTER SWITCH
The 5 way pickup character switch
allows the user five completely
different tone positions.
Neck
Center
Bridge
ALL 2 PICKUP MODELS : PICKUP BALANCER
The pickup balance control pot allows the
user to blend between the front and back
pickups using a single pot. The center
position of the pot has a de-tent which will
set both pickups to equal output.
Turning the knob clockwise increases the
neck pickup while decreasing the output of
the bridge pickup. Turning the knob counter
clockwise decreases the neck pickup and
increases the output of the bridge pickup.
BRIDGE
PICKUP
NECK
PICKUP
noise cancel coil
Инструкции по эксплуатации
Укажите здесь торговую марку и тип
В настоящее время вы находитесь на странице с руководствами . Выберите один из продуктов, чтобы сразу перейти к руководству по этому продукту. Не можете найти ? Тогда попробуйте вбить в поле поиска и модель, чтобы найти нужное руководство . На ManualsPDF.ru в настоящее время имеется 122 руководств . Самые популярные :
- Ibanez Soundgear SR300
- Ibanez GIO GSR200
- Ibanez RG350DXZ
Последнее добавленное руководство было добавлено 2021-08-25, и это Ibanez Premium SR1806E.

1 VOL, 1 TONE & 3 WAY LEVER SELECTER
INSTALLING THE STRING
To install a new string insert the ball end of
the new string into the slot and place the ball
end into the internal hook area of the saddle
as shown. Pull the string tight to the saddle
and restring the rest of the string as you
normally would on the machine head.
QUIK CHANGE ULTRA / FINE
TUNNING FUNCTION
QUIK CHANGE ULTRA has FINE
TUNER function.
Even after by the tuning machine,
you can make a quick-fine
adjustment by FINE TUNERS (E).
SPLITS FUNCTION
WITH «TRUE-DUO»SYSTEM
*BRIDGE PICKUP : «TRUE-DUO BUCKER»
DOWNSHIFTER
This is to certify that the aforementioned
equipments fully conform to protection
requirements of the following EC council directives.
DIRECTIVES: 89/336/EEC Electromagnetic compatibility
Printed in China AUG2005WEG ©2005
NECK
CENTER
BRIDGE
Ibanez Instruments are unique in the simplicity and versatility of our
switching systems. Each model was designed to allow the maximum
amount of useful pickup positions with the simplest operations.
JEM. PGM, RG, GRG, S(*), EXR, NDM, GRX :
3 PICKUPS (H-S-H)
(*) except S520EX
NECK
CENTER
BRIDGE
Humbucking is parallel connected.
RG(*), SA120 : 2 PICKUPS (H-H)
(*)except RG120
NECK
CENTER
BRIDGE
GSA, GRX : 3 PICKUPS (S-S-H)
NECK
CENTER
BRIDGE
MMM, RG120, S520EX, GSA, GRX, GAX30 :
2 PICKUPS (H-H)
NECK
CENTER
BRIDGE
AR, ARC, ARX, AXS, GAX(*), IC, ICX, RVX, GSZ:
2 PICKUPS (H-H)
(*) except GAX30
SWITCHING FUNCTION
The output level of the
instrument as well as the
quality of the signal can be
affected by the pickup height.
Pickup height should be
adjusted until the volume of
neck and bridge pickups are
almost equal with both
volumes wide open. The volume may drop drastically if the pickup
height is too low. As the pickups are magnetic, fret buzzing and
distortion may occur if the pickup is too close to the strings. Use a small
screwdriver to make adjustments to raise or lower the pickup.
*Instruments that have adjustable pole pieces can be adjusted to balance the output of each string.
PICKUPS
Ibanez steel string models are equipped with adjustable truss rods. The
purpose of a truss rod is to adjust the neck to counteract string tension.
There are many reasons for truss rod adjustments. One of the most
frequent reasons is changing string gauges or tuning pitch which can
affect string tension. String tension changes may affect the string height
and cause fret buzz or notes that don’t ring true. To adjust the truss rod,
locate the truss rod nut and adjust it by inserting the correct wrench into
the nut and tightening (clockwise) or loosening (counter clockwise) the
rod. Truss rod tension can be measured by installing a capo at the first
fret the holding the strings down at the fret position where the neck joins
the body. Insert a thickness gauge between the string and the fret at the
8th fret. There should
between 0.3 mm to 0.5mm
clearance. That clearance is
referred to as “neck relief.”
Too much neck relief can
cause the neck to have
higher action in the middle of
the neck causing poor
intonation and uncomfortable
playability. No neck relief can
cause fret buzz.
*Appropriate care must be taken when
adjusting the neck and we recommend only
qualified technicians perform this procedure.
NECK
Regular cleaning of your
guitar is one the most
important ways you can
maintain the finish and
lengthen string life. After
playing, wipe down your
instrument to remove any
perspiration from the
instrument. Perspiration can actually contain acids that can be corrosive
to the strings and metal parts of the guitar. Gloss finish guitars should be
polished with polish formulated specifically for musical instruments, and
a soft, treated guitar cloth or a cotton rag. Abrasive rags such as
polyester can scratch the finish. Oil finished guitars should be wiped
clean immediately after playing with a dry cotton rag only. If your guitar
has become discolored due to extended use or heavy perspiration,
factory appearance, see a qualified guitar repair person about methods
to restore the oil finish to its original factory appearance.
LOOSEN
TIGHTEN
8TH FRET
0.3~0.5mm
Maintenance
➣➣
Our congratulations and deepest thanks on
making Ibanez your choice of instrument. Ibanez
standards are second to none. All Ibanez
instruments are set up to our strict quality control
standards before shipping. The purpose of this
manual is to explain how to maintain your
instrument’s finish and to keep your guitar playing
as well as it did when it left our factory.
If strings become dirty, discolored, or produce a
dull sound or buzz, replace the strings with new
ones. For best results we recommend replacing
one string at a time, this will help to avoid
removing the string tension from the neck. When
replacing strings with different gauge strings, it
may be necessary to adjust the truss rod tension.
(We recommend only qualified technicians
perform this.) Instruments that have tremolo
systems installed may need to be adjusted after
string replacement as changes in string tension
can cause the tremolo to raise or lower. Ibanez
guitars and basses are factory equipped with the
following string gauges. Please follow the
instructions below for your particular model.
The strings should be tightly wound on to the
tuning machines from top to bottom with 2 to 3
string wraps around the post. In the case of
unwound guitar strings, the ends of the strings
should be prepared as shown in the diagram to
prevent unintentional slippage from the posts. In
the case of tuning machines, where the string
ends are inserted into the posts, the string can be
cut to length in advance using a pair of string
cutters.
If the tuning machines are sealed gear units, they
are self-lubricating types. The set screws for the tuning knob are
adjustment screws that can be tightened with a small Phillips head
screwdriver to increase the tension.
*The use of coarse strings may lead to buzzing and sound distortion. Using strings that have twists or kinks may
cause buzzing or decreased sustain. Make sure that the new strings are smooth and free from any defects
before installing.
STRINGS AND TUNING MACHINES
1
3
2
LOOSEN
TIGHTEN
Solid guitars w/Tremolo, JTK, ICX, RVX & ALL Gio
RG321MH, SZ, AXS, AR,ARC, ARX & IC
7-String model
MMM1
.009/.011/.016/.024/.032/.042 inch
.010/.013/.017/.026/.036/.046 inch
.010/.013/.017/.026/.036/.046/.054 inch
.014/.017/.030/.040/.056/.074 inch
STRING GAUGES
LOOSEN
TIGHTEN
LOOSEN
TIGHTEN
CLEANING
Intonation adjustment is
the operation of
adjusting the location of
the string at the saddle
to compensate for
different string gauges
or different tunings.
Follow the instructions
of the particular bridge intonation below. Intonation is properly set when
the 12th fret note and the 12th fret harmonic are exactly the same note .
This is the center point of the scale and the most accurate way of setting
a standard scale length. With the harmonic note as the standard, if the
fretted note is flat move the bridge saddle forward toward the headstock
(a) to decrease the string length. If the fretted note is sharp, move it back
away from the headstock (b) to increase the string length intonation
adjustments.
* Please note that strings can be broken when the saddle is moved, so always loosen the strings before
making adjustments.
INTONATION
Ibanez guitar and bass string action is set at the
factory. However there are many reasons that an
instrument’s string height can change. Instruments
can be affected by changes in temperature and
moisture. High string action can make the guitar
difficult to play. If the string action is too low, fret
buzz or unclear notes can occur. To remedy this,
follow the instructions for the particular type of
bridge installed. In the case of string action, make
sure the guitar is in tune and the truss rod is adjusted properly. Ibanez
action is set at the 14th fret. The action may also need to be readjusted
after the neck has been adjusted or strings have been changed to a
different gauge. Follow the instructions in the relevant bridge manual to
make adjustments.
* If strings other than those described above are used, gradually increase the action clearance from the treble side
through to the bass side.
ACTION
.009-string’s guitars except Gio Ibanez
all Gio Ibanez & .010-, .014- string’s guitars
BASS SIDE
TREBLE SIDE
Guitar Bridges
➣➣
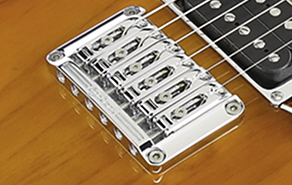
To change strings, thread the new
strings through the string grommets
located on the back of the guitar and
bring them up and over the saddle.
The intonation can be adjusted by
adjusting the saddle forward or
backward using a Phillips (+) head
screwdriver on the intonation
adjustment screw at the rear of the
bridge. String height is controlled by
raising or lowering the small Allen screws using a wrench on either side
of the saddle.
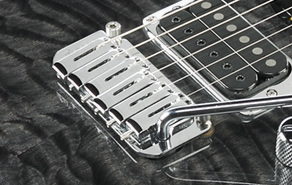
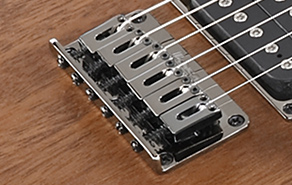
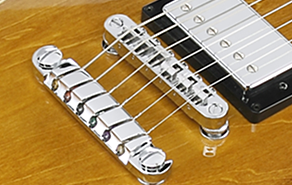
HARDTAIL BRIDGE
The height adjustment can be
adjusted by 4 pcs of 2.0mm of allen
screws (B) on the bridge. Since the
adjustment screws are locked by the
bridge lock screw (A), you must
loosen the bridge lock screw by
3.0mm Allen wrench before
adjustment.
Each saddle is also locked by a
saddle lock screw (C). To adjust the
intonation, use a 2.0mm Allen
wrench to loosen the saddle locke
screws, and then adjust the
Intonation screw (D) by a 2.0mm
Allen wrench. When you are finished with the adjustment, lock the
saddle and tune the guitar.
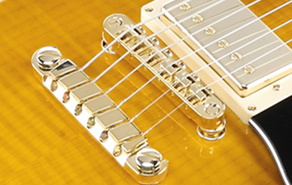
GIBRALTAR CUSTOM BRIDGE
A
B
C
D
SPLITS FUNCTION
Guitar Electronics
➣➣
OTHERS
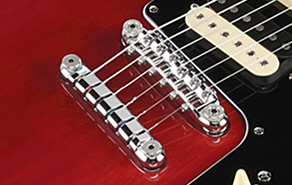
GIBRALTAR III & FULL TUNE III
The action can be adjusted by using a slot head (-) screwdriver to turn
the adjustment bolt at either end (A).
The intonation can be adjusted by moving the saddle forward or
backward using a screwdriver to turn the adjustment screw of each
saddle (B).
The height adjustment of the QUIK
CHANGE III can be adjusted by
using a slot head (-) screwdriver or
a coin turn the adjustment studs at
either side of the tailpiece (C).
(A)
(B)
(A)
(B)
NECK
CENTER
BRIDGE
SZ : 2 PICKUPS (H-H)
CONTROLS
VOLUME
5 WAY
PICKUP SELECTOR
TONE
JEM, PGM, NDM, RG, SAS, SA, GSA60,
GRX70,40
VOLUME
3 WAY
PICKUP SELECTOR
TONE
w/COIL TAP ON/OFF SW.
JS
(*)Coil Tap Switch on Tone
3 WAY
PICKUP SELECTOR
NECK
VOLUME
BRIDGE
VOLUME
NECK TONE
BRIDGE
TONE
AR, IC
Guitar Controls
➣➣
*
NECK TONE
BRIDGE TONE
3 WAY
PICKUP SELECTOR
NECK
VOLUME
BRIDGE VOLUME
AXS, AX, GAX70,75
TONE
NECK VOLUME
BRIDGE
VOLUME
3WAY PICKUP
SELECTOR
SZ, ARC, ARX
VOLUME
TOGGLE SWITCH
TONE
ICX, RVX
TOGGLE
NECK
VOLUME
TONE
BRIDGE VOLUME
GSZ
QUIK CHANGE TAILPIECES
QUIK CHANGE MINI
QUIK CHANGE CLASSIC
QUIK CHANGE III
QUIK CHANGE ULTRA
(E)
VOLUME
TOGGLE SWITCH
TONE
SEESAW SW. FOR BRIDGE PU
SEESAW SW. FOR NECK PU
JTK
NECK
CENTER
BRIDGE
NECK
CENTER
BRIDGE
HUMBUCKER PICKUP MODE
SINGLE PICKUP MODE
VOLUME POT
SWITCH PUSH DOWN
VOLUME POT
SWITCH PULL UP
SAS36/SA260 : 3 PICKUPS(S-S-H)
JS : Coilt Tap Switch by TONE POT
Pull up=TAP ON NECK&BRIDGE Both
pickups
JTK : Coil Tap Swith by SEESAW Switch
SEESAW DOWNED UPFOWARD=TAP ON
NECK
CENTER
BRIDGE
NECK
CENTER
BRIDGE
JS, JTK : 2 PICKUPS (H-H)
JS, JTK (WHEN COIL TAP SWITCH WORKED)
NECK
CENTER
BRIDGE
NECK
CENTER
BRIDGE
HUMBUCKER PICKUP MODE
SINGLE PICKUP MODE
VOLUME POT
SWITCH PUSH DOWN
VOLUME POT
SWITCH PULL UP
HUMBUCKERS
PARALEL COONNECTED
SAS32 : 2 PICKUPS(H-H)
The Ibanez DOWNSHIFTER allows the pitch of a string to be dropped to a
preset desired position with a simple lever operation. To achieve precise
tuning for both the up and down positions, you will need to preset both
lever settings before operating the Downshifter.
PLEASE NOTE: The Downshifter device was designed to provide the
highest level of pitch accuracy. However, it should be understood that
the Downshifter is a mechanical device. Pitch variations and tuning
readjustments, especially after frequent use, are to be expected.
(C)
tuning screw clockwise to reduce the pitch,
or counter clockwise to raise the pitch. This
adjustment can be done by hand or with a
standard screwdriver or a coin until the
desired down pitch is acquired. (The preset
factory pitch is set one whole step down to
D.) When the lever is raised to the up
position, the thumbscrew can be turned
freely but will have no effect on the raised lever pitch. However, it will
affect the settings of down lever pitch.
TUNING
First check that the Downshifter lever arm is
raised to the up position then tune the string
normally using the standard tuning machines
on the headstock.
(Note: the Downshifter tuning screw has no
effect on the pitch in the up position.) Next,
lower the lever on the Downshifter to the down position and the pitch of
the string will drop down. Adjust the rear
1
2
3
SPECIAL TUNING
The Downshifter also allows the pitch to be raised by setting the standard
tuning while the lever is in the lower position. When the lever is raised the
pitch will also be raised and can be adjusted to the desired pitch.
VOLUME
3 WAY
PICKUP SELECTOR
TONE
MMM, RG120, S520EX, GSA20,
GRX20,22, GAX30
1 VOL, 1 TONE(*) & 3 WAY TOGGLE SWITCH
1 VOL, 1 TONE & 3 WAY TOGGLE SWITCH
& 2 SEESAW SWICHES
1 VOL, 1 TONE & 3 WAY TOGGLE SWITCH
2 VOL, 1 TONE & 3 WAY TOGGLE SWITCH
2 VOL, 1 TONE & 3 WAY TOGGLE SWITCH
2 VOL, 2 TONE & 3 WAY TOGGLE SWITCH
2 VOL, 2 TONE & 3 WAY TOGGLE SWITCH
1.5mm
1.7mm
2.0mm
2.3mm
1 VOL(*), 1 TONE & 5 WAY LEVER SELECTER
*SAS/SA260 : TRUE-DUO Switch on Volume