
Ru
Подробное руководство пользователя
ЦИФРОВАЯ ФОТОКАМЕРА
 07:07
07:07
Фотоаппарат Nikon Coolpix p510
 05:54
05:54
Видеообзор Nikon CoolPix P510
 07:28
07:28
Nikon Coolpix P510 Review — Giant Zoom!
 07:08
07:08
Обзор фотоаппарата Nikon Coolpix P520
 05:29
05:29
Обзор фотоаппарата Nikon coolpix P510
 09:31
09:31
Видео Тест фотоаппарата Nikon Coolpix P510
 09:24
09:24
Nikon Coolpix P510 Распаковка + Тесты видео
Ru
Подробное руководство пользователя
ЦИФРОВАЯ ФОТОКАМЕРА

Сведения о товарных знаках
• Microsoft, Windows и Windows Vista являются охраняемыми товарными знаками или
официальными товарными знаками корпорации Майкрософт в США и/или других странах.
• Macintosh, Mac OS и QuickTime являются товарными знаками Apple Inc., зарегистрированными
в США и других странах. Логотип iFrame и знак iFrame являются товарными знаками компании
Apple Inc.
• Adobe и Acrobat являются зарегистрированными товарными знаками корпорации Adobe
Systems Inc.
• Логотипы SDXC, SDHC и SD являются товарными знаками SD-3C, LLC.
• PictBridge является товарным знаком.
• HDMI, логотип
и High-Definition Multimedia Interface являются товарными
знаками HDMI Licensing LLC.
• Все другие торговые наименования, приводимые в настоящем руководстве и в другой
документации, которая поставляется вместе с изделиями компании Nikon, являются товарными
знаками или зарегистрированными товарными знаками своих владельцев.
AVC Patent Portfolio License
Данный продукт имеет лицензию AVC Patent Portfolio License для личного и некоммерческого
использования клиентом в целях (i) кодирования видео в соответствии со стандартом AVC
(«видеосодержимое AVC») и/или (ii) декодирования видеосодержимого AVC, закодированного
клиентом в рамках личной и некоммерческой деятельности и/или полученного от поставщика
видеосодержимого, имеющего лицензию на предоставление видеосодержимого AVC. Эта
лицензия не распространяется на любое другое использование, а также не подразумевается для
такого использования. Дополнительную информацию можно получить от MPEG LA, L.L.C.
См. веб-сайт
http://www.mpegla.com.

i Введение Компоненты фотокамеры и основные возможности Осно…
Страница 3
- Изображение
- Текст

Введение, Прочитайте эту информацию в первую очередь, Проверка комплектности
Страница 4
- Изображение
- Текст
ii
Вв
ед
ени
е
Введение
Прочитайте эту информацию в первую очередь
Благодарим вас за покупку цифровой фотокамеры Nikon COOLPIX P510.
Перед началом эксплуатации фотокамеры прочитайте информацию раздела «Меры
предосторожности» (
Avi) и изучите это руководство. Храните это руководство в доступном
месте и используйте его, чтобы изучить все возможности вашей новой фотокамеры.
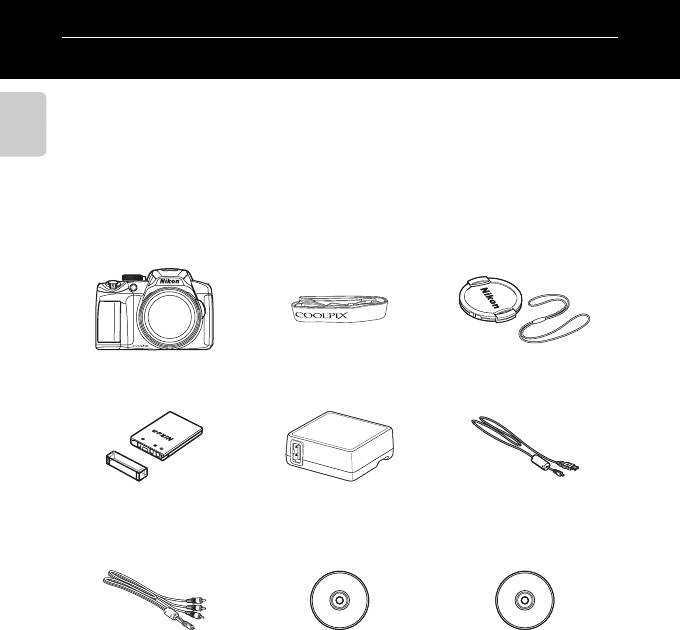
Проверка комплектности
При отсутствии любых комплектующих обратитесь в магазин, в котором вы приобрели
фотокамеру.
* Штекер сетевого блока питания переменного тока входит в комплект, если фотокамера приобретена
в стране или регионе, где требуется штекер сетевого блока питания переменного тока. Форма штекера
сетевого блока питания переменного тока зависит от страны или региона покупки.
ПРИМЕЧАНИЕ. Карта памяти не входит в комплект фотокамеры.
Цифровая фотокамера
COOLPIX P510
Ремень фотокамеры
Крышка объектива LC-CP24
(со шнуром)
Литий-ионная аккумуляторная
батарея EN-EL5
(с защитной крышкой)
Сетевое зарядное устройство
EH-69P*
USB-кабель UC-E6
Аудио-/видеокабель EG-CP16
ViewNX 2 Installer CD
(Установочный компакт-диск с ПО
ViewNX 2)
Reference Manual CD (Компакт-
диск с подробным руководством
пользователя)
• Гарантийный талон

iii
Прочитайте эту информацию в первую очередь
Вв
ед
ени
е
Об этом руководстве
Если вы хотите воспользоваться фотокамерой прямо сейчас, прочитайте раздел, посвященный
фотосъемке «Основные принципы съемки и просмотра» (
A17).
Чтобы изучить основные элементы фотокамеры и базовые операции, обратитесь
к соответствующему разделу «Компоненты фотокамеры и основные возможности» (
A1).
Прочая информация
• Символы и правила именования
Для простоты поиска информации в этом руководстве используются следующие символы
и правила именования:
• Карты памяти SD, SDHC и SDXC именуются в тексте этого руководства «карты памяти».
• Настройки на момент покупки далее называются «настройками по умолчанию».
• Названия пунктов меню, отображаемых на мониторе фотокамеры, а также названия кнопок
и текст сообщений, отображаемых на мониторе компьютера, выделяются жирным шрифтом.
• Примеры экранов монитора и видоискателя в данном руководстве иногда показаны без
изображений. Это позволяет более четко представить символы.
• Иллюстрации и образцы индикации на мониторе, приведенные в этом руководстве, могут
отличаться от фактических.
Символ
Описание
B
Этот символ обозначает предупреждения и информацию, которую следует прочитать
перед началом работы с фотокамерой.
C
Этим символом обозначены примечания, с которыми необходимо ознакомиться перед
использованием фотокамеры.
A/E/F
Эти символы обозначают другие страницы, на которых приведена значимая
информация;
E: Раздел «Руководство» F: «Технические примечания и предметный
указатель.»

Информация и меры предосторожности, Концепция «постоянного совершенствования, Перед съемкой важных событий
О руководстве пользователя
- Изображение
- Текст
iv
Прочитайте эту информацию в первую очередь
Вв
ед
ени
е
Информация и меры предосторожности
Концепция «постоянного совершенствования»
В рамках развиваемой компанией Nikon концепции постоянного совершенствования пользователям предоставляется
регулярно обновляемая информация о поддержке выпущенных изделий и учебные материалы на следующих
веб-сайтах.
• Для пользователей в США: http://www.nikonusa.com/
• Для пользователей в Европе и Африке: http://www.europe-nikon.com/support/
• Для пользователей в странах Азии, Океании и Ближнего Востока: http://www.nikon-asia.com/
Посетите один из этих веб-сайтов для получения последних сведений об изделиях, советов, ответов на часто
задаваемые вопросы и общих рекомендаций по фотосъемке и обработке цифровых изображений. Дополнительные
сведения можно получить у региональных представителей компании Nikon. Контактные сведения можно получить на
веб-сайте, указанном ниже:
http://imaging.nikon.com/
Используйте только фирменные электронные принадлежности Nikon
Фотокамеры Nikon COOLPIX отвечают самым современным стандартам и имеют сложную электронную схему. Только
фирменные электронные аксессуары Nikon (включая зарядные устройства для батарей, батареи, сетевое зарядное
устройство и сетевые адаптеры), специально рекомендованные компанией Nikon для использования с этой цифровой
фотокамерой Nikon, разработаны и протестированы в соответствии со специфическими требованиями,
предъявляемыми к ее эксплуатации и безопасности.
ИСПОЛЬЗОВАНИЕ ЭЛЕКТРОННЫХ ПРИНАДЛЕЖНОСТЕЙ ДРУГИХ ПРОИЗВОДИТЕЛЕЙ МОЖЕТ ПРИВЕСТИ
К ПОВРЕЖДЕНИЮ ФОТОКАМЕРЫ И АННУЛИРОВАНИЮ ГАРАНТИИ NIKON.
Использование литий-ионных аккумуляторных батарей, не имеющих голографического клейма Nikon, других
производителей может повредить работе фотокамеры или привести к перегреву, воспламенению, разрушению или
протечке батареи.
Для получения сведений о фирменных принадлежностях Nikon обратитесь к местному официальному торговому
представителю компании Nikon.
Перед съемкой важных событий
Перед съемкой важных событий, например свадьбы, или перед тем как взять фотокамеру в путешествие, сделайте
пробный снимок, чтобы убедиться в правильности работы фотокамеры. Компания Nikon не несет ответственности за
убытки или упущенную выгоду, возникшие в результате неправильной работы изделия.
О руководстве пользователя
• Никакие разделы документации, входящей в комплект этого изделия, не могут быть воспроизведены, пересланы,
перешифрованы, занесены в поисковую систему или переведены на другой язык, в любой возможной форме
и с применением любых возможных средств, без предварительного письменного разрешения компании Nikon.
• Компания Nikon не несет ответственности за любой ущерб, обусловленный использованием этого изделия.
• Компания Nikon оставляет за собой право изменять спецификации оборудования и программного обеспечения,
описанного в документации, в любой момент времени и без предварительного уведомления.
• Мы приложили все усилия для обеспечения точности и полноты информации, изложенной в документации, и будем
благодарны, если вы сообщите о любых обнаруженных ошибках и пропусках региональному представителю
компании Nikon (адрес прилагается отдельно).
Голографическая наклейка: подтверждает, что
данное устройство является изделием компании Nikon.

v
Прочитайте эту информацию в первую очередь
Вв
ед
ени
е
Уведомление о запрещении копирования или воспроизведения
Необходимо помнить, что даже простое обладание материалом, скопированным или воспроизведенным цифровым
способом с помощью сканера, цифровой фотокамеры или другого устройства, может преследоваться по закону.
• Материалы, копирование или воспроизведение которых запрещено законом
Не копируйте и не воспроизводите денежные банкноты, монеты, ценные бумаги, государственные ценные бумаги
и ценные бумаги органов местного самоуправления, даже если такие копии и репродукции отмечены штампом
«образец». Запрещено копирование и воспроизведение денежных банкнот, монет и ценных бумаг других государств.
Запрещено копирование и воспроизведение негашеных почтовых марок и почтовых открыток, выпущенных
государством, без письменного разрешения государственных органов.
Запрещено копирование и воспроизведение печатей государственных учреждений и документов, заверенных
в соответствии с законодательством.
• Предостережения относительно копирования и воспроизведения
Копии и репродукции ценных бумаг, выпущенных частными компаниями (акции, векселя, чеки, подарочные
сертификаты и т. д.), сезонных билетов или купонов помечаются предупреждениями согласно требованиям
государственных органов, кроме минимального числа копий, необходимых для использования компанией в деловых
целях. Не копируйте и не воспроизводите государственные паспорта; лицензии, выпущенные государственными
учреждениями и частными компаниями; удостоверения личности и такие документы, как пропуска или талоны на
питание.
• Уведомления о соблюдении авторских прав
Копирование или воспроизведение книг, музыкальных произведений, произведений живописи, гравюр,
географических карт, чертежей, фильмов и фотографий с зарегистрированным авторским правом охраняется
государственным и международным законодательством об авторском праве. Не используйте изделие для изготовления
незаконных копий, нарушающих законодательство об авторском праве.
Утилизация устройств хранения данных
Обратите внимание, что при удалении изображений или форматировании устройств хранения данных, таких как карты
памяти или внутренняя память фотокамеры, исходные данные изображений уничтожаются не полностью. В некоторых
случаях файлы, удаленные с отслуживших свой срок устройств хранения данных, можно восстановить с помощью
имеющихся в продаже программных средств. Информацией личного характера могут воспользоваться
злоумышленники. Ответственность за обеспечение конфиденциальности любой подобной информации лежит
исключительно на пользователе.
Прежде чем избавиться от неиспользуемых устройств хранения данных или передать право собственности на них
другому лицу, следует стереть всю информацию с помощью имеющегося в продаже специального программного
обеспечения или отформатировать устройство, а затем заполнить его изображениями, не содержащими личной
информации (например, видами ясного неба). Не забудьте также заменить снимки, выбранные для параметра
Выбрать снимок в настройках Экран приветствия (
A108). При физическом уничтожении устройств хранения
данных соблюдайте меры предосторожности, чтобы не нанести ущерба здоровью или имуществу.
В моделях COOLPIX P510 данные журнала, сохраненные на карте памяти, обрабатываются так же, как и другие данные.
Несохраненные данные журнала событий можно удалить с карты памяти, выбрав последовательно
Создать журнал
➝
Завершить журнал
➝ Очистить журнал.

vi
Вв
ед
ени
е
Меры предосторожности
Перед началом работы с устройством внимательно изучите следующие меры безопасности во
избежание получения травм и повреждения изделия Nikon. Всем лицам, использующим данное
изделие, следует ознакомиться с инструкциями по безопасности.
ПРЕДУПРЕЖДЕНИЯ
В случае неисправности выключите
фотокамеру
Если вы заметите дым или ощутите необычный
запах, исходящий от цифровой фотокамеры или
от сетевого зарядного устройства, немедленно
отключите сетевое зарядное устройство
и извлеките батарею, соблюдая при этом
осторожность, чтобы не получить ожоги.
Продолжение работы с устройством может
привести к получению травм. После извлечения
батареи или отключения источника питания
доставьте изделие для проверки в ближайший
авторизованный сервисный центр компании
Nikon.
Не разбирайте фотокамеру
Контакт с внутренними элементами фотокамеры
или сетевого зарядного устройства может стать
причиной травмы. Ремонтные работы могут
выполнять только квалифицированные
механики. Если вследствие падения или иной
чрезвычайной ситуации целостность
фотокамеры или сетевого зарядного устройства
нарушится, отключите сетевое питание и/или
извлеките батарею и обратитесь
в авторизованный сервисный центр Nikon.
Не используйте фотокамеру или
сетевое зарядное устройство
в присутствии возгораемых газов.
Использование фотокамеры в присутствии
легковоспламеняющихся веществ, таких как
пропан или бензин, а также при наличии
в воздухе легковоспламеняющихся аэрозолей
или пыли может привести к взрыву или
пожару.
Меры предосторожности при
обращении с ремнем фотокамеры
Запрещается надевать ремень фотокамеры на
шею младенца или ребенка.
Храните в недоступном для детей
месте
Не храните изделия в зоне досягаемости
детей. Иначе это может привести к травмам.
Примите особые меры предосторожности во
избежание попадания батарей и других
небольших предметов детям в рот.
Когда фотокамера, сетевое зарядное
устройство или сетевой адаптер
включены или используются,
избегайте длительного физического
контакта с ними.
Детали этих устройств нагреваются, и их
длительный контакт с кожей может привести
к низкотемпературным ожогам.
Соблюдайте меры предосторожности
при обращении с батареей
Нарушение правил обращения с батареей
может привести к протечке электролита,
перегреву или взрыву. Соблюдайте
следующие меры предосторожности при
использовании батареи с данным изделием.
• Перед заменой батареи выключите
фотокамеру. Если вы используете сетевое
Данным символом отмечены предупреждения и сведения, с которыми необходимо ознакомиться
до начала работы с изделием Nikon во избежание травм.

vii Меры предосторожности Вв ед ение зарядное устройство…
Страница 9
- Изображение
- Текст
vii
Меры предосторожности
Вв
ед
ени
е
зарядное устройство / сетевой адаптер,
обязательно отключите их от сети.
• Используйте только литий-ионную
аккумуляторную батарею EN-EL5 (входит
в комплект). Для зарядки батареи вставьте ее
в фотокамеру и подключите сетевое
зарядное устройство EH-69P (входит
в комплект).
• При установке батареи в фотокамеру
соблюдайте полярность.
• Не разбирайте батарею и не замыкайте ее
контакты. Запрещается удалять изоляцию
или вскрывать корпус батареи.
• Не подвергайте батарею сильному нагреву
или воздействию открытого огня.
• Не погружайте батареи в воду и не
допускайте попадания на них воды.
• Во время перевозки надевайте на батарею
защитную крышку. Не храните и не
транспортируйте батареи вместе
с металлическими предметами, например
шпильками или украшениями.
• Полностью разряженная батарея может
протекать. Во избежание повреждения
изделия извлекайте из него разряженные
батареи.
• Немедленно прекратите использовать
батарею, если вы заметили в ней какие-
либо изменения, например изменение
окраски или деформацию.
• В случае попадания жидкости, вытекшей из
поврежденной батареи, на одежду или
кожу немедленно и тщательно промойте
пораженные участки водой.
• Если жидкость, вытекшая из батареи,
попала в глаза, немедленно промойте их
чистой проточной водой и обратитесь за
медицинской помощью.
• Не пытайтесь заряжать батареи, которые не
предназначены для этого.
Соблюдайте следующие правила
безопасного обращения с сетевым
зарядным устройством
• Не допускайте попадания воды на
устройство. Несоблюдение этого
требования может привести к возгоранию
или поражению электрическим током.
• Пыль на металлических частях сетевой вилки
или вокруг них необходимо удалять
с помощью сухой ткани. Продолжение
работы с устройством может привести
к возгоранию.
• Во время грозы не дотрагивайтесь до
разъемов и не приближайтесь к сетевому
зарядному устройству. Несоблюдение этой
меры предосторожности может привести
к поражению электрическим током.
• Берегите USB-кабель от повреждений, не
вносите в него конструктивные изменения,
не тяните за него с усилием, не сгибайте его
и не ставьте на него тяжелые предметы, не
подвергайте его воздействию открытого
огня или высоких температур. В случае
повреждения изоляции сетевого шнура
и оголения проводов доставьте его для
проверки в авторизованный сервисный
центр Nikon. Несоблюдение этого
требования может привести к возгоранию
или поражению электрическим током.
• Не дотрагивайтесь до разъемов и до
сетевого зарядного устройства мокрыми
руками. Несоблюдение этой меры
предосторожности может привести
к поражению электрическим током.
• Не используйте совместно с дорожными
трансформаторами или адаптерами,
предназначенными для преобразования
напряжения, а также с инверторами
постоянного тока. Нарушение этого
требования может привести
к повреждению изделия или к его
перегреву или загоранию.

viii Меры предосторожности Вв ед ение Используйте только соо…
Страница 10
- Изображение
- Текст
viii
Меры предосторожности
Вв
ед
ени
е
Используйте только
соответствующие кабели
При подключении кабелей к входным
и выходным разъемам и гнездам фотокамеры
используйте только специальные кабели
Nikon, поставляемые вместе с фотокамерой
или продаваемые отдельно.
Соблюдайте осторожность при
обращении с подвижными частями
фотокамеры
Будьте внимательны. Следите за тем, чтобы
ваши пальцы и другие предметы не были
зажаты крышкой объектива или другими
подвижными частями фотокамеры.
Компакт-диски
Компакт-диски, входящие в комплект этого
устройства, не предназначены для
прослушивания на CD-проигрывателях.
Воспроизведение компакт-дисков с данными
на аудиороигрывателе может привести
к нарушениям слуха или повреждению
оборудования.
Соблюдайте осторожность при
использовании вспышки
Использование вспышки на близком
расстоянии 1 м от глаз объекта съемки может
вызвать временное ухудшение зрения.
Особенную осторожность следует соблюдать
при фотографировании детей: в этом случае
вспышка должна находиться на расстоянии не
менее одного метра от объекта съемки.
Не используйте вспышку, когда ее
излучатель соприкасается с телом
человека или каким-либо предметом
Несоблюдение этой меры предосторожности
может привести к ожогам или пожару.
Избегайте контакта
с жидкокристаллическим
веществом
Если монитор разбился, необходимо
предпринять срочные меры во избежание
травм осколками стекла и предупредить
попадание жидкокристаллического вещества
на кожу, в глаза и в рот.
Отключите питание, если вы
находитесь в самолете или
в больнице
Если вы находитесь в самолете, отключите
питание во время взлета или посадки. Кроме
того, прежде чем сесть в самолет, ВЫКЛЮЧИТЕ
функцию записи информации GPS. При
использовании фотокамеры в больнице,
следуйте инструкциям, принятым в данной
больнице. Электромагнитные волны,
излучаемые данной фотокамерой, могут
прерывать работу электронных систем
самолетов или медицинских инструментов.
3D-изображения
Не следует непрерывно в течение длительного
времени просматривать изображения
в формате 3D, снятые с помощью этой
фотокамеры, на экране телевизора, на
мониторе или на другом дисплее. У детей
зрительная система окончательно не
сформирована, поэтому перед просмотром
изображений в формате 3D следует
проконсультироваться с педиатром или
офтальмологом и соблюдать их инструкции.
Длительный просмотр изображений в формате
3D может вызвать напряжение органов зрения,
головокружение и общий дискомфорт.
Прекратите просмотр, если возникнут любые из
перечисленных симптомов, и при
необходимости обратитесь к врачу.

Комментарии
Раздел: Бытовая, кухонная техника, электроника и оборудование
Тип: Фотоаппарат
Характеристики, спецификации
Общее число пикселов:
16.79 млн
Число эффективных пикселов:
16.1 млн
Максимальное разрешение:
4608 x 3456
Чувствительность:
100 — 1600 ISO, Auto ISO, ISO6400, ISO12800
Баланс белого:
автоматический
Вспышка:
встроенная, подавление эффекта красных глаз
Стабилизатор изображения (фотосъемка):
оптический, подвижный элемент в объективе
Скорость съемки:
7 кадр./сек
Максимальная серия снимков:
5 для JPEG
Время работы таймера:
2, 10 c
Формат кадра (фотосъемка):
4:3, 3:2, 1:1, 16:9
Фокусное расстояние:
24 — 1008 мм
Функция «Оптический Zoom»:
42x
Использование экрана в качестве видоискателя:
есть
Жидко кристалический экран:
921000 точек, 3 дюйма
Тип ЖК экрана:
поворотный
Ручная настройка выдержки и диафрагмы:
есть
Автоматическая обработка экспозиции:
с приоритетом затвора, с приоритетом диафрагмы
Подсветка автофокуса:
есть
Минимальное расстояние съемки:
0.01 м
Тип карт памяти:
SD, SDHC, SDXC
Объём встроенной памяти:
90 Мб
Интерфейсы:
USB 2.0, видео, HDMI, аудио
Формат аккумуляторов:
свой собственный
Количество аккумуляторов:
1
Емкость аккумулятора:
240 фотографий
Запись видео роликов:
есть
Максимальное разрешение видеороликов:
1920×1080
Функция «Цифровой Zoom»:
2x
Вес устройства:
555 г, с элементами питания
Инструкция к Фотоаппарату Nikon COOLPIX P510
ЦИФРОВАЯ ФОТОКАМЕРА
Подробное руководство пользователя
Ru

Сведения о товарных знаках
•
Microsoft, Windows и Windows Vista являются охраняемыми товарными знаками или
официальными товарными знаками корпорации Майкрософт в США и/или других странах.
•
Macintosh, Mac OS и QuickTime являются товарными знаками Apple Inc., зарегистрированными
в США и других странах. Логотип iFrame и знак iFrame являются товарными знаками компании
Apple Inc.
•
Adobe и Acrobat являются зарегистрированными товарными знаками корпорации Adobe
Systems Inc.
•
Логотипы SDXC, SDHC и SD являются товарными знаками SD-3C, LLC.
•
PictBridge является товарным знаком.
•
HDMI, логотип и High-Definition Multimedia Interface являются товарными
знаками HDMI Licensing LLC.
•
Все другие торговые наименования, приводимые в настоящем руководстве и в другой
документации, которая поставляется вместе с изделиями компании Nikon, являются товарными
знаками или зарегистрированными товарными знаками своих владельцев.
AVC Patent Portfolio License
Данный продукт имеет лицензию AVC Patent Portfolio License для личного и некоммерческого
использования клиентом в целях (i) кодирования видео в соответствии со стандартом AVC
(«видеосодержимое AVC») и/или (ii) декодирования видеосодержимого AVC, закодированного
клиентом в рамках личной и некоммерческой деятельности и/или полученного от поставщика
видеосодержимого, имеющего лицензию на предоставление видеосодержимого AVC. Эта
лицензия не распространяется на любое другое использование, а также не подразумевается для
такого использования. Дополнительную информацию можно получить от MPEG LA, L.L.C.
См. веб-сайт
http://www.mpegla.com
.

Введение
Компоненты фотокамеры и основные возможности
Основные принципы съемки и просмотра
Функции съемки
Функции просмотра
Запись и просмотр видеороликов
Использование GPS
Общие настройки фотокамеры
Раздел «Руководство»
Технические примечания и предметный указатель
i
Введение
Прочитайте эту информацию в первую очередь
Благодарим вас за покупку цифровой фотокамеры Nikon COOLPIX P510.
Перед началом эксплуатации фотокамеры прочитайте информацию раздела «Меры
предосторожности» (
A
vi) и изучите это руководство. Храните это руководство в доступном
Введение
месте и используйте его, чтобы изучить все возможности вашей новой фотокамеры.
Проверка комплектности
При отсутствии любых комплектующих обратитесь в магазин, в котором вы приобрели
фотокамеру.
Цифровая фотокамера
Ремень фотокамеры
Крышка объектива LC-CP24
COOLPIX P510
(со шнуром)
Литий-ионная аккумуляторная
Сетевое зарядное устройство
USB-кабель UC-E6
батарея EN-EL5
EH-69P*
(с защитной крышкой)
Аудио-/видеокабель EG-CP16 ViewNX 2 Installer CD
Reference Manual CD (Компакт-
(Установочный компакт-диск с ПО
диск с подробным руководством
ViewNX 2)
пользователя)
•
Гарантийный талон
* Штекер сетевого блока питания переменного тока входит в комплект, если фотокамера приобретена
в стране или регионе, где требуется штекер сетевого блока питания переменного тока. Форма штекера
сетевого блока питания переменного тока зависит от страны или региона покупки.
ПРИМЕЧАНИЕ.
Карта памяти не входит в комплект фотокамеры.
ii

Прочитайте эту информацию в первую очередь
Об этом руководстве
Если вы хотите воспользоваться фотокамерой прямо сейчас, прочитайте раздел, посвященный
фотосъемке «Основные принципы съемки и просмотра» (
A
17).
Чтобы изучить основные элементы фотокамеры и базовые операции, обратитесь
Введение
к соответствующему разделу «Компоненты фотокамеры и основные возможности» (
A
1).
Прочая информация
•
Символы и правила именования
Для простоты поиска информации в этом руководстве используются следующие символы
и правила именования:
Символ Описание
Этот символ обозначает предупреждения и информацию, которую следует прочитать
B
перед началом работы с фотокамерой.
Этим символом обозначены примечания, с которыми необходимо ознакомиться перед
C
использованием фотокамеры.
Эти символы обозначают другие страницы, на которых приведена значимая
A
/
E
/
F
информация;
E
: Раздел «Руководство»
F
: «Технические примечания и предметный
указатель.»
•
Карты памяти SD, SDHC и SDXC именуются в тексте этого руководства «карты памяти».
•
Настройки на момент покупки далее называются «настройками по умолчанию».
•
Названия пунктов меню, отображаемых на мониторе фотокамеры, а также названия кнопок
и текст сообщений, отображаемых на мониторе компьютера, выделяются жирным шрифтом.
•
Примеры экранов монитора и видоискателя в данном руководстве иногда показаны без
изображений. Это позволяет более четко представить символы.
•
Иллюстрации и образцы индикации на мониторе, приведенные в этом руководстве, могут
отличаться от фактических.
iii

Прочитайте эту информацию в первую очередь
Информация и меры предосторожности
Концепция «постоянного совершенствования»
В рамках развиваемой компанией Nikon концепции постоянного совершенствования пользователям предоставляется
Введение
регулярно обновляемая информация о поддержке выпущенных изделий и учебные материалы на следующих
веб-сайтах.
•
Для пользователей в США:
http://www.nikonusa.com/
•
Для пользователей в Европе и Африке:
http://www.europe-nikon.com/support/
•
Для пользователей в странах Азии, Океании и Ближнего Востока:
http://www.nikon-asia.com/
Посетите один из этих веб-сайтов для получения последних сведений об изделиях, советов, ответов на часто
задаваемые вопросы и общих рекомендаций по фотосъемке и обработке цифровых изображений. Дополнительные
сведения можно получить у региональных представителей компании Nikon. Контактные сведения можно получить на
веб-сайте, указанном ниже:
http://imaging.nikon.com/
Используйте только фирменные электронные принадлежности Nikon
Фотокамеры Nikon COOLPIX отвечают самым современным стандартам и имеют сложную электронную схему. Только
фирменные электронные аксессуары Nikon (включая зарядные устройства для батарей, батареи, сетевое зарядное
устройство и сетевые адаптеры), специально рекомендованные компанией Nikon для использования с этой цифровой
фотокамерой Nikon, разработаны и протестированы в соответствии со специфическими требованиями,
предъявляемыми к ее эксплуатации и безопасности.
ИСПОЛЬЗОВАНИЕ ЭЛЕКТРОННЫХ ПРИНАДЛЕЖНОСТЕЙ ДРУГИХ ПРОИЗВОДИТЕЛЕЙ МОЖЕТ ПРИВЕСТИ
К ПОВРЕЖДЕНИЮ ФОТОКАМЕРЫ И АННУЛИРОВАНИЮ ГАРАНТИИ NIKON.
Использование литий-ионных аккумуляторных батарей, не имеющих голографического клейма Nikon, других
производителей может повредить работе фотокамеры или привести к перегреву, воспламенению, разрушению или
протечке батареи.
Для получения сведений о фирменных принадлежностях Nikon обратитесь к местному официальному торговому
представителю компании Nikon.
Голографическая наклейка:
подтверждает, что
данное устройство является изделием компании Nikon.
Перед съемкой важных событий
Перед съемкой важных событий, например свадьбы, или перед тем как взять фотокамеру в путешествие, сделайте
пробный снимок, чтобы убедиться в правильности работы фотокамеры. Компания Nikon не несет ответственности за
убытки или упущенную выгоду, возникшие в результате неправильной работы изделия.
О руководстве пользователя
•
Никакие разделы документации, входящей в комплект этого изделия, не могут быть воспроизведены, пересланы,
перешифрованы, занесены в поисковую систему или переведены на другой язык, в любой возможной форме
и с применением любых возможных средств, без предварительного письменного разрешения компании Nikon.
•
Компания Nikon не несет ответственности за любой ущерб, обусловленный использованием этого изделия.
•
Компания Nikon оставляет за собой право изменять спецификации оборудования и программного обеспечения,
описанного в документации, в любой момент времени и без предварительного уведомления.
•
Мы приложили все усилия для обеспечения точности и полноты информации, изложенной в документации, и будем
благодарны, если вы сообщите о любых обнаруженных ошибках и пропусках региональному представителю
компании Nikon (адрес прилагается отдельно).
iv

Прочитайте эту информацию в первую очередь
Уведомление о запрещении копирования или воспроизведения
Необходимо помнить, что даже простое обладание материалом, скопированным или воспроизведенным цифровым
способом с помощью сканера, цифровой фотокамеры или другого устройства, может преследоваться по закону.
•
Материалы, копирование или воспроизведение которых запрещено законом
Введение
Не копируйте и не воспроизводите денежные банкноты, монеты, ценные бумаги, государственные ценные бумаги
и ценные бумаги органов местного самоуправления, даже если такие копии и репродукции отмечены штампом
«образец». Запрещено копирование и воспроизведение денежных банкнот, монет и ценных бумаг других государств.
Запрещено копирование и воспроизведение негашеных почтовых марок и почтовых открыток, выпущенных
государством, без письменного разрешения государственных органов.
Запрещено копирование и воспроизведение печатей государственных учреждений и документов, заверенных
в соответствии с законодательством.
•
Предостережения относительно копирования и воспроизведения
Копии и репродукции ценных бумаг, выпущенных частными компаниями (акции, векселя, чеки, подарочные
сертификаты и т. д.), сезонных билетов или купонов помечаются предупреждениями согласно требованиям
государственных органов, кроме минимального числа копий, необходимых для использования компанией в деловых
целях. Не копируйте и не воспроизводите государственные паспорта; лицензии, выпущенные государственными
учреждениями и частными компаниями; удостоверения личности и такие документы, как пропуска или талоны на
питание.
•
Уведомления о соблюдении авторских прав
Копирование или воспроизведение книг, музыкальных произведений, произведений живописи, гравюр,
географических карт, чертежей, фильмов и фотографий с зарегистрированным авторским правом охраняется
государственным и международным законодательством об авторском праве. Не используйте изделие для изготовления
незаконных копий, нарушающих законодательство об авторском праве.
Утилизация устройств хранения данных
Обратите внимание, что при удалении изображений или форматировании устройств хранения данных, таких как карты
памяти или внутренняя память фотокамеры, исходные данные изображений уничтожаются не полностью. В некоторых
случаях файлы, удаленные с отслуживших свой срок устройств хранения данных, можно восстановить с помощью
имеющихся в продаже программных средств. Информацией личного характера могут воспользоваться
злоумышленники. Ответственность за обеспечение конфиденциальности любой подобной информации лежит
исключительно на пользователе.
Прежде чем избавиться от неиспользуемых устройств хранения данных или передать право собственности на них
другому лицу, следует стереть всю информацию с помощью имеющегося в продаже специального программного
обеспечения или отформатировать устройство, а затем заполнить его изображениями, не содержащими личной
информации (например, видами ясного неба). Не забудьте также заменить снимки, выбранные для параметра
Выбрать снимок
внастройках
Экран приветствия
(
A
108). При физическом уничтожении устройств хранения
данных соблюдайте меры предосторожности, чтобы не нанести ущерба здоровью или имуществу.
В моделях COOLPIX P510 данные журнала, сохраненные на карте памяти, обрабатываются так же, как и другие данные.
Несохраненные данные журнала событий можно удалить с карты памяти, выбрав последовательно
Создать журнал
➝
Завершить журнал
➝
Очистить журнал
.
v
Меры предосторожности
Перед началом работы с устройством внимательно изучите следующие меры безопасности во
избежание получения травм и повреждения изделия Nikon. Всем лицам, использующим данное
изделие, следует ознакомиться с инструкциями по безопасности.
Введение
Данным символом отмечены предупреждения и сведения, с которыми необходимо ознакомиться
до начала работы с изделием Nikon во избежание травм.
ПРЕДУПРЕЖДЕНИЯ
В случае неисправности выключите
или пыли может привести к взрыву или
фотокамеру
пожару.
Если вы заметите дым или ощутите необычный
Меры предосторожности при
запах, исходящий от цифровой фотокамеры или
обращении с ремнем фотокамеры
от сетевого зарядного устройства, немедленно
Запрещается надевать ремень фотокамеры на
отключите сетевое зарядное устройство
шею младенца или ребенка.
иизвлеките батарею, соблюдая при этом
осторожность, чтобы не получить ожоги.
Храните в недоступном для детей
Продолжение работы с устройством может
месте
привести к получению травм. После извлечения
Не храните изделия в зоне досягаемости
батареи или отключения источника питания
детей. Иначе это может привести к травмам.
доставьте изделие для проверки в ближайший
Примите особые меры предосторожности во
авторизованный сервисный центр компании
избежание попадания батарей и других
Nikon.
небольших предметов детям в рот.
Не разбирайте фотокамеру
Когда фотокамера, сетевое зарядное
Контакт с внутренними элементами фотокамеры
устройство или сетевой адаптер
или сетевого зарядного устройства может стать
включены или используются,
причиной травмы. Ремонтные работы могут
избегайте длительного физического
выполнять только квалифицированные
контакта с ними.
механики. Если вследствие падения или иной
Детали этих устройств нагреваются, и их
чрезвычайной ситуации целостность
длительный контакт с кожей может привести
фотокамеры или сетевого зарядного устройства
к низкотемпературным ожогам.
нарушится, отключите сетевое питание и/или
Соблюдайте меры предосторожности
извлеките батарею и обратитесь
в авторизованный сервисный центр Nikon.
при обращении с батареей
Нарушение правил обращения с батареей
Не используйте фотокамеру или
может привести к протечке электролита,
сетевое зарядное устройство
перегреву или взрыву. Соблюдайте
в присутствии возгораемых газов.
следующие меры предосторожности при
Использование фотокамеры в присутствии
использовании батареи с данным изделием.
легковоспламеняющихся веществ, таких как
•
Перед заменой батареи выключите
пропан или бензин, а также при наличии
фотокамеру. Если вы используете сетевое
в воздухе легковоспламеняющихся аэрозолей
vi

Меры предосторожности
зарядное устройство / сетевой адаптер,
Соблюдайте следующие правила
обязательно отключите их от сети.
безопасного обращения с сетевым
•
Используйте только литий-ионную
зарядным устройством
аккумуляторную батарею EN-EL5 (входит
•
Не допускайте попадания воды на
Введение
в комплект). Для зарядки батареи вставьте ее
устройство. Несоблюдение этого
в фотокамеру и подключите сетевое
требования может привести к возгоранию
зарядное устройство EH-69P (входит
или поражению электрическим током.
вкомплект).
•
Пыль на металлических частях сетевой вилки
•
При установке батареи в фотокамеру
или вокруг них необходимо удалять
соблюдайте полярность.
с помощью сухой ткани. Продолжение
•
Не разбирайте батарею и не замыкайте ее
работы с устройством может привести
контакты. Запрещается удалять изоляцию
квозгоранию.
или вскрывать корпус батареи.
•
Во время грозы не дотрагивайтесь до
•
Не подвергайте батарею сильному нагреву
разъемов и не приближайтесь к сетевому
или воздействию открытого огня.
зарядному устройству. Несоблюдение этой
•
Не погружайте батареи в воду и не
меры предосторожности может привести
допускайте попадания на них воды.
к поражению электрическим током.
•
Во время перевозки надевайте на батарею
•
Берегите USB-кабель от повреждений, не
защитную крышку. Не храните и не
вносите в него конструктивные изменения,
транспортируйте батареи вместе
не тяните за него с усилием, не сгибайте его
с металлическими предметами, например
и не ставьте на него тяжелые предметы, не
шпильками или украшениями.
подвергайте его воздействию открытого
•
Полностью разряженная батарея может
огня или высоких температур. В случае
протекать. Во избежание повреждения
повреждения изоляции сетевого шнура
изделия извлекайте из него разряженные
и оголения проводов доставьте его для
батареи.
проверки в авторизованный сервисный
•
Немедленно прекратите использовать
центр Nikon. Несоблюдение этого
батарею, если вы заметили в ней какие-
требования может привести к возгоранию
либо изменения, например изменение
или поражению электрическим током.
окраски или деформацию.
•
Не дотрагивайтесь до разъемов и до
•
В случае попадания жидкости, вытекшей из
сетевого зарядного устройства мокрыми
поврежденной батареи, на одежду или
руками. Несоблюдение этой меры
кожу немедленно и тщательно промойте
предосторожности может привести
пораженные участки водой.
к поражению электрическим током.
•
Если жидкость, вытекшая из батареи,
•
Не используйте совместно с дорожными
попала в глаза, немедленно промойте их
трансформаторами или адаптерами,
чистой проточной водой и обратитесь за
предназначенными для преобразования
медицинской помощью.
напряжения, а также с инверторами
•
Не пытайтесь заряжать батареи, которые не
постоянного тока. Нарушение этого
предназначены для этого.
требования может привести
к повреждению изделия или к его
перегреву или загоранию.
vii
Меры предосторожности
Используйте только
Избегайте контакта
соответствующие кабели
с жидкокристаллическим
При подключении кабелей к входным
веществом
Введение
и выходным разъемам и гнездам фотокамеры
Если монитор разбился, необходимо
используйте только специальные кабели
предпринять срочные меры во избежание
Nikon, поставляемые вместе с фотокамерой
травм осколками стекла и предупредить
или продаваемые отдельно.
попадание жидкокристаллического вещества
на кожу, в глаза и в рот.
Соблюдайте осторожность при
обращении с подвижными частями
Отключите питание, если вы
фотокамеры
находитесь в самолете или
вбольнице
Будьте внимательны. Следите за тем, чтобы
Если вы находитесь в самолете, отключите
ваши пальцы и другие предметы не были
питание во время взлета или посадки. Кроме
зажаты крышкой объектива или другими
того, прежде чем сесть в самолет, ВЫКЛЮЧИТЕ
подвижными частями фотокамеры.
функцию записи информации GPS. При
Компакт-диски
использовании фотокамеры в больнице,
Компакт-диски, входящие в комплект этого
следуйте инструкциям, принятым в данной
устройства, не предназначены для
больнице. Электромагнитные волны,
прослушивания на CD-проигрывателях.
излучаемые данной фотокамерой, могут
Воспроизведение компакт-дисков с данными
прерывать работу электронных систем
на аудиороигрывателе может привести
самолетов или медицинских инструментов.
к нарушениям слуха или повреждению
3D-изображения
оборудования.
Не следует непрерывно в течение длительного
Соблюдайте осторожность при
времени просматривать изображения
использовании вспышки
в формате 3D, снятые с помощью этой
Использование вспышки на близком
фотокамеры, на экране телевизора, на
расстоянии 1 м от глаз объекта съемки может
мониторе или на другом дисплее. У детей
вызвать временное ухудшение зрения.
зрительная система окончательно не
Особенную осторожность следует соблюдать
сформирована, поэтому перед просмотром
при фотографировании детей: в этом случае
изображений в формате 3D следует
вспышка должна находиться на расстоянии не
проконсультироваться с педиатром или
менее одного метра от объекта съемки.
офтальмологом и соблюдать их инструкции.
Длительный просмотр изображений в формате
Не используйте вспышку, когда ее
3D может вызвать напряжение органов зрения,
излучатель соприкасается с телом
головокружение и общий дискомфорт.
человека или каким-либо предметом
Прекратите просмотр, если возникнут любые из
Несоблюдение этой меры предосторожности
перечисленных симптомов, и при
может привести к ожогам или пожару.
необходимости обратитесь к врачу.
viii
Уведомления
Уведомление для потребителей в Европе
МЕРЫ ПРЕДОСТОРОЖНОСТИ
СУЩЕСТВУЕТ РИСК ВЗРЫВА, ЕСЛИ
Введение
УСТАНОВЛЕН НЕВЕРНЫЙ ТИП БАТАРЕИ.
УТИЛИЗИРУЙТЕ ИСПОЛЬЗОВАННЫЕ
БАТАРЕИ СОГЛАСНО ИНСТРУКЦИЯМ.
Данный символ означает, что
изделие должно утилизироваться
отдельно.
Следующие замечания касаются
только пользователей
в европейских странах.
•
Данное изделие предназначено для
раздельной утилизации в соответствующих
пунктах утилизации. Не выбрасывайте
изделие вместе с бытовым мусором.
•
Подробные сведения можно получить у
продавца или в местной организации,
ответственной за вторичную переработку
отходов.
Этот символ на батарее указывает
на то, что данная батарея
подлежит раздельной утилизации.
Следующие замечания касаются
только пользователей в европейских странах:
•
Все батареи, независимо от того,
промаркированы ли они этим символом
или нет, подлежат раздельной утилизации
в соответствующих пунктах сбора. Не
выбрасывайте их вместе с бытовыми
отходами.
•
Подробные сведения можно получить у
продавца или в местной организации,
ответственной за вторичную переработку
отходов.
ix

Оглавление
Введение……………………………………………….……………………………………………………….………………….……………………………………… ii
Прочитайте эту информацию в первую очередь ………………..………..………..………..………..………..………..…………..…….. ii
Проверка комплектности…..…………..……………………..……………………..…………..………………..……………………………..……………………..…….. ii
Введение
Об этом руководстве….……………………..……………………..……………………..…………..…………………………..……………………..………………………... iii
Информация и меры предосторожности …………………………..……………………..……………………..……….………….……………………..… iv
Меры предосторожности…………………..………..………..………..………..………..………..………..…………..………..………..………..……. vi
ПРЕДУПРЕЖДЕНИЯ………………………..………………………..……………………..……………………..………………………..…………..……………………..……… vi
Уведомления………….………..………..………..………..………..………..………..………..………..….………….………..………..………..………..……. ix
Компоненты фотокамеры и основные возможности…………………………………………………………………………………… 1
Компоненты фотокамеры…………………..………..………..………..………..………..………..………..………..………..………..………..……….. 2
Корпус фотокамеры…………………………..………………………..……………………..………..…………………………..……………………..……………………..…. 2
Элементы управления, используемые в режиме съемки.…..….….……………………..……………………..…………...…………..……. 4
Элементы управления, используемые в режиме просмотра………...…………..…………..…………..………………….….…………. 5
Изменение угла монитора …………………..…………..……………………..……………………..………………………..…………..……………………..…………. 6
Крепление ремня фотокамеры и установка крышки объектива………………………..………………………..……………………… 7
Монитор…………………………..……………………..………………………..……………………..…….…….…………………..………………………..……………………..……. 8
Основные операции…………………..………..………..………..………..………..………..………..…………..………..………..………..………..….. 11
Переключение из режима съемки в режим просмотра и обратно……………………..…………..……………………..……….. 11
Использование поворотного мультиселектора……………..……………………..………………………..………..………………………..…….. 12
Использование меню (кнопка
d
)……….……………………..………………………..……………………..……………………..……………..……….. 13
Переключение информации на мониторе (кнопка
s
) ………………..…………..……………………..……………………..…….. 15
Включение и выключение монитора (кнопка
x
)….……………………..……………………..……………………..……………………….... 16
Использование видоискателя.…………..…………..……………………..……………………..………………..…………………………..………………………. 16
Основные принципы съемки и просмотра ………………………………..…………………………………………………………..…….. 17
Этап подготовки 1. Установка батареи……..………..………..………..………..………..………..………..…………..………..………..….. 18
Этап подготовки 2. Зарядка батареи…………………..………..………..………..………..………..………..……………..………..……….... 20
Этап подготовки 3. Установка карты памяти……………………..………..………..………..………..………..……………..………..….. 22
Внутренняя память и карты памяти………………..………………………..……………………..…………..…….…..…………..……………………..…….. 23
Рекомендованные карты памяти……………………..……………………..……………………..…………………………..…………..……………………..….. 23
Шаг 1. Включение фотокамеры…………………..………..………..………..………..………..………..…………..………..………..………..….. 24
Включение и выключение фотокамеры………..……………………..……………………..………………………..……………..……………………..….. 25
Настройка отображения языка, даты и времени……….……………………..……………………..………………………..…………………….... 26
Шаг 2. Выбор режима съемки ……………………..………..………..………..………..………..………..……………..………..………..……….... 28
Доступные режимы съемки………………………………..……………………..……………………..…………..…………………………..……………………….... 29
x

Оглавление
Шаг 3. Компоновка кадра………….………..………..……..………..………..………..………..………..…………..………..………..………..…….. 30
Использование зума……..……………………..…………..……………………..……………………..………………………..……………………..…………………….... 31
Шаг 4. Фокусировка и съемка…….………..………..………..………..………..………..………..………..………..………..………..………..….. 32
Шаг 5. Просмотр снимков…………………..………..………..………..………..………..………..……..…………..………..………..………..…….. 34
Введение
Изменение метода отображения снимков……………….………..……………………..………………………..…………………..……………………. 35
Шаг 6. Удаление ненужных снимков……..………..………..………..………..………..………..………..……….…………..………..……….. 36
Функции съемки…………………………………………………………………………………………………..………………………………………..…….. 39
Режим
A
(Авто) …………..………..………..………..………..………..………..………..………..………..…….……………..………..………..……….. 40
Изменение настроек режима
A
(Авто) …………..……………………..………..………………………..……………………..……………………….... 40
Сюжетный режим (съемка в соответствии с сюжетом)……………………..………..………..………..………..………....……….. 41
Изменение настроек сюжетного режима…………………………..……………………..……………………..……..….………..………………………. 42
Характеристики каждого сюжета…..……………………..……………………..…………..……………………..……………………..……………………….... 42
Использование функции смягчения тона кожи ….…………..……………………..……………………..…………....…………….………..…….. 54
Режим «Специальн. эффекты» (применение эффектов в процессе съемки)………..………..…………..………..….. 55
Характеристики каждого специального эффекта……………..…………..……………………..………………………..……………………..….. 55
Изменение настроек режима «Специальн. эффекты»…………………………..………………………..………..………………………………. 56
Режимы
j
,
k
,
l
,
m
(настройка экспозиции для съемки)…….…………..………..…………..………..………..………….... 57
Изменение режимов
j
,
k
,
l
,
m
…………………..………………………..………..………………………..……………………..…………………………. 60
Параметры, доступные в меню съемки….…………..……………………..…………..……………………..……….…..…………..…………………….... 60
M
(режимы пользовательских настроек User Settings)……………….………..…………..………..………..…………….……….. 63
Сохранение настроек в режиме
M
…………………..………………………..………..………………………..……………………..…………………………. 64
Функции, настраиваемые с помощью мультиселектора ………….………..………………..………..………..………..…………. 65
Доступные функции ……………………………..…………..……………………..……………………..…………………..……………………..……………………..…….. 65
Использование вспышки (режимы вспышки)……………………..……………………..……………………..………..………………………………. 66
Использование автоспуска ….………..……………………..………………………..………..………………….….……………………..………………………..….. 69
Таймер улыбки (съемка улыбающихся лиц)………..………..………………………..……………………..……………..……………………..……….. 70
Использование режима фокусировки……….………………………..……………………..……………………..….……..…………..……………………. 72
Регулировка яркости (поправка экспозиции)…..………..……………………..……………………..………….…....……………………..……….. 74
Список настроек по умолчанию……….…………..……………………..……………………..……………………………..…………..……………………..….. 75
Изменение качества и размера изображения…………………..………..………..………..………..………..……….…….………..….. 77
Доступное качество изображения…………..………..………………………..………..……………………..…………………………..…………………….... 77
Доступный размер изображения…..…………..……………………..……………………..……………………….….…………..……………………..……….. 78
xi

Оглавление
Функции, которые нельзя использовать одновременно ……….………..………..………..………..………..………....……….. 80
Диапазон управления выдержкой (режимы
j
,
k
,
l
,
m
)………..……………………..……………………..……………………..….. 83
Фокусировка на объекте…………..………..………..………..………..………..………..………..………..…………..………..………..………..….. 84
Использование функции «АФ с обнаруж. объекта«……………..………..………………………..……………………..……………………….... 84
Введение
Использование функции распознавания лиц……………………..……………………..…………..…………………..………………………..…….. 85
Блокировка фокусировки………….……………………..……………………..……………………..………………..……………………..………………………..….. 86
Функции просмотра ………………………………………….…………………………………………………….………………………………………….. 87
Функции, доступные в режиме просмотра (меню просмотра) …….………..………..………..………..………..………...…. 88
Подключение фотокамеры к телевизору, ПК или принтеру……………………..………..………..………..………..…………. 90
Использование программы ViewNX 2………….………..………..………..………..………..………..………..…………..………..……….... 91
Установка программы ViewNX 2 ……….………..………………………..……………………..…………………..………………………..…………………….... 91
Передача снимков на компьютер………….………..………………………..……………………..…………………………..…………..…………………….... 93
Просмотр снимков…………………………..………………………..……………………..…………..……….……..………..………………………..…………………….... 94
Запись и просмотр видеороликов ………………..…………………………………………………………………………..……………………. 95
Запись видеороликов…………………..………..………..………..………..………..………..………..…………..………..………..………..……….... 96
Изменение настроек видеосъемки (меню видео)…….……………………..……………………..………………………..…………………….... 99
Просмотр видеороликов…………….………..………..………..………..………..………..………..………..…………..………..………..……….. 100
Использование GPS………………………………………………………………………….……………………………………………………………….. 101
Включение записи данных GPS……………………..………..………..………..………..………..………..……..……..………..………..……… 102
Изменение настроек GPS (меню параметров GPS)……………..………..………..………..………..………..………..…………..… 105
Общие настройки фотокамеры………………………………………………………………………………………..…………………………….. 107
Меню настройки ………..………..………..………..………..………..………..………..………..………..…………….………..………..………..……… 108
xii

Оглавление
Раздел «Руководство»……………………………………………………………………….…………………….……………………………………..
E
1
Фотосъемка с ручной фокусировкой……..………..………..………..………..………..………..………..………..………………..……
E
2
Использование режима «Простая панорама» (съемка и просмотр)……………….………..…………..………..……
E
3
Фотосъемка в режиме «Простая панорама»…….…………..……………………..……………………..……………..………………………….
E
3
Введение
Просмотр простой панорамы (прокрутка)……………………..……………………..……………………..……………………..……………….
E
5
Использование режима «Съемка панорамы«…………..………..………..………..………..………..………..……………..………
E
6
Использование 3D-фотосъемки………………………..………..………..………..………..………..………..…..………………..………...
E
8
Режимы
j
,
k
,
l
,
m
………………..………..………..………..………..………..………..………..………..………..…………..………..…….
E
10
j
(Програм. авто. режим),
k
(Авто с приор. выдерж.) или
l
(Авто с приор. диафраг.)..…………..
E
10
Режим
m
(Ручной)…………………………..……………………..………………………..……………………..…..……………………………..…………………..
E
11
Просмотр и удаление снимков, сделанных в режиме непрерывной
съемки (последовательности)……………..………..………..………..………..………..………..………..…………….………..………....
E
13
Просмотр снимков в последовательности…………………………..…………..……………………..……………….….……………………..
E
13
Удаление снимков в последовательности….………………………..……………………..……………………..…………..…………………..
E
14
Редактирование снимков………………………..………..………..………..………..………..………..………..………..………..………..….
E
15
Функции редактирования .………..………………………..……………………..……………………..………………………..…………..…………………..
E
15
k
Быстрая обработка: повышение контраста и насыщенности…………………………..………..……………………..
E
17
I
D-Lighting: повышение яркости и контраста..………..……………………..………………………..……………….….……………..
E
17
e
Смягчение тона кожи: смягчение оттенков кожи…………..…………..……………………..……………………..……………..
E
18
p
Эфф. фильтров: применение эффектов цифрового фильтра………..…………..……………………..…………………..
E
19
g
Уменьшить снимок: уменьшение размера изображения………..……………………..……………………..……………..
E
20
j
Черная рамка: добавление черной рамки вокруг изображения……………………..………..……………………..
E
21
a
Кадрирование: создание кадрированной копии……….…………..……………………..……………………..…………………..
E
22
Подключение фотокамеры к телевизору (для просмотра снимков)…….………..………..………..………..…….
E
23
Подключение фотокамеры к принтеру (прямая печать) ……..………..………..………..………..………..………..…....
E
25
Подключение фотокамеры к принтеру …..……………………..………………………..……………………..………………………..…………..
E
26
Печать отдельных снимков……….……………………..……………………..……………………..…………………..……………………..………………..
E
27
Печать нескольких снимков……….……………………..……………………..……………………..…………...…………..………..……………………..
E
28
Редактирование видеороликов ……….………..………..………..………..………..………..………..………....…………………..…….
E
31
Сохранение фрагментов видеоролика………………………………..………………………..……………………...………….…………………..
E
31
Сохранение кадра видеоролика в качестве снимка ….………………………..……………………..…………..……………………..
E
32
xiii

Оглавление
Меню съемки (режим
j
,
k
,
l
или
m
)…………….………..………..………..………..………..………..………..………..……….
E
33
Качество и размер изображения ……..…………..……………………..……………………..…………………….….…………..……………………..
E
33
Picture Control (COOLPIX Picture Control).………..……………………..…………..……………………..……..…….…………..………………..
E
33
Польз. Picture Control (пользовательский COOLPIX Picture Control)…..…………..……………………..……………..…
E
37
Введение
Баланс белого (настройка оттенка)……………..……………………..……………………..…………………….….…………..……………………..
E
38
Замер экспозиции………….……………………..…………..……………………..……………………..……………………..………………………..……………..
E
40
Непрерывная съемка…………………..……………………..………………………..……………………..…..…….…………..…………..……………………..
E
41
Чувствительность ………..………………………..……………………..…………..……………………..……………………..……………………..………………..
E
45
Брекет. экспозиции ….……………………..……………………..………………………..……………………..……………………..…………..…………………..
E
46
Режим зоны АФ…………..………………………..……………………..……………………..…………..…..…….……………………..…………..…………………..
E
47
Режим автофокуса…….……………………..………………………..……………………..…………..……………………..……………………..…………………..
E
51
Попр. мощн. вспышки..………………………..……………………..…………..……………………..………...…………..……………………..………………..
E
52
Фильтр понижен. шума..………………………..………..……………………..………………………..……….…..…………..……………………..…………..
E
52
Активный D-Lighting..……………………..……………………..………………………..…………………….….…………..……………………..………………..
E
53
Сохранение и сброс пользовательских настроек (user settings) ……..…………..……………………..………………..…
E
53
Память зума……..…………..……………………..……………………..………………………..………….……….………………………..………..……………………..
E
54
Начальное полож. зума……………..…………..…………..……………………..……………………..……………………..………………………..…………..
E
54
Меню просмотра………..………..………..………..………..………..………..………..………..………..…………..………..………..………..….
E
55
a
Задание печати (формирование задания печати DPOF)..…………..……………………..…………..………………….….
E
55
b
Показ слайдов..…………..……………………..…………..……………………..……………………..………………..……………………..…………………..
E
57
d
Защита……………………..……………………..……………………..……………………..…………..………………………..……………………..………………..
E
58
Экран выбора изображений………….……………………..……………………..…………..…………………………..……………………..……………..
E
59
f
Повернуть снимок.………………………..……………………..……………………..…………..……………………..……………………..………………..
E
60
E
Звуковая заметка………….…………..……………………..……………………..………………………....………….…………..…………..…………………..
E
61
h
Копирование (копирование файлов из внутренней памяти на карту памяти и обратно)…..
E
62
C
Свойства отображаемой последовательности…….……………………..……………………..……………………….……….…..
E
63
x
Выбрать основн. снимок…….……………………..………………………..……………………..……………..…………………..……………………..
E
63
Меню видео………….………..………..………..………..………..………..………..………..………..…..……..………..………..………..………....
E
64
Параметры видео….………..………………………..………..……………………..………………………....………….…………..……………………..…………..
E
64
Видеозапись в замедленном и ускоренном режиме (видео HS) …………………………..…………………..……………..
E
66
Режим автофокуса…….……………………..………………………..……………………..…………..……………………..……………………..…………………..
E
68
xiv

Оглавление
Меню настройки GPS ……….………..………..………..………..………..………..………..………..………..…………..………..………..…….
E
69
Настройки GPS…….…………..……………………..…………..……………………..……………………...……………..………..………………………..…………..
E
69
Функция (Create Log) «Создать журнал» (запись хронологических данных о перемещении)…….
E
71
Просмотреть журнал………….…………..……………………..……………………..……………………..….……..…………..…………..……………………..
E
73
Введение
Меню настройки ………..………..………..………..………..………..………..………..………..………..…………….………..………..………....
E
74
Экран приветствия ………..………………………..………..………………………..……………………..….…………..…………..………..……………………..
E
74
Часовой пояс и дата……………………..……………………..………………………..……………………....………….…………..………..……………………..
E
75
Настройки монитора….……………………..……………………..………………………..………..………….…..…………..……………………..……………..
E
78
Печать даты (впечатывание даты и времени на снимках)………..…………..…………..………………………..……..…………
E
79
Подавл. вибраций………..……………………..……………………..……………………..…………..……..……….…………..……………………..……………..
E
80
Обнаруж. движения….……………………..……………………..………………………..…………………….…….………..……………………..………………..
E
81
АФ-помощь………………………..………………………..………..……………………..………………………..……………………..……………………..……………..
E
82
Цифровой зум……………..………………………..……………………..……………………..…………..……………………..……………………..…………………..
E
82
Назначение функции боковому рычажку зуммирования………..………..……………………..…………..……………..…..….
E
83
Настройка звука….………..………………………..……………………..……………………..…………....……….………..………………………..………………..
E
84
Авто выкл.………………………..……………………..……………………..………………………..…….….……………………..………………………..………………..
E
84
Форматирование памяти/карты памяти.………..……………………..…………..……………………..…………………………..……………..
E
85
Язык/Language….…………..……………………..………………………..……………………..………..……………………..……………………..…………………..
E
85
Настройки ТВ…………….……………………..……………………..………………………..…………………..……………………..……………………..……………..
E
86
Кнопка Fn ……….……………………..…………..……………………..……………………..…………….……………….………..……………………..…………………..
E
87
Зарядка от ПК…….…………..……………………..………………………..……………………..………...…………..………..………………………..………………..
E
88
Перекл. управ. «Av/Tv»…………..………..……………………..………………………..……………………..…………..……………………..…………………..
E
90
Сброс нум. файлов …………………………..……………………..………………………..…………………..……………..……………………..…………………..
E
90
Предуп. о закр. глаз………….…………..……………………..……………………..……………………..………………..……………………..…………………..
E
91
Полоса изображений……………………………..…………..……………………..……………………..……..………………………………..…………………..
E
92
Загрузка Eye-Fi……..…………..……………………..……………………..…………..………………………………..…………..……………………..………………..
E
93
Инвертировать индик-ры…..…………..……………………..……………………..…………..………………..……………………………..………………..
E
94
Сброс всех знач…..…………..……………………..…………..……………………..……………………...……………..…………..…………..……………………..
E
94
Версия прошивки …..………………………..……………………..……………………..……………………..……………………..…………..……………………..
E
97
Имена файлов и папок ……………………..………..………..………..………..………..………..………..…..………………..………..……….
E
98
Дополнительные принадлежности…….………..………..………..………..………..………..………..………..…………..………...
E
100
Сообщения об ошибках………..………..………..………..………..………..………..………..………..……..…..………..………..……….
E
101
xv

Оглавление
Технические примечания и предметный указатель ……………………………….……………………………………….……..
F
1
Уход за изделиями ……………………..………..………..………..………..………..………..………..…….…….………..………..………..………..
F
2
Фотокамера..……………………..……………………..…………..……………………..…………………..…………………………..………………………..……………….
F
2
Введение
Батарея………………………………..……………………..…………..……………………..………………………..……………………..……………………..………………….
F
3
Сетевое зарядное устройство…………………………..……………………..……………………..…………….……….…………..……………………..…..
F
4
Карты памяти…………..………..………………………..………..……………………..…………………………..……………………..…………..……………………..…..
F
5
Уход за фотокамерой……….………..………..………..………..………..………..………..………..……….…….………..………..………..……..
F
6
Чистка.…………..……………………..……………………..…………..……………………..………………………..……………………..……………………..………………….
F
6
Хранение………..…………..……………………..……………………..……………………..…………….……………….…………..……………………..…………………….
F
6
Поиск и устранение неисправностей ..………..………..………..………..………..………..………..………..…..……………..………..
F
7
Технические характеристики .………..………..………..………..………..………..………..………..………...………….………..………...
F
15
Поддерживаемые стандарты.…………..……………..………………………..………………………..…………..……………………..…………………….
F
18
Алфавитный указатель………………………..………..………..………..………..………..………..………...……….………..………..………...
F
19
xvi

Компоненты фотокамеры
и основные возможности
Компоненты фотокамеры и основные возможности
В этой главе содержится информация о компонентах фотокамеры, основных функциях каждого из
них и основных возможностях фотокамеры.
Компоненты фотокамеры………………………………………………..2
Корпус фотокамеры…………….………..……………………………………………………….………..……..…...2
Элементы управления, используемые в режиме съемки ..………..……….………..…….4
Элементы управления, используемые в режиме просмотра..…………………………..5
Изменение угла монитора……….………..……….………..……….……………………………………..…….6
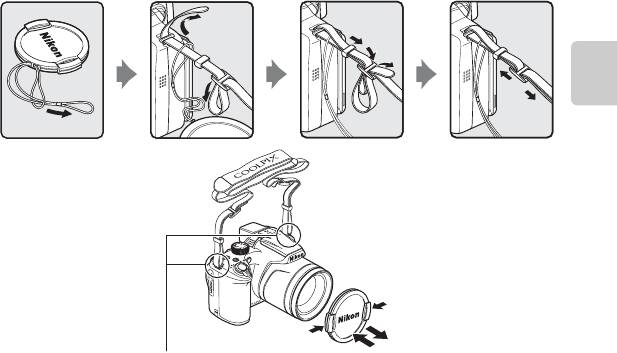
Крепление ремня фотокамеры и установка крышки объектива …..……….………..7
Монитор…………………….………..……………………………………………………….………..……………..………..8
Основные операции……………………………………………………….11
Переключение из режима съемки в режим просмотра и обратно.……………… 11
Использование поворотного мультиселектора…………….………………………………….. 12
Использование меню (кнопка
d
) ……………………………………………………………………. 13
Переключение информации на мониторе (кнопка
s
)………….………..……….. 15
Включение и выключение монитора (кнопка
x
)…….……….……………………………. 16
Использование видоискателя ………….…………………………………….………..……….………..…. 16
Если вы хотите как можно быстрее приступить к работе с фотокамерой, ознакомьтесь
сразделом «Основные принципы съемки и просмотра» (
A
17).
1
Компоненты фотокамеры и основные возможности
Компоненты фотокамеры
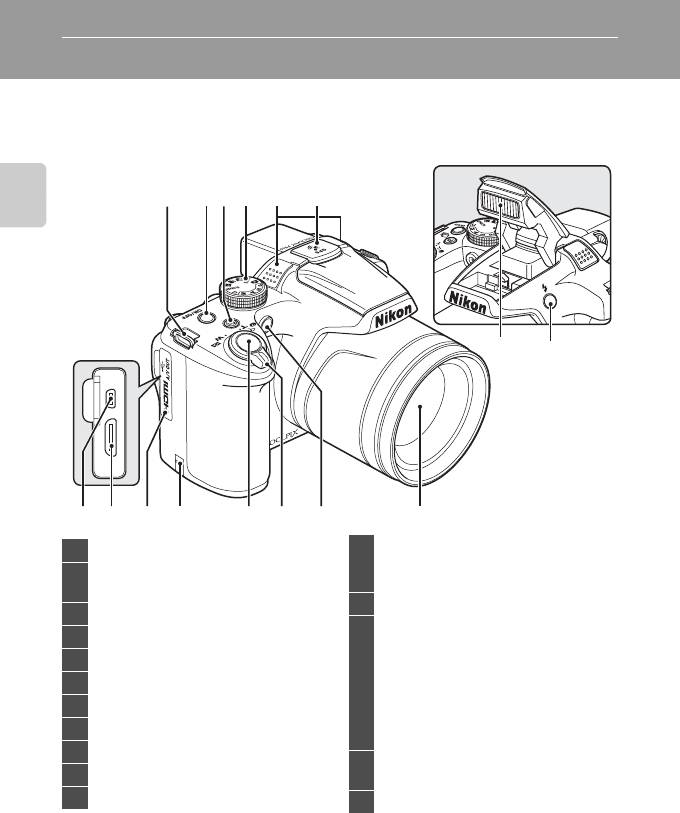
Корпус фотокамеры
Вспышка в поднятом
состоянии
21 4
3
5 6
Компоненты фотокамеры и основные возможности
78
13
14 15 161110912
Крышка разъема питания (для подключения
1
Проушина для ремня фотокамеры…….………..…….7
12
с помощью отдельно поставляемого сетевого
Выключатель питания/индикатор
2
блока питания)
…………….………………………E
100
включения питания
……………………………..………. 25
13
Спусковая кнопка затвора………………..…………….4, 32
3
Кнопка
w
(FUNC)…..………..………………………..……..110
Рычажок зуммирования………………..……………………...31
4
Диск выбора режимов…………………..…………..…………. 28
f
: уменьшение зума…….………..…………………31
5
Микрофон (стереофонический)………………. 88, 96
g
: увеличение зума …..…………..…………………31
h
: просмотр уменьшенных
6
GPS-антенна…………………..………..………………………..……..103
14
изображений………………..……………………...35
7
Вспышка…………………………..………..………………………..………. 66
i
: увеличение/уменьшение при
просмотре…………………………..…………………35
8
Кнопка
m
(открытие вспышки)…………………..……. 66
j
: справка………..……………………..……………………41
9
USB-/аудио-/видеоразъем…..………………………. 20, 90
Индикатор автоспуска………………………..…………………69
15
10
HDMI mini (тип С)…………………………..……………………..…. 90
Вспомогательная подсветка АФ………….………...109
11
Крышка разъема………………..…………..…………………. 20, 90
16
Объектив
2
Компоненты фотокамеры
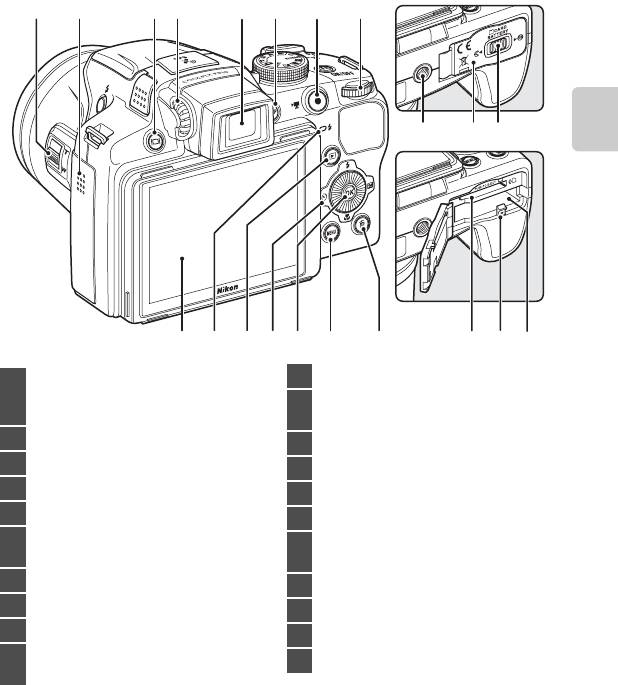
2 4 5 876
31
16 17 18
Компоненты фотокамеры и основные возможности
911
10 1312 14 15
19 20 21
11
Кнопка
c
(просмотр)…………..………..…………….11, 34
Боковой рычажок зуммирования……………..…..109
1
f
: уменьшение зума…..……………………..……. 31
Поворотный мультиселектор
12
g
: увеличение зума….……………………..………. 31
(мультиселектор) …….…………..……………………..………..….12
2
Динамик………………..……………………..……………88, 100, 109
13
Кнопка
k
(сделать выбор) ………..……………………...12
3
Кнопка
x
(монитор) …..………..……………………..……. 16
14
Кнопка
d
(меню)…..………………………..…………………13
4
Регулятор диоптрийной настройки…..………….. 16
15
Кнопка
l
(удалить)………………………..…………….36, 100
5
Электронный видоискатель….………………………..…. 16
16
Штативное гнездо
Кнопка
s
(отображение информации на
Крышка батарейного отсека/гнезда для
6
17
экране)………………………..……………………..……………………..…. 15
карты памяти……..…………..……………………..…………….18, 22
7
Кнопка
b
(видеосъемка
e
)…………..…11, 34, 96
18
Защелка крышки…………..………………………..………….18, 22
8
Диск управления………………………..……………………..……. 57
19
Гнездо для карты памяти…….………..………………………22
9
Монитор………..…………..……………………..……………………. 8, 28
20
Защелка батареи……….……………………..……………….18, 19
Индикатор зарядки.……………………..…………20,
E
89
21
Батарейный отсек………..……………………..……………………18
10
Индикатор вспышки…..…………..……………………..………. 66
3
Компоненты фотокамеры
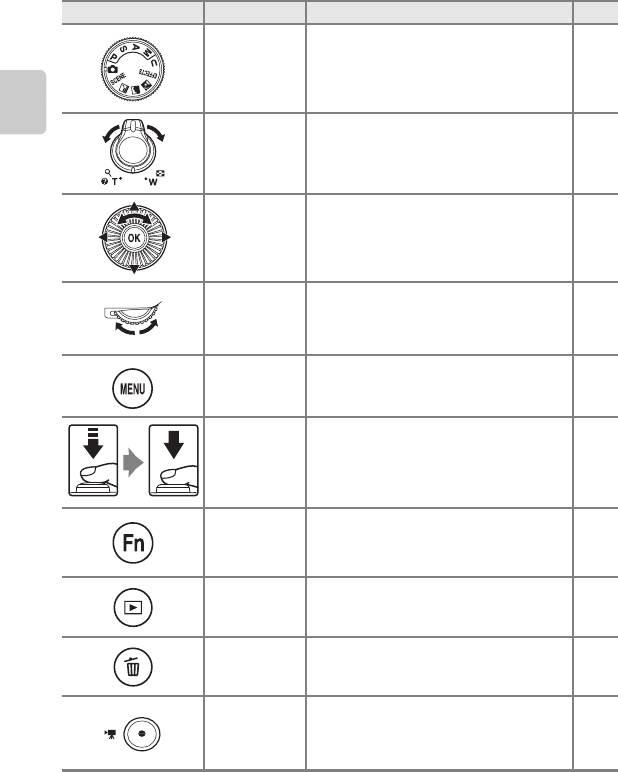
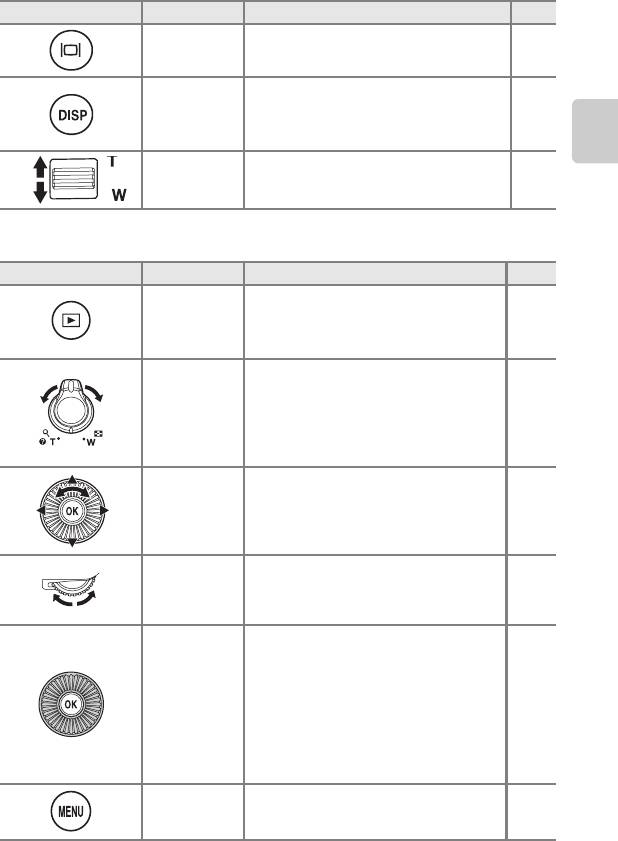
Элементы управления, используемые в режиме съемки
Элемент управления Название Основная функция
A
Диск выбора
Изменение режима съемки. 28
режимов
Для увеличения поверните этот рычажок
Компоненты фотокамеры и основные возможности
Рычажок
в положение
g
(
i
) (телескопическое положение
31
зуммирования
объектива), для уменьшения — в положение
f
(
h
) (широкоугольное положение).
Поворотный
Дополнительные сведения см. в разделе
12
мультиселектор
«Использование поворотного мультиселектора».
57,
Настройка гибкой программы (в режиме съемки
j
)
Диск управления
59,
или выдержки (в режимах съемки
k
и
m
).
110
Кнопка
d
Отображение и скрытие меню. 13
(меню)
При нажатии наполовину (т.е. до тех пор, пока не
почувствуется легкое сопротивление): установка
Спусковая кнопка
фокусировки и экспозиции.
32
затвора
При нажатии до конца (т.е. до упора): спуск
затвора.
Кнопка
w
Отображение меню настройки предварительно
110
(FUNC)
назначенной функции.
Кнопка
11,
Просмотр снимков.
просмотра
34
Кнопка удаления Удаление последнего сохраненного изображения. 36
Кнопка
b
(кнопка
Начало и прекращение видеосъемки. 96
видеосъемки
e
)
4
Компоненты фотокамеры
Элемент управления Название Основная функция
A
Кнопка
x
Включение и выключение монитора. 16
(монитор)
Кнопка
s
(отображение
Включение отображения соответствующей
15
информации на
информации на мониторе.
экране)
Боковой рычажок
Использование функции, назначенной в меню
Компоненты фотокамеры и основные возможности
109
зуммирования
Боковой рычажок зум.
.
Элементы управления, используемые в режиме просмотра
Элемент управления Название Основная функция
A
•
Когда фотокамера выключена, при нажатии
25
Кнопка
и удержании этой кнопки она включается
просмотра
в режиме просмотра.
•
Возврат в режим съемки.
11
•
Увеличение изображения при повороте
35
в положение
g
(
i
); отображение
Рычажок
уменьшенных изображений или календаря при
зуммирования
повороте в положение
f
(
h
).
•
Регулировка громкости звуковых заметок
88,
и просмотра видеороликов.
100
Поворотный
Дополнительные сведения см. в разделе
12
мультиселектор
«Использование поворотного мультиселектора».
Диск управления Регулировка увеличения размера изображения. 35
•
Отображение отдельных снимков
E
13
в последовательности в режиме
полнокадрового просмотра.
•
Прокрутка изображения, сделанного в режиме
E
3
Кнопка «Сделать
«Простая панорама».
выбор»
•
Просмотр видеороликов.
100
•
Переключение из режима просмотра
12
уменьшенных или увеличенных снимков
в режим полнокадрового просмотра.
Кнопка
d
Отображение и скрытие меню. 13
(меню)
5
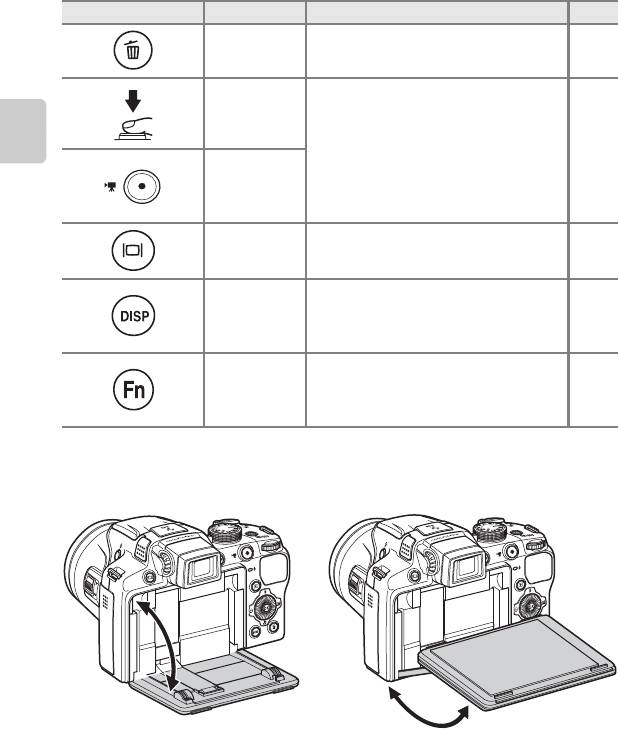
Компоненты фотокамеры
Элемент управления Название Основная функция
A
Кнопка удаления Удаление снимков. 36
Спусковая кнопка
затвора
Возврат в режим съемки. –
Кнопка
b
Компоненты фотокамеры и основные возможности
(кнопка
видеосъемки
e
)
Кнопка
x
Включение и выключение монитора. 16
(монитор)
Кнопка
s
(отображение
Включение отображения соответствующей
15
информации на
информации на мониторе.
экране)
Отображение информации о месте съемки
Кнопка
w
изображения во время записи журнала (широты,
E
73
(FUNC)
долготы и текущего местоположения на
отслеживаемом маршруте для создания журнала).
Изменение угла монитора
Монитор можно опустить до угла наклона 82° или поднять до 90°. Это удобно для съемки в тех
случаях, когда фотокамера поднята над головой или опущена вниз.
B
Монитор. Примечания
•
Не прилагайте чрезмерные усилия при изменении угла монитора.
•
Монитор нельзя перевести в горизонтальное положение.
•
При съемке в обычных условиях устанавливайте монитор в исходное положение.
6
Компоненты фотокамеры
Крепление ремня фотокамеры и установка крышки объектива
Прикрепите крышку объектива к ремню, а затем прикрепите ремень фотокамеры.
Компоненты фотокамеры и основные возможности
Прикрепите ремень в двух местах.
B
Крышка объектива
•
Перед съемкой снимите крышку объектива.
•
Когда съемка не производится, например при выключенном питании, или когда вы переносите фотокамеру,
закрывайте объектив крышкой для его защиты.
•
Не прикрепляйте к крышке объектива никакие другие предметы, кроме объектива.
7
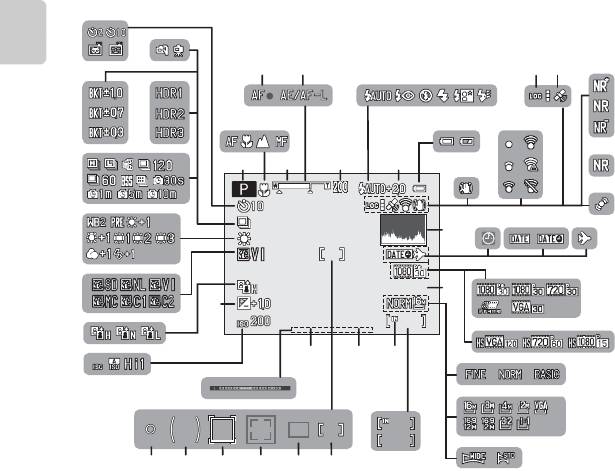
Компоненты фотокамеры
Монитор
•
Информация, отображаемая на мониторе во время съемки и просмотра, зависит от настроек
и использования фотокамеры. Чтобы отобразить или скрыть информацию, отображаемую на
мониторе (
A
15), нажмите кнопку
s
(отображение информации на экране).
Режим съемки
Компоненты фотокамеры и основные возможности
1/250
8
1/2 5 0
F5.6
F5.6
29m 0s
F5.61/250
29m 0s
11
29m 0s
999
999
9999
9999
12 13
14
7
2
9
15
1
3
6
10
16
18
19
17
20
23
39
999
2936 28
37
999
9999
303132333435
27
999
47
46
45
45
44
43
8
42
41
21
999
22
40
38
24
25
26

Компоненты фотокамеры
1
Режим съемки ..…………..…………..……………………..…..28, 29
29
Значение диафрагмы…….………………………..…………….. 57
2
Режим фокусировки……..…………..……………………..…….73
Зона фокусировки
30
3
Индикатор зума…………….………..………………………..……….31
(ручной режим, по центру)..………...32,
49
,
50
,
61
4
Индикатор фокусировки……………………………..……….32
Зона фокусировки (авто, АФ
5
Индикатор AE/AF-L (АЭ/АФ-Б)…………………….
E
7
31
с обнаружением объекта)..……………………..………..… 61
6
Память зума…..………..………………………..……………………..….62
Зона фокусировки (распознавание лиц,
7
Flash mode………….………..…………..……………………..………….67
32
распознавание питомцев)…….………..52, 61, 70, 85
8
Попр. мощн. вспышки………..…………..……………………...61
33
Зона фокусировки (ведение объекта)………….. 61
9
Индикатор уровня заряда батареи ……..………….24
Компоненты фотокамеры и основные возможности
34
Зона центровзвешенного замера
……..……….…61
10
Подавл. вибраций (символ)……………………..……….108
35
Зона точечного замера
……..……….……..…………….61
11
Индикатор связи Eye-Fi …….………..…….. 111,
E
93
36
Выдержка……………….…………..……………………..…………………57
12
Отображение журнала…..………..………………………...105
Прием GPS-сигнала……….………..……………………..…….104
37
Индикатор экспозиции
……..……….……..…………….59
13
14
Фильтр понижен. шума
……..……….……………..…….62
38
Чувствительность…………..……………………..………….30, 61
15
Серия с пониж. шума
…….……….……………..……….…43
39
Величина коррекции экспозиции………………….. 74
16
Символ обнаружения движения……………..…….109
40
Активный D-Lighting..……………………..…………………….. 62
17
Просм./закр. гист...……………………..…………………. 74, 108
41
COOLPIX Picture Control
……..……….………………….. 60
18
Индикатор «Дата не установлена»…………. 27, 108
42
Баланс белого
……..………..……..……..……….…………….60
19
Печать даты………..…………..………..………………………..…….108
43
Режим непрерывной съемки
……..………..….52,
61
20
Пункт назначения (индикатор)….…………..……….108
44
Освещение сзади (HDR)
……..……….………………….. 44
Параметры видео (видеоролики со
45
Брекетинг экспозиции
……..……….……….………..…. 61
21
стандартной скоростью)…………………………..………….99
46
С рук/Со штатива
…….………..……..……..………....42
,
47
22
Параметры видео (видеоролики HS)……….…….99
Автоспуск….……………………..……………………..………………….. 69
23
Длина видеоролика…………………..…………………….96, 98
47
Таймер улыбки
……..………..……..……..………..……..…..70
24
Качество изображ. ………………..……………………..………….77
Автосп. для пор. пит.
……………….……..………………..52
25
Размер изображения…………..……………………..………….78
26
Простая панорама
……..……….……..……………….…….51
27
Число оставшихся кадров (снимков) ….…..24, 79
28
Индикатор внутренней памяти…………………..…….24
9
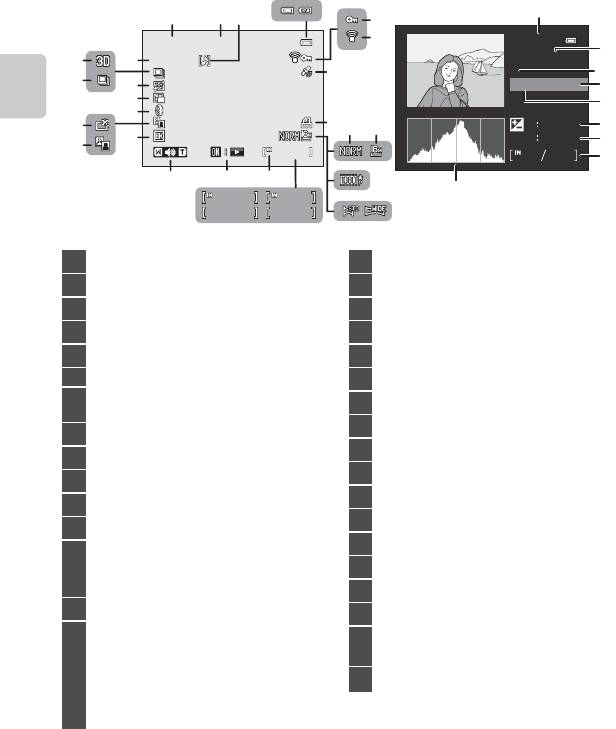
Компоненты фотокамеры
Режим просмотра
Компоненты фотокамеры и основные возможности
999/ 999
1
Символ
j
отображается, если выбран режим съемки
A
,
y
,
j
,
c
,
W
,
u
или
j
.
2
Гистограмма — это график распределения тонов на снимке. По горизонтальной оси показана яркость пикселей;
более темные тона находятся слева, а более светлые — справа. По вертикальной оси показано число пикселей.
10
999/ 999
9999.JP
9999.JPG
12:00
9999.JPG
12:00
12:0015/05/2012
15/05/2012
15/05/2012
999/ 999
1m 0s
1m 0s
9999/9999
99 9 9 / 9 999
999/ 999
99 9 / 9 99
1m 0s
9999/9999
1m 0s
Полнокадровый просмотр (
A
15) Съемочная информация (
A
15)
4
26
12
3
5
6
100NIKON
25
25
0004.JPG
24
P
27
7
23
22
1/250 F5.6
28
21
29
20
8
19
+1.0
30
9 10
17
ISO
200
31
18
1324
32
14 131516
11
33
999/ 999
1m 0s
1m 0s
12
a
b
1
Дата записи………………..………………………..……………………...26
16
Индикатор громкости…..……………………..……… 88, 100
2
Время записи ……………………………..……………………..……….26
17
Индикатор черной рамки..…………..……………………..88
3
Индикатор звуковой заметки……..……………………...88
18
D-Lighting (символ)…………..………………………..………..…88
4
Индикатор уровня заряда батареи….…………..….24
19
Индикатор быстрой обработки.…………..………..…88
5
Символ защиты…..……………………..……………………..……….88
20
Индикатор эффектов фильтров………………………..88
6
Индикатор связи Eye-Fi……..………..……..111,
E
93
21
Уменьшить снимок………………………………… 88,
E
22
Индикатор записанной информации GPS
Индикатор смягчения тона кожи…………………..…88
7
22
………..………..………………………..……………………..…………..……….104
23
Отображение последовательности..…....
E
13
8
Символ задания печати….………..………………………..….88
24
Индикатор 3D-снимка…………..…………..…………………..53
9
Качество изображ.………….………..……………………..……….77
25
Номер и тип файла……………………………..…………
E
98
10
Размер изображения….…………..……………………..……….78
26
Имя папки …………………………..……………………..………
E
98
11
Параметры видео……………………..……………………….96, 99
1
27
Режим съемки
……….………..………………………..……………..29
12
Индикатор режима «Простая панорама»…..….51
28
Значение диафрагмы……….……………………..…………..…32
(a) Номер текущего кадра/
13
общее число кадров…….………………………..……….34
29
Выдержка………..……………………..……………………..…………..…32
(b) Длина видеоролика..………..……………………..…….100
30
Величина коррекции экспозиции…..……………….74
14
Индикатор внутренней памяти ……………..………….34
31
Чувствительность…….…………..……………………..………..…61
Указатель воспроизведения простой
Номер текущего кадра/общее число
панорамы……….…………..……………………..………………….
E
5
32
кадров…….…………..……………………..……………………..…………..34
Указатель воспроизведения
15
2
последовательности……..…………..………………….
E
13
33
Гистограмма
Индикатор воспроизведения
видеоролика………………..……………………..…………..……….100
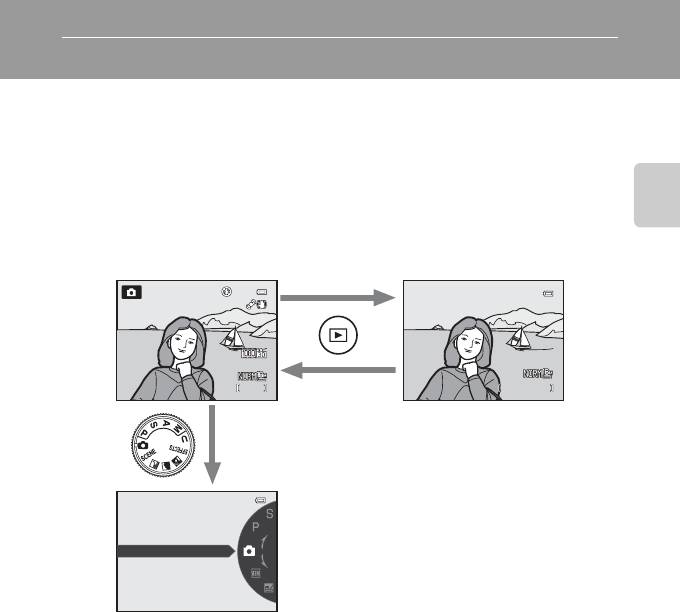
Основные операции
Переключение из режима съемки в режим просмотра и обратно
У фотокамеры два рабочих режима: режим съемки, предназначенный для создания снимков,
и режим просмотра, предназначенный для просмотра снимков.
Чтобы переключиться из одного режима в другой, нажмите кнопку
c
(просмотр).
•
Из режима просмотра в режим съемки также можно переключиться, нажав спусковую кнопку
затвора или кнопку
b
(кнопку видеосъемки
e
).
Компоненты фотокамеры и основные возможности
•
Вращая диск выбора режимов, совместите символ с отметкой, чтобы выбрать
соответствующий режим съемки (
A
28, 29).
11
4/ 132
0004.JPG
4/ 132
0004.JPG
15:30
0004.JPG
15:30
15/05/2012
15:30
15/05/2012
15/05/2012
1/250
1/250
1/250 F5.6
F5.6
F5.6
840
840
25m 0s
25m 0s
Режим съемки Режим просмотра
25m 0s
840
Авто режим
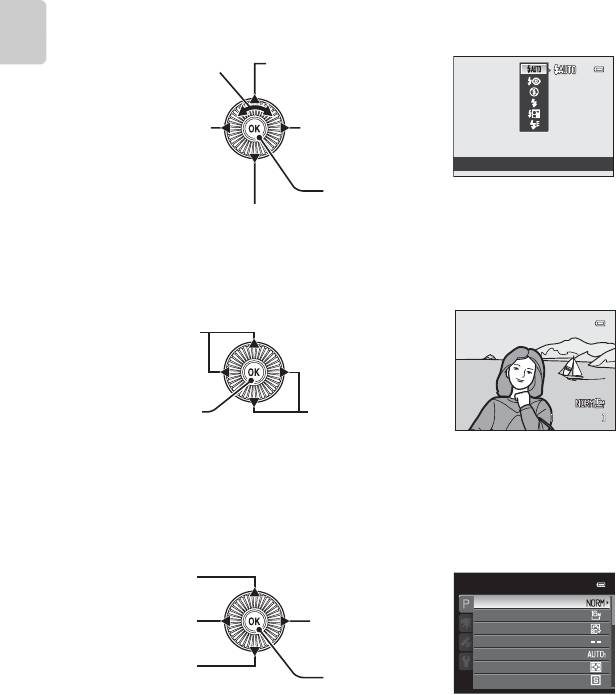
Основные операции
Использование поворотного мультиселектора
Для применения поворотного мультиселектора его можно вращать, нажимать стрелки вверх (
H
),
вниз (
I
), влево (
J
) и вправо (
K
), а также кнопку
k
.
•
В этом руководстве «поворотный мультиселектор» также называется «мультиселектором».
В режиме съемки
Поворачивайте для настройки
Отображение меню
m
(режим
Компоненты фотокамеры и основные возможности
значения диафрагмы*/
вспышки) (
A
66)
выбора пункта
Отображение шкалы
o
Отображение меню
n
(поправка экспозиции)
(автоспуск/таймер улыбки)
(
A
74)
(
A
69, 70)
Авто
Сделать выбор
Отображение меню
D
(режим фокусировки) (
A
72)
*В режимах съемки
l
и
m
(
A
59) можно настроить значение диафрагмы. Когда отображается меню, в нем
можно выбрать необходимые параметры.
В режиме просмотра
Выбор предыдущего
1
снимка
/перемещение
отображаемой области
при увеличении снимка
(
A
35).
4/
1
Предыдущий или следующий снимок также можно выбрать вращением поворотного мультиселектора.
2
При отображении уменьшенных или увеличенных изображений эта кнопка переключает фотокамеру в режим
полнокадрового просмотра.
При отображении меню
* Пункты меню, расположенные выше или ниже, также можно выбирать вращением поворотного мультиселектора.
12
4/
132
132
0004.JPG
4/ 132
0004.JPG
15:30
0004.JPG
15:30
15/05/2012
15:30
15/05/2012
15/05/2012
Выбор следующего
1
снимка
/перемещение
Просмотр видеороликов
2
отображаемой области
(
A
100)
при увеличении снимка
(
A
35).
Выбор пункта выше*
Выбор пункта справа/
Меню съемки
Выбор пункта слева/
переход в подменю
Качество изображ.
Размер изображения
возврат к предыдущему
(применение
Picture Control
экрану
выбранных значений)
Польз. Picture Control
Баланс белого
Выбор пункта ниже*
Замер экспозиции
Сделать выбор
Непрерывный
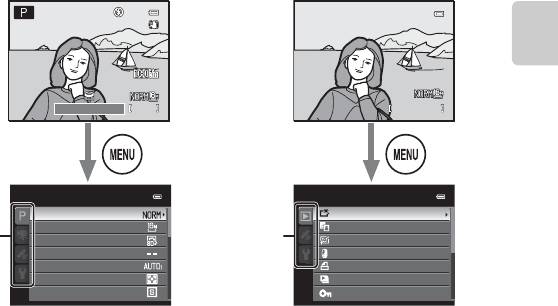
Основные операции
Использование меню (кнопка
d
)
Если нажать кнопку
d
, находясь на экране съемки или просмотра, откроется меню текущего
режима. В открывшемся меню можно изменить различные настройки.
Компоненты фотокамеры и основные возможности
1/125
13
1/125
1/125 F5.6
F5.6
F5.6
840
840
25m 0s
25m 0s
25m 0s
840
4/
Меню съемки
Качество изображ.
Размер изображения
Picture Control
Польз. Picture Control
Баланс белого
Замер экспозиции
Непрерывный
4/
132
132
0004.JPG
4/ 132
0004.JPG
15:30
0004.JPG
15:30
15/05/2012
15:30
15/05/2012
Режим съемки Режим просмотра
15/05/2012
Меню просмотра
Быстрая обработка
D-Lighting
Вкладки
Вкладки
Смягчение тона кожи
Эфф. фильтров
Задание печати
Показ слайдов
Защита
Меню съемки Меню просмотра
Вкладка
j
:
Вкладка
c
:
отображает настройки, которые можно изменить
отображение настроек, доступных в режиме
в выбранном режиме съемки (
A
28).
просмотра.
Отображаемый значок вкладки зависит от
Вкладка
z
:
выбранного режима съемки.
отображение пунктов меню настройки GPS
Вкладка
D
:
(
A
105).
отображение параметров видеозаписи.
Вкладка
z
:
Вкладка
z
:
отображение меню настройки, в котором можно
отображение пунктов меню настройки GPS
изменить общие настройки.
(
A
105).
Вкладка
z
:
отображение меню настройки, в котором можно
изменить общие настройки.
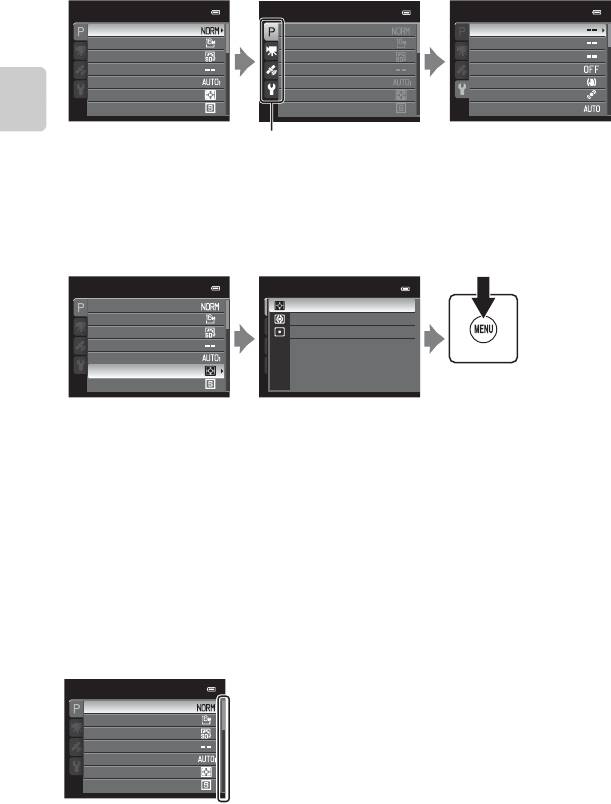
Основные операции
Переключение между вкладками
Меню съемки
Меню съемки
Настройка
Качество изображ.
Качество изображ.
Экран приветствия
Размер изображения
Размер изображения
Часовой пояс и дата
Picture Control
Picture Control
Настройка монитора
Польз. Picture Control
Польз. Picture Control
Печать даты
Баланс белого
Баланс белого
Подавл. вибраций
Замер экспозиции
Замер экспозиции
Обнаруж. движения
Непрерывный
Непрерывный
АФ-помощь
Компоненты фотокамеры и основные возможности
Чтобы выделить вкладку,
Для выбора какой-либо вкладки
На монитор будет выведено
нажмите кнопку поворотного
воспользуйтесь кнопками
выбранное меню.
мультиселектора
J
.
поворотного мультиселектора
H
или
I
, а затем нажмите
кнопку
k
либо кнопку
K
.
Выбор пунктов меню
Меню съемки
Замер экспозиции
Качество изображ.
Матричный
Размер изображения
Центр.-взвешенный
Picture Control
Точечный
Польз. Picture Control
Баланс белого
Замер экспозиции
Непрерывный
Для выбора пункта меню
Выберите пункт кнопкой
H
Изменив все необходимые
воспользуйтесь кнопками
или
I
и нажмите кнопку
k
.
настройки, нажмите кнопку
поворотного
d
(меню), чтобы выйти из
мультиселектора
H
или
I
,
меню.
а затем нажмите кнопку
K
либо кнопку
k
.
C
Использование диска выбора режимов при просмотре меню. Примечание
Поворотом диска выбора режимов во время просмотра меню вы можете изменить значение выбранной настройки.
Ряд настроек невозможно изменить с помощью диска выбора режимов.
C
Если меню содержит две и более страниц
На текущую страницу указывает полоса прокрутки.
Меню съемки
Качество изображ.
Размер изображения
Picture Control
Польз. Picture Control
Баланс белого
Замер экспозиции
Непрерывный
14

Основные операции
Переключение информации на
мониторе (кнопка
s
)
Для того чтобы переключить информацию,
отображающуюся на мониторе во время съемки или
просмотра, нажмите кнопку
s
(отображение
информации на экране).
Для съемки
Компоненты фотокамеры и основные возможности
1/250
Отображение информации
Сетка кадрирования
Информация скрыта
Отображение снимка и съемочной
видеоролика
Отображение только снимка.
информации.
Отображение диапазона
видеоролика в кадре.
Для просмотра
Отображение информации
Отображение съемочной
Информация скрыта
оснимке
информации
Отображение только сделанного
Отображение сделанного снимка
(за исключением видеороликов)
снимка.
и информации о параметрах
Отображение гистограммы
снимка.
и съемочной информации*.
* Дополнительные сведения о гистограмме и съемочной информации см. в разделе
A
10.
C
Отображение гистограммы и сетки кадрирования при съемке
Параметры отображения для монитора можно изменить в меню настройки (
A
108) с помощью параметра
Настройка монитора
. К параметрам отображения относятся гистограмма и сетка кадрирования.
15
1/250
1/250 F5.6
F5.6
F5.6
840
840
25m 0s
25m 0s
25m 0s
1/250
840
1/250
1/250 F5.6
F5.6
F5.6
840
840
25m 0s
25m 0s
25m 0s
840
100NIKON
0004.JPG
P
1/250 F5.6
+1.0
ISO
200
1324
4/
132
0004.JPG
4/ 132
0004.JPG
15:30
0004.JPG
15:30
15/05/2012
15:30
15/05/2012
15/05/2012
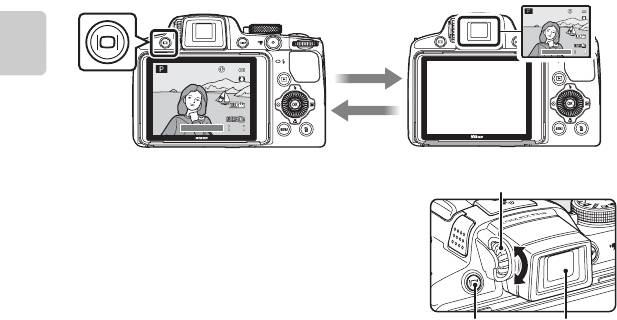
Основные операции
Включение и выключение монитора (кнопка
x
)
Для переключения между монитором и видоискателем нажмите кнопку
x
(монитор).
Воспользуйтесь тем устройством, который более всего подходит к условиям съемки.
1/250
Компоненты фотокамеры и основные возможности
Использование видоискателя
Используйте видоискатель для компоновки кадра, когда
изображение на мониторе трудно рассмотреть из-за яркого
освещения. Для того чтобы переключиться на видоискатель,
нажмите кнопку
x
.
Если изображение в видоискателе трудно различимо,
выполните регулировку поворотом регулятора диоптрийной
настройки, глядя в видоискатель.
•
Следите за тем, чтобы не коснуться глаза пальцами или
ногтями.
16
1/2 50
1/250 F5.6
F5. 6
F5.6
840
840
25m 0s
840
25m 0s
25m 0s
1/250
1/250
1/250 F5.6
F5.6
F5.6
840
840
25m 0s
840
25m 0s
ВидоискательМонитор
25m 0s
Регулятор диоптрийной настройки
Кнопка
x
Видоискатель
Оглавление
Аннотации для Фотоаппарата Nikon COOLPIX P510 в формате PDF
Топ 10 инструкций
Другие инструкции

Данная инструкция на русском языке предназначена для фотокамеры
Nikon Coolpix P510, описывает принцип работы и основные моменты эксплуатации устройства.
Производитель настойчиво рекомендует перед включением фотокамеры
внимательно изучить настоящую инструкцию.
Инструкция для фотокамеры
представлена в формате PDF. Все современные браузеры уже поддерживают данный формат и сложностей с открытием файла возникнуть не должно.
Но если открыть инструкцию все же не удается, то необходимо установить на компьютер программу для чтения PDF файлов, например, Acrobat Reader. Если у вас возникли сложности с открытием инструкции на смартфоне под управлением Android, нужно установить, например, Adobe Acrobat Reader.
Комментарии (0)
Комментарии про другие Фотокамеры
Другие Фотокамеры Nikon
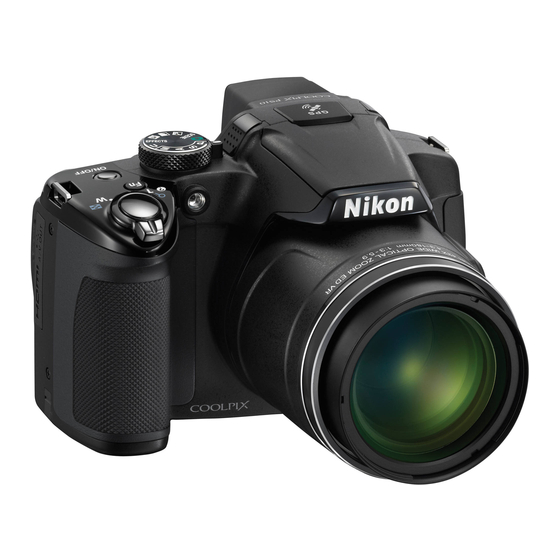
-
Contents
-
Table of Contents
-
Troubleshooting
-
Bookmarks
Quick Links
DIGITAL CAMERA
Reference Manual
En
Related Manuals for Nikon COOLPIX P510
Summary of Contents for Nikon COOLPIX P510
-
Page 1
DIGITAL CAMERA Reference Manual… -
Page 2: Trademark Information
High-Definition Multimedia Interface are trademarks or registered trademarks of HDMI Licensing LLC. • All other trade names mentioned in this manual or the other documentation provided with your Nikon product are trademarks or registered trademarks of their respective holders. AVC Patent Portfolio License…
-
Page 3
Introduction Parts of the Camera and Basic Operations The Basics of Shooting and Playback Shooting Features Playback Features Recording and Playing Back Movies Using GPS General Camera Setup Reference Section Technical Notes and Index… -
Page 4: Read This First
Introduction Read This First Thank you for purchasing the Nikon COOLPIX P510 digital camera. Before using the camera, please read the information in “For Your Safety” (Avi) and familiarize yourself with the information provided in this manual. After reading, please keep this manual handy and refer to it to enhance your enjoyment of your new camera.
-
Page 5: About This Manual
About This Manual If you want to start using the camera right away, see “The Basics of Shooting and Playback” (A17). To learn about the parts of the camera and basic operations, see “Parts of the Camera and Basic Operations” (A1). Other Information •…
-
Page 6: Information And Precautions
Before taking pictures on important occasions (such as at weddings or before taking the camera on a trip), take a test shot to ensure that the camera is functioning normally. Nikon will not be held liable for damages or lost profits that may result from product malfunction.
-
Page 7
For the COOLPIX P510, the log data saved on the memory card is handled in the same way as other data. You can delete unsaved log data from the memory card using Create log ➝ End log ➝ Erase… -
Page 8: For Your Safety
For Your Safety To prevent damage to your Nikon product or injury to yourself or to others, read the following safety precautions in their entirety before using this equipment. Keep these safety instructions where all those who use the product will read them.
-
Page 9
USB cable, place it under heavy objects, or expose it to heat or flames. Should the insulation be damaged and the wires become exposed, take it to a Nikon- authorized service representative for inspection. Failure to observe these precautions could result in fire or electric shock. -
Page 10
Use appropriate cables When connecting cables to the input and output jacks, use only the cables provided or sold by Nikon for the purpose, to maintain compliance with product regulations. Handle moving parts with care… -
Page 11: Notices
Modifications The FCC requires the user to be notified that any changes or modifications made to this device that are not expressly approved by Nikon Corporation may void the user’s authority to operate the equipment. Interface Cables Use the interface cables sold or provided by Nikon for your equipment.
-
Page 12
State of California to cause birth defects or other reproductive harm. Wash hands after handling. Nikon Inc., 1300 Walt Whitman Road, Melville, New York 11747-3064 Tel: 631-547-4200 Notice for Customers in Canada… -
Page 13: Table Of Contents
Table of Contents Introduction … ii Read This First … ii Confirming the Package Contents… ii About This Manual… iii Information and Precautions… iv For Your Safety… vi WARNINGS … vi Notices … ix Parts of the Camera and Basic Operations … 1 Parts of the Camera …
-
Page 14
Table of Contents Shooting Features … 39 A (Auto) Mode… 40 Changing A (Auto) Mode Settings… 40 Scene Mode (Shooting Suited to Scenes) … 41 Changing Scene Mode Settings… 42 Characteristics of Each Scene … 42 Using Skin Softening … 54 Special Effects Mode (Applying Effects When Shooting) … -
Page 15
Recording and Playing Back Movies… 95 Recording Movies … 96 Changing Movie Recording Settings (Movie Menu) … 99 Playing Back Movies… 100 Using GPS … 101 Starting GPS Data Recording… 102 Changing the GPS Settings (GPS Options Menu)… 105 General Camera Setup… 107 The Setup Menu … -
Page 16
Table of Contents Editing Movies… E31 Extracting Only the Desired Portions of the Movie… E31 Saving a Frame from a Movie as a Still Picture … E32 Shooting Menu (j, k, l or m Mode) … E33 Image Quality and Image Size… E33 Picture Control (COOLPIX Picture Control) … -
Page 17
The Setup Menu … E74 Welcome Screen … E74 Time Zone and Date… E75 Monitor Settings… E78 Print Date (Imprinting Date and Time on Pictures)… E79 Vibration Reduction … E80 Motion Detection… E81 AF Assist… E82 Digital Zoom… E82 Assign Side Zoom Control … E83 Sound Settings… -
Page 18
Table of Contents Technical Notes and Index … F1 Caring for the Products… F2 The Camera … F2 The Battery… F3 Charging AC Adapter … F4 The Memory Cards… F5 Caring for the Camera … F6 Cleaning … F6 Storage … F6 Troubleshooting… -
Page 19: Parts Of The Camera And Basic Operations
Parts of the Camera and Basic Operations This chapter describes the parts of the camera and also explains the main functions of each part and the basic camera operations. Parts of the Camera …2 The Camera Body …2 Controls Used in Shooting Mode …4 Controls Used in Playback Mode …5 Changing the Angle of the Monitor …6 Attaching the Camera Strap and Lens Cap…7…
-
Page 20: Parts Of The Camera
Parts of the Camera and Basic Operations Parts of the Camera The Camera Body Eyelet for camera strap …7 Power switch/power-on lamp…25 w (FUNC) button… 110 Mode dial…28 Microphone (stereo) … 88, 96 GPS antenna… 103 Flash…66 m (flash pop-up) button …66 USB/Audio video connector…
-
Page 21
Side zoom control… 109 f : Wide …31 g : Tele…31 Speaker …88, 100, 109 x (monitor) button …16 Diopter adjustment control…16 Electronic viewfinder …16 s (display) button … 15 b (e movie-record) button … 11, 34, 96 Command dial …57 Monitor…8, 28 Charge lamp…20, E89 Flash lamp… -
Page 22: Controls Used In Shooting Mode
Parts of the Camera Controls Used in Shooting Mode Control Zoom control Rotary multi Command dial d (menu) release button Delete button Delete the last image that was saved. b (e movie- record) button Name Main Function Mode dial Change the shooting mode. Rotate toward g (i) (telephoto zoom position) to zoom in, and rotate toward f (h) (wide-angle position) to zoom…
-
Page 23: Controls Used In Playback Mode
Control Name x (monitor) button s (display) button Side zoom control Controls Used in Playback Mode Control Name Playback button Zoom control Rotary multi selector Command dial Apply selection button d (menu) button Parts of the Camera Main Function Switch the monitor display. Switch the information displayed on the monitor.
-
Page 24: Changing The Angle Of The Monitor
Parts of the Camera Control Delete button Delete images. release button b (e movie- record) button x (monitor) s (display) Changing the Angle of the Monitor The angle of the monitor can be lowered down to 82° or raised upward to 90°. This is convenient when taking pictures with the camera held at high or low positions.
-
Page 25: Attaching The Camera Strap And Lens Cap
Parts of the Camera Attaching the Camera Strap and Lens Cap Attach the lens cap to the strap, and then attach the strap to the camera. Attach the strap at two places. Lens Cap • Remove the lens cap before you shoot a picture. •…
-
Page 26: The Monitor
Parts of the Camera The Monitor • The information that is displayed on the monitor during shooting and playback changes depending on the camera’s settings and state of use. Press the s (display) button to hide or show the information on the monitor (A15). Shooting Mode 29m 0s 29m 0s…
-
Page 27
Shooting mode…28, 29 Focus mode…73 Zoom indicator …31 Focus indicator…32 AE/AF-L indicator…E7 Zoom memory…62 Flash mode …67 Flash exp. comp…62 Battery level indicator …24 Vibration reduction icon …108 Eye-Fi communication indicator … 111, E93 Log display…105 GPS reception …104 Noise reduction filter …62 Noise reduction burst …43 Motion detection icon …109 View/hide histograms…74, 108… -
Page 28: Playback Mode
Parts of the Camera Playback Mode Full-frame display (A15) 15/05/2012 15/05/2012 15/05/2012 12:00 12:00 12:00 9999.JPG 9999.JP 9999.JPG 9999/9999 9999/9999 9999/9999 Date of recording… 26 Time of recording … 26 Voice memo indicator… 88 Battery level indicator … 24 Protect icon… 88 Eye-Fi communication indicator …111, E93 Recorded GPS information indicator…
-
Page 29: Basic Operations
Basic Operations Switching Between Shooting Mode and Playback Mode The camera has two modes of operation: Shooting mode, which is used for taking pictures, and playback mode, which is used for viewing pictures. Press the c (playback) button to switch between shooting mode and playback mode.
-
Page 30: Using The Rotary Multi Selector
Basic Operations Using the Rotary Multi Selector Operate by rotating the rotary multi selector, pressing up (H), down (I), left (J) or right (K) on the rotary multi selector, or pressing the k button. • The “rotary multi selector” is also referred to as the “multi selector” in this manual.
-
Page 31: Using Menus (The D Button)
Using Menus (the d Button) When the d button is pressed while the shooting screen or playback screen is displayed, the menu for the current mode is displayed. Once the menu is displayed, various settings can be changed. Shooting mode 25m 0s 25m 0s 25m 0s…
-
Page 32: Switching Between Tabs
Basic Operations Switching Between Tabs Shooting menu Image quality Image size Picture Control Custom Picture Control White balance Metering Continuous Press the rotary multi selector J to highlight the tab. Selecting Menu Items Shooting menu Image quality Image size Picture Control Custom Picture Control White balance Metering…
-
Page 33: Switching The Information On The Monitor (S Button)
Switching the Information on the Monitor (s button) To switch the information displayed on the monitor during shooting and playback, press the s (display) button. For Shooting 25m 0s 25m 0s 25m 0s 1/250 1/250 1/250 F5.6 F5.6 F5.6 Display information Display the picture and the shooting information.
-
Page 34: Switching The Monitor Display (X Button)
Basic Operations Switching the Monitor Display (x button) Press the x (monitor) button to switch between the monitor and viewfinder. Switch to the one that suits the shooting conditions. Monitor 1/250 1/250 1/250 F5.6 F5.6 F5.6 Using the Viewfinder Use the viewfinder to frame pictures when bright light makes it difficult to see the display on the monitor.
-
Page 35: The Basics Of Shooting And Playback
The Basics of Shooting and Playback Preparation Preparation 1 Insert the Battery …18 Preparation 2 Charge the Battery …20 Preparation 3 Insert a Memory Card…22 Shooting Step 1 Turn the Camera On…24 Setting the Display Language, Date, and Time (First Use Only) …26 Step 2 Select a Shooting Mode…28 Step 3 Frame a Picture …30 Step 4 Focus and Shoot…32…
-
Page 36: Preparation 1 Insert The Battery
The Basics of Shooting and Playback Preparation 1 Insert the Battery Open the battery-chamber/memory card slot cover. Insert the included EN-EL5 battery (rechargeable Li-ion battery). • Use the battery to push the orange battery latch down in the direction indicated by the arrow (1), and fully insert the battery (2).
-
Page 37: Removing The Battery
Removing the Battery Turn the camera off (A25) and be sure that the power- on lamp and the monitor have turned off before opening the battery-chamber/memory card slot cover. To eject the battery, open the battery-chamber/ memory card slot cover and push the orange battery latch in the direction shown (1).
-
Page 38: Preparation 2 Charge The Battery
Preparation 2 Charge the Battery Prepare the included Charging AC Adapter EH-69P. If a plug adapter* is included with your camera, attach the plug adapter to the plug on the Charging AC Adapter. Push the plug adapter firmly until it is securely held in place. Once the two are connected, attempting to forcibly remove the plug adapter could damage the product.
-
Page 39
Understanding the Charge Lamp Status Flashes slowly (green) The battery is charging. The battery is not charging. When charging is complete, the charge lamp flashing slowly in green stops and is turned off. • The ambient temperature is not suited to charging. Charge the battery indoors with an ambient temperature of 5°C to 35°C (41°F to 95°F). -
Page 40: Preparation 3 Insert A Memory Card
Preparation 3 Insert a Memory Card Confirm that the power-on lamp and the monitor are turned off and open the battery- chamber/memory card slot cover. • Be sure to turn off the camera before opening the cover. Insert the memory card. •…
-
Page 41: Internal Memory And Memory Cards
Removing Memory Cards Before opening the battery-chamber/memory card slot cover, turn the camera off and confirm that the power- on lamp and the monitor are off. Press the memory card in lightly with your finger (1) to partially eject it, and then pull it out straight (2). High Temperature Caution The camera, battery, and memory card may be hot immediately after using the camera.
-
Page 42: Step 1 Turn The Camera On
Step 1 Turn the Camera On Remove the lens cap and press the power switch to turn on the camera. • If you are turning the camera on for the first time, see “Setting the Display Language, Date, and Time” (A26). •…
-
Page 43: Turning The Camera On And Off
Turning the Camera On and Off • When the camera is turned on, the power-on lamp (green) lights and the monitor is turned on (the power-on lamp turns off when the monitor is turned on). • To turn off the camera, press the power switch. Both the monitor and the power-on lamp are turned off.
-
Page 44: Setting The Display Language, Date, And Time
Step 1 Turn the Camera On Setting the Display Language, Date, and Time Dialogs for language selection and camera clock setting are displayed the first time the camera is turned on. Press the multi selector H or I to choose the desired language and press the k button.
-
Page 45
Press H or I to choose Yes and press the k button. • After finishing the setting, the lens extends slightly and the shooting screen is displayed. Daylight Saving Time If daylight saving time is in effect, press the multi selector H to enable the daylight saving time function while setting the region in step 3. -
Page 46: Step 2 Select A Shooting Mode
Step 2 Select a Shooting Mode Rotate the mode dial to select the shooting mode. • The following describes how to take pictures in A (auto) mode as an example. Rotate the mode dial to A. • The camera switches to A (auto) mode and the shooting mode icon changes to A.
-
Page 47: Available Shooting Modes
Available Shooting Modes j, k, l, m mode (A57) Choose these modes for greater control over shutter speed and aperture value. Settings in the shooting menu (A60) are available to suit the shooting conditions and the type of shot you want to capture. A (auto) mode (A40) Shoot easily with basic camera operations without…
-
Page 48: Step 3 Frame A Picture
Step 3 Frame a Picture Ready the camera. • Keep your fingers, hair, strap and other objects away from the lens, flash, AF-assist illuminator and microphone. Frame the picture. • Point the camera at the subject. ISO Sensitivity E (ISO sensitivity, A8) may be displayed on the shooting screen. When E is displayed, the ISO sensitivity is automatically raised.
-
Page 49: Using The Zoom
Using the Zoom Rotate the zoom control to activate the optical zoom. • To zoom in so that the subject fills a larger area of the frame, rotate toward g (telephoto zoom position). • To zoom out so that the area visible increases in the frame, rotate toward f (wide-angle position).
-
Page 50: Step 4 Focus And Shoot
Step 4 Focus and Shoot Press the shutter-release button halfway, i.e., press the button slightly until you feel resistance. • When you press the shutter-release button halfway, the camera sets the focus and exposure (shutter speed and aperture value). Focus and exposure remain locked while the shutter-release button is pressed halfway.
-
Page 51: More Information
Note on Recording Images and Saving Movies The indicator showing the number of exposures remaining or the indicator showing the maximum movie length flashes while images are being recorded or while a movie is being saved. Do not open the battery-chamber/memory card slot cover or remove the battery or memory card while an indicator is flashing.
-
Page 52: Step 5 Play Back Images
Step 5 Play Back Images Press the c (playback) button. • When you switch from shooting mode to playback mode, the last image saved will be displayed in full-frame playback mode. Use the multi selector to view previous or next images. •…
-
Page 53: Changing How Images Are Displayed
Changing How Images Are Displayed When using playback mode, you can change how images are displayed by rotating the zoom control toward f (h)/g (i). Playback Zoom 15/05/2012 15/05/2012 15/05/2012 15:30 15:30 15:30 0004.JPG 0004.JPG 0004.JPG 4/ 4/ 132 4/ 132 Image is displayed in full- frame playback mode.
-
Page 54: Step 6 Delete Unwanted Images
Step 6 Delete Unwanted Images Press the button to delete the image currently displayed on the monitor. Press the multi selector H or I to select the desired deletion method and press the k button. • Current image: Only the current image is deleted. If the key picture of a sequence is selected, all images in the sequence are deleted.
-
Page 55
Operating the Erase Selected Images Screen Press the multi selector J or K to select an image to be deleted, and then press H to display y. • To cancel the selection, press I to remove y. • Rotate the zoom control (A31) toward g (i) to switch back to full-frame playback or f(h) to display thumbnails. -
Page 57: Shooting Features
Shooting Features This chapter describes each of the camera’s shooting modes and the features that are available when using shooting mode. By referring to this information, you will learn how to select different shooting modes and adjust settings according to the shooting conditions and the kind of images you want to capture.
-
Page 58: A (Auto) Mode
Shooting Features A (Auto) Mode Shoot easily with basic camera operations without going into detailed settings. The camera selects the focus area for autofocus in accordance with the composition or subject. • When the camera detects the main subject, it focuses on that subject (Target finding AF).
-
Page 59: Scene Mode (Shooting Suited To Scenes)
Scene Mode (Shooting Suited to Scenes) When one of the following scenes is selected using the mode dial or the scene menu, images are captured using settings that are optimized for the selected scene. y (Scene) Press the d button to display the scene menu and choose one of the following shooting scenes.
-
Page 60: Changing Scene Mode Settings
Scene Mode (Shooting Suited to Scenes) Changing Scene Mode Settings • “Features That Can Be Set Using the Multi Selector“ (A65) vary with scene mode. See “List of the Default Settings” (A75) for more information. • Functions that can be set using the d button: The image quality and image size can be set (A77).
-
Page 61
c Landscape Use this mode for vivid landscapes and cityscapes. Press the d button to select Noise reduction burst or Single shot in Landscape. • Noise reduction burst: This enables you to shoot a sharp landscape with a minimum of noise. -
Page 62
Scene Mode (Shooting Suited to Scenes) o Backlighting Use when light is coming from behind the subject, throwing features or details into shadow. Press the d button to set HDR (high dynamic range) compositing using the HDR setting. • When HDR is set to Off (default setting): The flash fires to prevent the backlit subject from being hidden in shadow. -
Page 63: Shooting Operation
y M x Scene auto selector When you frame a picture, the camera automatically selects the optimum scene for simpler shooting. e/b: Portrait, f: Landscape, h/c: Night portrait, g: Night landscape, i: Close-up, j/d: Backlighting, d: Other scenes • When the camera automatically selects a scene mode, the shooting mode icon changes to that for the scene mode currently enabled.
-
Page 64
Scene Mode (Shooting Suited to Scenes) y M b Portrait Use this mode for portraits. • The camera detects and focuses on a face (see “Using Face Detection” (A85) for more information). • After the skin softening feature makes facial skin tones softer, the camera records the image (A54). -
Page 65
y M e Night portrait Use this mode for portraits taken at sunset or at night. Flash is used to illuminate the subject while maintaining the mood of the background. Select Hand-held or Tripod on the screen that is displayed when e Night portrait scene mode is selected. -
Page 66
Scene Mode (Shooting Suited to Scenes) y M f Party/indoor Suitable for taking pictures in parties. Captures the effects of candlelight and other indoor background lighting. • The camera focuses at the center area of the frame. • When shooting in a dark location, hold the camera steadily to avoid the effects of camera shake. -
Page 67
y M k Close-up Use this mode to photograph flowers, insects, and other small objects at close range. Select Noise reduction burst or Single shot on the screen that is displayed when k Close-up scene mode is selected. • Noise reduction burst: This setting enables you to shoot a sharp picture with a minimum of noise. -
Page 68
Scene Mode (Shooting Suited to Scenes) y M u Food Use this mode when taking pictures of food. • The focus mode (A72) setting is changed to p (macro close-up) and the camera automatically zooms to the closest position to the subject where the camera can shoot. •… -
Page 69
y M p Panorama Use this mode for shooting panorama pictures. On the screen that is displayed when p Panorama scene mode is selected, select V Easy panorama or U Panorama assist. • Easy panorama (default setting): Shoots panorama pictures that can be played back on the camera by moving the camera in the direction you want to create a panorama picture. -
Page 70
Scene Mode (Shooting Suited to Scenes) y M O Pet portrait Use this mode for shooting pictures of dogs or cats. • Select Single or Continuous on the screen that is displayed when O Pet portrait scene mode is selected. — Single: One picture is captured at a time. -
Page 71
y M s 3D photography Use this mode for taking 3D pictures viewable in three dimensions on a 3D-compatible TV or monitor. The camera takes one picture for each eye to simulate a three-dimensional image. Pictures taken in this mode are saved with Normal as the image quality and O 1920×1080 as the image size. -
Page 72: Using Skin Softening
Scene Mode (Shooting Suited to Scenes) Using Skin Softening In the following shooting modes, the camera detects up to three human faces when the shutter is released, and processes the image to make facial skin tones softer before saving the image. •…
-
Page 73: Special Effects Mode (Applying Effects When Shooting)
Special Effects Mode (Applying Effects When Shooting) The effect can be applied to pictures during shooting. One of the nine special effects is selected to shoot. To select an effect, press the d button to display the special effects menu. •…
-
Page 74: Changing Special Effects Mode Settings
Special Effects Mode (Applying Effects When Shooting) Option Selective color Painting High ISO monochrome Silhouette Special Effects Mode Settings When Movie options (A99) is set to h HS 120 fps (640×480), Soft, Nostalgic sepia or Painting cannot be selected. More Information See “Note on the Command Dial Operation When Menus are Displayed”…
-
Page 75: J, K, L, M Modes (Setting The Exposure For Shooting)
j, k, l, m Modes (Setting the Exposure for Shooting) Pictures can be shot with greater control by setting the shooting menu (A60) items in addition to setting the shutter speed or aperture value manually according to shooting conditions and requirements. •…
-
Page 76: Adjusting The Shutter Speed
j, k, l, m Modes (Setting the Exposure for Shooting) Adjusting the Shutter Speed Faster 1/1000 s Adjusting the Aperture Value Larger aperture (Small f-number) Aperture and Zoom The aperture value (f-number) indicates the lens brightness. Large apertures (expressed by small fnumbers) let more light into the camera, and small apertures (large f-numbers) let less light.
-
Page 77
j (Programmed auto) (E10) Use for automatic control of the exposure by the camera. • Different combinations of shutter speed and aperture value can be selected without changing the exposure by rotating the command dial during shooting (“flexible program”). While flexible program is in effect, a flexible program mark (A) is displayed next to the mode indicator (j) in the upper left of the monitor. -
Page 78: Changing J, K, L, M Modes
j, k, l, m Modes (Setting the Exposure for Shooting) Changing j, k, l, m Modes • See “Features That Can Be Set Using the Multi Selector” (A65) for more information on flash mode (A66), self-timer (A69)/smile timer (A70), focus mode (A72) and exposure compensation (A74).
-
Page 79
Option Adjust colors in the image closer to the colors as they appear to the eye. Although Auto (normal) (default setting) can be used under most types of lighting, you can apply the white balance setting suited to the sky White balance conditions or light source to achieve better results if the default setting results are unsatisfactory. -
Page 80
j, k, l, m Modes (Setting the Exposure for Shooting) Option When Single AF (default setting) is selected, the camera focuses only while the shutter-release button is pressed halfway. When Full-time AF is selected, the camera Autofocus mode focuses even when the shutter-release button is not pressed halfway. -
Page 81: M (User Setting Modes)
M (User Setting Modes) Setting combinations that are frequently used for shooting (User settings) can be saved in M. Shooting is possible in j (Programmed auto), k (Shutter-priority auto), l (Aperture-priority auto) or m (Manual). Rotate the mode dial to M to retrieve the settings saved in Save user settings.
-
Page 82: Saving Settings In M Mode
M (User Setting Modes) Saving Settings in M Mode Rotate the mode dial to the desired exposure mode. • Rotate to j, k, l or m. • Settings can be saved even if rotated to M (the default settings of shooting mode j are saved when the camera is first purchased).
-
Page 83: Features That Can Be Set Using The Multi Selector
Features That Can Be Set Using the Multi Selector Press the multi selector H (m), J (n), I (D), or K ( the following functions. n Self-timer (A69)/ Smile timer (A70) Self-timer D Focus mode (A72) Autofocus Available Functions Available functions differ according to the shooting mode as follows. •…
-
Page 84: Using The Flash (Flash Modes)
Features That Can Be Set Using the Multi Selector Using the Flash (Flash Modes) You can shoot pictures with a flash by raising the flash. You can set a flash mode that suits the shooting conditions. Press the (flash pop-up) button to raise the flash.
-
Page 85: Available Flash Modes
Lowering the Flash When not using the flash, gently push to lower the flash until it clicks shut. Effective Range of the Flash The flash has a range of about 0.5 to 8.0 m (1 ft 8 in. to 26 ft) for wide-angle position, and about 1.5 to 4.5 m (5 ft to 14 ft) for telephoto zoom position (when ISO sensitivity is set to Auto).
-
Page 86
Auto with Red-eye Reduction This camera uses advanced red-eye reduction (“In-Camera Red-Eye Fix”). If the camera detects “red-eye” when a picture is taken, Nikon’s own In-Camera Red-Eye Fix processes the image before it is recorded. Note the following when taking pictures: •… -
Page 87: Using The Self-Timer
Using the Self-timer The self-timer is suitable for taking group pictures and reducing the vibration when the shutter-release button is pressed. When using the self-timer, use of a tripod is recommended. Set Vibration reduction in the setup menu (A108) to Off when using a tripod to stabilize the camera. Press self-timer) on the multi selector.
-
Page 88: Smile Timer (Shooting Smiling Faces)
Features That Can Be Set Using the Multi Selector Smile Timer (Shooting Smiling Faces) When this mode is selected, the camera detects smiling faces and automatically releases the shutter even if you don’t press the shutter-release button. • This function can be used when the shooting mode is A (auto), j, k, l, m, M, scene mode Portrait or Night portrait.
-
Page 89
Notes on Smile Timer • The digital zoom is not available. • Under some shooting conditions, faces and smiling faces may not be detected properly. • See “Using Face Detection“ (A85) for more information. • The smile timer cannot be used simultaneously with certain shooting modes. See “Available Functions”… -
Page 90: Using Focus Mode
Features That Can Be Set Using the Multi Selector Using Focus Mode Choose a focus mode according to the desired scene. Press focus mode) on the multi selector. Use the multi selector to choose the desired focus mode and press the k button. •…
-
Page 91
Available Focus Modes Autofocus The camera automatically adjusts the focus according to the distance to the subject. Use when the distance from the subject to the lens is 50 cm (1 ft 8 in.) or more, or 1.5 m (5 ft) or more at the maximum telephoto zoom position. Macro close-up Use for close-ups of flowers or small objects. -
Page 92: Adjusting Brightness (Exposure Compensation)
Features That Can Be Set Using the Multi Selector Adjusting Brightness (Exposure Compensation) By adjusting exposure compensation when taking pictures, you can adjust overall image brightness. Press exposure compensation) on the multi selector. Press the multi selector H or I to select a compensation value.
-
Page 93: List Of The Default Settings
Exposure Compensation Value • The changed exposure compensation value applied in j, k or l mode is saved in the camera’s memory even after the camera is turned off. • When the shooting mode is the Fireworks show scene mode (A50) or m (Manual) (A59), the exposure compensation cannot be used.
-
Page 94
Features That Can Be Set Using the Multi Selector The default settings in scene mode are described below. Flash mode (A66) j (A42) c (A43) W (A44) x (A45) b (A46) d (A46) e (A47) f (A48) Z (A48) z (A48) h (A48) i (A48) k (A49) -
Page 95: Changing The Image Quality And Image Size
Changing the Image Quality and Image Size The image quality (compression ratio) and image size can be selected for recording. Available Image Quality Display the shooting screen M d button (A13) M Shooting menu M Image quality Lower compression ratios result in higher quality pictures, but also larger file sizes, limiting the number of pictures that can be recorded.
-
Page 96: Available Image Size
Changing the Image Quality and Image Size Available Image Size Display the shooting screen M d button (A13) M Shooting menu M Image size You can set the image size (amount of pixels) for pictures recorded. The larger the image, the larger the size at which it can be printed or displayed without becoming noticeably “grainy, ”…
-
Page 97
Number of Exposures Remaining The following table lists the approximate number of pictures that can be stored in the internal memory and on a 4 GB memory card, at each combination of Image size (A78) and Image quality (A77) settings. Note that the number of exposures that can be stored differs depending on the composition of the image (due to JPEG compression). -
Page 98: Features That Cannot Be Used Simultaneously
Features That Cannot Be Used Simultaneously Some shooting settings cannot be used in combination with other functions. Restricted function Focus mode (A72) Continuous Flash mode (A61) Exposure bracketing (A61) Self-timer/Smile AF area mode timer (A61) AF area mode Focus mode (A61) Continuous Image quality…
-
Page 99
Restricted function Setting Picture Control White balance (A60) Active D-Lighting Picture Control (A62) Active D-Lighting Metering (A62) Continuous (A61)/Exposure bracketing (A61) Continuous/ Exposure bracketing Self-timer (A69)/Smile timer (A70) Picture Control (A60) Smile timer (A70) Focus mode (A72) AF area mode Picture Control (A60) White balance… -
Page 100
Features That Cannot Be Used Simultaneously Restricted function Continuous Print date (A61) Continuous (A61) Sound settings Exposure bracketing (A61) Smile timer (A70)/ Continuous Blink warning (A61)/Exposure bracketing (A61) Smile timer (A70) Focus mode (A72) Continuous Digital zoom (A61) AF area mode (A61) Zoom memory (A62) -
Page 101: The Control Range Of The Shutter Speed (J, K, L, M Modes)
The Control Range of the Shutter Speed (j, k, l, m Modes) The control range of the shutter speed differs depending on the aperture value or the ISO sensitivity setting. Additionally, the control range changes in the following continuous shooting settings. Setting Auto Fixed range auto…
-
Page 102: Focusing On Subject
Focusing on Subject The focus area or focus range for adjusting focus varies depending on the shooting mode and focus mode (A72). • In j, k, l, m or M mode, an area can be set to adjust focus by selecting AF area mode (A61) in the shooting menu.
-
Page 103: Using Face Detection
Using Face Detection In the following shooting modes, the camera uses face detection to automatically focus on human faces. If the camera detects more than one face, a double border is displayed around the face that the camera will focus on, and single borders are displayed around the other faces.
-
Page 104: Focus Lock
Focusing on Subject Focus Lock Use focus lock to focus on off-center subjects when center is selected for AF area mode. To focus on off-center subjects when AF area mode (A61) is set to Center in j, k, l, m or M mode, use focus lock as described below. Position the subject at the center of the frame.
-
Page 105: Playback Features
Playback Features This chapter describes the features available when playing back images. 15/05/2012 15/05/2012 15/05/2012 15:30 15:30 15:30 0004.JPG 0004.JPG 0004.JPG 4/ 132 4/ 132 4/ 132 Playback menu Quick retouch D-Lighting Skin softening Filter effects Print order Slide show Protect…
-
Page 106: Features Available In Playback Mode (Playback Menu)
Playback Features Features Available in Playback Mode (Playback Menu) When viewing images in full-frame playback mode or thumbnail playback mode, you can configure the following functions by pressing the d button to display the menu, and then selecting the c tab (A13).
-
Page 107
Option Display a sequence of images shot continuously as C Sequence display individual images, or display only the key picture of a options sequence. Change the key picture for the series of pictures that were shot continuously (Pictures in a sequence, E13). x Choose key picture •… -
Page 108: Connecting The Camera To A Tv, Computer, Or Printer
Connecting the Camera to a TV, Computer, or Printer You can enhance your enjoyment of images and movies by connecting the camera to a TV, computer, or printer. • Before connecting the camera to an external device, make sure the remaining battery level is sufficient and turn the camera off.
-
Page 109: Using Viewnx 2
• Windows XP Home Edition/Professional (Service Pack 3) Macintosh • Mac OS X (version 10.5.8, 10.6.8, 10.7.2) Refer to the Nikon website for the latest information on operating system compatibility. Start the computer and insert the ViewNX 2 Installer CD into the CD- ROM drive.
-
Page 110
The following software is installed: • ViewNX 2 (consisting of the three modules below) — Nikon Transfer 2: For transferring images to the computer — ViewNX 2: For viewing, editing, and printing transferred images — Nikon Movie Editor: For basic editing of transferred movies •… -
Page 111: Transferring Images To The Computer
Import File using Nikon Transfer 2 and click OK. 2 Double-click Import File. If the memory card contains a large number of images, it may take a while for Nikon Transfer 2 to start. Wait until Nikon Transfer 2 starts.
-
Page 112: Viewing Images
Transfer images to the computer. • Confirm that the name of the connected camera or removable disk is displayed as the “Source” on the “Options” title bar of Nikon Transfer 2 ( 1 ). • Click Start Transfer ( 2 ).
-
Page 113: Recording And Playing Back Movies
Recording and Playing Back Movies You can record movies by simply pressing the 25m 0s 25m 0s 25m 0s 1/125 1/125 1/125 F5.6 F5.6 F5.6 In playback mode, press the 15/05/2012 15:30 15:30 15:30 0004.MOV 0004.MOV 0004.MOV 10m16s 10m16s 10m16s movie-record) button.
-
Page 114: Recording Movies
Recording and Playing Back Movies Recording Movies You can record movies by simply pressing the Color tones, white balance, and other settings are the same as they are when taking still images. Turn on the camera and display the shooting screen.
-
Page 115: Notes On Movie Recording
Notes on Movie Recording • When saving a movie onto a memory card, a memory card with an SD speed class of Class 6 or higher is recommended (A23). If the transfer speed of the card is slow, the movie recording may end unexpectedly.
-
Page 116
Recording Movies Maximum Movie Length Movie options (A99) d HD 1080pP (1920×1080) e HD 1080p (1920×1080) f HD 720p (1280×720) iFrame 540 (960×540) g VGA (640×480) All figures are approximate. The maximum movie length varies with the make of the memory card and the bitrate of the recorded movie. -
Page 117: Changing Movie Recording Settings (Movie Menu)
Changing Movie Recording Settings (Movie Menu) The following option settings can be changed. Display the shooting screen M d button M e tab (A13) Option Select the type of movie recorded. The camera can record normal speed movies and high speed (HS) movies, which Movie options can be played back in slow motion or fast motion.
-
Page 118: Playing Back Movies
To delete a movie, use full-frame playback mode (A34) or thumbnail playback mode (A35) to select a movie and press the l button (A36). Note on Movie Playback Movies recorded with cameras other than COOLPIX P510 cannot be played back. Description Rewind the movie while the k button is pressed down.
-
Page 119: Using Gps
Using GPS The Global Positioning System (GPS) is a satellite-based navigation system using the electro-magnetic waves of a network of GPS satellites placed into orbit. This chapter describes how to record the position information on the image using GPS.
-
Page 120: Starting Gps Data Recording
Using GPS Starting GPS Data Recording The camera’s internal GPS receives signals from the GPS satellites and calculates its current time and position. Calculation of the position is known as positioning. The position information (latitude and longitude) can be recorded on the pictures to be shot.
-
Page 121
Notes on GPS • It takes a few minutes to obtain position information when positioning is performed for the first time or in a situation where positioning cannot be performed for a long period of time, or just after the battery is replaced. •… -
Page 122
Starting GPS Data Recording Note on Pictures with Recorded Position Information An individual may be identified from still pictures that have been recorded with location information. Observe caution when you transfer still pictures recorded with location information, or GPS log files to a third party or upload them to a network such as the Internet where the public can view them. -
Page 123: Changing The Gps Settings (Gps Options Menu)
Changing the GPS Settings (GPS Options Menu) In GPS options menu, the following option settings can be changed. Press the d button z (GPS setting) tab (A14) Option Record GPS data: When set to On, signals are being received from the GPS satellite and positioning starts (A102).
-
Page 125: General Camera Setup
General Camera Setup This chapter describes the various settings that can be adjusted in the z setup menu. 25m 0s 25m 0s 25m 0s 1/250 1/250 1/250 F5.6 F5.6 F5.6 • See “Using Menus (the d Button)” (A13) for more information about using the camera’s menus.
-
Page 126: The Setup Menu
General Camera Setup The Setup Menu Press the d button M z (setup) tab (A13) From the menu screen, select the z tab to display the setup menu, and then you can change the following settings. Option Welcome screen Time zone and date Monitor settings Print date Vibration reduction…
-
Page 127
Option When the camera detects camera shake or subject movement at the time of shooting, it automatically increases ISO sensitivity and shutter speed to reduce blurring. The default setting is Auto. The r indicator lights in green when the camera Motion detection detects camera shake or subject movement and increases shutter speed. -
Page 128
The Setup Menu Option TV settings Fn button Charge by computer Toggle Av/Tv selection Reset file numbering Blink warning Filmstrip Description Adjust settings for connection to television. • When the camera is connected to a television using an audio/video cable but no picture is displayed on the television, set Video mode to NTSC or PAL according to the type of signal compatible with the television. -
Page 129
Option Set whether or not to enable the function for sending Eye-Fi upload images to a computer using a commercially available Eye-Fi card. The default setting is Disable. Set the +/– display direction of exposure indicator to be Reverse indicators displayed when the shooting mode is m. -
Page 131: Reference Section
Reference Section The Reference Section provides detailed information and hints for using the camera. Shooting Taking Pictures with Manual Focus … E2 Using Easy Panorama (Shooting and Playing back) … E3 Using Panorama Assist … E6 Using 3D Photography… E8 j, k, l, m Modes…E10 Playback Playing and Deleting Images Captured Using Continuous Shooting Mode…
-
Page 132: Taking Pictures With Manual Focus
Reference Section Taking Pictures with Manual Focus Available when the shooting mode is j, k, l, m, M, special effects mode or the Sports scene mode. Press the multi selector I (p focus mode). • Use the multi selector to choose E (manual focus) and press the k button.
-
Page 133: Using Easy Panorama (Shooting And Playing Back)
Using Easy Panorama (Shooting and Playing back) Taking Pictures with Easy Panorama Rotate the mode dial to y M d button M Select V Easy panorama and press the k button. Select the shooting range from Wide (360°), and press the k (180°) or button.
-
Page 134
Using Easy Panorama (Shooting and Playing back) Press the shutter-release button all the way, and release it. • The I icons showing the panorama direction are displayed. Move the camera straight and slowly in one of the four directions to start shooting. •… -
Page 135: Viewing Easy Panorama (Scroll)
* Scrolling can also be performed by rotating the multi selector. Note on Viewing Pictures Recorded with Easy Panorama Panorama pictures recorded with functions other than easy panorama of the COOLPIX P510 may not be scrolled or zoomed on this camera.
-
Page 136: Using Panorama Assist
Using Panorama Assist Using a tripod makes the composition easier. When using a tripod to stabilize the camera, set Vibration reduction ( Rotate the mode dial to y M d button M Select U Panorama assist and press the k button.
-
Page 137
Press the k button when shooting is completed. • The camera returns to step 2. Notes on Panorama Assist • Set the flash mode, self-timer, focus mode and exposure compensation before releasing the shutter for the first picture. The settings cannot be changed after shooting the first picture. Pictures cannot be deleted, nor can zoom, Image quality (A77), or Image size (A78) be adjusted after shooting the first picture. -
Page 138: Using 3D Photography
Using 3D Photography The camera takes one picture for each eye to simulate a three-dimensional image on a 3D-compatible TV or monitor. Rotate the mode dial to y M d button M s 3D photography Frame the subject. • The focus area that the camera focuses on can be moved to areas other than the center of the frame.
-
Page 139: Taking 3D Pictures
Taking 3D Pictures • Moving subjects are not suited to 3D photography. We recommend shooting still subjects. • Pictures have a less pronounced 3D feel as the distance between the camera and background is increased. • Pictures may have a less pronounced 3D feel when the subject is dark or when the second picture is not aligned precisely.
-
Page 140: J, K, L, M Modes
j, k, l, m Modes j (Programmed auto), k (Shutter-priority auto) or l (Aperture-priority auto) Rotate the mode dial to j, k or l. Rotate the command dial or multi selector to set the exposure. • In j mode, the flexible program (A59) can be set using the command dial. •…
-
Page 141: M (Manual) Mode
m (Manual) Mode The user controls both the shutter speed and aperture value. • The shutter speed can be set in a range from a maximum speed of 1/4000 to 8 seconds. Rotate the mode dial to m. Rotate the command dial to set a shutter speed.
-
Page 142
j, k, l, m Modes Note on Shooting When zooming is performed after the exposure is set, aperture value may be changed. Note on ISO Sensitivity When ISO sensitivity (E45) is set to Auto (default setting) or Fixed range auto, ISO sensitivity is fixed at ISO 100. -
Page 143: Playing And Deleting Images Captured Using Continuous Shooting Mode (Sequence)
• Select an image: Rotate the multi selector or press J or K. • Zoom in: Rotate the zoom control toward g (i) (A35). Note on Sequence Pictures captured continuously with cameras other than COOLPIX P510 cannot be displayed as a sequence. Sequence Display Options Select Sequence display options (E63) in the playback menu to set all sequences to be displayed using their key pictures or to display them as individual images.
-
Page 144: Deleting Images In A Sequence
Playing and Deleting Images Captured Using Continuous Shooting Mode (Sequence) Changing Key Picture in Sequence A sequence’s key picture can be changed using Choose key picture (E63) in the playback menu. Playback Menu Options Available When Using Sequence When the d button is pressed during an image sequence playback, the following menu operations are available.
-
Page 145: Editing Still Images
• When no faces are detected in the picture, skin softening cannot be applied (E18). • If a copy created using the COOLPIX P510 is viewed on a different digital camera, it may not be possible to display the picture properly or transfer it to a computer.
-
Page 146
Editing Still Images Restrictions on Image Editing The following restrictions apply when editing pictures that were created by editing. Editing functions used Quick retouch D-Lighting Skin softening Filter effects Small picture Black border Crop • Copies created by editing cannot be edited again using the same editing function. •… -
Page 147: Quick Retouch: Enhancing Contrast And Saturation
k Quick Retouch: Enhancing Contrast and Saturation Select a picture (A34) M d button (A13) M Press the multi selector H or I to choose the setting level, and press the k button. • The original version is displayed on the left and the edited version is displayed on the right.
-
Page 148: Skin Softening: Softening Skin Tones
Editing Still Images e Skin Softening: Softening Skin Tones Select a picture (A34) M d button (A13) M Press the multi selector H or I to choose the setting level, and press the k button. • A confirmation screen is displayed, and the image is displayed zoomed in on the face edited by skin softening.
-
Page 149: Filter Effects: Applying Digital Filter Effects
p Filter Effects: Applying Digital Filter Effects Select a picture (A34) M d button (A13) M Option Keep only the selected image color and make other colors Selective color black-and-white. Produce star-like rays of light that radiate outward from bright Cross screen objects such as sunlight reflections and city lights.
-
Page 150: Small Picture: Reducing The Size Of An Image
Editing Still Images Confirm the result and press the k button. • A new, edited copy is created. • To cancel, press J. • Copies created by editing with filter effects can be recognized by the c icon displayed in playback mode. g Small Picture: Reducing the Size of an Image Select a picture (A34) M d button (A13) M Press the multi selector H or I to choose the…
-
Page 151: Black Border: Adding A Black Border To Pictures
j Black Border: Adding a Black Border to Pictures Select a picture (A34) M d button (A13) M Press the multi selector H or I to choose the desired frame thickness, and press the k button. • Choose a frame thickness from Thin, Medium or Broad line.
-
Page 152: Crop: Creating A Cropped Copy
Editing Still Images a Crop: Creating a Cropped Copy Create a copy containing only the portion visible on the monitor when u is displayed with playback zoom (A35) enabled. Cropped copies are stored as separate files. Enlarge the picture for cropping (A35). Refine copy composition.
-
Page 153: Connecting The Camera To A Tv (Viewing Images On A Tv)
Connecting the Camera to a TV (Viewing Images on a TV) Connect the camera to a television to play back pictures on the television. If your television is equipped with an HDMI connector, you can connect it to the camera with a commercially available HDMI cable to play back pictures. Turn off the camera.
-
Page 154
Connecting the Camera to a TV (Viewing Images on a TV) Tune the television to the video channel. • See the instruction manual provided with your TV for details. Hold down the c button to turn on the camera. • The camera enters playback mode, and the recorded pictures are displayed on the TV. -
Page 155: Connecting The Camera To A Printer (Direct Print)
• When connecting the camera to a printer, use a fully charged battery to prevent the camera from turning off unexpectedly. • If the AC Adapter EH-62A (available separately) (E100) is used, COOLPIX P510 can be powered from an electrical outlet. Do not, under any circumstances, use an AC Adapter other than the EH- 62A.
-
Page 156: Connecting The Camera To A Printer
Connecting the Camera to a Printer (Direct Print) Connecting the Camera to a Printer Turn off the camera. Turn on the printer. • Check the printer settings. Connect the camera to the printer using the included USB cable. • Be sure that the plug is oriented correctly. When disconnecting the cable, do not pull the plug at an angle.
-
Page 157: Printing Individual Images
Printing Individual Images After connecting the camera to the printer correctly (E26), print pictures by following the procedure below. Use the multi selector to choose the picture to be printed, and press the k button. • Rotate the zoom control toward f (h) to display 12 thumbnails, or toward g (i) to switch back to full- frame playback mode.
-
Page 158: Printing Multiple Images
Connecting the Camera to a Printer (Direct Print) Choose the desired paper size and press the k button. • To specify the paper size using the printer settings, choose Default in the paper size menu. Choose Start print and press the k button. Printing starts.
-
Page 159
Choose the desired paper size and press the k button. • To specify the paper size using the printer settings, choose Default in the paper size menu. Choose Print selection, Print all images or DPOF printing and press the k button. Print selection Choose the pictures (up to a maximum of 99) and number of copies (up to nine per picture). -
Page 160
Connecting the Camera to a Printer (Direct Print) Print all images All pictures stored in the internal memory or on the memory card are printed one per each. • When the menu shown on the right is displayed, choose Start print and press the k button to start printing. -
Page 161: Editing Movies
Editing Movies Extracting Only the Desired Portions of the Movie The desired portions of a recorded movie can be saved as a separate file. Play back the movie to be edited and pause at the start point of the portion that is to be extracted (A100). Use the multi selector J or K to choose I on the playback control, and press the k button.
-
Page 162: Saving A Frame From A Movie As A Still Picture
Editing Movies Notes on Editing Movies • Use a fully charged battery to prevent the camera from turning off during editing. When the battery level is B, movie editing is not possible. • Once a movie is created through editing, it cannot be used again for extracting a movie. To extract another range, select and edit the original movie.
-
Page 163: Shooting Menu (J, K, L Or M Mode)
The icon for the current setting other than Standard is displayed on the monitor Notes on COOLPIX Picture Control • The COOLPIX Picture Control feature of the COOLPIX P510 cannot be used with other makes of cameras, Capture NX, Capture NX 2 and ViewNX 2 Picture Control feature.
-
Page 164
Shooting Menu (j, k, l or m Mode) Customizing Existing COOLPIX Picture Controls: Quick Adjust and Manual Adjust COOLPIX Picture Control can be customized using Quick adjust, which allows for balanced adjustment of sharpness, contrast, saturation and other image editing components, or manual adjust, which allows for detailed adjusting of the components individually. -
Page 165
Types of Quick Adjust and Manual Adjust Option Adjust the sharpness, contrast and saturation levels automatically. Five levels of adjustment are available from -2 to Quick adjust Choose from options between -2 and +2 to reduce or emphasize the effect of the selected COOLPIX Picture Control. The default setting is 0. -
Page 166
Shooting Menu (j, k, l or m Mode) Option Toning Quick adjust is not available in Neutral, Monochrome, Custom 1 and Custom 2. The values set manually are disabled if quick adjust is used after manual setting. Not displayed for Monochrome. Only displayed for Monochrome. -
Page 167: Custom Picture Control (Coolpix Custom Picture Control)
Custom Picture Control (COOLPIX Custom Picture Control) Rotate the mode dial to j, k, l or m M d button M j, k, l or m tab (A13) M Custom Picture Control The picture editing options created by customizing COOLPIX Custom Picture Controls can be registered up to two options.
-
Page 168: White Balance (Adjusting Hue)
Shooting Menu (j, k, l or m Mode) White Balance (Adjusting Hue) Rotate the mode dial to j, k, l or m M d button M j, k, l or m tab (A13) M White balance The color of light reflected from an object varies with the color of the light source. The human brain is able to adapt to changes in the color of the light source, with the result that white objects appear white whether seen in the shade, direct sunlight, or under incandescent lighting.
-
Page 169
Using Preset Manual Use when you want to make pictures taken under unusual lighting conditions (e.g., lamps with reddish-light) look as though they were shot in normal light. Use the procedure below to measure the white balance value under the lighting used during shooting. -
Page 170: Metering
Shooting Menu (j, k, l or m Mode) Metering Rotate the mode dial to j, k, l or m M d button M j, k, l or m tab (A13) M Metering The process of measuring the brightness of the subject to determine the exposure is known as “metering.
-
Page 171: Continuous Shooting
Continuous Shooting Rotate the mode dial to j, k, l or m M d button M j, k, l or m tab (A13) M Continuous Change the settings for continuous shooting and BSS (Best Shot Selector). Option Single (default setting) Continuous H Continuous L Pre-shooting cache…
-
Page 172: Iso Sensitivity
Shooting Menu (j, k, l or m Mode) Option BSS (Best Shot Selector) Multi-shot 16 Intvl timer shooting The icon for the current setting other than Single is displayed on the monitor (A8). Notes on Continuous Shooting • Focus, exposure and white balance are fixed at the values determined with the first shot in each series. •…
-
Page 173: Interval Timer Shooting
Pre-shooting Cache When Pre-shooting cache is selected, shooting begins when the shutter-release button is pressed halfway for 0.5 seconds or longer, and images captured before the shutter-release button is pressed all the way are saved along with images captured after the shutter-release button is pressed all the way.
-
Page 174
• To prevent the camera from turning off unexpectedly during shooting, use a fully charged battery. • If the AC Adapter EH-62A (available separately) (E100) is used, COOLPIX P510 can be powered from an electrical outlet. Do not use any other make or model of AC adapter. Failure to observe this precaution could result in overheating or damage to the camera. -
Page 175: Iso Sensitivity
ISO Sensitivity Rotate the mode dial to j, k, l or m M d button M j, k, l or m tab (A13) M ISO sensitivity The higher the ISO sensitivity, the less light needed for taking pictures. The higher the ISO sensitivity, the darker the subject that can be shot. Additionally, even with subjects of similar brightness, pictures can be taken at faster shutter speeds, and blurring caused by camera shake and subject movement can be reduced.
-
Page 176: Exposure Bracketing
Shooting Menu (j, k, l or m Mode) Exposure Bracketing Rotate the mode dial to j, k or l M d button M j, k or l tab (A13) M Exposure bracketing The exposure (brightness) can be changed automatically during continuous shooting.
-
Page 177: Af Area Mode
AF Area Mode Rotate the mode dial to j, k, l or m M d button M j, k, l or m tab (A13) M AF area mode You can set how the focus area is determined for autofocus. Option The camera automatically detects and focuses on a face (see “Using Face Detection”…
-
Page 178
Shooting Menu (j, k, l or m Mode) Option x Manual y Center s Subject tracking Description Choose manually the focus position from 99 areas in the screen. This option is suited to situations in which the intended subject is relatively still and not positioned at the center of the frame. -
Page 179
Option When the camera detects the main subject, it focuses on that subject. See “Using the Target Finding AF” M Target finding AF (A84) for more information. Notes on AF Area Mode • When the digital zoom is in effect, the camera focuses on the subject at the center of the frame regardless of the applied AF area mode option. -
Page 180: Using Subject Tracking
Shooting Menu (j, k, l or m Mode) Using Subject Tracking Rotate the mode dial to j, k, l or m M d button M j, k, l or m tab (A13) M AF area mode Choose this mode to shoot moving subjects. Subject tracking begins once you select a subject to be focused on, and the focus area will move and follow the subject.
-
Page 181: Autofocus Mode
Notes on Subject Tracking • The digital zoom is not available. • Set the zoom position, flash mode, focus mode, or menu settings before registering a subject. If any of these are changed after a subject is registered, the subject will be canceled. •…
-
Page 182: Flash Exp. Comp
Shooting Menu (j, k, l or m Mode) Flash Exp. Comp. Rotate the mode dial to j, k, l or m M d button M j, k, l or m tab (A13) M Flash exp. comp. Flash exp. comp. option is used to adjust the flash output. Use this option when the flash is too bright or too dark.
-
Page 183: Active D-Lighting
Active D-Lighting Rotate the mode dial to j, k, l or m M d button M j, k, l or m tab (A13) M Active D-Lighting “Active D-Lighting” preserves details in highlights and shadows, creating photographs with natural contrast. The image taken reproduces the contrast effect that is seen with the naked eye.
-
Page 184: Zoom Memory
Shooting Menu (j, k, l or m Mode) Zoom Memory Rotate the mode dial to j, k, l or m M d button M j, k, l or m tab (A13) M Zoom memory Option Off (default setting) Notes on Zoom Operation •…
-
Page 185: The Playback Menu
The Playback Menu For more information about image editing functions; (Quick retouch, D- Lighting, Skin softening, Filter effects, Small picture and Black border), see “Editing Still Images” (E15). a Print Order (Creating a DPOF Print Order) Press the c button (Playback mode) M d button (A13) M a Print order If you choose to use one of the following methods to print pictures that are stored on a memory card, the pictures to print and the number of copies can be set in advance on the memory card.
-
Page 186
The Playback Menu Choose whether or not to also print shooting date and shooting information. • Choose Date and press the k button to print the shooting date on all pictures in the print order. • Choose Info and press the k button to print shooting information (shutter speed and aperture value) on all pictures in the print order. -
Page 187: Slide Show
b Slide Show Press the c button (Playback mode) M d button (A13) M b Slide show View pictures stored in the internal memory or on a memory card in an automatic slide show. Use the multi selector to choose Start, and press the k button.
-
Page 188: Protect
The Playback Menu d Protect Press the c button (Playback mode) M d button (A13) M d Protect Protect selected pictures from accidental deletion. In the image selection screen, choose a picture and set or cancel protection. See “The Image Selection Screen” (E59) for more information. Note, however, that formatting the camera’s internal memory or the memory card (E85) permanently erases the protected files.
-
Page 189: The Image Selection Screen
The Image Selection Screen The image selection screen is displayed in the following menus. Only one image can be selected for some menu items, while for other menu items, multiple images can be selected. Functions for which only one image can be selected •…
-
Page 190: Rotate Image
Notes on Image Rotation • Images captured with cameras other than COOLPIX P510 cannot be rotated. • Images captured using 3D photography cannot be rotated. • While only the key picture of a sequence is displayed, images cannot be rotated. Apply the setting…
-
Page 191: E Voice Memo
• Voice memos cannot be attached to pictures taken with cameras other than COOLPIX P510. • Voice memos of the images with the Protect setting (E58) cannot be deleted.
-
Page 192: Copy (Copy Between Internal Memory And Memory Card)
The Playback Menu h Copy (Copy Between Internal Memory and Memory Card) Press the c button (Playback mode) M d button (A13) M h Copy Copy pictures between the internal memory and a memory card. Use the multi selector to select an option from the copy screen, and press the •…
-
Page 193: C Sequence Display Options
Message: “Memory contains no images.” If there are no pictures stored on the memory card when playback mode is selected, the message, the Memory contains no images., is displayed. Press the playback menu to copy the pictures stored in the camera’s internal memory to the memory card. More Information See “File and Folder Names”…
-
Page 194: The Movie Menu
The Movie Menu Movie Options Display the shooting screen M d button M e (Movie) tab (A13) M Movie options You can choose the type of movie to shoot. The camera can record normal speed movies and HS (high speed) movies (E66), which can be played back in slow motion or fast motion.
-
Page 195
HS Movies See “Recording Movies in Slow Motion and Fast Motion (HS Movie)” (E66) for more information. Option h HS 120 fps (640×480) i HS 60 fps (1280×720) j HS 15 fps (1920×1080) * The maximum movie length for a single movie is 30 seconds when it is saved in the internal memory. -
Page 196: Recording Movies In Slow Motion And Fast Motion (Hs Movie)
The Movie Menu Recording Movies in Slow Motion and Fast Motion (HS Movie) Display the shooting screen M d button M e (Movie) tab (A13) M Movie options HS (high speed) movies can be recorded. Movies recorded using HS movie can be played back in slow motion at 1/4 or 1/2 of normal playback speed, or played back in fast motion at a speed two times faster than normal speed.
-
Page 197
Notes on HS Movie • The sound is not recorded. • Zoom position, focus, exposure and white balance are locked when the button is pressed to start recording. HS Movie Recorded movies are played back at about 30 frames per second. When Movie options (E64) in the movie menu is set to HS 60 fps (1280×720), movies that can be played back in slow motion can be recorded. -
Page 198: Autofocus Mode
The Movie Menu Autofocus Mode Display the shooting screen M d button M e (Movie) tab (A13) M Autofocus mode Choose how the camera focuses when recording normal speed movies (E64). Option A Single AF Lock on the focus when the b (e movie-record) button is pressed (default to start recording.
-
Page 199: Gps Setting Menu
GPS Setting Menu GPS Settings Press the d button M z (GPS setting) tab (A13) M GPS options Option When set to On, signals are being received from the GPS satellite, and Record GPS data positioning starts (A102). • The default setting is Off. Signals from the GPS satellite are used to set the date and time of the camera’s internal clock (only when Record GPS data in GPS Synchronize…
-
Page 200: Turn On The Camera
Download the latest A-GPS file from the website below, and use it to update the file. http://nikonimglib.com/agps2/index.html • The A-GPS file for COOLPIX P510 is only available from the website above. • To update the A-GPS file, set Record GPS data to Off. When On is selected, the A-GPS file cannot be updated.
-
Page 201: Create Log (Record The Log Of Moving Information)
Create Log (Record the log of moving information) Press the d button M z (GPS setting) tab (A13) M Create log When log recording starts, the measured tracking information is recorded until a preset time has elapsed at the interval set for Log interval. •…
-
Page 202: View Log
GPS Setting Menu Select Save log, and press the k button. • The log data is saved to a memory card. Notes on Log Recording • If the date and time are not set, the log cannot be recorded. • Use a fully charged battery to prevent the camera from turning off during log recording. When the battery power becomes exhausted, loge recording ends.
-
Page 203: View Log
View Log Press the d button M z (GPS setting) tab (A13) M View log Check or erase the log data stored in the memory card using Create log (E71). Use the multi selector to select the log data to be displayed, and press the k button.
-
Page 204: The Setup Menu
The Setup Menu Welcome Screen Press the d button M z tab (A13) M Welcome screen Choose whether or not to display the welcome screen on the monitor when the camera is turned on. Option None Display the shooting or playback screen without displaying the (default setting) welcome screen.
-
Page 205: Time Zone And Date
Time Zone and Date Press the d button M z tab (A13) M Time zone and date Option Set the camera clock to the current date and time. Use the multi selector to set the date and time. • Choose an item: Press K or J (selected in the following order: D (day) ➝…
-
Page 206
The Setup Menu Setting the Travel Destination Time Zone Use the multi selector to choose Time zone, and press the k button. • The Time zone screen is displayed. Choose x Travel destination and press the k button. • The date and time displayed on the monitor change according to the region currently selected. -
Page 207
Time Zones The camera supports the time zones listed below. For time differences not listed below, set the camera clock using Time zone and date. UTC +/- Location Midway, Samoa Hawaii, Tahiti Alaska, Anchorage PST (PDT): Los Angeles, Seattle, Vancouver MST (MDT): Denver, Phoenix CST (CDT): Chicago, Houston, Mexico City… -
Page 208: Monitor Settings
The Setup Menu Monitor Settings Press the d button M z tab (A13) M Monitor settings Option On (default setting): Picture is displayed on the monitor immediately Image review after shooting and the monitor display returns to shooting screen. Off: Picture is not displayed immediately after shooting. Choose from five settings to select the monitor brightness.
-
Page 209: Print Date (Imprinting Date And Time On Pictures)
Print Date (Imprinting Date and Time on Pictures) Press the d button M z tab (A13) M Print date The shooting date and time can be imprinted on pictures at the time of shooting. This information can be printed even from printers that do not support printing of the date and time (E56).
-
Page 210: Vibration Reduction
The Setup Menu Vibration Reduction Press the d button M z tab (A13) M Vibration reduction Option (default setting) k Off • When using a tripod to stabilize the camera, set vibration reduction to Off. When On is selected, an icon for this setting is displayed on the monitor (A8). Notes on Vibration Reduction •…
-
Page 211: Motion Detection
Motion Detection Press the d button M z tab (A13) M Motion detection Enable motion detection to reduce the effects of camera shake and subject movement when shooting still pictures. Option If the camera detects the movement of the subject or camera shake, the ISO sensitivity is raised and the shutter speed is increased to reduce their effects.
-
Page 212: Af Assist
The Setup Menu AF Assist Press the d button M z tab (A13) M AF assist Enable or disable the AF-assist illuminator that assists the autofocus when the lighting is dim. Option Auto (default setting) Digital Zoom Press the d button M z tab (A13) M Digital zoom Enable or disable the digital zoom.
-
Page 213: Assign Side Zoom Control
Assign Side Zoom Control Press the d button M z tab (A13) M Assign side zoom control Choose the function to be performed during shooting when the side zoom control is used. Option When shooting, use the side zoom control (A31) to adjust the Zoom (default setting) zoom.
-
Page 214: Sound Settings
The Setup Menu Sound Settings Press the d button M z tab (A13) M Sound settings Adjust the following sound settings. Option Button sound Shutter sound Notes on Sound Settings • In Pet portrait scene mode, even when On is set, the button sound and shutter sound are disabled.
-
Page 215: Format Memory/Format Card
Format Memory/Format Card Press the d button M z tab (A13) M Format memory/Format card Format the internal memory or a memory card. Formatting permanently deletes all data in the internal memory or memory card. The deleted data cannot be recovered. Be sure to transfer important pictures to a computer before formatting.
-
Page 216: Tv Settings
The Setup Menu TV Settings Press the d button M z tab (A13) M TV settings Adjust the settings for connecting to a TV. Option Video mode HDMI HDMI device control HDMI 3D output HDMI and HDMI-CEC “HDMI” is an abbreviation of High-Definition Multimedia Interface, which is one type of multimedia interface.
-
Page 217: Fn Button
Fn Button Press the d button M z tab (A13) M Fn button Assign the frequently used shooting menu to the w (FUNC) button (A2). • This can be used when j, k, l, m or M is chosen for shooting mode. Option Image size (A78) Display the setting for image size.
-
Page 218: Charge By Computer
• When the camera is connected to a computer, an application installed on the computer, such as Nikon Transfer 2, may start. If the camera was connected to the computer for the sole purpose of charging the battery, exit the application.
-
Page 219
The Charge Lamp The following chart explains charge lamp status when the camera is connected to a computer. Option Flashes slowly (green) Battery charging. Battery not charging. If the charge lamp changes from slow flashing (green) to off while the power-on lamp is lit, charging is complete. •… -
Page 220: Toggle Av/Tv Selection
The Setup Menu Toggle Av/Tv Selection Press the d button M z tab (A13) M Toggle Av/Tv selection Switch the method for setting the flexible program, shutter speed or aperture value. • This feature can be used when shooting mode is set to j, k, l, m or M. Option Do not toggle selection (default setting)
-
Page 221: Blink Warning
Blink Warning Press the d button M z tab (A13) M Blink warning Choose whether or not blinking eyes are detected when using face detection (A85) in the following shooting modes. • In the following scene modes: Scene auto selector (A45), Portrait (A46) or Night portrait (when Tripod is selected) (A47) •…
-
Page 222: Filmstrip
The Setup Menu Filmstrip Press the d button M z tab (A13) M Filmstrip Allows you to select whether or not filmstrips are displayed when you rotate the multi selector quickly in full-frame playback mode (A34). Option Off (default setting) Note on Filmstrip Display In order to display the filmstrip, at least ten images must be saved in the camera’s internal memory or on the memory card.
-
Page 223: Eye-Fi Upload
Eye-Fi Upload Press the d button M z tab (A13) M Eye-Fi upload Option Upload images created by the camera to a preselected Enable destination. Disable Images will not be uploaded. (default setting) Notes on Eye-Fi Cards • Note that images will not be uploaded if signal strength is insufficient even if Enable is selected. •…
-
Page 224: Reverse Indicators
The Setup Menu Reverse Indicators Press the d button M z tab (A13) M Reverse indicators Change the +/– display direction of the exposure indicator displayed when shooting mode is m. The + side of the indicators is set to the left and – side is set to the right in the default setting.
-
Page 225
Landscape Menu Option Landscape (A43) Backlighting Menu Option HDR (A44) Special Effects Menu Option Special effects (A55) Shooting Menu Option Image quality (A77) Image size (A78) Picture Control (E33) White balance (E38) Fine adjustment in white balance (E38) Metering (E40) Continuous (E41) Intvl timer shooting (E43) ISO sensitivity (E45) -
Page 226
The Setup Menu GPS Setting Menu Option Record GPS data (E69) Log interval (E71) Log recording duration (E71) Setup Menu Option Welcome screen (E74) Image review (E78) Brightness (E78) View/hide framing grid (E78) View/hide histograms (E78) Print date (E79) Vibration reduction (E80) Motion detection (E81) AF assist (E82) Digital zoom (E82) -
Page 227: Firmware Version
Reset all is performed. To change these settings back to the default settings, use Reset user settings (E53). Firmware Version Press the d button M z tab (A13) M Firmware version Displays the current camera firmware version. The Setup Menu Default value Default Key picture only COOLPIX P510 Ver.X.X Back…
-
Page 228: File And Folder Names
• A folder for storing files is automatically created using the following naming convention: “Folder number + NIKON” (e.g., “100NIKON”). If there are 200 files in a folder, a new folder is created. (For example, the folder name following “100NIKON”…
-
Page 229
• When image files or voice files are copied to or from the internal memory or memory card (E62), the file naming conventions are as follows: — Selected images: Files copied using selected images are copied to the current folder (or to the folder used for subsequent pictures), where they are assigned file numbers in ascending order following the largest file number in memory. -
Page 230: Optional Accessories
2 When using in other countries, use a commercially available plug adapter as necessary. For more information about plug adapters, consult your travel agency. See our websites or product catalogs for up-to-date information on accessories for the COOLPIX P510. E100 1, 2…
-
Page 231: Error Messages
Error Messages The following table lists the error messages and other warnings displayed on the monitor, as well as the solutions for dealing with them. Display Clock not set. (flashes) Set date and time. Battery exhausted. Battery exhausted. Charge or replace the battery. Battery temperature is high.
-
Page 232
Error Messages Display Memory card has not been formatted for use in this camera. Card is not formatted. All data stored on the memory card is deleted when formatted. Format card? If there is any data on the card that you want to keep, select No, and backup the data to a computer before formatting the memory card. -
Page 233
Copy from the playback menu. File contains no File not created with COOLPIX P510. image data. File cannot be viewed on this camera. View file using the computer or any other devices which was This file cannot be used to create or edit this file. -
Page 234
Error has occurred in camera’s internal circuitry. Turn off camera, remove and reinsert battery, and turn on System error camera. If the error persists, contact retailer or Nikon-authorized service representative. Could not obtain GPS The camera clock is not set correctly. -
Page 235
Display Specified size of paper is not loaded. Printer error: check Load the specified size of paper, select Resume and press the paper k button to resume printing.* Paper has jammed in the printer. Printer error: paper Remove the jammed paper, select Resume and press the k button to resume printing.* No paper is loaded in the printer. -
Page 236
E106… -
Page 237: Technical Notes And Index
Technical Notes and Index Caring for the Products …F2 The Camera…F2 The Battery…F3 Charging AC Adapter…F4 The Memory Cards…F5 Caring for the Camera …F6 Cleaning…F6 Storage …F6 Troubleshooting…F7 Specifications…F15 Supported Standards… F18 Index …F19…
-
Page 238: Caring For The Products
Technical Notes and Index Caring for the Products The Camera To ensure continued enjoyment of this Nikon product, observe the following precautions when using or storing the device. Be sure to read and follow the warnings of “For Your Safety” (Avi to Aviii) thoroughly before using the products.
-
Page 239: The Battery
• Images on the monitor may be difficult to see under bright lighting. • The monitor is lit by an LED backlight. Should the monitor begin to dim or flicker, contact your Nikon-authorized service representative. The Battery • Be sure to read and follow the warnings of “For Your Safety” (Avi to Aviii) thoroughly before using the battery.
-
Page 240: Charging Ac Adapter
Caring for the Products • If the battery will not be used for some time, insert it in the camera and run it flat before removing it for storage. The battery should be stored in a cool location with an ambient temperature of 15°C to 25°C (59°F to 77°F). Do not store the battery in hot or extremely cold locations.
-
Page 241: The Memory Cards
The Memory Cards • Use only Secure Digital memory cards. See “Approved Memory Cards” (A23). • Be sure to observe the precautions in the memory card documentation when you use the memory card. • Do not affix labels or stickers to the memory card. •…
-
Page 242: Caring For The Camera
Caring for the Camera Cleaning Avoid touching glass parts with your fingers. Remove dust or lint with a blower (typically a small device with a rubber bulb attached to one end that is pumped to produce a stream of air out the other end). To remove fingerprints, oily substances, or other stains that cannot be removed with a blower, carefully Lens/ wipe the lens with a dry soft cloth or eyewear cleaning cloth, using a spiral…
-
Page 243: Troubleshooting
Troubleshooting If the camera fails to function as expected, check the list of common problems below before consulting your retailer or Nikon-authorized service representative. Refer to the page numbers in the right-most column for more information. • See “Error Messages” (E101) for more information.
-
Page 244
Troubleshooting Problem • Camera is off. • Battery is exhausted. • Standby mode for saving power: Press the power switch, shutter-release button, c button or b (e movie-record) button, or rotate the mode dial. Monitor or • Monitor and viewfinder cannot be used simultaneously. Press viewfinder is blank. -
Page 245
Data already recorded is not affected. In the event of continued malfunction, contact your retailer or Nikon-authorized service representative. Cause/Solution Troubleshooting 108, E79 –… -
Page 246
Troubleshooting Shooting Issues Problem Cannot set to Disconnect the HDMI cable or USB cable. shooting mode. • When camera is in playback mode, press the c button, shutter-release button or b (e movie-record) button. • When menus are displayed, press the d button. No picture can be •… -
Page 247
Problem • Flash is set to W (off ). Flash does not fire. • A shooting mode where flash cannot fire is selected. • Another function that is set now is restricting the flash. • Off is selected for Digital zoom in the setup menu. •… -
Page 248
Troubleshooting Problem • Flash is set to W (off ). • Flash window is blocked. • Subject is beyond flash range. Pictures are too • Adjust exposure compensation. dark • Raise the ISO sensitivity. (underexposed). • Subject is backlit. Raise the flash, and set the scene mode W (Backlighting) with HDR to Off or set the flash mode to X (fill flash). -
Page 249
• Confirm that the operating system used is compatible with connected to a the camera. computer. • Computer is not set to launch Nikon Transfer 2 automatically. For more information on Nikon Transfer 2, refer to help information contained in ViewNX 2. The PictBridge… -
Page 250
Troubleshooting Problem Pictures to be • Memory card contains no pictures. Replace memory card. printed are not • Remove memory card to print pictures from internal memory. displayed. • Pictures taken by 3D photography cannot be printed. Paper size cannot be selected from the camera in the following situations, even for PictBridge compatible printers. -
Page 251: Specifications
Specifications Nikon COOLPIX P510 Digital Camera Type Compact digital camera Effective pixels 16.1 million Image sensor 1/2.3-in. type CMOS; approx. 16.79 million total pixels Lens 42× optical zoom, NIKKOR lens 4.3-180mm (angle of view equivalent to that of 24-1000 mm…
-
Page 252
Specifications Image size (pixels) ISO sensitivity (Standard output sensitivity) Exposure Metering Exposure control Shutter Speed Aperture Range Self-timer Built-in flash Range (approx.) (ISO sensitivity: Auto) Flash control Interface Data transfer protocol MTP, PTP Video output HDMI output • 16 M 4608×3456 •… -
Page 253
Audio/video output; digital I/O (USB); I/O terminal HDMI Mini Connector (Type C) (HDMI output) Receiver frequency 1575.42 MHz (C/A code), geodetic system WGS 84 Arabic, Brazilian Portuguese, Chinese (Simplified and Traditional), Czech, Danish, Dutch, English, Finnish, French, Supported languages German, Greek, Hindi, Hungarian, Indonesian, Italian, Japanese, Korean, Norwegian, Polish, Portuguese, Romanian, Russian, Spanish, Swedish, Thai, Turkish, Ukrainian, Vietnamese •… -
Page 254: Supported Standards
(W × H × D) Weight Specifications • Nikon will not be held liable for any errors this manual may contain. • The appearance of this product and its specifications are subject to change without notice. Supported Standards • DCF: Design Rule for Camera File System is a standard widely used in the digital camera industry to ensure compatibility among different makes of camera.
-
Page 255: Index
Index Symbols R E7, E8 l Aperture-priority auto mode 57, k Apply selection button 5, 12 A Auto mode 28 o Backlighting 44 l Delete button 4, 6, 36, E61 s (display) button 5, 6, 15 o Exposure compensation 12, 74 m Flash mode 66 m Flash pop-up button 66 p Focus mode 72…
-
Page 256
Index Close-up k 49 Command dial 4, 5 Computer 90 Continuous 61, E41 Contrast E35 COOLPIX Custom Picture Control 60, COOLPIX Picture Control 60, E33 Create log 105, E71 Crop E22, E31 Custom Picture Control 60, E37 Date and time 26, E75 Daylight saving time 27 Delete 36, E61 Digital zoom 31, 109, E82… -
Page 257
Lens cap 7 Li-ion rechargeable battery 18, E100 Lithium-ion type battery 20, E100 Macro close-up 73 Manual focus 73, E2 Manual mode 57, E11 Memory capacity 24 Memory card 22, 23 Memory card slot 22 Metering 61, E40 Microphone 96, E61 Minimum shutter speed 61, E45 Mode dial 11, 28 Monitor 6, 8, 10, F6… -
Page 258: Welcome Screen
Index Shooting 28 Shooting menu 60 Shutter sound 109, E84 Shutter speed 57 Shutter-priority auto mode 57, E10 Shutter-release button 4, 6, 32 Single 61, E41 Single AF E51, E68 Skin softening 54, 88, E18 Slide show 88, E57 Slow sync 67 Small picture 88, E20 Smile timer 70 Snow z 48…
-
Page 260
No reproduction in any form of this manual, in whole or in part (except for brief quotation in critical articles or reviews), may be made without written authorization from NIKON CORPORATION. FX2B02(11) 6MM18711-02 © 2012 Nikon Corporation…
This manual is also suitable for:
26329Coolpix p510