
&
+15
Запуск машины. Программы
Таблица программ
Т к а н ь и с те п е н ь
з а г р я з н е н и я
П р о г р . Т е м п е —
р а тур а
М о ю щ е е
с р е д с тв о
С м яг-
читель
У д ален ие
п ятен /
Отбели ватель
Д ли те ль —
н о с ть
ц и к л а,
м и н .
О п и с а н и е ц и к л а с ти р к и
п р е д в а р .
с т и р к а
о с н о в .
с т и р к а
О б ы ч н ы е п р о гр а м м ы
О чень сильно загрязненное белое
белье (просты ни, скатерти и т.п.)
1
9 0 °C
1 3 5
П р е д ва р и те л ьн а я с ти р к а , с ти р к а ,
п о л о с к а н и е , п р о м е ж у то ч н ы й и
о к о н ч а те л ьн ы й о тж и м
О чень сильно загрязненное белое
белье (просты ни, скатерти и т.п.)
2
9 0 °C
Деликатн./
О бы чны й
1 2 5
С тирка, полоскание, проме ж уточны й
и окончате льны й отж им
С ильно за грязне н ное бе лое и
устойчивое цве тное бе лье
2
6 0 °C
Деликатн./
О бы чны й
1 1 0
С тирка, полоскание, проме ж уточны й
и окончате льны й отж им
С ильно за грязне н ное бе лое и
линяю щ е е ц ве тн ое б е лье
2
4 0 °C
Деликатн./
О бы чны й
1 0 5
С тирка, полоскание, проме ж уточны й
и окончате льны й отж им
С л а б о за гр я зн е н н о е б е л о е и
л и н я ю щ е е ц ве тн о е б е л ье
(п р о с ты н и , с к а те р ти и т.п .)
3
4 0 °C
Деликатн./
О бы чны й
7 0
С тирка, полоскание, проме ж уточны й
и окончате льны й отж им
С ильно загрязненное устойчивое
цветное белье (детская одежда и пр.)
4
6 0
°C
Д е л и к а тн ы й
7 5
С ти р к а , п о л о с к а н и е , о с та н о вк а с
во д о й и л и д е л и к а тн ы й о тж и м
С ильно загрязненное устойчивое
цветное белье (детская одежда и пр.)
4
4 0 °C
Д е л и к а тн ы й
6 0
С ти р к а , п о л о с к а н и е , о с та н о вк а с
во д о й и л и д е л и к а тн ы й о тж и м
Ш е р с ть
5
4 0 °C
5 0
С ти р к а , п о л о с к а н и е , о с та н о вк а с
во д о й и д е л и к а тн ы й о тж и м
О собо деликатны е ткани и одежда
(занавеси, ш елк, вискоза и пр.)
6
3 0 °C
4 5
С ти р к а , п о л о с к а н и е , о с та н о вк а с
во д о й и л и с л и в
4 п р о гр а м м ы д л я В а с
С ильно за грязне н ное и
устойчивое цве тное бе лье
7
6 0 °C
6 5
С тирка, полоскание, проме ж уточны й
и окончате льны й отж им
С л а б о за гр я зн е н н о е б е л о е и
л и н я ю щ е е ц ве тн о е б е л ье
(со р о ч к и , м а й к и и п р .)
8
4 0 °C
5 5
С тирка, полоскание, проме ж уточны й
и окончате льны й отж им
С л а б о за гр язне нн ое ли няю щ е е
ц ве тн ое бе лье (лю б а я о де ж д а )
9
4 0
°C
4 5
С ти р к а , п о л о с к а н и е , д е л и к а тн ы й
о тж и м
С л а б о за гр язне нн ое ли няю щ е е
ц ве тн ое бе лье (лю б а я о де ж д а )
1 0
3 0 °C
3 0
С ти р к а , п о л о с к а н и е , д е л и к а тн ы й
о тж и м
С п о р т
С порти вна я обувь
(
м а к с . 2 п а р ы .
)
1 1
3 0
°C
5 0
С ти р к а в х о л о д н о й во д е (б е з
м о ю щ е г о с р е д с тва ), с ти р к а ,
п о л о с к а н и е и д е л и к а тн ы й о тж и м
С порти вна я оде ж да (спортивны е
костю мы , ш орты и пр.)
1 2
3 0 °C
6 0
С тирка, полоскание, проме ж уточны й
и окончате льны й отж им
M E M O
П о зво л я е т вве с ти в п а м я ть м а ш и н ы л ю б у ю п р о г р а м м у с ти р к и
Ч а с т н ы е п р о г р а м м ы
П о л о с к а н и е
Деликатн./
О бы чны й
П о л о с к а н и е и о тж и м
О тж и м
С л и в и о тж и м
С л и в
С л и в
Краткие инструкции: Порядок
запуска программы
1. Включите стиральную машину, нажав кнопку .
2. Загрузите белье и закройте дверцу машины.
3. Установите рукоятку программатора на нужную
программу. На дисплее появится прогнозируемая
продолжительность выбранного цикла. Температу-
ра и скорость отжима задаются автоматически в
соответствии с выбранной программой (как изме-
нить их см. на с. 19).
4. Выберите дополнительные функции (см. стр. 19).
5. Добавьте в распределитель моющее средство,
ополаскиватель, отбеливатель (см. с. 20).
6. Запустите программу, нажав кнопку ПУСК/СБРОС
(Start/Reset).
Для отмены запуска держите нажатой кнопку ПУСК/
СБРОС (Start/Reset) в течение 2-х секунд.
По окончании программы на дисплее появится со-
общение END (Конец). Подождите пока на дисплее
погаснет символ блокировки дверцы. Выключите сти-
ральную машину, нажав кнопку
. Откройте дверцу
машины. Вынув белье, оставьте дверцу машины при-
открытой, чтобы дать испариться оставшейся влаге.
Обязательно перекройте кран подачи воды и отклю-
чите машину из сети.
Примечание
-Рекомендуется, чтобы для программ 7 — 8 загрузка белья не превышала 3,5 кг.
-Для программы 12 рекомендуется, чтобы вес загружаемого белья не превышал 2 кг.
—
«Остановка с водой»: см. дополнительную функцию «Легкая глажка» на с. 7. Данные в таблице, являются справочны-
ми и могут меняться в зависимости от конкретных условий стирки (объем стирки, температура воды в водопроводной
системе, температура в помещении и др.).
Специальная программа
Повседневная стирка 30′ мин (программа 10 для Синтетических тканей) предназначена для быстрой стирки слабо-
загрязненного белья: цикл длится всего 30 минут, что позволяет сэкономить время и электроэнергию. Установив эту
программу (10 при температуре 30°С), Вы можете стирать различные виды тканей вместе (за исключением шерсти и
шелка) при максимальной загрузке белья 3 кг. Мы рекомендуем использовать жидкое моющее средство.
(см. с. 17).
Инструкция и руководство для
Indesit WIE 107  на русском на английском


72 страницы подробных инструкций и пользовательских руководств по эксплуатации
 58:16
58:16
Замена подшипников в стиральной машине Indesit с клееным баком
 07:12
07:12
Коды ошибок стиральной машины Индезит
 01:49
01:49
Сброс программы индезит WISE8
 05:40
05:40
Обзор стиральной машины Indesit WISE10
 03:07
03:07
Indesit Wie 107. Мигают все индикаторы. Не сложный ремонт
 04:55
04:55
Замена амортизаторов Indesit WIE 107/ shockabsorbers replacement
 15:01
15:01
Как разобрать Индезит WISE10
1
GB
English,1
Contents
Installation, 2-3
Unpacking and levelling, 2
Electric and water connections, 2-3
The first wash cycle, 3
Technical details, 3
Washing machine description, 4-5
Control panel, 4
Display, 5
MEMO Programme, 5
Starting and Programmes, 6
Briefly: how to start a programme, 6
Programme table, 6
Personalisations, 7
Setting the spin cycle, 7
Setting the Delay Timer, 7
Setting the temperature, 7
Functions, 7
Detergents and laundry, 8
Detergent dispenser, 8
Bleach cycle, 8
Preparing your laundry, 8
Special items, 8
Precautions and advice, 9
General safety, 9
Disposal, 9
Saving energy and respecting the environment, 9
Care and maintenance, 10
Cutting off the water or electricity supply, 10
Cleaning your appliance, 10
Cleaning the detergent dispenser, 10
Caring for your appliance door and drum, 10
Cleaning the pump, 10
Checking the water inlet hose, 10
Troubleshooting, 11
Service, 12
Before calling for Assistance, 12
WASHING MACHINE
WIE 107
Instructions for use
GB
Slovenèina,25
SL
РУССКИЙ,13
CIS
Hrvatski,37
HR
Magyar,49
HU
ЕЛЛЗНЙКБ,61
GR

Installation, Unpacking and levelling, Electric and water connections
Страница 2
- Изображение
- Текст
2
GB
Keep this instruction manual in a safe place for
future reference. Should the appliance be sold,
transferred or moved, make sure the instruction
manual accompanies the washing machine to inform
the new owner as to its operation and features.
Read these instructions carefully: they contain vital
information on installation, use and safety.
Unpacking and levelling
Unpacking
1. Unpack the washing machine.
2. Check whether the washing machine has been
damaged during transport. If this is the case, do not
install it and contact your retailer.
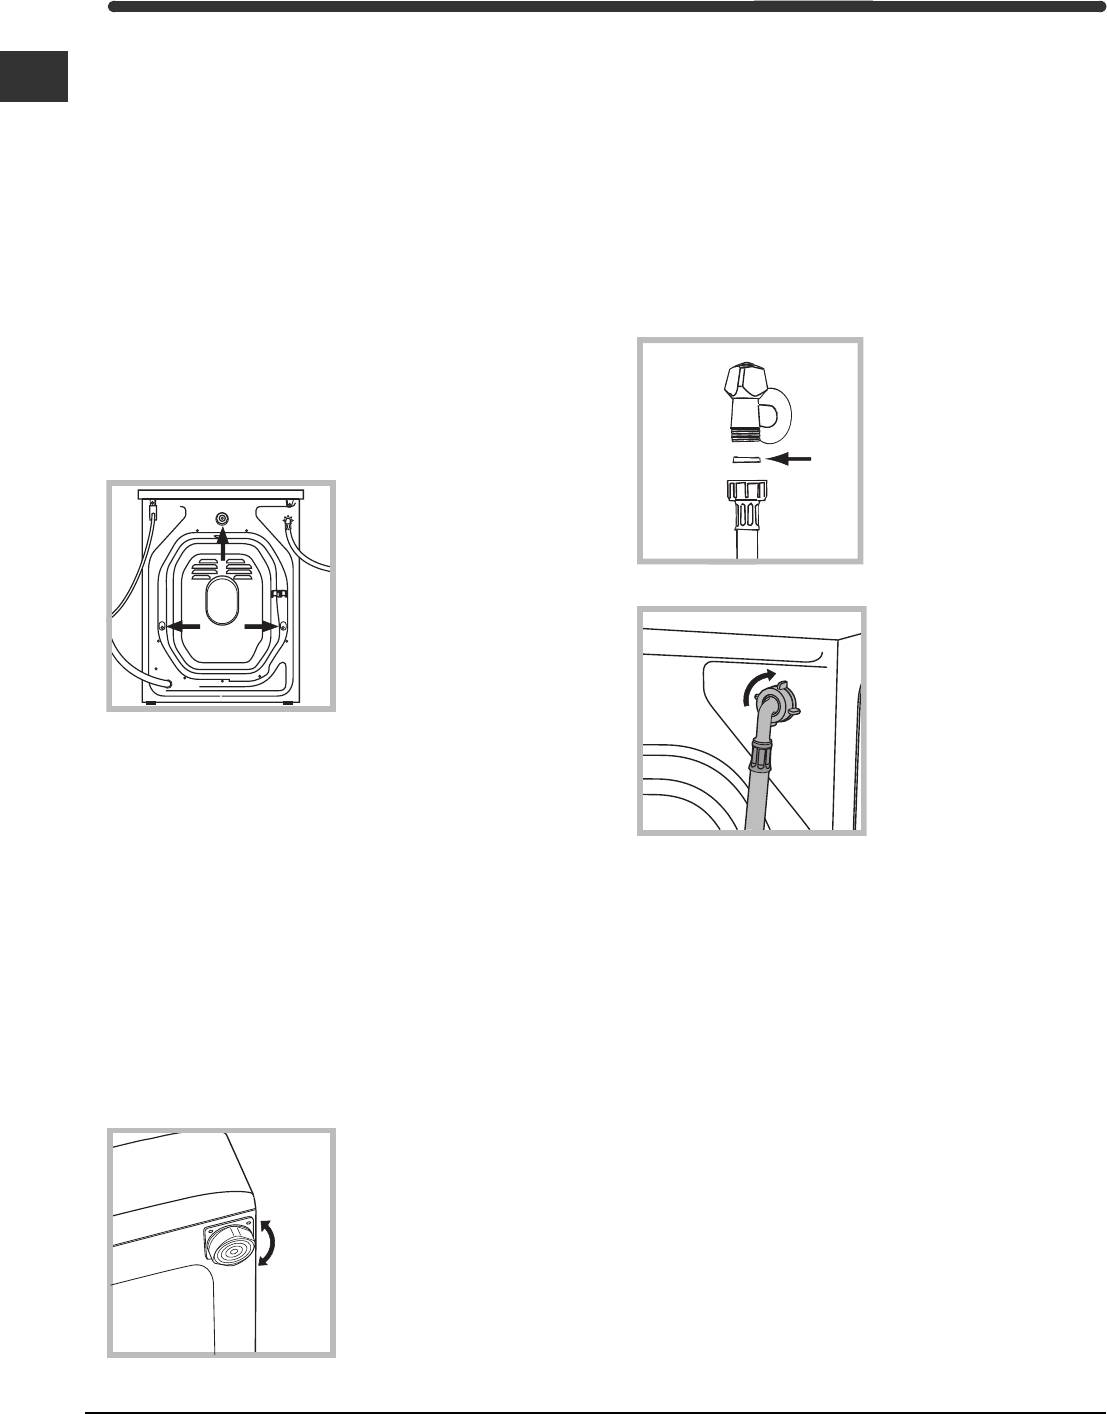
3. Remove the 3
protective screws and
the rubber washer with
the respective spacer,
situated on the rear of
the appliance (see
figure).
4. Seal the gaps using the plastic plugs provided.
5. Use the plug provided to seal the three holes
where the plug was housed, situated on the lower
right-hand side on the rear of your appliance.
6. Keep all the parts: you will need them again if the
washing machine needs to be moved to another
location.
Packaging materials are not children’s toys.
Levelling
1. Install the washing machine on a flat sturdy floor,
without resting it up against walls, furniture cabinets
or other.
2. If the floor is not
perfectly level, compen-
sate for any unevenness
by tightening or
loosening the adjustable
front feet (see figure);
the angle of inclination,
measured according to
the worktop, must not
exceed 2°.
Levelling your appliance correctly will provide it with
stability and avoid any vibrations, noise and shifting
during operation. If it is placed on a fitted or loose
carpet, adjust the feet in such a way as to allow
enough room for ventilation beneath the washing
machine.
Electric and water connections
Connecting the water inlet hose
1. Insert seal A into the
end of the inlet hose
and screw the latter
onto a cold water tap
with a 3/4 gas threaded
mouth (see figure).
Before making the
connection, allow the
water to run freely until
it is perfectly clear.
2. Connect the other end
of the water inlet hose to
the washing machine,
screwing it onto the
appliance’s cold water
inlet, situated on the top
right-hand side on the
rear of the appliance
(see figure).
3. Make sure there are no kinks or bends in the
hose.
The water pressure at the tap must be within the
values indicated in the Technical details table
(on the next page).
If the water inlet hose is not long enough, contact
a specialist store or an authorised serviceman.
Installation
A

3
GB
Service
Tr
oubleshooting
Precautions
Care
Programmes
Detergents
Installation
Description
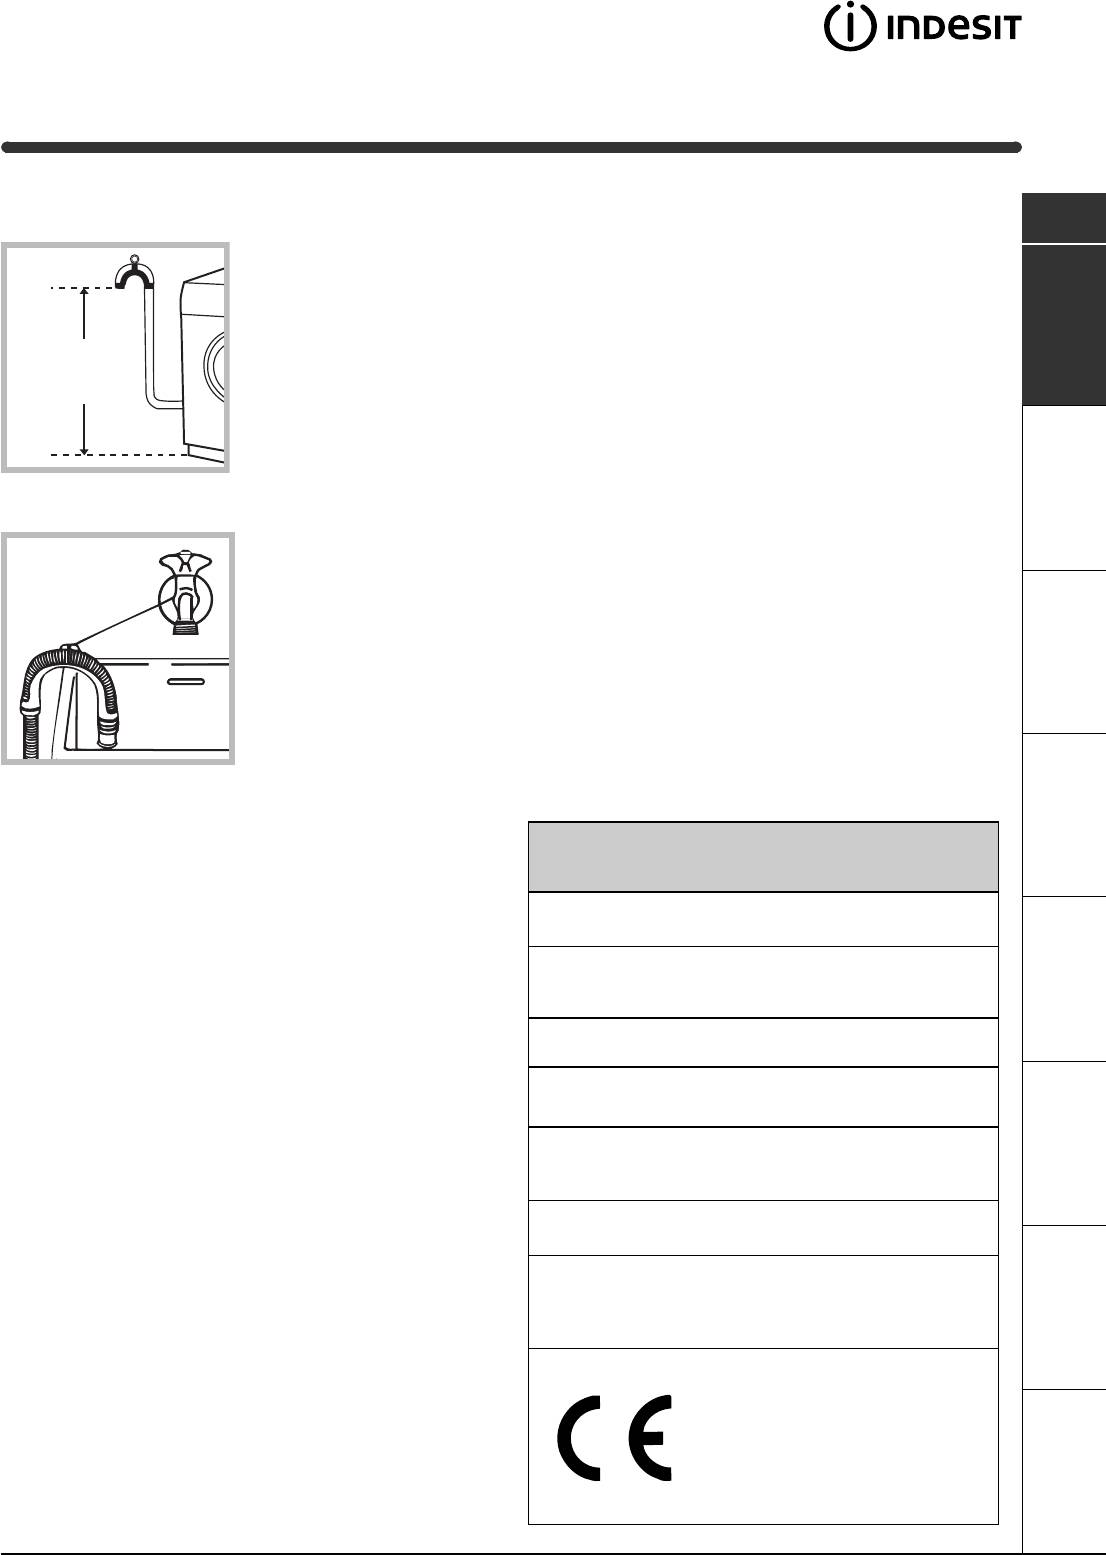
Connecting the drain hose
Connect the drain hose,
without bending it, to a
draining duct or a wall
drain situated between
65 and 100 cm from
the floor;
alternatively, place it
over the edge of a
basin, sink or tub,
fastening the duct
supplied to the tap (see
figure). The free end of
the hose should not be
underwater.
We advise against the use of hose extensions; in
case of absolute need, the extension must have the
same diameter as the original hose and must not
exceed 150 cm in length.
Electric connection
Before plugging the appliance into the mains
socket, make sure that:
the socket is earthed and in compliance with the
applicable law;
the socket is able to sustain the appliance’s
maximum power load indicated in the Technical
details table (on the right);
the supply voltage is included within the values i
ndicated on the Technical details table
(on the right);
the socket is compatible with the washing
machine’s plug. If this is not the case, replace
the socket or the plug.
The washing machine should not be installed in an
outdoor environment, not even when the area is
sheltered, because it may be very dangerous to
leave it exposed to rain and thunderstorms.
When the washing machine is installed, the mains
socket must be within easy reach.
Do not use extensions or multiple sockets.
The power supply cable must never be bent or
dangerously compressed.
The power supply cable must only be replaced by
an authorised serviceman.
Warning! The company denies all liability if and when
these norms are not respected.
The first wash cycle
Once the appliance has been installed, and before
you use it for the first time, run a wash cycle with
detergent and no laundry, setting the 90°C
programme without a pre-wash cycle.
65 — 100 cm
Technical details
Model
WIE 107
Dimensions
59.5 cm wide
85 cm high
52.5 cm deep
Capacity
from 1 to 5 kg
Electric
connections
voltage 220/230 Volts 50 Hz
maximum absorbed power 1850 W
Water
connections
maximum pressure 1 MPa (10 bar)
minimum pressure 0.05 MPa (0.5 bar)
drum capacity 46 litres
Spin speed
up to 1000 rpm
Control
programmes
according to
IEC456 directive
programme 2; temperature 60°C;
run with a load of 5 kg.
This appliance is compliant with the
following European Community
Directives:
— 73/23/CEE of 19/02/73 (Low
Voltage) and subsequent amendments
— 89/336/CEE of 03/05/89
(Electromagnetic Compatibility) and
subsequent amendments

4
GB
Control panel
Washing machine description
Control knob
Display
Detergent dispenser
SPIN
button
TEMPERATURE
button
START/STOP
button
START/RESET
button
Detergent dispenser to add detergent and fabric
softener (see page 8).
SPIN button to adjust the spin speed or exclude it
altogether (see page 7).
DELAY TIMER button to delay the start of the set
programme for a maximum period of 24 hours
(see page 7).
TEMPERATURE button to adjust the wash tempe-
rature (see page 7).
Display to programme the washing machine and
follow the wash cycle progress (see opposite page).
FUNCTION buttons: to select the functions
available. The button corresponding to the function
selected will remain on.
START/RESET button to start the programmes or
cancel any incorrect settings.
START/STOP button to turn the washing machine
on and off.
Control knob to select the wash programmes.
The knob stays still during the cycle.
DELAY TIMER
button
FUNCTION
Buttons

5
GB
Display
In addition to being a practical tool to programme your appliance (see page 7), the display provides useful
information concerning the wash cycle.
Once you have pressed the START/RESET button to
start the programme, the display will indicate the
amount of time left until the end of the wash cycle. If
a delayed start has been set (using the Delay Timer,
see page 7), the delay time will be indicated on the
display.
Service
Tr
oubleshooting
Precautions
Care
Programmes
Detergents
Installation
Description
Door lock:
If the symbol is on, the washing machine door is locked to prevent it from being opened accidentally. To avoid
any damages, wait for the symbol to switch itself off before you open the appliance door.
At the end of the programme, the word END is displayed.
In the event of an anomaly, an error code will appear, such as: F-01, which should be communicated to the
Service Centre (see page 12).
«MEMO» Programme
This programme allows you to store your favourite or most-used wash cycle.
All you have to do is set the desired programme and, once it has started, turn the KNOB to position
; the
wash cycle will be stored automatically and the word MEMO appears on the display, flashing for a few seconds.
Subsequently, you can start the «MEMO» cycle by simply turning the KNOB to position
; you will be able to
see the temperature/spin cycle/delay timer values by pressing the corresponding buttons; you will also be able to
modify them but this variation will only be valid for the programme in progress and it will not be stored in the
«MEMO» cycle.
If you want to store a new wash cycle, repeat the above-mentioned operations.

Starting and programmes, Programme table, Briefly: starting a programme
Страница 6
- Изображение
- Текст
6
GB
Type of fabric and
degree of soil
Programmes Tempe-
rature
D etergent
Fabric
softener
Stain removal
option/bleach
C ycle
length
(minutes)
D escription of wash cycle
pre-
w ash
w ash
Standard
Extremely soiled whites
(sheets, tablecloths, etc.)
1
90°C
135
Pre-wash, wash cycle, rinse cycles,
intermediate and final spin cycles
Extremely soiled whites
(sheets, tablecloths, etc.)
2
90°C
Delicate/
Traditional
125
Wash cycle, rinse cycles,
intermediate and final spin cycles
Heavily soiled whites and fast
colours
2
60°C
Delicate/
Traditional
110
Wash cycle, rinse cycles,
intermediate and final spin cycles
Heavily soiled whites and
delicate colours
2
40°C
Delicate/
Traditional
105
Wash cycle, rinse cycles,
intermediate and final spin cycles
Slightly soiled whites and
delicate colours (shirts,
jumpers, etc.)
3
40°C
Delicate/
Traditional
70
Wash cycle, rinse cycles,
intermediate and final spin cycles
Heavily soiled fast colours
(baby linen, etc.)
4
60
°C
Delicate
75
Wash cycle, rinse cycles, anti-
crease or delicate spin cycle
Heavily soiled fast colours
(baby linen, etc.)
4
40°C
Delicate
60
Wash cycle, rinse cycles, anti-
crease or delicate spin cycle
W ool
5
40°C
50
Wash cycle, rinse cycles
,
anti-
crease and delicate spin cycle
Very delicate fabrics
(curtains, silk, viscose, etc.)
6
30°C
45
Wash cycle, rinse cycles, anti-
crease or draining cycle
Tim e 4 you
Heavily soiled whites and fast
colours
7
60°C
65
Wash cycle, rinse cycles,
intermediate and final spin cycles
Slightly soiled whites and
delicate colours (shirts,
jumpers, etc.)
8
40°C
55
Wash cycle, rinse cycles,
intermediate and final spin cycles
Delicate colours (all types of
slightly soiled garments)
9
40
°C
45
Wash cycle, rinse cycles,
delicate spin cycle
Delicate colours (all types of
slightly soiled garments)
10
30°C
30
Wash cycle, rinse cycles and
delicate spin cycle
Sport
Sports shoes
(MAX. 2 pairs)
11
30
°C
50
Cold wash (without detergents),
wash cycle, rinse cycles, and
delicate spin cycle
Fabrics for sportswear
(Tracksuits, shorts, etc.)
12
30°C
60
Wash cycle, rinse cycles,
intermediate and final spin cycles
M EM O
Allows for any wash cycle to be stored
PAR TIAL PR OGR AM M ES
Rinse
Delicate/
Traditional
Rinse cycles and spin cycle
Spin
Draining and spin cycle
Drain
Draining
Starting and Programmes
Programme table
Notes
-For programmes 7 and 8, we advise against exceeding a wash load of 3.5 kg.
-For programme 12 we advise against exceeding a wash load of 2 kg.
-For the anti-crease function: see Easy iron, opposite page. The information contained in the table is purely indicative.
Special programme
Daily (programme 10 for Synthetics) is designed to wash lightly soiled garments in a short amount of time: it only lasts
30 minutes and allows you to save on both time and energy. By setting this programme (10 at 30°C), you can wash
different fabrics together (except for woollen and silk items), with a maximum load of 3 kg.
We recommend the use of liquid detergent.
Briefly: starting a programme
1. Turn the washing machine on by pressing button
.
2. Load your laundry into the washing machine and
shut the appliance door.
3. Set the knob to the desired programme. The
estimated duration of the selected programme is
displayed. The temperature and spin speed are
automatically set according to the programme
(to change them, see page 7).
4. Select any functions (see page 7).
5. Add the detergent and any fabric softener
(see page 8).
6. Start he programme by pressing the START/RESET
button.
To cancel it, keep the START/RESET button
pressed for at least 2 seconds.
7. When the programme has ended, the word END is
displayed. Take out your laundry and leave the
appliance door ajar to allow the drum to dry
thoroughly.
8. Turn the washing machine off by pressing button
.
(see page 5).

Personalisations, Setting the spin cycle, Setting the delay timer
Setting the temperature, Functions
- Изображение
- Текст
7
GB
Function
Effect
Comments
Enabled with
programmes:
Stain
removal
Bleaching cycle
designed to
remove the
toughest stains.
Please remember to pour the bleach into extra compartment 4
(see page 8).
This function is incompatible with the EASY IRON function.
2, 3, 4,
Rinse cycle.
Extra Rinse
Increases the
efficiency of the
rinse.
Recommended when the appliance has a full load or with large
quantities of detergent.
1, 2, 3, 4, 7,
8, 9, 11, 12,
Rinse cycle.
Easy iron
This option
reduces the
amount of
creasing on
fabrics, making
them easier to
iron.
When this function is set, programmes 4, 5, 6 will end, with the
laundry left to soak (Anti-crease), and the relative button flashes:
— to conclude the cycle, press the START/RESET button or the
EASY IRON button;
— to run the draining cycle alone, set the knob to the relative
symbol and press the START/RESET button.
This function is incompatible with the STAIN REMOVAL function.
3, 4, 5, 6, 7, 8,
9, Rinse
cycle.
Service
Tr
oubleshooting
Precautions
Care
Programmes
Detergents
Installation
Description
Personalisations
Setting the spin cycle
If, when the appliance is switched on, the KNOB is positioned on
a programme with a spin cycle, a fixed
appears. Press button
and the maximum spin speed allowed for the programme set
will be displayed, and the
icon flashes. Press it again and the
values lower until they reach OFF, which indicates that the spin
cycle has been excluded (press it again to go back to the
maximum value); stop on the desired speed, after approximately
2 seconds the setting is accepted: the symbol
remains fixed.
The spin cycle setting is enabled with all the programmes except
for 6 and the Draining cycle.
Setting the Delay Timer
Press the button
and you will see the word OFF on the
display, while the relative symbol flashes.
Press the button again and «1h» appears, that is, a delay of one
hour (this can reach up to 24h); stop on the «desired» delay; after
approximately 2 seconds the setting is accepted, following which,
the time for the set programme appears on the display and the
symbol remains on.
If you now press the START/RESET button, the set «delay»
appears; this decreases every hour until the start of the cycle. In
this phase, the «delay» can only be modified by decreasing it.
The Delay Timer regulation is enabled with all programmes.
Setting the temperature
If, when the appliance is switched on, the KNOB is positioned on a programme for which the temperature needs
to be regulated, a fixed appears. Press button and the maximum temperature allowed for the programme set
will be displayed and the icon flashes. Press it again and the temperature lowers until it reaches OFF, which
indicates a cold wash cycle (press it again to go back to the maximum value); stop on the desired value, after
approximately 2 seconds the setting is accepted: the symbol remains fixed.
The temperature adjustment is enabled with all wash programmes.
Functions
To enable a function:
1. press the button corresponding to the desired function, according to the table below;
2. the function is enabled when the corresponding button is illuminated.
Note: The rapid flashing of the button indicates that the corresponding function cannot be selected for the
programme set.
If you set a function that is incompatible with another function you selected previously, only the last one selected
will be enabled.
FUNCTION buttons

8
GB
Detergent dispenser
Good washing results also depend on the correct
dose of detergent: adding too much detergent won’t
necessarily make for a more efficient wash, and may
in fact cause build up on the interior of your
appliance and even pollute the environment.
Open up the detergent
dispenser and pour in
the detergent and fabric
softener, as follows.
compartment 1: Detergent for pre-wash
(powder)
Before pouring in the detergent, make sure that
extra compartment 4 has been removed.
compartment 2: Detergent for the wash cycle
(powder or liquid)
Liquid detergent should only be poured in
immediately prior to the wash cycle start.
compartment 3: Additives (fabric softeners, etc.)
The fabric softener should not overflow from the grid.
extra compartment 4: Bleach
Do not use hand wash detergent because it may
form too much foam.
Bleach cycle
Traditional bleach should be used on sturdy
white fabrics, and delicate bleach for coloured
fabrics, synthetics and for wool.
Place extra
compartment 4,
provided, into
compartment 1.
When pouring in the
bleach, be careful not to
exceed the «max» level
indicated on the central
pivot (see figure).
To run the bleach cycle alone, pour the bleach into extra
compartment 4 and set the Rinse programme
.
To bleach during a wash cycle, pour in the detergent
and fabric softener, set the desired programme and
enable the Stain removal function (see page 7).
The use of extra compartment 4 excludes the
possibility of using the pre-wash cycle. In addition,
the bleach cycle cannot be run with programmes 6
(Silk) and Daily (see page 6).
Preparing your laundry
Divide your laundry according to:
— the type of fabric/the symbol on the label.
— the colours: separate coloured garments from
whites.
Empty all pockets and check for loose buttons.
Do not exceed the weight limits stated below,
which refer to the weight when dry:
Sturdy fabrics: max 5 kg
Synthetic fabrics: max 2.5 kg
Delicate fabrics: max 2 kg
Wool: max 1 kg
How much does your laundry weigh?
1 sheet 400-500 g
1 pillow case 150-200 g
1 tablecloth 400-500 g
1 bathrobe 900-1,200 g
1 towel 150-250 g
Special items
Curtains: fold curtains and place them in a pillow
case or mesh bag. Wash them separately without
exceeding half the appliance load. Use programme 6
which excludes the spin cycle automatically.
Quilted coats and windbreakers: if they are
padded with goose or duck down, they can be
machine-washed. Turn the garments inside out and
load a maximum of 2-3 kg, repeating the rinse cycle
once or twice and using the delicate spin cycle.
Wool: for best results, use a specific detergent,
taking care not to exceed a load of 1 kg.
Detergents and laundry
1
2
3
4

Precautions and advice, General safety, Disposal
Saving energy and respecting the environment
- Изображение
- Текст
9
GB
Precautions and advice
Service
Tr
oubleshooting
Precautions
Care
Programmes
Detergents
Installation
Description
The washing machine was designed and built in
compliance with the applicable international safety
regulations. The following information is provided for
your safety and should consequently be read carefully.
General safety
This appliance has been designed for non-
professional, household use and its functions must
not be changed.
This washing machine should only be used by
adults and in accordance with the instructions
provided in this manual.
Never touch the washing machine when barefoot
or with wet or damp hands or feet.
Do not pull on the power supply cable to unplug
the appliance from the electricity socket. Pull the
plug out yourself.
Do not open the detergent dispenser while the
appliance is in operation.
Do not touch the drain water as it could reach
very high temperatures.
Never force the washing machine door: this could
damage the safety lock mechanism designed to
prevent any accidental openings.
In the event of a malfunction, do not under any
circumstances touch internal parts in order to
attempt repairs.
Always keep children well away from the
appliance while in operation.
The appliance door tends to get quite hot during
the wash cycle.
Should it have to be moved, proceed with the
help of two or three people and handle it with the
utmost care. Never try to do this alone, because
the appliance is very heavy.
Before loading your laundry into the washing
machine, make sure the drum is empty.
Disposal
Disposing of the packaging material:
observe local regulations, so the packaging can
be re-used.
Disposing of an old washing machine:
before scrapping your appliance, cut the power
supply cable and remove the appliance door.
Saving energy and respecting the
environment
Environmentally-friendly technology
If you only see a little water through your appliance
door, this is because thanks to the latest Indesit
technology, your washing machine only needs less
than half the amount of water to get the best
results: an objective reached to respect the
environment.
Saving on detergent, water,
energy and time
To avoid wasting resources, the washing machine
should be used with a full load. A full load instead
of two half loads allows you to save up to 50% on
energy.
The pre-wash cycle is only necessary on
extremely soiled garments. Avoiding it will save on
detergent, time, water and between 5 and 15%
energy.
Treating stains with a stain remover or leaving
them to soak before washing will cut down the
need to wash them at high temperatures. A
programme at 60°C instead of 90°C or one at
40°C instead of 60°C will save up to 50% on
energy.
Use the correct quantity of detergent depending
on the water hardness, how soiled the garments
are and the amount of laundry you have, to avoid
wastage and to protect the environment: despite
being biodegradable, detergents do contain
ingredients that alter the natural balance of the
environment. In addition, avoid using fabric
softener as much as possible.
If you use your washing machine from late in the
afternoon until the early hours of the morning, you
will help reduce the electricity board’s peak load.
The Delay Timer option (see page 7) helps to
organise your wash cycles accordingly.
If your laundry has to be dried in a tumble dryer,
select a high spin speed. Having the least water
possible in your laundry will save you time and
energy in the drying process.

10
GB
Care and maintenance
Cutting off the water or electricity
supply
Turn off the water tap after every wash. This will
limit the wear of your appliance’s water system
and also prevent leaks.
Unplug your appliance when cleaning it and
during all maintenance operations.
Cleaning your appliance
The exterior and rubber parts of your appliance can
be cleaned with a soft cloth soaked in lukewarm
soapy water. Do not use solvents or abrasives.
Cleaning the detergent dispenser
Remove the dispenser
by pulling it out (see
figure).
Wash it under running
water; this operation
should be repeated
frequently.
Caring for your appliance door and
drum
Always leave the appliance door ajar to prevent
unpleasant odours from forming.
Cleaning the pump
The washing machine is fitted with a self-cleaning
pump that does not require any maintenance.
Sometimes, small items (such as coins or buttons)
may fall into the pre-chamber that protects the
pump, situated in the lower part of the same.
Make sure the wash cycle has ended and unplug
the appliance.
To access the pre-chamber:
1. using a screwdriver,
remove the cover panel
on the lower front of the
washing machine (see
figure);
2. unscrew the lid
rotating it anti-
clockwise (see figure): a
little water may trickle
out. This is perfectly
normal;
3. clean the interior thoroughly;
4. screw the lid back on;
5. reposition the panel, making sure the hooks are
securely in place before you push it onto the
appliance.
Checking the water inlet hose
Check the water inlet hose at least once a year. If
you see any cracks, replace it immediately: during
the wash cycles, water pressure is very strong and
a cracked hose could easily split open.
Never use hoses that have already been used.

Комментарии
-
Bookmarks
Quick Links
Related Manuals for Indesit WIE 107
Summary of Contents for Indesit WIE 107
-
Page 16
Äèñïëåé Ðàñïðåäåëèòåëü ìîþùèõ ñðåäñòâ Äèñïëåé… -
Page 18
M E M O… -
Page 23
Àâòîðèçîâàííûé Ñåðâèñíûé öåíòð… -
Page 26
njem, tako da se bo novi lastnik lahko seznanil z delovanjem in ustreznimi opozorili. Pozorno preberite navodila. Našli boste pomembne informacije glede namestitve, uporabe in zagotavljanja varnosti. ko). Pralni stroj namestite na ravna in trda tla. Naj se ne dotika sten, pohištva ipd. pralnega stroja ko). -
Page 27
Odsvetuj Ko je pralni st Ne uporabljajte podaljškov in razdelivcev. Kabel naj ne bo prepognjen ali stisnjen. °… -
Page 29
Vratca so blokirana:… -
Page 30
M E M O 90°C 90°C 60°C 40°C 40°C °C 40°C 40°C 30°C 60°C 40°C °C 30°C °C 30°C… -
Page 32
Ne uporabljajte… -
Page 33
Ta pralni stroj je izdelan po mednarodnih varnostnih predpisih. Pozorno preberite naslednja opozorila, ki so zap… -
Page 34
Ne uporabljajte rabljenih cevi. -
Page 38
cioniranju stroja i o upozorenjima koja se na njega odnose. Postav… -
Page 39
Ne p Ne smije se pregibati ili pritiskati kabel. °… -
Page 41
Vrata blokirana:… -
Page 42
M E M O °C °C °C °C °C 60°C °C °C °C °C °C 40°C °C 30°C °C… -
Page 44
Nemojte up Tradicionalno sredstvo za izbjeljivanje koristi se za otporne bijele tkanine, a ono blago za obojene tkanine, sintetiku i vunu. -
Page 46
Ostavljajte uvijek pritvorena vrata kako bi se izbjeglo stvaranje neugodnih mirisa. na satu d kazaljke… -
Page 50
A csomagolóanyag nem gyermekjáték A mosógépet sík és kemény padlóra állítsa, úgy, hogy ne érjen falhoz, bútorhoz vagy máshoz. Illessze az A tömí lennie… -
Page 51
Ne használjon hosszabbítót vagy elosztót. Ne legyen a kábel megtörve vagy összenyomva. A hálózati kábelt csak megbízott szakember cserélheti. °C;… -
Page 53
Ajtózár:… -
Page 54
M E M O 9 0 °C 9 0 °C 6 0 °C 4 0 °C 4 0 °C °C 4 0 °C 4 0 °C 3 0 °C 6 0 °C 4 0 °C °C 3 0 °C °C 3 0 °C… -
Page 57
A mosógépet a nemzetközi biztonsági szabványok… -
Page 58
Az ajtót hagyja mindig résre nyitva, nehogy rossz szagok keletkezzenek. A mosógép öntisztító szivattyúval van felszerelve, melynek nincs szüksége tisztítási és karbant az óra járásával ellentétes irányban forgatva csavarja le a fedelet természetes, hogy egy kevés víz kifolyik; Soha ne alkalmazzon már használt csöveket. -
Page 60
öz. -
Page 64
ÅðéëïãÝáò ÈÞêç áðïññõðáíôéêþí ÈÞêç áðïññõðáíôéêþí ÐëÞêôñï åðéëïãÞò Ïèüíç… -
Page 66
ME M O… -
Page 67
âëÝðå óåë. 68…
This manual is also suitable for:
Wie 127

Instructions for use
WASHING MACHINE
Contents
GB
Installation, 2-3
GB
CIS
SL
Unpacking and levelling, 2
Electric and water connections, 2-3
English,1
ÐÓÑÑÊÈÉ,13
Slovenèina,25
The first wash cycle, 3
Technical details, 3
Washing machine description, 4-5
HR
HU
GR
Control panel, 4
Display, 5
Hrvatski,37
Magyar,4 9
ÅËËÇÍÉÊÁ,61
MEMO Programme, 5
Starting and Programmes, 6
Briefly: how to start a programme, 6
Programme table, 6
Personalisations, 7
Setting the spin cycle, 7
WIE 107
Setting the Delay Timer, 7
Setting the temperature, 7
Functions, 7
Detergents and laundry, 8
Detergent dispenser, 8
Bleach cycle, 8
Preparing your laundry, 8
Special items, 8
Precautions and advice, 9
General safety, 9
Disposal, 9
Saving energy and respecting the environment, 9
Care and maintenance, 10
Cutting off the water or electricity supply, 10
Cleaning your appliance, 10
Cleaning the detergent dispenser, 10
Caring for your appliance door and drum, 10
Cleaning the pump, 10
Checking the water inlet hose, 10
Troubleshooting, 11
Service, 12
Before calling for Assistance, 12
1
Installation
Keep this instruction manual in a safe place for
Levelling your appliance correctly will provide it with
GB
future reference. Should the appliance be sold,
stability and avoid any vibrations, noise and shifting
transferred or moved, make sure the instruction
during operation. If it is placed on a fitted or loose
manual accompanies the washing machine to inform
carpet, adjust the feet in such a way as to allow
the new owner as to its operation and features.
enough room for ventilation beneath the washing
machine.
Read these instructions carefully: they contain vital
information on installation, use and safety.
Electric and water connections
Unpacking and levelling
Connecting the water inlet hose
Unpacking
1. Insert seal A into the
1. Unpack the washing machine.
end of the inlet hose
2. Check whether the washing machine has been
and screw the latter
damaged during transport. If this is the case, do not
onto a cold water tap
install it and contact your retailer.
with a 3/4 gas threaded
A
mouth (see figure).
3. Remove the 3
Before making the
protective screws and
connection, allow the
the rubber washer with
water to run freely until
the respective spacer,
it is perfectly clear.
situated on the rear of
the appliance (see
2. Connect the other end
figure).
of the water inlet hose to
the washing machine,
screwing it onto the
appliance’s cold water
inlet, situated on the top
right-hand side on the
4. Seal the gaps using the plastic plugs provided.
rear of the appliance
5. Use the plug provided to seal the three holes
(see figure).
where the plug was housed, situated on the lower
right-hand side on the rear of your appliance.
6. Keep all the parts: you will need them again if the
3. Make sure there are no kinks or bends in the
washing machine needs to be moved to another
hose.
location.
The water pressure at the tap must be within the
Packaging materials are not children’s toys.
values indicated in the Technical details table
(on the next page).
Levelling
If the water inlet hose is not long enough, contact
1. Install the washing machine on a flat sturdy floor,
a specialist store or an authorised serviceman.
without resting it up against walls, furniture cabinets
or other.
2. If the floor is not
perfectly level, compen-
sate for any unevenness
by tightening or
loosening the adjustable
front feet (see figure);
the angle of inclination,
measured according to
the worktop, must not
exceed 2°.
2
Connecting the drain hose
Do not use extensions or multiple sockets.
GB
Connect the drain hose,
The power supply cable must never be bent or
without bending it, to a
dangerously compressed.
draining duct or a wall
drain situated between
The power supply cable must only be replaced by
65 and 100 cm from
an authorised serviceman.
65 — 100 cm
the floor;
Warning! The company denies all liability if and when
these norms are not respected.
The first wash cycle
Once the appliance has been installed, and before
alternatively, place it
you use it for the first time, run a wash cycle with
over the edge of a
detergent and no laundry, setting the 90°C
basin, sink or tub,
programme without a pre-wash cycle.
fastening the duct
supplied to the tap (see
figure). The free end of
the hose should not be
underwater.
We advise against the use of hose extensions; in
case of absolute need, the extension must have the
same diameter as the original hose and must not
Technical details
exceed 150 cm in length.
Electric connection
Model
WIE 107
Before plugging the appliance into the mains
59.5 cm wide
Dimensions
85 cm high
socket, make sure that:
52.5 cm deep
the socket is earthed and in compliance with the
applicable law;
Capacity
from 1 to 5 kg
the socket is able to sustain the appliance’s
Electric
voltage 220/230 Volts 50 Hz
maximum power load indicated in the Technical
connections
maximum absorbed power 1850 W
details table (on the right);
maximum pressure 1 MPa (10 bar)
Water
minimum pressure 0.05 MPa (0.5 bar)
connections
the supply voltage is included within the values i
drum capacity 46 litres
ndicated on the Technical details table
(on the right);
Spin speed
up to 1000 rpm
Control
the socket is compatible with the washing
programmes
programme 2; temperature 60°C;
machine’s plug. If this is not the case, replace
according to
run with a load of 5 kg.
the socket or the plug.
IEC456 directive
This appliance is compliant with the
The washing machine should not be installed in an
following European Community
outdoor environment, not even when the area is
Directives:
sheltered, because it may be very dangerous to
— 73/23/CEE of 19/02/73 (Low
ServiceTroubleshootingPrecautions CareProgrammes DetergentsInstallation Description
leave it exposed to rain and thunderstorms.
Voltage) and subsequent amendments
— 89/336/CEE of 03/05/89
When the washing machine is installed, the mains
(Electromagnetic Compatibility) and
subsequent amendments
socket must be within easy reach.
3
- Manuals
- Brands
- Indesit Manuals
- Washer
- WIE 107
- Instructions for use manual
-
Contents
-
Table of Contents
-
Troubleshooting
-
Bookmarks
Available languages
-
EN
-
PL
Quick Links
English, 13
Downloaded From WashingMachine-Manual.com Manuals
Related Manuals for Indesit WIE 107
Summary of Contents for Indesit WIE 107
-
Page 1
English, 13 Downloaded From WashingMachine-Manual.com Manuals… -
Page 2
(zobacz rysunek). (zobacz rysunek). (zobacz rysunek). (zobacz na s¹siedniej stronie). (zobacz rysunek) . Downloaded From WashingMachine-Manual.com Manuals… -
Page 3
zobacz rysunek (zobacz obok); zobacz obok ° Po zainstalowaniu pr Downloaded From WashingMachine-Manual.com Manuals… -
Page 4
Pokrêt³o Wyœwietlacz Szufladka œrodków pior¹cych (display) Szufladka na œrodki pior¹ce zobacz str. 8 zobacz str. 7 (zobacz str. 7). Pokrêt³o zobacz str. 7 Wyœwietlacz (display) Downloaded From WashingMachine-Manual.com Manuals… -
Page 5
(zobacz str. 7) zobacz str. 7 Zablokowane drzwiczki pralki: (zobacz str. 12). Downloaded From WashingMachine-Manual.com Manuals… -
Page 6
zobacz str. 8 zobacz str. 7 (zobacz str. 7). 9 0 °C 9 0 °C 6 0 °C 4 0 °C 4 0 °C °C 4 0 °C 4 0 °C 3 0 °C 6 0 °C 4 0 °C °C 3 0 °C °C… -
Page 7
(zobacz str. 8 Downloaded From WashingMachine-Manual.com Manuals… -
Page 8
zobacz str. 6 Tradycyjnego delikatnego zobacz rysunek) zobacz str. 7 Downloaded From WashingMachine-Manual.com Manuals… -
Page 9
• zobacz str. 7 Downloaded From WashingMachine-Manual.com Manuals… -
Page 10
zobacz rysunek ; zobacz rysunek zobacz rysunek : Downloaded From WashingMachine-Manual.com Manuals… -
Page 11
zobacz str. 12 zobacz str. 7). zobacz str. 3). zobacz str. 3). zobacz str. 6 zobacz str. 7). zobacz str. 3 zobacz str. 2). zobacz str. 2 zobacz str. 2 zobacz str. 2 zobacz str. 10 zobacz str. 3 Downloaded From WashingMachine-Manual.com Manuals… -
Page 12
• zobacz str. 11); Downloaded From WashingMachine-Manual.com Manuals… -
Page 13: Table Of Contents
Starting and Programmes, 18 Briefly: how to start a programme, 18 Programme table, 18 Personalisations, 19 Setting the spin cycle, 19 WIE 107 Setting the Delay Timer, 19 Setting the temperature, 19 Functions, 19 Detergents and laundry, 20 Detergent dispenser, 20…
-
Page 14: Installation
Installation Keep this instruction manual in a safe place for Levelling your appliance correctly will provide it with future reference. Should the appliance be sold, stability and avoid any vibrations, noise and shifting transferred or moved, make sure the instruction during operation.
-
Page 15: The First Wash Cycle
Technical details exceed 150 cm in length. Electric connection Model WIE 107 Before plugging the appliance into the mains 59.5 cm wide Dimensions 85 cm high socket, make sure that: 53,5 cm deep •…
-
Page 16: Washing Machine Description
Washing machine description Control panel FUNCTION Buttons START/RESET button START/STOP button Display Control knob Detergent dispenser TEMPERATURE button SPIN DELAY TIMER button button Detergent dispenser to add detergent and fabric FUNCTION buttons: to select the functions softener (see page 20). available.
-
Page 17: Display
Display In addition to being a practical tool to programme your appliance (see page 19), the display provides useful information concerning the wash cycle. Once you have pressed the START/RESET button to start the programme, the display will indicate the amount of time left until the end of the wash cycle.
-
Page 18: Starting And Programmes
Starting and Programmes Briefly: starting a programme 5. Add the detergent and any fabric softener (see page 20). 1. Turn the washing machine on by pressing button 6. Start he programme by pressing the START/RESET 2. Load your laundry into the washing machine and button.
-
Page 19: Personalisations
Personalisations Setting the spin cycle FUNCTION buttons If, when the appliance is switched on, the KNOB is positioned on a programme with a spin cycle, a fixed appears. Press button and the maximum spin speed allowed for the programme set will be displayed, and the icon flashes.
-
Page 20: Detergents And Laundry
Detergents and laundry Detergent dispenser The use of extra compartment 4 excludes the possibility of using the pre-wash cycle. In addition, Good washing results also depend on the correct the bleach cycle cannot be run with programmes 6 dose of detergent: adding too much detergent won’t (Silk) and Daily (see page 18).
-
Page 21: Precautions And Advice
If you only see a little water through your appliance not be changed. door, this is because thanks to the latest Indesit technology, your washing machine only needs less • This washing machine should only be used by…
-
Page 22: Care And Maintenance
Care and maintenance Cutting off the water or electricity Cleaning the pump supply The washing machine is fitted with a self-cleaning • Turn off the water tap after every wash. This will pump that does not require any maintenance. limit the wear of your appliance’s water system Sometimes, small items (such as coins or buttons) and also prevent leaks.
-
Page 23: Troubleshooting
Troubleshooting Your washing machine could fail to work. Before calling for Assistance (see page 24), make sure the problem can’t easily be solved by consulting the following list. Possible causes/Solution: Problem • The appliance is not plugged into the socket, or not enough to The washing machine won’t make contact.
-
Page 24: Service
Service 195042001.00 11/2003 — Xerox Business Services Before calling for Assistance: • Check whether you can solve the problem on your own (see page 23); • Restart the programme to check whether the problem has been solved; • If this is not the case, contact an authorised Technical Service Centre on the telephone number provided on the guarantee certificate.
Instructions for use WASHING MACHINE Contents GB English,1 HR Hrvatski,37 CIS ÐÓÑÑÊÈÉ,13 HU Magyar,49 SL Slovenèina,25 GR ÅËËÇÍÉÊÁ,61 GB Installation, 2-3 Unpacking and levelling, 2 Electric and water connections, 2-3 The first wash cycle, 3 Technical details, 3 Washing machine description, 4-5
Installation Keep this instruction manual in a safe place for future reference. Should the appliance be sold, transferred or moved, make sure the instruction manual accompanies the washing machine to inform the new owner as to its operation and features. GB Read these instructions carefully:
Do not use extensions or multiple sockets. Connecting the drain hose The power supply cable must never be bent or dangerously compressed. The power supply cable must only be replaced by an authorised serviceman. GB Installation 65 — 100 cm Connect the drain hose, without bending it, to a
Washing machine description Control panel FUNCTION GB Buttons START/RESET button START/STOP button Display Detergent dispenser Control knob TEMPERATURE button SPIN button Detergent dispenser to add detergent and fabric softener (see page 8). SPIN button to adjust the spin speed or exclude it
Display GB Description Once you have pressed the START/RESET button to start the programme, the display will indicate the amount of time left until the end of the wash cycle. If a delayed start has been set (using the Delay Timer, see page 7), the delay time will be indicated on the display.
Starting and Programmes Briefly: starting a programme GB 5. Add the detergent and any fabric softener (see page 8). 6. Start he programme by pressing the START/RESET button. To cancel it, keep the START/RESET button pressed for at least 2 seconds. 7. When the programme has ended, the word END is
Personalisations FUNCTION buttons Setting the spin cycle Programmes Press the button and you will see the word OFF on the display, while the relative symbol flashes. Press the button again and «1h» appears, that is, a delay of one hour (this can reach up to 24h); stop on the «desired» delay; after
Detergents and laundry Detergent dispenser GB Good washing results also depend on the correct dose of detergent: adding too much detergent won’t necessarily make for a more efficient wash, and may in fact cause build up on the interior of your appliance and even pollute the environment. 4 1 2 3
Precautions and advice General safety This appliance has been designed for nonprofessional, household use and its functions must not be changed. Do not pull on the power supply cable to unplug the appliance from the electricity socket. Pull the plug out yourself. Do not touch the drain water
Care and maintenance Cutting off the water or electricity supply GB Turn off the water tap after every wash. This will limit the wear of your appliance’s water system and also prevent leaks. Unplug your appliance when cleaning it and during all maintenance operations. Cleaning your appliance
Troubleshooting Your washing machine could fail to work. Before calling for Assistance (see page 12), make sure the problem can’t easily be solved by consulting the following list. The wash cycle won’t start. The appliance door is not shut properly (the word DOOR is displayed). button has not
Service Before calling for Assistance: Check whether you can solve the problem on your own (see page 11); Restart the programme to check whether the problem has been solved; If this is not the case, contact an authorised Technical Service Centre on the telephone number provided on the
Ðóêîâîäñòâî ïî ýêïóàòàöèè ÑÒÈÐÀËÜÍÀß ÌÀØÈÍÀ Ñîäåðæàíèå CIS ÐÓÑÑÊÈÉ CIS Óñòàíîâêà, 14-15 Ðàñïàêîâêà è âûðàâíèâàíèå, 14 Ïîäêëþ÷åíèå ê âîäîïðîâîäíîé è ýëåêòðè÷åñêîé ñåòè, 14-15 Ïðîáíûé öèêë ñòèðêè, 15 Òåõíè÷åñêèå õàðàêòåðèñòèêè, 15 Îïèñàíèå ñòèðàëüíîé ìàøèíû, 16-17 Ïàíåëü óïðàâëåíèÿ, 16 Äèñïëåé, 17
Óñòàíîâêà Ñîõðàíèòå äàííîå ðóêîâîäñòâî. Îíî äîëæíî áûòü â êîìïëåêòå ñî ñòèðàëüíîé ìàøèíîé â ñëó÷àå ïðîäàæè, ïåðåäà÷è îáîðóäîâàíèÿ èëè ïðè ïåðååçäå íà íîâóþ êâàðòèðó, ÷òîáû íîâûé âëàäåëåö îáîðóäîâàíèÿ ìîã îçíàêîìèòüñÿ ñ ïðàâèëàìè åãî ôóíêöèîíèðîâàíèÿ è îáñëóæèâàíèÿ. +15 Âíèìàòåëüíî ïðî÷èòàéòå
Ïîäñîåäèíåíèå ñëèâíîãî øëàíãà Ïî çàâåðøåíèè óñòàíîâêè, ïåðåä íà÷àëîì ýêñïëóàòàöèè íåîáõîäèìî ïðîèçâåñòè îäèí öèêë ñòèðêè ñî ñòèðàëüíûì ïîðîøêîì, íî áåç áåëüÿ, ïî ïðîãðàììå 90°C áåç ïðåäâàðèòåëüíîé ñòèðêè. Òåõíè÷åñêèå õàð àêòåð èñòèêè Ðàçìåðû øèðèíà 59,5 ñì âûñîòà 85 ñì ãëóáèíà 52 ,5 ñì Çàãð óçêà 1
Îïèñàíèå ñòèðàëüíîé ìàøèíû Ïàíåëü óïðàâëåíèÿ +15 Êíîïêè âûáîðà ÔÓÍÊÖÈÈ Êíîïêà ÏÓÑÊ/ÑÁÐÎÑ (Start/Reset) Êíîïêà ÂÊËÞ×ÅÍÈÅ/ ÂÛÊËÞ×ÅÍÈÅ Äèñïëåé Ðàñïðåäåëèòåëü ìîþùèõ ñðåäñòâ Êíîïêà ÒÅÌÏÅÐÀÒÓÐÀ Êíîïêà ÎÒÆÈÌ Ðàñïðåäåëèòåëü ìîþùèõ ñðåäñòâ äëÿ çàãðóçêè ñòèðàëüíîãî ïîðîøêà è ñìÿã÷èòåëåé (ñì. ñ. 20). Êíîïêà
Äèñïëåé Äèñïëåé ÿâëÿåòñÿ óäîáíûì ñðåäñòâîì ïðîãðàììèðîâàíèÿ ñòèðàëüíîé ìàøèíû (ñì. ñòð. 19), à òàêæå èñòî÷íèêîì ïîëåçíîé èíôîðìàöèè î âûïîëíÿåìîì öèêëå ñòèðêè. Óñòàíîâêà Îïèñàíèå Ïðè íàæàòèè êíîïêè ÏÓÑÊ/ÑÁÐÎÑ (Start/Reset) äëÿ çàïóñêà ïðîãðàììû íà äèñïëåå ïîêàçûâàåòñÿ ïðèáëèçèòåëüíîå âðåìÿ,
Çàïóñê ìàøèíû. Ïðîãðàììû +15 Êðàòêèå èíñòðóêöèè: Ïîðÿäîê çàïóñêà ïðîãðàììû 6. Çàïóñòèòå ïðîãðàììó, íàæàâ êíîïêó ÏÓÑÊ/ÑÁÐÎÑ (Start/Reset). Äëÿ îòìåíû çàïóñêà äåðæèòå íàæàòîé êíîïêó ÏÓÑÊ/ ÑÁÐÎÑ (Start/Reset) â òå÷åíèå 2-õ ñåêóíä. Ïî îêîí÷àíèè ïðîãðàììû íà äèñïëåå ïîÿâèòñÿ ñîîáùåíèå END (Êîíåö).
Ïåðñîíàëèçàöèÿ ñòèðêè Êíîïêè âûáîðà ÔÓÍÊÖÈÈ Óñòàíîâêà ñêîðîñòè îòæèìà Óñòàíîâêà Åñëè, êîãäà ìàøèíà âêëþ÷åíà, Ïðîãðàììàòîð óñòàíîâëåíà íà CIS ïðîãðàììó, ïðåäóñìàòðèâàþùóþ îòæèì, íà äèñïëåå óñòîé÷èâî íà äèñïëåå áóäåò áóäåò ãîðåòü ñèìâîë . Ïðè íàæàòèè êíîïêè îòîáðàæàòüñÿ ìàêñèìàëüíàÿ äîïóñòèìàÿ äëÿ
Ìîþùèå ñðåäñòâà è áåëüå +15 Ðàñïðåäåëèòåëü ìîþùèõ ñðåäñòâ Õîðîøèé ðåçóëüòàò ñòèðêè çàâèñèò òàêæå îò ïðàâèëüíîé äîçèðîâêè ìîþùåãî ñðåäñòâà: åãî èçáûòîê íå ãàðàíòèðóåò áîëåå ýôôåêòèâíóþ ñòèðêó, íàïðîòèâ ìîæåò ïðèâåñòè ê îáðàçîâàíèþ íàëåòîâ âíóòðè ìàøèíû è çàãðÿçíåíèþ îêðóæàþùåé ñðåäû. 4 1 2 3
Ïðåäóïðåæäåíèÿ è ðåêîìåíäàöèè Îáùèå ïðàâèëà áåçîïàñíîñòè Ñòèðàëüíàÿ ìàøèíà äîëæíà èñïîëüçîâàòüñÿ òîëüêî âçðîñëûìè ëèöàìè, ñ îáëþäàþùèìè èíñòðóêöèè, ïðèâåäåííûå â äàííîì ðóêîâîäñòâå. Íå òÿíèòå çà ïèòàþùèé êàáåëü, ÷òîáû âûíóòü âèëêó èç ðîçåòêè: áåðèòåñü çà âèëêó. Íå êàñàéòåñü ñëèâàåìîé âîäû, åå
Îáñëóæèâàíèå è óõîä +15 Îòêëþ÷åíèå âîäû è ýëåêòðè÷åñòâà ×èñòêà íàñîñà Ïåðåêðûâàéòå âîäîïðîâîäíûé êðàí ïîñëå êàæäîé ñòèðêè. Òàêèì îáðàçîì ñîêðàùàåòñÿ èçíîñ âîäîïðîâîäíîé ñèñòåìû ñòèðàëüíîé ìàøèíû è óñòðàíÿåòñÿ âåðîÿòíîñòü ïðîòå÷åê. Ñòèðàëüíàÿ ìàøèíà èìååò ñëèâíîé íàñîñ ñàìîî÷èùàþùåãîñÿ òèïà,
Íåèñïðàâíîñòè è ìåòîäû èõ óñòðàíåíèÿ  ñëó÷àå íåóäîâëåòâîðèòåëüíûõ ðåçóëüòàòîâ ñòèðêè èëè âîçíèêíîâåíèÿ íåèñïðàâíîñòåé, ïðåæäå ÷åì îáðàòèòüñÿ â Àâòîðèçîâàííûé Ñåðâèñíûé öåíòð (ñì. ñ. 24), ïðî÷èòàéòå ýòîò ðàçäåë.  áîëüøèíñòâå ñëó÷àåâ Âû ìîæåòå ðåøèòü âîçíèêøèå ïðîáëåìû ñàìè. Âèëêà íå âñòàâëåíà â
Ñåðâèñíîå îáñëóæèâàíèå Ïåðåä òåì êàê îáðàòèòüñÿ â Àâòîðèçîâàííûé Ñåðâèñíûé öåíòð: Óáåäèòåñü, ÷òî âû íå ìîæåòå óñòðàíèòü íåèñïðàâíîñòü ñàìîñòîÿòåëüíî (ñì. ñ. 23). Çàïóñòèòå ïðîãðàììó ïîâòîðíî äëÿ ïðîâåðêè èñïðàâíîñòè ìàøèíû.  ïðîòèâíîì ñëó÷àå îáðàòèòåñü â Àâòîðèçîâàííûé Ñåðâèñíûé öåíòð ïî
Navodila za uporabo PRALNI STROJ Vsebina SL Slovenèina SL Namestitev, 26-27 Odstranitev embalae in izravnavanje, 26 Prikljuèitev na vodovodno in elektrièno napeljavo, 26-27 Prvo pranje, 27 Tehnièni podatki, 27 Opis pralnega stroja, 28-29 Upravljalna ploèa, 28 Prikazovalnik, 29 Program MEMO, 29
Namestitev Shranite to knjiico, da jo boste lahko po potrebi uporabili. Èe boste pralni stroj prodali, ga nehali uporabljati ali premestili drugam, naj bo knjiica pri njem, tako da se bo novi lastnik lahko seznanil z delovanjem in ustreznimi opozorili. SL Pozorno preberite navodila. Našli
Ne uporabljajte podaljškov in razdelivcev. Namestitev odtoène cevi SL Kabel naj ne bo prepognjen ali stisnjen. Namestitev 65 — 100 cm Odtoèno cev, ki ne sme biti prepognjena, prikljuèite na odtoèni sistem ali na odtok na zidu, ki sta v viini 65 100 cm od tal; Elektrièni kabel lahko zamenja
Opis pralnega stroja Upravljalna ploèa SL Tipka Tipke FUNKCIJ START/RESET Tipka VKLOP/IZKLOP Prikazovalnik Predal za pralna sredstva Gumb Tipka Tipka CENTRIFUGA Tipka DELAY TIMER Predal za pralna sredstva za odmerjanje detergentov in dodatkov (glej str. 32). Tipke FUNKCIJ: za nastavitev
Prikazovalnik SL Prikazovalnik slui za programiranje pranja (glej str. 31), poleg tega pa nas tudi sproti obveèa o poteku pranja. Namestitev Ko pritisnemo na tipko START/RESET za zagon pralnega programa, se na prikazovalniku pokae èas, ki bo potreben do konca pranja. Èe je nastavljena zakasnitev
Zagon in razlièni pralni programi Na kratko: kako zagnati program pranja SL 4. Izberite funkcije po elji (glej str. 31). 5. Vstavite detergent in dodatke (glej str. 32). 6. Poenite program s pritiskom na tipko START/ RESET. Za preklic drite tipko START/RESET najmanj 2 sekundi. 7. Ob zakljuèku
Posebne nastavitve Tipke FUNKCIJ Nastavitev centrifuge Opis Funkcija delay timer SL Namestitev Èe je ob vkljuèitvi pralnega stroja GUMB naravnan na program, ki omogoèa nastavitev hitrosti centrifuge, znak miruje (ne se pokae maksimalna hitrost utripa). Ob pritisku na tipko centrifuge, ki jo
Pralna sredstva in perilo Predal za pralna sredstva SL Dobri uèinki pranja so odvisni tudi od pravilnega odmerjanja pralnih sredstev. Èe z njimi pretiravamo, perilo ni niè bolje oprano, poveèamo pa verjetnost nastajanja usedlin v pralnem stroju in onesnaevanje okolja. 4 1 2 3 Odprite predal za
Opozorila in nasveti Varnost Varèevanje in skrb za okolje Ta naprava je bila zasnovana za uporabo v gospodinjstvu in ne za profesionalno uporabo. Zaradi tega ne smete spreminjati funkcij naprave. Okolju prijazna tehnologija Skozi vratca boste videli le malo vode. Razlog je v novi tehnologiji
Vzdrevanje in èièenje SL Odklop vodovodne in elektriène napeljave Èièenje èrpalke Po vsakem pranju zaprite pipo za dotok vode. Tako zmanjate izrabo vodovodnega sistema v pralnem stroju in prepreèite, da bi voda odtekala. V pralnem stroju je èrpalka, ki se èisti sama in ne potrebuje rednega
Motnje in njihovo odpravljanje Lahko se zgodi, da pralni stroj ne deluje. Preden se obrnete na servis (glej str. 36), preverite s pomoèjo naslednjega seznama, èe gre za katero od natetih lahko odpravljivih motenj. Pralni stroj se ne vkljuèi. Vtikaè ni vstavljen v vtiènico elektriène napeljave
Pomoè Preden poklièete pooblaèeni servis: Poglejte, èe lahko motnjo odpravite sami (glej str. 35); Ponovno poenite program, da preverite, ali je bila motnja odpravljena; V nasprotnem primeru poklièite pooblaèeni servis na telefonsko tevilko, ki je zapisana na garancijskem listu. SL Ne
Upute za uporabu PERILICA RUBLJA Pregled HR Hrvatski HR Postavljanje, 38-39 Raspakiravanje i izravnavanje, 38 Hidraulièni i elektrièni prikljuèci, 38-39 Prvi ciklus pranja, 39 Tehnièki podaci, 39 Opis perilice rublja, 40-41 Kontrolna ploèa, 40 Display, 41 Program MEMO, 41 Pokretanje i programi,
Postavljanje HR Vano je saèuvati ove upute kako bi ste ih mogli prouèiti u svakom trenutku. U sluèaju prodaje, ustupanja ili seljenja, provjeriti da se nalaze zajedno s perilicom kako bi se novog vlasnika obavijestilo o funkcioniranju stroja i o upozorenjima koja se na njega odnose. Pomno
Ne smije se pregibati ili pritiskati kabel. Spajanje cijevi za odvod vode 65 — 100 cm HR Elektrièni kabel smiju promijeniti jedino ovlateni tehnièari. Postavljanje Spojite odvodnu cijev ne savijajuæi je, na kanalizaciju ili na odvod u zidu, na visini od 65-100 cm od poda; Pozor! Proizvoðaè
Opis perilice rublja Kontrolna ploèa HR Tipke FUNKCIJA Tipka START/RESET Tipka UKLJUÈENJE/ ISKLJUÈENJE Display Pretinac za deterdent Tipka Tipka CENTRIFUGA U pretinac za deterdent stavljamo deterdent i aditive (vidi str. 44). Tipkom CENTRIFUGA se podeava brzina centrifugiranja sve do njegovog
Display HR Osim to je vrlo koristan za programiranje stroja (vidi str. 43), display prua podatke o ciklusu pranja. Postavljanje Nakon pritiska na tipku START/RESET u svrhu pokretanja programa, na display-u se prikazuje vrijeme koje nedostaje do zavretka ciklusa. Ako postavite kanjenje
Pokretanje i programi Ukratko: pokrenuti program HR 4. Odaberite potrebne funkcije (vidi str. 43). 5. Uspite deterdent i aditive (vidi str. 44). 6. Pokrenite program pritiskom na tipku START/ RESET. Ponitavanje se vri pritiskom na tipku START/ RESET u trajanju od barem 2 sekunde. 7. Po zavretku
Osobni izbor Tipke FUNKCIJA Podeavanje centrifugiranja HR Postavljanje Ako se pri ukljuèenju stroja GUMB nalazi na programu koji predviða neæe treptjeti. Pritiskom na tipku centrifugiranje, simbol prikazuje se najveæa dozvoljena brzina centrifugiranja za postavljeni program i simbol trepti.
Deterdent i rublje Pretinac za deterdent HR Dobar ishod pranja ovisi i o ispravnom odmjeravanju kolièine deterdenta: pretjeranim kolièinama ne pospjeujemo uèinak pranja veæ pomaemo stvaranje naslaga na unutarnjim dijelovima perilice i zagaðujemo okolinu. 4 1 2 3 Izvucite pretinac za deterdent
Mjere predostronosti i savjeti Opæa sigurnost Ovaj je uredaj osmiljen i izraden za kucnu, a ne profesionalnu uporabu i zabranjeno je vriti preinake njegovih funkcija. Ne dodirujte stroj bosih nogu ni s vlanim rukama ili stopalima. Ne otvarajte pretinac za deterdent dok stroj radi. Ni u
Odravanje i oèuvanje Zatvaranje vode i iskljuèivanje elektriène struje HR Nakon svakog pranja zatvorite slavinu s vodom. Tako se ogranièava troenje hidrauliènih instalacija perilice i uklanja opasnost gubitka. Iskljuèite utikaè iz struje dok èistite perilicu, kao prilikom izvoðenja radova
Nepravilnosti i rjeenja Moe se dogoditi da perilica ne radi. Prije no to telefonirate Servisnoj slubi (vidi str. 48), provjerite da se ne radi o problemu kojeg se moe lako rijeiti uz pomoæ popisa koji slijedi. Ciklus pranja ne zapoèinje. Vrata nisu dobro zatvorena (na display-u se
Servisna sluba Prije pozivanja Servisne slube: provjerite da li sami moete otkloniti nepravilnost (vidi str. 47); ponovno pokrenite program da bi ste provjerili da li je problem otklonjen; U negativnom sluèaju, obratiti se ovlatenoj Tehnièkoj slubi na broj telefona naznaèen na garantnom
Használati utasítás MOSÓGÉP Összefoglalás HU Magyar HU Üzembehelyezés, 50-51 Kicsomagolás és vízszintbe állítás, 50 Víz és elektromos csatlakozás, 50-51 Elsõ mosási ciklus, 51 Mûszaki adatok, 51 Mosógép leírása, 52-53 Vezérlõpanel, 52 Kijelzõ, 53 MEMO Program, 53 Indítás és Programok, 54 Röviden:
Üzembehelyezés HU E kézikönyv megõrzése azért fontos, hogy bármikor elõvehesse, és megnézhesse. Ha a mosógépet eladná, átadná vagy másnál helyezné el, gondoskodjon arról, hogy e használati utasítás a géppel együtt maradjon, hogy az új tulajdonos is megismerhesse a mosógép funkcióit és az ezekre
A leeresztõcsõ csatlakoztatása HU Ne legyen a kábel megtörve vagy összenyomva. Üzembehelyezés 65 — 100 cm A leeresztõcsövet csatlakoztassa lefolyóhoz vagy a padlótól 65 és 100 cm közötti magasságban lévõ fali lefolyószifonhoz anélkül, hogy megtörné, Ne használjon hosszabbítót vagy elosztót. A
A mosógép leírása Vezérlõpanel FUNKCIÓ billentyûk HU START/RESET billentyû BEKAPCSOLÁS/ KIKAPCSOLÁS billentyû Kijelzõ Mosószeradagoló fiók Tárcsa HÕMÉRSÉKLET billentyû CENTRIFUGA billentyû Mosószeradagoló fiók a mosószerek és adalékszerek betöltésére (lásd 56. oldal). CENTRIFUGA billentyû a
Kijelzõ HU Üzembehelyezés A mosógép programozásán kívül (lásd 55. old.), a kijelzõ a mosási ciklussal kapcsolatos információk megjelenítésére szolgál. Az után, hogy a program elindításához megnyomta a START/RESET billentyût, a kijelzõn a ciklus végéig hátlalévõ idõ látható. Abban az esetben, ha az
Indítás és Programok Röviden: egy program elindítása 4. A lehetséges funkciók kiválasztása (lásd old. 55). 5. Töltse be a mosószert és az adalékokat (lásd 56. oldal). 6. A START/RESET billentyû megnyomásával indítsa el a programot. A törléshez tartsa nyomva a START/RESET billentyût legalább 2
Program módosítások FUNKCIÓ billentyûk Centrifugálás beállítása Ha a mosógép bekapcsolásakor a TÁRCSA olyan programra van állítva, amelynél a centrifugálást be kell állítani, az ikon gomb megnyomásával megjelenik a folyamatosan világít. Az beállított programra vonatkozó maximális centrifugálási
Mosószerek és mosandók Mosószeradagoló fiók HU A mosás eredményessége függ a mosószer helyes adagolásától is: ha túl sokat adagol belõle, a mosás nem lesz hatékonyabb, de hozzájárul ahhoz, hogy lerakódás képzõdjön a mosógépben, valamint a környezetet is jobban szennyezi. 4 1 2 3 Húzza ki a
Óvintézkedések és tanácsok A mosógépet a nemzetközi biztonsági Általános biztonság Ezt a készüléket egyfajta háztartási és nem professzionális használatra tervezték, és a funkcióit megváltoztatni nem szabad. A csatlakozódugót az aljzatból ne a kábelt, hanem a csatlakozót fogva húzza ki. Ne
Karbantartás és törõdés A víz elzárása és az elektromos áram kikapcsolása HU Minden mosás után zárja el a vízcsapot. Így kíméli a mosógép vízrendszerét, és megszünteti a vízszivárgás kockázatát. Húzza ki a hálózati csatlakozódugót az aljzatból, amikor a mosógépet tisztítja vagy karbantartást
Rendellenességek és elhárírásuk Megtörténhet, hogy a mosógép nem mûködik. Mielõtt felhívná a Szervizt (lásd 60. oldal) ellenõrizze, hogy nem olyan problémáról van szó, amely a következõ lista segítségével egyszerûen megoldható. A mosási ciklus nem indul el. Az ajtó nincs jól becsukva (a
Szerviz Mielõtt a Szervizhez fordulna: Gyõzõdjön meg arról, hogy a hibát nem tudja maga is elhárítani (lásd 59. oldal); Újból indítsa el a programot, hogy lássa, elhárította-e a hibát; Ellenkezõ esetben forduljon a megbízott Szakszervizhez: a telefonszámot a garanciajegyen találja. HU Soha
Ïäçãßåò ÷ñÞóçò ÐËÕÍÔÇÑÉÏ ÑÏÕ×ÙÍ Ðåñéå÷üìåíá GR ÅËËÇÍÉÊÁ GR ÅãêáôÜóôáóç, 62-63 Áðïóõóêåõáóßá êáé ïñéæïíôßùóç, 62 ÕäñáõëéêÝò êáé çëåêôñéêÝò óõíäÝóåéò, 62-63 Ðñþôïò êýêëïò ðëõóßìáôïò, 63 Ôå÷íéêÜ óôïé÷åßá, 63 ÐåñéãñáöÞ ôïõ ðëõíôçñßïõ, 64-65 Ôáìðëü åëÝã÷ïõ, 64 Ïèüíç, 65 Ðñüãñáììá MEMO, 65 Åêêßíçóç êáé
ÅãêáôÜóôáóç GR Åßíáé óçìáíôéêü íá öõëÜîåôå ôï åã÷åéñßäéï áõôü ãéá íá ìðïñåßôå íá ôï óõìâïõëåýåóôå ïðïéáäÞðïôå óôéãìÞ. Óå ðåñßðôùóç ðþëçóçò, ðáñá÷þñçóçò Þ ìåôáêüìéóçò, âåâáéùèåßôå üôé ðáñáìÝíåé ìáæß ìå ôï ðëõíôÞñéï ãéá íá ðëçñïöïñåß ôïí íÝï éäéïêôÞôç ãéá ôç ëåéôïõñãßá êáé ôéò ó÷åôéêÝò
Óýíäåóç ôïõ óùëÞíá áäåéÜóìáôïò íåñïý ÓõíäÝóôå ôïí óùëÞíá áäåéÜóìáôïò íåñïý ÷ùñßò íá ôïí ôóáêßóåôå óå ìéá áðï÷Ýôåõóç Þ óå ìéá åðéôïß÷éá áðï÷Ýôåõóç óå ýøïò áðü ôï Ýäáöïò ìåôáîý 65 êáé 100 cm. Ìçí ôóáêßæåôå êáé ìçí ôïðïèåôåßôå âáñéÜ áíôéêåßìåíá ðÜíù óôï êáëþäéï ôñïöïäïóßáò. Ìðïñåßôå åðßóçò íá
ÐåñéãñáöÞ ôïõ ðëõíôçñßïõ Ôáìðëü åëÝã÷ïõ GR ÐëÞêôñá ÐëÞêôñï ËÅÉÔÏÕÑÃÉÁÓ START/RESET ÐëÞêôñï ÁÍÁÌÌÁÔÏÓ/ ÓÂÇÓÉÌÁÔÏÓ Ïèüíç ÈÞêç áðïññõðáíôéêþí ÅðéëïãÝáò ÐëÞêôñï ÐëÞêôñï ÓÔÕØÉÌÁÔÏÓ ÈÞêç áðïññõðáíôéêþí ãéá ôçí ðñïóèÞêç áðïññõðáíôéêþí êáé ðñüóèåôùí (âëÝðå óåë. 68). ÐëÞêôñï ÓÔÕØÉÌÁÔÏÓ ãéá ôçí åðéëïãÞ ôçò
Ïèüíç GR ÐåñéãñáöÞ Áöïý ðáôÞóåôå ôï êïõìðß START/RESET ãéá íá åêêéíÞóåôå ôï ðñüãñáììá, óôçí ïèüíç áðåéêïíßæåôáé ï ÷ñüíïò ðïõ õðïëåßðåôáé ãéá ôï ôÝëïò ôïõ êýêëïõ. Óôçí ðåñßðôùóç ðïõ ôÝèçêå ìéá êáèõóôÝñçóç óôçí þñá åêêßíçóçò (Delay Timer, âëÝðå óåë. 67), áõôü èá áðåéêïíéóôåß. ÅãêáôÜóôáóç Åêôüò ôïõ
Åêêßíçóç êáé ÐñïãñÜììáôá Åí óõíôïìßá: åêêßíçóç åíüò ðñïãñÜììáôïò GR 4. ÅðéëÝîôå åíäå÷üìåíåò ëåéôïõñãßåò (âëÝðå óåë. 67). 5. ÔïðïèåôÞóôå ôï áðïññõðáíôéêü êáé ôõ÷üí ðñüóèåôá (âëÝðå óåë. 68). 6. ÅêêéíÞóôå ôï ðñüãñáììá ðéÝæïíôáò ôï êïõìðß START/RESET. Ãéá ôçí áêýñùóç êñáôÞóôå ðáôçìÝíï ôï êïõìðß
ÐñïóùðéêÝò Ñõèìßóåéò ÐëÞêôñá ËÅÉÔÏÕÑÃÉÁÓ Ñõèìßóôå ôï óôýøéìï Áí êáôÜ ôçí Ýíáñîç ëåéôïõñãßáò ôïõ ìç÷áíÞìáôïò ï ÅÐÉËÏÃÅÁÓ åßíáé ôïðïèåôçìÝíïò óå Ýíá ðñüãñáììá ðïõ ðñïâëÝðåé ôç ñýèìéóç ôçò èåñìïêñáóßáò, ôï åéêïíßäéï åìöáíßæåôáé óôáèåñü. ÐéÝæïíôáò ôï êïõìðß áðåéêïíßæåôáé ç ìÝãéóôç åðéôñåðôÞ èåñìïêñáóßá
ÁðïññõðáíôéêÜ êáé ñïý÷á ÈÞêç áðïññõðáíôéêþí GR Ôï êáëü áðïôÝëåóìá ôïõ ðëõóßìáôïò åîáñôÜôáé åðßóçò êáé áðü ôç óùóôÞ äïóïëïãßá ôïõ áðïññõðáíôéêïý: õðåñâÜëëïíôáò äåí ðëÝíïõìå áðïôåëåóìáôéêüôåñá êáé åðéðëÝïí óõíôåëïýìå óôç äçìéïõñãßá êñïýóôáò óôá åóùôåñéêÜ ìÝñç ôïõ ðëõíôçñßïõ êáé óôç ìüëõíóç ôïõ
ÐñïöõëÜîåéò êáé óõìâïõëÝò ÄéÜèåóç ôïõ ðáëéïý ðëõíôçñßïõ: ðñéí ôï ðåôÜîåôå, êáôáóôÞóôå ôï ìç ÷ñçóéìïðïéÞóéìï êüâïíôáò ôï êáëþäéï çëåêôñéêÞò ôñïöïäïóßáò êáé âãÜæïíôáò ôçí ðüñôá. ÃåíéêÞ áóöÜëåéá Åîïéêïíüìçóç åíÝñãåéáò êáé óåâáóìüò ôïõ ðåñéâÜëëïíôïò Ç óõóêåõÞ áõôÞ ó÷åäéÜóôçêå ãéá ïéêéáêÞ ÷ñÞóç, ìç
ÓõíôÞñçóç êáé öñïíôßäá Êëåßóéìï ðáñï÷þí íåñïý êáé çëåêôñéêïý ñåýìáôïò GR Êáèáñéóìüò ôçò áíôëßáò Êëåßíåôå ôçí âñýóç ìåôÜ áðü êÜèå ðëýóéìï. ¸ôóé ðåñéïñßæåôáé ç öèïñÜ ôçò õäñáõëéêÞò åãêáôÜóôáóçò ôïõ ðëõíôçñßïõ êáé áðïóïâåßôáé ï êßíäõíïò áðùëåéþí. Ôï ðëõíôÞñéï äéáèÝôåé ìéá áíôëßá áõôïêáèáñéæüìåíç ðïõ
ÐñïâëÞìáôá êáé ëýóåéò Ìðïñåß íá óõìâåß ôï ðëõíôÞñéï íá ìç ëåéôïõñãåß. Ðñéí ôçëåöùíÞóåôå óôçí ÕðïóôÞñéîç (âëÝðå óåë. 72), åëÝãîôå áí äåí ðñüêåéôáé ãéá Ýíá ðñüâëçìá ðïõ åðéëýåôáé åýêïëá ìå ôç âïÞèåéá ôïõ áêüëïõèïõ êáôáëüãïõ. GR ÐéèáíÜ áßôéá / Ëýóç: Ôï ðëõíôÞñéï äåí áíÜâåé. Ôï âýóìá äåí Ý÷åé
Ôå÷íéêÞ ÕðïóôÞñéîç 195041579.00 11/2003 — Xerox Business Services Ðñéí êáëÝóåôå ôçí ôå÷íéêÞ õðïóôÞñéîç: Âåâáéùèåßôå üôé äåí ìðïñåßôå íá åðéëýóåôå ìüíïé óáò ôï ðñüâëçìá (âëÝðå óåë. 71) ÅðáíåêêéíÞóôå ôï ðñüãñáììá ãéá íá åëÝãîåôå áí ôï ðñüâëçìá áíôéìåôùðßóôçêå Óå áíôßèåôç ðåñßðôùóç,