- Manuals
- Brands
- VeriFone Manuals
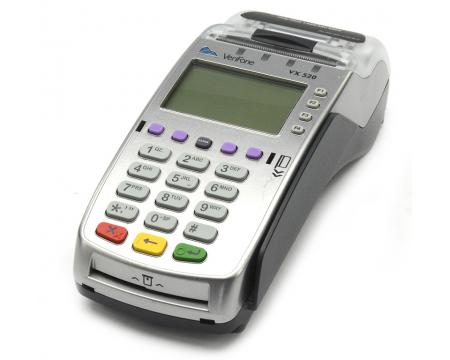
- Payment Terminal
- Vx-520 Series APACS 40
- Reference manual
-
Contents
-
Table of Contents
-
Bookmarks
Quick Links
VX 520
Reference Guide
VeriFone Part Number DOC252-004-EN-B, Revision B
Related Manuals for VeriFone VX 520
Summary of Contents for VeriFone VX 520
-
Page 1
VX 520 Reference Guide VeriFone Part Number DOC252-004-EN-B, Revision B… -
Page 2
VeriFone, Inc. The information contained in this document is subject to change without notice. Although VeriFone has attempted to ensure the accuracy of the contents of this document, this document may include errors or omissions. The examples and sample programs are for illustration only and may not be suited for your purpose. -
Page 3: Table Of Contents
Connection Ports ……….18 Installing the Smart Battery (VX 520 GPRS Only) ….. . . 21 Establishing Telephone Line Connections .
-
Page 4
VeriFone Certificate Authority ……..75… -
Page 5
Build a VeriFone.zip File …….. -
Page 6
VeriFone Cleaning Kit …….. -
Page 7: Preface
Chapter Using the Terminal Keys. Explains the operational features of the VX 520 unit and describes how to use the VX 520 keys to perform all the data entry or Terminal Manager tasks described in this manual. Chapter Verix Terminal Manager.
-
Page 8: Related Documentation
Pinouts, ASCII Table, Keypress Scan Codes, and Glossary. Related To learn more about the VX 520 terminal, refer to the following set of documents: Documentation VPN DOC252-001-EN VX 520 Certifications and Regulations VPN DOC252-002-EN VX 520 Quick Installation Guide VX 520 Installation Guide…
-
Page 9
The lighting symbol is used Due to risk of shock do not use the WARNING as a warning when bodily terminal near water. injury might occur. VX 520 R EFERENCE UIDE… -
Page 10: Acronym Definitions
Micromodule-Size Security Access Module Payment Card Industry PIN-Entry Device Personal Identification Number Random Access Memory RJ-11 Registered Jack 11 RJ-45 Registered Jack 45 RS-232 Recommended Standard 232 Security Access Module Terminal Management Agent VeriFone Part Number VX 520 R EFERENCE UIDE…
-
Page 11: Hapter
The VX 520 offers several communication options, enhanced display, increased processing power, expanded memory, and two USB peripheral ports. The VX 520 terminal uses a robust, sleek, and highly functional design. VeriFone ships variants of the VX 520 terminals for different markets. Your NOTE terminal may have a different configuration from the features described in this section.
-
Page 12: Features And Benefits
VX 520 terminals provide the right combination of features and functions. This Benefits includes a triple-track magnetic-stripe card reader, landed smart card reader, integrated PIN pad, a quiet internal thermal printer (ITP). The VX 520 GPRS is a portable, line- or battery-powered device with added GPRS wireless technology. Connectivity •…
-
Page 13: Countertop Performance In A Handover Design
The VX 520 GPRS series meets the needs of TablePAY, DeliveryPAY, and CarsidePAY markets. True Multi- • The VX 520 terminal offers 32 MB of RAM, and 128 MB Flash memory, which Application supports multiple applications on a single terminal. Capability •…
-
Page 14
ERMINAL VERVIEW Features and Benefits VX 520 R EFERENCE UIDE… -
Page 15: Hapter
Using the Smart Card Reader • Using the Magnetic Card Reader Selecting Use the following guidelines when selecting a location for your VX 520 terminal. Terminal Location Ease of Use • Select a location convenient for both merchant and cardholder.
-
Page 16: Electrical Considerations
Remove all plastic wrapping from the terminal and other components. Remove the clear protective film from the LCD screen. Do not use a terminal that has been damaged or tampered with. The VX 520 CAUTION terminal comes equipped with tamper-evident labels. If a label or component appears damaged, please notify the shipping company and your VeriFone representative or service provider immediately.
-
Page 17: Examining Terminal Features
ERMINAL ETUP Examining Terminal Features Examining Before you continue the installation process, notice the features of the VX 520 Terminal terminal (see Figure Features INTERNAL THERMAL PRINTER PRINTER DOOR LATCH SERRATED METAL MAGNETIC STRIP CARD READER ATM-STYLE TERMINAL DISPLAY FUNCTION KEYS…
-
Page 18: Connection Ports
• Three SAM (security access module) compartments, built into the side of the terminal. The VX 520 terminal contains MSAM cardholders to support multiple stored-value card programs or other merchant card requirements.
-
Page 19
ERMINAL ETUP Examining Terminal Features Figure 4 Figure 5 show the connection ports for the VX 520 terminal. POWER PORT RS-232 SERIAL PORT RJ-11 TELEPHONE PORT Figure 4 VX 520 Power and Connection Ports HOST USB PORT ETHERNET PORT CLIENT USB PORT… -
Page 20
ERMINAL ETUP Examining Terminal Features To use the The connection ports offer multiple connectivity for the VX 520 terminal. Please connection ports refer to the following list of peripheral devices for the connectivity options. Host USB Port • PINpad 1000 USB •… -
Page 21: Installing The Smart Battery (Vx 520 Gprs Only)
Installing the Smart Battery (VX 520 GPRS Only) Installing the The smart battery fits in a slot on the back of the VX 520 GPRS terminal. The Smart Battery locking tab clicks when the battery is in place. The slot is keyed, so that there is (VX 520 GPRS only one way to insert the battery.
-
Page 22: Establishing Telephone Line Connections
Connections the line is dedicated to the terminal. RJ-11 Figure 8 VX 520 Direct Telephone Connection WARNING To reduce the risk of fire, use only No. 26AWG or larger UL Listed or CSA Certified Telecommunication Line Cord. VX 520 R…
-
Page 23: Installing The Paper Roll In The Printer
Installing the Paper Roll in the Printer Installing the A fast, quiet thermal printer is built into the VX 520 terminal. Before you can Paper Roll in the process transactions that require a receipt or record, you must install a roll of Printer thermal-sensitive paper in the printer.
-
Page 24
(see Figure 11). CAUTION To prevent the paper roll cover from damaging the print roller, always gently press down on the printer dust cover to close it. Figure 11 Closing Paper Roll Cover VX 520 R EFERENCE UIDE… -
Page 25: Installing/Replacing Msam Cards
For paper ordering information, refer to Accessories and Documentation. Installing/ When you first receive your VX 520 terminal, you may need to install one or more Replacing MSAM MSAM cards or you may need to replace old cards. Cards CAUTION Observe standard precautions when handling electrostatically sensitive devices.
-
Page 26
The cardholder connector base has an image resembling the notched corner of an MSAM card to ensure the card is positioned correctly. Close the MSAM cardholder panel, and then replace the terminal rear cover. VX 520 R EFERENCE UIDE… -
Page 27: Installing/Replacing Sim Card (Vx 520 Gprs Only)
ETUP Installing/Replacing SIM Card (VX 520 GPRS Only) Installing/ The VX 520 GPRS terminal supports the installation of a SIM (Subscriber Identity Replacing SIM Module) card. Use the following procedure to replace or install a SIM card. Card (VX 520…
-
Page 28: Optional Device Connections
ETUP Connecting Optional Devices Optional Device The VX 520 terminal has a port that can operate either as a PIN Pad port or an Connections RS-232 port, depending on the power source available. Connecting the PIN Pad or Smart Card Reader to the VX 520 Use the following procedures to connect a PIN Pad or smart card reader.
-
Page 29
ECRs require a separate power source. Before connecting a check reader or similar device, remove the power cord from and ensure that the indicator LED is not lit. Figure 18 VX 520 Sample ECR Connection VX 520 R EFERENCE UIDE… -
Page 30: Connecting The Terminal Power Pack
Connecting the When you have finished connecting optional peripheral(s), you are ready to Terminal Power connect the VX 520 terminal to the provided power source. Pack Using an incorrectly rated power supply may damage the terminal or cause it not CAUTION to work as specified.
-
Page 31: Charging The Smart Battery (Vx 520 Gprs Only)
When the terminal has power, the terminal lights are activated and the LED indicator remains lit. If an application is loaded in the terminal, it starts after the initial VeriFone copyright screen and usually displays a unique copyright screen. If no application…
-
Page 32: Privacy Shield (Optional)
Privacy Shield The privacy shield protects the customers’ PIN entry from being seen by the (Optional) cashier or other customers. The illustration shows an example of a VX 520 with the optional privacy shield. Figure 20 VX 520 Optional Privacy Shield…
-
Page 33: Using The Magnetic Card Reader
Leave the smart card in the card reader until the transaction is complete. Premature card removal will invalidate the transaction. Using the The VX 520 terminal supports credit or debit card transactions. Magnetic Card Reader To conduct a credit or…
-
Page 34
ERMINAL ETUP Using the Magnetic Card Reader VX 520 R EFERENCE UIDE… -
Page 35: Hapter
Using the Terminal Keys Before proceeding to other tasks, familiarize yourself with the operational features of the VX 520 terminal keypad to enter data. This section describes how to use the keypad, which consists of a 12-key Telco- style keypad, three color-coded keys below the keypad, the ALPHA key above the…
-
Page 36: Data Entry Modes
For this reason, once you enter terminal manager, you cannot return to the application in the same session. If you turn on a VX 520 terminal that does not have an application stored in terminal memory, the system prompt appears.
-
Page 37: Function Key Descriptions
In normal mode, the ALPHA key enables you to enter one of the two or more characters or symbols assigned to individual keys on the 12-key Telco-style keypad (note that this is in normal mode and is application-specific). VX 520 R EFERENCE UIDE…
-
Page 38
2 and hold it down, “2222222…” appears on the display. If two or more characters display on the VX 520 screen, pressing ALPHA changes the last character on the line to the next letter, number, or symbol in the key sequence. -
Page 39
In Verix Terminal Manager, press the enter key to begin a selected procedure, step forward or backward in a procedure, and confirm data entries. The specific effect of the enter key depends on the currently active terminal manager menu. VX 520 R EFERENCE UIDE… -
Page 40: Programmable Function (Pf) Key Descriptions
↑ • Move to the previous menu or screen ↓ • Move to the next menu or screen ↑ • Scroll up menu options ↓ • Scroll down menu options VX 520 R EFERENCE UIDE…
-
Page 41: Hapter
Manager • Application programmers configure a development terminal, download development versions of the VX 520 application program, then test and debug the application until it is validated and ready to be downloaded to other terminals. • Deployers of terminals to end-user sites perform the specific tasks required…
-
Page 42: Manager Local And Remote Operations
For information on performing remote operations, such as downloads, refer to Chapter Performing Downloads. Verifying The VX 520 terminal you are using may or may not have an application program Terminal Status running on it. After you have set up the terminal (Chapter Terminal Setup) and…
-
Page 43: Entering Verix Terminal Manager
PF1 and PF2 keys. File Groups The VX 520 Verix operating system implements a file system in RAM and in flash memory. Files are assigned to one of the groups for access control. Groups are similar to computer directories—in that different applications can be stored in separate file groups, just like different computer applications can be stored in separate directories.
-
Page 44: Passwords
↑ ↓ Figure 24 Menu 1 VERIX TERMINAL MGR 1> EOS Directory 2> Clear Memory 3> Calibrate Screen 4> Terminal Info 5> Diags 6> System Error Log ↓ ↑ ↑ ↓ Figure 25 Menu 2 VX 520 R EFERENCE UIDE…
-
Page 45: Verix Terminal Manager Procedures
PF3 button then press the enter key. Use the PF4 key to scroll up the menu options. Complete the operation. Return to the main Verix Terminal Manager menu. Procedure descriptions are arranged in the following table: Table 6 Procedural Description Example Display Action Screen displayed Action required VX 520 R EFERENCE UIDE…
-
Page 46
The following keys have the same function on all submenus: • Press the enter key to save changes from a submenu and return to the menu screen. • Press the cancel key to exit any submenu without saving changes. VX 520 R EFERENCE UIDE… -
Page 47: Enter And Exit Verix Terminal Manager
ERMINAL ANAGER Verix Terminal Manager Menus Enter and Exit Verix To enter terminal manager after you have turned on the VX 520 terminal, follow Terminal Manager the procedure described in Table On successful completion, some operations automatically exit terminal manager NOTE and restart the terminal.
-
Page 48: Menu 1
You must also clear some or all flash memory if your terminal does not have enough space for the impending download. CAUTION Some application program downloads automatically reset the system password. VX 520 R EFERENCE UIDE…
-
Page 49
Press to toggle between a parameter and its value. NOTE For a complete list of the ASCII characters supported by the VX 520 series, as well as their decimal and hexadecimal equivalents, please refer to Appendix CONFIG.SYS: Protected and Non-protected Records The concept of protected and non-protected records applies only to the CONFIG.SYS files in your terminal. -
Page 50
Then, type a filename and press . Skip to 2> EDIT PARAMETERS 1> ADD VARIABLE / 1> NEW 2> EDIT PARAMETERS 3> EDIT for the next procedures. VX 520 R EFERENCE UIDE… -
Page 51
1> ADD VARIABLE 1> NEW parameter name and press PARAMETER: ___________________ ___________________ GID nn: *APNAME Enter a value for the new parameter and press PARAMETER: Press to cancel creating a new variable. <parm name> VALUE: ________________________ ________________________ VX 520 R EFERENCE UIDE… -
Page 52
Type the number of the file group (1 for the primary application; between 1–15 for other applications) into GROUP ID: nn which to perform the download. (Refer to Chapter 6 detailed download instructions and information.) After you type a file group number, press VX 520 R EFERENCE UIDE… -
Page 53
FROM GROUP nn? applications. If you selected from the previous screen, a VERIX TERMINAL MGR DOWNLOAD confirmation screen appears. Select to confirm or **** WARNING **** to cancel the deletion. CONFIRM DELETION FOR Application VX 520 R EFERENCE UIDE… -
Page 54
*ZP Host Phone num ______________ ______________ VTM DOWNLOAD MGR Gnn Choose to download via the COM 1 port. 2> COM1 Unit Receive Mode To return to the main menu without saving your selection, press WAITING FOR DOWNLOAD VX 520 R EFERENCE UIDE… -
Page 55
VTM DOWNLOAD MGR Gnn Choose in Menu 2 of the Download 1> USB DEV screen to download using the USB connection. Unit Receive Mode To return to the main menu without saving your WAITING FOR DOWNLOAD selection, press VX 520 R EFERENCE UIDE… -
Page 56
*ZP HOST ADDR PORT _______ VTM DOWNLOAD MGR Gnn If *ZT (terminal ID used by VeriCentre) is not defined, you must enter a valid terminal ID (up to 15 characters long) and press *ZT TERMINAL ID ______________ VX 520 R EFERENCE UIDE… -
Page 57
GROUP n PASSWORD prompts for the group’s password prior to __________ downloading applications. To continue, enter the required password. If you enter an incorrect password, appears. PLEASE TRY AGAIN Press . Verify your password and reenter it. VX 520 R EFERENCE UIDE… -
Page 58
PRINT 6> FLASH DIRECTORY VERIX TERMINAL MGR Type the number of the file group (1 for the primary application; between 1–15 for other applications). Group ID: nn After you type a file group number, press VX 520 R EFERENCE UIDE… -
Page 59: Menu 2
, press the PF2 key. VERIX TERMINAL MGR 1> EOS DIRECTORY ** VERIX EOS Files ** This screen displays the Verix enterprise open source (EOS) files. <CONTENTS> To return to , press SYS MODE MENU 2 VX 520 R EFERENCE UIDE…
-
Page 60
ID. To go back to the second menu of the VERIX without deleting files, press TERMINAL MGR 3> CALIBRATE SCREEN To go back to the second menu of VERIX TERMINAL Unavailable , press VX 520 R EFERENCE UIDE… -
Page 61
PinPad Modem Type Ver: F2000B03B5000104 Modem Model: CX93001 Modem Ctry: ↑ ↓ VTM MGR TERMINAL INFO Life -743271072 Rset Rcnt 181639804 Tamper Detected CERT nnnnnnn ↑ ↓ VTM MGR TERMINAL INFO HeaP Stack 2552 ↑ VX 520 R EFERENCE UIDE… -
Page 62
IPP serial number, baud SN: nnnnnnnnnnnnnnnnn rate, and mode are displayed. 1> RESET00 MODE: VISA To reset the IPP, press 1; to exit the test and return to 2> EXIT screen, press 2 or VERIX DIAGS MGR VX 520 R EFERENCE UIDE… -
Page 63
• REVERSE END For more information about magnetic card error messages, refer to the Verix V Operating System Programmers Manual (VPN 23230). To stop the test and return to the VERIX DIAGS MGR screen, press VX 520 R EFERENCE UIDE… -
Page 64
To view the USB device settings and availability, choose 5> USB INFO To calibrate the screen, select 6> DISPLAY TESTSCREEN To return to the second menu of the VERIX TERMINAL or quit any operation within this menu, press VX 520 R EFERENCE UIDE… -
Page 65
Outputting log . . . Log output done To go back to the screen, press VERIX DIAGS MGR 5> DIAGS > PF1 KEY > BATTERY STATUS <EMPTY> To go back to the screen, press VERIX DIAGS MGR VX 520 R EFERENCE UIDE… -
Page 66
USB DEVICE INFO Power 0 mA Speed FULL To go back to the screen, press VERIX DIAGS MGR ↑ 5> DIAGS > PF1 KEY > DISPLAY TESTSCREEN To go back to the screen, press VERIX DIAGS MGR VX 520 R EFERENCE UIDE… -
Page 67
For detailed error log descriptions, see ERROR LOG. After making any notations, press the key under the down arrow (PF1) to view additional error log information, if shown. To go back to the screen, press VERIX DIAGS MGR VX 520 R EFERENCE UIDE… -
Page 68: Menu 3
To see the time, select 2> EDIT TIME 2> EDIT TIME 3> EDIT DATE To set the date, select 3> EDIT DATE 4> DECREMENT HOUR To adjust the current time one hour back, select ↑ ↓ 4> DECREMENT HOUR VX 520 R EFERENCE UIDE…
-
Page 69
Press to return to the third menu of the VERIX TERMINAL MGR 1> CLOCK 4> DECREMENT HOUR Select 4> DECREMENT HOUR to reduce an hour TIME AND DATE from the current time setting. HH:MM:SS MM:DD:YY VX 520 R EFERENCE UIDE… -
Page 70: 3> Change Passwords
VERIX TERMINAL MGR Enter the current password for the selected file group and press GROUP nn If you enter an incorrect password, appears. Press . Verify PLEASE TRY AGAIN your password and reenter it. VX 520 R EFERENCE UIDE…
-
Page 71
VTM PASSWORD MGR screen, press . to return to the third menu of VERIX TERMINAL MGR PASSWORD CHANGED 4> KEY MANAGEMENT Key Management 1> IPP Key Load 2> RKL Key Load 3> RKL Key Status ↑ ↓ VX 520 R EFERENCE UIDE… -
Page 72
1> END 4> KEY MANAGEMENT 3> RKL KEY STATUS RKL Key Status Public key name <EMPTY> Press to view the Private Key Hash. Press to return to the screen. KEY MANAGEMENT VX 520 R EFERENCE UIDE… -
Page 73
ERIX ERMINAL ANAGER Verix Terminal Manager Menus Table 10 Verix Terminal Manager Menu 3 Display Action RKL Key Status Private key hash Press to return to the screen. KEY MANAGEMENT VX 520 R EFERENCE UIDE… -
Page 74
ERIX ERMINAL ANAGER Verix Terminal Manager Menus VX 520 R EFERENCE UIDE… -
Page 75: Hapter
File authentication is a secured process for authenticating files using digital signatures, cryptographic keys, and digital certificates. This process makes it possible for the sponsor of a VX 520 terminal to logically secure access to the terminal by controlling who is authorized to download application files to that terminal.
-
Page 76: Special Files Used In The File Authentication Process
VX 520 clients—either internally within VeriFone or externally to sponsors. All certificates issued by the VeriFone CA for the VX 520 platform, and for any VeriFone platform with the VeriShield security architecture, are hierarchically related. That is, a lower-level certificate can only be authenticated under the authority of a higher-level certificate.
-
Page 77
To establish the logical security of applications to download to a VX 520 terminal, the designated signer uses the signer private key issued by the VeriFone CA as this is a required input to the VeriShield File Signing Tool. -
Page 78: How File Authentication Works
If these values match, the operating system marks the application file “authenticated” and allows it to run. The application file is tested and debugged. After the application file is fully debugged, it becomes an input for the deployment process. VX 520 R EFERENCE UIDE…
-
Page 79
IF A MATCHING APPLICATION FILE IS FOUND, OS COMPARES .P7S FILE’S SIGNATURE AGAINST VALUES IN THE APPLICATION FILE’S CALCULATED SIGNATURE. IF THE VALUES MATCH, THE TWO FILES ARE AUTHENTICATED, AND THE ATTR_NOT_AUTH BIT IS SET TO 0. Figure 27 The Development Process VX 520 R EFERENCE UIDE… -
Page 80
Smart card containing a set of certificates and private key. Smart card PIN. The VeriFone CA sends the smart card and smart card PIN to the sponsor. The sponsor uses the smart card and smart card PIN as inputs for the deployment process. -
Page 81
If these values match, the operating system marks the application file “authenticated” and allows it to run. Each successfully authenticated executable application file is allowed to run on the terminal (otherwise, the executable remains stored in the terminal memory but is not allowed to run). VX 520 R EFERENCE UIDE… -
Page 82
IF A MATCHING APPLICATION FILE IS FOUND, OS COMPARES *.*.P7S FILE’S SIGNATURE AGAINST VALUES IN THE APPLICATION FILE’S CALCULATED SIGNATURE. IF THE VALUES MATCH, THE TWO FILES ARE AUTHENTICATED, AND THE ATTR_NOT_AUTH BIT IS SET TO 0. Figure 29 The Deployment Process VX 520 R EFERENCE UIDE… -
Page 83: Planning For File Authentication
UTHENTICATION Introduction to File Authentication Planning for File File authentication is an integral part of every VX 520 terminal. To safeguard the Authentication terminal’s logical security, the file authentication module requires that any executable code file must be successfully authenticated before the operating system allows it to execute on the terminal.
-
Page 84
Determine Successful Authentication To ensure the VX 520 terminal’s logical security, never assume that a target file was authenticated simply because it downloaded to the VX 520 terminal together with its signature file. -
Page 85: Digital Certificates And The File Authentication Process
1. If the modified file is an executable, it is no longer allowed to run. Digital Certificates The file authentication module always processes certificates before it processes and the File signature files. Digital certificates (*.crt files) generated by the VeriFone CA Authentication have two important functions in the file authentication process: Process •…
-
Page 86
Introduction to File Authentication A development set of higher-level certificates is downloaded into each VX 520 terminal upon manufacture. When you take a new VX 520 terminal out of its shipping carton, certificate data is already stored in the terminal’s certificate tree. -
Page 87
VeriFone CA to use to logically secure sponsor and signer privileges when the VX 520 terminal is prepared for deployment. Customer-specific sponsor and signer certificates are usually downloaded to a VX 520 terminal as part of the standard application download procedure performed by a deployment service. -
Page 88
(up to a maximum of 21 certificates). Required Inputs to the File Signing Process The required inputs to the file signing process are somewhat different for development terminals than deployment terminals. The significant differences are shown in Table VX 520 R EFERENCE UIDE… -
Page 89
The following three unique inputs, which • are issued at customer request by the VeriFone CA, are required for the file signing process, as well as the application files you want to sign and authenticate: Signer certificate, with the filename •… -
Page 90
To do this, the original sponsor must order a “clear” smart card from the VeriFone CA. The clear smart card is specific to the requesting sponsor. It restores a deployment terminal to the… -
Page 91: File Authentication And The File System
UTHENTICATION File Authentication and the File System File Application Memory Logically Divided Into File Groups Authentication The memory of a VX 520 terminal is logically divided into two main areas, or and the File partitions: System • Operating System •…
-
Page 92
RAM. A signature file must know if its matching application file is stored in flash or RAM. If a signature file cannot locate its matching application file, the application file is not authenticated. VX 520 R EFERENCE UIDE… -
Page 93
A typical application download includes a variety of different file types. The following restrictions in Table 14 describe how you can download different kinds of files to the VX 520 terminal and how files are stored in the file system: Table 14 Download File Extensions File Type Restriction Certificate (*.crt) -
Page 94: Verishield File Signing Tool
VeriShield File Signing Tool dialog box to make the required entries. The file signing process for operating system files is done for VX 520 customers NOTE by the VeriFone CA. For operating system updates, VeriFone provides customers with a complete download package that includes all certificates and signature files required for authentication.
-
Page 95: Command-Line Entries For The Verishield File Signing Tool
Use the VxSIGN.KEY developer signer private key for development terminals. Use the signer private key provided by the VeriFone CA for deployment terminals. Signer password for decrypting Required input only for -P, -p the signer private key.
-
Page 96
*FA variable in the file group’s CONFIG.SYS file to 0, all signature files are deleted from RAM when file authentication is complete. Removing *.p7s files will prevent application files from executing after a back-to-back download. VX 520 R EFERENCE UIDE… -
Page 97: Verishield File Signing Tool Graphical Interface Mode
Press ALT+S or click the […] button to the right of the Signature file field to enter a filename for the signature file to be generated. The filename extension must always be *.p7s. You can also choose another directory on the host PC to store the generated signature file. VX 520 R EFERENCE UIDE…
-
Page 98
ALT+A or click Cancel to exit the VeriShield File Signing Tool. When the necessary signature files are generated to authenticate the application or applications on the VX 520 terminal, perform the application download procedure. For more information about file authentication within the context of specific… -
Page 99: Hapter
VX 520 download and upload procedures: • Direct downloads: File and/or data transfer directly from the sending system (a host computer) to the receiving system (a VX 520 terminal). A special cable (VPN 05651-xx) connects the RS-232 serial ports of the two systems. •…
-
Page 100: Download Tools
VeriCentre automates application downloads and updates to terminal records. • DDL.EXE: Downloads files and data from a development system or another host computer, directly to a VX 520 terminal over a serial cable connection. VX 520 R EFERENCE UIDE…
-
Page 101: Download Content
OS software and firmware of the sending and receiving VX 520 terminals. Download In general, you can download files and data to a VX 520 terminal. The types of Content files and data can be grouped into the following functional categories: •…
-
Page 102: Full And Partial Downloads
The file authentication module is not invoked, nor are any applications allowed to execute, until the terminal is manually restarted from within terminal manager. VX 520 R EFERENCE UIDE…
-
Page 103: Downloads Download Methods
• Full OS downloads are usually performed by VeriFone at the factory and, on occasion, by those who deploy terminals on-site to upgrade older terminals to a newer OS version.
-
Page 104: Support For Multiple Applications
Applications application can run (execute) on the terminal. The application memory of the VX 520 terminal uses a system of file groups to store and manage multiple applications, as well as operating system files. This system of file groups are used in such a way that the data integrity of each…
-
Page 105: Physical And Logical Access To File Groups
ERFORMING OWNLOADS Use of RAM and Flash Memory Physical and The VX 520 operating system controls physical access to GIDs 1–15 using Logical Access to password-protected terminal manager functions. File Groups To download data into a specific file group, first enter terminal manager and choose the target group by making the appropriate menu selections, then, enter the correct password for that file group.
-
Page 106: Defragment Flash For Application Downloads
A terminal manager procedure is also available for clearing the RAM or flash memory, either entirely or for a specific file group, to prepare a VX 520 terminal for a clean download. NOTE The flash defragment operation is not necessary for a VX 520 terminal just out of the box.
-
Page 107: Redirecting Files To Other File Groups
(the same as SETDRIVE.x). The syntax of this convention is SETGROUP.n, where n = 1–15 for GIDs 1–15. To create a zero-length SETGROUP file on the download computer, use the DOS command REM as in the following example: REM >SETGROUP.2 VX 520 R EFERENCE UIDE…
-
Page 108: Restrictions On File Redirection
If no number is added to the SETGROUP filename, SETGROUP.1 (GID1) is assumed. Restrictions on File The VX 520 file system restricts how you can redirect files to other file groups. Redirection Here are the important points to remember: •…
-
Page 109: Using Ddl.exe To Automatically Redirect Files
OWNLOADS Use of RAM and Flash Memory Using DDL.EXE to The version of DDL.EXE included in the VX 520 SDK allows you to change the Automatically default drive and file group for a direct download by preceding the filename(s) on Redirect Files the DDL command line with a special filename.
-
Page 110: File Authentication Requirements
(executable) is authenticated, it is allowed to run on the terminal. Otherwise, it does not execute. • If one executable file required by an application with multiple executables fails to authenticate, the main application may crash when it attempts to access the non-authenticated executable. VX 520 R EFERENCE UIDE…
-
Page 111: File Authentication Process During An Application Download
In a typical batch application download, file authentication proceeds as follows: All certificate files (*.crt), signature files (*.p7s), and application files (*.out, *.lib, *.fon, *.vft, *.dat, and so on) download to the VX 520 deployment terminal in batch mode. When the terminal restarts after the download, the file authentication module searches the RAM-based file system for the following two file types: •…
-
Page 112
RAM. When all required certificates are authenticated and stored in the certificate tree, the file authentication process for signature files can proceed. Figure 33 Display Prompts During the File Authentication Process VX 520 R EFERENCE UIDE… -
Page 113
When all certificates and signature files are processed and special files are deleted or redirected as required, the terminal restarts and the *GO application executes. VX 520 R EFERENCE UIDE… -
Page 114: File Group Permissions
This section discusses how file authentication controls who (which business Permissions entity) can store application files in which file groups in the VX 520 file system. By inserting zero-length SETDRIVE.x and SETGROUP.n files into a download list, you can specify which drive (x = I: RAM or F: flash) and in which group (n = 1–15) to store an application file.
-
Page 115: File Authentication For Back-To-Back Application Downloads
When performing a back-to-back application download between two VX 520 for Back-to-Back terminals, the file authentication process on the receiving terminal is similar to an Application application download from a host computer to a standalone VX 520 terminal. Downloads There are some important differences to take into account: •…
-
Page 116: Timing Considerations Due To The Authentication Process
To optimize the authentication process, download certificates in a higher-level- certificates-first order. This way, they process faster than a random order download. VX 520 R EFERENCE UIDE…
-
Page 117: Optimize Available Memory Space For Successful Downloads
For information regarding file compression, refer to the Verix V Operating System Compression Programmers Manual (VPN 23230). Effect of When downloading application files and data to a VX 520 terminal, an important Downloads on consideration is the effect of download procedure on existing application files, files Existing Files…
-
Page 118: Set Up The Download Environment
Set Up the The first step in performing a download to a VX 520 terminal is to establish the Download physical communication link between the sending and receiving systems required…
-
Page 119: Cable Connection For Direct Downloads
Connect the DIN-type connector on one end of the cable to the COM1 (or COM2) serial I/O port on the download computer. Connect the RJ-45 connector on the other end of the download cable to the RS-232 port on the back panel of the VX 520 terminal. HOST COMPUTER FOR DOWNLOADS OR…
-
Page 120: Cable Connection For Back-To-Back Application Downloads
Set Up the Download Environment Confirm that the parameters for the download by telephone are set in the download tool. Confirm that the receiving VX 520 terminal has a direct telephone line connection. Ensure that the correct keyed variables used to control downloads by telephone are stored in the CONFIG.SYS file of the target file group on the…
-
Page 121
In both cases, the message will USB DOWNLOAD COMPLETE appear on the terminal screen after the VERIFONE.ZIP file has been downloaded. TERMINAL MGR ENTRY If an application prompt appeared and you chose to enter terminal manager, you are Please Enter Password prompted to type the system password. -
Page 122: Direct Application Downloads
The procedure for direct application downloads is also Downloads discussed. Hardware Checklist The correct cable connects the download computer serial port (COM1 or COM2) to the RS-232 serial port (COM1) of the VX 520 terminal (refer to Cable Connection for Direct Downloads). Software Checklist …
-
Page 123: Checklist For Effects On Files And Settings In The Receiving Terminal
Group 1 application memory area of a VX Procedure 520 deployment terminal. Steps described in the Action column are performed directly on the VX 520 terminal. Notes provided in this column indicate and explain actions you must perform on the host computer.
-
Page 124
If you selected on a 1> FULL DNLD multiple application download, you will be prompted to clear the existing application on the currently selected group. Select to continue or 1> YES to cancel downloading 2> NO applications. VX 520 R EFERENCE UIDE… -
Page 125
Otherwise, you must restart the terminal manually by selecting on the first menu of RESTART . If an application VERIX TERMINAL MGR resides on the terminal following the download, it executes on restart. VX 520 R EFERENCE UIDE… -
Page 126
If the application attempts to access an unauthenticated executable or library, it may crash. Repeat the Direct Application Download Procedure using the correct certificates and/or signature files. For more information on startup errors, see STARTUP ERRORS. VX 520 R EFERENCE UIDE… -
Page 127: Direct Operating System Downloads
Downloads downloads is also discussed. Hardware Checklist The correct cable connects the download computer serial port (COM1 or COM2) to the RS-232 serial port (COM1) of the VX 520 terminal (refer to Cable Connection for Direct Downloads). Software Checklist …
-
Page 128: Direct Operating System Download Procedure
When the terminal restarts and the new OS files process, they are moved out of the Group 1 RAM into the Group 0 area of the VX 520 file system. Direct Operating The procedure in Table 19…
-
Page 129
If you performed a full download, the terminal restarts automatically. Otherwise, you must restart the terminal manually by selecting on the first 1> RESTART VERIX TERMINAL MGR menu. If an application resides on the terminal following the download, it executes on restart. VX 520 R EFERENCE UIDE… -
Page 130
(partial download). Because a full OS download clears the RAM, all terminal applications, related certificates, and signature files must download to the DOWNLOAD NEEDED terminal when performing this type of download. <error message> VX 520 R EFERENCE UIDE… -
Page 131: Download By Telephone
Hardware Checklist Set up the dial-up telephone line and modem connection on the host computer. Set up the direct telephone line connection on the receiving VX 520 terminal, as described in Telephone Line Connection for Telephone Downloads. Software Checklist …
-
Page 132
*ZP HOST PHONE NUM ______________ VTM DOWNLOAD MGR Gnn If *ZT (terminal ID used by VeriCentre) is not defined, you must enter a valid terminal ID (up to 15 characters long) and press *ZT TERMINAL ID ______________ VX 520 R EFERENCE UIDE… -
Page 133
VERIX TERMINAL MGR resides on the terminal following the download, it executes on restart. If an error occurs during connection or download, an error message is displayed. For more information on downloading errors, DOWNLOADING ERRORS. VX 520 R EFERENCE UIDE… -
Page 134
If the application attempts to access an unauthenticated executable or library, it may crash. Repeat the Download by Telephone Procedure using the correct certificates and/or signature files. For more information on startup errors, see STARTUP ERRORS. VX 520 R EFERENCE UIDE… -
Page 135: Back-To-Back Application Downloads
Hardware Checklist The correct serial cable connects the RS-232 ports of the sending and receiving VX 520 terminals (refer to Cable Connection for Back-to-Back Application Downloads). Verify that the RAM size on the receiving terminal is large enough to receive files uploaded from the sending terminal.
-
Page 136: Checklist For Effects On Files And Settings In The Receiving Terminal
Back-to-Back The back-to-back application download process consists of two main phases: Application Preparing a Gold VX 520 terminal (transfers application files to the Target VX Download 520 terminal). Procedure Downloading application files from the Gold terminal to a properly configured Target terminal.
-
Page 137
Specify whether to perform a full or partial download then select COM1 as the receiving port. Connect a cable (VeriFone part number 05651-xx) between the RS-232 serial ports of the Gold and Target terminals. From any terminal manager menu on the Gold terminal, press [*] and enter the GID1 password to initiate the file transfer. -
Page 138
The procedure in Table 21 walks you through a back-to-back application download from a sending VX 520 terminal (Gold) to a receiving VX 520 terminal (Target). Back-to-back downloads require that one terminal, the Gold terminal, be loaded with the required applications. The receiving terminal is the Target terminal. The… -
Page 139
The Target terminal begins to validate all files. Allow the Target terminal to complete file authentication and reboot the terminal. The Gold terminal is ready to perform another download. An application- specific menu is displayed after the Target terminal completes the reboot. VX 520 R EFERENCE UIDE… -
Page 140: Download From A Usb Flash Drive
Before you begin, make sure that the USB device is properly inserted in the terminal’s USB port and the VeriFone.zip file resides in the device. VeriFone.zip is the only filename recognized by the system as a downloadable file. For more information on how to build a VeriFone.zip file, see Build a VeriFone.zip File…
-
Page 141
Use the following instructions to build a CONFIG.SYS downloadable file: Open Notepad and create a .txt file containing parameter and value pairs. Run the Variable Length Record (VLR) utility to convert the text file to a downloadable file format (vlr -c input.file output.file). VX 520 R EFERENCE UIDE… -
Page 142
After creating a CONFIG.SYS downloadable file, move the created file to the proper folder. Then, create a new .zip file named VeriFone.zip on your root drive and move all the required GID folders into the .zip file. Make sure that Save Full Path Info is selected. -
Page 143: Usb Flash Drive Download Procedure
Download from a USB Flash Drive USB Flash Drive To begin downloading from a USB flash drive, insert the flash drive into the USB Download port of the VX 520 terminal and follow the instructions on Table Procedure Table 22…
-
Page 144
USB device. 1> COM2 2> USB FLASH MEMORY ↑ VERIX TERMINAL MGR Select to begin the download. 2> CONTINUE DOWNLOAD Gnn DOWNLOAD FROM USB FLASH MEMORY DEVICE 1> CANCEL DOWNLOAD 2> CONTINUE VX 520 R EFERENCE UIDE… -
Page 145
Display Action VERIX TERMINAL MGR The terminal will automatically download the DOWNLOAD Gnn file VeriFone.zip from the USB flash drive. appears on the USB DOWNLOAD COMPLETE terminal screen after a successful download. USB DOWNLOAD COMPLETE If you performed a full download, the terminal restarts automatically. -
Page 146
If the application attempts to access an unauthenticated executable or library, it may crash. Repeat the Direct Application Download Procedure using the correct certificates and/or signature files. For more information on startup errors, see STARTUP ERRORS. VX 520 R EFERENCE UIDE… -
Page 147: Hapter
The VX 520 uses an 18-watt wall-mount power supply as a standard power NOTE source. An optional 36-watt power supply may also be used for all other variants of the VX 520. However, the VX 520 GPRS requires the 36-watt power supply to optimize battery charging. DC Power Pack…
-
Page 148: External Dimensions
Dimensions • Width: 87 mm (3.4 in) VeriFone ships variants of the VX 520 terminal for different markets. Your terminal NOTE may have a different configuration. The basic processes described in this guide remain the same, regardless of terminal configuration.
-
Page 149: Hapter
Do not spray cleaners or other solutions directly onto the keypad or terminal display. Smart Card Do not attempt to clean the smart card reader. Doing so may void any warranty. Reader For smart card reader service, contact your VeriFone distributor or service provider. VX 520 R EFERENCE UIDE…
-
Page 150
AINTENANCE Smart Card Reader VX 520 R EFERENCE UIDE… -
Page 151: Hapter
• International – Contact your VeriFone representative Return a Before returning a VX 520 terminal to VeriFone, you must obtain an MRA number. Terminal for The following procedure describes how to return one or more VX 520 terminals for Service repair or replacement (U.S.
-
Page 152: Power Pack
The VX 520 uses an 18-watt wall-mount power supply as a standard power NOTE source. An optional 36-watt power supply may also be used for all other variants of the VX 520. However, the VX 520 GPRS requires the 36-watt power supply to optimize battery charging. VX 520 R…
-
Page 153: Connectors
VPN PPR 252-001-01-A 49 mm (1.93 in) diameter, 57 mm (2.24 in) wide VeriFone ships variants of the VX 520 terminal for different markets. Your terminal NOTE may have a different printer configuration and use one or the other of the printer paper types.
-
Page 154
ERVICE AND UPPORT Accessories and Documentation VX 520 R EFERENCE UIDE… -
Page 155: Hapter
HAPTER Troubleshooting Guidelines The troubleshooting guidelines provided in the following section are included to assist you to successfully install and configure your VX 520 terminal. If you have problems operating your VX 520 terminal, please read through these troubleshooting examples.
-
Page 156: Guidelines Terminal Does Not Dial Out
Printer. • If the problem persists, it may be due to poor paper quality. Install a new roll of higher-quality paper. WARNING Poor-quality paper may jam the printer. To order high-quality VeriFone paper, refer to Accessories and Documentation. Keypad Does…
-
Page 157: Transactions Fail To Process
If they are not experiencing difficulties with their line, contact the telephone company and have your line checked. • If the telephone line works, contact your local VeriFone representative for assistance. VX 520 R EFERENCE…
-
Page 158: Printer Does Not Print
• Verify that the printer roller and paper roll dust cover are properly installed. • If the problem persists, contact your VeriFone distributor or service provider. Terminal Display • Connect the terminal in to a known-good power supply (if you have one) to Does not Show see if this clears the problem.
-
Page 159: A P P En Di
File authentication module processes. • File compression module use messages from the VeriCentre DMM terminal management and download tool. Error Messages The following error messages may appear when the VX 520 terminal is in Verix Terminal Manager. Table 23 Error Messages Display…
-
Page 160
DBMON.OUT application. DOWNLOADING ERRORS VERIX TERMINAL MGR This error only occurs on a VX 520 terminal when DOWNLOAD downloading through TCP/IP. An application that supports the TCP stack does not exist. TCP/IP NOT PRESENT… -
Page 161
PRINTER DIAGNOSTICS ERRORS PRINTER ID is displayed when you select NO PAPER TEST F3 VERSION 0PRED1A1 and there is no paper installed in the PAPER FEED F4 STATUS printer. NO PAPER TEST F3 PAPER FEED F4 VX 520 R EFERENCE UIDE… -
Page 162
LOAD TERMINAL The (optional) Terminal Management Agent (TMA) MANAGEMENT AGENT software is not resident in the VX 520 terminal. The TMA software is required to perform remote diagnostics. For more information about support for remote diagnostics, contact your VeriFone service provider. -
Page 163
*FAILED* This message remains on screen until all new signature files are checked. New digital certificates are always checked first, followed by new signature files, in an uninterrupted process. VX 520 R EFERENCE UIDE… -
Page 164: Information Messages
In special cases where system certificates are being installed, SYSTEM is displayed instead of CERTIFICATE CHECK CERTIFICATE Information The following information messages may appear when the VX 520 terminal is in Messages terminal manager. Table 24 Information Messages Display Action DOWNLOADING INFORMATION…
-
Page 165
***_______ VERIX TERMINAL MGR This screen indicates that the terminal is ready for DOWNLOAD Gnn download and is waiting for a response from the host. UNIT RECEIVE MODE WAITING FOR DOWNLOAD VX 520 R EFERENCE UIDE… -
Page 166
• ADDR that the application was trying to access. If you report a system error to VeriFone, you may be asked to provide the information displayed on this screen. For detailed information about the error log function and the terms listed above, please refer to the Verix eVo OS Programmers Manual (VPN DOC00301). -
Page 167
RAM FILES nnnn Closest estimate of used memory (in KB). • INUSE — INUSE nnnn AVAIL nnnn Lowest number of free memory (in KB). • AVAIL — FLASH FILES nnnn INUSE nnnn AVAIL nnnn VX 520 R EFERENCE UIDE… -
Page 168
GIDs is deleted and the flash memory is ALL RAM AND FLASH CLEAR being merged. COALESCING FLASH PASSWORD INFORMATION VERIX TERMINAL MGR This message confirms that you have successfully PASSWORD changed a GID password or the system password. PASSWORD CHANGED VX 520 R EFERENCE UIDE… -
Page 169
LIST SYNC DRIVERS F4 CUSTOMER CARD When a SAM card is tested, the following information POWER UP: PASSED is displayed. GET ATR: PASSED READ TEST: PASSED WRITE TEST: PASSED READ VERIFY TEST: PASS ALL TESTS: PASSED VX 520 R EFERENCE UIDE… -
Page 170
At startup, the terminal displays a copyright notice QT00E20B screen that shows the terminal model number, the OS 12/22/2009 Verix version of the VX 520 stored in the terminal’s flash memory, the date the firmware was loaded into the COPYRIGHT 1997-2009 terminal, and the copyright notice. -
Page 171
— number of times the terminal has been reset • RCNT either through application control, a terminal manager request, or a power cycle — indicates whether the terminal • TAMPER DETECTED has been tampered (N = No, Y = Yes) VX 520 R EFERENCE UIDE… -
Page 172
— shows the memory set aside for the OS • STACK STACK 1700 stack. This is where the terminal stores data for NEXT CERT F3 running tasks like all the parameters from the call Select to view other certificates. NEXT CERT F3 ↑ VX 520 R EFERENCE UIDE… -
Page 173: A P P En Di
PPENDIX Port Pinouts The tables in this appendix list pinouts for the VX 520 terminals. PIN Pad Serial Connector Function Description Port No connection VPINpad +9V DC regulated power No connection No connection Power ground /RXD Receive data LOOKING INTO…
-
Page 174: Ethernet Port
Receive data — No connection No connection USB Pinout Connector Function Description USB_5V_EXT 5V USB Power (200mA) nUSB_DEVICE USB Device Signal — pUSB_DEVICE USB Device Signal + USB Ground Receptacle Plug DC Input Jack – Polarity VX 520 R EFERENCE UIDE…
-
Page 175: A P P En Di
PPENDIX ASCII Table ASCII Values The following section shows the ASCII table for the VX 520 display. Table 25 VX 520 Display ASCII Table ASCII ASCII ASCII ASCII » & < > VX 520 R EFERENCE UIDE…
-
Page 176: Vx 520 R Eference G Uide
ASCII T ABLE ASCII Values VX 520 R EFERENCE UIDE…
-
Page 177: A P P En Di
PPENDIX Keypress Scan Codes Keypress Scan The following section shows the Keypad Scan Code table for the VX 520. Codes Table Table 26 Keypress Scan Codes Scan Code Notes 0xB1 ‘1’ with high order bit set 0xB2 ‘2’ with high order bit set 0xB3 ‘3’…
-
Page 178: Auto-Repeating Keys
100 msec that the key is being held. Dual keypresses do not auto-repeat. NOTE When you hold down the BACKSPACE key, it changes from 0x88 to 0x8E and does not autorepeat. VX 520 R EFERENCE UIDE…
-
Page 179: Glossary
CONFIG.SYS record which begins with the smallest unit of storage and hence of information the *ZA key. A VX 520 application ID can be up to 21 in any binary system within a computer. characters long. For VeriCentre Download…
-
Page 180
The carrier signal on a phone line is purpose, such as to connect a VX 520 terminal to a modulated with frequency or amplitude variations to host computer. See Leased line. -
Page 181
An area of non-volatile memory terminal only and not in interaction with a host where files can be stored. The VX 520 also has a computer. For the VX 520, local functions such as RAM-based file system. Files can be stored in RAM… -
Page 182
In the Abbreviation for personal computer. Usually, PC VX 520 terminal, the RAM (or SRAM) is commonly refers to an IBM-compatible personal computer. used to store applications and temporary data… -
Page 183
LOSSARY Remote host computer through a terminal card reader. The VX 520 card A host computer reader has a bi-directional swipe direction. The user connected to a VX 520 terminal over a dial-up must hold the card so that the magnetic stripe is telephone line to download files or data, or to faces in and towards the keyboard. -
Page 184
Information stored on tracks 1, 2, or 3 of a debit or credit card magnetic stripe, which can be read by a magnetic card reader device, such as the one that is integrated in the VX 520 terminal. Transaction An exchange of data resulting in a transfer of goods, services, value, and/or information between two parties. -
Page 185: I N De X
VeriFone back-to-back application downloads cable connection by telephone data entry modes definition normal mode direct download utility (DDL) terminal manager direct downloads date and time download types determine last reset downloading a new operating system VX 520 R EFERENCE UIDE…
-
Page 186
OS downloads default sponsor certificate VX 520 R EFERENCE UIDE… -
Page 187
PIN pad to VX 520 private cryptographic key connecting a smart card reader to VX 520 public cryptographic key connecting optional device(s) relationship to signature files connecting the terminal power pack… -
Page 188
VX 520 D/E power supply peripherals VX 520 DC power pack troubleshooting VX 520 GPRS power pack PIN pad system password port pinouts ports downloads and… -
Page 189
VX 520 GPRS cleaning charging Smart battery documentation power pack specifications electrical considerations SIM card installation environmental factors Smart battery repair VX 520 wireless capability replacement troubleshooting thermal printer paper storage thermal printers about the thermal printer paper paper jams troubleshooting time… -
Page 190: Gateway Place, Suite
VeriFone, Inc. 2099 Gateway Place, Suite 600 San Jose, CA, 95110 USA Tel: (800) VeriFone (837-4366) www.verifone.com VX 520 Reference Guide VeriFone Part Number DOC252-004-EN-B, Revision B…
VeriFone Vx520 — это небольшой, но производительный терминал для оплаты товаров и услуг. Это портативное устройство обладает целым рядом характеристик, которые обеспечивают успешную работу. Для более продуктивного использования аппарата предлагаем ознакомиться с Verifone Vx520 инструкция по эксплуатации.
В главном меню собраны следующие комнаты:
- VANZARE (F1) – оплата товаров/услуг;
- ANULARE (F2) – отмена оплаты;
- SISTEM (F3) – служебное меню банка;
- JURNAL (F4) – служебное меню кассира.
Цветные кнопки на терминале имеют значения:
- Зеленая — <ENTER> — подтверждение предшествующих действий;
- Желтая — <CLEAR> — корректировка введенной информации;
- Красная — <CANCEL> — переход в главное меню или отмена действия.
Порядок работы с картами:
- карты с чипами вставляются в отверстие спереди терминала и находятся там в течении всей операции;
- карты без чипа проводятся по желобу по правому борту терминала магнитной стороной внутрь.
На экране терминала отображается номер карты, который должен совпадать с цифрами нанесенными на саму карточку.
Ввод суммы:
- введите сумму операции на цифровой панели и нажмите <ENTER>;
- скорректировать набор цифр поможет команда <CLEAR>;
- для отмены введите <CANCEL>.
Терминал сам определяет необходимость проверки операции введением ПИН-КОДА. Если это потребуется, то на экране появится соответствующее сообщение. Далее пользователю потребуется ввести четырехзначный код на терминале или ПИН-паде завершая команду клавишей <ENTER>. Ввод только клавиши <ENTER> позволит провести транзакцию без PIN-кода. Клавиша <CANCEL> прекращает проведение операции. Клавиша <CLEAR> удаляет введенные символы.
Успешная операция заканчивается получением от процессингового центра ответа 00 – TRANZACTIE OK. Принтер терминала начинает печать в двух экземплярах чек (PENTRU BANCA, PENTRU CLIENT), один из которых остается у кассира. Если проведение операции не требует введения ПИН-кода, то на одном из чеков клиент должен оставить подпись.
Если же на экране не появляется код 00 при оплате, то в проведении операции было отказано. В этом случае терминалом будет напечатан один чек с объяснением отказа в оплате.
Операция отмены
Операция «ANULARE» проводится исключительно до закрытия операционного дня. Для отмены операции потребуется соответствующий чек. В главном меню потребуется выбрать необходимую позицию меню «ANULARE». Терминал запросит сумму операции, которую необходимо ввести в соответствии с данными на чеке. После ввода суммы стоит нажать <ENTER> или <CLEAR> в случае ошибки при вводе.
Отмена операции завершается успешно, если процессинговый центр выводит на экран 00 – TRANZACTIE OK, а на принтере терминала распечатываются два экземпляра чека (PENTRU BANCA, PENTRU CLIENT). Оба распечатанных чека должны быть подписаны кассиром, осуществившим данную операцию, соответствующий экземпляр вручается клиенту.
Меню JURNAL
В этом разделе содержится 4 основных пункта:
1) Закрытие операционного дня
Команда используется для закрытия дня, распечатки отчета и удаления информации из памяти терминала. Нажмите 1, чтобы выбрать опцию RAPORT FINAL. После терминал устанавливает связь с банком для проверки итогов. На экране может появиться:
a) RAPORTUL EFECTUAT CU SUCCES – проверка прошла успешно.
b) !!! ATENTIE !!! INCERCATI MAI TIRZIU — в процессе проверки обнаружена проблема попробуйте позже.
2) Промежуточный отчет
Для просмотра промежуточного отчета нажмите 2, чтобы выбрать опцию RAPORT INTERMEDIAR.
3) Распечатка копии чека
Введите 3, чтобы выбрать опцию RETIPARIRE CHITANTA, а после ввести номер чека.
4) Распечатка копии нерезультативного чека
Введите 4, чтобы выбрать опцию RETIPARIRE Decline (будет распечатан последний нерезультативный чек).
Если день не был закрыт, то на следующий день проведение операций по терминалу будет невозможна.
Порядок замены бумаги в терминале
- нажмите на черную кнопку;
- откройте крышку терминала;
- положите рулончик термической бумаги в терминал;
- оставьте свободный край бумаги снаружи;
- закройте крышку терминала до щелчка.
Эта краткая инструкция для терминала Verifone Vx520 поможет вам более эффективно использовать данный аппарат.
Читайте еще:
Инструкция по установке СКНО в РБ
СКНО – модем для контроля кассового оборудования. Это устройство собирает, обрабатывает и передает информацию о денежном обороте кассового аппарата…
Подробнее
Как установить платежный терминал
Терминалы упрощают оплату товаров и услуг, делают этот процесс действительно быстрым. Но само подключение банковского терминала потребует времени…
Подробнее
Среди оборудования от компании VeriFone для приема платежных карт выгодно выделяется POS-терминал VeriFone VX520. Он отличается удобством применения, простотой настроек, возможностью приема всех видов пластиковых карт. В основе аппарата — мощный процессор, который способствует быстрой обработке информации. За счет высокоскоростного шифрования обеспечивается защита данных от мошенников.
Подберем VeriFone под любой бизнес и бюджет.
Оставьте заявку и получите консультацию в течение 5 минут.
VeriFone VX520: инструкция по подготовке терминала к работе
Согласно инструкции, подключение VeriFone VX520 к сети Интернет возможно через следующие виды связи:
- GPRS. Связь с интернетом возможна через SIM-карту с подключенной услугой доступа, предоставляемой мобильным оператором.
- Ethernet. К аппарату подключают провод от модема или роутера. Преимущества проводного интернета заключаются в стабильности и высокой скорости.
Подключение к интернету через Wi-Fi не поддерживается.
Клавиатура аппарата состоит их нескольких клавиш, на каждую их них возложены определенные функции.
Функциональное назначение кнопок POS-терминала:
- F1-F4 — кнопки навигации (F1 открывает меню административных операций в режиме ожидания);
- кнопки с цифрами — ввод суммы;
- красная, желтая и зеленая кнопки — отмена, удаление и подтверждение действий соответственно.
Прежде чем приступить к работе, нужно удостовериться в том, что принтер заправлен кассовой лентой. Для установки рулона бумаги осторожно откройте крышку, аккуратно нажав на черную кнопку, согласно направлению стрелки. Вставьте чековую ленту так, чтобы она при печати чеков разматывалась снизу. Потяните за край, он должен выйти из лотка. Захлопните крышку и оторвите часть бумаги, которая видна снаружи.
Чтобы включить терминал, удерживайте зеленую кнопку примерно 5 секунд, пока он не перейдет в режим ожидания (на дисплее появится надпись «Введите карту»). Для отключения удерживайте кнопку красного цвета.
Терминал VeriFone VX520: инструкция по эксплуатации
Согласно инструкции по эксплуатации, терминал VeriFone VX520 поддерживает финансовые и административные операции. Основная его функция в точках продаж — проведение оплаты за товары. Для получения доступа к денежным операциям нужно вставить пластиковую карту в чип-ридер либо провести магнитной полосой через считыватель (зависит от вида используемой карты). Любую операцию, проведенную в течение рабочей смены, можно отменить. После этого деньги возвращаются на счет владельца карты.
Также терминал позволяет проводить административные операции, такие как печать копий чеков, формирование отчетов за смену и прочие. Чтобы открыть доступ к этим операциям, нужно нажать F1, когда терминал находится в режиме ожидания.
После совершения любой из операций устройство автоматически, в течение нескольких секунд, переходит в режим ожидания. Выбирать требуемый пункт можно как при помощи кнопок навигации, так и путем нажатия соответствующих цифр.
В зависимости от версии программного обеспечения, пункты меню могут немного различаться.
Мы готовы помочь!
Задайте свой вопрос специалисту в конце статьи. Отвечаем быстро и по существу. К комментариям
Финансовые операции
Чтобы провести оплату за товар, выберите в предложенном меню требуемый раздел. Далее сделайте следующее:
- Укажите сумму с помощью цифровых кнопок. Чтобы ввести копейки, нажмите после рублей кнопку «*». Недопустимо выполнять операции с суммами ниже 1 рубля.
- Подтвердите действия зеленой клавишей. При необходимости коррекции суммы нажимайте желтую кнопку.
- Если понадобится введение PIN-кода, система его запросит. Подтвердите действие зеленой кнопкой.
- Сверьте информацию на карте с той, которая появится на экране. Если она не совпадает, попробуйте совершить операцию снова. Если совпадает, подтвердите.
- Устанавливается соединение с банком и происходит обмен данными, это займет 3—40 секунд. По завершении процесса появится надпись об одобрении операции и начале печати чеков.
- Выйдет первый чек, на котором клиент должен поставить подпись. Подтвердить. Начнется печать следующего чека.
В случае сбоя выйдет только один чек с сообщением об отклонении операции и кодом ошибки.
Отмена операции возможна только до момента закрытия смены. Выполните действия в следующей очередности:
- Выберите требуемый раздел.
- Введите номер документа, сформированного при осуществлении операции, которую нужно отменить. Подтвердите нажатием на зеленую кнопку.
- Данные чека выводятся на экран. Снова подтвердите.
- Происходит проверка карты. Сравните данные на дисплее с информацией на карте. Подтвердите.
- Устанавливается соединение с банком и происходит обмен данными.
- После успешно проведенной операции начинается печать чеков.
Деньги практически моментально поступят на счет покупателя.
Подберем POS-терминал VeriFone, установим и настроим за 1 час.
Оставьте заявку и получите консультацию в течение 5 минут.
Административные операции
Сформировать копию чека можно, отыскав его по номеру, или повторив печать последнего фискального документа. Чтобы узнать чековый номер, зайдите в меню «Отчеты» и выберите полный отчет. В нем представлены сведения всех операций за текущий период. Имейте в виду, что после закрытия смены база терминала очистится и печать копии чека будет невозможной. Номер, найденный в полном отчете, введите после выбора раздела «Печать копии чека по номеру».
В разделе меню «Отчеты» можно распечатать краткий или полный отчет за текущий период. Разница между ними заключается в содержании. В кратком отчете указаны итоговые суммы по каждой операции, а в полном — детальная информация, включая номер чека, карты, дату и прочее.
В разделе «Служебные операции» доступны:
- «Сверка итогов». Происходит закрытие смены и очистка сведений по всем операциям, выполненным за текущий период. Система сверяет информацию в базе с той, которая хранится в банке. В зависимости от результата, осуществляется печать чека с сообщением о совпадении либо несовпадении итогов.
- «Загрузка ключей». Осуществляется загрузка рабочих ключей из банковской системы в аппарат. Чаще всего операция выполняется при появлении ошибки с кодом 898.
- «Проверка связи». Выполняется связь устройства с банком.
Если произошла случайная блокировка аппарата, нажмите F1 и подтвердите зеленой кнопкой.
Возможные неисправности и способы их устранения
Основные виды неисправностей POS-терминала VeriFone VX520 и варианты их решения представлены в таблице.
| Возможные неисправности | Решения |
| Не выходит чек | Проверьте наличие кассовой ленты в принтере. Перезагрузите аппарат |
| Не удается завершить операцию, сообщение на экране указывает на ошибку при установке соединения (работа по GPRS) | Отключите аппарат, а затем включите через 1 минуту.
Проверьте доступный баланс на SIM-карте: извлеките ее из аппарата и вставьте в мобильный телефон. |
| Не получается завершить операцию, ошибка при установке соединения (работа по Ethernet) | Отключите аппарат и включите через 1 минуту.
Перезагрузите устройство доступа к интернету (роутер, модем). Проверьте наличие связи путем совершения операции «Загрузка ключей» |
Кроме того, на ошибки указывает появление следующих кодов на экране аппарата:
- 051 — срок действия карты завершен;
- 050 — операция невозможна по причине блокировки карты;
- 055 — операция запрещена банком-эмитентом;
- 058 — карта не активна;
- 076 — не хватает денег для совершения операции;
- 205 — ввод неверной суммы;
- 201 — неправильно указан PIN-код.
В случае серьезных неисправностей, не поддающихся самостоятельному устранению, стоит обратиться за помощью к специалистам.
Подключение VeriFone VX520 к 1С
Для работы VeriFone VX520 с 1С предварительно нужно скачать и установить соответствующий драйвер.
Работа POS-терминала с 1С осуществляется следующим образом.
- Сначала программа 1С отправляет драйверу запрос, который тот впоследствии перенаправляет в систему терминала.
- Происходит обмен данными между терминалом и сервером банка.
- В 1С приходит ответ. Если операция прошла успешно, начинается печать чека. Если нет — аппарат выдает ошибку. Ее решение зависит от причины появления.
Подключение VeriFone VX520 к 1С осуществляется через USB или RS-232.
Для настройки POS-терминала сделайте следующее:
- Подключите аппарат к ПК.
- Установите требуемый драйвер.
- Удостоверьтесь в адекватной работе устройства («Пуск» — «Устройства и принтеры», выбрать оборудование и посмотреть его свойства).
- Зайдите в раздел «Администрирование» программы 1С. Выберете «РМК и оборудование», потом — «Подключаемое оборудование».
- Нажмите «Создать».
- Укажите тип (эквайринговый терминал) и наименование устройства.
Далее можно ввести некоторые параметры, такие как код валюты, устройства и прочие. В конце выполните тест, по результатам которого можно судить о правильности подключения и настройки.
Драйвер для VeriFone VX520
Без драйвера для VeriFone VX520 становится невозможным подключение аппарата к компьютеру. В частности, он необходим для успешной интеграции терминала и 1С.
Скачать драйвер для VeriFone VX520 можно с официального сайта компании. Чтобы его установить, потребуется запуск файла setup.exe. В случае успешной установки можно заметить, как появится еще один СОМ-порт (по умолчанию 9-й). Но при желании номер можно изменить в файле silent.bat.
Как перезагрузить терминал VeriFone VX520?
Если аппарат завис или отказывается выполнять команды, иногда помогает решить проблему обычная перезагрузка. Как перезагрузить терминал VeriFone VX520?
Воспользуйтесь одним из двух способов:
- Отключите аппарат от источника питания. Извлеките аккумулятор, а затем установите через пару минут и включите устройство.
- Зажмите зеленую кнопку и клавишу с цифрой 7 одновременно и удерживайте до тех пор, пока система не запросит пароль. Введите «1», нажмите кнопку «alpha», которая расположена между фиолетовыми клавишами в верхнем ряду. Откроется окно, где выбирайте «Restart».
Начнется перезагрузка устройства. Если с ее помощью устранить сбой не удалось, придется обращаться за помощью к специалистам.
Подберем POS-терминал VeriFone для вашего бизнеса. Доставим в любую точку РФ!
Оставьте заявку и получите консультацию в течение 5 минут.
Оцените, насколько полезна была информация в статье?
Наш каталог продукции
У нас Вы найдете широкий ассортимент товаров в сегментах
кассового, торгового, весового, банковского и офисного оборудования.
Посмотреть весь каталог