Galaxy J3 (2016)
SM-J320F/DS
-
Samsung Pay: как использовать, обзор, список банков, смартфонов, часовСамая свежая информация о сервисе Samsung Pay для РФ и РБ. Список банков, платежных систем, смартфонов и часов. Инструкции по регистрации и добавлению карт
-
Обновление
Как перенести Windows на новый SSD SamsungЧасто задаваемые вопросы о технике SSD Samsung. Узнайте подробнее о ‘Как перенести Windows на новый SSD Samsung’ с помощью службы поддержки Samsung.
-
Настройка
Как узнать дату изготовления (производства) техники SamsungХотите узнать дату производства вашей техники Samsung? Ответ в этой статье.
-
Список банков, которые работают с Samsung Pay в БеларусиСписок банков для Беларуси в этой статье. Информация обновляется.
-
Настройка
Как cделать скриншот ладонью на смартфоне Samsung GalaxyЧасто задаваемые вопросы о технике Мобильные устройства Samsung. Узнайте подробнее о ‘Как cделать скриншот ладонью на смартфоне Samsung Galaxy’ с помощью службы поддержки Samsung.
-
Камера
Как установить вспышку на звонок на Samsung GalaxyЧасто задаваемые вопросы о технике Мобильные устройства Samsung. Узнайте подробнее о ‘Как установить вспышку на звонок на смартфоне Samsung Galaxy’ с помощью службы поддержки Samsung.
-
Какие устройства поддерживают Samsung PayЧасто задаваемые вопросы о технике Мобильные устройства Samsung. Узнайте подробнее о ‘Какие устройства поддерживают Samsung Pay’ с помощью службы поддержки Samsung.
-
Настройка
Как дублировать изображение со смартфона Samsung на телевизорКак дублировать изображение со смартфона Samsung на телевизор
-
Беспроводной интернет / Wi-Fi
На Samsung Galaxy пропадает мобильная сетьСмартфон или планшет теряет сеть? Читайте рекомендации от производителя в этой статье.
-
Приложения
Приложение на Samsung Galaxy не работает или показывает ошибку «Приложение остановлено»Часто задаваемые вопросы о технике Телевизоры Samsung. Узнайте подробнее о ‘Приложение на Samsung Galaxy не работает или показывает ошибку «Приложение остановлено»’ с помощью службы поддержки Samsung.
-
Настройка
Как отключить режим «Не беспокоить» на Samsung GalaxyЧасто задаваемые вопросы о технике Мобильные устройства Samsung. Узнайте подробнее о ‘Как отключить режим «Не беспокоить» на Samsung Galaxy’ с помощью службы поддержки Samsung.
-
Приложения
Как включить мультиоконный режим на Samsung Galaxy?Часто задаваемые вопросы о технике Samsung Galaxy . Узнайте подробнее о ‘Как включить мультиоконный режим на Samsung Galaxy?’ с помощью службы поддержки Samsung
-
Беспроводной интернет / Wi-Fi
Как устранить неполадки при подключении Samsung Galaxy к Wi-FiЧасто задаваемые вопросы о технике Samsung Galaxy. Узнайте подробнее о ‘Как устранить неполадки при подключении Samsung Galaxy к Wi-Fi’ с помощью службы поддержки Samsung
-
Спецификации / Функции
Samsung Galaxy медленно работает (тормозит)Тормозит и зависает смартфон или планшет? Читайте официальные рекомендации от производителя
-
Беспроводной интернет / Wi-Fi
Не работает мобильный интернет на Samsung GalaxyНе работает интернет? Читайте рекомендации от производителя
-
Использование
Как вирусы попадают на Android и как их удалять. Нужен ли антивирус на AndroidЧасто задаваемые вопросы о технике Мобильные устройства Samsung. Узнайте подробнее о ‘Как вирусы попадают на Андроид и как их удалять’ с помощью службы поддержки Samsung.
-
Использование
Как записаться в сервисный центр SamsungИнструкция по записи в сервисный центр Samsung
-
Настройка
Не снимается пароль, пин-код или рисунок с экрана блокировки на Samsung GalaxyЧасто задаваемые вопросы о технике Мобильные устройства Samsung. Узнайте подробнее о ‘Не снимается пароль, пин-код или рисунок с экрана блокировки на Samsung Galaxy’ с помощью службы поддержки Samsung.
-
Связь / Сеть / Звонки
Что делать, если на Samsung Galaxy не поступают входящие звонкиЧасто задаваемые вопросы о технике Samsung Galaxy. Узнайте подробнее о ‘Что делать, если на Samsung Galaxy не поступают входящие звонки’ с помощью службы поддержки Samsung
-
Питание / Зарядка
Samsung Galaxy самостоятельно перезагружаетсяСмартфон или планшет Samsung Galaxy сам перезагружается? Как это исправить, читайте здесь.
-
Спецификации / Функции
Полосы и пятна на дисплее Samsung GalaxyПолосы, пятна, цифры на экране? Не спешите в ремонт, читайте рекомендации от производителя
-
Использование
Что делать, если сенсорный экран на Samsung Galaxy не распознаёт касанияЧасто задаваемые вопросы о Мобильных устройствах Samsung. Узнайте подробнее о ‘Что делать, если сенсорный экран на Samsung Galaxy не распознаёт касания’ с помощью службы поддержки Samsung.
-
Сообщения / Почта
Что делать, если не приходят SMS (сообщения) на Samsung GalaxyПошаговая инструкция от службы поддержки на тему: что делать, если не приходят SMS (сообщения) на Samsung Galaxy
-
Копия данных / Восстановление
Как сохранить контакты на Samsung Galaxy так, чтобы не потерятьЧасто задаваемые вопросы о технике Мобильные устройства Samsung. Узнайте подробнее о ‘Как сохранить контакты на Samsung Galaxy так, чтобы не потерять’ с помощью службы поддержки Samsung.
-
Копия данных / Восстановление
Как сохранить контакты в аккаунте Google на Samsung GalaxyЧасто задаваемые вопросы о технике Мобильные устройства Samsung. Узнайте подробнее о ‘Как сохранить контакты в аккаунте Google на Samsung Galaxy’ с помощью службы поддержки Samsung.
-
Настройка
Как узнать, где сохранен контакт на Samsung GalaxyЧасто задаваемые вопросы о технике Мобильные устройства Samsung. Узнайте подробнее о ‘Как определить, где сохранен контакт на Samsung Galaxy’ с помощью службы поддержки Samsung.
-
Копия данных / Восстановление
Как сохранить контакты, фото, видео, музыку и другие данные с Samsung GalaxyЧасто задаваемые вопросы о технике Мобильные устройства Samsung. Узнайте подробнее о ‘Как сохранить контакты, фото, видео, музыку и другие данные с Samsung Galaxy’ с помощью службы поддержки Samsung.
-
Настройка
Как сделать скриншот экрана на смартфоне или планшете Samsung GalaxyЧасто задаваемые вопросы о технике Мобильные устройства Samsung. Узнайте подробнее о ‘Как сделать скриншот экрана на смартфоне или планшете Samsung Galaxy’ с помощью службы поддержки Samsung.
-
Настройка
Как создать аккаунт Samsung на смартфоне или планшетеЧасто задаваемые вопросы о технике Мобильные устройства Samsung. Узнайте подробнее о ‘Как зарегистрировать аккаунт Samsung на смартфоне или планшете’ с помощью службы поддержки Samsung.
-
Использование
Как проверить оригинальность Samsung Galaxy и не купить подделкуЧасто задаваемые вопросы о технике Мобильные устройства Samsung. Узнайте подробнее о ‘Как определить оригинальность телефона/планшета Samsung Galaxy? Как не купить подделку?’ с помощью службы поддержки
-
Настройка
Как войти в аккаунт Samsung на смартфоне или планшетеЧасто задаваемые вопросы о технике Мобильные устройства Samsung. Узнайте подробнее о ‘Как войти в аккаунт Samsung на смартфоне или планшете’ с помощью службы поддержки Samsung.
-
Samsung Pay
Что делать, если не работает NFC на Samsung Galaxy?Часто задаваемые вопросы о технике Samsung Galaxy. Узнайте подробнее о ‘Что делать, если не работает NFC на Samsung Galaxy?’ с помощью службы поддержки Samsung
-
Камера
Не работает автофокус в камере на Samsung GalaxyНе работает автофокус? Читайте рекомендации от производителя в этой статье.
-
Использование
Как добавить файл в «Избранное» на Samsung GalaxyЧасто задаваемые вопросы о технике Samsung Galaxy. Узнайте подробнее о ‘Как добавить файл в «Избранное» на Samsung Galaxy’ с помощью службы поддержки Samsung
-
Копия данных / Восстановление
Как сделать сброс настроек (hard reset, factory reset) на Samsung GalaxyПошаговая инструкция по сбросу настроек на Samsung Galaxy от производителя. Фото + видео. Информация обновляется.
-
Настройка
Как выбрать SIM-карту для интернета на смартфонах Galaxy с двумя SIM-картамиЧасто задаваемые вопросы о технике Samsung Galaxy. Узнайте подробнее о ‘Как выбрать SIM-карту для интернета на смартфонах Galaxy Duos с двумя SIM-картами’ с помощью службы поддержки Samsung.
-
Беспроводной интернет / Wi-Fi
Как подключить смартфон или планшет Samsung к телевизоруИнформация от производителя: как подключить смартфон или планшет Samsung к телевизору
-
Беспроводной интернет / Wi-Fi
Как найти файлы, которые скачаны из интернета на Samsung GalaxyНе знаете, как найти загруженные файлы из интернета? Читайте пошаговую инструкцию с фотографиями от производителя.
-
Использование
Как отследить, где находится ребенокЧасто задаваемые вопросы о технике Мобильные устройства Samsung. Узнайте подробнее о ‘Как отследить, где находится ребенок’ с помощью службы поддержки Samsung.
-
Приложения
Как правильно устанавливать приложения на АндроидЧасто задаваемые вопросы о технике Мобильные устройства Samsung. Узнайте подробнее о ‘Как правильно устанавливать приложения на Андроид’ с помощью службы поддержки Samsung.
-
Использование
Galaxy eSIM и поддерживаемые операторы сетейЧасто задаваемые вопросы о мобильных устройствах Samsung. Узнайте подробнее о ‘Galaxy eSIM и поддерживаемые операторы сетей ‘ с помощью службы поддержки Samsung.
-
Приложения
Что умеет приложение Samsung Members?Часто задаваемые вопросы о технике Мобильные устройства Samsung. Узнайте подробнее о ‘Что умеет приложение Samsung Members?’ с помощью службы поддержки Samsung.
-
Обновление
Как автоматически оптимизировать устройство GalaxyFAQ по использованию на мобильных устройствах. Узнайте подробнее, Как автоматически оптимизировать устройство Galaxy, в Samsung Support.
-
Использование
Как снимать видео с помощью режима SuperSteady GalaxyFAQ для мобильных устройств. Узнайте подробнее, Как снимать видео с помощью режима SuperSteady Galaxy, в Samsung Support.
-
Использование
Что делать, если Samsung Galaxy не подключается автоматически к сети Wi-FiЧасто задаваемые вопросы о мобильных устройствах Samsung. Узнайте подробнее о ‘Что делать, если Samsung Galaxy не подключается автоматически к сети Wi-Fi’ с помощью службы поддержки Samsung.
-
Можно ли добавить карту в Samsung Pay из мобильного приложения БанкаКак добавлять карту в Samsung Pay из мобильного приложения банка
-
Использование
Как установить PIN-код на SIM-карту на Samsung GalaxyЧасто задаваемые вопросы о мобильных устройствах Samsung. Узнайте подробнее о ‘Как установить PIN-код на SIM-карту на Samsung Galaxy’ с помощью службы поддержки Samsung.
-
Использование
Нет звука во время звонка при подключении Samsung Galaxy через Bluetooth к аудио устройствуЧасто задаваемые вопросы о мобильных устройствах Samsung. Узнайте подробнее о ‘Нет звука во время звонка при подключении Samsung Galaxy через Bluetooth к аудио устройству’ с помощью службы поддержки Samsung
-
Использование
Что делать, если появляется ошибка в приложении «Контакты» на Samsung GalaxyЧасто задаваемые вопросы о мобильных устройствах Samsung. Узнайте подробнее о ‘Что делать, если появляется ошибка в приложении «Контакты» на Samsung Galaxy’ с помощью службы поддержки Samsung.
-
Использование
Как отключить SIM-карту в смартфоне Samsung GalaxyЧасто задаваемые вопросы о мобильных устройствах Samsung. Узнайте подробнее о ‘Как отключить SIM-карту в смартфоне Samsung Galaxy’ с помощью службы поддержки Samsung.
-
Использование
Как извлечь карту памяти из Samsung GalaxyЧасто задаваемые вопросы о мобильных устройствах Samsung. Узнайте подробнее о ‘Как извлечь карту памяти из Samsung Galaxy’ с помощью службы поддержки Samsung.
-
Блокировка
Что делать, если потерял или украли Samsung GalaxyЧасто задаваемые вопросы о технике Мобильные устройства Samsung. Узнайте подробнее о ‘Что делать, если потерял или украли Samsung Galaxy’ с помощью службы поддержки Samsung.
-
Использование
Возможные зазоры и звуки при нажатии на смартфонах Samsung GalaxyЧасто задаваемые вопросы о бытовой технике Samsung. Узнайте подробнее о ‘Зазорах и звуках при нажатии на смартфонах Samsung’ с помощью службы поддержки Samsung.
-
Копия данных / Восстановление
Как сохранить данные, если дисплей Samsung Galaxy не работает?Часто задаваемые вопросы о технике Мобильные устройства Samsung. Узнайте подробнее о ‘Как сохранить данные, если дисплей Samsung Galaxy не работает’ с помощью службы поддержки Samsung.
-
Использование
Есть ли защитная пленка на экране моего смартфона Samsung GalaxyЧасто задаваемые вопросы о мобильной технике Samsung. Узнайте подробнее ‘ Есть ли защитная пленка на экране моего смартфона Samsung Galaxy S-серии и Note-серии’ с помощью службы поддержки Samsung.
-
Спецификации / Функции
Что делать, если экран Samsung Galaxy чёрный и не включается, но телефон работаетЧасто задаваемые вопросы о технике Мобильные устройства Samsung. Узнайте подробнее о ‘Что делать, если не включается экран Samsung Galaxy, но телефон работает’ с помощью службы поддержки Samsung.
-
Батарея
Режим «Быстрой зарядки» на смартфоне Samsung GalaxyЧасто задаваемые вопросы о бытовой технике Samsung. Узнайте подробнее о ‘Режиме «Быстрой зарядки» на смартфоне Samsung’ с помощью службы поддержки Samsung.
-
Использование
Влагозащита телефонов GalaxyFAQ по использованию на мобильных устройствах. Узнайте подробнее о Влагозащита телефонов Galaxy, в Samsung Support.
-
Samsung Pay
Как удалить платежную карту из Samsung PayЧасто задаваемые вопросы о технике Мобильные устройства Samsung. Узнайте подробнее о ‘Как удалить платежную карту из Samsung Pay’ с помощью службы поддержки Samsung.
-
Использование
Узнайте подробнее, Как улучшить звук голосового вызова в Galaxy S23.FAQ для мобильных устройств. Узнайте подробнее, Как улучшить звук голосового вызова в Galaxy S23, в Samsung Support.
-
Использование
Как улучшить качество кадров с крупным планом в устройстве Galaxy S23FAQ по использованию на мобильных устройствах. Узнайте подробнее, Как улучшить качество кадров с крупным планом в устройстве Galaxy S23, в Samsung Support.
-
Использование
Как настроить плавающие уведомления на Samsung GalaxyЧасто задаваемые вопросы о мобильных устройствах Samsung. Узнайте подробнее о ‘Как настроить плавающие уведомления на Samsung Galaxy’ с помощью службы поддержки Samsung.
-
Использование
Как использовать режим «Низкая производительность» в Galaxy S23FAQ для мобильных устройств. Узнайте подробнее, Как использовать режим «Низкая производительность» в Galaxy S23, в Samsung Support.
-
Использование
Как выполнять удаление объектов в Galaxy S23FAQ по использованию на мобильных устройствах. Узнайте подробнее, Как выполнять удаление объектов в Galaxy S23, в Samsung Support.
-
Использование
Профессиональная фотосъемка с помощью приложения Galaxy Expert RAWFAQ для мобильных устройств. Узнайте подробнее, что такое Профессиональная фотосъемка с помощью приложения Galaxy Expert RAW, в Samsung Support.
-
Samsung Pay
Что делать, если появляется сообщение «Приложение Samsung Pay остановлено»Часто задаваемые вопросы о бытовой технике Samsung. Узнайте подробнее ‘Что делать, если появляется сообщение «Приложение Samsung Pay остановлено» ‘ с помощью службы поддержки Samsung.
-
Samsung Pay
Что делать, если не открывается приложение Samsung PayЧасто задаваемые вопросы о Samsung Pay. Узнайте подробнее о ‘Что делать, если не открывается приложение Samsung Pay’ с помощью службы поддержки Samsung.
-
Использование
Что делать, если устройство Galaxy S23 перегреваетсяFAQ для мобильных устройств. Узнайте подробнее, Что делать, если устройство Galaxy S23 перегревается, в Samsung Support.
-
Использование
Почему камера в Galaxy S23 не распознает QR-кодFAQ по использованию на мобильных устройствах. Узнайте подробнее, Почему камера в Galaxy S23 не распознает QR-код, в Samsung Support.
-
Samsung Apps
Как настроить электронную почту на смартфоне Samsung GalaxyЧасто задаваемые вопросы о технике Samsung Galaxy. Узнайте подробнее о ‘Как настроить электронную почту на смартфоне Samsung Galaxy’ с помощью службы поддержки Samsung
-
Использование
Не отображается информация об уровне заряда на Galaxy S21Не отображается информация об уровне заряда на Galaxy S21
-
Спецификации / Функции
Как очистить память Samsung Galaxy. Как перенести файлы на карту памяти.Закончилась память на смартфоне или планшете Samsung? Переходите по ссылке и читайте эту статью!
-
Обновление
Как обновить прошивку Samsung GalaxyЧасто задаваемые вопросы о технике Мобильные устройства Samsung. Узнайте подробнее о ‘Как обновить прошивку Samsung Galaxy’ с помощью службы поддержки Samsung.
-
Сообщения / Почта
Как включить или выключить отчет о доставке SMS на Samsung GalaxyЧасто задаваемые вопросы о технике Мобильные устройства Samsung. Узнайте подробнее о ‘Как включить или отключить отчет о доставке смс на Samsung Galaxy’ с помощью службы поддержки Samsung.
-
Питание / Зарядка
Как избавиться от микровибраций устройства Samsung GalaxyЧасто задаваемые вопросы о технике Мобильные устройства Samsung. Узнайте подробнее о ‘Как избавиться от микровибраций устройства Samsung Galaxy’ с помощью службы поддержки Samsung.
-
Использование
Как добавить приложение на главный экран Samsung GalaxyЧасто задаваемые вопросы о технике Мобильные устройства Samsung. Узнайте подробнее о ‘Как добавить приложение на главный экран Samsung Galaxy’ с помощью службы поддержки Samsung.
-
Использование
Как чистить устройство GalaxyЧасто задаваемые вопросы о технике Мобильные устройства Samsung. Узнайте подробнее о ‘Как чистить устройство Galaxy’ с помощью службы поддержки Samsung.
-
Использование
Полезные функции клавиатуры Samsung GalaxyЧасто задаваемые вопросы о технике Мобильные устройства Samsung. Узнайте подробнее о ‘Полезные функции клавиатуры Samsung на телефоне Galaxy’ с помощью службы поддержки Samsung.
-
Использование
Как воспроизводить звук на динамиках и устранить проблемы режима «Без звука»FAQ по использованию на мобильных телефонах и устройствах. Узнайте подробнее, как воспроизводить звук на динамиках и устранить проблемы режима «Без звука», в Samsung Support.
-
Использование
Как установить скорость обновления экрана на смартфоне Samsung GalaxyЧасто задаваемые вопросы о мобильных устройствах Samsung. Узнайте подробнее о ‘Как установить скорость обновления экрана на смартфоне Samsung Galaxy’ с помощью службы поддержки Samsung.
-
Использование
Устранение ошибок в приложении «Камера»Часто задаваемые вопросы о технике Мобильные устройства Samsung. Узнайте подробнее о ‘Устранение ошибок в приложении «Камера» ‘ с помощью службы поддержки Samsung.
-
Беспроводной интернет / Wi-Fi
Устранение проблем с мобильными данными на Samsung GalaxyЧасто задаваемые вопросы о технике Мобильные устройства Samsung. Узнайте подробнее о ‘Устранение проблем с мобильными данными на Samsung Galaxy’ с помощью службы поддержки Samsung.
-
Звук / Динамик / Микрофон
Что делать, если плохое качество звука во время телефонного звонка на Samsung GalaxyЧасто задаваемые вопросы о технике Мобильные устройства Samsung. Узнайте подробнее о ‘Что делать, если плохое качество звука во время телефонного звонка на Samsung Galaxy’ с помощью службы поддержки Samsung
-
Использование
Как устранить проблемы с обновлением программного обеспечения на устройстве GalaxyЧасто задаваемые вопросы о технике Мобильные устройства Samsung. Узнайте подробнее о ‘Как устранить проблемы с обновлением программного обеспечения на устройстве Galaxy’ с помощью службы поддержки Samsung
-
Bluetooth
Как устранить проблему c нестабильным звуком в гарнитуре BluetoothЧасто задаваемые вопросы о технике Мобильные устройства Samsung. Узнайте подробнее о ‘Как устранить проблему c нестабильным звуком в гарнитуре Bluetooth’ с помощью службы поддержки Samsung.
-
Копия данных / Восстановление
Что делать, если ваше устройство Galaxy не обнаруживает SD-картуЧасто задаваемые вопросы о технике Мобильные устройства Samsung. Узнайте подробнее о ‘Что делать, если ваше устройство Galaxy не обнаруживает SD-карту’ с помощью службы поддержки Samsung.
-
Батарея
Проблемы, возникающие при использовании проводных зарядных устройств с Samsung GalaxyЧасто задаваемые вопросы о технике Мобильные устройства Samsung. Узнайте подробнее о ‘Проблемы, возникающие при использовании проводных зарядных устройств с Samsung Galaxy’ с помощью службы поддержки Samsung
-
Использование
Вопросы о ONE UI 4.0Часто задаваемые вопросы о технике Мобильные устройства Samsung. Узнайте подробнее о ‘Вопросы о ONE UI 4.0’ с помощью службы поддержки Samsung.
-
Использование
Для того чтобы телефон Galaxy не замедлялся и не зависал, регулярно перезагружайте егоЧасто задаваемые вопросы о технике Мобильные устройства Samsung. Узнайте подробнее о ‘Для того чтобы телефон Galaxy не замедлялся и не зависал, регулярно перезагружайте его’ с помощью службы поддержки
-
Звук / Динамик / Микрофон
Дисплей на Samsung Galaxy работает неправильноЧасто задаваемые вопросы о технике Мобильные устройства Samsung. Узнайте подробнее о ‘Дисплей на Samsung Galaxy работает неправильно’ с помощью службы поддержки Samsung.
-
Использование
Между экраном и рамкой моего устройства Samsung Galaxy есть зазорЧасто задаваемые вопросы о технике Мобильные устройства Samsung. Узнайте подробнее о ‘Между экраном и рамкой моего устройства Samsung Galaxy есть зазор’ с помощью службы поддержки Samsung.
-
Использование
Что делать, если S Pen заряжается не полностьюЧасто задаваемые вопросы о смартфонах Samsung. Узнайте подробнее о ‘Что делать, если S Pen заряжается не полностью’ с помощью службы поддержки Samsung.
-
Использование
Что делать, если гаснет экран во время использования смартфона GalaxyЧасто задаваемые вопросы о смартфонах Samsung Galaxy. Узнайте подробнее о ‘Что делать, если гаснет экран во время использования смартфона Galaxy’ с помощью службы поддержки Samsung
-
Использование
Что делать, если S Pen часто теряет соединение с смартфоном GalaxyЧасто задаваемые вопросы о смартфонах Samsung. Узнайте подробнее о ‘Что делать, если S Pen часто теряет соединение с смартфоном Galaxy’ с помощью службы поддержки Samsung.
-
Использование
Что делать, если сенсорный экран работает некорректноЧасто задаваемые вопросы о Мобильных Устройствах. Узнайте больше о том, что делать, если ваш сенсорный экран не работает должным образом, в службе поддержки Samsung.
-
Использование
Что делать, если на устройстве Galaxy перестали работать кнопкиЧасто задаваемые вопросы о технике Мобильные устройства Samsung. Узнайте подробнее о ‘Что делать, если на устройстве Galaxy перестали работать кнопки’ с помощью службы поддержки Samsung.
-
Звук / Динамик / Микрофон
Что делать, если в проводных наушниках с Type-C нет звукаЧасто задаваемые вопросы о технике Мобильные устройства Samsung. Узнайте подробнее о ‘Что делать, если в проводных наушниках с Type-C нет звука’ с помощью службы поддержки Samsung.
-
Связь / Сеть / Звонки
Что делать, если устройство Galaxy не позволяет совершать или принимать вызовыЧасто задаваемые вопросы о технике Мобильные устройства Samsung. Узнайте подробнее о ‘Что делать, если устройство Galaxy не позволяет совершать или принимать вызовы’ с помощью службы поддержки Samsung.
-
Использование
Будет ли работать NFC при использовании LED-чехлаЧасто задаваемые вопросы о технике Мобильные устройства Samsung. Узнайте подробнее о ‘Будет ли работать NFC при установке LED-чехла’ с помощью службы поддержки Samsung.
-
Настройка
Как удалить всю мою персональную информацию с моего устройстваЧасто задаваемые вопросы о технике Мобильные устройства Samsung. Узнайте подробнее о ‘Как удалить всю мою персональную информацию с моего устройства’ с помощью службы поддержки Samsung.
-
Использование
Как изменить фон экрана вызова на смартфоне Samsung GalaxyЧасто задаваемые вопросы о мобильной технике Samsung. Узнайте подробнее о ‘Как изменить фон экрана вызова на смартфоне Samsung Galaxy’ с помощью службы поддержки Samsung.
-
Использование
Как изменить режим экрана и настроить цвет дисплея на Samsung GalaxyЧасто задаваемые вопросы о мобильной технике Samsung. Узнайте подробнее о ‘Как изменить режим экрана и настроить цвет дисплея на Samsung Galaxy’ с помощью службы поддержки Samsung.
-
Использование
Как найти номер модели, серийный номер или IMEI смартфона Samsung GalaxyЧасто задаваемые вопросы о технике Мобильные устройства Samsung. Узнайте подробнее о ‘Как найти номер модели, серийный номер или IMEI смартфона’ с помощью службы поддержки Samsung.
-
Использование
Защита вашего устройства Galaxy от вредоносных программЧасто задаваемые вопросы о технике Мобильные устройства Samsung. Узнайте подробнее о ‘Защита вашего устройства Galaxy от вредоносных программ’ с помощью службы поддержки Samsung.
-
Использование
Перезагрузка зависшего устройства GalaxyЧасто задаваемые вопросы о технике Мобильные устройства Samsung. Узнайте подробнее о ‘Устранение ошибок в приложении «Камера»’ с помощью службы поддержки Samsung.
-
Блокировка
Как настроить и использовать Samsung Pass на Samsung GalaxyЧасто задаваемые вопросы о Мобильных устройствах Samsung. Узнайте подробнее о ‘Как настроить и использовать Samsung Pass на Samsung Galaxy’ с помощью службы поддержки Samsung.
-
Использование
Как установить местоположение в виджете Погода на Samsung GalaxyЧасто задаваемые вопросы о технике Мобильные устройства Samsung. Узнайте подробнее о ‘Как установить местоположение в виджете Погода на Samsung Galaxy’ с помощью службы поддержки Samsung.
-
Samsung Apps
Как использовать диагностику в приложении Samsung Members на устройстве GalaxyЧасто задаваемые вопросы о технике Мобильные устройства Samsung. Узнайте подробнее о ‘Как использовать диагностику в приложении Samsung Members на устройстве Galaxy’ с помощью службы поддержки Samsung.
-
Использование
Что делать, если уронил свое устройство Samsung Galaxy в водуЧасто задаваемые вопросы о технике Мобильные устройства Samsung. Узнайте подробнее о ‘Что делать, если уронил свое устройство Samsung Galaxy в воду’ с помощью службы поддержки Samsung.
-
Использование
Мое устройство Samsung Galaxy разбито или на экране появилась трещинаЧасто задаваемые вопросы о технике Мобильные устройства Samsung. Узнайте подробнее о ‘Мое устройство Samsung Galaxy разбито или на экране появилась трещина’ с помощью службы поддержки Samsung.
-
Использование
Новые возможности ONE UI 4.0Часто задаваемые вопросы о технике Мобильные устройства Samsung. Узнайте подробнее о ‘Новые возможности ONE UI 4.0’ с помощью службы поддержки Samsung.
-
Беспроводной интернет / Wi-Fi
Что делать, если звонки прерываются или на устройстве Galaxy нет сигнала сетиЧасто задаваемые вопросы о технике Мобильные устройства Samsung. Узнайте подробнее о ‘Что делать, если звонки прерываются или на устройстве Galaxy нет сигнала сети’ с помощью службы поддержки Samsung.
-
Использование
Не работает интернет на другом устройстве при раздаче Wi-Fi с телефона Samsung GalaxyЧасто задаваемые вопросы о мобильных устройствах Samsung. Узнайте подробнее о ‘Почему не работает интернет на другом устройстве при раздаче Wi-Fi с телефона Samsung Galaxy’ с помощью службы поддержки Samsung
-
Использование
Как обновить приложения в Google Play Маркете на Samsung GalaxyЧасто задаваемые вопросы о мобильных устройствах Samsung. Узнайте подробнее о ‘Как обновить приложения в Google Play Маркете на Samsung Galaxy’ с помощью службы поддержки Samsung.
-
Использование
Как включить автоматическое добавление значка приложения на главный экран Samsung GalaxyЧасто задаваемые вопросы о мобильных устройствах Samsung. Узнайте подробнее о ‘Как включить автоматическое добавление значка приложения на главный экран Samsung Galaxy’ с помощью службы поддержки Samsung
-
Использование
Как включить определение местоположения по GPS на Samsung GalaxyЧасто задаваемые вопросы о мобильных устройствах Samsung. Узнайте подробнее о ‘Как включить определение местоположения по GPS на Samsung Galaxyy’ с помощью службы поддержки Samsung.
-
Использование
Как продлить время работы аккумулятора Galaxy Z Flip4Часто задаваемые вопросы о мобильной технике Samsung. Узнайте подробнее о ‘Как продлить время работы аккумулятора Galaxy Z Flip4’ с помощью службы поддержки Samsung.
-
Обновление
Когда выйдет новая прошивка для Samsung GalaxyЧасто задаваемые вопросы о технике Мобильные устройства Samsung. Узнайте подробнее о ‘Когда выйдет новая прошивка для Samsung Galaxy’ с помощью службы поддержки Samsung.
-
Использование
Как настроить автоматическую загрузку обновлений на Samsung GalaxyЧасто задаваемые вопросы о мобильных устройствах Samsung. Узнайте подробнее о ‘Как настроить автоматическую загрузку обновлений на Samsung Galaxy’ с помощью службы поддержки Samsung.
-
Использование
Что делать, если не определяется фирменный чехол для смартфона Samsung GalaxyЧасто задаваемые вопросы о мобильных устройствах Samsung. Узнайте подробнее о ‘Что делать, если не определяется фирменный чехол для смартфона Samsung Galaxy’ с помощью службы поддержки Samsung.
-
Использование
Что делать, если не отображаются фотографии в «Галерее» на Samsung GalaxyЧасто задаваемые вопросы о мобильных устройствах Samsung. Узнайте подробнее о ‘Что делать, если не отображаются фотографии в «Галерее» на Samsung Galaxy’ с помощью службы поддержки Samsung.
-
Samsung Pay
Какие карты «Мир» можно добавить в Samsung PayЧасто задаваемые вопросы о Samsung Pay. Узнайте подробнее о ‘Какие карты «Мир» можно добавить в Samsung Pay’ с помощью службы поддержки Samsung.
-
Звук / Динамик / Микрофон
Как активировать звук Dolby Atmos на Samsung GalaxyВопросы и Ответы для категории Мобильные устройства Samsung. Узнайте подробнее о ‘Как активировать систему Dolby Atmos для стереодинамиков на Note9?’ у Службы Поддержки Samsung.
-
Настройка
Как включить режим набора T9 на клавиатуре Samsung GalaxyЧасто задаваемые вопросы о технике Мобильные устройства Samsung. Узнайте подробнее о ‘Как включить режим набора T9 на клавиатуре Samsung Galaxy’ с помощью службы поддержки Samsung.
-
Настройка
Как вернуть старую версию приложения на Samsung GalaxyЧасто задаваемые вопросы о технике Мобильные устройства Samsung. Узнайте подробнее о ‘Как вернуть старую версию приложения на Samsung Galaxy’ с помощью службы поддержки Samsung.
-
Сообщения / Почта
Что делать, если не отправляются SMS на Samsung GalaxyЧасто задаваемые вопросы о технике Мобильные устройства Samsung. Узнайте подробнее о ‘Что делать, если не отправляются смс на Samsung Galaxy’ с помощью службы поддержки Samsung.
-
Настройка
Как настроить яркость экрана на смартфоне или планшете Samsung GalaxyПошаговая инструкция от службы поддержки на тему: Как настроить яркость экрана на смартфоне или планшете Samsung Galaxy
-
Как добавить банковскую карту в Samsung PayКак добавить банковскую карту в Samsung Pay. Пошаговая инструкция от производителя
-
Использование
Как перенести данные с iPhone или iPad на новое устройство Galaxy с помощью Smart SwitchFAQ для мобильных устройств. Узнайте подробнее о том, Как перенести данные с iPhone или iPad на новое устройство Galaxy с помощью Smart Switch
-
Использование
Как удалить аккаунт (учетную запись) Samsung с Samsung GalaxyЧасто задаваемые вопросы о технике Мобильные устройства Samsung. Узнайте подробнее о ‘Как удалить учетную запись Samsung с мобильного устройства Samsung Galaxy ‘ с помощью службы поддержки Samsung.
-
Настройка
Как добавить язык ввода на клавиатуре SamsungЧасто задаваемые вопросы о технике Samsung Galaxy. Узнайте подробнее о ‘Как добавить язык ввода на клавиатуре Samsung’ с помощью службы поддержки Samsung
-
Использование
Как переключить язык на клавиатуре Samsung GalaxyЧасто задаваемые вопросы о технике Мобильные устройства Samsung. Узнайте подробнее о ‘Как переключить язык на клавиатуре Samsung Galaxy’ с помощью службы поддержки Samsung.
-
Настройка
Как изменить язык системы на Samsung Galaxy?Часто задаваемые вопросы о технике Samsung Galaxy. Узнайте подробнее о ‘Как изменить язык системы на Samsung Galaxy?’ с помощью службы поддержки Samsung
-
Использование
Сценарии использования телевизора Samsung в приложении SmartThingsЧасто задаваемые вопросы о Бытовой технике Samsung. Узнайте подробнее о ‘Сценарии использования телевизора Samsung в приложении SmartThings’ с помощью службы поддержки Samsung.
-
Использование
Как подключить наушники Galaxy Buds к смартфонуЧасто задаваемые вопросы о Мобильных Устройствах. Узнайте больше о том, Как подключить наушники Galaxy Buds к смартфону, с помощью справочной системы Samsung Support.
-
Использование
Как изменить циферблат часов Galaxy WatchЧасто задаваемые вопросы о мобильных устройствах Samsung. Узнайте подробнее о ‘Как изменить циферблат часов Galaxy Watch’ с помощью службы поддержки Samsung.
-
Использование
Как настроить двухэтапную проверку для Samsung AccountЧасто задаваемые вопросы о технике Мобильные устройства Samsung. Узнайте подробнее о ‘Как настроить двухэтапную проверку для Samsung Account’ с помощью службы поддержки Samsung.
-
Батарея
Проблемы с беспроводной зарядкой на устройстве Samsung GalaxyЧасто задаваемые вопросы о технике Мобильные устройства Samsung. Узнайте подробнее о ‘Проблемы с беспроводной зарядкой на устройстве Samsung Galaxy’ с помощью службы поддержки Samsung.
-
Использование
Мой смартфон Samsung Galaxy не распознает отпечатки пальцев. Как это исправить?Часто задаваемые вопросы о технике Мобильные устройства Samsung. Узнайте подробнее о ‘Мой смартфон Samsung Galaxy не распознает отпечатки пальцев. Как это исправить?’ с помощью службы поддержки Samsung
-
Настройка
Датчик приближения не работает должным образомЧасто задаваемые вопросы о технике Мобильные устройства Samsung. Узнайте подробнее о ‘Датчик приближения не работает должным образом’ с помощью службы поддержки Samsung.
-
Использование
Устранение проблем, возникающих при использовании Smart ViewЧасто задаваемые вопросы о технике Мобильные устройства Samsung. Узнайте подробнее о ‘Устранение проблем, возникающих при использовании Smart View’ с помощью службы поддержки Samsung.
-
Приложения
Что делать, если приложения на Samsung Galaxy останавливаются и зависаютЧасто задаваемые вопросы о технике Мобильные устройства Samsung. Узнайте подробнее о ‘Что делать, если приложения на Samsung Galaxy останавливаются и зависают ‘ с помощью службы поддержки Samsung.
-
Приложения
Что делать, если пропал ярлык приложения на Samsung GalaxyЧасто задаваемые вопросы о технике Samsung Galaxy. Узнайте подробнее о ‘Что делать, если пропал ярлык приложения’ с помощью службы поддержки Samsung
-
Настройка
Что делать, если приложения отключаются в фоновом режиме?Часто задаваемые вопросы о технике Samsung Galaxy. Узнайте подробнее о ‘Что делать, если приложения отключаются в фоновом режиме?’ с помощью службы поддержки Samsung
-
Питание / Зарядка
Как правильно заряжать аккумулятор на смартфоне или планшете и другие частые вопросыЕсть вопросы по зарядке аккумуляторов на планшете или смартфоне Samsung? Читайте рекомендации от производителя в этой статье.
-
Использование
Что делать, если на Samsung Galaxy не работают исходящие вызовыЧасто задаваемые вопросы о технике Мобильные устройства Samsung. Узнайте подробнее о ‘Что делать, если на Samsung Galaxy не работают исходящие вызовы’ с помощью службы поддержки Samsung.
-
Настройка
Что делать, если на Samsung Galaxy не удаляется контактЧасто задаваемые вопросы о технике Samsung Galaxy. Узнайте подробнее о ‘Что делать, если на Samsung Galaxy не удаляется контакт’ с помощью службы поддержки Samsung
-
Настройка
Что делать, если перестали скачиваться файлы из интернета?Часто задаваемые вопросы о технике Samsung Galaxy. Узнайте подробнее о ‘Что делать, если перестали скачиваться файлы из интернета?’ с помощью службы поддержки Samsung
-
Настройка
Как Андроид-приложения обновляются и как это настроитьЧасто задаваемые вопросы о технике Мобильные устройства Samsung. Узнайте подробнее о ‘Как Андроид-приложения обновляются и как это настроить’ с помощью службы поддержки Samsung.
-
Связь / Сеть / Звонки
Как добавить номер в черный список на Samsung GalaxyЧасто задаваемые вопросы о технике Мобильные устройства Samsung. Узнайте подробнее о ‘Как заблокировать вызовы от определенных номеров на Samsung Galaxy’ с помощью службы поддержки Samsung.
-
Сообщения / Почта
Как заблокировать смс или ммс от некоторых номеров на Samsung GalaxyЧасто задаваемые вопросы о технике Мобильные устройства Samsung. Узнайте подробнее о ‘Как заблокировать смс или ммс от некоторых номеров на Samsung Galaxy’ с помощью службы поддержки Samsung.
-
Сообщения / Почта
Как создать аккаунт Google на Samsung GalaxyЧасто задаваемые вопросы о технике Мобильные устройства Samsung. Узнайте подробнее о ‘Как создать аккаунт Google на Samsung Galaxy’ с помощью службы поддержки Samsung.
-
Сообщения / Почта
Как удалить номер из черного списка для сообщений на Samsung GalaxyЧасто задаваемые вопросы о технике Мобильные устройства Samsung. Узнайте подробнее о ‘Как удалить номер из черного списка для сообщений на Samsung Galaxy’ с помощью службы поддержки Samsung.
-
Приложения
Как правильно удалять приложения на Андроид. Как отключить приложения.Часто задаваемые вопросы о технике Мобильные устройства Samsung. Узнайте подробнее о ‘Как правильно удалять приложения на Андроид. Как отключить приложения’ с помощью службы поддержки Samsung.
-
Сообщения / Почта
Как удалить аккаунт со смартфона или планшета Samsung GalaxyЧасто задаваемые вопросы о технике Мобильные устройства Samsung. Узнайте подробнее о ‘Как удалить аккаунт со смартфона или планшета Samsung Galaxy’ с помощью службы поддержки Samsung.
-
Связь / Сеть / Звонки
Как сохранить контакты на карту памяти на Samsung GalaxyЧасто задаваемые вопросы о технике Мобильные устройства Samsung. Узнайте подробнее о ‘Как сохранить контакты на карту памяти на Samsung Galaxy’ с помощью службы поддержки Samsung.
-
Использование
Как узнать версию Android на смартфоне или планшете Samsung GalaxyЧасто задаваемые вопросы о технике Мобильные устройства Samsung. Узнайте подробнее о ‘Как узнать версию Андроид на Samsung Galaxy’ с помощью службы поддержки Samsung.
-
Настройка
Как настроить мобильный интернет на смартфоне или планшете Samsung GalaxyЧасто задаваемые вопросы о технике Мобильные устройства Samsung. Узнайте подробнее о ‘Как настроить мобильный интернет на смартфоне или планшете Samsung Galaxy’ с помощью службы поддержки Samsung.
-
Настройка
Как настроить синхронизацию с аккаунтами на Samsung GalaxyЧасто задаваемые вопросы о технике Мобильные устройства Samsung. Узнайте подробнее о ‘Как настроить синхронизацию с аккаунтами на Samsung Galaxy’ с помощью службы поддержки Samsung.
-
Настройка
Как загрузить Samsung Galaxy в безопасном режиме и для чего он нуженЧасто задаваемые вопросы о технике Мобильные устройства Samsung. Узнайте подробнее о ‘Как загрузить Samsung Galaxy в безопасный режим и для чего он нужен’ с помощью службы поддержки Samsung.
-
Беспроводной интернет / Wi-Fi
Как использовать Samsung Galaxy как модем или точку доступа Wi-FiЧасто задаваемые вопросы о технике Мобильные устройства Samsung. Узнайте подробнее о ‘Как использовать Samsung Galaxy как модем или точку доступа Wi-Fi’ с помощью службы поддержки Samsung.
-
Приложения
Как пользоваться приложением Календарь на смартфоне SamsungЧасто задаваемые вопросы о технике Samsung Galaxy. Узнайте подробнее о ‘Как пользоваться приложением Календарь на смартфоне Samsung?’ с помощью службы поддержки Samsung
-
Использование
Как пользоваться услугой связи VoLTE на Samsung Galaxy?Часто задаваемые вопросы о технике Samsung Galaxy. Узнайте подробнее о ‘Как пользоваться услугой связи VoLTE на Samsung Galaxy?’ с помощью службы поддержки Samsung
-
Настройка
Как войти в аккаунт Google на смартфоне или планшете Samsung GalaxyЧасто задаваемые вопросы о технике Мобильные устройства Samsung. Узнайте подробнее о ‘Как войти в аккаунт Google на смартфоне или планшете Samsung Galaxy’ с помощью службы поддержки Samsung.
-
Настройка
Как изменить режим сети на Samsung GalaxyЧасто задаваемые вопросы о технике Мобильные устройства Samsung. Узнайте подробнее о ‘Как изменить режим сети на Samsung Galaxy’ с помощью службы поддержки Samsung.
-
Приложения
Как удалить данные приложения на Samsung GalaxyЧасто задаваемые вопросы о технике Мобильные устройства Samsung. Узнайте подробнее о ‘Как удалить данные приложения на Samsung Galaxy’ с помощью службы поддержки Samsung.
-
Беспроводной интернет / Wi-Fi
Как отключить мобильный интернет (через сим-карту) на Samsung GalaxyЧасто задаваемые вопросы о технике Мобильные устройства Samsung. Узнайте подробнее о ‘Как отключить мобильный интернет (через сим-карту) на Samsung Galaxy’ с помощью службы поддержки Samsung.
-
Приложения
Как отключить уведомления от определенных приложений на Samsung GalaxyЧасто задаваемые вопросы о технике Мобильные устройства Samsung. Узнайте подробнее о ‘Как отключить уведомления от определенных приложений на Samsung Galaxy’ с помощью службы поддержки Samsung.
-
Настройка
Как включить фонарик на Samsung GalaxyЧасто задаваемые вопросы о технике Samsung Galaxy. Узнайте подробнее о ‘Как включить фонарик на Samsung Galaxy’ с помощью службы поддержки Samsung.
-
Связь / Сеть / Звонки
Как установить, удалить и поменять фото контакта на Samsung GalaxyЧасто задаваемые вопросы о технике Мобильные устройства Samsung. Узнайте подробнее о ‘Как установить, удалить и поменять фото контакта на Samsung Galaxy’ с помощью службы поддержки Samsung.
-
Приложения
Как добавить виджет на главный экран Samsung Galaxy?Часто задаваемые вопросы о технике Samsung Galaxy. Узнайте подробнее о ‘Как добавить виджет на главный экран Samsung Galaxy’ с помощью службы поддержки Samsung
-
Копия данных / Восстановление
Как сделать архивацию защищенной папки на Samsung Galaxy?Часто задаваемые вопросы о технике Samsung Galaxy. Узнайте подробнее о ‘Как сделать архивацию защищенной папки на Samsung Galaxy?’ с помощью службы поддержки Samsung
-
Использование
Как изменить пароль от аккаунта Samsung со смартфона GalaxyЧасто задаваемые вопросы о технике Мобильные устройства Samsung. Узнайте подробнее о ‘Как изменить пароль от аккаунта Samsung со смартфона Galaxy’ с помощью службы поддержки Samsung.
-
Блокировка
Как поменять способ блокировки экрана на Samsung GalaxyЧасто задаваемые вопросы о технике Мобильные устройства Samsung. Узнайте подробнее о ‘Как поменять способ блокировки экарана на Samsung Galaxy’ с помощью службы поддержки Samsung.
-
Использование
Как выбрать приоритетную SIM-карту для SMS-сообщений на Samsung GalaxyЧасто задаваемые вопросы о технике Мобильные устройства Samsung. Узнайте подробнее о ‘Как выбрать приоритетную SIM-карту для SMS-сообщений на Samsung Galaxy’ с помощью службы поддержки Samsung.
-
Беспроводной интернет / Wi-Fi
Как удалить данные браузера: кеш, историю, кукис на Samsung GalaxyПошаговая инструкция с фотографиями на тему: Как очистить кеш, историю, кукис и другие данные на Samsung Galaxy
-
Приложения
Как настроить приложения на вашем Samsung Galaxy Watch Active2Как настроить приложения на вашем Samsung Galaxy Watch Active2
-
Использование
Как настроить режим набора Т9 на Samsung GalaxyЧасто задаваемые вопросы о технике Мобильные устройства Samsung. Узнайте подробнее о ‘Как настроить режим набора Т9 на Samsung Galaxy’ с помощью службы поддержки Samsung.
-
Приложения
Как отключить уведомления от приложений на смартфоне Samsung Galaxy?Пошаговая инструкция от службы поддержки на тему: Как отключить уведомления от приложений на смартфоне Samsung Galaxy?
-
Питание / Зарядка
Как быстро зарядить Samsung GalaxyЧасто задаваемые вопросы о технике Мобильные устройства Samsung. Узнайте подробнее о ‘Как быстро зарядить Samsung Galaxy’ с помощью службы поддержки Samsung.
-
Настройка
Как вернуть панель Edge на Samsung Galaxy, если она пропалаЧасто задаваемые вопросы о технике Мобильные устройства Samsung. Узнайте подробнее о ‘Как вернуть панель Edge на Samsung Galaxy, если она пропала’ с помощью службы поддержки Samsung.
-
Приложения
Как скрыть приложение на Samsung GalaxyЧасто задаваемые вопросы о технике Мобильные устройства Samsung. Узнайте подробнее о ‘Как скрыть приложение на Samsung Galaxy’ с помощью службы поддержки Samsung.
-
Связь / Сеть / Звонки
Как заблокировать звонки и сообщения от незнакомых номеров на Samsung GalaxyХотите заблокировать звонки и сообщения от незнакомых номеров и принимать их только от контактов? Читайте пошаговую инструкцию с фотографиями.
-
Использование
Как не закрывать определенное приложение на Samsung GalaxyЧасто задаваемые вопросы о технике Мобильные устройства Samsung. Узнайте подробнее о ‘Как не закрывать определенное приложение на Samsung Galaxy’ с помощью службы поддержки Samsung.
-
Настройка
Как экономить трафик на смартфоне Samsung GalaxyЧасто задаваемые вопросы о технике Samsung Galaxy. Узнайте подробнее о ‘Как экономить трафик на смартфоне Samsung Galaxy’ с помощью службы поддержки Samsung
-
Копия данных / Восстановление
Как сохранить резервную копию файлов на Samsung GalaxyЧасто задаваемые вопросы о технике Samsung Galaxy. Узнайте подробнее о ‘Как сохранить резервную копию файлов’ с помощью службы поддержки Samsung
-
Как начать пользоваться Samsung PayКак зарегистрироваться и начать пользоваться Samsung Pay. Пошаговая инструкция от производителя
-
Настройка
Как восстановить удаленные контакты на Samsung GalaxyЧасто задаваемые вопросы о технике Samsung Galaxy. Узнайте подробнее о ‘Как восстановить удаленные контакты на Samsung Galaxy’ с помощью службы поддержки Samsung
-
Настройка
Как восстановить удаленные фотографии на Samsung GalaxyЧасто задаваемые вопросы о технике Samsung Galaxy. Узнайте подробнее о ‘Как восстановить удаленные фотографии на Samsung Galaxy’ с помощью службы поддержки Samsung
-
Использование
Что делать, если забыл пароль или адрес почты от аккаунта SamsungЧасто задаваемые вопросы о технике Мобильные устройства Samsung. Узнайте подробнее о ‘Что делать, если забыл пароль или адрес почты от аккаунта Samsung’ с помощью службы поддержки Samsung.
-
Приложения
Как ограничить фоновые данные для приложений на Samsung Galaxy?Часто задаваемые вопросы о технике Мобильные устройства Samsung. Узнайте подробнее о ‘Как ограничить фоновые данные для приложений на Samsung Galaxy?’ с помощью службы поддержки Samsung.
-
Копия данных / Восстановление
Как сохранить контакты на SIM-карту или скопировать с SIM-карты на Samsung GalaxyПошаговая инструкция от службы поддержки на тему: Как сохранить контакты на SIM-карту или скопировать с SIM-карты на Samsung Galaxy?
-
Настройка
Как сохранить данные из Samsung CloudЧасто задаваемые вопросы о технике Samsung Galaxy. Узнайте подробнее о ‘Как сохранить данные из Samsung Cloud’ с помощью службы поддержки Samsung
-
Беспроводной интернет / Wi-Fi
Как сохранять файлы из интернета на карту памяти на Samsung GalaxyЧасто задаваемые вопросы о технике Мобильные устройства Samsung. Узнайте подробнее о ‘Как автоматически сохранять файлы из интернета на карту памяти на Samsung Galaxy’ с помощью службы поддержки Samsung
-
Сообщения / Почта
Как настроить отправку сообщений на короткие номера на Samsung GalaxyЧасто задаваемые вопросы о технике Мобильные устройства Samsung. Узнайте подробнее о ‘Как настроить отправку сообщений на короткие номера на Samsung Galaxy’ с помощью службы поддержки Samsung.
-
Настройка
Как настроить тайм-аут (время ожидания) экрана на Samsung GalaxyЧасто задаваемые вопросы о технике Samsung Galaxy. Узнайте подробнее о ‘Как настроить тайм-аут (время ожидания) экрана на Samsung Galaxy’ с помощью службы поддержки Samsung
-
Настройка
Как настроить отпечаток пальца на Samsung Galaxy?Часто задаваемые вопросы о технике Samsung Galaxy. Узнайте подробнее о ‘Как настроить отпечаток пальца на Samsung Galaxy?’ с помощью службы поддержки Samsung
-
Использование
Как настроить защищенную папку на смартфоне Samsung GalaxyЧасто задаваемые вопросы о технике Samsung Galaxy. Узнайте подробнее о ‘Как настроить защищенную папку на смартфоне’ с помощью службы поддержки Samsung
-
Беспроводной интернет / Wi-Fi
Как настроить виртуальную SIM-карту (eSIM) на Samsung GalaxyЧасто задаваемые вопросы о технике Samsung Galaxy. Узнайте подробнее о ‘Как настроить виртуальную SIM-карту (eSIM) на Samsung Galaxy’ с помощью службы поддержки Samsung
-
Батарея
Как включить отображение процента зарядки на Samsung GalaxyЧасто задаваемые вопросы о технике Мобильные устройства Samsung. Узнайте подробнее о ‘Как включить отображение процента зарядки на Samsung Galaxy’ с помощью службы поддержки Samsung.
-
Использование
Как включить отображение текста уведомлений на экране блокировки Samsung GalaxyЧасто задаваемые вопросы о технике Мобильные устройства Samsung. Узнайте подробнее о ‘Как включить отображение текста уведомлений на экране блокировки Samsung Galaxy’ с помощью службы поддержки Samsung
-
Настройка
Как отсортировать отображение контактов на Samsung GalaxyЧасто задаваемые вопросы о технике Samsung Galaxy. Узнайте подробнее о ‘Как отсортировать отображение контактов’ с помощью службы поддержки Samsung
-
Мультимедийный контент
Как синхронизировать галерею телефона Samsung Galaxy с OneDriveЧасто задаваемые вопросы о технике Samsung Galaxy. Узнайте подробнее о ‘Как синхронизировать галерею телефона с OneDrive’ с помощью службы поддержки Samsung
-
Настройка
Как снять замедленное видео на Samsung Galaxy?Часто задаваемые вопросы о технике Samsung Galaxy. Узнайте подробнее о ‘Как снять замедленное видео на Samsung Galaxy?’ с помощью службы поддержки Samsung
-
Настройка
Как перенести все приложения на главный экран на Samsung GalaxyЧасто задаваемые вопросы о технике Мобильные устройства Samsung. Узнайте подробнее о ‘Как перенести все приложения на главный экран на Samsung Galaxy’ с помощью службы поддержки Samsung.
-
Samsung Apps
Резервное копирование и передача данных с помощью Smart Switch на Samsung GalaxyЧасто задаваемые вопросы о Smart Switch. Узнайте подробнее о ‘Как создавать и передавать резервные копии данных с помощью Smart Switch на телефоне Galaxy’ с помощью службы поддержки Samsung.
-
Использование
Как перенести приложение на карту памяти на Samsung GalaxyЧасто задаваемые вопросы о технике Мобильные устройства Samsung. Узнайте подробнее о ‘Как перенести приложение на карту памяти на Samsung Galaxy’ с помощью службы поддержки Samsung.
-
Настройка
Как настроить боковую панель Edge на Samsung GalaxyЧасто задаваемые вопросы о технике Мобильные устройства Samsung. Узнайте подробнее о ‘Как настроить боковую панель Edge на Samsung Galaxy’ с помощью службы поддержки Samsung.
-
Блокировка
Как настроить разблокировку Samsung Galaxy двойным касаниемЧасто задаваемые вопросы о технике Samsung Galaxy. Узнайте подробнее о ‘Как настроить разблокировку касанием’ с помощью службы поддержки Samsung
-
Использование
Как использовать стикеры с AR-эмодзиFAQ по использованию приложений и сервисов. Узнайте подробнее об использовании стикеров с AR-эмодзи в Samsung Support.
-
Камера
Как использовать режим гиперлапс при съемке на Samsung GalaxyЧасто задаваемые вопросы о технике Samsung Galaxy. Узнайте подробнее о ‘Как использовать режим гиперлапс при съемке на Samsung Galaxy’ с помощью службы поддержки Samsung
-
Камера
Как использовать режим «Живой фокус» при съемке фотографий?Часто задаваемые вопросы о технике Samsung Galaxy. Узнайте подробнее о ‘Как использовать режим «Живой фокус» при съемке фотографий?’ с помощью службы поддержки Samsung
-
Использование
Как пользоваться функцией PowerShare на смартфоне GalaxyЧасто задаваемые вопросы о Samsung mobile. Обратитесь в службу поддержки Samsung, чтобы узнать больше о том, как пользоваться функцией PowerShare на смартфоне Galaxy.
-
Настройка
Как печатать быстрее на Samsung GalaxyНепрерывный ввод — способ быстрого набора текста. Читайте статью, чтобы узнать больше
-
Использование
Зачем нужна зеленая точка в верхней части экранаFAQ по использованию на мобильных устройствах. Узнайте, зачем нужна зеленая точка в верхней части экрана, в Samsung Support.
-
Спецификации / Функции
Что делать, если Samsung Galaxy упал в водуКак безопасно высушить смартфон или планшет, если он упал в воду. Читайте ответ в этой статье.
-
Использование
Что делать, если на Samsung Galaxy медленный мобильный интернетЧасто задаваемые вопросы о технике Мобильные устройства Samsung. Узнайте подробнее о ‘Что делать, если на Samsung Galaxy медленный мобильный интернет’ с помощью службы поддержки Samsung.
-
Батарея
На моем устройстве Galaxy не работает быстрая зарядка. Как это исправить?Часто задаваемые вопросы о технике Мобильные устройства Samsung. Узнайте подробнее о ‘На моем устройстве Galaxy не работает быстрая зарядка. Как это исправить?’ с помощью службы поддержки Samsung.
-
Использование
Как считать QR-код с мобильного устройства Samsung GalaxyЧасто задаваемые вопросы о Мобильных устройствах Samsung. Узнайте подробнее о ‘Как считать QR-код с мобильного устройства Samsung Galaxy’ с помощью службы поддержки Samsung.
-
Использование
Мой смартфон Samsung Galaxy определяет GPS-координаты неточно. Как это исправить?Часто задаваемые вопросы о технике Мобильные устройства Samsung. Узнайте подробнее о ‘Мой смартфон Samsung Galaxy определяет GPS-координаты неточно. Как это исправить?’ с помощью службы поддержки Samsung
-
Что делать, если забыт PIN-код от Samsung Pay. Как восстановить?Забыли PIN-код от Samsung Pay? Информация от производителя в этой статье
-
Использование
Что делать, если компас на Samsung Galaxy не работает или показывает неправильное направлениеЧасто задаваемые вопросы о технике Мобильные устройства Samsung. Узнайте подробнее о ‘Что делать, если компас на Samsung Galaxy не работает или показывает неправильное направление’ с помощью службы поддержки
-
Настройка
Сбиваются настройки даты, времени и часового пояса на Samsung GalaxyЧасто задаваемые вопросы о технике Мобильные устройства Samsung. Узнайте подробнее о ‘Сбиваются настройки даты, времени и часового пояса на Samsung Galaxy’ с помощью службы поддержки Samsung.
-
Питание / Зарядка
Что делать, если смартфон или планшет Samsung Galaxy не заряжаетсяЧасто задаваемые вопросы о технике Мобильные устройства Samsung. Узнайте подробнее о ‘Что делать, если смартфон или планшет Samsung Galaxy не заряжается’ с помощью службы поддержки Samsung.
-
Батарея
Что делать, если смартфон или планшет Samsung Galaxy не включаетсяЧасто задаваемые вопросы о технике Мобильные устройства Samsung. Узнайте подробнее о ‘Что делать, если смартфон или планшет Samsung Galaxy не включается’ с помощью службы поддержки Samsung.
-
Настройка
Что делать, если батарея на Samsung Galaxy быстро садитсяЧасто задаваемые вопросы о технике Мобильные устройства Samsung. Узнайте подробнее о ‘Что делать, если батарея на Samsung Galaxy быстро садится’ с помощью службы поддержки Samsung.
-
Блокировка
Что делать, если Samsung Galaxy заблокировался и запрашивает аккаунт GoogleЧасто задаваемые вопросы о технике Мобильные устройства Samsung. Узнайте подробнее о ‘Что делать, если Samsung Galaxy заблокировался и запрашивает аккаунт Google’ с помощью службы поддержки Samsung.
-
Использование
Что делать, если телефон Samsung Galaxy озвучивает мои действияЧасто задаваемые вопросы о Мобильных устройствах Samsung. Узнайте подробнее о ‘Что делать, если телефон Samsung Galaxy озвучивает мои действия’ с помощью службы поддержки Samsung.
-
Использование
Что делать, если разбиты дисплей, экран, матрица на технике SamsungЧасто задаваемые вопросы о технике Фотокамеры Samsung. Узнайте подробнее о ‘Что делать, если разбиты дисплей, экран, матрица на технике Samsung’ с помощью службы поддержки Samsung.
-
Беспроводной интернет / Wi-Fi
Что делать, если Samsung Galaxy неверно определяет ваше местоположениеЧто мне делать, если информация о местоположении на моем смартфоне Samsung является неточной?
-
Использование
Что означают иконки в верхней панели Samsung Galaxy?Часто задаваемые вопросы о технике Samsung Galaxy. Узнайте подробнее о ‘Что означают иконки в верхней панели Samsung Galaxy?’ с помощью службы поддержки Samsung
-
Сообщения / Почта
Что такое аккаунт (учетная запись)Часто задаваемые вопросы о технике Мобильные устройства Samsung. Узнайте подробнее о ‘Что такое аккаунт (учетная запись)’ с помощью службы поддержки Samsung.
-
Беспроводной интернет / Wi-Fi
Что такое Samsung Flow и как им пользоваться?Что такое Samsung Flow и как им пользоваться?
-
Использование
Что такое папка Knox и как ей пользоваться?Часто задаваемые вопросы о Мобильных Устройствах. Узнайте больше о том, Что такое папка Knox и как ей пользоваться, с помощью справочной системы Samsung Support.
-
Использование
Что делать, если Samsung Galaxy зависает и не включаетсяЧасто задаваемые вопросы о Бытовой технике Samsung. Узнайте подробнее о ‘Что делать, если Samsung Galaxy зависает и не включается’ с помощью службы поддержки Samsung.
-
Использование
Что делать, если Samsung Galaxy долго заряжаетсяЧасто задаваемые вопросы о технике Мобильные устройства Samsung. Узнайте подробнее о ‘Что делать, если Samsung Galaxy долго заряжается’ с помощью службы поддержки Samsung.
-
Samsung Pay
Что делать, если возникает ошибка доступа к Samsung Pay (несанкционированные изменения)Часто задаваемые вопросы о технике Мобильные устройства Samsung. Узнайте подробнее о ‘Что делать, если возникает ошибка доступа к Samsung Pay (несанкционированные изменения)’ с помощью службы поддержки
-
Использование
Где посмотреть модель, серийный номер и IMEI на технике SamsungЧасто задаваемые вопросы о технике SSD Samsung. Узнайте подробнее о ‘Где посмотреть модель, серийный номер и IMEI на технике Samsung’ с помощью службы поддержки Samsung.
-
Использование
Как подключить ваше устройство Galaxy к другим устройствам с помощью приложения Подключенные устройстваFAQ для мобильных устройств. Узнайте подробнее, Как подключить ваше устройство Galaxy к другим устройствам с помощью приложения Подключенные устройства, в Samsung Support.
-
Использование
Как автоматически обновлять виджет погоды Samsung Galaxy с помощью движенияFAQ для мобильных устройств. Узнайте подробнее, Как автоматически обновлять виджет погоды Samsung Galaxy с помощью движения, в Samsung Support.
-
Использование
Как изменить настройки языка в приложениях на устройстве GalaxyFAQ по использованию на мобильных устройствах. Узнайте подробнее, Как изменить настройки языка в приложениях на устройстве Galaxy, в Samsung Support.
-
Использование
Как выбирать и просматривать только те альбомы, которые вы хотите видеть в галерее GalaxyFAQ для мобильных устройств. Узнайте подробнее, Как выбирать и просматривать только те альбомы, которые вы хотите видеть в галерее Galaxy, в Samsung Support.
-
Использование
Как использовать камеру Galaxy, чтобы добавить и отредактировать водяной знак для фотографийFAQ для мобильных устройств. Узнайте подробнее, Как использовать камеру Galaxy, чтобы добавить и отредактировать водяной знак для фотографий, в Samsung Support.
-
Использование
Как изменить порядок значков на панели быстрых настроек в Samsung GalaxyЧасто задаваемые вопросы о мобильной технике Samsung. Узнайте подробнее о ‘Как изменить порядок значков на панели быстрых настроек в Samsung Galaxy’ с помощью службы поддержки Samsung.
-
Использование
Как использовать устройство Galaxy в чрезвычайной ситуацииFAQ для мобильных устройств. Узнайте подробнее, Как использовать устройство Galaxy в чрезвычайной ситуации в экстренных ситуациях, чтобы связаться с контактным лицом в случае чрезвычайной ситуации и просмотреть
-
Использование
Техника безопасности при эксплуатации устройства GalaxyFAQ для мобильных устройств. Узнайте подробнее, как обеспечивается Техника безопасности при эксплуатации устройства Galaxy в Samsung Support.
-
Использование
Что делать, если самопроизвольно включается режим «Не беспокоить»Часто задаваемые вопросы о технике Мобильные устройства Samsung. Узнайте подробнее о ‘Что делать, если самопроизвольно включается режим «Не беспокоить»’ с помощью службы поддержки Samsung.
-
Настройка
Как включить или отключить права администратора на Samsung GalaxyЧасто задаваемые вопросы о технике Мобильные устройства Samsung. Узнайте подробнее о ‘Как включить или отключить права администратора на Samsung Galaxy’ с помощью службы поддержки Samsung.
-
Bluetooth
Что делать, если Samsung Galaxy не подключается к другим устройствам и аксессуарам по BluetoothЧасто задаваемые вопросы о технике Мобильные устройства Samsung. Узнайте подробнее о ‘Что делать, если устройство не подключается по Bluetooth к Samsung Galaxy?’ с помощью службы поддержки Samsung.
-
Использование
Как решить проблемы с подключением S PenFAQ по использованию на мобильных устройствах. Узнайте подробнее о том, Как решить проблемы с подключением S Pen, в Samsung Support.
-
Звук / Динамик / Микрофон
Что делать, если не работает микрофон на Samsung Galaxy?Часто задаваемые вопросы о Мобильных устройствах Samsung. Узнайте подробнее о ‘Что делать, если не работает микрофон на Samsung Galaxy’ с помощью службы поддержки Samsung.
-
Настройка
Что делать, если не отображаются уведомления при загрузке файлов?Часто задаваемые вопросы о технике Samsung Galaxy. Узнайте подробнее о ‘Что делать, если не отображаются уведомления при загрузке файлов?’ с помощью службы поддержки Samsung
-
Настройка
Что делать, если в галерее не отображаются фотографии?Часто задаваемые вопросы о технике Samsung Galaxy. Узнайте подробнее о ‘Что делать, если в галерее не отображаются фотографии?’ с помощью службы поддержки Samsung
-
Настройка
Что делать, если нет звука о сообщении?Часто задаваемые вопросы о технике Samsung Galaxy. Узнайте подробнее о ‘Что делать, если нет звука о сообщении?’ с помощью службы поддержки Samsung
-
Настройка
Что делать, если не открывается защищенная папка?Часто задаваемые вопросы о технике Samsung Galaxy. Узнайте подробнее о ‘Что делать, если не открывается защищенная папка?’ с помощью службы поддержки Samsung
-
Камера
Что делать, если не работает функция управления камерой телефона с часов Galaxy WatchЧасто задаваемые вопросы о мобильной технике Samsung. Узнайте подробнее о ‘Что делать, если не работает функция управления камерой телефона с часов Galaxy Watch’ с помощью службы поддержки Samsung.
-
Использование
Как управлять камерой смартфона Samsung Galaxy с часов или браслетаЧасто задаваемые вопросы о мобильных устройствах Samsung. Узнайте подробнее о ‘Как управлять камерой смартфона Samsung Galaxy с часов или браслета’ с помощью службы поддержки Samsung.
-
Использование
Как установить определенную мелодию для контакта на Samsung GalaxyЧасто задаваемые вопросы о технике Мобильные устройства Samsung. Узнайте подробнее о ‘Как установить определенную мелодию для контакта на Samsung Galaxy’ с помощью службы поддержки Samsung.
-
Использование
Как создать альбом в галерее Samsung GalaxyЧасто задаваемые вопросы о технике Мобильные устройства Samsung. Узнайте подробнее о ‘Как создать альбом в галерее Samsung Galaxy’ с помощью службы поддержки Samsung.
-
Использование
Чем отличаются Galaxy Z Fold3 и Galaxy Z Fold4?FAQ по использованию на мобильных устройствах. Узнайте подробнее, Чем отличаются Galaxy Z Fold3 и Galaxy Z Fold4, в Samsung Support.
-
Использование
Чем отличаются Galaxy Z Flip3 и Galaxy Z Flip4?FAQ по использованию на мобильных устройствах. Узнайте подробнее, Чем отличаются Galaxy Z Flip3 и Galaxy Z Flip4, в Samsung Support.
-
Связь / Сеть / Звонки
Что делать, если пропали контакты в телефоне Samsung GalaxyЧасто задаваемые вопросы о технике Мобильные устройства Samsung. Узнайте подробнее о ‘Что делать, если пропали контакты в телефоне Samsung Galaxy’ с помощью службы поддержки Samsung.
-
Использование
Как создать аккаунт Samsung на нашем сайтеЧасто задаваемые вопросы о технике Мобильные устройства Samsung. Узнайте подробнее о ‘Как создать аккаунт Samsung на нашем сайте’ с помощью службы поддержки Samsung.
-
Приложения
Как очистить кэш приложений на смартфоне Samsung GalaxyЧасто задаваемые вопросы о технике Мобильные устройства Samsung. Узнайте подробнее о ‘Как очистить кэш приложений на смартфоне Samsung Galaxy’ с помощью службы поддержки Samsung.
-
Настройка
Увеличенное отображение символов на клавиатуре смартфона GalaxyЧасто задаваемые вопросы о технике Мобильные устройства Samsung. Узнайте подробнее о ‘Увеличенное отображение символов на клавиатуре смартфона Galaxy’ с помощью службы поддержки Samsung.
-
Использование
Как ремонтировать технику Samsung быстрееЧасто задаваемые вопросы о Мобильных устройствах Samsung. Узнайте подробнее о ‘Как ремонтировать технику Samsung быстрее’ с помощью службы поддержки Samsung.
-
Блокировка
Как показывать часы и уведомления на экране блокировки в режиме Always On Display на Samsung GalaxyЧасто задаваемые вопросы о технике Мобильные устройства Samsung. Узнайте подробнее о ‘Как показывать часы и уведомления в режиме энергосбережения Samsung Galaxy — функция Always On Display’ с помощью службы
-
Samsung Apps
Как добавить участника в приложении SmartThings на Samsung GalaxyЧасто задаваемые вопросы о технике Мобильные устройства Samsung. Узнайте подробнее о ‘Как добавить участника в приложении SmartThings’ с помощью службы поддержки Samsung.
-
Использование
Как удалить аккаунт Google или Samsung с планшета или смартфона Samsung GalaxyЧасто задаваемые вопросы о мобильных устройствах. Узнайте подробнее о ‘Как удалить аккаунт Google или Samsung с планшета или смартфона Samsung Galaxy’ с помощью службы поддержки Samsung.
-
Использование
Как пользоваться приложением Samsung DeX на смартфоне Galaxy S22Часто задаваемые вопросы о Мобильных Устройствах. Узнайте больше о том, Как пользоваться приложением Samsung DeX на смартфоне Galaxy S22, с помощью справочной системы Samsung Support.
-
Использование
Как установить соединение часов Galaxy Watch со смартфономЧасто задаваемые вопросы о Мобильных Устройствах. Узнайте больше о том, Как установить соединение часовGalaxy Watch со смартфоном, с помощью справочной системы Samsung Support.
-
Камера
Уникальные режимы съёмки в смартфонах Galaxy Z Flip3 5gЧасто задаваемые вопросы о технике Мобильные устройства Samsung. Узнайте подробнее о ‘Уникальные режимы съёмки в смартфонах Galaxy Z Flip3 5g’ с помощью службы поддержки Samsung.
-
Использование
Совместимость электронного пера S Pen от Galaxy S22 Ultra с другими устройствамиЧасто задаваемые вопросы о технике Мобильные устройства Samsung. Узнайте подробнее о ‘Совместимость других устройств с S Pen от Galaxy S22 Ultra и использование S Pen от других серий на S22 Ultra’ с помощью
-
Использование
Новые возможности смартфонов Galaxy Z Flip3 5GЧасто задаваемые вопросы о технике Мобильные устройства Samsung. Узнайте подробнее о ‘Новые возможности со смартфоном Galaxy Z Flip3 5G’ с помощью службы поддержки Samsung.
-
Использование
Что такое мобильная экосистема Samsung GalaxyЧасто задаваемые вопросы о Мобильных устройствах Samsung. Узнайте подробнее о ‘Что такое мобильная экосистема Samsung Galaxy’ с помощью службы поддержки Samsung.
-
Использование
Что делать, если самостоятельно включается голосовой поиск Google на Samsung GalaxyЧасто задаваемые вопросы о технике Мобильные устройства Samsung. Узнайте подробнее о ‘Что делать, если самостоятельно включается голосовой поиск Google на Samsung Galaxy’ с помощью службы поддержки Samsung
-
Использование
Как просмотреть панель навигации на устройстве Galaxy?FAQ для мобильных устройств. Узнайте подробнее, Как просмотреть панель навигации на устройстве Galaxy, в Samsung Support.
-
Настройка
Как настроить яркость экрана Samsung GalaxyЧасто задаваемые вопросы о технике Мобильные устройства Samsung. Узнайте подробнее о ‘Как настроить яркость экрана Samsung Galaxy’ с помощью службы поддержки Samsung.
-
Использование
Как изменить отображаемое имя наушников Galaxy Buds?Часто задаваемые вопросы о Мобильных Устройствах. Узнайте больше о том, Как изменить отображаемое имя наушников Galaxy Buds, с помощью справочной системы Samsung Support.
-
Samsung Pay
Как получить деньги, которые перевели через Samsung PayЧасто задаваемые вопросы о Мобильных устройствах Samsung. Узнайте подробнее о ‘Как получить деньги, которые перевели через Samsung Pay’ с помощью службы поддержки Samsung.
-
Использование
Как добавлять и управлять устройствами Samsung в приложении SmartThingsЧасто задаваемые вопросы о SmartThings. Узнайте подробнее о ‘Как добавлять и управлять устройствами Samsung в приложении SmartThings’ с помощью службы поддержки Samsung.
-
Использование
Как установить защитную пленку на смартфон Galaxy Z Fold4Часто задаваемые вопросы о Мобильных Устройствах. Узнайте больше о том, как установить защитную пленку на смартфон Galaxy Z Fold4, с помощью справочной системы Samsung Support.
-
Использование
Как зарядить наушники Galaxy BudsЧасто задаваемые вопросы о Мобильных Устройствах. Узнайте больше о том, Как зарядить наушники Galaxy Buds, с помощью справочной системы Samsung Support.
-
Использование
Как быстро зарядить часы Galaxy Watch5Часто задаваемые вопросы о Мобильных Устройствах. Узнайте больше о том, как быстро зарядить часы Galaxy Watch5, с помощью справочной системы Samsung Support.
-
Мультимедийный контент
Как управлять мультимедиа и устройствами на смартфоне GalaxyКак управлять мультимедиа и устройствами на смартфоне Galaxy
-
Использование
Как скрыть навигационную панель на устройствах GalaxyЧасто задаваемые вопросы о Мобильных Устройствах. Узнайте больше о том, Как скрыть навигационную панель на устройствах Galaxy, с помощью справочной системы Samsung Support.
-
Использование
Как улучшить качество вибрации на устройстве Galaxy S22FAQ по использованию на мобильных устройствах. Узнайте подробнее, как улучшить качество вибрации на устройстве Galaxy S22.
-
Использование
Как использовать функцию Single Take с помощью ИИ-камеры серии Galaxy S22FAQ по использованию на мобильных устройствах. Узнайте подробнее, как использовать функцию Single Take с помощью ИИ-камеры серии Galaxy S22, в Samsung Support.
-
Использование
Как воспользоваться всеми возможностями панелей EdgeЧасто задаваемые вопросы о Мобильных Устройствах. Узнайте больше о том, Как воспользоваться всеми возможностями Панелей Edge с помощью справочной системы Samsung Support.
-
Использование
Как управлять звонками если к смартфону подключено несколько устройств BluetoothЧасто задаваемые вопросы о Мобильных Устройствах. Узнайте больше о том, Как управлять звонками если к смартфону подключено несколько устройств Bluetooth, с помощью справочной системы Samsung Support.
-
Использование
Как управлять плитками на часах Galaxy WatchЧасто задаваемые вопросы о Мобильных Устройствах. Узнайте больше о том, Как управлять плитками на часах Galaxy Watch, с помощью справочной системы Samsung Support.
-
Приложения
Как установить стикеры Bitmoji на Always On Display на Samsung GalaxyЧасто задаваемые вопросы о технике Samsung Galaxy. Узнайте подробнее о ‘Как установить стикеры Bitmoji на Always On Display’ с помощью службы поддержки Samsung
-
Samsung Pay
Как установить отпечаток пальца на Samsung PayЧасто задаваемые вопросы о технике Мобильные устройства Samsung. Узнайте подробнее о ‘Как установить отпечаток пальца на Samsung Pay’ с помощью службы поддержки Samsung.
-
Блокировка
Как задать определенный отпечаток пальца для защищенной папкиЧасто задаваемые вопросы о технике Мобильные устройства Samsung. Узнайте подробнее о ‘Как задать определенный отпечаток пальца для защищенной папки’ с помощью службы поддержки Samsung.
-
Использование
ОС Android 12 OSЧасто задаваемые вопросы о Мобильных Устройствах. Узнайте больше о том, Как устранить ошибки съемки экрана на устройствах под управлением ОС Android 12, с помощью справочной системы Samsung Support.
-
Samsung Pay
Как перевести деньги с карты на карту через Samsung Payасто задаваемые вопросы о технике Samsung. Узнайте подробнее о ‘Как перевести деньги с карты на карту через Samsung Pay’ с помощью службы поддержки Samsung
-
Использование
Как пользоваться функцией Always On DisplayFAQ по использованию на мобильных устройствах. Узнайте подробнее, Как пользоваться функцией Always On Display, в Samsung Support.
-
Использование
Как использовать приложение Android Message на устройстве GalaxyЧасто задаваемые вопросы о Мобильных Устройствах. Узнайте больше о том, Как использовать приложение Android Message на устройстве Galaxy с помощью справочной системы Samsung Support.
-
Использование
Как пользоваться функцией Scroll Capture на смартфоне GalaxyЧасто задаваемые вопросы о Мобильных Устройствах. Узнайте больше о том, Как пользоваться функцией Scroll Capture на смартфоне Galaxy, с помощью справочной системы Samsung Support.
-
Использование
Как пользоваться панелью задач Galaxy Z Fold4FAQ по использованию на мобильных устройствах. Узнайте подробнее, Как пользоваться панелью задач Galaxy Z Fold4, в Samsung Support.
-
Использование
Как использовать S Pen S22 Ultra и проверить совместимостьFAQ по использованию на мобильных устройствах. Узнайте подробнее об использовании S22 S Pen и проверьте совместимость с Samsung Support.
-
Использование
Что делать, если браузер открывает страницу с рекламой на Samsung GalaxyЧасто задаваемые вопросы о технике Мобильные устройства Samsung. Узнайте подробнее о ‘Что делать, если браузер открывает страницу с рекламой на Samsung Galaxy’ с помощью службы поддержки Samsung.
-
Использование
Удаленная диагностика техники SamsungУзнайте подробнее, как удаленно провести диагностику вашей техники через Samsung Visual Support с помощью службы поддержки Samsung.
-
Использование
Что такое ремонт с доставкойЧасто задаваемые вопросы о технике Мобильные устройства Samsung. Узнайте подробнее о ‘Что такое ремонт с доставкой’ с помощью службы поддержки Samsung.
-
Использование
Что такое режим энергосбережения смартфона Galaxy?Часто задаваемые вопросы о Мобильных Устройствах. Узнайте больше о том, Что такое режим энергосбережения смартфона Galaxy, с помощью справочной системы Samsung Support.
-
Использование
Что представляет собой функция «Обслуживание устройства» в телефонах Galaxy?Часто задаваемые вопросы о технике Мобильные устройства Samsung. Узнайте подробнее о ‘Что представляет собой функция «Обслуживание устройства» в телефонах Galaxy?’ с помощью службы поддержки Samsung.
-
Использование
Что такое функция быстрой зарядки смартфона Galaxy Z Flip4 и Galaxy Z Fold4?Часто задаваемые вопросы о Мобильных Устройствах. Узнайте больше о том, что такое функция быстрой зарядки смартфона Galaxy Z Flip4 и Galaxy Z Fold4, с помощью справочной системы Samsung.
-
Использование
Что такое режим сгибания в устройствах Galaxy Z Flip4 и Galaxy Z Fold4?FAQ по использованию на мобильных устройствах. Узнайте подробнее, Что такое режим сгибания в устройствах Galaxy Z Flip4 и Galaxy Z Fold4, в Samsung Support.
-
Использование
Что такое складной экран и защитная пленка на смартфоне?Часто задаваемые вопросы о Мобильных Устройствах. Узнайте больше о том, Что такое складной экран и защитная пленка на смартфоне, с помощью справочной системы Samsung Support.
-
Использование
Что представляет собой функция Galaxy Buds «Аудио 360»?FAQ для мобильных устройств. Узнайте подробнее, Что представляет собой функция Galaxy Buds «Аудио 360», в разделе поддержки Samsung.
-
Использование
Что такое функция Galaxy Buds2 Pro 360 audio?Часто задаваемые вопросы о Мобильных Устройствах. Узнайте больше о том, Что такое функция Galaxy Buds2 Pro 360 audio, с помощью справочной системы Samsung.
-
Использование
Что такое защитная пленка на устройствах Galaxy Z Flip4 и Galaxy Z Fold4FAQ по использованию на мобильных устройствах. Узнайте подробнее о том,Что такое защитная пленка на устройствах Galaxy Z Flip4 и Galaxy Z Fold4, в Samsung Support.
-
Использование
Что такое камера за дисплеем Galaxy Z Fold4?FAQ по использованию на мобильных устройствах. Узнайте подробнее, что такое камера за дисплеем Galaxy Z Fold4, в Samsung Support.
-
Использование
Что делать, если микрофон или динамик работает некорректноЧасто задаваемые вопросы о технике Мобильные устройства Samsung. Узнайте подробнее о ‘Что делать, если микрофон или динамик работает некорректно’ с помощью службы поддержки Samsung.
-
Использование
Почему мой телефон работает медленно и как его ускоритьЧасто задаваемые вопросы о технике Мобильные устройства Samsung. Узнайте подробнее о ‘Почему мой телефон работает медленно и как его ускорить?’ с помощью службы поддержки Samsung.
-
Использование
Какие функции есть в часах Samsung?FAQ по использованию на мобильных телефонах и устройствах. Узнайте подробнее, какие функции есть в часах Samsung, в Samsung Support.
-
Samsung Apps
В SmartThings теряется подключение Samsung Galaxy к другому устройствуЧасто задаваемые вопросы о SmartThings. Узнайте подробнее о ‘В SmartThings теряется подключение между Samsung Galaxy и другим устройством’ с помощью службы поддержки Samsung.
-
Обновление
Как обновить последнюю версию программного обеспечения для вашего мобильного устройства GalaxyКак обновить последнюю версию программного обеспечения для вашего мобильного устройства Galaxy
-
{{file.description}}
- Версия {{file.fileVersion}}
- {{file.fileSize}} MB
- {{file.fileModifiedDate}}
- {{file.osNames}}
Полезные ссылки
Другие программные инструменты и сервисы
Kies
Программа для создания резервных копий. Подойдет для всех смартфонов и планшетов Galaxy на Android от 2.3 до 4.3 и смартфонов Wave (Bada)
Читать дальше
Smart View
Приложение для просмотра мультимедийного контента с мобильного устройства или компьютера на телевизоре Samsung Smart TV
Читать дальше
Smart Switch
Программа для обновления прошивки и создания резервных копий. Подойдет для всех смартфонов и планшетов Galaxy на Android 4.3 и новее
Читать дальше
ДОПОЛНИТЕЛЬНАЯ ИНФОРМАЦИЯ
Информация о гарантии
Узнайте, что входит в гарантийные обязательства


Индивидуальная поддержка
Получите помощь от официальных центров поддержки


Новости и уведомления
Обьявления о важных продуктах и услугах


Данная инструкция на русском языке предназначена для мобильного телефона
Samsung Galaxy J3 (2016) SM-J320, описывает принцип работы и основные моменты эксплуатации устройства.
Производитель настойчиво рекомендует перед включением мобильного телефона
внимательно изучить настоящую инструкцию.
Инструкция для мобильного телефона
представлена в формате PDF. Все современные браузеры уже поддерживают данный формат и сложностей с открытием файла возникнуть не должно.
Но если открыть инструкцию все же не удается, то необходимо установить на компьютер программу для чтения PDF файлов, например, Acrobat Reader. Если у вас возникли сложности с открытием инструкции на смартфоне под управлением Android, нужно установить, например, Adobe Acrobat Reader.
Руководство
пользователя
www.samsung.com
SM-J320F/DS
SM-J320H/DS
Russian. 03/2016. Rev.1.0

2
Содержание
Основные сведения об
устройстве
4 Прочтите перед использованием
5 Комплект поставки
6 Внешний вид устройства
8 Аккумулятор
14 SIM- и USIM-карты
16 Карта памяти
18 Включение и выключение устройства
18 Сенсорный экран
21 Главный экран
27 Экран блокировки
28 Панель уведомлений
30 Ввод текста
32 Снимок экрана
32 Запуск приложений
32 Управление устройством и
сохраненными на нем данными
Приложения
36 Установка и удаление приложений
37 Телефон
40 Контакты
41 Сообщения
43 Интернет
44 E-mail
45 Камера
51 Галерея
52 Smart Manager
54 S Planner
56 Видео
57 Звукозапись
58 Мои файлы
58 Заметки
59 Часы
60 Калькулятор
61 Радио
62 Приложения Google
Настройки
64 Введение
64 Wi-Fi
66 Bluetooth
67 Автономный режим
68 Точка доступа и модем
69 Использование данных
69 Диспетчер SIM-карт
70 Мобильные сети
70 Другие настройки
72 Звуки и уведомления
72 Дисплей
73 Приложения
73 Обои
73 Темы
74 Экран блокировки и защита

Содержание
3
74 Конфиденциальность
75 Простой режим
75 Специальные возможности
76 Учетные записи
77 Архивация и сброс
77 Язык и ввод
78 Батарея
78 Память
79 Дата и время
79 Руководство пользователя
79 Об устройстве
Приложение
80 Устранение неполадок

4
Основные сведения об
устройстве
Прочтите перед использованием
Пожалуйста, в целях правильного и безопасного использования устройства, прежде чем
приступать к работе с ним, изучите это руководство.
•
Приведенные ниже описания основаны на настройках устройства по умолчанию.
•
Приведенные сведения могут частично не соответствовать функциям данного устройства. Это
зависит от региона, характеристик устройства, программного обеспечения или поставщика
услуг.
•
Содержимое (высококачественное содержимое) с высоким потреблением ресурсов ЦП и
ОЗУ влияет на общую производительность устройства. Приложения, использующие такое
содержимое, могут работать некорректно в зависимости от характеристик устройства и
среды, в которой оно используется.
•
Компания Samsung не несет ответственности за нарушения быстродействия, вызванные
приложениями, выпущенными не компанией Samsung.
•
Компания Samsung не несет ответственности за нарушения быстродействия или
совместимости, возникшие вследствие редактирования настроек реестра или внесения
изменений в операционную систему. Попытки изменить настройки операционной системы
могут привести к перебоям в работе устройства или приложений.
•
ПО, звуковые файлы, обои, изображения и прочее содержимое, предустановленное на
этом устройстве, лицензированы для ограниченного использования. Копирование и
использование этих материалов в коммерческих или иных целях является нарушением
авторского права. Пользователи несут полную ответственность за незаконное использование
мультимедийного содержимого.
•
За использование услуг по передаче данных, таких как обмен сообщениями, загрузка и
отправка файлов, автосинхронизация или службы определения местонахождения, может
взиматься дополнительная плата, размер которой зависит от условий текущего тарифного
плана. Для передачи большого количества данных рекомендуется использовать функцию
Wi-Fi.
•
Предустановленные на устройстве приложения подлежат обновлению, в дальнейшем
их поддержка может быть прекращена без предварительного уведомления. В случае
возникновения вопросов относительно предустановленных приложений обратитесь в
сервисный центр Samsung. По вопросам, касающимся установленных вами приложений,
обращайтесь к вашему поставщику услуг.

Основные сведения об устройстве
5
•
Изменение операционной системы устройства и установка ПО из неофициальных источников
могут вызвать сбои в работе устройства и повреждение или утерю данных. Такие действия
являются нарушением условий лицензионного соглашения Samsung и ведут к прекращению
действия гарантии.
Обозначения, используемые в данном руководстве
Предостережение — Cитуации, которые могут привести к получению травмы вами или
кем-либо из окружающих
Внимание — Cитуации, которые могут привести к повреждению устройства или другого
оборудования
Примечание — Примечания, советы или дополнительные сведения
Комплект поставки
В комплект поставки входят следующие компоненты:
•
Устройство
•
Аккумулятор
•
Краткое руководство
•
Комплект поставки и набор доступных аксессуаров могут различаться в разных
регионах и определяются поставщиком услуг.
•
Поставляемые аксессуары предназначены исключительно для данного устройства и
могут быть несовместимы с другими устройствами.
•
Внешний вид изделий и технические характеристики могут быть изменены без
предварительного уведомления.
•
Дополнительные аксессуары можно приобрести у местных дилеров компании
Samsung. Перед покупкой убедитесь, что они совместимы с вашим устройством.
•
Применяйте только аксессуары, рекомендованные компанией Samsung.
Использование нерекомендованных аксессуаров может привести к проблемам в
работе и сбоям, на которые не распространяется гарантия.
•
Доступность любых аксессуаров целиком и полностью зависит от производителя.
Дополнительные сведения о доступных аксессуарах см. на веб-сайте Samsung.
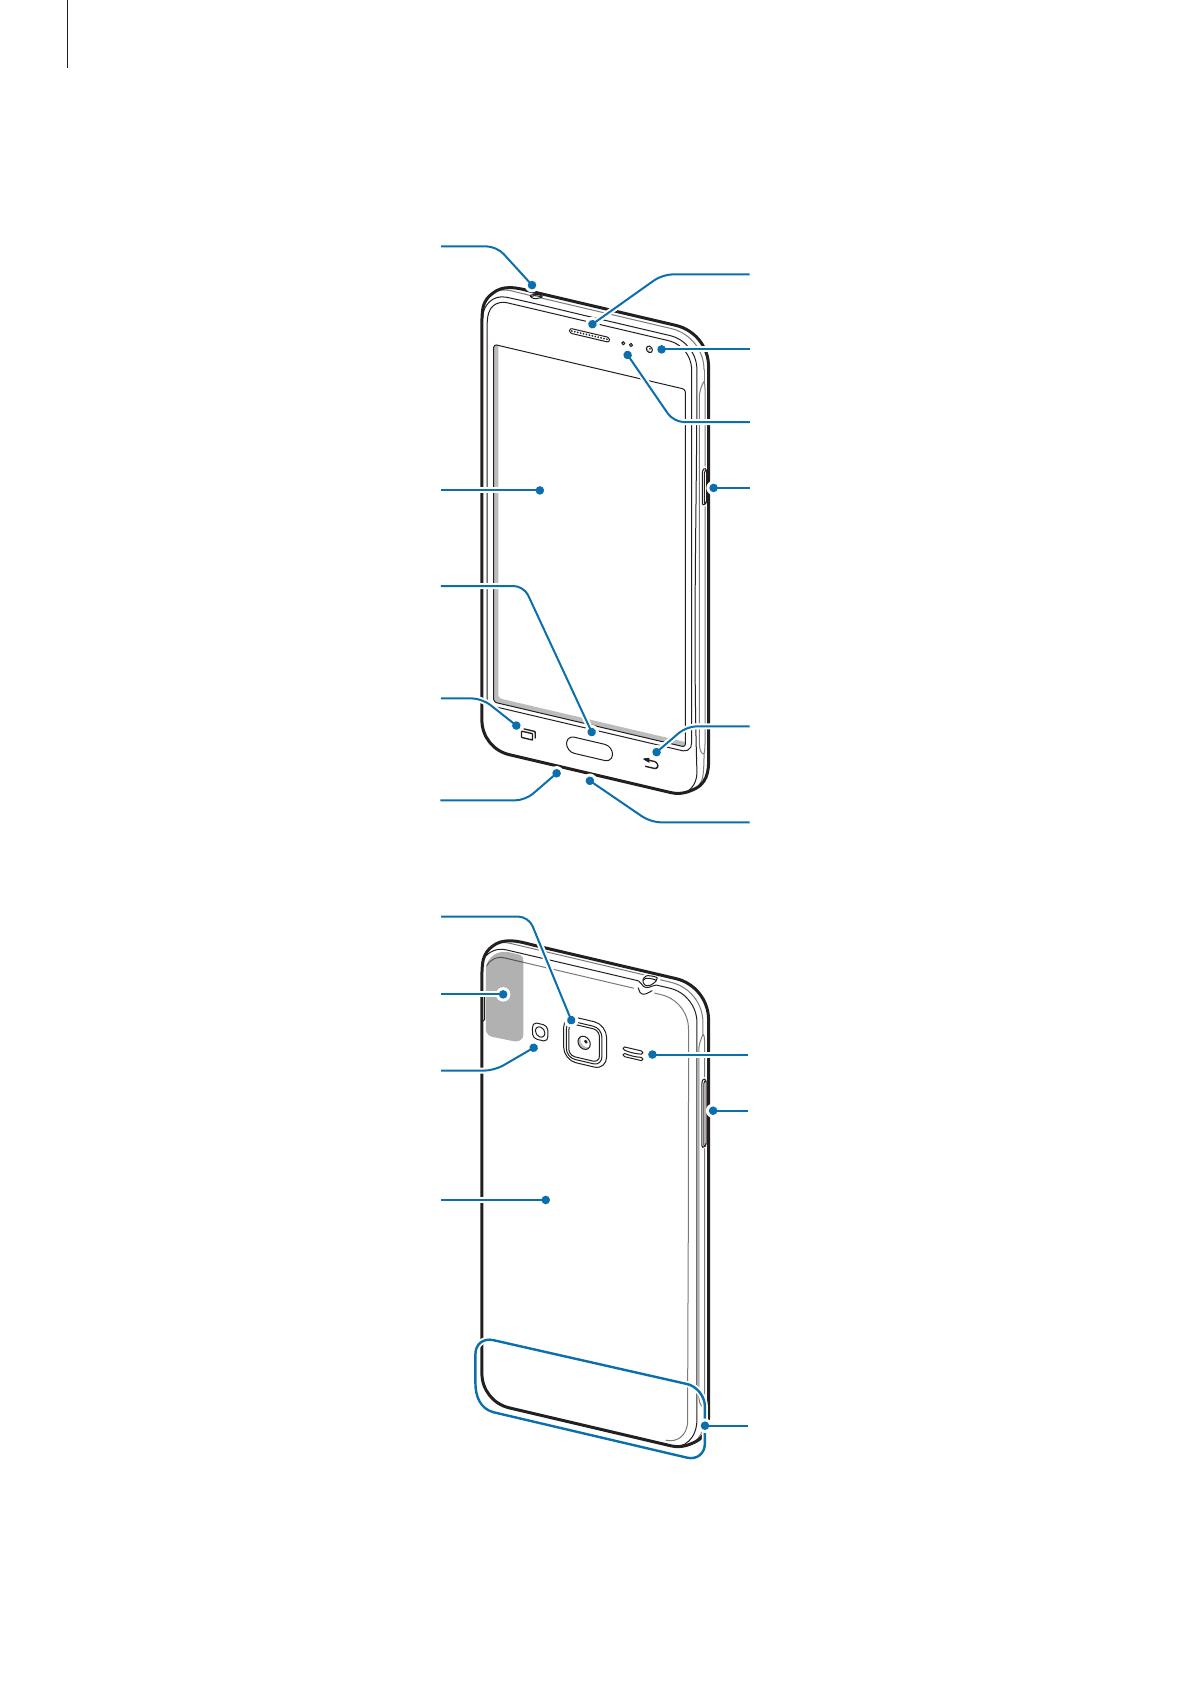
Основные сведения об устройстве
6
Внешний вид устройства
Микрофон
Клавиша «Назад»
Передняя камера
Датчики расстояния
Внешний динамик
Клавиша питания
Универсальный разъем
Сенсорный экран
Клавиша «Последние»
Клавиша «Главный экран»
Динамик
Клавиша громкости
Крышка аккумулятора
GPS антенна
Вспышка
Основная антенна
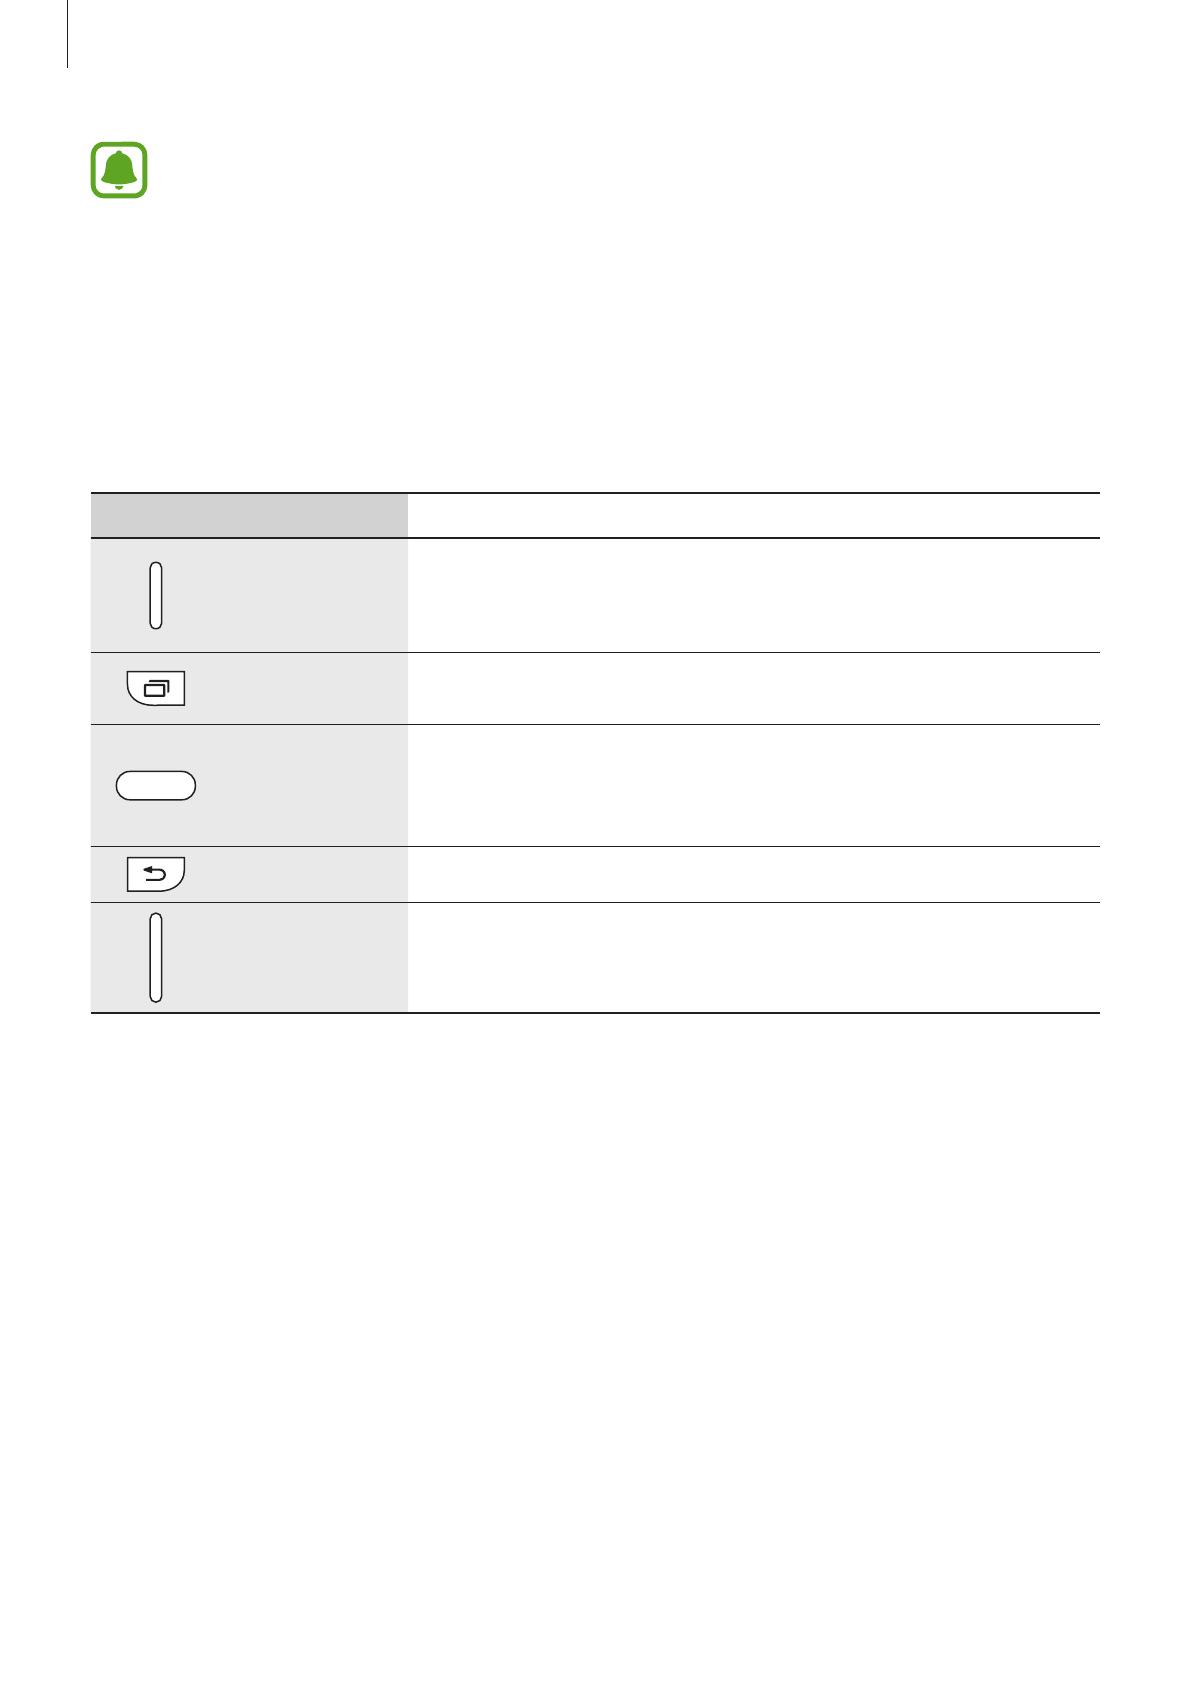
Основные сведения об устройстве
7
•
Не прикасайтесь к антенне и не закрывайте ее руками или какими-либо предметами.
Это может вызвать ухудшение сигнала соединения или разрядку аккумулятора.
•
Рекомендовано использование защитной пленки, одобренной компанией
Samsung. Использование нерекомендованных защитных пленок может привести к
неисправности датчиков.
•
Не допускайте попадания жидкости на сенсорный экран. Повышенная влажность и
попадание жидкости могут стать причиной неправильной работы сенсорного экрана.
Клавиши
Клавиша Функция
Питание
•
Нажмите и удерживайте, чтобы включить или выключить
устройство.
•
Нажмите, чтобы включить или заблокировать экран.
Последние
•
Коснитесь, чтобы открыть список недавно использованных
приложений.
Главный экран
•
Нажмите, чтобы включить заблокированный экран.
•
Нажмите для возврата на главный экран.
•
Нажмите и удерживайте для запуска приложения
.
Назад
•
Коснитесь для возврата на предыдущий экран.
Громкость
•
Нажмите для регулировки громкости звуков устройства.

Основные сведения об устройстве
8
Аккумулятор
Установка аккумулятора
1
Снимите заднюю крышку.
Соблюдайте осторожность, чтобы не поранить пальцы при снятии крышки аккумулятора.
Не изгибайте и не перекручивайте крышку аккумулятора. Это может повредить ее.
2
Установите аккумулятор так, чтобы его золотистые контакты были совмещены с контактами
устройства.
1
2
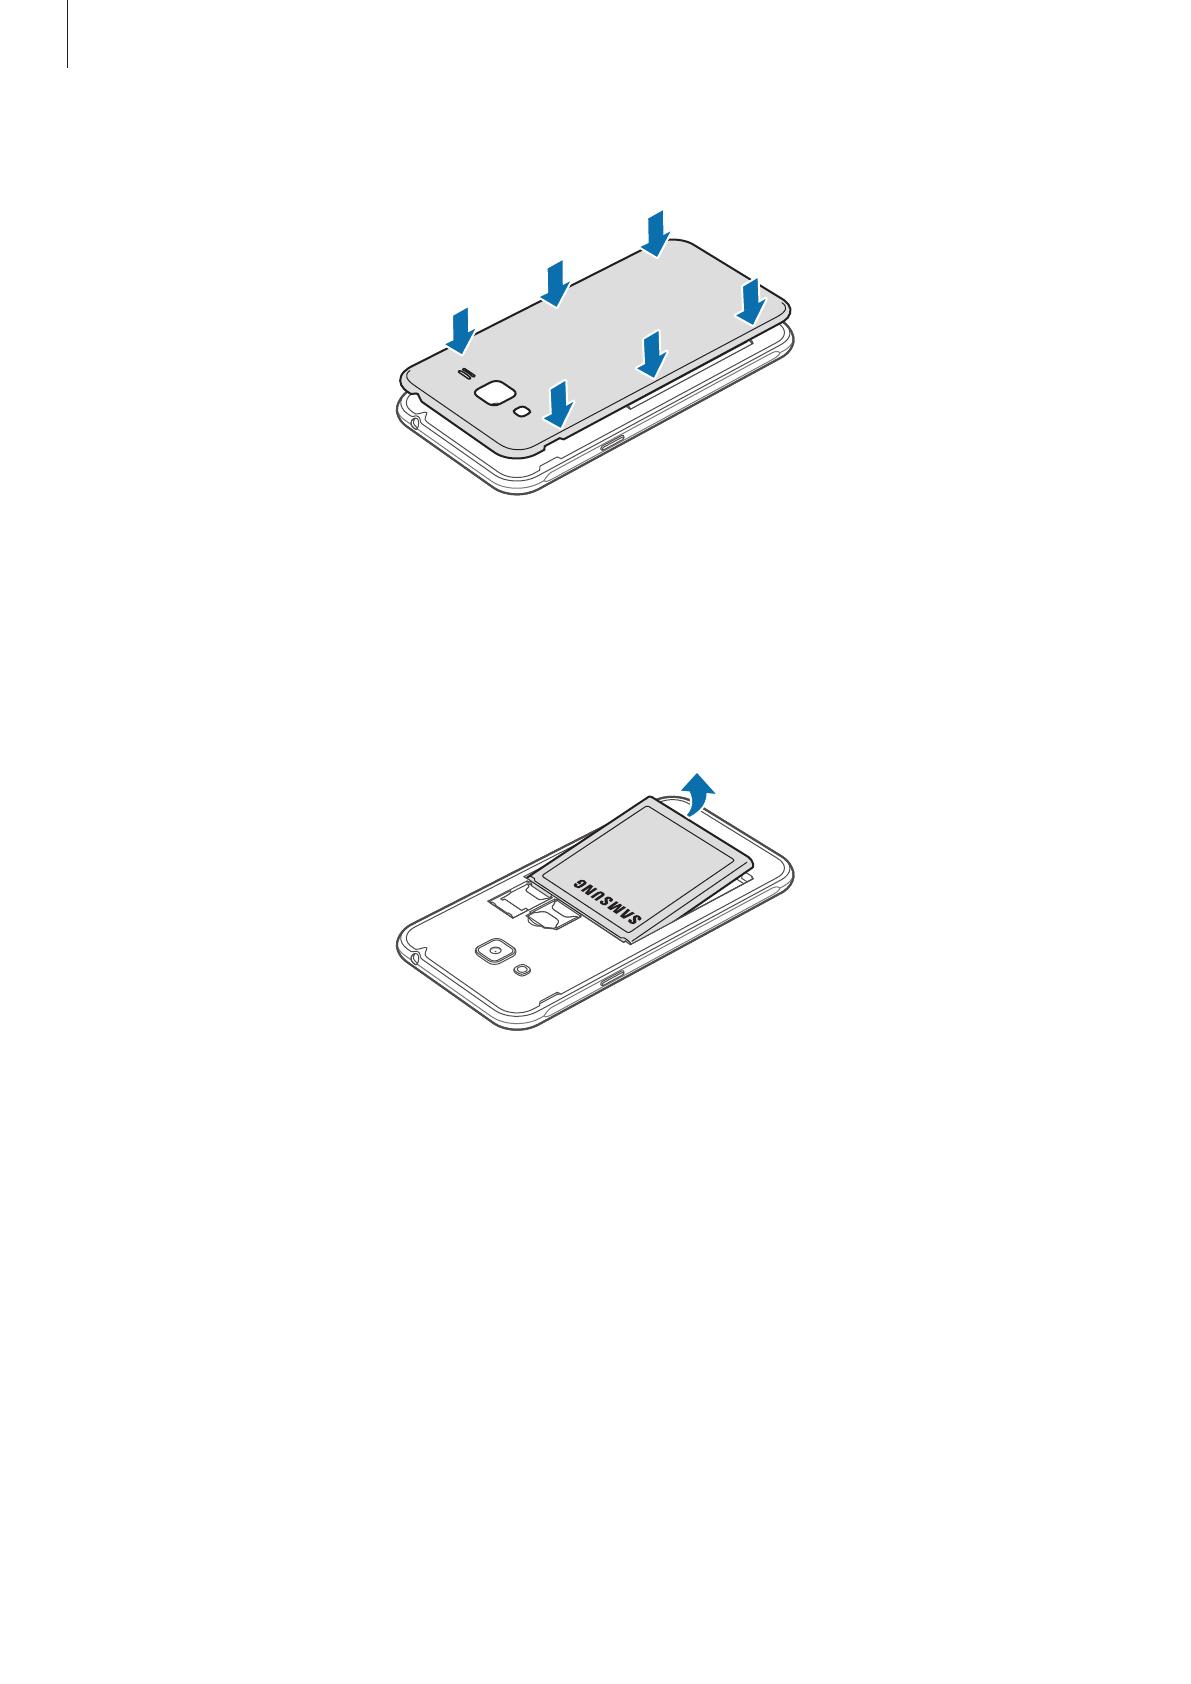
Основные сведения об устройстве
9
3
Установите крышку аккумулятора на место.
Извлечение аккумулятор
1
Снимите заднюю крышку.
2
Извлеките аккумулятор.
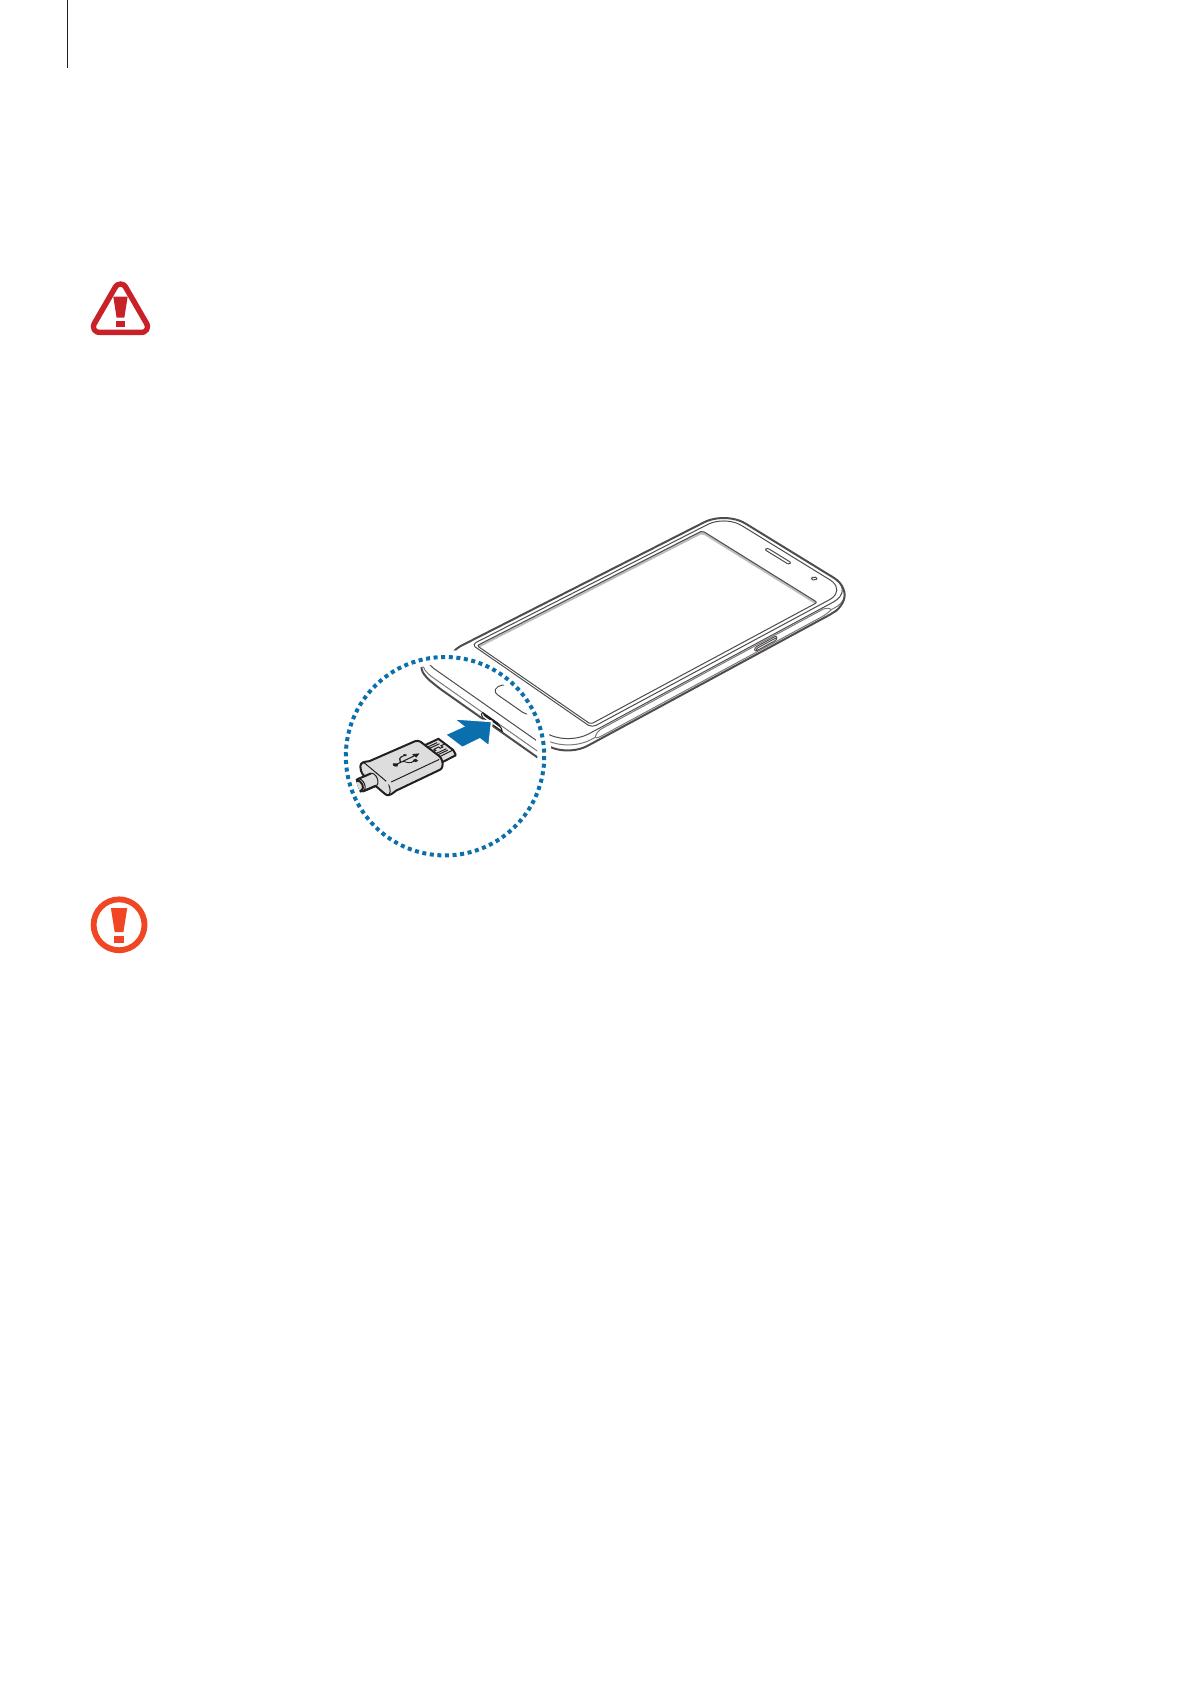
Основные сведения об устройстве
10
Зарядка аккумулятора
Перед первым использованием устройства или после продолжительного периода, в течение
которого устройство не использовалось, необходимо зарядить аккумулятор.
Используйте только аккумуляторы, зарядные устройства и кабели, одобренные
компанией Samsung. Использование несовместимых зарядных устройств и кабелей может
привести к взрыву аккумулятора или повреждению устройства.
1
Подключите кабель USB одним концом к USB-адаптеру питания, а другим — к универсальному
разъему.
Неправильное подключение зарядного устройства может привести к серьезному
повреждению вашего устройства. Гарантия не распространяется на любые повреждения,
возникшие в результате неправильного использования устройства и аксессуаров.
Основные сведения об устройстве
11
2
Подключите USB-адаптер питания к электрической розетке.
3
По окончании зарядки отключите ваше устройство от зарядного устройства. Сначала
отключите зарядное устройство от вашего устройства, затем от электрической розетки.
Перед извлечением аккумулятора необходимо отсоединить зарядное устройство. В
противном случае устройство может быть повреждено.
В целях экономии электроэнергии отключайте зарядное устройство, если оно не
используется. Зарядное устройство не оснащено выключателем питания, поэтому его
нужно отключать, чтобы прервать процесс зарядки и сэкономить электроэнергию. При
использовании зарядное устройство должно плотно прилегать к розетке и быть легко
доступным.
Просмотр оставшегося времени зарядки
Во время зарядки откройте главный экран и коснитесь
Меню
→
Настройки
→
Батарея
.
Фактическое время зарядки зависит от состояния устройства и условий зарядки.
Оставшееся время зарядки может не отображаться на устройстве во время зарядки при
слишком низкой или высокой температуре окружающей среды.
Снижение потребления электроэнергии
Ниже перечислены рекомендации по экономии заряда аккумулятора устройства.
•
Оптимизируйте работу устройства с помощью приложения Smart Manager.
•
Если устройство не используется, переведите его в спящий режим, нажав клавишу питания.
•
Включите режим энергосбережения.
•
Закройте неиспользуемые приложения.
•
Отключите Bluetooth, если он не используется.
•
Отключите Wi-Fi, если он не используется.
•
Отключите автосинхронизацию приложений.
•
Уменьшите время работы подсветки.
•
Уменьшите яркость экрана.

Основные сведения об устройстве
12
Советы и меры предосторожности во время зарядки
аккумулятора
•
Когда заряд аккумулятора подходит к концу, появляется значок пустого аккумулятора.
•
При полной разрядке аккумулятора включить устройство сразу после подключения к
зарядному устройству невозможно. Чтобы включить устройство, следует подождать
несколько минут, пока аккумулятор немного зарядится.
•
При одновременном использовании нескольких приложений, а также приложений,
требующих соединения с другими устройствами, аккумулятор разряжается быстрее. Чтобы
избежать отключения от сети или разрядки аккумулятора во время передачи данных, эти
приложения следует всегда запускать при полностью заряженном аккумуляторе.
•
Зарядка от других источников питания, например от ПК, без использования специального
зарядного устройства может происходить медленнее из-за меньшей силы электрического
тока.
•
Во время зарядки аккумулятора можно пользоваться устройством, но это замедляет процесс
зарядки.
•
Если устройство получает нестабильное питание во время зарядки, сенсорный экран
может не реагировать на касания. В этом случае отключите зарядное устройство от вашего
устройства.
•
Во время зарядки устройство и зарядное устройство могут нагреваться. Это нормальное
явление, не влияющее на производительность и срок службы устройства. Если аккумулятор
нагреется больше обычного, зарядное устройство может прекратить свою работу.
•
Если устройство не заряжается, обратитесь c ним в сервисный центр Samsung вместе с
зарядным устройством.

Основные сведения об устройстве
13
Энергосбережение
В целях экономии заряда аккумулятора можно ограничить использование функций устройства.
На главном экране выберите пункт
Меню
→
Настройки
→
Батарея
→
Энергосбережение
и
коснитесь переключателя, чтобы включить соответствующий режим.
Для автоматического перехода в режим энергосбережения по достижении заданного уровня
заряда аккумулятора выберите пункт
Запускать энергосбережение
и задайте нужный параметр.
Экстремальное энергосбережение
В этом режиме можно продлить работу устройства от аккумулятора. В режиме максимального
энергосбережения происходит следующее:
•
Все цвета экрана отображаются в серой палитре.
•
Доступ к приложениям ограничивается списком основных и выбранных приложений.
•
Отключается мобильная передача данных при выключении экрана.
•
Отключаются функции Wi-Fi и Bluetooth.
На главном экране выберите пункт
Меню
→
Настройки
→
Батарея
→
Экстремальное
энергосбережение
и коснитесь переключателя, чтобы включить соответствующий режим.
Чтобы отключить режим максимального энергосбережения, выберите пункт
ОПЦИИ
→
Отключить энергосбережение
.
Оставшееся время использования устройства указывает на время, оставшееся до полной
разрядки аккумулятора. Оно зависит от настроек устройства и условий, в которых оно
используется.
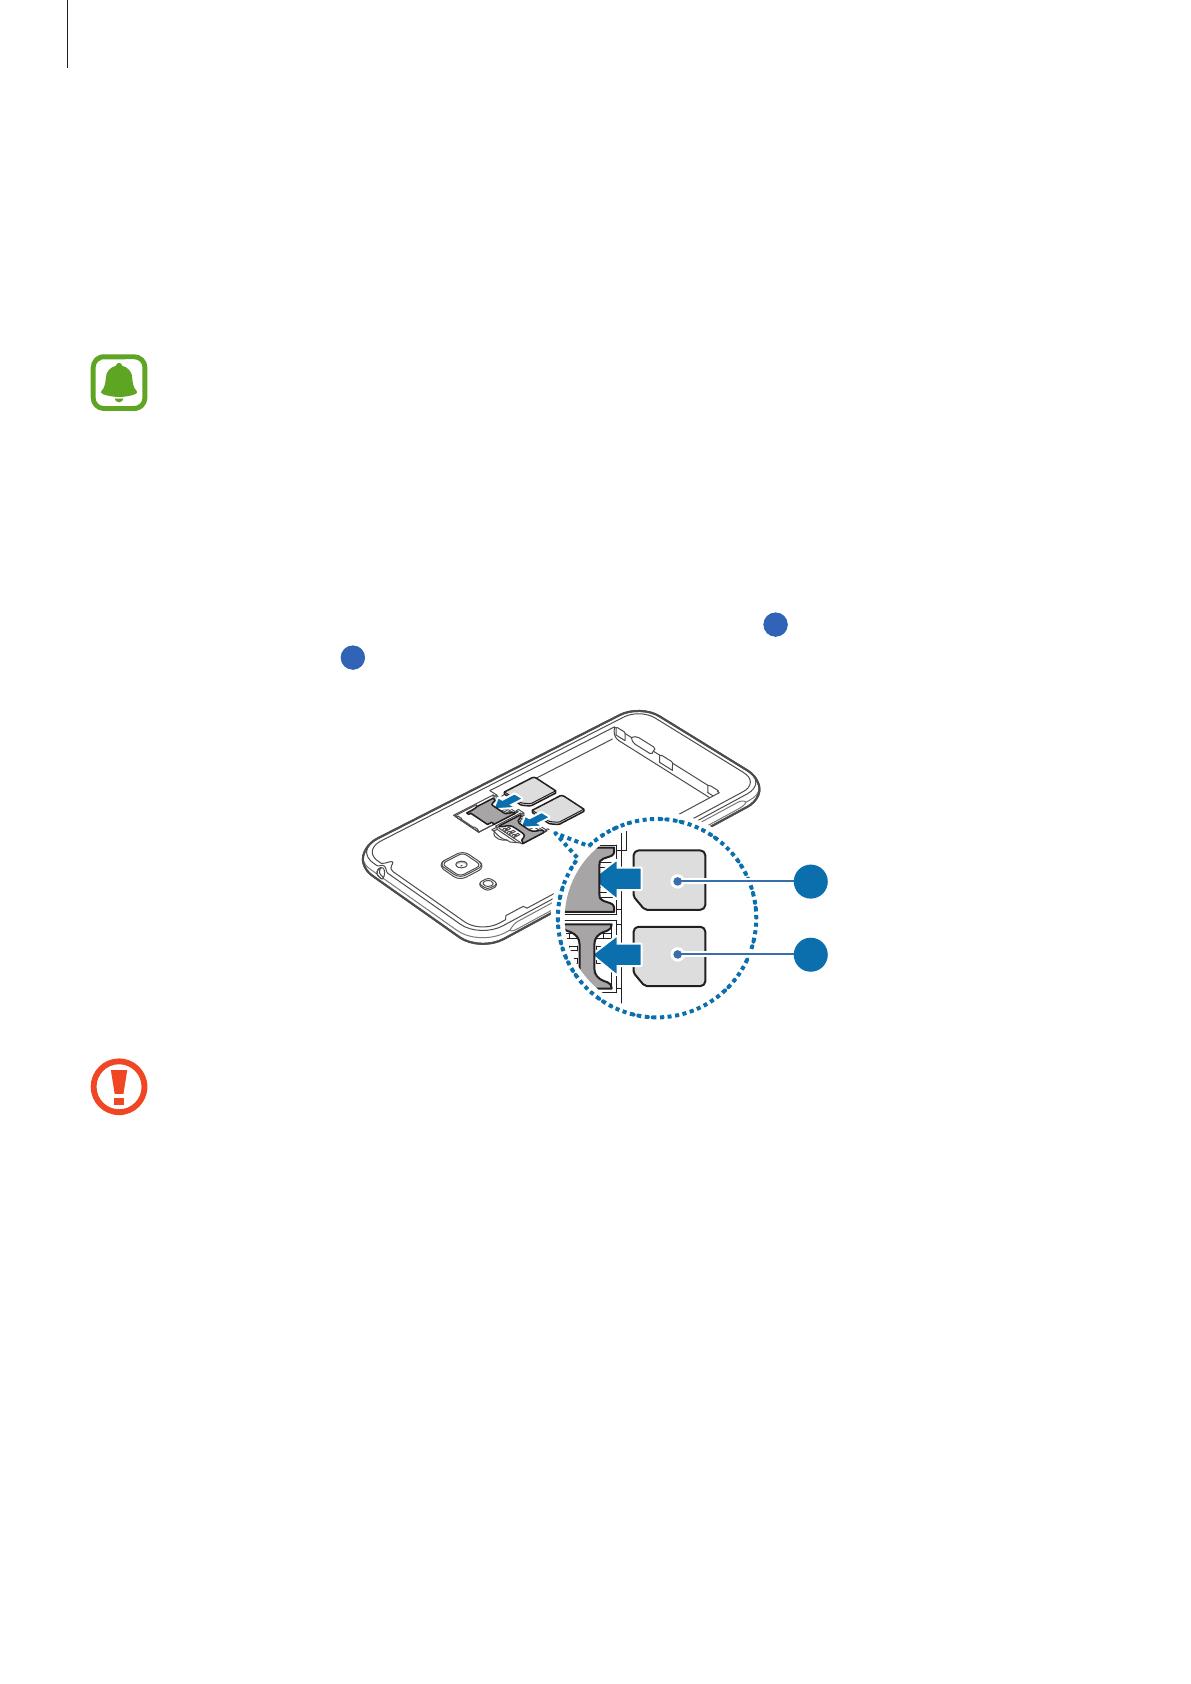
Основные сведения об устройстве
14
SIM- и USIM-карты
Установка SIM- или USIM-карты
Вставьте SIM- или USIM-карту, полученную у поставщика услуг мобильной связи.
•
С устройством работают только карты стандарта micro-SIM.
•
Доступность некоторых услуг LTE зависит от поставщика услуг. Дополнительную
информацию о доступности услуг можно получить у поставщика услуг.
1
Снимите крышку аккумулятора и извлеките аккумулятор.
2
Вставьте SIM- или USIM-карту в устройство золотистыми контактами вниз.
Вставьте основную SIM- или USIM-карту в гнездо SIM-карты 1 (
1
) и дополнительную — в
гнездо SIM-карты 2 (
2
).
1
2
•
Не вставляйте карту памяти в разъем для SIM-карты. Если карта памяти была по ошибке
вставлена в разъем для SIM-карты, то для ее извлечения из устройства обратитесь в
сервисный центр Samsung.
•
Не теряйте и не позволяйте другим использовать вашу SIM- или USIM-карту. Компания
Samsung не несет ответственности за повреждения или неудобства, вызванные утерей
или кражей карты.
3
Установите аккумулятор и крышку аккумулятора на место.
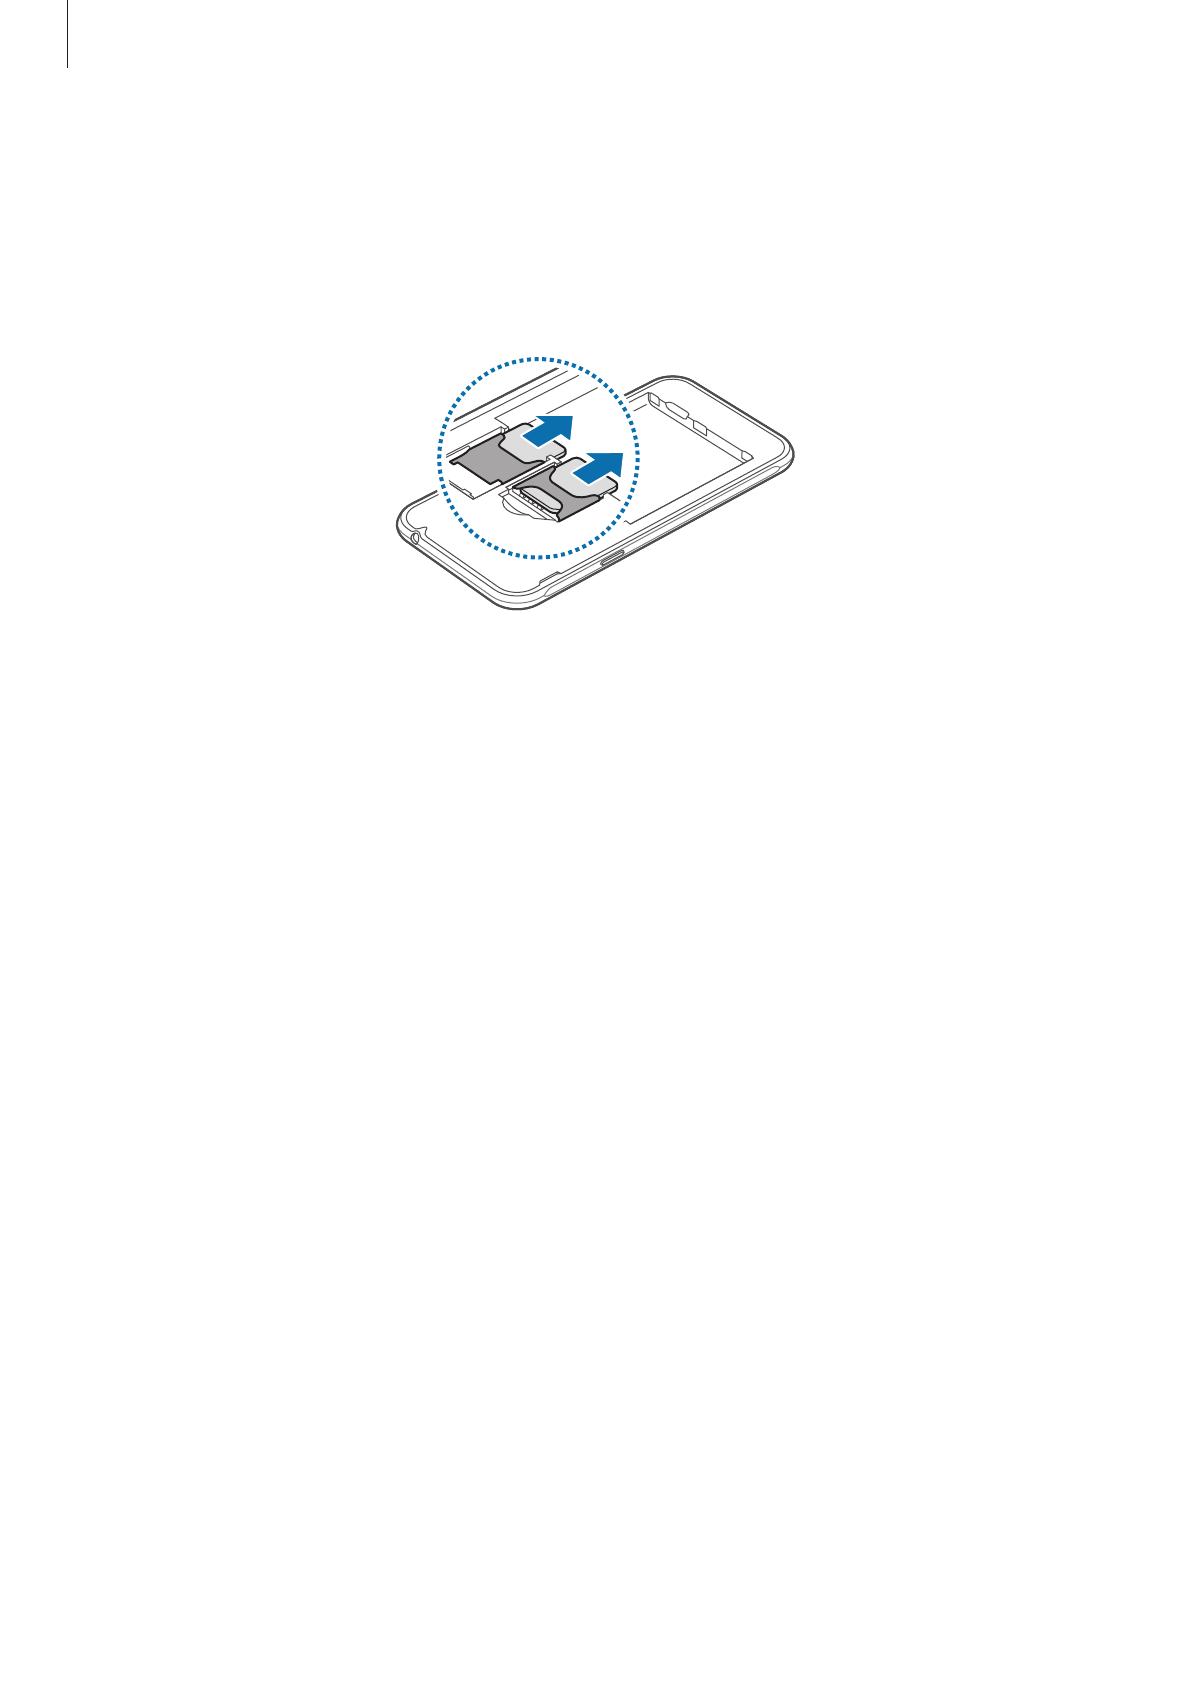
Основные сведения об устройстве
15
Извлечение SIM- или USIM-карты
1
Снимите крышку аккумулятора и извлеките аккумулятор.
2
Выньте SIM-карту или USIM-карту.
Использование SIM- и USIM-карт
Если в устройство вставлены две SIM- или USIM-карты, можно пользоваться двумя номерами или
услугами двух операторов.
Активация карты SIM или USIM
На главном экране выберите
Меню
→
Настройки
→
Диспетчер SIM-карт
. Выберите SIM— или
USIM-карту и нажмите переключатель для активации.
Изменение имени и значка карты SIM или USIM
На главном экране выберите
Меню
→
Настройки
→
Диспетчер SIM-карт
. Выберите SIM— или
USIM-карту и нажмите
Имя
или
Значок
. Выберите отображаемое имя и значок для каждой карты.
Переключение между картами
Когда активированы две SIM или USIM-карты, на панели уведомлений отображаются значки
выбора карты. Откройте панель уведомлений и выберите карту.
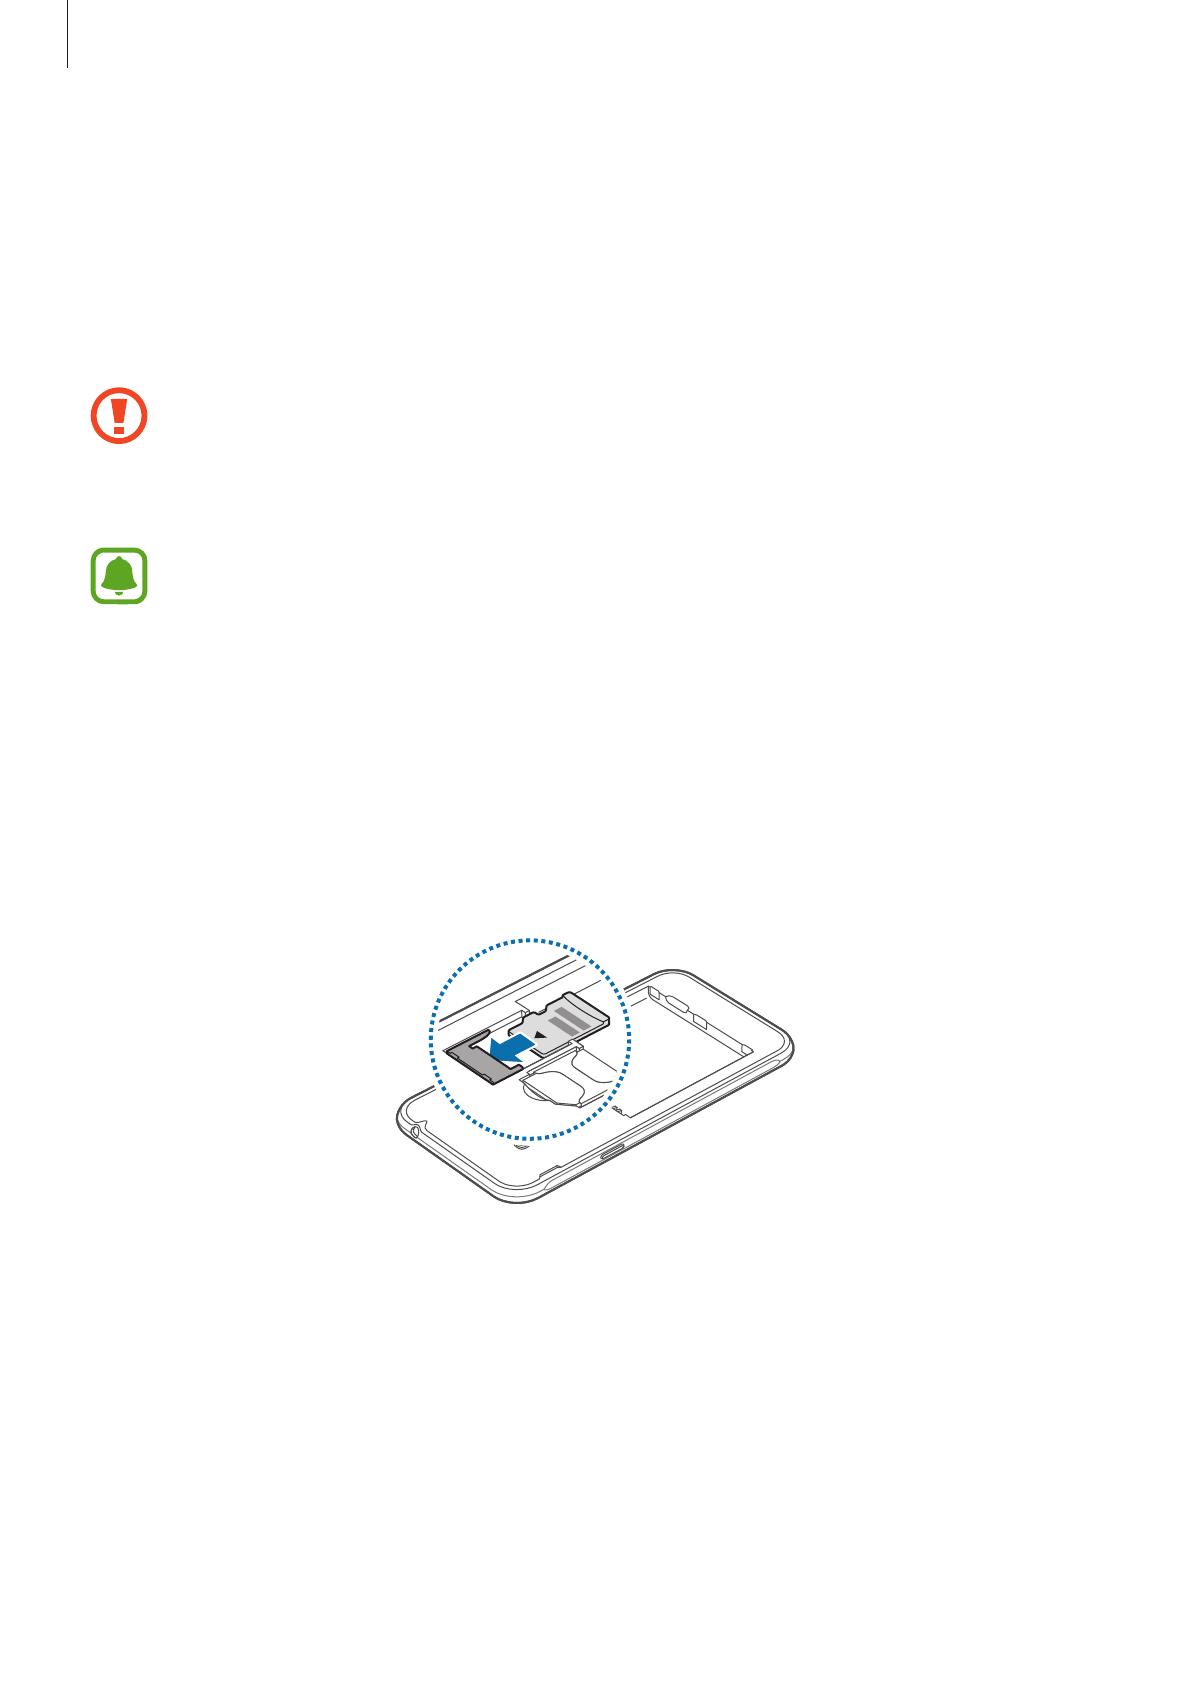
Основные сведения об устройстве
16
Карта памяти
Установка карты памяти
Устройство поддерживает карты памяти емкостью не более 128 ГБ. Совместимость карт памяти с
устройством зависит от типа карты и ее изготовителя.
•
Некоторые карты памяти могут быть несовместимы с вашим устройством.
Использование несовместимой карты памяти может повредить устройство, саму карту
или данные, хранящиеся на ней.
•
Вставляйте карту памяти правильной стороной вверх.
•
Устройство поддерживает карты памяти с файловой системой FAT и exFAT. Если вставить
карту памяти с файловой системой, отличной от FAT, устройство выдаст запрос на
форматирование карты.
•
При частом удалении и записи данных срок службы карт памяти сокращается.
•
При установке карты памяти в устройство список файлов, хранящихся на карте,
отображается в папке
Мои файлы
→
Карта памяти
.
1
Снимите крышку аккумулятора и извлеките аккумулятор.
2
Вставьте карту памяти в устройство золотистыми контактами вниз.
3
Установите аккумулятор и крышку аккумулятора на место.
Основные сведения об устройстве
17
Извлечение карты памяти
Во избежание потери данных отключите карту памяти перед ее извлечением.
На главном экране выберите пункт
Меню
→
Настройки
→
Память
→
Отключить карту памяти
SD
.
1
Снимите крышку аккумулятора и извлеките аккумулятор.
2
Извлеките карту памяти.
3
Установите аккумулятор и крышку аккумулятора на место.
Не извлекайте карту памяти во время передачи и получения данных. Это может привести
к повреждению или утере данных, а также вызвать повреждения устройства или карты
памяти. Компания Samsung не несет ответственности за любые утери, вызванные
использованием поврежденных карт памяти, включая утерю данных.
Форматирование карты памяти
После форматирования на ПК карты памяти могут неправильно работать при установке в
устройство. Форматируйте карты памяти только с помощью устройства.
На главном экране выберите пункт
Меню
→
Настройки
→
Память
→
Формат. карту памяти SD
→
ФОРМАТ. КАРТУ ПАМЯТИ SD
→
УДАЛИТЬ ВСЕ
.
Перед форматированием карты памяти рекомендуется создать резервные копии
всех важных данных, хранящихся на карте памяти. Гарантия производителя не
распространяется на потерю данных, вызванную действиями пользователя.
Основные сведения об устройстве
18
Включение и выключение устройства
Чтобы включить устройство, нажмите и удерживайте клавишу питания в течение нескольких
секунд.
При первом включении устройства, а также после сброса настроек следуйте инструкциям на
экране для настройки устройства.
Для выключения устройства нажмите и удерживайте клавишу питания, а затем выберите пункт
Выключение
.
•
Если устройство «зависает» и не реагирует на действия, для его перезагрузки
одновременно нажмите и удерживайте клавиши питания и уменьшения громкости в
течение более чем 7 секунд.
•
В местах, где использование беспроводных устройств запрещено, например в
самолетах или больницах, следуйте требованиям предупреждающих табличек и
указаниям персонала.
Сенсорный экран
•
Следите за тем, чтобы сенсорный экран не соприкасался с электронными устройствами.
Возникающие при этом электростатические разряды могут привести к неправильной
работе сенсорного экрана или выходу его из строя.
•
Во избежание повреждений сенсорного экрана не касайтесь его острыми предметами
и не нажимайте на него слишком сильно пальцами.
•
Устройство может не распознать касания, близкие к краям экрана, поскольку они
находятся за пределами области сенсорного ввода.
•
Если сенсорный экран остается в режиме ожидания в течение длительного времени, на
нем могут появляться шлейфы от изображения (эффект выгорания экрана) и артефакты.
Выключайте сенсорный экран, если не планируете пользоваться устройством в
ближайшее время.
•
Рекомендуется управлять сенсорным экраном с помощью пальцев.
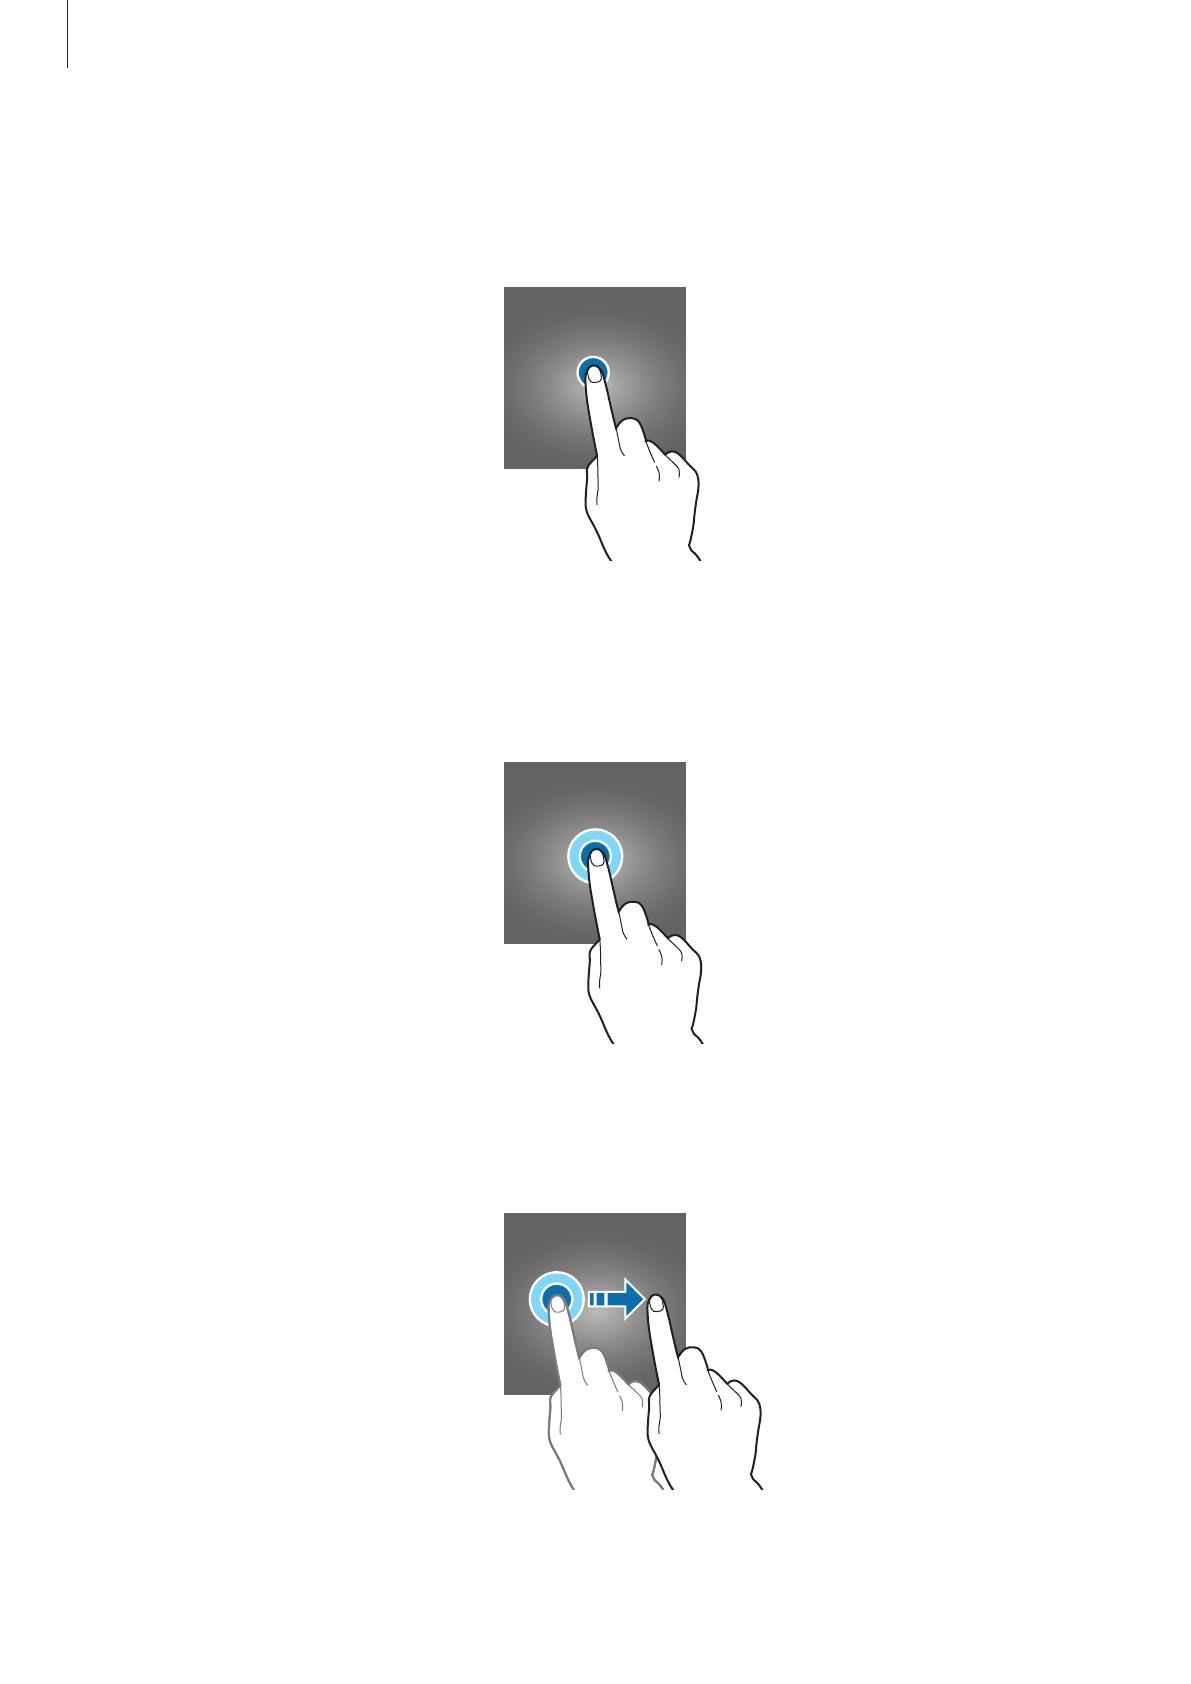
Основные сведения об устройстве
19
Касание
Коснитесь экрана, чтобы открыть приложение, выбрать пункт меню, нажать экранную кнопку или
ввести символ с помощью экранной клавиатуры.
Нажатие и удерживание
Чтобы просмотреть доступные параметры, коснитесь элемента или экрана и удерживайте его не
менее 2 секунд.
Перетаскивание
Чтобы переместить элемент, коснитесь его и, удерживая, перетащите в нужное место.
Основные сведения об устройстве
20
Двойное касание
Дважды коснитесь веб-страницы или изображения, чтобы увеличить масштаб. Чтобы вернуться к
исходному масштабу, снова дважды коснитесь экрана.
Прокрутка
Проведите вправо или влево по главному экрану или экрану приложений, чтобы перейти на
другие панели. Прокрутите пальцем изображение вверх или вниз, чтобы переместиться по веб-
странице или списку элементов, например списку контактов.
Увеличение и уменьшение масштаба
Разведите два пальца на экране веб-страницы, карты или изображения, чтобы увеличить масштаб
фрагмента. Сведите их, чтобы уменьшить масштаб.
- Manuals
- Brands
- Samsung Manuals
- Cell Phone
- Galaxy J3 6
- User manual
-
Contents
-
Table of Contents
-
Bookmarks
Quick Links
User Guide
[UG template version 15b]
[Boost-Samsung-J320P-UM-EN-122315-FINAL]
Related Manuals for Samsung Galaxy J3 6
Summary of Contents for Samsung Galaxy J3 6
-
Page 1: User Guide
User Guide [UG template version 15b] [Boost-Samsung-J320P-UM-EN-122315-FINAL]…
-
Page 1: User Guide
User Guide [UG template version 15b] [VMU-Samsung-J320-UM-EN-120415-R3]…
-
Page 2: Table Of Contents
Launch Applications……………………17 Apps List ……………………….. 18 Phone Number ………………………. 22 Airplane Mode ……………………….. 23 Enter Text……………………….25 Samsung Keyboard ……………………25 Google Voice Typing……………………26 Tips for Editing Text ……………………27 Google Account……………………… 27 Create a Google Account………………….27 Sign In to Your Google Account ………………..
-
Page 2: Table Of Contents
Apps List ……………………….. 17 Phone Number ………………………. 21 Airplane Mode ……………………….. 21 Enter Text ……………………….23 Samsung Keyboard ……………………23 Google Voice Typing ……………………24 Tips for Editing Text ……………………25 Google Account ……………………… 25 Create a Google Account ………………….26 Sign In to Your Google Account ………………..
-
Page 3
Uninstall an App…………………….. 42 Get Help with Google Play………………….43 Lock and Unlock Your Screen ………………….44 Update Your Phone……………………..46 Update Your Phone Software ………………… 46 Update Your Profile……………………48 Update Your PRL……………………49 Your Phone Interface ……………………..51 Home Screen Basics……………………… -
Page 3
Uninstall an App …………………….. 40 Get Help with Google Play ………………….41 Lock and Unlock Your Screen ………………….42 Update Your Phone……………………..44 Update Your Phone Software ………………… 44 Update Your Profile ……………………46 Update Your PRL ……………………47 Your Phone Interface ……………………..49 Home Screen Basics……………………… -
Page 4
Caller ID Blocking ……………………83 Call Waiting ……………………..83 Conference Calling ……………………84 Call Forwarding……………………… 86 Phone Settings……………………..87 Contacts …………………………92 Contacts Screen Layout……………………92 Add a Contact ……………………….. 93 View Contacts ……………………….. 97 Edit a Contact ……………………….98 Delete a Contact …………………….. -
Page 4
Caller ID Blocking ……………………81 Call Waiting ……………………..81 Conference Calling ……………………82 Call Forwarding ……………………… 84 Phone Settings ……………………..85 Contacts …………………………90 Contacts Screen Layout ……………………90 Add a Contact ……………………….. 91 View Contacts ……………………….. 95 Edit a Contact ……………………….96 Delete a Contact …………………….. -
Page 5
Email …………………………132 Set Up an Email Account ………………….132 Add an Email Account………………….. 133 Add an Exchange ActiveSync Account………………136 Compose and Send Email ………………….138 Open Email Messages………………….140 Delete an Email Account………………….142 Manage Your Email Inbox………………….144 Exchange ActiveSync Email Features……………… -
Page 5
Email …………………………130 Set Up an Email Account ………………….130 Add an Email Account ………………….. 131 Add an Exchange ActiveSync Account ………………134 Compose and Send Email ………………….136 Open Email Messages ………………….138 Delete an Email Account ………………….140 Manage Your Email Inbox …………………. -
Page 6
Switch Cameras……………………179 Set Camera Options ……………………. 180 Apps and Features………………………. 182 1Weather ……………………….182 airG …………………………182 Boost 411 ……………………….182 Boost Music……………………….182 Boost Wallet ……………………….182 Boost Zone……………………….183 boostTV ……………………….. 183 Calculator ……………………….183 Calendar ……………………….184 Add an Event to the Calendar……………….. -
Page 6
Switch Cameras ……………………178 Set Camera Options ……………………. 179 Apps and Features ………………………. 181 Calculator ……………………….181 Calendar ……………………….182 Add an Event to the Calendar ………………..183 View Calendar Events ………………….. 185 Share Calendar Events ………………….186 Sync Calendars ……………………. 188 Synchronize an Exchange ActiveSync Calendar ………….. -
Page 7
Microsoft OneNote ……………………..213 Microsoft PowerPoint ……………………213 Microsoft Word ……………………..213 My Files ……………………….. 214 NextRadio ……………………….214 Pages Manager……………………..214 Samsung Milk Music ……………………. 215 Uber …………………………215 Video …………………………215 Voice Recorder ……………………..216 YouTube……………………….218 Connectivity…………………………. 219 Transfer Files Between Your Phone and a Computer ………….. -
Page 7
Microsoft PowerPoint ……………………211 Microsoft Word ……………………..211 My Files ……………………….. 212 NextRadio ……………………….212 Pages Manager ……………………..213 Samsung Milk Music ……………………. 213 Uber …………………………213 Video …………………………214 Voice Recorder ……………………..214 YouTube ……………………….216 Connectivity …………………………. 218 Transfer Files Between Your Phone and a Computer ………….. -
Page 8
Hotspot Settings……………………..243 Airplane Mode ……………………… 247 Data Usage Settings ……………………. 248 Mobile Networks Settings ……………………. 250 More Connection Settings……………………. 251 Tethering Settings……………………251 Printing ……………………….253 Virtual Private Networks (VPN)………………..256 Default Messaging App Settings………………..262 Sounds and Notifications Settings ………………..263 Sound Mode…………………….. -
Page 8
Virtual Private Networks (VPN) ………………..255 Default Messaging App Settings ………………..261 Sounds and Notifications Settings ………………..262 Sound Mode ……………………..263 Volume ……………………….264 Ringtones and Sounds ………………….265 Vibrations ……………………..267 Sound Quality and Effects ………………….268 Notifications……………………..269 Display Settings …………………….. -
Page 9
For Assistance ……………………….328 Boost Account Information and Help ………………..328 Manage Your Account ………………….328 Re-Boost ……………………… 329 Samsung KNOX……………………..329 Legal Information ……………………..329 Disclaimer of Warranties; Exclusion of Liability ……………. 330 Intellectual Property ……………………330 Copyright Information…………………… 331 Index………………………….. -
Page 9
Copyright Information ……………………328 Intellectual Property …………..Error! Bookmark not defined. Disclaimer of Warranties; Exclusion of Liability ……Error! Bookmark not defined. Samsung KNOX …………….Error! Bookmark not defined. Samsung Electronics America (SEA), Inc……..Error! Bookmark not defined. Index …………………………..331 viii… -
Page 10: Introduction
The following topics describe the basics of using this guide and your new phone. About the User Guide ® Thank you for purchasing your new Samsung Galaxy J3 (2016). The following topics explain how best to use this guide to get the most out of your phone.
-
Page 10: Introduction
The following topics describe the basics of using this guide and your new phone. About the User Guide ® Thank you for purchasing your new Samsung Galaxy J3 (2016). The following topics explain how best to use this guide to get the most out of your phone.
-
Page 11
1. From home, tap Apps > Boost Zone 2. From the Boost Zone main page, tap My Account. 3. Tap a topic to view its contents. Introduction… -
Page 11
1. From home, tap Apps > My Account 2. From the My account main page, tap Support. 3. Tap a topic to view its contents. Introduction… -
Page 12: Get Started
Get Started The following topics give you all the information you need to set up your phone and wireless service the first time. Parts and Functions These topics illustrate your phone’s primary parts and key functions. Phone Layout The following illustration outlines your phone’s primary external features and buttons. Front View Part Description…
-
Page 12: Get Started
Get Started The following topics give you all the information you need to set up your phone and wireless service the first time. Parts and Functions These topics illustrate your phone’s primary parts and key functions. Phone Layout The following illustration outlines your phone’s primary external features and buttons. Part Description Return you to the previous screen, or close a dialog box, options…
-
Page 13: Set Up Your Phone
Part Description Turn the phone or screen on or off, enable Airplane mode, or Restart Power/Lock key the phone. Return you to the previous screen, or close a dialog box, options Back key menu, the notification panel, or the keyboard. Returns you to the home screen.
-
Page 13: Set Up Your Phone
Part Description Plug in a headset for convenient, hands-free conversations. Headset jack Returns you to the home screen. Home key Transmit your voice for phone calls or record your voice or ambient Microphone sounds for voice recordings and videos. There are two microphones, one on the top and one on the bottom.
-
Page 14
Part Description Headset jack Plug in a headset for convenient, hands-free conversations. Play ringtones and sounds. The speaker also lets you hear the caller’s Speaker voice in speakerphone mode. Rear camera Take pictures and videos. USB charger/accessory port Connect the phone to the charger using a USB cable. Help illuminate subjects in low-light environments when the camera is Flash focusing and capturing a picture or video. -
Page 14
You should fully charge the battery as soon as possible. Caution: Use only Samsung-approved charging devices and batteries. Samsung accessories are designed to maximize battery life. Using other accessories may invalidate your warranty and may cause damage. -
Page 15: Turn Your Phone On And Off
You should fully charge the battery as soon as possible. Caution: Use only Samsung-approved charging devices and batteries. Samsung accessories are designed to maximize battery life. Using other accessories may invalidate your warranty and may cause damage.
-
Page 15: Turn Your Phone On And Off
5. If your phone is not yet activated, see Activation and Service for more information. Turn Your Phone On and Off The instructions below explain how to turn your phone on and off. Turn Your Phone On ■ Press and hold the Power/Lock key. …
-
Page 16: Use The Touchscreen
Turn Your Phone On ■ Press and hold the Power/Lock key. Your phone will power on. Depending on the settings, you may see the lock screen. Lock and Unlock Your Screen Screen Lock for information about using the screen lock.
-
Page 16: Use The Touchscreen
Turn Your Phone Off 1. Press and hold the Power/Lock key to open the phone options menu. Tap Power off > Power off to turn the phone off. Your phone will power off. Your screen remains blank while your phone is off (unless the battery is charging). Note: If your device is not responding, press and hold both the Power/Lock key and Volume down key simultaneously for more than seven seconds to restart the device.
-
Page 17: Touch And Hold
2. Tap Power off > Power off to turn the phone off. Your phone will power off. Your screen remains blank while your phone is off (unless the battery is charging). Tip: If your device is not responding, press and hold both the Power/Lock key and Volume down key simultaneously for more than seven seconds to restart the device.
-
Page 17: Touch And Hold
Touch and Hold To open the available options for an item (for example, a contact or link in a Web page), touch and hold the item. Get Started…
-
Page 18: Swipe Or Slide
Swipe or Slide To swipe or slide means to quickly drag your finger vertically or horizontally across the screen. Drag To drag, press and hold your finger with some pressure before you start to move your finger. While dragging, do not release your finger until you have reached the target position. Get Started…
-
Page 18: Swipe Or Slide
Swipe or Slide To swipe or slide means to quickly drag your finger vertically or horizontally across the screen. Drag To drag, press and hold your finger with some pressure before you start to move your finger. While dragging, do not release your finger until you have reached the target position. Flick Flicking the screen is similar to swiping, except that you need to move your finger in light, quick strokes.
-
Page 19: Pinch And Spread
Flick Flicking the screen is similar to swiping, except that you need to move your finger in light, quick strokes. This finger gesture is always in a vertical direction, such as when flicking the contacts or message list. Rotate For most screens, you can automatically change the screen orientation from portrait to landscape by turning the phone sideways.
-
Page 19: Pinch And Spread
Rotate For most screens, you can automatically change the screen orientation from portrait to landscape by turning the phone sideways. When entering text, you can turn the phone sideways to bring up a bigger keyboard. See Enter Text for more details. Note: Auto rotate must be enabled for the screen orientation to automatically change.
-
Page 20: Activation And Service
Note: Auto rotate must be enabled for the screen orientation to automatically change. To enable screen rotation, slide your finger down from the status bar to display the notification panel, and then tap Auto rotate to enable the option. Pinch and Spread Pinch the screen by moving two fingers inward to zoom out, or spread by moving two fingers outward to zoom in.
-
Page 20: Activation And Service
Activation and Service Before using your phone, you must set up your service with Virgin Mobile. You will need your phone’s serial numbers (MEID and ICC ID). These numbers can be found on the phone’s packaging. For more information about your Virgin Mobile account, see Virgin Mobile Account Information and Help.
-
Page 21: Complete The Setup Screens
Activation and Service Before using your phone, you must set up your service with Boost Mobile. You will need your phone’s serial number (MEID), printed on a sticker inside the battery compartment. For more information about your Boost Mobile account, see Boost Account Information and Help.
-
Page 21: Complete The Setup Screens
If you do not agree to the EULA, you cannot continue with setup. • If you consent to provide diagnostic and usage data to Samsung, tap the check box. Hands Free Activation: Automatically connect to the network and set up voice and data services.
-
Page 22
Samsung account, or follow the prompts to create a new account. • To sign in to or set up a Samsung account, you will have to review and agree to the Terms and Conditions by tapping Agree when prompted. -
Page 22
Samsung account, or follow the prompts to create a new account. • To sign in to or set up a Samsung account, you will have to review and agree to the Terms and Conditions by tapping Agree when prompted. -
Page 23: Basic Operations
Easy mode: Easy mode offers a simpler home screen layout, with larger text and icons. Tap ON/OFF to turn on Easy mode. You can also choose Easy mode from Settings at any time. 3. Tap Finish to complete setup. …
-
Page 23: Basic Operations
Basic Operations The following topics outline basic features and operations of your phone. Basics The following topics offer an overview of your phone’s basic operations. Home Screen and Applications (Apps) List Most of your phone’s operations originate from the home screen or the apps list. 1.
-
Page 24: Phone Settings Menu
■ Tap the Recent Apps key to view a list of recently used applications. Phone Settings Menu You can customize your phone’s settings and options through the Settings menu. ■ From home, tap Apps > Settings – or – Drag the notification panel down and tap Settings …
-
Page 25: Capture Screenshots
■ Tap the Recent Apps key to view a list of recently used applications. Phone Settings Menu You can customize your phone’s settings and options through the Settings menu. ■ From home, tap Apps > Settings – or – Drag the notification panel down and tap Settings …
-
Page 25: Capture Screenshots
Turn Screen Rotation On or Off 1. Open the notification panel by dragging down from the top of the screen. 2. Tap Screen rotation to turn the option on or off. You may need to scroll left or right to see the Auto rotate option. …
-
Page 26: Apps List
Turn Screen Rotation On or Off 1. Open the notification panel by dragging down from the top of the screen. 2. Tap Screen rotation to turn the option on or off. You may need to scroll left or right to see the Auto rotate option. …
-
Page 26: Apps List
1. From home, tap Apps The apps list opens. 2. Tap an app icon to launch the corresponding application. The application opens. Tip: Swipe left to view additional apps list screens. Some apps may reside within folders in the apps list; to open these, tap the folder and then tap the app icon.
-
Page 27
1. From home, tap Apps The apps list opens. 2. Tap an app icon to launch the corresponding application. The application opens. Tip: Swipe left to view additional apps list screens. Some apps may reside within folders in the apps list; to open these, tap the folder and then tap the app icon. -
Page 27
Function/Service Set alarms, view time in time zones around the world, use a stopwatch, Clock set a timer, and use your phone as a desk clock. Store and manage contacts from a variety of sources, including contacts you enter and save directly in your phone as well as contacts Contacts synchronized with your Google Account, compatible email programs (including Exchange Server), and your Facebook friends. -
Page 28
Function/Service Discover millions of DRM-free music tracks, ringtones, and ringback Boost Music tones from Boost’s official music store and player. Boost Wallet is a quick and easy way to make payments with cash directly from your Boost Mobile phone. Send money, pay bills and top-up Boost Wallet your mobile phone account balance. -
Page 28
Function/Service Organize your life by creating, editing, and managing memos. Located in Memo the Tools folder in the apps list. Send and receive text and multimedia messages. Messages Messaging Plus provides high quality video calling, group chat, and media sharing along with easy registration, a full emoji keyboard, and Messaging Plus other convenient features. -
Page 29
Function/Service Discover apps designed exclusively for your Galaxy device. Galaxy Apps View and edit pictures and watch videos that you have taken with your Gallery phone’s camera or downloaded. Send and receive messages using Google’s Gmail service. Located in Gmail the Google folder in the apps list. -
Page 29
Play Store paid apps ranging from productivity apps to games. Samsung Milk Music is a streaming radio service that offers a simple way to find the music that is right for you. With a library of over 13 million Samsung Milk Music songs and 200+ stations, the interactive dial makes it easy to skim through stations, to find the perfect soundtrack for the moment. -
Page 30: Phone Number
Play Store paid apps ranging from productivity apps to games. Samsung Milk Music is a streaming radio service that offers a simple way to find the music that is right for you. With a library of over 13 million Samsung Milk Music songs and 200+ stations, the interactive dial makes it easy to skim through stations, to find the perfect soundtrack for the moment.
-
Page 30: Phone Number
Phone Number Follow the instructions below to display your phone’s wireless phone number. 1. From home, tap Apps > Settings > About device 2. Tap Status > Sim card status. You will see the number listed under My phone number. Airplane Mode Airplane mode turns off all functions that emit or receive signals, while leaving your phone on so you can use apps that do not require a signal or data.
-
Page 31
Function/Service Configure settings and options on your phone. Settings Search and find transportation service using the Uber app. Request a ride Uber and get picked up within minutes. View videos on your phone. Video Record voice memos and share them with others. Located in the Tools Voice Recorder folder in the apps list. -
Page 31
To turn on Airplane mode: 1. Press and hold the Power/Lock key to display the device options menu. 2. Tap Airplane mode > Turn on to turn Airplane mode on. Your phone is now in Airplane mode. An Airplane mode icon displays on the status bar. -
Page 32: Enter Text
1. From home, tap Apps > Settings > About device 2. Tap Status > Sim card status. You will see the number listed under My phone number. Airplane Mode Airplane mode turns off all functions that emit or receive signals, while leaving your phone on so you can use apps that do not require a signal or data.
-
Page 32: Enter Text
Assigning the Samsung Keyboard for Text Entry If you have multiple text input methods installed on your device, you can select the Samsung keyboard to be your default text input method from Settings, or you can choose it at any time while entering text.
-
Page 33: Google Voice Typing
1. Press and hold the Power/Lock key to display the device options menu. 2. Tap Airplane mode > Turn on to turn Airplane mode on. Your phone is now in Airplane mode. An Airplane mode icon displays on the status bar. Tip: You can also turn on Airplane mode through the notification panel.
-
Page 33: Google Voice Typing
Emoticon to display a list of emoticons. • Settings to view the Samsung keyboard settings menu. If you have more than one language selected in Samsung keyboard settings, you can swipe your finger over to switch between languages. Configure Samsung Keyboard ■…
-
Page 34: Tips For Editing Text
Assigning the Samsung Keyboard for Text Entry If you have multiple text input methods installed on your device, you can select the Samsung keyboard to be your default text input method from Settings, or you can choose it at any time while entering text.
-
Page 34: Tips For Editing Text
Touch and hold on the Samsung keyboard, and then tap 2. Speak into the microphone and watch your text being entered. 3. If the text is incorrect, tap Delete 4. Once you have completed entering your text, tap . The keyboard will reappear.
-
Page 35: Create A Google Account
Emoticon to display a list of emoticons. • Settings to view the Samsung keyboard settings menu. If you have more than one language selected in Samsung keyboard settings, you can swipe your finger over to switch between languages. Configure Samsung Keyboard ■…
-
Page 35: Create A Google Account
Google Account Cautions Be sure not to forget your Google Account ID or password. Create a Google Account If you do not already have a Google Account, you can create one online or by using your phone. Note: You can also create and sign into your Google/Gmail account through your phone’s Setup application.
-
Page 36
2. Speak into the microphone and watch your text being entered. 3. If the text is incorrect, tap Delete 4. Once you have completed entering your text, tap . The keyboard will reappear. Note: You can assign a new language to Google voice typing. Tap >… -
Page 36
2. Tap Add account. 3. Tap Google > Or create a new account. Basic Operations… -
Page 37
Note: Although you need a Gmail account to use certain features of your phone, such as Google Play, you do not need to use Gmail as the default account for your phone. Create a Google Account Online 1. From a computer, launch a Web browser and navigate to google.com. 2. On the main page, click Sign in. -
Page 37
4. Enter your First name and Last name, and then tap Next. 5. Enter a desired Username, and then tap Next. Basic Operations… -
Page 38
2. Tap Add account. 3. Tap Google > Or create a new account. Basic Operations… -
Page 38
6. When prompted, enter and re-type a password. Then tap Next. 7. Enter a valid phone number to help you recover your Google Account and password if you ever forget it, and then tap Next. To skip this step, tap Skip. Note: When setting up a new Google Account, either on your phone or online, you will be prompted to add a secondary email address. -
Page 39
4. Enter your First name and Last name, and then tap Next. 5. Enter a desired Username, and then tap Next. Basic Operations… -
Page 39
9. Your phone connects with the Google servers and displays your account information. Tap Next. Basic Operations… -
Page 40
6. When prompted, enter and re-type a password. Then tap Next. 7. Enter a valid phone number to help you recover your Google Account and password if you ever forget it, and then tap Next. To skip this step, tap Skip. Note: When setting up a new Google Account, either on your phone or online, you will be prompted to add a secondary email address. -
Page 40
10. Configure your Google data backup and communication, and then tap Next. 11. If desired, you can set up payment options for purchases through the Google Play store, and then tap Next. You are signed in to your new Google Account. Basic Operations… -
Page 41: Sign In To Your Google Account
9. Your phone connects with the Google servers and displays your account information. Tap Next. Basic Operations…
-
Page 41: Sign In To Your Google Account
Your Google Account is listed in Apps > Settings > Accounts Sign In to Your Google Account If you have a Google Account but have not yet signed in with your phone, follow these instructions to sign in to your Google Account. 1.
-
Page 42
10. Configure your Google data backup and communication, and then tap Next. 11. If desired, you can set up payment options for purchases through the Google Play store, and then tap Next. You are signed in to your new Google Account. Basic Operations… -
Page 42
2. Tap Add account. 3. Tap Google. Basic Operations… -
Page 43
Your Google Account is listed in Apps > Settings > Accounts Sign In to Your Google Account If you have a Google Account but have not yet signed in with your phone, follow these instructions to sign in to your Google Account. 1. -
Page 43
4. Tap Enter your email, enter your Gmail address, and then tap Next. 5. Enter your password and tap Next. 6. Read the Google Terms of Service, Privacy Policy, and other legal documents, and then tap Accept. Basic Operations… -
Page 44
2. Tap Add account. 3. Tap Google. Basic Operations… -
Page 44
7. Configure your Google data backup and communication, and then tap Next. Basic Operations… -
Page 45: Google Play Store
4. Tap Enter your email, enter your Gmail address, and then tap Next. 5. Enter your password and tap Next. 6. Read the Google Terms of Service, Privacy Policy, and other legal documents, and then tap Accept. Basic Operations…
-
Page 45: Google Play Store
8. Set up payment information for use in the Google Play store, and then tap Next. You are now signed in to your Google Account, and your phone will start synchronizing with your Google Account. Your Google Account is listed in Apps >…
-
Page 46: Find And Install An App
7. Configure your Google data backup and communication, and then tap Next. Basic Operations…
-
Page 46: Find And Install An App
bestselling books and blockbuster movies and music. When you find what you want, you can easily download and install it on your phone. To access the Google Play store app, you must first connect to the Internet using your phone’s Wi-Fi or mobile data connection and sign in to your Google Account.
-
Page 47: Request A Refund For A Paid App
8. Set up payment information for use in the Google Play store, and then tap Next. You are now signed in to your Google Account, and your phone will start synchronizing with your Google Account. Your Google Account is listed in Apps >…
-
Page 47: Request A Refund For A Paid App
The selected app is downloaded and installed on your phone. Warning: Read the notification carefully! Be especially cautious with applications that have access to many functions or a significant amount of your data. Once you tap OK on this screen, you are responsible for the results of using this item on your phone.
-
Page 48
bestselling books and blockbuster movies and music. When you find what you want, you can easily download and install it on your phone. To access the Google Play store app, you must first connect to the Internet using your phone’s Wi-Fi or mobile data connection and sign in to your Google Account. -
Page 48
2. Tap Menu > My apps. 3. Tap the app you want to update, and then tap Update > Accept. The app update is downloaded and installed. Set Automatic App Updates 1. From home, tap Apps > Play Store Basic Operations… -
Page 49: Uninstall An App
The selected app is downloaded and installed on your phone. Warning: Read the notification carefully! Be especially cautious with applications that have access to many functions or a significant amount of your data. Once you tap OK on this screen, you are responsible for the results of using this item on your phone.
-
Page 49: Uninstall An App
2. Tap Menu > My apps. 3. Tap the app you want to set for auto-update, and then tap More options > Auto-update. The app is set to update automatically whenever an update becomes available. Note: Automatic updates are unavailable for some apps. Uninstall an App You can uninstall any app that you have downloaded and installed from Google Play.
-
Page 50: Get Help With Google Play
2. Tap Menu > My apps. 3. Tap the app you want to update, and then tap Update > Accept. The app update is downloaded and installed. Set Automatic App Updates 1. From home, tap Apps > Play Store Basic Operations…
-
Page 50: Get Help With Google Play
2. Tap Menu > My apps. 3. On the Installed screen, tap the app you want to uninstall, and then tap Uninstall > OK. The app is uninstalled and removed from your phone. Get Help with Google Play The Google Play store app offers an online help option if you have questions or want to know more about the app.
-
Page 51: Lock And Unlock Your Screen
2. Tap Menu > My apps. 3. Tap the app you want to set for auto-update, and then tap More options > Auto-update. The app is set to update automatically whenever an update becomes available. Note: Automatic updates are unavailable for some apps. Uninstall an App You can uninstall any app that you have downloaded and installed from the Google Play store.
-
Page 51: Lock And Unlock Your Screen
2. Tap Menu > Help & Feedback. Your phone will display the Google Play store Help page, where you will find comprehensive, categorized information about Google Play. Tap Browse all articles to browse the full help menu, or tap Search help to search for specific topics. Lock and Unlock Your Screen Your phone allows you to quickly turn the screen off when not in use and to turn it back on and unlock it when you need it.
-
Page 52: Turn The Screen On And Unlock It
2. Tap Menu > My apps. 3. On the Installed screen, tap the app you want to uninstall, and then tap Uninstall > OK. The app is uninstalled and removed from your phone. Get Help with Google Play The Google Play store app offers an online help option if you have questions or want to know more about the app.
-
Page 52: Turn The Screen On And Unlock It
To save battery power, the phone automatically turns off the screen after a certain period of time when you leave it idle. You will still be able to receive messages and calls while the phone’s screen is off. Note: For information on how to adjust the time before the screen turns off, see Display Settings.
-
Page 53: Update Your Phone
2. Tap Menu > Help & Feedback. Your phone will display the Google Play store Help page, where you will find comprehensive, categorized information about Google Play. Tap Browse all articles to browse the full help menu, or tap Search help to search for specific topics. Lock and Unlock Your Screen Your phone allows you to quickly turn the screen off when not in use and to turn it back on and unlock it when you need it.
-
Page 53: Update Your Phone
Update Your Phone From time to time, updates may become available for your phone. You can download and apply updates through the Settings > System Update menu. Software Update Cautions During update: The phone cannot be used until the software update is complete. It may take time to update your phone’s software.
-
Page 54
Note: For information on how to adjust the time before the screen turns off, see Display Settings. Turn the Screen On and Unlock It 1. To turn the screen on, press the Power/Lock key. The lock screen appears. 2. Swipe your finger across the screen to unlock it. … -
Page 54
3. Scroll through the list of previously downloaded Google apps and choose those you wish to reinstall. 4. Follow the prompts. Update Your Phone’s Software Once you have backed up all your data, use the Update now option to update your phone’s software. ■… -
Page 55: Update Your Profile
Update Your Phone From time to time, updates may become available for your phone. You can download and apply updates through the Settings > System Update menu. Software Update Cautions During update: The phone cannot be used until the software update is complete. It may take time to update your phone’s software.
-
Page 55: Update Your Profile
Confirm Your Current Phone Software 1. From home, tap Apps > Settings > About device 2. Locate the Software version read-only field. Update Your Profile This option allows you to automatically update your online user profile information. If you choose to change your user name and select a new one online, you must then update the user name on your phone.
-
Page 56: Update Your Prl
3. Scroll through the list of previously downloaded Google apps and choose those you wish to reinstall. 4. Follow the prompts. Update Your Phone’s Software Once you have backed up all your data, use the Update now option to update your phone’s software. ■…
-
Page 56: Update Your Prl
1. From home, tap Apps > Settings > System Update > Update Profile. 2. Follow the prompts. The phone will download and install the profile update and you will see a confirmation when complete. Note: If your data services or account syncing ever seems to go out unexpectedly, use this feature to reconnect with the network.
-
Page 57
Confirm Your Current Phone Software 1. From home, tap Apps > Settings > About device 2. Locate the Software version read-only field. Update Your Profile This option allows you to automatically update your online user profile information. If you choose to change your user name and select a new one online, you must then update the user name on your phone. -
Page 57
2. Follow the prompts. The phone will download and install the PRL update and you will see a confirmation when complete. Basic Operations… -
Page 58: Your Phone Interface
1. From home, tap Apps > Settings > System Update > Update Profile. 2. Follow the prompts. The phone will download and install the profile update and you will see a confirmation when complete. Note: If your data services or account syncing ever seems to go out unexpectedly, use this feature to reconnect with the network.
-
Page 58: Your Phone Interface
Your Phone Interface The following topics describe how to use and customize your phone’s home screen, understand the status bar, and use the notification panel. Home Screen Basics The home screen is the starting point for your phone’s applications, functions, and menus. You can customize your home screen by adding application icons, shortcuts, folders, widgets, and more.
-
Page 59: Extended Home Screens
2. Follow the prompts. The phone will download and install the PRL update and you will see a confirmation when complete. Basic Operations…
-
Page 59: Extended Home Screens
Item Description The notification area of the status bar (on the left) displays notifications Notification area for incoming messages, missed calls, application updates, and more. Primary shortcuts are application shortcuts that appear in the same location on all of your phone’s home screens. These are customizable Primary shortcuts except for the Applications (Apps) shortcut, which remains static.
-
Page 60: Status Bar And Notification Panel
Your Phone Interface The following topics describe how to use and customize your phone’s home screen, understand the status bar, and use the notification panel. Home Screen Basics The home screen is the starting point for your phone’s applications, functions, and menus. You can customize your home screen by adding application icons, shortcuts, folders, widgets, and more.
-
Page 60: Status Bar And Notification Panel
2. Scroll through the thumbnail screens to the right until you see a blank screen with a + sign. 3. Tap to add the screen. A new blank home screen will be added to the far right of your screens. Status Bar and Notification Panel Your phone’s status and notifications are available at a glance at the top of the screen.
-
Page 61
Item Description The status bar displays icons to notify you of your phone’s status (on Status bar the right side) and notifications (on the left side). Widgets are self-contained apps that reside on your phone’s home Widget screen. Application icons are shortcuts to favorite applications. You can add Application icons and remove these shortcuts as you wish. -
Page 61
Status Bar Layout Main Status Icons Icon Status Bluetooth active: Bluetooth is active. GPS active: GPS is active. Wi-Fi active: Wi-Fi is active. Downloading: A download is in progress. Mute mode: Mute mode is activated. Vibrate mode: Vibrate mode is activated. Speakerphone: Speakerphone is activated. -
Page 62
2. Scroll through the thumbnail screens to the right until you see a blank screen with a + sign. 3. Tap to add the screen. A new blank home screen will be added to the far right of your screens. Status Bar and Notification Panel Your phone’s status and notifications are available at a glance at the top of the screen. -
Page 62
Icon Status 4G LTE: The device is connected to a 4G LTE wireless network. Airplane mode: Airplane mode is enabled. Sync active: Accounts are being synced. Battery (charging): The battery is charging. Battery (full charge): The battery is fully charged. Main Notification Icons Icon Notification… -
Page 63: Notification Panel
Status Bar Layout Main Status Icons Icon Status Bluetooth active: Bluetooth is active. GPS active: GPS is active. Wi-Fi active: Wi-Fi is active. Downloading: A download is in progress. Mute mode: Mute mode is activated. Vibrate mode: Vibrate mode is activated. Speakerphone: Speakerphone is activated.
-
Page 63: Notification Panel
Icon Notification Update successful: An update has installed successfully. Keyboard active: A keyboard is active. More notifications available: Additional notifications are available. (Drag down to view.) Notification Panel Your phone’s notifications appear at the left side of the status bar, and you can access the full notification panel by pulling down the status bar.
-
Page 64
Icon Status 4G LTE: The device is connected to a 4G LTE wireless network. Airplane mode: Airplane mode is enabled. Sync active: Accounts are being synced. Battery (charging): The battery is charging. Battery (full charge): The battery is fully charged. Main Notification Icons Icon Notification… -
Page 64
Notification Panel Layout The notification panel gives you access to notifications, Settings, and the Quick settings menu. Notification Panel Quick Settings The Quick settings list at the top of the notification panel lets you quickly access frequently used settings options. Scroll left or right to display all available settings, and tap an icon to turn the selected feature on or off. -
Page 65: Customize The Home Screen
Icon Notification Update downloading: An update is currently downloading. Update successful: An update has installed successfully. Keyboard active: A keyboard is active. More notifications available: Additional notifications are available. Drag down to view. Notification Panel Your phone’s notifications appear at the left side of the status bar, and you can access the full notification panel by pulling down the status bar.
-
Page 65: Customize The Home Screen
2. Tap Edit to display the Quick settings panel options. 3. Drag buttons to arrange which options appear in the Quick settings panel. You will see two sets of buttons, Active buttons on top and Available buttons below. • You can have ten buttons active in the Quick settings panel.
-
Page 66: Change The Wallpaper
Notification Panel Layout The notification panel gives you access to notifications, Settings, and the Quick settings menu. Notification Panel Quick Settings The Quick settings list at the top of the notification panel lets you quickly access frequently used settings options. Scroll left or right to display all available settings, and tap an icon to turn the selected feature on or off.
-
Page 66: Change The Wallpaper
● Displaying the Home Screen Menu: From home, touch and hold an empty space to display the home screen menu. Menu options include Wallpapers, Widgets, and Themes. Change the Wallpaper Select and assign your phone’s background wallpaper. 1. From home, touch and hold an empty space, and then tap Wallpapers …
-
Page 67: Add Shortcuts To The Home Screen
2. Tap Edit to display the Quick settings panel options. 3. Drag buttons to arrange which options appear in the Quick settings panel. You will see two sets of buttons, Active buttons on top and Available buttons below. • You can have ten buttons active in the Quick settings panel.
-
Page 67: Add Shortcuts To The Home Screen
Home screen: Set the background wallpaper for your home screen. Lock screen: Set the wallpaper for your phone’s lock screen. Home and lock screens: Set a wallpaper for both your home screen and your lock screen. 3. Select a wallpaper and tap Set as wallpaper. …
-
Page 68: Add Folders To The Home Screen
● Displaying the Home Screen Menu: From home, touch and hold an empty space to display the Home screen menu. Menu options include Wallpapers, Widgets, and Themes. Change the Wallpaper Select and assign your phone’s background wallpaper. 1. From home, touch and hold an empty space, and then tap Wallpapers …
-
Page 68: Add Folders To The Home Screen
1. From home, touch and hold an empty space, and then tap Widgets 2. Touch and hold a widget icon. The icon will disengage and you will see thumbnails of your home screens. 3. Drag the icon to an empty location on one of the home screens. …
-
Page 69
Home screen: Set the background wallpaper for your home screen. Lock screen: Set the wallpaper for your phone’s lock screen. Home and lock screens: Set a wallpaper for both your home screen and your lock screen. 3. Select a wallpaper and tap Set as wallpaper. … -
Page 69
2. Type a name for the folder and tap Done. A new folder is created. 3. To add more app shortcuts to the folder, touch and hold a shortcut and drag it on top of the new folder. The new shortcut is added to the folder. Change Folder Names Once you have added folders, you can change the name easily from the folder display. -
Page 70: Phone App
1. From home, touch and hold an empty space, and then tap Widgets 2. Touch and hold a widget icon. The icon will disengage and you will see thumbnails of your home screens. 3. Drag the icon to an empty location on one of the home screens. …
-
Page 70: Phone App
Phone App The following topics outline the use of your device’s phone app to place and receive calls, use voicemail, set up and manage contacts, and more. Place and Answer Calls The following topics describe how to directly dial calls, how to answer incoming calls, and how to use the in-call screen options.
-
Page 71
2. Type a name for the folder and tap Done. A new folder is created. 3. To add more app shortcuts to the folder, touch and hold a shortcut and drag it on top of the new folder. The new shortcut is added to the folder. Change Folder Names Once you have added folders, you can change the name easily from the folder display. -
Page 71
1. From home, tap Phone to display the phone screen. The phone app opens. If necessary, tap to display the keypad. 2. Tap the number keys on the keypad to enter the phone number. As you enter digits, Smart Dial searches for contacts that match. If you see the number you want to dial, tap the contact to fill in the number on the keypad. -
Page 72: Call Emergency Numbers
Phone App The following topics outline the use of your device’s phone app to place and receive calls, use voicemail, set up and manage contacts, and more. Place and Answer Calls The following topics describe how to directly dial calls, how to answer incoming calls, and how to use the in-call screen options.
-
Page 72: Call Emergency Numbers
3. Tap to call the number. The phone dials the number. The call begins when the other party answers. 4. To end the call, tap The call ends. Troubleshooting Problem: Call does not connect. Solution 1: Was the number dialed using the correct area code? Solution 2: Are you in an area with poor wireless coverage? Try calling again from another area.
-
Page 73: Answer Phone Calls
1. From home, tap Phone to display the phone screen. The phone app opens. If necessary, tap to display the keypad. 2. Tap the number keys on the keypad to enter the phone number. As you enter digits, Smart Dial searches for contacts that match. If you see the number you want to dial, tap the contact to fill in the number on the keypad.
-
Page 73: Answer Phone Calls
If necessary, tap to display the keypad. 3. Tap As long as you are in an area covered by wireless service, the emergency call is placed. Enhanced 9-1-1 (E 9-1-1) Information This phone features an embedded Global Positioning System (GPS) chip necessary for utilizing E 9-1-1 emergency location services where available.
-
Page 74
3. Tap to call the number. The phone dials the number. The call begins when the other party answers. 4. To end the call, tap The call ends. Troubleshooting Problem: Call does not connect. Solution 1: Was the number dialed using the correct area code? Solution 2: Are you in an area with poor wireless coverage? Try calling again from another area. -
Page 74
Answer an Incoming Call 1. When a call arrives, drag to the right to answer it. The call begins. 2. To end the call, tap The call ends. Mute the Ringing Sound ■ To mute the ringer without rejecting the call, press the Volume key down. Phone App… -
Page 75
If necessary, tap to display the keypad. 3. Tap As long as you are in an area covered by wireless service, the emergency call is placed. Enhanced 9-1-1 (E 9-1-1) Information This phone features an embedded Global Positioning System (GPS) chip necessary for utilizing E 9-1-1 emergency location services where available. -
Page 75
Reject an Incoming Call ■ When a call arrives, drag to the left to reject it. The ringtone or vibration will stop and call will be sent directly to voicemail. Reject a Call and Send a Text Message You can reject an incoming call and automatically send a text message to the caller. 1. -
Page 76: In-Call Screen Layout And Options
Answer an Incoming Call 1. When a call arrives, drag to the right to answer it. The call begins. 2. To end the call, tap The call ends. Mute the Ringing Sound ■ To mute the ringer without rejecting the call, press the Volume key down. Phone App…
-
Page 76: In-Call Screen Layout And Options
You can edit existing reject messages or create new ones through the Call settings menu. From home, tap Phone > More > Settings > Call blocking > Call-reject messages and edit or create reject messages. In-Call Screen Layout and Options While you are on a call, you will see a number of options.
-
Page 77: Place A Call From Contacts
Reject an Incoming Call ■ When a call arrives, drag to the left to reject it. The ringtone or vibration will stop and call will be sent directly to voicemail. Reject a Call and Send a Text Message You can reject an incoming call and automatically send a text message to the caller. 1.
-
Page 77: Place A Call From Contacts
● Speaker: Route the phone’s audio through the speaker (On) or through the earpiece (Off). Activate Speaker to route the phone’s audio through the speaker. (You can adjust the speaker volume using the Volume key.) Deactivate Speaker to use the phone’s earpiece. Warning: Because of higher volume levels, do not place the phone near your ear during speakerphone use.
-
Page 78
You can edit existing reject messages or create new ones through the Call settings menu. From home, tap Phone > More > Settings > Call blocking > Call-reject messages and edit or create reject messages. In-Call Screen Layout and Options While you are on a call, you will see a number of options. -
Page 78
1. From home, tap Phone 2. Tap Contacts to display the Contacts list. The Contacts list appears. Phone App… -
Page 79: Call From Call Logs
● Speaker: Route the phone’s audio through the speaker (On) or through the earpiece (Off). Activate Speaker to route the phone’s audio through the speaker. (You can adjust the speaker volume using the Volume key.) Deactivate Speaker to use the phone’s earpiece. Warning: Because of higher volume levels, do not place the phone near your ear during speakerphone use.
-
Page 79: Call From Call Logs
3. Tap a contact. 4. Tap Call next to the number you want to call. The phone dials the number. The call begins when the other party answers. 5. To end the call, tap Tip: You can also place a call directly from the Contacts list. Swipe the entry you want to call from left to right to place a call to the entry’s primary number.
-
Page 80
1. From home, tap Phone 2. Tap Contacts to display the Contacts list. The Contacts list appears. Phone App… -
Page 80
1. From home, tap Phone 2. Tap Log to display the call logs list. The call logs list appears. Phone App… -
Page 81: Optional Services
3. Tap a contact. 4. Tap Call next to the number you want to call. The phone dials the number. The call begins when the other party answers. 5. To end the call, tap Tip: You can also place a call directly from the Contacts list. Swipe the entry you want to call from left to right to place a call to the entry’s primary number.
-
Page 81: Optional Services
3. Tap an entry to display the call details. 4. Tap to place a call. The phone dials the number. The call begins when the other party answers. For additional options, tap the name or number. 5. To end the call, tap Tip: You can also place a call directly from the Call logs list.
-
Page 82: Voicemail Setup
1. From home, tap Phone 2. Tap Log to display the call logs list. The call logs list appears. Phone App…
-
Page 82: Voicemail Setup
Voicemail Setup You should set up your voicemail and personal greeting as soon as your phone is activated. Always use a password to protect against unauthorized access. Your phone automatically transfers all unanswered calls to your voicemail, even if your phone is in use or turned off. 1.
-
Page 83: Set Up Visual Voicemail
3. Tap an entry to display the call details. 4. Tap to place a call. The phone dials the number. The call begins when the other party answers. For additional options, tap the name or number. 5. To end the call, tap Tip: You can also place a call directly from the Call logs list.
-
Page 83: Set Up Visual Voicemail
Set Up Visual Voicemail Setting up Visual Voicemail follows many of the same procedures as setting up traditional voicemail. You should set up your voicemail and personal greeting as soon as your phone is activated. Your phone automatically transfers all unanswered calls to your voicemail, even if your phone is in use or turned off. Note: To set up your traditional voicemail box, see Voicemail Setup.
-
Page 84: Review Visual Voicemail
Voicemail Setup You should set up your voicemail and personal greeting as soon as your phone is activated. Always use a password to protect against unauthorized access. Your phone automatically transfers all unanswered calls to your voicemail, even if your phone is in use or turned off. 1.
-
Page 84: Review Visual Voicemail
Create a password (part of standard voicemail). Record your name announcement. Record your greeting. Important: Voicemail Password – It is strongly recommended that you create a password when setting up your voicemail to protect against unauthorized access. Without a password, anyone who has access to your phone is able to access your voicemail messages.
-
Page 85: Listen To Multiple Voicemail Messages
Set Up Visual Voicemail Setting up Visual Voicemail follows many of the same procedures as setting up traditional voicemail. You should set up your voicemail and personal greeting as soon as your phone is activated. Your phone automatically transfers all unanswered calls to your voicemail, even if your phone is in use or turned off. Note: To set up your traditional voicemail box, see Voicemail Setup.
-
Page 85: Listen To Multiple Voicemail Messages
2. Tap a message, and then tap Play to review it. Tip: There are several icons at the bottom of the review screen for maintenance, storage, messaging, and other options. For an explanation of all your options, tap More options > Help > Visual Voicemail Menu >…
-
Page 86: Visual Voicemail Options
Create a password (part of standard voicemail). Record your name announcement. Record your greeting. Important: Voicemail Password – It is strongly recommended that you create a password when setting up your voicemail to protect against unauthorized access. Without a password, anyone who has access to your phone is able to access your voicemail messages.
-
Page 86: Visual Voicemail Options
You can navigate through voicemail messages as frequently as you would like. You can even move to the next or previous message before you are finished listening to the current one. Visual Voicemail Options Your visual voicemail options appear as icons at the bottom of the voicemail review screen. 1.
-
Page 87: Configure Visual Voicemail Settings
2. Tap a message, and then tap Play to review it. Tip: There are several icons at the bottom of the review screen for maintenance, storage, messaging, and other options. For an explanation of all your options, tap More options > Help > Visual Voicemail Menu >…
-
Page 87: Configure Visual Voicemail Settings
Reply: Reply to the message using text or voice message. More options: Access Archive, Settings, and Help features. 4. Touch and hold a message to manage your messages. The following options are available: All: Select all messages. …
-
Page 88
You can navigate through voicemail messages as frequently as you would like. You can even move to the next or previous message before you are finished listening to the current one. Visual Voicemail Options Your visual voicemail options appear as icons at the bottom of the voicemail review screen. 1. From home, tap Apps >… -
Page 88
2. Tap More options > Settings. You will see the voicemail settings menu. 3. Select an option to change its settings: Avatar: Configure you Avatar options. Display: Change your voicemail message theme and enter a name to identify yourself to people when replying or forwarding messages. -
Page 89
Reply: Reply to the message using text or voice message. More options: Access Archive, Settings, and Help features. 4. Touch and hold a message to manage your messages. The following options are available: All: Select all messages. … -
Page 89
1. From home, tap Apps > Voicemail 2. Tap More options > Settings > Preferences > Personalize voicemail. 3. Tap OK to connect to the voicemail system. Follow the prompts to change your current greeting. Edit the Display Name Using the Voicemail Menu From your Visual Voicemail menu, you can quickly change the name or number attached to your voice messages. -
Page 90: Caller Id Blocking
2. Tap More options > Settings. You will see the voicemail settings menu. 3. Select an option to change its settings: Avatar: Configure you Avatar options. Display: Change your voicemail message theme and enter a name to identify yourself to people when replying or forwarding messages.
-
Page 90: Caller Id Blocking
3. Tap the existing identification field and enter a new identifying name or number (used to identify you to recipients of your voice messages). 4. Tap OK to save your information. Caller ID Blocking Caller ID identifies a caller before you answer the phone by displaying the number of the incoming call. If you do not want your number displayed when you make a call, follow these steps.
-
Page 91: Conference Calling
1. From home, tap Apps > Voicemail 2. Tap More options > Settings > Preferences > Personalize voicemail. 3. Tap OK to connect to the voicemail system. Follow the prompts to change your current greeting. Edit the Display Name Using the Voicemail Menu From your Visual Voicemail menu, you can quickly change the name or number attached to your voice messages.
-
Page 91: Conference Calling
■ Slide to the right. (This puts the first caller on hold and answers the second call.) To switch back to the first caller: ■ Tap Swap Conference Calling With conference calling, also known as 3-way calling, you can talk to two people at the same time. When using this feature, the normal airtime rates will be charged for each of the two calls.
-
Page 92
3. Tap the existing identification field and enter a new identifying name or number (used to identify you to recipients of your voice messages). 4. Tap OK to save your information. Caller ID Blocking Caller ID identifies a caller before you answer the phone by displaying the number of the incoming call. If you do not want your number displayed when you make a call, follow these steps. -
Page 92
2. Once you have established the connection, tap Add call, and dial the second number (or place the call from Log or Contacts). This puts the first caller on hold and dials the second number. 3. When you are connected to the second party, tap Merge . -
Page 93: Call Forwarding
■ Slide to the right. (This puts the first caller on hold and answers the second call.) To switch back to the first caller: ■ Tap Swap Conference Calling With conference calling, also known as 3-way calling, you can talk to two people at the same time. When using this feature, the normal airtime rates will be charged for each of the two calls.
-
Page 93: Call Forwarding
Call Forwarding Call Forwarding lets you forward all your incoming calls to another phone number – even when your phone is turned off. You can continue to make calls from your phone when you have activated Call Forwarding. Note: You are charged a higher rate for calls you have forwarded. To activate Call Forwarding: 1.
-
Page 94: Phone Settings
2. Once you have established the connection, tap Add call, and dial the second number (or place the call from Log or Contacts). This puts the first caller on hold and dials the second number. 3. When you are connected to the second party, tap Merge .
-
Page 94: Phone Settings
1. From home, tap Phone The phone app opens. If necessary, tap to display the keypad. 2. Tap 3. Tap You will hear a tone to confirm the deactivation. Phone Settings Configure options for calling with your phone. Tip: You can also access Phone settings from the Phone app.
-
Page 95
Call Forwarding Call Forwarding lets you forward all your incoming calls to another phone number – even when your phone is turned off. You can continue to make calls from your phone when you have activated Call Forwarding. Note: You are charged a higher rate for calls you have forwarded. To activate Call Forwarding: 1. From home, tap Phone to display the phone screen. -
Page 95
1. From home, tap Phone to display the phone screen. The phone app opens. If necessary, tap to display the keypad. 2. Tap More > Settings to configure options: Swipe to call or send messages: Make calls or send messages by swiping right or left across a contact’s information in Contacts, or a log item in the Phone app. -
Page 96
1. From home, tap Phone The phone app opens. If necessary, tap to display the keypad. 2. Tap 3. Tap You will hear a tone to confirm the deactivation. Phone Settings Configure options for calling with your phone. Tip: You can also access Phone settings from the Phone app. -
Page 96
• Call-reject messages: Create and manage text messages to send to callers when rejecting incoming calls. Messages you create here are available from the incoming call screen when you use the Reject with message option. Answering and ending calls: Manage settings for answering and ending calls. •… -
Page 97: Access Call Settings
1. From home, tap Phone to display the phone screen. The phone app opens. If necessary, tap to display the keypad. 2. Tap More > Settings to configure options: Swipe to call or send messages: Make calls or send messages by swiping right or left across a contact’s information in Contacts, or a log item in the Phone app.
-
Page 97: Access Call Settings
Access Call Settings ■ From home, tap Phone > More > Settings. The Call settings menu displays. Call Settings Options Use the Call settings menu to adjust the following settings: Setting Description Swipe to call or send Place a call to a displayed contact by swiping right. Send a message to messages a displayed contact by swiping left.
-
Page 98
• Call-reject messages: Create and manage text messages to send to callers when rejecting incoming calls. Messages you create here are available from the incoming call screen when you use the Reject with message option. Answering and ending calls: Manage settings for answering and ending calls. •… -
Page 98
Setting Description Set the length of DTMF tones, which are used when pressing the DTMF tones keypad while on a call. Voicemail settings Configure your voicemail. Phone App… -
Page 99: Contacts
Access Call Settings ■ From home, tap Phone > More > Settings. The Call settings menu displays. Call Settings Options Use the Call settings menu to adjust the following settings: Setting Description Swipe to call or send Place a call to a displayed contact by swiping right. Send a message to a displayed contact by swiping left.
-
Page 99: Contacts
Contacts The Contacts application lets you store and manage contacts from a variety of sources, including contacts you enter and save directly in your phone as well as contacts synchronized with your Google Account, your PC, compatible email programs (including Exchange Server), and your Facebook friends. Contacts Cautions Information saved in Contacts may be lost or changed if the battery is left uncharged.
-
Page 100: Add A Contact
Setting Description Set the length of DTMF tones, which are used when pressing the DTMF tones keypad while on a call. Voicemail settings Configure your voicemail. Phone App…
-
Page 100: Add A Contact
Item Description Show the contact’s details. Contact Add a new contact. Add new contact Add a Contact You can add contacts from the Contacts application. Enter details such as name, phone numbers, email addresses, mailing addresses, and more. 1. From home, tap Apps >…
-
Page 101
Contacts The Contacts application lets you store and manage contacts from a variety of sources, including contacts you enter and save directly in your phone as well as contacts synchronized with your Google Account, your PC, compatible email programs (including Exchange Server), and your Facebook friends. Contacts Cautions Information saved in Contacts may be lost or changed if the battery is left uncharged. -
Page 101
2. Tap to add a contact. The Save contact to screen appears. 3. If you have multiple account types associated with your phone, select a contact type. Select Device as the sync account if you want your contacts on your phone only; they will not be synced with your Google Account. -
Page 102
Item Description Show the contact’s details. Contact Add new contact Add a new contact. Add a Contact You can add contacts from the Contacts application. Enter details such as name, phone numbers, email addresses, mailing addresses, and more. 1. From home, tap Apps >… -
Page 102
4. Use the keyboard to enter as much information as you want. Photo: Tap to assign a picture to the contact. Name: Enter the contact’s name. Phone number: Enter a phone number for the contact. Email: Enter an email address. … -
Page 103: Save A Phone Number
2. Tap to add a contact. The Save contact to screen appears. 3. If you have multiple account types associated with your phone, select a contact type. Select Device as the sync account if you want your contacts on your phone only; they will not be synced with your Google Account.
-
Page 103: Save A Phone Number
5. When you have finished adding information, tap Save. The contact is added. Save a Phone Number You can save a phone number to Contacts directly from the phone keypad. 1. From home, tap Phone to display the phone screen. …
-
Page 104: View Contacts
4. Use the keyboard to enter as much information as you want. Photo: Tap to assign a picture to the contact. Name: Enter the contact’s name. Phone number: Enter a phone number for the contact. Email: Enter an email address. …
-
Page 104: View Contacts
2. Enter a phone number and tap Add to Contacts. 3. To add a new contact, tap Create contact. To add the number to an existing contact, tap Update existing. For an existing contact, tap the contact name and select a number type for the new number. …
-
Page 105: Edit A Contact
5. When you have finished adding information, tap Save. The contact is added. Save a Phone Number You can save a phone number to Contacts directly from the phone keypad. 1. From home, tap Phone to display the phone screen. …
-
Page 105: Edit A Contact
1. From home, tap Apps > Contacts You will see the Contacts list. 2. Tap a contact to view its details. The contact’s detailed listing appears. Edit a Contact Once you have added a contact, you can add or edit any of the information in the entry, assign a caller ID picture, customize with a unique ringtone, and more.
-
Page 106
2. Enter a phone number and tap Add to Contacts. 3. To add a new contact, tap Create contact. To add the number to an existing contact, tap Update existing. For an existing contact, tap the contact name and select a number type for the new number. … -
Page 106
1. From home, tap Apps > Contacts You will see the Contacts list. 2. Tap a contact to view its details. The contact’s detailed listing appears. 3. Tap Edit. 4. Tap any field you want to change or add. See Add a Contact. -
Page 107: Delete A Contact
1. From home, tap Apps > Contacts You will see the Contacts list. 2. Tap a contact to view its details. The contact’s detailed listing appears. Edit a Contact Once you have added a contact, you can add or edit any of the information in the entry, assign a caller ID picture, customize with a unique ringtone, and more.
-
Page 107: Delete A Contact
5. Add or edit the information, and then tap Save. Your changes are saved to the contact entry. Delete a Contact You can delete a contact from the contacts details page. 1. From home, tap Apps > Contacts You will see the Contacts list. Contacts…
-
Page 108: Share A Contact
1. From home, tap Apps > Contacts You will see the Contacts list. 2. Tap a contact to view its details. The contact’s detailed listing appears. 3. Tap Edit. 4. Tap any field you want to change or add. See Add a Contact.
-
Page 108: Share A Contact
2. Tap a contact to view its details. The contact’s detailed listing appears. 3. Tap More > Delete > Delete. The contact is deleted. Tip: You can also touch and hold the contact from the Contacts list and tap Delete > Delete. Share a Contact You can quickly share contacts using Bluetooth, email, Gmail, or text messaging.
-
Page 109: Import Contacts
5. Add or edit the information, and then tap Save. Your changes are saved to the contact entry. Delete a Contact You can delete a contact from the contacts details page. 1. From home, tap Apps > Contacts You will see the Contacts list. Contacts…
-
Page 109: Import Contacts
You will see the Contacts list. 2. Tap a contact to display it, and then tap More > Share contact. You will see list of sharing methods. 3. Select a sharing method: Bluetooth: Send the information using Bluetooth. See Bluetooth for information on pairing and sending using Bluetooth.
-
Page 110
2. Tap a contact to view its details. The contact’s detailed listing appears. 3. Tap More > Delete > Delete. The contact is deleted. Tip: You can also touch and hold the contact from the Contacts list and tap Delete > Delete. Share a Contact You can quickly share contacts using Bluetooth, email, Gmail, or text messaging. -
Page 110
Import Contacts from Device Storage 1. From home, tap Apps > Contacts You will see the Contacts list. 2. Tap More > Settings > Import/Export contacts. You will see the Import/Export contacts menu. 3. Tap Import. 4. Select a destination for the imported contacts. 5. -
Page 111: Back Up Contacts
You will see the Contacts list. 2. Tap a contact to display it, and then tap More > Share contact. You will see list of sharing methods. 3. Select a sharing method: Add to OneNote: Save the information to your OneNote account. …
-
Page 111: Back Up Contacts
Back Up Contacts If you are saving contacts to an account that does not automatically back them up using the Cloud, you can manually back them up to your phone’s memory for re-import if needed. 1. From home, tap Apps >…
-
Page 112: Contacts Settings
Import Contacts from Device Storage 1. From home, tap Apps > Contacts You will see the Contacts list. 2. Tap More > Settings > Import/Export contacts. You will see the Import/Export contacts menu. 3. Tap Import. 4. Select a destination for the imported contacts. 5.
-
Page 112: Contacts Settings
2. Tap More > Settings to configure options: Import/Export contacts: Import contacts from your phone’s internal memory and export contacts to your phone’s internal memory. Move device contacts to: Move contacts saved on your device to your Google or Samsung accounts. Contacts…
-
Page 113
Back Up Contacts If you are saving contacts to an account that does not automatically back them up using the Cloud, you can manually back them up to your phone’s memory for re-import if needed. 1. From home, tap Apps >… -
Page 113
Contacts to display: Choose contacts to display in Contacts. You can choose only contacts from your phone’s memory, or from an account, or choose other sources. You can also create a customized list of contacts to display. Sort by: Choose how contacts are sorted, by first or last name. … -
Page 114: Messaging And Internet
2. Tap More > Settings to configure options: Import/Export contacts: Import contacts from your phone’s internal memory and export contacts to your phone’s internal memory. Move device contacts to: Move contacts saved on your device to your Google or Samsung accounts. Contacts…
-
Page 114: Messaging And Internet
Messaging and Internet With wireless service and your phone’s messaging and data capabilities, you have the opportunity to share information through many different channels and accounts, including Gmail (Google), personal and corporate email, text and multimedia messaging, social networking accounts, and Hangouts. Text and Multimedia Messaging With Text Messaging (SMS), you can send and receive instant text messages between your wireless phone and another messaging-ready phone.
-
Page 115: Send A Multimedia Message (Mms)
Contacts to display: Choose contacts to display in Contacts. You can choose only contacts from your phone’s memory, or from an account, or choose other sources. You can also create a customized list of contacts to display. Sort by: Choose how contacts are sorted, by first or last name. …
-
Page 115: Send A Multimedia Message (Mms)
information, any matching phone numbers from your Contacts list are displayed. Tap a match to enter that number or address directly. Tap Recipients , and then select the contacts to whom you want to send the message. You can also select contact groups as recipients. When you have selected all the message recipients, tap Done.
-
Page 116
Messaging and Internet With wireless service and your phone’s messaging and data capabilities, you have the opportunity to share information through many different channels and accounts, including Gmail (Google), personal and corporate email, text and multimedia messaging, social networking accounts, and Hangouts. Text and Multimedia Messaging With Text Messaging (SMS), you can send and receive instant text messages between your wireless phone and another messaging-ready phone. -
Page 116
1. From home, tap Apps > Messages 2. On the Messaging screen, tap Compose The Compose screen opens. 3. Fill in one or more recipients. You can: Enter phone numbers directly in the Enter recipient field. If you are sending the message to several phone numbers, separate the phone numbers with a comma. -
Page 117: Create A Slideshow
information, any matching phone numbers from your Contacts list are displayed. Tap a match to enter that number or address directly. Tap Recipients , and then select the contacts to whom you want to send the message. You can also select contact groups as recipients. When you have selected all the message recipients, tap Done.
-
Page 117: Create A Slideshow
5. Tap and select from the following file attachments: Image: Attach a stored picture. See Gallery. Take picture: Take a new picture and attach it. See Camera and Video. Video: Attach a stored video. See Gallery. Record video: Record a new video and attach it.
-
Page 118: Save And Resume A Draft Message
1. From home, tap Apps > Messages 2. On the Messaging screen, tap Compose The Compose screen opens. 3. Fill in one or more recipients. You can: Enter phone numbers directly in the Enter recipient field. If you are sending the message to several phone numbers, separate the phone numbers with a comma.
-
Page 118: Save And Resume A Draft Message
2. To compose your slideshow, do any of the following: Add a picture: Tap > Image and select a picture. Add a video: Tap > Video and select a video. (You cannot add both a picture and a video on the same slide.) …
-
Page 119: New Messages Notification
5. Tap and select from the following file attachments: Image: Attach a stored picture. See Gallery. Take picture: Take a new picture and attach it. See Camera and Video. Video: Attach a stored video. See Gallery. Record video: Record a new video and attach it.
-
Page 119: New Messages Notification
3. When you finish editing the message, tap New Messages Notification Depending on your notification settings, the phone will play a ringtone, vibrate, or display the message briefly in the status bar when you receive a new text or multimedia message. A new message icon also appears in the notifications area of the status bar to notify you of a new text or multimedia message.
-
Page 120
2. To compose your slideshow, do any of the following: Add a picture: Tap > Image and select a picture. Add a video: Tap > Video and select a video. (You cannot add both a picture and a video on the same slide.) … -
Page 120
View a Multimedia Message (MMS) 1. From home, tap Apps > Messages 2. On the Messaging screen, tap a multimedia message or conversation to open it. 3. Tap the attachment to open it. If the attachment is a vCard contact, it is imported to your phone’s Contacts list. For more information, see Contacts. -
Page 121: Reply To A Message
3. When you finish editing the message, tap New Messages Notification Depending on your notification settings, the phone will play a ringtone, vibrate, or display the message briefly in the status bar when you receive a new text or multimedia message. A new message icon also appears in the notifications area of the status bar to notify you of a new text or multimedia message.
-
Page 121: Reply To A Message
Reply to a Message 1. From home, tap Apps > Messages 2. On the Messaging screen, tap a conversation to open it. 3. Tap the Enter message field at the bottom of the screen, enter your reply message, and then tap Send Note: To reply to a text message with a multimedia message, open the text message and tap .
-
Page 122: Messages Settings
View a Multimedia Message (MMS) 1. From home, tap Apps > Messages 2. On the Messaging screen, tap a multimedia message or conversation to open it. 3. Tap the attachment to open it. If the attachment is a vCard contact, it is imported to your phone’s Contacts list. For more information, see Contacts.
-
Page 122: Messages Settings
Messages Settings The messages settings menu lets you control options for your text and MMS messages including message limits, size settings, and notifications. 1. From home, tap Apps > Messages 2. Tap More > Settings to configure options: Notifications: When turned on, notifications for new messages display in the status bar. Tap ON/OFF to turn the setting on, and then configure options: •…
-
Page 123
Reply to a Message 1. From home, tap Apps > Messages 2. On the Messaging screen, tap a conversation to open it. 3. Tap the Enter message field at the bottom of the screen, enter your reply message, and then tap Send Note: To reply to a text message with a multimedia message, open the text message and tap . -
Page 123
• Pop-up display: Choose whether a new message pops up on the display to notify you. Quick responses: Create and manage text phrases that you can add to messages. Spam filter: Block messages by filtering based on criteria you set. Tap Spam filter, and then configure filters: •… -
Page 124: Gmail
Messages Settings The messages settings menu lets you control options for your text and MMS messages including message limits, size settings, and notifications. 1. From home, tap Apps > Messages 2. Tap More > Settings to configure options: Notifications: When turned on, notifications for new messages display in the status bar. Tap ON/OFF to turn the setting on, and then configure options: •…
-
Page 124: Gmail
Gmail Use Google’s Gmail service and your Google Account to send, receive, and manage your Gmail messages. Before using Gmail, you must register a Google (Gmail) Account on your phone. See Google Account for details. Gmail Cautions Gmail is handled as email from a PC. Restricting email from PCs on your phone prevents your phone from receiving Gmail.
-
Page 125
• Pop-up display: Choose whether a new message pops up on the display to notify you. Quick responses: Create and manage text phrases that you can add to messages. Spam filter: Block messages by filtering based on criteria you set. Tap Spam filter, and then configure filters: •… -
Page 125
2. In the inbox, tap Compose The Gmail composition window opens. 3. Enter the message recipient(s), subject, and message, and then tap Send The Gmail message is sent. Gmail Composition Options ● Adding Cc/Bcc: In the To field, tap to display Cc and Bcc fields. -
Page 126: Check Received Gmail Messages
Gmail Use Google’s Gmail service and your Google Account to send, receive, and manage your Gmail messages. Before using Gmail, you must register a Google (Gmail) Account on your phone. See Google Account for details. Gmail Cautions Gmail is handled as email from a PC. Restricting email from PCs on your phone prevents your phone from receiving Gmail.
-
Page 126: Check Received Gmail Messages
● Save as a draft (Send Later): While composing your message, tap More options > Save draft. The message is saved as a draft for later. ● Delete Mail Being Composed: In the mail composition window, tap More options > Discard >…
-
Page 127
2. In the inbox, tap Compose The Gmail composition window opens. 3. Enter the message recipient(s), subject, and message, and then tap Send The Gmail message is sent. Gmail Composition Options ● Adding Cc/Bcc: In the To field, tap to display Cc and Bcc fields. -
Page 127
1. From home, tap Apps > Google > Gmail The Gmail inbox opens. 2. Tap the message thread you want to view. The message thread opens, with the newest message displayed. Options when Reviewing Gmail Messages ● Replying to Gmail Messages: With the Gmail message open, tap Reply , compose your reply message, and tap Send … -
Page 128: Use Gmail Labels
● Save as a draft (Send Later): While composing your message, tap More options > Save draft. The message is saved as a draft for later. ● Delete Mail Being Composed: In the mail composition window, tap More options > Discard > Discard.
-
Page 128: Use Gmail Labels
● Forwarding Gmail Messages: With the Gmail message open, tap More options > Forward, enter a recipient and an additional message, and tap Send Use Gmail Labels Gmail saves all mail in one box, but you can add labels that allow you to sort your Gmail conversation threads.
-
Page 129: Archive Gmail Threads
1. From home, tap Apps > Google > Gmail The Gmail inbox opens. 2. Tap the message thread you want to view. The message thread opens, with the newest message displayed. Options when Reviewing Gmail Messages ● Replying to Gmail Messages: With the Gmail message open, tap Reply , compose your reply message, and tap Send …
-
Page 129: Archive Gmail Threads
3. Tap a label for the thread. The thread is added to the selected label. Tip: To add or manage your Gmail labels, open your Gmail account from your computer, click More at the bottom of the label list on the left, and then click Manage labels or Create new labels. Any changes you make from your computer will be reflected on your phone.
-
Page 130: Mute Gmail Threads
● Forwarding Gmail Messages: With the Gmail message open, tap More options > Forward, enter a recipient and an additional message, and tap Send Use Gmail Labels Gmail saves all mail in one box, but you can add labels that allow you to sort your Gmail conversation threads.
-
Page 130: Mute Gmail Threads
The inbox opens. 2. Touch and hold a conversation thread (or touch the thread’s icon/picture) to add a checkmark to it, and then tap Archive The thread is now archived. Mute Gmail Threads If registered on a mailing list, there will be threads with always-continuing conversations. For long threads that are not important, mute the threads and they will no longer appear in the inbox.
-
Page 131: Delete Gmail Threads
3. Tap a label for the thread. The thread is added to the selected label. Tip: To add or manage your Gmail labels, open your Gmail account from your computer, click More at the bottom of the label list on the left, and then click Manage labels or Create new labels. Any changes you make from your computer will be reflected on your phone.
-
Page 131: Delete Gmail Threads
The inbox opens. 2. Touch and hold a conversation thread (or touch the thread’s icon/picture) to add a checkmark to it, and then tap More options > Mute. The thread is now hidden. Delete Gmail Threads If you no longer wish to keep a Gmail conversation thread (or touch the thread’s icon/picture), you can simply delete it from the inbox.
-
Page 132: Search Gmail Messages
The inbox opens. 2. Touch and hold a conversation thread (or touch the thread’s icon/picture) to add a checkmark to it, and then tap Archive The thread is now archived. Mute Gmail Threads If registered on a mailing list, there will be threads with always-continuing conversations. For long threads that are not important, mute the threads and they will no longer appear in the inbox.
-
Page 132: Search Gmail Messages
2. Touch and hold a conversation thread (or touch the thread’s icon/picture) to add a checkmark to it, and then tap Delete The thread is deleted. Note: Depending on your settings, you may be asked to confirm the deletion. Tap Delete to confirm. See Gmail Settings.
-
Page 133: Report Spam Gmail
The inbox opens. 2. Touch and hold a conversation thread (or touch the thread’s icon/picture) to add a checkmark to it, and then tap More options > Mute. The thread is now hidden. Delete Gmail Threads If you no longer wish to keep a Gmail conversation thread (or touch the thread’s icon/picture), you can simply delete it from the inbox.
-
Page 133: Report Spam Gmail
2. Tap Search 3. Enter your search text and tap Search The search results appear. Tap a message or thread from the list to display it. Report Spam Gmail You can report spam Gmail messages from your phone’s Gmail inbox. Messaging and Internet…
-
Page 134: Add Another Google (Gmail) Account
2. Touch and hold a conversation thread (or touch the thread’s icon/picture) to add a checkmark to it, and then tap Delete The thread is deleted. Note: Depending on your settings, you may be asked to confirm the deletion. Tap Delete to confirm. See Gmail Settings.
-
Page 134: Add Another Google (Gmail) Account
1. From home, tap Apps > Google > Gmail The inbox opens. 2. Touch and hold a conversation thread (or touch the thread’s icon/picture) to add a checkmark to it, and then tap More options > Report spam. The selected message is reported as spam. Add Another Google (Gmail) Account If you have multiple Gmail accounts you wish to view on your phone, you can add them from the Settings >…
-
Page 135
2. Tap Search 3. Enter your search text and tap Search The search results appear. Tap a message or thread from the list to display it. Report Spam Gmail You can report spam Gmail messages from your phone’s Gmail inbox. Messaging and Internet… -
Page 135
1. From home, tap Apps > Settings > Accounts > Add account. 2. Tap Google. Messaging and Internet… -
Page 136: Switching Between Gmail Accounts
1. From home, tap Apps > Google > Gmail The inbox opens. 2. Touch and hold a conversation thread (or touch the thread’s icon/picture) to add a checkmark to it, and then tap More options > Report spam. The selected message is reported as spam. Add Another Google (Gmail) Account If you have multiple Gmail accounts you wish to view on your phone, you can add them from the Settings >…
-
Page 136: Switching Between Gmail Accounts
3. Enter your Gmail username and password, and then tap Next. 4. Follow the prompts to review and agree to the Terms of Service and Privacy Policy, and then tap Accept. 5. After your phone connects with the Google servers, select the items you would like to sync with your phone and then tap Next.
-
Page 137
1. From home, tap Apps > Settings > Accounts > Add account. 2. Tap Google. Messaging and Internet… -
Page 137
1. From home, tap Apps > Google > Gmail The Primary inbox opens. 2. Tap Menu 3. Tap the icon for the account you want to view from the list at the top of the menu. The selected account’s Primary inbox is displayed. Messaging and Internet… -
Page 138: Gmail Settings
3. Enter your Gmail username and password, and then tap Next. 4. Follow the prompts to review and agree to the Terms of Service and Privacy Policy, and then tap Accept. 5. After your phone connects with the Google servers, select the items you would like to sync with your phone and then tap Next.
-
Page 138: Gmail Settings
Gmail Settings You can access settings for the Gmail app and for your individual Gmail accounts from the Gmail Settings menu. 1. From home, tap Apps > Google > Gmail The Primary inbox opens. 2. Tap Menu > Settings 3.
-
Page 139: Email
1. From home, tap Apps > Google > Gmail The Primary inbox opens. 2. Tap Menu 3. Tap the icon for the account you want to view from the list at the top of the menu. The selected account’s Primary inbox is displayed. Messaging and Internet…
-
Page 139: Email
General settings: Gmail default action, Conversation view, Swipe actions, Sender image, Reply all, Auto-fit messages, Auto-advance, Confirm before deleting, Confirm before archiving, and Confirm before sending. Account settings: Inbox type, Inbox categories, Notifications, Inbox sound & vibrate, Signature, Vacation responder, Sync Gmail, Days of mail to sync, Manage labels, Download attachments, and Images.
-
Page 140: Add An Email Account
Gmail Settings You can access settings for the Gmail app and for your individual Gmail accounts from the Gmail Settings menu. 1. From home, tap Apps > Google > Gmail The Primary inbox opens. 2. Tap Menu > Settings 3.
-
Page 140: Add An Email Account
Add an Email Account You can add several types of personal email accounts, such as POP3 and IMAP accounts, on your phone. Add an Email Account from the Email App You can add email accounts directly from the email app, even if you have another email account set up. 1.
-
Page 141
General settings: Gmail default action, Conversation view, Swipe actions, Sender image, Reply all, Auto-fit messages, Auto-advance, Confirm before deleting, Confirm before archiving, and Confirm before sending. Account settings: Inbox type, Inbox categories, Notifications, Inbox sound & vibrate, Signature, Vacation responder, Sync Gmail, Days of mail to sync, Manage labels, Download attachments, and Images. -
Page 141
The email account is added and you will begin receiving email for the account. Add an Email Account from the Settings Menu You can also set up email accounts from the Settings > Accounts menu. 1. From home, tap Apps >… -
Page 142
Add an Email Account You can add several types of personal email accounts, such as POP3 and IMAP accounts, on your phone. Add an Email Account from the Email App You can add email accounts directly from the email app, even if you have another email account set up. 1. -
Page 142
3. Enter the Email address and Password for the email account and then tap Next. Tapping Next prompts your phone to attempt a “regular” email setup and test the incoming and outgoing servers. If you have custom settings you need to configure, tap Manual setup and enter your settings. These may include mail type, user name, password, server, security type, and more. -
Page 143: Add An Exchange Activesync Account
The email account is added and you will begin receiving email for the account. Add an Email Account from the Settings Menu You can also set up email accounts from the Settings > Accounts menu. 1. From home, tap Apps >…
-
Page 143: Add An Exchange Activesync Account
5. Enter an account name and a display name and tap Done to complete setup. The email account is set up and you will begin receiving email for the account. Important: If the account type you want to set up is not in the phone database, you will be asked to enter more details.
-
Page 144
3. Enter the Email address and Password for the email account and then tap Next. Tapping Next prompts your phone to attempt a “regular” email setup and test the incoming and outgoing servers. If you have custom settings you need to configure, tap Manual setup and enter your settings. These may include mail type, user name, password, server, security type, and more. -
Page 144
2. Enter the Email address and Password for the email account and then tap Manual setup. 3. Enter the required information. Email address: Enter your email address. Domainusername: Enter your network domain and username, separated by “”. Password: Enter your network access password (case-sensitive). -
Page 145: Compose And Send Email
5. Enter an account name and a display name and tap Done to complete setup. The email account is set up and you will begin receiving email for the account. Important: If the account type you want to set up is not in the phone database, you will be asked to enter more details.
-
Page 145: Compose And Send Email
Use secure connection (SSL): Tap to place a checkmark in the box, if your system requires SSL encryption. Use client certificate: Tap to place a checkmark in the box, if your system requires certification. 4. Tap Next and follow the prompts to configure options for the account. 5.
-
Page 146
2. Enter the Email address and Password for the email account and then tap Manual setup. 3. Enter the required information. Email address: Enter your email address. Domainusername: Enter your network domain and username, separated by “”. Password: Enter your network access password (case-sensitive). -
Page 146
1. From home, tap Apps > Email The email inbox opens. If you want to switch to a different email account, tap the account name at the top of the screen and select another account. You can also view multiple inboxes at once. Tap the account name at the top of the screen and then tap Combined inbox to see messages from all your configured email accounts. -
Page 147: Open Email Messages
Use secure connection (SSL): Tap to place a checkmark in the box, if your system requires SSL encryption. Use client certificate: Tap to place a checkmark in the box, if your system requires certification. 4. Tap Next and follow the prompts to configure options for the account. 5. Enter an account name and a display name and tap Done to complete setup.
-
Page 147: Open Email Messages
To attach pictures or other files to the email, tap Attach, select a file type, and then tap a file to attach it. For additional options when composing email messages, tap More and select an option. 4. Tap Send. …
-
Page 148
1. From home, tap Apps > Email The email inbox opens. If you want to switch to a different email account, tap the account name at the top of the screen and select another account. You can also view multiple inboxes at once. Tap the account name at the top of the screen and then tap Combined inbox to see messages from all your configured email accounts. -
Page 148
1. Drag the status bar down to display the notification panel. 2. Tap the new message from the notification panel. The new email message opens. If you have two or more new email messages, tapping the notification opens the email inbox. Tap a message to open it. -
Page 149: Delete An Email Account
To attach pictures or other files to the email, tap Attach, select a file type, and then tap a file to attach it. For additional options when composing email messages, tap More and select an option. 4. Tap Send. …
-
Page 149: Delete An Email Account
The email inbox opens. 2. Tap the message you want to view. The email message opens. Tip: Tap the account name at the top of the screen to switch to a different email account. 3. Tap Reply or Reply all to reply to the message.
-
Page 150
1. Drag the status bar down to display the notification panel. 2. Tap the new message from the notification panel. The new email message opens. If you have two or more new email messages, tapping the notification opens the email inbox. Tap a message to open it. -
Page 150
1. From home, tap Apps > Email The email inbox opens. 2. Tap More > Settings. Messaging and Internet… -
Page 151: Manage Your Email Inbox
The email inbox opens. 2. Tap the message you want to view. The email message opens. Tip: Tap the account name at the top of the screen to switch to a different email account. 3. Tap Reply or Reply all to reply to the message.
-
Page 151: Manage Your Email Inbox
3. Tap the account name, and then tap Remove > Remove. The account is deleted from your phone Manage Your Email Inbox Your email inbox provides management options for viewing, sorting, and deleting your email messages. View Your Email Inbox 1.
-
Page 152: Exchange Activesync Email Features
1. From home, tap Apps > Email The email inbox opens. 2. Tap More > Settings. Messaging and Internet…
-
Page 152: Exchange Activesync Email Features
Sort Email Messages 1. On the email account inbox, tap More > Sort by. 2. Select options for sorting email messages. Delete Email Messages 1. On the email account inbox, touch and hold the message you want to delete. Tap additional emails to delete.
-
Page 153
3. Tap the account name, and then tap Remove > Remove. The account is deleted from your phone Manage Your Email Inbox Your email inbox provides management options for viewing, sorting, and deleting your email messages. View Your Email Inbox 1. From home, tap Apps >… -
Page 153
1. From home, tap Apps > Email 2. Tap More > Settings. Messaging and Internet… -
Page 154
Sort Email Messages 1. On the email account inbox, tap More > Sort by. 2. Select options for sorting email messages. Delete Email Messages 1. On the email account inbox, touch and hold the message you want to delete. Tap additional emails to delete. -
Page 154
3. Tap the Exchange ActiveSync account name to view its options. The following options are available: • Sync account: Keep the account synchronized on your phone. • Account name: Change the account name. • Always Cc/Bcc myself: Send a copy of each email you send to yourself. •… -
Page 155: Email Settings
2. Tap More > Settings. 3. Tap the Exchange ActiveSync account name to view its options. The following options are available: • Sync account: Keep the account synchronized on your phone. • Account name: Change the account name. • Always Cc/Bcc myself: Send a copy of each email you send to yourself.
-
Page 155: Email Settings
• In case of sync conflict: Select whether the device or the server has priority during a sync conflict. • Sync Contacts: Sync your Contacts with your Exchange account. • Sync Calendar: Sync your calendar with your Exchange account. • Sync Task: Sync your tasks with your Exchange account.
-
Page 156
• Period to sync Email: Configure how far back in time you want to sync your email account. • Limit retrieval size: Set a limit to the size of email messages you want to receive on your phone. • Limit retrieval size while roaming: Set a different email size limit when your phone is on roaming. -
Page 156
Manage accounts: Configure options for specific accounts. Available settings depend on the type of account. Add account: Add additional email accounts. View as: View emails in Standard format, or as Conversations. Auto fit content: Shrink email content to fit the screen. Content can still be viewed in detail by zooming in. -
Page 157
General Email Preferences 1. From home, tap Apps > Email The email inbox opens. 2. Tap More > Settings to configure options. General email settings, which affect all email accounts, include: Manage accounts: Configure options for specific accounts. Available settings depend on the type of account. -
Page 157
1. From home, tap Apps > Email > More > Settings. 2. Tap an account to set its options. Individual email account settings may vary; see your service provider for details. Common settings include: Sync account: Configure options for synchronizing your phone with your account: … -
Page 158: Browser
Auto fit content: Shrink email content to fit the screen. Content can still be viewed in detail by zooming in. Email notifications: Notifications for new emails display in the status bar. When disabled, you can control notifications for each of your email accounts individually in the account’s settings.
-
Page 158: Browser
Period to sync Calendar: Choose the period for synchronizing calendar events between your phone and account. Empty server trash: Delete the contents of the trash folder on the account server. In case of sync conflict: Choose whether information from the server or phone has priority when there is a conflict.
-
Page 159: Add A Bookmark
Show images: Choose whether to automatically display embedded images in the body of an email. Sync schedule: Set a sync schedule for email, such as choosing different sync options for peak days or times, or when roaming. Period to sync Email: Choose the period for synchronizing email between your phone and account.
-
Page 159: Add A Bookmark
■ From home, tap Apps > Internet The browser opens. The first time you launch Internet, you may be prompted to enter your 10-digit wireless phone number to access the Virgin Mobile home page. You can also launch the browser by tapping a URL in a text message, email message, or Gmail message.
-
Page 160
private information, credit card numbers, corporate secrets, and more, and provide protection against online threats (eavesdropping, falsification, impersonation, and more). SSL/TLS Cautions When opening a secured page, users must decide as their responsibility whether or not to open the page with use of SSL/TLS. Boost and the applicable Certification Authorities make no guarantees whatsoever to users regarding security of SSL/TLS. -
Page 160
1. From home, tap Apps > Internet The browser opens. 2. Navigate to the Web page you want to bookmark, and tap Bookmarks > Add. The add bookmark window opens. 3. Check or change the bookmark title, URL, and more, and then tap Save. … -
Page 161: View Browser History
1. From home, tap Apps > Internet The browser opens. 2. Navigate to the Web page you want to bookmark, and tap Bookmarks > Add. The add bookmark window opens. 3. Check or change the bookmark title, URL, and more, and then tap Save. …
-
Page 161: View Browser History
Bookmark Options ● Editing Bookmarks: From the browser, tap Bookmarks , touch and hold a bookmark, tap More > Edit bookmark, edit the bookmark, and then tap Save. ● Deleting Bookmarks: From the browser, tap Bookmarks , touch and hold a bookmark, and then tap Delete.
-
Page 162: Open New Browser Tab
Bookmark Options ● Editing Bookmarks: From the browser, tap Bookmarks , touch and hold a bookmark, tap More > Edit bookmark, edit the bookmark, and then tap Save. ● Deleting Bookmarks: From the browser, tap Bookmarks , touch and hold a bookmark, and then tap Delete.
-
Page 162: Open New Browser Tab
2. Tap Bookmarks The bookmark window opens. 3. Tap the History tab, and then tap an entry. The Web page opens. Open New Browser Tab Use tabs to switch between websites quickly and easily. Messaging and Internet…
-
Page 163
2. Tap Bookmarks The bookmark window opens. 3. Tap the History tab, and then tap an entry. The Web page opens. Open New Browser Tab Use tabs to switch between websites quickly and easily. Messaging and Internet… -
Page 163
1. From home, tap Apps > Internet The browser opens. 2. Tap Tabs The window opens. If you do not see Tabs , drag the Web page down to display the address bar on top and the options bar on the bottom. 3. -
Page 164: Browser Settings
1. From home, tap Apps > Internet The browser opens. 2. Tap Tabs The window opens. If you do not see Tabs , drag the Web page down to display the address bar on top and the options bar on the bottom. 3.
-
Page 164: Browser Settings
To switch windows, tap Tabs , and then touch a thumbnail. Browser Settings Configure Internet settings, to customize the browser to your preferences. 1. From home, tap Apps > Internet The browser opens. 2. Tap More > Settings to configure options: …
-
Page 165: Chrome Browser
To switch windows, tap Tabs , and then touch a thumbnail. Browser Settings Configure Internet settings, to customize the browser to your preferences. 1. From home, tap Apps > Internet The browser opens. 2. Tap More > Settings to configure options: …
-
Page 165: Chrome Browser
Auto fill profile: Manage your Auto fill profile. Manual zoom: Override website requests to control zoom level Privacy: Choose options related to privacy. Advanced: Choose settings to control how the browser treats content, such as allowing JavaScript, blocking pop-ups, and managing website data.
-
Page 166
Auto fill profile: Manage your Auto fill profile. Manual zoom: Override website requests to control zoom level Privacy: Choose options related to privacy. Advanced: Choose settings to control how the browser treats content, such as allowing JavaScript, blocking pop-ups, and managing website data. -
Page 166
The search results appear or a Web page opens. Chrome Support ■ To find on-phone help with Chrome, from Chrome, tap More options > Help & feedback. A Web page will open displaying Google help for Chrome. Tip: For more information, from your computer, visit: google.com/chrome. Messaging and Internet… -
Page 167: Camera And Video
The search results appear or a Web page opens. Chrome Support ■ To find on-phone help with Chrome, from Chrome, tap More options > Help & feedback. A Web page will open displaying Google help for Chrome. Tip: For more information, from your computer, visit: google.com/chrome. Messaging and Internet…
-
Page 167: Camera And Video
Camera and Video You can use the camera or video camera to take and share pictures and videos. Your phone comes with a 5 megapixel rear camera and a 2 megapixel front camera that let you capture sharp pictures and videos.
-
Page 168: Take Pictures And Record Videos
Camera and Video You can use the camera or video camera to take and share pictures and videos. Your phone comes with a 5 megapixel rear camera and a 2 megapixel front camera that let you capture sharp pictures and videos.
-
Page 168: Take Pictures And Record Videos
Take Pictures and Record Videos The following topics teach you how to take pictures and record videos with your phone’s camera. Capturing Pictures/Videos ● File Format for Pictures: File format for pictures is JPEG (.jpg). ● File Format for Videos: File format for videos is MPEG4 (.mp4). Camera Cautions If Lens Becomes Dirty: Fingerprints/smudges on lens prevent capturing of clear still images/videos.
-
Page 169: Record Videos
2. Aim the camera at your subject and then tap The shutter clicks and the picture is captured and saved to your phone. Tip: You can launch the camera from the lock screen. Swipe up from the lock screen to open the camera.
-
Page 170: Shooting Modes
2. Aim the camera at your subject and then tap The shutter clicks and the picture is captured and saved to your phone. Tip: You can launch the camera from the lock screen. Swipe up from the lock screen to open the camera.
-
Page 170: Shooting Modes
Video recording begins. to pause recording. Tap to resume a paused recording. 3. Tap to stop recording. The camera stops recording and the video is captured and saved to your phone. Shooting Modes Your phone’s camera offers many shooting modes, to make your pictures or videos special. 1.
-
Page 171: View Pictures And Videos Using Gallery
Rear camera • Auto: Automatically adjusts the exposure to optimize the color and brightness of pictures. • Pro: Adjust the ISO sensitivity, exposure value, white balance, focal length, and color tone manually while taking pictures. • Panorama: Take multiple pictures to merge into one expansive picture. You can create a horizontal or vertical panorama picture.
-
Page 172
Rear camera • Auto: Automatically adjusts the exposure to optimize the color and brightness of pictures. • Pro: Adjust the ISO sensitivity, exposure value, white balance, focal length, and color tone manually while taking pictures. • Panorama: Take multiple pictures to merge into one expansive picture. You can create a horizontal or vertical panorama picture. -
Page 172
For pictures that are on your phone, you can do basic editing such as rotating and cropping. You can also easily assign a picture as your contact picture or wallpaper and share pictures with your friends. 1. From home, tap Apps >… -
Page 173
For pictures that are on your phone, you can do basic editing such as rotating and cropping. You can also easily assign a picture as your contact picture or wallpaper and share pictures with your friends. 1. From home, tap Apps >… -
Page 173
4. For a picture, tap a thumbnail to view the picture. While viewing a picture full-screen you can use the following options: Share: Choose a method for sharing the picture. Edit: Modify your picture. Delete: Erase the current picture. … -
Page 174
For a picture, tap a thumbnail to view the picture. While viewing a picture full-screen you can use the following options: Share: Choose a method for sharing the picture. Edit: Modify your picture. Delete: Erase the current picture. … -
Page 174
Tap Play to play the video. Share: Choose a method for sharing the video. Editor: Edit the video. Delete: Erase the current video. More: Choose other options, including: • Details: View file details. • Slideshow: Create a slideshow. Pictures and Videos: Review Screen After capturing a picture or video, from the camera screen, tap the thumbnail to see the item in the review screen. -
Page 175: Edit Pictures
Tap Play to play the video. Share: Choose a method for sharing the video. Editor: Edit the video. Delete: Erase the current video. More: Choose other options, including: • Details: View file details. • Slideshow: Create a slideshow. Pictures and Videos: Review Screen After capturing a picture or video, from the camera screen, tap the thumbnail to see the item in the review screen.
-
Page 175: Edit Pictures
Edit Pictures Whether you are browsing pictures in filmstrip or grid view in the Gallery application, you can tap a picture to open a selection menu and choose to delete the picture, rotate or crop it, and more. Rotate a Picture The editing options let you rotate pictures 90 degrees clockwise.
-
Page 176: Crop A Picture
3. Tap Edit > Rotate. The picture is rotated and saved to the phone. Crop a Picture Use the editing tools to crop your pictures. 1. From home, tap Apps > Gallery The Gallery app opens. 2. Tap the picture you want to crop. Camera and Video…
-
Page 177
3. Tap Edit > Rotate. The picture is rotated and saved to the phone. Crop a Picture Use the editing tools to crop your pictures. 1. From home, tap Apps > Gallery The Gallery app opens. 2. Tap the picture you want to crop. Camera and Video… -
Page 177
3. Tap Edit > Crop. A crop box appears on the picture. 4. To adjust the crop box size, touch and hold the edge of the box. When directional arrows appear, drag your finger inward to or outward to resize the crop box. … -
Page 178: Photo Editor
3. Tap Edit > Crop. A crop box appears on the picture. 4. To adjust the crop box size, touch and hold the edge of the box. When directional arrows appear, drag your finger inward to or outward to resize the crop box. …
-
Page 178: Photo Editor
Photo Editor Perform advanced edits on your pictures, including straightening, adjusting the tone, adding visual effects, and enhancing portraits. 1. From home, tap Apps > Gallery The Gallery app opens. 2. Tap the picture you want to edit. 3. Tap Edit >…
-
Page 179: Collage
Photo Editor Perform advanced edits on your pictures, including straightening, adjusting the tone, adding visual effects, and enhancing portraits. 1. From home, tap Apps > Gallery The Gallery app opens. 2. Tap the picture you want to edit. 3. Tap Edit >…
-
Page 179: Collage
4. Adjust your picture with these tools: Adjustment: Straighten and freely rotate your picture. Tone: Adjust the brightness, contrast, saturation, temperature, and hue of the picture. Effect: Add color effects to your picture. Portrait: Apply effects such as brightening, softening, and fixing red eye when a face or faces are detected in a picture.
-
Page 180
4. Adjust your picture with these tools: Adjustment: Straighten and freely rotate your picture. Tone: Adjust the brightness, contrast, saturation, temperature, and hue of the picture. Effect: Add color effects to your picture. Portrait: Apply effects such as brightening, softening, and fixing red eye when a face or faces are detected in a picture. -
Page 180
1. From home, tap Apps > Gallery The Gallery app opens. 2. Tap a picture you want to add to a collage. 3. Tap Edit > Collage. 4. Tap or Add to select additional pictures for the collage. Tap pictures to select them. -
Page 181: Share Pictures And Videos
1. From home, tap Apps > Gallery The Gallery app opens. 2. Tap a picture you want to add to a collage. 3. Tap Edit > Collage. 4. Tap or Add to select additional pictures for the collage. Tap pictures to select them.
-
Page 181: Share Pictures And Videos
Your collage layout will be displayed. Use the tools at the bottom of the screen to adjust your collage. Aspect ratio: Adjust the aspect ratio of the collage. Layout: Change the layout of the collage. Border: Choose the border roundness and margin for the collage. …
-
Page 182: Send Pictures Or Videos By Email Or Gmail
Send Pictures or Videos by Email or Gmail You can send several pictures, videos, or both in an email or Gmail message. They are added as file attachments in your email. For more information about using email and Gmail, see Compose and Send Email Create and Send a Gmail…
-
Page 183: Send A Picture Or Video By Multimedia Message
3. Tap Share, and then on the sharing menu, tap Email or Gmail. Follow prompts to complete and send the message. Note: If you have multiple email accounts or Gmail accounts, the default account will be used. Check the “From”…
-
Page 184
3. Tap Share, and then on the sharing menu, tap Email or Gmail. Follow prompts to complete and send the message. Note: If you have multiple email accounts or Gmail accounts, the default account will be used. Check the “From”… -
Page 184
1. From home, tap Apps > Gallery The Gallery app opens. 2. Tap the pictures or videos you want to share. To select multiple items, touch and hold an image to turn on multiple select. Tap all the items you want to include. -
Page 185: Send Pictures Or Videos Using Bluetooth
1. From home, tap Apps > Gallery The Gallery app opens. 2. Tap the pictures or videos you want to share. To select multiple items, touch and hold an image to turn on multiple select. Tap all the items you want to include.
-
Page 185: Send Pictures Or Videos Using Bluetooth
Send Pictures or Videos Using Bluetooth You can select several pictures, videos, or both and send them to someone’s phone or your computer using Bluetooth. 1. From home, tap Apps > Gallery The Gallery app opens. 2. Tap the pictures or videos you want to share. …
-
Page 186: Share Videos On Youtube
Send Pictures or Videos Using Bluetooth You can select several pictures, videos, or both and send them to someone’s phone or your computer using Bluetooth. 1. From home, tap Apps > Gallery The Gallery app opens. 2. Tap the pictures or videos you want to share. …
-
Page 186: Share Videos On Youtube
Follow the prompts to complete and send the files. For more information, see Bluetooth. Share Videos on YouTube You can share your videos by uploading them to YouTube. Before you do this, you must create a YouTube account and sign in to that account on your phone. 1.
-
Page 187: Camera Options And Settings
Follow the prompts to complete and send the files. For more information, see Bluetooth. Share Videos on YouTube You can share your videos by uploading them to YouTube. Before you do this, you must create a YouTube account and sign in to that account on your phone. 1. From home, tap Apps >…
-
Page 187: Camera Options And Settings
3. Tap Share, and then on the sharing menu, tap YouTube. 4. Enter the prompted information, such as description and tags, and select a privacy option. 5. Tap Upload The upload is completed. Camera Options and Settings You can adjust your camera’s settings using the icons on the main camera screen and the full camera settings menu.
-
Page 188: Set Camera Options
2. Tap The camera switches type. Set Camera Options You can configure your camera’s settings to fit any situation and event. 1. From home, tap Apps > Camera The camera viewfinder appears. 2. Tap Settings . If you do not see the Settings option, tap to display the options icons.
-
Page 189
2. Tap The camera switches type. Set Camera Options You can configure your camera’s settings to fit any situation and event. 1. From home, tap Apps > Camera The camera viewfinder appears. 2. Tap Settings . If you do not see the Settings option, tap to display the options icons. -
Page 189
• Picture size: Change the resolution of pictures. Different settings are available for the front and rear cameras. • Video size: Select a resolution. Use higher resolution for higher quality. Higher resolution videos take up more memory. • Grid lines: Display viewfinder grid lines to help composition when selecting subjects. •… -
Page 190: Apps And Features
• Picture size: Change the resolution of pictures. Different settings are available for the front and rear cameras. • Video size: Select a resolution. Use higher resolution for higher quality. Higher resolution videos take up more memory. • Grid lines: Display viewfinder grid lines to help composition when selecting subjects. •…
-
Page 190: Apps And Features
Apps and Features The following topics detail many of your phone’s tools and features such as maps and navigation, calendar, clock, social networking apps, music, memos, and more. Calculator Your phone’s convenient built-in calculator lets you perform basic mathematical equations. 1.
-
Page 191: Calendar
Apps and Features The following topics detail many of your phone’s tools and features such as maps and navigation, calendar, clock, social networking apps, music, memos, and more. 1Weather Check weather and forecasts with 1Weather: Widget Forecast Radar, which combines a groundbreaking UI with a power set of weather tools.
-
Page 191: Calendar
2. Tap keys for calculations. Calculation results appear. Tip: To use the scientific calculator, make sure Auto rotate is turned on (drag the notification panel down and tap Auto rotate) and rotate the screen to the landscape orientation. Keys for the scientific calculator appear. Calendar Use Calendar to create and manage events, meetings, and appointments.
-
Page 192: Add An Event To The Calendar
Boost Zone Stay connected to all the latest news and information from Boost. Included here are news, feedback, featured applications and tips/tricks for your device. ■ From home, tap Apps > Boost Zone boostTV Watch live and on demand entertainment from popular broadcast and cable networks, news channels and primetime TV shows.
-
Page 192: Add An Event To The Calendar
● Change Calendar View: From the Calendar, tap the drop-down menu in the upper left corner, and then tap Year, Month, Week, Day, or Tasks to change the current view. ● View the Next/Previous Time Period (Year/Month/Week/Day view): From the Calendar, flick the screen left or right.
-
Page 193
2. Tap keys for calculations. Calculation results appear. Tip: To use the scientific calculator, make sure Auto rotate is turned on (drag the notification panel down and tap Auto rotate) and rotate the screen to the landscape orientation. Keys for the scientific calculator appear. Calendar Use Calendar to create and manage events, meetings, and appointments. -
Page 193
2. Tap New The add event window opens. Enter an event title, start date/time, end date/time, and more, and then tap Save. The event is added to your Calendar. Selecting a Calendar ■ If you have more than one calendar, select a calendar by tapping the current Calendar on the Add Event screen. -
Page 194: View Calendar Events
● Change Calendar View: From the Calendar, tap the drop-down menu in the upper left corner, and then tap Year, Month, Week, Day, or Tasks to change the current view. ● View the Next/Previous Time Period (Year/Month/Week/Day view): From the Calendar, flick the screen left or right.
-
Page 194: View Calendar Events
Calendar application on your phone. For more information about creating and managing multiple Google Calendars, visit calendar.google.com. Select Samsung Calendar to create an event that will sync with your Samsung account. Select your Outlook or Exchange account to create an event that will sync with these account types.
-
Page 195: Share Calendar Events
2. Tap New The add event window opens. Enter an event title, start date/time, end date/time, and more, and then tap Save. The event is added to your Calendar. Selecting a Calendar ■ If you have more than one calendar, select a calendar by tapping the current Calendar on the Add Event screen.
-
Page 195: Share Calendar Events
1. From home, tap Apps > Calendar The Calendar app opens. 2. Tap a date and then tap an event. The event details appear. Tap the event to view details and edit the event. Share Calendar Events Once you have created a Calendar event, you can share it with others using a variety of methods.
-
Page 196
Calendar application on your phone. For more information about creating and managing multiple Google Calendars, visit calendar.google.com. Select Samsung Calendar to create an event that will sync with your Samsung account. Select your Outlook or Exchange account to create an event that will sync with these account types. -
Page 196
1. From home, tap Apps > Calendar 2. Tap a date and then tap an event to see its details. Apps and Features… -
Page 197: Sync Calendars
1. From home, tap Apps > Calendar The Calendar app opens. 2. Tap a date and then tap an event. The event details appear. Tap the event to view details and edit the event. Share Calendar Events Once you have created a Calendar event, you can share it with others using a variety of methods.
-
Page 197: Sync Calendars
3. From the event details screen, tap Share. 4. Choose a Share as option (Event file (VCS) or Text). 5. Select a sharing method and follow the prompts to send the Event information. Sync Calendars You can select which calendars you would like to sync on your phone, along with what types of information you want to sync.
-
Page 198
1. From home, tap Apps > Calendar 2. Tap a date and then tap an event to see its details. Apps and Features… -
Page 198
1. From home, tap Apps > Calendar The Calendar app opens. 2. Tap More > Manage calendars. Apps and Features… -
Page 199: Synchronize An Exchange Activesync Calendar
3. From the event details screen, tap Share. 4. Choose a Share as option (Event file (VCS) or Text). 5. Select a sharing method and follow the prompts to send the Event information. Sync Calendars You can select which calendars you would like to sync on your phone, along with what types of information you want to sync.
-
Page 199: Synchronize An Exchange Activesync Calendar
3. Select sync options by tapping ON/OFF next to each item. The sync settings have been updated. Synchronize an Exchange ActiveSync Calendar If you have set up a Microsoft Exchange ActiveSync account on your phone, you can also synchronize Exchange ActiveSync calendar events on your phone.
-
Page 200
1. From home, tap Apps > Calendar The Calendar app opens. 2. Tap More > Manage calendars. Apps and Features… -
Page 200
1. From home, tap Apps > Calendar The Calendar app opens. 2. Tap More > Settings to configure the following options: First day of week: Choose a day to start each calendar week. Show week numbers: Enable or disable display of week numbers on the calendar. … -
Page 201: Callwatch
3. Select sync options by tapping ON/OFF next to each item. The sync settings have been updated. Synchronize an Exchange ActiveSync Calendar If you have set up a Microsoft Exchange ActiveSync account on your phone, you can also synchronize Exchange ActiveSync calendar events on your phone.
-
Page 201: Callwatch
Notifications: • Notification sound: Choose a sound for calendar event notifications. • Vibration: Enable or disable vibration, to play for calendar event notifications. Set default reminders: Set default reminders for Events and All-day events. Lock time zone: When enabled, event times will be locked to the time zone you select. Times and dates will not change, even if you travel to another time zone.
-
Page 202
1. From home, tap Apps > Calendar The Calendar app opens. 2. Tap More > Settings to configure the following options: First day of week: Choose a day to start each calendar week. Show week numbers: Enable or disable display of week numbers on the calendar. … -
Page 202
1. From home, tap Apps > Settings 2. Tap Date and time Apps and Features… -
Page 203: Set Alarms
• Notification sound: Choose a sound for calendar event notifications. • Vibration: Enable or disable vibration, to play for calendar event notifications. Set default reminders: Set default reminders for Events and All-day events. Lock time zone: When enabled, event times will be locked to the time zone you select. Times and dates will not change, even if you travel to another time zone.
-
Page 203: Set Alarms
3. Set available date and time options. To set the date and time, tap ON/OFF to turn Automatic date and time off. To select a time zone, tap ON/OFF to turn Automatic time zone off. Your date and time settings are applied and saved. Set Alarms Set multiple alarms using your phone’s Clock app.
-
Page 204: World Clock
1. From home, tap Apps > Settings 2. Tap Date and time Apps and Features…
-
Page 204: World Clock
2. Tap Add. 3. Set the alarm options, including time, days, and repeat pattern. 4. When finished, tap Save. You will see the alarm icon in the status bar. Phone at Alarm Time ● At the set alarm time, the phone sounds the alarm and/or vibrates. ●…
-
Page 205: Stopwatch
3. Set available date and time options. To set the date and time, tap ON/OFF to turn Automatic date and time off. To select a time zone, tap ON/OFF to turn Automatic time zone off. Your date and time settings are applied and saved. Set Alarms Set multiple alarms using your phone’s Clock app.
-
Page 205: Stopwatch
1. From home, tap Apps > Clock > World clock. 2. Tap Add to add another city. 3. Swipe the list or tap the Search field to search for a city. 4. Tap a city to add it to the World clock list. 5.
-
Page 206: Timer
2. Tap Add. 3. Set the alarm options, including time, days, and repeat pattern. 4. When finished, tap Save. You will see the alarm icon in the status bar. Phone at Alarm Time ● At the set alarm time, the phone sounds the alarm and/or vibrates. ●…
-
Page 206: Timer
2. Tap Start to begin timing. 3. Tap Stop to stop timing. Additional options include Lap to keep track of laps, Resume to continue timing, and Reset to reset the stopwatch to zero. Timer The timer provides a countdown timer for up to 99 hours, 59 minutes, and 59 seconds. 1.
-
Page 207: Gadget Guardian
1. From home, tap Apps > Clock > World clock. 2. Tap Add to add another city. 3. Swipe the list or tap the Search field to search for a city. 4. Tap a city to add it to the World clock list. 5.
-
Page 207: Gadget Guardian
From home, tap Apps > Gadget Guardian Galaxy Apps Discover apps designed exclusively for your Galaxy phone. Note: You must sign in to a Samsung account in order to download Galaxy Apps. ■ From home, tap Apps > Galaxy Apps…
-
Page 208
2. Tap Start to begin timing. 3. Tap Stop to stop timing. Additional options include Lap to keep track of laps, Resume to continue timing, and Reset to reset the stopwatch to zero. Timer The timer provides a countdown timer for up to 99 hours, 59 minutes, and 59 seconds. 1. From home, tap Apps >… -
Page 208
While viewing pictures in the Gallery, scroll up the screen to view more albums. Simply tap an album to view the photos or videos in that album. If you have downloaded any photos and videos, these will be placed in the All downloads album. 1. -
Page 209: Google Hangouts
From home, tap Apps > Gadget Guardian Galaxy Apps Discover apps designed exclusively for your Galaxy phone. Note: You must sign in to a Samsung account in order to download Galaxy Apps. ■ From home, tap Apps > Galaxy Apps…
-
Page 209: Google Hangouts
Google Hangouts Hangouts is Google’s instant messaging service. Use to communicate with other Hangout users, as well as for video calling. Log in to a Google Account beforehand (see Google Account). Using Hangouts 1. From home, tap Apps > Google >…
-
Page 210: Google Maps
While viewing pictures in the Gallery, scroll up the screen to view more albums. Simply tap an album to view the photos or videos in that album. If you have downloaded any photos and videos, these will be placed in the All downloads album. 1. From home, tap Apps >…
-
Page 210: Google Maps
3. Type a name, email, number, or circle, or select a contact from the list. 4. Type a message or tap to start a video chat. A chat window or a video chat window opens. Each time text is entered, the corresponding friend appears. …
-
Page 211
Google Hangouts Hangouts is Google’s instant messaging service. Use to communicate with other Hangout users, as well as for video calling. Log in to a Google Account beforehand (see Google Account). Using Hangouts 1. From home, tap Apps > Google >… -
Page 211
View Maps of Specified Places Use Google Maps to locate and map a specific address or destination. 1. From home, tap Apps > Maps Google Maps opens. Note: The first time you access Maps, you may be prompted to accept the Terms of Service and Privacy Policy. -
Page 212: Google Play Movies & Tv
3. Type a name, email, number, or circle, or select a contact from the list. to start a video chat. 4. Type a message or tap A chat window or a video chat window opens. Each time text is entered, the corresponding friend appears. …
-
Page 212: Google Play Movies & Tv
3. Enter an address, city, facility name, and more, and then tap a candidate in the results list. A map of the specified location opens. Google Maps Options ● Viewing Current Location: From the Maps app, tap ● Obtain Useful Area Information for Current Location: Tap the Search field, enter the information you are looking for, and then tap a result to view it.
-
Page 213: Google Play Music
View Maps of Specified Places Use Google Maps to locate and map a specific address or destination. 1. From home, tap Apps > Maps Google Maps opens. Note: The first time you access Maps, you may be prompted to accept the Terms of Service and Privacy Policy.
-
Page 213: Google Play Music
Google Play Music The Google Play Music app lets you browse, shop, and play back songs purchased from Google Play as well as songs you have loaded from your own music library. The music you choose is automatically stored in your Google Play Music library and instantly ready to play by streaming or download. Note: For information about loading music onto your phone, see Transfer Files Between Your Phone and Computer.
-
Page 214
3. Enter an address, city, facility name, and more, and then tap a candidate in the results list. A map of the specified location opens. Google Maps Options ● Viewing Current Location: From the Maps app, tap ● Obtain Useful Area Information for Current Location: Tap the Search field, enter the information you are looking for, and then tap a result to view it. -
Page 214
Feature Description Music list View current playlist or queue Options menu Access the options menu. Display music images and album names (if available). Music image/album name Shuffle playlist Shuffle the current playlist or queue. Song length The length of the song. Rate (thumbs up/thumbs down) Rate the current song. -
Page 215: Google Search
Google Play Music The Google Play Music app lets you browse, shop, and play back songs purchased from Google Play as well as songs you have loaded from your own music library. The music you choose is automatically stored in your Google Play Music library and instantly ready to play by streaming or download. Note: For information about loading music onto your phone, see Transfer Files Between Your Phone and Computer.
-
Page 215: Google Search
Create Playlists in Google Play Music Organize music into playlists to fit every occasion. 1. From home, tap Apps > Google > Play Music The Play Music app opens to the Listen Now screen. 2. Tap Menu to view your library or playlists, or to access Google Play Music online. 3.
-
Page 216: Use Google Search
Feature Description Music list View current playlist or queue Options menu Access the options menu. Music image/album name Display music images and album names (if available). Shuffle playlist Shuffle the current playlist or queue. The length of the song. Song length Rate (thumbs up/thumbs down) Rate the current song.
-
Page 216: Use Google Search
Use Google Search Type search terms in the Google Search bar to find information on your phone and around the globe. 1. From home, tap the Google search bar or tap Apps > Google > Google The Search window opens. …
-
Page 217: Use Google Voice Search
Create Playlists in Google Play Music Organize music into playlists to fit every occasion. 1. From home, tap Apps > Play Music The Play Music app opens to the Listen Now screen. 2. Tap Menu to view your library or playlists, or to access Google Play Music online. 3.
-
Page 217: Use Google Voice Search
To search by voice, tap in the search bar and speak your search terms. Google Search Options ● Changing Search Information: In the search results window, tap Menu > Settings > Phone search and select where to search. ● Using Google Now: Google Now automatically searches for information based on search keywords used, your current location, and more, and presents search results in the search screen.
-
Page 218: Instagram
Use Google Search Type search terms in the Google Search bar to find information on your phone and around the globe. 1. From home, tap the Google search bar or tap Apps > Google > Google The Search window opens. …
-
Page 218: Instagram
Instagram Capture and share photos and videos with your friends. Customize what you capture, and then share it on your feed or post it directly to your friends. Located in the Social folder in the apps list. Install Instagram 1. From home, tap Apps >…
-
Page 219: Messaging Plus
To search by voice, tap in the search bar and speak your search terms. Google Search Options ● Changing Search Information: In the search results window, tap Menu > Settings > Phone search and select where to search. ● Using Google Now: Google Now automatically searches for information based on search keywords used, your current location, and more, and presents search results in the search screen.
-
Page 219: Messaging Plus
2. Tap and enter your memo title and text. 3. Tap Save. The memo is saved. Messaging Plus Messaging Plus provides high quality video calling, group chat, and media sharing along with easy registration, a full emoji keyboard, and other convenient features. ■…
-
Page 220: Microsoft Excel
Instagram Capture and share photos and videos with your friends. Customize what you capture, and then share it on your feed or post it directly to your friends. Located in the Social folder in the apps list. Install Instagram 1. From home, tap Apps >…
-
Page 220: Microsoft Excel
2. Follow the prompts to log in with your Facebook account. See Facebook. Microsoft Excel Create and share spreadsheets quickly and easily with Microsoft Excel. ■ From home, tap Apps > Microsoft Apps > Excel Note: The first time you access Microsoft Excel on your phone, you may be prompted to update the app using Google Play.
-
Page 221: My Files
2. Tap and enter your memo title and text. 3. Tap Save. The memo is saved. Messaging Plus Messaging Plus provides high quality video calling, group chat, and media sharing along with easy registration, a full emoji keyboard, and other convenient features. ■…
-
Page 221: My Files
My Files My Files allows you to manage your sounds, images, videos, Bluetooth files, Android files, and other data in one convenient location. This application allows you to launch a file if the associated application is already on your phone. 1.
-
Page 222: Pages Manager
2. Follow the prompts to log in with your Facebook account. See Facebook. Microsoft Excel Create and share spreadsheets quickly and easily with Microsoft Excel. ■ From home, tap Apps > Microsoft Apps > Excel Note: The first time you access Microsoft Excel on your phone, you may be prompted to update the app using Google Play.
-
Page 222: Pages Manager
Samsung Milk Music Samsung Milk Music is a streaming radio service that offers a simple way to find the music that is right for you. With a library of over 13 million songs and 200+ stations, the interactive dial makes it easy to skim through stations, to find the perfect soundtrack for the moment.
-
Page 223: Video
Video Play videos stored on your phone, or from your other devices (you must sign in to your Samsung account to play videos synced from your other devices). 1. From home, tap Apps > Video 2. Scroll through the videos stored on your phone. After a few seconds, each video thumbnail begins playing a preview of the clip.
-
Page 223: Video
My Files My Files allows you to manage your sounds, images, videos, Bluetooth files, Android files, and other data in one convenient location. This application allows you to launch a file if the associated application is already on your phone. 1.
-
Page 224
To cancel the recording, tap Back , and then tap Discard. To block incoming calls while recording, tap Call rejection Play Back a Voice Recording 1. From a home screen, Apps > Tools > Voice Recorder 2. Tap Recordings 3. -
Page 224
Samsung Milk Music Samsung Milk Music is a streaming radio service that offers a simple way to find the music that is right for you. With a library of over 13 million songs and 200+ stations, the interactive dial makes it easy to skim through stations, to find the perfect soundtrack for the moment. -
Page 225: Youtube
2. Tap Recordings to view a list of recordings. 3. Tap More for options: Edit: Tap on recordings to select them. After selection, you can delete or rename the recording. Share: Select voice recordings to share. Delete a Voice Recording 1.
-
Page 225: Youtube
2. Scroll through the videos stored on your phone. After a few seconds, each video thumbnail begins playing a preview of the clip. 3. Tap a video to view it. Voice Recorder The Voice recorder allows you to record an audio file up to one minute long and then immediately share it.
-
Page 226
2. Tap Account Your account menu appears. 3. Tap Upload to select a video from your phone. Enter a title, description, and tags, and select a privacy setting. 4. Tap Upload The video is uploaded to your YouTube channel. Apps and Features… -
Page 226
2. Tap Recordings 3. Tap a recording to play it back. Share a Voice Recording 1. From home, tap Apps > Tools > Voice Recorder 2. Tap Recordings , and then touch and hold on a recording to display options. 3. Tap More >… -
Page 227: Connectivity
Connectivity The following topics address your phone’s connectivity options, including USB file transfer and tethering, Wi-Fi, Bluetooth, IR connectivity, and more. Transfer Files Between Your Phone and a Computer You can use the supplied USB connector to connect your phone directly to your computer and transfer music, pictures, and other content files.
-
Page 227: Connectivity
Delete a Voice Recording 1. From home, tap Apps > Tools > Voice Recorder 2. Tap Recordings , and then touch and hold on a recording to select it. 3. Tap Delete > Delete. YouTube View videos uploaded to YouTube and upload your own videos to your YouTube account. View YouTube Videos You can use the YouTube app to view videos on YouTube even if you aren’t signed in to a YouTube account.
-
Page 228: Wi-Fi
Note: The first time you attach the phone to a computer, the device driver software will automatically install on the computer. 2. Drag the status bar down to display the notification panel. 3. You will see either Connected as a media device or Connected as a camera. …
-
Page 228: Wi-Fi
Connectivity The following topics address your phone’s connectivity options, including USB file transfer and tethering, Wi-Fi, Bluetooth, IR connectivity, and more. Transfer Files Between Your Phone and a Computer You can use the supplied USB connector to connect your phone directly to your computer and transfer music, pictures, and other content files.
-
Page 229: Turn Wi-Fi On And Connect To A Wireless Network
The availability and range of the Wi-Fi signal depends on a number of factors, including infrastructure and other objects through which the signal passes. Turn Wi-Fi On and Connect to a Wireless Network Use the Connections setting menu to enable your phone’s Wi-Fi feature and connect to an available Wi-Fi network.
-
Page 229: Turn Wi-Fi On And Connect To A Wireless Network
Note: The first time you attach the phone to a computer, the device driver software will automatically install on the computer. 2. Drag the status bar down to display the notification panel. 3. You will see either Connected as a media device or Connected as a camera. …
-
Page 230: Wi-Fi Settings
To disable Wi-Fi, tap ON/OFF again. 3. Tap a Wi-Fi network to connect, enter the password (if it is not an open network), and then tap Connect. Your phone is connected to the Wi-Fi network. You will see in the status bar.
-
Page 230: Wi-Fi Settings
The availability and range of the Wi-Fi signal depends on a number of factors, including infrastructure and other objects through which the signal passes. Turn Wi-Fi On and Connect to a Wireless Network Use the Connections setting menu to enable your phone’s Wi-Fi feature and connect to an available Wi-Fi network.
-
Page 231
1. From home, tap Apps > Settings > Wi-Fi The Wi-Fi settings menu appears. 2. Tap ON/OFF to turn Wi-Fi on. Wi-Fi is enabled. You will see the names and security settings of in-range Wi-Fi networks. To disable Wi-Fi, tap ON/OFF again. Connectivity… -
Page 231
To disable Wi-Fi, tap ON/OFF again. 3. Tap a Wi-Fi network to connect, enter the password (if it is not an open network), and then tap Connect. Your phone is connected to the Wi-Fi network. You will see in the status bar. -
Page 232: Disconnect Wi-Fi
3. Tap More > Advanced. The advanced Wi-Fi settings menu appears. 4. Configure your Wi-Fi settings. Your Wi-Fi settings changes are saved. Disconnect Wi-Fi You may want to remove a connected Wi-Fi network. 1. From home, tap Apps >…
-
Page 232: Disconnect Wi-Fi
1. From home, tap Apps > Settings > Wi-Fi The Wi-Fi settings menu appears. 2. Tap ON/OFF to turn Wi-Fi on. Wi-Fi is enabled. You will see the names and security settings of in-range Wi-Fi networks. To disable Wi-Fi, tap ON/OFF again. Connectivity…
-
Page 233: Wi-Fi Direct
2. Press and hold the name of the connected access point, and then tap Forget network. Wi-Fi is disconnected and the network settings are removed. After “forgetting” an access point, you need to enter the correct password (and other network …
-
Page 233: Wi-Fi Direct
3. Tap More > Advanced. The advanced Wi-Fi settings menu appears. 4. Configure your Wi-Fi settings. Your Wi-Fi settings changes are saved. Disconnect Wi-Fi You may want to remove a connected Wi-Fi network. 1. From home, tap Apps >…
-
Page 234
2. Tap ON/OFF to turn Wi-Fi on. Wi-Fi is enabled. You will see the names and security settings of in-range Wi-Fi networks. 3. Tap Wi-Fi Direct. The Wi-Fi Direct settings menu appears. Wi-Fi Direct and Wi-Fi are unavailable at the same time. 4. -
Page 234
2. Press and hold the name of the connected access point, and then tap Forget network. Wi-Fi is disconnected and the network settings are removed. After “forgetting” an access point, you need to enter the correct password (and other network settings, if required) to reconnect. -
Page 235: Bluetooth
If a connection is not accepted after a certain period, the connection request is cancelled. To stop a connection, tap the device name on the Wi-Fi Direct list. Bluetooth Bluetooth is a short-range communications technology that allows you to connect wirelessly to a number of Bluetooth devices, such as headsets and hands-free car kits, and Bluetooth-enabled handhelds, computers, printers, and wireless phones.
-
Page 235: Bluetooth
2. Tap ON/OFF to turn Wi-Fi on. Wi-Fi is enabled. You will see the names and security settings of in-range Wi-Fi networks. 3. Tap Wi-Fi Direct. The Wi-Fi Direct settings menu appears. Wi-Fi Direct and Wi-Fi are unavailable at the same time. 4.
-
Page 236
1. From home, tap Apps > Settings > Bluetooth The Bluetooth settings open. 2. Tap ON/OFF to turn Bluetooth on. Bluetooth is enabled. To disable Bluetooth, tap ON/OFF again. Tip: You can also turn Bluetooth on or off with the Quick settings button in the notification panel. Drag the status bar down to display the notification panel and then tap Bluetooth to turn Bluetooth on or off. -
Page 236
If a connection is not accepted after a certain period, the connection request is cancelled. To stop a connection, tap the device name on the Wi-Fi Direct list. Bluetooth Bluetooth is a short-range communications technology that allows you to connect wirelessly to a number of Bluetooth devices, such as headsets and hands-free car kits, and Bluetooth-enabled handhelds, computers, printers, and wireless phones. -
Page 237: Pair Bluetooth Devices
1. From home, tap Apps > Settings > Bluetooth The Bluetooth settings open. 2. Tap ON/OFF to turn Bluetooth on. Bluetooth is enabled. To disable Bluetooth, tap ON/OFF again. Tip: You can also turn Bluetooth on or off with the Quick settings button in the notification panel. Drag the status bar down to display the notification panel and then tap Bluetooth to turn Bluetooth on or off.
-
Page 237: Pair Bluetooth Devices
Pair Bluetooth Devices Search for and pair nearby Bluetooth devices. Saved Bluetooth devices can be connected simply. Note: Before pairing, turn on Bluetooth on the other device and make sure it is visible or discoverable. To pair Bluetooth devices: 1. From home, tap Apps >…
-
Page 238
Pair Bluetooth Devices Search for and pair nearby Bluetooth devices. Saved Bluetooth devices can be connected simply. Note: Before pairing, turn on Bluetooth on the other device and make sure it is visible or discoverable. To pair Bluetooth devices: 1. From home, tap Apps >… -
Page 238
The Bluetooth device is paired to your phone. Unpairing from a Paired Device 1. From the Bluetooth settings menu, tap Settings next to the paired device you wish to unpair. 2. Tap Unpair. The device is unpaired from your phone. To make another connection with the device, you will need to pair again. -
Page 239: Connect To A Paired Bluetooth Device
The Bluetooth device is paired to your phone. Unpairing from a Paired Device 1. From the Bluetooth settings menu, tap Settings next to the paired device you wish to unpair. 2. Tap Unpair. The device is unpaired from your phone. To make another connection with the device, you will need to pair again.
-
Page 239: Connect To A Paired Bluetooth Device
Connect to a Paired Bluetooth Device You can listen to music over a Bluetooth stereo headset, or have hands-free conversations using a compatible Bluetooth headset or car kit. It is the same procedure to set up stereo audio and hands-free devices.
-
Page 240: Share Information Using Bluetooth
Connect to a Paired Bluetooth Device You can listen to music over a Bluetooth stereo headset, or have hands-free conversations using a compatible Bluetooth headset or car kit. It is the same procedure to set up stereo audio and hands-free devices.
-
Page 240: Share Information Using Bluetooth
The pairing and connection status is displayed below the device’s name in the Bluetooth devices section. When the device is connected to your phone, the Bluetooth connected icon is displayed in the status bar. Depending on the type of device you have connected, you can then start using the headset or car kit to listen to music or make and receive phone calls.
-
Page 241
The pairing and connection status is displayed below the device’s name in the Bluetooth devices section. When the device is connected to your phone, the Bluetooth connected icon is displayed in the status bar. Depending on the type of device you have connected, you can then start using the headset or car kit to listen to music or make and receive phone calls. -
Page 241
You will see the Contacts list. 2. Tap a contact to send. 3. Tap More > Share contact > Bluetooth. Connectivity… -
Page 242: Receiving Data Using Bluetooth
You will see the Contacts list. 2. Tap a contact to send. 3. Tap More > Share contact > Bluetooth. Connectivity…
-
Page 242: Receiving Data Using Bluetooth
4. Tap a paired device to receive the data. The contact information is sent. If you see a message to confirm, follow the prompts. Receiving Data Using Bluetooth Transfer files to your device using Bluetooth. Note: Your phone must be paired with another Bluetooth-enabled device in order to send information. 1.
-
Page 243
4. Tap a paired device to receive the data. The contact information is sent. If you see a message to confirm, follow the prompts. Receiving Data Using Bluetooth Transfer files to your device using Bluetooth. Note: Your phone must be paired with another Bluetooth-enabled device in order to send information. 1. When another device attempts to send a file to your phone using Bluetooth, you will see a request to accept the file. -
Page 243
When you open a received file, what happens next depends on the file type: • Media files and documents are usually opened directly in a compatible application. • For a vCalendar file, select the calendar where you want to save the event, and then tap Import. -
Page 244: Settings
When you open a received file, what happens next depends on the file type: • Media files and documents are usually opened directly in a compatible application. • For a vCalendar file, select the calendar where you want to save the event, and then tap Import.
-
Page 244: Settings
Settings The following topics provide an overview of items you can change using your phone’s Settings menus. Basic Settings to access your phone’s settings menu. From home, tap App > Settings The table below outlines the top-level settings categories. Category Description Enable and set Wi-Fi options.
-
Page 245: Access Settings
Settings The following topics provide an overview of items you can change using your phone’s Settings menus. Basic Settings to access your phone’s settings menu. From home, tap App > Settings The table below outlines the top-level settings categories. Category Description Wi-Fi Enable and set Wi-Fi options.
-
Page 245: Access Settings
Set accessibility options such as screen magnification, hearing aid Accessibility compatibility, and more. Accounts Set up accounts such as Samsung, Google, and more. Set up backup options for your phone, as well as resetting the phone to its Backup and reset factory defaults.
-
Page 246
Set accessibility options such as screen magnification, hearing aid Accessibility compatibility, and more. Accounts Set up accounts such as Samsung, Google, and more. Set up backup options for your phone, as well as resetting the phone to its Backup and reset factory defaults. -
Page 246
Slide the status bar down to open the notification panel, and then tap Settings The settings menu opens. Customize Quick Settings At the top of the main settings menu is a section of Quick settings. You can include up to nine primary settings options in the Quick settings menu. -
Page 247: Wi-Fi Settings Menu
Slide the status bar down to open the notification panel, and then tap Settings The settings menu opens. Customize Quick Settings At the top of the main settings menu is a section of Quick settings. You can include up to nine primary settings options in the Quick settings menu.
-
Page 247: Wi-Fi Settings Menu
2. Tap Edit. 3. Check or uncheck options to include in Quick settings. The counter at the top right corner indicates how many items have been selected out of the maximum of 9. 4. Tap the Back key to return to the main settings menu. Wi-Fi Settings Menu The Wi-Fi settings menu lets you turn Wi-Fi on or off, set up and connect to available Wi-Fi networks, and configure advanced Wi-Fi options.
-
Page 248
2. Tap Edit. 3. Check or uncheck options to include in Quick settings. The counter at the top right corner indicates how many items have been selected out of the maximum of 9. 4. Tap the Back key to return to the main settings menu. Wi-Fi Settings Menu The Wi-Fi settings menu lets you turn Wi-Fi on or off, set up and connect to available Wi-Fi networks, and configure advanced Wi-Fi options. -
Page 248
The Wi-Fi settings menu appears. 2. Tap ON/OFF to turn Wi-Fi on. Wi-Fi is enabled. You will see the names and security settings of in-range Wi-Fi networks. To disable Wi-Fi, tap ON/OFF again. 3. Tap a Wi-Fi network, enter the password, and tap Connect. … -
Page 249
The Wi-Fi settings menu appears. 2. Tap ON/OFF to turn Wi-Fi on. Wi-Fi is enabled. You will see the names and security settings of in-range Wi-Fi networks. To disable Wi-Fi, tap ON/OFF again. 3. Tap a Wi-Fi network, enter the password, and tap Connect. … -
Page 249
Connect to a Wi-Fi Network Using WPS Wi-Fi Protected Setup (WPS) is a network security standard that allows you to easily secure a wireless network connection between your phone and a router. To connect using a WPS button: 1. From Wi-Fi settings, tap More > WPS push button. 2. -
Page 250: Bluetooth Settings
Connect to a Wi-Fi Network Using WPS Wi-Fi Protected Setup (WPS) is a network security standard that allows you to easily secure a wireless network connection between your phone and a router. To connect using a WPS button: 1. From Wi-Fi settings, tap More > WPS push button. 2. Tap the WPS button on your router.
-
Page 250: Bluetooth Settings
Bluetooth Settings Your phone’s Bluetooth capabilities let you use wireless headsets, send and receive pictures and files, and more. For details on your phone’s Bluetooth usage, see Bluetooth. Access Bluetooth Settings ■ From home, tap Apps > Settings > Bluetooth …
-
Page 251: Hotspot Settings
Bluetooth Settings Your phone’s Bluetooth capabilities let you use wireless headsets, send and receive pictures and files, and more. For details on your phone’s Bluetooth usage, see Bluetooth. Access Bluetooth Settings ■ From home, tap Apps > Settings > Bluetooth …
-
Page 251: Hotspot Settings
● Cancelling pairing: From Bluetooth settings, tap Settings next to a paired device name, and then tap Unpair. This setting is available when Bluetooth is enabled. ● Enable service from paired device: From Bluetooth settings, tap Settings next to a paired device name, and then tap the listing under Use for.
-
Page 252: Configure Hotspot
1. From home, tap Apps > Settings > Mobile Hotspot The Hotspot settings open. 2. Tap ON/OFF to turn Hotspot on or off. Note: Turning on Hotspot will turn off Wi-Fi. Configure Hotspot Set up Hotspot to your preferences. 1.
-
Page 253: Allowed Devices
1. From home, tap Apps > Settings > Mobile Hotspot The Hotspot settings open. 2. Tap ON/OFF to turn Hotspot on or off. Note: Turning on Hotspot will turn off Wi-Fi. Configure Hotspot Set up Hotspot to your preferences. 1.
-
Page 253: Allowed Devices
Configure Hotspot: • Network name: View and change the name of your Mobile Hotspot. • Hide my device: When enabled, your Mobile Hotspot is not visible to other Wi-Fi devices during a scan. Other devices can still connect to your Mobile Hotspot, but will have to set up the connection manually with your Network SSID and Password.
-
Page 254
Configure Hotspot: • Network name: View and change the name of your Mobile Hotspot. • Hide my device: When enabled, your Mobile Hotspot is not visible to other Wi-Fi devices during a scan. Other devices can still connect to your Mobile Hotspot, but will have to set up the connection manually with your Network SSID and Password. -
Page 254
Note: Using the Hotspot feature consumes battery power and uses data services. 1. From home, tap Apps > Settings > Mobile Hotspot 2. Tap More > Allowed devices. 3. Tap Add, and then enter the other device’s Device name and MAC address. Consult the other device’s settings to find these details. -
Page 255: Airplane Mode
Note: Using the Hotspot feature consumes battery power and uses data services. 1. From home, tap Apps > Settings > Mobile Hotspot 2. Tap More > Allowed devices. 3. Tap Add, and then enter the other device’s Device name and MAC address. Consult the other device’s settings to find these details.
-
Page 255: Airplane Mode
4. Tap OK to add the device to the Allowed devices list. Airplane Mode When you enable Airplane mode, your phone disconnects from all networks, meaning you cannot use make calls, send or receive messages, or access the Internet. It also turns off other connectivity features, such as Wi-Fi and Bluetooth.
-
Page 256: Data Usage Settings
1. From home, tap Apps > Settings > Airplane mode 2. Tap ON/OFF to enable Airplane mode. Note: You can also enable or disable Airplane Mode through the notification panel Quick settings (drag down the status bar and tap Airplane mode > Turn on), or through the Power/Lock key (press and hold the Power/Lock key, and then tap Airplane mode >…
-
Page 257
1. From home, tap Apps > Settings > Airplane mode 2. Tap ON/OFF to enable Airplane mode. Note: You can also enable or disable Airplane Mode through the notification panel Quick settings (drag down the status bar and tap Airplane mode > Turn on), or through the Power/Lock key (press and hold the Power/Lock key, and then tap Airplane mode >… -
Page 257
■ From home, tap Apps > Settings > Data usage The data usage window opens. Data Usage Settings Options ● Mobile data: Tap ON/OFF next to Mobile data. ● Limit mobile data usage: Tap ON/OFF next to Limit mobile data usage, and then drag the horizontal limit slider up or down to set the data usage limit. -
Page 258: Mobile Networks Settings
■ From home, tap Apps > Settings > Data usage The data usage window opens. Data Usage Settings Options ● Mobile data: Tap ON/OFF next to Mobile data. ● Limit mobile data usage: Tap ON/OFF next to Limit mobile data usage, and then drag the horizontal limit slider up or down to set the data usage limit.
-
Page 258: Mobile Networks Settings
Mobile Networks Settings The Mobile networks settings menu allows you to configure your mobile network connections. Set options for network selection and data service. 1. From home, tap Apps > Settings > Mobile networks 2. Configure options: Network mode: Choose a preferred network mode. Available options depend on your phone’s features, but may include: CDMA, LTE/CDMA, GSM/UMTS, and Automatic (the recommended setting).
-
Page 259: Tethering Settings
Setting Description Set a default text messaging app. Default messaging app Access More Connection Options 1. From home, tap Apps > Settings > More connection settings 2. Set items. Your settings are saved and implemented. Tethering Settings Use Tethering to share your device’s Internet connection with a computer that connects to your device using USB cable or by Bluetooth.
-
Page 260: Printing
More Connection Settings The More connection settings menu provides access to additional network options, such as default messaging app, VPN, mobile networks, and printers (if available). More Connection Settings Options Setting Description Share your device’s mobile data connection using USB or Bluetooth. Tethering Set up printers to print from your phone.
-
Page 260: Printing
1. From home, tap Apps > Settings > More connection settings 2. Tap Tethering. Bluetooth tethering: Pair your device with the computer using Bluetooth. Consult the computer’s documentation for more information about configuring your computer to pair using Bluetooth. Tap Bluetooth tethering to turn tethering on. Printing You can print from your phone, using Wi-Fi, to an optional compatible printer (not included).
-
Page 261
Important: Use of the Tethering feature requires an additional subscription. Visit boostmobile.com learn more. Note: Using the tethering feature consumes battery power and uses data services. 1. From home, tap Apps > Settings > More connection settings 2. Tap Tethering. … -
Page 261
Add a Printer Before you can print to a printer, you must add and set it up on your phone. You will need to know the IP address of the printer; consult the printer’s documentation for this information. 1. From home, tap Apps >… -
Page 262: Set Up A Printer
Printing You can print from your phone, using Wi-Fi, to an optional compatible printer (not included). Your phone and the optional printer must be connected to the same Wi-Fi network. Add a Printer Before you can print to a printer, you must add and set it up on your phone. You will need to know the IP address of the printer;…
-
Page 262: Set Up A Printer
5. Tap More > Add printer > Add printer (or , depending on the plug-in), and then enter a name and the IP address of the printer. Set Up a Printer Add a printer to a print service and configure settings. Note: Below settings are examples only.
-
Page 263
3. Follow the prompts to download and install a print driver from the Google Play store. 4. Choose a print service from the list, and then tap ON/OFF to turn the service on or off. The service must be on to add a printer. 5. Tap More >… -
Page 263
1. From the Printing settings screen, select a print service from the list. 2. Tap ON/OFF to turn the service on. The service must be on to add a printer. Settings… -
Page 264: Virtual Private Networks (Vpn)
1. From the Printing settings screen, select a print service from the list. 2. Tap ON/OFF to turn the service on. The service must be on to add a printer. Settings 255…
-
Page 264: Virtual Private Networks (Vpn)
3. Tap More > Add printer and follow the prompts to add a printer. 4. Tap More > Printer settings to configure printer options. Available options may vary depending on the type of printer, and not all printers support all options. Virtual Private Networks (VPN) From your phone, you can add, set up, and manage virtual private networks (VPNs) that allow you to connect and access resources inside a secured local network, such as your corporate network.
-
Page 265: Set Up Secure Credential Storage
Before you can initiate a VPN connection, your phone must first establish a Wi-Fi or data connection. For information about setting up and using these connections on your phone, see Browser Turn Wi-Fi On and Connect to a Wireless Network. Set Up Secure Credential Storage If your network administrator instructs you to download and install security certificates, you must first set up the phone’s secure credential storage.
-
Page 266
Before you can initiate a VPN connection, your phone must first establish a Wi-Fi or data connection. For information about setting up and using these connections on your phone, see Browser Turn Wi-Fi On and Connect to a Wireless Network. Set Up Secure Credential Storage If your network administrator instructs you to download and install security certificates, you must first set up the phone’s secure credential storage. -
Page 266
3. Enter a new password (at least eight characters without any spaces) for the credential storage, scroll down and confirm the password, and then tap OK. 4. Select your display option for notifications on the lock screen, and then tap Done. … -
Page 267: Add A Vpn Connection
3. Enter a new password (at least eight characters without any spaces) for the credential storage, scroll down and confirm the password, and then tap OK. 4. Select your display option for notifications on the lock screen, and then tap Done. …
-
Page 267: Add A Vpn Connection
6. Tap Trust agents, and then tap your preferred system and user credentials. Your secure credentials storage is set. You can then download and install the certificates needed to access your local network. Your network administrator can tell you how to do this. Add a VPN Connection Use the More connection settings menu to add a VPN connection to your phone.
-
Page 268
6. Tap Trust agents, and then tap your preferred system and user credentials. Your secure credentials storage is set. You can then download and install the certificates needed to access your local network. Your network administrator can tell you how to do this. Add a VPN Connection Use the More connection settings menu to add a VPN connection to your phone. -
Page 268
2. Tap More > Add VPN, and then enter the information for the VPN you want to add. Information may include Name, Type, Server address, PPP encryption (MPPE), and advanced options. Set up all options according to the security details you have obtained from your network administrator. -
Page 269: Connect To A Vpn
2. Tap More > Add VPN, and then enter the information for the VPN you want to add. Information may include Name, Type, Server address, PPP encryption (MPPE), and advanced options. Set up all options according to the security details you have obtained from your network administrator.
-
Page 269: Connect To A Vpn
The VPN settings window appears. Connect to a VPN 1. From the VPNs section of the VPN setting window, tap the VPN that you want to connect to. 2. When prompted, enter your login credentials, and then tap Connect. …
-
Page 270: Default Messaging App Settings
The VPN settings window appears. Connect to a VPN 1. From the VPNs section of the VPN setting window, tap the VPN that you want to connect to. 2. When prompted, enter your login credentials, and then tap Connect. …
-
Page 270: Default Messaging App Settings
Disconnect from a VPN 1. Drag the status bar down to open the notification panel. 2. Tap the VPN connection to display the VPN connection window. 3. Tap Disconnect to disconnect from the VPN. Your phone disconnects from the VPN. Default Messaging App Settings If you have multiple messaging apps installed on your phone, you can choose the app your phone uses for messaging.
-
Page 271: Sounds And Notifications Settings
1. From home, tap Apps > Settings > More connection settings > Default messaging app. 2. Choose a messaging app. The default messaging app is set. Note: If you choose a default messaging app other than Messages (for example, Google Hangouts), you will not be able to use the standard Messages app unless you restore it as the default messaging app.
-
Page 272: Sound Mode
Sounds and Notifications Settings Overview The sounds and notifications settings menu allows you to configure the following options: Sound Setting Description Sound mode Set the sound mode for the phone (Sound, Vibrate, or Mute). Volume Set the volume for ringtones, media, system features, and more. Set your ringtones and notification sounds for your phone, apps, keypad, Ringtones and sounds and other features.
-
Page 273: Volume
2. Tap Sound mode, and then choose a mode: Sound: Your phone uses the sounds, vibrations, and volume levels you have chosen in Sound settings for notifications and alerts. Vibrate: Your phone vibrates for notifications and alerts. Mute: Your phone plays no sounds or vibrations.
-
Page 274: Ringtones And Sounds
2. Tap Volume and then drag the sliders to set the default volume for: Ringtone Media Notifications System Ringtones and Sounds Choose a ringtone for incoming calls. 1. From home, tap Apps > Settings > Sounds and notifications Settings…
-
Page 275: Add A Ringtone
2. Tap Volume and then drag the sliders to set the default volume for: Ringtone Media Notifications System Ringtones and Sounds Choose a ringtone for incoming calls. 1. From home, tap Apps > Settings > Sounds and notifications Settings…
-
Page 275: Add A Ringtone
2. Tap Ringtones and sounds for options: Ringtone: Select a default ringtone. Default notification sound: Choose a default sound for notifications. Messages notifications: Tones play and/or the phone vibrates when new messages arrives. Calendar notifications: Tones play and/or the phone vibrates to remind you of events. …
-
Page 276: Vibrations
1. From the Ringtones and sounds menu, tap Ringtone. 2. Scroll to the bottom of the list and tap Add ringtone 3. Select a source (OneDrive or Sound picker) for the ringtone. You will see a list of compatible songs or audio files. To load music on your phone, see Transfer Files between Your Phone and a Computer.
-
Page 277: Sound Quality And Effects
1. From home, tap Apps > Settings > Sounds and notifications 2. Tap Vibrations for options: Vibration pattern. Select a vibration pattern, or create a new one. Vibrate while ringing: The phone vibrates when ringing. Sound Quality and Effects Select options for sound quality while headphones or compatible Bluetooth headsets or speakers are connected.
-
Page 278: Notifications
1. From home, tap Apps > Settings > Sounds and notifications 2. Tap Sound quality and effects for options: Adapt Sound: Find the best sound quality for you and use it during calls and while playing music or videos. …
-
Page 279: Display Settings
1. From home, tap Apps > Settings > Sounds and notifications 2. Tap Sound quality and effects for options: Adapt Sound: Find the best sound quality for you and use it during calls and while playing music or videos. …
-
Page 279: Display Settings
1. From home, tap Apps > Settings > Sounds and notifications 2. Set notification sound options: Do not disturb: Silence all calls and alerts during scheduled times. You can allow exceptions. Notifications on lock screen: Choose whether to display sensitive content and notifications when the screen is locked.
-
Page 280
1. From home, tap Apps > Settings > Sounds and notifications 2. Set notification sound options: Do not disturb: Silence all calls and alerts during scheduled times. You can allow exceptions. Notifications on lock screen: Choose whether to display sensitive content and notifications when the screen is locked. -
Page 280
Display Setting Description Set a screen timeout duration. Screen timeout Note: Longer durations discharge the battery more quickly Select a screen display mode to optimize it for the content being Screen mode displayed. Select a screensaver to be displayed when the device is docked or Daydream sleeping. -
Page 281: Motions And Gestures
Display Setting Description Set a screen timeout duration. Screen timeout Note: Longer durations discharge the battery more quickly Select a screen display mode to optimize it for the content being Screen mode displayed. Select a screensaver to be displayed when the device is docked or Daydream sleeping.
-
Page 281: Motions And Gestures
Motions and Gestures Enable or disable motions and gestures which provide phone control by moving the phone or by gesturing. Access Motions and Gestures Settings 1. From home, tap Apps > Settings > Motions and gestures 2. Tap ON/OFF to turn on Smart alert, which vibrates the phone when picked up to notify you about missed calls and messages.
-
Page 282
Motions and Gestures Enable or disable motions and gestures which provide phone control by moving the phone or by gesturing. Access Motions and Gestures Settings 1. From home, tap Apps > Settings > Motions and gestures 2. Tap ON/OFF to turn on Smart alert, which vibrates the phone when picked up to notify you about missed calls and messages. -
Page 282
Apps Setting Description Check all apps. Check disabled apps. Tab is only available if you have disabled apps. Disabled Access the Application Manager 1. From home, tap Apps > Settings > Applications 2. Tap Application manager. 3. Tap items to view details. Settings… -
Page 283: Default Applications
Apps Setting Description Check all apps. Disabled Check disabled apps. Tab is only available if you have disabled apps. Access the Application Manager 1. From home, tap Apps > Settings > Applications 2. Tap Application manager. 3. Tap items to view details. Settings…
-
Page 283: Default Applications
Check your application settings condition and access additional options. Note: Depending on the app and its location, you may be able to force the app closed, uninstall or disable the app, clear cache and data, and more. Default Applications Set or clear default applications for certain built-in features of the phone.
-
Page 284: Wallpaper
Messages: Choose a default app for messaging. Clear defaults: Tap Clear to clear any defaults you may have set during phone use, such as YouTube to view a video or Maps to launch a Web address link. Note: If you choose a default messaging app other than Messages (Google Hangouts for example), you will not be able to use the Messages app unless you restore it as the default messaging app.
-
Page 285: Themes
3. Tap a wallpaper to preview it. 4. Tap Set as wallpaper to set the selected wallpaper for the screen or screens. Your wallpaper is changed. Themes Themes are packages of visual content that provide different wallpapers and icons for your phone. Change the Theme 1.
-
Page 286: Lock Screen And Security Settings
– or – Touch and hold an empty area on a home screen, and then tap Themes. 2. Tap a theme to view it. 3. To find other themes, tap Theme store. 4. To download a theme, tap the theme, and then tap Download. 5.
-
Page 287: Screen Lock
– or – Touch and hold an empty area on a home screen, and then tap Themes. 2. Tap a theme to view it. 3. To find other themes, tap Theme store. 4. To download a theme, tap the theme, and then tap Download. 5.
-
Page 287: Screen Lock
Setting Description Select items to show on the lock screen, like a Dual clock, the Weather, Show information and Owner information. Set your secure lock functions, such as Auto lock, and Lock instantly Secure lock settings with the Power/Lock key. Unlock effect Set the effect shown when the lock screen wakes up.
-
Page 288
Setting Description Select items to show on the lock screen, like a Dual clock, the Weather, Show information and Owner information. Set your secure lock functions, such as Auto lock, and Lock instantly Secure lock settings with the Power/Lock key. Set the effect shown when the lock screen wakes up. -
Page 288
● Pattern ● ● Password ● None Important: To protect your phone and data from unauthorized access, it is recommended that you use the highest security level available (Password protection). It is also recommended you frequently change your password to ensure the safety of your phone and personal data. Access Screen Lock Settings 1. -
Page 289
2. Tap Screen lock type. The Screen lock settings menu opens. Use Swipe to Unlock the Screen ■ From the Screen lock type menu, tap Swipe to save the setting. The screen lock is set. Settings… -
Page 290: Use A Screen Unlock Pattern
2. Tap Screen lock type. The Screen lock settings menu opens. Use Swipe to Unlock the Screen ■ From the Screen lock type menu, tap Swipe to save the setting. The screen lock is set. Settings…
-
Page 290: Use A Screen Unlock Pattern
Use a Screen Unlock Pattern 1. From the Screen lock type menu, tap Pattern. 2. Draw the screen unlock pattern by connecting at least four dots in a vertical, horizontal, or diagonal direction. Lift your finger from the screen when finished. …
-
Page 291
Use a Screen Unlock Pattern 1. From the Screen lock type menu, tap Pattern. 2. Draw the screen unlock pattern by connecting at least four dots in a vertical, horizontal, or diagonal direction. Lift your finger from the screen when finished. … -
Page 291
4. When prompted, draw the screen unlock pattern again, and then tap Confirm. The screen unlock pattern is saved. 5. Enter a backup PIN, tap Continue, re-enter the PIN, and tap OK to save your screen unlock pattern. Settings… -
Page 292
4. When prompted, draw the screen unlock pattern again, and then tap Confirm. The screen unlock pattern is saved. 5. Enter a backup PIN, tap Continue, re-enter the PIN, and tap OK to save your screen unlock pattern. Settings… -
Page 292
6. Select display options for notifications on the lock screen. The screen lock is set. If you fail to draw the correct unlock pattern on the screen after five attempts, you will be prompted to wait for 30 seconds before you can try again. Note: If you do not want the unlock pattern to display on the screen when you unlock it, from home, tap Apps >… -
Page 293: Use A Screen Unlock Pin
6. Select display options for notifications on the lock screen. The screen lock is set. If you fail to draw the correct unlock pattern on the screen after five attempts, you will be prompted to wait for 30 seconds before you can try again. Note: If you do not want the unlock pattern to display on the screen when you unlock it, from home, tap Apps >…
-
Page 293: Use A Screen Unlock Pin
Use a Screen Unlock PIN 1. From the Screen lock type menu, tap PIN. 2. Enter a PIN, tap Continue, re-enter your PIN, and tap OK to save the setting. 3. Select display options for notifications on the lock screen. …
-
Page 294: Use A Screen Unlock Password
Use a Screen Unlock PIN 1. From the Screen lock type menu, tap PIN. 2. Enter a PIN, tap Continue, re-enter your PIN, and tap OK to save the setting. 3. Select display options for notifications on the lock screen. …
-
Page 294: Use A Screen Unlock Password
Use a Screen Unlock Password 1. From the Screen lock type menu, tap Password. 2. Enter a password with at least 4 characters, including at least one letter, tap Continue, and then enter your password again to confirm it. 3. Select display options for notifications on the lock screen. …
-
Page 295: Disable The Screen Lock
Important: To protect your phone and data from unauthorized access, it is recommended that you use the screen unlock password (highest security). It is also recommended that you frequently change your password to ensure the safety of your phone and personal data. Disable the Screen Lock Follow the instructions below to turn off your current screen lock.
-
Page 296: Device Security
3. Draw your unlock screen pattern, enter your PIN, or enter your password. 4. Tap None. The screen lock is disabled. Device Security Configure security for your phone. 1. From home, tap Apps > Settings > Lock screen and security …
-
Page 297
3. Draw your unlock screen pattern, enter your PIN, or enter your password. 4. Tap None. The screen lock is disabled. Device Security Configure security for your phone. 1. From home, tap Apps > Settings > Lock screen and security … -
Page 297
Make passwords visible: Display password characters briefly as you type them. Security policy updates: Automatically or manually check for security policy updates. Send security reports: Send security reports to Samsung using Wi-Fi for threat analysis. Device administrators: Manage your device administrators and application installation privileges. -
Page 298: Privacy
Make passwords visible: Display password characters briefly as you type them. Security policy updates: Automatically or manually check for security policy updates. Send security reports: Send security reports to Samsung using Wi-Fi for threat analysis. Device administrators: Manage your device administrators and application installation privileges.
-
Page 298: Privacy
Pin windows: Pin an app on your device screen, preventing access to other features of your phone. Usage data access: View the applications that can access your device’s usage history. Notification access: View the applications that can access notifications you receive on your phone.
-
Page 299: Location Settings
Location Settings Your Location services settings menu lets you select how your phone determines its location (using the wireless networks, GPS satellites, both, or neither). Enable Location Services Before using any features that require location assistance, you must enable your phone’s Location services.
-
Page 300
Location Settings Your Location services settings menu lets you select how your phone determines its location (using the wireless networks, GPS satellites, both, or neither). Enable Location Services Before using any features that require location assistance, you must enable your phone’s Location services. -
Page 300
3. Tap ON/OFF to enable Location services. Your phone’s Location services are enabled. If you see a confirmation, follow the prompts to connect. Changing Location Method You can change the methods used for determining your location. Note: Location must be turned on to change locating method. 1. -
Page 301: Location Services
3. Tap ON/OFF to enable Location services. Your phone’s Location services are enabled. If you see a confirmation, follow the prompts to connect. Changing Location Method You can change the methods used for determining your location. Note: Location must be turned on to change locating method. 1.
-
Page 301: Location Services
2. Tap Location. 3. Tap Locating method. 4. Select a locating method. Each mode has a description of which method or methods are used to estimate your location. Your phone’s Locating method is set. Location Services Google uses Location Reporting to store and use your device’s most recent location data. Google apps, such as Google Maps, can use this data to improve your search results based on places that you have visited.
-
Page 302: Report Diagnostic Info
1. From home, tap Apps > Settings > Privacy 2. Tap Location. 3. Tap Google Location History and sign in to your Google Account for more options. Report Diagnostic Info You can choose to enable reporting of diagnostic info when your phone experiences technical problems. Settings…
-
Page 303: Easy Mode
Enable Report Diagnostic Info 1. From home, tap Apps > Settings > Privacy 2. Tap Report diagnostic info. 3. Read the consent information and tap Yes to enable. Easy Mode Easy mode provides a simpler experience using your phone, with a simpler home screen layout and simpler app interactions.
-
Page 304
Enable Report Diagnostic Info 1. From home, tap Apps > Settings > Privacy 2. Tap Report diagnostic info. 3. Read the consent information and tap Yes to enable. Easy Mode Easy mode provides a simpler experience using your phone, with a simpler home screen layout and simpler app interactions. -
Page 304
Easy Mode Overview The following Easy mode options may be configured: Easy mode Option Description Standard mode Use the standard home screen layout. Use a simpler home screen layout and straight forward application Easy mode interactions. The font size Large will be applied throughout the device. Enable Easy Mode 1. -
Page 305
2. Tap Easy mode, and then select the apps you want to use from the Easy applications list. 3. Tap Done to apply your Easy mode settings. Return to Standard Mode You can use the Easy mode Settings menu to return to Standard mode. 1. -
Page 306: Accessibility Settings
2. Tap Easy mode, and then select the apps you want to use from the Easy applications list. 3. Tap Done to apply your Easy mode settings. Return to Standard Mode You can use the Easy mode Settings menu to return to Standard mode. 1.
-
Page 306: Accessibility Settings
2. Tap Standard mode and then tap Done. Accessibility Settings The Accessibility menu lets you enable and manage accessibility-related applications. Accessibility Settings Overview The following Accessibility options may be configured: Accessibility Option Description Vision Configure accessibility features for vision. Hearing Configure accessibility features for hearing and sounds.
-
Page 307: Vision Accessibility Settings
Accessibility Option Description Receive spoken feedback describing what you touch, select, or activate. TalkBack Control your device using configurable key combinations. Switch Access Access Accessibility Options 1. From home, tap Apps > Settings > Accessibility 2. Set available accessibility options. …
-
Page 308
Accessibility Option Description TalkBack Receive spoken feedback describing what you touch, select, or activate. Switch Access Control your device using configurable key combinations. Access Accessibility Options 1. From home, tap Apps > Settings > Accessibility 2. Set available accessibility options. … -
Page 308
1. From home, tap Apps > Settings > Accessibility 2. Tap Vision to configure options: Dark screen: Keeps your phone’s screen turned off at all times. When Dark screen is enabled, double-press the Power/Lock key to turn it on or off while using your phone. … -
Page 309: Hearing Accessibility Settings
1. From home, tap Apps > Settings > Accessibility 2. Tap Vision to configure options: Dark screen: Keeps your phone’s screen turned off at all times. When Dark screen is enabled, double-press the Power/Lock key to turn it on or off while using your phone. …
-
Page 309: Hearing Accessibility Settings
Magnification gestures: Control zoom and pan options with specific gestures such as triple- tapping, double pinching, and dragging two fingers across the screen. Grayscale: Display screens in grayscale instead of color. Negative colors: Screen colors are reversed. …
-
Page 310: Dexterity And Interaction Settings
Hearing aids: Automatically adjusts to attempt to improve the sound quality for use with hearing aids. Samsung subtitles (CC): Displays Samsung subtitles where available. Tap ON/OFF to turn the option on or off, and then configure options. Google subtitles (CC): Displays Google subtitles where available. Tap ON/OFF to turn the option on or off, and then configure options like Language, Text size, and Caption style.
-
Page 311
Hearing aids: Automatically adjusts to attempt to improve the sound quality for use with hearing aids. Samsung subtitles (CC): Displays Samsung subtitles where available. Tap ON/OFF to turn the option on or off, and then configure options. Google subtitles (CC): Displays Google subtitles where available. Tap ON/OFF to turn the option on or off, and then configure options like Language, Text size, and Caption style. -
Page 311
1. From home, tap Apps > Settings > Accessibility 2. Tap Dexterity and interaction to configure this option: Assistant menu: Assistant menu can improve phone accessibility by providing quick access to important functions. A shortcut appears on all screens to give you access to the Assistant menu. -
Page 312: Configure Other Accessibility Settings
1. From home, tap Apps > Settings > Accessibility 2. Tap Dexterity and interaction to configure this option: Assistant menu: Assistant menu can improve phone accessibility by providing quick access to important functions. A shortcut appears on all screens to give you access to the Assistant menu.
-
Page 312: Configure Other Accessibility Settings
• Assistant plus: When turned on, Assistant plus displays contextual menu options for some apps in Assistant menu. Not all apps support this option. Tap Assistant plus, and then tap ON/OFF to turn the option on or off. After you turn on Assistant plus, enable or disable apps to use with Assistant plus.
-
Page 313: Add Accounts
Notification reminder: Set the phone to alert you using vibration or sound to remind you of unread notifications. Answering and ending calls: Select options for answering and ending calls. • Pressing the Home key: Answer calls by pressing the Home key. •…
-
Page 314
Notification reminder: Set the phone to alert you using vibration or sound to remind you of unread notifications. Answering and ending calls: Select options for answering and ending calls. • Pressing the Home key: Answer calls by pressing the Home key. •… -
Page 314
2. Tap Add account. An Add account window appears. 3. Tap an account type and then follow the prompts to add the required account information. The account is added to the accounts list. Manage Existing Accounts 1. From home, tap Apps >… -
Page 315: Backup And Reset
2. Tap Add account. An Add account window appears. 3. Tap an account type and then follow the prompts to add the required account information. The account is added to the accounts list. Manage Existing Accounts 1. From home, tap Apps >…
-
Page 315: Backup And Reset
Your phone’s Backup and reset menu lets you back up your phone’s data and settings to Google servers before resetting your phone to the original factory settings. The Factory data reset erases all data from the phone’s application storage, including: ● Your Samsung account ● Your Google Account ●…
-
Page 316
Your phone’s Backup and reset menu lets you back up your phone’s data and settings to Google servers before resetting your phone to the original factory settings. The Factory data reset erases all data from the phone’s application storage, including: ● Your Samsung account ● Your Google Account ●… -
Page 316
Backup and Reset Option Description Enable backup for application data, Wi-Fi passwords, and other settings Back up my data to your Google Account. When reinstalling an application, backed up settings and data will be Automatic restore restored from your Google Account. Reset all settings to their factory defaults except the security, language, Reset settings and account settings. -
Page 317: Factory Data Reset
Backup and Reset Option Description Enable backup for application data, Wi-Fi passwords, and other settings Back up my data to your Google Account. When reinstalling an application, backed up settings and data will be Automatic restore restored from your Google Account. Reset all settings to their factory defaults except the security, language, Reset settings and account settings.
-
Page 317: Factory Data Reset
When a device is factory reset, the device will not be able to be setup without the user entering the Google Account associated with the device. Caution: You should remove your Google Account before shipping your device to Samsung or any other service provider for service and before resetting the device to factory settings.
-
Page 318
When a device is factory reset, the device will not be able to be setup without the user entering the Google Account associated with the device. Caution: You should remove your Google Account before shipping your device to Samsung or any other service provider for service and before resetting the device to factory settings. -
Page 318
1. From home, tap Apps > Settings > Backup and reset The Backup and reset menu opens. 2. Tap Factory data reset. Settings… -
Page 319
1. From home, tap Apps > Settings > Backup and reset The Backup and reset menu opens. 2. Tap Factory data reset. Settings… -
Page 319
3. Read the factory data reset information page and tap Reset device. 4. If prompted, enter your current pattern, PIN, or password. 5. Tap Delete all. Your phone will power down and reset itself. Once the phone has reset, it will run through the Hands Free Activation and update processes again. -
Page 320: Language And Input Settings
3. Read the factory data reset information page and tap Reset device. 4. If prompted, enter your current pattern, PIN, or password. 5. Tap Delete all. Your phone will power down and reset itself. Once the phone has reset, it will run through the Hands Free Activation and update processes again.
-
Page 320: Language And Input Settings
Set the language for your display and menus. Default keyboard Set the default method for entering text. Samsung keyboard Set Samsung keyboard options. Google voice typing Set options for Google Voice text entry. Voice input Set your voice search options.
-
Page 321
Set the language for your display and menus. Default keyboard Set the default method for entering text. Samsung keyboard Set Samsung keyboard options. Google voice typing Set options for Google Voice text entry. Set your voice search options. Voice input Text-to-speech options Set Text-to-speech options. -
Page 321
The Language and input settings menu opens. 2. Set options. The Language and input settings are applied and saved. Select the Default Language for Your Phone 1. From home, tap Apps > Settings > Language and input Settings… -
Page 322
The Language and input settings menu opens. 2. Set options. The Language and input settings are applied and saved. Select the Default Language for Your Phone 1. From home, tap Apps > Settings > Language and input Settings… -
Page 322
2. Tap Language. 3. Tap an available language. Language and Input Options Some of the Language and input options are detailed below. 1. From home, tap Apps > Settings > Language and input Settings… -
Page 323: Battery Settings
2. Tap Language. 3. Tap an available language. Language and Input Options Some of the Language and input options are detailed below. 1. From home, tap Apps > Settings > Language and input Settings…
-
Page 323: Battery Settings
Language: Tap a language to assign it. Default keyboard: Tap an input method to set it as the default. Samsung keyboard: Configure your keyboard options. Google voice typing: Configure your options, including language detection. Voice input: Tap a settings option and follow the prompts.
-
Page 324: Power Saving Mode
1. From home, tap Apps > Settings > Battery 2. Tap Display battery percentage to show the percentage of battery charge remaining on the status bar. 3. Tap items to view details. Check your battery condition and access additional options. Power Saving Mode Save battery power by activating Power saving mode, which reduces or turns off certain features to decrease battery consumption.
-
Page 325
1. From home, tap Apps > Settings > Battery 2. Tap Display battery percentage to show the percentage of battery charge remaining on the status bar. 3. Tap items to view details. Check your battery condition and access additional options. Power Saving Mode Save battery power by activating Power saving mode, which reduces or turns off certain features to decrease battery consumption. -
Page 325
Turn On Power Saving Mode 1. From home, tap Apps > Settings > Battery 2. Tap Power saving mode. 3. Tap ON/OFF to enable Power saving mode. Power saving mode is activated. 4. Tap Start power saving to enable Power saving mode immediately, or at a selected percentage of battery power. -
Page 326: Ultra Power Saving Mode
Turn On Power Saving Mode 1. From home, tap Apps > Settings > Battery 2. Tap Power saving mode. 3. Tap ON/OFF to enable Power saving mode. Power saving mode is activated. 4. Tap Start power saving to enable Power saving mode immediately, or at a selected percentage of battery power.
-
Page 326: Ultra Power Saving Mode
Ultra Power Saving Mode Conserve power and extend your phone’s battery life by using a minimal home screen layout, limiting the number of usable apps, turning off mobile data when the screen is off, and turning off connectivity features such as Wi-Fi and Bluetooth. Turn On Ultra Power Saving Mode 1.
-
Page 327: Storage Settings
Turn Off Ultra Power Saving Mode ■ From home, tap More > Turn off Ultra power saving mode. The phone returns to normal power mode. Storage Settings The Storage settings menu lets you manage internal storage on your phone. Storage Settings Overview The sound settings menu allows you to configure the following options: Storage Device…
-
Page 328: Microsd Card
Access Storage Settings 1. From home, tap Apps > Settings > Storage 2. View memory usage for the different types of information stored in your phone’s memory. Tap an item for more information. microSD Card A microSD memory card is an optional accessory (not included) that allows you to store images, videos, music, documents, and other data on your phone.
-
Page 329: Install A Microsd Card
Install a microSD Card Follow the instructions below to install an optional memory card (not included). 1. Remove the back cover. Grasp the phone firmly and locate the slot at the top of the phone. Place your fingernail in the opening and firmly “pop” the cover off the phone. 2.
-
Page 330: Date And Time Settings
Format a microSD Card Formatting a microSD card permanently removes all files stored on the card. 1. From home, tap Apps > Settings > Storage. 2. Scroll down the screen, tap Format SD card > Format SD card > Delete all. Note: Formatting erases all the data on an installed microSD card, after which the files CANNOT be retrieved.
-
Page 331: Activate This Device
Access Date and Time Options 1. From home, tap Apps > Settings > Date and time 2. Set available date and time options. Your date and time settings are applied and saved. Activate This Device The Activate this device menu lets you activate a new phone or use additional self-service options such as checking the status of an in-service phone.
-
Page 332: System Update
1. From home, tap Apps > Settings > Activate this device The Self Service menu appears. 2. Follow the prompts to activate your phone or review your summary. Your phone activates. If already activated on an account, you will see a usage and plan summary.
-
Page 333: About Device
1. From home, tap Apps > Settings > Activate this device The Self Service menu appears. 2. Follow the prompts to activate your phone or review your summary. Your phone activates. If already activated on an account, you will see a usage and plan summary.
-
Page 333: About Device
Access System Update ■ From home, tap Apps > Settings > System Update The System Update menu appears. For details about updating your phone, see Update Your Phone. About Device The About device menu lets you access important phone information, search for and apply updates, and view legal and safety information.
-
Page 334
Access System Update ■ From home, tap Apps > Settings > System Update The System Update menu appears. For details about updating your phone, see Update Your Phone. About Device The About device menu lets you access important phone information, search for and apply updates, and view legal and safety information. -
Page 334
Review various types of important legal information, including Open Legal information source licenses, Google legal information, System WebView licenses, Wallpapers, Samsung legal information, and the Privacy Alert. Change the name of your device (other devices see this name when Device name using Mobile Hotspot or Bluetooth). -
Page 335
Access About Device Options 1. From home, tap Apps > Settings > About device 2. Select or view available options. Your phone information is displayed. Settings… -
Page 336: For Assistance
Access About Device Options 1. From home, tap Apps > Settings > About device 2. Select or view available options. Your phone information is displayed. Settings…
-
Page 336: For Assistance
For Assistance The following topics address areas of support for your phone, including troubleshooting, specifications, account information, warranty information, and customer service contact information. Virgin Mobile Account Information and Help Find out about managing your account online and on your phone, buying additional minutes for your plan, and getting help.
-
Page 337: Copyright Information
For Assistance The following topics address areas of support for your phone, including troubleshooting, specifications, account information, warranty information, and customer service contact information. Boost Account Information and Help Find out about managing your account online and on your phone, buying additional minutes for your plan, and getting help.
-
Page 337: Copyright Information
Mobile name and logo are registered trademarks of Virgin Enterprises Ltd. and used under license by Virgin Mobile. Other marks are the property of their respective owners. ©2015 Samsung Electronics America, Inc. Samsung, Samsung Galaxy, and Samsung Milk Music are all trademarks of Samsung Electronics Co., Ltd.
-
Page 338: Intellectual Property
Full written terms and detailed information about the warranty and obtaining service are available on the device at: Settings > About device > Legal Information > Samsung legal or you may access the online version of the Health/Safety and Warranty guide for your device at: English samsung.com/us/Legal/Phone-HSGuide…
-
Page 338: Intellectual Property
Intellectual Property All Intellectual Property, as defined below, owned by or which is otherwise the property of Samsung or its respective suppliers relating to the SAMSUNG Phone, including but not limited to, accessories, parts, or software relating thereto (the “Phone System”), is proprietary to Samsung and protected under federal laws, state laws, and international treaty provisions.
-
Page 339: Samsung Knox
DOWNLOAD CERTAIN SOFTWARE, SUCH AS CUSTOM OS. Intellectual Property All Intellectual Property, as defined below, owned by or which is otherwise the property of Samsung or its respective suppliers relating to the SAMSUNG Phone, including but not limited to, accessories, parts, or software relating thereto (the “Phone System”), is proprietary to Samsung and protected under federal…
-
Page 339: Samsung Knox
DOWNLOAD CERTAIN SOFTWARE, SUCH AS CUSTOM OS. Samsung KNOX ™ is Samsung’s security platform and is a mark for a Samsung device tested for security Samsung KNOX with enterprise use in mind. Additional licensing fee may be required. For more information about Knox, please refer to: samsung.com/us/knox…
-
Page 340: Index
No title to or ownership in the Intellectual Property is transferred to you. All applicable rights of the Intellectual Property shall remain with SAMSUNG and its suppliers. Open Source Software…
-
Page 340: Index
Index 3-way Calling, 82 History, 152 About Device, 324 Launch connection, 149 Accessibility Settings, 297 Settings, 155 Accessory Port, 4 Windows, 153 Account (Virgin Mobile) Calculator, 181 Auto Pay, 327 Calendar, 182 Manage, 327 Add event, 183 Top-up, 327 Settings, 190 Accounts Sync, 188 Add new, 304…
-
Page 341
Index 1Weather, 182 Brightness, 271 3-way Calling, 84 Browser About Device, 325 Bookmark, 151 Accessibility Settings, 298 History, 153 Launch connection, 151 Accessory Port, 5 Accounts Settings, 156 Add new, 305 Windows, 154 Manage, 306 Calculator, 183 Settings, 305 Calendar, 184 Add event, 185 Activation, 323 airG, 182… -
Page 341
Instagram, 209 Create account, 26 International Dialing, 87 Delete threads, 122 Internet, 105 Labels, 119 Keyboard Mute threads, 121 Samsung, 23 New messages, 117 Language Settings, 311 Read and reply, 117 Location Read messages, 117 GPS satellites, 290 Report spam, 124… -
Page 342
Archive threads, 122 Create account, 27 International Dialing, 89 Delete threads, 124 Internet, 107 Labels, 121 Keyboard Mute threads, 123 Samsung, 25 Language Settings, 312 New messages, 119 Location Read and reply, 119 Read messages, 119 GPS satellites, 291 Index… -
Page 342
Share pictures and videos, 174 Settings, 265 Music Rotate, 9 Google Play Music, 204 Samsung Keyboard, 23 My Files, 212 Samsung Milk Music, 213 NextRadio, 212 Save a Phone Number, 94 Notification Icons, 53 Screen Lock, 278 Notification Panel, 51 Screen Timeout, 271… -
Page 343
Share pictures and videos, 175 Settings, 266 Music Rotate, 10 Samsung Keyboard, 25 Google Play Music, 206 Samsung Milk Music, 215 My Files, 214 NextRadio, 214 Save a Phone Number, 96 Notification Icons, 55 Screen Lock, 279 Notification Panel, 53… -
Page 343
Slide, 8 Videos Sound Settings, 262 Record, 160 Speaker, 4 Share via Bluetooth, 176 Spread, 10 Share via messaging, 174 Status Bar, 51 Share via YouTube, 177 Status Icons, 52 Virtual Private Networks (VPN), 255 Stopwatch, 196 Add connection, 258 Storage Secure credential storage, 256 Settings, 318…
This manual is also suitable for:
J320
Скачать
Руководство
пользователя
www.samsung.com
SM-J320F/DS
SM-J320H/DS
Russian. 03/2016. Rev.1.0