Дилер не найден
По вашему индексу дилеры не найдены.
Найти шоурум
347366
Close
Индекс места доставки
- Manuals
- Brands
- Jacuzzi Manuals
- Hot Tub
- J-200 Series
- Owner’s manual
-
Contents
-
Table of Contents
-
Troubleshooting
-
Bookmarks
Quick Links
• J-280 ™
• J-275 ™
• J-245 ™
• J-235 ™
• J-225 ™
• J-215 ™
• J-210 ™
J-200 ™ COLLECTION
OWNER’S MANUAL
2530-277F Rev B
Related Manuals for Jacuzzi J-200 Series
Summary of Contents for Jacuzzi J-200 Series
-
Page 1
• J-280 ™ • J-275 ™ • J-245 ™ • J-235 ™ • J-225 ™ • J-215 ™ • J-210 ™ J-200 ™ COLLECTION OWNER’S MANUAL 2530-277F Rev B… -
Page 2
Attention New Spa Owner! Congratulations on the purchase of your new Jacuzzi ® spa! The following is a list of automated functions performed by your spa. These functions are listed below in an attempt to alleviate any operational concerns you may have during… -
Page 3: Table Of Contents
Programming the Water Refresh Timer ……..33 11.6 Programming the Time …………..34 11.7 Programming the Date…………..34 11.8 Programming the Temperature Format ……..35 11.9 Programming the Language …………35 11.10 Programming the Lock Feature ……….. 35 © Jacuzzi Hot Tubs, Inc. All Rights Reserved…
-
Page 4
J-200 12.0 Spa Maintenance …………… 36 12.1 Cleaning The Filters…………..37 12.2 Draining and Refilling…………..40 12.3 Pillow Care………………. 40 12.4 Cleaning The Spa Interior …………41 12.5 Cover Care and Maintenance …………41 12.6 Maintaining The Synthetic Cabinet ……….42 12.7 Winterizing ………………. -
Page 5: Important Spa Owner Information
Jacuzzi premium insulating cover in place at all times when the spa is not in use. Read and carefully follow the requirements for your spa’s support base found in Section 4.0 titled,…
-
Page 6: Important Safety Instructions For All Spa Owners
J-200 Important Safety Instructions for all Spa Owners READ AND FOLLOW ALL INSTRUCTIONS CAREFULLY! This spa was manufactured to meet the standards and specifications outlined in the “Virginia Graeme Baker Pool and Spa Safety Act” (VGB Safety Act). When installing and using this spa, basic safety precautions should always be followed, including: DANGER: RISK OF SEVERE INJURY OR DROWNING!
-
Page 7
J-200 • A grounding wire connector is provided on this unit to connect a minimum No. 8 AWG (8.4 mm²) solid copper conductor between this unit and any metal equipment, metal enclosures of electrical equipment, metal water pipe, or conduit within 5 feet (1.5m) of the unit. -
Page 8
J-200 WARNING: RISK OF SEVERE INJURY OR DEATH! • Since excessive water temperatures have a high potential for causing fetal damage during the early months of pregnancy, if pregnant or possibly pregnant, consult your physician before using a spa. • Pregnant or possibly pregnant women should limit spa water temperatures to 100°F (38°C). -
Page 9
J-200 WARNING: In addition to maintenance of filters and water chemistry, proper ventilation is recommended to reduce the risk of contracting a waterborne illness (e.g. an infection, bacteria or virus) and/or respiratory ailments that could be present in the air or water. Consult a licensed architect or building contractor to determine your specific needs if installing your hot tub indoors. -
Page 10: Entrapment Risk
J-200 Entrapment Risk The Consumer Products Safety Commission/USA has reported that users of pools and spas have become entrapped (stuck) to drain and/or suction fittings causing death, drowning, or serious injury (see diagram below). This spa was manufactured to meet the standards and specifica- tions outlined in the “Virginia Graeme Baker Pool and Spa Safety Act”…
-
Page 11: Hyperthermia
A Warning Sign is provided in your warranty packet. Please install at a location near your spa, where it is visible to users of the spa. For additional or replacement Warning Signs please contact your local Jacuzzi dealer and reference item number #6530-082.
-
Page 12: Important Safety Instructions
No. 6 AWG (10 mm²). 5. SAVE THESE INSTRUCTIONS. General Electrical Safety Instructions Your new Jacuzzi spa is equipped with a “state-of-the-art” equipment system. It contains the most advanced safety and self-protective equipment in the industry. Nonetheless, this spa must be installed properly to ensure dependable usage.
-
Page 13: Choosing A Location
J-200 Choosing A Location IMPORTANT: Because of the combined weight of the spa, water and users, it is extremely important that the base upon which the spa rests be smooth, flat, level and capable of uniformly supporting this weight, without shifting or settling, for the entire time the spa is in place. If the spa is placed on a surface which does not meet these requirements, damage to the skirt and/or the spa shell may result.
-
Page 14: Outdoor Location
J-200 Outdoor Location In selecting the ideal outdoor location for your spa, we suggest that you take into consideration: • The proximity to changing area and shelter (especially in colder weather). • The pathway to and from your spa (this should be free of debris so that dirt and leaves are not easily tracked into the spa).
-
Page 15
J-200 • Proper Drainage: It is extremely important to have in place measures to sufficiently handle excessive water spillage. Be sure the flooring in which the spa rests on has adequate drainage and can handle the entire contents of the spa. Be sure to make provisions for ceilings and other structures that may be below the spas installation. -
Page 16: General Electrical Safety Instructions
Proper grounding is extremely important. Jacuzzi spas are equipped with a current collector system. A pressure wire connector is provided on the surface of the control box, located outside the equipment door (Figure…
-
Page 17: Power Requirements
J-200 Power Requirements Jacuzzi spas are designed to provide optimum performance and flexibility of use when connected to the maximum electrical service listed below. Minor circuit board modifications can be performed to allow your new spa to accept an electrical service other than the factory operation setting.
-
Page 18: Electrical Wiring Instructions
J-200 Electrical Wiring Instructions IMPORTANT NOTICE: The electrical wiring of this spa must meet the requirements of the National Electrical Code/USA (NEC) and/or any applicable state or local codes. The electrical circuit must be installed by a qualified electrician and approved by a local building/electrical inspection authority. 1.
-
Page 19
J-200 9. Select the power supply inlet you want to use (Figure A). Feed power cable to control box, then install it through the large opening provided in the bottom side of the box. 10. Connect wires, color to color, on terminal blocks TB1 and TB3 (Figure C, page 16). -
Page 20
J-200 Figure B Control Box STEP LIGHT (OPTIONAL) F3 0.125A 240V 1. Main Terminal 2. Bonding Lug/Grounding Terminal 3. Power wires entrance (electrical fitting and conduit must be installed) Figure C Connections (North American 60 Hz 240 VAC Connection Models) STEP LIGHT (OPTIONAL) F3 0.125A 240V… -
Page 21
J-200 Figure D (North American 60 Hz 120/240 VAC Convertible Models) STEP LIGHT (OPTIONAL) F3 0.125A 240V Wht Black Green Green 240 VAC 4-Wire connection 60 Hz 120 VAC 3-Wire connection 60 Hz 120V 3-WIRE CONNECTION Jumper Wires 120V 120V 120V 120V FROM… -
Page 22: Spa Fill Up Procedure
Clear all debris from the spa. Although the spa shell has been polished at the factory, you may want to treat it with a specially formulated spa cleaner. Consult your authorized Jacuzzi dealer for additional information prior to filling spa.
-
Page 23
J-200 5. Add Start-Up Chemicals Add the spa water chemicals as recommended by your authorized Jacuzzi dealer. See Section 13.0 “Water Quality Maintenance” (page 43) for general guidance. WARNING: RISK OF POISONING OR DEATH. Never leave chemicals opened and accessible to anyone. -
Page 24
J-200 8. Place Cover On Spa • Keeping the insulating cover in place anytime the spa is not in use will reduce the time required for heating, thereby minimizing operating costs. • The time required for initial heat-up will vary depending on the starting water temperature. -
Page 25
Water that is too soft can be corrosive to metal components. 13. Consult your authorized Jacuzzi dealer for chemical recommendations, then add chemicals to hot tub water to achieve a constant sanitizer reading within the levels recommended on the inside cover of this manual. -
Page 26
J-200 WARNING: RISK OF PERSONAL INJURY. • To decrease the risk of injury, entrapment or drowning, never leave your hot tub unattended for any reason, especially if while the cover is open and accessible to small children and animals! • To decrease the risk of contracting a waterborne illness (e.g. -
Page 27: Control Functions
J-200 Control Functions Control Panel A. Menu ( ) Button: Allows access to the programming menus. 2-pump control panel shown B. LCD Display: Can display current wa- ter temperature (default display), water temperature set point, selected menu functions, and error messages. Displays a CLEARRAY icon ( ) and heat icon ( ) when…
-
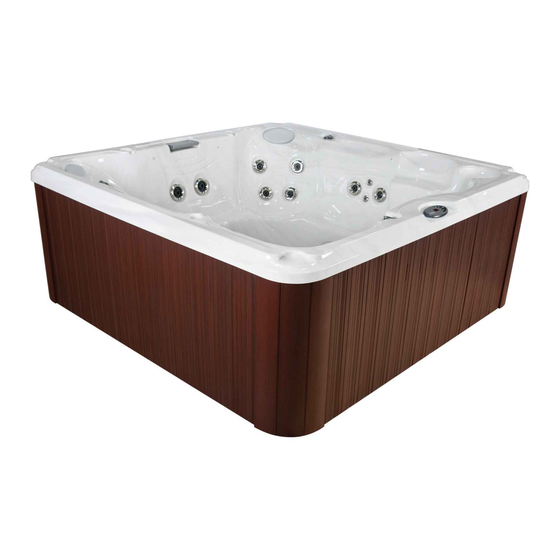
Page 28: General Spa Features And Controls
J-200 General Spa Features and Controls J-280 model illustrated — Jet locations and features vary by model. 9. Heater Return/Gravity Drain 1. Control Panel 10. Filter lid with one underlying 2. Headrest Pillows (4 ea.) filter cartridge (Filter requires 3. Air Controls (4 ea.) periodic cleaning) 4.
-
Page 29: General Spa Features And Controls
J-200 General Spa Features and Controls J-275 model illustrated — Jet locations and features vary by model. 1. Control Panel 12. Cup Holders (3 ea.) 2. Air Controls (3 ea.) 13. Filter skimmer with one un- 3. Optional audio system speakers derlying filter cartridge (Filter (4 ea.) requires periodic cleaning)
-
Page 30: Operating Instructions
2. Control panel displays the controller and control panel software versions. 3. Control panel scrolls the message, “WELCOME TO JACUZZI.” Note: It is common for the heater to turn on after the spa is first filled because tap water is often very cold. If water temperature, at this time, is less than the factory default temperature setting of 100°F (38°C) the…
-
Page 31: Activate Jets Pump
J-200 10.2 Activate Jets Pump The control panel JETS 1 button activates jets pump 1. The first press activates low speed, the second press activates high speed, and the third press shuts jets pump 1 off. The JETS 2 button activates jets pump 2. The first press activates high speed, the second press turns jets pump 2 off.
-
Page 32: Selecting Desired Massage Action
10.7 Optional BLUEWAVE® Spa Stereo System (J-215 to J-280) Spas equipped with the optional Jacuzzi audio system offer enhanced enjoyment. These models include a high-quality AUX/Bluetooth stereo receiver with four high-quality marine speakers for unsurpassed sound quality and long-life.
-
Page 33: Optional Smarttub™ System (60Hz Models Only)
J-200 10.10 Optional SmartTub™ System (60Hz models only) Advances in technology have allowed us to create a better and smarter hot tub. Our SmartTub™ system operates on a cellular network. The advantages of this system are: • A more stable connection to internet for outdoor environment. The SmartTub™…
-
Page 34: Menu Features And Programming Instructions
J-200 3. Status: • Cyan light — breathing (slow pulsing) indicates the status is good. • Cyan light — flashing indicates that the system is completing a connection to the cloud. • Green light — flashing indicates waiting for a connection to the cellular tower.
-
Page 35: Programming The Primary Filtration
J-200 11.1 Programming the Primary Filtration During the primary filtration cycle, the pump 1 low speed and CLEARRAY are activated. The hot tub is programmed to cycle 4 times (every 6 hours) throughout the day, each cycle last 2 hours, and a default start time of 12:00 AM, but this can be changed.
-
Page 36: Programming The Change Filter Timer
J-200 A. Programming the Heating Mode To change the programmed heating mode: Note: If no button is pressed within 5 seconds of each selection the screen will revert back to the Main Menu and the current settings will remain active. 1.
-
Page 37: Programming The Clearray® Timer
J-200 11.4 Programming the CLEARRAY® Timer A programmable change bulb timer can be set to remind you when to when it is time to replace the UV bulb for the CLEARRAY system. • The default setting is for 365 days. •…
-
Page 38: Programming The Time
J-200 11.6 Programming the Time To program the time, follow the steps below: Note: If no button is pressed within 5 seconds of each selection the screen will revert back to the Main Menu and the current settings will remain active. 1.
-
Page 39: Programming The Temperature Format
J-200 1. Press until you get to the “TEMP” Menu. The display will scroll “TEMPERATURE FORMAT.” After the second scroll, if no action is taken, the system will revert back to the Main Menu. 2. Press to switch between °F or °C. Once selected press to save the change.
-
Page 40: Spa Maintenance
12.0 Spa Maintenance Proper and regular maintenance of your spa will help it retain its beauty and performance. Your authorized Jacuzzi dealer can supply you with all the information, supplies, and accessory products you will need to accomplish this. DANGER: RISK OF SEVERE INJURY OR DROWNING BY ENTRAPMENT! •…
-
Page 41: Cleaning The Filters
J-200 12.1 Cleaning The Filters TO DECREASE DROWNING OR ENTRAPMENT, ALWAYS TURN POWER TO SPA OFF BEFORE CLEANING THE FILTER CARTRIDGE! J-210/J-215/J-225/J-235/J-245/J-275 Models: These model spas are equipped with a skimmer basket and filter cartridge located in the skimmer/filter well. Filtering is accomplished when jets pump #1 turns on in low speed initiating water flow through the skimmer basket and polyester mesh filter cartridge.
-
Page 42
J-200 J-280 Models: These model spas are equipped with a skimmer bag and one high performance pleated filter cartridge located under the filter cover. Debris are filtered by drawing water through the skimmer bag and filter cartridge when jets pump 1 is running a programmed filter cycle or when manually activated by spa use. -
Page 43
Jacuzzi dealer. The average life expectancy of each filter is approximately two years with proper care and water quality maintenance. -
Page 44: Draining And Refilling
J-200 12.2 Draining and Refilling About every 3 months, you will want to replace the spa’s water. The frequency depends on a number of variables including the amount of use, attention paid to water quality maintenance, etc. You will know it is time for a change when you cannot control sudsing and/or you can no longer get the normal feel or sparkle to the water even though the key water balance measurements are all within the proper parameters.
-
Page 45: Cleaning The Spa Interior
This could cause severe sudsing when the spa is refilled. 12.5 Cover Care and Maintenance Certain hot tub covers distributed by Jacuzzi Hot Tubs have a vinyl or PROLAST™/PROLAST™ Extreme encasement. This vinyl or PROLAST™/PROLAST™ Extreme encasement also referred to as the cover “skin”…
-
Page 46: Maintaining The Synthetic Cabinet
12.7 Winterizing Your Jacuzzi spa is designed to automatically protect itself against freezing when operating properly. During periods of severe freezing temperatures, you should check periodically to be certain that the electrical supply to the spa has not been interrupted. In extreme, bitter cold weather less than 32°F (0°C), program the primary filtration cycle…
-
Page 47: Restarting Your Spa In Cold Weather
10. Re-install synthetic cabinet side panel and cover spa so that no casual moisture can enter into it. Consult your authorized Jacuzzi dealer if you have any questions regarding winter use or winterizing. 12.8…
-
Page 48: Ph Control
Some are necessary to compensate for out-of-balance water, some aid in cosmetic water treatment and others simply alter the feel or smell of the water. Your authorized Jacuzzi dealer can advise you on the use of these additives. When adding spa shock (chlorine or non-chlorine) or pH balancing chemicals activate the jets pump(s) and leave the spa cover open for a minimum of 20 minutes.
-
Page 49: Clearray® Lamp Replacement And Quartz Tube Maintenance
J-200 the purification system; it has two LED indicator lights, the green indicating incoming power flow and the red indicating the system is properly working. CLEARRAY is standard for all models. Note: The CLEARRAY only runs when pump 1 is on low speed for an automatic reason, a heat call or a filter cycle.
-
Page 50
J-200 UV BULB REPLACEMENT AND QUARTZ TUBE MAINTENANCE: Note: Location of CLEARRAY System and connection may vary by model. 1. Turn the breaker to the spa OFF. DRAIN YOUR SPA. Note: If you are only replacing the UV bulb then the spa does not have to be drained. -
Page 51
J-200 original quartz tube to protect it from breakage during transportation. Place the new quartz tube (2) into the water chamber (1) with the domed end first making sure it is inserted and seated inside the quartz end holder. Only a small portion will be exposed when it is seated correctly. -
Page 52: Error Conditions/Error Messages
The display will alternate between the current temperature reading and the scrolling message “CHANGE CLEARRAY BULB” as long as the error exists. The countdown timer for the UV bulb needs to be reset (page 33). A new UV bulb can be purchased from a local Jacuzzi dealer.
-
Page 53: Panel Displays Change Filter
The display will alternate between the current temperature reading and the scrolling message “CHANGE FILTER” as long as the error exists. The countdown timer for the Change Filter feature needs to be reset (page 32). New filters can be purchased from a local Jacuzzi dealer. 14.7 Panel Displays Change Water The water refresh timer has expired.
-
Page 54: Panel Displays T—Oh
Water temperature is above acceptable limits. DO NOT ENTER SPA! Water temperature has reached 112°F (44°C). The Jets Pump 1 has activated to circulate water through heater. Contact your authorized Jacuzzi dealer or qualified service technician. The display will alternate between “T—OH” and the current water temperature.
-
Page 55: Troubleshooting Procedures
15.0 Troubleshooting Procedures In the event your Jacuzzi spa is not working the way it should, please first review all the installation and operating instructions in this manual and check the message on the panel display. If you are still not satisfied it is working properly, please follow the appropriate troubleshooting instructions below.
-
Page 56: No Heat
Nonetheless, we are always striving to improve the quality and features of our products. Your input as a Jacuzzi spa owner is a cherished part of this process. If you have any comments or suggestions, or if you wish to be informed on any new products for your spa, please write to us.
-
Page 57: Circuit Board Diagrams
J-200 16.0 Circuit Board Diagrams 16.1 North American 2-Pump Models This wiring diagram is used for the 240V 60 Hz North American spa models. 1 2 3 4 5 6 7 8 9 10…
-
Page 58: North American 1-Pump Convertible Models
J-200 16.2 North American 1-Pump Convertible Models This wiring diagram is used for all 1-Pump 120/240V 60 Hz North American convertible spa models. 1 2 3 4 5 6 7 8 9 10…
-
Page 59: North American J-210, J-215 And J-225 Convertible Power Models (For A 4-Wire 240V 60 Hz Connection)
J-200 16.3 North American J-210, J-215 and J-225 Convertible Power Models (For a 4-wire 240V 60 Hz connection) This wiring diagram is used for all North American 240V 60 Hz convertible power models. Dedicated 240V models must be permanently connected (hard-wired) to the power supply. Note: 240 VAC 4-wire connection enhances heater output from 1kW to 4kW.
-
Page 60: Dip Switch Settings And Wiring
J-200 17.0 Dip Switch Settings and Wiring 17.1 Switch settings for Domestic 60Hz Models The dip switches are at the S1 location on the board. A. 2-Pump Models 240V DOMESTIC DIP SWITCH SETTINGS S1 LOCATION (factory default) DIP SWITCH NUMBER BREAKER OFF OFF OFF OFF OFF OFF OFF OFF ON 50A*…
-
Page 61: Optional Bluewave® Spa Stereo System
J-200 18.0 Optional BLUEWAVE® Spa Stereo System To start enjoying your new stereo receiver, please read the following operation instructions in their entirety. 1. Media Locker Handle Slide the handle to lock and unlock the protective door. 2. Power Button Press power button once to turn “ON”…
-
Page 62: Electronic Device Connections And Functions
J-200 18.1 Electronic Device Connections and Functions A. Connecting Your Auxiliary Device Using the 3.5 mm Cable (purchased separately): 1. Plug one end of the cable to “Aux” connection on the stereo, Figure A. 2. Plug the other end of the cable into the head phone jack connection on the Auxiliary device.
-
Page 63: Stereo Cautions
J-200 18.2 Stereo Cautions DANGER RISK OF SHOCK OR “CAUTION — Risk of Electric Shock. Do not ELECTROCUTION! leave compartment door open.” “CAUTION — Risk of Electric Shock. Replace components only with identical components.” 3. “Do not operate the audio/video controls while inside in the spa.” “WARNING — Risk of Electrocution.
 Loading…

|
Transformer |
Control |
||
|
230 VAC |
|||
|
BLK |
J20 |
||
|
J1 |
|||
|
J21 |
|||
|
WHT |
JP1 |
||
|
K1 |
8 |
7 |
|
|
6 |
5 |
||
|
J12 |
4 |
3 |
|
|
BRN |
2 |
1 |
|
|
K2 |
J2 |
||
|
BRN |
J14 |
||
|
Circ. |
J3 |
||
|
Pump |
J16 |
|
BLU |
J11 |
|||||||||||||||||||||||||||||||||
|
J15 |
F1 |
|||||||||||||||||||||||||||||||||
|
U |
K5 |
K7 |
K8 |
|||||||||||||||||||||||||||||||
|
J13 |
J5 |
|||||||||||||||||||||||||||||||||
|
BRN |
Heater IN |
Heater OU |
||||||||||||||||||||||||||||||||
|
J17 |
J7 |
J8 |
J9 |
J1 |
||||||||||||||||||||||||||||||
|
F1 |
J6 |
BLK |
BLU |
BRN |
BLU |
BRN |
||||||||||||||||||||||||||||
|
BRN |
||||||||||||||||||||||||||||||||||
|
20A |
||||||||||||||||||||||||||||||||||
|
LO |
HI |
|||||||||||||||||||||||||||||||||
|
250V |
Main |
|||||||||||||||||||||||||||||||||
|
SC-20 |
||||||||||||||||||||||||||||||||||
|
Pump |
|
LED Series Hot Tub Owner’s Manual |
||
|
TB1 |
J-210, J-220, J-230 Models |
|
|
2 |
6530-322, Rev-C |
230 VAC, 3-Wire Connection
USE COPPER CONDUCTORS ONLY. WIRE SIZE MUST
BRN BE APPROPRIATE PER NEC AND/OR LOCAL CODES
Attention New Spa Owner!
Congratulations on the purchase of your new Jacuzzi® spa! The following is a list of automated functions performed by your spa. These functions are listed below in an attempt to suppress any operational concerns you may have during the first
24-hours of ownership! Also listed below are important maintenance recommendations you should observe on a regular basis to protect your new investment.
Automated Operations
Approximately two minutes after power is applied to the spa, the first skimming/ heating cycle turns on pump 1. In J-230 models, an automatic five minute “blowout” function also activates pump 2 for a period of five minutes to flush all lines. Then, after five minutes, pump 2 turns off and pump 1 continues to operate for the duration of the cycle. Note: this function only occurs during the first filtration/ heating cycle each day.
Maintain Healthy Spa Water
Always maintain your spa’s water chemistry within the following parameters as defined by the Association of Pool And Spa Professionals/USA:
|
pH |
7.2 — 7.4 |
|
Free Chlorine |
3-5 ppm |
|
Free Bromine |
4-6 ppm |
|
Total Alkalinity |
100-120 ppm |
|
Calcium Hardness |
150-250 ppm |
Always maintain your spas filter as outlined below to ensure healthy spa water. Refer to page 27 “Water Quality Maintenance” for additional information.
Required Filter Maintenance
Your new spa is equipped with an advanced water filtration system that provides unsurpassed water quality! To ensure maximum water quality at all times, you should clean the filter cartridge every three months, or earlier as necessary. See page 24 for detailed filter cartridge cleaning/replacement instructions.
Required Water Replacement
You should replace the spa’s water every 3 months. The frequency
depends on a number of variables including frequency of use, number of users, and attention paid to water quality maintenance. You will know it is time for a change when you cannot control sudsing and/or you can no longer get the normal feel or sparkle to the water, even though the key water balance measurements are all within the proper parameters. See page 27-28 for additional information.
Table of Contents |
||
|
1.0 |
Important Spa Owner Information………………………………………. |
1 |
|
2.0 |
FCC Notice………………………………………………………………………… |
1 |
|
3.0 |
Important Safety Instructions……………………………………………… |
2 |
|
4.0 |
Choosing A Location………………………………………………………….. |
7 |
|
4.1 |
Outdoor Location…………………………………………………………………. |
7 |
|
4.2 |
Indoor Location……………………………………………………………………. |
8 |
|
5.0 |
General Electrical Safety Instructions…………………………………. |
8 |
|
6.0 |
Power Requirements………………………………………………………….. |
9 |
|
7.0 |
Electrical Wiring Instructions……………………………………………. |
10 |
|
8.0 |
Spa Fill Up Procedure………………………………………………………. |
13 |
|
9.0 |
Control Functions…………………………………………………………….. |
17 |
|
9.1 |
Control Panel…………………………………………………………………….. |
17 |
|
9.2 |
Spa Features And Controls.………………………………………………… |
18 |
|
9.3 |
Jet/Air Controls Diagram (J-210 & J-220 Models)…………………… |
19 |
|
9.4 |
Jet/Air Controls Diagram (J-230 Models).……………………………… |
20 |
|
10.0 |
Operating Instructions……………………………………………………… |
21 |
|
10.1 |
Setting Water Temperature………………………………………………….. |
21 |
|
10.2 |
Activate Pumps………………………………………………………………….. |
21 |
|
10.3 |
Light Button………………………………………………………………………. |
21 |
|
10.4 |
Selecting Desired Message Action……………………………………….. |
22 |
|
10.5 |
Adjusting Individual Jet Flow……………………………………………….. |
22 |
|
10.6 |
Air Controls……………………………………………………………………….. |
22 |
|
11.0 |
Automatic Filtration Cycles………………………………………………. |
22 |
|
11.1 |
Standard Filtration/Heating Modes (F1-F3)……………………………. |
22 |
|
11.2 |
Economy Filtration/Heating Modes (F4-F6)…………………………… |
23 |
|
11.3 |
Lock Modes (L1-L2)……………………………………………………………. |
23 |
|
11.4 |
Selecting The Skimmer/Heating Mode………………………………….. |
23 |
|
12.0 |
Spa Maintenance……………………………………………………………… |
24 |
|
12.1 |
Cleaning The Filter.……………………………………………………………. |
24 |
|
12.2 |
Draining and Refilling.………………………………………………………… |
25 |
|
12.3 |
Cleaning The Spa Interior……………………………………………………. |
25 |
|
12.4 |
Pillow Care (J-220/J-230 Only)……………………………………………. |
25 |
|
12.5 |
Maintaining The Cover……………………………………………………….. |
26 |
|
12.6 |
Maintaining The Synthetic Cabinet……………………………………….. |
26 |
|
12.7 |
Winterizing………………………………………………………………………… |
26 |
|
11.8 |
Restarting Your Spa n Cold Weather.…………………………………… |
27 |
|
13.0 |
Water Quality Maintenance……………………………………………….. |
27 |
|
13.1 |
pH Control………………………………………………………………………… |
27 |
|
13.2 |
Sanitizing.…………………………………………………………………………. |
28 |
|
13.3 |
Optional CD Ozone Water Maintenance System……………………. |
28 |
|
14.0 |
Error Conditions/Error Messages……………………………………… |
28 |
|
14.1 |
Panel Displays SN1……………………………………………………………. |
28 |
|
14.2 |
Panel Displays SN2……………………………………………………………. |
29 |
|
14.3 |
Panel Displays FL1…………………………………………………………….. |
29 |
|
14.4 |
Panel Displays FL2…………………………………………………………….. |
29 |
|
14.5 |
Panel Displays COL……………………………………………………………. |
29 |
|
14.6 |
Panel Displays ICE…………………………………………………………….. |
29 |
|
14.7 |
Panel Displays OH.……………………………………………………………. |
29 |
|
14.8 |
Panel Displays — — — — ………………………………………………………….. |
29 |
|
15.0 |
Troubleshooting Procedures…………………………………………….. |
30 |
|
15.1 |
None of The Components Operate (e.g. Pump, Light).…………… |
30 |
|
15.2 |
Pump Does Not Operate But Light Does.……………………………… |
30 |
|
15.3 |
Poor Jet Action.…………………………………………………………………. |
30 |
|
15.4 |
Water is Too Hot………………………………………………………………… |
30 |
|
15.5 |
No Heat……………………………………………………………………………. |
31 |
|
16.0 |
J-210/J-220 Convertible Circuit Diagram (60Hz)…………………. |
32 |
|
17.0 |
J-230 Circuit Diagram (60Hz)…………………………………………….. |
33 |
|
18.0 |
J-220 Export Circuit Diagram (50Hz)…………………………………. |
34 |
|
19.0 |
J-230 Export Circuit Diagram (50Hz)…………………………………. |
35 |

1.0 Important Spa Owner Information
Your Jacuzzi® 200 series spa is constructed to the highest standards and is capable of providing many years of trouble-free use. However, because heat retentive materials are utilized to insulate the spa for efficient operation, an uncovered spa surface directly exposed to sunlight and high temperatures for an extended period is subject to permanent damage. Damage caused by exposing the spa to this abuse is not covered by warranty. We recommend that you always keep the spa full of water when it is exposed to direct sunlight and that you keep the
Jacuzzi premium insulating cover in place at all times when the spa is not in use. Read and carefully follow the requirements for your spa’s support base found in section 4.0 titled, “Choosing a Location” (page 7).
Jacuzzi constantly strives to offer the finest spas available, therefore modifications and enhancements may be made which affect the specifications, illustrations and/or instructions contained herein.
2.0 FCC Notice
This equipment has been tested and found to comply with the limits for a Class B Digital Device, pursuant to Part 15 of the FCC Rules. These limits are designed to provide reasonable protection against harmful interference in a residential installation. This equipment generates, uses and can radiate radio frequency energy and, if not installed and used in accordance with the instructions, may cause harmful interference to radio communications. However, there is no guarantee that interference will not occur in a particular installation. If this equipment does cause
harmful interference to radio or television reception, which can be determined by turning the equipment off and on, the user is encouraged to try to correct the interference by one or more of the following measures:
1.Rearrange or relocate the receiving antenna.
2.Increase the separation between the equipment and receiver
3.Connect the equipment into an outlet on a circuit different from the circuit connected.
4.Consult the dealer or an experienced radio/TV technician for help.
Changes or modifications not expressly approved by the party responsible for FCC compliance could void the user’s authority to operate this equipment.
page

3.0 IMPORTANT SAFETY INSTRUCTIONS
READ AND FOLLOW ALL INSTRUCTIONS CAREFULLY
When installing and using this electrical equipment, basic safety precautions should always be followed, including:
1.Warning: To reduce the risk of injury, do not permit children to use this product unless they are closely supervised at all times.
2.Warning: A grounding wire connector is provided on this unit to connect a minimum No. 8 AWG (8.4mm2) solid copper conductor between this unit and any metal equipment, metal enclosures of electrical equipment, metal water pipe, or conduit within 5 feet
(1.5m) of the unit.
3.Danger: Risk of Accidental Drowning. Extreme caution must be exercised to prevent unauthorized access by children. To avoid accidents, ensure that children cannot use this spa unless they are supervised at all times.
4.Danger: Risk of Injury. The suction fittings in this spa are sized to match the specific water flow created by the pump. Should the need arise to replace the suction fittings or the pump, be sure that the flow rates are compatible. Never operate the spa if the suction fittings are broken or missing. Never replace a suction fitting with one rated less than the flow rate marked on the original suction fitting.
5.Danger: Risk of Electric Shock. Install at least 5 feet (1.5m), from all metal surfaces. As an alternative, a spa may be installed within 5 feet of metal surfaces if each metal surface is permanently connected (bonded) by a minimum No. 8 AWG (8.4 mm2) solid copper conductor attached to the wire connector on the grounding lug, inside the equipment compartment on the equipment box.
6.Danger: Risk of Electric Shock. Do not permit any electrical appliance, such as a light, telephone, radio, television, etc. within 5 feet (1.5m) of a spa unless such appliances are built-in by the manufacturer.
7.Electrical Supply: The electrical supply for this product must include a suitably rated switch or circuit breaker to open all
ungrounded supply conductors to comply with section 422-20 of the National Electrical Code/USA, ANSI/NFPA 70. The disconnect must be readily accessible and visible to the spa occupant but installed at least 5 feet (1.5m), from the spa water.
page

8.Warning: To Reduce the Risk of Injury:
9.The water in the spa should never exceed 104°F (40°C). Water temperatures between 100°F (38°C) and 104°F (40°C) are considered safe for a healthy adult. Lower water temperatures are recommended for young children and when spa use may exceed 10 minutes.
10.Since excessive water temperatures have a high potential for causing fetal damage during the early months of pregnancy, pregnant or possibly pregnant women should limit spa water temperatures to
100°F (38°C). If pregnant, please consult your physician before using a spa.
11.Before entering the spa, the user should measure the water temperature with an accurate thermometer since the tolerance of water temperature-regulating devices may vary as much as +/- 5°F
(2°C).
12.The use of alcohol, drugs, or medication before or during spa use may lead to unconsciousness with the possibility of drowning.
13.Persons suffering from obesity or a medical history of heart disease, low or high blood pressure, circulatory system problems, diabetes, infectious diseases or immune deficiency syndromes should consult a physician before using a spa. If you experience breathing difficulties in association with using or operating your spa, discontinue use and consult your physician.
14.Persons using medication should consult a physician before using a spa since some medication may induce drowsiness, while other medication may affect heart rate, blood pressure, and circulation.
15.Always shower before and after using your spa. To reduce the possibility of contracting a waterborne illness, always maintain water chemistry within the parameters listed on the inside cover of this manual. If you or other bathers experience such a condition, discontinue use and seek medical attention.
page

IMPORTANT CSA SAFETY INSTRUCTIONS (CANADA ONLY)
When using this electrical equipment, basic safety precautions should always be followed, including the following:
1.Read and follow all instructions.
2.A green colored terminal or a terminal marked G, Gr, Ground,
Grounding or the  symbol* is located inside the supply terminal box or compartment. To reduce the risk of electric shock, this terminal must be connected to the grounding means provided in the electric supply service panel with a continuous copper wire equivalent in size to the circuit conductors that supply this equipment.
*IEC Publication 417, Symbol 5019.
3.At least two lugs marked “Bonding Lugs” are provided on the external surface or on the inside of the supply terminal box/compartment.
To reduce the risk of electric shock, connect the local common bonding grid in the area of the spa to these terminals with an insulated or bare copper conductor not smaller than No. 6 AWG (10 mm2).
4.All field installed metal components such as rails, ladders, drains or other similar hardware within 10 feet (3m) of the spa shall be bonded to the equipment grounding buss with copper conductors not smaller than No. 6 AWG (10 mm2).
5.SAVE THESE INSTRUCTIONS.
WARNING: Children should not use spas without adult supervision.
WARNING: Do not use spas unless all suction guards are installed to prevent body and hair entrapment.
WARNING: People with infectious diseases should not use a spa.
WARNING: To avoid injury, exercise care when entering or exiting the spa.
WARNING: Do not use drugs or alcohol before or during the use of a spa to avoid unconsciousness and possible drowning.
WARNING: Pregnant or possibly pregnant women should consult a physician before using a spa.
page

WARNING: Water temperature in excess of 40°C (104°F) may be injurious to your health.
WARNING: Before entering the spa, measure the water temperature with an accurate thermometer.
WARNING: Do not use a spa immediately following strenuous exercise.
WARNING: Prolonged immersion in a spa may be injurious to your health.
WARNING: Do not permit electric appliances (such as lights, telephone, radio, television, etc.) within 5 feet (1.5m) of this spa unless such appliances are built-in by the manufacturer.
CAUTION: Maintain water chemistry in accordance with manufacturer’s instructions.
WARNING: The use of alcohol or drugs can greatly increase the risk of fatal hyperthermia in spas.
SAVE THESE INSTRUCTIONS
HYPERTHERMIA
Prolonged immersion in hot water may induce hyperthermia. A description of the causes, symptoms, and effects of hyperthermia are as follows:
Hyperthermia occurs when the internal temperature of the body reaches a level several degrees above the normal body temperature of 98.6°F
(37°C). The symptoms of hyperthermia include drowsiness, lethargy, and an increase in the internal temperature of the body. The effects of hyperthermia include:
1.Unawareness of impending hazard;
2.Failure to perceive heat;
3.Failure to recognize the need to exit spa;
4.Physical inability to exit spa;
5.Fetal damage in pregnant women; and
6.Unconsciousness and danger of drowning.
page

A warning sign is provided in your warranty packet. Please install it at a location near your spa, where it is visible to the user of the spa. For additional or replacement signs please contact your local Jacuzzi spas dealer and reference item number #6530-082.
CAUTIONS
1.Persons suffering from heart disease, diabetes, high or low blood pressure, and any condition requiring medical treatment, pregnant women, the elderly, or infants should consult with a physician before using a spa.
2.The Consumer Products Safety Commission/USA has stated that the water temperature in a spa should not exceed 104°F (40°C). Immersion in water in excess of 104°F (40°C) can be hazardous to your health.
3.Observe a reasonable time limit when using the spa. Long exposures at higher temperatures can cause high body temperature. Symptoms may include dizziness, nausea, fainting, drowsiness, and reduced awareness. These effects could possibly result in drowning.
4.Do not use the spa under the influence of alcohol, narcotics, or other drugs. Use of the spa under these conditions may lead to serious consequences.
5.Always test the spa water temperature before entering the spa.
Enter and exit the spa slowly. Wet surfaces can be very slippery.
6.Never bring any electrical appliances into or near the spa. Never operate any electrical appliances from inside the spa or when you are wet unless such appliances are built-in by the manufacturer.
7.Proper chemical maintenance of spa water is necessary to maintain safe water and prevent possible damage to spa components.
8.Use the straps and clip tie downs to secure the cover when not in use. This will help to discourage unsupervised children from entering the spa and keep the spa cover secure in high-wind conditions. There is no representation that the cover, clip tie-downs, or actual locks will prevent access to the spa.
page
![]()
4.0 Choosing A Location
IMPORTANT: Because of the combined weight of the spa, water and users, it is extremely important that the base upon which the spa rests be smooth, flat, level and capable of uniformly supporting this weight, without shifting or settling, for the entire time the spa is in place. If the spa is placed on a surface which does not meet these requirements, damage to the skirt and/or the spa shell may result. Damage caused by improper support is not covered under warranty. It is the responsibility of the spa owner to assure the integrity of the support over time.
We recommend a poured, reinforced concrete slab with a minimum thickness of 4 inches (10cm). Wood decking is also acceptable provided it is constructed so that it meets the requirements outlined above. The spa must be installed in such a manner as to provide drainage away from the spa. Placing the spa in a depression without provisions for proper drainage could allow rain, overflow and other casual water
to flood the equipment and create a wet condition in which it would sit. For spas which will be recessed into a floor or deck, install so as to permit access to the equipment, either from above or below, for servicing. Make certain that there are no obstructions which would prevent removal of the cabinet side panels and access to the jets components, especially on the side with the equipment bay doors.
4.1 Outdoor Location
In selecting the ideal outdoor location for your spa, we suggest that you take into consideration:
1.The proximity to changing area and shelter (especially in colder weather).
2.The pathway to and from your spa (this should be free of debris so that dirt and leaves are not easily tracked into the spa).
3.The closeness to trees and shrubbery (remember that leaves and birds could create extra work in keeping the spa clean).
4.A sheltered environment (less wind and weather exposure can result in lowered operation and maintenance costs).
5.The overall enhancement of your environment. It is preferable not to place the spa under an unguttered roof overhang since run-off water will shorten the life expectancy of the spa cover.
page

4.2 Indoor Location
For indoor installations, be certain to make provisions for proper ventilation. When the spa is in use, considerable amounts of moisture will escape. This can damage certain surfaces over time. If you have any questions regarding the placement or installation of your spa, consult your authorized Jacuzzi dealer.
WARNING: In addition to maintenance of filters and water chemistry, proper ventilation is recommended to reduce the risk of exposure to viruses and bacteria that could be present in the air or water. Consult a licensed architect or building contractor to determine your specific needs if installing your spa indoors.
5.0 General Electrical Safety Instructions
Your new Jacuzzi® spa is equipped with a “state-of-the-art” equipment system. It contains the most advanced safety and self-protective equipment in the industry. Nonetheless, this spa must be installed properly to insure dependable usage. Please contact your dealer or local building department should you have any questions regarding your installation.
Proper grounding is extremely important. Jacuzzi spas are equipped with a current collector system. A pressure wire connector is provided on the surface of the control box, located outside the equipment door (Figure B, page 12) to permit connection of a bonding wire between this point and any ground metal equipment, metal water pipe or conduit within 5 feet (1.5m) of the spa, or copper clad grounding rod buried within 5 feet (1.5m) of the spa. Bonding wire must be at least No. 8
AWG (8.4mm2) solid copper wire. This is a most important safety assurance feature. Before installing this spa, check with the local building department to insure installation conforms to local building codes.
120/240 Volt Convertible Models
A spa connected to a 120VAC electrical service must be located close enough to a grounded, grounding-type electrical outlet so that the included power cord can be plugged directly into it. DO NOT USE
AN EXTENSION CORD as this could cause damage to the spa’s equipment due to insufficient voltage. The power supplied to this spa must be a dedicated circuit with no other appliances or lights sharing the power provided by the circuit.
page

6.0 Power Requirements
Jacuzzi® spas are designed to provide optimum performance and flexibility of use when connected to the maximum electrical service listed in the tables below. If you prefer, your dealer can perform a minor circuit board modification to allow your spa to accept an electrical service other than the factory setting.
US/Canada J-210/J-220 1-Pump Convertible Model (60Hz)
|
120V/15A* |
240V/30A* |
240V/40A** |
||
|
Voltage: |
120 VAC |
240 VAC |
240 VAC |
|
|
# of Wires: |
3 (15A GFCI Cord |
4 |
4 |
|
|
US only*) |
||||
|
Frequency: |
60Hz |
60Hz |
60Hz |
|
|
Current Draw: |
12A |
21A |
30A |
|
|
Circuit Breaker: |
15A, 1-Pole |
30A, 2-Pole |
40A, 2-Pole |
For 240 VAC Heater Operation: Move the red wire on the main terminal strip (TB1) from position #1 to position #3. Make certain wires are connected exactly as shown in Figure-D (page 12) before applying power. Failure to do so will result in damage to the circuit board and/or related components and void the manufacturer’s warranty.
*All Canadian spas must be hard wired (120 VAC or 240 VAC) per CSA Canadian standards. (page 4).
*In 15A/30A configuration, the heater will not operate at the same time as the high-speed jets pump. The factory setting is 120V/15A.
**In 40A configuration, remove the jumper JP1 #1-2 on the circuit board to allow the heater to operate at the same time as the high-speed jets pump (page 32).
US / Canada J-230 2-Pump Model (60Hz)
|
240V/40A* |
240V/50A** |
240V/60A*** |
||
|
Voltage: |
240 VAC |
240 VAC |
240 VAC |
|
|
# of Wires: |
3 |
3 |
3 |
|
|
Frequency: |
60Hz |
60Hz |
60Hz |
|
|
Current Draw: |
26A |
36A |
45A |
|
|
Circuit Breaker: |
40A, 2-Pole |
50A, 2-Pole |
60A, 2-Pole |
*In 40A configuration, the heater will not operate while either jets pump is running in high speed. Note: pump 2 runs only in high speed.
**In 50A configuration, the heater will not operate while both jet pumps are running in high speed. Note: pump 2 runs only in high speed.
This is the factory setting.
***In 60A configuration, the heater will operate while both jet pumps are running in high speed. Note: pump 2 runs only in high speed.
page
-
Contents
-
Table of Contents
-
Bookmarks
Quick Links
ÉˉÓχÒÒ‡ÊÌ˚ ‚‡ÌÌ˚
Схема предварительной установки
Related Manuals for Jacuzzi J-Sha Mi Corner
Summary of Contents for Jacuzzi J-Sha Mi Corner
-
Page 1
ÉˉÓχÒÒ‡ÊÌ˚ ‚‡ÌÌ˚ Схема предварительной установки… -
Page 2
AVVERTENZE WARNUNG • Tutte le misure sono espresse in centimetri • Sämtliche Maßangaben in cm • I disegni riportati non sono in scala • Die Zeichnungen sind nicht im Maßstab WARNING ADVERTENCIAS • All measures are in centimetres • Todas las medidas vienen en centímetros •… -
Page 3
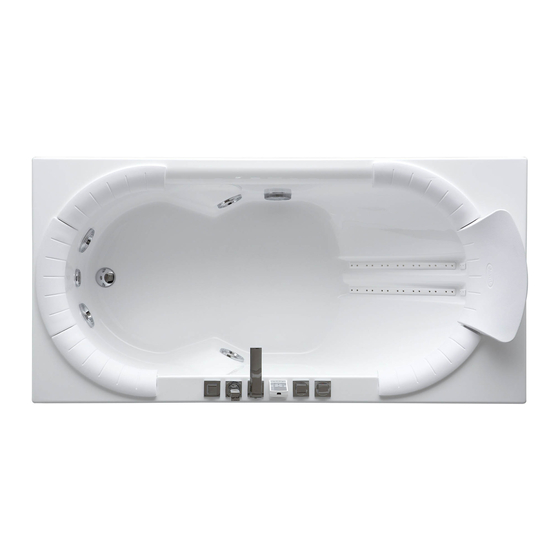
Informazioni generali Predisposizione acqua calda/fredda Le vasche idromassaggio Jacuzzi®, a parte alcuni modelli, sono ATTENZIONE: (IEC 60335-1/A2) La pressione dell’im- disponibili sia con lo schienale a sinistra che a destra. La versio- pianto idraulico che alimenta l’apparecchiatura non ne SX-DX si individua ponendosi davanti alla vasca, di fronte ai deve superare i 600 kPa (6 bar). -
Page 4
60 cm ed una altezza di nello laterale sul lato schienale. 225 cm. I modelli J-Sha Mi e J-Sha Mi Corner, dotati di sistema troppo- pieno nascosto sotto il bordo vasca, richiedono uno scavo nel pavimento per la sistemazione del sifone (vedere scheda rispet- tiva). -
Page 5
General Information Hot/cold water preinstallation Most of the Jacuzzi® whirlpool baths are available with the back- CAUTION: (IEC 60335-1/A2) The pressure of the water rest on either the left or right-hand side. The Left-Right version system supplying water to the appliance must not ex- can be identified by standing in front of the bath, opposite the ceed 600 kPa (6 bar). -
Page 6
For the rectangular models, in order to facilitate any work on the lumbar hydromassage system, it is advisable to install the side panel on the backrest side. The J-Sha Mi and J-Sha Mi Corner models, equipped with an overflow system hidden underneath the bathtub rim, require an 0,6 m excavation in the floor for installation of the siphon (see respec- tive sheet). -
Page 7
La version à gauche ou à droite est définie en se plaçant dépasser 600 kPa (6 bar). devant la baignoire face aux commandes. Jacuzzi Europe S.p.A. conseille l’utilisation du panneau frontal dé- — modèles sans robinetterie montable, fourni sur demande (de série sur certains modèles), qui facilite l’accès en cas d’éventuelles interventions d’entretien. -
Page 8
60 cm et une hau- teur de 225 cm. Les modèles J-Sha Mi et J-Sha Mi Corner, dotés de système trop-plein caché sous le bord de la baignoire, nécessitent d’une cavité dans le sol pour le positionnement du siphon (voir fiche respective). -
Page 9
Datenblatt) und ausreichend bemessen ist. Mit Ausnahme einiger Modelle sind die Hydromassagewannen Jacuzzi® sowohl mit linker als auch mit rechter Rückenlehne lie- Einige Modelle sehen die Installation eines Beleuchtungs- ferbar. Die re.-li. Ausführung stellt man fest, wenn man sich vor systems am Boden vor;… -
Page 10
Bestimmungen und Normen des jeweiligen Landes ent- sprechen. Im besonderen ist zu berücksichtigen, dass jede Art Für die Modelle J-Sha Mi und J-Sha Mi Corner, die ein unter von Elektroinstallationen im Bereich des Gerätes in einem Ab- dem Wannenrand verborgenes Überlaufsystem besitzen, ist stand von mindestens 60 cm und in einer Höhe von mindestens… -
Page 11
Para determinar si la versión de la bañera es dcha. los 600 kPa (6 bar). o izda., es necesario mirarla desde delante, frente a los mandos. Jacuzzi Europe S.p.A. recomienda utilizar el específico panel — modelos sin grifería frontal desmontable, suministrado bajo pedido (en algunos modelos viene de serie), que garantiza un fácil acceso para… -
Page 12
Los modelos J-Sha Mi y J-Sha Mi Corner, dotados de rebosadero 0,6 m oculto bajo el borde de la bañera, requieren un hueco en el suelo para la colocación del sifón (vea la ficha correspondiente). -
Page 13
Общая информация ВНИМАНИЕ: В моделях, оснащённых нагревателем, убедиться, что электрическая система здания мо- Гидромассажные ванны Jacuzzi®, за исключением некоторых жет подавать соответствующую мощность (см.соот- моделей, могут быть как с левой, так и с правой спинкой. Мо- ветствующую схему) и соразмерена соответствую- дель… -
Page 14
выключателей и т.д.) в ванных комнатах должен соответство- вать положениям закона, а также нормам всех Государств; Модели J-Sha Mi и J-Sha Mi Corner, оснащённые системой в особенности, не допускаются электрические установки в перелива, скрытой под бортом ванной,требуют паз на полу… -
Page 15
окружающих металлических масс, в соответствии с нормативом EN 60335.2.60. ВНИМАНИЕ! Отсоединить оборудование от линии электропитания перед проведением каких-либо ра- бот технического обслуживания. -
Page 16
220-240 V 180x80x74 cm ~ 58 kg kg/m ~ 251 50/60 Hz ~ 13 kg 3,5 A — 0,7 kW ESEMPIO: vasca con schienale opposto al muro ESEMPIO: vasca con schienale a muro EXAMPLE: bath with backrest opposite wall EXAMPLE: bath with backrest against wall EXEMPLE: baignoire avec dossier opposé… -
Page 17
220-240 V 190x90x74 cm ~ 65 kg ~ 46 kg ~ 267 kg/m ~ 324 ~224 50/60 Hz ~ 14 kg 3,5 A — 0,7 kW ESEMPIO: vasca con schienale opposto al muro ESEMPIO: vasca con schienale a muro EXAMPLE: bath with backrest opposite wall EXAMPLE: bath with backrest against wall EXEMPLE: baignoire avec dossier opposé… -
Page 18
I dati e le caratteristiche non impegnano la Jacuzzi Europe S.p.A., che si riserva il diritto di apportare tutte le modifiche ritenute opportune senza obbligo di preavviso o di sostituzione The data and characteristics indicated do not oblige Jacuzzi Europe, who reserves the right to make the necessary changes they feel opportune without forewarning or substitution Les caractéristiques indiquées, n’engagent pas la Jacuzzi Europe, qui se réserve le droit d’apporter… -
Page 19
установка эксплуатация и техобслуживание ТЩАТЕЛЬНО ХРАНИТЬ… -
Page 21: Table Of Contents
Indice Index Importante Important …………..4 …………….Avvertenze ………….. 7 Warnings …………..8 Installazione …………13 Installation …………13 Uso & manutenzione ……….20 Use & maintenance ……….22 Sommaire Inhaltsverzeichnis Important …………..5 Wichtig …………..5 Recommandations ……….9 Hinweise …………..10 Installation …………
-
Page 22: Importante
L’aerazione dev’essere garantita, anche se non si utiliz- Aeration must be guaranteed also if Jacuzzi® panels are not zano i pannelli Jacuzzi®. used (see “Instruction for pre-installation”). Panels must be…
-
Page 23: Important
L’aération doit être assurée même si l’on n’utilise pas les Hydromassagefunktion notwendig ist. Eine einwandfreie panneaux Jacuzzi® (voir fiche de pré-installation). Les pan- Belüftung ist jedenfalls zu gewährleisten, auch wenn kei- neaux doivent être fixés de manière stable. Pour les enlever, ne Jacuzzi®-Verkleidungen (siehe Merkblatt Vorinstalla-…
-
Page 24: Importante
La ventilación debe estar garantizada, incluso si no se ÇÂÌÚËÎflˆËfl ‰ÓÎÊ̇ ·˚Ú¸ Ó·ÂÒÔ˜Â̇ Ú‡ÍÊÂ Ë ‚ utilizan los paneles Jacuzzi® (véase ficha de preinstalación). ÚÓÏ ÒÎÛ˜‡Â, ÂÒÎË Ì ËÒÔÓθÁÛ˛ÚÒfl Ô‡ÌÂÎË Jacuz- Los paneles se deben fijar con firmeza y, para retirarlos, se zi®…
-
Page 25: Avvertenze
È fatto assoluto divieto di utilizzare l’apparecchiatura per usi diversi da quelli espressamente previsti. Jacuzzi non risponde per eventuali danni derivati da utilizzi impropri. Nel caso di interventi di manutenzione e/o riparazione che comportino la sostituzione di componenti, devono essere utilizzati ricambi originali Jacuzzi®, pena la decadenza della…
-
Page 26: Recommandations
Jacuzzi décline toute responsabilité pour tout dommage dé- rivant d’une utilisation impropre. En cas d’opérations d’entretien et/ou de réparation, néces- sitant le remplacement de composants, utiliser des pièces détachées originales Jacuzzi® ; en cas contraire, le fabricant décline toute responsabilité pour tout dommage dérivant de l’intervention effectuée.
-
Page 27: Warnings
It is completely forbidden to use the appliance in ways that differ from those expressly detailed. Jacuzzi will not assume responsibility for any damage caused by improper use. In the instance of maintenance and/or repair operations, which involve the replacement of components, Jacuzzi®…
-
Page 28: Hinweise
Person beaufsichtigt werden, die für deren Sicher- heit verantwortlich ist. Kinder müssen beaufsichtigt werden, damit sichergestellt Jacuzzi Europe S.p.A. lehnt jede Haftung ab, falls: wird, dass sie nicht mit dem Gerät spielen. — die Installation nicht durch Personal durchgeführt wird, das Die Wannen dürfen immer nur in Innenräumen für den Haus-…
-
Page 29: Advertencias
Es necesario vigilar a los niños para asegurarse de que no Jacuzzi Europe S.p.A. no se responsabiliza en caso de que: jueguen con el aparato. — la instalación sea realizada por parte de personal no cuali- Las bañeras deben utilizarse única y exclusivamente en inte-…
-
Page 30
движений, ощущений и/или восприятия, либо не имею- должны всегда использоваться оригинальные запасные щими достаточных сведений для эксплуатации данного части Jacuzzi®, под угрозой утраты гарантии и ответ- оборудования. Во время пользования устройством не- ственности Изготовителя за ущерб, обусловленный про- обходимо обеспечить присмотр за детьми человеком, изведенным… -
Page 31: Installazione
/ installation type / type d’installation / Installationstyp / tipo de instalación / типология установки optional / option / opcionales / опция Jacuzzi®…
-
Page 32
220-240 V 50 or 60 Hz 1~… -
Page 33
Ø 8 mm ~ 60’ (1hour) Ø 6×40 mm… -
Page 34
IMPORTANTE: nei Paesi in cui il valore di tensione 220-240V viene fornito da un sistema bifase (L+L), il collegamento va in ogni caso effet- tuato sui morsetti L e N. IMPORTANT: for Countries where 220-240V voltage is supplied by a two-phase system (L+L), the con- nection has to be made on terminals L and N anyway. -
Page 35
Ø 3,9×13 Ø 3,9×13 Ø 3,9×13… -
Page 36
“A” “B” “A” “A” “B” “B” ~ 17 mm ~ 11 mm ~ 13 mm… -
Page 37
180° Ø 4,2×22… -
Page 38
Per igienizzare il circuito idraulico della vasca (circa una volta al dell’idromassaggio: mese a seconda dell’utilizzo dell’idromassaggio) si consiglia il liqui- do J-MX 07 proposto da Jacuzzi e reperibile presso i Centri Assisten- 34-36 °C —> 20 minuti di idromassaggio za/Rivenditori autorizzati. -
Page 39
In ogni caso, il livello dell’acqua in vasca (senza nessuno immerso) deve superare di circa 5-6 cm i getti più alti. Versare nell’acqua della vasca 50-100 ml di liquido J-MX 07. Azionare l’idromassaggio per poco più di 1 minuto; lasciare che il liquido agisca per almeno altri 15 minuti. -
Page 40
15-20 minutes (5-10 minutes are necessary before the ac- tion of the moving water begins to take effect). SANITIZATION We recommend the J-MX 07 liquid, offered by Jacuzzi and available We recommend setting the water temperature at approxi- at the Assistance Centres/Authorised Retailers, is used to clean the mately 36 °C;… -
Page 41
Pour 50-100 ml of J-MX 07 liquid into the tub. Activate the hydromassage for just over 1 minute; leave the liquid to act for at least a further 15 minutes. Open the drain and empty the tub. TROUBLESHOOTING… The hydromassage does not activate — Check that the main switch is on. -
Page 42
élevées, il est préférable de diminuer la fois par mois selon l’utilisation de l’hydromassage), le liquide J-MX durée de l’hydromassage : 07 proposé par Jacuzzi et en vente auprès des Centres d’Assistance/ Revendeurs agréés est conseillé. 34-36 °C —> 20 minutes d’hydromassage Il est possible d’effectuer l’hygiénisation avec la même eau que… -
Page 43
Dans tous les cas, le niveau de l’eau dans la baignoire (sans personne à l’intérieur) doit dépasser d’environ 5-6 cm les jets les plus hauts. Verser dans l’eau de la baignoire 50-100 ml de liquide J-MX 07. Actionner l’hydromassage pendant un peu plus d’1 minute et laisser que le liquide agisse pendant au moins 15 minutes. -
Page 44
Wir empfehlen die Regulierung der Wassertemperatur auf 36 pro Monat, je nach Nutzung der Unterwassermassage) wird die °C; bei höheren Temperaturen sollte die Dauer der Unterwasser- Flüssigkeit J-MX 07 von Jacuzzi empfohlen, die beim Kundenser- massage verkürzt werden: vice/autorisierten Händlern erhältlich ist. -
Page 45
In jedem Fall muss der Wasserstand in der Wanne (wenn sich nichts und niemand darin befindet) etwa 5-6 cm über den obersten Düsen liegen. In das Wasser der Wanne etwa 50-100 ml der Flüssigkeit J-MX 07 geben. Die Unterwassermassage-Funktion etwas länger als 1 Minute betätigen und die Flüssigkeiten dann mindestens 15 Minuten einwirken lassen. -
Page 46
Se recomienda ajustar la temperatura del agua a 36 °C; si se una vez al mes, dependiendo del uso del hidromasaje) se recomien- usan temperaturas más altas, es preferible acortar la duración da el líquido J-MX 07 propuesto por Jacuzzi y disponible en los Cen- del hidromasaje: tros de Asistencia/Distribuidores autorizados. -
Page 47
Verter en el agua de la bañera 50-100 ml de líquido J-MX 07. Activar el hidromasaje durante poco más de 1 minuto; dejar que el líquido actúe durante otros 15 minutos como mínimo. Abrir el desagüe y vaciar la bañera. EN CASO DE PROBLEMAS… -
Page 48
34-36 °C —> 20 минут гидромассажа сти использования гидромассажа), рекомендуется использо- 36-38 °C —> 15 минут гидромассажа вание жидкости J-MX 07, предлагаемой Jacuzzi, которую можно 38-40 °C —> 10 минут гидромассажа приобрести в Сервисных Центрах/у Авторизованных дилеров. Можно производить санитарную обработку при приме-… -
Page 49
массажа, при условии того, что не были использованы мыла, масла, косметические средства; в противном случае, слить и вновь наполнить ванну. В любом случае, уровень воды в ванне (без находящихся в ней людей) должен превышать приблизительно на 5-6 см верхние струи. Залить… -
Page 50
I dati e le caratteristiche non impegnano la Jacuzzi Europe S.p.A., che si riserva il diritto di apportare tutte le modifiche ritenute opportune senza obbligo di preavviso o di sostituzione The data and characteristics indicated do not oblige Jacuzzi Europe, who reserves the right to make the necessary changes they feel opportune without forewarning or substitution Les caractéristiques indiquées, n’engagent pas la Jacuzzi Europe, qui se réserve le droit d’apporter… -
Page 51
vasche idromassaggio whirlpool baths baignoires d’hydromassage Hydromassagewannen bañeras de hidromasaje ÉˉÓχÒÒ‡ÊÌ˚ ‚‡ÌÌ˚ Schemi elettrici Electrical diagrams Schémas électriques Schaltpläne Esquemas eléctricos ˝ÎÂÍÚ˘ÂÒÍË ÒıÂÏ˚… -
Page 52
Sicurezza elettrica ….. . 3 Electrical safety ……4 Sécurité… -
Page 53: Sicurezza Elettrica
60 cm ed un’altezza di 225 cm. sponsabilità del Costruttore. L’apparecchio venga riparato da personale non autorizzato o usando parti di ricambio non originali della Jacuzzi Europe S.p.A. 0,6 m 0,6 m Le vasche idromassaggio Jacuzzi ®…
-
Page 54: Electrical Safety
Jacuzzi ® whirlpool baths are Class “I” appliances, and must be an- JACUZZI EUROPE S.p.A. shall not be held liable: chored securely and permanently connected to the electric mains and earth system without any intermediate connections. If installation is carried out by unqualified personnel and/or per- sonnel unauthorized to carry out installation.
-
Page 55: Sécurité Électrique
“I” et doivent par conséquent être fixées et raccordées de façon stable et définitive, sans raccordements intermédiaires, au Jacuzzi Europe S.p.A. décline toute responsabilité dans les cas suivants : réseau électrique et à la ligne de mise à la terre.
-
Page 56: Elektrische Sicherheit
Erdungsanlage anzuschließen sind. der Wanne aus zugänglich sein. Die elektrische Anlage und die Erdungsanlage des JACUZZI EUROPE S.p.A. lehnt jede Verantwortung ab, falls: Gebäudes müssen funktionstüchtig sein und den die Installation durch nicht qualifiziertes u/o nicht für die In- einschlägigen nationalen Gesetzesvorschriften und…
-
Page 57: Seguridad Eléctrica
JACUZZI EUROPE S.p.A. declina toda responsabilidad en caso de que: Las instalaciones eléctrica y de tierra del edificio de- ben ser eficaces y conformes con las disposiciones La instalación sea realizada por personal no cualificado y/o no…
-
Page 58: Ùîâíú˘âòí‡Fl ·Âáóô‡Òìóòú
ùÎÂÍÚ˘ÂÒ͇fl ÒÂÚ¸ Ë ÒËÒÚÂχ Á‡ÁÂÏÎÂÌËfl Á‰‡ÌËfl доступны для тех, кто находится в ванне. ‰ÓÎÊÌ˚ ·˚Ú¸ ËÒÔ‡‚Ì˚ÏË Ë ÒÓÓÚ‚ÂÚÒÚ‚Ó‚‡Ú¸ Ú·ӂ‡ÌËflÏ Á‡ÍÓ̇ Ë ÒÔˆˇθÌ˚Ï Ì‡ˆËÓ̇θÌ˚Ï îËχ JACUZZI EUROPE S.p.A. Ì ÌÂÒÂÚ ÓÚ‚ÂÚÒÚ‚ÂÌÌÓÒÚË, ÌÓχÏ. ÂÒÎË: — ìÒÚ‡Ìӂ͇ ‚˚ÔÓÎÌflÂÚÒfl ÌÂÍ‚‡ÎËÙˈËÓ‚‡ÌÌ˚Ï ÑÓÎÊÌÓ ·˚Ú¸ Ô‰ÛÒÏÓÚÂÌÓ ÒÔˆˇθÌÓÂ…
-
Page 59
1 ON 0 OFF JP 7 1 ON 0 OFF 220-240V~ 50/60 Hz êìëëäàâ FRANÇAIS DEUTSCH ITALIANO ENGLISH ESPAÑOL ‰ËÒÔÎÂÈ display display display display display ̇ÒÓÒ pump pompe pompa Pumpe bomba Ù‡Á‡ phase phase fase Phase fase ÌÂÈڇθ neutral neutre neutro Nulleiter neutro… -
Page 60: Jp7 Dis
JP 7 DIS GRS1 GRS1 GRS2 GRS2 FARO FARO IDRO IDRO DISI DISI L-F L-F EV EV LSERB LSERB VALE VALE ARIA ARIA CS2132801 CS2132801 IN IN POMPA POMPA POMPA POMPA RISC RISC 220-240V~ 50/60 Hz êìëëäàâ ITALIANO ENGLISH FRANÇAIS DEUTSCH ESPAÑOL ‰ËÒÔÎÂÈ…
-
Page 61
JP 7 Y T H E Y O U N G C O L L E C T I O N 220-240V~ 50/60 Hz êìëëäàâ ITALIANO ENGLISH FRANÇAIS DEUTSCH ESPAÑOL ‰ËÒÔÎÂÈ display display display display display Á‡˘ËÚ‡ ÓÚ ‡·ÓÚ˚‚ÒÛıÛ˛ contromarcia a secco marcha atrás a seco dry run device contre fonction. -
Page 62: Jp 7 Y Dis
JP 7 Y DIS T H E Y O U N G C O L L E C T I O N 220-240V~ 50/60 Hz êìëëäàâ ITALIANO ENGLISH FRANÇAIS DEUTSCH ESPAÑOL ‰ËÒÔÎÂÈ display display display display display Á‡˘ËÚ‡ ÓÚ ‡·ÓÚ˚‚ÒÛıÛ˛ contromarcia a secco marcha atrás a seco dry run device…
-
Page 63: Jp 7 Y Air
JP 7 Y AIR T H E Y O U N G C O L L E C T I O N 220-240V~ 50/60 Hz êìëëäàâ ITALIANO ENGLISH FRANÇAIS DEUTSCH ESPAÑOL ‰ËÒÔÎÂÈ display display display display display Á‡˘ËÚ‡ ÓÚ ‡·ÓÚ˚‚ÒÛıÛ˛ contromarcia a secco marcha atrás a seco dry run device…
-
Page 64: Jp 7 Y Air Dis
JP 7 Y AIR DIS T H E Y O U N G C O L L E C T I O N 220-240V~ 50/60 Hz êìëëäàâ ITALIANO ENGLISH FRANÇAIS DEUTSCH ESPAÑOL ‰ËÒÔÎÂÈ display display display display display Á‡˘ËÚ‡ ÓÚ ‡·ÓÚ˚‚ÒÛıÛ˛ contromarcia a secco marcha atrás a seco dry run device…
-
Page 65: Jp 7 Opd
JP 7 OPD J 2 5 D Z 6 GRS1 GRS2 FARO IDRO DISI LSERB POMPA 220-240V~ 50/60 Hz êìëëäàâ ITALIANO ENGLISH FRANÇAIS DEUTSCH ESPAÑOL ‰ËÒÔÎÂÈ display display display display display Á‡˘ËÚ‡ ÓÚ ‡·ÓÚ˚‚ÒÛıÛ˛ contromarcia a secco dry run device contre fonction.
-
Page 66: Jp 7 Opf
JP 7 OPF 220-240V~ 50/60 Hz êìëëäàâ ITALIANO ENGLISH FRANÇAIS DEUTSCH ESPAÑOL ‰ËÒÔÎÂÈ display display display display display Á‡˘ËÚ‡ ÓÚ ‡·ÓÚ˚‚ÒÛıÛ˛ contromarcia a secco dry run device contre fonction. à sec Trockenlaufschutz marcha atrás a seco ̇ÒÓÒ pompa pump pompe Pumpe bomba Ò‚ÂÚËθÌËÍ…
-
Page 67: Jp 7 Opo
JP 7 OPO 220-240V~ 50/60 Hz êìëëäàâ ITALIANO ENGLISH FRANÇAIS DEUTSCH ESPAÑOL ‰ËÒÔÎÂÈ display display display display display Á‡˘ËÚ‡ ÓÚ ‡·ÓÚ˚‚ÒÛıÛ˛ contromarcia a secco dry run device contre fonction. à sec Trockenlaufschutz marcha atrás a seco ̇ÒÓÒ pompa pump pompe Pumpe bomba Ù‡Á‡…
-
Page 68: Jp 7 Pne
JP 7 PNE 220-240V~ 50/60 Hz êìëëäàâ ITALIANO ENGLISH FRANÇAIS DEUTSCH ESPAÑOL ‰ËÒÔÎÂÈ pulsante on/off on/off button touche on/off botón on/off Taste on/off ̇ÒÓÒ pompa pump pompe bomba Pumpe Ù‡Á‡ fase phase phase fase Phase ÌÂÈڇθ neutro neutral neutre neutro Nulleiter Á‡ÁÂÏÎÂÌËÂ…
-
Page 69
1 ON 0 OFF JP 8 1 ON 0 OFF N L N L N L N L N 220-240V~ 50/60 Hz êìëëäàâ ITALIANO ENGLISH FRANÇAIS DEUTSCH ESPAÑOL ‰ËÒÔÎÂÈ display display display display display ̇ÒÓÒ pompa pump pompe bomba Pumpe Ù‡Á‡… -
Page 70
1 ON 0 OFF JP 8 1 ON 0 OFF N L N L N L N L N 220-240V~ 50/60 Hz êìëëäàâ ITALIANO ENGLISH FRANÇAIS DEUTSCH ESPAÑOL ‰ËÒÔÎÂÈ display display display display display Á‡˘ËÚ‡ ÓÚ ‡·ÓÚ˚‚ÒÛıÛ˛ contromarcia a secco dry run device contre fonction. -
Page 71: Jp 8 Dis
1 ON 0 OFF JP 8 DIS 1 ON 0 OFF N L N L N L N L 220-240V~ 50/60 Hz êìëëäàâ ITALIANO ENGLISH FRANÇAIS DEUTSCH ESPAÑOL ‰ËÒÔÎÂÈ display display display display display Á‡˘ËÚ‡ ÓÚ ‡·ÓÚ˚‚ÒÛıÛ˛ contromarcia a secco dry run device contre fonction.
-
Page 72: Air 70
AIR 70 THE YO UNG C O L L E C TIO N 220-240V~ 50/60 Hz êìëëäàâ ITALIANO ENGLISH FRANÇAIS DEUTSCH ESPAÑOL ‰ËÒÔÎÂÈ display display display display display Á‡˘ËÚ‡ ÓÚ ‡·ÓÚ˚‚ÒÛıÛ˛ contromarcia a secco dry run device contre fonction. à sec marcha atrás a seco Trockenlaufschutz ̇‰‰Û‚…
-
Page 73: Air 75
AIR 75 220-240V~ 50/60 Hz êìëëäàâ ITALIANO ENGLISH FRANÇAIS DEUTSCH ESPAÑOL ‰ËÒÔÎÂÈ pulsante on/off on/off button touche on/off botón on/off Taste on/off кнопку ВКЛ/ВЫКЛ contromarcia a secco dry run device contre fonction. à sec marcha atrás a seco Trockenlaufschutz ̇‰‰Û‚ („Â̇ÚÓ…
-
Page 74
JP 12 GRS1 GRS2 FARO IDRO CS2132801 POMPA POMPA RISC 220-240V~ 50/60 Hz êìëëäàâ ITALIANO ENGLISH FRANÇAIS DEUTSCH ESPAÑOL ‰ËÒÔÎÂÈ display display display display display Á‡˘ËÚ‡ ÓÚ ‡·ÓÚ˚‚ÒÛıÛ˛ contromarcia a secco dry run device contre fonction. à sec Trockenlaufschutz marcha atrás a seco ˝ÎÂÍÚÓχ„ÌËÚ… -
Page 75: Jp 12 Dis
JP 12 DIS GRS1 GRS1 GRS2 GRS2 FARO FARO IDRO IDRO DISI DISI LSERB VALE VALE ARIA ARIA CS2132801 CS2132801 POMPA POMPA POMPA POMPA RISC RISC 220-240V~ 50/60 Hz êìëëäàâ ITALIANO ENGLISH FRANÇAIS DEUTSCH ESPAÑOL ‰ËÒÔÎÂÈ display display display display display Á‡˘ËÚ‡…
-
Page 76: Jp 12 F Dis
1 ON 0 OFF JP 12 F DIS GRS1 GRS1 GRS2 GRS2 FARO FARO IDRO IDRO DISI DISI LSERB LSERB VALE VALE ARIA ARIA GRS1 GRS1 GRS2 GRS2 CS2132801 CS2132801 IN IN POMPA POMPA POMPA POMPA RISC RISC FARO FARO IDRO IDRO DISI…
-
Page 77: Jp 12 Tlc / Jp 12 Dis Tlc
JP 12 TLC / JP 12 DIS TLC 220-240V~ 50/60 Hz êìëëäàâ ITALIANO ENGLISH FRANÇAIS DEUTSCH ESPAÑOL ÒÓ‰ËÌËÚ.͇·Âθ ˝Í‚ËÔÓÚÂ̈ˇθÌ˚È cavo coll. equipotenziale equipotential conn. cable câble coll. équipotentiel Äquipotentialanschlusskabel cable conex. equipotencial ÚÂÏÔ‡ÚÛÌ˚È ‰‡Ú˜ËÍ sonda di temperatura temperature probe sonde de température Temperatursonde sonda de temperatura Á‡˘ËÚ‡…
-
Page 78: Jp 12 Dis /F Tlc
JP 12 DIS / F TLC 220-240V~ 50/60 Hz êìëëäàâ ITALIANO ENGLISH FRANÇAIS DEUTSCH ESPAÑOL ÒÓ‰ËÌËÚ.͇·Âθ ˝Í‚ËÔÓÚÂ̈ˇθÌ˚È cavo coll. equipotenziale equipotential conn. cable câble coll. équipotentiel Äquipotentialanschlusskabel cable conex. equipotencial ÚÂÏÔ‡ÚÛÌ˚È ‰‡Ú˜ËÍ sonda di temperatura temperature probe sonde de température Temperatursonde sonda de temperatura защитное…
-
Page 79: Jp 12 Dis F/R/Tlc
JP 12 DIS / F / R TLC 220-240V~ 50/60 Hz êìëëäàâ ITALIANO ENGLISH FRANÇAIS DEUTSCH ESPAÑOL ÒÓ‰ËÌËÚ.͇·Âθ ˝Í‚ËÔÓÚÂ̈ˇθÌ˚È cavo coll. equipotenziale equipotential conn. cable câble coll. équipotentiel Äquipotentialanschlusskabel cable conex. equipotencial ÚÂÏÔ‡ÚÛÌ˚È ‰‡Ú˜ËÍ sonda di temperatura temperature probe sonde de température Temperatursonde sonda de temperatura защитное…
-
Page 80: Jp 12 Dis F/R/A/Tlc
JP 12 DIS / F / R / A TLC 220-240V~ 50/60 Hz êìëëäàâ ITALIANO ENGLISH DEUTSCH ESPAÑOL FRANÇAIS ÒÓ‰ËÌËÚ.͇·Âθ ˝Í‚ËÔÓÚÂ̈ˇθÌ˚È cavo coll. equipotenziale equipotential conn. cable câble coll. équipotentiel Äquipotentialanschlusskabel cable conex. equipotencial ÚÂÏÔ‡ÚÛÌ˚È ‰‡Ú˜ËÍ sonda di temperatura temperature probe sonde de température Temperatursonde sonda de temperatura…
-
Page 81: Jp 12 Disi T/A/Tlc
JP 12 F DISI T/A/R/TLC * — JP 12 DISI T/A/TLC 220-240V~ 50/60 Hz êìëëäàâ ITALIANO ENGLISH FRANÇAIS DEUTSCH ESPAÑOL Pumpe ̇ÒÓÒ pompa pump pompe bomba ÒÂÌÓÒ‡ Empfänger ricevitore receiver récepteur receptor Magnetventil Desinfektion ˝ÎÂÍÚÓÍÎ‡Ô‡Ì ‰ÂÁËÌÙÂ͈ËË elettrovalvola disinfezione disinfection solenoid valve électrovanne désinfection electroválvula desinfección ÛÓ‚Ì.
-
Page 82: Jp 12 F Double T/A/R/Tlc
JP 12 F DOUBLE T/A/R/TLC harmonic filter filter1 filter2 220-240V~ 50/60 Hz harmonic filter êìëëäàâ ITALIANO ENGLISH FRANÇAIS DEUTSCH ESPAÑOL ̇ÒÓÒ Pumpe pompa pump pompe bomba Empfänger ÒÂÌÓÒ‡ ricevitore receiver récepteur receptor Magnetventil Desinfektion ˝ÎÂÍÚÓÍÎ‡Ô‡Ì ‰ÂÁËÌÙÂ͈ËË elettrovalvola disinfezione disinfection solenoid valve électrovanne désinfection electroválvula desinfección ÛÓ‚Ì.
-
Page 83: Jp 12 F Disi T/B/R/Tlc, Jp 12 Disi T/B/Tlc
JP 12 F DISI T/B/R/TLC * — JP 12 DISI T/B/TLC GRS1 GRS1 GRS2 GRS2 FARO FARO IDRO IDRO DISI DISI L-F L-F EV EV LSERB LSERB VALE VALE ARIA POMPA POMPA POMPA POMPA RISC RISC 220-240V~ 50/60 Hz êìëëäàâ ITALIANO ENGLISH FRANÇAIS…
-
Page 84: Jp 8 12
2 JP 8 12 220-240V~ 50/60 Hz êìëëäàâ ITALIANO ENGLISH FRANÇAIS DEUTSCH ESPAÑOL ‰ËÒÔÎÂÈ display display display display display Á‡˘ËÚ‡ ÓÚ ‡·ÓÚ˚‚ÒÛıÛ˛ contromarcia a secco dry run device contre fonction. à sec Trockenlaufschutz marcha atrás a seco ˝ÎÂÍÚÓχ„ÌËÚ elettromagnete electromagnet électro-aimant Elektromagnet electroaimán…
-
Page 85: Jp 8 12 Dis
1 ON 0 OFF 1 ON 0 OFF 2 JP 8 12 DIS A IR A IR GRS1 G RS 1 GRS1 G RS 1 1 ON GRS2 G RS2 GRS2 G RS2 0 OFF FARO FA RO FARO FA RO IDRO ID RO IDRO…
-
Page 86: Jp 8 12 F Dis R
2 JP 8 12 F DIS R 220-240V~ 50/60 Hz êìëëäàâ ITALIANO ENGLISH FRANÇAIS DEUTSCH ESPAÑOL ‰ËÒÔÎÂÈ display display display display display Á‡˘ËÚ‡ ÓÚ ‡·ÓÚ˚‚ÒÛıÛ˛ contromarcia a secco dry run device contre fonction. à sec Trockenlaufschutz marcha atrás a seco ˝ÎÂÍÚÓχ„ÌËÚ…
-
Page 87
1 ON 0 OFF 1 ON 0 OFF 2 JP 8 12 F DIS R A IR A IR GRS1 G RS 1 GRS1 G RS 1 1 ON GRS2 G RS2 GRS2 G RS2 0 OFF FARO FA RO FARO FA RO IDRO… -
Page 88: Jp 8/12 F Dis T
2JP8/12 F DIS T GRS1 GRS1 GRS2 GRS2 L1 L1 FARO FARO T1 T1 IDRO IDRO K2 K2 K3 K3 K1 K1 DISI DISI L4 L4 L-F L-F TEST TEST EV EV ALIM. ALIM. POMPA POMPA LSERB LSERB VALE VALE ARIA ARIA IN IN…
-
Page 89: Jp 8/12 Dis T
2JP8/12 DIS T GRS1 GRS1 GRS2 GRS2 L1 L1 FARO FARO T1 T1 IDRO IDRO K2 K2 K3 K3 K1 K1 DISI DISI L4 L4 L-F L-F TEST TEST EV EV POMPA POMPA ALIM. ALIM. LSERB LSERB VALE VALE ARIA ARIA IN IN POMPA…
-
Page 90
I dati e le caratteristiche non impegnano la Jacuzzi Europe S.p.A., che si riserva il diritto di apportare tutte le modifiche ritenute opportune senza obbligo di preavviso o di sostituzione The data and characteristics indicated do not oblige Jacuzzi Europe, who reserves the right to make the necessary changes they feel opportune without forewarning or substitution Les caractéristiques indiquées, n’engagent pas la Jacuzzi Europe, qui se réserve le droit d’apporter… -
Page 91
Declaration of performance vasche idromassaggio & spa Whirlpool baths & Spas (hot tubs) baignoires hydromassage & spa Whirlwannen und Whirlpools bañeras de hidromasaje y minipiscinas banheiras de hidromassagem e spa hydromassagebaden & spa’s hydromassagebadkar & spa poreammeet & spa-altaat boblebade og spa μπανιέρες… -
Page 92
4. Nome, denominazione commerciale registrata o marchio registrato e indirizzo del fabbri- facturer as required under Article 11(5): cante ai sensi dell’articolo 11, paragrafo 5: Jacuzzi Europe S.p.A. Jacuzzi Europe S.p.A. S.S. Pontebbana, km 97,200 33098 Valvasone (PN) ITALIA S.S. Pontebbana, km 97,200 33098 Valvasone (PN) ITALIA Tel + 39 0434 859111•… -
Page 93
4. Name, eingetragene Handelsbezeichnung oder eingetragenes Markenzeichen und Ad- cant conformément à l’article 11, paragraphe 5 : resse des Herstellers gemäß Artikel 11, Absatz 5: Jacuzzi Europe S.p.A. Jacuzzi Europe S.p.A. S.S. Pontebbana, km 97,200 33098 Valvasone (PN) ITALIE S.S. Pontebbana, km 97,200 33098 Valvasone (PN) ITALIEN Tél + 39 0434 859111•… -
Page 94
4. Nome, designação comercial ou marca comercial registada e endereço de contacto do arreglo al artículo 11, apartado 5: fabricante, nos termos do n.º 5 do artigo 11º: Jacuzzi Europe S.p.A. Jacuzzi Europe S.p.A. S.S. Pontebbana, km 97,200 33098 Valvasone (PN) ITALIA S.S. -
Page 95
4. Naam, geregistreerde handelsnaam of geregistreerd handelsmerk en contactadres van de fabrikant krachtens artikel 11, paragraaf 5: 4 Namn, registrerad handelsbeteckning eller registrerat märke och adress till tillverkaren i Jacuzzi Europe S.p.A. enlighet med artikel 11, paragraf 5: Jacuzzi Europe S.p.A. -
Page 96
4. Navn, registreret firmanavn eller registreret varemærke og adresse på fabrikanten i hen- jaan saa yhteyden, kuten 11 artiklan 5 kohdassa edellytetään: hold til artikel 11, stk 5: Jacuzzi Europe S.p.A. Jacuzzi Europe S.p.A. S.S. Pontebbana, km 97,200 33098 Valvasone (PN) ITALIA S.S. -
Page 97
τασκευαστή σύμφωνα με το άρθρο 11, παράγραφος 5: článku 11, odstavec 5: Jacuzzi Europe S.p.A. Společnost Jacuzzi Europe S.p.A. S.S. Pontebbana, km 97,200 33098 Valvasone (PN) ITALIA S.S. Pontebbana, km 97,200 33098 Valvasone (PN) ITÁLIE Τηλ + 39 0434 859111• Φαξ + 39 0434 85278 Tel + 39 0434 859111•… -
Page 98
4. Nazwa, zarejestrowana nazwa handlowa lub zarejestrowany znak towarowy i adres zvajalca v skladu s 5. paragrafom 11. člena: producenta zgodnie z artykułem 11, ustęp 5: Jacuzzi Europe S.p.A. Jacuzzi Europe S.p.A. S.S. Pontebbana, km 97,200 33098 Valvasone (PN) ITALIJA S.S. -
Page 99
článkom 11, odsek 5: 4. A gyártók neve, bejegyzett kereskedelmi neve, illetve bejegyzett védjegye, valamint érte- Jacuzzi Europe S.p.A. sítési címe a 11. cikk (5) bekezdésében előírtaknak megfelelőn: S.S. Pontebbana, km 97,200 33098 Valvasone (PN) TALIANSKO Jacuzzi Europe S.p.A. -
Page 100
în temeiul articolului 11, alineatul (5): 4. Име, деноминация на регистрирана търговска марка или регистрирана тър- Jacuzzi Europe S.p.A. говска марка и адрес на производителя в съответствие с член 11, параграф 5: S.S. Pontebbana, km 97,200 33098 Valvasone (PN) ITALIA Jacuzzi Europe S.p.A. -
Page 101
4. Ražotāja nosaukums, reģistrētais komercnosaukums vai reģistrētā preču zīme un kon- nagu nõutud artiklis 11(5): taktadrese (kā paredzēts Regulas 11. panta 5. punktā): Jacuzzi Europe S.p.A. Jacuzzi Europe S.p.A. S.S. Pontebbana, km 97, 200 33098 Valvasone (PN) ITAALIA S.S. Pontebbana, km 97,200 33098 Valvasone (PN) , ITALIJA Tel + 39 0434 859111 •… -
Page 102
4. Gamintojo pavadinimas, registruotasis prekių pavadinimas arba registruotasis prekių ženklas ir kontaktinis adresas, kaip reikalaujama pagal 11 straipsnio 5 dalį: „Jacuzzi Europe S.p.A.“ S.S. Pontebbana, km 97,200 33098 Valvasone (PN) ITALIJA Tel. + 39 0434 859111• Faks. + 39 0434 85278 www.jacuzzi.eu — info@jacuzzi.it… -
Page 103
NB: l’asterisco posto alla fine del codice indica il colore del modello: A-bianco (vasche idro- POZOR: zvezdica na koncu šifre se nanaša na barvo modela: A-bela (masažne kadi); 52- massaggio); 52-bianco (spa); B-champagne (vasche idromassaggio); 25-pergamon (vasche idro- bela (bazeni); B-šampanjec (masažne kadi); 25-pergamon (masažne kadi); 15-edelweiss (masažne massaggio);… -
Page 104
Conforto 140 JWCFO402VF, JWBCFO402FLPF 9443-677A, 9443-676A, 9443-652A, 9443-653A J-Sha mi 9443-368*, 9443-369*, 9C43-358*, 9C43-359* 9443-479*, 9443-480*, 9443-503*, 9443-504* J-Sha mi corner 9443-457A, 9C43-433A 9443-642*, 9443-643*, 9443-194A, 9443-195A Muse 9F43-792A, 9F43-793A, 9F43-796A, 9F43-797A 9443-491A, 9443-492A, 9443-626A, 9443-627A 9F43-794A, 9F43-795A, 9F43-798A, 9F43-799A… -
Page 105
mod. cod. mod. cod. Nova 9F43-567A, 9F43-568A, 9F43-570A, 9F43-571A Sharp 75 9440-27**, 9440-3093, 9440-3094 9F43-564A, 9F43-563A, 9Q43-543*, 9Q43-544* 9440-29**, 9440-3293, 9440-3294 Sharp 70 9Q43-540*, 9Q43-541*, 9Q43-566*, 9Q43-565* 9H43-080*, 9H43-081*, 9H43-084*, 9H43-085* (es.: 9H43-080* ) 9Q43-567A, 9Q43-568A, 9Q43-570A, 9Q43-571A 9H43-088*, 9H43-089*, 9H43-937A, 9H43-936A Sharp70 (Mix70) 9Q43-564A, 9Q43-563A, 9H43-545*, 9H43-569A (es.: 9H4M-080*) -
Page 106
mod. cod. mod. cod. 9550-007*, 9550-006A, 9550-015*, 9550-014A Mayfair 9440-620*, 9H40-622*, 9440-619*, 9H40-621* 9H50-007*, 9H50-006A, 9H50-015*, 9H50-014A Notting Hill 9547-293A, 9547-291A, 9547-292A, 9547-290A 9423-6800, 9423-6810, 9423-6700, 9D50-007* 9547-297A, 9547-295A, 9547-296A, 9547-294A 9D50-015*, 9D50-006A, 9D50-014A, 9E50-007* Link 170×78 9B58-030A, 9B58-028A, 9B58-029A, 9B58-027A 9E50-006A, 9E50-015*, 9E50-014A, 9D23-6800 9B58-012A, 9B58-010A, 9B58-011A, 9B58-009A 9D23-6810, 9D23-6700… -
Page 107
mod. cod. mod. cod. J495 9444896*, 9444897*, 9444898*, 9444899* SPA-PAK JSPA20/2-BL-CT-R 94428710 9444900, 9444901*, 9444902*, 9444903* SPA-PAK JSPA20/2-BL-CT-SC 94428720 J480 9444904*, 9444907*, 9444908*, 9444909* SPA-PAK JSPA20/2-BL-CT 94428730 9444910*, 9444911*, 9444912*, 9444913* SPA-PAK JSPA20/1-CT-R 94428740 9444914*, 9444915* SPA-PAK JSPA20/1-CT-SC 94428750 J465 9444916*, 9444917*, 9444918*, 9444919* SPA-PAK JSPA20/1-CT 94428760… -
Page 110
I dati e le caratteristiche non impegnano la Jacuzzi Europe S.p.A., che si riserva il diritto di apportare tutte le modifiche ritenute opportune senza obbligo di preavviso o di sostituzione The data and characteristics indicated do not oblige Jacuzzi Europe, who reserves the right to make the necessary changes they feel opportune without forewarning or substitution Les caractéristiques indiquées, n’engagent pas la Jacuzzi Europe, qui se réserve le droit d’apporter… -
Page 111
VASCA IDROMASSAGGIO LAGOON … -
Page 112
220-240 V 190x90x74 cm ~ 65 kg kg/m 50/60 Hz ~ 324 ~224 ~ 14 kg 3,5 A — 0,7 kW ESEMPIO: vasca con schienale opposto al muro ESEMPIO: vasca con schienale a muro EXAMPLE: bath with backrest opposite wall EXAMPLE: bath with backrest against wall EXEMPLE: baignoire avec dossier opposé…
This manual is also suitable for:
J-sha mi
- Manuals
- Lawn and Garden Support
- Jacuzzi Support
- Hot Tub Support
Support
User Manuals
Question About Jacuzzi Hot Tub j-spa 20/2 BL
send me manual…
send me manual
Asked by K.Liyanapatabeni on 02/05/2015
0
Answer
ManualsOnline posted an answer 8 years, 2 months ago
The ManualsOnline team has found the manual for this product! We hope it helps solve your problem.
Get the Manual Here
Add Your Answer
Please Note: Do not submit personal information as it will be displayed online.
Ask a Question
Request a Manual