![]()
Download Article
A quick guide to signing up for Jabber and setting up your messaging client
![]()
Download Article
Jabber (XMPP) is an Open Source IM Protocol similar to Whatsapp, Telegram, or Facebook Messenger. It offers a lot of different domains for the address, which in turn allows for more customization than other services. This wikiHow teaches you how to register a Jabber account.
-
1
-
2
Enter a username. Use the bar next to «Username» to enter your username. Your username can contain letters or numbers, but no special characters.
- Usernames are not case sensitive.
Advertisement
-

3
Select a suffix (if available). The format for a Jabber address is Username@domain.extension (i.e. username@xmpp.jp). Some registration websites allow you to select which domain name you want to use as your suffix in your Jabber address. Others only give you one option. If you have the option, use the drop-down menu next to your username to select a domain name you want to register to.
-
4
Enter your password and confirm it. There are two lines where you use to create a password. Enter your password in the first line. To confirm your password, type your password in the second line exactly as you did in the first line.
-
5
Verify that you are a person. Most XMPP registration websites have a tool to verify that you are a real person. This may be a reCaptcha box that requires you to check the box that says «I am not a robot», or you may be required to enter characters you see in an image to register your account. Follow the instructions to verify that you are a person.
-
6
Click Register. This registers your XMPP address with the server you selected. Remember your username, address, and password.


Advertisement
-
1
Go to a Jabber client download page. The client is the software you can use to sign in to your Jabber account and chat with people over instant messages. Go to a website and for a Jabber client and look for the «Downloads» page. You can also download and install a Jabber client for your mobile device from the App Store on iPhone or iPad, or the Google Play Store on Android. The following are Jabber clients you can download:[1]
[2]
- Psi (Windows/macOS)
- Swift (Windows/macOS/Linux)
- Pidgin (Windows/macOS/Linux)
- Talkonaut (Android/iOS)
- You can also use a Jabber account with Apple Messages on Mac.
-
2
Download and install the Jabber client. On PC and Mac, go to the website for the Jabber client you wish to download and click the download link for the version that will run on your operating system. Double-click the downloaded file and follow the instructions in the install wizard to complete the installation process. On mobile devices, open the Google Play Store, or App Store and search for the Jabber client you want to download. Tap Get or Install below the Jabber client you want to install.
-
3
Open the Jabber client. On Windows, you can find apps you’ve downloaded in the Windows Start menu. On Mac, you can find apps you’ve downloaded in the Applications folder in the Finder. On mobile devices, tap the icon on your home screen or apps menu.
-
4
Click the option to sign in with an existing account. Each Jabber client is a little different. Some may ask you to register an account with the client you downloaded. Some may ask you to click the option to add a new account. Others may have a simple sign-in screen that you enter your address and password to sign in.
-
5
Select the option to sign in with a Jabber or XMPP protocol. Some Instant Messaging apps support multiple instant messaging protocols. If your IM client supports multiple IM platforms, select the option to sign in with a Jabber or XMPP account.
-
6
Enter your username or address. The sign-in screen for each Jabber client is different. If you are asked to enter your jabber address, enter your full address (i.e. username@xmpp.jp). If you are asked to enter your username, just enter the username portion of your address.
-
7
Enter the domain portion of your Jabber address. If your Jabber client does not ask you to enter your enter Jabber address on one line, enter the portion that comes after the @ symbol in the line that says «Domain» or «Host» or something similar.
-
8
Enter your password. Enter the password for your Jabber account in the line that says «Password».
-
9
Click the sign-in button. After you enter your Jabber account credentials, click the button that says «Log In», or «Sign In» or something similar.
- If you are not able to sign in with your Jabber client, try a different client.


Advertisement
Ask a Question
200 characters left
Include your email address to get a message when this question is answered.
Submit
Advertisement
Thanks for submitting a tip for review!
Things You’ll Need
- A Jabber account
- A Jabber Client
References
About This Article
Article SummaryX
1. Search for a website that registers Jabber or XMPP addresses.
2. Enter a username.
3. Select a domain (if available).
4. Enter a password and confirm it.
5. Follow the instructions to confirm you are a person.
6. Click Register.
7. Download and install a Jabber/XMPP client.
8. Open the Jabber/XMPP client.
9. Select the option to sign in to an existing/Jabber/XMPP account.
10. Enter your username or address.
11. Enter the domain, if required.
12. Enter your password.
13. Click the Sign In button.
Did this summary help you?
Thanks to all authors for creating a page that has been read 288,515 times.
Is this article up to date?
![]()
Загрузить PDF
![]()
Загрузить PDF
Jabber (XMPP) — это мессенджер (система обмена сообщениями), аналогичный Whatsapp, Telegram и Facebook Messenger. Этот мессенджер предлагает разные доменные имена для адреса, что предоставляет больший выбор для пользователей (по сравнению с другими сервисами). В данной статье мы расскажем вам, как создать учетную запись Jabber.
-
1
-
2
Введите имя пользователя. Сделайте это в строке «Username» или «Имя пользователя». Имя пользователя может содержать буквы или цифры, но не специальные символы.
- Имя пользователя не чувствительно к регистру.
-
3
Выберите доменное имя (если возможно). Формат адреса Jabber: username@domain.extension (то есть username@xmpp.jp). На некоторых сайтах регистрации можно выбрать доменное имя, которое будет использоваться в адресе Jabber; на других сайтах это сделать нельзя. Если у вас есть выбор, откройте меню у имени пользователя и выберите нужное доменное имя.
-
4
Введите пароль и подтвердите его. Сделайте это в двух соответствующих строках. В первой строке введите пароль, а во второй введите его еще раз, чтобы подтвердить правильность ввода.
-
5
Докажите, что вы человек. Для этого на большинстве сайтов регистрации XMPP есть специальный инструмент, например капча (нужно ввести символы) или опция «Я не робот» (нужно установить флажок). Следуйте инструкциям на экране, чтобы доказать, что вы не бот.
-
6
Нажмите Register или Зарегистрироваться. Ваш XMPP-адрес будет зарегистрирован на выбранном сервере. Запомните имя пользователя, адрес и пароль.
Реклама


-
1
Перейдите на страницу загрузки клиента Jabber. Клиент — это программное обеспечение, которое используется для авторизации в Jabber и общения с людьми через мгновенные сообщения. Перейдите на веб-сайт загрузки клиента Jabber и найдите на нем страницу «Downloads» или «Загрузки». Установить клиент на мобильное устройство можно через App Store (iPhone/iPad) или Play Маркет (Android). Ниже перечислены клиенты Jabber, которые можно загрузить:[1]
[2]
- Psi (Windows/MacOS)
- Swift (Windows/MacOX/Linux)
- Pidgin (Windows/MacOS/Linux)
- Talkonaut (Android/iOS)
- Также аккаунт Jabber можно использовать в программе «Сообщения» на компьютере Mac.
-
2
Скачайте и установите Jabber-клиент. На компьютере с Windows и macOS перейдите на веб-сайт загрузки нужного клиента, а затем щелкните по ссылке у версии, которая совместима с операционной системой вашего компьютера. Дважды щелкните по скачанному файлу и следуйте инструкциям в окне установщика, чтобы установить клиент. На мобильных устройствах откройте Play Маркет или App Store, найдите нужный клиент Jabber, а затем нажмите «Загрузить» или «Установить» под клиентом.
-
3
Запустите клиент Jabber. В Windows он находится в меню «Пуск», а на компьютере Mac в папке «Программы» в Finder. На мобильных устройствах нажмите на значок на главном экране или на панели приложений.
-
4
Выберите опцию, чтобы авторизоваться в созданном аккаунте. Каждый Jabber-клиент работает по-своему. Некоторые могут попросить вас зарегистрировать аккаунт в самом клиенте, а другие — нажать на опцию, чтобы добавить учетную запись. У третьих есть простая страница авторизации, на которой нужно ввести адрес и пароль.
-
5
Выберите опцию, чтобы авторизоваться в аккаунте с протоколом Jabber или XMPP. Некоторые приложения для обмена мгновенными сообщениями поддерживают несколько протоколов обмена сообщениями. Если ваш клиент обмена сообщениями поддерживает несколько протоколов, выберите опцию, чтобы войти в учетную запись с протоколом Jabber или XMPP.
-
6
Введите имя пользователя или адрес. Страница авторизации различается у каждого клиента Jabber. Если вас просят ввести свой адрес Jabber, введите полный адрес (то есть username@xmpp.jp). Если же нужно ввести имя пользователя, просто введите часть адреса, которая расположена до символа «@».
-
7
Введите имя домена вашего адреса Jabber. Если Jabber-клиент не просит ввести ваш полный адрес, введите часть адреса, которая расположена после символа «@». Сделайте это в строке «Domain», «Host», «Домен», «Хост» или аналогичной.
-
8
Введите пароль. Введите пароль к своей учетной записи Jabber в строке «Password» или «Пароль».
-
9
Нажмите кнопку входа. Когда вы введете учетные данные своего аккаунта Jabber, нажмите кнопку «Log In», «Sign In», «Войти» или аналогичную.
- Если у вас не получается войти в клиент Jabber, воспользуйтесь другим клиентом.
Реклама


Что вам понадобится
- Jabber-аккаунт
- Jabber-клиент
Об этой статье
Эту страницу просматривали 46 255 раз.
Была ли эта статья полезной?
Jabber.ru — публичный сервер для виртуального общения в мессенджерах на платформах Windows, Linux, Android, а также в веб-клиентах. Учётная запись, созданная в Джаббере, может быть использована в любом приложении. Сервис предоставляет своим пользователям возможность связаться с друзьями и единомышленниками в любой точке планеты. Плюс к этому, совершать бесплатно звонки и сохранять на сервере историю переписки.
Регистрация
Эта инструкция поможет вам зарегистрироваться на Джаббере.
Процедура ввода данных состоит из трёх простых шагов.
Шаг #1
1. На официальном сайте сервиса (jabber.ru), на главной странице, щёлкните по ссылке «Регистрация» (меню под разделами сайта).

2. «Логин» — придумайте логин для авторизации.
Совет! В дополнительном поле вы можете выбрать другое доменное имя для аккаунта. Кроме jabber.ru доступен xmpp.ru.

3. «Почта»: укажите адрес рабочего email (не используйте временные электронные ящики).
4. «Введите цифры… »: напечатайте в поле код, отображенный на картинке.

5. Клацните кнопку «Зарегистрироваться».
Шаг #2
1. Зайдите на почтовый ящик, указанный при регистрации.
2. Откройте сообщение от jabber.ru и для продолжения ввода данных кликните ссылку.

Шаг #3
Введите в соответствующих полях два раза пароль. При составлении символьной комбинации используйте цифры, строчные и прописные буквы латиницы. Её длина должна составлять примерно 10-15 знаков (оптимальный вариант для устойчивости).

Авторизация в Psi
1. Зайдите на официальную страничку мессенджера Psi (psi-im.org). Щёлкните раздел «Download».

2. Скачайте дистрибутив для используемой операционной системы.
3.Установите. В окне инсталлятора выберите необходимые компоненты программы. Клацните «Далее».

4. Запустите клиент от имени администратора.
5. В дополнительном окне «Настройки аккаунта» выберите «Использовать существующий».

6. В открывшемся блоке аккаунт, в поле XMPP Address, введите логин и пароль от учётной записи в jabber.
Внимание! Используйте полный формат: @jabber.ru и @xmpp.ru.

7. Кликните кнопку «Сохранить».
8. По запросу клиента в поле «Общее» введите дополнительные данные: ФИО, Ник, Дата рождения, Телефон. А затем щёлкните «Опубликовать».
В каких ещё мессенджерах можно использовать аккаунт Jabber?
Выбор клиентов совместимых с сервером Jabber огромен. Как для компьютера, так и для мобильных устройств. Рассмотрим наиболее популярные.

Xabber
Свободный клиент для устройств на базе ОС Android. Наделён аскетичным интерфейсом и красивым дизайном. Лёгок в управлении. Поддерживает использование нескольких профилей, создание конференций.
Gajim
Кроссплатформенное решение (BSD, Linux, Microsoft). Осуществляет голосовые и видео коммуникации по сети. Умеет автоматически менять статус. Предоставляет управление закладками. Наделён функциями для администрирования конференций. Отправляет уведомления о сообщениях на сервис Gmail (по желанию пользователя).
QIP Infium
Мультипротокольный мессенджер. Функционирует в сети с 2005 года. Может использовать внешние модули. Имеет комфортный интерфейс.
Приятных вам бесед в Jabber!
Возникли сложности? Напишите об этом в комментариях и мы постараемся вам помочь.
А если статья оказалась вам полезной, не забудьте поставить лайк!
![]()
Загрузить PDF
![]()
Загрузить PDF
В данной статье описана установка XMPP-клиента на Android и создание аккаунта в федерации XMPP. В качестве клиента используется бесплатное приложение с открытым исходным кодом «Conversations Legacy», в качестве сервера — 404.city. Через клиент Conversations можно обмениваться файлами, передавая через ссылку, даже тем у кого не установлен XMPP. Conversations имеет несколько видов шифрования(OTR, PGP, OMEMO), поддержку сети TOR и одобрен в качестве безопасного мессенджера проектом Prisma Break. В клиенте есть поддержка зашифрованных, приватных, групповых чатов и публичных конференций XMPP. Сервер 404.city официально поддерживает полную совместимость с клиентом Conversations, имеет набор современных расширений XMPP и повышенный уровень защиты конфиденциальности
-
1
Введите в поиске Play маркета «Conversations Legacy». Обратите внимание, существует два XMPP-клиента «Conversations» и «Conversations Legacy». Это разные версии приложения от одного разработчика. «Conversations» — платная версия, «Conversations Legacy» — бесплатная. Не перепутайте их, Вам необязательно тратится на покупку платной версии. В этой статье описана установка бесплатной версии «Conversations Legacy»
-
2
Нажмите «Установить»
-
3
После установки приложения нажмите на иконку «Conversations» и откройте приложение
-
4
После того как приложение открылось нажмите на надпись «Использовать своего провайдера». Сервер по умолчанию «Conversations.im» становится платным после 6 месяцев обслуживания.
-
5
Регистрация на XMPP-сервере. Сервер 404.city официально занимается бесплатной поддержкой серверной совместимости с Conversations. Если на XMPP-сервере нет необходимой поддержки расширений XMPP, клиент Conversations может работать c ошибками: не передавать файлы в оффлайн, сильнее расходовать батарею смартфона, в клиенте может не работать шифрование, синхронизация на несколько устройств и так далее.
- Вы может создать аккаунт на сервере 404.city через Conversations. Для создания аккаунта укажите Jabber ID в формате user@404.city и используйте галочку «Создать новый аккаунт на сервере». В логине на 404.city могут быть использованы символы: латинские буквы, цифры, точка, дефис, знак подчеркивания.
- Если Вам неудобен этот способ или не получилось создать аккаунт, Вы можете воспользоваться веб-регистрацией на сайте 404.city.
- Использовать сервер 404.city необязательно. Клиент Conversations может подключиться к любому открытому XMPP-серверу. Вы можете выбрать другой XMPP-сервер из списка с с более чем 1 000 публичных серверов или использовать существующий Jabber-аккаунт.
-
6
Введите капчу
-
7
Добавьте аватар. Если появилась форма загрузки аватара, значит, Jabber-аккаунт успешно создан! Регистрация законченна
-
8
В настройках аккаунта, нажав на кнопку с тремя точками, Вы можете посмотреть список доступных серверных расширений (XEP)
Реклама


-
1
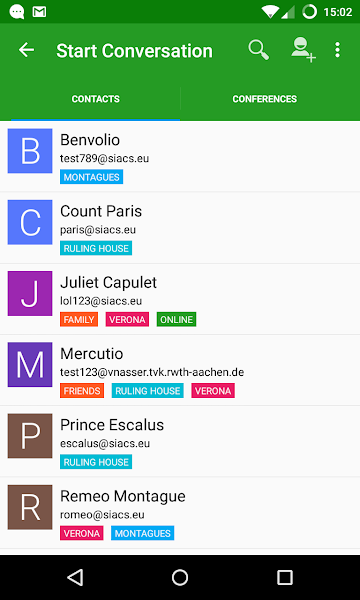
Добавьте контакт собеседника. XMPP-адреса похожи на адреса электронной почты. Пользователи с разных серверов могут разговаривать с друг другом, если это не запрещено политикой сервера. Для общения между разными серверами, необходимо дождаться пока собеседник авторизует Ваш контакт. Пользователь XMPP может заходить на конференции на других серверах. Добавляется конференция в Conversations, так же как контакт, но в соседней вкладке «конференции»
-
2
Чтобы видеть присутствие или отсутствие собеседника внутри беседы, зайдите в настройки и выберите пункт «Использовать кнопку индикатор»
-
3
После этого, кнопка отправки станет менять цвет в зависимости от доступности собеседника
Реклама


Об этой статье
Эту страницу просматривали 10 996 раз.
Была ли эта статья полезной?
Jabber: С чего начать?
Contents
- 1 Выбор клиентской программы
- 1.1 Клиенты для настольных /ноутбуков
- 1.1.1 Клиенты для операционной системы MS Windows
- 1.1.2 Другие операционные системы
- 1.2 Мобильные устройства
- 1.2.1 Телефоны
- 1.2.2 Смартфоны и КПК
- 1.1 Клиенты для настольных /ноутбуков
- 2 Выбрать сервер
- 3 Выбрать имя
- 4 Соединиться!
- 5 Смотрите также
Выбор клиентской программы[edit]
Чтобы подключиться к Jabber, необходимо скачать и установить клиентскую программу (клиент) сети Jabber. Веб-клиенты можно не устанавливать, а запускать прямо в браузере (но они, как правило, менее удобные в использовании).
См. Список клиентских программ
Клиенты для настольных /ноутбуков[edit]
Внешний вид «флагманских» клиентов для настольных компьютеров.
Клиенты для операционной системы MS Windows[edit]
Если вы уже используйте один из мультипротокольных клиентов (Miranda, GAIM), то задача ещё более упрощается. Достаточно прибегнуть к помощи соответствущего плагина, который обеспечивает работу Jabber. Если ваш клиент Trillian, то тут возникает проблема — в нём Jabber-модуль входит только в платную версию.
Если вы имеете учётную запись на серверах компании Google (например, пользутесь сервисом Gmail) или являетесь участником LiveJournal, то вам не придётся регистрировать Jabber-аккаунт, потому что он уже у вас есть (список компаний, которые внедряют Jabber, постоянно расширяется, возможно, ваш интернет-провайдер или сервис-провайдер уже дал вам такую возможность). Вам остается только произвести действия по скачиванию и настройке клиента.
- Руководство для пользователей Google
- Руководство для пользователей LiveJournal
Другие операционные системы[edit]
Если у вас иная операционная система, то воспользуйтесь соответствующей инструкцией: Linux/BSD, MacOS, OS/2.
Мобильные устройства[edit]
Телефоны[edit]
Если вы хотите попробовать Jabber на мобильном телефоне, то воспользуйтесь Bombus.
Смартфоны и КПК[edit]
Если у вас смартфон либо КПК, то тут всё зависит от функциональных особностей вашего гаджета, а также операционной системы, под управлением которой он работает. Если это ОС семейства Windows CE (Windows Mobile, PocketPC), то стоит попробовать Bombus-ng.
Если это Palm, тот тут, скорее всего, вам придётся приобрести программу-клиент за деньги (либо украсть её). Ситуация с клиентами для ОС Symbian похожая. Но если на устройстве есть виртуальная Java-машина, то может быть запущен Bombus. В том же Symbian она есть.
Если же вы не хотите или не можете устанавливать программы на свой компьютер, можно воспользоваться веб-клиентом или клиентом на Java.
Если конфигурация сети такова, чтобы воспрепятствовать работе чего-либо отличного от браузера (например, на предприятии), то нужно будет произвести дополнительные настройки, чтобы обойти ограничения. Об этом в статье «Способы соединения с сервером».
Выбрать сервер[edit]
Вы можете воспользоваться существующей учётной записью, если уже являетесь зарегистрированным пользователем
- Яндекса (@ya.ru),
- Рамблера (@rambler.ru),
- GMail (@gmail.com).
Вы можете выбрать региональный сервер или сервер провайдера. Вот список.![]() Проверить: Если в вашем регионе/городе сервер отсутствует, то регистрируйтесь на региональном. // Это что значит?
Проверить: Если в вашем регионе/городе сервер отсутствует, то регистрируйтесь на региональном. // Это что значит?
Если не знаете, какой сервер выбрать, рекомендуем «центральный» российский сервер Jabber.ru.
Выбрать имя[edit]
Самый простой вариант — использовать имя вашего почтового ящика или ваш никнейм. Например, если ваша электронная почта выглядит как niko-lay@example.com, то niko-lay будет вполне логично выбрать и для Jabber.
Соединиться![edit]
Ну и в конце концов соединиться с этим самым сервером. Спросить по ICQ знакомых (в первую очередь из IT): «А кто пользуется Jabber? Мой JID такой-то.» Ответившим отрицательно — дать ссылку на wiki.jrudevels.org, тех же, кому вы сообщили свой JID, скоро уже можно будет увидеть в Jabber-клиенте.
Вроде бы все работает. А что еще умеет этот жаббер?
ToDo: деть куда-то эту ссылку
Ну а если не работает? Совсем не работает. Даже соединение с сервером установить не удается… Тогда нужно понять, на каком этапе проблема, чтобы успешно ее решить. Смотрите краткое руководство по поиску проблемного места.
Смотрите также[edit]
- Быстрый старт с Bombus
Cisco Jabber для Андроид представляет собой приложение для совместной работы. Через него можно устраивать видеоконференции, вести переговоры, обмениваться сообщениями. Это очень удобно, если оппоненты находятся в разных городах или странах. Приложение можно бесплатно скачать на андроид, и работать как с локальными, так и облачными архитектурами.
Особенности приложения
С его помощью можно выполнять множество полезных для работы действий:
- Передавать голосовые сообщения быстро и с высококачественным воспроизведением голоса.
- Мгновенно обмениваться сообщениями и одномоментно присутствовать в мессенджерах.
- Можно использовать как для телефонов, так и для планшетов и Мас.
- С приложением легко работать, находить нужных людей и получать информацию о них.
- Платформа надежно соединяет пользователя с оппонентами вне зависимости от используемого интернет соединения (мобильная передача данных, роуминг и пр).
Андроид устройство можно активно задействовать в корпоративной связи. Используя приложение можно передавать, принимать и отправлять звонки. Для этого нужно установить Cisco Jabber бесплатно, ввести необходимые данные и начать использование.
Преимущества приложения
Помимо безграничных возможностей для работы, Cisco Jabber имеет еще ряд преимуществ:
- Пользователи всегда находятся на связи. Приложение работает в фоновом режиме и при совершении вызова автоматически включается.
- Простой и понятный интерфейс. Для совершения звонков представлена цифровая клавиатура, можно также выбирать из списка контактов или избранных вызовов.
- При использовании данного приложения значительно снижаются затраты на мобильную связь, особенно, если воспользоваться функцией набора номера через офисный телефон.
- Функция конфиденциальности позволяет скрывать номер телефона, т.е. при совершении вызова он не будет отображаться.
- Имеется возможность переадресации вызова, конференц-звонки и пр.
- Воспроизводить и просматривать сообщения можно в любое время и в любом порядке.
Функции Cisco Jabber
Установив приложение на андроид, пользователь получает множество полезных функций:
- возможность работать, принимать звонки и сообщения по номеру телефона офиса, или мобильного телефона;
- имеются функции переадресации, возобновление, удержание или переадресация вызова;
- можно переключаться между несколькими активными вызовами;
- передача обслуживания с мобильного на стационарный телефон и наоборот и пр.
Cisco Jabber на APKshki.com скачали 4091 раз. Cisco Jabber распространяется бесплатно в расширении apk.
Все приложения и игры на нашем сайте проходят обязательную проверку антивирусом с последними сигнатурами.
![]()
Загрузить PDF
![]()
Загрузить PDF
В данной статье описана установка XMPP-клиента на Android и создание аккаунта в федерации XMPP. В качестве клиента используется бесплатное приложение с открытым исходным кодом «Conversations Legacy», в качестве сервера — 404.city. Через клиент Conversations можно обмениваться файлами, передавая через ссылку, даже тем у кого не установлен XMPP. Conversations имеет несколько видов шифрования(OTR, PGP, OMEMO), поддержку сети TOR и одобрен в качестве безопасного мессенджера проектом Prisma Break. В клиенте есть поддержка зашифрованных, приватных, групповых чатов и публичных конференций XMPP. Сервер 404.city официально поддерживает полную совместимость с клиентом Conversations, имеет набор современных расширений XMPP и повышенный уровень защиты конфиденциальности
-
1
Введите в поиске Play маркета «Conversations Legacy». Обратите внимание, существует два XMPP-клиента «Conversations» и «Conversations Legacy». Это разные версии приложения от одного разработчика. «Conversations» — платная версия, «Conversations Legacy» — бесплатная. Не перепутайте их, Вам необязательно тратится на покупку платной версии. В этой статье описана установка бесплатной версии «Conversations Legacy»
-
2
Нажмите «Установить»
-
3
После установки приложения нажмите на иконку «Conversations» и откройте приложение
-
4
После того как приложение открылось нажмите на надпись «Использовать своего провайдера». Сервер по умолчанию «Conversations.im» становится платным после 6 месяцев обслуживания.
-
5
Регистрация на XMPP-сервере. Сервер 404.city официально занимается бесплатной поддержкой серверной совместимости с Conversations. Если на XMPP-сервере нет необходимой поддержки расширений XMPP, клиент Conversations может работать c ошибками: не передавать файлы в оффлайн, сильнее расходовать батарею смартфона, в клиенте может не работать шифрование, синхронизация на несколько устройств и так далее.
- Вы может создать аккаунт на сервере 404.city через Conversations. Для создания аккаунта укажите Jabber ID в формате user@404.city и используйте галочку «Создать новый аккаунт на сервере». В логине на 404.city могут быть использованы символы: латинские буквы, цифры, точка, дефис, знак подчеркивания.
- Если Вам неудобен этот способ или не получилось создать аккаунт, Вы можете воспользоваться веб-регистрацией на сайте 404.city.
- Использовать сервер 404.city необязательно. Клиент Conversations может подключиться к любому открытому XMPP-серверу. Вы можете выбрать другой XMPP-сервер из списка с с более чем 1 000 публичных серверов или использовать существующий Jabber-аккаунт.
-
6
Введите капчу
-
7
Добавьте аватар. Если появилась форма загрузки аватара, значит, Jabber-аккаунт успешно создан! Регистрация законченна
-
8
В настройках аккаунта, нажав на кнопку с тремя точками, Вы можете посмотреть список доступных серверных расширений (XEP)
Реклама
-
1
Добавьте контакт собеседника. XMPP-адреса похожи на адреса электронной почты. Пользователи с разных серверов могут разговаривать с друг другом, если это не запрещено политикой сервера. Для общения между разными серверами, необходимо дождаться пока собеседник авторизует Ваш контакт. Пользователь XMPP может заходить на конференции на других серверах. Добавляется конференция в Conversations, так же как контакт, но в соседней вкладке «конференции»
-
2
Чтобы видеть присутствие или отсутствие собеседника внутри беседы, зайдите в настройки и выберите пункт «Использовать кнопку индикатор»
-
3
После этого, кнопка отправки станет менять цвет в зависимости от доступности собеседника
Реклама
Об этой статье
Эту страницу просматривали 10 996 раз.
Была ли эта статья полезной?
Xabber

Xabber
Jabber Клиент с открытым исходным кодом, простым и аккуратным дизайном. Можно использовать одновременно с несколькими аккаунтами. Разрабатывается с целью быть лучшим андроид клиентом: не просто открытым, но и свободным от рекламы.
Поддерживает в том числе:
- Modern material interface
- Multiple accounts support
- Multi user chat (MUC)
- Chat history
- Avatars
- Notification setting for each contact
- Stream compression
- OTR, TLS, SSL, SASL
- Message delivery receipts
Conversations
Conversations
Открытый jabber клиент разработанный специально для Android 4+
Создавался с целью быть как можно более красивым и удобным, без ущерба для безопасности использования.
Поддерживает несколько аккаунтов, MUC, любые виды шифрования (OMEMO, OTR, PGP), отправку и приём изображений. Интегрируется с адресной книгой телефона. Почти не влияет на потребление электропитания.
Yaxim
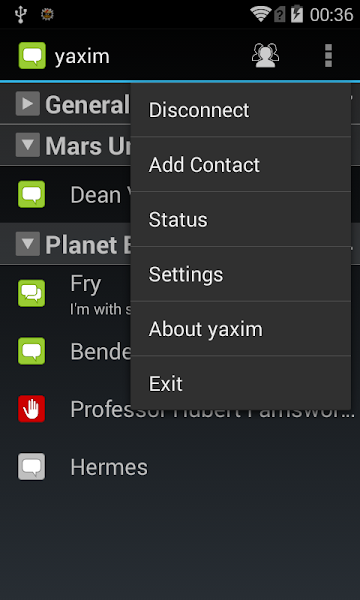
Yaxim
Минималистичный клиент для Android.
Несмотря на простой дизайн, yaxim стремится быть надёжным и полезным приложением. Из существенных плюсов можно отметить легковесность, поддержку конференций, подтверждения о доставке сообщений.
https://yaxim.org/download/
Adium
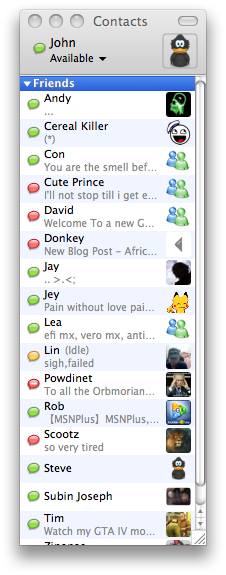
Adium
Универсальный клиент мгновенного обмена сообщениями (мессенджер) для Mac OS X-систем, который поддерживает множество протоколов, и выпущен под лицензией GNU GPL.
Поддержка русского языка, использование многочисленных протоколов, tab-ы, уникальные возможности настройки интерфейса, возможность шифрования сообщений — вот далеко не полный список его возможностей.
http://www.ixbt.com/td/adium.shtml
Pidgin

Pidgin
Один из лучших кроссплатформенных клиентов. Поддерживает сразу несколько протоколов и аккаунтов (ICQ, Jabber, MSN, умеет Twitter)
Позволяет сохранять комментарии к пользователям из контакт‐листа. Может объединять несколько контактов в один метаконтакт.
https://ru.wikipedia.org/wiki/Pidgin
IM+
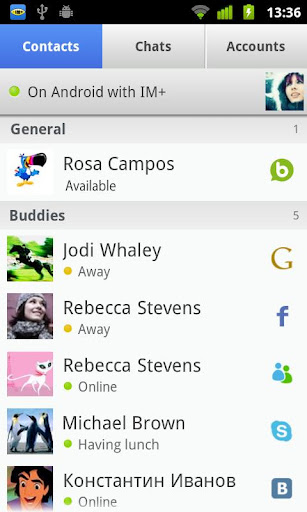
IM+
кроссплатформенная программа обмена мгновенными сообщениями для мобильных устройств, а также кроссплатформенное веб-приложение. Поддерживает протоколы Twitter, Facebook, Google Talk, XMPP, Yahoo!, AOL Instant Messenger, ICQ, Myspace, Windows Live Messenger/MSN, ВКонтакте, Mail.Ru Агент, Я.Онлайн, Одноклассники.ru.
Позволяет обмениваться файлами, сохраняет историю, допускает чат сразу с несколькими собеседниками, поддерживает скины и графические смайлики.
![]()
Download Article
A quick guide to signing up for Jabber and setting up your messaging client
![]()
Download Article
Jabber (XMPP) is an Open Source IM Protocol similar to Whatsapp, Telegram, or Facebook Messenger. It offers a lot of different domains for the address, which in turn allows for more customization than other services. This wikiHow teaches you how to register a Jabber account.
-
1
-
2
Enter a username. Use the bar next to «Username» to enter your username. Your username can contain letters or numbers, but no special characters.
- Usernames are not case sensitive.
Advertisement
-
3
Select a suffix (if available). The format for a Jabber address is Username@domain.extension (i.e. username@xmpp.jp). Some registration websites allow you to select which domain name you want to use as your suffix in your Jabber address. Others only give you one option. If you have the option, use the drop-down menu next to your username to select a domain name you want to register to.
-
4
Enter your password and confirm it. There are two lines where you use to create a password. Enter your password in the first line. To confirm your password, type your password in the second line exactly as you did in the first line.
-
5
Verify that you are a person. Most XMPP registration websites have a tool to verify that you are a real person. This may be a reCaptcha box that requires you to check the box that says «I am not a robot», or you may be required to enter characters you see in an image to register your account. Follow the instructions to verify that you are a person.
-
6
Click Register. This registers your XMPP address with the server you selected. Remember your username, address, and password.


Advertisement
-
1
Go to a Jabber client download page. The client is the software you can use to sign in to your Jabber account and chat with people over instant messages. Go to a website and for a Jabber client and look for the «Downloads» page. You can also download and install a Jabber client for your mobile device from the App Store on iPhone or iPad, or the Google Play Store on Android. The following are Jabber clients you can download:[1]
[2]
- Psi (Windows/macOS)
- Swift (Windows/macOS/Linux)
- Pidgin (Windows/macOS/Linux)
- Talkonaut (Android/iOS)
- You can also use a Jabber account with Apple Messages on Mac.
-
2
Download and install the Jabber client. On PC and Mac, go to the website for the Jabber client you wish to download and click the download link for the version that will run on your operating system. Double-click the downloaded file and follow the instructions in the install wizard to complete the installation process. On mobile devices, open the Google Play Store, or App Store and search for the Jabber client you want to download. Tap Get or Install below the Jabber client you want to install.
-
3
Open the Jabber client. On Windows, you can find apps you’ve downloaded in the Windows Start menu. On Mac, you can find apps you’ve downloaded in the Applications folder in the Finder. On mobile devices, tap the icon on your home screen or apps menu.
-
4
Click the option to sign in with an existing account. Each Jabber client is a little different. Some may ask you to register an account with the client you downloaded. Some may ask you to click the option to add a new account. Others may have a simple sign-in screen that you enter your address and password to sign in.
-
5
Select the option to sign in with a Jabber or XMPP protocol. Some Instant Messaging apps support multiple instant messaging protocols. If your IM client supports multiple IM platforms, select the option to sign in with a Jabber or XMPP account.
-
6
Enter your username or address. The sign-in screen for each Jabber client is different. If you are asked to enter your jabber address, enter your full address (i.e. username@xmpp.jp). If you are asked to enter your username, just enter the username portion of your address.
-
7
Enter the domain portion of your Jabber address. If your Jabber client does not ask you to enter your enter Jabber address on one line, enter the portion that comes after the @ symbol in the line that says «Domain» or «Host» or something similar.
-
8
Enter your password. Enter the password for your Jabber account in the line that says «Password».
-
9
Click the sign-in button. After you enter your Jabber account credentials, click the button that says «Log In», or «Sign In» or something similar.
- If you are not able to sign in with your Jabber client, try a different client.


Advertisement
Ask a Question
200 characters left
Include your email address to get a message when this question is answered.
Submit
Advertisement
Thanks for submitting a tip for review!
Things You’ll Need
- A Jabber account
- A Jabber Client
References
About This Article
Article SummaryX
1. Search for a website that registers Jabber or XMPP addresses.
2. Enter a username.
3. Select a domain (if available).
4. Enter a password and confirm it.
5. Follow the instructions to confirm you are a person.
6. Click Register.
7. Download and install a Jabber/XMPP client.
8. Open the Jabber/XMPP client.
9. Select the option to sign in to an existing/Jabber/XMPP account.
10. Enter your username or address.
11. Enter the domain, if required.
12. Enter your password.
13. Click the Sign In button.
Did this summary help you?
Thanks to all authors for creating a page that has been read 280,018 times.
Is this article up to date?
![]()
Download Article
A quick guide to signing up for Jabber and setting up your messaging client
![]()
Download Article
Jabber (XMPP) is an Open Source IM Protocol similar to Whatsapp, Telegram, or Facebook Messenger. It offers a lot of different domains for the address, which in turn allows for more customization than other services. This wikiHow teaches you how to register a Jabber account.
-
1
-
2
Enter a username. Use the bar next to «Username» to enter your username. Your username can contain letters or numbers, but no special characters.
- Usernames are not case sensitive.
Advertisement
-
3
Select a suffix (if available). The format for a Jabber address is Username@domain.extension (i.e. username@xmpp.jp). Some registration websites allow you to select which domain name you want to use as your suffix in your Jabber address. Others only give you one option. If you have the option, use the drop-down menu next to your username to select a domain name you want to register to.
-
4
Enter your password and confirm it. There are two lines where you use to create a password. Enter your password in the first line. To confirm your password, type your password in the second line exactly as you did in the first line.
-
5
Verify that you are a person. Most XMPP registration websites have a tool to verify that you are a real person. This may be a reCaptcha box that requires you to check the box that says «I am not a robot», or you may be required to enter characters you see in an image to register your account. Follow the instructions to verify that you are a person.
-
6
Click Register. This registers your XMPP address with the server you selected. Remember your username, address, and password.
Advertisement
-
1
Go to a Jabber client download page. The client is the software you can use to sign in to your Jabber account and chat with people over instant messages. Go to a website and for a Jabber client and look for the «Downloads» page. You can also download and install a Jabber client for your mobile device from the App Store on iPhone or iPad, or the Google Play Store on Android. The following are Jabber clients you can download:[1]
[2]
- Psi (Windows/macOS)
- Swift (Windows/macOS/Linux)
- Pidgin (Windows/macOS/Linux)
- Talkonaut (Android/iOS)
- You can also use a Jabber account with Apple Messages on Mac.
-
2
Download and install the Jabber client. On PC and Mac, go to the website for the Jabber client you wish to download and click the download link for the version that will run on your operating system. Double-click the downloaded file and follow the instructions in the install wizard to complete the installation process. On mobile devices, open the Google Play Store, or App Store and search for the Jabber client you want to download. Tap Get or Install below the Jabber client you want to install.
-
3
Open the Jabber client. On Windows, you can find apps you’ve downloaded in the Windows Start menu. On Mac, you can find apps you’ve downloaded in the Applications folder in the Finder. On mobile devices, tap the icon on your home screen or apps menu.
-
4
Click the option to sign in with an existing account. Each Jabber client is a little different. Some may ask you to register an account with the client you downloaded. Some may ask you to click the option to add a new account. Others may have a simple sign-in screen that you enter your address and password to sign in.
-
5
Select the option to sign in with a Jabber or XMPP protocol. Some Instant Messaging apps support multiple instant messaging protocols. If your IM client supports multiple IM platforms, select the option to sign in with a Jabber or XMPP account.
-
6
Enter your username or address. The sign-in screen for each Jabber client is different. If you are asked to enter your jabber address, enter your full address (i.e. username@xmpp.jp). If you are asked to enter your username, just enter the username portion of your address.
-
7
Enter the domain portion of your Jabber address. If your Jabber client does not ask you to enter your enter Jabber address on one line, enter the portion that comes after the @ symbol in the line that says «Domain» or «Host» or something similar.
-
8
Enter your password. Enter the password for your Jabber account in the line that says «Password».
-
9
Click the sign-in button. After you enter your Jabber account credentials, click the button that says «Log In», or «Sign In» or something similar.
- If you are not able to sign in with your Jabber client, try a different client.
Advertisement
Ask a Question
200 characters left
Include your email address to get a message when this question is answered.
Submit
Advertisement
Thanks for submitting a tip for review!
Things You’ll Need
- A Jabber account
- A Jabber Client
References
About This Article
Article SummaryX
1. Search for a website that registers Jabber or XMPP addresses.
2. Enter a username.
3. Select a domain (if available).
4. Enter a password and confirm it.
5. Follow the instructions to confirm you are a person.
6. Click Register.
7. Download and install a Jabber/XMPP client.
8. Open the Jabber/XMPP client.
9. Select the option to sign in to an existing/Jabber/XMPP account.
10. Enter your username or address.
11. Enter the domain, if required.
12. Enter your password.
13. Click the Sign In button.
Did this summary help you?
Thanks to all authors for creating a page that has been read 280,018 times.
Is this article up to date?

В данном материале подробно рассматривается настройка пользователя, имеющего стационарный телефон, а также мобильный телефон Samsung Galaxy, на который мы установим Cisco Jabber For Android.
Исходные параметры
CUCM Version 11.5
Имя Ivan
Фамилия Zolotov
Город Tyumen
Login izolotov
DN 1356
Настройка стационарного телефона
Заходим в свойства телефона и выставляем:
- Description: 1356 — Tyumen — Ivan Zolotov
- Device pool: Tyumen_pool
- Calling Search Space: Tyumen_Internal_css
- Owner User ID: izolotov
Жмем Save, затем для применения параметров Apply. При этом телефон перезагрузится.
На той же странице слева вверху щелкнем “Line 1” и зайдем в свойства линии и заполним следующие поля:
- Directory Number: 1356
- Route Partition: Oncluster_pt
- Description: 1356 — Tyumen — Ivan Zolotov
- Alerting name: 1356 Ivan Zolotov
- ASCII Alerting name: 1356 Ivan Zolotov
- Calling Search Space: Tyumen_Internal_css
- Выставляем CSS Tyumen_Internal_css для параметров Call Forward:
- Forward All
- Forward Busy Internal
- Forward Busy External
- Forward No Answer Internal
- Forward No Answer External
- Display (Internal Caller ID): 1356 Ivan Zolotov
- ASCII Display (Internal Caller ID): 1356 Ivan Zolotov
- Line Text Label: 1356 Ivan Zolotov
- ASCII Line Text Label: 1356 Ivan Zolotov
- Нажимаем Save (без этого не появится кнопка Associate end users)
- Users Associated with Line – выбираем заведенного пользователя
- Нажимаем Save – Apply
Настройка свойств пользователя
User Management -> End User
Controlled Devices, жмём Device Associations – находим стационарный телефон и добавляем его
Permissions Information, добавляем Standard CCM End Users.
Проверка
Стационарный телефон должен успешно звонить и принимать звонки.
Пользователь должен успешно заходить на Cisco Unified Communications Self Care Portal
Пробный логин Cisco Jabber
Даже без предварительных настроек на CUCM. Пользователь уже должен успешно логиниться в Cisco Jabber:
Для начала настроим параметры сервера: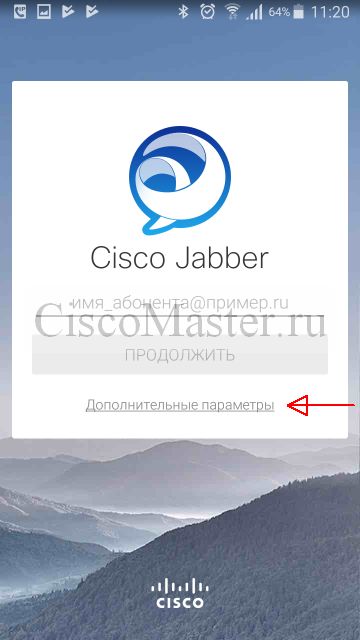
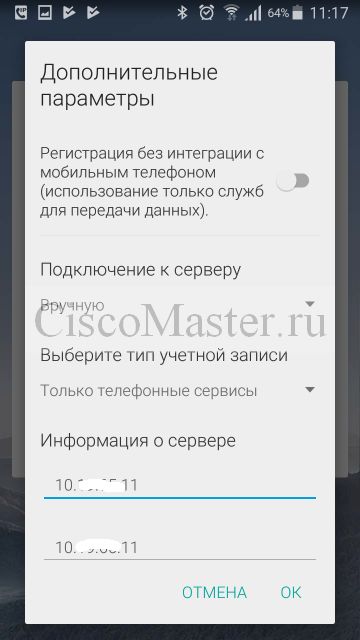
Далее логинимся пользователем в формате username@AD_domain_name_fqdn + доменный пароль этого пользователя.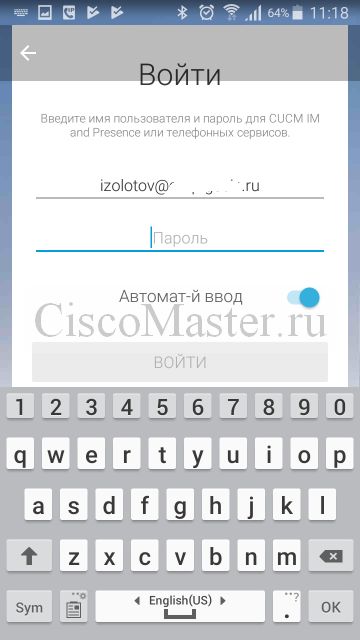
После успешного логина мы увидим: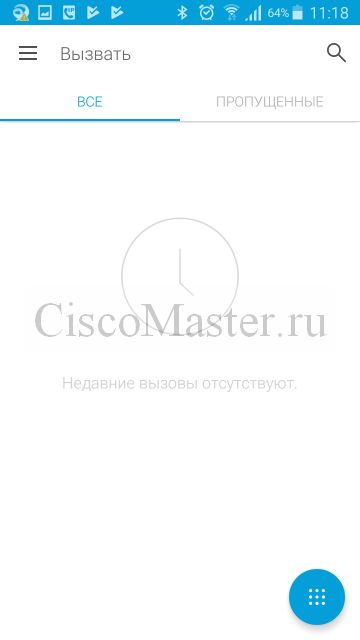
Но при попытке вызвать клавиатуру будет выдаваться ошибка: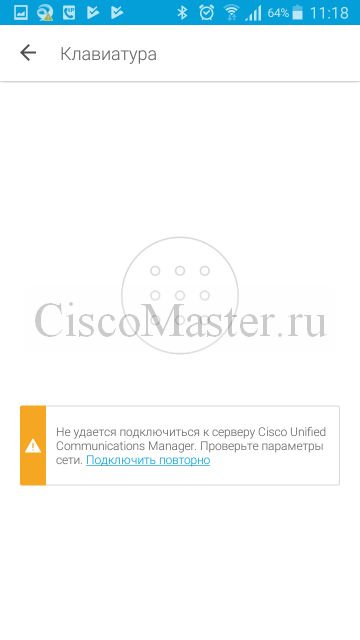
Настройка Cisco Jabber for Android на CUCM
Настроим теперь Cisco Jabber for Android в качестве второго аппарата.
Перед началом следует проверить что наш Device pool поддерживает кодек G.711.
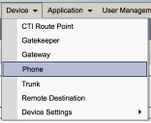
Идём
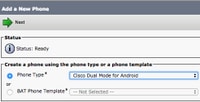
Device > Phone > Add > Cisco Dual Mode for Android
Вводим параметры устройства:
- Device Name: BOTIZOLOTOV
- Имя Device Name должно быть UPPERCASE и должно начинаться с BOT
- Длина до 15 символов
- Может включать симвоолы A to Z, 0 to 9, dash (-), or underscore (_)
- Рекомендуется задавать в формате BOTUSERNAME
- Description: 1356 — Tyumen — Ivan Zolotov
- Device pool: Tyumen_pool
- Phone Button Template: Standard Dual Mode for Android
- Calling Search Space: Tyumen_Internal_css
- Owner User ID: izolotov
- Primary Phone: выбрать соответствующий desktop Phone
- Device Security Profile: Cisco Dual Mode for Android — Standard SIP Non-Secure Profile
- SIP Profile: Standard SIP Profile
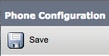
- Нажимаем Save – Apply
На той же странице слева вверху щелкнем “Line 1” и зайдем в свойства линии и заполним следующие поля:
- Directory Number: 1356
- Route Partition: Oncluster_pt
Система автоматом «узнает» этот DN и подгрузит все параметры данного DN. - Нажимаем Save – Apply
После этого при логине в Jabber мы уже сможем принимать и отправлять звонки.
Настройка свойств пользователя
User Management -> End User
Controlled Devices, жмём Device Associations – находим Jabber телефон и добавляем его
Источники:
https://supportforums.cisco.com/document/98886/configuring-cisco-jabber-…
Содержание
- Jabber for Android — Quick Start Guide
- Available Languages
- Download Options
- Bias-Free Language
- Contents
- Introduction
- Prerequisites
- Software Requirements
- Hardware Requirements
- Configuring Phone Services
- Jabber Softphone
- Configuring Voicemail
- Unity Connection Configuration
- CUCM Configuration
- Configuring Directory
- LDAP Directory Services
- UDS Directory Services
- Configuring CUCM End Users
- Service Discovery
- Downloading and Installing Cisco Jabber
- Logging in to Jabber
Jabber for Android — Quick Start Guide
Available Languages
Download Options
Bias-Free Language
The documentation set for this product strives to use bias-free language. For the purposes of this documentation set, bias-free is defined as language that does not imply discrimination based on age, disability, gender, racial identity, ethnic identity, sexual orientation, socioeconomic status, and intersectionality. Exceptions may be present in the documentation due to language that is hardcoded in the user interfaces of the product software, language used based on RFP documentation, or language that is used by a referenced third-party product. Learn more about how Cisco is using Inclusive Language.
Contents
Introduction
This document describes the necessary steps required for a successful deployment of Cisco Jabber for Android with basic features. This is a quick start guide and will not cover any of the advanced features supported by Cisco Jabber for Android.
Prerequisites
Cisco recommends you have a basic understanding of the Cisco Unified Communications Manager (CUCM) administration web page as well as experience with basic phone configurations.
Software Requirements
This guide assumes the following software versions are in use:
- Cisco Unified Communications Manager (CUCM) version 10.5(2) or higher.
- Cisco Unified IM and Presence (IM&P) version 10.5(2) or higher.
- Cisco Unity Connection (CUXN) version 10.5 or higher.
- Jabber for Android 12.1 or higher.
- Android Operating System 4.4 or later.
Hardware Requirements
The below hardware specifications are the suggested minimum requirements for running Cisco Jabber for Android on a Android operating system:
- CPU
- 1.5-GHz dual-core
- 1.2-GHz quad-core or later
- Display
- Minimum display resolution requirement for two-way video is 480 x 800.
- Minimum display resolution requirement for IM only is 320 x 480.
Note: Cisco Jabber for Android is not supported on Android devices that are based on an Intel chipset or Android devices with Tegra 2 chipset
Configuring Phone Services
Jabber Softphone
Jabber for Android provides a option to supply phone services through a Cisco Dual Mode for Android device which is often referred to as a BOT or Softphone.
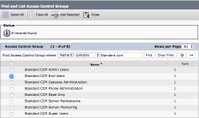
To configure a BOT device, log in to the CUCM Administration web page and navigate to Device > Phone.
From the Find and List Phones menu select Add New.

Once on the Add a New Phone menu search the phone type drop down for the Cisco Dual Mode for Android device type. Once selected click Next.
The table below (Table 1.0) contains all the fields that must be configured when setting up a Cisco Dual Mode for Android (BOT) device in CUCM. Majority of required fields have default configurations and don’t need to manually configured unless otherwise required for your deployment. You must manually configure all the fields where the Configured by Default column in the table below is set to NO.
Tip: Cisco recommends that all Cisco Dual Mode for Android devices be configured with a device name prefix of BOT. For example, you provision a user named Holly Day with a BOT device. Her CUCM end user user ID Is hday so her BOT device name would be BOTHDAY.
Table 1.0
Choose a Presence group for the end user. The selected group specifies the devices, end users, and application users that can monitor this directory number.
The default value for Presence Group specifies Standard Presence group, configured with installation.
| Required Fields | Default Parameter | Configured by Default | Description |
| Device Name | Must be manually added, device name should begin with BOT. | NO | Enter a name to identify software-based telephones |
| Device Pool | Must select one of the available device pools. | NO | Choose the device pool to which you want this phone assigned. The device pool defines sets of common characteristics for devices, such as region, date/time group, and softkey template. |
| Phone Button Template | Standard Client Service Framework | NO | Choose the appropriate phone button template. The phone button template determines the configuration of buttons on a phone and identifies which feature (line, speed dial, and so on) is used for each button. |
| Common Phone Profile | Standard Common Phone Profile | YES | C hoose a common phone profile from the list of available common phone profiles |
| Location | Hub_None | YES | Use locations to implement call admission control (CAC) in a centralized call-processing system. The location specifies the total bandwidth that is available for calls to and from this location. A location setting of Hub_None means that the locations feature does not keep track of the bandwidth that this Cisco Unified IP Phone consumes. A location setting of Phantom specifies a location that enables successful CAC across intercluster trunks that use H.323 protocol or SIP. |
| Built In Bridge | Default | YES | Enable or disable the built-in conference bridge for the barge feature by using the Built In Bridge drop-down list box (choose On, Off, or Default) |
| Privacy | Default | YES | For each phone that wants Privacy, choose On in the Privacy drop-down list box. When privacy is enabled, the system removes the call information from all phones that share lines and blocks other shared lines from barging in on its calls. |
| Device Mobility Mode | Default | YES | Turn the device mobility feature on or off for this device or choose Default to use the default device mobility mode. Default setting uses the value for the Device Mobility Mode service parameter for the device. |
| Owner User ID | Set the user ID | NO | From the drop-down list box, choose the user ID of the assigned phone user. The user ID gets recorded in the call detail record (CDR) for all calls made from this device. Assigning a user ID to the device also moves the device from «Unassigned Devices» to «Users» in the License Usage Report. |
| Use Trusted Relay Point | Default | YES | From the drop-down list box, enable or disable whether Cisco Unified CM inserts a trusted relay point (TRP) device with this media endpoint. A Trusted Relay Point (TRP) device designates an MTP or transcoder device that is labeled as Trusted Relay Point. |
| Always Use Primary Line | Default | YES | From the drop-down list box select (Off, On or Default). Default — Cisco Unified Communications Manager uses the configuration from the Always Use Prime Line service parameter, which supports the Cisco CallManager service |
| Always Use Prime Line for Voice Message | Default | YES | From the drop-down list box select (Off, On or Default). Default — Cisco Unified CM uses the configuration from the Always Use Prime Line for Voice Message service parameter, which supports the Cisco CallManager service. |
| Packet Capture Mode | None | YES | This setting exists for troubleshooting encryption only; packet capturing may cause high CPU usage or call-processing interruptions. |
| BLF Presence Group | Standard Presence Group | YES | |
| Device Security Profle | Must be manually selected. | NO | You must apply a security profile to all phones that are configured in Cisco Unified Communications Manager Administration . Installing Cisco Unified Communications Manager provides a set of predefined, nonsecure security profiles for auto-registration. To enable security features for a phone, you must configure a new security profile for the device type and protocol and apply it to the phone. If the phone does not support security, choose a nonsecure profile. |
| SIP Profile | Must be manually selected. | NO | Choose the default SIP profile or a specific profile that was previously created. SIP profiles provide specific SIP information for the phone such as registration and keepalive timers, media ports, and do not disturb control. Typically the Standard SIP Profile for Mobile Devices would be used on a BOT device. |
| Certificate Operation | No Pending Operation | YES | This field is related to CAPF enrollment. |
| DND Option | Call Reject | YES | When you enable DND on the phone, this parameter allows you to specify how the DND features handle incoming calls. |
Once you have configured all the required field for the BOT configuration save the configuration by selecting the Save button.
Now that you have created a BOT you will need to add a directory number to the device. This can be done by select the Add a new DN option located at the top left of the BOT configuration.
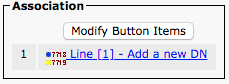
Note: This document does not cover the complete line configuration for the BOT device. Line configuration is a standard configuration that must be performed for all phones and is not a configuration that is specific to BOT devices.
Tip: Once you have configuring a directory number your BOT device make sure to associate the CUCM end user to the directory number. This can be done by scrolling to the bottom of the directory number configuration and selecting Associate End Users. This configuration is required if you plan to use Jabber for phone presence.
Configuring Voicemail
Jabber for Android is able to retrieve and playback voicemail messages that have been stored on Cisco Unity Connection. To setup voicemail for Jabber for Android please follow the steps below:
Unity Connection Configuration
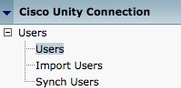
Start by logging into Cisco Unity Connection web administration web page and navigating to Users > Users.
When presented with Search Users page search for and select your Jabber for Android users mailbox.
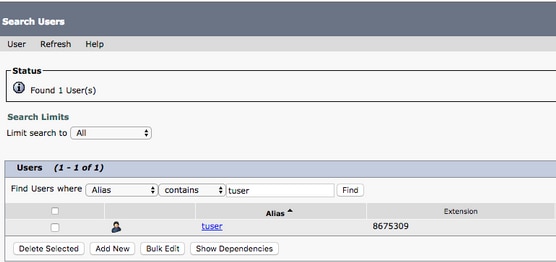
Once presented with the Edit User Basics page of the user Mailbox notate the Calls of Service that is configured.

Via the left hand navigation pane navigate to Class of Service > Class of Service.
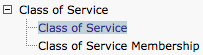
When presented with the Search Class of Service page search for and select the class of service you previously notated.
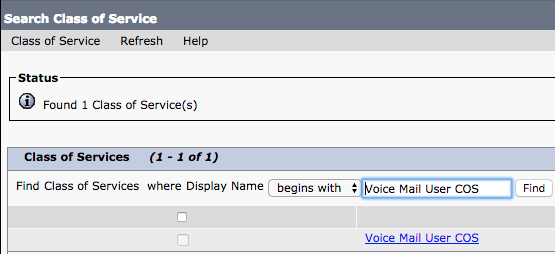
Once on the Edit Class of Service page verify that the following:
- Verify that the check box is checked for the Allow Users to Use the Web Inbox and RSS Feeds feature.
- Also verify that the Allow Users to Use Unified Client to Access Voicemail feature is enabled by checking the box near the feature name.
Once the Class of Service configuration has been verified navigate to System Settings > Advanced > API Settings in the left navigation pane. Enable all three of the settings presented on the API Configuration page.

CUCM Configuration
Now that Unity Connection is setup we will move on to the CUCM configuration for Jabber for Android voicemail. Start by navigating to User Management > User Settings > UC Service.
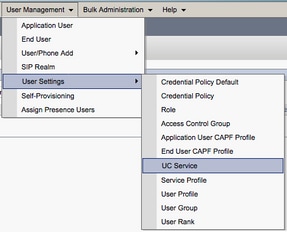
Once on the Find and List UC Services page select Add New.

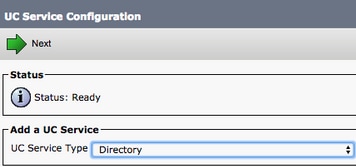
When presented with the UC Service Configuration page select Voicemail from the UC Service Type drop down then select Next.

You will then be presented with the UC Service Configuration page. Start by selecting Unity Connection from the Product Type dropdown. You will also need to configure a Name for the Voicemail UC Service as well as provided the IP, Hostname or Fully Qualified Domain Name (FQDN) of the Unity Connection server that is running the REST and Jetty services.

Note: Up to three Voicemail UC Services can be assigned to a UC Service Profile.
Now that the Voicemail UC Service(s) are defined we will assign them to the Service Profile. Start by navigating to User Management > User Settings > Service Profile.

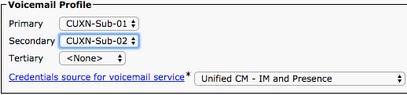
From the Find and LIst Service Profiles menu search for and select the service profile used by your Jabber for Android users or create a new service profile by selecting Add New.


Once on the Service Profile Configuration page scroll down to the Voicemail Profile section and assign the Voicemail UC Service(s) to the service profile then select Save.
Note: The Jabber for Android setup above assumes that Unity Connection is using LDAP authentication. In cases where mailboxes are not LDAP integrated please refer to the Cisco On-Premises Deployment Guide.
Configuring Directory
Jabber for Android is dependent on directory services for resolution of corporate contacts. Jabber is able to perform directory resolution through Lightweight Directory Access Protocol (LDAP) or CUCM User Data Services (UDS). Please refer to the sections below for information on configuration of LDAP or UDS directory services for Jabber for Android.
LDAP Directory Services
Jabber for Android supports three well known LDAP directory services, as seen below:
- Active Directory Domain Services
- OpenLDAP
- Active Directory Lightweight Directory Service (AD LDS)
This guide will provide the steps to configure Jabber for Android 12.1 or above to integrate with Active Directory Domain Services, as this is a common integration.
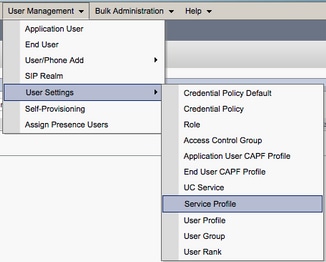
Start by logging into the CUCM Administration web page and navigating to User Management > User Settings > UC Service.

Once on the Find and List UC Services page select Add New.

When presented with the UC Service Configuration page select the Directory from the UC Service Type drop down and select Next.
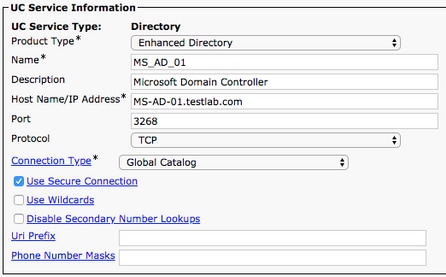
You will then be presented with the UC Service Configuration page. Select Enhanced Directory from the Product Type drop down. You will also need to configure a Name for the Directory UCService as well as provided the IP, Hostname or Fully Qualified Domain Name (FQDN) of the directory server.
By default the Connection Type will be set to Global Catalog which assumes that a Microsoft Domain Controller is being used as the the directory source. If a Global Catalog server is in use the Port number in the configuration should be set to 3268. Cisco does recommend the use of a Global Catalog server as a directory resource as it provides more efficient resolutions of queries.
Tip: In cases where you are not using a domain controller for Microsoft Active Directory Domain Services the Directory UC Service should have the Port set to 389 to Connection Type should be set to Ldap.
Note: Up to three Directory UC Services can be assigned to a UC Service Profile.
Now that the Directory UC Service(s) are defined we will assign them to the Service Profile. Start by navigating to User Management > User Settings > Service Profile.
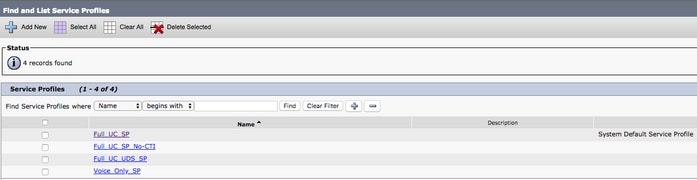
From the Find and LIst Service Profiles menu search for and select the service profile used by your Jabber for Android users or create a new service profile by selecting Add New.

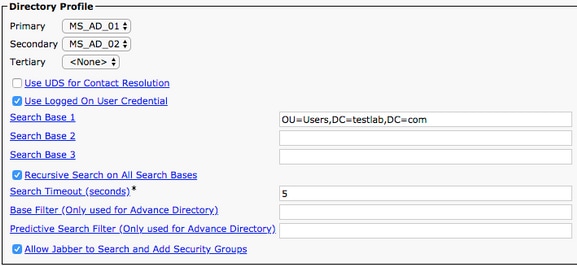
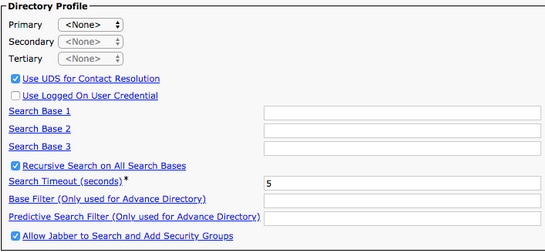
Once on the Service Profile Configuration page scroll down to the Directory Profile section and assign the Directory UC Service(s) to the service profile. You will also need to define the Active Directory search base, this should be the organization unit or directory where your corporate users exist.
While configuring the Directory Profile section you will also have to configure a directory authentication method. Check the check box near the «Use Logged On User Credential» to prevent anonymous queries and force Jabber to authenticate with the credentials that were entered during Jabber log in. If the Use Logged On User Credential is left unchecked Jabber will attempt to perform a nonymous access to the directory server. Anonymous directory access is not recommended by Cisco.
Once you are done configuring the Directory Profile select Save.
Note: If you are using CUCM 10.X — 11.5.X the Directory Profile section of the Service Profile will also include username and password fields that allow for a dis tinguished name to be used as the user ID that is authorized to run queries on the LDAP server. In CUCM 12.X if you want to use a single user ID for authentication for directory services you will need to use the ConnectionUsername and ConnectionPassword parameters in the jabber-config.xml.
Caution: Cisco Jabber queries contact source using various attributes, not all of these attributes are indexed by default. To ensure efficient searches the attributes used by Cisco Jabber must be indexed on the directory server. For more information please refer to the LDAP Prerequisites section of the Jabber Planning Guide.
UDS Directory Services
CUCM User Data Services (UDS) provides a contact source API that can be used by Jabber over Cisco Expressway mobile and remote access for the contact resolution and it is an optional contact service for clients on the corporate network. The UDS contact source uses the Unified CM end user table information to provide a directory resolution.
Start by logging into the CUCM Administration web page and navigating to User Management > User Settings > Service Profile.

From the Find and LIst Service Profiles menu search for and select the service profile used by your Jabber for Android users or create a new service profile by selecting Add New.

Once on the Service Profile Configuration page scroll down to the Directory Profile section and check the check box labeled Use UDS for Contact Resolution then select Save.
Once UDS Is enabled on the service profile Jabber for Android will automatically discover the CUCM UDS servers during the Jabber log in process.
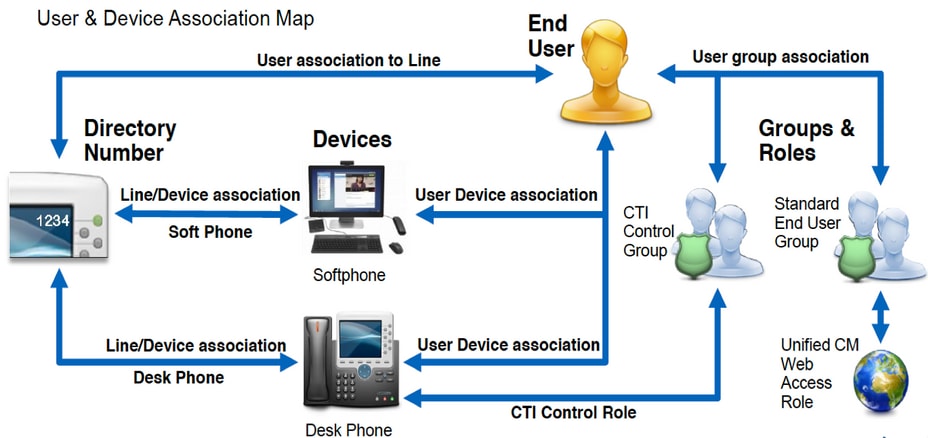
Configuring CUCM End Users
The CUCM end user configuration is a crucial step in deploying Jabber for Android as many of Jabbers features are dependent on this configuration. The image below depicts all the Jabber configurations that are dependent on the CUCM end user configuration.
To configure the Jabber for Android CUCM end user start by logging into the CUCM Administration web page and navigating to User Management > End User.
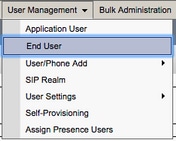
From the Find and LIst Users menu search for and select the CUCM end user you wish to configure for Jabber for Android.

Once on the End User Configuration web page scroll down to the Service Settings section, here you can assign the end user the services you want them to use. To enable a user to be able to log in to Jabber for Android you must enable the Home Cluster service by checking the check box next to the service name.
If your end users will be using Jabber for Android for instant messaging you will need to enable their end user for the service by checking the check box next to the field labeled Enable User for Unified IM and Presence.
Next you will want to assign a service profile by selecting a service profile from the UC Service Profile drop down. The service profile is used to provide the Jabber client with CUCM UC service configuration. .
Note: If you don’t assign a service profile to the CUCM end user then the user will automatically use the service profile that is set as the system default service profile.

Next scroll down to the Device Information section. Here you can manage the CUCM end users controlled devices. Assign the user their softphone (BOT). CUCM provides this list of device to Jabber for Android during Jabber log in.

You can assign a device to a user by selecting the Device Association button. You will then be presented with the User Device Association menu. From here you can search for the CUCM end users devices. When you find a device place a check mark in the check box next to the device and select Save Selected Changes.

Now scroll down to the Directory Number Association section and select the CUCM end users primary extension from the Primary Extension drop down.

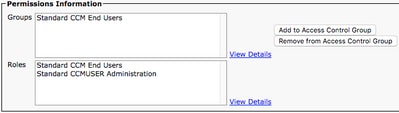
Next scroll down to the Permissions Information section. Here will will assign the permissions that are needed by Jabber for Android.
The table below (Table 1.1) lists all the required roles, their privileges and the reason why Jabber needs the role assigned.
Table 1.1
| Roles | Privileges/Resources | Jabber Role Usage |
| Standard CCM End Users | Grant an end user log-in rights to the Cisco Unified CM User Options. | Jabber SOAP Authentication |
| Standard CCMUSER Administration | Allows access to the Cisco Unified CM User Options. | Jabber SOAP Authentication |
To assign a permission group to the CUCM end user select the Add to Access Control Group button.
Next, search for the access control group you would like to add and select the checkbox located near the access control groups name. When finished select the Add Selected button.
Service Discovery
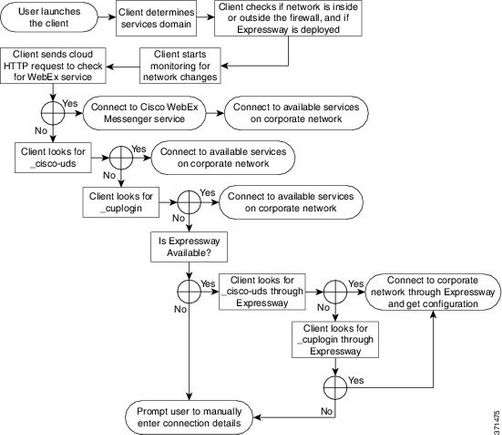
For the Cisco Jabber client to be able to log in it must first be aware of the services (CUCM, IM&P or Expressway) it will use for authentication and configuration retrieval. Cisco recommends configuring automatic service discovery through the use of Domain Name System (DNS) Service Location (SRV) records as this provides a seamless user experience and ease of administration.
The image below is graphical depiction of the Jabber automatic service discovery process.
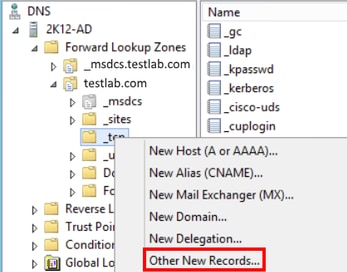
To add DNS SRV record to Microsoft DNS Manager navigate to your domain and expand the tree. Right click on the _tcp folder and select Other New Records.
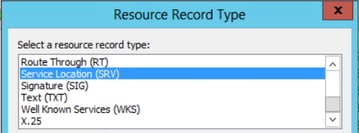
When presented with the Resource Record Type window, highlight the Service Location (SRV) then select Create Record.
Next you will be presented with the «New Resource Record» pane. Here you will configure a SRV record for each of the CUCM servers that will be used for Jabbers initial UDS home cluster lookup.
Below is a configuration example for the _cisco-uds SRV record. In this example the _cisco-uds record resolves to three CUCM nodes within a CUCM cluster.
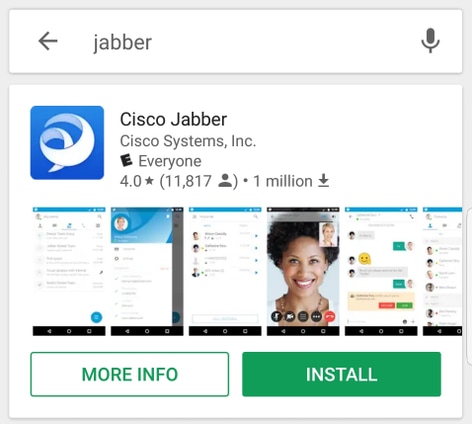
Downloading and Installing Cisco Jabber
Start by opening the Android Play Store on the Android device.

Once in the Play Store application search for Jabber using the play store search bar. Once you have found the Cisco Jabber application simply select the application and choose the option to INSTALL.
Logging in to Jabber
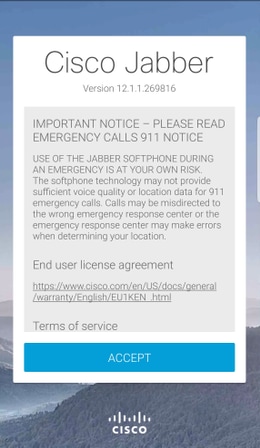
To perform a first time login for Jabber for Android, start by finding the Cisco Jabber application on the Android device and launching it .

Once the Jabber for Android application launches you will be presented with the End user license agreement. Please read through the notices and terms of service. If you wish to continue select Accept.
Jabber will then request permission to integrate with the Android phone’s native calling, contacts and storage features. If this is acceptable and you wish to continue with Jabber logIn select GET STARTED.

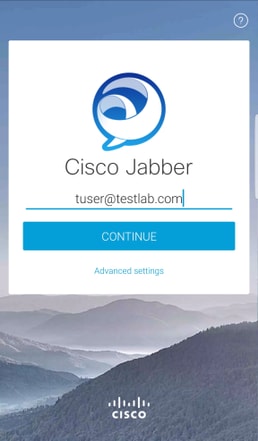
Next the Jabber application will display the service discovery login screen. Here you will provided the Jabber username and the domain that will be used for service discovery (example. tuser@testlab.com). To proceed with login select the CONTINUE button.
Once service discovery has finished you will be prompted to provide the credentials for Jabber log. Provide a valid Jabber username and password and select SIGN IN.
Источник