ОГЛАВЛЕНИЕ
ОГЛАВЛЕНИЕ
…………………………………………25
Условные знаки, используемые в
настоящей инструкции ……………………….25
Буквы в скобках …………………………………….25
Проблемы и ремонт …………………………….25
БЕЗОПАСНОСТЬ
………………………………….25
Основные правила по технике безопас-
ности ………………………………………………………..25
Предназначенное использование ……26
Инструкции по эксплуатации …………….26
ОПИСАНИЕ ПРИБОРА
……………………..26
Описание прибора ………………………………26
Описание контейнера для
молока ……………………………………………………..26
Описание панели управления ……………26
Описание индикаторов ……………………….27
ПРЕДВАРИТЕЛЬНЫЕ ОПЕРАЦИИ
.27
Проверка транспортировки ………………27
Установка прибора ………………………………27
Подключение прибора ………………………..27
Первое включение прибора в работу 28
ВЫКЛЮЧЕНИЕ ПРИБОРА
……………..28
НАСТРОЙКА УСТАНОВОК МЕНЮ
.29
Установка языка ……………………………………29
Установка времени ………………………………29
Установка времени автоматического
включения ………………………………………………29
Установка температуры ………………………29
Установка автоматического выключения
……………………………………………………………………29
Возврат к заводским настройкам (сброс)
……………………………………………………………………30
Функция статистики ……………………………..30
ПРИГОТОВЛЕНИЕ КОФЕ
………………..30
Выбор вкуса кофе …………………………………30
Выбор вкуса кофе …………………………………30
Регулировка кофемолки ……………………..30
Приготовление кофе при использова-
нии кофе в зёрнах ………………………………..31
Приготовление кофе при использова-
нии молотого кофе ………………………………31
Приготовление кофе при использова-
нии молотого кофе ………………………………31
24
ПРИГОТОВЛЕНИЕ НАПИТКОВ С
МОЛОКОМ
……………………………………………….31
Наполнение и установка
контейнера для молока ………………………..32
Наполнение и установка контейнера
для молока ……………………………………………..32
Приготовление взбитого молока ……..32
Приготовление кофе с молоком ……….32
Приготовление горячего молока ……..33
Очистка контейнера для молока после
использования ………………………………………33
Программирование количества кофе и
молока в чашке ……………………………………..33
ПРИГОТОВЛЕНИЕ ГОРЯЧЕЙ ВОДЫ
.34
Приготовление ……………………………………..34
Изменение количества ………………………..34
ОЧИСТКА
………………………………………………….34
Очистка кофемашины ………………………….34
Очистка контейнера для кофейной гущи
……………………………………………………………………34
Очистка контейнера для кофейной гущи
……………………………………………………………………35
Очистка бачка для воды ……………………..35
Очистка сопел подачи кофе ………………35
Очистка воронки для засыпания моло-
того кофе ………………………………………………..35
Очистка внутренней части кофемашины
35
Очистка заварочного узла ………………….35
Очистка контейнера для молока ………36
УДАЛЕНИЕ НАКИПИ E
…………………….36
ПРОГРАММИРОВАНИЕ
ЖЁСТКОСТИ ВОДЫ
……………………………37
Измерение жёсткости воды ……………….37
Программирование жёсткости воды 37
ТЕХНИЧЕСКИЕ ДАННЫЕ
………………..37
СООБЩЕНИЯ, ПОКАЗЫВАЕМЫЕ
НА ДИСПЛЕЕ
…………………………………………..38
РЕШЕНИЕ ПРОБЛЕМ
…………………………40
DeLonghi Perfecta ESAM 5500 Automatic Coffee Maker Manual
INTRODUCTION
Thank you for choosing the ESAM 5500 automatic coffee maker. We hope you enjoy using your new appliance. Take a few minutes to read these instructions. This will avoid all risks and damage to the machine.
Symbols used in these instructions
Important warnings are identified by these symbols. These warnings must absolutely be respected.
Failure to observe the instructions could result in electric shock, serious injury, burns, fire or damage to the appliance.
Failure to observe the warning could result in possibly life threatening injury from electric shock.
Failure to observe the warning could result in injury or damage to the appliance.
Failure to observe the warning could result in scalds or burns.
NB: This symbol identifies important advice or information for the user.
Letters in brackets
The letters in brackets correspond to the legend in the Description of the appliance.
Troubleshooting and repairs
In the event of problems, first try and resolve them following the information given in the section «Displayed messages» and «Troubleshooting». If this does not resolve the problem or you require further information, you should consult the customer service center by calling the number given on the «Customer Service» sheet. If your country is not among those listed on the sheet, call the number given in the guarantee. If repairs are required, contact the customer service center only. The addresses are given in the guarantee certificate provided with the machine.
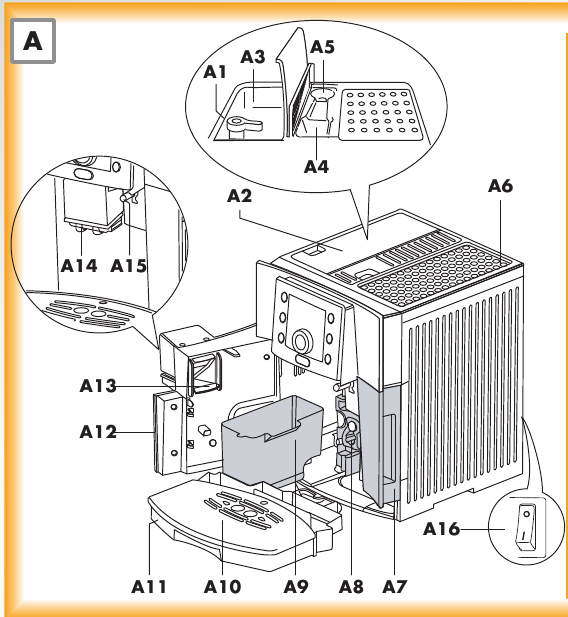
DESCRIPTION
Description of the appliance
- Grinding coarseness regulator knob
- Bean container lid
- Container for coffee beans
- Ground coffee feed funnel
- Compartment for measuring scoop
- Cup warmer shelf
- Water tank
- Infuser
- Coffee grounds container
- Cup tray
- Drip tray
- Service door
- Coffee guide
- Coffee spout (adjustable height)
- Hot water and steam nozzle
- Main switch (some models only)
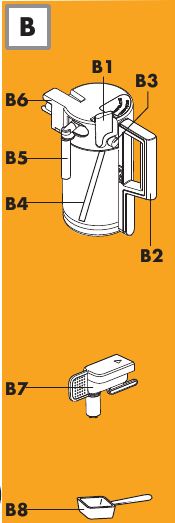
Description of milk container
- Milk frother slide
- Milk container handle
- CLEAN button
- Milk intake tube
- Frothed milk spout
- Milk frother
- Hot water spout
- Measuring scoop
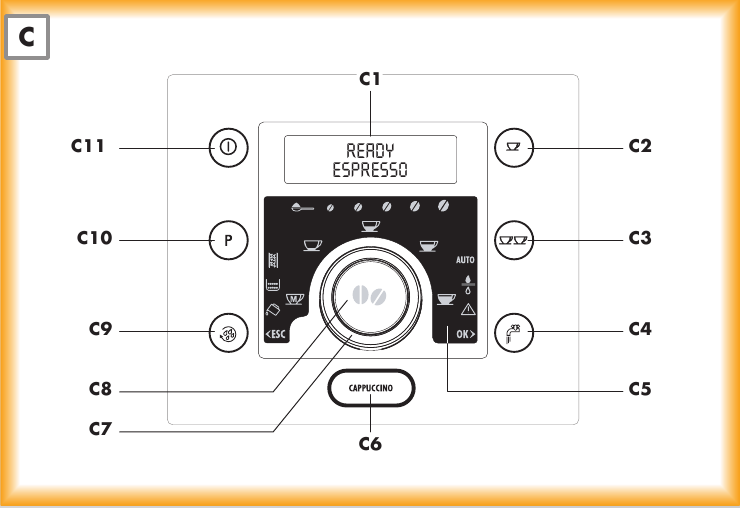
Description of control panel
A number of buttons on the panel have a dual function. This is indicated in brackets in the description.
- Display: guides the user in operating the appliance.
button: to prepare 1 cup of coffee with the settings displayed
button: to prepare 2 cups of coffee with the settings displayed.
- button: Delivers hot water (Button is also used as «OK» for MENU selections)
- Indicator lights: indicate the current settings, alarm messages or need for maintenance.
- CAPPUCCINO button to prepare cappuccino or frothed milk for Latte.
- Selection knob: turn clockwise or counterclockwise until corresponding to the quantity of coffee comes on
customized «my coffee»
espresso coffee
normal coffee
long coffee
extra long coffee
(When you access the MENU: turn to select). - Aroma selection button
: press until the light corresponding to the strength of coffee you want to make comes on.
re-ground coffee
extra-mild taste
mild taste
standard taste
strong taste
extra-strong taste
- Rinse button
: performs a brief rinse to heat the infuser.
(Button is also usedas «ESC» for MENU selections) - P button to access the menu:
button: turns the appliance on and off
Explanation of indicator lights


PRELIMINARY CHECKS
Controls after transport
After removing the packaging, make sure the product is complete and undamaged and that all accessories are present. Do not use the appliance if it is visibly damaged. Contact the Customer Service Center if product seems damaged in any way.
Installing the appliance
When you install the appliance, you should respect the following safety warnings:
- The appliance gives off heat. Leave a free space of at least 1 inch around the sides and back of the appliance and at least 6 inches at the top, otherwise the heat could be trapped and damage the machine.
- Water penetrating the appliance could cause damage. Do not place the appliance near taps or sinks.
- The appliance could be damaged if the water it contains freezes. Do not install the appliance in a room where the temperature could drop below freezing point.
- Arrange the power cable in such a way that it cannot be damaged by sharp edges or contact with hot surfaces (e.g. electric hot plates).
Connecting the appliance
Check that the mains power supply voltage corresponds to the value indicated on the rating plate on the bottom of the appliance.
Connect the appliance to an properly grounded and correctly installed socket with a minimum current rating of 10A only. If the power socket does not match the plug on the appliance, have the socket replaced with a suitable type by a qualified professional.
Using the appliance for the first time
NB!
- Coffee has been used to factory test the appliance and it is therefore completely normal for there to be traces of coffee in the mill. The machine is, however, guaranteed to be new.
- You should customize water hardness as soon as possible following the instructions in the section «Setting water hardness».
- Some models are fitted with a water softener filter which reduces the build up of limescale in the appliance. To install, see the instructions in the section «Installing the filter».
- Plug appliance into electrical outlet.
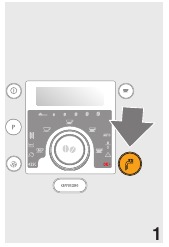
You must first select the language (the languages scroll through at intervals of about two seconds): - When English appears, press the button for three seconds (fig. 1). Once the language has been saved, the message «English Installed» is displayed.
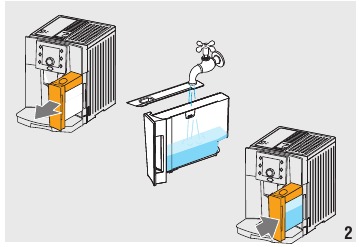
Follow the instructions indicated by the appliance: - «FILL TANK!»: remove the water tank, fill to the MAX line with fresh water then replace in the appliance (fig. 2).
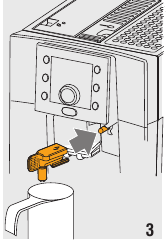
- «INSERT WATER SPOUT AND PRESS OK»: Check that the hot water spout is inserted on the nozzle and place a container underneath (fig. 3).
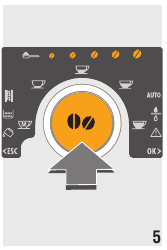
Press the button (fig. 1). «Please Wait…» is displayed and the appliance begins to run off hot water.
The appliance ends the first start up procedure, then the message «Turning Off, Please Wait…» is displayed and the appliance goes off. The coffee maker is now ready for normal use.
NB! When using the appliance for the first time, you need to make 4 to 5 cups of coffee and 4 to 5 cappuccinos before the appliance starts to give satisfactory results.
TURNING THE APPLIANCE ON
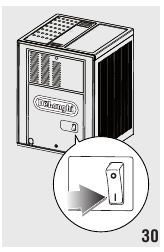
N.B.! Before turning the appliance on, make sure the main switch is in the I position (fig. 30). Each time the appliance is turned on, it performs an automatic preheat and rinse cycle which cannot be interrupted. The appliance is ready for use only after completion of this cycle.
During rinsing, a little hot water is run off from the coffee spouts. Avoid contact with splashes of water.
After heating, the message «RINSING» is displayed. While the boiler is heating, the appliance also heats the internal circuits by circulating hot water.
The appliance is at temperature when the message «READY Standard Taste» is displayed.
TURNING THE APPLIANCE OFF
Each time the appliance is turned off, it performs an automatic rinse cycle which cannot be interrupted.
Danger of burns! During rinsing, a little hot water is run off from the coffee spouts. Avoid contact with splashes of water.
To turn the appliance off, press the 
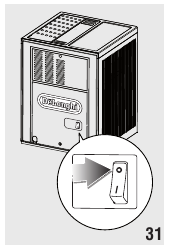
N.B.! If the appliance is not used for an extended period, place the main switch in the 0 position (fig. 31).
Setting the clock
- Press the P button to enter the menu;
- Turn the selection knob until «Adjust Time» is displayed;
- Press the
button;
- Turn the selection knob to change the hours;
- Press the
button to confirm (or the
button to cancel the operation);
- Turn the selection knob to change the minutes;
- Press the
button to confirm (or the
button to cancel the operation);
- Press the
button to exit the menu.
Setting the language
- Press the P button to enter the menu;
- Turn the selection knob until «Set Language» is displayed;
- Press the
button;
- Turn the selection knob until the required language is displayed;
- Press the
button to confirm (or the
button to cancel the operation);
- Press the
button to exit the menu.
Setting automatic start up time
You can set the auto-start time in order to have the appliance automatically turn on (for example in the morning) so you can make coffee immediately.
- Press the P button to enter the menu;
- Turn the selection knob until «Auto-Start» is displayed;
- Press the
button;
- Turn the selection knob to change the hours;
- Press the
button to confirm (or the
button to cancel the operation);
- Turn the selection knob to change the minutes;
- Press the
button to confirm (or the
button to cancel the operation);
- Press the
button to exit the menu.
After confirming the time, the red AUTO light on the display comes on indicating that the function is active.
To deactivate the function, select auto-start from the menu and press OK. Then exit by pressing the 
The AUTO icon on the display goes off.NB! To activate this function, the time must be set.
Descaling
- Press the P button to enter the menu;
- Turn the selection knob until «Descaling» is displayed;
- Press the
button;
- The message «Confirm?» is displayed.
- Press the
button to confirm (or the
button to cancel the operation);
- Carry out descaling as described in the section «Descaling».
Setting the temperature
- Press the
button to enter the menu;
- Turn the selection knob until «Set Temperature» is displayed;
- Press the
button;
- Turn the selection knob until the required temperature (high, medium, low) is displayed;
- Press the
button to confirm (or the
button to cancel the operation);
- Press the
button to exit the menu.
Auto-Off
- Press the P button to enter the menu;
- Turn the selection knob until «Auto-Off» is displayed;
- Press the
button;
- Turn the selection knob until the required number of hours of operation (1, 2 or 3) is displayed;
- Press the
button to confirm (or the
button to cancel the operation);
- Press the
button to exit the menu.
Setting water hardness
- Press the P button to enter the menu;
- Turn the selection knob until «Water Hardness» is displayed;
- Press the
button;
- Turn the selection knob until the water hardness measured using the indicator strip is displayed (see paragraph «Measuring water hardness»);
- Press the
button to confirm (or the
button to cancel the operation);
- Press the
button to exit the menu.
Resetting factory default values (reset)
This function resets the entire menu with the default values (except the language, which remains as set).
- Press the P button to enter the menu;
- Turn the selection knob until «Default Values» is displayed;
- Press the
button;
- The message «Confirm?» is displayed.
- Press the
button to confirm and exit (or the
button to cancel the operation);
Installing the filter
Certain models are provided with a water softener filter (alternatively it can be purchased separately from an authorized Customer Service Center).
To install the filter, proceed as follows:
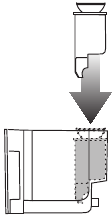
- Insert the filter in the water tank as far as it will go (see figure alongside).
When you install the filter, you must notify the appliance of its presence.
- Press the P button to enter the menu;
- Turn the selection knob until «Install Filter» is displayed;
- Press the
button;
- The message «Confirm?» is displayed.
- Press the
button to confirm (an asterisk appears at the top right of the display);
- Press the
button to exit the menu.
Replacing the filter («Reset water filter»)
When the red light 
- Extract the exhausted filter and replace with a new one;
- Press the P button to enter the menu;
- Turn the selection knob until «Reset Water Filter» is displayed;
- Press the
button;
- The message «Confirm?» is now displayed.
- Press the
button to confirm (or the
button to cancel the operation);
- Press the
button to exit the menu.
Removing the filter
If you want to use the appliance without a filter, you must remove it and notify the appliance of its removal as follows:
- Press the P button to enter the menu;
- Turn the selection knob until «Install Filter» is displayed;
- Press the
button;
- The message «Confirm?» is displayed.
- Press the
button;
- When the asterisk has disappeared from the top right of the display, press
to exit the menu.
If this is not done, the appliance could become clogged with limescale.
Statistics function
- Press the P button to enter the menu;
- Turn the selection knob until «Statistics» is displayed;
- Press the
button;
- Turn the selection knob to verify: — how many coffees have been made;
- how many cappuccinos have been made; — how many times the machine has been descaled; — the total number of litres of water run off;
- how many times the water filter has been replaced.
- Press the
button twice to exit the menu.
MAKING COFFEE
Selecting the coffee taste
The appliance is preset to make coffee with a standard taste.
You an also choose one of these tastes:


To change the flavor, press the 
Selecting the quantity of coffee in the cup
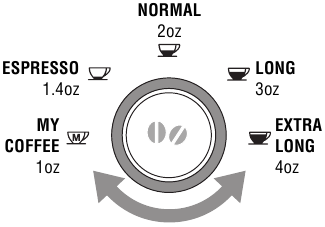
To select the quantity of coffee, turn the selection knob until the light corresponding to the required quantity of coffee comes on:
Customizing the «MY COFFEE» quantity
The appliance is factory preset to automatically deliver 1oz.
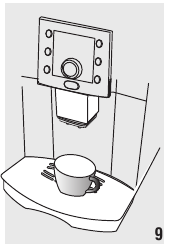
- Place a cup under the coffee spouts (fig. 9).
- Turn the selection knob (C7) until the
light comes on.
- Press and hold the 1 cup button
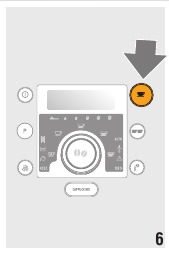
for at least eight seconds (fig. 6).
When the message «1 MY COFFEE Program Quantity» is displayed the button can be released and coffee will be delivered into the cup; - As soon as the coffee in the cup reaches the required level, press the 1 cup button
again.
The quantity set has now been programmed. The «my coffee» button is only programmable using the 1 coffee button. When «my coffee» setting is being used and the 2 coffee button is pressed, a double shot of the programmed quantity will be delivered.
Preparing coffee using coffee beans
Do not use caramelized or candied coffee beans as they could stick to the coffee mill and make it unusable.
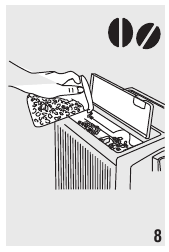
- Fill the container (A3) with coffee beans (fig. 8).
- Place under the coffee spouts:
- 1 cup, if you want to make 1 coffee (fig. 9);
- 2 cups, if you want 2 coffees.
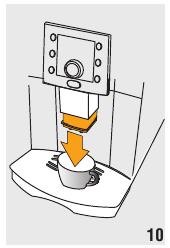
- Lower the spouts as near as possible to the cup. This makes a creamier coffee (fig. 10).
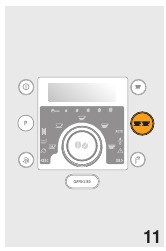
- Press the corresponding coffee button (1 cup
or 2 cups
) (fig. 6 and 11).
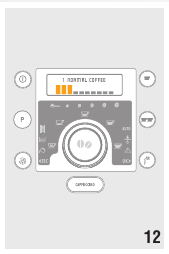
- Preparation begins. A progress bar appears on the display and gradually advances as the procedure progresses (fig. 12).
Once the coffee has been made, the appliance is ready to use again.
NB!
Making coffee using pre-ground coffee
NB! If you use pre-ground coffee, you can only make one cup of coffee at a time.
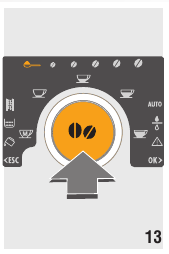
- Press the
button repeatedly (fig. 13) until «READY PRE-GROUND» is displayed.
Regulating the coffee mill
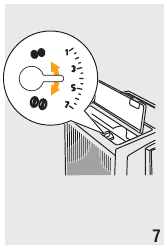
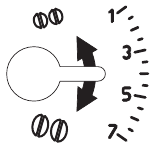
The coffee mill is preset in the factory to prepare coffee correctly and should not require regulating initially. However, if after making the first few coffees you find that run-off is either too fast or too slow (drips), this can be corrected by adjusting the grinding coarseness regulator knob (fig. 7).
For slower run-off and creamier coffee, turn one click towards the «1» (finer ground coffee). For faster run-off (without dripping, turn one click towards the «7» (coarser ground coffee).
These adjustments will only be evident after at least 2 cups of coffee have been run off.
NB! The grinding coarseness regulator must only be turned when the coffee mill is in operation (After coffee button has been pressed and you hear the grinder working.) Only adjust grinder one setting at a time.
MAKING MILK-BASED DRINKS
Filling and attaching the milk container
- Turn the lid of the milk container clockwise until it becomes noticeably difficult to turn, then remove the lid.
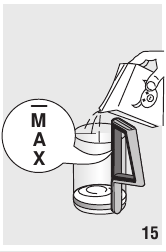
- Fill the milk container with a sufficient quantity of milk, not exceeding the MAX level marked on the handle (fig. 15).
NB! You should ideally use skimmed or 2% milk at refrigerator temperature (about 41°F).
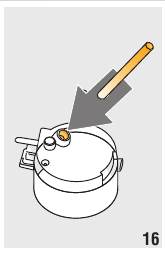
- Make sure the milk intake tube (B4) is correctly inserted in the bottom of the milk container lid (fig. 16).
- Replace the milk container lid and turn counterclockwise as far as it will go.
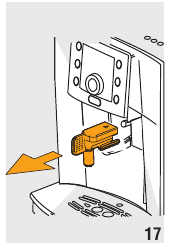
- Remove the hot water spout from the nozzle (fig. 17).
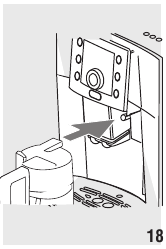
- Attach the container to the nozzle, pushing as far as it will go (fig. 18).
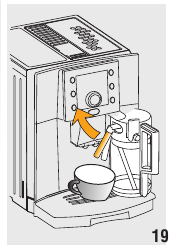
- Place a sufficiently large cup under the coffee spouts (A14) and the frothed milk spout (fig. 19). If necessary, move the frothed milk spout slightly outwards (B5 — fig. 19).
Making cappuccino
- Fill the milk container (B) with milk and attach it as described in the section «Filling and attaching the milk container».
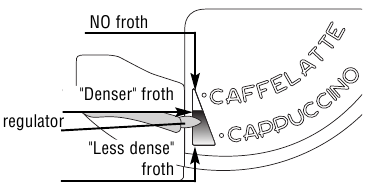
- Position the milk frother slide (B1) between the words CAPPUCCINO and CAFFELATTE printed on the milk container lid cover. The quantity of froth can be adjusted by moving the slide towards the word CAFFELATTE for a denser froth. Moving it towards the word CAPPUCCINO obtains a less dense froth.
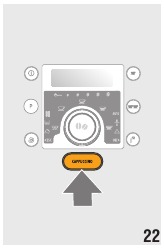
- Press the cappuccino button (fig. 22).
The message «Cappuccino» is displayed. (After a few seconds, frothed milk runs out of the milk spout into the cup below. Run off of milk stops automatically and run off of coffee begins.)
N.B.! If you want to stop preparation, press the CAPPUCCINO button twice. Pressing it once stops frothed milk run-off, pressing it twice stops coffee run-off.
Making frothed milk
- Fill the container (B) with milk and attach it as described in the section «Filling and attaching the milk container».
- Set the frothed milk regulator (B1) to the quantity of froth required.
- Press the CAPPUCCINO button (fig. 22) twice. The message «Milk Frothing» is displayed.
NB! If you want to stop preparation of frothed milk, press the CAPPUCCINO button once.
Making caffelatte
- Fill the container (B) with milk and attach it as described in the section «Filling and attaching the milk container».
- Set the frothed milk slide (B1) to CAFFELATTE.
- Press the CAPPUCCINO button (fig. 22). The message «Cappuccino» is displayed.
NB! If you want to stop preparation of caffelatte, press the CAPPUCCINO button twice.
Making hot milk
- Fill the container (B) with milk and attach it as described in the section «Filling and attaching the milk container».
- Set the frothed milk slide(B1) to CAFFELATTE
- Press the CAPPUCCINO button (fig. 22) twice. The message «Milk Frothing» is displayed.
NB! If you want to stop preparation of hot milk, press the CAPPUCCINO button once.
Programming the quantity of coffee and milk in the cup for cappuccino or frothed milk
The appliance is factory preset to automatically deliver 2.4oz of frothed milk and 2.7oz of coffee.
To modify these quantities, proceed as follows:
- Place a cup under the coffee spouts and the frothed milk spout (fig. 19).
- Press and hold the CAPPUCCINO button for at least eight seconds (fig. 22). The message «Milk for Cappuccino Program Quantity» is displayed.
- Release the button. The appliance starts running off milk.
- Once the required quantity of milk has been run off into the cup, press the CAPPUCCINO button again.
- After a few seconds, the appliance starts running off coffee into the cup and the message «Coffee for Cappuccino Program Quantity» is displayed.
- Once the required quantity of coffee has been run off into the cup, press the CAPPUCCINO button again. Coffee run-off stops and «READY» is displayed.
The machine is now reprogrammed with the new quantities.
Cleaning the milk container after use
Clean the internal tubes of the milk container each time you use it to avoid the build-up of milk residues or blockages.
When cleaning the internal tubes of the milk container, a little hot water leaks out of the frothed milk tube (B5). Avoid contact with splashes of water.
- Place a cup or other container under the frothed milk spout (B5 — fig. 19);
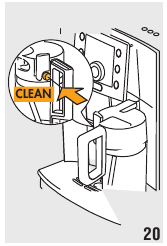
- Press the «CLEAN» button (B3 — fig. 20) and hold it down for at least eight seconds.
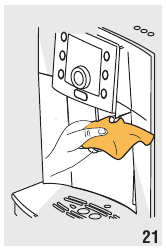
The message «Cleaning» is displayed. - Remove the milk container and clean the nozzle with a sponge (fig. 21).
HEATING WATER
Preparation
Never leave the machine unsupervised while running off hot water. As shown below, stop run-off of hot water when the cup is full. The hot water spout becomes hot while water is running off and must be handled by the handle only.
- Make sure the hot water spout (B7) is attached correctly (fig. 3).
- Place a container under the spout (as close as possible to avoid splashes).
- Press the
button (fig. 1). The message «Hot Water…» is displayed. Water runs out of the spout.
NB! Stop the flow of hot water by pressing the

You should not run off hot water for more than two minutes at a time.
Changing the quantity
The appliance is factory preset to automatically deliver 8.5oz. To modify these quantities, proceed as follows:
- Position a container under the spouts.
- Press and hold the button down for 8 seconds. The message «Hot Water Program Quantity» is displayed.
- When the hot water in the cup reaches the required level, press the button again.
The machine is now reprogrammed with the new quantity.
CLEANING AND MAINTENANCE
Danger of electric shock! Before performing any cleaning operations, the machine must be turned off and disconnected from the mains power supply.
Never immerse the coffee maker in water.
Danger of burns. Allow the machine to cool down before cleaning.
- Do not use solvents, abrasive detergents or alcohol to clean the coffee maker.
- None of the components can be washed in a dishwasher.
- Do not use metal objects to remove encrustations or coffee deposits as they could scratch metal or plastic surfaces.
Emptying the drip tray
If the drip tray (A11) is not emptied regularly, the water could overflow from the edge and seep inside or around the machine. This could damage the machine, the surface it rests on or the surrounding area.
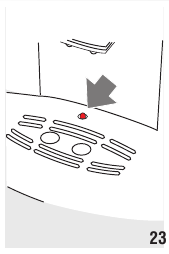
The drip tray has a water level indicator in the form of a red float which rises up as the level of water in the drip tray rises.
Empty the drip tray before the red float protrudes from the tray (fig. 23).
To remove the tray:
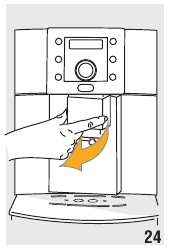
- Open the service door (fig. 24);
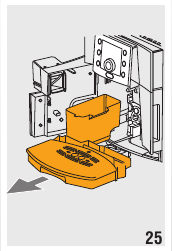
- Remove the drip tray and the grounds container (Fig. 25);
- Empty the drip tray and grounds container (A9);
- Insert the drip tray complete with grounds container (A9);
- Close the service door.
Cleaning the coffee maker
The following parts of the machine must be cleaned regularly:
- water tank (A7),
- drip tray (A11),
- coffee grounds container (A9),
- coffee spouts (A14) and hot water nozzle (A15),
- pre-ground coffee feed funnel (A4),
- inside the machine, accessible after opening the service door (A12),
- infuser (A8),
- milk container (B)
Cleaning the water tank
- Clean the water tank (A7) regularly (about once a month) with a damp cloth and a little mild dish detergent.
- Clean to remove all soap residues, then rinse the water tank thoroughly.
Cleaning the drip tray
- Clean the drip tray (A11) each time you empty it using a damp cloth and a little mild dish detergent.
Cleaning the coffee grounds container
- Clean the grounds container (A9) each time you empty it using a damp cloth and a little mild dish detergent.
- Try removing the toughest coffee encrustations with a toothpick. If this is not sufficient, soften the encrustations by soaking the grounds container in water for a few minutes.
Grounds container MUST be emptied every time the service door is open, even if container is not full as the counter will reset. If this is not done, the grounds container may fill up past capacity and damage the machine. Grounds container will display light every 14 single shots or 7 double shots. (This cleaning task can be done without powering the machine off.)
Cleaning the spouts
- Clean the nozzle (A15), ideally each time the frother is used, with a sponge or cloth (fig. 21).
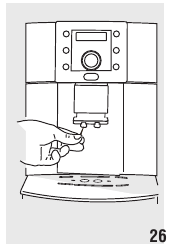
- Check regularly (about once a month) that the holes in the coffee spout (A14) are not blocked. If necessary, remove coffee deposits with a toothpick (fig. 26), sponge or stiff bristled kitchen brush.
Cleaning the coffee feed funnel
- Check regularly (about once a month) that the pre-ground coffee feed funnel is not blocked. If necessary, remove coffee deposits with a wooden skewer.
Cleaning the inside of the machine
- Check regularly (about once a week) that the inside of the machine is not blocked. If necessary, remove coffee deposits with a toothpick, sponge or stiff bristled kitchen brush.
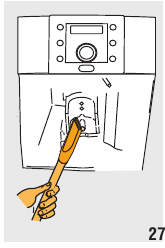
- Remove the residues with a vacuum cleaner (fig. 27).
Cleaning the infuser
The infuser must be cleaned at least once a month.
The infuser (A8) may not be removed when the appliance is on. Do not attempt to use force to remove the infuser as this could damage the machine.
- Turn the machine off.
- Open the service door (fig. 24);
- Remove the drip tray and grounds container (fig. 25);
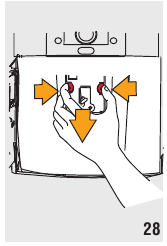
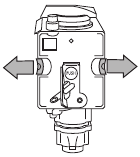
- Press the two red release buttons inwards and at the same time extract the infuser (fig. 28).
Do not use dish detergent to clean the infuser (A8). The detergent would remove the lubricant applied to the inside of the piston, causing the infuser to seize up and become unusable.
- Soak the infuser in water for about 15 minutes, then rinse.
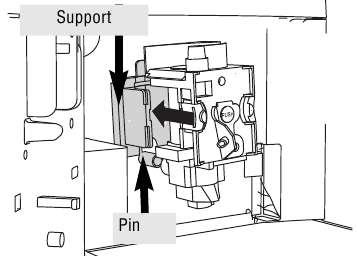
- After cleaning, replace the infuser (A8) by sliding it onto the internal support and pin at the bottom, then push the PUSH symbol fully in until it clicks into place.
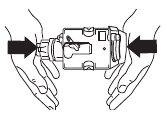
NB! If you encounter difficulty inserting the infuser, before inserting it you must adapt it to the right dimension by pressing it forcefully from the bottom and top as shown in the figure.
- Once inserted, make sure the two red buttons have snapped out.
- Replace the drip tray (A11) and grounds container (A9).
- Close the service door (A12).
Cleaning the milk container
Always clean the tubes inside the milk container (B) when you prepare milk. If there is still milk in the container, do not leave it out of the refrigerator for longer than necessary. Clean the container each time you prepare milk as described in the section «Cleaning the milk container after use».
- Turn the lid of the milk container clock-wise then remove it.
- Remove the milk spout and intake tube.
- Remove the pointer by pulling it outwards.
- Wash all the components thoroughly with hot water and mild dish detergent. Make sure there are no milk residues left inside the holes and the groove on the fine end of the pointer.
- Check that the intake tube and spout are not clogged with milk residues.
- Replace the pointer, milk spout and intake tube.
- Replace the milk container lid.
DESCALING
Descale the machine when the red light and the message «DESCALE» flash on the display.
Descaler contains acids which may irritate the skin and eyes. It is vital to respect the manufacturer’s safety warnings given on the descaler pack and the warnings relating to the procedure to follow in the event of contact with the skin and eyes.
NB! Failure to descale the appliance as described above voids the guarantee.
- Press the P button to enter the menu;
- Turn the selection knob until «Descaling» is displayed;
- Select by pressing the
button. The message «Descaling Confirm?» is displayed. Press
to activate the function.
- If the message «INSERT WATER SPOUT» is displayed, insert it (fig. 3).
- The message «Insert Descaler. Confirm?» is displayed.
- Empty the water tank (A7).
- Pour the descaler diluted with water (respecting the proportions indicated on the descaler bottle) into the water tank. Always use descaler recommended by De’Longhi (contact an authorized customer service center).
- Place an empty container with a minimum capacity of 50 oz under the hot water spout (B7) (fig. 3).
Danger of burns
Hot water containing acid runs out of the hot water spout. Avoid contact with splashes of water.
- Press the
button to confirm that you have added the solution and begin the descaling procedure.
- The message «Descaling Underway» is displayed.
After about 30 minutes, the message «Rinsing FILL TANK!» is displayed.
- Remove the water tank, empty, rinse with running water, fill with clean water and replace.
- Empty the container used to collect the descaler solution and replace it under the hot water spout.
- Press the
button to start rinsing. Hot water runs out of the spout and the message «Rinsing…» is displayed.
- When the water tank is completely empty, the message «Rinsing Complete… Confirm?» is displayed.
- Press the
button, fill the water tank and the appliance is ready for use.
SETTING WATER HARDNESS
The DESCALE message is displayed after a period of time established according to water hardness. The machine is factory set for a hardness value of 1.
The machine can also be programmed according to the hardness of your tap water. By programming the water hardness, the machine will adjust the frequency of the descaling message displayed.
Measuring water hardness
- Remove the «TOTAL HARDNESS TEST» indicator paper from its pack.
- Immerse the paper completely in a glass of water for one second.
- Remove the paper from the water and shake lightly.
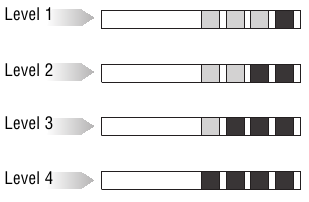
After about a minute, 1, 2, 3, or 4 red squares form, depending on the hardness of the water. Each square corresponds to one level.
Setting water hardness
- Press the P button to enter the menu.
- Turn the selection knob to select «Water Hardness».
- Confirm the selection by pressing the
button.
- Turn the selection knob and set the level shown by the indicator paper (see previous paragraph).
- Press the
button to confirm the setting.
- Press the
button to exit the menu.
The machine is now reprogrammed with the new water hardness setting.
TECHNICAL SPECIFICATION
Voltage: 120 V~ 50/60 Hz max. 10A
Absorbed power:1350W
Pressure: 15 bar
Water tank capacity: 60 ounces
Size: LxHxP: 10.7 x14.7×17.3 in
Weight: 25 lbs
DISPLAYED MESSAGES
| DISPLAYED MESSAGES | POSSIBLE CAUSE | REMEDY |
| FILL TANK! |
|
|
| GROUND TOO FINE ADJUST MILL! Insert water spout and press ok |
|
|
| INSERT WATER SPOUT! |
|
|
| EMPTY GROUNDS CONTAINER |
|
|
| INSERT GROUNDS CONTAINER |
|
|
| INSERT MILK CONTAINER! |
|
|
| ADD PRE-GROUND COFFEE! |
|
|
| DESCALE! |
|
|
| LESS COFFEE! |
|
|
| FILL BEANS CONTAINER! |
|
|
| INSERT INFUSER ASSEMBLY! |
|
|
| CLOSE DOOR! |
|
|
| GENERAL ALARM! |
|
|
TROUBLESHOOTING
Below is a list of some of the possible malfunctions.
If the problem cannot be resolved as described, contact a Customer Service Center.
| PROBLEM | POSSIBLE CAUSE | REMEDY |
| The coffee is not hot |
|
|
| The coffee is not creamy enough |
|
|
| The coffee runs out too slowly or in drips. |
|
|
| The coffee runs out too quickly. |
|
|
| The coffee does not come out of one of the spouts. |
|
|
| The coffee does not come out of the spouts, but around the service door (A12). |
|
|
| Water comes out of the spouts instead of coffee. |
|
|
| The milk does not come out of the milk spout (B5). |
|
|
| The milk is not well frothed. |
|
|
| The milk contains bubbles or squirts out of the milk spout. |
|
|
Documents / Resources
Download manual
Here you can download full pdf version of manual, it may contain additional safety instructions, warranty information, FCC rules, etc.
Download DeLonghi Perfecta ESAM 5500 Automatic Coffee Maker Manual
-
Инструкции по эксплуатации
1
DeLonghi ESAM 5500 Perfecta Cappuccino инструкция по эксплуатации
(18 страниц)
- Языки:Русский
-
Тип:
PDF -
Размер:
368.29 KB -
Описание:
Кофе-машина
Просмотр
На NoDevice можно скачать инструкцию по эксплуатации для DeLonghi ESAM 5500 Perfecta Cappuccino. Руководство пользователя необходимо для ознакомления с правилами установки и эксплуатации DeLonghi ESAM 5500 Perfecta Cappuccino. Инструкции по использованию помогут правильно настроить DeLonghi ESAM 5500 Perfecta Cappuccino, исправить ошибки и выявить неполадки.
(скачивание инструкции бесплатно)
Формат файла: PDF
Доступность: Бесплатно как и все руководства на сайте. Без регистрации и SMS.
Дополнительно: Чтение инструкции онлайн
RU
КОФЕМАШИНА ДЛЯ ПРИГОТОВЛЕНИЯ КОФЕ И КАПУЧЧИНО
ESAM5500
10
Страница:
(1 из 24)
навигация
1
2
3
4
5
6
7
8
9
10
11
12
13
14
15
16
17
18
19
20
21
22
23
24
Оглавление инструкции
- Страница 1 из 25
КОФЕМАШИНА ДЛЯ ПРИГОТОВЛЕНИЯ КОФЕ И КАПУЧЧИНО 10 ESAM5500 RU - Страница 2 из 25
A A1 A5 A3 B B1 B3 B6 A4 A6 A2 B5 B4 A14 A15 B2 A13 B7 A12 A16 A11 A10 A9 A8 B8 A7 C C1 C11 Ready espresso C2 C10 C3 C9 C4 C8 C5 C7 C6 3 - Страница 3 из 25
1 2 3 4 5 6 7 8 9 10 11 1 normal coffee M A X 12 13 14 4 15 - Страница 4 из 25
16 17 18 19 20 21 22 23 24 25 26 27 28 29 30 31 CLEAN 5 - Страница 5 из 25
ОГЛАВЛЕНИЕ ВВЕДЕНИЕ ……………………………………………26 Символы, используемые в настоящей инструкции……………………………………………26 Буквы в скобках…………………………………..26 Проблемы и ремонт ……………………………26 - Страница 6 из 25
ВВЕДЕНИЕ Благодарим за то, что вы выбрали нашу автоматическую машину для приготовление кофе и капуччино „ESAM 5500“. Желаем Вам приятного времяпрепровождения с нашими прибором. Потратьте пару минут, чтобы прочитать эти инструкции по эксплуатации. Благодаря этому Вы избежите опасностей или - Страница 7 из 25
Опасность! Храните упаковочный материал (полиэтиленовые мешки, пенопласт) вне досягаемости детьми. Опасность! Не разрешайте пользоваться прибором людям (в том числе и детям) с пониженным уровнем восприятия и психофизических возможностей или с недостаточным опытом и знаниями, за исключением случаев, - Страница 8 из 25
C6. Кнопка CAPPUCCINO (капуччино) предназначена для приготовления капуччино или взбитого молока. C7. Ручка выбора: поверните по часовой или против часовой стрелки до включения индикатора, соответствующего количеству кофе. чтобы подтвердить выбор в меню. Указывает на кнопку, которую необходимо - Страница 9 из 25
До запуска прибора ВКЛЮЧЕНИЕ ПРИБОРА Обратите внимание! Машина испытана на заводе с использованием кофе, поэтому следы кофе в кофемолке – абсолютно нормальное явление. В любом случае гарантировано, что эта машина – абсолютно новая. • Рекомендуется сразу же определить жесткость воды, выполнив - Страница 10 из 25
7. Нажмите кнопку для того, чтобы подтвердить операцию (или кнопку , чтобы ее отменить); 8. Затем нажмите кнопку для выхода из меню. После того, как время будет подтверждено, на дисплее загорится красный индикатор AUTO, указывая включение режима. Для отключения режима выберите из меню пункт - Страница 11 из 25
6. Нажмите кнопку для того, чтобы подтвердить операцию (в правом верхнем углу дисплея появится звездочка); 7. Затем нажмите кнопку для выхода из меню. появится требуемое количество часов времени работы (1, 2 или 3 часа); 5. Нажмите кнопку для того, чтобы подтвердить операцию (или кнопку , чтобы ее - Страница 12 из 25
кнопку 1 чашка . При этом запрограммированное количество примет новое значение. ПРИГОТОВЛЕНИЕ КОФЕ Выбор вкуса кофе Кофеварка отрегулирована на заводе для приготовления кофе с нормальным вкусом. Можно задать один из следующих вкусов: Регулировка кофемолки Кофемолка не должна подвергаться - Страница 13 из 25
Приготовление кофе при использовании кофе в зернах Attenzione! Ни в коем случае не засыпайте молотый кофе, если кофеварка выключена, чтобы избежать рассыпания кофе внутри нее и ее загрязнения. В этом случае машина может сломаться. • Ни в коем случае не засыпайте более 1 мерки, заполненной до краев, - Страница 14 из 25
Очистка контейнера для молока после использования Приготовление капуччино 1. Наполните контейнер (В) молоком, и установите его, как показано в параграфе «Наполнение и установка контейнера для молока». 2. Установите регулятор взбивания молока (В1) между надписями CAPPUCCINO (капуччино) и CAFFELATTE - Страница 15 из 25
рис. 3. 2. Установите емкость для воды под узлом (как можно ближе, чтобы избежать брызг). 3. Нажмите кнопку , рис. 1. На дисплее появится сообщение «Горячая вода…», вода начнет выливаться из узла подачи воды. Обратите внимание! Если Вы хотите прервать приготовление взбитого молока, один раз - Страница 16 из 25
Слив из ванночки сбора капель Очистка ванночки сбора капель • Внимание! Если ванночка для сбора капель (А11) периодически не сливается, вода может перелиться через край и попасть в машину или разлиться рядом с ней. Это может повредить машину, поверхность, на которой она стоит или окружающую - Страница 17 из 25
7. После того, как он вставлен убедитесь, что две кнопки красного цвета вышли наружу. 8. Очистите ванночку для сбора воды (А11) с контейнером для кофейной гущи (А9); 9. Закройте дверцу для ухода (А12). Очистка заварочного узла Заварочный узел должен очищаться не реже одного раза в месяц. Внимание! - Страница 18 из 25
12. Извлеките бачок для воды, слейте из него воду, сполосните проточной водой, наполните чистой водой, и установите на место. 13. Слейте емкость, использовавшуюся для сбора антинакипина, и вновь поставьте ее под узел для подачи горячей воды. 14. Нажмите кнопку , чтобы начать споласкивание. Горяча - Страница 19 из 25
Программирование сти воды жестко- 1. Нажмите кнопку Р, чтобы войти в меню. 2. Вращайте ручку переключения пока на дисплее не появится сообщение «Жесткость воды». 3. Подтвердите выбор, нажав кнопку . 4. Поверните ручку переключения, и выберите уровень, соответствующий индикаторной полоске (см. - Страница 20 из 25
СООБЩЕНИЯ, ПОКАЗЫВАЕМЫЕ НА ДИСПЛЕЕ ПОКАЗЫВАЕМОЕ СООБЩЕНИЕ ВОЗМОЖНАЯ ПРИЧИНА НАПОЛНИТЕ БАЧОК! • Бачок для пустой либо вставлен. воды плохо • Наполните бачок для воды и/или правильно вставьте его, нажав до упора и щелчка. СЛИШКОМ МЕЛКИЙ ПОМОЛ ОТРЕГУЛИРУЙТЕ ПОМОЛ! Вставьте узел подачи воды и нажмите - Страница 21 из 25
ПОКАЗЫВАЕМОЕ СООБЩЕНИЕ ВОЗМОЖНАЯ ПРИЧИНА УДАЛИТЕ НАКИПЬ! • Указывает, что в к о ф е в а р к е образовалась накипь. • Необходимо как можно быстрее выполнить программу очистки от накипи, описанную в гл. «Удаление накипи». УМЕНЬШИТЕ ДОЗУ КОФЕ! • Воронка для молотого кофе засорена. • • Использовано - Страница 22 из 25
РЕШЕНИЕ ПРОБЛЕМ Ниже перечислены некоторые возможные неисправности. Если проблема не может быть решена, как указано, необходимо связаться с сервисной службой. ПРОБЛЕМА ВОЗМОЖНАЯ ПРИЧИНА УСТРАНЕНИЕ • Чашки не подогреты. • • Заварочная головка охладилась, так как прошли 2-3 минуты с момента - Страница 23 из 25
ПРОБЛЕМА ВОЗМОЖНАЯ ПРИЧИНА УСТРАНЕНИЕ Кофе не выливается из одного или обоих носиков узла подачи кофе. • Засорены отверстия носиков. • Очистите носики при помощи зубочистки, губки или кухонной щеточки с жесткой щетиной, рис. 26. Кофе не выливается из носиков узла подачи кофе, а течет по дверце для - Страница 24 из 25
ТЕХНИЧЕСКИЕ ДАННЫЕ Напряжение электропитания: 220-240 В, 50/60 Гц, макс. 10 А Потребляемая мощность: 1350W Давление: 15 bar Емкость бачка для воды: 1,7 литра Размеры: ДЛ.хВЫС.хГЛ.: 272x374x441 mm Вес: 11,4 Kg Прибор соответствует следующим постановлениям ЕС: • Директиве по низкому напряжению - Страница 25 из 25


 button: to prepare 1 cup of coffee with the settings displayed
  button: to prepare 2 cups of coffee with the settings displayed.
  customized «my coffee»
 espresso coffee
 normal coffee
 long coffee
 extra long coffee
 : press until the light corresponding to the strength of coffee you want to make comes on.
 re-ground coffee
 extra-mild taste
 mild taste
 standard taste
 strong taste
 extra-strong taste
 : performs a brief rinse to heat the infuser.
 button: turns the appliance on and off
 button;
 button to cancel the operation);
 light comes on.
 for at least eight seconds (fig. 6).
 or 2 cups
  ) (fig. 6 and 11).
 button repeatedly (fig. 13) until «READY PRE-GROUND» is displayed.

 button and run off water from the spout for a few seconds
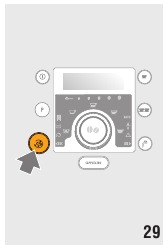
 button (fig. 29).