-
Инструкции по эксплуатации
1

Philips HD7751 инструкция по эксплуатации
(144 страницы)
- Языки:Русский
-
Тип:
PDF -
Размер:
1.92 MB -
Описание:
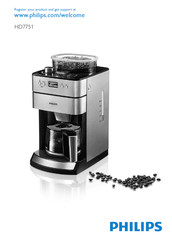
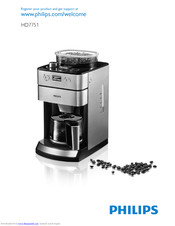
Кофеварка
Просмотр
На NoDevice можно скачать инструкцию по эксплуатации для Philips HD7751. Руководство пользователя необходимо для ознакомления с правилами установки и эксплуатации Philips HD7751. Инструкции по использованию помогут правильно настроить Philips HD7751, исправить ошибки и выявить неполадки.
Раздел: Бытовая, кухонная техника, электроника и оборудование
Тип: Кофеварка
Характеристики, спецификации
Тип используемого кофе:
зерновой
Мощность устройства:
1000 Вт
Настройки:
контроль крепости кофе
Автоматическая декальцинация:
нет
Встроенная кофемолка:
есть, регулировка степени помола, емкость контейнера для зерен 250 г
Противокапельная система:
есть
Возможность одновременного приготовления двух чашек:
нет
Дисплей:
есть, с подсветкой
Отсек для хранения шнура:
есть
Съемный лоток для сбора капель:
есть
Материал изготовления корпуса:
металл
Индикатор уровня воды:
есть
Размеры (Ш*В*Г):
22x42x32 см
Инструкция к Кофеварке Philips HD7751
HD7751
Register your product and get support at
www.philips.com/welcome
1

HD7751
102
174
163
151
138
126
114
90
ENGLISH 6
78
66
54
42
30
18
186

6
Warning
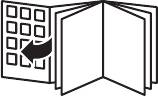
22 Hotplate
23 Overow hole
24 On/off switch
Important
Read this user manual carefully before you use the appliance and save it for
future reference.
Danger
— Never immerse the appliance in water or any other liquid, nor rinse it
under the tap.
— Check if the voltage indicated on the bottom of the appliance
20 OPEN button for lter basket holder
corresponds to the local mains voltage before you connect the
appliance.
— If the mains cord is damaged, you must have it replaced by Philips, a
service centre authorised by Philips or similarly qualied persons in
order to avoid a hazard.
— This appliance is not intended for use by persons (including children)
with reduced physical, sensory or mental capabilities, or lack of
experience and knowledge, unless they have been given supervision or
instruction concerning use of the appliance by a person responsible for
their safety.
21 Water reservoir with water level window
19 Start/standby button
Introduction
6 2-10 cups button
Congratulations on your purchase and welcome to Philips! To fully
benet from the support that Philips offers, register your product at
www.philips.com/welcome.
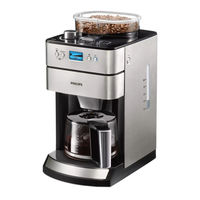
General description (Fig. 1)
1 Permanent lter
2 Filter basket
3 Filter basket holder
4 Jug lid
5 Glass jug
7 STRENGTH button
18 Pre-ground coffee button
8 Display
9 Grind selection knob
10 Lock of coffee bean chute
11 Measuring spoon
12 Cleaning brush
13 Coffee bean container lid
14 Coffee bean container
15 Water reservoir lid
16 Lid of coffee bean chute
17 Steam vent
ENGLISH

— Children should be supervised to ensure that they do not play with the
by clients in hotels, motels, bed and breakfasts and other residential
— Do not move the appliance while it is operating.
— Wait until the appliance has cooled down before you store it. The
hotplate and the coffee jug may be hot.
— After you have unpacked the appliance, make sure it is complete and
undamaged. If in doubt, do not use the appliance but contact the
Consumer Care Centre in your country.
— This appliance is intended for normal household use only. It is not
intended for use in environments such as staff kitchens of shops, ofces,
farms or other work environments. Nor is it intended to be used
environments.
handle.
This Philips appliance complies with all standards regarding electromagnetic
elds (EMF). If handled properly and according to the instructions in this
user manual, the appliance is safe to use based on scientic evidence
available today.
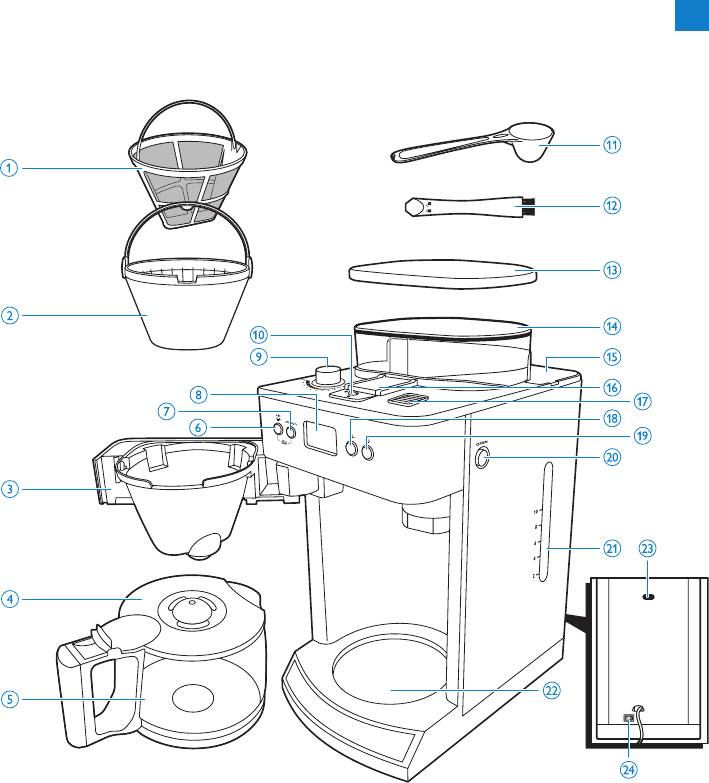
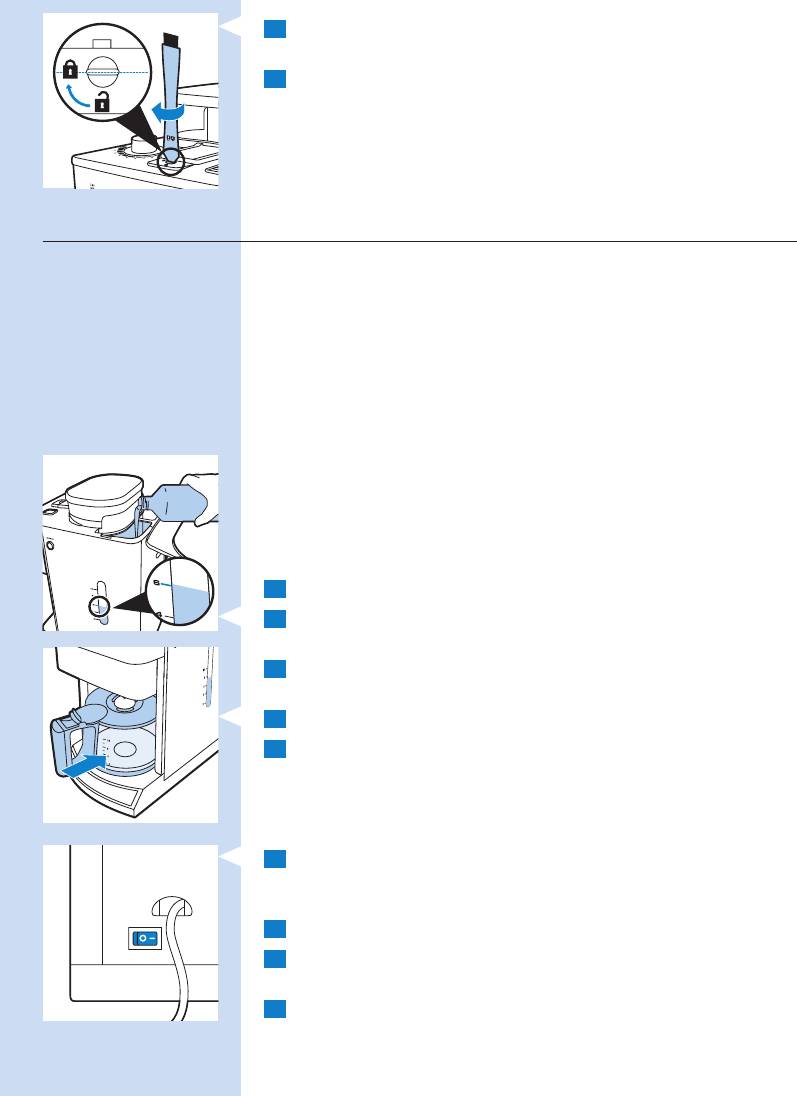
Flushing the appliance
You need to ush the coffeemaker once before rst use.
1 Put the mains plug in the wall socket.
— Never use the jug in a microwave oven.
— The jug is hot during and after brewing. Always hold the jug by its
appliance.
correctly and with care to avoid scalding by hot water and steam.
— Keep the mains cord out of the reach of children. Do not let the
mains cord hang over the edge of the table or worktop on which the
appliance stands.
— Do not touch the grinding burrs of the appliance, especially when the
appliance is connected to the mains.
— Keep the packaging materials (plastic bags, cardboard buffers, etc.) out
of the reach of children, as they are not a toy.
— Do not touch the hot surfaces of the appliance when it operates.
— This appliance is designed to grind beans and make coffee. Use it
— Do not use the appliance if the plug, the mains cord or the appliance
before you clean it.
itself is damaged.
— If a problem occurs that you cannot solve by means of this user manual,
contact the Consumer Care Centre in your country. If the problem
cannot be solved, take the appliance to a service centre authorised
by Philips for examination or repair. Do not attempt to repair the
appliance yourself, otherwise your guarantee becomes invalid.
Caution
— Do not place the appliance on a hot surface and prevent the mains
cord from coming into contact with hot surfaces.
— Unplug the appliance if problems occur during grinding or brewing and
ENGLISH 7
2 Set the on/off switch on the back of the appliance to ‘I’ to switch on
Note: Make sure the jug lid is in place. Without the jug lid, the drip stop
setting are not shown on the display.
Note: When you switch off the grinder, the number of cups and the strength
, The button lights up when you press it.
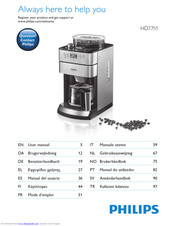
7 Press the pre-ground coffee button to switch off the grinder.
6 Press the start/standby button.
appliance.
Note: Make sure you put the jug on the hotplate with the spout facing into the
‘Drip stop function’).
function is activated automatically (see chapter ‘Using the appliance’, section
5 Place the jug on the hotplate.
the appliance.
4 Close the water reservoir lid.
Note: Do not put coffee beans or ground coffee in the appliance.
water up to the 10-cup indication.
3 Open the water reservoir lid. Fill the water reservoir with fresh cold
you can press any button to reactivate the appliance.
on to indicate that the appliance is still switched on. In standby mode,
this case, the display goes out and only the start/standby button stays
any button within 1 minute, the appliance goes into standby mode. In
, The start/standby button and the display light up. If you do not press
ENGLISH8
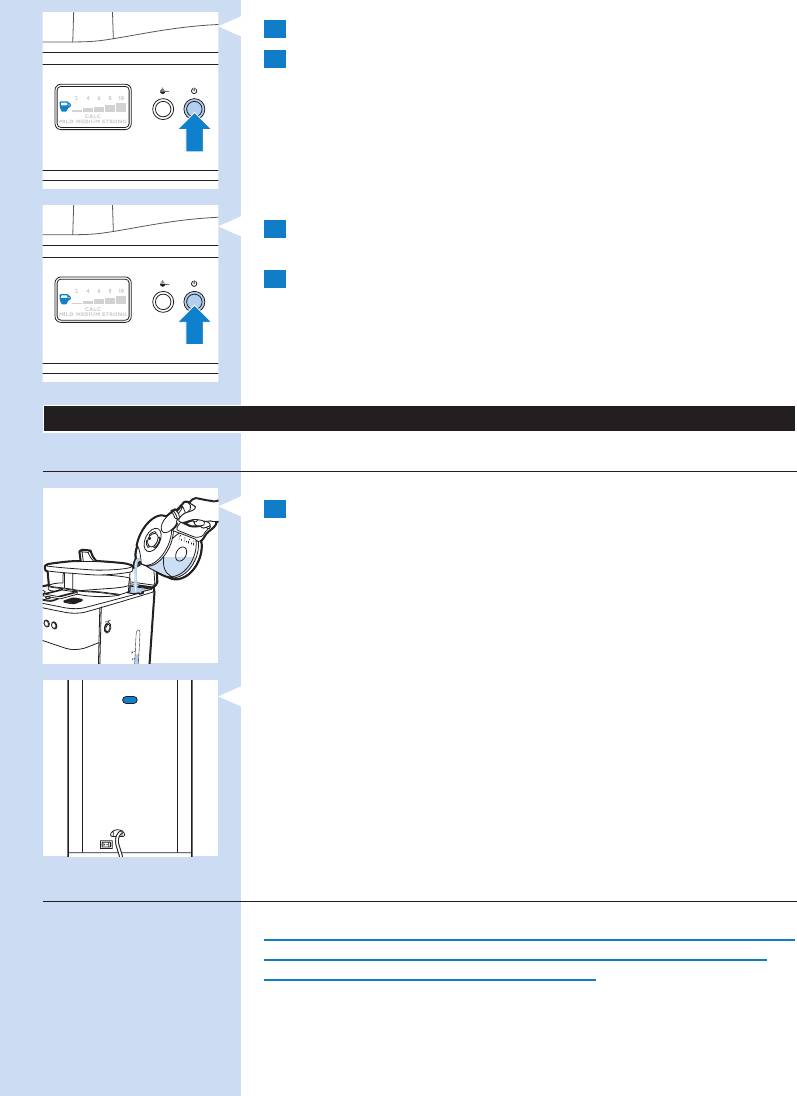
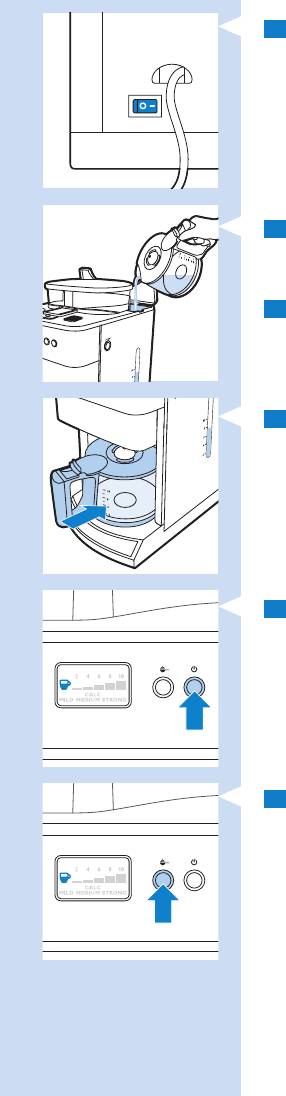
8 Press the start/standby button to start the brewing process.
how much water to put in the water reservoir. Keep in mind that the
water reservoir and block up the water inlet.
container with coffee beans. Otherwise coffee beans can fall into the
Alwayskeepthewaterreservoirlidclosedwhenyoullthecoffeebean
water spills from the opening at the back.
Note: Do not ll the water reservoir beyond the 10-cup indication, otherwise
Tip: Use the jug to ll the water reservoir with the required amount of water.
water.
amount of brewed coffee will be slightly less, since ground coffee absorbs
level window and on the jug. You can use these indications to determine
9 Lettheapplianceoperateuntilallthewaterhasowedintothejug.
There are indications for 2 to 10 cups (275ml to 1375ml) on the water
required amount of cold water.
1 Openthewaterreservoirlidandllthewaterreservoirwiththe
Filling the water reservoir
11 Empty the jug.
process.
10 Press the start/standby button to stop the brewing/ keep-warm
nished.
, The coffeemaker produces 5 beeps when the brewing process is
ENGLISH 9

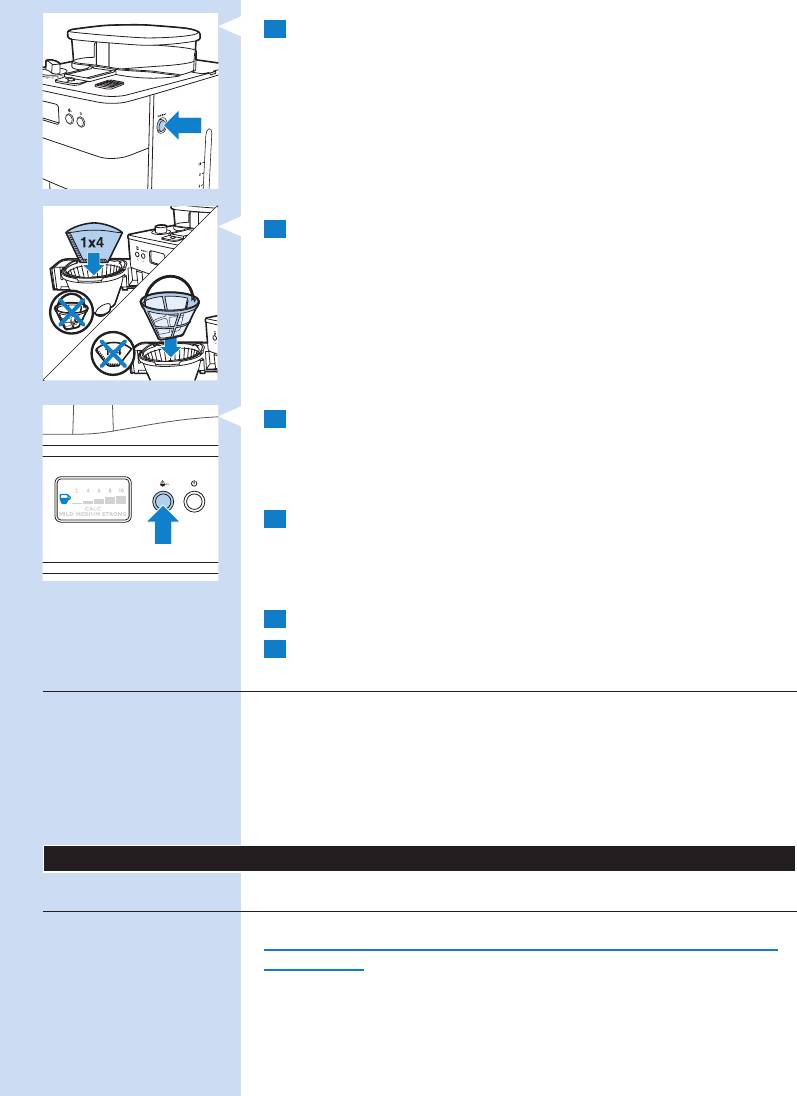
1 Press the OPEN button on the right side of the appliance to
(fromnetocoarse).Thereareninegrindsettings.
RESET
CALC
mind that the appliance uses all water in the water reservoir.
is consistent with the amount of water in the water reservoir. Please keep in
Note: Make sure that the number of cups you select with the 2-10 cups button
, The grinder grinds the required amount of coffee beans.
, The selected number of cups appears on the display.
, The 2-10 cups button lights up when you press it.
times as the desired number of cups.
5 To select the number of cups, press the 2-10 cups button as many
4 Turn the grind selection knob to select the desired type of grind
openthelterbasketholder.
caramelised beans.
To prevent the grinder from jamming, do not use unroasted or
the grinder from jamming, do not exceed this amount.
The maximum capacity of the coffee bean container is 250g. To prevent
Note: Always make sure the bean container is at least half full.
container for the amount of coffee you want to brew.
coffeebeans(2).Makesurethereareenoughcoffeebeansinthe
3 Removethecoffeebeancontainerlid(1)andllthecontainerwith
to collect the ground coffee.
2 Placeapaperlter(no.4)orthepermanentlterinthelterbasket
ENGLISH10
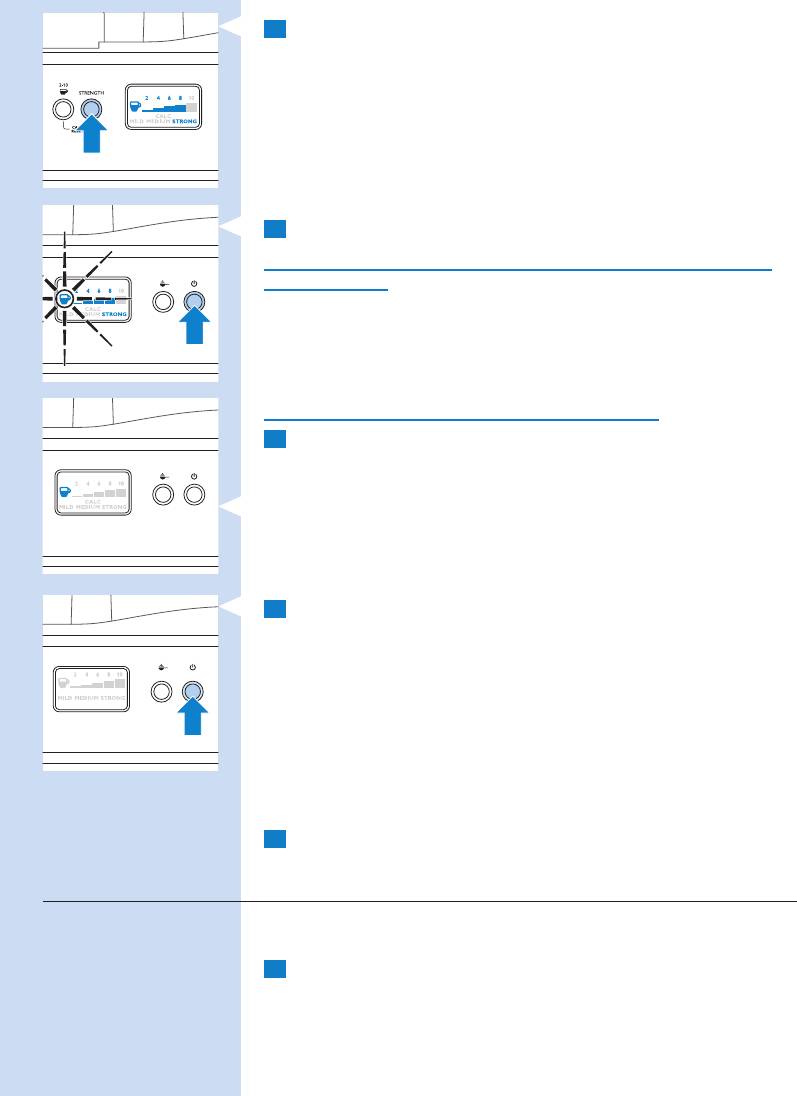
6 Press the STRENGTH button once or several times until the desired
again.
still switched on.
Note: If you do not press the start/standby button to put the appliance in
standby mode, the appliance goes into standby mode automatically after 30
minutes. The start/standby button stays on to indicate that the appliance is still
switched on.
Note: You can press any button to activate the appliance and brew coffee
10 If you do not intend to brew coffee again soon, set the on/off switch
start/standby button to put the appliance in standby mode.
on the back of the appliance to ‘O’ to switch off the appliance.
If you want to use pre-ground coffee instead of coffee beans, follow the
steps below.
1 Fill the water reservoir with water, as described in ‘Filling the water
reservoir’.
, The start/standby button stays on to indicate that the appliance is
9 If you do not need the hotplate to keep the coffee hot, press the
coffeestrengthisselected(mild,mediumorstrong).
processisnished.
, The STRENGTH button lights up when you press it.
, The display shows the selected coffee strength.
7 Press the start/standby button to start the brewing process.
Keep away from the steam vent during brewing, as hot steam escapes
through the vent.
, Thefreshnessindicatorashesonthedisplayuntilthebrewing
, The coffeemaker produces 5 beeps when the brewing process is
brewing, to indicate that the coffee is fresh.
nished.
, The hotplate switches on automatically.
Do not touch the hotplate while it is on, as it gets hot.
8 Wait until the coffeemaker has stopped beeping before you remove
the jug from the hotplate.
Note: After brewing, coffee drips from the lter basket for several seconds.
, The freshness indicator is shown on the display for 30 minutes after
ENGLISH 11
2 Press the OPEN button on the right side of the appliance to
The drip stop function enables you to remove the jug from the
RESET
CALC
under the tap.
Never immerse the appliance in water or any other liquid, nor rinse it
Cleaning after every use
Cleaning and maintenance
basket overows.
do not put the jug back onto the hotplate within 20 seconds, the lter
Note: The brewing process does not stop when you remove the jug. If you
the jug, the drip stop stops the ow of coffee into the jug.
coffeemaker before the brewing process is nished. When you remove
Drip stop function
openthelterbasketholder.
7 Follow steps 7, 8 and 9 in section ‘Using coffee beans’.
6 Closethelterbasketholderandplacethejugonthehotplate.
for each cup (125ml).
a medium-strong cup of coffee, use one measuring spoon (approximately 6g)
Note: How much pre-ground coffee you use is a matter of personal taste. For
5 Putpre-groundcoffeeinthepaperlterorinthepermanentlter.
setting are not shown on the display.
Note: When you switch off the grinder, the number of cups and the strength
, The button lights up when you press it.
4 Press the pre-ground coffee button to switch off the grinder.
3 Placeapaperlter(no.4)orthepermanentlterinthelterbasket.
ENGLISH12
1 Set the on/off switch on the back of the appliance to ‘O’ to switch off
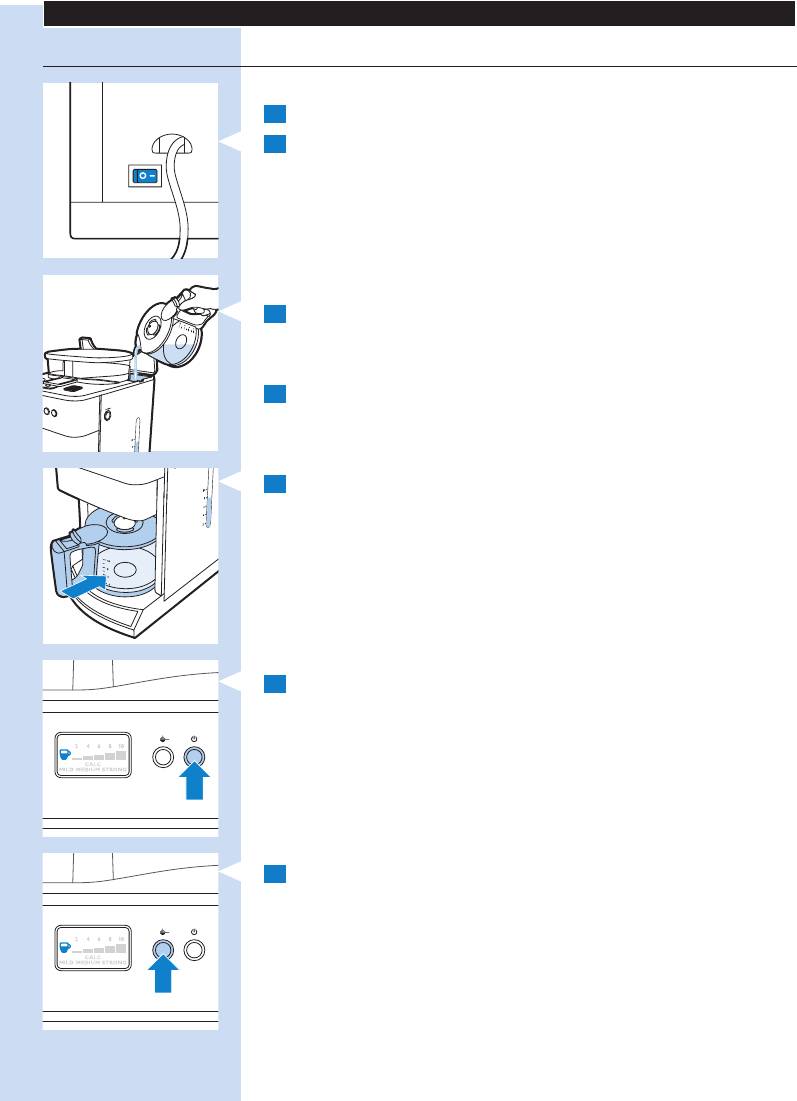
, The start/standby button and the display lights up.
, Thegroundcoffeeresiduesfallintothelterbasket.
the ground coffee.
Tip: Place a paper lter or the permanent lter in the lter basket to collect
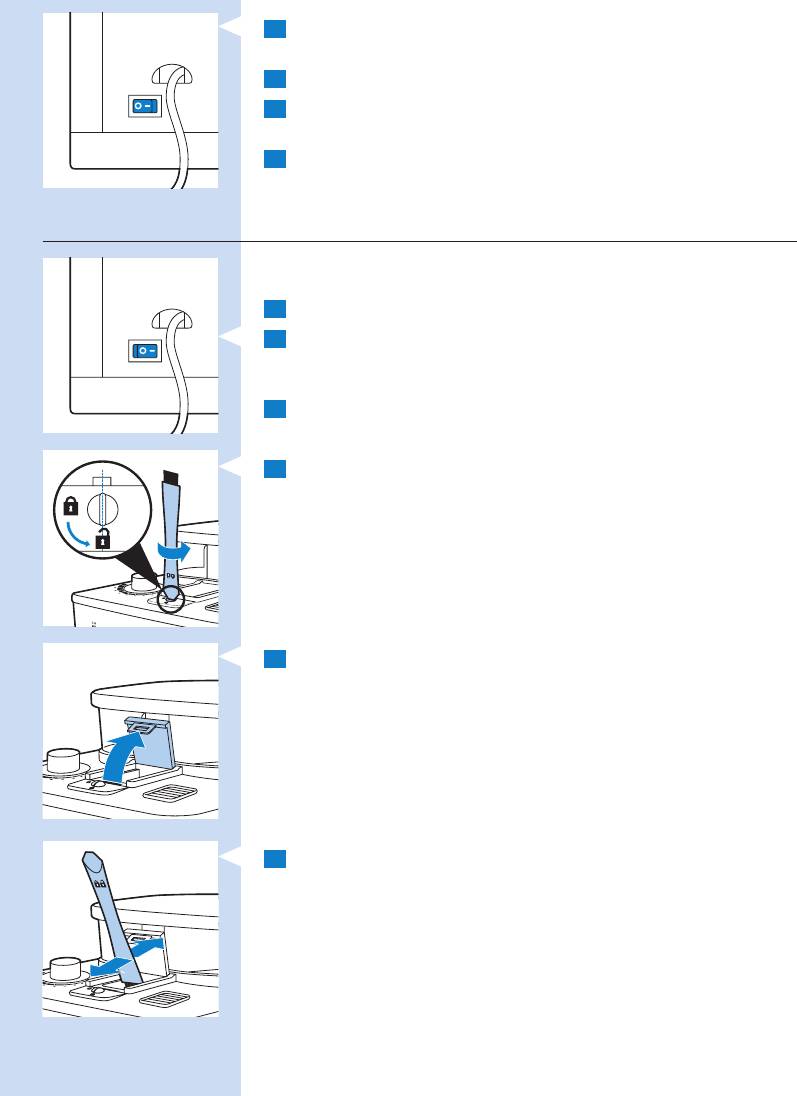
lower part of the chute.
6 Use the cleaning brush to brush ground coffee residues into the
5 Open the lid of the coffee bean chute.
and turn the lock to the ‘open’ position.
4 Inserttheatendofthecleaningbrushhandleintothechutelock
the wall socket.
3 Press the start/standby button and then remove the mains plug from
the appliance.
the appliance.
2 Set the on/off switch on the back of the appliance to ‘I’ to switch on
1 Put the mains plug in the wall socket.
the frequency of use.
You have to clean the coffee bean chute every 1 to 2 weeks, depending on
water and some washing-up liquid.
4 Cleanthelterbasket,thepermanentlterandthejugwithhot
cloth.
3 Wipe the outside of the coffeemaker and the hotplate with a damp
2 Remove the mains plug from the wall socket.
ENGLISH 13
7 Close the lid of the coffee bean chute and turn the lock to the
6 Set the on/off switch on the back of the appliance to ‘I’ to switch on
2 Fillthewaterreservoirwith7cupsofwhitevinegar(4%aceticacid)
and 3 cups of water.
3 Placeapaperlter(no.4)inthelterbasketandclosethelter
basket holder.
4 Place the empty jug on the hotplate.
5 Put the mains plug in the wall socket.
the appliance.
button and the STRENGTH button simultaneously.
, The start/standby button and the display lights up.
7 Press the start/standby button.
8 Press the ‘grinder off’ button to switch off the grinder. Then and
press the start/standby button to start the brewing process.
9 Waituntilhalfofthevinegar-watersolutionhasowedintothejug.
Then press the start/standby button to stop the brewing process and
let the solution soak for at least 15 minutes.
1 Open the water reservoir lid.
Note: To remove the ‘CALC’ message from the display, press the 2-10 CUPS
‘locked’ position.
Regular descaling prolongs the life of the appliance and guarantees optimal
8 Removethepaperlterwiththegroundcoffeeresiduesandthrow
it away.
Descaling the coffeemaker
When the message ‘CALC’ appears on the display (after approx. 60
brewing processes), you need to descale the coffeemaker, as scale can clog
the coffeemaker.
brewing results and a constant brewing time for a long time. Descale the
appliance every time the ‘CALC’ message appears on the display.
appliance:
— every 120 brewing cycles if you use soft water (up to 18dH).
— every 60 brewing cycles if you use hard water (over 18dH).
You can contact your local water board for information about the water
hardness in your area.
Note: If you are not aware of the water hardness in your area and are not
in a position to contact your local water board, we advise you to descale the
ENGLISH14
10 Press the start/standby button to switch the coffeemaker back on
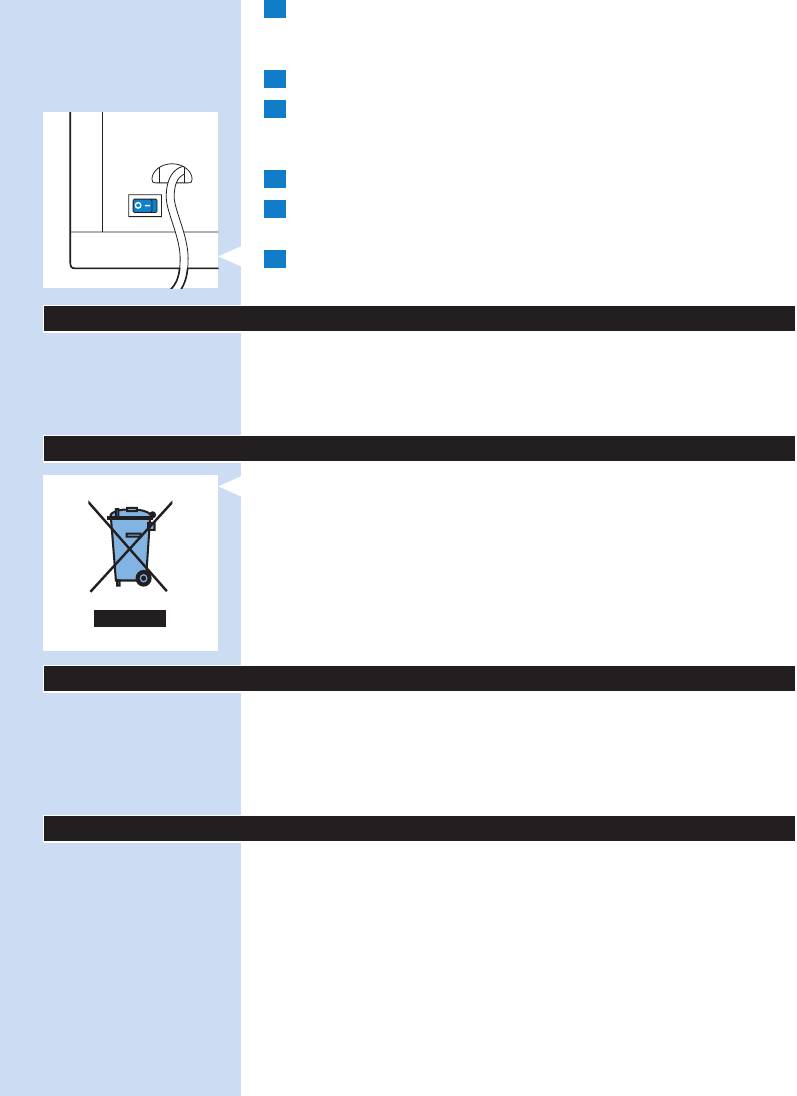
Environment
the information below, contact the Consumer Care Centre in your country.
encounter with the appliance. If you are unable to solve the problem with
This chapter summarises the most common problems you could
to your local Philips dealer.
guarantee leaet. If there is no Consumer Care Centre in your country, go
Care Centre in your country. You nd its phone number in the worldwide
the Philips website at www.philips.com or contact the Philips Consumer
If you need service or information or if you have a problem, please visit
Guarantee and service
recycling. By doing this, you help to preserve the environment.
at the end of its life, but hand it in at an ofcial collection point for
— Do not throw away the appliance with the normal household waste
Centre in your country.
andwaituntiltherestofthesolutionhasowedintothejug.Then
problems obtaining the parts, please contact the Philips Consumer Care
to your Philips Saeco dealer or visit www.philips.com/shop. If you have
If you need to replace a part or want to purchase an additional part, go
Replacement
the appliance.
15 Set the on/off switch on the back of the appliance to ‘O’ to switch off
up liquid.
14 Cleanthelterbasketandthejugwithhotwaterandsomewashing-
13 Repeat step 12 until the water no longer tastes or smells like vinegar.
coffeemaker complete the entire brewing process and empty the jug.
standby button to start another brewing process. Let the
12 Fill the water reservoir with cold water and press the start/
11 Emptythejugandthrowawaythepaperlter.
press the start/standby button to put the appliance in standby mode.
ENGLISH 15

Problem Possible solution
brewing process. Therefore we advise you not to remove the jug and
strength with the STRENGTH button. In this case you can only increase
the coffee strength by increasing the amount of pre-ground coffee or
decreasing the amount of water, or by using coffee of a stronger blend
or avour.
The lter overows when
I remove the jug from the
appliance while it is brewing
coffee.
If you remove the jug for more than 20 seconds during the brewing
process, the drip stop causes the lter holder to overow. Also note
that the coffee does not reach its full taste before the end of the
pour out the coffee before the end of the brewing process.
coffee is too weak.
The appliance continues to
drip long after the brewing
process has ended.
The dripping is caused by condensation of steam. It is completely
normal that the appliance drips for some time.
If the dripping does not stop, the drip stop may be clogged. To clean the
drip stop, push it to open it and then rinse it under the tap.
If you remove the jug for more than 20 seconds during the brewing
process, the drip stop causes the lter basket to overow.
The coffee is not hot enough. Place the jug properly on the hotplate.
Make sure that the hotplate and the bottom of the jug are clean.
When the grinder is switched off, you cannot change the coffee
STRENGTH button, but the
The appliance does not work. Put the mains plug in the wall socket and set the on/off switch on the
ground coffee button, as this switches off the grinder.
back of the appliance to ‘O’.
Make sure that the voltage indicated on the appliance corresponds to
the local mains voltage.
Fill the water reservoir with water.
When I use the grinder, the
coffee is too weak.
Make sure the number of cups you select with the 2-10 cups button is
consistent with the amount of water in the water reservoir. Please keep
in mind that the appliance uses all the water in the water reservoir.
Use the STRENGTH button to set the coffee strength to ‘strong’.
When you use coffee beans, make sure you do not press the pre-
Use coffee beans of a stronger blend or avour.
strength to ‘strong’ with the
To increase the coffee strength, select a higher number of cups with the
2-10 cups button than the number of cups you ll the water reservoir
with.
When I use pre-ground
coffee, the coffee is too weak.
Make sure the amount of pre-ground coffee in the lter is consistent
with the amount of water in the water reservoir. Please keep in mind
that the appliance uses all the water in the water reservoir.
Use ground coffee of a stronger blend or avour.
To increase the coffee strength, increase the amount of pre-ground
coffee or decrease the amount of water.
I have set the coffee
ENGLISH16

Problem Possible solution
Use thin cups, because they absorb less heat from the coffee than thick
cups.
Do not use milk that comes directly out of the fridge.
Descale the appliance. See section ‘Descaling’ in chapter ‘Cleaning and
maintenance’.
ENGLISH 17

18
22 Нагревателна плоча
23 Отвор за преливане
24 Ключ за вкл./изкл.
Преди да използвате уреда, прочетете внимателно това ръководство
за експлоатация и го запазете за справка в бъдеще.
— Не потапяйте задвижващия блок във вода или друга течност и не
го мийте с течаща вода.
— Преди да включите уреда в контакта, проверете дали
20 Бутон OPEN за отваряне на държача на поставката за филтър
напрежението, посочено на дъното на уреда, отговаря на това на
местната електрическа мрежа.
— Ако захранващият кабел се повреди, той трябва винаги да се
подменя от Philips, упълномощен сервиз на Philips или други
квалифицирани лица, за да се избегне опасност.
— Този уред не е предназначен за ползване от хора с физичиска,
сетивна или умствена недостатъчност, а също и от лица без
опит и познания, вкл. деца, ако са оставени без надзор и не са
инструктирани от страна на отговарящо за тяхната безопасност
лице относно начина на използване на уреда.
21 Воден резервоар с прозорче за ниво на водата
19 Бутон за старт/готовност
6 Бутон 2-10 CUPS
Поздравления за вашата покупка и добре дошли във Philips! За
да се възползвате изцяло от предлаганата от Philips поддръжка,
регистрирайте продукта си на адрес www.philips.com/welcome.
1 Постоянен филтър
2 Поставка за филтър
3 Държач на поставката за филтър
4 Капак на каната
5 Стъклена кана
7 Бутон STRENGTH
18 Бутон за мляно кафе
8 Дисплей
9 Бутон за степен на смилане
10 Предпазител на улея за кафе на зърна
11 Мерителна лъжица
12 Четка за почистване
13 Капак на контейнера за кафе на зърна
14 Контейнер за кафе на зърна
15 Капак на водния резервоар
16 Капак на улея за кафе на зърна
17 Отвор за пара

— Следете деца да не играят с уреда.
вашата страна.
— Каната е гореща по време на приготвянето на кафе и след това.
Винаги я дръжте за дръжката.
— Никога не използвайте каната в микровълнова фурна.
— Не местете уреда по време на работа.
— Изчакайте уреда да изстине, преди да го приберете. Възможно е
нагревателната плоча и каната за кафе да са горещи.
— След като сте разопаковали уреда, проверете дали доставката е
пълна и уреда е в изправност. Ако имате съмнения, не използвайте
уреда и се свържете с Центъра за обслужване на клиенти във
— Този уред е предназначен само за обикновени битови цели. Той
време на мелене или варене на кафе, както и преди почистване на
не е предназначен за използване на места, като кухни за персонала
в магазини, офиси, ферми или други работни помещения, нито
за използване от клиенти в хотели, мотели, места за нощуване и
закуска и други жилищни помещения.
Този уред Philips е в съответствие с всички стандарти по отношение
на електромагнитните излъчвания (EMF). Ако се употребява правилно
и съобразно напътствията в Ръководството, уредът е безопасен за
използване според наличните досега научни факти.
уреда.
— Изключвайте щепсела от контакта, ако възникнат проблеми по
— Пазете захранващия кабел от достъп на деца. Не го оставяйте да
приготвяне на кафе. Използвайте го съобразно предписанията, за
виси през ръба на масата или работния плот, на който е поставен
уредът.
— Не докосвайте смилащите устройства, особено когато уредът е
свързан в мрежата.
— Пазете материалите за опаковка (полиетиленови пликове, кашони
и др.) далече от достъп на деца, тъй като те не са играчки.
— Не докосвайте горещите повърхности на уреда по време на
работа.
— Този уред е предназначен за мелене на кафе на зърна и
да избегнете изгаряния от пара и гореща вода.
допиране до горещи повърхности.
— Не използвайте уреда, ако щепселът, мрежовият кабелът или
самият уред са повредени.
— Ако се появи проблем и не можете да го разрешите с помощта
на ръководството за потребителя, свържете се с Центъра за
обслужване на клиенти във вашата страна. Ако проблемът не
може да бъде отстранен, занесете уреда в упълномощен от Philips
сервизен център за преглед и поправка. Не се опитвайте сами да
ремонтирате уреда, защото гаранцията ще стане невалидна.
— Не слагайте уреда върху гореща повърхност и пазете кабела от
19
4 Затворетекапаканаводниярезервоар.
сила на кафето не се показват на дисплея.
Забележка: Когато изключите мелачката, индикациите за брой чаши и
, Бутонътсветва,когатогонатиснете.
7 Натиснетебутоназамлянокафе,задаизключитемелачката.
6 Натиснетебутоназастарт/готовност.
плоча с улей, насочен навътре към уреда.
Забележка: Каната трябва да бъде поставена върху нагревателната
спиране на прокапването”).
автоматично (вж. глава “Използване на уреда”, раздел “Функция за
капака на каната функцията за спиране на прокапването се активира
Забележка: Уверете се, че капакът на каната е на мястото си. Без
5 Сложетеканатавърхунагревателнатаплоча.
Забележка: Не поставяйте в уреда кафе на зърна, нито мляно кафе.
пряснастуденаводадоозначениетоза10чаши.
3 Отворетекапаканаводниярезервоар.Напълнетерезервоарас
бутон,задаактивиратеуредаотново.
остававключен.Врежимготовностможетеданатиснетевсеки
старт/готовностоставадасвети,задапокаже,чеуредътси
готовност.Втозислучайдисплеятизгасваисамобутонътза
бутонврамкитена1минута,уредътпреминававрежим
, Бутонътзастарт/готовностидисплеятсветват.Аконенатиснете
задавключитеуреда.
2 Поставетеключазавкл./изкл.нагърбанауредавположение“І”,
1 Включетещепселаназахранващиякабелвконтакта.
Преди първата употреба трябва да промиете кафемашината.
20
Аннотация для Кофеварки Philips HD7751 в формате PDF
Топ 10 инструкций
Другие инструкции
Страницы и текст этой инструкции
 Инструкция кофеварки Philips HD7751_00
 Информация отображена на картинке
 Информация отображена на картинке
 Информация отображена на картинке
 Информация отображена на картинке
Как использовать наш сайт инструкций OnlineManuals.ru
Наша цель состоит в том, чтобы предоставить вам быстрый доступ к содержанию инструкции для кофеварки Philips HD7751_00.
С помощью онлайн просмотра, Вы можете быстро просмотреть содержимое инструкции и найти решение проблемы с кофеварки Philips HD7751_00.
Для Вашего удобства
Если листать руководство пользователя кофеварки Philips HD7751_00 прямо на сайте, не очень удобно для Вас, есть два возможных решения:
• Просмотр в полноэкранном режиме — легко просмотреть руководство пользователя (без загрузки его на свой компьютер), Вы можете использовать режим полноэкранного просмотра.
Для просмотра инструкции пользователя кофеварки Philips HD7751_00 на полном экране, используйте кнопку «Открыть в Pdf-viewer».
• Загрузка на компьютер — Вы можете также скачать Инструкция кофеварки Philips HD7751_00 на свой компьютер и сохранить его в файлах.
Многие люди предпочитают читать документы не на экране, а в печатной версии.
Возможность печати руководства пользователя также была предусмотрена на нашем сайте,
и вы можете использовать ее, нажав на иконку «печать» в Pdf-viewer.
Нет необходимости печатать все руководство кофеварки Philips HD7751_00, можно выбрать только нужные страницы инструкции.
- Manuals
- Brands
- philips Manuals
- Coffee Maker
- HD7751
Manuals and User Guides for philips HD7751. We have 7 philips HD7751 manuals available for free PDF download: User Manual, Manual, Service Manual
philips HD7751 User Manual (109 pages)
Brand: philips
|
Category: Coffee Maker
|
Size: 1.76 MB
Table of Contents
-
General Description (Fig. 1)
5
-
Electromagnetic Fields (EMF)
6
-
Before First Use
6
-
Flushing the Appliance
6
-
Using the Appliance
7
-
Filling the Water Reservoir
7
-
Using Coffee Beans
7
-
Using Pre-Ground Coffee
8
-
Cleaning and Maintenance
9
-
Drip Stop Function
9
-
Cleaning after Every Use
9
-
Descaling the Coffeemaker
9
-
Ordering Accessories
10
-
Guarantee and Support
10
-
Troubleshooting
11
-
Generel Beskrivelse (Fig. 1)
12
-
Elektromagnetiske Felter (EMF)
13
-
Før Apparatet Tages I Brug
13
-
Sådan Bruges Apparatet
14
-
Påfyldning Af Vandtanken
14
-
Rengøring Og Vedligeholdelse
16
-
Bestilling Af Tilbehør
17
-
Sikkerhed Og Support
17
-
Elektromagnetische Felder
20
-
Vor dem Ersten Gebrauch
20
-
Das Gerät Durchspülen
20
-
Das Gerät Benutzen
21
-
Den Wasserbehälter Füllen
21
-
Kaffebohnen Verwenden
21
-
Gemahlenen Kaffee Verwenden
23
-
Reinigung und Wartung
23
-
Reinigung nach jedem Gebrauch
23
-
Die Kaffeebohnenschütte Reinigen
24
-
Die Kaffeemaschine Entkalken
24
-
Zubehör Bestellen
25
-
Garantie und Support
25
-
Fehlerbehebung
25
-
Γενική Περιγραφή (Εικ. 1)
27
-
Ηλεκτρομαγνητικά Πεδία (EMF)
28
-
Καθαρισμός Της Συσκευής Με Νερό
28
-
Χρήση Της Συσκευής
29
-
Καθαρισμός Και Συντήρηση
32
-
Εγγύηση Και Υποστήριξη
34
-
Αντιμετώπιση Προβλημάτων
34
-
Campos Electromagnéticos (CEM)
37
-
Antes de Utilizarlo por Primera Vez
37
-
Limpieza del Aparato Antes de Usarlo
37
-
Uso del Aparato
38
-
Llenado del Depósito de Agua
38
-
Limpieza y Mantenimiento
40
-
Eliminación de Los Depósitos de Cal de la Cafetera
41
-
Medio Ambiente
42
-
Garantía y Asistencia
42
-
Sähkömagneettiset Kentät (EMF)
45
-
Laitteen Huuhtelu
45
-
Vesisäiliön Täyttäminen
46
-
Puhdistus Ja Hoito
48
-
Tarvikkeiden Tilaaminen
49
-
Takuu Ja Tuki
49
-
Avant la Première Utilisation
52
-
Rinçage de L’appareil
52
-
Utilisation de L’appareil
53
-
Remplissage du Réservoir
53
-
Utilisation Avec des Grains de Café
53
-
Fonction Stop-Goutte
55
-
Nettoyage Et Entretien
55
-
Nettoyage Après Chaque Utilisation
55
-
Détartrage de la Machine À Café
56
-
Garantie Et Assistance
57
-
Dépannage
57
-
Campi Elettromagnetici (EMF)
60
-
Primo Utilizzo
60
-
Come Lavare L’apparecchio
60
-
Modalità D’uso Dell’apparecchio
61
-
Riempimento del Serbatoio Dell’acqua
61
-
Pulizia E Manutenzione
63
-
Ordinazione Degli Accessori
65
-
Algemene Beschrijving (Fig. 1)
67
-
Elektromagnetische Velden (EMV)
68
-
Voor Het Eerste Gebruik
68
-
Het Apparaat Doorspoelen
68
-
Het Apparaat Gebruiken
69
-
Het Waterreservoir Vullen
69
-
Met Koffiebonen
69
-
Schoonmaken en Onderhoud
71
-
Accessoires Bestellen
73
-
Garantie en Ondersteuning
73
-
Problemen Oplossen
73
-
Elektromagnetiske Felt (EMF)
76
-
Før Første Gangs Bruk
76
-
Skylle Apparatet
76
-
Bruke Apparatet
77
-
Rengjøring Og Vedlikehold
79
-
Bestille Tilbehør
80
-
Garanti Og Støtte
80
-
Descrição Geral (Fig. 1)
82
-
Antes da Primeira Utilização
83
-
Limpeza Do Aparelho
83
-
Utilizar O Aparelho
84
-
Limpeza E Manutenção
86
-
Encomendar Acessórios
88
-
Meio Ambiente
88
-
Garantia E Assistência
88
-
Elektromagnetiska Fält (EMF)
91
-
Före Första Användningen
91
-
Använda Apparaten
92
-
Rengöring Och Underhåll
94
-
Beställa Tillbehör
95
-
Garanti Och Support
95
-
Elektromanyetik Alanlar (EMF)
98
-
İlk Kullanımdan Önce
98
-
Cihazın Boşaltılması
98
-
Cihazın KullanıMı
99
-
Su Haznesinin Doldurulması
99
-
Kahve Çekirdeklerinin KullanıMı
99
-
Önceden Öğütülmüş Kahve Kullanılması
100
-
Damlama Durdurma Fonksiyonu
101
-
Temizlik Ve BakıM
101
-
Kahve Makinesinde Kireç Temizleme
101
-
Garanti Ve Destek
102
-
Sorun Giderme
102
Advertisement
Philips HD7751 User Manual (202 pages)
Brand: Philips
|
Category: Coffee Maker
|
Size: 6.67 MB
Table of Contents
-
Table of Contents
5
-
English
6
-
Български
18
-
Čeština
30
-
Eesti
42
-
Hrvatski
54
-
Magyar
66
-
Қазақша
78
-
Lietuviškai
90
-
Latviešu
102
-
Polski
114
-
Română
126
-
Русский
138
-
Slovensky
151
-
Slovenščina
163
-
Srpski
174
-
Українська
186

Philips HD7751 User Manual (124 pages)
Philips Coffeemaker HD7751/00 Grind and Brew System Stainless Steel
Brand: Philips
|
Category: Coffee Maker
|
Size: 1.79 MB
Table of Contents
-
English
5
-
Table of Contents
5
-
Introduction
5
-
General Description
5
-
Important
6
-
Before First Use
7
-
Flushing the Appliance
7
-
Using the Appliance
7
-
Filling the Water Reservoir
7
-
Using Coffee Beans
8
-
Drip Stop Function
9
-
-
Cleaning and Maintenance
10
-
Cleaning after Every Use
10
-
Descaling the Coffeemaker
10
-
-
Ordering Accessories
11
-
Environment
11
-
Guarantee and Service
11
-
Troubleshooting
12
-
-
Deutsch
23
-
Allgemeine Beschreibung
23
-
Einführung
23
-
Wichtig
23
-
Vor dem Ersten Gebrauch
24
-
Das Gerät Benutzen
25
-
Reinigung und Pflege
27
-
Garantie und Kundendienst
29
-
Umwelt
29
-
Zubehör Bestellen
29
-
Fehlerbehebung
30
-
-
Español
42
-
Antes de Utilizarlo por Primera Vez
44
-
Uso del Aparato
44
-
Limpieza y Mantenimiento
47
-
Garantía y Servicio
48
-
Medio Ambiente
48
-
Solicitud de Accesorios
48
-
Guía de Resolución de Problemas
49
-
Puhdistus Ja Hoito
55
-
Takuu Ja Huolto
56
-
-
-
Français
59
-
Description Générale
59
-
Important
59
-
Introduction
59
-
Avant la Première Utilisation
60
-
Utilisation de L’appareil
61
-
Nettoyage Et Entretien
64
-
Commande D’accessoires
65
-
Environnement
65
-
Garantie Et Service
65
-
10 Dépannage
66
-
-
Italiano
68
-
Descrizione Generale
68
-
Importante
68
-
Introduzione
68
-
Primo Utilizzo
69
-
Modalità D’uso Dell’apparecchio
70
-
Pulizia E Manutenzione
73
-
Garanzia E Assistenza
74
-
Ordinazione Degli Accessori
74
-
Tutela Dell’ambiente
74
-
Risoluzione Dei Guasti
75
-
Het Waterreservoir Vullen
79
-
Problemen Oplossen
84
-
Garanti Och Service
108
-
-
Advertisement
Philips HD7751 User Manual (162 pages)
Brand: Philips
|
Category: Coffee Maker
|
Size: 16.38 MB
Table of Contents
-
Table of Contents
5
-
English
6
-
Filling the Water Reservoir
9
-
Drip Stop Function
12
-
Cleaning after Every Use
12
-
Descaling the Coffeemaker
14
-
Dansk
18
-
Deutsch
30
-
Ελληνικα
42
-
Español
55
-
Suomi
67
-
Français
78
-
Italiano
90
-
Nederlands
102
-
Het Waterreservoir Vullen
105
-
Norsk
114
-
Português
125
-
Svenska
137
-
Türkçe
148
Philips HD7751 User Manual (144 pages)
Brand: Philips
|
Category: Coffee Maker
|
Size: 2.01 MB
Table of Contents
-
English
5
-
Table of Contents
5
-
Introduction
5
-
General Description
5
-
Important
6
-
Before First Use
7
-
Using the Appliance
7
-
Drip Stop Function
9
-
-
Cleaning and Maintenance
10
-
Ordering Accessories
11
-
Environment
11
-
Guarantee and Service
11
-
Troubleshooting
12
-
General
90
-
-
-
Русский
99
-
Важная Информация
99
-
Введение
99
-
Общее Описание
99
-
Перед Первым Использованием
100
-
Использование Прибора
101
-
Очистка И Уход
104
-
Гарантия И Обслуживание
105
-
Защита Окружающей Среды
105
-
Принадлежностей
105
-
Поиск И Устранение Неисправностей
106
-
Drip Stop
108
-
Display
109
-
-

Philips HD7751 Manual (28 pages)
Brand: Philips
|
Category: Coffee Maker
|
Size: 1.95 MB
Table of Contents
-
General Description (Fig. 1)
6
-
Electromagnetic Fields (EMF)
7
-
Before First Use
7
-
Flushing the Appliance
7
-
Using the Appliance
8
-
Filling the Water Reservoir
8
-
Using Coffee Beans
8
-
Using Pre-Ground Coffee
9
-
Drip Stop Function
10
-
Cleaning and Maintenance
10
-
Cleaning the Coffee Bean Chute
10
-
Descaling the Coffeemaker
11
-
Warranty and Support
12
-
Ordering Accessories
12
-
Troubleshooting
12

Philips HD7751 Service Manual (7 pages)
Brand: Philips
|
Category: Coffee Maker
|
Size: 0.77 MB
Table of Contents
-
Disassembly-/Re-Assembly
2
-
Repair Instructions
3
-
Electrical Diagram
3
-
Parts List
4
-
Exploded View
5
Advertisement
Related Products
-
Philips HD7751/00
-
Philips HD7753/00
-
Philips HD7753
-
Philips HD7762
-
Philips HD7765
-
Philips HD7740
-
Philips HD7767
-
Philips HD7768
-
Philips HD7769
-
Philips HD7769/00
philips Categories
![]()
TV
![]()
Monitor
![]()
Stereo System
Electric Shaver
![]()
CD Player
More philips Manuals
(скачивание инструкции бесплатно)
Формат файла: PDF
Доступность: Бесплатно как и все руководства на сайте. Без регистрации и SMS.
Дополнительно: Чтение инструкции онлайн
Страница:
(1 из 144)
навигация

1

2

3

4

5

6

7

8

9

10

11

12

13

14

15

16

17

18

19

20

21

22

23

24

25

26

27

28

29

30

31

32

33

34

35

36

37

38

39

40

41

42

43

44

45

46

47

48

49

50

51

52

53

54

55

56

57

58

59

60

61

62

63

64

65

66

67

68

69

70

71

72

73

74

75

76

77

78

79

80

81

82

83

84

85

86

87

88

89

90

91

92

93

94

95

96

97

98

99

100

101

102

103

104

105

106

107

108

109

110

111

112

113

114

115

116

117

118

119

120

121

122

123

124

125

126

127

128

129

130

131

132

133

134

135

136

137

138

139

140

141

142

143

144
Оглавление инструкции
Document Outline
- Table of content
- English
- Български
- Čeština
- Eesti
- Hrvatski
- Magyar
- Қазақша
- Lietuviškai
- Latviešu
- Spis treści
- Română
- Русский
- Slovensky
- Slovenščina
- Srpski
- Українська
Инструкции и руководства похожие на PHILIPS HD7751
Другие инструкции и руководства из категории Кофеварка
© 2023 manuals-help.ru, Все права защищены