-
Драйверы
9
-
Руководства по ремонту
1
-
Инструкции по эксплуатации
2
Языки:

Kyocera ECOSYS M3540dn инструкция по эксплуатации
(418 страниц)
- Языки:Русский
-
Тип:
PDF -
Размер:
43.47 MB -
Описание:
Лазерное мфу
Просмотр

Kyocera ECOSYS M3540dn инструкция по эксплуатации
(398 страниц)
- Языки:Английский
-
Тип:
PDF -
Размер:
27.65 MB
Просмотр
На NoDevice можно скачать инструкцию по эксплуатации для Kyocera ECOSYS M3540dn. Руководство пользователя необходимо для ознакомления с правилами установки и эксплуатации Kyocera ECOSYS M3540dn. Инструкции по использованию помогут правильно настроить Kyocera ECOSYS M3540dn, исправить ошибки и выявить неполадки.
 Loading…
![]()
q PRINT q COPY q SCAN q FAX
ECOSYS M3040dn
ECOSYS M3540dn
РУКОВОДСТВО ПО ЭКСПЛУАТАЦИИ
> Предисловие
Предисловие
Благодарим вас за приобретение аппарата ECOSYS M3040dn/ECOSYS M3540dn.
Настоящее руководство содержит сведения по эксплуатации и техобслуживанию аппарата, а также описание несложных действий по устранению возникающих неполадок и поддержанию аппарата в как можно лучшем состоянии.
Перед эксплуатацией аппарата ознакомьтесь с данным руководством по эксплуатации.
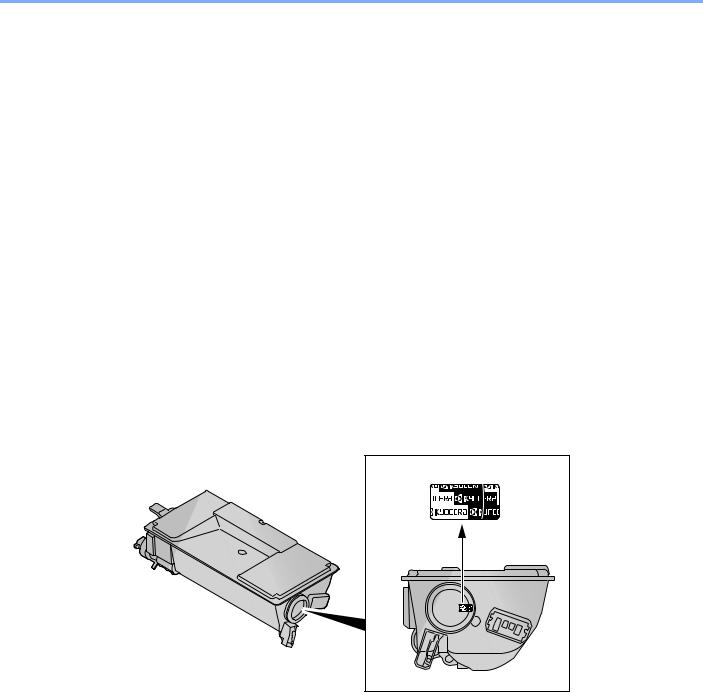
Мы рекомендуем использовать наши фирменные расходные материалы.
Пожалуйста, примите во внимание, что в случае если пользователь решит использовать неоригинальный (контрафактный или совместимый) тонер, то мы не гарантируем надлежащую работу устройства. Мы не проводили тестирования тонеров, изготовленных другими производителями, в связи с чем мы не можем достоверно утверждать, что тот или иной тонер, изготовленный другим производителем, совместим с нашей продукцией. Мы рекомендуем использовать оригинальный тонер, как указано в Руководстве пользователя, прилагаемом к устройству. Использование неоригинального (контрафактного или совместимого) тонера может привести к повреждению устройства. Подобное повреждение может повлиять на условия гарантии и повлечь дополнительные расходы для пользователя в связи со снятием таких устройств с гарантийного ремонта. Кроме того, использование контрафактного тонера — это поддержка незаконной деятельности недобросовестных производителей, действующих с нарушением законов Российской Федерации. Просим принять во внимание настоящую информацию о рисках, связанных с использованием неоригинального тонера.
На фирменных расходных материалах имеется этикетка, изображенная ниже.
i

Cодержание
|
Предисловие………………………………………………………………………………………………………….. |
i |
|
|
Общие сведения………………………………………………………………………………………………….. |
vii |
|
|
Функции аппарата ………………………………………………………………………………………………. |
viii |
|
|
Руководства, поставляемые с аппаратом…………………………………………………………… |
xii |
|
|
О руководстве по эксплуатации (данном документе) ………………………………………… |
xiv |
|
|
Структура документа……………………………………………………………………………………. |
xiv |
|
|
Условные обозначения в данном руководстве……………………………………………….. |
xv |
|
|
Карта меню ……………………………………………………………………………………………………….. |
xviii |
|
|
1 |
Правовая информация и правила техники безопасности ……….. |
1-1 |
|
Примечание ………………………………………………………………………………………………………. |
1-2 |
|
|
Условные обозначения по технике безопасности в данном руководстве ………. |
1-2 |
|
|
Окружающая среда ……………………………………………………………………………………. |
1-3 |
|
|
Меры предосторожности при эксплуатации …………………………………………………. |
1-4 |
|
|
Меры безопасности при работе с лазером в странах Европы ………………………. |
1-5 |
|
|
Законодательные ограничения на копирование и сканирование ………………….. |
1-6 |
|
|
EN ISO 7779 ………………………………………………………………………………………………. |
1-6 |
|
|
EK1-ITB 2000 ……………………………………………………………………………………………… |
1-6 |
|
|
Правовая информация ………………………………………………………………………………. |
1-7 |
|
|
Функция управления энергосбережением ………………………………………………….. |
1-13 |
|
|
Функция автоматического двустороннего копирования ………………………………. |
1-13 |
|
|
Сбережение ресурсов — бумага ……………………………………………………………….. |
1-13 |
|
|
Экологическая польза от функции «управления режимом питания» …………….. |
1-14 |
|
|
Программа Energy Star (ENERGY STAR®) …………………………………………………. |
1-14 |
|
|
2 |
Установка и настройка аппарата ………………………………………………. |
2-1 |
|
Наименования компонентов …………………………………………………………………………….. |
2-2 |
|
|
Внешняя сторона аппарата ………………………………………………………………………… |
2-2 |
|
|
Разъемы/внутренние компоненты ………………………………………………………………. |
2-3 |
|
|
С установленным дополнительным оборудованием ……………………………………. |
2-4 |
|
|
Подключение аппарата и других устройств ……………………………………………………… |
2-5 |
|
|
Подсоединение кабелей ……………………………………………………………………………………. |
2-6 |
|
|
Подсоединение кабеля LAN ……………………………………………………………………….. |
2-6 |
|
|
Подсоединение кабеля USB ……………………………………………………………………….. |
2-7 |
|
|
Подсоединение кабеля питания …………………………………………………………………. |
2-7 |
|
|
Включение/выключение питания ……………………………………………………………………… |
2-8 |
|
|
Включение питания ……………………………………………………………………………………. |
2-8 |
|
|
Выключение питания …………………………………………………………………………………. |
2-8 |
|
|
Вход в систему/выход из системы …………………………………………………………………… |
2-9 |
|
|
Вход ………………………………………………………………………………………………………….. |
2-9 |
|
|
Выход ……………………………………………………………………………………………………… |
2-10 |
|
|
Настройки аппарата по умолчанию ………………………………………………………………… |
2-11 |
|
|
Установка даты и времени ……………………………………………………………………….. |
2-11 |
|
|
Настройка сети (подключение с помощью кабеля подключения к локальной сети) ……. |
2-13 |
|
|
Функция экономии энергии …………………………………………………………………………….. |
2-17 |
|
|
Энергосберегающий режим и автоматический энергосберегающий режим …. |
2-17 |
|
|
Режим ожидания и автоматическое ожидание …………………………………………… |
2-20 |
|
|
Установка программного обеспечения …………………………………………………………… |
2-25 |
|
|
Программное обеспечение на DVD (Windows) …………………………………………… |
2-25 |
|
|
Установка программного обеспечения в Windows ……………………………………… |
2-26 |
|
|
Удаление программного обеспечения ……………………………………………………….. |
2-32 |
|
|
Установка программного обеспечения на компьютер Mac ………………………….. |
2-33 |
|
|
Установка TWAIN-драйвера ……………………………………………………………………… |
2-35 |
|
|
Установка WIA-драйвера ………………………………………………………………………….. |
2-37 |
|
|
Проверка счетчика ………………………………………………………………………………………….. |
2-38 |
|
|
Дополнительная подготовка для администратора ………………………………………… |
2-39 |
ii

|
Отправка документов на ПК ……………………………………………………………………… |
2-39 |
|
|
Усиление безопасности ……………………………………………………………………………. |
2-39 |
|
|
Command Center RX ………………………………………………………………………………………… |
2-41 |
|
|
Доступ к Command Center RX ……………………………………………………………………. |
2-42 |
|
|
Изменение настроек безопасности ……………………………………………………………. |
2-44 |
|
|
Изменение информации об устройстве …………………………………………………….. |
2-46 |
|
|
Настройки электронной почты ………………………………………………………………….. |
2-48 |
|
|
Регистрация адресатов …………………………………………………………………………….. |
2-53 |
|
|
Создание нового пользовательского ящика ………………………………………………. |
2-55 |
|
|
Печать документа, сохраненного в пользовательском ящике …………………….. |
2-56 |
|
|
Передача данных из других наших продуктов ……………………………………………….. |
2-58 |
|
|
Перенос адресной книги …………………………………………………………………………… |
2-58 |
|
|
3 |
Подготовка к использованию …………………………………………………… |
3-1 |
|
Использование панели управления …………………………………………………………………. |
3-2 |
|
|
Кнопки панели управления …………………………………………………………………………. |
3-2 |
|
|
Метод работы ……………………………………………………………………………………………. |
3-3 |
|
|
Отображение оригиналов и бумаги …………………………………………………………….. |
3-4 |
|
|
Экран справки ……………………………………………………………………………………………. |
3-4 |
|
|
Загрузка бумаги ………………………………………………………………………………………………… |
3-5 |
|
|
Указания по загрузке бумаги ………………………………………………………………………. |
3-6 |
|
|
Загрузка в кассеты …………………………………………………………………………………….. |
3-7 |
|
|
Загрузка бумаги в универсальный лоток ……………………………………………………. |
3-11 |
|
|
Указание формата бумаги и типа носителя ……………………………………………….. |
3-15 |
|
|
Стопор бумаги …………………………………………………………………………………………………. |
3-19 |
|
|
Подготовка к отправке документа в общую папку на ПК ………………………………… |
3-20 |
|
|
Создание примечания об имени компьютера и полного имени компьютера … |
3-20 |
|
|
Определение имени пользователя и полного имени домена ……………………… |
3-21 |
|
|
Создание общей папки, создание примечания об общей папке ………………….. |
3-22 |
|
|
Настройка брандмауэра Windows ……………………………………………………………… |
3-26 |
|
|
Регистрация адресатов в адресной книге ………………………………………………………. |
3-30 |
|
|
Добавление адресата (Адресная книга) …………………………………………………….. |
3-30 |
|
|
Добавление адресата к клавише набора одним нажатием |
||
|
(Клавиша набора одним нажатием) …………………………………………………………… |
3-39 |
|
|
4 |
Печать с ПК ……………………………………………………………………………….. |
4-1 |
|
Печать с ПК ……………………………………………………………………………………………………….. |
4-2 |
|
|
Печать на нестандартных форматах бумаги ……………………………………………….. |
4-4 |
|
|
Экран параметров печати драйвера принтера …………………………………………….. |
4-5 |
|
|
Справка по драйверу принтера …………………………………………………………………… |
4-6 |
|
|
Изменение стандартных настроек драйвера принтера (Windows 7) ……………… |
4-6 |
|
|
Отмена печати с компьютера ……………………………………………………………………… |
4-6 |
|
|
Печать с помощью AirPrint ……………………………………………………………………………….. |
4-7 |
|
|
Печать данных, сохраненных на принтере ………………………………………………………. |
4-8 |
|
|
Определение ящика заданий с помощью компьютера и сохранение задания печати ….. |
4-8 |
|
|
Печать документов из ящика конфиденциальной печати …………………………….. |
4-8 |
|
|
Печать документа из ящика сохраненных заданий …………………………………….. |
4-12 |
|
|
Печать документа из ящика быстрых копий ……………………………………………….. |
4-15 |
|
|
Печать документов из ящика проверки и удержания ………………………………….. |
4-18 |
|
|
5 |
Эксплуатация аппарата …………………………………………………………….. |
5-1 |
|
Загрузка оригиналов …………………………………………………………………………………………. |
5-2 |
|
|
Размещение оригиналов на стекле оригинала …………………………………………….. |
5-2 |
|
|
Загрузка оригиналов в автоподатчик оригиналов ………………………………………… |
5-3 |
|
|
Проверка серийного номера оборудования …………………………………………………….. |
5-5 |
|
|
Программа ………………………………………………………………………………………………………… |
5-6 |
|
|
Регистрация программ ……………………………………………………………………………….. |
5-6 |
|
|
Подтверждение зарегистрированной программы ………………………………………… |
5-7 |
iii

|
Вызов программы ………………………………………………………………………………………. |
5-7 |
|
|
Перезапись программы ………………………………………………………………………………. |
5-7 |
|
|
Удаление программы …………………………………………………………………………………. |
5-8 |
|
|
Настройки клавиши выбора ……………………………………………………………………………… |
5-9 |
|
|
Копирование ……………………………………………………………………………………………………. |
5-10 |
|
|
Основные операции …………………………………………………………………………………. |
5-10 |
|
|
Отмена заданий ……………………………………………………………………………………….. |
5-12 |
|
|
Передача …………………………………………………………………………………………………………. |
5-13 |
|
|
Основные операции …………………………………………………………………………………. |
5-14 |
|
|
Задание адресата ……………………………………………………………………………………. |
5-16 |
|
|
Проверка и изменение адресатов ……………………………………………………………… |
5-21 |
|
|
Экран подтверждения адресатов ………………………………………………………………. |
5-23 |
|
|
Повторный вызов …………………………………………………………………………………….. |
5-23 |
|
|
Отправить мне (эл. почта) ………………………………………………………………………… |
5-24 |
|
|
Передача адресатам разных типов (групповая рассылка) ………………………….. |
5-24 |
|
|
Отмена заданий передачи ………………………………………………………………………… |
5-25 |
|
|
WSD сканирование …………………………………………………………………………………… |
5-26 |
|
|
Сканирование с помощью TWAIN ……………………………………………………………… |
5-30 |
|
|
Порядок использования функций факса ………………………………………………………… |
5-33 |
|
|
Что такое ящик документов? …………………………………………………………………………… |
5-34 |
|
|
Использование пользовательского ящика …………………………………………………….. |
5-36 |
|
|
Создание нового пользовательского ящика ………………………………………………. |
5-36 |
|
|
Изменение и удаление пользовательского ящика ……………………………………… |
5-39 |
|
|
Хранение документов ………………………………………………………………………………. |
5-41 |
|
|
Печать документов …………………………………………………………………………………… |
5-41 |
|
|
Редактирование документов …………………………………………………………………….. |
5-43 |
|
|
Удаление документов ………………………………………………………………………………. |
5-44 |
|
|
Печать документов, сохраненных на съемном носителе USB ……………………….. |
5-46 |
|
|
Сохранение документов на съемный модуль USB (Сканировать на USB) …….. |
5-48 |
|
|
Проверка сведений о съемном носителе USB ……………………………………………….. |
5-50 |
|
|
Извлечение съемного носителя USB ……………………………………………………………… |
5-51 |
|
|
6 |
Использование различных функций ………………………………………… |
6-1 |
|
Доступные функции аппарата ………………………………………………………………………….. |
6-2 |
|
|
Копирование ……………………………………………………………………………………………… |
6-2 |
|
|
Отправить …………………………………………………………………………………………………. |
6-3 |
|
|
Пользовательский ящик (печать) ………………………………………………………………… |
6-4 |
|
|
Съемная память (сохранение файла, печать документов) …………………………… |
6-5 |
|
|
Функции …………………………………………………………………………………………………………….. |
6-7 |
|
|
Формат оригинала ……………………………………………………………………………………… |
6-7 |
|
|
Выбор бумаги …………………………………………………………………………………………….. |
6-8 |
|
|
Ориентация ориг. (Ориентация оригинала) …………………………………………………. |
6-9 |
|
|
Разбор по копиям …………………………………………………………………………………….. |
6-10 |
|
|
Плотность ………………………………………………………………………………………………… |
6-10 |
|
|
Изображение оригинала …………………………………………………………………………… |
6-10 |
|
|
EcoPrint ……………………………………………………………………………………………………. |
6-11 |
|
|
Выбор цвета …………………………………………………………………………………………….. |
6-11 |
|
|
Резкость ………………………………………………………………………………………………….. |
6-12 |
|
|
Плотность фона ……………………………………………………………………………………….. |
6-12 |
|
|
Подавл. фона (Подавление проступания) …………………………………………………. |
6-13 |
|
|
Масштаб ………………………………………………………………………………………………….. |
6-13 |
|
|
Совмещенная печать ……………………………………………………………………………….. |
6-15 |
|
|
Двустороннее копирование ………………………………………………………………………. |
6-17 |
|
|
Непрерывное сканирование ……………………………………………………………………… |
6-19 |
|
|
Уведомление о завершении задания ………………………………………………………… |
6-19 |
|
|
Ввод имени файла …………………………………………………………………………………… |
6-20 |
|
|
Замещение приоритета ……………………………………………………………………………. |
6-20 |
|
|
Тихий режим ……………………………………………………………………………………………. |
6-20 |
|
|
Двухсторонняя печать (2-стор. оригинал) ………………………………………………….. |
6-21 |
|
|
Формат для передачи ………………………………………………………………………………. |
6-21 |
iv

|
Формат файла …………………………………………………………………………………………. |
6-23 |
|
|
Разделение файлов …………………………………………………………………………………. |
6-25 |
|
|
Разрешение сканирования ……………………………………………………………………….. |
6-26 |
|
|
Тема/текст ……………………………………………………………………………………………….. |
6-26 |
|
|
FTP-передача с шифрованием …………………………………………………………………. |
6-27 |
|
|
Удал. после печ. (Удаление после печати) ………………………………………………… |
6-27 |
|
|
Формат сохранения ………………………………………………………………………………….. |
6-27 |
|
|
Шифрованный PDF ………………………………………………………………………………….. |
6-28 |
|
|
Печать JPEG/TIFF ……………………………………………………………………………………. |
6-28 |
|
|
XPS, вписать в страницу …………………………………………………………………………… |
6-29 |
|
|
7 |
Состояние/Отм. задач ……………………………………………………………….. |
7-1 |
|
Проверка состояния задания ……………………………………………………………………………. |
7-2 |
|
|
Проверка журнала задания ………………………………………………………………………………. |
7-8 |
|
|
Передача истории журнала ………………………………………………………………………. |
7-12 |
|
|
Выполнение задания ………………………………………………………………………………………. |
7-13 |
|
|
Приостановка и возобновление заданий …………………………………………………… |
7-13 |
|
|
Отмена заданий ……………………………………………………………………………………….. |
7-13 |
|
|
Проверка состояния устройства …………………………………………………………………….. |
7-15 |
|
|
Проверка остатка тонера и бумаги ………………………………………………………………….. |
7-16 |
|
|
8 |
Настройка и регистрация (Системное меню) ……………………………. |
8-1 |
|
Системное меню ……………………………………………………………………………………………….. |
8-2 |
|
|
Параметры системного меню ……………………………………………………………………… |
8-3 |
|
|
Отчет ………………………………………………………………………………………………………… |
8-6 |
|
|
Система/Сетевой ……………………………………………………………………………………….. |
8-9 |
|
|
Польз/Учет задан ……………………………………………………………………………………… |
8-18 |
|
|
Свойство пользователя ……………………………………………………………………………. |
8-18 |
|
|
Общие параметры ……………………………………………………………………………………. |
8-19 |
|
|
Копирование ……………………………………………………………………………………………. |
8-33 |
|
|
Принтер …………………………………………………………………………………………………… |
8-34 |
|
|
Отправить ……………………………………………………………………………………………….. |
8-36 |
|
|
ФАКС ………………………………………………………………………………………………………. |
8-37 |
|
|
Ящик документов ……………………………………………………………………………………… |
8-37 |
|
|
Правка адресата ………………………………………………………………………………………. |
8-38 |
|
|
Настройка/обслуж (Настройка/обслуживание) …………………………………………… |
8-39 |
|
|
9 |
Проверка подлинности и учет пользователей |
|
|
(Реквизиты пользователя, Учет заданий) ………………………………… |
9-1 |
|
|
Обзор управления входом пользователей в систему ……………………………………… |
9-2 |
|
|
Включение управления входом пользователей в систему ……………………………… |
9-3 |
|
|
Настройки для управления входом пользователей в систему ………………………… |
9-5 |
|
|
Добавление пользователя (Список локальных пользователей) ……………………. |
9-5 |
|
|
Изменение свойств пользователя ………………………………………………………………. |
9-9 |
|
|
Настройки блокировки учетной записи пользователя ………………………………… |
9-13 |
|
|
Управление входом пользователей в систему с целью печати …………………… |
9-14 |
|
|
Для управления регистрацией пользователей с целью сканирования с |
||
|
помощью TWAIN ………………………………………………………………………………………. |
9-16 |
|
|
Для управления регистрацией пользователей с целью сканирования с |
||
|
помощью WIA ………………………………………………………………………………………….. |
9-17 |
|
|
Для управления регистрацией пользователей с целью отправки факсов с ПК …… |
9-18 |
|
|
Локал. авториз. (Локальная авторизация) ………………………………………………….. |
9-19 |
|
|
Авториз. группы (Настройки авторизации группы) ……………………………………… |
9-20 |
|
|
Свойства польз. NW (Получение свойств пользователя сети) ……………………. |
9-21 |
|
|
Настройки смарт-карты …………………………………………………………………………….. |
9-22 |
|
|
Использование функций управления входом пользователей в систему ………. |
9-23 |
|
|
Вход в систему/выход из системы …………………………………………………………….. |
9-23 |
|
|
Управление входом пользователей в систему с помощью ПК …………………….. |
9-23 |
v

|
Общие сведения об учете заданий …………………………………………………………………. |
9-24 |
||
|
Включение учета заданий ……………………………………………………………………………….. |
9-25 |
||
|
Доступ к учету заданий …………………………………………………………………………….. |
9-26 |
||
|
Настройка учетной записи ………………………………………………………………………………. |
9-27 |
||
|
Добавление учетной записи ……………………………………………………………………… |
9-27 |
||
|
Ограничение использования аппарата ……………………………………………………… |
9-29 |
||
|
Редактирование учетной записи ……………………………………………………………….. |
9-30 |
||
|
Удаление учетной записи …………………………………………………………………………. |
9-31 |
||
|
Учет заданий для печати ………………………………………………………………………….. |
9-32 |
||
|
Учет заданий для сканирования с использованием TWAIN ………………………… |
9-33 |
||
|
Учет заданий для сканирования с использованием WIA …………………………….. |
9-34 |
||
|
Учет заданий факса, переданных с компьютера ………………………………………… |
9-35 |
||
|
Настройка учета заданий ………………………………………………………………………………… |
9-37 |
||
|
Параметры по умолчанию ………………………………………………………………………… |
9-37 |
||
|
Подсчет количества напечатанных страниц ………………………………………………. |
9-38 |
||
|
Печать отчета учета …………………………………………………………………………………. |
9-39 |
||
|
Использование учета заданий ………………………………………………………………………… |
9-40 |
||
|
Вход в систему/выход из системы …………………………………………………………….. |
9-40 |
||
|
Учет заданий на ПК ………………………………………………………………………………….. |
9-41 |
||
|
Неизвестный идентификатор задания ……………………………………………………………. |
9-42 |
||
|
10 |
Устранение неисправностей …………………………………………………… |
10-1 |
|
|
Регулярное обслуживание ………………………………………………………………………………. |
10-2 |
||
|
Очистка ……………………………………………………………………………………………………. |
10-2 |
||
|
Замена контейнера с тонером …………………………………………………………………… |
10-5 |
||
|
Замена бункера для отработанного тонера ……………………………………………….. |
10-8 |
||
|
Устранение неисправностей …………………………………………………………………………. |
10-10 |
||
|
Устранение сбоев в работе …………………………………………………………………….. |
10-10 |
||
|
Реагирование на сообщения …………………………………………………………………… |
10-16 |
||
|
Устранение замятия бумаги ……………………………………………………………………. |
10-27 |
||
|
11 |
Приложение …………………………………………………………………………….. |
11-1 |
|
|
Дополнительное оборудование ……………………………………………………………………… |
11-2 |
||
|
Общие сведения о дополнительном оборудовании ……………………………………. |
11-2 |
||
|
Дополнительные приложения …………………………………………………………………… |
11-9 |
||
|
Способ ввода символов ……………………………………………………………………………….. |
11-11 |
||
|
Использование клавиш …………………………………………………………………………… |
11-11 |
||
|
Выбор типа символов …………………………………………………………………………….. |
11-12 |
||
|
Символы, которые можно ввести с помощью цифровой клавиатуры ………… |
11-12 |
||
|
Ввод символов ……………………………………………………………………………………….. |
11-13 |
||
|
Ввод символов ……………………………………………………………………………………….. |
11-14 |
||
|
Ввод с использованием экрана выбора символов ……………………………………. |
11-15 |
||
|
Бумага ……………………………………………………………………………………………………………. |
11-16 |
||
|
Основные характеристики бумаги …………………………………………………………… |
11-16 |
||
|
Выбор подходящей бумаги ……………………………………………………………………… |
11-17 |
||
|
Бумага специального назначения ……………………………………………………………. |
11-20 |
||
|
Характеристики ……………………………………………………………………………………………… |
11-24 |
||
|
Набор основных функций ……………………………………………………………………….. |
11-24 |
||
|
Функции копирования ……………………………………………………………………………… |
11-26 |
||
|
Функции принтера ………………………………………………………………………………….. |
11-26 |
||
|
Функции сканера …………………………………………………………………………………….. |
11-27 |
||
|
Автоподатчик оригиналов ……………………………………………………………………….. |
11-27 |
||
|
Податчик бумаги (на 500 листов, дополнительно) ……………………………………. |
11-28 |
||
|
Глоссарий ……………………………………………………………………………………………………… |
11-29 |
||
|
Алфавитный указатель …………………………………………………. |
Алфавитный указатель-1 |
vi
> Общие сведения
Общие сведения
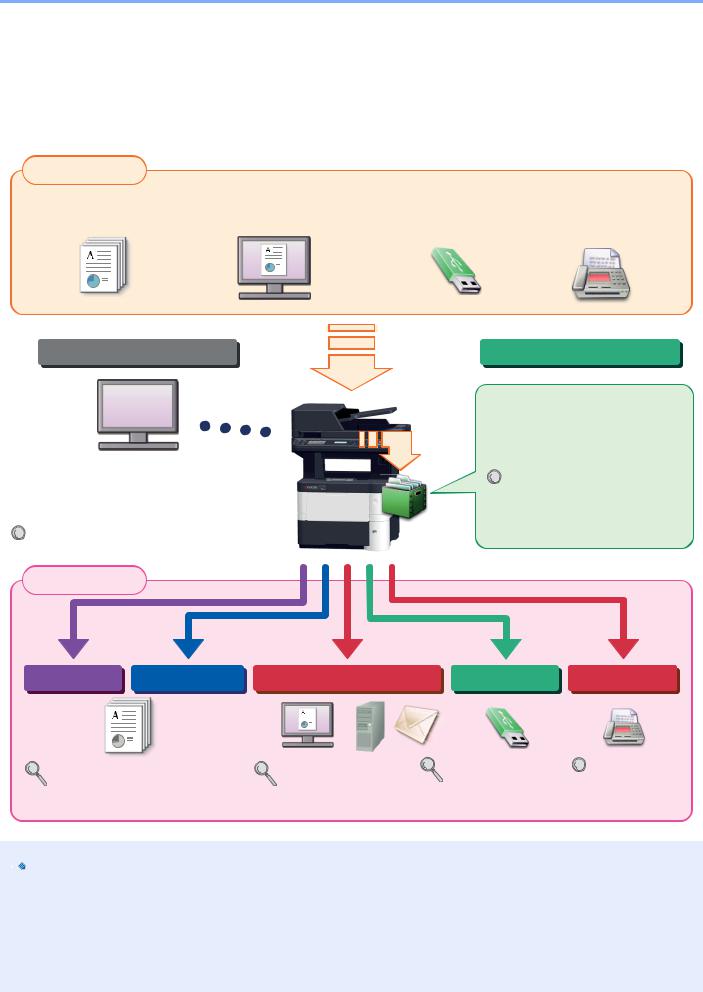
Данный аппарат стандартно комплектуется функциями копирования и печати, при этом отсканированное изображение может отправляться получателю электронного письма как вложение или передаваться на компьютер, подключенный в одну сеть с аппаратом. Изделия с функцией факса могут использоваться как полноценное устройство передачи факсов.
Входные данные
|
Оригинал |
Электронные данные |
USB-память |
Данные факса |
Операции, выполняемые с ПК
Command Center RX
Проверить состояние и изменить настройки аппарата можно с помощью веб-браузера, установленного на компьютере.
Command Center RX (стр. 2-41)
 Command Center RX User Guide
Функции ящика документов
Данная функция полезна при выполнении различных задач, в том числе при сохранении данных на компьютере или в модуле памяти USB.
Печать данных, сохраненных
 на принтере (стр. 4-8) Использование пользовательского ящика
(стр. 5-36)
Выходные данные
|
Функции копирования |
Функции принтера |
Функции передачи |
USB-память |
|
Копирование (стр. 5-10) |
Передача (стр. 5-13) |
Сохранение документов |
|
Печать с ПК (стр. 4-1) |
на съемный модуль USB |
|
|
(Сканировать на USB) |
||
|
(стр. 5-48) |
Функции факса
Руководство
 по
по
эксплуатации
факса


 ПРИМЕЧАНИЕ
•Прежде чем приступить к использованию аппарата, обязательно прочтите раздел Правовая информация и правила техники безопасности на стр. 1-1.
•Порядок выполнения действий по подготовке к эксплуатации аппарата, в том числе подключению кабелей и установке программного обеспечения, изложен в разделе Установка и настройка аппарата на стр. 2-1.
•Порядок загрузки бумаги, настройки общих папок и добавления адресов в адресную книгу изложен в разделе Подготовка к использованию на стр. 3-1.
vii
> Функции аппарата
Функции аппарата
Аппарат оснащен рядом полезных функций. Ниже приведены примеры некоторых из них. Для получения подробной информации см. Использование различных функций (стр. 6-1).
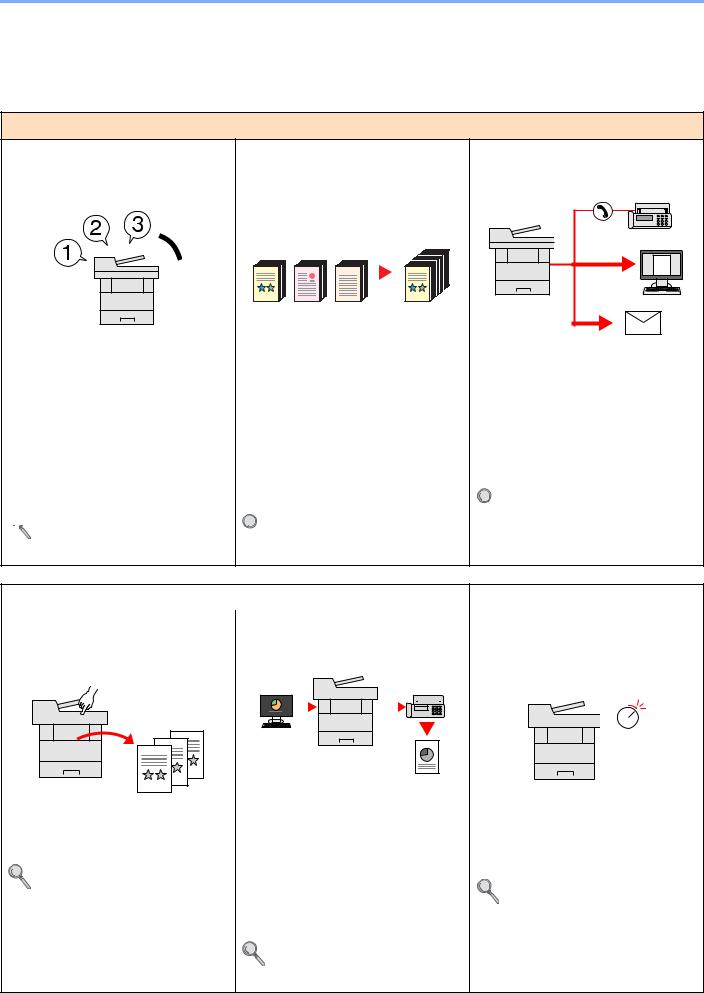
Оптимизация процессов обработки документов в офисе
Доступ к часто используемым функциям по одному нажатию (Программа)
Можно заранее настроить часто используемые функции.
После включения функций в программу предварительно настроенных функций для их вызова потребуется только нажатие номера программы. Использование этой программы всегда приводит к получению одинаковых результатов, даже если ее используют различные пользователи.
 Программа (стр. 5-6)
Сканирование множества оригиналов отдельными партиями, а затем выпуск одним заданием (Непрерывное сканирование)
Эта функция полезна при подготовке многостраничных раздаточных материалов.
Когда невозможно поместить в автоподатчик оригиналов большое количество документов за один раз, оригиналы можно отсканировать отдельными партиями и затем скопировать или отправить как одно задание.
 Непрерывное сканирование (стр.
  6-19)
6-19)
Одна рассылка с использованием нескольких вариантов рассылки (Групповая рассылка)
Один и тот же документ можно отправить нескольким получателям, используя различные методы.
Вы можете задать несколько получателей для различных методов рассылки, например, по электронной почте, SMB или факсу.
При этом можно сэкономить время, отправляя одно задание один раз.
Передача адресатам разных 
 типов (групповая рассылка) (стр.
5-24)
|
Оптимизация процессов обработки документов в офисе |
Экономия энергии и расходов |
|||||||||||||||||||||
|
Сохранение часто используемых |
Отправка факса с компьютера |
Настраиваемые режимы экономии |
||||||||||||||||||||
|
документов в аппарате |
(Отправка факса с компьютера) |
энергии |
||||||||||||||||||||
|
(Пользовательский ящик) |
(Функция экономии энергии) |
|||||||||||||||||||||
Off
|
Эта функция позволяет экономить |
||
|
Часто используемые документы можно |
бумагу, используемую для отправки |
Аппарат оснащен функцией экономии |
|
сохранять в аппарате и затем при |
факсов. |
энергии, который автоматически |
|
необходимости распечатывать их. |
Можнофайл, подлежащийпередачепо |
включает дежурный режим или режим |
|
Использование пользовательского |
факсу, отправить с ПК, не |
ожидания. |
|
ящика (стр. 5-36) |
распечатывая его. Таким образом |
Функция экономии энергии (стр. 2-17) |
|
можно уменьшить расход бумаги и |
||
|
более рационально подойти к |
||
|
выполнению заданий передачи. |
||
|
Руководство по эксплуатации |
||
|
факса |
viii
> Функции аппарата
Экономия энергии и расходов
Использование меньшего количества тонера для печати
(EcoPrint)
Благодаря данной функции можно сократить расход тонера.
Используйте эту функцию, чтобы сэкономить тонер, если вам нужно всего лишь проверить содержимое печатного документа, например при пробной печати, или распечатать документ для внутреннего подтверждения.
Используйте эту функцию, если не требуется высококачественная печать.
EcoPrint (стр. 6-11)
|
Печать нескольких оригиналов на |
Передача факса для снижения |
|||||||||||||||||||||||
|
одном листе |
расходов на передачу данных |
|||||||||||||||||||||||
|
(Двусторонняя печать/совмещение) |
(Передача факса с задержкой) |
|||||||||||||||||||||||
|
Оригиналы можно печатать на обеих |
С помощью этой функции можно |
|
сторонах листа бумаги. Кроме того, |
уменьшить расходы на передачу |
|
несколько оригиналов можно |
данных. |
|
напечатать на одном листе бумаги. |
Расходы на передачу данных можно |
|
Совмещенная печать (стр. 6-15) |
снизить, настроив таймер на период |
|
Двустороннее копирование (стр. |
времени с более низким тарифом на |
|
6-17) |
обмен данными. |
|
Руководство по эксплуатации |
|
|
факса |
|
Создание визуально |
Усиление безопасности |
|||||||||||||||||||||||||||||||
|
привлекательных документов |
||||||||||||||||||||||||||||||||
|
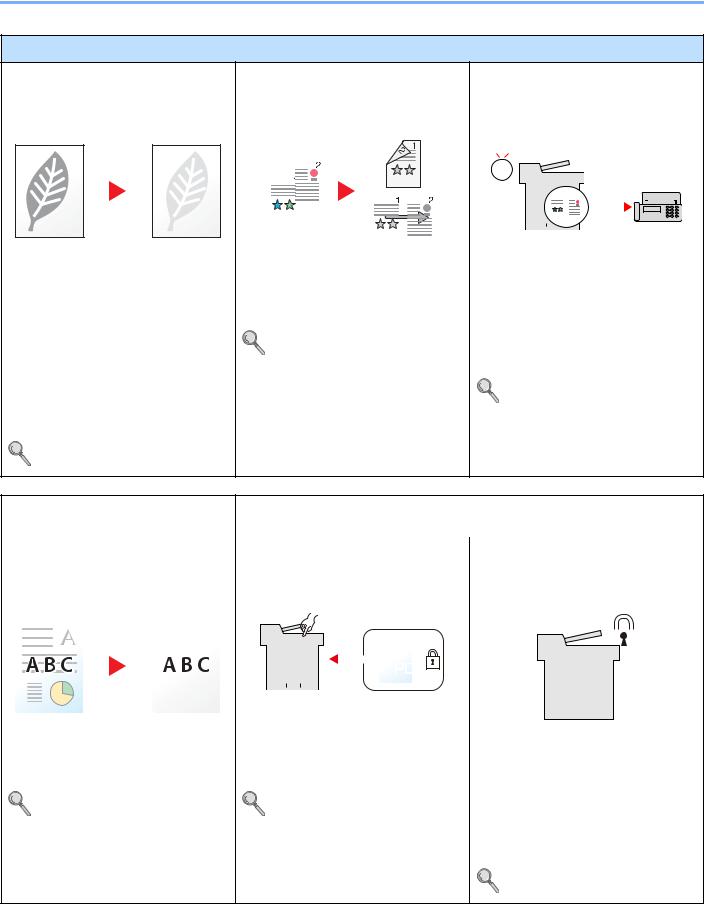
Предотвращение проступания |
Защита файла PDF паролем |
Защита данных, сохраненных на |
||||||||||||||||||||||||||||||
|
изображения |
(Функции шифрования PDF) |
диске SSD |
||||||||||||||||||||||||||||||
|
(Предотвращение проступания) |
(Шифрование/перезапись) |
|||||||||||||||||||||||||||||||
|
Для ограничения просмотра, печати и |
||
|
При сканировании тонких оригиналов |
редактирования документа |
Можно автоматически перезаписывать |
|
можно предотвратить проступание |
используйте функцию защиты паролем |
ненужные данные, оставшиеся на |
|
изображения на обратной стороне. |
документов в формате PDF. |
диске SSD. |
|
Подавл. фона (Подавление |
Шифрованный PDF (стр. 6-28) |
Чтобы не допустить утечку |
|
проступания) (стр. 6-13) |
информации за пределы компании, |
|
|
аппарат может выполнять |
||
|
автоматическое шифрование данных |
||
|
перед их записью на диск SSD. |
||
|
Защита данных (стр. 8-17) |
ix
![]()
> Функции аппарата
Усиление безопасности
|
Предотвращение потери готовых |
Вход в систему с помощью |
|
документов |
идентификационной карты |
|
(Частная печать) |
(Доступ по бесконтактной карте) |
OK !
|
В аппарате можно временно сохранять |
Для входа в систему достаточно |
||||||||||||
|
отправленный на печать документ. При |
поднести к аппарату бесконтактную |
||||||||||||
|
печати документа непосредственно |
идентификационную карту. При этом |
||||||||||||
|
нажатием кнопки на аппарате |
не требуется введение имени |
||||||||||||
|
устраняется рискпопаданиядокумента |
пользователя и пароля. |
||||||||||||
|
в руки другого пользователя. |
Card Authentication Kit(B) |
||||||||||||
|
Печать данных, сохраненных на |
|||||||||||||
|
«Устройство ограничения доступа |
|||||||||||||
|
принтере (стр. 4-8) |
по бесконтактной карте» (стр. 11-3) |
Усиление безопасности (Настройки для пользователя с полномочиями администратора)
С целью усиления безопасности администраторы могут использовать различные функции.
 Усиление безопасности (стр. 2-39)
Более эффективное использование функций
Снижение уровня шума аппарата (Тихий режим)
Вы можете установить более тихий режим работы аппарата, снизив уровень его шума. Указанный режим настраивается по заданию.
 Тихий режим (стр. 6-20)
Расширение функций по мере надобности (Приложение)
Набор функций аппарата можно расширить, установив программные приложения.
Можно установить приложения, которые помогут оптимизировать повседневную работу, например, расширить возможности сканирования.
Дополнительные приложения
 (стр. 11-9)
Установка аппарата без использования сетевых кабелей (Беспроводная сеть)
В вычислительной среде, в которой предусмотрено использование беспроводной локальнойсети, аппарат можно устанавливать без подключения сетевых кабелей.
 Беспровод. сеть (стр. 8-14)
x

> Функции аппарата
Более эффективное использование функций
|
Использование модуля памяти USB |
Задание формата файла |
|||||||||||||||||||||||||||||||
|
(Модуль памяти USB) |
изображения |
|||||||||||||||||||||||||||||||
|
(Формат файла) |
||||||||||||||||||||||||||||||||
|
Данная функция полезна в тех |
||
|
ситуациях, когда необходимо |
Приотправке/сохраненииизображений |
|
|
распечатать документ вне офиса или |
можно выбрать различные форматы |
|
|
когданевозможнонапечататьдокумент |
файла. |
|
|
с ПК. |
Формат файла (стр. 6-23) |
|
|
Сохраненные в модуле памяти USB |
||
|
файлы можно вывести на печать, |
||
|
подключив модуль памяти USB |
||
|
непосредственно к аппарату. |
||
|
Кроме того, в модуль памяти USB |
||
|
можно сохранить оригинал, |
||
|
отсканированный с помощью аппарата. |
||
|
Печать документов, сохраненных |
||
|
на съемном носителе USB (стр. 5- |
||
|
46) |
||
|
Сохранение документов на |
||
|
съемный модуль USB |
||
|
(Сканировать на USB) (стр. 5-48) |
Дистанционное использование функций аппарата
(Command Center RX)
Имеется возможность удаленного доступа к аппарату для выполнения печати, отправки или загрузки данных.
Администраторы могут задать настройкидляуправленияаппаратоми его использования.
Command Center RX (стр. 2-41)
xi
> Руководства, поставляемые с аппаратом
Руководства, поставляемые с аппаратом
В комплект поставки аппарата входят следующие руководства. При необходимости сверяйтесь с соответствующим руководством.
Содержание руководств может быть изменено без уведомления в целях улучшения технических характеристик аппарата.
Печатные руководства
Быстрое начало использования аппарата
Правила безопасного использования аппарата
Quick Guide
В данном руководстве содержится описание основных функций аппарата, принципов использования удобных функций, порядка проведения планового техобслуживания и действий при возникновении неполадок.
Safety Guide
Предоставляет информацию по безопасности и предостережения относительно среды установки и эксплуатации аппарата. Обязательно прочитайте это руководство перед использованием данного аппарата.
Safety Guide (ECOSYS M3040dn/ECOSYS M3540dn)
В данном руководстве приведены указания относительно свободного пространства, необходимого для установки аппарата, описание предупредительных надписей и иные сведения по технике безопасности. Обязательно прочитайте это руководство перед использованием данного аппарата.
Руководства (PDF) на DVD-диске (Product Library)
Надлежащее
использование
аппарата
Использование функций факса
Использование бесконтактной карты
Усиление
безопасности
Легкая регистрация информации об аппарате и выполнение настроек
Руководство по эксплуатации (данный документ)
Содержит описание процедур загрузки бумаги, выполнения операций копирования, печати и сканирования, а также содержит настройки по умолчанию и другую информацию.
Руководство по эксплуатации факса
Содержит описание порядка использования функций факса.
Card Authentication Kit (B) Operation Guide
Содержит описание порядка выполнения аутентификации с использованием идентификационной карты.
Data Security Kit (E) Operation Guide
Содержит описаниепорядкавнедрения ииспользованиякомплекта Data Security Kit (E), а также перезаписи и шифрования данных.
Command Center RX User Guide
Содержит описание метода доступа к аппарату с компьютера через веб-браузер для проверки и изменения параметров.
|
Printer Driver User Guide |
||
|
Печать данных с |
||
|
Содержит описание порядка установки драйвера принтера и использования функций |
||
|
компьютера |
||
|
принтера. |
|
KYOCERA Net Direct Print Operation Guide |
||
|
Непосредственная |
||
|
Содержит описание порядка печати файлов PDF без запуска Adobe Acrobat или |
||
|
печать файла PDF |
||
|
Reader. |
|
KYOCERA Net Viewer User Guide |
|
|
Мониторингаппарата |
|
|
и других принтеров в |
Содержит описание порядка мониторинга сетевых систем печати (аппарата) с |
|
сети |
помощью KYOCERA Net Viewer. |
xii

> Руководства, поставляемые с аппаратом
|
PRESCRIBE Commands Command Reference |
||
|
Печать без |
||
|
Описание командных функций PRESCRIBE и управление каждым типом эмуляции. |
||
|
использования |
PRESCRIBE Commands Technical Reference |
|
|
драйвера принтера |
||
|
Описание собственного языка принтера (команды PRESCRIBE). |
||
Для просмотра руководств, записанных на диске DVD, необходимо установить Adobe Reader 8.0 или последующей версии.
xiii

> О руководстве по эксплуатации (данном документе)
О руководстве по эксплуатации (данном документе)
Структура документа
В настоящем руководстве содержатся следующие разделы.
|
Раздел |
Содержание |
|
|
1 |
Правовая информация и |
Содержит описание мер предосторожности при использовании аппарата и |
|
правила техники |
информацию относительно торговых марок. |
|
|
безопасности |
||
|
2 |
Установка и настройка |
Содержит описание деталей аппарата, порядка подключения кабелей, установки |
|
аппарата |
программного обеспечения, входа в систему и выхода из нее, а также иных |
|
|
процедур, связанных с администрированием аппарата. |
||
|
3 |
Подготовка к использованию |
Содержит описание процедур подготовки и настройки, необходимых для начала |
|
эксплуатации аппарата, в том числе порядка использования панели управления, |
||
|
загрузки бумаги и создания адресной книги. |
||
|
4 |
Печать с ПК |
Объясняет функции, доступные при использовании аппарата в качестве принтера. |
|
5 |
Эксплуатация аппарата |
Содержит описание основных процедур, связанных с эксплуатацией аппарата, в |
|
том числе процедур размещения оригиналов, выполнения копий, отправки |
||
|
документов и использования ящиков для документов. |
||
6Использование различных Содержит описание дополнительных функций аппарата.
функций
|
7 |
Состояние/Отм. задач |
Объясняет способы проверки состояния задания и журнала заданий, а также |
|
способы отмены заданий, которые уже печатаются или ожидают печати. Также |
||
|
содержит описание порядка проверки уровней бумаги и тонера, проверки |
||
|
состояния устройства, а также отмены передачи факса. |
||
|
8 |
Настройка и регистрация |
Описание системного меню и принципы управления аппарата с помощью данного |
|
(Системное меню) |
меню. |
|
9Проверка подлинности и учет Пояснение реквизитов пользователя и процедуры учета заданий.
пользователей (Реквизиты пользователя, Учет заданий)
|
10 |
Устранение неисправностей |
Содержит описания порядка действий в ситуациях, когда закончился тонер, |
|
отображается ошибка, возникло замятие бумаги или иная проблема. |
||
|
11 |
Приложение |
Содержит описание дополнительного оборудования для аппарата. Содержит |
|
сведения о типах носителя и форматах бумаги, а также глоссарий терминов. В |
||
|
этом разделе описывается ввод символов и указаны технические характеристики |
||
|
аппарата. |
||
xiv
> О руководстве по эксплуатации (данном документе)
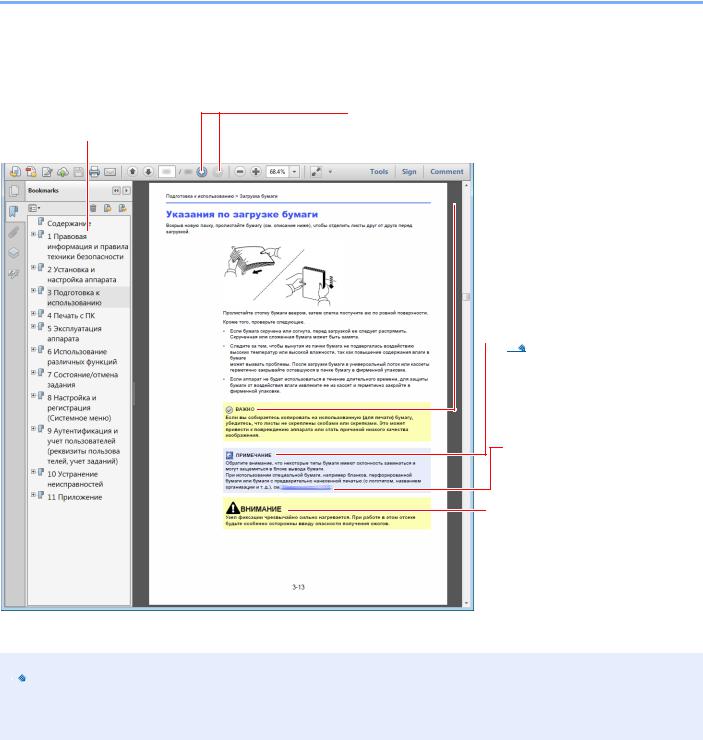
Условные обозначения в данном руководстве
В приведенных ниже объяснениях в качестве примера используется Adobe Reader XI.
Щелкните элемент оглавления для быстрого перехода к соответствующей странице.


 ПРИМЕЧАНИЕ
Щелкните для перехода от текущей страницы к ранее отображавшейся странице. Данная функция удобна, если необходимо вернуться к странице, с которой был выполнен быстрый переход к текущей странице.

 ВАЖНО
ВАЖНО
Указывает на требования по эксплуатации и ограничения, которые необходимо соблюдать для безопасной эксплуатации аппарата и недопущения повреждения самого аппарата или иной собственности.

 ПРИМЕЧАНИЕ
Указывает на дополнительные объяснения и справочную информацию по эксплуатации аппарата.
См. раздел .
Щелкните подчеркнутый текст для перехода к соответствующей странице.

 ВНИМАНИЕ
Предупреждает о возможности получения травмы или механического повреждения аппарата при недостаточном внимании или несоблюдении соответствующих правил.
Отображаемые в программе Adobe Reader элементы могут различаться в зависимости от порядка использования программы. Если оглавление или инструменты не отображаются, см. справку по программе
Adobe Reader.
К некоторым элементам в данном руководстве применяются следующие условные обозначения.
|
Условное |
Описание |
Пример |
|
обозначение |
||
|
[Жирный |
Указывает на кнопки на панели управления или |
Нажмите клавишу [Старт]. |
|
шрифт] |
экранные кнопки интерфейса. |
Нажмите кнопку [OK]. |
|
[Обычный |
Обозначает сообщение или настройку, |
На дисплее сообщений появляется [Готов к |
|
шрифт] |
отображаемую на дисплее сообщений. |
копированию]. |
|
С помощью [▲] или [▼] выберите [Вкл.]. |
||
|
«Обычный |
Обозначает сообщение или настройку, |
Можно выбрать из меню «Размер печати». |
|
шрифт» |
отображаемую на экране компьютера |
|
xv
> О руководстве по эксплуатации (данном документе)
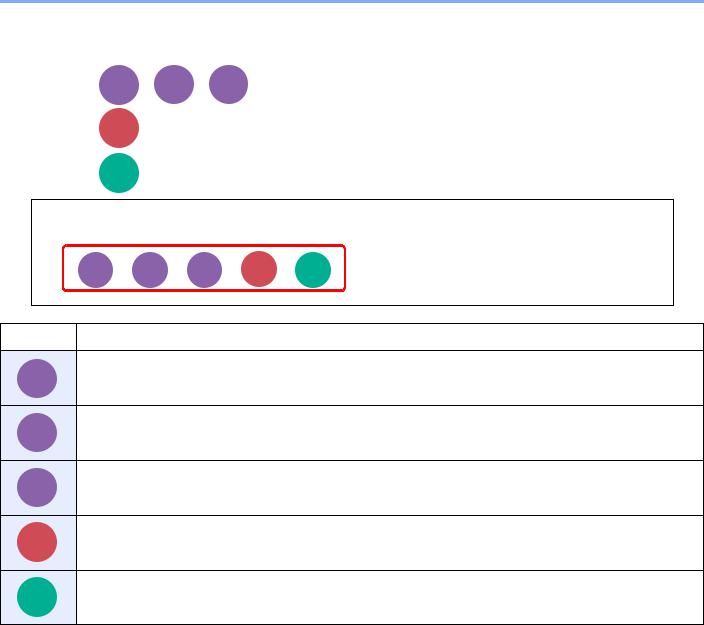
На страницах, посвященных дополнительным функциям, режимы, в которых могут использоваться такие функции, показаны с помощью пиктограмм.
Печать:
Передача:
Сохранение:
|
Копирование |
Печать с |
Печать с |
|
ящика |
USB |
|
|
Передача |
||
|
Скан. на |
||
|
USB |
5 ! ! ! $ . # 7 ,
Функцию можно использовать при копировании документа.
Копирование
Функцию можно использовать при печати из пользовательского ящика (дополнительно).
Печать с ящика
Функцию можно использовать при печати со съемного модуля памяти, например с USB-носителя.
Печать с USB
Функцию можно использовать при отправке документа.
Передача
Функцию можно использовать для сохранения на съемный модуль памяти, например на USB-носитель.
Скан. на USB
xvi
> О руководстве по эксплуатации (данном документе)
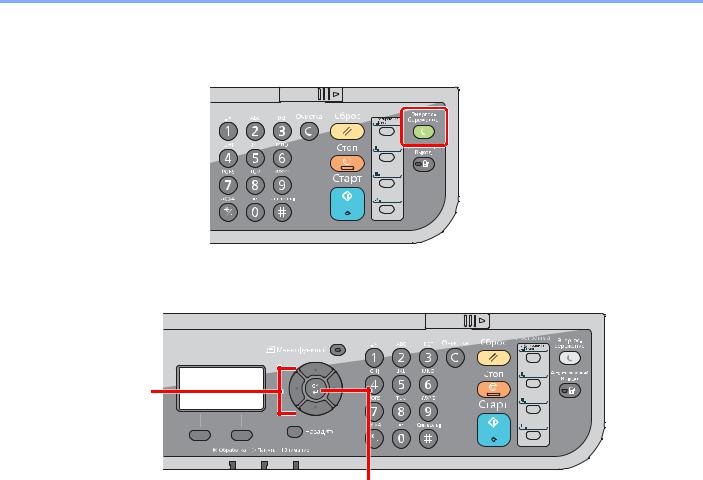
Условные обозначения в процедурах по эксплуатации аппарата
Нажимаемые кнопки панели управления выделены красным.
Процедуры, состоящие из последовательности операций, выполняемых на панели управления или на компьютере, пронумерованы, как показано ниже.
1
2
xvii

> Карта меню
Карта меню
(Здесь используются названия, отображаемые на дисплее сообщений. Они могут отличаться от заголовков соответствующих разделов.)
Тихий режим (стр. 6-20)
Выбор бумаги (стр. 6-8)
Разбор по копиям (стр. 6-10)
Дуплекс (стр. 6-17)
Масштаб (стр. 6-13)
Совместить (стр. 6-15)
Формат оригинала (стр. 6-7)
Ориентация ориг. (стр. 6-9)
Оригинал изобр. (стр. 6-10)
Плотн. (стр. 6-10)
EcoPrint (стр. 6-11)
Непрерывное скан (стр. 6-19)
Ввод имени файла (стр. 6-20)
Увед. о зав. задан. (стр. 6-19)
Замещ. приоритета (стр. 6-20)
Резкость (стр. 6-12)
Плотность фона (стр. 6-12)
Подавл. фона (стр. 6-13)
xviii
> Карта меню
Мне (эл. почта) (стр. 5-24)
E-mail (стр. 5-18)
Папка (SMB) (стр. 5-19)
Папка (FTP) (стр. 5-19)
WSD сканирование (стр. 5-28)
ФАКС (см. Руководство по эксплуатации факса.)
Тихий режим (стр. 6-20)
Выбор цвета (стр. 6-11)
Формат оригинала (стр. 6-7)
Оригинал изобр. (стр. 6-10)
Разрешение скан. (стр. 6-26)
Фор. передач (стр. 6-21)
Масштаб (стр. 6-13)
Ориентация ориг. (стр. 6-9)
Непрерывное скан (стр. 6-19)
Формат файла (стр. 6-23)
Ввод имени файла (стр. 6-20)
Тема/текст (стр. 6-26)
Увед. о зав. задан. (стр. 6-19)
Разрешение факса (см. Руководство по эксплуатации факса.)
Пер факса с здр. (см. Руководство по эксплуатации факса.)
Прям. пер. факса (см. Руководство по эксплуатации факса.)
Пр ф. с опросом (см. Руководство по эксплуатации факса.)
Отчет FAX TX (см. Руководство по эксплуатации факса.)
Плотность (стр. 6-10)
Дуплекс (стр. 6-21)
FTP-перед с шифр (стр. 6-27)
Разделен. файлов (стр. 6-25)
Резкость (стр. 6-12)
Плотность фона (стр. 6-12)
Подавл. фона (стр. 6-13)
xix
![]()
> Карта меню
|
Пользоват. |
(Выбор |
Печать (изм. наб.) |
Тихий режим (стр. 6-20) |
|
ящик |
файлов) |
Разбор по копиям (стр. 6-10) |
|
|
Выбор бумаги (стр. 6-8) |
|||
|
Дуплекс (стр. 6-17) |
|||
|
EcoPrint (стр. 6-11) |
|||
|
Ввод имени файла (стр. 6-20) |
|||
|
Увед. о зав. задан. (стр. 6-19) |
|||
|
Замещ. приоритета (стр. 6-20) |
|||
|
Удал. после печ. (стр. 6-27) |
|||
|
Ящик доп. адреса (см. Руководство по эксплуатации факса.) |
|||
|
Ящик опроса (см. Руководство по эксплуатации факса.) |
|||
|
Ящик |
Личный (стр. 4-8) |
||
|
заданий |
Быстрая копия (стр. 4-15) |
||
|
Память |
Сохранить |
Тихий режим (стр. 6-20) |
|
|
USB |
файл |
Выбор цвета (стр. 6-11) |
|
|
Формат оригинала (стр. 6-7) |
|||
|
Оригинал изобр. (стр. 6-10) |
|||
|
Разрешение скан. (стр. 6-26) |
|||
|
Формат сохранен. (стр. 6-27) |
|||
|
Масштаб (стр. 6-13) |
|||
|
Ориентация ориг. (стр. 6-9) |
|||
|
Непрерывное скан (стр. 6-19) |
|||
|
Формат файла (стр. 6-23) |
|||
|
Разделен. файлов (стр. 6-25) |
|||
|
Ввод имени файла (стр. 6-20) |
|||
|
Увед. о зав. задан. (стр. 6-19) |
|||
|
Плотность (стр. 6-10) |
|||
|
Дуплекс (стр. 6-21) |
|||
|
Резкость (стр. 6-12) |
|||
|
Плотность фона (стр. 6-12) |
|||
|
Подавл. фона (стр. 6-13) |
|||
|
xx |
> Карта меню
|
Модуль |
(Выбор |
Печать |
|
памяти |
файлов) |
|
|
USB |
||
Тихий режим (стр. 6-20)
Выбор бумаги (стр. 6-8)
Разбор по копиям (стр. 6-10)
Дуплекс (стр. 6-17)
EcoPrint (стр. 6-11)
Ввод имени файла (стр. 6-20)
Увед. о зав. задан. (стр. 6-19)
Замещ. приоритета (стр. 6-20)
Зашифрован. PDF (стр. 6-28)
Печать JPEG/TIFF (стр. 6-28)
XPS впис. по стр. (стр. 6-29)
Вызов программы. (стр. 5-6)
Печ. сост. задания (стр. 7-4)
Отпр. сост. задан. (стр. 7-5)
Сост. зад. сохр. (стр. 7-6)
Плановое задание (стр. 7-7)
Журн. задан. печ. (стр. 7-10)
Отпр. журн. задан. (стр. 7-11)
Сох. журн. зад. (стр. 7-12)
Журн.задан.факса (см. Руководство по эксплуатации факса.)
Сканер (стр. 7-15)
Принтер (стр. 7-15)
ФАКС (см. Руководство по эксплуатации факса.)
Состоян. тонера (стр. 7-16)
Состоян. бумаги (стр. 7-16)
Память USB (стр. 7-15)
SSD (стр. 7-15)
Клавиатура USB (стр. 7-15)
Беспровод. сеть (стр. 7-15)
xxi

> Карта меню
|
Отчет |
Печать отчета |
Карта меню (стр. 8-6) |
|
Страница состояния (стр. 8-6) |
||
|
Список шрифтов (стр. 8-6) |
||
|
Опц. сост. сети (стр. 8-7) |
||
|
Настр. отч. адм. (см. Руководство по эксплуатации факса.) |
||
|
Настр. отч. рез. (стр. 8-7) |
||
|
Ист. журн. заданий |
Автоотправка (стр. 8-8) |
|
|
Передать историю (стр. 8-8) |
||
|
Адресат (стр. 8-8) |
||
|
Тема (стр. 8-8) |
||
|
Личная информ. (стр. 8-8) |
||
|
Счетчик (стр. 2-38) |
||
xxii

> Карта меню
|
Система/Сетевой |
Настройки сети |
Настройка TCP/IP |
TCP/IP (стр. 8-9) |
|
Настр. IPv4 (стр. 8-9) |
|||
|
Настр. IPv6 (стр. 8-10) |
|||
|
Bonjour (стр. 8-10) |
|||
|
Детали протокола (стр. 8-10) |
|||
|
WSD сканирование (стр. 8-11) |
|||
|
WSD печать (стр. 8-11) |
|||
|
IPSec (стр. 8-11) |
|||
|
Безоп. протокол (стр. 8-12) |
|||
|
Имя хоста (стр. 8-12) |
|||
|
Интерфейс LAN (стр. 8-12) |
|||
|
Перезапуск сети (стр. 8-13) |
|||
|
Опциональная сеть |
Основн. (стр. 8-13) |
||
|
Сеть (Wi-Fi) |
Беспровод. сеть (стр. 8-14) |
||
|
Основн. (стр. 8-16) |
|||
|
Сет.инт. (отп.) (стр. 8-16) |
|||
|
Уст. блок. и/ф. |
Хост USB (стр. 8-16) |
||
|
Устройство USB (стр. 8-16) |
|||
|
Устр. хран. USB (стр. 8-16) |
|||
|
Доп. интерфейс 1 (стр. 8-16) |
|||
|
Доп. интерфейс 2 (стр. 8-16) |
|||
|
Уровень защиты (стр. 8-17) |
|||
|
Защита данных (стр. 8-17) |
|||
|
Перезапуск (стр. 8-18) |
|||
|
Дополнит.функция (стр. 11-9) |
|||
xxiii

> Карта меню
|
Польз/Учет задан |
Уст. рек. польз |
Реквизиты польз. (стр. 9-3) |
||
|
Список лок польз (стр. 9-5) |
||||
|
Локал. авториз. (стр. 9-19) |
||||
|
Блок. уч. записи (стр. 9-13) |
||||
|
Настр. ID-карты |
Вход с клав-ры (стр. 9-22) |
|||
|
Вход по паролю (стр. 9-22) |
||||
|
Авториз. группы (стр. 9-20) |
||||
|
Свойства польз. NW (стр. 9-21) |
||||
|
Настр. уч. зад. |
Учет заданий (стр. 9-25) |
|||
|
Доступ к учету (стр. 9-26) |
||||
|
Список учета (стр. 9-39) |
||||
|
Общий учет (стр. 9-38) |
||||
|
Учет кажд. зад. (стр. 9-38) |
||||
|
Список зап. (стр. 9-27) |
||||
|
Настройка по умолчанию |
Примен. огран. (стр. 9-37) |
|||
|
Число копий (стр. 9-37) |
||||
|
Предел счетчика (стр. 9-37) |
||||
|
Неизв. ид. задан. (стр. 9-42) |
||||
|
Свойство пользователя (стр. 9-9) |
||||
|
Общие параметры |
Язык (стр. 8-19) |
|||
|
Экран по умолч. (стр. 8-19) |
||||
|
Звук |
Сигнал (стр. 8-19) |
|||
|
Динамик факса (см. Руководство по эксплуатации факса) |
||||
|
Монитор факса (см. Руководство по эксплуатации факса) |
||||
|
Яркость экрана (стр. 8-20) |
||||
|
Ориг./Пар. бум. |
Форм. польз. ориг. (стр. 8-20) |
|||
|
Устр. ориг. умолч. (стр. 8-20) |
||||
|
Польз. форм. бум. (стр. 8-21) |
||||
|
Настр. кассеты 1 |
Формат кассеты 1 (стр. 8-23) |
|||
|
Тип кассеты 1 (стр. 8-23) |
||||
|
Настр. кассеты 2 |
Формат кассеты 2 (стр. 8-23) |
|||
|
Тип кассеты 2 (стр. 8-23) |
||||
|
Настр. кассеты 3 |
Формат кассеты 3 (стр. 8-23) |
|||
|
Тип кассеты 3 (стр. 8-23) |
||||
|
Настр. кас. 4 |
Формат кассеты 4 (стр. 8-23) |
|||
|
Тип кассеты 4 (стр. 8-23) |
||||
|
Настр. кас. 5 |
Формат кассеты 5 (стр. 8-23) |
|||
|
Тип кассеты 5 (стр. 8-23) |
||||
xxiv

> Карта меню
|
Общие параметры |
Ориг./Пар. бум. |
Настр. ун. лотка |
Разм. унив. лотка (стр. 8-23) |
|
|
Тип унив. лотка (стр. 8-23) |
||||
|
Уст. типа носит. (стр. 8-24) |
||||
|
Носит. для авто (стр. 8-22) |
||||
|
Устр. по ум. (стр. 8-22) |
||||
|
Дств со спецбум. (стр. 8-22) |
||||
|
Устан. огран. (стр. 8-24) |
||||
|
Ед. измерения (стр. 8-25) |
||||
|
Обработка ошибок |
Ош. 2-стор. бум. (стр. 8-25) |
|||
|
Ошиб несоотв бум (стр. 8-25) |
||||
|
Установка даты |
Дата/время (стр. 8-25) |
|||
|
Формат даты (стр. 8-25) |
||||
|
Час. пояс (стр. 8-25) |
||||
|
Летнее время (стр. 8-25) |
||||
|
Настр. таймера |
Авт. сброс панели (стр. 8-26) |
|||
|
Таймер сбр. пан. (стр. 8-26) |
||||
|
Таймер мал. мощ. (стр. 8-26) |
||||
|
Уровень сна (модели для Европы) (стр. 8-26) |
||||
|
Правила сна (модели для Европы) (стр. 8-27) |
||||
|
Тайм. реж. ожид. (стр. 8-27) |
||||
|
Правило выключ. (стр. 8-27) |
||||
|
Таймер выключ. (стр. 8-27) |
||||
|
Авт. удал. ошиб. (стр. 8-28) |
Таймер сбр. ош. (стр. 8-28)
Неиспольз. время (см. Руководство по эксплуатации факса)
xxv

> Карта меню
|
Общие параметры |
Функция по умолч |
Выбор цвета (стр. 8-28) |
Разрешение скан. (стр. 8-28)
Разрешение факса (см. Руководство по эксплуатации факса.)
Ориг. изоб. (Коп.) (стр. 8-28)
Ор. изоб. (Отпр.) (стр. 8-28)
Масштаб (стр. 8-28)
Разбор по копиям (стр. 8-28)
Ориентация ориг. (стр. 8-28)
Фон (Копирование) (стр. 8-28)
Фон (Отправить) (стр. 8-28)
EcoPrint (стр. 8-29)
Подавл фона коп (стр. 8-29)
Подав фона отпр (стр. 8-29)
Ввод имени файла (стр. 8-29)
Тема/текст (стр. 8-29)
Непр скан-искFAX (стр. 8-29)
Непр скан-ФАКС (стр. 8-29)
Формат файла (стр. 8-29)
Разделен. файлов (стр. 8-29)
Печать JPEG/TIFF (стр. 8-29)
XPS впис. по стр. (стр. 8-29)
|
Настр. деталей |
Макет 2 в 1 (стр. 8-30) |
|
|
Макет 4 в 1 (стр. 8-30) |
||
|
Лин. границы (стр. 8-30) |
||
|
ориг. сшивание (стр. 8-30) |
||
|
Финиш. сшивание (стр. 8-30) |
||
|
Качество изобр. (стр. 8-30) |
||
|
Сж. цв. TIFF (стр. 8-30) |
||
|
PDF/A (стр. 8-30) |
||
|
PDF выс. сжатия (стр. 8-30) |
||
Операция входа (стр. 8-30)
РЕЖ. RAM-ДИСКА (стр. 8-31)
Формат. SSD (стр. 8-31)
Формат. карту SD (стр. 8-31)
Дополн. память (стр. 8-32)
Отоб. сост/журн. (стр. 8-32)
Тип клавиат. USB (стр. 8-32)
Сигн. уров. тонера (стр. 8-33)
xxvi

> Карта меню
|
Копирование |
Выбор бумаги (стр. 8-33) |
||
|
Автовыбор бумаги (стр. 8-33) |
|||
|
Автом. приор. % (стр. 8-33) |
|||
|
Выб. настр ключа (стр. 8-33) |
|||
|
Принтер |
Настр. эмуляции (стр. 8-34) |
||
|
EcoPrint (стр. 8-34) |
|||
|
Отмена A4/LTR (стр. 8-34) |
|||
|
Дуплекс (стр. 8-34) |
|||
|
Копии (стр. 8-34) |
|||
|
ориг. (стр. 8-34) |
|||
|
A4 по ширине (стр. 8-34) |
|||
|
Лим. врем. под. бум. (стр. 8-34) |
|||
|
Перевод строки (стр. 8-34) |
|||
|
Возврат каретки (стр. 8-34) |
|||
|
Имя задания (стр. 8-35) |
|||
|
Имя пользователя (стр. 8-35) |
|||
|
Приор. ун. лотка (стр. 8-35) |
|||
|
Реж. подачи бум. (стр. 8-35) |
|||
|
Автозам. кассеты (стр. 8-35) |
|||
|
Разрешение (стр. 8-35) |
|||
|
KIR (стр. 8-35) |
|||
|
Отправить |
Выб. настр ключа (стр. 8-36) |
||
|
Пров. адресата (стр. 8-36) |
|||
|
Ввод нов. распол. (стр. 8-36) |
|||
|
Вызов адресата (стр. 8-36) |
|||
|
Экран по умолч. (стр. 8-36) |
|||
|
Отправка/пересыл (стр. 8-36) |
|||
|
ФАКС (см. Руководство по эксплуатации факса.) |
|||
|
Ящик докум. |
Пользоват. ящик (стр. 5-36) |
||
|
Ящик доп. адреса (см. Руководство по эксплуатации факса.) |
|||
|
Ящик заданий |
Зад. быстр. копий (стр. 8-37) |
||
|
Удал. сохр. задан. (стр. 8-37) |
|||
|
Носители информ. (стр. 8-37) |
|||
|
Ящик опроса (см. Руководство по эксплуатации факса.) |
|||
|
Выб. настр ключа (стр. 8-38) |
|||
|
Правка адресата |
Адресная книга (стр. 3-30) |
||
|
Спис. печати (стр. 8-38) |
|||
xxvii

> Карта меню
|
Настройка/обслуж |
Режим тишины (стр. 8-39) |
|
Рег. плотн. коп. (стр. 8-39) |
|
|
Пер./плотн. ящ. (стр. 8-39) |
|
|
Плотность фона (стр. 8-39) |
|
|
Плотность печати (стр. 8-39) |
|
|
Автокор. цвета (стр. 8-39) |
|
|
Корр. черн полос. (стр. 8-39) |
|
xxviii
1Правовая информация и правила техники безопасности
Перед использованием аппарата, пожалуйста, прочтите данную информацию. В этом разделе приводится информация по следующим темам.
|
Примечание …………………………………………………………………………………………………………………………………… |
1-2 |
|
Условные обозначения по технике безопасности в данном руководстве ………………………………….. |
1-2 |
|
Окружающая среда ……………………………………………………………………………………………………………….. |
1-3 |
|
Меры предосторожности при эксплуатации ……………………………………………………………………………. |
1-4 |
|
Меры безопасности при работе с лазером в странах Европы ………………………………………………….. |
1-5 |
|
Законодательные ограничения на копирование и сканирование ……………………………………………… |
1-6 |
|
EN ISO 7779 ………………………………………………………………………………………………………………………….. |
1-6 |
|
EK1-ITB 2000 ………………………………………………………………………………………………………………………… |
1-6 |
|
Правовая информация ………………………………………………………………………………………………………….. |
1-7 |
|
Функция управления энергосбережением …………………………………………………………………………….. |
1-13 |
|
Функция автоматического двустороннего копирования ………………………………………………………….. |
1-13 |
|
Сбережение ресурсов — бумага …………………………………………………………………………………………… |
1-13 |
|
Экологическая польза от функции «управления режимом питания» ………………………………………… |
1-14 |
|
Программа Energy Star (ENERGY STAR®) …………………………………………………………………………….. |
1-14 |
1-1
![]()
Правовая информация и правила техники безопасности > Примечание
Примечание
Условные обозначения по технике безопасности в данном руководстве
Специальные предупреждающие символы в разделах настоящего руководства и на компонентах аппарата призваны обратить внимание пользователя на возможную опасность как для него самого, так и для других людей и окружающих объектов, связанную с эксплуатацией данного аппарата, а также помочь обеспечить правильную и безопасную его эксплуатацию. Символы и их описания приведены ниже.
ПРЕДУПРЕЖДЕНИЕ! Предупреждает о возможности получения тяжелой травмы или смерти при недостаточном внимании или несоблюдении соответствующих
правил.
ВНИМАНИЕ! Предупреждает о возможности получения травмы или механического повреждения аппарата при недостаточном внимании или несоблюдении соответствующих правил.
Символы
Символ показывает, что соответствующий раздел включает в себя предупреждения относительно безопасности. Знаки внутри символа призваны привлечь внимание пользователя.
 … [Общее предупреждение]
 … [Предупреждение о возможности ожога]
Символ  указывает, что соответствующий раздел содержит информацию о запрещенных действиях. Внутри символа приводится условное обозначение запрещенного действия.
 … [Предупреждение о запрещенном действии]
 … [Разборка запрещена]
Символ указывает, что соответствующий раздел содержит информацию о действиях, которые должны быть выполнены. Внутри символа приводится условное обозначение обязательного действия.
 … [Уведомление об обязательном действии]
 … [Выньте вилку питания из сетевой розетки]
 … [Обязательно подключайте аппарат к сетевой розетке с заземлением]
В случае предупреждения по технике безопасности в данном руководстве напечатаны неразборчиво или в случае потери самого руководства, обратитесь к представителю сервисной службы и закажите новое руководство (услуга платная).
|
ПРИМЕЧАНИЕ |
|
Оригинал, имеющий близкое сходство с банковским билетом, может в некоторых необычных случаях |
|
копироваться неправильно, так как данный аппарат имеет специальную функцию предотвращения |
|
изготовления подделок. |
1-2

Правовая информация и правила техники безопасности > Примечание
Окружающая среда
Аппарат предназначен для эксплуатации в следующих условиях окружающей среды:
•Температура: от 10 до 32,5° C
(при температуре 32,5° C влажность не должна превышать 70%).
•Влажность: от 15 до 80%
(при влажности 80% температура не должна превышать 30° C).
Неблагоприятные условия окружающей среды могут негативно сказаться на качестве изображения. Рекомендуется использовать аппарат в следующих условиях окружающей среды: температура 16—27° C и ниже, влажность 36—65%.
При размещении аппарата избегайте его установки в следующих местах.
•Вблизи окна или в местах, где на него будут попадать прямые солнечные лучи.
•В местах, подверженных вибрации.
•В местах с резкими перепадами температуры.
•В местах, находящихся по действием прямых потоков горячего или холодного воздуха.
•Избегайте мест с плохой вентиляцией.
Непрочный материал пола при перемещении аппарата после установки может быть поврежден роликами.
При копировании выделяется некоторое количество озона, но оно незначительно и не сказывается отрицательно на здоровье. Тем не менее, при длительном использовании аппарата в помещении с плохой вентиляцией или при изготовлении очень большого количества копий может ощущаться неприятный запах. Для обеспечения оптимальных условий окружающей среды при копировании рекомендуется хорошо проветривать помещение.
1-3

Правовая информация и правила техники безопасности > Примечание
Меры предосторожности при эксплуатации
Меры предосторожности при обращении с расходными материалами
 ВНИМАНИЕ
Не пытайтесь поджечь детали, содержащие тонер. Искры от пламени могут стать причиной ожогов. Храните детали, содержащие тонер, в недоступном для детей месте.
Если тонер просыплется из деталей, его содержащих, не вдыхайте его и не проглатывайте, а также избегайте попадания в глаза и на кожу.
•Если вы вдохнули тонер, выйдите на свежий воздух и тщательно прополощите горло большим количеством воды. При появлении кашля обратитесь к врачу.
•Если вы проглотили тонер, прополощите рот водой и выпейте 1-2 чашки воды, чтобы разбавить содержимое желудка. При необходимости обратитесь к врачу.
•При попадании тонера в глаза тщательно промойте их водой. При продолжительном дискомфорте в глазах обратитесь к врачу.
•При попадании тонера на кожу помойте ее водой с мылом.
Не пытайтесь силой открыть или разрушить детали, содержащие тонер.
Другие меры предосторожности
Сдайте использованный контейнер с тонером и контейнер для отработанного тонера по месту приобретения аппарата или в службу поддержки. Переработка или утилизация использованных контейнеров с тонером и контейнеров для отработанного тонера производится в соответствии с установленными нормами.
Храните аппарат, избегая воздействия на него прямых солнечных лучей.
Храните аппарат в месте, где температура остается ниже 40 °C, избегая резких изменений температуры и влажности.
Если аппарат не будет использоваться в течение длительного периода, выньте бумагу из кассеты и универсального лотка, поместите ее обратно в оригинальную упаковку и запечатайте.
1-4

Правовая информация и правила техники безопасности > Примечание
Меры безопасности при работе с лазером в странах Европы
Лазерное излучение опасно для организма человека. Поэтому лазерное излучение, создаваемое внутри аппарата, герметично закрыто защитным кожухом и наружной крышкой. При правильной эксплуатации аппарата пользователем излучение не проникает за пределы его корпуса.
Настоящий аппарат классифицирован как лазерное изделие Class 1 в соответствии со стандартом IEC/EN 60825-1:2007.
Внимание: выполнение процедур, отличных от изложенных в данном руководстве, может привести к опасному воздействию лазерного излучения.
Эти наклейки прикреплены на блок лазерного сканера внутри аппарата и находятся вне зоны доступа пользователя.
Информация относительно лазерных изделий CLASS 1 указана в паспортной таблице.
1-5

Правовая информация и правила техники безопасности > Примечание
Законодательные ограничения на копирование и сканирование
Может быть запрещено копирование материала, защищенного авторскими правами, без разрешения владельца тех прав.
Копирование/сканирование следующих изображений запрещено и может быть уголовно наказуемым. Это может ограничиваться не только данными изображениями. Не копируйте/сканируйте умышленно изображения, которые не предназначены для копирования/сканирования:
•бумажные деньги;
•банкноты;
•ценные бумаги;
•печати;
•паспорта;
•сертификаты.
Местные законы и предписания могут запрещать или ограничивать копирование и сканирование иного, не упомянутого выше.
EN ISO 7779
Maschinenlärminformations-Verordnung 3. GPSGV, 06.01.2004: Der höchste Schalldruckpegel beträgt 70 dB (A) oder weniger gemäß EN ISO 7779.
EK1-ITB 2000
Das Gerät ist nicht für die Benutzung im unmittelbaren Gesichtsfeld am Bildschirmarbeitsplatz vorgesehen. Um störende Reflexionen am Bildschirmarbeitsplatz zu vermeiden, darf dieses Produkt nicht im unmittelbaren Gesichtsfeld platziert werden.
1-6

Правовая информация и правила техники безопасности > Примечание
Правовая информация
Копирование или какое-либо иное воспроизведение настоящего руководства полностью или частично без предварительного письменного разрешения корпорации KYOCERA Document Solutions Inc. запрещено.
В отношении торговых марок
•PRESCRIBE является зарегистрированной торговой маркой Kyocera Corporation.
•KPDL является торговой маркой Kyocera Corporation.
•Microsoft, Windows, Windows XP, Windows Server 2003, Windows Vista, Windows Server 2008, Windows 7, Windows Server 2012, Windows 8 и Internet Explorer являются зарегистрированными торговыми марками или торговыми марками Microsoft Corporation в США и (или) других странах.
•PCL является торговой маркой Hewlett-Packard Company.
•Adobe Acrobat, Adobe Reader и PostScript являются торговыми марками Adobe Systems, Incorporated.
•Ethernet является зарегистрированной торговой маркой Xerox Corporation.
•IBM и IBM PC/AT являются торговыми марками International Business Machines Corporation.
•AppleTalk, Bonjour, Macintosh и Mac OS являются торговыми марками Apple Inc., зарегистрированными в США и других странах.
•TypeBankG-B, TypeBankM-M и Typebank-OCR являются торговыми марками TypeBank®.
•Все шрифты европейских языков, инсталлированные в этом аппарате, используются согласно лицензионному соглашению с Monotype Imaging Inc.
•Helvetica, Palatino и Times являются зарегистрированными торговыми марками Linotype GmbH.
•ITC Avant Garde Gothic, ITC Bookman, ITC ZapfChancery и ITC ZapfDingbats являются зарегистрированными торговыми марками International Typeface Corporation.
•ThinPrint — товарный знак Cortado AG в Германии и других странах.
•В этом аппарате инсталлированы шрифты UFST™ MicroType® фирмы Monotype Imaging Inc.
•В программном обеспечении, используемом в аппарате, имеются модули, разработанные Independent JPEG Group.
•iPad, iPhone и iPod являются торговыми марками Apple Inc., зарегистрированными в США и других странах.
•AirPrint и логотип AirPrint являются торговыми марками Apple Inc.
•iOS является торговой маркой или зарегистрированной торговой маркой Cisco в США и других странах и используется по лицензии Apple Inc.
Все другие торговые марки и названия продуктов являются товарными знаками или зарегистрированными товарными знаками; обозначения ™ и ® в данном руководстве по эксплуатации не используются.
1-7

Правовая информация и правила техники безопасности > Примечание
GPL/LGPL
Это изделие содержит программное обеспечение GPL (http://www.gnu.org/licenses/gpl.html) и/или LGPL (http:// www.gnu.org/licenses/lgpl.html), входящее в прошивку. Можно получить исходный код, а также разрешается копировать, перераспределять и изменять его в соответствии с условиями GPL/LGPL. Для получения дополнительной информации, в том числе о доступности исходного кода, посетите веб-сайт http://www.kyoceradocumentsolutions.com/gpl/.
OpenSSL License
Copyright (c) 1998-2006 The OpenSSL Project. All rights reserved.
Redistribution and use in source and binary forms, with or without modification, are permitted provided that the following conditions are met:
1.Redistributions of source code must retain the above copyright notice, this list of conditions and the following disclaimer.
2.Redistributions in binary form must reproduce the above copyright notice, this list of conditions and the following disclaimer in the documentation and/or other materials provided with the distribution.
3.All advertising materials mentioning features or use of this software must display the following acknowledgment: «This product includes software developed by the OpenSSL Project for use in the OpenSSL Toolkit. (http://www.openssl.org/)»
4.The names «OpenSSL Toolkit» and «OpenSSL Project» must not be used to endorse or promote products derived from this software without prior written permission.
For written permission, please contact openssl-core@openssl.org.
5.Products derived from this software may not be called «OpenSSL» nor may «OpenSSL» appear in their names without prior written permission of the OpenSSL Project.
6.Redistributions of any form whatsoever must retain the following acknowledgment: «This product includes software developed by the OpenSSL Project for use in the OpenSSL Toolkit (http://www.openssl.org/)»
THIS SOFTWARE IS PROVIDED BY THE OpenSSL PROJECT «AS IS» AND ANY EXPRESSED OR IMPLIED WARRANTIES, INCLUDING, BUT NOT LIMITED TO, THE IMPLIED WARRANTIES OF MERCHANTABILITY AND FITNESS FOR A PARTICULAR PURPOSE ARE DISCLAIMED. IN NO EVENT SHALL THE OpenSSL PROJECT OR ITS CONTRIBUTORS BE LIABLE FOR ANY DIRECT, INDIRECT, INCIDENTAL, SPECIAL, EXEMPLARY, OR CONSEQUENTIAL DAMAGES (INCLUDING, BUT NOT LIMITED TO, PROCUREMENT OF SUBSTITUTE GOODS OR SERVICES; LOSS OF USE, DATA, OR PROFITS; OR BUSINESS INTERRUPTION) HOWEVER CAUSED AND ON ANY THEORY OF LIABILITY, WHETHER IN CONTRACT, STRICT LIABILITY, OR TORT (INCLUDING NEGLIGENCE OR OTHERWISE) ARISING IN ANY WAY OUT OF THE USE OF THIS SOFTWARE, EVEN IF ADVISED OF THE POSSIBILITY OF SUCH DAMAGE.
Original SSLeay License
Copyright (C) 1995-1998 Eric Young (eay@cryptsoft.com) All rights reserved.
This package is an SSL implementation written by Eric Young (eay@cryptsoft.com). The implementation was written so as to conform with Netscapes SSL.
This library is free for commercial and non-commercial use as long as the following conditions are adhered to. The following conditions apply to all code found in this distribution, be it the RC4, RSA, lhash, DES, etc., code; not just the SSL code. The SSL documentation included with this distribution is covered by the same copyright terms except that the holder is Tim Hudson (tjh@cryptsoft.com).
Copyright remains Eric Young’s, and as such any Copyright notices in the code are not to be removed.
If this package is used in a product, Eric Young should be given attribution as the author of the parts of the library used.
This can be in the form of a textual message at program startup or in documentation (online or textual) provided with the package.
Redistribution and use in source and binary forms, with or without modification, are permitted provided that the following conditions are met:
1-8

Правовая информация и правила техники безопасности > Примечание
1.Redistributions of source code must retain the copyright notice, this list of conditions and the following disclaimer.
2.Redistributions in binary form must reproduce the above copyright notice, this list of conditions and the following disclaimer in the documentation and/or other materials provided with the distribution.
3.All advertising materials mentioning features or use of this software must display the following acknowledgement: «This product includes cryptographic software written by Eric Young (eay@cryptsoft.com)»
The word ‘cryptographic’ can be left out if the routines from the library being used are not cryptographic related :-).
4.If you include any Windows specific code (or a derivative thereof) from the apps directory (application code) you must include an acknowledgement: «This product includes software written by Tim Hudson (tjh@cryptsoft.com)»
THIS SOFTWARE IS PROVIDED BY ERIC YOUNG «AS IS» AND ANY EXPRESS OR IMPLIED WARRANTIES, INCLUDING, BUT NOT LIMITED TO, THE IMPLIED WARRANTIES OF MERCHANTABILITY AND FITNESS FOR A PARTICULAR PURPOSE ARE DISCLAIMED. IN NO EVENT SHALL THE AUTHOR OR CONTRIBUTORS BE LIABLE FOR ANY DIRECT, INDIRECT, INCIDENTAL, SPECIAL, EXEMPLARY, OR CONSEQUENTIAL DAMAGES (INCLUDING, BUT NOT LIMITED TO, PROCUREMENT OF SUBSTITUTE GOODS OR SERVICES; LOSS OF USE, DATA, OR PROFITS; OR BUSINESS INTERRUPTION) HOWEVER CAUSED AND ON ANY THEORY OF LIABILITY, WHETHER IN CONTRACT, STRICT LIABILITY, OR TORT (INCLUDING NEGLIGENCE OR OTHERWISE) ARISING IN ANY WAY OUT OF THE USE OF THIS SOFTWARE, EVEN IF ADVISED OF THE POSSIBILITY OF SUCH DAMAGE.
The licence and distribution terms for any publically available version or derivative of this code cannot be changed. i.e. this code cannot simply be copied and put under another distribution licence [including the GNU Public Licence.]
Monotype Imaging License Agreement
1Software shall mean the digitally encoded, machine readable, scalable outline data as encoded in a special format as well as the UFST Software.
2You agree to accept a non-exclusive license to use the Software to reproduce and display weights, styles and versions of letters, numerals, characters and symbols (Typefaces) solely for your own customary business or personal purposes at the address stated on the registration card you return to Monotype Imaging. Under the terms of this License Agreement, you have the right to use the Fonts on up to three printers. If you need to have access to the fonts on more than three printers, you need to acquire a multiuser license agreement which can be obtained from Monotype Imaging. Monotype Imaging retains all rights, title and interest to the Software and Typefaces and no rights are granted to you other than a License to use the Software on the terms expressly set forth in this Agreement.
3To protect proprietary rights of Monotype Imaging, you agree to maintain the Software and other proprietary information concerning the Typefaces in strict confidence and to establish reasonable procedures regulating access to and use of the Software and Typefaces.
4You agree not to duplicate or copy the Software or Typefaces, except that you may make one backup copy. You agree that any such copy shall contain the same proprietary notices as those appearing on the original.
5This License shall continue until the last use of the Software and Typefaces, unless sooner terminated. This License may be terminated by Monotype Imaging if you fail to comply with the terms of this License and such failure is not remedied within thirty (30) days after notice from Monotype Imaging. When this License expires or is terminated, you shall either return to Monotype Imaging or destroy all copies of the Software and Typefaces and documentation as requested.
6You agree that you will not modify, alter, disassemble, decrypt, reverse engineer or decompile the Software.
7Monotype Imaging warrants that for ninety (90) days after delivery, the Software will perform in accordance with Monotype Imaging-published specifications, and the diskette will be free from defects in material and workmanship. Monotype Imaging does not warrant that the Software is free from all bugs, errors and omissions.
The parties agree that all other warranties, expressed or implied, including warranties of fitness for a particular purpose and merchantability, are excluded.
8Your exclusive remedy and the sole liability of Monotype Imaging in connection with the Software and Typefaces is repair or replacement of defective parts, upon their return to Monotype Imaging.
In no event will Monotype Imaging be liable for lost profits, lost data, or any other incidental or consequential damages, or any damages caused by abuse or misapplication of the Software and Typefaces.
9Massachusetts U.S.A. law governs this Agreement.
1-9

Правовая информация и правила техники безопасности > Примечание
10 You shall not sublicense, sell, lease, or otherwise transfer the Software and/or Typefaces without the prior written consent of Monotype Imaging.
11Use, duplication or disclosure by the Government is subject to restrictions as set forth in the Rights in Technical Data and Computer Software clause at FAR 252-227-7013, subdivision (b)(3)(ii) or subparagraph (c)(1)(ii), as appropriate. Further use, duplication or disclosure is subject to restrictions applicable to restricted rights software as set forth in FAR 52.227-19 (c)(2).
12You acknowledge that you have read this Agreement, understand it, and agree to be bound by its terms and conditions. Neither party shall be bound by any statement or representation not contained in this Agreement. No change in this Agreement is effective unless written and signed by properly authorized representatives of each party. By opening this diskette package, you agree to accept the terms and conditions of this Agreement.
Knopflerfish License
This product includes software developed by the Knopflerfish Project. http://www.knopflerfish.org
Copyright 2003-2010 The Knopflerfish Project. All rights reserved.
Redistribution and use in source and binary forms, with or without modification, are permitted provided that the following conditions are met:
—Redistributions of source code must retain the above copyright notice, this list of conditions and the following disclaimer.
—Redistributions in binary form must reproduce the above copyright notice, this list of conditions and the following disclaimer in the documentation and/or other materials provided with the distribution.
—Neither the name of the KNOPFLERFISH project nor the names of its contributors may be used to endorse or promote products derived from this software without specific prior written permission.
THIS SOFTWARE IS PROVIDED BY THE COPYRIGHT HOLDERS AND CONTRIBUTORS «AS IS» AND ANY EXPRESS OR IMPLIED WARRANTIES, INCLUDING, BUT NOT LIMITED TO, THE IMPLIED WARRANTIES OF MERCHANTABILITY AND FITNESS FOR A PARTICULAR PURPOSE ARE DISCLAIMED. IN NO EVENT SHALL THE COPYRIGHT OWNER OR CONTRIBUTORS BE LIABLE FOR ANY DIRECT, INDIRECT, INCIDENTAL, SPECIAL, EXEMPLARY, OR CONSEQUENTIAL DAMAGES (INCLUDING, BUT NOT LIMITED TO, PROCUREMENT OF SUBSTITUTE GOODS OR SERVICES; LOSS OF USE, DATA, OR PROFITS; OR BUSINESS INTERRUPTION) HOWEVER CAUSED AND ON ANY THEORY OF LIABILITY, WHETHER IN CONTRACT, STRICT LIABILITY, OR TORT (INCLUDING NEGLIGENCE OR OTHERWISE) ARISING IN ANY WAY OUT OF THE USE OF THIS SOFTWARE, EVEN IF ADVISED OF THE POSSIBILITY OF SUCH DAMAGE.
Apache License (Version 2.0)
Apache License
Version 2.0, January 2004
http://www.apache.org/licenses/
TERMS AND CONDITIONS FOR USE, REPRODUCTION, AND DISTRIBUTION
1.Definitions.
«License» shall mean the terms and conditions for use, reproduction, and distribution as defined by Sections 1 through 9 of this document.
«Licensor» shall mean the copyright owner or entity authorized by the copyright owner that is granting the License.
«Legal Entity» shall mean the union of the acting entity and all other entities that control, are controlled by, or are under common control with that entity. For the purposes of this definition, «control» means (i) the power, direct or indirect, to cause the direction or management of such entity, whether by contract or otherwise, or (ii) ownership of fifty percent (50%) or more of the outstanding shares, or (iii) beneficial ownership of such entity.
«You» (or «Your») shall mean an individual or Legal Entity exercising permissions granted by this License.
«Source» form shall mean the preferred form for making modifications, including but not limited to software source code, documentation source, and configuration files.
1-10

Правовая информация и правила техники безопасности > Примечание
«Object» form shall mean any form resulting from mechanical transformation or translation of a Source form, including but not limited to compiled object code, generated documentation, and conversions to other media types.
«Work» shall mean the work of authorship, whether in Source or Object form, made available under the License, as indicated by a copyright notice that is included in or attached to the work (an example is provided in the Appendix below).
«Derivative Works» shall mean any work, whether in Source or Object form, that is based on (or derived from) the Work and for which the editorial revisions, annotations, elaborations, or other modifications represent, as a whole, an original work of authorship. For the purposes of this License, Derivative Works shall not include works that remain separable from, or merely link (or bind by name) to the interfaces of, the Work and Derivative Works thereof.
«Contribution» shall mean any work of authorship, including the original version of the Work and any modifications or additions to that Work or Derivative Works thereof, that is intentionally submitted to Licensor for inclusion in the Work by the copyright owner or by an individual or Legal Entity authorized to submit on behalf of the copyright owner. For the purposes of this definition, «submitted» means any form of electronic, verbal, or written communication sent to the Licensor or its representatives, including but not limited to communication on electronic mailing lists, source code control systems, and issue tracking systems that are managed by, or on behalf of, the Licensor for the purpose of discussing and improving the Work, but excluding communication that is conspicuously marked or otherwise designated in writing by the copyright owner as «Not a Contribution.»
«Contributor» shall mean Licensor and any individual or Legal Entity on behalf of whom a Contribution has been received by Licensor and subsequently incorporated within the Work.
2.Grant of Copyright License. Subject to the terms and conditions of this License, each Contributor hereby grants to You a perpetual, worldwide, non-exclusive, no-charge, royalty-free, irrevocable copyright license to reproduce, prepare Derivative Works of, publicly display, publicly perform, sublicense, and distribute the Work and such Derivative Works in Source or Object form.
3.Grant of Patent License. Subject to the terms and conditions of this License, each Contributor hereby grants to You a perpetual, worldwide, non-exclusive, no-charge, royalty-free, irrevocable (except as stated in this section) patent license to make, have made, use, offer to sell, sell, import, and otherwise transfer the Work, where such license applies only to those patent claims licensable by such Contributor that are necessarily infringed by their Contribution(s) alone or by combination of their Contribution(s) with the Work to which such Contribution(s) was submitted. If You institute patent litigation against any entity (including a cross-claim or counterclaim in a lawsuit) alleging that the Work or a Contribution incorporated within the Work constitutes direct or contributory patent infringement, then any patent licenses granted to You under this License for that Work shall terminate as of the date such litigation is filed.
4.Redistribution. You may reproduce and distribute copies of the Work or Derivative Works thereof in any medium, with or without modifications, and in Source or Object form, provided that You meet the following conditions:
(a)You must give any other recipients of the Work or Derivative Works a copy of this License; and (b)You must cause any modified files to carry prominent notices stating that You changed the files; and
(c)You must retain, in the Source form of any Derivative Works that You distribute, all copyright, patent, trademark, and attribution notices from the Source form of the Work, excluding those notices that do not pertain to any part of the Derivative Works; and
(d)If the Work includes a «NOTICE» text file as part of its distribution, then any Derivative Works that You distribute must include a readable copy of the attribution notices contained within such NOTICE file, excluding those notices that do not pertain to any part of the Derivative Works, in at least one of the following places: within a NOTICE text file distributed as part of the Derivative Works; within the Source form or documentation, if provided along with the Derivative Works; or, within a display generated by the Derivative Works, if and wherever such third-party notices normally appear. The contents of the NOTICE file are for informational purposes only and do not modify the License. You may add Your own attribution notices within Derivative Works that You distribute, alongside or as an addendum to the NOTICE text from the Work, provided that such additional attribution notices cannot be construed as modifying the License.
You may add Your own copyright statement to Your modifications and may provide additional or different license terms and conditions for use, reproduction, or distribution of Your modifications, or for any such Derivative Works as a whole, provided Your use, reproduction, and distribution of the Work otherwise complies with the conditions stated in this License.
1-11
![]()
Правовая информация и правила техники безопасности > Примечание
5.Submission of Contributions. Unless You explicitly state otherwise, any Contribution intentionally submitted for inclusion in the Work by You to the Licensor shall be under the terms and conditions of this License, without any additional terms or conditions. Notwithstanding the above, nothing herein shall supersede or modify the terms of any separate license agreement you may have executed with Licensor regarding such Contributions.
6.Trademarks. This License does not grant permission to use the trade names, trademarks, service marks, or product names of the Licensor, except as required for reasonable and customary use in describing the origin of the Work and reproducing the content of the NOTICE file.
7.Disclaimer of Warranty. Unless required by applicable law or agreed to in writing, Licensor provides the Work (and each Contributor provides its Contributions) on an «AS IS» BASIS, WITHOUT WARRANTIES OR CONDITIONS OF ANY KIND, either express or implied, including, without limitation, any warranties or conditions of TITLE, NONINFRINGEMENT, MERCHANTABILITY, or FITNESS FOR A PARTICULAR PURPOSE. You are solely responsible for determining the appropriateness of using or redistributing the Work and assume any risks associated with Your exercise of permissions under this License.
8.Limitation of Liability. In no event and under no legal theory, whether in tort (including negligence), contract, or otherwise, unless required by applicable law (such as deliberate and grossly negligent acts) or agreed to in writing, shall any Contributor be liable to You for damages, including any direct, indirect, special, incidental, or consequential damages of any character arising as a result of this License or out of the use or inability to use the Work (including but not limited to damages for loss of goodwill, work stoppage, computer failure or malfunction, or any and all other commercial damages or losses), even if such Contributor has been advised of the possibility of such damages.
9.Accepting Warranty or Additional Liability. While redistributing the Work or Derivative Works thereof, You may choose to offer, and charge a fee for, acceptance of support, warranty, indemnity, or other liability obligations and/or rights consistent with this License. However, in accepting such obligations, You may act only on Your own behalf and on Your sole responsibility, not on behalf of any other Contributor, and only if You agree to indemnify, defend, and hold each Contributor harmless for any liability incurred by, or claims asserted against, such Contributor by reason of your accepting any such warranty or additional liability.
END OF TERMS AND CONDITIONS
APPENDIX: How to apply the Apache License to your work.
To apply the Apache License to your work, attach the following boilerplate notice, with the fields enclosed by brackets «[]» replaced with your own identifying information. (Don’t include the brackets!) The text should be enclosed in the appropriate comment syntax for the file format. We also recommend that a file or class name and description of purpose be included on the same “printed page” as the copyright notice for easier identification within third-party archives.
Copyright [yyyy] [name of copyright owner]
Licensed under the Apache License, Version 2.0 (the «License»); you may not use this file except in compliance with the License. You may obtain a copy of the License at
http://www.apache.org/licenses/LICENSE-2.0
Unless required by applicable law or agreed to in writing, software distributed under the License is distributed on an «AS IS» BASIS, WITHOUT WARRANTIES OR CONDITIONS OF ANY KIND, either express or implied. See the License for the specific language governing permissions and limitations under the License.
1-12

Правовая информация и правила техники безопасности > Примечание
Функция управления энергосбережением
Данный аппарат имеет режим энергосбережения, в котором энергопотребление снижается по истечении определенного времени с момента последнего использования устройства, а также режим ожидания, в котором функции печати и отправки факсов остаются в режиме ожидания, но энергопотребление тем не менее снижается до минимума, когда в течение заданного промежутка времени с устройством не выполняется никаких действий. Кроме того, устройство оснащено режимом «Питание отключено», при котором устройство автоматически выключается по истечении некоторого времени, в течение которого с устройством не выполняются никакие действия.
Энергосберегающий режим
Устройство автоматически переходит в режим низкого энергопотребления по истечении 1 минуты с момента последнего действия с ним. Длительность простоя до перехода в дежурный режим может быть увеличена. Более подробная информация приведена в разделе Энергосберегающий режим и автоматический энергосберегающий режим (стр. 2-17).
Режим ожидания
Устройство автоматически переходит в режим ожидания по истечении 1 минуты с момента последнего его использования. Длительность простоя до перехода в режим ожидания может быть увеличена. Более подробная информация приведена в разделе Режим ожидания и автоматическое ожидание (стр. 2-20).
Режим «Питание выключено»
Устройство автоматически отключает свое питание по истечении 1 часа с момента его последнего использования. Длительность простоя до перехода в режим «Питание выключено» может быть увеличена. Для этого необходимо изменить настройки таймера отключения питания. Вы также можете задать правила для перехода машины в режим «Питание отключено» для отдельных функций. Более подробная информация приведена в разделах Правило выключ. (стр. 8-27) и Таймер выключ. (стр. 8-27).
Функция автоматического двустороннего копирования
Для данного аппарата двустороннее копирование является стандартной функцией. Например, двустороннее копирование на один лист двух односторонних оригиналов позволяет сократить расход бумаги. Более подробная информация приведена в разделе Двустороннее копирование (стр. 6-17).
Печать в двустороннем режиме позволяет уменьшить расход бумаги и способствует сохранению лесных ресурсов. Использование режима двусторонней печати также приводит к уменьшению закупок бумаги и, следовательно, к снижению расходов. Рекомендуется в аппаратах, поддерживающих функцию двусторонней печати, использовать этот режим по умолчанию.
Сбережение ресурсов — бумага
В целях сохранения и рационального использования лесных ресурсов рекомендуется использовать переработанную, а также первичную бумагу, сертифицированную в соответствии с программами рационального использования природных ресурсов или снабженную общепризнанной экологической маркировкой,
соответствующую стандарту EN 12281:2002* или эквивалентному стандарту качества.
Данный аппарат также поддерживает печать на бумаге плотностью 64 г/м2. Использование такой бумаги, на изготовление которой расходуется меньше сырья, вносит дополнительный вклад в сохранение лесных ресурсов.
* : EN12281:2002 «Бумага для печати и офиса — требования к бумаге для получения изображений с помощью сухого тонера»
Более подробную информацию по рекомендуемым типам бумаги можно получить у представителя сервисной службы или у торгового представителя.
1-13

Правовая информация и правила техники безопасности > Примечание
Экологическая польза от функции «управления режимом питания»
Чтобы снизить энергопотребление в случае простоя, аппарат оснащен функцией управления режимом питания, которая автоматически активирует энергосберегающий режим, если аппарат не используется в течение определенного времени.
Хотя для возврата аппарата из энергосберегающего режима в режим ГОТОВНОСТИ потребуется незначительное время, это может существенно снизить энергопотребление. Рекомендуется для работы с аппаратом задать время активации энергосберегающего режима в качестве настройки по умолчанию.
Программа Energy Star (ENERGY STAR®)
Наша компания, будучи участником международной программы Energy Star, определила, что данный продукт соответствует стандартам, утвержденным этой программой.
ENERGY STAR® — добровольная программа эффективного энергопотребления, целью которой является разработка и распространение изделий с высокими показателями энергосбережения, что способствует предотвращению глобального потепления. Приобретая изделия, отвечающие
критериям ENERGY STAR®, пользователи могут внести вклад в уменьшение выбросов парниковых газов при использовании изделия и сократить расходы на энергоресурсы.
1-14
|
2 |
Установка и |
|
|
настройка аппарата |
||
|
В данной главе содержится информация для администратора аппарата, в том числе наименования |
||
|
компонентов, порядок подключения кабелей и установки программного обеспечения. |
||
|
Наименования компонентов ……………………………………………………………………………………………………………. |
2-2 |
|
|
Внешняя сторона аппарата ……………………………………………………………………………………………………. |
2-2 |
|
|
Разъемы/внутренние компоненты ………………………………………………………………………………………….. |
2-3 |
|
|
С установленным дополнительным оборудованием ……………………………………………………………….. |
2-4 |
|
|
Подключение аппарата и других устройств ……………………………………………………………………………………… |
2-5 |
|
|
Подсоединение кабелей …………………………………………………………………………………………………………………. |
2-6 |
|
|
Подсоединение кабеля LAN …………………………………………………………………………………………………… |
2-6 |
|
|
Подсоединение кабеля USB ………………………………………………………………………………………………….. |
2-7 |
|
|
Подсоединение кабеля питания …………………………………………………………………………………………….. |
2-7 |
|
|
Включение/выключение питания …………………………………………………………………………………………………….. |
2-8 |
|
|
Включение питания ……………………………………………………………………………………………………………….. |
2-8 |
|
|
Выключение питания …………………………………………………………………………………………………………….. |
2-8 |
|
|
Вход в систему/выход из системы …………………………………………………………………………………………………… |
2-9 |
|
|
Вход ……………………………………………………………………………………………………………………………………… |
2-9 |
|
|
Выход …………………………………………………………………………………………………………………………………. |
2-10 |
|
|
Настройки аппарата по умолчанию ………………………………………………………………………………………………… |
2-11 |
|
|
Установка даты и времени ……………………………………………………………………………………………………. |
2-11 |
|
|
Настройка сети (подключение с помощью кабеля подключения к локальной сети) …………………. |
2-13 |
|
|
Функция экономии энергии ……………………………………………………………………………………………………………. |
2-17 |
|
|
Энергосберегающий режим и автоматический энергосберегающий режим …………………………….. |
2-17 |
|
|
Режим ожидания и автоматическое ожидание ………………………………………………………………………. |
2-20 |
|
|
Установка программного обеспечения …………………………………………………………………………………………… |
2-25 |
|
|
Программное обеспечение на DVD (Windows) ………………………………………………………………………. |
2-25 |
|
|
Установка программного обеспечения в Windows …………………………………………………………………. |
2-26 |
|
|
Удаление программного обеспечения …………………………………………………………………………………… |
2-32 |
|
|
Установка программного обеспечения на компьютер Mac ……………………………………………………… |
2-33 |
|
|
Установка TWAIN-драйвера …………………………………………………………………………………………………. |
2-35 |
|
|
Установка WIA-драйвера ……………………………………………………………………………………………………… |
2-37 |
|
|
Проверка счетчика ……………………………………………………………………………………………………………………….. |
2-38 |
|
|
Дополнительная подготовка для администратора ………………………………………………………………………….. |
2-39 |
|
|
Отправка документов на ПК …………………………………………………………………………………………………. |
2-39 |
|
|
Усиление безопасности ……………………………………………………………………………………………………….. |
2-39 |
|
|
Command Center RX ……………………………………………………………………………………………………………………… |
2-41 |
|
|
Доступ к Command Center RX ………………………………………………………………………………………………. |
2-42 |
|
|
Изменение настроек безопасности ………………………………………………………………………………………. |
2-44 |
|
|
Изменение информации об устройстве ………………………………………………………………………………… |
2-46 |
|
|
Настройки электронной почты ……………………………………………………………………………………………… |
2-48 |
|
|
Регистрация адресатов ……………………………………………………………………………………………………….. |
2-53 |
|
|
Создание нового пользовательского ящика …………………………………………………………………………… |
2-55 |
|
|
Печать документа, сохраненного в пользовательском ящике …………………………………………………. |
2-56 |
|
|
Передача данных из других наших продуктов ………………………………………………………………………………… |
2-58 |
|
|
Перенос адресной книги ………………………………………………………………………………………………………. |
2-58 |
2-1

Установка и настройка аппарата > Наименования компонентов
Наименования компонентов
Внешняя сторона аппарата |
|||||
|
1 |
2 |
3 |
4 |
13 |
14 |
|
10 |
15 |
||||
|
5 |
11 |
16 |
|||
|
6 |
|||||
|
7 |
12 |
||||
|
8 |
|||||
|
17 |
|||||
|
9 |
|
1 |
Автоподатчик оригиналов |
10 |
Ограничитель оригиналов |
|
2 |
Направляющие ширины оригиналов |
11 |
Гнездо памяти USB |
|
3 |
Лоток оригиналов |
12 |
Кнопка открытия передней крышки |
|
4 |
Выходной лоток оригиналов |
13 |
Щелевое стекло |
|
5 |
Внутренний лоток |
14 |
Метки размера оригинала |
|
6 |
Стопор бумаги |
15 |
Стекло оригинала |
|
7 |
Передняя крышка |
16 |
Панель управления |
|
8 |
Кассета 1 |
17 |
Ручки |
|
9 |
Выключатель питания |
18 Задняя крышка
19 Ручки
 С установленным дополнительным оборудованием (стр. 2-4)
18
19
2-2

Установка и настройка аппарата > Наименования компонентов
Разъемы/внутренние компоненты
|
3 |
|||
|
4 |
6 |
||
|
5 |
7 |
||
|
1 |
Разъем для подключения к телефонной линии |
5 |
Разъем интерфейса USB |
|
2 |
Разъем для подключения к телефонному аппарату |
6 |
Рычаг для конвертов |
|
3 |
Дополнительный интерфейс |
7 |
Крышка блока термофиксатора |
|
4 |
Разъем сетевого интерфейса |
11
12
13
12 

14
8Направляющие ширины бумаги
9Опорная часть универсального лотка
10Универсальный лоток
11Направляющая длины бумаги
15
12 Направляющие ширины бумаги
13 Нижняя пластина
14 Диск формата
15 Крышка секции двусторонней печати
2-3

Установка и настройка аппарата > Наименования компонентов
17 18
|
19 |
20 |
|||
|
16 |
Контейнер с (черным) тонером |
19 |
Левая крышка |
|
|
17 |
Фиксирующий рычаг контейнера с тонером |
20 |
Бункер для отработанного тонера |
|
|
18 |
Регистрационный валик |
С установленным дополнительным оборудованием
1
2
3
4
5
|
1 |
Устройство считывания карт |
4 |
Кассета 4 |
|
2 |
Кассета 2 |
5 |
Кассета 5 |
|
3 |
Кассета 3 |
Дополнительное оборудование (стр. 11-2) |
2-4

Установка и настройка аппарата > Подключение аппарата и других устройств
Подключение аппарата и других устройств
Приготовьте кабели, требующиеся для эксплуатации аппарата и подходящие к вашей среде подключений.
Подключение аппарата к ПК через USB
МФУ
USB
Подключение аппарата к ПК в сети


 ПРИМЕЧАНИЕ
Если предполагается использование аппарата с установленным комплектом беспроводных интерфейсов, нет необходимости подключать кабель ЛВС. Для использования аппарата в беспроводной локальной сети требуется изменить его настройки по умолчанию (с помощью системного меню).
Опциональная сеть (стр. 8-13)
Допустимые типы кабелей
|
Среда подключения |
Функция |
Необходимый кабель |
|
Подключение кабеля LAN к |
Принтер/сканер/сетевой факс*1 |
Кабель подключения к локальной сети |
|
аппарату |
(10BASE-T, 100BASE-TX, 1000BASE-T) |
|
|
Подключение кабеля USB к |
Принтер/сканер (TWAIN/WIA) |
Кабель, совместимый с интерфейсом USB |
|
аппарату |
2.0 (высокоскоростной, совместимый с |
|
|
интерфейсом USB, макс. 5,0 м) |
||
|
*1 Только на изделиях с установленной функцией факса. |
2-5

Установка и настройка аппарата > Подсоединение кабелей
Подсоединение кабелей
Подсоединение кабеля LAN
 ВАЖНО Если питание включено, выключите его с помощью выключателя.
 Выключение питания (стр. 2-8)
1 Подключите кабель к аппарату.
1 Подключите кабель LAN к разъему сетевого интерфейса.
2 Подсоедините другой конец кабеля к концентратору.
2 Настройте аппарат.
Включите аппарат и выполните конфигурирование сети.
Для получения подробной информации см. Настройка сети (подключение с помощью кабеля  подключения к локальной сети) на стр. 2-13.
2-6

Установка и настройка аппарата > Подсоединение кабелей
Подсоединение кабеля USB
 ВАЖНО Если питание включено, выключите его с помощью выключателя.
 Выключение питания (стр. 2-8)
1 Подключите кабель к аппарату.
1 Подсоедините кабель USB к разъему интерфейса USB на левой стороне корпуса.
2 Подсоедините другой конец кабеля к ПК.
Подсоединение кабеля питания
1 Подключите кабель к аппарату.
1 Снимите крышку.
2Подсоедините один конец прилагаемого кабеля питания к аппарату, а другой — к розетке.
 ВАЖНО Используйте только кабель питания, поставляемый с аппаратом.
2-7
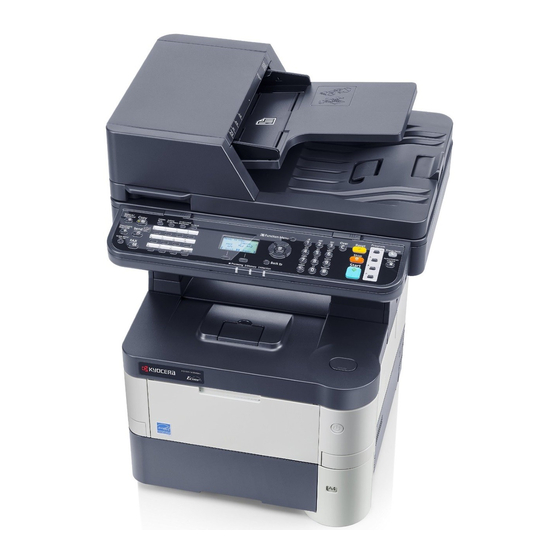
- Manuals
- Brands
- Kyocera Manuals
- Fax Machine
- ECOSYS M3540dn
- Operation manual
-
Contents
-
Table of Contents
-
Troubleshooting
-
Bookmarks
Quick Links
›
›
›
›
COPY
SCAN
FAX
FAX OPERATION GUIDE
ECOSYS M3540dn
Related Manuals for Kyocera ECOSYS M3540dn
Summary of Contents for Kyocera ECOSYS M3540dn
-
Page 1
› › › › PRINT COPY SCAN FAX OPERATION GUIDE ECOSYS M3540dn… -
Page 2: Table Of Contents
Contents Contents ……………………….i Preface ………………………..v About the FAX Operation Guide (this Guide) …………….v Structure of the guide …………………v Conventions in This Guide ……………….. vi Legal and Safety Information ……….1-1 Notice ……………………… 1-2 Safety Conventions in This Guide …………….1-2 About this Operation Guide ………………
-
Page 3
Original Image ……………………3-20 FAX Resolution ……………………3-21 Orig.Orientation ……………………3-21 Continuous Scan …………………… 3-21 File Name Entry ……………………3-21 JobFinish Notice ……………………. 3-21 FAX Delayed Transmission ………………..3-22 Cancelling and Sending Delayed Transmissions (Queued) ……..3-22 FAX Direct Transmission ………………..3-23 Cancelling Direct Transmission ……………. -
Page 4
Deleting Originals after Printing from a Sub Address Box ……..5-17 Deleting Originals from a Sub Address Box …………. 5-18 Printing a Sub Address Box List …………….5-19 Sub Address Transmission ………………5-20 Polling Communication ………………….. 5-22 Polling Transmission ………………..5-22 Polling Reception ………………… -
Page 5
Report ……………………8-3 Common Settings ………………….. 8-3 FAX ……………………..8-4 Adjust/Maint………………….. 8-8 Transmission Restriction …………………. 8-9 Registering Permit FAX No………………8-10 Changing and Deleting Permit FAX No…………..8-11 Registering Reject FAX No………………8-11 Changing and Deleting Reject FAX No…………..8-12 Registering Permit ID No. -
Page 6: Contents
Preface This Operation Guide is intended to help you operate the machine correctly, perform routine maintenance and take a simple troubleshooting action as necessary, so that you can always use the machine in good condition. Please read the Operation Guide before using the facsimile. Keep it close to the facsimile for easy reference. About the FAX Operation Guide (this Guide) Structure of the guide This Operation Guide contains the following chapters.
-
Page 7: Conventions In This Guide
Conventions in This Guide Adobe Reader X is used as an example in the explanations below. Click an item in the Table of Contents Click to move from the current page to the previously to jump to the corresponding page. displayed page.
-
Page 8
Conventions used in procedures for operating the machine Operation panel keys that are pressed are outlined in red. Procedures consisting of a sequence of operation panel or touch panel operations are numbered as shown below. -
Page 9: Legal And Safety Information
Legal and Safety Information Please read this information before using your machine. This chapter provides information on the following topics. Notice …………………………… 1-2 Safety Conventions in This Guide ………………….1-2 About this Operation Guide ……………………1-3 Legal Notice ……………………….. 1-3 FCC PART 68 REQUIREMENTS ………………….
-
Page 10: Notice
Legal and Safety Information > Notice Notice Safety Conventions in This Guide The sections of this handbook and parts of the facsimile marked with symbols are safety warnings meant to protect the user, other individuals and surrounding objects, and ensure correct and safe usage of the facsimile. WARNING: Indicates that serious injury or even death may result from insufficient attention to or incorrect compliance with the related points.
-
Page 11: About This Operation Guide
Legal and Safety Information > Notice About this Operation Guide This Operation Guide contains information on using the facsimile functions of this machine. Please read the Operation Guide before you start using the machine. During use, refer to the Operation Guide for your machine for information regarding the sections listed below. Environment Precautions for Use Loading Paper…
-
Page 12: Important Safety Instructions
Legal and Safety Information > Notice 7 If trouble is experienced with this equipment, please contact the following company for repair and (or) warranty information: KYOCERA Document Solutions America, Inc. 225 Sand Road, Fairfield, New Jersey 07004-0008, USA Phone: +1-973-808-8444…
-
Page 13: Declarations To European Directives
Legal and Safety Information > Notice 4 Utiliser seulement le cordon d’alimentation et le type de piles indiqués dans ce manuel. Ne pas jeter les piles dans le feu: elles peuvent exploser. Se conformer aux règlements pertinents quant à l’élimination des piles. CONSERVER CES INSTRUCTIONS Declarations to European Directives DECLARATION OF CONFORMITY TO 2004/108/EC, 2006/95/EEC, 93/68/EEC, 1999/5/EC and 2009/125/EC…
-
Page 14: Network Compatibility Declaration
Legal and Safety Information > Notice • AN 11R00 AN for P • GR 04R00 National AN for GR • AN 12R00 AN for E • NO 01R00 National AN for N • AN 16R00 General Advisory Note • NO 02R00 National AN for N •…
-
Page 15: Before Using The Fax Machine
Before Using the Fax Machine This chapter explains the following topics: Part Names and Functions ……………………..2-2 Machine …………………………2-2 Operation Method ………………………. 2-5 Setting Date and Time ……………………….2-6 Local FAX Information Entry ……………………..2-8 TTI (Transmit Terminal Identification) …………………. 2-8 Local FAX Name ……………………….
-
Page 16: Part Names And Functions
Before Using the Fax Machine > Part Names and Functions Part Names and Functions Machine This chapter explains the names of parts when the machine is used as a fax machine. For the parts required when functions other than FAX are used, refer to the machine’s Operation Guide. Operation panel Perform the fax operation with this panel.
-
Page 17
Before Using the Fax Machine > Part Names and Functions Document Processor (DP) Top Cover Open this cover when the original jammed in the Document Processor. Original Width Guides Adjust these guides according to the original width. Original Table Stack the sheet originals on this table. Original Eject Table Read originals are ejected onto this table. -
Page 18: Operation Panel
Before Using the Fax Machine > Part Names and Functions Operation Panel Displays the Status/Job Numeric keys. Cancel screen. Enter numbers and Displays the function menu for copy, symbols. print, transmission and document box. Displays the Document Box/USB screen. Increments or decrements numbers, or selects menu in the message display.
-
Page 19: Operation Method
Before Using the Fax Machine > Part Names and Functions Operation Method This section explains how to operate the setting menus on the message display. Displaying the Menus and Configuring Settings Press the [System Menu/Counter] key, or [Function Menu] key to display the setting menus. Press the [▲] key, [▼] key, [◄] key, [►] key, [OK] key, or [Back] key to select a menu, and perform settings.
-
Page 20: Setting Date And Time
Before Using the Fax Machine > Setting Date and Time Setting Date and Time Set the local date and time at the place of installation. When you send a fax using the transmission function, the date and time as set here will be printed in the header of the fax.
-
Page 21
Before Using the Fax Machine > Setting Date and Time Press the [OK] key. Press the [▲] or [▼] key to set the hour, minute, and second. Press the [◄] and [►] key to move the cursor right and left. Date/Time: Hour Min. -
Page 22: Local Fax Information Entry
Before Using the Fax Machine > Local FAX Information Entry Local FAX Information Entry Register the local FAX information below. TTI (Transmit Terminal Identification) Select whether or not to print the local fax information on the fax on the receiving system. Display the screen.
-
Page 23: Local Fax Number
Before Using the Fax Machine > Local FAX Information Entry Press the [OK] key. Set the Local FAX Name Use the numeric keys to enter the local fax name. Local FAX Name: Sales department Common Settings Text NOTE Refer to Character Entry Method on page 10-2 for details on entering characters.
-
Page 24: Local Fax Id
Before Using the Fax Machine > Local FAX Information Entry Local FAX ID Enter the local fax ID. The local fax ID can limit other parties with which you can communicate. The Local FAX ID is used for transmission limit purposes. (Refer to Transmission Restriction on page 8-9.) Display the screen.
-
Page 25: Ecm Tx
Before Using the Fax Machine > Local FAX Information Entry Press the [OK] key. Press the [▲] or [▼] key to select [FAX Dialing Mode]. Press the [OK] key. Set the FAX Dialing Mode. Press [▲] or [▼] to select [Tone(DTMF)] or [Pulse(10pps)]. FAX Dialing Mode: Tone(DTMF) Pulse(10pps)
-
Page 26: Tx Start Speed
Before Using the Fax Machine > Local FAX Information Entry TX Start Speed Set the TX Start Speed. When communication conditions are bad, the fax may not be transmitted correctly. In that case, set a lower TX Start Speed. NOTE Normally this should be used with the default setting.
-
Page 27: Pbx Setting (Europe Only)
Before Using the Fax Machine > Local FAX Information Entry PBX Setting (Europe only) When using this machine in environment in which PBX for connection to multiple phones for business use is installed, perform the following PBX setting. NOTE Before connecting this machine to PBX, it is recommended to contact the company that installed the PBX system to request connection of this machine.
-
Page 28: Registering Destinations In The Address Book
Before Using the Fax Machine > Registering Destinations in the Address Book Registering Destinations in the Address Book Save frequently used destinations to the Address Book or One Touch Keys. The saved destinations can be changed. The destinations are available for Send as E-mail, Send to Folder, and Fax Transmission. NOTE Contact addresses can also be registered with Command Center RX.
-
Page 29
Before Using the Fax Machine > Registering Destinations in the Address Book Menu: Detail/Edit Delete Add Address Press the [OK] key. Select the registration method. Press the [▲] or [▼] key to select [Contact]. Press the [OK] key. Enter the contact name. Press the [] or [] key to select [Contact Name]. -
Page 30
Before Using the Fax Machine > Registering Destinations in the Address Book Enter the fax number. FAX No. Entry: 0123456789 Detail Enter the fax number of the receiving system using the numeric keys. Up to 32 digits can be entered as the fax number of the receiving system. Pressing the [Address Recall/Pause] key adds about three seconds of waiting time during… -
Page 31
Before Using the Fax Machine > Registering Destinations in the Address Book Press the [OK] key. FAX No. Entry: 0123456789 Detail Enter the address number. Press the [] or [] key to select [Address Number]. Detail: Address Number: 6/ 6 Edit Press [Edit]. -
Page 32: Adding A Group
Before Using the Fax Machine > Registering Destinations in the Address Book Adding a Group Compile two or more contacts into a group. Designations in the group can be added at the same time. When adding a group, a maximum of 50 groups can be added in the Address Book. Before adding a group in the Address Book, the contacts to be included in the group must be added first.
-
Page 33
Before Using the Fax Machine > Registering Destinations in the Address Book Enter the group name. Press the [] or [] key to select [Group Name]. Detail: Group Name: 1/ 3 Edit Press [Edit]. Enter the group name. Group Name: Sales Group Common Settings Text… -
Page 34
Before Using the Fax Machine > Registering Destinations in the Address Book NOTE When checking information of the destination, press [Menu], select [Details], and then press the [OK] key. Press the [OK] key. The fax number and address of the member selected are displayed. Press the [OK] key. -
Page 35: Editing And Deleting Address Book Entries
Before Using the Fax Machine > Registering Destinations in the Address Book Enter the address number. Address Number: (001 — 250) Press the [▲], [▼] key or numeric keys to enter a particular Address Number (001-250). Address Number is an ID for a destination. Register the group.
-
Page 36
Before Using the Fax Machine > Registering Destinations in the Address Book Detail: Contact Name 1/ 6 Edit Press [Edit]. Refer to Adding a contact on page 2-14 Adding a Group on page 2-18 for how to change. To delete a member (group) Press the [▲] or [▼] key to select the group to edit. -
Page 37: Printing Address List
Before Using the Fax Machine > Registering Destinations in the Address Book Press the [▲] or [▼] key to select [Delete]. Press the [OK] key. Press [Yes] in confirmation screen. Printing Address List You can print the list of destinations registered in the Address Book. You can sort the list in the order of index or address numbers of the destinations.
-
Page 38: Adding A Destination On One Touch Key
Before Using the Fax Machine > Registering Destinations in the Address Book Adding a Destination on One Touch Key Add a new destination (contact or group) on One Touch Key. Adding a Destination Add a new destination (contact or group). A maximum of 22 destinations can be registered. To register a destination to a One Touch Key, it must first be registered in the Address Book.
-
Page 39: Editing And Deleting One Touch Key
Before Using the Fax Machine > Registering Destinations in the Address Book Press the [OK] key. The fax number and address of the destination selected are displayed. Press the [OK] key. [Completed.] is displayed and One Touch Key is registered. Editing and Deleting One Touch Key Edit and delete the destinations you added to One Touch Key.
-
Page 40
Before Using the Fax Machine > Registering Destinations in the Address Book Press the [OK] key. The fax number and address of the destination selected are displayed. Press the [OK] key. [Completed.] is displayed and the destination is changed. When deleting registration contents Press the [▲] or [▼] key to select [Delete]. -
Page 41: Sending Faxes
Sending Faxes This chapter explains the following topics: Basic transmission procedure ……………………..3-2 Checking and Editing Destinations ………………….3-5 Checking the Send Status ……………………3-7 Priority Override Send ……………………..3-7 Cancelling the Transmission ……………………3-9 Using redial ……………………….. 3-11 Methods For Entering the Destination ………………….3-12 Entering the destination fax number with the numeric keys …………..
-
Page 42: Basic Transmission Procedure
Sending Faxes > Basic transmission procedure Basic transmission procedure The basic procedure for using the fax system is explained below. Press the [FAX] key. Ready to send. 2013/08/08 10:10 200x100dpi Quiet FAX Res. The base screen for fax appears. Place the originals. Refer to the machine’s Operation Guide for placing originals.
-
Page 43
Sending Faxes > Basic transmission procedure NOTE Up to 64 digits can be entered as the fax number of the receiving system. Pressing the [Address Recall/Pause] key adds about three seconds of waiting time during dialing. For example, when dialing the receiving system on an external line, you can use this method to insert a pause before resuming dialing after you dial a specific number. -
Page 44
Sending Faxes > Basic transmission procedure NOTE When continuous scan is set, you can continue with scanning of a next original after an original on the glass surface has been stored in memory. Every time one page is scanned, you perform an operation to allow continued scanning, and after all the originals have been stored in memory, the receiving system is dialed. -
Page 45: Checking And Editing Destinations
Sending Faxes > Basic transmission procedure Checking and Editing Destinations Check and edit a selected destination. Press the [FAX] key. Press the [Confirm/Add Destination] key. Check the destination. Press the [▲] or [▼] key to select the destination you want to check. Dest.
-
Page 46
Sending Faxes > Basic transmission procedure NOTE When editing information of the destination, press [Details]. Press the [OK] key. Add the destination (when entering the FAX number using the numeric keys). Press [Add]. Dest. Confirm.: 0123456789 Sales Group 9876543210 Exit Enter the fax number of the receiving system using the numeric keys. -
Page 47: Checking The Send Status
Sending Faxes > Basic transmission procedure Checking the Send Status Press the [Status/Job Cancel] key. Display the send job status screen. Press the [▲] or [▼] key to select [Send Job Status]. Press the [OK] key. Display the send job status screen. Check the details of the transmission job.
-
Page 48
Sending Faxes > Basic transmission procedure Press the [OK] key. Display the send job status screen. Press the [▲] or [▼] key to select the fax job to be sent by priority override. Send Job Status: 0010 0123456789 0011 1234567890 . . . 0012 2345678901 . -
Page 49: Cancelling The Transmission
Sending Faxes > Basic transmission procedure Cancelling the Transmission The method for cancelling communication with this machine differs depending on the transmission method (memory transmission or direct transmission) and communication form. Methods of cancelling in various cases are explained here. Cancelling Memory Transmission (while originals are being scanned) Press the [Stop] key.
-
Page 50
Sending Faxes > Basic transmission procedure Cancelling Transmission (during communication) Follow this procedure to break the connection and stop transmission/reception. Press the [Status/Job Cancel] key. Disconnection of communication. Press the [▲] or [▼] key to select [FAX]. Press the [OK] key. Check the status of communication. -
Page 51: Using Redial
Sending Faxes > Basic transmission procedure Using redial Redial is a function allowing you to dial the last entered number once again. Use this when the receiving system does not respond when you have tried to send a fax. When you want to send the fax to the same receiving system, press the [Address Recall/Pause] key, and you can call the receiving system you dialed…
-
Page 52: Methods For Entering The Destination
Sending Faxes > Methods For Entering the Destination Methods For Entering the Destination Entering the destination fax number with the numeric keys The procedure for entering the destination fax number with the numeric keys is explained below. NOTE Dest. Entry(FAX) on page 8-7 is set to [Prohibit], it is not possible to directly enter a fax number.
-
Page 53: Choosing From The Address Book
Sending Faxes > Methods For Entering the Destination Item Description Sub Address Set this to transmit using a Sub Address. For details, refer to Sub Address Transmission on page 5-20. Encrypted TX This is set when using encrypted transmission to send the data. For details, refer Using the Encrypted Transmission on page 5-32.
-
Page 54
Sending Faxes > Methods For Entering the Destination Press the [▲] or [▼] key to select the destination. Address Book: Sales Department 1 Sales Group Support Department Menu NOTE When checking information of the destination, press [Menu], select [Details], and then press the [OK] key. -
Page 55: Choosing By One Touch Key
Sending Faxes > Methods For Entering the Destination Choosing by One Touch Key Select the destination using the One Touch Keys. NOTE For more information on adding One Touch keys, refer to Adding a Destination on One Touch Key on page 2-24.
-
Page 56: Login/Logout
Sending Faxes > Login/Logout Login/Logout Logging in when User Accounting has been Enabled When user accounting has been enabled, you need to enter a User ID and Password to use the machine. Login Enter the login user name. If this screen is displayed during operations, press the [OK] key while the column for entering a login user name is selected.
-
Page 57
Sending Faxes > Login/Logout Enter the login password using the numeric keys and press the [OK] key. Login Password: Text For details on character entry, refer to Character Entry Method on page 10-2. Press [Login]. Logout To logout from the machine, press the [Authentication/Logout] key to return to the login user name/login password entry screen. -
Page 58: Logging In When Job Accounting Has Been Enabled
Sending Faxes > Login/Logout Logging in when Job Accounting has been Enabled When job accounting has been enabled, you need to enter an Account ID when using the machine. Login Enter the account ID. If this screen is displayed during operations, enter the account ID. Account ID: Counter NOTE…
-
Page 59: Fax Transmission Functions
Sending Faxes > Fax transmission functions Fax transmission functions To configure the settings for functions, press the key of the function you want to configure. You can also press the [Function Menu] key to select from other functions displayed on the message display. Operation Method (page 2-5) Selects the item displayed or changes the numeric value.
-
Page 60: Quiet Mode
Sending Faxes > Quiet Mode Reference Function Description page Manual Send This method allows you to send originals by pressing page 3-25 the [Start] key after confirming that the telephone line has connected to the receiving system. NOTE For the procedure for transmitting FAX, refer to Basic transmission procedure on page 3-2.
-
Page 61: Fax Resolution
Sending Faxes > FAX Resolution FAX Resolution Select fineness of images when sending FAX. The larger the number, the better the image resolution. However, better resolution also means larger file sizes and longer send times. Item Description 200x100dpi Norm.(Normal) when sending originals with standard size Typical character size: 10.5 point Resolution Resolution characters…
-
Page 62: Fax Delayed Transmission
Sending Faxes > FAX Delayed Transmission FAX Delayed Transmission Set a send time. You can use delayed transmission together with the broadcast transmission function, etc. Item Description Does not use the delayed transmission. Uses the delayed transmission. Start Time Set the time from between 00:00 and 23:59 in one-minute increments. IMPORTANT If the current time displayed on the message display is not correct, you cannot send originals correctly at the preset time.
-
Page 63: Fax Direct Transmission
Sending Faxes > FAX Direct Transmission Canceling a job and immediate transmission. Canceling a job Press the [▲] or [▼] key to select the job to cancel. Scheduled Job: 0010 0123456789 0011 1234567890 0012 2345678901 Cancel Menu Press [Cancel]. Press [Yes] in confirmation screen. The selected job is deleted. Immediate transmission Press the [▲] or [▼] key to select the job you want to send by immediate transmission.
-
Page 64: Cancelling Direct Transmission
Sending Faxes > FAX TX Report Cancelling Direct Transmission During direct transmission, to cancel communication during transmission, press the [Stop] key. The originals that have been scanned are ejected, and the screen returns to the fax default screen. When originals remain in the document processor, take them out.
-
Page 65: Manual Send
Sending Faxes > Manual Send Manual Send This method allows you to send originals by pressing the [Start] key after confirming that the telephone line has connected to the receiving system. NOTE Connecting a telephone set (commercially available product) to this machine enables you to talk with the person at the receiving system before sending originals.
-
Page 66: Using Chain Dial
Sending Faxes > Using Chain Dial Using Chain Dial Chain dial is a function that allows you to dial by linking fax numbers of the receiving systems with a chain number created with a number common to several destinations. By setting multiple phone numbers from several telephone companies to a chain number, you can later choose the one that costs the least to send the fax to a remote or international destination.
-
Page 67
Sending Faxes > Using Chain Dial Press the [OK] key. Chain: 2120123456 Detail To select the next fax number, repeat steps from step 2. Press the [Start] key. The transmission will start. NOTE When On is selected in Check New Dest., a confirmation screen is displayed for the entered FAX number. -
Page 68: Program
Sending Faxes > Program Program By registering sets of frequently used functions as a single program, you can simply press one of the [Program I] to [Program IV] keys as needed to recall those functions. The following functions are already registered in [Program I] key.
-
Page 69: Confirming The Registered Program
Sending Faxes > Program Register the program. Press the one of the [Program I] to [Program IV] keys where you want to register the settings and hold it (2 seconds or more). The current settings are registered to the selected program key. Confirming the Registered Program The settings of the registered program can be confirmed by recalling the program.
-
Page 70: Deleting Program
Sending Faxes > Program Overwrite the program. Press the one of the [Program I] to [Program IV] keys to change and hold it (2 seconds or more). Press the [▲] or [▼] key to select [Overwrite], and press the [OK] key. Menu: Overwrite Delete…
-
Page 71: Receiving Faxes
Receiving Faxes This chapter explains the following topics: FAX Automatic Reception ……………………..4-2 Reception Method ………………………. 4-2 Checking and Changing the Reception Method ………………4-2 Flow of reception ……………………….. 4-3 Canceling reception (Disconnection of communication) …………….4-4 Manual Reception ………………………… 4-5 Flow of reception ………………………..
-
Page 72: Fax Automatic Reception
Receiving Faxes > FAX Automatic Reception FAX Automatic Reception When using this machine as a FAX-dedicated machine that does not receive telephone calls, set the machine to FAX dedicated reception. No special operation is required when receiving faxes. Reception Method This machine allows the following five reception methods.
-
Page 73: Flow Of Reception
Receiving Faxes > FAX Automatic Reception Flow of reception Reception Starts When a fax comes in, the [Processing] indicator blinks and reception automatically begins. NOTE You can change the number of times the ringing tone rings. (Refer to Reception on page 8- Memory Reception When the machine cannot print a fax due to paper running out or a paper jams, it temporarily stores originals that have been sent in the image memory.
-
Page 74: Canceling Reception (Disconnection Of Communication)
Receiving Faxes > FAX Automatic Reception Canceling reception (Disconnection of communication) When you cancel receiving by disconnecting the telephone line during communication, use the following procedure. Display the screen. Press the [System Menu/Counter] key. Disconnection of communication. Press the [▲] or [▼] key to select [FAX]. Press the [OK] key.
-
Page 75: Manual Reception
Receiving Faxes > Manual Reception Manual Reception This method allows you to receive faxes by pressing the hook] key after confirming that the telephone line has connected to the sending system. NOTE To use Manual Reception, you need to change the receiving mode to Manual Reception. To change to manual mode, refer to RX Settings on page 8-6.
-
Page 76: Fax Reception Functions
Receiving Faxes > Fax reception functions Fax reception functions The reception method and fax printing method can be set. What do you want to do? Reference Page Restrict the type of paper that can be used. FAX Media Type page 4-7 …
-
Page 77: Fax Reception Settings
Receiving Faxes > Fax reception settings Fax reception settings FAX Media Type Specify the paper type to be used for print output of the received fax. Supported paper types All Media Type, Plain, Rough, Vellum, Labels, Recycled, Bond, Cardstock, Color, Envelope, Thick, High Quality, Custom 1-8 For more information about configuring settings, refer to Reception on page 8-6.
-
Page 78: Rx Date/Time
Receiving Faxes > Fax reception settings Press the [OK] key. Press the [▲] or [▼] key to select the paper type you want to use for fax reception. Press the [OK] key. Set the paper type. Configure paper settings for fax reception. When selecting the paper type, select the same paper type as you selected in step 3.
-
Page 79: Duplex Printing
Receiving Faxes > Fax reception settings Duplex Printing When received multiple pages of data are the same width, they can be printed out on both sides of paper having the same width as the data. Print on both sides. Do not print on both sides. For more information about configuring settings, refer to Default fax settings on page 8-2.
-
Page 80: Using Convenient Fax Functions
Using Convenient Fax Functions This chapter explains the following topics: Forward Settings …………………………5-2 Type of Forwarding Destination ………………….. 5-2 Setting Forwarding ……………………… 5-2 Registering Forwarding Destination ………………….5-3 Changing and Deleting Registration Contents ………………5-5 Forwarding Time Setting …………………….. 5-6 File Format Setting ……………………..
-
Page 81: Forward Settings
Using Convenient Fax Functions > Forward Settings Forward Settings When you have received a fax, you can forward the received image to other fax machines or computers, or set printing. Type of Forwarding Destination Only one forwarding destination can be specified. When forwarding is set to [On], all received documents will be forwarded to the specified destination.
-
Page 82: Registering Forwarding Destination
Using Convenient Fax Functions > Forward Settings Registering Forwarding Destination Use the procedure below to register a forwarding destination. Display the screen. Press the [System Menu/Counter] key. Press the [▲] or [▼] key to select [FAX]. Press the [OK] key. Press the [▲] or [▼] key to select [Reception].
-
Page 83
Using Convenient Fax Functions > Forward Settings Press the [▲] or [▼] key to select the destination. Contacts: Sales Department 1 Sales Department 2 Sales Department 3 Menu NOTE When selecting the destination, press [Menu] and then [▲] or [▼] key, select [Search(Name)], and then press the [OK] key. -
Page 84: Changing And Deleting Registration Contents
Using Convenient Fax Functions > Forward Settings Changing and Deleting Registration Contents Use the procedure below to change or delete registration contents. Display the screen. Press the [System Menu/Counter] key. Press the [▲] or [▼] key to select [FAX]. Press the [OK] key. Press the [▲] or [▼] key to select [Reception].
-
Page 85: Forwarding Time Setting
Using Convenient Fax Functions > Forward Settings Press the [OK] key. Repeat the entry of the forwarding destination information. Press the [OK] key. To delete the destination Press the [▲] or [▼] key to select [Delete]. Press the [OK] key. Press [Yes] in confirmation screen.
-
Page 86: File Format Setting
Using Convenient Fax Functions > Forward Settings Configure the function. Press the [▲] or [▼] key to select [All day] or [Preset Time]. Forward Time: All day Preset Time To forward all day, select [All day] and press the [OK] key. To set a forwarding start time and end time, select [Preset Time] and press the [OK] key, and then set the start time and end time.
-
Page 87: E-Mail Subject Add. Info Setting
Using Convenient Fax Functions > Forward Settings Press the [▲] or [▼] key to select [Forward Settings]. Press the [OK] key. Press the [▲] or [▼] key to select [File Format]. Press the [OK] key. Configure the function. Press the [▲] or [▼] key to select [PDF], [TIFF] or [XPS]. NOTE If you have selected [PDF] for file format, PDF Encryption functions are available.
-
Page 88: Ftp Encrypted Tx Setting
Using Convenient Fax Functions > Forward Settings FTP Encrypted TX Setting Specify whether to use FTP encryption when you send data. NOTE To use FTP encryption, set SSL to [On] in the Secure Protocol settings. For details, refer to the Operation Guide for the machine. Display the screen.
-
Page 89: Print Setting
Using Convenient Fax Functions > Forward Settings Press the [OK] key. Press the [▲] or [▼] key to select [Forward Settings]. Press the [OK] key. Press the [▲] or [▼] key to select [File Name Entry]. Press the [OK] key. Configure the function.
-
Page 90: Settings For Forwarding From Command Center Rx (Forward Settings)
Using Convenient Fax Functions > Forward Settings Press the [▲] or [▼] key to select [Print]. Press the [OK] key. Configure the function. Press the [▲] or [▼] key to select [On] (print) or [Off] (do not print). Press the [OK] key. Settings for Forwarding from Command Center RX (Forward Settings) You can use Command Center RX on a computer connected to the network to specify the forwarding settings on this…
-
Page 91: Sub Address Box Function
Using Convenient Fax Functions > Sub Address Box Function Sub Address Box Function Sub Address Box A Sub Address Box is a box for storing received originals on the machine to which the FAX System is to be installed. Using sub address reception function, you can store received originals in a personal Sub Address Box. For the method for using a Sub Address Box, see the next section.
-
Page 92: Registering A Sub Address Box
Using Convenient Fax Functions > Sub Address Box Function Registering a Sub Address Box Up to 20 Sub Address Boxes can be registered. NOTE If user login administration is enabled, you can only edit destinations in the Address Book by logging in with administrator privileges.
-
Page 93: Changing/Deleting Sub Address Box
Using Convenient Fax Functions > Sub Address Box Function Use the [▲] or [▼] key or the numeric keys to enter a box number (01 to 20). Press the [OK] key. 10To finish the registration of a box, press the [▲] or [▼] key and select [Exit] then press the [OK] key.
-
Page 94: Printing Originals From A Sub Address Box
Using Convenient Fax Functions > Sub Address Box Function Press the [OK] key. Changing/Deleting Changing Press the [▲] or [▼] key to select the box you want edit. Sub Address Box: Box 1 Box 2 Box 3 Menu Press the [OK] key. NOTE •…
-
Page 95
Using Convenient Fax Functions > Sub Address Box Function Press the [OK] key. Selecting the Originals. Press the [▲] or [▼] key to select the box containing the document you want to print. Press the [OK] key. NOTE If a Sub Address Box is protected by a password, enter the correct password. Press the [▲] or [▼] key to select the document you want to print. -
Page 96: Checking Details
Using Convenient Fax Functions > Sub Address Box Function Checking Details You can use the procedure below to check the details of documents forwarded to a Sub Address Box. Display the screen. Press the [Document Box/USB] key. Press the [▲] or [▼] key to select [Sub Address Box]. Press the [OK] key.
-
Page 97: Deleting Originals From A Sub Address Box
Using Convenient Fax Functions > Sub Address Box Function Selecting the Originals. Press the [▲] or [▼] key to select the box containing the document you want to print. Press the [OK] key. NOTE If a Sub Address Box is protected by a password, enter the correct password. Press the [▲] or [▼] key to select the document you want to print.
-
Page 98: Printing A Sub Address Box List
Using Convenient Fax Functions > Sub Address Box Function Press the [▲] or [▼] key to select [Sub Address Box]. Press the [OK] key. Selecting the Originals. Press the [▲] or [▼] key to select the box containing the document you want to delete. Press the [OK] key.
-
Page 99: Sub Address Transmission
Using Convenient Fax Functions > Sub Address Box Function Press the [▲] or [▼] key to select [Sub Address Box]. Press the [OK] key. Print Press the [▲] or [▼] key to select [SubAddr Box List]. Press the [OK] key. Press [Yes] in confirmation screen.
-
Page 100
Using Convenient Fax Functions > Sub Address Box Function Configure the function. Press [Detail]. FAX No. Entry: 0123456789 Chain Detail Press the [] or [] key to select [Sub Address]. FAX Detail: Sub Address: 1/ 6 1234567890 Edit Press [Edit]. Enter the sub address using the numeric keys. -
Page 101: Polling Communication
Using Convenient Fax Functions > Polling Communication Polling Communication Polling communication is a communication mode in which the transmission of originals on the sending machine is controlled by the receiving machine. This allows the receiving machine to tailor the reception of originals to its own circumstances.
-
Page 102
Using Convenient Fax Functions > Polling Communication Overwrite Setting To allow overwriting, set this option to [Allowed]. Use the procedure below to overwrite the existing document if the same name is added to the new file. If this option is set to [Not Allowed], the existing document will not be overwritten if the same file name is set. Display the screen. -
Page 103: Cancelling Polling Transmissions
Using Convenient Fax Functions > Polling Communication Press the [OK] key. Select the functions. Press the [Function Menu] key. It is possible to set the following functions. Press the [OK] key when the setting is complete. Item Description Quiet Mode Lower print and scan speed for quiet processing.
-
Page 104: Polling Reception
Using Convenient Fax Functions > Polling Communication Polling Reception This function automatically triggers transmission of originals stored on the sending machine when the receiving machine dials the sending machine’s number. NOTE Multiple contacts cannot be specified for polling reception. If you specified a destination for which encrypted communication is registered, encrypted communication is disabled for polling reception.
-
Page 105
Using Convenient Fax Functions > Polling Communication Press the [OK] key. Press the [▲] or [▼] key to select [On]. Press the [OK] key. Specifying destination. For details, refer to Methods For Entering the Destination on page 3-12. Press the [Start] key. The operations for reception begin. -
Page 106: Printing From A Polling Box
Using Convenient Fax Functions > Polling Communication Press the [Start] key. Press the [Start] key. The operations for reception begin. NOTE When On is selected in Check New Dest., a confirmation screen is displayed for the entered FAX number. Re-enter the same FAX number and press [OK]. For details, refer to Check New Dest.
-
Page 107: Checking Details
Using Convenient Fax Functions > Polling Communication Item Description File Name Entry Adds a file name. JobFinish Notice Sends E-mail notice when a job is complete. Print Override Suspends the current job and gives a new job top priority. For each of the functions, refer to the machine’s Operation Guide. Press the [Start] key.
-
Page 108
Using Convenient Fax Functions > Polling Communication Press the [▲] or [▼] key to select [Polling Box]. Press the [OK] key. Selecting the Originals. Press the [▲] or [▼] key to select the document you want to delete. Polling Box: Store File FAX 1 FAX 2… -
Page 109: Encryption
Using Convenient Fax Functions > Encryption Encryption This method allows you to communicate with originals encrypted by the sending system. Therefore, even when a third party tries to view the originals in the middle of communication by some means, the third party is prevented from knowing the actual contents of the originals.
-
Page 110: Registering An Encryption Key
Using Convenient Fax Functions > Encryption Registering an Encryption Key An encryption key is required when registering the Address Book used for encryption communication (the other party is directly entered using the numeric keys) in the sending system and when setting encryption in the receiving system. For the creation of the encryption key, numbers from 0 to 9 and letters from A to F are arranged to form 16 numbers and/or letters arbitrarily.
-
Page 111: Using The Encrypted Transmission
Using Convenient Fax Functions > Encryption Press the [▲] or [▼] key to select [FAX]. Press the [OK] key. Press the [▲] or [▼] key to select [TX/RX Common]. Press the [OK] key. Press the [▲] or [▼] key to select [Encryption Key]. Press the [OK] key.
-
Page 112
Using Convenient Fax Functions > Encryption Press the [FAX] key. Place the originals. Specifying destination. FAX No. Entry: 0123456789 Chain Detail Enter the fax number of the receiving system using the numeric keys. NOTE When encrypted transmission has been set to a destination in the Address Book or One touch keys, you can use the destination. -
Page 113: Setting The Encrypted Reception
Using Convenient Fax Functions > Encryption Select the encryption box. If you need to select an encryption box, set the box. Enter the box number (0000 to 9999) using the numeric keys. Press the [OK] key. Finish the encrypted transmission settings. Press the [OK] key.
-
Page 114
Using Convenient Fax Functions > Encryption Turn on encrypted reception. Press the [▲] or [▼] key to select [Encryption RX]. Press the [OK] key. Press the [▲] or [▼] key to select [On]. Press the [OK] key. Press the [▲] or [▼] key to select the encryption key number that you used to register the encryption key that you decided upon with the sender. -
Page 115: Using A Connected Telephone
Using Convenient Fax Functions > Using a Connected Telephone Using a Connected Telephone It is possible to connect a telephone (a commercially available item) to this machine and use various functions. FAX/TEL Auto Switch Reception This reception method is convenient when using both telephone and fax on a single telephone line. When fax originals have been sent, the machine automatically receives them, and when the other party is calling from a telephone, the machine makes a ringing tone urging the user to respond.
-
Page 116
Using Convenient Fax Functions > Using a Connected Telephone NOTE At the end of the conversation, you can also receive faxes by using the Remote Switch Function. (Refer to Remote Switch Function on page 5-43.) Preparation: Refer to to select [Auto(FAX/TEL)]. RX Settings on page 8-6 The telephone rings. -
Page 117: Fax/Answering Machine Auto Switch Reception
Using Convenient Fax Functions > Using a Connected Telephone FAX/Answering Machine Auto Switch Reception This method is convenient when using both the answering machine and fax. When fax originals have been sent, the machine receives them automatically, and when the call is from a telephone, the machine follows the functions of the connected answering machine.
-
Page 118
Using Convenient Fax Functions > Using a Connected Telephone The telephone rings. The connected telephone set makes ringing tone the set number of times. NOTE If you lift the handset while the telephone set is still making the ringing tone, the machine enters a status the same as manual reception. -
Page 119: Drd Reception (Available For Inch Versions Only)
Using Convenient Fax Functions > Using a Connected Telephone DRD Reception (Available for inch versions only) This reception mode utilizes the Distinctive Ring Pattern service available through some telephone companies. With this service, you can use two or more fax numbers on a single telephone line. Thus, you can use this fax and a telephone on the same line, and you can still designate a different fax number for each of them.
-
Page 120: Manual Send
Using Convenient Fax Functions > Using a Connected Telephone Answer the call. The machine will then ring using the predetermined ring pattern. When the call is from a telephone Lift the handset and speak with the other party. When the conversation is over, fax reception can be initiated manually.
-
Page 121: Manual Reception
Using Convenient Fax Functions > Using a Connected Telephone Press the [Start] key. Transmission begins. Replace the handset. When sending starts, return the handset to its original position. Manual Reception Reception is possible after confirming that the telephone line has connected to the sending party. NOTE FAX Automatic Reception has been preset for the receiving mode of this machine.
-
Page 122: Remote Switch Function
Using Convenient Fax Functions > Using a Connected Telephone Press [ManualRX]. On Hook: ManualRX Reception will start. NOTE When using a telephone set that can send tone signals, use the telephone to start the reception of originals with the remote switch function. (Refer to Remote Switch Function on page 5-43.)
-
Page 123
Using Convenient Fax Functions > Using a Connected Telephone The connected telephone set makes a ringing tone. Lift the handset of the telephone. NOTE You can change the number of times the ringing tone rings. (Refer to Reception on page 8- Press the remote switch dial number (2 digits). -
Page 124: Sending Faxes From Pc
Sending Faxes from This chapter explains the following topics: Flow of Sending Faxes from PC ……………………6-2 Flow of Network FAX Receiving ……………………. 6-2 Setup ……………………………. 6-3 Installing the FAX Driver …………………….. 6-3 Uninstalling the FAX Driver ……………………6-5 Basic Transmission ……………………….6-6 Configuring the Driver Default Settings ………………..
-
Page 125: Flow Of Sending Faxes From Pc
Sending Faxes from PC > Flow of Sending Faxes from PC The Network FAX function enables any PC, which is networked to the machine, to perform sending and receiving of faxes. Its primary features include the following. • PC-prepared document can be sent and received by fax without being printed out. •…
-
Page 126: Setup
Sending Faxes from PC > Setup Setup The following preparation is needed before using Network FAX. Connection to a PC Connect the machine to a PC using the network cable. For details, refer to the machine’s Operation Guide. Machine Registration Using the memory transmission function, select the recipient PC or file format.
-
Page 127
Sending Faxes from PC > Setup Select FAX Driver. Select [Custom Install]. Select the print system to be installed. Click [ Select [FAX Driver]. Click [ Click [Install]. NOTE • The machine cannot be detected unless it is on. If the computer fails to detect the machine, verify that it is connected to the computer via a network or USB cable and that it is turned on and click (Reload). -
Page 128: Uninstalling The Fax Driver
Uninstallation on Windows must be done by a user logged on with administrator privileges. Display the screen. Click [Start] button on the Windows and then select [All Programs], [Kyocera], and [Uninstall Kyocera Product Library] to display the Uninstall Wizard. Uninstall the software.
-
Page 129: Basic Transmission
Sending Faxes from PC > Basic Transmission Basic Transmission Create the document to be sent. Use an application on your computer to create the document to be sent. Set the original size and orientation. Select [Print] from the File menu. The Print dialog box for the application that you are using will appear.
-
Page 130
Sending Faxes from PC > Basic Transmission Select settings on the FAX Setting tab. Specify fax settings such as the original size on the FAX Setting tab, and click [OK]. For detailed information on the settings on the tab, refer to Configuring the Driver Default Settings on page 6-9. -
Page 131
Sending Faxes from PC > Basic Transmission Set the destination. Use the keyboard to enter the destination fax number in the [Address Setting] tab. Click [Add to Destination List]. The destination information will appear in the address list. To send to multiple destinations, repeat this operation. -
Page 132: Configuring The Driver Default Settings
Sending Faxes from PC > Basic Transmission Configuring the Driver Default Settings Use the FAX Setting tab of the print settings screen to set the original size and other transmission conditions. Display the screen. From the start button, click [Control Panel], [Hardware and Sound], and…
-
Page 133: Default Settings Dialog Box
Sending Faxes from PC > Basic Transmission Default Settings Dialog Box By setting the transmission conditions that you use most in this dialog box, you can minimize the need to change the settings each time. The Default Settings dialog box can be accessed by the following procedure: Display the screen.
-
Page 134
Sending Faxes from PC > Basic Transmission Item Description Transmit and Print Check the checkbox when you want to print out the documents at the fax checkbox machine same time as you send them by fax. Display confirm You can check the checkbox to display the destination confirmation screen dialog checkbox and check the destinations before transmission. -
Page 135
Sending Faxes from PC > Basic Transmission Item Description User Login checkbox If the fax machine is set to User Login, select either Use Specific Login User Name Prompt for Login User Name as desired. Use Specific Login User Name: Enter the Login User Name and Password. -
Page 136: Changing Transmit Settings
Sending Faxes from PC > Basic Transmission Changing Transmit Settings Transmit Settings can be changed at the time of transmission. (1) Selecting a Destination from the Address Book NOTE There are three types of Address Books from which you can select the party to transmit to.
-
Page 137
Sending Faxes from PC > Basic Transmission Select the desired Address Book. To select the Address Book registered in the fax machine, select [Address Book/XXXX (model name)] from the drop-down menu. NOTE To use the Windows Address Book, select [Windows Address Book]. -
Page 138
Sending Faxes from PC > Basic Transmission Click on the [OK] button. [Transmit Settings] dialog box will be displayed once again. (2) Subaddress-Based Communication NOTE In order to conduct sub address communication, the other party’s system also needs to be equipped with sub address communication functions of the same type. Open the Option Settings dialog box. -
Page 139
Sending Faxes from PC > Basic Transmission (3) Cover Page Settings A Cover Page can be set as the first page of a fax transmission. In addition to the standard templates for Cover Pages, original templates can be created and used. To attach and transmit a Cover Page, place a check in the check box for [Attach Cover Page]… -
Page 140: Using Cover Pages
Sending Faxes from PC > Basic Transmission Using Cover Pages Cover Page Selection (Transmission Settings) The Cover Page is attached to the fax and sent as the first page. About Cover Pages The Cover Page can be selected from a template. The Cover Page contains such destination information and sender information as that shown below.
-
Page 141
Sending Faxes from PC > Basic Transmission Attaching and Transmitting a Cover Page The procedure for attaching and transmitting a Cover Page is shown below. Open the Transmit Settings dialog box. Perform Steps 1 to 7 of the Basic Transmission method given on page to display the Transmit Settings dialog box. -
Page 142
Sending Faxes from PC > Basic Transmission Add the destination to the destination list. Add this information to the [Destination List] by clicking on the [Add to Destination List] button. To change the recipient information of a destination that has been added to the [Destination List], select the destination to be changed and click on the [Edit] button. -
Page 143
Sending Faxes from PC > Basic Transmission Attach a Cover Page. Click on the [Cover Page] tab and place a check in the [Attach Cover Page] checkbox. Select the Cover Page to be attached. Select a Cover Page template from the [Cover Page Templates] list. -
Page 144
Sending Faxes from PC > Basic Transmission Click on the [Close] button. Edit the Message. Click on the [Edit Message] button. Enter the message to be added to the Cover Page and click on the [OK] button. Item Description Message A maximum of 1,000 characters can be entered. -
Page 145: Cover Page Registration (Default Settings)
Sending Faxes from PC > Basic Transmission Cover Page Registration (Default Settings) If the Cover Page is registered in the Default Settings, the action of selecting the Cover Page for each transmission can be omitted. Template Selection Select the Cover Page template to be registered in the Default Settings. The registration method is as follows.
-
Page 146
Sending Faxes from PC > Basic Transmission Check the contents of the Cover Page. Click on the [Preview] button. A preview of the currently selected template will be displayed. To display a different template, use the drop-down menu at the top of the dialog box or click on the [] or [] button. -
Page 147
Sending Faxes from PC > Basic Transmission Sender Information Registration Please register the sender information to be included on the Cover Page. NOTE For information regarding the registration method, refer to (4) Sender Information Tab on page 6-12. Creating New Cover Page Templates Perform the following procedure to create an original Cover Page template. -
Page 148
Sending Faxes from PC > Basic Transmission Enter the characters. From the Menu bar, click on [Insert] and then [Textbox] and then position the textbox and enter the characters. Position the field box. From the Menu bar’s [Insert] menu, select the field box to be positioned. IMPORTANT If there are too many characters in the entered information, such as recipient name or company name, the information will not fit in the field box and some of… -
Page 149
Sending Faxes from PC > Basic Transmission Menu Item Template Display Inserted Information Sender Company Sender — Company Sender information company name Department Sender — Department Sender information department name Name Sender — Name Sender information sender name FAX Number Sender — FAX Number Sender information FAX number Telephone… -
Page 150: Transmission Control
Sending Faxes from PC > Basic Transmission Transmission Control Perform the following procedure when you want to use your computer to verify the status of a fax transmission currently being processed, or to actually terminate that transmission. Once a fax transmission starts being processed, a Transmission Control icon will be displayed in the Windows Task Bar.
-
Page 151: Managing Jobs
Managing Jobs This chapter explains the following topics: Various Reports for FAX ……………………….. 7-2 Checking FAX Job History ……………………..7-3 Send Job Log and Print Job Log ………………….7-3 Outgoing FAX Log and Incoming FAX Log ………………..7-4 Printing Administrative Reports (Result Rpt Set.) ………………..7-5 Send Result Reports (Send Result) ………………….
-
Page 152: Various Reports For Fax
Managing Jobs > Various Reports for FAX Various Reports for FAX Check the fax transmission results and registration status using the following tools. Reports Display Menu Contents to Timing of Check Reference Location Check Page FAX job history Message display Send Job Log History of latest 16 Any time…
-
Page 153: Checking Fax Job History
Managing Jobs > Checking FAX Job History Checking FAX Job History Send Job Log and Print Job Log You can display the history of the latest 16 each of send (including scan jobs) and receipt (including copy and print jobs) results on the message display for checking.
-
Page 154: Outgoing Fax Log And Incoming Fax Log
Managing Jobs > Checking FAX Job History Outgoing FAX Log and Incoming FAX Log Display the history of the latest 50 each of send and receipt results on the display for checking. NOTE Even when job accounting is enabled, 50 each of send and receipt results are displayed regardless of the account ID. For details of the job history check, refer to the machine’s Operation Guide.
-
Page 155: Printing Administrative Reports (Result Rpt Set.)
Managing Jobs > Printing Administrative Reports (Result Rpt Set.) Printing Administrative Reports (Result Rpt Set.) You can print various administrative reports to check the results of fax transmission or the status of the functional setup. Send Result Reports (Send Result) Each time you send a fax, you can print a report to confirm whether the fax was sent successfully.
-
Page 156: Report For Job Canceled Before Sending
Managing Jobs > Printing Administrative Reports (Result Rpt Set.) Send Result Report Send Result Report Report for Job Canceled before Sending Print a send result report when the job is canceled before being sent. NOTE This is not displayed if E-mail/Folder and Fax are both set to [Off] in Send Result Reports. Display the screen.
-
Page 157: Fax Rx Result Reports
Managing Jobs > Printing Administrative Reports (Result Rpt Set.) If [Dest. or Name] is selected, either the name (destination name) or the destination (FAX No.) stored in the address book is shown. If [Dest. and Name] is selected, both the name (destination name) and destination (FAX No.) are shown. When the destination was directly entered, only the destination (FAX No.) is shown.
-
Page 158
Managing Jobs > Printing Administrative Reports (Result Rpt Set.) Press the [OK] key. Press the [▲] or [▼] key to select [Result Rpt Set.]. Press the [OK] key. Press the [▲] or [▼] key to select [FAX RX Result]. Press the [OK] key. Configure the function. -
Page 159: Activity Report (Outgoing Fax Rpt And Incoming Fax Rpt)
Managing Jobs > Activity Report (Outgoing FAX Rpt and Incoming FAX Rpt) Activity Report (Outgoing FAX Rpt and Incoming FAX Rpt) Activity reports are reports of both the sent faxes and the received faxes. Each report lists the history of the latest 50 sent or received fax data.
-
Page 160
Managing Jobs > Activity Report (Outgoing FAX Rpt and Incoming FAX Rpt) Press the [▲] or [▼] key to select [Report]. Press the [OK] key. Press the [▲] or [▼] key to select [Admin Rpt Set.]. Press the [OK] key. Press the [▲] or [▼] key to select [Outgoing FAX Rpt] or [Incoming FAX Rpt]. -
Page 161: Status Page
Managing Jobs > Status Page Status Page A status page provides information on a number of user setups. FAX-related information includes the Local FAX Number, Local FAX Name, fax line setting, etc. You can print it out as necessary. Display the screen. Press the [System Menu/Counter] key.
-
Page 162: Reporting Fax Receipt Result By E-Mail
Managing Jobs > Reporting FAX Receipt Result by E-mail Reporting FAX Receipt Result by E-mail Fax receipt can also be notified by e-mail instead of checking the receipt result report. Display the screen. Press the [System Menu/Counter] key. Press the [▲] or [▼] key to select [Report]. Press the [OK] key.
-
Page 163
Managing Jobs > Reporting FAX Receipt Result by E-mail Press the [▲] or [▼] key to select the destination. Press the [OK] key. Enter the E-mail address Press the [▲] or [▼] key to select [Address Entry]. Press the [OK] key. Enter the desired e-mail address using the numeric keys. -
Page 164: Confirmation Screen Of Destinations
Managing Jobs > Confirmation Screen of Destinations Confirmation Screen of Destinations When selecting [On] for Dest. Check before Send, the confirmation screen of destinations appears after pressing the [Start] key. For details, refer to Dest. Check before Send in the machine’s Operation Guide. Follow the steps below to confirm the destinations.
-
Page 165
Managing Jobs > Confirmation Screen of Destinations Press [Next]. When you have finished checking all destinations, press [Next]. Press the [Start] key. Start sending. 7-15… -
Page 166: Fax Settings
Fax Settings This chapter explains the following topics: Default fax settings ……………………….8-2 System Menu Settings ……………………..8-2 Report …………………………8-3 Common Settings ………………………. 8-3 FAX …………………………..8-4 Adjust/Maint……………………….. 8-8 Transmission Restriction ………………………. 8-9 Registering Permit FAX No……………………8-10 Changing and Deleting Permit FAX No.
-
Page 167: Default Fax Settings
Fax Settings > Default fax settings Default fax settings This section explains the fax settings in the system menu. Press the [System Menu/Counter] key to show the settings on the message display. Then, select from the settings displayed. Refer to Operation Method on page 2-5.
-
Page 168: Report
Fax Settings > Default fax settings Report Print reports to check the machine settings and status. Default settings for printing the result reports can also be configured. Item Description Report Status Page A status page provides information on a number of user setups. FAX- Print related information includes the Local FAX Number, Local FAX Name, fax line setting, etc.
-
Page 169: Fax
Fax Settings > Default fax settings Timer Setting Item Description Unusable Time This feature sets a time period during which the machine will not print received faxes. Refer to Unusable Time on page 8-18. Function Defaults Item Description FAX Resolution Select the default scanning resolution.
-
Page 170
Fax Settings > Default fax settings Item Description Local FAX Name Register the local FAX name printed in the transmit terminal identification (TTI) area. Refer to Local FAX Name on page 2-8. Local FAX ID Register the local FAX ID. Refer to Local FAX ID on page 2-10. -
Page 171
Fax Settings > Default fax settings Reception Item Description FAX Media Type Specify the paper type to be used for print output of the received fax. Value: All Media Type, Plain, Rough, Vellum, Labels, Recycled, Bond, Cardstock, Color, Envelope, Thick, High Quality, Custom 1-8 Refer to FAX Media Type on page 4-7. -
Page 172
Fax Settings > Default fax settings Item Description Duplex Printing When received multiple pages of data are the same width, they can be printed out on both sides of paper having the same width as the data. Value: On, Off For details, refer to Duplex Printing on page 4-9. -
Page 173: Adjust/Maint
Fax Settings > Default fax settings Adjust/Maint. Adjust printing quality and conduct machine maintenance. Service Setting Item Description FAX Call Set.(Europe only) When using this machine in environment in which PBX for connection to multiple phones for business use is installed, perform the following PBX setting. Exchange Select.
-
Page 174: Transmission Restriction
Fax Settings > Transmission Restriction Transmission Restriction This function allows you to send or receive originals only when communication requirements are met. Using this function can limit other parties with which you can communicate. Specifically, you must register communication requirements (Permit FAX No./Permit ID No.) and set the transmission limit in advance.
-
Page 175: Registering Permit Fax No
Fax Settings > Transmission Restriction Prerequisites Reception Rejection Requirements Reception • Register Reject FAX numbers. • The sender’s Local FAX Number is Rejection (Refer to Registering Reject FAX No. not registered. on page 8-11.) • The sender’s Local Fax Number •…
-
Page 176: Changing And Deleting Permit Fax No
Fax Settings > Transmission Restriction Changing and Deleting Permit FAX No. Display the screen. Press the [System Menu/Counter] key. Press the [▲] or [▼] key to select [FAX]. Press the [OK] key. Press the [▲] or [▼] key to select [TX/RX Restrict.]. Press the [OK] key.
-
Page 177: Changing And Deleting Reject Fax No
Fax Settings > Transmission Restriction Press the [▲] or [▼] key to select [FAX]. Press the [OK] key. Press the [▲] or [▼] key to select [TX/RX Restrict.]. Press the [OK] key. Press the [▲] or [▼] key to select [Reject No. List]. Press the [OK] key.
-
Page 178: Registering Permit Id No
Fax Settings > Transmission Restriction Change/Delete. Changing Press the [▲] or [▼] key to select the Reject FAX No. to be changed. Press the [OK] key. Use the numeric keys to reenter the Reject FAX number. NOTE For the procedure for entering a number, refer to Registering Reject FAX No.
-
Page 179: Changing And Deleting Permit Id No
Fax Settings > Transmission Restriction Press the [OK] key. Use the numeric keys to enter Permit ID No. (0000 to 9999), Press the [OK] key. To register another permit fax number, repeat Steps 2-1 to 2-5. Changing and Deleting Permit ID No. Display the screen.
-
Page 180: Setting Send Restriction
Fax Settings > Transmission Restriction Setting Send Restriction Restrict the other parties to which you send originals only to the ones registered in Permit FAX No. and Permit ID No. as well as the ones registered in the Address Book. To change the sending restriction, follow the steps below. Display the screen.
-
Page 181: Setting Reception Restriction
Fax Settings > Transmission Restriction Setting Reception Restriction Restrict incoming faxes so that you only receive originals from senders registered in Permit FAX No. and Permit ID No. and senders registered in your Address Book. This mode also allows you to set a [Reject List] for Reception Restriction so that reception from senders on the list of Rejected FAX numbers or from senders whose Local FAX Number is not registered are rejected.
-
Page 182
Fax Settings > Transmission Restriction Press the [OK] key. Press the [▲] or [▼] key to select [UnknownNumber RX]. Press the [OK] key. Configure the function. Press the [▲] or [▼] key to select [Prohibit] or [Permit]. Press the [OK] key. To receive faxes from the unknown number, select [Permit]. -
Page 183: Unusable Time
Fax Settings > Unusable Time Unusable Time This feature sets a time period during which the machine will not print received faxes. IMPORTANT When Unusable Time is set, in addition to fax printing, all other printing operations are prohibited during the unusable time period, including printing of copy jobs and printer jobs.
-
Page 184
Fax Settings > Unusable Time NOTE If the same time is set as the start time and end time, you cannot use all day. Press the [OK] key. Set the cancel code Specify the code to temporarily cancel the unusable setting during unusable time. Use the numeric keys to enter Unlock Code (0000 to 9999) Press the [OK] key. -
Page 185: Account Management
Fax Settings > Account Management Account Management Account management is user management that specifies the users who can use the machine and job accounting that controls the usage per account. In user accounting, up to 100 users can be managed using User ID and Password. In job accounting, the status of fax use per account can be known for up to 100 accounts for sending of originals and making communication reservation after entering Account ID.
-
Page 186
Fax Settings > Account Management Restriction of use function When you have enabled job accounting, you need to enter an Account ID when performing the following operations. • Normal transmission • Delayed transmission • Broadcast transmission • Sub address transmission •… -
Page 187: Troubleshooting
Troubleshooting This chapter explains the following topics: Indicators During Sending/Receiving Operation ………………..9-2 Responding to an Attention Indicator Flashes ………………..9-2 Precautions When Turning Power OFF ………………….9-3 Messages …………………………..9-4 Error Code List …………………………9-6 Troubleshooting …………………………9-9…
-
Page 188: Indicators During Sending/Receiving Operation
Troubleshooting > Indicators During Sending/Receiving Operation Indicators During Sending/Receiving Operation The [Processing] and [Memory] indicators show the fax transmission status. • The [processing] indicator blinks during fax transmission and reception. • The [Memory] indicator blinks when source data is being stored in memory for memory transmission. •…
-
Page 189: Precautions When Turning Power Off
Troubleshooting > Precautions When Turning Power OFF Precautions When Turning Power OFF To power off the machine, press the Power switch. You cannot automatically receive a fax when the power switch is turned off. Make sure that the [Processing] indicator and the [Memory] indicator are off before turning off the power switch. Check that the indicators are off.
-
Page 190: Messages
Troubleshooting > Messages Messages When an error occurs, the display may show one of the messages listed below. These will help you identify and correct the problem. NOTE When a transmission error occurs, a sent/receipt result report is produced. Check the error code shown in the report and refer to Error Code List on page 9-6 for a description.
-
Page 191
Troubleshooting > Messages Message Checkpoint Corrective Action Reference Page Polling box limit exceeded. Is [OK] displayed on the screen? The specified box is full, and no further 5-22 Job is canceled. storage is available; Job is canceled. Press the [OK] key. Try to perform the job again after printing or deleting data from the box. -
Page 192: Error Code List
Troubleshooting > Error Code List Error Code List When a transmission error occurs, one of the following error codes is recorded in the TX/RX Result Report and Activity Report. NOTE “U” or “E” will appear in the error code depending on the communication speed setting. Error Code Possible Cause/Action Busy…
-
Page 193
Troubleshooting > Error Code List Error Code Possible Cause/Action U01600 Communication error occurred during reception of high-speed transmission. Ask the sender to reduce the transmission speed and send again. NOTE If the communication error occurs frequently, change the default setting of RX Start Speed in System Menu. -
Page 194
Troubleshooting > Error Code List Error Code Possible Cause/Action U04500 Encrypted reception was canceled because the encryption key does not match. U05100 Transmission was canceled because communication requirements are not met due to the transmission restriction set on this machine. Check with the recipient. U05200 Reception was canceled because communication requirements are not met due to the reception restriction set on this machine. -
Page 195: Troubleshooting
Troubleshooting > Troubleshooting Troubleshooting When a problem occurs, first check the following. If the problem persists, contact your dealer or service representative. Symptom Checkpoint Corrective Action Reference Page Cannot send document. Is the modular cord connected Connect the modular cord correctly. ―…
-
Page 196
Troubleshooting > Troubleshooting Symptom Checkpoint Corrective Action Reference Page Cannot output from a Sub Is the box password been set? Enter the correct box password. 5-12 Address Box. Cannot use polling reception. Is polling transmission being Check with the recipient. ―… -
Page 197: 10 Appendix
10 Appendix This chapter explains the following topics: Character Entry Method ……………………… 10-2 Specifications …………………………10-6 Menu Map ………………………….. 10-8 Received FAX Sizes and Paper Priority (Metric Model) …………….. 10-12 Received FAX Sizes and Paper Priority (Inch Model) ………………10-13 10-1…
-
Page 198: Character Entry Method
Appendix > Character Entry Method Character Entry Method This section explains how to enter characters. Using the Keys Account Name: Text Display/Key Description Message Display Displays entered characters. [Clear] key Press to delete characters. Numeric keys Press to enter characters and symbols. Arrow keys Press to select the entry position, or select a character from the character list.
-
Page 199: Selecting Type Of Characters
Appendix > Character Entry Method Selecting Type of Characters To enter characters, the following three types are available: Types Description To enter alphabets. To enter numerals. Symbols To enter symbols. In a character entry screen, press [Text] to select the type of characters you want to enter. Account Name: Account Name: Symbols:…
-
Page 200: Entering Symbols
Appendix > Character Entry Method Keys Characters (Each press of a key changes the character in the order from left to right.) (Repeats from the first character on the left) 9 (During number entry) ‘ (space) (Repeats from the first character on the left) 0 (During number entry) Press to change the character in the cursor position between upper case and lower case.
-
Page 201
Appendix > Character Entry Method Press the [*/.] key. [r] changes to [R]. Account Name: Text Press the [►] key. The cursor moves to the right. Account Name: Text Press the [#] key. Displays the symbol list. Symbols: !»#$%&'()*+,-./:;<=> ?@[]^_`{|}~€ ƒ„…†‡^‰ <‘’“”•–—˜™>¡¢£¤¥¦§¨©ª… -
Page 202: Specifications
Appendix > Specifications Specifications NOTE Specifications are subject to change without notice. FAX function Item Description Compatibility SuperG3 Communication Line Subscriber telephone line Transmission Time 3 seconds or less (JBIG, ITU-T A4 #1 chart) Transmission Speed 33600/31200/28800/26400/24000/21600/19200/16800/14400/12000/ 9600/7200/4800/2400 bps Coding Scheme MMR/MR/MH/JBIG Error Correction Original Size…
-
Page 203
Appendix > Specifications FAX Driver functions Item Description Hardware IBM PC-AT compatible computer Interface 10BASE-T, 100BASE-TX, 1000BASE-T Operating system Windows XP, Windows Server 2003/2008/2012, Windows Vista and Windows 7/8 Transmission Resolution (400 × 400dpi), Fine (200 × 200dpi), Ultra Fine Normal (100 ×… -
Page 204: Menu Map
Appendix > Menu Map Menu Map Address Book (page 3-13) Redial (page 3-11) Checking and Editing Destinations (page 3-5) Manual Send (page 3-25) Manual Reception (page 4-5) One Touch Key (page 3-15) Program (page 3-28) Quiet Mode (page 3-20) Original Size (page 3-20) Original Image (page 3-20) FAX Resolution (page 3-21) Orig.Orientation (page 3-21)
-
Page 205
Appendix > Menu Map Print Job Status (refer to the machine’s Operation Guide) Send Job Status (refer to the machine’s Operation Guide) Store Job Status (refer to the machine’s Operation Guide) Scheduled Job (page 3-22) Print Job Log (page 7-3) Send Job Log (page 7-3) Store Job Log (refer to the machine’s Operation Guide) FAX Job Log… -
Page 206
Appendix > Menu Map Common Settings Language (refer to the machine’s Operation Guide) Default Screen (refer to the machine’s Operation Guide) Sound (page 8-3) FAX Speaker Volume (page 8-3) FAX Monitor Volume (page 8-3) Display Bright. (refer to the machine’s Operation Guide) Orig./Paper Set. -
Page 207
Appendix > Menu Map FAX (page 8-4) TX/RX Common Encryption Key (page 5-30) Transmission TTI (page 2-8) (page 8-4) Local FAX Name (page 2-8) Local FAX ID (page 2-10) Local FAX Number (page 2-9) FAX Dialing Mode (page 2-10) Retry Times (page 8-4) ECM TX (page 2-11) TX Start Speed (page 2-12) Reception (page 8-6) -
Page 208: Received Fax Sizes And Paper Priority (Metric Model)
Appendix > Received FAX Sizes and Paper Priority (Metric Model) Received FAX Sizes and Paper Priority (Metric Model) When no paper loaded in the cassettes matches the received fax size and orientation, the machine automatically chooses the printing paper according to the following priority. Received FAX Size Long Originals *1 Long Originals *2…
-
Page 209: Received Fax Sizes And Paper Priority (Inch Model)
Appendix > Received FAX Sizes and Paper Priority (Inch Model) Received FAX Sizes and Paper Priority (Inch Model) When no paper loaded in the cassettes matches the received fax size and orientation, the machine automatically chooses the printing paper according to the following priority. Received FAX Size Long Originals *2 Legal…
-
Page 210: Index
Index ECM RX ECM TX Numerics E-mail Notice Job Finish Notice 3-21 2 in 1 Printing Reporting FAX Receipt Result 7-12 Encryption Communication 5-30 Changing and Deleting Registration Contents of Account Management 8-20 Encryption Key 5-31 Address Book 2-14, 3-13 Encryption Box No.
-
Page 211
Machine (Names) Received FAX Sizes and Paper Priority 10-12, 10-13 Manual Reception 4-5, 5-42 Receiving Mode 4-2, Manual Send 3-25, 5-41 Redial 3-11 Memory Reception Changing Retry Times Memory Transmission Reject Fax No. Cancel Change/Deletion 8-12 Menu Map 10-8 Registration 8-11 Messages Remote Diagnostics… -
Page 212
> Index Telephone Line Time Transmission Restriction Communication Establishing Requirements Permit FAX No. 8-10 Permit ID No. 8-13 Prerequisites Reception Rejection Requirements 8-10 Reception Restriction Setting 8-16 Reject FAX No. 8-11 Send Restriction Setting 8-15 Unknown Number Reception 8-16 Troubleshooting TX Start Speed Unusable Time 8-18… -
Page 214
KYOCERA Document Solutions Inc. – 2-28, 1-Chome – Tamatsukuri – Chuo-Ku Osaka 540-8585 – Japan – www.kyoceradocumentsolutions.com…
Центр скачивания
Убедитесь в правильности наименования продукта, выберите файл для скачивания и нажмите кнопку «Загрузить». Начнется загрузка.
Ознакомьтесь перед скачиванием.
Краткое руководство
См. краткое руководство для начала работы с продуктом.
Видео по установке
Просмотреть все видео
Закрыть
Скачать
Название файла
Версия
Дата выпуска
Размер файла
Просмотреть все

Закрыть<

Название файла
Версия
Дата выпуска
Размер файла
Просмотреть все
Закрыть
Название файла
Версия
Дата выпуска
Размер файла
Просмотреть все
Закрыть
Название файла
Версия
Дата выпуска
Размер файла
Просмотреть все
Закрыть
Название файла
Версия
Дата выпуска
Размер файла
Просмотреть все
Закрыть
Выберите операционную систему
Простая установка
Вы можете скачать веб-установщик, который упрощает установку нужных драйверов (только для Windows).
Процедуру скачивания Web-установщика см. в руководстве по эксплуатации продукта.