РУКОВОДСТВО ПО
ЭКСПЛУАТАЦИИ
q
q
COPY
q
SCAN
TASKalfa 1800
TASKalfa 2200
i
> Предисловие
Предисловие
Настоящее руководство содержит сведения по эксплуатации и техобслуживанию аппарата, а также описание
несложных действий по устранению возникающих неполадок и поддержанию аппарата в как можно лучшем
состоянии.
Перед эксплуатацией аппарата ознакомьтесь с данным руководством по эксплуатации.
Мы рекомендуем использовать наши фирменные расходные материалы.
Пожалуйста, примите во внимание, что в случае если пользователь решит использовать неоригинальный
(контрафактный или совместимый) тонер, то мы не гарантируем надлежащую работу устройства. Мы не
проводили тестирования тонеров, изготовленных другими производителями, в связи с чем мы не можем
достоверно утверждать, что тот или иной тонер, изготовленный другим производителем, совместим с
нашей
продукцией. Мы рекомендуем использовать оригинальный тонер, как указано в Руководстве пользователя,
прилагаемом к устройству. Использование неоригинального (контрафактного или совместимого) тонера может
привести к повреждению устройства. Подобное повреждение может повлиять на условия гарантии и повлечь
дополнительные расходы для пользователя в связи со снятием таких устройств с гарантийного ремонта. Кроме
того, использование
контрафактного тонера – это поддержка незаконной деятельности недобросовестных
производителей, действующих с нарушением законов Российской Федерации. Просим принять во внимание
настоящую информацию о рисках, связанных с использованием неоригинального тонера.
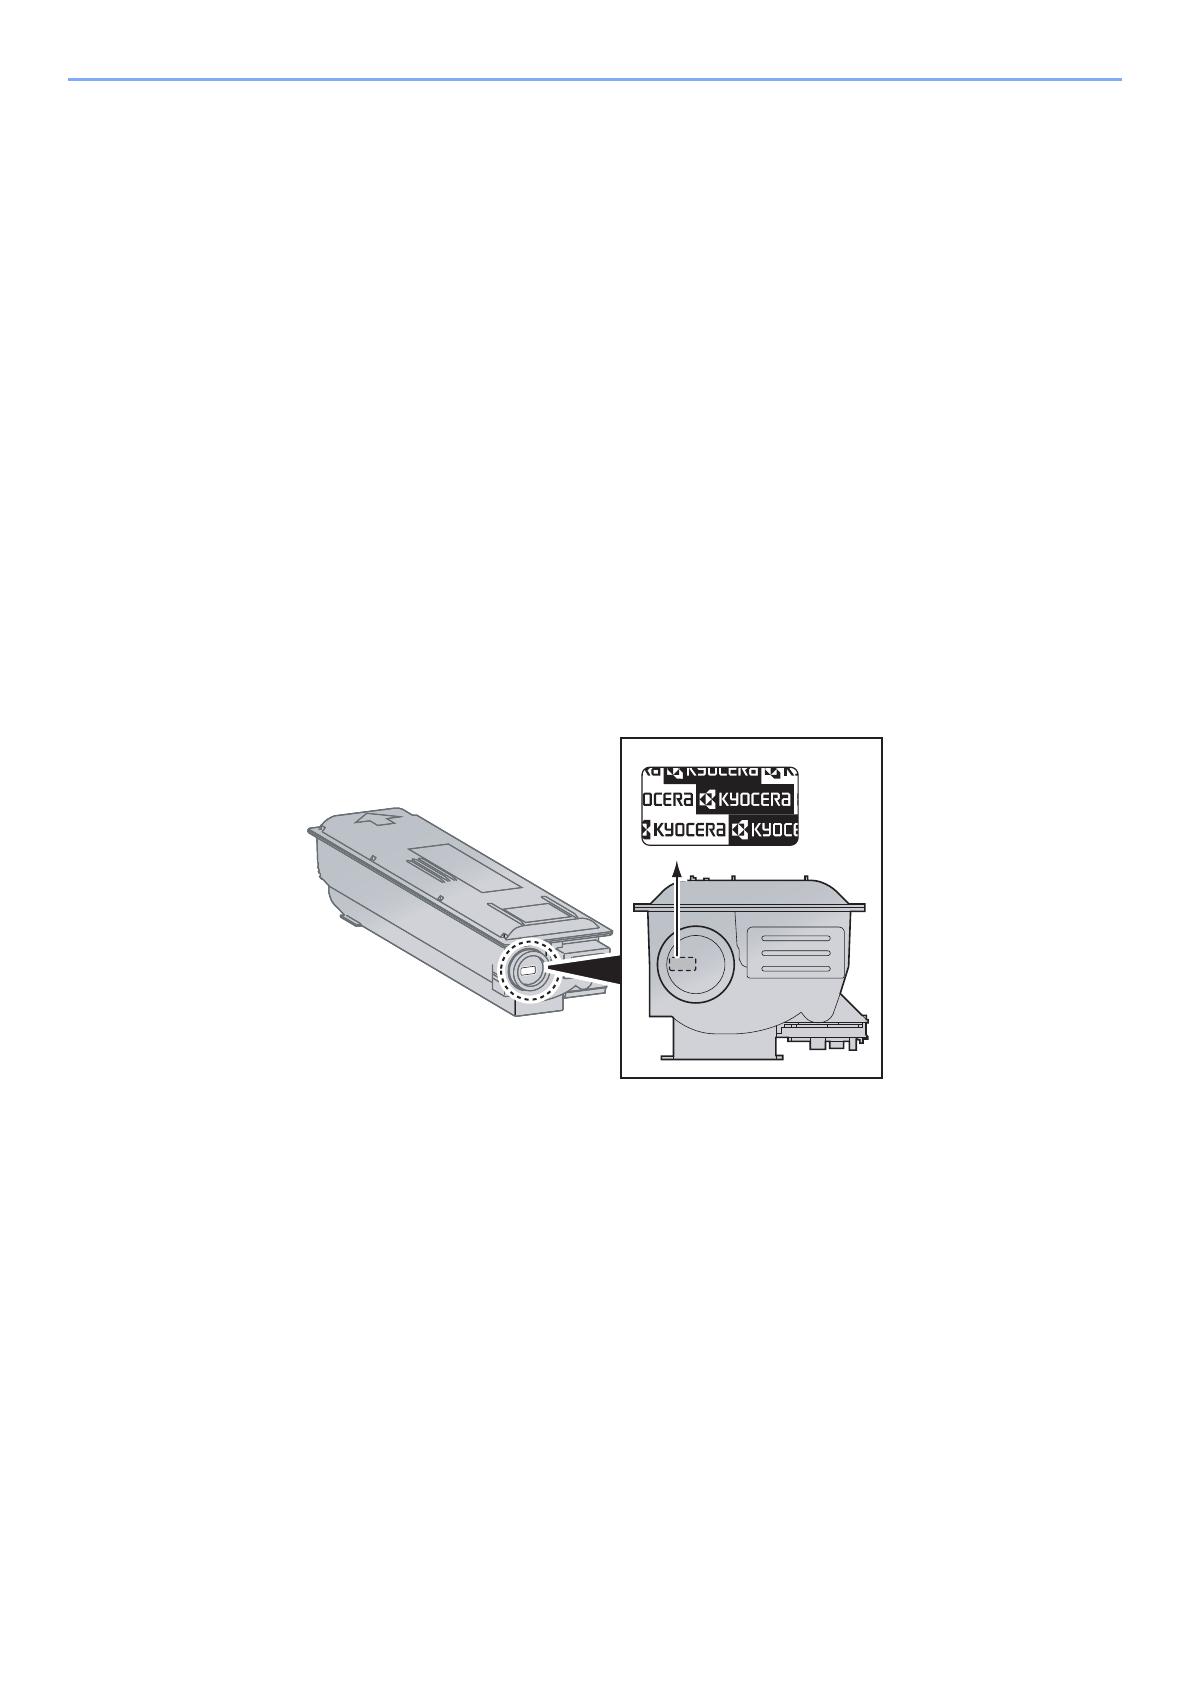
На фирменных расходных материалах имеется этикетка, изображенная ниже.

ii
Cодержание
Предисловие ………………………….………………..…………….……………….………………..……………. i
Общие сведения ……………….…………….………………..……………….…………….……………….….. vi
Функции аппарата …………….…………….………………..…………….……………….……………….…. vii
Руководства, поставляемые с аппаратом…………..…………….……………….…………….…… x
О руководстве по эксплуатации (данном документе) …………….…………….……………… xi
Структура документа……….……………..……………….……………….…………….……………… xi
Условные обозначения в данном руководстве…………..…………….……………….……. xii
Карта меню ………………………….…………….………………..……………….…………….……………….. xv
1 Правовая информация и правила техники безопасности …………1-1
Примечание ……………………..……………….………………..…………….……………….…………….… 1-2
Условные обозначения по технике безопасности в данном руководстве ……….. 1-2
Окружающая среда …..……………….………………..…………….……………….…………….… 1-3
Меры предосторожности при эксплуатации ………..…………….………………..………… 1-3
Меры безопасности при работе с лазером в странах Европы …………………..…… 1-4
Safety Instructions Regarding the Disconnection of Power ………..……………….……… 1-5
Законодательные ограничения на копирование и сканирование …..………………. 1-5
EN ISO 7779 …….………………..…………….……………….………………..…………….………… 1-5
EK1-ITB 2000 …………….…………….………………..……………….…………….……………….… 1-5
Правовая информация ……………………………..…………….……………….…………….…… 1-6
Функция управления энергосбережением ……………..………………..…………….……… 1-7
Функция автоматического двустороннего копирования …..……………….……………. 1-7
Сбережение ресурсов — бумага ……….…………….……………….…………….……………. 1-7
Экологическая польза от функции «управления режимом питания» ……………..… 1-7
Программа
Energy Star (ENERGY STAR®) …….……………….……………….……………. 1-8
2 Установка и настройка аппарата ……………………….……………………….2-1
Наименования компонентов ………….………………..…………….……………….……………….… 2-2
Внешние элементы аппарата ……………………………….………………..……………….…… 2-2
Разъемы/внутренние компоненты ……………..……………….……………….…………….… 2-4
С установленным дополнительным оборудованием ……………….……………….…… 2-5
Определение способа подключения и подготовка кабелей ……………………………… 2-6
Пример подключения ………………………………..…………….……………….……………….… 2-6
Подготовка необходимых кабелей ……………………..…………….………………..………… 2-6
Подсоединение кабелей ………..………………..…………….……………….………………..………… 2-7
Подсоединение кабеля USB ……….……………..……………….……………….…………….… 2-7
Подсоединение кабеля питания ………………..……………….……………….…………….… 2-7
Включение/выключение питания …………………………….…………….………………..………… 2-8
Включение питания …………………………….…………….………………..……………….……… 2-8
Выключение питания ………………………….…………….………………..……………….……… 2-9
Установка программного обеспечения ……………………………….…………….…………….. 2-10
Программное обеспечение на диске Product Library (Windows) ……………………. 2-10
Установка программного обеспечения в Windows …………………..……………….…. 2-11
Деинсталляция программного обеспечения
………….……………..……………….……. 2-15
Настройка общего принтера ……………..…………….……………….…………….………….. 2-16
Установка программного обеспечения на компьютер Mac ……….…………….……. 2-17
KYOCERA Client Tool ……..……………..……………….……………….………………..………. 2-18
Настройка драйвера WIA ..………………..…………….……………….………………..………. 2-19
Имя пользователя и пароль администратора …………………….……………….………….. 2-20
Параметры администратора ………….……………….…………….……………….………….. 2-20
Параметры функции энергосбережения ……………….……………….…………….………….. 2-22
Режим ожидания и таймер режима ожидания ……………..……………….…………….. 2-22
Таймер отключения питания ………….…………….……………….…………….…………….. 2-23
Проверка счетчика …………..……………….………………..…………….……………….…………….. 2-27

iii
3 Подготовка к использованию ………………………….…………………………3-1
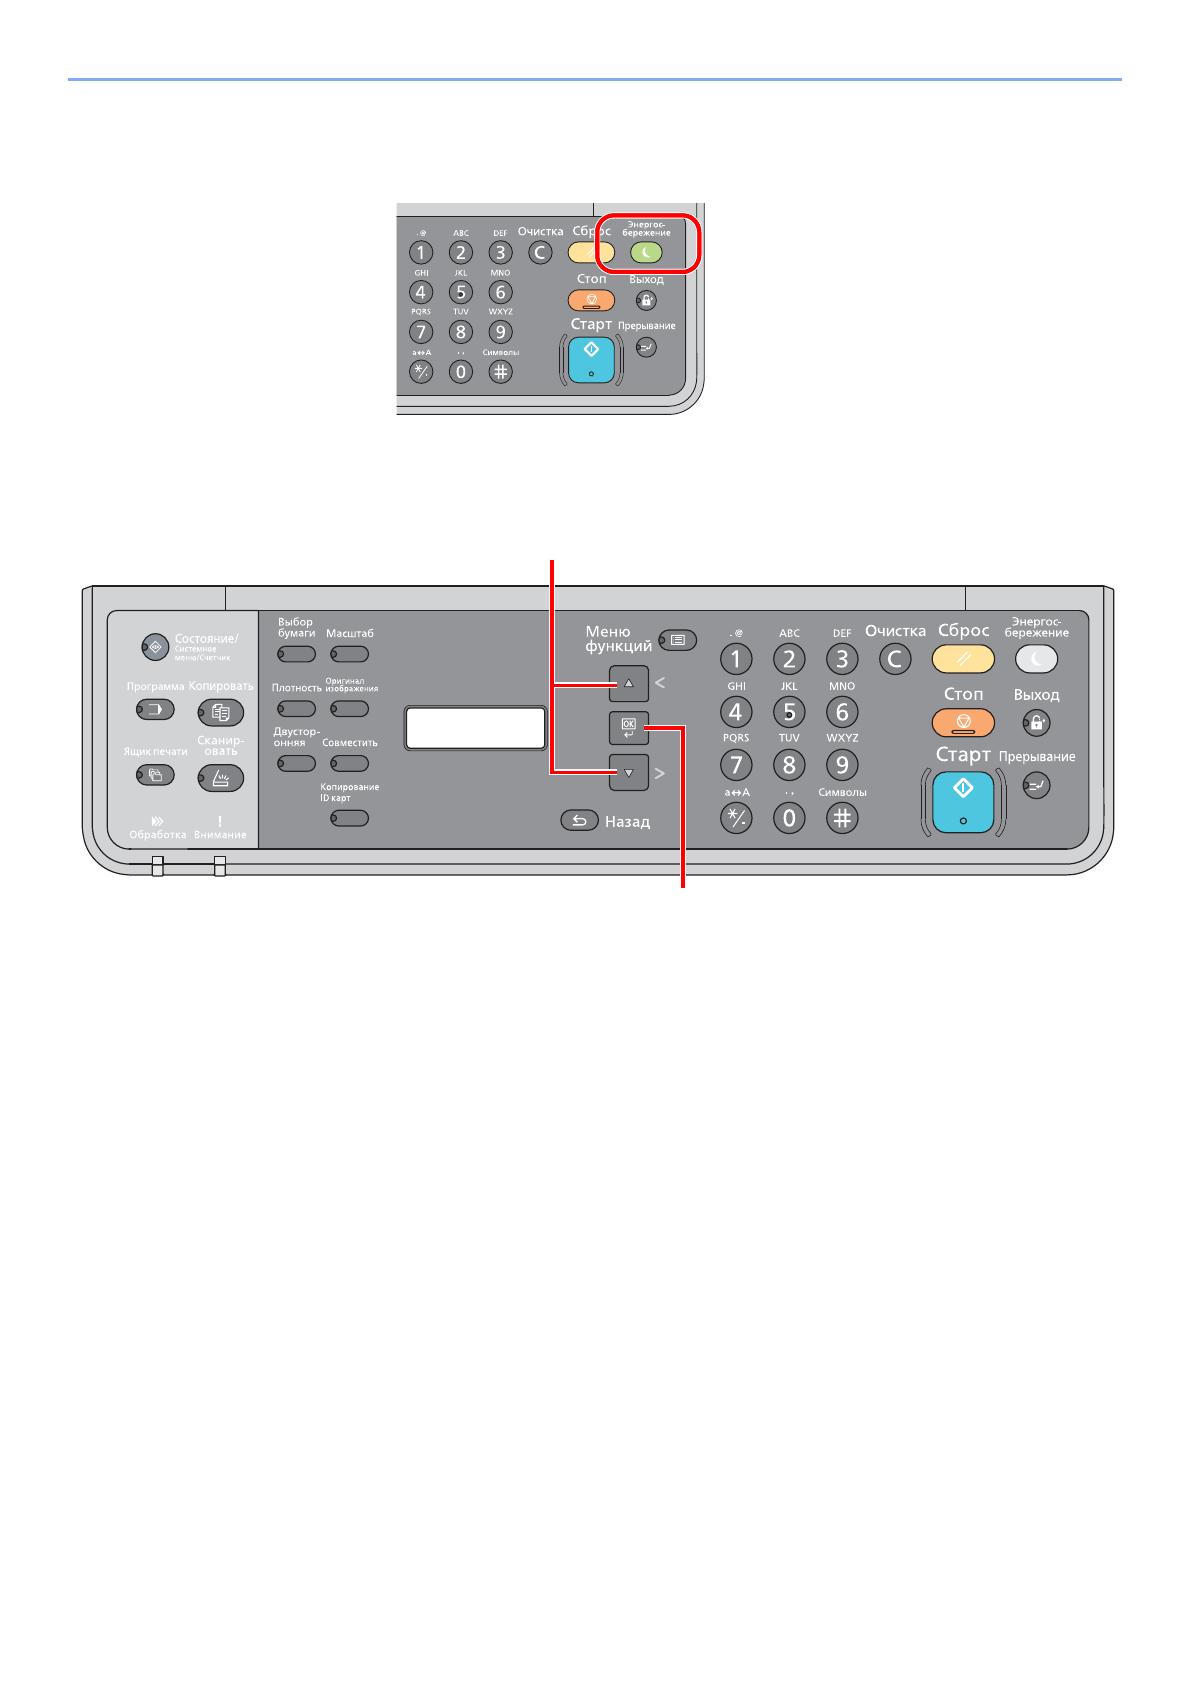
Использование панели управления ………….……………….………………..…………….……… 3-2
Кнопки панели управления ……………….……………….…………….………………..………… 3-2
Метод работы ………..……………….………………..…………….……………….…………….…… 3-3
Отображение оригиналов и бумаги ………..………………..……………….…………….…… 3-4
Загрузка бумаги ………………….………………..…………….……………….…………….………………. 3-5
Перед загрузкой бумаги …………..………………..……………….…………….……………….… 3-6
Загрузка в кассеты …………………………..……………….…………….………………..………… 3-7
Загрузка бумаги в универсальный лоток …………………..……………….……………….. 3-10
Указание формата бумаги и типа носителя …..……………….…………….…………….. 3-13
4 Печать с ПК ………………………………………………………………….……………..4-1
Печать с ПК …………..…………….………………..……………….…………….……………….……………. 4-2
Настройки печати драйвера принтера …………………..……………..……………….……… 4-5
Справка по драйверу принтера …………………………….………………..…………….……… 4-6
Изменение стандартных настроек драйвера принтера (Windows 7) ………………. 4-6
Отмена заданий ……………………………….……………….…………….………………..………… 4-6
Использование ящика печати …………..………………..…………….……………….…………….… 4-8
Сохранение документа в ящик печати ………………….………………..…………….……… 4-9
Печать документа из ящика печати …………………………….……………….…………….. 4-10
5 Эксплуатация аппарата ………………………………………………………………5-1
Загрузка оригиналов ………..……………….……………..……………….……………….…………….… 5-2
Размещение оригиналов на стекле оригинала …………….…………….……………….… 5-2
Загрузка оригиналов в автоподатчик оригиналов (опция) ……………………………… 5-3
Проверка серийного номера оборудования …………………….……………….…………….… 5-6
Копирование …………………….……………….……………..……………….…………….……………….… 5-7
Основные операции ……….………………..…………….……………….………………..………… 5-7
Прерывание копирования …………..………………..…………….……………….………………. 5-8
Копир. ID-карт (Копирование ID-карт) ..…………….……………….…………….……………. 5-9
Использование различных функций .……………….……………….…………….………….. 5-11
Программа ……………….……………….………………..…………….……………….…………….. 5-26
Отмена заданий ……………………………….……………….…………….………………..………. 5-30
Сканирование ………….………………..…………….……………….…………….………………..………. 5-31
Сканирование изображения в указанное место назначения ………….…………….. 5-33
Сканирование изображения с выбором места назначения
(Быстрое сканирование) ……….……………….…………….………………..…………….……. 5-36
Сканирование с помощью TWAIN ……………………………….……………….…………….. 5-37
Отмена заданий ……………………………….……………….…………….………………..………. 5-38
6 Проверка состояния …………………………………………………………………..6-1
Проверка состояния задания …………………….……………….………………..…………….……… 6-2
Проверка журнала задания ………………………….………………..…………….……………….…… 6-4
Приостановка и возобновление заданий ………..……………….…………….……………….… 6-7
Отмена заданий, которые выполняются/ожидают печати ………..……………….……… 6-8
Проверка состояния устройства ……………………..…………….……………….…………….…… 6-9
Проверка остатка тонера и бумаги …………….……………….………………..…………….……. 6-10
Проверка из KYOCERA Client Tool …….………………..……………….……………….………….. 6-11
7 Системное меню и KYOCERA Client Tool ……..…………………………….7-1
Настройки аппарата по умолчанию (системное меню) ……………..……………….……… 7-2
Параметры системного меню ……..………………..…………….……………….………………. 7-3
Отчет ………………………………..…………….……………….………………..…………….………… 7-4
Система ………..…………….………………..……………….…………….……………….……………. 7-5
Админ/учет ………………….………………..…………….……………….…………….………………. 7-5
Общие параметры ………………..……………….…………….………………..…………….……… 7-5

iv
Копировать …………….……………….…………….………………..……………….…………….…. 7-14
Принтер ………..……………….……………..……………….…………….……………….………….. 7-15
Настройка/обслуж (Настройка/обслуж) …………………………….…………….………….. 7-15
Настройки на ПК по умолчанию (KYOCERA Client Tool) ……..……………….………….. 7-16
Метод работы ………..……………….………………..…………….……………….…………….…. 7-16
Обзор экрана ………………………………..……………….…………….……………….………….. 7-17
Настройка параметров администрирования …………………..……………….………….. 7-19
Параметры места назначения сканирования ……………………………….…………….. 7-20
Параметры быстрого сканирования/TWAIN ……………………………….……………….. 7-23
Параметры ящика печати …………………………………….………………..……………….…. 7-26
8 Учет заданий ………………………………………………………………………………8-1
Общие сведения об учете заданий ………………………….………………..…………….………… 8-2
Включение учета заданий ……..……………..……………….……………….…………….……………. 8-4
Настройка учетной записи ………………..………………..…………….……………….………………. 8-5
Добавление учетной записи ……….……………..……………….……………….…………….… 8-5
Ограничение использования аппарата ………………………….……………….……………. 8-7
Редактирование учетной записи ………….……………….……………..……………….……… 8-8
Удаление учетной записи …………..………………..…………….……………….………………. 8-9
Учет заданий при совместном доступе к принтеру ……………………………..………. 8-10
Неизвестный идентификатор задания ………….…………….……………….…………….. 8-12
Настройка учета заданий ……………….………………..…………….……………….…………….…. 8-13
Настройка по умолчанию ..………………..…………….……………….………………..………. 8-13
Подсчет количества напечатанных страниц ………….……………..……………….……. 8-14
Отчет учета (Отчет об учете) ……………………………….……………..……………….……. 8-16
Использование учета заданий
……………..…………….……………….…………….…………….. 8-18
Вход в систему/выход из системы …………………..…………….……………….………….. 8-18
Печать при совместном доступе к принтеру ………………..……………….…………….. 8-18
9 Устранение неисправностей ………………………………………………………9-1
Регулярное обслуживание ………………..………………..…………….……………….………………. 9-2
Очистка ……………………….…………….………………..……………….…………….………………. 9-2
Замена контейнера с тонером …………..……………….…………….………………..………… 9-3
Замена бункера для отработанного тонера ………..………………..……………….……… 9-6
Устранение неисправностей ………………..……………….…………….……………….……………. 9-8
Устранение сбоев в работе …………………………….……………….………………..………… 9-8
Реагирование на сообщения …………….……………….………………..…………….………. 9-12
Устранение замятия бумаги …….………………..…………….……………….…………….…. 9-17
10 Приложение …………………………………………..………………………………….10-1
Дополнительное оборудование ……….……………..……………….…………….……………….. 10-2
Общие сведения о дополнительном оборудовании ………………………………….…. 10-2
Способ ввода символов …………..…………….……………….…………….………………..………. 10-4
Использование клавиш ……………………….……………….………………..…………….……. 10-4
Символы, которые можно ввести с помощью цифровой клавиатуры …..………. 10-4
Ввод символов …………………..……………….…………….………………..…………….………. 10-5
Ввод символов …………………..……………….…………….………………..…………….………. 10-6
Бумага …….……………….………………..…………….……………….…………….………………..……….10—7
Основные характеристики бумаги ……………..……………….…………….……………….. 10-7
Выбор подходящей бумаги …………………….…………….………………..…………….……. 10-8
Бумага специального назначения …………..………………..…………….………………... 10-11
Характеристики ……….…………….………………..……………….………………..……………….….. 10-15
Набор основных функций …………………………………….………………..………………... 10-15
Функции копирования …………………………….………………..……………….……………... 10-16
Функции принтера ……….………………..…………….……………….……………….………… 10-16
Функции сканера …………….………………..……………….………………..……………….….. 10-17
Автоподатчик оригиналов (Автоматически в обратном порядке)

v
(дополнительно) …………….………………..……………….………………..…………….…….. 10-17
Податчик бумаги (на 300 листов) (дополнительно) ………………….………………... 10-18
Устройство двусторонней печати (дополнительно) …………..………………..…….. 10-18
Глоссарий ……………………..…………….……………….………………..……………….……………... 10-19
Алфавитный указатель ……………….…………….……………….…..Алфавитный указатель-1
vi
> Общие сведения
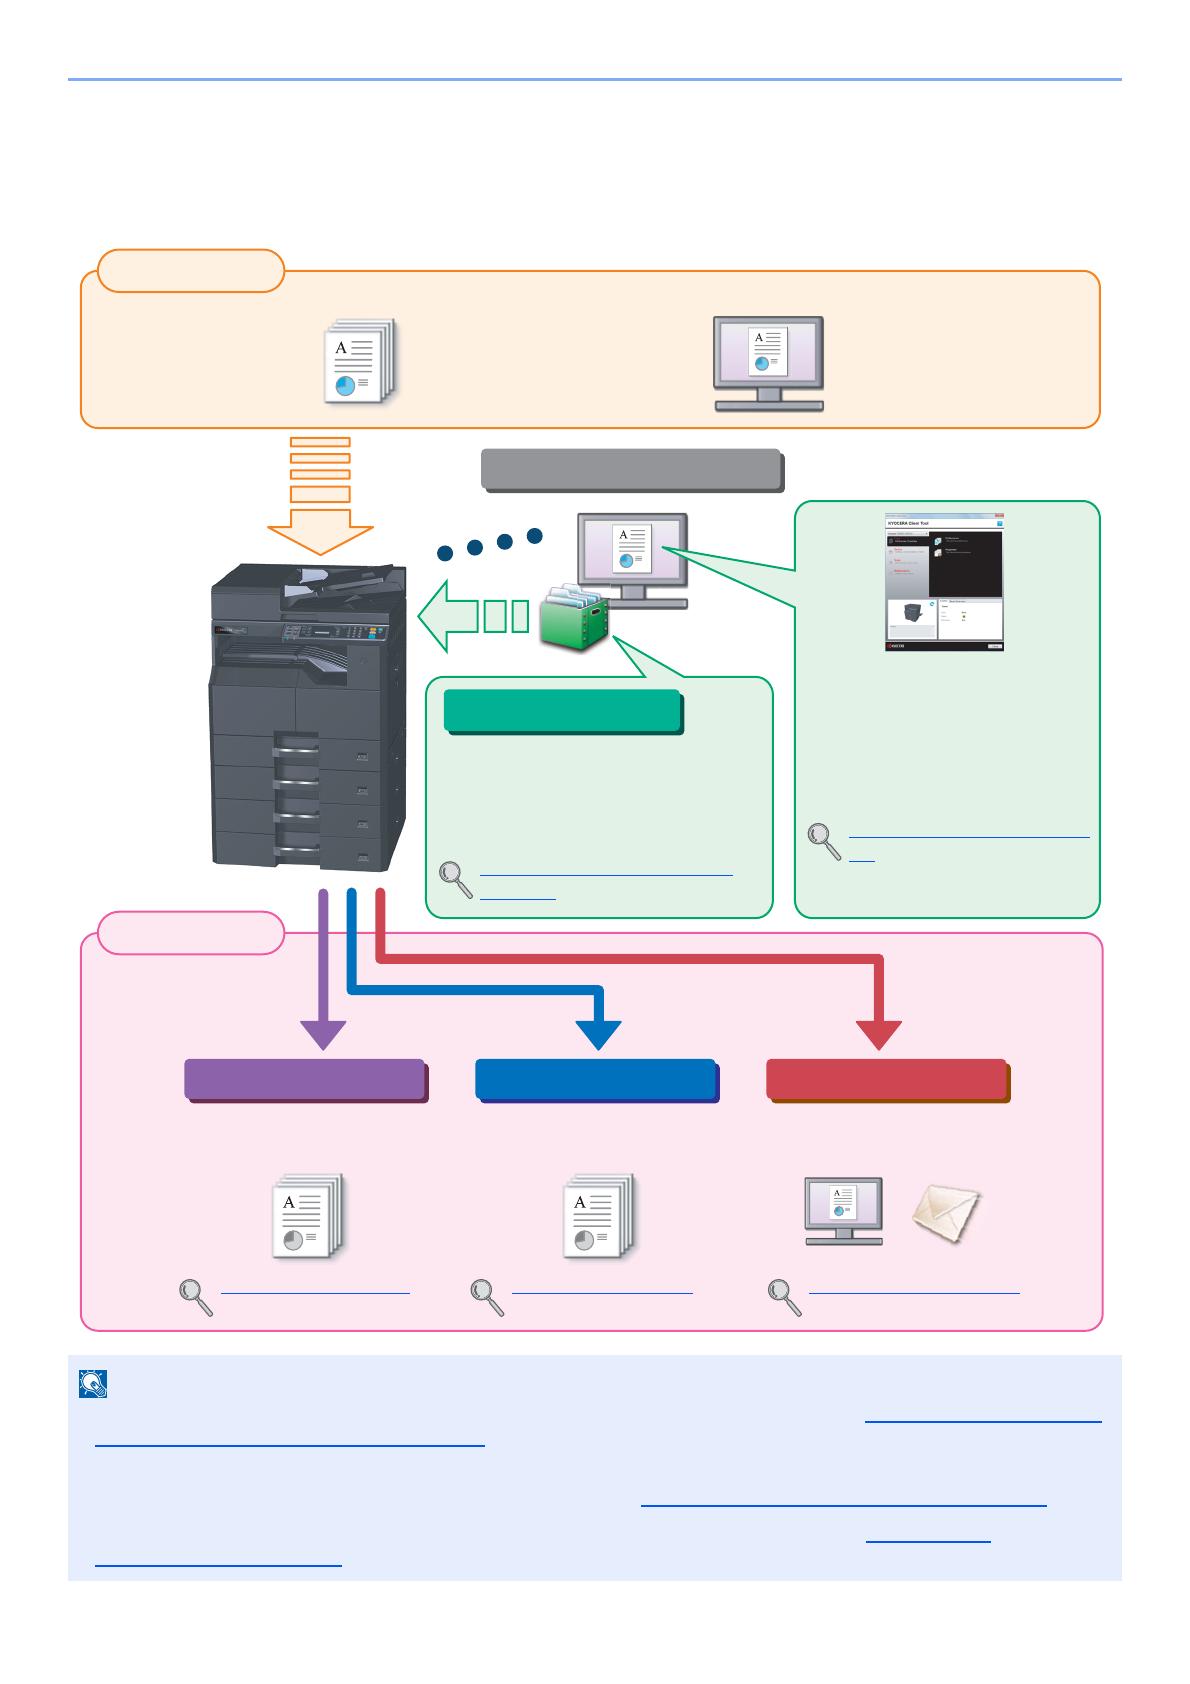
Общие сведения
Данный аппарат предлагает стандартные функции печати и копирования и может сохранять отсканированные
изображения на компьютер.
• Прежде чем приступить к использованию аппарата, обязательно прочтите раздел Правовая информация и
правила техники безопасности на стр. 1-1.
• Порядок выполнения действий по подготовке к эксплуатации аппарата, в том числе подключению кабелей и
установке программного обеспечения, изложен в разделе Установка и настройка аппарата на стр. 2-1
.
• Подробнее об использовании панели управления и загрузке бумаги см. в разделе Подготовка к
использованию на стр. 3-1.
Функции копирования Функции принтера Функции сканера
Выходные данные
Входные данные
Операции, выполняемые с ПК
Оригинал Электронные данные
Функции ящика печати
Функции ящика печати позволяют
временно сохранять данные печати в
ящике печати на компьютере и
выводить эти данные на печать,
выполняя операции на аппарате.
Использование ящика печати
(стр. 4-8)
KYOCERA Client Tool
Проверить состояние и изменить
настройки сканирования
аппарата можно с помощью
KYOCERA Client Tool,
установленного на компьютере.
KYOCERA Client Tool (стр. 2-
18)
Копирование (стр. 5-7) Печать с ПК (стр. 4-2) Сканирование (стр. 5-31)
Копирование и печать
оригиналов.
Печать данных с ПК. Сканирование оригиналов и
отправка данных на ПК.
vii
> Функции аппарата
Функции аппарата
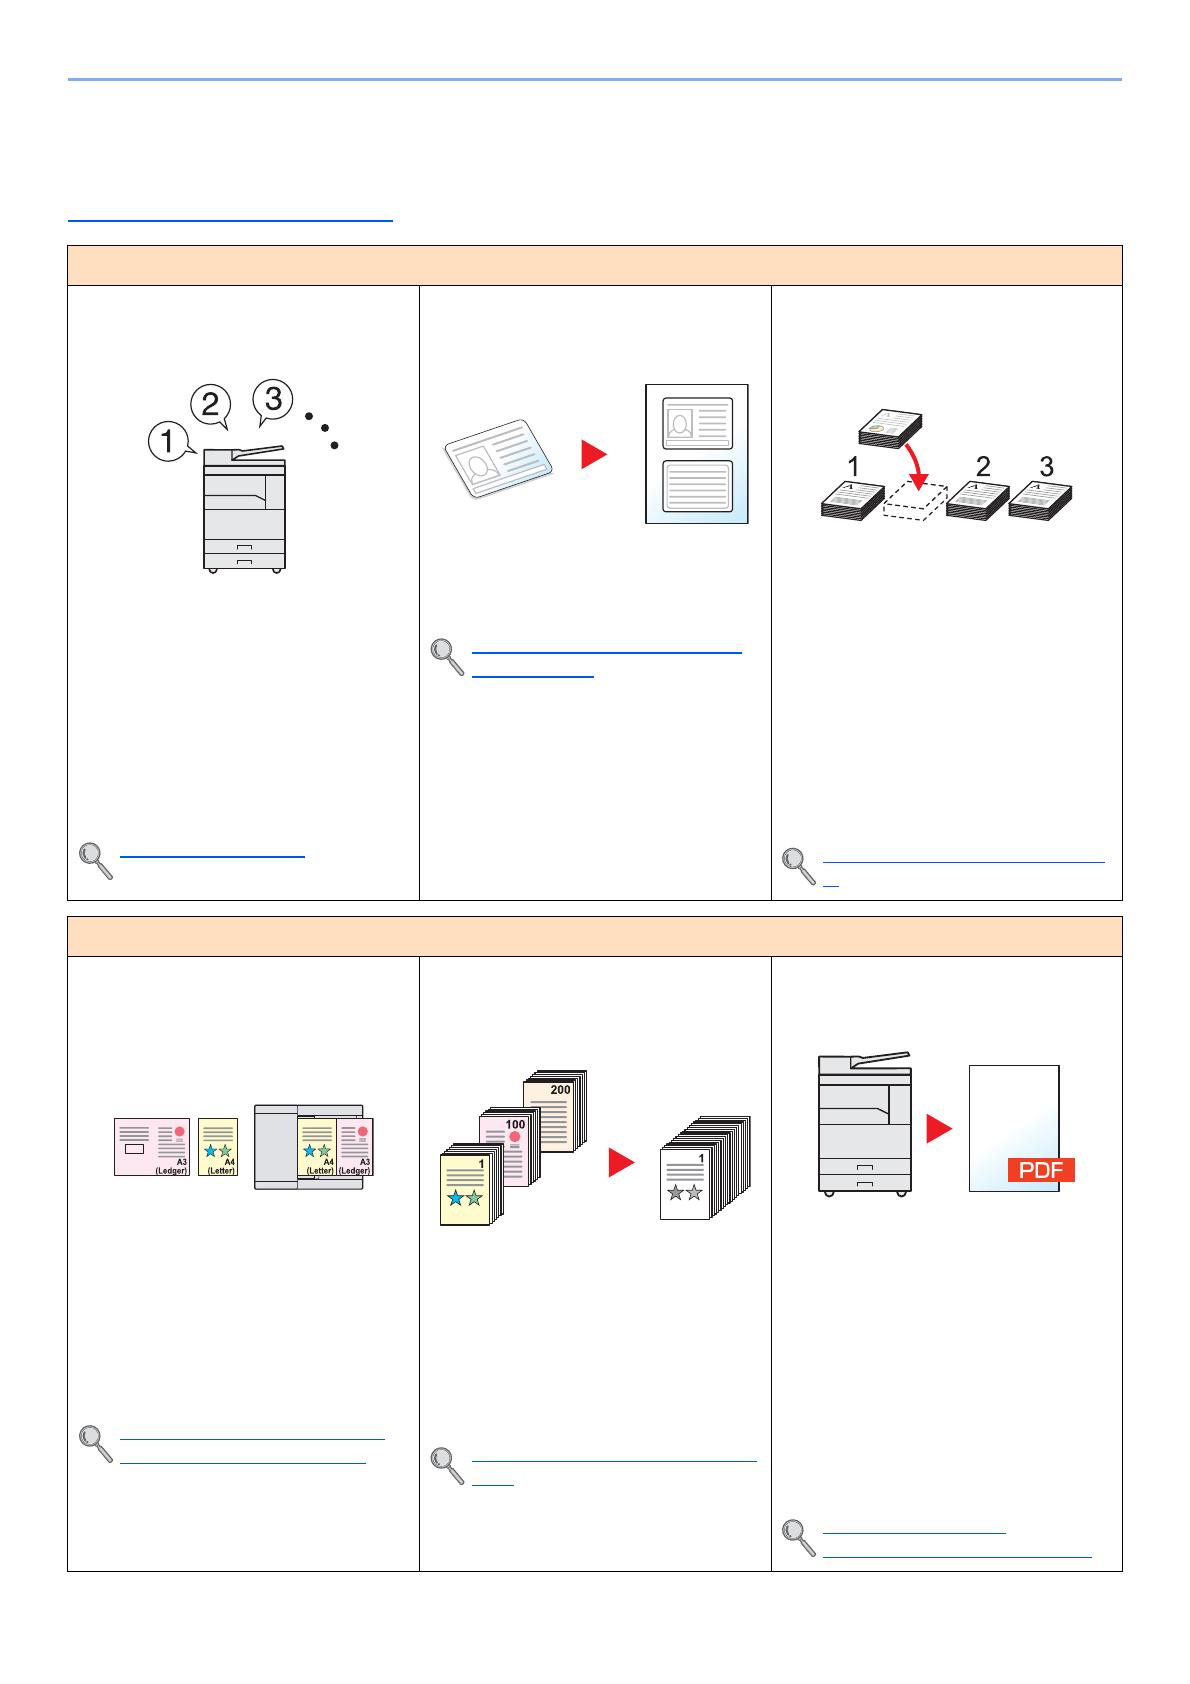
Аппарат оснащен множеством полезных функций. Ниже приведены примеры некоторых из них. Подробнее см.
Эксплуатация аппарата на стр. 5-1
.
Оптимизация процессов обработки документов в офисе
Доступ к часто используемым
функциям по одному нажатию
(программа)
Можно заранее настроить часто
используемые функции.
После включения функций в
программу предварительно
настроенных функций для их вызова
потребуется только нажатие номера
программы. Использование этой
программы всегда приводит к
получению одинаковых результатов,
даже если ее используют различные
пользователи.
Программа (стр. 5-26)
Копирование обеих сторон ID-карты
на одном листе (Копир. ID-карт)
Можно скопировать лицевую и
оборотную стороны ID-карты на один
лист бумаги.
Копир. ID-карт (Копирование ID-
карт) (стр. 5-9)
Прерывание других выполняемых
заданий и немедленное выполнение
копирования (Прер. копир—я)
Можно прервать все другие
выполняемые задания и выполнить
свое задание копирования
немедленно.
Если другие пользователи выполняют
копирование большого количества
страниц, данная функция позволит
прервать эти задания и немедленно
произвести свое копирование.
По завершении этого копирования
аппарат продолжит выполнять
приостановленные задания
печати.
Прерывание копирования (стр. 5-

Оптимизация процессов обработки документов в офисе
Сканирование оригиналов
различного размера за один раз
(Оригиналы разных форматов)
Эта функция полезна при подготовке
материалов для конференции.
За один раз можно настроить
различные размеры оригиналов, чтобы
не приходилось выполнять сброс
параметров оригиналов вне
зависимости от их размера.
Ориг.Разн.Формат. (Оригиналы
разных форматов) (стр. 5-22)
Сканирование множества оригиналов
отдельными партиями, а затем выпуск
одним заданием (Непрерывное
сканирование)
Эта функция полезна при подготовке
многостраничных раздаточных
материалов.
Когда невозможно поместить в
автоподатчик оригиналов большое
количество документов за один раз,
оригиналы можно отсканировать
отдельными партиями и затем
скопировать или как одно задание.
Непрерывное сканирование (стр.
5-25)
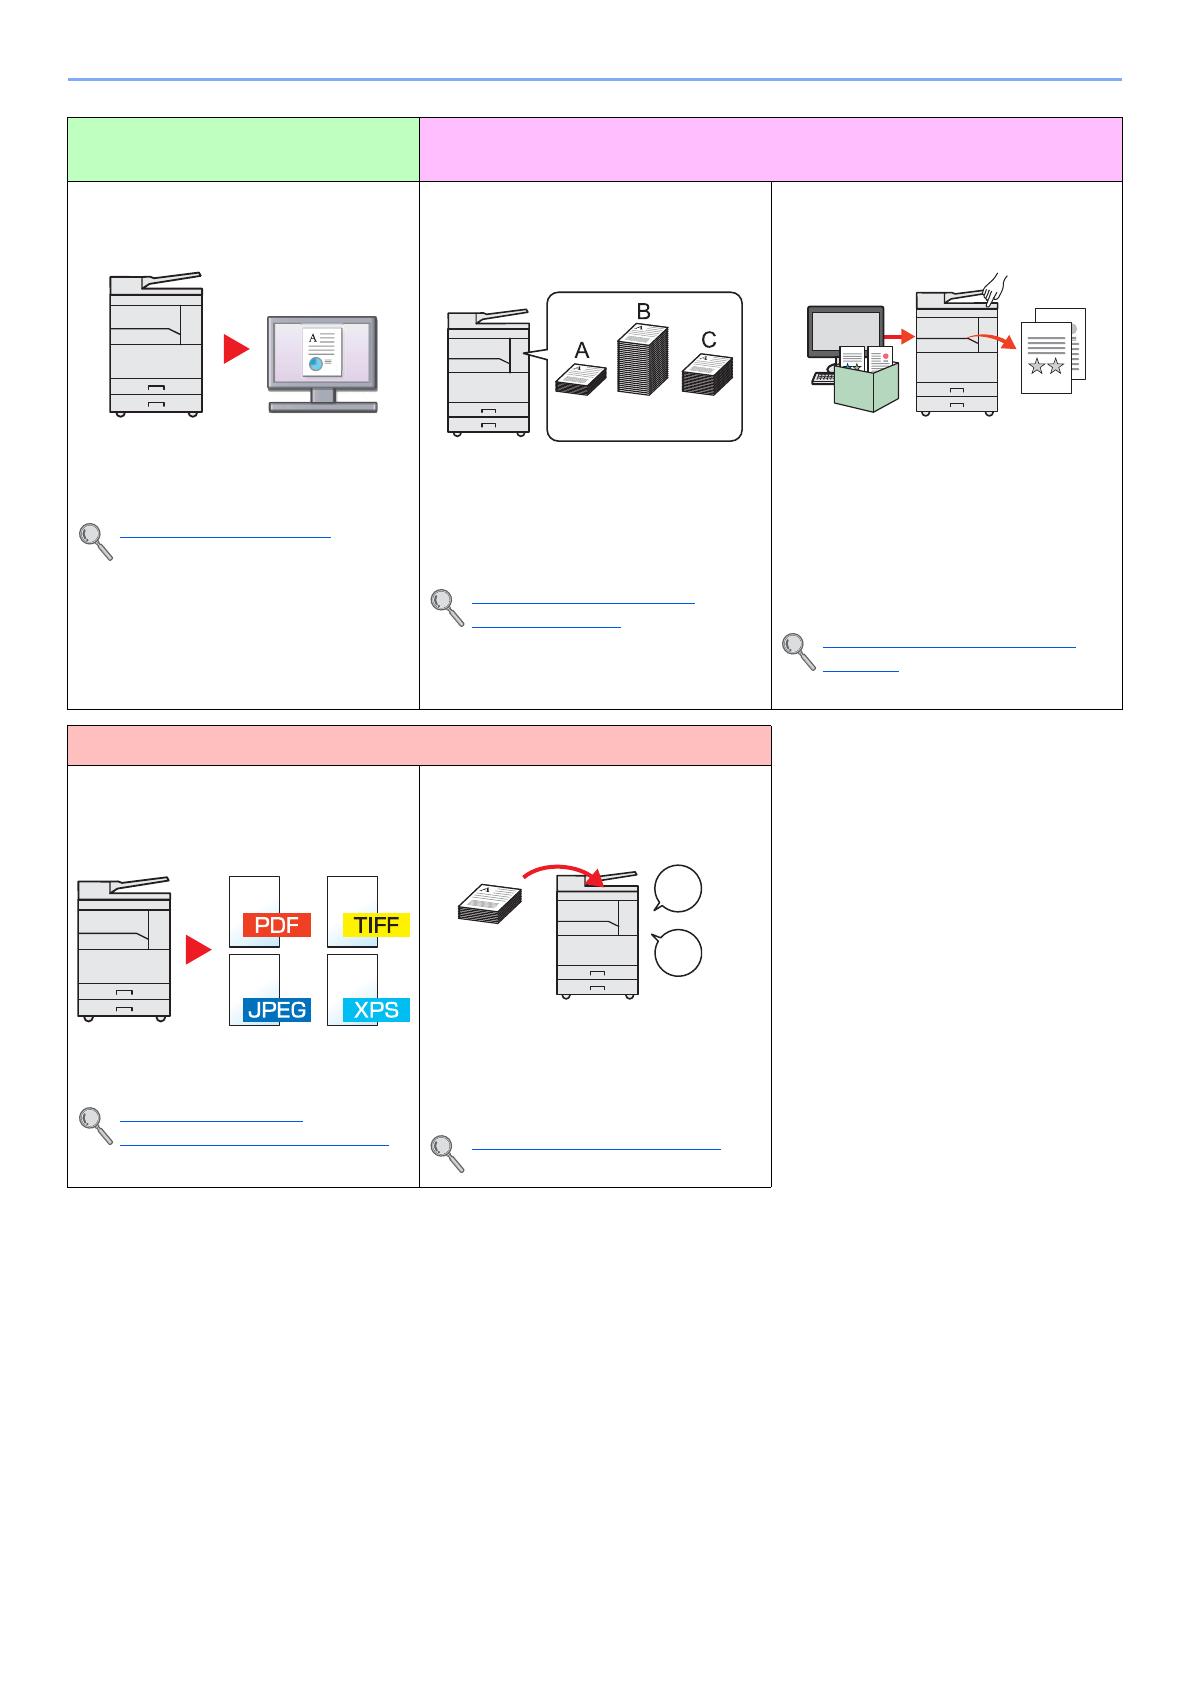
Сканирование документов в файлы
PDF высокого сжатия
(PDF высокого сжатия)
Можно создавать цветные документы
высокого качества в формате PDF
такого же малого размера, что и черно—
белые.
Данная функция позволяет
сканировать документы в файлы PDF
высокого сжатия, сохраняя
удобочитаемость.
Поскольку полноцветные документы можно
сжать до столь же малого размера, что и
черно—белые, такие документы можно
использовать в качестве вложений в
сообщения электронной почты.
Параметры быстрого
сканирования/TWAIN (стр. 7-23)
viii
> Функции аппарата
Оптимизация процессов
обработки документов в офисе
Экономия энергии и расходов
Каждая страница отсканированного
документа сохраняется в отдельном
файле
(Разделение файлов)
Можно создавать отдельный файл для
каждой страницы документа.
Для каждой страницы сканируемого
оригинала создается и сохраняется
отдельный файл.
К концу имени файла добавляется
последовательный номер из трех
цифр, например «abc_001.pdf» или
«abc_002.pdf».
Параметры быстрого
сканирования/TWAIN (стр. 7-23)
Настраиваемые режимы экономии
энергии
(Ожидание/отключение питания)
Аппарат оснащается функцией
энергосбережения, автоматически
отключающей питание или
переводящей аппарат в режим
ожидания.
Параметры функции
энергосбережения (стр. 2-22)
Удаление черных теней,
появляющихся на кромках копии
(Стирание границы)
Данная функция позволяет печатать
документы, не копируя ненужные
участки, что помогает снизить расход
тонера.
Можно удалить тени, появляющиеся
вокруг границ копии при сканировании
оригинала. Также можно удалить тени,
появляющиеся на границах и в центре
копии при сканировании книги. Таким
образом, можно
создать более
привлекательный визуально документ.
Стирание границы (стр. 5-24)
Экономия энергии и расходов Создание визуально
привлекательных документов
Использование для печати
меньшего количества тонера
(EcoPrint)
Благодаря данной функции можно
сократить расход тонера.
Используйте эту функцию, чтобы
сэкономить тонер, если вам нужно
всего лишь проверить содержимое
печатного документа, например, при
пробной печати, или распечатать
документ для внутреннего
подтверждения.
Используйте эту функцию, если не
требуется высококачественная печать.
EcoPrint (стр. 5-22)
Печать нескольких оригиналов на
одном листе
(Двусторонняя печать/совмещение)
Оригиналы можно печатать на обеих
сторонах листа бумаги. Кроме того,
несколько оригиналов можно
напечатать на одном листе бумаги.
Совместить (стр. 5-18)
Двусторонняя (стр. 5-15)
Добавление полей для сшивания
(Поле)
Это удобно при подготовке материалов
к брошюрованию.
Можно сместить копируемое
изображение, чтобы предусмотреть
поле для сшивания копий.
Если копии двусторонние, поля на
лицевой и оборотной сторонах можно
настроить так, чтобы они находились в
одинаковом положении.
Поле (стр. 5-23)
Off
ix
> Функции аппарата
Создание визуально
привлекательных документов
Усиление безопасности
Сканирование оригиналов в цвете и
отправка их на ПК (Сканирование)
Можно сканировать оригиналы и
преобразовывать их в электронные
данные, например в цветные PDF.
Сканирование (стр. 5-31)
Управление подсчетом
скопированных/отпечатанных копий
по учетной записи (Учет заданий)
Можно контролировать и ограничивать
количество копируемых/печатаемых
копий для учетной записи, присвоив
каждой учетной записи идентификатор
учетной записи.
Общие сведения об учете
заданий (стр. 8-2)
Предотвращение потери готовых
документов (Ящик печати)
Можно временно сохранить документ
принтера в ящике печати на
компьютере. При печати документа с
аппарата устраняется риск попадания
документа в руки другого человека.
Благодаря ПИН—коду, присвоенному
ящику печати, можно усилить
безопасность.
Использование ящика печати
(стр. 4-8)
Более эффективное использование функций
Задание формата файла
изображения
(Формат файла)
При сохранении изображений можно
выбрать различные форматы файла.
Параметры быстрого
сканирования/TWAIN (стр. 7-23)
Добавление имени файла (Ввод
имени файла)
Данная функция облегчает проверку
журнала и состояния заданий.
Заданию можно присвоить имя и
номер.
Ввод имени файла (стр. 5-25)

x
> Руководства, поставляемые с аппаратом
Руководства, поставляемые с аппаратом
В комплект поставки аппарата входят следующие руководства. При необходимости сверяйтесь с
соответствующим руководством.
Содержание руководств может быть изменено без уведомления в целях улучшения технических характеристик
аппарата.
Печатные руководства
Руководства (PDF) на диске Product Library
Для просмотра руководств, записанных на диске Product Library, необходимо установить Adobe Reader 8.0 или
более поздней версии.
Быстрое начало
использования
аппарата
Quick Guide
Объясняет основные функции аппарата.
Правила безопасного
использования
аппарата
Safety Guide
Содержит информацию о безопасности и предостережения относительно установки и
эксплуатации аппарата. Обязательно прочитайте это руководство перед
использованием данного аппарата.
Safety Guide (TASKalfa 1800/TASKalfa 2200)
В данном руководстве приведены указания относительно свободного пространства,
необходимого для установки аппарата, описание предупредительных надписей и
иные сведения о технике безопасности. Обязательно прочитайте это руководство
перед использованием данного аппарата.
Надлежащее
использование
аппарата
Руководство по эксплуатации (данный документ)
Содержит описание процедур загрузки бумаги, выполнения операций копирования,
печати и сканирования, а также содержит параметры по умолчанию и другую
информацию.
Печать данных с
компьютера
Printer Driver User Guide
Содержит описание порядка установки драйвера принтера и использования функций
принтера.
Использование
KYOCERA Client Tool
KYOCERA Client Tool User Guide
Объясняет использование KYOCERA Client Tool.
xi
> О руководстве по эксплуатации (данном документе)
О руководстве по эксплуатации (данном
документе)
Структура документа
В настоящем руководстве содержатся следующие разделы.
Раздел Содержание
1 Правовая информация и
правила техники
безопасности
Содержит описание мер предосторожности при использовании аппарата и
информацию относительно торговых марок.
2 Установка и настройка
аппарата
Содержит описание деталей аппарата, порядка подключения кабелей, установки
программного обеспечения, а также иных процедур, связанных с
администрированием аппарата.
3 Подготовка к использованию Содержит описание настроек и процедур подготовки, необходимых для начала
эксплуатации аппарата, в том числе порядка использования панели управления,
создания адресной книги и загрузки бумаги.
4 Печать с ПК Объясняет функции, доступные при использовании аппарата в качестве принтера.
5 Эксплуатация аппарата Содержит описание основных процедур, связанных с эксплуатацией аппарата, в
том числе процедуры размещения оригиналов, выполнения копий и
сканирования.
6 Проверка состояния Объясняет способы проверки состояния задания и журнала заданий, а также
способы отмены заданий, которые уже печатаются или ожидают печати. Также
объясняются способы проверки уровней высоты стопки бумаги и тонера, а также
проверки состояния устройства.
7 Системное меню и KYOCERA
Client Tool
Объясняет системное меню, связанное с общей эксплуатацией и служебными
программами аппарата.
8 Учет заданий Объясняет учет заданий.
9 Устранение неисправностей Содержит описания порядка действий в ситуациях, когда закончился тонер,
отображается ошибка, замялась бумага или возникла иная проблема.
10 Приложение Содержит описание дополнительного оборудования для аппарата. Содержит
сведения о типах носителя и форматах бумаги, а также глоссарий терминов. В
этом разделе описывается ввод символов и указаны технические характеристики
аппарата.
xii
> О руководстве по эксплуатации (данном документе)
Условные обозначения в данном руководстве
В приведенных ниже объяснениях в качестве примера используется Adobe Reader X.
К некоторым элементам в данном руководстве применяются следующие условные обозначения.
Отображаемые в программе Adobe Reader элементы могут различаться в зависимости от порядка использования
программы. Если оглавление или инструменты не отображаются, см. справку по программе Adobe Reader.
Условное
обозначение
Описание Пример
[Жирный
шрифт]
Указывает на кнопки на панели
управления или экранные кнопки
интерфейса.
Нажмите клавишу [Старт].
Нажмите кнопку [OK].
[Обычный
шрифт]
Обозначает сообщение или настройку,
отображаемую на дисплее сообщений.
На дисплее сообщений появляется [Готов к копированию.].
С помощью [▲] или [▼] выберите [Вкл.].
«Обычный
шрифт«
Обозначает сообщение или настройку,
отображаемую на экране компьютера.
Можно выбрать из меню «Размер печати«.
Щелкните для перехода от текущей страницы к ранее
отображавшейся странице. Данная функция удобна, если
необходимо вернуться к странице, с которой был
выполнен быстрый переход к текущей странице.
Щелкните элемент оглавления для
быстрого перехода к
соответствующей странице.
Предупреждает о возможности
получения травмы или
механического повреждения
аппарата при недостаточном
внимании или несоблюдении
соответствующих правил.
Указывает на дополнительные
объяснения и справочную
информацию по эксплуатации
аппарата.
Указывает на требования по
эксплуатации и ограничения,
которые необходимо соблюдать
для правильной эксплуатации
аппарата и недопущения
повреждения самого аппарата
или иного имущества.
См. раздел
Щелкните подчеркнутый текст
для перехода к
соответствующей странице.
xiii
> О руководстве по эксплуатации (данном документе)
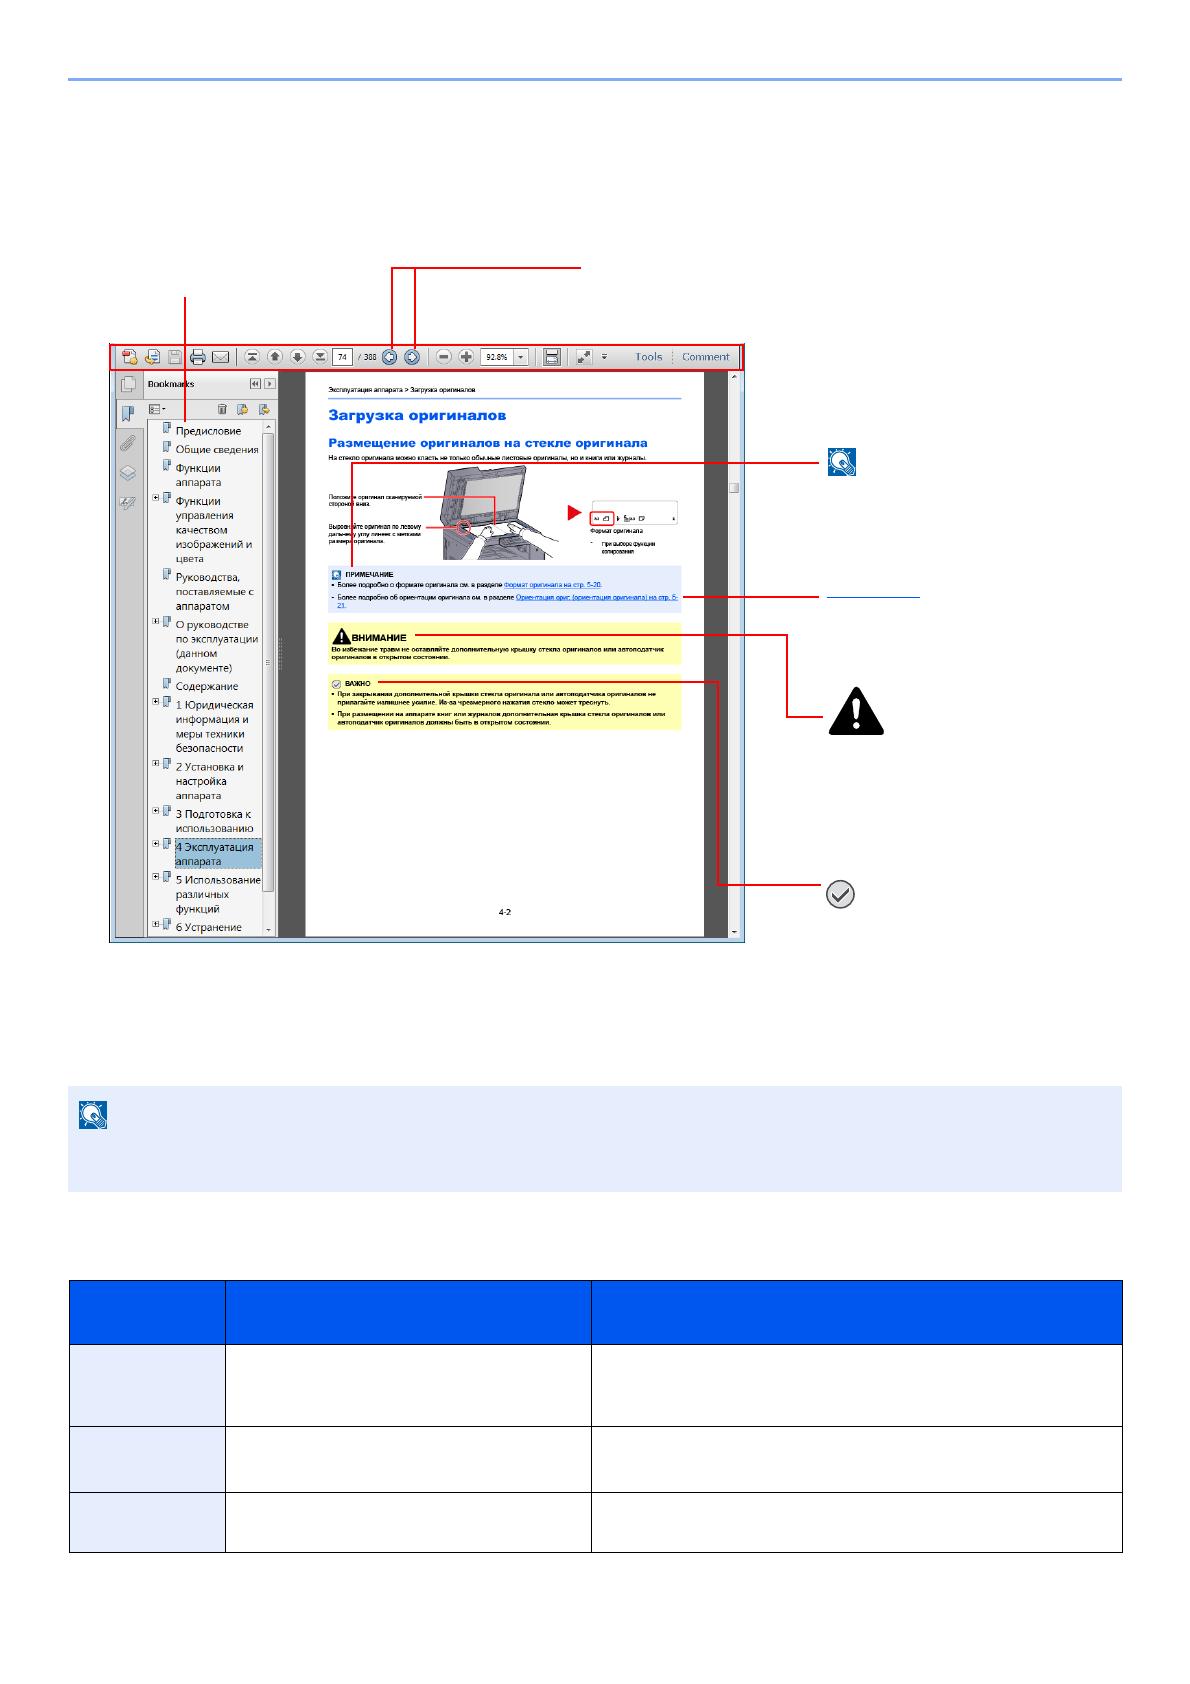
Условные обозначения в рабочих процедурах
Нажимаемые кнопки панели управления выделены красным.
Процедуры, состоящие из последовательности операций, выполняемых на панели управления или на
компьютере, пронумерованы, как показано ниже.
xiv
> О руководстве по эксплуатации (данном документе)
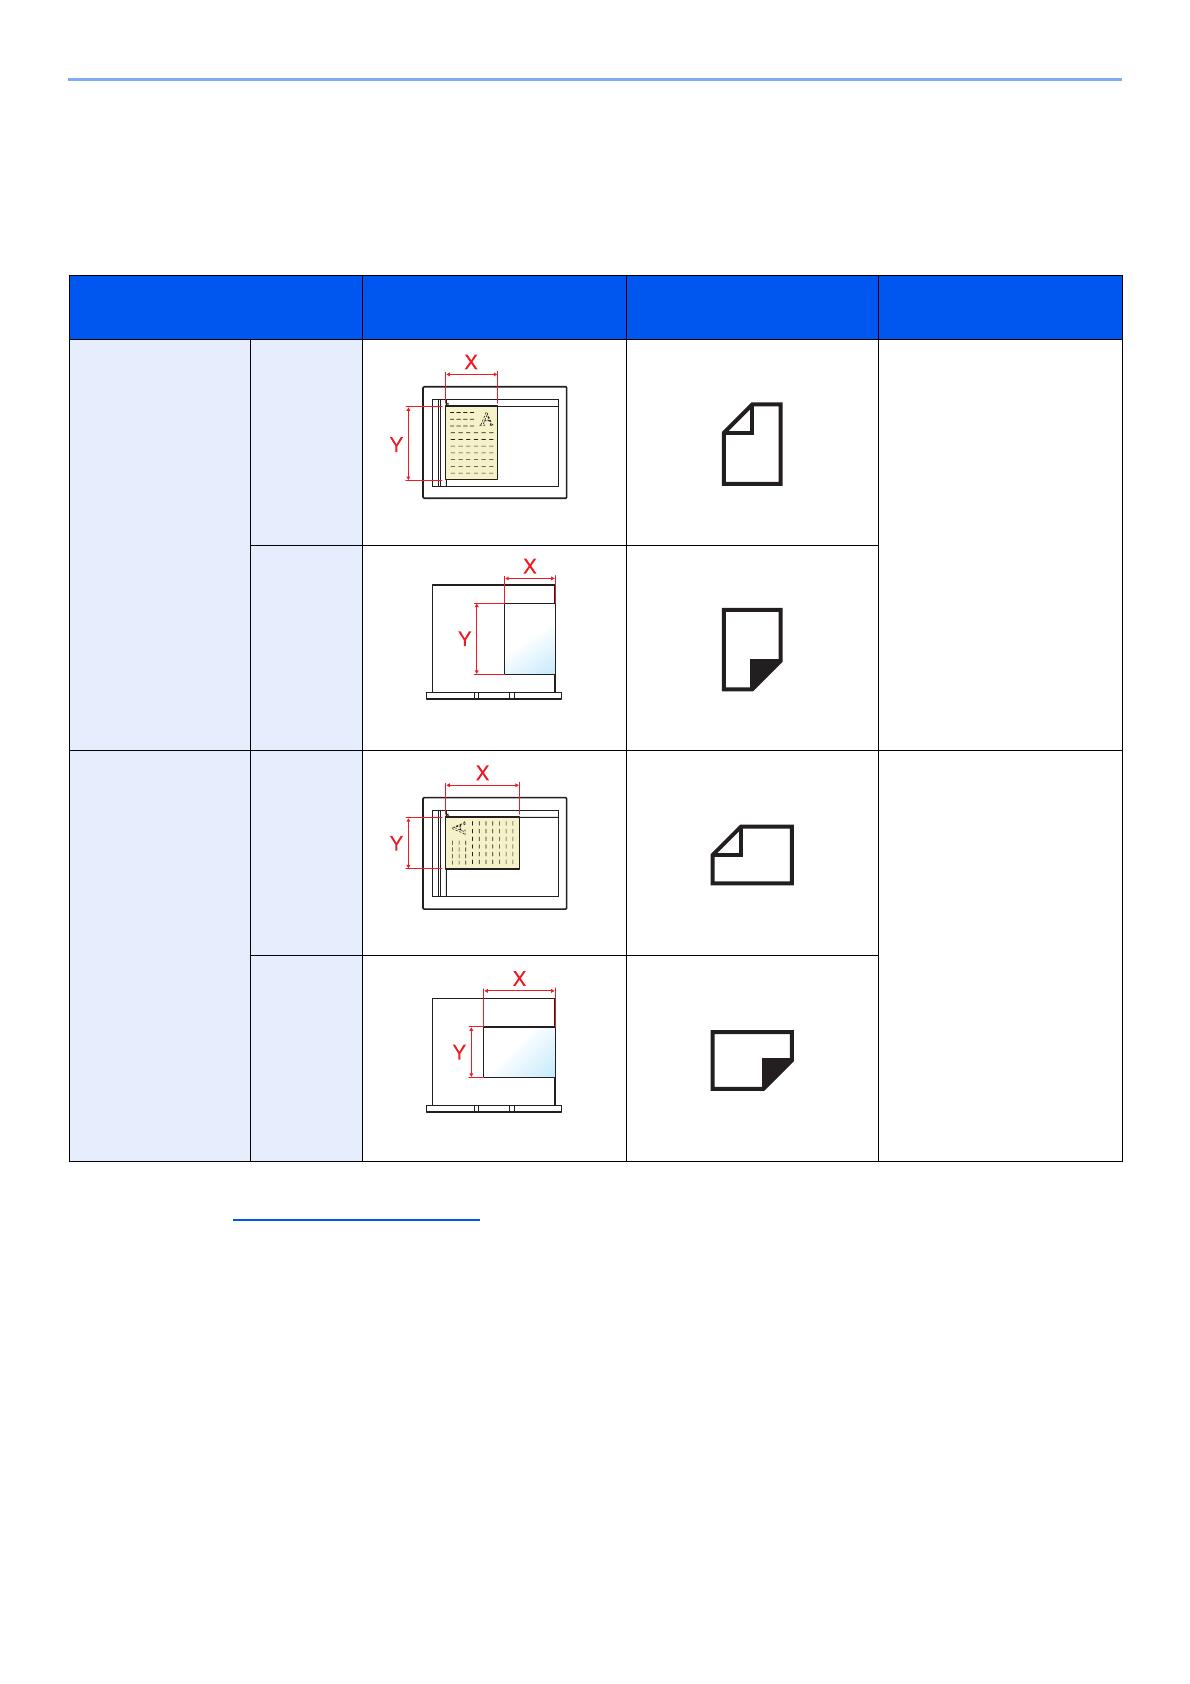
Формат и ориентация оригиналов и бумаги
Такие форматы оригиналов и бумаги, как A4, B5 и Letter, можно использовать и в горизонтальной, и в
вертикальной ориентации. Для различения этих двух ориентаций при использовании указанных форматов к
номеру формата добавляется «-R» для обозначения горизонтальной ориентации.
Для отображения ориентации оригинала и бумаги на дисплее сообщений используются следующие значки.
Ориентация Установка положения
(X: ширина, Y: длина)
Дисплей Формат, указанный в
данном руководстве
*1
*1 Формат оригинала/бумаги, который можно использовать, различается в зависимости от функции и лотка бумаги.
Подробнее см. Характеристики на стр. 10-15
.
Вертикальный Оригинал A4, B5, Letter и пр.
Бумага
Горизонтальный Оригинал A4-R, B5-R, Letter-R и пр.
Бумага
xv
> Карта меню
Карта меню
(Здесь используются названия, отображаемые на дисплее сообщений. Они могут отличаться от заголовков
соответствующих разделов.)
Выбор бумаги (стр.5—13)
Масштаб (стр.5—14)
Плотность (стр.5—15)
Оригинал изобр. (стр.5—15)
Двусторонняя (стр.5—15)
Совместить (стр.5—18)
Копир. ID-карт (стр.5—9)
По копиям/сдвиг (стр.5—20)
Формат оригинала (стр.5—20)
Ориентация ориг. (стр.5—21)
Ориг.Разн.Формат. (стр.5—22)
EcoPrint (стр.5—22)
Плотность фона (стр.5—22)
Поле (стр.5—23)
Стирание границы (стр.5—24)
Непрерывное скан (стр.5—25)
Автоповорот (стр.5—25)
Ввод имени файла (стр.5—25)
Готов к сканированию. (стр.5—33)
xvi
> Карта меню
Выбор программы (стр.5—26)
Ящик печати (стр.4—10)
Состояние Печ.сост.задания (стр.6—2)
Журн.задан.печ. (стр.6—4
)
Отпр.журн.задан. (стр.6—4
)
Сканер (стр.6—9
)
Принтер (стр.6—9
)
Состоян. тонера (стр.6—10
)
Состоян. бумаги (стр.6—10
)
Отчет Печать отчета Карта меню (стр.7—4)
Страница состояния (стр.7—4
)
Состояние сервиса (стр.7—4
)
Счетчик (стр.2—27)
Система Уст. блок. и/ф. (стр.7—5)
Админ/учет Установки адми. (стр.2—20)
Настр. уч. зад. Учет заданий (стр.8—4)
Отчет учета (стр.8—16
)
Общий учет (стр.8—14
)
Учет кажд. зад. (стр.8—14
)
Список уч. зап. (стр.8—5
)
Парам. по умолч. (стр.8—13
)
Неизв. ид.задан. (стр.8—12
)
xvii
> Карта меню
Общие параметры Язык (стр.7—5)
Экран по умолч. (стр.7—6
)
Звук Сигнал (стр.7—6)
Яркость экрана (стр.7—6
)
Тихий режим (стр.7—6
)
Ориг./Пар. бум. Форм.польз.ориг. (стр.7—6)
Польз. форм.бум. (стр.7—7
)
Настр. кассеты 1 Формат кассеты 1 (стр.7—9)
Тип кассеты 1 (стр.7—9
)
Настр. кассеты 2 Формат кассеты 2 (стр.7—9)
Тип кассеты 2 (стр.7—9
)
Настр. кассеты 3 Формат кассеты 3 (стр.7—9)
Тип кассеты 3 (стр.7—9
)
Настр. кас. 4 Формат кассеты 4 (стр.7—9)
Тип кассеты 4 (стр.7—9
)
Настр. ун. лотка Разм.унив.лотка (стр.7—9)
Тип унив. лотка (стр.7—9
)
Уст. типа носит. (стр.7—7
)
Авт.обнар—е ориг. (стр.7—7
)
Носит. для авто (стр.7—8
)
Устр. под. по ум. (стр.7—8
)
Дств со спецбум. (стр.7—8
)
Устан. огран. (стр.7—11
)
Ед. измерения (стр.7—11
)
Обработка ошибок Ош. 2-стор. бум. (стр.7—11)
ОшибНесоотвБум (стр.7—11
)
Настр. таймера Таймер сбр. ош. (стр.7—12)
Таймер ожидания (стр.7—12
)
Таймер сбр. пан. (стр.7—12
)
Очистка прерыв. (стр.7—12
)
Правило выключ. (стр.7—12
)
Таймер выключ. (стр.7—12
)
Авт. удал. ошиб. (стр.7—12
)
Авт.сброс панели (стр.7—12
)
xviii
> Карта меню
Общие параметры Функция по умолч Оригинал изобр. (стр.7—13)
Масштаб (стр.7—13
)
По копиям/сдвиг (стр.7—13
)
Ориентация ориг. (стр.7—13
)
Стирание границы (стр.7—13
)
Поле (стр.7—13
)
Плотность фона (стр.7—13
)
EcoPrint (стр.7—13
)
Автоповорот (стр.7—13
)
Ввод имени файла (стр.7—13
)
Непрерывное скан (стр.7—13
)
Настр. деталей Макет 2 в 1 (стр.7—14)
Макет 4 в 1 (стр.7—14
)
Лин. границы (стр.7—14
)
Ориг. сшивание (стр.7—14
)
Сшив.книжн.ориг. (стр.7—14
)
Финиш. сшивание (стр.7—14
)
Копирование Выбор бумаги (стр.7—14)
Автовыбор бумаги (стр.7—14
)
Автом. приор. % (стр.7—14
)
Принтер Лим.врем.под.бум (стр.7—15)
Настройка/обслуж Рег. плотности (стр.7—15)
Плотность фона (стр.7—15
)
Плотность печати (стр.7—15
)
Правильно. Корр. черн полос (стр.7—15
)
Настройка службы Очистка барабана (стр.7—15)

1-1
1 Правовая
информация и
правила техники
безопасности
Перед использованием аппарата прочтите данную информацию. В этом разделе приводится информация по
следующим темам.
Примечание ……………….………………..…………….……………….…………….………………..…………….…………………… 1-2
Условные обозначения по технике безопасности в данном руководстве ………………..………………... 1-2
Окружающая среда ……….…………….………………..…………….……………….………………..…………….……….. 1-3
Меры предосторожности при эксплуатации …………………….……………….……………..……………….…….. 1-3
Меры безопасности при работе с лазером в странах Европы …………………………..…………….……….. 1-4
Safety Instructions Regarding the Disconnection of Power …………………………..……………….……………… 1-5
Законодательные ограничения на копирование и сканирование ……….………………..…………….…….. 1-5
Правовая информация …….………………..……………….…………….………………..…………….……………….….. 1-6
Функция управления энергосбережением
………………………….………………..…………….……………….….. 1-7
Функция автоматического двустороннего копирования ……………..…………….……………….……………... 1-7
Сбережение ресурсов — бумага ………………………….………………..…………….……………….…………….….. 1-7
Экологическая польза от функции «управления режимом питания» ………….…………….………………... 1-7
Программа Energy Star (ENERGY STAR®) ……………………………..……………….…………….………………... 1-8
/
- Manuals
- Brands
- Kyocera Manuals
- All in One Printer
- TASKalfa 1800
- Operation manual
-
Contents
-
Table of Contents
-
Troubleshooting
-
Bookmarks
Quick Links
›
›
›
COPY
SCAN
operatioN guide
TASKalfa 1800
TASKalfa 2200
Related Manuals for Kyocera TASKalfa 1800
Summary of Contents for Kyocera TASKalfa 1800
-
Page 1: Operation Guide
› › › PRINT COPY SCAN operatioN guide TASKalfa 1800 TASKalfa 2200…
-
Page 2
> Preface Preface This Operation Guide is intended to help you operate the machine correctly, perform routine maintenance, and take simple troubleshooting measures as needed so that the machine can always be used in the optimum condition. Please read this Operation Guide before using the machine. We recommend the use of our own brand supplies. -
Page 3: Table Of Contents
Installing Software in Windows …………….2-11 Uninstalling the Software ………………2-15 Setting the Shared Printer ………………2-16 Installing Software in Mac Computer …………… 2-17 KYOCERA Client Tool ………………… 2-18 Setting WIA Driver ………………..2-19 Administrator User Name and Password …………… 2-20 Administrator Setting ………………..2-20 Setting Energy Saver Function ………………
-
Page 4
Checking Device Status ………………… 6-9 Checking the Remaining Amount of Toner and Paper ……….6-10 Checking from KYOCERA Client Tool …………….6-11 System Menu and KYOCERA Client Tool ……7-1 Default Settings on the Machine (System Menu) …………7-2 System Menu Settings ………………..7-3 Report …………………… -
Page 5
Printer ……………………7-15 Adjust/Maint. (Adjustment/Maintenance) …………..7-15 Default Settings on the PC (KYOCERA Client Tool) …………. 7-16 Operation Method ………………..7-16 Screen Overview …………………. 7-17 Configuring the Administrative Settings …………..7-19 Scan Destination Settings ………………7-20 Quick Scan/TWAIN Settings ………………7-23 Print Box Settings ………………… -
Page 6
Duplex Unit (Option) ………………..10-18 Glossary …………………….. 10-19 Index ……………………..Index-1… -
Page 7: Overview
KYOCERA Client Tool You can check the status and Print Box functions configure the scan settings of the machine from KYOCERA Client Print Box functions allow you to Tool installed on your computer. temporarily save print data in the Print…
-
Page 8: Machine Features
> Machine Features Machine Features The machine is equipped with many useful functions. Here are some examples. For details, refer to Operation on the Machine on page 5-1. Optimize your office workflow Access to frequently used functions Copy both sides of an ID card on a Interrupt other running jobs and with just one touch (Program) single sheet (ID Card Copy)
-
Page 9
> Machine Features Optimize your office workflow Save energy and cost Separate each page of a scanned Save energy as needed Erase black shadows that appear at document into a single file (Sleep / Power Off) the edges of a copy (Border Erase) (File separation) The machine is equipped with the Energy This function allows you to print… -
Page 10
> Machine Features Create attractive documents Strengthen security Scan originals in color and send them Manage the copy/print count by Prevent loss of finished documents to a PC (Scan) account (Job Accounting) (Print Box) You can scan originals and convert them You can check and restrict the copy/print You can temporarily save a printer into electronic data, such as a color PDF. -
Page 11: Guides Provided With The Machine
Explains how to install the printer driver and use the printer function. KYOCERA Client Tool User Guide Use KYOCERA Client Tool Explains how to use KYOCERA Client Tool. Install the Adobe Reader (version 8.0 or later) to view the manuals on the Product Library disc.
-
Page 12: About The Operation Guide (This Guide)
Explains how to check the status of a job and the job history, and how to cancel jobs being printed or waiting to print. Also explains how to check paper and toner levels, and how to check the device status. System Menu and KYOCERA Explains System Menu related to overall machine operation and utilities. Client Tool Job Accounting Explains job accounting.
-
Page 13: Conventions Used In This Guide
> About the Operation Guide (this Guide) Conventions Used in This Guide Adobe Reader X is used as an example in the explanations below. Click an item in the Table of Contents Click to move from the current page to the previously to jump to the corresponding page.
-
Page 14
> About the Operation Guide (this Guide) Conventions used in operation procedures Operation panel keys that are pressed are outlined in red. Procedures consisting of a sequence of operation panel actions or computer operations are numbered as shown below. xiii… -
Page 15
> About the Operation Guide (this Guide) Size and Orientation of Originals and Paper Original sizes and paper sizes such as A4, B5, and Letter can be used in both the horizontal and vertical orientations. To distinguish the orientations when these sizes are used, «-R» is added to sizes used in the horizontal orientation. The following icons are used to indicate original and paper placement orientations on the message display. -
Page 16: Menu Map
> Menu Map Menu Map (The names displayed on the message display are used here. These may differ from the referenced titles.) Paper Selection (page 5-12) Zoom (page 5-13) Density (page 5-14) Original Image (page 5-14) Duplex (page 5-14) Combine (page 5-17) ID card Copy…
-
Page 17
> Menu Map Print Box (page 4-10) Status Print Job Status (page 6-2) Print Job Log (page 6-4) Send Job Log (page 6-4) Scanner (page 6-9) Printer (page 6-9) Toner Status (page 6-10) Paper Status (page 6-10) Report Report Print Menu Map (page 7-4) -
Page 18
> Menu Map Common Settings Language (page 7-5) Default Screen (page 7-6) Sound Buzzer (page 7-6) Display Bright. (page 7-6) Quiet Mode (page 7-6) Orig./Paper Set. Custom Orig.Size (page 7-7) Custom PaperSize (page 7-7) Cassette 1 Set. Cassette 1 Size (page 7-9) Cassette 1 Type… -
Page 19
> Menu Map Common Settings Function Default Original Image (page 7-13) Zoom (page 7-13) Collate/Offset (page 7-13) Orig. Orientation (page 7-13) Border Erase (page 7-13) Margin (page 7-13) Backgrnd Density (page 7-13) EcoPrint (page 7-13) Auto Rotation (page 7-13) File Name Entry (page 7-13) Continuous Scan… -
Page 20: Legal And Safety Information
Legal and Safety Information Please read this information before using your machine. This chapter provides information on the following topics. Notice …………………………… 1-2 Safety Conventions in This Guide ………………….1-2 Environment ……………………….. 1-3 Precautions for Use ……………………..1-3 Laser Safety (Europe) ……………………..1-4 Safety Instructions Regarding the Disconnection of Power …………..
-
Page 21: Notice
Legal and Safety Information > Notice Notice Safety Conventions in This Guide The sections of this guide and parts of the machine marked with symbols are safety warnings meant to protect the user, other individuals and surrounding objects, and ensure correct and safe usage of the machine. The symbols and their meanings are indicated below.
-
Page 22: Environment
Legal and Safety Information > Notice Environment The service environmental conditions are as follows: • Temperature: 50 to 90.5 °F (10 to 32.5 °C) • Humidity: 15 to 80% However, adverse environmental conditions may affect the image quality. Avoid the following locations when selecting a site for the machine.
-
Page 23: Laser Safety (Europe)
Legal and Safety Information > Notice Laser Safety (Europe) Laser radiation could be hazardous to the human body. For this reason, laser radiation emitted inside this machine is hermetically sealed within the protective housing and external cover. In the normal operation of the product by user, no radiation can leak from the machine.
-
Page 24: Safety Instructions Regarding The Disconnection Of Power
Legal and Safety Information > Notice Safety Instructions Regarding the Disconnection of Power Caution: The power plug is the main isolation device! Other switches on the equipment are only functional switches and are not suitable for isolating the equipment from the power source. Attention: Le débranchement de la fiche secteur est le seul moyen de mettre l’appareil hors tension.
-
Page 25: Legal Information
Legal and Safety Information > Notice Legal Information Copying or other reproduction of all or part of this guide without the prior written consent of KYOCERA Document Solutions Inc. is prohibited. Regarding Trade Names • TASKalfa is a trademark or registered trademark of KYOCERA Document Solutions Inc.
-
Page 26: Energy Saving Control Function
Legal and Safety Information > Notice Energy Saving Control Function To reduce energy consumption while in a waiting state, the device comes equipped with an energy saving control function for switching to Sleep as well as Power Off Mode where power consumption is automatically reduced to a minimum after a certain amount of time elapses since the device was last used.
-
Page 27: Installing And Setting Up The Machine
Installing Software in Windows ………………….. 2-11 Uninstalling the Software ……………………2-15 Setting the Shared Printer ……………………2-16 Installing Software in Mac Computer ………………… 2-17 KYOCERA Client Tool ……………………… 2-18 Setting WIA Driver ……………………..2-19 Administrator User Name and Password ………………….2-20 Administrator Setting ……………………..2-20 Setting Energy Saver Function ……………………
-
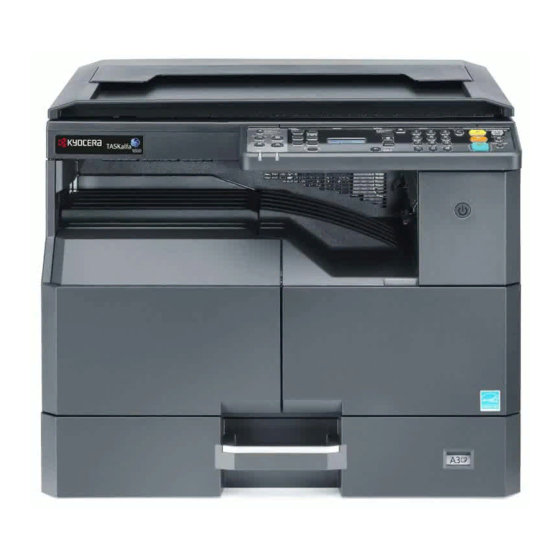
Page 28: Part Names
Installing and Setting up the Machine > Part Names Part Names Machine Exterior 1 Document Processor (DP) 8 Operation Panel 2 Original Width Guides 9 Cassette 1 3 Original Table 10 Front Cover 4 Original Eject Table 11 Power Switch 5 Slit Glass 12 Handles 6 Original Size Indicator Plates…
-
Page 29
Installing and Setting up the Machine > Part Names 14 Paper Width Adjusting Tab 15 Paper Length Guide 16 Paper Width Guide 17 Cleaning Cloth Compartment 18 Original Stopper 19 Right Cover 1 Lever 20 Right Cover 1 21 Paper Width Guide 22 Multi Purpose Tray 23 Support Tray Section of the Multi Purpose Tray… -
Page 30: Connectors/Interior
Installing and Setting up the Machine > Part Names Connectors/Interior 1 USB Interface Connector 2 Toner Container 3 Toner Container Lever 4 Waste Toner Box…
-
Page 31: With Optional Equipments Attached
Installing and Setting up the Machine > Part Names With Optional Equipments Attached 1 Original Cover 2 Document Processor (DP) 3 Cassette 2 4 Cassette 3 5 Cassette 4 6 Duplex Unit 7 Right Cover 2 8 Right Cover 3 9 Right Cover 4 Optional Equipment (page 10-2)
-
Page 32: Determining The Connection Method And Preparing Cables
Preparing Cables Check how to connect the machine to a PC, and prepare the necessary cables for your environment. Connection Example Connect the machine to the PC by referring to the illustration below. KYOCERA Client Tool • Printer settings •…
-
Page 33: Connecting Cables
Installing and Setting up the Machine > Connecting Cables Connecting Cables Connecting USB Cable IMPORTANT If the power is on, turn the power switch off. Power Off (page 2-9) Connect the machine. Connect the USB cable to the USB interface connector located on the left side of the body. Connect the other end of the cable to the PC.
-
Page 34: Power On/Off
Installing and Setting up the Machine > Power On/Off Power On/Off Power On When the [Energy Saver] indicator is lit… (Recovery from sleep) [Energy Saver] indicator Press any key on the operation panel. When the [Energy Saver] indicator is off… Turn the power switch on.
-
Page 35: Power Off
Installing and Setting up the Machine > Power On/Off Power Off When not turning off the power switch… (sleep) [Energy Saver] indicator Press the [Energy Saver] key. The [Energy Saver] indicator will light up. Sleep and Sleep Timer (page 2-22) When turning off the power switch…
-
Page 36: Installing Software
• When connecting the computer (Host PC) connected to the machine via USB to the computer on the network (Client PC) and using the machine as a shared printer, KYOCERA Client Tool needs to be installed on the Host PC.
-
Page 37: Installing Software In Windows
Installing and Setting up the Machine > Installing Software Installing Software in Windows The following procedure is an example for installing the software in Windows 7. You can use either [Express Install] or [Custom Install] can be selected for the installation method. [Express Install] automatically detects connected machines and installs the required software.
-
Page 38: Express Install
[Express Install]. Packages include the following software: • Driver Package GX DRIVER, Kyocera TWAIN Driver GX, Kyocera WIA Driver, KYOCERA Client Tool NOTE • The machine cannot be detected unless it is on. If the computer fails to detect the…
-
Page 39: Custom Install
Installing and Setting up the Machine > Installing Software Custom Install Install using [Custom Install]. Select [Custom Install] tab. Select the device to be installed, and click the arrow button to move it to the «Products to Install» list. The following buttons are available. : This button is used to switch the display between icon and text display.
-
Page 40: Finish The Installation
Installing and Setting up the Machine > Installing Software Select the utility to be installed, and then click the arrow button to move it to the «Products to Install» list. Click [Install]. NOTE If the Windows security window appears, click [Install this driver software anyway].
-
Page 41: Uninstalling The Software
Uninstallation on Windows must be done by a user logged on with administrator privileges. Display the screen. Click [Start] button on the Windows and then select [All Programs], [Kyocera], and [Uninstall Kyocera Product Library] to display the Uninstall Wizard. In Windows 8, select [Search] in charms, [Apps], and then [Uninstall Kyocera Product Library].
-
Page 42: Setting The Shared Printer
Installing and Setting up the Machine > Installing Software Setting the Shared Printer If the computer connected to the machine (Host PC) via USB is also connected to the computer on the network (Client PC), printing from the computer on the network is enabled by setting the machine as the shared printer. This section explains how to operate the device on the Host PC and on the Client PC respectively by using the setting example on Windows 7.
-
Page 43: Installing Software In Mac Computer
• Installation on Mac OS must be done by a user logged on with administrator privileges. • In the Authenticate screen, enter the name and password used to log in to the operating system. Insert the Product Library disc. Double-click the [Kyocera] icon. Display the screen. Double-click [OS X 10.5 or…
-
Page 44: Kyocera Client Tool
Installing and Setting up the Machine > Installing Software KYOCERA Client Tool KYOCERA Client Tool gives you quick access to common machine features and settings, plus the current status of all supported machines. You can also use KYOCERA Client Tool to order toner, download printer drivers and open the company website.
-
Page 45: Setting Wia Driver
Installing and Setting up the Machine > Installing Software Setting WIA Driver Register this machine to the WIA Driver. Instructions are based on interface elements as they appear in Windows 7. Display the screen. Click [Start] button on the Windows and enter [Scanner] in [Search programs and files].
-
Page 46: Administrator User Name And Password
Installing and Setting up the Machine > Administrator User Name and Password Administrator User Name and Password If you are setting a function that requires administrator rights, you must enter your login user name and login password. The factory default login user name and login password are set as shown below. Login User Name Login Password Admin…
-
Page 47
Installing and Setting up the Machine > Administrator User Name and Password NOTE If the login user name entry screen appears during operations, log in by referring to Administrator User Name and Password on page 2-20. The factory default login user name and login password are set as shown below. Login User Name Login Password Admin… -
Page 48: Setting Energy Saver Function
Installing and Setting up the Machine > Setting Energy Saver Function Setting Energy Saver Function To use the Energy Saver function, configure the following settings: • Sleep and Sleep Timer (page 2-22) • Power Off Timer (page 2-23) Sleep and Sleep Timer Sleep To enter Sleep, press the [Energy…
-
Page 49: Power Off Timer
Installing and Setting up the Machine > Setting Energy Saver Function Press the [▲] or [▼] key to select [Timer Settings], and press the [OK] key. Common Settings Timer Settings NOTE If the login user name entry screen appears during operations, log in by referring to Administrator User Name and Password on page 2-20.
-
Page 50
Installing and Setting up the Machine > Setting Energy Saver Function Press the [▲] or [▼] key to select [Common Settings], and press the [OK] key. Status/Sys. Menu Common Settings Press the [▲] or [▼] key to select [Timer Settings], and press the [OK] key. Common Settings Timer Settings NOTE… -
Page 51
Installing and Setting up the Machine > Setting Energy Saver Function Press the [▲] or [▼] key to select [Common Settings], and press the [OK] key. Status/Sys. Menu Common Settings Press the [▲] or [▼] key to select [Timer Settings], and press the [OK] key. Common Settings Timer Settings NOTE… -
Page 52: Checking The Counter
Installing and Setting up the Machine > Checking the Counter Checking the Counter Press the [Status/System Menu/Counter] key to check the number of sheets printed and scanned. Display the screen. Press the [Status/System Menu/Counter] key. Press the [▲] or [▼] key to select [Counter], and press the [OK] key. Status/Sys.
-
Page 53: Preparation Before Use
Preparation before This chapter explains the following operations. Using the Operation Panel ……………………..3-2 Operation Panel Keys ……………………..3-2 Operation Method ………………………. 3-3 Display for Originals and Paper ………………….. 3-4 Loading Paper …………………………3-5 Before Loading Paper ……………………..3-6 Loading in the Cassettes ……………………. 3-7 Loading Paper in the Multi Purpose Tray ………………..
-
Page 54: Using The Operation Panel
Preparation before Use > Using the Operation Panel Using the Operation Panel Operation Panel Keys Displays the following Displays the paper Displays the function screens. selection screen. menu for copy. Status / Report / Counter / Increments or System / Admin/ Displays the zoom setting decrements numbers, or Accounting / Common…
-
Page 55: Operation Method
Preparation before Use > Using the Operation Panel Operation Method This section explains how to operate the setting menus on the message display. Displaying the Menus and Configuring Settings Press the [Status/System Menu/Counter] key, [Function Menu] key, or function keys to display the setting menus. Press the [▲] key, [▼] key, [OK] key, or [Back] key to select a menu, and perform settings.
-
Page 56: Display For Originals And Paper
Preparation before Use > Using the Operation Panel Display for Originals and Paper The copy screen displays the selected paper source. Ready to copy. Original size Original orientation Paper orientation Paper size Paper source…
-
Page 57: Loading Paper
Preparation before Use > Loading Paper Loading Paper Paper can be loaded in the one standard cassette and the multi purpose tray. A paper feeder is also available as an option. (Refer to Optional Equipment on page 10-2.) For the paper load methods for each cassette, refer to the page below. PF-480 Cassettes Page…
-
Page 58: Before Loading Paper
Preparation before Use > Loading Paper Before Loading Paper When you open a new package of paper, fan the sheets to separate them slightly prior to loading in the following steps. Bend the whole set of sheets to swell them in the middle. Hold the stack at both ends and stretch it while keeping the entire stack swelled.
-
Page 59: Loading In The Cassettes
Preparation before Use > Loading Paper Loading in the Cassettes The standard cassette can hold plain paper, recycled paper or color paper. Cassette 1 hold up to 300 sheets of plain paper (80 g/m²). The following paper sizes are supported: A3, B4, A4, A4-R, B5, B5-R, A5-R, Folio, Ledger, Legal, Oficio II, Letter, Letter-R, Statement-R, 8K, 16K, 16K-R, and 216 ×…
-
Page 60: Load Paper
Preparation before Use > Loading Paper Adjust the cassette size. Holding the paper width adjusting tab, move the paper width guides to fit the paper. Paper sizes are marked on the cassette. IMPORTANT Make sure that the width guides are flush against the paper. If there is space between the guides and the paper, set the width guides again.
-
Page 61
Preparation before Use > Loading Paper IMPORTANT • Load the paper with the print side facing up. • After removing new paper from its packaging, fan the paper before loading it in the cassette. (Refer to Before Loading Paper on page 3-6.) •… -
Page 62: Loading Paper In The Multi Purpose Tray
Preparation before Use > Loading Paper Loading Paper in the Multi Purpose Tray The multi purpose tray will hold up to 100 sheets of A4 or smaller plain paper (80 g/m²) or up to 25 sheets of plain paper (80 g/m²) lager than A4. The multi purpose tray accepts paper sizes from A3 to A6-R and Hagaki and from Ledger to Statement-R, 8K, 16K and 16K-R.
-
Page 63: Adjust The Multi Purpose Tray Size
Preparation before Use > Loading Paper Adjust the multi purpose tray size. Load paper. Insert the paper along the paper width guides into the tray until it stops. After removing new paper from its packaging, fan the paper before loading it in the multi- purpose tray.
-
Page 64
Preparation before Use > Loading Paper When you load envelopes or cardstock in the multi purpose tray Load the paper with the print side facing down. For the procedure for printing, refer to the Printer Driver User Guide. Example: When printing the address. Open the flap. -
Page 65: Specifying Paper Size And Media Type
Preparation before Use > Loading Paper Specifying Paper Size and Media Type The default paper size setting for cassette 1 and for the optional paper feeder (cassettes 2 to 4) is [Auto], and the default media type setting is [Plain]. For the multi purpose tray, the default paper size setting is [A4], and the default media type setting is [Plain].
-
Page 66
Preparation before Use > Loading Paper Press the [▲] or [▼] key to select [Cassette 1 (to 4) Set.], and press the [OK] key. Orig./Paper Set. Cassette 1 Set. NOTE [Cassette 2] to [Cassette 4] are shown when the optional paper feeder is installed. Specify the paper size. -
Page 67
Preparation before Use > Loading Paper Press the [▲] or [▼] key to select the media type, and press the [OK] key. Cassette 1 Type Plain Specifying Paper Size and Media Type for the Multi Purpose Tray (MP Tray Setting) To change the type of paper to be used in the multi purpose tray, specify the paper size. -
Page 68
Preparation before Use > Loading Paper Press the [▲] or [▼] key to select [MP Tray Set.], and press the [OK] key. Orig./Paper Set. MP Tray Set. Specify the paper size. Press the [▲] or [▼] key to select [MP Tray Size], and press the [OK] key. MP Tray Set. -
Page 69
Preparation before Use > Loading Paper Press the [▲] or [▼] key to select the media type, and press the [OK] key. MP Tray Type Plain 3-17… -
Page 70: Printing From Pc
Printing from PC This chapter explains the following topics: Printing from PC …………………………4-2 Printer Driver Print Settings ……………………4-5 Printer Driver Help ……………………… 4-6 Changing the Default Printer Driver Settings (Windows 7) …………..4-6 Canceling Jobs ……………………….4-6 Using Print Box …………………………4-8 Saving Document to a Print Box ………………….
-
Page 71: Printing From Pc
Printing from PC > Printing from PC Printing from PC Follow the steps below to print documents from applications. NOTE • To print the document from applications, install the printer driver on your computer from the supplied Product Library disc. •…
-
Page 72
Printing from PC > Printing from PC Select the [Basic] tab. Click «Print size» menu and select the paper size to use for printing. To load the paper of size that is not included in print sizes of the machine such as cardstock or envelopes, the paper size needs to be registered. -
Page 73
Printing from PC > Printing from PC Click tray] in the «Source» menu. Select the type of paper in the «Media type» menu. 2, 7 NOTE If you loaded a postcard or envelope, select [Cardstock] or [Envelope] in the «Media type» menu. -
Page 74: Printer Driver Print Settings
Printing from PC > Printing from PC Printer Driver Print Settings The printer driver print settings screen allows you to configure a variety of print-related settings. For more information, refer to the Printer Driver User Guide on the Product Library disc. Description [Quick Print] tab…
-
Page 75: Printer Driver Help
Printing from PC > Printing from PC Printer Driver Help The printer driver includes Help. To learn about print settings, open the printer driver print settings screen and display Help as explained below. • Click the [?] button in the upper right corner of the screen and then click the item you want to know about. •…
-
Page 76
Printing from PC > Printing from PC Press the [▲] or [▼] key to select [Cancel Job], and press the [OK] key. 0010 doc001.doc Cancel Job NOTE Select [Details] and press the [OK] key to show the detailed information of the job. Press the [▲] or [▼] key to select [Yes] in the confirmation screen, and press the [OK] key. -
Page 77: Using Print Box
Use Multiple Boxes A maximum of 10 Print Boxes (Box 01 to 10) can be set by using KYOCERA Client Tool. When connecting the computer (Host PC) connected to the machine via USB to the computer on the network (Client PC) and using the machine as a shared printer, each Client PC can use a different Print Box.
-
Page 78: Saving Document To A Print Box
Use the procedure below to save a document in the Print Box created on the Host PC. Print Box can be selected from [Box 01] to [Box 10]. To use the other boxes or to change the default box name, configure the settings on KYOCERA Client Tool. Refer to Default Settings on the PC (KYOCERA Client Tool) on page 7-16.
-
Page 79: Printing Document From Print Box
Print a document saved in a Print Box. NOTE • All documents saved in the selected Print Box are printed. • KYOCERA Client Tool must be running on the computer from which printing from Print Box is executed. Refer to Accessing KYOCERA Client Tool on page 2-18.
-
Page 80: Operation On The Machine
Operation on the Machine This chapter explains the following topics: Loading Originals …………………………. 5-2 Placing Originals on the Platen …………………… 5-2 Loading Originals in the Document Processor (Option) …………….5-3 Checking the Equipment’s Serial Number ………………….5-5 Copying …………………………..5-6 Basic Operation ……………………….
-
Page 81: Loading Originals
Operation on the Machine > Loading Originals Loading Originals Placing Originals on the Platen You may place books or magazines on the platen in addition to ordinary sheet originals. Put the scanning side facedown. Align it flush against the original Original size size indicator plates with the back left corner as the reference point.
-
Page 82: How To Load Originals
Operation on the Machine > Loading Originals Loading Originals in the Document Processor (Option) The optional document processor automatically scans each sheet of multiple originals. Both sides of two-sided originals are scanned. Originals Supported by the Document Processor The document processor supports the following types of originals. Detail Document Processor Weight…
-
Page 83: Place The Originals
Operation on the Machine > Loading Originals Adjust the original width guides. Place the originals. Original size When selecting the copying function Put the side to be scanned (or the first side of two-sided originals) face-up. Slide the leading edge into the document processor as far as it will go. NOTE •…
-
Page 84: Checking The Equipment’s Serial Number
Operation on the Machine > Checking the Equipment’s Serial Number Checking the Equipment’s Serial Number The equipment’s serial number is printed in the location shown in the figure. TASKalfa 2200 NOTE You’ll need the equipment’s serial number when contacting your Service Representative. Please check the number before contacting your Service Representative.
-
Page 85: Copying
Operation on the Machine > Copying Copying Basic Operation Follow the steps as below for basic copying. Press the [Copy] key. Place the originals. Original size Paper size Check the original size and the paper size. NOTE • For loading instructions, refer to Loading Originals on page 5-2.
-
Page 86: Interrupt Copy
Operation on the Machine > Copying Interrupt Copy This function allows you to pause the current jobs in progress when you need to make copies immediately. When the interruption copy ends, the machine resumes the paused print jobs. NOTE If the machine is left unused for 60 seconds in interrupt copy mode, interrupt copying is automatically cancelled and printing resumes.
-
Page 87: Id Card Copy
Operation on the Machine > Copying ID Card Copy Use to copy the front and back sides of a license or other ID card on one sheet of paper. Configure the settings. Press the [ID Card Copy] key. Press the [▲] or [▼] key to select [On], and press the [OK] key. ID card Copy Place the original.
-
Page 88
Operation on the Machine > Copying Press the [Start] key. One side of the card is scanned. Turn the original over. Align with the ID Card marks on the Original Size Indicator Plates. Turn over the card. Press Start Key. Put it on same place. -
Page 89: Using Various Functions
Operation on the Machine > Copying Using Various Functions To configure the settings for functions, press the key of the function you want to configure. You can also press the [Function Menu] key to select from other functions displayed on the message display. Operation Method (page 3-3).
-
Page 90
Operation on the Machine > Copying Reference Function Description page Collate/Offset Offsets the output by page or set. page 5-19 Original Size Specify the original size to be scanned. page 5-19 Orig. Orientation Select the orientation of the original document top edge page 5-20 to scan correct direction. -
Page 91: Paper Selection
Operation on the Machine > Copying Paper Selection Select the cassette or multi-purpose tray that contains the required paper size. NOTE Specify in advance the size and type of the paper loaded in the cassette (refer to Specifying Paper Size and Media Type on page 3-13).
-
Page 92
Operation on the Machine > Copying Zoom Adjust the zoom to reduce or enlarge the image. The following zoom options are available. Item Value Description 100% Reproduces the original size. Auto Adjusts the image to match the paper size. A3: 141% A5: 70% Standard Zoom Reduces or enlarges at preset… -
Page 93: Original Image
Operation on the Machine > Copying Density Adjust density. Press the [▲] or [▼] key to select [Darker +3] to [Lighter -3]. Original Image Select original image type. Item Description Text+Photo Best for mixed text and photo documents. Photo Best for photos taken with a camera. Text Sharply renders pencil text and fine lines.
-
Page 94
Operation on the Machine > Copying Two-sided to Two-sided Produces two-sided copies from two-sided originals. The optional duplex unit and document processor are required. NOTE The paper sizes supported in Two-sided to Two-sided mode are A3, B4, Original Copy A4, A4-R, B5, B5-R, A5-R, Ledger, Legal, Letter, Letter-R, Executive, Statement-R, Oficio II, 216 ×… -
Page 95
Operation on the Machine > Copying Item Value Description Advanced Duplex ― Changes the settings. 1-sided>> Finish. Binding Left/Right, Top Select the binding orientation of copies, and press the [OK] 2-sided key. Orig. Orientation Top Edge on Top, Top Select the orientation of the original document top edge to Edge on Left scan correct direction. -
Page 96
Operation on the Machine > Copying Combine Combines 2 or 4 original sheets into 1 printed page. You can select the page layout and the type of boundary lines around the pages. The following types of the boundary lines are available. None Solid Line Dotted Line… -
Page 97
Operation on the Machine > Copying Layout image Value Image 2 in 1 L to R/T to B R to L 4 in 1 Right then Down Down then Right Left then Down Down then Left NOTE • The paper sizes supported in Combine mode are A3, A4-R, A4, A5-R, B4, B5-R, B5, Folio, 216 × 340 mm, Ledger, Letter-R, Letter, Legal, Statement-R, Oficio II, 8K, 16K-R and 16K. -
Page 98: Original Size
Operation on the Machine > Copying Collate/Offset Offsets the output by page or set. Value Image Description ― Disables the function. Collate Only Scans multiple originals and delivers complete sets of copies as required according to page number. Offset Each Page When offsetting is used, printed copies are produced after rotating each page by 90 degrees.
-
Page 99
Operation on the Machine > Copying Orig. Orientation (Original Orientation) Select the orientation of the original document top edge to scan correct direction. To use any of the following functions, the document’s original orientation must be set. • Duplex • Margin •… -
Page 100
Operation on the Machine > Copying Mixed Size Orig. (Mixed Size Originals) Scans multiple sheets of the same width using the document processor. NOTE The optional document processor is required. Value Description Disables the function. Enables Mixed Size Originals. EcoPrint EcoPrint saves toner when printing. -
Page 101
Operation on the Machine > Copying Margin Add margins (white space). In addition, you can set the margin width and the back page margin. NOTE The default setting for margin width can be changed. For details, refer to Margin on page 7-13. -
Page 102: Border Erase
Operation on the Machine > Copying Border Erase Erases the black border that forms around the image. The following modes are available. Border Erase Sheet Erases black borders around the single sheet original. Original Copy Border Erase Book Erases black borders around the edges and in the middle of the original such as a thick book.
-
Page 103: Continuous Scan
Operation on the Machine > Copying Continuous Scan Scans a large number of originals in separate batches and then produce as one job. To scan the next original, press the [Start] key. After scanning all originals, press the [OK] key. Copying starts. Value Description Disables the function.
-
Page 104: Program
Operation on the Machine > Copying Program By registering sets of frequently used functions as a single program, you can simply select the program number as needed to recall those functions. You can also name the programs for easy identification when recalling. NOTE •…
-
Page 105: Confirming The Registered Program
Operation on the Machine > Copying Enter a program name using the numeric keys and press the [OK] key. Program Name The program is registered. Character Entry Method (page 10-4) NOTE • Up to 32 characters can be entered. • If the program number is already used in any of the existing programs, the change confirmation screen appears.
-
Page 106: Changing The Program Name
Operation on the Machine > Copying Overwriting Program Programs can be changed with the same procedures as those for registering programs. When selecting the program number to be registered, select the program to be changed and overwrite the program number. Refer to Registering Program on page 5-25.
-
Page 107
Operation on the Machine > Copying Delete the program. Press the [▲] or [▼] key to select [Delete], and press the [OK] key. Program 01 Delete Press the [▲] or [▼] key to select [Yes] in the confirmation screen, and press the [OK] key. 5-28… -
Page 108: Canceling Jobs
Operation on the Machine > Copying Canceling Jobs You can cancel jobs by pressing the [Stop] key. When a job is being executed The copy job is canceled. When there are waiting jobs [Print Job List] is displayed. Press the [▲] or [▼] key to select the job to cancel, and press the [OK] key. Print Job List 0010 doc0010 NOTE…
-
Page 109: Scanning
When saving an image in a location other than «My Documents», the destination needs to be set beforehand by using KYOCERA Client Tool. If the shared folder in the computer (Client PC) on the network is selected for the destination, an image can be saved on the computer that is not connected to the machine via USB.
-
Page 110
Scan the Image by Selecting the Destination (Quick Scan) Select the scan method and destination for each job by using KYOCERA Client Tool. Perform a scan by operating the computer (Host PC) connected to the machine via USB. If the shared folder in the computer (Client PC) on the network is selected for the destination, an image can be saved on the computer that is not connected to the machine via USB. -
Page 111: Scan The Image To The Specified Destination
It is easy to scan from the operation panel on the machine. Before using this function, you need to preset the destination folder where to save scanned image and image quality using KYOCERA Client Tool. Refer to Default Settings on the PC (KYOCERA Client Tool) on page 7-16.
-
Page 112
If there are settings that you change from «My Documents» in the computer (Host PC) connected to the machine via USB, set the destination by using KYOCERA Client Tool. You can simply select the destination number as needed to recall those functions. -
Page 113: Scan The Image By Selecting The Destination (Quick Scan)
Default Settings on the PC (KYOCERA Client Tool) on page 7-16. KYOCERA Client Tool needs to be operated on the computer (Host PC) connected to the machine via USB. Place the originals on the machine. Loading Originals (page 5-2) Execute scanning on the Host PC.
-
Page 114: Scanning Using Twain
Operation on the Machine > Scanning Scanning using TWAIN This section explains how to scan an original using TWAIN. The procedure for scanning using the TWAIN driver is explained as an example. The WIA driver is used in the same way.
-
Page 115: Canceling Jobs
Operation on the Machine > Scanning Canceling Jobs You can cancel jobs by pressing the [Stop] key. 5-36…
-
Page 116: Checking The Status
Checking Job History ……………………….6-4 Pause and Resumption of Jobs ……………………. 6-7 Canceling the Jobs in Printing/Waiting ………………….. 6-8 Checking Device Status ……………………….. 6-9 Checking the Remaining Amount of Toner and Paper ………………6-10 Checking from KYOCERA Client Tool ………………….6-11…
-
Page 117: Checking Job Status
Checking the Status > Checking Job Status Checking Job Status Check the status of jobs being processed or waiting to be printed. Available Status Screens You can check the status of jobs being processed or waiting on the message display. The following job statuses are available.
-
Page 118
Checking the Status > Checking Job Status Check the status. Press the [▲] or [▼] key to select the item you want to check. Then, press the [OK] key to show the information on the item. Detail Status To check other items, press the [Back] key to return to the previous screen. Item Description Status… -
Page 119: Checking Job History
Checking the Status > Checking Job History Checking Job History Check the history of completed jobs. Available Job History Screens The following job histories are available. Screen Job histories to be displayed Print Job Log • Copy • Printer • Printing from Print Box •…
-
Page 120: Print Job Log
Checking the Status > Checking Job History Check the job history. Press the [▲] or [▼] key to select the item you want to check. Then, press the [OK] key to show the information on the item. Detail Result To check other items, press the [Back] key to return to the previous screen. Print Job Log Item Description…
-
Page 121
Checking the Status > Checking Job History NOTE If the login user name entry screen appears during operations, log in by referring to Administrator User Name and Password on page 2-20. The factory default login user name and login password are set as shown below. Login User Name Login Password Admin… -
Page 122: Pause And Resumption Of Jobs
Checking the Status > Pause and Resumption of Jobs Pause and Resumption of Jobs Pause/resume all printing jobs in printing/waiting. Display the screen. Press the [Status/System Menu/Counter] key. Press the [▲] or [▼] key to select [Status], and press the [OK] key. Status/Sys.
-
Page 123: Canceling The Jobs In Printing/Waiting
Checking the Status > Canceling the Jobs in Printing/Waiting Canceling the Jobs in Printing/Waiting Cancel the printing jobs in printing/waiting. Display the screen. Press the [Status/System Menu/Counter] key. Press the [▲] or [▼] key to select [Status], and press the [OK] key. Status/Sys.
-
Page 124: Checking Device Status
Checking the Status > Checking Device Status Checking Device Status Configure the devices or check their status. Display the screen. Press the [Status/System Menu/Counter] key. Press the [▲] or [▼] key to select [Status], and press the [OK] key. Status/Sys. Menu Status Check the status.
-
Page 125: Checking The Remaining Amount Of Toner And Paper
Checking the Status > Checking the Remaining Amount of Toner and Paper Checking the Remaining Amount of Toner and Paper Check the remaining amount of toner and paper on the message display. Display the screen. Press the [Status/System Menu/Counter] key. Press the [▲] or [▼] key to select [Status], and press the [OK] key.
-
Page 126: Checking From Kyocera Client Tool
Checking the Status > Checking from KYOCERA Client Tool Checking from KYOCERA Client Tool You can check the current status of the machine from the KYOCERA Client Tool. Item Description Machine status Show a 3D image of the selected machine and its current status. Click (Refresh) to refresh the machine status.
-
Page 127: System Menu And Kyocera Client Tool
Common Settings ………………………. 7-5 Copy …………………………7-14 Printer …………………………7-15 Adjust/Maint. (Adjustment/Maintenance) ………………..7-15 Default Settings on the PC (KYOCERA Client Tool) ………………7-16 Operation Method ……………………..7-16 Screen Overview ……………………… 7-17 Configuring the Administrative Settings ………………..7-19 Scan Destination Settings ……………………7-20 Quick Scan/TWAIN Settings ……………………
-
Page 128: Default Settings On The Machine (System Menu)
System Menu and KYOCERA Client Tool > Default Settings on the Machine (System Menu) Default Settings on the Machine (System Menu) Configure settings related to overall machine operation. Press the [Status/System Menu/Counter] key to show the settings on the message display. Then, select from the settings displayed.
-
Page 129: System Menu Settings
System Menu and KYOCERA Client Tool > Default Settings on the Machine (System Menu) System Menu Settings This section explains the functions that can be configured in System Menu. To configure the settings, select the item in System Menu and press the setting item. For details on each function, see the table below.
-
Page 130: Report
System Menu and KYOCERA Client Tool > Default Settings on the Machine (System Menu) Report Print reports to check the machine settings and status. Report Print Report Report Print If the system menu is operated without a login (account ID is not entered) while job accounting is enabled, the account ID must be entered before the report can be printed.
-
Page 131: System
System Menu and KYOCERA Client Tool > Default Settings on the Machine (System Menu) System Configure machine system settings. I/F Block Set. (Interface Block Setting) System I/F Block Set. Protect the machine by blocking the USB interface. Item Description I/F Block Set.
-
Page 132: Default Screen
System Menu and KYOCERA Client Tool > Default Settings on the Machine (System Menu) Default Screen Common Settings Default Screen Item Description Default Screen Select the screen appearing right after start-up (default screen). Value: Copy, Scan, Print Box, Program Sound…
-
Page 133
System Menu and KYOCERA Client Tool > Default Settings on the Machine (System Menu) Orig./Paper Set. (Original/Paper Settings) Common Settings Orig./Paper Set. Item Description Orig./ Custom Orig.Size Set up frequently-used custom original size. Paper Set. To register a custom original size, enter the desired size. The custom size options are displayed on the screen to select original size. -
Page 134
System Menu and KYOCERA Client Tool > Default Settings on the Machine (System Menu) Item Description Orig./ Media for Auto Select a default media type for auto paper selection when [Auto] is selected of Paper Paper Set. Selection. If [Plain] is selected, the paper source with plain paper loaded in the specific size is selected. -
Page 135
System Menu and KYOCERA Client Tool > Default Settings on the Machine (System Menu) Cassette 1 (to 4) Set. (Cassette 1 (to 4) Settings) Common Settings Orig./Paper Set. Cassette 1 (to 4) Set. To fix the type of paper to be used in cassettes 1 or the optional paper feeders (cassettes 2 to 4), specify the paper size and media type. -
Page 136
System Menu and KYOCERA Client Tool > Default Settings on the Machine (System Menu) Media Type Set. (Media Type Settings) Common Settings Orig./Paper Set. Media Type Set. The following settings can be selected. Y (default): Default setting, Y: Available, N: Not available… -
Page 137: Error Handling
System Menu and KYOCERA Client Tool > Default Settings on the Machine (System Menu) Preset Limit Common Settings Preset Limit Item Description Preset Limit Restrict the number of copies that can be made at one time. Value: 1 to 999 copies…
-
Page 138: Timer Settings
System Menu and KYOCERA Client Tool > Default Settings on the Machine (System Menu) Timer Settings Common Settings Timer Settings Configure settings related to the time. Item Description Timer Err. Clear Timer If you select [On] for Auto Error Clear, set the amount of time to wait before Settings automatically clearing errors.
-
Page 139
System Menu and KYOCERA Client Tool > Default Settings on the Machine (System Menu) Function Default Common Settings Function Default Set the defaults for the following functions. Item Description Function Original Image Set the default original document type. Default Value: Text+Photo, Photo, Text… -
Page 140: Copy
System Menu and KYOCERA Client Tool > Default Settings on the Machine (System Menu) Item Description Function Detail Settings Set the defaults for the following detail settings: Default 2 in 1 Layout Set the default for the 2-in-1 layout of Combine copies.
-
Page 141: Printer
System Menu and KYOCERA Client Tool > Default Settings on the Machine (System Menu) Printer Printer When printing from computers, settings are generally made on the application software screen. However, the following settings are available for configuring the defaults to customize the machine.
-
Page 142: Default Settings On The Pc (Kyocera Client Tool)
System Menu and KYOCERA Client Tool > Default Settings on the PC (KYOCERA Client Tool) Default Settings on the PC (KYOCERA Client Tool) Various machine settings can be configured from a computer using KYOCERA Client Tool. Install KYOCERA Client Tool from the provided Product Library disc. NOTE •…
-
Page 143: Screen Overview
System Menu and KYOCERA Client Tool > Default Settings on the PC (KYOCERA Client Tool) Screen Overview The screen overview of the KYOCERA Client Tool is as follows. Item Description Reference Page Machine list The list at the top of KYOCERA Client Tool screen includes all of the —…
-
Page 144
System Menu and KYOCERA Client Tool > Default Settings on the PC (KYOCERA Client Tool) Item Description Reference Page Scan Configure TWAIN and Quick Scan settings. — Scan to PDF, Scan to Email and Scan to Folder can also be executed from this tab. -
Page 145: Configuring The Administrative Settings
System Menu and KYOCERA Client Tool > Default Settings on the PC (KYOCERA Client Tool) Configuring the Administrative Settings Configure the administrative settings on [Configuration] of the [Device] tab. Configure screen has the followings tabs. • [Device Defaults] tab: Select inches or millimeters as the unit of measurement for page sizes, watermark, poster, and gutter settings in the printer driver.
-
Page 146: Scan Destination Settings
System Menu and KYOCERA Client Tool > Default Settings on the PC (KYOCERA Client Tool) Scan Destination Settings Configure the Scan Destination settings on [Scan Destination] of the [Device] tab. IMPORTANT To reflect settings in the machine, the [Reset] key on the operation panel of the machine needs to be pressed.
-
Page 147
System Menu and KYOCERA Client Tool > Default Settings on the PC (KYOCERA Client Tool) Item Description Resolution Select fineness of scanning resolution. Value: 200×200 dpi 300×300 dpi 400×400 dpi 600×600 dpi NOTE [400×400 dpi] and [600×600 dpi] can be set only if [Monochrome] is set for Scan color. -
Page 148
System Menu and KYOCERA Client Tool > Default Settings on the PC (KYOCERA Client Tool) Item Description Destination folder Specified folder where the scanned image will be saved. To select the folder, click [Browse] to open «Browse for Folder». The default settings are shown below: C:Users<user>My Documents (on Windows Vista/Windows 7/Windows
-
Page 149: Quick Scan/Twain Settings
System Menu and KYOCERA Client Tool > Default Settings on the PC (KYOCERA Client Tool) Quick Scan/TWAIN Settings Configure the Quick Scan/TWAIN settings on [Preferences] or [Quick Scan Settings] of the [Scan] tab. Item Description Preferences Change the TWAIN scan settings. This setting is effective for Quick Scan only.
-
Page 150
System Menu and KYOCERA Client Tool > Default Settings on the PC (KYOCERA Client Tool) Item Description Original image Select original image type. Value: Text, Photo, Text+Photo Destiny Select the density. Value: -3 (Lighter) to 3 (Darker) To automatically set the density depending on the density of originals, select the [Auto] checkbox. -
Page 151
System Menu and KYOCERA Client Tool > Default Settings on the PC (KYOCERA Client Tool) Item Description File format settings (The item displayed changes depending on the value specified for File format.) Separate files When this is selected, scanned data is separated into files page by page. -
Page 152: Print Box Settings
System Menu and KYOCERA Client Tool > Default Settings on the PC (KYOCERA Client Tool) Print Box Settings Configure the Print Box settings on [Print Box Destination] of the [Device] tab. When KYOCERA Client Tool is installed, Print Boxes 1 to 10 are automatically created.
-
Page 153: Job Accounting
Job Accounting This chapter explains the following topics: Overview of Job Accounting ……………………..8-2 Enabling Job Accounting ……………………… 8-3 Setting an Account ……………………….. 8-4 Adding an Account ……………………… 8-4 Restricting the Use of the Machine ………………….8-6 Editing an Account ……………………… 8-7 Deleting an Account ……………………..
-
Page 154: Overview Of Job Accounting
To manage the scan job account by using Quick Scan/TWAIN To manage the scan job account by using Quick Scan or TWAIN, you need to configure KYOCERA Client Tool settings on the computer (Host PC) connected to the machine via USB. (Refer to…
-
Page 155: Enabling Job Accounting
Job Accounting > Enabling Job Accounting Enabling Job Accounting Enable job accounting. Use the procedure below. Access job accounting setting. Press the [Status/System Menu/Counter] key. Press the [▲] or [▼] key to select [Admin/Accounting], and press the [OK] key. Status/Sys. Menu Admin/Accounting NOTE If the login user name entry screen appears during operations, log in by referring to…
-
Page 156: Setting An Account
Job Accounting > Setting an Account Setting an Account You can add, change and delete an account and set the restriction for each account. Adding an Account Up to 10 individual accounts can be added. The following entries are required. Item Descriptions Account Name…
-
Page 157
Job Accounting > Setting an Account Enter the account information. Enter the account name and press the [OK] key. Account Name NOTE Refer to Character Entry Method on page 10-4 for details on entering characters. Enter the account ID and press the [OK] key. Account ID A new account is added on the Account List. -
Page 158: Restricting The Use Of The Machine
Job Accounting > Setting an Account Restricting the Use of the Machine This section explains how to restrict the use of the machine by account or the number of sheets available. The items that can be restricted differ depending on whether [Split] or [Total] is selected for Copy/Print Count on page 8- •…
-
Page 159: Editing An Account
Job Accounting > Setting an Account Editing an Account This changes the registered account information. Display the screen. Press the [Status/System Menu/Counter] key. Press the [▲] or [▼] key to select [Admin/Accounting], and press the [OK] key. Status/Sys. Menu Admin/Accounting NOTE If the login user name entry screen appears during operations, log in by referring to Administrator User Name and Password on page…
-
Page 160: Deleting An Account
Job Accounting > Setting an Account Deleting an Account This deletes the account. Display the screen. Press the [Status/System Menu/Counter] key. Press the [▲] or [▼] key to select [Admin/Accounting], and press the [OK] key. Status/Sys. Menu Admin/Accounting NOTE If the login user name entry screen appears during operations, log in by referring to Administrator User Name and Password on page 2-20.
-
Page 161: Job Accounting When Sharing The Printer
Job Accounting > Setting an Account Job Accounting when Sharing the Printer When using the machine as the shared printer, printing from the computer (Client PC) on the network can be managed with job accounting by configuring job accounting for the computer (Host PC) connected to the machine via USB. Settings when Sharing the Printer When using the machine as a shared printer and managing the printing from the Client PC by using job accounting, configure the Host PC as follows.
-
Page 162
Job Accounting > Setting an Account Select [Job accounting] and [Prompt for account ID] on the [Job Accounting] tab. Click the [OK] button. NOTE • If [Prompt for account ID] is set, the screen for entering the Account ID appears when printing from the Client PC. -
Page 163: Unknown Id Job
Job Accounting > Setting an Account Unknown ID Job This specifies the behavior for handling the jobs sent with unknown account IDs (i.e., unsent IDs). The setting items are as follows. Item Descriptions Permit The job is permitted to be printed. Reject The job is rejected (not printed).
-
Page 164: Configuring Job Accounting
Job Accounting > Configuring Job Accounting Configuring Job Accounting Default Setting Set the defaults for job accounting. To configure the settings, select the item in Default Setting and press the setting item. Admin/Accounting Job Account. Set. Default Setting For details on each function, see the table below. Item Description Apply Limit…
-
Page 165: Counting The Number Of Pages Printed
Job Accounting > Configuring Job Accounting Counting the Number of Pages Printed This counts the number of pages printed. Counts are classified into Total Job Accounting and Each Job Accounting. A new count can also be started after resetting the count data which was stored for a certain period of time. Total Accounting / Admin/Accounting Job Account.
-
Page 166: Print The Report
Job Accounting > Configuring Job Accounting Account. Report (Accounting Report) The total pages counted of all relevant accounts can be printed as an accounting report. Reports have different formats depending on how the count of copiers and printers is administered. When [Split] is selected for Managing the Copy/Printer Count ACCOUNT.
-
Page 167: Using Job Accounting
Job Accounting > Using Job Accounting Using Job Accounting This section explains procedures while setting job accounting. Login/Logout If job accounting is enabled, an account ID entry screen appears each time you use this machine. Use the procedure below to login and logout. Login In the screen below, enter the account ID using the numeric keys and press the [OK] key.
-
Page 168: Troubleshooting
Troubleshooting This chapter explains the following topics: Regular Maintenance ……………………….9-2 Cleaning …………………………9-2 Toner Container Replacement ……………………. 9-3 Waste Toner Box Replacement ………………….. 9-6 Troubleshooting …………………………9-8 Solving Malfunctions ……………………..9-8 Responding to Messages ……………………9-11 Clearing Paper Jams ……………………..9-16…
-
Page 169: Regular Maintenance
Troubleshooting > Regular Maintenance Regular Maintenance Cleaning Clean the machine regularly to ensure optimum printing quality. CAUTION For safety, always unplug the power cord before cleaning the machine. Original Cover/Glass Platen Wipe the backside of the original cover, the inside of the document processor and the glass platen with a soft cloth dampened with alcohol or mild detergent.
-
Page 170: Toner Container Replacement
Troubleshooting > Regular Maintenance Toner Container Replacement When toner runs low, [Toner is low.] appears in the message display. Make sure you have a new toner container available for replacement. When the message display displays [Add toner.], replace the toner. CAUTION Do not attempt to incinerate parts which contain toner.
-
Page 171
Troubleshooting > Regular Maintenance IMPORTANT Shake the toner container according to the procedure and place the container in position. -
Page 172
Troubleshooting > Regular Maintenance CLICK! NOTE Return the exhausted toner container and waste toner box to your dealer or service representative. The collected toner container and waste toner box will be recycled or disposed in accordance with the relevant regulations. -
Page 173: Waste Toner Box Replacement
Troubleshooting > Regular Maintenance Waste Toner Box Replacement When replacing the toner container, replace the waste toner box as well. You also need to replace the waste toner box when [WasteTonerBox is full or not installed.] is displayed on the message display. CAUTION Do not attempt to incinerate parts which contain toner.
-
Page 174
Troubleshooting > Regular Maintenance NOTE Return the exhausted toner container and waste toner box to your dealer or service representative. The collected toner container and waste toner box will be recycled or disposed in accordance with the relevant regulations. -
Page 175: Troubleshooting
Is there a message on the screen, Determine the appropriate response to page 9-11 does not produce copies. KYOCERA Client Tool, or the Status the message and respond accordingly. Monitor? Is the machine in Sleep mode? Press any key on the operation panel to page 2-22 recover the machine from Sleep mode.
-
Page 176
Troubleshooting > Troubleshooting Reference Symptom Checkpoints Corrective Actions Page Printouts are curled. Is the paper damp? Replace the paper with new paper. page 3-5 Cannot print. Is the machine plugged in? Plug the power cord into an AC outlet. ― Is the machine powered on? Turn on the power switch. -
Page 177
Troubleshooting > Troubleshooting Reference Symptom Checkpoints Corrective Actions Page Printouts are too dark even Have you changed the density? Select appropriate density level. page 5-14 though the background of page 7-15 the scanned original is white. Copies have a moire pattern Is the original a printed photograph? Set the original image to [Photo]. -
Page 178: Responding To Messages
An error message appears in the message display of the machine’s operation panel. If the [Attention] indicator is lit or flashing and an error message appears in the message display of the machine’s operation panel, check the KYOCERA Client Tool or Status Monitor. Add toner.
-
Page 179
Troubleshooting > Troubleshooting Reference Message Display Checkpoints Corrective Actions Page Close the Document Is the top cover of the document Close the document processor cover. — processor cover. processor open? Close the front cover. Is the front cover open? Close the front cover. ―… -
Page 180
Troubleshooting > Troubleshooting Reference Message Display Checkpoints Corrective Actions Page Maximum Number of Is the acceptable scanning count Cannot scan pages any more. The job is ― scanned pages. exceeded? canceled. Press the [OK] key. Memory is full. ― Unable to continue the job as the ―… -
Page 181
Troubleshooting > Troubleshooting Reference Message Display Checkpoints Corrective Actions Page Replace all originals and ― Remove originals from the document ― press Start key. processor, put them back in their original order, and place them again. Press the [OK] key to resume printing. Press the [Stop] key to cancel the job. -
Page 182
2-7 disconnected. USB cable. Is the PC powered on? Press the [OK] key and turn the PC ― power on. Cannot find KYOCERA Client Tool. Press the [OK] key and open page 2-18 KYOCERA Client Tool. Reference Message Display Checkpoints… -
Page 183: Clearing Paper Jams
Troubleshooting > Troubleshooting Clearing Paper Jams If a paper jam occurs, [Paper Jam] appears in the message display and the machine will stop. This section explains the procedures to remove the jammed paper. PaperJam.(Cassette 1) Jam Location Detailed paper jam positions are as follows. Error Message Paper Jam Location Reference Page…
-
Page 184: Multi Purpose Tray
Troubleshooting > Troubleshooting Cassette 1 Cassettes 2 to 4 Procedures for handling a paper jam in Cassettes 2, 3, and 4 are all the same. This section explains procedures using Cassette 2 as an example. Multi purpose tray NOTE If you cannot remove the paper, do not forcibly pull it out. Refer to Inside Right Cover 1 on page 9-18.
-
Page 185: Inside Right Cover
Troubleshooting > Troubleshooting Inside Right Cover 1 9-18…
-
Page 186: Document Processor
Troubleshooting > Troubleshooting Inside Right Covers 2 or 3 Procedures for handling a paper jam in Right Covers 2 and 3 are all the same. This section explains procedures using Right Cover 2 as an example. Document Processor NOTE If the original is difficult to remove, turn the dial (B). The original will scroll out to a position where it can be removed easily.
-
Page 187: 10 Appendix
10 Appendix This chapter explains the following topics: Optional Equipment ……………………….10-2 Overview of Optional Equipment ………………….10-2 Character Entry Method ……………………… 10-4 Using the Keys ……………………….10-4 Characters That Can be Entered Using the Numeric Keys …………..10-4 Entering Symbols ……………………… 10-5 Entering Characters ……………………..
-
Page 188: Optional Equipment
Appendix > Optional Equipment Optional Equipment Overview of Optional Equipment The following optional equipment is available for the machine. (1) DP-480 (1) PLATEN COVER TYPE H (2) DU-480 (3) PF-480 10-2…
-
Page 189
Appendix > Optional Equipment (1) DP-480 «Document Processor (Reverse Automatic)» PLATEN COVER TYPE H «Original Cover» Automatically scans originals. Also you can perform duplex copying and split copying. For document processor operation, refer to Loading Originals in the Document Processor (Option) on page 5-3. -
Page 190: Character Entry Method
Appendix > Character Entry Method Character Entry Method This section explains how to enter characters. Using the Keys Account Name Display/Key Description Message Display Displays entered characters. [Clear] key Press to delete characters. Numeric Keys Press to enter characters and symbols. [▲…
-
Page 191: Entering Symbols
Appendix > Character Entry Method Keys Characters (Each press of a key changes the character in the order from left to right.) (Repeats from the first character on the left) 3 (During number entry) (Repeats from the first character on the left) 4 (During number entry) (Repeats from the first character on the left) 5 (During number entry)
-
Page 192: Entering Characters
Appendix > Character Entry Method Press the [OK] key. The selected symbol is entered. Account Name R& Entering Characters Follow the steps shown below to enter «R&D» for example. Press the [7] key three times. [r] is entered. Account Name Press the [*/.] key.
-
Page 193: Paper
Appendix > Paper Paper This section explains the paper sizes and types that can be used in the paper source. For details on the sizes, types, and number of sheets of paper that can be loaded in each paper tray, refer to Specifications on page 10-15.
-
Page 194: Choosing The Appropriate Paper
Appendix > Paper Choosing the Appropriate Paper This section describes guidelines for choosing paper. Condition Avoid using paper with bent corners or that is curled, dirty, or torn. Do not use paper that has a rough surface or paper fiber lint, or that is especially delicate. Use of paper in any of these conditions will not only deliver poor copies but may also cause jams and shorten the useful life of the machine.
-
Page 195: Moisture Content
Appendix > Paper Smoothness The paper surface should be smooth, but it must be uncoated. With paper that is too smooth and slippery, several sheets may accidentally be supplied at once, causing jams. Basis Weight In countries that use the metric system, basis weight is the weight in grams of one sheet of paper one square meter in area.
-
Page 196
Appendix > Paper Other Paper Specifications Porosity: The density of the paper fibers Stiffness: Paper must be stiff enough or it may buckle in the machine, causing jams. Curl: Most paper naturally tends to curl after the package is opened. When paper passes through the fixing unit, it curls upward slightly. -
Page 197: Special Paper
Appendix > Paper Special Paper This section describes printing onto special paper and print media. The following paper and media can be used. • Transparencies • Preprinted paper • Bond paper • Recycled paper • Thin paper (from 52 g/m² to 105 g/m² or less) •…
-
Page 198
Appendix > Paper Label Be sure to feed labels from the multi purpose tray. For selecting labels, use extreme care so that the adhesive may not come in direct contact with any part of the machine and that the labels are not easily peeled from the carrier sheet. Adhesives that stick to the drum or rollers and peeled labels remaining in the machine may cause a failure. -
Page 199: Thick Paper
Appendix > Paper Hagaki Burrs Burrs Before loading Hagaki into the multi purpose tray, fan them and align the edges. If the Hagaki paper is curled, straighten it before loading. Printing onto curled Hagaki may cause jams. Use unfolded Oufukuhagaki (available at post offices). Some Hagaki may still have rough edges developed by a paper cutter on the back side.
-
Page 200: Preprinted Paper
Appendix > Paper Preprinted Paper Preprinted paper must conform to the specifications listed on page 10-7. The colored ink must be able to withstand the heat of printing. It must be resistant to silicone oil as well. Do not use paper with a treated surface such as glossy paper used for calendars.
-
Page 201: Specifications
Appendix > Specifications Specifications IMPORTANT Specifications are subject to change without notice. Common Functions Item Description Type Desktop Printing Method Electrophotography by semiconductor laser, single drum system Paper Weight Cassette 64 to 105 g/m² Multi Purpose 45 to 160 g/m², 230 g/m² (Cardstock) Tray Paper Type Cassette…
-
Page 202: Copy Functions
230 V Specification Model: 220-240 V 50/60 Hz 6.3 A Options Refer to Optional Equipment on page 10-2. Copy Functions Item Description Copy Speed TASKalfa 1800 TASKalfa 2200 feed from A4/Letter 18 sheets/min 22 sheets/min Cassette A4-R/Letter-R 13 sheets/min 13 sheets/min A3/Ledger…
-
Page 203: Scanner Functions
Appendix > Specifications Item Description Interface USB Interface Connector: 1 (USB Hi-Speed) Page Description Language Hostbased (GDI) Scanner Functions Item Description Resolution B/W: 600 dpi, 400 dpi, 300 dpi, 200 dpi Color, Grayscale: 300 dpi, 200 dpi File Format TIFF (MMR/JPEG compression), PDF (MMR/JPEG compression/ high compression), JPEG, BMP Scanning Speed <600 dpi>…
-
Page 204: Paper Feeder (300-Sheet) (Option)
Appendix > Specifications Paper Feeder (300-sheet) (Option) Item Description Paper Supply Method Automatic Feeding (No. Sheets: 300, 80 g/m²) Paper Size A3, B4, A4, A4-R, B5, B5-R, A5-R, Ledger, Legal, Oficio II, Letter-R, Letter, Statement-R, Folio, 8K, 16K, 16K-R, 216 × 340 mm Supported Paper Paper weight: 64 to 105 g/m²…
-
Page 205: Glossary
Appendix > Glossary Glossary Auto Form Feed Timeout During data transmission, the machine may sometimes have to wait until receiving the next data. This is the auto form feed timeout. When the preset timeout passes, the machine automatically prints output. However, no output is performed if the last page has no data to be printed.
-
Page 206: Status Page
Appendix > Glossary Status Page The page lists machine conditions, such as the memory capacity, total number of prints and scans, and paper source settings. TWAIN (Technology Without An Interesting Name) A technical specification for connecting scanners, digital cameras, and other image equipment to computers. The TWAIN compatible devices enable you to process image data on any relevant application software.
-
Page 207
Index Cleaning Original Cover/Glass Platen Slit Glass Cleaning Cloth Compartment Numerics Collate/Offset 5-19 2 in 1 Layout 5-18 Default 7-13 Default 7-14 Colored Paper 10-13 4 in 1 Layout 5-18 Combine 5-17 Default 7-14 Common Settings Default Screen Display Brightness Adjustment/Maintenance 7-15 Error Handling… -
Page 208
8-11 Default 7-14 First Copy Time 10-16 First Print Time 10-16 KYOCERA Client Tool 7-16 Form Feed Timeout 7-15 Accessing KYOCERA Client Tool 2-18 Front Cover Label 10-12 Glossary 10-19 Language Grayscale 10-19 Legal Information Guides Provided with the Machine… -
Page 209
Paper Jams 9-16 Cassette 1 9-17 Operation Panel 2-2, Cassettes 2 to 4 9-17 Option Document Processor 9-19 Document Processor 10-3 Inside Right Cover 1 9-18 Duplex Unit 10-3 Inside Right Covers 2 or 3 9-19 Original Cover 10-3 Jam Location 9-16 Overview 10-2… -
Page 210
Document Processor 10-17 Duplex Unit 10-18 Paper Feeder (300-sheet) 10-18 Printer Functions 10-16 Scanner Functions 10-17 Status KYOCERA Client Tool 6-11 Paper Status 6-10 Print Job Log Print Job Status Printer Scanner Send Job Log Toner Status 6-10 Status Page… -
Page 212
Phone: +33-1-69852600 Fax: +27-11-466-3050 Fax: +33-1-69853409 KYOCERA Document Solutions Russia LLC KYOCERA Document Solutions Espana, S.A. Botanichesky pereulok 5, Moscow, 129090, Edificio Kyocera, Avda. de Manacor No.2, Russia 28290 Las Matas (Madrid), Spain Phone: +7(495)741-0004 Phone: +34-91-6318392 Fax: +7(495)741-0018 Fax: +34-91-6318219… -
Page 213
KYOCERA Document Solutions Inc. – 2-28, 1-Chome – Tamatsukuri – Chuo-Ku Osaka 540-8585 – Japan – www.kyoceradocumentsolutions.com…
-
Драйверы
4
-
Руководства по ремонту
1
-
Инструкции по эксплуатации
1

Kyocera TASKalfa 1800 инструкция по эксплуатации
(213 страниц)
- Языки:Английский
-
Тип:
PDF -
Размер:
11.55 MB
Просмотр
На NoDevice можно скачать инструкцию по эксплуатации для Kyocera TASKalfa 1800. Руководство пользователя необходимо для ознакомления с правилами установки и эксплуатации Kyocera TASKalfa 1800. Инструкции по использованию помогут правильно настроить Kyocera TASKalfa 1800, исправить ошибки и выявить неполадки.
МФУ Kyocera TASKalfa 1800 — инструкция пользователя по применению, эксплуатации и установке на русском языке. Мы надеемся, она поможет вам решить возникшие у вас вопросы при эксплуатации техники.
Вы можете скачать инструкцию к Kyocera TASKalfa 1800 по ссылке ниже, если не хотите ждать загрузки. Если остались вопросы, задайте их в комментариях после инструкции.
«Загружаем инструкцию», означает, что нужно подождать пока файл загрузится и можно будет его читать онлайн. Некоторые инструкции очень большие и время их появления зависит от вашей скорости интернета.
Полезные видео
Остались вопросы?
Не нашли свой ответ в руководстве или возникли другие проблемы? Задайте свой вопрос в форме ниже с подробным описанием вашей ситуации, чтобы другие люди и специалисты смогли дать на него ответ. Если вы знаете как решить проблему другого человека, пожалуйста, подскажите ему

Часто задаваемые вопросы

Как посмотреть инструкцию к Kyocera TASKalfa 1800?
Необходимо подождать полной загрузки инструкции в сером окне на данной странице или скачать кликнув по специальной кнопке.
Руководство на русском языке?
Все наши руководства представлены на русском языке или схематично, поэтому вы без труда сможете разобраться с вашей моделью
Как можно распечатать инструкцию?
Скачайте ее по специальной кнопке над формой чтения на ваше устройства и отправьте на печать.