Данная инструкция на русском языке предназначена для конструктора Lego
42110 Land Rover Defender, описывает принцип работы и основные моменты эксплуатации устройства.
Производитель настойчиво рекомендует перед включением конструктора Lego
внимательно изучить настоящую инструкцию.
Инструкция для конструктора Lego
представлена в формате PDF. Все современные браузеры уже поддерживают данный формат и сложностей с открытием файла возникнуть не должно.
Но если открыть инструкцию все же не удается, то необходимо установить на компьютер программу для чтения PDF файлов, например, Acrobat Reader. Если у вас возникли сложности с открытием инструкции на смартфоне под управлением Android, нужно установить, например, Adobe Acrobat Reader.
Требуются инструкции по сборке из вашего набора ЛЕГО set 42110 Technic Land Rover Defender? Ниже вы можете просмотреть и загрузить бесплатно инструкции по сборке в формате PDF. Кроме того, приведены часто задаваемые вопросы, рейтинг изделия и отзывы пользователей, что позволит оптимально использовать ваше изделие. Если это не то руководство, которое вы искали, – свяжитесь с нами.
Ваше устройство неисправно, и в руководстве отсутствует решение? Перейдите в Repair Café для получения бесплатных ремонтных услуг.
Руководство

Рейтинг
Сообщите нам, что вы думаете о ЛЕГО set 42110 Technic Land Rover Defender, оставив оценку продукта. Хотите поделиться вашими впечатлениями от данного изделия или задать вопрос? Вы можете оставить комментарий в нижней части страницы.
Довольны ли вы данным изделием ЛЕГО?
Да Нет
58 голоса
Часто задаваемые вопросы
Наша служба поддержки выполняет поиск полезной информации по изделиям и отвечает на часто задаваемые вопросы. Если вы заметили неточность в наших часто задаваемых вопросах, сообщите нам об этом с помощью нашей контактной формы.
В наборе нет одного элемента Lego, где можно заказать запасной? Проверенный
В компании Lego работает служба, где можно заказать отдельные элементы или куда можно обратиться в случае нехватки элементов в наборе. Дополнительную информацию см. на веб-сайте.
Это было полезно (4107)
Как предотвратить изменение цвета игрушек Lego? Проверенный
Цвет пластиковых игрушек Lego меняется по двум главным причинам: длительное воздействие солнечного света или сигаретного дыма. Постарайтесь минимизировать воздействие этих факторов на ваши игрушки Playmobil.
Это было полезно (1381)
Как лучше всего чистить детали конструктора Lego? Проверенный
Lego советуют чистить детали вручную с помощью воды (не выше 40°C) и щадящего чистящего средства. Никогда не мойте детали Lego в посудомоечной или стиральной машине. Оставьте детали сушиться на воздухе. Очищайте электрические детали исключительно сухой тканью.
Это было полезно (1262)
Каждый раз после сборки нового набора Lego у меня остается несколько маленьких деталей. Я забыл(-а) ими воспользоваться? Проверенный
Нет, во многих наборах Lego есть запасные детали для мелких элементов.
Это было полезно (1021)
Как лучше всего наносить наклейки на детали Lego? Проверенный
Чтобы наклейки можно было переклеить, рекомендуется обработать место нанесения наклейки средством для очистки стекол. После размещения наклейки дайте ей высохнуть, чтобы она держалась на месте.
Это было полезно (904)
Где я могу найти список деталей моего набора Lego? Проверенный
Многие современные инструкции Lego включают список деталей в конце буклета. В случае нескольких буклетов список можно найти в середине PDF-файла.
Это было полезно (857)
Можно ли использовать детали Lego и Duplo вместе? Проверенный
Да, детали Lego и Duplo совместимы. Детали Lego устанавливаются на детали Duplo с полыми шипами. Детали Duplo лучше всего устанавливаются на более крупные детали Lego, на мелких деталях они могут держаться хуже.
Это было полезно (794)
С какого возраста можно играть с Lego? Проверенный
Большинство наборов Lego предназначены для детей от 4 лет, поскольку содержат мелкие детали. Специальная серия Duplo предназначена для детей от 1,5 лет. Возрастные ограничения всегда указываются на коробке.
Это было полезно (776)
Где я могу найти инструкции для альтернативной модели моего набора Lego Technic? Проверенный
Мы объединили инструкции для альтернативных моделей с инструкциями для основной модели. Прокрутите обычные инструкции, чтобы просмотреть альтернативную модель.
Это было полезно (325)


Lego Land Rover Defender — LEGO Technic № 42110 — инструкция пользователя по применению, эксплуатации и установке на русском языке. Мы надеемся, она поможет вам решить возникшие у вас вопросы при эксплуатации техники.
Вы можете скачать инструкцию к Land Rover Defender — LEGO Technic № 42110 по ссылке ниже, если не хотите ждать загрузки. Если остались вопросы, задайте их в комментариях после инструкции.
«Загружаем инструкцию», означает, что нужно подождать пока файл загрузится и можно будет его читать онлайн. Некоторые инструкции очень большие и время их появления зависит от вашей скорости интернета.
Остались вопросы?
Не нашли свой ответ в руководстве или возникли другие проблемы? Задайте свой вопрос в форме ниже с подробным описанием вашей ситуации, чтобы другие люди и специалисты смогли дать на него ответ. Если вы знаете как решить проблему другого человека, пожалуйста, подскажите ему


Часто задаваемые вопросы

Как посмотреть инструкцию к Land Rover Defender — LEGO Technic № 42110?
Необходимо подождать полной загрузки инструкции в сером окне на данной странице или скачать кликнув по специальной кнопке.
Руководство на русском языке?
Все наши руководства представлены на русском языке или схематично, поэтому вы без труда сможете разобраться с вашей моделью
Как можно распечатать инструкцию?
Скачайте ее по специальной кнопке над формой чтения на ваше устройства и отправьте на печать.
- Главная
- Lego custom
- Улучшенная версия Land Rover Defender 42110

Автор Администратор в 05.12.2019. Опубликовано Lego custom, Внедорожники, Разное
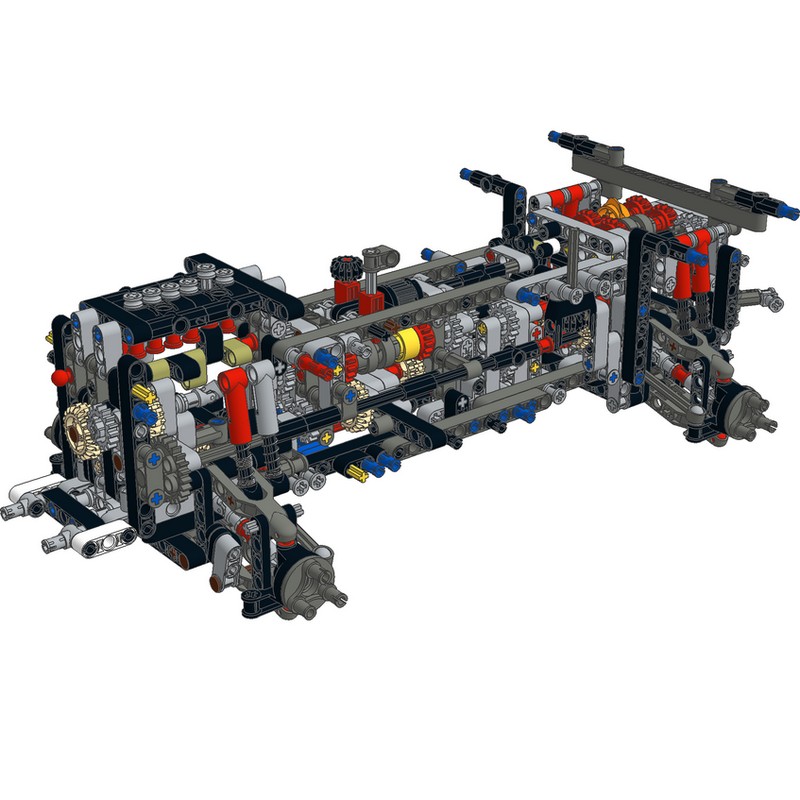
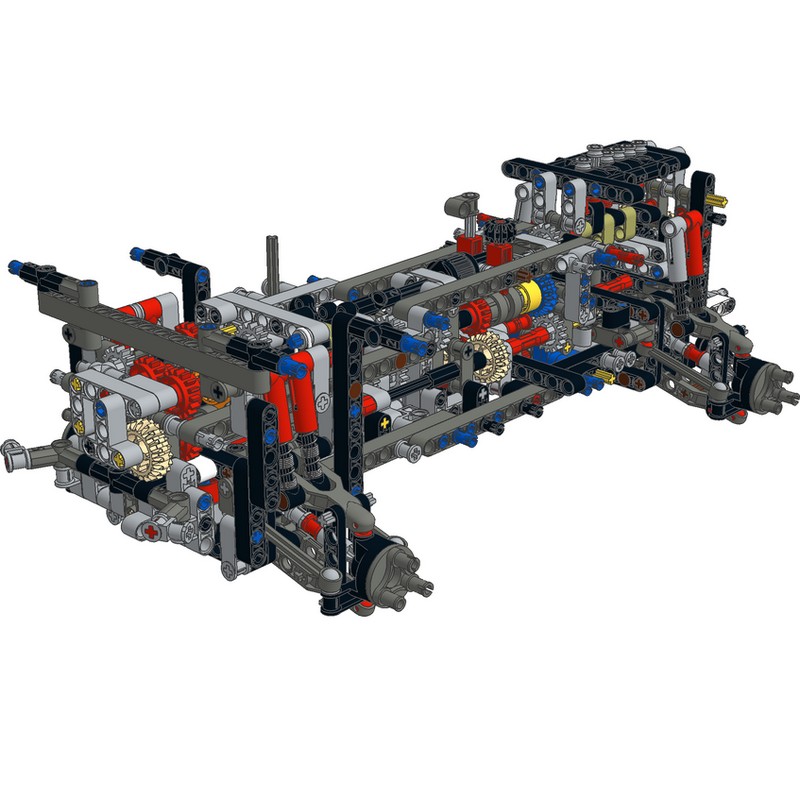
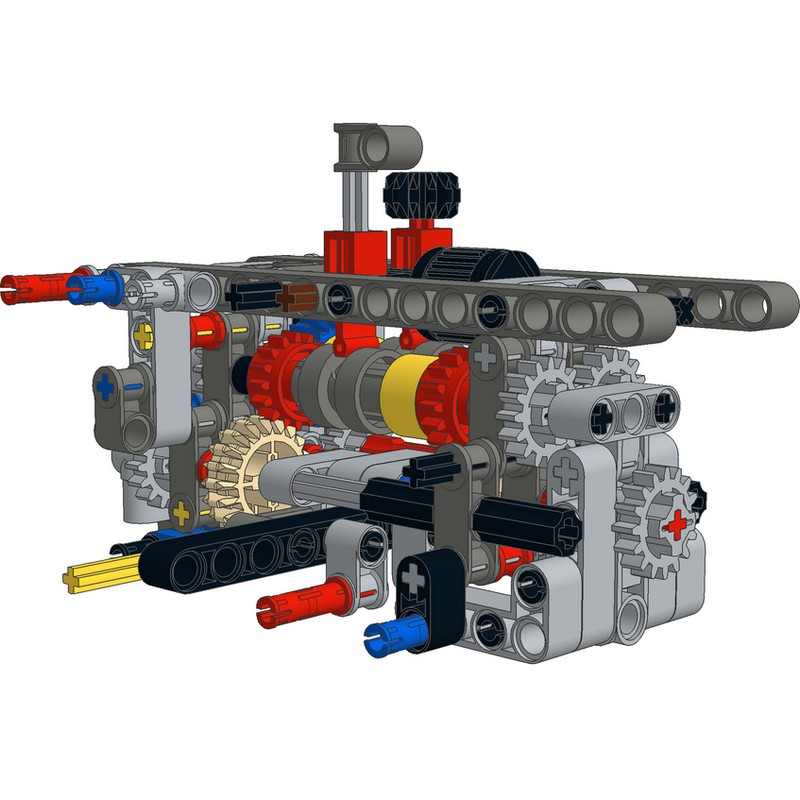
Улучшенная версия Land Rover Defender 42110 — автор: jb70. От автора — Оригинальный дизайн имел эти ошибки: смещение вверх приводит к большему обороту двигателя; переднее передаточное число было сопоставимо с 4-й передачей; Переключатель Hi / Lo не влияет на задний ход. А так же следующие недостатки: низкая частота вращения двигателя в целом; высокий крутящий момент в зубчатой передаче и проскальзывание, вызванное универсальными шарнирами.
Поэтому автор перепроектировал совершенно новую последовательность зубчатых передач, включая DNR, Hi / Lo и 4-скоростную коробку передач, которые в итоге получили прямые соединения без каких-либо универсальных шарниров:

Скачать инструкцию по сборке
Теги: Land Rover, lego technic
Hello Eurobrickers,
Finally I am ready to present my latest MOC, the so called Bruiser Conversion of the 4-door Jeep Wrangler. The real thing is done by JK Crew, it looks like this (more awesome pictures here):
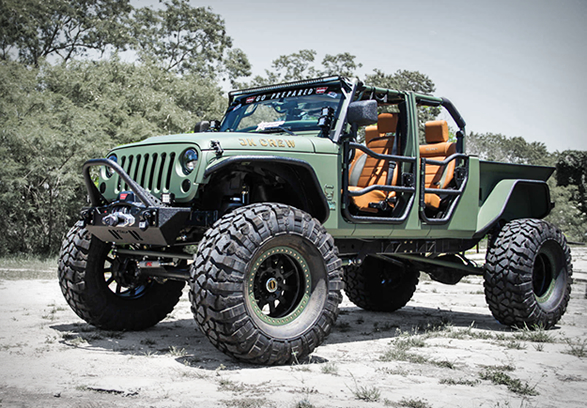

The conversion includes pimped up suspension, a longer body on the rear part, turned into a pickup, and larger wheels. As for the scale, the real Jeep Wrangler has around 80 cm wheels, and the conversion has around 110 cm wheels. I thought this would be an excellent material for an alternate build from the 42110 Land Rover set because of the color match and the available parts (like those rear mudguards), and the 80 mm wheels of the Defender, and the 107 mm Lego tractor tires result in a good 1:10 scale match. I thought it would deserve the large tires and a motorization, all available in the set 42099. So I ended up with two versions:
— Manual version, pure alternate build from 42110, with an optional raised geometry and large tires
— RC version that is a dual alternate with 42099
I will present both versions below. They are identical on the outside, they differ in the chassis build and the gearbox / drivetrain.
Manual version (42110 alternate)
I wanted to build something from the Land Rover that has a more aggressive suspension with large articulation. I have been playing with the idea of 4-link suspensions on both axles, and the 8 A-arms in the set are just enough for that. However, I had to do it with short springs only, so I used similar geometry as the rear axle of Grohl’s stadium truck, but with longer lower links on both axles. Furthermore, I wanted to build it in a way that works both with the stock Defender wheels, and with larger ones. So I built a chassis in a way that the springs can be positioned in two places, and the suspension geometry becomes lower or higher. Along with this, the front axle is also moved one stud to the front, to make space for the steering of the front wheel (just like in the real version).

As such a suspension requires a lot of space (if you want large articulation), the actual useful space in the middle of the model becomes relatively short. I wanted to preserve the same functions of the gearbox as in the Defender, so I had to compact it. Taking ideas from the Pimp my Land Rover project I managed to create a version of it that fits into the available space, keeping the same layout of the controls. Furthermore, I have included a functional V8 engine (the real one has a V8 Corvette engine).

One part that I struggled with a lot was the HoG steering, as it was quite hard to bypass the gearbox and the front seats as well. Finally I managed to do it under the seats, but I could not fit a functional steering wheel as the chassis structure that holds the front suspension was just in the middle of its way. The interior came out quite clean and also replicates the real one quite well I think. The seats are similar to those of the Defender, but I had to make them shorter, as the roof is also shorter:

On the outside one key point is that the real thing (at least this version) has its doors made of steel bars (which gives it a great look I think). This is good as the Defender would not have enough green panels to build 4 doors, but the bar doors could be built (at first I did not think I could get such a clean look, but I am quite happy with the result). On the front, I reused some ideas from my Willys Jeep, but changed it to a bit more modern look. On the rear part, the fender piece was an obvious fit, and I wanted to emphasize the bed with system parts, which also came out nicely I think. At first the A and B pillars and the roof was tricky to make solid, as it is only built from a few liftarms. But the final assembly is super strong, thanks to the column in the middle that goes through the gearbox (that was a key structural element to make). The model can be lifted safely with the roof. Some side panelling was also tricky to get into place, but I am satisfied with the overall looks. The doors, the hood and the tailgate are openable. The spare wheel fits nicely in the bed. One last feature I could add thanks to the Defender parts is the front bullbar with a compact functional winch (with rachet mechanism).
Here are some side-by-side images for a comparison. I think it works well with both wheel options.


More info, pictures and building instructions are available on Rebrickable.
RC version (42110 + 42099 alternate)
For the RC version I decided to use components from set 42099 as it has everything required: XL motors for torque, heavy-duty CV joints, planetary hubs, more A-arms and hard springs for suspension and the few extra parts in black color. First of all, I wanted to motorize it in a way that I keep the interior and the functional fake engine as well. Second, I wanted to add a simplified gearbox. The placement of the battery was obvious in the bed, the steering motor would go onto the front axle, but the space required for the two (coupled) XL motors was less obvious. Finally, I could squeeze them under the rear seats, and place the gearbox in front of them into the drivetrain. As for the gearbox, incorporating a 2-speed one (hi/lo gear) was simple, but I wanted to do something more with the available parts. Finally, I managed to add an RWD/AWD switch. For this, gearbox routing is a bit tricky, going through itself through idler clutch gears, and returning later. Furthermore, the front and rear parts of the driveshaft rotate in opposing directions, which is resolved later by the proper placement of the differentials on the axles. It was really challenging to brace the whole gearbox properly so that the gears cannot skip anywhere, I had to rebuild and test it several times (those two coupled XLs have a lot of power). On the downside, I suspect the relative complexity of the gearbox add some friction to the system.

As I wanted to maximize ground clearance, the front axle was tricky to build, since the planetary hubs can only be connected with ball joints when steered. For this, I applied the trick used by other as well, that slants the lower A-arms a bit, resulting in very slightly non-vertical front wheels, but it is so negligible I bet you’d never notice. The resulting axle is fairly slick, I am happy with the result.

As the steering motor made the front axle higher, the functional piston engine had to be minimized as well, and I could only do a mini V6 with the available parts. Unfortunately, this small construction does not run super smooth in a V configuration (sometimes the 2L liftarms in the main shaft kind of collide into the half pins that make up the pistons for a moment, instead of smoothly pushing them up; the inline configuration with the same technique works smoother). For this reason, there is some friction resulting from driving the fake engine as well.
Here is the final chassis, and one more image about the ground clearance at the rear:

Although the final gearbox construction is strong enough not to let the gears skip, there is one weak link: the driving ring can move out of the clutch gear under very high torque (although in my tests the model sooner went up the wall if not blocked). This is because the gear stick does not firmly hold it in place. However, it can be solved by fixing it into one position with a linkage coming out of the center column. This issue made me think how much more powerful it could be if the gearbox and the fake piston engine was bypassed, and eventually led to the construction of a heavy-duty variant (in which the gearbox is still kept, but instead controls the speed of the fake engine, when not in neutral). The heavy-duty variant is further geared down a bit to have even more torque. It can climb almost everything if the ground clearance permits, as you can see quite a few cases in the video.
A few more images about the whole model:


More info, images and building instructions are available on Rebrickable.
Let me know how you like it!
Cheers,
Viktor
Edited September 14, 2021 by gyenesvi