Sign up to stay connected with the world of Leica
Subscribe for updates on Leica news, events and promotions.
Country
Available languages
I want to receive advertising information based on my interests and activities from the Leica Camera Group on Leica Camera products, services, events, and marketing promotions. I can withdraw my consent at any time! Please click here for further information on the marketing & data privacy consent.
User Manual for Leica 7×24 Rangemaster CRF 2000-B Laser Rangefinder Edition 2017Click to enlarge the picture Contents of the user manual for the Leica 7×24 Rangemaster CRF 2000-B Laser
|
|||||||||||||||||||||||||||||||||||||||||||
|
User manual for the Leica 7×24 Rangemaster CRF 2000-B Laser contain basic instructions that need to be followed during installation and operation. Before starting your appliance, the user manual should be read through carefully. Follow all the safety instructions and warnings, and be guided by the given recommendations. User manual is an integral part of any Leica product, and if it is sold or transferred, they should be handed over jointly with the product. Following the instructions for use is an essential prerequisite for protecting health and property during use, as well as recognition of liability on the part of the manufacturer for possible defects should you make a warranty claim. Download an official Leica user manual in which you will find instructions on how to install, use, maintain and service your product. And do not forget – unsuitable use of a Leica product will considerably shorten its lifespan! |
|||||||||||||||||||||||||||||||||||||||||||
Product descriptionThis edition of the Leica 7×24 Rangemaster CRF 2000-B Laser Rangefinder commemorates the 25th anniversary of the introduction of Leica’s Geovid line with a new forest green armoring. Its 2000-yard range and fast 0.3 second processing rate give you a critical edge when it matters most. Complementing the rangefinder is an integrated ballistic computer that uses multiple readings, including range, angle to target, barometric pressure, temperature, and your specific ammunition load, to adjust the displayed distance plus the number of click adjustments to your riflescope, so you can compensate correctly for improved shot accuracy. The ballistic computer and companion EHR (Equivalent Horizontal Range) are accurate to more than half a mile.A simple one-button interface provides critical ease-of-use and a red LED display clearly shows the ranging information in your line-of-sight in an uncluttered layout. An ambient light sensor automatically adjusts the display brightness so you’ll always be able to clearly see the information without overloading your vision. Designed for durability, the housing is made of a lightweight and durable carbon-fiber reinforced ABS plastic. Weighing in at just over 7 ounces, including the CR2 battery, the Rangemaster CRF will be a valuable addition to your kit. Along with its standard Cordura nylon field case, the 2017 commemorative model comes with a special carry case.
In the Box Leica 7×24 Rangemaster CRF 2000-B Laser Rangefinder Edition 2017 Table of Contents |
|||||||||||||||||||||||||||||||||||||||||||
Upload User Manual Have you got an user manual for the Leica 7×24 Rangemaster CRF 2000-B Laser Rangefinder Edition 2017 in electronic form? Please send it to us and help us expand our library of instruction manuals. To upload the product manual, we first need to check and make sure you are not a robot. After that, your «Submit Link» or «Upload File» will appear.   Please enter here the link to the user manual of this product:
Enter here the file with the user manual of this product from your computer/phone: 0%
Technical parametersLeica Rangemaster CRF 2000-B Specs
Rating70% users recommend this product to others. And what about you? This product has already been rated by 98 owners. Add your rating and experience with the product. Discussion Ask our technicians if you have a problem with your settings, Post new comment to Leica 7×24 Rangemaster CRF 2000-B Laser Rangefinder Edition 2017
Post a new topic / query / comment: Items marked with * are required. Your name *: E-mail : Subject *: Message *: Your email address will not be displayed. Do not forget to fill it in if you want to receive a reply to your enquiry/contribution. |

| Request for user manual |
|
You can’t find the operation manual you are looking for? Let us know and we will try to add the missing manual:
I’m looking for a manual / Request for manual Current requests for instruction manuals: need 3 t260tp radios manuals… KONUSMOTOR -130 MM F.1000 f/7.6 — EQUATORIAL REFLECTOR… Stilnend night vision binoculars CAD GXL2200 condensor microphone… Please email me the user manual (link to for download) for your Thank you so very much. Christopher Cox… |
| Discussion |
|
Latest contributions to the discussion:
Onkyo CR-N575 I unplugged the device… Thanks, Jacques… lifespan of the Byte 3 CC Battery dead Straight 20-60x60mm |
Лазерный дальномер Leica Rangemaster CRF 2000-B с баллистическим калькулятором (арт.40 536)
Дальномеры Leica – необходимый атрибут снаряжения тех, кто занимается спортивной стрельбой и охотой. Объединяя в своем прочном корпусе высококачественную оптику с самой современной электроникой, они обеспечивают лучшие результаты при измерении расстояний. Дальномеры Leica делают все необходимые измерения с максимальной точностью, и создают тем самым все условия для мастерской стрельбы. Благодаря своим компактным размерам они легко помещаются в кармане.
Эргономичный дизайн дальномера Leica CRF позволяет легко управляться с ним только одной рукой. А компактные размеры дают возможность носить дальномер в кармане.
Использование линз из флюорита и асферических линз обеспечивает удивительное по детализации изображение. Светосильная оптика гарантирует абсолютно четкое и контрастное изображение целей, в том числе и находящихся на больших расстояниях.
При производстве любых моделей дальномеров Leica Rangemaster используются только самые лучшие оптические и электронные компоненты. Точное определение расстояния и других важных параметров осуществляется одним нажатием кнопки.
Высококачественная оптика обеспечивает широкое поле зрения и гарантирует превосходную яркость изображения. Пользователи могут точное измерить расстояние до 1500 м, в то время как дальномер рассчитывает соответствующую баллистическую кривую. Недавно разработанный баллистический калькулятор ABC учитывает при расчетах уклон местности, температуру воздуха, величину атмосферного давления, а также тип применяемого боеприпаса.
- Manuals
- Brands
- Leica Manuals
- Measuring Instruments
- DS2000
- User manual
-
Contents
-
Table of Contents
-
Bookmarks
Quick Links
Leica DS2000
User Manual
Version 1.0
English
Related Manuals for Leica DS2000
Summary of Contents for Leica DS2000
-
Page 1
Leica DS2000 User Manual Version 1.0 English… -
Page 2
Refer to the following resources for all DS2000 documentation/software: • the Leica USB stick • https://myworld.leica-geosystems.com Leica Geosystems On the last page of this manual, you can find the address of Leica Geosystems head- Address Book quarters. For a list of regional contacts, please visit http://leica-geosystems.com/contact-us/sales_support. -
Page 3
Add your subscriptions and manage users for Leica Geosystems Trusted Services, the secure software services, that assist you to optimise your workflow and increase your efficiency. -
Page 4: Table Of Contents
General System Components Delivery Contents DS2000 Components Accessories General Battery Handling Requirements for Using a GPS antenna with the DS2000 Setup Unfolding and Adjusting the Handle Preparing the Antenna Attaching and Connecting the Laptop or Tablet Inserting the Battery Mounting the Spray Support…
-
Page 5
Planning a Survey Procedures for Working with the DS2000 Preparing an Acquisition Marking Out Targets on Site Mapping Utilities without Using GPS Mapping Utilities Using GPS Care and Transport Transport Storage Cleaning and Drying Technical Data General Conformity to National Regulations… -
Page 6: Safety Directions
Important paragraphs which must be adhered to in practice as they enable the product to be used in a technically correct and efficient manner. Leica DM2000, Safety Directions…
-
Page 7: Definition Of Use
• To ensure that it is used in accordance with the instructions. • To be familiar with local regulations relating to safety and accident prevention. • To inform Leica Geosystems immediately if the product and the application becomes unsafe. • To ensure that the national laws, regulations and conditions for the operation of e.g.
-
Page 8: Hazards Of Use
Precautions: The person responsible for the product must make all users fully aware of the existing dangers. Leica DM2000, Safety Directions…
-
Page 9
• Using the product after incorrect attempts were made to carry out repairs Precautions: Do not open the product. Only Leica Geosystems authorised service centres are enti- tled to repair these products. During the transport, shipping or disposal of batteries it is possible for inappropriate CAUTION mechanical influences to constitute a fire hazard. -
Page 10: Electromagnetic Compatibility Emc
WARNING Although the product meets the strict regulations and standards which are in force in this respect, Leica Geosystems cannot completely exclude the possibility that other equipment may be disturbed. There is a risk that disturbances may be caused in other equipment if the product is…
-
Page 11: Fcc Statement, Applicable In U
Precautions: Although the product meets the strict regulations and standards which are in force in this respect, Leica Geosystems cannot completely exclude the possibility that other equipment can be disturbed or that humans or animals can be affected. • Do not operate the product with radio or digital cellular phone devices in the vicinity of filling stations or chemical installations, or in other areas where an explosion hazard exists.
-
Page 12: Ices-003 Statement, Applicable In Canada
équivalente (p.i.r.e.) ne dépasse pas l’intensité nécessaire à l’étab- lissement d’une communication satisfaisante.Le présent appareil est conforme aux CNR d’Industrie Canada applicables aux appareils radio exempts de licence.L’exploita- Leica DM2000, Safety Directions…
-
Page 13
:(1) Ll’appareil ne doit pas produire de brouillage. (2) L’utilisateur de l’appareil doit accepter tout brouillage radioélectrique subi, même si le brouillage est susceptible d’en compromettre le fonctionnement. Leica DM2000, Safety Directions… -
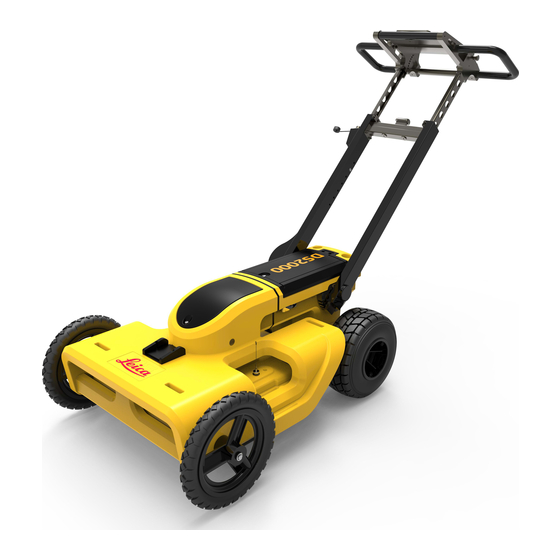
Page 14: Description Of The System
Description of the System General Area of application The DS2000 system is intended for localising and mapping underground utilities and can therefore be used for civil engineering applications. System Components DS2000 System The DS2000 system consist of the following components:…
-
Page 15: Ds2000 Components
Handle The handle of the DS2000 can be adjusted both in height and incli- nation. For easy transport of the DS2000, the handle can be folded At the side of the handle bar is an Ethernet plug for connecting the laptop/tablet to the cable of the control unit.
-
Page 16: Accessories
GPS support The GPS support can be attached to the DS2000 to provide a (optional) holder for a GPS pole.
-
Page 17: General Battery Handling
Requirements for Using a GPS Antenna with the DS2000 Requirements The DS2000 can be used with a GPS antenna to position the scan data in real-time without the need to set up a measurement grid. For using the DS2000 with a GPS antenna, the GPS antenna has to meet the following requirements: •…
-
Page 18: Setup
Setup Procedure for The setup procedure of the DS2000 consists of the following steps: setting up the • Unfolding and adjusting the handle (refer to «3.1 Unfolding and Adjusting the DS2000 Handle») • Preparing the antenna (refer to «3.2 Preparing the Antenna») •…
-
Page 19: Preparing The Antenna
Two-wheeled version • For transportation, push the lever to the left position. • When using the DS2000 in rough terrain, push the lever to the middle position. The antenna has limited mobility. • When using the DS2000 in smooth terrain, push the lever to the right position. The movement of the antenna is blocked.
-
Page 20: Inserting The Battery
• The valve has to be pressed horizontally. • The paint emerges from the top of the valve and flows along the elongation of the spray can (not perpendicular to it). a) Horizontal pressure on the valve b) Spray paint 012320_001 Leica DM2000, Setup…
-
Page 21: Mounting The Gps Support
Insert the upper part of the GPS support into the holes at the back of the battery compartment. Attach the lower part of the GPS support at the bottom of the battery compartment. Use the tightening screws to screw both parts together. Leica DM2000, Setup…
-
Page 22: Calibrating The Encoders
Calibrating the Encoders Calibration proce- Calibrate the encoders when using the DS2000 for the first time or when the dure distance measured by the encoders deviates from the actual distance. Inflate the tyres of the rear wheels to a pressure of 2 bar.
-
Page 23: Software
Software Software Installation Requirements for When purchasing a DS2000 package that includes a tablet, the Ouverture software is installing the already installed on the tablet. Ouverture software However, you can also operate the DS2000 with any laptop/tablet. When installing the Ouverture software on another laptop/tablet, respect the following requirements.
-
Page 24: Acquisition Of Scan Data
To select a single scan line on the defined grid, click a line while this mode is active. To select several lines, click and drag to create a selection frame over the lines. This function is available before starting an acquisition. Leica DM2000, Software…
-
Page 25
Click this button to display the Map section or a radargramm at its full extent. Click this button to zoom in or out. Only for the radargrams: Click this button to increase or reduce the contrast of the radargram. Leica DM2000, Software… -
Page 26
Map Section a) Compass b) Loaded map layers c) Current position of the DS2000 radar d) Inserted target e) Scan line 012462_001 Radargrams Shallow: 700 MHz radargram Deep: 250 MHz radargram a) Horizontal scale (distance travelled). The yellow line indicates the current position of… -
Page 27
Displays the GPS status. Click this button to display further details. If the number of satellites detected by the GPS antenna is low, the following dialogue window is displayed: Displays the battery status. Click this button to display further details. Leica DM2000, Software… -
Page 28: The Assisted Project Setup Screen
Use the acquisition commands to start and stop the acquisition of scan data. For a detailed description of these and other available functions, refer to «4.3.1 The Acquisition Screen». The length of a single scan must not exceed 800 m. Leica DM2000, Software…
-
Page 29: Data Acquisition With The New Assisted Project Function
To edit a single point of the reference line, select the point in the map and change the parameters in the Reference Line section. You can change the distance from the previous point and the angle relative to the previous segment of the line. Leica DM2000, Software…
-
Page 30
To reset the grid to the default, click the button beneath the Grid section. With the Starting Point Editor you can change the position of the DS2000 in relation Starting Point Editor to the measurement grid within the map. -
Page 31: Placing A Target
Note: The parameters are interdependent. Changing one parameter changes the other two parameters accordingly. To reset the parameter values to the default setting, click this button. To confirm all changes and insert the marker, click OK, otherwise click Cancel. Leica DM2000, Software…
-
Page 32: Generating A Survey Report
Additional Notes and If necessary, enter additional information. Additional Figures section To view the report before saving, click Preview. To generate and save the report, click Save. To close the dialogue without saving the report, click Cancel. Leica DM2000, Software…
-
Page 33: Review Of Scan Data
Click this button to export targets to one of the following file formats: • dat • shp • dxf Click this button to open the Survey Report dialogue for generating a report of the scan data. For a detailed description, refer to «4.3.6 Gener- ating a Survey Report». Leica DM2000, Software…
-
Page 34: Review Of Scan Data With The Open Project Function
Select a project file from the file directory and click Open. targets The Review Acquisition screen is displayed. To export the scan data and inserted targets of the project, click the export button in the Review Acquisition menu. Select a file format and click Export. Leica DM2000, Software…
-
Page 35: Settings
Positioning section c) Click this button to turn on or off the GPS. d) Click this button to open the Positioning Settings dialogue. e) Click this button to reset the settings to the default values. Leica DM2000, Software…
-
Page 36
For a good positioning, this value should not be greater than 2. • Fix: Indicates the Real-Time Kinematic (RTK) status. – GPS Fix: without GPS – RTK Fix: without RTK – RKT Float Fix: no connection to the base station Leica DM2000, Software… -
Page 37: Hardware Settings
A bar indicates the progress of the calibration procedure. To complete the calibration procedure, click the STOP button. Enter the distance travelled with the DS2000. The software calculates the new spatial resolution of the encoders. To start a new calibration procedure, repeat the steps 2 to 4.
-
Page 38: Graphics Settings
4.6.3 Graphics Settings Available functions 012465_001 a) Graphics section: Select the display mode for the radargrams. b) Click this button to reset the settings to the default values. Available Display Modes Gray Scale B-W-B W-B-W Russian Leica DM2000, Software…
-
Page 39: International Settings
(metres, feet, yards) and depth (metres, centi- metres, inches, feet). b) Language section: Select the preferred language. The change of the language becomes only effective after restarting the software. c) Click this button to reset the settings to the default values. Leica DM2000, Software…
-
Page 40: Planning A Survey
Planning a Survey Jobsite Investiga- To carry out a survey with the DS2000 in the most efficient way, gather all available tion information: • Make yourself familiar with the jobsite features. • Obtain technical maps about existing utilities on the jobsite.
-
Page 41: Procedures For Working With The Ds2000
Acquisition Commands» within «4.3.1 The Acquisition Screen»). Start moving the DS2000 along the scan line. When a target is detected, stop and move the DS2000 back until the vertical yellow line of the radargram is on top of the target.
-
Page 42: Mapping Utilities Without Using Gps
Acquisition Commands» within «4.3.1 The Acquisition Screen»). Start moving the DS2000 along the scan line. When a target is detected, stop and move the DS2000 back until the vertical yellow line of the radargram is on top of the target.
-
Page 43: Mapping Utilities Using Gps
GPS If available, mount the spray support. Mount the GPS support on the DS2000 and attach the pole with the GPS antenna. Ensure that the laptop/tablet is connected to the control unit and to the antenna.
-
Page 44: Care And Transport
Transport Shipping When transporting the product by rail, air or sea, always use the complete original Leica Geosystems packaging, transport container and cardboard box, or its equivalent, to protect against shock and vibration. Shipping, transport When transporting or shipping batteries, the person responsible for the product must…
-
Page 45: Technical Data
Technical Data General Dimensions DS2000 (two-wheeled version) 540 mm 1455 mm 1090 mm 410 mm 584.5 mm 012436_001 DS2000 (four-wheeled version) 584.5 mm 1343 mm 1047 mm 393 mm 698 mm 012437_001 Weight Without battery and laptop/tablet DS2000 (two-wheeled) 24 kg…
-
Page 46: Conformity To National Regulations
• FCC Part 15 (applicable in US) • Hereby, Leica Geosystems AG, declares that the DS2000 is in compliance with the essential requirements and other relevant provisions of Directive 1999/5/EC and other applicable European Directives. The declaration of conformity may be consulted at http://www.leica-geosystems.com/ce.
-
Page 47: Software Licence Agreement
Leica Geosystems. Such software is protected by copyright and other laws and its use is defined and regulated by the Leica Geosystems Software Licence Agreement, which covers aspects such as, but not limited to, Scope of the Licence, Warranty, Intellectual Property Rights, Limitation of Liability, Exclusion of other Assurances, Governing Law and Place of Jurisdiction.
-
Page 48
847039-1.0.0en Original text Published in Switzerland © 2016 Leica Geosystems AG, Heerbrugg, Switzerland Leica Geosystems AG Heinrich-Wild-Strasse CH-9435 Heerbrugg Switzerland Phone +41 71 727 31 31 www.leica-geosystems.com…
Лазерный дальномер Leica Rangemaster CRF 2000-B – современный прибор для строителей, проектировщиков, охотников и всех тех, кому необходимо замерять расстояние до цели. Диапазон измерений составляет 10–1825 метров с погрешностью ± 2,0 метра. Измерения можно проводить в метрах или ярдах. Корпус герметичный и водозащищенный, усилен углеродным волокном алюминия. Оптические элементы имеют фазовое и водоотталкивающее покрытия.
Дальномер лазерный Leica Rangemaster CRF 2000-B, черный, артикул 09224 по цене 59 375 рублей в наличии и под заказ в интернет-магазине. Для покупателей лазерные дальномеры Leica представлены широким ассортиментом товаров и аксессуаров к ним. Гарантия от производителя на данный товар — 12 мес. Приобрести можно on-line на нашем сайте, позвонив по телефону 8 (800) 301-94-25 или обратившись в онлайн-чат.
Доставка в Москве и по всей России осуществляется почтой, транспортными компаниями и курьерской службой.
Развернуть описаниеСкрыть описание