M-AUDIO M Track Duo Руководство пользователя

Введение
Комплектация
- М-трек дуэт
- Кабель USB-BtoUSB-A
- Карты загрузки программного обеспечения
- Руководство пользователя
- Руководство по безопасности и гарантии
Поддержка
Для получения последней информации об этом продукте (системные требования, информация о совместимости и т. Д.) И регистрации продукта посетите m-audio.com. Для получения дополнительной поддержки по продукту посетите m-audio.com/support.
Быстрое начало
Пользователи macOS: Для работы в соответствии с классом с M-Track Duo установка драйвера не требуется.
Пользователи iOS: Мощности устройства iOS недостаточно для работы M-Track Duo. Используйте комплект для подключения камеры Apple (продается отдельно), переходной USB-кабель (продается отдельно) и адаптер питания USB (продается отдельно), который обеспечивает дополнительный USB-разъем для питания M-Track Duo.
Пользователи Windows:
Перед подключением M-Track Duo к компьютеру установите драйверы:
- Перейдите на m-audio.com/drivers и загрузите последнюю версию драйвера M-Track Duo для своей операционной системы.
- Откройте приложение file вы скачали и дважды щелкните установщик драйвера file.
- Следуйте инструкциям на экране, чтобы установить драйверы.
Software:
Мы включили Pro Tools | First M-Audio Edition и MPC Beats с вашим M-Track Duo, так что вы можете начать создавать музыку с помощью профессионального программного обеспечения прямо из коробки.
Зарегистрируйте свой M-Track Duo на m-audio.com/softwaredownloadи следуйте инструкциям по установке в своей учетной записи.
Виртуальные инструменты:
Следуйте инструкциям в вашей учетной записи для установки прилагаемого виртуального инструмента. plugins. После установки большинство DAW не загружают виртуальный инструмент. plugins автоматически. Чтобы получить доступ к виртуальному инструменту plugins с Pro Tools | Сначала M-Audio Edition, вам нужно будет выбрать папку плагина для программного обеспечения для сканирования:
Профессиональные инструменты | Папки первого плагина M-Audio Edition (AAX):
Windows (32-разрядная версия): C: Программа Files (x86) Общие FilesAvidAudioPlug-Ins Windows (64-разрядная версия): C: Программа FilesОбщий FilesAvidAudioPlug-Ins macOS: Macintosh HD / Библиотека / Поддержка приложений / Avid / Audio / Plug-Ins Чтобы установить M-Track Duo в качестве устройства воспроизведения по умолчанию, следуйте инструкциям ниже в зависимости от операционной системы вашего компьютера.
Windows:
- Используйте прилагаемый USB-кабель для подключения M-Track Duo к компьютеру.
- На панели задач найдите значок «динамик» регулятора громкости. Щелкните динамик правой кнопкой мыши и
откройте Настройки звука> Звуки. Или перейдите в меню «Пуск»> «Система»> «Звук»> «Панель управления звуком». - На панели управления звуком Windows выберите вкладку «Воспроизведение» и выберите «Аудиокодек USB» в качестве устройства по умолчанию.
- Щелкните вкладку «Запись» и выберите USB-аудиокодек в качестве устройства по умолчанию.
- Щелкните Свойства в правом нижнем углу.
- В новом окне щелкните вкладку «Дополнительно» и выберите 2-канальный, 16-битный, 48000 Гц (студийное качество) в качестве формата по умолчанию.
- Снимите оба флажка в разделе «Эксклюзивный режим».
- Щелкните OK, чтобы закрыть окно свойств.
- Щелкните OK, чтобы закрыть панель управления звуком.
MacOS:
- Используйте прилагаемый USB-кабель для подключения M-Track Duo к компьютеру.
- Перейдите в Приложения> Утилиты> Настройка Audio MIDI.
- В окне «Аудиоустройства» выберите «Аудиокодек USB» в левом столбце.
- Щелкните правой кнопкой мыши USB-аудиокодек и выберите «Использовать это устройство для ввода звука».
- Щелкните правой кнопкой мыши USB-аудиокодек и выберите «Использовать это устройство для вывода звука».
- Выйдите из настройки Audio MIDI.
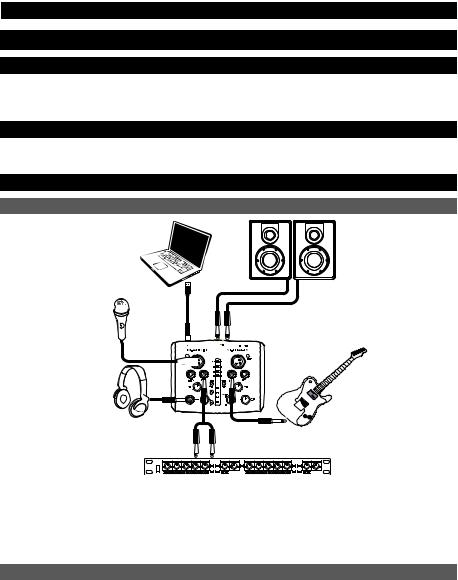
Схема подключения
Элементы, не указанные в разделе «Введение»> «Содержимое упаковки», продаются отдельно.

Примечание: Используйте переключатель + 48V (фантомное питание), только если микрофон требует фантомного питания. Для большинства динамических и ленточных микрофонов фантомное питание не требуется, но для большинства конденсаторных микрофонов требуется. Обратитесь к документации вашего микрофона, чтобы узнать, нужно ли ему фантомное питание.
Настройка M-Track Duo с вашим программным обеспечением
Настройка M-Track Duo с помощью Pro Tools | Первое издание M-Audio
- Используйте прилагаемый USB-кабель для подключения M-Track Duo к компьютеру.
- Open Pro Tools | Первое издание M-Audio.
- Перейдите в раздел «Настройка»> «Механизм воспроизведения…».
- Откройте раскрывающееся меню Playback Engine и выберите USB Audio Codec.
Примечание:
Возможно, вам потребуется сохранить и перезапустить ваш проект. - Выберите свой Sample Rate, а затем нажмите OK, чтобы закрыть окно настройки. Теперь вы можете добавлять треки для отправки и получения звука от источников, подключенных к входам M-Track Duo, и передавать записанный звук обратно через выходы M-Track Duo.
Настройка M-Track Duo с помощью MPC Beats
- Используйте прилагаемый USB-кабель для подключения M-Track Duo к компьютеру.
- Откройте MPC Beats.
- Перейдите в Edit> Preferences….
- Для пользователей Windows: в окне «Аудио» выберите ASIO в раскрывающемся меню «Тип аудиоустройства». В раскрывающемся меню «Устройство» выберите M-Track Solo и Duo ASIO. Для пользователей MacOS: в окне «Аудио» выберите «Аудиокодек USB» в раскрывающихся меню «Выход» и «Вход».
Примечание: Возможно, вам потребуется сохранить и перезапустить ваш проект. - Выберите свой Sample Rate, а затем нажмите OK, чтобы закрыть окно настроек. Теперь вы можете добавлять треки для отправки и получения звука от источников, подключенных к входам M-Track Duo, и передавать записанный звук обратно через выходы M-Track Duo.
Особенности
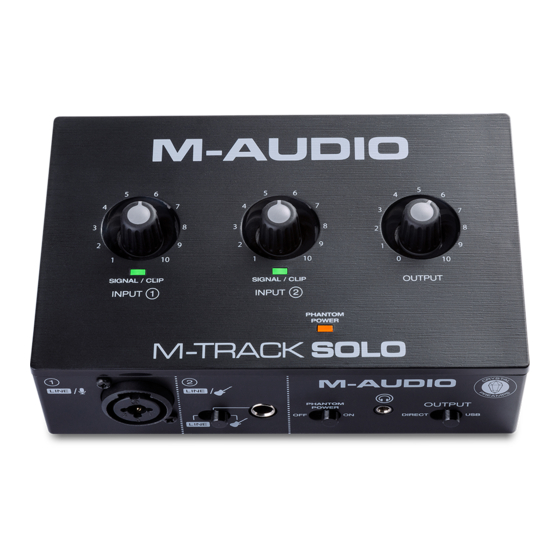
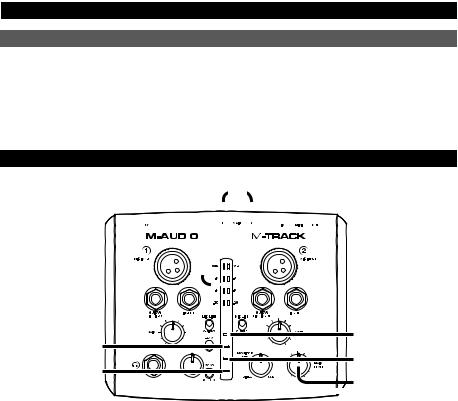
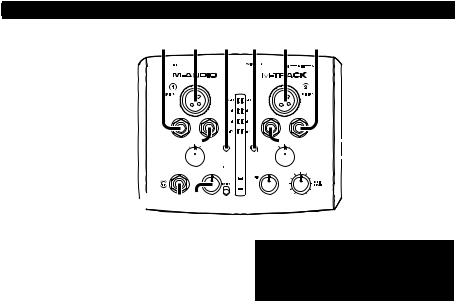
Верхняя панель
- Входное усиление: Регулирует уровень усиления входа. Установите этот регулятор так, чтобы соответствующий индикатор сигнала / ограничения (расположенный под регулятором) отображал «нормальный» уровень во время выступления, но не настолько высокий, чтобы индикатор «зажимал» или достигал пика, вызывая искажение звука.

- Светодиод сигнала / фиксации: Светодиод загорается зеленым светом при обнаружении входного сигнала. Светодиод загорится красным, если уровень сигнала слишком высок, что может вызвать искажение или «клиппирование». В этом случае уменьшите входное усиление и / или уменьшите выходной уровень вашего источника звука.
- Уровень наушников: Регулирует выходную громкость выхода на наушники.
- Уровень монитора: Регулирует выходную громкость основных выходов, которые должны быть подключены к вашим активным мониторам или ampболее жизненная система.
- Светодиод + 48В (фантомное питание): Загорается при включенном фантомном питании.

Задняя панель
- USB-порт (тип B): это соединение позволит вам отправлять аудио на компьютер и с него. Используйте прилагаемый кабель USB-B-USB-A для подключения M-Track Duo к компьютеру. M-Track Duo требует подключения USB 2.0 (или выше).
- Основные выходы: используйте стандартные кабели TRS 1/4 дюйма (6.35 мм) для подключения этих выходов к мониторам с питанием, amplifier system и т. д. Микширование, которое вы слышите на этих выходах, будет определяться переключателем Direct Mono / Direct Stereo / USB. Уровень этих выходов регулируется ручкой Monitor Level.


Передняя панель
- Комбинированный вход: подключите к этому входу микрофон, гитару или бас-гитару с активным звукоснимателем или устройство линейного уровня. Для микрофонов используйте кабель XLR или TRS-кабель 1/4 дюйма (6.35 мм). Для гитары или бас-гитары с активным звукоснимателем используйте стандартный кабель TS 1/4 дюйма (6.35 мм). Для сигналов линейного уровня используйте кабель TRS 1/4 дюйма (6.35 мм).

- Переключатель Line / Instrument: установите переключатель в положение Line при подключении микрофона или клавиатуры. Установите переключатель в положение «Инструмент» при подключении гитары или бас-гитары.
- Переключатель + 48 В (фантомное питание): этот переключатель активирует и деактивирует фантомное питание. При активации (горит) фантомное питание подает +48 В на комбинированный вход. Обратите внимание, что для большинства динамических и ленточных микрофонов фантомное питание не требуется, в отличие от большинства конденсаторных микрофонов. Обратитесь к документации вашего микрофона, чтобы узнать, нужно ли ему фантомное питание.
- Выход для наушников: Подключите к этому выходу наушники TRS 1/4 дюйма (6.35 мм). Микширование, которое вы слышите на этом выходе, будет определяться переключателем Direct Mono / Direct Stereo / USB. Уровень этого выхода регулируется ручкой уровня наушников.
- Переключатель Direct Mono / Direct Stereo / USB: этот переключатель управляет отправкой прямого монофонического входного сигнала, прямого стереофонического входного сигнала или обратного сигнала USB-потока на выход для наушников и основные выходы.
- Если установлено значение USB, будет слышно только воспроизведение звука USB с вашего компьютера.
- Установите переключатель в положение Direct Mono, чтобы контролировать прямой входной сигнал, когда все входы суммируются и одинаково слышны с каждой стороны. Это полезно для мониторинга сигнала гитары или вокального микрофона. Этот переключатель не влияет на воспроизведение DAW или способ записи звука в DAW; он влияет только на то, как вы слышите входной сигнал в выходах для наушников и основных выходах.
- Установите переключатель в положение Direct Stereo, чтобы контролировать прямой входной сигнал с входом 1 в левом канале и входом 2 в правом канале. Это полезно, если вы хотите напрямую контролировать настройку стереомикрофона, например, стереосигнал с клавиатуры или накладные микрофоны ударных.

Документы / Ресурсы
Рекомендации
- Manuals
- Brands
- M-Audio Manuals
- Accessories
- M-Track Solo
- User manual
-
Contents
-
Table of Contents
-
Bookmarks
Quick Links
User Guide
English ( 2 – 8 )
Guía del usuario
Español ( 9– 15 )
Guide d’utilisation
Français ( 16 – 22 )
Guida per l’uso
Italiano ( 23 – 29 )
Benutzerhandbuch
Deutsch ( 30– 36 )
Appendix
English ( 37 – 39 )
Related Manuals for M-Audio M-Track Solo
Summary of Contents for M-Audio M-Track Solo
-
Page 1
User Guide English ( 2 – 8 ) Guía del usuario Español ( 9– 15 ) Guide d’utilisation Français ( 16 – 22 ) Guida per l’uso Italiano ( 23 – 29 ) Benutzerhandbuch Deutsch ( 30– 36 ) Appendix English ( 37 –… -
Page 2: Box Contents
Introduction Box Contents M-Track Solo User Guide USB-B–to–USB-A Cable Safety & Warranty Manual Software Download Cards Support For the latest information about this product (system requirements, compatibility information, etc.) and product registration, visit m-audio.com. For additional product support, visit m-audio.com/support.
-
Page 3: Quick Start
After installation, most DAWs will not load virtual instrument plugins automatically. In order to access the virtual instrument plugins with Pro Tools | First M-Audio Edition, you will need to choose the plugin folder for the software to scan:…
-
Page 4
To set M-Track Solo as your default playback device, follow the directions below based on your computer’s operating system. Windows: 1. Use the included USB cable to connect the M-Track Solo to your computer. 2. In the Taskbar, locate the Volume Control «speaker» icon. Right-click the speaker and open Sound Settings >… -
Page 5: Connection Diagram
Connection Diagram Items not listed under Introduction > Box Contents are sold separately. Guitar Monitors Computer Microphone Headphones Rear Panel Front Panel Note: Use the +48V (Phantom Power) Switch only if a microphone requires phantom power. Most dynamic microphones and ribbon microphones do not require phantom power, but most condenser microphones do.
-
Page 6
Select your Sample Rate and then click OK to close the Setup window. You can now add tracks to send and receive audio from sources connected to M-Track Solo inputs and stream recorded audio back through the M-Track Solo outputs. -
Page 7: Top Panel
Use the included USB-B-to-USB-A cable to connect the M-Track Solo to a computer. The M-Track Solo requires a USB 2.0 connection (or higher). Main Outputs: Use standard RCA cables to connect these outputs to your powered monitors, amplifier system, etc.
-
Page 8: Front Panel
Front Panel Combo Input: Connect a microphone, a guitar or bass with an active pickup, or a line-level device to this input. For microphones, use an XLR or 1/4” (6.35 mm) TRS cable. For a guitar or bass with an active pickup, use a standard 1/4”…
-
Page 9: Contenido De La Caja
Manual sobre la seguridad y garantía Tarjetas de descarga de software Soporte Para obtener la información más completa acerca de este product (los requisitos del sistema, compatibilidad, etc) y registro del producto, visite m-audio.com. Para soporte adicional del producto, visite m-audio.com/support.
-
Page 10: Conexión Rápida
Siga las instrucciones de la pantalla para instalar los drivers. Software: Hemos incluido Pro Tools | First M-Audio Edition y MPC Beats con su M-Track Solo de modo que puede comenzar a hacer música con software profesional en cuanto lo saca de la caja.
-
Page 11
Windows: Utilice el cable USB incluido para conectar el M-Track Solo a su ordenador. Localice en la barra de tareas el icono del «altavoz» del control de volumen. Haga clic derecho en el altavoz y abierto Ajustes de sonido >… -
Page 12: Diagrama De Instalación
Diagrama de instalación Los elementos que no se enumeran en Introducción > Contenido de la caja se venden por separado. Guitarra Monitores alimentados Computadora Micrófono Auriculares Panel trasero Panel frontal Nota: Utilice el interruptor +48 V (potencia fantasma) solamente si un micrófono requiere potencia fantasma.
-
Page 13
Ahora puede añadir pistas para enviar y recibir audio desde las fuentes conectadas a las entradas del M-Track Solo y transmitir el audio grabado de regreso por las salidas del M-Track Solo. Instalación del M-Track Solo con MPC Beats Utilice el cable USB incluido para conectar el M-Track Solo a su ordenador. -
Page 14: Panel Superior
Utilice los cable USB-B–a–USB-A para conectar el M-Track Solo a un ordenador. El M-Track Solo requiere una conexión USB 2.0 (o superior). Salidas principales: Utilice cables RCA para conectar estas salidas a sus monitores alimentados, sistema de amplificación, etc.
-
Page 15: Panel Frontal
Panel frontal Entrada combinada: Conecte un micrófono, guitarra o bajo con captador activo o un dispositivo de nivel de línea a esta entrada. Para micrófonos, utilice un cable XLR o TRS de 6,35 mm (1/4 pulg.). Entrada de 1/4″: para señales de nivel de línea, use un cable TRS de 1/4″…
-
Page 16: Contenu De La Boîte
Cartes de téléchargement de logiciel Assistance Pour les dernières informations concernant ce produit (la configuration système minimale requise, la compatibilité, etc) et l’enregistrement du produit, veuillez visitez le site m-audio.com. Pour toute assistance supplémentaire, veuillez visiter le site m-audio.com/support.
-
Page 17
Logiciel : Nous avons inclus l’application Pro Tools | First M-Audio Edition et MPC Beats avec l’M-Track Solo afin que vous puissiez commencer à créer de la musique avec un logiciel de qualité professionnelle aussitôt que vous le sortez de la boîte. Veuillez enregistrer l’M-Track Solo sur le site m-audio.com/softwaredownload… -
Page 18
Pour définir le M-Track Solo comme périphérique de lecture par défaut, veuillez suivre les instructions ci-dessous, selon le système d’exploitation de votre ordinateur. Windows : Utilisez le câble USB inclus pour brancher le M-Track Solo à votre ordinateur. Dans la barre des tâches, recherchez l’icône de la commande de volume (haut-parleur). Faites un clic droit sur l’icône du haut-parleur et ouvrir Paramètres son>… -
Page 19: Schéma De Connexion
Schéma de connexion Les éléments qui ne figurent pas dans la section Présentation > Contenu de la boîte sont vendus séparément. Guitare Moniteurs amplifiés Casque Microphone Ordinateur d’écoute Panneau arrière Panneau avant Important : Utiliser la touche d’alimentation fantôme (+48V) uniquement lorsqu’un microphone nécessite une alimentation fantôme.
-
Page 20
Setup. Vous pouvez maintenant ajouter des pistes et recevoir un signal audio des sources branchées aux entrées de l’M-Track Solo et transmettre en continu des fichiers par le biais des sorties de l’M-Track Solo. Installation de M-Track Solo avec MPC Beats Utilisez le câble USB fourni pour brancher l’interface M-Track Solo à… -
Page 21: Caractéristiques
Utilisez le câble USB-B–vers–USB-A fourni pour brancher l’M- Track Solo à un ordinateur. L’M-Track Solo requiert une connexion USB 2.0 (ou version ultérieure). Sorties principales : Utilisez des câbles RCA pour relier ces sorties à vos moniteurs amplifiés, à…
-
Page 22: Panneau Avant
Panneau avant Entrée combo : Cette entrée permet de brancher un microphone, une guitare ou une basse avec un micro actif, ou un appareil à niveau ligne. Pour brancher un microphone, utilisez un câble XLR ou TRS 6,35 mm. Entrée 1/4″ : pour les signaux de niveau ligne, utilisez un câble TRS 1/4″…
-
Page 23: Contenuti Della Confezione
Schede di download del software Assistenza Per conoscere le ultime informazioni in merito a questo prodotto (i requisiti di sistema complete, compatibilità, ecc) e per la registrazione del prodotto, recarsi alla pagina m-audio.com. Per ulteriore assistenza, recarsi alla pagina m-audio.com/support.
-
Page 24: Inizio Rapido
2. Aprire il file scaricato e fare doppio clic sul file di installazione dei driver. 3. Seguire le istruzioni su schermo per installare i driver. Software: Con l’M-Track Solo abbiamo incluso il Pro Tools | First M-Audio Edition e MPC Beats in modo da consentirvi di iniziare immediatamente a fare musica con software professionale.
-
Page 25
Per configurare l’M-Track Solo come dispositivo di riproduzione predefinito, seguire le indicazioni seguenti, basandosi sul proprio sistema operativo. Windows: Servirsi del cavo USB in dotazione per collegare l’M-Track Solo al computer. Nella Barra delle applicazioni, individuare l’icona «Speaker» di controllo del Volume. Fare clic col tasto destro del mouse e aperto Impostazioni audio>… -
Page 26: Schema Dei Collegamenti
Schema dei collegamenti Elementi non elencati sotto Introduzione > Contenuti della confezione sono venduti separatamente. Chitarra Monitor Microfono Computer Cuffie Pannello posteriore Pannello anteriore Importante: Servirsi dell’interruttore +48V (l’alimentazione phantom) solo se un microfono richiede l’alimentazione phantom. La maggior parte microfoni dinamici e i microfoni a nastro non richiedono alimentazione phantom, mentre la maggior parte dei microfoni a condensatore sì.
-
Page 27
Per utenti Windows: Nella finestra Audio, selezionare ASIO nel menu a discesa Audio Device Type. Nel menu a discesa Device selezionare M-Track Solo and Duo ASIO. Per utenti MacOS: Nella finestra Audio, selezionare USB Audio Codec sotto i menu a discesa Output e Input. -
Page 28: Pannello Superiore
Servirsi dei cavo da USB-B–a–USB-A in dotazione per collegare l’M-Track Solo al computer. L’M-Track Solo richiede un collegamento USB 2.0 (o superiore). Uscite principali: servirsi di cavi RCA per collegare queste uscite a monitor, impianto di amplificazione, ecc.
-
Page 29: Pannello Anteriore
Pannello anteriore Ingresso combo: collegare un microfono, una chitarra o un basso con pickup attivo o un dispositivo a livello di linea a questo ingresso. Per i microfoni, servirsi di un cavo TRS XLR o da 1/4” (6,35 mm). Ingresso 1/4″: per segnali a livello di linea, utilizzare un cavo TRS da 1/4″…
-
Page 30
Benutzerhandbuch (Deutsch) Einführung Lieferumfang M-Track Solo Benutzerhandbuch USB-B-zu-USB-A Kabel Sicherheitshinweise undantieinformationen Software Download-Karten Kundendienst Für aktuelle Informationen diesem Produkt (Systemanforderungen, Informationen zur Kompatibilität etc.) und zur Produktregistrierung besuchen Sie m-audio.com. Um weitere Unterstützung zu Ihrem Produkt zu erhalten besuchen Sie… -
Page 31
Befolgen Sie die Anweisungen am Bildschirm, um die Treiber zu installieren. Software: Wir liefern M-Track Solo mit Pro Tools | First M-Audio Edition und MPC Beats aus, damit Sie Ihre Musikproduktion gleich mit professioneller Software starten können. Registrieren Sie Ihren M- Track Solo zuerst auf m-audio.com/softwaredownload… -
Page 32
Anweisungen je nach Betriebssystem Ihres Computers. Windows: Schließen Sie Ihr M-Track Solo mit dem mitgelieferten USB-Kabel an Ihren Computer an. Suchen Sie das Lautsprechersymbol für die Lautstärke in der Taskleiste. Klicken Sie mit der rechten Maustaste auf den Lautsprecher und öffnen Soundeinstellungen > Sounds. -
Page 33
Anschlussdiagramm Teile, die nicht unter Einführung > Lieferumfang angegeben sind, sind separat erhältlich. Gitarre Aktivemonitore Computer Mikrofon Kopfhörer Rückseite Vorderseite Wichtig: Verwenden Sie den +48V (Phantomspeisung)-Schalter nur dann, wenn ein Mikrofon eine Phantomspeisung benötigt. Die meisten dynamischen Mikrofone und Bändchenmikrofone benötigen keine Phantomspeisung. -
Page 34
Gehen Sie zu Edit > Preferences…. Für Windows-Anwender: Wählen Sie im Audio-Fenster die Option ASIO im Dropdown-Menü Audio Device Type aus. Im Dropdown-Menü Device wählen Sie die Option M-Track Solo and Duo ASIO. Für MacOS-Anwender: Wählen Sie im Audio-Fenster die Option USB Audio Codec unter den Output — und Input-Dropdown-Menüs aus. -
Page 35
Rückseite USB-Port (Typ B): Über diesen Anschluss können Sie Audio- an und vom Computer senden. Verwenden Sie die im Lieferumfang enthaltenen USB-B-auf-USB-A-Kabel, um Ihr M-Track Solo an einen Computer anzuschließen. M-Track Solo benötigt einen USB 2.0-Anschluss (oder höher). Hauptausgäng: Verwenden handelsübliche… -
Page 36
Vorderseite Combo-Eingang: Schließen Sie ein Mikrofon, eine Gitarre, einen Bass mit einem aktiven Pickup oder ein Line-Level-Gerät an diesen Eingang an. Für Mikrofone verwenden Sie ein XLR- oder 1/4″ (6,35 mm) TRS- Kabel. 1/4″ Eingang: Verwenden Sie für Signale mit Line- Pegel ein 6,35 mm (1/4″) TRS-Kabel. -
Page 37: Technical Specifications
Appendix (English) Technical Specifications All specifications are measured at 20 kHz bandwidth. Specifications are subject to change without notice. Mic Input (balanced XLR) Frequency Response 20 Hz – 20 kHz (+0.1 dB) Signal-to-Noise Ratio 109 dB (A-weighted) 0.003% (min. gain, 0 dBu out, A-weighted) THD+N -128 dBu (max.
-
Page 38
Instrument Input (unbalanced 1/4″ [6.35 mm] TS) 20 Hz – 20 kHz (+0.1 dB) Frequency Response THD+N 0.005% (min. gain, 0 dBu output, A-weighted) 1 MΩ Input Impedance Gain Range -10 dB to +44 dB RCA Outputs 20 Hz – 20 kHz (+0.1 dB) Frequency Response Signal-to-Noise Ratio 109 dB (A-weighted) -
Page 39: Trademarks And Licenses
Weight 0.66 lbs. / 0.30 kg Trademarks & Licenses M-Audio and MPC Beats are trademarks of inMusic Brands, Inc., registered in the U.S. and other countries. Windows is a registered trademark of Microsoft Corporation in the United States and other countries.
-
Page 40
Manual Version 1.4…
инструкцияM-Audio M-Track MKII

User Guide
English ( 3 – 5 )
Guía del usuario
Español ( 6 – 8 )
Guide d’utilisation
Français ( 9 – 11 )
Guida per l’uso
Italiano ( 12 – 14 )
Benutzerhandbuch
Deutsch ( 15 – 17 )
Appendix
English ( 18 )
Посмотреть инструкция для M-Audio M-Track MKII бесплатно. Руководство относится к категории Диктофоны, 1 человек(а) дали ему среднюю оценку 7.5. Руководство доступно на следующих языках: английский. У вас есть вопрос о M-Audio M-Track MKII или вам нужна помощь? Задайте свой вопрос здесь
- User Guide (English)
- Guía del usuario (Español)
- Guide d’utilisation (Français)
- Guida per l’uso (Italiano)
- Benutzerhandbuch (Deutsch)
- Appendix (English)
Нужна помощь?
У вас есть вопрос о M-Audio а ответа нет в руководстве? Задайте свой вопрос здесь Дай исчерпывающее описание проблемы и четко задайте свой вопрос. Чем детальнее описание проблемы или вопроса, тем легче будет другим пользователям M-Audio предоставить вам исчерпывающий ответ.
Количество вопросов: 0

Главная
| M-Audio | |
| M-Track MKII | |
| Диктофон | |
| английский | |
| Руководство пользователя (PDF) |
Не можете найти ответ на свой вопрос в руководстве? Вы можете найти ответ на свой вопрос ниже, в разделе часто задаваемых вопросов о M-Audio M-Track MKII.
Инструкция M-Audio M-Track MKII доступно в русский?
Не нашли свой вопрос? Задайте свой вопрос здесь
Нет результатов

M-Audio M-Track Quad
инструкция36 страниц(ы)

Hikvision DS-7108NI-Q1/8P/M
инструкция93 страниц(ы)

Hikvision DS-7108NI-Q1/M
инструкция93 страниц(ы)

Philips Voice Tracer DVT4110
инструкция26 страниц(ы)

Hikvision DS-7108NI-E1/8P/M
инструкция182 страниц(ы)

Hikvision DS-7104NI-E1/4P/M
инструкция182 страниц(ы)

Philips Voice Tracer DVT1250
инструкция42 страниц(ы)

Philips Voice Tracer DVT2050
инструкция44 страниц(ы)

Philips Voice Tracer DVT6110
инструкция26 страниц(ы)

Philips Voice Tracer LFH0612
инструкция22 страниц(ы)
Посмотреть все M-Audio руководства Посмотреть все M-Audio Диктофон руководства
 Loading…
![]()
USER GUIDE
ENGLISH ( 3 – 6 )
GUÍA DEL USUARIO
ESPAÑOL ( 7 – 10 )
GUIDE D’UTILISATION
FRANÇAIS ( 11 – 14 )
GUIDA PER L’USO
ITALIANO ( 15 – 18 )
BENUTZERHANDBUCH
DEUTSCH ( 19 – 22 )

USER GUIDE (ENGLISH)
Box Contents
|
y |
M-Track |
y |
User Guide |
|
y |
USB cable |
y |
Safety Instructions & Warranty Information booklet |
ySoftware DVD
Support
For complete system requirements, compatibility information, and product registration, visit the support section of the M-Audio website: www.m-audio.com/support.
Quick Start
Setup Scenario*
Computer
Monitors
Microphone 
|
* Items not listed in Box |
External Effects Module |
|
Contents are not included. |
(e.g., compressor, reverb, etc.) |
Notes:
yWhen recording a guitar or bass with an active pickup, set the M-Track’s MIC/LINE / GUITAR SWITCH to «MIC/LINE.» If your instrument uses a passive pickup, set the switch to «GUITAR.»
yDo not use the MIC INPUT and GUITAR/LINE INPUT at the same time on one channel. This may overload the channel and cause distortion.
yPlug the M-Track directly into your computer, and avoid using a USB hub. Hubs can interfere with the M-Track’s audio and MIDI timing signals.
Recommended Installations
We highly recommend installing the following software applications:
Ableton Live Lite: We’ve included Ableton Live Lite with your M-Track so you can get started making music with professional software right out of the box. Insert the DVD into your computer’s DVD drive, open the «setup» application or .exe (Windows) or .mpkg file (Mac), and then follow the on-screen instructions to install the software. Also, visit www.ableton.com to check for any available software updates.
Ignite (www.airmusictech.com/getignite): We recommend downloading Ignite, a music creation tool designed by AIR Music Technology to be easiest way to capture, build, and share musical ideas. Ignite works well on its own or as a writing companion to the production capabilities of your software.
3

Audio Setup
The M-Track is a class-compliant device that can be used with any digital audio workstation (DAW) or recording software that supports USB audio. To enable your M-Track to send and receive audio to and from your computer, follow the instructions below for your computer’s operating system.
Be sure your audio software program is set up to receive audio via the M-Track. This can usually be done in your software’s «Preferences» or «Device Setup.» Please consult your software manual for more information.
If you want even lower latency, read the text in the gray box at the bottom of the page, which discusses ASIO4ALL.
Windows
Windows 7:
1.Use the included cable to connect the M-Track to your computer.
|
2. |
Go to Start Menu Control Panel Hardware and Sound Sound. |
3.Click the Playback tab and select M-Track as the default device.
4.Click the Recording tab and select M-Track as the default device.
5.Click Properties in the lower right-hand corner.
6.In the new window, click the Advanced tab and select 2-channel, 16-bit, 44100 Hz (CD Quality) as the default format.
7.Uncheck both boxes under Exclusive Mode.
8.Click the Levels tab and set the slider to «4.»
9.Click OK to close the Properties window.
10.Click OK to close the Sound control panel.
Note: If you are using the ASIO4ALL driver (see below), before you open the ASIO4ALL control panel, use the steps above to make sure M-Track is not selected as the default device. If you want to play your computer’s audio through M-Track after you close your DAW, you may need to repeat the steps above to reselect it as the default device.
Windows Vista:
1.Use the included cable to connect the M-Track to your computer.
|
2. |
Go to Start Menu Control Panel Sound. (If you don’t see Sound, select Switch to Classic View, and the Sound |
|
Control Panel should become available.) |
3.Click the Playback tab and select M-Track as the default device.
4.Click the Recording tab and select M-Track as the default device.
5.Click Properties in the lower right-hand corner.
6.In the new window, click the Advanced tab and select 2-channel, 16-bit, 44100 Hz (CD Quality) as the default format.
7.Uncheck both boxes under Exclusive Mode.
8.Click OK to close the Properties window.
9.Click OK to close the Sound control panel.
Note: If you are using the ASIO4ALL driver (see below), before you open the ASIO4ALL control panel, use the steps above to make sure M-Track is not selected as the default device. If you want to play your computer’s audio through M-Track after you close your DAW, you may need to repeat the steps above to reselect it as the default device.
Windows XP:
1.Use the included cable to connect the M-Track to your computer.
|
2. |
Go to Start Menu Control Panel Sounds and Audio Devices. |
3.Click the Audio tab.
4.Under Sound Playback and Sound Recording, select USB Audio Codec as the default device. (If you have other USB audio devices connected to your computer, which may have identical names, you may need to try selecting each one until the M-Track is recognized.)
5.Click OK.
Note: If you are using the ASIO4ALL driver (see below), before you open the ASIO4ALL control panel, use the steps above to make sure M-Track is not selected as the default device. If you want to play your computer’s audio through M-Track after you close your DAW, you may need to repeat the steps above to reselect it as the default device.
IMPORTANT: If you experience too much latency after adjusting your software latency settings, we recommend the free ASIO4ALL (Audio Stream Input/Output) driver for Windows at www.asio4all.com. ASIO drivers generally perform better and with lower latency since they create a more efficient communication between audio devices and software.
To download and install ASIO4ALL:
1.Go to www.asio4all.com and download the latest release for your region.
2.Double-click the downloaded ASIO4ALL .exe file.
3.Follow the on-screen instructions to install ASIO4ALL.
To set up ASIO4ALL with your DAW:
1.With M-Track connected to your computer, open your DAW.
2.Click the arrow icon in the Windows System Tray, which will open the ASIO4ALL control panel. 
3.Click the wrench icon in the lower right corner of the control panel. 
4.Under the WDM Device List, click the + box next to M-Track to expand it. (In Windows XP, this will appear as USB Audio Codec.)
5.Make sure both boxes next to the Out and In under M-Track (or USB Audio Codec in Windows XP) are checked/lit. If they are not, click them. 
6.Make sure all other boxes are unchecked/unlit. If they are checked/lit, click them.
7.Close the control panel.
Note: You can select M-Track as your default device in the ASIO4ALL control panel only if it is not selected as your Windows default device.
4
Mac
1.Use the included USB cable to connect the M-Track to your computer.
2. Go to System Preferences Sound.
3.Under the Output tab, select M-Track as your default device.
4.Under the Input tab, select M-Track as your default device.
5.Close the window.
Features
|
1 |
10 |
2 |
4 |
5 |
||||||
|
8 |
9 |
|
|
7 |
||
|
6 |
||
|
3 |
||
1.USB PORT – Use the included cable to connect the M-Track to a computer. M-Track requires a USB 1.1 (or higher) connection.
2.MAIN OUT – Use standard 1/4″ cables to connect this output to a pair of powered speakers. The level of this output is controlled by the MAIN LEVEL knob.
3.MAIN LEVEL – Adjusts the output volume of the MAIN OUT so you can control the listening level of your connected powered monitors.
4.MIDI IN – Use a standard five-pin MIDI cable to connect this input to the MIDI OUT of an external MIDI device.
5.MIDI OUT – Use a standard five-pin MIDI cable to connect this output to the MIDI IN of an external MIDI device.
6.PHANTOM POWER LED – Lights up when phantom power is engaged.
7.MIDI OUT LED – Flashes when MIDI data is sent from your software to M-Track’s MIDI OUT.
8.MIDI IN LED – Flashes whenever MIDI data is received from an external MIDI controller.
9.USB LED – Illuminates when a valid USB connection has been established between your computer and M-Track. Use this light to verify that M-Track is receiving power and is ready to use.
10.LED METERS – Indicates the audio level of the MAIN OUT.
5
11.MIC INPUT – Connect a microphone to this input with an XLR cable.
12.GUITAR / LINE INPUT – Connect a line-level device or guitar to this input with a 1/4″ cable.
NOTE: Do not use the MIC INPUT and GUITAR/LINE INPUT at the same time on one channel. This may overload the channel and cause distortion.
13.MIC/LINE / GUITAR SWITCH – When this switch is
in the «GUITAR» position, the channel will serve as a high-impedance input for connecting guitar or bass instruments. When the switch is in the «MIC/LINE» position, the channel will accept mic or linelevel signals.
14.GAIN – Adjusts the channel’s input gain level. For your signal’s gain to be at an optimally high level, make sure that its loudest output causes the amber lights on the LED METERS to illuminate. (Higher levels can result in «clipping» or distortion of the signal, and signals recorded at lower levels may not be heard in the mix.) After that, do the same in your software using its meters.
15.INSERT – The insert jack allows you to insert a compressor, EQ, or any other signal processor in between the M-Track’s preamplifier and A/D converter. Any processing done by a connected insert processor will be recorded into your software.
16.PHANTOM POWER SWITCH – This switch activates and deactivates phantom power. When activated, phantom power supplies +48V to both XLR mic inputs. Please note that most dynamic microphones do not require phantom power, while most condenser microphones do. Do not use phantom power with any ribbon microphones as it will damage them. Consult your microphone’s documentation to find out whether it needs phantom power.
17.MONITOR MIX – Blend in any amount of zero-latency signal (direct monitoring) from your inputs with the output from your DAW. When fully in the «USB» position, you will hear only sound from your DAW. When fully in the «DIRECT» position, you will hear only your source through M-Track’s inputs.
This knob is useful during recording when dealing with the «buffer size» and «latency.» The computer takes a short amount of time to process the incoming audio before sending it back out; this time is determined by the buffer size setting. Latency is the resulting delay between the incoming sound (playing your instrument, singing, etc.) and outgoing sound (when you hear it in the DAW). Higher buffer sizes result in higher latency.
If your computer is powerful enough, you may be able to set your buffer size low enough such that you may never need direct monitoring. In this case, set the knob all the way to the «USB» position to monitor only the audio output of your DAW.
In other cases, though, low buffer sizes can consume a lot of your computer’s CPU and cause audio glitches, so you may need to use a higher buffer setting, resulting in latency. In this case, use a higher buffer size and turn the knob more towards the «DIRECT» position to monitor your incoming signal without latency. When listening to the playback, turn it all the way to the «USB» position.
18.MONO / STEREO – Switches the headphones and MAIN OUT mixes between mono or stereo operation. Use the stereo setting to direct-monitor the input signal when recording a stereo source, if you want to hear each channel in their respective left and right sides. Use the mono setting to directmonitor the input signal when recording only one source or if you want to hear both channels equally on each side. This switch does not affect the DAW playback or how your sound is recorded into your DAW; it affects only how you hear the input signal in the headphones and MAIN OUT.
19.HEADPHONES – Connect your 1/4″ headphones to this output.
20.HEADPHONE VOLUME – Adjusts the volume level of the headphone output.
6
GUÍA DEL USUARIO (ESPAÑOL)
Contenido de la caja
|
y |
M-Track |
y |
Guía del usuario |
|
y |
Cable USB |
y |
Folleto de información sobre la seguridad y la garantía |
yDVD software
Soporte
Para obtener información sobre los requisitos completos de sistema, la compatibilidad y el registro del producto, visite la sección de soporte del sitio web de M-Audio: www.m-audio.com/support.
Guía de inicio rápido
Instalaciones adicionales*
Computadora
Altavoces
Microfóno
Auriculares
* Los elementos que no se enumeran en Contenido de la caja no están incluidos.
Notas:
Guitarra
Módulo de efectos externos
(por ej. compresor, reverberación, etc.)
yCuando grabe una guitarra o bajo con captor activo, ajuste el CONMUTADOR MICROFÓNO/LÍNEA / GUITARRA de M-Track a «MIC/LINE». Si su instrumento usa un captor pasivo, ajuste el conmutador a «GUITAR».
yNo utilice la ENTRADA DE MICROFONO (Microphone) y la ENTRADA DE GUITARRA / LÍNEA (Guitar / Line) al mismo tiempo en el mismo canal. Esto puede saturar el canal y causar distorsión.
yEnchufe la M-Track directamente a su computador y evite usar un hub USB. Los hubs pueden interferir con las señales de sincronización de audio y MIDI de la interfaz M-Track.
Instalaciones adicionales
También recomendamos especialmente instalar las siguientes aplicaciones de software:
Ableton Live Lite: Hemos incluido Ableton Live Lite con su M-Track de modo que puede comenzar a hacer música con software profesional en cuanto lo saca de la caja. Inserte el DVD en la lectora de DVD de su computadora, abra la aplicación «setup» (instalación) o .exe (Windows) o el archivo .mpkg (Mac), y luego siga las instrucciones de la pantalla para instalar el software. Visite también www.ableton.com para comprobar si hay actualizaciones de software disponibles.
Ignite (www.airmusictech.com/getignite): Recomendamos bajar Ignite, una herramienta de creación musical diseñada por Air Music Technology para ser la manera más fácil de capturar, construir y compartir ideas musicales. Ignite funciona bien por sí mismo o como complemento de redacción de las capacidades de producción de su DAW. Los controles del Axiom AIR están totalmente integrados con Ignite, a fin de brindar un fácil control de las tareas comunes como selección de presets, control de parámetros y navegación de interfaces. Para más información, consulte la sección Cómo controlar Ignite de este manual.
7

Configuración de audio
M-Track es un dispositivo que cumple especificaciones de clase y que se puede usar con cualquier estación de trabajo o software de grabación de audio digital compatible con el audio USB. Para permitir que M-Track envíe y reciba audio hacia y desde la computadora, siga las instrucciones de más abajo correspondientes al sistema operativo de la misma.
Asegúrese de que su programa de software de audio esté configurado para recibir audio por M- Track. Esto se puede hacer habitualmente en «Preferences» o «Device Setup» (Configuración de dispositivos) de su software. Para más información, consulte el manual de su software.
Si desea una latencia aún menor, lea el texto del cuadro gris del pie de la página, que se refiere a ASIO4ALL.
Windows
Windows 7:
1.Use el cable incluido para conectar el M-Track a su computadora.
|
2. |
Vaya al menú Start Control Panel Hardware and Sound Sound (Inicio > Panel de control > Hardware y |
|
Sonido > Sonido). |
3.Haga clic en la pestaña Playback (Reproducción) y seleccione M-Track como dispositivo predeterminado.
4.Haga clic en la pestaña Recording (Grabación) y seleccione M-Track como dispositivo predeterminado.
5.Haga clic en Properties (Propiedades) en la esquina inferior derecha.
6.En la nueva ventana, haga clic en la pestaña Advanced (Avanzadas) y seleccione 2-channel, 16-bit, 44100 Hz (CD Quality) [2 canales, 16 bits, 44100 Hz (calidad de CD)] como formato predeterminado.
7.Deseleccione ambas casillas debajo de Exclusive Mode (Modo exclusivo).
8.Haga clic en la pestaña Levels (Niveles) y ajuste el deslizador a «4».
9.Haga clic en OK (Aceptar) para cerrar las ventana Properties.
10.Haga clic en OK para cerrar el panel de control Sound.
Nota: Si está usando el driver ASIO4ALL (ver abajo), antes de abrir el panel de control de ASIO4ALL, siga los pasos precedentes para asegurarse de que el M-Track no esté seleccionado como dispositivo predeterminado. Si desea reproducir el audio de su computadora a través de M-Track después de cerrar su DAW, es posible que deba repetir los pasos precedentes para volver a seleccionarlo como dispositivo predeterminado.
Windows Vista:
1.Use el cable incluido para conectar el M-Track a su computadora.
|
2. |
Vaya al menú Start Control Panel Sound (Inicio > Panel de control > Sonido). (Si no ve Sound, seleccione |
|
Switch to Classic View (Cambiar a vista clásica) —el panel de control Sound debe aparecer.) |
3.Haga clic en la pestaña Playback (Reproducción) y seleccione M-Track como dispositivo predeterminado.
4.Haga clic en la pestaña Recording (Grabación) y seleccione M-Track como dispositivo predeterminado.
5.Haga clic en Properties (Propiedades) en la esquina inferior derecha.
6.En la nueva ventana, haga clic en la pestaña Advanced (Avanzadas) y seleccione 2-channel, 16-bit, 44100 Hz (CD Quality) [2 canales, 16 bits, 44100 Hz (calidad de CD)] como formato predeterminado.
7.Deseleccione ambas casillas debajo de Exclusive Mode (Modo exclusivo).
8.Haga clic en OK (Aceptar) para cerrar las ventana Properties.
9.Haga clic en OK para cerrar el panel de control Sound.
Nota: Si está usando el driver ASIO4ALL (ver abajo), antes de abrir el panel de control de ASIO4ALL, siga los pasos precedentes para asegurarse de que el M-Track no esté seleccionado como dispositivo predeterminado. Si desea reproducir el audio de su computadora a través de M-Track después de cerrar su DAW, es posible que deba repetir los pasos precedentes para volver a seleccionarlo como dispositivo predeterminado.
Windows XP:
1.Use el cable incluido para conectar el M-Track a su computadora.
|
2. |
Vaya al menú Start Control Panel Sounds and Audio Devices (Inicio > Panel de control > Dispositivos de sonido |
y audio).
3.Haga clic en la pestaña Audio.
4.En Sound Playback (Reproducción de sonido) y Sound Recording (Grabación de sonido) seleccione USB Audio Codec (Códec de audio USB) como dispositivo predeterminado. (Si tiene conectados a su computadora otros dispositivos de audio USB que puedan tener nombres idénticos, puede ser necesario que pruebe a seleccionar cada uno hasta que se reconozca el M-Track.)
5.Haga clic en OK (Aceptar).
Nota: Si está usando el driver ASIO4ALL (ver abajo), antes de abrir el panel de control de ASIO4ALL, siga los pasos precedentes para asegurarse de que el M-Track no esté seleccionado como dispositivo predeterminado. Si desea reproducir el audio de su computadora a través de M-Track después de cerrar su DAW, es posible que deba repetir los pasos precedentes para volver a seleccionarlo como dispositivo predeterminado.
IMPORTANTE: Si sigue experimentando latencia después de ajustar los parámetros de latencia de su computadora, recomendamos gratuitamente el driver ASIO4ALL (Entrada/salida de corriente de audio) para PC de www.asio4all.com. En general, los drivers ASIO funcionan mejor y con menor latencia, dado que crean una comunicación más eficiente entre los dispositivos de audio y el software.
Para bajar e instalar ASIO4ALL:
1.Vaya a www.asio4all.com y baje la versión más reciente correspondiente a su región.
2.Haga doble clic en el archivo ASIO4ALL .exe que bajó.
3.Siga las instrucciones de la pantalla para instalar ASIO4ALL.
8
Documentation Search
Our Manuals and Quick Start Guides provide comprehensive, easy-to-understand instructions on using your device.
Series
You must select a series
Product
You must select a product
Language
You must select a language
Start Over
Latest Documentation
| Product | Document | Date | |
|---|---|---|---|
| Keystation 49es MK2 | Keystation 49es (MKII) — User Guide v1.5 | 02-01-2023 | Download |
| Keystation 88 MK3 | Keystation 88 MK3 User Guide v1.9 | 02-01-2023 | Download |
| Keystation 61 MK3 | Keystation 61 MK3 User Guide v1.6 | 02-01-2023 | Download |
| Keystation 49 MK3 | Keystation 49 MK3 User Guide v1.6 | 02-01-2023 | Download |
| M-Track Duo | M-Track Duo User Guide v1.5 | 02-01-2023 | Download |