
GET0194-001A
[EE]
INSTRUCTIONS
ИНСТРУКЦИИ ПО ЭКСПЛУАТАЦИИ
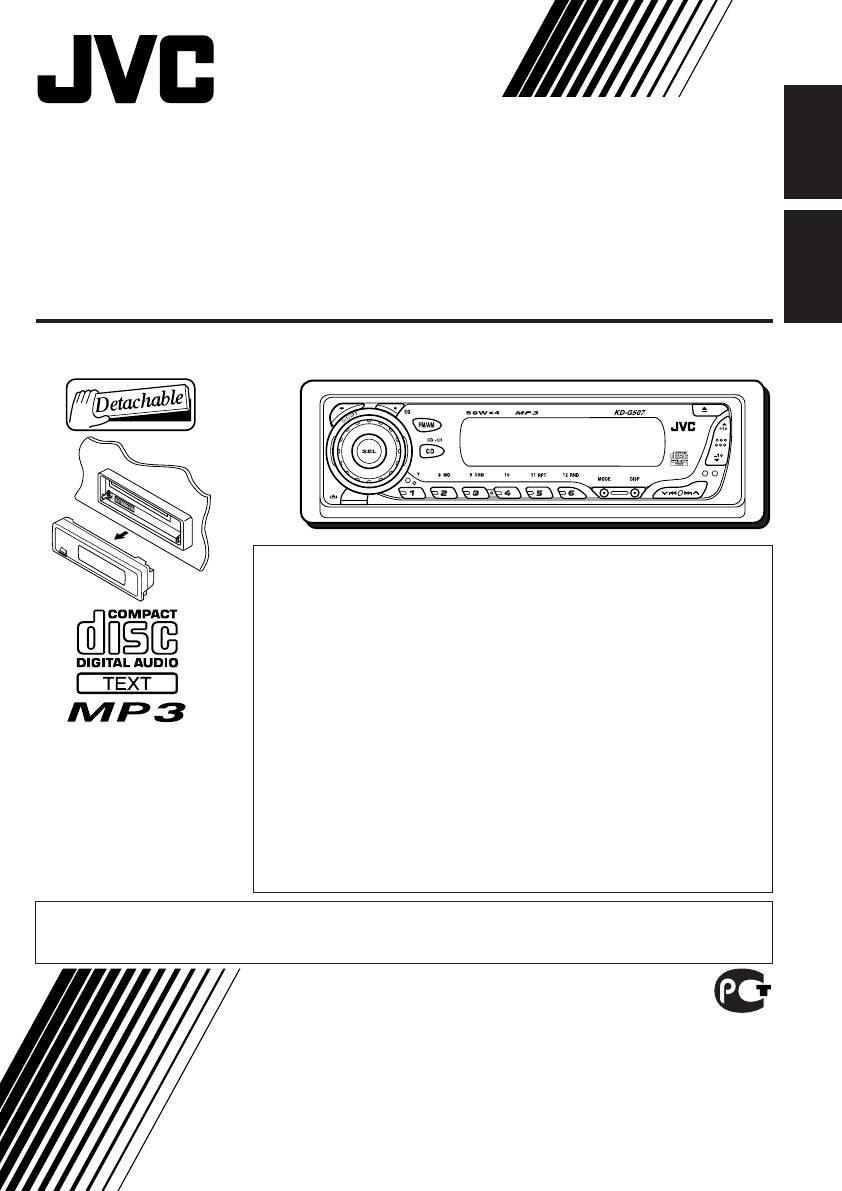
KD-G507
CD RECEIVER
РЕСИВЕР С ПРОИГРЫВАТЕЛЕМ КОМПАКТ-ДИСКОВ
ENGLISH
Р
УCCKИЙ
For installation and
connections, refer to the
separate manual.
Указания по установке и
выполнению
соединений приводятся
в отдельной
инструкции.
В соответствии с Законом Российской Федерации “О защите прав
потребителей” срок службы (годности) данного товара “по истечении
которого он может представлять опасность для жизни, здоровья
потребителя, причинять вред его имуществу или окружающей среде”
составляет семь (7) лет со дня производства. Этот срок является
временем, в течение которого потребитель данного товара может
безопасно им пользоваться при условии соблюдения инструкции по
эксплуатации данного товара, проводя необходимое обслуживание,
включающее замену расходных материалов и/или соответствующее
ремонтное обеспечение в специализированном сервисном центре.
Дополнительные косметические материалы к данному товару,
поставляемые вместе с ним, могут храниться в течение двух (2) лет со
дня его производства.
Срок службы (годности), кроме срока хранения дополнительных
косметических материалов, упомянутых в предыдущих двух пунктах, не
затрагивает никаких других прав потребителя, в частности, гарантийного
свидетельства JVC, которое он может получить в соответствии с законом
о правах потребителя или других законов, связанных с ним.
• This unit is equipped with the display demonstration. To cancel it, see page 6.
• Данное устройство имеет функцию демонстрации на экране дисплея. Порядок ее отмены
смотрите на странице 6.
Cover001A_KD-G507_f.p65
11/21/03, 2:43 PM
3
 03:55
03:55
Подключаем AUX к магнитоле JVC KD-G511
 10:34
10:34
Автомагнитолы JVC. Обновленный модельный ряд. Головные устройства JVC.
 04:21
04:21
AUX магнитолы KD-G807
 11:25
11:25
Доступная процессорная магнитола JVC KD-X355
 06:05
06:05
CD-Ресивер JVC KD-R207 и видеообращение в конце
 03:49
03:49
JVC KD-R561EY Автомагнитола с изменяемой подсветкой Обзор avtozvuk.ua
INSTRUCTIONS ИНСТРУКЦИИ ПО ЭКСПЛУАТАЦИИ KD…
Kd-g507, Instructions
- Изображение
- Текст
GET0194-001A
[EE]
INSTRUCTIONS
ИНСТРУКЦИИ ПО ЭКСПЛУАТАЦИИ
KD-G507
CD RECEIVER
РЕСИВЕР С ПРОИГРЫВАТЕЛЕМ КОМПАКТ-ДИСКОВ
ENGLISH
Р
УCCKИЙ
For installation and
connections, refer to the
separate manual.
Указания по установке и
выполнению
соединений приводятся
в отдельной
инструкции.
В соответствии с Законом Российской Федерации “О защите прав
потребителей” срок службы (годности) данного товара “по истечении
которого он может представлять опасность для жизни, здоровья
потребителя, причинять вред его имуществу или окружающей среде”
составляет семь (7) лет со дня производства. Этот срок является
временем, в течение которого потребитель данного товара может
безопасно им пользоваться при условии соблюдения инструкции по
эксплуатации данного товара, проводя необходимое обслуживание,
включающее замену расходных материалов и/или соответствующее
ремонтное обеспечение в специализированном сервисном центре.
Дополнительные косметические материалы к данному товару,
поставляемые вместе с ним, могут храниться в течение двух (2) лет со
дня его производства.
Срок службы (годности), кроме срока хранения дополнительных
косметических материалов, упомянутых в предыдущих двух пунктах, не
затрагивает никаких других прав потребителя, в частности, гарантийного
свидетельства JVC, которое он может получить в соответствии с законом
о правах потребителя или других законов, связанных с ним.
• This unit is equipped with the display demonstration. To cancel it, see page 6.
• Данное устройство имеет функцию демонстрации на экране дисплея. Порядок ее отмены
смотрите на странице 6.
Cover001A_KD-G507_f.p65
11/21/03, 2:43 PM
3

Important for laser products, English how to use the mode button, How to reset your unit
Страница 2
- Изображение
- Текст
2
ENGLISH
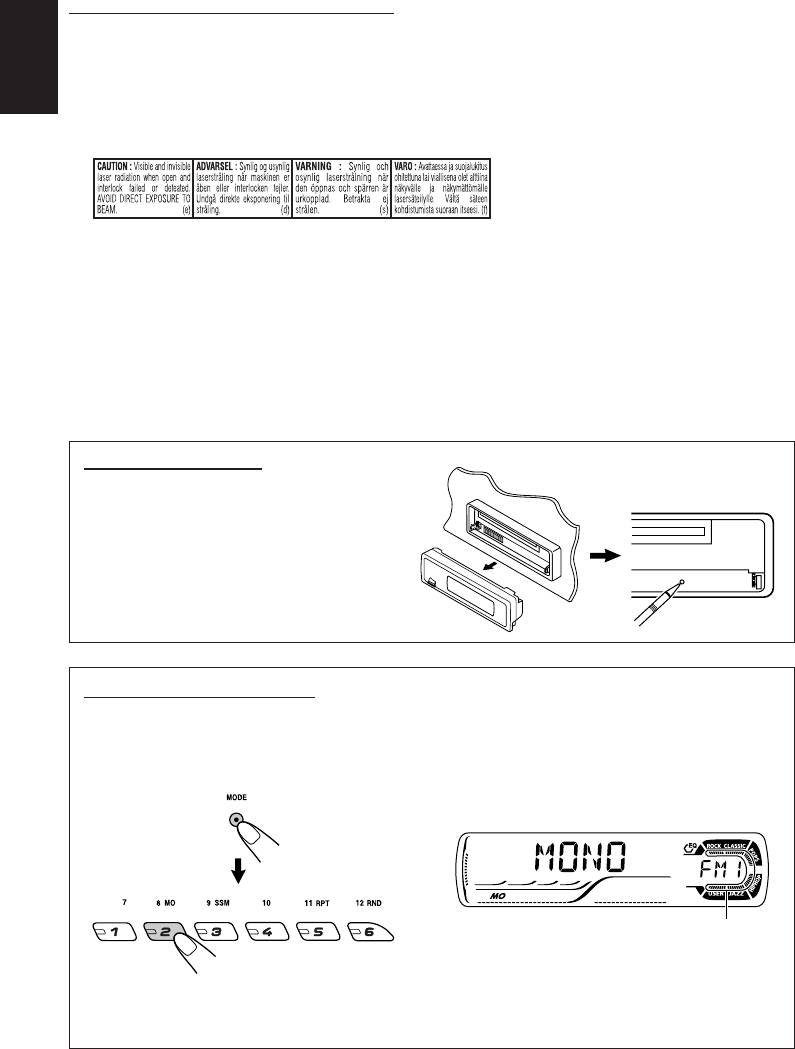
How to use the MODE button
If you press MODE, the unit goes into functions mode, then the number buttons and
5/∞ buttons
work as different function buttons.
Ex.: When number button 2 works as MO (monaural) button.
To use these buttons for original functions again after pressing MODE, wait for 5 seconds
without pressing any of these buttons until the functions mode is cleared.
• Pressing MODE again also clears the functions mode.
Time countdown indicator
IMPORTANT FOR LASER PRODUCTS
1. CLASS 1 LASER PRODUCT
2. CAUTION: Do not open the top cover. There are no user serviceable parts inside the unit; leave all
servicing to qualified service personnel.
3. CAUTION: Visible and invisible laser radiation when open and interlock failed or defeated. Avoid
direct exposure to beam.
4. REPRODUCTION OF LABEL: CAUTION LABEL, PLACED OUTSIDE THE UNIT.
How to reset your unit
After detaching the control panel, press the
reset button on the panel holder using a ball-
point pen or a similar tool.
This will reset the built-in microcomputer.
Note:
Your preset adjustments—such as preset channels
or sound adjustments—will also be erased.
EN02-04_KD-G507[EE]f.p65
11/21/03, 2:43 PM
2

ENGLISH CONTENTS Thank you for purchasing a JVC product. Pl…
Страница 3
- Изображение
- Текст
3
ENGLISH
CONTENTS
Thank you for purchasing a JVC product. Please read all instructions carefully before operation,
to ensure your complete understanding and to obtain the best possible performance from the unit.
How to reset your unit ………………………….
2
How to use the MODE button ……………….
2
LOCATION OF THE BUTTONS …………
4
Control panel ………………………………………
4
BASIC OPERATIONS …………………..
5
Turning on the power …………………………..
5
Canceling the display demonstration ……..
6
Setting the clock ………………………………….
7
RADIO OPERATIONS ………………….
8
Listening to the radio ……………………………
8
Storing stations in memory …………………..
9
Tuning in to a preset station …………………. 10
CD OPERATIONS ……………………… 11
Playing a CD ……………………………………… 11
Locating a track or a particular portion
on a CD ………………………………………….. 12
Selecting CD playback modes ……………… 13
Playing a CD Text ……………………………….. 14
Prohibiting disc ejection ………………………. 14
MP3 INTRODUCTION …………………. 15
What is MP3? …………………………………….. 15
How are MP3 files recorded and
played back? …………………………………… 15
MP3 OPERATIONS ……………………. 16
Playing an MP3 disc …………………………… 16
Locating a file or a particular portion
on a disc …………………………………………. 17
Selecting MP3 playback modes ……………. 19
SOUND ADJUSTMENTS ………………. 20
Selecting preset sound modes
(C-EQ: custom equalizer) ………………….. 20
Adjusting the sound ……………………………. 21
OTHER MAIN FUNCTIONS ……………. 22
Changing the general settings (PSM) ……. 22
Detaching the control panel …………………. 25
CD CHANGER OPERATIONS ………….. 26
Playing discs ……………………………………… 26
Selecting the playback modes ……………… 29
EXTERNAL COMPONENT OPERATIONS … 30
Playing an external component …………….. 30
USING THE REMOTE CONTROLLER ….. 31
Location of the buttons ………………………… 32
TROUBLESHOOTING …………………. 33
MAINTENANCE ……………………….. 36
Handling discs ……………………………………. 36
SPECIFICATIONS ……………………… 37
*Temperature inside the car….
If you have parked the car for a long time in hot
or cold weather, wait until the temperature in the
car becomes normal before operating the unit.
BEFORE USE
*For safety….
• Do not raise the volume level too much, as this will
block outside sounds, making driving dangerous.
• Stop the car before performing any complicated
operations.
EN02-04_KD-G507[EE]f.p65
11/21/03, 2:43 PM
3

4
ENGLISH
a
s
d
g
zx
/
l
f
9
u
i
o
;
p
e
r
w
t
y
q
1
3
4
6
2
5
7
8
h
j
k
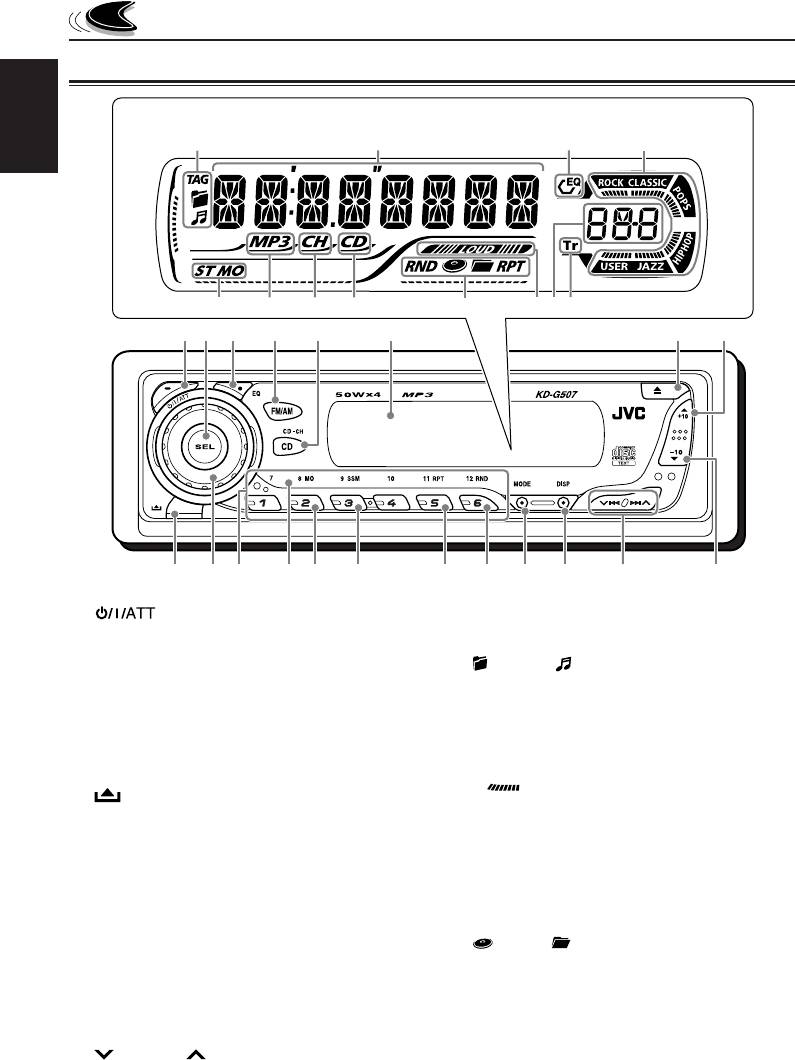
LOCATION OF THE BUTTONS
Control panel
1
(standby/on/attenuator) button
2 SEL (select) button
3 EQ (equalizer) button
4 FM/AM button
5 CD CD-CH (CD changer) button
6 Display window
7
0 (eject) button
8
5 (up) button
+10 button
9
(control panel release) button
p Control dial
q Number buttons
w Remote sensor
• You can control this unit with an optionally
purchased remote controller.
e MO (monaural) button
r SSM (Strong-station Sequential Memory)
button
t RPT (repeat) button
y RND (random) button
u MODE button
i DISP (display) button
o
4/¢
buttons
;
∞ (down) button
–10 button
Display window
a Disc information indicators—TAG (ID3 Tag),
(folder),
(track/file)
s Main display
d EQ (equalizer) indicator
f Sound mode (C-EQ: custom equalizer)
indicators—ROCK, CLASSIC, POPS,
HIP HOP, JAZZ, USER
•
also works as level meter during play if
the level meter is activated (see page 23).
g Tuner reception indicators—ST (stereo),
MO (monaural)
h MP3 indicator
j CH (CD changer) indicator
k CD indicator
l Playback mode/item indicators—RND (random),
(disc),
(folder), RPT (repeat)
/ LOUD (loudness) indicator
z Source display
Volume level indicator
x Tr (track) indicator
Display window
EN02-04_KD-G507[EE]f.p65
11/21/03, 2:43 PM
4

5
ENGLISH
4
Adjust the sound as you want. (See
pages 20 and 21.)
To drop the volume in a moment
Press
briefly while listening to any
source. “ATT” starts flashing on the display, and
the volume level will drop in a moment.
To resume the previous volume level, press the
button briefly again.
• If you turn the control dial, you can also restore
the sound.
To turn off the power
Press and hold
for more than one
second.
“SEE YOU” appears, then the unit turns off.
• If you turn off the power while listening to a
disc, disc play will start from where playback
has been stopped previously, next time you
turn on the power.
CAUTION on Volume Setting:
Discs produce very little noise compared with
other sources. If the volume level is adjusted for
the tuner, for example, the speakers may be
damaged by the sudden increase in the output
level. Therefore, lower the volume before playing a
disc and adjust it as required during playback.
Turning on the power
1
Turn on the power.
Note on One-Touch Operation:
When you select a source in step
2 below, the
power automatically comes on. You do not have
to press this button to turn on the power.
2
Select the source.
To operate the tuner (FM or AM),
see pages 8 – 10.
To play a CD,
see pages 11 – 14.
To play an MP3 disc,
see pages 16 – 19.
To operate the CD changer,
see pages 26 – 29.
To operate the external component
(LINE IN), see page 30.
3
Adjust the volume.
BASIC OPERATIONS
Volume level indicator
Volume level appears.
To increase the volume
To decrease the volume
3
2
1
EN05-07_KD-G507[EE]f.p65
11/21/03, 3:42 PM
5

6
ENGLISH
Canceling the display
demonstration
When shipped from the factory, display
demonstration has been activated, and starts
automatically when no operations are done for
about 20 seconds.
• It is recommended to cancel the display
demonstration before you use the unit for the
first time.
To cancel the display demonstration, follow
the procedure below:
1
Press and hold SEL (select) for more
than 2 seconds so that one of the
PSM items appears on the display.
(PSM: see pages 22 and 23.)
2
Select “DEMO” if not shown on the
display.
3
Select “DEMO OFF.”
4
Finish the setting.
To activate the display demonstration, repeat
the same procedure and select “DEMO ON” in
step
3.
DEMO OFF
DEMO ON
EN05-07_KD-G507[EE]f.p65
11/21/03, 2:44 PM
6

7
ENGLISH
Setting the clock
1
Press and hold SEL (select) for more
than 2 seconds so that one of the
PSM items appears on the display.
(PSM: see pages 22 and 23.)
2
Set the hour.
1 Select “CLOCK H” (hour) if not shown on
the display.
2 Adjust the hour.
1
2
3
Set the minute.
1 Select “CLOCK M” (minute).
2 Adjust the minute.
1
2
4
Finish the setting.
To check the current clock time or change the
display mode
Press DISP (display) repeatedly.
Each time you press the button,
the display changes as follows:
• During tuner operation:
• During disc operation:
Notes:
• While playing a conventional CD, “NO NAME”
appears for the disc title/performer and the track title.
• For indication change while playing a CD Text or
an MP3 disc, see also pages 14 and 17.
• During external component operation:
• During power off:
The power turns on and the clock time is
shown for 5 seconds, then the power turns off.
Elapsed
playing time
Clock
Disc title /
performer
Track title
Frequency
Clock
LINE IN
Clock
EN05-07_KD-G507[EE]f.p65
11/21/03, 3:10 PM
7

8
ENGLISH
RADIO OPERATIONS
Listening to the radio
You can use either automatic searching or manual
searching to tune in to a particular station.
Searching for a station automatically:
Auto search
1
Select the band (FM1 – 3, AM).
Each time you press the
button, the band changes as
follows:
Note:
This receiver has three FM bands (FM1, FM2,
FM3). You can use any one of them to listen to
an FM broadcast.
2
Start searching for a station.
When a station is received, searching stops.
Selected band appears.
Lights up when receiving an FM stereo
broadcast with sufficient signal strength.
To stop searching before a station is
received, press the same button you have
pressed for searching.
Note:
FM1 and FM2: 87.5 MHz – 108.0 MHz
FM3: 65.00 MHz – 74.00 MHz
Searching for a station manually:
Manual search
1
Select the band (FM1 – 3, AM).
Each time you press the
button, the band changes as
follows:
Note:
This receiver has three FM bands (FM1, FM2,
FM3). You can use any one of them to listen to
an FM broadcast.
2
Press and hold
¢
or
4
until “M” (manual) starts flashing on
the display.
To search for stations of
higher frequencies
To search for stations of lower frequencies
FM1
FM2
FM3
AM
FM1
FM2
FM3
AM
EN08-10_KD-G507[EE]f.p65
11/21/03, 2:44 PM
8

9
ENGLISH
3
Tune in to a station you want while
“M” (manual) is still flashing.
• If you release your finger from the button,
the manual mode will automatically turns
off after 5 seconds.
• If you hold down the button, the frequency
keeps changing—in 50 kHz intervals
(87.5 MHz – 108.0 MHz for FM 1 and
FM 2), in 30 kHz intervals (65.00 MHz –
74.00 MHz for FM 3) and 9 kHz for AM
—MW/LW until you release the button.
When an FM stereo broadcast is hard to
receive:
1
Press MODE to enter the
functions mode while listening
to an FM stereo broadcast.
2
Press MO (monaural), while
“MODE” is still flashing on the
display, so that “MONO”
appears on the display.
Each time you press the button,
monaural mode turns on and off
alternately.
When the MO indicator is lit on the display, the
sound you hear becomes monaural but the
reception will be improved.
To tune in to stations of
higher frequencies
To tune in to stations of lower frequencies
MO (monaural) indicator
Storing stations in memory
You can use one of the following two methods to
store broadcasting stations in memory.
• Automatic preset of FM stations: SSM (Strong-
station Sequential Memory)
• Manual preset of both FM and AM stations
FM station automatic preset: SSM
You can preset 6 local FM stations in each FM
band (FM1, FM2, and FM3).
1
Select the FM band (FM1 – 3) you
want to store FM stations into.
Each time you press the
button, the band changes as
follows:
2
Press MODE to enter the functions
mode.
3
Press and hold SSM for about
2 seconds.
Local FM stations with the strongest signals are
searched and stored automatically in the band
number you have selected (FM1, FM2, or FM3).
These stations are preset in the number buttons
—No.1 (lowest frequency) to No.6 (highest
frequency).
When automatic preset is over, the station stored
in number button 1 will be automatically tuned in.
“SSM” flashes, then disappears
when automatic preset is over.
FM1
FM2
FM3
AM
EN08-10_KD-G507[EE]f.p65
11/21/03, 3:11 PM
9

10
ENGLISH
4
Repeat the above procedure to store
other stations into other preset
numbers.
Notes:
• A previously preset station is erased when a new
station is stored in the same preset number.
• Preset stations are erased when the power supply to
the memory circuit is interrupted (for example,
during battery replacement). If this occurs, preset
the stations again.
Tuning in to a preset station
You can easily tune in to a preset station.
Remember that you must store stations first. If
you have not stored them yet, see “Storing
stations in memory” on pages 9 and 10.
1
Select the band (FM1 – 3, AM).
Each time you press the
button, the band changes as
follows:
2
Select the number (1 – 6) for the
preset station you want.
Note:
You can also use the
5 (up) or ∞ (down) button on
the unit to select the next or previous preset stations.
Each time you press the
5 (up) or ∞ (down) button,
the next or previous preset station is tuned in.
Manual preset
You can preset up to 6 stations in each band
(FM1, FM2, FM3, and AM) manually.
Ex.: Storing FM station of 92.5 MHz into the
preset number 1 of the FM1 band.
1
Select the band (FM1 – 3, AM) you
want to store stations into (in this
example, FM1).
Each time you press the
button, the band changes as
follows:
2
Tune in to a station (in this example,
of 92.5 MHz).
3
Press and hold the number button
(in this example, 1) for more than
2 seconds.
To tune in to stations of
higher frequencies
To tune in to stations of lower frequencies
Preset number flashes for a while.
FM1
FM2
FM3
AM
FM1
FM2
FM3
AM
EN08-10_KD-G507[EE]f.p65
11/21/03, 2:44 PM
10

Комментарии
ENGLISH
CD RECEIVER
РЕСИВЕР С ПРОИГРЫВАТЕЛЕМ КОМПАКТ-ДИСКОВ
РУCCKИЙ
KD-G507
В соответствии с Законом Российской Федерации “О защите прав
потребителей” срок службы (годности) данного товара “по истечении
которого он может представлять опасность для жизни, здоровья
потребителя, причинять вред его имуществу или окружающей среде”
составляет семь (7) лет со дня производства. Этот срок является
временем, в течение которого потребитель данного товара может
безопасно им пользоваться при условии соблюдения инструкции по
эксплуатации данного товара, проводя необходимое обслуживание,
включающее замену расходных материалов и/или соответствующее
ремонтное обеспечение в специализированном сервисном центре.
For installation and
Дополнительные косметические материалы к данному товару,
connections, refer to the
поставляемые вместе с ним, могут храниться в течение двух (2) лет со
separate manual.
дня его производства.
Указания по установке и
Срок службы (годности), кроме срока хранения дополнительных
косметических материалов, упомянутых в предыдущих двух пунктах, не
выполнению
затрагивает никаких других прав потребителя, в частности, гарантийного
соединений приводятся
свидетельства JVC, которое он может получить в соответствии с законом
в отдельной
о правах потребителя или других законов, связанных с ним.
инструкции.
• This unit is equipped with the display demonstration. To cancel it, see page 6.
• Данное устройство имеет функцию демонстрации на экране дисплея. Порядок ее отмены
смотрите на странице 6.
INSTRUCTIONS
ИНСТРУКЦИИ ПО ЭКСПЛУАТАЦИИ
GET0194-001A
[EE]
Cover001A_KD-G507_f.p65 11/21/03, 2:43 PM3
IMPORTANT FOR LASER PRODUCTS
1. CLASS 1 LASER PRODUCT
2. CAUTION: Do not open the top cover. There are no user serviceable parts inside the unit; leave all
servicing to qualified service personnel.
ENGLISH
3. CAUTION: Visible and invisible laser radiation when open and interlock failed or defeated. Avoid
direct exposure to beam.
4. REPRODUCTION OF LABEL: CAUTION LABEL, PLACED OUTSIDE THE UNIT.
How to reset your unit
After detaching the control panel, press the
reset button on the panel holder using a ball-
point pen or a similar tool.
This will reset the built-in microcomputer.
Note:
Your preset adjustments—such as preset channels
or sound adjustments—will also be erased.
How to use the MODE button
If you press MODE, the unit goes into functions mode, then the number buttons and 5/∞ buttons
work as different function buttons.
Ex.: When number button 2 works as MO (monaural) button.
Time countdown indicator
To use these buttons for original functions again after pressing MODE, wait for 5 seconds
without pressing any of these buttons until the functions mode is cleared.
• Pressing MODE again also clears the functions mode.
2
EN02-04_KD-G507[EE]f.p65 11/21/03, 2:43 PM2

Thank you for purchasing a JVC product. Please read all instructions carefully before operation,
to ensure your complete understanding and to obtain the best possible performance from the unit.
CONTENTS
ENGLISH
How to reset your unit …………………………. 2
SOUND ADJUSTMENTS ………………. 20
How to use the MODE button ………………. 2
Selecting preset sound modes
(C-EQ: custom equalizer) ………………….. 20
LOCATION OF THE BUTTONS ………… 4
Adjusting the sound ……………………………. 21
Control panel ……………………………………… 4
OTHER MAIN FUNCTIONS ……………. 22
BASIC OPERATIONS ………………….. 5
Changing the general settings (PSM) ……. 22
Turning on the power ………………………….. 5
Detaching the control panel …………………. 25
Canceling the display demonstration …….. 6
Setting the clock …………………………………. 7
CD CHANGER OPERATIONS ………….. 26
Playing discs ……………………………………… 26
RADIO OPERATIONS …………………. 8
Selecting the playback modes ……………… 29
Listening to the radio …………………………… 8
Storing stations in memory ………………….. 9
EXTERNAL COMPONENT OPERATIONS ... 30
Tuning in to a preset station …………………. 10
Playing an external component …………….. 30
CD OPERATIONS ……………………… 11
USING THE REMOTE CONTROLLER ….. 31
Playing a CD ……………………………………… 11
Location of the buttons ………………………… 32
Locating a track or a particular portion
TROUBLESHOOTING …………………. 33
on a CD ………………………………………….. 12
Selecting CD playback modes ……………… 13
MAINTENANCE ……………………….. 36
Playing a CD Text ……………………………….. 14
Handling discs ……………………………………. 36
Prohibiting disc ejection ………………………. 14
SPECIFICATIONS ……………………… 37
MP3 INTRODUCTION …………………. 15
What is MP3? …………………………………….. 15
How are MP3 files recorded and
played back? …………………………………… 15
MP3 OPERATIONS ……………………. 16
Playing an MP3 disc …………………………… 16
Locating a file or a particular portion
on a disc …………………………………………. 17
Selecting MP3 playback modes ……………. 19
BEFORE USE
*For safety….
*Temperature inside the car….
• Do not raise the volume level too much, as this will
If you have parked the car for a long time in hot
block outside sounds, making driving dangerous.
or cold weather, wait until the temperature in the
• Stop the car before performing any complicated
car becomes normal before operating the unit.
operations.
3
EN02-04_KD-G507[EE]f.p65 11/21/03, 2:43 PM3
LOCATION OF THE BUTTONS
Control panel
Display window
a s d
f
ENGLISH
g zx/
h jk
l
1 3 4 62
5
7 8
9 u i o ;
p
q
e rw t y
1 (standby/on/attenuator) button
Display window
2 SEL (select) button
a Disc information indicators—TAG (ID3 Tag),
3 EQ (equalizer) button
(folder), (track/file)
4 FM/AM button
s Main display
5 CD CD-CH (CD changer) button
d EQ (equalizer) indicator
6 Display window
f Sound mode (C-EQ: custom equalizer)
7 0 (eject) button
indicators—ROCK, CLASSIC, POPS,
8 5 (up) button
HIP HOP, JAZZ, USER
+10 button
• also works as level meter during play if
9 (control panel release) button
the level meter is activated (see page 23).
p Control dial
g Tuner reception indicators—ST (stereo),
q Number buttons
MO (monaural)
w Remote sensor
h MP3 indicator
• You can control this unit with an optionally
j CH (CD changer) indicator
purchased remote controller.
k CD indicator
e MO (monaural) button
l Playback mode/item indicators—RND (random),
r SSM (Strong-station Sequential Memory)
(disc), (folder), RPT (repeat)
button
/ LOUD (loudness) indicator
t RPT (repeat) button
z Source display
y RND (random) button
Volume level indicator
u MODE button
x Tr (track) indicator
i DISP (display) button
o 4/¢ buttons
; ∞ (down) button
–10 button
4
EN02-04_KD-G507[EE]f.p65 11/21/03, 2:43 PM4
Магнитолы JVC KD-G507 — инструкция пользователя по применению, эксплуатации и установке на русском языке. Мы надеемся, она поможет вам решить возникшие у вас вопросы при эксплуатации техники.
Вы можете скачать инструкцию к JVC KD-G507 по ссылке ниже, если не хотите ждать загрузки. Если остались вопросы, задайте их в комментариях после инструкции.
«Загружаем инструкцию», означает, что нужно подождать пока файл загрузится и можно будет его читать онлайн. Некоторые инструкции очень большие и время их появления зависит от вашей скорости интернета.
Полезные видео
Остались вопросы?
Не нашли свой ответ в руководстве или возникли другие проблемы? Задайте свой вопрос в форме ниже с подробным описанием вашей ситуации, чтобы другие люди и специалисты смогли дать на него ответ. Если вы знаете как решить проблему другого человека, пожалуйста, подскажите ему


Часто задаваемые вопросы

Как посмотреть инструкцию к JVC KD-G507?
Необходимо подождать полной загрузки инструкции в сером окне на данной странице или скачать кликнув по специальной кнопке.
Руководство на русском языке?
Все наши руководства представлены на русском языке или схематично, поэтому вы без труда сможете разобраться с вашей моделью
Как можно распечатать инструкцию?
Скачайте ее по специальной кнопке над формой чтения на ваше устройства и отправьте на печать.
ENGLISH РУCCKИЙ CD RECEIVER РЕСИВЕР С ПРОИГРЫВАТЕЛЕМ КОМПАКТ-ДИСКОВ KD-G507 For installation and connections, refer to the separate manual. Указания по установке и выполнению соединений приводятся в отдельной инструкции. В соответствии с Законом Российской Федерации “О защите прав потребителей”
ENGLISH IMPORTANT FOR LASER PRODUCTS 1. CLASS 1 LASER PRODUCT 2. CAUTION: Do not open the top cover. There are no user serviceable parts inside the unit; leave all servicing to qualified service personnel. 3. CAUTION: Visible and invisible laser radiation when open and interlock failed or defeated.
ENGLISH Thank you for purchasing a JVC product. Please read all instructions carefully before operation, to ensure your complete understanding and to obtain the best possible performance from the unit. CONTENTS How to reset your unit …………………………. How to use the MODE button
LOCATION OF THE BUTTONS ENGLISH Control panel Display window a s g 12 3 9 1 2 3 4 5 6 7 8 9 p q w e r t y u i o ; p q h j 4 5 w e d k f /zx l 6 r (standby/on/attenuator) button SEL (select) button EQ (equalizer) button FM/AM button CD CD-CH (CD changer) button Display window 0 (eject) button 5 (up)
ENGLISH BASIC OPERATIONS 3 1 2 Turning on the power 1 Volume level appears. Turn on the power. Volume level indicator 2 Note on One-Touch Operation: When you select a source in step 2 below, the power automatically comes on. You do not have to press this button to turn on the power. 4 Select the
ENGLISH Canceling the display demonstration 3 When shipped from the factory, display demonstration has been activated, and starts automatically when no operations are done for about 20 seconds. • It is recommended to cancel the display demonstration before you use the unit for the first time. To
ENGLISH 4 Setting the clock 1 Finish the setting. Press and hold SEL (select) for more than 2 seconds so that one of the PSM items appears on the display. (PSM: see pages 22 and 23.) To check the current clock time or change the display mode Press DISP (display) repeatedly. Each time you press the
ENGLISH RADIO OPERATIONS Listening to the radio You can use either automatic searching or manual searching to tune in to a particular station. Searching for a station automatically: Auto search 1 Select the band (FM1 – 3, AM). Each time you press the button, the band changes as follows: FM1 FM2 FM3
Tune in to a station you want while “M” (manual) is still flashing. To tune in to stations of higher frequencies Storing stations in memory ENGLISH 3 You can use one of the following two methods to store broadcasting stations in memory. • Automatic preset of FM stations: SSM (Strongstation
ENGLISH 4 Manual preset You can preset up to 6 stations in each band (FM1, FM2, FM3, and AM) manually. Ex.: Storing FM station of 92.5 MHz into the preset number 1 of the FM1 band. 1 Select the band (FM1 – 3, AM) you want to store stations into (in this example, FM1). Each time you press the
ENGLISH CD OPERATIONS Refer “MP3 OPERATIONS” on pages 16 to 19 for operating MP3 discs. The display changes to show the following: Current source indication Playing a CD 1 Open the control panel. CD indicator Total playing time Total track number of the inserted disc of the inserted disc Note on
ENGLISH To stop play and eject the CD To go to a particular track directly Press 0. CD play stops and the control panel flips down. The CD automatically ejects from the loading slot. The source changes to the previously selected source. • If you change the source, CD play also stops (without
To play back tracks repeatedly (Track Repeat Play) • Ex. 1: To select track number 32 while playing track number 6 You can play back the current track repeatedly. 1 Press MODE to enter the functions mode while playing a CD. (Three times) 10 20 30 Track 6 (Twice) 31 32 • Ex. 2 : To select
ENGLISH Playing a CD Text Prohibiting disc ejection In a CD Text, some information about the disc (its disc title, performer, and track title) is recorded. This CD Text information will be shown automatically when you play a CD Text. You can prohibit disc ejection and can lock a disc in the loading
What is MP3? MP3 is an abbreviation of Motion Picture Experts Group (or MPEG) Audio Layer 3. MP3 is simply a file format with a data compression ratio of 1:10 (128 Kbps*). * Bit rate is the average number of bits that one second of audio data will consume. The unit used is Kbps. To get a better
ENGLISH MP3 OPERATIONS Refer also to “CD OPERATIONS” on pages 11 to 14. The display changes to show the following: Current source indication Playing an MP3 disc 1 Open the control panel. CD indicator Note on One-Touch Operation: When a disc is already in the loading slot, pressing CD CD-CH turns on
Press 0. Playback stops and the control panel flips down. The disc automatically ejects from the loading slot. To change the display information While playing back an MP3 file, you can change the MP3 disc information shown on the display. Press DISP (display) repeatedly. Each time you press the
ENGLISH To go to a particular file quickly within the current folder (+10 and –10 buttons) 1 Press MODE to enter the functions mode while playing a disc. 2 Press +10 or –10. To skip 10 files* forwards to the last file To skip 10 files* backwards to the first file * First time you press +10 or –10
Press 5 (up) while playing an MP3 disc to skip to the next folder. Each time you press the button consecutively, the next folder is located (and the first file in the folder starts playing, if recorded). Press ∞ (down) while playing an MP3 disc to skip back to the previous folder. Each time you
ENGLISH SOUND ADJUSTMENTS Selecting preset sound modes (C-EQ: custom equalizer) You can select a preset sound mode (C-EQ: custom equalizer) suitable to the music genre. Select the sound mode you want. Each time you press the button, the sound modes change as follows: Indication For: Preset values
Adjusting the sound You can adjust the sound characteristics to your preference. 1 Select the item you want to adjust. Each time you press the button, the adjustable items change as follows: BAS TRE (bass) (treble) VOL LOUD BAL (loudness) (balance) To do: Adjust the bass. Adjust the setting. To
ENGLISH OTHER MAIN FUNCTIONS Changing the general settings (PSM) 3 Adjust the PSM item selected. You can change the items listed in the table below and on page 23 by using the PSM (Preferred Setting Mode) control. Basic Procedure 1 2 Press and hold SEL (select) for more than 2 seconds so that one
Selectable values/items Scroll mode ONCE AUTO OFF EXT IN* External component TAG DISP Tag display AMP GAIN Amplifier gain control Factory-preset See settings page ONCE 23 CHANGER LINE IN CHANGER 24 TAG OFF TAG ON TAG ON 24 LOW PWR HIGH PWR HIGH PWR 24 ENGLISH SCROLL Indications * Displayed only
ENGLISH To select the external component to use —EXT IN To select the amplifier gain control —AMP GAIN You can connect the external component to the CD changer jack on the rear using the Line Input Adapter KS-U57 (not supplied). To use the external component as the playback source through this
You can detach the control panel when leaving the car. When detaching or attaching the control panel, be careful not to damage the connectors on the back of the control panel and on the panel holder. Attaching the control panel 1 Insert the right side of the control panel into the groove on the
ENGLISH CD CHANGER OPERATIONS We recommend that you use the JVC MP3compatible CD changer with your unit. Playing discs By using this CD changer, you can play back your original CD-Rs (Recordable) and CD-RWs (Rewritable) recorded either in audio CD format or in MP3 format. • You can also connect
To go to a particular disc directly Press the number button corresponding to the disc number to start its playback (while the CD changer is playing). ENGLISH • When the current disc is a CD: Playback starts from the first track of the current disc. Selected disc number Elapsed playing time Current
ENGLISH This operation is only possible when using JVC MP3-compatible CD changer (CH-X1500). To go to a track/file quickly (+10 and –10 buttons) 1 Press MODE to enter the functions mode while playing a disc. To skip to the next or previous folder (only for MP3 discs) Press 5 (up) while playing an
To play back tracks/files at random (Folder Random/Disc Random/Magazine Random Play) To play back tracks/files repeatedly (Track Repeat/Folder Repeat/Disc Repeat Play) 1 Press MODE to enter the functions mode during play. ENGLISH Selecting the playback modes 1 Press MODE to enter the functions mode
ENGLISH EXTERNAL COMPONENT OPERATIONS Playing an external component 2 You can connect the external component to the CD changer jack on the rear using the Line Input Adapter KS-U57 (not supplied). 3 Preparations: • For connecting the Line Input Adapter KS-U57 and the external component, refer to the
USING THE REMOTE CONTROLLER 3. Return the battery holder. Insert again the battery holder by pushing it until you hear a clicking sound. (back side) ENGLISH This unit can be remotely controlled as instructed here (with an optionally purchased remote controller). We recommend that you use remote
ENGLISH Location of the buttons RM-RK60 S 3 • Selects the preset stations while listening to the radio. Each time you press the button, the preset station number increases, and the selected station is tuned in. • Skips to the first file of the previous folder while listening to an MP3 disc. Each
What appears to be trouble is not always serious. Check the following points before calling a service center. Symptoms Disc Playback FM/AM General • Sound cannot be heard from the speakers. Causes Remedies The volume level is set to the minimum level. Adjust it to the optimum level. Connections are
ENGLISH Symptoms Causes • Disc cannot be played back. No MP3 files are recorded on the disc. MP3 files do not have the extension code <.mp3> in their file names. Remedies Change the disc. Add the extension code <.mp3> to their file names. MP3 Playback MP3 files are not recorded in Change the disc.
Remedies No disc is in the magazine. Insert discs into the magazine. Discs are inserted upside down. Insert discs correctly. • “NO MAG” appears on the display. No magazine is loaded in the CD changer. Insert the magazine. • “RESET 8” appears on the display. This unit is not connected to the CD
ENGLISH MAINTENANCE Handling discs When playing a CD-R or CD-RW This unit has been designed to reproduce CDs, CD-Rs (Recordable), CD-RWs (Rewritable), and CD Texts. • This unit is also compatible with MP3 discs. How to handle discs When removing a disc Center holder from its case, press down the
AUDIO AMPLIFIER SECTION CD PLAYER SECTION Maximum Power Output: Front: 50 W per channel Rear: 50 W per channel Continuous Power Output (RMS): Front: 19 W per channel into 4 Ω, 40 Hz to 20 000 Hz at no more than 0.8% total harmonic distortion. Rear: 19 W per channel into 4 Ω, 40 Hz to 20 000 Hz at
ВАЖНО ДЛЯ ЛАЗЕРНОЙ АППАРАТУРЫ РУCCKИЙ 1. ЛАЗЕРНАЯ АППАРАТУРА КЛАССА 1 2. ПРЕДУПРЕЖДЕНИЕ: Не открывайте верхнюю крышку. Внутри устройства нет частей, которые пользователь может отремонтировать. Ремонт должен осуществляться квалифицированным обслуживающим персоналом. 3. ПРЕДУПРЕЖДЕНИЕ: Видимое и
Благодарим Вас за приобретение изделия JVC. Перед тем, как приступать к эксплуатации, пожалуйста, внимательно прочитайте все инструкции с тем, чтобы полностью изучить и обеспечить оптимальную работу этого устройства. СОДЕРЖАНИЕ Как перенастроить Ваше устройство … Как пользоваться Кнопка MODE
РАСПОЛОЖЕНИЕ КНОПОК Панель управления Окно на экране дисплея s d f РУCCKИЙ a g 12 3 9 h j 4 5 w e p q k /zx l 6 r 1 Кнопка (резервный/включено/ аттенюатор) 2 Кнопка SEL (выбор) 3 Кнопка EQ (эквалайзер) 4 Кнопка FM/AM 5 Кнопка CD CD-CH (проигрывательавтомат компакт-дисков) 6 Окно на экране дисплея 7
1 3 2 Включение 1 Появляется уровня громкости. Включите устройство. Примечание в отношении включения в одно касание: Когда Вы выбираете источник сигнала в пункте 2 ниже, устройство автоматически включается. Вам не нужно нажимать эту кнопку для того, чтобы включить устройство. 2 Выберите источник
РУCCKИЙ Отмена демонстрации функций дисплея 3 На заводе-изготовителе устанавливается демонстрация функций дисплея, которая запускается автоматически при включении нового устройства, если в течение 20 секунд не будет выполнено никаких операций. • Перед первым использованием устройства рекомендуется
1 Нажмите и держите кнопку SEL (выбор) в течение более 2 секунд с тем, чтобы на экране дисплея появился один из параметров PSM. (PSM: Смотрите на страницах 22 и 23). 4 РУCCKИЙ Установка часов Закончите настройку. Для проверки текущего времени на часах или изменения режима работы дисплея Повторно
РУCCKИЙ ОПЕРАЦИИ С РАДИОПРИЕМНИКОМ Прослушивание радио Вы можете использовать автоматический или ручной поиск при настройке на конкретную радиостанцию. Примечание: FM1 и FM2: От 87,5 МГц до 108,0 МГц FM3: От 65,00 МГц до 74,00 МГц Автоматический поиск радиостанции: Автоматический поиск 1 Выберите
Настройтесь на радиостанцию, которую Вы хотите слушать, пока мигает буква “M” (ручной). Чтобы настроиться на радиостанции с более высокими частотами Чтобы настроиться на радиостанции с более низкими частотами • Если Вы снимите палец с кнопки, ручной режим автоматически выключится через 5 секунд. •
Ручное программирование 4 РУCCKИЙ Вы можете запрограммировать до 6 радиостанций в каждом диапазоне (FM1, FM2, FM3 и AM) вручную. Пример.: Для того, чтобы запомнить радиостанцию FM с частотой 92,5 МГц на кнопке программирования под номером 1 диапазона FM1. 1 Выберите тот диапазон (FM1 – 3, AM), в
Сведения о работе с дисками MP3 см. в разделе “ОПЕРАЦИИ MP3” на стр. 16 – 19. На дисплее отображаются следующие элементы: Индикация текущего источника звука РУCCKИЙ ОПЕРАЦИИ С КОМПАКТ-ДИСКАМИ Воспроизведение компакт-диска 1 Откройте панель управления. Индикатор CD Общее число Общее время дорожки на
РУCCKИЙ Останов воспроизведения и извлечение компакт-диск Чтобы перейти непосредственно на определенныйе дорожки Нажмите на 0. Воспроизведение компакт-диска останавливается и панель управления открывается. Kомпакт-диск автоматически извлекается из отверстия для дисков. Источник сигнала меняется на
• Пример. 1: Выбор дорожки 32 при воспроизведении дорожки 6 (Три раза) (Дважды) Дорожка 6 10 20 30 31 32 • Пример. 2: Выбор дорожки 8 при воспроизведении дорожки 36 Когда режим произвольного воспроизведения дисков включен, на дисплее загораются индикаторы RND и . Воспроизведение
РУCCKИЙ Воспроизведение текста на компакт-диске Запрещение извлечения диска В тексте на компакт-диске записана некоторая информация о диске (название диска, исполнитель и название дорожки). Эта информация CD-текста будет отображаться автоматически при воспроизведении CD-текста. Для запрещения
ПРЕДИСЛОВИЕ К МР3 МР3 – это сокращение от Звукового слоя 3 экспертной группы по кинематографии (или MPEG). МР3 – это просто формат файла со степенью сжатия данных 1:10 (128 Кбит/с*). * Скорость передачи данных в битах – это среднее количество битов, которое может захватить одна секунда звуковых
РУCCKИЙ ОПЕРАЦИИ МР3 См. также “ОПЕРАЦИИ С КОМПАКТДИСКАМИ” на стр. 11 – 14. Воспроизведение диска МР3 1 На дисплее отображаются следующие элементы: Индикация текущего источника звука Откройте панель управления. Индикатор CD Примечание в отношении включения в одно касание: Когда диск уже вставлен в
Нажмите на 0. Воспроизведение останавливается и панель управления открывается. Диск автоматически извлекается из отверстия для дисков. Изменение отображаемой информации При воспроизведении файле MP3 Вы можете изменить информацию о диске MP3, показанную на дисплее. Повторно нажмите кнопку DISP
Быстрый переход к определенному файлу в текущей папке (кнопки +10 и –10) 1 Нажмите на MODE, чтобы войти в режим РУCCKИЙ функций во время воспроизведения диска. 2 Нажмите +10 или –10. Переход на 10 файлов* вперед к последней файлу Переход на 10 файлов* назад к первой файлу * При однократном нажатии
Нажмите кнопку 5 (вверх) при воспроизведении диска MP3, чтобы перейти к следующей папке. При каждом последующем нажатии кнопки выполняется поиск следующей папки (и начинается воспроизведение первого файла этой папки). Нажмите кнопку ∞ (вниз) при воспроизведении диска MP3, чтобы перейти к предыдущей
РУCCKИЙ НАСТРОЙКА ЗВУКА Выбор запрограммированных режимов звучания (C-EQ: специализированный эквалайзер) Шаблон индикации изменяется для каждого режима звучания, за исключением режима “USER”. Пример.: Экран дисплея при выборе “ROCK” (рок) Вы можете выбрать запрограммированный режим звучания (C-EQ:
Вы можете настроить характеристики звука по Вашему вкусу. 1 Выберите тот параметр, который Вы хотите настроить. При каждом нажатии кнопки регулируемые параметры меняются следующим образом: BAS (низкие частоты) TRE FAD (высокие (регулятор частоты) уровня сигнала) VOL LOUD громкости выполненная
ДРУГИЕ ГЛАВНЫЕ ФУНКЦИИ 2 РУCCKИЙ Изменение общих параметров настройки (PSM) Вы можете изменить элементы, перечисленные в приведенной ниже таблице и на стр. 23, с помощью параметров управления PSM (предпочитаемый режим настройки). 3 Выберите тот параметр PSM, который Вы хотите настроить. Настройте
SCROLL Режим прокрутки экрана ONCE AUTO OFF Запрограммированная См. заводская страницу настройка ONCE 23 EXT IN* Внешний компонент CHANGER LINE IN CHANGER 24 TAG DISP Изображение тега на экране дисплея TAG OFF TAG ON TAG ON 24 AMP GAIN Регулятор усиления LOW PWR HIGH PWR HIGH PWR 24 РУCCKИЙ
РУCCKИЙ Чтобы выбрать внешний компонент для использования—EXT IN Выбор регулятора усиления —AMP GAIN Вы можете подключить внешний компонент к контактному гнезду проигрывателя-автомата компакт-дисков на задней панели с помощью Адаптера входной линии KS-U57 (не поставляется). Для того, чтобы
Вы можете отсоединить панель управления, когда выходите из машины. При отсоединении или установке панели управления соблюдайте осторожность, чтобы не повредить разъемы на задней стороне панели управления и на держателе панели. Как присоединить панель управления 1 Вставьте правую сторону панели
РУCCKИЙ ОПЕРАЦИИ С ПРОИГРЫВАТЕЛЕМ -АВТОМАТОМ КОМПАКТ-ДИСКОВ 26 Рекомендуется использовать с Вашим устройством cовместимое с MP3 устройство автоматической смены компакт-дисков компании JVC. Проигрыватель компакт-дисков позволяет воспроизводить компакт-диски однократной и многократной записи,
Номер выбранного диска Истекшее время воспроизведения Номер текущей дорожки Примечания: • Когда Вы нажимаете на кнопку CD CD-CH, питание автоматически включается. Вам не нужно нажимать кнопку, чтобы включить питание. • Если Вы меняете источник звука или выключаете данное устройство, воспроизведение
Данная операция возможна только при использовании проигрывателяавтомата компакт-дисков компании JVC, совместимого с MP3 (CH-X1500). РУCCKИЙ Для быстрого перехода к дорожке или файлу (кнопки +10 и –10) 1 Нажмите на MODE, чтобы войти в режим функций во время воспроизведения диска. 2 Нажмите +10 или
Воспроизведение дорожек или файлов в произвольном режиме (произвольное воспроизведение папок/дисков/нескольких дисков) Повторное воспроизведение дорожек или файлов (повторное воспроизведение дорожек/папок/дисков) 1 Нажмите кнопку MODE в режиме воспроизведения для перехода в режим настройки функций.
РУCCKИЙ ОПЕРАЦИИ С ВНЕШНИМ КОМПОНЕНТОМ Воспроизведение внешнего компонента Вы можете подключить внешний компонент к контактному гнезду проигрывателя-автомата компакт-дисков на задней панели с помощью Адаптера входной линии KS-U57 (не поставляется). Подготовка: • Порядок соединения Адаптера входной
ИСПОЛЬЗОВАНИЕ ПУЛЬТА ДИСТАНЦИОННОГО УПРАВЛЕНИЯ Дистанционный датчик • Не подвергайте дистанционный датчик воздействию сильного света (прямого солнечного света или искусственного освещения). Установка батарейки Когда расстояние, с которого можно управлять, уменьшается или снижается эффективность
Расположение кнопок РУCCKИЙ RM-RK60 S 3 • Осуществляет выбор запрограммированных радиостанций во время прослушивания радио. При каждом нажатии этой кнопки номер запрограммированной радиостанции возрастает, и приемник настраивается на запрограммированную радиостанцию. • Переходит к первому файлу
ВЫЯВЛЕНИЕ НЕИСПРАВНОСТЕЙ То, что может вначале показаться неисправностью, не всегда представляет собой серьезную проблему. Перед тем, как обращаться в центр технического обслуживания, проверьте следующие пункты. Воспроизведение дисков FM/AM Общее • Громкоговорители не издают звуков. Причины Способ
Симптомы Причины На данном диске нет файлов МР3. Поменяйте диск. Файлы МР3 не имеют дополнительного кода <.mp3> в названиях их файлов. Прибавьте дополнительный код <.mp3> к названиям их файлов. Файлы МР3 не записаны в формате, совместимом с ISO 9660, уровнем 1, уровнем 2, Romeo или Joliet.
Способ устранения В накопителе нет диска. Диски вставлены неправильной стороной. Диски вставлен неправильно. Вставьте диски правильно. • На экране дисплея появляется надпись “NO MAG”. В проигрыватель-автомат компакт-дисков не вставлен накопитель. Вставьте накопитель. • На экране дисплея появляется
РУCCKИЙ ТЕХНИЧЕСКОЕ ОБСЛУЖИВАНИЕ Обращение с дисками Воспроизведение компакт-дисков однократной или многократной записи Данное устройство предназначено для воспроизведения компакт-дисков (перезаписываемых и однократной записи), а также CD-текста. • Устройство также поддерживает воспроизведение
СЕКЦИЯ УСИЛИТЕЛЯ ЗВУКОВОЙ ЧАСТОТЫ СЕКЦИЯ ПРОИГРЫВАТЕЛЯ КОМПАКТ-ДИСКОВ Максимальная выходная мощность: Передние:50 Вт на канал Задние: 50 Вт на канал Непрерывная выходная мощность (RMS): Передние:19 Вт на канал в 4 Ω, от 40 Гц до 20 000 Гц при не более 0,8% суммарного. Задние: 19 Вт на канал в 4 Ω,
Having TROUBLE with operation? Please reset your unit Refer to page of How to reset your unit Затруднения при эксплуатации? Пожалуйста, перезагрузите Ваше устройство Для получения информации о перезагрузке Вашего устройства обратитесь на соответствующую страницу EN, RU 1203KKSMDTJEIN © 2003 VICTOR