![]()

В начале апреля этого года сайт Yoyogames получил русскоязычную версию. Но помимо локализации сайта, перевод также получило руководство по конструктору игр Game Maker 2.
Это руководство — отправная точка в знакомстве с GameMaker Studio 2. В нем можно узнать о том, как устроен интерфейс программы, редакторы, настройки игр и IDE. Руководство также содержит обзор drag-and-drop интерфейса и справочник по языку GML.
Игровой конструктор Game Maker — хорошо зарекомендовавший себя инструмент для создания 2D игр. На нем были сделаны такие игры как Hotline Miami, Hyper Light Drifter, Nidhogg 2 и многие другие.

Adam Sinicki / Android Authority
If you want to develop games for Android, Android Studio is not the best choice of tool. While Android Studio is a powerful IDE and comes with many additional tools for development, it is primarily suited to productivity apps and tools and has a steep learning curve. It’s fortunate then that there are many other options available, such as the excellent GameMaker Studio 2. This post will serve as a GameMaker Studio tutorial to get you started, and an overview of the tool.
What is GameMaker Studio?
Before we begin with the GameMaker Studio tutorial, what exactly is a GameMaker Studio?
Like Unity and Unreal, GameMaker Studio, is a game engine that incorporates a powerful IDE (integrated development environment) for easy development. Where GameMaker differs, however, is in its relative simplicity and target audience. This is a drag-and-drop tool with relatively less cording involved than many of its rivals. This makes GameMaker ideal not only for beginners but also artists and designers that want to build games without learning to code.
what exactly is a GameMaker Studio?
What exactly is a GameMaker Studio?
That said, for those that do want to add some custom logic, there is a “GameMaker Language” that affords slightly more flexibility.

Adam Sinicki / Android Authority
With this ease of use does come a slightly more limited scope. GameMaker Studio 2 is a 2D game engine; so if you have dreams of building the next Doom, then you’ll need to look elsewhere. But don’t be mistaken: this is still a pro-level IDE that powers some highly successful titles. These include the linkes of Minit, Blazing Chrome, Hyper Light Drifter, and my personal favorite: Katana Zero.
Another caveat of GameMaker Studio is that it is not free, whereas the more powerful Unity and Unreal Engine are. Pricing is very reasonable, however, with the Creator License costing $39. This permits users to develop and publish games for Windows and MacOS. Console licenses are much more expensive however, costing $799 each, or $1,500 for all three. The licenses last for 12 months and are non-renewing, and there are other options such as a Developer license and Education license. There is also a 30-day trial so you can see if you get along with the workflow before you take the plunge.
This makes GameMaker ideal not only for beginners, but also artists and designers that want to build games without learning to code.
At the time of writing the engine is in version 2.3.1.542. However, it is most commonly known as “GameMaker Studio 2.”
Now, on with the GameMaker Studio tutorial!
How to use GameMaker Studio 2
To get started with GameMaker Studio 2, first create a new project. Next choose the “Drag and Drop” option, which we will be using for this GameMaker Studio tutorial.
Quick tip: if ever you’re looking for information or help online, make sure you search for “GameMaker Studio DND.” This short hand will ensure you get information relating to the drag and drop version, rather than GameMaker Language (GML).

Adam Sinicki / Android Authority
You’ll now be greeted with a Workspace on the left and an asset browser on the right. The asset browser lets you see all the elements in your project folder.
Every game needs sprites, so take yours and drop them into the Sprites folder. If you don’t have any sprites of your own, you should be able to download some from the web. I’m using sprites from an old greenscreen style game I made. This little chap is called “Bee Boo.”
Adam Sinicki / Android Authority
When you drop the sprite in, you should see it automatically open up in a separate window for closer inspection. Notice that it automatically has a collision box; the small grey outline surrounding the image. This defines the physical size of your sprite and facilitates interactions with the environment. If you need to change this, you can select the “Collision Mask” drop-down menu on the left, and then select “Manual” under mode. You’ll now be able to drag and resize the box as needed. Make sure that the original sprite is 32×32 pixels, or change the dimensions by clicking “edit sprite.” The collision box should generally be the same size and shape as the sprite.
When you build a game for real, you’ll probably want to use multiple sprites to create animations. For now, we can just use a static character that glides around the screen. If you do want to make an idle animation, however, you can simply drag another sprite next to the first one in the timeline and then set the FPS in the top left.

Adam Sinicki / Android Authority
Creating a tile set
I’ve also dropped in a “tile set.” This is a selection of sprites that will be used to draw levels. In this case, I’m using green semi-transparent squares. The image itself is a large translucent PNG that has a 32×32 pixel square in it. That square is in the top left but is shunted 32 pixels to the right. This will make sense in a moment!

Adam Sinicki / Android Authority
Create something similar of your own and then drop it into the Sprites folder.
Now right click on the “Tile Sets” folder and select “Create Tile Set.” When this opens up, you’ll need to select the sprite you just added. Now set the tile width and height to “32.”
What this does is to automatically divide the image into blocks of 32×32. The top left square is always the “empty” image. The following squares will take care of the tile as it appears from different angles. So if you have grass on top of your platforms and dirt on the sides, you’re covered! The smart thing is that there is an “Auto Tiling” option that will automatically make that judgement call for you.
For now though, I’m just using two tiles: an empty tile, and a plane square.
Creating a room
Now for the fun part of this GameMaker Studio tutorial: building a level… or “room.” Rooms are screens that can represent levels of a game or chunks of a level. This is the equivalent of a “scene” in Unity.
The first thing to do is to add a background. Simply click on the Background layer in the Room Editor window, then select a sprite underneath. This needs to come from your Sprites folder, so make sure to drop the image in there first. I’m using a pretty starfield.
Next, we need to add our tiles. You can do this by clicking on the tile layer icon in the Room Editor window – this looks like an isometric grid.

Adam Sinicki / Android Authority
Now you’ll be able to choose a tile set to use. We’re going to use the one we just made. You can then simply draw onto your grid to create your level layout! By using the tile layer, you’ll also be creating less work for the GPU.
GameMaker Studio tutorial: building objects

Adam Sinicki / Android Authority
Once the level has been drawn, we need a character to explore it. To create the player, right click no the “Objects” folder in the Assets Browser and create a new object. Call this object “Player” and select the sprite you made earlier.
You’ll notice you have some more options now. Make sure you’ve unticked “uses physics” as this will make things more complicated.
We’re going to create another object, too. which will be a completely empty object with physics once again disabled. You can click the “New Sprite” button to create this empty image, then define the size of the empty image and its collision box. This should be set to 32×32.
Adding objects to the rom
It’s time to see our game in action!
Switch back to the Room tab and then select the “Instances” layer in the Room Editor window. An “instance” refers to an instance of an object that can interact with other objects in the Room. That means the player character you created is actually a “prefab” or a class that can have multiple identical copies called instances. This isn’t something you’ll need to worry about for a long time but it’s useful context!
Once you’re in the Instances layer, you can simply drag and drop your character into the scene wherever you want it. This will be your player’s starting position.

Adam Sinicki / Android Authority
You’re also going to drag and drop your invisible ground layer a few times and resize it to perfectly match wherever you drew your tiles. You can resize these objects by simply grabbing an edge and pulling. This is necessary because the tiles themselves are in the Tile layer and don’t have any impact on our game objects. Of course, you could just use objects with sprites to draw your levels, but this is a more efficient method in terms of the GPU and speed of creating levels.
Adding gravity to the player character
If you click on the Play button at the top of the screen, you can test out what you’ve built. Right now, nothing happens; we’ve got a bit further to go before this GameMaker Studio tutorial is through!
To fix this, we need to add “events” to our player. So, double click on the Player in the Asset Browser and then choose Events > Add Event.
An event is simply an action or change that occurs within the room. The first event we’re going to add is called a “Step” event. Step is essentially one lap of the gameloop. Each time the game refreshes, this event is triggered. This then, is where we want our gravity to go!
As we’re using Drag and Drop, we can add our game logic simply by choosing commands from a toolbox. Here’s what our logic is going to look like:

Adam Sinicki / Android Authority
So, if there is an object at position Y + 2 (two beneath the player) then set the gravity to 0 and set the vertical speed to 0. Else (otherwise), set the gravity to 0.5.
Make sure to tick “relative” so that these positions are relative to the player object.
Build this flow chart yourself by dragging the elements from the right and placing them underneath or next-to the commands they follow on from logically.
Adding gravity force will automatically cause your player to fall. We turn the gravity off when we hit another object but we also need to set the vertical speed back to 0 to get rid of any lingering momentum. Otherwise the G-forces would prevent our player from being able to move!
Adding player controls
Now we need to add events to let our character move. We want to be able to walk left and right and jump up in the air.
Luckily, we have an event called “Key Down” that also lets us pick the key we want to listen for. This will trigger whenever the key is down, which also means the player will be able to simply hold left or right (rather than needing to tap the button).
The logic that goes here is pretty self-explanatory. We check to see if the pixels next to our player are clear. If they are, the player moves one step in that direction:

Adam Sinicki / Android Authority
Do the same thing for the other direction.
Jump is slightly different. Here, we’re going to move the player slightly in the air so there is no collision, then apply vertical force and set the direction to “up.” This will give us a nice, natural jump movement. Again, we want to check that the player is on the ground before any of this happens, though:

Adam Sinicki / Android Authority
Now hit play and you should find that you can actually control the player, explore the level, and fall into pits. Not bad for about 10 minutes of set-up!
Closing comments

Adam Sinicki / Android Authority
And, with that, this GameMaker Studio tutorial is over!
While this isn’t a “full game,” it’s enough to get a good feel for how GameMaker Studio works, and whether it clicks for you. This is a powerful tool if you want to get a 2D game running quickly, and that can only be a good thing for gaming on the Android platform. Let us know what you think of GameMaker Studio in the comments below, and if you would like to see a tutorial for GameMaker Language in future. Happy developing!
For more developer tutorials and news from Android Authority, sign up below!
Добро пожаловать в список из 10 трюков и советов по GameMaker Studio 2. Независимо от того, знакомы ли вы уже с этим движком или только начали его изучать, можно узнать что-то новое.
#1 Ссылка на конкретный экземпляр объекта
Функции создания экземпляров, такие как instance_create_layer и instance_create_depth — одни из самых основных функций, которые разработчики используют в Game Maker. Но не все знают, что они возвращают идентификатор созданного экземпляра, который можно сохранить в переменную для дальнейшего его использования.
var inst;
inst = instance_create_depth(x, y, -10000, obj_Bullet);

with (inst) {
    speed = other.shoot_speed;
    direction = other.image_angle;
}
#2 Макросы и перечисления
Macros и Enums не нуждаются в вызове для инициализации — достаточно скрипта, в котором хранятся ваши макросы и энумераторы, и они будут загружены в ваш проект.
#3 Средняя кнопка мыши
Для экономии времени вы можете щёлкать средней кнопкой мыши на ресурс или функцию в редакторе кода. GMS2 откроет соответствующий объект или, если это функция, то страницу со справкой.
#4 Тернарные операторы в GameMaker Studio 2
GMS2 поддерживает тернарные операторы, которые предоставляют элегантный подход к условным выражениям: <условие>? <условие истинно>: <условие ложно>
// обычный подход
if (standingOnIce) {
  friction = ice_friction;
}
else {
  friction = default_friction;
}

// тернарная операция
friction = (standingOnIce ? ice_friction : default_friction);
#5 Сохранить результат выражения в переменной
Вместо использования оператора if вы можете заносить результат выражения сразу в переменную.
// обычный подход
if (abs(speed) > 0) {
  moving = true;
}
else {
  moving = false;
}

// занесение результата в переменную
moving = (abs(speed) > 0);
#6 Дельта-синхронизация в GameMaker
Дельта-синхронизация — это количество микросекунд, прошедших с последнего кадра. К примеру, вы можете связать перемещение с delta_time для обеспечения постоянной скорости движения на всех устройствах, независимо от частоты кадров.
var seconds_since_last_frame = (delta_time / 1000000);
var distance_to_move_this_frame = (distance_per_second * seconds_since_last_frame);
x += distance_to_move_this_frame;
#7 Поворот объекта «лицом» к курсору мыши
Простой пример, как постепенно поворачивать объект к курсору
var targetDirection = point_direction(x, y, mouse_x, mouse_y);
var angleDifference = angle_difference(image_angle, targetDirection);
var angleIncrement = 10;

image_angle -= (min(abs(angleDifference), angleIncrement) * sign(angleDifference));
#8 Использование Clamp
Вместо использования операторов if для ограничения значения переменной, вы можете использовать Clamp, что гораздо удобней и умещается в одну строку.
// обычный подход
if (spd > maxspd) {
  spd = maxspd;
}
else if (spd < 0) {
  spd = 0;
}

// метод с Clamp
spd = clamp(spd, 0, maxspd);
#9 Мигание текста или спрайта
Простой способ для мигания спрайта или текста с заданным интервалом:
///@desc blink(c_white, c_black, 0.5);
///@arg on_val
///@arg off_val
///@arg [rate]
var on_val = argument[0];
var off_val = argument[1];
var rate = (argument_count > 2 ? (argument[2] * 1000) : 1000);

if (current_time % (rate * 2) >= rate) return on_val;
return off_val;
#10 Шаблоны кода
В меню Preferences -> Objects вы можете создать шаблон, который будет использоваться по умолчанию для всех новых сценариев и событий. Это может сэкономить вам очень много времени.
Ссылка на вторую часть статьи
Ссылка на оригинал
В этом уроке мы создадим игру простого и казуального жанра — IO. IO-игры — лучший жанр для начинающего разработчика это узкое направление в многопользовательских онлайн-играх, отличающееся упрощенным «песочным» геймплеем и огромной массовкой игроков, сосредоточенной в рамках единой локации («комнаты», room). Название этого класса игр произошло от Интернет-домена .io (Индийский Океан), на котором выкладывались пионеры жанра, например, agar.io и diep.io. Для начинающего разработчика такие игры интересны несложной технической реализацией и интуитивным построением геймплея в плане дизайна и поиска баланса. Но для упрощения мы сделаем вариант одиночной игры. И так:
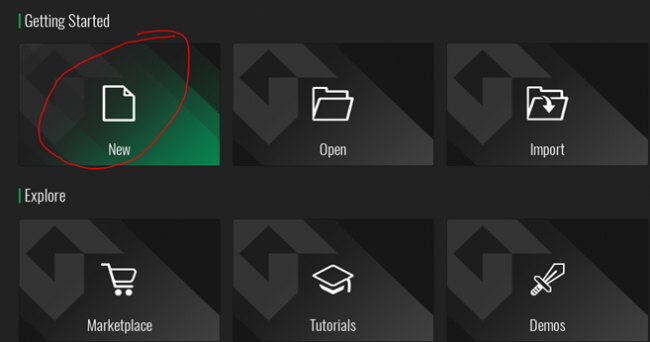
Запускаем наш Game Maker Studio 2. Перед нами будет стартовое меню, нажимаем «New», что значит «Новый», для создания нового проекта:
И появится следующий выбор:
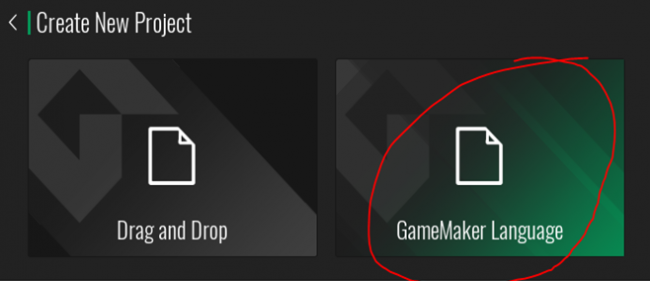
Движок GMS2 позволяет создавать игры на своем языке программирования GameMaker Language (GML) либо вообще без написания кода, то есть собирать игру как бы из логических блоков (Drag and Drop). Я бы рекомендовал учиться сразу писать код. Конкретно в этом уроке я буду объяснять работу именно проектов на основе кода, т.е. выбираем второй вариант. Ну а далее вы выбираете место, где будете сохранять своей проект и дадите ему имя.
Готовим ресурсы для игры
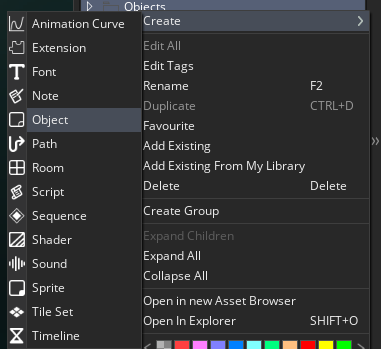
Сейчас нам необходимо будет подготовить ресурсы для игры. Для этого заходим в меню справа и видим вот такой список:
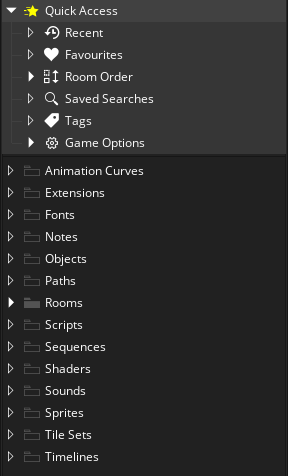
Нам нужны будут спрайты(Sprites), объекты(Objects) и пока одна комната(rooms), которая у нас создана автоматически.
Понадобится спрайт игрока, спрайт еды, и спрайт стены, можно нарисовать все во внутреннем редакторе, можно нарисовать во внешнем – (например) paint. Я буду рисовать спрайт игрока 64 на 64, спрайт стены 64 на 64 и спрайт еды 8 на 8.
После создания спрайта мы увидим настройки спрайта:

1. Название спрайта, поставим s_player
2. Размер спрайта, этот оставляем как есть
3. Редактор спрайта, нажимаем на него 2 раза и зайдем в редактор.
Перед нами внутренний редактор спрайтов, я нарисую схематически круг, и это будет наш персонаж – игрок.
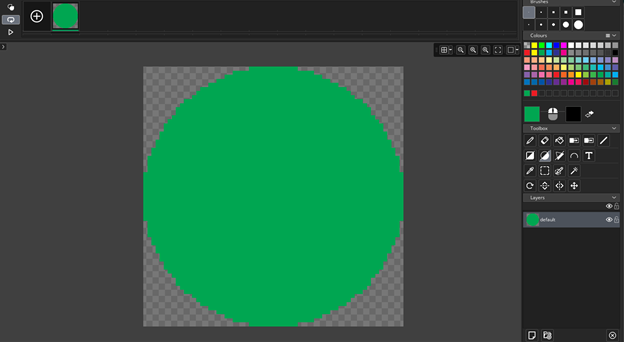
Возвращаемся обратно и видим следующее:
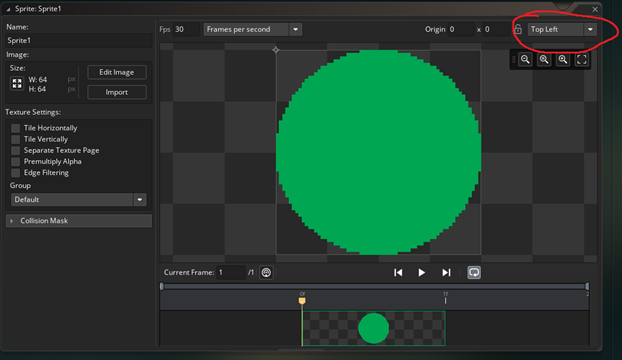
Где выделено красным, это начало координат спрайта, у персонажа выставим на Middle Centre:
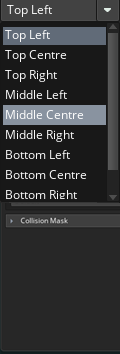
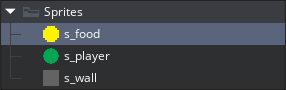
Таким же образом рисуем спрайт еды, пусть он будет желтый, меняем размер спрайта на 8×8 и у него тоже ставим начало координат на Middle Centre и еще рисуем 64 на 64 серый квадрат – это будет стена, у него не меняем начало координат.
В итоге у нас должно получиться что то такое:
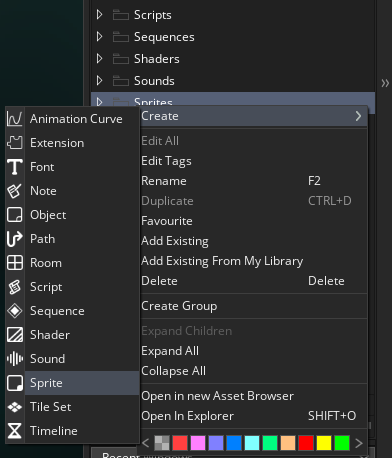
Теперь возвращаемся к меню справа, ищем папку Object и создаем объект игрока, стены, еды и объект контроля:
Перед нами будет окно настроек объекта:
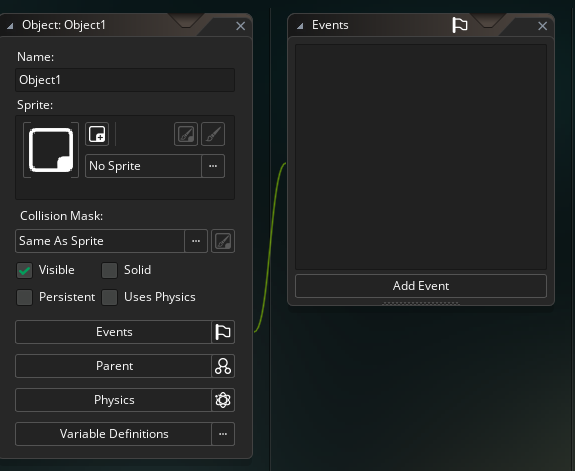
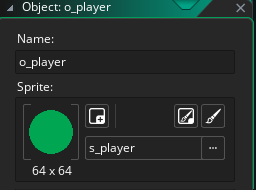
В поле Name указываем имя, o_player. Нажимаем на поле No Sprite и выбираем наш спрайт игрока. Все объект игрока создан.
Теперь нужно чтобы он умел шевелиться, также он должен иметь переменную массы, когда мы будем перемешаться по комнате и есть пищу – наш кружок будет расти.
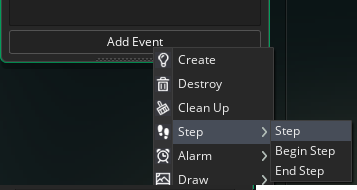
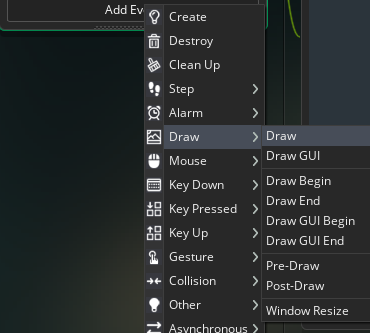
В GMS2 вся логика игры основана на событиях объектов, то есть при определенных событиях прописанных в объекте, выполняются прописанные нами действия. Есть основные события, это событие создания, выполняется при создании объекта, событие шага и рисования, выполняются каждый шаг в игре(об этом позже), событие рисования для того чтобы отрисовывать спрайты, интерфейс и тд. , событие столкновений будет происходить каждый раз когда один объект сталкивается с другим и событие Уничтожения срабатывает когда объект будет уничтожен.
Заходим в меню Add Event и выбираем Step то есть Шаг – код который выполняется каждый шаг в игре, за одну секунду в игре происходит 60 шагов.
У нас появится редактор где мы можем начать писать код, пропишем чтобы наш кружок следовал за мышкой при нажатии ЛКМ:

Этот код будет заставлять объект следовать за мышкой. Мы прописали чтобы каждый шаг, 60 раз в секунду, игра проверяла нажата ли ЛКМ, если да то поменять направление движения объекта по прямой-направленной к координатам мыши, и если мышка не нажата мы устанавливаем скорость 0.
Теперь создадим объект Стены:
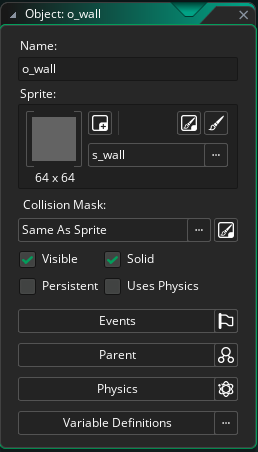
Ему не нужно создавать события(Events). Главное поставить галочку что он твердый(Solid)
Теперь создадим объект еды, все тоже самое:
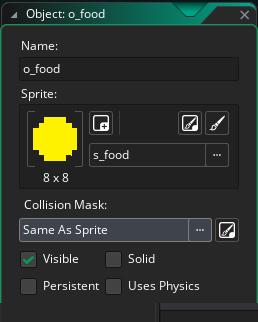
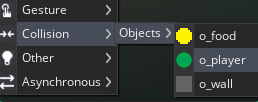
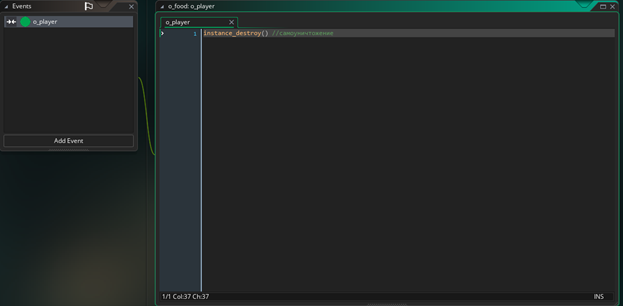
Твердым его делать не нужно. В событиях создадим ему событие столкновения с o_player и пропишем строчку самоуничтожения:
Вернемся к объекту игрока. Добавим событие Create и создадим там глобальную переменную size (Размер). В движке есть несколько типов переменных, Глобальные – действуют по всей игре, к ним можно обращаться и менять их с любой комнаты и с любого объекта, локальные переменные обычно инициализируются в событии создания и используются внутри объекта, но к ним можно получить доступ из вне, но только в той же комнате, но это нам сейчас не понадобится.
И так Create – выполняется только 1 раз при создании объекта.

Создадим события столкновения с едой и там будем прибавлять 0.01 к размеру.

И создадим пустое событие столкновения со стеной. Это нужно чтобы движок обрабатывал столкновение, иначе он будет просто игнорировать столкновение.

Создадим последний объект – o_control
Он будет создавать еду на карте:
Добавляем событие Create и запустим таймер.
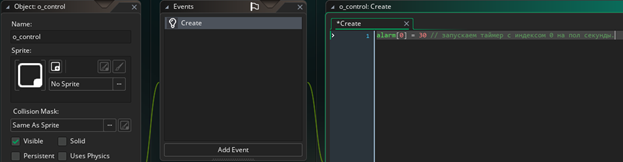
Создадим событие таймера с индексом 0 и пропишем там случайное создание еды в рамках комнаты с учетом стен вокруг нее и будем запускать таймер сначала каждую секунду.
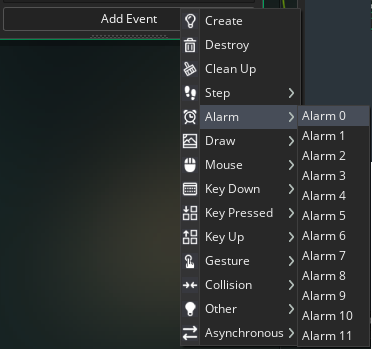

Alarm[] – один из изначально заданных локальных переменных каждого объекта, alarm – таймер, срабатывает после указанного количества шагов, и запускает событие. Есть и другие такие переменные, например direction – направление, speed – скорость, x и y координаты и множество других.
Вернемся к объекту игрока, и создадим событие Draw
В нем пропишем рисование спрайта игрока с увеличением размера в зависимости от глобальной переменной size

Draw_self() говорит что нужно рисовать себя
Image_xscale и yscale увеличивают изображение и сам объект в зависимости от переменной размера.
Теперь расставим все что мы сделали по комнате.
Точнее нам нужно сделать стену вокруг комнаты, поставить в нее объект игрока и объект контроля и попробуем запустить проект.
Заходим в комнату:
![]()
Видим окно-редактор комнаты:
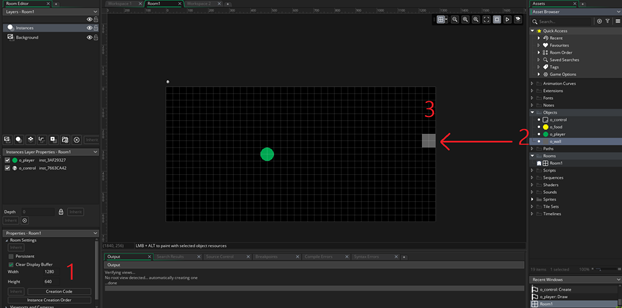
1. Установим размеры кратные 64, мне лично нравится 1280 на 640
2. Расставляем объекты, берем с меню и отпускаем в комнате в 2 берем в 3 отпускам.
У меня получилось так:
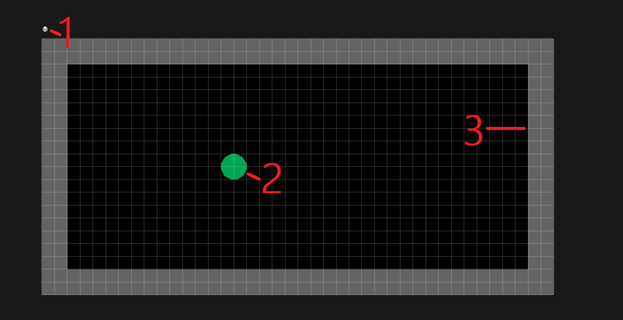
1 – объект контроля
2 – объект игрока
3 – стена
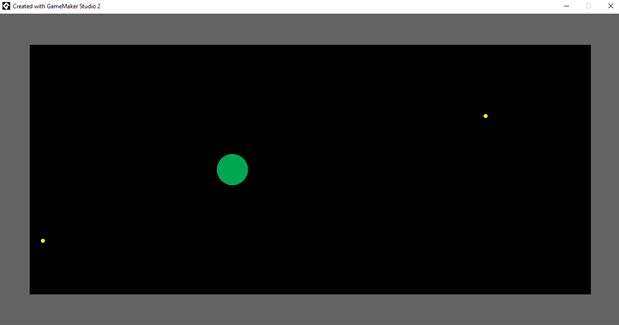
Пробуем запустить и подождать какое-то время, попутно побегать нашим кружком.
Начало игры:
После минуты игры:
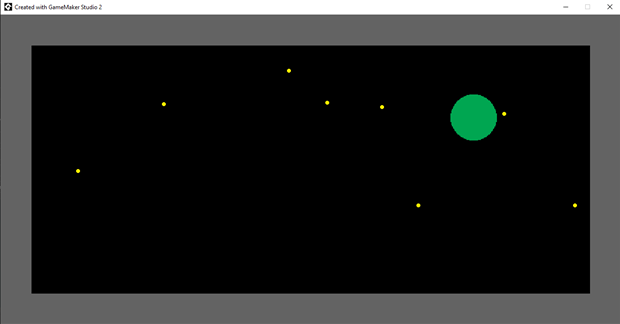
Как мы видим все работает, в следующем уроке можно увеличить комнату, сделать ИИ который будет кушать и пытаться охотиться за игроком и уменьшать скорость в зависимости от массы. На этом урок 1 закончен. Я прикрепляю исходник и исполняемый файл. Вы можете скачать и попробовать сами.
| Прикрепленный файл | Размер |
|---|---|
| GMS2Lesson1 — Игра.zip | 1.95 Мб |
| GMS2Lesson1 — Исходник.rar | 13.86 кб |
Конструктор Game Maker призван максимально упростить создание игр, чтобы у каждого пользователя появился шанс воплотить свои идеи в жизнь. По сравнению с классической разработкой игр, данная программа значительно облегчила данный процесс, но из-за его многогранности и сложности, сама превратилась в инструмент, требующий изучения.
Если вы ни разу не сталкивались с визуальными игровыми конструкторами, то врятли сможете разобраться в Game Maker самостоятельно. Эта программа заменила ввод кода, множеством готовых функций, в разнообразии которых, легко теряются начинающие разработчики.
Чтобы помочь вам быстрее овладеть инструментами Game Maker, мы собрали 2 сборника видеоуроков, где по шагам, наглядно, демонстрируется процесс создания игр.
Изучаем основы Game Maker
Базовый курс уроков Game Maker, поможет новичкам освоиться в программе и создать свою первую 2D игру. Автор видео подробно рассказывает, что нужно делать, как и зачем.
Знакомимся с жанрами
Сборник уроков для любителей. В данных видеороликах демонстрируется процесс разработки игр разных жанров. На наглядном примере показывают, как создаются TDS-стрелялки, платформеры, раннеры, стратегии и редакторы карт.
![]()
Game Maker
Создание игр, 2D движки, Мобильные игры