Guitar Rig 5 не нуждается в особом представлении, о её возможностях знает практически каждый гитарист, использующий цифровую обработку звука. Большое количество разнообразных эффектов, программные аналоги известных усилителей, настройка тона, встроенный проигрыватель для игры под «минусову» и много других полезных функций и возможностей, позволяющие в полной мере раскрыть реалии своего творчества.
К сожалению, очень часто, пользователи при первом знакомстве с Guitar Rig 5 сталкиваются с проблемой – «запустил программу, подключил гитару, но она не звучит». Данная, пошагово описанная инструкция, поможет преодолеть эту проблему и наслаждаться новым звучанием своей гитары. Рассматривается вариант настройки в ПК, необорудованном отдельной звуковой картой.
Скриншот 1
Скриншот 2
Скриншот 3
Скриншот 4
1. ASIO. Это программа создаёт оптимизацию звукового потока — на вход и на выход. Улучшает качество звучания и снижает задержку передачи аудиопотока. То есть гитара будет звучать без запаздывания. Программа не является платной и доступна для скачивания на официальном сайте. ASIO – необходимо скачать и установить на ПК, перед тем, как запускать и настраивать Guitar Rig.
2. Настройка аудио. Теперь, когда ASIO установлен, можно перейти непосредственно к настройкам программы. Для этого нужно зайти в пункт <Audio and MIDI Settings> меню <File> (скриншот 1). В открывшейся опции (скриншот 2) в графе <DRIVER> из ниспадающего меню нужно выбрать <ASIO>. Эта настройка указывает, какой звуковой драйвер программа должна использовать (скриншот 3). В противном случае был бы задействован стандартный звуковой драйвер Windows, который уступает по качеству звучания.
3. Если сделано всё правильно, в трее появляется значок подключенного в Guitar rig драйвера. В этой же опции, нужно кликнуть по кнопке <ASIO config>, и также сделать необходимые настройки (скриншот 4). Предварительно нужно подключить гитару в линейный вход ПК. В списке подключенных устройств не должно быть крестиков, указывающих на то, что устройство отключено. Их появление может быть вызвано тем, что параллельно на компьютере запущено другое ПО, которое также использует данные устройства. Его необходимо закрыть и перезапустить Guitar Rig.
4. Затем, <Размер буфера> — выставляется опытным путём. Чем меньше его значение, тем меньше запаздывание, но ухудшается стабильность звучания и может появиться характерное потрескивание. Если больше – качество звука лучше, но увеличивается время задержки. Нужно найти оптимальный вариант. Эта настройка зависит от мощности ПК.
5. <Смещение буфера> — рекомендуется выставить в 0 мс.
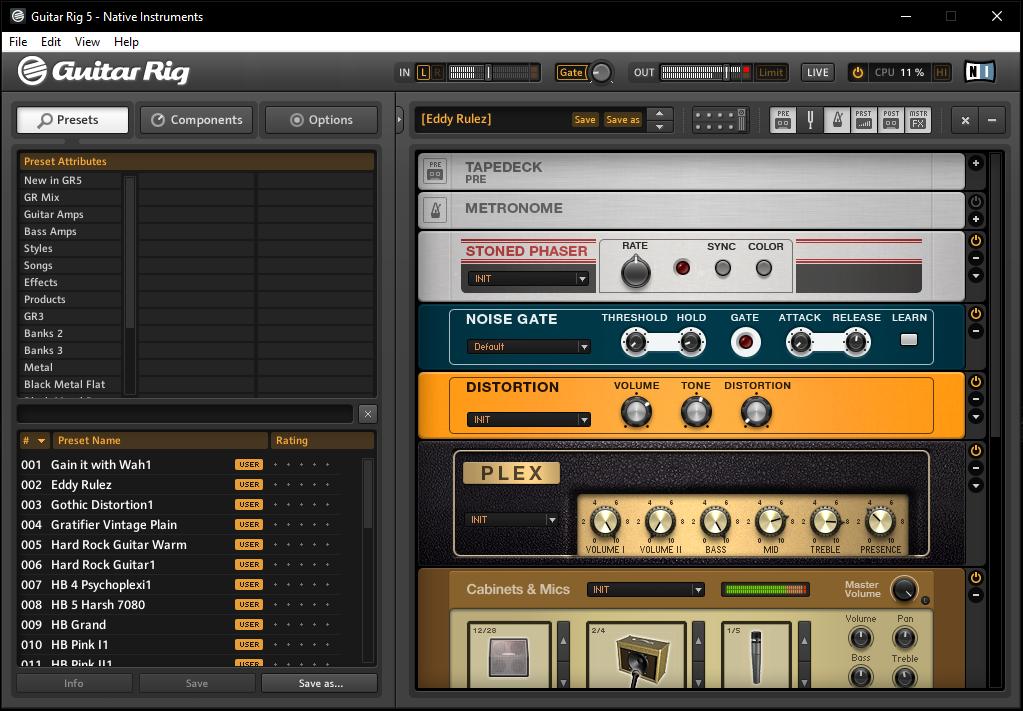
6. Если все действия выполнены верно, гитара уже должна звучать в Guitar Rig. Можно пользоваться установленными пресетами <Presets>, перейти к стилям <Styles> и выбрать интересующий, например, <Metal>. Далее перейти в нижнюю панель и выбрать конфигурацию усилителя и эффектов.
7. Если одновременно с обработанным звуком слышится чистый звук (без эффектов), необходимо в системной настройке звука в Windows отключить линейный вход (иконка динамика в трее -> значок динамики -> вкладка <Уровни>).
Ну, вот и всё, теперь можно приступать к гитарному искусству с новым звучанием.
Что делать, если в наличии есть гитара и компьютер и возникает желание записать сочинённое Вами произведение? В этом нам поможет программа Guitar Rig. Она является многофункциональным гитарным процессором. На данный момент актуальной является пятая версия (Guitar Rig 5) этого программного продукта. Для тех, кто не знаком с данной программой ниже приведён скрин интерфейса.
Интерфейс программы Guitar Rig 5
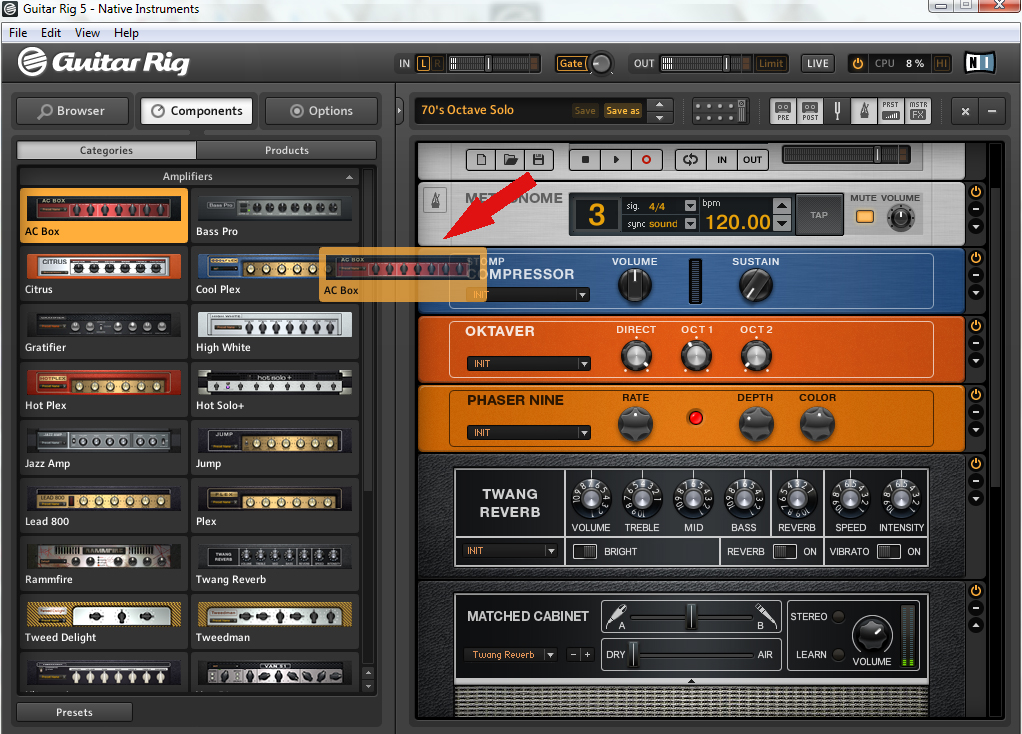
Целью данной статьи является обзорное ознакомление с программой Guitar Rig. Рабочая область программы разделена на две части. Слева у нас находится набор компонентов, справа рабочая область с выбранным инструментарием. Мы с Вами уже рассматривали различные примочки для гитар. Так вот в данном случае все эффекты скомпанованы по категориям, т.е. Вы можете найти несколько различных видов дисторшна или дилэя. Из них можно строить разнообразные цепи эффектов. Также у Вас есть возможность выбирать тип гитарного усилителя («голову») и подходящий к нему кабинет. На изображении как раз показан список усилителей, а понравившийся Вам просто перетаскивается в рабочую область справа для дальнейшей работы.
Промо ролик программы Guitar Rig
Для каждого элемента цепи эффектов есть кнопка байпас и различные тонкие настройки. Новичкам рекомендую использовать стандартные настройки готовых программных прессетов для различных стилей музыки, если Вы уже более опытный гитарист, то смело можете менять настройки, крутить различные ручки.
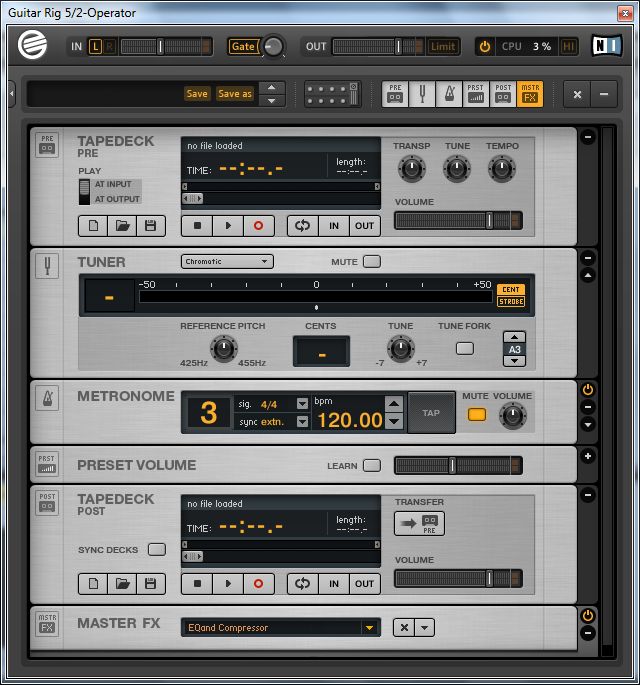
Рассмотрим более подробно рабочую область справа. В ней есть несколько основных элементов: верхняя дека (tapedeck pre), тюнер, метроном, нижняя дека (tapedeck post). Верхняя дека предназначена для записи чистого сигнала гитары, а нижняя дека для обработанного. Следовательно, вы можете записать чистый звук гитары и потом экспериментировать с ним. Накладывая различные эффекты и применяя разные настройки. Также в верхнюю деку можно поместить какой-то файл для проигрывания. Например, партию барабанов. И Вы спокойно сможете играть под ударные и записывать свою гитарную партию.
Я бы порекомендовал данную программу начинающим гитаристам. Вы только купили гитару, слышали о разных эффектах для гитары, но на практике не пробовали их. У Вас есть отличная возможность с программой Guitar Rig поэкспериментировать с этими эффектами, выстроить из них цепь и чётко определить для себя, какие же примочки Вам именно нужны.
Описать все возможности программы Guitar Rig в небольшом обзоре невозможно. Различных эффектов и настроек здесь огромное количество. Наша цель – познакомить Вас с этой программой. А Вам уже предстоит пробовать, экспериментировать, что-то менять и находить свой звук. И я думаю Вы получили начальные знания о том, как пользоваться программой Guitar Rig.
Запись обработка гитары в Guitar Rig
Кстати, для тех, кто интересуется элитной недвижимостью, советую отличный поселок горки 8.
- Manuals
- Brands
- Native Instruments Manuals
- Software
- Guitar Rig 5
- Application reference
-
Contents
-
Table of Contents
-
Bookmarks
Quick Links
Related Manuals for Native Instruments Guitar Rig 5
Summary of Contents for Native Instruments Guitar Rig 5
-
Page 1
Application Reference… -
Page 2
The information in this document is subject to change without notice and does not repre- sent a commitment on the part of Native Instruments GmbH. The software described by this document is subject to a License Agreement and may not be copied to other media. -
Page 3
Contact Germany Native Instruments GmbH Schlesische Str. 29-30 D-10997 Berlin Germany www.native-instruments.de Native Instruments North America, Inc. 6725 Sunset Boulevard 5th Floor Los Angeles, CA 90028 www.native-instruments.com © Native Instruments GmbH, 2011. All rights reserved. -
Page 4: Table Of Contents
Loading and Saving Rack Presets …………….29 4.1.4 Importing Presets …………………. 29 4.1.5 Exporting Presets ………………….. 30 4.1.6 Saving New Rack Presets ………………30 4.1.7 Tags on Three Levels ………………..32 4.1.8 Tagging Presets ………………….33 GUITAR RIG 5 — Application Reference — 4…
-
Page 5
Plug-In Location ………………….54 7.1.3 Setting Up a Guitar or Bass Track …………….54 7.1.4 Synchronization ………………….55 7.1.5 Total Recall ………………….. 55 Automating Parameters ………………….55 7.2.1 The Automation List ………………..55 GUITAR RIG 5 — Application Reference — 5… -
Page 6
Menu Bar ……………………68 File ……………………….. 68 Edit ……………………….. 69 View ……………………….69 Help ……………………….70 10 Audio and MIDI Settings ……………….. 71 10.1 Audio ……………………….71 11 Keyboard Shortcuts ………………..74 GUITAR RIG 5 — Application Reference — 6… -
Page 7: Introduction
Welcome to the GUITAR RIG 5 Application Reference! About this Manual This manual covers all elements of GUITAR RIG 5 in detail. If you want to get deeply into the software, this is the document to refer to. The following documents are also available: ▪…
-
Page 8: Safety Considerations
For your protection, set all output levels to a minimum before using GUITAR RIG 5. Gradually raise the volume controls while mu- sic is playing to set the desired listening level. If you experience any hearing problems or persistent ringing in the ears, consult an audiologist immediately.
-
Page 9: User Interface
Global Header The Global Header (visible both in Standard view and in Live view) assembles the main input and output controls as well as the system performance display of GUITAR RIG 5. GUITAR RIG Global Header GUITAR RIG 5 — Application Reference — 9…
-
Page 10: Input And Output
▪ The Learn function automatically sets the optimum threshold. Double click the threshold knob and do not play your instrument for some seconds: GUITAR RIG 5 analyses your signal and sets the threshold just above any residual noise.
-
Page 11
You might need to disable some components or turn off high quality mode to save CPU power. Then re-activate the audio engine by clicking the Power button. GUITAR RIG 5 — Application Reference — 11… -
Page 12: Live View
Live view. It hides the Rack and instead puts the most important perform- ance features into a clear layout. The Live view is perfect for on-stage use, consolidating the following elements: ▪ Global Header ▪ Current Preset List as defined in the Preset Browser GUITAR RIG 5 — Application Reference — 12…
-
Page 13: Toolbar And Rack
Toolbar and Rack If you are in Live view, please return to Standard view by clicking on the LIVE button to continue our tour through the user interface of GUITAR RIG 5. GUITAR RIG 5 — Application Reference — 13…
-
Page 14
Preset List, even if it is not visible, by clicking on the Up/Down arrows. Save makes changes to the loaded preset permanent, overriding the stored settings ▪ with the current ones. Factory Presets and User Presets are now stored in separate folders. GUITAR RIG 5 — Application Reference — 14… -
Page 15: Virtual Rig Kontrol
The Rack holds all the components that are processing your sound — giving a clear over- view of the signal flow. It is the heart of GUITAR RIG 5’s functionality, and is incredibly easy to use. See section ↑3, Components and the Rack…
-
Page 16: Sidekick
↑8.1.3, Linking External MIDI Controllers to the Virtual Rig Kontrol details. SideKick About a third of the user interface is occupied by the SideKick, a multi-functional area on the left hand side of the screen. GUITAR RIG 5 — Application Reference — 16…
-
Page 17
▪ The Preset Browser (1) allows filtering of all available Rack Presets on three levels; you can organize your presets and perform a text search to easily find your presets. See section ↑3, Components and the Rack on working with presets. GUITAR RIG 5 — Application Reference — 17… -
Page 18
▪ The Options screen (3) serves to configure external controllers and their assignments, as well as preferences such as the window height, the path to presets, and other de- tails. See section ↑8, Options on setting up MIDI controllers and other options. GUITAR RIG 5 — Application Reference — 18… -
Page 19: Components And The Rack
Components and the Rack Building a Rack from Scratch On the first start, the Rack of GUITAR RIG 5 is empty. You will hear dry, slightly pre-am- plified guitar sound when you play: an invitation to try out the various components for yourself.
-
Page 20: The Component Pool
3.1.2 Setting Up an Amp The fastest way to start designing sounds with GUITAR RIG 5 is by adding an amp to the Rack. If you want to quickly create a guitar sound, try the Jump amplifier. ► Drag the amp’s icon from the Component Pool to the Rack. You can also double click the icon.
-
Page 21
Mics, Control Room, Control Room Pro, and Matched Cabinets. Another option is to use the pull down menu included in the matched cabinet. Here you will see the full list of available cabinets. You can also use the plus/minus tabs to toggle through the list. GUITAR RIG 5 — Application Reference — 21… -
Page 22: Basics For Rack Building
The audio signal runs through the chain of rack modules from top to bottom, except if you are using special tools that create parallel processing paths, like the Split. See the Compo- nents Reference for details on these tools. GUITAR RIG 5 — Application Reference — 22…
-
Page 23
▪ If you don’t want to replace another component when using Drag & Drop, make sure you drop it beneath the other components, which is indicated by an orange line in- stead of the rectangle. GUITAR RIG 5 — Application Reference — 23… -
Page 24
▪ The On/Off button allows for true bypassing of the module — no power is con- sumed when it is turned off. ▪ The (Minus) button minimizes the module’s display. ▪ The triangular arrow toggles its expert panel, if available. GUITAR RIG 5 — Application Reference — 24… -
Page 25: Working With Presets
Controllers), which is indicated by a small padlock symbol. These will not be affected by controller assignments stored in a Rack Preset. GUITAR RIG 5 ships with a huge amount of Rack Presets of any style, and you can easily create more as you see fit.
-
Page 26: The Preset Browser
Working with Presets The Preset Browser The Preset Browser The Preset Browser Click on the Browser button to open the Preset Browser — a powerful tool for finding and organizing all your Rack Presets. GUITAR RIG 5 — Application Reference — 26…
-
Page 27: Tags And The Preset List
Clicking on the column headers will sort by the according values, first ascending then de- scending. GUITAR RIG 5 — Application Reference — 27…
-
Page 28: The Search Engine
The new search engine will help you to quickly find a particular preset by entering part of its name. The search bar, situated between the Preset Browser and the Preset List, is al- ways ready to process your requests. GUITAR RIG 5 — Application Reference — 28…
-
Page 29: Loading And Saving Rack Presets
Rack or at the bottom of the SideKick. 4.1.4 Importing Presets There are two ways of importing presets into GUITAR RIG 5 — either of them can be the most convenient way to go: GUITAR RIG 5 — Application Reference — 29…
-
Page 30: Exporting Presets
The Preset Browser ▪ When you drag and drop preset files into the Preset Browser, they will be copied to the Sounds folder of GUITAR RIG 5 and get the tag(s) that were selected before. ▪ After selecting from the GUITAR RIG 5 menu, you can copy presets to File >…
-
Page 31
User saved presets are marked with a user icon inside the preset lists. Custom presets can be spotted in GUITAR RIG 5 by just looking at the preset lists.To delete a pre- set, right-click (ctrl-click) on it in the Preset List and select… -
Page 32: Tags On Three Levels
No preset will be harmed by deleting a tag — all presets are still in the Preset List when no tag is selected. ► To delete a preset, right-click on it in the Preset List and select Remove from disk. GUITAR RIG 5 — Application Reference — 32…
-
Page 33: Tagging Presets
Any preset can carry an unlimited number of tags! Adding tags to presets works simply with drag and drop: ► Click on one of the presets in the Preset List and drag it onto one of the tags in the left column of the Preset Browser. GUITAR RIG 5 — Application Reference — 33…
-
Page 34
▪ After removing all tags from a preset, it is still available in the Preset Browser when you de-select all tags. ▪ To really delete a preset, highlight it, right-click and select Remove from disk. GUITAR RIG 5 — Application Reference — 34… -
Page 35: Preset Info Page
After selecting one of the tags, the Preset List will change showing all the pre- sets containing this tag. Deleting a preset from the Preset List will remove the cur- rently selected tag from it. GUITAR RIG 5 — Application Reference — 35…
-
Page 36: Component Presets
Working with Presets Component Presets Component Presets GUITAR RIG 5 comes with plenty of factory presets for components, providing a timesav- ing alternative to dialing in classic sounds for each component by hand. 4.3.1 Basics A Component Preset contains the settings for a single component. After selecting an item of the Component Pool, press the Presets tab: a list of available Component Presets is dis- played below in the SideKick.
-
Page 37
Component Preset anywhere into the Rack. Component Presets and the Rack Each rack module displays the name of its current Component Preset in a small box on its left hand side, the Component Preset Display. GUITAR RIG 5 — Application Reference — 37… -
Page 38
Once you have found a good setting for a component you use regularly, you will want to save your own Component Preset. To do this you will want to create a Bank. The Banks are user-defined categories where Component presets are stored. GUITAR RIG 5 — Application Reference — 38… -
Page 39
► From the component pull down menu choose Save as → The new preset will be titled New Preset until a title is chosen. ► To save any changes to the preset currently displayed, select Save from the component menu. GUITAR RIG 5 — Application Reference — 39… -
Page 40
By clicking on the column headers of the list of Component Presets, you can sort it by List Number (#), Name, and Rating. Save a quality rating with each preset by clicking on one of the 5 stars right beside its name. This can always be changed later. GUITAR RIG 5 — Application Reference — 40… -
Page 41: The Rack Tools
The Rack Tools Tapedeck Pre The Rack Tools The following sections will introduce you to the Rack Tools of GUITAR RIG 5: Tapedeck Pre and Post, Tuner and Metronome. Tapedeck Pre The Tapedeck Pre Rack Tool Tapedeck Pre is the tool for playing back and recording audio at the beginning of GUITAR RIG’s signal chain (except when…
-
Page 42: Recording
Recording your guitar will pick up the processed sound, just as you hear it at the output. Use Tapedeck Post if you want to record your guitar part with the actual GUITAR RIG 5 — Application Reference — 42…
-
Page 43: Interaction With Tapedeck Pre
The Rack Tools Tapedeck Post sound, e.g. for using it ”outside of” GUITAR RIG 5. Files you import and play back will not be processed, which makes Tapedeck Post ideal for playing drum loops and your own backing tracks. Its controls are similar to Tapedeck Pre, except that it has no Transpose (TRANSP),…
-
Page 44: Tuner
-1. TUNE FORK produces a reference tone. To select its pitch, click on the note field to the ▪ right and drag up or down, or click on the Arrow buttons. GUITAR RIG 5 — Application Reference — 44…
-
Page 45: Metronome And Synchronization
▪ sound: The current tempo is stored with the Rack content when you save a preset. In this setting, the Metronome loads the tempo information when you load a preset. This is useful for preparing presets with synchronized effects e.g. for a live show. GUITAR RIG 5 — Application Reference — 45…
-
Page 46: Preset Volume
▪ Use the crossfader to switch between the Dry signal and the Wet (affected) signal. ▪ Use the slider to control the volume level of the wet signal. GUITAR RIG 5 — Application Reference — 46…
-
Page 47: Master Fx
▪ Configure your Master FX chain from factory or user presets. ▪ Click on the (cross) to empty the whole Master FX section. ▪ Click on the arrow to minimize the Master FX section. GUITAR RIG 5 — Application Reference — 47…
-
Page 48
Tools section of the Component Pool. New Banks may also be created similarly to other Component Presets. Just as the other Rack Tools, the Master FX can’t be selected or highlighted. GUITAR RIG 5 — Application Reference — 48… -
Page 49: The Rig Kontrol
RIG 5. Nine freely assignable switches and an expression pedal are at your disposal right after connecting it. Note that you can use the Rig Kontrol to control GUITAR RIG 5, even if you do not use it as your audio interface. For detailed information about the hardware and how to use the integrated audio interface, refer to the Hardware Reference.
-
Page 50: Assigning Functions To The Rig Kontrol
If you operate a switch or the pedal of the (physical) RIG KONTROL, both the Virtual Rig Kontrol and the assigned function will react to it. The label of Switch 1 is dragged onto the Volume I knob of the Plex. GUITAR RIG 5 — Application Reference — 50…
-
Page 51: Configuring Assignments
Kontrol. Click on the arrow button to reveal the assignment, then click on a label or switch on the Virtual Rig Kontrol to select it. The functions assigned to this particular control are now shown in the expert panel. GUITAR RIG 5 — Application Reference — 51…
-
Page 52
▪ The left bracket defines the value mapped to the controller at zero; the right bracket defines the value mapped to the controller at maximum. GUITAR RIG 5 — Application Reference — 52… -
Page 53: Assigning Functions To External Controllers
Rack. If the external footswitch you are using is “on” only while pressed (instead of switching be- tween “on” and “off”), activate Toggle mode in the context menu of the according input. GUITAR RIG 5 — Application Reference — 53…
-
Page 54: Using Guitar Rig In A Host
Setting Up a Guitar or Bass Track To setup a track to be processed by GUITAR RIG 5, just create an audio track and insert GUITAR RIG 5 as an effect. The audio track will hold the bare, unprocessed signal and your sound will be routed through GUITAR RIG before reaching the output stage of your DAW.
-
Page 55: Synchronization
(because it works both with audio and MIDI), you should use it as a signal process- ing / effects insert. 7.1.4 Synchronization If you want GUITAR RIG 5 to be in time with your host, remember to turn on Ext mode in the Metronome (see section ↑5.4, Metronome and Synchronization). This will turn off the speed setting of GUITAR RIG and use the host’s tempo as a master.
-
Page 56: Automating Parameters In Apple Logic Pro
In the View menu, turn on track automation for the selected track, so you can see what you are doing. Change the track to Latch Touch mode Start playback. GUITAR RIG 5 — Application Reference — 56…
-
Page 57: Sidechaining
In GUITAR RIG 5, a Sidechaining control is available in the Envelope, LFO, Input Level in the Modifier section and in the Stomp Compressor, Tube Compressor, and in the all new Fast Comp from the DYNAMICS section.
-
Page 58: Options
TAR RIG 5 reacts to MIDI Program Change messages regardless of assignments: They switch presets within the current Preset List. Controller Assignment the Easy Way The quickest way to control any knob with a MIDI device is provided by its context menu: GUITAR RIG 5 — Application Reference — 58…
-
Page 59: Setting Up External Midi Controllers
(instead of switching between “on” and “off” each time you press it), this will be the be- havior of the assigned parameter as well. If you want to change it, activate Toggle Mode the Menu of the according controller. GUITAR RIG 5 — Application Reference — 59…
-
Page 60: Assigning Functions To Controllers
0), the right one the value mapped to the controller at maximum (MIDI value 127). ▪ As switches are either on or off, the brackets can be used to define the difference be- tween the actual knob positions they trigger. GUITAR RIG 5 — Application Reference — 60…
-
Page 61
The Controller menu Even if you prefer drag and drop, the menu is necessary to assign functions that are not controlled by any rack module, e.g., switching presets. GUITAR RIG 5 — Application Reference — 61… -
Page 62: Linking External Midi Controllers To The Virtual Rig Kontrol
8.1.3 Linking External MIDI Controllers to the Virtual Rig Kontrol The Virtual Rig Kontrol is a perfectly integrated component of GUITAR RIG 5, sporting pre-assigned functions for many presets and a convenient display for all its assignments, especially in Live view. If your external MIDI controller features a comparable set of con- trols, it can make sense to map it to the Virtual Rig Kontrol and then use the latter for assigning functions instead.
-
Page 63
“off” as soon as it is released. This can be very useful when triggering effects. In GUITAR RIG 5, each controller input can be set to work in “Hold mode” via its context menu to reflect this difference. Just right-click any label of the Virtual Rig Kontrol, or click on Menu in any entry of the MIDI Controller list to call it up. -
Page 64: Preferences
In most cases, turning off Hold mode will enable them to work in the other mode as well. Preferences Under the Options tab, click on Preferences to configure GUITAR RIG 5. GUITAR RIG 5 — Application Reference — 64…
-
Page 65
Options Preferences The Preferences Menu It offers the following settings: Window Height: Use this control to set the height of the GUITAR RIG 5 window. You can ▪ choose among . The actual dimensions in pixels (given in Small Medium Large brackets) depend on the physical display resolution of your monitor. -
Page 66: Rig Kontrol 1 Support
8.2.1 Rig Kontrol 1 Support The earliest Rig Kontrol can still be used for controlling GUITAR RIG 5, with the natural limitation of having only one audio input channel, of course. The second channel trans- mits the unit’s control signal and is therefore not available. To activate Rig Kontrol 1 com-…
-
Page 67
Options Preferences Left channel blocked by Rig Kontrol GUITAR RIG 5 — Application Reference — 67… -
Page 68: Menu Bar
File Menu Bar GUITAR RIG 5 is designed in a way that — once set up — you will hardly ever need to use the Menu bar. Most functions are easier to access another way, as explained above. How- ever, it may be necessary to change the «Audio and MIDI settings…» in standalone mode.
-
Page 69: Edit
Activates full screen mode, giving you the maximum possible resolution — extremely useful in Live view. Press ESC or F4 to return to normal mode. Hide/Show SideKick Hides or shows the left area of the GUITAR RIG 5 user interface, where Preset Browser, Components Browser and Options are displayed. Hide/Show Live View…
-
Page 70: Help
Open Manual… For access to all available manuals, navigate to your language. Visit GUITAR RIG 5 on the Web… Your permanent bookmark to the GUITAR RIG 5 website, where you find product-related resources, news and entertaining extras! Visit the Knowledge Base…
-
Page 71: Audio And Midi Settings
Choose the correct type of driver for your audio interface. Using ASIO (Windows) / CoreAu- dio (Mac OS X) is strongly recommended. Device Select your audio device from the list. If it doesn’t appear, check if it is connected and its drivers are properly installed. GUITAR RIG 5 — Application Reference — 71…
-
Page 72
SideChain function, this is the place to go. The left column shows the available channels of your audio interface. The entries in the right column are GUITAR RIG 5 — Application Reference — 72… -
Page 73
The left column shows all available MIDI devices , sorted by Input and Output. The entries in the right column are actually menus. By clicking on them, you can turn them on or off. Mind that any devices you want to use to control GUITAR RIG 5 have to be activated (turned On) under Input. -
Page 74: Keyboard Shortcuts
[Delete] Edit Select All [Ctrl]+[A] [Cmd]+[A] View Hide/Show Hints [Ctrl]+[I] [Cmd]+[I] View Full Screen [F4] [F4] View Hide/Show RigKontrol [F3] [F3] View Hide/Show SideKick [F2] [F2] View Hide/Show Live View [F1] [F1] GUITAR RIG 5 — Application Reference — 74…
Большинство компьютерных музыкантов, использующих виртуальные студии звукозаписи и секвенсоры, не говоря уже профессиональных гитаристах, очень часто сталкивается с тем, что им нужно обработать чистый гитарный звук, добавив всевозможные эффекты. Современные гитарные процессоры наивысшего качества и самых известных брендов стоят весьма недешево, и позволить себе такую покупку может далеко не каждый. Поэтому музыканты предпочитают пользоваться виртуальными «примочками», в которых наборы эффектов представлены гораздо шире.
К одним из самых популярных приложений относится небезызвестный эффект-процессор Guitar Rig, на данный момент доступный в виде пятой модификации. Несмотря на множество встроенных пресетов, настройка гитары в Guitar Rig 5 у многих пользователей вызывает массу вопросов, поскольку в этом процессе необходимо учесть некоторые важные нюансы.
Что такое Guitar Rig: краткие сведения
Сама же программа представляет собой мощнейший комбайн, состоящий из огромного количества эффектов, которые можно комбинировать между собой в любых сочетаниях. Предустановленных шаблонов тут тоже хватает.
Грубо говоря, можно просто выбрать понравившийся набор, который может соответствовать именно тем настройкам звука, которые используются либо определенными гитаристами с мировыми именами, либо применяются в определенных стилях музыки, отдельных композициях и т.д. Каждый подключенный модуль в виде кабинетов и цепочек эффектов можно перестраивать по своему усмотрению, сохранять собственные настройки, импортировать дополнительные шаблоны и т. д.
Само приложение разработано всемирно известной в области создания и совершенствования звуковых компьютерных технологий компанией Native Instruments и является платным. Однако на просторах Рунета можно найти версии с ключами, лицензиями или кей-генераторами. Конечно, использование такого ПО является противозаконным, но наших пользователей это не останавливает. Суть не в том. Оставим в стороне морально-этические соображения и займемся исключительно настройкой Guitar Rig 5.
Нюансы установки
После загрузки инсталлятора на компьютер и его запуска необходимо четко определиться, какую именно версию предполагается использовать. Данное программное обеспечение может устанавливаться и в виде самостоятельной программы (Standalone), и в виде виртуального плагина форматов VST или AAX, подключаемого к хосту основной студийной программы (DAW).
Процесс установки достаточно прост и заострять на нем внимание особого смысла нет. Но вот в качестве дополнительного компонента настоятельно рекомендуется установить специальный звуковой драйвер ASIO4ALL, без использования которого настройка Guitar Rig 5 на оптимальное качество звучания станет абсолютно бессмысленной. Установщик драйвера можно загрузить из интернета. Но при использовании его в качестве основного устройства воспроизведения необходимо выполнить ряд важных настроек.
Предварительная настройка звукового драйвера
Когда вы запустите гитарный процессор в первый раз в виде самостоятельного приложения, сразу появится окно настройки аудиоинтерфейса, в котором из списка доступных устройств и нужно выбрать ASIO4ALL. Если же плагин активируется в студийной программе-секвенсоре, для него автоматически будет применен тот драйвер, который используется в основном приложении. Основные параметры, предлагаемые по умолчанию, можно не менять.
А вот значение буфера, устанавливаемое в стандартных настройках Guitar Rig 5 и ASIO на 512 сэмплов, лучше сразу выставить на максимум (2048 сэмплов). Это позволит избежать торможения в работе гитарного процессора и непредвиденных скачков или помех при воспроизведении звука. Обратите внимание, что при использовании стационарной программы настоятельно рекомендуется отключить микрофон (если таковой подключен к обычному ПК или по умолчанию включен на ноутбуке), поскольку сразу же появится наводка на колонки в виде сильнейшего свиста.
Настройка звука в Guitar Rig 5
Наконец, кратко остановимся на использовании гитарных модулей и эффектов. Если вы новичок в вопросах настройки Guitar Rig 5, можете просто просмотреть доступные шаблоны, выбрав нужный раздел, и двойным кликом активировать загрузку набора предустановленных модулей и настроек.
Также можно использовать выбора стиля, название какой-то известной композиции или задать поиск по ключевым словам. Наконец, если имеющиеся шаблоны вам не нравятся, можете загрузить из интернета дополнительные наборы, созданные энтузиастами своего дела, хотя и собственные эксперименты с кабинетами и всевозможными гитарными эффектами многим тоже могут прийтись по вкусу.
Главная
/
Техника
-
- Встроить
- Пожаловаться
youtube.com
08.01.2016, 15:07:49
Сохранено в Электрогитара
Техника
Игорь Кипарин
65 подписчиков
Нет комментариев
Содержание статьи:
- Что такое Guitar Rig: краткие сведения
- Нюансы установки
- Предварительная настройка звукового драйвера
- Настройка звука в Guitar Rig 5
Большинство компьютерных музыкантов, использующих виртуальные студии звукозаписи и секвенсоры, не говоря уже профессиональных гитаристах, очень часто сталкивается с тем, что им нужно обработать чистый гитарный звук, добавив всевозможные эффекты. Современные гитарные процессоры наивысшего качества и самых известных брендов стоят весьма недешево, и позволить себе такую покупку может далеко не каждый. Поэтому музыканты предпочитают пользоваться виртуальными «примочками», в которых наборы эффектов представлены гораздо шире.
К одним из самых популярных приложений относится небезызвестный эффект-процессор Guitar Rig, на данный момент доступный в виде пятой модификации. Несмотря на множество встроенных пресетов, настройка гитары в Guitar Rig 5 у многих пользователей вызывает массу вопросов, поскольку в этом процессе необходимо учесть некоторые важные нюансы.
Что такое Guitar Rig: краткие сведения
Сама же программа представляет собой мощнейший комбайн, состоящий из огромного количества эффектов, которые можно комбинировать между собой в любых сочетаниях. Предустановленных шаблонов тут тоже хватает.
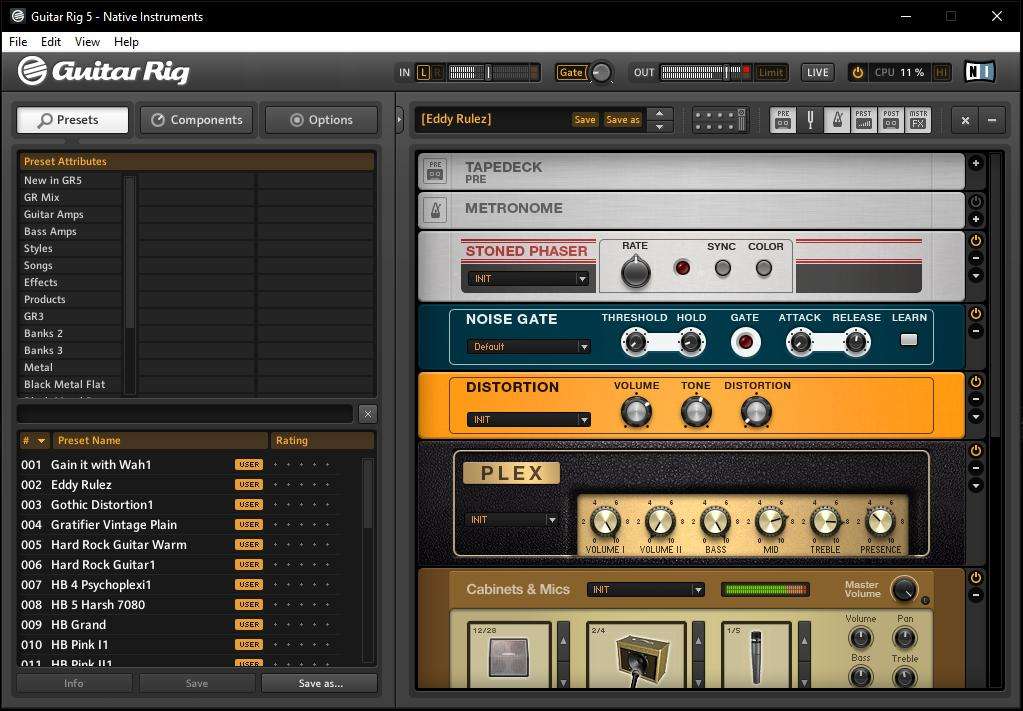
Грубо говоря, можно просто выбрать понравившийся набор, который может соответствовать именно тем настройкам звука, которые используются либо определенными гитаристами с мировыми именами, либо применяются в определенных стилях музыки, отдельных композициях и т.д. Каждый подключенный модуль в виде кабинетов и цепочек эффектов можно перестраивать по своему усмотрению, сохранять собственные настройки, импортировать дополнительные шаблоны и т. д.
Само приложение разработано всемирно известной в области создания и совершенствования звуковых компьютерных технологий компанией Native Instruments и является платным. Однако на просторах Рунета можно найти версии с ключами, лицензиями или кей-генераторами. Конечно, использование такого ПО является противозаконным, но наших пользователей это не останавливает. Суть не в том. Оставим в стороне морально-этические соображения и займемся исключительно настройкой Guitar Rig 5.
Нюансы установки
После загрузки инсталлятора на компьютер и его запуска необходимо четко определиться, какую именно версию предполагается использовать. Данное программное обеспечение может устанавливаться и в виде самостоятельной программы (Standalone), и в виде виртуального плагина форматов VST или AAX, подключаемого к хосту основной студийной программы (DAW).
Процесс установки достаточно прост и заострять на нем внимание особого смысла нет. Но вот в качестве дополнительного компонента настоятельно рекомендуется установить специальный звуковой драйвер ASIO4ALL, без использования которого настройка Guitar Rig 5 на оптимальное качество звучания станет абсолютно бессмысленной. Установщик драйвера можно загрузить из интернета. Но при использовании его в качестве основного устройства воспроизведения необходимо выполнить ряд важных настроек.
Предварительная настройка звукового драйвера
Когда вы запустите гитарный процессор в первый раз в виде самостоятельного приложения, сразу появится окно настройки аудиоинтерфейса, в котором из списка доступных устройств и нужно выбрать ASIO4ALL. Если же плагин активируется в студийной программе-секвенсоре, для него автоматически будет применен тот драйвер, который используется в основном приложении. Основные параметры, предлагаемые по умолчанию, можно не менять.
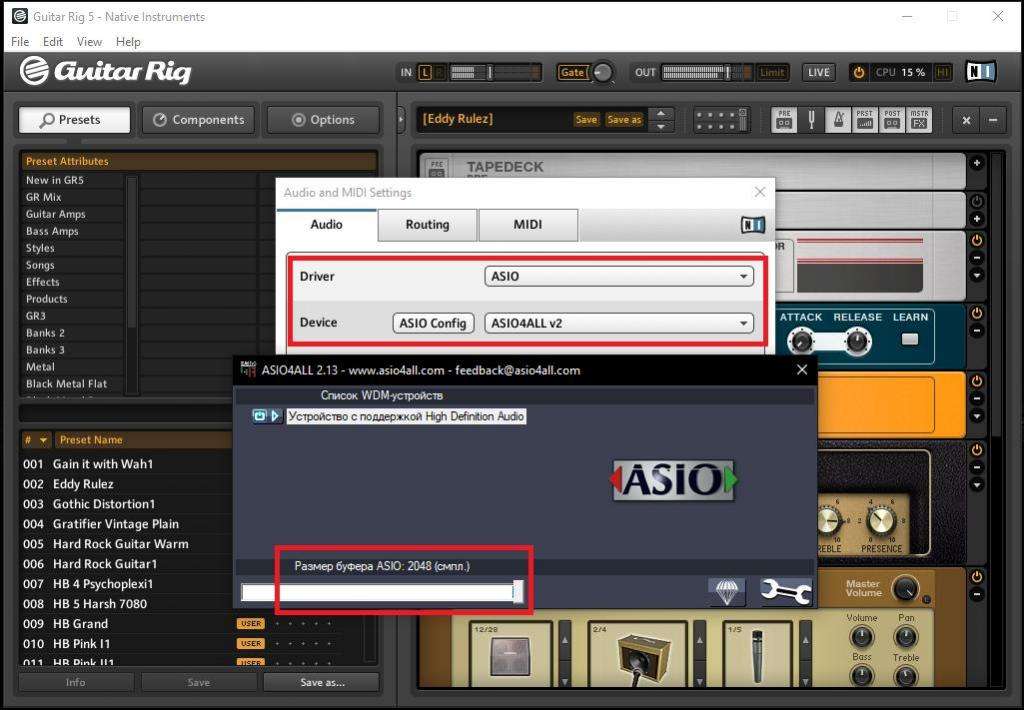
А вот значение буфера, устанавливаемое в стандартных настройках Guitar Rig 5 и ASIO на 512 сэмплов, лучше сразу выставить на максимум (2048 сэмплов). Это позволит избежать торможения в работе гитарного процессора и непредвиденных скачков или помех при воспроизведении звука. Обратите внимание, что при использовании стационарной программы настоятельно рекомендуется отключить микрофон (если таковой подключен к обычному ПК или по умолчанию включен на ноутбуке), поскольку сразу же появится наводка на колонки в виде сильнейшего свиста.
Настройка звука в Guitar Rig 5
Наконец, кратко остановимся на использовании гитарных модулей и эффектов. Если вы новичок в вопросах настройки Guitar Rig 5, можете просто просмотреть доступные шаблоны, выбрав нужный раздел, и двойным кликом активировать загрузку набора предустановленных модулей и настроек.
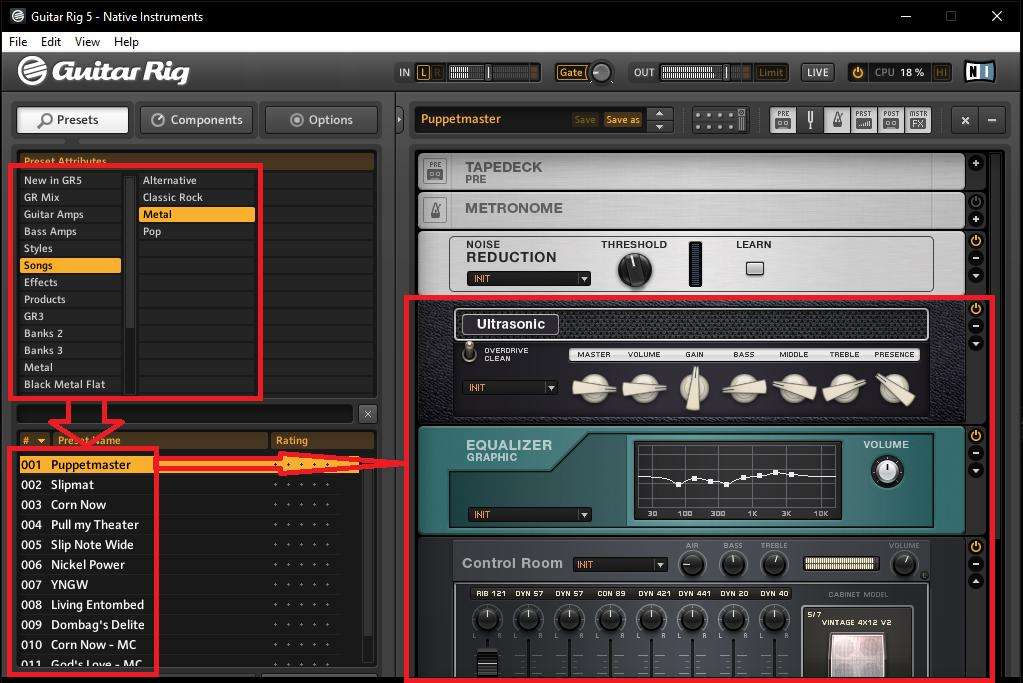
Также можно использовать выбора стиля, название какой-то известной композиции или задать поиск по ключевым словам. Наконец, если имеющиеся шаблоны вам не нравятся, можете загрузить из интернета дополнительные наборы, созданные энтузиастами своего дела, хотя и собственные эксперименты с кабинетами и всевозможными гитарными эффектами многим тоже могут прийтись по вкусу.

Жду ваши вопросы и мнения в комментариях


