- Главная
- Статьи
- Sonar. Секреты и советы. Часть 1. Первые шаги. Первоначальная настройка.

Sonar. Секреты и советы
автор: Overload
от SonarMusic.ru:
Статья изначально создавалась автором для описания Cakewalk Sonar 5.2, но актуальна и для более поздних версий. В вышедших позднее версиях 6-8 добавилось большое количество новых функций и возможностей, которые будут описаны отдельно. Какие-то изменения мы будем указывать в тексте.
Глава 1
НАСТРОЙКА ПЕРВОНАЧАЛЬНАЯ
Для начала мы немного настроим Cakewalk Sonar для нормальной комфортной работы.
Предполагается, что Sonar установлен полностью. После установки Sonar попросит ассоциировать себя со всеми файлами Cakewalk, которые могут встретиться на компьютере. Потом Sonar проанализирует Вашу звуковую карту, а затем – MIDI-девайсы, которые в Вашей звуковой плате обязательно присутствуют. В более-менее простых звуковых платах как правило присутствуют два виртуальных MIDI-порта, например, в карте SB Live! они называются SB Live! Synth 1 и 2. Их оба надо инициализировать (попросту выделить) и передвинуть вверх таблицы командой Move Selected Devices To Top. Если в Вашей системе присутствует не виртуальная, а реальная MIDI-клавиатура, то следует перед запуском Sonar включить клавиатуру (и, соответственно, установить дрова). Иначе, если её запустить во время работы Sonar, тот её попросту не увидит.
После правильной установки и запуска Sonar мы увидим вот такую картину:
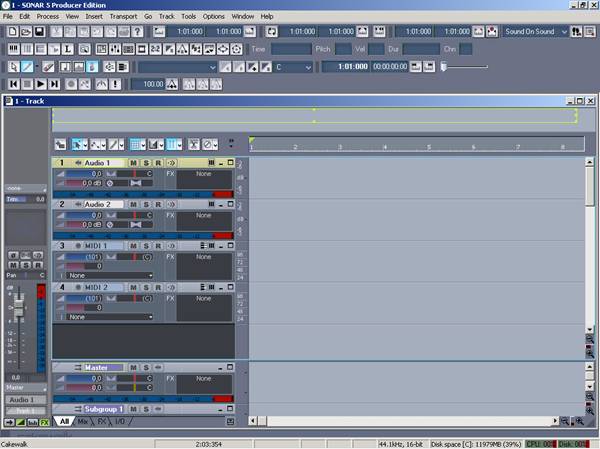
Тех, кто работал с другими подобными программами, не удивит такое количество разнообразных элементов. Новичка же они попросту испугают. Это всё не так страшно, особенно если учесть, что ВСЁ здесь поддаётся настройке. Например, над основным окном программы (где дорожки), располагается Навигатор (горизонтальная полоса с зелёными «верёвками»). Разработчики Sonar думали, что он поможет пользователю лучше ориентироваться в фонограмме. Ещё есть левая вертикаль с ползунком. По умолчанию она показывает статус выделенной дорожки или шины, вот сейчас она указывает на состояние Мастера (основного выхода со звуковой карты). Эти панели можно закрыть, вот таким образом:
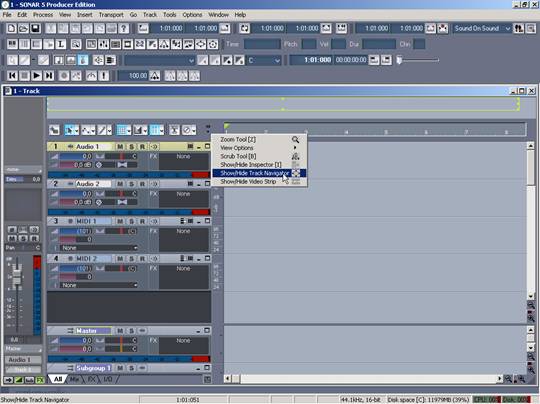
Если нажать на двойную стрелочку слева от зелёного флажка, появится выпадающее меню функций, скрытых при дефолтном размере окон. Конечно, их можно увидеть и так – для этого захватим мышкой вертикальный разделитель (слева от белых цыфирок) и подвинем всю эту беду вправо, вот так:
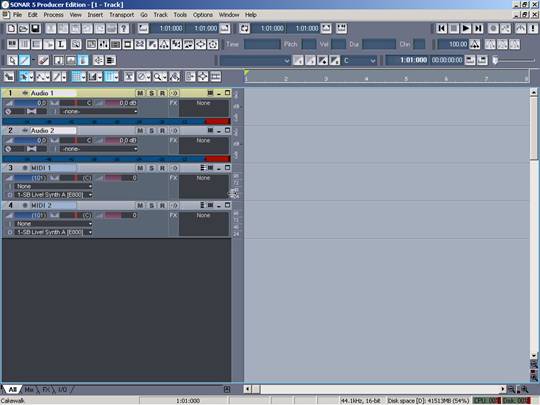
После того, как мы отключим две эти нам пока «ненужные» опции, нажмём справа вверху кнопку «полного экрана» (их две, не перепутайте, верхняя отвечает за окно ВСЕЙ программы, а та, что пониже – за рабочую область проекта), картинка станет такой:

Здесь я убрал и несколько дорожек, что были под рабочими – это мастер-дорожка, а также подгруппы, при потрековой записи вначале они и не нужны. Только я их не убрал вообще, а скрыл (квадратик с треугольничком правее надписи I/O внизу панели, при повторном нажатии они вновь появятся).
от SonarMusic.ru: В последствии все отключенные опции можно будет вернуть обратно аналогичным образом. (К тому же на современных мониторах с большим разрешениям они занимают не очень много места) По умолчанию Sonar при первом открытии разворачивает так называемый Normal-проект, включающий в себя 2 аудио- и 2 MIDI— дорожки. Конечно, любую из них можно запросто убрать, скопировать или склонировать, причём со всеми данными на ней (или – без), либо добавить пару – тройку пустых. И уж, конечно, можно запомнить такое положение дел и перезаписать шаблон «Normal» вот в таком виде, как мы его сейчас наблюдаем.
Далее мы разберёмся с кнопками Панели управления Sonar, это те, что над рабочим окном.
Популярные метки
Присоединяйтесь к нам:


Скачать бесплатно Cakewalk
Быстрый старт
Новости сайта
Вышел Cakewalk 2022.11 
Мы рады объявить о выпуске версии 2022.11! Этот выпуск включает в себя различные улучшения удобства…
Вышел Cakewalk 2022.09 
Мы рады объявить о выпуске версии 2022.09! В первую очередь это отладочный выпуск, который включает исправления…
Вышел Cakewalk 2022.06 
Мы рады объявить о выпуске версии программы 2022.06! В этом выпуске представлены улучшения панели управления…
Случайная новость
Разделы форума
Работа с аудио
Подразделы: Запись и обработка вокала, Запись и обработка гитары, Барабаны, Электронная и танцевальная музыка, Hip-Hop, RNB
Работа с MIDI, контроллеры, автоматизация
Работа с видео
VST эффекты, инструменты, ProChannel, Rewire
Музыкальное оборудование
Настройка. Общие вопросы
Другие программы для создания музыки и совместное их использование с Cakewalk и Sonar
О звуке, сведение, мастеринг, акустическая отделка помещений
Сэмплы, библиотеки для инструментов
Творчество
Подразделы: Школа
Шоубизнес, продвижение творчества, промоушн, авторское право. Концерты, конкурсы, фестивали, релизы альбомов
Обсуждение сайта
Другое. Разговоры на общие темы
Продам — куплю
Предложения о сотрудничестве, поиск музыкантов
Меню сайта
Профессиональная цифровая аудио-студия скрывает в себе колоссальный функционал, на изучение которого могут уйти долгие месяцы метода проб и ошибок. Но зачем тратить драгоценное время на тыканье неизвестных кнопок и манипуляции с загадочными ползунками, когда существует структурированное руководство, проясняющее большую часть вопросов.
Забудьте про метод научного тыка. По завершению просмотра этих уроков вы сможете не только уверенно пользоваться программой, но и создавать вполне достойные музыкальные композиции.
Сборка состоит из 2-х видео-мануалов, по версиям SONAR 8 и X1. Все версии Cakewalk SONAR имеют схожий интерфейс и не переживайте если ваша окажется чуть более новой. Разработчики придерживаются единого стиля, и с обновлениями в первую очередь расширяют функционал и улучшают производительность своего софта.
Мини-курс по SONAR 8
Коротенький мануал для новичков, желающих быстрее влиться в творческий процесс, без углубления в детали. Состоит из 3-х видеоуроков, общей продолжительностью 24 минуты.
Основы SONAR X1
Более детальное изучение программы с мастер-классом от профессионального композитора. Рекомендуем как начинающим, так и более-менее уверенным пользователям. Сборка включает всего 2 лекции, протяженностью 1 час 35 минут. Смотрите внимательно, повторяйте увиденное на практике, и вы быстро освоите этот сложный и одновременно замечательный инструмент.
Скачать мануал «Основы SONAR X1»
одним архивом
Яндекс.Диск
/ MEGA
Выражаем особую благодарность сайту sonarmusic.ru за информативные видеоуроки, которые несомненно помогут множеству заинтересованных людей, и возможно, подарят нашему миру несколько хороших музыкантов!
![]()
SONAR X1
Руководство пользователя

Информация, приведенная в данном руководстве, может быть изменена без отдельного уведомления со стороны Cakewalk, Inc. Права на использование описанного в данном руководстве программного обеспечения определяются лицензионным соглашением. Любое незаконное копирование и распространение данного программного обеспечения запрещено. Также запрещено копирование и распространение в любой форме данного документа без письменного разрешения Cakewalk, Inc.
Copyright © 2010 Cakewalk, Inc. Все права защищены.
Program Copyright © 2010 Cakewalk, Inc. Все права защищены.
ACID является торговой маркой Sony Creative Software, Inc.
Cakewalk является зарегистрированной торговой маркой Cakewalk, логотипы Inc. и Cakewalk являются торговыми марками Cakewalk, Inc. Права на названия других компаний и продукции принадлежат соответствующим владельцам.
Веб-сайт Cakewalk — www.cakewalk.com/
*Информация, приведенная в данном руководстве, относится ко всем версиям SONAR X1 — Producer, Studio, Essential и LE. Если та или иная функция имеется только в конкретной версии SONAR X1, это оговаривается отдельно.
|
Roland SONAR X1. Руководство пользователя |
2 |

Введение
SONAR — профессиональная программа для работы со звуком и создания музыки на базе персонального компьютера. Она предназначена для музыкантов, композиторов, аранжировщиков, инженеров звукозаписи, разработчиков мультимедийной продукции и игр. SONAR поддерживает множество популярных аудиоформатов, в том числе WAV, MP3, ACID, WMA, AIFF, и представляет собой готовое решение для быстрой и эффективной работы со звуком.
Программа SONAR не только объединяет в себе MIDI- и аудиовозможности, она является центральным элементом звукозаписывающей студии благодаря поддержки работы с большинством аппаратных аудиоинтерфейсов, аудио- и MIDI-плагинов, программных синтезаторов, StudioWare, а также протокола MIDI Machine Control (MMC).
Общие сведения о SONAR
Cakewalk SONAR является флагманской программой в линии интегрированных аудио-/MIDI-секвенсоров для платформы Windows. Она предназначена для для работы со звуком и создания музыки. Ниже перечислены основные возможности SONAR.
Публикация
Под публикацией в данном контексте подразумевается распечатка нотных партитур (и возможно текста) созданных в SONAR музыкальных произведений в целях их последующего распространения в печатном виде. Также возможно распространение музыкальных файлов. SONAR предоставляет возможность обмена музыкальными данными с другими пользователями в различных форматах.
Работа с музыкальным материалом
SONAR является мощным музыкальным приложением с огромным набором инструментов для записи авторского аудиоматериала, обработка, редакции и микширования звука. Практически все управление осуществляется с помощью компьютерной мыши. Полнофункциональный секвенсор объединяет в себе возможности записи/ воспроизведения MIDI- и аудиоматериала с дальнейшей обработкой звука.
SONAR позволяет выводить на экран и осуществлять редакцию музыкального материала с точностью до ноты с помощью отображения партитуры или MIDI-событий, а также распечатывать полную партитуру или выбранные ее части. Доступна графическая редакция изменений темпа и громкости, а также внесение в партитуру текстовой информации.
Ремикширование
Клипы Groove позволяют импортировать, создавать, экспортировать и редактировать циклы, а также быстро изменять темп и тональность всего проекта. В окне Browser можно прослушивать циклы согласно темпу и тональности проекта перед помещением их на трек.
Озвучивание игр
SONAR является наилучшим решением для озвучивания электронных игр. Удобный секвенсор позволяет свободно оперировать музыкальными темами, что облегчает процесс сопоставления звуковых фрагментов игровым персонажам, объектам и событиям. Результат работы можно сохранить в формате стандартного MIDIфайла, который поддерживается практически всем музыкальным оборудованием.
Работа со звуком
Для создания аудио CD или мастер-лент SONAR предоставляет весь необходимый набор инструментов микширования и мастеринга. Многоканальная запись позволяет потреково сохранять аудиоматериалы студийной сессии или концертного выступления. Для управления миксом предусмотрены переконфигурируемые шины. Доступен огромный набор реальных стереоэффектов, таких как хорус, флэнжер, реверберация и задержка, которые можно использовать в разрывах треков, в качестве петли или в общем миксе. SONAR поддерживает частоту дискретизации 44.1 кГц для аудио CD, формат 24 бит/96 кГц для DVD, а также позволяет варьировать частоту дискретизации. Все аудиоэффекты имеют разрядность 32 бит с плавающей запятой или 64 бит для получения максимального качества звука.
Разнообразие музыкальных форматов
Программа SONAR представляет собой идеальный вариант для передачи музыки по сетям Интернет, поскольку она поддерживает создание файлов в компактных по объему форматах: MIDI, MP3 и Windows Media Advanced Streaming. Любой проект SONAR можно сохранить в одном из этих форматов с помощью всего нескольких операций.
|
3 |
Roland SONAR X1. Руководство пользователя |

Озвучивание видеоматериалов
SONAR предоставляет набор функций аудио пост-продакшн, в том числе покадровую аудио-/MIDI-синхронизацию с таймкодом, приходящим с внешнего устройства, а также высококачественные временную коррекцию и редакцию с точностью до сэмпла и распознаванием переходов через нулевой уровень. Кроме того, поддержка SONAR видеофайлов помогает осуществлять синхронизацию с цифровым видеорядом, облегчая его озвучивание.
Размещение музыки в Интернет
Cakewalk Publisher позволяет воспроизводить и распространять результаты вашей работы по компьютерным сетям. С помощью Cakewalk Publisher можно организовать создание пользовательских плейлистов и загрузку соответствующих музыкальных пьес на любые веб-сайты. Доступно дополнение плейлистов сопроводительными изображениями, ссылками (в формате URL), а также информацией об исполнителе, треках и альбомах.
Создание аудио CD
SONAR имеет встроенный модуль записи аудио CD, позволяющий переносить готовые аудиотреки на дисковую матрицу в формате, совместимым со стандартными CD-плеерами.
Удобство работы
SONAR предоставляет все возможности для организации удобного для пользователя рабочего поля программы и аудио-/MIDI-конфигурирования системы. Также предусмотрена интеграция SONAR с другими программами обработки звука, что обеспечивает постоянную работу SONAR в фоновом режиме. Доступен набор программных модулей, поддерживающих различные аудиоустройства Roland и Yamaha. Для связи со стандартным студийным аудиооборудованием служит заложенная в SONAR уникальная технология StudioWare.
Работа со звуком в компьютере
Ниже описаны два основных формата музыки, используемые в компьютере: MIDI и цифровой звук.
MIDI
MIDI (Musical Instrument Digital Interface) — это общепринятый протокол связи между различным музыкальным оборудованием (звуковыми платами, синтезаторами и другими электронными инструментами) и компьютерами. Для MIDI-коммутации используются специальные кабели. Для записи MIDI-данных в SONAR необходимо MIDIкабелем подключить порт MIDI OUT инструмента к порту MIDI IN звуковой карты или MIDI-интерфейса компьютера. Также требуется установка в компьютер драйвера, прилагаемого к звуковой карте или MIDIинтерфейсу.
Протокол MIDI предусматривает обмен определенной информацией и командами между скоммутированными устройствами. Например, чтобы имитировать взятие ноты на клавиатуре, компьютер передает в инструмент MIDIсообщение «Note On», соответствующее требуемой ноте. Чтобы прервать звучание ноты, компьютер передает в инструмент MIDI-сообщение «Note Off».
Протокол MIDI включает в себя огромное количество инструкций, например, сообщения об изменении звука ноты (банка и патча), сообщения, связанные с работой педали сустейна или манипуляциями колесом высоты тона и так далее. С помощью передачи необходимых сообщений в нужное время компьютер позволяет управлять электронными инструментами, с помощью которых воспроизводится музыкальный материал.
MIDI-данные можно передавать по 16 независимым каналам. В конфигурации любого MIDI-устройства предусмотрена возможность выбора каналов, служащих для приема MIDI-сообщений.
MIDI-файлы содержат все MIDI-сообщения и временную информацию, использующуюся для воспроизведения пьесы. MIDI-файлы можно открывать и воспроизводить в различных программах, включая SONAR. Они имеют расширение .mid.
Формат MIDI имеет следующие преимущества:
•Компактный формат хранения музыкальных данных.
•Удобное назначение партий на звуковые модули.
•Различные типы музыкальных событий (темпа, нот, и так далее), доступных для отображения и редакции.
Основным неудобством формата MIDI является то, что звук, доводимый до слушателя, в полной мере зависит от используемого MIDI-оборудования. И, естественно, качество звучания синтезатора будет намного выше, чем простой компьютерной звуковой платы.
|
Roland SONAR X1. Руководство пользователя |
4 |

Цифровой звук
Цифровой звук (в рамках данного руководства называемый просто «звуком») является наиболее простым способом передачи музыки. Работа с ним аналогична использованию магнитофона — запись и воспроизведение. Цифровой звук представляет собой последовательность событий, называемых сэмплами. Чтобы записать звук в SONAR, подключите аудиовыход электронного инструмента к аудиовходу звуковой карты или аудиоинтерфейса. Для записи вокала или акустического инструмента к аудиовходу звуковой карты или аудиоинтерфейса подключите микрофон.
Звуковые волны
Звуковые волны представляют собой колебания воздуха. Они распространяются от источника колебаний во всех направлениях. Когда колебания достигают уха, они воспринимаются барабанный перепонкой и интерпретируются мозгом в качестве звука. Аналогично, если колебания воспринимаются микрофоном, его мембрана преобразует их в электрические сигналы, которые подаются в подключенное устройство.
Звуковые колебания имеют большую частоту. Воспринимаемый человеческим ухом диапазон частот находится в пределах от 20 до 16000-20000 колебаний в секунду.
Запись цифрового звука
При записи цифрового звука компьютер принимает электрический сигнал с аудиоисточника и преобразует его в последовательность сэмплов (для получения качества аудио CD частота равна 44100 сэмплов в секунду), величина каждого из которых находится в диапазоне от 0 до 65535, и сохраняет ее.
Для воспроизведения этой последовательности сэмплов компьютер преобразует ее в электрический сигнал, который подается в громкоговоритель. На основе этого сигнала громкоговоритель излучает звуковые колебания, аналогичные записанному исходному звуку.
Основным преимуществом цифрового звука является его качество. В отличие от MIDI, цифровой звук сохраняет все свои изначальные нюансы, гармоники и другие характеристики. Однако, его хранение требует значительного дискового пространства. Для записи 1-минутного фрагмента стереозвука с качеством аудио CD требуется около 10 Мб дискового пространства.
В рамках компьютера цифровой звук обычно сохраняется в файлах Wave (с расширением .wav). Этот формат поддерживается практически всеми звуковыми программами. SONAR позволяет воспроизводить, записывать и редактировать файлы Wave.
Установка
SONAR можно установить в любом компьютере, работающем под управлением Windows Vista, Windows 7, Windows XP или x64 и оборудованным звуковой платой или встроенным звуковым модулем. Для подключения других устройств, например, MIDI-клавиатуры, электрогитары или микрофона, потребуются соответствующие коммутационные кабели и необходимые разъемы в компьютере.
*SONAR X1 Producer и Studio непосредственно поддерживаются Windows x64. SONAR X1 Essential работает в качестве 32-битной программы под управлением Windows x64.
Перед началом установки SONAR не забудьте пройти процедуру регистрации на веб-сайте http://www.cakewalk.com/register, чтобы получить доступ к обновлениям программы и технической поддержке. Для этого потребуются серийный номер программы, ваше имя и адрес электронной почты.
Чтобы подключить к компьютеру MIDI-клавиатуру, потребуется MIDI-интерфейс. На некоторых звуковых платах он уже имеется в наличии. Среди доступных MIDI-интерфейсов многие предусматривают подключение по USB.
Во избежание повреждения оборудования перед началом какой-либо коммутации отключите питание компьютера и остальных устройств.
Пользовательский доступ
Для работы предыдущих версий SONAR требовался вход в Windows с привилегиями администратора. В текущей версии это правило отменено. Установка и использование SONAR доступна пользователям с любым уровнем доступа. Для многопользовательской работы с персональными установками достаточно иметь только одну установленную в компьютере копию SONAR.
При первой установке SONAR все файлы приложения и файлы .ini помещаются в следующие системные папки категории «All Users»:
Windows XP:
C:Documents and SettingsAll UsersApplication DataCakewalk
|
5 |
Roland SONAR X1. Руководство пользователя |
Windows Vista / Windows 7:
C:ProgramDataCakewalk
При первом запуске SONAR все рабочие файлы (такие как шаблоны треков и проектов) копируются из общей системной папки (All Users) в папку конкретного пользователя (User Account).
Если установить патч SONAR поверх изначальной инсталляции, рабочие файлы в папке пользователя не замещаются никакими обновленными рабочими файлами патча. Однако, эту операцию можно выполнить принудительно.
*Следующая операция переписывает рабочие файлы SONAR (такие как шаблоны треков и проектов) в папке текущего пользователя. Перед этим выводится запрос на подтверждение или отмену. Будьте осторожны, чтобы не утерять важные данные.
Чтобы принудительно обновить и переписать использующиеся по умолчанию рабочие файлы, запустите SONAR, удерживая клавишу CTRL.
Данные в папке Program Files распространяются на всех пользователей.
Аудиокоммутация
Среди аудиоинтерфейсов (звуковых плат) наиболее распространенными являются CardBus (PCI), USB/USB2 и FireWire. В ноутбуках могут использоваться аудиокарты PCMCIA. Многие аудиоинтерфейсы также оборудованы входами/выходами MIDI, а также содержат встроенные MIDI-синтезаторы. Ниже будут описаны различные варианты аудиокоммутации.
Аналоговые и цифровые входы
Имеется два основных типа аудиовходов, аналоговые и цифровые. Аналоговые входы служат для подключения к компьютеру гитары, микрофона или других инструментов. Преобразование в цифровой формат осуществляется с помощью аудиоинтерфейса. Цифровые входы служат для непосредственного подключения к компьютеру цифровых устройств. К цифровым входам подключаются внешние АЦП, некоторые гитарные процессоры, например, Line 6 POD, и различные системы записи, такие как ADAT. Аналоговые входы имеют более широкое распространение, ими по стандарту оборудованы практически все звуковые платы компьютеров (в том числе встроенные в материнскую плату). Цифровые входы становятся все более популярными, ими обычно оснащается профессиональное и “полупрофессиональное” аудиооборудование. Аналоговые входы поддерживают работу как с моно, так и со стерео сигналами (при наличии стереовхода), а количество поддерживаемых цифровым входом каналов определяется форматом интерфейса.
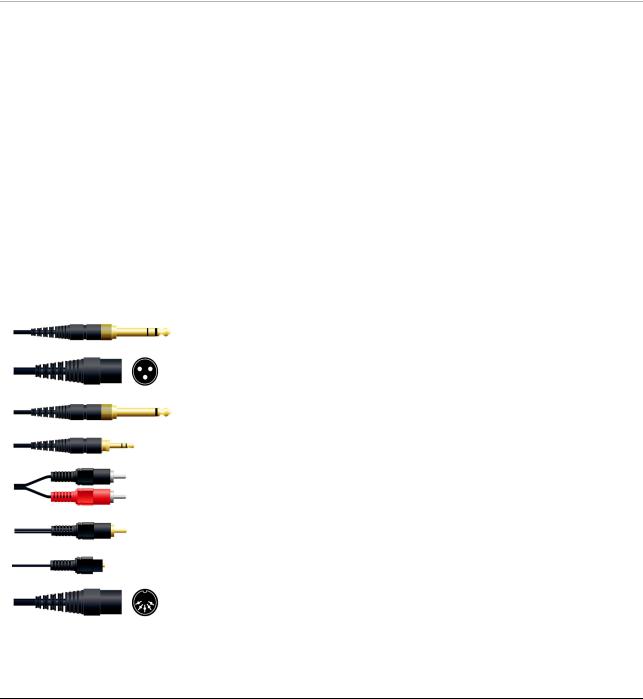
В таблице приведены наиболее часто встречающиеся варианты коммутации.
|
Разъем |
Тип |
Описание |
|
1/4” TRS |
Симметричная аналоговая коммутация |
|
|
XLR |
Симметричная аналоговая коммутация микрофонов, |
|
|
профессионального аудиооборудования |
||
|
1/4” TS |
Несимметричная аналоговая коммутация гитарного |
|
|
кабеля, «Hi-Z» |
||
|
1/8” миниджек |
Симметричная аналоговая коммутация наушников, |
|
|
настольной компьютерной аудиосистемы |
||
|
RCA |
Аналоговая коммутация проигрывателя пластинок, |
|
|
кассетного магнитофона |
||
|
SPDIF |
Цифровая коммутация стереосигналов |
|
|
Оптический |
Цифровая коммутация стереосигналов |
|
|
MIDI |
MIDI-коммутация |
|
См. документацию на используемый аудиоинтерфейс.
|
Roland SONAR X1. Руководство пользователя |
6 |
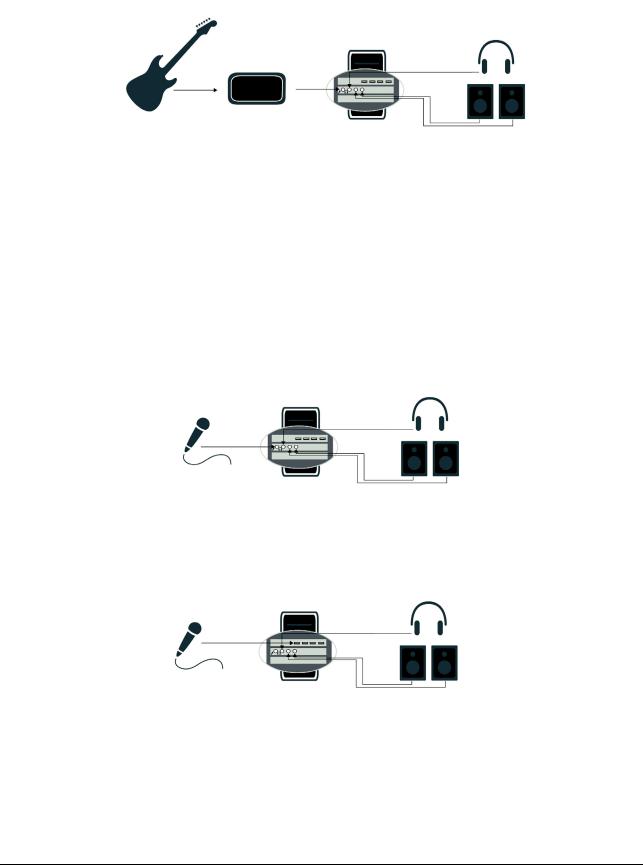
Подключение электрогитары или клавишного инструмента
•Если звуковая плата компьютера оборудована входом на 1/8” миниджеке (как встроенная в материнскую плату), для подключения к нему 1/4” гитарного кабеля приобретите соответствующий переходник, и подключите последний к микрофонному или линейному 1/8” входу звуковой платы. Для подключения клавишного инструмента используйте линейный вход звуковой платы и линейный выход инструмента.
•Профессиональная или “полупрофессиональная” звуковая плата как правило оборудуется 1/4” входом, к которому подключается гитара или инструмент.
|
Гитара |
DI Box |
Звуковая плата компьютера |
Наушники |
|
(или внешний аудиоинтерфейс) |
или мониторы |
Подключение микрофона
•Если звуковая плата компьютера оборудована входом на 1/8” миниджеке (как встроенная в материнскую плату), для подключения к нему 1/4” микрофонного кабеля приобретите соответствующий переходник, и подключите последний к микрофонному 1/8” входу звуковой платы.
•Если используется профессиональная или “полупрофессиональная” звуковая плата, она уже обычно оборудована 1/4” входом, к которому подключается микрофон.
•Если используется микрофонный кабель с разъемом XLR, а звуковая плата или аудиоинтерфейс оборудованы 1/4” входом, приобретите соответствующий переходник, и подключите последний к входу аудиооборудования. Если устройство оборудовано входом XLR, желательно использовать именно его.
•Если микрофон уже подключен к микшеру или предусилителю, скоммутируйте выход микшера или предусилителя с линейным входом аудиооборудования. Этот способ обычно гарантирует наилучшие результаты.
Микрофонный вход
|
Микрофон Звуковая плата компьютера |
Наушники |
|
(или внешний аудиоинтерфейс) |
или мониторы |
USB-коммутация
|
Микрофон USB Звуковая плата компьютера |
Наушники |
|
(или внешний аудиоинтерфейс) |
или мониторы |
Аудиокоммутация завершена.
|
7 |
Roland SONAR X1. Руководство пользователя |
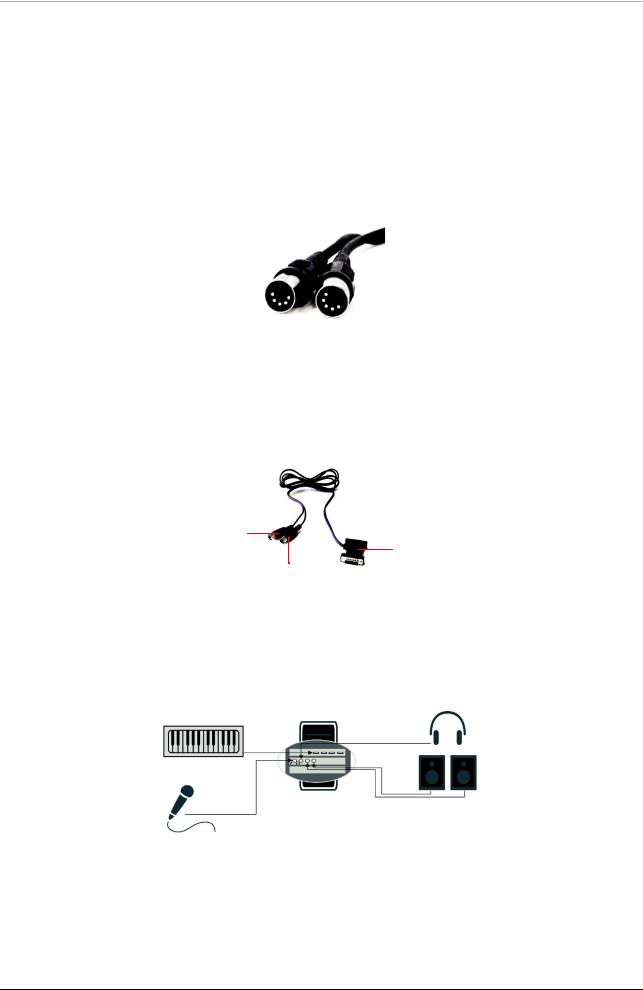
MIDI-коммутация
Существуют три основных разновидности MIDI-коммутации.
•Кабель USB. Широко распространенный на сегодняшний день вариант MIDI-коммутации. Разъемами USB оборудованы как компьютеры, так и MDI-клавиатуры, MIDI-интерфейсы и электронные инструменты. При использовании отдельного MIDI-интерфейса USB для его коммутации с другим оборудованием обычно требуется применение стандартных MIDI-кабелей (см. далее). Для работы с устройством часто требуется установка в компьютер специального драйвера.
•Стандартный MIDI-кабель. Это также широко распространенный вариант MIDI-коммутации. Практически любые MIDI-устройства оборудованы такими разъемами, даже при наличии коммутации по USB. Для коммутации требуется два кабеля, один для соединения порта MIDI OUT инструмента с портом MIDI IN внешнего MIDI-интерфейса или звуковой платы, другой — для соединения порта MIDI IN инструмента с портом MIDI OUT внешнего MIDI-интерфейса или звуковой платы. Большинство MIDI- и аудиоинтерфейсов оборудованы 5-контактными разъемами данного типа.
*Если внешний MIDI-контроллер используется только для управления программным инструментом, достаточно одного MIDI-кабеля, которым соединяется порт MIDI OUT контроллера с портом MIDI IN внешнего MIDIинтерфейса.
•Разъем джойстика. Это — устаревший и редко применяющийся формат коммутации, разработанный для звуковых плат серии SoundBlaster. Для его использования требуется переходник. С одной стороны переходника имеется 5-контактный MIDI-разъем OUT, подключаемый к порту MIDI IN инструмента, и разъем IN, подключаемый к порту MIDI OUT инструмента, а с другой стороны — 15-контактный разъем, подключаемый к порту MIDI/Joystick звуковой платы. Также на нем обычно предусмотрен сквозной порт для подключения джойстика.
A
C
B
A.Этот разъем MIDI IN подключается к порту MIDI OUT инструмента.
B.Этот разъем MIIDI OUT подключается к порту MIDI IN инструмента.
C.Этот разъем подключается к порту MIDI/Joystick звуковой платы.
USB-коммутация
MIDI-клавиатура USB
|
Микрофонный вход |
|
|
Звуковая плата компьютера |
Наушники |
|
(или внешний аудиоинтерфейс) |
или мониторы |
Микрофон
|
Roland SONAR X1. Руководство пользователя |
8 |
Подключение/отключение устройств
В процессе работы SONAR можно подключать и отключать аудио-/MIDI-устройства USB/FireWire, при этом программа будет адекватно реагировать на эти операции.
При подключении/отключении устройства SONAR выдает запрос на подтверждение действия. Если выбрать Yes, воспроизведение остановится, и внутренние установки программы обновятся.
Сохранение установок аудиоустройств
Доступные входы и выходы зависят от задействованного аудиоустройства и режима драйвера. Их состояние запоминается и восстанавливается в SONAR при последующем подключении устройства. Это позволяет свободно оперировать подключением/отключением таких устройств. Такой подход работает и при переключении режимов драйвера.
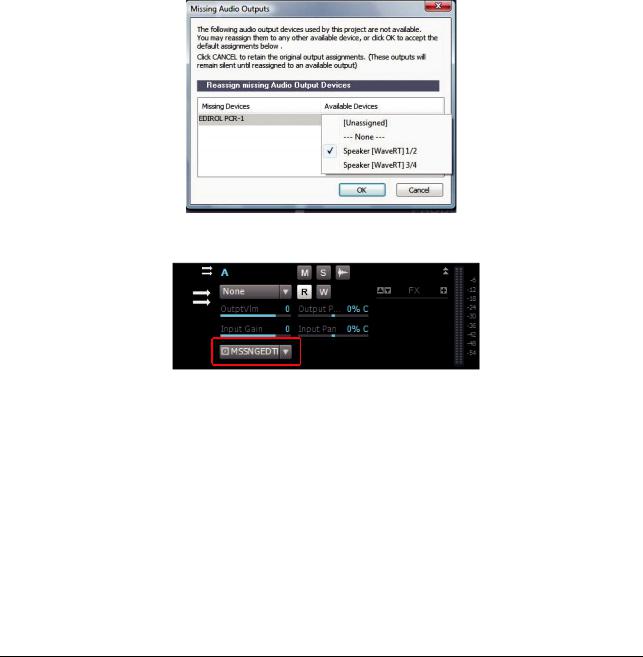
Загрузка проекта после смены аудиоустройств
При загрузке проекта после смены аудиоустройств SONAR будет пытаться автоматически переназначить выходы отсутствующих устройств на новые. Если совпадений не найдено, откроется окно Missing Audio Outputs, в котором можно произвести эти назначения вручную.
В окне Missing Audio Outputs для отсутствующих устройств представлены назначения по умолчанию. Если нажать OK, эти назначения будут приняты, если нажать Cancel, будут оставлены исходные назначения отсутствующего устройства. Вместо использования Cancel можно выбрать [Unassigned] в списке Available Devices. После отказа от переназначения в области выбора выходов SONAR будут показаны имена отсутствующих устройств с префиксом MISSING.
*Окно Missing Audio Outputs не открывается, если отсутствует выходной порт, являющийся единственным. В этом случае SONAR автоматически назначает отсутствующий выходной порт на доступный выходной порт.
Переназначение согласно именам драйверов
Если в секции Edit > Preferences > Audio — Devices установить флажок Use Friendly Names To Represent Audio Drivers, SONAR будет сканировать различные аппаратные конфигурации и режимы драйверов и переназначать устройства согласно присвоенным именам их драйверов, даже при несовпадении аппаратных имен.
Это очень удобно при переключении режима драйвера и загрузке проекта, над которым ранее велась работа в другом режиме драйвера, или же при продолжении работы с другой аппаратной конфигурацией. Данная установка обеспечивает автоматическое переназначение всех выходов.
*Данная установка имеет приоритет над текущими аппаратными именами.
|
9 |
Roland SONAR X1. Руководство пользователя |
Смена выходных MIDI-устройств
Изменение выходных портов MIDI в секции Edit > Preferences > MIDI — Devices дает следующий эффект:
•Включение нового выходного порта. Все треки MIDI и панели управления сохраняют свои текущие назначения выходного порта.
•Отключение не назначенного выходного порта. Все треки MIDI и панели управления сохраняют свои текущие назначения выходного порта.
•Отключение назначенного выходного порта. Результат для треков MIDI и панелей управления различен:
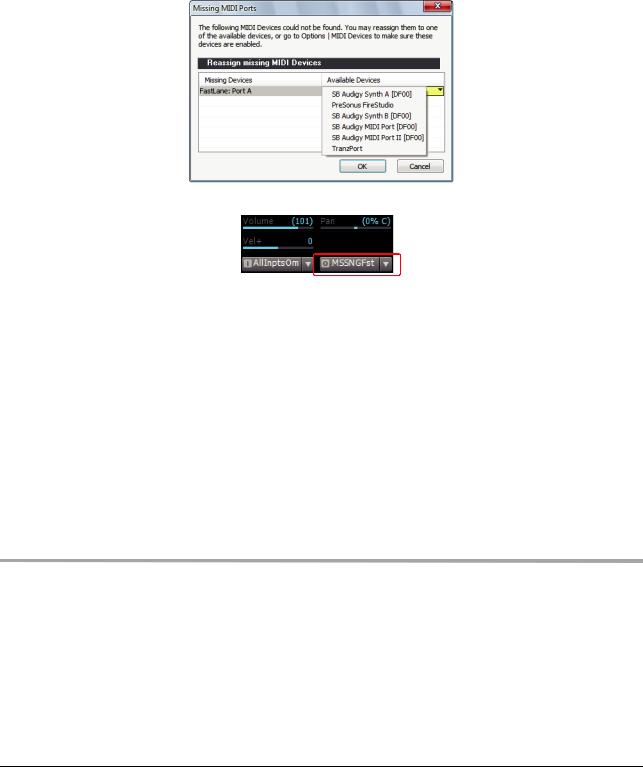
•Треки MIDI. Открывается окно Missing MIDI Ports, в котором можно переназначить отсутствующие выходные порты на доступные.
* Если не переназначить отсутствующее устройство, в области Output трека будет отображаться MISSING: <имя отсутствующего устройства >. Если в дальнейшем отсутствующее устройство снова будет подключено, трек будет назначен на него автоматически.
•Панели управления. Выходные порты не назначаются (None).
Загрузка проекта после изменения конфигурации MIDI
При загрузке проекта после отключения любого из назначенных выходных MIDI-устройств, что обычно происходит после передачи проекта в другой компьютер, происходит следующее:
•Треки MIDI. Открывается окно Missing MIDI Ports, в котором можно переназначить отсутствующие выходные порты на доступные.
*Если не переназначить отсутствующее устройство, в области Output трека будет отображаться MISSING: <имя отсутствующего устройства >. Если в дальнейшем отсутствующее устройство снова будет подключено, трек будет назначен на него автоматически.
•Панели управления. Выходные порты не назначаются (None).
Переназначение портов MIDI для панелей управления
SONAR запоминает имена портов MIDI, назначенных на панели управления. Это гарантирует корректное назначение на них портов MIDI даже при подключении или отключении других MIDI-устройств.
Запуск SONAR
Для запуска SONAR можно использовать следующие способы:
•Нажать два раза на иконку SONAR на рабочем столе.
•Нажать Start и выбрать Programs > Cakewalk > SONAR X1 (Producer, Studio или Essential) > SONAR X1 (Producer, Studio или Essential).
•Нажать Start, перейти в Documents и выбрать файл проекта SONAR.
•Два раза нажать на программу SONAR или любой документ SONAR в Windows Explorer или меню Find.
|
Roland SONAR X1. Руководство пользователя |
10 |
Соседние файлы в предмете [НЕСОРТИРОВАННОЕ]
- #
- #
- #
- #
- #
- #
- #
- #
- #
- #
- #
-
Contents
-
Table of Contents
-
Troubleshooting
-
Bookmarks
Related Manuals for CAKEWALK Cakewalk SONAR
Summary of Contents for CAKEWALK Cakewalk SONAR
-
Page 1
Cakewalk SONAR ™ © User’s Guide… -
Page 3
Program Copyright © 2005 Twelve Tone Systems, Inc. All rights reserved. ACID is a trademark of Sonic Foundry, Inc. Cakewalk is a registered trademark of Twelve Tone Systems, Inc. SONAR and the Cakewalk logo are trademarks of Twelve Tone Systems, Inc. Other company and prod- uct names are trademarks of their respective owners. -
Page 5: Table Of Contents
Table of Contents Preface …………xxiii About This Book .
-
Page 6
Starting to Use SONAR ……..49 2 Tutorials . -
Page 7
Tutorial 8—Using Soft Synths ……. . . 96 Inserting Cakewalk TTS-1 into a Project ….. 96 Playing MIDI Tracks through a Soft Synth . -
Page 8
Configurable Panning Laws ……. 128 Adjusting Volume Trim ……..128 Assigning a MIDI Channel (Chn) . -
Page 9
The Audio Engine Button ……..162 Loop Recording . -
Page 10
Take Management and Comping Takes ……210 Clip Muting and Isolating (Clip Soloing) ……212 Clip Muting with the Default Style . -
Page 11
Note Names ……….248 Displaying Notes and Controllers (Piano Roll View Only) . -
Page 12
Filtering Events ……… 297 Adding Arpeggio . -
Page 13
Scrubbing ……….328 Basic Audio Processing . -
Page 14
Preparing to Mix ……….364 Configuring the Console and Track Views . -
Page 15
Preparing to Create an Audio CD ……413 Preparing Audio for Distribution ……413 Exporting OMF Files . -
Page 16
Converting MIDI Envelopes to Shapes ….. . . 451 Snapshots ……….451 Adding Nodes at a Selection . -
Page 17
Chords and Marks ……… . 482 Adding Chord Symbols . -
Page 18
What Can They Do and Not Do? ……513 Where Do Instrument Definitions Come From? ….513 Start of Tutorial . -
Page 19
19 Audio File Management ……….539 The Project Files Dialog . -
Page 20
Why Can’t SONAR Find My Audio Files? ……563 I Get an a Error Message When I Change a Project to 24-bit Audio . . . 563 Bouncing Tracks Takes a Long Time . -
Page 21
New Normalize and Gain Commands ……578 MIDI Scale/Zoom Control ……..578 Audio Meter Enhancements . -
Page 22: Sysx View Buttons 5
xxii…
-
Page 23: Preface
SONAR for use with audio hardware, and SONAR’s new features. Registering SONAR Today New Cakewalk products will require product registration. When you register your product, you provide some information including your name and email address, as well as the serial number for your product.
-
Page 24: Conventions Used In This Book
Simply press F1 or click the Help button in any dialog box to find the information you need. If you are new to recording and editing music on your PC, see the online help topic “Beginner’s Guide to Cakewalk Software” for an introduction.
-
Page 25: Introduction
Introduction SONAR is a professional tool for authoring sound and music on your personal computer. It’s designed for musicians, composers, arrangers, audio and production engineers, multimedia and game developers, and recording engineers. SONAR supports Wave, MP3, ACIDized waves, WMA, AIFF and other popular formats, providing all the tools you need to do professional-quality work rapidly and efficiently.
-
Page 26: About Sonar
About SONAR SONAR is the flagship product of the Cakewalk line of integrated MIDI and digital audio sequencers for the Windows platform. SONAR has a comprehensive feature set that makes it the single most productive tool for sound and music authoring. Here are some of the ways you can use SONAR.
-
Page 27: Flexibility
synchronizing audio or MIDI to film or video. Or, you can turn chase lock off to conserve CPU power. SONAR provides high-quality time stretching and sample-accurate editing with zero-crossing detection so you can make the fine adjustments you need in record time. In addition, SONAR’s support for video files gives you convenient synchronized access to digitized video, making film and video scoring easier than ever.
-
Page 28: Digital Audio
Digital Audio Digital audio is a simple way to record and play sounds of any type. It works like a tape recorder—you record something, then later play it back. Digital audio stores the sound as a long series of numbers. Sound Waves Sound waves are vibrations in the air.
-
Page 29: Setup
To connect a MIDI keyboard to your computer, you need standard MIDI cables or a MIDI adapter cable, such as the one available in Cakewalk’s PC Music Pack. One end of the adapter cable should have two 5- pin DIN connectors that connect to your keyboard or other MIDI device. At the other end, you need a 15-pin connector to connect to a sound card through its MIDI/joystick port.
-
Page 30: Audio Connections
Audio Connections There are several types of audio interfaces (soundcards). CardBus (PCI), USB/USB2 and FireWire are the most common. Laptops can use an audio PCMCIA card. Many audio interfaces also have MIDI inputs and some have built in MIDI synthesizers as well. This section covers the various audio connection options.
-
Page 31: Midi Connections
• Double-click the SONAR icon on your desktop. • Click the Start button, and choose Programs-Cakewalk-SONAR 5 (Studio Edition or Producer Edition)-SONAR 5 (Studio Edition or Producer Edition). • Click the Start button, point to Documents, and choose a SONAR project from the menu.
-
Page 32
Close. You can see the Quick Start dialog box later by choosing Help-Quick Start. Migrating Preferences If you have a previous version of Cakewalk installed, SONAR will detect it and give you the option of migrating certain preferences from a single earlier version. -
Page 33
Description… Audio data directory (WaveData folder) and SONAR uses the Data directory and Picture Picture Cache directory locations Cache directories from the previous Cakewalk version for storing project wave files and their waveform image files. Running Wave Profiler The first time you start SONAR, it automatically runs the Wave Profiler utility. Wave Profiler determines the proper MIDI and Audio timings for your sound card and writes them to a file that SONAR refers to when using the card. -
Page 34
Select Options-MIDI Devices. You will see the MIDI Devices dialog box, which lets you choose instruments on MIDI inputs and outputs. Devices selected for MIDI output Device selected for MIDI input Device not selected for MIDI output Click here to change order of MIDI devices Look at the left window. -
Page 35: Sonar Basics
the Options-MIDI Devices command to enable the new driver in SONAR’s list. Note: After you add or remove a driver with the Drivers icon in the Windows Control Panel, you must restart Windows for the change to take effect. Defining Your MIDI Instrument or Sound Card Once you have selected your MIDI Input and Output devices, SONAR, by default, plays back MIDI sequences using a General MIDI instrument definition.
-
Page 36: Opening A File
Other Types of Files SONAR lets you create and work with several other types of files, in addition to project (. ) and bundle (. ) files that store your projects: File type… Description… MIDI files (extension . Standard MIDI files. Template files (extension .
-
Page 37
pane, and the Bus pane. You can change the size of the panes by dragging the vertical or horizontal splitter bars that separate them. The Track pane The Clips pane Expanded Clips track Minimized tracks Track icon Splitter bars Track/Bus Inspector The Bus pane Show/Hide Bus pane All of the current track’s controls, plus a few that are only available in the Console view, are contained… -
Page 38
The current track’s controls are contained in the Track/Bus Inspector. The Clips pane shows the clips in your project on a horizontal timeline called the Time Ruler that helps you visualize how your project is organized. Clips contain markings that indicate their contents. The Clips pane lets you select, move, cut and copy clips from place to place to change the arrangement of music and sound in your project. -
Page 39
Track/Bus Inspector for an Audio Track Track/Bus Inspector for a MIDI Track Input menu Trim Fx bin: large view with assignable sliders Send controls: MIDI ch., Bank, Patch Phase, Mono, Input Echo Input Echo Mute, Solo, Arm Mute, Solo, Arm Volume fader Volume meter Volume fader… -
Page 40
You can hide or show any of the Track/Bus Inspector’s controls, and use it to display the controls from any track or bus. The following table shows you how: To do this… Do this… Hide or show the Track/Bus Inspector Press i on your keyboard. -
Page 41: The Console View
The Console View The Console view is where you can mix the sounds on all the different tracks to create the final mix of your project. While the Track view provides most of the same controls, you may want to use the more familiar interface of the Console view for mixing.
-
Page 42
Other Views SONAR has a number of other views you can use to display and work on your project. To display these views, select one or more tracks, by Ctrl-clicking their track numbers and: • Click the icon for the view in the Views toolbar •… -
Page 43
The Staff view : displays the notes from one or more MIDI tracks using standard music notation, similar to the way the notation would appear on a printed page. You can add, edit, or delete notes; create percussion parts; add guitar chords and other notation markings; display guitar tablature; display the Fretboard pane;… -
Page 44
The Loop Explorer view : allows you to preview ACIDized files and other Wave files; and drag and drop them into your project. The Event List view : displays the events in a project individually, so that you can make changes at a very detailed level. -
Page 45
Tempo To view and edit the project’s tempo changes. Zoom Controls Many of the views contain Zoom tools that let you change the horizontal and vertical scale of the view: Zoom Clips pane out vertically Vertical Zoom fader for Clips pane Zoom Clips pane in vertically Zoom Bus pane out vertically Vertical Zoom fader for Bus pane… -
Page 46
Hold down Z Arm the Zoom tool Undo the current zoom Fit tracks to window Show all tracks Shift+F Fit project to window Shift+Double Click a clip Maximize track height Docking Views You can dock any view other than the Console view in the lower-right corner of the Track view by enabling a view’s Enable Tabbed option. -
Page 47: Working On A Project
Locking Views By default SONAR allows only one instance of each view, but you can lock the contents of most views, preserving the current view by forcing a new instance of the view to appear if necessary. Locking views is the only way you can have multiple instances of the same view open. Only the Track and Console views cannot be locked.
-
Page 48: Windows Taskbar Indicators
Windows Taskbar Indicators When SONAR is running, you’ll normally see two indicators in your Windows Taskbar, right next to the clock. The MIDI activity monitor contains two lights that indicate MIDI input and output. When you play your MIDI keyboard, the first light flashes when each note is pressed, and it flashes again when each note is released.
-
Page 49: Starting To Use Sonar
Choose the desired wallpaper according to the table: To do this… Do this… Use the default wallpaper Check Default in the Wallpaper list Not use any wallpaper Check None in the Wallpaper list Use a custom bitmap Check Custom, choose a bitmap, and click Open Click OK when you are done.
-
Page 51: Tutorials
Tutorials Now that you’ve learned some of the basics, it’s time to put that knowledge to work. These tutorials will give you some hands-on practice in playing, recording, and mixing your projects. Note: If, during installation, you chose in the Select Components dialog not to install the Tutorials folder (part of the Sample files), you will not have access to the sample tutorial files needed to follow the tutorials in this chapter.
-
Page 52: Tutorial 1-The Basics
Let’s insert a software synthesizer, Cakewalk TTS-1, to the tutorial project file. To Insert Cakewalk TTS-1 into a Project Use the Insert-Soft Synths command and click Cakewalk TTS-1 on the popup menu. The Insert Soft Synth Options dialog appears.
-
Page 53
Cakewalk TTS-1’s property page (interface). Click OK. SONAR opens the TTS-1 interface, and inserts a synth track that has the Cakewalk TTS-1’s output 1 as an input. Feel free to look over the Cakewalk TTS-1’s interface, but we will not be making any adjustments here in this tutorial. -
Page 54
Enter to display the track’s Output menu, and choose the Cakwalk TTS-1 again. Repeat step 3 for each track. Each MIDI track is now routed to the Cakewalk TTS-1. Next we need to enable the audio output we’ll use to hear the sounds the software synthesizer produces. To Enable Audio Outputs Select Options-Audio from the menu. -
Page 55
The following optional procedure describes how to configure your project to use these MIDI outputs.. If you’re happy using Cakewalk TTS-1, feel free to skip ahead to the next section. To Use Other Sound Sources for MIDI Tracks Select Options-MIDI Devices from the menu to open the MIDI Devices dialog box. -
Page 56: Playing The Project
Dropdown arrow to MIDI Channel menu for display menu track 1 Let’s play the project! Playing the Project Buttons in the Large Transport toolbar, shown in the following picture, can control most of SONAR’s basic playback functions. If you don’t see the Large Transport toolbar, then choose View-Toolbars and check Transport (Large).
-
Page 57: To Pause Playback
Now time marker Now time The Now time is also shown in the Transport toolbar, both in MBT (measure/beat/tick) format and in time code format (hour/minute/second/frame). During playback, the Now time increases in accordance with the progress of the project. You can set the Now time of the project by clicking in the Time Ruler in the Clips pane, or (when playback is stopped) by dragging the Now time slider in the Large Transport toolbar.
-
Page 58: Restarting The Project Automatically
Markers toolbar lets you move the Now time to a marker, add a new marker at the Now time, and edit the marker list. If you don’t see the Markers toolbar, then choose View-Toolbars and check Markers. Open Markers view Previous Next Insert…
-
Page 59
To loop over the entire project, do the following: In the Loop toolbar, click the Loop Start time. The time display changes to an edit box with spin controls. To loop over the entire project, the loop must start at 1:01:000. If the Loop Start time is not already set to 1:01:000, use the keyboard or spin controls to enter this value. -
Page 60: Changing The Tempo
Click Rewind. The project rewinds to the Loop Start time. Click Play. A quicker way of selecting the loop times in the preceding example would be to simply click in the area between the markers at the top of the Clips pane, then click to copy the selection start and end times to the Loop/Auto Shuttle toolbar.
-
Page 61: Muting And Soloing Tracks
Setting the Tempo Ratios Tempo ratios can be changed by Shift-clicking on them in the Tempo toolbar and entering a new number in the dialog box. By default, tempo ratios are set to 0.50, 1.00, and 2.00, respectively. Advanced Tempo Control This project is a special case in that it has only one tempo for the entire project.
-
Page 62: Changing A Track’s Instrument
Playing a Track Solo If you want to hear one track by itself, you could mute all other tracks. But there’s a quicker way to do it—the Solo button. For example, to play the drum part by itself, do the following: Click the Solo button in the Drum track (track 5).
-
Page 63: Playing Music On A Keyboard
You can change the patch at other times in the project besides the beginning by using the Insert-Bank/ Patch Change command: Stop playback. Select the track in which you want to insert a patch change by clicking on its track number. Move the Now time to the place where you want to insert the patch change.
-
Page 64: Tutorial 2-Recording Midi
Output 1, the second device to Output 2, and so on. For help with these settings, see the online help topic “Setting Up Output Devices.” Click OK. Routing MIDI Data to the Keyboard Let’s play back the Piano track through your MIDI keyboard. First, turn your keyboard on and make sure it is set up to receive MIDI input on channel one.
-
Page 65: Recording A Midi Track
Select the MIDI tracks template from the template list. Click OK. SONAR opens a new project named Tutorial2, containing only MIDI tracks. Recording a MIDI Track Let’s record a new MIDI track in the project. Setting Up the Metronome Musicians often use a metronome to keep track of the beat. SONAR’s metronome is more versatile than most real metronomes.
-
Page 66: Recording Midi
In the Inputs column, select your sound card’s MIDI In device or the MIDI In for your external MIDI interface. For help with these settings, seethe online help topic “Setting Up the MIDI In and MIDI Out Devices.” Click OK. Setting Up Playback During recording, SONAR will play the rest of a project as usual.
-
Page 67: Saving Your Work
Display the controls of the track you recorded by clicking its Restore Strip Size button , or by dragging the Vertical Zoom control that’s located at the lower right corner of the Clips pane. You may need to click the All tab at the bottom of the Track pane to display all the controls. Click the Output dropdown arrow to display the menu of available outputs.
-
Page 68: Loop Recording
Click OK. SONAR saves the project under the new name. From now on, you can click the Save button to save this project. Loop Recording If you’d like to record several takes successively, you can set up SONAR to loop over the entire project, or just some section of it.
-
Page 69: Punch-In Recording
Loop Recording Finally, let’s record our takes: Choose Transport-Record Options to display the Record Options dialog box. Choose the Store Takes in Separate Tracks option to store each new take in a separate track. Each time a new take starts, the settings from the first track will be copied to the new track. Click OK.
-
Page 70
Let’s try it. Suppose you want to replace several measures in the recording you made earlier in this tutorial. Display the Record toolbar by choosing View-Toolbars-Record. Record mode Step record Auto-punch on/off Click to open the Record Options dialog box Click here to set punch Punch In Punch Out… -
Page 71: Tutorial 3-Recording Digital Audio
Tutorial 3—Recording Digital Audio To record digital audio, you need some sort of device hooked up to your sound card’s line or mic input— an electric guitar, a preamp, or a mixer, for example. If nothing else, try playing or singing into a microphone! If you have never connected an instrument to your sound card, see “To Connect an Electric Guitar to Your Computer”…
-
Page 72: Open A New Project
Use the Options-Audio command to open the Audio Options dialog box. On the General tab, find the Audio Driver Bit Depth field and select one of the options. Click OK. For more information about audio driver bit depth, see the online help topic “Bit Depths for Playback.” To set the record bit depth: Use the Options-Global command to open the Global Options dialog box.
-
Page 73: Recording Digital Audio
To check the audio input levels: Click the Arm button in your new audio track. The track’s meter becomes a record meter. Perform as you would during recording. Watch the meter respond to the sounds you produce. If the meter does not respond, you may need to raise the volume of your plugged-in instrument. Also, make sure that the Audio Engine button in the Transport toolbar is depressed.
-
Page 74: Recording Another Take
Recording Another Take If you’d like to delete your performance and try again, do the following: Choose Edit-Undo Recording to undo your recording, or press Ctrl+Z (Undo). If necessary, click Rewind or press w. Make sure the track is still armed for recording. Click Record When you finish recording, click the Stop button , or press the Spacebar.
-
Page 75: Tutorial 4-Editing Midi
Tutorial 4—Editing MIDI SONAR has too many powerful MIDI features to look at in one tutorial, so let’s look at some of the most basic features and also cover some exciting new ones, such as slip editing and MIDI envelopes. In this tutorial, start by opening the file in the Tutorial folder where SONAR is TUTORIAL…
-
Page 76: Editing Notes In The Piano Roll View
While holding down the Ctrl key, drag the first clip in the bass track to the right and release the mouse when the start of the clip is at measure three. The Drag and Drop Options dialog box appears. Click OK—SONAR places a copy of the clip in measures three through four. Ctrl-dragging a clip copies and moves it, while dragging without holding down any extra keys moves a clip without making a copy of it.
-
Page 77
Find the note that starts at the beginning of measure three and move the cursor over the beginning of the note so that the cursor becomes a cross. Drag the beginning of the note to the left by a half beat, and release the mouse. Beat 1 of Measure 3 Drag note from here Drag Horizontal Zoom control… -
Page 78: Slip Editing
When you move the Draw tool over a note, it changes into one of 3 different editing tools, depending on what part of the note you move it over: • If you move the Draw tool over the beginning or end of a note, the Draw tool changes into a cross. When you drag one end of a note with the cross icon, the other end of the note stays put, thereby changing the duration of the note as you move the opposite end.
-
Page 79: Drawing Midi Envelopes
Drag the end of the second clip to the left until just the “tail” or glissando of the data is hidden. Like this Hide this region In the third clip, hold down both the Alt and Shift keys and drag only the data inside the clip to the left by about one eighth note.
-
Page 80: Converting Midi To Audio
Right-click the line that’s between the last two nodes, and choose Slow Curve from the Envelope Editing menu. SONAR changes the line to a curve. Now the drop in volume is a little more gradual. Now you have some interesting dynamics in your track. You can add a lot more to your envelope, and add more envelopes if you wish.
-
Page 81: Tutorial 5-Editing Audio
Tutorial 5—Editing Audio In this tutorial we will be editing a bundle file with drums, bass, guitar and organ. We will add some additional percussion, and edit some of the existing tracks. This tutorial covers the following: • Importing wave files •…
-
Page 82: Moving And Looping The Clips
Open the Tutorials folder located in the directory where SONAR is installed. Select and click Open. ORGAN A new clip appears in the selected track at the specified Now Time—measure 18. 10. Double-click the track name, and type in a new name: “Organ,” and press Enter. 11.
-
Page 83: Automatic Crossfades
When the cursor turns into a rectangle, click and drag the beginning of the clip until you have reached the beginning of the waveform. Drag to here The beginning of the clip is now hidden. The data is not lost, as you will see if you drag the beginning to where it was originally.
-
Page 84: Tutorial 6-Using Groove Clips
In the Source Category field, choose Entire Mix. In the Channel Format field, since our two original percussion tracks are in stereo, choose Stereo. This way we preserve their stereo quality. In the Source Bus(es) field, make sure the name of the sound card that the relevant tracks use to play back on is highlighted.
-
Page 85: Adding Groove Clips To A Project
Adding Groove Clips to a Project There are two ways to add a Groove clip to your project. Let’s use both. To Import a Groove Clip Select File-New to create a new project. In the New Project File dialog box, enter Tutorial6 in the Name field. Select the Normal template from the template list and click OK.
-
Page 86: Looping Groove Clips
Navigate to the Tutorial folder in the directory where you installed SONAR. Select 100 and drag it into the Clips pane below the Sound Effect track at measure 3. ONETWO Repeat step 8 by dragging 100 below Track 2 at measure 7 and 100 below Track 3 BEAT ORGAN…
-
Page 87
To Crop a Groove Clip Click the dropdown arrow on the Snap to Grid button to open its dialog box, set the Musical Time duration to Quarter, and click OK to close the dialog box. Move your cursor over the beginning of the second clip in Track 2 until it looks like this “Crop”… -
Page 88: Changing The Pitch Of Groove Clips
Click on the clip and drag it one measure to the left. Like this: The Drag and Drop Options dialog appears. In the Drag and Drop Options dialog, click Blend Old and New and click OK. You have added Groove clips and edited them. Your project should look like this: Let’s take a listen to what we have.
-
Page 89: Changing The Tempo Of Your Project
Right-click in the Time Ruler at the beginning of measure 1 and select Insert Marker from the menu. The Marker dialog appears. In the Groove Clip Pitch dropdown, select C and click OK. Create another pitch marker at the beginning of measure 2, this time selecting F from the Groove Clip Pitch Change dropdown.
-
Page 90
The Loop Construction view appears. You see that there is silence at both the beginning and end of the clip. We are going to slip edit the clip so that the clip begins with the attack of the first note and ends as the last note tails off. -
Page 91
The bass track is now a Groove clip, so you can move it where you want and create repetitions by dragging it out. Let’s create another Groove clip. To Create a Groove Clip (example 2) For this example we are going to use a clip that does not need to be slip edited. In the Explorer view, navigate to the Tutorials folder in the directory where you installed SONAR. -
Page 92: Tutorial 7-Mixing
Let’s add some flanging to the first guitar track in TUTORIAL Add the flange effect to a guitar track by right-clicking its FX field, and choosing Audio Effects- Cakewalk-FxFlange from the popup menu. The effect’s dialog box appears. Choose a preset flange setting from the Presets field.
-
Page 93: Automating An Individual Effect’s Settings
Play the project to hear what it sounds like. You can continue to adjust the effect while the project plays; there is a slight delay before your adjustments are audible. Close the dialog box. You can add effects to buses with the same method (right-click the FX field in a bus, and choose an effect from the popup menu).
-
Page 94: Grouping Controls
Grouping Controls To assist in manipulating the controls, you can tie faders to one another. For example, if you want to increase the volume level on several tracks at the same time, you can assign them to a group. Then, when you move one volume fader, you move them all.
-
Page 95: Exporting An Mp3 File
When you’re done tweaking the mix, to make sure you don’t accidentally erase any automation data, you can disarm any armed controls by clicking the Disarm All Automation Controls button in the Automation toolbar, or the red AUTO indicator that’s in the Status bar. Exporting an MP3 File When your project finally sounds the way you want, you can export it in any or all of several file formats, including:…
-
Page 96: Tutorial 8-Using Soft Synths
Cakewalk TTS-1 is a great example of a soft synth, so let’s use it for our tutorial. Because this soft synth supports the mult-output format, it has multiple outputs (4), and you can record the movement of some of its controls as automation.
-
Page 97: Playing Midi Tracks Through A Soft Synth
Cakewalk TTS-1 displayed in the first row, and opens Cakewalk TTS-1’s property page. Notice that the Output field of the MIDI track is labeled Cakewalk TTS-1 1. The “1” means that this is the first instance of Cakewalk TTS-1 that you have inserted into this project. If you use the Insert-Soft Synths command to insert another instance or copy of Cakewalk TTS-1 into this project, its label will be Cakewalk TTS-1 2, and it will function as a totally separate synth.
-
Page 98
Let’s set our MIDI tracks to use different outputs on the TTS-1: in the TTS-1 interface, click the System button to open the System Settings panel, and click the Option button in System Settings to open the Options dialog. On the Output Assign tab look in the Tone Name column, and click one of the four Output buttons next to each name in the Tone Name column. -
Page 99: Tutorial 9-Drum Maps
Tutorial 9—Drum Maps In SONAR drum maps allow you to assign a single MIDI track to multiple outputs. MIDI drum tracks appear in the Piano Roll view’s Drum Grid pane. In the Note Map pane you can map pitches to notes in any number of software or hardware outputs.
-
Page 100: Map Drum Notes To Different Outputs
Now it is time to mix things up a bit. Lets send some of your drum sounds to a different output. Map Drum Notes to Different Outputs First, we need to create an output to use, so let’s open Cakewalk TTS-1 and use that soft synth for this part of the tutorial.
-
Page 101
The new Port/Channel pair Cakewalk TTS-1 1 / 10 appears in the Port and Channels field at the bottom of the Drum Map Manager. In the Bank column for the Port/Channel pair Cakewalk TTS-1 1 / 1 select 15360-Preset Rhythm. -
Page 103: Controlling Playback
Controlling Playback When you play your SONAR project, you have full control over the tempo or speed of playback, which tracks are played, which sound cards or other devices are used to produce the sound, and what the tracks sound like. SONAR’s multi-MIDI enhancements give you the ability to play multiple synths or tracks from a single keyboard or controller, or let multiple performers play the same or different tracks.
-
Page 104: The Now Time And How To Use It
The Now Time and How to Use It Every project has a current time, known as the Now time, which keeps track of where you are in a project. The Now time appears as a vertical line in the Track view and is displayed in both the Large Transport toolbar and the Position toolbar, in two formats: The measure, beat, and tick number (MBT) identifies the Now time in musical time units.
-
Page 105
Here are some examples of times expressed in this format (assuming that zero is the start time): Time… What it means… 00:00:00:00 The beginning of the project 00:05:10:00 Five minutes and ten seconds from the beginning of the project 01:30:00:00 One hour and thirty minutes into the project 00:00:00:05 Five frames into the project… -
Page 106: The Now Time Marker
Meter/Key Click to jump to the end Signature display Click to jump to the beginning Click to move ahead one measure Drag to any desired position Click to back up one The Large Transport toolbar differs from the Transport toolbar because it displays the Now time (which you can set by entering numbers into the display fields in either MBT or SMPTE time) and the Meter/ Key Signature display.
-
Page 107: Displaying The Now Time In Large Print
To Change the Now Time Marker Behavior Select Options-Global from the SONAR menu. The Global Options dialog appears. Click the General tab. Uncheck the On Stop, Rewind to Now Marker option to have the Now time marker move to follow the current Now time when you stop playback.
-
Page 108: The Time Ruler
Go-Thru Sets the Now time to the Thru time (the end time of the current time selection) Go-Beginning Ctrl+Home Sets the Now time to the beginning of the project Go-End Ctrl+End Sets the Now time to the end of the project Go-Previous Measure Ctrl+PgUp…
-
Page 109: Controlling Playback
The M:B:T setting follows your settings in the Meter/Key view. If you project is set to 4/4 time, you have four beats in the Time Ruler for each measure. If your project is set to 6/8 time, you have six beats in the Time Ruler for each measure.
-
Page 110: Handling Stuck Notes
Note: You can control the MIDI messages that are sent by the Transport-Reset command by changing the Panic Strength variable in the file. CAKEWALK To Clear Stuck Notes • Choose Transport-Reset, or click on the Large Transport toolbar.
-
Page 111
Looping is defined in the Loop/Auto Shuttle toolbar, as shown here: Click to copy the Click to turn looping on or off selection (From and Thru) Click to open the Loop/Auto Shuttle dialog box Loop Start time Loop End time To set up a loop, you do three things: •… -
Page 112: Track-By-Track Playback
• Click between two markers in the Track, Staff, or Piano Roll view to select a range of times, then click in the Loop/Auto Shuttle toolbar to copy the selection time to the loop time. • Type the loop start and end times directly into the toolbar. •…
-
Page 113: The Playback State Toolbar
Phase normal or inverted If a track was accidentally recorded out of phase with another track, the Phase button lets you reverse the phase of a track. While playback is in progress, you can mute and unmute tracks in any combination, which means you can hear only the tracks that you want.
-
Page 114: Soloing Tracks
To Archive or Unarchive Tracks Select one or more tracks in the Track view. Choose Track-Archive, or right-click and choose Archive from the menu to toggle the archive status of the selected tracks. Soloing Tracks Sometimes you want to hear a single track, or a few tracks at once, without having to mute all the other tracks.
-
Page 115: Changing Track Settings
Note: You may lose important stereo data by using mono effects with stereo tracks because your stereo tracks are summed to mono in order to pass through the effect. If you never want your stereo data to be summed to mono, select stereo. To Use a Track’s Stereo/Mono Button Display the Track view or Console view.
-
Page 116
Audio track interior controls Volume slider Pan slider Mono/stereo switch Trim Phase button Input Output Send destination Send enable Send level Send pan Send pre-post Audio track FX bin, meter, and track scale Meter (shown in vertical position) Track scale FX interleave indicator FX bin… -
Page 117
Show Layers Hides or shows track layers. button Minimize/restore Collapses track to minumum possible height, or restores it to the size track button it was before it was minimized. Maximize/restore Expands track to maximum possible height, or restores it to the size track button it was before it was maximized. -
Page 118
MIDI Track Parameters The following pictures illustrate MIDI track parameters: A MIDI track MIDI track titlebar controls Input Echo button Strip selector Track name Show layers button Maximize track Minimize track PRV Mode button Mute, Solo and Arm buttons Header icon Track number MIDI track interior controls… -
Page 119
MIDI track FX bin and track scale Track scale MIDI FX bin Here is a summary table of the different MIDI track parameters and how they are used: Parameter… What it means… Strip selector Click this to add a track to a Quick Group, which means that certain controls in tracks that are in the Quick Group are grouped. -
Page 120
Velocity trim The change in velocity (volume) that will be applied to notes in this track on playback; ranges from –127 to +127 Input The input source for the track, used in recording Output The output device through which the track is played Ch (channel) The MIDI channel through which the notes will be played Bank… -
Page 121
Hide or show a track Open the Track Manager dialog (press M), and check or uncheck a track’s checkbox in the dialog. Maximize a track Click the Maximize button in the track Restore a track to its original size (before it Click the Restore button in the track was minimized or maximized) Minimize a track… -
Page 122
Changing Audio Track Settings in the Track Pane You can change the values in the Track pane in a number of ways: Control How to change the setting Volume, Pan, Volume Trim, Send Output Click on the control and move your cursor left or Level, and Send Pan right to adjust values, or press Enter and type a value. -
Page 123: Setting Up Output Devices
Change the value by 10 (for Key+, by 12) Press the [ or ] key, or right-click on the spinner control Enter a new value Press Enter and type the new value using the keyboard, and press Enter For numeric fields, you can press and hold both mouse buttons to change the value by increments of 10 (12, a full octave, for Key+).
-
Page 124
If your computer has several MIDI outs, choose the ones you want to use and put them in a particular order using the Options-MIDI Devices command. The order in which your MIDI devices appear in the Output menus in the Track and Console views is based solely on the order in which the selected outs appear in the MIDI Devices dialog box. -
Page 125: Assigning Tracks To Outputs
Assigning Tracks to Outputs You assign each track to a MIDI or an audio output using the Output dropdown in the Track view. From then on, material on that track will be sent to the appropriate output device. Note: If you rearrange your MIDI output devices after making output assignments, you may find MIDI information being sent to different instruments than you expect.
-
Page 126
Tip: If your bank name is too long to fit in the bank field, hold your cursor over the bank name. A tooltip appears with the complete bank name. Note that a single MIDI channel can only play one patch at a time on each instrument assigned to that channel. -
Page 127: Adding Effects
To Add an Audio Effect in the Track Pane • In an audio track, right-click in the FX field, choose Audio Effects-Cakewalk, and select an effect from the menu that appears. Adjusting Volume and Pan The Volume and Pan settings control the initial volume and pan of a track during playback.
-
Page 128: Configurable Panning Laws
Hard left is 100% left. Hard right is 100% right. Pan is centered at C. You can also change the pan and volume settings in a variety of other ways, as described on page 122. To change the pan settings for more than one track at a time, select the tracks you want to change and choose Track-Property-Pan.
-
Page 129: Adjusting The Key/Transposing A Track (Key+)
On playback, the channel number is used to direct the MIDI information to a particular piece of equipment. The Chn parameter in the Track view redirects all events in the track to the specified channel, ignoring the channel number stored with each event. If this parameter is left blank, all events in the track are sent to their original channels.
-
Page 130: Adjusting The Time Alignment Of A Midi Track (Time+)
as they are stored in the file. You can edit the velocity values in those views, or use the Process-Scale Velocity or Process-Interpolate command. Velocity is different from volume in that it is an attribute of each event, rather than a controller that affects an entire MIDI channel.
-
Page 131: Controlling Live Midi Playback-Midi Echo
Patch/Controller Searchback If this option is enabled, SONAR searches for and sends the most recent Before Play Starts patch change, wheel, and pedal events on each output and MIDI channel before starting playback. This ensures that all these settings are correct, even if you start playback at an arbitrary point in your project.
-
Page 132
dropdown menu, which has the Manage Presets choice that allows you to create and store your favorite combinations of MIDI input choices. To Play One Synth at a Time from One or More MIDI Keyboards • Since this is SONAR’s default behavior, simply use the Up or Down arrow keys on your computer keyboard to choose the current track (the current track has a gold titlebar), and choose the synth you want to play by using the track’s Output, Bank, Patch, and Channel fields. -
Page 133: Local Control
Now, when you choose inputs for other tracks, you can choose the preset you saved by clicking the Presets option in the track’s Input dropdown menu. If you want to edit a preset, select it in the top window of the MIDI Input Presets dialog, edit it, and click the disk icon. If you want to delete a preset, select it in the same dialog and click the X button to delete it.
-
Page 134: The Play List View
SONAR’s Play List view lets you create and work with a series of project, MIDI, and bundle files. As each file plays, SONAR loads it and displays it in the Track view and other views like any other project file. The Play List View The Play List view lets you create, edit, and save a play list (or set) of up to 999 SONAR projects.
-
Page 135: Video Playback, Import, And Export
To Play Files from the Play List View To play back files from the Play List view, follow the instructions in the table. To do this… Do this… Activate the play list Click in the Play List view toolbar so that the button is pressed.
-
Page 136: Inserting And Playing Back Videos
SONAR Producer also has a Video Thumbnails pane at the top of the Track view, which shows individual frames of your video at different places in your project (See below for more information). You open the Video view by using the View-Video command. The Video view displays the Now time (as in the Big Time view) and the video itself.
-
Page 137
To Enable or Disable Video Playback Open the Video view by choosing View-Video. Right-click in the Video view and choose Animate. If your computer is not fast enough to play back video efficiently, you can get better performance by temporarily disabling video animation during playback. To Set the Time Display Format •… -
Page 138: Exporting Video
To Set the Video Display Format Right-click in the Video view and choose an option from the Stretch Options menu: To do this… Do this… Display the video in its original size Choose Original Size Stretch the video to fill the Video view Choose Stretch to Window Stretch the video as much as possible Choose Preserve Aspect Ratio…
-
Page 139: Optimizing Video Performance
To Export a Video Make sure your audio tracks are completely mixed, and your video Start time, Trim-In time, and Trim-Out time are set the way you want them. Use the File-Export Video command. The Export Video dialog appears. In the File Name field, type a name for your new video. In the Files of Type field, choose the kind of video file you want the exported file to be.
-
Page 140
Video Thumbnails pane Show/hide video pane Show/hide frame numbers Show/hide thumbnails button button button Splitter bar Video track strip Frame number Here are the various commands and functions of the Video Thumbnails pane: • You can show or hide the pane. •… -
Page 141: Video Playback On A Firewire Dv Device
To Hide or Show Frame Numbers on Frames • In the video track strip, click the Show/Hide Frame Numbers button To Open the Video Properties Dialog • Double-click the video track strip. To Open the Video View • Double-click the Video Thumbnails pane. To Move the Now Time to a Thumbnail •…
-
Page 142: Exporting A Project To A Firewire Dv Device
Click the Encoding Options button to open the AVI Encoder options dialog, and choose DV Video Encoder in the Video Codec field. Click OK. Click the Audio Mixdown Options button to open a dialog of audio mixdown options. Choose the audio options you want, but remember that if you plan to save the project to DV tape, choose the following audio format: •…
-
Page 143: Synchronizing External Video Playback To Audio
Close the property page, and click the Save button in the Export Video dialog to start exporting. If you’re printing to a device that uses tape, the tape stops rolling when the export process is finished. Synchronizing External Video Playback to Audio Because there is more latency in FireWire video playback than in PC digital audio playback, video playback on an external device will probably be playing back later than the audio tracks in SONAR.
-
Page 144: Restoring Missing Audio Files
Restoring Missing Audio Files When you open a project file that references audio files which SONAR can not find, the Locate Missing Audio dialog appears. Use the following procedure to restore the missing audio files to your project. To Restore Missing Audio Files In the Locate Missing Audio dialog, click the Search button.
-
Page 145: Recording
Recording You can add sound or music to a SONAR™ project in many different ways. You can record your own material using a MIDI-equipped instrument, use a microphone or another audio input to record digital audio information, or import sound or music data from an existing digital data file.
-
Page 146: Creating A New Project
Creating a New Project You can add music and sound to an existing project or to a new project. Just as in any Windows program, you open an existing project file using the File-Open command, and create a new project file using the File-New command.
-
Page 147: Setting The Meter And Key Signatures
To Create a New Project File Choose File-New to display the New Project File dialog box. If you have the per-project audio folders option enabled, enter a file name, set the folder where you want to store the new file, and set the folder where you want to store the new file’s audio. Choose a template from the list.
-
Page 148: Setting The Metronome And Tempo Settings
• 3/4 (three beats per measure, each quarter note gets a beat) • 6/8 (six beats per measure, each eighth note gets a beat) The top number of a meter, the number of beats per measure, can be from 1 through 99. The bottom number of a meter is the value of each beat.
-
Page 149
You can customize the metronome sound to use audio or any note on a MIDI instrument. By default, SONAR uses a hi-hat cymbal sound from a General MIDI drum kit for the MIDI metronome, but you can change this setting to anything you like by changing the MIDI output, MIDI channel, and duration. You can also choose the note and velocity (volume) to use for the first beat of each measure and for all other beats. -
Page 150: Setting The Audio Sampling Rate And Bit Depth
Press w, or click to rewind to the beginning of the piece. Your tempo and metronome settings are now ready. When you save the project file, the metronome and tempo settings will be saved as well. To Change Your Metronome Settings Open the Metronome Settings dialog box in one of the following ways: •…
-
Page 151
SONAR lets you choose from several different sampling rates: 11025 Hz, 22050 Hz, 44100 Hz, 48000 Hz, 88200 Hz, 96000 Hz, 176400Hz, and 192000 Hz. The default used by SONAR is 44100 Hz, the same rate as audio CDs. However, you may choose a higher rate and later mixdown to 44100. You can also enter any hardware-supported value in the Sampling Rate field. -
Page 152: Setting The Midi Timing Resolution
To Set the Sampling Rate and Audio Driver Bit Depth for New Projects Choose Options-Audio to display the Audio Options dialog box. On the General tab of the dialog, select a value in the Sampling Rate dropdown menu, and a value from the Audio Driver Bit Depth dropdown menu.
-
Page 153: Recording Modes
Recording Modes Any material you record is stored in a new clip. If you record into several tracks at once, one clip is created in each track. If you record into a track that already contains clips, you can choose one of three recording modes to determine what happens to those clips.
-
Page 154
• All Inputs-(MIDI Omni or MIDI ch 1-16)—with this setting the track will record any MIDI input coming in on any enabled port (MIDI interface input driver) on any channel, unless you choose a particular MIDI channel instead of MIDI Omni. Then the track will only record input that’s on the MIDI channel you chose. -
Page 155: Arming Tracks For Recording
To Choose a MIDI Input in the Console View At the top of a MIDI track module, click the Input button. A popup menu of MIDI channels appears. Choose an input from the following: • None—this option actually sets the Input field to Omni: with this setting the track will record any MIDI input coming in on any enabled port (MIDI interface input driver) on any channel.
-
Page 156: Auto Arming
Auto Arming You must arm tracks in order to record. To safeguard your data, there is no automatic arming of any tracks. If you want to record MIDI tracks without arming a track, choose Options-Global, and select the General tab. Click the Allow MIDI Recording without an Armed Track checkbox. This feature lets you start recording a new track simply by making it the current track and pressing R or clicking the Record button in the toolbar.
-
Page 157
Clipping indicator Volume Fader Meter When the audio level exceeds 0dB, some of the audio information is lost. This is known as overload. Many sound cards use clipping to deal with an overloaded signal, but clipping can distort the audio signal. -
Page 158: Tuning An Instrument
In the track you want to record your instrument on, right-click in the Effects bin. From the menu that appears, select Audio Effects-Cakewalk-Tuner. Click the track’s Input Monitor button. If you don’t click the Input Monitor button on the track the Tuner is patched into, you will not be able to use the tuner.
-
Page 159: Confidence Recording And Waveform Preview
If you do not see a new clip in the Clips pane, you may have a problem with audio input. See Appendix A: Troubleshooting for more information. Important: Make sure you have enough space on your hard disk when recording digital audio. Running out of hard disk space when recording can lead to unpredictable results.
-
Page 160
monitoring on or off on all audio tracks with one click. • Audio Engine button —clicking this button so that it’s in its up position turns all audio activity in SONAR off, which includes input monitoring. Note: When you use input monitoring, make sure that the track you’re playing through uses the same audio interface (sound card) for both input and output. -
Page 161
With this information in hand, let’s follow a simple audio signal through the system to understand how echoes get introduced into the input monitor path. say “1” Suppose you are counting «1, 2, 3» into your sound card very quickly. When you say the first «1,» this sound immediately appears in all the places indicated in the illustration above. -
Page 162: The Audio Engine Button
Finally, you say «3.» By this time the original «1» has been converted back to analog audio by the DAC, and that analog signal is mixed in with the «3» you have just said. The ultimate result is that you hear a «1»…
-
Page 163: Loop Recording
You may experience slightly better playback and recording performance by turning the Audio Engine button off before you press the Play or Record buttons. This happens if your computer’s resources are already stretched to the limit. When you start recording or playback with the audio engine already functioning, there is still some processing that SONAR has to do that’s left over when you start the transport.
-
Page 164: Punch Recording
Choose Transport-Record Options, or click on the Record toolbar, to display the Record Options dialog box. Choose to stack all takes in a single track or to store them in separate tracks. If you choose to stack all takes in a single track, choose either Sound on Sound or Overwrite mode. Click OK to close the Record Options dialog, and set the Now time to the point in the project where you want to start recording.
-
Page 165
The Record toolbar shows the punch settings, as shown here: Record mode Step record Enable punch recording Click to open the Record Options dialog box Click here to set punch Punch Punch In times to the selection start Out Time Time and end times When punch recording is enabled, the punch times are indicated by special markers in the Time Ruler,… -
Page 166: Step Recording
Click , or press r, or choose Transport-Record. If your metronome count-in is turned on, it will play the count-in measures or beats. Play or perform the material you want to record. Click , or press the Spacebar, or choose Transport-Stop to stop recording. The material you play during the punch time is recorded in the chosen track, either replacing any existing material (Overwrite mode) or blending with it (Sound on Sound mode).
-
Page 167
• Change tracks while recording • Add step sizes together by Ctrl-clicking additional step sizes, or by pressing the + key between each step size selection • Delete as many step-recorded notes as you want, while moving the insertion point back through the steps you delete •… -
Page 168
Custom tick size field Total step size display fClick to move insertion point by step size. Step Record Toggle button to enable/ disable step recording Insertion point location Position slider Basic/Advanced button Here’s a picture of Advanced mode: Randomize durations field Click to move Step pattern insertion point by… -
Page 169
Set the insertion point by doing one or more of the following: • Click the Step Advance button to move the insertion point forward by the current step size, or click the Step Backwards button to move the insertion point backward by the current step size. -
Page 170
You can press Ctrl+Z during or after recording to undo your recording one step at a time. Note: options that you choose in Advanced mode, such as Link to Now Time, are still in force when you use Basic mode. To Use Advanced Step Recording The procedure for Advanced step recording is the same as for Basic, but with these extra options, which become available when you click the Bas./Adv. -
Page 171: Step Record Keyboard Shortcuts
disable step recording at will without closing the Step Record window: just click the Activate Step Recording button in the Step Record dialog, or press Shift+R. Step Record Keyboard Shortcuts The default keyboard shortcuts for step recording are on the Num Pad, so that you can keep one hand on your MIDI keyboard to play notes with, and use the other hand on the Num Pad to use shortcuts.
-
Page 172: Step Pattern Recording
Measure advance Ctrl+Num Pad Enter Auto Advance Num Pad . Toggle step recording Shift+ R Step Pattern Recording The Pattern option lets you define a repeating rhythmic pattern of notes and rests so that you can use step recording more efficiently. For example, suppose your project is in 4/4 time, and one track has a pattern that is two measures long: quarter notes in the first measure and on the first two beats of the second measure, followed by a half-note rest on the last two beats.
-
Page 173: Recording Specific Ports And Channels
Recording Specific Ports and Channels Most MIDI instruments are capable of sending information on several different channels at once. By default, SONAR merges all incoming MIDI data and records it on whatever MIDI tracks are armed. However, SONAR also allows you to control which MIDI input ports and channels each track will record.
-
Page 174: Input Filtering
• Manage Presets—if you want to create or edit any preset collections of input ports and channels, you can select this option (see following procedure). Click OK. SONAR shows new track inputs in the Input fields in the Track pane. Note: You can use external MIDI synchronization to automate the process of loading multichannel sequences from other MIDI devices.
-
Page 175: Importing Music And Sound
From now on, SONAR records only the types of events you have chosen. Importing Music and Sound While recording is perhaps the most common way of adding material to a SONAR project, there are several other methods you can also use. SONAR lets you import music into a project from several different types of digital data files, including MIDI files;…
-
Page 176: Importing Material From Another Sonar Project
To import a Broadcast Wave file: If you want SONAR to import Broadcast Wave files always at their timestamped location, select Options-Global, click the Audio Data tab and check the Always Import Broadcast Waves At Their Timestamp option. Otherwise, set the Now Time and current track to indicate where the audio should be placed.
-
Page 177
such as Pro Tools, Avid and Logic systems. SONAR also exports projects as OMF files that you can open in Pro Tools and other audio software. SONAR now allows you to select sample rate and bit depth during OMF import. A few general guidelines for preparing OMF files for import into SONAR: •… -
Page 178: Importing Midi Files
If you know the exact tempo of the file, enter it into the Initial Tempo field. It is always preferable to know and enter the project tempo at this point. If you don’t know the project tempo you can open the file at the default tempo and then change the file’s tempo later, but this will cause the clips to move.
-
Page 179
SONAR also lets you save files in several other formats, as described in the table: File type… Format… Explanation… Standard MIDI Used to transfer MIDI-only projects to other software products that support Standard MIDI files. Bundle A single file that includes all the material in your project: MIDI data, project settings, and audio data. -
Page 180: Labeling Your Projects
Labeling Your Projects SONAR lets you attach subtitles, composer credits, copyright, and other information to your projects, as shown in the following table: Title The title for your project; prints automatically at the top of a Staff view printout. Subtitle For a subtitle or dedication;…
-
Page 181: File Statistics
To Display and Edit Project Information Choose File-Info to display the File Info window. Edit the information as desired. If you want the File Info window to display automatically, save the file. Click Stats to see statistics about the contents of the file. Choose File-Print Preview if you want to print the project information Close the File Info window.
-
Page 183: Arranging
Arranging The Track view makes it easy to arrange and mix your projects from a single view. From one location, you can select, copy, move, mix, and rearrange the parts of your project, using menu commands or drag-and-drop tools. You can add real-time audio and MIDI effects from the Effects bin and buses.
-
Page 184: Arranging Tracks
Arranging Tracks SONAR provides a variety of commands that let you work with the tracks in your project. Here are some of the things you can do: You can… Here’s why… Rearrange the tracks in the Track view This makes it easier to see and work with a subset of tracks, so that they appear in a different order like the rhythm section, or the vocals and vocal backing tracks, or all muted tracks.
-
Page 185
• Use the Track-Sort command to rearrange the tracks in order based on the track name, status, or other setting. To Drag a Track to a New Position Position the mouse just to the right of the track number, over the track icon of the track you want to move. -
Page 186: Inserting Tracks
Selected If you choose this attribute, SONAR puts all the selected tracks at either the top or bottom of the Tracks window, depending on whether you choose descending (top) or ascending (bottom) in the Order list. Size If you choose this attribute, SONAR puts the tracks in order by size, either in descending or ascending order.
-
Page 187: Configuring The Display Of Tracks In The Track View
• Pick a main audio output for the tracks in the Main Destination field. • If you want the main output that you chose to be the default output for new audio tracks, enable the Set as Default Bus checkbox. You can also choose the default bus by right-clicking a bus, and choosing Set as Default Bus from the popup menu.
-
Page 188: Copying Tracks
Undo View Change This command restores the view to its previous state. There are up to 16 levels of undo. Redo View Change This command restores the view to the state prior to the Shift+U Undo View Change command. Vertical FX Bins Changes track FX bins from vertical position into horizontal FX fields located with other track property fields.
-
Page 189: Track Templates
track properties as they are. If you delete or wipe a track by mistake, you can use Edit-Undo to restore the deleted material. When you delete or wipe a track, the track information is not placed on the SONAR clipboard. To remove material from a track and place it on the clipboard, use the Edit-Cut command instead.
-
Page 190: Track Icons
This inserts tracks that are exactly like the template. If you don’t want to use all of the track characteristics that are in the template, you can filter the characteristics that you don’t want by selecting Import Filter from the popup menu. This opens the Track Template Import Options dialog, which allows you to specify what track characteristics you want to import.
-
Page 191: Arranging Clips
Save the image as a .bmp file in the Track Icons directory in your SONAR program folder. Arranging Clips The Track view provides many ways for you to rearrange, copy, and paste clips to arrange your music the way you want. The easiest is to select the clips or portions of clips you want to arrange and then drag and drop them wherever you want.
-
Page 192
little harder. As a result, if your computer has an older, slower CPU you may want to turn off the display of clip contents.: Zoom Clips pane out vertically Vertical Zoom fader for Clips pane Zoom Clips pane in vertically Zoom Bus pane out vertically Vertical Zoom fader for Bus pane Zoom in horizontally… -
Page 193
Redo Zoom Shift+U Turn On Zoom tool (use the Zoom tool Hold down Z to select the area to zoom to) Display Now Time in Center of Clips Pane Fit project to window Shift+F Fit tracks and buses to window To Display Clip Names and Contents Right-click in the Clips pane, and choose View Options from the menu. -
Page 194: Using The Navigator View
Use a custom color Click the Choose Color button and pick a color from the Color dialog box Click OK. SONAR changes the color of the selected clips. Using the Navigator View The Navigator view displays a large part of your project so you can see an overview of your song.
-
Page 195: Moving And Copying Clips
Select all the clips in a track Click on the track number in the Track view. Select a portion of one or more clips Press and hold the Alt key and drag across the clips. The Snap to Grid setting determines the size portion you can select.
-
Page 196
Note that if you copy or move clips to new, empty tracks, you don’t have to worry about these settings. In this case, the track properties that go with the clips are automatically applied to the new track. When you use drag-and-drop editing: •… -
Page 197
SONAR moves the clips to their new location. Note: Moving an audio clip (other than a Groove clip) to a part of your project that has a different tempo changes the size of the clip. To Move Clips Using Cut and Paste Select the clips you want to move. -
Page 198: Nudge
Right-click on the selected clip and choose Clip Properties. SONAR opens the Clip Properties dialog box. Enter a new start time, or use the spinners or keyboard to change the start time. Click OK when you are done. SONAR moves the clip to the start time you chose. To Copy Clips Using Drag and Drop Select the clips you want to copy.
-
Page 199: Nudge Settings
Nudge Settings The Nudge tab in the Global Options dialog allows you to set the three Nudge settings. To Nudge a Clip Left or Right Use the following procedure to nudge a clip. Select the clip you want to nudge. Select Process-Nudge Left(1-3) from the menu to move the clip left or Process-Nudge Right(1-3) to move the clip right.
-
Page 200: Working With Partial Clips
To Nudge a Clip Using Keyboard Shortcuts Select the clip you want to nudge. If necessary, turn on Num Lock (press the Num Lock key on your keyboard). Press the appropriate Num Key. • Left 1—NumPad 1 • Right 1—NumPad 3 •…
-
Page 201: Markers And The Snap Grid
• Choose Edit-Select-By Time, enter the start and end time, and click OK. Select one or more tracks by clicking, Shift-clicking, or Ctrl-clicking on the track numbers in the Track view. To adjust the start and end time of the selection, hold the Shift key while clicking on the Time Ruler.
-
Page 202
an interval, such as a whole note, half note, or quarter note; a marker; an event; the start or end of a clip; or a user-defined number of frames, seconds or samples. From then on, when you move or copy clips or markers, items will be snapped to the nearest point on the Snap Grid. -
Page 203: Snap Offsets
If you selected Musical Time or Absolute Time, select Move To to align selections and clips to the grid, or Move By to move clips by the grid interval. Click OK. All time selections and drag-and-drop editing operations use the new Snap Grid interval. Snap Offsets Snap offsets allow you to set a point other than the beginning of a clip as the “snap”…
-
Page 204
a marker, the marker will be snapped to the beginning of the nearest measure. You are allowed to have any number of markers at a single time point. To display the Markers view, choose View-Markers or click on the Views toolbar. From the Markers view, you can use the File-Print and File-Print Preview commands to print a listing of markers. -
Page 205
To Add a Marker on the Fly • Click in the Markers toolbar, or Press F11. SONAR adds a marker at the Now time and displays it in the Time Ruler, the Markers view, and the Markers toolbar. To Edit a Marker Either right-click on the marker in the Time Ruler, or choose a marker in the Markers view and click . -
Page 206: Working With Linked Clips
• Press F5 twice to display a list of markers, choose the marker you want, and click OK. • Click on a marker in the Markers view to set the Now time to that marker. • Click in the Markers toolbar to jump to the next or previous marker. •…
-
Page 207
command.You can easily unlink linked clips, and then edit them individually. You have two options when unlinking linked clips: Option… How it works… New linked group The clips you selected will still be linked to each other, but won’t be linked to any clips that are not selected Independent Every selected clip will be completely independent… -
Page 208: Splitting And Combining Clips
• Link to Original Clip(s)—If you choose this option, the new copies and the original clip are linked together. Edits you make to any of the linked clips, including the original, affect all other linked clips in the group. Choose the other options you want and click OK. SONAR creates copies of the selected clips that are linked in the way you chose.
-
Page 209
Note: Combining a stereo and mono clip always produces a stereo clip. The Split command lets you split clips four different ways: Option… How it works… Split at Time Splits selected clips at a specific point in time. By default, the split occurs at the Now time, but you can choose any time you want. -
Page 210: Take Management And Comping Takes
Right-click on of the clips and select Bounce to Clip(s) from the popup menu. SONAR combines the selected clips into a single, new clip. Take Management and Comping Takes By default, SONAR stacks any overlapping clips on top of each other, but you can choose to display them in separate layers (lanes) in the same track.
-
Page 211
Mute and solo buttons for layers After the option is enabled, you can move clips on top of each other without creating new layers. To move overlapping clips back into separate layers, use the Rebuild command (see below). Note 1: if you want to move a clip to the exact same time placement in an adjacent layer, hold the Shift key down while you drag. -
Page 212: Clip Muting And Isolating (Clip Soloing)
Remove Empty Layers command. To Add an Empty Layer to a Track • Right-click the Track Scale at the position where you want the new layer, and choose Insert Layer from the popup menu. To Delete a Layer from a Track •…
-
Page 213: Clip Muting With The Default Style
• Alternate style—use the Mute tool to mute or unmute entire clips by clicking clips instead of dragging through time regions. A clip that is completely muted displays the Mute icon in its upper left corner. You can choose this behavior by choosing Mute Entire Clips under Click+Drag Behavior in the Mute tool dropdown menu.
-
Page 214: Clip Muting With The Alternate Style
Mute icon Note: if the clip you’re muting or unmuting with this method already has one or more muted time ranges, these time ranges remain muted while you Alt-click the clip, so you don’t lose any precise mute edits you’ve performed. To completely unmute the clip in the picture below, first Alt-click the clip to remove the Mute icon, and then drag through the upper half of the clip in the muted area(s).
-
Page 215: Audition (Selection Playback)
Using the Mute tool, Alt-click inside the upper half of a clip in the muted area. You can mute or unmute a clip without using the Mute tool if you want. Pressing Q on your keyboard toggles the mute status of all selected clips. Any muted time ranges remain muted. Audition (Selection Playback) The Transport-Audition command plays back only selected clips and/or time ranges.
-
Page 216: Track Folders
Track Folders A track folder contains tracks in the Track pane of the Track view. Track folders make larger projects much easier to manage—you can group different types of tracks in their own folder: vocals, soft synths, ReWire instruments, drums, etc. The main characteristics of a track folder are: •…
-
Page 217
• Right-click a track that’s not in a track folder and select Move to Folder-Track Folder “n” from the popup menu. • Select the tracks you want to add to the folder, right-click on the folder and select Add Track(s) to Folder from the menu that appears. The added track appears in the track folder, and is indented a little to show that it’s inside the track folder. -
Page 218: Adding Effects In The Track View
description in the Description field of the Folder Properties dialog, and click OK. To Select all Clips in a Time Range • Hold down the Alt key while dragging a selection on the composite clip. Now you can edit, move, cut and paste all the selected clips by editing the selected part of the composite clip.
-
Page 219: Using The Tempo Toolbar
any other type of change you can imagine. The tempo changes you add to your project become part of the project and are saved with the project file. You can add tempo changes to your project in the following ways: •…
-
Page 220: Using The Tempo Commands
Note: Tempo ratios can only be used in projects that contain no audio tracks and cannot be used when using any form of synchronization. For more information, see Chapter 18, Synchronizing Your Gear. To Change the Current Tempo in the Tempo Toolbar Enable Groove clip Looping on any audio clips that you want to follow the tempo changes.
-
Page 221
Click in the toolbar or choose Insert-Tempo Change to display the Tempo dialog box. Check the Insert a New Tempo box. Enter a new tempo in one of the following ways: • Type a value in the Tempo field. • Click the arrows to change the value. -
Page 222: Using The Tempo View
clips which you want to follow tempo changes can also be converted to Groove clips in the Loop Construction view. To Modify the Most Recent Tempo Change Enable Groove Clip Looping on any audio clips that you want to follow the tempo changes.
-
Page 223
The graph has several tools you can use to add or modify tempo changes: Tool… Name… What it’s for… Select Drat the Select tool in either the Tempo list or graphic display to select tempos to edit Draw Draw a custom curve indicating changes in tempo Line Draw a straight line indicating a steady increase or decrease in tempo… -
Page 224
Select the tool. Drag a line in the graph from the starting time and tempo to the ending time and tempo. SONAR introduces a linear series of tempo changes. To Draw a Series of Tempo Changes in the Tempo View Enable Groove Clip Looping on any audio clips that you want to follow the tempo changes. -
Page 225: Undo, Redo, And The Undo History
Looping enabled has beveled edges instead of sharp corners. The same command disables Groove Clip Looping on any selected clip that has Groove Clip Looping enabled. Click the Tempo List button to display or hide the tempo list. In the tempo list, select the tempo change to be edited. Click Tempo Properties or double-click the tempo change to open the Tempo dialog box.
-
Page 226
The Edit-History command displays a complete history of the commands and actions you can undo for the current project. The Undo History dialog box looks like this: Most recent change Click to clear the undo Earliest change history Adjust the number of steps you can undo The History command is grayed out until you make a change to the current project that can be undone. -
Page 227: Using Loops
In SONAR, you can import ACID™ loops, or digital audio clips and convert them to Groove clips. You can also record your own audio and create Groove clips. To download more Groove clips and loops, visit www.cakewalk.com. Note: Groove clips and ACIDized loops are loaded into RAM, and can take up a lot of memory.
-
Page 228: The Loop Construction View
The Loop Construction View The Loop Construction view is where you create and edit Groove clips. The Loop Construction view toolbar has tools for editing slicing markers and controls for previewing loops. Loop Construction Controls The following is a list of the tools and controls in the Loop Construction view, followed by a description: Save Loop as WAV This button opens the Save As dialog.
-
Page 229
also insert markers in the Time Ruler which change the project pitch. These markers, called pitch markers affect only Groove clips with Follow Project Pitch enabled. Root Note The Root Note represents the key in which the loop was originally recorded. The Follow Project Pitch feature uses this information, when checked, to transpose the loop to match the project’s default project pitch and pitch markers. -
Page 230
Preview Loops Plays the current loop repeatedly. Use the Stop Preview control to stop playback. Enable Slice Auto-Preview Plays a slice when you click on it. Click Auto-Preview Loop Repeatedly plays a selected slice. Preview Bus Select the main out through which you want to listen to the clip. Properties The Properties button opens the Clip Properties dialog. -
Page 231: The Loop Explorer View
move an automatic marker, it turns purple to show you that it has been edited. For information on editing slicing markers, see “To Edit the Slicing Markers in a Groove Clip” on page 237. Audio Scaling Audio scaling is the increase or decrease in the size (scale) of the waveform in clip. Audio scaling allows you to make detailed edits by zooming in on the parts of the waveform closest to the zero crossing (silence) while preserving the track size.
-
Page 232: Folders Pane
The Loop Explorer view toolbar has the following controls: Tool… Name… What It Does… Move Up Opens the folder one level above the active folder. Refresh Refreshes the active folder. Windows Explorer Opens Windows Explorer at the same directory being viewed in the Loop Explorer view. Play Plays the selected media file.
-
Page 233: Working With Loops
When you preview a Groove clip in the Loop Explorer view, the clip plays in the project key and at the project tempo. To Drag a Loop into a Project Click and drag the Wave file from the Loop Explorer view to the Track view. Drop the Wave file in the track and at the time in which you want it in your project.
-
Page 234: Working With Groove Clips
Working with Groove Clips Groove clips are . files that behave similarly to Sonic Foundry’s ACIDized loops (SONAR also has MIDI Groove clips—see “MIDI Groove Clips” on page 239). Groove clips contain information about the audio content, including the original tempo, original reference pitch, number of beats in the loop, and audio transient information.
-
Page 235: Using Groove Clips
Using Groove Clips Groove clips are easy to use because they automatically adjust to your project’s pitch markers and tempo. You can import existing loops or create your own, using the Loop Construction view. To Import a Groove Clip into Your Project Select a Track in the Track view.
-
Page 236
• Reference note—The original key of the recorded clip. SONAR uses the Reference note when it transposes Groove clips to match your project’s pitch. These attributes can be edited in the Loop Construction view. To Set the Number of Beats in a Groove Clip When you open a clip in the Loop Construction view, SONAR determines the number of beats in the clip. -
Page 237: Editing Slices
To Transpose a Groove Clip to Match Your Project’s Pitch Follow this procedure to force the Groove clip to follow the project’s default pitch. Double-click the clip you want to transpose to the project’s pitch. The clip appears in the Loop Construction view. Click the Follow Project Pitch button.
-
Page 238: Saving Groove Clips As Wave Files/Acidized Wave Files
To Preview a Groove Clip Slice Double-click on a clip to open the Loop Construction view. Click the Enable Slice Auto-preview button. Click a slice to hear it. To Adjust a Groove Clip Slice Gain In the Loop Construction view, select the slice on which you want to adjust the gain. In the Slice Gain field, click the plus or minus buttons to change the gain value.
-
Page 239: Midi Groove Clips
there are no pitch markers, all Groove clips play at the default project pitch, unless the Follow Project Pitch parameter is disabled. Pitch marker: Groove Pitch marker: Groove clips with Follow clips with Follow Project Pitch enabled Project Pitch enabled play with the Root play with the Root Time Ruler…
-
Page 240
determines what beat boundaries (if any) you can roll to. • You can edit individual repetitions without altering any other copies (unlike audio Groove clips). Note: If you then roll the edge of your MIDI Groove clip back over the area you edited, you will lose your edits. -
Page 241: Exporting, And Importing Midi Groove Clips
To Transpose a MIDI Groove Clip with Pitch Markers Use the same method you use for audio Groove clips: see “Using Pitch Markers in the Track View” on page 238. Exporting, and Importing MIDI Groove Clips You can not export MIDI Groove clips by saving your project as a Standard MIDI File—Standard MIDI Files do not contain MIDI Groove clip data, such as transposition value, etc.
-
Page 242: Importing Project5 Patterns
Drag the MIDI Groove clip to the track and time where you want it to go. Importing Project5 Patterns Project5 is Cakewalk’s pattern-based soft synth work station that has its own library (pattern bin) full of MIDI and audio patterns, stored on disk. If you have Project5 MIDI patterns on your hard disk, you can import them directly into SONAR.
-
Page 243: Editing Midi Events And Controllers
Editing MIDI Events and Controllers SONAR lets you edit the events in your projects in dozens of different ways. The Piano Roll view lets you add and edit notes, controllers, and automation data interactively, using a graphic display. SONAR’s many editing commands can improve the quality of recorded performances, filter out certain types of events, and modify the tempos and dynamics of your projects.
-
Page 244: Event Inspector Toolbar
Event Inspector Toolbar The Event Inspector toolbar is available from the View menu by selecting View-Toolbars and checking Event Inspector in the Toolbars dialog. The Event Inspector has the following: • Time • Pitch • Velocity • Duration • Channel To Display a Note’s Properties in the Event Inspector Toolbar •…
-
Page 245: Note Map Pane
The Piano Roll view consists of the Note Map pane, the Drum Grid pane, the Notes pane, the Controller pane, the Piano Roll view toolbar, and the Track List pane. Toolbar Show/Hide MIDI Events menu Edit MIDI Event Type menu Note Map pane Drum Grid pane Notes pane…
-
Page 246: Controller Pane
Controller Pane This pane displays controller events, which you can edit. You can show or hide this pane by clicking the Use Controller Pane button that is in the Piano Roll view toolbar, or by pressing C. When the Controller pane is hidden, all controller events appear in the Notes pane. Track List Pane The Track List pane is home to a list of all tracks currently displayed in the Piano Roll view.
-
Page 247
the Piano Roll view, click the Show/Hide Track List pane button . The following shows three tracks in the Track List pane: Track disabled for track editing Track’s data shown in Output Notes pane Track’s data hidden in Notes pane Current track Mute Solo… -
Page 248: Note Names
Note Names You can change the instrument definition for the active track in the Piano Roll view. Right-click the piano keys in the Notes pane to open the Note Names dialog where you can use note names that are defined as part of any instrument definition. For more information about instrument definitions, see Chapter 16, Using Instrument Definitions.
-
Page 249: Adding And Editing Notes In The Piano Roll View
• To show all controllers in all displayed tracks, click Add All Existing Value Types. After you choose an option, the menu closes. You can repeat steps 2 and 3 to choose more options. To hide or show all controllers in all tracks, click the left side of the Edit MIDI Event Type button. The button turns white when all controllers are hidden, and blue when all controllers are showing.
-
Page 250: Editing Notes With The Draw Tool And The Select Tool
Select notes as shown in the table: To do this… Do this… Select a single note Click on the note Select several notes at once Drag a rectangle around the notes you want to select Add to the selection Hold the Shift key while selecting notes Toggle the selection Hold the Ctrl key while selecting notes Select notes in a certain time range.
-
Page 251
Draw tool in velocity-edit mode Tooltip showing cursor position Velocity column Tooltips give you a constant readout of the cursor position, how much you’ve edited the selection, and how many notes you’re editing. In the picture below, the tooltip lists the current location of the cursor, how far the selection has moved from its original location (1252 ticks to the right), the current pitch level and MIDI note number of the cursor (E8 100), how far from the note’s original pitch the cursor has moved (1 half-step higher), and how many notes are in the selection. -
Page 252
Change the duration Drag the right edge of the note in either direction. Copy and paste notes Hold the Ctrl key down, and drag notes so as to either move them horizontally or change the pitch (see above), and release the mouse at the desired location. Add a note See “To Draw Notes”… -
Page 253
To Edit Notes with the Select Tool If you want to edit multiple notes at the same time, select them with the Select tool. Editing any of the notes in the selection edits all the selected notes in the same way. Set the Snap to Grid to the desired value (if you’re editing in the Inline Piano Roll view, make sure you use the PRV tab of the Snap to Grid dialog). -
Page 254: Adding And Editing Controllers In The Piano Roll View
Adding and Editing Controllers in the Piano Roll View Controller events (MIDI continuous controllers, pitch wheel, NRPN’s, and RPN’s) appear in either the Notes Pane or the Controller pane, depending on whether you choose to display the Controller pane or not.
-
Page 255: Selecting Controllers
• Value—this field is greyed-out if you choose Wheel or ChanAft in the Type field. If you choose Control, RPN, or NRPN in the Type field, choose which Control, RPN, or NRPN you want to add. For example, to edit volume, choose 7-Volume in this field if you chose Control in the Type field.
-
Page 256: Editing Controllers
To Select Controller Events of the Same Type Click the Edit MIDI Event Type menu , choose the type of event you want to select from the popup menu. Activate the Select tool in the Piano Roll toolbar or the Inline Piano Roll toolbar (depending on which view you’re working in), and select one or more controller events by usint the following techniques: •…
-
Page 257: The Inline Piano Roll View
The Inline Piano Roll View The Inline Piano Roll view lets you edit note and continuous controller events for a single track directly in the Track view. Clicking the PRV Mode button in a track changes the Clips pane for that track into a single-track Piano Roll view which displays all the track’s MIDI data, including data from all track layers.
-
Page 258: Displaying The Inline Piano Roll View
Inline Piano Roll toolbar Show/Hide Notes Show/Hide Velocity Tails (on drum-mapped tracks) Draw tool Select tool PRV Mode Show/Hide Auto Erase button Fit Content Controllers To draw and edit notes and controllers in the Inline Piano Roll view, see “Adding and Editing Notes in the Piano Roll View”…
-
Page 259
MIDI Scale in Notes mode MIDI Scale To Zoom Vertically with the MIDI Scale Put the MIDI Scale into notes mode by right-clicking the MIDI Scale and choosing Notes from the popup menu. Hold the mouse over the MIDI Scale so that the cursor changes to a small vertical keyboard, and drag upward to zoom in. -
Page 260: Displaying Notes And Controllers In The Inline Piano Roll View
Click the Fit Content button on the Inline Piano Roll toolbar. To display the Inline Piano Roll toolbar, use the View-Toolbars command to open the Toolbars dialog, and check the Inline Piano Roll checkbox. To Change the MIDI Scale’s Display Mode •…
-
Page 261: Selecting And Editing Events
Selecting and Editing Events SONAR has many editing commands that you can use to modify the events that make up your project. Here are some of the things you can do: • Transpose events, clips, tracks, or an entire project to a different key •…
-
Page 262
To Transpose Selected Events Select the tracks, clips, or events you want to transpose. Choose Process-Transpose to display the Transpose dialog box. Use the spinners or enter the number of semi-tones to transpose. Use the + and — keys on your keypad to go up or down by one or [ and ] to go up or down by octaves. Check Diatonic Math if you want to transpose along the major scale of the current key. -
Page 263: Shifting Events In Time
Shifting Events in Time The Track view lets you move entire clips forward or backward in time by using drag and drop editing or by changing the start time of selected clips. The Process-Slide command is slightly more flexible— you can use it to shift individual events and markers (or selected events and markers) either forward or backward in time.
-
Page 264
SONAR inserts a blank measure at the Now time. To Insert Blank Time or Measures into a Project Select Edit-Select-None to make sure that no track or time range is selected. Select the range of time you want to insert by dragging in the Time Ruler. Choose Insert-Time/Measures to display the Insert Time/Measures dialog box. -
Page 265: Stretching And Shrinking Events
The Delete dialog box appears. Click the following checkboxes: • Events in Tracks • Delete Hole—if you want the data that comes after the hole to retain its same placement in a measure, check the Shift by Whole Measures option. Click any of the other options you want to delete.
-
Page 266
To Stretch or Shrink Using Percentages Select the events you want to change. Choose Process-Length to display the Length dialog box. Choose to change the Start Times and/or Durations of selected notes by checking the boxes. If you want to stretch selected audio clips, check the Stretch Audio box. When this checkbox is enabled, the following two options become available: •… -
Page 267: Reversing Notes In A Clip
Choose one of the following: • Tempo Map–Choose this option if you want the tempo to change but not the duration of notes and events. For example, if your clip contains quarter notes, and you want those notes to stay quarter notes even though the elapsed time of the clip changes, choose Tempo Map.
-
Page 268: Slip Editing Midi (Non-Destructive Editing)
You can also edit note velocities in the Notes pane of the Piano Roll view, which lets you draw shapes other than straight line changes. For more information, see “Adding and Editing Notes in the Piano Roll View” on page 249. To Scale Velocities Select the events whose velocity data you want to change.
-
Page 269
If you insert a new MIDI event which does not fall within the boundary of a slip-edited clip, a new MIDI clip, which contains the new MIDI events, is created. Important: Adding controller data beyond the slip-edited boundaries of a slip-edited clip in the Piano Roll view results in the slip-edited data being displayed in the Piano Roll view. -
Page 270: Slip-Editing Multiple Midi Clips
To Permanently Delete Slip-edited MIDI Data Select the clips that contain the slip-edited data you want to delete. Select the Edit-Apply Trimming command. SONAR permanently deletes the slip-edited data from the clips you selected. Slip-editing Multiple MIDI Clips You can slip-edit multiple clips at the same time. To Slip-edit Multiple MIDI Clips at Once Select the clips you want to slip-edit.
-
Page 271
SONAR has two different quantize commands: Command… How it works… Process-Quantize Adjusts the start time and duration of selected notes so that they line up with a fixed size grid Process-Groove Quantize Lays a grid over an existing piece of music (the groove pattern), and then adjusts the start time, duration, and velocity of selected notes so that they line up with the grid These commands have quite a few settings, making them very flexible and powerful. -
Page 272
Offset Normally, the resolution grid is aligned evenly with the start of measures and beats. As an option, you can shift the grid earlier or later by any desired number of clock ticks. If the resolution is a quarter note and you’ve set the offset to +3 ticks, then a note that is originally near 1:01:000 would be moved to 1:01:003—three ticks beyond the beat boundary. -
Page 273
Swing Many projects do not have notes positioned on a perfectly even time grid. For example, projects with a swing feel, though they may be written entirely in eighth notes, are often played more like eighth-note triplets, with the first note extended and the second one shortened. The swing option lets you distort the timing grid so each pair of notes is spaced unevenly, giving the quantized material a swing feel. -
Page 274: Other Settings
When you use Groove Quantize, you can also perform adjustments on out-of-window events. There are four options: Option… How it works… Do Not Change Notes outside the window are not changed. Quantize to Resolution Notes outside the window are snapped to a regular grid of the specified resolution.
-
Page 275
Choose one of your own presets from the list, or enter the settings you want according to the table: Setting… What to do… Resolution Choose a note size or enter the number of clock ticks Change Check the event types and characteristics you want to change Options Enter values for Strength, Swing, Window,… -
Page 276
Window Sensitivity Enter the window sensitivity value (percentage) If Outside Window Choose what should happen to events outside the window Only Notes, Lyrics and Audio Check to prevent MIDI controller, aftertouch, and xRPN data from being adjusted Stretch Audio Check to stretch audio clips to adjust their duration Strength Use the sliders or enter values for Note… -
Page 277
To Define a New Groove Select the music that defines the groove using any of the selection tools and commands. Choose Edit-Copy to place the music onto the Windows clipboard. You can now use the Groove Quantize command with the clipboard as the “Groove File.” To Save a Groove Pattern Select the music that defines the groove using any of the selection tools and commands. -
Page 278: Fit Improvisation
To Delete a Groove Choose Process-Groove Quantize to display the Groove Quantize dialog box. Click the Define button to display the Define Groove dialog box. Select the file containing the groove to delete. Select the pattern name of the groove. Click the Delete button, and confirm that you want to delete the groove pattern.
-
Page 279: Snap To Scale
The Process-Fit Improvisation command lets you take a recording and create a tempo map (with measure and beat boundaries) that fits what you played. Your performance is not changed in any way, even though the note start times and durations are adjusted to fit the new tempo map. This is important if you later want to use any of SONAR’s editing features that depend on a proper tempo map for best results.
-
Page 280
You can create custom scales, modify existing ones, and choose how SONAR handles non-scale notes. To Enable or Disable Snap to Scale for a Single Track • In the Track view, in the track that you want to affect, click the Scale Snap button. Scale Snap button: Scale menu turns blue when… -
Page 281
To Create a Scale Open the Scale Manager dialog by clicking the dropdown arrow in the Scale menu, and choosing Scale Manager from the menu that appears (you can also use the Track-Snap to Scale-Scales- Scale Manager command, or the right-click menu in the Piano Roll view’s Track List pane). In the Scale Family field, click the scale family that you want your scale to appear under when your scale appears in the Scale menu. -
Page 282: Searching For Events
Keyboard display Scale degree buttons When you’re through choosing scale degrees, click the Close button to save your changes. To Restore a Scale or Scales to Factory Settings Open the Scale Manager dialog. If you want to restore a particular scale to factory settings, select it in the Scale: field, click the Defaults button, and in the Scale Defaults dialog, select Restore Current Scale (if factory), and click OK.
-
Page 283: Event Filters
Select all the events in a project that have the specified attributes Edit-Select-By Filter Modify an existing selection to keep only those events that have the Edit-Select-By Filter specified attributes Replace all events that meet specified attributes with modified Edit-Interpolate versions of the events These capabilities can help you find problem spots or errors in a project or make systematic changes to events that have particular attributes.
-
Page 284
Different types of events have different parameters, as shown in the table: This event type… Has these parameters… Note Pitch, velocity, and duration Key Aftertouch Pitch and pressure value Controller Controller number and value RPN/NRPN RPN/NRPN number and value Patch Change Bank and patch numbers Channel Aftertouch Pressure value… -
Page 285
Searching for an Event The Go-Search command is used to find the next event (searching forward from the Now time) that meets the criteria you lay out in an event filter. Once you have found the first such event, you can find the next event that meets the criteria using the Go-Search Again command (or by pressing F3). -
Page 286
Choose Edit-Select-By Filter to display the Event Filter dialog box. Click the None button to clear the dialog box. Check the Note checkbox, and enter a minimum value of C4. The maximum should already be set to C9. Click OK. SONAR selects all the notes from C4 up. Choose Edit-Cut to move the selected notes to the clipboard. -
Page 287: Controllers, Rpns, Nrpns, And Automation Data
Duration From 0:01:00 to From 0:01:000 to Converts all notes that are between a 0:02:000 0:01:000 quarter note and half note in length, and makes them all quarter notes Channel From 1 to 1 From 2 to 2 Changes all events on MIDI channel 1 to MIDI channel 2 Channel From 1 to 16…
-
Page 288
The Piano Roll toolbar contains several dropdown lists that let you choose the controller you want to see and edit. The contents of these lists depend on the output and channel settings and on the instrument assigned to that output and channel. Different instruments use controllers in different ways. See Chapter 16, Using Instrument Definitions. -
Page 289: The Event List View
• MIDI key aftertouch (KeyAft) values Remember that note velocity is an attribute of each note and not a completely separate event. You cannot add or remove velocity events in the Notes pane, but you can use the draw tool to adjust the velocity values for existing notes.
-
Page 290: Event List Buttons And Overview
When the Event List view includes more than one track, events are mixed together in chronological order. For example, if you select tracks 1 and 3 when you open the Event List view, you see a single list of intermingled events from tracks 1 and 3. You can have any number of Event List views, each containing any number of tracks, open at the same time.
-
Page 291
MCIcmd Windows Media Control MCI command text Interface (MCI) command Wave Audio Digital audio wave Name, velocity (0-127), and number of samples Shape Events Automation graph segments Change in values, kind of shape, and length in made up of a solid line MBT format. -
Page 292: Selecting Events In The Event List View
Selecting Events in the Event List View The following table describes how to select events in the Event List view: To do this… Do this… Select a single event Click on the event. Select multiple, contiguous events Select the first event, hold the Shift key down and click the last event.
-
Page 293
small amount • Click and hold both mouse buttons, and then drag the mouse up or down to change the value by a larger amount • Double-click a cell, and then enter or choose a new value If you change the time of an event, it may also change its position in the event list. The Event List view follows that event to its new location. -
Page 294: Additional Event Information
To Play Events Step by Step Using the keyboard, hold the Ctrl and Shift keys and press the Spacebar to play the currently highlighted event. If the event is a note event, it plays until you release the Spacebar. When you release the Spacebar, the highlight moves to the next event. Continue pressing the Spacebar to play events one by one.
-
Page 295: Midi Effects (Midi Plug-Ins)
SET CDAUDIO TIME FORMAT Plays a specific track from the CD drive TMSF PLAY CDAUDIO 3 STOP CDAUDIO Stops the CD from playing While MCI commands can be used to play Wave files, these files are played at their normal speed and are not necessarily synchronized with MIDI or other audio data.
-
Page 296: Quantizing
Quantizing The Quantize command moves events to (or towards) an evenly-spaced timing grid. The Quantize effect is similar to the Process-MIDI Effects-Cakewalk FX-Quantize command. For more information, see “Other Settings” on page 274. The quantize effect parameters are as follows: Parameter/Option…
-
Page 297: Filtering Events
To Apply Echo/Delay to MIDI Data Select the data to be affected. Choose MIDI Effects-Cakewalk FX-Echo Delay from the Process menu or from the popup menu to open the Echo Delay dialog box. Set the echo/delay parameters, as described in the table above.
-
Page 298: Adding Arpeggio
Chord recognized The chord the Arpeggiator recognizes and plays. To Apply the Arpeggiator to MIDI Data Select the data to be affected. Choose MIDI Effects-Cakewalk FX-Arpeggiator from the Process menu or from the popup menu to open the Arpeggiator dialog box.
-
Page 299: Analyzing Chords
To Analyze a Chord Select the notes to be analyzed. Choose MIDI Effects-Cakewalk FX-Chord Analyzer from the Process menu or from the popup menu to open the Transpose dialog box. Click the Audition key. SONAR displays the chord and its name.
-
Page 300: Transposing Midi Notes With The Transpose Midi Effect
-10 to 10. To Change Note Velocities Select the data to be affected. Choose MIDI Effects-Cakewalk FX-Velocity from the Process menu or from the popup menu to open the Velocity dialog box. Select options as described in the table above.
-
Page 301
To Transpose MIDI Data Select the data to be affected. Choose MIDI Effects-Cakewalk FX-Transpose from the Process menu or from the popup menu to open the Transpose dialog box. Set the transposition options as described in the table above. -
Page 303: Drum Maps And The Drum Grid Pane
Drum Maps and the Drum Grid Pane There are several panes in the Piano Roll view designed for use with MIDI drum tracks: the Note Map pane which lists the original pitch values and the mapped values for each note, and the Drum Grid pane which displays your drum tracks (any track assigned to a drum map) and where you can edit your drum tracks.
-
Page 304: The Basics
The Basics Drum maps are virtual MIDI ports that you create and edit. Drum maps give you total control over all the MIDI drum sounds you have access to either in the form of software (soft synths) or hardware (external MIDI sound modules). Drum maps in SONAR allow you to do the following: •…
-
Page 305
Delete Drum New Drum Preset list Current Drum Map Map button Map button Click to create a new row Rows Port/Channel pairs Drum Maps Used in Current Project This field displays all the currently available drum maps. click the New button to create a new drum map and Delete to delete a drum map. -
Page 306: Working In The Drum Map Manager
Settings The Settings section is where you map the following for each In Note (source): • In Note—The source MIDI note value. • Out Note—The MIDI note value that plays on the destination sound source. • Name—The user-defined name for the row. •…
-
Page 307: The Map Properties Dialog
The Map Properties Dialog The Map Properties dialog lets you change all the settings for an individual mapped note in your drum map. The settings in the Map Properties dialog are the same as a single row in the Drum Map Manager. If you want to edit more than one drum note pitch mapping, click the Map Mgr button to open the Drum Map Manager dialog.
-
Page 308: Using Drum Maps
Using Drum Maps The following topics cover using drum-mapped tracks, including how to display drum tracks in the Drum Grid pane and how to edit note velocities. Assigning a MIDI Track to a Drum Map Use the following procedure to assign a MIDI track to a drum map: To Assign a MIDI Track to a Drum Map Display the Track view if it is minimized.
-
Page 309: Velocity Tails
Velocity Tails In the Drum Grid pane, you have the option of showing the velocity of each note as a series of bars. The higher the bars, the higher the velocity value. Notes with velocity showing Notes without velocity showing To Display Velocity Tails in the Drum Grid Pane •…
-
Page 310: Previewing A Mapped Sound
Previewing a Mapped Sound Use the following procedure to hear the drum sound you have mapped a note to. To Preview a Mapped Sound • In the Note Map pane, click on the name of the sound you want to hear. The Note Map Pane The Note Map pane displays the current drum map.
-
Page 311: The Drum Grid Pane
In the Map Properties dialog, enter a new value in the Note Out field and press the Enter key, or use the +/- buttons to change the value and press the Enter key. To Change Multiple Note Out Settings Open the Drum Map Manager. In the Drum Map Manager, select a contiguous range of rows by selecting the first in the range, and holding down the Shift key while selecting the last in the range.
-
Page 312: The Pattern Brush Tool
To Turn on Grid Lines in the Drum Map Pane • Click the Show/Hide Grid Lines combo button in the Piano Roll view toolbar. • Press the I key. To Set the Drum Map Pane Grid Line Resolution • Click the down arrow on the Show/Hide Grid Lines combo button and select an option from the menu that appears.
-
Page 313: Creating Custom Patterns
Your cursor should appear like this when in the Drum Grid pane. Click where you want to begin placing notes and drag until you have inserted all the notes you want. Release the mouse button. SONAR creates a series of notes, at equal intervals. To Paint a Custom Pattern of Notes Using the Pattern Brush Tool Open a track in the Drum Grid pane.
-
Page 314
Right-click in the Time Ruler where you want the pattern to start and select Insert Marker from the menu that appears. The Marker dialog appears. Enter the name you want to use for the first pattern and click OK. In a MIDI track, enter a pattern of notes. If you want to create a second pattern, repeat steps 2 through 4. -
Page 315: Editing Audio
Editing Audio The Track view lets you edit and arrange audio clips. You can perform basic tasks such as cut, copy, paste, and move; apply simple audio processing such as gain change, fades, and equalization; and use sophisticated audio effects such as stereo chorus and reverb. The Track view lets you see your audio clips on a timeline, arranged by track, to help you visualize the organization of your project’s audio data.
-
Page 316: Digital Audio Fundamentals
Digital Audio Fundamentals Digital audio is a numeric representation of sound; it is sound stored as numbers. In order to understand what the numbers mean, you need to start with the basic principles of acoustics, the science of sound. Basic Acoustics Sound is produced when molecules in the air are disturbed by some type of motion produced by a vibrating object.
-
Page 317
The displacement of the string changes as the string vibrates, as shown here: The segment marked “A” represents the string as it is pulled back by the pick; “B” shows it moving back towards its resting point, “C” represents the string moving through the resting point and onward to its outer limit;… -
Page 318: Waveforms
played. Rather, all these vibrations are added together to form a complex or composite sound that our ear perceives as a single tone. Fundamental frequency (1f) 100% amplitude 2x fundamental (2f) 50% amplitude 3x fundamental (3f) 33% amplitude 4x fundamental (4f) 25% amplitude 5x fundamental (5f) 20% amplitude…
-
Page 319
The waveform of a trumpet blast might look like this: And the waveform of a spoken word might look like this: The three waveforms shown above are quite different from one another, both in appearance and sound. Each has its own characteristic shape, or envelope, and each has its own complex combination of frequency components, which can change across the duration of the sound. -
Page 320: Recording A Sound
excursions of waveform amplitude. For example, a close-up of a portion of the guitar waveform might look like this: The waveform crosses the zero line twice during each complete vibration. These zero-crossings are important in digital audio processing; they are good places to cut waveforms apart and splice them together.
-
Page 321: The Decibel Scale
Here is what a clipped waveform might look like: Clipping is not usually desirable and may have unpleasant audible effects. Sudden irregularities in the waveform of any type can cause clicks, pops, and distortion of the original sound. The Decibel Scale In acoustics, the decibel (dB) scale is a scale for measuring the relative loudness of two sounds.
-
Page 322: Managing Audio Data
Managing Audio Data Because of the great size of audio data, SONAR uses an intelligent scheme for storing audio clips on disk to conserve disk space and minimize the time it takes to load and save data. Audio data is not stored directly in your project file, but rather in separate files in a special directory.
-
Page 323: Editing Clip Properties
Editing Clip Properties Audio clips have several properties that you can change: Property… Description… Name The name of a clip is used in the Track view and Event List view. You can assign any name to help you remember the contents of the clip.
-
Page 324: Audio Scaling
Audio Scaling Audio scaling is the increase or decrease in the size (scale) of the waveform in a track or bus. Audio scaling allows you to make detailed edits by zooming in on the parts of the waveform closest to the zero crossing (silence) while preserving the track or bus size.
-
Page 325
To Scale All Audio Tracks Together To scale all audio tracks together, follow the instructions in the table below: To do this… Do this… Increase the scale for all tracks Press Alt+Up Arrow. Hold down the Ctrl key and click the Vertical Zoom In button. -
Page 326: Splitting Audio Clips
To Scale a Single Track or Bus To scale a single audio track, follow the instructions in the table below: To do this… Do this… Increase/decrease the scale of There are several ways to increase or decrease the size of an individual stereo or mono tracks individual track’s or bus’s waveform: •…
-
Page 327: Bouncing To Clips
Click once to make a single split, or to make two splits, click where you want the first split, drag within a clip and release to make a second split. To Split Clips with the Split Command Select the clip you want to split. Right-click the selected clip and select Split from the menu.
-
Page 328: Scrubbing
Choose Edit-Bounce to Track(s). The Bounce to Track(s) dialog appears. Select the track you want to bounce to in the Destination field. Select other options in the Mixdown Audio/Bounce to Track(s) dialog and click OK. The clips are combined into a single clip on the destination track. Empty space between clips is filled with silence in the new clip.
-
Page 329: Using The Normalize And Gain Commands
Presets are a way to store dialog settings so that you can apply the exact same processing or effect again in the future. The following table tells you how to use presets in the effects dialog boxes. To do this… Do this…
-
Page 330: Reversing Audio Data
To Use the Gain Command Select the audio data you want to edit. Use the Process-Audio-Gain command to open the Gain dialog. If you only want to change the overall volume of the selection, move the New Left Channel-From Left slider and the New Right Channel-From Right sliders by a similar amount. You can press the Audition button to try out your edits.
-
Page 331
Using Remove Silence to split long audio clips into smaller ones opens a variety of creative possibilities. The parameters in the Remove Silence dialog box are used to specify exactly what you mean by silence. More precisely, Remove Silence employs what is called a digital noise gate. The gate is a type of filter, it passes data through, or stops it from passing through, according to certain criteria. -
Page 332: Extracting Timing
To Remove Silence Select the audio data to be affected. Choose Process-Audio-Remove Silence to open the Remove Silence dialog box. Set the digital noise gate parameters as described in the table above. Check the Split Clips box to delete the silent sections of audio. Click OK to remove silence from the selected data.
-
Page 333
Minimum Length (ms) The minimum allowable amount of time between pulses. If you are working with dynamic source material, and Extract Timing seems to generate clusters of pulses that seem incorrect, you should experiment with increasing the value of this parameter. Find a Steady Rhythm Tells SONAR to look for a steady rhythm among all the pulses it finds. -
Page 334: Removing Dc Offset
Set the Timing Synthesis parameters as described in the table above. Click OK. The generated events are automatically placed on the Clipboard. You can paste them to a new track, or use them directly in another command (such as Groove Quantize). Removing DC Offset Some models of audio hardware produce a DC offset while recording, which is caused by electrical mismatches between the audio hardware and the input device or instrument.
-
Page 335: Slip-Editing Audio (Non-Destructive Editing)
Slip-editing Audio (Non-destructive Editing) Slip editing allows you to non-destructively hide or reveal the beginning of a clip, the end of a clip, or both. The hidden material in a clip is not heard during playback. All hidden material remains intact and can be restored.
-
Page 336
Make edits according to the following table: To do this… Do this… Trim the beginning of a clip Move the cursor over the beginning of a clip. When the cursor changes in appearance to look like this , click and drag the clip to the right until you have removed the unwanted information. -
Page 337
The same clip with the Clip before scroll-trimming clip shifted by 3 beats Slide-trimming the beginning of a clip Press the Alt+Shift keys and move the (Moving the start time of the clip and the cursor over the beginning of the clip. When clip’s contents while preserving the end the cursor changes to look like this time) -
Page 338: Slip-Editing Multiple Audio Clips
Slip-editing Multiple Audio Clips You can slip-edit multiple clips at the same time. To Slip-edit Multiple Clips at Once Make sure all clips are not loop-enabled. Select the clips you want to slip-edit. Move your cursor over the beginning or end range of the selected clips until your cursor changes to look like this: Drag the boundary to the desired location and release.
-
Page 339
Linear out/Fast Curve in Slow Curve out/Linear in Slow Curve out/Slow Curve in Slow Curve out/Fast Curve in Fast Curve out/Linear in Fast Curve out/Slow Curve in Fast Curve out/Fast Curve in To Create a Real-time Fade-in in an Audio Clip Use the following procedure to create a fade-in in an audio clip: In the Track view’s Clips pane, move your mouse over the top part of the beginning of a clip until the cursor looks like this:… -
Page 340
As you drag your mouse a fade-in appears on your clip. To Create a Real-time Fade-out in an Audio Clip Use the following procedure to create a fade-out in an audio clip: In the Track view’s Clips pane, move your mouse over the top part of the end of a clip until the cursor looks like this: When your cursor changes, click and drag to the left until you reach your desired fade-out length. -
Page 341
The two clips now overlap with a crossfade, looking something like this: Fade-out First clip Fade-in Second clip Crossfade You can edit fade-ins and fade-outs. You can change the start, end and position of a fade. The following procedures all demonstrate edits to a fade-in, but fade-outs work exactly the same. To Edit the Start Time of a Fade While Maintaining the End Time of the Fade Changing the start time of a fade-in is essentially slip editing the beginning of the clip. -
Page 342
To Edit the Start Time of a Fade While Maintaining the Length of the Fade Use this procedure to change the start time of the fade-in while maintaining the length of the fade: In the Clips pane, move your cursor over the middle part of the beginning of a clip which has a fade-in. -
Page 343: Applying Fades And Crossfades Offline
Alter Existing Times Select this option if you wish to change the existing fade lengths. You don’t need to check this option if you’re creating new fades. Alter Existing Curves Select this option if you wish to change the existing fade types. You don’t need to check this option if you’re creating new fades.
-
Page 344
Select an envelope from the dropdown list. If desired, manipulate the curve as described in the table above. Click OK. SONAR applies the fade to the selected audio data. To Crossfade Two Overlapping Clips Select two overlapping audio clips. They need not be on the same track, but they must overlap in time for the command to have any effect. -
Page 345: Audio Effects (Audio Plug-Ins)
Audio Effects (Audio Plug-ins) SONAR provides the ability to use plug-in audio effects. Some audio plug-in effects are supplied with SONAR. Others can be purchased from third-party software manufacturers, and appear automatically in SONAR’s menus once they are installed on your system. If you need help when using a plug-in, press the F1 key on your computer keyboard to open the plug-in’s help file.
-
Page 346: Directly Applying Audio Effects
If you leave it unchecked, the processed data will replace the original audio clips. Shifting Pitch The Cakewalk-Pitch Shifter raises or lowers the pitch of an audio signal, while leaving the duration of the audio clip unchanged. The pitch shift parameters are as follows: Parameter/ Meaning…
-
Page 347: Stretching Time And Pitch
Click OK. SONAR applies the pitch shift to the selected data. This is a fast pitch shifter that uses minimal computation time. The Cakewalk Time/Pitch Stretch command, described below, can produce higher quality output, but requires a lot more computational time.
-
Page 348
To Apply Time/Pitch Stretch to Audio Data Select the audio data to be affected. Choose Audio Effects-Cakewalk-Time/Pitch Stretch from the Process menu or from the popup menu to open the Cakewalk FX Time/Pitch Stretch dialog box. Set the time/pitch stretch parameters, as described in the table above. -
Page 349: Working With Software Synthesizers
Working with Software Synthesizers SONAR’s Synth Rack view makes inserting a soft synth or ReWire instrument a one-step process, and makes viewing and configuring these instruments simple. SONAR also supports multi-port synths, which allow you to use different synth tracks and effects for each patch or group of patches in a multi-timbral, multi-port synth.
-
Page 350: Synth Rack View
Synth Rack View Open the Synth Rack view with the View-Synth Rack command. The Synth Rack view lets you view, insert, delete, and configure your soft synths. You can also mute and solo any or all of them from this view.
-
Page 351: Multi-Port Soft Synths
To add a soft synth to the audio and synth tracks’ Input menus (drop-downs) and the MIDI tracks’ Output menus, you have to insert each soft synth that you want to use into each project. There are two basic ways to insert soft synths in SONAR: You can insert soft synths from the Synth Rack view or with the Insert-Soft Synths command.
-
Page 352
To Insert a Soft Synth from the Synth Rack View or Menu If you want to use the Synth Rack view, open the Synth Rack view with the View-Synth Rack command, and click the Insert button to display the popup menu of installed soft synths. If you want to use the menu command, use the Insert-Soft Synths command to display the popup menu of installed soft synths. -
Page 353: Opening A Soft Synth’s Property Page
Under Soft Synths, choose the name of a soft synth. Two things happen: the soft synth’s interface appears, and the soft synth’s name appears in the track’s or bus’s FX bin, with a bypass button next to the name. Set the soft synth’s parameters (choose sounds, effects, etc.), and drag its interface out of the way. Click the Output field of a MIDI track to display the output menu.
-
Page 354
the focus is on the MIDI track that’s patched to the second soft synth. It also makes it possible to record notes or automation data from the soft synth to any armed MIDI track. To Play a Soft Synth with Recorded MIDI Data Insert a soft synth into the project (see “Inserting a Soft Synth”… -
Page 355: Muting And Soloing Soft Synth Tracks
• In the synth track that uses the soft synth as an input, choose another input for the track. If you don’t select another soft synth as an input, the synth track becomes a regular audio track. To Remove a Soft Synth from a Project •…
-
Page 356: Automating A Soft Synth’s Controls
SONAR creates new audio tracks from the outputs you selected. When you’re through converting, don’t forget to mute your MIDI tracks so you won’t hear them and the new audio track(s) at the same time. Note: you control the bit depth of all rendering operations (bouncing, freezing, applying effects) on the Audio Data tab of the Global Options dialog (Options-Global command) in the Render Bit Depth field.
-
Page 357: Rewire Instruments
SONAR records the fader or knob movements. Check the Output fields of the MIDI tracks you recorded into and play back the track. To Automate a Soft Synth’s Controls in the Track View In a MIDI track that uses the synth as an output, right-click in the Clips pane and choose Envelopes-Create-MIDI from the popup menu.
-
Page 358: Inserting A Rewire Instrument
• You can insert ReWire devices into SONAR projects from the Synth Rack view or Insert menu, and you can tell SONAR to create the necessary synth tracks and one MIDI track at that time. You can also tell SONAR to open the ReWire application’s property page, because, unlike synths, ReWire applications must have their property pages (interfaces) open in order to function.
-
Page 359
the ReWire Instrument, and set an existing MIDI track’s Output field to the ReWire Instrument. The existing audio track will then become a synth track. • If you want to open the ReWire Instrument’s interface from this dialog, check the Open These Windows: Synth Property Page checkbox (always check this option: ReWire Instruments do not sound unless their property pages are open). -
Page 360: Mixing Down Rewire Instruments
Now you can use separate effects for each of your ReWire devices. Note: Always close your ReWire applications before closing SONAR or a SONAR project. Mixing Down ReWire Instruments To either mix down or bounce ReWire instruments to new audio tracks, use the same procedures as for synths.
-
Page 361: Recording A Stand-Alone Synth
In the Outputs field, make sure the name of your stand-alone synth’s MIDI driver is highlighted, and click OK. Click the Output field of an unused MIDI track to display the output menu. Select the name of the stand-alone synth’s MIDI driver. If your stand-alone synth is multi-timbral, change the track’s MIDI channel to the same one that the synth uses for the sound you want to hear.
-
Page 362
In SONAR, click the Record button. SONAR records all the MIDI tracks that are assigned to the stand-alone synth as a stereo audio track. After you finish recording, mute the MIDI tracks that you just recorded so you don’t hear them and the new audio track at the same time. -
Page 363: Mixing And Effects Patching
Mixing and Effects Patching This chapter describes SONAR™ as a live digital mixer that gives you full track-by-track control over recording and playback of your project. You can mix in either the Track view or the Console view. The Console view has a 4-band EQ patched to every audio track (Producer Edition only). The Console view and the Track view support automation, which lets you record and play back volume and pan changes, and other track parameters.
-
Page 364: Preparing To Mix
SONAR lets you mix together the digital audio portions of a project, including all real-time effects and control movements, to a stereo track or stereo pair of audio tracks. You can use the mixed-down tracks to create a CD master or to publish your work on the internet. Preparing to Mix The Console and Track views contain all the controls you need to mix your project.
-
Page 365
Sound controls in the Console view are grouped in modules. There are several types of modules: Module type… What you can do… MIDI track Set the track’s output, channel, bank, and patch; set the input; mute, solo, and arm the track; set channel volume, panning, chorus, and reverb levels;… -
Page 366
The Console view contains several different types of controls. Here’s how they are used: Click a button to enable/disable it Drag sliders left and right Click drop-down menus to select options Click and drag up/down on knobs Drag the volume fader up or down You can adjust Console view controls in the following ways: •… -
Page 367
The Track View The Track pane The Clips pane Expanded Clips track Minimized tracks Track icon Track/Bus Inspector Show/Hide Bus pane Splitter bars The Bus pane There are four types of modules in the Track view: Track type… What you can do… MIDI track Set the track’s output, channel, bank, and patch;… -
Page 368: Configuring The Console And Track Views
The Track view contains several different types of controls. Here’s how they are used: Click and drag left or right to change values Right-click and select from a menu of effects Click to enable or disable Click to toggle from Pre to Post Click the small white arrow to open a menu of options For information on using the controls in the Track view, see “Changing Track Settings”…
-
Page 369
To Display All the Tracks in a Project • Click the Zoom tool’s down arrow and select Show All Tracks from the Zoom tool menu. To Hide Selected Tracks Select the tracks you want to hide. Click the Zoom tool’s down arrow and select Hide Selected Tracks from the Zoom tool menu. To Display Only Selected Tracks Select the tracks you want to display. -
Page 370
To Show or Hide Meters in the Track View • Click the Show/Hide Meters button to display all meters or click on the arrow to the right of the Show/Hide Meters button to display only the meters you want to see or to customize the appearance of your meters. -
Page 371: Mixing Midi
Press Enter. If you rename a track, the new name is copied to the Track view. If no name has been assigned to a track, the Console view and Track view display the track’s number. To Link Left/Right Faders in a Console View Module In the module whose faders you want to link, adjust the volume of each fader to the appropriate level.
-
Page 372: Converting Midi To Audio
When moving the Volume fader, the Value box in the toolbar displays the level from a scale of 0 (minimum) to 127 (maximum). When you move the Pan slider, the Value box displays the pan value on a scale that ranges from 100% Left to 100% Right with center represented by a C. Converting MIDI to Audio The following options cover three basic MIDI setups: •…
-
Page 373: Signal Flow
Signal Flow The following graphic shows an audio track’s signal flow: Audio clip Soft Synth input Hardware input Clip mute V-Vocal Clip fades Input meters (record) Clip envelopes Clip FX bin Volume Trim Phase/Interleave Playback Meter (pre fader/pre FX) Send level Pre fader Send pan FX bin…
-
Page 374: Routing And Mixing Digital Audio
You control the mixing and playback of an audio track as follows: To do this… Do this… Add a real-time audio effect to Right-click in the FX bin and select an effect from the list (for the track more information, see “Using Real-Time Effects” later in the chapter) Remove an effect Select the effect and press Delete or right-click and select…
-
Page 375
This is shown in the picture below: Bus Send level Bus send on/off button Pre/Post fader button Phase button Pan control Volume fader Output Any audio track can be tapped, before or after the track volume control, and sent to one or more buses. A bus can tap any number of audio tracks. -
Page 376: Stereo Buses
The audio in each bus is processed by the input gain and pan controls (main output buses don’t have these controls), then processed by any real-time effects you have patched, sent through the bus output level and pan controls, and then sent to the designated main out, in stereo. You can also insert a send control on a bus, and send the bus signal to another bus, or route the output of a bus to another bus.
-
Page 377: Surround Buses (Producer Edition Only)
Set the Send Pan to be the same as the Right-click the Send Pan control and choose Follow Bus bus that the bus feeds into Pan from the popup menu. This setting is only active when the send has the same interleave as the bus it feeds into, and is set to «Post Fader.»…
-
Page 378: Main Outs
Main Outs Each enabled hardware channel has a main out channel strip in the Console view. Main outs are the final destination for all of your audio in SONAR. Main outs accept input from both tracks and buses. Main outs contains a left channel and a right channel, but only one volume fader. You control the left/ right balance of each main out with the balance slider.
-
Page 379: Hiding And Showing Meters
Buses The level of the output signal the bus is sending back from the effects. Hiding and Showing Meters The display and configuration of the meters in the Track view is independent of the meters in the Console view, and vice versa. Buttons in the Track view and Console view toolbars hide or show all the meters of each kind in each view.
-
Page 380: Changing The Meters’ Display
To Show or Hide All Main Meters in the Console View • In the Console view, click the dropdown menu to the right of the Show Meters button and select Main Meters from the menu that appears. To Show or Hide Individual Bus Meters in the Track View •…
-
Page 381: Segmented And Non-Segmented Meters
The dropdown menus give you the following display options: Menu option… What it does… Peak Choosing this option causes the meter to display the highest amplitude in the signal that occurs in a complete cycle of a frequency. Choosing this option causes the meter to display more of an average of the amplitudes that occur in a complete cycle of a frequency.
-
Page 382: Changing The Meters’ Performance
The Audio Meter Settings dialog (Options- Audio Meter Settings command) lets you choose segmented or non-segmented meters for the Track and/or Console views. You can customize the colors of non-segmented meters in the Colors dialog—use the Options-Colors command, and choose VU LO Level, VU HI Level, or VU Tick Marks. Changing the Meters’…
-
Page 383: Waveform Preview For Buses And Synth Tracks
the track or bus and clicking Show Peak Marker from the popup menu. Colors for both Peak Markers and their text fields are configurable in the Colors dialog (Options-Colors command). Peak marker Because a Peak Marker may be offscreen, you can jump to a peak marker by right-clicking the numeric peak display in the track/bus header strip and choosing Go To Peak from the context menu (see picture below).
-
Page 384: Freeze Tracks And Synths
Waveform Preview Waveform Preview button in Track view Waveform Preview button in Bus Inspector Freeze Tracks and Synths The Freeze feature allows you to temporarily bounce your track, including soft synths and effects, to reduce the amount of CPU power needed. The Freeze feature also works for synths patched in the Synth Rack.
-
Page 385
• Quick Unfreeze Synth—hides and mutes the bounced audio, enables the synth and track FX bin. Bounced audio is retained, and toggling between Quick Freeze and Quick Unfreeze should be instantaneous. • Quick Freeze Synth—only available after a Quick Unfreeze, the Quick Freeze function redisplays and unmutes the bounced audio instantaneously, disables the synth, and any effects on the synth track. -
Page 386: Using Real-Time Effects
• In the Synth Rack view, click the Freeze/Unfreeze button , and choose Unfreeze Synth from the menu that appears. SONAR discards bounced audio, enables the synth and the synth audio track’s FX bin. SONAR will be re-bounce the audio if you choose Freeze again. To Do a Quick Unfreeze of a Synth •…
-
Page 387: Effects Parameters
or remove them entirely at any time. Since most effects require complex numeric calculations, real- time effects processing puts a heavy load on your computer’s CPU. If you use too many effects, the CPU will not be able to keep up and playback will sound choppy and disconnected. You can also apply real-time audio effects to a submix in a bus.
-
Page 388
An FX bin in a bus in the An FX bin in a track in Console view the Console view Here’s how to insert and configure effects: To do this… Do this… Add a real-time effect to a MIDI Right-click in the FX bin of the track or bus you want to add the effect to, track, audio track, synth track or and select an effect from the popup menu. -
Page 389: Presets
Mono indicator Stereo indicator Surround indicator (in 5.1 mode) Presets Presets are a way to store property page settings so that you can recall the exact same group of settings again in the future. Effects and soft synths use presets, and so do some other functions you’ll find in certain dialogs.
-
Page 390: Effects On Clips
disappears, but will reappear in the other project, showing you that the displayed settings in that project are different from the last saved version of the preset. If you want to get rid of the asterisk in all projects, save the preset in each project with the exact same settings. Effects on Clips Both audio and MIDI clips now contain full-featured FX bins.
-
Page 391: V-Vocal Clips
FX bin. • To copy an effect to another FX bin (on a track or a clip), hold the Ctrl key down, and then drag the name of the effect to the other FX bin. • To change the order of an effect in an FX bin, drag the name of the effect up or down to the desired place in the effects chain.
-
Page 392: Using V-Vocal
To Bypass or Unbypass a Single V-Vocal Clip • Right-click the V-Vocal clip and choose Roland V-Vocal-Bypass/Unbypass from the Clips pane popup menu. When you bypass a V-Vocal clip, you hear the original audio data that makes up the V-Vocal clip without hearing any V-Vocal processing.
-
Page 393: Playing Back V-Vocal Clips
Description of Interface Components • Edit mode—select the parameter you want to edit: pitch, time, formant, or dynamics. • Zoom—continuous horizontal or vertical zooming by dragging the center vertically or horizontally. If you drag the center while pressing the Shift key, you can restrict the zoom direction to horizontal or vertical.
-
Page 394: Pitch Editing
To Play a V-Vocal Clip • To play a V-Vocal clip, click the play button in the V-Vocal interface, or press the Spacebar. • To stop playback, press the Spacebar, or click the Stop button. • To mute the track that the V-Vocal clip is in, click the M button in the V-Vocal interface. •…
-
Page 395
Nodes appear automatically when you shift pitch. Tips: • Ctrl-dragging snaps the pitch to the pitch correction grid. Shift dragging moves the pitch by 100 cent increments. • You can also edit pitch by dragging a node up or down. •… -
Page 396
the Correct button, the selected area conforms to the light blue notes on the keyboard. You can also click the note names in the Select Pitch Correction field to select notes. Note that light blue note names are selected, grey note names are not selected, and red note names are bypassed. Note: to display different octaves, drag the vertical scroll bar that is at the right side of the graph up or down. -
Page 397: Editing Time
The cursor displays a fade-in icon when it is ready to add a fade-in: Drag the vibrato segment to the right for the length of the fade-in that you want to add. Editing Time To edit timing with V-Vocal, the Time button in the edit mode section must be enabled. To Edit Time Make sure the Time button is enabled.
-
Page 398: Editing Dynamics
When you drag the red line, nodes are automatically created at the start and end of the selected region. You can drag the nodes to create different shapes. Tips: • Double-clicking the red line in a selected region adds nodes to the place where you click, and also to the start and end of the selected region.
-
Page 399: Keyboard Shortcuts
Keyboard Shortcuts The following table lists the V-Vocal keyboard shortcuts: Command… Shortcut… Arrow tool Line tool L , or hold down Shift while using the Pen tool Pen tool Vibrato/LFO tool Erase tool Hand tool Zoom tool Undo zoom Redo zoom Shift+U Zoom vertically Ctrl+Up/Down arrow keys…
-
Page 400
Redo Ctrl+Shift+Z Cancel drag gesture Select All Ctrl+A Select None Ctrl+Shift+A Return selection to default Delete settings Solo track Show/hide waveform in Pitch Shift+W edit mode Go to/Center cursor Scroll up/down Up/Down arrow keys; PageUp/PageDown Scroll left/right Left/Right arrow keys… -
Page 401: Using The Per-Track Eq (Producer Edition Only)
Using the Per-track EQ (Producer Edition Only) Each audio track in the Console view in the Producer version of SONAR has a 4-band EQ patched into it by default. You can hide the EQ, hide its graph (plot), display only one band, or display all four bands Here’s a graphic of the EQ and its controls: Plot Frequency, Gain, and Q…
-
Page 402: Applying Audio Effects
To Choose What Band You’re Controlling When Only One Band is Showing • Click the Band menu that’s at the bottom of the EQ display, and choose the band number you want to control. To Enable or Disable the EQ •…
-
Page 403: Applying Midi Effects
Applying MIDI Effects You can destructively apply the MIDI effects in a track’s patch point. This makes it easy for you to experiment with MIDI effects before you commit to them on a more permanent basis. To Apply MIDI Effects Destructively In the Track view, select the tracks or clips to be affected.
-
Page 404: Using Control Groups
Wizard, and the VST Configuration Wizard relays the message to the host program so it can synchronize playback time to the delayed output from the plug-in. • Do not intercept NRPNs—the wizard uses NRPNs to run automation of your VST plug-ins. However, some instruments have their own implementation of this process, so checking this box passes the NRPNs directly to the instrument, allowing it to manage its own automation.
-
Page 405
Absolute The range of motion in all controls in the group is identical. When you move one control in the group, all other controls in the group move the same amount in the same direction. The controls do not necessarily need to start at the same level. -
Page 406
Relative The range of motion for controls in the group is not the same. All controls in the group have the same value at one point—the lowest level for send, return, and volume levels, and zero for pan controls. Here are two examples: Example 1 The volume controls are… -
Page 407
SONAR adds the control to the group. Controls, knobs and faders are highlighted with the group’s color indicator. To Remove a Control from Its Group Right-click on the control. Choose Remove From Group from the menu. SONAR removes the control from the group and displays the control with the neutral color indicator. To Remove All Controls from a Group •… -
Page 408: Quick Groups
SONAR sets the start value of the control. The Set Start = Current and Set End = Current commands set the range of motion that a grouped control moves through as the other members of the group move through their starting and ending values.
-
Page 409
A track strip selector in the Console view A bus strip selector in the Console view You can make part of a Quick Group into a permanent group by right-clicking a grouped control, and using the Group-Save command from the popup menu. This creates a group of whatever kind of control you right-clicked from all the tracks or buses in the Quick Group. -
Page 410: Using Remote Control
Using Remote Control This section explains how to assign knobs or sliders on a MIDI controller to control specific parameters on specific tracks. If you have a control surface with groups of faders such as a Tascam US-428 or CM Labs MotorMix, see the online help topic “Working with External Devices.”…
-
Page 411: Using The Learn Option
Set the MIDI Channel field to the channel that your controller sends out. Click OK. You can now work the control from your MIDI device. If you arm the control for automation and click the Record Automation button in the SONAR Transport, you can record your external controller’s knob or fader movements.
-
Page 412
To Mix Down (Bounce) Audio Tracks Set all volume, pan, effects, and automation settings just as you want them. Select the tracks or clips you want to mix down. If you are using effects on the tracks and want to mix the effects down at this time, select the whole length of the longest track or clip plus an extra measure for the reverb or effects “tail.”… -
Page 413: Preparing To Create An Audio Cd
CD. Most CD burners come with CD burning software, if yours did not, you will need to buy CD burning software, like Cakewalk’s Pyro. To download a free demo of Pyro, visit the Cakewalk website. Preparing Audio for Distribution The File-Export Audio command exports your project as a new file or files that you can burn to a CD, or distribute via the Web or e-mail.
-
Page 414
The Open Media Format, created by AVID Technology, is designed to port a project to other applications or platforms. OMF files preserve tracks, clip positions, slip edits and some other project attributes depending on which application is writing or reading the OMF file. If your audio hardware is configured for stereo playback, Wave files are created in stereo;… -
Page 415
24 and you export to 16, you lose some sound definition, but you get some of it back if the Dithering option is on in the Audio Options dialog box (see “Dithering” on page 419 for more information). 13. In the Mix Enables field, choose the elements you want to include in the mixdown. If you want to exclude muted tracks and/or include only soloed tracks, make sure Track Mute/Solo is checked. -
Page 416
• Entire Mix—choosing this option creates one file for your entire mix, unless you’re exporting a surround mix with Split Mono selected in the Channel Format field. In the Source Buses/Tracks field, choose the buses or tracks you want to use as a source to create your mix. -
Page 417
14. If you want to save the settings you created in the Export Audio dialog, type a name for them in the Preset window and then click the floppy disk icon that’s next to the window. 15. Click Export. The Cakewalk MP3 Encoder dialog appears. -
Page 418: Exporting Omf Files
16. Choose options and click OK. The audio is compacted and exported to a file or files with the extension . Exporting OMF Files OMF (Open Media Format) files are designed for cross-platform compatibility. For more information about the OMF format, see “Importing OMF Projects” on page 176. If you plan to export a SONAR project to another program that can read OMF files, it pays to consider three things before you start your SONAR project: •…
-
Page 419: Dithering
• • Automation • Effects Dithering Dithering is a process you can use when you convert a higher bit-depth file to 16 bits. SONAR features the Pow-r dithering process, short for Psycho-acoustically Optimized Wordlength Reduction, which can produce 16-bit files that sound indistinguishable from 24-bit source files. Dithering adds a small amount of noise to the 16-bit file to approximate the sounds that were lost when the other bits were removed.
-
Page 421: Surround Mixing
Surround Mixing SONAR Producer fully supports surround mixing (SONAR Studio can open surround projects created in Producer, converting them to stereo). SONAR (Producer) can create finished surround mixes in all popular surround formats, includinfg Windows Media 9 Pro. You can use a joystick to control surround panning if you want. Note: it’s always advisable to know the required sampling rate and audio driver bit depth for the target medium that your surround project will be used in.
-
Page 422: Surround Basics
Surround Basics Surround sound is a common name for various techniques for positioning audio in reference to the listener. Whereas regular stereo is limited to left/right positioning, within a relatively narrow field, surround sound opens possibilities of positioning an audio source anywhere around the listener. Surround sound comes in many formats.
-
Page 423
Side right—directly to the right of the listener Right Surround Surround (rear center) Left Surround Side Left—directly to the left of the listener Left (standard Stereo placement) Left of center Low Frequency Effect speaker(s)—placed according to room acoustics To mix in surround sound in SONAR, you must insert at least one surround bus. A project can include multiple surround buses, but all surround buses in a project use the same surround format (5.1, 7.1, etc.). -
Page 424: Choosing A Surround Format
• 6.0 (Music/Alternative) • 6.1 (Film/Alternative) • 6.1 (Music/Alternative) • 6.1 (SMPTE/ITU) • 7.0 (Heptagon) • 7.0 (Film/Alternative) • 7.0 (Music/Alternative) • 7.1 (Film/Alternative) • 7.1 (Music/Alternative) • 7.1 (SMPTE/ITU) • 8.0 (Octagon) • 8.0 (Film/Alternative) • 8.0 (Music/Alternative) • 8.1 (Film/Alternative) •…
-
Page 425: Surround Buses
To Choose a Surround Format and Set Sound Card Outputs Use the Options-Project command. The Project Options dialog appears. Click the Surround tab. Select a format from the Surround Format dropdown. The diagram to the right of the Surround Format menu changes to illustrate the speaker placement of the format that you chose.
-
Page 426: Routing In Surround
Routing in Surround Tracks can send output to a surround bus, the Surround Main, or a hardware output. If a track is routed to a surround bus or the Surround Main, it has surround meters and a surround panner. You can route any track or bus to another bus, the Surround Main or a hardware out.
-
Page 427
The following table lists the downmixing settings in the Surround tab of the Project Options dialog and gives a brief description of what the setting does. You can also manually enter other values besides these preset ones: Downmixing Setting Options Center Downmix Level (dB) These options determine how much of the center is mixed to the left and right. -
Page 428: Panning In Surround
Panning in Surround Unlike stereo panning which sends sound to left and right speakers, surround panning means sending sound to multiple speakers at points along a circle. When a track/bus/send is assigned to a surround bus, the Pan control turns into a multi-dimensional surround panner.
-
Page 429: Controlling Surround Panning
Controlling Surround Panning Here are pictures of the large surround panner and medium surround panner: Large Surround Panner Angle and focus marker Right speaker icon Width markers Medium Surround Panner The large surround panner has some sliders at the bottom that the medium surround panner doesn’t have, except for the LFE Send slider, which the medium panner has.
-
Page 430: To Change The Angle
• Focus—this is the perceived distance of the sound source from the center of the circle on a scale of 0 to 100, 0 meaning the center of the circle, and 100 meaning the perimeter. • Width markers—these are two smaller spheres equidistant from the Angle and Focus marker. Their distance from each other and from the front of the circle shows the Width value (see definition below).
-
Page 431
To Mute a Surround Speaker • In the large surround panner, click a speaker icon to mute its output. The speaker icon turns grey when the speaker is muted. • In the small surround panner, click a white square to mute a speaker’s output. The square turns grey when the speaker is muted. -
Page 432: Automating Surround Panning
Alt+Shift+drag Constrains to angle at 100% focus Ctrl+Shift+drag Constrains to focus only Shift+click Sets panner point to the point that you click (large and medium panners only) Shift+drag controls (Angle, Width, etc.) Fine resolution Up/Down cursor keys Move to next/previous widget in surround panner Left/Right cursor keys Move to next/previous panner in same track Ctrl+up/down…
-
Page 433
The joystick will grab the current pan position/sphere anytime you pull the trigger button (the «firing» button under your index finger). When recording automation, you write new automation every time you pull the trigger button. Various joystick buttons can be used to: •… -
Page 434: Surround Metering
Surround Metering Meters in tracks routed to surround buses or the Surround Main, and meters in surround buses work the same as stereo meters (see “Metering” on page 378), however, surround meters display more channels. For example, a project in 5.1 would have a six-channel meter. Six-channel meter Bass Management A bass management system takes all the frequencies below a certain frequency (normally 80Hz) from…
-
Page 435: Surround Effects
Surround Effects SONAR lets you use your existing stereo or mono effects as surround effects. SONAR does this through the SurroundBridge, which automatically sets up your existing mono & stereo plug-ins so you can patch them into surround buses (buses, not tracks). The SurroundBridge The SurroundBridge automatically loads enough instances of a plug-in to handle all your surround channels.
-
Page 436
On the SurroundBridge tab of the effect’s property page, use the dropdown menus in the Left Input and Right Input columns to assign individual surround channels to instances of the effect. Your assignments take effect immediately, and the names of the tabs in the property page change to reflect the new assignments. -
Page 437: Importing Surround Mixes
not change color when you click the Enable checkbox, because it is a separate system. The Bypass button is automatable in some plug-ins. To Save a Preset Set the effect’s parameters the way you want them. In the Presets field of the effect’s property page, type a name for the preset, and click the floppy disk icon that’s just right of the Presets field.
-
Page 438: Exporting Surround Mixes
Exporting Surround Mixes You can export your surround mixes as multi-channel PCM wave files, or as Windows Media Pro files. To Export a Surround Multi-channel File Use the File-Export-Audio command to open the Export Audio dialog. Type a name for your file. In the Files of Type field, choose one of the following: •…
-
Page 439: Automation
Automation Automation means to record the movement of a fader, knob, or other control so that the next time you play your project, that control moves automatically. SONAR allows you to graphically automate much more than just volume and pan controls—you can automate individual controls, faders, and knobs that control the main outs, individual tracks, buses, individual effects’…
-
Page 440: Quick Automation Guide
Quick Automation Guide The following table summarizes Console and Track view automation: What you can Parameters you can How you can automate automate… automate… them… Individual tracks Gain, pan, mute, bus send Draw envelopes in the Clips pane, gain, bus send balance, MIDI record the fader movements, or controllers, MIDI chorus and take a snapshot…
-
Page 441: The Automation Toolbar
The Automation Toolbar Display the Automation toolbar by using the View-Toolbars command to open the Toolbars dialog box, and making sure that the Automation checkbox is checked. If you slide the cursor over each button or field in the toolbar, tooltips pop up to tell you each function. The Automation toolbar gives you quick access to some powerful automation controls: •…
-
Page 442: Creating And Editing Audio Envelopes
Make sure that the Enable Automation Playback button in the Automation toolbar is depressed; rewind the project, play it, and listen to the results. Do one of the following: • Rewind the project and re-record the automation data. • If you are happy with the result, right-click the armed control and deselect Arm for Automation from the menu.
-
Page 443
Choose Add Node from the menu. A node appears on the envelope. Note: A shortcut to add a node is to double-click the envelope. Move the cursor over the node until a cross appears under it, and drag the node in any direction you want. -
Page 444: Creating And Editing Midi Envelopes
Creating and Editing MIDI Envelopes This method is only available in the Clips pane. You can also draw MIDI controller data in the Piano Roll view, but the technique is different (see “Adding and Editing Controllers in the Piano Roll View” on page 254).
-
Page 445: Dotted Lines
The Envelope Editing menu appears. Choose Add Node from the menu. A node (very small rectangle) appears on the envelope. Note: A shortcut to create a node is to double-click the envelope. Move the cursor over the node until a cross appears under it, and drag the node in any direction you want.
-
Page 446: Using The Envelope Draw Tool
Using the Envelope Draw Tool The Envelope Draw tool allows you to draw both freehand and preset shapes on an existing envelope. To Draw Freehand Activate the envelope you want to edit (click it with the Envelope tool Enable the Envelope Draw tool: click in the Track view toolbar.
-
Page 447: Drawing Envelopes On Clips
Drag one of the selected nodes in the direction that you want to move the selected area. Stretching stops if any selected node bumps into an adjacent unselected node. Drawing Envelopes on Clips You can also draw envelopes on audio clips, but only for gain, pan, and any automatable effects that are inserted on the clips.
-
Page 448: Deleting Envelopes
Deleting Envelopes To Delete a Single Envelope Move the cursor over the envelope until a vertical, double-ended arrow appears under it, and right- click the envelope. The Envelope Editing menu appears. Choose Delete Envelope from the menu. SONAR deletes the envelope. To Delete Several or All Envelopes Select the data that contains the envelopes you want to delete—you can select parts of tracks, one or more whole tracks, or all tracks.
-
Page 449: Resetting Envelopes And Nodes To Current Or Neutral Values
To Paste an Envelope Select the track(s) and location (Now Time) you want to paste the data to. Press Ctrl+V or use the Edit-Paste command. The Paste dialog box appears. Choose a track and location to paste to, if you haven’t already. Click OK.
-
Page 450
• Press the o key. In Offset mode, all controls that can be offset appear with a plus sign. For example Vol+. The following audio controls support both Envelope and Offset modes: Control Envelope Mode Range Offset Mode Range Volume -Infinity to +6dB, default is 0dB -Infinity to +6dB, default is 0dB 100% L to 100% R, default is C… -
Page 451: Converting Midi Envelopes To Shapes
To Display Envelopes on a Percentage Scale Select Options-Global to open the Global Options dialog. In the General tab, click the Display Envelopes on Percentage Scale checkbox. Click OK. Converting MIDI Envelopes to Shapes MIDI controllers you edit in the Piano Roll view and MIDI envelopes you create in the Track view Clips pane are actually separate data, even if they control the same parameter.
-
Page 452: Adding Nodes At A Selection
Disarm all controls by clicking the Disarm All Automation Controls button in the Automation toolbar, or by clicking the red AUTO indicator in the Status bar. You can play back your project with or without the automation data by clicking the Enable Automation Playback button in the Automation toolbar.
-
Page 453: Recording Groups Of Faders And/Or Knobs
When you finish moving the knobs and faders, click the Stop button in the Transport toolbar. Play back the track and listen to the result. Then you can either re-record the automation or disarm the parameters. You can disarm all armed parameters at once by clicking the red AUTO indicator that’s in the Status bar at the bottom of the SONAR window, or by clicking the Disarm All Automation Controls button that’s in the Automation toolbar.
-
Page 454: Recording Automation Data From An External Controller
Recording Automation Data from an External Controller You can record automation data from an external controller or a MIDI keyboard. To Record Automation Data from an External Controller In either the Track view or Console view, right-click the control or knob that you want to control externally, and choose Remote Control from the popup menu.
-
Page 455: The Envelope Editing And Node Editing Menus
The Envelope Editing and Node Editing Menus The Envelope Editing menu appears when you move the cursor over an envelope until a double-ended arrow appears under it, and right-click the envelope. The Node Editing menu is almost identical, and appears when you move the cursor over a node until a cross appears under it and right-click.
-
Page 456: Automated Muting
Automated Muting The Mute buttons in the Track view and Console view work in two ways: • You can record or draw automation for each Mute button, and the automation data controls the buttons. • You can click a Mute button while playback is in progress and manually override any automation data for that button.
-
Page 457: Layouts, Templates
Layouts, Templates and Key Bindings A layout is the current arrangement of all the views that pertain to a particular project. The layout of each project is stored automatically as part of every project file. In addition, you can save the current layout or load any saved layout and apply it to the current project. You might want to create a layout so you can easily arrange the views in a convenient size and position on the screen.
-
Page 458: Layouts
Layouts The layout of the views that are displayed for a project is stored automatically in the project file when you save the project. By default, the layout of all the views is restored when the file is opened. You can automatically arrange all open views so that they are all visible by using the Window-Tile in Rows command.
-
Page 459
There are two options in Windows Layouts dialog (select View-Layouts to open) that control how layouts are used, as described in the following table: Option… Meaning… Close Old Windows Before Loading New If checked, SONAR will close all the views of the Ones current project before applying the layout. -
Page 460: Floating Views And Dual Monitor Support
Click Close to exit the Window Layouts dialog box. To Rename a Layout Choose View-Layouts to display the Window Layouts dialog box. Choose the layout you want to rename from the list. Click Rename to display the Rename Existing Layout dialog box. Enter a new name for the layout, and click OK.
-
Page 461: Templates
To Float a View Open the view you want to float. Click the view’s icon located in the upper left corner of the view. Piano Roll view icon In the menu that appears, click Enable Floating. Move the view wherever you want. Templates Template files make it easy to create new projects with certain predefined settings.
-
Page 462: Template Example: Three Midi Instruments
The following parameters are saved globally and are not stored in template or project files: • Initialization file parameters • Big Time font settings • MIDI device settings • Instrument definitions • Autosave options • Key bindings • Color settings To Create a Template Create a new file using the File-New command.
-
Page 463: Key Bindings
The third synthesizer can respond to 16 MIDI channels, but the only channels left are 9 and 11 through 16. Enter these numbers in the corresponding tracks. You will need to mute the unused channels on the third synthesizer (1 through 8 and 10) so they won’t play. These are assigned to the drum machine and the second synthesizer.
-
Page 464
You can choose one of two options to define the key binding shift key: • MIDI key (typically, the very lowest or highest key on your MIDI keyboard) • Controller event (typically, one of the pedals) If you use a MIDI key as the key binding shift key, then you lose the ability to play that note by itself. When you play the note, SONAR assumes you are about to choose one of the key bindings you have created and ignores the note. -
Page 465: Importing Key Bindings
Highlight the key you want to bind from the Key list (if you click inside the Key window to put the focus on it, you can then play a note on your MIDI keyboard, and the note automatically becomes highlighted in the Key window). Select the command you want to bind from the Function list.
-
Page 467: Working With Notation And Lyrics
Working with Notation and Lyrics This chapter describes three SONAR views that are used to edit the music notation and lyrics of your project. • SONAR’s Staff view lets you work with your composition in a standard musical staff, guitar tablature and a virtual guitar fretboard. You can add, move, and delete notes with your mouse or with your computer keyboard.
-
Page 468: The Staff View
The Staff View The Staff view is composed of a Staff pane and a Fretboard. When you first open the Staff view, you may see only the Staff and not the Fretboard. Resize the Staff view by dragging its edges until you can see everything easily. When you save your file, whatever size the Staff view is will be the way it appears the next time you open the file.
-
Page 469: Opening The Staff View
Opening the Staff View There are three ways to open the Staff view: • In the Track view, select the MIDI tracks you want to see, then click the Staff View button • In the Track view, select the MIDI tracks you want to see, then choose View-Staff. •…
-
Page 470
Transpose Opens the Transpose dialog box. See “Transposing” on page 261 for more information. Slide Opens the Slide dialog box. Interpolate Opens the Event Filter Search dialog box. See “Process- Interpolate” on page 286 for more information. Length Opens the Length dialog box. See “Stretching and Shrinking Events”… -
Page 471: The Fretboard
The Fretboard The Fretboard shows you the notes located at the Now time in the Staff pane, laid out on a virtual guitar fretboard. For example, if the Staff pane shows you this: The Fretboard pane shows you this: The Fretboard stays in sync with the Now Time during playback and recording, and stays in sync with the scrub time during scrubbing.
-
Page 472: Basic Musical Editing
Ebony Hi Fretboard appears in ebony with high screen resolution. Ebony Lo Fretboard appears in ebony with low screen resolution. Maple Hi Fretboard appears in maple with high screen resolution. Maple Lo Fretboard appears in maple with low screen resolution. Basic Musical Editing The Staff view’s tools let you edit a project by manipulating the elements of standard music notation.
-
Page 473: Inserting Notes With The Fretboard
Click the cursor on the vertical line at the pitch that you want. To add a sharp or flat, right-click the note to open the Note Properties dialog box—in the Pitch field, use the + or — buttons to raise or lower the pitch, and click OK. You can type enharmonic spellings into the Pitch field, such as C#5, E”4.
-
Page 474: Moving, Copying, And Deleting Notes On The Staff
Note: Tied notes must be selected together, since the series is really just a single MIDI note. To select tied notes, you must click or drag a rectangle around the first note of the series. Moving, Copying, and Deleting Notes on the Staff Selections can be cut, copied, pasted, and deleted with Edit menu commands.
-
Page 475: Moving Notes From Within The Fretboard
Any notes whose notehead is touched by the eraser will be deleted. Moving Notes from within the Fretboard You can drag notes displayed in the fretboard horizontally along each string to change their pitch. They always change in the chromatic scale. You can not drag notes from one string to another. To Change the Pitch of a Single Note in the Fretboard Click in the Time Ruler to set the Now time to the time of the note you want to change.
-
Page 476: Changing Note Properties
To Play Notes with Step Play Set the Now time by clicking in the Time Ruler. Step through the music as follows: To do this… Do this… Step forward Click , or press Ctrl+right arrow Step backward Click , or press Ctrl+left arrow Changing Note Properties The Staff view lets you edit all the MIDI parameters for a note, including those not normally portrayed by standard musical notation.
-
Page 477: Deglitch Dialog
SONAR changes the note’s parameters and redraws the note if necessary. Deglitch Dialog When recording MIDI guitar, even the best players occasionally play unintended notes. The Deglitch feature allows you to filter out the softest, shortest, and highest notes in the file. There are three filters in the Deglitch dialog: Pitch With the Pitch filter you can set the maximum pitch allowed in the track.
-
Page 478: Beaming Of Rests
SONAR inserts all three triplet notes at the same pitch. You can then drag the second and third notes to their correct pitch locations. Beaming of Rests The Staff view supports beaming of rests, a practice that is popular with rhythmically complex music. Beam lengths are extended to include rests that are integral parts of the beamed group of notes.
-
Page 479: Using Enharmonic Spellings
Here’s what the Staff view looks like with and without these options: Fill and Trim off Fill and Trim on On the other hand, if you are entering notes into the Staff view with the mouse, Fill and Trim Durations may produce confusing results.
-
Page 480
requires knowledge regarding what key or scale is being evoked—knowledge that only the composer possesses. For example, if a modulation is being prepared, then the new key signature has not yet been completely established, and the harmony has already begun to shift. In fact, there may not even be a scale in a diatonic sense: chromatic scales, for instance, are supposed to sharp on the way up and flat on the way down. -
Page 481: Midi Channels And The Fretboard
Quick Start Menu or from the File menu. To use the File menu method, choose File-Open and choose Cakewalk Template from the Files of type field. Then choose the Roland GT-30 Guitar Synthesizer template.
-
Page 482: Chords And Marks
Chords and Marks The Staff view lets you add and edit chord symbols, dynamic markings, hairpin symbols, and pedal events. Like notes, these symbols are placed in the score with the Draw tool. They can be selected, cut, copied, pasted, deleted, and dragged and dropped. With the exception of pedal marks, though, these symbols have no audible effect;…
-
Page 483
To Edit a Chord Symbol Right-click the symbol to open the Chord Properties dialog box. Edit information about the chord according to the table: To do this… Do this… Move a chord in time Change the Time property. Give the chord a new name Select a chord from the dropdown list, or type a new name. -
Page 484
To Add a Guitar Chord Grid Right-click the chord symbol to open the Chord Properties dialog box. Follow the instructions in the table: To do this… Do this… Display a blank chord grid Click New Grid Place a dot on the grid Select the finger number (1-4, or T for Thumb), then click the grid at the appropriate string and fret location… -
Page 485: Adding Expression Marks
Adding Expression Marks Expression marks tell a performer how to interpret the notes and durations on the page. They provide a necessary supplement to simple notation, in which notes have only pitch and duration, but no hint of how loudly, softly, or smoothly, they are to be played. Dynamic marks—from ppp (pianississimo) for “very, very softly”…
-
Page 486: Adding Hairpin Symbols
Adding Hairpin Symbols Some musical phrases vary dynamically, increasing or decreasing in loudness for dramatic effect. SONAR lets you insert traditional crescendo and diminuendo hairpin symbols that convey this information to a performer, as shown here: If the track is split into treble/bass staves, hairpin symbols are allowed only below the treble staff. To Add a Hairpin Symbol Click the Draw tool Select the Hairpin tool…
-
Page 487
Pedal event parameters are as follows: Parameters… Meaning… Time The time of the event, in measures, beats, and ticks (MBT). Channel The MIDI channel on which the event will be sent. Value The event value. A value of 127 depresses the pedal, a value of 0 raises it. -
Page 488: Tablature
Tablature The Staff view can display guitar or bass MIDI tracks as tablature. You can generate and edit tablature or enter notes on either the fretboard or on the tablature staff to create a new track. You can export tablature to an ASCII file for printing or distribution on the Web. Tablature Settings Both the Staff View Layout dialog box and the Tablature Settings dialog box create tablature settings for a whole track at a time.
-
Page 489: Changing Fretboard Texture And Orientation
The next time you want to use these settings for a track, choose your Preset in the Staff View Layout dialog box from the Presets dropdown list. Changing Fretboard Texture and Orientation You can change fretboard texture and orientation (high string on top or bottom of neck) in the Staff View Layout dialog box, or by right-clicking the Fretboard.
-
Page 490: Entering Notes From The Tab Staff
Channel is selected, the user chooses which series of MIDI Channels should be considered. This is useful for MIDI Guitarists that record parts in MONO mode, where each string transmits on a different MIDI channel. To Regenerate TAB In the Staff view, use the Select tool to drag a rectangle around the notes or TAB numbers you want to change.
-
Page 491: Editing Chords Or Groups Of Notes From The Tab Staff
Entering Notes from the Fretboard If you prefer to work with the Fretboard instead of a musical staff, Cakewalk makes it easy to enter notes from the Fretboard. You can enter single notes or chords by clicking the string and fret of the note you want to enter at the Now Time position.
-
Page 492: Working With Percussion
You can delete a note right after you enter it by pressing Ctrl+Z, or at any time by clicking the Eraser tool and clicking the note in the notation or TAB staffs. Cakewalk gives you several options to play and hear the notes in your track: •…
-
Page 493: Setting Up A Percussion Staff Or Line
Make sure that the output/channel combination used by your track is assigned to a percussion instrument definition. For example, channel 10 of a General MIDI output should be assigned to the General MIDI Drums instrument definition. Click OK in both dialog boxes. SONAR shows the new track output and channel in the Track view, and will use the proper percussion instrument names in the Piano Roll view, Event List view, and Percussion Notation dialog box.
-
Page 494: Ghost Strokes
Set the notehead and articulation mark Select the sound in the MIDI Note list, then select a Notehead for a percussion sound Type and Articulation Symbol. (Only bound sounds can be assigned a notehead type and articulation symbol other than the default.) Control how unbound percussion In the Display As list, click the pitch that you want all unbound…
-
Page 495: The Meter/Key View
Alternatively, you can choose File-Print and skip the print preview window. The Meter/Key View The Meter/Key view lets you enter meter and key changes at measure boundaries. Meter and key changes affect all tracks. What Is Meter? The meter—also known as the time signature—describes how to divide time into rhythmic pulses. When you set the meter, you are specifying the number of beats per measure and the note value of each beat.
-
Page 496: Opening The Meter/Key View
• How the notes are transposed when the Diatonic option is enabled. The key signature affects only how SONAR displays pitches for you. Changing the key signature does not affect the MIDI key number (pitch) stored with each note. To actually transpose pitches, use the Transpose command or edit notes individually by using the Piano Roll, Event List, or Staff views.
-
Page 497
To Add a Meter/Key Change Open the Meter/Key view. Click Add , or choose Insert-Meter/Key Change, to open the Meter/Key Signature dialog box. Enter information about the new meter/key change. Click OK. SONAR inserts the meter/key change into the project. The meter/key change will appear in the Staff view at the appropriate measure. -
Page 498: Music Notation For Non-Concert-Key
Music Notation for Non-concert-key Instruments For historical reasons, certain musical instruments are traditionally notated in a transposed key rather than the actual key. For example, a normal (Bb) trumpet part is written in the key one whole step higher than the actual concert key, and an Eb alto sax part is written a major sixth higher. Musicians have traditionally learned to read and refer to the notes they play using the proper transposition interval for their instrument.
-
Page 499: Adding And Editing Lyrics In The Staff View
You can enter and edit lyrics in several ways: • Using the Lyrics tool in the Staff view • Using the Lyrics view • Inserting lyric events in the Event List view The Staff view is usually the preferred location for entering lyrics, since you can see the notes with which the lyrics are associated.
-
Page 500: Opening The Lyrics View
To Edit Lyrics Click the Draw tool Click the word you want to change. Edit the word as desired. Press Enter. SONAR replaces the old word with the new one. Opening the Lyrics View There are three ways to open the Lyrics view: •…
-
Page 501
To Enter Lyrics in the Lyrics View Click in the upper left corner of the view to position the cursor at the start of the text. Follow the instructions in the table: To do this… Do this… Enter a word or syllable Type it End a word or syllable and move to Type a space or hyphen… -
Page 503: Using Instrument Definitions
Instrument definitions for many popular MIDI instruments are included with SONAR or are available on the Cakewalk web site (www.cakewalk.com). If an instrument definition is not available for your instrument, and you are familiar with MIDI and how it works, you can use SONAR to create your own instrument definition.
-
Page 504: Assigning Instruments
Assigning Instruments SONAR lets you assign a MIDI instrument definition to each available MIDI output and channel. The assignments you make determine the MIDI bank names, patch names, note names, and controller names that you see during your SONAR session. Suppose that you have a Roland GS-compatible synthesizer attached to MIDI output 1.
-
Page 505: Importing Instrument Definitions
If SONAR does not include an instrument definition for your MIDI instrument, you can find additional and updated instrument definitions on the Downloads section of the Cakewalk website (www.cakewalk.com). Simply download the files to your SONAR folder, unzip if necessary, and import the instrument definitions as described below.
-
Page 506: Creating Instrument Definitions
The instrument definitions you imported should now appear in the Uses Instrument list in the Assign Instruments dialog box. Creating Instrument Definitions SONAR lets you create and edit instrument definitions. To create an instrument definition, you must answer these types of questions: •…
-
Page 507
The Define Instruments and Names dialog box contains two trees: • The Instruments tree in the left half of the dialog box lists all defined instruments and their characteristics • The Names tree in the right half of the dialog box shows all the resources you use to define an instrument You expand or collapse the folders and lists in each tree by clicking on the + or –… -
Page 508: Creating And Editing Patch Name And Other Lists
To Save an Instrument Definition Click Close to close the Define Instruments and Names dialog box. Click OK. SONAR saves the instrument definition in the file. MASTER To Export an Instrument Definition In the Define Instruments and Names dialog box, right-click an Instrument name in the Instrument tree and choose Export from the menu to display the Export Instrument Definition dialog box.
-
Page 509: Copying Name Lists
Copying Name Lists You can easily create new lists that are similar to other lists. For example, suppose you want to create a new patch name list called NewList that is almost identical to the General MIDI patch list, but with one or two small changes.
-
Page 510: Assigning Patch Names
Here is an example of the Normal bank select method. According to the documentation for the Roland JV-1080 synthesizer, the PR-A Bank has a Controller 0 value of 81 and a Controller 32 value of 0. You compute the bank number that you enter in the instrument definition as follows: (81 x 128) + 0 = 10,368.
-
Page 511: Assigning Note Names
Press the Del key, or right-click on the bank name and choose Delete from the popup menu. To Set or Clear the Drum Flag • Right-click on the bank in the Instrument tree, and choose Drums from the popup menu. Assigning Note Names Each patch may have a list of up to 128 names for notes.
-
Page 512: Assigning Controller, Rpn, And Nrpn Names
Enter the patch number that should use these note names, or enter –1 to indicate that this list of note names should be used as the default. SONAR displays the updated patch and note name lists. If necessary, SONAR adds a new patch to the instrument definition. To Remove a Note Name List In the Instrument tree in the Note Names for Patches folder of the instrument you’re editing, highlight the name of the note names list (for example, “diatonic”).
-
Page 513: Instrument Definition Tutorial
SONAR can read. Many of these files come with SONAR, and many more are available at Cakewalk’s website, and also at lilchips.com. Instrument definition files have the extension .
-
Page 514: Start Of Tutorial
contains definitions for many Roland modules. The file contains miscellaneous ROLAND MISC definitions that might include your instrument if you don’t see a specific file for it. You can find these files in your SONAR folder. The file contains all the instrument definitions currently loaded MASTER into SONAR, and determines the list of instruments that appears in the Assign Instruments dialog box.
-
Page 515
Instruments and Names dialog box to see if another one has the right patch names in it, and rename it Var #01. To Substitute and Rename a Patch List Use the Options-Instruments command to open the Assign Instruments dialog box, and click the Define button to open the Define Instruments and Names dialog box. -
Page 516
To Create a Patch Name List for Your Own Sounds You could create a new list by copying and renaming an existing list (right-click a list and choose New Patch Name List from the popup menu), but since the instrument definition we imported for the XP-10 includes a list called Roland XP-10 User Tone 1, let’s just edit that one: in the Names Tree window on the right, right-click the Roland XP-10 User Tone 1 list and choose Add Patch Name from the popup menu. -
Page 517: Using System Exclusive Data
Using System Exclusive Data SONAR’s System Exclusive (Sysx) librarian provides you with 8192 banks in which to hold MIDI System Exclusive messages. A bank is a storage area plus some associated parameters such as a destination output and an optional description. Each bank can hold any number of messages;…
-
Page 518: What Is System Exclusive
What Is System Exclusive? System Exclusive data is MIDI’s way of letting each synthesizer manufacturer transmit private data about its products. A System Exclusive message has a manufacturer ID; the rest of the message is completely proprietary and varies for each manufacturer, even for each of its products. SONAR does not understand what this data means;…
-
Page 519: Importing, Creating, And Dumping Sysx Banks
Click the Auto Send Bank button A checkmark appears next to the bank name in the Auto column to show that the bank is marked for auto-sending. While the bank is still highlighted, click the Output button to open the Sysx Bank Output dialog. Enter the number of the output you want to send this bank out through, and click OK.
-
Page 520
After you close the editing window, your new bank appears in the Sysx view. Use the buttons in the toolbar to name it, give it an output number, and mark it for auto-sending, if you want. Save your project when you’re finished. To Dump a Sysx Bank into SONAR Choose Options-Global and click the MIDI tab, and make sure that the System Exclusive item is checked. -
Page 521: More About Dump Request Macros
Macros. These are short System Exclusive messages sent to a synthesizer to make it dump (send back) System Exclusive data. DRMs are defined in your CAKEWALK.INI file in the [Dump Request Macros] section. You may add your own DRMs or modify the ones that we have provided. Use the Windows Notepad to edit the file.
-
Page 522: Send
Save your project when you’re finished. Sysx View Buttons Here is a description of the buttons in the Sysx view. Send Send transmits the current bank’s System Exclusive message. If nothing seems to happen, make sure you have correctly set the output (see later in this chapter). This button is disabled if the current bank is empty.
-
Page 523: Load Bank And Save Bank
patch-editing programs available that let you edit data using sliders and other tools rather than raw hex data). When you select a bank and click the Edit Bytes button, SONAR converts the binary data into a text representation and pops up the Edit System Exclusive Bytes dialog box, in which you can edit the text. If you make changes and click OK to keep them, SONAR tries to convert the text back into binary format.
-
Page 524: Real-Time Recording Of System Exclusive Messages
You don’t need to use Sysx meta-events for sending System Exclusive information at the beginning of your project. Instead, use the Auto option for System Exclusive banks. Banks that are marked Auto are transmitted automatically by SONAR when it loads the project file they are stored in. Use the Sysx meta-event only when you need to send a Sysx Bank during the middle of the project.
-
Page 525: Troubleshooting
SysxSendDelayMsecs=n This setting causes SONAR to delay n milliseconds if it encounters an F7 in a System Exclusive bank, but only if the line SysxDelayAfterF7=n is not zero. The line SysxDelayAfterF7=n enables a delay between Sysx messages, while the line SysxSendDelayMsecs=n sets the size of the delay. n = 60 Default value (in milliseconds) SysxDelayAfterF7=n This setting causes SONAR to delay Sysx transmission for a certain amount of time if it encounters an…
-
Page 526
My Equipment Is Not receiving Sysx from SONAR Make sure the instrument is set up to receive System Exclusive messages. In the Sysx View, make sure the right output is selected. Verify that the Sysx message originally transmitted from the same kind of instrument. -
Page 527: Synchronizing Your Gear
Synchronizing Your Gear Your computer is often used with other equipment: sound cards, MIDI equipment, and digital tape decks or other digital recording tools. All these devices can have their own built- in clocks or timing mechanisms. When several pieces of equipment are used together, it’s important that they operate in synchronization.
-
Page 528: Synchronization Overview
Synchronization Overview SONAR supports several different types of synchronization, which rely on a variety of different clock sources: Clock source… Timing is determined by… Internal The clock on the computer motherboard Audio The clock on the computer’s sound card MIDI Sync The clock on an external MIDI device SMPTE/MIDI Time Code (MTC) A time code signal (in SMPTE or some other…
-
Page 529: Choosing Clock Sources When Sonar Is The Master
Many technical support requests concern synchronization problems, which are among the hardest to diagnose and duplicate over the phone. If you experience problems, before you call, perform as much experimentation and gather as much information as possible about what does and doesn’t work. The more prepared you are, the more we can help.
-
Page 530: Sonar As The Slave
The following MIDI messages are sent by the master device to support MIDI Sync: Message… How it is used… Start This message tells slave devices to start playing from the beginning of the currently loaded sequence. Stop This message tells slave devices to stop playback. Continue This message tells slave devices to continue playing from the current location in the currently loaded sequence.
-
Page 531: Sonar As The Master
From now on, SONAR starts playback and recording only after the appropriate message is received from the master device. Tip: Make sure the Status bar is displayed when using MIDI Sync. Otherwise, you will not be able to see the MIDI Sync status messages. To display the Status bar, choose Options-Global and click the General tab.
-
Page 532: Using Midi Sync With Drum Machines
In the MIDI Sync Output Ports field, check off the output ports that you want to send the sync signal out of. Click OK. From now on, the transport controls in SONAR control playback on the external MIDI devices. Using MIDI Sync with Drum Machines The most flexible way to use a MIDI drum machine is to record the notes it generates into SONAR, then use that machine as a MIDI playback device.
-
Page 533
0,0,15 and hit enter. The SMPTE/MTC Offset value should now be 00:00:15:00 or 15 seconds. Frame Rates Seven time code frame rates are supported in SONAR, which are normally used for the following types of applications: External Cakewalk Description… Timecodes… Setting 24 frames per second 24 FPS Used for theatrical film worldwide. -
Page 534
To Use SONAR as the Master MTC Generator Configure the clocks on each external device that you want to synchronize to receive SMPTE/MTC. Make sure they’re connected to MIDI outputs from your computer or MIDI interface. Click on SONAR’s Sync toolbar to use the Internal or Audio clock source (to display the Sync toolbar, use the View-Toolbars-Sync command). -
Page 535: Playing Digital Audio Under Smpte/Mtc Sync
When SONAR is the slave, here’s how things work: • SONAR monitors for a SMPTE/MTC signal. You are able to perform other action in SONAR while waiting for the signal. • Start playback on the external device. It takes about two seconds for SONAR to lock from the time it receives time code input.
-
Page 536: Smpte/Mtc Sync And Full Chase Lock
SMPTE/MTC Sync and Full Chase Lock When using SMPTE/MTC Sync with full chase lock, the first time you play any audio the pitch may fluctuate wildly for up to 30 seconds. Also, you may occasionally note the pitch of the audio sounding consistently high or low pitch. A simple analogy makes this behavior easy to understand: Synchronizing audio to SMPTE/MTC is a lot like trying to get even and stay neck-and-neck with another car on the freeway.
-
Page 537: Midi Machine Control (Mmc)
The frame rate is set incorrectly The frame rate on the stripe must match the frame rate you set in SONAR. The offset is set incorrectly The offset you enter in SONAR must match the start time of recorded material on the tape. SONAR is not configured correctly Verify and/or repeat the steps in “To Configure SONAR to Sync to SMPTE/MTC”…
-
Page 538
To Configure MIDI Machine Control Choose Options-Project, and click the Clock tab. Select SMPTE/MTC as the clock source. Click the MIDI Out tab. Check the Transmit MMC box. Enter the ID of the master timing device in the Time Code Master’s Unit ID box. Click OK. -
Page 539: Audio File Management
Audio File Management Project files in SONAR do not contain the digital audio itself. A SONAR project file (. references the audio contained in the project, so care must be taken when backing up your digital audio projects. This chapter covers file management, including backing up your projects.
-
Page 540: The Project Files Dialog
The Project Files Dialog SONAR projects, extension . , contain all your project information with the exception of your digital audio data. This data is stored in a separate folder or folders. You can opt to save the audio data for all of your projects in a single audio folder, or create multiple folders.
-
Page 541: Project Files And Bundle Files
Audio Path field. If you want to store the project in the Cakewalk Projects folder, and its audio in the Global Audio Folder, uncheck the Store Project Audio in its Own Folder option.
-
Page 542: Audio Folders
Folder field on the Audio Data tab in the Global Options dialog. You can also create audio folders on a per-project basis. Important Note: Previous versions of Cakewalk used a folder called the WaveData folder, located in the product directory.
-
Page 543
Note: if you want to use per-project audio folders, but you don’t want to choose a folder and fill out the New Project File dialog every time you open a new project, you can choose to load the Normal template file every time you use the File-New command. -
Page 544: Imported Audio Files
Imported Audio Files By default, SONAR will make a copy of any audio data imported using the File-Import-Audio command and place the imported audio into the project’s audio folder. You can configure SONAR to simply reference audio from its current location if, for example, you want to import large quantities of audio data into a project and don’t want to consume time and disk space by making copies of the files.
-
Page 545
Bundle Files Creates a single file for ease of portability. A bundle file is a single file that contains all the information— except video—used in a project. A bundle file includes everything that is stored in a normal project file, plus all the digital audio that is used in the project. -
Page 546: Deleting Unused Audio Files
Deleting Unused Audio Files The Tools-Clean Audio Folder command is used to delete digital audio files in an audio folder if they are no longer used by any of your projects. You should use this command from time to time to free up disk space.
-
Page 547: Improving Audio Performance
Improving Audio Performance Digital audio presents several challenges: it is large, using enormous amounts of disk space, especially at higher sampling rates and bit-depths, and it is CPU-intensive. Added to this mix is the wide variety of audio hardware available today. This chapter covers some common problems with recording and playback and how to configure your computer and audio hardware for optimum performance.
-
Page 548: System Configuration
MIDI and digital audio material may not play back correctly. Note to users of previous Cakewalk products: The DMA settings in versions of Cakewalk prior to SONAR 1.0 were displayed in bytes rather than samples. Using your previous DMA settings in SONAR will not work.
-
Page 549: Sampling Rates
• To disable an audio device, click the name of the device so that it is not highlighted. Click OK. Disabling a device in the Audio Options dialog box usually prevents conflicts with other audio devices. Occasionally you may need to disable a device in the Windows Control Panel. SONAR also allows you to choose the sound card whose clock should be used to control recording and playback timing (if you only have one sound card, SONAR automatically uses it).
-
Page 550: Bit Depths, And Float Resolution
To Import Audio That Has a Different Sampling Rate • Use the File-Import Audio command to import the audio file(s) (this converts them to the project sampling rate). Bit Depths, and Float Resolution SONAR supports all common bit depths. SONAR’s 32-bit capability provides full floating-point resolution for extended dynamic range, and more precise audio processing.
-
Page 551: Bit Depths For Recording
To Rewrite Audio Files at Different Bit Depths Use the Tools-Change Audio Format command to open the Change Audio Format dialog. Choose a new bit depth in the New Bit Depth field. If you’re changing to 16 bits, you can check or uncheck the Apply Dither checkbox. Dithering means to add a certain audio signal to 16 bit audio to make it sound more like it did as a higher-bit signal.
-
Page 552: Bit Depths For Rendering Audio
File Stats. The File Stats dialog lists the correct sample rate and bit depth. Final step: use the File-Export Audio command. Be sure to select 16 for the Bit Depth and uncheck all Mix Enables. Now you can burn your exported audio file to CD, using Cakewalk Pyro, or other software.
-
Page 553: Improving Performance With Digital Audio
Improving Performance with Digital Audio When a project contains many tracks of digital audio or when many real-time effects are in use, your computer may have difficulty keeping up during playback. When this occurs, you’ll hear portions of the audio drop out, stutter, or pop. Or maybe your project responds slowly to real-time effects and volume changes.
-
Page 554
Defragment your hard disk If your hard disk is fragmented, playback of audio will be slower. Use the Disk Defragmenter to correct the situation. Turn off dithering on the Advanced tab of Dithering subtly improves your mix, but most people can’t hear the Audio Options dialog box (choose it. -
Page 555: Mixing Latency
Mixing Latency SONAR has a slider in the Audio Options dialog box, on the General tab, to set mixing latency. Mixing latency is the amount of time SONAR allocates to prepare a buffer full of audio data for playback. Lower latency settings add processing time because of the need to refill the smaller data buffers more often.
-
Page 556
• Mute—Whenever a track is muted, the Mute indicator lights up. You can click the Mute indicator to unmute all muted tracks. • Solo—Whenever a track is soloed, the solo indicator lights up. You can click the Solo indicator to unsolo all soloed tracks. -
Page 557: Troubleshooting
User’s Guide was printed. To view the Readme file, select Help-View README.RTF. • Visit our website at www.cakewalk.com, where you’ll find answers to frequently asked questions, tech support documents, program patches and updates, and more. When I Play a File, I Don’t Hear Anything Open a project (.
-
Page 558
No MIDI output device is selected. Choose Options-MIDI Devices, and check the Output device list. Make sure that your computer sound card is highlighted and at the top of the list. If this doesn’t work, try choosing different output devices, one at a time, to see if any of them produces sound. -
Page 559: I Can’t Record From My Midi Instrument
I Can’t Record from My MIDI Instrument If you are unable to record music from your electronic keyboard, synthesizer, or other MIDI instrument, first test to see if you are able to play back a project through the keyboard. Then try the following: Possible problem……
-
Page 560: When I Play A File Containing Audio, The Audio Portion Doesn’t Play
When I Play a File Containing Audio, the Audio Portion Doesn’t Play Open a bundle file ( ) and click the Play button. Do you hear the audio tracks in the project (there may be MIDI tracks in the bundle file, so you must mute them). If not, try the following: Possible problem……
-
Page 561: My Track Or Bus Fader Is Maximized, But There’s No Sound Or Level
Your sound card isn’t hooked up Try recording audio using the Microsoft Sound correctly. Recorder (Start-Programs-Accessories- Entertainment-Sound Recorder). If it fails, check your sound card documentation to make sure it is properly installed and configured. You have not set up SONAR to record. Make sure that 1) you have chosen an input for the track;…
-
Page 562: How Do I Use Sonar To Access All The Sounds On My Midi Instrument
How Do I Use SONAR to Access All the Sounds on My MIDI Instrument? SONAR is normally set up to access the 128 sounds that are part of the General MIDI standard. SONAR also includes custom instrument definitions that match the sounds on many popular instruments.
-
Page 563: Why Can’t Sonar Find My Audio Files
SONAR looks for all audio data in a certain directory or folder, called the Data Directory, in Cakewalk Projects (or the WaveData Directory in previous versions of Cakewalk products). If you have renamed or moved either SONAR or the Data Directory, SONAR may not be able to find your audio files.
-
Page 564: Why Do I Get Errors From The Wave Profiler
Why Do I Get Errors from the Wave Profiler? Audio devices such as voice modems or speakerphone devices can cause an error message when running the Wave Profiler. Sometimes these errors are harmless; on other occasions you need to disable the voice modem or speaker-phone device before running the Wave Profiler.
-
Page 565: No Sound From My Soft Synth
No Sound from My Soft Synth Use the following table to troubleshoot problems hearing a synth in SONAR: Possible problem… What to do… Synth doesn’t sound when a recorded • Make sure you select a MIDI channel in the MIDI MIDI track is sent to it.
-
Page 566: I Can’t Open My Project
Reopen the Pro Audio file in SONAR. If the volume sounds correct, save the file in Sonar. If other Pro Audio 9 files were opening correctly in SONAR, change the VoMethod=N line in SONAR’s file back to what it originally was, and re-save the file. I Can’t Open My Project Your project may have become corrupted, or SONAR is attempting to use a plug-in that is not longer on your system.
-
Page 567: Appendix B: Hardware Setup
Appendix B: Hardware Setup This appendix contains additional details on configuring your equipment for use with SONAR. Connect Your MIDI Equipment If you are using a MIDI interface (such as an MPU-401 or Sound Blaster MIDI option) with an external MIDI keyboard, you need to connect the equipment using MIDI cables. It is possible to connect your equipment in some rather complex ways that may cause problems.
-
Page 568
If Your Keyboard Has a MIDI Thru Jack If your keyboard has three MIDI jacks—In, Out, and Thru—then use the following diagram. If you are using a 15-pin joystick adapter cable that splits into two MIDI cables: • Connect the 15-pin jack to your computer’s joystick port. •… -
Page 569
If your master keyboard now seems to double notes (they sound thicker), or if you can play only one half as many notes at once, first make sure that no MIDI channel is being used by more than one of your MIDI devices. If no MIDI channel is assigned to duplicate devices and you hear doubling or only half as many notes as you should, see “My Keyboard Doubles Every Note I Play”… -
Page 570: Set Up To Record Digital Audio
Set Up to Record Digital Audio In general, the inputs of sound cards take 1/8” stereo mini-jacks. Sound cards usually have two inputs—one for line level inputs and the other for microphones (at mic level). The line level input is stereo; the mic input could be either stereo or mono. If your final output does not terminate in a 1/8”…
-
Page 571
Electric Guitar Through Effects Rack You can also plug an electric guitar into an effects rack, then send the output of the rack to the sound card’s input, as shown in the following diagram: This diagram assumes that the output of the rack is at line level. If it is at pro level instead (+4 dB), and your card does not accept a +4 db input, you will need to attenuate (lower) the F/ X rack’s signal. -
Page 572
Microphone Direct-In Microphones can be plugged into the sound card’s mic input. Some inexpensive microphones are made especially for use with sound cards and come equipped with 1/8” jacks. However, better quality microphones take better quality cables, which do not terminate in 1/8” jacks. The diagram below illustrates how to connect a microphone that terminates in a 1/4”… -
Page 573
Mixer You can connect a mixer to the sound card with a setup of the following kind: Note: If your mixer has buses, use them! This helps avoid feedback. -
Page 575: Appendix C: New Features In Sonar 5
Appendix C: New Features in SONAR 5 SONAR 5 has many new features (some features are in SONAR Producer only). The following is a list of each new feature, and a brief description. V-Vocal The new V-Vocal feature integrates Roland’s VariPhrase technology directly into SONAR Producer.
-
Page 576: Improved Midi Step Recording
For more information, see “Displaying Notes and Controllers (Piano Roll View Only)” on page 248, “Adding and Editing Controllers in the Piano Roll View” on page 254, and “Adding and Editing Notes in the Piano Roll View” on page 249. Improved MIDI Step Recording Step recording now gives you immediate visual feedback of what you’ve recorded, has streamlined and configurable shortcuts, does unlimited backstep deleting, lets you use other…
-
Page 577: Float File Support And Multiple Bit Depths
Float File Support and Multiple Bit Depths You can now play files of different bit depths in the same project. You can choose bit depths for playback, recording, importing, exporting, and processing (bouncing, freezing, applying effects). 32-bit support for these functions gives you full floating-point resolution for greater dynamic range and more precise editing.
-
Page 578: Lock Track Height
Lock Track Height You can now lock a track’s height so that the height stays the same when you use a zoom or fit command. See “To Lock or Unlock the Height of a Track” on page 188 for more information.
-
Page 579: Audio Meter Enhancements
Audio Meter Enhancements You now have the option of using segmented or non-segmented meters in the Track and Console views. Meter colors are also now customizable in the Colors dialog. See “Segmented and Non-segmented Meters” on page 381 for more information. Enhanced Preset Management The Presets window that appears at the top of plug-ins and some dialogs now has two new features: a Most Recently Used menu, and a Preset Dirty Flag.
-
Page 581: Index
Index Symbols Amplitude 318 Anchor points, see Snap offsets 203 files 179 Apply Trimming 270 size limitation of 541 Archive 114 files 35 Archiving tracks 114 files 461 Arm 155 files 179 Arm for Automation 441 files 517 ASCII TAB files 461 exporting to 491 saving as 491…
-
Page 582
under SMPTE/MTC Sync 536 Audio folders 542 where it is stored 542 per-project 542 Audio hardware Audio 152 Audio CD Wave Profiler 548 Audio performance how to create 413 improving 547 Audio clips 321 Audio processing Bounce to Clip(s) 327 playing backward 330 changing name off 323 –… -
Page 583
adding to an improvised track See Fit drawing envelopes on clips 447 Improvisation Enable Automation Playback button 439 Batch mode Envelope tool 442 playing back files in 133 faders and knobs in Console view 441 Beat Value 496 jump 443 Beats per Measure 496 methods 441 Beats, accenting 278… -
Page 584
– arranging 191 arranging audio 315 Cakewalk FX Stereo Reverb 296 audio 321 Cakewalk Pitch Shifter 346 changing colors of 193 – Cakewalk Time/Pitch Stretch 347 – combining 208 copying 195 creating 413 copying using copy and paste 198 quality 320… -
Page 585
Combining clips 208 Credits 180 – Comping takes 210 Crescendos 267 Confidence recording 159 creating using Process-Scale Velocity 267 Connecting Cropping overlapping clips 212 electric guitar 30 Crossfade 338 microphone 31 changing the curve types in 342 Console view curve types 338 adjusting knobs in 366 Crossfade 343 automating controls in 441… -
Page 586
Delay editing 304 adding 296 opening 308 Delete 189 saving 307 Digital audio recording See Recording audio the basics 304 Digital audio See Audio tutorial 99 Digital distortion 157 Dual monitor support 460 Diminuendo 486 Dump Request Macros (DRM) 520 Dirty flag Duration in presets 389… -
Page 587
Editing MIDI drawing audio envelopes in the Track view 442 tutorial 75 Edit-Paste drawing envelopes on clips 447 arranging clips using 191 resetting to default values 449 importing tracks from a project using 176 showing or hiding envelopes 447 pasting envelopes using 449 Envelopes-Track 442 Edit-Redo 152 per-track 401… -
Page 588
searching for 282 File Info window 180 File menu selecting 285 Open 36 shifting in time 263 File-Close 179 shifting the time of 130 shrink using percentages 266 File-Export-Audio 356 step by step playback 294 File-Export-OMF 418 stretch using percentages 266 File-Import-Audio 175 stretching and shrinking 265 File-Info 180… -
Page 589
Search Next 282 Follow Bus Pan 377 Thru 108 Follow Track Pan 374 Time 107 Forums Gridlines, displaying 201 Cakewalk xxiv Groove clips 35 Freezing tracks and synths 384 creating 235 Frequency 316 dragging into project 233 fundamental 317 editing 235… -
Page 590
190 inserting in a track Importing Inserting tracks 186 audio files 175 Insert-Meter/Key Change 496 – from a Cakewalk project 176 Insert-Meter/Key Changes 147 – music 175 Insert-Time Measures 264 Importing different sampling rates 550 Instrument Definition Tutorial 513… -
Page 591
Keyboard choosing an 125 – connecting MIDI 29 parameter 120 Local Control setting 133 track settings 115 notes doubling on 562 wrong, on playback 561 See also Instruments parameters 291 Instruments – patches 125 accessing all sounds on 562 recording accompaniments 173 –… -
Page 592
Loop recording 163 jump to 205 locking/unlocking 205 using 163 Loop/Auto Shuttle moving 205 settings 111 pitch 238 toolbar 111 setting Now time with 108 Looping setting time range with 206 delays 131 snap-to grid 201 enabling loops for 233 using 203 –… -
Page 593
– configuring display of 380 playback settings 115 improving performance 382 recording music from 156 playback and record 368 routing data 123 segmented 381 setting up in and out devices 33 Metronome 148 synchronization 529 synchronization status messages 531 audio 148 time code 528 changing settings 150 timing resolution 152… -
Page 594
374 using 194 – MIDI 371 New track tracks 553 adding 186 tutorial 92 Newsgroups, Cakewalk xxiv Mixing audio effects 346 Next Marker 205 options 346 Next Measure 108 Modules 365 Nodes Mono to Mono 346 adding to a selected envelope segment… -
Page 595
Normalize command 329 selecting and editing 253 Notation selecting in Piano Roll view 249 editing 472 size of 275 non-concert key 498 stuck 110 Notation and Lyrics 467 transposing 129 – Note events 290 using enharmonic spellings 479 Now Time transposing pitch of 261 rewind on stop 107 Note Map pane 310… -
Page 596
Patch/Controller Searchback Before Play Outputs 120 Starts 131 assigning tracks to 125 Patches MIDI 124 downloading 557 setting 123 Pattern Brush tool 312 Overlap Ratio 347 creating custom patterns for 313 Overlapping clips how it works 312 cropping to eliminate overlap 212 painting a custom pattern with 313 Overload 157 painting notes using 312… -
Page 597
MIDI Groove clips and 241 Preamp output moving 239 connecting to 572 transposing Groove clips with 238 Preferences using 238 migrating from previous version of Cakewalk 32 Pitch wheel 288 Preferred interleave 114 parameters 290 Presets Play 110 dirty flag 389 Play List 134… -
Page 598
Process-Apply Audio Effects opening 32 applying realtime audio effects using 345 saving 179 Process-Apply MIDI Effects views 458 apply realtime MIDI effects using 403 Project 150 Process-Audio-Apply Audio Effects Project file 35 apply multiple realtime effects using 402 creating new 146 Process-Audio-Crossfade Project Files dialog 540 creating a destructive crossfade using… -
Page 599
offset option 275 eliminating echo 564 synchronizing rhythm and solo tracks erasing 158 with 278 inputs 153 using 274 – – loop 163 Window setting 273 MIDI 156 Quantize 270 modes 153 Queue buffers 555 problems 559 – Quick freeze 384 punch-in 164 specifying MIDI ports and channels to Quick Groups 408… -
Page 600
Set Start=Current 407 Sampling rates Settings importing audio at different rates 550 migrating from previous version of Sampling resolution 320 Cakewalk 32 Save Bank 523 Shapes 443 Save options 178 Show Automated Mute 456 bundle file 179 Show layers 210… -
Page 601
recording a hardware-emulating synth trimming multiple clips 270 removing from a track 354 to permanently delete slip-edited data Solo 114 Soloing a soft synth 355 using 268 Slip-editing Soloing clips 212 SONAR multiple clips 338 – as master 531 SMPTE 104 –… -
Page 602
using 168 editing Sysx banks 521 using Advanced mode 170 events 518 importing, creating, and dumping sysx using pattern-based 172 banks 519 Stop 110 ini file settings 524 Strength, quantizing parameter 272 Receive 522 Striping 532 recording Sysx messages in real time 524 Stuck note, stopping 110 sending sysx banks at startup 518 Surround effects 435… -
Page 603
Tabbed views 46 chord property 482 Tablature event 265 – defining a style 488 inserting blank 263 editing 490 MBT 104 exporting as an ASCII text file 491 note property 476 generating 489 pedal event parameter 487 Quick TAB 489 SMPTE 104 –… -
Page 604
Track Track templates 189 current 131 – Track view 36 layers 210 adding effects in 127 locking height of 188 bank settings in 125 Show Automated Mute 456 clips pane not visible in 562 Track folders 216 keyboard shortcuts in 37 Track icons 190 patch settings in 125 Track input 120… -
Page 605
selecting single 184 notes 129 setting channels for 129 parameter 120 setting key offset of 129 Trigger and freewheel 535 setting time offset of 130 Trim Durations 478 – silencing 113 Triplets 477 soloing 114 Troubleshooting 557 sort by archived 185 I can’t open my project 566 sort by channel 185 MIDI Sync 532… -
Page 606
Uninstalling SONAR 29 allowing multiple instances of the same Unlink surround effect 436 docking in bus pane 46 Updates 557 Event List 289 USB audio floating 47 24 bit problems 563 Fretboard 468 Loop Construction 228 Loop Explorer 231 – Vel+ 120 Lyrics 44 Velocity 284… -
Page 607
Windows system sounds, turning off 109 Window-Tile in Rows 458 Wipe 189 World Wide Web xxiv authoring 26 Cakewalk site xxiv publishing audio on 413 Zero Controllers When Play Stops 130 Zero-crossings 320 Zoom keyboard shortcuts 45 Zoom Controls 45… -
Page 609: License Agreement
(«Cakewalk» or the «Licensor») grants to you, the Licensee, a nonexclusive license to have one person use the enclosed Cakewalk software product (the «Product») on one personal computer at a time. If you want to use the Prod- uct on more than one personal computer at a time, or if you want to network the Product, you must obtain separate licenses from Cakewalk by calling (617) 423-9004.
-
Page 610
Twelve Tone Systems, Inc., d/b/a Cakewalk. 8. TERMINATION. This License Agreement will terminate immediately if you breach any of its terms. Upon termination, you will be required promptly to return to Cakewalk or to destroy all copies of the Product covered by this License Agreement.
Скачать Руководство пользователя Cakewalk Sonar — X3, Инструкция по эксплуатации на Программное обеспечение pdf бесплатно
На этой странице вы можете совершенно бесплатно скачать Руководство пользователя Cakewalk Sonar — X3.
У документа PDF Руководство пользователя 54 страниц, а его размер составляет 2.41 Mb.
Читать онлайн Программное обеспечение Cakewalk Sonar — X3 Руководство пользователя

Скачать файл PDF «Cakewalk Sonar — X3 Руководство пользователя» (2.41 Mb)
Популярность:
19764 просмотры
Подсчет страниц:
54 страницы
Тип файла:
Размер файла:
2.41 Mb