
Решил сделать руководство по эксплуатации сие автомобиля для знакомства с некоторыми его функциями, особенностями и «плюшками», которых в нем не мало. Постепенно по мере готовности информации буду добавлять ее в данную запись, вдруг кому пригодится и поможет.
Комментарии
13
Войдите или зарегистрируйтесь, чтобы писать комментарии, задавать вопросы и участвовать в обсуждении.

А скажите пожалуйста, что это за кнопочки с цифрами? Просто у меня нет люка и не понятно для чего эти кнопки?


Это относится к программированию въездных ворот, чтобы, например в своем доме из машины кнопкой открыть ворота/шлакбаум, смысл такой этих кнопок. Но в этом блоке не совсем те частоты, которые используются у нас, нежели в Американдии. Введите на драйве поисковый запрос — программирование ворот Шевроле Эквинокс и почитайте варианты решения сие вопроса

Я езжу на Chevrolet Equinox (3G)
А если отключить старт-стоп, на АлиЭкспресс есть кабель, не отключатся ли ещё какие-нибудь опции. Может есть электро схема, какие опции сидят на одних проводах с автостопом.
Все работает нормально с этим кабелем, выключается только старт-стоп

Govanni
А если отключить старт-стоп, на АлиЭкспресс есть кабель, не отключатся ли ещё какие-нибудь опции. Может есть электро схема, какие опции сидят на одних проводах с автостопом.
Если у вас есть автозапуск со штатного ключа, то он перестанет работать

Это правда? У вас нет других ошибок?
Да, других точно нет. Сам убедился в том, что не заведётся с незакрытым капотом, когда разбирался в фишках машины. А проводок, как раз, имитирует открытый капот, который и не даёт работать автостопу и автозапуску со штатного ключа
А-а-а-а-а, вон оно что. Вот китайцы молодцы
MikhailVy
Да, других точно нет. Сам убедился в том, что не заведётся с незакрытым капотом, когда разбирался в фишках машины. А проводок, как раз, имитирует открытый капот, который и не даёт работать автостопу и автозапуску со штатного ключа
Посетил я тут шеви плюс. Программист сказал, что поставите этот шнурок, приедете и он откорректирует инфу, которая будет поступать в мозги и всё будет работать.
А он может просто программно отключить автостоп? В снг такое делают, у нас не встречал
Программно нет. он не нашел эту настройку в прошивке.
MikhailVy
А он может просто программно отключить автостоп? В снг такое делают, у нас не встречал
Поставили провод . автостоп отключился. Автозапуск работает. Без программного вмешательства


привет. а есть ссылка на полную версию инструкции? скинь плиз.
Посмотреть инструкция для Chevrolet Equinox (2018) бесплатно. Руководство относится к категории Автомобили, 8 человек(а) дали ему среднюю оценку 9.1. Руководство доступно на следующих языках: английский. У вас есть вопрос о Chevrolet Equinox (2018) или вам нужна помощь? Задайте свой вопрос здесь
Не можете найти ответ на свой вопрос в руководстве? Вы можете найти ответ на свой вопрос ниже, в разделе часто задаваемых вопросов о Chevrolet Equinox (2018).
Как перевести мили в километры?
Где я могу узнать идентификационный номер транспортного средства Chevrolet?
Что такое идентификационный номер транспортного средства (VIN)?
Когда транспортному средству Chevrolet требуется техническое обслуживание?
Когда следует заменять тормозную жидкость на Chevrolet?
В чем разница между топливом E10 и E5?
Одна или несколько дверей не открываются изнутри. Что мне делать?
Автомобильный радиоприемник не включается, что делать?
Инструкция Chevrolet Equinox (2018) доступно в русский?
Не нашли свой вопрос? Задайте свой вопрос здесь
Contents
Introduction . . . . . . . . . . . . . . . . . . . . . . 2
In Brief . . . . . . . . . . . . . . . . . . . . . . . . . . . 5
Keys, Doors, and Windows . . . . . 31
Seats and Restraints . . . . . . . . . . . 58
Storage . . . . . . . . . . . . . . . . . . . . . . . 107
Instruments and Controls . . . . . . 110
Lighting . . . . . . . . . . . . . . . . . . . . . . . 157
Infotainment System . . . . . . . . . . 165
Climate Controls . . . . . . . . . . . . . . 189
Driving and Operating . . . . . . . . . 196
Vehicle Care . . . . . . . . . . . . . . . . . . 275
Service and Maintenance . . . . . 367
Technical Data . . . . . . . . . . . . . . . . 382
Customer Information . . . . . . . . . 386
Reporting Safety Defects . . . . . . 396
OnStar . . . . . . . . . . . . . . . . . . . . . . . . 400
Index . . . . . . . . . . . . . . . . . . . . 411
Need a manual for your Chevrolet Equinox (2018)? Below you can view and download the PDF manual for free. There are also frequently asked questions, a product rating and feedback from users to enable you to optimally use your product. If this is not the manual you want, please contact us.
Is your product defective and the manual offers no solution? Go to a Repair Café for free repair services.
Manual

Rating
Let us know what you think about the Chevrolet Equinox (2018) by leaving a product rating. Want to share your experiences with this product or ask a question? Please leave a comment at the bottom of the page.
Are you satisfied with this Chevrolet product?
Yes No
Be the first to rate this product
0 votes
Frequently Asked Questions
Our support team searches for useful product information and answers to frequently asked questions. If you find an inaccuracy in our frequently asked questions, please let us know by using our contact form.
My car has a timing chain, what is the replacement interval for it? Verified
With normal use, a timing chain should last the entire lifespan of the car and does not need to be replaced.
This was helpful (2216)
I can’t open one or more of the doors from the inside, why is that? Verified
The child safety lock is probably activated. This can often be deactivated with a mechanism in the door.
This was helpful (669)
How often should I change my oil? Verified
Almost every car has its own exact guideline, but in general it’s wise to change your oil every 10.000 to 15.000 kilometers or once every year. Polluted oil can cause serious damage to the engine over time.
This was helpful (568)
When should the airbag on the side of the passenger seat be switched off? Verified
When driving with a child in a car seat on the passenger seat, the airbag on that side should be switched off. This is also advisable for children up to 12 years old that take place in the passenger seat. This is to prevent injuries in case of an accident.
This was helpful (536)
The car keys won’t unlock the car from a distance anymore, why is that? Verified
Car keys that can unlock from a distance generally work with a battery. When it runs out, the key won’t work anymore. Replace the battery and try again.
This was helpful (497)
Will a lower tire pressure result in more grip when driving in the snow? Verified
No, although the tires will have more surface in contact with the road with a lower pressure, it will nevertheless result in less stability. Always drive with the correct tire pressure!
This was helpful (299)
I filled my car with the wrong fuel, what should I do? Verified
Do not drive! It does not matter wether you put diesel in a gasoline car or gasoline in a diesel car. In both cases it can cause damage to the enige and/or other parts of the car. Contact roadside assistance.
This was helpful (195)
Where can I find the VIN number of my car? Verified
This can vary between brands and models, but on many cars the VIN number can be found on the door jamb, under the hood or on the metal flooring at the front seat.
This was helpful (163)
How often should I replace the blades on my windscreen wipers? Verified
It’s advisable to replace the wiper blades at least once a year. Signs that the blades need to be replaced are streaking, leaving a haze, making noise or the rubber coming off.
This was helpful (148)
What is the VIN number? Verified
VIN stands for Vehicle Identification Number and is a unique number that every car has. This makes the car indentifyable after for example a crash or in the case of a recall. It also allows a car to be identified in the case the number plates are missing.
This was helpful (118)
How many miles is one kilometer? Verified
One kilometer equals 0,621 mile. Ten kilometers makes 6,21 miles. One mile equals 1,609 kilometer. Ten miles makes 16,09 kilometers.
This was helpful (117)
Can I use the windscreen wipers while there is ice on the windscreen? Verified
No, this is not advisable. Ice is sharp and can damage the rubber on the wiper blades.
This was helpful (115)
 Loading…
![]()

Contents
Introduction . . . . . . . . . . . . . . . . . . . . . . 2
In Brief . . . . . . . . . . . . . . . . . . . . . . . . . . . 5
Keys, Doors, and Windows . . . . . 31
Seats and Restraints . . . . . . . . . . . 58
Storage . . . . . . . . . . . . . . . . . . . . . . . 108
Instruments and Controls . . . . . . 112
Lighting . . . . . . . . . . . . . . . . . . . . . . . 157
Infotainment System . . . . . . . . . . 165
Climate Controls . . . . . . . . . . . . . . 190
Driving and Operating . . . . . . . . . 198
Vehicle Care . . . . . . . . . . . . . . . . . . 278
Service and Maintenance . . . . . 371
Technical Data . . . . . . . . . . . . . . . . 385
Customer Information . . . . . . . . . 389
Reporting Safety Defects . . . . . . 400
OnStar . . . . . . . . . . . . . . . . . . . . . . . . 403
Index . . . . . . . . . . . . . . . . . . . . 415

2Introduction
Introduction
The names, logos, emblems, slogans, vehicle model names, and vehicle body designs appearing in this manual including, but not limited to, GM, the GM logo, CHEVROLET, the CHEVROLET Emblem, and EQUINOX are trademarks and/or service marks of General Motors LLC, its subsidiaries, affiliates,
or licensors.
For vehicles first sold in Canada, substitute the name “General Motors of Canada Company” for Chevrolet Motor Division wherever it appears in this manual.
This manual describes features that may or may not be on the vehicle because of optional equipment that was not purchased on the vehicle, model variants, country specifications, features/applications that may not be available in your region, or changes subsequent to the printing of this owner’s manual.
Refer to the purchase documentation relating to your specific vehicle to confirm the features.
Keep this manual in the vehicle for quick reference.
Canadian Vehicle Owners
A French language manual can be obtained from your dealer, at www.helminc.com, or from:
Propriétaires Canadiens
On peut obtenir un exemplaire de ce guide en français auprès du concessionnaire ou à l’adresse suivante:
Helm, Incorporated
Attention: Customer Service
47911 Halyard Drive
Plymouth, MI 48170
USA
Using this Manual
To quickly locate information about the vehicle, use the Index in the back of the manual. It is an alphabetical list of what is in the manual and the page number where it can be found.
|
Litho in U.S.A. |
© 2017 General Motors LLC. All Rights Reserved. |
|
Part No. 23143657 D Fourth Printing |
Introduction 3
About Driving the Vehicle
As with other vehicles of this type, failure to operate this vehicle correctly may result in loss of control or an accident. Be sure to read the driving guidelines in this manual in the section called “Driving and Operating” and specifically
Driver Behavior 0 199, Driving Environment 0 199, and Vehicle Design 0 199.
Danger, Warning, and
Caution
Warning messages found on vehicle labels and in this manual describe hazards and what to do to avoid or reduce them.
{Danger
Danger indicates a hazard with a high level of risk which will result in serious injury or death.
{Warning
Warning indicates a hazard that could result in injury or death.
Caution
Caution indicates a hazard that could result in property or vehicle damage.
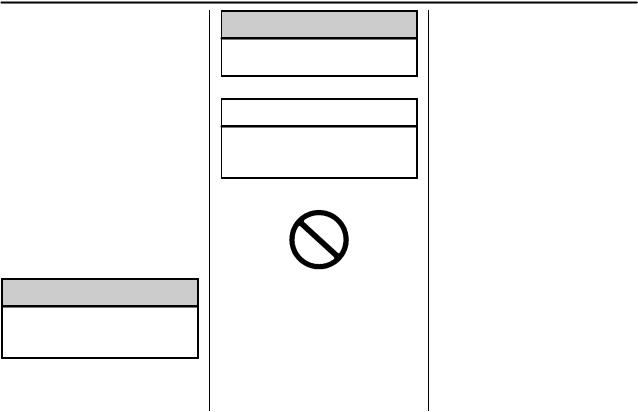
A circle with a slash through it is a safety symbol which means “Do Not,” “Do not do this,” or “Do not let this happen.”
Symbols
The vehicle has components and labels that use symbols instead of text. Symbols are shown along with the text describing the operation or information relating to a specific component, control, message, gauge, or indicator.
M : Shown when the owner’s manual has additional instructions or information.
* : Shown when the service manual has additional instructions or information.
0 : Shown when there is more information on another page — “see page.”

4Introduction
Vehicle Symbol Chart
Here are some additional symbols that may be found on the vehicle and what they mean. See the features in this manual for information.
9 : Airbag Readiness Light
# : Air Conditioning
! : Antilock Brake System (ABS) $ : Brake System Warning Light
» : Charging System
I : Cruise Control
` : Do Not Puncture
^ : Do Not Service
B : Engine Coolant Temperature
O : Exterior Lamps
_ : Flame/Fire Prohibited
. : Fuel Gauge
+ : Fuses
3 : Headlamp High/Low-Beam Changer
j : ISOFIX/LATCH System Child Restraints
* : Malfunction Indicator Lamp
: : Oil Pressure
O : Power
/ : Remote Vehicle Start
> : Seat Belt Reminders
7 : Tire Pressure Monitor
d : Traction Control/StabiliTrak
a : Under Pressure
M : Windshield Washer Fluid

In Brief
Instrument Panel
Instrument Panel . . . . . . . . . . . . . . . . 6
Initial Drive Information
Initial Drive Information . . . . . . . . . . 8
Stop/Start System . . . . . . . . . . . . . . . 8
Remote Keyless Entry (RKE)
System . . . . . . . . . . . . . . . . . . . . . . . . 8
Remote Vehicle Start . . . . . . . . . . . 8
Door Locks . . . . . . . . . . . . . . . . . . . . . 9
Liftgate . . . . . . . . . . . . . . . . . . . . . . . . 10
Windows . . . . . . . . . . . . . . . . . . . . . . . 10
Seat Adjustment . . . . . . . . . . . . . . . 11
Memory Features . . . . . . . . . . . . . . 13
Heated and Ventilated Seats . . . 13
Head Restraint Adjustment . . . . 14
Seat Belts . . . . . . . . . . . . . . . . . . . . . 14
Passenger Sensing System . . . 14
Mirror Adjustment . . . . . . . . . . . . . . 15
Steering Wheel Adjustment . . . . 15
Interior Lighting . . . . . . . . . . . . . . . . 16
Exterior Lighting . . . . . . . . . . . . . . . 17
Windshield Wiper/Washer . . . . . . 17
Climate Controls . . . . . . . . . . . . . . . 18
Transmission . . . . . . . . . . . . . . . . . . 19
Vehicle Features
Infotainment System . . . . . . . . . . . 20
Radio(s) . . . . . . . . . . . . . . . . . . . . . . . 20
Satellite Radio . . . . . . . . . . . . . . . . . 21
Portable Audio Devices . . . . . . . . 21
Bluetooth® . . . . . . . . . . . . . . . . . . . . . 21
Steering Wheel Controls . . . . . . . 21
Cruise Control . . . . . . . . . . . . . . . . . 22
Driver Information
Center (DIC) . . . . . . . . . . . . . . . . . 23
Forward Collision Alert (FCA)
System . . . . . . . . . . . . . . . . . . . . . . . 23
Forward Automatic
Braking (FAB) . . . . . . . . . . . . . . . . 23
Lane Keep Assist (LKA) . . . . . . . 23
Lane Change Alert (LCA) . . . . . . 24
Surround Vision . . . . . . . . . . . . . . . 24
Rear Vision Camera (RVC) . . . . 24
Rear Cross Traffic Alert (RCTA)
System . . . . . . . . . . . . . . . . . . . . . . . 24
Parking Assist . . . . . . . . . . . . . . . . . 24
Power Outlets . . . . . . . . . . . . . . . . . 25
Universal Remote System . . . . . 25
Sunroof . . . . . . . . . . . . . . . . . . . . . . . . 25
Performance and Maintenance
Traction Control/Electronic
Stability Control . . . . . . . . . . . . . . 26
Tire Pressure Monitor . . . . . . . . . . 27
Fuel (LYX — 1.5L L4 Turbo
Engine) . . . . . . . . . . . . . . . . . . . . . . . 27 Fuel (LTG — 2.0L L4 Turbo
Engine) . . . . . . . . . . . . . . . . . . . . . . . 28 Fuel (Diesel) . . . . . . . . . . . . . . . . . . . 28 E85 or FlexFuel . . . . . . . . . . . . . . . . 28 Engine Oil Life System . . . . . . . . 28 Driving for Better Fuel
Economy . . . . . . . . . . . . . . . . . . . . . 29 Diesel Particulate Filter . . . . . . . . 29 Diesel Exhaust Fluid . . . . . . . . . . . 30 Roadside Assistance
Program . . . . . . . . . . . . . . . . . . . . . . 30

6In Brief
Instrument Panel

1.Air Vents 0 195.
2.Turn Signal Lever. See Turn and Lane-Change Signals 0 161.
IntelliBeam® System Button (If Equipped). See Exterior Lamp Controls 0 157.
3.Instrument Cluster 0 122.
Driver Information Center (DIC) Display. See Driver Information Center (DIC) 0 139.
4.Windshield Wiper/Washer 0 114.
5.Infotainment 0 165.
6.Light Sensor. See Automatic Headlamp System 0 160.
7.Hazard Warning Flashers 0 160.
8.Climate Control Systems 0 190
(If Equipped).
Dual Automatic Climate Control System 0 192 (If Equipped).
9.Heated and Ventilated Front Seats 0 66 (If Equipped).
10.Power Outlets 0 118.
11.Wireless Charging 0 120 (If Equipped).
12.USB Port 0 173.
Auxiliary Input Jack. See
Auxiliary Devices 0 179.
13.All-Wheel Drive 0 234 (If Equipped).
Tow/Haul Mode 0 234.
14.Electric Parking Brake 0 236.
15.Shift Lever. See Automatic Transmission 0 231.
Manual Mode 0 233.
16.ENGINE START/STOP Button. See Ignition Positions 0 215.
17.Steering Wheel Controls 0 113.
Traction Control/Electronic Stability Control 0 238.
18.Horn 0 114.
19.Steering Wheel Adjustment
0 113 (Out of View).
20.Cruise Control 0 241.
Heated Steering Wheel 0 114
(If Equipped).
Forward Collision Alert (FCA) System 0 248 (If Equipped).
Lane Keep Assist (LKA) 0 254
(If Equipped).
21.Hood Release. See Hood
0 281.
22.Fog Lamps 0 161 (If Equipped).
23.Exterior Lamp Controls 0 157.
24.Data Link Connector (DLC) (Out of View). See Malfunction Indicator Lamp (Check Engine Light) 0 130.
25.Instrument Panel Illumination Control 0 162.

8In Brief
Initial Drive
Information
This section provides a brief overview about some of the important features that may or may not be on your specific vehicle.
For more detailed information, refer to each of the features which can be found later in this owner’s manual.
Stop/Start System
The vehicle may have a fuel saving Stop/Start system to shut off the engine and help conserve fuel.
When the brakes are applied and the vehicle is at a complete stop, the engine may turn off. When the brake pedal is released or the accelerator pedal is pushed, the engine will restart. The engine may restart even while the brake is applied. See Starting the Engine
0 217.
Remote Keyless Entry
(RKE) System
The Remote Keyless Entry (RKE) transmitter may work up to
60 m (197 ft) away from the vehicle.
With Power Liftgate Shown
Press the button to remove the key. The key can be used for all locks.
K : Press to unlock the driver door or all doors depending on vehicle personalization settings.
For vehicles with the manual liftgate, unlocking all doors will also unlock the liftgate.
Q : Press to lock all doors.
Lock and unlock feedback can be personalized. See Vehicle Personalization 0 145.
b : If equipped with the power liftgate, press twice quickly until the liftgate begins to move.
7 : Press and release to initiate vehicle locator. Press and hold for at least three seconds to sound the
panic alarm. Press 7 again to cancel the panic alarm.
/ : Press Q and release and then immediately press and hold / for at least four seconds to start the engine from outside the vehicle. See Remote Vehicle Start 0 38.
See Keys 0 31 and Remote Keyless Entry (RKE) System Operation 0 32.
Remote Vehicle Start
If equipped, the engine can be started from outside of the vehicle.

Starting the Vehicle
1.Press and release Q on the RKE transmitter.
2.Immediately press and hold / for at least four seconds or until the turn signal lamps flash.
Start the vehicle normally after entering.
When the vehicle starts, the parking lamps will turn on.
Remote start can be extended.
Canceling a Remote Start
To cancel a remote start, do one of the following:
.Press and hold / until the parking lamps turn off.
.Turn on the hazard warning flashers.
. Turn the vehicle on and then off.
See Remote Vehicle Start 0 38.
Door Locks
To lock or unlock the vehicle from the outside, press Q or K on the Remote Keyless Entry (RKE) transmitter.
Q : Press to lock the doors. The indicator light in the switch will come on when the door is locked.
K : Press to unlock the doors.
See Door Locks 0 40.
To manually unlock a door from inside the vehicle, pull once on the door handle to unlock it, and a second time to open it.
Keyless Access
Press the button on the driver door handle when the RKE transmitter is within 1 m (3 ft) of the driver door handle. When unlocking from the driver door, the first press unlocks that door; press again within
five seconds to unlock all passenger doors. See Remote Keyless Entry (RKE) System Operation 0 32.
![]()
10 In Brief
Liftgate
Manual Liftgate Operation
Unlock the vehicle before opening the liftgate.
To open the liftgate, press the touch pad under the liftgate handle and lift up.
Do not press the touch pad while closing the liftgate. This may cause the liftgate to be unlatched.
Power Liftgate Operation
To operate the power liftgate, the vehicle must be in P (Park). The taillamps flash when the power liftgate moves.
Choose the power liftgate mode by turning the dial on the switch to either the 3/4 or MAX position.
Press 8to open or close the liftgate.
Hands-Free Liftgate
The liftgate will not operate if the RKE transmitter is not within
1 m (3 ft).
To operate, kick your foot straight up in one swift motion under the rear bumper between the left exhaust pipe and the license plate, then pull it back.
See Liftgate 0 44.
Windows
Power windows work when the ignition is on, in ACC/ACCESSORY, or in Retained Accessory Power (RAP). See Retained Accessory Power (RAP) 0 221.
Using the window switch, press to open or pull to close the window.
The windows may be temporarily disabled if they are used repeatedly within a short time.
See Power Windows 0 53.
Seat Adjustment
Manual Front Seats
To adjust a manual seat:
1.Pull the handle at the front of the seat.
2.Slide the seat to the desired position and release the handle.
3.Try to move the seat back and forth to be sure it is locked in place.
Seat Height Adjuster
Move the lever up or down to manually raise or lower the seat.
See Seat Adjustment 0 61.
Reclining Seatbacks
To recline the manual seatback:
1.Lift the lever.
2.Move the seatback to the desired position, then release the lever to lock the seatback in place.
3.Push and pull on the seatback to make sure it is locked.

12 In Brief
To return the seatback to an upright position:
1.Lift the lever fully without applying pressure to the seatback, and the seatback returns to the upright position.
2.Push and pull on the seatback to make sure it is locked.
See Reclining Seatbacks 0 62.
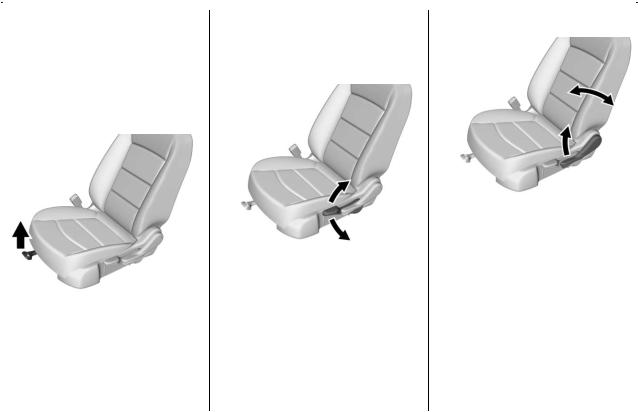
Power Driver Seat
To adjust a power driver seat, if equipped:
.Move the seat forward or rearward by sliding the control forward or rearward.
.Raise or lower the front part of the seat cushion by moving the front of the control up or down.
.Raise or lower the entire seat by moving the rear of the control up or down.
See Power Seat Adjustment 0 61.
To recline a power seatback, if equipped:
.Tilt the top of the control rearward to recline.
.Tilt the top of the control forward to raise.
See Reclining Seatbacks 0 62.
Lumbar Adjustment
If equipped, press and hold the front or rear of the control to increase or decrease lumbar support.
See Lumbar Adjustment 0 62.
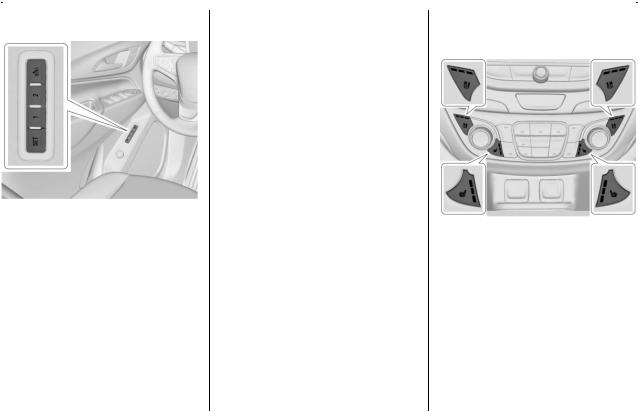
Memory Features
If equipped, memory seats allow two drivers to store and recall their unique seat positions for driving the vehicle, and a shared exit position for getting out of the vehicle. Other feature positions may also be set, such as power mirrors and power steering wheel, if equipped. Memory positions are linked to RKE transmitter 1 or 2 for automatic memory recalls.
Before storing, adjust all available memory feature positions. Turn the ignition on and then press and release SET; a beep will sound. Then immediately press and hold 1,
2, or B (Exit) on the driver door until two beeps sound. To manually recall these positions, press and
hold 1, 2, or B until the saved position is reached.
When Auto Memory Recall is enabled in vehicle personalization, positions previously stored to memory buttons 1 and 2 are recalled when the ignition is changed from off to on or ACC/ ACCESSORY.
When Easy Exit Options is enabled in vehicle personalization, the feature automatically recalls the previously stored exit position when exiting the vehicle. See Memory Seats 0 63.
Heated and Ventilated
Seats
If available, the buttons are on the climate control panel. To operate, the engine must be running.
To heat the driver or passenger seat cushion and seatback, press L or M. Indicator lights on the button show the current setting.
To ventilate the driver or passenger seat cushion and seatback, press {
or C. Indicator lights on the button show the current setting.

14 In Brief
Press the heated or ventilated button once for the highest setting. With each press of the button, the heated or ventilated seat will change to the next lower setting, and then to the off setting. The lights indicate three for the highest setting and one for the lowest.
See Heated and Ventilated Front
Seats 0 66.
Head Restraint
Adjustment
Do not drive until the head restraints for all occupants are installed and adjusted properly.
To achieve a comfortable seating position, change the seatback recline angle as little as necessary while keeping the seat and the head restraint height in the proper position.
See Head Restraints 0 59 and Seat
Adjustment 0 61.
Seat Belts |
Passenger Sensing |
|
System |
Refer to the following sections for important information on how to use seat belts properly:
.Seat Belts 0 71.
.How to Wear Seat Belts Properly 0 72.
.Lap-Shoulder Belt 0 73.
.Lower Anchors and Tethers for Children (LATCH System) 0 97.
The passenger sensing system turns off the front outboard passenger frontal airbag under certain conditions. No other airbag is affected by the passenger sensing system. See Passenger Sensing System 0 84.
The passenger airbag status indicator will light on the overhead console when the vehicle is started. See Passenger Airbag Status Indicator 0 129.
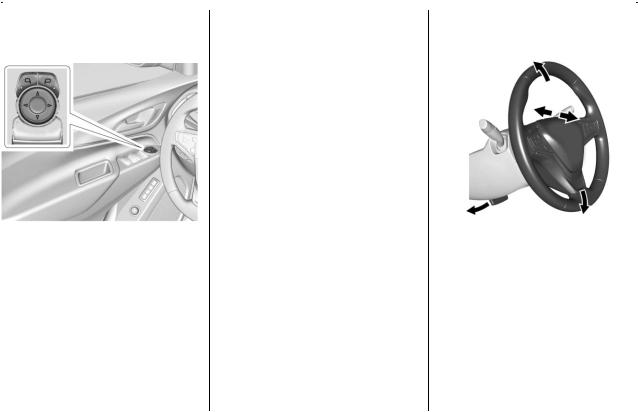
Mirror Adjustment
Exterior
To adjust the mirrors:
1.Press j or | to choose the driver or passenger mirror.
2.Press the arrows on the control pad to move each mirror in the desired direction.
See Power Mirrors 0 51.
Interior
Adjustment
Adjust the rearview mirror to clearly view the area behind the vehicle.
Manual Rearview Mirror
If equipped, push the tab forward for daytime use and pull it rearward for nighttime use to avoid glare of the headlamps from behind. See
Manual Rearview Mirror 0 52.
Automatic Dimming Rearview
Mirror
If equipped, the mirror will automatically reduce the glare of the headlamps from behind. The dimming feature comes on when the vehicle is started. See Automatic Dimming Rearview Mirror 0 52.
Steering Wheel
Adjustment
To adjust the steering wheel:
1.Pull the lever down.
2.Move the steering wheel up or down.
3.Pull or push the steering wheel closer or away from you.
4.Pull the lever up to lock the steering wheel in place.
Do not adjust the steering wheel while driving.

16 In Brief
Interior Lighting
Dome Lamps
The dome lamp controls are in the overhead console.
To operate, press the following buttons:
jOFF : Press to turn off the dome lamps when a door is open. An indicator light on the button will turn on when the dome lamp
override is activated. Press j OFF again to deactivate this feature
and the indicator light will turn off. The dome lamps will come on when doors are opened.
+ ON/OFF : Press to turn the dome lamps on manually.
Reading Lamps
There are reading lamps on the overhead console and over the rear passenger doors. These lamps come on when any door is opened.
Front Reading Lamps
The front reading lamps are in the overhead console.
Press the lamp lenses to turn the front reading lamps on or off.
Rear Reading Lamps
Press the lamp lens to turn the rear passenger reading lamps on or off.
For more information on interior lighting, see Instrument Panel Illumination Control 0 162.
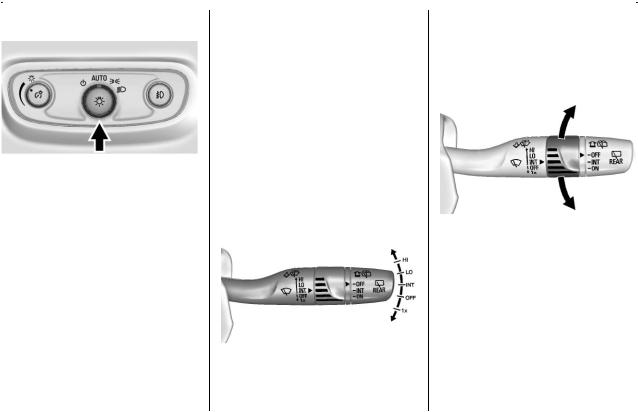
Exterior Lighting
The exterior lamp control is on the instrument panel to the left of the steering column.
There are four positions.
O : Turns the exterior lamps off and deactivates the AUTO mode. Turn
to O again to reactivate the AUTO mode.
In Canada, the headlamps will automatically reactivate when the vehicle is shifted out of P (Park).
AUTO : Turns the exterior lamps on and off automatically depending on outside lighting.
; : Turns on the parking lamps including all lamps, except the headlamps.
5 : Turns on the headlamps together with the parking lamps and instrument panel lights.
See:
.Exterior Lamp Controls 0 157
.Daytime Running Lamps (DRL) 0 159
.Fog Lamps 0 161
Windshield Wiper/Washer
The windshield wiper/washer lever is on the side of the steering column. With the ignition on or in
ACC/ACCESSORY, move the windshield wiper lever to select the wiper speed.
HI : Use for fast wipes.
LO : Use for slow wipes.
INT : Move the lever up to INT for intermittent wipes, then turn the band up for more frequent wipes or down for less frequent wipes.
OFF : Use to turn the wipers off.
1X : For a single wipe, briefly move the wiper lever down. For several wipes, hold the wiper lever down.
f: Pull the windshield wiper lever toward you to spray windshield washer fluid and activate the wipers.
18 In Brief
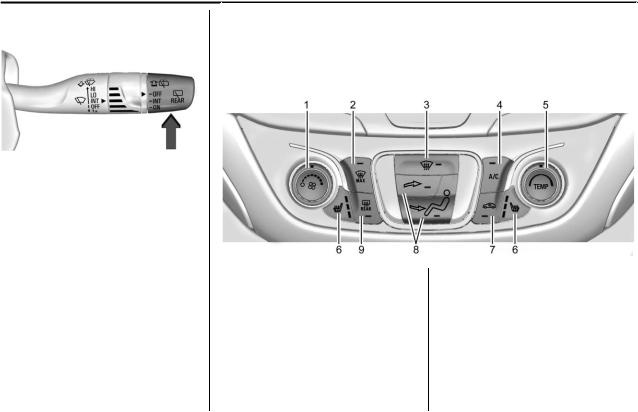
Rear Window Wiper/Washer
Turn the end of the windshield wiper lever to operate the rear window wiper/washer.
OFF : Turns the system off.
INT : Intermittent wipes.
ON : Slow wipes.
1: Push the windshield wiper lever forward to spray washer fluid on the rear window. The lever automatically returns to its original position when released.
See Windshield Wiper/Washer
0 114 and Rear Window Wiper/
Washer 0 115.
Climate Controls
The vehicle’s heating, cooling, defrosting, and ventilation can be controlled with these systems.
Climate Control System
|
1. |
Fan Control |
6. |
Driver and Passenger Heated |
|
2. |
MAX Defrost |
Seats (If Equipped) |
|
|
3. |
Defrost/Defog |
7. |
Recirculation |
|
4. |
A/C (Air Conditioning) |
8. |
Air Delivery Mode Controls |
|
5. |
Temperature Control |
9. |
Rear Window Defogger |
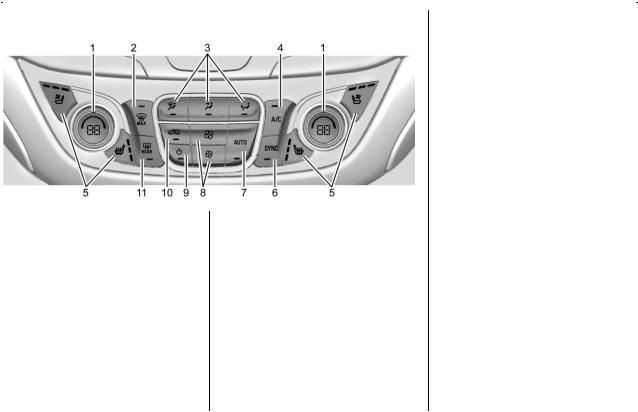
Dual Automatic Climate Control System
1.Driver and Passenger Temperature Controls
2.MAX Defrost
3.Air Delivery Mode Controls
4.A/C (Air Conditioning)
5.Heated and Ventilated Front Seats (If Equipped)
6.SYNC (Synchronized Temperature)
7.AUTO (Automatic Operation)
8.Fan Control
9. Power
10.Recirculation
11.Rear Window Defogger
See Climate Control Systems 0 190
(If Equipped) or Dual Automatic Climate Control System 0 192 (If Equipped).
Transmission
Electronic Range Select
(ERS) Mode
ERS or manual mode allows for the selection of the range of gear positions. Use this mode when driving downhill to limit the top gear and vehicle speed. See Manual Mode 0 233.
To use this feature:
1.Move the shift lever to L (Manual Mode).
2.Press the plus/minus button on the shift lever, to increase or decrease the gear range available.
![]()
20 In Brief
Vehicle Features
Infotainment System
Base radio information is included in this manual. See the infotainment manual for information on other available infotainment systems.
Read the following pages to become familiar with the features.
{Warning
Taking your eyes off the road for too long or too often while using any infotainment feature can cause a crash. You or others could be injured or killed. Do not give extended attention to infotainment tasks while driving. Limit your glances at the vehicle displays and focus your attention on driving. Use voice commands whenever possible.
The infotainment system has built-in features intended to help avoid distraction by disabling some
functions when driving. These functions may gray out when they are unavailable. Many infotainment features are also available through the instrument cluster and steering wheel controls.
Before driving:
.Become familiar with the operation, center stack controls, and infotainment display controls.
.Set up the audio by presetting favorite stations, setting the tone, and adjusting the speakers.
.Set up phone numbers in advance so they can be called easily by pressing a single control or by using a single voice command if equipped with Bluetooth phone capability.
See Defensive Driving 0 200.
To play the infotainment system with the ignition off, see Retained Accessory Power (RAP) 0 221.
Radio(s)
O :
.Press to turn the power on.
.Press and hold to turn the power off.
.Press to mute/unmute the system when on.
.Turn to decrease or increase the volume.
g :
.Radio: Press and release to fast seek the strongest previous station or channel.
.USB/Music/Pictures: Press to go to the previous content. Press and hold to fast rewind.
d:
.Radio: Press and release to fast seek the next strongest station or channel.
.USB/Music/Pictures: Press to go to the next content. Press and hold to fast forward.
5 :
.Press and release to access the phone screen, answer an incoming call, or access the device home screen.
See Overview 0 167.
Satellite Radio
If equipped, vehicles with a SiriusXM satellite radio tuner and a valid SiriusXM satellite radio subscription can receive SiriusXM programming.
SiriusXM Satellite Radio
Service
SiriusXM is a satellite radio service based in the 48 contiguous United States and 10 Canadian provinces. SiriusXM satellite radio has a wide variety of programming and commercial-free music, coast to coast, and in digital-quality sound. A fee is required to receive the SiriusXM service.
Refer to:
.www.siriusxm.com or call 1-888-601-6296 (U.S.).
.www.siriusxm.ca or call 1-877-438-9677 (Canada).
See Satellite Radio 0 171.
Portable Audio Devices
This vehicle has a 3.5 mm (1/8 in) auxiliary input and USB ports on the center stack and may have USB ports inside the center console. External devices such as iPods, MP3 players, and USB storage devices may be connected.
See Auxiliary Devices 0 179 and
USB Port 0 173.
Bluetooth®
The Bluetooth system allows users with a Bluetooth-enabled cell phone to make and receive hands-free calls using the vehicle audio system and controls.
The Bluetooth-enabled cell phone must be paired with the in-vehicle Bluetooth system before it can be used in the vehicle. Not all phones will support all functions.
See Bluetooth (Infotainment Controls) 0 181 or Bluetooth (Overview) 0 180.
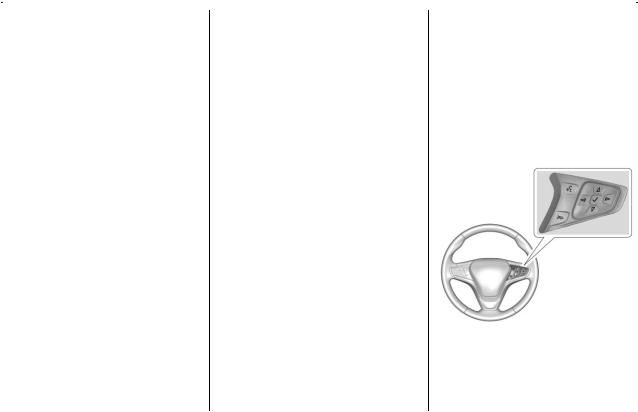
Steering Wheel Controls
If equipped, some audio controls can be adjusted at the steering wheel.
22 In Brief
g : For vehicles with OnStar or a Bluetooth system, press to interact with those systems. See OnStar Overview 0 403 or Bluetooth (Infotainment Controls) 0 181 or Bluetooth (Overview) 0 180.
c : Press to reject an incoming call or end a current call. Press to mute or unmute the infotainment system when not on a call.
o or p : Press to go to the previous or next menu option.
w or x : Press to go to the next or previous selection.
V : Press to select a highlighted menu option.
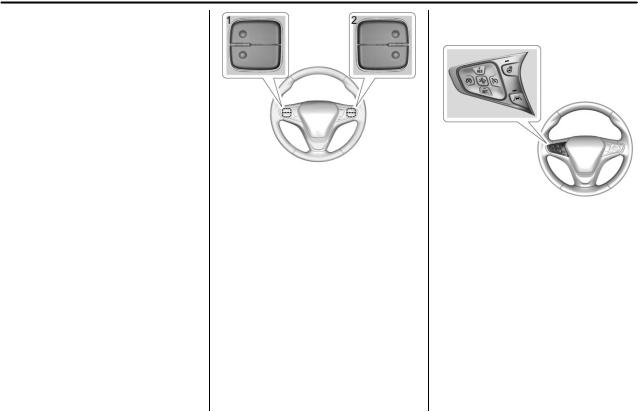
The favorite and volume switches are on the back of the steering wheel.
1.Favorite: When on a radio source, press to select the next or previous favorite. When on a media source, press to select the next or previous track.
2.Volume: Press to increase or decrease the volume.
Cruise Control
1 : Press to turn the cruise control system on and off. A white indicator comes on in the instrument cluster when cruise is turned on.
* : Press to disengage cruise control without erasing the set speed from memory.
+RES : If there is a set speed in memory, press to resume that speed or press and hold to accelerate. If cruise control is already active, use to increase vehicle speed.
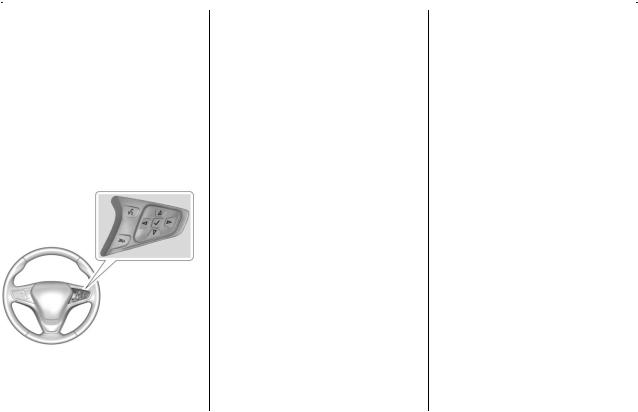
−SET : Press briefly to set the speed and activate cruise control. If cruise control is already active, use to decrease vehicle speed.
See Cruise Control 0 241.
Driver Information
Center (DIC)
The DIC display is in the instrument cluster. It shows the status of many vehicle systems.
w or x : Press to move up or down in a list.
o or p : Press to move between the interactive display zones in the cluster.
V : Press to open a menu or select a menu item. Press and hold to reset values on certain screens.
See Driver Information Center (DIC) 0 139.
Forward Collision Alert
(FCA) System
If equipped, FCA may help avoid or reduce the harm caused by front-end crashes. FCA provides a
green indicator, V, when a vehicle is detected ahead. This indicator displays amber if you follow a vehicle too closely. When approaching a vehicle ahead too quickly, FCA provides a flashing red alert on the windshield and rapidly beeps or pulses the driver seat.
See Forward Collision Alert (FCA)
System 0 248.
Forward Automatic
Braking (FAB)
If the vehicle has Forward Collision Alert (FCA), it also has FAB, which includes Intelligent Brake
Assist (IBA). When the system detects a vehicle ahead in your path that is traveling in the same direction that you may be about to crash into, it can provide a boost to braking or automatically brake the vehicle. This can help avoid or lessen the severity of crashes when driving in a forward gear.
See Forward Automatic Braking (FAB) 0 250.
Lane Keep Assist (LKA)
If equipped, LKA may help avoid crashes due to unintentional lane departures. It may assist by gently turning the steering wheel if the vehicle approaches a detected lane marking without using a turn signal in that direction. It may also provide a Lane Departure Warning (LDW) alert as the lane marking is crossed. The system will not assist or alert if

24 In Brief
it detects that you are actively steering. Override LKA by turning the steering wheel. LKA uses a camera to detect lane markings between 60 km/h (37 mph) and 180 km/h (112 mph).
See Lane Departure Warning (LDW) 0 254 and Lane Keep Assist (LKA) 0 254.
Lane Change Alert (LCA)
If equipped, the LCA system is a lane-changing aid that assists drivers with avoiding lane change crashes that occur with moving vehicles in the side blind zone (or spot) areas or with vehicles rapidly approaching these areas from behind. The LCA warning display will light up in the corresponding outside mirror and will flash if the turn signal is on. The Side Blind Zone Alert (SBZA) system is included as part of the LCA system.
See Side Blind Zone Alert (SBZA) 0 252 and Lane Change Alert (LCA) 0 252.
Surround Vision
If equipped, views around the vehicle appear in the infotainment display to aid with parking and low-speed maneuvers.
See “Surround Vision” under
Assistance Systems for Parking or Backing 0 245.
Front Vision Camera
If equipped, a view of the area in front of the vehicle appears on the infotainment display to aid with parking and low-speed maneuvers.
See “Front Vision Camera” under
Assistance Systems for Parking or Backing 0 245.
Rear Vision
Camera (RVC)
The RVC displays a view of the area behind the vehicle on the infotainment display when the vehicle is shifted into R (Reverse) to aid with parking and low-speed backing maneuvers.
See Assistance Systems for Parking or Backing 0 245.
Rear Cross Traffic Alert
(RCTA) System
If equipped, the RCTA system shows a triangle with an arrow on the infotainment display to warn of traffic behind your vehicle that may cross your vehicle’s path while in R (Reverse). In addition, beeps will sound, or the driver seat will pulse.
See Assistance Systems for Parking or Backing 0 245.
Parking Assist
If equipped, Rear Parking
Assist (RPA) uses sensors on the rear bumper to assist with parking and avoiding objects while in
R (Reverse). It operates at speeds less than 8 km/h (5 mph). RPA may display a warning triangle on the infotainment display and a graphic on the instrument cluster to provide the object distance. In addition, multiple beeps or seat pulses may occur if very close to an object.
See Assistance Systems for Parking or Backing 0 245.
Power Outlets
The vehicle has three 12-volt accessory power outlets, which can be used to plug in electrical equipment, such as a cell phone or MP3 player.
There are power outlets:
.On the center stack below the climate control system.
.On the rear of the center floor console.
.In the rear cargo area.
To use the outlet, remove the cover.
See Power Outlets 0 118.
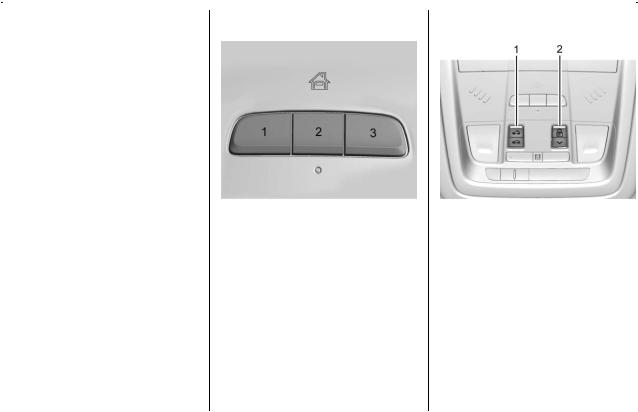
Universal Remote System
If equipped, the Universal Remote System allows for garage door openers, security systems, and home automation devices to be programmed to work with these buttons in the vehicle.
See Universal Remote System 0 154.
Sunroof
1.Sunroof Switch
2.Sunshade Switch
If equipped, the sunroof only operates when the ignition is on or in ACC/ACCESSORY, or when Retained Accessory Power (RAP) is active. See Retained Accessory Power (RAP) 0 221.

26 In Brief
Sunroof Switch
Express-Open/Express-Close : To express-open the sunroof, fully
press and release e(1). Press the switch again to stop it. To express-close the sunroof, fully
press and release g(1). Press the switch again to stop it.
Open/Close (Manual Mode) : To open the sunroof, press and hold e(1) until the sunroof reaches the desired position. Press and hold g(1) to close it.
Comfort Stop : The sunroof has a comfort stop feature that stops the sunroof from opening fully. Press
and release the rear of gto open the sunroof to the comfort open position. Pressing the rear of g again will open the sunroof fully.
If the sunshade is not fully open when the comfort stop feature is pressed the second time, the sunshade will open fully.
Vent : From the closed position, press e(1) to vent the sunroof.
Sunshade Switch
Express-open/Express-close : To express-open the sunshade, fully
press and release r (2). To express-close the sunshade, fully press and release s (2) . Press the switch again to stop it.
Open/Close : To open the sunshade, press and hold r (2) until the sunshade reaches the desired position.
When the sunroof is opened, an air deflector will automatically raise. The air deflector will retract when the sunroof is closed.
Performance and
Maintenance
Traction Control/
Electronic Stability
Control
The Traction Control System (TCS) limits wheel slip. The system is on when the vehicle is started.
The StabiliTrak system assists with directional control of the vehicle in difficult driving conditions. The system is on when the vehicle is started.
TCS and StabiliTrak can be turned off or on using the Driver Information Center (DIC) controls. See Traction Control/Electronic Stability Control 0 238.

Tire Pressure Monitor
This vehicle may have a Tire Pressure Monitor System (TPMS).
The low tire pressure warning light alerts to a significant loss in pressure of one of the vehicle’s tires. If the warning light comes on, stop as soon as possible and inflate the tires to the recommended pressure shown on the Tire and Loading Information label. See
Vehicle Load Limits 0 210. The warning light will remain on until the tire pressure is corrected.
The low tire pressure warning light may come on in cool weather when the vehicle is first started, and then turn off as the vehicle is driven. This may be an early indicator that the tire pressures are getting low and the tires need to be inflated to the proper pressure.
The TPMS does not replace normal monthly tire maintenance. Maintain the correct tire pressures.
See Tire Pressure Monitor System 0 328.
Tire Fill Alert (If Equipped)
This feature provides visual and audible alerts outside the vehicle to help when inflating an underinflated tire to the recommended cold tire pressure. See “Tire Fill Alert (If Equipped)” under Tire Pressure Monitor Operation 0 329.
Fuel (LYX — 1.5L L4 Turbo
Engine)
Regular Fuel
Use only unleaded gasoline rated 87 octane or higher in your vehicle. Do not use gasoline with an octane rating lower as it may result in vehicle damage and lower fuel economy. See Fuel (Gasoline)
0 256.
28 In Brief
Fuel (LTG — 2.0L L4 Turbo
Engine)
Premium Recommended Fuel
Use premium 93 octane unleaded gasoline in your vehicle. Unleaded gasoline with an octane rating as low as 87 may be used, but it will reduce performance and fuel economy. See Fuel (Gasoline)
0 256.
Fuel (Diesel)
Use of diesel fuel with ultra low sulfur content (15 ppm, maximum) is required. See Fuel for Diesel Engines 0 258.
E85 or FlexFuel
No E85 or FlexFuel
Gasoline-ethanol fuel blends greater than E15 (15% ethanol by volume), such as E85, cannot be used in this vehicle.
Engine Oil Life System
The engine oil life system calculates engine oil life based on vehicle use and displays the CHANGE ENGINE OIL SOON message when it is time to change the engine oil and filter.
The oil life system should be reset to 100% only following an oil change.
Resetting the Oil Life System
1.Display REMAINING OIL LIFE on the DIC menu. See Driver Information Center (DIC) 0 139.
2.Press and hold V for several seconds while the Oil Life display is active to reset the Oil Life system.
3.REMAINING OIL LIFE 100% will be displayed when the oil life system is successfully reset.
The oil life system can also be reset as follows:
1.Place the ignition in Service Mode. See Ignition Positions 0 215.
2.Display REMAINING OIL LIFE on the DIC menu. See Driver Information Center (DIC) 0 139.
3.Fully press and release the accelerator pedal three times within five seconds.
4.If the display changes to 100%, the system is reset.
See Engine Oil Life System 0 292.

Driving for Better Fuel Economy
Driving habits can affect fuel mileage. Here are some driving tips to get the best fuel economy possible.
.Avoid fast starts and accelerate smoothly.
.Brake gradually and avoid abrupt stops.
.Avoid idling the engine for long periods of time.
.When road and weather conditions are appropriate, use cruise control.
.Always follow posted speed limits or drive more slowly when conditions require.
.Keep vehicle tires properly inflated.
.Combine several trips into a single trip.
.Replace the vehicle’s tires with the same TPC Spec number molded into the tire’s sidewall near the size.
.Follow recommended scheduled maintenance.
Diesel Particulate Filter
The engine is equipped with a Diesel Particulate Filter (DPF) that will filter or trap particulates. The DPF is under the vehicle in the exhaust system.
Depending on a number of factors monitored by the engine computer, the DPF will need to be cleaned of accumulated solids. When a cleaning is needed, the engine computer will initiate a cleaning action by warming the exhaust gas temperature. This feature has been designed to operate automatically, with limited operator involvement or awareness.
Cleaning the DPF (Exhaust
Filter)
While the DPF cleaning is automatically controlled by the engine computer, the vehicle will
need to operate continuously for approximately 25 minutes and at speeds greater than
50 km/h (30 mph) to clean the DPF effectively.
Special DPF Driver Messages
If the vehicle is used for numerous short trips or extended slow-speed operation, the engine computer may not be able to clean the DPF effectively. If this happens, a Driver Information Center (DIC) message will display.
If the vehicle continues to be driven in a manner that prevents effective DPF cleaning, the DPF will become plugged. If this occurs, the engine computer will turn on the malfunction indicator lamp in the instrument cluster and a DIC message will display. See Diesel Particulate Filter 0 225, Fuel for Diesel Engines 0 258 and Engine Oil 0 288.
![]()
30 In Brief
Diesel Exhaust Fluid
Diesel Exhaust Fluid (DEF) is used with diesel engines to reduce the amount of regulated emissions produced. The DEF system must be maintained for the vehicle to run properly. It is normal to hear the DEF system purge fluid back into the tank after the vehicle is shut off.
For the correct DEF see
Recommended Fluids and
Lubricants 0 381.
As the DEF tank becomes low on fluid, warnings begin with approximately 1 600 km (1,000 mi) of remaining range. These warnings will increase in intensity as the tank becomes empty. Once the tank is empty, the vehicle speed will be limited. If there is an issue with the quality of the fluid or the exhaust fluid system, warnings will be displayed in the Driver Information Center (DIC). See Diesel Exhaust Fluid 0 226.
Roadside Assistance
Program
U.S.: 1-800-243-8872
TTY Users (U.S. Only): 1-888-889-2438
Canada: 1-800-268-6800
New Chevrolet owners are automatically enrolled in the Roadside Assistance Program.
See Roadside Assistance Program 0 393.

Keys, Doors, and Windows 31
Keys, Doors, and
Windows
Keys and Locks
Keys . . . . . . . . . . . . . . . . . . . . . . . . . . . 31
Remote Keyless Entry (RKE)
System . . . . . . . . . . . . . . . . . . . . . . . 32
Remote Keyless Entry (RKE)
System Operation . . . . . . . . . . . . 32
Remote Vehicle Start . . . . . . . . . . 38
Door Locks . . . . . . . . . . . . . . . . . . . . 40
Power Door Locks . . . . . . . . . . . . . 42
Delayed Locking . . . . . . . . . . . . . . . 42
Automatic Door Locks . . . . . . . . . 43
Lockout Protection . . . . . . . . . . . . . 43
Safety Locks . . . . . . . . . . . . . . . . . . . 44
Doors
Liftgate . . . . . . . . . . . . . . . . . . . . . . . . 44
Vehicle Security
Vehicle Security . . . . . . . . . . . . . . . . 49
Vehicle Alarm System . . . . . . . . . 49
Immobilizer . . . . . . . . . . . . . . . . . . . . 50
Immobilizer Operation . . . . . . . . . 50
Exterior Mirrors
Folding Mirrors . . . . . . . . . . . . . . . . . 51
Heated Mirrors . . . . . . . . . . . . . . . . . 52
Automatic Dimming Mirror . . . . . 52
Reverse Tilt Mirrors . . . . . . . . . . . . 52
Interior Mirrors
Interior Rearview Mirrors . . . . . . . 52
Manual Rearview Mirror . . . . . . . . 52
Automatic Dimming Rearview
Mirror . . . . . . . . . . . . . . . . . . . . . . . . . 52
Windows
Windows . . . . . . . . . . . . . . . . . . . . . . . 53
Power Windows . . . . . . . . . . . . . . . 53
Sun Visors . . . . . . . . . . . . . . . . . . . . . 55
Roof
Sunroof . . . . . . . . . . . . . . . . . . . . . . . . 55
Keys and Locks
Keys
{Warning
Leaving children in a vehicle with a Remote Keyless Entry (RKE) transmitter is dangerous and children or others could be seriously injured or killed. They could operate the power windows or other controls or make the vehicle move. The windows will function with the RKE transmitter in the vehicle, and children or others could be caught in the path of a closing window. Do not leave children in a vehicle with an RKE transmitter.
Convex Mirrors . . . . . . . . . . . . . . . . 51
Power Mirrors . . . . . . . . . . . . . . . . . . 51

32 Keys, Doors, and Windows
The key that is part of the Remote Keyless Entry (RKE) transmitter can be used for all locks.
Remove the key by pressing the button on the side of the RKE transmitter near the bottom and pull the key out. Never pull the key out without pressing the button.
See your dealer if a new transmitter is needed.
If locked out of the vehicle, see
Roadside Assistance Program 0 393.
With an active OnStar service plan, an OnStar Advisor may remotely unlock the vehicle. See OnStar Overview 0 403.
Remote Keyless Entry
(RKE) System
See Radio Frequency Statement 0 399.
If there is a decrease in the Remote Keyless Entry (RKE) operating range:
.Check the distance. The transmitter may be too far from the vehicle.
.Check the location. Other vehicles or objects may be blocking the signal.
.Check the transmitter’s battery. See “Battery Replacement” later in this section.
.If the transmitter is still not working correctly, see your dealer or a qualified technician for service.
Remote Keyless Entry
(RKE) System Operation
The keyless access system allows for vehicle entry when the transmitter is within 1 m (3 ft). See “Keyless Access Operation” later in this section.
The RKE transmitter may work up to 60 m (197 ft) away from the vehicle.
Other conditions can affect the performance of the transmitter. See
Remote Keyless Entry (RKE) System 0 32.

Keys, Doors, and Windows 33
With Remote Start and Power
Liftgate Shown
The following may be available:
Q : Press to lock all doors. The turn signal indicators may flash and/or the horn may sound on the second press to indicate locking. See
Vehicle Personalization 0 145. If the driver door is open when Q is pressed and Unlocked Door Anti-Lockout is enabled through vehicle personalization, all doors will lock and then the driver door will immediately unlock. If a passenger door is open when Q is pressed, all doors lock.
Pressing Q may also arm the theft-deterrent system. See Vehicle Alarm System 0 49.
K : Press to unlock the driver door. Press K again within five seconds to unlock all doors. The RKE transmitter can be programmed to unlock all doors on the first button press. See Vehicle Personalization
0 145. The turn signal indicators may flash to indicate unlocking has occurred. See Vehicle
Personalization 0 145. Pressing K may also disarm the theft-deterrent system. See Vehicle Alarm System 0 49.
If equipped with the manual liftgate, unlocking all doors will also unlock the liftgate.
Press and hold K until the windows fully open. Windows will not operate unless remote window operation is enabled. See Vehicle Personalization 0 145.
b : Press twice quickly to open or close the power liftgate, if equipped. Press again to stop the power liftgate.
7 : Press and release one time to initiate vehicle locator. The exterior lamps flash and the horn chirps
three times. Press and hold 7 for at least three seconds to sound the panic alarm. The horn sounds and
the turn signals flash until 7 is pressed again or the vehicle is started.
/ : If equipped, first press and release Q then immediately press
and hold / for at least
four seconds to start the engine from outside the vehicle using the RKE transmitter. See Remote Vehicle Start 0 38.
Keyless Access Operation
With the Keyless Access system, you can lock and unlock the doors and access the liftgate without removing the RKE transmitter from your pocket, purse, briefcase, etc.

34 Keys, Doors, and Windows
The RKE transmitter should be within 1 m (3 ft) of the liftgate or door being opened. If equipped, there will be buttons on the outside door handles.
Keyless Access can be programmed to unlock all doors on the first lock/unlock press from the driver door. See Vehicle Personalization 0 145.
Keyless Unlocking/Locking from the Driver Door
When the doors are locked and the RKE transmitter is within 1 m (3 ft) of the driver door handle, pressing the lock/unlock button on the driver door handle will unlock the driver door.
If the lock/unlock button is pressed again within five seconds, all passenger doors will unlock.
Driver Shown, Passenger Similar
Pressing the lock/unlock button will cause all doors to lock if any of the following occur:
.It has been more than
five seconds since the first lock/ unlock button press.
.Two lock/unlock button presses were used to unlock all doors.
.Any vehicle door has opened and all doors are now closed.
Keyless Unlocking/Locking from Passenger Doors
When the doors are locked and the RKE transmitter is within 1 m (3 ft) of the door handle, pressing the lock/ unlock button on that door handle will unlock all doors. Pressing the lock/unlock button will cause all doors to lock if any of the following occur:
.The lock/unlock button was used to unlock all doors.
.Any vehicle door has opened and all doors are now closed.
Passive Locking
If equipped with Keyless Access, this vehicle will lock several seconds after all doors are closed if the vehicle is off and at least one RKE transmitter has been removed or none remain in the interior.
If other electronic devices interfere with the RKE transmitter signal, the vehicle may not detect the RKE transmitter inside the vehicle.
If passive locking is enabled, the doors may lock with the RKE

Keys, Doors, and Windows 35
transmitter inside the vehicle. Do not leave the RKE transmitter in an unattended vehicle.
To customize the doors to automatically lock when exiting the vehicle, see “Remote Lock, Unlock, Start” under Vehicle Personalization 0 145.
Temporary Disable of Passive
Locking
Temporarily disable the passive locking by pressing and holding K on the interior door switch with a door open for at least four seconds, or until three chimes are heard. Passive locking will then remain disabled until Q on the interior door is pressed, or until the vehicle is turned on.
Remote Left in Vehicle Alert
When the vehicle is turned off and an RKE transmitter is left in the vehicle, the horn will chirp three times after all doors are closed. To turn on or off, see Vehicle Personalization 0 145.
Remote No longer in Vehicle
If the vehicle is on with a door open, and then all doors are closed, the vehicle will check for RKE transmitter(s) inside. If an RKE transmitter is not detected, the DIC will display NO REMOTE DETECTED and the horn will chirp three times. This occurs only once each time the vehicle is driven.
To turn on or off see Vehicle Personalization 0 145
Keyless Liftgate Opening
When the doors are locked, press the touch pad on the liftgate handle to open the liftgate if the RKE transmitter is within 1 m (3 ft).
Programming Transmitters to the Vehicle
Only RKE transmitters programmed to the vehicle will work. If a transmitter is lost or stolen, a replacement can be purchased and programmed through your dealer. The vehicle can be reprogrammed so that lost or stolen transmitters no
longer work. Each vehicle can have up to eight transmitters matched
to it.
Programming with Recognized Transmitters
A new transmitter can be programmed to the vehicle when there are two recognized transmitters.
To program, the vehicle must be off and all of the transmitters, both currently recognized and new, must be with you.
1.Remove the key lock cylinder cap on the driver door handle. See Door Locks 0 40. Place the two recognized transmitters in the cupholder.
2.Insert the vehicle key of the transmitter into the key lock cylinder on the driver door handle and turn the key, counterclockwise, to the unlock position five times within
10 seconds.

36 Keys, Doors, and Windows
The Driver Information Center (DIC) displays READY FOR REMOTE #2, 3, 4, ETC.
3.Place the new transmitter into the cupholder.
4.Press ENGINE START/STOP. When the transmitter is learned the DIC display will show that it is ready to program the next transmitter.
5.Remove the transmitter from
the cupholder and press K or Q on the transmitter.
To program additional transmitters, repeat Steps 3–5.
When all additional transmitters are programmed, press and hold ENGINE START/STOP for 12 seconds to exit programming mode.
6.Put the key back into the transmitter.
Programming without Recognized Transmitters
If two currently recognized transmitters are not available, follow this procedure to program up to eight transmitters. This feature is not available in Canada. This procedure will take approximately 30 minutes to complete. The vehicle must be off and all of the transmitters you wish to program must be with you.
1.Remove the key lock cylinder cap on the driver door handle. See Door Locks 0 40. Insert the vehicle key of the transmitter into the key lock cylinder on the driver door handle and turn the key,
counterclockwise, to the unlock position five times within
10 seconds.
The Driver Information Center (DIC) displays REMOTE LEARN PENDING,
PLEASE WAIT.
2.Wait for 10 minutes until the DIC displays PRESS ENGINE START BUTTON TO LEARN and then press ENGINE START/STOP.
The DIC display will again show REMOTE LEARN PENDING, PLEASE WAIT.
3.Repeat Step 2 two additional times. After the third time all previously known transmitters will no longer work with the vehicle. Remaining transmitters can be relearned during the next steps.
The DIC display should now show READY FOR REMOTE
# 1.

Keys, Doors, and Windows 37
4.Place the new transmitter into the cupholder.
5.Press ENGINE START/STOP. When the transmitter is learned the DIC display will show that it is ready to program the next transmitter.
6.Remove the transmitter from
the cupholder and press K or Q on the transmitter.
To program additional transmitters, repeat Steps 4–6.
When all additional transmitters are programmed, press and hold ENGINE START/STOP for 12 seconds to exit programming mode.
7.Put the key back into the transmitter.
Starting the Vehicle with a Low Transmitter Battery
When the vehicle is started, if the transmitter battery is weak, the DIC may display NO REMOTE DETECTED or NO REMOTE KEY WAS DETECTED PLACE KEY IN TRANSMITTER POCKET THEN START YOUR VEHICLE. The REPLACE BATTERY IN REMOTE KEY message may also be displayed at this time.
To start the vehicle:
1.Place the transmitter in the cupholder.
2.With the vehicle in P (Park) or N (Neutral), press the brake pedal and ENGINE START/STOP.
Replace the transmitter battery as soon as possible.
Battery Replacement
Replace the battery if the REPLACE BATTERY IN REMOTE KEY message displays in the DIC.

38 Keys, Doors, and Windows
Caution
When replacing the battery, do not touch any of the circuitry on the transmitter. Static from your body could damage the transmitter.
The battery is not rechargeable. To replace the battery:
1.Press the button on the side of the transmitter and pull the key out.
2.Separate the two halves of the transmitter using a flat tool inserted into the area near the key slot.
3.Remove the battery by pushing on the battery and sliding it toward the bottom of the transmitter.
4.Insert the new battery, positive side facing the back cover. Push the battery down until it is held in place. Replace with a CR2032 or equivalent battery.
5.Snap the battery cover back on to the transmitter.
Remote Vehicle Start
The vehicle may have this feature that allows you to start the engine from outside the vehicle.
/ : This button will be on the RKE transmitter if the vehicle has remote start.
The climate control system will use the previous settings during a remote start. The rear defog may come on during remote start based on cold ambient conditions. The rear defog indicator light does not come on during remote start.

Keys, Doors, and Windows 39
If the vehicle has heated and ventilated front seats, they may come on during a remote start. See
Heated and Ventilated Front Seats 0 66.
Laws in some local communities may restrict the use of remote starters. For example, some laws require a person using remote start to have the vehicle in view. Check local regulations for any requirements.
Other conditions can affect the performance of the transmitter. See
Remote Keyless Entry (RKE) System 0 32.
Do not use remote start if the vehicle is low on fuel.
Starting the Engine Using Remote
Start
1.Press and release Q on the RKE transmitter.
2.Immediately press and hold / for at least four seconds or until the turn signal lamps flash. The turn signal lamps flashing
confirms the request to remote start the vehicle has been received.
The parking lamps will turn on and remain on as long as the engine is running. The vehicle’s doors will be locked.
3.Turn the ignition on before driving.
The engine will shut off after 10 minutes unless a time extension is done or the ignition is turned on.
Extending Engine Run Time
For a 10-minute extension, after 30 seconds repeat Steps 1 and 2
while the engine is still running. The remote start can be extended once.
When the remote start is extended, the second 10 minutes will be added.
For example, if the engine has been running for 10 minutes, and
10 minutes are added, the engine will run for a total of 20 minutes.
A maximum of two remote starts or a start with an extension are allowed between ignition cycles.
The ignition must be turned on and then back off to use remote start again.
Canceling a Remote Start
To shut off the engine:
.Press and hold / until the parking lamps turn off.
.Turn on the hazard warning flashers.
.Turn the ignition on and then off.
Conditions in Which Remote Start
Will Not Work
The remote vehicle start feature will not operate if:
.A transmitter is in the vehicle.
.The hood is not closed.
.The hazard warning flashers are on.
.There is an emission control system malfunction.
![]()
40 Keys, Doors, and Windows
.The engine coolant temperature is too high.
.The oil pressure is low.
.Two remote vehicle starts or a start with an extension have already been used.
.The vehicle is not in P (Park).
Remote Start Ready
If the vehicle does not have the remote vehicle start feature, it may have the remote start ready feature. This feature allows your dealer to add the manufacturer’s remote vehicle start feature. See your dealer to add the manufacturer’s remote vehicle start feature to the vehicle.
Door Locks
{Warning
Unlocked doors can be dangerous.
.Passengers, especially children, can easily open the doors and fall out of a moving vehicle. The doors can be unlocked and opened while the vehicle is moving. The chance of being thrown out of the vehicle in a crash is increased if the doors are not locked. So, all passengers should wear seat belts properly and the doors should be locked whenever the vehicle is driven.
.Young children who get into unlocked vehicles may be unable to get out. A child can be overcome by extreme heat and can suffer
(Continued)
Warning (Continued)
permanent injuries or even death from heat stroke. Always lock the vehicle whenever leaving it.
.Outsiders can easily enter through an unlocked door when you slow down or stop the vehicle. Locking the doors can help prevent this from happening.
To lock or unlock the doors from the outside:
.Press Q or K on the Remote Keyless Entry (RKE) transmitter. See Remote Keyless Entry (RKE) System Operation 0 32.
.Use the key in the driver door. The key lock cylinder is covered with a cap.
To lock or unlock the doors from the inside:
.Press Q or K on the power door lock switch.

Keys, Doors, and Windows 41
.Push down on the door lock knob to lock a door.
.Pull the door handle once to unlock the door. Pull the handle again to unlatch it.
Keyless Access
If equipped, the RKE transmitter must be within 1 m (3 ft) of the liftgate or door being opened. Press the button on the door handle to open. See Remote Keyless Entry (RKE) System Operation 0 32.
Driver Door Key Lock Cylinder
Access (In Case of Dead
Battery)
To access the driver door key lock cylinder:
1.Pull the door handle (1) to the open position and hold it open until cap removal is complete.
2.Insert the key into the slot (3) on the bottom of the cap (2) and lift the key upward.
3.Move the cap (2) rearward and remove.
4.Use the key in the cylinder.
To replace the cap:
1.Pull the door handle (1) to the open position and hold it open until cap installation is complete.
2.Insert the two tabs (6) at the back of the cap between the seal (5) and the metal base (4).

42 Keys, Doors, and Windows
3.Slide the cap forward and press the forward edge to install the cap in place.
4.Release the door handle.
5.Check that the cap is secure.
Free-Turning Locks
The door key lock cylinder turns freely when either the wrong key is used, or the correct key is not fully inserted. The free-turning door lock feature prevents the lock from being forced open. To reset the lock, turn it to the vertical position with the correct key fully inserted. Remove the key and insert it again. If this does not reset the lock, turn the key halfway around in the cylinder and repeat the reset procedure.
Power Door Locks
Q : Press to lock the doors. The indicator light in the switch will come on when the door is locked.
K : Press to unlock the doors.
Delayed Locking
This feature delays the actual locking of the doors until
five seconds after all doors are closed.

Keys, Doors, and Windows 43
Delayed locking can only be turned on when the Unlocked Door Anti-Lockout feature has been turned off.
When Q is pressed on the power door lock switch with the door open, a chime will sound three times indicating that delayed locking is active.
The doors will then lock automatically five seconds after all doors are closed. If a door is reopened before five seconds have elapsed, the five-second timer will reset once all the doors are closed again.
Press Q on the door lock switch
again, or press Q on the RKE transmitter, to override this feature and lock the doors immediately.
Delayed locking can be programmed. See Vehicle Personalization 0 145.
Automatic Door Locks
The doors will lock automatically when all doors are closed, the ignition is on, and the vehicle is shifted out of P (Park).
If a vehicle door is unlocked and then opened and closed, the doors will lock either when your foot is removed from the brake or the vehicle speed becomes faster than 13 km/h (8 mph).
To unlock the doors:
.Press K on the power door lock switch.
.Shift into P (Park).
Automatic door locking cannot be disabled. Automatic door unlocking can be programmed. See Vehicle Personalization 0 145.
Lockout Protection
If the ignition is on or in ACC/ ACCESSORY and the power door lock switch is pressed with the
driver door open, all the doors will lock and only the driver door will unlock.
If the vehicle is off and locking is requested while a door is open, when all doors are closed the vehicle will check for RKE transmitters inside. If an RKE transmitter is detected and the number of RKE transmitters inside has not reduced, the driver door will unlock and the horn will chirp three times.
Lockout Protection can be manually overridden by pressing and holding Q on the power door lock switch.
Unlocked Door Anti-Lockout
If Unlocked Door Anti-Lockout is turned on and the vehicle is off, the driver door is open, and locking is requested, all the doors will lock and the driver door will remain open. Press the button again to lock the driver door. The Unlocked Door Anti-Lockout feature can be turned on or off. See Vehicle Personalization 0 145.

44 Keys, Doors, and Windows
Safety Locks
The rear door safety locks prevent passengers from opening the rear doors from inside the vehicle.
Manual Safety Locks
If equipped, the safety lock is on the inside edge of the rear doors. To use the safety lock:
1.Move the lever forward to the lock position.
2.Close the door.
3.Do the same for the other rear door.
To open a rear door when the safety lock is on:
1.Unlock the door by activating the inside handle, by pressing the power door lock switch, or by using the Remote Keyless Entry (RKE) transmitter.
2.Open the door from the outside.
When the safety lock is enabled, adults and older children will not be able to open the rear door from the inside. Cancel the safety locks to enable the doors to open from the inside.
To cancel the safety lock:
1.Unlock the door and open it from the outside.
2.Move the lever rearward to unlock. Do the same for the other door.
Doors
Liftgate
{Warning
Exhaust gases can enter the vehicle if it is driven with the liftgate or trunk/hatch open, or with any objects that pass through the seal between the body and the trunk/hatch or
liftgate. Engine exhaust contains carbon monoxide (CO) which cannot be seen or smelled. It can cause unconsciousness and even death.
If the vehicle must be driven with the liftgate or trunk/hatch open:
.Close all of the windows.
.Fully open the air outlets on or under the instrument panel.
(Continued)

Keys, Doors, and Windows 45
Warning (Continued)
.Adjust the climate control system to a setting that brings in only outside air and set the fan speed to the highest setting. See “Climate Control Systems” in the Index.
.If the vehicle is equipped with a power liftgate, disable the power liftgate function.
See Engine Exhaust 0 224.
Caution
To avoid damage to the liftgate or liftgate glass, make sure the area above and behind the liftgate is clear before opening it.
Manual Liftgate
To unlock the liftgate, press the power door lock switch or press K on the Remote Keyless Entry (RKE) transmitter twice within
five seconds. See Remote Keyless Entry (RKE) System Operation 0 32.
To open the liftgate, press the touch pad under the liftgate handle and lift up.
Use the pull cup to lower and close the liftgate. Do not press the touch pad while closing the liftgate. This may cause the liftgate to be unlatched.
Always close the liftgate before driving.
Power Liftgate Operation
{Warning
You or others could be injured if caught in the path of the power liftgate. Make sure there is no one in the way of the liftgate as it is opening and closing.
Caution
Driving with an open and unsecured liftgate may result in damage to the power liftgate components.

46 Keys, Doors, and Windows
To operate the power liftgate, the vehicle must be in P (Park). The taillamps flash when the power liftgate moves.
The modes are:
.MAX: Opens to maximum height.
.3/4: Opens to a reduced height that can be set from 3/4 to fully open. Use to prevent the liftgate from opening into overhead obstructions such as a garage door or roof-mounted cargo. The liftgate can be manually opened all the way.
.OFF: Opens manually only.
To open the power liftgate, first select MAX or 3/4 mode. Then:
.Press b twice quickly on the RKE transmitter until the liftgate moves.
.Press 8on the driver door. The driver door must either be unlocked or locked without the security armed.
.Press the touch pad on the underside of the liftgate handle after unlocking all doors. The RKE transmitter must be within 1 m (3 ft).
Press l on the bottom of the liftgate next to the pull cup to close.
Press any liftgate button or the touch pad while the liftgate is moving to stop it. Pressing again restarts the operation in the reverse direction. The touch pad on the liftgate handle cannot be used to close the liftgate.
Caution
Manually forcing the liftgate to open or close during a power cycle can damage the vehicle. Allow the power cycle to complete.
The power liftgate may be temporarily disabled under extreme low temperatures, or after repeated power cycling over a short period of time. If this occurs, the liftgate can still be operated manually.

Keys, Doors, and Windows 47
If the vehicle is accelerated before the liftgate has completed moving, the liftgate may stop or reverse direction. Make sure the liftgate is closed and latched before driving.
Falling Liftgate Detection
If the power liftgate automatically closes after a power opening cycle, it indicates that the system is reacting to excess weight on the liftgate or a possible support strut failure. A repetitive chime will sound while the falling liftgate detection feature is operating. Remove any excess weight. If the liftgate continues to automatically close after opening, see your dealer for service before using the power liftgate.
Interfering with the power liftgate motion or manually closing the liftgate too quickly after power opening may resemble a support strut failure. This could also activate the falling liftgate detection feature. Allow the liftgate to complete its operation and wait a few seconds before manually closing the liftgate.
Obstacle Detection Features
If the liftgate encounters an obstacle during a power open or close cycle, the liftgate will automatically reverse direction and move a short distance away from the obstacle. After removing the obstruction, the power liftgate operation can be used again. If the liftgate encounters multiple obstacles on the same power cycle, the power function will deactivate. After removing the obstructions, manually close the liftgate which will allow normal power operation functions to resume.
If the vehicle is locked while the liftgate is closing, and an obstacle is encountered that prevents the liftgate from completely closing, the horn will sound as an alert that the liftgate did not close.
Pinch sensors are on the side edges of the liftgate. If an object is caught between the liftgate and the vehicle and presses against this sensor, the liftgate will reverse direction and then stop. The liftgate will remain open until it is activated again or closed manually.
Setting the 3/4 Mode
To change the position the liftgate stops at when opening:
1.Select MAX or 3/4 mode and power open the liftgate.
2.Stop the liftgate movement at the desired height by pressing any liftgate button. Manually adjust the liftgate position if needed.
3.Press and hold lnext to the pull cup on the outside of the liftgate until the turn signals flash and a beep sounds. This indicates the setting has been recorded.
The liftgate cannot be set below a minimum programmable height. If there is no light flash or sound,
then the height adjustment may be too low.
Manual Operation
Select OFF to manually operate the liftgate. See “Manual Liftgate” at the beginning of this section.

48 Keys, Doors, and Windows
Caution
Attempting to move the liftgate too quickly and with excessive force may result in damage to the vehicle.
Hands-Free Operation
Hands-free operation is enabled. See Vehicle Personalization 0 145.
The liftgate may be operated with a kicking motion under the rear bumper between the left exhaust pipe and the license plate. See
Vehicle Personalization 0 145. Select Off, On-Open and Close, or On-Open Only.
The liftgate will not operate if the RKE transmitter is not within
1 m (3 ft).
The hands-free feature will not work while the liftgate is moving. To stop the liftgate while in motion use one of the liftgate buttons.
Length of Kick Zone
To operate, kick your foot straight up in one swift motion under the rear bumper between the left exhaust pipe and the license plate, then pull it back.
Caution
Splashing water may cause the liftgate to open. Keep the RKE transmitter away from the rear bumper detection area or turn the liftgate mode to OFF when
(Continued)
Caution (Continued)
cleaning or working near the rear bumper to avoid accidental opening.
.Do not sweep your foot side to side.
.Do not keep your foot under the bumper; the liftgate will not activate.
.Do not touch the liftgate until it has stopped moving.
.This feature may be temporarily disabled under some conditions. If the liftgate does not respond to the kick, open or close the liftgate by another method or start the vehicle. The feature will be re-enabled.
When closing the liftgate using this feature, there will be a short delay. The taillamps will flash and a chime will sound. Step away from the liftgate before it starts moving.

Keys, Doors, and Windows 49
Vehicle Security
This vehicle has theft-deterrent features; however, they do not make the vehicle impossible to steal.
Vehicle Alarm System
This vehicle has an anti-theft alarm system.
The indicator light, on the instrument panel near the windshield, indicates the status of the system:
Off : Alarm system is disarmed.
On Solid : Vehicle is secured during the delay to arm the system.
Fast Flash : Vehicle is unsecured. A door, the hood, or the liftgate
is open.
Slow Flash : Alarm system is armed.
Arming the Alarm System
1.Turn off the vehicle.
2.Lock the vehicle in one of three ways:
. Use the RKE transmitter.
.With a door open, press the interior Q.
3.After 30 seconds the alarm system will arm, and the indicator light will begin to slowly flash indicating the alarm system is operating. Pressing Q on the RKE transmitter a second time will bypass the 30-second delay and immediately arm the alarm system.
The vehicle alarm system will not arm if the doors are locked with the key.
If the driver door is opened without first unlocking with the RKE transmitter, the horn will chirp and the lights will flash to indicate pre-alarm. If the vehicle is not started, or the door is not unlocked
by pressing K on the RKE transmitter during the 10-second pre-alarm, the alarm will be activated.
If a door, the hood, or the liftgate is opened without first disarming the system, the turn signals will flash and the horn will sound for about 30 seconds. The alarm system will then re-arm to monitor for the next unauthorized event.
Disarming the Alarm System
To disarm the alarm system or turn off the alarm if it has been activated:
.Press K on the RKE transmitter.
.Start the vehicle.