Материал из BikesWiki — энциклопедия японских мотоциклов
Перейти к: навигация, поиск

Yamaha TTR 250
Ниже представлены прямые ссылки на скачку сервисной документации.
Для Yamaha TT-R250
- Руководство пользователя (Owners Manual) на Yamaha TT-R250
- Сервисный мануал (Service Manual) на Yamaha TT-R250 (на русском)
Обзор модели
- Yamaha TT-R 250
Источник — «https://bikeswiki.ru/index.php?title=Yamaha_TT-R250:_мануалы&oldid=9417»
Категория:
- Сервисная документация
 YAMAHA
TTR250L(C)
РУКОВОДСТВО ПО ТЕХНИЧЕСКОМУ ОБСЛУЖИВАНИЮ
|
LIT 11616-12-57 |
5GF-28197-E0 |
|
Yamaha TTR250L(C) Service Manual Rev_01 |
Sargas Kiev 14/05/11 |

TTR250L(C)
РУКОВОДСТВО ПО ТЕХНИЧЕСКОМУ ОБСЛУЖИВАНИЮ
©2011 Саргас Издание 1-е, Май 2011 Все права защищены 
Воспроизведение или использование любой части данного документа без моего письменного разрешения будет жестоко наказано Вашей совестью.
|
Yamaha TTR250L(C) Service Manual Rev_01 |
2/276 |

ПРИМЕЧАНИЕ
Изначально этот руководство разрабатывалось Yamaha Motor Company для использования в авторизированных дилерских и сервисных центрах Yamaha. Поскольку невозможно вместить всю информацию в одно руководство, подразумевается, что каждый, использующий данное руководство, обладает базовыми знаниями в области обслуживания и ремонта мотоциклов. Попытки проведения ремонта без таковых знаний могут сделать Ваш мотоцикл небезопасным или даже непригодным к эксплуатации.
Yamaha Motors постоянно работает над усовершенствованием своих моделей. Информация о модификации и значительных изменениях в спецификациях или процедурах направляется во все авторизированные дилерские центры Yamaha и отображается в последующих редакциях данного руководства.
ПРИМЕЧАНИЕ:______________________________________________________________________________
Дизайн и спецификации могут быть изменены без уведомления.
___________________________________________________________________________________________
ВАЖНАЯ ИНФОРМАЦИЯ
Особо важная информация в данном руководстве сопровождается следующими обозначениями.
Предостерегающий сигнал, означающий БУДЬТЕ ВНИМАТЕЛЬНЫ! ВЛИЯЕТ НА БЕЗОПАСНОСТЬ!
Игнорирование требований обозначенных ОСТОРОЖНО может привести к травмам или гибели мотоциклиста, находящих близко людей или человека, выполняющего ремонт/обслуживание мотоцикла.
Знаком ВНИМАНИЕ помечаются специальные меры, игнорирование которых может привести к повреждению мотоцикла.
ПРИМЕЧАНИЕ: В примечаниях приводится информация, позволяющая лучше понимать и выполнять действия.
|
Yamaha TTR250L(C) Service Manual Rev_01 |
3/276 |

КАК ИСПОЛЬЗОВАТЬ ДАННОЕ РУКОВОДСТВО
СТРУКТУРА РУКОВОДСТВА
Это руководство разработано как простой, удобный для чтения справочник. Руководство поделено на главы, разделы и подразделы. Здесь не приведены всеобъемлющие пояснения по установке, снятию, сборке, разборке и диагностике.
ОРГАНИЗАЦИЯ СТРАНИЦ
Указанные ниже цифры в кружках относятся к примеру страницы (см. ниже).
 Аббревиатура и изображение в верхнем правом углу каждой страницы соответствует текущей главе.
 Текущий раздел указан в верхней части страницы.
 Подраздел указан более мелким шрифтом, нежели раздел.
 Линией из звездочек (*) обрамляются важные процедуры. Каждый шаг такой процедуры обозначается маркером (●).
 Важная информация, такая как тип жидкости, момент затяжки, специальный инструмент помещена в рамку и помечена соответствующим символом.
 Цифры в кружках относятся к графическим схемам и изображениям
 Буквы нижнего регистра в кружках относятся к размерам, указанным на схемах или меткам
 Буквы верхнего регистра в квадратах относятся к другим пояснениям по графическим схемам
 Стрелки, помещенные после указания дефектов, сопровождают рекомендуемые действия.
 В Главе 3, «Периодический Контроль и Регулировка», вместо раздела в верхней части страницы указывается подраздел.
СБОРОЧНЫЕ СХЕМЫ
Для облегчения идентификации частей и шагов процедуры в начале каждого раздела, посвященного разборке узла, приводится сборочная схема.
|
Yamaha TTR250L(C) Service Manual Rev_01 |
4/276 |
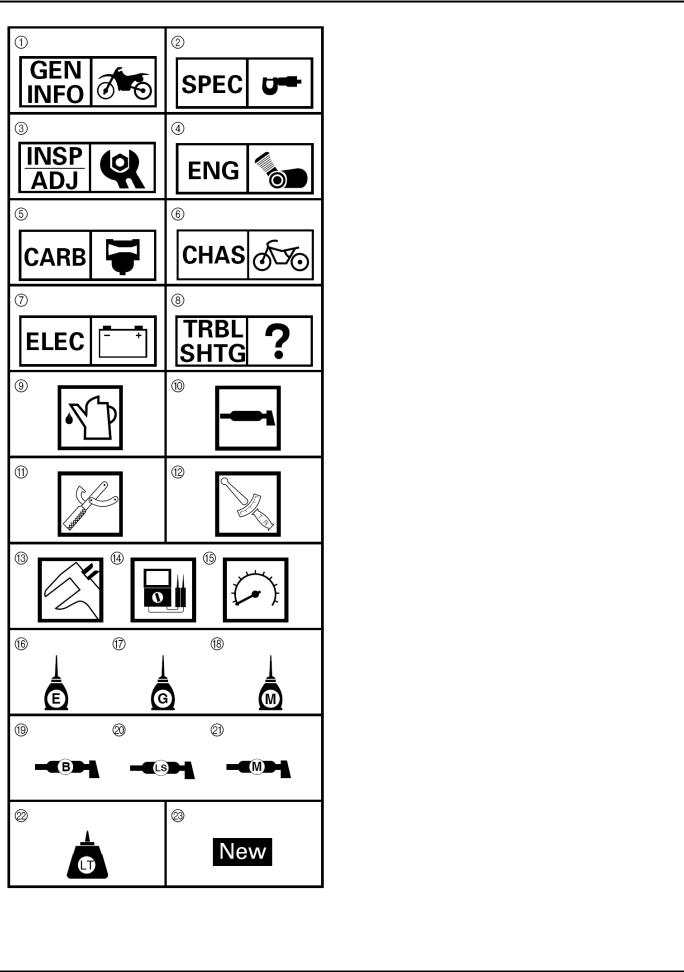
ГРАФИЧЕСКИЕ СИМВОЛЫ
Графические символы с  по
по  размещаются в правом верхнем углу каждой страницы и указывают тему Главы.
 Общая информация
 Спецификации
 Периодический контроль и регулировка
 Двигатель
 Карбюратор
 Ходовая
 Электрика
  Решение проблем
Графические символы с  по
по  служат для определения спецификаций, встречающихся в тексте.
 Заливаемая жидкость
 Смазка
 Специальный инструмент
 Момент затяжки
 Предел износа, зазор, люфт
 Обороты двигателя
 Ω, V, A
Графические символы с  по
по  на сборочных схемах служат для указания типа смазки и точек нанесения смазки.
 Моторное масло
 Трансмиссионное масло
 Дисульфид молибденовое масло
 Консистентная смазка для подшипников колес
 Легкая литиевая смазка
  Дисульфид молибденовая смазка
Графические символы с  по
по  на сборочных схемах указывают где необходимо применять
фиксатор  и где необходимо устанавливать новые части
  .
.
 Фиксатор (LOCTITE®)
 Замена
|
Yamaha TTR250L(C) Service Manual Rev_01 |
5/276 |

ОГЛАВЛЕНИЕ
ОБЩАЯ ИНФОРМАЦИЯ
СПЕЦИФИКАЦИИ
ПЕРИОДИЧЕСКИЙ КОНТРОЛЬ И РЕГУЛИРОВКА
ДВИГАТЕЛЬ
КАРБЮРАТОР
ХОДОВАЯ
БОРТОВАЯ СЕТЬ
РЕШЕНИЕ ПРОБЛЕМ
|
Yamaha TTR250L(C) Service Manual Rev_01 |
6/276 |

ОГЛАВЛЕНИЕ ГЛАВА 1.
ОБЩАЯ ИНФОРМАЦИЯ
|
Yamaha TTR250L(C) Service Manual Rev_01 |
7/276 |

|
Yamaha TTR250L(C) Service Manual Rev_01 |
8/276 |

|
Yamaha TTR250L(C) Service Manual Rev_01 |
9/276 |

|
Yamaha TTR250L(C) Service Manual Rev_01 |
10/276 |
Руководство на английском языке по ремонту мотоциклов Yamaha TT350S.
- Издательство: Yamaha Motor Co., Ltd.
- Год издания: 1985
- Страниц: 229
- Формат: PDF
- Размер: 67,1 Mb
Руководство на английском языке по ремонту мотоциклов Yamaha TT600RE 2004 года выпуска.
- Издательство: Yamaha Motor Co., Ltd.
- Год издания: 2003
- Страниц: 382
- Формат: PDF
- Размер: 10,4 Mb

Сборник руководств на английском языке по эксплуатации и техническому обслуживанию мотоциклов Yamaha моделей TT-R50/TT-R90/TT-R110/TT-R125/TT-R225/TT-R230/TT-R250.
- Издательство: Yamaha Motor Co., Ltd.
- Год издания: —
- Страниц: —
- Формат: PDF
- Размер: 56,6 Mb
Руководство на английском, немецком и испанском языках по техническому обслуживанию и ремонту мотоциклов Yamaha моделей TT-R50E и TT-R50EV.
- Издательство: Yamaha Motor Co., Ltd.
- Год издания: 2005
- Страниц: 390
- Формат: PDF
- Размер: 9,7 Mb

Сборник руководств на английском, немецком и испанском языках по техническому обслуживанию и ремонту мотоциклов Yamaha моделей TT-R90, TT-R90ES, TT-R90ET, TT-R90EV, TT-R90M, TT-R90N, TT-R90P, TT-R90R, TT-R90S, TT-R90T и TT-R90V.
- Издательство: Yamaha Motor Co., Ltd.
- Год издания: —
- Страниц: —
- Формат: PDF
- Размер: 64,4 Mb
Сборник руководств на английском, немецком и испанском языках по техническому обслуживанию и ремонту мотоциклов Yamaha TT-R125 различных модификаций.
- Издательство: Yamaha Motor Co., Ltd.
- Год издания: —
- Страниц: —
- Формат: PDF
- Размер: 153,3 Mb
Руководство на английском языке по ремонту мотоциклов Yamaha моделей TTR225L, TTR225M и XT225-C.
- Издательство: Yamaha Motor Co., Ltd.
- Год издания: 1999
- Страниц: 414
- Формат: PDF
- Размер: 67,1 Mb
Руководство на английском языке по ремонту мотоциклов Yamaha моделей TTR250L и TTR250LC.
- Издательство: Yamaha Motor Co., Ltd.
- Год издания: 1999
- Страниц: 295
- Формат: PDF
- Размер: 28,5 Mb

Сборник руководств на английском, французском, немецком, испанском и итальянском языках по ремонту мотоциклов Yamaha моделей TT-R90, TT-R90E, TT-R125, TT-R125E, TT-R125LW, TT-R125LWE и др.
- Издательство: Yamaha
- Год издания: —
- Страниц: —
- Формат: ISO
- Размер: 1,7 Gb

(скачивание инструкции бесплатно)
Формат файла: PDF
Доступность: Бесплатно как и все руководства на сайте. Без регистрации и SMS.
Дополнительно: Чтение инструкции онлайн

Страница:
(1 из 52)
навигация

1

2

3

4

5

6

7

8

9

10

11

12

13

14

15

16

17

18

19

20

21

22

23

24

25

26

27

28

29

30

31

32

33

34

35

36

37

38

39

40

41

42

43

44

45

46

47

48

49

50

51

52
Оглавление инструкции
- Страница 1 из 53
- Страница 2 из 53
- Страница 3 из 53
— Тефлоновое покрытие поршней; цилиндры с керамическим покрытием; карбюраторы с увеличенным диаметром диффузора; коммутаторы с регулировкой угла опережения зажигания; катушки зажигания с двойной обмоткой; головки цилиндра с увеличенными клапанами; текстолитовые лепестковые клапаны; пружины клапанов - Страница 4 из 53
- Страница 5 из 53
- Страница 6 из 53
- Страница 7 из 53
СПАСИБО ЗА ПОКУПКУ Благодарим Вас за покупку мотоцикла IRBIS. Данное руководство содержит важную информацию по технике безопасности предоставляет сведения о специальных приёмах и практических навыках, необходимых для управления этим транспортным средством, а также включает инструкции по безопасному - Страница 8 из 53
СОДЕРЖАНИЕ Спасибо за покупку………………………………………………………………………………………… 1 Содержание………………………………………………………………………………………………….. 2 Техника безопасности………………………………………………………………………………………. 3 Идентификационные номера………………………………………………………………………………. 6 Технические характеристики…………..…………………………………………………………..………. 7 - Страница 9 из 53
ТЕХНИКА БЕЗОПАСНОСТИ Мотоцикл является технически сложным транспортным средством и может быть опасным в управлении. Управление мотоциклом отличается от управления другими транспортными средствами, включая скутеры и автомобили. Даже при совершении обычных манёвров, таких как повороты, въезд в гору - Страница 10 из 53
ТЕХНИКА БЕЗОПАСНОСТИ Не допускается управление мотоциклом без мотоциклетного защитного шлема соответствующего размера. Также необходимо надеть средство для защиты глаз (защитную маску или защитные очки), перчатки, ботинки на жёсткой подошве, рубашку или куртку с длинным рукавом и длинные брюки. - Страница 11 из 53
ТЕХНИКА БЕЗОПАСНОСТИ Всегда держите обе руки на руле, а обе ноги на подножках во время вождения. Не допускается езда на заднем колесе, подпрыгивания и другие трюки. Никогда не превышайте допустимую нагрузку на мотоцикл. Перевозимый груз должен быть равномерно распределён и безопасно закреплён. - Страница 12 из 53
ИДЕНТИФИКАЦИОННЫЕ НОМЕРА Запишите идентификационный номер мотоцикла (VIN), номер двигателя и модель мотоцикла для ссылок на них в будущем. 1. Идентификационный номер ТС (VIN): 2. Номер двигателя: 3. Модель транспортного средства: Идентификационный номер ТС (VIN) нанесён на раму мотоцикла. Номер - Страница 13 из 53
ТЕХНИЧЕСКИЕ ХАРАКТЕРИСТИКИ Пункт Размеры Д x Ш x В База Рама Вес сухой Передняя подвеска Задняя подвеска Колеса Тормозная система Передний/задний тормоз Двигатель Максимальная мощность Максимальный крутящий момент Система питания Рабочий объем Сцепление Коробка передач Главная передача Система - Страница 14 из 53
УСТРОЙСТВО МОТОЦИКЛА 1. Руль; 2. Двигатель; 3. Заднее крыло; 4. Заднее колесо; 5. Подножка; 6. Рычаг переключения передач; 7. Топливный кран; 8. Передний амортизатор; 9. Переднее колесо; 10. Передняя фара; 11. Зеркала заднего вида; 12. Седло; 13. Топливный бак; 14. Переднее крыло; 15. Педаль - Страница 15 из 53
ОСНОВНЫЕ ОРГАНЫ УПРАВЛЕНИЯ Замок зажигания: Замок зажигания расположен за щитком передней фары на панели приборов. Положение «OFF» — вся цепь разорвана; ключ может быть вынут из замка зажигания. Положение «ON» — вся цепь замкнута; двигатель можно запустить; ключ вынуть нельзя. Органы управления - Страница 16 из 53
ОСНОВНЫЕ ОРГАНЫ УПРАВЛЕНИЯ Органы управления левой рукоятки: 1. Переключатель ближнего/дальнего света фары « »: Переведите переключатель в данное положение для включения ближнего света фары. « »: Переведите переключатель в данное положение для включения дальнего света фары. 2. Рычаг сцепления. Для - Страница 17 из 53
ОСНОВНЫЕ ОРГАНЫ УПРАВЛЕНИЯ Педаль заднего тормоза: Педаль заднего тормоза расположена с правой стороны двигателя. Нажатие педали активирует задний тормоз. Всегда перед запуском двигателя проверяйте педаль заднего тормоза. Только убедившись, что она работает плавно, заводите двигатель. Топливный - Страница 18 из 53
ОСНОВНЫЕ ОРГАНЫ УПРАВЛЕНИЯ Педаль переключения передач: Данный мотоцикл оснащен 5-и ступенчатой механической коробкой передач. Педаль переключения передач расположена с левой стороны двигателя. Нажимайте на педаль для того чтобы изменить передачу или включить нейтральную передачу. Схема включения - Страница 19 из 53
ПОДГОТОВКА К ЭКСПЛУАТАЦИИ Проверка перед поездкой: Проверьте мотоцикл перед поездкой. Приведённые здесь пункты занимают лишь несколько минут, но в результате могут сэкономить время и обеспечить безопасность поездки. Уровень топлива – проверить на наличие его утечки. Передний и задний тормоза – - Страница 20 из 53
УПРАВЛЕНИЕ МОТОЦИКЛОМ Перед началом движения ещё раз просмотрите раздел по безопасности при эксплуатации мотоцикла. Убедитесь, что воспламеняющиеся материалы, такие как сухая трава и листья, не контактируют с системой выпуска мотоцикла во время движения, работы на холостом ходу или при стоянке. 1. - Страница 21 из 53
ПЕРИОДИЧЕСКОЕ ОБСЛУЖИВАНИЕ ПРОВЕРКА И ЗАМЕНА МОТОРНОГО МАСЛА Запрещается применять обычное и трансмиссионные масла. Рекомендуется применять масло, предназначенное для 4-х тактных двигателей с интегрированной коробкой передач и сцеплением в масляной ванне. На заводе мотоцикл заправлен маслом для - Страница 22 из 53
ПЕРИОДИЧЕСКОЕ ОБСЛУЖИВАНИЕ РЕГУЛИРОВКА КАРБЮРАТОРА Самостоятельное изменение основных настроек карбюратора может негативно повлиять на устойчивую работу двигателя. Регулировку оборотов холостого хода следует проводить на прогретом двигателе. Оптимальный уровень оборотов холостого хода 1500 об/мин ± - Страница 23 из 53
ПЕРИОДИЧЕСКОЕ ОБСЛУЖИВАНИЕ ОБСЛУЖИВАНИЕ АККУМУЛЯТОРА На мотоцикле используется свинцово-кислотный обслуживаемый аккумулятор 12V7Ah (12 вольт, 7 ампер-часа). Если мотоцикл не используется длительное время, снимите с него аккумуляторную батарею, чтобы уменьшить ее разрядку. Сначала снимите - Страница 24 из 53
ПЕРИОДИЧЕСКОЕ ОБСЛУЖИВАНИЕ Проверка уровня тормозной жидкости: Поставьте мотоцикл на ровную поверхность. Посмотрите на индикатор уровня тормозной жидкости. Сильно нажмите на рычаг тормоза и посмотрите как изменится уровень тормозной жидкости, если он опустится ниже обозначенного предела необходимо - Страница 25 из 53
ПЕРИОДИЧЕСКОЕ ОБСЛУЖИВАНИЕ ЦЕПЬ Срок службы цепи зависит от ее надлежащей смазки и регулировки. Недостаток технического обслуживания может привести к преждевременному износу или повреждению цепного привода и звездочки. Необходимо периодически проверять и смазывать цепь мотоцикла. Проверка состояния - Страница 26 из 53
ПЕРИОДИЧЕСКОЕ ОБСЛУЖИВАНИЕ ВОЗДУШНЫЙ ФИЛЬТР Снятие, очистка и установка воздушного фильтра: Воздушный фильтр (1) должен обслуживаться регулярно. При езде по пыльным дорогам очищайте его чаще. Содержание воздушного фильтра в чистоте очень важно для правильной работы двигателя. Порядок разборки: - Страница 27 из 53
ШИНЫ Для комфортной и безопасной езды на вашем мотоцикле рекомендуется устанавливать шины типоразмера 2.75-21 спереди и 4.60-18 сзади. В целях безопасности шины должны быть правильного типа и размера, находиться в хорошем состоянии, с удовлетворительным состоянием протектора и с давлением воздуха в - Страница 28 из 53
АКСЕССУАРЫ И МОДИФИКАЦИИ Изменения в конструкции или использование аксессуаров, не изготовленных компанией Irbis, могут отрицательно сказаться на безопасности вождения мотоцикла. Прежде, чем вы решите внести изменения в конструкцию мотоцикла или добавить какие-нибудь аксессуары, ознакомьтесь со - Страница 29 из 53
МОЙКА И ХРАНЕНИЕ Мойка мотоцикла: При мойке мотоцикла следующие детали не мойте водой под давлением — замок зажигания, выключатели электрооборудования, воздушный фильтр, инструментальный ящик, втулка колеса и выхлопное отверстие глушителя. Это может повредить их. После чистки мотоцикла обмойте его - Страница 30 из 53
РЕГЛАМЕНТНЫЕ РАБОТЫ Мотоцикл необходимо обслуживать либо по достижении указанного пробега (км), либо спустя определённое время после продажи (1 месяц, 3 месяца, 6 месяцев и т. д.), в зависимости от того, что наступит ранее. Перед выполнением обслуживания необходимо провести его тщательную мойку. - Страница 31 из 53
СХЕМА ЭЛЕКТРООБОРУДОВАНИЯ 25 - Страница 32 из 53
УСЛОВИЯ ГАРАНТИИ УВАЖАЕМЫЙ ПОКУПАТЕЛЬ! ВНИМАТЕЛЬНО ОЗНАКОМЬТЕСЬ С УСЛОВИЯМИ ГАРАНТИИ! Гарантийный срок эксплуатации изделия составляет 6 месяцев со дня продажи или 1000 км в зависимости от того, что наступит ранее (при отсутствии нарушений настоящих Условий). Гарантийный ремонт осуществляется - Страница 33 из 53
УСЛОВИЯ ГАРАНТИИ Ограниченная гарантия (300 км или 1 месяц) распространяется на: шаровые опоры, цепь, подшипники, рулевые наконечники. Гарантия не распространяется на: — расходные детали и материалы: тормозные колодки, тормозные диски и барабаны, патрубки и пластмассовые изделия, амортизаторы, АКБ, - Страница 34 из 53
ГАРАНТИЙНЫЙ ТАЛОН Изделие Модель Номер двигателя Номер рамы Дата продажи ФИО клиента Адрес Дата выдачи мотоцикла первому владельцу Гарантийный срок мотоцикла указан в условиях гарантии. Данный талон действителен только при условии его заполнения в день продажи, и наличии действительных подписей - Страница 35 из 53
ТАЛОНЫ ТО 1-ое техническое обслуживание (1-й месяц со дня продажи или 300 км пробега). Дата: Работы произвел: ФИО мастера: Подпись: Список работ: Печать сервисного центра 2-ое техническое обслуживание (3-й месяц со дня продажи или 600 км пробега). Дата: Работы произвел: ФИО мастера: Подпись: Список - Страница 36 из 53
ТАЛОНЫ ТО 3-ое техническое обслуживание (6-й месяц со дня продажи или 1000 км пробега). Дата: Работы произвел: ФИО мастера: Подпись: Список работ: Печать сервисного центра 4-ое техническое обслуживание (12-й месяц со дня продажи или 4000 км пробега). Дата: Работы произвел: ФИО мастера: Подпись: - Страница 37 из 53
ТАЛОНЫ ТО 5-ое техническое обслуживание (18-й месяц со дня продажи или 8000 км пробега). Дата: Работы произвел: ФИО мастера: Подпись: Список работ: Печать сервисного центра 6-ое техническое обслуживание (24-й месяц со дня продажи или 12000 км пробега). Дата: Работы произвел: ФИО мастера: Подпись: - Страница 38 из 53
ТАЛОНЫ ТО 7-ое техническое обслуживание (30-й месяц со дня продажи или 16000 км пробега). Дата: Работы произвел: ФИО мастера: Подпись: Список работ: Печать сервисного центра 8-ое техническое обслуживание (36-й месяц со дня продажи или 20000 км пробега). Дата: Работы произвел: ФИО мастера: Подпись: - Страница 39 из 53
ГАРАНТИЙНЫЙ ТАЛОН №1 Изделие Модель Номер двигателя Номер рамы Дата продажи Дата приема Дата выдачи Проявление дефекта Работы произвел: ФИО мастера Печать сервисного центра Подпись Срок гарантии – 6 месяцев или 1000 км 33 - Страница 40 из 53
ГАРАНТИЙНЫЙ ТАЛОН №2 Изделие Модель Номер двигателя Номер рамы Дата продажи Дата приема Дата выдачи Проявление дефекта Работы произвел: ФИО мастера Печать сервисного центра Подпись 34 Срок гарантии – 6 месяцев или 1000 км - Страница 41 из 53
ГАРАНТИЙНЫЙ ТАЛОН №3 Изделие Модель Номер двигателя Номер рамы Дата продажи Дата приема Дата выдачи Проявление дефекта Работы произвел: ФИО мастера Печать сервисного центра Подпись Срок гарантии – 6 месяцев или 1000 км 35 - Страница 42 из 53
ДЛЯ ЗАМЕТОК _________________________________________________________________________________________________________________________________________________________________ - Страница 43 из 53
ДЛЯ ЗАМЕТОК _________________________________________________________________________________________________________________________________________________________________ - Страница 44 из 53
ПОИСК НЕИСПРАВНОСТЕЙ 38 - Страница 45 из 53
ПОИСК НЕИСПРАВНОСТЕЙ 39 - Страница 46 из 53
ПОИСК НЕИСПРАВНОСТЕЙ 40 - Страница 47 из 53
ПОИСК НЕИСПРАВНОСТЕЙ 41 - Страница 48 из 53
ЛИСТ ОТК 1. Рама (несущий элемент) 2. Двигатель 3. Трансмиссия 4. Ходовая часть (подвеска, рулевое управление) 5. Тормозная система 6. Электрооборудование 7. Внешний вид 8. Упаковка 9. Комплектность поставки Отдел технического контроля VIN номер - Страница 49 из 53
_________________________________________________________________________________________________________________________________________________________________ - Страница 50 из 53
_________________________________________________________________________________________________________________________________________________________________ - Страница 51 из 53
Ваш сервисный центр Адрес: Телефоны: Время работы: ООО «Ирбис Моторз» сохраняет за собой право вносить любые изменения, включая изменения технических характеристик, дизайна и оснащения моделей без предварительного уведомления. Материалы, опубликованные в данном руководстве по эксплуатации, - Страница 52 из 53
www.irbismotors.ru - Страница 53 из 53
Инструкции и руководства похожие на Irbis TTR250R
Другие инструкции и руководства из категории внедорожный мотоцикл
© 2023 manuals-help.ru, Все права защищены
- Manuals
- Brands
- Yamaha Manuals
- Motorcycle
- TT-R250
- Owner’s manual
-
Contents
-
Table of Contents
-
Troubleshooting
-
Bookmarks
Quick Links
OWNER’S MANUAL
TTR250T(C)
5GF-28199-16
LIT-11626-18-24
Related Manuals for Yamaha TT-R250
Summary of Contents for Yamaha TT-R250
-
Page 1
OWNER’S MANUAL TTR250T(C) 5GF-28199-16 LIT-11626-18-24… -
Page 3
INTRODUCTION EAU10060 Congratulations on your purchase of the Yamaha TTR250 This model is the result of Yamaha’s vast experience in the pro- duction of fine sporting, touring, and pacesetting racing machines. It represents the high degree of craftsmanship and reli- ability that have made Yamaha a leader in these fields. -
Page 4: Important Manual Information
This manual should be considered a permanent part of this machine and should remain with it even if the machine is subsequently sold. Yamaha continually seeks advancements in product design and quality. Therefore, while this manual contains the most current product information available at the time of printing, there may be minor discrepancies between your machine…
-
Page 5
IMPORTANT MANUAL INFORMATION EWA10010 WARNING PLEASE READ THIS MANUAL AND THE “YOU AND YOUR MOTORCYCLE: RIDING TIPS” BOOKLET CAREFULLY AND COMPLETELY BEFORE OPERATING THIS MACHINE. DO NOT ATTEMPT TO OPERATE THIS MACHINE UNTIL YOU HAVE ATTAINED ADEQUATE KNOWLEDGE OF ITS CONTROLS AND OPERATING FEATURES AND UNTIL YOU HAVE BEEN TRAINED IN SAFE AND PROPER RIDING TECHNIQUES. -
Page 6
IMPORTANT MANUAL INFORMATION EAU10192 AFFIX DEALER LABEL HERE TTR250T OWNER’S MANUAL ©2004 by Yamaha Motor Corporation, U.S.A. 1st edition, April 2004 All rights reserved. Any reprinting or unauthorized use without the written permission of Yamaha Motor Corporation, U.S.A. is expressly prohibited. -
Page 7: Table Of Contents
TABLE OF CONTENTS SAFETY INFORMATION ….1-1 OPERATION AND IMPORTANT Adjusting the clutch lever free Location of important labels ….1-6 RIDING POINTS……..5-1 play ……….6-18 Starting and warming up a cold Adjusting the brake lever free DESCRIPTION ……..2-1 engine ………. 5-1 play ……….6-18 Left view ………..2-1 Starting a warm engine ….
-
Page 8
TABLE OF CONTENTS MACHINE CARE AND STORAGE ..7-1 Care ……….7-1 Storage ……….7-3 SPECIFICATIONS ……8-1 CONSUMER INFORMATION….9-1 Identification numbers …..9-1 Motorcycle noise regulation …..9-3 Maintenance record ……9-4 YAMAHA MOTOR CORPORATION, U.S.A. OFF-ROAD MOTORCYCLE LIMITED WARRANTY ….9-5 YAMAHA EXTENDED SERVICE (Y.E.S.) ………9-7… -
Page 9: Safety Information
SAFETY INFORMATION EAU10330 TIONS. is veering wide on a turn due to MACHINES ARE SINGLE TRACK VE- Safe riding EXCESSIVE SPEED or undercor- HICLES. THEIR SAFE USE AND OP- Always make pre-operation nering (insufficient lean angle for ERATION ARE DEPENDENT UPON checks.
-
Page 10
Modifications made to this machine not keep the following in mind: available, you must personally be re- approved by Yamaha, or the removal of Cargo accessory weight sponsible for the proper selection, in-… -
Page 11
SAFETY INFORMATION those provided under “Loading”. winds. the vicinity of an open flame. Never install accessories or carry Certain accessories can dis- Never start the engine or let it run cargo that would impair the perfor- place the operator from his or for any length of time in a closed mance of your machine. -
Page 12
SAFETY INFORMATION flame), otherwise it could catch fire. When transporting the machine in another vehicle, make sure that it is kept upright and that the fuel cock(s) are turned to “ON” or “RES” (for vacuum type)/“OFF” (for manual type). If the machine should lean over, gasoline may leak out of the carburetor or fuel tank. -
Page 13: Location Of Important Labels
SAFETY INFORMATION EAU10381 Location of important labels Please read the following important labels carefully before operating this vehicle.
-
Page 14
This unit contains high pressure nitrogen gas. follows. Mishandling can cause explosion. FRONT : 100 kPa,{1.00 kgf/cm }, 15 psi Read owner’s manual for instructions. REAR 100 kPa,{1.00 kgf/cm }, 15 psi Do not incinerate, puncture or open. 3RV-21668-A0 YAMAHA 4AA-22259-80… -
Page 15: Description
DESCRIPTION EAU10410 Left view 1. Headlight (page 6-29) 8. Front fork damping adjusting screw (page 3-7) 2. Front fork air valve (page 3-7) 3. Fuel cock (page 3-5) 4. Starter (choke) knob (page 3-6) 5. Air filter element (page 6-11) 6.
-
Page 16: Right View
DESCRIPTION EAU10420 Right view 1. Spark arrester (page 6-13) 8. Shock absorber assembly spring preload adjusting nut (page 3-9) 2. Battery (page 6-27) 3. Fuse (page 6-28) 4. Shock absorber assembly compression damping force adjusting knob (page 3-9) 5. Main switch (page 3-1) 6.
-
Page 17: Controls And Instruments
DESCRIPTION EAU10430 Controls and instruments 1. Clutch lever (page 3-2) 2. Left handlebar switch (page 3-1) 3. Tripmeter (page 3-1) 4. Right handlebar switches (page 3-1) 5. Brake lever (page 3-3) 6. Throttle grip (page 6-14) 7. Fuel tank cap (page 3-4)
-
Page 18: Instrument And Control Functions
INSTRUMENT AND CONTROL FUNCTIONS EAU10450 EAU11830 EAU12343 Main switch Tripmeter Handlebar switches Left The main switch controls the ignition 1. Tripmeter 1. Light switch “ ” and lighting systems. The various main 2. Tripmeter reset knob switch positions are described below. Right The tripmeter shows the distance trav- eled since it was last set to zero with the…
-
Page 19: Clutch Lever
INSTRUMENT AND CONTROL FUNCTIONS EAU12540 tions prior to starting the engine. EAU31640 Light switch “ ” Clutch lever Set this switch to “ ” to turn on the headlight and the taillight. ECA10980 CAUTION: Always turn the key to “OFF” and light switch to “OFF”…
-
Page 20: Shift Pedal
INSTRUMENT AND CONTROL FUNCTIONS EAU12870 EAU12890 EAU12941 Shift pedal Brake lever Brake pedal 1. Shift pedal 1. Brake lever 1. Brake pedal The shift pedal is located on the left The brake lever is located at the right The brake pedal is on the right side of side of the engine and is used in com- handlebar grip.
-
Page 21: Fuel Tank Cap
EWA10880 WARNING wise. Your Yamaha engine has been de- Do not overfill the fuel tank, oth- EWA11090 signed to use regular unleaded gaso- WARNING erwise it may overflow when the…
-
Page 22: Fuel Tank Breather Hose
10%. Gasohol containing methanol is not recom- mended by Yamaha because it can cause damage to the fuel system or ve- hicle performance problems. 1. Fuel tank breather hose…
-
Page 23: Starter (Choke) Knob «1
INSTRUMENT AND CONTROL FUNCTIONS fuel while riding, move the lever to this EAU13600 Starter (choke) knob “ ” position. Fill the tank at the first oppor- tunity. Be sure to set the lever back to “ON” after refueling! FUEL 1. Arrow mark positioned over “ON” 1.
-
Page 24: Seat
INSTRUMENT AND CONTROL FUNCTIONS EAU13960 EAU14671 (×2) Seat Adjusting the front fork To remove the seat The front fork is equipped with air 1. Remove the bolts, and then pull valves for adjusting the spring rate and the seat off. screws for adjusting the damping force.
-
Page 25
An optional air pressure gauge is avail- EWA10180 WARNING soften the damping, turn the ad- able at a Yamaha dealer. Always adjust both fork legs equal- justing screw on each fork leg in di- 4. To increase the spring rate and ly, otherwise poor handling and loss rection (b). -
Page 26: Adjusting The Shock Absorber
INSTRUMENT AND CONTROL FUNCTIONS EAU15070 ECA10960 Adjusting the shock absorber CAUTION: assembly Be sure to install the rubber caps to This shock absorber assembly is prevent dust, etc. from entering the equipped with a spring preload adjust- fork legs. ing nut, a rebound damping force ad- NOTE: justing dial…
-
Page 27
A special wrench is needed to Rebound damping force make this adjustment and it can be Compression damping force obtained at a Yamaha dealer. The spring preload setting is deter- mined by measuring distance A, shown in the illustration. The short- er the distance A is, the higher the spring preload;… -
Page 28: Starting Circuit Cut-Off System
If a malfunction is noted, have a Although the total number of clicks of a high heat sources, otherwise it Yamaha dealer check the system be- damping force adjusting mechanism may explode due to excessive fore riding.
-
Page 29
4. Push the start switch. Does the engine start? The neutral switch may be defective. The motorcycle should not be ridden until checked by a Yamaha dealer. 5. Turn the engine off. 6. Shift the transmission into gear. 7. Keep the clutch lever pulled. -
Page 30: Pre-Operation Checks
PRE-OPERATION CHECKS EAU15591 The condition of a vehicle is the owner’s responsibility. Vital components can start to deteriorate quickly and unexpectedly, even if the vehicle remains unused (for example, as a result of exposure to the elements). Any damage, fluid leakage or loss of tire air pressure could have serious consequences.
-
Page 31: Pre-Operation Check List
Lubricate cable if necessary. Clutch 6-18 Check lever free play. Adjust if necessary. Make sure that operation is smooth. Check cable free play. Throttle grip 6-14, 6-24 If necessary, have Yamaha dealer adjust cable free play and lubricate cable and grip housing.
-
Page 32
PRE-OPERATION CHECKS ITEM CHECKS PAGE Make sure that operation is smooth. Control cables 6-23 Lubricate if necessary. Check chain slack. Adjust if necessary. Drive chain 6-21, 6-23 Check chain condition. Lubricate if necessary. Check for damage. Check tire condition and tread depth. Wheels and tires 6-15, 6-17 Check air pressure. -
Page 33: Operation And Important Riding Points
OPERATION AND IMPORTANT RIDING POINTS EAU15960 EAU16451 completely close the throttle. (See EWA10280 Starting and warming up a page 3-6.) WARNING cold engine 5. Start the engine by pushing the This model is designed for In order for the starting circuit cut-off start switch.
-
Page 34: Starting A Warm Engine
OPERATION AND IMPORTANT RIDING POINTS (choke) turned off. EAU16640 EAU16671 Starting a warm engine Shifting Follow the same procedure as for start- ing a cold engine with the exception that the starter (choke) is not required when the engine is warm. 1.
-
Page 35: Engine Break-In
If any engine trouble should occur od for the engine. To allow the engine during the engine break-in period, to cool down from the temporary build- immediately have a Yamaha dealer up of heat, cruise at a lower engine check the vehicle. speed.
-
Page 36: Parking
OPERATION AND IMPORTANT RIDING POINTS EAU17170 Parking When parking, stop the engine, remove the key from the main switch, and then turn the fuel cock lever to “OFF”. EWA10310 WARNING Since the engine and exhaust system can become very hot, park in a place where pedestri- ans or children are not likely to touch them.
-
Page 37: Periodic Maintenance And Minor Repair
If you are not familiar with mainte- If you do not have the tools or experi- nance work, have a Yamaha dealer ence required for a particular job, have do it for you. a Yamaha dealer perform it for you. EWA10340 WARNING Modifications approved…
-
Page 38: Periodic Maintenance Chart For The Emission Control System
From 1800 mi (3000 km) or 18 months, repeat the maintenance intervals starting from 600 mi (1000 km) or 6 months. Items marked with an asterisk should be performed by a Yamaha dealer as they require special tools, data and technical skills.
-
Page 39: General Maintenance And Lubrication Chart
PERIODIC MAINTENANCE AND MINOR REPAIR EAU35340 General maintenance and lubrication chart INITIAL EVERY 100 mi 600 mi 1200 mi ITEM CHECKS AND MAINTENANCE JOBS (150 km) (1000 km) (2000 km) 1 month 6 months 12 months Check operation. √ √ √…
-
Page 40
17 * Shock absorber assembly Replace if necessary. √ 18 * Rear suspension link pivots Apply molybdenum disulfide grease lightly. Apply Yamaha chain and cable lube or engine oil 10W-30 thor- √ √ √ 19 * Control and meter cables oughly. -
Page 41
PERIODIC MAINTENANCE AND MINOR REPAIR EAU18670 NOTE: The air filter needs more frequent service if you are riding in unusually wet or dusty areas. Hydraulic brake service Regularly check and, if necessary, correct the brake fluid level. Every two years replace the internal components of the brake master cylinders and calipers, and change the brake fluid. -
Page 42: Removing And Installing The Cowling And Panels
PERIODIC MAINTENANCE AND MINOR REPAIR EAU18721 To install the cowling Removing and installing the Place the cowling in the original posi- cowling and panels tion, and then install the screws. The cowling and panels shown need to be removed to perform some of the EAU19292 Panels A and B maintenance jobs described in this…
-
Page 43: Checking The Spark Plug
Do not attempt to diagnose such problems yourself. Instead, have a Yamaha dealer check the vehicle. 1. Spark plug cap 2. Remove the spark plug as shown, 2. Check the spark plug for electrode…
-
Page 44
PERIODIC MAINTENANCE AND MINOR REPAIR necessary. 3. Install the spark plug with the EAU19784 Engine filter spark plug wrench, and then tight- Specified spark plug: element en it to the specified torque. NGK/CR9E The engine oil level should be checked DENSO/U27ESR-N Tightening torque: before each ride. -
Page 45
PERIODIC MAINTENANCE AND MINOR REPAIR 3. Remove the engine oil filler bolt place them if necessary. NOTE: and drain bolt to drain the oil from The engine oil should be between the 4. Remove the oil filter element drain the crankcase. minimum and maximum level marks. -
Page 46
PERIODIC MAINTENANCE AND MINOR REPAIR Tightening torque: Recommended oil: (×3) Oil filter element cover bolt: See page 8-1. 10 Nm (1.0 m·kgf, 7.2 ft·lbf) Oil quantity: Without oil filter element replace- ment: NOTE: 1.10 L (1.16 US qt) (0.97 Imp.qt) Make sure that the O-rings are properly With oil filter element replacement: seated. -
Page 47: Cleaning The Air Filter Element
7 Nm (0.7 m·kgf, 5.0 ft·lbf) turn the engine off immediately so it will not seize. If this occurs, (×3) have a Yamaha dealer repair the vehicle. After checking the oil pressure, tighten the bleed bolt to the specified torque.
-
Page 48
NOTE: The sponge material should be wet but not dripping. Recommended oil: Yamaha foam air filter oil or other quality air filter oil 7. Install the sponge material onto 1. Sponge material the frame, insert the air filter ele- 2. -
Page 49: Cleaning The Spark Arrester
PERIODIC MAINTENANCE AND MINOR REPAIR EAU21240 Cleaning the spark arrester NOTE: Make sure to select a well-ventilated area free of combustible materials to clean the spark arrester. 1. Remove the tailpipe by removing the bolts, and then pulling it out of the muffler.
-
Page 50: Adjusting The Carburetor
Yamaha dealer, who has the neces- must be adjusted by a Yamaha dealer sary professional knowledge and expe- at the intervals specified in the periodic rience. However, the following may be maintenance and lubrication chart.
-
Page 51: Tires
PERIODIC MAINTENANCE AND MINOR REPAIR EAU35830 during a ride. Tires Off-road riding: Securely pack the heaviest Front: To maximize the performance, durabil- items close to the center of the 100 kPa (15 psi) (1.00 kgf/cm ity, and safe operation of your machine, Rear: vehicle distribute…
-
Page 52
PERIODIC MAINTENANCE AND MINOR REPAIR has a nail or glass fragments in it, or if very carefully and replace it as Front tire: the sidewall is cracked, have a Yamaha soon possible with Size: dealer replace the tire immediately. high-quality product. -
Page 53: Spoke Wheels
If any dam- this model, and they must be se- age is found, have a Yamaha curely mounted to maintain the in- dealer replace the wheel. Do not herent stability of the original attempt even the smallest repair to design.
-
Page 54: Adjusting The Clutch Lever Free Play
PERIODIC MAINTENANCE AND MINOR REPAIR EAU22030 lever free play, turn the adjusting EAU22092 Adjusting the clutch lever free Adjusting the brake lever free bolt in direction (b). play play 3. If the specified clutch lever free play could be obtained as de- scribed above, tighten the locknut and skip the rest of the procedure, otherwise proceed as follows.
-
Page 55: Checking The Front And Rear Brake Pads
If there is air in the hy- have a Yamaha dealer replace the draulic system, have a Yamaha brake pads as a set. dealer bleed the system before 1.
-
Page 56: Checking The Brake Fluid Level
However, if the make sure that the top of the brake brake fluid level goes down sud- fluid reservoir is level. denly, have a Yamaha dealer 1. Minimum level mark Use only the recommended quality check the cause.
-
Page 57: Changing The Brake Fluid
EAU22730 EAU22760 Changing the brake fluid Drive chain slack Have a Yamaha dealer change the The drive chain slack should be brake fluid at the intervals specified in checked before each ride and adjusted the NOTE after the periodic mainte- if necessary.
-
Page 58
PERIODIC MAINTENANCE AND MINOR REPAIR 3. Tighten the axle nut to the speci- EWA10700 NOTE: WARNING fied torque. Make sure that both adjusting plates Always use a new cotter pin for the are in the same position for proper Tightening torque: axle nut. -
Page 59: Lubricating The Drive Chain
Service the drive chain as ed if necessary. If a cable is damaged follows. or does not move smoothly, have a ECA10581 Yamaha dealer check or replace it. CAUTION: Recommended lubricant: The drive chain must be lubricated Yamaha Chain and Cable Lube…
-
Page 60: Checking And Lubricating The Throttle Grip And Cable
PERIODIC MAINTENANCE AND MINOR REPAIR EAU23110 EAU23140 EAU23180 Checking and lubricating the Checking and lubricating the Lubricating the brake pedal throttle grip and cable brake and clutch levers The operation of the throttle grip should be checked before each ride. In addi- tion, the cable should be lubricated or replaced at the intervals specified in the periodic maintenance chart.
-
Page 61: Checking And Lubricating The Sidestand
Yamaha dealer check or re- To check the operation sidestand pivot and metal-to-metal 1. Place the vehicle on a level sur- pair it.
-
Page 62: Checking The Steering
2. Hold the lower ends of the front fork legs and try to move them for- ward and backward. If any free play can be felt, have a Yamaha dealer check or repair the steering. 6-26…
-
Page 63: Battery
To charge the battery burns. Avoid any contact with Have a Yamaha dealer charge the bat- skin, eyes or clothing and al- tery as soon as possible if it seems to ways shield your eyes when have discharged.
-
Page 64: Replacing The Fuse
2. Spare fuse sealed-type (MF) battery charg- devices operate. The fuse holder is located behind panel er, have a Yamaha dealer 4. If the fuse immediately blows B. (See page 6-6.) charge your battery. again, have a Yamaha dealer If the fuse is blown, replace it as fol- check the electrical system.
-
Page 65: Replacing The Headlight Bulb
PERIODIC MAINTENANCE AND MINOR REPAIR EAU23841 Replacing the headlight bulb This model is equipped with a quartz bulb headlight. If the headlight bulb burns out, replace it as follows. 1. Remove cowling A together with the headlight unit. (See page 6-6.) 2.
-
Page 66: Replacing The Taillight Bulb
1. Screw the headlight unit. 4. Install the lens by installing the 2. Taillight lens 7. Have a Yamaha dealer adjust the screws. 2. Remove the defective bulb by headlight beam if necessary. ECA10680 pushing it in and turning it counter- CAUTION: clockwise.
-
Page 67: Supporting The Machine
WARNING (×4) requiring the machine to stand upright. It is advisable to have a Yamaha Check that the machine is in a stable dealer service the wheel. and level position before starting any Securely support the machine maintenance.
-
Page 68
PERIODIC MAINTENANCE AND MINOR REPAIR the wheel hub so that the projec- tions mesh with the slots. (×4) 1. Retainer 1. Upper nut 2. Wheel axle 2. Lower nut 3. Wheel axle holder nut 3. Gap 1. Tripmeter gear unit 3. -
Page 69: Rear Wheel
3. Remove each swingarm end cover by removing the screws. EAU25280 To remove the rear wheel EWA10820 WARNING (×2) It is advisable to have a Yamaha dealer service the wheel. Securely support the machine (×2) (×2) so that there is no danger of it NOTE: falling over.
-
Page 70: Troubleshooting
However, should your machine re- ter pin. quire any repair, take it to a Yamaha dealer, whose skilled technicians have Tightening torque: the necessary tools, experience, and Axle nut: 105 Nm (10.5 m·kgf, 76 ft·lbf)
-
Page 71: Troubleshooting Chart
Remove the spark plug and check the electrodes. The engine does not start. Have a Yamaha dealer check the vehicle. Check the battery. 4. Battery The engine turns over The battery is good.
-
Page 72: Machine Care And Storage
MACHINE CARE AND STORAGE EAU26000 brush, but never apply such prod- sponges which have been in Care ucts onto seals, gaskets, sprock- contact with strong or abrasive While the open design of a machine re- ets, the drive chain and wheel cleaning products, solvent or veals the attractiveness of the technol- axles.
-
Page 73
MACHINE CARE AND STORAGE any marks. If the windshield is and a mild detergent, after the en- tection spray metal, scratched, use a quality plastic gine has cooled down. including chrome- and nickel-plat- polishing compound after ed, surfaces. ECA10790 CAUTION: washing. -
Page 74: Storage
NOTE: from corrosion. will allow water and humidity to Consult a Yamaha dealer for advice on a. Remove the spark plug cap seep in and cause rust. what products to use. and spark plug.
-
Page 75
MACHINE CARE AND STORAGE install the spark plug and the Do not store the battery in an ex- spark plug cap. cessively cold or warm place [less than 0 °C (30 °F) or more EWA10950 WARNING than 30 °C (90 °F)]. For more in- To prevent damage or injury from formation on storing the battery, sparking, make sure to ground the… -
Page 76: Specifications
SPECIFICATIONS EAU26337 Engine oil: Type x quantity: Dimensions: Y30P x 1 Type: Spark plug(s): Overall length: YAMALUBE 4, SAE10W30 or SAE20W40 2095 mm (82.5 in) Manufacturer/model: 0° 10° 30° 50° 70° 90° 110° 130°F Overall width: NGK/CR9E 835 mm (32.9 in) YAMALUBE 4 (10W30) Manufacturer/model: or SAE 10W30…
-
Page 77
SPECIFICATIONS 4th: Tire air pressure (measured on cold Front suspension: 27/25 (1.080) tires): Type: 5th: Telescopic fork Off-road riding: 24/27 (0.889) Spring/shock absorber type: Front: 6th: Coil-air spring/oil damper 100 kPa (15 psi) (1.00 kgf/cm 22/29 (0.759) Wheel travel: Rear: Chassis: 280.0 mm (11.02 in) 100 kPa (15 psi) (1.00 kgf/cm… -
Page 78
SPECIFICATIONS Fuse: Fuse: 15.0 A… -
Page 79: Consumer Information
Record the key identification number, vehicle identification number and mod- el label information in the spaces pro- vided below for assistance when ordering spare parts from a Yamaha dealer or for reference in case the vehi- cle is stolen. KEY IDENTIFICATION NUMBER: 1.
-
Page 80
1. Model label The model label is affixed to the frame under the seat. (See page 3-7.) Record the information on this label in the space provided. This information will be needed when ordering spare parts from a Yamaha dealer. -
Page 81: Motorcycle Noise Regulation
CONSUMER INFORMATION EAU26560 Motorcycle noise regulation TAMPERING WITH NOISE CONTROL SYSTEM PROHIBITED: Federal law prohibits the following acts or the causing thereof: (1) The removal or rendering inoperative by any person other than for purposes of maintenance, repair, or replacement of any device or element of design incorporated into any new ve- hicle for the purpose of noise control prior to its sale or delivery to the ultimate purchaser or while it is in use or (2) the use of the vehicle after such device or element of design has been removed or rendered inoperative by any person.
-
Page 82: Maintenance Record
CONSUMER INFORMATION EAU26651 Maintenance record Have a Yamaha dealer complete this record when the machine is serviced. Maintenance Date of Servicing dealer Mileage Remarks interval service name and address…
-
Page 83: Yamaha Motor Corporation, U.s.a. Off-Road Motorcycle Limited Warranty
CONSUMER INFORMATION EAU26670 YAMAHA MOTOR CORPORATION, U.S.A. OFF-ROAD MOTORCYCLE LIMITED WARRANTY…
-
Page 84
CONSUMER INFORMATION… -
Page 85: Yamaha Extended Service (Y.e.s.)
This excellent Y.E.S. plan coverage is only available to dealer to see how comforting uninterrupted factory- Yamaha owners like you, and only while your Yamaha is still backed protection can be. within the Yamaha Limited Warranty period. So visit your authorized Yamaha dealer to get all the facts.
-
Page 86
Yamaha Limited Warranty expires. A special note: If visiting your dealer isn’t convenient, contact Yamaha with your Primary ID number (your frame number). We’ll be happy to help you get the Y.E.S. coverage you need. -
Page 87
INDEX Fuel…………3-4 Sidestand, checking and lubricating..6-25 Fuel cock ………..3-5 Spark plug, checking ……… 6-7 Accessories and replacement parts..6-17 Fuel tank breather hose……3-5 Specifications ……….8-1 Air filter element, cleaning……. 6-11 Fuel tank cap ……….3-4 Starter (choke) knob……..3-6 Fuse, replacing ……..6-28 Starting and warming up a cold Battery…………. -
Page 88
YAMAHA MOTOR CO., LTD. PRINTED IN JAPAN PRINTED IN JAPAN PRINTED ON RECYCLED PAPER 2002·5–0.6×1(E) 2004.5–0.7×1 !